
Chapter 15. Deploying and using Red Hat build of OptaPlanner in Red Hat OpenShift Container Platform: an employee rostering starter example
As a business rules developer, you can test and interact with the Red Hat build of OptaPlanner functionality by quickly deploying the optaweb-employee-rostering starter project included in the Red Hat Process Automation Manager distribution to OpenShift.
Prerequisites
- You have access to a deployed OpenShift environment. For details, see the documentation for the OpenShift product that you use.
15.1. Overview of the employee rostering starter application
The employee rostering starter application assigns employees to shifts on various positions in an organization. For example, you can use the application to distribute shifts in a hospital between nurses, guard duty shifts across a number of locations, or shifts on an assembly line between workers.
Optimal employee rostering must take a number of variables into account. For example, different skills can be required for shifts in different positions. Also, some employees might be unavailable for some time slots or might prefer a particular time slot. Moreover, an employee can have a contract that limits the number of hours that the employee can work in a single time period.
The Red Hat build of OptaPlanner rules for this starter application use both hard and soft constraints. During an optimization, the planning engine may not violate hard constraints, for example, if an employee is unavailable (out sick), or that an employee cannot work two spots in a single shift. The planning engine tries to adhere to soft constraints, such as an employee’s preference to not work a specific shift, but can violate them if the optimal solution requires it.
15.2. Installing and starting the employee rostering starter application on OpenShift
Use the runOnOpenShift.sh script to deploy the Employee Rostering starter application to Red Hat OpenShift Container Platform. The runOnOpenShift.sh shell script is available in the Red Hat Process Automation Manager 7.12.0 Kogito and OptaPlanner 8 Decision Services Quickstarts distribution.
The runOnOpenShift.sh script builds and packages the application source code locally and uploads it to the OpenShift environment for deployment. This method requires Java Development Kit, Apache Maven, and a bash shell command line.
15.2.1. Deploying the application using the provided script
You can deploy the Employee Rostering starter application to Red Hat OpenShift Container Platform using the provided script. The script builds and packages the application source code locally and uploads it to the OpenShift environment for deployment.
Prerequisites
-
You are logged in to the target OpenShift environment using the
occommand line tool. For more information about this tool, see the OpenShift Container Platform CLI Reference. - OpenJDK 11 or later is installed. Red Hat build of Open JDK is available from the Software Downloads page in the Red Hat Customer Portal (login required).
- Apache Maven 3.6 or higher is installed. Maven is available from the Apache Maven Project website.
-
A
bashshell environment is available on your local system.
Procedure
Navigate to the Software Downloads page in the Red Hat Customer Portal (login required), and select the product and version from the drop-down options:
- Product: Process Automation Manager
- Version: 7.12.0
-
Download the Red Hat Process Automation Manager 7.12 Maven Repository Kogito and OptaPlanner 8 Maven Repository (
rhpam-7.12.0-kogito-maven-repository.zip) file. -
Extract the
rhpam-7.12.0-kogito-maven-repository.zipfile. -
Copy the contents of the
rhpam-7.12.0-kogito-maven-repository/maven-repositorysubdirectory into the~/.m2/repositorydirectory. -
Download the
rhpam-7.12.0-kogito-and-optaplanner-quickstarts.zipfile from the Software Downloads page of the Red Hat Customer Portal. - Extract the downloaded archive.
-
Navigate to the
optaweb-employee-rosteringfolder. To build the Employee Rostering application, run the following command:
mvn clean install -DskipTests -DskipITs
Log in to an OpenShift account or a Red Hat Code Ready Container instance. In the following example,
<account-url>is the URL for an OpenShift account or Red Hat Code Ready Container instance and<login-token>is the login token for that account:oc login <account-url> --token <login-token>
Create a new project to host Employee Rostering:
oc new-project optaweb-employee-rostering
Run the provision script to build and deploy the application:
./runOnOpenShift.sh
Compilation and packaging might take up to 10 minutes to complete. These processes continually show progress on the command line output.
When the operation completes, the following message is displayed, where
<URL>is the URL for the deployment:You can access the application at <URL> once the deployment is done.
Enter the URL that you used earlier in the procedure, for either an OpenShift account or Red Hat Code Ready Container instance, to access the deployed application. The first startup can take up to a minute because additional building is completed on the OpenShift platform.
NoteIf the application does not open a minute after clicking the link, perform a hard refresh of your browser page.
15.3. Using the employee rostering starter application
You can use the web interface to use the Employee Rostering starter application. The interface is developed in ReactJS. You can also access the REST API to create a custom user interface as necessary.
15.3.1. The draft and published periods
At any particular moment, you can use the application to create the roster for a time period, called a draft period. By default, the length of a draft period is three weeks.
When the roster is final for the first week of the draft period, you can publish the roster. At this time, the roster for the first week of the current draft period becomes a published period. In a published period, the roster is fixed and you can no longer change it automatically (however, emergency manual changes are still possible). This roster can then be distributed to employees so they can plan their time around it. The draft period is shifted a week later.
For example, assume that a draft period of September 1 to September 21 is set. You can automatically create the employee roster for this period. Then, when you publish the roster, the period up to September 7 becomes published. The new draft period is September 8 to September 28.
For instructions about publishing the roster, see Section 15.3.12, “Publishing the shift roster”.
15.3.2. The rotation pattern
The employee rostering application supports a rotation pattern for shifts and employees.
The rotation pattern is a "model" period of any time starting from two days. The pattern is not tied to a particular date.
You can create time buckets for every day of the rotation. Every time bucket sets the time of a shift. Optionally, the template can include the name of the default employee for the shift.
When you publish the roster, the application adds a new week to the draft period. At this time, the shifts and, if applicable, default employee names are copied from the rotation pattern to the new part of the draft period.
When the end of the rotation pattern is reached, it is automatically restarted from the beginning.
If weekend shift patterns in your organization are different from weekday shift patterns, use a rotation pattern of one week or a whole number of weeks, for example, 14, 21, or 28 days. The default length is 28 days. Then the pattern is always repeated on the same weekdays and you can set the shifts for different weekdays.
For instructions about editing the rotation pattern, see Section 15.3.13, “Viewing and editing the rotation pattern”.
15.3.3. Employee Rostering tenants
The Employee Rostering application supports multiple tenants. Each tenant is an independent set of data, including inputs and roster outputs. Changing data for one tenant does not affect other tenants. You can switch between tenants to use several independent data sets, for example, to prepare employee rosters for different locations.
Several sample tenants are present after installation, representing several typical enterprise types such as a factory or hospital. You can select any of these tenants and modify them to suit your needs. You can also create a new tenant to enter data from a blank slate.
15.3.3.1. Changing an Employee Rostering tenant
You can change the current tenant. After you select a different tenant, all of the displayed information refers to this tenant and any changes you make affect only this tenant.
Procedure
- In the Employee Rostering application web interface, in the top right part of the browser window, click the Tenant list.
- Select a tenant from the list.
15.3.3.2. Creating a tenant
You can create a new tenant to enter data from a blank slate. When creating a tenant, you can set several parameters that determine how the application prepares the output for this tenant.
You cannot change tenant parameters after you create the tenant.
Procedure
- To create a new tenant in the Employee Rostering application web interface, in the top right corner of the browser window click the settings (gear) icon then click Add.
Set the following values:
- Name: The name of the new tenant. This name is displayed in the list of tenants.
- Schedule Start Date: The start date of the initial draft period. After you publish the roster, this date becomes the start date of the published period. The weekday of this date always remains the weekday that starts the draft period, any particular published period, and the first use of the rotation pattern. So it is usually most convenient to set the start date to the start of a week (Sunday or Monday).
- Draft Length (days): The length of the draft period. The draft period stays the same length for the lifetime of the tenant.
- Publish Notice (days): The length of the publish notice period. Aspire to publish the final roster for any day at least this time in advance, so employees have enough notice to plan their personal life around their shift times. In the current version, this setting is not enforced in any way.
- Publish Length (days): The length of the period that becomes published (fixed) every time you publish the roster. In the current version, this setting is fixed at 7 days.
- Rotation Length (days): The length of the rotation pattern.
- Timezone: The timezone of the environment to which the roster applies. This timezone is used to determine the "current" date for user interface display.
- Click Save.
The tenant is created with blank data.
15.3.4. Entering skills
You can set all skills that are required in any position within the roster. For example, a 24-hour diner can require cooking, serving, bussing, and hosting skills, in addition to skills such as general human resources and restaurant operations.
Procedure
In the Employee Rostering application web interface, click the Skills tab.
You can see the numbers of currently visible skills in the top right part of the browser window, for example,
1-15 of 34. You can use the < and > buttons to display other skills in the list.You can enter any part of a skill name in the Search box to search for skills.
Complete the following steps to add a new skill:
- Click Add.
- Enter the name of the new skill in the text field under Name.
- Click the Save icon.
- To edit the name of a skill, click the Edit Skill icon (pencil shape) next to the skill.
- To delete a skill, click the Delete Skill icon (trashcan shape) next to the skill.
Within each tenant, skill names must be unique. You cannot delete a skill if the skill is associated with an employee or spot.
15.3.5. Entering spots
You must enter the list of spots, which represent various positions at the business. For a diner, spots include the bar, the bussing stations, the front counter, the various kitchen stations, the serving areas, and the office.
For each spot, you can select one or more required skills from the list that you entered in the Skills tab. The application rosters only employees that have all of the required skills for a spot into that spot. If the spot has no required skill, the application can roster any employee into the spot.
Procedure
- To enter or change spots in the Employee Rostering application web interface, click the Spots tab. You can enter any part of a spot name in the Search box to search for spots.
Complete the following steps to add a new spot:
- Click Add Spot.
- Enter the name of the new spot in the text field under Name.
- Optional: Select one or more skills from the drop-down list under Required skill set.
- Click the Save icon.
- To edit the name and required skills for a spot, click the Edit Spot icon (pencil shape) next to the spot.
- To delete a spot, click the Delete Spot icon (trashcan shape) next to the spot.
Within each tenant, spot names must be unique. You cannot delete a spot when any shifts are created for it.
15.3.6. Entering the list of contracts
You must enter the list of all of the types of contracts that the business uses for employees.
A contract determines the maximum time that the employee can work in a day, calendar week, calendar month, or calendar year.
When creating a contract, you can set any of the limitations or none at all. For example, a part-time employee might not be allowed to work more than 20 hours in a week, while a full-time employee might be limited to 10 hours in a day and 1800 hours in a year. Another contract might include no limitations on worked hours.
You must enter all work time limits for contracts in minutes.
Procedure
To enter or change the list of contracts in the Employee Rostering application web interface, click the Contracts tab.
You can see the numbers of currently visible contracts in the top right part of the browser window, for example,
1-15 of 34. You can use the < and > buttons to display other contracts in the list.You can enter any part of a contract name in the Search box to search for contracts.
Complete the following steps to add a new contract:
- Click Add.
- Enter the name of the contract in the text field under Name.
Enter the required time limits under Maximum minutes:
- If the employee must not work more than a set time per day, enable the check box at Per Day and enter the amount of minutes in the field next to this check box.
- If the employee must not work more than a set time per calendar week, enable the check box at Per Week and enter the amount of minutes in the field next to this check box.
- If the employee must not work more than a set time per calendar month, enable the check box at Per Month and enter the amount of minutes in the field next to this check box.
- If the employee must not work more than a set time per calendar year, enable the check box at Per Year and enter the amount of minutes in the field next to this check box.
- Click the Save icon.
- To edit the name and time limits for a contract, click the Edit Contract icon (pencil shape) next to the name of the contract.
- To delete a contract, click the Delete Contract icon (trashcan shape) next to the name of the contract.
Within each tenant, contract names must be unique. You cannot delete a contract if it is assigned to any employee.
15.3.7. Entering the list of employees
You must enter the list of all employees of the business, the skills they possess, and the contracts that apply to them. The application rosters these employees to spots according to their skills and according to the work time limits in the contracts.
Procedure
To enter or change the list of employees in the Employee Rostering application web interface, click the Employees tab.
You can see the numbers of currently visible employees in the top right part of the browser window, for example,
1-15 of 34. You can use the < and > buttons to display other employees in the list.You can enter any part of an employee name in the Search box to search for employees.
Complete the following steps to add a new employee:
- Click Add.
- Enter the name of the employee in the text field under Name.
- Optional: Select one or more skills from the drop-down list under Skill set.
- Select a contract from the drop-down list under Contract.
- Click the Save icon.
- To edit the name and skills for an employee, click the Edit Employee icon (pencil shape) next to the name of the employee.
- To delete an employee, click the Delete Employee icon (trashcan shape) next to the name of the employee.
Within each tenant, employee names must be unique. You cannot delete employees if they are rostered to any shifts.
15.3.8. Setting employee availability
You can set the availability of employees for particular time spans.
If an employee is unavailable for a particular time span, the employee can never be assigned to any shift during this time span (for example, if the employee has called in sick or is on vacation). Undesired and desired are employee preferences for particular time spans; the application accommodates them when possible.
Procedure
To view and edit employee availability in the Employee Rostering application web interface, click the Availability Roster tab.
In the top left part of the window, you can see the dates for which the roster is displayed. To view other weeks, you can use the < and > buttons next to the Week of field. Alternatively, you can click the date field and change the date to view the week that includes this date.
-
To create an availability entry for an employee, click empty space on the schedule and then select an employee. Initially, an
Unavailableentry for the entire day is created. To change an availability entry, click the entry. You can change the following settings:
- From and To date and time: The time span to which the availability entry applies.
Status: you can select Unavailable, Desired, or Undesired status from a drop-down list.
To save the entry, click Apply.
To delete an availability entry, click the entry, then click Delete availability.
You can also change or delete an availability entry by moving the mouse pointer over the entry and then clicking one of the icons displayed over the entry:
-
Click the
 icon to set the status of the entry to Unavailable.
-
Click the
 icon to set the status of the entry to Undesired.
-
Click the
 icon to set the status of the entry to Desired.
-
Click the
 icon to delete the entry.
-
Click the
If an employee is already assigned to a shift and then you create or change an availability entry during this shift, the assignment is not changed automatically. You must create the employee shift roster again to apply new or changed availability entries.
15.3.9. Viewing and editing shifts in the shift roster
The Shift Roster is a table of all spots and all possible time spans.
If an employee must be present in a spot during a time span, a shift must exist for this spot and this time span. If a spot requires several employees at the same time, you can create several shifts for the same spot and time span.
Each shift is represented by a rectangle at the intersection of a spot (row) and time span (column).
When new time is added to the draft period, the application copies the shifts (and default employees, if present) from the rotation pattern into this new part of the draft period. You can also manually add and edit shifts in the draft period.
Procedure
To view and edit the shift roster in the Employee Rostering application web interface, click the Shift tab.
In the top left part of the window, you can see the dates for which the roster is displayed. To view other weeks, you can use the < and > buttons next to the Week of field. Alternatively, you can click the date field and change the date to view the week that includes this date.
- To add a shift, click an open area of the schedule. The application adds a shift, determining the slot and time span automatically from the location of the click.
To edit a shift, click the shift. You can set the following values for a shift:
- From and To date and time: The exact time and duration of the shift.
- Employee: The employee assigned to the shift.
Pinned: Whether the employee is pinned to the shift. If an employee is pinned, automatic employee rostering cannot change the assignment of the employee to the shift. A pinned employee is not automatically replicated to any other shift.
To save the changes, click Apply.
- To delete a shift, click the shift, and then click Delete shift.
15.3.10. Creating and viewing the employee shift roster
You can use the application to create and view the optimal shift roster for all employees.
Procedure
- To view and edit the shift roster in the Employee Rostering application web interface, click the Shift tab.
- To create the optimal shift roster, click Schedule. The application takes 30 seconds to find the optimal solution.
Result
When the operation is finished, the Shift Roster view contains the optimal shift roster. The new roster is created for the draft period. The operation does not modify the published periods.
In the top left part of the window, you can see the dates for which the roster is displayed. To view other weeks, you can use the < and > buttons next to the Week of field. Alternatively, you can click the date field and change the date to view the week that includes this date.
In the draft period, the borders of boxes that represent shifts are dotted lines. In the published periods, the borders are unbroken lines.
The color of the boxes that represent shifts shows the constraint status of every shift:
- Strong green: Soft constraint matched; for example, the shift is in a "desired" timeslot for the employee.
- Pale green: No constraint broken.
- Grey: Soft constraint broken; for example, the shift is in an "undesired" timeslot for the employee.
- Yellow: Medium constraint broken; for example, no employee is assigned to the shift.
- Red: Hard constraint broken; for example, an employee has two shifts at the same time.
15.3.11. Viewing employee shifts
You can view the assigned shifts for particular employees in an employee-centric table. The information is the same as the Shift Roster, but the viewing format might be more convenient for informing employees about their assigned shifts.
Procedure
To view a table of employees and shifts in the Employee Rostering application web interface, click the Availability Roster tab.
In the top left part of the window, you can see the dates for which the roster is displayed. To view other weeks, you can use the < and > buttons next to the Week of field. Alternatively, you can click the date field and change the date to view the week that includes this date.
You can see the numbers of currently visible employees in the top right part of the browser window, for example, 1-10 of 34. You can use the < and > buttons next to the numbers to display other employees in the list.
In the draft period, the borders of boxes representing shifts are dotted lines. In the published periods, the borders are unbroken lines.
15.3.12. Publishing the shift roster
When you publish the shift roster, the first week of the draft period becomes published. Automatic employee rostering no longer changes any shift assignments in the published period, though emergency manual changing is still possible. The draft period is shifted one week later. For details about draft and published periods, see Section 15.3.1, “The draft and published periods”.
Procedure
- To view and edit the shift roster in the Employee Rostering application web interface, click the Shift tab.
- Review the shift roster for the first week of the draft period to ensure that it is acceptable.
- Click Publish.
15.3.13. Viewing and editing the rotation pattern
The rotation pattern enables you to add, move, and delete shifts so you can manage your employee resources efficiently. It is defined by time buckets and seats.
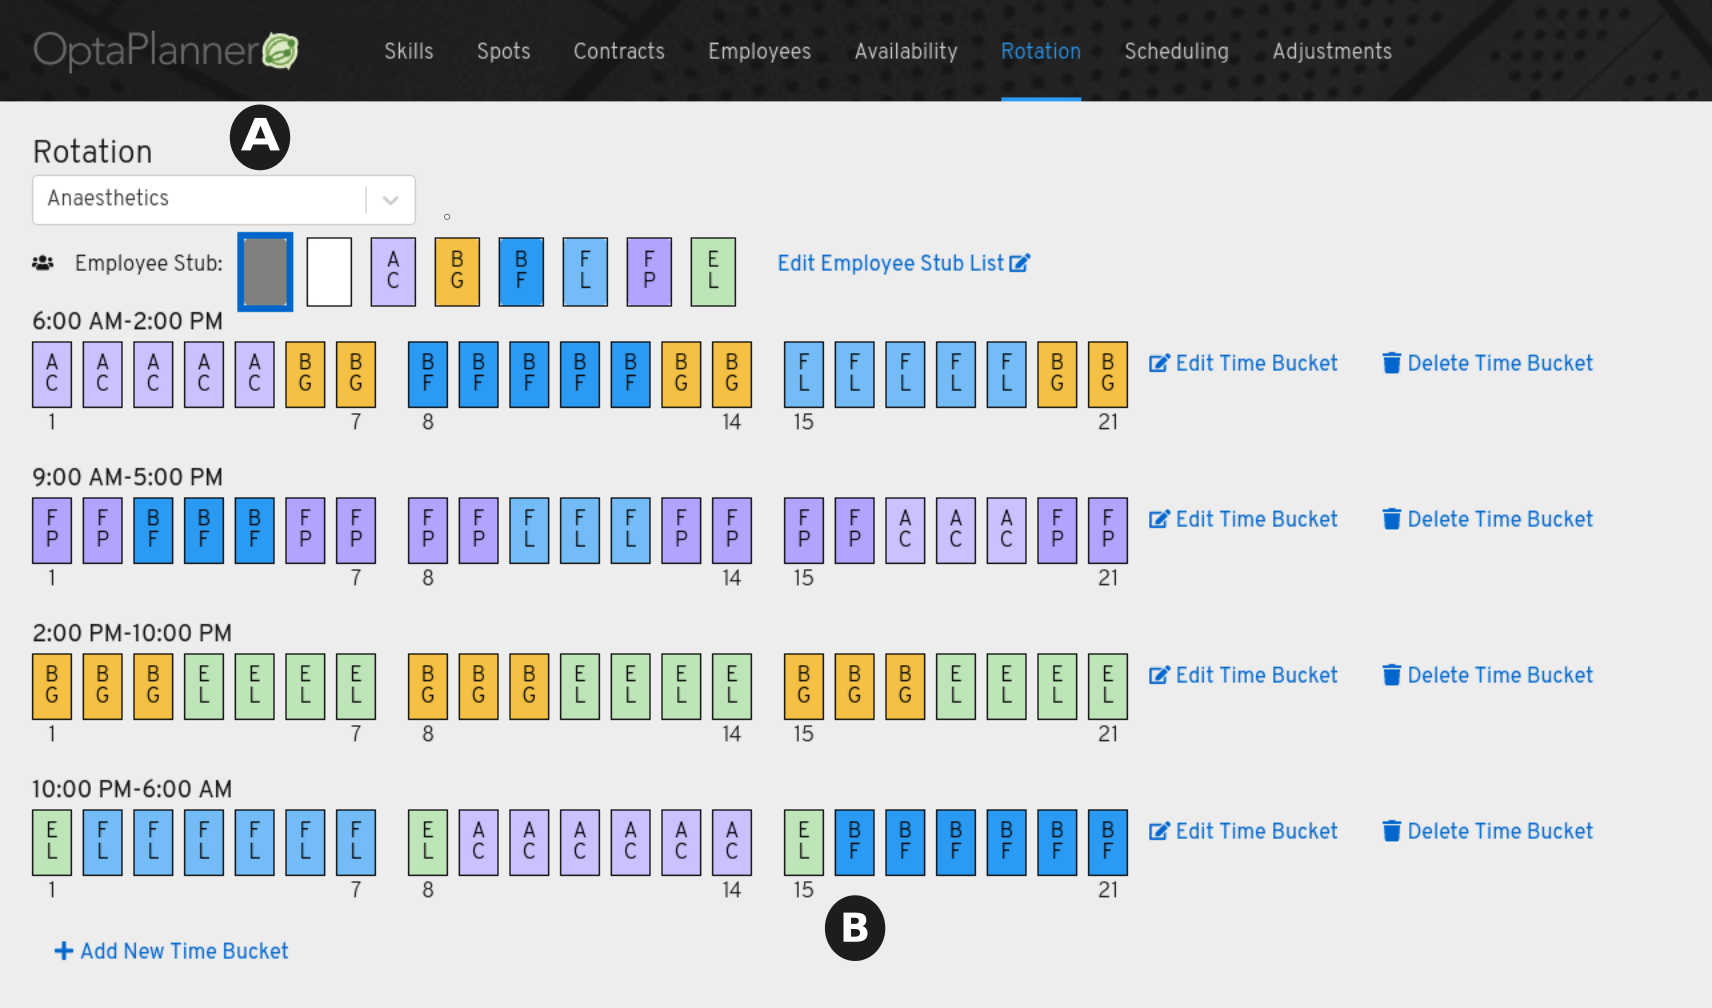
- A time bucket describes a time slot (for example, 9:00 a.m. to 5:00 p.m.) for a particular spot or location (A) (for example, Anaesthetics), over two or more days, and any skills that are required (for example, firearm training).
- A seat (B) is an employee assignment for a particular day in a specific time bucket.
- An employee stub is an icon that represents an employee that is available to be assigned to a time bucket. Employee stubs are listed in the Employee Stub List.
For more information about the rotation pattern, see Section 15.3.2, “The rotation pattern”.
Procedure
- Click the Rotation tab to view and edit the rotation pattern.
- Select a spot from the Rotation menu.
- Click Add New Time Bucket. The Creating Working Time Bucket dialog is displayed.
- Specify a start and end time, select any additional required skills, select the days for this time bucket, and click Save. The unassigned seats for that time bucket appears on the Rotation page organized by time ranges.
- To create an employee stub list so that you can add employees to the rotation, click Edit Employee Stub List.
- In the Edit Employee Stub List dialog, click Add Employee and select an employee from the list.
- Add all of the employees required for this stub list and click Save. The employees appear above the time buckets on the Rotation page.
- Click an employee icon to select an employee from the employee stub list.
Click and drag the mouse over the seats of a time bucket to assign the selected employee to those seats. The seat is populated with the employee icon.
NoteA time bucket can only have one employee assigned to it for each day. To add multiple employees to the same time bucket, copy the time bucket and change the employee name as required.
- To provision the schedule, click Scheduling and select the spot that you created the rotation for.
- Click Provision and specify the date range.
- Deselect the spots that you do not want to include in this schedule.
- Click the arrow next to the selected spot and deselect any time buckets that you do not want to use in your schedule.
- Click Provision Shifts. The calendar is populated with shifts generated from the time buckets.
- To modify a shift, click a generated shift on the calendar.