
Managing Red Hat Process Automation Manager and KIE Server settings
Abstract
Preface
As a developer or system administrator, you can modify Red Hat Process Automation Manager and KIE Server settings and properties to meet your business needs. You can modify the behavior of the Red Hat Process Automation Manager runtime, the Business Central interface, or the KIE Server.
Making open source more inclusive
Red Hat is committed to replacing problematic language in our code, documentation, and web properties. We are beginning with these four terms: master, slave, blacklist, and whitelist. Because of the enormity of this endeavor, these changes will be implemented gradually over several upcoming releases. For more details, see our CTO Chris Wright’s message.
Part I. Managing and monitoring KIE Server
As a system administrator, you can install, configure, and upgrade Red Hat Process Automation Manager for production environments, quickly and easily troubleshoot system failures, and ensure that systems are running optimally.
Prerequisites
- Red Hat JBoss Enterprise Application Platform 7.3 is installed. For more information, see Red Hat JBoss Enterprise Application Platform 7.3 Installation Guide.
- Red Hat Process Automation Manager is installed. For more information, see Planning a Red Hat Process Automation Manager installation.
-
Red Hat Process Automation Manager is running and you can log in to Business Central with the
adminrole. For more information, see Planning a Red Hat Process Automation Manager installation.
Chapter 1. Red Hat Process Automation Manager components
Red Hat Process Automation Manager is made up of Business Central and KIE Server.
Business Central is the graphical user interface where you create and manage business rules. You can install Business Central in a Red Hat JBoss EAP instance or on the Red Hat OpenShift Container Platform (OpenShift).
Business Central is also available as a standalone JAR file. You can use the Business Central standalone JAR file to run Business Central without deploying it to an application server.
KIE Server is the server where rules and other artifacts are executed. It is used to instantiate and execute rules and solve planning problems. You can install KIE Server in a Red Hat JBoss EAP instance, in a Red Hat JBoss EAP cluster, on OpenShift, in an Oracle WebLogic server instance, in an IBM WebSphere Application Server instance, or as a part of Spring Boot application.
You can configure KIE Server to run in managed or unmanaged mode. If KIE Server is unmanaged, you must manually create and maintain KIE containers (deployment units). A KIE container is a specific version of a project. If KIE Server is managed, the Process Automation Manager controller manages the KIE Server configuration and you interact with the Process Automation Manager controller to create and maintain KIE containers.
Chapter 2. System integration with Maven
Red Hat Process Automation Manager is designed to be used with Red Hat JBoss Middleware Maven Repository and Maven Central repository as dependency sources. Ensure that both the dependencies are available for projects builds.
Ensure that your project depends on specific versions of an artifact. LATEST or RELEASE are commonly used to specify and manage dependency versions in your application.
-
LATESTrefers to the latest deployed (snapshot) version of an artifact. -
RELEASErefers to the last non-snapshot version release in the repository.
By using LATEST or RELEASE, you do not have to update version numbers when a new release of a third-party library is released, however, you lose control over your build being affected by a software release.
2.1. Preemptive authentication for local projects
If your environment does not have access to the internet, set up an in-house Nexus and use it instead of Maven Central or other public repositories. To import JARs from the remote Maven repository of Red Hat Process Automation Manager server to a local Maven project, turn on pre-emptive authentication for the repository server. You can do this by configuring authentication for guvnor-m2-repo in the pom.xml file as shown below:
<server>
  <id>guvnor-m2-repo</id>
  <username>admin</username>
  <password>admin</password>
  <configuration>
    <wagonProvider>httpclient</wagonProvider>
    	<httpConfiguration>
      	<all>
      	   <usePreemptive>true</usePreemptive>
      	</all>
    	</httpConfiguration>
  </configuration>
</server>
Alternatively, you can set Authorization HTTP header with Base64 encoded credentials:
<server>
  <id>guvnor-m2-repo</id>
  <configuration>
  	<httpHeaders>
  	   <property>
    	    <name>Authorization</name>
    	    <!-- Base64-encoded "admin:admin" -->
    	    <value>Basic YWRtaW46YWRtaW4=</value>
  	   </property>
    </httpHeaders>
  </configuration>
</server>
2.2. Duplicate GAV detection in Business Central
In Business Central, all Maven repositories are checked for any duplicated GroupId, ArtifactId, and Version (GAV) values in a project. If a GAV duplicate exists, the performed operation is canceled.
Duplicate GAV detection is disabled for projects in Development Mode. To enable duplicate GAV detection in Business Central, go to project Settings → General Settings → Version and toggle the Development Mode option to OFF (if applicable).
Duplicate GAV detection is executed every time you perform the following operations:
- Save a project definition for the project.
-
Save the
pom.xmlfile. - Install, build, or deploy a project.
The following Maven repositories are checked for duplicate GAVs:
-
Repositories specified in the
<repositories>and<distributionManagement>elements of thepom.xmlfile. -
Repositories specified in the Maven
settings.xmlconfiguration file.
2.3. Managing duplicate GAV detection settings in Business Central
Business Central users with the admin role can modify the list of repositories that are checked for duplicate GroupId, ArtifactId, and Version (GAV) values for a project.
Duplicate GAV detection is disabled for projects in Development Mode. To enable duplicate GAV detection in Business Central, go to project Settings → General Settings → Version and toggle the Development Mode option to OFF (if applicable).
Procedure
- In Business Central, go to Menu → Design → Projects and click the project name.
- Click the project Settings tab and then click Validation to open the list of repositories.
Select or clear any of the listed repository options to enable or disable duplicate GAV detection.
In the future, duplicate GAVs will be reported for only the repositories you have enabled for validation.
NoteTo disable this feature, set the
org.guvnor.project.gav.check.disabledsystem property totruefor Business Central at system startup:$ ~/EAP_HOME/bin/standalone.sh -c standalone-full.xml -Dorg.guvnor.project.gav.check.disabled=true
Chapter 3. Applying patch updates and minor release upgrades to Red Hat Process Automation Manager
Automated update tools are often provided with both patch updates and new minor versions of Red Hat Process Automation Manager to facilitate updating certain components of Red Hat Process Automation Manager, such as Business Central, KIE Server, and the headless Process Automation Manager controller. Other Red Hat Process Automation Manager artifacts, such as the decision engine and standalone Business Central, are released as new artifacts with each minor release and you must re-install them to apply the update.
You can use the same automated update tool to apply both patch updates and minor release upgrades to Red Hat Process Automation Manager 7.10. Patch updates of Red Hat Process Automation Manager, such as an update from version 7.10 to 7.10.1, include the latest security updates and bug fixes. Minor release upgrades of Red Hat Process Automation Manager, such as an upgrade from version 7.9.x to 7.10, include enhancements, security updates, and bug fixes.
Only updates for Red Hat Process Automation Manager are included in Red Hat Process Automation Manager update tools. Updates to Red Hat JBoss EAP must be applied using Red Hat JBoss EAP patch distributions. For more information about Red Hat JBoss EAP patching, see the Red Hat JBoss EAP patching and upgrading guide.
Prerequisites
- Your Red Hat Process Automation Manager and KIE Server instances are not running. Do not apply updates while you are running an instance of Red Hat Process Automation Manager or KIE Server.
Procedure
Navigate to the Software Downloads page in the Red Hat Customer Portal (login required), and select the product and version from the drop-down options.
If you are upgrading to a new minor release of Red Hat Process Automation Manager, such as an upgrade from version 7.9.x to 7.10, first apply the latest patch update to your current version of Red Hat Process Automation Manager and then follow this procedure again to upgrade to the new minor release.
Click Patches, download the Red Hat Process Automation Manager [VERSION] Update Tool, and extract the downloaded
rhpam-$VERSION-update.zipfile to a temporary directory.This update tool automates the update of certain components of Red Hat Process Automation Manager, such as Business Central, KIE Server, and the headless Process Automation Manager controller. Use this update tool first to apply updates and then install any other updates or new release artifacts that are relevant to your Red Hat Process Automation Manager distribution.
If you want to preserve any files from being updated by the update tool, navigate to the extracted
rhpam-$VERSION-updatefolder, open theblacklist.txtfile, and add the relative paths to the files that you do not want to be updated.When a file is listed in the
blacklist.txtfile, the update script does not replace the file with the new version but instead leaves the file in place and in the same location adds the new version with a.newsuffix. If you block files that are no longer being distributed, the update tool creates an empty marker file with a.removedsuffix. You can then choose to retain, merge, or delete these new files manually.Example files to be excluded in
blacklist.txtfile:WEB-INF/web.xml // Custom file styles/base.css // Obsolete custom file kept for record
The contents of the blocked file directories after the update:
$ ls WEB-INF web.xml web.xml.new
$ ls styles base.css base.css.removed
In your command terminal, navigate to the temporary directory where you extracted the
rhpam-$VERSION-update.zipfile and run theapply-updatesscript in the following format:ImportantMake sure that your Red Hat Process Automation Manager and KIE Server instances are not running before you apply updates. Do not apply updates while you are running an instance of Red Hat Process Automation Manager or KIE Server.
On Linux or Unix-based systems:
$ ./apply-updates.sh $DISTRO_PATH $DISTRO_TYPE
On Windows:
$ .\apply-updates.bat $DISTRO_PATH $DISTRO_TYPE
The
$DISTRO_PATHportion is the path to the relevant distribution directory and the$DISTRO_TYPEportion is the type of distribution that you are updating with this update.The following distribution types are supported in Red Hat Process Automation Manager update tool:
-
rhpam-business-central-eap7-deployable: Updates Business Central (business-central.war) rhpam-kie-server-ee8: Updates KIE Server (kie-server.war)NoteThe update tool will update and replace Red Hat JBoss EAP EE7 to Red Hat JBoss EAP EE8. Red Hat JBoss EAP EE7 is used for WebLogic and WebSphere, whereas version EE8 is used for Red Hat JBoss EAP. Make sure that the KIE Server on WebLogic and WebSphere is not updated by the update tool.
-
rhpam-kie-server-jws: Updates KIE Server on Red Hat JBoss Web Server (kie-server.war) -
rhpam-controller-ee7: Updates the headless Process Automation Manager controller (controller.war) rhpam-controller-jws: Updates the headless Process Automation Manager controller on Red Hat JBoss Web Server (controller.war)Example update to Business Central and KIE Server for a full Red Hat Process Automation Manager distribution on Red Hat JBoss EAP:
./apply-updates.sh ~EAP_HOME/standalone/deployments/business-central.war rhpam-business-central-eap7-deployable ./apply-updates.sh ~EAP_HOME/standalone/deployments/kie-server.war rhpam-kie-server-ee8
Example update to headless Process Automation Manager controller, if used:
./apply-updates.sh ~EAP_HOME/standalone/deployments/controller.war rhpam-controller-ee7
The update script creates a
backupfolder in the extractedrhpam-$VERSION-updatefolder with a copy of the specified distribution, and then proceeds with the update.
-
After the update tool completes, return to the Software Downloads page of the Red Hat Customer Portal where you downloaded the update tool and install any other updates or new release artifacts that are relevant to your Red Hat Process Automation Manager distribution.
For files that already exist in your Red Hat Process Automation Manager distribution, such as
.jarfiles for the decision engine or other add-ons, replace the existing version of the file with the new version from the Red Hat Customer Portal.If you use the standalone Red Hat Process Automation Manager 7.10.0 Maven Repository artifact (
rhpam-7.10.0-maven-repository.zip), such as in air-gap environments, download Red Hat Process Automation Manager 7.10.x Maven Repository and extract the downloadedrhpam-7.10.x-maven-repository.zipfile to your existing~/maven-repositorydirectory to update the relevant contents.Example Maven repository update:
$ unzip -o rhpam-7.10.x-maven-repository.zip 'rhba-7.10.1.GA-maven-repository/maven-repository/*' -d /tmp/rhbaMavenRepoUpdate $ mv /tmp/rhbaMavenRepoUpdate/rhba-7.10.0.GA-maven-repository/maven-repository/ $REPO_PATH/
NoteYou can remove the
/tmp/rhbaMavenRepoUpdatefolder after you complete the update.- After you finish applying all relevant updates, start Red Hat Process Automation Manager and KIE Server and log in to Business Central.
Verify that all project data is present and accurate in Business Central, and in the top-right corner of the Business Central window, click your profile name and click About to verify the updated product version number.
If you encounter errors or notice any missing data in Business Central, you can restore the contents in the
backupfolder within therhpam-$VERSION-updatefolder to revert the update tool changes. You can also re-install the relevant release artifacts from your previous version of Red Hat Process Automation Manager in the Red Hat Customer Portal. After restoring your previous distribution, you can try again to run the update.
Chapter 4. Configuring and starting KIE Server
You can configure your KIE Server location, user name, password, and other related properties by defining the necessary configurations when you start KIE Server.
Procedure
Navigate to the Red Hat Process Automation Manager 7.10 bin directory and start the new KIE Server with the following properties. Adjust the specific properties according to your environment.
$ ~/EAP_HOME/bin/standalone.sh --server-config=standalone-full.xml 1 -Dorg.kie.server.id=myserver 2 -Dorg.kie.server.user=kie_server_username 3 -Dorg.kie.server.pwd=kie_server_password 4 -Dorg.kie.server.controller=http://localhost:8080/business-central/rest/controller 5 -Dorg.kie.server.controller.user=controller_username 6 -Dorg.kie.server.controller.pwd=controller_password 7 -Dorg.kie.server.location=http://localhost:8080/kie-server/services/rest/server 8 -Dorg.kie.server.persistence.dialect=org.hibernate.dialect.PostgreSQLDialect 9 -Dorg.kie.server.persistence.ds=java:jboss/datasources/psjbpmDS 10
- 1
- Start command with
standalone-full.xmlserver profile - 2
- Server ID that must match the server configuration name defined in Business Central
- 3
- User name to connect with KIE Server from the Process Automation Manager controller
- 4
- Password to connect with KIE Server from the Process Automation Manager controller
- 5
- Process Automation Manager controller location, Business Central URL with
/rest/controllersuffix - 6
- User name to connect to the Process Automation Manager controller REST API
- 7
- Password to connect to the Process Automation Manager controller REST API
- 8
- KIE Server location (on the same instance as Business Central in this example)
- 9
- Hibernate dialect to be used
- 10
- JNDI name of the data source used for your previous Red Hat JBoss BPM Suite database
If Business Central and KIE Server are installed on separate application server instances (Red Hat JBoss EAP or other), use a separate port for the KIE Server location to avoid port conflicts with Business Central. If a separate KIE Server port has not already been configured, you can add a port offset and adjust the KIE Server port value accordingly in the KIE Server properties.
Example:
-Djboss.socket.binding.port-offset=150 -Dorg.kie.server.location=http://localhost:8230/kie-server/services/rest/server
If the Business Central port is 8080, as in this example, then the KIE Server port, with a defined offset of 150, is 8230.
KIE Server connects to the new Business Central and collects the list of deployment units (KIE containers) to be deployed.
When you use a class inside a dependency JAR file to access KIE Server from KIE Server client, you get the ConversionException and ForbiddenClassException in Business Central. To avoid generating these exceptions in Business Central, do one of the following:
- If the exceptions are generated on the client-side, add following system property to the kie-server client:
System.setProperty("org.kie.server.xstream.enabled.packages", "org.example.**");-
If the exceptions are generated on the server-side, open
standalone-full.xmlfrom the Red Hat Process Automation Manager installation directory, set the following property under the <system-properties> tag:
<property name="org.kie.server.xstream.enabled.packages" value="org.example.**"/>
- Set the following JVM property:
-Dorg.kie.server.xstream.enabled.packages=org.example.**
It is expected that you do not configure the classes that exists in KJAR using these system property. Ensure that only known classes are used in the system property to avoid any vulnerabilities.
The org.example is an example package, you can define any package that you want to use. You can specify multiple packages separated by comma , for example, org.example1.* * , org.example2.* * , org.example3.* *.
You can also add specific classes , for example, org.example1.Mydata1, org.example2.Mydata2.
Chapter 5. Configuring JDBC data sources for KIE Server
A data source is an object that enables a Java Database Connectivity (JDBC) client, such as an application server, to establish a connection with a database. Applications look up the data source on the Java Naming and Directory Interface (JNDI) tree or in the local application context and request a database connection to retrieve data. You must configure data sources for KIE Server to ensure correct data exchange between the servers and the designated database.
For production environments, specify an actual data source. Do not use the example data source in production environments.
Prerequisites
- The JDBC providers that you want to use to create database connections are configured on all servers on which you want to deploy KIE Server, as described in the "Creating Datasources" and "JDBC Drivers" sections of the Red Hat JBoss Enterprise Application Server Configuration Guide.
-
The Red Hat Process Automation Manager 7.10.0 Add Ons (
rhpam-7.10.0-add-ons.zip) file is downloaded from the Software Downloads page in the Red Hat Customer Portal.
Procedure
Complete the following steps to prepare your database:
-
Extract
rhpam-7.10.0-add-ons.zipin a temporary directory, for exampleTEMP_DIR. -
Extract
TEMP_DIR/rhpam-7.10.0-migration-tool.zip. -
Change your current directory to the
TEMP_DIR/rhpam-7.10.0-migration-tool/ddl-scriptsdirectory. This directory contains DDL scripts for several database types. Import the DDL script for your database type into the database that you want to use.
- The following example creates jBPM database structures in PostreSQL
psql jbpm < /ddl-scripts/postgresql/postgresql-jbpm-schema.sql
NoteIf you are using PostgreSQL or Oracle in conjunction with Spring Boot, you must import the respective Spring Boot DDL script, for example
/ddl-scripts/oracle/oracle-springboot-jbpm-schema.sqlor/ddl-scripts/postgresql/postgresql-springboot-jbpm-schema.sql.NoteThe PostgreSQL DDL scripts create the PostgreSQL schema with auto-incrementing integer value (OID) columns for entity attributes annotated with
@LOB. To use other binary column types such as BYTEA instead of OID, you must create the PostgreSQL schema with thepostgresql-bytea-jbpm-schema.sqlscript and set the Red Hat Process Automation Managerorg.kie.persistence.postgresql.useBytea=trueflag. Red Hat Process Automation Manager does not provide a migration tool to change from an OID-based to a BYTEA-based schema.
-
Extract
-
Open
EAP_HOME/standalone/configuration/standalone-full.xmlin a text editor and locate the<system-properties>tag. Add the following properties to the
<system-properties>tag where<DATASOURCE>is the JNDI name of your data source and<HIBERNATE_DIALECT>is the hibernate dialect for your database.NoteThe default value of the
org.kie.server.persistence.dsproperty isjava:jboss/datasources/ExampleDS. The default value of theorg.kie.server.persistence.dialectproperty isorg.hibernate.dialect.H2Dialect.<property name="org.kie.server.persistence.ds" value="<DATASOURCE>"/> <property name="org.kie.server.persistence.dialect" value="<HIBERNATE_DIALECT>"/>
The following example shows how to configure a datasource for the PostgreSQL hibernate dialect:
<system-properties> <property name="org.kie.server.repo" value="${jboss.server.data.dir}"/> <property name="org.kie.example" value="true"/> <property name="org.jbpm.designer.perspective" value="full"/> <property name="designerdataobjects" value="false"/> <property name="org.kie.server.user" value="rhpamUser"/> <property name="org.kie.server.pwd" value="rhpam123!"/> <property name="org.kie.server.location" value="http://localhost:8080/kie-server/services/rest/server"/> <property name="org.kie.server.controller" value="http://localhost:8080/business-central/rest/controller"/> <property name="org.kie.server.controller.user" value="kieserver"/> <property name="org.kie.server.controller.pwd" value="kieserver1!"/> <property name="org.kie.server.id" value="local-server-123"/> <!-- Data source properties. --> <property name="org.kie.server.persistence.ds" value="java:jboss/datasources/KieServerDS"/> <property name="org.kie.server.persistence.dialect" value="org.hibernate.dialect.PostgreSQLDialect"/> </system-properties>
The following dialects are supported:
-
DB2:
org.hibernate.dialect.DB2Dialect -
MSSQL:
org.hibernate.dialect.SQLServer2012Dialect -
MySQL:
org.hibernate.dialect.MySQL5InnoDBDialect -
MariaDB:
org.hibernate.dialect.MySQL5InnoDBDialect -
Oracle:
org.hibernate.dialect.Oracle10gDialect -
PostgreSQL:
org.hibernate.dialect.PostgreSQL82Dialect -
PostgreSQL plus:
org.hibernate.dialect.PostgresPlusDialect -
Sybase:
org.hibernate.dialect.SybaseASE157Dialect
Chapter 6. Managed KIE Server
A managed instance requires an available Process Automation Manager controller to start the KIE Server.
A Process Automation Manager controller manages the KIE Server configuration in a centralized way. Each Process Automation Manager controller can manage multiple configurations at once, and there can be multiple Process Automation Manager controllers in the environment. Managed KIE Server can be configured with a list of Process Automation Manager controllers, but will only connect to one at a time.
All Process Automation Manager controllers should be synchronized to ensure that the same set of configuration is provided to the server, regardless of the Process Automation Manager controller to which it connects.
When the KIE Server is configured with a list of Process Automation Manager controllers, it will attempt to connect to each of them at startup until a connection is successfully established with one of them. If a connection cannot be established, the server will not start, even if there is a local storage available with configuration. This ensures consistency and prevents the server from running with redundant configuration.
To run the KIE Server in standalone mode without connecting to Process Automation Manager controllers, see Chapter 7, Unmanaged KIE Server.
Chapter 7. Unmanaged KIE Server
An unmanaged KIE Server is a standalone instance, and therefore must be configured individually using REST/JMS API from the KIE Server itself. The configuration is automatically persisted by the server into a file and that is used as the internal server state, in case of restarts.
The configuration is updated during the following operations:
- Deploy KIE container
- Undeploy KIE container
- Start KIE container
- Stop KIE container
If the KIE Server is restarted, it will attempt to re-establish the same state that was persisted before shutdown. Therefore, KIE containers (deployment units) that were running will be started, but the ones that were stopped will not.
Chapter 8. Configuring the environment mode in KIE Server and Business Central
You can set KIE Server to run in production mode or in development mode. Development mode provides a flexible deployment policy that enables you to update existing deployment units (KIE containers) while maintaining active process instances for small changes. It also enables you to reset the deployment unit state before updating active process instances for larger changes. Production mode is optimal for production environments, where each deployment creates a new deployment unit.
In a development environment, you can click Deploy in Business Central to deploy the built KJAR file to a KIE Server without stopping any running instances (if applicable), or click Redeploy to deploy the built KJAR file and replace all instances. The next time you deploy or redeploy the built KJAR, the previous deployment unit (KIE container) is automatically updated in the same target KIE Server.
In a production environment, the Redeploy option in Business Central is disabled and you can click only Deploy to deploy the built KJAR file to a new deployment unit (KIE container) on a KIE Server.
Procedure
-
To configure the KIE Server environment mode, set the
org.kie.server.modesystem property toorg.kie.server.mode=developmentororg.kie.server.mode=production. To configure the deployment behavior for a project in Business Central, go to project Settings → General Settings → Version and toggle the Development Mode option.
NoteBy default, KIE Server and all new projects in Business Central are in development mode.
You cannot deploy a project with Development Mode turned on or with a manually added
SNAPSHOTversion suffix to a KIE Server that is in production mode.
Chapter 9. Configuring KIE Server to connect to Business Central
This section provides a sample setup that you can use for testing purposes. Some of the values are unsuitable for a production environment, and are marked as such.
If a KIE Server is not configured in your Red Hat Process Automation Manager environment, or if you require additional KIE Servers in your Red Hat Process Automation Manager environment, you must configure a KIE Server to connect to Business Central.
If you are deploying KIE Server on Red Hat OpenShift Container Platform, see the Deploying a Red Hat Process Automation Manager environment on Red Hat OpenShift Container Platform 4 using Operators document for instructions about configuring it to connect to Business Central.
KIE Server can be managed or unmanaged. If KIE Server is unmanaged, you must manually create and maintain KIE containers (deployment units). If KIE Server is managed, the Process Automation Manager controller manages the KIE Server configuration and you interact with the Process Automation Manager controller to create and maintain the KIE containers.
Make the changes described in this section if KIE Server is managed by Business Central and you have installed Red Hat Process Automation Manager from the ZIP files. If you have installed Business Central, you can use the headless Process Automation Manager controller to manage KIE Server, as described in Chapter 10, Installing and running the headless Process Automation Manager controller.
Prerequisites
-
Business Central and KIE Server are installed in the base directory of the Red Hat JBoss EAP installation (
EAP_HOME).
You must install Business Central and KIE Server on different servers in production environments. In this sample situation, we use only one user named controllerUser, containing both rest-all and the kie-server roles. However, if you install KIE Server and Business Central on the same server, for example in a development environment, make the changes in the shared standalone-full.xml file as described in this section.
Users with the following roles exist:
-
In Business Central, a user with the role
rest-all -
On the KIE Server, a user with the role
kie-server
-
In Business Central, a user with the role
Procedure
-
In your Red Hat Process Automation Manager installation directory, navigate to the
standalone-full.xmlfile. For example, if you use a Red Hat JBoss EAP installation for Red Hat Process Automation Manager, go to$EAP_HOME/standalone/configuration/standalone-full.xml. Open the
standalone-full.xmlfile and under the<system-properties>tag, set the following JVM properties:Table 9.1. JVM Properties for the KIE Server instance
Property Value Note org.kie.server.iddefault-kie-serverThe KIE Server ID.
org.kie.server.controllerhttp://localhost:8080/business-central/rest/controllerThe location of Business Central. The URL for connecting to the API of Business Central.
org.kie.server.controller.usercontrollerUserThe user name with the role
rest-allwho can log in to the Business Central.org.kie.server.controller.pwdcontrollerUser1234;The password of the user who can log in to the Business Central.
org.kie.server.locationhttp://localhost:8080/kie-server/services/rest/serverThe location of the KIE Server. The URL for connecting to the API of KIE Server.
Table 9.2. JVM Properties for the Business Central instance
Property Value Note org.kie.server.usercontrollerUserThe user name with the role
kie-server.org.kie.server.pwdcontrollerUser1234;The password of the user.
The following example shows how to configure a KIE Server instance:
<property name="org.kie.server.id" value="default-kie-server"/> <property name="org.kie.server.controller" value="http://localhost:8080/business-central/rest/controller"/> <property name="org.kie.server.controller.user" value="controllerUser"/> <property name="org.kie.server.controller.pwd" value="controllerUser1234;"/> <property name="org.kie.server.location" value="http://localhost:8080/kie-server/services/rest/server"/>
The following example shows how to configure a for Business Central instance:
<property name="org.kie.server.user" value="controllerUser"/> <property name="org.kie.server.pwd" value="controllerUser1234;"/>
To verify that KIE Server starts successfully, send a GET request to
http://SERVER:PORT/kie-server/services/rest/server/when KIE Server is running. For more information about running Red Hat Process Automation Manager on KIE Server, see Running Red Hat Process Automation Manager.After successful authentication, you receive an XML response similar to the following example:
<response type="SUCCESS" msg="Kie Server info"> <kie-server-info> <capabilities>KieServer</capabilities> <capabilities>BRM</capabilities> <capabilities>BPM</capabilities> <capabilities>CaseMgmt</capabilities> <capabilities>BPM-UI</capabilities> <capabilities>BRP</capabilities> <capabilities>DMN</capabilities> <capabilities>Swagger</capabilities> <location>http://localhost:8230/kie-server/services/rest/server</location> <messages> <content>Server KieServerInfo{serverId='first-kie-server', version='7.5.1.Final-redhat-1', location='http://localhost:8230/kie-server/services/rest/server', capabilities=[KieServer, BRM, BPM, CaseMgmt, BPM-UI, BRP, DMN, Swagger]}started successfully at Mon Feb 05 15:44:35 AEST 2018</content> <severity>INFO</severity> <timestamp>2018-02-05T15:44:35.355+10:00</timestamp> </messages> <name>first-kie-server</name> <id>first-kie-server</id> <version>7.5.1.Final-redhat-1</version> </kie-server-info> </response>Verify successful registration:
- Log in to Business Central.
Click Menu → Deploy → Execution Servers.
If registration is successful, you will see the registered server ID.
Chapter 10. Installing and running the headless Process Automation Manager controller
You can configure KIE Server to run in managed or unmanaged mode. If KIE Server is unmanaged, you must manually create and maintain KIE containers (deployment units). If KIE Server is managed, the Process Automation Manager controller manages the KIE Server configuration and you interact with the Process Automation Manager controller to create and maintain KIE containers.
Business Central has an embedded Process Automation Manager controller. If you install Business Central, use the Execution Server page to create and maintain KIE containers. If you want to automate KIE Server management without Business Central, you can use the headless Process Automation Manager controller.
10.1. Using the installer to configure KIE Server with the Process Automation Manager controller
KIE Server can be managed by the Process Automation Manager controller or it can be unmanaged. If KIE Server is unmanaged, you must manually create and maintain KIE containers (deployment units). If KIE Server is managed, the Process Automation Manager controller manages the KIE Server configuration and you interact with the Process Automation Manager controller to create and maintain KIE containers.
The Process Automation Manager controller is integrated with Business Central. If you install Business Central, you can use the Execution Server page in Business Central to interact with the Process Automation Manager controller.
You can use the installer in interactive or CLI mode to install Business Central and KIE Server, and then configure KIE Server with the Process Automation Manager controller.
Prerequisites
- Two computers with backed-up Red Hat JBoss EAP 7.3 server installations are available.
- Sufficient user permissions to complete the installation are granted.
Procedure
- On the first computer, run the installer in interactive mode or CLI mode. See Installing and configuring Red Hat Process Automation Manager on Red Hat JBoss EAP 7.3 for more information.
- On the Component Selection page, clear the KIE Server box.
- Complete the Business Central installation.
- On the second computer, run the installer in interactive mode or CLI mode.
- On the Component Selection page, clear the Business Central box.
- On the Configure Runtime Environment page, select Perform Advanced Configuration.
- Select Customize KIE Server properties and click Next.
Enter the controller URL for Business Central and configure additional properties for KIE Server. The controller URL has the following form where
<HOST:PORT>is the address of Business Central on the second computer:<HOST:PORT>/business-central/rest/controller
- Complete the installation.
- To verify that the Process Automation Manager controller is now integrated with Business Central, go to the Execution Servers page in Business Central and confirm that the KIE Server that you configured appears under REMOTE SERVERS.
10.2. Installing the headless Process Automation Manager controller
You can install the headless Process Automation Manager controller and use the REST API or the KIE Server Java Client API to interact with it.
Prerequisites
-
A backed-up Red Hat JBoss EAP installation version 7.3 is available. The base directory of the Red Hat JBoss EAP installation is referred to as
EAP_HOME. - Sufficient user permissions to complete the installation are granted.
Procedure
Navigate to the Software Downloads page in the Red Hat Customer Portal (login required), and select the product and version from the drop-down options:
- Product: Process Automation Manager
- Version: 7.10
-
Download Red Hat Process Automation Manager 7.10.0 Add Ons (the
rhpam-7.10.0-add-ons.zipfile). -
Extract the
rhpam-7.10.0-add-ons.zipfile. Therhpam-7.10.0-controller-ee7.zipfile is in the extracted directory. -
Extract the
rhpam-7.10.0-controller-ee7archive to a temporary directory. In the following examples this directory is calledTEMP_DIR. Copy the
TEMP_DIR/rhpam-7.10.0-controller-ee7/controller.wardirectory toEAP_HOME/standalone/deployments/.WarningEnsure that the names of the headless Process Automation Manager controller deployments you copy do not conflict with your existing deployments in the Red Hat JBoss EAP instance.
-
Copy the contents of the
TEMP_DIR/rhpam-7.10.0-controller-ee7/SecurityPolicy/directory toEAP_HOME/bin. - When prompted to overwrite files, select Yes.
-
In the
EAP_HOME/standalone/deployments/directory, create an empty file namedcontroller.war.dodeploy. This file ensures that the headless Process Automation Manager controller is automatically deployed when the server starts.
10.2.1. Creating a headless Process Automation Manager controller user
Before you can use the headless Process Automation Manager controller, you must create a user that has the kie-server role.
Prerequisites
-
The headless Process Automation Manager controller is installed in the base directory of the Red Hat JBoss EAP installation (
EAP_HOME).
Procedure
-
In a terminal application, navigate to the
EAP_HOME/bindirectory. Enter the following command and replace
<USER_NAME>and<PASSWORD>with the user name and password of your choice.$ ./add-user.sh -a --user <USER_NAME> --password <PASSWORD> --role kie-server
NoteMake sure that the specified user name is not the same as an existing user, role, or group. For example, do not create a user with the user name
admin.The password must have at least eight characters and must contain at least one number and one non-alphanumeric character, but not & (ampersand).
- Make a note of your user name and password.
10.2.2. Configuring KIE Server and the headless Process Automation Manager controller
If KIE Server will be managed by the headless Process Automation Manager controller, you must edit the standalone-full.xml file in KIE Server installation and the standalone.xml file in the headless Process Automation Manager controller installation.
Prerequisites
-
KIE Server is installed in an
EAP_HOME. The headless Process Automation Manager controller is installed in an
EAP_HOME.NoteYou should install KIE Server and the headless Process Automation Manager controller on different servers in production environments. However, if you install KIE Server and the headless Process Automation Manager controller on the same server, for example in a development environment, make these changes in the shared
standalone-full.xmlfile.-
On KIE Server nodes, a user with the
kie-serverrole exists. On the server nodes, a user with the
kie-serverrole exists.Procedure
In the
EAP_HOME/standalone/configuration/standalone-full.xmlfile, add the following properties to the<system-properties>section and replace<USERNAME>and<USER_PWD>with the credentials of a user with thekie-serverrole:<property name="org.kie.server.user" value="<USERNAME>"/> <property name="org.kie.server.pwd" value="<USER_PWD>"/>
In the KIE Server
EAP_HOME/standalone/configuration/standalone-full.xmlfile, add the following properties to the<system-properties>section:<property name="org.kie.server.controller.user" value="<CONTROLLER_USER>"/> <property name="org.kie.server.controller.pwd" value="<CONTROLLER_PWD>"/> <property name="org.kie.server.id" value="<KIE_SERVER_ID>"/> <property name="org.kie.server.location" value="http://<HOST>:<PORT>/kie-server/services/rest/server"/> <property name="org.kie.server.controller" value="<CONTROLLER_URL>"/>
- In this file, replace the following values:
-
Replace
<CONTROLLER_USER>and<CONTROLLER_PWD>with the credentials of a user with thekie-serverrole. -
Replace
<KIE_SERVER_ID>with the ID or name of the KIE Server installation, for example,rhpam-7.10.0-kie-server-1. -
Replace
<HOST>with the ID or name of the KIE Server host, for example,localhostor192.7.8.9. Replace
<PORT>with the port of the KIE Server host, for example,8080.NoteThe
org.kie.server.locationproperty specifies the location of KIE Server.-
Replace
<CONTROLLER_URL>with the URL of the headless Process Automation Manager controller. KIE Server connects to this URL during startup.
10.3. Running the headless Process Automation Manager controller
After you have installed the headless Process Automation Manager controller on Red Hat JBoss EAP, use this procedure to run the headless Process Automation Manager controller.
Prerequisites
-
The headless Process Automation Manager controller is installed and configured in the base directory of the Red Hat JBoss EAP installation (
EAP_HOME).
Procedure
-
In a terminal application, navigate to
EAP_HOME/bin. If you installed the headless Process Automation Manager controller on the same Red Hat JBoss EAP instance as the Red Hat JBoss EAP instance where you installed the KIE Server, enter one of the following commands:
On Linux or UNIX-based systems:
$ ./standalone.sh -c standalone-full.xml
On Windows:
standalone.bat -c standalone-full.xml
If you installed the headless Process Automation Manager controller on a separate Red Hat JBoss EAP instance from the Red Hat JBoss EAP instance where you installed the KIE Server, start the headless Process Automation Manager controller with the
standalone.shscript:NoteIn this case, ensure that you made all required configuration changes to the
standalone.xmlfile.On Linux or UNIX-based systems:
$ ./standalone.sh
On Windows:
standalone.bat
To verify that the headless Process Automation Manager controller is working on Red Hat JBoss EAP, enter the following command where
<CONTROLLER>and<CONTROLLER_PWD>is the user name and password. The output of this command provides information about the KIE Server instance.curl -X GET "http://<HOST>:<PORT>/controller/rest/controller/management/servers" -H "accept: application/xml" -u '<CONTROLLER>:<CONTROLLER_PWD>'
Alternatively, you can use the KIE Server Java API Client to access the headless Process Automation Manager controller.
10.4. Clustering KIE Servers with the headless Process Automation Manager controller
The Process Automation Manager controller is integrated with Business Central. However, if you do not install Business Central, you can install the headless Process Automation Manager controller and use the REST API or the KIE Server Java Client API to interact with it.
Prerequisites
-
A backed-up Red Hat JBoss EAP installation version 7.3 or later is available. The base directory of the Red Hat JBoss EAP installation is referred to as
EAP_HOME. - Sufficient user permissions to complete the installation are granted.
- An NFS server with a shared folder is available as described in Installing and configuring Red Hat Process Automation Manager in a Red Hat JBoss EAP clustered environment.
Procedure
Navigate to the Software Downloads page in the Red Hat Customer Portal (login required), and select the product and version from the drop-down options:
- Product: Process Automation Manager
- Version: 7.10
-
Download Red Hat Process Automation Manager 7.10.0 Add Ons (the
rhpam-7.10.0-add-ons.zipfile). -
Extract the
rhpam-7.10.0-add-ons.zipfile. Therhpam-7.10.0-controller-ee7.zipfile is in the extracted directory. -
Extract the
rhpam-7.10.0-controller-ee7archive to a temporary directory. In the following examples this directory is calledTEMP_DIR. Copy the
TEMP_DIR/rhpam-7.10.0-controller-ee7/controller.wardirectory toEAP_HOME/standalone/deployments/.WarningEnsure that the names of the headless Process Automation Manager controller deployments you copy do not conflict with your existing deployments in the Red Hat JBoss EAP instance.
-
Copy the contents of the
TEMP_DIR/rhpam-7.10.0-controller-ee7/SecurityPolicy/directory toEAP_HOME/bin. - When prompted to overwrite files, click Yes.
-
In the
EAP_HOME/standalone/deployments/directory, create an empty file namedcontroller.war.dodeploy. This file ensures that the headless Process Automation Manager controller is automatically deployed when the server starts. -
Open the
EAP_HOME/standalone/configuration/standalone.xmlfile in a text editor. Add the following properties to the
<system-properties>element and replace<NFS_STORAGE>with the absolute path to the NFS storage where the template configuration is stored:<system-properties> <property name="org.kie.server.controller.templatefile.watcher.enabled" value="true"/> <property name="org.kie.server.controller.templatefile" value="<NFS_STORAGE>"/> </system-properties>
Template files contain default configurations for specific deployment scenarios.
If the value of the
org.kie.server.controller.templatefile.watcher.enabledproperty is set to true, a separate thread is started to watch for modifications of the template file. The default interval for these checks is 30000 milliseconds and can be further controlled by theorg.kie.server.controller.templatefile.watcher.intervalsystem property. If the value of this property is set to false, changes to the template file are detected only when the server restarts.To start the headless Process Automation Manager controller, navigate to
EAP_HOME/binand enter the following command:On Linux or UNIX-based systems:
$ ./standalone.sh
On Windows:
standalone.bat
For more information about running Red Hat Process Automation Manager in a Red Hat JBoss Enterprise Application Platform clustered environment, see Installing and configuring Red Hat Process Automation Manager in a Red Hat JBoss EAP clustered environment.
Chapter 11. Configuring Smart Router for TLS support
You can configure Smart Router (KIE Server Router) for TLS support to allow HTTPS traffic.
Prerequisites
- KIE Server is installed on each node of a Red Hat JBoss EAP 7.3 cluster.
- Smart Router is installed and configured. For more information, see Installing and configuring Red Hat Process Automation Manager in a Red Hat JBoss EAP clustered environment.
Procedure
To start Smart Router with TLS support and HTTPS enabled, use the TLS keystore properties, for example:
java -Dorg.kie.server.router.tls.keystore = <KEYSTORE_PATH> -Dorg.kie.server.router.tls.keystore.password = <KEYSTORE_PWD> -Dorg.kie.server.router.tls.keystore.keyalias = <KEYSTORE_ALIAS> -Dorg.kie.server.router.tls.port = <HTTPS_PORT> -jar rhpam-7.9.0-smart-router.jarorg.kie.server.router.tls.portis a property used to configure the HTTPS port. The default HTTPS port value is9443.
Chapter 12. Activating or deactivating a KIE container on KIE Server
You can now stop the creation of new process instances from a given container by deactivating it but at the same time continue working on its existing process instances and tasks. In case the deactivation is temporary, you can activate the container again later. The activation or deactivation of KIE containers do not require restarting of KIE server.
Prerequisites
- A KIE container has been created and configured in Business Central.
Procedure
- Log in to Business Central.
- In the main menu, click Menu → Deploy → Execution Servers.
- From the Server Configurations pane, which is on the left of the page, select your server.
- From the Deployment Units pane, select the deployment unit you want to activate or deactivate.
Click Activate or Deactivate in the upper-right corner of the deployment unit pane.
You cannot create a process instance from a KIE container once it is deactivated.
Chapter 13. Deployment descriptors
Processes and rules are stored in Apache Maven based packaging and are known as knowledge archives, or KJAR. The rules, processes, assets, and other project artifacts are part of a JAR file built and managed by Maven. A file kept inside the META-INF directory of the KJAR called kmodule.xml can be used to define the KIE bases and sessions. This kmodule.xml file, by default, is empty.
Whenever a runtime component such as KIE Server is about to process the KJAR, it looks up kmodule.xml to build the runtime representation.
Deployment descriptors supplement the kmodule.xml file and provide granular control over your deployment. The presence of these descriptors is optional and your deployment will proceed successfully without them. You can set purely technical properties using these descriptors, including meta values such as persistence, auditing, and runtime strategy.
These descriptors allow you to configure the KIE Server on multiple levels, including server level default, different deployment descriptor per KJAR, and other server configurations. You can use descriptors to make simple customizations to the default KIE Server configuration, possibly per KJAR.
You can define these descriptors in a file called kie-deployment-descriptor.xml and place this file next to your kmodule.xml file in the META-INF folder. You can change this default location and the file name by specifying it as a system parameter:
-Dorg.kie.deployment.desc.location=file:/path/to/file/company-deployment-descriptor.xml
13.1. Deployment descriptor configuration
Deployment descriptors allow the user to configure the execution server on multiple levels:
- Server level: The main level and the one that applies to all KJARs deployed on the server.
- KJAR level: This enables you to configure descriptors on a per KJAR basis.
- Deploy time level: Descriptors that apply while a KJAR is being deployed.
The granular configuration items specified by the deployment descriptors take precedence over the server level ones, except in case of configuration items that are collection based, which are merged. The hierarchy works like this: deploy time configuration > KJAR configuration > server configuration.
The deploy time configuration applies to deployments done via the REST API.
For example, if the persistence mode (one of the items you can configure) defined at the server level is NONE but the same mode is specified as JPA at the KJAR level, the actual mode will be JPA for that KJAR. If nothing is specified for the persistence mode in the deployment descriptor for that KJAR (or if there is no deployment descriptor), it will fall back to the server level configuration, which in this case is NONE (or to JPA if there is no server level deployment descriptor).
What Can You Configure?
High level technical configuration details can be configured via deployment descriptors. The following table lists these along with the permissible and default values for each.
Table 13.1. Deployment Descriptors
| Configuration | XML Entry | Permissible Values | Default Value |
|---|---|---|---|
| Persistence unit name for runtime data | persistence-unit | Any valid persistence package name | org.jbpm.domain |
| Persistence unit name for audit data | audit-persistence-unit | Any valid persistence package name | org.jbpm.domain |
| Persistence mode | persistence-mode | JPA, NONE | JPA |
| Audit mode | audit-mode | JPA, JMS or NONE | JPA |
| Runtime Strategy | runtime-strategy | SINGLETON, PER_REQUEST or PER_PROCESS_INSTANCE | SINGLETON |
| List of Event Listeners to be registered | event-listeners |
Valid listener class names as | No default value |
| List of Task Event Listeners to be registered | task-event-listeners |
Valid listener class names as | No default value |
| List of Work Item Handlers to be registered | work-item-handlers |
Valid Work Item Handler classes given as | No default value |
| List of Globals to be registered | globals |
Valid Global variables given as | No default value |
| Marshalling strategies to be registered (for pluggable variable persistence) | marshalling-strategies |
Valid | No default value |
| Required Roles to be granted access to the resources of the KJAR | required-roles | String role names | No default value |
| Additional Environment Entries for KIE session | environment-entries |
Valid | No default value |
| Additional configuration options of KIE session | configurations |
Valid | No default value |
| Classes used for serialization in the remote services | remoteable-class |
Valid | No default value |
Do not use the Singleton runtime strategy with the EJB Timer Scheduler (the default scheduler in KIE Server) in a production environment. This combination can result in Hibernate problems under load. Per process instance runtime strategy is recommended if there is no specific reason to use other strategies. For more information about this limitation, see Hibernate issues with Singleton strategy and EJBTimerScheduler.
13.2. Managing deployment descriptors
Deployment descriptors can be configured in Business Central in Menu → Design → $PROJECT_NAME → Settings → Deployments.
Every time a project is created, a stock kie-deployment-descriptor.xml file is generated with default values.
It is not necessary to provide a full deployment descriptor for all KJARs. Providing partial deployment descriptors is possible and recommended. For example, if you need to use a different audit mode, you can specify that for the KJAR only, all other properties will have the default value defined at the server level.
When using OVERRIDE_ALL merge mode, all configuration items must be specified, because the relevant KJAR will always use specified configuration and will not merge with any other deployment descriptor in the hierarchy.
13.3. Restricting access to the runtime engine
The required-roles configuration item can be edited in the deployment descriptors. This property restricts access to the runtime engine on a per-KJAR or per-server level by ensuring that access to certain processes is only granted to users that belong to groups defined by this property.
The security role can be used to restrict access to process definitions or restrict access at run time.
The default behavior is to add required roles to this property based on repository restrictions. You can edit these properties manually if required by providing roles that match actual roles defined in the security realm.
Procedure
- To open the project deployment descriptors configuration in Business Central, open Menu → Design → $PROJECT_NAME → Settings → Deployments.
- From the list of configuration settings, click Required Roles, then click Add Required Role.
- In the Add Required Role window, type the name of the role that you want to have permission to access this deployment, then click Add.
- To add more roles with permission to access the deployment, repeat the previous steps.
- When you have finished adding all required roles, click Save.
Chapter 14. Accessing runtime data from Business Central
The following pages in Business Central allow you to view the runtime data of the KIE Server:
- Process Reports
- Task Reports
- Process Definitions
- Process Instances
- Execution Errors
- Jobs
- Tasks
These pages use the credentials of the currently logged in user to load data from the KIE Server. Therefore, to be able to view the runtime data in Business Central, ensure that the following conditions are met:
-
The user exists in the KIE container (deployment unit) running the Business Central application. This user must have
admin,analyst, ordeveloperroles assigned, in addition to thekie-serverrole, with full access to the runtime data. Themanagerandprocess_adminroles also allow access to runtime data pages in Business Central. -
The user exists in the KIE container (deployment unit) running the KIE Server and has
kie-serverrole assigned. - Communication between Business Central and the KIE Server is established. That is, the KIE Server is registered in the Process Automation Manager controller, which is part of Business Central.
The
deployment.business-central.warlogin module is present in thestandalone.xmlconfiguration of the server running Business Central:<login-module code="org.kie.security.jaas.KieLoginModule" flag="optional" module="deployment.business-central.war"/>
Chapter 15. Execution error management
When an execution error occurs for a business process, the process stops and reverts to the most recent stable state (the closest safe point) and continues its execution. If an error of any kind is not handled by the process the entire transaction rolls back, leaving the process instance in the previous wait state. Any trace of this is only visible in the logs, and usually displayed to the caller who sent the request to the process engine.
Users with process administrator (process-admin) or administrator (admin) roles are able to access error messages in Business Central. Execution error messaging provides the following primary benefits:
- Better traceability
- Visibility in case of critical processes
- Reporting and analytics based on error situations
- External system error handling and compensation
Configurable error handling is responsible for receiving any technical errors thrown throughout the process engine execution (including task service). The following technical exceptions apply:
-
Anything that extends
java.lang.Throwable - Process level error handling and any other exceptions not previously handled
There are several components that make up the error handling mechanism and allow a pluggable approach to extend its capabilities.
The process engine entry point for error handling is the ExecutionErrorManager. This is integrated with RuntimeManager, which is then responsible for providing it to the underlying KieSession and TaskService.
From an API point of view, ExecutionErrorManager provides access to the following components:
-
ExecutionErrorHandler: The primary mechanism for error handling -
ExecutionErrorStorage: Pluggable storage for execution error information
15.1. Managing execution errors
By definition, every process error that is detected and stored is unacknowledged and must be handled by someone or something (in case of automatic error recovery). Errors are filtered on the basis of whether or not they have been acknowledged. Acknowledging an error saves the user information and time stamp for traceability. You can access the Error Management view at any time.
Procedure
- In Business Central, go to Menu → Manage → Execution Errors.
- Select an error from the list to open the Details tab. This displays information about the error or errors.
Click the Acknowledge button to acknowledge and clear the error. You can view the error later by selecting Yes on the Acknowledged filter in the Manage Execution Errors page.
If the error was related to a task, a Go to Task button is displayed.
Click the Go to Task button, if applicable, to view the associated job information in the Manage Tasks page.
In the Manage Tasks page, you can restart, reschedule, or retry the corresponding task.
15.2. The ExecutionErrorHandler
The ExecutionErrorHandler is the primary mechanism for all process error handling. It is bound to the life cycle of RuntimeEngine; meaning it is created when a new runtime engine is created, and is destroyed when RuntimeEngine is disposed. A single instance of the ExecutionErrorHandler is used within a given execution context or transaction. Both KieSession and TaskService use that instance to inform the error handling about processed nodes/tasks. ExecutionErrorHandler is informed about:
- Starting of processing of a given node instance.
- Completion of processing of a given node instance.
- Starting of processing of a given task instance.
- Completion of processing of a given task instance.
This information is mainly used for errors that are of unknown type; that is, errors that do not provide information about the process context. For example, upon commit time, database exceptions do not carry any process information.
15.3. Execution error storage
ExecutionErrorStorage is a pluggable strategy that permits various ways of persisting information about execution errors. Storage is used directly by the handler that gets an instance of the store when it is created (when RuntimeEngine is created). Default storage implementation is based on the database table, which stores every error and includes all of the available information. Some errors may not contain details, as this depends on the type of error and whether or not it is possible to extract specific information.
15.4. Error types and filters
Error handling attempts to catch and handle any kind of error, therefore it needs a way to categorize errors. By doing this, it is able to properly extract information from the error and make it pluggable, as some users may require specific types of errors to be thrown and handled in different ways than what is provided by default.
Error categorization and filtering is based on ExecutionErrorFilters. This interface is solely responsible for building instances of ExecutionError, which are later stored by way of the ExecutionErrorStorage strategy. It has following methods:
-
accept: indicates if given error can be handled by the filter. -
filter: where the actual filtering, handling, and so on happens. -
getPriority: indicates the priority that is used when calling filters.
Filters process one error at a time and use a priority system to avoid having multiple filters returning alternative “views” of the same error. Priority enables more specialized filters to see if the error can be accepted, or otherwise allow another filter to handle it.
ExecutionErrorFilter can be provided using the ServiceLoader mechanism, which enables the capability of error handling to be easily extended.
Red Hat Process Automation Manager ships with the following ExecutionErrorFilters :
Table 15.1. ExecutionErrorFilters
| Class name | Type | Priority |
|---|---|---|
| org.jbpm.runtime.manager.impl.error.filters.ProcessExecutionErrorFilter | Process | 100 |
| org.jbpm.runtime.manager.impl.error.filters.TaskExecutionErrorFilter | Task | 80 |
| org.jbpm.runtime.manager.impl.error.filters.DBExecutionErrorFilter | DB | 200 |
| org.jbpm.executor.impl.error.JobExecutionErrorFilter | Job | 100 |
Filters are given a higher execution order based on the lowest value of the priority. In the above table, filters are invoked in the following order:
- Task
- Process
- Job
- DB
15.5. Auto acknowledging execution errors
When executions errors occur they are unacknowledged by default, and require a manual acknowledgment to be performed otherwise they are always seen as information that requires attention. In case of larger volumes, manual actions can be time consuming and not suitable in some situations.
Auto acknowledgment resolves this issue. It is based on scheduled jobs by way of the jbpm-executor, with the following three types of jobs available:
org.jbpm.executor.commands.error.JobAutoAckErrorCommand-
Responsible for finding jobs that previously failed but now are either canceled, completed, or rescheduled for another execution. This job only acknowledges execution errors of type
Job. org.jbpm.executor.commands.error.TaskAutoAckErrorCommand-
Responsible for auto acknowledgment of user task execution errors for tasks that previously failed but now are in one of the exit states (completed, failed, exited, obsolete). This job only acknowledges execution errors of type
Task. org.jbpm.executor.commands.error.ProcessAutoAckErrorCommand-
Responsible for auto acknowledgment of process instances that have errors attached. It acknowledges errors where the process instance is already finished (completed or aborted), or the task that the error originated from is already finished. This is based on
init_activity_idvalue. This job acknowledges any type of execution error that matches the above criteria.
Jobs can be registered on the KIE Server. In Business Central you can configure auto acknowledge jobs for errors:
Prerequisites
- Execution errors of one or more type have accumulated during processes execution but require no further attention.
Procedure
- In Business Central, click Menu → Manage → Jobs.
- In the top right of the screen, click New Job.
- Type the process correlation key into the Business Key field.
- In the Type field, add type of the auto acknowledge job type from the list above.
Select a Due On time for the job to be completed:
-
To run the job immediately, select the
Run nowoption. To run the job at a specific time, select
Run later. A date and time field appears next to theRun lateroption. Click the field to open the calendar and schedule a specific time and date for the job.
-
To run the job immediately, select the
- Click Create to create the job and return to the Manage Jobs page.
The following steps are optional, and allow you to configure auto acknowledge jobs to run either once (SingleRun), on specific time intervals (NextRun), or using the custom name of an entity manager factory to search for jobs to acknowledge (EmfName).
- Click the Advanced tab.
- Click the Add Parameter button.
Enter the configuration parameter you want to apply to the job:
-
SingleRun:trueorfalse -
NextRun: time expression, such as 2h, 5d, 1m, and so on. EmfName: custom entity manager factory name.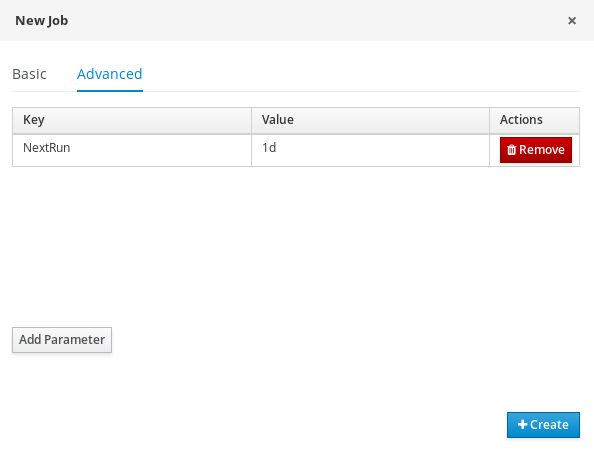
-
15.6. Cleaning up the error list
The ExecutionErrorInfo error list table can be cleaned up to remove redundant information. Depending on the life cycle of the process, errors may remain in the list for some time, and there is no direct API with which to clean up the list. Instead, the ExecutionErrorCleanupCommand command can be scheduled to periodically clean up errors.
The following parameters can be set for the clean up command. The command is restricted to deleting execution errors of already completed or aborted process instances:
DateFormat-
Date format for further date related parameters - if not given
yyyy-MM-ddis used (pattern ofSimpleDateFormatclass).
-
Date format for further date related parameters - if not given
EmfName- Name of the entity manager factory to be used for queries (valid persistence unit name).
SingleRun-
Indicates if execution should be single run only (
true|false).
-
Indicates if execution should be single run only (
NextRun- Provides next execution time (valid time expression, for example: 1d, 5h, and so on)
OlderThan- Indicates what errors should be deleted - older than given date.
OlderThanPeriod- Indicated what errors should be deleted older than given time expression (valid time expression e.g. 1d, 5h, and so on)
ForProcess- Indicates errors to be deleted only for given process definition.
ForProcessInstance- Indicates errors to be deleted only for given process instance.
ForDeployment- Indicates errors to be deleted that are from given deployment ID.
Chapter 16. Prometheus metrics monitoring in Red Hat Process Automation Manager
Prometheus is an open-source systems monitoring toolkit that you can use with Red Hat Process Automation Manager to collect and store metrics related to the execution of business rules, processes, Decision Model and Notation (DMN) models, and other Red Hat Process Automation Manager assets. You can access the stored metrics through a REST API call to the KIE Server, through the Prometheus expression browser, or using a data-graphing tool such as Grafana.
You can configure Prometheus metrics monitoring for an on-premise KIE Server instance, for KIE Server on Spring Boot, or for a KIE Server deployment on Red Hat OpenShift Container Platform.
For the list of available metrics that KIE Server exposes with Prometheus, download the Red Hat Process Automation Manager 7.10.0 Source Distribution from the Red Hat Customer Portal and navigate to ~/rhpam-7.10.0-sources/src/droolsjbpm-integration-$VERSION/kie-server-parent/kie-server-services/kie-server-services-prometheus/src/main/java/org/kie/server/services/prometheus.
Red Hat support for Prometheus is limited to the setup and configuration recommendations provided in Red Hat product documentation.
16.1. Configuring Prometheus metrics monitoring for KIE Server
You can configure your KIE Server instances to use Prometheus to collect and store metrics related to your business asset activity in Red Hat Process Automation Manager. For the list of available metrics that KIE Server exposes with Prometheus, download the Red Hat Process Automation Manager 7.10.0 Source Distribution from the Red Hat Customer Portal and navigate to ~/rhpam-7.10.0-sources/src/droolsjbpm-integration-$VERSION/kie-server-parent/kie-server-services/kie-server-services-prometheus/src/main/java/org/kie/server/services/prometheus.
Prerequisites
- KIE Server is installed.
-
You have
kie-serveruser role access to KIE Server. - Prometheus is installed. For information about downloading and using Prometheus, see the Prometheus documentation page.
Procedure
-
In your KIE Server instance, set the
org.kie.prometheus.server.ext.disabledsystem property tofalseto enable the Prometheus extension. You can define this property when you start KIE Server or in thestandalone.xmlorstandalone-full.xmlfile of Red Hat Process Automation Manager distribution. If you are running Red Hat Process Automation Manager on Spring Boot, configure the required key in the
application.propertiessystem property:Spring Boot application.properties key for Red Hat Process Automation Manager and Prometheus
kieserver.jbpm.enabled=true kieserver.drools.enabled=true kieserver.dmn.enabled=true kieserver.prometheus.enabled=true
In the
prometheus.yamlfile of your Prometheus distribution, add the following settings in thescrape_configssection to configure Prometheus to scrape metrics from KIE Server:Scrape configurations in prometheus.yaml file
scrape_configs: - job_name: 'kie-server' metrics_path: /SERVER_PATH/services/rest/metrics basicAuth: username: USER_NAME password: PASSWORD static_configs: - targets: ["HOST:PORT"]Scrape configurations in prometheus.yaml file for Spring Boot (if applicable)
scrape_configs: - job_name: 'kie' metrics_path: /rest/metrics static_configs: - targets: ["HOST:PORT"]Replace the values according to your KIE Server location and settings.
Start the KIE Server instance.
Example start command for Red Hat Process Automation Manager on Red Hat JBoss EAP
$ cd ~/EAP_HOME/bin $ ./standalone.sh --c standalone-full.xml
After you start the configured KIE Server instance, Prometheus begins collecting metrics and KIE Server publishes the metrics to the REST API endpoint
http://HOST:PORT/SERVER/services/rest/metrics(or on Spring Boot, tohttp://HOST:PORT/rest/metrics).In a REST client or curl utility, send a REST API request with the following components to verify that KIE Server is publishing the metrics:
For REST client:
-
Authentication: Enter the user name and password of the KIE Server user with the
kie-serverrole. HTTP Headers: Set the following header:
-
Accept:application/json
-
-
HTTP method: Set to
GET. -
URL: Enter the KIE Server REST API base URL and metrics endpoint, such as
http://localhost:8080/kie-server/services/rest/metrics(or on Spring Boot,http://localhost:8080/rest/metrics).
For curl utility:
-
-u: Enter the user name and password of the KIE Server user with thekie-serverrole. -H: Set the following header:-
accept:application/json
-
-
-X: Set toGET. -
URL: Enter the KIE Server REST API base URL and metrics endpoint, such as
http://localhost:8080/kie-server/services/rest/metrics(or on Spring Boot,http://localhost:8080/rest/metrics).
Example curl command for Red Hat Process Automation Manager on Red Hat JBoss EAP
curl -u 'baAdmin:password@1' -X GET "http://localhost:8080/kie-server/services/rest/metrics"
Example curl command for Red Hat Process Automation Manager on Spring Boot
curl -u 'baAdmin:password@1' -X GET "http://localhost:8080/rest/metrics"
Example server response
# HELP kie_server_container_started_total Kie Server Started Containers # TYPE kie_server_container_started_total counter kie_server_container_started_total{container_id="task-assignment-kjar-1.0",} 1.0 # HELP solvers_running Number of solvers currently running # TYPE solvers_running gauge solvers_running 0.0 # HELP dmn_evaluate_decision_nanosecond DMN Evaluation Time # TYPE dmn_evaluate_decision_nanosecond histogram # HELP solver_duration_seconds Time in seconds it took solver to solve the constraint problem # TYPE solver_duration_seconds summary solver_duration_seconds_count{solver_id="100tasks-5employees.xml",} 1.0 solver_duration_seconds_sum{solver_id="100tasks-5employees.xml",} 179.828255925 solver_duration_seconds_count{solver_id="24tasks-8employees.xml",} 1.0 solver_duration_seconds_sum{solver_id="24tasks-8employees.xml",} 179.995759653 # HELP drl_match_fired_nanosecond Drools Firing Time # TYPE drl_match_fired_nanosecond histogram # HELP dmn_evaluate_failed_count DMN Evaluation Failed # TYPE dmn_evaluate_failed_count counter # HELP kie_server_start_time Kie Server Start Time # TYPE kie_server_start_time gauge kie_server_start_time{name="myapp-kieserver",server_id="myapp-kieserver",location="http://myapp-kieserver-demo-monitoring.127.0.0.1.nip.io:80/services/rest/server",version="7.4.0.redhat-20190428",} 1.557221271502E12 # HELP kie_server_container_running_total Kie Server Running Containers # TYPE kie_server_container_running_total gauge kie_server_container_running_total{container_id="task-assignment-kjar-1.0",} 1.0 # HELP solver_score_calculation_speed Number of moves per second for a particular solver solving the constraint problem # TYPE solver_score_calculation_speed summary solver_score_calculation_speed_count{solver_id="100tasks-5employees.xml",} 1.0 solver_score_calculation_speed_sum{solver_id="100tasks-5employees.xml",} 6997.0 solver_score_calculation_speed_count{solver_id="24tasks-8employees.xml",} 1.0 solver_score_calculation_speed_sum{solver_id="24tasks-8employees.xml",} 19772.0 # HELP kie_server_case_started_total Kie Server Started Cases # TYPE kie_server_case_started_total counter kie_server_case_started_total{case_definition_id="itorders.orderhardware",} 1.0 # HELP kie_server_case_running_total Kie Server Running Cases # TYPE kie_server_case_running_total gauge kie_server_case_running_total{case_definition_id="itorders.orderhardware",} 2.0 # HELP kie_server_data_set_registered_total Kie Server Data Set Registered # TYPE kie_server_data_set_registered_total gauge kie_server_data_set_registered_total{name="jbpmProcessInstanceLogs::CUSTOM",uuid="jbpmProcessInstanceLogs",} 1.0 kie_server_data_set_registered_total{name="jbpmRequestList::CUSTOM",uuid="jbpmRequestList",} 1.0 kie_server_data_set_registered_total{name="tasksMonitoring::CUSTOM",uuid="tasksMonitoring",} 1.0 kie_server_data_set_registered_total{name="jbpmHumanTasks::CUSTOM",uuid="jbpmHumanTasks",} 1.0 kie_server_data_set_registered_total{name="jbpmHumanTasksWithUser::FILTERED_PO_TASK",uuid="jbpmHumanTasksWithUser",} 1.0 kie_server_data_set_registered_total{name="jbpmHumanTasksWithVariables::CUSTOM",uuid="jbpmHumanTasksWithVariables",} 1.0 kie_server_data_set_registered_total{name="jbpmProcessInstancesWithVariables::CUSTOM",uuid="jbpmProcessInstancesWithVariables",} 1.0 kie_server_data_set_registered_total{name="jbpmProcessInstances::CUSTOM",uuid="jbpmProcessInstances",} 1.0 kie_server_data_set_registered_total{name="jbpmExecutionErrorList::CUSTOM",uuid="jbpmExecutionErrorList",} 1.0 kie_server_data_set_registered_total{name="processesMonitoring::CUSTOM",uuid="processesMonitoring",} 1.0 kie_server_data_set_registered_total{name="jbpmHumanTasksWithAdmin::FILTERED_BA_TASK",uuid="jbpmHumanTasksWithAdmin",} 1.0 # HELP kie_server_execution_error_total Kie Server Execution Errors # TYPE kie_server_execution_error_total counter # HELP kie_server_task_completed_total Kie Server Completed Tasks # TYPE kie_server_task_completed_total counter # HELP kie_server_container_running_total Kie Server Running Containers # TYPE kie_server_container_running_total gauge kie_server_container_running_total{container_id="itorders_1.0.0-SNAPSHOT",} 1.0 # HELP kie_server_job_cancelled_total Kie Server Cancelled Jobs # TYPE kie_server_job_cancelled_total counter # HELP kie_server_process_instance_started_total Kie Server Started Process Instances # TYPE kie_server_process_instance_started_total counter kie_server_process_instance_started_total{container_id="itorders_1.0.0-SNAPSHOT",process_id="itorders.orderhardware",} 1.0 # HELP solver_duration_seconds Time in seconds it took solver to solve the constraint problem # TYPE solver_duration_seconds summary # HELP kie_server_task_skipped_total Kie Server Skipped Tasks # TYPE kie_server_task_skipped_total counter # HELP kie_server_data_set_execution_time_seconds Kie Server Data Set Execution Time # TYPE kie_server_data_set_execution_time_seconds summary kie_server_data_set_execution_time_seconds_count{uuid="jbpmProcessInstances",} 8.0 kie_server_data_set_execution_time_seconds_sum{uuid="jbpmProcessInstances",} 0.05600000000000001 # HELP kie_server_job_scheduled_total Kie Server Started Jobs # TYPE kie_server_job_scheduled_total counter # HELP kie_server_data_set_execution_total Kie Server Data Set Execution # TYPE kie_server_data_set_execution_total counter kie_server_data_set_execution_total{uuid="jbpmProcessInstances",} 8.0 # HELP kie_server_process_instance_completed_total Kie Server Completed Process Instances # TYPE kie_server_process_instance_completed_total counter # HELP kie_server_job_running_total Kie Server Running Jobs # TYPE kie_server_job_running_total gauge # HELP kie_server_task_failed_total Kie Server Failed Tasks # TYPE kie_server_task_failed_total counter # HELP kie_server_task_exited_total Kie Server Exited Tasks # TYPE kie_server_task_exited_total counter # HELP dmn_evaluate_decision_nanosecond DMN Evaluation Time # TYPE dmn_evaluate_decision_nanosecond histogram # HELP kie_server_data_set_lookups_total Kie Server Data Set Running Lookups # TYPE kie_server_data_set_lookups_total gauge kie_server_data_set_lookups_total{uuid="jbpmProcessInstances",} 0.0 # HELP kie_server_process_instance_duration_seconds Kie Server Process Instances Duration # TYPE kie_server_process_instance_duration_seconds summary # HELP kie_server_case_duration_seconds Kie Server Case Duration # TYPE kie_server_case_duration_seconds summary # HELP dmn_evaluate_failed_count DMN Evaluation Failed # TYPE dmn_evaluate_failed_count counter # HELP kie_server_task_added_total Kie Server Added Tasks # TYPE kie_server_task_added_total counter kie_server_task_added_total{deployment_id="itorders_1.0.0-SNAPSHOT",process_id="itorders.orderhardware",task_name="Prepare hardware spec",} 1.0 # HELP drl_match_fired_nanosecond Drools Firing Time # TYPE drl_match_fired_nanosecond histogram # HELP kie_server_container_started_total Kie Server Started Containers # TYPE kie_server_container_started_total counter kie_server_container_started_total{container_id="itorders_1.0.0-SNAPSHOT",} 1.0 # HELP kie_server_process_instance_sla_violated_total Kie Server Process Instances SLA Violated # TYPE kie_server_process_instance_sla_violated_total counter # HELP kie_server_task_duration_seconds Kie Server Task Duration # TYPE kie_server_task_duration_seconds summary # HELP kie_server_job_executed_total Kie Server Executed Jobs # TYPE kie_server_job_executed_total counter # HELP kie_server_deployments_active_total Kie Server Active Deployments # TYPE kie_server_deployments_active_total gauge kie_server_deployments_active_total{deployment_id="itorders_1.0.0-SNAPSHOT",} 1.0 # HELP kie_server_process_instance_running_total Kie Server Running Process Instances # TYPE kie_server_process_instance_running_total gauge kie_server_process_instance_running_total{container_id="itorders_1.0.0-SNAPSHOT",process_id="itorders.orderhardware",} 2.0 # HELP solvers_running Number of solvers currently running # TYPE solvers_running gauge solvers_running 0.0 # HELP kie_server_work_item_duration_seconds Kie Server Work Items Duration # TYPE kie_server_work_item_duration_seconds summary # HELP kie_server_job_duration_seconds Kie Server Job Duration # TYPE kie_server_job_duration_seconds summary # HELP solver_score_calculation_speed Number of moves per second for a particular solver solving the constraint problem # TYPE solver_score_calculation_speed summary # HELP kie_server_start_time Kie Server Start Time # TYPE kie_server_start_time gauge kie_server_start_time{name="sample-server",server_id="sample-server",location="http://localhost:8080/kie-server/services/rest/server",version="7.48.1-SNAPSHOT",} 1.557285486469E12If the metrics are not available in KIE Server, review and verify the KIE Server and Prometheus configurations described in this section.
You can also interact with your collected metrics in the Prometheus expression browser at
http://HOST:PORT/graph, or integrate your Prometheus data source with a data-graphing tool such as Grafana:Figure 16.1. Prometheus expression browser with KIE Server metrics
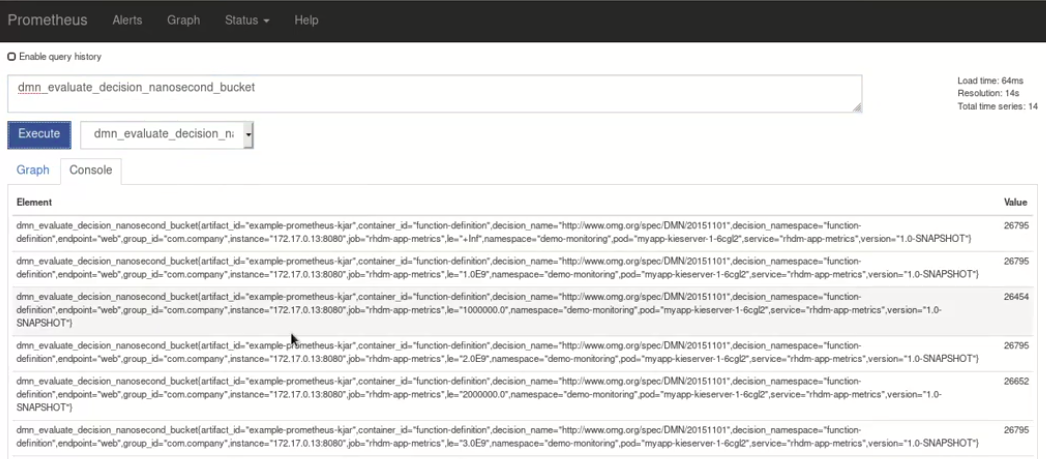
Figure 16.2. Prometheus expression browser with KIE Server target

Figure 16.3. Grafana dashboard with KIE Server metrics for DMN models

Figure 16.4. Grafana dashboard with KIE Server metrics for solvers

Figure 16.5. Grafana dashboard with KIE Server metrics for processes, cases, and tasks
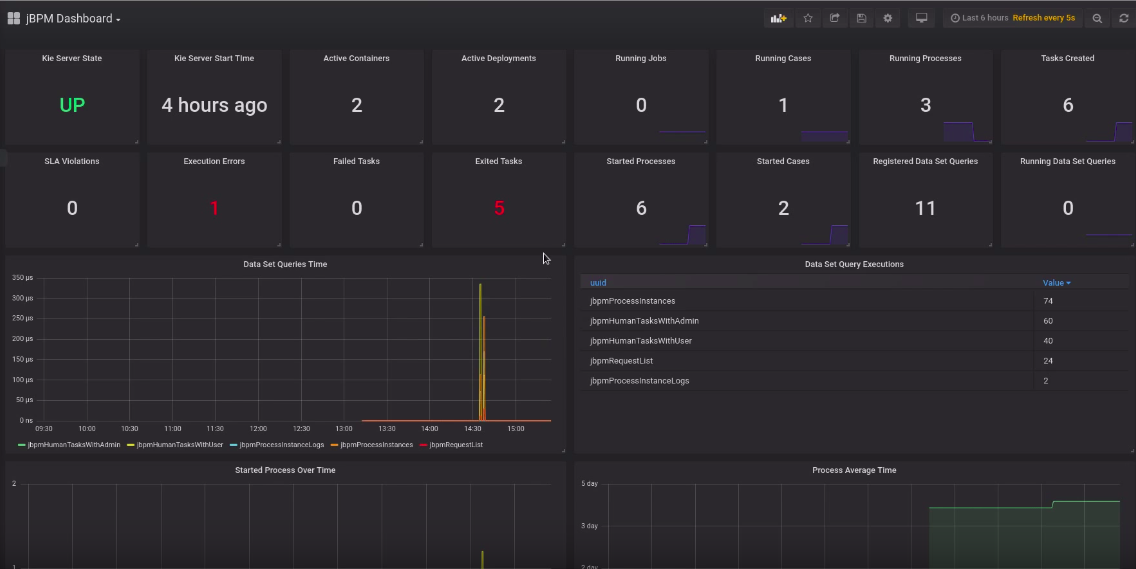
-
Authentication: Enter the user name and password of the KIE Server user with the
Additional resources
16.2. Configuring Prometheus metrics monitoring for KIE Server on Red Hat OpenShift Container Platform
You can configure your KIE Server deployment on Red Hat OpenShift Container Platform to use Prometheus to collect and store metrics related to your business asset activity in Red Hat Process Automation Manager. For the list of available metrics that KIE Server exposes with Prometheus, download the Red Hat Process Automation Manager 7.10.0 Source Distribution from the Red Hat Customer Portal and navigate to ~/rhpam-7.10.0-sources/src/droolsjbpm-integration-$VERSION/kie-server-parent/kie-server-services/kie-server-services-prometheus/src/main/java/org/kie/server/services/prometheus.
Prerequisites
- KIE Server is installed and deployed on Red Hat OpenShift Container Platform. For more information about KIE Server on OpenShift, see the relevant OpenShift deployment option in the Product documentation for Red Hat Process Automation Manager 7.10.
-
You have
kie-serveruser role access to KIE Server. - Prometheus Operator is installed. For information about downloading and using Prometheus Operator, see the Prometheus Operator project in GitHub.
Procedure
In the
DeploymentConfigobject of your KIE Server deployment on OpenShift, set thePROMETHEUS_SERVER_EXT_DISABLEDenvironment variable tofalseto enable the Prometheus extension. You can set this variable in the OpenShift web console or use theoccommand in a command terminal:oc set env dc/<dc_name> PROMETHEUS_SERVER_EXT_DISABLED=false -n <namespace>
If you have not yet deployed your KIE Server on OpenShift, then in the OpenShift template that you plan to use for your OpenShift deployment (for example,
rhpam710-prod-immutable-kieserver.yaml), you can set thePROMETHEUS_SERVER_EXT_DISABLEDtemplate parameter tofalseto enable the Prometheus extension.If you are using the OpenShift Operator to deploy KIE Server on OpenShift, then in your KIE Server configuration, set the
PROMETHEUS_SERVER_EXT_DISABLEDenvironment variable tofalseto enable the Prometheus extension:apiVersion: app.kiegroup.org/v1 kind: KieApp metadata: name: enable-prometheus spec: environment: rhpam-trial objects: servers: - env: - name: PROMETHEUS_SERVER_EXT_DISABLED value: "false"Create a
service-metrics.yamlfile to add a service that exposes the metrics from KIE Server to Prometheus:apiVersion: v1 kind: Service metadata: annotations: description: RHPAM Prometheus metrics exposed labels: app: myapp-kieserver application: myapp-kieserver template: myapp-kieserver metrics: rhpam name: rhpam-app-metrics spec: ports: - name: web port: 8080 protocol: TCP targetPort: 8080 selector: deploymentConfig: myapp-kieserver sessionAffinity: None type: ClusterIPIn a command terminal, use the
occommand to apply theservice-metrics.yamlfile to your OpenShift deployment:oc apply -f service-metrics.yaml
-
Create an OpenShift secret, such as
metrics-secret, to access the Prometheus metrics on KIE Server. The secret must contain the "username" and "password" elements with KIE Server user credentials. For information about OpenShift secrets, see the Secrets chapter in the OpenShift Developer Guide. Create a
service-monitor.yamlfile that defines theServiceMonitorobject. A service monitor enables Prometheus to connect to the KIE Server metrics service.apiVersion: monitoring.coreos.com/v1 kind: ServiceMonitor metadata: name: rhpam-service-monitor labels: team: frontend spec: selector: matchLabels: metrics: rhpam endpoints: - port: web path: /services/rest/metrics basicAuth: password: name: metrics-secret key: password username: name: metrics-secret key: usernameIn a command terminal, use the
occommand to apply theservice-monitor.yamlfile to your OpenShift deployment:oc apply -f service-monitor.yaml
After you complete these configurations, Prometheus begins collecting metrics and KIE Server publishes the metrics to the REST API endpoint
http://HOST:PORT/kie-server/services/rest/metrics.You can interact with your collected metrics in the Prometheus expression browser at
http://HOST:PORT/graph, or integrate your Prometheus data source with a data-graphing tool such as Grafana.The host and port for the Prometheus expression browser location
http://HOST:PORT/graphwas defined in the route where you exposed the Prometheus web console when you installed the Prometheus Operator. For information about OpenShift routes, see the Routes chapter in the OpenShift Architecture documentation.Figure 16.6. Prometheus expression browser with KIE Server metrics
Figure 16.7. Prometheus expression browser with KIE Server target

Figure 16.8. Grafana dashboard with KIE Server metrics for DMN models
Figure 16.9. Grafana dashboard with KIE Server metrics for solvers
Figure 16.10. Grafana dashboard with KIE Server metrics for processes, cases, and tasks
Additional resources
16.3. Extending Prometheus metrics monitoring in KIE Server with custom metrics
After you configure your KIE Server instance to use Prometheus metrics monitoring, you can extend the Prometheus functionality in KIE Server to use custom metrics according to your business needs. Prometheus then collects and stores your custom metrics along with the default metrics that KIE Server exposes with Prometheus.
As an example, this procedure defines custom Decision Model and Notation (DMN) metrics to be collected and stored by Prometheus.
Prerequisites
- Prometheus metrics monitoring is configured for your KIE Server instance. For information about Prometheus configuration with KIE Server on-premise, see Section 16.1, “Configuring Prometheus metrics monitoring for KIE Server”. For information about Prometheus configuration with KIE Server on Red Hat OpenShift Container Platform, see Section 16.2, “Configuring Prometheus metrics monitoring for KIE Server on Red Hat OpenShift Container Platform”.
Procedure
Create an empty Maven project and define the following packaging type and dependencies in the
pom.xmlfile for the project:Example pom.xml file in the sample project
<packaging>jar</packaging> <properties> <version.org.kie>7.48.0.Final-redhat-00004</version.org.kie> </properties> <dependencies> <dependency> <groupId>org.kie</groupId> <artifactId>kie-api</artifactId> <version>${version.org.kie}</version> </dependency> <dependency> <groupId>org.kie.server</groupId> <artifactId>kie-server-api</artifactId> <version>${version.org.kie}</version> </dependency> <dependency> <groupId>org.kie.server</groupId> <artifactId>kie-server-services-common</artifactId> <version>${version.org.kie}</version> </dependency> <dependency> <groupId>org.kie.server</groupId> <artifactId>kie-server-services-drools</artifactId> <version>${version.org.kie}</version> </dependency> <dependency> <groupId>org.kie.server</groupId> <artifactId>kie-server-services-prometheus</artifactId> <version>${version.org.kie}</version> </dependency> <dependency> <groupId>org.kie</groupId> <artifactId>kie-dmn-api</artifactId> <version>${version.org.kie}</version> </dependency> <dependency> <groupId>org.kie</groupId> <artifactId>kie-dmn-core</artifactId> <version>${version.org.kie}</version> </dependency> <dependency> <groupId>org.jbpm</groupId> <artifactId>jbpm-services-api</artifactId> <version>${version.org.kie}</version> </dependency> <dependency> <groupId>org.jbpm</groupId> <artifactId>jbpm-executor</artifactId> <version>${version.org.kie}</version> </dependency> <dependency> <groupId>org.optaplanner</groupId> <artifactId>optaplanner-core</artifactId> <version>${version.org.kie}</version> </dependency> <dependency> <groupId>io.prometheus</groupId> <artifactId>simpleclient</artifactId> <version>0.5.0</version> </dependency> </dependencies>Implement the relevant listener from the
org.kie.server.services.prometheus.PrometheusMetricsProviderinterface as part of the custom listener class that defines your custom Prometheus metrics, as shown in the following example:Sample implementation of the
DMNRuntimeEventListenerlistener in a custom listener classpackage org.kie.server.ext.prometheus; import io.prometheus.client.Gauge; import org.kie.dmn.api.core.ast.DecisionNode; import org.kie.dmn.api.core.event.AfterEvaluateBKMEvent; import org.kie.dmn.api.core.event.AfterEvaluateContextEntryEvent; import org.kie.dmn.api.core.event.AfterEvaluateDecisionEvent; import org.kie.dmn.api.core.event.AfterEvaluateDecisionServiceEvent; import org.kie.dmn.api.core.event.AfterEvaluateDecisionTableEvent; import org.kie.dmn.api.core.event.BeforeEvaluateBKMEvent; import org.kie.dmn.api.core.event.BeforeEvaluateContextEntryEvent; import org.kie.dmn.api.core.event.BeforeEvaluateDecisionEvent; import org.kie.dmn.api.core.event.BeforeEvaluateDecisionServiceEvent; import org.kie.dmn.api.core.event.BeforeEvaluateDecisionTableEvent; import org.kie.dmn.api.core.event.DMNRuntimeEventListener; import org.kie.server.api.model.ReleaseId; import org.kie.server.services.api.KieContainerInstance; public class ExampleCustomPrometheusMetricListener implements DMNRuntimeEventListener { private final KieContainerInstance kieContainer; private final Gauge randomGauge = Gauge.build() .name("random_gauge_nanosecond") .help("Random gauge as an example of custom KIE Prometheus metric") .labelNames("container_id", "group_id", "artifact_id", "version", "decision_namespace", "decision_name") .register(); public ExampleCustomPrometheusMetricListener(KieContainerInstance containerInstance) { kieContainer = containerInstance; } public void beforeEvaluateDecision(BeforeEvaluateDecisionEvent e) { } public void afterEvaluateDecision(AfterEvaluateDecisionEvent e) { DecisionNode decisionNode = e.getDecision(); ReleaseId releaseId = kieContainer.getResource().getReleaseId(); randomGauge.labels(kieContainer.getContainerId(), releaseId.getGroupId(), releaseId.getArtifactId(), releaseId.getVersion(), decisionNode.getModelName(), decisionNode.getModelNamespace()) .set((int) (Math.random() * 100)); } public void beforeEvaluateBKM(BeforeEvaluateBKMEvent event) { } public void afterEvaluateBKM(AfterEvaluateBKMEvent event) { } public void beforeEvaluateContextEntry(BeforeEvaluateContextEntryEvent event) { } public void afterEvaluateContextEntry(AfterEvaluateContextEntryEvent event) { } public void beforeEvaluateDecisionTable(BeforeEvaluateDecisionTableEvent event) { } public void afterEvaluateDecisionTable(AfterEvaluateDecisionTableEvent event) { } public void beforeEvaluateDecisionService(BeforeEvaluateDecisionServiceEvent event) { } public void afterEvaluateDecisionService(AfterEvaluateDecisionServiceEvent event) { } }The
PrometheusMetricsProviderinterface contains the required listeners for collecting Prometheus metrics. The interface is incorporated by thekie-server-services-prometheusdependency that you declared in your projectpom.xmlfile.In this example, the
ExampleCustomPrometheusMetricListenerclass implements theDMNRuntimeEventListenerlistener (from thePrometheusMetricsProviderinterface) and defines the custom DMN metrics to be collected and stored by Prometheus.Implement the
PrometheusMetricsProviderinterface as part of a custom metrics provider class that associates your custom listener with thePrometheusMetricsProviderinterface, as shown in the following example:Sample implementation of the
PrometheusMetricsProviderinterface in a custom metrics provider classpackage org.kie.server.ext.prometheus; import org.jbpm.executor.AsynchronousJobListener; import org.jbpm.services.api.DeploymentEventListener; import org.kie.api.event.rule.AgendaEventListener; import org.kie.api.event.rule.DefaultAgendaEventListener; import org.kie.dmn.api.core.event.DMNRuntimeEventListener; import org.kie.server.services.api.KieContainerInstance; import org.kie.server.services.prometheus.PrometheusMetricsProvider; import org.optaplanner.core.impl.phase.event.PhaseLifecycleListener; import org.optaplanner.core.impl.phase.event.PhaseLifecycleListenerAdapter; public class MyPrometheusMetricsProvider implements PrometheusMetricsProvider { public DMNRuntimeEventListener createDMNRuntimeEventListener(KieContainerInstance kContainer) { return new ExampleCustomPrometheusMetricListener(kContainer); } public AgendaEventListener createAgendaEventListener(String kieSessionId, KieContainerInstance kContainer) { return new DefaultAgendaEventListener(); } public PhaseLifecycleListener createPhaseLifecycleListener(String solverId) { return new PhaseLifecycleListenerAdapter() { }; } public AsynchronousJobListener createAsynchronousJobListener() { return null; } public DeploymentEventListener createDeploymentEventListener() { return null; } }In this example, the
MyPrometheusMetricsProviderclass implements thePrometheusMetricsProviderinterface and includes your customExampleCustomPrometheusMetricListenerlistener class.-
To make the new metrics provider discoverable for KIE Server, create a
META-INF/services/org.kie.server.services.prometheus.PrometheusMetricsProviderfile in your Maven project and add the fully qualified class name of thePrometheusMetricsProviderimplementation class within the file. For this example, the file contains the single lineorg.kie.server.ext.prometheus.MyPrometheusMetricsProvider. Build your project and copy the resulting JAR file into the
~/kie-server.war/WEB-INF/libdirectory of your project. For example, on Red Hat JBoss EAP, the path to this directory isEAP_HOME/standalone/deployments/kie-server.war/WEB-INF/lib.If you are deploying Red Hat Process Automation Manager on Red Hat OpenShift Container Platform, create a custom KIE Server image and add this JAR file to the image. For more information about creating a custom KIE Server image with an additional JAR file, see Deploying a Red Hat Process Automation Manager environment on Red Hat OpenShift Container Platform 4 using Operators.
Start the KIE Server and deploy the built project to the running KIE Server. You can deploy the project using the Business Central interface or the KIE Server REST API (a
PUTrequest tohttp://SERVER:PORT/kie-server/services/rest/server/containers/{containerId}).After your project is deployed on a running KIE Server, Prometheus begins collecting metrics and KIE Server publishes the metrics to the REST API endpoint
http://HOST:PORT/SERVER/services/rest/metrics(or on Spring Boot, tohttp://HOST:PORT/rest/metrics).
Chapter 17. Configuring OpenShift connection timeout
By default, the OpenShift route is configured to time out HTTP requests that are longer than 30 seconds. This may cause session timeout issues in Business Central resulting in the following behaviors:
- "Unable to complete your request. The following exception occurred: (TypeError) : Cannot read property 'indexOf' of null."
- "Unable to complete your request. The following exception occurred: (TypeError) : b is null."
- A blank page is displayed when clicking the Project or Server links in Business Central.
All Business Central templates already include extended timeout configuration.
To configure longer timeout on Business Central OpenShift routes, add the haproxy.router.openshift.io/timeout: 60s annotation on the target route:
- kind: Route
apiVersion: v1
id: "$APPLICATION_NAME-rhpamcentr-http"
metadata:
name: "$APPLICATION_NAME-rhpamcentr"
labels:
application: "$APPLICATION_NAME"
annotations:
description: Route for Business Central's http service.
haproxy.router.openshift.io/timeout: 60s
spec:
host: "$BUSINESS_CENTRAL_HOSTNAME_HTTP"
to:
name: "$APPLICATION_NAME-rhpamcentr"For a full list of global route-specific timeout annotations, see the OpenShift Documentation.
Chapter 18. Persistence
Binary persistence, or marshaling, converts the state of the process instance into a binary data set. Binary persistence is a mechanism used to store and retrieve information persistently. The same mechanism is also applied to the session state and work item states.
When you enable persistence of a process instance:
- Red Hat Process Automation Manager transforms the process instance information into binary data. Custom serialization is used instead of Java serialization for performance reasons.
- The binary data is stored together with other process instance metadata, such as process instance ID, process ID, and the process start date.
The session can also store other forms of state, such as the state of timer jobs, or data required for business rules evaluation. Session state is stored separately as a binary data set along with the ID of the session and metadata. You can restore the session state by reloading a session with given ID. Use ksession.getId() to get the session ID.
Red Hat Process Automation Manager will persist the following when persistence is configured:
- Session state: This includes the session ID, date of last modification, the session data that business rules would need for evaluation, state of timer jobs.
- Process instance state: This includes the process instance ID, process ID, date of last modification, date of last read access, process instance start date, runtime data (the execution status including the node being executed, variable values, and other process instance data) and the event types.
- Work item runtime state: This includes the work item ID, creation date, name, process instance ID, and the work item state itself.
Based on the persisted data, you can restore the state of execution of all running process instances in case of failure or to temporarily remove running instances from memory and restore them later.
18.1. Configuring KIE Server persistence
You can configure the KIE Server persistence by passing Hibernate or JPA parameters as system properties.
The KIE Server can acknowledge the system properties with the following prefixes and you can use every Hibernate or JPA parameters with these prefixes:
-
javax.persistence -
hibernate
Procedure
To configure KIE Server persistence, complete any of the following tasks:
If you want to configure KIE Server persistence using Red Hat JBoss EAP configuration file, complete the following tasks:
-
In your Red Hat Process Automation Manager installation directory, navigate to the
standalone-full.xmlfile. For example, if you use Red Hat JBoss EAP installation for Red Hat Process Automation Manager, go to$EAP_HOME/standalone/configuration/standalone-full.xmlfile. Open the
standalone-full.xmlfile and under the<system-properties>tag, set your Hibernate or JPA parameters as system properties.Example of configuring KIE Server persistence using Hibernate parameters
<system-properties> ... <property name="hibernate.hbm2ddl.auto" value="create-drop"/> ... <system-properties>Example of configuring KIE Server persistence using JPA parameters
<system-properties> ... <property name="javax.persistence.jdbc.url" value="jdbc:mysql://mysql.db.server:3306/my_database?useSSL=false&serverTimezone=UTC"/> ... <system-properties>
If you want to configure KIE Server persistence using command line, complete the following tasks:
Pass the parameters directly from the command line using
-Dkey=valueas follows:Example of configuring KIE Server persistence using Hibernate parameters:
$EAP_HOME/bin/standalone.sh -Dhibernate.hbm2ddl.auto=create-drop
Example of configuring KIE Server persistence using JPA parameters:
$EAP_HOME/bin/standalone.sh -Djavax.persistence.jdbc.url=jdbc:mysql://mysql.db.server:3306/my_database?useSSL=false&serverTimezone=UTC
-
In your Red Hat Process Automation Manager installation directory, navigate to the
18.2. Configuring safe points
To allow persistence, add the jbpm-persistence JAR files to the classpath of your application and configure the process engine to use persistence. The process engine automatically stores the runtime state in the storage when the process engine reaches a safe point.
Safe points are points where the process instance has paused. When a process instance invocation reaches a safe point in the process engine, the process engine stores any changes to the process instance as a snapshot of the process runtime data. However, when a process instance is completed, the persisted snapshot of process instance runtime data is automatically deleted.
BPMN2 safe point nodes ensure that the process engine saves the state of the process definition at the point where the execution stops and the transaction is committed. The following BPMN2 nodes are considered safe points:
All intermediate CATCH events
- Timer Intermediate event
- Error Intermediate event
- Conditional Intermediate event
- Compensation Intermediate event
- Signal Intermediate event
- Escalation Intermediate event
- Message Intermediate event
- User tasks
- Custom (defined by the user) service tasks that do not complete the task in the handler
If a failure occurs and you need to restore the process engine runtime from the storage, the process instances are automatically restored and their execution resumes so there is no need to reload and trigger the process instances manually.
Consider the runtime persistence data to be internal to the process engine. You should not access persisted runtime data or modify them directly because this might have unexpected side effects.
For more information about the current execution state, refer to the history log. Query the database for runtime data only if absolutely necessary.
18.3. Session persistence entities
Sessions are persisted as SessionInfo entities. These persist the state of the runtime KIE session, and store the following data:
Table 18.1. SessionInfo
| Field | Description | Nullable |
|---|---|---|
|
| The primary key. | NOT NULL |
|
| The last time that entity was saved to a database. | |
|
| The state of a session. | NOT NULL |
|
| The session start time. | |
|
| A version field containing a lock value. |
18.4. Process instance persistence entities
Process instances are persisted as ProcessInstanceInfo entities, which persist the state of a process instance on runtime and store the following data:
Table 18.2. ProcessInstanceInfo
| Field | Description | Nullable |
|---|---|---|
|
| The primary key. | NOT NULL |
|
| The last time that the entity was saved to a database. | |
|
| The last time that the entity was retrieved from the database. | |
|
| The ID of the process. | |
|
| The state of a process instance in form of a binary data set. | NOT NULL |
|
| The start time of the process. | |
|
| An integer representing the state of a process instance. | NOT NULL |
|
| A version field containing a lock value. |
ProcessInstanceInfo has a 1:N relationship to the EventTypes entity.
The EventTypes entity contains the following data:
Table 18.3. EventTypes
| Field | Description | Nullable |
|---|---|---|
|
|
A reference to the | NOT NULL |
|
| A finished event in the process. |
18.5. Work item persistence entities
Work items are persisted as workiteminfo entities, which persist the state of the particular work item instance on runtime and store the following data:
Table 18.4. WorkItemInfo
| Field | Description | Nullable |
|---|---|---|
|
| The primary key. | NOT NULL |
|
| The name of the work item. | |
|
| The (primary key) ID of the process. There is no foreign key constraint on this field. | NOT NULL |
|
| The state of a work item. | NOT NULL |
|
| A version field containing a lock value. | |
|
| The work item state in as a binary data set. | NOT NULL |
18.6. Correlation key entities
The CorrelationKeyInfo entity contains information about the correlation key assigned to the given process instance. This table is optional. Use it only when you require correlation capabilities.
Table 18.5. CorrelationKeyInfo
| Field | Description | Nullable |
|---|---|---|
|
| The primary key. | NOT NULL |
|
| The assigned name of the correlation key. | |
|
| The ID of the process instance which is assigned to the correlation key. | NOT NULL |
|
| A version field containing a lock value. |
The CorrelationPropertyInfo entity contains information about correlation properties for a correlation key assigned the process instance.
Table 18.6. CorrelationPropertyInfo
| Field | Description | Nullable |
|---|---|---|
|
| The primary key. | NOT NULL |
|
| The name of the property. | |
|
| The value of the property. | NOT NULL |
|
| A version field containing a lock value. | |
|
| A foreign key mapped to the correlation key. | NOT NULL |
18.7. Context mapping entity
The ContextMappingInfo entity contains information about the contextual information mapped to a KieSession. This is an internal part of RuntimeManager and can be considered optional when RuntimeManager is not used.
Table 18.7. ContextMappingInfo
| Field | Description | Nullable |
|---|---|---|
|
| The primary key. | NOT NULL |
|
| The context identifier. | NOT NULL |
|
|
The | NOT NULL |
|
| A version field containing a lock value. | |
|
| Holds the identifier of the deployment unit that the given mapping is associated with |
18.8. Pessimistic Locking Support
The default locking mechanism for persistence of processes is optimistic. With multi-thread high concurrency to the same process instance, this locking strategy can result in bad performance.
This can be changed at runtime to allow the user to set locking on a per process basis and to allow it to be pessimistic (the change can be made at a per KIE Session level or Runtime Manager level as well and not just at the process level).
To set a process to use pessimistic locking, use the following configuration in the runtime environment:
import org.kie.api.runtime.Environment; import org.kie.api.runtime.EnvironmentName; import org.kie.api.runtime.manager.RuntimeManager; import org.kie.api.runtime.manager.RuntimeManagerFactory; ... env.set(EnvironmentName.USE_PESSIMISTIC_LOCKING, true); 1 RuntimeManager manager = RuntimeManagerFactory.Factory.get().newPerRequestRuntimeManager(environment); 2
18.9. Persisting process variables in a separate database schema in Red Hat Process Automation Manager
When you create process variables to use within the processes that you define, Red Hat Process Automation Manager stores those process variables as binary data in a default database schema. You can persist process variables in a separate database schema for greater flexibility in maintaining and implementing your process data.
For example, persisting your process variables in a separate database schema can help you perform the following tasks:
- Maintain process variables in human-readable format
- Make the variables available to services outside of Red Hat Process Automation Manager
- Clear the log of the default database tables in Red Hat Process Automation Manager without losing process variable data
This procedure applies to process variables only. This procedure does not apply to case variables.
Prerequisites
- You have defined processes in Red Hat Process Automation Manager for which you want to implement variables.
- If you want to persist variables in a database schema outside of Red Hat Process Automation Manager, you have created a data source and the separate database schema that you want to use. For information about creating data sources, see Configuring Business Central settings and properties.
Procedure
In the data object file that you use as a process variable, add the following elements to configure variable persistence:
Example Person.java object configured for variable persistence
@javax.persistence.Entity 1 @javax.persistence.Table(name = "Person") 2 public class Person extends org.drools.persistence.jpa.marshaller.VariableEntity 3 implements java.io.Serializable { 4 static final long serialVersionUID = 1L; @javax.persistence.GeneratedValue(strategy = javax.persistence.GenerationType.AUTO, generator = "PERSON_ID_GENERATOR") @javax.persistence.Id 5 @javax.persistence.SequenceGenerator(name = "PERSON_ID_GENERATOR", sequenceName = "PERSON_ID_SEQ") private java.lang.Long id; private java.lang.String name; private java.lang.Integer age; public Person() { } public java.lang.Long getId() { return this.id; } public void setId(java.lang.Long id) { this.id = id; } public java.lang.String getName() { return this.name; } public void setName(java.lang.String name) { this.name = name; } public java.lang.Integer getAge() { return this.age; } public void setAge(java.lang.Integer age) { this.age = age; } public Person(java.lang.Long id, java.lang.String name, java.lang.Integer age) { this.id = id; this.name = name; this.age = age; } }
- 1
- Configures the data object as a persistence entity.
- 2
- Defines the database table name used for the data object.
- 3
- Creates a separate
MappedVariablemapping table that maintains the relationship between this data object and the associated process instance. If you do not need this relationship maintained, you do not need to extend theVariableEntityclass. Without this extension, the data object is still persisted, but contains no additional data. - 4
- Configures the data object as a serializable object.
- 5
- Sets a persistence ID for the object.
To make the data object persistable using Business Central, navigate to the data object file in your project, click the Persistence icon in the upper-right corner of the window, and configure the persistence behavior:
Figure 18.1. Persistence configuration in Business Central

In the
pom.xmlfile of your project, add the following dependency for persistence support. This dependency contains theVariableEntityclass that you configured in your data object.Project dependency for persistence
<dependency> <groupId>org.drools</groupId> <artifactId>drools-persistence-jpa</artifactId> <version>${rhpam.version}</version> <scope>provided</scope> </dependency>In the
~/META-INF/kie-deployment-descriptor.xmlfile of your project, configure the JPA marshalling strategy and a persistence unit to be used with the marshaller. The JPA marshalling strategy and persistence unit are required for objects defined as entities.JPA marshaller and persistence unit configured in the kie-deployment-descriptor.xml file
<marshalling-strategy> <resolver>mvel</resolver> <identifier>new org.drools.persistence.jpa.marshaller.JPAPlaceholderResolverStrategy("myPersistenceUnit", classLoader)</identifier> <parameters/> </marshalling-strategy>In the
~/META-INFdirectory of your project, create apersistence.xmlfile that specifies in which data source you want to persist the process variable:Example persistence.xml file with data source configuration
<persistence xmlns="http://java.sun.com/xml/ns/persistence" xmlns:orm="http://java.sun.com/xml/ns/persistence/orm" xmlns:xsi="http://www.w3.org/2001/XMLSchema-instance" version="2.0" xsi:schemaLocation="http://java.sun.com/xml/ns/persistence http://java.sun.com/xml/ns/persistence/persistence_2_0.xsd http://java.sun.com/xml/ns/persistence/orm http://java.sun.com/xml/ns/persistence/orm_2_0.xsd"> <persistence-unit name="myPersistenceUnit" transaction-type="JTA"> <provider>org.hibernate.jpa.HibernatePersistenceProvider</provider> <jta-data-source>java:jboss/datasources/ExampleDS</jta-data-source> 1 <class>org.space.example.Person</class> <exclude-unlisted-classes>true</exclude-unlisted-classes> <properties> <property name="hibernate.dialect" value="org.hibernate.dialect.PostgreSQLDialect"/> <property name="hibernate.max_fetch_depth" value="3"/> <property name="hibernate.hbm2ddl.auto" value="update"/> <property name="hibernate.show_sql" value="true"/> <property name="hibernate.id.new_generator_mappings" value="false"/> <property name="hibernate.transaction.jta.platform" value="org.hibernate.service.jta.platform.internal.JBossAppServerJtaPlatform"/> </properties> </persistence-unit> </persistence>- 1
- Sets the data source in which the process variable is persisted
To configure the marshalling strategy, persistence unit, and data source using Business Central, navigate to project Settings → Deployments → Marshalling Strategies and to project Settings → Persistence:
Figure 18.2. JPA marshaller configuration in Business Central

Figure 18.3. Persistence unit and data source configuration in Business Central

Chapter 19. Define the LDAP login domain
When you are setting up Red Hat Process Automation Manager to use LDAP for authentication and authorization, define the LDAP login domain because the Git SSH authentication may use another security domain.
To define the LDAP login domain, use the org.uberfire.domain system property. For example, on Red Hat JBoss Enterprise Application Platform, add this property in the standalone.xml file as shown:
<system-properties> <!-- other system properties --> <property name="org.uberfire.domain" value="LDAPAuth"/> </system-properties>
Ensure that the authenticated user has appropriate roles (admin,analyst,reviewer) associated with it in LDAP.
Chapter 20. Authenticating third-party clients through RH-SSO
To use the different remote services provided by Business Central or by KIE Server, your client, such as curl, wget, web browser, or a custom REST client, must authenticate through the RH-SSO server and have a valid token to perform the requests. To use the remote services, the authenticated user must have the following roles:
-
rest-allfor using Business Central remote services. -
kie-serverfor using the KIE Server remote services.
Use the RH-SSO Admin Console to create these roles and assign them to the users that will consume the remote services.
Your client can authenticate through RH-SSO using one of these options:
- Basic authentication, if it is supported by the client
- Token-based authentication
20.1. Basic authentication
If you enabled basic authentication in the RH-SSO client adapter configuration for both Business Central and KIE Server, you can avoid the token grant and refresh calls and call the services as shown in the following examples:
For web based remote repositories endpoint:
curl http://admin:password@localhost:8080/business-central/rest/repositories
For KIE Server:
curl http://admin:password@localhost:8080/kie-server/services/rest/server/
Chapter 21. KIE Server system properties
The KIE Server accepts the following system properties (bootstrap switches) to configure the behavior of the server:
Table 21.1. System properties for disabling KIE Server extensions
| Property | Values | Default | Description |
|---|---|---|---|
|
|
|
|
If set to |
|
|
|
|
If set to |
|
|
|
|
If set to |
|
|
|
|
If set to |
|
|
|
|
If set to |
|
|
|
|
If set to |
|
|
|
|
If set to |
|
|
|
|
If set to |
|
|
|
|
If set to |
Some Process Automation Manager controller properties listed in the following table are marked as required. Set these properties when you create or remove KIE Server containers in Business Central. If you use the KIE Server separately without any interaction with Business Central, you do not need to set the required properties.
Table 21.2. System properties required for Process Automation Manager controller
| Property | Values | Default | Description |
|---|---|---|---|
|
| String | N/A | An arbitrary ID to be assigned to the server. If a headless Process Automation Manager controller is configured outside of Business Central, this is the ID under which the server connects to the headless Process Automation Manager controller to fetch the KIE container configurations. If not provided, the ID is automatically generated. |
|
| String |
| The user name used to connect with the KIE Server from the Process Automation Manager controller, required when running in managed mode. Set this property in Business Central system properties. Set this property when using a Process Automation Manager controller. |
|
| String |
| The password used to connect with the KIE Server from the Process Automation Manager controller, required when running in managed mode. Set this property in Business Central system properties. Set this property when using a Process Automation Manager controller. |
|
| String | N/A | A property that enables you to use token-based authentication between the Process Automation Manager controller and the KIE Server instead of the basic user name and password authentication. The Process Automation Manager controller sends the token as a parameter in the request header. The server requires long-lived access tokens because the tokens are not refreshed. |
|
| URL | N/A |
The URL of the KIE Server instance used by the Process Automation Manager controller to call back on this server, for example, |
|
| Comma-separated list | N/A |
A comma-separated list of URLs to the Process Automation Manager controller REST endpoints, for example, |
|
| String |
| The user name to connect to the Process Automation Manager controller REST API. Setting this property is required when using a Process Automation Manager controller. |
|
| String |
| The password to connect to the Process Automation Manager controller REST API. Setting this property is required when using a Process Automation Manager controller. |
|
| String | N/A | A property that enables you to use token-based authentication between the KIE Server and the Process Automation Manager controller instead of the basic user name and password authentication. The server sends the token as a parameter in the request header. The server requires long-lived access tokens because the tokens are not refreshed. |
|
| Long |
| The waiting time in milliseconds between repeated attempts to connect the KIE Server to the Process Automation Manager controller when the server starts. |
Table 21.3. Persistence system properties
| Property | Values | Default | Description |
|---|---|---|---|
|
| String | N/A | A data source JNDI name. Set this property when enabling the BPM support. |
|
| String | N/A | A transaction manager platform for Hibernate properties. Set this property when enabling the BPM support. |
|
| String | N/A | The Hibernate dialect to be used. Set this property when enabling the BPM support. |
|
| String | N/A | The database schema to be used. |
Table 21.4. Executor system properties
| Property | Values | Default | Description |
|---|---|---|---|
|
| Integer |
|
The time between the moment the Red Hat Process Automation Manager executor finishes a job and the moment it starts a new one, in a time unit specified in the |
|
|
|
|
The time unit in which the |
|
| Integer |
| The number of threads used by the Red Hat Process Automation Manager executor. |
|
| Integer |
| The number of retries the Red Hat Process Automation Manager executor attempts on a failed job. |
|
| String |
| Job executor JMS queue for KIE Server. |
|
|
|
|
If set to |
Table 21.5. Human task system properties
| Property | Values | Default | Description |
|---|---|---|---|
|
|
|
| A property that specifies the implementation of user group callback to be used:
|
|
| Fully qualified name | N/A |
A custom implementation of the |
|
|
|
| Enables task cleanup job listener to remove tasks once the process instance is completed. |
|
|
|
| Enables task BAM module to store task related information. |
|
| String |
| User who can access all the tasks from KIE Server. |
|
| String |
| The group that users must belong to in order to view all the tasks from KIE Server. |
Table 21.6. System properties for loading keystore
| Property | Values | Default | Description |
|---|---|---|---|
|
| URL | N/A |
The URL is used to load a Java Cryptography Extension KeyStore (JCEKS). For example, |
|
| String | N/A | The password is used for the JCEKS. |
|
| String | N/A | The alias name of the key for REST services where the password is stored. |
|
| String | N/A | The password of an alias for REST services. |
|
| String | N/A | The alias of the key for default REST Process Automation Manager controller. |
|
| String | N/A | The password of an alias for default REST Process Automation Manager controller. |
Table 21.7. Other system properties
| Property | Values | Default | Description |
|---|---|---|---|
|
| Path | N/A |
The location of a custom |
|
| String |
| The response queue JNDI name for JMS. |
|
|
|
|
When set to |
|
|
|
| A property that enables you to bypass the authenticated user for task-related operations, for example queries. |
|
| Integer |
| This property specifies the maximum number of executed rules to avoid situations where rules run into an infinite loop and make the server completely unresponsive. |
|
|
|
| This property turns off the EJB Timers local cache. |
|
| String | N/A |
The JAAS |
|
| Path |
| The location where KIE Server state files are stored. |
|
|
|
| A property that instructs the KIE Server to hold the deployment until the Process Automation Manager controller provides the container deployment configuration. This property only affects servers running in managed mode. The following options are available:
* |
|
|
|
| The Startup strategy of KIE Server used to control the KIE containers that are deployed and the order in which they are deployed. |
|
|
|
|
When set to |
|
|
Java packages like | N/A | A property that specifies additional packages to whitelist for marshalling using XStream. |
|
| String |
|
Fully qualified name of the class that implements |
|
|
|
|
While using JSON marshalling, if the property is set to |
Chapter 22. KIE Server capabilities and extensions
The capabilities in KIE Server are determined by plug-in extensions that you can enable, disable, or further extend to meet your business needs. KIE Server supports the following default capabilities and extensions:
Table 22.1. KIE Server capabilities and extensions
| Capability name | Extension name | Description |
|---|---|---|
|
|
| Provides the core capabilities of KIE Server, such as creating and disposing KIE containers on your server instance |
|
|
| Provides the Business Rule Management (BRM) capabilities, such as inserting facts and executing business rules |
|
|
| Provides the Business Process Management (BPM) capabilities, such as managing user tasks and executing business processes |
|
|
| Provides additional user-interface capabilities related to business processes, such as rendering XML forms and SVG images in process diagrams |
|
|
| Provides the case management capabilities for business processes, such as managing case definitions and milestones |
|
|
| Provides the Business Resource Planning (BRP) capabilities, such as implementing solvers |
|
|
| Provides the Decision Model and Notation (DMN) capabilities, such as managing DMN data types and executing DMN models |
|
|
| Provides the Swagger web-interface capabilities for interacting with the KIE Server REST API |
To view the supported extensions of a running KIE Server instance, send a GET request to the following REST API endpoint and review the XML or JSON server response:
Base URL for GET request for KIE Server information
http://SERVER:PORT/kie-server/services/rest/server
Example JSON response with KIE Server information
{
"type": "SUCCESS",
"msg": "Kie Server info",
"result": {
"kie-server-info": {
"id": "test-kie-server",
"version": "7.26.0.20190818-050814",
"name": "test-kie-server",
"location": "http://localhost:8080/kie-server/services/rest/server",
"capabilities": [
"KieServer",
"BRM",
"BPM",
"CaseMgmt",
"BPM-UI",
"BRP",
"DMN",
"Swagger"
],
"messages": [
{
"severity": "INFO",
"timestamp": {
"java.util.Date": 1566169865791
},
"content": [
"Server KieServerInfo{serverId='test-kie-server', version='7.26.0.20190818-050814', name='test-kie-server', location='http:/localhost:8080/kie-server/services/rest/server', capabilities=[KieServer, BRM, BPM, CaseMgmt, BPM-UI, BRP, DMN, Swagger]', messages=null', mode=DEVELOPMENT}started successfully at Sun Aug 18 23:11:05 UTC 2019"
]
}
],
"mode": "DEVELOPMENT"
}
}
}
To enable or disable KIE Server extensions, configure the related *.server.ext.disabled KIE Server system property. For example, to disable the BRM capability, set the system property org.drools.server.ext.disabled=true. For all KIE Server system properties, see Chapter 21, KIE Server system properties.
By default, KIE Server extensions are exposed through REST or JMS data transports and use predefined client APIs. You can extend existing KIE Server capabilities with additional REST endpoints, extend supported transport methods beyond REST or JMS, or extend functionality in the KIE Server client.
This flexibility in KIE Server functionality enables you to adapt your KIE Server instances to your business needs, instead of adapting your business needs to the default KIE Server capabilities.
If you extend KIE Server functionality, Red Hat does not support the custom code that you use as part of your custom implementations and extensions.
22.1. Extending an existing KIE Server capability with a custom REST API endpoint
The KIE Server REST API enables you to interact with your KIE containers and business assets (such as business rules, processes, and solvers) in Red Hat Process Automation Manager without using the Business Central user interface. The available REST endpoints are determined by the capabilities enabled in your KIE Server system properties (for example, org.drools.server.ext.disabled=false for the BRM capability). You can extend an existing KIE Server capability with a custom REST API endpoint to further adapt the KIE Server REST API to your business needs.
As an example, this procedure extends the Drools KIE Server extension (for the BRM capability) with the following custom REST API endpoint:
Example custom REST API endpoint
/server/containers/instances/{containerId}/ksession/{ksessionId}
This example custom endpoint accepts a list of facts to be inserted into the working memory of the decision engine, automatically executes all rules, and retrieves all objects from the KIE session in the specified KIE container.
Procedure
Create an empty Maven project and define the following packaging type and dependencies in the
pom.xmlfile for the project:Example pom.xml file in the sample project
<packaging>jar</packaging> <properties> <version.org.kie>7.48.0.Final-redhat-00004</version.org.kie> </properties> <dependencies> <dependency> <groupId>org.kie</groupId> <artifactId>kie-api</artifactId> <version>${version.org.kie}</version> </dependency> <dependency> <groupId>org.kie</groupId> <artifactId>kie-internal</artifactId> <version>${version.org.kie}</version> </dependency> <dependency> <groupId>org.kie.server</groupId> <artifactId>kie-server-api</artifactId> <version>${version.org.kie}</version> </dependency> <dependency> <groupId>org.kie.server</groupId> <artifactId>kie-server-services-common</artifactId> <version>${version.org.kie}</version> </dependency> <dependency> <groupId>org.kie.server</groupId> <artifactId>kie-server-services-drools</artifactId> <version>${version.org.kie}</version> </dependency> <dependency> <groupId>org.kie.server</groupId> <artifactId>kie-server-rest-common</artifactId> <version>${version.org.kie}</version> </dependency> <dependency> <groupId>org.drools</groupId> <artifactId>drools-core</artifactId> <version>${version.org.kie}</version> </dependency> <dependency> <groupId>org.drools</groupId> <artifactId>drools-compiler</artifactId> <version>${version.org.kie}</version> </dependency> <dependency> <groupId>org.slf4j</groupId> <artifactId>slf4j-api</artifactId> <version>1.7.25</version> </dependency> </dependencies>Implement the
org.kie.server.services.api.KieServerApplicationComponentsServiceinterface in a Java class in your project, as shown in the following example:Sample implementation of the
KieServerApplicationComponentsServiceinterfacepublic class CusomtDroolsKieServerApplicationComponentsService implements KieServerApplicationComponentsService { 1 private static final String OWNER_EXTENSION = "Drools"; 2 public Collection<Object> getAppComponents(String extension, SupportedTransports type, Object... services) { 3 // Do not accept calls from extensions other than the owner extension: if ( !OWNER_EXTENSION.equals(extension) ) { return Collections.emptyList(); } RulesExecutionService rulesExecutionService = null; 4 KieServerRegistry context = null; for( Object object : services ) { if( RulesExecutionService.class.isAssignableFrom(object.getClass()) ) { rulesExecutionService = (RulesExecutionService) object; continue; } else if( KieServerRegistry.class.isAssignableFrom(object.getClass()) ) { context = (KieServerRegistry) object; continue; } } List<Object> components = new ArrayList<Object>(1); if( SupportedTransports.REST.equals(type) ) { components.add(new CustomResource(rulesExecutionService, context)); 5 } return components; } }- 1
- Delivers REST endpoints to the KIE Server infrastructure that is deployed when the application starts.
- 2
- Specifies the extension that you are extending, such as the
Droolsextension in this example. - 3
- Returns all resources that the REST container must deploy. Each extension that is enabled in your KIE Server instance calls the
getAppComponentsmethod, so theif ( !OWNER_EXTENSION.equals(extension) )call returns an empty collection for any extensions other than the specifiedOWNER_EXTENSIONextension. - 4
- Lists the services from the specified extension that you want to use, such as the
RulesExecutionServiceandKieServerRegistryservices from theDroolsextension in this example. - 5
- Specifies the transport type for the extension, either
RESTorJMS(RESTin this example), and theCustomResourceclass that returns the resource as part of thecomponentslist.
Implement the
CustomResourceclass that the KIE Server can use to provide the additional functionality for the new REST resource, as shown in the following example:Sample implementation of the
CustomResourceclass// Custom base endpoint: @Path("server/containers/instances/{containerId}/ksession") public class CustomResource { private static final Logger logger = LoggerFactory.getLogger(CustomResource.class); private KieCommands commandsFactory = KieServices.Factory.get().getCommands(); private RulesExecutionService rulesExecutionService; private KieServerRegistry registry; public CustomResource() { } public CustomResource(RulesExecutionService rulesExecutionService, KieServerRegistry registry) { this.rulesExecutionService = rulesExecutionService; this.registry = registry; } // Supported HTTP method, path parameters, and data formats: @POST @Path("/{ksessionId}") @Consumes({MediaType.APPLICATION_XML, MediaType.APPLICATION_JSON}) @Produces({MediaType.APPLICATION_XML, MediaType.APPLICATION_JSON}) public Response insertFireReturn(@Context HttpHeaders headers, @PathParam("containerId") String id, @PathParam("ksessionId") String ksessionId, String cmdPayload) { Variant v = getVariant(headers); String contentType = getContentType(headers); // Marshalling behavior and supported actions: MarshallingFormat format = MarshallingFormat.fromType(contentType); if (format == null) { format = MarshallingFormat.valueOf(contentType); } try { KieContainerInstance kci = registry.getContainer(id); Marshaller marshaller = kci.getMarshaller(format); List<?> listOfFacts = marshaller.unmarshall(cmdPayload, List.class); List<Command<?>> commands = new ArrayList<Command<?>>(); BatchExecutionCommand executionCommand = commandsFactory.newBatchExecution(commands, ksessionId); for (Object fact : listOfFacts) { commands.add(commandsFactory.newInsert(fact, fact.toString())); } commands.add(commandsFactory.newFireAllRules()); commands.add(commandsFactory.newGetObjects()); ExecutionResults results = rulesExecutionService.call(kci, executionCommand); String result = marshaller.marshall(results); logger.debug("Returning OK response with content '{}'", result); return createResponse(result, v, Response.Status.OK); } catch (Exception e) { // If marshalling fails, return the `call-container` response to maintain backward compatibility: String response = "Execution failed with error : " + e.getMessage(); logger.debug("Returning Failure response with content '{}'", response); return createResponse(response, v, Response.Status.INTERNAL_SERVER_ERROR); } } }In this example, the
CustomResourceclass for the custom endpoint specifies the following data and behavior:-
Uses the base endpoint
server/containers/instances/{containerId}/ksession -
Uses
POSTHTTP method Expects the following data to be given in REST requests:
-
The
containerIdas a path argument -
The
ksessionIdas a path argument - List of facts as a message payload
-
The
Supports all KIE Server data formats:
- XML (JAXB, XStream)
- JSON
-
Unmarshals the payload into a
List<?>collection and, for each item in the list, creates anInsertCommandinstance followed byFireAllRulesandGetObjectcommands. -
Adds all commands to the
BatchExecutionCommandinstance that calls to the decision engine.
-
Uses the base endpoint
-
To make the new endpoint discoverable for KIE Server, create a
META-INF/services/org.kie.server.services.api.KieServerApplicationComponentsServicefile in your Maven project and add the fully qualified class name of theKieServerApplicationComponentsServiceimplementation class within the file. For this example, the file contains the single lineorg.kie.server.ext.drools.rest.CusomtDroolsKieServerApplicationComponentsService. -
Build your project and copy the resulting JAR file into the
~/kie-server.war/WEB-INF/libdirectory of your project. For example, on Red Hat JBoss EAP, the path to this directory isEAP_HOME/standalone/deployments/kie-server.war/WEB-INF/lib. Start the KIE Server and deploy the built project to the running KIE Server. You can deploy the project using either the Business Central interface or the KIE Server REST API (a
PUTrequest tohttp://SERVER:PORT/kie-server/services/rest/server/containers/{containerId}).After your project is deployed on a running KIE Server, you can start interacting with your new REST endpoint.
For this example, you can use the following information to invoke the new endpoint:
-
Example request URL:
http://localhost:8080/kie-server/services/rest/server/containers/instances/demo/ksession/defaultKieSession -
HTTP method:
POST HTTP headers:
-
Content-Type: application/json -
Accept: application/json
-
Example message payload:
[ { "org.jbpm.test.Person": { "name": "john", "age": 25 } }, { "org.jbpm.test.Person": { "name": "mary", "age": 22 } } ]-
Example server response:
200(success) Example server log output:
13:37:20,347 INFO [stdout] (default task-24) Hello mary 13:37:20,348 INFO [stdout] (default task-24) Hello john
-
Example request URL:
22.2. Extending KIE Server to use a custom data transport
By default, KIE Server extensions are exposed through REST or JMS data transports. You can extend KIE Server to support a custom data transport to adapt KIE Server transport protocols to your business needs.
As an example, this procedure adds a custom data transport to KIE Server that uses the Drools extension and that is based on Apache MINA, an open-source Java network-application framework. The example custom MINA transport exchanges string-based data that relies on existing marshalling operations and supports only JSON format.
Procedure
Create an empty Maven project and define the following packaging type and dependencies in the
pom.xmlfile for the project:Example pom.xml file in the sample project
<packaging>jar</packaging> <properties> <version.org.kie>7.48.0.Final-redhat-00004</version.org.kie> </properties> <dependencies> <dependency> <groupId>org.kie</groupId> <artifactId>kie-api</artifactId> <version>${version.org.kie}</version> </dependency> <dependency> <groupId>org.kie</groupId> <artifactId>kie-internal</artifactId> <version>${version.org.kie}</version> </dependency> <dependency> <groupId>org.kie.server</groupId> <artifactId>kie-server-api</artifactId> <version>${version.org.kie}</version> </dependency> <dependency> <groupId>org.kie.server</groupId> <artifactId>kie-server-services-common</artifactId> <version>${version.org.kie}</version> </dependency> <dependency> <groupId>org.kie.server</groupId> <artifactId>kie-server-services-drools</artifactId> <version>${version.org.kie}</version> </dependency> <dependency> <groupId>org.drools</groupId> <artifactId>drools-core</artifactId> <version>${version.org.kie}</version> </dependency> <dependency> <groupId>org.drools</groupId> <artifactId>drools-compiler</artifactId> <version>${version.org.kie}</version> </dependency> <dependency> <groupId>org.slf4j</groupId> <artifactId>slf4j-api</artifactId> <version>1.7.25</version> </dependency> <dependency> <groupId>org.apache.mina</groupId> <artifactId>mina-core</artifactId> <version>2.1.3</version> </dependency> </dependencies>Implement the
org.kie.server.services.api.KieServerExtensioninterface in a Java class in your project, as shown in the following example:Sample implementation of the
KieServerExtensioninterfacepublic class MinaDroolsKieServerExtension implements KieServerExtension { private static final Logger logger = LoggerFactory.getLogger(MinaDroolsKieServerExtension.class); public static final String EXTENSION_NAME = "Drools-Mina"; private static final Boolean disabled = Boolean.parseBoolean(System.getProperty("org.kie.server.drools-mina.ext.disabled", "false")); private static final String MINA_HOST = System.getProperty("org.kie.server.drools-mina.ext.port", "localhost"); private static final int MINA_PORT = Integer.parseInt(System.getProperty("org.kie.server.drools-mina.ext.port", "9123")); // Taken from dependency on the `Drools` extension: private KieContainerCommandService batchCommandService; // Specific to MINA: private IoAcceptor acceptor; public boolean isActive() { return disabled == false; } public void init(KieServerImpl kieServer, KieServerRegistry registry) { KieServerExtension droolsExtension = registry.getServerExtension("Drools"); if (droolsExtension == null) { logger.warn("No Drools extension available, quitting..."); return; } List<Object> droolsServices = droolsExtension.getServices(); for( Object object : droolsServices ) { // If the given service is null (not configured), continue to the next service: if (object == null) { continue; } if( KieContainerCommandService.class.isAssignableFrom(object.getClass()) ) { batchCommandService = (KieContainerCommandService) object; continue; } } if (batchCommandService != null) { acceptor = new NioSocketAcceptor(); acceptor.getFilterChain().addLast( "codec", new ProtocolCodecFilter( new TextLineCodecFactory( Charset.forName( "UTF-8" )))); acceptor.setHandler( new TextBasedIoHandlerAdapter(batchCommandService) ); acceptor.getSessionConfig().setReadBufferSize( 2048 ); acceptor.getSessionConfig().setIdleTime( IdleStatus.BOTH_IDLE, 10 ); try { acceptor.bind( new InetSocketAddress(MINA_HOST, MINA_PORT) ); logger.info("{} -- Mina server started at {} and port {}", toString(), MINA_HOST, MINA_PORT); } catch (IOException e) { logger.error("Unable to start Mina acceptor due to {}", e.getMessage(), e); } } } public void destroy(KieServerImpl kieServer, KieServerRegistry registry) { if (acceptor != null) { acceptor.dispose(); acceptor = null; } logger.info("{} -- Mina server stopped", toString()); } public void createContainer(String id, KieContainerInstance kieContainerInstance, Map<String, Object> parameters) { // Empty, already handled by the `Drools` extension } public void disposeContainer(String id, KieContainerInstance kieContainerInstance, Map<String, Object> parameters) { // Empty, already handled by the `Drools` extension } public List<Object> getAppComponents(SupportedTransports type) { // Nothing for supported transports (REST or JMS) return Collections.emptyList(); } public <T> T getAppComponents(Class<T> serviceType) { return null; } public String getImplementedCapability() { return "BRM-Mina"; } public List<Object> getServices() { return Collections.emptyList(); } public String getExtensionName() { return EXTENSION_NAME; } public Integer getStartOrder() { return 20; } @Override public String toString() { return EXTENSION_NAME + " KIE Server extension"; } }The
KieServerExtensioninterface is the main extension interface that KIE Server can use to provide the additional functionality for the new MINA transport. The interface consists of the following components:Overview of the
KieServerExtensioninterfacepublic interface KieServerExtension { boolean isActive(); void init(KieServerImpl kieServer, KieServerRegistry registry); void destroy(KieServerImpl kieServer, KieServerRegistry registry); void createContainer(String id, KieContainerInstance kieContainerInstance, Map<String, Object> parameters); void disposeContainer(String id, KieContainerInstance kieContainerInstance, Map<String, Object> parameters); List<Object> getAppComponents(SupportedTransports type); <T> T getAppComponents(Class<T> serviceType); String getImplementedCapability(); 1 List<Object> getServices(); String getExtensionName(); 2 Integer getStartOrder(); 3 }- 1
- Specifies the capability that is covered by this extension. The capability must be unique within KIE Server.
- 2
- Defines a human-readable name for the extension.
- 3
- Determines when the specified extension should be started. For extensions that have dependencies on other extensions, this setting must not conflict with the parent setting. For example, in this case, this custom extension depends on the
Droolsextension, which hasStartOrderset to0, so this custom add-on extension must be greater than0(set to20in the sample implementation).
In the previous
MinaDroolsKieServerExtensionsample implementation of this interface, theinitmethod is the main element for collecting services from theDroolsextension and for bootstrapping the MINA server. All other methods in theKieServerExtensioninterface can remain with the standard implementation to fulfill interface requirements.The
TextBasedIoHandlerAdapterclass is the handler on the MINA server that reacts to incoming requests.Implement the
TextBasedIoHandlerAdapterhandler for the MINA server, as shown in the following example:Sample implementation of the
TextBasedIoHandlerAdapterhandlerpublic class TextBasedIoHandlerAdapter extends IoHandlerAdapter { private static final Logger logger = LoggerFactory.getLogger(TextBasedIoHandlerAdapter.class); private KieContainerCommandService batchCommandService; public TextBasedIoHandlerAdapter(KieContainerCommandService batchCommandService) { this.batchCommandService = batchCommandService; } @Override public void messageReceived( IoSession session, Object message ) throws Exception { String completeMessage = message.toString(); logger.debug("Received message '{}'", completeMessage); if( completeMessage.trim().equalsIgnoreCase("quit") || completeMessage.trim().equalsIgnoreCase("exit") ) { session.close(false); return; } String[] elements = completeMessage.split("\\|"); logger.debug("Container id {}", elements[0]); try { ServiceResponse<String> result = batchCommandService.callContainer(elements[0], elements[1], MarshallingFormat.JSON, null); if (result.getType().equals(ServiceResponse.ResponseType.SUCCESS)) { session.write(result.getResult()); logger.debug("Successful message written with content '{}'", result.getResult()); } else { session.write(result.getMsg()); logger.debug("Failure message written with content '{}'", result.getMsg()); } } catch (Exception e) { } } }In this example, the handler class receives text messages and executes them in the
Droolsservice.Consider the following handler requirements and behavior when you use the
TextBasedIoHandlerAdapterhandler implementation:- Anything that you submit to the handler must be a single line because each incoming transport request is a single line.
-
You must pass a KIE container ID in this single line so that the handler expects the format
containerID|payload. - You can set a response in the way that it is produced by the marshaller. The response can be multiple lines.
-
The handler supports a stream mode that enables you to send commands without disconnecting from a KIE Server session. To end a KIE Server session in stream mode, send either an
exitorquitcommand to the server.
-
To make the new data transport discoverable for KIE Server, create a
META-INF/services/org.kie.server.services.api.KieServerExtensionfile in your Maven project and add the fully qualified class name of theKieServerExtensionimplementation class within the file. For this example, the file contains the single lineorg.kie.server.ext.mina.MinaDroolsKieServerExtension. -
Build your project and copy the resulting JAR file and the
mina-core-2.0.9.jarfile (which the extension depends on in this example) into the~/kie-server.war/WEB-INF/libdirectory of your project. For example, on Red Hat JBoss EAP, the path to this directory isEAP_HOME/standalone/deployments/kie-server.war/WEB-INF/lib. Start the KIE Server and deploy the built project to the running KIE Server. You can deploy the project using either the Business Central interface or the KIE Server REST API (a
PUTrequest tohttp://SERVER:PORT/kie-server/services/rest/server/containers/{containerId}).After your project is deployed on a running KIE Server, you can view the status of the new data transport in your KIE Server log and start using your new data transport:
New data transport in the server log
Drools-Mina KIE Server extension -- Mina server started at localhost and port 9123 Drools-Mina KIE Server extension has been successfully registered as server extension
For this example, you can use Telnet to interact with the new MINA-based data transport in KIE Server:
Starting Telnet and connecting to KIE Server on port 9123 in a command terminal
telnet 127.0.0.1 9123
Example interactions with KIE Server in a command terminal
Trying 127.0.0.1... Connected to localhost. Escape character is '^]'. # Request body: demo|{"lookup":"defaultKieSession","commands":[{"insert":{"object":{"org.jbpm.test.Person":{"name":"john","age":25}}}},{"fire-all-rules":""}]} # Server response: { "results" : [ { "key" : "", "value" : 1 } ], "facts" : [ ] } demo|{"lookup":"defaultKieSession","commands":[{"insert":{"object":{"org.jbpm.test.Person":{"name":"mary","age":22}}}},{"fire-all-rules":""}]} { "results" : [ { "key" : "", "value" : 1 } ], "facts" : [ ] } demo|{"lookup":"defaultKieSession","commands":[{"insert":{"object":{"org.jbpm.test.Person":{"name":"james","age":25}}}},{"fire-all-rules":""}]} { "results" : [ { "key" : "", "value" : 1 } ], "facts" : [ ] } exit Connection closed by foreign host.Example server log output
16:33:40,206 INFO [stdout] (NioProcessor-2) Hello john 16:34:03,877 INFO [stdout] (NioProcessor-2) Hello mary 16:34:19,800 INFO [stdout] (NioProcessor-2) Hello james
22.3. Extending the KIE Server client with a custom client API
KIE Server uses predefined client APIs that you can interact with to use KIE Server services. You can extend the KIE Server client with a custom client API to adapt KIE Server services to your business needs.
As an example, this procedure adds a custom client API to KIE Server to accommodate a custom data transport (configured previously for this scenario) that is based on Apache MINA, an open-source Java network-application framework.
Procedure
Create an empty Maven project and define the following packaging type and dependencies in the
pom.xmlfile for the project:Example pom.xml file in the sample project
<packaging>jar</packaging> <properties> <version.org.kie>7.48.0.Final-redhat-00004</version.org.kie> </properties> <dependencies> <dependency> <groupId>org.kie.server</groupId> <artifactId>kie-server-api</artifactId> <version>${version.org.kie}</version> </dependency> <dependency> <groupId>org.kie.server</groupId> <artifactId>kie-server-client</artifactId> <version>${version.org.kie}</version> </dependency> <dependency> <groupId>org.drools</groupId> <artifactId>drools-compiler</artifactId> <version>${version.org.kie}</version> </dependency> </dependencies>Implement the relevant
ServicesClientinterface in a Java class in your project, as shown in the following example:Sample
RulesMinaServicesClientinterfacepublic interface RulesMinaServicesClient extends RuleServicesClient { }A specific interface is required because you must register client implementations based on the interface, and you can have only one implementation for a given interface.
For this example, the custom MINA-based data transport uses the
Droolsextension, so this exampleRulesMinaServicesClientinterface extends the existingRuleServicesClientclient API from theDroolsextension.Implement the
RulesMinaServicesClientinterface that the KIE Server can use to provide the additional client functionality for the new MINA transport, as shown in the following example:Sample implementation of the
RulesMinaServicesClientinterfacepublic class RulesMinaServicesClientImpl implements RulesMinaServicesClient { private String host; private Integer port; private Marshaller marshaller; public RulesMinaServicesClientImpl(KieServicesConfiguration configuration, ClassLoader classloader) { String[] serverDetails = configuration.getServerUrl().split(":"); this.host = serverDetails[0]; this.port = Integer.parseInt(serverDetails[1]); this.marshaller = MarshallerFactory.getMarshaller(configuration.getExtraJaxbClasses(), MarshallingFormat.JSON, classloader); } public ServiceResponse<String> executeCommands(String id, String payload) { try { String response = sendReceive(id, payload); if (response.startsWith("{")) { return new ServiceResponse<String>(ResponseType.SUCCESS, null, response); } else { return new ServiceResponse<String>(ResponseType.FAILURE, response); } } catch (Exception e) { throw new KieServicesException("Unable to send request to KIE Server", e); } } public ServiceResponse<String> executeCommands(String id, Command<?> cmd) { try { String response = sendReceive(id, marshaller.marshall(cmd)); if (response.startsWith("{")) { return new ServiceResponse<String>(ResponseType.SUCCESS, null, response); } else { return new ServiceResponse<String>(ResponseType.FAILURE, response); } } catch (Exception e) { throw new KieServicesException("Unable to send request to KIE Server", e); } } protected String sendReceive(String containerId, String content) throws Exception { // Flatten the content to be single line: content = content.replaceAll("\\n", ""); Socket minaSocket = null; PrintWriter out = null; BufferedReader in = null; StringBuffer data = new StringBuffer(); try { minaSocket = new Socket(host, port); out = new PrintWriter(minaSocket.getOutputStream(), true); in = new BufferedReader(new InputStreamReader(minaSocket.getInputStream())); // Prepare and send data: out.println(containerId + "|" + content); // Wait for the first line: data.append(in.readLine()); // Continue as long as data is available: while (in.ready()) { data.append(in.readLine()); } return data.toString(); } finally { out.close(); in.close(); minaSocket.close(); } } }This example implementation specifies the following data and behavior:
- Uses socket-based communication for simplicity
-
Relies on default configurations from the KIE Server client and uses
ServerUrlfor providing the host and port of the MINA server - Specifies JSON as the marshalling format
-
Requires received messages to be JSON objects that start with an open bracket
{ - Uses direct socket communication with a blocking API while waiting for the first line of the response and then reads all lines that are available
- Does not use stream mode and therefore disconnects the KIE Server session after invoking a command
Implement the
org.kie.server.client.helper.KieServicesClientBuilderinterface in a Java class in your project, as shown in the following example:Sample implementation of the
KieServicesClientBuilderinterfacepublic class MinaClientBuilderImpl implements KieServicesClientBuilder { 1 public String getImplementedCapability() { 2 return "BRM-Mina"; } public Map<Class<?>, Object> build(KieServicesConfiguration configuration, ClassLoader classLoader) { 3 Map<Class<?>, Object> services = new HashMap<Class<?>, Object>(); services.put(RulesMinaServicesClient.class, new RulesMinaServicesClientImpl(configuration, classLoader)); return services; } }-
To make the new client API discoverable for the KIE Server client, create a
META-INF/services/org.kie.server.client.helper.KieServicesClientBuilderfile in your Maven project and add the fully qualified class name of theKieServicesClientBuilderimplementation class within the file. For this example, the file contains the single lineorg.kie.server.ext.mina.client.MinaClientBuilderImpl. -
Build your project and copy the resulting JAR file into the
~/kie-server.war/WEB-INF/libdirectory of your project. For example, on Red Hat JBoss EAP, the path to this directory isEAP_HOME/standalone/deployments/kie-server.war/WEB-INF/lib. Start the KIE Server and deploy the built project to the running KIE Server. You can deploy the project using either the Business Central interface or the KIE Server REST API (a
PUTrequest tohttp://SERVER:PORT/kie-server/services/rest/server/containers/{containerId}).After your project is deployed on a running KIE Server, you can start interacting with your new KIE Server client. You use your new client in the same way as the standard KIE Server client, by creating the client configuration and client instance, retrieving the service client by type, and invoking client methods.
For this example, you can create a
RulesMinaServiceClientclient instance and invoke operations on KIE Server through the MINA transport:Sample implementation to create the
RulesMinaServiceClientclientprotected RulesMinaServicesClient buildClient() { KieServicesConfiguration configuration = KieServicesFactory.newRestConfiguration("localhost:9123", null, null); List<String> capabilities = new ArrayList<String>(); // Explicitly add capabilities (the MINA client does not respond to `get-server-info` requests): capabilities.add("BRM-Mina"); configuration.setCapabilities(capabilities); configuration.setMarshallingFormat(MarshallingFormat.JSON); configuration.addJaxbClasses(extraClasses); KieServicesClient kieServicesClient = KieServicesFactory.newKieServicesClient(configuration); RulesMinaServicesClient rulesClient = kieServicesClient.getServicesClient(RulesMinaServicesClient.class); return rulesClient; }Sample configuration to invoke operations on KIE Server through the MINA transport
RulesMinaServicesClient rulesClient = buildClient(); List<Command<?>> commands = new ArrayList<Command<?>>(); BatchExecutionCommand executionCommand = commandsFactory.newBatchExecution(commands, "defaultKieSession"); Person person = new Person(); person.setName("mary"); commands.add(commandsFactory.newInsert(person, "person")); commands.add(commandsFactory.newFireAllRules("fired")); ServiceResponse<String> response = rulesClient.executeCommands(containerId, executionCommand); Assert.assertNotNull(response); Assert.assertEquals(ResponseType.SUCCESS, response.getType()); String data = response.getResult(); Marshaller marshaller = MarshallerFactory.getMarshaller(extraClasses, MarshallingFormat.JSON, this.getClass().getClassLoader()); ExecutionResultImpl results = marshaller.unmarshall(data, ExecutionResultImpl.class); Assert.assertNotNull(results); Object personResult = results.getValue("person"); Assert.assertTrue(personResult instanceof Person); Assert.assertEquals("mary", ((Person) personResult).getName()); Assert.assertEquals("JBoss Community", ((Person) personResult).getAddress()); Assert.assertEquals(true, ((Person) personResult).isRegistered());
Chapter 23. Performance tuning considerations with KIE Server
The following key concepts or suggested practices can help you optimize KIE Server performance. These concepts are summarized in this section as a convenience and are explained in more detail in the cross-referenced documentation, where applicable. This section will expand or change as needed with new releases of Red Hat Process Automation Manager.
- Ensure that development mode is enabled during development
You can set KIE Server or specific projects in Business Central to use
productionmode ordevelopmentmode. By default, KIE Server and all new projects in Business Central are in development mode. This mode provides features that facilitate your development experience, such as flexible project deployment policies, and features that optimize KIE Server performance during development, such as disabled duplicate GAV detection. Use development mode until your Red Hat Process Automation Manager environment is established and completely ready for production mode.For more information about configuring the environment mode or duplicate GAV detection, see the following resources:
- Adapt KIE Server capabilities and extensions to your specific needs
The capabilities in KIE Server are determined by plug-in extensions that you can enable, disable, or further extend to meet your business needs. By default, KIE Server extensions are exposed through REST or JMS data transports and use predefined client APIs. You can extend existing KIE Server capabilities with additional REST endpoints, extend supported transport methods beyond REST or JMS, or extend functionality in the KIE Server client.
This flexibility in KIE Server functionality enables you to adapt your KIE Server instances to your business needs, instead of adapting your business needs to the default KIE Server capabilities.
For information about enabling, disabling, or extending KIE Server capabilities, see Chapter 22, KIE Server capabilities and extensions.
Chapter 24. Additional resources
- Installing and configuring Red Hat Process Automation Manager on Red Hat JBoss EAP 7.3
- Planning a Red Hat Process Automation Manager installation
- Installing and configuring Red Hat Process Automation Manager on Red Hat JBoss EAP 7.3
- Deploying a Red Hat Process Automation Manager environment on Red Hat OpenShift Container Platform 4 using Operators
- Deploying a Red Hat Process Automation Manager environment on Red Hat OpenShift Container Platform 3 using templates
Part II. Configuring Business Central settings and properties
As an administrator, you can customize the following on the admin Settings page:
- Roles: Set the home page, priority, and permissions of a role.
- Groups: Set the home page, priority, and permissions of a group as well as create and delete groups.
- Users: Create and delete users, add or remove groups and roles from users, and view user permissions.
- Artifacts: View M2 repository artifacts, upload artifacts, view, and download JAR files.
- Data Sources: Add, update, or delete data sources and database drivers.
- Data Sets: Create, modify, or delete data sets.
- Projects: View and edit project preferences such as file export properties, space properties, default values, and advanced GAV properties.
- Artifact Repository: Manage artifact repository properties.
- Languages: Set the Business Central language.
- Process Administration: Set the default pagination option in Business Central.
- Process Designer: Set diagram editor properties.
- SSH Keys: Add or delete SSH keys.
- Custom Tasks Administration: Enable or disable default service tasks and upload custom service tasks.
- Dashbuilder Data Transfer: Import and export Dashbuilder data as ZIP files in Business Central.
- Profiles: Set the workbench profile as Planner and Rules or Full.
- Archetypes: View, add, validate, set as default, and delete the archetypes. Used as a template when creating a new project in Business Central.
Prerequisites
- Red Hat JBoss Enterprise Application Platform 7.3.0 is installed. For more information, see Red Hat JBoss Enterprise Application Platform 7.3 Installation Guide.
- Red Hat Process Automation Manager is installed and running. For more information, see Installing and configuring Red Hat Process Automation Manager on Red Hat JBoss EAP 7.3.
-
You are logged in to Business Central with the
adminuser role.
Chapter 25. User and group management
Business Central defines three types of entities for security management: users, groups, and roles. You can assign permissions to both roles and groups. You can assign the following roles in Business Central:
- process-admin
- manager
- admin
- analyst
- developer
- user
User roles in the application Role Registry have a role identifier, whereas user groups do not.
Use Business Central to create and manage as many users and groups as you require. A user must be assigned to at least one user-specific role to log in to Business Central. User privileges depend on permissions from the groups and roles that the user is a member of. Note that the role or group priority is considered if a user has several roles or groups assigned to it.
25.1. Creating users
User privileges and settings are controlled by the roles assigned to a user and the groups that a user belongs to. You can create any number of users in Business Central.
Do not create a user called unknown in process engine or KIE Server. The unknown user account is a reserved system name with superuser access. The unknown user account performs tasks related to the SLA violation listener when there are no users logged in.
Procedure
- In Business Central, select the Admin icon in the top-right corner of the screen and select Users.
- Click New user, enter a user name, and then click Next.
- To assign roles to the user, click the Roles tab, click Add Roles, select the desired roles, and click Add to selected roles.
- Optional: To assign groups to the user, click the Groups tab, click Add to groups, select the desired groups, and click Add to selected groups.
- Click Create.
- Click Yes to set a password for the user, enter a desired password, and click Change.
The user must have at least one role to access Business Central.
25.2. Editing users
You can change the group and role of a user using the Users option on the Business Central Settings page. All user permissions are based on the group and role permissions of the user. You can view the user permissions from the Permissions tab.
Procedure
- In Business Central, select the Admin icon in the top-right corner of the screen and select Users.
- From the All users list, click the user you want to edit. The user details display in the right pane.
Click Edit to perform any of the following tasks:
- To change the groups of a user, click the Groups tab, click Add to groups, select the groups you want the user to be part of, click Add to selected groups, and click Save.
- To change the roles of a user, click the Roles tab, click Add roles, select the roles you want to assign to the user, click Add to selected roles, and click Save.
- To view the user permissions, click the Permissions tab and expand the attributes.
- To change the password, click Change Password, enter the new password, and click Change.
- To delete the user, click Delete and then click Yes to confirm removal.
25.3. Creating groups
In Business Central, you can use groups to control permissions for a collection of users. You can create as many groups as you want but a group must have at least one user.
Procedure
- In Business Central, select the Admin icon in the top-right corner of the screen and select Groups.
- Click New group, enter a group name, and then click Next.
Select the users that you want to add to this group, and then click Add selected users.
The newly created group is listed under All groups.
25.4. Editing groups
You can edit the attribute of a group such as home page, priority, and permissions according to your requirements. From the Groups option on the Business Central Settings page, you can modify or delete a group.
Procedure
- In Business Central, select the Admin icon in the top-right corner of the screen and select Groups.
- From the All groups list, click the group that you want to edit. The user details display in the right pane.
- Select the home page from the Home Page list.
- Select the priority from the Priority list.
In the Permissions section, expand the resource attribute and change its permission.
NoteYou can add exceptions to Pages, Editor, Spaces, and Projects permissions.
- Click Save to apply the changes.
Chapter 26. Security management
Security management is the process of managing users, groups, and permissions. You can control access to Business Central resources and features from the Business Central Security management page.
Business Central defines three types of entities for security management: users, groups, and roles. You can assign permissions to both roles and groups. A user inherits permissions from the groups and roles that the user is a member of.
26.1. Security management providers
In the context of security management, a realm restricts access to different application resources. Realms contain information about users, groups, roles, and permissions. A concrete user and group management service implementation for a specific realm is called a security management provider.
If the built-in security management providers do not meet the requirements of your application security realm, then you can build and register your own security management provider.
If the security management provider is not installed, the user interface for managing the security realm is not available. After you install and configure a security management provider, the user and group management features are automatically enabled in the security management user interface.
Business Central includes the Red Hat JBoss EAP security management provider which supports realm types based on the contents of the application-users.properties or application-roles.properties property file.
26.1.1. Configuring the Red Hat JBoss EAP security management provider based on property files
You can build and register your own Red Hat JBoss EAP security management provider. To use the Red Hat JBoss EAP security management provider based on property files, complete the steps in this procedure.
Prerequisites
- Red Hat JBoss EAP is installed.
Procedure
To use an existing users or roles property file from the Red Hat JBoss EAP instance, include the following system properties in the
EAP_HOME/standalone/configuration/application-users.propertiesandEAP_HOME/standalone/configuration/application-roles.propertiesfiles, as shown in the following example:<property name="org.uberfire.ext.security.management.wildfly.properties.realm" value="ApplicationRealm"/> <property name="org.uberfire.ext.security.management.wildfly.properties.users-file-path" value="/standalone/configuration/application-users.properties"/> <property name="org.uberfire.ext.security.management.wildfly.properties.groups-file-path" value="/standalone/configuration/application-roles.properties"/>
The following table provides a description and default value for these properties:
Table 26.1. Red Hat JBoss EAP security management provider based on property files
Property Description Default value org.uberfire.ext.security.management.wildfly.properties.realmThe name of the realm. This property is not mandatory.
ApplicationRealmorg.uberfire.ext.security.management.wildfly.properties.users-file-pathThe absolute file path for the users property file. This property is mandatory.
./standalone/configuration/application-users.propertiesorg.uberfire.ext.security.management.wildfly.properties.groups-file-pathThe absolute file path for the groups property file. This property is mandatory.
./standalone/configuration/application-roles.propertiesCreate the
security-management.propertiesfile in the root directory of your application. For example, create the following file:src/main/resources/security-management.properties
Enter the following system property and security provider name as a value in the
security-management.propertiesfile:<property name="org.uberfire.ext.security.management.api.userManagementServices" value="WildflyUserManagementService"/>
26.1.2. Configuring the Red Hat JBoss EAP security management provider based on property files and CLI mode
To use the Red Hat JBoss EAP security management provider based on property files and CLI mode, complete the steps in this procedure.
Prerequisites
- Red Hat JBoss EAP is installed.
Procedure
To use an existing users or roles property file from the Red Hat JBoss EAP instance, include the following system properties in the
EAP_HOME/standalone/configuration/application-users.propertiesandEAP_HOME/standalone/configuration/application-roles.propertiesfiles, as shown in the following example:<property name="org.uberfire.ext.security.management.wildfly.cli.host" value="localhost"/> <property name="org.uberfire.ext.security.management.wildfly.cli.port" value="9990"/> <property name="org.uberfire.ext.security.management.wildfly.cli.user" value="<USERNAME>"/> <property name="org.uberfire.ext.security.management.wildfly.cli.password" value="<USER_PWD>"/> <property name="org.uberfire.ext.security.management.wildfly.cli.realm" value="ApplicationRealm"/>
The following table provides a description and default value for these properties:
Table 26.2. Red Hat JBoss EAP security management provider based on property files and CLI mode
Property Description Default value org.uberfire.ext.security.management.wildfly.cli.hostThe native administration interface host.
localhostorg.uberfire.ext.security.management.wildfly.cli.portThe native administration interface port.
9990org.uberfire.ext.security.management.wildfly.cli.userThe native administration interface username.
NA
org.uberfire.ext.security.management.wildfly.cli.passwordThe native administration interface user’s password.
NA
org.uberfire.ext.security.management.wildfly.cli.realmThe realm used by the application’s security context.
ApplicationRealmCreate the
security-management.propertiesfile in the root directory of your application. For example, create the following file:src/main/resources/security-management.properties
Enter the following system property and security provider name as a value in the
security-management.propertiesfile:<property name="org.uberfire.ext.security.management.api.userManagementServices" value="WildflyCLIUserManagementService"/>
26.2. Permissions and settings
A permission is an authorization granted to a user to perform actions related to a specific resource within the application. For example, a user can have following permissions:
- View a page.
- Save the project.
- View a repository.
- Delete a dashboard.
You can grant or deny a permission and a permission can be global or resource specific. You can use permissions to protect access to resources and customize features within the application.
26.2.1. Changing permissions for groups and roles in Business Central
In Business Central, you cannot change permissions for an individual user. However, you can change permissions for groups and roles. The changed permissions apply to users with the role or that belong to a group that you changed.
Any changes that you make to roles or groups affect all of the users associated with that role or group.
Prerequisites
-
You are logged in to Business Central with the
adminuser role.
Procedure
- To access the Security management page in Business Central, select the Admin icon in the top-right corner of the screen.
Click Roles, Groups, or Users on the Business Central Settings page.
The Security management page opens on the tab for the icon that you clicked.
- From the list, click the role or group you want to edit. All details are displayed in the right panel.
- Set the Home Page or Priority under the Settings section.
Set the Business Central, page, editor, space, and project permissions under the Permissions section.
Figure 26.1. Setting the permissions

- Click the arrow next to a resource type to expand the resource type whose permissions you want to change.
Optional: To add an exception for a resource type, click Add Exception and then set the permissions as required.
NoteYou cannot add an exception to the Business Central resource type.
- Click Save.
26.2.2. Changing the Business Central home page
The home page is the page that appears after you log in to Business Central. By default, the home page is set to Home. You can specify a different home page for each role and group.
Procedure
- In Business Central, select the Admin icon in the top-right corner of the screen and select Roles or Groups.
- Select a role or group.
- Select a page from the Home Page list.
Click Save.
NoteThe role or group must have read access to a page before you can make it the home page.
26.2.3. Setting priorities
A user can have multiple roles and belong to multiple groups. The Priority setting determines the order of precedence of a role or group.
Prerequisites
-
You are logged in to Business Central with the
adminuser role.
Procedure
- In Business Central, select the Admin icon in the top-right corner of the screen and select Roles or Groups.
- Select a role or group.
- Select a priority from the Priority menu, and then click Save.
If a user has a role or belongs to a group that has conflicting settings, the settings of the role or group with the highest priority applies.
Chapter 27. Artifact management
You can manage artifacts from the Artifacts page in Business Central. The artifact repository is a local Maven repository and there is only one Maven repository for each installation. Business Central recommends using Maven repository solutions like Sonatype Nexus™, Apache Archiva™, or JFrog Artifactory™.
The Artifacts page lists all the artifacts in the Maven repository. You can upload artifacts to the Maven repository.
You can only upload JAR, KJAR, and pom.xml files to the Artifacts repository.
27.1. Viewing an artifact
You can view all the content of the local maven repository from the Artifacts page.
Procedure
- In Business Central, select the Admin icon in the top-right corner of the screen and select Artifacts.
- Click Open to view the artifact details.
- Click Ok to go back to the Artifacts page.
27.2. Downloading an artifact
You can download and save an artifact from Business Central repository to the local storage of a project.
Procedure
- In Business Central, select the Admin icon in the top-right corner of the screen and select Artifacts.
- Click Download.
- Browse to the directory where you want to save the artifact.
- Click Save.
27.3. Uploading an artifact
You can upload an artifact from the local storage to a project in Business Central.
Procedure
- In Business Central, select the Admin icon in the top-right corner of the screen and select Artifacts.
- Click Upload.
- Click Choose File and browse to the directory from where you want to upload the artifact.
Click Upload.
NoteIf you are using a non-Maven artifact, first deploy the artifact to the Maven repository using the
mvn deploycommand and then refresh the artifact list in Business Central.
Chapter 28. Data source management
Business Central provides data source management features that enable you to define data sources for accessing a database. These data sources are then used by other Business Central components such as the data sets. A database driver enables communication between a data source and the targeted database.
From the Data Source Authoring page you can add data sources and database drivers to Business Central.
Business Central provides a default data source that can be used but cannot be edited or deleted.
28.1. Adding a database driver
You can add a new database driver to Business Central.
Procedure
- In Business Central, select the Admin icon in the top-right corner of the screen and select Data Sources.
- In the DataSource Explorer pane, click Add Driver. The New driver window opens.
- In the New driver window, enter the Name, Driver Class Name, Group Id, Artifact Id, and Version of the database driver.
- Click Finish to add the driver to Business Central.
28.2. Editing a database driver
You can update the properties of a database driver from the Driver Definition pane.
Procedure
- In Business Central, select the Admin icon in the top-right corner of the screen and select Data Sources.
- In the DataSource Explorer pane, select the driver you want to edit.
- In the Driver Definition pane, make the necessary changes to the Name, Driver Class Name, Group Id, Artifact Id, and the Version fields.
- Click Update.
- Click Yes to save the changes to the driver.
28.3. Deleting a database driver
You can remove database drivers from the Data Source Definition pane of Business Central.
Procedure
- In Business Central, select the Admin icon in the top-right corner of the screen and select Data Sources.
- In the DataSource Explorer pane, select the driver you want to delete.
- Click Remove.
- Click Delete to delete the driver.
28.4. Adding a data source
You can add a new data source to Business Central from the Data Sources Authoring page.
Procedure
- In Business Central, select the Admin icon in the top-right corner of the screen and select Data Sources.
- In the DataSource Explorer pane, click Add DataSource. The New data source window opens.
- In the New data source window, enter the data source Name, database Connection URL, User and Password, and Driver.
- Click Test Connection to verify the connection to the database.
- Click Finish to add the data source to Business Central.
28.5. Editing a data source
You can edit the properties of a data source and also test its connection to the database in Business Central.
Procedure
- In Business Central, select the Admin icon in the top-right corner of the screen and select Data Sources.
- In the DataSource Explorer pane, click the data source you want to edit.
- In the Data Source Definition pane, make the necessary changes to the Name, Connection URL, User, Password, and the Driver fields.
- Click Test Connection to verify the connection to the database.
- Click Update.
- Click Save to confirm the changes to the data source.
28.6. Deleting a data source
You can delete an existing data source from the DataSource Explorer pane in Business Central.
Procedure
- In Business Central, select the Admin icon in the top-right corner of the screen and select Data Sources.
- In the DataSource Explorer pane, click the data source you want to delete.
- Click Remove.
- Click Delete to confirm the deletion of the data source.
Chapter 29. Data sets authoring
A data set is a collection of related sets of information and can be stored in many ways. For example, in a database, in a Microsoft Excel file, or in memory. A data set definition instructs Business Central methods to access, read, and parse a data set. Business Central does not store data. It enables you to define access to a data set regardless of where the data is stored.
For example, if data is stored in a database, a valid data set can contain the entire database or a subset of the database as a result of an SQL query. In both cases the data is used as input for the reporting components of Business Central which then displays the information.
To access a data set, you must create and register a data set definition. The data set definition specifies the location of the data set, options to access it, read it, and parse it, and the columns that it contains.
The Data Sets page is visible only to users with the admin role.
29.1. Adding data sets
You can create a data set to fetch data from an external data source and use that data for the reporting components.
Procedure
In Business Central, go to Admin → Data Sets.
The Data Sets page opens.
Click New Data Set and select one of the following provider types:
- Bean: Generates a data set from a Java class
- CSV: Generates a data set from a remote or local CSV file
- SQL: Generates a data set from an ANSI-SQL compliant database
- Elastic Search: Generates a data set from Elastic Search nodes
- Prometheus: Generates a data set using the Prometheus query
Execution Server: Generates a data set using the custom query feature of an Execution Server
NoteYou must configure KIE Server for Execution Server option.
Complete the Data Set Creation Wizard and click Test.
NoteThe configuration steps differ based on the provider you choose.
- Click Save.
29.2. Editing data sets
You can edit existing data sets to ensure that the data fetched to the reporting components is up-to-date.
Procedure
In Business Central, go to Admin → Data Sets.
The Data Set Explorer page opens.
- In the Data Set Explorer pane, search for the data set you want to edit, select the data set, and click Edit.
In the Data Set Editor pane, use the appropriate tab to edit the data as required. The tabs differ based on the data set provider type you chose.
For example, the following changes are applicable for editing a CSV data provider:
- CSV Configuration: Enables you to change the name of the data set definition, the source file, the separator, and other properties.
Preview: Enables you to preview the data. After you click Test in the CSV Configuration tab, the system executes the data set lookup call and if the data is available, a preview appears. Note that the Preview tab has two sub-tabs:
- Data columns: Enables you to specify what columns are part of your data set definition.
- Filter: Enables you to add a new filter.
Advanced: Enables you to manage the following configurations:
- Caching: See Caching for more information.
- Cache life-cycle Enables you to specify an interval of time after which a data set (or data) is refreshed. The Refresh on stale data feature refreshes the cached data when the back-end data changes.
- After making the required changes, click Validate.
- Click Save.
29.3. Data refresh
The data refresh feature enables you to specify an interval of time after which a data set (or data) is refreshed. You can access the Data refresh every feature on the Advanced tab of the data set. The Refresh on stale data feature refreshes the cached data when the back-end data changes.
29.4. Caching data
Business Central provides caching mechanisms for storing data sets and performing data operations using in-memory data. Caching data reduces network traffic, remote system payload, and processing time. To avoid performance issues, configure the cache settings in Business Central.
For any data lookup call that results in a data set, the caching method determines where the data lookup call is executed and where the resulting data set is stored. An example of a data lookup call would be all the mortgage applications whose locale parameter is set as "Urban".
Business Central data set functionality provides two cache levels:
- Client level
- Back-end level
You can set the Client Cache and Backend Cache settings on the Advanced tab of the data set.
Client cache
When the cache is turned on, the data set is cached in a web browser during the lookup operation and further lookup operations do not perform requests to the back-end. Data set operations like grouping, aggregations, filtering, and sorting are processed in the web browser. Enable client caching only if the data set size is small, for example, for data sets with less than 10 MB of data. For large data sets, browser issues such as slow performance or intermittent freezing can occur. Client caching reduces the number of back-end requests including requests to the storage system.
Back-end cache
When the cache is enabled, the decision engine caches the data set. This reduces the number of back-end requests to the remote storage system. All data set operations are performed in the decision engine using in-memory data. Enable back-end caching only if the data set size is not updated frequently and it can be stored and processed in memory. Using back-end caching is also useful in cases with low latency connectivity issues with the remote storage.
Back-end cache settings are not always visible in the Advanced tab of the Data Set Editor because Java and CSV data providers rely on back-end caching (data set must be in the memory) in order to resolve any data lookup operation using the in-memory decision engine.
Chapter 30. Archetype management
Business Central provides an archetype management feature that enables you to list, add, validate, set as default, and delete the archetypes. You can manage archetypes from the Archetypes page in Business Central. Archetypes are projects that are installed in Apache Maven repositories in which a template structure is set or can be created if required.
For the most up-to-date and detailed information about archetypes, see the Introduction to Archetypes page.
30.1. Listing archetypes
The Archetypes page lists all the archetypes that are added in Business Central. This list provides the detailed information about Group ID, Artifact ID, Version, Created Date, Status, and Actions of an archetype.
Prerequisites
- You have created an archetype and listed it in the Business Central Settings from the maven repository.
Procedure
In Business Central, select the Admin icon in the top-right corner of the screen and select Archetypes.
In the Status column, green icon indicates it is a valid archetype, red icon indicates it is an invalid archetype whereas blue icon indicates the corresponding archetype is the default one for the new spaces.
30.2. Adding an archetype
You can add a new archetype to Business Central.
Prerequisites
- You have installed an archetype in the Maven repository.
Procedure
- In Business Central, select the Admin icon in the top-right corner of the screen and select Archetypes.
- Click Add Archetype.
- In the Add Archetype panel, enter the GAV attributes in the Group ID, Artifact ID, and Version fields respectively.
- Click Add.
Business Central validates the newly added archetype and make it available to be used as a template in all the spaces.
30.3. Managing additional features of an archetype
You can delete, set a default, and validate the archetypes from the Archetypes page in Business Central.
Prerequisites
- You have created an archetype and listed in the Business Central Settings from the Maven repository.
Procedure
- In Business Central, select the Admin icon in the top-right corner of the screen and select Archetypes.
From the Actions column, click the
 icon on the right side of an archetype.
- Select Delete from the drop-down menu to delete an archetype from the list.
Select Validate from the drop-down menu to validate whether the archetype is valid or not.
NoteWhen the Business Central is starting up, all the registered archetypes are automatically validated.
- Select Set as default from the drop-down menu to set an archetype as a default for the new spaces.
30.4. Creating a project using archetypes
You can use archetypes to create a project in Business Central. When you create a project in Business Central, it is added to the Git repository that is connected to your Red Hat Process Automation Manager installation.
Prerequisites
- You have created an archetype and listed it in the Business Central Settings from the Maven repository.
- You have set an archetype as default in your space in the Business Central.
Procedure
- In Business Central, go to Menu → Design → Projects.
- Select or create the space into which you want to add a new project from an archetype template.
- Click Add Project.
- Type the project name and description in the Name and Description fields respectively.
- Click Configure Advanced Options.
- Select the Based on template check box.
- Select the archetype from drop-down options if required. The default archetype is selected that is already set in the space.
- Click Add.
The Assets view of the project opens based on the selected archetype template.
30.5. Managing archetypes using space settings in Business Central
When you add the archetypes to Business Central, they can be used as a templates in all the spaces. You can manage all the archetypes from the Settings tab which is available in the space. This tab is visible only to users with the admin role.
Prerequisites
- You have installed an archetype in the Maven repository.
- You have created an archetype and listed it in the Business Central Settings from the Maven repository.
Procedure
- In Business Central, go to Menu → Design → Projects.
- Select or create the space into which you want to manage the archetypes. The default space is MySpace.
- Click Settings.
- To include or exclude the archetypes in the space, select the Include check box.
-
From the Actions column, click the
icon on the right side of an archetype and select Set as default from the drop-down menu to set an archetype as a default for the space.
- Click Save.
Chapter 31. Customizing project preferences
In Business Central, a project is a part of your space and stores the related assets. You can add multiple projects in a space.
For example, an organization includes various departments, such as HR, Payroll, Engineering, and R&D. You can map each department to a space in Business Central, along with adding respective projects.
You can customize the project settings in Business Central. Also, you can create a new project or clone projects from an existing Git repository.
Procedure
- In Business Central, select the Admin icon in the upper-right corner and select Projects.
In the Project Preferences panel, select the preference you want to modify. The project preferences include:
Project Importing: This preference consists of the following property:
- Select the Allow multiple projects to be imported on cluster to import multiple projects on a cluster.
File exporting: This preference consists of the following properties:
Table 31.1. File exporting properties
Field Description PDF orientation
Determines whether the PDF orientation is portrait or landscape.
PDF units
Determines whether the PDF unit is PT, MM, CN, or IN.
PDF page format
Determines whether the PDF page format is A[0-10], B[0-10], or C[0-10].
Spaces: This preference consists of the following properties:
Table 31.2. Spaces properties
Field Description Name
The default name of the space that is created automatically if none exists.
Owner
The default owner of the space that is created automatically if none exists.
Group ID
The default group ID of the space that is created automatically if none exists.
Alias (in singular)
Determines the customized alias (singular) of the space.
Alias (in plural)
Determines the customized alias (plural) of the space.
Default values: This preference consists of the following properties:
Table 31.3. Default values properties
Field Description Version
The default version number of a project when creating projects.
Description
The default description of a project when creating projects.
Branch
The default branch to be used when using a Git repository.
Assets Per Page
Used to customize the number of assets per page in the project. The default value is
15.Advanced GAV preferences: This preference consists of the following properties:
Table 31.4. Advanced GAV preference properties
Field Description Disable GAV conflict check?
Determines whether to enable or disable the GAV conflict check. Disabling this checkbox enables the projects to contain the same GAV (group ID, artifact, and version).
Allow child GAV edition?
Determines whether to allow child or subprojects to contain GAV edition.
NoteDuplicate GAV detection is disabled for projects in the development mode. To enable duplicate GAV detection for a project in Business Central, go to project Settings → General Settings → Version and toggle the Development Mode option to OFF (if applicable).
- Click Save.
Chapter 32. Customizing artifact repository properties
In some cases, projects need to resolve external dependencies to build domain model JAR files. A repository contains the needed artifacts and has the following features:
- The repository is a Maven repository.
- All snapshots are time stamped.
- Assets are stored mostly in the local hard drive.
By default, the artifact repository is in $WORKING_DIRECTORY/repositories/kie.
Procedure
- In Business Central, select the Admin icon in the top-right corner of the screen and select Artifact Repository. The Artifact Repository page opens.
- Make selections and enter information in the Properties section.
- Click Save.
Chapter 33. Customizing language settings
You can change the language on the Business Central Settings page. Business Central supports the following languages:
- English
- Spanish
- French
- Japanese
The default language is English.
Procedure
- In Business Central, select the Admin icon in the top-right corner of the screen and select Languages. The Language Selector window opens.
- Select the desired language from the Language list.
- Click Ok.
Chapter 34. Customizing process administration
You can customize the default pagination option in Business Central by editing the Default items per page property on the Process Administration page.
Procedure
- In Business Central, select the Admin icon in the top-right corner of the screen and select Process Administration.
From the Properties section, update the Default items per page property and click Save.
NoteYou can specify 10, 20, 50, or 100 items to display on each page.
Chapter 35. Customizing the process designer
You can customize the process designer in Business Central by editing the properties of the diagram editor on the Business Central Settings page.
Procedure
- In Business Central, select the Admin icon in the top-right corner of the screen and select Process Designer.
In the Properties section, update any of the following properties:
- Select the Auto hide category panel check box to automatically hide a category toolbar panel.
- In the Drawing area width field, enter an integer value between 2800 and 5600 to set the width of the drawing area.
- In the Drawing area height field, enter an integer value between 1400 and 2800 to set the height of the drawing area.
- Select the Enable HiDPI check box if you are using a high resolution display and are seeing blurry text and objects. This option is disabled by default.
- Click Save.
Chapter 36. SSH Keys
Business Central provides an SSH keystore service to enable user SSH authentication. Business Central provides a configurable default SSH keystore, extensible APIs (for custom implementations), and support for multiple SSH public key formats.
You can access the SSH Keys option on the Business Central Settings page to register your SSH public keys.
36.1. Default SSH keystore
The default SSH keystore included with Business Central provides a file-based storage mechanism to store a user’s public keys. By default, Business Central uses the *.security folder as the root directory. However, you can also use a custom storage path by setting the value of the appformer.ssh.keys.storage.folder system property to point to a different folder.
The SSH public keys are stored in the {securityFolderPath}/pkeys/{userName}/ folder structure.
Each SSH public key consists of the following files, located in the storage folder:
{keyId}.pub: This file contains the SSH public key content. As the file name determines the logic key ID on the system, ensure that the file name is not modified during run time.For example:
ssh-rsa AAAAB3NzaC1yc2EAAAADAQABAAACAQDmak4Wu23RZ6XmN94bOsqecZxuTa4RRhhQmHmTZjMB7HM57/90u/B/gB/GhsPEu1nAXL0npY56tT/MPQ8vRm2C2W9A7CzN5+z5yyL3W01YZy3kzslk77CjULjfhrcfQSL3b2sPG5jv5E5/nyC/swSytucwT/PE7aXTS9H6cHIKUdYPzIt94SHoBxWRIK7PJi9d+eLB+hmDzvbVa1ezu5a8yu2kcHi6NxxfI5iRj2rsceDTp0imC1jMoC6ZDfBvZSxL9FXTMwFdNnmTlJveBtv9nAbnAvIWlilS0VOkdj1s3GxBxeZYAcKbcsK9sJzusptk5dxGsG2Z8vInaglN6OaOQ7b7tcomzCYYwviGQ9gRX8sGsVrw39gsDIGYP2tA4bRr7ecHnlNg1b0HCchA5+QCDk4Hbz1UrnHmPA2Lg9c3WGm2qedvQdVJXuS3mlwYOqL40aXPs6890PvFJUlpiVSznF50djPnwsMxJZEf1HdTXgZD1Bh54ogZf7czyUNfkNkE69yJDbTHjpQd0cKUQnu9tVxqmBzhX31yF4VcsMeADcf2Z8wlA3n4LZnC/GwonYlq5+G93zJpFOkPhme8c2XuPuCXF795lsxyJ8SB/AlwPJAhEtm0y0s0l1l4eWqxsDxkBOgN+ivU0czrVMssHJEJb4o0FLf7iHhOW56/iMdD9w== userName
.{keyId}.pub.meta: This file contains the key metadata in JSON format. A new metadata file is dynamically generated if a key has no metadata.For example:
{ "name":"Key", "creationDate":"Oct 10, 2018 10:10:50 PM", "lastTimeUsed":"Oct 11, 2018 12:11:23 PM" }
36.2. Custom SSH keystore
You can extend and customize the default SSH keystore according to your requirements. Use the appformer.ssh.keystore system property to specify the Java class name of the SSH service to use. If this property is not defined or it contains an incorrect value, then the default SSH keystore is loaded.
To create a custom implementation of the SSH keystore, your Java class must implement the org.uberfire.ssh.service.backend.keystore.SSHKeyStore class defined in the uberfire-ssh-api module.
36.3. Creating an SSH key
Before you can add or register SSH keys to Business Central, you must generate an SSH key on your system.
Procedure
- Open a command terminal on your system.
Run the
ssh-keygencommand to create the SSH key as shown in the following example, where<user_login>is your user name:ssh-keygen -t rsa -b 4096 -C "<user_login>"
NoteThe SSH key formats supported by Business Central keystore are
ssh-rsa,ssh-dss,ecdsa-sha2-nistp256,ecdsa-sha2-nistp384, andecdsa-sha2-nistp521.When prompted, press Enter and accept the default key file location as shown in the following example, where
<user_login>is your user name:Enter a file in which to save the key (/home/<user_login>/.ssh/id_rsa): [Press enter]
At the command prompt, enter and confirm the passphrase:
Enter passphrase (empty for no passphrase): [Type a passphrase] Enter same passphrase again: [Type passphrase again]
Start the
ssh-agent:eval "$(ssh-agent -s)" Agent pid <any-number-here>
Add the new SSH private key to the
ssh-agent. If you have used a different key name, replaceid_rsain that code:ssh-add ~/.ssh/id_rsa
36.4. Registering your SSH public key with the SSH keystore
You must register your newly created SSH public key with the Business Central keystore.
Procedure
- Open a command terminal on your system.
Run the
catcommand as shown in the following example, whereid_rsais your key name:cat ~/.ssh/id_rsa.pub
- Copy the contents of your SSH public key.
- In Business Central, select the Admin icon in the top-right corner of the screen and select SSH Keys.
- On the SSH Keys page, click Add SSH Key.
In the Add SSH Key window, enter a name in the Name field and copy the contents of the SSH public key to the Key field.
NoteThe Name and the Key fields are mandatory.
- Click Add SSH Key to register the key.
36.5. Deleting an SSH key
You can delete an SSH key from Business Central by from the SSH Keys page.
Procedure
- In Business Central, select the Admin icon in the top-right corner of the screen and select SSH Keys.
- On the SSH Keys page, click the delete icon of the SSH key you want to delete.
- Click Delete SSH Key to confirm the deletion.
Chapter 37. Managing custom tasks in Business Central
Custom tasks (work items) are tasks that you can customize and reuse across multiple business processes or across all projects in Business Central. Red Hat Process Automation Manager provides a set of custom tasks within the custom task repository in Business Central. You can enable or disable the default custom tasks and upload custom tasks into Business Central to implement the tasks in the relevant processes.
Red Hat Process Automation Manager includes a limited set of supported custom tasks. Custom tasks that are not included in Red Hat Process Automation Manager are not supported.
Procedure
In Business Central, click
 in the upper-right corner and select Custom Tasks Administration.
This page lists the custom task installation settings and available custom tasks for processes in projects throughout Business Central. The custom tasks that you enable on this page become available in the project-level settings where you can then install each custom task to be used in processes. The way in which the custom tasks are installed in a project is determined by the global settings that you enable or disable under Settings on this Custom Tasks Administration page.
Under Settings, enable or disable each setting to determine how the available custom tasks are implemented when a user installs them at the project level.
The following custom task settings are available:
- Install as Maven artifact: Uploads the custom task JAR file to the Maven repository that is configured with Business Central, if the file is not already present.
-
Install custom task dependencies into project: Adds any custom task dependencies to the
pom.xmlfile of the project where the task is installed. -
Use version range when installing custom task into project: Uses a version range instead of a fixed version of a custom task that is added as a project dependency. Example:
[7.16,)instead of7.16.0.Final
Enable or disable (set to ON or OFF) any available custom tasks as needed. Custom tasks that you enable are displayed in project-level settings for all projects in Business Central.
Figure 37.1. Enable custom tasks and custom task settings
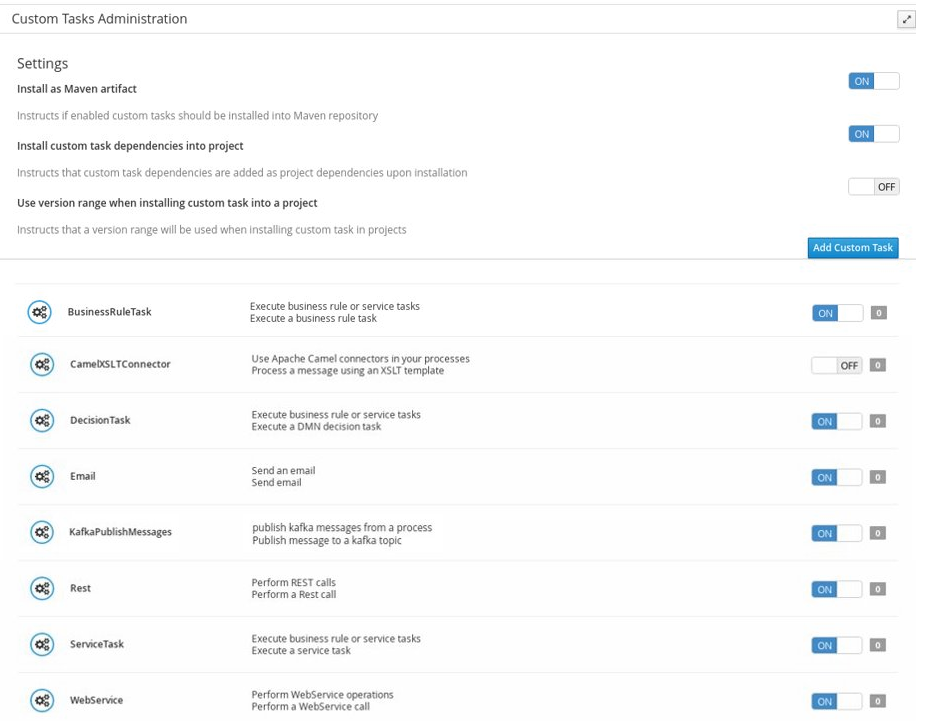
-
To add a custom task, click Add Custom Task, browse to the relevant JAR file, and click the Upload icon. The JAR file must contain work item handler implementations annotated with
@Wid. - Optional: To remove a custom task, click remove on the row of the custom task you want to remove and click Ok to confirm removal.
- After you configure all required custom tasks, navigate to a project in Business Central and go to the project Settings → Custom Tasks page to view the available custom tasks that you enabled.
- For each custom task, click Install to make the task available to the processes in that project or click Uninstall to exclude the task from the processes in the project.
If you are prompted for additional information when you install a custom task, enter the required information and click Install again.
The required parameters for the custom task depend on the type of task. For example, rule and decision tasks require artifact GAV information (Group ID, Artifact ID, Version), email tasks require host and port access information, and REST tasks require API credentials. Other custom tasks might not require any additional parameters.
Figure 37.2. Install custom tasks for use in processes
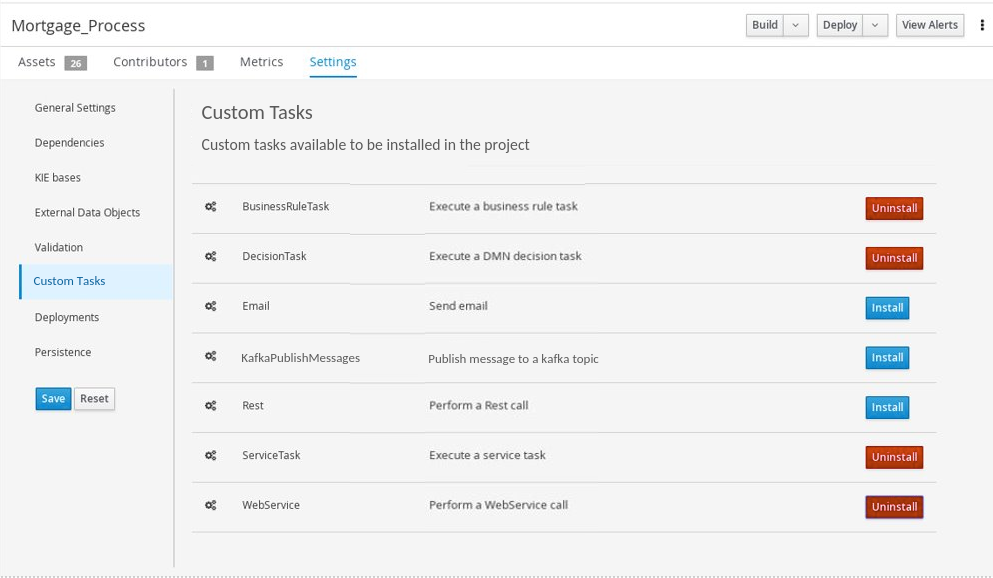
- Click Save.
Return to the project page, select or add a business process in the project, and in the process designer palette, select the Custom Tasks option to view the available custom tasks that you enabled and installed:
Figure 37.3. Access installed custom tasks in process designer
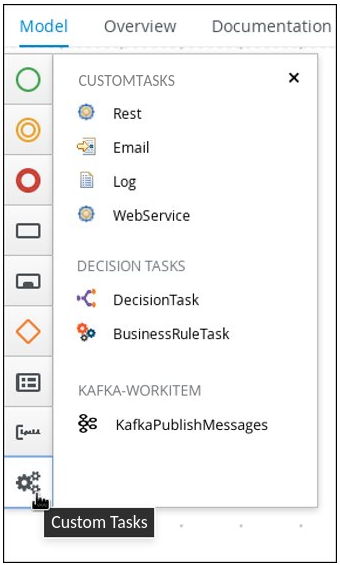
Chapter 38. Dashbuilder data management in Business Central
Dashbuilder is a dashboard and reporting tool integrated in Business Central and is used by the Datasets editor and Content Manager page. Dashbuilder supports the following data types:
- Datasets
- Pages
- Navigation
You can export, import, and deploy Dashbuilder-related data as ZIP files in Business Central.
This feature is only accessible by administrator users.
38.1. Exporting Dashbuilder data
You can export the Dashbuilder-related data such as datasets, pages, and navigation from Business Central as a ZIP file.
Procedure
- In Business Central, select the Admin icon in the upper-right corner of the screen and select Dashbuilder Data Transfer.
To export the Dashbuilder-related data, complete any of the following tasks:
If you want to export the entire Dashbuilder data as a ZIP file, complete the following tasks:
On the Dashbuilder Data Transfer page, click Export all.
An
export.zipfile containing entire Dashbuilder data is downloaded. Theexport.zipfile structure is separated by data type, as shown in the following example:dashbuilder/datasets/definitions/dataset-example1.dset dashbuilder/datasets/definitions/dataset-example2.dset dashbuilder/datasets/readme.md dashbuilder/perspectives/page1/perspective_layout dashbuilder/perspectives/page1/perspective_layout.plugin dashbuilder/perspectives/page2/perspective_layout dashbuilder/perspectives/page2/perspective_layout.plugin dashbuilder/perspectives/readme.md dashbuilder/navigation/navigation/navtree.json dashbuilder/navigation/readme.md VERSION
If you want to export the customized user created and provided Dashbuilder data as a ZIP file, complete the following tasks:
- On the Dashbuilder Data Transfer page, click Custom export.
Select the datasets and pages that you want to include in a ZIP file in the Export Wizard panel and click Next.
The Export Wizard panel validates the selected datasets and pages. The summary of the datasets and pages is available on the panel.
NoteNavigation is always included in the exported ZIP file.
If your export is ready, click Download.
An
export.zipfile containing customized Dashbuilder data is downloaded.NoteYou must select the associated pages and datasets in the Export Wizard panel. If you fail to select both datasets and pages, then an error is generated and you cannot download the
export.zipfile. Therefore, you must select at least one page.- Click Finish.
38.2. Importing Dashbuilder data
You can import Dashbuilder-related data to Business Central from a ZIP file if the archive is structured in the same way as the following example:
dashbuilder/datasets/definitions/dataset-example1.dset dashbuilder/datasets/definitions/dataset-example2.dset dashbuilder/datasets/readme.md dashbuilder/perspectives/page1/perspective_layout dashbuilder/perspectives/page1/perspective_layout.plugin dashbuilder/perspectives/page2/perspective_layout dashbuilder/perspectives/page2/perspective_layout.plugin dashbuilder/perspectives/readme.md dashbuilder/navigation/navigation/navtree.json dashbuilder/navigation/readme.md VERSION
Procedure
In Business Central, select the Admin icon in the upper-right corner of the screen and select Dashbuilder Data Transfer.
WarningYou must import Dashbuilder data to a clean installation of Red Hat Process Automation Manager in order to avoid overwriting data on an existing system.
- On the Dashbuilder Data Transfer page, click the Choose File icon.
- Navigate to the ZIP file you want to import and select the file.
- Click the Upload icon.
- Click Import.
38.3. Deploying dashboards from Business Central on Dashbuilder Runtime
You can automatically deploy the dashboards from Business Central on Dashbuilder Runtime. Business Central is linked to Dashbuilder Runtime using a gradual export feature.
Prerequisites
- Dashbuilder Runtime is configured on your system.
-
You have set the
dashbuilder.runtime.multisystem property totruein thestandalone.xmlfile. You have set the value of
dashbuilder.runtime.locationsystem property to the Dashbuilder Runtime URL, as shown in the following example:<property name="dashbuilder.runtime.location" value=" http://localhost:8080"
You have set the
dashbuilder.export.dirsystem property to the shared directory where Dashbuilder Runtime reads its model, as shown in the following example:<property name="dashbuilder.export.dir" value="/tmp/dashbuilder/models/"
Procedure
- In Business Central, go to Menu → Design → Pages.
- In the Components panel, drag and edit the required component types to the canvas as needed and click Save to finish.
- Select the Admin icon in the upper-right corner of the screen and select Dashbuilder Data Transfer.
- On the Dashbuilder Data Transfer page, click Custom export.
- Select the pages that you want to include in the ZIP file in the Export Wizard panel, and click Next.
Select Export Wizard and click Open.
You can see the Dashbuilder Runtime home page. If you are not logged in, you are redirected to the login page.
Go to Dashboards → Runtime Dashboards and you can see the pages.
The selected data is exported and Dashbuilder Runtime updates the model content when it is opened.
Chapter 39. LDAP connection
Business Central provides a dedicated UserGroupCallback implementation for LDAP servers with Red Hat Process Automation Manager to enable the user task service to retrieve information on users, groups, and roles directly from an LDAP service.
You can configure the following LDAP UserGroupCallback implementation properties:
Table 39.1. LDAP UserGroupCallback properties
| Property | Description |
|---|---|
|
| User name for connecting to the LDAP server. This property is optional if it is not specified and the LDAP server accepts anonymous access. |
|
| Password for connecting to the LDAP server. This property is optional if it is not specified and the LDAP server accepts anonymous access. |
|
| Context in LDAP with user information. |
|
| Context in LDAP with group and role. |
|
| Context in LDAP with user group and role membership information.
This property is optional if it is not specified and the |
|
| Filter for searching user information. This property usually contains substitution keys {0} that are replaced with parameters. |
|
| Filter for searching group and role information. This property usually contains substitution keys {0} that are replaced with parameters. |
|
| Filter for searching user group and role membership information. This property usually contains substitution keys {0} that are replaced with parameters. |
|
| Attribute name of the user ID in LDAP.
This property is optional if it is not specified and the |
|
| Attribute name of the group and role ID in LDAP.
This property is optional if it is not specified and the |
|
|
User ID in a DN, instructs the callback to query for user DN before searching for roles. This is optional and is |
|
|
Initial context factory class name; is |
|
|
Authentication type where the possible values are |
|
|
Security protocol to be used, for example, |
|
|
LDAP url (by default |
39.1. LDAP UserGroupCallback implementation
You can use the LDAP UserGroupCallback implementation by configuring the respective LDAP properties in one of the following ways:
Programmatically: Build a properties object with the respective
LDAPUserGroupCallbackImplproperties and createLDAPUserGroupCallbackImplusing the same properties object as its parameter.For example:
import org.kie.api.PropertiesConfiguration; import org.kie.api.task.UserGroupCallback; ... Properties properties = new Properties(); properties.setProperty(LDAPUserGroupCallbackImpl.USER_CTX, "ou=People,dc=my-domain,dc=com"); properties.setProperty(LDAPUserGroupCallbackImpl.ROLE_CTX, "ou=Roles,dc=my-domain,dc=com"); properties.setProperty(LDAPUserGroupCallbackImpl.USER_ROLES_CTX, "ou=Roles,dc=my-domain,dc=com"); properties.setProperty(LDAPUserGroupCallbackImpl.USER_FILTER, "(uid={0})"); properties.setProperty(LDAPUserGroupCallbackImpl.ROLE_FILTER, "(cn={0})"); properties.setProperty(LDAPUserGroupCallbackImpl.USER_ROLES_FILTER, "(member={0})"); UserGroupCallback ldapUserGroupCallback = new LDAPUserGroupCallbackImpl(properties); UserGroupCallbackManager.getInstance().setCallback(ldapUserGroupCallback);Declaratively: Create the
jbpm.usergroup.callback.propertiesfile in the root of your application or specify the file location as a system property.For example:
-Djbpm.usergroup.callback.properties=FILE_LOCATION_ON_CLASSPATHEnsure that you register the LDAP callback when starting the user task server.
For example:
#ldap.bind.user= #ldap.bind.pwd= ldap.user.ctx=ou\=People,dc\=my-domain,dc\=com ldap.role.ctx=ou\=Roles,dc\=my-domain,dc\=com ldap.user.roles.ctx=ou\=Roles,dc\=my-domain,dc\=com ldap.user.filter=(uid\={0}) ldap.role.filter=(cn\={0}) ldap.user.roles.filter=(member\={0}) #ldap.user.attr.id= #ldap.roles.attr.id=
Additional resources
Chapter 40. Database connection
Business Central provides a dedicated UserGroupCallback implementation for database server with Red Hat Process Automation Manager to enable the user task service. The user task service helps in retrieving information on users and groups (roles) directly from databases.
You can configure the following database UserGroupCallback implementation properties:
Table 40.1. Database UserGroupCallback properties
| Property | Description |
|---|---|
|
| JNDI name of the data source used for connections |
|
| Verifies the user existence |
|
| Collects the groups for a given user |
|
| Verifies the group existence |
40.1. Database UserGroupCallback implementation
In database UserGroupCallback implementation, you must create the required database. You can use this implementation by configuring the respective database properties in one of the following ways:
Programmatically: Build a properties object with the respective
DBUserGroupCallbackImplproperties and createDBUserGroupCallbackImplusing the same properties object as its parameter.For example:
import static org.jbpm.services.task.identity.DBUserGroupCallbackImpl.DS_JNDI_NAME; import static org.jbpm.services.task.identity.DBUserGroupCallbackImpl.PRINCIPAL_QUERY; import static org.jbpm.services.task.identity.DBUserGroupCallbackImpl.ROLES_QUERY; import static org.jbpm.services.task.identity.DBUserGroupCallbackImpl.USER_ROLES_QUERY; ... props = new Properties(); props.setProperty(DS_JNDI_NAME, "jdbc/jbpm-ds"); props.setProperty(PRINCIPAL_QUERY, "select userId from Users where userId = ?"); props.setProperty(ROLES_QUERY, "select groupId from UserGroups where groupId = ?"); props.setProperty(USER_ROLES_QUERY, "select groupId from UserGroups where userId = ?"); callback = new DBUserGroupCallbackImpl(props);
Declaratively: Create the
jbpm.usergroup.callback.propertiesfile in the root of your application or specify the file location as a system property.For example:
-Djbpm.usergroup.callback.properties=FILE_LOCATION_ON_CLASSPATHEnsure that you register the database callback when starting the user task server.
For example:
System.setProperty("jbpm.usergroup.callback.properties", "/jbpm.usergroup.callback.db.properties"); callback = new DBUserGroupCallbackImpl(true); ... db.ds.jndi.name = jdbc/jbpm-ds db.user.query = select userId from Users where userId = ? db.roles.query = select groupId from UserGroups where groupId = ? db.user.roles.query = select groupId from UserGroups where userId = ?
Additional resources
Chapter 41. Configuring Maven using settings.xml file
Java application development uses the Apache Maven build automation tool to build and manage software projects. Maven uses Project Object Model (POM) configuration XML files to define both, the project properties and the build process.
Maven uses repositories to store Java libraries, plug-ins, and other build artifacts. Repositories can be either local or remote. A local repository is a download of artifacts from a remote repository cached on a local machine. A remote repository is any other repository accessed using common protocols, such as http:// when located on an HTTP server, or file:// when located on a file server. The default repository is the public remote Maven 2 Central Repository. Configuration of Maven is performed by modifying the settings.xml file. You can either configure global Maven settings in the M2_HOME/conf/settings.xml file, or user-level settings in the USER_HOME/.m2/settings.xml file.
Additional resources
- Configuring an external Maven repository for Business Central and KIE Server
- Packaging and deploying a Red Hat Process Automation Manager project in Maven
- Maven settings and repositories for Red Hat Process Automation Manager
- System integration with Maven
- Welcome to Apache Maven
- Apache Maven Project - Introduction to Repositories
- Apache Maven Parent POMs Reference.
Chapter 42. GAV check management
In Business Central, projects are identified by the Group ID, Artifact ID, and Version (GAV) Maven naming convention. GAV values differentiate projects and project versions as well as identify dependencies with particular projects.
By default, Business Central detects duplicate GAVs. This feature can be disabled by users with the admin role.
42.1. Configuring GAV checks and child GAV edition
This procedure describes how to configure GAV checks in Business Central.
Procedure
- In Business Central, go to Menu → Design → Projects and click the project name.
- In the project window, click the Settings tab.
In the General Settings tab, perform any of the following tasks:
- To enable other projects to have the same GAV, select the Disable GAV conflict check check box.
- To enable child projects to have GAV edition, select the Allow child GAV edition check box.
Click Save.
NoteYou can click Reset to undo all changes.
- Click Save to confirm the changes.
Duplicate GAV detection is disabled for projects in Development Mode. To enable duplicate GAV detection in Business Central, go to project Settings → General Settings → Version and toggle the Development Mode option to OFF (if applicable).
42.2. Configuring GAV checks for all projects
This procedure describes how to configure GAV checks for all projects in Business Central. You can also disable GAV checks at system startup.
Procedures
- In Business Central, select the Admin icon in the top-right corner of the screen and select Projects. The Projects window opens.
In the Advanced GAV preferences tab, perform any of the following tasks:
- To enable other projects to have the same GAV, select the Disable GAV conflict check check box.
- To enable child projects to have GAV edition, select the Allow child GAV edition check box.
- Click Save.
You can also disable the duplicate GAV detection feature by setting the org.guvnor.project.gav.check.disabled system property to true for Business Central at system startup:
$ ~/EAP_HOME/bin/standalone.sh -c standalone-full.xml
-Dorg.guvnor.project.gav.check.disabled=true
Chapter 43. Configuring the environment mode in KIE Server and Business Central
You can set KIE Server to run in production mode or in development mode. Development mode provides a flexible deployment policy that enables you to update existing deployment units (KIE containers) while maintaining active process instances for small changes. It also enables you to reset the deployment unit state before updating active process instances for larger changes. Production mode is optimal for production environments, where each deployment creates a new deployment unit.
In a development environment, you can click Deploy in Business Central to deploy the built KJAR file to a KIE Server without stopping any running instances (if applicable), or click Redeploy to deploy the built KJAR file and replace all instances. The next time you deploy or redeploy the built KJAR, the previous deployment unit (KIE container) is automatically updated in the same target KIE Server.
In a production environment, the Redeploy option in Business Central is disabled and you can click only Deploy to deploy the built KJAR file to a new deployment unit (KIE container) on a KIE Server.
Procedure
-
To configure the KIE Server environment mode, set the
org.kie.server.modesystem property toorg.kie.server.mode=developmentororg.kie.server.mode=production. To configure the deployment behavior for a project in Business Central, go to project Settings → General Settings → Version and toggle the Development Mode option.
NoteBy default, KIE Server and all new projects in Business Central are in development mode.
You cannot deploy a project with Development Mode turned on or with a manually added
SNAPSHOTversion suffix to a KIE Server that is in production mode.
Chapter 44. Git hooks and remote Git repository integration
Git hooks are bash scripts that execute before or after Git events such as git commit or git push. In Business Central, you can use Git hooks to configure repositories to trigger specified actions every time events happen. For more information about Git hooks, see Customizing Git Hooks.
You can integrate remote Git repositories with Business Central by using post-commit Git hooks. This enables you to automate content replication between Business Central and remote repositories. For example, you can implement a real-time backup strategy where changes you make to your Business Central projects are replicated to your remote Git repositories.
Business Central only supports post-commit Git hooks.
A post-commit Git hook executes after every commit as a sync operation. Business Central waits for the post-commit bash to complete and no other write operation occurs in the repository.
44.1. Creating post-commit Git hooks
You can create a post-commit Git hook bash script file that executes code contained in that file or execute code from a different file such as a Java program.
Procedure
Create a
post-commitGit hook file:$ touch post-commit
Set the permissions of the
post-commitfile to755:$ chmod 755 post-commit
Add
#!/bin/bashand any required code to thepost-commitfile, for example:To push all changes to a remote repository:
#!/bin/bash
git push origin +master
To log a message:
#!/bin/bash
echo 'Hello World'
To execute code of another file:
#!/bin/bash
java -jar _EAP_HOME_/bin/.niogit/<SPACE>/<PROJECT_NAME>.git/hooks/git-push.jar
NoteTo use post-commit Git hooks that execute Java code, you must use the following Java libraries:
- JGit: Used to interact with internal Business Central Git repositories.
- GitHub API for Java: Used to communicate with GitHub.
For more information about post-commit Git hook and Java code examples, see Business Central post-commit Git Hooks Integration.
44.2. Importing remote Git repositories
You can import a remote Git repository in to Business Central and configure a post-commit Git hook to automatically push changes to that remote repository.
Prerequisites
- Red Hat Process Automation Manager is installed in a Red Hat JBoss EAP 7.3 server instance.
- Red Hat Process Automation Manager projects exist in an external Git repository.
- Read access credentials for the external Git repository.
-
(For Windows) Cygwin is installed with the Git package added during installation and the path to the Cygwin
/binfolder is added to your environmentPATHvariable. For example,C:\cygwin64\bin. For more information about Cygwin installation, see Installing and Updating Cygwin Packages.
Procedure
- In Business Central, go to Menu → Projects.
- Select or create the space that you want to import the Git projects into.
-
Click
on the right side of the screen and select Import Project.
-
In the Import Project window, enter the URL of your Git repository, for example,
https://github.com/USERNAME/REPOSITORY_NAME.git, and the credentials for the Git repository. Click Import.
The project is added to the Business Central Git repository and is then available in the space.
ImportantUse the HTTPS or Git protocol instead of a SCP-style SSH URL. Business Central does not support the basic SSH URL and an error appears if you use this URL.
You must have your public ssh key configured in your Git provider.
The Git repository must be a KJAR project, containing only a single KJAR that is compatible with the Red Hat Process Automation Manager version. The KJAR content must be in the root of the repository.
In a command terminal, navigate to the
hooksfolder located in the repository Git folder of the project. For example:$ cd _EAP_HOME_/bin/.niogit/<SPACE>/<PROJECT_NAME>.git/hooks
Create a
post-commitfile that pushes changes to the remote Git repository. For example:#!/bin/sh git push origin +master
For more information about creating post-commit Git hooks, see Section 44.1, “Creating post-commit Git hooks”.
Optional: To check that the configuration was successful, create a guided rule in Business Central:
- In Business Central go to Menu → Projects → Add Asset → Guided Rule.
- On the Create new Guided Rule page, enter the required information.
Click Ok.
Business Central automatically pushes all changes to the remote repository.
Additional resources
44.3. Configuring Git hooks for existing remote Git project repositories
If you have an existing remote Git repository project you can create a post-commit Git hook in a remote Git repository of that existing project and integrate the remote Git repository with Business Central.
Prerequisites
- Red Hat Process Automation Manager is installed in a Red Hat JBoss EAP 7.3 server instance.
- Red Hat Process Automation Manager projects exist in an external Git repository.
- Read access credentials for the external Git repository.
-
(For Windows operating system) Cygwin is installed with the Git package added during installation and the path to the Cygwin
/binfolder is added to your environmentPATHvariable. For example,C:\cygwin64\bin. For more information about Cygwin installation, see Installing and Updating Cygwin Packages.
Procedure
In a command terminal, navigate to the
hooksfolder located in the repository Git folder of the project. For example:$ cd _EAP_HOME_/bin/.niogit/<SPACE>/<PROJECT_NAME>.git/hooks
Create a
post-commitfile that pushes changes to the remote Git repository. For example:#!/bin/sh git push origin +master
For more information about creating post-commit Git hooks, see Section 44.1, “Creating post-commit Git hooks”.
Optional: To check that the configuration was successful, create a guided rule in Business Central:
- In Business Central go to Menu → Projects → Add Asset → Guided Rule.
- On the Create new Guided Rule page, enter the required information.
Click Ok.
Business Central automatically pushes all changes to the remote repository.
44.4. Configuring Git hooks as a system property for Business Central
If you do not have an existing Git repository project or if you want to apply post-commit Git hooks to a large number of project repositories you can specify a directory containing a hook file for the value of the org.uberfire.nio.git.hooks system property. This directory is copied to the Git repositories.
If you specify the org.uberfire.nio.git.hooks system property, all Business Central internal repositories and project repositories use the post-commit Git hook. You should only use fully qualified paths in your script.
Prerequisites
- Red Hat Process Automation Manager is installed in a Red Hat JBoss EAP 7.3 server instance.
-
(For Windows operating system) Cygwin is installed with the Git package added during installation and the path to the Cygwin
/binfolder is added to your environmentPATHvariable. For example,C:\cygwin64\bin. For more information about Cygwin installation, see Installing and Updating Cygwin Packages.
Procedure
Create a post-commit Git hook in a directory on your local system.
For more information about creating post-commit Git hooks, see Section 44.1, “Creating post-commit Git hooks”.
To specify the directory with the hook file for the value of the
org.uberfire.nio.git.hookssystem property, do one of the following tasks:Add the
org.uberfire.nio.git.hookssystem property to thestandalone.xmlfile. For example:<system-properties> <property name="org.uberfire.nio.git.hooks" value="_EAP_HOME_/hooks"> </property> ... </system-properties>
Use the
-Dorg.uberfire.nio.git.hooksenvironment variable when executing Business Central. For example:$ ./standalone.sh -c standalone-full.xml -Dorg.uberfire.nio.git.hooks=_EAP_HOME_/hooks
Start Business Central.
The post-commit Git hook is copied to all Business Central internal repositories and project repositories.
Additional resources
44.5. Integrating remote Git repositories
In the following example, you use a post-commit Git hook and Java code to integrate Business Central with a remote Git repository. For the Java code example, see Business Central post-commit Git Hooks Integration. The example provides the following functionality:
-
Automatic generation of the template
.gitremoteconfiguration file -
Validation of the
.gitremoteconfiguration file for required parameters -
Patterns defined in the ignore parameter of the
.gitremotefile are ignored by Git - Message and notification output to users
- Support for GitLab and GitHub token authentication
- Support for GitLab group and subgroup project creation
- Support for GitHub organization repository creation
Prerequisites
- Red Hat Process Automation Manager is installed in a Red Hat JBoss EAP 7.3 server instance.
- Java Development Kit (JDK) 8 is installed.
- Maven is installed.
Procedure
In a terminal window, clone the GitHub repository to your system:
$ git clone https://github.com/kiegroup/bc-git-integration-push.git
Navigate to the cloned repository:
$ cd bc-git-integration-push
Execute a Maven clean install:
$ mvn clean install
Create a
/hooksfolder in yourEAP_HOMEdirectory:$ mkdir -p _EAP_HOME_/hooks/
Copy the
git-push-2.1-SNAPSHOT.jarto theEAP_HOME/hooks/folder:$ cp bc-git-integration-push/target/git-push-2.1-SNAPSHOT.jar _EAP_HOME_/hooks/
Optional: To create a template
.gitremoteconfiguration file, rungit-push-2.1-SNAPSHOT.jar:$ java -jar git-push-2.1-SNAPSHOT.jar
Example template
.gitremoteconfiguration file#This is an auto generated template empty property file provider=GIT_HUB login= password= token= remoteGitUrl=https://api.github.com/ useSSH=false ignore=.*demo.*, test.* githubOrg=OrgName gitlabGroup=Group/subgroup
Modify the
.gitremoteconfiguration file parameters.Table 44.1. Example
.gitremoteparametersParameter Description providerThe Git provider. Only two values are accepted: GIT_HUB and GIT_LAB. Required
loginThe user name for the Git provider. Required
passwordA plain text password. Not required if a
tokenis provided.tokenA generated token to replace the
usernameandpasswordbased unsecured connection. Note: If this is not set a warning is displayed that you are using an unsecured connection. Not required if apasswordis provided. Note: GitLab only supports token authentication.remoteGitUrlA public provider URL or a locally hosted enterprise for any provider. Required. Note: The public GitHub URL should be the API URL. For example, api.github.com.
useSSHBoolean to allow the SSH protocol to push changes to the remote repository. Optional. Default = false. Note: This parameter uses the local
~/.ssh/directory to obtain the SSH configuration.ignoreA comma separated regular expressions to ignore project names that match any of these expressions. Optional.
githubOrgDefines the repository organization if GitHub is used as the provider. Optional.
gitlabGroupDefines the repository group and subgroup if GitLab is used as the provider Optional.
Create a
post-commitGit hook file inEAP_HOME/hooks:$ touch post-commit
Set the permissions of the
post-commitfile to755:$ chmod 755 post-commit
Add
#!/bin/bashand code to executegit-push-2.1-SNAPSHOT.jarto thepost-commitfile:$ echo "#\!/bin/bash\njava -jar $APP_SERVER_HOME/hooks/git-push-2.1-SNAPSHOT.jar" > hooks/post-commit
Start Business Central with the
-Dorg.uberfire.nio.git.hooksenvironment variable set. For example:$ ./standalone.sh -c standalone-full.xml -Dorg.uberfire.nio.git.hooks=_EAP_HOME_/hooks
To use post-commit Git hooks that execute Java code, you must use the following Java libraries:
- JGit: Used to interact with internal Business Central Git repositories.
- GitHub API for Java: Used to communicate with GitHub.
For more information about post-commit Git hook and Java code examples, see Business Central post-commit Git Hooks Integration.
44.6. Git hook exit codes
When a Git hook exits an integer value is returned which determines the status of the Git hook execution. This integer value is known as a Git hook exit code. The execution status can be a success (1), warning (2 to 30) or error (31 to 255).
44.7. Customizing Git hook notifications
Business Central provides a mechanism that enables users to receive customized Git hook notifications based on the hook exit codes.
To enable the notification mechanism you must create a *.properties file containing the custom messages and then specify the path to that file as the value of the appformer.git.hooks.bundle system property.
Procedure
Create the
*.propertiesfile and add a line for each exit code with a corresponding message in the following format:<exit_code>=<display_message>The
<exit_code>is the Git hook exit code and the<display_message>is the custom message that is displayed to a user.For example:
0=Success! All working as expected.
1=Warning! Please check the logs and advise your admin.
.
.
31=Error! Please advise your admin immediately.
NoteIt is not necessary to define all the possible exit codes in the *.properties file. Notifications appear only for the exit codes defined in the *.properties file.
ImportantThe notification service only supports the
ISO 8859-1(LATIN 1) character set in the properties file. If you want to use extended characters, please use their escaped Unicode character code sequences.To enable Git hook notifications, specify the path to the file as the value of the
appformer.git.hooks.bundlesystem property.See the following example of a
standalone.xmlfile with the setting that points to aMessages.propertiesfile:<system-properties> <property name="appformer.git.hooks.bundle" value="/opt/jboss-as/git-hooks-messages/Messages.properties"> </property> ... </system-properties>
44.7.1. Git hook notifications in Business Central
You can view Git hook notifications in Business Central. There are three Git hook exit code notification types.
Table 44.2. Git hook UI notification types
| Exit code | Customized message | UI notification color |
|---|---|---|
|
| Success! All working as expected. | Green |
|
| Warning! Please check the logs and advise your admin. | Orange |
|
| Error! Please advise your admin immediately. | Red |
UNIX machines only support error codes between 0 (success) to 255 (error), any exit code outside of this range will end up being converted into a different code which may cause showing a wrong notification message.
Windows machines don’t have this limitation and support a wide range of exit codes.
44.7.2. Git hook notification internationalization support
You can internationalize notification messages by placing additional properties files in the same path as the original properties file specified as the appformer.git.hooks.bundle system property.
The name of the different localized files must be <filename>_<lang>.properties, where the <filename> is the same as the original. For example, where the system property points to Messages.properties, you can create Messages_en.properties for English, Messages_fr.properties for French, or Messages_it.properties for Italian.
The notification service will choose the properties file based on the user’s language, if there are no available translations for that language it will use the entries from the original Messages.properties file.
Chapter 45. Role-based access control for branches in Business Central
Business Central provides the option for users to restrict the access for a target branch for a specific collaborator type. The security check uses both the Security Management screen and contributors sources to grant or deny permissions to spaces and projects. For example, if a user has the security permission to update a project and has write permission on that branch, based on the contributor type, then they are able to create new assets.
45.1. Customizing role-based branch access
You can customize contributor role permissions for each branch of a project in Business Central. For example, you can set Read, Write, Delete, and Deploy access for each role assigned to a branch.
Procedure
- In Business Central, go to Menu → Design → Projects.
If needed, add a new contributor:
- Click the project name and then click the Contributors tab.
- Click Add Contributor.
- Enter user name in the text field.
- Select the Contributor role type from the drop-down list.
- Click Ok.
Customize role-based branch access for the relevant contributor:
- Click Settings → Branch Management.
- Select the branch name from the drop-down list.
- In the Role Access section, select or deselect the permissions check boxes to specify role-based branch access for each available role type.
- Click Save and click Save again to confirm your changes.
Chapter 46. Viewing process instance logs
You can view all the process events of an instance from its Logs tab. The instance logs list all the current and previous process states. Business Central has two types of logs for process instances, Business and Technical logs.
Procedure
- In Business Central, go to Menu → Manage → Process Instances.
- On the Manage Process Instances page, click the process instance whose log you want to view.
Select the Logs tab:
- Click Business to view the business events log.
- Click Technical to view the technical events log.
- Click Asc or Desc to change the order of the log files.
Chapter 47. Business Central system properties
The Business Central system properties listed in this section are passed to standalone*.xml files.
- Git directory
Use the following properties to set the location and name for the Business Central Git directory:
-
org.uberfire.nio.git.dir: Location of the Business Central Git directory. -
org.uberfire.nio.git.dirname: Name of the Business Central Git directory. Default value:.niogit. -
org.uberfire.nio.git.ketch: Enables or disables Git ketch. -
org.uberfire.nio.git.hooks: Location of the Git hooks directory.
-
- Git over HTTP
Use the following properties to configure access to the Git repository over HTTP:
-
org.uberfire.nio.git.proxy.ssh.over.http: Specifies whether SSH should use an HTTP proxy. Default value:false. -
http.proxyHost: Defines the host name of the HTTP proxy. Default value:null. -
http.proxyPort: Defines the host port (integer value) of the HTTP proxy. Default value:null. -
http.proxyUser: Defines the user name of the HTTP proxy. -
http.proxyPassword: Defines the user password of the HTTP proxy. -
org.uberfire.nio.git.http.enabled: Enables or disables the HTTP daemon. Default value:true. -
org.uberfire.nio.git.http.host: If the HTTP daemon is enabled, it uses this property as the host identifier. This is an informative property that is used to display how to access the Git repository over HTTP. The HTTP still relies on the servlet container. Default value:localhost. -
org.uberfire.nio.git.http.hostname: If the HTTP daemon is enabled, it uses this property as the host name identifier. This is an informative property that is used to display how to access the Git repository over HTTP. The HTTP still relies on the servlet container. Default value:localhost. -
org.uberfire.nio.git.http.port: If the HTTP daemon is enabled, it uses this property as the port number. This is an informative property that is used to display how to access the Git repository over HTTP. The HTTP still relies on the servlet container. Default value:8080.
-
- Git over HTTPS
Use the following properties to configure access to the Git repository over HTTPS:
-
org.uberfire.nio.git.proxy.ssh.over.https: Specifies whether SSH uses an HTTPS proxy. Default value:false. -
https.proxyHost: Defines the host name of the HTTPS proxy. Default value:null. -
https.proxyPort: Defines the host port (integer value) of the HTTPS proxy. Default value:null. -
https.proxyUser: Defines the user name of the HTTPS proxy. -
https.proxyPassword: Defines the user password of the HTTPS proxy. -
user.dir: Location of the user directory. -
org.uberfire.nio.git.https.enabled: Enables or disables the HTTPS daemon. Default value:false -
org.uberfire.nio.git.https.host: If the HTTPS daemon is enabled, it uses this property as the host identifier. This is an informative property that is used to display how to access the Git repository over HTTPS. The HTTPS still relies on the servlet container. Default value:localhost. -
org.uberfire.nio.git.https.hostname: If the HTTPS daemon is enabled, it uses this property as the host name identifier. This is an informative property that is used to display how to access the Git repository over HTTPS. The HTTPS still relies on the servlet container. Default value:localhost. -
org.uberfire.nio.git.https.port: If the HTTPS daemon is enabled, it uses this property as the port number. This is an informative property that is used to display how to access the Git repository over HTTPS. The HTTPS still relies on the servlet container. Default value:8080.
-
- JGit
-
org.uberfire.nio.jgit.cache.instances: Defines the JGit cache size. -
org.uberfire.nio.jgit.cache.overflow.cleanup.size: Defines the JGit cache overflow cleanup size. -
org.uberfire.nio.jgit.remove.eldest.iterations: Enables or disables whether to remove eldest JGit iterations. -
org.uberfire.nio.jgit.cache.evict.threshold.duration: Defines the JGit evict threshold duration. -
org.uberfire.nio.jgit.cache.evict.threshold.time.unit: Defines the JGit evict threshold time unit.
-
- Git daemon
Use the following properties to enable and configure the Git daemon:
-
org.uberfire.nio.git.daemon.enabled: Enables or disables the Git daemon. Default value:true. -
org.uberfire.nio.git.daemon.host: If the Git daemon is enabled, it uses this property as the local host identifier. Default value:localhost. -
org.uberfire.nio.git.daemon.hostname: If the Git daemon is enabled, it uses this property as the local host name identifier. Default value:localhost -
org.uberfire.nio.git.daemon.port: If the Git daemon is enabled, it uses this property as the port number. Default value:9418. org.uberfire.nio.git.http.sslVerify: Enables or disables SSL certificate checking for Git repositories. Default value:true.NoteIf the default or assigned port is already in use, a new port is automatically selected. Ensure that the ports are available and check the log for more information.
-
- Git SSH
Use the following properties to enable and configure the Git SSH daemon:
-
org.uberfire.nio.git.ssh.enabled: Enables or disables the SSH daemon. Default value:true. -
org.uberfire.nio.git.ssh.host: If the SSH daemon enabled, it uses this property as the local host identifier. Default value:localhost. -
org.uberfire.nio.git.ssh.hostname: If the SSH daemon is enabled, it uses this property as local host name identifier. Default value:localhost. org.uberfire.nio.git.ssh.port: If the SSH daemon is enabled, it uses this property as the port number. Default value:8001.NoteIf the default or assigned port is already in use, a new port is automatically selected. Ensure that the ports are available and check the log for more information.
-
org.uberfire.nio.git.ssh.cert.dir: Location of the.securitydirectory where local certificates are stored. Default value: Working directory. -
org.uberfire.nio.git.ssh.idle.timeout: Sets the SSH idle timeout. -
org.uberfire.nio.git.ssh.passphrase: Pass phrase used to access the public key store of your operating system when cloning git repositories with SCP style URLs. Example:git@github.com:user/repository.git. -
org.uberfire.nio.git.ssh.algorithm: Algorithm used by SSH. Default value:RSA. -
org.uberfire.nio.git.gc.limit: Sets the GC limit. -
org.uberfire.nio.git.ssh.ciphers: A comma-separated string of ciphers. The available ciphers areaes128-ctr,aes192-ctr,aes256-ctr,arcfour128,arcfour256,aes192-cbc,aes256-cbc. If the property is not used, all available ciphers are loaded. org.uberfire.nio.git.ssh.macs: A comma-separated string of message authentication codes (MACs). The available MACs arehmac-md5,hmac-md5-96,hmac-sha1,hmac-sha1-96,hmac-sha2-256,hmac-sha2-512. If the property is not used, all available MACs are loaded.NoteIf you plan to use RSA or any algorithm other than DSA, make sure you set up your application server to use the Bouncy Castle JCE library.
-
- KIE Server nodes and Process Automation Manager controller
Use the following properties to configure the connections with the KIE Server nodes from the Process Automation Manager controller:
-
org.kie.server.controller: The URL is used to connect to the Process Automation Manager controller. For example,ws://localhost:8080/business-central/websocket/controller. -
org.kie.server.user: User name used to connect to the KIE Server nodes from the Process Automation Manager controller. This property is only required when using this Business Central installation as a Process Automation Manager controller. -
org.kie.server.pwd: Password used to connect to the KIE Server nodes from the Process Automation Manager controller. This property is only required when using this Business Central installation as a Process Automation Manager controller.
-
- Maven and miscellaneous
Use the following properties to configure Maven and other miscellaneous functions:
kie.maven.offline.force: Forces Maven to behave as if offline. If true, disables online dependency resolution. Default value:false.NoteUse this property for Business Central only. If you share a runtime environment with any other component, isolate the configuration and apply it only to Business Central.
-
org.uberfire.gzip.enable: Enables or disables Gzip compression on theGzipFiltercompression filter. Default value:true. -
org.kie.workbench.profile: Selects the Business Central profile. Possible values areFULLorPLANNER_AND_RULES. A prefixFULL_sets the profile and hides the profile preferences from the administrator preferences. Default value:FULL -
org.appformer.m2repo.url: Business Central uses the default location of the Maven repository when looking for dependencies. It directs to the Maven repository inside Business Central, for example,http://localhost:8080/business-central/maven2. Set this property before starting Business Central. Default value: File path to the innerm2repository. -
appformer.ssh.keystore: Defines the custom SSH keystore to be used with Business Central by specifying a class name. If the property is not available, the default SSH keystore is used. -
appformer.ssh.keys.storage.folder: When using the default SSH keystore, this property defines the storage folder for the user’s SSH public keys. If the property is not available, the keys are stored in the Business Central.securityfolder. -
appformer.experimental.features: Enables the experimental features framework. Default value:false. -
org.kie.demo: Enables an external clone of a demo application from GitHub. -
org.uberfire.metadata.index.dir: Place where the Lucene.indexdirectory is stored. Default value: Working directory. -
org.uberfire.ldap.regex.role_mapper: Regex pattern used to map LDAP principal names to the application role name. Note that the variable role must be a part of the pattern as the application role name substitutes the variable role when matching a principle value and role name. -
org.uberfire.sys.repo.monitor.disabled: Disables the configuration monitor. Do not disable unless you are sure. Default value:false. -
org.uberfire.secure.key: Password used by password encryption. Default value:org.uberfire.admin. -
org.uberfire.secure.alg: Crypto algorithm used by password encryption. Default value:PBEWithMD5AndDES. -
org.uberfire.domain: Security-domain name used by uberfire. Default value:ApplicationRealm. -
org.guvnor.m2repo.dir: Place where the Maven repository folder is stored. Default value:<working-directory>/repositories/kie. -
org.guvnor.project.gav.check.disabled: Disables group ID, artifact ID, and version (GAV) checks. Default value:false. -
org.kie.build.disable-project-explorer: Disables automatic build of a selected project in Project Explorer. Default value:false. -
org.kie.builder.cache.size: Defines the cache size of the project builder. Default value:20. -
org.kie.library.assets_per_page: You can customize the number of assets per page in the project screen. Default value:15. -
org.kie.verification.disable-dtable-realtime-verification: Disables the real-time validation and verification of decision tables. Default value:false.
- Process Automation Manager controller
Use the following properties to configure how to connect to the Process Automation Manager controller:
-
org.kie.workbench.controller: The URL used to connect to the Process Automation Manager controller, for example,ws://localhost:8080/kie-server-controller/websocket/controller. -
org.kie.workbench.controller.user: The Process Automation Manager controller user. Default value:kieserver. -
org.kie.workbench.controller.pwd: The Process Automation Manager controller password. Default value:kieserver1!. -
org.kie.workbench.controller.token: The token string used to connect to the Process Automation Manager controller.
-
- Java Cryptography Extension KeyStore (JCEKS)
Use the following properties to configure JCEKS:
-
kie.keystore.keyStoreURL: The URL used to load a Java Cryptography Extension KeyStore (JCEKS). For example,file:///home/kie/keystores/keystore.jceks. -
kie.keystore.keyStorePwd: The password used for the JCEKS. -
kie.keystore.key.ctrl.alias: The alias of the key for the default REST Process Automation Manager controller. -
kie.keystore.key.ctrl.pwd: The password of the alias for the default REST Process Automation Manager controller.
-
- Rendering
Use the following properties to switch between Business Central and KIE Server rendered forms:
-
org.jbpm.wb.forms.renderer.ext: Switches the form rendering between Business Central and KIE Server. By default, the form rendering is performed by Business Central. Default value:false. -
org.jbpm.wb.forms.renderer.name: Enables you to switch between Business Central and KIE Server rendered forms. Default value:workbench.
-
Chapter 48. Performance tuning considerations with Business Central
The following key concepts or suggested practices can help you optimize Business Central configuration and Red Hat Process Automation Manager performance. These concepts are summarized in this section as a convenience and are explained in more detail in the cross-referenced documentation, where applicable. This section will expand or change as needed with new releases of Red Hat Process Automation Manager.
- Ensure that development mode is enabled during development
You can set KIE Server or specific projects in Business Central to use
productionmode ordevelopmentmode. By default, KIE Server and all new projects in Business Central are in development mode. This mode provides features that facilitate your development experience, such as flexible project deployment policies, and features that optimize KIE Server performance during development, such as disabled duplicate GAV detection. Use development mode until your Red Hat Process Automation Manager environment is established and completely ready for production mode.For more information about configuring the environment mode or duplicate GAV detection, see the following resources:
- Disable verification and validation of complex guided decision tables
The decision table verification and validation feature of Business Central is enabled by default. This feature helps you validate your guided decision tables, but with complex guided decision tables, this feature can hinder decision engine performance. You can disable this feature by setting the
org.kie.verification.disable-dtable-realtime-verificationsystem property value totrue.For more information about guided decision table validation, see Designing a decision service using guided decision tables.
- Disable automatic builds if you have many large projects
In Business Central, when you navigate between projects in the Project Explorer side panel, the selected project is built automatically so that the Alerts window is updated to show any build errors for the project. If you have large projects or frequently switch between many projects that are under active development, this feature can hinder Business Central and decision engine performance.
To disable automatic project builds, set the
org.kie.build.disable-project-explorersystem property totrue.
Part III. Using standalone perspectives in Business Central
As a business rules developer, you can embed standalone perspectives from Business Central in your web application and then use them to edit rules, processes, decision tables, and other assets.
Prerequisites
- Business Central is deployed and is running on a web/application server.
- You are logged in to Business Central.
Chapter 49. Standalone perspectives in Business Central
Business Central provides specialized editors for authoring assets based on the asset’s format. Business Central has a feature that enables you to use these editors individually. This feature is known as the standalone perspective mode of the editor or simply the standalone perspectives.
As a business rules developer, you can embed a standalone perspective in your web application and then use it to edit rules, processes, decision tables, and other assets. After embedding a perspective you can edit an asset in your own application without switching to Business Central. You can use this feature to customize your web application. In addition to standalone perspectives you can also embed standalone custom pages (dashboards) in your applications.
You can access a standalone perspective by using a specific web address in a browser with the standalone and perspective parameters. A standalone perspective’s web address may also contain additional parameters.
Chapter 50. Using the standalone library perspective
You can use the library perspective of Business Central to select a project you want to edit. You can also perform all the authoring functions on the selected project.
The standalone library perspective can be used in two ways, with and without using the header=UberfireBreadcrumbsContainer parameter. The difference is that the address with the header parameter will display a breadcrumb trail on top of the library perspective. Using this link you can create additional Spaces for your projects.
Procedure
- Log in to Business Central.
In a web browser, enter the appropriate web address:
For accessing the standalone library perspective without the
headerparameterhttp://localhost:8080/business-central/kie-wb.jsp?standalone=true&perspective=LibraryPerspectiveThe standalone library perspective without the breadcrumb trail opens in the browser.
For accessing the standalone library perspective with the
headerparameterhttp://localhost:8080/business-central/kie-wb.jsp?standalone=true&perspective=LibraryPerspective&header=UberfireBreadcrumbsContainerThe standalone library perspective with the breadcrumb trail opens in the browser.
Chapter 51. Using the standalone editor perspective
You can use the standalone editor perspective of Business Central to access an asset’s specific editor. By using this perspective, you can open an asset’s editor and can modify the asset as required.
The web address for accessing an asset’s standalone editor perspective contains the standalone and path parameters. The path parameter must contain the complete path to the asset and the web address can end with #StandaloneEditorPerspective string. Also, by varying the path parameter, you can access a specific asset’s editor in the standalone mode.
Procedure
- Log in to Business Central.
In a web browser, enter the appropriate web address as required, for example,
For editing a process:
http://localhost:8080/business-central/kie-wb.jsp?standalone&path=default://master@MySpace/Shop/src/main/resources/com/purchase.bpmn#StandaloneEditorPerspectiveThe Process Designer opens in the standalone mode.
For editing a form:
http://localhost:8080/business-central/kie-wb.jsp?standalone&path=default://master@MySpace/Mortgage_Process/src/main/resources/ApplicationMortgage.frm#StandaloneEditorPerspectiveThe Form Modeler opens in the standalone mode.
Chapter 52. Using the standalone content manager perspective
By using the standalone content manager perspective in your application, you can create and edit your application’s content and its navigation menus.
Procedure
- Log in to Business Central.
In a web browser, enter the following web address in the address bar,
http://localhost:8080/business-central/kie-wb.jsp?standalone=true&perspective=ContentManagerPerspectiveThe standalone content manager perspective opens in the browser.
Chapter 53. Using standalone custom pages(dashboards)
Apart from standalone perspectives, you can also embed custom pages, also known as dashboards, in your application. For accessing the custom pages from your application, provide the name of the custom page as the value of the perspective parameter. Note that the perspective parameter is case-sensitive.
Procedure
- Log in to Business Central.
In a web browser, enter the custom page’s web address in the address bar, for example,
http://localhost:8080/business-central/kie-wb.jsp?standalone=true&perspective=CustomPageNameThe standalone custom page opens in the browser. Replace the value, CustomPageName, with the name of the custom page you want to use in the standalone mode.
Part IV. Building custom dashboard widgets
As a business analyst or business rules developer, use the Page Editor tool to design and define your page and specify the information to be displayed on it. You can decide which components are a part of your page. You can also customize the component properties of a page according to your requirements. Optionally, before creating a page, you can define a data set to feed the reporting components of the page.
Prerequisites
- You have sufficient permissions for creating pages.
Chapter 54. Data sets authoring
A data set is a collection of related sets of information and can be stored in many ways. For example, in a database, in a Microsoft Excel file, or in memory. A data set definition instructs Business Central methods to access, read, and parse a data set. Business Central does not store data. It enables you to define access to a data set regardless of where the data is stored.
For example, if data is stored in a database, a valid data set can contain the entire database or a subset of the database as a result of an SQL query. In both cases the data is used as input for the reporting components of Business Central which then displays the information.
To access a data set, you must create and register a data set definition. The data set definition specifies the location of the data set, options to access it, read it, and parse it, and the columns that it contains.
The Data Sets page is visible only to users with the admin role.
54.1. Adding data sets
You can create a data set to fetch data from an external data source and use that data for the reporting components.
Procedure
In Business Central, go to Admin → Data Sets.
The Data Sets page opens.
Click New Data Set and select one of the following provider types:
- Bean: Generates a data set from a Java class
- CSV: Generates a data set from a remote or local CSV file
- SQL: Generates a data set from an ANSI-SQL compliant database
- Elastic Search: Generates a data set from Elastic Search nodes
- Prometheus: Generates a data set using the Prometheus query
Execution Server: Generates a data set using the custom query feature of an Execution Server
NoteYou must configure KIE Server for Execution Server option.
Complete the Data Set Creation Wizard and click Test.
NoteThe configuration steps differ based on the provider you choose.
- Click Save.
54.2. Editing data sets
You can edit existing data sets to ensure that the data fetched to the reporting components is up-to-date.
Procedure
In Business Central, go to Admin → Data Sets.
The Data Set Explorer page opens.
- In the Data Set Explorer pane, search for the data set you want to edit, select the data set, and click Edit.
In the Data Set Editor pane, use the appropriate tab to edit the data as required. The tabs differ based on the data set provider type you chose.
For example, the following changes are applicable for editing a CSV data provider:
- CSV Configuration: Enables you to change the name of the data set definition, the source file, the separator, and other properties.
Preview: Enables you to preview the data. After you click Test in the CSV Configuration tab, the system executes the data set lookup call and if the data is available, a preview appears. Note that the Preview tab has two sub-tabs:
- Data columns: Enables you to specify what columns are part of your data set definition.
- Filter: Enables you to add a new filter.
Advanced: Enables you to manage the following configurations:
- Caching: See Caching for more information.
- Cache life-cycle Enables you to specify an interval of time after which a data set (or data) is refreshed. The Refresh on stale data feature refreshes the cached data when the back-end data changes.
- After making the required changes, click Validate.
- Click Save.
54.3. Data refresh
The data refresh feature enables you to specify an interval of time after which a data set (or data) is refreshed. You can access the Data refresh every feature on the Advanced tab of the data set. The Refresh on stale data feature refreshes the cached data when the back-end data changes.
54.4. Caching data
Business Central provides caching mechanisms for storing data sets and performing data operations using in-memory data. Caching data reduces network traffic, remote system payload, and processing time. To avoid performance issues, configure the cache settings in Business Central.
For any data lookup call that results in a data set, the caching method determines where the data lookup call is executed and where the resulting data set is stored. An example of a data lookup call would be all the mortgage applications whose locale parameter is set as "Urban".
Business Central data set functionality provides two cache levels:
- Client level
- Back-end level
You can set the Client Cache and Backend Cache settings on the Advanced tab of the data set.
Client cache
When the cache is turned on, the data set is cached in a web browser during the lookup operation and further lookup operations do not perform requests to the back-end. Data set operations like grouping, aggregations, filtering, and sorting are processed in the web browser. Enable client caching only if the data set size is small, for example, for data sets with less than 10 MB of data. For large data sets, browser issues such as slow performance or intermittent freezing can occur. Client caching reduces the number of back-end requests including requests to the storage system.
Back-end cache
When the cache is enabled, the decision engine caches the data set. This reduces the number of back-end requests to the remote storage system. All data set operations are performed in the decision engine using in-memory data. Enable back-end caching only if the data set size is not updated frequently and it can be stored and processed in memory. Using back-end caching is also useful in cases with low latency connectivity issues with the remote storage.
Back-end cache settings are not always visible in the Advanced tab of the Data Set Editor because Java and CSV data providers rely on back-end caching (data set must be in the memory) in order to resolve any data lookup operation using the in-memory decision engine.
Chapter 55. Page authoring
Pages, also known as perspectives, are collections of following components:
- Core components
- Navigational components
- Reporting components
Also, a page can have none or any number of components. The Page Editor tool is used to edit the pages.
A page has either the Fluid style or the Page style. The Fluid style is a classical web page with a vertical scroll bar, when the page exceeds the available height. The Page style is a web page that will always fit to the windows height.
55.1. Creating pages
You can use the Pages perspective to create a page that consists of different types of components. After a page has been created and all the components in it defined, use the Page Editor to save, delete, rename, or copy pages as required.
The following procedure describes how to create a page and add the required components to it:
Procedure
- In Business Central, go to Menu → Design → Pages.
- In the Pages panel, click New. Alternatively, click New Page on the Page Editor pane.
- In the New Page dialog box, enter a value in the Name field and select the required style.
- Click Ok. The new page opens in the Page Editor.
- In the Components pane, expand the components and drag the required component types to the editor canvass.
- After placing the components on the page, edit its properties from the Properties pane.
- Click Save and then click Save again.
55.2. Saving, deleting, renaming, or copying pages
After you have created and defined a page, use the Page Editor to save, delete, rename, or copy pages as required.
Procedure
- In Business Central, go to Menu → Design → Pages.
- Select a page from the Pages panel. The page opens in the Page Editor.
- Perform the desired operation and select Save, Delete, Rename, or Copy from the upper right corner of the Page Editor.
Figure 55.1. Save, delete, rename, or copy pages

55.3. Navigation tree
The Workbench navigation tree contains the entries that are displayed in Business Central’s Main menu. Changes to this navigation tree structure will be reflected in the Main menu on the Home page. Such mechanism can be used, for example, to publish new pages.
Also, additional navigation trees can be created. These custom trees can be used to configure the navigation components within a page. You cannot delete the Workbench tree from the Navigation panel but you can edit the Workbench tree hierarchy to suit your requirements. This feature helps users customize the Main menu of Business Central with new pages.
The Workbench tree, which appears by default in the Navigation panel, is the main Menu of Business Central.
55.4. Components
A page contains different types of components. You can use the following component types in a page:
- Core components: Used to specify custom HTML information or display existing pages. There are two types of core components.
Table 55.1. Core component sub-types
| Core component sub-types | Description |
|---|---|
| HTML | This component opens an HTML editor widget. This can be used to create HTML pages using text, images, tables, links, colors, and so on. You can customize the page as per your requirements. |
| Page | This component allows you to add previously created pages to a new dashboard. You can use this component to nest custom pages you have already created in your dashboard. |
Core components are not mandatory.
- Navigation components: Used for navigating between pages. There are six types of navigation components.
Table 55.2. Navigation component sub-types
| Navigation component sub-types | Description |
|---|---|
| Target Div | This component is used by the Tab list, Menu bar, and the Tree navigator components to display their entries and keep track of the last item clicked. |
| Menu Bar | This component displays the entries of a navigation tree in the form of a menu bar. There is no limit to the number of levels supported by Business Central. |
| Tile Navigator | This component displays the navigation group in the form of tiles. Groups are displayed as folders but for single entries, its content is displayed instead when selected. |
| Tree | This component displays the entries in a vertical tree structure format. |
| Carousel | This component displays or cycles through the selected pages like a carousel or a slide show. |
| Tab List | This component displays selected menu pages as tabs at the top of the component. |
The target div setting is not needed for non-target div components such as Carousel or Tile navigator.
Reporting components: Used for displaying data from data sets (see Data sets authoring section) in the form of graphs, tables, maps, and so on. There are ten types of reporting components. The reporting components can be configured using the New Displayer widget, which has the following three tabs:
- Type: Choose how to display custom data graphically.
- Data: Choose a data set from the list of custom data sets that you had created from the Data Sets section available in the Settings menu.
- Display: Edit and customize how the content is displayed by adding titles, changing colors, size, and so on.
55.4.1. Placing components on the page editor to create a page
To create pages, you must drag the components to the Editor canvas of the Pages perspective. After placing all of the required components on the page, click Save.
55.4.2. Using the Preview tab to preview pages
While creating or editing pages, click the Preview tab on the Page Editor to preview a page before saving it.
55.4.3. Component properties
The components used in a page have different properties associated with them. The Properties panel enables you to customize a component by editing the following properties:
- Panel properties: Used to customize component panel properties such as Width, Height, and Background Color.
- Margin properties: Used to customize component margin properties such as Top, Bottom, Left, and Right.
- Padding properties: Used to customize component padding properties such as Top, Bottom, Left, and Right.
HTML components also have additional text properties to customize component Alignment, Decoration, Color, Size, and Weight properties.
55.5. Heatmap components
In Business Central, you can add heatmap components to a page. Heatmap components are used to display heat information over a process diagram. The color on the process diagram nodes is related to the value you assign to each node and based on the assigned value, the color varies on a process diagram. If the assigned value is maximum, the heat intensifies and if a minimum value is assigned, then heat is not displayed on the process diagram.
You can export the heatmap components to Dashbuilder Runtime and retrieve the heat information from a KIE Server dataset. You can also create, edit, and build a dashboard using a heatmap component.
55.5.1. Creating heatmap components for a process
You can create heatmap components for a specific process in Business Central.
Prerequisites
- KIE Server is deployed and connected to Business Central.
-
You have set the
dashbuilder.components.enablesystem property totruein thestandalone.xmlfile. - You have created a project with at least one business process asset in Business Central.
- A project with a process definition has been deployed in Business Central.
- Sample process instances are created.
Procedure
Create a new KIE Server dataset using the following steps:
In Business Central, go to Admin → Data Sets.
The Data Set Explorer page opens.
Click New Data Set and select the Execution Server provider type.
The Data Set Creation Wizard page opens.
- Enter the name of the dataset.
- Select the server configuration. The server configuration is available if the project is deployed.
- Select CUSTOM query target from the list.
In the Query field, enter the following custom SQL query.
select pil.externalId, pil.processId, nid, nodetype, nodename, count(nid) as total_hits, avg(execution_time) as averageExecutionTime, min(execution_time) as minExecutionTime, max(execution_time) as maxExecutionTime from( select max(log_date) as lastLog, processinstanceid as piid, nodeinstanceid as niid, nodeid as nid, nodetype, nodename, DATEDIFF(SECOND, min(log_date), max(log_date)) as execution_time from NodeInstanceLog group by processinstanceid, nodeinstanceid, nid order by lastLog ) inner join ProcessInstanceLog pil on pil.processInstanceId = piid group by pil.externalId, nid, nodename- Complete the Data Set Creation Wizard and click Test.
- Click Save.
- In Business Central, go to Menu → Design → Pages.
- In the Pages panel, click New.
- In the New Page dialog box, enter a value in the Name field and select the required style.
Click OK.
The new page opens in the Page Editor and you can see that the Heatmaps component is available under the Components panel.
- In the Components panel, expand the Heatmaps components and drag the Process Heatmap component type to the Page Editor.
- In the Displayer editor wizard, click Data tab and select the newly created KIE Server dataset.
- In the Data tab, select NID and AVERAGEEXECUTIONTIME from the Columns field.
Click the Component Editor tab and enter the values for the mandatory fields including Server Template, Container ID, and Process Definition ID into the Component Properties field.
NoteTo access the value of Server Template, go to Deploy → Execution Servers → Server Configurations. For the value of Container ID, go to Manage → Process Instances, you can click on the process instance you want to use and in the, Deployment corresponds to the Container ID and the Definition ID is the Process Definition ID.
- Click the Display tab and edit the value of Chart, Margins, Filter, Refresh, and Columns as per your requirements.
Click +OK.
Figure 55.2. Example process heatmap components

You can see the heat information on the process diagram.
55.5.2. Creating heatmap components for multiple processes
You can create heatmap components for multiple processes in Business Central.
Prerequisites
- KIE Server is deployed and connected to Business Central.
-
You have set the
dashbuilder.components.enablesystem property totruein thestandalone.xmlfile. - You have created multiple projects in Business Central and it contains at least one business process asset.
- A project with a process definition has been deployed in Business Central.
- Sample process instances are created.
Procedure
Create a new KIE Server dataset using the following steps:
In Business Central, go to Admin → Data Sets.
The Data Set Explorer page opens.
Click New Data Set and select the Execution Server provider type.
The Data Set Creation Wizard page opens.
- Enter the name of the dataset.
- Select the server configuration. The server configuration is available if the project is deployed.
- Select CUSTOM query target from the list.
In the Query field, enter the following custom SQL query.
select pil.externalId, pil.processId, nid, nodetype, nodename, count(nid) as total_hits, avg(execution_time) as averageExecutionTime, min(execution_time) as minExecutionTime, max(execution_time) as maxExecutionTime from( select max(log_date) as lastLog, processinstanceid as piid, nodeinstanceid as niid, nodeid as nid, nodetype, nodename, DATEDIFF(SECOND, min(log_date), max(log_date)) as execution_time from NodeInstanceLog group by processinstanceid, nodeinstanceid, nid order by lastLog ) inner join ProcessInstanceLog pil on pil.processInstanceId = piid group by pil.externalId, nid, nodename- Complete the Data Set Creation Wizard and click Test.
- Click Save.
- In Business Central, go to Menu → Design → Pages.
- In the Pages panel, click New.
- In the New Page dialog box, enter a value in the Name field and select the required style.
Click OK.
The new page opens in the Page Editor and you can see that the Heatmaps component is available under the Components panel.
- In the Components panel, expand the Heatmaps components and drag the All Processes Heatmaps component type to the canvas.
- In the Displayer editor wizard, click Data tab and select the newly created KIE Server dataset.
- In the Data tab, select EXTERNALID, PROCESSID, NID, and AVERAGEEXECUTIONTIME from the Columns field.
- In the Process Selector box, select the Container and Process values as per your requirement.
Click the Component Editor tab and enter the value in the Server Template (mandatory) field.
NoteTo access the value of Server Template, go to Deploy → Execution Servers → Server Configurations.
- Click the Display tab and edit the value of Chart, Margins, Filter, Refresh, and Columns as per your requirements.
Click +OK.
Figure 55.3. Example multiple processes heatmap components

You can see the heat information on the process diagram.
55.5.3. Executing a heatmap component
You can execute the internal heatmap components locally, outside of Business Central for testing purpose only. The same API is used to create external components, which you can use to build your own components. For more information about external components, see Section 55.6, “External components”
To run the specific heatmap component, complete the following steps:
Prerequisites
- You have installed npm on your system. For more information about installing npm, see Downloading and installing Node.js and npm.
- You have installed Yarn on your system. For more information about installing Yarn, See Yarn Installation.
- You have cloned the Appformer repository to run the components outside of Business Central.
Procedure
-
Go to the
appformer/dashbuilder/dashbuilder-shared/dashbuilder-jsdirectory. Open the terminal in the
dashbuilder-jsdirectory and enter the following command:yarn run init && yarn run build:fast
You can see the following components are present in the
dashbuilder-js/packagesdirectory:- processes-heatmaps-component
- process-heatmap-component
- logo-component
- heatmap-component
Go to the
dashbuilder-js/packagesdirectory, open the desired heatmap component and enter the following command in the terminal:yarn run start
To access the component, enter http://localhost:9001/ in a web browser.
The selected component is displayed on the web browser.
55.6. External components
In Business Central, you can add external components to a page. The components are disabled by default. To enable the external components, change the value of dashbuilder.components.enable system property to true.
The external component location is set and configured with the dashbuilder.components.dir system property. The default value of this system property is /tmp/dashbuilder/components. You must set the component under the components directory with a parent directory, which is used as the component ID. For example, if the component ID is mycomp and the component directory is /tmp/dashbuilder/components, then the component base directory is /tmp/dashbuilder/components/mycomp.
Business Central checks the manifest.json file in the components directory. The manifest.json must contain at least one name text parameter.
Table 55.3. manifest.json file descriptions
| Parameter | Description |
|---|---|
|
| Name of the component displayed under Components section. |
|
| Icon of the component displayed under Components section. |
|
| A flag that indicates that the component does not require a data set. |
|
|
The list of parameters are using |
Sample manifest.json file
{
    "name": "Heat Map Experiment",
    "icon": "fa fa-bell-o",
    "parameters": [
        {
            "name": "svg",
            "type": "text",
            "defaultValue": "",
            "label": "SVG XML",
            "category": "SVG Content"
            "mandatory": true
        },
        {
            "name": "svgUrl",
            "type": "text",
            "defaultValue": "",
            "label": "SVG URL",
            "category": "SVG URL"
            "mandatory": true
        }
        ,
        {
            "name": "ksProcessId",
            "type": "text",
            "defaultValue": "",
            "label": "Process ID",
            "category": "Kie Server"
            "mandatory": true
        }
    ]
}
55.6.1. Creating external components
The following procedure describes how to create and add the external components to a page:
Procedure
Set the component under components directory with a parent directory.
For example, if the component ID is
mycompand the component directory is/tmp/dashbuilder/components, then the component base directory is/tmp/dashbuilder/components/mycomp.-
Create the
manifest.jsonfile in the component directory. -
Create
index.htmlfile with HTML content. -
In a terminal application, navigate to
EAP_HOME/bin. To enable the external components, set the value of
dashbuilder.components.enablesystem property totrue:$ ~/EAP_HOME/bin/standalone.sh -c standalone-full.xml -Ddashbuilder.components.dir={component directory base path} -Ddashbuilder.components.enable=trueStart Business Central, go to Menu → Design → Pages.
External Components is available under Components pane.
- In the Components pane, expand the External Components and drag the required component types to the canvas.
- Click Save.
Chapter 56. Security management
Security management is the process of managing users, groups, and permissions. You can control access to Business Central resources and features from the Business Central Security management page.
Business Central defines three types of entities for security management: users, groups, and roles. You can assign permissions to both roles and groups. A user inherits permissions from the groups and roles that the user is a member of.
56.1. Security management providers
In the context of security management, a realm restricts access to different application resources. Realms contain information about users, groups, roles, and permissions. A concrete user and group management service implementation for a specific realm is called a security management provider.
If the built-in security management providers do not meet the requirements of your application security realm, then you can build and register your own security management provider.
If the security management provider is not installed, the user interface for managing the security realm is not available. After you install and configure a security management provider, the user and group management features are automatically enabled in the security management user interface.
Business Central includes the Red Hat JBoss EAP security management provider which supports realm types based on the contents of the application-users.properties or application-roles.properties property file.
56.1.1. Configuring the Red Hat JBoss EAP security management provider based on property files
You can build and register your own Red Hat JBoss EAP security management provider. To use the Red Hat JBoss EAP security management provider based on property files, complete the steps in this procedure.
Prerequisites
- Red Hat JBoss EAP is installed.
Procedure
To use an existing users or roles property file from the Red Hat JBoss EAP instance, include the following system properties in the
EAP_HOME/standalone/configuration/application-users.propertiesandEAP_HOME/standalone/configuration/application-roles.propertiesfiles, as shown in the following example:<property name="org.uberfire.ext.security.management.wildfly.properties.realm" value="ApplicationRealm"/> <property name="org.uberfire.ext.security.management.wildfly.properties.users-file-path" value="/standalone/configuration/application-users.properties"/> <property name="org.uberfire.ext.security.management.wildfly.properties.groups-file-path" value="/standalone/configuration/application-roles.properties"/>
The following table provides a description and default value for these properties:
Table 56.1. Red Hat JBoss EAP security management provider based on property files
Property Description Default value org.uberfire.ext.security.management.wildfly.properties.realmThe name of the realm. This property is not mandatory.
ApplicationRealmorg.uberfire.ext.security.management.wildfly.properties.users-file-pathThe absolute file path for the users property file. This property is mandatory.
./standalone/configuration/application-users.propertiesorg.uberfire.ext.security.management.wildfly.properties.groups-file-pathThe absolute file path for the groups property file. This property is mandatory.
./standalone/configuration/application-roles.propertiesCreate the
security-management.propertiesfile in the root directory of your application. For example, create the following file:src/main/resources/security-management.properties
Enter the following system property and security provider name as a value in the
security-management.propertiesfile:<property name="org.uberfire.ext.security.management.api.userManagementServices" value="WildflyUserManagementService"/>
56.1.2. Configuring the Red Hat JBoss EAP security management provider based on property files and CLI mode
To use the Red Hat JBoss EAP security management provider based on property files and CLI mode, complete the steps in this procedure.
Prerequisites
- Red Hat JBoss EAP is installed.
Procedure
To use an existing users or roles property file from the Red Hat JBoss EAP instance, include the following system properties in the
EAP_HOME/standalone/configuration/application-users.propertiesandEAP_HOME/standalone/configuration/application-roles.propertiesfiles, as shown in the following example:<property name="org.uberfire.ext.security.management.wildfly.cli.host" value="localhost"/> <property name="org.uberfire.ext.security.management.wildfly.cli.port" value="9990"/> <property name="org.uberfire.ext.security.management.wildfly.cli.user" value="<USERNAME>"/> <property name="org.uberfire.ext.security.management.wildfly.cli.password" value="<USER_PWD>"/> <property name="org.uberfire.ext.security.management.wildfly.cli.realm" value="ApplicationRealm"/>
The following table provides a description and default value for these properties:
Table 56.2. Red Hat JBoss EAP security management provider based on property files and CLI mode
Property Description Default value org.uberfire.ext.security.management.wildfly.cli.hostThe native administration interface host.
localhostorg.uberfire.ext.security.management.wildfly.cli.portThe native administration interface port.
9990org.uberfire.ext.security.management.wildfly.cli.userThe native administration interface username.
NA
org.uberfire.ext.security.management.wildfly.cli.passwordThe native administration interface user’s password.
NA
org.uberfire.ext.security.management.wildfly.cli.realmThe realm used by the application’s security context.
ApplicationRealmCreate the
security-management.propertiesfile in the root directory of your application. For example, create the following file:src/main/resources/security-management.properties
Enter the following system property and security provider name as a value in the
security-management.propertiesfile:<property name="org.uberfire.ext.security.management.api.userManagementServices" value="WildflyCLIUserManagementService"/>
56.2. Permissions and settings
A permission is an authorization granted to a user to perform actions related to a specific resource within the application. For example, a user can have following permissions:
- View a page.
- Save the project.
- View a repository.
- Delete a dashboard.
You can grant or deny a permission and a permission can be global or resource specific. You can use permissions to protect access to resources and customize features within the application.
56.2.1. Changing permissions for groups and roles in Business Central
In Business Central, you cannot change permissions for an individual user. However, you can change permissions for groups and roles. The changed permissions apply to users with the role or that belong to a group that you changed.
Any changes that you make to roles or groups affect all of the users associated with that role or group.
Prerequisites
-
You are logged in to Business Central with the
adminuser role.
Procedure
- To access the Security management page in Business Central, select the Admin icon in the top-right corner of the screen.
Click Roles, Groups, or Users on the Business Central Settings page.
The Security management page opens on the tab for the icon that you clicked.
- From the list, click the role or group you want to edit. All details are displayed in the right panel.
- Set the Home Page or Priority under the Settings section.
Set the Business Central, page, editor, space, and project permissions under the Permissions section.
Figure 56.1. Setting the permissions
- Click the arrow next to a resource type to expand the resource type whose permissions you want to change.
Optional: To add an exception for a resource type, click Add Exception and then set the permissions as required.
NoteYou cannot add an exception to the Business Central resource type.
- Click Save.
56.2.2. Changing the Business Central home page
The home page is the page that appears after you log in to Business Central. By default, the home page is set to Home. You can specify a different home page for each role and group.
Procedure
- In Business Central, select the Admin icon in the top-right corner of the screen and select Roles or Groups.
- Select a role or group.
- Select a page from the Home Page list.
Click Save.
NoteThe role or group must have read access to a page before you can make it the home page.
56.2.3. Setting priorities
A user can have multiple roles and belong to multiple groups. The Priority setting determines the order of precedence of a role or group.
Prerequisites
-
You are logged in to Business Central with the
adminuser role.
Procedure
- In Business Central, select the Admin icon in the top-right corner of the screen and select Roles or Groups.
- Select a role or group.
- Select a priority from the Priority menu, and then click Save.
If a user has a role or belongs to a group that has conflicting settings, the settings of the role or group with the highest priority applies.
Chapter 57. Creating a custom dashboard widget
In order to create custom dashboards, users must combine some of the features of the Business Central (like data sets, pages, navigation trees, and permissions) together and publish them. Dashboards are pages containing at least one reporting component.
There are four stages in the creation of a custom dashboard:
- Data set authoring - In this stage, you define a data set for accessing the data and displaying it through the pages. For more information, see Adding data sets.
- Page authoring - In this stage, you create the pages which are used to display the data from the data sets, among other things. For more information, see Creating pages.
- Publication - In this stage, navigation between pages are defined when you create the custom navigation trees or modify the existing default one (Workbench tree). For more information, see Creating a navigation tree or Editing a navigation tree.
- Security management - In this stage, role and group permissions are set which defines the privileges that are granted to a user when the user is working on Business Central. For more information, see Security management.
You will have to follow the stages listed above if you plan on migrating your dashboards from previous versions of Business Central to the latest one. Note that there is no automatic migration path or tooling to assist you in that regard. You must recreate all your dashboards from scratch.
Appendix A. Versioning information
Documentation last updated on Tuesday, March 8, 2022.
Appendix B. Contact information
Red Hat Process Automation Manager documentation team: brms-docs@redhat.com