
Red Hat Training
A Red Hat training course is available for Red Hat Process Automation Manager
Getting started with business processes
Abstract
Preface
As a citizen developer who wants to build rule-based solutions quickly, you can use Business Central in Red Hat Process Automation Manager to design a variety of business processes. A business process is a graph that describes the order in which a series of steps must be executed using a flow chart. A process consists of a collection of predefined node types that are linked to each other using connections. Each of the nodes represents one step in the overall process while the connections specify how to transition from one node to the other.
Prerequisites
- Red Hat JBoss Enterprise Application Platform 7.1.0 is installed. For installation information, see the Red Hat JBoss EAP 7.1.0 Installation Guide.
- Red Hat Process Automation Manager is installed and configured with Process Server. For more information, see Installing and configuring Red Hat Process Automation Manager on Red Hat JBoss EAP 7.1.
-
Red Hat Process Automation Manager is running and you can log in to Business Central with the
developerrole. For more information, see Planning a Red Hat Process Automation Manager installation.
Chapter 1. Overview
Red Hat Process Automation Manager enables you to automate your business processes and decisions. For example, a bank offers a housing mortgage loan service. When a customer wants to buy a new property using credit, they contact a broker at the bank who assists in filing for a mortgage loan. The broker collects information about the property and the customer, such as the salary of the customer, social security number, the property sale price, and the requested loan amount. The broker then submits a request on behalf of the customer.
Using Red Hat Process Automation Manager, the housing mortgage department of the bank creates a complete business process for the mortgage loan. Whenever a customer submits a request, a new process instance is created. This ensures consistency in the quality of evaluating each request, provides complete visibility into the status of each request, and makes the process efficient and effective.
Chapter 2. Migrating business processes from new to legacy process designer
You can migrate a business process from the new process designer in Business Central to the legacy process designer. By default, all business processes open in the new process designer. But once you migrate a business process, it will always open in the legacy designer.
Migrating business processes is an irreversible process.
Procedure
- Log in to Business Central and go to Menu → Projects.
- From Assets tab, select the business process. It will open in the new process designer.
- Click Migrate and a warning will appear.
Click Migrate Diagram.
The process designer will restart and the business process will re-open in the legacy process designer.
Migrating a business process will result in two changes:
The name of the business process in the process designer will change, for example,
- Name in new process designer: business-process-name.bpmn - Business Processes
- Name in legacy process designer: business-process-name.bpmn2 - Business Processes (legacy)
- The extension of the business process will change from *.bpmn to *.bpmn2.
Chapter 3. Opening the Mortgage Process sample project
The Mortgage Process sample project consists of predefined data objects, guided decision tables, guided rules, forms, and a business process. Using the sample project provides a quick way to get acclimated with Red Hat Process Automation Manager. In a real business scenario, you would create all of the assets by providing data that is specific to your business requirements.
The business process application example includes features that are Technology Preview only. Technology Preview features are not supported with Red Hat production service level agreements (SLAs), might not be functionally complete, and are not recommended for production. These features provide early access to upcoming product features, enabling customers to test functionality and provide feedback during the development process. For more information about Red Hat Technology Preview support, see Technology Preview Features Support Scope.
Procedure
Navigate to the Mortgage Process sample project to view the predefined assets.
- Log in to Business Central and click Menu → Design → Projects.
-
Click
 in the upper-right corner of the screen and select Try Samples.
- Select Mortgage Process and click Ok.
The Assets view of the project opens.
Chapter 4. Data objects
Data objects are the building blocks for the rule assets that you create. Data objects are custom data types implemented as Java objects in specified packages of your project. For example, you might create a Person object with data fields Name, Address, and DateOfBirth to specify personal details for loan application rules. These custom data types determine what data your assets and your decision services are based on.
For more information about creating data objects, see "Creating data objects" in Designing a decision service using guided decision tables.
4.1. Viewing the Mortgage Process data objects
This tutorial utilizes the predefined data objects in the Mortgage Process sample project.
The Mortgage Process data model is composed of four data objects:
-
Applicant -
Bankruptcy -
IncomeSource -
LoanApplication
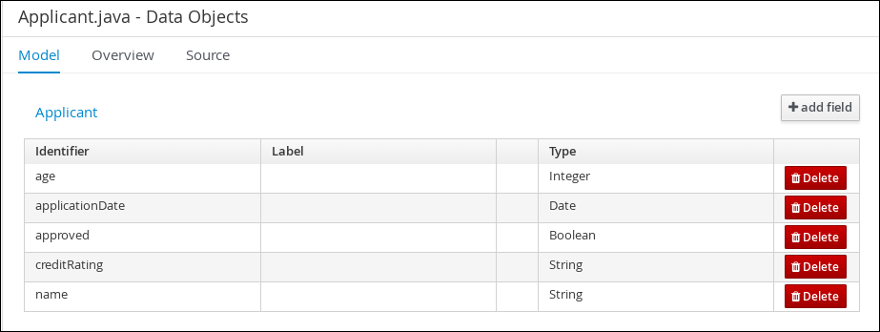
4.1.1. Viewing the Applicant data object
Follow these steps to familiarize yourself with the predefined Applicant data object.
Procedure
- Click Menu → Design → Projects, then click Mortgage Process.
-
Input
Applicant.javain to the project’s asset search box and click the Applicant data object. Review the Applicant data object fields.
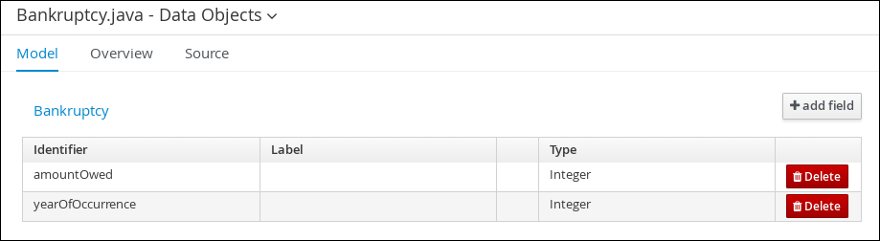
4.1.2. Viewing the Bankruptcy data object
Follow these steps to familiarize yourself with the predefined Bankruptcy data object.
Procedure
- Click Menu → Design → Projects, then click Mortgage Process.
-
Input
Bankruptcy.javain to the project’s asset search box and click the Bankruptcy data object. Review the Bankruptcy data object fields.
4.1.3. Viewing the IncomeSource data object
Follow these steps to familiarize yourself with the predefined IncomeSource data object.
Procedure
- Click Menu → Design → Projects, then click Mortgage Process.
-
Input
IncomeSource.javain to the project’s asset search box and click the IncomeSource data object. Review the IncomeSource data object fields.

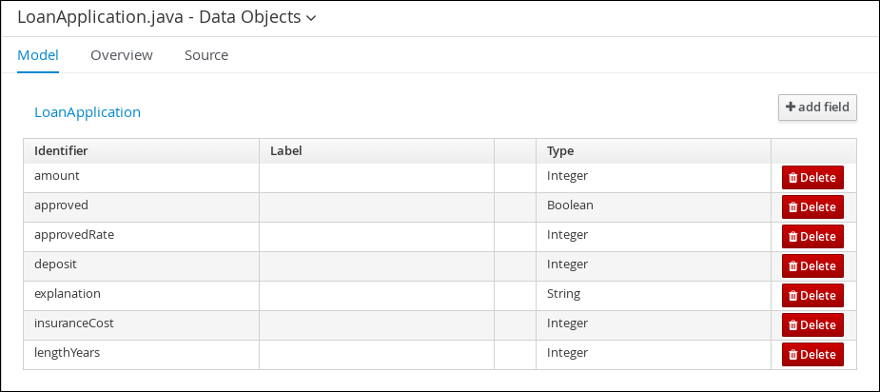
4.1.4. Viewing the LoanApplication data object
Follow these steps to familiarize yourself with the predefined LoanApplication data object.
Procedure
- Click Menu → Design → Projects, then click Mortgage Process.
-
Input
LoanApplication.javain to the project’s asset search box and click the LoanApplication data object. Review the LoanApplication data object fields.
Chapter 5. Creating the MortgageApprovalProcess business process
A business process is a graph that describes the order in which a series of steps must be executed using a flow chart. A business process consists of a collection of nodes that are linked to each other using connections. Each of the nodes represents one step in the overall process while the connections specify how to transition from one node to the other.
The Mortgage Process sample project contains a predefined MortgageApprovalProcess business process. For this tutorial, you will delete the existing MortgageApprovalProcess business process and recreate it to gain a better understanding of creating a business process.
5.1. Delete the existing business process
Procedure
You must delete the sample business process before you can create your own.
Procedure
- Log in to Business Central and click Menu → Design → Projects, then click Mortgage Process.
-
Input
MortgageApprovalProcess.bpmnin to the project’s asset search box and click on the MortgageApprovalProcess business process. - Select Delete from the toolbar, then click Delete to confirm that you want to delete this asset.
5.1.1. Validating the mortgage
The mortgage validation business process determines whether or not the new application contains the required data before proceeding. If all of the specified data requirements are met, the application will move on to the mortgage calculation business process.
Procedure
- Log in to Business Central and click Menu → Design → Projects, then click Mortgage Process.
- Click Add Asset → Business Process.
Enter the following values:
-
Business Process:
MortgageApprovalProcess -
Package: Select
com.myspace.mortgage_app
-
Business Process:
- Click Ok. The diagram editor opens.
-
In the upper-right corner, click the Diagram properties
 icon.
icon.
-
Scroll down and expand Process Data and click
 in the Process Variables section.
Enter the following values:
-
Name:
application. -
Data Type:
Application [com.myspace.mortgage_app]
-
Name:
- Click Save, then Save, to confirm your changes.
5.1.2. Creating outgoing connections
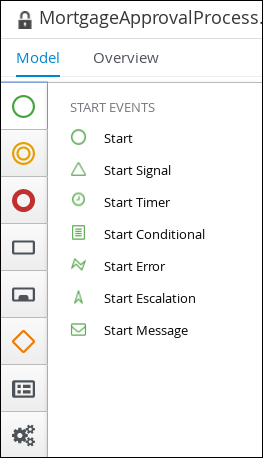
This section describes how to create an outgoing connection from the start event to an exclusive gateway and then from the exclusive gateway to the business rule task. Exclusive gateways are used to make decisions and react to events based on the available data. A business rule task represents a set of rules that must be evaluated.
Red Hat Process Automation Manager contains a predefined selection of node types to simplify business process creation. The predefined node panel is located on the left side of the diagram editor. Click on the various node icons to reveal the available options as shown here.
Procedure
Click on the start event and create an outgoing connection from the start event to an exclusive gateway.
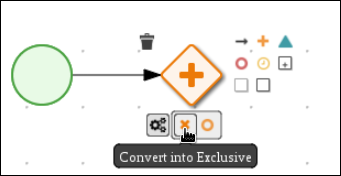
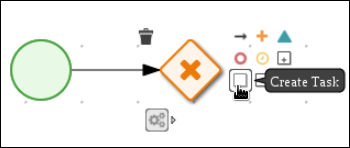
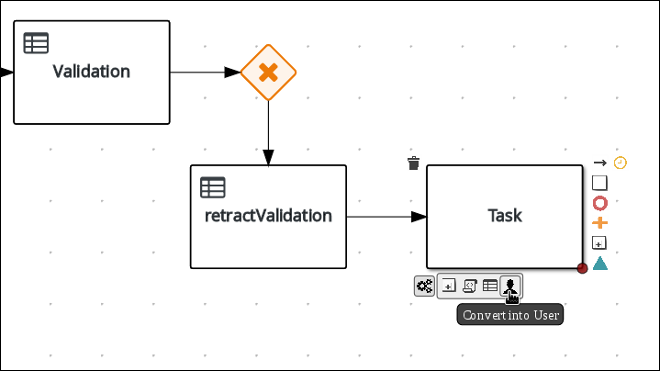
Create an outgoing connection from the exclusive gateway to a task.
Convert the new task to a business rule task.

-
Click on the business rules task and enter
Validationin the Name field of the Diagram properties panel. - Expand Implementation/Execution, select validation in the Rule Flow Group field.
Define the following Java expression in the On Exit Action field :
System.out.println(application.getProperty());
-
Scroll down and expand the Data Assignments section and click
 next to Assignments.
In the Validation Data I/O window, click Add to create the following assignments:
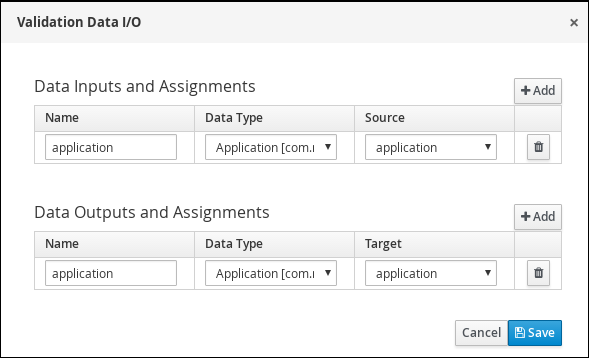
- Click Save.
- In the diagram editor, click Save, then Save, to confirm your changes.
5.1.3. Defining the validation data
This section describes how to define the data that will determine whether the application data is correct or if there is an error or any missing information.
Procedure
Click on the Validation task and create an outgoing connection to an exclusive gateway.
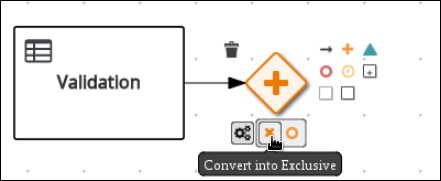
Create an outgoing connection from the exclusive gateway to a new business rule task.

Click the created connection.

-
In the Diagram Properties panel, input
Invalidin the Name field. Expand Implementation/Execution, and enter the following Drools condition expression:
-
Condition Expression:
ValidationErrorDO() -
Condition Expression Language:
drools
-
Condition Expression:
-
Click on the business rule task and enter
Retract Validationin the Name field of the Diagram properties panel. -
Expand Implementation/Execution and enter
errorin the Rule Flow Group field. Create an outgoing connection from the Retract Validation task to a new user task.
-
Click the user task and in the Diagram Properties panel, input
Correct Datain the Name field. Expand Implementation/Execution and enter:
-
Task Name:
CorrectData -
Groups:
broker
-
Task Name:
-
Click
next to Assignments. In the Correct Data Data I/O window, click Add to create the following assignments:
In the Correct Data Data I/O window, click Add to create the following assignments:

- Click Save.
- In the diagram editor, click Save, then Save, to confirm your changes.
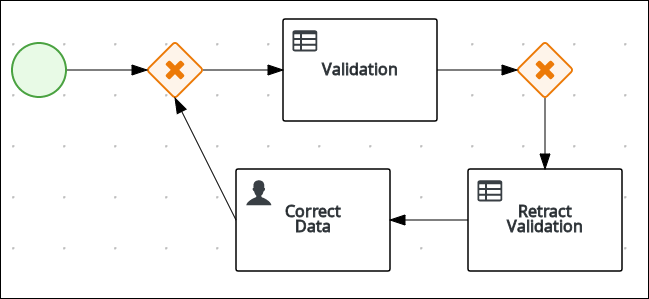
Connect the Correct Data back to the first exclusive gateway. Your workflow should look similar to the following diagram:
5.1.4. Calculating the mortgage
The mortgage calculation business process determines the applicant’s mortgage borrowing limit.
Procedure
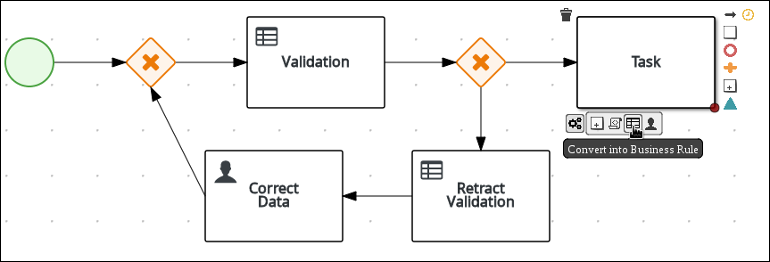
Return to the second exclusive gateway. Create an outgoing connection to a business rule task.
-
Click the created connection and in the Diagram Properties panel, input
Validin the Name field. Expand Implementation/Execution, select and enter:
-
Condition Expression:
not ValidationErrorDO() -
Condition Expression Language:
drools
-
Condition Expression:
-
Click the created business rule task and in the Diagram Properties panel, input
Mortgage Calculationin the Name field. -
Expand Implementation/Execution, select and enter
mortgagecalculationin the Rule Flow Group field. Click
next to Assignments. In the Mortgage Calculation Data I/O window, click Add to create the following assignments:
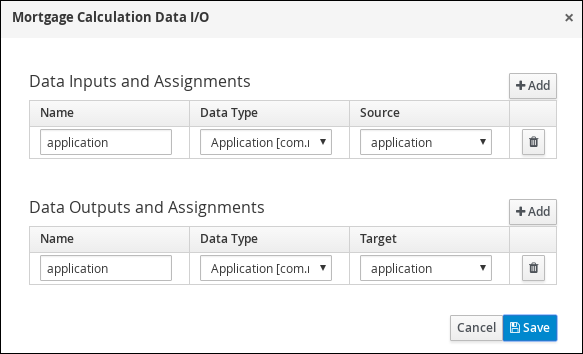
- Click Save.
Click on an empty space on the canvas, scroll down, expand Process Data, and click
next to Process Variables. Enter the following values:
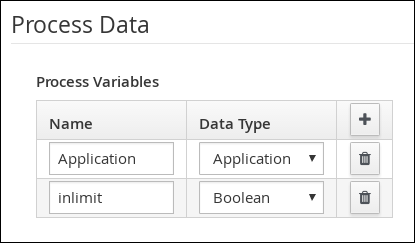
-
Name:
inlimit -
Date Type:
Boolean
-
Name:
Create an outgoing connection from the Mortgage Calculation task to a user task.
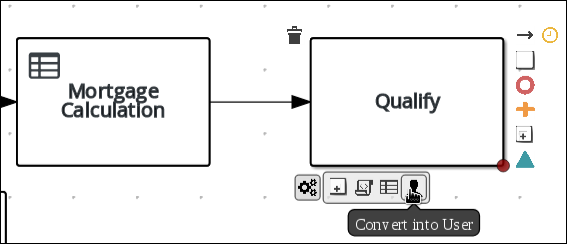
-
Click on the user task and enter
Qualifyin the Name field. Expand Implementation/Execution and enter:
-
Task Name:
Qualify -
Groups:
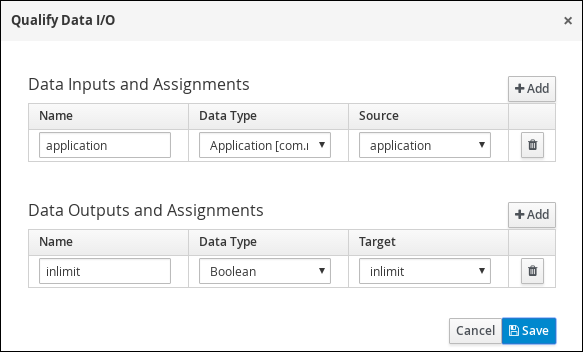
approver Click
next to Assignments. In the Qualify Data I/O window, click Add to create the following assignments:
-
Task Name:
- Click Save. Above the canvas, click Save, then Save, to confirm your changes.
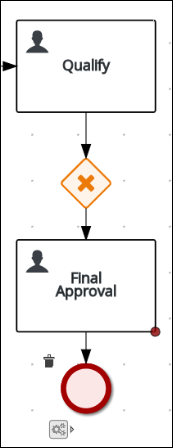
Create an outgoing connection from the Qualify task to an exclusive gateway.
- Click on the GATEWAYS icon in the node panel.
- Click on Exclusive and drag it to the right of the Qualify task.
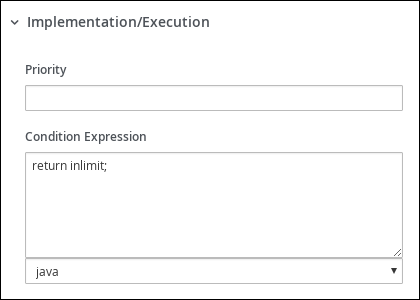
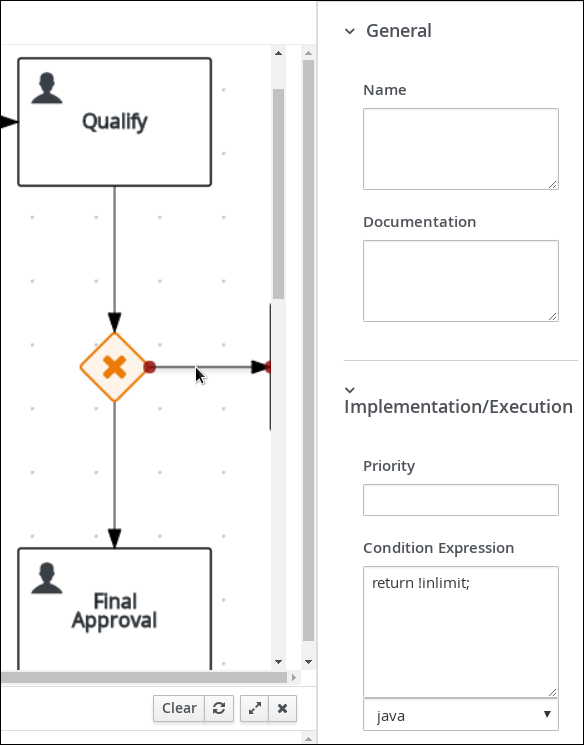
- Create an outgoing connection from the exclusive gateway and connect it to a user task.
Click the connection, name it
in Limitand define the following Java Condition expression:return inlimit;
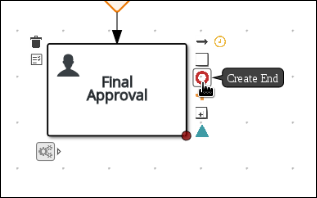
Click the user task and define:
-
Name:
Final Approval -
Task Name:
finalapproval -
Groups:
manager
-
Name:
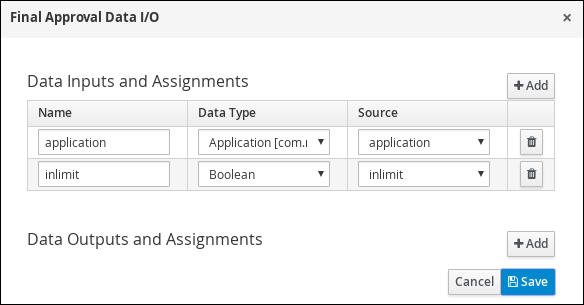
Click
next to Assignments. In the Final Approval Data I/O window, click Add to create the following assignments:
- Click Save. Above the canvas, click Save, then Save, to confirm your changes.
5.1.5. Increasing the down payment
The increasing the down payment business process checks to see if the applicant qualifies for the loan by increasing their down payment. The final result will be either the final loan approval, or loan denial based on the applicant’s inability to increase the down payment.
Procedure
Create an outgoing connection from the Final Approval user task and connect it to an end event.
Return to the exclusive gateway that connects with the Final Approval user task. Create a second outgoing connection and connect it to a new user task.

Click the connection, name it
Not in Limitand define the following Java expression:return !inlimit;
Click on an empty space on the canvas, scroll down, expand Process Data, and click
next to Process Variables. Enter the following values:
-
Name:
incdownpayment Data Type:
Boolean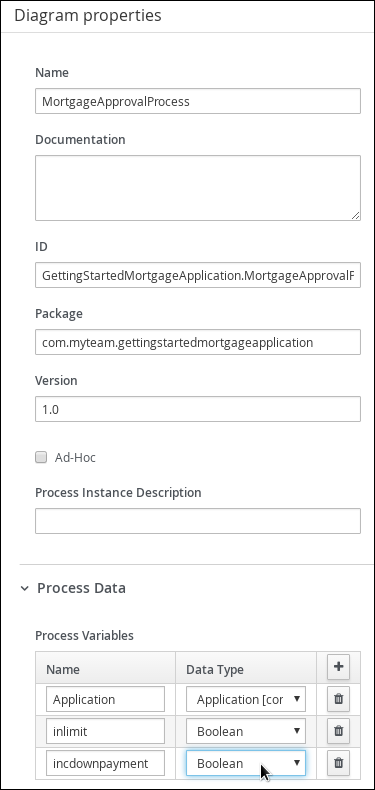
-
Name:
Click the created user task and define:
-
Name:
Increase Down Payment -
Task Name:
incdown -
Groups:
broker Click
next to Assignments. In the Increase Down Payment Data I/O window, click Add to create the following assignments:

-
Name:
- Click Save. Above the canvas, click Save, then Save, to confirm your changes.
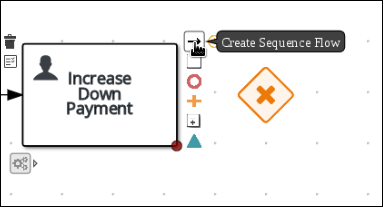
Create an outgoing connection from the Increase Down Payment task to an exclusive gateway.
- Click on the GATEWAYS icon in the node panel.
- Click on Exclusive and drag it to the right of the Increase Down Payment task.
Click on the Create Sequence Flow icon to create a connection to the exclusive gateway.
Create an outgoing connection from the exclusive gateway and connect it to an end event. Then, click the connection, name it
Down payment not increased, and create the following Java expression:return !incdownpayment;
Create an outgoing connection from the exclusive gateway and connect it to the first exclusive gateway. Then, click the connection, name it
Down payment increased, and create the following Java expression:return incdownpayment;
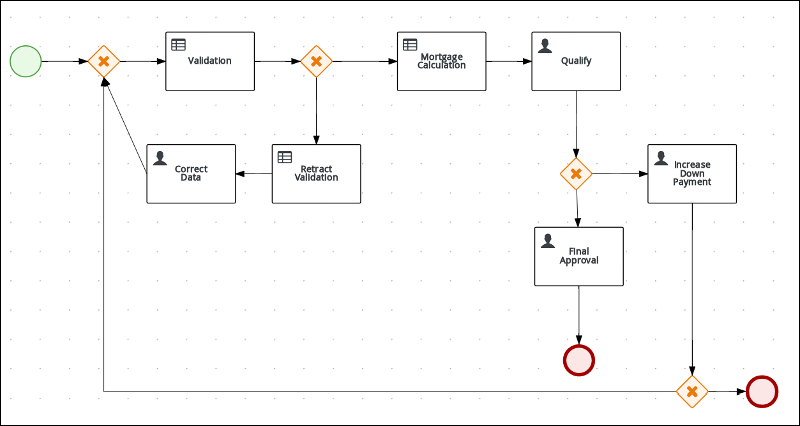
- Above the canvas, click Save, then Save, to confirm your changes.
The final version of the business process:
Chapter 6. Guided rules
Guided rules are business rules that you create in a UI-based guided rules designer in Business Central that leads you through the rule-creation process. The guided rules designer provides fields and options for acceptable input based on the data objects for the rule being defined. The guided rules that you define are compiled into Drools Rule Language (DRL) rules as with all other rule assets.
All data objects related to a guided rule must be in the same project package as the guided rule. Assets in the same package are imported by default. After you create the necessary data objects and the guided rule, you can use the Data Objects tab of the guided rules designer to verify that all required data objects are listed or to import other existing data objects by adding a New item.
6.1. Viewing the Mortgage Process business rules
Follow these steps to familiarize yourself with the predefined business rules for the Mortgage Process project.
Related information
Business rules are defined using the Guided Rule wizard in Red Hat Process Automation Manager. For information about creating guided business rules, see Designing a decision service using guided rules.
6.1.1. Viewing the CreditApproval guided rule
Procedure
- Click Menu → Design → Projects, then click Mortgage Process.
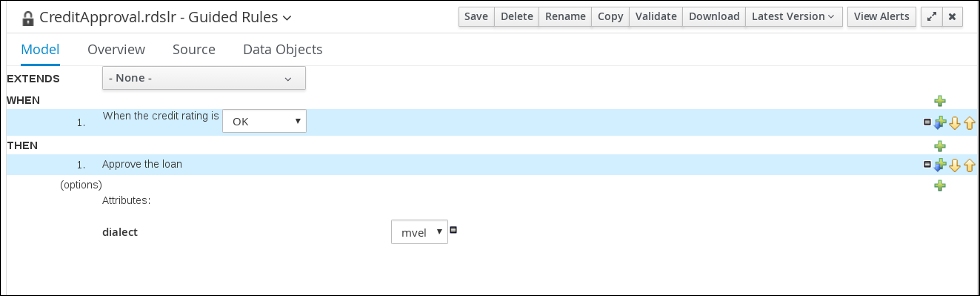
- Click the CreditApproval guided rule.
Review the CreditApproval guided rule’s WHEN and THEN conditions and values.
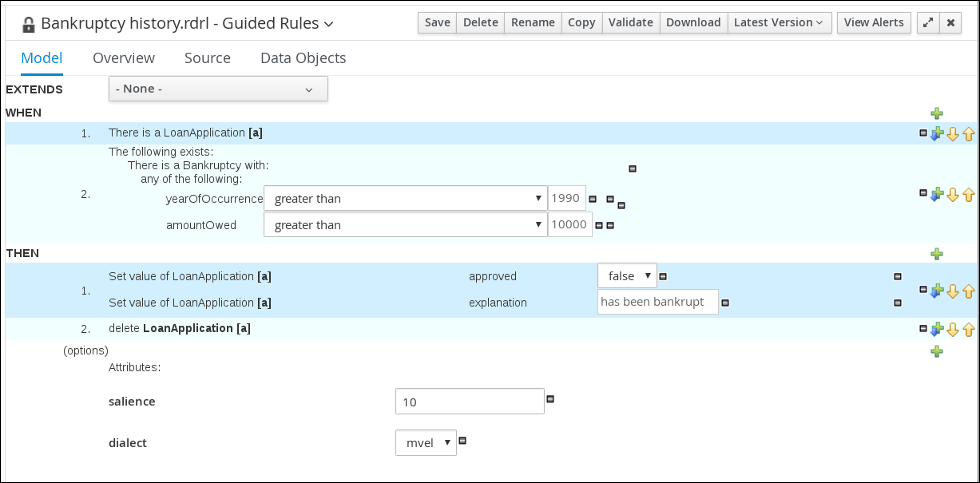
6.1.2. Viewing the Bankruptcy history guided rule
Procedure
- Click Menu → Design → Projects, then click Mortgage Process.
- Click the Bankruptcy history guided rule.
Review the Bankruptcy history guided rule’s WHEN and THEN conditions and values.
6.1.3. Viewing the Underage guided rule
Procedure
- Click Menu → Design → Projects, then click Mortgage Process.
- Click the Underage guided rule.
Review the Underage guided rule’s WHEN and THEN conditions and values.

Chapter 7. Guided decision tables
Guided decision tables are a wizard-led alternative to uploaded decision table spreadsheets for defining business rules in a tabular format. With guided decision tables, you are led by a UI-based wizard in Business Central that helps you define rule attributes, metadata, conditions, and actions based on specified data objects in your project. After you create your guided decision tables, the rules you defined are compiled into Drools Rule Language (DRL) rules as with all other rule assets.
All data objects related to a guided decision table must be in the same project package as the guided decision table. Assets in the same package are imported by default. After you create the necessary data objects and the guided decision table, you can use the Data Objects tab of the guided decision tables designer to verify that all required data objects are listed or to import other existing data objects by adding a New item.
7.1. Viewing the Pricing loans decision table
The goal of this chapter is to introduce you to the Pricing loans decision table. For this tutorial, you will not create and set the decision table conditions. Instead, review the values and the conditions that are already defined in the Mortgage Process sample project’s Pricing loans Guided Decision Tables asset. For information about creating decision tables, see Designing a decision service using guided decision tables.
Prerequisites
The business rules have been defined. For more information, see Section 6.1, “Viewing the Mortgage Process business rules”.
Procedure
- Log in to Business Central and click Menu → Design → Projects, then Mortgage Process.
Scroll down and click the Pricing loans Guided Decision Tables asset.

Chapter 8. Generating and editing forms
The following chapter shows you how to automatically generate forms for collecting user data for your mortgage application business process. We have also included a bit more information about editing forms to familiarize you with Red Hat Process Automation Manager form manipulation.
Prerequisites
The business process model has been completed. For more information, see Chapter 5, Creating the MortgageApprovalProcess business process.
8.1. Automatic Form Generation
Red Hat Process Automation Manager enables you to automatically generate forms. For this business process you will automatically generate the Applicant, Property, and Application forms.
Procedure
- Log in to Business Central and click Menu → Design → Projects, then Mortgage Process.
- From the asset list, select the MortgageApprovalProcess business process.
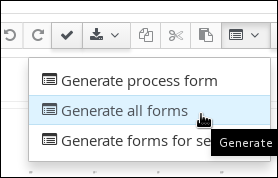
Click on the Form Generation menu in the upper-right menu and select Generate all forms.
- Click Menu → Design → Projects, then Mortgage Process.
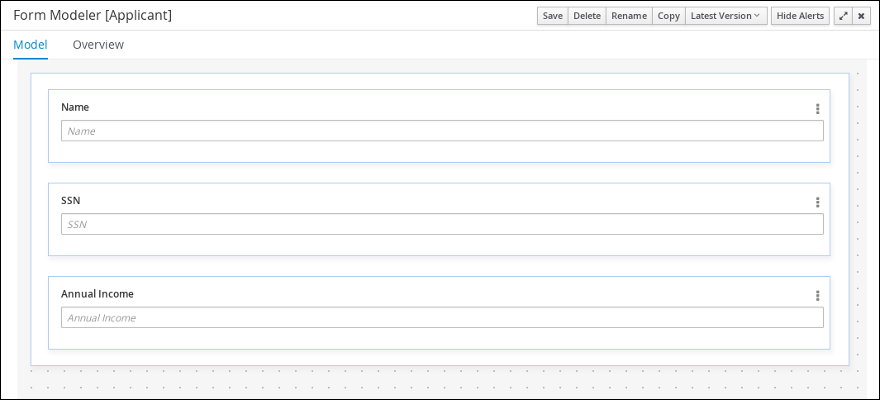
From the asset list, select the Applicant form.
The Applicant form should look as follows:
- Click Menu → Design → Projects, then Mortgage Process.
From the asset list, select the Property form. The Property form should look as follows:

- Click Menu → Design → Projects, then Mortgage Process.
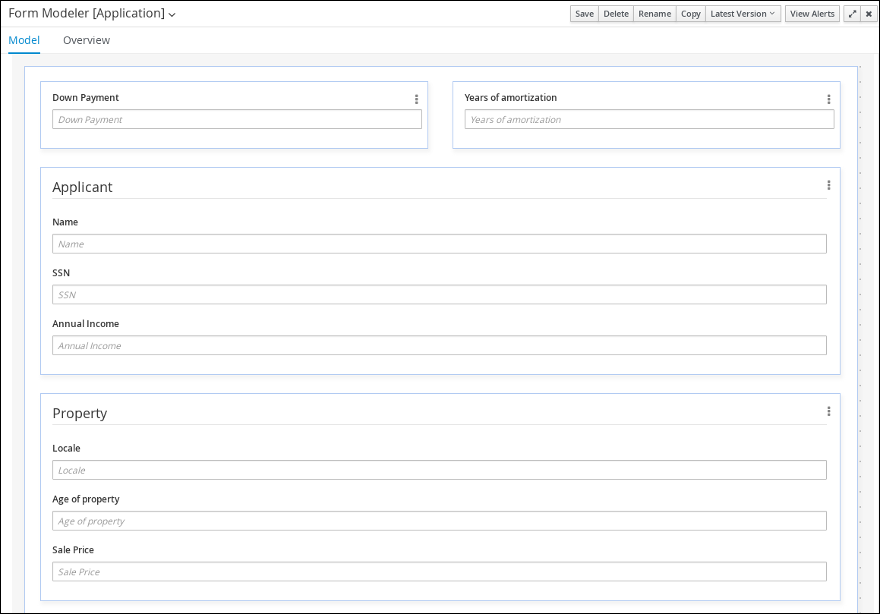
From the asset list, select the Application form. The Application form should look as follows:
- Click on the X in the upper-right corner to close the editor.
8.2. Editing forms (Optional)
The following optional process shows you how to edit the Applicant form that you previously defined as part of this tutorial business process:
Procedure
- Log in to Business Central and click Menu → Design → Projects, then Mortgage Process.
Click the Applicant data object form and add a new Address row.
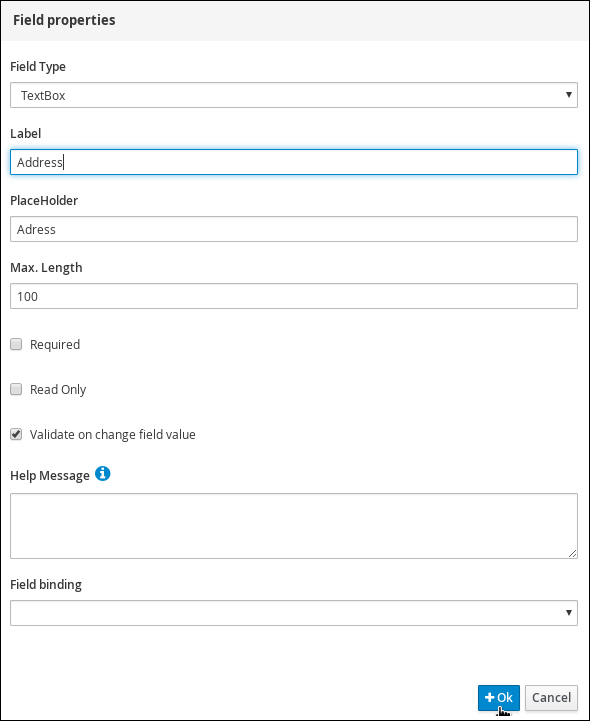
- Expand the Form Controls menu and drag the TextBox field in to the existing form.
Complete the form field properties for the new Address row.
- Click the three vertical dots in the upper-right corner to edit or delete the row.
- Click Save, then click Save to confirm your changes.
Chapter 9. Deploying Mortgage Process application
The following chapter instructs you how to build and deploy a new instance of the Mortgage Process application in Red Hat Process Automation Manager.
Prerequisites
The Process Server is deployed and connected to the Business Central.
Procedure
- Log in to Business Central and click Menu → Design → Projects.
- Click on the project you want to deploy, for example Mortgage Process.
Click Deploy.
- If there is no KIE container (deployment unit) with the project name, a container with default values is automatically created.
- If an older version of the project is already deployed, go to the project settings and change the project version. When finished, save the change and click Deploy. This will deploy a new version of the same project with the latest changes in place, alongside the older version(s).
-
To verify the deployment, click Menu → Manage → Process Definitions, and click
 .
.
- Click on the three vertical dots in the Actions column and select Start to start a new instance of the process.
Chapter 10. Executing the Mortgage Process
Now that you have deployed the project, you can execute the project’s defined functionality. For this tutorial you will input data in to a mortgage application form acting as the mortgage broker. The MortgageApprovalProcess business process will run and will determine whether or not the applicant has offered an acceptable down payment based on the decision rules that you defined earlier. The business process will either end the rule testing or request that the applicant increase the down payment to proceed. If the application passes the business rule testing, the bank’s approver will review the application and either approve or deny the loan.
Prerequisites
- The Process Server is deployed and connected to the Red Hat Process Automation Manager
- The Mortgage Process application has been deployed
The user or users working on the tasks must be members of the following groups:
- approver - For the Qualify task
- broker - For the Correct Data and Increase Down Payment tasks
- manager - For the Final Approval task
Procedure
- Log in to Red Hat Process Automation Manager and click Menu → Manage → Process Definitions.
- Click any where in the MortgageApprovalProcess row to view the process details.
- Click the Diagram tab to view the business process diagram in the editor.
- Click on the X in the upper-right corner to close the editor.
Click New Process Instance to open the Application form and input the following values in to the form fields:
-
Down Payment:
30000 -
Years of amortization:
10 -
Name:
Ivo -
Annual Income:
60000 -
SSN:
123456789 -
Age of property:
8 -
Address of property:
Brno -
Locale:
Rural -
Property Sale Price:
50000
-
Down Payment:
- Click Submit to start a new process instance. After starting the process instance, the Instance Details view opens.
- Click on the Diagram tab to view the process flow within the process diagram. The state of the process will be highlighted as it moves through each task.
- Click Menu → Track → Task Inbox. This will take you to the Qualify form.
- As the approver, you will review the Qaulify task information, and if approved, select Is mortgage application in limit? and click Complete.
- In the Task Inbox, click any where in the Final Approval row to open the Final Approval task.
- Click Claim to claim responsibility for the task, then click Complete to finalize the loan approval process.
The Save and Release buttons are only used to either pause the approval process and save the instance if you are waiting on a field value, or to release the task for another user to modify.
Chapter 11. Monitoring the MortgageApprovalProcess process application
The following chapter shows how different bank employees, such as a system administrator or a knowledge worker, might use some of the monitoring capabilities to track an instance of the mortgage approval process.
Prerequisites
The Process Server is deployed and connected to the Business Central.
Procedure
- Log in to Red Hat Process Automation Manager and click Menu → Manage → Process Instances.
- In the Manage Process Instances window, you can set filters, such as State, Errors, Id, and so on.
- Select Completed in the State filter to view all completed MortgageApprovalProcess instances.
Click on each of the following tabs to get a feel for what type of information is available to monitor a specific process instance:
- Instance Details
- Process Variables
- Documents
- Logs
- Diagram
- Click Menu → Track → Process Reports. This view contains a variety of charts that can help a senior process manager to gain an overview of all processes based on Type, Start Date, Running Time, and so on to assist with task reporting.
11.1. Filtering process instances using default or advanced filters
Business Central now provides you with default and advanced filters to help you filter and search through running process instances. You can also create custom filters using the Advanced Filters option.
11.1.1. Filtering process instances using default filters
Filter processes instances by attributes such as State, Errors, Filter By, Name, Start Date, and Last update.
Procedure
- In Business Central, go to Menu → Manage → Process Instances.
On the Manage Process Instances page, click the filter icon on the left of the page to expand the Filters pane.
This pane lists the following process attributes which you can use to filter process instances:
- State: Filter process instances based on their state (Active, Aborted, Completed, Pending, and Suspended).
- Errors: Filter process instances by errors.
Filter By: Filter process instances based on Id, Initiator, Correlation Key, or Description attribute.
- Select the required attribute.
- Enter the search query in the text field below.
- Click Apply.
- Name: Filter process instances based on process definition name.
- Start Date: Filter process instances based on their creation date.
- Last update: Filter process instances based on their last modified date.
You can also use the Advanced Filters option to create custom filters in Business Central.
11.1.2. Filtering process instances using advanced filters
Use the Advanced Filters option to create custom process instance filters. The newly created custom filter is added to the Saved Filters pane, which is accessible by clicking on the star icon on the left of the Manage Process Instances page.
Procedure
- In Business Central, go to Menu → Manage → Process Instances.
- On the Manage Process Instances page, click on Advanced Filters icon.
- In the Advanced Filters pane, enter the name and description of the filter, and click Add New.
- Select an attribute from the Select column drop-down list, for example, processName. The content of the drop-down changes to processName != value1.
- Click the drop-down again and choose the required logical query. For the processName attribute, choose equals to.
Change the value of the text field to the name of the process you want to filter.
NoteThe name must match the value defined in the business process of the project.
- Click Save and the processes are filtered according to the filter definition.
Click on the star icon to open the Saved Filters pane.
In the Saved Filters pane, you can view all the saved advanced filters.
Appendix A. Versioning information
Documentation last updated on Friday, May 22, 2020.