
Red Hat Training
A Red Hat training course is available for Red Hat OpenStack Platform
QuickStart Guide for CloudForms with Red Hat OpenStack Platform
Getting started with CloudForms on Red Hat OpenStack Platform
Abstract
Chapter 1. Introduction to Red Hat CloudForms
CloudForms Management Engine delivers the insight, control, and automation that enterprises need to address the challenges of managing virtual environments. This technology enables enterprises with existing virtual infrastructures to improve visibility and control, and those starting virtualization deployments to build and operate a well-managed virtual infrastructure.
Red Hat CloudForms 4.0 is comprised of a single component, the CloudForms Management Engine. It has the following feature sets:
- Insight: Discovery, Monitoring, Utilization, Performance, Reporting, Analytics, Chargeback, and Trending.
- Control: Security, Compliance, Alerting, Policy-Based Resource, and Configuration Enforcement.
- Automate: IT Process, Task and Event, Provisioning, and Workload Management and Orchestration.
- Integrate: Systems Management, Tools and Processes, Event Consoles, Configuration Management Database (CMDB), Role-based Administration (RBA), and Web Services.
1.1. Architecture
The diagram below describes the capabilities of CloudForms Management Engine. Its features are designed to work together to provide robust management and maintenance of your virtual infrastructure.

The architecture comprises the following components:
- The CloudForms Management Engine Appliance (Appliance) which is supplied as a secure, high-performance, preconfigured virtual machine. It provides support for HTTPS communications.
- The CloudForms Management Engine Server (Server) resides on the Appliance. It is the software layer that communicates between the SmartProxy and the Virtual Management Database. It includes support for HTTPS communications.
- The Virtual Management Database (VMDB) resides either on the Appliance or another computer accessible to the Appliance. It is the definitive source of intelligence collected about your Virtual Infrastructure. It also holds status information regarding Appliance tasks.
- The CloudForms Management Engine Console (Console) is the Web interface used to view and control the Server and Appliance. It is consumed through Web 2.0 mash-ups and web services (WS Management) interfaces.
- The SmartProxy can reside on the Appliance or on an ESX Server. If not embedded in the Server, the SmartProxy can be deployed from the Appliance. A SmartProxy agent must be configured in each storage location, and must be visible to the Appliance. The SmartProxy acts on behalf of the Appliance communicating with it over HTTPS on standard port 443.
1.2. Requirements
To use CloudForms Management Engine, the following requirements must be met:
One of the following web browsers:
- Mozilla Firefox for versions supported under Mozilla’s Extended Support Release (ESR)
- Internet Explorer 8, or higher
- Google Chrome for Business
- A monitor with a minimum resolution of 1280x1024.
- Adobe Flash Player 9, or above. At the time of publication, you can access it at http://www.adobe.com/products/flashplayer/
- The CloudForms Management Engine Appliance must already be installed and activated in your enterprise environment.
- The SmartProxy must have visibility to the virtual machines and cloud instances that you want to control.
- The resources that you want to control must have a SmartProxy associated with them.
Due to browser limitations, Red Hat supports logging in to only one tab for each multi-tabbed browser. Console settings are saved for the active tab only. For the same reason, CloudForms Management Engine does not guarantee that the browser’s Back button will produce the desired results. Red Hat recommends using the breadcrumbs provided in the Console.
1.3. Getting Help and Giving Feedback
If you experience difficulty with a procedure described in this documentation, visit the Red Hat Customer Portal at http://access.redhat.com. Through the Customer Portal, you can:
- Search or browse through a knowledgebase of technical support articles about Red Hat products.
- Submit a support case to Red Hat Global Support Services (GSS).
- Access other product documentation.
Red Hat also hosts a large number of electronic mailing lists for discussion of Red Hat software and technology. You can find a list of publicly available mailing lists at https://www.redhat.com/mailman/listinfo. Click on the name of any mailing list to subscribe to that list or to access the list archives.
1.4. Documentation Feedback
If you find a typographical error in this manual, or if you have thought of a way to make this manual better, please submit a report to GSS through the customer portal.
When submitting a report, be sure to mention the manual’s identifier: QuickStart Guide for CloudForms with OpenStack
- If you have a suggestion for improving the documentation, try to be as specific as possible when describing it.
- If you have found an error, please include the section number and some of the surrounding text so that we can easily find it.
Chapter 2. Installing CloudForms
Red Hat CloudForms can be installed on a number of virtualization platforms, such as VMware vSphere, and Red Hat Enterprise Virtualization. This chapter describes how to install and configure Red Hat CloudForms on Red Hat OpenStack Platform.
CloudForms Management Engine can be installed and configured in a few quick steps. After downloading the CloudForms Management Engine appliance from the Red Hat Customer Portal, the installation process takes you through the steps of uploading it to a supported virtualization environment or cloud provider.
After installing the CloudForms Management Engine appliance, you must configure the database for Red Hat CloudForms. See Section 2.7, “Configuring a Database for CloudForms Management Engine”.
2.1. Obtaining the CloudForms Management Engine Appliance
- Go to access.redhat.com and log in to the Red Hat Customer Portal using your customer account details.
- Click Downloads in the menu bar.
- Click A-Z to sort the product downloads alphabetically.
- Click Red Hat CloudForms to access the product download page. The latest version of each download displays by default.
- From the list of installers and images under Product Software, select CFME OpenStack Virtual Appliance and click Download Now.
2.2. Uploading the Appliance to OpenStack
Log in to your OpenStack dashboard to upload the CloudForms Management Engine appliance.
- Log in to the OpenStack dashboard.
-
In the Project tab, navigate to
Compute > Images. - Click Create Image.
- In Name, enter a name for the image.
- From Image Source list, select Image Location. Note that currently only images available from an HTTP URL are supported.
- In Image Location, enter the external (HTTP) URL you will load the image from, for example, http://example.com/image.iso.
-
From the Format list, select the image format. For example,
ISO - Optical Disk Image. -
Specify the Architecture. For example,
i386for a 32-bit architecture, orx86-64for a 64-bit architecture. - Leave the Minimum Disk (GB) and Minimum RAM (MB) fields empty.
- Check the Public box to make the appliance available to all users.
- Check the Protected box to protect the image from being accidentally deleted.
- Click Create Image.
The appliance’s image is placed in a queue to be uploaded. It may take some time before the status of the image changes from Queued to Active.
2.3. Adding a Rule to a Security Group
Security groups allow you to control whether network traffic can reach an instance on its public IP address. Note that the security group rules are processed before the network traffic reaches the firewall rules defined within the instance itself.
In the default configuration, the default security group accepts all connections from the default source; all instances within the default group can talk to each other on any port.
- From the OpenStack dashboard, navigate to Project > Compute > Access & Security.
-
Navigate to
Security Groups > Manage Ruleson the row for the default security group.
-
Click Add Rule.
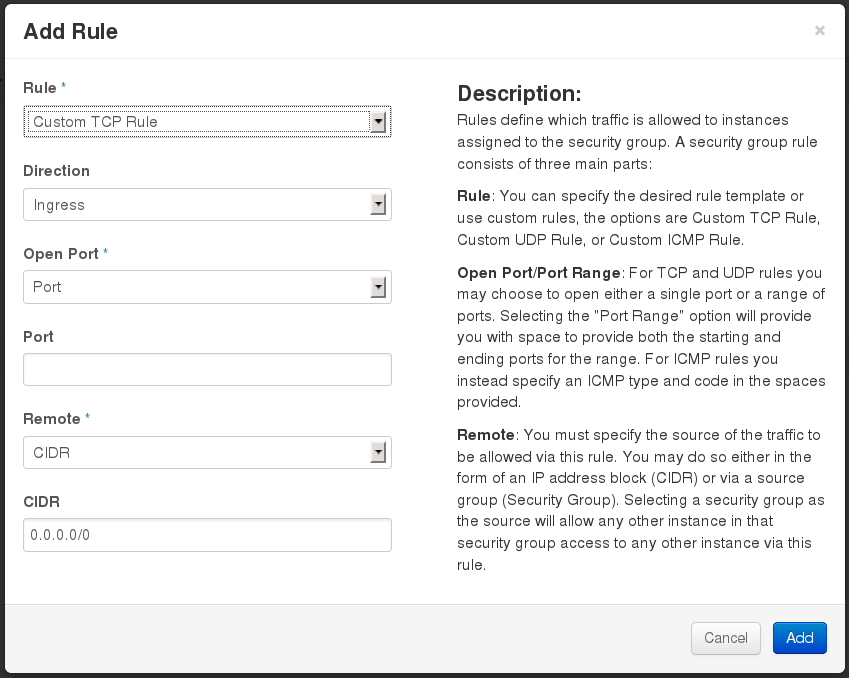
Configure the rule.
-
Select
Rule > Custom TCP Rule. -
Select
Direction > Ingress. - Select Port from the Open Port list.
-
Specify
443in the Port field. - Select CIDR from the Remote list.
-
Specify
0.0.0.0/0in the CIDR field. - Click Add.
-
Select
2.4. Creating a Custom Flavor for CloudForms Management Engine
A flavor is a resource allocation profile that specifies, for example, how many virtual CPUs and how much RAM can be allocated to an instance. For example, you can run CloudForms Management Engine on a Red Hat OpenStack m1.large flavor, which specifies a virtual machine with 4 cores, 8GB RAM, and 80GB disk space. Creating a flavor to run CloudForms Management Engine is optional.
The following procedure demonstrates how to create a flavor with the minimum requirements (4 vCPUs, 6GB RAM, 40GB disk space) for CloudForms Management Engine. For more information about flavors, see the Red Hat Enterprise Linux OpenStack Platform Administration User Guide.
- Log in to the OpenStack dashboard as admin.
-
In the Admin tab, navigate to
System > Flavors. - Click Create Flavor to display the Create Flavor dialog.
Configure the settings to define a flavor that meets CloudForms Management Engine system requirements.
- Enter a name for the flavor.
Enter the following settings:
- VCPUs: 4
- RAM MB: 6144
- Root Disk GB: 45
- Ephemeral Disk GB: 0
- Swap Disk MB: 0
- Click Create Flavor.
As a result, a new flavor specific to CloudForms Management Engine is created.
2.5. Launching the CloudForms Management Engine Appliance
-
From the OpenStack dashboard, navigate to
Project > Compute > Instances. - Click Launch Instance.
- Enter a name for the instance.
- Select the custom flavor for your instance. The flavor selection determines the computing resources available to your instance. The resources used by the flavor are displayed in the Flavor Details pane.
- Enter 1 in the Instance Count field.
Select a boot option from the Instance Boot Source list:
- Boot from image - displays a new field for Image Name. Select the image from the drop-down list.
- Boot from snapshot - displays a new field for Instance Snapshot. Select the snapshot from the drop-down list.
- Boot from volume - displays a new field for Volume. Select the volume from the drop-down list.
- Boot from image (creates a new volume) - boot from an image and create a volume by choosing Device Size and Device Name for your volume. Some volumes can be persistent. To ensure the volume is deleted when the instance is deleted, select Delete on Terminate.
- Boot from volume snapshot (creates a new volume) - boot from volume snapshot and create a new volume by choosing Volume Snapshot from the drop-down list and adding a Device Name for your volume. Some volumes can be persistent. To ensure the volume is deleted when the instance is deleted, select Delete on Terminate.
- Click Networking and select a network for the instance by clicking the + (plus) button for the network from Available Networks.
- Click Launch.
2.6. Adding a Floating IP Address
When you create an instance, Red Hat OpenStack Platform automatically assigns a fixed IP address in the network to which the instance belongs. This IP address is permanently associated with the instance until the instance is terminated.
In addition to the fixed address, you can also assign a floating IP address to an instance. Unlike fixed IP addresses, you can modify floating IP addresses associations at any time, regardless of the state of the instances involved.
At the command-line on your Red Hat OpenStack Platform controller, create a pool of floating IP addresses using the
nova-manage floating createcommand. Replace IP_BLOCK with the desired block of IP addresses (expressed in CIDR notation).$ nova-manage floating create IP_BLOCK
-
In the Project tab, navigate to
Compute > Access & Security. -
Click
Floating IPs > Allocate IP To Project. The Allocate Floating IP window is displayed.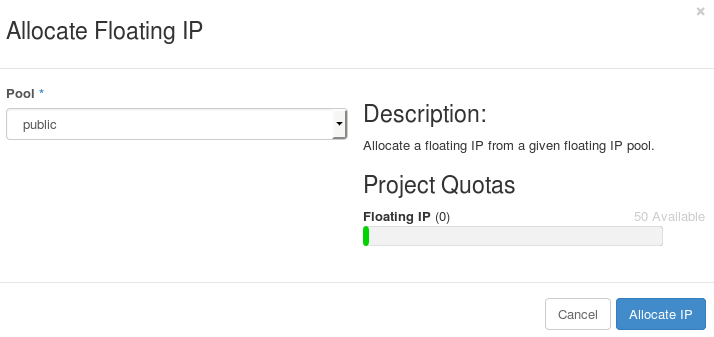
- Click Allocate IP to allocate a floating IP from the pool. The allocated IP address appears in the Floating IPs table.
-
Select the newly allocated IP address from the Floating IPs table. Click Associate to assign the IP address to a specific instance.
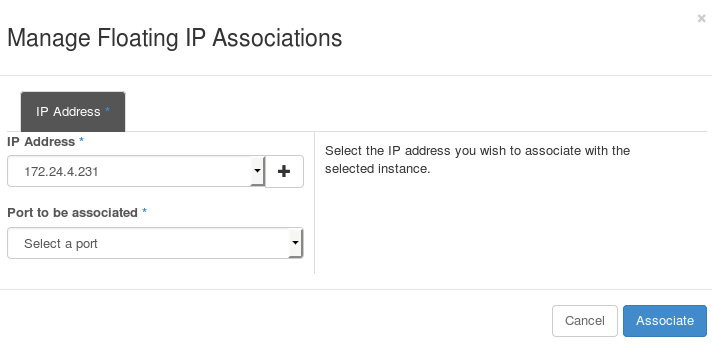
- Select an instance with which to associate the floating IP Address.
- Click Associate to associate the IP address with the selected instance.
To disassociate a floating IP address from an instance when it is no longer required, click Release Floating IPs.
2.7. Configuring a Database for CloudForms Management Engine
Before using CloudForms Management Engine, you will need to configure the database options for it. CloudForms Management Engine provides two options for database configuration:
- Install an internal PostgreSQL database to the appliance
- Configure the appliance to use an external PostgreSQL database
See CPU Sizing Assistant for a Dedicated VMDB Host in the Deployment Planning Guide for guidelines on CPU requirements.
2.8. Configuring an Internal Database
Before installing an internal database, add a disk to the infrastructure hosting your appliance. See the documentation specific to your infrastructure for instructions on how to add a disk. As a storage disk usually cannot be added while a virtual machine is running, Red Hat recommends adding the disk before starting the appliance. Red Hat CloudForms only supports installing of an internal VMDB on blank disks. The installation will fail if the disks are not blank.
- Start the appliance and open a terminal from your virtualization or cloud provider.
-
After starting the appliance, log in with a user name of
rootand the default password ofsmartvm. This displays the Bash prompt for therootuser. -
Enter the
appliance_consolecommand. The CloudForms Management Engine Appliance summary screen displays. - Press Enter to manually configure settings.
- Select 8) Configure Database from the menu.
You are prompted to create or fetch an encryption key.
- If this is the first CFME appliance, choose 1) Create key.
- If this is not the first CFME appliance, choose 2) Fetch key from remote machine to fetch the key from the first CFME appliance. All CFME appliances in a multi-region deployment must use the same key.
- Choose 1) Internal for the database location.
Choose a disk for the database. For example:
1)  /dev/vdb: 20480

Choose disk:
Enter 1 to choose
/dev/vdbfor the database location.When prompted, enter a unique three-digit region ID to create a new region.
ImportantCreating a new region destroys any existing data on the chosen database.
- Confirm the configuration when prompted.
CloudForms Management Engine configures the internal database.
2.9. Configuring an External Database
The postgresql.conf file used with CloudForms Management Engine databases requires specific settings for correct operation. For example, it must correctly reclaim table space, control session timeouts, and format the PostgreSQL server log for improved system support. Due to these requirements, Red Hat recommends that external CloudForms Management Engine databases use a postgresql.conf file based on the standard file used by the CloudForms Management Engine appliance.
Ensure you configure the settings in the postgresql.conf to suit your system. For example, customize the shared_buffers setting according to the amount of real storage available in the external system hosting the PostgreSQL instance. In addition, depending on the aggregate number of appliances expected to connect to the PostgreSQL instance, it may be necessary to alter the max_connections setting.
Because the postgresql.conf file controls the operation of all databases managed by a single instance of PostgreSQL, do not mix CloudForms Management Engine databases with other types of databases in a single PostgreSQL instance.
Chapter 3. Adding an OpenStack Cloud Provider
CloudForms Management Engine supports operating with the OpenStack admin tenant. When creating an OpenStack provider in CloudForms Management Engine, select the OpenStack provider’s admin user because it is the default administrator of the OpenStack admin tenant. When using the admin credentials, a user in CloudForms Management Engine provisions into the admin tenant, and sees images, networks, and instances that are associated with the admin tenant.
- Navigate to → .
-
Click
 (Configuration), then click
 (Add a New Cloud Provider).
- Enter a Name for the provider.
- From the Type drop down menu select OpenStack.
Enter the Host Name (or IPv4 or IPv6 address) of the provider.
ImportantThe Host Name must use a unique fully qualified domain name.
Enter the API Port of your Keystone service. The default port is
5000.ImportantIf the Keystone service is configured to use SSL, you must enter the SSL port for Keystone.
-
Select the appropriate API Version from the list. The default is
Keystone v2. - Select the appropriate Zone for the provider. By default, the zone is set to default.
In the Credentials area, under Default, provide the login credentials required for the Keystone user:
ImportantTo enable discovery of OpenStack cloud providers, ensure that the
iptablesfor the OpenStack host providing Keystone services allows port 5000 access to all hosts on the same network.- Enter the user name in the Username field.
- Enter the user password in the Password field.
- Confirm the user password in the Confirm Password field.
- Click Validate to confirm CloudForms Management Engine can connect to the OpenStack Infrastructure instance.
You can use AMPQ if ceilometer is not configured for Events. If AMQP credentials were changed during the OpenStack provider install, use the AMQP tab of the Credentials area to provide the login credentials required for the Advanced Message Queuing Protocol messaging service on your OpenStack Nova component:
- Enter the administrative user name in the Username field.
- Enter the user password in the Password field.
- Confirm the user password in the Confirm Password field.
Click Validate to confirm CloudForms Management Engine can connect to the messaging service.
NoteTo enable ceilometer to store events sent by OpenStack services, you will need to configure the following:
- Undercloud - Before running openstack undercloud install, edit undercloud.conf by setting store_events to true.
- Overcloud - On your controller, create an additional environment file called ceilometer.yaml with the following options:
parameter_defaults:
  CeilometerStoreEvents: true
Then, add this environment file to the
overcloud deploycommand, for example:openstack overcloud deploy --templates -e ~/ceilometer.yaml
- Click Add.
In order to collect inventory and metrics from an OpenStack environment, the CloudForms Management Engine Appliance requires that the adminURL endpoint for the OpenStack environment should be on a non-private network. Hence, the OpenStack adminURL endpoint should be assigned an IP address other than 192.168.x.x. Additionally, make sure that all the Keystone endpoints must be accessbile, otherwise refresh will fail.
For Red Hat CloudForms to be able to receive events from a Red Hat OpenStack provider, the OpenStack configuration file must be modified. Specifically, the notification_driver field must be defined.
For Nova and Heat, in order to start getting notifications, manually change the configuration files as below and restart services.
/etc/heat/heat.conf
notification_driver=glance.openstack.common.notifier.rpc_notifier
notification_topics=notifications
/etc/nova/nova.conf
notification_driver=messaging
notification_topics=notifications
Chapter 4. Adding an OpenStack Infrastructure Provider
After you have deployed your CloudForms Management Engine appliance, you can begin managing your OpenStack environment by adding it as an OpenStack Infrastructure provider. Supply the details of the admin account to get access to the resources in the admin tenant:
-
Navigate to
Infrastructure > Providers. -
Click
(Configuration), then click
(Add a New Infrastructure Provider).
- Enter the Name of the provider to add. The Name is how the device is labeled in the console.
- Select OpenStack Platform Director from the Type list.
Enter the Host Name or IP address(IPv4 or IPv6) of the provider.
ImportantThe Host Name must use a unique fully-qualified domain name (FQDN).
Select the API Version of the keystone service from the list. The default is
Keystone v2.ImportantIf the keystone service is configured to use SSL, you must enter the keystone SSL port.
-
Select the appropriate
Zonefor the provider. By default, the zone is set todefault. In the Credentials area, under Default, provide the login credentials required for the OpenStack Infrastructure administrative user:
- Enter the user name in the Username field.
- Enter the password in the Password field.
- Confirm the user password in the Confirm Password field.
- Click Validate to confirm that the CloudForms Management Engine can connect to the OpenStack Infrastructure instance using the user name and password.
Under AMQP, provide the login credentials required for the Advanced Message Queuing Protocol messaging service:
- Enter the administrative user name in the Username field.
- Enter the user password in the Password field.
- Confirm the user password in the Confirm Password field.
- Click Validate to confirm CFME can connect to the messaging service.
Under RSA key pair, provide the user name and private key required to connect via SSH to all hosts in the provider:
- Enter the administrative user name in the Username field.
- Enter the private key from the machine on which OpenStack was deployed in the Private Key field.
- Click Add.
CloudForms Management Engine requires that the adminURL endpoint for all OpenStack services be on a non-private network. As a result, you should assign the adminURL endpoint an IP address of something other than 192.168.x.x. The adminURL endpoint must be accessible to the CFME Appliance that is responsible for collecting inventory and gathering metrics from the OpenStack environment. In addition, make sure that all the keystone endpoints are accessible, otherwise the refresh process will fail.
4.1. Configuring Red Hat CloudForms to Receive Events
To allow Red Hat CloudForms to receive events from a Red Hat OpenStack Platform environment, you must configure the notification_driver option for the Compute service and Orchestration service in that environment.
Edit /etc/heat/heat.conf, and specify the following options:
notification_driver=glance.openstack.common.notifier.rpc_notifier
notification_topics=notifications
Edit /etc/nova/nova.conf, and specify the following options:
notification_driver=messaging
notification_topics=notifications
Restart the Compute service and Orchestration services:
# systemctl restart openstack-heat-api.service \
  openstack-heat-api-cfn.service \
  openstack-heat-engine.service \
  openstack-heat-api-cloudwatch.service
# systemctl restart openstack-nova-compute.service
4.2. Configuring the Telemetry Service to Store Events
By default, the Telemetry service does not store events emitted by other services in a Red Hat OpenStack Platform environment. The following procedure outlines how to enable the Telemetry service to store such events so that they are exposed to Red Hat CloudForms when a Red Hat OpenStack Platform environment is added as an infrastructure provider.
- On the director node, edit undercloud.conf, and set store_events to true.
Create an environment file called ceilometer.yaml, and add the following contents:
parameter_defaults:
  CeilometerStoreEvents: true
Add the environment file to the overcloud deploy command:
# openstack overcloud deploy --templates -e ~/ceilometer.yaml
Chapter 5. CloudForms Lifecycle Management
This chapter discusses lifecycle activities that are part of the CloudForms Management Engine Automate component; these activies can include the provisioning and retirement of instances. CloudForms Management Engine Automate enables real-time, bidirectional process integration and adaptive automation for management events and administrative or operational activities.
- Operations Management with service level resource enforcement.
- Resource Management - including datastore cleanup, snapshot aging and enforcement, and virtual machine/instance aging and retirement.
- Configuration and Change Management - including enforced closed loop change management.
- Lifecycle Management - including provisioning, customization, reconfiguration, approval, CMDB updates, and retirement.
Provisioning requires that the Automation Engine server role be enabled. Check your server role settings in Configure > Configuration > Server > Server Control.
5.1. Provisioning
When a virtual machine or cloud instance is provisioned, it goes through multiple phases:
- Phase 1 - the request must be made, and includes ownership information, tags, virtual hardware requirements, the operating system, and any customization of the request.
- Phase 2 - the request must go through an approval phase, either automatic or manual.
-
Phase 3 - the request is executed. This part of provisioning consists of pre-processing and post-processing. Pre-processing acquires IP addresses for the user, creates CMDB instances, and creates the virtual machine or instance based on information in the request. Post-processing activates the CMDB instance and emails the user. The steps for provisioning may be modified at any time using CloudForms Management Engine.

5.2. Provisioning an OpenStack Instance from an Image
Cloud instances follow the same process (Request, Approval, Deployment) as a standard virtual machine from virtualization infrastructure. First, a user makes a request for instances and specifies the image, tags, availability zone and hardware profile flavor. Second, the request goes through the approval phase. Finally, CloudForms Management Engine executes the request.
This procedure describes how to provision an OpenStack instance from an image:
- Navigate to Menu > Clouds > Instances.
-
Click
 (Lifecycle), then click
(Provision Instances).
(Lifecycle), then click
(Provision Instances).
- Select an OpenStack image from the list presented. These images must be available on your OpenStack provider.
- Click Continue.
On the Request tab, enter information about this provisioning request. In Request Information, type in at least a first and last name and an email address. This email is used to send the requester status emails during the provisioning process for items such as auto-approval, quota, provision complete, retirement, request pending approval, and request denied. The other information is optional. If the CloudForms Management Engine Server is configured to use LDAP, you can use the Look Up button to populate the other fields based on the email address.
NoteParameters with a * next to the label are required to submit the provisioning request.
- Click the Purpose tab to select the appropriate tags for the provisioned instance.
Click the Catalog tab for basic instance options.
- To change the image to use as a basis for the instance, select it from the list of images.
- Select the Number of Instances to provision.
- Type an Instance Name and Instance Description.
- Click the Environment tab to select the instance’s Tenant, Availabilty Zones, Cloud Network, Security Groups, and Public IP Address. If no specific Tenant is required, select the Choose Automatically checkbox.
Click the Properties tab to set provider options such as flavors and security settings.
- Select a flavor from the Instance Type list.
- Select a Guest Access Key Pair for access to the instance.
Click the Customize tab to set additional instance options.
- Under Credentials, enter a Root Password for the root user access to the instance.
- Enter IP Address Information for the instance. Leave as DHCP for automatic IP assignment from the provider.
- Enter any DNS information for the instance if necessary.
- Use Customize Template to configure additional instance settings. You can select from the Cloud-Init scripts stored on your appliance.
Click the Schedule tab to set the provisioning and retirement date and time.
- In Schedule Info, choose whether the provisioning begins upon approval, or at a specific time. If you select Schedule, you will be prompted to enter a date and time.
- In Lifespan, select whether to power on the instances after they are created, and whether to set a retirement date. If you select a retirement period, you will be prompted for when to receive a retirement warning.
- Click Submit.
The provisioning request is sent for approval. For the provisioning to begin, a user with the admin, approver, or super admin account role must approve the request. The admin and super admin roles can also edit, delete, and deny the requests. You will be able to see all provisioning requests where you are either the requester or the approver.
After submission, the appliance assigns each provision request a Request ID. If an error occurs during the approval or provisioning process, use this ID to locate the request in the appliance logs. The Request ID consists of the region associated with the request followed by the request number. As regions define a range of one trillion database IDs, this number can be several digits long.
Request ID Format
Request 99 in region 123 results in Request ID 123000000000099.
5.3. Controlling the Power State of an Instance
This procedure allows you to control the power states of an instance using the CloudForms Management Engine console.
-
Navigate to
Clouds > Instances. - Click the instance to change the power state.
Click Power Operations, then click the button for the desired power operation:
-
Click
 (Start) to start the selected instances.
-
Click
 (Terminate) to terminate the selected instances.
-
Click
 (Suspend) to suspend the selected instances.
-
Click
 (Reset) to reset the selected instances.
-
Click
 (Stop Guest) to stop the guest operating system.
-
Click
 (Restart Guest) to restart the guest operating system.
-
Click
- Click OK.
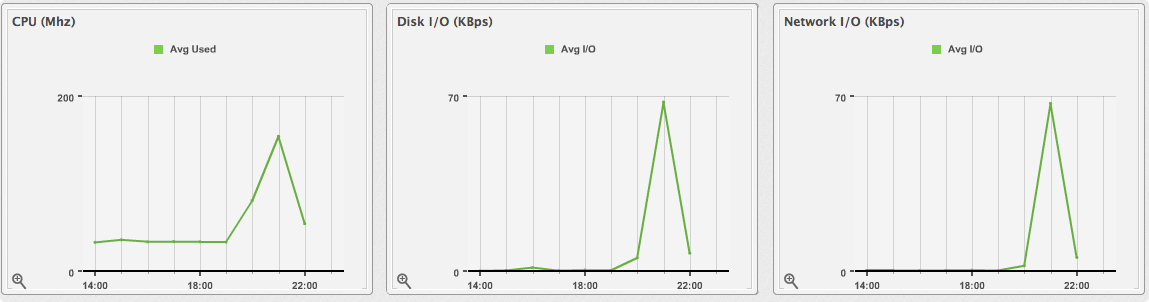
5.4. Viewing Capacity and Utilization Charts for an Instance
This procedure allows you to review the capacity and utilization data for instances that are part of a cluster.
To use this feature, you must have a server assigned to the Capacity & Utilization Collector server role. In additon, this server will require network visibility of the cloud provider. For more information, see the CloudForms General Configuration guide.
- Navigate to → .
- Click the accordion to view capacity data.
- Click the item to view.
-
Click
 (Monitoring), and then
(Utilization) on the taskbar.
(Monitoring), and then
(Utilization) on the taskbar.
Select to view hourly, most recent hour, or daily data points for the dates to view data.
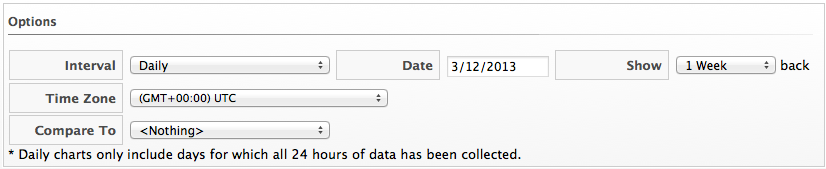
- Select a Time Profile.
Daily charts only include full days of data; this means that CloudForms Management Engine requires a complete 24 data point range for that day.
Chapter 6. Further reading
For more information on Red Hat CloudForms, see the official documentation.
Red Hat OpenStack Platform is the only OpenStack cloud provider supported by Red Hat CloudForms.