
Chapter 1. Deploying and configuring OpenStack Key Manager (barbican)
OpenStack Key Manager (barbican) is the secrets manager for Red Hat OpenStack Platform. You can use the barbican API and command line to centrally manage the certificates, keys, and passwords used by OpenStack services. Barbican is not enabled by default in Red Hat OpenStack Platform. You can deploy barbican in an existing OpenStack deployment.
Barbican currently supports the following use cases described in this guide:
- Symmetric encryption keys - used for Block Storage (cinder) volume encryption, ephemeral disk encryption, and Object Storage (swift) encryption, among others.
- Asymmetric keys and certificates - used for glance image signing and verification, among others.
OpenStack Key Manager integrates with the Block Storage (cinder), Networking (neutron), and Compute (nova) components.
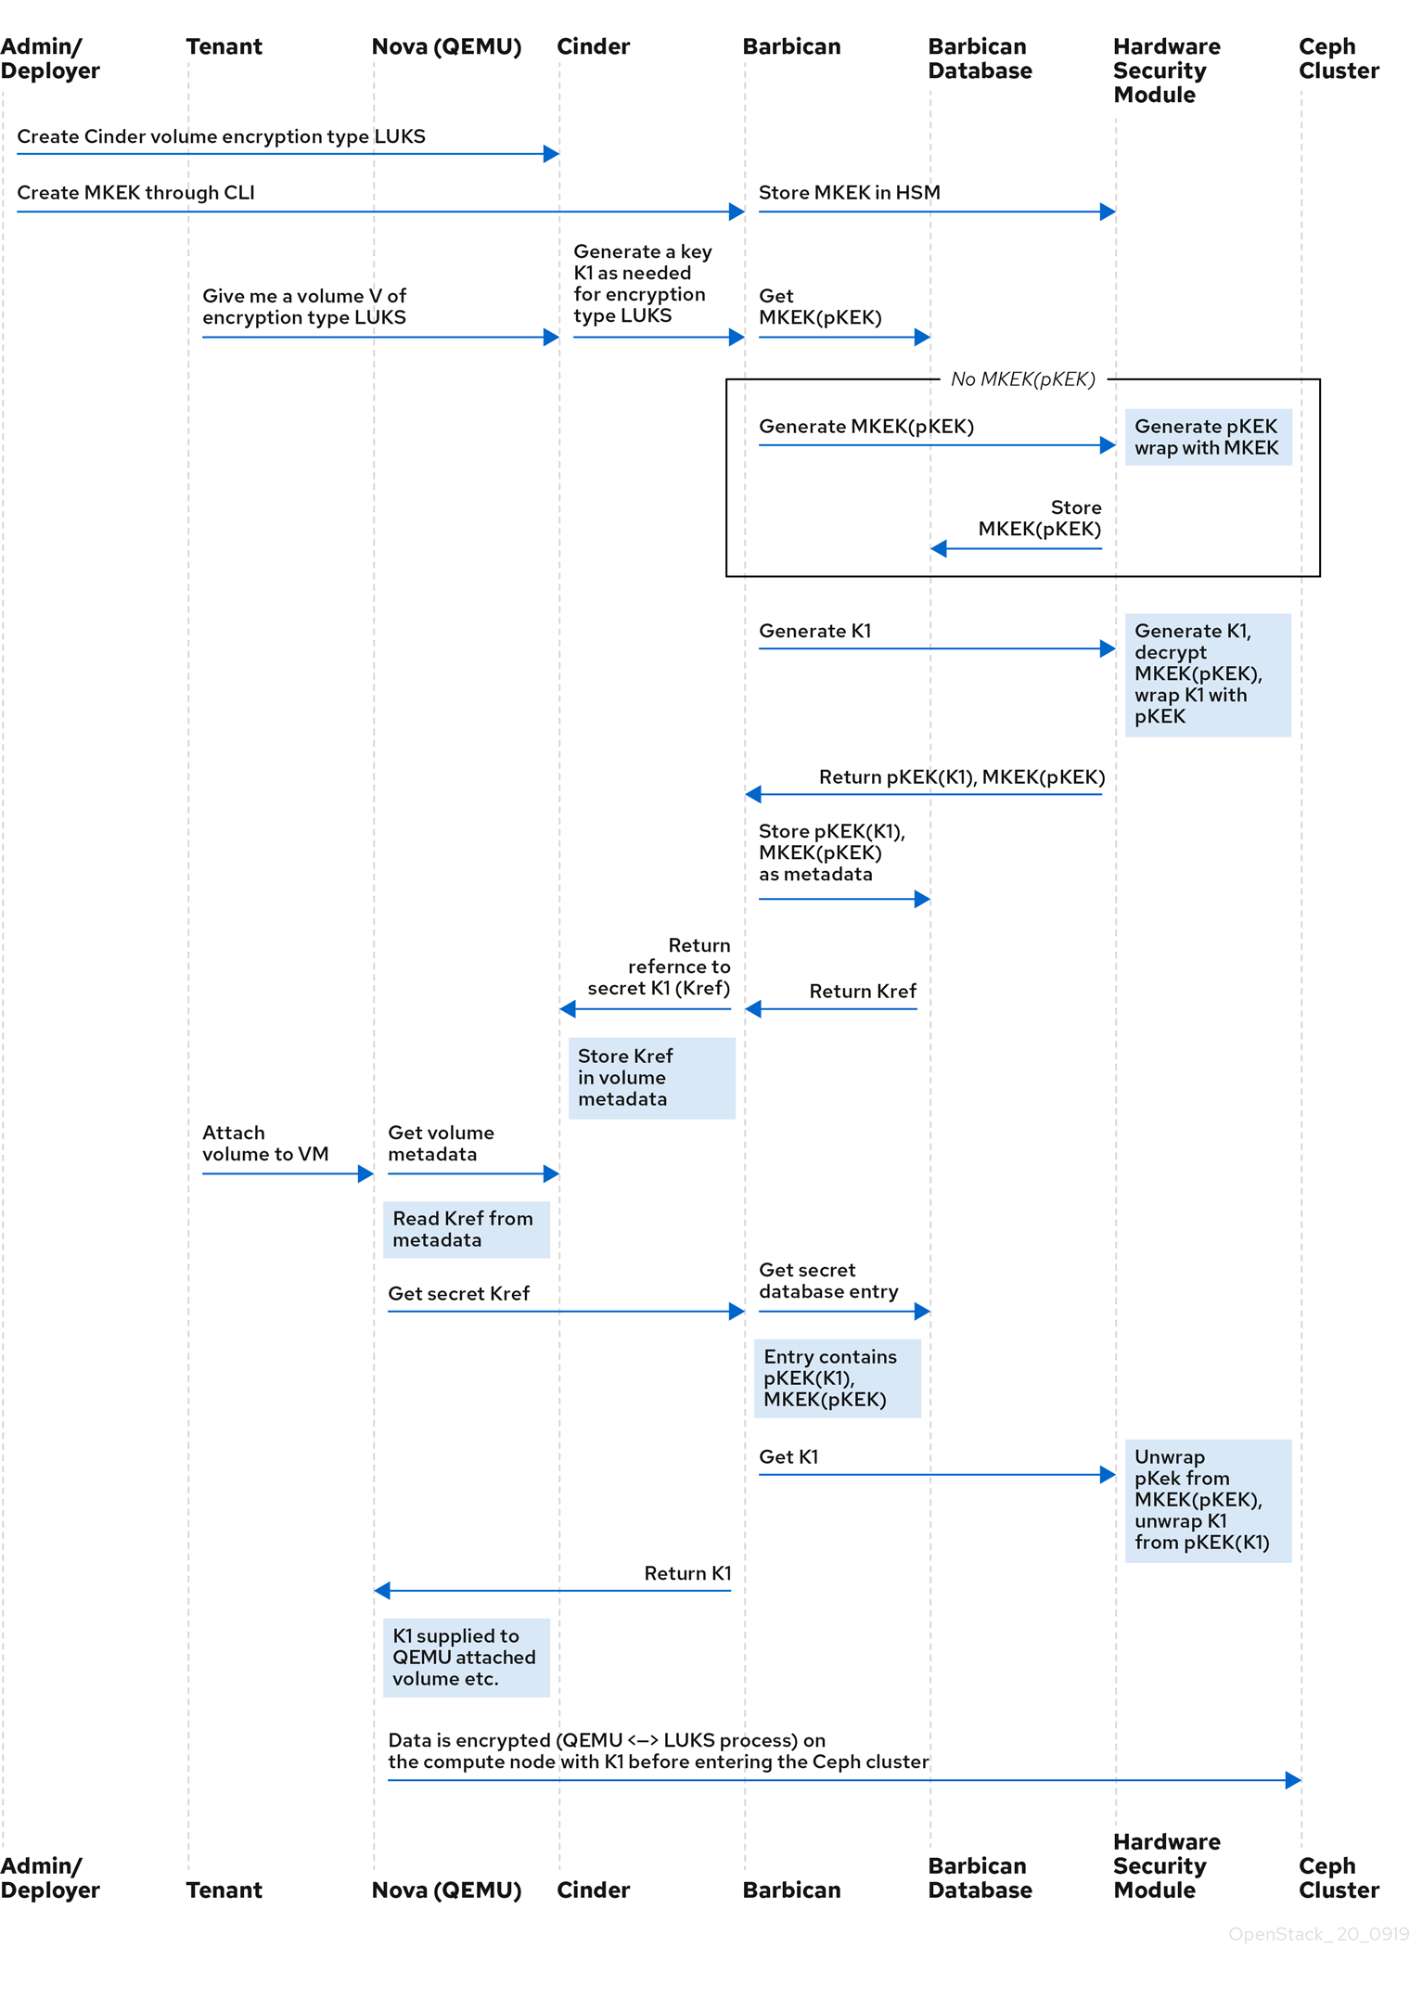
1.1. OpenStack Key Manager workflow
The following diagram shows the workflow that OpenStack Key Manager uses to manage secrets for your environment.
1.2. OpenStack Key Manager encryption types
Secrets such as certificates, API keys, and passwords, can be stored in an encrypted blob in the barbican database or directly in a secure storage system. You can use a simple crypto plugin or PKCS#11 crypto plugin to encrypt secrets.
To store the secrets as an encrypted blob in the barbican database, the following options are available:
-
Simple crypto plugin - The simple crypto plugin is enabled by default and uses a single symmetric key to encrypt all secret payloads. This key is stored in plain text in the
barbican.conffile, so it is important to prevent unauthorized access to this file. PKCS#11 crypto plugin - The PKCS#11 crypto plugin encrypts secrets with project-specific key encryption keys (pKEK), which are stored in the barbican database. These project-specific pKEKs are encrypted by a main key-encryption-key (MKEK), which is stored in a hardware security module (HSM). All encryption and decryption operations take place in the HSM, rather than in-process memory. The PKCS#11 plugin communicates with the HSM through the PKCS#11 API. Because the encryption is done in secure hardware, and a different pKEK is used per project, this option is more secure than the simple crypto plugin.
Red Hat supports the PKCS#11 back end with any of the following HSMs.
Device Supported in release High Availability (HA) support ATOS Trustway Proteccio NetHSM
16.0+
16.1+
Entrust nShield Connect HSM
16.0+
Not supported
Thales Luna Network HSM
16.1+ (Technology Preview)
16.1+ (Technology Preview)
NoteRegarding high availability (HA) options: The barbican service runs within Apache and is configured by director to use HAProxy for high availability. HA options for the back end layer will depend on the back end being used. For example, for simple crypto, all the barbican instances have the same encryption key in the config file, resulting in a simple HA configuration.
1.2.1. Configuring multiple encryption mechanisms
You can configure a single instance of Barbican to use more than one back end. When this is done, you must specify a back end as the global default back end. You can also specify a default back end per project. If no mapping exists for a project, the secrets for that project are stored using the global default back end.
For example, you can configure Barbican to use both the Simple crypto and PKCS#11 plugins. If you set Simple crypto as the global default, then all projects use that back end. You can then specify which projects use the PKCS#11 back end by setting PKCS#11 as the preferred back end for that project.
If you decide to migrate to a new back end, you can keep the original available while enabling the new back end as the global default or as a project-specific back end. As a result, the old secrets remain available through the old back end, and new secrets are stored in the new global default back end.
1.3. Deploying Key Manager
To deploy OpenStack Key Manager, first create an environment file for the barbican service and redeploy the overcloud with additional environment files. You then add users to the creator role to create and edit barbican secrets or to create encrypted volumes that store their secret in barbican.
This procedure configures barbican to use the simple_crypto back end. Additional back ends are available, such as PKCS#11 which requires a different configuration, and different heat template files depending on which HSM is used. Other back ends such as KMIP, Hashicorp Vault and DogTag are not supported.
Prerequisites
- Overcloud is deployed and running
Procedure
On the undercloud node, create an environment file for barbican.
$ cat /home/stack/templates/configure-barbican.yaml
	parameter_defaults:
	  BarbicanSimpleCryptoGlobalDefault: true
The
BarbicanSimpleCryptoGlobalDefaultsets this plugin as the global default plugin.You can also add the following options to the environment file:
-
BarbicanPassword- Sets a password for the barbican service account. -
BarbicanWorkers- Sets the number of workers forbarbican::wsgi::apache. Uses'%{::processorcount}'by default. -
BarbicanDebug- Enables debugging. -
BarbicanPolicies- Defines policies to configure for barbican. Uses a hash value, for example:{ barbican-context_is_admin: { key: context_is_admin, value: 'role:admin' } }. This entry is then added to/etc/barbican/policy.json. Policies are described in detail in a later section. -
BarbicanSimpleCryptoKek- The Key Encryption Key (KEK) is generated by director, if none is specified.
-
Add the following files to the
openstack overcloud deploycommand, without removing previously added role, template or environment files from the script:- /usr/share/openstack-tripleo-heat-templates/environments/services/barbican.yaml
- /usr/share/openstack-tripleo-heat-templates/environments/barbican-backend-simple-crypto.yaml
- /home/stack/templates/configure-barbican.yaml
Re-run the deployment script to apply changes to your deployment:
$ openstack overcloud deploy \
    --timeout 100 \
    --templates /usr/share/openstack-tripleo-heat-templates \
    --stack overcloud \
    --libvirt-type kvm \
    --ntp-server clock.redhat.com \
    -e /home/stack/containers-prepare-parameter.yaml \
    -e /home/stack/templates/config_lvm.yaml \
    -e /usr/share/openstack-tripleo-heat-templates/environments/network-isolation.yaml \
    -e /home/stack/templates/network/network-environment.yaml \
    -e /home/stack/templates/hostnames.yml \
    -e /home/stack/templates/nodes_data.yaml \
    -e /home/stack/templates/extra_templates.yaml \
    -e /home/stack/container-parameters-with-barbican.yaml \
    -e /usr/share/openstack-tripleo-heat-templates/environments/services/barbican.yaml \
    -e /usr/share/openstack-tripleo-heat-templates/environments/barbican-backend-simple-crypto.yaml \
    -e /home/stack/templates/configure-barbican.yaml \
    --log-file overcloud_deployment_38.log
Retrieve the
idof thecreatorrole:openstack role show creator +-----------+----------------------------------+ | Field | Value | +-----------+----------------------------------+ | domain_id | None | | id | 4e9c560c6f104608948450fbf316f9d7 | | name | creator | +-----------+----------------------------------+
NoteYou will not see the
creatorrole unless OpenStack Key Manager (barbican) is installed.Assign a user to the
creatorrole and specify the relevant project. In this example, a user nameduser1in theproject_aproject is added to thecreatorrole:openstack role add --user user1 --project project_a 4e9c560c6f104608948450fbf316f9d7
Verification
Create a test secret. For example:
$ openstack secret store --name testSecret --payload 'TestPayload'
+---------------+------------------------------------------------------------------------------------+
| Field         | Value                                                                              |
+---------------+------------------------------------------------------------------------------------+
| Secret href   | https://192.168.123.163/key-manager/v1/secrets/4cc5ffe0-eea2-449d-9e64-b664d574be53 |
| Name          | testSecret                                                                         |
| Created       | None                                                                               |
| Status        | None                                                                               |
| Content types | None                                                                               |
| Algorithm     | aes                                                                                |
| Bit length    | 256                                                                                |
| Secret type   | opaque                                                                             |
| Mode          | cbc                                                                                |
| Expiration    | None                                                                               |
+---------------+------------------------------------------------------------------------------------+
Retrieve the payload for the secret you just created:
openstack secret get https://192.168.123.163/key-manager/v1/secrets/4cc5ffe0-eea2-449d-9e64-b664d574be53 --payload
+---------+-------------+
| Field   | Value       |
+---------+-------------+
| Payload | TestPayload |
+---------+-------------+
1.4. Viewing Key Manager policies
Barbican uses policies to determine which users are allowed to perform actions against the secrets, such as adding or deleting keys. To implement these controls, keystone project roles such as creator you created earlier, are mapped to barbican internal permissions. As a result, users assigned to those project roles receive the corresponding barbican permissions.
The default policy is defined in code and typically does not require any amendments. If policy changes have not been made, you can view the default policy using the existing container in your environment. If changes have been made to the default policy, and you would like to see the defaults, use a separate system to pull the openstack-barbican-api container first.
Prerequisites
- OpenStack Key Manager is deployed and running
Procedure
Use your Red Hat credentials to log in to podman:
podman login
username: ********
password: ********
Pull the
openstack-barbican-apicontainer:podman pull \ registry.redhat.io/rhosp-rhel8/openstack-barbican-api:16.2
Generate the policy file in the current working directory:
podman run -it \
registry.redhat.io/rhosp-rhel8/openstack-barbican-api:16.2 \
oslopolicy-policy-generator \
--namespace barbican > barbican-policy.yaml
Verification
Review the barbican-policy.yaml file to check the policies used by barbican. The policy is implemented by four different roles that define how a user interacts with secrets and secret metadata. A user receives these permissions by being assigned to a particular role:
admin- The admin role can read, create, edit and delete secrets across all projects.
creator- The creator role can read, create, edit, and delete secrets that are in the project for which the creator is scoped.
observer- The observer role can only read secrets.
audit- The audit role can only read metadata. The audit role can not read secrets.
For example, the following entries list the admin, observer, and creator keystone roles for each project. On the right, notice that they are assigned the role:admin, role:observer, and role:creator permissions:
#
#"admin": "role:admin"

#
#"observer": "role:observer"

#
#"creator": "role:creator"
These roles can also be grouped together by barbican. For example, rules that specify admin_or_creator can apply to members of either rule:admin or rule:creator.
Further down in the file, there are secret:put and secret:delete actions. To their right, notice which roles have permissions to execute these actions. In the following example, secret:delete means that only admin and creator role members can delete secret entries. In addition, the rule states that users in the admin or creator role for that project can delete a secret in that project. The project match is defined by the secret_project_match rule, which is also defined in the policy.
secret:delete": "rule:admin_or_creator and rule:secret_project_match"