
Chapter 16. Managing instances
As a cloud administrator, you can monitor and manage the instances running on your cloud.
16.1. Securing connections to the VNC console of an instance
You can secure connections to the VNC console for an instance by configuring the allowed TLS ciphers and the minimum protocol version to enforce for incoming client connections to the VNC proxy service.
Procedure
-
Log in to the undercloud as the
stackuser. Source the
stackrcfile:[stack@director ~]$ source ~/stackrc
- Open your Compute environment file.
Configure the minimum protocol version to use for VNC console connections to instances:
parameter_defaults:
  ...
  NovaVNCProxySSLMinimumVersion: <version>
Replace
<version>with the minimum allowed SSL/TLS protocol version. Set to one of the following valid values:-
default: Uses the underlying system OpenSSL defaults. tlsv1_1: Use if you have clients that do not support a later version.NoteTLS 1.0 and TLS 1.1 are deprecated in RHEL 8, and not supported in RHEL 9.
-
tlsv1_2: Use if you want to configure the SSL/TLS ciphers to use for VNC console connections to instances.
-
If you set the minimum allowed SSL/TLS protocol version to
tlsv1_2, then configure the SSL/TLS ciphers to use for VNC console connections to instances:parameter_defaults: NovaVNCProxySSLCiphers: <ciphers>
Replace
<ciphers>with a colon-delimited list of the cipher suites to allow. Retrieve the list of available ciphers fromopenssl.Add your Compute environment file to the stack with your other environment files and deploy the overcloud:
(undercloud)$ openstack overcloud deploy --templates \
  -e [your environment files]  \
  -e /home/stack/templates/<compute_environment_file>.yaml
16.2. Database cleaning
The Compute service includes an administrative tool, nova-manage, that you can use to perform deployment, upgrade, clean-up, and maintenance-related tasks, such as applying database schemas, performing online data migrations during an upgrade, and managing and cleaning up the database.
Director automates the following database management tasks on the overcloud by using cron:
- Archives deleted instance records by moving the deleted rows from the production tables to shadow tables.
- Purges deleted rows from the shadow tables after archiving is complete.
16.2.1. Configuring database management
The cron jobs use default settings to perform database management tasks. By default, the database archiving cron jobs run daily at 00:01, and the database purging cron jobs run daily at 05:00, both with a jitter between 0 and 3600 seconds. You can modify these settings as required by using heat parameters.
Procedure
- Open your Compute environment file.
Add the heat parameter that controls the cron job that you want to add or modify. For example, to purge the shadow tables immediately after they are archived, set the following parameter to "True":
parameter_defaults:
  ...
  NovaCronArchiveDeleteRowsPurge: True
For a complete list of the heat parameters to manage database cron jobs, see Configuration options for the Compute service automated database management.
- Save the updates to your Compute environment file.
Add your Compute environment file to the stack with your other environment files and deploy the overcloud:
(undercloud)$ openstack overcloud deploy --templates \
  -e [your environment files] \
  -e /home/stack/templates/<compute_environment_file>.yaml
16.2.2. Configuration options for the Compute service automated database management
Use the following heat parameters to enable and modify the automated cron jobs that manage the database.
Table 16.1. Compute (nova) service cron parameters
| Parameter | Description |
|---|---|
|
| Set this parameter to "True" to archive deleted instance records from all cells.
Default: |
|
| Use this parameter to archive deleted instance records based on their age in days.
Set to
Default: |
|
| Use this parameter to configure the file for logging deleted instance records.
Default: |
|
| Use this parameter to configure the hour at which to run the cron command to move deleted instance records to another table.
Default: |
|
| Use this parameter to configure the maximum delay, in seconds, before moving deleted instance records to another table.
Default: |
|
| Use this parameter to configure the maximum number of deleted instance records that can be moved to another table.
Default: |
|
| Use this parameter to configure the minute past the hour at which to run the cron command to move deleted instance records to another table.
Default: |
|
| Use this parameter to configure on which day of the month to run the cron command to move deleted instance records to another table.
Default: |
|
| Use this parameter to configure in which month to run the cron command to move deleted instance records to another table.
Default: |
|
| Set this parameter to "True" to purge shadow tables immediately after scheduled archiving.
Default: |
|
| Set this parameter to "True" to continue to move deleted instance records to another table until all records are moved.
Default: |
|
| Use this parameter to configure the user that owns the crontab that archives deleted instance records and that has access to the log file the crontab uses.
Default: |
|
| Use this parameter to configure on which day of the week to run the cron command to move deleted instance records to another table.
Default: |
|
| Use this parameter to purge shadow tables based on their age in days.
Set to
Default: |
|
| Set this parameter to "True" to purge shadow tables from all cells.
Default: |
|
| Use this parameter to configure the file for logging purged shadow tables.
Default: |
|
| Use this parameter to configure the hour at which to run the cron command to purge shadow tables.
Default: |
|
| Use this parameter to configure the maximum delay, in seconds, before purging shadow tables.
Default: |
|
| Use this parameter to configure the minute past the hour at which to run the cron command to purge shadow tables.
Default: |
|
| Use this parameter to configure in which month to run the cron command to purge the shadow tables.
Default: |
|
| Use this parameter to configure on which day of the month to run the cron command to purge the shadow tables.
Default: |
|
| Use this parameter to configure the user that owns the crontab that purges the shadow tables and that has access to the log file the crontab uses.
Default: |
|
| Use this parameter to enable verbose logging in the log file for purged shadow tables.
Default: |
|
| Use this parameter to configure on which day of the week to run the cron command to purge the shadow tables.
Default: |
16.3. Migrating virtual machine instances between Compute nodes
You sometimes need to migrate instances from one Compute node to another Compute node in the overcloud, to perform maintenance, rebalance the workload, or replace a failed or failing node.
- Compute node maintenance
- If you need to temporarily take a Compute node out of service, for instance, to perform hardware maintenance or repair, kernel upgrades and software updates, you can migrate instances running on the Compute node to another Compute node.
- Failing Compute node
- If a Compute node is about to fail and you need to service it or replace it, you can migrate instances from the failing Compute node to a healthy Compute node.
- Failed Compute nodes
- If a Compute node has already failed, you can evacuate the instances. You can rebuild instances from the original image on another Compute node, using the same name, UUID, network addresses, and any other allocated resources the instance had before the Compute node failed.
- Workload rebalancing
- You can migrate one or more instances to another Compute node to rebalance the workload. For example, you can consolidate instances on a Compute node to conserve power, migrate instances to a Compute node that is physically closer to other networked resources to reduce latency, or distribute instances across Compute nodes to avoid hot spots and increase resiliency.
Director configures all Compute nodes to provide secure migration. All Compute nodes also require a shared SSH key to provide the users of each host with access to other Compute nodes during the migration process. Director creates this key using the OS::TripleO::Services::NovaCompute composable service. This composable service is one of the main services included on all Compute roles by default. For more information, see Composable Services and Custom Roles in the Advanced Overcloud Customization guide.
If you have a functioning Compute node, and you want to make a copy of an instance for backup purposes, or to copy the instance to a different environment, follow the procedure in Importing virtual machines into the overcloud in the Director Installation and Usage guide.
16.3.1. Migration types
Red Hat OpenStack Platform (RHOSP) supports the following types of migration.
Cold migration
Cold migration, or non-live migration, involves shutting down a running instance before migrating it from the source Compute node to the destination Compute node.
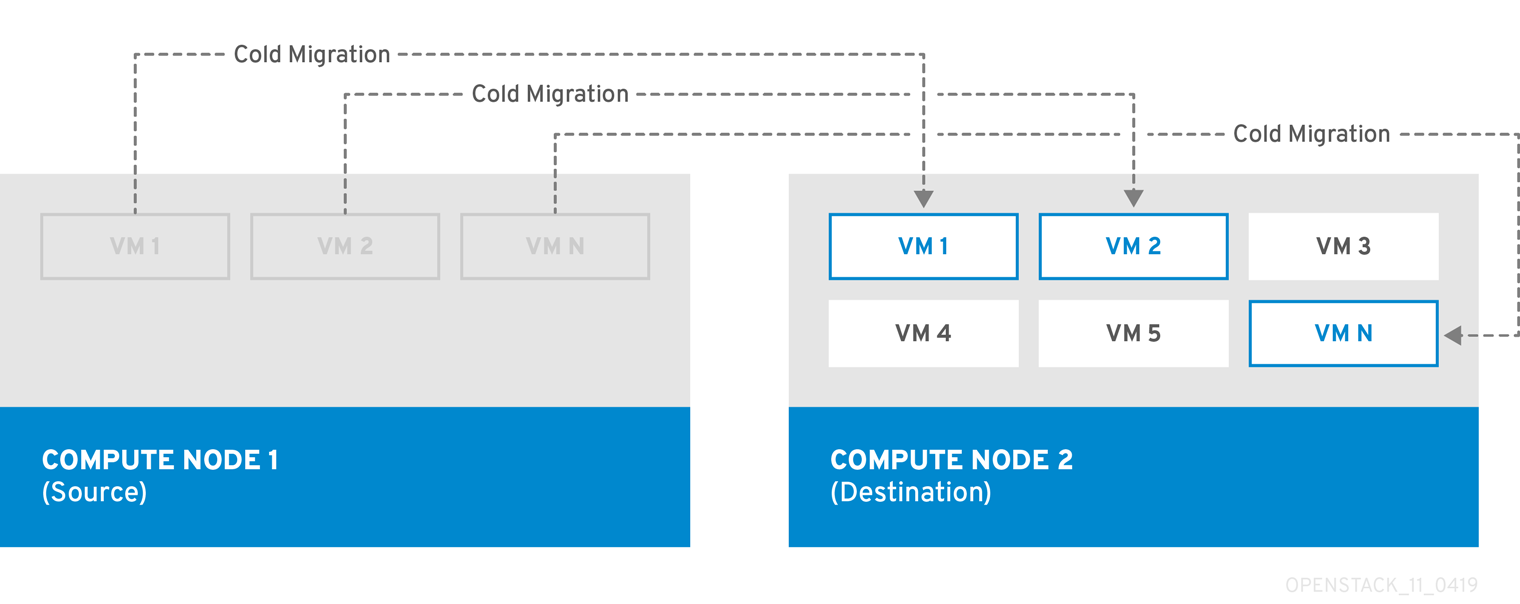
Cold migration involves some downtime for the instance. The migrated instance maintains access to the same volumes and IP addresses.
Cold migration requires that both the source and destination Compute nodes are running.
Live migration
Live migration involves moving the instance from the source Compute node to the destination Compute node without shutting it down, and while maintaining state consistency.
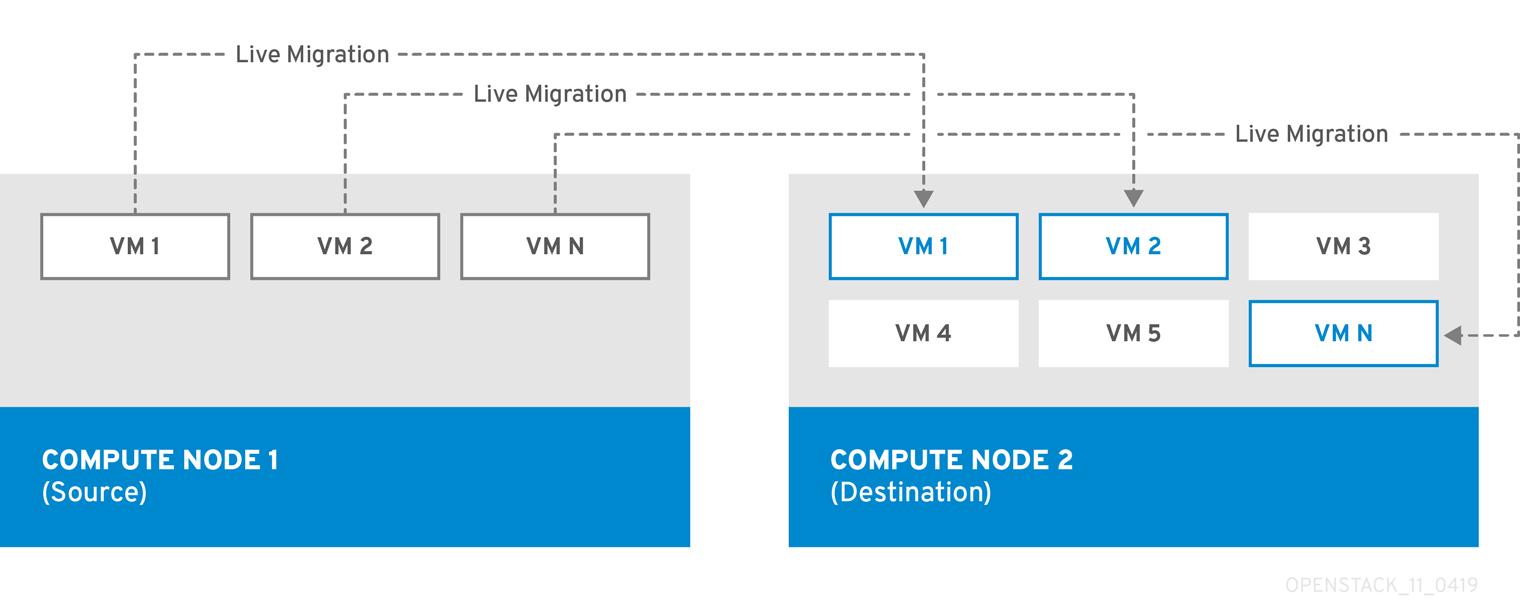
Live migrating an instance involves little or no perceptible downtime. However, live migration does impact performance for the duration of the migration operation. Therefore, instances should be taken out of the critical path while being migrated.
Live migration impacts the performance of the workload being moved. Red Hat does not provide support for increased packet loss, network latency, memory latency or a reduction in network bandwith, memory bandwidth, storage IO, or CPU peformance during live migration.
Live migration requires that both the source and destination Compute nodes are running.
In some cases, instances cannot use live migration. For more information, see Migration constraints.
Evacuation
If you need to migrate instances because the source Compute node has already failed, you can evacuate the instances.
16.3.2. Migration constraints
Migration constraints typically arise with block migration, configuration disks, or when one or more instances access physical hardware on the Compute node.
CPU constraints
The source and destination Compute nodes must have the same CPU architecture. For example, Red Hat does not support migrating an instance from an x86_64 CPU to a ppc64le CPU.
Migration between different CPU models is not supported. In some cases, the CPU of the source and destination Compute node must match exactly, such as instances that use CPU host passthrough. In all cases, the CPU features of the destination node must be a superset of the CPU features on the source node.
Memory constraints
The destination Compute node must have sufficient available RAM. Memory oversubscription can cause migration to fail.
Block migration constraints
Migrating instances that use disks that are stored locally on a Compute node takes significantly longer than migrating volume-backed instances that use shared storage, such as Red Hat Ceph Storage. This latency arises because OpenStack Compute (nova) migrates local disks block-by-block between the Compute nodes over the control plane network by default. By contrast, volume-backed instances that use shared storage, such as Red Hat Ceph Storage, do not have to migrate the volumes, because each Compute node already has access to the shared storage.
Network congestion in the control plane network caused by migrating local disks or instances that consume large amounts of RAM might impact the performance of other systems that use the control plane network, such as RabbitMQ.
Read-only drive migration constraints
Migrating a drive is supported only if the drive has both read and write capabilities. For example, OpenStack Compute (nova) cannot migrate a CD-ROM drive or a read-only config drive. However, OpenStack Compute (nova) can migrate a drive with both read and write capabilities, including a config drive with a drive format such as vfat.
Live migration constraints
In some cases, live migrating instances involves additional constraints.
Live migration impacts the performance of the workload being moved. Red Hat does not provide support for increased packet loss, network latency, memory latency or a reduction in network bandwidth, memory bandwidth, storage IO, or CPU performance during live migration.
- No new operations during migration
- To achieve state consistency between the copies of the instance on the source and destination nodes, RHOSP must prevent new operations during live migration. Otherwise, live migration might take a long time or potentially never end if writes to memory occur faster than live migration can replicate the state of the memory.
- CPU pinning with NUMA
-
NovaSchedulerDefaultFiltersparameter in the Compute configuration must include the valuesAggregateInstanceExtraSpecsFilterandNUMATopologyFilter. - Multi-cell clouds
- In a multi-cell cloud, instances can be live migrated to a different host in the same cell, but not across cells.
- Floating instances
-
When live migrating floating instances, if the configuration of
NovaComputeCpuSharedSeton the destination Compute node is different from the configuration ofNovaComputeCpuSharedSeton the source Compute node, the instances will not be allocated to the CPUs configured for shared (unpinned) instances on the destination Compute node. Therefore, if you need to live migrate floating instances, you must configure all the Compute nodes with the same CPU mappings for dedicated (pinned) and shared (unpinned) instances, or use a host aggregate for the shared instances. - Destination Compute node capacity
- The destination Compute node must have sufficient capacity to host the instance that you want to migrate.
- SR-IOV live migration
- Instances with SR-IOV-based network interfaces can be live migrated. Live migrating instances with direct mode SR-IOV network interfaces incurs network downtime. This is because the direct mode interfaces need to be detached and re-attached during the migration.
- Packet loss on ML2/OVN deployments
ML2/OVN does not support live migration without packet loss. This is because OVN cannot handle multiple port bindings and therefore does not know when a port is being migrated.
To minimize package loss during live migration, configure your ML2/OVN deployment to announce the instance on the destination host once migration is complete:
parameter_defaults: ComputeExtraConfig: nova::config::nova_config: workarounds/enable_qemu_monitor_announce_self: value: 'True'- Live migration on ML2/OVS deployments
- During the live migration process, when the virtual machine is unpaused in the destination host, the metadata service might not be available because the metadata server proxy has not yet spawned. This unavailability is brief. The service becomes available momentarily and the live migration succeeds.
- Constraints that preclude live migration
- You cannot live migrate an instance that uses the following features.
- PCI passthrough
- QEMU/KVM hypervisors support attaching PCI devices on the Compute node to an instance. Use PCI passthrough to give an instance exclusive access to PCI devices, which appear and behave as if they are physically attached to the operating system of the instance. However, because PCI passthrough involves direct access to the physical devices, QEMU/KVM does not support live migration of instances using PCI passthrough.
- Port resource requests
You cannot live migrate an instance that uses a port that has resource requests, such as a guaranteed minimum bandwidth QoS policy. Use the following command to check if a port has resource requests:
$ openstack port show <port_name/port_id>
16.3.3. Preparing to migrate
Before you migrate one or more instances, you need to determine the Compute node names and the IDs of the instances to migrate.
Procedure
Identify the source Compute node host name and the destination Compute node host name:
(undercloud)$ source ~/overcloudrc
(overcloud)$ openstack compute service list
List the instances on the source Compute node and locate the ID of the instance or instances that you want to migrate:
(overcloud)$ openstack server list --host <source> --all-projects
Replace
<source>with the name or ID of the source Compute node.Optional: If you are migrating instances from a source Compute node to perform maintenance on the node, you must disable the node to prevent the scheduler from assigning new instances to the node during maintenance:
(overcloud)$ openstack compute service set <source> nova-compute --disable
Replace
<source>with the host name of the source Compute node.
You are now ready to perform the migration. Follow the required procedure detailed in Cold migrating an instance or Live migrating an instance.
16.3.4. Cold migrating an instance
Cold migrating an instance involves stopping the instance and moving it to another Compute node. Cold migration facilitates migration scenarios that live migrating cannot facilitate, such as migrating instances that use PCI passthrough. The scheduler automatically selects the destination Compute node. For more information, see Migration constraints.
Procedure
To cold migrate an instance, enter the following command to power off and move the instance:
(overcloud)$ openstack server migrate <instance> --wait
-
Replace
<instance>with the name or ID of the instance to migrate. -
Specify the
--block-migrationflag if migrating a locally stored volume.
-
Replace
- Wait for migration to complete. While you wait for the instance migration to complete, you can check the migration status. For more information, see Checking migration status.
Check the status of the instance:
(overcloud)$ openstack server list --all-projects
A status of "VERIFY_RESIZE" indicates you need to confirm or revert the migration:
If the migration worked as expected, confirm it:
(overcloud)$ openstack server resize --confirm <instance>
Replace
<instance>with the name or ID of the instance to migrate. A status of "ACTIVE" indicates that the instance is ready to use.If the migration did not work as expected, revert it:
(overcloud)$ openstack server resize --revert <instance>
Replace
<instance>with the name or ID of the instance.
Restart the instance:
(overcloud)$ openstack server start <instance>
Replace
<instance>with the name or ID of the instance.Optional: If you disabled the source Compute node for maintenance, you must re-enable the node so that new instances can be assigned to it:
(overcloud)$ openstack compute service set <source> nova-compute --enable
Replace
<source>with the host name of the source Compute node.
16.3.5. Live migrating an instance
Live migration moves an instance from a source Compute node to a destination Compute node with a minimal amount of downtime. Live migration might not be appropriate for all instances. For more information, see Migration constraints.
Procedure
To live migrate an instance, specify the instance and the destination Compute node:
(overcloud)$ openstack server migrate <instance> --live-migration [--host <dest>] --wait
-
Replace
<instance>with the name or ID of the instance. Replace
<dest>with the name or ID of the destination Compute node.NoteThe
openstack server migratecommand covers migrating instances with shared storage, which is the default. Specify the--block-migrationflag to migrate a locally stored volume:(overcloud)$ openstack server migrate <instance> --live-migration [--host <dest>] --wait --block-migration
-
Replace
Confirm that the instance is migrating:
(overcloud)$ openstack server show <instance>

+----------------------+--------------------------------------+
| Field                | Value                                |
+----------------------+--------------------------------------+
| ...                  | ...                                  |
| status               | MIGRATING                            |
| ...                  | ...                                  |
+----------------------+--------------------------------------+
- Wait for migration to complete. While you wait for the instance migration to complete, you can check the migration status. For more information, see Checking migration status.
Check the status of the instance to confirm if the migration was successful:
(overcloud)$ openstack server list --host <dest> --all-projects
Replace
<dest>with the name or ID of the destination Compute node.Optional: If you disabled the source Compute node for maintenance, you must re-enable the node so that new instances can be assigned to it:
(overcloud)$ openstack compute service set <source> nova-compute --enable
Replace
<source>with the host name of the source Compute node.
16.3.6. Checking migration status
Migration involves several state transitions before migration is complete. During a healthy migration, the migration state typically transitions as follows:
- Queued: The Compute service has accepted the request to migrate an instance, and migration is pending.
- Preparing: The Compute service is preparing to migrate the instance.
- Running: The Compute service is migrating the instance.
- Post-migrating: The Compute service has built the instance on the destination Compute node and is releasing resources on the source Compute node.
- Completed: The Compute service has completed migrating the instance and finished releasing resources on the source Compute node.
Procedure
Retrieve the list of migration IDs for the instance:
$ nova server-migration-list <instance>

+----+-------------+-----------  (...)
| Id | Source Node | Dest Node | (...)
+----+-------------+-----------+ (...)
| 2  | -           | -         | (...)
+----+-------------+-----------+ (...)
Replace
<instance>with the name or ID of the instance.Show the status of the migration:
$ nova server-migration-show <instance> <migration_id>
-
Replace
<instance>with the name or ID of the instance. Replace
<migration_id>with the ID of the migration.Running the
nova server-migration-showcommand returns the following example output:+------------------------+--------------------------------------+ | Property | Value | +------------------------+--------------------------------------+ | created_at | 2017-03-08T02:53:06.000000 | | dest_compute | controller | | dest_host | - | | dest_node | - | | disk_processed_bytes | 0 | | disk_remaining_bytes | 0 | | disk_total_bytes | 0 | | id | 2 | | memory_processed_bytes | 65502513 | | memory_remaining_bytes | 786427904 | | memory_total_bytes | 1091379200 | | server_uuid | d1df1b5a-70c4-4fed-98b7-423362f2c47c | | source_compute | compute2 | | source_node | - | | status | running | | updated_at | 2017-03-08T02:53:47.000000 | +------------------------+--------------------------------------+
TipThe OpenStack Compute service measures progress of the migration by the number of remaining memory bytes to copy. If this number does not decrease over time, the migration might be unable to complete, and the Compute service might abort it.
-
Replace
Sometimes instance migration can take a long time or encounter errors. For more information, see Troubleshooting migration.
16.3.7. Evacuating an instance
If you want to move an instance from a dead or shut-down Compute node to a new host in the same environment, you can evacuate it.
The evacuate process destroys the original instance and rebuilds it on another Compute node using the original image, instance name, UUID, network addresses, and any other resources the original instance had allocated to it.
If the instance uses shared storage, the instance root disk is not rebuilt during the evacuate process, as the disk remains accessible by the destination Compute node. If the instance does not use shared storage, then the instance root disk is also rebuilt on the destination Compute node.
-
You can only perform an evacuation when the Compute node is fenced, and the API reports that the state of the Compute node is "down" or "forced-down". If the Compute node is not reported as "down" or "forced-down", the
evacuatecommand fails. - To perform an evacuation, you must be a cloud administrator.
16.3.7.1. Evacuating one instance
You can evacuate instances one at a time.
Procedure
Confirm that the instance is not running:
(overcloud)$ openstack server list --host <node> --all-projects
-
Replace
<node>with the name or UUID of the Compute node that hosts the instance.
-
Replace
Confirm that the host Compute node is fenced or shut down:
(overcloud)[stack@director ~]$ openstack baremetal node show <node>
-
Replace
<node>with the name or UUID of the Compute node that hosts the instance to evacuate. To perform an evacuation, the Compute node must have a status ofdownorforced-down.
-
Replace
Disable the Compute node:
(overcloud)[stack@director ~]$ openstack compute service set \
 <node> nova-compute --disable --disable-reason <disable_host_reason>
-
Replace
<node>with the name of the Compute node to evacuate the instance from. -
Replace
<disable_host_reason>with details about why you disabled the Compute node.
-
Replace
Evacuate the instance:
(overcloud)[stack@director ~]$ nova evacuate [--password <pass>] <instance> [<dest>]
Optional: Replace
<pass>with the administrative password required to access the evacuated instance. If a password is not specified, a random password is generated and output when the evacuation is complete.NoteThe password is changed only when ephemeral instance disks are stored on the local hypervisor disk. The password is not changed if the instance is hosted on shared storage or has a Block Storage volume attached, and no error message is displayed to inform you that the password was not changed.
-
Replace
<instance>with the name or ID of the instance to evacuate. Optional: Replace
<dest>with the name of the Compute node to evacuate the instance to. If you do not specify the destination Compute node, the Compute scheduler selects one for you. You can find possible Compute nodes by using the following command:(overcloud)[stack@director ~]$ openstack hypervisor list
Optional: Enable the Compute node when it is recovered:
(overcloud)[stack@director ~]$ openstack compute service set \
 <node> nova-compute --enable
-
Replace
<node>with the name of the Compute node to enable.
-
Replace
16.3.7.2. Evacuating all instances on a host
You can evacuate all instances on a specified Compute node.
Procedure
Confirm that the instances to evacuate are not running:
(overcloud)$ openstack server list --host <node> --all-projects
-
Replace
<node>with the name or UUID of the Compute node that hosts the instances to evacuate.
-
Replace
Confirm that the host Compute node is fenced or shut down:
(overcloud)[stack@director ~]$ openstack baremetal node show <node>
-
Replace
<node>with the name or UUID of the Compute node that hosts the instances to evacuate. To perform an evacuation, the Compute node must have a status ofdownorforced-down.
-
Replace
Disable the Compute node:
(overcloud)[stack@director ~]$ openstack compute service set \
 <node> nova-compute --disable --disable-reason <disable_host_reason>
-
Replace
<node>with the name of the Compute node to evacuate the instances from. -
Replace
<disable_host_reason>with details about why you disabled the Compute node.
-
Replace
Evacuate all instances on a specified Compute node:
(overcloud)[stack@director ~]$ nova host-evacuate [--target_host <dest>] <node>
Optional: Replace
<dest>with the name of the destination Compute node to evacuate the instances to. If you do not specify the destination, the Compute scheduler selects one for you. You can find possible Compute nodes by using the following command:(overcloud)[stack@director ~]$ openstack hypervisor list
-
Replace
<node>with the name of the Compute node to evacuate the instances from.
Optional: Enable the Compute node when it is recovered:
(overcloud)[stack@director ~]$ openstack compute service set \
 <node> nova-compute --enable
-
Replace
<node>with the name of the Compute node to enable.
-
Replace
16.3.8. Troubleshooting migration
The following issues can arise during instance migration:
- The migration process encounters errors.
- The migration process never ends.
- Performance of the instance degrades after migration.
16.3.8.1. Errors during migration
The following issues can send the migration operation into an error state:
- Running a cluster with different versions of Red Hat OpenStack Platform (RHOSP).
- Specifying an instance ID that cannot be found.
-
The instance you are trying to migrate is in an
errorstate. - The Compute service is shutting down.
- A race condition occurs.
-
Live migration enters a
failedstate.
When live migration enters a failed state, it is typically followed by an error state. The following common issues can cause a failed state:
- A destination Compute host is not available.
- A scheduler exception occurs.
- The rebuild process fails due to insufficient computing resources.
- A server group check fails.
- The instance on the source Compute node gets deleted before migration to the destination Compute node is complete.
16.3.8.2. Never-ending live migration
Live migration can fail to complete, which leaves migration in a perpetual running state. A common reason for a live migration that never completes is that client requests to the instance running on the source Compute node create changes that occur faster than the Compute service can replicate them to the destination Compute node.
Use one of the following methods to address this situation:
- Abort the live migration.
- Force the live migration to complete.
Aborting live migration
If the instance state changes faster than the migration procedure can copy it to the destination node, and you do not want to temporarily suspend the instance operations, you can abort the live migration.
Procedure
Retrieve the list of migrations for the instance:
$ nova server-migration-list <instance>
Replace
<instance>with the name or ID of the instance.Abort the live migration:
$ nova live-migration-abort <instance> <migration_id>
-
Replace
<instance>with the name or ID of the instance. -
Replace
<migration_id>with the ID of the migration.
-
Replace
Forcing live migration to complete
If the instance state changes faster than the migration procedure can copy it to the destination node, and you want to temporarily suspend the instance operations to force migration to complete, you can force the live migration procedure to complete.
Forcing live migration to complete might lead to perceptible downtime.
Procedure
Retrieve the list of migrations for the instance:
$ nova server-migration-list <instance>
Replace
<instance>with the name or ID of the instance.Force the live migration to complete:
$ nova live-migration-force-complete <instance> <migration_id>
-
Replace
<instance>with the name or ID of the instance. -
Replace
<migration_id>with the ID of the migration.
-
Replace
16.3.8.3. Instance performance degrades after migration
For instances that use a NUMA topology, the source and destination Compute nodes must have the same NUMA topology and configuration. The NUMA topology of the destination Compute node must have sufficient resources available. If the NUMA configuration between the source and destination Compute nodes is not the same, it is possible that live migration succeeds while the instance performance degrades. For example, if the source Compute node maps NIC 1 to NUMA node 0, but the destination Compute node maps NIC 1 to NUMA node 5, after migration the instance might route network traffic from a first CPU across the bus to a second CPU with NUMA node 5 to route traffic to NIC 1. This can result in expected behavior, but degraded performance. Similarly, if NUMA node 0 on the source Compute node has sufficient available CPU and RAM, but NUMA node 0 on the destination Compute node already has instances using some of the resources, the instance might run correctly but suffer performance degradation. For more information, see Migration constraints.