
Chapter 7. Configuring instance scheduling and placement
The Compute scheduler service determines on which Compute node or host aggregate to place an instance. When the Compute (nova) service receives a request to launch or move an instance, it uses the specifications provided in the request, the flavor, and the image to find a suitable host. For example, a flavor can specify the traits an instance requires a host to have, such as the type of storage disk, or the Intel CPU instruction set extension.
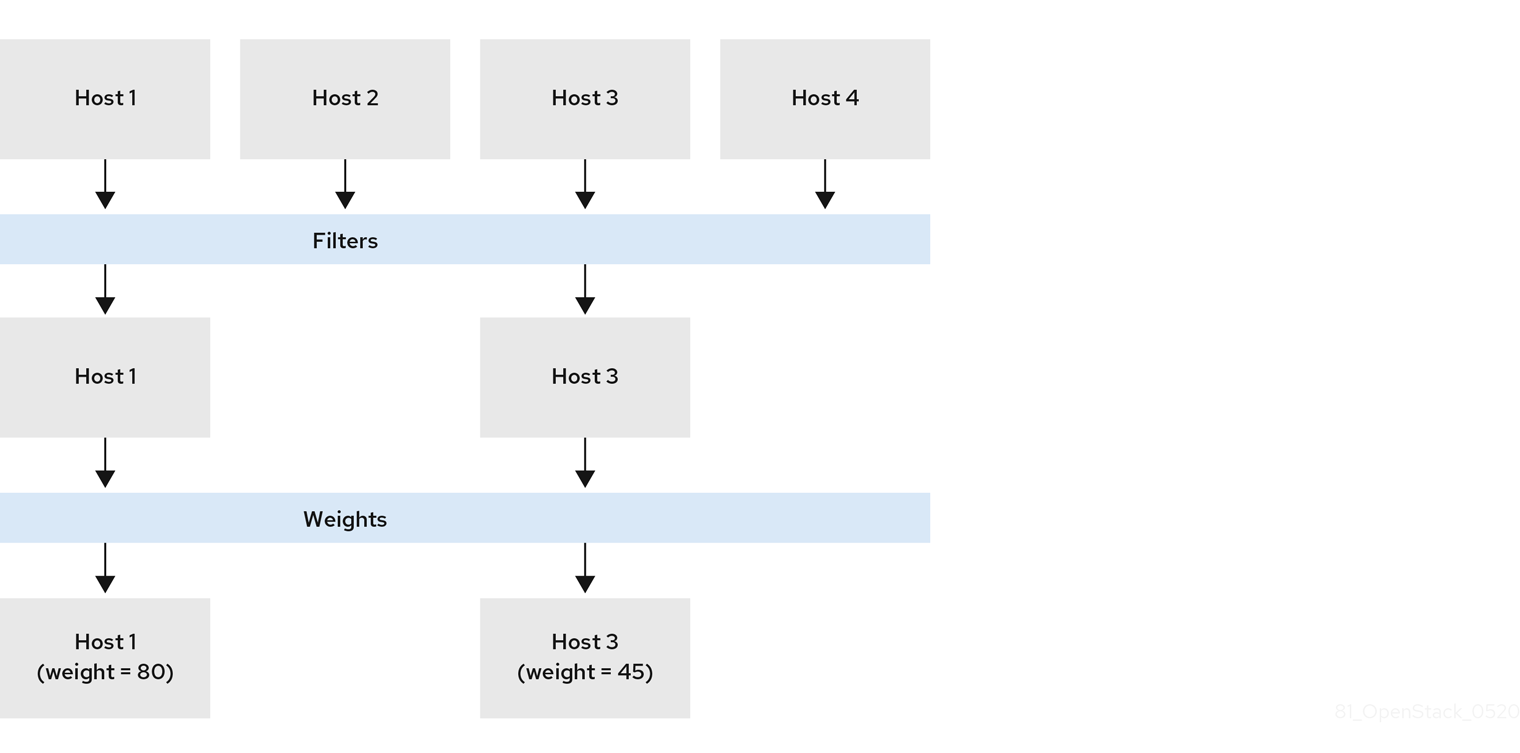
The Compute scheduler service uses the configuration of the following components, in the following order, to determine on which Compute node to launch or move an instance:
- Placement service prefilters: The Compute scheduler service uses the Placement service to filter the set of candidate Compute nodes based on specific attributes. For example, the Placement service automatically excludes disabled Compute nodes.
- Filters: Used by the Compute scheduler service to determine the initial set of Compute nodes on which to launch an instance.
- Weights: The Compute scheduler service prioritizes the filtered Compute nodes using a weighting system. The highest weight has the highest priority.
In the following diagram, host 1 and 3 are eligible after filtering. Host 1 has the highest weight and therefore has the highest priority for scheduling.
7.1. Prefiltering using the Placement service
The Compute service (nova) interacts with the Placement service when it creates and manages instances. The Placement service tracks the inventory and usage of resource providers, such as a Compute node, a shared storage pool, or an IP allocation pool, and their available quantitative resources, such as the available vCPUs. Any service that needs to manage the selection and consumption of resources can use the Placement service.
The Placement service also tracks the mapping of available qualitative resources to resource providers, such as the type of storage disk trait a resource provider has.
The Placement service applies prefilters to the set of candidate Compute nodes based on Placement service resource provider inventories and traits. You can create prefilters based on the following criteria:
- Supported image types
- Traits
- Projects or tenants
- Availability zone
7.1.1. Filtering by requested image type support
You can exclude Compute nodes that do not support the disk format of the image used to launch an instance. This is useful when your environment uses Red Hat Ceph Storage as an ephemeral backend, which does not support QCOW2 images. Enabling this feature ensures that the scheduler does not send requests to launch instances using a QCOW2 image to Compute nodes backed by Red Hat Ceph Storage.
Procedure
- Open your Compute environment file.
-
To exclude Compute nodes that do not support the disk format of the image used to launch an instance, set the
NovaSchedulerQueryImageTypeparameter toTruein the Compute environment file. - Save the updates to your Compute environment file.
Add your Compute environment file to the stack with your other environment files and deploy the overcloud:
(undercloud)$ openstack overcloud deploy --templates \
 -e [your environment files] \
 -e /home/stack/templates/<compute_environment_file>.yaml
7.1.2. Filtering by resource provider traits
Each resource provider has a set of traits. Traits are the qualitative aspects of a resource provider, for example, the type of storage disk, or the Intel CPU instruction set extension.
The Compute node reports its capabilities to the Placement service as traits. An instance can specify which of these traits it requires, or which traits the resource provider must not have. The Compute scheduler can use these traits to identify a suitable Compute node or host aggregate to host an instance.
To enable your cloud users to create instances on hosts that have particular traits, you can define a flavor that requires or forbids a particular trait, and you can create an image that requires or forbids a particular trait.
For a list of the available traits, see the os-traits library. You can also create custom traits, as required.
7.1.2.1. Creating an image that requires or forbids a resource provider trait
You can create an instance image that your cloud users can use to launch instances on hosts that have particular traits.
Procedure
Create a new image:
(overcloud)$ openstack image create ... trait-image
Identify the trait you require a host or host aggregate to have. You can select an existing trait, or create a new trait:
To use an existing trait, list the existing traits to retrieve the trait name:
(overcloud)$ openstack --os-placement-api-version 1.6 trait list
To create a new trait, enter the following command:
(overcloud)$ openstack --os-placement-api-version 1.6 trait \
 create CUSTOM_TRAIT_NAME
Custom traits must begin with the prefix
CUSTOM_and contain only the letters A through Z, the numbers 0 through 9 and the underscore “_” character.
Collect the existing resource provider traits of each host:
(overcloud)$ existing_traits=$(openstack --os-placement-api-version 1.6 resource provider trait list -f value <host_uuid> | sed 's/^/--trait /')
Check the existing resource provider traits for the traits you require a host or host aggregate to have:
(overcloud)$ echo $existing_traits
If the traits you require are not already added to the resource provider, then add the existing traits and your required traits to the resource providers for each host:
(overcloud)$ openstack --os-placement-api-version 1.6 \
 resource provider trait set $existing_traits \
 --trait <TRAIT_NAME> \
 <host_uuid>
Replace
<TRAIT_NAME>with the name of the trait that you want to add to the resource provider. You can use the--traitoption more than once to add additional traits, as required.NoteThis command performs a full replacement of the traits for the resource provider. Therefore, you must retrieve the list of existing resource provider traits on the host and set them again to prevent them from being removed.
To schedule instances on a host or host aggregate that has a required trait, add the trait to the image extra specs. For example, to schedule instances on a host or host aggregate that supports AVX-512, add the following trait to the image extra specs:
(overcloud)$ openstack image set \
 --property trait:HW_CPU_X86_AVX512BW=required \
 trait-image
To filter out hosts or host aggregates that have a forbidden trait, add the trait to the image extra specs. For example, to prevent instances from being scheduled on a host or host aggregate that supports multi-attach volumes, add the following trait to the image extra specs:
(overcloud)$ openstack image set \
 --property trait:COMPUTE_VOLUME_MULTI_ATTACH=forbidden \
 trait-image
7.1.2.2. Creating a flavor that requires or forbids a resource provider trait
You can create flavors that your cloud users can use to launch instances on hosts that have particular traits.
Procedure
Create a flavor:
(overcloud)$ openstack flavor create --vcpus 1 --ram 512 \
 --disk 2 trait-flavor
Identify the trait you require a host or host aggregate to have. You can select an existing trait, or create a new trait:
To use an existing trait, list the existing traits to retrieve the trait name:
(overcloud)$ openstack --os-placement-api-version 1.6 trait list
To create a new trait, enter the following command:
(overcloud)$ openstack --os-placement-api-version 1.6 trait \
 create CUSTOM_TRAIT_NAME
Custom traits must begin with the prefix
CUSTOM_and contain only the letters A through Z, the numbers 0 through 9 and the underscore “_” character.
Collect the existing resource provider traits of each host:
(overcloud)$ existing_traits=$(openstack --os-placement-api-version 1.6 resource provider trait list -f value <host_uuid> | sed 's/^/--trait /')
Check the existing resource provider traits for the traits you require a host or host aggregate to have:
(overcloud)$ echo $existing_traits
If the traits you require are not already added to the resource provider, then add the existing traits and your required traits to the resource providers for each host:
(overcloud)$ openstack --os-placement-api-version 1.6 \
 resource provider trait set $existing_traits \
 --trait <TRAIT_NAME> \
 <host_uuid>
Replace
<TRAIT_NAME>with the name of the trait that you want to add to the resource provider. You can use the--traitoption more than once to add additional traits, as required.NoteThis command performs a full replacement of the traits for the resource provider. Therefore, you must retrieve the list of existing resource provider traits on the host and set them again to prevent them from being removed.
To schedule instances on a host or host aggregate that has a required trait, add the trait to the flavor extra specs. For example, to schedule instances on a host or host aggregate that supports AVX-512, add the following trait to the flavor extra specs:
(overcloud)$ openstack flavor set \
 --property trait:HW_CPU_X86_AVX512BW=required \
 trait-flavor
To filter out hosts or host aggregates that have a forbidden trait, add the trait to the flavor extra specs. For example, to prevent instances from being scheduled on a host or host aggregate that supports multi-attach volumes, add the following trait to the flavor extra specs:
(overcloud)$ openstack flavor set \
 --property trait:COMPUTE_VOLUME_MULTI_ATTACH=forbidden \
 trait-flavor
7.1.3. Filtering by isolating host aggregates
You can restrict scheduling on a host aggregate to only those instances whose flavor and image traits match the metadata of the host aggregate. The combination of flavor and image metadata must require all the host aggregate traits to be eligible for scheduling on Compute nodes in that host aggregate.
Procedure
- Open your Compute environment file.
-
To isolate host aggregates to host only instances whose flavor and image traits match the aggregate metadata, set the
NovaSchedulerEnableIsolatedAggregateFilteringparameter toTruein the Compute environment file. - Save the updates to your Compute environment file.
Add your Compute environment file to the stack with your other environment files and deploy the overcloud:
(undercloud)$ openstack overcloud deploy --templates \
 -e [your environment files] \
 -e /home/stack/templates/<compute_environment_file>.yaml
Identify the traits you want to isolate the host aggregate for. You can select an existing trait, or create a new trait:
To use an existing trait, list the existing traits to retrieve the trait name:
(overcloud)$ openstack --os-placement-api-version 1.6 trait list
To create a new trait, enter the following command:
(overcloud)$ openstack --os-placement-api-version 1.6 trait \
 create CUSTOM_TRAIT_NAME
Custom traits must begin with the prefix
CUSTOM_and contain only the letters A through Z, the numbers 0 through 9 and the underscore “_” character.
Collect the existing resource provider traits of each Compute node:
(overcloud)$ existing_traits=$(openstack --os-placement-api-version 1.6 resource provider trait list -f value <host_uuid> | sed 's/^/--trait /')
Check the existing resource provider traits for the traits you want to isolate the host aggregate for:
(overcloud)$ echo $existing_traits
If the traits you require are not already added to the resource provider, then add the existing traits and your required traits to the resource providers for each Compute node in the host aggregate:
(overcloud)$ openstack --os-placement-api-version 1.6 \
 resource provider trait set $existing_traits \
 --trait <TRAIT_NAME> \
 <host_uuid>
Replace
<TRAIT_NAME>with the name of the trait that you want to add to the resource provider. You can use the--traitoption more than once to add additional traits, as required.NoteThis command performs a full replacement of the traits for the resource provider. Therefore, you must retrieve the list of existing resource provider traits on the host and set them again to prevent them from being removed.
- Repeat steps 6 - 8 for each Compute node in the host aggregate.
Add the metadata property for the trait to the host aggregate:
(overcloud)$ openstack --os-compute-api-version 2.53 aggregate set \
 --property trait:<TRAIT_NAME>=required <aggregate_name>
Add the trait to a flavor or an image:
(overcloud)$ openstack flavor set \
 --property trait:<TRAIT_NAME>=required <flavor>
(overcloud)$ openstack image set \
 --property trait:<TRAIT_NAME>=required <image>
7.1.4. Filtering by availability zone using the Placement service
You can use the Placement service to honor availability zone requests. To use the Placement service to filter by availability zone, placement aggregates must exist that match the membership and UUID of the availability zone host aggregates.
Procedure
- Open your Compute environment file.
-
To use the Placement service to filter by availability zone, set the
NovaSchedulerQueryPlacementForAvailabilityZoneparameter toTruein the Compute environment file. -
Remove the
AvailabilityZoneFilterfilter from theNovaSchedulerDefaultFiltersparameter. - Save the updates to your Compute environment file.
Add your Compute environment file to the stack with your other environment files and deploy the overcloud:
(undercloud)$ openstack overcloud deploy --templates \
 -e [your environment files] \
 -e /home/stack/templates/<compute_environment_file>.yaml
Additional resources
- For more information on creating a host aggregate to use as an availability zone, see Creating an availability zone.
7.2. Configuring filters and weights for the Compute scheduler service
You need to configure the filters and weights for the Compute scheduler service to determine the initial set of Compute nodes on which to launch an instance.
Procedure
- Open your Compute environment file.
Add the filters you want the scheduler to use to the
NovaSchedulerDefaultFiltersparameter, for example:parameter_defaults: NovaSchedulerDefaultFilters: AggregateInstanceExtraSpecsFilter,ComputeFilter,ComputeCapabilitiesFilter,ImagePropertiesFilter
Specify which attribute to use to calculate the weight of each Compute node, for example:
parameter_defaults:
  ComputeExtraConfig:
    nova::config::nova_config:
      filter_scheduler/weight_classes:
        value: nova.scheduler.weights.all_weighers
For more information on the available attributes, see Compute scheduler weights.
Optional: Configure the multiplier to apply to each weigher. For example, to specify that the available RAM of a Compute node has a higher weight than the other default weighers, and that the Compute scheduler prefers Compute nodes with more available RAM over those nodes with less available RAM, use the following configuration:
parameter_defaults: ComputeExtraConfig: nova::config::nova_config: filter_scheduler/weight_classes: value: nova.scheduler.weights.all_weighers filter_scheduler/ram_weight_multiplier: value: 2.0TipYou can also set multipliers to a negative value. In the above example, to prefer Compute nodes with less available RAM over those nodes with more available RAM, set
ram_weight_multiplierto-2.0.- Save the updates to your Compute environment file.
Add your Compute environment file to the stack with your other environment files and deploy the overcloud:
(undercloud)$ openstack overcloud deploy --templates \
 -e [your environment files] \
 -e /home/stack/templates/<compute_environment_file>.yaml
Additional resources
- For a list of the available Compute scheduler service filters, see Compute scheduler filters.
- For a list of the available weight configuration options, see Compute scheduler weights.
7.3. Compute scheduler filters
You configure the NovaSchedulerDefaultFilters parameter in your Compute environment file to specify the filters the Compute scheduler must apply when selecting an appropriate Compute node to host an instance. The default configuration applies the following filters:
-
AvailabilityZoneFilter: The Compute node must be in the requested availability zone. -
ComputeFilter: The Compute node can service the request. -
ComputeCapabilitiesFilter: The Compute node satisfies the flavor extra specs. -
ImagePropertiesFilter: The Compute node satisfies the requested image properties. -
ServerGroupAntiAffinityFilter: The Compute node is not already hosting an instance in a specified group. -
ServerGroupAffinityFilter: The Compute node is already hosting instances in a specified group.
You can add and remove filters. The following table describes all the available filters.
Table 7.1. Compute scheduler filters
| Filter | Description |
|---|---|
|
| Use this filter to match the image metadata of an instance with host aggregate metadata. If any of the host aggregate metadata matches the metadata of the image, then the Compute nodes that belong to that host aggregate are candidates for launching instances from that image. The scheduler only recognises valid image metadata properties. For details on valid image metadata properties, see Image metadata properties. |
|
| Use this filter to match namespaced properties defined in the flavor extra specs of an instance with host aggregate metadata.
You must scope your flavor If any of the host aggregate metadata matches the metadata of the flavor extra spec, then the Compute nodes that belong to that host aggregate are candidates for launching instances from that image. |
|
|
Use this filter to filter hosts by I/O operations with a per-aggregate |
|
|
Use this filter to limit the availability of Compute nodes in project-isolated host aggregates to a specified set of projects. Only projects specified using the Note
The project can still place instances on other hosts. To restrict this, use the |
|
|
Use this filter to limit the number of instances each Compute node in an aggregate can host. You can configure the maximum number of instances per-aggregate by using the |
|
|
Use this filter to pass hosts if no flavor metadata key is set, or the flavor aggregate metadata value contains the name of the requested flavor. The value of the flavor metadata entry is a string that may contain either a single flavor name or a comma-separated list of flavor names, such as |
|
| Use this filter to consider all available Compute nodes for instance scheduling. Note Using this filter does not disable other filters. |
|
| Use this filter to launch instances on a Compute node in the availability zone specified by the instance. |
|
|
Use this filter to match namespaced properties defined in the flavor extra specs of an instance against the Compute node capabilities. You must prefix the flavor extra specs with the
A more efficient alternative to using the |
|
| Use this filter to pass all Compute nodes that are operational and enabled. This filter should always be present. |
|
|
Use this filter to enable scheduling of an instance on a different Compute node from a set of specific instances. To specify these instances when launching an instance, use the $ openstack server create --image cedef40a-ed67-4d10-800e-17455edce175 \ --flavor 1 --hint different_host=a0cf03a5-d921-4877-bb5c-86d26cf818e1 \ --hint different_host=8c19174f-4220-44f0-824a-cd1eeef10287 server-1 |
|
| Use this filter to filter Compute nodes based on the following properties defined on the instance image:
Compute nodes that can support the specified image properties contained in the instance are passed to the scheduler. For more information on image properties, see Image metadata properties. |
|
|
Use this filter to only schedule instances with isolated images on isolated Compute nodes. You can also prevent non-isolated images from being used to build instances on isolated Compute nodes by configuring
To specify the isolated set of images and hosts use the parameter_defaults:
ComputeExtraConfig:
nova::config::nova_config:
filter_scheduler/isolated_hosts:
value: server1, server2
filter_scheduler/isolated_images:
value: 342b492c-128f-4a42-8d3a-c5088cf27d13, ebd267a6-ca86-4d6c-9a0e-bd132d6b7d09
|
|
|
Use this filter to filter out hosts that have concurrent I/O operations that exceed the configured |
|
|
Use this filter to limit scheduling to Compute nodes that report the metrics configured by using To use this filter, add the following configuration to your Compute environment file: parameter_defaults:
ComputeExtraConfig:
nova::config::nova_config:
DEFAULT/compute_monitors:
value: 'cpu.virt_driver'
By default, the Compute scheduler service updates the metrics every 60 seconds. To ensure the metrics are up-to-date, you can increase the frequency at which the metrics data is refreshed using the parameter_defaults:
ComputeExtraConfig:
nova::config::nova_config:
DEFAULT/update_resources_interval:
value: '2'
|
|
|
Use this filter to schedule instances with a NUMA topology on NUMA-capable Compute nodes. Use flavor |
|
|
Use this filter to filter out Compute nodes that have more instances running than specified by the |
|
|
Use this filter to schedule instances on Compute nodes that have the devices that the instance requests by using the flavor Use this filter if you want to reserve nodes with PCI devices, which are typically expensive and limited, for instances that request them. |
|
|
Use this filter to enable scheduling of an instance on the same Compute node as a set of specific instances. To specify these instances when launching an instance, use the $ openstack server create --image cedef40a-ed67-4d10-800e-17455edce175 \ --flavor 1 --hint same_host=a0cf03a5-d921-4877-bb5c-86d26cf818e1 \ --hint same_host=8c19174f-4220-44f0-824a-cd1eeef10287 server-1 |
|
| Use this filter to schedule instances in an affinity server group on the same Compute node. To create the server group, enter the following command: $ openstack server group create --policy affinity <group_name>
To launch an instance in this group, use the $ openstack server create --image <image> \ --flavor <flavor> \ --hint group=<group_uuid> <instance_name> |
|
| Use this filter to schedule instances that belong to an anti-affinity server group on different Compute nodes. To create the server group, enter the following command: $ openstack server group create --policy anti-affinity <group_name>
To launch an instance in this group, use the $ openstack server create --image <image> \ --flavor <flavor> \ --hint group=<group_uuid> <instance_name> |
|
|
Use this filter to schedule instances on Compute nodes that have a specific IP subnet range. To specify the required range, use the $ openstack server create --image <image> \ --flavor <flavor> \ --hint build_near_host_ip=<ip_address> \ --hint cidr=<subnet_mask> <instance_name> |
7.4. Compute scheduler weights
Each Compute node has a weight that the scheduler can use to prioritize instance scheduling. After the Compute scheduler applies the filters, it selects the Compute node with the largest weight from the remaining candidate Compute nodes.
The Compute scheduler determines the weight of each Compute node by performing the following tasks:
- The scheduler normalizes each weight to a value between 0.0 and 1.0.
- The scheduler multiplies the normalized weight by the weigher multiplier.
The Compute scheduler calculates the weight normalization for each resource type by using the lower and upper values for the resource availability across the candidate Compute nodes:
- Nodes with the lowest availability of a resource (minval) are assigned '0'.
- Nodes with the highest availability of a resource (maxval) are assigned '1'.
Nodes with resource availability within the minval - maxval range are assigned a normalized weight calculated by using the following formula:
(node_resource_availability - minval) / (maxval - minval)
If all the Compute nodes have the same availability for a resource then they are all normalized to 0.
For example, the scheduler calculates the normalized weights for available vCPUs across 10 Compute nodes, each with a different number of available vCPUs, as follows:
| Compute node | 1 | 2 | 3 | 4 | 5 | 6 | 7 | 8 | 9 | 10 |
| No of vCPUs | 5 | 5 | 10 | 10 | 15 | 20 | 20 | 15 | 10 | 5 |
| Normalized weight | 0 | 0 | 0.33 | 0.33 | 0.67 | 1 | 1 | 0.67 | 0.33 | 0 |
The Compute scheduler uses the following formula to calculate the weight of a Compute node:
(w1_multiplier * norm(w1)) + (w2_multiplier * norm(w2)) + ...
The following table describes the available configuration options for weights.
Weights can be set on host aggregates using the aggregate metadata key with the same name as the options detailed in the following table. If set on the host aggregate, the host aggregate value takes precedence.
Table 7.2. Compute scheduler weights
| Configuration option | Type | Description |
|---|---|---|
|
| String | Use this parameter to configure which of the following attributes to use for calculating the weight of each Compute node:
|
|
| Floating point | Use this parameter to specify the multiplier to use to weigh hosts based on the available RAM. Set to a positive value to prefer hosts with more available RAM, which spreads instances across many hosts. Set to a negative value to prefer hosts with less available RAM, which fills up (stacks) hosts as much as possible before scheduling to a less-used host. The absolute value, whether positive or negative, controls how strong the RAM weigher is relative to other weighers. Default: 1.0 - The scheduler spreads instances across all hosts evenly. |
|
| Floating point | Use this parameter to specify the multiplier to use to weigh hosts based on the available disk space. Set to a positive value to prefer hosts with more available disk space, which spreads instances across many hosts. Set to a negative value to prefer hosts with less available disk space, which fills up (stacks) hosts as much as possible before scheduling to a less-used host. The absolute value, whether positive or negative, controls how strong the disk weigher is relative to other weighers. Default: 1.0 - The scheduler spreads instances across all hosts evenly. |
|
| Floating point | Use this parameter to specify the multiplier to use to weigh hosts based on the available vCPUs. Set to a positive value to prefer hosts with more available vCPUs, which spreads instances across many hosts. Set to a negative value to prefer hosts with less available vCPUs, which fills up (stacks) hosts as much as possible before scheduling to a less-used host. The absolute value, whether positive or negative, controls how strong the vCPU weigher is relative to other weighers. Default: 1.0 - The scheduler spreads instances across all hosts evenly. |
|
| Floating point | Use this parameter to specify the multiplier to use to weigh hosts based on the host workload. Set to a negative value to prefer hosts with lighter workloads, which distributes the workload across more hosts. Set to a positive value to prefer hosts with heavier workloads, which schedules instances onto hosts that are already busy. The absolute value, whether positive or negative, controls how strong the I/O operations weigher is relative to other weighers. Default: -1.0 - The scheduler distributes the workload across more hosts. |
|
| Floating point | Use this parameter to specify the multiplier to use to weigh hosts based on recent build failures. Set to a positive value to increase the significance of build failures recently reported by the host. Hosts with recent build failures are then less likely to be chosen.
Set to Default: 1000000.0 |
|
| Floating point | Use this parameter to specify the multiplier to use to weigh hosts during a cross-cell move. This option determines how much weight is placed on a host which is within the same source cell when moving an instance. By default, the scheduler prefers hosts within the same source cell when migrating an instance. Set to a positive value to prefer hosts within the same cell the instance is currently running. Set to a negative value to prefer hosts located in a different cell from that where the instance is currently running. Default: 1000000.0 |
|
| Positive floating point | Use this parameter to specify the multiplier to use to weigh hosts based on the number of PCI devices on the host and the number of PCI devices requested by an instance. If an instance requests PCI devices, then the more PCI devices a Compute node has the higher the weight allocated to the Compute node. For example, if there are three hosts available, one with a single PCI device, one with multiple PCI devices and one without any PCI devices, then the Compute scheduler prioritizes these hosts based on the demands of the instance. The scheduler should prefer the first host if the instance requests one PCI device, the second host if the instance requires multiple PCI devices and the third host if the instance does not request a PCI device. Configure this option to prevent non-PCI instances from occupying resources on hosts with PCI devices. Default: 1.0 |
|
| Integer | Use this parameter to specify the size of the subset of filtered hosts from which to select the host. You must set this option to at least 1. A value of 1 selects the first host returned by the weighing functions. The scheduler ignores any value less than 1 and uses 1 instead. Set to a value greater than 1 to prevent multiple scheduler processes handling similar requests selecting the same host, creating a potential race condition. By selecting a host randomly from the N hosts that best fit the request, the chance of a conflict is reduced. However, the higher you set this value, the less optimal the chosen host may be for a given request. Default: 1 |
|
| Positive floating point | Use this parameter to specify the multiplier to use to weigh hosts for group soft-affinity. Note You need to specify the microversion when creating a group with this policy: $ openstack --os-compute-api-version 2.15 server group create --policy soft-affinity <group_name> Default: 1.0 |
|
| Positive floating point | Use this parameter to specify the multiplier to use to weigh hosts for group soft-anti-affinity. Note You need to specify the microversion when creating a group with this policy: $ openstack --os-compute-api-version 2.15 server group create --policy soft-affinity <group_name> Default: 1.0 |
|
| Floating point |
Use this parameter to specify the multiplier to use for weighting metrics. By default, Set to a number greater than 1.0 to increase the effect of the metric on the overall weight. Set to a number between 0.0 and 1.0 to reduce the effect of the metric on the overall weight.
Set to 0.0 to ignore the metric value and return the value of the Set to a negative number to prioritize the host with lower metrics, and stack instances in hosts. Default: 1.0 |
|
|
Comma-separated list of | Use this parameter to specify the metrics to use for weighting, and the ratio to use to calculate the weight of each metric. Valid metric names:
Example: |
|
| Boolean |
Use this parameter to specify how to handle configured
|
|
| Floating point |
Use this parameter to specify the weight to use if any Default: -10000.0 |