
Network Functions Virtualization Planning and Configuration Guide
Planning and Configuring the Network Functions Virtualization (NFV) OpenStack Deployment
Abstract
Making open source more inclusive
Red Hat is committed to replacing problematic language in our code, documentation, and web properties. We are beginning with these four terms: master, slave, blacklist, and whitelist. Because of the enormity of this endeavor, these changes will be implemented gradually over several upcoming releases. For more details, see our CTO Chris Wright’s message.
Providing feedback on Red Hat documentation
We appreciate your input on our documentation. Tell us how we can make it better.
Providing documentation feedback in Jira
Use the Create Issue form to provide feedback on the documentation. The Jira issue will be created in the Red Hat OpenStack Platform Jira project, where you can track the progress of your feedback.
- Ensure that you are logged in to Jira. If you do not have a Jira account, create an account to submit feedback.
- Click the following link to open a the Create Issue page: Create Issue
- Complete the Summary and Description fields. In the Description field, include the documentation URL, chapter or section number, and a detailed description of the issue. Do not modify any other fields in the form.
- Click Create.
Chapter 1. Understanding Red Hat Network Functions Virtualization (NFV)
Network Functions Virtualization (NFV) is a software-based solution that helps the Communication Service Providers (CSPs) to move beyond the traditional, proprietary hardware to achieve greater efficiency and agility while reducing the operational costs.
An NFV environment allows for IT and network convergence by providing a virtualized infrastructure using the standard virtualization technologies that run on standard hardware devices such as switches, routers, and storage to virtualize network functions (VNFs). The management and orchestration logic deploys and sustains these services. NFV also includes a Systems Administration, Automation and Life-Cycle Management thereby reducing the manual work necessary.
1.1. Advantages of NFV
The main advantages of implementing network functions virtualization (NFV) are as follows:
- Accelerates the time-to-market by allowing you to to quickly deploy and scale new networking services to address changing demands.
- Supports innovation by enabling service developers to self-manage their resources and prototype using the same platform that will be used in production.
- Addresses customer demands in hours or minutes instead of weeks or days, without sacrificing security or performance.
- Reduces capital expenditure because it uses commodity-off-the-shelf hardware instead of expensive tailor-made equipment.
- Uses streamlined operations and automation that optimize day-to-day tasks to improve employee productivity and reduce operational costs.
1.2. Supported Configurations for NFV Deployments
You can use the Red Hat OpenStack Platform director toolkit to isolate specific network types, for example, external, project, internal API, and so on. You can deploy a network on a single network interface, or distributed over a multiple-host network interface. With Open vSwitch you can create bonds by assigning multiple interfaces to a single bridge. Configure network isolation in a Red Hat OpenStack Platform installation with template files. If you do not provide template files, the service networks deploy on the provisioning network.
There are two types of template configuration files:
network-environment.yamlThis file contains network details, such as subnets and IP address ranges, for the overcloud nodes. This file also contains the different settings that override the default parameter values for various scenarios.
Host network templates, for example, compute.yaml and controller.yaml
These templates define the network interface configuration for the overcloud nodes. The values of the network details are provided by the
network-environment.yamlfile.
These heat template files are located at /usr/share/openstack-tripleo-heat-templates/ on the undercloud node. For samples of these heat template files for NFV, see Sample DPDK SR-IOV YAML files.
The Hardware requirements and Software requirements sections provide more details on how to plan and configure the heat template files for NFV using the Red Hat OpenStack Platform director.
You can edit YAML files to configure NFV. For an introduction to the YAML file format, see YAML in a Nutshell.
- Data Plane Development Kit (DPDK) and Single Root I/O Virtualization (SR-IOV)
Red Hat OpenStack Platform (RHOSP) supports NFV deployments with the inclusion of automated OVS-DPDK and SR-IOV configuration.
ImportantRed Hat does not support the use of OVS-DPDK for non-NFV workloads. If you need OVS-DPDK functionality for non-NFV workloads, contact your Technical Account Manager (TAM) or open a customer service request case to discuss a Support Exception and other options. To open a customer service request case, go to Create a case and choose Account > Customer Service Request.
- Hyper-converged Infrastructure (HCI)
- You can colocate the Compute sub-system with the Red Hat Ceph Storage nodes. This hyper-converged model delivers lower cost of entry, smaller initial deployment footprints, maximized capacity utilization, and more efficient management in NFV use cases. For more information about HCI, see the Hyperconverged Infrastructure Guide.
- Composable roles
- You can use composable roles to create custom deployments. Composable roles allow you to add or remove services from each role. For more information about the Composable Roles, see Composable services and custom roles.
- Open vSwitch (OVS) with LACP
- As of OVS 2.9, LACP with OVS is fully supported. This is not recommended for Openstack control plane traffic, as OVS or Openstack Networking interruptions might interfere with management. For more information, see Open vSwitch (OVS) bonding options.
- OVS Hardware offload
- Red Hat OpenStack Platform supports, with limitations, the deployment of OVS hardware offload. For information about deploying OVS with hardware offload, see Configuring OVS hardware offload.
- Open Virtual Network (OVN)
The following NFV OVN configurations are available in RHOSP 16.1.4:
1.3. NFV data plane connectivity
With the introduction of NFV, more networking vendors are starting to implement their traditional devices as VNFs. While the majority of networking vendors are considering virtual machines, some are also investigating a container-based approach as a design choice. An OpenStack-based solution should be rich and flexible due to two primary reasons:
- Application readiness - Network vendors are currently in the process of transforming their devices into VNFs. Different VNFs in the market have different maturity levels; common barriers to this readiness include enabling RESTful interfaces in their APIs, evolving their data models to become stateless, and providing automated management operations. OpenStack should provide a common platform for all.
Broad use-cases - NFV includes a broad range of applications that serve different use-cases. For example, Virtual Customer Premise Equipment (vCPE) aims at providing a number of network functions such as routing, firewall, virtual private network (VPN), and network address translation (NAT) at customer premises. Virtual Evolved Packet Core (vEPC), is a cloud architecture that provides a cost-effective platform for the core components of Long-Term Evolution (LTE) network, allowing dynamic provisioning of gateways and mobile endpoints to sustain the increased volumes of data traffic from smartphones and other devices.
These use cases are implemented using different network applications and protocols, and require different connectivity, isolation, and performance characteristics from the infrastructure. It is also common to separate between control plane interfaces and protocols and the actual forwarding plane. OpenStack must be flexible enough to offer different datapath connectivity options.
In principle, there are two common approaches for providing data plane connectivity to virtual machines:
- Direct hardware access bypasses the linux kernel and provides secure direct memory access (DMA) to the physical NIC using technologies such as PCI Passthrough or single root I/O virtualization (SR-IOV) for both Virtual Function (VF) and Physical Function (PF) pass-through.
- Using a virtual switch (vswitch), implemented as a software service of the hypervisor. Virtual machines are connected to the vSwitch using virtual interfaces (vNICs), and the vSwitch is capable of forwarding traffic between virtual machines, as well as between virtual machines and the physical network.
Some of the fast data path options are as follows:
- Single Root I/O Virtualization (SR-IOV) is a standard that makes a single PCI hardware device appear as multiple virtual PCI devices. It works by introducing Physical Functions (PFs), which are the fully featured PCIe functions that represent the physical hardware ports, and Virtual Functions (VFs), which are lightweight functions that are assigned to the virtual machines. To the VM, the VF resembles a regular NIC that communicates directly with the hardware. NICs support multiple VFs.
- Open vSwitch (OVS) is an open source software switch that is designed to be used as a virtual switch within a virtualized server environment. OVS supports the capabilities of a regular L2-L3 switch and also offers support to the SDN protocols such as OpenFlow to create user-defined overlay networks (for example, VXLAN). OVS uses Linux kernel networking to switch packets between virtual machines and across hosts using physical NIC. OVS now supports connection tracking (Conntrack) with built-in firewall capability to avoid the overhead of Linux bridges that use iptables/ebtables. Open vSwitch for Red Hat OpenStack Platform environments offers default OpenStack Networking (neutron) integration with OVS.
- Data Plane Development Kit (DPDK) consists of a set of libraries and poll mode drivers (PMD) for fast packet processing. It is designed to run mostly in the user-space, enabling applications to perform their own packet processing directly from or to the NIC. DPDK reduces latency and allows more packets to be processed. DPDK Poll Mode Drivers (PMDs) run in busy loop, constantly scanning the NIC ports on host and vNIC ports in guest for arrival of packets.
- DPDK accelerated Open vSwitch (OVS-DPDK) is Open vSwitch bundled with DPDK for a high performance user-space solution with Linux kernel bypass and direct memory access (DMA) to physical NICs. The idea is to replace the standard OVS kernel data path with a DPDK-based data path, creating a user-space vSwitch on the host that uses DPDK internally for its packet forwarding. The advantage of this architecture is that it is mostly transparent to users. The interfaces it exposes, such as OpenFlow, OVSDB, the command line, remain mostly the same.
1.4. ETSI NFV Architecture
The European Telecommunications Standards Institute (ETSI) is an independent standardization group that develops standards for information and communications technologies (ICT) in Europe.
Network functions virtualization (NFV) focuses on addressing problems involved in using proprietary hardware devices. With NFV, the necessity to install network-specific equipment is reduced, depending upon the use case requirements and economic benefits. The ETSI Industry Specification Group for Network Functions Virtualization (ETSI ISG NFV) sets the requirements, reference architecture, and the infrastructure specifications necessary to ensure virtualized functions are supported.
Red Hat is offering an open-source based cloud-optimized solution to help the Communication Service Providers (CSP) to achieve IT and network convergence. Red Hat adds NFV features such as single root I/O virtualization (SR-IOV) and Open vSwitch with Data Plane Development Kit (OVS-DPDK) to Red Hat OpenStack.
1.5. NFV ETSI architecture and components
In general, a network functions virtualization (NFV) platform has the following components:
Figure 1.1. NFV ETSI architecture and components
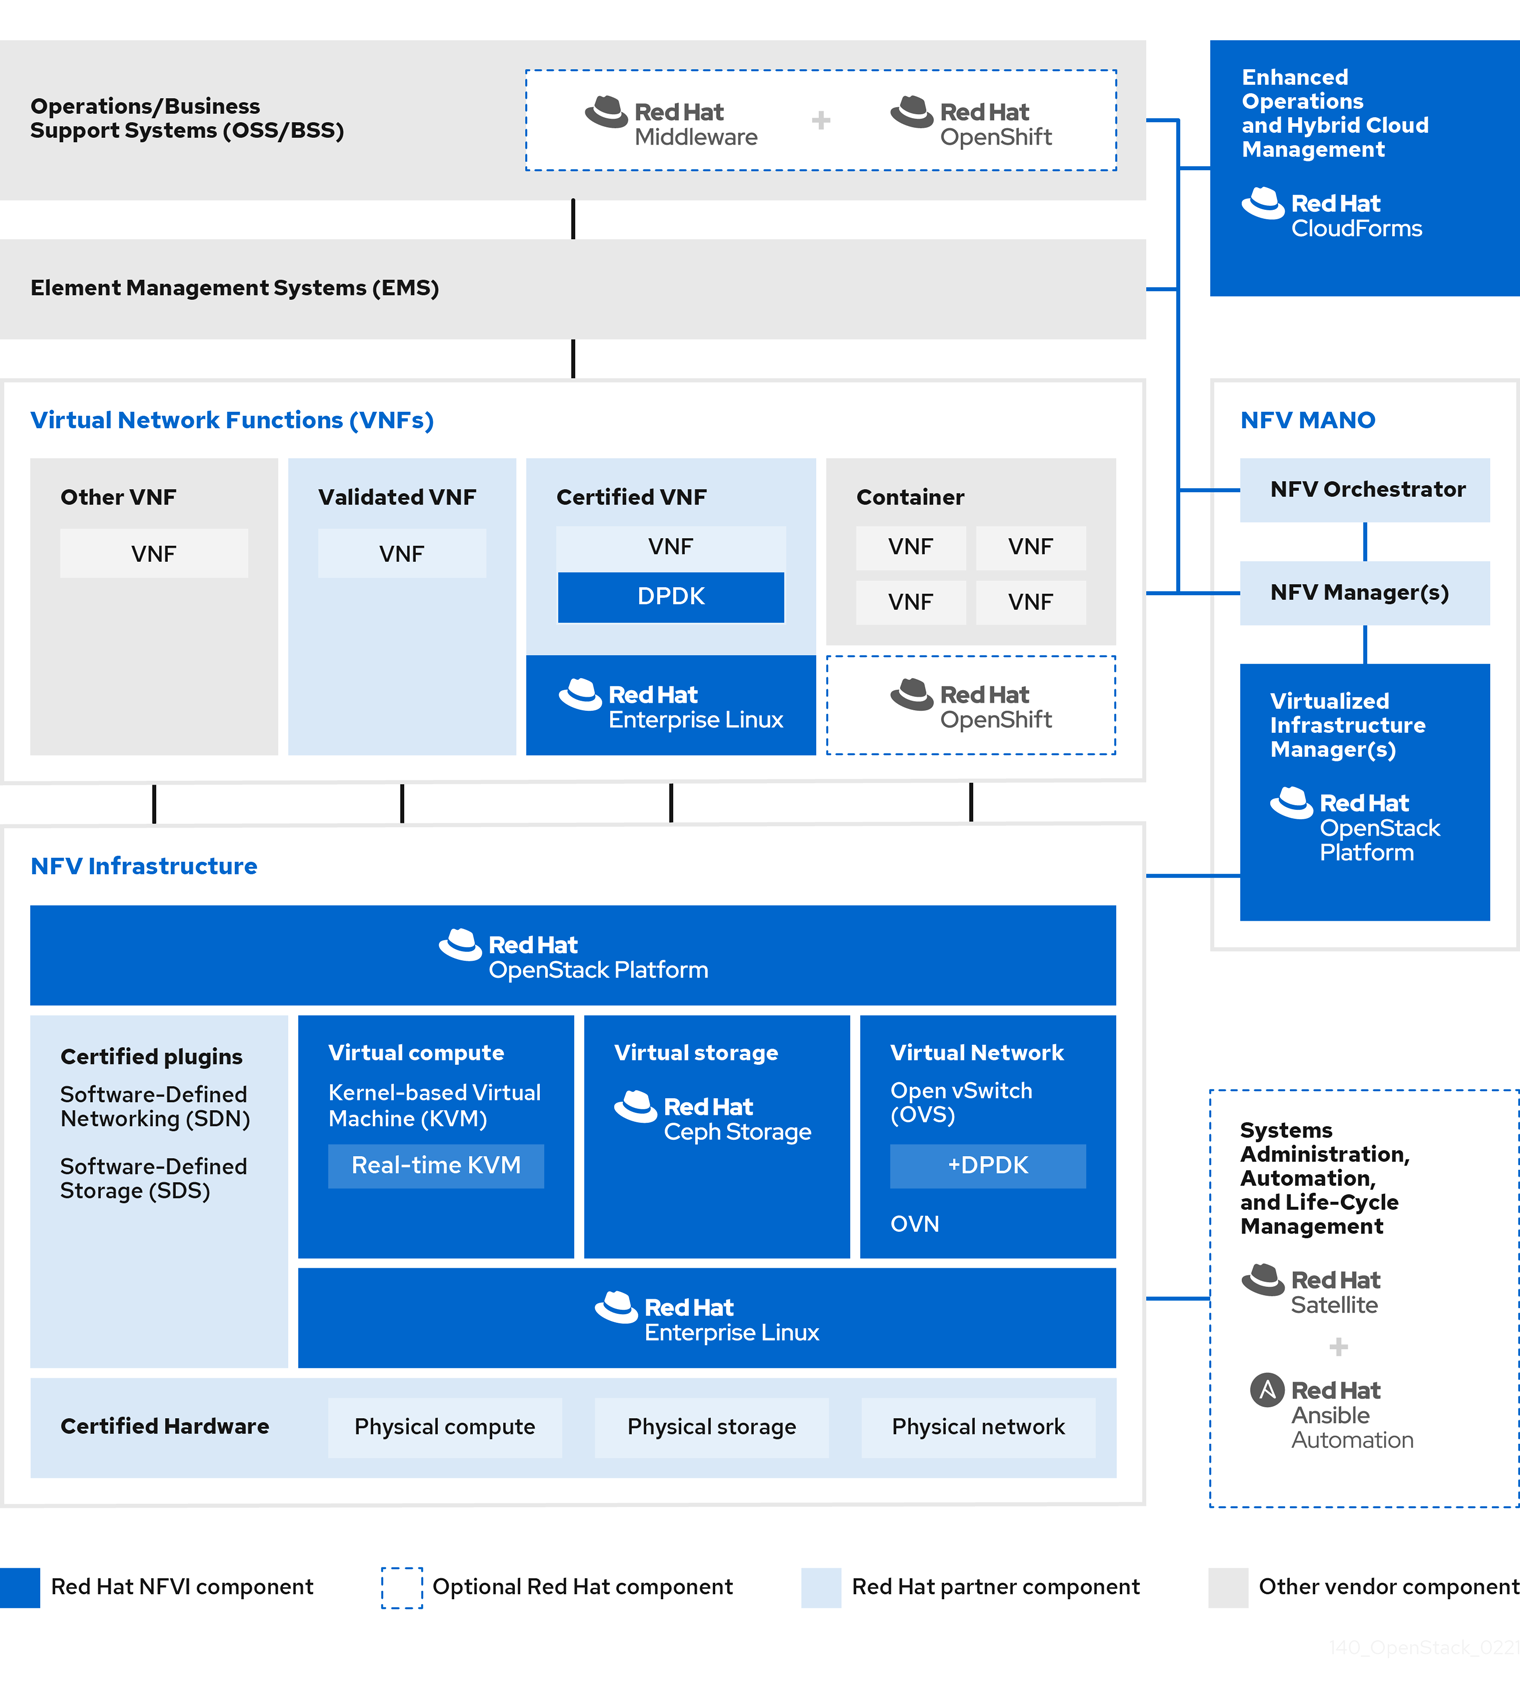
- Virtualized Network Functions (VNFs) - the software implementation of routers, firewalls, load balancers, broadband gateways, mobile packet processors, servicing nodes, signalling, location services, and other network functions.
- NFV Infrastructure (NFVi) - the physical resources (compute, storage, network) and the virtualization layer that make up the infrastructure. The network includes the datapath for forwarding packets between virtual machines and across hosts. This allows you to install VNFs without being concerned about the details of the underlying hardware. NFVi forms the foundation of the NFV stack. NFVi supports multi-tenancy and is managed by the Virtual Infrastructure Manager (VIM). Enhanced Platform Awareness (EPA) improves the virtual machine packet forwarding performance (throughput, latency, jitter) by exposing low-level CPU and NIC acceleration components to the VNF.
- NFV Management and Orchestration (MANO) - the management and orchestration layer focuses on all the service management tasks required throughout the life cycle of the VNF. The main goals of MANO is to allow service definition, automation, error-correlation, monitoring, and life-cycle management of the network functions offered by the operator to its customers, decoupled from the physical infrastructure. This decoupling requires additional layers of management, provided by the Virtual Network Function Manager (VNFM). VNFM manages the life cycle of the virtual machines and VNFs by either interacting directly with them or through the Element Management System (EMS) provided by the VNF vendor. The other important component defined by MANO is the Orchestrator, also known as NFVO. NFVO interfaces with various databases and systems including Operations/Business Support Systems (OSS/BSS) on the top and the VNFM on the bottom. If the NFVO wants to create a new service for a customer, it asks the VNFM to trigger the instantiation of a VNF, which may result in multiple virtual machines.
- Operations and Business Support Systems (OSS/BSS) - provides the essential business function applications, for example, operations support and billing. The OSS/BSS needs to be adapted to NFV, integrating with both legacy systems and the new MANO components. The BSS systems set policies based on service subscriptions and manage reporting and billing.
- Systems Administration, Automation and Life-Cycle Management - manages system administration, automation of the infrastructure components and life cycle of the NFVi platform.
1.6. Red Hat NFV components
Red Hat’s solution for NFV includes a range of products that can act as the different components of the NFV framework in the ETSI model. The following products from the Red Hat portfolio integrate into an NFV solution:
- Red Hat OpenStack Platform - Supports IT and NFV workloads. The Enhanced Platform Awareness (EPA) features deliver deterministic performance improvements through CPU Pinning, Huge pages, Non-Uniform Memory Access (NUMA) affinity and network adaptors (NICs) that support SR-IOV and OVS-DPDK.
- Red Hat Enterprise Linux and Red Hat Enterprise Linux Atomic Host - Create virtual machines and containers as VNFs.
- Red Hat Ceph Storage - Provides the the unified elastic and high-performance storage layer for all the needs of the service provider workloads.
- Red Hat JBoss Middleware and OpenShift Enterprise by Red Hat - Optionally provide the ability to modernize the OSS/BSS components.
- Red Hat CloudForms - Provides a VNF manager and presents data from multiple sources, such as the VIM and the NFVi in a unified display.
- Red Hat Satellite and Ansible by Red Hat - Optionally provide enhanced systems administration, automation and life-cycle management.
1.7. NFV installation summary
The Red Hat OpenStack Platform director installs and manages a complete OpenStack environment. The director is based on the upstream OpenStack TripleO project, which is an abbreviation for "OpenStack-On-OpenStack". This project takes advantage of the OpenStack components to install a fully operational OpenStack environment; this includes a minimal OpenStack node called the undercloud. The undercloud provisions and controls the overcloud (a series of bare metal systems used as the production OpenStack nodes). The director provides a simple method for installing a complete Red Hat OpenStack Platform environment that is both lean and robust.
For more information on installing the undercloud and overcloud, see the Director Installation and Usage guide.
To install the NFV features, complete the following additional steps:
-
Include SR-IOV and PCI Passthrough parameters in your
network-environment.yamlfile, update thepost-install.yamlfile for CPU tuning, modify thecompute.yamlfile, and run theovercloud_deploy.shscript to deploy the overcloud. -
Install the DPDK libraries and drivers for fast packets processing by polling data directly from the NICs. Include the DPDK parameters in your
network-environment.yamlfile, update thepost-install.yamlfiles for CPU tuning, update thecompute.yamlfile to set the bridge with DPDK port, update thecontroller.yamlfile to set the bridge and an interface with VLAN configured, and run theovercloud_deploy.shscript to deploy the overcloud.
Chapter 2. NFV performance considerations
For a network functions virtualization (NFV) solution to be useful, its virtualized functions must meet or exceed the performance of physical implementations. Red Hat’s virtualization technologies are based on the high-performance Kernel-based Virtual Machine (KVM) hypervisor, common in OpenStack and cloud deployments.
Red Hat OpenStack Platform director configures the Compute nodes to enforce resource partitioning and fine tuning to achieve line rate performance for the guest virtual network functions (VNFs). The key performance factors in the NFV use case are throughput, latency, and jitter.
You can enable high-performance packet switching between physical NICs and virtual machines using data plane development kit (DPDK) accelerated virtual machines. OVS 2.10 embeds support for DPDK 17 and includes support for vhost-user multiqueue, allowing scalable performance. OVS-DPDK provides line-rate performance for guest VNFs.
Single root I/O virtualization (SR-IOV) networking provides enhanced performance, including improved throughput for specific networks and virtual machines.
Other important features for performance tuning include huge pages, NUMA alignment, host isolation, and CPU pinning. VNF flavors require huge pages and emulator thread isolation for better performance. Host isolation and CPU pinning improve NFV performance and prevent spurious packet loss.
2.1. CPUs and NUMA nodes
Previously, all memory on x86 systems was equally accessible to all CPUs in the system. This resulted in memory access times that were the same regardless of which CPU in the system was performing the operation and was referred to as Uniform Memory Access (UMA).
In Non-Uniform Memory Access (NUMA), system memory is divided into zones called nodes, which are allocated to particular CPUs or sockets. Access to memory that is local to a CPU is faster than memory connected to remote CPUs on that system. Normally, each socket on a NUMA system has a local memory node whose contents can be accessed faster than the memory in the node local to another CPU or the memory on a bus shared by all CPUs.
Similarly, physical NICs are placed in PCI slots on the Compute node hardware. These slots connect to specific CPU sockets that are associated to a particular NUMA node. For optimum performance, connect your datapath NICs to the same NUMA nodes in your CPU configuration (SR-IOV or OVS-DPDK).
The performance impact of NUMA misses are significant, generally starting at a 10% performance hit or higher. Each CPU socket can have multiple CPU cores which are treated as individual CPUs for virtualization purposes.
For more information about NUMA, see What is NUMA and how does it work on Linux?
2.1.1. NUMA node example
The following diagram provides an example of a two-node NUMA system and the way the CPU cores and memory pages are made available:
Figure 2.1. Example: two-node NUMA system
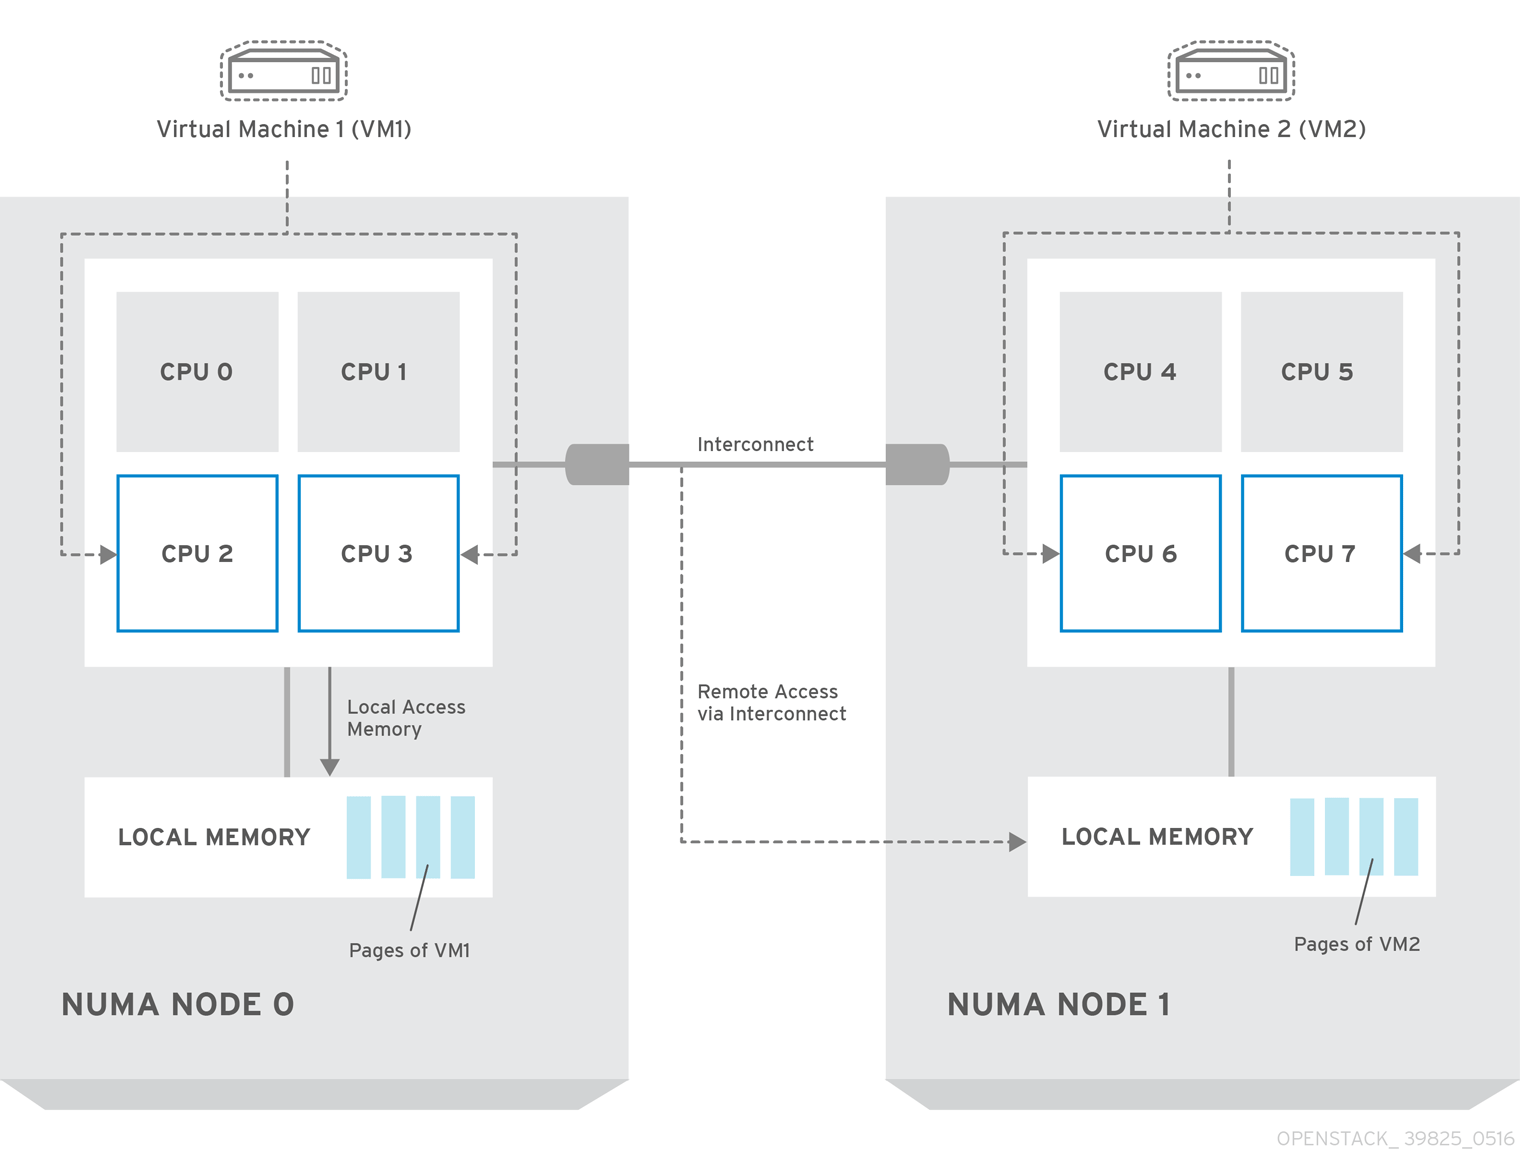
Remote memory available via Interconnect is accessed only if VM1 from NUMA node 0 has a CPU core in NUMA node 1. In this case, the memory of NUMA node 1 acts as local for the third CPU core of VM1 (for example, if VM1 is allocated with CPU 4 in the diagram above), but at the same time, it acts as remote memory for the other CPU cores of the same VM.
2.1.2. NUMA aware instances
You can configure an OpenStack environment to use NUMA topology awareness on systems with a NUMA architecture. When running a guest operating system in a virtual machine (VM) there are two NUMA topologies involved:
- the NUMA topology of the physical hardware of the host
- the NUMA topology of the virtual hardware exposed to the guest operating system
You can optimize the performance of guest operating systems by aligning the virtual hardware with the physical hardware NUMA topology.
2.2. CPU pinning
CPU pinning is the ability to run a specific virtual machine’s virtual CPU on a specific physical CPU, in a given host. vCPU pinning provides similar advantages to task pinning on bare-metal systems. Since virtual machines run as user space tasks on the host operating system, pinning increases cache efficiency.
For details on how to configure CPU pinning, see Configuring CPU pinning on Compute nodes in the Configuring the Compute service for instance creation guide.
2.3. Huge pages
Physical memory is segmented into contiguous regions called pages. For efficiency, the system retrieves memory by accessing entire pages instead of individual bytes of memory. To perform this translation, the system looks in the Translation Lookaside Buffers (TLB) that contain the physical to virtual address mappings for the most recently or frequently used pages. When the system cannot find a mapping in the TLB, the processor must iterate through all of the page tables to determine the address mappings. Optimize the TLB to minimize the performance penalty that occurs during these TLB misses.
The typical page size in an x86 system is 4KB, with other larger page sizes available. Larger page sizes mean that there are fewer pages overall, and therefore increases the amount of system memory that can have its virtual to physical address translation stored in the TLB. Consequently, this reduces TLB misses, which increases performance. With larger page sizes, there is an increased potential for memory to be under-utilized as processes must allocate in pages, but not all of the memory is likely required. As a result, choosing a page size is a compromise between providing faster access times with larger pages, and ensuring maximum memory utilization with smaller pages.
2.4. Port security
Port security is an anti-spoofing measure that blocks any egress traffic that does not match the source IP and source MAC address of the originating network port. You cannot view or modify this behavior using security group rules.
By default, the port_security_enabled parameter is set to enabled on newly created Neutron networks in OpenStack. Newly created ports copy the value of the port_security_enabled parameter from the network they are created on.
For some NFV use cases, such as building a firewall or router, you must disable port security.
To disable port security on a single port, run the following command:
openstack port set --disable-port-security <port-id>
To prevent port security from being enabled on any newly created port on a network, run the following command:
openstack network set --disable-port-security <network-id>
Chapter 3. Hardware requirements for NFV
This section describes the hardware requirements for NFV.
For a complete list of the certified hardware for Red Hat OpenStack Platform, see Red Hat OpenStack Platform certified hardware.
3.1. Tested NICs for NFV
For a list of tested NICs for NFV, see the Red Hat Knowledgebase solution Network Adapter Fast Datapath Feature Support Matrix.
Use the default driver for the supported NIC, unless you are configuring OVS-DPDK on NVIDIA (Mellanox) network interfaces. For NVIDIA network interfaces, you must set the corresponding kernel driver in the j2 network configuration template.
Example
In this example, the mlx5_core driver is set for the Mellanox ConnectX-5 network interface:
members
 - type: ovs_dpdk_port
    name: dpdk0
    driver: mlx5_core
    members:
    - type: interface
      name: enp3s0f0
3.2. Troubleshooting hardware offload
In a Red Hat OpenStack Platform(RHOSP) 16.2 deployment, OVS Hardware Offload might not offload flows for VMs with switchdev-capable ports and Mellanox ConnectX5 NICs. To troubleshoot and configure offload flows in this scenario, disable the ESWITCH_IPV4_TTL_MODIFY_ENABLE Mellanox firmware parameter. For more troubleshooting information about OVS Hardware Offload in RHOSP 16.2, see the Red Hat Knowledgebase solution OVS Hardware Offload with Mellanox NIC in OpenStack Platform 16.2.
Procedure
- Log in to the Compute nodes in your RHOSP deployment that have Mellanox NICs that you want to configure.
Use the
mstflintutility to query theESWITCH_IPV4_TTL_MODIFY_ENABLEMellanox firmware parameter .[root@compute-1 ~]# yum install -y mstflint [root@compute-1 ~]# mstconfig -d <PF PCI BDF> q ESWITCH_IPV4_TTL_MODIFY_ENABLE
If the
ESWITCH_IPV4_TTL_MODIFY_ENABLEparameter is enabled and set to1, then set the value to0to disable it.[root@compute-1 ~]# mstconfig -d <PF PCI BDF> s ESWITCH_IPV4_TTL_MODIFY_ENABLE=0`
- Reboot the node.
3.3. Discovering your NUMA node topology
When you plan your deployment, you must understand the NUMA topology of your Compute node to partition the CPU and memory resources for optimum performance. To determine the NUMA information, perform one of the following tasks:
- Enable hardware introspection to retrieve this information from bare-metal nodes.
- Log on to each bare-metal node to manually collect the information.
You must install and configure the undercloud before you can retrieve NUMA information through hardware introspection. For more information about undercloud configuration, see the Director Installation and Usage guide.
3.4. Retrieving hardware introspection details
The Bare Metal service hardware-inspection-extras feature is enabled by default, and you can use it to retrieve hardware details for overcloud configuration. For more information about the inspection_extras parameter in the undercloud.conf file, see Configuring director.
For example, the numa_topology collector is part of the hardware-inspection extras and includes the following information for each NUMA node:
- RAM (in kilobytes)
- Physical CPU cores and their sibling threads
- NICs associated with the NUMA node
Procedure
To retrieve the information listed above, substitute <UUID> with the UUID of the bare-metal node to complete the following command:
$ openstack baremetal introspection data save \
<UUID> | jq .numa_topology
The following example shows the retrieved NUMA information for a bare-metal node:
{
  "cpus": [
    {
      "cpu": 1,
      "thread_siblings": [
        1,
        17
      ],
      "numa_node": 0
    },
    {
      "cpu": 2,
      "thread_siblings": [
        10,
        26
      ],
      "numa_node": 1
    },
    {
      "cpu": 0,
      "thread_siblings": [
        0,
        16
      ],
      "numa_node": 0
    },
    {
      "cpu": 5,
      "thread_siblings": [
        13,
        29
      ],
      "numa_node": 1
    },
    {
      "cpu": 7,
      "thread_siblings": [
        15,
        31
      ],
      "numa_node": 1
    },
    {
      "cpu": 7,
      "thread_siblings": [
        7,
        23
      ],
      "numa_node": 0
    },
    {
      "cpu": 1,
      "thread_siblings": [
        9,
        25
      ],
      "numa_node": 1
    },
    {
      "cpu": 6,
      "thread_siblings": [
        6,
        22
      ],
      "numa_node": 0
    },
    {
      "cpu": 3,
      "thread_siblings": [
        11,
        27
      ],
      "numa_node": 1
    },
    {
      "cpu": 5,
      "thread_siblings": [
        5,
        21
      ],
      "numa_node": 0
    },
    {
      "cpu": 4,
      "thread_siblings": [
        12,
        28
      ],
      "numa_node": 1
    },
    {
      "cpu": 4,
      "thread_siblings": [
        4,
        20
      ],
      "numa_node": 0
    },
    {
      "cpu": 0,
      "thread_siblings": [
        8,
        24
      ],
      "numa_node": 1
    },
    {
      "cpu": 6,
      "thread_siblings": [
        14,
        30
      ],
      "numa_node": 1
    },
    {
      "cpu": 3,
      "thread_siblings": [
        3,
        19
      ],
      "numa_node": 0
    },
    {
      "cpu": 2,
      "thread_siblings": [
        2,
        18
      ],
      "numa_node": 0
    }
  ],
  "ram": [
    {
      "size_kb": 66980172,
      "numa_node": 0
    },
    {
      "size_kb": 67108864,
      "numa_node": 1
    }
  ],
  "nics": [
    {
      "name": "ens3f1",
      "numa_node": 1
    },
    {
      "name": "ens3f0",
      "numa_node": 1
    },
    {
      "name": "ens2f0",
      "numa_node": 0
    },
    {
      "name": "ens2f1",
      "numa_node": 0
    },
    {
      "name": "ens1f1",
      "numa_node": 0
    },
    {
      "name": "ens1f0",
      "numa_node": 0
    },
    {
      "name": "eno4",
      "numa_node": 0
    },
    {
      "name": "eno1",
      "numa_node": 0
    },
    {
      "name": "eno3",
      "numa_node": 0
    },
    {
      "name": "eno2",
      "numa_node": 0
    }
  ]
}
3.5. NFV BIOS settings
The following table describes the required BIOS settings for NFV:
You must enable SR-IOV global and NIC settings in the BIOS, or your Red Hat OpenStack Platform (RHOSP) deployment with SR-IOV Compute nodes will fail.
Table 3.1. BIOS Settings
| Parameter | Setting |
|---|---|
|
| Disabled. |
|
| Disabled. |
|
| Enabled. |
|
| Enabled. |
|
| Enabled. |
|
| Enabled. |
|
| Performance. |
|
| Enabled. |
|
|
Disabled in NFV deployments that require deterministic performance. |
|
| Enabled for Intel cards if VFIO functionality is needed. |
|
| Disabled. |
On processors that use the intel_idle driver, Red Hat Enterprise Linux can ignore BIOS settings and re-enable the processor C-state.
You can disable intel_idle and instead use the acpi_idle driver by specifying the key-value pair intel_idle.max_cstate=0 on the kernel boot command line.
Confirm that the processor is using the acpi_idle driver by checking the contents of current_driver:
# cat /sys/devices/system/cpu/cpuidle/current_driver
acpi_idle
You will experience some latency after changing drivers, because it takes time for the Tuned daemon to start. However, after Tuned loads, the processor does not use the deeper C-state.
Chapter 4. Software requirements for NFV
This section describes the supported configurations and drivers, and subscription details necessary for NFV.
4.1. Registering and enabling repositories
To install Red Hat OpenStack Platform, you must register Red Hat OpenStack Platform director using the Red Hat Subscription Manager, and subscribe to the required channels. For more information about registering and updating your undercloud, see Registering the undercloud and attaching subscriptions in the Director Installation and Usage guide.
Procedure
Register your system with the Content Delivery Network, entering your Customer Portal user name and password when prompted.
[stack@director ~]$ sudo subscription-manager register
Determine the entitlement pool ID for Red Hat OpenStack Platform director, for example {Pool ID} from the following command and output:
[stack@director ~]$ sudo subscription-manager list --available --all --matches="Red Hat OpenStack"
Subscription Name:   Name of SKU
Provides:            Red Hat Single Sign-On
                     Red Hat Enterprise Linux Workstation
                     Red Hat CloudForms
                     Red Hat OpenStack
                     Red Hat Software Collections (for RHEL Workstation)
SKU:                 SKU-Number
Contract:            Contract-Number
Pool ID:             {Pool-ID}-123456
Provides Management: Yes
Available:           1
Suggested:           1
Service Level:       Support-level
Service Type:        Service-Type
Subscription Type:   Sub-type
Ends:                End-date
System Type:         Physical
Include the
Pool IDvalue in the following command to attach the Red Hat OpenStack Platform 16.2 entitlement.[stack@director ~]$ sudo subscription-manager attach --pool={Pool-ID}-123456Disable the default repositories.
subscription-manager repos --disable=*
Enable the required repositories for Red Hat OpenStack Platform with NFV.
$ sudo subscription-manager repos \
--enable=rhel-8-for-x86_64-baseos-eus-rpms \
--enable=rhel-8-for-x86_64-appstream-eus-rpms \
--enable=rhel-8-for-x86_64-highavailability-eus-rpms \
--enable=ansible-2.9-for-rhel-8-x86_64-rpms \
--enable=openstack-16.2-for-rhel-8-x86_64-rpms \
--enable=rhel-8-for-x86_64-nfv-rpms \
--enable=fast-datapath-for-rhel-8-x86_64-rpms
Update your system so you have the latest base system packages.
[stack@director ~]$ sudo dnf update -y
[stack@director ~]$ sudo reboot
To register your overcloud nodes, see Ansible-based overcloud registration in the Advanced Overcloud Customization guide.
4.2. Supported configurations for NFV deployments
Red Hat OpenStack Platform (RHOSP) supports the following NFV deployments using director:
- Single root I/O virtualization (SR-IOV)
- Open vSwitch with Data Plane Development Kit (OVS-DPDK)
Additionally, you can deploy RHOSP with any of the following features:
Implementing composable services and custom roles.
For more information, see the Composable services and custom roles in the Advanced Overcloud Customization guide
Colocating Compute and Ceph Storage service on the same host.
For more information, see the Hyperconverged Infrastructure Guide.
Configuring Real-time Compute nodes.
For more information, see Configuring real-time compute in the Configuring the Compute Service for Instance Creation guide.
Enabling hardware offload.
For more information, see Configuring OVS hardware offload.
4.2.1. Deploying RHOSP with the OVS mechanism driver
Deploy RHOSP with the OVS mechanism driver:
Procedure
Modify the
containers-prepare-parameter.yamlfile so that theneutron_driverparameter is set toovs.parameter_defaults: ContainerImagePrepare: - push_destination: true set: neutron_driver: ovs ...Include the
neutron-ovs.yamlenvironment file in the/usr/share/openstack-tripleo-heat-templates/environments/servicesdirectory with your deployment script.TEMPLATES=/usr/share/openstack-tripleo-heat-templates openstack overcloud deploy --templates \ -e ${TEMPLATES}/environments/network-environment.yaml \ -e ${TEMPLATES}/environments/network-isolation.yaml \ -e ${TEMPLATES}/environments/services/neutron-ovs.yaml \ -e ${TEMPLATES}/environments/services/neutron-ovs-dpdk.yaml \ -e ${TEMPLATES}/environments/services/neutron-sriov.yaml \ -e /home/stack/containers-prepare-parameter.yaml
4.2.2. Deploying OVN with OVS-DPDK and SR-IOV
Deploy DPDK and SRIOV VMs on the same node as OVN.
Procedure
Generate the
ComputeOvsDpdkSriovrole:openstack overcloud roles generate -o roles_data.yaml Controller ComputeOvsDpdkSriov
-
Add
OS::TripleO::Services::OVNMetadataAgentto the Controller role. Add the custom resources for OVS-DPDK with the
resource_registryparameter:resource_registry: # Specify the relative/absolute path to the config files you want to use for override the default. OS::TripleO::ComputeOvsDpdkSriov::Net::SoftwareConfig: nic-configs/computeovsdpdksriov.yaml OS::TripleO::Controller::Net::SoftwareConfig: nic-configs/controller.yamlIn the parameter_defaults section, edit the value of the tunnel type parameter to
geneve:NeutronTunnelTypes: 'geneve' NeutronNetworkType: ['geneve', 'vlan']
Optional: If you use a centralized routing model, disable Distributed Virtual Routing (DVR):
NeutronEnableDVR: false
Under
parameters_defaults, set the bridge mapping:# The OVS logical-to-physical bridge mappings to use. NeutronBridgeMappings: "datacentre:br-ex,data1:br-link0,data2:br-link1"
Configure the network interfaces in the
computeovsdpdksriov.yamlfile:- type: ovs_user_bridge name: br-link0 use_dhcp: false ovs_extra: - str_replace: template: set port br-link0 tag=_VLAN_TAG_ params: _VLAN_TAG_: get_param: TenantNetworkVlanID addresses: - ip_netmask: get_param: TenantIpSubnet members: - type: ovs_dpdk_port name: br-link0-dpdk-port0 rx_queue: 1 members: - type: interface name: eno3 - type: sriov_pf name: eno4 use_dhcp: false numvfs: 5 defroute: false nm_controlled: true hotplug: true promisc: falseInclude the following yaml files in your deployment script:
- neutron-ovn-dpdk.yaml
- neutron-ovn-sriov.yaml
Open Virtual Networking (OVN) is the default networking mechanism driver in Red Hat OpenStack Platform 16.2. If you want to use OVN with distributed virtual routing (DVR), you must include the environments/services/neutron-ovn-dvr-ha.yaml file in the openstack overcloud deploy command. If you want to use OVN without DVR, you must include the environments/services/neutron-ovn-ha.yaml file in the openstack overcloud deploy command, and set the NeutronEnableDVR parameter to false. If you want to use OVN with SR-IOV, you must include the environments/services/neutron-ovn-sriov.yaml file as the last of the OVN environment files in the openstack overcloud deploy command.
4.2.3. Deploying OVN with OVS TC Flower offload
Deploy OVS TC Flower offload on the same node as OVN.
The Red Hat Enterprise Linux Traffic Control (TC) subsystem does not support connection tracking (conntrack) helpers or application layer gateways (ALGs). Therefore, if you are using ALGs, you must disable TC Flower offload.
Procedure
Generate the
ComputeOvsDpdkSriovrole:openstack overcloud roles generate -o roles_data.yaml \ ControllerSriov ComputeSriov
Configure the
physical_networkparameter settings relevant to your deployment.-
For VLAN, set the
physical_networkparameter to the name of the network that you create in neutron after deployment. Use this value for theNeutronBridgeMappingsparameter also. Under role-specific parameters, such as
ComputeSriovOffloadParameters, ensure the value of theOvsHwOffloadparameter istrue.parameter_defaults: NeutronBridgeMappings: 'datacentre:br-ex,tenant:br-offload' NeutronNetworkVLANRanges: 'tenant:502:505' NeutronFlatNetworks: 'datacentre,tenant' NeutronPhysicalDevMappings: - tenant:ens1f0 - tenant:ens1f1 NovaPCIPassthrough: - address: "0000:17:00.1" physical_network: "tenant" - address: "0000:3b:00.1" physical_network: "tenant" NeutronTunnelTypes: '' NeutronNetworkType: 'vlan' ComputeSriovOffloadParameters: OvsHwOffload: True KernelArgs: "default_hugepagesz=1GB hugepagesz=1G hugepages=32 intel_iommu=on iommu=pt isolcpus=1-11,13-23" IsolCpusList: "1-11,13-23" NovaReservedHostMemory: 4096 NovaComputeCpuDedicatedSet: ['1-11','13-23'] NovaComputeCpuSharedSet: ['0','12']
-
For VLAN, set the
Configure the network interfaces in the
computeovsdpdksriov.yamlfile:- type: ovs_bridge name: br-offload mtu: 9000 use_dhcp: false addresses: - ip_netmask: get_param: TenantIpSubnet members: - type: linux_bond name: bond-pf bonding_options: "mode=active-backup miimon=100" members: - type: sriov_pf name: ens1f0 numvfs: 3 primary: true promisc: true use_dhcp: false defroute: false link_mode: switchdev - type: sriov_pf name: ens1f1 numvfs: 3 promisc: true use_dhcp: false defroute: false link_mode: switchdevInclude the following yaml files in your deployment script:
- ovs-hw-offload.yaml
neutron-ovn-sriov.yaml
TEMPLATES_HOME=”/usr/share/openstack-tripleo-heat-templates” CUSTOM_TEMPLATES=”/home/stack/templates” openstack overcloud deploy --templates \ -r ${CUSTOM_TEMPLATES}/roles_data.yaml \ -e ${TEMPLATES_HOME}/environments/services/neutron-ovn-sriov.yaml \ -e ${TEMPLATES_HOME}/environments/ovs-hw-offload.yaml \ -e ${CUSTOM_TEMPLATES}/network-environment.yaml
4.3. Supported drivers for NFV
For a complete list of supported drivers, see Component, Plug-In, and Driver Support in Red Hat OpenStack Platform .
For a list of NICs tested for Red Hat OpenStack Platform deployments with NFV, see Tested NICs for NFV.
4.4. Compatibility with third-party software
For a complete list of products and services tested, supported, and certified to perform with Red Hat OpenStack Platform, see Third Party Software compatible with Red Hat OpenStack Platform. You can filter the list by product version and software category.
For a complete list of products and services tested, supported, and certified to perform with Red Hat Enterprise Linux, see Third Party Software compatible with Red Hat Enterprise Linux. You can filter the list by product version and software category.
Chapter 5. Network considerations for NFV
The undercloud host requires at least the following networks:
- Provisioning network - Provides DHCP and PXE-boot functions to help discover bare-metal systems for use in the overcloud.
- External network - A separate network for remote connectivity to all nodes. The interface connecting to this network requires a routable IP address, either defined statically, or generated dynamically from an external DHCP service.
The minimal overcloud network configuration includes the following NIC configurations:
- Single NIC configuration - One NIC for the provisioning network on the native VLAN and tagged VLANs that use subnets for the different overcloud network types.
- Dual NIC configuration - One NIC for the provisioning network and the other NIC for the external network.
- Dual NIC configuration - One NIC for the provisioning network on the native VLAN, and the other NIC for tagged VLANs that use subnets for different overcloud network types.
- Multiple NIC configuration - Each NIC uses a subnet for a different overcloud network type.
For more information on the networking requirements, see Preparing your undercloud networking in the Director Installation and Usage guide.
Chapter 6. Planning an SR-IOV deployment
Optimize single root I/O virtualization (SR-IOV) deployments for NFV by setting individual parameters based on your Compute node hardware.
To evaluate your hardware impact on the SR-IOV parameters, see Discovering your NUMA node topology.
6.1. Hardware partitioning for an SR-IOV deployment
To achieve high performance with SR-IOV, partition the resources between the host and the guest.
Figure 6.1. NUMA node topology

A typical topology includes 14 cores per NUMA node on dual socket Compute nodes. Both hyper-threading (HT) and non-HT cores are supported. Each core has two sibling threads. One core is dedicated to the host on each NUMA node. The virtual network function (VNF) handles the SR-IOV interface bonding. All the interrupt requests (IRQs) are routed on the host cores. The VNF cores are dedicated to the VNFs. They provide isolation from other VNFs and isolation from the host. Each VNF must use resources on a single NUMA node. The SR-IOV NICs used by the VNF must also be associated with that same NUMA node. This topology does not have a virtualization overhead. The host, OpenStack Networking (neutron), and Compute (nova) configuration parameters are exposed in a single file for ease, consistency, and to avoid incoherence that is fatal to proper isolation, causing preemption, and packet loss. The host and virtual machine isolation depend on a tuned profile, which defines the boot parameters and any Red Hat OpenStack Platform modifications based on the list of isolated CPUs.
6.2. Topology of an NFV SR-IOV deployment
The following image has two VNFs each with the management interface represented by mgt and the data plane interfaces. The management interface manages the ssh access, and so on. The data plane interfaces bond the VNFs to DPDK to ensure high availability, as VNFs bond the data plane interfaces using the DPDK library. The image also has two provider networks for redundancy. The Compute node has two regular NICs bonded together and shared between the VNF management and the Red Hat OpenStack Platform API management.
Figure 6.2. NFV SR-IOV topology

The image shows a VNF that uses DPDK at an application level, and has access to SR-IOV virtual functions (VFs) and physical functions (PFs), for better availability or performance, depending on the fabric configuration. DPDK improves performance, while the VF/PF DPDK bonds provide support for failover, and high availability. The VNF vendor must ensure that the DPDK poll mode driver (PMD) supports the SR-IOV card that is being exposed as a VF/PF. The management network uses OVS, therefore the VNF sees a mgmt network device using the standard virtIO drivers. You can use that device to initially connect to the VNF, and ensure that the DPDK application bonds the two VF/PFs.
6.3. Topology for NFV SR-IOV without HCI
Observe the topology for SR-IOV without hyper-converged infrastructure (HCI) for NFV in the image below. It consists of compute and controller nodes with 1 Gbps NICs, and the director node.
Figure 6.3. NFV SR-IOV topology without HCI

Chapter 7. Deploying SR-IOV technologies
In your Red Hat OpenStack Platform NFV deployment, you can achieve higher performance with single root I/O virtualization (SR-IOV), when you configure direct access from your instances to a shared PCIe resource through virtual resources.
7.1. Configuring SR-IOV
To deploy Red Hat OpenStack Platform (RHOSP) with single root I/O virtualization (SR-IOV), configure the shared PCIe resources that have SR-IOV capabilities that instances can request direct access to.
The following CPU assignments, memory allocation, and NIC configurations are examples, and might be different from your use case.
Prerequisites
For details on how to install and configure the undercloud before deploying the overcloud, see the Director Installation and Usage guide.
NoteDo not manually edit any values in
/etc/tuned/cpu-partitioning-variables.confthat director heat templates modify.-
Access to the undercloud host and credentials for the
stackuser.
Procedure
-
Log in to the undercloud as the
stackuser. Source the
stackrcfile:[stack@director ~]$ source ~/stackrc
Generate a new roles data file named
roles_data_compute_sriov.yamlthat includes theControllerandComputeSriovroles:(undercloud)$ openstack overcloud roles \ generate -o /home/stack/templates/roles_data_compute_sriov.yaml \ Controller ComputeSriov
ComputeSriovis a custom role provided with your RHOSP installation that includes theNeutronSriovAgentandNeutronSriovHostConfigservices, in addition to the default compute services.To prepare the SR-IOV containers, include the
neutron-sriov.yamlandroles_data_compute_sriov.yamlfiles when you generate theovercloud_images.yamlfile.$ sudo openstack tripleo container image prepare \ --roles-file ~/templates/roles_data_compute_sriov.yaml \ -e /usr/share/openstack-tripleo-heat-templates/environments/services/neutron-sriov.yaml \ -e ~/containers-prepare-parameter.yaml \ --output-env-file=/home/stack/templates/overcloud_images.yaml
For more information on container image preparation, see Preparing container images in the Director Installation and Usage guide.
Create a copy of the
/usr/share/openstack-tripleo-heat-templates/environments/network-environment.yamlfile in your environment file directory:$ cp /usr/share/openstack-tripleo-heat-templates/environments/network-environment.yaml /home/stack/templates/network-environment-sriov.yaml
Add the following parameters under
parameter_defaultsin yournetwork-environment-sriov.yamlfile to configure the SR-IOV nodes for your cluster and your hardware configuration:NeutronNetworkType: 'vlan' NeutronNetworkVLANRanges: - tenant:22:22 - tenant:25:25 NeutronTunnelTypes: ''To determine the
vendor_idandproduct_idfor each PCI device type, use one of the following commands on the physical server that has the PCI cards:To return the
vendor_idandproduct_idfrom a deployed overcloud, use the following command:# lspci -nn -s <pci_device_address> 3b:00.0 Ethernet controller [0200]: Intel Corporation Ethernet Controller X710 for 10GbE SFP+ [<vendor_id>: <product_id>] (rev 02)
To return the
vendor_idandproduct_idof a physical function (PF) if you have not yet deployed the overcloud, use the following command:(undercloud) [stack@undercloud-0 ~]$ openstack baremetal introspection data save <baremetal_node_name> | jq '.inventory.interfaces[] | .name, .vendor, .product'
Configure role specific parameters for SR-IOV compute nodes in your
network-environment-sriov.yamlfile:ComputeSriovParameters: IsolCpusList: "1-19,21-39" KernelArgs: "default_hugepagesz=1GB hugepagesz=1G hugepages=32 iommu=pt intel_iommu=on isolcpus=1-19,21-39" TunedProfileName: "cpu-partitioning" NeutronBridgeMappings: - tenant:br-link0 NeutronPhysicalDevMappings: - tenant:p7p1 NovaComputeCpuDedicatedSet: '1-19,21-39' NovaReservedHostMemory: 4096NoteThe
NovaVcpuPinSetparameter is now deprecated, and is replaced byNovaComputeCpuDedicatedSetfor dedicated, pinned workloads.Configure the PCI passthrough devices for the SR-IOV compute nodes in your
network-environment-sriov.yamlfile:ComputeSriovParameters: ... NovaPCIPassthrough: - vendor_id: "<vendor_id>" product_id: "<product_id>" address: <NIC_address> physical_network: "<physical_network>" ...-
Replace
<vendor_id>with the vendor ID of the PCI device. -
Replace
<product_id>with the product ID of the PCI device. -
Replace
<NIC_address>with the address of the PCI device. For information about how to configure theaddressparameter, see Guidelines for configuring NovaPCIPassthrough in the Configuring the Compute Service for Instance Creation guide. Replace
<physical_network>with the name of the physical network the PCI device is located on.NoteDo not use the
devnameparameter when you configure PCI passthrough because the device name of a NIC can change. To create a Networking service (neutron) port on a PF, specify thevendor_id, theproduct_id, and the PCI device address inNovaPCIPassthrough, and create the port with the--vnic-type direct-physicaloption. To create a Networking service port on a virtual function (VF), specify thevendor_idandproduct_idinNovaPCIPassthrough, and create the port with the--vnic-type directoption. The values of thevendor_idandproduct_idparameters might be different between physical function (PF) and VF contexts. For more information about how to configureNovaPCIPassthrough, see Guidelines for configuring NovaPCIPassthrough in the Configuring the Compute Service for Instance Creation guide.
-
Replace
Configure the SR-IOV enabled interfaces in the
compute.yamlnetwork configuration template. To create SR-IOV VFs, configure the interfaces as standalone NICs:- type: sriov_pf name: p7p3 mtu: 9000 numvfs: 10 use_dhcp: false defroute: false nm_controlled: true hotplug: true promisc: false - type: sriov_pf name: p7p4 mtu: 9000 numvfs: 10 use_dhcp: false defroute: false nm_controlled: true hotplug: true promisc: falseNoteThe
numvfsparameter replaces theNeutronSriovNumVFsparameter in the network configuration templates. Red Hat does not support modification of theNeutronSriovNumVFsparameter or thenumvfsparameter after deployment. If you modify either parameter after deployment, it might cause a disruption for the running instances that have an SR-IOV port on that PF. In this case, you must hard reboot these instances to make the SR-IOV PCI device available again.Ensure that the list of default filters includes the value
AggregateInstanceExtraSpecsFilter:NovaSchedulerDefaultFilters: ['AvailabilityZoneFilter','ComputeFilter','ComputeCapabilitiesFilter','ImagePropertiesFilter','Serve rGroupAntiAffinityFilter','ServerGroupAffinityFilter','PciPassthroughFilter','AggregateInstanceExt raSpecsFilter']
-
Run the
overcloud_deploy.shscript.
7.2. Configuring NIC partitioning
You can reduce the number of NICs that you need for each host by configuring single root I/O virtualization (SR-IOV) virtual functions (VFs) for Red Hat OpenStack Platform (RHOSP) management networks and provider networks. When you partition a single, high-speed NIC into multiple VFs, you can use the NIC for both control and data plane traffic. This feature has been validated on Intel Fortville NICs, and Mellanox CX-5 NICs.
Procedure
- Open the NIC config file for your chosen role.
Add an entry for the interface type
sriov_pfto configure a physical function that the host can use:- type: sriov_pf name: <interface_name> use_dhcp: false numvfs: <number_of_vfs> promisc: <true/false>-
Replace
<interface_name>with the name of the interface. -
Replace
<number_of_vfs>with the number of VFs. -
Optional: Replace
<true/false>withtrueto set promiscuous mode, orfalseto disable promiscuous mode. The default value istrue.
NoteThe
numvfsparameter replaces theNeutronSriovNumVFsparameter in the network configuration templates. Red Hat does not support modification of theNeutronSriovNumVFsparameter or thenumvfsparameter after deployment. If you modify either parameter after deployment, it might cause a disruption for the running instances that have an SR-IOV port on that physical function (PF). In this case, you must hard reboot these instances to make the SR-IOV PCI device available again.-
Replace
Add an entry for the interface type
sriov_vfto configure virtual functions that the host can use:- type: <bond_type> name: internal_bond bonding_options: mode=<bonding_option> use_dhcp: false members: - type: sriov_vf device: <pf_device_name> vfid: <vf_id> - type: sriov_vf device: <pf_device_name> vfid: <vf_id> - type: vlan vlan_id: get_param: InternalApiNetworkVlanID spoofcheck: false device: internal_bond addresses: - ip_netmask: get_param: InternalApiIpSubnet routes: list_concat_unique: - get_param: InternalApiInterfaceRoutes-
Replace
<bond_type>with the required bond type, for example,linux_bond. You can apply VLAN tags on the bond for other bonds, such asovs_bond. Replace
<bonding_option>with one of the following supported bond modes:-
active-backup Balance-slbNoteLACP bonds are not supported.
-
Specify the
sriov_vfas the interface type to bond in thememberssection.NoteIf you are using an OVS bridge as the interface type, you can configure only one OVS bridge on the
sriov_vfof asriov_pfdevice. More than one OVS bridge on a singlesriov_pfdevice can result in packet duplication across VFs, and decreased performance.-
Replace
<pf_device_name>with the name of the PF device. -
If you use a
linux_bond, you must assign VLAN tags. If you set a VLAN tag, ensure that you set a unique tag for each VF associated with a singlesriov_pfdevice. You cannot have two VFs from the same PF on the same VLAN. -
Replace
<vf_id>with the ID of the VF. The applicable VF ID range starts at zero, and ends at the maximum number of VFs minus one. - Disable spoof checking.
-
Apply VLAN tags on the
sriov_vfforlinux_bondover VFs.
-
Replace
To reserve VFs for instances, include the
NovaPCIPassthroughparameter in an environment file, for example:NovaPCIPassthrough: - address: "0000:19:0e.3" trusted: "true" physical_network: "sriov1" - address: "0000:19:0e.0" trusted: "true" physical_network: "sriov2"
Director identifies the host VFs, and derives the PCI addresses of the VFs that are available to the instance.
Enable
IOMMUon all nodes that require NIC partitioning. For example, if you want NIC Partitioning for Compute nodes, enable IOMMU using theKernelArgsparameter for that role:parameter_defaults: ComputeParameters: KernelArgs: "intel_iommu=on iommu=pt"NoteWhen you first add the
KernelArgsparameter to the configuration of a role, the overcloud nodes are automatically rebooted. If required, you can disable the automatic rebooting of nodes and instead perform node reboots manually after each overcloud deployment.For more information, see Configuring manual node reboot to define KernelArgs in the Configuring the Compute Service for Instance Creation guide.
Add your role file and environment files to the stack with your other environment files and deploy the overcloud:
(undercloud)$ openstack overcloud deploy --templates \ -r os-net-config.yaml -e [your environment files] \ -e /home/stack/templates/<compute_environment_file>.yaml
Validation
Log in to the overcloud Compute node as
heat-adminand check the number of VFs:[heat-admin@overcloud-compute-0 heat-admin]$ sudo cat /sys/class/net/p4p1/device/sriov_numvfs 10 [heat-admin@overcloud-compute-0 heat-admin]$ sudo cat /sys/class/net/p4p2/device/sriov_numvfs 10
Show OVS connections:
[heat-admin@overcloud-compute-0]$ sudo ovs-vsctl show b6567fa8-c9ec-4247-9a08-cbf34f04c85f Manager "ptcp:6640:127.0.0.1" is_connected: true Bridge br-sriov2 Controller "tcp:127.0.0.1:6633" is_connected: true fail_mode: secure datapath_type: netdev Port phy-br-sriov2 Interface phy-br-sriov2 type: patch options: {peer=int-br-sriov2} Port br-sriov2 Interface br-sriov2 type: internal Bridge br-sriov1 Controller "tcp:127.0.0.1:6633" is_connected: true fail_mode: secure datapath_type: netdev Port phy-br-sriov1 Interface phy-br-sriov1 type: patch options: {peer=int-br-sriov1} Port br-sriov1 Interface br-sriov1 type: internal Bridge br-ex Controller "tcp:127.0.0.1:6633" is_connected: true fail_mode: secure datapath_type: netdev Port br-ex Interface br-ex type: internal Port phy-br-ex Interface phy-br-ex type: patch options: {peer=int-br-ex} Bridge br-tenant Controller "tcp:127.0.0.1:6633" is_connected: true fail_mode: secure datapath_type: netdev Port br-tenant tag: 305 Interface br-tenant type: internal Port phy-br-tenant Interface phy-br-tenant type: patch options: {peer=int-br-tenant} Port dpdkbond0 Interface dpdk0 type: dpdk options: {dpdk-devargs="0000:18:0e.0"} Interface dpdk1 type: dpdk options: {dpdk-devargs="0000:18:0a.0"} Bridge br-tun Controller "tcp:127.0.0.1:6633" is_connected: true fail_mode: secure datapath_type: netdev Port vxlan-98140025 Interface vxlan-98140025 type: vxlan options: {df_default="true", egress_pkt_mark="0", in_key=flow, local_ip="152.20.0.229", out_key=flow, remote_ip="152.20.0.37"} Port br-tun Interface br-tun type: internal Port patch-int Interface patch-int type: patch options: {peer=patch-tun} Port vxlan-98140015 Interface vxlan-98140015 type: vxlan options: {df_default="true", egress_pkt_mark="0", in_key=flow, local_ip="152.20.0.229", out_key=flow, remote_ip="152.20.0.21"} Port vxlan-9814009f Interface vxlan-9814009f type: vxlan options: {df_default="true", egress_pkt_mark="0", in_key=flow, local_ip="152.20.0.229", out_key=flow, remote_ip="152.20.0.159"} Port vxlan-981400cc Interface vxlan-981400cc type: vxlan options: {df_default="true", egress_pkt_mark="0", in_key=flow, local_ip="152.20.0.229", out_key=flow, remote_ip="152.20.0.204"} Bridge br-int Controller "tcp:127.0.0.1:6633" is_connected: true fail_mode: secure datapath_type: netdev Port int-br-tenant Interface int-br-tenant type: patch options: {peer=phy-br-tenant} Port int-br-ex Interface int-br-ex type: patch options: {peer=phy-br-ex} Port int-br-sriov1 Interface int-br-sriov1 type: patch options: {peer=phy-br-sriov1} Port patch-tun Interface patch-tun type: patch options: {peer=patch-int} Port br-int Interface br-int type: internal Port int-br-sriov2 Interface int-br-sriov2 type: patch options: {peer=phy-br-sriov2} Port vhu4142a221-93 tag: 1 Interface vhu4142a221-93 type: dpdkvhostuserclient options: {vhost-server-path="/var/lib/vhost_sockets/vhu4142a221-93"} ovs_version: "2.13.2"Log in to your OVS-DPDK SR-IOV Compute node as
heat-adminand check Linux bonds:[heat-admin@overcloud-computeovsdpdksriov-1 ~]$ cat /proc/net/bonding/<bond_name> Ethernet Channel Bonding Driver: v3.7.1 (April 27, 2011) Bonding Mode: fault-tolerance (active-backup) Primary Slave: None Currently Active Slave: eno3v1 MII Status: up MII Polling Interval (ms): 0 Up Delay (ms): 0 Down Delay (ms): 0 Peer Notification Delay (ms): 0 Slave Interface: eno3v1 MII Status: up Speed: 10000 Mbps Duplex: full Link Failure Count: 0 Permanent HW addr: 4e:77:94:bd:38:d2 Slave queue ID: 0 Slave Interface: eno4v1 MII Status: up Speed: 10000 Mbps Duplex: full Link Failure Count: 0 Permanent HW addr: 4a:74:52:a7:aa:7c Slave queue ID: 0
List OVS bonds:
[heat-admin@overcloud-computeovsdpdksriov-1 ~]$ sudo ovs-appctl bond/show ---- dpdkbond0 ---- bond_mode: balance-slb bond may use recirculation: no, Recirc-ID : -1 bond-hash-basis: 0 updelay: 0 ms downdelay: 0 ms next rebalance: 9491 ms lacp_status: off lacp_fallback_ab: false active slave mac: ce:ee:c7:58:8e:b2(dpdk1) slave dpdk0: enabled may_enable: true slave dpdk1: enabled active slave may_enable: true
If you used NovaPCIPassthrough to pass VFs to instances, test by Deploying an instance for SR-IOV.
7.3. Example configurations for NIC partitions
Linux bond over VFs
The following example configures a Linux bond over VFs, disables spoofcheck, and applies VLAN tags to sriov_vf:
- type: linux_bond
name: bond_api
bonding_options: "mode=active-backup"
members:
- type: sriov_vf
device: eno2
vfid: 1
vlan_id:
get_param: InternalApiNetworkVlanID
spoofcheck: false
- type: sriov_vf
device: eno3
vfid: 1
vlan_id:
get_param: InternalApiNetworkVlanID
spoofcheck: false
addresses:
- ip_netmask:
get_param: InternalApiIpSubnet
routes:
list_concat_unique:
- get_param: InternalApiInterfaceRoutesOVS bridge on VFs
The following example configures an OVS bridge on VFs:
- type: ovs_bridge
name: br-bond
use_dhcp: true
members:
- type: vlan
vlan_id:
get_param: TenantNetworkVlanID
addresses:
- ip_netmask:
get_param: TenantIpSubnet
routes:
list_concat_unique:
- get_param: ControlPlaneStaticRoutes
- type: ovs_bond
name: bond_vf
ovs_options: "bond_mode=active-backup"
members:
- type: sriov_vf
device: p2p1
vfid: 2
- type: sriov_vf
device: p2p2
vfid: 2OVS user bridge on VFs
The following example configures an OVS user bridge on VFs and applies VLAN tags to ovs_user_bridge:
- type: ovs_user_bridge
name: br-link0
use_dhcp: false
mtu: 9000
ovs_extra:
- str_replace:
template: set port br-link0 tag=_VLAN_TAG_
params:
_VLAN_TAG_:
get_param: TenantNetworkVlanID
addresses:
- ip_netmask:
list_concat_unique:
- get_param: TenantInterfaceRoutes
members:
- type: ovs_dpdk_bond
name: dpdkbond0
mtu: 9000
ovs_extra:
- set port dpdkbond0 bond_mode=balance-slb
members:
- type: ovs_dpdk_port
name: dpdk0
members:
- type: sriov_vf
device: eno2
vfid: 3
- type: ovs_dpdk_port
name: dpdk1
members:
- type: sriov_vf
device: eno3
vfid: 37.4. Configuring OVS hardware offload
The procedure for OVS hardware offload configuration shares many of the same steps as configuring SR-IOV.
Since Red Hat OpenStack Platform 16.2.3, to offload traffic from Compute nodes with OVS hardware offload and ML2/OVS, you must set the disable_packet_marking parameter to true in the openvswitch_agent.ini configuration file, and then restart the neutron_ovs_agent container.
+
cat /var/lib/config-data/puppet-generated/neutron/\ etc/neutron/plugins/ml2/openvswitch_agent.ini [ovs] disable_packet_marking=True
Procedure
Generate an overcloud role for OVS hardware offload that is based on the Compute role:
openstack overcloud roles generate -o roles_data.yaml \ Controller Compute:ComputeOvsHwOffload
-
Optional: Change the
HostnameFormatDefault: '%stackname%-compute-%index%'name for theComputeOvsHwOffloadrole. -
Add the
OvsHwOffloadparameter under role-specific parameters with a value oftrue. -
To configure neutron to use the iptables/hybrid firewall driver implementation, include the line:
NeutronOVSFirewallDriver: iptables_hybrid. For more information aboutNeutronOVSFirewallDriver, see Using the Open vSwitch Firewall in the Advanced Overcloud Customization Guide. Configure the
physical_networkparameter to match your environment.-
For VLAN, set the
physical_networkparameter to the name of the network you create in neutron after deployment. This value should also be inNeutronBridgeMappings. For VXLAN, set the
physical_networkparameter tonull.Example:
parameter_defaults: NeutronOVSFirewallDriver: iptables_hybrid ComputeSriovParameters: IsolCpusList: 2-9,21-29,11-19,31-39 KernelArgs: "default_hugepagesz=1GB hugepagesz=1G hugepages=128 intel_iommu=on iommu=pt" OvsHwOffload: true TunedProfileName: "cpu-partitioning" NeutronBridgeMappings: - tenant:br-tenant NovaPCIPassthrough: - vendor_id: <vendor-id> product_id: <product-id> address: <address> physical_network: "tenant" - vendor_id: <vendor-id> product_id: <product-id> address: <address> physical_network: "null" NovaReservedHostMemory: 4096 NovaComputeCpuDedicatedSet: 1-9,21-29,11-19,31-39-
Replace
<vendor-id>with the vendor ID of the physical NIC. -
Replace
<product-id>with the product ID of the NIC VF. Replace
<address>with the address of the physical NIC.For more information about how to configure
NovaPCIPassthrough, see Guidelines for configuring NovaPCIPassthrough in the Configuring the Compute Service for Instance Creation guide.
-
For VLAN, set the
Ensure that the list of default filters includes
NUMATopologyFilter:parameter_defaults: NovaSchedulerEnabledFilters: - AvailabilityZoneFilter - ComputeFilter - ComputeCapabilitiesFilter - ImagePropertiesFilter - ServerGroupAntiAffinityFilter - ServerGroupAffinityFilter - PciPassthroughFilter - NUMATopologyFilterNoteOptional: For details on how to troubleshoot and configure OVS Hardware Offload issues in RHOSP 16.2 with Mellanox ConnectX5 NICs, see Troubleshooting Hardware Offload.
Configure one or more network interfaces intended for hardware offload in the
compute-sriov.yamlconfiguration file:- type: ovs_bridge name: br-tenant mtu: 9000 members: - type: sriov_pf name: p7p1 numvfs: 5 mtu: 9000 primary: true promisc: true use_dhcp: false link_mode: switchdevNote-
Do not use the
NeutronSriovNumVFsparameter when configuring Open vSwitch hardware offload. The number of virtual functions is specified using thenumvfsparameter in a network configuration file used byos-net-config. Red Hat does not support modifying thenumvfssetting during update or redeployment. -
Do not configure Mellanox network interfaces as a nic-config interface type
ovs-vlanbecause this prevents tunnel endpoints such as VXLAN from passing traffic due to driver limitations.
-
Do not use the
Include the
ovs-hw-offload.yamlfile in theovercloud deploycommand:TEMPLATES_HOME=”/usr/share/openstack-tripleo-heat-templates” CUSTOM_TEMPLATES=”/home/stack/templates” openstack overcloud deploy --templates \ -r ${CUSTOM_TEMPLATES}/roles_data.yaml \ -e ${TEMPLATES_HOME}/environments/ovs-hw-offload.yaml \ -e ${CUSTOM_TEMPLATES}/network-environment.yaml \ -e ${CUSTOM_TEMPLATES}/neutron-ovs.yaml
Verification
Confirm that a PCI device is in
switchdevmode:# devlink dev eswitch show pci/0000:03:00.0 pci/0000:03:00.0: mode switchdev inline-mode none encap enable
Verify if offload is enabled in OVS:
# ovs-vsctl get Open_vSwitch . other_config:hw-offload “true”
7.5. Tuning examples for OVS hardware offload
For optimal performance you must complete additional configuration steps.
Adjusting the number of channels for each network interface to improve performance
A channel includes an interrupt request (IRQ) and the set of queues that trigger the IRQ. When you set the mlx5_core driver to switchdev mode, the mlx5_core driver defaults to one combined channel, which might not deliver optimal performance.
Procedure
On the PF representors, enter the following command to adjust the number of CPUs available to the host. Replace $(nproc) with the number of CPUs you want to make available:
$ sudo ethtool -L enp3s0f0 combined $(nproc)
CPU pinning
To prevent performance degradation from cross-NUMA operations, locate NICs, their applications, the VF guest, and OVS in the same NUMA node. For more information, see Configuring CPU pinning on Compute nodes in the Configuring the Compute Service for Instance Creation guide.
7.6. Configuring components of OVS hardware offload
A reference for configuring and troubleshooting the components of OVS HW Offload with Mellanox smart NICs.
Nova
Configure the Nova scheduler to use the NovaPCIPassthrough filter with the NUMATopologyFilter and DerivePciWhitelistEnabled parameters. When you enable OVS HW Offload, the Nova scheduler operates similarly to SR-IOV passthrough for instance spawning.
Neutron
When you enable OVS HW Offload, use the devlink cli tool to set the NIC e-switch mode to switchdev. Switchdev mode establishes representor ports on the NIC that are mapped to the VFs.
Procedure
To allocate a port from a
switchdev-enabled NIC, log in as an admin user, create a neutron port with abinding-profilevalue ofcapabilities, and disable port security:$ openstack port create --network private --vnic-type=direct --binding-profile '{"capabilities": ["switchdev"]}' direct_port1 --disable-port-securityPass this port information when you create the instance.
You associate the representor port with the instance VF interface and connect the representor port to OVS bridge
br-intfor one-time OVS data path processing. A VF port representor functions like a software version of a physical “patch panel” front-end.For more information about new instance creation, see Deploying an instance for SR-IOV.
OVS
In an environment with hardware offload configured, the first packet transmitted traverses the OVS kernel path, and this packet journey establishes the ml2 OVS rules for incoming and outgoing traffic for the instance traffic. When the flows of the traffic stream are established, OVS uses the traffic control (TC) Flower utility to push these flows on the NIC hardware.
Procedure
Use director to apply the following configuration on OVS:
$ sudo ovs-vsctl set Open_vSwitch . other_config:hw-offload=true
- Restart to enable HW Offload.
Traffic Control (TC) subsystems
When you enable the hw-offload flag, OVS uses the TC data path. TC Flower is an iproute2 utility that writes data path flows on hardware. This ensures that the flow is programmed on both the hardware and software data paths, for redundancy.
Procedure
Apply the following configuration. This is the default option if you do not explicitly configure
tc-policy:$ sudo ovs-vsctl set Open_vSwitch . other_config:tc-policy=none
- Restart OVS.
NIC PF and VF drivers
Mlx5_core is the PF and VF driver for the Mellanox ConnectX-5 NIC. The mlx5_core driver performs the following tasks:
- Creates routing tables on hardware.
- Manages network flow management.
-
Configures the Ethernet switch device driver model,
switchdev. - Creates block devices.
Procedure
Use the following
devlinkcommands to query the mode of the PCI device.$ sudo devlink dev eswitch set pci/0000:03:00.0 mode switchdev $ sudo devlink dev eswitch show pci/0000:03:00.0 pci/0000:03:00.0: mode switchdev inline-mode none encap enable
NIC firmware
The NIC firmware performs the following tasks:
- Maintains routing tables and rules.
- Fixes the pipelines of the tables.
- Manages hardware resources.
- Creates VFs.
The firmware works with the driver for optimal performance.
Although the NIC firmware is non-volatile and persists after you reboot, you can modify the configuration during run time.
Procedure
Apply the following configuration on the interfaces, and the representor ports, to ensure that TC Flower pushes the flow programming at the port level:
$ sudo ethtool -K enp3s0f0 hw-tc-offload on
Ensure that you keep the firmware updated.Yum or dnf updates might not complete the firmware update. For more information, see your vendor documentation.
7.7. Troubleshooting OVS hardware offload
Prerequisites
- Linux Kernel 4.13 or newer
- OVS 2.8 or newer
- RHOSP 12 or newer
- Iproute 4.12 or newer
- Mellanox NIC firmware, for example FW ConnectX-5 16.21.0338 or newer
For more information about supported prerequisites, see see the Red Hat Knowledgebase solution Network Adapter Fast Datapath Feature Support Matrix.
Configuring the network in an OVS HW offload deployment
In a HW offload deployment, you can choose one of the following scenarios for your network configuration according to your requirements:
- You can base guest VMs on VXLAN and VLAN by using either the same set of interfaces attached to a bond, or a different set of NICs for each type.
- You can bond two ports of a Mellanox NIC by using Linux bond.
- You can host tenant VXLAN networks on VLAN interfaces on top of a Mellanox Linux bond.
Ensure that individual NICs and bonds are members of an ovs-bridge.
Refer to the below example network configuration:
- type: ovs_bridge
name: br-offload
mtu: 9000
use_dhcp: false
members:
- type: linux_bond
name: bond-pf
bonding_options: "mode=active-backup miimon=100"
members:
- type: sriov_pf
name: p5p1
numvfs: 3
primary: true
promisc: true
use_dhcp: false
defroute: false
link_mode: switchdev
- type: sriov_pf
name: p5p2
numvfs: 3
promisc: true
use_dhcp: false
defroute: false
link_mode: switchdev
- type: vlan
vlan_id:
get_param: TenantNetworkVlanID
device: bond-pf
addresses:
- ip_netmask:
get_param: TenantIpSubnetThe following bonding configurations are supported:
- active-backup - mode=1
- active-active or balance-xor - mode=2
- 802.3ad (LACP) - mode=4
The following bonding configuration is not supported:
- xmit_hash_policy=layer3+4
Verifying the interface configuration
Verify the interface configuration with the following procedure.
Procedure
-
During deployment, use the host network configuration tool
os-net-configto enablehw-tc-offload. -
Enable
hw-tc-offloadon thesriov_configservice any time you reboot the Compute node. Set the
hw-tc-offloadparameter toonfor the NICs that are attached to the bond:.[root@overcloud-computesriov-0 ~]# ethtool -k ens1f0 | grep tc-offload hw-tc-offload: on
Verifying the interface mode
Verify the interface mode with the following procedure.
Procedure
-
Set the eswitch mode to
switchdevfor the interfaces you use for HW offload. -
Use the host network configuration tool
os-net-configto enableeswitchduring deployment. Enable
eswitchon thesriov_configservice any time you reboot the Compute node.[root@overcloud-computesriov-0 ~]# devlink dev eswitch show pci/$(ethtool -i ens1f0 | grep bus-info | cut -d ':' -f 2,3,4 | awk '{$1=$1};1')
The driver of the PF interface is set to "mlx5e_rep", to show that it is a representor of the e-switch uplink port. This does not affect the functionality.
Verifying the offload state in OVS
Verify the offload state in OVS with the following procedure.
Enable hardware offload in OVS in the Compute node.
[root@overcloud-computesriov-0 ~]# ovs-vsctl get Open_vSwitch . other_config:hw-offload "true"
Verifying the name of the VF representor port
To ensure consistent naming of VF representor ports, os-net-config uses udev rules to rename the ports in the <PF-name>_<VF_id> format.
Procedure
After deployment, verify that the VF representor ports are named correctly.
root@overcloud-computesriov-0 ~]# cat /etc/udev/rules.d/80-persistent-os-net-config.rules # This file is autogenerated by os-net-config SUBSYSTEM=="net", ACTION=="add", ATTR{phys_switch_id}!="", ATTR{phys_port_name}=="pf*vf*", ENV{NM_UNMANAGED}="1" SUBSYSTEM=="net", ACTION=="add", DRIVERS=="?*", KERNELS=="0000:65:00.0", NAME="ens1f0" SUBSYSTEM=="net", ACTION=="add", ATTR{phys_switch_id}=="98039b7f9e48", ATTR{phys_port_name}=="pf0vf*", IMPORT{program}="/etc/udev/rep-link-name.sh $attr{phys_port_name}", NAME="ens1f0_$env{NUMBER}" SUBSYSTEM=="net", ACTION=="add", DRIVERS=="?*", KERNELS=="0000:65:00.1", NAME="ens1f1" SUBSYSTEM=="net", ACTION=="add", ATTR{phys_switch_id}=="98039b7f9e49", ATTR{phys_port_name}=="pf1vf*", IMPORT{program}="/etc/udev/rep-link-name.sh $attr{phys_port_name}", NAME="ens1f1_$env{NUMBER}"
Examining network traffic flow
HW offloaded network flow functions in a similar way to physical switches or routers with application-specific integrated circuit (ASIC) chips. You can access the ASIC shell of a switch or router to examine the routing table and for other debugging. The following procedure uses a Broadcom chipset from a Cumulus Linux switch as an example. Replace the values that are appropriate to your environment.
Procedure
To get Broadcom chip table content, use the
bcmcmdcommand.root@dni-7448-26:~# cl-bcmcmd l2 show mac=00:02:00:00:00:08 vlan=2000 GPORT=0x2 modid=0 port=2/xe1 mac=00:02:00:00:00:09 vlan=2000 GPORT=0x2 modid=0 port=2/xe1 Hit
Inspect the Traffic Control (TC) Layer.
# tc -s filter show dev p5p1_1 ingress … filter block 94 protocol ip pref 3 flower chain 5 filter block 94 protocol ip pref 3 flower chain 5 handle 0x2 eth_type ipv4 src_ip 172.0.0.1 ip_flags nofrag in_hw in_hw_count 1 action order 1: mirred (Egress Redirect to device eth4) stolen index 3 ref 1 bind 1 installed 364 sec used 0 sec Action statistics: Sent 253991716224 bytes 169534118 pkt (dropped 0, overlimits 0 requeues 0) Sent software 43711874200 bytes 30161170 pkt Sent hardware 210279842024 bytes 139372948 pkt backlog 0b 0p requeues 0 cookie 8beddad9a0430f0457e7e78db6e0af48 no_percpu-
Examine the
in_hwflags and the statistics in this output. The wordhardwareindicates that the hardware processes the network traffic. If you usetc-policy=none, you can check this output or a tcpdump to investigate when hardware or software handles the packets. You can see a corresponding log message indmesgor inovs-vswitch.logwhen the driver is unable to offload packets. For Mellanox, as an example, the log entries resemble syndrome messages in
dmesg.[13232.860484] mlx5_core 0000:3b:00.0: mlx5_cmd_check:756:(pid 131368): SET_FLOW_TABLE_ENTRY(0x936) op_mod(0x0) failed, status bad parameter(0x3), syndrome (0x6b1266)
In this example, the error code (0x6b1266) represents the following behavior:
0x6B1266 | set_flow_table_entry: pop vlan and forward to uplink is not allowed
Validating systems
Validate your system with the following procedure.
Procedure
- Ensure SR-IOV and VT-d are enabled on the system.
-
Enable IOMMU in Linux by adding
intel_iommu=onto kernel parameters, for example, using GRUB.
Limitations
You cannot use the OVS firewall driver with HW offload because the connection tracking properties of the flows are unsupported in the offload path in OVS 2.11.
7.8. Debugging hardware offload flow
You can use the following procedure if you encounter the following message in the ovs-vswitch.log file:
2020-01-31T06:22:11.257Z|00473|dpif_netlink(handler402)|ERR|failed to offload flow: Operation not supported: p6p1_5
Procedure
To enable logging on the offload modules and to get additional log information for this failure, use the following commands on the Compute node:
ovs-appctl vlog/set dpif_netlink:file:dbg # Module name changed recently (check based on the version used ovs-appctl vlog/set netdev_tc_offloads:file:dbg [OR] ovs-appctl vlog/set netdev_offload_tc:file:dbg ovs-appctl vlog/set tc:file:dbg
Inspect the
ovs-vswitchdlogs again to see additional details about the issue.In the following example logs, the offload failed because of an unsupported attribute mark.
2020-01-31T06:22:11.218Z|00471|dpif_netlink(handler402)|DBG|system@ovs-system: put[create] ufid:61bd016e-eb89-44fc-a17e-958bc8e45fda recirc_id(0),dp_hash(0/0),skb_priority(0/0),in_port(7),skb_mark(0),ct_state(0/0),ct_zone(0/0),ct_mark(0/0),ct_label(0/0),eth(src=fa:16:3e:d2:f5:f3,dst=fa:16:3e:c4:a3:eb),eth_type(0x0800),ipv4(src=10.1.1.8/0.0.0.0,dst=10.1.1.31/0.0.0.0,proto=1/0,tos=0/0x3,ttl=64/0,frag=no),icmp(type=0/0,code=0/0), actions:set(tunnel(tun_id=0x3d,src=10.10.141.107,dst=10.10.141.124,ttl=64,tp_dst=4789,flags(df|key))),6 2020-01-31T06:22:11.253Z|00472|netdev_tc_offloads(handler402)|DBG|offloading attribute pkt_mark isn't supported 2020-01-31T06:22:11.257Z|00473|dpif_netlink(handler402)|ERR|failed to offload flow: Operation not supported: p6p1_5
Debugging Mellanox NICs
Mellanox has provided a system information script, similar to a Red Hat SOS report.
https://github.com/Mellanox/linux-sysinfo-snapshot/blob/master/sysinfo-snapshot.py
When you run this command, you create a zip file of the relevant log information, which is useful for support cases.
Procedure
You can run this system information script with the following command:
# ./sysinfo-snapshot.py --asap --asap_tc --ibdiagnet --openstack
You can also install Mellanox Firmware Tools (MFT), mlxconfig, mlxlink and the OpenFabrics Enterprise Distribution (OFED) drivers.
Useful CLI commands
Use the ethtool utility with the following options to gather diagnostic information:
- ethtool -l <uplink representor> : View the number of channels
- ethtool -I <uplink/VFs> : Check statistics
- ethtool -i <uplink rep> : View driver information
- ethtool -g <uplink rep> : Check ring sizes
- ethtool -k <uplink/VFs> : View enabled features
Use the tcpdump utility at the representor and PF ports to similarly check traffic flow.
- Any changes you make to the link state of the representor port, affect the VF link state also.
- Representor port statistics present VF statistics also.
Use the below commands to get useful diagnostic information:
$ ovs-appctl dpctl/dump-flows -m type=offloaded $ ovs-appctl dpctl/dump-flows -m $ tc filter show dev ens1_0 ingress $ tc -s filter show dev ens1_0 ingress $ tc monitor
7.9. Deploying an instance for SR-IOV
Use host aggregates to separate high performance compute hosts. For information on creating host aggregates and associated flavors for scheduling see Creating host aggregates.
Pinned CPU instances can be located on the same Compute node as unpinned instances. For more information, see Configuring CPU pinning on Compute nodes in the Configuring the Compute Service for Instance Creation guide.
Deploy an instance for single root I/O virtualization (SR-IOV) by performing the following steps:
Procedure
Create a flavor.
$ openstack flavor create <flavor> --ram <MB> --disk <GB> --vcpus <#>
TipYou can specify the NUMA affinity policy for PCI passthrough devices and SR-IOV interfaces by adding the extra spec
hw:pci_numa_affinity_policyto your flavor. For more information, see Flavor metadata in the Configuring the Compute Service for Instance Creation guide.Create the network.
$ openstack network create net1 --provider-physical-network tenant --provider-network-type vlan --provider-segment <VLAN-ID> $ openstack subnet create subnet1 --network net1 --subnet-range 192.0.2.0/24 --dhcp
Create the port.
Use vnic-type
directto create an SR-IOV virtual function (VF) port.$ openstack port create --network net1 --vnic-type direct sriov_port
Use the following command to create a virtual function with hardware offload. You must be an admin user to set
--binding-profile.$ openstack port create --network net1 --vnic-type direct --binding-profile '{"capabilities": ["switchdev"]} sriov_hwoffload_portUse vnic-type
direct-physicalto create an SR-IOV physical function (PF) port that is dedicated to a single instance. This PF port is a Networking service (neutron) port but is not controlled by the Networking service, and is not visible as a network adapter because it is a PCI device that is passed through to the instance.$ openstack port create --network net1 --vnic-type direct-physical sriov_port
Deploy an instance.
$ openstack server create --flavor <flavor> --image <image> --nic port-id=<id> <instance name>
7.10. Creating host aggregates
For better performance, deploy guests that have CPU pinning and huge pages. You can schedule high performance instances on a subset of hosts by matching aggregate metadata with flavor metadata.
Procedure
You can configure the
AggregateInstanceExtraSpecsFiltervalue, and other necessary filters, through the heat parameterNovaSchedulerEnabledFiltersunderparameter_defaultsin your deployment templates.parameter_defaults: NovaSchedulerEnabledFilters: - AggregateInstanceExtraSpecsFilter - AvailabilityZoneFilter - ComputeFilter - ComputeCapabilitiesFilter - ImagePropertiesFilter - ServerGroupAntiAffinityFilter - ServerGroupAffinityFilter - PciPassthroughFilter - NUMATopologyFilterNoteTo add this parameter to the configuration of an existing cluster, you can add it to the heat templates, and run the original deployment script again.
Create an aggregate group for SR-IOV, and add relevant hosts. Define metadata, for example,
sriov=true, that matches defined flavor metadata.# openstack aggregate create sriov_group # openstack aggregate add host sriov_group compute-sriov-0.localdomain # openstack aggregate set --property sriov=true sriov_group
Create a flavor.
# openstack flavor create <flavor> --ram <MB> --disk <GB> --vcpus <#>
Set additional flavor properties. Note that the defined metadata,
sriov=true, matches the defined metadata on the SR-IOV aggregate.# openstack flavor set --property sriov=true --property hw:cpu_policy=dedicated --property hw:mem_page_size=1GB <flavor>
Chapter 8. Planning your OVS-DPDK deployment
To optimize your Open vSwitch with Data Plane Development Kit (OVS-DPDK) deployment for NFV, you should understand how OVS-DPDK uses the Compute node hardware (CPU, NUMA nodes, memory, NICs) and the considerations for determining the individual OVS-DPDK parameters based on your Compute node.
When using OVS-DPDK and the OVS native firewall (a stateful firewall based on conntrack), you can track only packets that use ICMPv4, ICMPv6, TCP, and UDP protocols. OVS marks all other types of network traffic as invalid.
Red Hat does not support the use of OVS-DPDK for non-NFV workloads. If you need OVS-DPDK functionality for non-NFV workloads, contact your Technical Account Manager (TAM) or open a customer service request case to discuss a Support Exception and other options. To open a customer service request case, go to Create a case and choose Account > Customer Service Request.
8.1. OVS-DPDK with CPU partitioning and NUMA topology
OVS-DPDK partitions the hardware resources for host, guests, and itself. The OVS-DPDK Poll Mode Drivers (PMDs) run DPDK active loops, which require dedicated CPU cores. Therefore you must allocate some CPUs, and huge pages, to OVS-DPDK.
A sample partitioning includes 16 cores per NUMA node on dual-socket Compute nodes. The traffic requires additional NICs because you cannot share NICs between the host and OVS-DPDK.
Figure 8.1. NUMA topology: OVS-DPDK with CPU partitioning
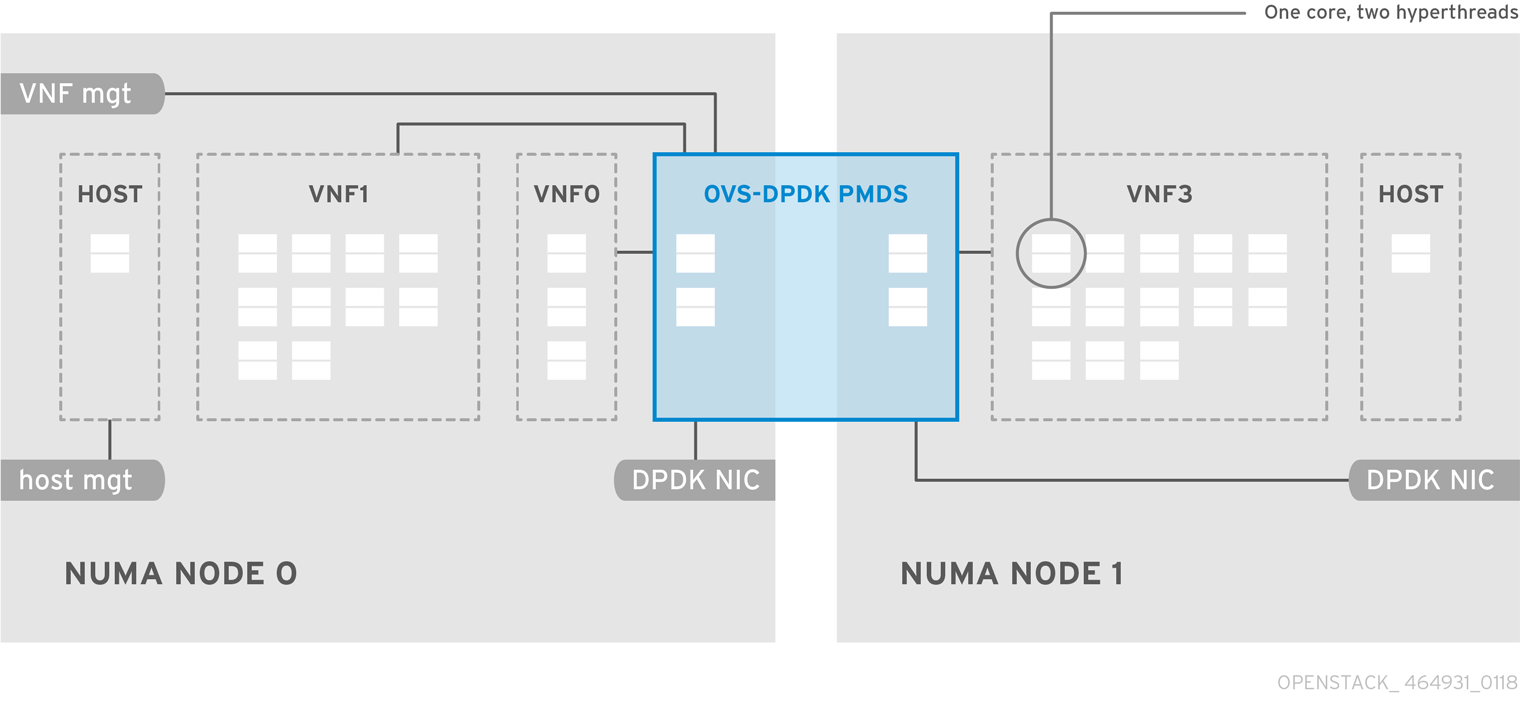
You must reserve DPDK PMD threads on both NUMA nodes, even if a NUMA node does not have an associated DPDK NIC.
For optimum OVS-DPDK performance, reserve a block of memory local to the NUMA node. Choose NICs associated with the same NUMA node that you use for memory and CPU pinning. Ensure that both bonded interfaces are from NICs on the same NUMA node.
8.2. Workflows and derived parameters
This feature is available in this release as a Technology Preview, and therefore is not fully supported by Red Hat. It should only be used for testing, and should not be deployed in a production environment. For more information about Technology Preview features, see Scope of Coverage Details.
You can use the Red Hat OpenStack Platform Workflow (mistral) service to derive parameters based on the capabilities of your available bare-metal nodes. Workflows use a YAML file to define a set of tasks and actions to perform. You can use a pre-defined workbook, derive_params.yaml, in the directory tripleo-common/workbooks/. This workbook provides workflows to derive each supported parameter from the results of Bare Metal introspection. The derive_params.yaml workflows use the formulas from tripleo-common/workbooks/derive_params_formulas.yaml to calculate the derived parameters.
You can modify derive_params_formulas.yaml to suit your environment.
The derive_params.yaml workbook assumes all nodes for a particular composable role have the same hardware specifications. The workflow considers the flavor-profile association and nova placement scheduler to match nodes associated with a role, then uses the introspection data from the first node that matches the role.
For more information about Workflows, see Troubleshooting workflows and executions.
You can use the -p or --plan-environment-file option to add a custom plan_environment.yaml file, containing a list of workbooks and any input values, to the openstack overcloud deploy command. The resultant workflows merge the derived parameters back into the custom plan_environment.yaml, where they are available for the overcloud deployment.
For details on how to use the --plan-environment-file option in your deployment, see Plan environment metadata.
8.3. Derived OVS-DPDK parameters
This feature is available in this release as a Technology Preview, and therefore is not fully supported by Red Hat. It should only be used for testing, and should not be deployed in a production environment. For more information about Technology Preview features, see Scope of Coverage Details.
The workflows in derive_params.yaml derive the DPDK parameters associated with the role that uses the ComputeNeutronOvsDpdk service.
The workflows can automatically derive the following parameters for OVS-DPDK. The NovaVcpuPinSet parameter is now deprecated, and is replaced by NovaComputeCpuDedicatedSet for dedicated, pinned workflows:
- IsolCpusList
- KernelArgs
- NovaReservedHostMemory
- NovaComputeCpuDedicatedSet
- OvsDpdkSocketMemory
- OvsPmdCoreList
To avoid errors, you must configure role-specific tagging for role-specific parameters.
The OvsDpdkMemoryChannels parameter cannot be derived from the introspection memory bank data because the format of memory slot names are inconsistent across different hardware environments.
In most cases, the default number of OvsDpdkMemoryChannels is four. Consult your hardware manual to determine the number of memory channels per socket, and update the default number with this value.
For more information about workflow parameters, see Deriving DPDK parameters with workflows.
8.4. OVS-DPDK parameters
This section describes how OVS-DPDK uses parameters within the director network_environment.yaml heat templates to configure the CPU and memory for optimum performance. Use this information to evaluate the hardware support on your Compute nodes and how to partition the hardware to optimize your OVS-DPDK deployment.
For more information on an how to generate these values with the derived_parameters.yaml workflow instead, see Workflows and derived parameters.
Always pair CPU sibling threads, or logical CPUs, together in the physical core when allocating CPU cores.
For details on how to determine the CPU and NUMA nodes on your Compute nodes, see Discovering your NUMA node topology. Use this information to map CPU and other parameters to support the host, guest instance, and OVS-DPDK process needs.
8.4.1. CPU parameters
OVS-DPDK uses the following parameters for CPU partitioning:
- OvsPmdCoreList
Provides the CPU cores that are used for the DPDK poll mode drivers (PMD). Choose CPU cores that are associated with the local NUMA nodes of the DPDK interfaces. Use
OvsPmdCoreListfor thepmd-cpu-maskvalue in OVS. Use the following recommendations forOvsPmdCoreList:- Pair the sibling threads together.
- Performance depends on the number of physical cores allocated for this PMD Core list. On the NUMA node which is associated with DPDK NIC, allocate the required cores.
- For NUMA nodes with a DPDK NIC, determine the number of physical cores required based on the performance requirement, and include all the sibling threads or logical CPUs for each physical core.
- For NUMA nodes without DPDK NICs, allocate the sibling threads or logical CPUs of any physical core except the first physical core of the NUMA node.
You must reserve DPDK PMD threads on both NUMA nodes, even if a NUMA node does not have an associated DPDK NIC.
- NovaComputeCpuDedicatedSet
A comma-separated list or range of physical host CPU numbers to which processes for pinned instance CPUs can be scheduled. For example,
NovaComputeCpuDedicatedSet: [4-12,^8,15]reserves cores from 4-12 and 15, excluding 8.-
Exclude all cores from the
OvsPmdCoreList. - Include all remaining cores.
- Pair the sibling threads together.
-
Exclude all cores from the
- NovaComputeCpuSharedSet
- A comma-separated list or range of physical host CPU numbers used to determine the host CPUs for instance emulator threads.
- IsolCpusList
A set of CPU cores isolated from the host processes.
IsolCpusListis theisolated_coresvalue in thecpu-partitioning-variable.conffile for thetuned-profiles-cpu-partitioningcomponent. Use the following recommendations forIsolCpusList:-
Match the list of cores in
OvsPmdCoreListandNovaComputeCpuDedicatedSet. - Pair the sibling threads together.
-
Match the list of cores in
- DerivePciWhitelistEnabled
To reserve virtual functions (VF) for VMs, use the
NovaPCIPassthroughparameter to create a list of VFs passed through to Nova. VFs excluded from the list remain available for the host.For each VF in the list, populate the address parameter with a regular expression that resolves to the address value.
The following is an example of the manual list creation process. If NIC partitioning is enabled in a device named
eno2, list the PCI addresses of the VFs with the following command:[tripleo-admin@compute-0 ~]$ ls -lh /sys/class/net/eno2/device/ | grep virtfn lrwxrwxrwx. 1 root root 0 Apr 16 09:58 virtfn0 -> ../0000:18:06.0 lrwxrwxrwx. 1 root root 0 Apr 16 09:58 virtfn1 -> ../0000:18:06.1 lrwxrwxrwx. 1 root root 0 Apr 16 09:58 virtfn2 -> ../0000:18:06.2 lrwxrwxrwx. 1 root root 0 Apr 16 09:58 virtfn3 -> ../0000:18:06.3 lrwxrwxrwx. 1 root root 0 Apr 16 09:58 virtfn4 -> ../0000:18:06.4 lrwxrwxrwx. 1 root root 0 Apr 16 09:58 virtfn5 -> ../0000:18:06.5 lrwxrwxrwx. 1 root root 0 Apr 16 09:58 virtfn6 -> ../0000:18:06.6 lrwxrwxrwx. 1 root root 0 Apr 16 09:58 virtfn7 -> ../0000:18:06.7
In this case, the VFs 0, 4, and 6 are used by
eno2for NIC Partitioning. Manually configureNovaPCIPassthroughto include VFs 1-3, 5, and 7, and consequently exclude VFs 0,4, and 6, as in the following example:NovaPCIPassthrough: - physical_network: "sriovnet2" address: {"domain": ".*", "bus": "18", "slot": "06", "function": "[1-3]"} - physical_network: "sriovnet2" address: {"domain": ".*", "bus": "18", "slot": "06", "function": "[5]"} - physical_network: "sriovnet2" address: {"domain": ".*", "bus": "18", "slot": "06", "function": "[7]"}
8.4.2. Memory parameters
OVS-DPDK uses the following memory parameters:
- OvsDpdkMemoryChannels
Maps memory channels in the CPU per NUMA node.
OvsDpdkMemoryChannelsis theother_config:dpdk-extra="-n <value>"value in OVS. Observe the following recommendations forOvsDpdkMemoryChannels:-
Use
dmidecode -t memoryor your hardware manual to determine the number of memory channels available. -
Use
ls /sys/devices/system/node/node* -dto determine the number of NUMA nodes. - Divide the number of memory channels available by the number of NUMA nodes.
-
Use
- NovaReservedHostMemory
Reserves memory in MB for tasks on the host.
NovaReservedHostMemoryis thereserved_host_memory_mbvalue for the Compute node innova.conf. Observe the following recommendation forNovaReservedHostMemory:- Use the static recommended value of 4096 MB.
- OvsDpdkSocketMemory
Specifies the amount of memory in MB to pre-allocate from the hugepage pool, per NUMA node.
OvsDpdkSocketMemoryis theother_config:dpdk-socket-memvalue in OVS. Observe the following recommendations forOvsDpdkSocketMemory:- Provide as a comma-separated list.
- For a NUMA node without a DPDK NIC, use the static recommendation of 1024 MB (1GB)
-
Calculate the
OvsDpdkSocketMemoryvalue from the MTU value of each NIC on the NUMA node. The following equation approximates the value for
OvsDpdkSocketMemory:MEMORY_REQD_PER_MTU = (ROUNDUP_PER_MTU + 800) * (4096 * 64) Bytes
- 800 is the overhead value.
- 4096 * 64 is the number of packets in the mempool.
- Add the MEMORY_REQD_PER_MTU for each of the MTU values set on the NUMA node and add another 512 MB as buffer. Round the value up to a multiple of 1024.
Sample Calculation - MTU 2000 and MTU 9000
DPDK NICs dpdk0 and dpdk1 are on the same NUMA node 0, and configured with MTUs 9000, and 2000 respectively. The sample calculation to derive the memory required is as follows:
Round off the MTU values to the nearest multiple of 1024 bytes.
The MTU value of 9000 becomes 9216 bytes. The MTU value of 2000 becomes 2048 bytes.
Calculate the required memory for each MTU value based on these rounded byte values.
Memory required for 9000 MTU = (9216 + 800) * (4096*64) = 2625634304 Memory required for 2000 MTU = (2048 + 800) * (4096*64) = 746586112
Calculate the combined total memory required, in bytes.
2625634304 + 746586112 + 536870912 = 3909091328 bytes.
This calculation represents (Memory required for MTU of 9000) + (Memory required for MTU of 2000) + (512 MB buffer).
Convert the total memory required into MB.
3909091328 / (1024*1024) = 3728 MB.
Round this value up to the nearest 1024.
3724 MB rounds up to 4096 MB.
Use this value to set
OvsDpdkSocketMemory.OvsDpdkSocketMemory: "4096,1024"
Sample Calculation - MTU 2000
DPDK NICs dpdk0 and dpdk1 are on the same NUMA node 0, and each are configured with MTUs of 2000. The sample calculation to derive the memory required is as follows:
Round off the MTU values to the nearest multiple of 1024 bytes.
The MTU value of 2000 becomes 2048 bytes.
Calculate the required memory for each MTU value based on these rounded byte values.
Memory required for 2000 MTU = (2048 + 800) * (4096*64) = 746586112
Calculate the combined total memory required, in bytes.
746586112 + 536870912 = 1283457024 bytes.
This calculation represents (Memory required for MTU of 2000) + (512 MB buffer).
Convert the total memory required into MB.
1283457024 / (1024*1024) = 1224 MB.
Round this value up to the nearest multiple of 1024.
1224 MB rounds up to 2048 MB.
Use this value to set
OvsDpdkSocketMemory.OvsDpdkSocketMemory: "2048,1024"
8.4.3. Networking parameters
- OvsDpdkDriverType
-
Sets the driver type used by DPDK. Use the default value of
vfio-pci. - NeutronDatapathType
-
Datapath type for OVS bridges. DPDK uses the default value of
netdev. - NeutronVhostuserSocketDir
-
Sets the vhost-user socket directory for OVS. Use
/var/lib/vhost_socketsfor vhost client mode.
8.4.4. Other parameters
- NovaSchedulerEnabledFilters
- Provides an ordered list of filters that the Compute node uses to find a matching Compute node for a requested guest instance.
- VhostuserSocketGroup
Sets the vhost-user socket directory group. The default value is
qemu. SetVhostuserSocketGrouptohugetlbfsso that theovs-vswitchdandqemuprocesses can access the shared huge pages and unix socket that configures the virtio-net device. This value is role-specific and should be applied to any role leveraging OVS-DPDK.ImportantTo use the parameter
VhostuserSocketGroupyou must also setNeutronVhostuserSocketDir. For more information, see Section 8.4.3, “Networking parameters”.- KernelArgs
Provides multiple kernel arguments to
/etc/default/grubfor the Compute node at boot time. Add the following values based on your configuration:hugepagesz: Sets the size of the huge pages on a CPU. This value can vary depending on the CPU hardware. Set to 1G for OVS-DPDK deployments (default_hugepagesz=1GB hugepagesz=1G). Use this command to check for thepdpe1gbCPU flag that confirms your CPU supports 1G.lshw -class processor | grep pdpe1gb
-
hugepages count: Sets the number of huge pages available based on available host memory. Use most of your available memory, exceptNovaReservedHostMemory. You must also configure the huge pages count value within the flavor of your Compute nodes. -
iommu: For Intel CPUs, add"intel_iommu=on iommu=pt" -
isolcpus: Sets the CPU cores for tuning. This value matchesIsolCpusList.
For more information about CPU isolation, see the Red Hat Knowledgebase solution OpenStack CPU isolation guidance for RHEL 8 and RHEL 9.
- DdpPackage
Configures Dynamic Device Personalization (DDP), to apply a profile package to a device at deployment to change the packet processing pipeline of the device. Add the following lines to your network_environment.yaml template to include the DDP package:
parameter_defaults: ComputeOvsDpdkSriovParameters: DdpPackage: "ddp-comms"
8.4.5. VM instance flavor specifications
Before deploying VM instances in an NFV environment, create a flavor that utilizes CPU pinning, huge pages, and emulator thread pinning.
- hw:cpu_policy
-
When this parameter is set to
dedicated, the guest uses pinned CPUs. Instances created from a flavor with this parameter set have an effective overcommit ratio of 1:1. The default value isshared. - hw:mem_page_size
Set this parameter to a valid string of a specific value with standard suffix (For example,
4KB,8MB, or1GB). Use 1GB to match thehugepageszboot parameter. Calculate the number of huge pages available for the virtual machines by subtractingOvsDpdkSocketMemoryfrom the boot parameter. The following values are also valid:- small (default) - The smallest page size is used
- large - Only use large page sizes. (2MB or 1GB on x86 architectures)
- any - The compute driver can attempt to use large pages, but defaults to small if none available.
- hw:emulator_threads_policy
-
Set the value of this parameter to
shareso that emulator threads are locked to CPUs that you’ve identified in the heat parameter,NovaComputeCpuSharedSet. If an emulator thread is running on a vCPU with the poll mode driver (PMD) or real-time processing, you can experience negative effects, such as packet loss.
8.5. Two NUMA node example OVS-DPDK deployment
The Compute node in the following example includes two NUMA nodes:
- NUMA 0 has cores 0-7. The sibling thread pairs are (0,1), (2,3), (4,5), and (6,7)
- NUMA 1 has cores 8-15. The sibling thread pairs are (8,9), (10,11), (12,13), and (14,15).
- Each NUMA node connects to a physical NIC, namely NIC1 on NUMA 0, and NIC2 on NUMA 1.
Figure 8.2. OVS-DPDK: two NUMA nodes example
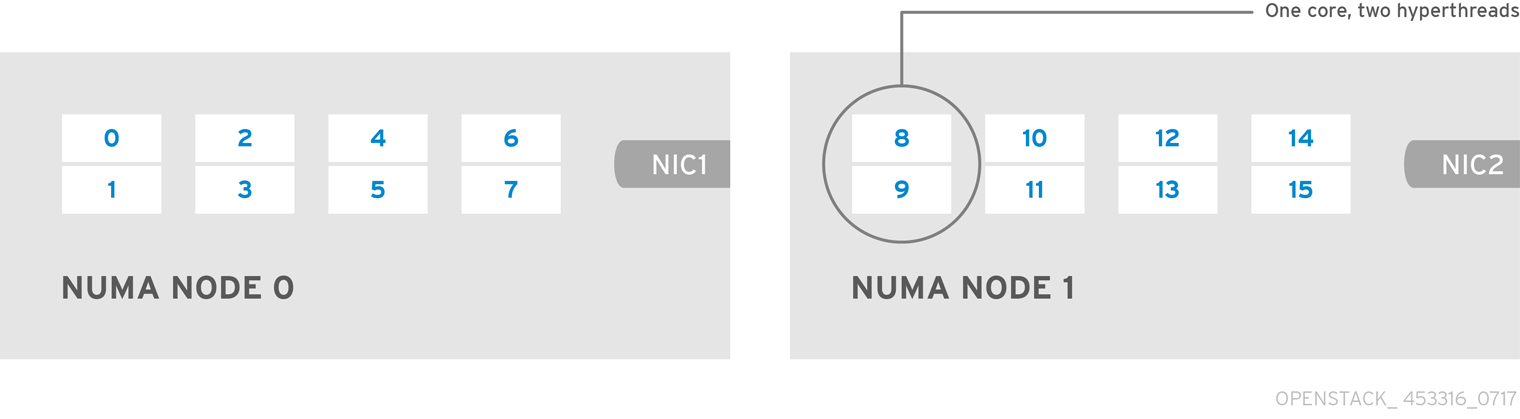
Reserve the first physical cores or both thread pairs on each NUMA node (0,1 and 8,9) for non-datapath DPDK processes.
This example also assumes a 1500 MTU configuration, so the OvsDpdkSocketMemory is the same for all use cases:
OvsDpdkSocketMemory: "1024,1024"
NIC 1 for DPDK, with one physical core for PMD
In this use case, you allocate one physical core on NUMA 0 for PMD. You must also allocate one physical core on NUMA 1, even though DPDK is not enabled on the NIC for that NUMA node. The remaining cores are allocated for guest instances. The resulting parameter settings are:
OvsPmdCoreList: "2,3,10,11" NovaComputeCpuDedicatedSet: "4,5,6,7,12,13,14,15"
NIC 1 for DPDK, with two physical cores for PMD
In this use case, you allocate two physical cores on NUMA 0 for PMD. You must also allocate one physical core on NUMA 1, even though DPDK is not enabled on the NIC for that NUMA node. The remaining cores are allocated for guest instances. The resulting parameter settings are:
OvsPmdCoreList: "2,3,4,5,10,11" NovaComputeCpuDedicatedSet: "6,7,12,13,14,15"
NIC 2 for DPDK, with one physical core for PMD
In this use case, you allocate one physical core on NUMA 1 for PMD. You must also allocate one physical core on NUMA 0, even though DPDK is not enabled on the NIC for that NUMA node. The remaining cores are allocated for guest instances. The resulting parameter settings are:
OvsPmdCoreList: "2,3,10,11" NovaComputeCpuDedicatedSet: "4,5,6,7,12,13,14,15"
NIC 2 for DPDK, with two physical cores for PMD
In this use case, you allocate two physical cores on NUMA 1 for PMD. You must also allocate one physical core on NUMA 0, even though DPDK is not enabled on the NIC for that NUMA node. The remaining cores are allocated for guest instances. The resulting parameter settings are:
OvsPmdCoreList: "2,3,10,11,12,13" NovaComputeCpuDedicatedSet: "4,5,6,7,14,15"
NIC 1 and NIC2 for DPDK, with two physical cores for PMD
In this use case, you allocate two physical cores on each NUMA node for PMD. The remaining cores are allocated for guest instances. The resulting parameter settings are:
OvsPmdCoreList: "2,3,4,5,10,11,12,13" NovaComputeCpuDedicatedSet: "6,7,14,15"
8.6. Topology of an NFV OVS-DPDK deployment
This example deployment shows an OVS-DPDK configuration and consists of two virtual network functions (VNFs) with two interfaces each:
-
The management interface, represented by
mgt. - The data plane interface.
In the OVS-DPDK deployment, the VNFs operate with inbuilt DPDK that supports the physical interface. OVS-DPDK enables bonding at the vSwitch level. For improved performance in your OVS-DPDK deployment, it is recommended that you separate kernel and OVS-DPDK NICs. To separate the management (mgt) network, connected to the Base provider network for the virtual machine, ensure you have additional NICs. The Compute node consists of two regular NICs for the Red Hat OpenStack Platform API management that can be reused by the Ceph API but cannot be shared with any OpenStack project.
Figure 8.3. Compute node: NFV OVS-DPDK
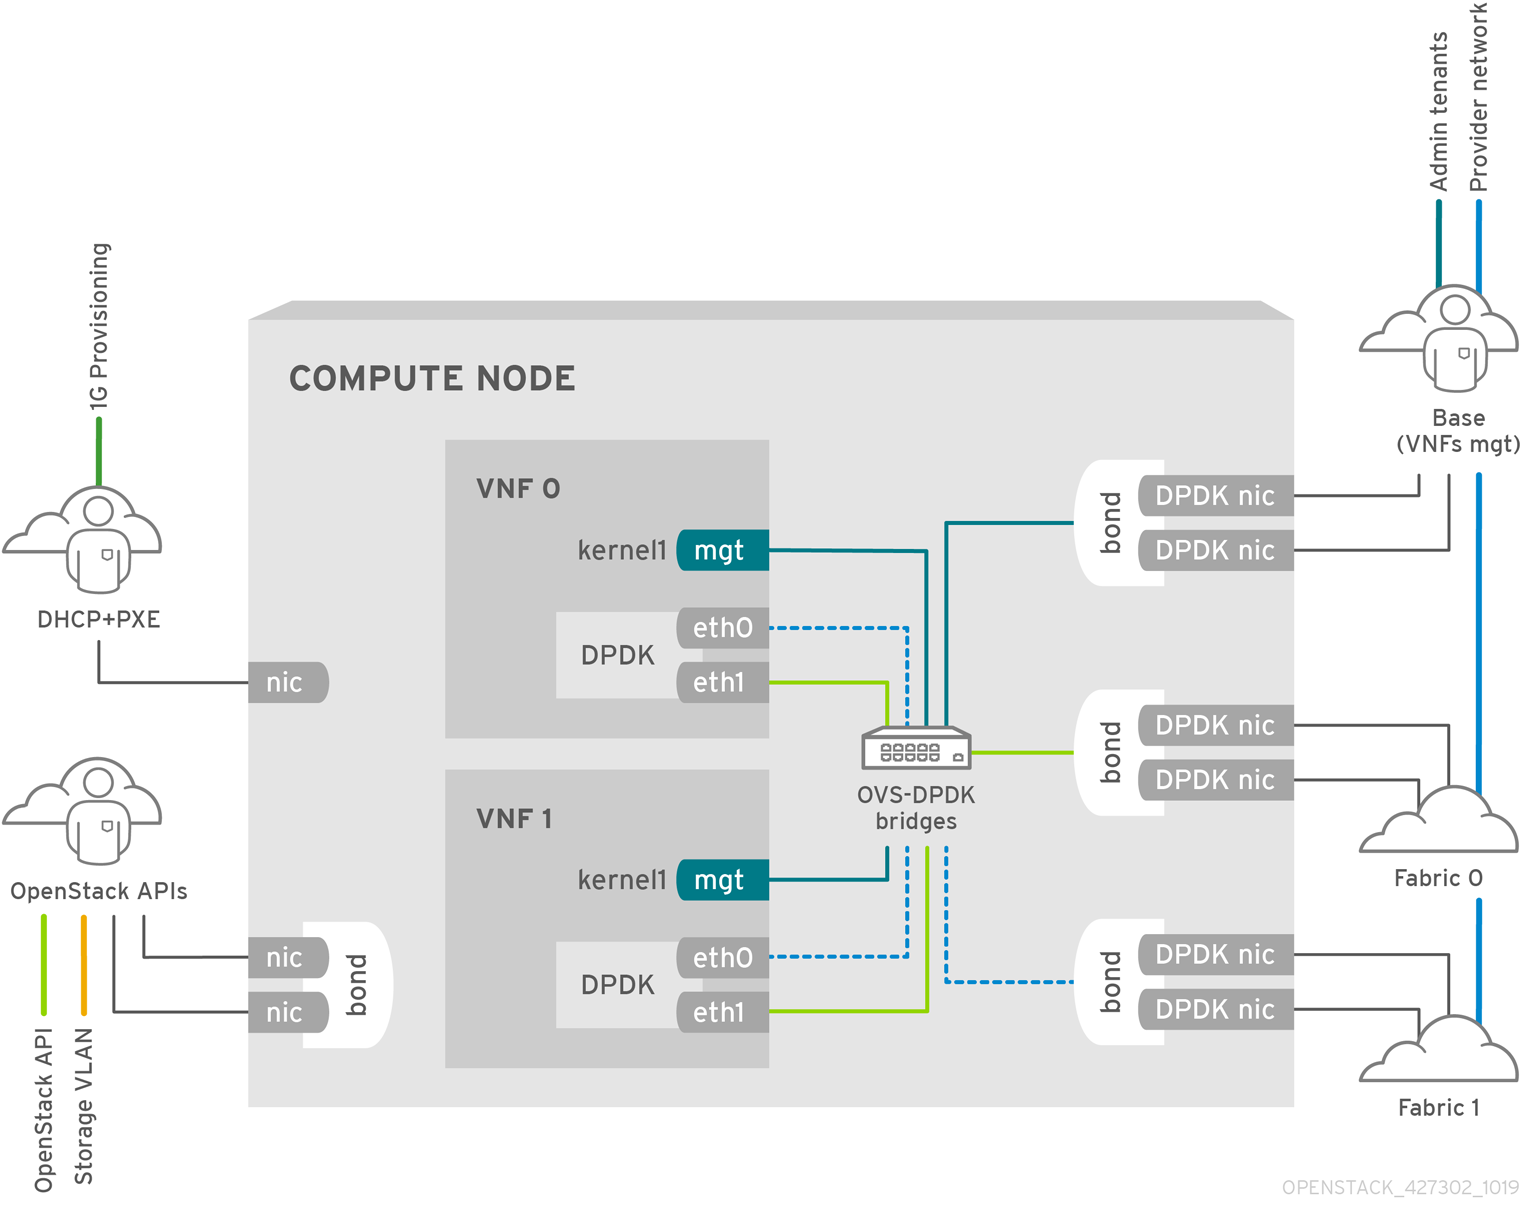
NFV OVS-DPDK topology
The following image shows the topology for OVS-DPDK for NFV. It consists of Compute and Controller nodes with 1 or 10 Gbps NICs, and the director node.
Figure 8.4. NFV topology: OVS-DPDK

Chapter 9. Configuring an OVS-DPDK deployment
This section deploys OVS-DPDK within the Red Hat OpenStack Platform environment. The overcloud usually consists of nodes in predefined roles such as Controller nodes, Compute nodes, and different storage node types. Each of these default roles contains a set of services defined in the core heat templates on the director node.
The following figure shows an OVS-DPDK topology with two bonded ports for the control plane and data plane:
Figure 9.1. Sample OVS-DPDK topology

This guide provides examples for CPU assignments, memory allocation, and NIC configurations that can vary from your topology and use case. For more information on hardware and configuration options, see Hardware requirements for NFV.
9.1. Deriving DPDK parameters with workflows
This feature is available in this release as a Technology Preview, and therefore is not fully supported by Red Hat. It should only be used for testing, and should not be deployed in a production environment. For more information about Technology Preview features, see Scope of Coverage Details.
For an overview of the Mistral workflow for DPDK, see Workflows and derived parameters.
Prerequisites
You must have bare metal introspection, including hardware inspection extras (inspection_extras) enabled to provide the data retrieved by this workflow. Hardware inspection extras are enabled by default. For more information about hardware of the nodes, see Creating an inventory of the bare-metal node hardware.
Define the Workflows and Input Parameters for DPDK
The following list outlines the input parameters you can provide to the OVS-DPDK workflows:
- num_phy_cores_per_numa_node_for_pmd
- This input parameter specifies the required minimum number of cores for the NUMA node associated with the DPDK NIC. One physical core is assigned for the other NUMA nodes not associated with DPDK NIC. Ensure that this parameter is set to 1.
- huge_page_allocation_percentage
-
This input parameter specifies the required percentage of total memory, excluding
NovaReservedHostMemory, that can be configured as huge pages. TheKernelArgsparameter is derived using the calculated huge pages based on thehuge_page_allocation_percentagespecified. Ensure that this parameter is set to 50.
The workflows calculate appropriate DPDK parameter values from these input parameters and the bare-metal introspection details.
To define the workflows and input parameters for DPDK:
Copy the
usr/share/openstack-tripleo-heat-templates/plan-samples/plan-environment-derived-params.yamlfile to a local directory and set the input parameters to suit your environment.workflow_parameters: tripleo.derive_params.v1.derive_parameters: # DPDK Parameters # # Specifies the minimum number of CPU physical cores to be allocated for DPDK # PMD threads. The actual allocation will be based on network config, if # the a DPDK port is associated with a numa node, then this configuration # will be used, else 1. num_phy_cores_per_numa_node_for_pmd: 1 # Amount of memory to be configured as huge pages in percentage. Ouf the # total available memory (excluding the NovaReservedHostMemory), the # specified percentage of the remaining is configured as huge pages. huge_page_allocation_percentage: 50Run the
openstack overcloud deploycommand and include the following information:-
The
update-plan-onlyoption - The role file and all environment files specific to your environment
The
plan-environment-derived-parms.yamlfile with the--plan-environment-fileoptional argument$ openstack overcloud deploy --templates --update-plan-only \ -r /home/stack/roles_data.yaml \ -e /home/stack/<environment-file> \ ... _#repeat as necessary_ ... **-p /home/stack/plan-environment-derived-params.yaml**
-
The
The output of this command shows the derived results, which are also merged into the plan-environment.yaml file.
Started Mistral Workflow tripleo.validations.v1.check_pre_deployment_validations. Execution ID: 55ba73f2-2ef4-4da1-94e9-eae2fdc35535 Waiting for messages on queue '472a4180-e91b-4f9e-bd4c-1fbdfbcf414f' with no timeout. Removing the current plan files Uploading new plan files Started Mistral Workflow tripleo.plan_management.v1.update_deployment_plan. Execution ID: 7fa995f3-7e0f-4c9e-9234-dd5292e8c722 Plan updated. Processing templates in the directory /tmp/tripleoclient-SY6RcY/tripleo-heat-templates Invoking workflow (tripleo.derive_params.v1.derive_parameters) specified in plan-environment file Started Mistral Workflow tripleo.derive_params.v1.derive_parameters. Execution ID: 2d4572bf-4c5b-41f8-8981-c84a363dd95b Workflow execution is completed. result: ComputeOvsDpdkParameters: IsolCpusList: 1,2,3,4,5,6,7,9,10,17,18,19,20,21,22,23,11,12,13,14,15,25,26,27,28,29,30,31 KernelArgs: default_hugepagesz=1GB hugepagesz=1G hugepages=32 iommu=pt intel_iommu=on isolcpus=1,2,3,4,5,6,7,9,10,17,18,19,20,21,22,23,11,12,13,14,15,25,26,27,28,29,30,31 NovaReservedHostMemory: 4096 NovaComputeCpuDedicatedSet: 2,3,4,5,6,7,18,19,20,21,22,23,10,11,12,13,14,15,26,27,28,29,30,31 OvsDpdkMemoryChannels: 4 OvsDpdkSocketMemory: 1024,1024 OvsPmdCoreList: 1,17,9,25
The OvsDpdkMemoryChannels parameter cannot be derived from introspection details. In most cases, this value should be 4.
Deploy the overcloud with the derived parameters
To deploy the overcloud with these derived parameters:
Copy the derived parameters from the deploy command output to the
network-environment.yamlfile.# DPDK compute node. ComputeOvsDpdkParameters: KernelArgs: default_hugepagesz=1GB hugepagesz=1G hugepages=32 iommu=pt intel_iommu=on TunedProfileName: "cpu-partitioning" IsolCpusList: "1,2,3,4,5,6,7,9,10,17,18,19,20,21,22,23,11,12,13,14,15,25,26,27,28,29,30,31" NovaComputeCpuDedicatedSet: ['2,3,4,5,6,7,18,19,20,21,22,23,10,11,12,13,14,15,26,27,28,29,30,31'] NovaReservedHostMemory: 4096 OvsDpdkSocketMemory: "1024,1024" OvsDpdkMemoryChannels: "4" OvsPmdCoreList: "1,17,9,25"NoteThese parameters apply to the specific role, ComputeOvsDpdk. You can apply these parameters globally, but role-specific parameters overwrite any global parameters.
- Deploy the overcloud using the role file and all environment files specific to your environment.
openstack overcloud deploy --templates \ -r /home/stack/roles_data.yaml \ -e /home/stack/<environment-file> \ ... #repeat as necessary ...
In a cluster with Compute, ComputeOvsDpdk, and ComputeSriov, the workflow applies the formula only for the ComputeOvsDpdk role, not Compute or ComputeSriovs.
9.2. Using composable roles to deploy an OVS-DPDK topology
With Red Hat OpenStack Platform, you can create custom deployment roles to add or remove services from each role.
The Red Hat OpenStack Platform operates in OVS client mode for OVS-DPDK deployments.
Prerequisites
- OVS 2.10
- DPDK 17
A supported NIC.
To view the list of supported NICs for NFV, see Tested NICs for NFV.
A RHOSP undercloud.
You must install and configure the undercloud before you can deploy the overcloud. See the Director Installation and Usage guide for details.
NoteDo not manually edit or change
isolated_coresor other values inetc/tuned/cpu-partitioning-variables.confthat the director heat templates modify.
Procedure
To configure OVS-DPDK, perform the following tasks:
-
If you use composable roles, copy and modify the
roles_data.yamlfile to add the custom role for OVS-DPDK. -
Update the appropriate
network-environment.yamlfile to include parameters for kernel arguments, and DPDK arguments. -
Update the
compute.yamlfile to include the bridge for DPDK interface parameters. -
Update the
controller.yamlfile to include the same bridge details for DPDK interface parameters. -
Run the
overcloud_deploy.shscript to deploy the overcloud with the DPDK parameters.
Additional resources
- Composable services and custom roles in the Advanced Overcloud Customization guide
- Hardware requirements for NFV.
9.3. Setting the MTU value for OVS-DPDK interfaces
Red Hat OpenStack Platform supports jumbo frames for OVS-DPDK. To set the maximum transmission unit (MTU) value for jumbo frames you must:
-
Set the global MTU value for networking in the
network-environment.yamlfile. -
Set the physical DPDK port MTU value in the
compute.yamlfile. This value is also used by the vhost user interface. - Set the MTU value within any guest instances on the Compute node to ensure that you have a comparable MTU value from end to end in your configuration.
VXLAN packets include an extra 50 bytes in the header. Calculate your MTU requirements based on these additional header bytes. For example, an MTU value of 9000 means the VXLAN tunnel MTU value is 8950 to account for these extra bytes.
You do not need any special configuration for the physical NIC because the NIC is controlled by the DPDK PMD, and has the same MTU value set by the compute.yaml file. You cannot set an MTU value larger than the maximum value supported by the physical NIC.
To set the MTU value for OVS-DPDK interfaces:
Set the
NeutronGlobalPhysnetMtuparameter in thenetwork-environment.yamlfile.parameter_defaults: # MTU global configuration NeutronGlobalPhysnetMtu: 9000
NoteEnsure that the OvsDpdkSocketMemory value in the
network-environment.yamlfile is large enough to support jumbo frames. For more information, see Memory parameters.Set the MTU value on the bridge to the Compute node in the
controller.yamlfile.- type: ovs_bridge name: br-link0 use_dhcp: false members: - type: interface name: nic3 mtu: 9000Set the MTU values for an OVS-DPDK bond in the
compute.yamlfile:- type: ovs_user_bridge name: br-link0 use_dhcp: false members: - type: ovs_dpdk_bond name: dpdkbond0 mtu: 9000 rx_queue: 2 members: - type: ovs_dpdk_port name: dpdk0 mtu: 9000 members: - type: interface name: nic4 - type: ovs_dpdk_port name: dpdk1 mtu: 9000 members: - type: interface name: nic5
9.4. Configuring a firewall for security groups
Dataplane interfaces require high performance in a stateful firewall. To protect these interfaces, consider deploying a telco-grade firewall as a virtual network function (VNF).
To configure control plane interfaces in an ML2/OVS deployment, set the NeutronOVSFirewallDriver parameter to openvswitch. To use the flow-based OVS firewall driver, modify the network-environment.yaml file under parameter_defaults. In an OVN deployment, you can implement security groups with Access Control Lists (ACL).
You cannot use the OVS firewall driver with HW offload because the connection tracking properties of the flows are unsupported in the offload path.
Example:
parameter_defaults: NeutronOVSFirewallDriver: openvswitch
Use the openstack port set command to disable the OVS firewall driver for dataplane interfaces.
Example:
openstack port set --no-security-group --disable-port-security ${PORT}9.5. Setting multiqueue for OVS-DPDK interfaces
Multiqueue is experimental, and only supported with manual queue pinning.
Procedure
To set the same number of queues for interfaces in OVS-DPDK on the Compute node, modify the
compute.yamlfile:- type: ovs_user_bridge name: br-link0 use_dhcp: false members: - type: ovs_dpdk_bond name: dpdkbond0 mtu: 9000 rx_queue: 2 members: - type: ovs_dpdk_port name: dpdk0 mtu: 9000 members: - type: interface name: nic4 - type: ovs_dpdk_port name: dpdk1 mtu: 9000 members: - type: interface name: nic5
9.6. Configuring OVS PMD Auto Load Balance
This feature is available in this release as a Technology Preview, and therefore is not fully supported by Red Hat. It should only be used for testing, and should not be deployed in a production environment. For more information about Technology Preview features, see Scope of Coverage Details.
You can use Open vSwitch (OVS) Poll Mode Driver (PMD) threads to perform the following tasks for user space context switching:
- Continuous polling of input ports for packets.
- Classifying received packets.
- Executing actions on the packets after classification.
Configure your RHOSP deployment to automatically load balance the OVS PMD threads by editing parameters for baremetal node pre-provisioning and for overcloud deployment. You must configure the feature during both node pre-provisioning and overcloud deployment.
Procedure
In the
baremetal_deployment.yamlfile or in a custom file, set the following baremetal node pre-provisioning parameters:pmd_auto_lb-
Set to
trueto enable PMD automatic load balancing. pmd_load_threshold- Percentage of processing cycles that one of the PMD threads must use consistently before triggering the PMD load balance. Integer, range 0-100.
pmd_improvement_thresholdMinimum percentage of evaluated improvement across the non-isolated PMD threads that triggers a PMD auto load balance. Integer, range 0-100.
To calculate the estimated improvement, a dry run of the reassignment is done and the estimated load variance is compared with the current variance. The default is 25%.
pmd_rebal_intervalMinimum time in minutes between two consecutive PMD Auto Load Balance operations. Range 0-20,000 minutes.
Configure this value to prevent triggering frequent reassignments where traffic patterns are changeable. For example, you might trigger a reassignment once every 10 minutes or once every few hours.
Example
ansible_playbooks: … - playbook: /usr/share/ansible/tripleo-playbooks/cli-overcloud-openvswitch-dpdk.yaml extra_vars: … pmd_auto_lb: true pmd_load_threshold: "70" pmd_improvement_threshold: "25" pmd_rebal_interval: "2"
Include the baremetal deployment file in your
openstack overcloud node provisioncommand as shown in the following example:Example
openstack overcloud node provision \ --stack overcloud \ --network-config \ --templates /usr/share/openstack-tripleo-heat-templates \ --output ~/templates/overcloud-baremetal-deployed.yaml \ home/stack/$OSP17REF/network/baremetal_deployment.yamlIn
dpdk-config.yamlor a custom file, set the following overcloud deployment parameters:OvsPmdAutoLbHeat equivalent of
pmd_auto_lb.Set to
trueto enable PMD automatic load balancing.OvsPmdLoadThresholdHeat equivalent of
pmd_load_threshold.Percentage of processing cycles that one of the PMD threads must use consistently before triggering the PMD load balance. Integer, range 0-100.
OvsPmdImprovementThresholdHeat equivalent of
pmd_improvement_threshold.Minimum percentage of evaluated improvement across the non-isolated PMD threads that triggers a PMD auto load balance. Integer, range 0-100.
To calculate the estimated improvement, a dry run of the reassignment is done and the estimated load variance is compared with the current variance. The default is 25%.
OvsPmdRebalIntervalHeat equivalent of
pmd_rebal_interval.Minimum time in minutes between two consecutive PMD Auto Load Balance operations. Range 0-20,000 minutes.
Configure this value to prevent triggering frequent reassignments where traffic patterns are changeable. For example, you might trigger a reassignment once every 10 minutes or once every few hours.
Example
parameter_merge_strategies: ComputeOvsDpdkSriovParameters:merge … parameter_defaults: ComputeOvsDpdkSriovParameters: … OvsPmdAutoLb: true OvsPmdLoadThreshold: 70 OvsPmdImprovementThreshold: 25 OvsPmdRebalInterval: 2
Add
dpdk-config.yamlor your dpdk configuration file to the stack with your other environment files, and deploy the overcloud:Example
(undercloud)$ openstack overcloud deploy --templates \ -e <your_environment_files> \ -e /home/stack/templates/dpdk-config.yaml
9.7. Known limitations for OVS-DPDK
Observe the following limitations when configuring OVS-DPDK with Red Hat OpenStack Platform for NFV:
- Use Linux bonds for non-DPDK traffic, and control plane networks, such as Internal, Management, Storage, Storage Management, and Tenant. Ensure that both the PCI devices used in the bond are on the same NUMA node for optimum performance. Neutron Linux bridge configuration is not supported by Red Hat.
- You require huge pages for every instance running on the hosts with OVS-DPDK. If huge pages are not present in the guest, the interface appears but does not function.
- With OVS-DPDK, there is a performance degradation of services that use tap devices, such as Distributed Virtual Routing (DVR). The resulting performance is not suitable for a production environment.
-
When using OVS-DPDK, all bridges on the same Compute node must be of type
ovs_user_bridge. The director may accept the configuration, but Red Hat OpenStack Platform does not support mixingovs_bridgeandovs_user_bridgeon the same node.
9.8. Creating a flavor and deploying an instance for OVS-DPDK
After you configure OVS-DPDK for your Red Hat OpenStack Platform deployment with NFV, you can create a flavor, and deploy an instance using the following steps:
Create an aggregate group, and add relevant hosts for OVS-DPDK. Define metadata, for example
dpdk=true, that matches defined flavor metadata.# openstack aggregate create dpdk_group # openstack aggregate add host dpdk_group [compute-host] # openstack aggregate set --property dpdk=true dpdk_group
NotePinned CPU instances can be located on the same Compute node as unpinned instances. For more information, see Configuring CPU pinning on Compute nodes in the Configuring the Compute Service for Instance Creation guide.
Create a flavor.
# openstack flavor create <flavor> --ram <MB> --disk <GB> --vcpus <#>
Set flavor properties. Note that the defined metadata,
dpdk=true, matches the defined metadata in the DPDK aggregate.# openstack flavor set <flavor> --property dpdk=true --property hw:cpu_policy=dedicated --property hw:mem_page_size=1GB --property hw:emulator_threads_policy=isolate
For details about the emulator threads policy for performance improvements, see Configuring emulator threads in the Configuring the Compute Service for Instance Creation guide.
Create the network.
# openstack network create net1 --provider-physical-network tenant --provider-network-type vlan --provider-segment <VLAN-ID> # openstack subnet create subnet1 --network net1 --subnet-range 192.0.2.0/24 --dhcp
Optional: If you use multiqueue with OVS-DPDK, set the
hw_vif_multiqueue_enabledproperty on the image that you want to use to create a instance:# openstack image set --property hw_vif_multiqueue_enabled=true <image>
Deploy an instance.
# openstack server create --flavor <flavor> --image <glance image> --nic net-id=<network ID> <server_name>
9.9. Troubleshooting the OVS-DPDK configuration
This section describes the steps to troubleshoot the OVS-DPDK configuration.
Review the bridge configuration, and confirm that the bridge has
datapath_type=netdev.# ovs-vsctl list bridge br0 _uuid : bdce0825-e263-4d15-b256-f01222df96f3 auto_attach : [] controller : [] datapath_id : "00002608cebd154d" datapath_type : netdev datapath_version : "<built-in>" external_ids : {} fail_mode : [] flood_vlans : [] flow_tables : {} ipfix : [] mcast_snooping_enable: false mirrors : [] name : "br0" netflow : [] other_config : {} ports : [52725b91-de7f-41e7-bb49-3b7e50354138] protocols : [] rstp_enable : false rstp_status : {} sflow : [] status : {} stp_enable : falseOptionally, you can view logs for errors, such as if the container fails to start.
# less /var/log/containers/neutron/openvswitch-agent.log
Confirm that the Poll Mode Driver CPU mask of the
ovs-dpdkis pinned to the CPUs. In case of hyper threading, use sibling CPUs.For example, to check the sibling of
CPU4, run the following command:# cat /sys/devices/system/cpu/cpu4/topology/thread_siblings_list 4,20
The sibling of
CPU4isCPU20, therefore proceed with the following command:# ovs-vsctl set Open_vSwitch . other_config:pmd-cpu-mask=0x100010
Display the status:
# tuna -t ovs-vswitchd -CP thread ctxt_switches pid SCHED_ rtpri affinity voluntary nonvoluntary cmd 3161 OTHER 0 6 765023 614 ovs-vswitchd 3219 OTHER 0 6 1 0 handler24 3220 OTHER 0 6 1 0 handler21 3221 OTHER 0 6 1 0 handler22 3222 OTHER 0 6 1 0 handler23 3223 OTHER 0 6 1 0 handler25 3224 OTHER 0 6 1 0 handler26 3225 OTHER 0 6 1 0 handler27 3226 OTHER 0 6 1 0 handler28 3227 OTHER 0 6 2 0 handler31 3228 OTHER 0 6 2 4 handler30 3229 OTHER 0 6 2 5 handler32 3230 OTHER 0 6 953538 431 revalidator29 3231 OTHER 0 6 1424258 976 revalidator33 3232 OTHER 0 6 1424693 836 revalidator34 3233 OTHER 0 6 951678 503 revalidator36 3234 OTHER 0 6 1425128 498 revalidator35 *3235 OTHER 0 4 151123 51 pmd37* *3236 OTHER 0 20 298967 48 pmd38* 3164 OTHER 0 6 47575 0 dpdk_watchdog3 3165 OTHER 0 6 237634 0 vhost_thread1 3166 OTHER 0 6 3665 0 urcu2
Chapter 10. Tuning a Red Hat OpenStack Platform environment
10.1. Pinning emulator threads
Emulator threads handle interrupt requests and non-blocking processes for virtual machine hardware emulation. These threads float across the CPUs that the guest uses for processing. If threads used for the poll mode driver (PMD) or real-time processing run on these guest CPUs, you can experience packet loss or missed deadlines.
You can separate emulator threads from VM processing tasks by pinning the threads to their own guest CPUs, increasing performance as a result.
To improve performance, reserve a subset of host CPUs for hosting emulator threads.
Procedure
Deploy an overcloud with
NovaComputeCpuSharedSetdefined for a given role. The value ofNovaComputeCpuSharedSetapplies to thecpu_shared_setparameter in thenova.conffile for hosts within that role.parameter_defaults: ComputeOvsDpdkParameters: NovaComputeCpuSharedSet: "0-1,16-17" NovaComputeCpuDedicatedSet: "2-15,18-31"Create a flavor to build instances with emulator threads separated into a shared pool.
openstack flavor create --ram <size_mb> --disk <size_gb> --vcpus <vcpus> <flavor>
Add the
hw:emulator_threads_policyextra specification, and set the value toshare. Instances created with this flavor will use the instance CPUs defined in thecpu_share_setparameter in the nova.conf file.openstack flavor set <flavor> --property hw:emulator_threads_policy=share
You must set the cpu_share_set parameter in the nova.conf file to enable the share policy for this extra specification. You should use heat for this preferably, as editing nova.conf manually might not persist across redeployments.
Verification
Identify the host and name for a given instance.
openstack server show <instance_id>
Use SSH to log on to the identified host as tripleo-admin.
ssh tripleo-admin@compute-1 [compute-1]$ sudo virsh dumpxml instance-00001 | grep `'emulatorpin cpuset'`
10.2. Configuring trust between virtual and physical functions
You can configure trust between physical functions (PFs) and virtual functions (VFs), so that VFs can perform privileged actions, such as enabling promiscuous mode, or modifying a hardware address.
Prerequisites
- An operational installation of Red Hat OpenStack Platform including director
Procedure
Complete the following steps to configure and deploy the overcloud with trust between physical and virtual functions:
Add the
NeutronPhysicalDevMappingsparameter in theparameter_defaultssection to link between the logical network name and the physical interface.parameter_defaults: NeutronPhysicalDevMappings: - sriov2:p5p2Add the new property,
trusted, to the SR-IOV parameters.parameter_defaults: NeutronPhysicalDevMappings: - sriov2:p5p2 NovaPCIPassthrough: - vendor_id: "8086" product_id: "1572" physical_network: "sriov2" trusted: "true"NoteYou must include double quotation marks around the value "true".
10.3. Utilizing trusted VF networks
Create a network of type
vlan.openstack network create trusted_vf_network --provider-network-type vlan \ --provider-segment 111 --provider-physical-network sriov2 \ --external --disable-port-security
Create a subnet.
openstack subnet create --network trusted_vf_network \ --ip-version 4 --subnet-range 192.168.111.0/24 --no-dhcp \ subnet-trusted_vf_network
Create a port. Set the
vnic-typeoption todirect, and thebinding-profileoption totrue.openstack port create --network sriov111 \ --vnic-type direct --binding-profile trusted=true \ sriov111_port_trusted
Create an instance, and bind it to the previously-created trusted port.
openstack server create --image rhel --flavor dpdk --network internal --port trusted_vf_network_port_trusted --config-drive True --wait rhel-dpdk-sriov_trusted
Verification
Confirm the trusted VF configuration on the hypervisor:
On the compute node that you created the instance, enter the following command:
# ip link 7: p5p2: <BROADCAST,MULTICAST,UP,LOWER_UP> mtu 9000 qdisc mq state UP mode DEFAULT group default qlen 1000 link/ether b4:96:91:1c:40:fa brd ff:ff:ff:ff:ff:ff vf 6 MAC fa:16:3e:b8:91:c2, vlan 111, spoof checking off, link-state auto, trust on, query_rss off vf 7 MAC fa:16:3e:84:cf:c8, vlan 111, spoof checking off, link-state auto, trust off, query_rss off-
Verify that the trust status of the VF is
trust on. The example output contains details of an environment that contains two ports. Note thatvf 6contains the texttrust on. -
You can disable spoof checking if you set
port_security_enabled: falsein the Networking service (neutron) network, or if you include the argument--disable-port-securitywhen you run theopenstack port createcommand.
10.4. Preventing packet loss by managing RX-TX queue size
You can experience packet loss at high packet rates above 3.5 million packets per second (mpps) for many reasons, such as:
- a network interrupt
- a SMI
- packet processing latency in the Virtual Network Function
To prevent packet loss, increase the queue size from the default of 512 to a maximum of 1024.
Prerequisites
-
Access to the undercloud host and credentials for the
stackuser.
Procedure
-
Log in to the undercloud host as the
stackuser. Source the
stackrcundercloud credentials file:$ source ~/stackrc
Create a custom environment YAML file and under
parameter_defaultsadd the following definitions to increase the RX and TX queue size:parameter_defaults: NovaLibvirtRxQueueSize: 1024 NovaLibvirtTxQueueSize: 1024
Run the deployment command and include the core heat templates, other environment files, the environment file that contains your RX and TX queue size changes:
Example
$ openstack overcloud deploy --templates \ -e <other_environment_files> \ -e /home/stack/my_tx-rx_queue_sizes.yaml
Verification
Observe the values for RX queue size and TX queue size in the
nova.conffile.$ egrep "^[rt]x_queue_size" /var/lib/config-data/puppet-generated/\ nova_libvirt/etc/nova/nova.conf
You should see the following:
rx_queue_size=1024 tx_queue_size=1024
Check the values for RX queue size and TX queue size in the VM instance XML file generated by libvirt on the Compute host:
- Create a new instance.
Obtain the Compute host and and instance name:
$ openstack server show testvm-queue-sizes -c OS-EXT-SRV-ATTR:\ hypervisor_hostname -c OS-EXT-SRV-ATTR:instance_name
Sample output
You should see output similar to the following:
+-------------------------------------+------------------------------------+ | Field | Value | +-------------------------------------+------------------------------------+ | OS-EXT-SRV-ATTR:hypervisor_hostname | overcloud-novacompute-1.sales | | OS-EXT-SRV-ATTR:instance_name | instance-00000059 | +-------------------------------------+------------------------------------+
Log into the Compute host and dump the instance definition.
Example
$ podman exec nova_libvirt virsh dumpxml instance-00000059
Sample output
You should see output similar to the following:
... <interface type='vhostuser'> <mac address='56:48:4f:4d:5e:6f'/> <source type='unix' path='/tmp/vhost-user1' mode='server'/> <model type='virtio'/> <driver name='vhost' rx_queue_size='1024' tx_queue_size='1024' /> <address type='pci' domain='0x0000' bus='0x00' slot='0x10' function='0x0'/> </interface> ...
10.5. Configuring a NUMA-aware vSwitch
This feature is available in this release as a Technology Preview, and therefore is not fully supported by Red Hat. It should only be used for testing, and should not be deployed in a production environment. For more information about Technology Preview features, see Scope of Coverage Details.
Before you implement a NUMA-aware vSwitch, examine the following components of your hardware configuration:
- The number of physical networks.
- The placement of PCI cards.
- The physical architecture of the servers.
Memory-mapped I/O (MMIO) devices, such as PCIe NICs, are associated with specific NUMA nodes. When a VM and the NIC are on different NUMA nodes, there is a significant decrease in performance. To increase performance, align PCIe NIC placement and instance processing on the same NUMA node.
Use this feature to ensure that instances that share a physical network are located on the same NUMA node. To optimize utilization of datacenter hardware, you must use multiple physnets.
To configure NUMA-aware networks for optimal server utilization, you must understand the mapping of the PCIe slot and the NUMA node. For detailed information on your specific hardware, refer to your vendor’s documentation. If you fail to plan or implement your NUMA-aware vSwitch correctly, you can cause the servers to use only a single NUMA node.
To prevent a cross-NUMA configuration, place the VM on the correct NUMA node, by providing the location of the NIC to Nova.
Prerequisites
-
You have enabled the filter
NUMATopologyFilter.
Procedure
-
Set a new
NeutronPhysnetNUMANodesMappingparameter to map the physical network to the NUMA node that you associate with the physical network. If you use tunnels, such as VxLAN or GRE, you must also set the
NeutronTunnelNUMANodesparameter.parameter_defaults: NeutronPhysnetNUMANodesMapping: {<physnet_name>: [<NUMA_NODE>]} NeutronTunnelNUMANodes: <NUMA_NODE>,<NUMA_NODE>Example
Here is an example with two physical networks tunneled to NUMA node 0:
- one project network associated with NUMA node 0
one management network without any affinity
parameter_defaults: NeutronBridgeMappings: - tenant:br-link0 NeutronPhysnetNUMANodesMapping: {tenant: [1], mgmt: [0,1]} NeutronTunnelNUMANodes: 0In this example, assign the physnet of the device named
eno2to NUMA number 0.# ethtool -i eno2 bus-info: 0000:18:00.1 # cat /sys/devices/pci0000:16/0000:16:02.0/0000:18:00.1/numa_node 0
Observe the physnet settings in the example heat template:
NeutronBridgeMappings: 'physnet1:br-physnet1' NeutronPhysnetNUMANodesMapping: {physnet1: [0] } - type: ovs_user_bridge name: br-physnet1 mtu: 9000 members: - type: ovs_dpdk_port name: dpdk2 members: - type: interface name: eno2
Verification
Follow these steps to test your NUMA-aware vSwitch:
Observe the configuration in the file
/var/lib/config-data/puppet-generated/nova_libvirt/etc/nova/nova.conf:[neutron_physnet_tenant] numa_nodes=1 [neutron_tunnel] numa_nodes=1
Confirm the new configuration with the
lscpucommand:$ lscpu
- Launch a VM with the NIC attached to the appropriate network.
10.6. Known limitations for NUMA-aware vSwitches
This feature is available in this release as a Technology Preview, and therefore is not fully supported by Red Hat. It should only be used for testing, and should not be deployed in a production environment. For more information about Technology Preview features, see Scope of Coverage Details.
This section lists the constraints for implementing a NUMA-aware vSwitch in a Red Hat OpenStack Platform (RHOSP) network functions virtualization infrastructure (NFVi).
- You cannot start a VM that has two NICs connected to physnets on different NUMA nodes, if you did not specify a two-node guest NUMA topology.
- You cannot start a VM that has one NIC connected to a physnet and another NIC connected to a tunneled network on different NUMA nodes, if you did not specify a two-node guest NUMA topology.
- You cannot start a VM that has one vhost port and one VF on different NUMA nodes, if you did not specify a two-node guest NUMA topology.
- NUMA-aware vSwitch parameters are specific to overcloud roles. For example, Compute node 1 and Compute node 2 can have different NUMA topologies.
- If the interfaces of a VM have NUMA affinity, ensure that the affinity is for a single NUMA node only. You can locate any interface without NUMA affinity on any NUMA node.
- Configure NUMA affinity for data plane networks, not management networks.
- NUMA affinity for tunneled networks is a global setting that applies to all VMs.
10.7. Quality of Service (QoS) in NFVi environments
You can offer varying service levels for VM instances by using quality of service (QoS) policies to apply rate limits to egress and ingress traffic on Red Hat OpenStack Platform (RHOSP) networks in a network functions virtualization infrastructure (NFVi).
In NFVi environments, QoS support is limited to the following rule types:
-
minimum bandwidthon SR-IOV, if supported by vendor. -
bandwidth limiton SR-IOV and OVS-DPDK egress interfaces.
Additional resources
10.8. Creating an HCI overcloud that uses DPDK
You can deploy your NFV infrastructure with hyperconverged nodes, by co-locating and configuring Compute and Ceph Storage services for optimized resource usage.
For more information about hyper-converged infrastructure (HCI), see the Hyperconverged Infrastructure Guide.
The sections that follow provide examples of various configurations.
10.8.1. Example NUMA node configuration
For increased performance, place the tenant network and Ceph object service daemon (OSD)s in one NUMA node, such as NUMA-0, and the VNF and any non-NFV VMs in another NUMA node, such as NUMA-1.
CPU allocation:
| NUMA-0 | NUMA-1 |
|---|---|
| Number of Ceph OSDs * 4 HT | Guest vCPU for the VNF and non-NFV VMs |
| DPDK lcore - 2 HT | DPDK lcore - 2 HT |
| DPDK PMD - 2 HT | DPDK PMD - 2 HT |
Example of CPU allocation:
| NUMA-0 | NUMA-1 | |
|---|---|---|
| Ceph OSD | 32,34,36,38,40,42,76,78,80,82,84,86 | |
| DPDK-lcore | 0,44 | 1,45 |
| DPDK-pmd | 2,46 | 3,47 |
| nova | 5,7,9,11,13,15,17,19,21,23,25,27,29,31,33,35,37,39,41,43,49,51,53,55,57,59,61,63,65,67,69,71,73,75,77,79,81,83,85,87 |
10.8.2. Example ceph configuration file
parameter_defaults:
CephPoolDefaultSize: 3
CephPoolDefaultPgNum: 64
CephPools:
- {"name": backups, "pg_num": 128, "pgp_num": 128, "application": "rbd"}
- {"name": volumes, "pg_num": 256, "pgp_num": 256, "application": "rbd"}
- {"name": vms, "pg_num": 64, "pgp_num": 64, "application": "rbd"}
- {"name": images, "pg_num": 32, "pgp_num": 32, "application": "rbd"}
CephConfigOverrides:
osd_recovery_op_priority: 3
osd_recovery_max_active: 3
osd_max_backfills: 1
CephAnsibleExtraConfig:
nb_retry_wait_osd_up: 60
delay_wait_osd_up: 20
is_hci: true
# 3 OSDs * 4 vCPUs per SSD = 12 vCPUs (list below not used for VNF)
ceph_osd_docker_cpuset_cpus: "32,34,36,38,40,42,76,78,80,82,84,86" # 1
# cpu_limit 0 means no limit as we are limiting CPUs with cpuset above
ceph_osd_docker_cpu_limit: 0 # 2
# numactl preferred to cross the numa boundary if we have to
# but try to only use memory from numa node0
# cpuset-mems would not let it cross numa boundary
# lots of memory so NUMA boundary crossing unlikely
ceph_osd_numactl_opts: "-N 0 --preferred=0" # 3
CephAnsibleDisksConfig:
osds_per_device: 1
osd_scenario: lvm
osd_objectstore: bluestore
devices:
- /dev/sda
- /dev/sdb
- /dev/sdcAssign CPU resources for ceph OSD processes with the following parameters. Adjust the values based on the workload and hardware in this hyperconverged environment.
- 1
- ceph_osd_docker_cpuset_cpus: Allocate 4 CPU threads for each OSD for SSD disks, or 1 CPU for each OSD for HDD disks. Include the list of cores and sibling threads from the NUMA node associated with ceph, and the CPUs not found in the three lists:
NovaComputeCpuDedicatedSet, andOvsPmdCoreList. - 2
- ceph_osd_docker_cpu_limit: Set this value to
0, to pin the ceph OSDs to the CPU list fromceph_osd_docker_cpuset_cpus. - 3
- ceph_osd_numactl_opts: Set this value to
preferredfor cross-NUMA operations, as a precaution.
10.8.3. Example DPDK configuration file
parameter_defaults:
ComputeHCIParameters:
KernelArgs: "default_hugepagesz=1GB hugepagesz=1G hugepages=240 intel_iommu=on iommu=pt # 1
isolcpus=2,46,3,47,5,7,9,11,13,15,17,19,21,23,25,27,29,31,33,35,37,39,41,43,49,51,53,55,57,59,61,63,65,67,69,71,73,75,77,79,81,83,85,87"
TunedProfileName: "cpu-partitioning"
IsolCpusList: # 2
”2,46,3,47,5,7,9,11,13,15,17,19,21,23,25,27,29,31,33,35,37,39,41,43,49,51,
53,55,57,59,61,63,65,67,69,71,73,75,77,79,81,83,85,87"
VhostuserSocketGroup: hugetlbfs
OvsDpdkSocketMemory: "4096,4096" # 3
OvsDpdkMemoryChannels: "4"
OvsPmdCoreList: "2,46,3,47" # 4- 1
- KernelArgs: To calculate
hugepages, subtract the value of theNovaReservedHostMemoryparameter from total memory. - 2
- IsolCpusList: Assign a set of CPU cores that you want to isolate from the host processes with this parameter. Add the value of the
OvsPmdCoreListparameter to the value of theNovaComputeCpuDedicatedSetparameter to calculate the value for theIsolCpusListparameter. - 3
- OvsDpdkSocketMemory: Specify the amount of memory in MB to pre-allocate from the hugepage pool per NUMA node with the
OvsDpdkSocketMemoryparameter. For more information about calculating OVS-DPDK parameters, see OVS-DPDK parameters. - 4
- OvsPmdCoreList: Specify the CPU cores that are used for the DPDK poll mode drivers (PMD) with this parameter. Choose CPU cores that are associated with the local NUMA nodes of the DPDK interfaces. Allocate 2 HT sibling threads for each NUMA node to calculate the value for the
OvsPmdCoreListparameter.
10.8.4. Example nova configuration file
parameter_defaults:
ComputeHCIExtraConfig:
nova::cpu_allocation_ratio: 16 # 2
NovaReservedHugePages: # 1
- node:0,size:1GB,count:4
- node:1,size:1GB,count:4
NovaReservedHostMemory: 123904 # 2
# All left over cpus from NUMA-1
NovaComputeCpuDedicatedSet: # 3
['5','7','9','11','13','15','17','19','21','23','25','27','29','31','33','35','37','39','41','43','49','51','|
53','55','57','59','61','63','65','67','69','71','73','75','77','79','81','83','85','87- 1
- NovaReservedHugePages: Pre-allocate memory in MB from the hugepage pool with the
NovaReservedHugePagesparameter. It is the same memory total as the value for theOvsDpdkSocketMemoryparameter. - 2
- NovaReservedHostMemory: Reserve memory in MB for tasks on the host with the
NovaReservedHostMemoryparameter. Use the following guidelines to calculate the amount of memory that you must reserve:- 5 GB for each OSD.
- 0.5 GB overhead for each VM.
- 4GB for general host processing. Ensure that you allocate sufficient memory to prevent potential performance degradation caused by cross-NUMA OSD operation.
- 3
- NovaComputeCpuDedicatedSet: List the CPUs not found in
OvsPmdCoreList, orCeph_osd_docker_cpuset_cpuswith theNovaComputeCpuDedicatedSetparameter. The CPUs must be in the same NUMA node as the DPDK NICs.
10.8.5. Recommended configuration for HCI-DPDK deployments
Table 10.1. Tunable parameters for HCI deployments
| Block Device Type | OSDs, Memory, vCPUs per device |
|---|---|
| NVMe |
Memory : 5GB per OSD |
| SSD |
Memory : 5GB per OSD |
| HDD |
Memory : 5GB per OSD |
Use the same NUMA node for the following functions:
- Disk controller
- Storage networks
- Storage CPU and memory
Allocate another NUMA node for the following functions of the DPDK provider network:
- NIC
- PMD CPUs
- Socket memory
10.8.6. Deploying the HCI-DPDK overcloud
Follow these steps to deploy a hyperconverged overcloud that uses DPDK.
Prerequisites
- Red Hat OpenStack Platform (RHOSP) 16.2.
- The latest version of Red Hat Ceph Storage 4.
-
The latest version of
ceph-ansible4, as provided by therhceph-4-tools-for-rhel-8-x86_64-rpmsrepository.
Procedure
Install
ceph-ansibleon the undercloud:$ sudo yum install ceph-ansible -y
Generate the
roles_data.yamlfile for the Controller and the ComputeHCIOvsDpdk roles.$ openstack overcloud roles generate -o ~/<templates>/roles_data.yaml \ Controller ComputeHCIOvsDpdk
Create and configure a new flavor with the
openstack flavor createandopenstack flavor setcommands.For more information, see Creating a new role in the Advanced Overcloud Customization Guide guide.
Deploy the overcloud with the custom
roles_data.yamlfile that you generated.Example
$ openstack overcloud deploy --templates \ --timeout 360 \ -r ~/<templates>/roles_data.yaml \ -e /usr/share/openstack-tripleo-heat-templates/environments/\ cephadm/cephadm-rbd-only.yaml \ -e /usr/share/openstack-tripleo-heat-templates/environments/network-isolation.yaml \ -e /usr/share/openstack-tripleo-heat-templates/environments/services-docker/neutron-ovs-dpdk.yaml \ -e ~/<templates>/<custom environment file>
ImportantThis example deploys Ceph RBD (block storage) without Ceph RGW (object storage). To include RGW in the deployment, use
cephadm.yamlinstead ofcephadm-rbd-only.yaml.
Additional resources
10.9. Synchronize your compute nodes with Timemaster
This feature is available in this release as a Technology Preview, and therefore is not fully supported by Red Hat. It should only be used for testing, and should not be deployed in a production environment. For more information about Technology Preview features, see Scope of Coverage Details.
Use time protocols to maintain a consistent timestamp between systems.
Red Hat OpenStack Platform (RHOSP) includes support for Precision Time Protocol (PTP) and Network Time Protocol (NTP).
You can use NTP to synchronize clocks in your network in the millisecond range, and you can use PTP to synchronize clocks to a higher, sub-microsecond, accuracy. An example use case for PTP is a virtual radio access network (vRAN) that contains multiple antennas which provide higher throughput with more risk of interference.
Timemaster is a program that uses ptp4l and phc2sys in combination with chronyd or ntpd to synchronize the system clock to NTP and PTP time sources. The phc2sys and ptp4l programs use Shared Memory Driver (SHM) reference clocks to send PTP time to chronyd or ntpd, which compares the time sources to synchronize the system clock.
The implementation of the PTPv2 protocol in the Red Hat Enterprise Linux (RHEL) kernel is linuxptp.
The linuxptp package includes the ptp4l program for PTP boundary clock and ordinary clock synchronization, and the phc2sys program for hardware time stamping. For more information about PTP, see Introduction to PTP in the Red Hat Enterprise Linux System Administrator’s Guide.
Chrony is an implementation of the NTP protocol. The two main components of Chrony are chronyd, which is the Chrony daemon, and chronyc which is the Chrony command line interface.
For more information about Chrony, see Using the Chrony suite to configure NTP in the Configuring basic system settings guide.
The following image is an overview of a packet journey in a PTP configuration.
Figure 10.1. PTP packet journey overview

The following image is a overview of a packet journey in the Compute node in a PTP configuration.
Figure 10.2. PTP packet journey detail
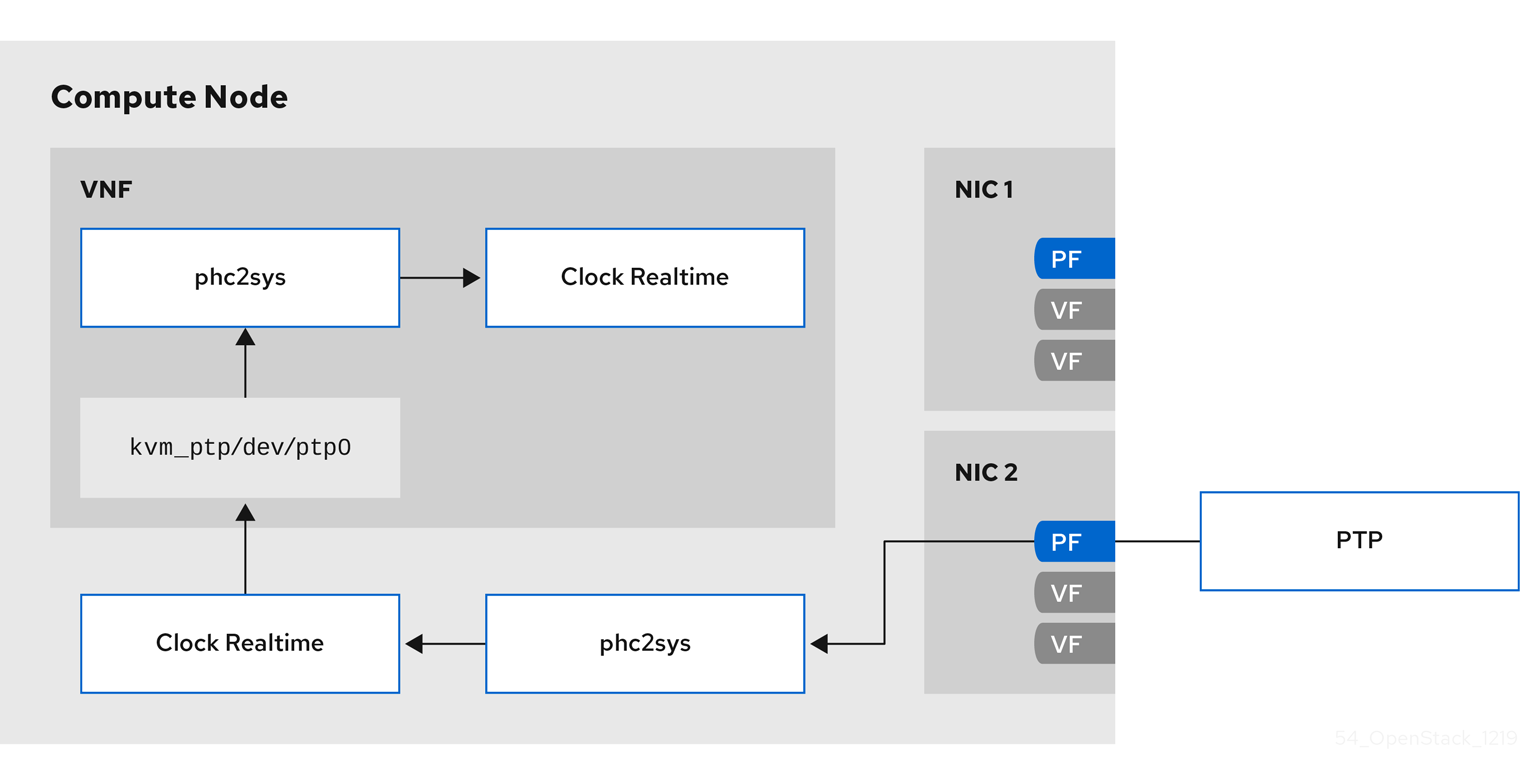
10.9.1. Timemaster hardware requirements
Ensure that you have the following hardware functionality:
- You have configured the NICs with hardware timestamping capability.
- You have configured the switch to allow multicast packets.
- You have configured the switch to also function as a boundary or transparent clock.
You can verify the hardware timestamping with the command ethtool -T <device>.
$ ethtool -T p5p1
Time stamping parameters for p5p1:
Capabilities:
hardware-transmit (SOF_TIMESTAMPING_TX_HARDWARE)
software-transmit (SOF_TIMESTAMPING_TX_SOFTWARE)
hardware-receive (SOF_TIMESTAMPING_RX_HARDWARE)
software-receive (SOF_TIMESTAMPING_RX_SOFTWARE)
software-system-clock (SOF_TIMESTAMPING_SOFTWARE)
hardware-raw-clock (SOF_TIMESTAMPING_RAW_HARDWARE)
PTP Hardware Clock: 6
Hardware Transmit Timestamp Modes:
off (HWTSTAMP_TX_OFF)
on (HWTSTAMP_TX_ON)
Hardware Receive Filter Modes:
none (HWTSTAMP_FILTER_NONE)
ptpv1-l4-sync (HWTSTAMP_FILTER_PTP_V1_L4_SYNC)
ptpv1-l4-delay-req (HWTSTAMP_FILTER_PTP_V1_L4_DELAY_REQ)
ptpv2-event (HWTSTAMP_FILTER_PTP_V2_EVENT)
You can use either a transparent or boundary clock switch for better accuracy and less latency. You can use an uplink switch for the boundary clock. The boundary clock switch uses an 8-bit correctionField on the PTPv2 header to correct delay variations, and ensure greater accuracy on the end clock. In a transparent clock switch, the end clock calculates the delay variation, not the correctionField.
10.9.2. Configuring Timemaster
The default Red Hat OpenStack Platform (RHOSP) service for time synchronization in overcloud nodes is OS::TripleO::Services::Timesync.
Known limitations
- Enable NTP for virtualized controllers, and enable PTP for bare metal nodes.
-
Virtio interfaces are incompatible, because
ptp4lrequires a compatible PTP device. -
Use a physical function (PF) for a VM with SR-IOV. A virtual function (VF) does not expose the registers necessary for PTP, and a VM uses
kvm_ptpto calculate time. - High Availability (HA) interfaces with multiple sources and multiple network paths are incompatible.
Procedure
To enable the Timemaster service on the nodes that belong to a role that you choose, replace the line that contains
OS::TripleO::Services::Timesyncwith the lineOS::TripleO::Services::TimeMasterin theroles_data.yamlfile section for that role.#- OS::TripleO::Services::Timesync - OS::TripleO::Services::TimeMaster
Configure the heat parameters for the compute role that you use.
#Example ComputeSriovParameters: PTPInterfaces: ‘0:eno1,1:eno2’ PTPMessageTransport: ‘UDPv4’
Include the new environment file in the
openstack overcloud deploycommand with any other environment files that are relevant to your environment:$ openstack overcloud deploy \ --templates \ … -e <existing_overcloud_environment_files> \ -e <new_environment_file1> \ -e <new_environment_file2> \ …
- Replace <existing_overcloud_environment_files> with the list of environment files that are part of your existing deployment.
- Replace <new_environment_file> with the new environment file or files that you want to include in the overcloud deployment process.
Verification
Use the command
phc_ctl, installed withptp4linux, to query the NIC hardware clock.# phc_ctl <clock_name> get # phc_ctl <clock_name> cmp
10.9.3. Example timemaster configuration
$ cat /etc/timemaster.conf # Configuration file for timemaster #[ntp_server ntp-server.local] #minpoll 4 #maxpoll 4 [ptp_domain 0] interfaces eno1 #ptp4l_setting network_transport l2 #delay 10e-6 [timemaster] ntp_program chronyd [chrony.conf] #include /etc/chrony.conf server clock.redhat.com iburst minpoll 6 maxpoll 10 [ntp.conf] includefile /etc/ntp.conf [ptp4l.conf] #includefile /etc/ptp4l.conf network_transport L2 [chronyd] path /usr/sbin/chronyd [ntpd] path /usr/sbin/ntpd options -u ntp:ntp -g [phc2sys] path /usr/sbin/phc2sys #options -w [ptp4l] path /usr/sbin/ptp4l #options -2 -i eno1
10.9.4. Example timemaster operation
$ systemctl status timemaster
● timemaster.service - Synchronize system clock to NTP and PTP time sources
Loaded: loaded (/usr/lib/systemd/system/timemaster.service; enabled; vendor preset: disabled)
Active: active (running) since Tue 2020-08-25 19:10:18 UTC; 2min 6s ago
Main PID: 2573 (timemaster)
Tasks: 6 (limit: 357097)
Memory: 5.1M
CGroup: /system.slice/timemaster.service
├─2573 /usr/sbin/timemaster -f /etc/timemaster.conf
├─2577 /usr/sbin/chronyd -n -f /var/run/timemaster/chrony.conf
├─2582 /usr/sbin/ptp4l -l 5 -f /var/run/timemaster/ptp4l.0.conf -H -i eno1
├─2583 /usr/sbin/phc2sys -l 5 -a -r -R 1.00 -z /var/run/timemaster/ptp4l.0.socket -t [0:eno1] -n 0 -E ntpshm -M 0
├─2587 /usr/sbin/ptp4l -l 5 -f /var/run/timemaster/ptp4l.1.conf -H -i eno2
└─2588 /usr/sbin/phc2sys -l 5 -a -r -R 1.00 -z /var/run/timemaster/ptp4l.1.socket -t [0:eno2] -n 0 -E ntpshm -M 1
Aug 25 19:11:53 computesriov-0 ptp4l[2587]: [152.562] [0:eno2] selected local clock e4434b.fffe.4a0c24 as best masterChapter 11. Enabling RT-KVM for NFV Workloads
To facilitate installing and configuring Red Hat Enterprise Linux Real Time KVM (RT-KVM), Red Hat OpenStack Platform provides the following features:
- A real-time Compute node role that provisions Red Hat Enterprise Linux for real-time.
- The additional RT-KVM kernel module.
- Automatic configuration of the Compute node.
11.1. Planning for your RT-KVM Compute nodes
When planning for RT-KVM Compute nodes, ensure that the following tasks are completed:
You must use Red Hat certified servers for your RT-KVM Compute nodes.
For more information, see Red Hat Enterprise Linux for Real Time certified servers.
Register your undercloud and attach a valid Red Hat OpenStack Platform subscription.
For more information, see Registering the undercloud and attaching subscriptions in the Director Installation and Usage guide.
Enable the repositories that are required for the undercloud, such as the
rhel-9-server-nfv-rpmsrepository for RT-KVM, and update the system packages to the latest versions.NoteYou need a separate subscription to a
Red Hat OpenStack Platform for Real TimeSKU before you can access this repository.For more information, see Enabling repositories for the undercloud in the Director Installation and Usage guide.
Building the real-time image
Install the libguestfs-tools package on the undercloud to get the virt-customize tool:
(undercloud) [stack@undercloud-0 ~]$ sudo dnf install libguestfs-tools
ImportantIf you install the
libguestfs-toolspackage on the undercloud, disableiscsid.socketto avoid port conflicts with thetripleo_iscsidservice on the undercloud:$ sudo systemctl disable --now iscsid.socket
Extract the images:
(undercloud) [stack@undercloud-0 ~]$ tar -xf /usr/share/rhosp-director-images/overcloud-full.tar (undercloud) [stack@undercloud-0 ~]$ tar -xf /usr/share/rhosp-director-images/ironic-python-agent.tar
Copy the default image:
(undercloud) [stack@undercloud-0 ~]$ cp overcloud-hardened-uefi-full.qcow2 overcloud-realtime-compute.qcow2
Register your image to enable Red Hat repositories relevant to your customizations. Replace
[username]and[password]with valid credentials in the following example.virt-customize -a overcloud-realtime-compute.qcow2 --run-command \ 'subscription-manager register --username=[username] --password=[password]' \ subscription-manager release --set 8.4
NoteFor security, you can remove credentials from the history file if they are used on the command prompt. You can delete individual lines in history using the
history -dcommand followed by the line number.Find a list of pool IDs from your account’s subscriptions, and attach the appropriate pool ID to your image.
sudo subscription-manager list --all --available | less ... virt-customize -a overcloud-realtime-compute.qcow2 --run-command \ 'subscription-manager attach --pool [pool-ID]'
Add the repositories necessary for Red Hat OpenStack Platform with NFV.
virt-customize -a overcloud-realtime-compute.qcow2 --run-command \ 'sudo subscription-manager repos --enable=rhel-8-for-x86_64-baseos-eus-rpms \ --enable=rhel-8-for-x86_64-appstream-eus-rpms \ --enable=rhel-8-for-x86_64-highavailability-eus-rpms \ --enable=ansible-2.9-for-rhel-8-x86_64-rpms \ --enable=openstack-16.2-for-rhel-8-x86_64-rpms \ --enable=rhel-8-for-x86_64-nfv-rpms \ --enable=fast-datapath-for-rhel-8-x86_64-rpms'
Create a script to configure real-time capabilities on the image.
(undercloud) [stack@undercloud-0 ~]$ cat <<'EOF' > rt.sh #!/bin/bash set -eux dnf -v -y --setopt=protected_packages= erase kernel.$(uname -m) dnf -v -y install kernel-rt kernel-rt-kvm tuned-profiles-nfv-host grubby --set-default /boot/vmlinuz*rt* EOF
Run the script to configure the real-time image:
(undercloud) [stack@undercloud-0 ~]$ virt-customize -a overcloud-realtime-compute.qcow2 -v --run rt.sh 2>&1 | tee virt-customize.log
NoteIf you see the following line in the
rt.shscript output,"grubby fatal error: unable to find a suitable template", you can ignore this error.Examine the
virt-customize.logfile that resulted from the previous command, to check that the packages installed correctly using thert.shscript .(undercloud) [stack@undercloud-0 ~]$ cat virt-customize.log | grep Verifying Verifying : kernel-3.10.0-957.el7.x86_64 1/1 Verifying : 10:qemu-kvm-tools-rhev-2.12.0-18.el7_6.1.x86_64 1/8 Verifying : tuned-profiles-realtime-2.10.0-6.el7_6.3.noarch 2/8 Verifying : linux-firmware-20180911-69.git85c5d90.el7.noarch 3/8 Verifying : tuned-profiles-nfv-host-2.10.0-6.el7_6.3.noarch 4/8 Verifying : kernel-rt-kvm-3.10.0-957.10.1.rt56.921.el7.x86_64 5/8 Verifying : tuna-0.13-6.el7.noarch 6/8 Verifying : kernel-rt-3.10.0-957.10.1.rt56.921.el7.x86_64 7/8 Verifying : rt-setup-2.0-6.el7.x86_64 8/8
Relabel SELinux:
(undercloud) [stack@undercloud-0 ~]$ virt-customize -a overcloud-realtime-compute.qcow2 --selinux-relabel
Extract vmlinuz and initrd:
(undercloud) [stack@undercloud-0 ~]$ mkdir image (undercloud) [stack@undercloud-0 ~]$ guestmount -a overcloud-realtime-compute.qcow2 -i --ro image (undercloud) [stack@undercloud-0 ~]$ cp image/boot/vmlinuz-3.10.0-862.rt56.804.el7.x86_64 ./overcloud-realtime-compute.vmlinuz (undercloud) [stack@undercloud-0 ~]$ cp image/boot/initramfs-3.10.0-862.rt56.804.el7.x86_64.img ./overcloud-realtime-compute.initrd (undercloud) [stack@undercloud-0 ~]$ guestunmount image
NoteThe software version in the
vmlinuzandinitramfsfilenames vary with the kernel version.Upload the image:
(undercloud) [stack@undercloud-0 ~]$ openstack overcloud image upload --update-existing --os-image-name overcloud-realtime-compute.qcow2
You now have a real-time image you can use with the ComputeOvsDpdkRT composable role on your selected Compute nodes.
Modifying BIOS settings on RT-KVM Compute nodes
To reduce latency on your RT-KVM Compute nodes, disable all options for the following parameters in your Compute node BIOS settings:
- Power Management
- Hyper-Threading
- CPU sleep states
- Logical processors
11.2. Configuring OVS-DPDK with RT-KVM
You must determine the best values for the OVS-DPDK parameters that you set in the network-environment.yaml file to optimize your OpenStack network for OVS-DPDK. For more details, see Deriving DPDK parameters with workflows.
11.2.1. Generating the ComputeOvsDpdk composable role
Use the ComputeOvsDpdkRT role to specify Compute nodes for the real-time compute image.
Generate roles_data.yaml for the ComputeOvsDpdkRT role.
# (undercloud) [stack@undercloud-0 ~]$ openstack overcloud roles generate -o roles_data.yaml Controller ComputeOvsDpdkRT
11.2.2. Configuring the OVS-DPDK parameters
Determine the best values for the OVS-DPDK parameters in the network-environment.yaml file to optimize your deployment. For more information, see Section 9.1, “Deriving DPDK parameters with workflows”.
Add the NIC configuration for the OVS-DPDK role you use under
resource_registry:resource_registry: # Specify the relative/absolute path to the config files you want to use for override the default. OS::TripleO::ComputeOvsDpdkRT::Net::SoftwareConfig: nic-configs/compute-ovs-dpdk.yaml OS::TripleO::Controller::Net::SoftwareConfig: nic-configs/controller.yaml
Under
parameter_defaults, set the OVS-DPDK, and RT-KVM parameters:# DPDK compute node. ComputeOvsDpdkRTParameters: KernelArgs: "default_hugepagesz=1GB hugepagesz=1G hugepages=32 iommu=pt intel_iommu=on isolcpus=1-7,17-23,9-15,25-31" TunedProfileName: "realtime-virtual-host" IsolCpusList: "1,2,3,4,5,6,7,9,10,17,18,19,20,21,22,23,11,12,13,14,15,25,26,27,28,29,30,31" NovaComputeCpuDedicatedSet: ['2,3,4,5,6,7,18,19,20,21,22,23,10,11,12,13,14,15,26,27,28,29,30,31'] NovaReservedHostMemory: 4096 OvsDpdkSocketMemory: "1024,1024" OvsDpdkMemoryChannels: "4" OvsPmdCoreList: "1,17,9,25" VhostuserSocketGroup: "hugetlbfs" ComputeOvsDpdkRTImage: "overcloud-realtime-compute"
11.2.3. Deploying the overcloud
Deploy the overcloud for ML2-OVS:
(undercloud) [stack@undercloud-0 ~]$ openstack overcloud deploy \ --templates \ -r /home/stack/ospd-16-vlan-dpdk-ctlplane-bonding-rt/roles_data.yaml \ -e /usr/share/openstack-tripleo-heat-templates/environments/network-isolation.yaml \ -e /usr/share/openstack-tripleo-heat-templates/environments/services/neutron-ovs.yaml \ -e /usr/share/openstack-tripleo-heat-templates/environments/services/neutron-ovs-dpdk.yaml \ -e /home/stack/ospd-16-vxlan-dpdk-data-bonding-rt-hybrid/containers-prepare-parameter.yaml \ -e /home/stack/ospd-16-vxlan-dpdk-data-bonding-rt-hybrid/network-environment.yaml
11.3. Launching an RT-KVM instance
Perform the following steps to launch an RT-KVM instance on a real-time enabled Compute node:
Create an RT-KVM flavor on the overcloud:
# openstack flavor create r1.small 99 4096 20 4 # openstack flavor set --property hw:cpu_policy=dedicated 99 # openstack flavor set --property hw:cpu_realtime=yes 99 # openstack flavor set --property hw:mem_page_size=1GB 99 # openstack flavor set --property hw:cpu_realtime_mask="^0-1" 99 # openstack flavor set --property hw:cpu_emulator_threads=isolate 99
Launch an RT-KVM instance:
# openstack server create --image <rhel> --flavor r1.small --nic net-id=<dpdk-net> test-rt
To verify that the instance uses the assigned emulator threads, run the following command:
# virsh dumpxml <instance-id> | grep vcpu -A1 <vcpu placement='static'>4</vcpu> <cputune> <vcpupin vcpu='0' cpuset='1'/> <vcpupin vcpu='1' cpuset='3'/> <vcpupin vcpu='2' cpuset='5'/> <vcpupin vcpu='3' cpuset='7'/> <emulatorpin cpuset='0-1'/> <vcpusched vcpus='2-3' scheduler='fifo' priority='1'/> </cputune>
Chapter 12. Example: Configuring OVS-DPDK and SR-IOV with VXLAN tunnelling
You can deploy Compute nodes with both OVS-DPDK and SR-IOV interfaces. The cluster includes ML2/OVS and VXLAN tunnelling.
In your roles configuration file, for example roles_data.yaml, comment out or remove the line that contains OS::TripleO::Services::Tuned, when you generate the overcloud roles.
ServicesDefault: # - OS::TripleO::Services::Tuned
When you have commented out or removed OS::TripleO::Services::Tuned, you can set the TunedProfileName parameter to suit your requirements, for example "cpu-partitioning". If you do not comment out or remove the line OS::TripleO::Services::Tuned and redeploy, the TunedProfileName parameter gets the default value of "throughput-performance", instead of any other value that you set.
12.1. Configuring roles data
Red Hat OpenStack Platform provides a set of default roles in the roles_data.yaml file. You can create your own roles_data.yaml file to support the roles you require.
For the purposes of this example, the ComputeOvsDpdkSriov role is created.
Additional resources
- Composable services and custom roles in the Advanced Overcloud Customization guide
- roles-data.yaml
12.2. Configuring OVS-DPDK parameters
You must determine the best values for the OVS-DPDK parameters that you set in the network-environment.yaml file to optimize your OpenStack network for OVS-DPDK. For more details, see Deriving DPDK parameters with workflows.
Add the custom resources for OVS-DPDK under
resource_registry:resource_registry: # Specify the relative/absolute path to the config files you want to use for override the default. OS::TripleO::ComputeOvsDpdkSriov::Net::SoftwareConfig: nic-configs/computeovsdpdksriov.yaml OS::TripleO::Controller::Net::SoftwareConfig: nic-configs/controller.yamlUnder
parameter_defaults, set the tunnel type tovxlan, and the network type tovxlan,vlan:NeutronTunnelTypes: 'vxlan' NeutronNetworkType: 'vxlan,vlan'
Under
parameters_defaults, set the bridge mapping:# The OVS logical->physical bridge mappings to use. NeutronBridgeMappings: - dpdk-mgmt:br-link0
Under
parameter_defaults, set the role-specific parameters for theComputeOvsDpdkSriovrole:########################## # OVS DPDK configuration # ########################## ComputeOvsDpdkSriovParameters: KernelArgs: "default_hugepagesz=1GB hugepagesz=1G hugepages=32 iommu=pt intel_iommu=on isolcpus=2-19,22-39" TunedProfileName: "cpu-partitioning" IsolCpusList: "2-19,22-39" NovaComputeCpuDedicatedSet: ['4-19,24-39'] NovaReservedHostMemory: 4096 OvsDpdkSocketMemory: "3072,1024" OvsDpdkMemoryChannels: "4" OvsPmdCoreList: "2,22,3,23" NovaComputeCpuSharedSet: [0,20,1,21] NovaLibvirtRxQueueSize: 1024 NovaLibvirtTxQueueSize: 1024NoteTo prevent failures during guest creation, assign at least one CPU with sibling thread on each NUMA node. In the example, the values for the
OvsPmdCoreListparameter denote cores 2 and 22 from NUMA 0, and cores 3 and 23 from NUMA 1.NoteThese huge pages are consumed by the virtual machines, and also by OVS-DPDK using the
OvsDpdkSocketMemoryparameter as shown in this procedure. The number of huge pages available for the virtual machines is thebootparameter minus theOvsDpdkSocketMemory.You must also add
hw:mem_page_size=1GBto the flavor you associate with the DPDK instance.NoteOvsDpdkMemoryChannelsis a required setting for this procedure. For optimum operation, ensure you deploy DPDK with appropriate parameters and values.Configure the role-specific parameters for SR-IOV:
NovaPCIPassthrough: - vendor_id: "8086" product_id: "1528" address: "0000:06:00.0" trusted: "true" physical_network: "sriov-1" - vendor_id: "8086" product_id: "1528" address: "0000:06:00.1" trusted: "true" physical_network: "sriov-2"
12.3. Configuring the controller node
Create the control-plane Linux bond for an isolated network.
- type: linux_bond name: bond_api bonding_options: "mode=active-backup" use_dhcp: false dns_servers: get_param: DnsServers members: - type: interface name: nic2 primary: trueAssign VLANs to this Linux bond.
- type: vlan vlan_id: get_param: InternalApiNetworkVlanID device: bond_api addresses: - ip_netmask: get_param: InternalApiIpSubnet - type: vlan vlan_id: get_param: StorageNetworkVlanID device: bond_api addresses: - ip_netmask: get_param: StorageIpSubnet - type: vlan vlan_id: get_param: StorageMgmtNetworkVlanID device: bond_api addresses: - ip_netmask: get_param: StorageMgmtIpSubnet - type: vlan vlan_id: get_param: ExternalNetworkVlanID device: bond_api addresses: - ip_netmask: get_param: ExternalIpSubnet routes: - default: true next_hop: get_param: ExternalInterfaceDefaultRouteCreate the OVS bridge to access
neutron-dhcp-agentandneutron-metadata-agentservices.- type: ovs_bridge name: br-link0 use_dhcp: false mtu: 9000 members: - type: interface name: nic3 mtu: 9000 - type: vlan vlan_id: get_param: TenantNetworkVlanID mtu: 9000 addresses: - ip_netmask: get_param: TenantIpSubnet
12.4. Configuring the Compute node for DPDK and SR-IOV
Create the computeovsdpdksriov.yaml file from the default compute.yaml file, and make the following changes:
Create the control-plane Linux bond for an isolated network.
- type: linux_bond name: bond_api bonding_options: "mode=active-backup" use_dhcp: false dns_servers: get_param: DnsServers members: - type: interface name: nic3 primary: true - type: interface name: nic4Assign VLANs to this Linux bond.
- type: vlan vlan_id: get_param: InternalApiNetworkVlanID device: bond_api addresses: - ip_netmask: get_param: InternalApiIpSubnet - type: vlan vlan_id: get_param: StorageNetworkVlanID device: bond_api addresses: - ip_netmask: get_param: StorageIpSubnetSet a bridge with a DPDK port to link to the controller.
- type: ovs_user_bridge name: br-link0 use_dhcp: false ovs_extra: - str_replace: template: set port br-link0 tag=_VLAN_TAG_ params: _VLAN_TAG_: get_param: TenantNetworkVlanID addresses: - ip_netmask: get_param: TenantIpSubnet members: - type: ovs_dpdk_bond name: dpdkbond0 mtu: 9000 rx_queue: 2 members: - type: ovs_dpdk_port name: dpdk0 members: - type: interface name: nic7 - type: ovs_dpdk_port name: dpdk1 members: - type: interface name: nic8NoteTo include multiple DPDK devices, repeat the
typecode section for each DPDK device that you want to add.NoteWhen using OVS-DPDK, all bridges on the same Compute node must be of type
ovs_user_bridge. Red Hat OpenStack Platform does not support bothovs_bridgeandovs_user_bridgelocated on the same node.
12.5. Deploying the overcloud
-
Run the
overcloud_deploy.shscript:
Chapter 13. Upgrading Red Hat OpenStack platform with NFV
For more information about upgrading Red Hat OpenStack Platform (RHOSP) with OVS-DPDK configured, see Preparing network functions virtualization (NFV) in the Framework for Upgrades (13 to 16.2) guide.
Chapter 14. Sample DPDK SR-IOV YAML files
This section provides sample yaml files as a reference to add single root I/O virtualization (SR-IOV) and Data Plane Development Kit (DPDK) interfaces on the same compute node.
These templates are from a fully-configured environment, and include parameters unrelated to NFV, that might not apply to your deployment. For a list of component support levels, see the Red Hat Knowledgebase solution Component Support Graduation.
14.1. roles_data.yaml
Run the
openstack overcloud roles generatecommand to generate theroles_data.yamlfile.Include role names in the command according to the roles that you want to deploy in your environment, such as
Controller,ComputeSriov,ComputeOvsDpdkRT,ComputeOvsDpdkSriov, or other roles.Example
For example, to generate a
roles_data.yamlfile that contains the rolesControllerandComputeHCIOvsDpdkSriov, run the following command:$ openstack overcloud roles generate -o roles_data.yaml \ Controller ComputeHCIOvsDpdkSriov
############################################################################### # File generated by TripleO ############################################################################### ############################################################################### # Role: Controller # ############################################################################### - name: Controller description: | Controller role that has all the controller services loaded and handles Database, Messaging and Network functions. CountDefault: 1 tags: - primary - controller networks: External: subnet: external_subnet InternalApi: subnet: internal_api_subnet Storage: subnet: storage_subnet StorageMgmt: subnet: storage_mgmt_subnet Tenant: subnet: tenant_subnet # For systems with both IPv4 and IPv6, you may specify a gateway network for # each, such as ['ControlPlane', 'External'] default_route_networks: ['External'] HostnameFormatDefault: '%stackname%-controller-%index%' # Deprecated & backward-compatible values (FIXME: Make parameters consistent) # Set uses_deprecated_params to True if any deprecated params are used. uses_deprecated_params: True deprecated_param_extraconfig: 'controllerExtraConfig' deprecated_param_flavor: 'OvercloudControlFlavor' deprecated_param_image: 'controllerImage' deprecated_nic_config_name: 'controller.yaml' update_serial: 1 ServicesDefault: - OS::TripleO::Services::Aide - OS::TripleO::Services::AodhApi - OS::TripleO::Services::AodhEvaluator - OS::TripleO::Services::AodhListener - OS::TripleO::Services::AodhNotifier - OS::TripleO::Services::AuditD - OS::TripleO::Services::BarbicanApi - OS::TripleO::Services::BarbicanBackendSimpleCrypto - OS::TripleO::Services::BarbicanBackendDogtag - OS::TripleO::Services::BarbicanBackendKmip - OS::TripleO::Services::BarbicanBackendPkcs11Crypto - OS::TripleO::Services::BootParams - OS::TripleO::Services::CACerts - OS::TripleO::Services::CeilometerAgentCentral - OS::TripleO::Services::CeilometerAgentNotification - OS::TripleO::Services::CephExternal - OS::TripleO::Services::CephGrafana - OS::TripleO::Services::CephMds - OS::TripleO::Services::CephMgr - OS::TripleO::Services::CephMon - OS::TripleO::Services::CephRbdMirror - OS::TripleO::Services::CephRgw - OS::TripleO::Services::CertmongerUser - OS::TripleO::Services::CinderApi - OS::TripleO::Services::CinderBackendDellPs - OS::TripleO::Services::CinderBackendDellSc - OS::TripleO::Services::CinderBackendDellEMCPowermax - OS::TripleO::Services::CinderBackendDellEMCPowerStore - OS::TripleO::Services::CinderBackendDellEMCSc - OS::TripleO::Services::CinderBackendDellEMCUnity - OS::TripleO::Services::CinderBackendDellEMCVMAXISCSI - OS::TripleO::Services::CinderBackendDellEMCVNX - OS::TripleO::Services::CinderBackendDellEMCVxFlexOS - OS::TripleO::Services::CinderBackendDellEMCXtremio - OS::TripleO::Services::CinderBackendDellEMCXTREMIOISCSI - OS::TripleO::Services::CinderBackendNetApp - OS::TripleO::Services::CinderBackendPure - OS::TripleO::Services::CinderBackendScaleIO - OS::TripleO::Services::CinderBackendVRTSHyperScale - OS::TripleO::Services::CinderBackendNVMeOF - OS::TripleO::Services::CinderBackup - OS::TripleO::Services::CinderHPELeftHandISCSI - OS::TripleO::Services::CinderScheduler - OS::TripleO::Services::CinderVolume - OS::TripleO::Services::Clustercheck - OS::TripleO::Services::Collectd - OS::TripleO::Services::ContainerImagePrepare - OS::TripleO::Services::DesignateApi - OS::TripleO::Services::DesignateCentral - OS::TripleO::Services::DesignateProducer - OS::TripleO::Services::DesignateWorker - OS::TripleO::Services::DesignateMDNS - OS::TripleO::Services::DesignateSink - OS::TripleO::Services::Docker - OS::TripleO::Services::Ec2Api - OS::TripleO::Services::Etcd - OS::TripleO::Services::ExternalSwiftProxy - OS::TripleO::Services::GlanceApi - OS::TripleO::Services::GnocchiApi - OS::TripleO::Services::GnocchiMetricd - OS::TripleO::Services::GnocchiStatsd - OS::TripleO::Services::HAproxy - OS::TripleO::Services::HeatApi - OS::TripleO::Services::HeatApiCloudwatch - OS::TripleO::Services::HeatApiCfn - OS::TripleO::Services::HeatEngine - OS::TripleO::Services::Horizon - OS::TripleO::Services::IpaClient - OS::TripleO::Services::Ipsec - OS::TripleO::Services::IronicApi - OS::TripleO::Services::IronicConductor - OS::TripleO::Services::IronicInspector - OS::TripleO::Services::IronicPxe - OS::TripleO::Services::IronicNeutronAgent - OS::TripleO::Services::Iscsid - OS::TripleO::Services::Keepalived - OS::TripleO::Services::Kernel - OS::TripleO::Services::Keystone - OS::TripleO::Services::LoginDefs - OS::TripleO::Services::ManilaApi - OS::TripleO::Services::ManilaBackendCephFs - OS::TripleO::Services::ManilaBackendIsilon - OS::TripleO::Services::ManilaBackendNetapp - OS::TripleO::Services::ManilaBackendUnity - OS::TripleO::Services::ManilaBackendVNX - OS::TripleO::Services::ManilaBackendVMAX - OS::TripleO::Services::ManilaScheduler - OS::TripleO::Services::ManilaShare - OS::TripleO::Services::Memcached - OS::TripleO::Services::MetricsQdr - OS::TripleO::Services::MistralApi - OS::TripleO::Services::MistralEngine - OS::TripleO::Services::MistralExecutor - OS::TripleO::Services::MistralEventEngine - OS::TripleO::Services::Multipathd - OS::TripleO::Services::MySQL - OS::TripleO::Services::MySQLClient - OS::TripleO::Services::NeutronApi - OS::TripleO::Services::NeutronBgpVpnApi - OS::TripleO::Services::NeutronSfcApi - OS::TripleO::Services::NeutronCorePlugin - OS::TripleO::Services::NeutronDhcpAgent - OS::TripleO::Services::NeutronL2gwAgent - OS::TripleO::Services::NeutronL2gwApi - OS::TripleO::Services::NeutronL3Agent - OS::TripleO::Services::NeutronLinuxbridgeAgent - OS::TripleO::Services::NeutronMetadataAgent - OS::TripleO::Services::NeutronML2FujitsuCfab - OS::TripleO::Services::NeutronML2FujitsuFossw - OS::TripleO::Services::NeutronOvsAgent - OS::TripleO::Services::NeutronVppAgent - OS::TripleO::Services::NeutronAgentsIBConfig - OS::TripleO::Services::NovaApi - OS::TripleO::Services::NovaConductor - OS::TripleO::Services::NovaIronic - OS::TripleO::Services::NovaMetadata - OS::TripleO::Services::NovaScheduler - OS::TripleO::Services::NovaVncProxy - OS::TripleO::Services::ContainersLogrotateCrond - OS::TripleO::Services::OctaviaApi - OS::TripleO::Services::OctaviaDeploymentConfig - OS::TripleO::Services::OctaviaHealthManager - OS::TripleO::Services::OctaviaHousekeeping - OS::TripleO::Services::OctaviaWorker - OS::TripleO::Services::OpenStackClients - OS::TripleO::Services::OVNDBs - OS::TripleO::Services::OVNController - OS::TripleO::Services::Pacemaker - OS::TripleO::Services::PankoApi - OS::TripleO::Services::PlacementApi - OS::TripleO::Services::OsloMessagingRpc - OS::TripleO::Services::OsloMessagingNotify - OS::TripleO::Services::Podman - OS::TripleO::Services::Rear - OS::TripleO::Services::Redis - OS::TripleO::Services::Rhsm - OS::TripleO::Services::Rsyslog - OS::TripleO::Services::RsyslogSidecar - OS::TripleO::Services::SaharaApi - OS::TripleO::Services::SaharaEngine - OS::TripleO::Services::Securetty - OS::TripleO::Services::Snmp - OS::TripleO::Services::Sshd - OS::TripleO::Services::SwiftProxy - OS::TripleO::Services::SwiftDispersion - OS::TripleO::Services::SwiftRingBuilder - OS::TripleO::Services::SwiftStorage - OS::TripleO::Services::Timesync - OS::TripleO::Services::Timezone - OS::TripleO::Services::TripleoFirewall - OS::TripleO::Services::TripleoPackages - OS::TripleO::Services::Tuned - OS::TripleO::Services::Vpp - OS::TripleO::Services::Zaqar ############################################################################### # Role: ComputeHCIOvsDpdkSriov # ############################################################################### - name: ComputeHCIOvsDpdkSriov description: | ComputeOvsDpdkSriov Node role hosting Ceph OSD too networks: InternalApi: subnet: internal_api_subnet Tenant: subnet: tenant_subnet Storage: subnet: storage_subnet StorageMgmt: subnet: storage_mgmt_subnet # CephOSD present so serial has to be 1 update_serial: 1 RoleParametersDefault: TunedProfileName: "cpu-partitioning" VhostuserSocketGroup: "hugetlbfs" NovaLibvirtRxQueueSize: 1024 NovaLibvirtTxQueueSize: 1024 ServicesDefault: - OS::TripleO::Services::Aide - OS::TripleO::Services::AuditD - OS::TripleO::Services::BootParams - OS::TripleO::Services::CACerts - OS::TripleO::Services::CephClient - OS::TripleO::Services::CephExternal - OS::TripleO::Services::CephOSD - OS::TripleO::Services::CertmongerUser - OS::TripleO::Services::Collectd - OS::TripleO::Services::ComputeCeilometerAgent - OS::TripleO::Services::ComputeNeutronCorePlugin - OS::TripleO::Services::ComputeNeutronL3Agent - OS::TripleO::Services::ComputeNeutronMetadataAgent - OS::TripleO::Services::ComputeNeutronOvsDpdk - OS::TripleO::Services::Docker - OS::TripleO::Services::IpaClient - OS::TripleO::Services::Ipsec - OS::TripleO::Services::Iscsid - OS::TripleO::Services::Kernel - OS::TripleO::Services::LoginDefs - OS::TripleO::Services::MetricsQdr - OS::TripleO::Services::Multipathd - OS::TripleO::Services::MySQLClient - OS::TripleO::Services::NeutronBgpVpnBagpipe - OS::TripleO::Services::NeutronSriovAgent - OS::TripleO::Services::NeutronSriovHostConfig - OS::TripleO::Services::NovaAZConfig - OS::TripleO::Services::NovaCompute - OS::TripleO::Services::NovaLibvirt - OS::TripleO::Services::NovaLibvirtGuests - OS::TripleO::Services::NovaMigrationTarget - OS::TripleO::Services::OvsDpdkNetcontrold - OS::TripleO::Services::ContainersLogrotateCrond - OS::TripleO::Services::Podman - OS::TripleO::Services::Rear - OS::TripleO::Services::Rhsm - OS::TripleO::Services::Rsyslog - OS::TripleO::Services::RsyslogSidecar - OS::TripleO::Services::Securetty - OS::TripleO::Services::Snmp - OS::TripleO::Services::Sshd - OS::TripleO::Services::Timesync - OS::TripleO::Services::Timezone - OS::TripleO::Services::TripleoFirewall - OS::TripleO::Services::TripleoPackages - OS::TripleO::Services::OVNController - OS::TripleO::Services::OVNMetadataAgent - OS::TripleO::Services::Ptp
14.2. network-environment-overrides.yaml
resource_registry:
    # Specify the relative/absolute path to the config files you want to use for override the default.
    OS::TripleO::ComputeOvsDpdkSriov::Net::SoftwareConfig:
      nic-configs/computeovsdpdksriov.yaml
    OS::TripleO::Controller::Net::SoftwareConfig:
      nic-configs/controller.yaml
# Customize all these values to match the local environment
parameter_defaults:
# The tunnel type for the project network (vxlan or gre). Set to '' to disable tunneling.
NeutronTunnelTypes: 'vxlan'
# The project network type for Neutron (vlan or vxlan).
NeutronNetworkType: 'vxlan,vlan'
# The OVS logical->physical bridge mappings to use.
NeutronBridgeMappings: 'access:br-access,dpdk-mgmt:br-link0'
# The Neutron ML2 and OpenVSwitch vlan mapping range to support.
NeutronNetworkVLANRanges: 'access:423:423,dpdk-mgmt:134:137,sriov-1:138:139,sriov-2:138:139'
# Define the DNS servers (maximum 2) for the overcloud nodes
DnsServers: ["10.46.0.31","10.46.0.32"]
# Nova flavor to use.
OvercloudControllerFlavor: controller
OvercloudComputeOvsDpdkSriovFlavor: computeovsdpdksriov
# Number of nodes to deploy.
ControllerCount: 3
ComputeOvsDpdkSriovCount: 2
# NTP server configuration.
NtpServer: ['clock.redhat.com']
# MTU global configuration
NeutronGlobalPhysnetMtu: 9000
# Configure the classname of the firewall driver to use for implementing security groups.
NeutronOVSFirewallDriver: openvswitch
SshServerOptions:
UseDns: 'no'
# Enable log level DEBUG for supported components
Debug: True
ControllerHostnameFormat: 'controller-%index%'
ControllerSchedulerHints:
'capabilities:node': 'controller-%index%'
ComputeOvsDpdkSriovHostnameFormat: 'computeovsdpdksriov-%index%'
ComputeOvsDpdkSriovSchedulerHints:
'capabilities:node': 'computeovsdpdksriov-%index%'
# From Rocky live migration with NumaTopologyFilter disabled by default
# https://bugs.launchpad.net/nova/+bug/1289064
NovaEnableNUMALiveMigration: true
##########################
# OVS DPDK configuration #
##########################
# In the future, most parameters will be derived by mistral plan.
# Currently mistral derive parameters is blocked:
# https://bugzilla.redhat.com/show_bug.cgi?id=1777841
# https://bugzilla.redhat.com/show_bug.cgi?id=1777844
ComputeOvsDpdkSriovParameters:
KernelArgs: "default_hugepagesz=1GB hugepagesz=1G hugepages=64 iommu=pt intel_iommu=on isolcpus=2-19,22-39"
TunedProfileName: "cpu-partitioning"
IsolCpusList: "2-19,22-39"
NovaComputeCpuDedicatedSet: ['2-10,12-17,19,22-30,32-37,39']
NovaReservedHostMemory: 4096
OvsDpdkSocketMemory: "1024,3072"
OvsDpdkMemoryChannels: "4"
OvsPmdCoreList: "11,18,31,38"
NovaComputeCpuSharedSet: [0,20,1,21]
# When using NIC partitioning on SR-IOV enabled setups, 'derive_pci_passthrough_whitelist.py'
# script will be executed which will override NovaPCIPassthrough.
# No option to disable as of now - https://bugzilla.redhat.com/show_bug.cgi?id=1774403
NovaPCIPassthrough:
- address: "0000:19:0e.3"
trusted: "true"
physical_network: "sriov1"
- address: "0000:19:0e.0"
trusted: "true"
physical_network: "sriov-2"
# NUMA aware vswitch
NeutronPhysnetNUMANodesMapping: {dpdk-mgmt: [0]}
NeutronTunnelNUMANodes: [0]
NeutronPhysicalDevMappings:
- sriov1:enp6s0f2
- sriov2:enp6s0f3
############################
# Scheduler configuration #
############################
NovaSchedulerDefaultFilters:
- "AvailabilityZoneFilter"
- "ComputeFilter"
- "ComputeCapabilitiesFilter"
- "ImagePropertiesFilter"
- "ServerGroupAntiAffinityFilter"
- "ServerGroupAffinityFilter"
- "PciPassthroughFilter"
- "NUMATopologyFilter"
- "AggregateInstanceExtraSpecsFilter"14.3. controller.yaml
heat_template_version: rocky
description: >
Software Config to drive os-net-config to configure VLANs for the controller role.
parameters:
ControlPlaneIp:
default: ''
description: IP address/subnet on the ctlplane network
type: string
ExternalIpSubnet:
default: ''
description: IP address/subnet on the external network
type: string
ExternalInterfaceRoutes:
default: []
description: >
Routes for the external network traffic. JSON route e.g. [{'destination':'10.0.0.0/16', 'nexthop':'10.0.0.1'}] Unless
the default is changed, the parameter is automatically resolved from the subnet host_routes attribute.
type: json
InternalApiIpSubnet:
default: ''
description: IP address/subnet on the internal_api network
type: string
InternalApiInterfaceRoutes:
default: []
description: >
Routes for the internal_api network traffic. JSON route e.g. [{'destination':'10.0.0.0/16', 'nexthop':'10.0.0.1'}] Unless
the default is changed, the parameter is automatically resolved from the subnet host_routes attribute.
type: json
StorageIpSubnet:
default: ''
description: IP address/subnet on the storage network
type: string
StorageInterfaceRoutes:
default: []
description: >
Routes for the storage network traffic. JSON route e.g. [{'destination':'10.0.0.0/16', 'nexthop':'10.0.0.1'}] Unless
the default is changed, the parameter is automatically resolved from the subnet host_routes attribute.
type: json
StorageMgmtIpSubnet:
default: ''
description: IP address/subnet on the storage_mgmt network
type: string
StorageMgmtInterfaceRoutes:
default: []
description: >
Routes for the storage_mgmt network traffic. JSON route e.g. [{'destination':'10.0.0.0/16', 'nexthop':'10.0.0.1'}] Unless
the default is changed, the parameter is automatically resolved from the subnet host_routes attribute.
type: json
TenantIpSubnet:
default: ''
description: IP address/subnet on the tenant network
type: string
TenantInterfaceRoutes:
default: []
description: >
Routes for the tenant network traffic. JSON route e.g. [{'destination':'10.0.0.0/16', 'nexthop':'10.0.0.1'}] Unless
the default is changed, the parameter is automatically resolved from the subnet host_routes attribute.
type: json
ManagementIpSubnet: # Only populated when including environments/network-management.yaml
default: ''
description: IP address/subnet on the management network
type: string
ManagementInterfaceRoutes:
default: []
description: >
Routes for the management network traffic. JSON route e.g. [{'destination':'10.0.0.0/16', 'nexthop':'10.0.0.1'}] Unless
the default is changed, the parameter is automatically resolved from the subnet host_routes attribute.
type: json
BondInterfaceOvsOptions:
default: bond_mode=active-backup
description: >-
The ovs_options string for the bond interface. Set things like lacp=active and/or bond_mode=balance-slb using this option.
type: string
ExternalNetworkVlanID:
default: 10
description: Vlan ID for the external network traffic.
type: number
InternalApiNetworkVlanID:
default: 20
description: Vlan ID for the internal_api network traffic.
type: number
StorageNetworkVlanID:
default: 30
description: Vlan ID for the storage network traffic.
type: number
StorageMgmtNetworkVlanID:
default: 40
description: Vlan ID for the storage_mgmt network traffic.
type: number
TenantNetworkVlanID:
default: 50
description: Vlan ID for the tenant network traffic.
type: number
ManagementNetworkVlanID:
default: 60
description: Vlan ID for the management network traffic.
type: number
ExternalInterfaceDefaultRoute:
default: 10.0.0.1
description: default route for the external network
type: string
ControlPlaneSubnetCidr:
default: ''
description: >
The subnet CIDR of the control plane network. (The parameter is automatically resolved from the ctlplane subnet's cidr
attribute.)
type: string
ControlPlaneDefaultRoute:
default: ''
description: >-
The default route of the control plane network. (The parameter is automatically resolved from the ctlplane subnet's
gateway_ip attribute.)
type: string
DnsServers: # Override this via parameter_defaults
default: []
description: >
DNS servers to use for the Overcloud (2 max for some implementations). If not set the nameservers configured in the
ctlplane subnet's dns_nameservers attribute will be used.
type: comma_delimited_list
EC2MetadataIp:
default: ''
description: >-
The IP address of the EC2 metadata server. (The parameter is automatically resolved from the ctlplane subnet's host_routes
attribute.)
type: string
ControlPlaneStaticRoutes:
default: []
description: >
Routes for the ctlplane network traffic. JSON route e.g. [{'destination':'10.0.0.0/16', 'nexthop':'10.0.0.1'}] Unless
the default is changed, the parameter is automatically resolved from the subnet host_routes attribute.
type: json
ControlPlaneMtu:
default: 1500
description: >-
The maximum transmission unit (MTU) size(in bytes) that is guaranteed to pass through the data path of the segments
in the network. (The parameter is automatically resolved from the ctlplane network's mtu attribute.)
type: number
StorageMtu:
default: 1500
description: >-
The maximum transmission unit (MTU) size(in bytes) that is guaranteed to pass through the data path of the segments
in the Storage network.
type: number
StorageMgmtMtu:
default: 1500
description: >-
The maximum transmission unit (MTU) size(in bytes) that is guaranteed to pass through the data path of the segments
in the StorageMgmt network.
type: number
InternalApiMtu:
default: 1500
description: >-
The maximum transmission unit (MTU) size(in bytes) that is guaranteed to pass through the data path of the segments
in the InternalApi network.
type: number
TenantMtu:
default: 1500
description: >-
The maximum transmission unit (MTU) size(in bytes) that is guaranteed to pass through the data path of the segments
in the Tenant network.
type: number
ExternalMtu:
default: 1500
description: >-
The maximum transmission unit (MTU) size(in bytes) that is guaranteed to pass through the data path of the segments
in the External network.
type: number
resources:
OsNetConfigImpl:
type: OS::Heat::SoftwareConfig
properties:
group: script
config:
str_replace:
template:
get_file: /usr/share/openstack-tripleo-heat-templates/network/scripts/run-os-net-config.sh
params:
$network_config:
network_config:
- type: interface
name: nic1
use_dhcp: false
addresses:
- ip_netmask:
list_join:
- /
- - get_param: ControlPlaneIp
- get_param: ControlPlaneSubnetCidr
routes:
- ip_netmask: 169.254.169.254/32
next_hop:
get_param: EC2MetadataIp
- type: ovs_bridge
name: br-link0
use_dhcp: false
mtu: 9000
members:
- type: interface
name: nic2
mtu: 9000
- type: vlan
vlan_id:
get_param: TenantNetworkVlanID
mtu: 9000
addresses:
- ip_netmask:
get_param: TenantIpSubnet
- type: vlan
vlan_id:
get_param: InternalApiNetworkVlanID
addresses:
- ip_netmask:
get_param: InternalApiIpSubnet
- type: vlan
vlan_id:
get_param: StorageNetworkVlanID
addresses:
- ip_netmask:
get_param: StorageIpSubnet
- type: vlan
vlan_id:
get_param: StorageMgmtNetworkVlanID
addresses:
- ip_netmask:
get_param: StorageMgmtIpSubnet
- type: ovs_bridge
name: br-access
use_dhcp: false
mtu: 9000
members:
- type: interface
name: nic3
mtu: 9000
- type: vlan
vlan_id:
get_param: ExternalNetworkVlanID
mtu: 9000
addresses:
- ip_netmask:
get_param: ExternalIpSubnet
routes:
- default: true
next_hop:
get_param: ExternalInterfaceDefaultRoute
outputs:
OS::stack_id:
description: The OsNetConfigImpl resource.
value:
get_resource: OsNetConfigImpl14.4. compute-ovs-dpdk.yaml
heat_template_version: rocky
description: >
Software Config to drive os-net-config to configure VLANs for the
compute role.
parameters:
ControlPlaneIp:
default: ''
description: IP address/subnet on the ctlplane network
type: string
ExternalIpSubnet:
default: ''
description: IP address/subnet on the external network
type: string
ExternalInterfaceRoutes:
default: []
description: >
Routes for the external network traffic.
JSON route e.g. [{'destination':'10.0.0.0/16', 'nexthop':'10.0.0.1'}]
Unless the default is changed, the parameter is automatically resolved
from the subnet host_routes attribute.
type: json
InternalApiIpSubnet:
default: ''
description: IP address/subnet on the internal_api network
type: string
InternalApiInterfaceRoutes:
default: []
description: >
Routes for the internal_api network traffic.
JSON route e.g. [{'destination':'10.0.0.0/16', 'nexthop':'10.0.0.1'}]
Unless the default is changed, the parameter is automatically resolved
from the subnet host_routes attribute.
type: json
StorageIpSubnet:
default: ''
description: IP address/subnet on the storage network
type: string
StorageInterfaceRoutes:
default: []
description: >
Routes for the storage network traffic.
JSON route e.g. [{'destination':'10.0.0.0/16', 'nexthop':'10.0.0.1'}]
Unless the default is changed, the parameter is automatically resolved
from the subnet host_routes attribute.
type: json
StorageMgmtIpSubnet:
default: ''
description: IP address/subnet on the storage_mgmt network
type: string
StorageMgmtInterfaceRoutes:
default: []
description: >
Routes for the storage_mgmt network traffic.
JSON route e.g. [{'destination':'10.0.0.0/16', 'nexthop':'10.0.0.1'}]
Unless the default is changed, the parameter is automatically resolved
from the subnet host_routes attribute.
type: json
TenantIpSubnet:
default: ''
description: IP address/subnet on the tenant network
type: string
TenantInterfaceRoutes:
default: []
description: >
Routes for the tenant network traffic.
JSON route e.g. [{'destination':'10.0.0.0/16', 'nexthop':'10.0.0.1'}]
Unless the default is changed, the parameter is automatically resolved
from the subnet host_routes attribute.
type: json
ManagementIpSubnet: # Only populated when including environments/network-management.yaml
default: ''
description: IP address/subnet on the management network
type: string
ManagementInterfaceRoutes:
default: []
description: >
Routes for the management network traffic.
JSON route e.g. [{'destination':'10.0.0.0/16', 'nexthop':'10.0.0.1'}]
Unless the default is changed, the parameter is automatically resolved
from the subnet host_routes attribute.
type: json
BondInterfaceOvsOptions:
default: 'bond_mode=active-backup'
description: The ovs_options string for the bond interface. Set things like
lacp=active and/or bond_mode=balance-slb using this option.
type: string
ExternalNetworkVlanID:
default: 10
description: Vlan ID for the external network traffic.
type: number
InternalApiNetworkVlanID:
default: 20
description: Vlan ID for the internal_api network traffic.
type: number
StorageNetworkVlanID:
default: 30
description: Vlan ID for the storage network traffic.
type: number
StorageMgmtNetworkVlanID:
default: 40
description: Vlan ID for the storage_mgmt network traffic.
type: number
TenantNetworkVlanID:
default: 50
description: Vlan ID for the tenant network traffic.
type: number
ManagementNetworkVlanID:
default: 60
description: Vlan ID for the management network traffic.
type: number
ExternalInterfaceDefaultRoute:
default: '10.0.0.1'
description: default route for the external network
type: string
ControlPlaneSubnetCidr:
default: ''
description: >
The subnet CIDR of the control plane network. (The parameter is
automatically resolved from the ctlplane subnet's cidr attribute.)
type: string
ControlPlaneDefaultRoute:
default: ''
description: The default route of the control plane network. (The parameter
is automatically resolved from the ctlplane subnet's gateway_ip attribute.)
type: string
DnsServers: # Override this via parameter_defaults
default: []
description: >
DNS servers to use for the Overcloud (2 max for some implementations).
If not set the nameservers configured in the ctlplane subnet's
dns_nameservers attribute will be used.
type: comma_delimited_list
EC2MetadataIp:
default: ''
description: The IP address of the EC2 metadata server. (The parameter
is automatically resolved from the ctlplane subnet's host_routes attribute.)
type: string
ControlPlaneStaticRoutes:
default: []
description: >
Routes for the ctlplane network traffic. JSON route e.g. [{'destination':'10.0.0.0/16', 'nexthop':'10.0.0.1'}] Unless
the default is changed, the parameter is automatically resolved from the subnet host_routes attribute.
type: json
ControlPlaneMtu:
default: 1500
description: >-
The maximum transmission unit (MTU) size(in bytes) that is guaranteed to pass through the data path of the segments
in the network. (The parameter is automatically resolved from the ctlplane network's mtu attribute.)
type: number
StorageMtu:
default: 1500
description: >-
The maximum transmission unit (MTU) size(in bytes) that is guaranteed to pass through the data path of the segments
in the Storage network.
type: number
InternalApiMtu:
default: 1500
description: >-
The maximum transmission unit (MTU) size(in bytes) that is guaranteed to pass through the data path of the segments
in the InternalApi network.
type: number
TenantMtu:
default: 1500
description: >-
The maximum transmission unit (MTU) size(in bytes) that is guaranteed to pass through the data path of the segments
in the Tenant network.
type: number
resources:
OsNetConfigImpl:
type: OS::Heat::SoftwareConfig
properties:
group: script
config:
str_replace:
template:
get_file: /usr/share/openstack-tripleo-heat-templates/network/scripts/run-os-net-config.sh
params:
$network_config:
network_config:
- type: interface
name: nic1
use_dhcp: false
defroute: false
- type: interface
name: nic2
use_dhcp: false
addresses:
- ip_netmask:
list_join:
- /
- - get_param: ControlPlaneIp
- get_param: ControlPlaneSubnetCidr
routes:
- ip_netmask: 169.254.169.254/32
next_hop:
get_param: EC2MetadataIp
- default: true
next_hop:
get_param: ControlPlaneDefaultRoute
- type: linux_bond
name: bond_api
bonding_options: mode=active-backup
use_dhcp: false
dns_servers:
get_param: DnsServers
members:
- type: interface
name: nic3
primary: true
- type: interface
name: nic4
  - type: vlan
    vlan_id:
      get_param: InternalApiNetworkVlanID
    device: bond_api
    addresses:
    - ip_netmask:
        get_param: InternalApiIpSubnet

  - type: vlan
    vlan_id:
      get_param: StorageNetworkVlanID
    device: bond_api
    addresses:
    - ip_netmask:
        get_param: StorageIpSubnet
  - type: ovs_user_bridge
    name: br-link0
    use_dhcp: false
    ovs_extra:
      - str_replace:
          template: set port br-link0 tag=_VLAN_TAG_
          params:
            _VLAN_TAG_:
               get_param: TenantNetworkVlanID
    addresses:
      - ip_netmask:
          get_param: TenantIpSubnet
    members:
      - type: ovs_dpdk_bond
        name: dpdkbond0
        mtu: 9000
        rx_queue: 2
        members:
          - type: ovs_dpdk_port
            name: dpdk0
            members:
              - type: interface
                name: nic7
          - type: ovs_dpdk_port
            name: dpdk1
            members:
              - type: interface
                name: nic8
- type: sriov_pf
name: nic9
mtu: 9000
numvfs: 10
use_dhcp: false
defroute: false
nm_controlled: true
hotplug: true
promisc: false
- type: sriov_pf
name: nic10
mtu: 9000
numvfs: 10
use_dhcp: false
defroute: false
nm_controlled: true
hotplug: true
promisc: false
outputs:
OS::stack_id:
description: The OsNetConfigImpl resource.
value:
get_resource: OsNetConfigImpl14.5. overcloud_deploy.sh
#!/bin/bash

THT_PATH='/home/stack/ospd-16-vxlan-dpdk-sriov-ctlplane-dataplane-bonding-hybrid'

openstack overcloud deploy \
--templates \
-e /usr/share/openstack-tripleo-heat-templates/environments/network-environment.yaml \
-e /usr/share/openstack-tripleo-heat-templates/environments/network-isolation.yaml \
-e /usr/share/openstack-tripleo-heat-templates/environments/services/neutron-ovs.yaml \
-e /usr/share/openstack-tripleo-heat-templates/environments/services/neutron-ovs-dpdk.yaml \
-e /usr/share/openstack-tripleo-heat-templates/environments/services/neutron-sriov.yaml \
-e /home/stack/containers-prepare-parameter.yaml \
-r $THT_PATH/roles_data.yaml \
-e $THT_PATH/network-environment-overrides.yaml \
-n $THT_PATH/network-data.yaml