
Chapter 7. Deploying storage at the edge
You can leverage Red Hat OpenStack Platform director to extend distributed compute node deployments to include distributed image management and persistent storage at the edge with the benefits of using Red Hat OpenStack Platform and Ceph Storage.
7.1. Deploying edge sites with storage
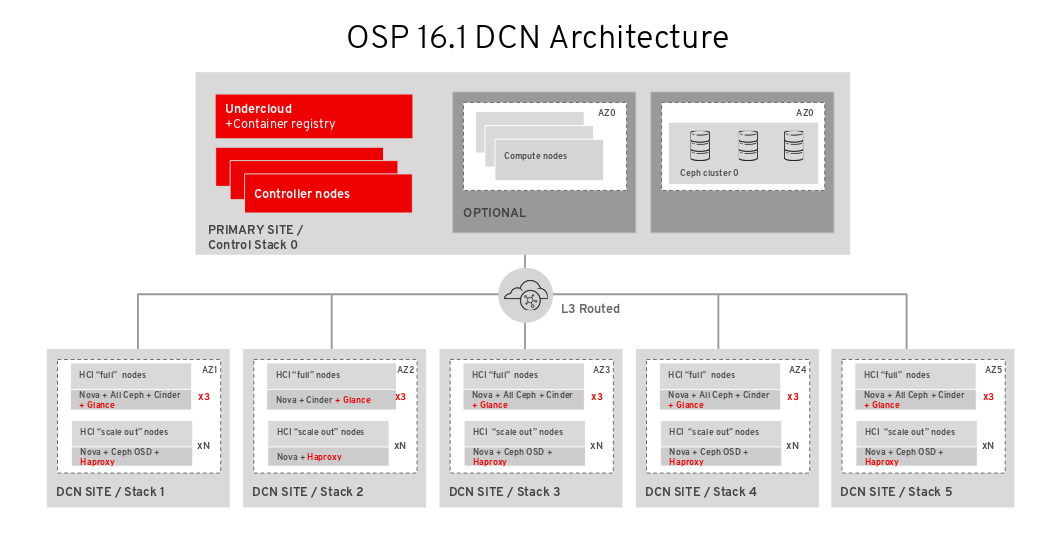
After you deploy the central site, build out the edge sites and ensure that each edge location connects primarily to its own storage backend, as well as to the storage back end at the central location.
A spine and leaf networking configuration should be included with this configuration, with the addition of the storage and storage_mgmt networks that ceph needs. For more information see Spine leaf networking.
You must have connectivity between the storage network at the central location and the storage network at each edge site so that you can move glance images between sites.
Ensure that the central location can communicate with the mons and osds at each of the edge sites. However, you should terminate the storage management network at site location boundaries, because the storage management network is used for OSD rebalancing.
Procedure
Export stack information from the
centralstack. You must deploy thecentralstack before running this command:openstack overcloud export \ --config-download-dir /var/lib/mistral/central/ \ --stack central \ --output-file ~/dcn-common/central-export.yamlNoteThe
config-download-dirvalue defaults to/var/lib/mistral/<stack>/.Create the
central_ceph_external.yamlfile. This environment file connects DCN sites to the central hub Ceph cluster, so the information is specific to the Ceph cluster deployed in the previous steps.sudo -E openstack overcloud export ceph \ --stack central \ --config-download-dir /var/lib/mistral \ --output-file ~/dcn-common/central_ceph_external.yaml
When Ceph is deployed without Red Hat OpenStack Platform director, you cannot run the
openstack overcloud export cephcommand. Manually create thecentral_ceph_external.yamlfile:parameter_defaults: CephExternalMultiConfig: - cluster: "central" fsid: "3161a3b4-e5ff-42a0-9f53-860403b29a33" external_cluster_mon_ips: "172.16.11.84, 172.16.11.87, 172.16.11.92" keys: - name: "client.openstack" caps: mgr: "allow *" mon: "profile rbd" osd: "profile rbd pool=vms, profile rbd pool=volumes, profile rbd pool=images" key: "AQD29WteAAAAABAAphgOjFD7nyjdYe8Lz0mQ5Q==" mode: "0600" dashboard_enabled: false ceph_conf_overrides: client: keyring: /etc/ceph/central.client.openstack.keyringThe
fsidparameter is the file system ID of your Ceph Storage cluster: This value is specified in the cluster configuration file in the[global]section:[global] fsid = 4b5c8c0a-ff60-454b-a1b4-9747aa737d19 ...
The
keyparameter is the ceph client key for the openstack account:[root@ceph ~]# ceph auth list ... [client.openstack] key = AQC+vYNXgDAgAhAAc8UoYt+OTz5uhV7ItLdwUw== caps mgr = "allow *" caps mon = "profile rbd" caps osd = "profile rbd pool=volumes, profile rbd pool=vms, profile rbd pool=images, profile rbd pool=backups, profile rbd pool=metrics" ...For more information on the parameters shown in the sample
central_ceph_external.yamlfile, see Creating a custom environment file.
Create the
~/dcn0/glance.yamlfile for Image service configuration overrides:parameter_defaults: GlanceEnabledImportMethods: web-download,copy-image GlanceBackend: rbd GlanceStoreDescription: 'dcn0 rbd glance store' GlanceBackendID: dcn0 GlanceMultistoreConfig: central: GlanceBackend: rbd GlanceStoreDescription: 'central rbd glance store' CephClientUserName: 'openstack' CephClusterName: centralConfigure the
ceph.yamlfile with configuration parameters relative to the available hardware.cat > /home/stack/dcn0/ceph.yaml << EOF parameter_defaults: CephClusterName: dcn0 CephAnsibleDisksConfig: osd_scenario: lvm osd_objectstore: bluestore devices: - /dev/sda - /dev/sdb CephPoolDefaultSize: 3 CephPoolDefaultPgNum: 128 EOFFor more information, see Mapping the Ceph Storage node disk layout.
Implement system tuning by using a file that contains the following parameters tuned to the requirements of you environment:
cat > /home/stack/dcn0/tuning.yaml << EOF parameter_defaults: CephAnsibleExtraConfig: is_hci: true CephConfigOverrides: osd_recovery_op_priority: 3 osd_recovery_max_active: 3 osd_max_backfills: 1 ## Set relative to your hardware: # DistributedComputeHCIParameters: # NovaReservedHostMemory: 181000 # DistributedComputeHCIExtraConfig: # nova::cpu_allocation_ratio: 8.2 EOF-
For more information about setting the values for the parameters
CephAnsibleExtraConfig, see Setting ceph-ansible group variables. -
For more information about setting the values for the parameters
CephConfigOverrides, see Customizing the Ceph Storage cluster.
-
For more information about setting the values for the parameters
Configure the naming conventions for your site in the
site-name.yamlenvironment file. The Nova availability zone and the Cinder storage availability zone must match. TheCinderVolumeClusterparameter is included when deploying an edge site with storage. This parameter is used when cinder-volume is deployed as active/active, which is required at edge sites. As a best practice, set the Cinder cluster name to match the availability zone:cat > /home/stack/central/site-name.yaml << EOF parameter_defaults: ... NovaComputeAvailabilityZone: dcn0 NovaCrossAZAttach: false CinderStorageAvailabilityZone: dcn0 CinderVolumeCluster: dcn0Generate the
roles.yamlfile to be used for the dcn0 deployment, for example:openstack overcloud roles generate DistributedComputeHCI DistributedComputeHCIScaleOut -o ~/dcn0/roles_data.yaml
Set the number systems in each role by creating the
~/dcn0/roles-counts.yamlfile with the desired values for each role.When using hyperconverged infrastructure (HCI), you must allocate three nodes to the DistributedComputeHCICount role to satisfy requirements for Ceph Mon and
GlanceApiEdgeservices.parameter_defaults: ControllerCount: 0 ComputeCount: 0 DistributedComputeHCICount: 3 DistributedComputeHCIScaleOutCount: 1 # Optional DistributedComputeScaleOutCount: 1 # Optional
Retrieve the container images for the edge site:
sudo openstack tripleo container image prepare \
--environment-directory dcn0 \
-r ~/dcn0/roles_data.yaml \
-e /usr/share/openstack-tripleo-heat-templates/environments/ceph-ansible/ceph-ansible.yaml \
...
-e /home/stack/dcn-common/central-export.yaml \
-e /home/stack/containers-prepare-parameter.yaml \
--output-env-file ~/dcn0/dcn0-images-env.yaml
NoteYou must include all environment files to be used for the deployment in the
openstack tripleo container image preparecommand.Deploy the edge site:
openstack overcloud deploy \ --stack dcn0 \ --templates /usr/share/openstack-tripleo-heat-templates/ \ -r ~/dcn0/roles_data.yaml \ -e /usr/share/openstack-tripleo-heat-templates/environments/ceph-ansible/ceph-ansible.yaml \ -e /usr/share/openstack-tripleo-heat-templates/environments/dcn-hci.yaml \ -e /usr/share/openstack-tripleo-heat-templates/environments/nova-az-config.yaml \ -e ~/dnc0/dcn0-images-env.yaml \ .... -e ~/dcn-common/central-export.yaml \ -e ~/dcn-common/central_ceph_external.yaml \ -e ~/dcn0/dcn_ceph_keys.yaml \ -e ~/dcn0/role-counts.yaml \ -e ~/dcn0/ceph.yaml \ -e ~/dcn0/site-name.yaml \ -e ~/dcn0/tuning.yaml \ -e ~/dcn0/glance.yamlNoteYou must include heat templates for the configuration of networking in your
openstack overcloud deploycommand. Designing for edge architecture requires spine and leaf networking. See Spine Leaf Networking for more details.
7.2. Creating additional distributed compute node sites
A new distributed compute node (DCN) site has its own directory of YAML files on the undercloud. For more information, see Section 4.7, “Managing separate heat stacks”. This procedure contains example commands.
Procedure
As the stack user on the undercloud, create a new directory for
dcn9:$ cd ~ $ mkdir dcn9
Copy the existing
dcn0templates to the new directory and replace thedcn0strings withdcn9:$ cp dcn0/ceph.yaml dcn9/ceph.yaml $ sed s/dcn0/dcn9/g -i dcn9/ceph.yaml $ cp dcn0/overrides.yaml dcn9/overrides.yaml $ sed s/dcn0/dcn9/g -i dcn9/overrides.yaml $ sed s/"0-ceph-%index%"/"9-ceph-%index%"/g -i dcn9/overrides.yaml $ cp dcn0/deploy.sh dcn9/deploy.sh $ sed s/dcn0/dcn9/g -i dcn9/deploy.sh
-
Review the files in the
dcn9directory to confirm that they suit your requirements. Edit undercloud.conf to add a new leaf. In the following example, leaf9 is added to undercloud.conf:
[leaf0]
cidr = 192.168.10.0/24
dhcp_start = 192.168.10.10
dhcp_end = 192.168.10.90
inspection_iprange = 192.168.10.100,192.168.10.190
gateway = 192.168.10.1
masquerade = False

…
[leaf9]
cidr = 192.168.19.0/24
dhcp_start = 192.168.19.10
dhcp_end = 192.168.19.90
inspection_iprange = 192.168.19.100,192.168.19.190
gateway = 192.168.10.1
masquerade = False
- Rerun the openstack undercloud install command to update the environment configuration.
In your overcloud templates, update the value of the
NetworkDeploymentActionsparameter from a value of["CREATE"], to a value of["CREATE", "UPDATE"]. If this parameter is not currently included in your templates, add it to one of your environment files, or create a new environment file.cat > /home/stack/central/network-environment.yaml << EOF parameter_defaults: NetworkDeploymentActions: ["CREATE", "UPDATE"] EOF
Run the deploy script for the central location. Include all templates that you used when you first deployed the central location, as well as the newly created or edited network-environment.yaml file:
openstack overcloud deploy \
    --stack central \
    --templates /usr/share/openstack-tripleo-heat-templates/ \
    -r ~/central/roles_data.yaml \
    -e /usr/share/openstack-tripleo-heat-templates/environments/ceph-ansible/ceph-ansible.yaml \
    -e /usr/share/openstack-tripleo-heat-templates/environments/dcn-hci.yaml \
    -e /usr/share/openstack-tripleo-heat-templates/environments/nova-az-config.yaml \
    -e ~/central/dcn9-images-env.yaml \
    ....
    -e ~/dcn-common/central-export.yaml \
    -e ~/dcn-common/central_ceph_external.yaml \
    -e ~/central/dcn_ceph_keys.yaml \
    -e ~/central/role-counts.yaml \
    -e ~/central/ceph.yaml \
    -e ~/central/site-name.yaml \
    -e ~/central/tuning.yaml \
    -e ~/central/glance.yaml
Verify that your nodes are available and in
Provisioning state:$ openstack baremetal node list
When your nodes are available, deploy the new edge site with all appropriate templates:
openstack overcloud deploy \ --stack dcn9 \ --templates /usr/share/openstack-tripleo-heat-templates/ \ -r ~/dcn9/roles_data.yaml \ -e /usr/share/openstack-tripleo-heat-templates/environments/ceph-ansible/ceph-ansible.yaml \ -e /usr/share/openstack-tripleo-heat-templates/environments/dcn-hci.yaml \ -e /usr/share/openstack-tripleo-heat-templates/environments/nova-az-config.yaml \ -e ~/dnc9/dcn9-images-env.yaml \ .... -e ~/dcn-common/central-export.yaml \ -e ~/dcn-common/central_ceph_external.yaml \ -e ~/dcn9/dcn_ceph_keys.yaml \ -e ~/dcn9/role-counts.yaml \ -e ~/dcn9/ceph.yaml \ -e ~/dcn9/site-name.yaml \ -e ~/dcn9/tuning.yaml \ -e ~/dcn9/glance.yaml- If you’ve deployed the locations with direct edge-to-edge communication, you must redeploy each edge site to update routes and establish communication with the new location.
7.3. Updating the central location
After you configure and deploy all of the edge sites using the sample procedure, update the configuration at the central location so that the central Image service can push images to the edge sites.
This procedure restarts the Image service (glance) and interrupts any long running Image service process. For example, if an image is being copied from the central Image service server to a DCN Image service server, that image copy is interrupted and you must restart it. For more information, see Clearing residual data after interrupted Image service processes.
Procedure
Create a
~/central/glance_update.yamlfile similar to the following. This example includes a configuration for two edge sites, dcn0 and dcn1:parameter_defaults: GlanceEnabledImportMethods: web-download,copy-image GlanceBackend: rbd GlanceStoreDescription: 'central rbd glance store' CephClusterName: central GlanceBackendID: central GlanceMultistoreConfig: dcn0: GlanceBackend: rbd GlanceStoreDescription: 'dcn0 rbd glance store' CephClientUserName: 'openstack' CephClusterName: dcn0 GlanceBackendID: dcn0 dcn1: GlanceBackend: rbd GlanceStoreDescription: 'dcn1 rbd glance store' CephClientUserName: 'openstack' CephClusterName: dcn1 GlanceBackendID: dcn1Create the
dcn_ceph.yamlfile. In the following example, this file configures the glance service at the central site as a client of the Ceph clusters of the edge sites,dcn0anddcn1.sudo -E openstack overcloud export ceph \ --stack dcn0,dcn1 \ --config-download-dir /var/lib/mistral \ --output-file ~/central/dcn_ceph.yaml
Redeploy the central site using the original templates and include the newly created
dcn_ceph.yamlandglance_update.yamlfiles.openstack overcloud deploy \ --stack central \ --templates /usr/share/openstack-tripleo-heat-templates/ \ -r ~/central/central_roles.yaml \ ... -e /usr/share/openstack-tripleo-heat-templates/environments/ceph-ansible/ceph-ansible.yaml \ -e /usr/share/openstack-tripleo-heat-templates/environments/nova-az-config.yaml \ -e ~/central/central-images-env.yaml \ -e ~/central/role-counts.yaml \ -e ~/central/site-name.yaml -e ~/central/ceph.yaml \ -e ~/central/ceph_keys.yaml \ -e ~/central/glance.yaml \ -e ~/central/dcn_ceph_external.yamlOn a controller at the central location, restart the
cinder-volumeservice. If you deployed the central location with thecinder-backupservice, then restart thecinder-backupservice too:ssh heat-admin@controller-0 sudo pcs resource restart openstack-cinder-volume ssh heat-admin@controller-0 sudo pcs resource restart openstack-cinder-backup
7.3.1. Clearing residual data after interrupted Image service processes
When you restart the central location, any long-running Image service (glance) processes are interrupted. Before you can restart these processes, you must first clean up residual data on the Controller node that you rebooted, and in the Ceph and Image service databases.
Procedure
Check and clear residual data in the Controller node that was rebooted. Compare the files in the
glance-api.conffile for staging store with the corresponding images in the Image service database, for example<image_ID>.raw.- If these corresponding images show importing status, you must recreate the image.
- If the images show active status, you must delete the data from staging and restart the copy import.
-
Check and clear residual data in Ceph stores. The images that you cleaned from the staging area must have matching records in their
storesproperty in the Ceph stores that contain the image. The image name in Ceph is the image id in the Image service database. Clear the Image service database. Clear any images that are in importing status from the import jobs there were interrupted:
$ glance image-delete <image_id>
7.4. Deploying Red Hat Ceph Storage Dashboard on DCN
Procedure
To deploy the Red Hat Ceph Storage Dashboard to the central location, see Adding the Red Hat Ceph Storage Dashboard to an overcloud deployment. These steps should be completed prior to deploying the central location.
To deploy Red Hat Ceph Storage Dashboard to edge locations, complete the same steps that you completed for central, however you must complete the following following:
Ensure that the
ManageNetworksparameter has a value offalsein your templates for deploying the edge site. When you setManageNetworkstofalse, Edge sites will use the existing networks that were already created in the central stack:parameter_defaults: ManageNetworks: false
- You must deploy your own solution for load balancing in order to create a high availability virtual IP. Edge sites do not deploy haproxy, nor pacemaker. When you deploy Red Hat Ceph Storage Dashboard to edge locations, the deployment is exposed on the storage network. The dashboard is installed on each of the three DistributedComputeHCI nodes with distinct IP addresses without a load balancing solution.
7.4.1. Creating a composable network for a Virtual IP
You can create an additional network to host virtual IP where the Ceph dashboard can be exposed. You must not be reusing network resources for multiple stacks. For more information on reusing network resources, see Reusing network resources in multiple stacks.
To create this additional network resource, use the provided network_data_dashboard.yaml heat template. The name of the created network is StorageDashboard.
Procedure
-
Log in to Red Hat OpenStack Platform Director as
stack. Generate the
DistributedComputeHCIDashboardrole and any other roles appropriate for your environment:openstack overcloud roles generate DistributedComputeHCIDashboard -o ~/dnc0/roles.yaml
Include the
roles.yamland thenetwork_data_dashboard.yamlin the overcloud deploy command:$ openstack overcloud deploy --templates \ -r ~/<dcn>/<dcn_site_roles>.yaml \ -n /usr/share/openstack-tripleo-heat-templates/network_data_dashboard.yaml \ -e <overcloud_environment_files> \ ... -e /usr/share/openstack-tripleo-heat-templates/environments/ceph-ansible/ceph-ansible.yaml \ -e /usr/share/openstack-tripleo-heat-templates/environments/ceph-ansible/ceph-dashboard.yaml
The deployment provides the three ip addresses where the dashboard is enabled on the storage network.
Verification
To confirm the dashboard is operational at the central location and that the data it displays from the Ceph cluster is correct, see Accessing Ceph Dashboard.
You can confirm that the dashboard is operating at an edge location through similar steps, however, there are exceptions as there is no load balancer at edge locations.
-
Retrieve dashboard admin login credentials specific to the selected stack from
/var/lib/mistral/<stackname>/ceph-ansible/group_vars/all.yml Within the inventory specific to the selected stack,
/var/lib/mistral/<stackname>/ceph-ansible/inventory.yml, locate the DistributedComputeHCI role hosts list and save all three of thestorage_ipvalues. In the example below the first two dashboard IPs are 172.16.11.84 and 172.16.11.87:DistributedComputeHCI: hosts: dcn1-distributed-compute-hci-0: ansible_host: 192.168.24.16 ... storage_hostname: dcn1-distributed-compute-hci-0.storage.localdomain storage_ip: 172.16.11.84 ... dcn1-distributed-compute-hci-1: ansible_host: 192.168.24.22 ... storage_hostname: dcn1-distributed-compute-hci-1.storage.localdomain storage_ip: 172.16.11.87- You can check that the Ceph Dashboard is active at one of these IP addresses if they are accessible to you. These IP addresses are on the storage network and are not routed. If these IP addresses are not available, you must configure a load balancer for the three IP addresses that you get from the inventory to obtain a virtual IP address for verification.