
Deploying an overcloud with containerized Red Hat Ceph
Configuring the director to deploy and use a containerized Red Hat Ceph cluster
Abstract
Making open source more inclusive
Red Hat is committed to replacing problematic language in our code, documentation, and web properties. We are beginning with these four terms: master, slave, blacklist, and whitelist. Because of the enormity of this endeavor, these changes will be implemented gradually over several upcoming releases. For more details, see our CTO Chris Wright’s message.
Providing feedback on Red Hat documentation
We appreciate your input on our documentation. Tell us how we can make it better.
Using the Direct Documentation Feedback (DDF) function
Use the Add Feedback DDF function for direct comments on specific sentences, paragraphs, or code blocks.
- View the documentation in the Multi-page HTML format.
- Ensure that you see the Feedback button in the upper right corner of the document.
- Highlight the part of text that you want to comment on.
- Click Add Feedback.
- Complete the Add Feedback field with your comments.
- Optional: Add your email address so that the documentation team can contact you for clarification on your issue.
- Click Submit.
Chapter 1. Introduction
Red Hat OpenStack Platform director creates a cloud environment called the overcloud. You can use director to configure extra features for an overcloud, including integration with Red Hat Ceph Storage (both Ceph Storage clusters created with the director or existing Ceph Storage clusters).
This guide includes instructions about how to integrate an existing Ceph Storage cluster with an overcloud. This means that director configures the overcloud to use the Ceph Storage cluster for storage needs. You manage and scale the cluster itself outside of the overcloud configuration.
This guide contains instructions for deploying a containerized Red Hat Ceph Storage cluster with your overcloud. Director uses Ansible playbooks provided through the ceph-ansible package to deploy a containerized Ceph cluster. The director also manages the configuration and scaling operations of the cluster.
For more information about containerized services in Red Hat OpenStack Platform (RHOSP), see Configuring a basic overcloud with the CLI tools in the Director Installation and Usage guide.
1.1. Introduction to Ceph Storage
Red Hat Ceph Storage is a distributed data object store designed to provide excellent performance, reliability, and scalability. Distributed object stores are the future of storage, because they accommodate unstructured data, and because clients can use modern object interfaces and legacy interfaces simultaneously. At the core of every Ceph deployment is the Ceph Storage cluster, which consists of several types of daemons, but primarily, these two:
- Ceph OSD (Object Storage Daemon)
- Ceph OSDs store data on behalf of Ceph clients. Additionally, Ceph OSDs utilize the CPU and memory of Ceph nodes to perform data replication, rebalancing, recovery, monitoring and reporting functions.
- Ceph Monitor
- A Ceph monitor maintains a master copy of the Ceph storage cluster map with the current state of the storage cluster.
For more information about Red Hat Ceph Storage, see the Red Hat Ceph Storage Architecture Guide.
1.2. Requirements
This guide contains information supplementary to the Director Installation and Usage guide.
Before you deploy a containerized Ceph Storage cluster with your overcloud, your environment must contain the following configuration:
- An undercloud host with the Red Hat OpenStack Platform (RHOSP) director installed. See Installing director on the undercloud.
- Any additional hardware recommended for Red Hat Ceph Storage. For more information about recommended hardware, see the Red Hat Ceph Storage Hardware Guide.
The Ceph Monitor service installs on the overcloud Controller nodes, so you must provide adequate resources to avoid performance issues. Ensure that the Controller nodes in your environment use at least 16 GB of RAM for memory and solid-state drive (SSD) storage for the Ceph monitor data. For a medium to large Ceph installation, provide at least 500 GB of Ceph monitor data. This space is necessary to avoid levelDB growth if the cluster becomes unstable. The following examples are common sizes for Ceph storage clusters:
- Small: 250 terabytes
- Medium: 1 petabyte
- Large: 2 petabytes or more.
If you use the Red Hat OpenStack Platform director to create Ceph Storage nodes, note the following requirements.
1.2.1. Ceph Storage node requirements
Ceph Storage nodes are responsible for providing object storage in a Red Hat OpenStack Platform environment.
For information about how to select a processor, memory, network interface cards (NICs), and disk layout for Ceph Storage nodes, see Hardware selection recommendations for Red Hat Ceph Storage in the Red Hat Ceph Storage Hardware Guide. Each Ceph Storage node also requires a supported power management interface, such as Intelligent Platform Management Interface (IPMI) functionality on the motherboard of the server.
Red Hat OpenStack Platform (RHOSP) director uses ceph-ansible, which does not support installing the OSD on the root disk of Ceph Storage nodes. This means that you need at least two disks for a supported Ceph Storage node.
Ceph Storage nodes and RHEL compatibility
- RHOSP 16.1 is supported on RHEL 8.2. However, hosts that are mapped to the Ceph Storage role update to the latest major RHEL release. Before upgrading to RHOSP 16.1 and later, review the Red Hat Knowledgebase article Red Hat Ceph Storage: Supported configurations.
Placement Groups (PGs)
- Ceph Storage uses placement groups (PGs) to facilitate dynamic and efficient object tracking at scale. In the case of OSD failure or cluster rebalancing, Ceph can move or replicate a placement group and its contents, which means a Ceph Storage cluster can rebalance and recover efficiently.
- The default placement group count that director creates is not always optimal, so it is important to calculate the correct placement group count according to your requirements. You can use the placement group calculator to calculate the correct count. To use the PG calculator, enter the predicted storage usage per service as a percentage, as well as other properties about your Ceph cluster, such as the number OSDs. The calculator returns the optimal number of PGs per pool. For more information, see Placement Groups (PGs) per Pool Calculator.
- Auto-scaling is an alternative way to manage placement groups. With the auto-scale feature, you set the expected Ceph Storage requirements per service as a percentage instead of a specific number of placement groups. Ceph automatically scales placement groups based on how the cluster is used. For more information, see Auto-scaling placement groups in the Red Hat Ceph Storage Strategies Guide.
Processor
- 64-bit x86 processor with support for the Intel 64 or AMD64 CPU extensions.
Network Interface Cards
- A minimum of one 1 Gbps Network Interface Cards (NICs), although Red Hat recommends that you use at least two NICs in a production environment. Use additional NICs for bonded interfaces or to delegate tagged VLAN traffic. Use a 10 Gbps interface for storage nodes, especially if you want to create a Red Hat OpenStack Platform (RHOSP) environment that serves a high volume of traffic.
Power management
- Each Controller node requires a supported power management interface, such as Intelligent Platform Management Interface (IPMI) functionality on the motherboard of the server.
1.3. Additional resources
The /usr/share/openstack-tripleo-heat-templates/environments/ceph-ansible/ceph-ansible.yaml environment file instructs the director to use playbooks derived from the ceph-ansible project. These playbooks are installed in /usr/share/ceph-ansible/ of the undercloud. In particular, the following file contains all the default settings that the playbooks apply:
-
/usr/share/ceph-ansible/group_vars/all.yml.sample
Although ceph-ansible uses playbooks to deploy containerized Ceph Storage, do not edit these files to customize your deployment. Instead, use heat environment files to override the defaults set by these playbooks. If you edit the ceph-ansible playbooks directly, your deployment fails.
For information about the default settings applied by director for containerized Ceph Storage, see the heat templates in /usr/share/openstack-tripleo-heat-templates/deployment/ceph-ansible.
Reading these templates requires a deeper understanding of how environment files and heat templates work in director. See Understanding Heat Templates and Environment Files for reference.
For more information about containerized services in RHOSP, see Configuring a basic overcloud with the CLI tools in the Director Installation and Usage guide.
Chapter 2. Preparing Ceph Storage nodes for overcloud deployment
All nodes in this scenario are bare metal systems using IPMI for power management. These nodes do not require an operating system because the director copies a Red Hat Enterprise Linux 8 image to each node. Additionally, the Ceph Storage services on these nodes are containerized. The director communicates to each node through the Provisioning network during the introspection and provisioning processes. All nodes connect to this network through the native VLAN.
2.1. Cleaning Ceph Storage node disks
The Ceph Storage OSDs and journal partitions require GPT disk labels. This means the additional disks on Ceph Storage require conversion to GPT before installing the Ceph OSD services. You must delete all metadata from the disks to allow the director to set GPT labels on them.
You can configure the director to delete all disk metadata by default by adding the following setting to your /home/stack/undercloud.conf file:
clean_nodes=true
With this option, the Bare Metal Provisioning service runs an additional step to boot the nodes and clean the disks each time the node is set to available. This process adds an additional power cycle after the first introspection and before each deployment. The Bare Metal Provisioning service uses the wipefs --force --all command to perform the clean.
After setting this option, run the openstack undercloud install command to execute this configuration change.
The wipefs --force --all command deletes all data and metadata on the disk, but does not perform a secure erase. A secure erase takes much longer.
2.2. Registering nodes
Import a node inventory file (instackenv.json) in JSON format to the director so that the director can communicate with the nodes. This inventory file contains hardware and power management details that the director can use to register nodes:
{
    "nodes":[
        {
            "mac":[
                "b1:b1:b1:b1:b1:b1"
            ],
            "cpu":"4",
            "memory":"6144",
            "disk":"40",
            "arch":"x86_64",
            "pm_type":"ipmi",
            "pm_user":"admin",
            "pm_password":"p@55w0rd!",
            "pm_addr":"192.0.2.205"
        },
        {
            "mac":[
                "b2:b2:b2:b2:b2:b2"
            ],
            "cpu":"4",
            "memory":"6144",
            "disk":"40",
            "arch":"x86_64",
            "pm_type":"ipmi",
            "pm_user":"admin",
            "pm_password":"p@55w0rd!",
            "pm_addr":"192.0.2.206"
        },
        {
            "mac":[
                "b3:b3:b3:b3:b3:b3"
            ],
            "cpu":"4",
            "memory":"6144",
            "disk":"40",
            "arch":"x86_64",
            "pm_type":"ipmi",
            "pm_user":"admin",
            "pm_password":"p@55w0rd!",
            "pm_addr":"192.0.2.207"
        },
        {
            "mac":[
                "c1:c1:c1:c1:c1:c1"
            ],
            "cpu":"4",
            "memory":"6144",
            "disk":"40",
            "arch":"x86_64",
            "pm_type":"ipmi",
            "pm_user":"admin",
            "pm_password":"p@55w0rd!",
            "pm_addr":"192.0.2.208"
        },
        {
            "mac":[
                "c2:c2:c2:c2:c2:c2"
            ],
            "cpu":"4",
            "memory":"6144",
            "disk":"40",
            "arch":"x86_64",
            "pm_type":"ipmi",
            "pm_user":"admin",
            "pm_password":"p@55w0rd!",
            "pm_addr":"192.0.2.209"
        },
        {
            "mac":[
                "c3:c3:c3:c3:c3:c3"
            ],
            "cpu":"4",
            "memory":"6144",
            "disk":"40",
            "arch":"x86_64",
            "pm_type":"ipmi",
            "pm_user":"admin",
            "pm_password":"p@55w0rd!",
            "pm_addr":"192.0.2.210"
        },
        {
            "mac":[
                "d1:d1:d1:d1:d1:d1"
            ],
            "cpu":"4",
            "memory":"6144",
            "disk":"40",
            "arch":"x86_64",
            "pm_type":"ipmi",
            "pm_user":"admin",
            "pm_password":"p@55w0rd!",
            "pm_addr":"192.0.2.211"
        },
        {
            "mac":[
                "d2:d2:d2:d2:d2:d2"
            ],
            "cpu":"4",
            "memory":"6144",
            "disk":"40",
            "arch":"x86_64",
            "pm_type":"ipmi",
            "pm_user":"admin",
            "pm_password":"p@55w0rd!",
            "pm_addr":"192.0.2.212"
        },
        {
            "mac":[
                "d3:d3:d3:d3:d3:d3"
            ],
            "cpu":"4",
            "memory":"6144",
            "disk":"40",
            "arch":"x86_64",
            "pm_type":"ipmi",
            "pm_user":"admin",
            "pm_password":"p@55w0rd!",
            "pm_addr":"192.0.2.213"
        }
    ]
}
Procedure
-
After you create the inventory file, save the file to the home directory of the stack user (
/home/stack/instackenv.json). Initialize the stack user, then import the
instackenv.jsoninventory file into director:$ source ~/stackrc $ openstack overcloud node import ~/instackenv.json
The
openstack overcloud node importcommand imports the inventory file and registers each node with the director.Assign the kernel and ramdisk images to each node:
$ openstack overcloud node configure <node>
- Result
- The nodes are registered and configured in director.
2.3. Pre-deployment validations for Ceph Storage
To help avoid overcloud deployment failures, verify that the required packages exist on your servers.
2.3.1. Verifying the ceph-ansible package version
The undercloud contains Ansible-based validations that you can run to identify potential problems before you deploy the overcloud. These validations can help you avoid overcloud deployment failures by identifying common problems before they happen.
Procedure
Verify that the correction version of the ceph-ansible package is installed:
$ ansible-playbook -i /usr/bin/tripleo-ansible-inventory /usr/share/ansible/validation-playbooks/ceph-ansible-installed.yaml
2.3.2. Verifying packages for pre-provisioned nodes
Ceph can service only overcloud nodes that have a certain set of packages. When you use pre-provisioned nodes, you can verify the presence of these packages.
For more information about pre-provisioned nodes, see Configuring a basic overcloud with pre-provisioned nodes.
Procedure
Verify that the servers contained the required packages:
ansible-playbook -i /usr/bin/tripleo-ansible-inventory /usr/share/ansible/validation-playbooks/ceph-dependencies-installed.yaml
2.4. Manually tagging nodes into profiles
After you register each node, you must inspect the hardware and tag the node into a specific profile. Use profile tags to match your nodes to flavors, and then assign flavors to deployment roles.
Procedure
Trigger hardware introspection to retrieve the hardware attributes of each node:
$ openstack overcloud node introspect --all-manageable --provide
-
The
--all-manageableoption introspects only the nodes that are in a managed state. In this example, all nodes are in a managed state. The
--provideoption resets all nodes to anactivestate after introspection.ImportantEnsure that this process completes successfully. This process usually takes 15 minutes for bare metal nodes.
-
The
Retrieve a list of your nodes to identify their UUIDs:
$ openstack baremetal node list
Add a profile option to the
properties/capabilitiesparameter for each node to manually tag a node to a specific profile. The addition of theprofileoption tags the nodes into each respective profile.NoteAs an alternative to manual tagging, use the Automated Health Check (AHC) Tools to automatically tag larger numbers of nodes based on benchmarking data.
For example, a typical deployment contains three profiles:
control,compute, andceph-storage. Run the following commands to tag three nodes for each profile:$ openstack baremetal node set --property capabilities='profile:control,boot_option:local' 1a4e30da-b6dc-499d-ba87-0bd8a3819bc0 $ openstack baremetal node set --property capabilities='profile:control,boot_option:local' 6faba1a9-e2d8-4b7c-95a2-c7fbdc12129a $ openstack baremetal node set --property capabilities='profile:control,boot_option:local' 6faba1a9-e2d8-4b7c-95a2-c7fbdc12129a $ openstack baremetal node set --property capabilities='profile:compute,boot_option:local' 484587b2-b3b3-40d5-925b-a26a2fa3036f $ openstack baremetal node set --property capabilities='profile:compute,boot_option:local' d010460b-38f2-4800-9cc4-d69f0d067efe $ openstack baremetal node set --property capabilities='profile:compute,boot_option:local' d930e613-3e14-44b9-8240-4f3559801ea6 $ openstack baremetal node set --property capabilities='profile:ceph-storage,boot_option:local' 484587b2-b3b3-40d5-925b-a26a2fa3036f $ openstack baremetal node set --property capabilities='profile:ceph-storage,boot_option:local' d010460b-38f2-4800-9cc4-d69f0d067efe $ openstack baremetal node set --property capabilities='profile:ceph-storage,boot_option:local' d930e613-3e14-44b9-8240-4f3559801ea6
You can also configure a new custom profile that you can use to tag a node for the Ceph MON and Ceph MDS services. See Chapter 3, Deploying Ceph services on dedicated nodes for details.
2.5. Defining the root disk for multi-disk clusters
Director must identify the root disk during provisioning in the case of nodes with multiple disks. For example, most Ceph Storage nodes use multiple disks. By default, director writes the overcloud image to the root disk during the provisioning process.
There are several properties that you can define to help director identify the root disk:
-
model(String): Device identifier. -
vendor(String): Device vendor. -
serial(String): Disk serial number. -
hctl(String): Host:Channel:Target:Lun for SCSI. -
size(Integer): Size of the device in GB. -
wwn(String): Unique storage identifier. -
wwn_with_extension(String): Unique storage identifier with the vendor extension appended. -
wwn_vendor_extension(String): Unique vendor storage identifier. -
rotational(Boolean): True for a rotational device (HDD), otherwise false (SSD). -
name(String): The name of the device, for example: /dev/sdb1.
Use the name property only for devices with persistent names. Do not use name to set the root disk for any other devices because this value can change when the node boots.
You can specify the root device using its serial number.
Procedure
Check the disk information from the hardware introspection of each node. Run the following command to display the disk information of a node:
(undercloud)$ openstack baremetal introspection data save 1a4e30da-b6dc-499d-ba87-0bd8a3819bc0 | jq ".inventory.disks"
For example, the data for one node might show three disks:
[
  {
    "size": 299439751168,
    "rotational": true,
    "vendor": "DELL",
    "name": "/dev/sda",
    "wwn_vendor_extension": "0x1ea4dcc412a9632b",
    "wwn_with_extension": "0x61866da04f3807001ea4dcc412a9632b",
    "model": "PERC H330 Mini",
    "wwn": "0x61866da04f380700",
    "serial": "61866da04f3807001ea4dcc412a9632b"
  }
  {
    "size": 299439751168,
    "rotational": true,
    "vendor": "DELL",
    "name": "/dev/sdb",
    "wwn_vendor_extension": "0x1ea4e13c12e36ad6",
    "wwn_with_extension": "0x61866da04f380d001ea4e13c12e36ad6",
    "model": "PERC H330 Mini",
    "wwn": "0x61866da04f380d00",
    "serial": "61866da04f380d001ea4e13c12e36ad6"
  }
  {
    "size": 299439751168,
    "rotational": true,
    "vendor": "DELL",
    "name": "/dev/sdc",
    "wwn_vendor_extension": "0x1ea4e31e121cfb45",
    "wwn_with_extension": "0x61866da04f37fc001ea4e31e121cfb45",
    "model": "PERC H330 Mini",
    "wwn": "0x61866da04f37fc00",
    "serial": "61866da04f37fc001ea4e31e121cfb45"
  }
]
Enter
openstack baremetal node set --property root_device=to set the root disk for a node. Include the most appropriate hardware attribute value to define the root disk.(undercloud)$ openstack baremetal node set --property root_device='{"serial":"<serial_number>"}' <node-uuid>For example, to set the root device to disk 2, which has the serial number
61866da04f380d001ea4e13c12e36ad6, enter the following command:(undercloud)$ openstack baremetal node set --property root_device='{"serial": "61866da04f380d001ea4e13c12e36ad6"}' 1a4e30da-b6dc-499d-ba87-0bd8a3819bc0NoteEnsure that you configure the BIOS of each node to include booting from the root disk that you choose. Configure the boot order to boot from the network first, then to boot from the root disk.
Director identifies the specific disk to use as the root disk. When you run the
openstack overcloud deploycommand, director provisions and writes the overcloud image to the root disk.
2.6. Using the overcloud-minimal image to avoid using a Red Hat subscription entitlement
By default, director writes the QCOW2 overcloud-full image to the root disk during the provisioning process. The overcloud-full image uses a valid Red Hat subscription. However, you can also use the overcloud-minimal image, for example, to provision a bare OS where you do not want to run any other OpenStack services and consume your subscription entitlements.
A common use case for this occurs when you want to provision nodes with only Ceph daemons. For this and similar use cases, you can use the overcloud-minimal image option to avoid reaching the limit of your paid Red Hat subscriptions. For information about how to obtain the overcloud-minimal image, see Obtaining images for overcloud nodes.
A Red Hat OpenStack Platform (RHOSP) subscription contains Open vSwitch (OVS), but core services, such as OVS, are not available when you use the overcloud-minimal image. OVS is not required to deploy Ceph Storage nodes. Use linux_bond instead of ovs_bond to define bonds. For more information about linux_bond, see Linux bonding options.
Procedure
To configure director to use the
overcloud-minimalimage, create an environment file that contains the following image definition:parameter_defaults: <roleName>Image: overcloud-minimal
Replace
<roleName>with the name of the role and appendImageto the name of the role. The following example shows anovercloud-minimalimage for Ceph storage nodes:parameter_defaults: CephStorageImage: overcloud-minimal
In the
roles_data.yamlrole definition file, set therhsm_enforceparameter toFalse.rhsm_enforce: False
-
Pass the environment file to the
openstack overcloud deploycommand.
The overcloud-minimal image supports only standard Linux bridges and not OVS because OVS is an OpenStack service that requires a Red Hat OpenStack Platform subscription entitlement.
Chapter 3. Deploying Ceph services on dedicated nodes
By default, the director deploys the Ceph MON and Ceph MDS services on the Controller nodes. This is suitable for small deployments. However, with larger deployments Red Hat recommends that you deploy the Ceph MON and Ceph MDS services on dedicated nodes to improve the performance of your Ceph cluster. Create a custom role for services that you want to isolate on dedicated nodes.
For more information about custom roles, see Creating a New Role in the Advanced Overcloud Customization guide.
The director uses the following file as a default reference for all overcloud roles:
-
/usr/share/openstack-tripleo-heat-templates/roles_data.yaml
3.1. Creating a custom roles file
To create a custom role file, complete the following steps:
Procedure
Make a copy of the
roles_data.yamlfile in/home/stack/templates/so that you can add custom roles:$ cp /usr/share/openstack-tripleo-heat-templates/roles_data.yaml /home/stack/templates/roles_data_custom.yaml
-
Include the new custom role file in the
openstack overcloud deploycommand.
3.2. Creating a custom role and flavor for the Ceph MON service
Complete the following steps to create a custom role CephMon and flavor ceph-mon for the Ceph MON role. You must already have a copy of the default roles data file as described in Chapter 3, Deploying Ceph services on dedicated nodes.
Procedure
-
Open the
/home/stack/templates/roles_data_custom.yamlfile. -
Remove the service entry for the Ceph MON service,
OS::TripleO::Services::CephMon, from the Controller role. Add the
OS::TripleO::Services::CephClientservice to the Controller role:[...] - name: Controller # the 'primary' role goes first CountDefault: 1 ServicesDefault: - OS::TripleO::Services::CACerts - OS::TripleO::Services::CephMds - OS::TripleO::Services::CephClient - OS::TripleO::Services::CephExternal - OS::TripleO::Services::CephRbdMirror - OS::TripleO::Services::CephRgw - OS::TripleO::Services::CinderApi [...]At the end of the
roles_data_custom.yamlfile, add a customCephMonrole that contains the Ceph MON service and all the other required node services:- name: CephMon ServicesDefault: # Common Services - OS::TripleO::Services::AuditD - OS::TripleO::Services::CACerts - OS::TripleO::Services::CertmongerUser - OS::TripleO::Services::Collectd - OS::TripleO::Services::Docker - OS::TripleO::Services::FluentdClient - OS::TripleO::Services::Kernel - OS::TripleO::Services::Ntp - OS::TripleO::Services::ContainersLogrotateCrond - OS::TripleO::Services::SensuClient - OS::TripleO::Services::Snmp - OS::TripleO::Services::Timezone - OS::TripleO::Services::TripleoFirewall - OS::TripleO::Services::TripleoPackages - OS::TripleO::Services::Tuned # Role-Specific Services - OS::TripleO::Services::CephMon
Enter the
openstack flavor createcommand to define a new flavor namedceph-monfor theCephMonrole:$ openstack flavor create --id auto --ram 6144 --disk 40 --vcpus 4 ceph-mon
NoteFor more information about this command, enter:
openstack flavor create --help.Map this flavor to a new profile, also named
ceph-mon:$ openstack flavor set --property "cpu_arch"="x86_64" --property "capabilities:boot_option"="local" --property "capabilities:profile"="ceph-mon" ceph-mon
NoteFor more information about this command, enter
openstack flavor set --help.Tag nodes into the new
ceph-monprofile:$ openstack baremetal node set --property capabilities='profile:ceph-mon,boot_option:local' UUID
Add the following configuration to the
node-info.yamlfile to associate theceph-monflavor with the CephMon role:parameter_defaults: OvercloudCephMonFlavor: CephMon CephMonCount: 3
For more information about tagging nodes, see Section 2.4, “Manually tagging nodes into profiles”. For more information about custom role profiles, see Tagging Nodes Into Profiles.
3.3. Creating a custom role and flavor for the Ceph MDS service
Complete the following steps to create a custom role CephMDS and flavor ceph-mds for the Ceph MDS role. You must already have a copy of the default roles data file as described in Chapter 3, Deploying Ceph services on dedicated nodes.
Procedure
-
Open the
/home/stack/templates/roles_data_custom.yamlfile. Remove the service entry for the Ceph MDS service,
OS::TripleO::Services::CephMds, from the Controller role:[...] - name: Controller # the 'primary' role goes first CountDefault: 1 ServicesDefault: - OS::TripleO::Services::CACerts # - OS::TripleO::Services::CephMds 1 - OS::TripleO::Services::CephMon - OS::TripleO::Services::CephExternal - OS::TripleO::Services::CephRbdMirror - OS::TripleO::Services::CephRgw - OS::TripleO::Services::CinderApi [...]- 1
- Comment out this line. In the next step, you add this service to the new custom role.
At the end of the
roles_data_custom.yamlfile, add a customCephMDSrole that contains the Ceph MDS service and all the other required node services:- name: CephMDS ServicesDefault: # Common Services - OS::TripleO::Services::AuditD - OS::TripleO::Services::CACerts - OS::TripleO::Services::CertmongerUser - OS::TripleO::Services::Collectd - OS::TripleO::Services::Docker - OS::TripleO::Services::FluentdClient - OS::TripleO::Services::Kernel - OS::TripleO::Services::Ntp - OS::TripleO::Services::ContainersLogrotateCrond - OS::TripleO::Services::SensuClient - OS::TripleO::Services::Snmp - OS::TripleO::Services::Timezone - OS::TripleO::Services::TripleoFirewall - OS::TripleO::Services::TripleoPackages - OS::TripleO::Services::Tuned # Role-Specific Services - OS::TripleO::Services::CephMds - OS::TripleO::Services::CephClient 1
- 1
- The Ceph MDS service requires the admin keyring, which you can set with either the Ceph MON or Ceph Client service. If you deploy Ceph MDS on a dedicated node without the Ceph MON service, you must also include the Ceph Client service in the new
CephMDSrole.
Enter the
openstack flavor createcommand to define a new flavor namedceph-mdsfor this role:$ openstack flavor create --id auto --ram 6144 --disk 40 --vcpus 4 ceph-mds
NoteFor more information about this command, enter
openstack flavor create --help.Map the new
ceph-mdsflavor to a new profile, also namedceph-mds:$ openstack flavor set --property "cpu_arch"="x86_64" --property "capabilities:boot_option"="local" --property "capabilities:profile"="ceph-mds" ceph-mds
NoteFor more information about this command, enter
openstack flavor set --help.Tag nodes into the new
ceph-mdsprofile:$ openstack baremetal node set --property capabilities='profile:ceph-mds,boot_option:local' UUID
For more information about tagging nodes, see Section 2.4, “Manually tagging nodes into profiles”. For more information about custom role profiles, see Tagging Nodes Into Profiles.
Chapter 4. Customizing the Storage service
The heat template collection provided by the director already contains the necessary templates and environment files to enable a basic Ceph Storage configuration.
Director uses the /usr/share/openstack-tripleo-heat-templates/environments/ceph-ansible/ceph-ansible.yaml environment file to create a Ceph cluster and integrate it with your overcloud during deployment. This cluster features containerized Ceph Storage nodes. For more information about containerized services in OpenStack, see Configuring a basic overcloud with the CLI tools in the Director Installation and Usage guide.
The Red Hat OpenStack director also applies basic, default settings to the deployed Ceph cluster. You must also define any additional configuration in a custom environment file:
Procedure
-
Create the file
storage-config.yamlin/home/stack/templates/. In this example, the~/templates/storage-config.yamlfile contains most of the overcloud-related custom settings for your environment. Parameters that you include in the custom environment file override the corresponding default settings from the/usr/share/openstack-tripleo-heat-templates/environments/ceph-ansible/ceph-ansible.yamlfile. Add a
parameter_defaultssection to~/templates/storage-config.yaml. This section contains custom settings for your overcloud. For example, to setvxlanas the network type of the networking service (neutron), add the following snippet to your custom environment file:parameter_defaults: NeutronNetworkType: vxlan
If necessary, set the following options under
parameter_defaultsaccording to your requirements:Option Description Default value CinderEnableIscsiBackend
Enables the iSCSI backend
false
CinderEnableRbdBackend
Enables the Ceph Storage back end
true
CinderBackupBackend
Sets ceph or swift as the back end for volume backups. For more information, see Section 4.4, “Configuring the Backup Service to use Ceph”.
ceph
NovaEnableRbdBackend
Enables Ceph Storage for Nova ephemeral storage
true
GlanceBackend
Defines which back end the Image service should use:
rbd(Ceph),swift, orfilerbd
GnocchiBackend
Defines which back end the Telemetry service should use:
rbd(Ceph),swift, orfilerbd
NoteYou can omit an option from
~/templates/storage-config.yamlif you intend to use the default setting.
The contents of your custom environment file change depending on the settings that you apply in the following sections. See Appendix A, Sample environment file: creating a Ceph Storage cluster for a completed example.
The following subsections contain information about overriding the common default storage service settings that the director applies.
4.1. Enabling the Ceph Metadata Server
The Ceph Metadata Server (MDS) runs the ceph-mds daemon, which manages metadata related to files stored on CephFS. CephFS can be consumed through NFS. For more information about using CephFS through NFS, see File System Guide and CephFS via NFS Back End Guide for the Shared File Systems service.
Red Hat supports deploying Ceph MDS only with the CephFS through NFS back end for the Shared File Systems service.
Procedure
To enable the Ceph Metadata Server, invoke the following environment file when you create your overcloud:
-
/usr/share/openstack-tripleo-heat-templates/environments/ceph-ansible/ceph-mds.yaml
For more information, see Section 7.2, “Initiating overcloud deployment”. For more information about the Ceph Metadata Server, see Configuring Metadata Server Daemons.
By default, the Ceph Metadata Server will be deployed on the Controller node. You can deploy the Ceph Metadata Server on its own dedicated node. For more information, see Section 3.3, “Creating a custom role and flavor for the Ceph MDS service”.
4.2. Enabling the Ceph Object Gateway
The Ceph Object Gateway (RGW) provides applications with an interface to object storage capabilities within a Ceph Storage cluster. When you deploy RGW, you can replace the default Object Storage service (swift) with Ceph. For more information, see Object Gateway Configuration and Administration Guide.
Procedure
To enable RGW in your deployment, invoke the following environment file when you create the overcloud:
-
/usr/share/openstack-tripleo-heat-templates/environments/ceph-ansible/ceph-rgw.yaml
For more information, see Section 7.2, “Initiating overcloud deployment”.
By default, Ceph Storage allows 250 placement groups per OSD. When you enable RGW, Ceph Storage creates six additional pools that are required by RGW. The new pools are:
- .rgw.root
- default.rgw.control
- default.rgw.meta
- default.rgw.log
- default.rgw.buckets.index
- default.rgw.buckets.data
In your deployment, default is replaced with the name of the zone to which the pools belong.
Therefore, when you enable RGW, set the default pg_num by using the CephPoolDefaultPgNum parameter to account for the new pools. For more information about how to calculate the number of placement groups for Ceph pools, see Section 5.4, “Assigning custom attributes to different Ceph pools”.
The Ceph Object Gateway is a direct replacement for the default Object Storage service. As such, all other services that normally use swift can seamlessly use the Ceph Object Gateway instead without further configuration. For more information, see the Block Storage Backup Guide.
4.3. Configuring Ceph Object Store to use external Ceph Object Gateway
Red Hat OpenStack Platform (RHOSP) director supports configuring an external Ceph Object Gateway (RGW) as an Object Store service. To authenticate with the external RGW service, you must configure RGW to verify users and their roles in the Identity service (keystone).
For more information about how to configure an external Ceph Object Gateway, see Configuring the Ceph Object Gateway to use Keystone authentication in the Using Keystone with the Ceph Object Gateway Guide.
Procedure
Add the following
parameter_defaultsto a custom environment file, for example,swift-external-params.yaml, and adjust the values to suit your deployment:parameter_defaults: ExternalSwiftPublicUrl: 'http://<Public RGW endpoint or loadbalancer>:8080/swift/v1/AUTH_%(project_id)s' ExternalSwiftInternalUrl: 'http://<Internal RGW endpoint>:8080/swift/v1/AUTH_%(project_id)s' ExternalSwiftAdminUrl: 'http://<Admin RGW endpoint>:8080/swift/v1/AUTH_%(project_id)s' ExternalSwiftUserTenant: 'service' SwiftPassword: 'choose_a_random_password'
NoteThe example code snippet contains parameter values that might differ from values that you use in your environment:
-
The default port where the remote RGW instance listens is
8080. The port might be different depending on how the external RGW is configured. -
The
swiftuser created in the overcloud uses the password defined by theSwiftPasswordparameter. You must configure the external RGW instance to use the same password to authenticate with the Identity service by using thergw_keystone_admin_password.
-
The default port where the remote RGW instance listens is
Add the following code to the Ceph config file to configure RGW to use the Identity service. Replace the variable values to suit your environment:
rgw_keystone_api_version = 3 rgw_keystone_url = http://<public Keystone endpoint>:5000/ rgw_keystone_accepted_roles = member, Member, admin rgw_keystone_accepted_admin_roles = ResellerAdmin, swiftoperator rgw_keystone_admin_domain = default rgw_keystone_admin_project = service rgw_keystone_admin_user = swift rgw_keystone_admin_password = <password_as_defined_in_the_environment_parameters> rgw_keystone_implicit_tenants = true rgw_keystone_revocation_interval = 0 rgw_s3_auth_use_keystone = true rgw_swift_versioning_enabled = true rgw_swift_account_in_url = trueNoteDirector creates the following roles and users in the Identity service by default:
- rgw_keystone_accepted_admin_roles: ResellerAdmin, swiftoperator
- rgw_keystone_admin_domain: default
- rgw_keystone_admin_project: service
- rgw_keystone_admin_user: swift
Deploy the overcloud with the additional environment files with any other environment files that are relevant to your deployment:
openstack overcloud deploy --templates \
-e <your_environment_files>
-e /usr/share/openstack-tripleo-heat-templates/environments/swift-external.yaml
-e swift-external-params.yaml
Verification
-
Log in to the undercloud as the
stackuser. Source the
overcloudrcfile:$ source ~/stackrc
Verify that the endpoints exist in the Identity service (keystone):
$ openstack endpoint list --service object-store

+---------+-----------+-------+-------+---------+-----------+---------------+
| ID | Region    | Service Name | Service Type | Enabled | Interface | URL |
+---------+-----------+-------+-------+---------+-----------+---------------+
| 233b7ea32aaf40c1ad782c696128aa0e | regionOne | swift | object-store | True    | admin     | http://192.168.24.3:8080/v1/AUTH_%(project_id)s |
| 4ccde35ac76444d7bb82c5816a97abd8 | regionOne | swift | object-store | True    | public    | https://192.168.24.2:13808/v1/AUTH_%(project_id)s |
| b4ff283f445348639864f560aa2b2b41 | regionOne | swift | object-store | True    | internal  | http://192.168.24.3:8080/v1/AUTH_%(project_id)s |
+---------+-----------+-------+-------+---------+-----------+---------------+
Create a test container:
$ openstack container create <testcontainer>
+----------------+---------------+------------------------------------+
| account | container | x-trans-id |
+----------------+---------------+------------------------------------+
| AUTH_2852da3cf2fc490081114c434d1fc157 | testcontainer | tx6f5253e710a2449b8ef7e-005f2d29e8 |
+----------------+---------------+------------------------------------+
Create a configuration file to confirm that you can upload data to the container:
$ openstack object create testcontainer undercloud.conf
+-----------------+---------------+----------------------------------+
| object          | container     | etag                             |
+-----------------+---------------+----------------------------------+
| undercloud.conf | testcontainer | 09fcffe126cac1dbac7b89b8fd7a3e4b |
+-----------------+---------------+----------------------------------+
Delete the test container:
$ openstack container delete -r <testcontainer>
4.4. Configuring the Backup Service to use Ceph
The Block Storage Backup service (cinder-backup) is disabled by default. To enable the Block Storage Backup service, complete the following steps:
Procedure
Invoke the following environment file when you create your overcloud:
-
/usr/share/openstack-tripleo-heat-templates/environments/cinder-backup.yaml
4.5. Configuring multiple bonded interfaces for Ceph nodes
Use a bonded interface to combine multiple NICs and add redundancy to a network connection. If you have enough NICs on your Ceph nodes, you can create multiple bonded interfaces on each node to expand redundancy capability.
You can then use a bonded interface for each network connection that the node requires. This provides both redundancy and a dedicated connection for each network.
The simplest implementation of bonded interfaces involves the use of two bonds, one for each storage network used by the Ceph nodes. These networks are the following:
- Front-end storage network (
StorageNet) - The Ceph client uses this network to interact with the corresponding Ceph cluster.
- Back-end storage network (
StorageMgmtNet) - The Ceph cluster uses this network to balance data in accordance with the placement group policy of the cluster. For more information, see Placement Groups (PG) in the in the Red Hat Ceph Architecture Guide.
To configure multiple bonded interfaces, you must create a new network interface template, as the director does not provide any sample templates that you can use to deploy multiple bonded NICs. However, the director does provide a template that deploys a single bonded interface. This template is /usr/share/openstack-tripleo-heat-templates/network/config/bond-with-vlans/ceph-storage.yaml. You can define an additional bonded interface for your additional NICs in this template.
For more information about creating custom interface templates, Creating Custom Interface Templates in the Advanced Overcloud Customization guide.
The following snippet contains the default definition for the single bonded interface defined in the /usr/share/openstack-tripleo-heat-templates/network/config/bond-with-vlans/ceph-storage.yaml file:
  type: ovs_bridge // 1
  name: br-bond
  members:
    -
      type: ovs_bond // 2
      name: bond1 // 3
      ovs_options: {get_param: BondInterfaceOvsOptions} 4
      members: // 5
        -
          type: interface
          name: nic2
          primary: true
        -
          type: interface
          name: nic3
    -
      type: vlan // 6
      device: bond1 // 7
      vlan_id: {get_param: StorageNetworkVlanID}
      addresses:
        -
          ip_netmask: {get_param: StorageIpSubnet}
    -
      type: vlan
      device: bond1
      vlan_id: {get_param: StorageMgmtNetworkVlanID}
      addresses:
        -
          ip_netmask: {get_param: StorageMgmtIpSubnet}
- 1
- A single bridge named
br-bondholds the bond defined in this template. This line defines the bridge type, namely OVS. - 2
- The first member of the
br-bondbridge is the bonded interface itself, namedbond1. This line defines the bond type ofbond1, which is also OVS. - 3
- The default bond is named
bond1. - 4
- The
ovs_optionsentry instructs director to use a specific set of bonding module directives. Those directives are passed through theBondInterfaceOvsOptions, which you can also configure in this file. For more information about configuring bonding module directives, see Section 4.5.1, “Configuring bonding module directives”. - 5
- The
memberssection of the bond defines which network interfaces are bonded bybond1. In this example, the bonded interface usesnic2(set as the primary interface) andnic3. - 6
- The
br-bondbridge has two other members: a VLAN for both front-end (StorageNetwork) and back-end (StorageMgmtNetwork) storage networks. - 7
- The
deviceparameter defines which device a VLAN should use. In this example, both VLANs use the bonded interface,bond1.
With at least two more NICs, you can define an additional bridge and bonded interface. Then, you can move one of the VLANs to the new bonded interface, which increases throughput and reliability for both storage network connections.
When you customize the /usr/share/openstack-tripleo-heat-templates/network/config/bond-with-vlans/ceph-storage.yaml file for this purpose, Red Hat recommends that you use Linux bonds (type: linux_bond ) instead of the default OVS (type: ovs_bond). This bond type is more suitable for enterprise production deployments.
The following edited snippet defines an additional OVS bridge (br-bond2) which houses a new Linux bond named bond2. The bond2 interface uses two additional NICs, nic4 and nic5, and is used solely for back-end storage network traffic:
  type: ovs_bridge
  name: br-bond
  members:
    -
      type: linux_bond
      name: bond1
      bonding_options: {get_param: BondInterfaceOvsOptions} // 1
      members:
        -
          type: interface
          name: nic2
          primary: true
        -
          type: interface
          name: nic3
    -
      type: vlan
      device: bond1
      vlan_id: {get_param: StorageNetworkVlanID}
      addresses:
        -
          ip_netmask: {get_param: StorageIpSubnet}
-
  type: ovs_bridge
  name: br-bond2
  members:
    -
      type: linux_bond
      name: bond2
      bonding_options: {get_param: BondInterfaceOvsOptions}
      members:
        -
          type: interface
          name: nic4
          primary: true
        -
          type: interface
          name: nic5
    -
      type: vlan
      device: bond1
      vlan_id: {get_param: StorageMgmtNetworkVlanID}
      addresses:
        -
ip_netmask: {get_param: StorageMgmtIpSubnet}- 1
- As
bond1andbond2are both Linux bonds (instead of OVS), they usebonding_optionsinstead ofovs_optionsto set bonding directives. For more information, see Section 4.5.1, “Configuring bonding module directives”.
For the full contents of this customized template, see Appendix B, Sample custom interface template: multiple bonded interfaces.
4.5.1. Configuring bonding module directives
After you add and configure the bonded interfaces, use the BondInterfaceOvsOptions parameter to set the directives that you want each bonded interface to use. You can find this information in the parameters: section of the /usr/share/openstack-tripleo-heat-templates/network/config/bond-with-vlans/ceph-storage.yaml file. The following snippet shows the default definition of this parameter (namely, empty):
BondInterfaceOvsOptions:
    default: ''
    description: The ovs_options string for the bond interface. Set
                 things like lacp=active and/or bond_mode=balance-slb
                 using this option.
    type: string
Define the options you need in the default: line. For example, to use 802.3ad (mode 4) and a LACP rate of 1 (fast), use 'mode=4 lacp_rate=1':
BondInterfaceOvsOptions:
    default: 'mode=4 lacp_rate=1'
    description: The bonding_options string for the bond interface. Set
                 things like lacp=active and/or bond_mode=balance-slb
                 using this option.
    type: string
For more information about other supported bonding options, see Open vSwitch Bonding Options in the Advanced Overcloud Optimization guide. For the full contents of the customized /usr/share/openstack-tripleo-heat-templates/network/config/bond-with-vlans/ceph-storage.yaml template, see Appendix B, Sample custom interface template: multiple bonded interfaces.
Chapter 5. Customizing the Ceph Storage cluster
Director deploys containerized Red Hat Ceph Storage using a default configuration. You can customize Ceph Storage by overriding the default settings.
Prerequistes
To deploy containerized Ceph Storage you must include the /usr/share/openstack-tripleo-heat-templates/environments/ceph-ansible/ceph-ansible.yaml file during overcloud deployment. This environment file defines the following resources:
-
CephAnsibleDisksConfig- This resource maps the Ceph Storage node disk layout. For more information, see Section 5.3, “Mapping the Ceph Storage node disk layout”. -
CephConfigOverrides- This resource applies all other custom settings to your Ceph Storage cluster.
Use these resources to override any defaults that the director sets for containerized Ceph Storage.
Procedure
Enable the Red Hat Ceph Storage 4 Tools repository:
$ sudo subscription-manager repos --enable=rhceph-4-tools-for-rhel-8-x86_64-rpms
Install the
ceph-ansiblepackage on the undercloud:$ sudo dnf install ceph-ansible
To customize your Ceph Storage cluster, define custom parameters in a new environment file, for example,
/home/stack/templates/ceph-config.yaml. You can apply Ceph Storage cluster settings with the following syntax in theparameter_defaultssection of your environment file:parameter_defaults: CephConfigOverrides: section: KEY:VALUENoteYou can apply the
CephConfigOverridesparameter to the[global]section of theceph.conffile, as well as any other section, such as[osd],[mon], and[client]. If you specify a section, thekey:valuedata goes into the specified section. If you do not specify a section, the data goes into the[global]section by default. For information about Ceph Storage configuration, customization, and supported parameters, see Red Hat Ceph Storage Configuration Guide.Replace
KEYandVALUEwith the Ceph cluster settings that you want to apply. For example, in theglobalsection,max_open_filesis theKEYand131072is the correspondingVALUE:parameter_defaults: CephConfigOverrides: global: max_open_files: 131072 osd: osd_scrub_during_recovery: falseThis configuration results in the following settings defined in the configuration file of your Ceph cluster:
[global]
max_open_files = 131072
[osd]
osd_scrub_during_recovery = false
5.1. Setting ceph-ansible group variables
The ceph-ansible tool is a playbook used to install and manage Ceph Storage clusters.
The ceph-ansible tool has a group_vars directory that defines configuration options and the default settings for those options. Use the group_vars directory to set Ceph Storage parameters.
For information about the group_vars directory, see Installing a Red Hat Ceph Storage cluster in the Installation Guide.
To change the variable defaults in director, use the CephAnsibleExtraConfig parameter to pass the new values in heat environment files. For example, to set the ceph-ansible group variable journal_size to 40960, create an environment file with the following journal_size definition:
parameter_defaults:
  CephAnsibleExtraConfig:
    journal_size: 40960
Change ceph-ansible group variables with the override parameters; do not edit group variables directly in the /usr/share/ceph-ansible directory on the undercloud.
5.2. Ceph containers for Red Hat OpenStack Platform with Ceph Storage
A Ceph container is required to configure OpenStack Platform to use Ceph, even with an external Ceph cluster. To be compatible with Red Hat Enterprise Linux 8, Red Hat OpenStack Platform (RHOSP) 16 requires Red Hat Ceph Storage 4. The Ceph Storage 4 container is hosted at registry.redhat.io, a registry that requires authentication.
You can use the heat environment parameter ContainerImageRegistryCredentials to authenticate at registry.redhat.io. For more information, see Container image preparation parameters.
5.3. Mapping the Ceph Storage node disk layout
When you deploy containerized Ceph Storage, you must map the disk layout and specify dedicated block devices for the Ceph OSD service. You can perform this mapping in the environment file that you created earlier to define your custom Ceph parameters: /home/stack/templates/ceph-config.yaml.
Use the CephAnsibleDisksConfig resource in parameter_defaults to map your disk layout. This resource uses the following variables:
| Variable | Required? | Default value (if unset) | Description |
|---|---|---|---|
| osd_scenario | Yes | lvm
NOTE: The default value is |
The |
| devices | Yes | NONE. Variable must be set. | A list of block devices that you want to use for OSDs on the node. |
| dedicated_devices |
Yes (only if | devices |
A list of block devices that maps each entry in the |
| dmcrypt | No | false |
Sets whether data stored on OSDs is encrypted ( |
| osd_objectstore | No | bluestore
NOTE: The default value is | Sets the storage back end used by Ceph.
NOTE: Although the value defaults to |
5.3.1. Using BlueStore
Procedure
To specify the block devices that you want to use as Ceph OSDs, use a variation of the following snippet:
parameter_defaults:
  CephAnsibleDisksConfig:
    devices:
      - /dev/sdb
      - /dev/sdc
      - /dev/sdd
      - /dev/nvme0n1
    osd_scenario: lvm
    osd_objectstore: bluestore
Because
/dev/nvme0n1is in a higher performing device class, the exampleparameter_defaultsproduces three OSDs that run on/dev/sdb,/dev/sdc, and/dev/sdd. The three OSDs use/dev/nvme0n1as theblock.dband BlueStore WAL device. Theceph-volumetool does this by using thebatchsubcommand. The same configuration is duplicated for each Ceph Storage node and assumes uniform hardware. If theblock.dband BlueStore WAL data reside on the same disks as the OSDs, then change the parameter defaults in the following way:parameter_defaults: CephAnsibleDisksConfig: devices: - /dev/sdb - /dev/sdc - /dev/sdd osd_scenario: lvm osd_objectstore: bluestore
5.3.2. Referring to devices with persistent names
Procedure
In some nodes, disk paths, such as
/dev/sdband/dev/sdc, might not point to the same block device during reboots. If this is the case with your Ceph Storage nodes, specify each disk with the/dev/disk/by-path/symlink to ensure consistent block device mapping throughout your deployments:parameter_defaults: CephAnsibleDisksConfig: devices: - /dev/disk/by-path/pci-0000:03:00.0-scsi-0:0:10:0 - /dev/disk/by-path/pci-0000:03:00.0-scsi-0:0:11:0 dedicated_devices: - /dev/nvme0n1 - /dev/nvme0n1Optional: Because you must set the list of OSD devices before overcloud deployment, it might not be possible to identify and set the PCI path of disk devices. In this case, gather the
/dev/disk/by-path/symlinkdata for block devices during introspection.In the following example, run the first command to download the introspection data from the undercloud Object Storage service (swift) for the server
b08-h03-r620-hciand save the data in a file calledb08-h03-r620-hci.json. Run the second command to grep for “by-path”. The output of this command contains the unique/dev/disk/by-pathvalues that you can use to identify disks.(undercloud) [stack@b08-h02-r620 ironic]$ openstack baremetal introspection data save b08-h03-r620-hci | jq . > b08-h03-r620-hci.json (undercloud) [stack@b08-h02-r620 ironic]$ grep by-path b08-h03-r620-hci.json "by_path": "/dev/disk/by-path/pci-0000:02:00.0-scsi-0:2:0:0", "by_path": "/dev/disk/by-path/pci-0000:02:00.0-scsi-0:2:1:0", "by_path": "/dev/disk/by-path/pci-0000:02:00.0-scsi-0:2:3:0", "by_path": "/dev/disk/by-path/pci-0000:02:00.0-scsi-0:2:4:0", "by_path": "/dev/disk/by-path/pci-0000:02:00.0-scsi-0:2:5:0", "by_path": "/dev/disk/by-path/pci-0000:02:00.0-scsi-0:2:6:0", "by_path": "/dev/disk/by-path/pci-0000:02:00.0-scsi-0:2:7:0", "by_path": "/dev/disk/by-path/pci-0000:02:00.0-scsi-0:2:0:0",
For more information about naming conventions for storage devices, see Overview of persistent naming attributes in the Managing storage devices guide.
5.3.3. Configuring OSDs in advanced scenarios
In an environment file, you list the block devices that you want to use for OSDs in the devices variable of the CephAnsibleDisksConfig resource.
When you use the devices variable without any other device configuration parameter, ceph-volume lvm batch automatically optimizes OSD configuration by evenly sharing the higher performance device as a block.db for the slower devices.
You can use the following procedures to configure devices to avoid running in ceph-volume lvm batch mode.
5.3.3.1. Using a block.db to improve performance
Using a block.db can improve the performance of your Ceph Storage cluster by increasing throughput and improving response times. A block.db is a database that consists of data segments and BlueStore write-ahead logs (WAL).
Procedure
Add the following content to an environment file:
parameter_defaults: CephAnsibleDisksConfig: devices: - /dev/sda - /dev/sdb - /dev/nvme0n1 - /dev/sdc - /dev/sdd - /dev/nvme0n2 osd_scenario: lvm osd_objectstore: bluestoreThis configures four OSDs:
sda,sdb,sdc, andsdd. Each pair has its own database:nvem0n1andnvme0n2.NoteThe order of the devices in the
deviceslist is significant. List the drives followed by the block.db and BlueStore WAL (DB-WAL) device. In the example,nvme0n1is the DB-WAL forsdaandsdbandnvme0n2is the DB-WAL forsdcandsdd. For more information, see Using BlueStore.-
Include the environment file that contains your new content in the deployment command with the
-eoption when you deploy the overcloud.
5.3.3.2. Using dedicated write-ahead log (WAL) devices
You can specify a dedicated write-ahead log (WAL) device. Using devices, dedicated_devices, and bluestore_wal_devices together means that you can isolate all components of an OSD on to separate devices, which can increase performance.
In the following example procedure, another additional dictionary, bluestore_wal_devices, isolates the write-ahead log on NVMe devices nvme0n1 and nvme0n2.
Procedure
Add the following content to an environment file:
parameter_defaults: CephAnsibleDisksConfig: devices: - /dev/sda - /dev/sdb dedicated_devices: - /dev/sdx - /dev/sdy bluestore_wal_devices: - /dev/nvme0n1 - /dev/nvme0n2-
Include the environment file that contains your new content in the deployment command with the
-eoption when you deploy the overcloud.
5.3.3.3. Using pre-created LVMs for increased control
In the previous advanced scenarios, ceph-volume uses different types of device lists to create logical volumes for OSDs. You can also create the logical volumes before ceph-volume runs and then pass ceph-volume an lvm_volumes list of those logical volumes. Although this requires that you create the logical volumes in advance, it means that you have more precise control. Because director is also responsible for hardware provisioning, you must create these LVMs in advance by using a first-boot script.
Procedure
Create an environment file,
/home/stack/templates/firstboot.yaml, that registers your heat template as theOS::TripleO::NodeUserDataresource type and contains the following content:resource_registry: OS::TripleO::NodeUserData: /home/stack/templates/ceph-lvm.yaml
Create an environment file,
/home/stack/templates/ceph-lvm.yaml. Add a list similar to the following example, which includes three physical volumes. If your devices list is longer, expand the example according to your requirements.heat_template_version: 2014-10-16 description: > Extra hostname configuration resources: userdata: type: OS::Heat::MultipartMime properties: parts: - config: {get_resource: ceph_lvm_config} ceph_lvm_config: type: OS::Heat::SoftwareConfig properties: config: | #!/bin/bash -x pvcreate /dev/sda vgcreate ceph_vg_hdd /dev/sda pvcreate /dev/sdb vgcreate ceph_vg_ssd /dev/sdb pvcreate /dev/nvme0n1 vgcreate ceph_vg_nvme /dev/nvme0n1 lvcreate -n ceph_lv_wal1 -L 50G ceph_vg_nvme lvcreate -n ceph_lv_db1 -L 500G ceph_vg_ssd lvcreate -n ceph_lv_data1 -L 5T ceph_vg_hdd lvs outputs: OS::stack_id: value: {get_resource: userdata}Use the
lvm_volumesparameter instead of the devices list in the following way. This assumes that the volume groups and logical volumes are already created. A typical use case in this scenario is that the WAL and DB LVs are on SSDs and the data LV is on HDDs:parameter_defaults: CephAnsibleDisksConfig: osd_objectstore: bluestore osd_scenario: lvm lvm_volumes: - data: ceph_lv_data1 data_vg: ceph_vg_hdd db: ceph_lv_db1 db_vg: ceph_vg_ssd wal: ceph_lv_wal1 wal_vg: ceph_vg_nvmeInclude the environment files that contain your new content in the deployment command with the
-eoption when you deploy the overcloud.- Note
- Specifying a separate WAL device is necessary only if that WAL device resides on hardware that performs better than the DB device. Usually creating a separate DB device is sufficient and the same partition is then used for the WAL function.
5.4. Assigning custom attributes to different Ceph pools
By default, Ceph Storage pools created with director have the same number of placement groups (pg_num and pgp_num) and sizes. You can use either method in Chapter 5, Customizing the Ceph Storage cluster to override these settings globally. Doing so applies the same values to all pools.
Use the CephPools parameter to apply different attributes to each Ceph Storage pool or create a new custom pool.
Procedure
Replace
POOLwith the name of the pool that you want to configure:parameter_defaults: CephPools: - name: POOLConfigure placement groups by doing one of the following:
To manually override the default settings, set
pg_numto the number of placement groups:parameter_defaults: CephPools: - name: POOL pg_num: 128 application: rbdAlternatively, to automatically scale placement groups, set
pg_autoscale_modetoTrueand settarget_size_ratioto a percentage relative to your expected Ceph Storage requirements:parameter_defaults: CephPools: - name: POOL pg_autoscale_mode: True target_size_ratio: PERCENTAGE application: rbdReplace
PERCENTAGEwith a decimal. For example, 0.5 equals 50 percent. The total percentage must equal 1.0 or 100 percent.The following values are for example only:
paramter_defaults: CephPools: - {"name": backups, "target_size_ratio": 0.1, "pg_autoscale_mode": True, "application": rbd} - {"name": volumes, "target_size_ratio": 0.5, "pg_autoscale_mode": True, "application": rbd} - {"name": vms, "target_size_ratio": 0.2, "pg_autoscale_mode": True, "application": rbd} - {"name": images, "target_size_ratio": 0.2, "pg_autoscale_mode": True, "application": rbd}For more information, see The placement group autoscaler in the Red Hat Ceph Storage Installation Guide.
Specify the application type.
The application type for Compute, Block Storage, and Image Storage is`rbd`. However, depending on what you use the pool for, you can specify a different application type.
For example, the application type for the gnocchi metrics pool is
openstack_gnocchi. For more information, see Enable Application in the Storage Strategies Guide .NoteIf you do not use the
CephPoolsparameter, director sets the appropriate application type automatically, but only for the default pool list.Optional: Add a pool called
custompoolto create a custom pool, and set the parameters specific to the needs of your environment:parameter_defaults: CephPools: - name: custompool pg_num: 128 application: rbd
For typical pool configurations of common Ceph use cases, see the Ceph Placement Groups (PGs) per Pool Calculator. This calculator is normally used to generate the commands for manually configuring your Ceph pools. In this deployment, the director configures the pools based on your specifications.
Red Hat Ceph Storage 3 (Luminous) introduced a hard limit on the maximum number of PGs an OSD can have, which is 200 by default. Do not override this parameter beyond 200. If there is a problem because the Ceph PG number exceeds the maximum, adjust the pg_num per pool to address the problem, not the mon_max_pg_per_osd.
5.5. Overriding parameters for dissimilar Ceph Storage nodes
All nodes with a role that host Ceph OSDs, such as CephStorage or ComputeHCI, use the global devices and dedicated_devices lists created in Section 5.3, “Mapping the Ceph Storage node disk layout”. These lists assume all of these servers have the same hardware. If there are servers with hardware this is not the same, you must update director with the details of the different devices and dedicated_devices lists using node-specific disk configuration.
Roles that host Ceph OSDs include the OS::TripleO::Services::CephOSD service in the roles_data.yaml file.
Ceph Storage nodes that do not have the same hardware as other nodes can cause performance issues. The more variance there is between a standard node and a node that you configure with node-specific overrides in your Red Hat OpenStack Platform (RHOSP) environment, the larger the possible performance penalty.
5.5.1. Node-specific disk configuration
Director must be configured for services with that do not have the same hardware. This is called node-specific disk configuration.
You can create your node-specific disk configuration by using one of the following methods:
- Automatic: You can generate a JSON heat environment file to automatically create the node-specific disk configuration.
- Manual: You can alter the node disk layout to create the node-specific disk configuration.
5.5.1.1. Generating a JSON heat environment file for Ceph devices
You can use the /usr/share/openstack-tripleo-heat-templates/tools/make_ceph_disk_list.py script to create a valid JSON heat environment file automatically from the introspection data of the Bare Metal Provisioning service (ironic). Use this JSON file to pass a node-specific disk configuration to director.
Procedure
Export the introspection data from the Bare Metal Provisioning service for the Ceph nodes that you want to deploy:
openstack baremetal introspection data save oc0-ceph-0 > ceph0.json openstack baremetal introspection data save oc0-ceph-1 > ceph1.json ...
Copy the utility to the home directory of the
stackuser on the undercloud and use it to generate anode_data_lookup.jsonfile../make_ceph_disk_list.py -i ceph*.json -o node_data_lookup.json -k by_path
Pass the introspection data file from the
openstack baremetal introspection data savecommand for all nodes that host Ceph OSDs to the utility because you can only defineNodeDataLookuponce during a deployment. The-ioption can take an expression like*.jsonor a list of files as input.Use the
-koption to define the key of the Bare Metal Provisioning disk data structure that you want to use to identify your OSD disk. Do not usenamebecause it produces a file of devices like/dev/sdd, which might not always point to the same device during a reboot. Instead, useby_path. This is the default if you do not specify-k.The Bare Metal Provisioning service reserves one of the available disks on the system as the root disk. The utility always excludes the root disk from the list of generated devices.
-
Optional: You can use
./make_ceph_disk_list.py –helpto see other available options. Include the
node_data_lookup.jsonfile with any other environment files that are relevant to your environment when you deploy the overcloud:$ openstack overcloud deploy \ --templates \ … -e <existing_overcloud_environment_files> \ -e node_data_lookup.json \ …
5.5.1.2. Altering the disk layout in Ceph Storage nodes
Non-homogeneous Ceph Storage nodes can cause performance issues. The more variance there is between a standard node and a node that you configure with node-specific overrides in your Red Hat OpenStack Platform (RHOSP) environment, the larger the possible performance penalty.
To pass a node-specific disk configuration to director, you must pass a heat environment file, such as node-spec-overrides.yaml, to the openstack overcloud deploy command and the file content must identify each server by a machine-unique UUID and a list of local variables to override the global variables.
You can extract the machine-unique UUID for each individual server or from the Bare Metal Provisioning service (ironic) database.
- Note
-
In the following procedure you create a valid YAML environment file that contains embedded valid JSON. You can also generate a full JSON file with
make_ceph_disk_list.pyand pass it to the deployment command as if it were YAML. For more information, see Generating a JSON heat environment file for Ceph devices.
Procedure
To locate the UUID for an individual server, log in to the server and enter the following command:
$ dmidecode -s system-uuid
To extract the UUID from the the Bare Metal Provisioning service database, enter the following command on the undercloud:
$ openstack baremetal introspection data save NODE-ID | jq .extra.system.product.uuid
WarningIf the
undercloud.confdoes not haveinspection_extras = truebefore undercloud installation or upgrade and introspection, then the machine-unique UUID is not in the Bare Metal Provisioning service database.ImportantThe machine-unique UUID is not the Bare Metal Provisioning service UUID.
A valid
node-spec-overrides.yamlfile might look like the following:parameter_defaults: NodeDataLookup: {"32E87B4C-C4A7-418E-865B-191684A6883B": {"devices": ["/dev/sdc"]}}All lines after the first two lines must be valid JSON. Use the
jqcommand to verify that the JSON is valid.-
Remove the first two lines (
parameter_defaults:andNodeDataLookup:) from the file temporarily. -
Run
cat node-spec-overrides.yaml | jq .
-
Remove the first two lines (
As the
node-spec-overrides.yamlfile grows, you can also use thejqcommand to ensure that the embedded JSON is valid. For example, because thedevicesanddedicated_deviceslist must be the same length, use the following command to verify that they are the same length before you start the deployment. In the following example, thenode-spec-c05-h17-h21-h25-6048r.yamlhas three servers in rack c05 in which slots h17, h21, and h25 are missing disks.(undercloud) [stack@b08-h02-r620 tht]$ cat node-spec-c05-h17-h21-h25-6048r.yaml | jq '.[] | .devices | length' 33 30 33 (undercloud) [stack@b08-h02-r620 tht]$ cat node-spec-c05-h17-h21-h25-6048r.yaml | jq '.[] | .dedicated_devices | length' 33 30 33 (undercloud) [stack@b08-h02-r620 tht]$
-
After the JSON has been validated add back the two lines which makes it a valid environment YAML file (
parameter_defaults:andNodeDataLookup:) and include it with-ein the deployment. In the example below, the updated heat environment file usesNodeDataLookupfor Ceph deployment. All of the servers had a devices list with 35 disks except one of them had a disk missing. This environment file overrides the default devices list for only that single node and gives it the list of 34 disks it must use instead of the global list. After the JSON is validated, add back the two lines that make it a valid environment YAML file (
parameter_defaults:andNodeDataLookup:) and include it with-ein the deployment command.In the following example, the updated heat environment file uses
NodeDataLookupfor Ceph deployment. All of the servers had a devices list with 35 disks except one of them had a disk missing. This environment file overrides the default devices list for only that single node and supplies the node with the list of 34 disks that it must use instead of the global list.parameter_defaults: # c05-h01-6048r is missing scsi-0:2:35:0 (00000000-0000-0000-0000-0CC47A6EFD0C) NodeDataLookup: { "00000000-0000-0000-0000-0CC47A6EFD0C": { "devices": [ "/dev/disk/by-path/pci-0000:03:00.0-scsi-0:2:1:0", "/dev/disk/by-path/pci-0000:03:00.0-scsi-0:2:32:0", "/dev/disk/by-path/pci-0000:03:00.0-scsi-0:2:2:0", "/dev/disk/by-path/pci-0000:03:00.0-scsi-0:2:3:0", "/dev/disk/by-path/pci-0000:03:00.0-scsi-0:2:4:0", "/dev/disk/by-path/pci-0000:03:00.0-scsi-0:2:5:0", "/dev/disk/by-path/pci-0000:03:00.0-scsi-0:2:6:0", "/dev/disk/by-path/pci-0000:03:00.0-scsi-0:2:33:0", "/dev/disk/by-path/pci-0000:03:00.0-scsi-0:2:7:0", "/dev/disk/by-path/pci-0000:03:00.0-scsi-0:2:8:0", "/dev/disk/by-path/pci-0000:03:00.0-scsi-0:2:34:0", "/dev/disk/by-path/pci-0000:03:00.0-scsi-0:2:9:0", "/dev/disk/by-path/pci-0000:03:00.0-scsi-0:2:10:0", "/dev/disk/by-path/pci-0000:03:00.0-scsi-0:2:11:0", "/dev/disk/by-path/pci-0000:03:00.0-scsi-0:2:12:0", "/dev/disk/by-path/pci-0000:03:00.0-scsi-0:2:13:0", "/dev/disk/by-path/pci-0000:03:00.0-scsi-0:2:14:0", "/dev/disk/by-path/pci-0000:03:00.0-scsi-0:2:15:0", "/dev/disk/by-path/pci-0000:03:00.0-scsi-0:2:16:0", "/dev/disk/by-path/pci-0000:03:00.0-scsi-0:2:17:0", "/dev/disk/by-path/pci-0000:03:00.0-scsi-0:2:18:0", "/dev/disk/by-path/pci-0000:03:00.0-scsi-0:2:19:0", "/dev/disk/by-path/pci-0000:03:00.0-scsi-0:2:20:0", "/dev/disk/by-path/pci-0000:03:00.0-scsi-0:2:21:0", "/dev/disk/by-path/pci-0000:03:00.0-scsi-0:2:22:0", "/dev/disk/by-path/pci-0000:03:00.0-scsi-0:2:23:0", "/dev/disk/by-path/pci-0000:03:00.0-scsi-0:2:24:0", "/dev/disk/by-path/pci-0000:03:00.0-scsi-0:2:25:0", "/dev/disk/by-path/pci-0000:03:00.0-scsi-0:2:26:0", "/dev/disk/by-path/pci-0000:03:00.0-scsi-0:2:27:0", "/dev/disk/by-path/pci-0000:03:00.0-scsi-0:2:28:0", "/dev/disk/by-path/pci-0000:03:00.0-scsi-0:2:29:0", "/dev/disk/by-path/pci-0000:03:00.0-scsi-0:2:30:0", "/dev/disk/by-path/pci-0000:03:00.0-scsi-0:2:31:0" ], "dedicated_devices": [ "/dev/disk/by-path/pci-0000:81:00.0-nvme-1", "/dev/disk/by-path/pci-0000:81:00.0-nvme-1", "/dev/disk/by-path/pci-0000:81:00.0-nvme-1", "/dev/disk/by-path/pci-0000:81:00.0-nvme-1", "/dev/disk/by-path/pci-0000:81:00.0-nvme-1", "/dev/disk/by-path/pci-0000:81:00.0-nvme-1", "/dev/disk/by-path/pci-0000:81:00.0-nvme-1", "/dev/disk/by-path/pci-0000:81:00.0-nvme-1", "/dev/disk/by-path/pci-0000:81:00.0-nvme-1", "/dev/disk/by-path/pci-0000:81:00.0-nvme-1", "/dev/disk/by-path/pci-0000:81:00.0-nvme-1", "/dev/disk/by-path/pci-0000:81:00.0-nvme-1", "/dev/disk/by-path/pci-0000:81:00.0-nvme-1", "/dev/disk/by-path/pci-0000:81:00.0-nvme-1", "/dev/disk/by-path/pci-0000:81:00.0-nvme-1", "/dev/disk/by-path/pci-0000:81:00.0-nvme-1", "/dev/disk/by-path/pci-0000:81:00.0-nvme-1", "/dev/disk/by-path/pci-0000:81:00.0-nvme-1", "/dev/disk/by-path/pci-0000:84:00.0-nvme-1", "/dev/disk/by-path/pci-0000:84:00.0-nvme-1", "/dev/disk/by-path/pci-0000:84:00.0-nvme-1", "/dev/disk/by-path/pci-0000:84:00.0-nvme-1", "/dev/disk/by-path/pci-0000:84:00.0-nvme-1", "/dev/disk/by-path/pci-0000:84:00.0-nvme-1", "/dev/disk/by-path/pci-0000:84:00.0-nvme-1", "/dev/disk/by-path/pci-0000:84:00.0-nvme-1", "/dev/disk/by-path/pci-0000:84:00.0-nvme-1", "/dev/disk/by-path/pci-0000:84:00.0-nvme-1", "/dev/disk/by-path/pci-0000:84:00.0-nvme-1", "/dev/disk/by-path/pci-0000:84:00.0-nvme-1", "/dev/disk/by-path/pci-0000:84:00.0-nvme-1", "/dev/disk/by-path/pci-0000:84:00.0-nvme-1", "/dev/disk/by-path/pci-0000:84:00.0-nvme-1", "/dev/disk/by-path/pci-0000:84:00.0-nvme-1" ] } }
5.5.2. Altering the BlueStore block.db size
The BlueStore block.db is a database of data segments and BlueStore write-ahead logs (WAL). There are two methods for altering the database size. Select one of these methods to alter the size.
5.5.2.1. Altering the BlueStore block.db size when you use ceph-volume
Use the following procedure to override the block.db size when you use ceph-volume. ceph-volume is used when osd_scenario: lvm. ceph-volume automatically sets the block.db size. However, you can override the block.db size for advanced scenarios.
The following example uses a ceph-ansible host variable, not a Ceph configuration file override, so that the block_db_size that is used is passed to the ceph-volume call.
Procedure
Create a JSON environment file with content similar to the following but replace the values according to your requirements:
{ "parameter_defaults": { "NodeDataLookup": { "32e87b4c-c4a7-41be-865b-191684a6883b": { "block_db_size": 3221225472 }, "ea6a84d6-cf89-4fe2-b7bd-869b3fe4dd6b": { "block_db_size": 3221225472 } } } }Include the JSON file with any other environment files that are relevant to your environment when you deploy the overcloud:
$ openstack overcloud deploy \ --templates \ … -e <existing_overcloud_environment_files> \ -e <json_environment_file> \ …
5.5.2.2. Altering the BlueStore block.db size when you use ceph-disk
Use the following procedure to override the block.db size when you use ceph-disk. ceph-disk is used when osd_scenario: non-collocated or osd_scenario: collocated.
The following example uses a Ceph configuration override for specific nodes to set the blustore_block_db_size. This Ceph configuration option is ignored when you use ceph-volume, however ceph-disk uses this configuration option.
Procedure
Create a JSON environment file with content similar to the following but replace the values according to your requirements:
{ "parameter_defaults": { "NodeDataLookup": { "32e87b4c-c4a7-41be-865b-191684a6883b": { "ceph_conf_overrides": { "osd": { "bluestore_block_db_size": 3221225472 } } }, "ea6a84d6-cf89-4fe2-b7bd-869b3fe4dd6b": { "ceph_conf_overrides": { "osd": { "bluestore_block_db_size": 3221225472 } } } } } }Include the JSON file with any other environment files that are relevant to your environment when you deploy the overcloud:
$ openstack overcloud deploy \ --templates \ … -e <existing_overcloud_environment_files> \ -e <json_environment_file> \ …
5.6. Increasing the restart delay for large Ceph clusters
During deployment, Ceph services such as OSDs and Monitors, are restarted and the deployment does not continue until the service is running again. Ansible waits 15 seconds (the delay) and checks 5 times for the service to start (the retries). If the service does not restart, the deployment stops so the operator can intervene.
Depending on the size of the Ceph cluster, you may need to increase the retry or delay values. The exact names of these parameters and their defaults are as follows:
health_mon_check_retries: 5 health_mon_check_delay: 15 health_osd_check_retries: 5 health_osd_check_delay: 15
Procedure
Update the
CephAnsibleExtraConfigparameter to change the default delay and retry values:parameter_defaults: CephAnsibleExtraConfig: health_osd_check_delay: 40 health_osd_check_retries: 30 health_mon_check_delay: 20 health_mon_check_retries: 10This example makes the cluster check 30 times and wait 40 seconds between each check for the Ceph OSDs, and check 20 times and wait 10 seconds between each check for the Ceph MONs.
-
To incorporate the changes, pass the updated
yamlfile with-eusingopenstack overcloud deploy.
5.7. Overriding Ansible environment variables
The Red Hat OpenStack Platform Workflow service (mistral) uses Ansible to configure Ceph Storage, but you can customize the Ansible environment by using Ansible environment variables.
Procedure
To override an ANSIBLE_* environment variable, use the CephAnsibleEnvironmentVariables heat template parameter.
This example configuration increases the number of forks and SSH retries:
parameter_defaults:
CephAnsibleEnvironmentVariables:
ANSIBLE_SSH_RETRIES: '6'
DEFAULT_FORKS: '35'For more information about Ansible environment variables, see Ansible Configuration Settings.
For more information about how to customize your Ceph Storage cluster, see Customizing the Ceph Storage cluster.
5.8. Enabling Ceph on-wire encryption
Starting with Red Hat Ceph Storage 4 and later, you can enable encryption for all Ceph traffic over the network with the introduction of the messenger version 2 protocol. The secure mode setting for messenger v2 encrypts communication between Ceph daemons and Ceph clients, giving you end-to-end encryption.
This feature is available in this release as a Technology Preview, and therefore is not fully supported by Red Hat. It should only be used for testing, and should not be deployed in a production environment. For more information about Technology Preview features, see Scope of Coverage Details.
This feature, although it is currently a Technology Preview, is intended for use with Red Hat OpenStack Platform (RHOSP) versions 16.1 and later. It is not supported on RHOSP version 13 deployments that use external Red Hat Ceph Storage version 4. For more information, see Ceph on-wire encryption in the Red Hat Ceph Storage Architecture Guide.
To enable Ceph on-wire encryption on RHOSP, set the following parameters in your environment override file:
parameter_defaults:
CephConfigOverrides:
global:
ms_cluster_mode: secure
ms_service_mode: secure
ms_client_mode: secureFor more information about Ceph on-wire encryption, see Ceph on-wire encryption in the Architecture Guide.
Chapter 6. Defining performance tiers for varying workloads in a Ceph Storage cluster with director
You can use Red Hat OpenStack Platform (RHOSP) director to deploy different Red Hat Ceph Storage performance tiers. You can combine Ceph CRUSH rules and the CephPools director parameter to use the device classes feature and build different tiers to accommodate workloads that have different performance requirements. For example, you can define a HDD class for normal workloads and an SSD class that distributes data only over SSDs for high performance loads. In this scenario, when you create a new Block Storage volume, you can choose the performance tier, either HDDs or SSDs.
- WARNING
-
Defining performance tiers in an existing environment might result in massive data movement in the Ceph cluster.
ceph-ansible, which director triggers during the stack update, does not have logic to check if a pool is already defined in the cluster and if it contains data. This means that defining performance tiers in an existing environment can be dangerous because the change of the default CRUSH rule that is associated with a pool results in data movement. If you require assistance or recommendations for adding or removing nodes, contact Red Hat support.
Ceph autodetects the disk type and assigns it to the corresponding device class, either HDD, SSD, or NVMe based on the hardware properties exposed by the Linux kernel. However, you can also customize the category according to your needs.
Prerequisites
- For new deployments, Red Hat Ceph Storage (RHCS) version 4.1 or later.
- For existing deployments, Red Hat Ceph Storage (RHCS) version 4.2 or later.
To deploy different Red Hat Ceph Storage performance tiers, create a new environment file that contains the CRUSH map details and then include it in the deployment command.
In the following procedures, each Ceph Storage node contains three OSDs, sdb and sdc are spinning disks and sdc is a SSD. Ceph automatically detects the correct disk type. You then configure two CRUSH rules, HDD and SSD, to map to the two respective device classes. The HDD rule is the default and applies to all pools unless you configure pools with a different rule.
Finally, you create an extra pool called fastpool and map it to the SSD rule. This pool is ultimately exposed through a Block Storage (cinder) back end. Any workload that consumes this Block Storage back end is backed by SSD only for fast performances. You can leverage this for either data or boot from volume.
6.1. Configuring the performance tiers
- WARNING
-
Defining performance tiers in an existing environment might result in massive data movement in the Ceph cluster.
ceph-ansible, which director triggers during the stack update, does not have logic to check if a pool is already defined in the cluster and if it contains data. This means that defining performance tiers in an existing environment can be dangerous because the change of the default CRUSH rule that is associated with a pool results in data movement. If you require assistance or recommendations for adding or removing nodes, contact Red Hat support.
Director does not expose specific parameters to cover this feature, however, you can generate the ceph-ansible expected variables by completing the following steps.
Procedure
-
Log in to the undercloud node as the
stackuser. -
Create an environment file, such as
/home/stack/templates/ceph-config.yaml, to contain the Ceph config parameters and the device classes variables. Alternatively, you can add the following configurations to an existing environment file. In the environment file, use the
CephAnsibleDisksConfigparameter to list the block devices that you want to use as Ceph OSDs:CephAnsibleDisksConfig: devices: - /dev/sdb - /dev/sdc - /dev/sdd osd_scenario: lvm osd_objectstore: bluestoreOptional: Ceph automatically detects the type of disk and assigns it to the corresponding device class. However, you can also use the
crush_device_classproperty to force a specific device to belong to a specific class or create your own custom classes. The following example contains the same list of OSDs with specified classes:CephAnsibleDisksConfig: lvm_volumes: - data: '/dev/sdb' crush_device_class: 'hdd' - data: '/dev/sdc' crush_device_class: 'hdd' - data: '/dev/sdd' crush_device_class: 'ssd' osd_scenario: lvm osd_objectstore: bluestoreAdd the
CephAnsibleExtraVarsparameters. Thecrush_rulesparameter must contain a rule for each class that you define or that Ceph detects automatically. When you create a new pool, if no rule is specified, the rule that you want Ceph to use as the default is selected.CephAnsibleExtraConfig: crush_rule_config: true create_crush_tree: true crush_rules: - name: HDD root: default type: host class: hdd default: true - name: SSD root: default type: host class: ssd default: falseAdd the
CephPoolsparameter:-
Use the
rule_nameparameter to specify the tier for each pool that does not use the default rule. In the following example, thefastpoolpool uses the SSD device class that is configured as a fast tier, to manage Block Storage volumes. Replace
<appropriate_PG_num>with the appropriate number of placement groups (PGs). Alternatively, use the placement group auto-scaler to calculate the number of PGs for the Ceph pools.For more information, see Assigning custom attributes to different Ceph pools.
Use the
CinderRbdExtraPoolsparameter to configurefastpoolas a Block Storage back end.CephPools: - name: fastpool pg_num: <appropraiate_PG_num> rule_name: SSD application: rbd CinderRbdExtraPools: fastpool
-
Use the
Use the following example to ensure that your environment file contains the correct values:
parameter_defaults: CephAnsibleDisksConfig: devices: - '/dev/sdb' - '/dev/sdc' - '/dev/sdd' osd_scenario: lvm osd_objectstore: bluestore CephAnsibleExtraConfig: crush_rule_config: true create_crush_tree: true crush_rules: - name: HDD root: default type: host class: hdd default: true - name: SSD root: default type: host class: ssd default: false CinderRbdExtraPools: fastpool CephPools: - name: fastpool pg_num: <appropriate_PG_num> rule_name: SSD application: rbdInclude the new environment file in the
openstack overcloud deploycommand.$ openstack overcloud deploy \ --templates \ … -e <other_overcloud_environment_files> \ -e /home/stack/templates/ceph-config.yaml \ …
Replace
<other_overcloud_environment_files>with the list of environment files that are part of your deployment.
If you apply the environment file to an existing Ceph cluster, the pre-existing Ceph pools are not updated with the new rules. For this reason, you must enter the following command after the deployment completes to set the rules to the specified pools.
$ ceph osd pool set <pool> crush_rule <rule>
-
Replace
<pool>with the name of the pool that you want to apply the new rule to. -
Replace
<rule>with one of the rule names that you specified with thecrush_rulesparameter. -
Replace
<appropriate_PG_num>with the appropriate number of placement groups or atarget_size_ratioand setpg_autoscale_modetotrue.
For every rule that you change with this command, update the existing entry or add a new entry in the CephPools parameter in your existing templates:
CephPools:
- name: <pool>
pg_num: <appropriate_PG_num>
rule_name: <rule>
application: rbd6.2. Mapping a Block Storage (cinder) type to your new Ceph pool
- WARNING
-
Defining performance tiers in an existing environment might result in massive data movement in the Ceph cluster.
ceph-ansible, which director triggers during the stack update, does not have logic to check if a pool is already defined in the cluster and if it contains data. This means that defining performance tiers in an existing environment can be dangerous because the change of the default CRUSH rule that is associated with a pool results in data movement. If you require assistance or recommendations for adding or removing nodes, contact Red Hat support.
After you complete the configuration steps, make the performance tiers feature available to RHOSP tenants by using Block Storage (cinder) to create a type that is mapped to the fastpool tier that you created.
Procedure
-
Log in to the undercloud node as the
stackuser. Source the
overcloudrcfile:$ source overcloudrc
Check the Block Storage volume existing types:
$ cinder type-list
Create the new Block Storage volume fast_tier:
$ cinder type-create fast_tier
Check that the Block Storage type is created:
$ cinder type-list
When the
fast_tierBlock Storage type is available, set thefastpoolas the Block Storage volume back end for the new tier that you created:$ cinder type-key fast_tier set volume_backend_name=tripleo_ceph_fastpool
Use the new tier to create new volumes:
$ cinder create 1 --volume-type fast_tier --name fastdisk
6.3. Verifying that the CRUSH rules are created and that your pools are set to the correct CRUSH rule
- WARNING
-
Defining performance tiers in an existing environment might result in massive data movement in the Ceph cluster.
ceph-ansible, which director triggers during the stack update, does not have logic to check if a pool is already defined in the cluster and if it contains data. This means that defining performance tiers in an existing environment can be dangerous because the change of the default CRUSH rule that is associated with a pool results in data movement. If you require assistance or recommendations for adding or removing nodes, contact Red Hat support.
Procedure
-
Log in to the overcloud Controller node as the
heat-adminuser. To verify that your OSD tiers are successfully set, enter the following command. Replace
<controller_hostname>with the name of your host Controller node.$ sudo podman exec -it ceph-mon-<controller_hostname> ceph osd tree
- In the resulting tree view, verify that the CLASS column displays the correct device class for each OSD that you set.
Also verify that the OSDs are correctly assigned to the device classes with following command. Replace
<controller_hostname>with the name of your host Controller node.$ sudo podman exec -it ceph-mon-<controller_hostname> ceph osd crush tree --show-shadow
Compare the resulting hierarchy with the results of the following command to ensure that the same values apply for each rule.
-
Replace
<controller_hostname>with the name of your host Controller node. Replace
<rule_name>with the name of the rule you want to check.$ sudo podman exec <controller_hostname> ceph osd crush rule dump <rule_name>
-
Replace
Verify that the rules name and ID that you created are correct according to the
crush_rulesparameter that you used during deployment. Replace<controller_hostname>with the name of your host Controller node.$ sudo podman exec -it ceph-mon-<controller_hostname> ceph osd crush rule dump | grep -E "rule_(id|name)"
Verify that the Ceph pools are tied to the correct CRUSH rule ID that you retrieved in Step 3. Replace
<controller_hostname>with the name of your host Controller node.$ sudo podman exec -it ceph-mon-<controller_hostname> ceph osd dump | grep pool
- For each pool, ensure that the rule ID matches the rule name that you expect.
Chapter 7. Creating the overcloud
When your custom environment files are ready, you can specify the flavors and nodes that each role uses and then execute the deployment. The following subsections explain both steps in greater detail.
7.1. Assigning nodes and flavors to roles
Planning an overcloud deployment involves specifying how many nodes and which flavors to assign to each role. Like all Heat template parameters, these role specifications are declared in the parameter_defaults section of your environment file (in this case, ~/templates/storage-config.yaml).
For this purpose, use the following parameters:
Table 7.1. Roles and Flavors for Overcloud Nodes
| Heat Template Parameter | Description |
|---|---|
| ControllerCount | The number of Controller nodes to scale out |
| OvercloudControlFlavor |
The flavor to use for Controller nodes ( |
| ComputeCount | The number of Compute nodes to scale out |
| OvercloudComputeFlavor |
The flavor to use for Compute nodes ( |
| CephStorageCount | The number of Ceph storage (OSD) nodes to scale out |
| OvercloudCephStorageFlavor |
The flavor to use for Ceph Storage (OSD) nodes ( |
| CephMonCount | The number of dedicated Ceph MON nodes to scale out |
| OvercloudCephMonFlavor |
The flavor to use for dedicated Ceph MON nodes ( |
| CephMdsCount | The number of dedicated Ceph MDS nodes to scale out |
| OvercloudCephMdsFlavor |
The flavor to use for dedicated Ceph MDS nodes ( |
The CephMonCount, CephMdsCount, OvercloudCephMonFlavor, and OvercloudCephMdsFlavor parameters (along with the ceph-mon and ceph-mds flavors) will only be valid if you created a custom CephMON and CephMds role, as described in Chapter 3, Deploying Ceph services on dedicated nodes.
For example, to configure the overcloud to deploy three nodes for each role (Controller, Compute, Ceph-Storage, and CephMon), add the following to your parameter_defaults:
parameter_defaults: ControllerCount: 3 OvercloudControlFlavor: control ComputeCount: 3 OvercloudComputeFlavor: compute CephStorageCount: 3 OvercloudCephStorageFlavor: ceph-storage CephMonCount: 3 OvercloudCephMonFlavor: ceph-mon CephMdsCount: 3 OvercloudCephMdsFlavor: ceph-mds
See Creating the Overcloud with the CLI Tools from the Director Installation and Usage guide for a more complete list of Heat template parameters.
7.2. Initiating overcloud deployment
During undercloud installation, set generate_service_certificate=false in the undercloud.conf file. Otherwise, you must inject a trust anchor when you deploy the overcloud, as described in Enabling SSL/TLS on Overcloud Public Endpoints in the Advanced Overcloud Customization guide.
- Note
- If you want to add Ceph Dashboard during your overcloud deployment, see Chapter 8, Adding the Red Hat Ceph Storage Dashboard to an overcloud deployment.
The creation of the overcloud requires additional arguments for the openstack overcloud deploy command. For example:
$ openstack overcloud deploy --templates -r /home/stack/templates/roles_data_custom.yaml \ -e /usr/share/openstack-tripleo-heat-templates/environments/ceph-ansible/ceph-ansible.yaml \ -e /usr/share/openstack-tripleo-heat-templates/environments/ceph-ansible/ceph-rgw.yaml \ -e /usr/share/openstack-tripleo-heat-templates/environments/ceph-ansible/ceph-mds.yaml -e /usr/share/openstack-tripleo-heat-templates/environments/cinder-backup.yaml \ -e /home/stack/templates/storage-config.yaml \ -e /home/stack/templates/ceph-config.yaml \ --ntp-server pool.ntp.org
The above command uses the following options:
-
--templates- Creates the Overcloud from the default Heat template collection (namely,/usr/share/openstack-tripleo-heat-templates/). -
-r /home/stack/templates/roles_data_custom.yaml- Specifies the customized roles definition file from Chapter 3, Deploying Ceph services on dedicated nodes, which adds custom roles for either Ceph MON or Ceph MDS services. These roles allow either service to be installed on dedicated nodes. -
-e /usr/share/openstack-tripleo-heat-templates/environments/ceph-ansible/ceph-ansible.yaml- Sets the director to create a Ceph cluster. In particular, this environment file will deploy a Ceph cluster with containerized Ceph Storage nodes. -
-e /usr/share/openstack-tripleo-heat-templates/environments/ceph-ansible/ceph-rgw.yaml- Enables the Ceph Object Gateway, as described in Section 4.2, “Enabling the Ceph Object Gateway”. -
-e /usr/share/openstack-tripleo-heat-templates/environments/ceph-ansible/ceph-mds.yaml- Enables the Ceph Metadata Server, as described in Section 4.1, “Enabling the Ceph Metadata Server”. -
-e /usr/share/openstack-tripleo-heat-templates/environments/cinder-backup.yaml- Enables the Block Storage Backup service (cinder-backup), as described in Section 4.4, “Configuring the Backup Service to use Ceph”. -
-e /home/stack/templates/storage-config.yaml- Adds the environment file containing your custom Ceph Storage configuration. -
-e /home/stack/templates/ceph-config.yaml- Adds the environment file containing your custom Ceph cluster settings, as described in Chapter 5, Customizing the Ceph Storage cluster. -
--ntp-server pool.ntp.org- Sets our NTP server.
You can also use an answers file to invoke all your templates and environment files. For example, you can use the following command to deploy an identical overcloud:
$ openstack overcloud deploy -r /home/stack/templates/roles_data_custom.yaml \ --answers-file /home/stack/templates/answers.yaml --ntp-server pool.ntp.org
In this case, the answers file /home/stack/templates/answers.yaml contains:
templates: /usr/share/openstack-tripleo-heat-templates/ environments: - /usr/share/openstack-tripleo-heat-templates/environments/ceph-ansible/ceph-ansible.yaml - /usr/share/openstack-tripleo-heat-templates/environments/ceph-rgw.yaml - /usr/share/openstack-tripleo-heat-templates/environments/ceph-mds.yaml - /usr/share/openstack-tripleo-heat-templates/environments/cinder-backup.yaml - /home/stack/templates/storage-config.yaml - /home/stack/templates/ceph-config.yaml
See Including environment files in an overcloud deployment for more details.
For a full list of options, enter:
$ openstack help overcloud deploy
For more information, see Configuring a basic overcloud with the CLI tools in the Director Installation and Usage guide.
The overcloud creation process begins and director provisions your nodes. This process takes some time to complete. To view the status of the overcloud creation, open a separate terminal as the stack user and enter the following commands:
$ source ~/stackrc $ openstack stack list --nested
7.2.1. Limiting the nodes on which ceph-ansible runs
You can reduce deployment update time by limiting the nodes where ceph-ansible runs. When Red Hat OpenStack Platform (RHOSP) uses config-download to configure Ceph, you can use the --limit option to specify a list of nodes, instead of running config-download and ceph-ansible across your entire deployment. This feature is useful, for example, as part of scaling up your overcloud, or replacing a failed disk. In these scenarios, the deployment can run only on the new nodes that you add to the environment.
Example scenario that uses --limit in a failed disk replacement
In the following example procedure, the Ceph storage node oc0-cephstorage-0 has a disk failure so it receives a new factory clean disk. Ansible needs to run on the oc0-cephstorage-0 node so that the new disk can be used as an OSD but it does not need to run on all of the other Ceph storage nodes. Replace the example environment files and node names with those appropriate to your environment.
Procedure
Log in to the undercloud node as the
stackuser and source thestackrccredentials file:# source stackrc
Complete one of the following steps so that the new disk is used to start the missing OSD.
Run a stack update and include the
--limitoption to specify the nodes where you wantceph-ansibleto run:$ openstack overcloud deploy --templates \ -r /home/stack/roles_data.yaml \ -n /usr/share/openstack-tripleo-heat-templates/network_data_dashboard.yaml \ -e /usr/share/openstack-tripleo-heat-templates/environments/ceph-ansible/ceph-ansible.yaml \ -e ~/my-ceph-settings.yaml \ -e <other-environment_files> \ --limit oc0-controller-0:oc0-controller-2:oc0-controller-1:oc0-cephstorage-0:undercloud
In this example, the Controllers are included because the Ceph mons need Ansible to change their OSD definitions.
If
config-downloadhas generated anansible-playbook-command.shscript, you can also run the script with the--limitoption to pass the specified nodes toceph-ansible:./ansible-playbook-command.sh --limit oc0-controller-0:oc0-controller-2:oc0-controller-1:oc0-cephstorage-0:undercloud
- Warning
-
You must always include the undercloud in the limit list otherwise
ceph-ansiblecannot be executed when you use--limit. This is necessary because theceph-ansibleexecution occurs through theexternal_deploy_steps_tasksplaybook, which runs only on the undercloud.
Chapter 8. Adding the Red Hat Ceph Storage Dashboard to an overcloud deployment
Red Hat Ceph Storage Dashboard is disabled by default but you can enable it in your overcloud with the Red Hat OpenStack Platform director. The Ceph Dashboard is a built-in, web-based Ceph management and monitoring application that administers various aspects and objects in your cluster. Red Hat Ceph Storage Dashboard comprises the following components:
- The Ceph Dashboard manager module provides the user interface and embeds the platform front end, Grafana.
- Prometheus, the monitoring plugin.
- Alertmanager sends alerts to the Dashboard.
- Node Exporters export cluster data to the Dashboard.
- Note
- This feature is supported with Ceph Storage 4.1 or later. For more information about how to determine the version of Ceph Storage installed on your system, see Red Hat Ceph Storage releases and corresponding Ceph package versions.
- Note
- The Red Hat Ceph Storage Dashboard is always colocated on the same nodes as the other Ceph manager components.
- Note
- If you want to add Ceph Dashboard during your initial overcloud deployment, complete the procedures in this chapter before you deploy your initial overcloud in Section 7.2, “Initiating overcloud deployment”.
The following diagram shows the architecture of Ceph Dashboard on Red Hat OpenStack Platform:
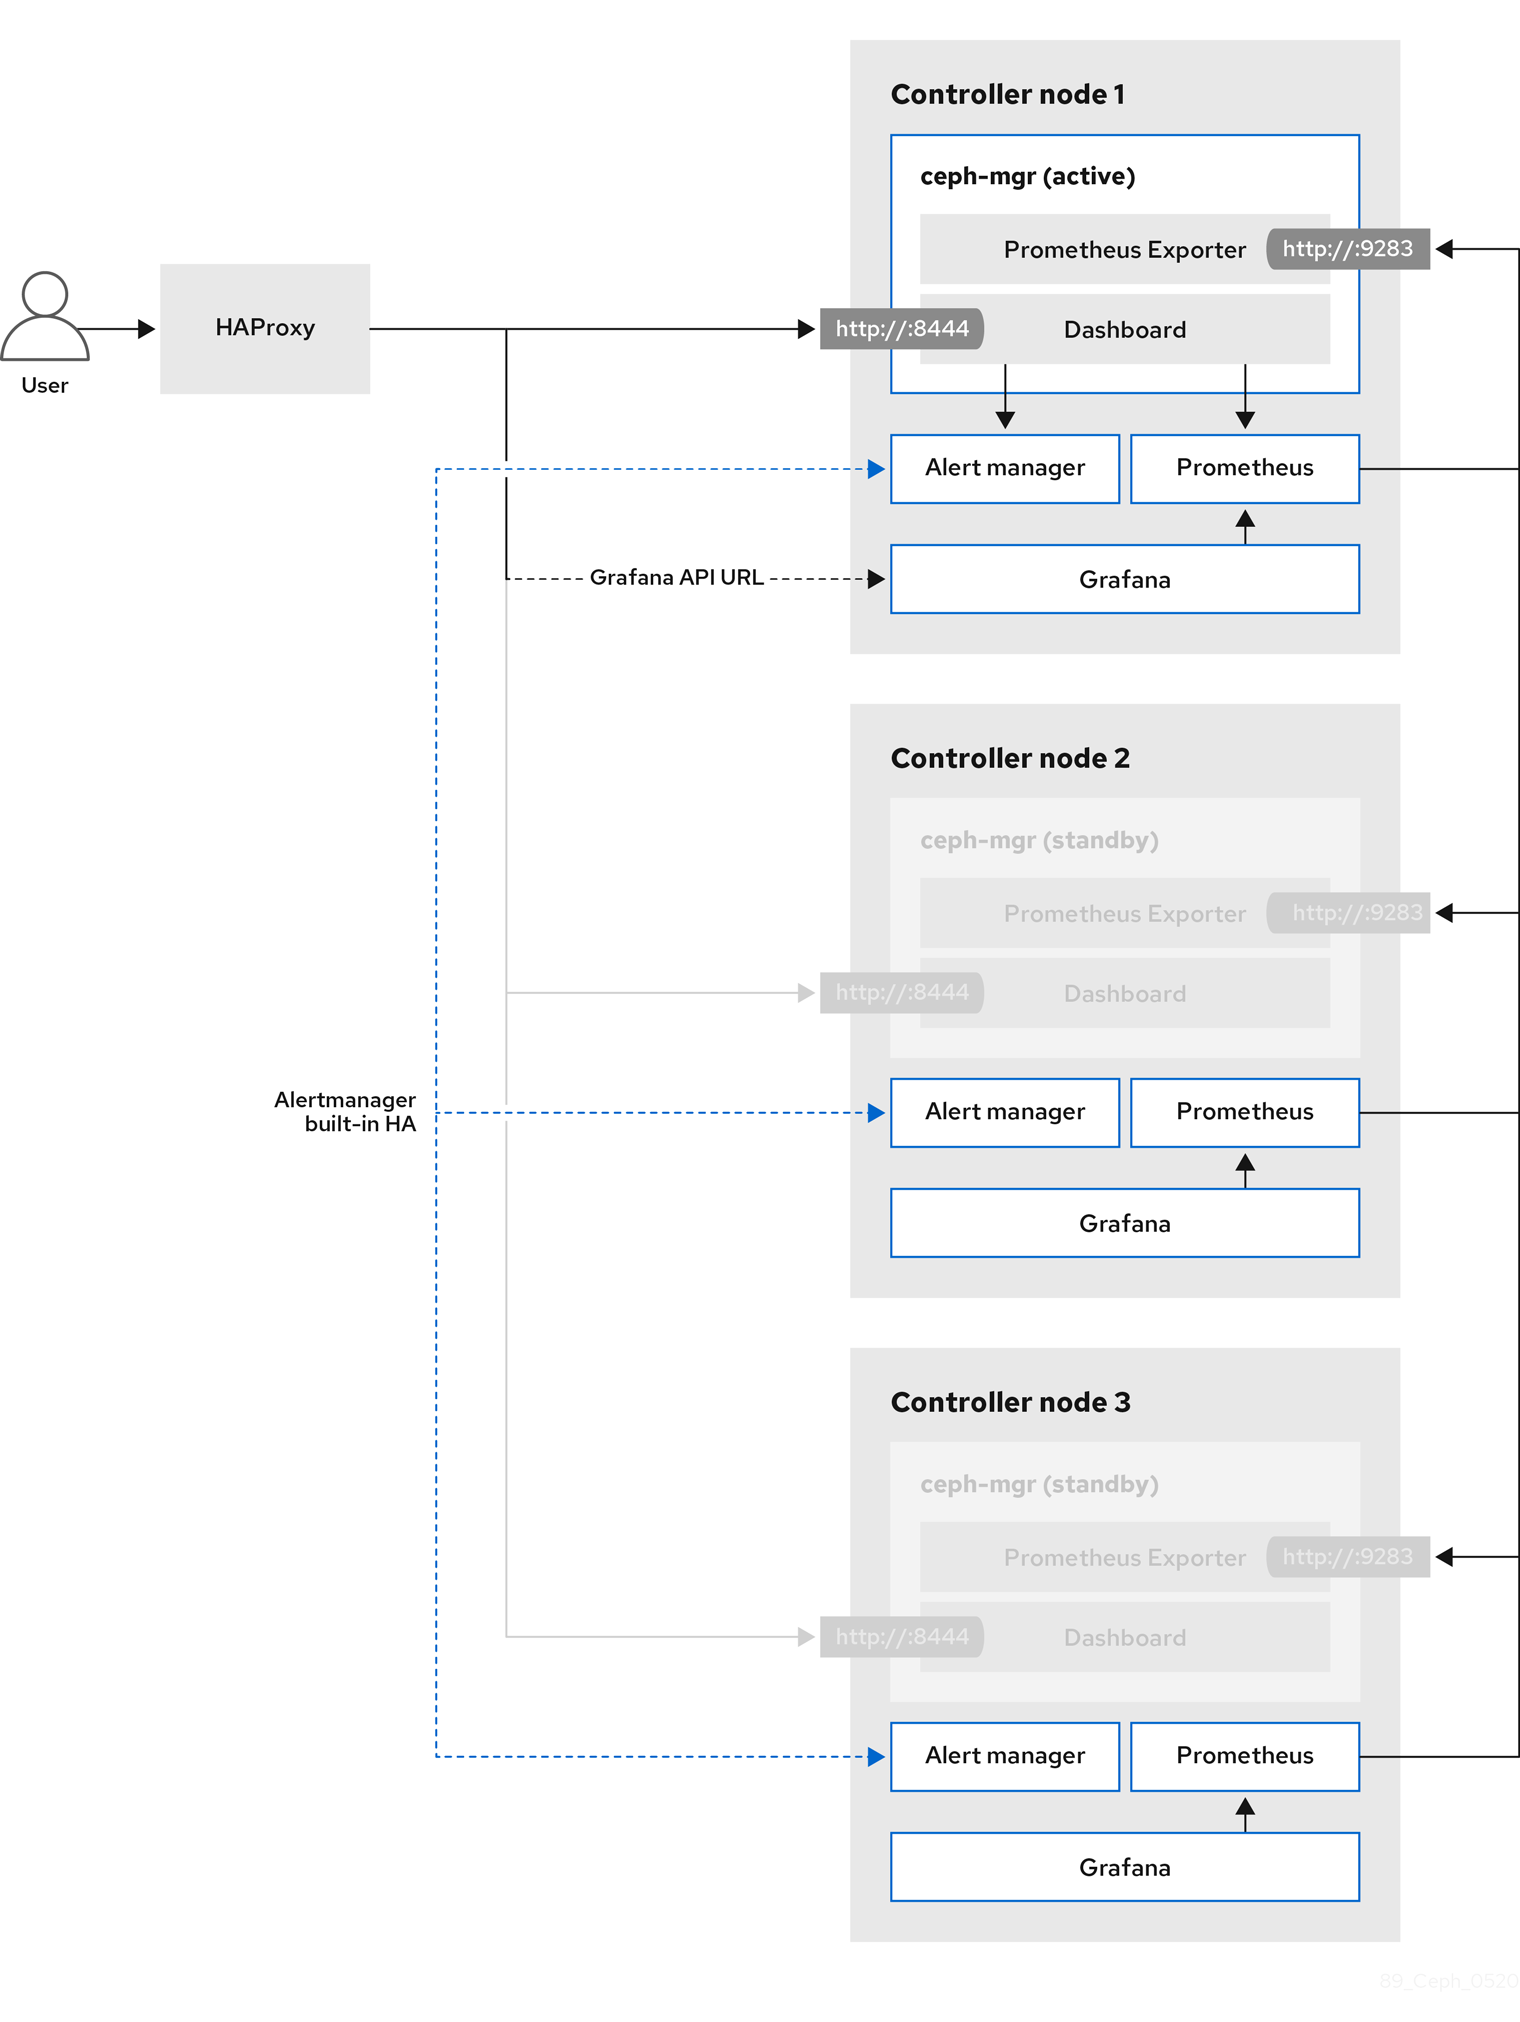
For more information about the Dashboard and its features and limitations, see Dashboard features in the Red Hat Ceph Storage Dashboard Guide.
TLS everywhere with Ceph Dashboard
The Dashboard front end is fully integrated with the TLS everywhere framework. You can enable TLS everywhere provided that you have the required environment files and they are included in the overcloud deploy command. This triggers the certificate request for both Grafana and the Ceph Dashboard and the generated certificate and key files are passed to ceph-ansible during the overcloud deployment. For instructions and more information about how to enable TLS for the Dashboard as well as for other openstack services, see the following locations in the Advanced Overcloud Customization guide:
- Enabling SSL/TLS on Overcloud Public Endpoints.
Enabling SSL/TLS on Internal and Public Endpoints with Identity Management.
- Note
- The port to reach the Ceph Dashboard remains the same even in the TLS-everywhere context.
8.1. Including the necessary containers for the Ceph Dashboard
Before you can add the Ceph Dashboard templates to your overcloud, you must include the necessary containers by using the containers-prepare-parameter.yaml file. To generate the containers-prepare-parameter.yaml file to prepare your container images, complete the following steps:
Procedure
-
Log in to your undercloud host as the
stackuser. Generate the default container image preparation file:
$ sudo openstack tripleo container image prepare default \ --local-push-destination \ --output-env-file containers-prepare-parameter.yaml
Edit the
containers-prepare-parameter.yamlfile and make the modifications to suit your requirements. The following examplecontainers-prepare-parameter.yamlfile contains the image locations and tags related to the Dashboard services including Grafana, Prometheus, Alertmanager, and Node Exporter. Edit the values depending on your specific scenario:parameter_defaults: ContainerImagePrepare: - push_destination: true set: ceph_alertmanager_image: ose-prometheus-alertmanager ceph_alertmanager_namespace: registry.redhat.io/openshift4 ceph_alertmanager_tag: v4.1 ceph_grafana_image: rhceph-4-dashboard-rhel8 ceph_grafana_namespace: registry.redhat.io/rhceph ceph_grafana_tag: 4 ceph_image: rhceph-4-rhel8 ceph_namespace: registry.redhat.io/rhceph ceph_node_exporter_image: ose-prometheus-node-exporter ceph_node_exporter_namespace: registry.redhat.io/openshift4 ceph_node_exporter_tag: v4.1 ceph_prometheus_image: ose-prometheus ceph_prometheus_namespace: registry.redhat.io/openshift4 ceph_prometheus_tag: v4.1 ceph_tag: latest
For more information about registry and image configuration with the containers-prepare-parameter.yaml file, see Container image preparation parameters in the Transitioning to Containerized Services guide.
8.2. Deploying Ceph Dashboard
- Note
- If you want to deploy Ceph Dashboard with a composable network, see Section 8.3, “Deploying Ceph Dashboard with a composable network”
- Note
- The Ceph Dashboard admin user role is set to read-only mode by default. To change the Ceph Dashboard admin default mode, see Section 8.4, “Changing the default permissions”.
Procedure
-
Log in to the undercloud node as the
stackuser. Include the following environment files, with all environment files that are part of your deployment, in the
openstack overcloud deploycommand:$ openstack overcloud deploy \ --templates \ -e <overcloud_environment_files> \ -e /usr/share/openstack-tripleo-heat-templates/environments/ceph-ansible/ceph-ansible.yaml \ -e /usr/share/openstack-tripleo-heat-templates/environments/ceph-ansible/ceph-dashboard.yaml
Replace
<overcloud_environment_files>with the list of environment files that are part of your deployment.- Result
- The resulting deployment comprises an external stack with the grafana, prometheus, alertmanager, and node-exporter containers. The Ceph Dashboard manager module is the back end for this stack, and it embeds the grafana layouts to provide ceph cluster specific metrics to the end users.
8.3. Deploying Ceph Dashboard with a composable network
You can deploy the Ceph Dashboard on a composable network instead of on the default Provisioning network. This eliminates the need to expose the Ceph Dashboard service on the Provisioning network. When you deploy the Dashboard on a composable network, you can also implement separate authorization profiles.
You must choose which network to use before you deploy because you can apply the Dashboard to a new network only when you first deploy the overcloud. You cannot apply the Dashboard to the existing external network or reuse one of the existing networks other than the Provisioning network. Use the following procedure to choose a composable network before you deploy.
Procedure
- Log in to the undercloud as the stack user.
Generate the Controller specific role to include the Dashboard composable network:
$ openstack overcloud roles generate -o /home/stack/roles_data_dashboard.yaml ControllerStorageDashboard Compute BlockStorage ObjectStorage CephStorage
- Result
A new
ControllerStorageDashboardrole is generated inside theroles_data.yamldefined as the output of the command. You must include this file in the template list when you use the overcloud deploy command.NOTE: The
ControllerStorageDashboardrole does not containCephNFSnornetwork_data_dashboard.yaml.-
Director provides a network environment file where the composable network is defined. The default location of this file is
/usr/share/openstack-tripleo-heat-templates/network_data_dashboard.yaml. You must include this file in the overcloud template list when you use the overcloud deploy command.
Include the following environment files, with all environment files that are part of your deployment, in the
openstack overcloud deploycommand:$ openstack overcloud deploy \ --templates \ -r /home/stack/roles_data.yaml \ -n /usr/share/openstack-tripleo-heat-templates/network_data_dashboard.yaml \ -e /usr/share/openstack-tripleo-heat-templates/environments/network-isolation.yaml \ -e /usr/share/openstack-tripleo-heat-templates/environments/network-environment.yaml \ -e <overcloud_environment_files> \ -e /usr/share/openstack-tripleo-heat-templates/environments/ceph-ansible/ceph-ansible.yaml \ -e /usr/share/openstack-tripleo-heat-templates/environments/ceph-ansible/ceph-dashboard.yaml
Replace
<overcloud_environment_files>with the list of environment files that are part of your deployment.- Result
- The resulting deployment comprises an external stack with the grafana, prometheus, alertmanager, and node-exporter containers. The Ceph Dashboard manager module is the back end for this stack, and it embeds the grafana layouts to provide Ceph cluster-specific metrics to the end users.
8.4. Changing the default permissions
The Ceph Dashboard admin user role is set to read-only mode by default for safe monitoring of the Ceph cluster. To permit an admin user to have elevated privileges so that they can alter elements of the Ceph cluster with the Dashboard, you can use the CephDashboardAdminRO parameter to change the default admin permissions.
- Warning
- A user with full permissions might alter elements of your cluster that director configures. This can cause a conflict with director-configured options when you run a stack update. To avoid this problem, do not alter director-configured options with Ceph Dashboard, for example, Ceph OSP pools attributes.
Procedure
-
Log in to the undercloud as the
stackuser. Create the following
ceph_dashboard_admin.yamlenvironment file:parameter_defaults: CephDashboardAdminRO: falseRun the overcloud deploy command to update the existing stack and include the environment file you created with all other environment files that are part of your existing deployment:
$ openstack overcloud deploy \ --templates \ -e <existing_overcloud_environment_files> \ -e ceph_dashboard_admin.yml
Replace
<existing_overcloud_environment_files>with the list of environment files that are part of your existing deployment.
8.5. Accessing Ceph Dashboard
To test that Ceph Dashboard is running correctly, complete the following verification steps to access it and check that the data it displays from the Ceph cluster is correct.
Procedure
-
Log in to the undercloud node as the
stackuser. Retrieve the dashboard admin login credentials:
[stack@undercloud ~]$ grep dashboard_admin_password /var/lib/mistral/overcloud/ceph-ansible/group_vars/all.yml
Retrieve the VIP address to access the Ceph Dashboard:
[stack@undercloud-0 ~]$ grep dashboard_frontend_vip /var/lib/mistral/overcloud/ceph-ansible/group_vars/all.yml
Use a web browser to point to the front end VIP and access the Dashboard. Director configures and exposes the Dashboard on the provisioning network, so you can use the VIP that you retrieved to access the Dashboard directly on TCP port 8444. Ensure that the following conditions are met:
- The Web client host is layer 2 connected to the provisioning network.
The provisioning network is properly routed or proxied, and it can be reached from the web client host. If these conditions are not met, you can still open a SSH tunnel to reach the Dashboard VIP on the overcloud:
client_host$ ssh -L 8444:<dashboard_vip>:8444 stack@<your undercloud>
Replace <dashboard_vip> with the IP address of the control plane VIP that you retrieved.
To access the Dashboard, go to: http://localhost:8444 in a web browser and log in with the following details:
-
The default user that
ceph-ansiblecreates: admin. The password in
/var/lib/mistral/overcloud/ceph-ansible/group_vars/all.yml.- Results
- You can access the Ceph Dashboard.
-
The numbers and graphs that the Dashboard displays reflect the same cluster status that the CLI command,
ceph -s, returns.
-
The default user that
For more information about the Red Hat Ceph Storage Dashboard, see the Red Hat Ceph Storage Administration Guide
Chapter 9. Post-deployment
The following subsections describe several post-deployment operations for managing the Ceph cluster.
9.1. Accessing the overcloud
The director generates a script to configure and help authenticate interactions with your overcloud from the undercloud. The director saves this file (overcloudrc) in your stack user’s home directory. Run the following command to use this file:
$ source ~/overcloudrc
This loads the necessary environment variables to interact with your overcloud from the undercloud CLI. To return to interacting with the undercloud, run the following command:
$ source ~/stackrc
9.2. Monitoring Ceph Storage nodes
After you create the overcloud, check the status of the Ceph Storage Cluster to ensure that it works correctly.
Procedure
Log in to a Controller node as the
heat-adminuser:$ nova list $ ssh heat-admin@192.168.0.25
Check the health of the cluster:
$ sudo podman exec ceph-mon-<HOSTNAME> ceph health
If the cluster has no issues, the command reports back
HEALTH_OK. This means the cluster is safe to use.Log in to an overcloud node that runs the Ceph monitor service and check the status of all OSDs in the cluster:
$ sudo podman exec ceph-mon-<HOSTNAME> ceph osd tree
Check the status of the Ceph Monitor quorum:
$ sudo podman exec ceph-mon-<HOSTNAME> ceph quorum_status
This shows the monitors participating in the quorum and which one is the leader.
Verify that all Ceph OSDs are running:
$ sudo podman exec ceph-mon-<HOSTNAME> ceph osd stat
For more information on monitoring Ceph Storage clusters, see Monitoring in the Red Hat Ceph Storage Administration Guide.
Chapter 10. Rebooting the environment
A situation might occur where you need to reboot the environment. For example, when you might need to modify the physical servers, or you might need to recover from a power outage. In this situation, it is important to make sure your Ceph Storage nodes boot correctly.
Make sure to boot the nodes in the following order:
- Boot all Ceph Monitor nodes first - This ensures the Ceph Monitor service is active in your high availability cluster. By default, the Ceph Monitor service is installed on the Controller node. If the Ceph Monitor is separate from the Controller in a custom role, make sure this custom Ceph Monitor role is active.
- Boot all Ceph Storage nodes - This ensures the Ceph OSD cluster can connect to the active Ceph Monitor cluster on the Controller nodes.
10.1. Rebooting a Ceph Storage (OSD) cluster
Complete the following steps to reboot a cluster of Ceph Storage (OSD) nodes.
Prerequisites
On a Ceph Monitor or Controller node that is running the
ceph-monservice, check that the Red Hat Ceph Storage cluster status is healthy and the pg status isactive+clean:$ sudo podman exec -it ceph-mon-controller-0 ceph -s
If the Ceph cluster is healthy, it returns a status of
HEALTH_OK.If the Ceph cluster status is unhealthy, it returns a status of
HEALTH_WARNorHEALTH_ERR. For troubleshooting guidance, see the Red Hat Ceph Storage 4 Troubleshooting Guide.
Procedure
Log in to a Ceph Monitor or Controller node that is running the
ceph-monservice, and disable Ceph Storage cluster rebalancing temporarily:$ sudo podman exec -it ceph-mon-controller-0 ceph osd set noout $ sudo podman exec -it ceph-mon-controller-0 ceph osd set norebalance
NoteIf you have a multistack or distributed compute node (DCN) architecture, you must specify the cluster name when you set the
nooutandnorebalanceflags. For example:sudo podman exec -it ceph-mon-controller-0 ceph osd set noout --cluster <cluster_name>- Select the first Ceph Storage node that you want to reboot and log in to the node.
Reboot the node:
$ sudo reboot
- Wait until the node boots.
Log into the node and check the cluster status:
$ sudo podman exec -it ceph-mon-controller-0 ceph status
Check that the
pgmapreports allpgsas normal (active+clean).- Log out of the node, reboot the next node, and check its status. Repeat this process until you have rebooted all Ceph storage nodes.
When complete, log in to a Ceph Monitor or Controller node that is running the
ceph-monservice, and re-enable cluster rebalancing:$ sudo podman exec -it ceph-mon-controller-0 ceph osd unset noout $ sudo podman exec -it ceph-mon-controller-0 ceph osd unset norebalance
NoteIf you have a multistack or distributed compute node (DCN) architecture, you must specify the cluster name when you unset the
nooutandnorebalanceflags. For example:sudo podman exec -it ceph-mon-controller-0 ceph osd set noout --cluster <cluster_name>Perform a final status check to verify that the cluster reports
HEALTH_OK:$ sudo podman exec -it ceph-mon-controller-0 ceph status
If a situation occurs where all overcloud nodes boot at the same time, the Ceph OSD services might not start correctly on the Ceph Storage nodes. In this situation, reboot the Ceph Storage OSDs so they can connect to the Ceph Monitor service.
Verify a HEALTH_OK status of the Ceph Storage node cluster with the following command:
$ sudo ceph status
Chapter 11. Scaling the Ceph Storage cluster
11.1. Scaling up the Ceph Storage cluster
You can scale up the number of Ceph Storage nodes in your overcloud by re-running the deployment with the number of Ceph Storage nodes you need.
Before doing so, ensure that you have enough nodes for the updated deployment. These nodes must be registered with the director and tagged accordingly.
Registering new Ceph Storage nodes
To register new Ceph storage nodes with director, complete the following steps.
Procedure
Log in to the undercloud as the
stackuser and initialize your director configuration:$ source ~/stackrc
-
Define the hardware and power management details for the new nodes in a new node definition template; for example,
instackenv-scale.json. Import this file in to director:
$ openstack overcloud node import ~/instackenv-scale.json
Importing the node definition template registers each node that is defined there to director.
Assign the kernel and ramdisk images to all nodes:
$ openstack overcloud node configure
For more information about registering new nodes, see Section 2.2, “Registering nodes”.
Manually tagging new nodes
After you register each node, you must inspect the hardware and tag the node into a specific profile. Use profile tags to match your nodes to flavors, and then assign flavors to deployment roles.
Procedure
Trigger hardware introspection to retrieve the hardware attributes of each node:
$ openstack overcloud node introspect --all-manageable --provide
-
The
--all-manageableoption introspects only the nodes that are in a managed state. In this example, all nodes are in a managed state. The
--provideoption resets all nodes to anactivestate after introspection.ImportantEnsure that this process completes successfully. This process usually takes 15 minutes for bare metal nodes.
-
The
Retrieve a list of your nodes to identify their UUIDs:
$ openstack baremetal node list
Add a profile option to the
properties/capabilitiesparameter for each node to manually tag a node to a specific profile. The addition of theprofileoption tags the nodes into each respective profile.NoteAs an alternative to manual tagging, use the Automated Health Check (AHC) Tools to automatically tag larger numbers of nodes based on benchmarking data. For example, the following commands tag three additional nodes with the
ceph-storageprofile:$ openstack baremetal node set --property capabilities='profile:baremetal,boot_option:local' 551d81f5-4df2-4e0f-93da-6c5de0b868f7 $ openstack baremetal node set --property capabilities='profile:baremetal,boot_option:local' 5e735154-bd6b-42dd-9cc2-b6195c4196d7 $ openstack baremetal node set --property capabilities='profile:baremetal,boot_option:local' 1a2b090c-299d-4c20-a25d-57dd21a7085b
If the nodes you tagged and registered use multiple disks, you can set director to use a specific root disk on each node. For more information, see Section 2.5, “Defining the root disk for multi-disk clusters”.
Redeploying the overcloud with additional Ceph Storage nodes
After you register and tag the new nodes, you can scale up the number of Ceph Storage nodes by redeploying the overcloud.
Procedure
Before you redeploy the overcloud, set the
CephStorageCountparameter in theparameter_defaultsof your environment file, in this case,~/templates/storage-config.yaml. In Section 7.1, “Assigning nodes and flavors to roles”, the overcloud is configured to deploy with three Ceph Storage nodes. The following example scales the overcloud to 6 nodes:parameter_defaults: ControllerCount: 3 OvercloudControlFlavor: control ComputeCount: 3 OvercloudComputeFlavor: compute CephStorageCount: 6 OvercloudCephStorageFlavor: ceph-storage CephMonCount: 3 OvercloudCephMonFlavor: ceph-mon- Redeploy the overcloud. The overcloud now has six Ceph Storage nodes instead of three.
11.2. Scaling down and replacing Ceph Storage nodes
In some cases, you might need to scale down your Ceph cluster, or even replace a Ceph Storage node, for example, if a Ceph Storage node is faulty. In either situation, you must disable and rebalance any Ceph Storage node that you want to remove from the overcloud to avoid data loss.
This procedure uses steps from the Red Hat Ceph Storage Administration Guide to manually remove Ceph Storage nodes. For more in-depth information about manual removal of Ceph Storage nodes, see Starting, stopping, and restarting Ceph daemons that run in containers and Removing a Ceph OSD using the command-line interface.
Procedure
-
Log in to a Controller node as the
heat-adminuser. The directorstackuser has an SSH key to access theheat-adminuser. List the OSD tree and find the OSDs for your node. For example, the node you want to remove might contain the following OSDs:
-2 0.09998 host overcloud-cephstorage-0 0 0.04999 osd.0 up 1.00000 1.00000 1 0.04999 osd.1 up 1.00000 1.00000
Disable the OSDs on the Ceph Storage node. In this case, the OSD IDs are 0 and 1.
[heat-admin@overcloud-controller-0 ~]$ sudo podman exec ceph-mon-<HOSTNAME> ceph osd out 0 [heat-admin@overcloud-controller-0 ~]$ sudo podman exec ceph-mon-<HOSTNAME> ceph osd out 1
The Ceph Storage cluster begins rebalancing. Wait for this process to complete. Follow the status by using the following command:
[heat-admin@overcloud-controller-0 ~]$ sudo podman exec ceph-mon-<HOSTNAME> ceph -w
After the Ceph cluster completes rebalancing, log in to the Ceph Storage node you are removing, in this case,
overcloud-cephstorage-0, as theheat-adminuser, and stop and disable the node.[heat-admin@overcloud-cephstorage-0 ~]$ sudo systemctl stop ceph-osd@0 [heat-admin@overcloud-cephstorage-0 ~]$ sudo systemctl stop ceph-osd@1 [heat-admin@overcloud-cephstorage-0 ~]$ sudo systemctl disable ceph-osd@0 [heat-admin@overcloud-cephstorage-0 ~]$ sudo systemctl disable ceph-osd@1
Stop the OSDs.
[heat-admin@overcloud-cephstorage-0 ~]$ sudo systemctl stop ceph-osd@0 [heat-admin@overcloud-cephstorage-0 ~]$ sudo systemctl stop ceph-osd@1
While logged in to the Controller node, remove the OSDs from the CRUSH map so that they no longer receive data.
[heat-admin@overcloud-controller-0 ~]$ sudo podman exec ceph-mon-<HOSTNAME> ceph osd crush remove osd.0 [heat-admin@overcloud-controller-0 ~]$ sudo podman exec ceph-mon-<HOSTNAME> ceph osd crush remove osd.1
Remove the OSD authentication key.
[heat-admin@overcloud-controller-0 ~]$ sudo podman exec ceph-mon-<HOSTNAME> ceph auth del osd.0 [heat-admin@overcloud-controller-0 ~]$ sudo podman exec ceph-mon-<HOSTNAME> ceph auth del osd.1
Remove the OSD from the cluster.
[heat-admin@overcloud-controller-0 ~]$ sudo podman exec ceph-mon-<HOSTNAME> ceph osd rm 0 [heat-admin@overcloud-controller-0 ~]$ sudo podman exec ceph-mon-<HOSTNAME> ceph osd rm 1
Remove the Storage node from the CRUSH map:
[heat-admin@overcloud-controller-0 ~]$ sudo docker exec ceph-mon-<HOSTNAME> ceph osd crush rm <NODE> [heat-admin@overcloud-controller-0 ~]$ sudo ceph osd crush remove <NODE>
You can confirm the <NODE> name as defined in the CRUSH map by searching the CRUSH tree:
[heat-admin@overcloud-controller-0 ~]$ sudo podman exec ceph-mon-<HOSTNAME> ceph osd crush tree | grep overcloud-osd-compute-3 -A 4 "name": "overcloud-osd-compute-3", "type": "host", "type_id": 1, "items": [] }, [heat-admin@overcloud-controller-0 ~]$In the CRUSH tree, ensure that the items list is empty. If the list is not empty, revisit step 7.
Leave the node and return to the undercloud as the
stackuser.[heat-admin@overcloud-controller-0 ~]$ exit [stack@director ~]$
Disable the Ceph Storage node so that director does not reprovision it.
[stack@director ~]$ openstack baremetal node list [stack@director ~]$ openstack baremetal node maintenance set UUID
Removing a Ceph Storage node requires an update to the
overcloudstack in director with the local template files. First identify the UUID of the overcloud stack:$ openstack stack list
Identify the UUIDs of the Ceph Storage node you want to delete:
$ openstack server list
Delete the node from the stack and update the plan accordingly:
ImportantIf you passed any extra environment files when you created the overcloud, pass them again here using the
-eoption to avoid making undesired changes to the overcloud. For more information, see Modifying the overcloud environment in the Director Installation and Usage guide.$ openstack overcloud node delete / --stack <stack-name> / --templates / -e <other-environment-files> / <node_UUID>
-
Wait until the stack completes its update. Use the
heat stack-list --show-nestedcommand to monitor the stack update. Add new nodes to the director node pool and deploy them as Ceph Storage nodes. Use the
CephStorageCountparameter inparameter_defaultsof your environment file, in this case,~/templates/storage-config.yaml, to define the total number of Ceph Storage nodes in the overcloud.parameter_defaults: ControllerCount: 3 OvercloudControlFlavor: control ComputeCount: 3 OvercloudComputeFlavor: compute CephStorageCount: 3 OvercloudCephStorageFlavor: ceph-storage CephMonCount: 3 OvercloudCephMonFlavor: ceph-monNoteFor more information about how to define the number of nodes per role, see Section 7.1, “Assigning nodes and flavors to roles”.
After you update your environment file, redeploy the overcloud:
$ openstack overcloud deploy --templates -e <ENVIRONMENT_FILE>
Director provisions the new node and updates the entire stack with the details of the new node.
Log in to a Controller node as the
heat-adminuser and check the status of the Ceph Storage node:[heat-admin@overcloud-controller-0 ~]$ sudo ceph status
-
Confirm that the value in the
osdmapsection matches the number of nodes in your cluster that you want. The Ceph Storage node that you removed is replaced with a new node.
11.3. Adding an OSD to a Ceph Storage node
This procedure demonstrates how to add an OSD to a node. For more information about Ceph OSDs, see Ceph OSDs in the Red Hat Ceph Storage Operations Guide.
Procedure
Notice the following heat template deploys Ceph Storage with three OSD devices:
parameter_defaults: CephAnsibleDisksConfig: devices: - /dev/sdb - /dev/sdc - /dev/sdd osd_scenario: lvm osd_objectstore: bluestoreTo add an OSD, update the node disk layout as described in Section 5.3, “Mapping the Ceph Storage node disk layout”. In this example, add
/dev/sdeto the template:parameter_defaults: CephAnsibleDisksConfig: devices: - /dev/sdb - /dev/sdc - /dev/sdd - /dev/sde osd_scenario: lvm osd_objectstore: bluestore-
Run
openstack overcloud deployto update the overcloud.
In this example, all hosts with OSDs have a new device called /dev/sde. If you do not want all nodes to have the new device, update the heat template. For information about how to define hosts with a differing devices list, see Section 5.5, “Overriding parameters for dissimilar Ceph Storage nodes” and Section 5.5.1.2, “Altering the disk layout in Ceph Storage nodes”.
11.4. Removing an OSD from a Ceph Storage node
This procedure demonstrates how to remove an OSD from a node. It assumes the following about the environment:
-
A server (
ceph-storage0) has an OSD (ceph-osd@4) running on/dev/sde. -
The Ceph monitor service (
ceph-mon) is running oncontroller0. - There are enough available OSDs to ensure the storage cluster is not at its near-full ratio.
For more information about Ceph OSDs, see Ceph OSDs in the Red Hat Ceph Storage Operations Guide.
Procedure
-
SSH into
ceph-storage0and log in asroot. Disable and stop the OSD service:
[root@ceph-storage0 ~]# systemctl disable ceph-osd@4 [root@ceph-stoarge0 ~]# systemctl stop ceph-osd@4
-
Disconnect from
ceph-storage0. -
SSH into
controller0and log in asroot. Identify the name of the Ceph monitor container:
[root@controller0 ~]# podman ps | grep ceph-mon ceph-mon-controller0 [root@controller0 ~]#
Enable the Ceph monitor container to mark the undesired OSD as
out:[root@controller0 ~]# podman exec ceph-mon-controller0 ceph osd out 4
NoteThis command causes Ceph to rebalance the storage cluster and copy data to other OSDs in the cluster. The cluster temporarily leaves the
active+cleanstate until rebalancing is complete.Run the following command and wait for the storage cluster state to become
active+clean:[root@controller0 ~]# podman exec ceph-mon-controller0 ceph -w
Remove the OSD from the CRUSH map so that it no longer receives data:
[root@controller0 ~]# podman exec ceph-mon-controller0 ceph osd crush remove osd.4
Remove the OSD authentication key:
[root@controller0 ~]# podman exec ceph-mon-controller0 ceph auth del osd.4
Remove the OSD:
[root@controller0 ~]# podman exec ceph-mon-controller0 ceph osd rm 4
-
Disconnect from
controller0. -
SSH into the undercloud as the
stackuser and locate the heat environment file in which you defined theCephAnsibleDisksConfigparameter. Notice the heat template contains four OSDs:
parameter_defaults: CephAnsibleDisksConfig: devices: - /dev/sdb - /dev/sdc - /dev/sdd - /dev/sde osd_scenario: lvm osd_objectstore: bluestoreModify the template to remove
/dev/sde.parameter_defaults: CephAnsibleDisksConfig: devices: - /dev/sdb - /dev/sdc - /dev/sdd osd_scenario: lvm osd_objectstore: bluestoreRun
openstack overcloud deployto update the overcloud.NoteIn this example, you remove the
/dev/sdedevice from all hosts with OSDs. If you do not remove the same device from all nodes, update the heat template. For information about how to define hosts with a differingdeviceslist, see Section 5.5, “Overriding parameters for dissimilar Ceph Storage nodes”.
Chapter 12. Replacing a failed disk
If one of the disks fails in your Ceph cluster, complete the following procedures to replace it:
- Determining if there is a device name change, see Section 12.1, “Determining if there is a device name change”.
- Ensuring that the OSD is down and destroyed, see Section 12.2, “Ensuring that the OSD is down and destroyed”.
- Removing the old disk from the system and installing the replacement disk, see Section 12.3, “Removing the old disk from the system and installing the replacement disk”.
- Verifying that the disk replacement is successful, see Section 12.4, “Verifying that the disk replacement is successful”.
12.1. Determining if there is a device name change
Before you replace the disk, determine if the replacement disk for the replacement OSD has a different name in the operating system than the device that you want to replace. If the replacement disk has a different name, you must update Ansible parameters for the devices list so that subsequent runs of ceph-ansible, including when director runs ceph-ansible, do not fail as a result of the change. For an example of the devices list that you must change when you use director, see Section 5.3, “Mapping the Ceph Storage node disk layout”.
If the device name changes and you use the following procedures to update your system outside of ceph-ansible or director, there is a risk that the configuration management tools are out of sync with the system that they manage until you update the system definition files and the configuration is reasserted without error.
Persistent naming of storage devices
Storage devices that the sd driver manages might not always have the same name across reboots. For example, a disk that is normally identified by /dev/sdc might be named /dev/sdb. It is also possible for the replacement disk, /dev/sdc, to appear in the operating system as /dev/sdd even if you want to use it as a replacement for /dev/sdc. To address this issue, use names that are persistent and match the following pattern: /dev/disk/by-*. For more information, see Persistent Naming in the Red Hat Enterprise Linux (RHEL) 7 Storage Administration Guide.
Depending on the naming method that you use to deploy Ceph, you might need to update the devices list after you replace the OSD. Use the following list of naming methods to determine if you must change the devices list:
- The major and minor number range method
If you used
sdand want to continue to use it, after you install the new disk, check if the name has changed. If the name did not change, for example, if the same name appears correctly as/dev/sdd, it is not necessary to change the name after you complete the disk replacement procedures.ImportantThis naming method is not recommended because there is still a risk that the name becomes inconsistent over time. For more information, see Persistent Naming in the RHEL 7 Storage Administration Guide.
- The
by-pathmethod If you use this method, and you add a replacement disk in the same slot, then the path is consistent and no change is necessary.
ImportantAlthough this naming method is preferable to the major and minor number range method, use caution to ensure that the target numbers do not change. For example, use persistent binding and update the names if a host adapter is moved to a different PCI slot. In addition, there is the possibility that the SCSI host numbers can change if a HBA fails to probe, if drivers are loaded in a different order, or if a new HBA is installed on the system. The
by-pathnaming method also differs between RHEL7 and RHEL8. For more information, see:- Article [What is the difference between "by-path" links created in RHEL8 and RHEL7?] https://access.redhat.com/solutions/5171991
- Overview of persistent naming attributes in the RHEL 8 Managing file systems guide.
- The
by-uuidmethod -
If you use this method, you can use the
blkidutility to set the new disk to have the same UUID as the old disk. For more information, see Persistent Naming in the RHEL 7 Storage Administration Guide. - The
by-idmethod - If you use this method, you must change the devices list because this identifier is a property of the device and the device has been replaced.
When you add the new disk to the system, if it is possible to modify the persistent naming attributes according to the RHEL7 Storage Administrator Guide, see Persistent Naming, so that the device name is unchanged, then it is not necessary to update the devices list and re-run ceph-ansible, or trigger director to re-run ceph-ansible and you can proceed with the disk replacement procedures. However, you can re-run ceph-ansible to ensure that the change did not result in any inconsistencies.
12.2. Ensuring that the OSD is down and destroyed
On the server that hosts the Ceph Monitor, use the ceph command in the running monitor container to ensure that the OSD that you want to replace is down, and then destroy it.
Procedure
Identify the name of the running Ceph monitor container and store it in an environment variable called
MON:MON=$(podman ps | grep ceph-mon | awk {'print $1'})Alias the
cephcommand so that it executes within the running Ceph monitor container:alias ceph="podman exec $MON ceph"
Use the new alias to verify that the OSD that you want to replace is down:
[root@overcloud-controller-0 ~]# ceph osd tree | grep 27 27 hdd 0.04790 osd.27 down 1.00000 1.00000
Destroy the OSD. The following example command destroys
OSD 27:[root@overcloud-controller-0 ~]# ceph osd destroy 27 --yes-i-really-mean-it destroyed osd.27
12.3. Removing the old disk from the system and installing the replacement disk
On the container host with the OSD that you want to replace, remove the old disk from the system and install the replacement disk.
Prerequisites:
- Verify that the device ID has changed. For more information, see Section 12.1, “Determining if there is a device name change”.
The ceph-volume command is present in the Ceph container but is not installed on the overcloud node. Create an alias so that the ceph-volume command runs the ceph-volume binary inside the Ceph container. Then use the ceph-volume command to clean the new disk and add it as an OSD.
Procedure
Ensure that the failed OSD is not running:
systemctl stop ceph-osd@27
Identify the image ID of the ceph container image and store it in an environment variable called
IMG:IMG=$(podman images | grep ceph | awk {'print $3'})Alias the
ceph-volumecommand so that it runs inside the$IMGCeph container, with theceph-volumeentry point and relevant directories:alias ceph-volume="podman run --rm --privileged --net=host --ipc=host -v /run/lock/lvm:/run/lock/lvm:z -v /var/run/udev/:/var/run/udev/:z -v /dev:/dev -v /etc/ceph:/etc/ceph:z -v /var/lib/ceph/:/var/lib/ceph/:z -v /var/log/ceph/:/var/log/ceph/:z --entrypoint=ceph-volume $IMG --cluster ceph"
Verify that the aliased command runs successfully:
ceph-volume lvm list
Check that your new OSD device is not already part of LVM. Use the
pvdisplaycommand to inspect the device, and ensure that theVG Namefield is empty. Replace<NEW_DEVICE>with the/dev/*path of your new OSD device:[root@overcloud-computehci-2 ~]# pvdisplay <NEW_DEVICE> --- Physical volume --- PV Name /dev/sdj VG Name ceph-0fb0de13-fc8e-44c8-99ea-911e343191d2 PV Size 50.00 GiB / not usable 1.00 GiB Allocatable yes (but full) PE Size 1.00 GiB Total PE 49 Free PE 0 Allocated PE 49 PV UUID kOO0If-ge2F-UH44-6S1z-9tAv-7ypT-7by4cp [root@overcloud-computehci-2 ~]#
If the
VG Namefield is not empty, then the device belongs to a volume group that you must remove.If the device belongs to a volume group, use the
lvdisplaycommand to check if there is a logical volume in the volume group. Replace<VOLUME_GROUP>with the value of theVG Namefield that you retrieved from thepvdisplaycommand:[root@overcloud-computehci-2 ~]# lvdisplay | grep <VOLUME_GROUP> LV Path /dev/ceph-0fb0de13-fc8e-44c8-99ea-911e343191d2/osd-data-a0810722-7673-43c7-8511-2fd9db1dbbc6 VG Name ceph-0fb0de13-fc8e-44c8-99ea-911e343191d2 [root@overcloud-computehci-2 ~]#
If the
LV Pathfield is not empty, then the device contains a logical volume that you must remove.If the new device is part of a logical volume or volume group, remove the logical volume, volume group, and the device association as a physical volume within the LVM system.
-
Replace
<LV_PATH>with the value of theLV Pathfield. -
Replace
<VOLUME_GROUP>with the value of theVG Namefield. Replace
<NEW_DEVICE>with the/dev/*path of your new OSD device.[root@overcloud-computehci-2 ~]# lvremove --force <LV_PATH> Logical volume "osd-data-a0810722-7673-43c7-8511-2fd9db1dbbc6" successfully removed
[root@overcloud-computehci-2 ~]# vgremove --force <VOLUME_GROUP> Volume group "ceph-0fb0de13-fc8e-44c8-99ea-911e343191d2" successfully removed
[root@overcloud-computehci-2 ~]# pvremove <NEW_DEVICE> Labels on physical volume "/dev/sdj" successfully wiped.
-
Replace
Ensure that the new OSD device is clean. In the following example, the device is
/dev/sdj:[root@overcloud-computehci-2 ~]# ceph-volume lvm zap /dev/sdj --> Zapping: /dev/sdj --> --destroy was not specified, but zapping a whole device will remove the partition table Running command: /usr/sbin/wipefs --all /dev/sdj Running command: /bin/dd if=/dev/zero of=/dev/sdj bs=1M count=10 stderr: 10+0 records in 10+0 records out 10485760 bytes (10 MB, 10 MiB) copied, 0.010618 s, 988 MB/s --> Zapping successful for: <Raw Device: /dev/sdj> [root@overcloud-computehci-2 ~]#
Create the new OSD with the existing OSD ID by using the new device but pass
--no-systemdso thatceph-volumedoes not attempt to start the OSD. This is not possible from within the container:ceph-volume lvm create --osd-id 27 --data /dev/sdj --no-systemd
Start the OSD outside of the container:
systemctl start ceph-osd@27
12.4. Verifying that the disk replacement is successful
To check that your disk replacement is successful, on the undercloud, complete the following steps.
Procedure
- Check if the device name changed, update the devices list according to the naming method you used to deploy Ceph. For more information, see Section 12.1, “Determining if there is a device name change”.
- To ensure that the change did not introduce any inconsistencies, re-run the overcloud deploy command to perform a stack update.
In cases where you have hosts that have different device lists, you might have to define an exception. For example, you might use the following example heat environment file to deploy a node with three OSD devices.
parameter_defaults: CephAnsibleDisksConfig: devices: - /dev/sdb - /dev/sdc - /dev/sdd osd_scenario: lvm osd_objectstore: bluestoreThe
CephAnsibleDisksConfigparameter applies to all nodes that host OSDs, so you cannot update thedevicesparameter with the new device list. Instead, you must define an exception for the new host that has a different device list. For more information about defining an exception, see Section 5.5, “Overriding parameters for dissimilar Ceph Storage nodes” and Section 5.5.1.2, “Altering the disk layout in Ceph Storage nodes”.
Appendix A. Sample environment file: creating a Ceph Storage cluster
The following custom environment file uses many of the options described throughout Chapter 2, Preparing Ceph Storage nodes for overcloud deployment. This sample does not include any commented-out options. For an overview on environment files, see Environment Files (from the Advanced Overcloud Customization guide).
/home/stack/templates/storage-config.yaml
parameter_defaults: 1
  CinderBackupBackend: ceph 2
  CephAnsibleDisksConfig: 3
    osd_scenario: lvm
    osd_objectstore: bluestore
    dmcrypt: true
    devices:
      - /dev/disk/by-path/pci-0000:03:00.0-scsi-0:0:10:0
      - /dev/disk/by-path/pci-0000:03:00.0-scsi-0:0:11:0
      - /dev/nvme0n1
  ControllerCount: 3 4
  OvercloudControlFlavor: control
  ComputeCount: 3
  OvercloudComputeFlavor: compute
  CephStorageCount: 3
  OvercloudCephStorageFlavor: ceph-storage
  CephMonCount: 3
  OvercloudCephMonFlavor: ceph-mon
  CephMdsCount: 3
  OvercloudCephMdsFlavor: ceph-mds
  NeutronNetworkType: vxlan 5
- 1
- The
parameter_defaultssection modifies the default values for parameters in all templates. Most of the entries listed here are described in Chapter 4, Customizing the Storage service. - 2
- If you are deploying the Ceph Object Gateway, you can use Ceph Object Storage (
ceph-rgw) as a backup target. To configure this, setCinderBackupBackendtoswift. See Section 4.2, “Enabling the Ceph Object Gateway” for details. - 3
- The
CephAnsibleDisksConfigsection defines a custom disk layout for deployments using BlueStore. - 4
- For each role, the
*Countparameters assign a number of nodes while theOvercloud*Flavorparameters assign a flavor. For example,ControllerCount: 3assigns 3 nodes to the Controller role, andOvercloudControlFlavor: controlsets each of those roles to use thecontrolflavor. See Section 7.1, “Assigning nodes and flavors to roles” for details.NoteThe
CephMonCount,CephMdsCount,OvercloudCephMonFlavor, andOvercloudCephMdsFlavorparameters (along with theceph-monandceph-mdsflavors) will only be valid if you created a customCephMONandCephMdsrole, as described in Chapter 3, Deploying Ceph services on dedicated nodes. - 5
NeutronNetworkType:sets the network type that theneutronservice should use (in this case,vxlan).
Appendix B. Sample custom interface template: multiple bonded interfaces
The following template is a customized version of /usr/share/openstack-tripleo-heat-templates/network/config/bond-with-vlans/ceph-storage.yaml. It features multiple bonded interfaces to isolate back-end and front-end storage network traffic, along with redundancy for both connections, as described in Section 4.5, “Configuring multiple bonded interfaces for Ceph nodes”.
It also uses custom bonding options, 'mode=4 lacp_rate=1', as described in Section 4.5.1, “Configuring bonding module directives”.
/usr/share/openstack-tripleo-heat-templates/network/config/bond-with-vlans/ceph-storage.yaml (custom)
heat_template_version: 2015-04-30

description: >
  Software Config to drive os-net-config with 2 bonded nics on a bridge
  with VLANs attached for the ceph storage role.

parameters:
  ControlPlaneIp:
    default: ''
    description: IP address/subnet on the ctlplane network
    type: string
  ExternalIpSubnet:
    default: ''
    description: IP address/subnet on the external network
    type: string
  InternalApiIpSubnet:
    default: ''
    description: IP address/subnet on the internal API network
    type: string
  StorageIpSubnet:
    default: ''
    description: IP address/subnet on the storage network
    type: string
  StorageMgmtIpSubnet:
    default: ''
    description: IP address/subnet on the storage mgmt network
    type: string
  TenantIpSubnet:
    default: ''
    description: IP address/subnet on the tenant network
    type: string
  ManagementIpSubnet: # Only populated when including environments/network-management.yaml
    default: ''
    description: IP address/subnet on the management network
    type: string
  BondInterfaceOvsOptions:
    default: 'mode=4 lacp_rate=1'
    description: The bonding_options string for the bond interface. Set
                 things like lacp=active and/or bond_mode=balance-slb
                 using this option.
    type: string
    constraints:
      - allowed_pattern: "^((?!balance.tcp).)*$"
        description: |
          The balance-tcp bond mode is known to cause packet loss and
          should not be used in BondInterfaceOvsOptions.
  ExternalNetworkVlanID:
    default: 10
    description: Vlan ID for the external network traffic.
    type: number
  InternalApiNetworkVlanID:
    default: 20
    description: Vlan ID for the internal_api network traffic.
    type: number
  StorageNetworkVlanID:
    default: 30
    description: Vlan ID for the storage network traffic.
    type: number
  StorageMgmtNetworkVlanID:
    default: 40
    description: Vlan ID for the storage mgmt network traffic.
    type: number
  TenantNetworkVlanID:
    default: 50
    description: Vlan ID for the tenant network traffic.
    type: number
  ManagementNetworkVlanID:
    default: 60
    description: Vlan ID for the management network traffic.
    type: number
  ControlPlaneSubnetCidr: # Override this via parameter_defaults
    default: '24'
    description: The subnet CIDR of the control plane network.
    type: string
  ControlPlaneDefaultRoute: # Override this via parameter_defaults
    description: The default route of the control plane network.
    type: string
  ExternalInterfaceDefaultRoute: # Not used by default in this template
    default: '10.0.0.1'
    description: The default route of the external network.
    type: string
  ManagementInterfaceDefaultRoute: # Commented out by default in this template
    default: unset
    description: The default route of the management network.
    type: string
  DnsServers: # Override this via parameter_defaults
    default: []
    description: A list of DNS servers (2 max for some implementations) that will be added to resolv.conf.
    type: comma_delimited_list
  EC2MetadataIp: # Override this via parameter_defaults
    description: The IP address of the EC2 metadata server.
    type: string

resources:
  OsNetConfigImpl:
    type: OS::Heat::StructuredConfig
    properties:
      group: os-apply-config
      config:
        os_net_config:
          network_config:
            -
              type: interface
              name: nic1
              use_dhcp: false
              dns_servers: {get_param: DnsServers}
              addresses:
                -
                  ip_netmask:
                    list_join:
                      - '/'
                      - - {get_param: ControlPlaneIp}
                        - {get_param: ControlPlaneSubnetCidr}
              routes:
                -
                  ip_netmask: 169.254.169.254/32
                  next_hop: {get_param: EC2MetadataIp}
                -
                  default: true
                  next_hop: {get_param: ControlPlaneDefaultRoute}
            -
              type: ovs_bridge
              name: br-bond
              members:
                -
                  type: linux_bond
                  name: bond1
                  bonding_options: {get_param: BondInterfaceOvsOptions}
                  members:
                    -
                      type: interface
                      name: nic2
                      primary: true
                    -
                      type: interface
                      name: nic3
                -
                  type: vlan
                  device: bond1
                  vlan_id: {get_param: StorageNetworkVlanID}
                  addresses:
                    -
                      ip_netmask: {get_param: StorageIpSubnet}
            -
              type: ovs_bridge
              name: br-bond2
              members:
                -
                  type: linux_bond
                  name: bond2
                  bonding_options: {get_param: BondInterfaceOvsOptions}
                  members:
                    -
                      type: interface
                      name: nic4
                      primary: true
                    -
                      type: interface
                      name: nic5
                -
                  type: vlan
                  device: bond1
                  vlan_id: {get_param: StorageMgmtNetworkVlanID}
                  addresses:
                    -
                      ip_netmask: {get_param: StorageMgmtIpSubnet}
outputs:
  OS::stack_id:
    description: The OsNetConfigImpl resource.
    value: {get_resource: OsNetConfigImpl}