
Chapter 5. Hardening Infrastructure and Virtualization
This section contains component-specific advice and information.
5.1. Vulnerability Awareness
Your operating procedures should have a plan to learn about new vulnerabilities and security updates. Hardware and software vendors typically announce the existence of vulnerabilities, and could offer workarounds and patches to address these.
Red Hat Product Security maintains sites to help you stay aware of security updates:
In addition to tracking updates, you will need to ensure your processes and deployments are designed in a way that that can accommodate the installation of regular security updates. For kernel updates, this would require rebooting the Compute and management nodes. Instance security updates should also be considered strongly when designing these processes, and hosted glance images should also be periodically updated to ensure that freshly created instances get the latest updates.
5.2. Network Time Protocol
You need to ensure that systems within your Red Hat OpenStack Platform cluster have accurate and consistent timestamps between systems. Red Hat OpenStack Platform on RHEL8 supports Chrony for time management. For more information, see Using the Chrony suite to configure NTP.
5.2.1. Why consistent time is important
Consistent time throughout your organization is important for both operational and security needs:
- Identifying a security event
- Consistent timekeeping helps you correlate timestamps for events on affected systems so that you can understand the sequence of events.
- Authentication and security systems
Security systems can be sensitive to time skew, for example:
- A kerberos-based authentication system might refuse to authenticate clients that are affected by seconds of clock skew.
- Transport layer security (TLS) certificates depend on a valid source of time. A client to server TLS connection fails if the difference between client and server system times exceeds the Valid From date range.
- Red Hat OpenStack Platform services
- Some core OpenStack services are especially dependent on accurate timekeeping, including High Availability (HA) and Ceph.
5.2.2. NTP design
Network time protocol (NTP) is organized in a hierarchical design. Each layer is called a stratum. At the top of the hierarchy are stratum 0 devices such as atomic clocks. In the NTP hierarchy, stratum 0 devices provide reference for publicly available stratum 1 and stratum 2 NTP time servers.
Do not connect your data center clients directly to publicly available NTP stratum 1 or 2 servers. The number of direct connections would put unnecessary strain on the public NTP resources. Instead, allocate a dedicated time server in your data center, and connect the clients to that dedicated server.
Configure instances to receive time from your dedicated time servers, not the host on which they reside.
Service containers running within the Red Hat OpenStack Platform environment still receive time from the host on which they reside.
5.2.3. Configuring NTP in Red Hat OpenStack Platform
Configure NTP on the undercloud and overcloud nodes using heat.
-
To configure the undercloud with NTP, use the the
undercloud_ntp_serversparameter in undercloud.conf before you run theopenstack undercloud installcommand. For undercloud minions, use theminion_ntp_serversparameter. For more information see Director Configuration Parameters. To configure the overcloud with NTP use the following parameters as an example:
parameter_defaults:
  TimeZone: 'US/Central'
  NtpServer: ['ntpserver01.example.com']
For more information on network timekeeping parameters, see Time Parameters in the Overcloud Parameters guide.
5.3. Compute
This section describes security considerations for Compute (nova).
5.3.1. Hypervisors in OpenStack
When you evaluate a hypervisor platform, consider the supportability of the hardware on which the hypervisor will run. Additionally, consider the additional features available in the hardware and how those features are supported by the hypervisor you chose as part of the OpenStack deployment. To that end, hypervisors each have their own hardware compatibility lists (HCLs). When selecting compatible hardware it is important to know in advance which hardware-based virtualization technologies are important from a security perspective.
5.3.1.1. Hypervisor versus bare metal
It is important to recognize the difference between using Linux containers or bare metal systems versus using a hypervisor like KVM. Specifically, the focus of this security guide is largely based on having a hypervisor and virtualization platform. However, should your implementation require the use of a bare metal or containerized environment, you must pay attention to the particular differences in regard to deployment of that environment.
For bare metal, make sure the node has been properly sanitized of data prior to re-provisioning and decommissioning. In addition, before reusing a node, you must provide assurances that the hardware has not been tampered or otherwise compromised. For more information see https://docs.openstack.org/ironic/queens/admin/cleaning.html
5.3.1.2. Hypervisor memory optimization
Certain hypervisors use memory optimization techniques that overcommit memory to guest virtual machines. This is a useful feature that allows you to deploy very dense compute clusters. One approach to this technique is through deduplication or sharing of memory pages: When two virtual machines have identical data in memory, there are advantages to having them reference the same memory. Typically this is performed through Copy-On-Write (COW) mechanisms, such as kernel same-page merging (KSM). These mechanisms are vulnerable to attack:
- Memory deduplication systems are vulnerable to side-channel attacks. In academic studies, attackers were able to identify software packages and versions running on neighboring virtual machines as well as software downloads and other sensitive information through analyzing memory access times on the attacker VM. Consequently, one VM can infer something about the state of another, which might not be appropriate for multi-project environments where not all projects are trusted or share the same levels of trust
- More importantly, row-hammer type attacks have been demonstrated against KSM to enact cross-VM modification of executable memory. This means that a hostile instance can gain code-execution access to other instances on the same Compute host.
Deployers should disable KSM if they require strong project separation (as with public clouds and some private clouds):
- To disable KSM, refer to Deactivating KSM.
5.3.2. Virtualization
5.3.2.1. Physical Hardware (PCI Passthrough)
PCI passthrough allows an instance to have direct access to a piece of hardware on the node. For example, this could be used to allow instances to access video cards or GPUs offering the compute unified device architecture (CUDA) for high performance computation. This feature carries two types of security risks: direct memory access and hardware infection.
Direct memory access (DMA) is a feature that permits certain hardware devices to access arbitrary physical memory addresses in the host computer. Often video cards have this capability. However, an instance should not be given arbitrary physical memory access because this would give it full view of both the host system and other instances running on the same node. Hardware vendors use an input/output memory management unit (IOMMU) to manage DMA access in these situations. You should confirm that the hypervisor is configured to use this hardware feature.
A hardware infection occurs when an instance makes a malicious modification to the firmware or some other part of a device. As this device is used by other instances or the host OS, the malicious code can spread into those systems. The end result is that one instance can run code outside of its security zone. This is a significant breach as it is harder to reset the state of physical hardware than virtual hardware, and can lead to additional exposure such as access to the management network.
Due to the risk and complexities associated with PCI passthrough, it should be disabled by default. If enabled for a specific need, you will need to have appropriate processes in place to help ensure the hardware is clean before reuse.
5.3.2.2. Virtual Hardware (QEMU)
When running a virtual machine, virtual hardware is a software layer that provides the hardware interface for the virtual machine. Instances use this functionality to provide network, storage, video, and other devices that might be needed. With this in mind, most instances in your environment will exclusively use virtual hardware, with a minority that will require direct hardware access. It is a good idea to only provision the hardware required. For example, it is unneccessary to provision a CD drive if you do not need it.
Confirm that your iptables have the default policy configured to filter network traffic, and consider examining the existing rule set to understand each rule and determine if the policy needs to be expanded upon.
Mandatory access controls limit the impact an attempted attack, by restricting the privileges on QEMU process to only what is needed. On Red Hat OpenStack Platform, SELinux is configured to run each QEMU process under a separate security context. SELinux policies have been pre-configured for Red Hat OpenStack Platform services.
OpenStack’s SELinux policies intend to help protect hypervisor hosts and virtual machines against two primary threat vectors:
- Hypervisor threats - A compromised application running within a virtual machine attacks the hypervisor to access underlying resources. For example, when a virtual machine is able to access the hypervisor OS, physical devices, or other applications. This threat vector represents considerable risk as a compromise on a hypervisor can infect the physical hardware as well as exposing other virtual machines and network segments.
- Virtual Machine (multi-project) threats - A compromised application running within a VM attacks the hypervisor to access or control another virtual machine and its resources. This is a threat vector unique to virtualization and represents considerable risk as a multitude of virtual machine file images could be compromised due to vulnerability in a single application. This virtual network attack is a major concern as the administrative techniques for protecting real networks do not directly apply to the virtual environment. Each KVM-based virtual machine is a process which is labeled by SELinux, effectively establishing a security boundary around each virtual machine. This security boundary is monitored and enforced by the Linux kernel, restricting the virtual machine’s access to resources outside of its boundary, such as host machine data files or other VMs.
Red Hat’s SELinux-based isolation is provided regardless of the guest operating system running inside the virtual machine. Linux or Windows VMs can be used.
5.3.2.3. Labels and Categories
KVM-based virtual machine instances are labelled with their own SELinux data type, known as svirt_image_t. Kernel level protections prevent unauthorized system processes, such as malware, from manipulating the virtual machine image files on disk. When virtual machines are powered off, images are stored as svirt_image_t as shown below:
system_u:object_r:svirt_image_t:SystemLow image1
system_u:object_r:svirt_image_t:SystemLow image2
system_u:object_r:svirt_image_t:SystemLow image3
system_u:object_r:svirt_image_t:SystemLow image4
The svirt_image_t label uniquely identifies image files on disk, allowing for the SELinux policy to restrict access. When a KVM-based compute image is powered on, SELinux appends a random numerical identifier to the image. SELinux is capable of assigning numeric identifiers to a maximum of 524,288 virtual machines per hypervisor node, however most OpenStack deployments are highly unlikely to encounter this limitation. This example shows the SELinux category identifier:
system_u:object_r:svirt_image_t:s0:c87,c520 image1
system_u:object_r:svirt_image_t:s0:419,c172 image2
5.3.2.4. SELinux users and roles
SELinux manages user roles. These can be viewed through the -Z flag, or with the semanage command. On the hypervisor, only administrators should be able to access the system, and should have an appropriate context around both the administrative users and any other users that are on the system.
5.3.2.5. Containerized services
Certain services, such as nova, glance, and keystone, now run within containers. This approach helps improve your security posture by making it easier to apply updates to services. Running each service in its own container also improves isolation between the services that coexist on the same bare metal. This can be helpful in reducing the attack surface should any one service be vulnerable to attack, by preventing easy access to adjacent services.
Any paths on the host machine that are mounted into the containers can be used as mount points to transfer data between container and host, if they are configured as ro/rw.
If you intend to update any configuration files, there are certain administration practices to consider, given that containerized services are ephemeral:
-
Do not update any configuration file you might find on the physical node’s host operating system, for example,
/etc/cinder/cinder.conf. This is because the containerized service does not reference this file. - Do not update the configuration file running within the container. This is because any changes are lost once you restart the container.
Instead, if you need to add any changes to containerized services, you will need to update the configuration file that is used to seed the container. These files are generated during the initial deployment, by puppet, and contain sensitive data important to the running of the cloud, and should be treated accordingly. These are stored within /var/lib/config-data/puppet-generated/. For example:
-
keystone:
/var/lib/config-data/puppet-generated/keystone/etc/keystone/keystone.conf -
cinder:
/var/lib/config-data/puppet-generated/cinder/etc/cinder/cinder.conf -
nova:
/var/lib/config-data/puppet-generated/nova_libvirt/etc/nova/nova.conf
Any changes made to these files will be applied once the container is restarted.
5.3.3. Hardening Compute Deployments
One of the main security concerns with any OpenStack deployment is the security and controls around sensitive files, such as the /var/lib/config-data/puppet-generated/nova_libvirt/etc/nova/nova.conf file. This configuration file contains many sensitive options including configuration details and service passwords. All such sensitive files should be given strict file level permissions, and monitored for changes through file integrity monitoring (FIM) tools, such as AIDE. These utilities will take a hash of the target file in a known good state, and then periodically take a new hash of the file and compare it to the known good hash. An alert can be created if it was found to have been modified unexpectedly.
The permissions of a file can be examined by moving into the directory the file is contained in and running the ls -lh command. This will show the permissions, owner, and group that have access to the file, as well as other information such as the last time the file was modified and when it was created.
The /var/lib/nova directory holds information about the instances on a given Compute node. This directory should be considered sensitive, with strictly enforced file permissions. In addition, it should be backed up regularly as it contains information and metadata for the instances associated with that host.
If your deployment does not require full virtual machine backups, consider excluding the /var/lib/nova/instances directory as it will be as large as the combined space of each instance running on that node. If your deployment does require full VM backups, you will need to ensure this directory is backed up successfully.
Data stored in the storage subsystem (for example, Ceph) being used for Block Storage (cinder) volumes should also be considered sensitive, as full virtual machine images can be retrieved from the storage subsystem if network or logical access allows this, potentially bypassing OpenStack controls.
5.3.4. Mitigating hardware vulnerabilities
OpenStack runs on physical server hardware, which inherently presents its own security challenges. This chapter presents approaches to mitigating hardware-based threats and vulnerabilities.
5.3.4.1. Hardening PCI passthrough
PCI passthrough allows you to give an instance direct access to certain physical hardware installed on the host. This can arise for a number of Network Function Virtualization (NFV) use cases. However, there are some security practices to consider:
If using PCI passthrough, consider deploying hardware that supports interrupt remapping. Otherwise, you would need to enable the allow_unsafe_interrupts setting, which might leave the Compute node vulnerable to interrupt injection attacks from a malicious instance.
For more information, see the Networking Guide: https://access.redhat.com/documentation/en-us/red_hat_openstack_platform/16.0/html-single/networking_guide/#review-the-allow_unsafe_interrupts-setting
5.3.4.2. Security harden management consoles
Many server vendors include a separate management console that enable a remote session to your server. Consider reviewing the practices prescribed by the vendor to security harden this point of access.
5.3.4.3. Firmware updates
Physical servers use complex firmware to enable and operate server hardware and lights-out management cards, which can have their own security vulnerabilities, potentially allowing system access and interruption. To address these, hardware vendors will issue firmware updates, which are installed separately from operating system updates. You will need an operational security process that retrieves, tests, and implements these updates on a regular schedule, noting that firmware updates often require a reboot of physical hosts to become effective.
5.4. Block Storage
OpenStack Block Storage (cinder) is a service that provides software (services and libraries) to self-service manage persistent block-level storage devices. This creates on-demand access to Block Storage resources for use with Compute (nova) instances. This creates software-defined storage through abstraction by virtualizing pools of block storage to a variety of back-end storage devices which can be either software implementations or traditional hardware storage products. The primary functions of this is to manage the creation, attachment, and detachment of the block devices. The consumer requires no knowledge of the type of back-end storage equipment or where it is located.
Compute instances store and retrieve block storage using industry-standard storage protocols such as iSCSI, ATA over Ethernet, or Fibre-Channel. These resources are managed and configured using OpenStack native standard HTTP RESTful API.
5.4.1. Volume Wiping
There are multiple ways to wipe a block storage device. The traditional approach is to set the lvm_type to thin, and then use the volume_clear parameter. Alternatively, if the volume encryption feature is used, then volume wiping is not necessary if the volume encryption key is deleted.
Previously, lvm_type=default was used to signify a wipe. While this method still works, lvm_type=default is not recommended for setting secure delete.
The volume_clear parameter can accept either zero or shred as arguments. zero will write a single pass of zeroes to the device. The shred operation will write three passes of predetermined bit patterns.
5.4.2. Hardening Block Storage
This section contains practical advice to harden the security of OpenStack Block Storage.
5.4.2.1. Set user/group ownership of config files to root/cinder
Configuration files contain critical parameters and information required for smooth functioning of the component. If an unprivileged user, either intentionally or accidentally, modifies or deletes any of the parameters or the file itself then it would cause severe availability issues resulting in a denial of service to the other end users. Thus user ownership of such critical configuration files must be set to root and group ownership must be set to cinder.
Check that the user and group ownership of these config files is set to root and cinder respectively, with these commands:
$ stat -L -c "%U %G" /var/lib/config-data/puppet-generated/cinder/etc/cinder/cinder.conf | egrep "root cinder"
$ stat -L -c "%U %G" /var/lib/config-data/puppet-generated/cinder/etc/cinder/api-paste.ini | egrep "root cinder"
$ stat -L -c "%U %G" /var/lib/config-data/puppet-generated/cinder/etc/cinder/policy.json | egrep "root cinder"
$ stat -L -c "%U %G" /var/lib/config-data/puppet-generated/cinder/etc/cinder/rootwrap.conf | egrep "root cinder"
5.4.2.2. Set strict permissions for configuration files
Check that the permissions for the following files are set to 640 or stricter.
$ stat -L -c "%a" /var/lib/config-data/puppet-generated/cinder/etc/cinder/cinder.conf
$ stat -L -c "%a" /var/lib/config-data/puppet-generated/cinder/etc/cinder/api-paste.ini
$ stat -L -c "%a" /var/lib/config-data/puppet-generated/cinder/etc/cinder/policy.json
$ stat -L -c "%a" /var/lib/config-data/puppet-generated/cinder/etc/cinder/rootwrap.conf
5.4.2.3. Use keystone for authentication
In /var/lib/config-data/puppet-generated/cinder/etc/cinder/cinder.conf, check that the value of auth_strategy under the [DEFAULT] section is set to keystone and not noauth.
5.4.2.4. Enable TLS for authentication
In /var/lib/config-data/puppet-generated/cinder/etc/cinder/cinder.conf, check that the value of www_authenticate_uri under the [keystone_authtoken] section is set to an Identity API endpoint that starts with https://, and the value of the parameter insecure also under [keystone_authtoken] is set to False.
5.4.2.5. Ensure Block Storage uses TLS to communicate with Compute
In cinder.conf, check that the value of glance_api_servers under the [DEFAULT] section is set to a value that starts with https://, and the value of the parameter glance_api_insecure is set to False.
5.4.2.6. Ensure NAS devices used for NFS are operating in a hardened environment
The Block Storage service (cinder) supports an NFS driver that works differently than a traditional block storage driver.
The NFS driver does not actually allow an instance to access a storage device at the block level. Instead, files are created on an NFS share and mapped to instances, which emulates a block device.
The Block Storage service supports secure configuration for such files by controlling the file permissions when cinder volumes are created. Cinder configuration can also control whether file operations are run as the root user or the current Red Hat OpenStack Platform process user.
There are several director heat parameters that control whether an NFS back end or a NetApp NFS Block Storage back end supports a NetApp feature called NAS secure:
- CinderNetappNasSecureFileOperations
- CinderNetappNasSecureFilePermissions
- CinderNasSecureFileOperations
- CinderNasSecureFilePermissions
Red Hat does not recommend that you enable the feature, because it interferes with normal volume operations. Director disables the feature by default, and Red Hat OpenStack Platform does not support it.
NAS devices integrated into the Block Storage service through the use of vendor-specific drivers should be considered sensitive and should be deployed in hardened, isolated environments. Any breach of these devices can lead to access or modification to instance data.
Review whether the value of
nas_secure_file_permissionsin the[DEFAULT]section of thecinder.conffile is set toauto.When the
nas_secure_file_permissionsparameter is set toauto, during startup, the Block Storage service detects whether there are existing cinder volumes:-
If there are no existing volumes, cinder sets the option to
Trueand uses secure file permissions. -
If cinder detects existing volumes, cinder sets the option to
Falseand uses the insecure method of handling file permissions.
-
If there are no existing volumes, cinder sets the option to
Review whether the
nas_secure_file_operationsparameter in the[DEFAULT]section in thecinder.conffile is set toauto.When the
nas_secure_file_operationsparameter is set toauto, during startup, the Block Storage service detects whether there are existing cinder volumes:-
If there are no existing volumes, cinder sets the option to
Trueand does not run as the root user. -
If cinder detects existing volumes, cinder sets the option to
Falseand uses the current method of running operations as therootuser.
-
If there are no existing volumes, cinder sets the option to
For new installations, the Block Storage service creates a marker file so that on subsequent restarts the Block Storage service remembers the original determination.
5.4.2.7. Set the max size for the body of a request
If the maximum body size per request is not defined, the attacker can craft an arbitrary OSAPI request of large size, causing the service to crash and finally resulting in a Denial Of Service attack. Assigning the maximum value ensures that any malicious oversized request gets blocked ensuring continued availability of the service.
Review whether osapi_max_request_body_size under the [DEFAULT] section in cinder.conf is set to 114688, or if max_request_body_size under the [oslo_middleware] section in cinder.conf is set to 114688.
5.4.2.8. Enable volume encryption
Unencrypted volume data makes volume-hosting platforms especially high-value targets for attackers, as it allows the attacker to read the data for many different VMs. In addition, the physical storage medium could be stolen, remounted, and accessed from a different machine. Encrypting volume data and volume backups can help mitigate these risks and provides defense-in-depth to volume-hosting platforms. Block Storage (cinder) is able to encrypt volume data before it is written to disk, so consider enabling volume encryption, and using Barbican for private key storage.
5.5. Networking
The OpenStack Networking service (neutron) enables the end-user or project to define and consume networking resources. OpenStack Networking provides a project-facing API for defining network connectivity and IP addressing for instances in the cloud, in addition to orchestrating the network configuration. With the transition to an API-centric networking service, cloud architects and administrators should take into consideration good practices to secure physical and virtual network infrastructure and services.
OpenStack Networking was designed with a plug-in architecture that provides extensibility of the API through open source community or third-party services. As you evaluate your architectural design requirements, it is important to determine what features are available in OpenStack Networking core services, any additional services that are provided by third-party products, and what supplemental services are required to be implemented in the physical infrastructure.
This section is a high-level overview of what processes and good practices should be considered when implementing OpenStack Networking.
5.5.1. Networking architecture
OpenStack Networking is a standalone service that deploys multiple processes across a number of nodes. These processes interact with each other and other OpenStack services. The main process of the OpenStack Networking service is neutron-server, a Python daemon that exposes the OpenStack Networking API and passes project requests to a suite of plug-ins for additional processing.
The OpenStack Networking components are:
-
Neutron server (
neutron-serverandneutron-*-plugin) - The neutron-server service runs on the Controller node to service the Networking API and its extensions (or plugins). It also enforces the network model and IP addressing of each port. The neutron-server requires direct access to a persistent database. Agents have indirect access to the database through neutron-server, with which they communicate using AMQP (Advanced Message Queuing Protocol). - Neutron database - The database is the centralized source of neutron information, with the API recording all transactions in the database. This allows multiple Neutron servers to share the same database cluster, which keeps them all in sync, and allows persistence of network configuration topology.
-
Plugin agent (
neutron-*-agent) - Runs on each compute node and networking node (together with the L3 and DHCP agents) to manage local virtual switch (vswitch) configuration. The enabled plug-in determines which agents are enabled. These services require message queue access and depending on the plug-in being used, access to external network controllers or SDN implementations. Some plug-ins, like OpenDaylight(ODL) and Open Virtual Network (OVN), do not require any python agents on compute nodes, requiring only an enabled Neutron plug-in for integration. -
DHCP agent (
neutron-dhcp-agent) - Provides DHCP services to project networks. This agent is the same across all plug-ins and is responsible for maintaining DHCP configuration. The neutron-dhcp-agent requires message queue access. Optional depending on plug-in. -
Metadata agent (
neutron-metadata-agent,neutron-ns-metadata-proxy) - Provides metadata services used to apply instance operating system configuration and user-supplied initialisation scripts (‘userdata’). The implementation requires theneutron-ns-metadata-proxyrunning in the L3 or DHCP agent namespace to intercept metadata API requests sent by cloud-init to be proxied to the metadata agent. -
L3 agent (
neutron-l3-agent) - Provides L3/NAT forwarding for external network access of VMs on project networks. Requires message queue access. Optional depending on plug-in. - Network provider services (SDN server/services) - Provides additional networking services to project networks. These SDN services might interact with neutron-server, neutron-plugin, and plugin-agents through communication channels such as REST APIs.
The following diagram shows an architectural and networking flow diagram of the OpenStack Networking components:
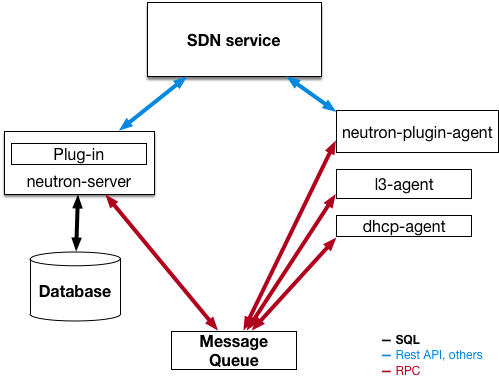
Note that this approach changes significantly when Distributed Virtual Routing (DVR) and Layer-3 High Availability (L3HA) are used. These modes change the security landscape of neutron, since L3HA implements VRRP between routers. The deployment needs to be correctly sized and hardened to help mitigate DoS attacks against routers, and local-network traffic between routers must be treated as sensitive, to help address the threat of VRRP spoofing. DVR moves networking components (such as routing) to the Compute nodes, while still requiring network nodes. As a result, the Compute nodes require access to and from public networks, increasing their exposure and requiring additional security consideration for customers, as they will need to make sure firewall rules and security model support this approach.
5.5.1.1. Neutron service placement on physical servers
This section describes a standard architecture that includes a controller node, a network node, and a set of compute nodes for running instances. To establish network connectivity for physical servers, a typical neutron deployment has up to four distinct physical data center networks:
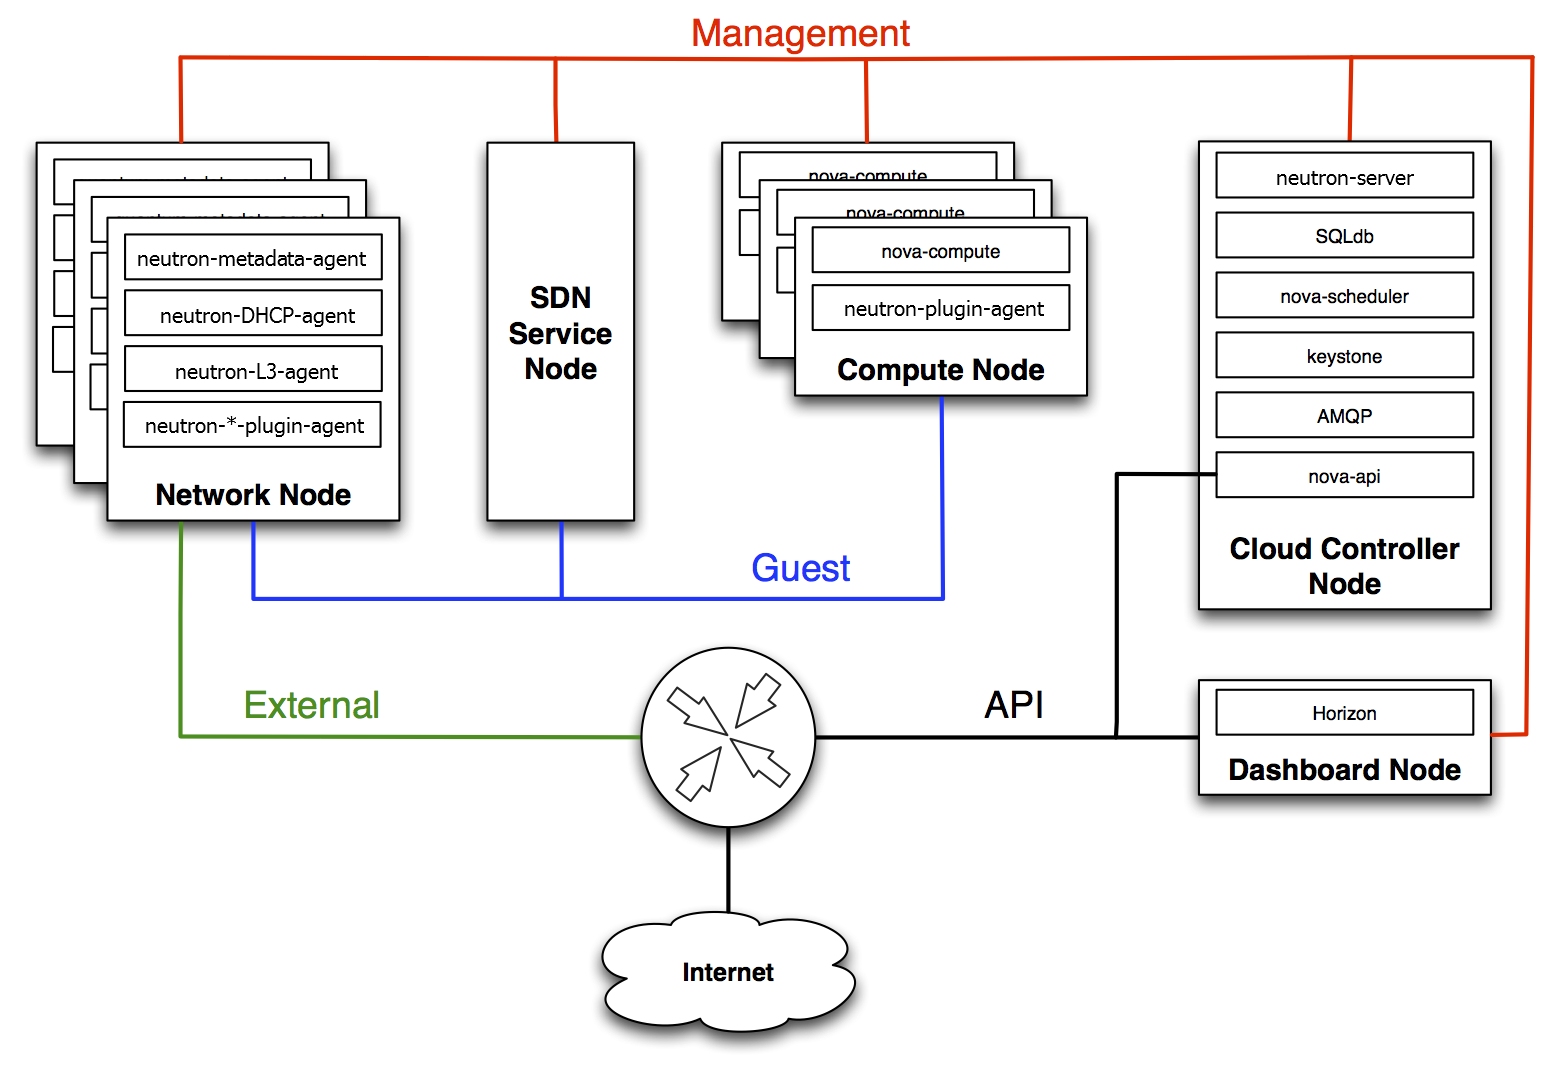
- Management network - Used for internal communication between OpenStack Components. The IP addresses on this network should be reachable only within the data center and is considered the Management Security zone. By default, the Management network role is performed by the Internal API network.
- Guest network(s) - Used for VM data communication within the cloud deployment. The IP addressing requirements of this network depend on the OpenStack Networking plug-in in use and the network configuration choices of the virtual networks made by the project. This network is considered the Guest Security zone.
- External network - Used to provide VMs with Internet access in some deployment scenarios. The IP addresses on this network should be reachable by anyone on the Internet. This network is considered to be in the Public Security zone. This network is provided by the neutron External network(s). These neutron VLANs are hosted on the external bridge. They are not created by Red Hat OpenStack Platform director, but are created by neutron in post-deployment.
- Public API network - Exposes all OpenStack APIs, including the OpenStack Networking API, to projects. The IP addresses on this network should be reachable by anyone on the Internet. This might be the same network as the external network, as it is possible to create a subnet for the external network that uses IP allocation ranges smaller than the full range of IP addresses in an IP block. This network is considered to be in the Public Security zone.
It is recommended you segment this traffic into separate zones. See the next section for more information.
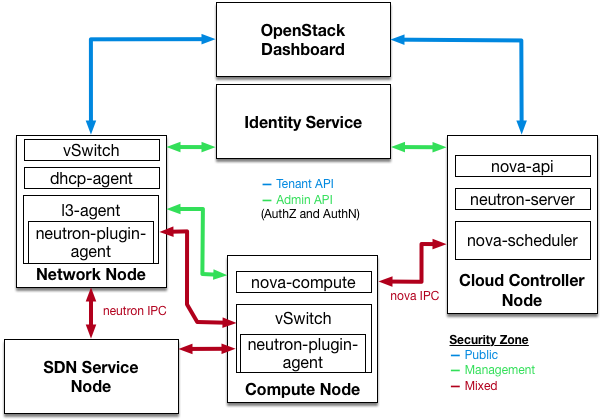
5.5.2. Use security zones
It is recommended that you use the concept of security zones to keep critical systems separate from each other. In a practical sense, this means isolating network traffic using VLANs and firewall rules. This should be done with granular detail, and the result should be that only the services that need to connect to neutron are able to do so.
In the following diagram, you can see that zones have been created to separate certain components:
- Dashboard: Accessible to public network and management network.
- Keystone: Accessible to management network.
- Compute node: Accessible to management network and Compute instances.
- Network node: Accessible to management network, Compute instances, and possibly public network depending upon neutron-plugin in use.
- SDN service node: Management services, Compute instances, and possibly public depending upon product used and configuration.
.
5.5.3. Networking Services
In the initial architectural phases of designing your OpenStack Network infrastructure it is important to ensure appropriate expertise is available to assist with the design of the physical networking infrastructure, to identify proper security controls and auditing mechanisms.
OpenStack Networking adds a layer of virtualized network services which gives projects the capability to architect their own virtual networks. Currently, these virtualized services are not as mature as their traditional networking counterparts. Consider the current state of these virtualized services before adopting them as it dictates what controls you might have to implement at the virtualized and traditional network boundaries.
5.5.3.1. L2 isolation using VLANs and tunneling
OpenStack Networking can employ two different mechanisms for traffic segregation on a per project/network combination: VLANs (IEEE 802.1Q tagging) or L2 tunnels using VXLAN or GRE encapsulation. The scope and scale of your OpenStack deployment determines which method you should use for traffic segregation or isolation.
5.5.3.2. VLANs
VLANs are realized as packets on a specific physical network containing IEEE 802.1Q headers with a specific VLAN ID (VID) field value. VLAN networks sharing the same physical network are isolated from each other at L2, and can even have overlapping IP address spaces. Each distinct physical network supporting VLAN networks is treated as a separate VLAN trunk, with a distinct space of VID values. Valid VID values are 1 through 4094.
VLAN configuration complexity depends on your OpenStack design requirements. To allow OpenStack Networking to more efficiently use VLANs, you must allocate a VLAN range (one for each project) and turn each Compute node physical switch port into a VLAN trunk port.
If you intend for your network to support more than 4094 projects, an L2 tunneling configuration is recommended over VLANs.
5.5.3.3. L2 tunneling
Network tunneling encapsulates each project/network combination with a unique “tunnel-id” that is used to identify the network traffic belonging to that combination. The project’s L2 network connectivity is independent of physical locality or underlying network design. By encapsulating traffic inside IP packets, that traffic can cross Layer-3 boundaries, removing the need for pre-configured VLANs and VLAN trunking. Tunneling adds a layer of obfuscation to network data traffic, reducing the visibility of individual project traffic from a monitoring point of view.
OpenStack Networking currently supports both GRE and VXLAN encapsulation. The choice of technology to provide L2 isolation is dependent upon the scope and size of project networks that will be created in your deployment.
5.5.3.4. Network services
The choice of project network isolation affects how the network security and control boundary is implemented for project services. The following additional network services are either available or currently under development to enhance the security posture of the OpenStack network architecture.
5.5.3.5. Access control lists
Compute supports project network traffic access controls through use of the OpenStack Networking service. Security groups allow administrators and projects the ability to specify the type of traffic, and direction (ingress/egress) that is allowed to pass through a virtual interface port. Security groups rules are stateful L2-L4 traffic filters.
5.5.4. L3 routing and NAT
OpenStack Networking routers can connect multiple L2 networks, and can also provide a gateway that connects one or more private L2 networks to a shared external network, such as a public network for access to the Internet.
The L3 router provides basic Network Address Translation (SNAT and DNAT) capabilities on gateway ports that uplink the router to external networks. This router SNATs (Source NAT) all egress traffic by default, and supports floating IPs, which creates a static one-to-one bidirectional mapping from a public IP on the external network to a private IP on one of the other subnets attached to the router. Floating IPs (through DNAT) provide external inbound connectivity to instances, and can be moved from one instances to another.
Consider using per-project L3 routing and Floating IPs for more granular connectivity of project instances. Special consideration should be given to instances connected to public networks or using Floating IPs. Usage of carefully considered security groups is recommended to filter access to only services which need to be exposed externally.
5.5.5. Quality of Service (QoS)
By default, Quality of Service (QoS) policies and rules are managed by the cloud administrator, which results in projects being unable to create specific QoS rules, or to attach specific policies to ports. In some use cases, such as some telecommunications applications, the administrator might trust the projects and therefore let them create and attach their own policies to ports. This can be done by modifying the policy.json file.
From Red Hat OpenStack Platform 12, neutron supports bandwidth-limiting QoS rules for both ingress and egress traffic. This QoS rule is named QosBandwidthLimitRule and it accepts two non-negative integers measured in kilobits per second:
-
max-kbps: bandwidth -
max-burst-kbps: burst buffer
The QoSBandwidthLimitRule has been implemented in the neutron Open vSwitch, Linux bridge and SR-IOV drivers. However, for SR-IOV drivers, the max-burst-kbps value is not used, and is ignored if set.
The QoS rule QosDscpMarkingRule was added in the Red Hat OpenStack Platform 10 (Newton) release. This rule marks the Differentiated Service Code Point (DSCP) value in the type of service header on IPv4 (RFC 2474) and traffic class header on IPv6 on all traffic leaving a virtual machine, where the rule is applied. This is a 6-bit header with 21 valid values that denote the drop priority of a packet as it crosses networks should it meet congestion. It can also be used by firewalls to match valid or invalid traffic against its access control list.
5.5.5.1. Load balancing
The OpenStack Load-balancing service (Octavia) provides a load balancing-as-a-service (LBaaS) implementation for Red Hat OpenStack platform director installations. To achieve load balancing, Octavia supports enabling multiple provider drivers. The reference provider driver (Amphora provider driver) is an open-source, scalable, and highly available load balancing provider. It accomplishes its delivery of load balancing services by managing a fleet of virtual machines—collectively known as amphorae—which it spins up on demand.
For more information about the Load-balancing service, see Load Balancing-as-a-Service (LBaaS) with Octavia in the Networking Guide.
5.5.6. Hardening the Networking Service
This section discusses OpenStack Networking configuration good practices as they apply to project network security within your OpenStack deployment.
5.5.6.1. Restrict bind address of the API server: neutron-server
To restrict the interface or IP address on which the OpenStack Networking API service binds a network socket for incoming client connections, specify the bind_host and bind_port in the /var/lib/config-data/puppet-generated/neutron/etc/neutron/neutron.conf file:
# Address to bind the API server
bind_host = IP ADDRESS OF SERVER

# Port the bind the API server to
bind_port = 9696
5.5.6.2. Restrict DB and RPC communication of the OpenStack Networking services
Various components of the OpenStack Networking services use either the messaging queue or database connections to communicate with other components in OpenStack Networking.
It is recommended that you follow the guidelines provided in Section 13.3, “Queue authentication and access control” for all components which require RPC communication.
5.5.6.3. Project network services workflow
OpenStack Networking provides users self-service configuration of network resources. It is important that cloud architects and operators evaluate their design use cases in providing users the ability to create, update, and destroy available network resources.
5.5.6.4. Networking resource policy engine
A policy engine and its configuration file (policy.json) within OpenStack Networking provides a method to provide finer grained authorization of users on project networking methods and objects. The OpenStack Networking policy definitions affect network availability, network security and overall OpenStack security. Cloud architects and operators should carefully evaluate their policy towards user and project access to administration of network resources.
It is important to review the default networking resource policy, as this policy can be modified to suit your security posture.
If your deployment of OpenStack provides multiple external access points into different security zones it is important that you limit the project’s ability to attach multiple vNICs to multiple external access points — this would bridge these security zones and could lead to unforeseen security compromise. You can help mitigate this risk by using the host aggregates functionality provided by Compute, or by splitting the project instances into multiple projects with different virtual network configurations. For more information on host aggregates, see https://access.redhat.com/documentation/en-us/red_hat_openstack_platform/16.0/html/instances_and_images_guide/ch-manage_instances#section-manage-host-aggregates.
5.5.6.5. Security groups
A security group is a collection of security group rules. Security groups and their rules allow administrators and projects the ability to specify the type of traffic and direction (ingress/egress) that is allowed to pass through a virtual interface port. When a virtual interface port is created in OpenStack Networking it is associated with a security group. Rules can be added to the default security group in order to change the behavior on a per-deployment basis.
When using the Compute API to modify security groups, the updated security group applies to all virtual interface ports on an instance. This is due to the Compute security group APIs being instance-based rather than port-based, as found in neutron.
5.5.6.6. Quotas
Quotas provide the ability to limit the number of network resources available to projects. You can enforce default quotas for all projects. To review the quota options, see /var/lib/config-data/puppet-generated/neutron/etc/neutron/neutron.conf.
OpenStack Networking also supports per-project quotas limit through a quota extension API. To enable per-project quotas, you must set the quota_driver option in /var/lib/config-data/puppet-generated/neutron/etc/neutron/neutron.conf. For example:
quota_driver = neutron.db.quota_db.DbQuotaDriver
5.5.6.7. Mitigate ARP spoofing
OpenStack Networking has a built-in feature to help mitigate the threat of ARP spoofing for instances. This should not be disabled unless careful consideration is given to the resulting risks.
5.5.6.8. Set the user/group ownership of config files to root/neutron
Configuration files contain critical parameters and information required for smooth functioning of the component. If an unprivileged user, either intentionally or accidentally modifies or deletes any of the parameters or the file itself then it would cause severe availability issues causing a denial of service to the other end users. Thus user ownership of such critical configuration files must be set to root and group ownership must be set to neutron.
Ensure the user and group ownership of the following files is set to root and neutron respectively. Note that the exact file path might vary for containerized services:
$ stat -L -c "%U %G" /var/lib/config-data/puppet-generated/neutron/etc/neutron/neutron.conf | egrep "root neutron"
$ stat -L -c "%U %G" /var/lib/config-data/puppet-generated/neutron/etc/neutron/api-paste.ini | egrep "root neutron"
$ stat -L -c "%U %G" /var/lib/config-data/puppet-generated/neutron/etc/neutron/policy.json | egrep "root neutron"
$ stat -L -c "%U %G" /var/lib/config-data/puppet-generated/neutron/etc/neutron/rootwrap.conf | egrep "root neutron"
5.5.6.9. Set Strict Permissions for Configuration Files
Check that the permissions for the following files are set to 640 or stricter. Note that the exact file path might vary for containerized services:
$ stat -L -c "%a" /var/lib/config-data/puppet-generated/neutron/etc/neutron/neutron.conf
$ stat -L -c "%a" /var/lib/config-data/puppet-generated/neutron/etc/neutron/api-paste.ini
$ stat -L -c "%a" /var/lib/config-data/puppet-generated/neutron/etc/neutron/policy.json
$ stat -L -c "%a" /var/lib/config-data/puppet-generated/neutron/etc/neutron/rootwrap.conf
5.5.6.10. Use Keystone for Authentication
In /var/lib/config-data/puppet-generated/neutron/etc/neutron/neutron.conf check that the value of auth_strategy under the [DEFAULT] section is set to keystone and not noauth or noauth2.
5.5.6.10.1. Use a Secure Protocol for Authentication
In /var/lib/config-data/puppet-generated/neutron/etc/neutron/neutron.conf check that the value of www_authenticate_uri under the [keystone_authtoken] section is set to an Identity API endpoint that starts with https://, and the value of the parameter insecure also under [keystone_authtoken] is set to False.
5.5.6.10.2. Enable TLS on Neutron API Server
In /var/lib/config-data/puppet-generated/neutron/etc/neutron/neutron.conf, ensure the parameter use_ssl under the [DEFAULT] section is set to True.