
Chapter 4. Virtual Machine Instances
OpenStack Compute is the central component that provides virtual machines on demand. Compute interacts with the Identity service for authentication, Image service for images (used to launch instances), and the dashboard service for the user and administrative interface.
Red Hat OpenStack Platform allows you to easily manage virtual machine instances in the cloud. The Compute service creates, schedules, and manages instances, and exposes this functionality to other OpenStack components. This chapter discusses these procedures along with procedures to add components like key pairs, security groups, host aggregates and flavors. The term instance is used by OpenStack to mean a virtual machine instance.
4.1. Manage Instances
Before you can create an instance, you need to ensure certain other OpenStack components (for example, a network, key pair and an image or a volume as the boot source) are available for the instance.
This section discusses the procedures to add these components, create and manage an instance. Managing an instance refers to updating, and logging in to an instance, viewing how the instances are being used, resizing or deleting them.
4.1.1. Add Components
Use the following sections to create a network, key pair and upload an image or volume source. These components are used in the creation of an instance and are not available by default. You will also need to create a new security group to allow SSH access to the user.
- In the dashboard, select Project.
- Select Network > Networks, and ensure there is a private network to which you can attach the new instance (to create a network, see Create a Network section in the Networking Guide).
- Select Compute > Access & Security > Key Pairs, and ensure there is a key pair (to create a key pair, see Section 4.2.1.1, “Create a Key Pair”).
Ensure that you have either an image or a volume that can be used as a boot source:
- To view boot-source images, select the Images tab (to create an image, see Section 1.2.1, “Creating an Image”).
- To view boot-source volumes, select the Volumes tab (to create a volume, see Create a Volume in the Storage Guide).
- Select Compute > Access & Security > Security Groups, and ensure you have created a security group rule (to create a security group, see Project Security Management in the Users and Identity Management Guide).
4.1.2. Launch an Instance
Launch one or more instances from the dashboard.
By default, the Launch Instance form is used to launch instances. However, you can also enable a Launch Instance wizard that simplifies the steps required. For more information, see Appendix B, Enabling the Launch Instance Wizard.
- In the dashboard, select Project > Compute > Instances.
- Click Launch Instance.
- Fill out the fields (those marked with '* ' are required), and click Launch.
One or more instances are created, and launched based on the options provided.
4.1.2.1. Launch Instance Options
The following table outlines the options available when launching a new instance using the Launch Instance form. The same options are also available in the Launch instance wizard.
Table 4.1. Launch Instance Form Options
| Tab | Field | Notes |
|---|---|---|
| Project and User | Project | Select the project from the dropdown list. |
| User | Select the user from the dropdown list. | |
| Details | Availability Zone | Zones are logical groupings of cloud resources in which your instance can be placed. If you are unsure, use the default zone (for more information, see Section 4.4, “Manage Host Aggregates”). |
| Instance Name | A name to identify your instance. | |
| Flavor | The flavor determines what resources the instance is given (for example, memory). For default flavor allocations and information on creating new flavors, see Section 4.3, “Manage Flavors”. | |
| Instance Count | The number of instances to create with these parameters. "1" is preselected. | |
| Instance Boot Source | Depending on the item selected, new fields are displayed allowing you to select the source:
| |
| Access and Security | Key Pair | The specified key pair is injected into the instance and is used to remotely access the instance using SSH (if neither a direct login information or a static key pair is provided). Usually one key pair per project is created. |
| Security Groups | Security groups contain firewall rules which filter the type and direction of the instance’s network traffic (for more information on configuring groups, see Project Security Management in the Users and Identity Management Guide). | |
| Networking | Selected Networks | You must select at least one network. Instances are typically assigned to a private network, and then later given a floating IP address to enable external access. |
| Post-Creation | Customization Script Source | You can provide either a set of commands or a script file, which will run after the instance is booted (for example, to set the instance host name or a user password). If Direct Input is selected, write your commands in the Script Data field; otherwise, specify your script file. Note Any script that starts with #cloud-config is interpreted as using the cloud-config syntax (for information on the syntax, see http://cloudinit.readthedocs.org/en/latest/topics/examples.html). |
| Advanced Options | Disk Partition | By default, the instance is built as a single partition and dynamically resized as needed. However, you can choose to manually configure the partitions yourself. |
| Configuration Drive | If selected, OpenStack writes metadata to a read-only configuration drive that is attached to the instance when it boots (instead of to Compute’s metadata service). After the instance has booted, you can mount this drive to view its contents (enables you to provide files to the instance). |
4.1.4. Resize an Instance
To resize an instance (memory or CPU count), you must select a new flavor for the instance that has the right capacity. If you are increasing the size, remember to first ensure that the host has enough space.
- Ensure communication between hosts by setting up each host with SSH key authentication so that Compute can use SSH to move disks to other hosts (for example, compute nodes can share the same SSH key).
Enable resizing on the original host by setting the
allow_resize_to_same_hostparameter to "True" in your Compute environment file.NoteThe
allow_resize_to_same_hostparameter does not resize the instance on the same host. Even if the parameter equals "True" on all Compute nodes, the scheduler does not force the instance to resize on the same host. This is the expected behavior.- In the dashboard, select Project > Compute > Instances.
- Click the instance’s Actions arrow, and select Resize Instance.
- Select a new flavor in the New Flavor field.
If you want to manually partition the instance when it launches (results in a faster build time):
- Select Advanced Options.
- In the Disk Partition field, select Manual.
- Click Resize.
4.1.5. Connect to an Instance
This section discusses the different methods you can use to access an instance console using the dashboard or the command-line interface. You can also directly connect to an instance’s serial port allowing you to debug even if the network connection fails.
4.1.5.1. Access an Instance Console using the Dashboard
The console allows you a way to directly access your instance within the dashboard.
- In the dashboard, select Compute > Instances.
-
Click the instance’s More button and select Console.
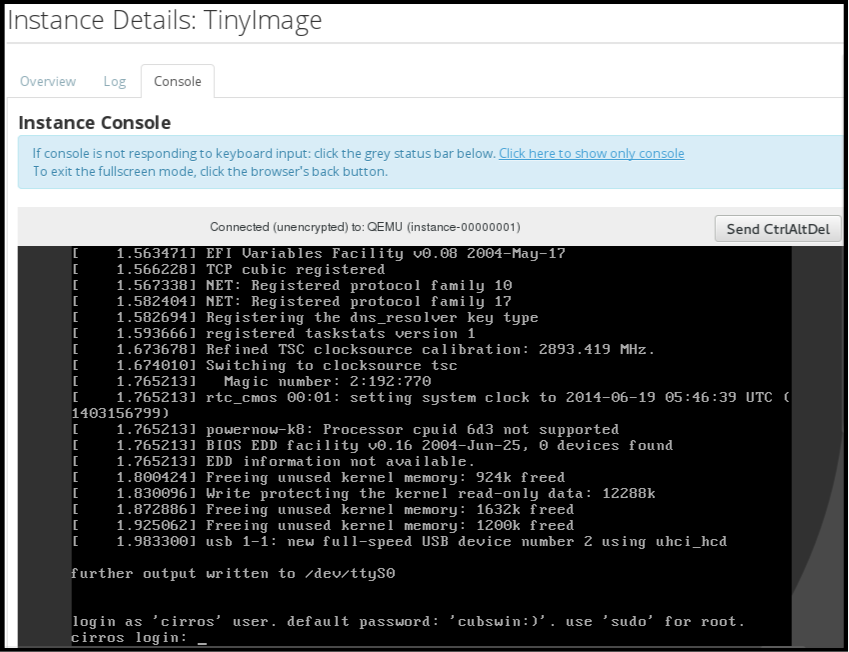
- Log in using the image’s user name and password (for example, a CirrOS image uses cirros/cubswin:)).
4.1.5.2. Directly Connect to a VNC Console
You can directly access an instance’s VNC console using a URL returned by nova get-vnc-console command.
- Browser
To obtain a browser URL, use:
$ nova get-vnc-console INSTANCE_ID novnc- Java Client
To obtain a Java-client URL, use:
$ nova get-vnc-console INSTANCE_ID xvpvnc
nova-xvpvncviewer provides a simple example of a Java client. To download the client, use:
# git clone https://github.com/cloudbuilders/nova-xvpvncviewer
# cd nova-xvpvncviewer/viewer
# make
Run the viewer with the instance’s Java-client URL:
# java -jar VncViewer.jar URLThis tool is provided only for customer convenience, and is not officially supported by Red Hat.
4.1.6. View Instance Usage
The following usage statistics are available:
Per Project
To view instance usage per project, select Project > Compute > Overview. A usage summary is immediately displayed for all project instances.
You can also view statistics for a specific period of time by specifying the date range and clicking Submit.
Per Hypervisor
If logged in as an administrator, you can also view information for all projects. Click Admin > System and select one of the tabs. For example, the Resource Usage tab offers a way to view reports for a distinct time period. You might also click Hypervisors to view your current vCPU, memory, or disk statistics.
NoteThe
vCPU Usagevalue (x of y) reflects the number of total vCPUs of all virtual machines (x) and the total number of hypervisor cores (y).
4.1.7. Delete an Instance
- In the dashboard, select Project > Compute > Instances, and select your instance.
- Click Terminate Instance.
Deleting an instance does not delete its attached volumes; you must do this separately (see Delete a Volume in the Storage Guide).
4.1.8. Manage Multiple Instances at Once
If you need to start multiple instances at the same time (for example, those that were down for compute or controller maintenance) you can do so easily at Project > Compute > Instances:
- Click the check boxes in the first column for the instances that you want to start. If you want to select all of the instances, click the check box in the first row in the table.
- Click More Actions above the table and select Start Instances.
Similarly, you can shut off or soft reboot multiple instances by selecting the respective actions.
4.2. Manage Instance Security
You can manage access to an instance by assigning it the correct security group (set of firewall rules) and key pair (enables SSH user access). Further, you can assign a floating IP address to an instance to enable external network access. The sections below outline how to create and manage key pairs, security groups, floating IP addresses and logging in to an instance using SSH. There is also a procedure for injecting an admin password in to an instance.
For information on managing security groups, see Project Security Management in the Users and Identity Management Guide.
4.2.1. Manage Key Pairs
Key pairs provide SSH access to the instances. Each time a key pair is generated, its certificate is downloaded to the local machine and can be distributed to users. Typically, one key pair is created for each project (and used for multiple instances).
You can also import an existing key pair into OpenStack.
4.2.1.1. Create a Key Pair
- In the dashboard, select Project > Compute > Access & Security.
- On the Key Pairs tab, click Create Key Pair.
- Specify a name in the Key Pair Name field, and click Create Key Pair.
When the key pair is created, a key pair file is automatically downloaded through the browser. Save this file for later connections from external machines. For command-line SSH connections, you can load this file into SSH by executing:
# ssh-add ~/.ssh/os-key.pem
4.2.1.2. Import a Key Pair
- In the dashboard, select Project > Compute > Access & Security.
- On the Key Pairs tab, click Import Key Pair.
- Specify a name in the Key Pair Name field, and copy and paste the contents of your public key into the Public Key field.
- Click Import Key Pair.
4.2.1.3. Delete a Key Pair
- In the dashboard, select Project > Compute > Access & Security.
- On the Key Pairs tab, click the key’s Delete Key Pair button.
4.2.2. Create a Security Group
Security groups are sets of IP filter rules that can be assigned to project instances, and which define networking access to the instance. Security group are project specific; project members can edit the default rules for their security group and add new rule sets.
- In the dashboard, select the Project tab, and click Compute > Access & Security.
- On the Security Groups tab, click + Create Security Group.
- Provide a name and description for the group, and click Create Security Group.
For more information on managing project security, see Project Security Management in the Users and Identity Management Guide.
4.2.3. Create, Assign, and Release Floating IP Addresses
By default, an instance is given an internal IP address when it is first created. However, you can enable access through the public network by creating and assigning a floating IP address (external address). You can change an instance’s associated IP address regardless of the instance’s state.
Projects have a limited range of floating IP address that can be used (by default, the limit is 50), so you should release these addresses for reuse when they are no longer needed. Floating IP addresses can only be allocated from an existing floating IP pool, see Create Floating IP Pools in the Networking Guide.
4.2.3.1. Allocate a Floating IP to the Project
- In the dashboard, select Project > Compute > Access & Security.
- On the Floating IPs tab, click Allocate IP to Project.
- Select a network from which to allocate the IP address in the Pool field.
- Click Allocate IP.
4.2.3.2. Assign a Floating IP
- In the dashboard, select Project > Compute > Access & Security.
- On the Floating IPs tab, click the address' Associate button.
Select the address to be assigned in the IP address field.
NoteIf no addresses are available, you can click the
+button to create a new address.- Select the instance to be associated in the Port to be Associated field. An instance can only be associated with one floating IP address.
- Click Associate.
4.2.3.3. Release a Floating IP
- In the dashboard, select Project > Compute > Access & Security.
- On the Floating IPs tab, click the address' menu arrow (next to the Associate/Disassociate button).
- Select Release Floating IP.
4.2.4. Log in to an Instance
Prerequisites:
- Ensure that the instance’s security group has an SSH rule (see Project Security Management in the Users and Identity Management Guide).
- Ensure the instance has a floating IP address (external address) assigned to it (see Section 4.2.3, “Create, Assign, and Release Floating IP Addresses”).
- Obtain the instance’s key-pair certificate. The certificate is downloaded when the key pair is created; if you did not create the key pair yourself, ask your administrator (see Section 4.2.1, “Manage Key Pairs”).
To first load the key pair file into SSH, and then use ssh without naming it:
Change the permissions of the generated key-pair certificate.
$ chmod 600 os-key.pem
Check whether
ssh-agentis already running:# ps -ef | grep ssh-agent
If not already running, start it up with:
# eval `ssh-agent`
On your local machine, load the key-pair certificate into SSH. For example:
$ ssh-add ~/.ssh/os-key.pem
- You can now SSH into the file with the user supplied by the image.
The following example command shows how to SSH into the Red Hat Enterprise Linux guest image with the user cloud-user:
$ ssh cloud-user@192.0.2.24
You can also use the certificate directly. For example:
$ ssh -i /myDir/os-key.pem cloud-user@192.0.2.24
4.2.5. Inject an admin Password Into an Instance
You can inject an admin (root) password into an instance using the following procedure.
In the
/etc/openstack-dashboard/local_settingsfile, set thechange_set_passwordparameter value toTrue.can_set_password: True
Set the
inject_passwordparameter to "True" in your Compute environment file.inject_password=true
Restart the Compute service.
# service nova-compute restart
When you use the nova boot command to launch a new instance, the output of the command displays an adminPass parameter. You can use this password to log into the instance as the root user.
The Compute service overwrites the password value in the /etc/shadow file for the root user. This procedure can also be used to activate the root account for the KVM guest images. For more information on how to use KVM guest images, see Section 1.2.1.1, “Use a KVM Guest Image With Red Hat OpenStack Platform”
You can also set a custom password from the dashboard. To enable this, run the following command after you have set can_set_password parameter to true.
# systemctl restart httpd.service
The newly added admin password fields are as follows:

These fields can be used when you launch or rebuild an instance.
4.3. Manage Flavors
Each created instance is given a flavor (resource template), which determines the instance’s size and capacity. Flavors can also specify secondary ephemeral storage, swap disk, metadata to restrict usage, or special project access (none of the default flavors have these additional attributes defined).
Table 4.3. Default Flavors
| Name | vCPUs | RAM | Root Disk Size |
|---|---|---|---|
| m1.tiny | 1 | 512 MB | 1 GB |
| m1.small | 1 | 2048 MB | 20 GB |
| m1.medium | 2 | 4096 MB | 40 GB |
| m1.large | 4 | 8192 MB | 80 GB |
| m1.xlarge | 8 | 16384 MB | 160 GB |
The majority of end users will be able to use the default flavors. However, you can create and manage specialized flavors. For example, you can:
- Change default memory and capacity to suit the underlying hardware needs.
- Add metadata to force a specific I/O rate for the instance or to match a host aggregate.
Behavior set using image properties overrides behavior set using flavors (for more information, see Section 1.2, “Manage Images”).
4.3.1. Update Configuration Permissions
By default, only administrators can create flavors or view the complete flavor list (select Admin > System > Flavors). To allow all users to configure flavors, specify the following in the /etc/nova/policy.json file (nova-api server):
"compute_extension:flavormanage": "",
4.3.2. Create a Flavor
- As an admin user in the dashboard, select Admin > System > Flavors.
Click Create Flavor, and specify the following fields:
Table 4.4. Flavor Options
Tab Field Description Flavor Information
Name
Unique name.
ID
Unique ID. The default value,
auto, generates a UUID4 value, but you can also manually specify an integer or UUID4 value.VCPUs
Number of virtual CPUs.
RAM (MB)
Memory (in megabytes).
Root Disk (GB)
Ephemeral disk size (in gigabytes); to use the native image size, specify
0. This disk is not used if Instance Boot Source=Boot from Volume.Epehemeral Disk (GB)
Secondary ephemeral disk size (in gigabytes) available to an instance. This disk is destroyed when an instance is deleted.
The default value is
0, which implies that no ephemeral disk is created.Swap Disk (MB)
Swap disk size (in megabytes).
Flavor Access
Selected Projects
Projects which can use the flavor. If no projects are selected, all projects have access (
Public=Yes).- Click Create Flavor.
4.3.3. Update General Attributes
- As an admin user in the dashboard, select Admin > System > Flavors.
- Click the flavor’s Edit Flavor button.
- Update the values, and click Save.
4.3.4. Update Flavor Metadata
In addition to editing general attributes, you can add metadata to a flavor (extra_specs), which can help fine-tune instance usage. For example, you might want to set the maximum-allowed bandwidth or disk writes.
- Pre-defined keys determine hardware support or quotas. Pre-defined keys are limited by the hypervisor you are using (for libvirt, see Table 4.5, “Libvirt Metadata”).
-
Both pre-defined and user-defined keys can determine instance scheduling. For example, you might specify
SpecialComp=True; any instance with this flavor can then only run in a host aggregate with the same key-value combination in its metadata (see Section 4.4, “Manage Host Aggregates”).
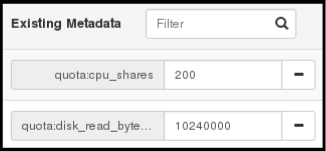
4.3.4.1. View Metadata
- As an admin user in the dashboard, select Admin > System > Flavors.
-
Click the flavor’s Metadata link (
YesorNo). All current values are listed on the right-hand side under Existing Metadata.
4.3.4.2. Add Metadata
You specify a flavor’s metadata using a key/value pair.
- As an admin user in the dashboard, select Admin > System > Flavors.
-
Click the flavor’s Metadata link (
YesorNo). All current values are listed on the right-hand side under Existing Metadata. - Under Available Metadata, click on the Other field, and specify the key you want to add (see Table 4.5, “Libvirt Metadata”).
- Click the + button; you can now view the new key under Existing Metadata.
Fill in the key’s value in its right-hand field.
- When finished with adding key-value pairs, click Save.
Table 4.5. Libvirt Metadata
| Key | Description |
|---|---|
|
| Action that configures support limits per instance. Valid actions are:
Example: |
|
| Definition of NUMA topology for the instance. For flavors whose RAM and vCPU allocations are larger than the size of NUMA nodes in the compute hosts, defining NUMA topology enables hosts to better utilize NUMA and improve performance of the guest OS. NUMA definitions defined through the flavor override image definitions. Valid definitions are:
Note
If the values of Example when the instance has 8 vCPUs and 4GB RAM:
The scheduler looks for a host with 2 NUMA nodes with the ability to run 6 CPUs + 3072 MB, or 3 GB, of RAM on one node, and 2 CPUS + 1024 MB, or 1 GB, of RAM on another node. If a host has a single NUMA node with capability to run 8 CPUs and 4 GB of RAM, it will not be considered a valid match. |
|
| An instance watchdog device can be used to trigger an action if the instance somehow fails (or hangs). Valid actions are:
Example: |
|
| You can use this parameter to specify the NUMA affinity policy for PCI passthrough devices and SR-IOV interfaces. Set to one of the following valid values:
Example: |
|
|
A random-number generator device can be added to an instance using its image properties (see If the device has been added, valid actions are:
Example: |
|
| Maximum permitted RAM to be allowed for video devices (in MB).
Example: |
|
| Enforcing limit for the instance. Valid options are:
Example: In addition, the VMware driver supports the following quota options, which control upper and lower limits for CPUs, RAM, disks, and networks, as well as shares, which can be used to control relative allocation of available resources among projects:
|
4.4. Manage Host Aggregates
A single Compute deployment can be partitioned into logical groups for performance or administrative purposes. OpenStack uses the following terms:
Host aggregates - A host aggregate creates logical units in a OpenStack deployment by grouping together hosts. Aggregates are assigned Compute hosts and associated metadata; a host can be in more than one host aggregate. Only administrators can see or create host aggregates.
An aggregate’s metadata is commonly used to provide information for use with the Compute scheduler (for example, limiting specific flavors or images to a subset of hosts). Metadata specified in a host aggregate will limit the use of that host to any instance that has the same metadata specified in its flavor.
Administrators can use host aggregates to handle load balancing, enforce physical isolation (or redundancy), group servers with common attributes, or separate out classes of hardware. When you create an aggregate, a zone name must be specified, and it is this name which is presented to the end user.
Availability zones - An availability zone is the end-user view of a host aggregate. An end user cannot view which hosts make up the zone, nor see the zone’s metadata; the user can only see the zone’s name.
End users can be directed to use specific zones which have been configured with certain capabilities or within certain areas.
4.4.1. Enable Host Aggregate Scheduling
By default, host-aggregate metadata is not used to filter instance usage. You must update the Compute scheduler’s configuration to enable metadata usage:
- Open your Compute environment file.
Add the following values to the
NovaSchedulerDefaultFiltersparameter, if they are not already present:AggregateInstanceExtraSpecsFilterfor host aggregate metadata.NoteScoped specifications must be used for setting flavor
extra_specswhen specifying bothAggregateInstanceExtraSpecsFilterandComputeCapabilitiesFilterfilters as values of the sameNovaSchedulerDefaultFiltersparameter, otherwise theComputeCapabilitiesFilterwill fail to select a suitable host. For details on the namespaces to use to scope the flavorextra_specskeys for these filters, see Table 4.7, “Scheduling Filters”.-
AvailabilityZoneFilterfor availability zone host specification when launching an instance.
- Save the configuration file.
- Deploy the overcloud.
4.4.2. View Availability Zones or Host Aggregates
As an admin user in the dashboard, select Admin > System > Host Aggregates. All currently defined aggregates are listed in the Host Aggregates section; all zones are in the Availability Zones section.
4.4.3. Add a Host Aggregate
- As an admin user in the dashboard, select Admin > System > Host Aggregates. All currently defined aggregates are listed in the Host Aggregates section.
- Click Create Host Aggregate.
- Add a name for the aggregate in the Name field, and a name by which the end user should see it in the Availability Zone field.
- Click Manage Hosts within Aggregate.
- Select a host for use by clicking its + icon.
- Click Create Host Aggregate.
4.4.4. Update a Host Aggregate
- As an admin user in the dashboard, select Admin > System > Host Aggregates. All currently defined aggregates are listed in the Host Aggregates section.
To update the instance’s Name or Availability zone:
- Click the aggregate’s Edit Host Aggregate button.
- Update the Name or Availability Zone field, and click Save.
To update the instance’s Assigned hosts:
- Click the aggregate’s arrow icon under Actions.
- Click Manage Hosts.
- Change a host’s assignment by clicking its + or - icon.
- When finished, click Save.
To update the instance’s Metadata:
- Click the aggregate’s arrow icon under Actions.
- Click the Update Metadata button. All current values are listed on the right-hand side under Existing Metadata.
- Under Available Metadata, click on the Other field, and specify the key you want to add. Use predefined keys (see Table 4.6, “Host Aggregate Metadata”) or add your own (which will only be valid if exactly the same key is set in an instance’s flavor).
Click the + button; you can now view the new key under Existing Metadata.
NoteRemove a key by clicking its - icon.
Click Save.
Table 4.6. Host Aggregate Metadata
Key Description filter_project_idIf specified, the aggregate only hosts this project (tenant). Depends on the
AggregateMultiTenancyIsolationfilter being set for the Compute scheduler.
4.4.5. Delete a Host Aggregate
- As an admin user in the dashboard, select Admin > System > Host Aggregates. All currently defined aggregates are listed in the Host Aggregates section.
Remove all assigned hosts from the aggregate:
- Click the aggregate’s arrow icon under Actions.
- Click Manage Hosts.
- Remove all hosts by clicking their - icon.
- When finished, click Save.
- Click the aggregate’s arrow icon under Actions.
- Click Delete Host Aggregate in this and the next dialog screen.
4.5. Schedule Hosts
The Compute scheduling service determines on which host, or host aggregate, to place an instance. As an administrator, you can influence where the scheduler places an instance. For example, you might want to limit scheduling to hosts in a certain group or with the right RAM.
You can configure the following components:
- Filters - Determine the initial set of hosts on which an instance might be placed (see Section 4.5.1, “Configure Scheduling Filters”).
- Weights - When filtering is complete, the resulting set of hosts are prioritized using the weighting system. The highest weight has the highest priority (see Section 4.5.2, “Configure Scheduling Weights”).
-
Scheduler service - There are a number of configuration options in the
/var/lib/config-data/puppet-generated/<nova_container>/etc/nova/nova.conffile (on the scheduler host), which determine how the scheduler executes its tasks, and handles weights and filters. - Placement service - Specify the traits an instance requires a host to have, such as the type of storage disk, or the Intel CPU instruction set extension (see Section 4.5.3, “Configure Placement Service Traits”).
In the following diagram, both host 1 and 3 are eligible after filtering. Host 1 has the highest weight and therefore has the highest priority for scheduling.

4.5.1. Configure Scheduling Filters
You define the filters you want the scheduler to use using the NovaSchedulerDefaultFilters parameter in your Compute environment file. Filters can be added or removed.
The default configuration runs the following filters in the scheduler:
- RetryFilter
- AvailabilityZoneFilter
- ComputeFilter
- ComputeCapabilitiesFilter
- ImagePropertiesFilter
- ServerGroupAntiAffinityFilter
- ServerGroupAffinityFilter
Some filters use information in parameters passed to the instance in:
-
The
nova bootcommand. - The instance’s flavor (see Section 4.3.4, “Update Flavor Metadata”)
- The instance’s image (see Appendix A, Image Configuration Parameters).
All available filters are listed in the following table.
Table 4.7. Scheduling Filters
| Filter | Description |
|---|---|
|
| Only passes hosts in host aggregates whose metadata matches the instance’s image metadata; only valid if a host aggregate is specified for the instance. For more information, see Section 1.2.1, “Creating an Image”. |
|
| Metadata in the host aggregate must match the host’s flavor metadata. For more information, see Section 4.3.4, “Update Flavor Metadata”. |
|
This filter can only be specified in the same
| |
|
|
A host with the specified Note The project can still place instances on other hosts. |
|
| Passes all available hosts (however, does not disable other filters). |
|
| Filters using the instance’s specified availability zone. |
|
|
Ensures Compute metadata is read correctly. Anything before the |
|
| Passes only hosts that are operational and enabled. |
|
|
Enables an instance to build on a host that is different from one or more specified hosts. Specify |
|
| Only passes hosts that match the instance’s image properties. For more information, see Section 1.2.1, “Creating an Image”. |
|
|
Passes only isolated hosts running isolated images that are specified using |
|
| Recognises and uses an instance’s custom JSON filters:
|
|
The filter is specified as a query hint in the
| |
|
| Filters out hosts with unavailable metrics. |
|
| Filters out hosts based on its NUMA topology. If the instance has no topology defined, any host can be used. The filter tries to match the exact NUMA topology of the instance to those of the host (it does not attempt to pack the instance onto the host). The filter also looks at the standard over-subscription limits for each NUMA node, and provides limits to the compute host accordingly. |
|
| The weigher can compute the weight based on the number of PCI devices on the host and the number of PCI devices requested by an instance. For example, if there are three hosts available, one with a single PCI device, one with multiple PCI devices and one without any PCI devices, then Compute should prioritize these hosts based on the demands of the instance. The first host should be preferred if the instance requests one PCI device, the second host if the instance requires multiple PCI devices and the third host if the instances does not request a PCI device. For more information, see Reserve NUMA Nodes with PCI Devices |
|
|
Filters out hosts that have failed a scheduling attempt; valid if |
|
|
Passes one or more specified hosts; specify hosts for the instance using the |
|
| Only passes hosts for a specific server group:
|
|
| Only passes hosts in a server group that do not already host an instance:
|
|
|
Only passes hosts on the specified IP subnet range specified by the instance’s cidr and
|
4.5.2. Configure Scheduling Weights
Hosts can be weighted for scheduling; the host with the largest weight (after filtering) is selected. All weighers are given a multiplier that is applied after normalising the node’s weight. A node’s weight is calculated as:
w1_multiplier * norm(w1) + w2_multiplier * norm(w2) + ...
You can configure weight options in the Compute node configuration file.
4.5.2.1. Configure Weight Options for Hosts
You can define the host weighers you would like the scheduler to use in the [DEFAULT] scheduler_weight_classes option. Valid weighers are:
-
nova.scheduler.weights.ram- Weighs the host’s available RAM. -
nova.scheduler.weights.metrics- Weighs the host’s metrics. -
nova.scheduler.weights.affinity- Weighs the host’s proximity to other hosts in the given server group. -
nova.scheduler.weights.all_weighers- Uses all host weighers (default).
Table 4.8. Host Weight Options
| Weigher | Option | Description |
|---|---|---|
| All |
[DEFAULT] |
Defines the subset size from which a host is selected (integer); must be at least |
| affinity |
[default] |
Used for weighing hosts for group soft-affinity. Should be a positive floating-point number, because a negative value results in the opposite behavior, which is normally controlled by |
| affinity |
[default] |
Used for weighing hosts for group soft-anti-affinity. Should be a positive floating-point number, because a negative value results in the opposite behavior, which is normally controlled by |
| metrics |
[metrics] |
Specifies how to handle metrics in [metrics]
|
| metrics |
[metrics] |
Used as the weight if any metric in [metrics] |
| metrics |
[metrics] |
Mulitplier used for weighing metrics. By default, |
| metrics |
[metrics] |
Specifies metrics and the ratio with which they are weighed; use a comma-separated list of
Example: |
| ram |
[DEFAULT] |
Multiplier for RAM (floating point). By default, |
4.5.3. Configure Placement Service Traits
The placement service tracks the inventory and usage of resource providers, which can be a compute node, a shared storage pool, or an IP allocation pool. Any service that needs to manage the selection and consumption of resources can use the placement service.
To query the placement service, install the python3-osc-placement package on the undercloud.
Each resource provider has a set of traits. Traits are the qualitative aspects of a resource provider, for example, the type of storage disk, or the Intel CPU instruction set extension. An instance can specify which of these traits it requires.
The Compute (nova) service interacts with the placement service when it creates instances, with the nova-compute and nova-scheduler processes.
nova-compute- Creates the resource provider record.
- Sets the inventory that describes the available quantitative resources, such as the available vCPUs.
-
Sets the traits that describe qualitative aspects of the resource provider. The
libvirtvirtualization driver reports these traits to the placement service (see Section 4.5.3.1, “libvirtvirtualization driver capabilities as placement service traits” for details).
nova-scheduler- Sends a request to the placement service for a list of allocation candidates.
- Decides which destination host to build a server on, based on the traits required by the instance.
4.5.3.1. libvirt virtualization driver capabilities as placement service traits
You can use the capabilities of libvirt virtualization drivers as placement service traits. The traits that you can specify are defined in the os-traits library, for example:
-
COMPUTE_TRUSTED_CERTS -
COMPUTE_NET_ATTACH_INTERFACE_WITH_TAG -
COMPUTE_IMAGE_TYPE_RAW -
HW_CPU_X86_AVX -
HW_CPU_X86_AVX512VL -
HW_CPU_X86_AVX512CD
See the os-traits library for a catalog of the standardized constants that an instance can request for a particular hardware, virtualization, storage, network, or device trait.
The following libvirt virtualization drivers automatically report the features that a host CPU provides, such as the type of instruction set, for example, SSE4, AVX, or AVX-512, to the placement service:
- Libvirt QEMU (x86)
- Libvirt KVM (x86)
- Libvirt KVM (ppc64)
If you are using one of these drivers, you can configure the flavor extra specs or image metadata for an instance to request a resource provider with specific CPU features.
4.5.3.2. Using placement service traits to specify resource provider requirements
You can use one of the following methods to specify the required resource provider traits for an instance:
In the following example procedures, the instance requires a particular type of CPU.
Prerequisites
-
The placement service package,
python3-osc-placement, is installed on the undercloud. Your deployment uses one of the following
libvirtvirtualization drivers:- Libvirt QEMU (x86)
- Libvirt KVM (x86)
- Libvirt KVM (ppc64)
Procedure: Requesting a trait using image metadata
Create a new image or modify an existing one to set the required trait:
$ openstack image create ... $IMAGE
$ openstack image set --property trait:HW_CPU_X86_AVX512BW=required $IMAGE
Boot an instance using the image:
$ openstack server create --image=$IMAGE ... $SERVER_NAME
Result: The instance is created on a host that supports AVX-512.
Procedure: Requesting a trait using flavor extra specs
Create a new flavor or modify an existing one to set the required trait:
$ openstack flavor create ... $FLAVOR
$ openstack flavor set --property trait:HW_CPU_X86_AVX512BW=required $FLAVOR
Boot an instance using the flavor:
$ openstack server create --flavor=$FLAVOR ... $SERVER_NAME
Result: The instance is created on a host that supports AVX-512.
4.5.4. Configuring a guaranteed minimum bandwidth QoS
You can create instances that request a guaranteed minimum bandwidth by using a Quality of Service (QoS) policy.
QoS policies with a guaranteed minimum bandwidth rule are assigned to ports on a specific physical network. When you create an instance that uses the configured port, the Compute scheduling service selects a host for the instance that satisfies this request. The Compute scheduling service checks the Placement service for the amount of bandwidth reserved by other instances on each physical interface, before selecting a host to deploy an instance on.
Limitations/Restrictions
- You can only assign a guaranteed minimum bandwidth QoS policy when creating a new instance. You cannot assign a guaranteed minimum bandwidth QoS policy to instances that are already running, as the Compute service only updates resource usage for an instance in placement during creation or move operations, which means the minimum bandwidth available to the instance cannot be guaranteed.
You cannot live migrate an instance that uses a port that has resource requests, such as a guaranteed minimum bandwidth QoS policy. Run the following command to check if a port has resource requests:
$ openstack port show <port_name/port_id>
Prerequisites
- A QoS policy is available that has a minimum bandwidth rule. For more information, see Configuring Quality of Service (QoS) policies
Procedure
List the available QoS policies:
(overcloud) $ openstack network qos policy list
----------------------------------------------------------------+ | ID | Name | Shared | Default | Project |----------------------------------------------------------------+ | 6d771447-3cf4-4ef1-b613-945e990fa59f | policy2 | True | False | ba4de51bf7694228a350dd22b7a3dc24 | | 78a24462-e3c1-4e66-a042-71131a7daed5 | policy1 | True | False | ba4de51bf7694228a350dd22b7a3dc24 | | b80acc64-4fc2-41f2-a346-520d7cfe0e2b | policy0 | True | False | ba4de51bf7694228a350dd22b7a3dc24 |----------------------------------------------------------------+Check the rules of each of the available policies to determine which has the required minimum bandwidth:
(overcloud) $ openstack network qos policy show policy0
----------------------------------------------------------------------------------------------------+ | Field | Value |----------------------------------------------------------------------------------------------------+ | description | | | id | b80acc64-4fc2-41f2-a346-520d7cfe0e2b | | is_default | False | | location | cloud=', project.domain_id=, project.domain_name='Default, project.id=ba4de51bf7694228a350dd22b7a3dc24, project.name=admin, region_name=regionOne, zone= | | name | policy0 | | project_id | ba4de51bf7694228a350dd22b7a3dc24 | | rules | [{min_kbps: 100000, direction: egress, id: d46218fe-9218-4e96-952b-9f45a5cb3b3c, qos_policy_id: b80acc64-4fc2-41f2-a346-520d7cfe0e2b, type: minimum_bandwidth}, {min_kbps: 100000, direction: ingress, id: 1202c4e3-a03a-464c-80d5-0bf90bb74c9d, qos_policy_id: b80acc64-4fc2-41f2-a346-520d7cfe0e2b, type: minimum_bandwidth}] | | shared | True | | tags | [] |----------------------------------------------------------------------------------------------------+Create a port from the appropriate policy:
(overcloud) $ openstack port create port-normal-qos --network net0 --qos-policy policy0
Create an instance, specifying the NIC port to use:
$ openstack server create --flavor cirros256 --image cirros-0.3.5-x86_64-disk --nic port-id=port-normal-qos --wait qos_instance
An "ACTIVE" status in the output indicates that you have successfully created the instance on a host that can provide the requested guaranteed minimum bandwidth.
4.5.4.1. Removing a guaranteed minimum bandwidth QoS from an instance
If you want to lift the guaranteed minimum bandwidth QoS policy restriction from an instance, you can detach the interface.
To detach the interface, enter the following command:
$ openstack server remove port <vm_name|vm_id> <port_name|port_id>
4.5.5. Reserve NUMA Nodes with PCI Devices
Compute uses the filter scheduler to prioritize hosts with PCI devices for instances requesting PCI. The hosts are weighted using the PCIWeigher option, based on the number of PCI devices available on the host and the number of PCI devices requested by an instance. If an instance requests PCI devices, then the hosts with more PCI devices are allocated a higher weight than the others. If an instance is not requesting PCI devices, then prioritization does not take place.
This feature is especially useful in the following cases:
- As an operator, if you want to reserve nodes with PCI devices (typically expensive and with limited resources) for guest instances that request them.
- As a user launching instances, you want to ensure that PCI devices are available when required.
For this value to be considered, one of the following values must be added to the NovaSchedulerDefaultFilters parameter in your Compute environment file: PciPassthroughFilter or NUMATopologyFilter.
The pci_weight_multiplier configuration option must be a positive value.
4.5.6. Configure Emulator Threads to run on Dedicated Physical CPU
The Compute scheduler determines the CPU resource utilization and places instances based on the number of virtual CPUs (vCPUs) in the flavor. There are a number of hypervisor operations that are performed on the host, on behalf of the guest instance, for example, with QEMU, there are threads used for the QEMU main event loop, asynchronous I/O operations and so on and these operations need to be accounted and scheduled separately.
The libvirt driver implements a generic placement policy for KVM which allows QEMU emulator threads to float across the same physical CPUs (pCPUs) that the vCPUs are running on. This leads to the emulator threads using time borrowed from the vCPUs operations. When you need a guest to have dedicated vCPU allocation, it is necessary to allocate one or more pCPUs for emulator threads. It is therefore necessary to describe to the scheduler any other CPU usage that might be associated with a guest and account for that during placement.
In an NFV deployment, to avoid packet loss, you have to make sure that the vCPUs are never preempted.
Before you enable the emulator threads placement policy on a flavor, check that the following heat parameters are defined as follows:
-
NovaComputeCpuSharedSet: Set this parameter to a list of CPUs defined to run emulator threads. -
NovaSchedulerDefaultFilters: IncludeNUMATopologyFilterin the list of defined filters.
You can define or change heat parameter values on an active cluster, and then redeploy for those changes to take effect.
To isolate emulator threads, you must use a flavor configured as follows:
# openstack flavor set FLAVOR-NAME \
--property hw:cpu_policy=dedicated \
--property hw:emulator_threads_policy=share
4.6. Manage Instance Snapshots
An instance snapshot allows you to create a new image from an instance. This is very convenient for upgrading base images or for taking a published image and customizing it for local use.
The difference between an image that you upload directly to the Image Service and an image that you create by snapshot is that an image created by snapshot has additional properties in the Image Service database. These properties are found in the image_properties table and include the following parameters:
Table 4.9. Snapshot Options
| Name | Value |
|---|---|
| image_type | snapshot |
| instance_uuid | <uuid of instance that was snapshotted> |
| base_image_ref | <uuid of original image of instance that was snapshotted> |
| image_location | snapshot |
Snapshots allow you to create new instances based on that snapshot, and potentially restore an instance to that state. Moreover, this can be performed while the instance is running.
By default, a snapshot is accessible to the users and projects that were selected while launching an instance that the snapshot is based on.
4.6.1. Create an Instance Snapshot
If you intend to use an instance snapshot as a template to create new instances, you must ensure that the disk state is consistent. Before you create a snapshot, set the snapshot image metadata property os_require_quiesce=yes. For example,
$ glance image-update IMAGE_ID --property os_require_quiesce=yes
For this to work, the guest should have the qemu-guest-agent package installed, and the image should be created with the metadata property parameter hw_qemu_guest_agent=yes set. For example,
$ glance image-create --name NAME \
--disk-format raw \
--container-format bare \
--file FILE_NAME \
--is-public True \
--property hw_qemu_guest_agent=yes \
--progress
If you unconditionally enable the hw_qemu_guest_agent=yes parameter, then you are adding another device to the guest. This consumes a PCI slot, and will limit the number of other devices you can allocate to the guest. It also causes Windows guests to display a warning message about an unknown hardware device.
For these reasons, setting the hw_qemu_guest_agent=yes parameter is optional, and the parameter should be used for only those images that require the QEMU guest agent.
- In the dashboard, select Project > Compute > Instances.
- Select the instance from which you want to create a snapshot.
- In the Actions column, click Create Snapshot.
In the Create Snapshot dialog, enter a name for the snapshot and click Create Snapshot.
The Images category now shows the instance snapshot.
To launch an instance from a snapshot, select the snapshot and click Launch.
4.6.2. Manage a Snapshot
- In the dashboard, select Project > Images.
- All snapshots you created, appear under the Project option.
For every snapshot you create, you can perform the following functions, using the dropdown list:
- Use the Create Volume option to create a volume and entering the values for volume name, description, image source, volume type, size and availability zone. For more information, see Create a Volume in the Storage Guide.
- Use the Edit Image option to update the snapshot image by updating the values for name, description, Kernel ID, Ramdisk ID, Architecture, Format, Minimum Disk (GB), Minimum RAM (MB), public or private. For more information, see Section 1.2.3, “Update an Image”.
- Use the Delete Image option to delete the snapshot.
4.6.3. Rebuild an Instance to a State in a Snapshot
In an event that you delete an instance on which a snapshot is based, the snapshot still stores the instance ID. You can check this information using the nova image-list command and use the snapshot to restore the instance.
- In the dashboard, select Project > Compute > Images.
- Select the snapshot from which you want to restore the instance.
- In the Actions column, click Launch Instance.
- In the Launch Instance dialog, enter a name and the other details for the instance and click Launch.
For more information on launching an instance, see Section 4.1.2, “Launch an Instance”.
4.6.4. Consistent Snapshots
Previously, file systems had to be quiesced manually (fsfreeze) before taking a snapshot of active instances for consistent backups.
Compute’s libvirt driver automatically requests the QEMU Guest Agent to freeze the file systems (and applications if fsfreeze-hook is installed) during an image snapshot. Support for quiescing file systems enables scheduled, automatic snapshots at the block device level.
This feature is only valid if the QEMU Guest Agent is installed (qemu-ga) and the image metadata enables the agent (hw_qemu_guest_agent=yes)
Snapshots should not be considered a substitute for an actual system backup.
4.7. Use Rescue Mode for Instances
Compute has a method to reboot a virtual machine in rescue mode. Rescue mode provides a mechanism for access when the virtual machine image renders the instance inaccessible. A rescue virtual machine allows a user to fix their virtual machine by accessing the instance with a new root password. This feature is useful if an instance’s filesystem is corrupted. By default, rescue mode starts an instance from the initial image attaching the current boot disk as a secondary one.
4.7.1. Preparing an Image for a Rescue Mode Instance
Due to the fact that both the boot disk and the disk for rescue mode have same UUID, sometimes the virtual machine can be booted from the boot disk instead of the disk for rescue mode.
To avoid this issue, you should create a new image as rescue image based on the procedure in Section 1.2.1, “Creating an Image”:
The rescue image is stored in glance and configured in the nova.conf as a default, or you can select when you do the rescue.
4.7.1.1. Rescue Image if Using ext4 Filesystem
When the base image uses ext4 filesystem, you can create a rescue image from it using the following procedure:
Change the UUID to a random value using the
tune2fscommand:# tune2fs -U random /dev/DEVICE_NODE
Here DEVICE_NODE is the root device node (for example,
sda,vda, and so on).Verify the details of the filesystem, including the new UUID:
# tune2fs -l
-
Update the
/etc/fstabto use the new UUID. You may need to repeat this for any additional partitions you have, that are mounted in thefstabby UUID. -
Update the
/boot/grub2/grub.conffile and update the UUID parameter with the new UUID of the root disk. - Shut down and use this image as your rescue image. This will cause the rescue image to have a new random UUID that will not conflict with the instance that you are rescuing.
The XFS filesystem cannot change the UUID of the root device on the running virtual machine. Reboot the virtual machine until the virtual machine is launched from the disk for rescue mode.
4.7.2. Adding the Rescue Image to the OpenStack Image Service
When you have completed modifying the UUID of your image, use the following commands to add the generated rescue image to the OpenStack Image service:
Add the rescue image to the Image service:
# glance image-create --name IMAGE_NAME --disk-format qcow2 \
  --container-format bare --is-public True --file IMAGE_PATH
Here IMAGE_NAME is the name of the image, IMAGE_PATH is the location of the image.
Use the
image-listcommand to obtain the IMAGE_ID required for launching an instace in the rescue mode.# glance image-list
You can also upload an image using the OpenStack Dashboard, see Section 1.2.2, “Upload an Image”.
4.7.3. Launching an Instance in Rescue Mode
Since you need to rescue an instance with a specific image, rather than the default one, use the
--imageparameter:# nova rescue --image IMAGE_ID VIRTUAL_MACHINE_ID
Here IMAGE_ID is the ID of the image you want to use and VIRTUAL_MACHINE_ID is ID of a virtual machine that you want to rescue.
NoteThe
nova rescuecommand allows an instance to perform a soft shut down. This allows the guest operating system to perform a controlled shutdown before the instance is powered off. The shut down behavior is configured usingshutdown_timeoutin your Compute configuration file. The value stands for the overall period (in seconds) a guest operation system is allowed to complete the shutdown. The default timeout is 60 seconds.The timeout value can be overridden on a per image basis by means of
os_shutdown_timeoutthat is an image metadata setting allowing different types of operating systems to specify how much time they need to shut down cleanly.- Reboot the virtual machine.
-
Confirm the status of the virtual machine is RESCUE on the controller node by using
nova listcommand or by using dashboard. - Log in to the new virtual machine dashboard by using the password for rescue mode.
You can now make the necessary changes to your instance to fix any issues.
4.7.4. Unrescuing an Instance
You can unrescue the fixed instance to restart it from the boot disk.
Execute the following commands on the controller node.
# nova unrescue VIRTUAL_MACHINE_ID
Here VIRTUAL_MACHINE_ID is ID of a virtual machine that you want to unrescue.
The status of your instance returns to ACTIVE once the unrescue operation has completed successfully.
4.8. Set a Configuration Drive for Instances
You can use the config-drive parameter to present a read-only drive to your instances. This drive can contain selected files that are then accessible to the instance. The configuration drive is attached to the instance at boot, and is presented to the instance as a partition. Configuration drives are useful when combined with cloud-init (for server bootstrapping), and when you want to pass large files to your instances.
4.8.1. Configuration Drive Options
Use your Compute environment file to set the following configuration drive parameters:
-
config_drive_format- sets the format of the drive, and accepts the optionsiso9660andvfat. By default, it usesiso9660. -
force_config_drive- this forces the configuration drive to be presented to all instances. Set to "True". -
mkisofs_cmd- specifies the command to use for ISO file creation. This value must not be changed, as only genisoimage is supported.
4.8.2. Use a Configuration Drive
An instance attaches its configuration drive at boot time. This is enabled by the --config-drive option. For example, this command creates a new instance named test-instance01 and attaches a drive containing a file named /root/user-data.txt:
# nova boot --flavor m1.tiny --config-drive true --file /root/user-data.txt=/root/user-data.txt --image cirros test-instance01
Once the instance has booted, you can log in to it and see a file named /root/user-data.txt.
You can use the configuration drive as a source for cloud-init information. During the initial instance boot, cloud-init can automatically mount the configuration drive and run the setup scripts.