
Deploying Distributed Compute Nodes with Separate Heat Stacks
Using separate heat stacks to manage your Red Hat Openstack Platform
Abstract
Chapter 1. Creating a deployment with separate heat stacks
When you use separate heat stacks in your Red Hat OpenStack Platform environment, you can isolate the management operations that director performs. For example, you can scale Compute nodes without updating the Controller nodes that the control plane stack manages. You can also use this technique to deploy multiple Red Hat Ceph Storage clusters.
1.1. Using separate heat stacks
In a typical Red Hat OpenStack Platform deployment, a single heat stack manages all nodes, including the control plane (Controllers). You can now use separate heat stacks to address previous architectural constraints.
- Use separate heat stacks for different node types. For example, the control plane, Compute nodes, and HCI nodes can each be managed by their own stack. This allows you to change or scale the compute stack without affecting the control plane.
- You can use separate heat stacks at the same site to deploy multiple Ceph clusters.
- You can use separate heat stacks for disparate availability zones (AZs) within the same data center.
Separate heat stacks are required for deploying Red Hat OpenStack Platform using a distributed compute node (DCN) architecture. This reduces network and management dependencies on the central data center. Each edge site in this architecture must also have its own AZ from both Compute and Storage nodes.
This feature is available in this release as a Technology Preview, and therefore is not fully supported by Red Hat. It should only be used for testing, and should not be deployed in a production environment. For more information about Technology Preview features, see Scope of Coverage Details.
1.2. Prerequisites for using separate heat stacks
Your environment must meet the following prerequisites before you create a deployment using separate heat stacks:
- A working Red Hat OpenStack Platform 16 undercloud.
- For Ceph Storage users: access to Red Hat Ceph Storage 4.
- For the central location: three nodes that are capable of serving as central Controller nodes. All three Controller nodes must be in the same heat stack. You cannot split Controller nodes, or any of the control plane services, across separate heat stacks.
- For the distributed compute node (DCN) site: three nodes that are capable of serving as hyper-converged infrastructure (HCI) Compute nodes or standard compute nodes.
- For each additional DCN site: three HCI compute or Ceph nodes.
- All nodes must be pre-provisioned or able to PXE boot from the central deployment network. You can use a DHCP relay to enable this connectivity for DCNs.
- All nodes have been introspected by ironic.
1.3. Limitations of the example separate heat stacks deployment
This document provides an example deployment that uses separate heat stacks on Red Hat OpenStack Platform. This example environment has the following limitations:
- Image service (glance) multi store is not currently available, but it is expected to be available in a future release. In the example in this guide, Block Storage (cinder) is the only service that uses Ceph Storage.
- Spine/Leaf networking - The example in this guide does not demonstrate any routing requirements. Routing requirements are found in most distributed compute node (DCN) deployments.
- Ironic DHCP Relay - This guide does not include how to configure ironic with a DHCP relay.
- Block Storage (cinder) active/active without Pacemaker is available as technical preview only.
- DCN HCI nodes are available as technical preview only.
Chapter 2. Designing your separate heat stacks deployment
To segment your deployment within separate heat stacks, you must first deploy a single overcloud with the control plane. You can then create separate stacks for the distributed compute node (DCN) sites. The following example shows separate stacks for different node types:
-
Controller nodes: A separate heat stack named
central, for example, deploys the controllers. When you create new heat stacks for the DCN sites, you must create them with data from thecentralstack. The Controller nodes must be available for any instance management tasks. -
DCN sites: You can have a separate, uniquely named heat stacks, such as
dcn0,dcn1, and so on. Use a DHCP relay to extend the provisioning network to the remote site.
To make management simpler, create a separate availability zone (AZ) for each stack.
If you use spine/leaf networking, you must use a specific format to define the Storage and StorageMgmt networks. Define the Storage and StorageMgmt networks as override values and enclose the values in single quotes. In the following example the storage network (referred to as the public_network) spans two subnets, is separated by a comma, and is enclosed in single quotes:
CephAnsibleExtraConfig:
  public_network: '172.23.1.0/24,172.23.2.0/24'
2.1. Reusing network resources in multiple stacks
You can configure multiple stacks to use the same network resources, such as VIPs and subnets. You can duplicate network resources between stacks by using either the ManageNetworks setting or the external_resource_* fields.
Do not use the ManageNetworks setting if you are using the external_resource_* fields.
If you are not reusing networks between stacks, each network that is defined in network_data.yaml must have a unique name across all deployed stacks. For example, the network name internal_api cannot be reused between stacks, unless you intend to share the network between the stacks. Give the network a different name and name_lower property, such as InternalApiCompute0 and internal_api_compute_0.
2.1.1. Using ManageNetworks to reuse network resources
With the ManageNetworks setting, multiple stacks can use the same network_data.yaml file and the setting is applied globally to all network resources. The network_data.yaml file defines the network resources that the stack uses:
- name: StorageBackup
  vip: true
  name_lower: storage_backup
  ip_subnet: '172.21.1.0/24'
  allocation_pools: [{'start': '171.21.1.4', 'end': '172.21.1.250'}]
  gateway_ip: '172.21.1.1'
Use the following sequence so that the new stack does not manage the existing network resources.
Procedure
-
Deploy the central stack with
ManageNetworks: trueor leave unset. - Deploy the additional stack.
When you add new network resources, for example when you add new leaves in a spine/leaf deployment, you must update the central stack with the new network_data.yaml. This is because the central stack still owns and manages the network resources. After the network resources are available in the central stack, you can deploy the additional stack to use them.
2.1.2. Using UUIDs to reuse network resources
If you need more control over which networks are reused between stacks, you can use the external_resource_* field for resources in the network_data.yaml file, including networks, subnets, segments, or VIPs. These resources are marked as being externally managed, and heat does not perform any create, update, or delete operations on them.
Add an entry for each required network definition in the network_data.yaml file. The resource is then available for deployment on the separate stack:
external_resource_network_id: Existing Network UUID
external_resource_subnet_id: Existing Subnet UUID
external_resource_segment_id: Existing Segment UUID
external_resource_vip_id: Existing VIP UUID
This example reuses the internal_api network from the control plane stack in a separate stack.
Procedure
Identify the UUIDs of the related network resources:
$ openstack network show internal_api -c id -f value
$ openstack subnet show internal_api_subnet -c id -f value
$ openstack port show internal_api_virtual_ip -c id -f value
Save the values that are shown in the output of the above commands and add them to the network definition for the
internal_apinetwork in thenetwork_data.yamlfile for the separate stack:- name: InternalApi external_resource_network_id: 93861871-7814-4dbc-9e6c-7f51496b43af external_resource_subnet_id: c85c8670-51c1-4b17-a580-1cfb4344de27 external_resource_vip_id: 8bb9d96f-72bf-4964-a05c-5d3fed203eb7 name_lower: internal_api vip: true ip_subnet: '172.16.2.0/24' allocation_pools: [{'start': '172.16.2.4', 'end': '172.16.2.250'}] ipv6_subnet: 'fd00:fd00:fd00:2000::/64' ipv6_allocation_pools: [{'start': 'fd00:fd00:fd00:2000::10', 'end': 'fd00:fd00:fd00:2000:ffff:ffff:ffff:fffe'}] mtu: 1400
2.2. Service placement
In this configuration, each distributed compute node (DCN) site is deployed within its own availability zone (AZ) for Compute and Block Storage (cinder):
-
Cinder: Each DCN site uses a Block Storage AZ to run the
cinder-volumeservice. Thecinder-volumeservice is expected to support active/active configuration in a future update. -
Glance: The Image service (glance) uses the Object Storage (swift) back end at the central site. Any Compute instances that are created in a DCN site AZ use
HTTP GETto retrieve the image from the central site. In a future release, the Image service will use the Ceph RBD back end at the central site and at DCN sites. Images can then be transported from the central site to the DCN sites, which means that they can be COW-booted at the DCN location. - Ceph: In this architecture, Ceph does not run at the central site. Instead, each DCN site runs its own Ceph cluster that is colocated with the Compute nodes using HCI. The Ceph back end is only used for Block Storage volumes.
2.3. Managing separate heat stacks
The procedures in this guide show how to deploy three heat stacks: central, dcn0, and dcn1. Red Hat recommends that you store the templates for each heat stack in a separate directory to keep the information about each deployment isolated.
Procedure
Define the
centralheat stack:$ mkdir central $ touch central/overrides.yaml
Extract data from the
centralheat stack into a common directory for all DCN sites:$ mkdir dcn-common $ touch dcn-common/overrides.yaml $ touch dcn-common/control-plane-export.yaml
The
control-plane-export.yamlfile is created later by theopenstack overcloud exportcommand. It is in thedcn-commondirectory because all DCN deployments in this guide must use this file.Define the
dcn0site.$ mkdir dcn0 $ touch dcn0/overrides.yaml
To deploy more DCN sites, create additional dcn directories by number.
Chapter 3. Retrieving the container images
Use the following procedure, and its example file contents, to retrieve the container images you need for deployments with separate heat stacks. For more information, see Preparing container images.
Procedure
Add your Registry Service Account credentials to
containers.yaml.parameter_defaults: NeutronMechanismDrivers: ovn ContainerImagePrepare: - push_destination: 192.168.24.1:8787 set: ceph_namespace: registry.redhat.io/rhceph ceph_image: rhceph-4-rhel8 ceph_tag: latest name_prefix: openstack- namespace: registry.redhat.io/rhosp16-rhel8 tag: latest ContainerImageRegistryCredentials: # https://access.redhat.com/RegistryAuthentication registry.redhat.io: registry-service-account-username: registry-service-account-passwordGenerate the environment file as
~/containers-env-file.yaml:$ openstack tripleo container image prepare -e containers.yaml --output-env-file ~/containers-env-file.yaml
In Deploying the central controllers and Deploying HCI nodes to the distributed compute node (DCN) site, the resulting
~/containers-env-file.yamlfile is included as part of the overcloud deployment procedure.
Chapter 4. Deploying the central controllers
Deploy the central controller cluster in a similar way to a typical overcloud deployment. This cluster does not require any Compute nodes, so you can set the Compute count to 0 to override the default of 1. The central controller has particular storage and Oslo configuration requirements. Use the following procedure to address these requirements.
Procedure
Create a file called
central/overrides.yamlwith settings similar to the following:parameter_defaults: NtpServer: - 0.pool.ntp.org - 1.pool.ntp.org ControllerCount: 3 ComputeCount: 0 OvercloudControlFlavor: baremetal OvercloudComputeFlavor: baremetal ControllerSchedulerHints: 'capabilities:node': '0-controller-%index%' GlanceBackend: swift-
ComputeCount: 0is an optional parameter to prevent Compute nodes from being deployed with the central Controller nodes. GlanceBackend: swiftuses Object Storage (swift) as the Image Service (glance) back end. Red Hat recommends that the Image service does not use Ceph in this configuration until multi-backend glance support is available.The resulting configuration interacts with the distributed compute nodes (DCNs) in the following ways:
- The Image service on the DCN creates a cached copy of the image it receives from the central Object Storage back end. The Image service uses HTTP to copy the image from Object Storage to the local disk cache.
Each DCN has its own Object Storage volume service. This means that users can schedule Object Storage volumes from the central node into different availability zones, because the Ceph volume service on the DCN uses the local Ceph cluster.
NoteThe central Controller node must be able to connect to the distributed compute node (DCN) site. The central Controller node can use a routed layer 3 connection.
-
Deploy the central Controller node. For example, you can use a
deploy.shfile with the following contents:#!/bin/bash STACK=central source ~/stackrc time openstack overcloud deploy \ --stack $STACK \ --templates /usr/share/openstack-tripleo-heat-templates/ \ -e /usr/share/openstack-tripleo-heat-templates/environments/podman.yaml \ -e ~/containers-env-file.yaml \ -e ~/central/overrides.yaml
Chapter 5. Deploying the HCI nodes
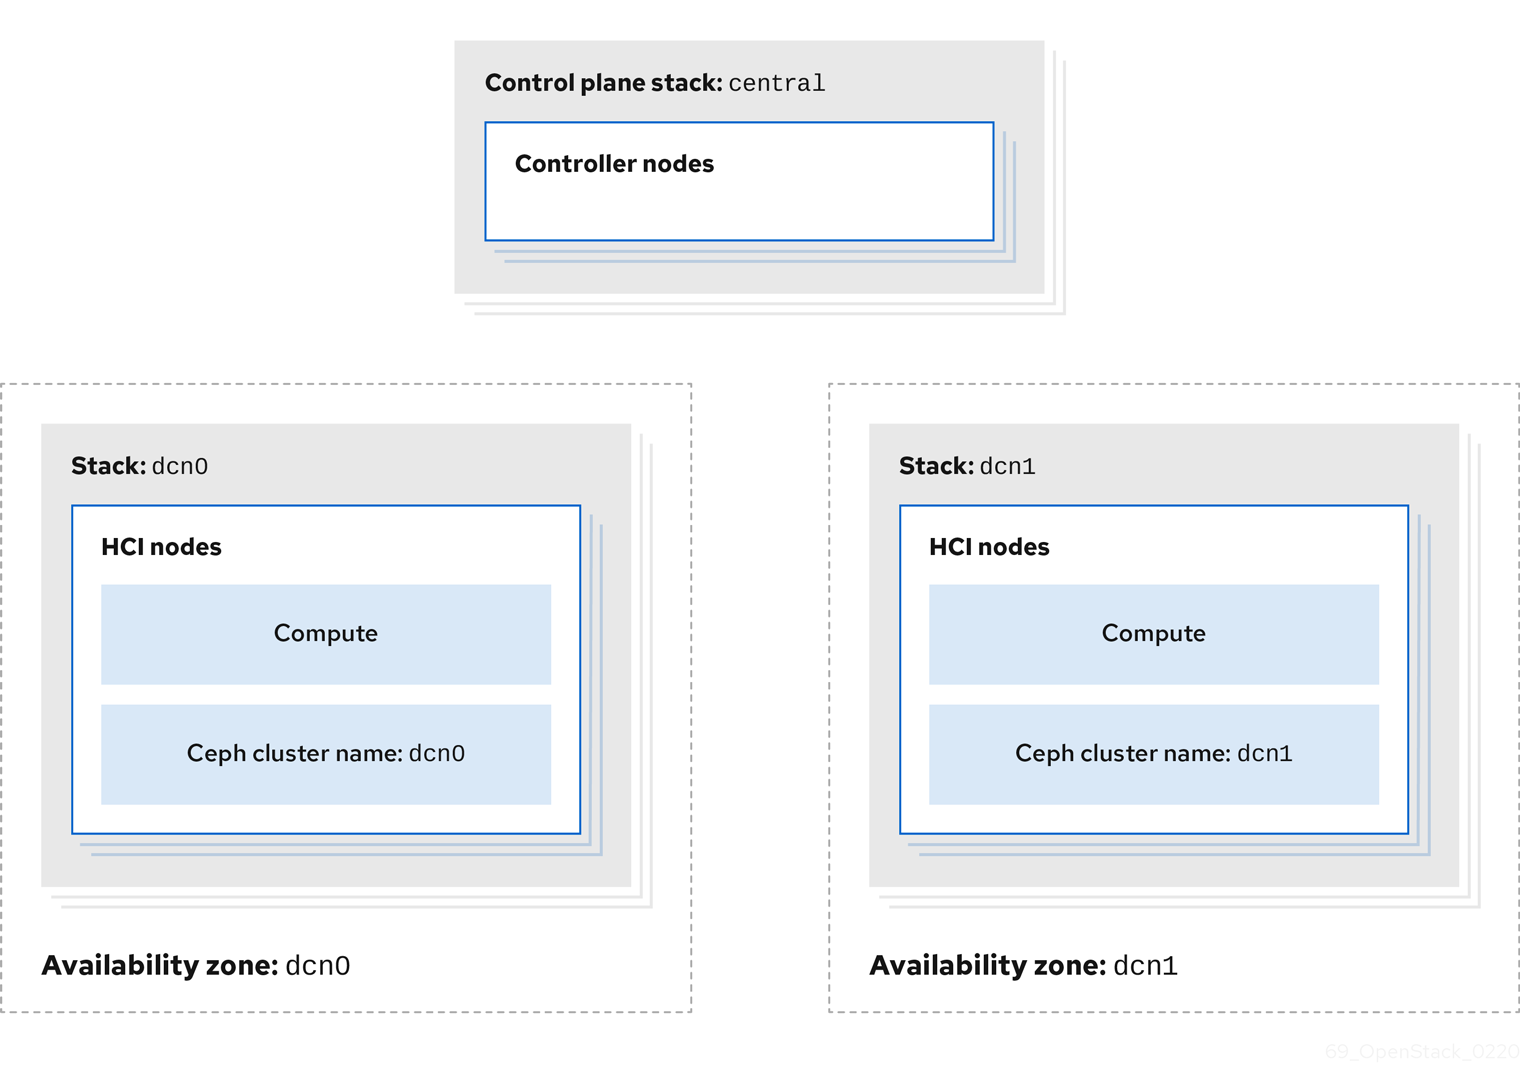
For DCN sites, you can deploy a hyper-converged infrastructure (HCI) stack that uses Compute and Ceph Storage on a single node. For example, the following diagram shows two DCN stacks named dcn0 and dcn1, each in their own availability zone (AZ). Each DCN stack has its own Ceph cluster and Compute services:
The procedures in Configuring the distributed compute node (DCN) environment files and Deploying HCI nodes to the distributed compute node (DCN) site describe this deployment method. These procedures demonstrate how to add a new DCN stack to your deployment and reuse the configuration from the existing heat stack to create new environment files. In the example procedures, the first heat stack deploys an overcloud within a centralized data center. Another heat stack is then created to deploy a batch of Compute nodes to a remote physical location.
5.1. Configuring the distributed compute node environment files
This procedure retrieves the metadata of your central site and then generates the configuration files that the distributed compute node (DCN) sites require:
Procedure
Export stack information from the
centralstack. You must deploy thecontrol-planestack before running this command:openstack overcloud export \ --config-download-dir /var/lib/mistral/central \ --stack central \ --output-file ~/dcn-common/control-plane-export.yaml \
This procedure creates a new control-plane-export.yaml environment file and uses the passwords in the plan-environment.yaml from the overcloud. The control-plane-export.yaml file contains sensitive security data. You can remove the file when you no longer require it to improve security.
5.2. Deploying HCI nodes to the distributed compute node site
This procedure uses the DistributedComputeHCI role to deploy HCI nodes to an availability zone (AZ) named dcn0. This role is used specifically for distributed compute HCI nodes.
CephMon runs on the HCI nodes and cannot run on the central Controller node. Additionally, the central Controller node is deployed without Ceph.
Procedure
Review the overrides for the distributed compute node (DCN) site in
dcn0/overrides.yaml:parameter_defaults: DistributedComputeHCICount: 3 DistributedComputeHCIFlavor: baremetal DistributedComputeHCISchedulerHints: 'capabilities:node': '0-ceph-%index%' CinderStorageAvailabilityZone: dcn0 NovaAZAttach: falseReview the proposed Ceph configuration in
dcn0/ceph.yaml.parameter_defaults: CephClusterName: dcn0 NovaEnableRbdBackend: false CephAnsiblePlaybookVerbosity: 3 CephPoolDefaultPgNum: 256 CephPoolDefaultSize: 3 CephAnsibleDisksConfig: osd_scenario: lvm osd_objectstore: bluestore devices: - /dev/sda - /dev/sdb - /dev/sdc - /dev/sdd - /dev/sde - /dev/sdf - /dev/sdg - /dev/sdh - /dev/sdi - /dev/sdj - /dev/sdk - /dev/sdl ## Everything below this line is for HCI Tuning CephAnsibleExtraConfig: ceph_osd_docker_cpu_limit: 1 is_hci: true CephConfigOverrides: osd_recovery_op_priority: 3 osd_recovery_max_active: 3 osd_max_backfills: 1 ## Set relative to your hardware: # DistributedComputeHCIParameters: # NovaReservedHostMemory: 181000 # DistributedComputeHCIExtraConfig: # nova::cpu_allocation_ratio: 8.2Replace the values for the following parameters with values that suit your environment. For more information, see the Deploying an overcloud with containerized Red Hat Ceph and Hyperconverged Infrastructure guides.
-
CephAnsibleExtraConfig -
DistributedComputeHCIParameters -
CephPoolDefaultPgNum -
CephPoolDefaultSize -
DistributedComputeHCIExtraConfig
-
Create a new file called
nova-az.yamlwith the following contents:resource_registry: OS::TripleO::Services::NovaAZConfig: /usr/share/openstack-tripleo-heat-templates/deployment/nova/nova-az-config.yaml parameter_defaults: NovaComputeAvailabilityZone: dcn0 RootStackName: central
Provided that the overcloud can access the endpoints that are listed in the
centralrcfile created by the central deployment, this command creates an AZ calleddcn0, with the new HCI Compute nodes added to that AZ during deployment.Run the
deploy.shdeployment script fordcn0:#!/bin/bash STACK=dcn0 source ~/stackrc if [[ ! -e distributed_compute_hci.yaml ]]; then openstack overcloud roles generate DistributedComputeHCI -o distributed_compute_hci.yaml fi time openstack overcloud deploy \ --stack $STACK \ --templates /usr/share/openstack-tripleo-heat-templates/ \ -r distributed_compute_hci.yaml \ -e /usr/share/openstack-tripleo-heat-templates/environments/disable-telemetry.yaml \ -e /usr/share/openstack-tripleo-heat-templates/environments/podman.yaml \ -e /usr/share/openstack-tripleo-heat-templates/environments/ceph-ansible/ceph-ansible.yaml \ -e /usr/share/openstack-tripleo-heat-templates/environments/cinder-volume-active-active.yaml \ -e ~/dcn-common/control-plane-export.yaml \ -e ~/containers-env-file.yaml \ -e ceph.yaml \ -e nova-az.yaml \ -e overrides.yamlWhen the overcloud deployment finishes, see the post-deployment configuration steps and checks in Chapter 6, Post-deployment configuration.
Chapter 6. Post-deployment configuration
After the overcloud deployment finishes, complete the following steps to validate the functionality.
Procedure
Create a test instance in the availability zones. In this example, the new instance runs on the distributed compute node (DCN). The specific AZ is targeted using the
--availability-zoneparameter:$ openstack server create --flavor m1.tiny --image cirros --network private --security-group basic dcn-instance --availability-zone dcn0
Create a volume on the first availability zone. This volume uses the cinder active/active service running on the
dcn0nodes.$ openstack volume create --size 1 --availability-zone dcn0 myvol
NoteThis step depends on the cinder availability zone configuration, which is defined by
CinderStorageAvailabilityZone. For more information, see Deploying availability zones in the Storage Guide.
You now have two separate HCI stacks, with a Ceph cluster deployed by each one. For more information on HCI, see Hyperconverged Infrastructure Guide.
6.1. Checking container health
Verify that the container is functioning correctly.
Procedure
- Log in to the node that is running the Ceph MON service by using SSH.
Run the following command to view container health:
$ podman exec ceph-mon-$HOSTNAME ceph -s --cluster CLUSTERNAME
Replace
CLUSTERNAMEwith the name of the cluster, for example,dcn0. The default value isceph.-
Confirm that the health status of the cluster is
HEALTH_OKand that all of the OSDs areup.
Chapter 7. Creating additional distributed compute node sites
A new distributed compute node (DCN) site has its own directory of YAML files on the undercloud. For more information, see Section 2.3, “Managing separate heat stacks”. This procedure contains example commands.
Procedure
As the stack user on the undercloud, create a new directory for
dcn1:$ cd ~ $ mkdir dcn1
Copy the existing
dcn0templates to the new directory and replace thedcn0strings withdcn1:$ cp dcn0/ceph.yaml dcn1/ceph.yaml $ sed s/dcn0/dcn1/g -i dcn1/ceph.yaml $ cp dcn0/overrides.yaml dcn1/overrides.yaml $ sed s/dcn0/dcn1/g -i dcn1/overrides.yaml $ sed s/"0-ceph-%index%"/"1-ceph-%index%"/g -i dcn1/overrides.yaml $ cp dcn0/deploy.sh dcn1/deploy.sh $ sed s/dcn0/dcn1/g -i dcn1/deploy.sh
-
Review the files in the
dcn1directory to confirm that they suit your requirements. Verify that your nodes are available and in
Provisioning state:$ openstack baremetal node list
When your nodes are available, run the
deploy.shfor thedcn1site:$ bash dcn1/deploy.sh