
Chapter 3. Identity and Access Management
3.1. Identity
This section contains conceptual information about identity.
3.1.1. Authentication
Authentication is an integral part of any real world OpenStack deployment. Give careful thought to this aspect of system design. A complete treatment of this topic is beyond the scope of this guide however some key topics are presented in the following sections.
At its most basic, authentication is the process of confirming identity - that a user is actually who they claim to be. A familiar example is providing a username and password when logging in to a system.
The OpenStack Identity service (keystone) supports multiple methods of authentication, including user name & password, LDAP, and other external authentication methods. Upon successful authentication, the Identity service provides the user with an authorization token used for subsequent service requests.
Transport Layer Security (TLS) provides authentication between services and persons using X.509 certificates. Although the default mode for TLS is server-side only authentication, you should consider using certificates for client authentication, as it is mandated in US government standards.
3.1.1.1. Invalid Login Attempts
The Identity Service (keystone) does not provide a method to limit access to accounts after repeated unsuccessful login attempts. A pattern of repetitive failed login attempts is generally an indicator of brute-force attacks. This type of attack is more prevalent in public cloud deployments. You can help mitigate this by using an external authentication system that blocks out an account after a configured number of failed login attempts. The account then might only be unlocked with further administrative intervention.
Detection techniques can also be used to mitigate damage. Detection involves frequent review of access control logs to identify unauthorized attempts to access accounts. Possible remediation would include reviewing the strength of the user password, or blocking the network source of the attack through firewall rules. You can add firewall rules on the keystone server that restrict the number of connections; this can help reduce the attack’s effectiveness.
In addition, it is useful to examine account activity for unusual login times and suspicious actions, and take corrective actions such as disabling the account.
3.1.1.2. Multi-factor Authentication
Employ multi-factor authentication for network access to privileged user accounts. The Identity service can integrate with external authentication services that can provide this functionality. For example, keystone can be integrated with Active Directory, Red Hat Identity Manager, FreeIPA, or a generic LDAP server, with multi-factor authentication being enforced by one of these.
This recommendation helps mitigate the various brute force, social engineering, and both spear and mass phishing attacks that might compromise passwords. For deployments that integrate with Red Hat Identity Management, multi-factor configuration is described in the Planning Identity Management Guide.
3.2. Authorization
The Identity service supports the notion of groups and roles. Users belong to groups while a group has a list of roles. OpenStack services reference the roles of the user attempting to access the service. The OpenStack policy enforcer middleware takes into consideration the policy rule associated with each resource then the user’s group/roles and association to determine if access is allowed to the requested resource.
3.2.1. Establish Formal Access Control Policies
Prior to configuring roles, groups, and users, you should document your required access control policies for the OpenStack installation. The policies should be consistent with any regulatory or legal requirements for the organization. Future modifications to the access control configuration should be done consistently with the formal policies. The policies should include the conditions and processes for creating, deleting, disabling, and enabling accounts, and for assigning privileges to the accounts. Periodically review the policies and ensure that the configuration is in compliance with approved policies.
3.2.2. Service Authorization
Cloud administrators must define a user with the role of admin for each service. This service account provides the service with the authorization to authenticate users.
The Compute and Object Storage services can be configured to use the Identity service to store authentication information. The Identity service supports client authentication for TLS, which might be enabled. TLS client authentication provides an additional authentication factor, in addition to the user name and password, that provides greater reliability on user identification. It reduces the risk of unauthorized access when user names and passwords might be compromised. However, there is additional administrative overhead and cost to issue certificates to users that might not be feasible in every deployment.
The cloud administrator should protect sensitive configuration files from unauthorized modification. This can be configured using mandatory access control frameworks such as SELinux, including the /var/lib/config-data/puppet-generated/keystone/etc/keystone/keystone.conf file and X.509 certificates.
Client authentication with TLS requires certificates be issued to services. These certificates can be signed by an external or internal certificate authority. OpenStack services check the validity of certificate signatures against trusted CAs by default and connections will fail if the signature is not valid or the CA is not trusted. Cloud deployers might use self-signed certificates; in this case, the validity check must be disabled or the certificate should be marked as trusted. To disable validation of self-signed certificates, set insecure=False in the [filter:authtoken] section in the /etc/nova/api.paste.ini file. This setting also disables certificates for other components. Note that the exact file path might vary for containerized services.
3.2.3. Administrative user accounts
Administrative user accounts should authenticate using both keystone and an external authentication service that supports 2-factor authentication, such as a certificate. An external authentication service can include Red Hat Identity Management, or Microsoft Active Directory. Integration with these services is described in https://access.redhat.com/documentation/en-us/red_hat_openstack_platform/15/html-single/integrate_with_identity_service/. This approach can help reduce the risk from passwords that might be compromised. This recommendation is in compliance with NIST 800-53 IA-2(1) guidance in the use of multi-factor authentication for network access to privileged accounts.
3.2.4. End Users
The Identity service can directly provide end-user authentication, or can be configured to use external authentication methods to conform to an organization’s security policies and requirements.
3.3. Policies
Each OpenStack service contains resources that are managed by access policies. For example, a resource might include the following functions:
- Permission to create and start instances
- The ability to attach a volume to an instance
As a Red Hat OpenStack Platform (RHOSP) administrator, you might need to create custom policies to introduce new roles with varying levels of access, or to change the default behavior of existing roles. You also need the ability to validate API access policies after changes, and debug those policies when they do not work. Validate and debug policies outside of a production deployment, where syntax errors can lead to downtime, and misapplied authorization can negatively impact security or usability.
3.3.1. Reviewing existing policies
Policy files for services traditionally existed in the /etc/$service directory. For example, the full path of the policy.json file for Compute (nova) was /etc/nova/policy.json.
There are two important architectural changes that affect how you can find existing policies:
Red Hat OpenStack Platform is now containerized.
Policy files, if present, are in the traditional path if you view them from inside the service container:
/etc/$service/policy.json
Policy files, if present, are in the following path if you view them from outside the service container:
/var/lib/config-data/puppet-generated/$service/etc/$service/policy.json
Each service has default policies that are provided in code, with files that are available only if you created them manually, or if they are generated with
oslopolicytooling. To generate a policy file, use theoslopolicy-policy-generatorfrom within a container, as in the following example:podman exec -it keystone oslopolicy-policy-generator --namespace keystone
By default, generated policies are pushed to stdout by osly.policy CLI tools.
3.3.2. Understanding service policies
Service policy file statements are either alias definitions or rules. Alias definitions exist at the top of the file. The following list contains an explanation of the alias definitions from the generated policy.json file for Compute (nova):
"context_is_admin": "role:admin"
When
rule:context_is_adminappears after a target, the policy checks that the user is operating with an administrative context before it allows that action."admin_or_owner": "is_admin:True or project_id:%(project_id)s"
When
admin_or_ownerappears after a target, the policy checks that the user is either an admin, or that their project ID matches the owning project ID of the target object before it allows that action."admin_api": "is_admin:True
When
admin_apiappears after a target, the policy checks that the user is an admin before it allows that action.
3.3.3. Policy syntax
Policy.json files support certain operators so that you can control the target scope of these settings. For example, the following keystone setting contains the rule that only admin users can create users:
"identity:create_user": "rule:admin_required"
The section to the left of the : character describes the privilege, and the section to the right defines who can use the privilege. You can also use operators to the right side to further control the scope:
-
!- No user (including admin) can perform this action. -
@and""- Any user can perform this action. -
not,and,or- Standard operator functions are available.
For example, the following setting means that no users have permission to create new users:
"identity:create_user": "!"
3.3.4. Using policy files for access control
To override the default rules, edit the policy.json file for the appropriate OpenStack service. For example, the Compute service has a policy.json in the nova directory, which is the correct location of the file for containerized services when you view it from inside the container.
- You must thoroughly test changes to policy files in a staging environment before implementing them in production.
-
You must check that any changes to the access control policies do not unintentionally weaken the security of any resource. In addition, any changes to a
policy.jsonfile are effective immediately and do not require a service restart.
3.3.4.1. Example: Creating a power user role
To customize the permissions of a keystone role, update the policy.json file of a service. This means that you can more granularly define the permissions that you assign to a class of users. This example creates a power user role for your deployment with the following privileges:
- Start an instance.
- Stop an instance.
- Manage the volumes that are attached to instances.
The intention of this role is to grant additional permissions to certain users, without the need to then grant admin access. To use these privileges, you must grant the following permissions to a custom role:
-
Start an instance:
"os_compute_api:servers:start": "role:PowerUsers" -
Stop an instance:
"os_compute_api:servers:stop": "role:PowerUsers" -
Configure an instance to use a particular volume:
"os_compute_api:servers:create:attach_volume": "role:PowerUsers" -
List the volumes that are attached to an instance:
"os_compute_api:os-volumes-attachments:index": "role:PowerUsers" -
Attach a volume:
"os_compute_api:os-volumes-attachments:create": "role:PowerUsers" -
View the details of an attached volume:
"os_compute_api:os-volumes-attachments:show": "role:PowerUsers" -
Change the volume that is attached to an instance:
"os_compute_api:os-volumes-attachments:update": "role:PowerUsers" -
Delete a volume that is attached to an instance:
"os_compute_api:os-volumes-attachments:delete": "role:PowerUsers"
When you modify the policy.json file, you override the default policy. As a result, members of PowerUsers are the only users that can perform these actions. To allow admin users to retain these permissions, you can create rules for admin_or_power_user. You can also use some basic conditional logic to define role:PowerUsers or role:Admin.
To ensure you use the keystone v3 API in your command line session, source the rc file that defines the v3 endpoint and settings:
OS_AUTH_URL=http://controller-hostname.lab.local:5000/v3
OS_USERNAME=username
OS_PASSWORD=password
OS_USER_DOMAIN_NAME=Default
OS_PROJECT_DOMAIN_NAME=Default
OS_PROJECT_NAME=project-name
OS_IDENTITY_API_VERSION=3
Create the custom keystone role:
$ openstack role create PowerUsers
+-----------+----------------------------------+
| Field     | Value                            |
+-----------+----------------------------------+
| domain_id | None                             |
| id        | 7061a395af43455e9057ab631ad49449 |
| name      | PowerUsers                      |
+-----------+----------------------------------+
Add an existing user to the role, and assign the role to a project:
$ openstack role add --project [PROJECT_NAME] --user [USER_ID] [PowerUsers-ROLE_ID]
NoteA role assignment is paired exclusively with one project. This means that when you assign a role to a user, you also define the target project at the same time. If you want the user to receive the same role but for a different project, you must assign the role to them again separately but target the different project.
View the default nova policy settings:
$ oslopolicy-policy-generator --namespace nova
Create custom permissions for the new
PowerUsersrole by adding the following entries to/etc/nova/policy.json:NoteTest your policy changes before deployment to verify that they work as you expect.
{
"os_compute_api:servers:start": "role:PowerUsers",
"os_compute_api:servers:stop": "role:PowerUsers",
"os_compute_api:servers:create:attach_volume": "role:PowerUsers",
"os_compute_api:os-volumes-attachments:index": "role:PowerUsers",
"os_compute_api:os-volumes-attachments:create": "role:PowerUsers",
"os_compute_api:os-volumes-attachments:show": "role:PowerUsers",
"os_compute_api:os-volumes-attachments:update": "role:PowerUsers",
"os_compute_api:os-volumes-attachments:delete": "role:PowerUsers"
}
When you save this file, the changes take effect immediately. Any users that are added to the
PowerUserskeystone role receive these privileges.
3.3.4.2. Example: Limiting access based on attributes
You can create policies that will restrict access to API calls based on the attributes of the user making that API call. For example, the following default rule states that keypair deletion is allowed if run from an administrative context, or if the user ID of the token matches the user ID associated with the target.
"os_compute_api:os-keypairs:delete": "rule:admin_api or user_id:%(user_id)s"
NOTE: * Newly implemented features are not guaranteed to be in every service with each release. Therefore, it is important to write rules using the conventions of the target service’s existing policies. For details on viewing these policies, see Reviewing existing policies. * All policies should be rigorously tested in a non-production environment for every version on which they will be deployed, as policies are not guaranteed for compatibility across releases.
Based on the above example, you can craft API rules to expand or restrict access to users based on whether or not they own a resource. Additionally, attributes can be combined with other restrictions to form rules as seen in the example below:
"admin_or_owner": "is_admin:True or project_id:%(project_id)s"
Considering the examples above, you can create a unique rule limited to administrators and users, and then use that rule to further restrict actions:
"admin_or_user": "is_admin:True or user_id:%(user_id)s"
"os_compute_api:os-instance-actions": "rule:admin_or_user"
For more information about the policy.json syntax options that are available, see Policy syntax.
3.3.4.3. Review role assignment
Generate a report of the role assignments:
openatck role assignment list --names
+---------------+--------------------+-------+----------------------+--------+-----------+
| Role          | User               | Group | Project              | Domain | Inherited |
+---------------+--------------------+-------+----------------------+--------+-----------+
| admin         | glance@Default     |       | services@Default     |        | False     |
| admin         | ceilometer@Default |       | services@Default     |        | False     |
| ResellerAdmin | ceilometer@Default |       | services@Default     |        | False     |
| PowerUsers    | demo-user@Default  |       | demo-project@Default |        | False     |
| admin         | swift@Default      |       | services@Default     |        | False     |
| admin         | aodh@Default       |       | services@Default     |        | False     |
| admin         | neutron@Default    |       | services@Default     |        | False     |
| admin         | nova@Default       |       | services@Default     |        | False     |
| _member_      | demo@Default       |       | demo@Default         |        | False     |
| admin         | cinder@Default     |       | services@Default     |        | False     |
| admin         | admin@Default      |       | admin@Default        |        | False     |
| admin         | gnocchi@Default    |       | services@Default     |        | False     |
+---------------+--------------------+-------+----------------------+--------+-----------
View the role assignment for a specific user:
$ openstack role assignment list --user demo-user --project demo-project --names
+-------------+----------------+-------+----------------------+--------+-----------+
| Role        | User           | Group | Project              | Domain | Inherited |
+-------------+----------------+-------+----------------------+--------+-----------+
| PowerUsers  | demo-user@Default |       | demo-project@Default |        | False  |
+-------------+----------------+-------+----------------------+--------+-----------+
3.4. Tokens
Once a user is authenticated, a token is generated for authorization and access to an OpenStack environment. A token can have a variable life span; however the default value for expiry is one hour. The recommended expiry value should be set to a lower value that allows enough time for internal services to complete tasks. In the event that the token expires before tasks complete, the cloud might become unresponsive or stop providing services. An example of expended time during use would be the time needed by the Compute service to transfer a disk image onto the hypervisor for local caching.
The token is often passed within the structure of a larger context of an Identity service response. These responses also provide a catalog of the various OpenStack services. Each service is listed with its name, access endpoints for internal, admin, and public access. The Identity service supports token revocation. This manifests as an API to revoke a token, to list revoked tokens and individual OpenStack services that cache tokens to query for the revoked tokens and remove them from their cache and append the same to their list of cached revoked tokens.
There are two supported token types: UUID, and Fernet. PKI and PKIZ tokens were deprecated with Red Hat OpenStack Platform 11.
3.4.1. UUID tokens
UUID tokens are persistent tokens, 32 bytes in length, and stored in the Identity service back end along with the authentication metadata. Clients must pass their UUID token to the Identity service for validation. UUID tokens were once the default token provider.
3.4.2. Fernet tokens
Fernet tokens are now the default token provider. Fernet is a secure messaging format explicitly designed for use in API tokens. Fernet tokens are non-persistent (no need to be persisted to a database), lightweight (within 180 to 240 bytes) and reduce the operational overhead required to run a cloud. Authentication and authorization metadata is bundled into a message packed payload, which is then encrypted and signed in as a Fernet token (within 180 to 240 bytes).
Unlike UUID, PKI and PKIZ tokens, Fernet tokens do not require persistence. The keystone token database no longer suffers bloat as a side effect of authentication. Pruning expired tokens from the token database is no longer required when using Fernet tokens. Since Fernet tokens are non-persistent, they do not have to be replicated. As long as each keystone node shares the same repository, you can create and validate Fernet tokens instantly across nodes.
Compared to PKI and PKIZ tokens, Fernet tokens are smaller in size; usually kept under a 250 byte limit. For PKI and PKIZ tokens, bigger service catalogs will result in longer token lengths. This pattern does not exist with Fernet tokens because the contents of the encrypted payload is kept to minimum.
For information about Fernet tokens and rotating Fernet keys, see https://access.redhat.com/documentation/en-us/red_hat_openstack_platform/15/html-single/deploy_fernet_on_the_overcloud/.
3.5. Keystone domains
Keystone domains are high-level security boundaries, logically grouping projects, users and groups. As such, they can be used to centrally manage all keystone-based identity components. With the introduction of account domains, server, storage and other resources can now be logically grouped into multiple projects (previously called tenants) which can themselves be grouped under a master account-like container. In addition, multiple users can be managed within an account domain and assigned roles that vary for each project.
The Identity V3 API supports multiple domains. Users of different domains might be represented in different authentication backends. They might even have different attributes that must be mapped to a single set of roles and privileges, that are used in the policy definitions to access the various service resources.
Where a rule might specify access to only admin users and users belonging to the project, the mapping might be trivial. In other scenarios the cloud administrator might need to approve the mapping routines per project.
Domain-specific authentication drivers allow the Identity service to be configured for multiple domains using domain-specific configuration files. Enabling the drivers and setting the domain-specific configuration file location occur in the [identity] section of the /var/lib/config-data/puppet-generated/keystone/etc/keystone/keystone.conf file. For example:
[identity]
domain_specific_drivers_enabled = True
domain_config_dir = /var/lib/config-data/puppet-generated/keystone/etc/keystone/domains/
Any domains without a domain-specific configuration file will use options in the primary /var/lib/config-data/puppet-generated/keystone/etc/keystone/keystone.conf file.
3.6. Federating with the Identity Service
Federated Identity is a mechanism to establish trusts between Identity Providers and Service Providers (SP). In this case, the Service Providers are the services provided by an OpenStack cloud.
For authentication and authorization services, the OpenStack identity model considers the external authentication database to be a separate keystone domain. Each federated authentication mechanism is associated with a keystone domain, with support for multiple coexisting domains. You can use roles to grant users in external domains access to resources in the cloud; this approach also works in cross-domain multi-tenant deployments. This approach also has implications for a per-component policy, as not all OpenStack roles can be mapped in policy back to externally authenticated users. For example, there is usually additional configuration and consideration required if users in an external authentication database require administrative access similar to that of the admin user in the admin domain.
Federated Identity provides a way to use existing credentials to access cloud resources such as servers, volumes, and databases, across multiple endpoints provided in multiple authorized clouds using a single set of credentials, without having to provision additional identities or log in multiple times. The credential is maintained by the user’s Identity Provider.
The Identity service can store user credentials in an SQL Database, or might use an LDAP-compliant directory server. The Identity database might be separate from databases used by other OpenStack services to reduce the risk of a compromise of the stored credentials.
When you use a username and password to authenticate, Identity does not enforce policies on password strength, expiration, or failed authentication attempts. Organizations that desire to enforce stronger password policies should consider using Identity extensions or external authentication services.
LDAP simplifies integration of Identity authentication into an organization’s existing directory service and user account management processes. Authentication and authorization policy in OpenStack might be delegated to another service. A typical use case is an organization that seeks to deploy a private cloud and already has a database of employees and users in an LDAP system. Using this as the authentication authority, requests to the Identity service are delegated to the LDAP system, which will then authorize or deny based on its policies. Upon successful authentication, the Identity service then generates a token that is used for access to authorized services.
Note that if the LDAP system has attributes defined for the user such as admin, finance, HR etc, these must be mapped into roles and groups within Identity for use by the various OpenStack services. The /var/lib/config-data/puppet-generated/keystone/etc/keystone/keystone.conf file maps LDAP attributes to Identity attributes.
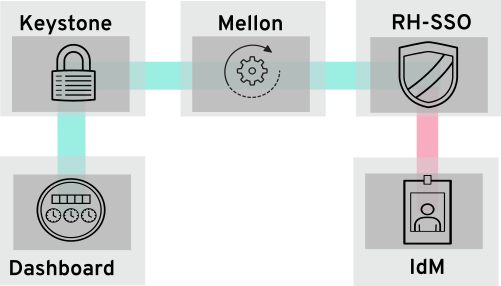
3.7. Federate with IdM using Red Hat Single Sign-On
You can use Red Hat Single Sign-On (RH-SSO) to federate your IdM users for OpenStack authentication (authN). Federation allows your IdM users to login to the OpenStack Dashboard without revealing their credentials to any OpenStack services. Instead, when Dashboard needs a user’s credentials, it will forward the user to Red Hat Single Sign-On (RH-SSO) and allow them to enter their IdM credentials there. As a result, RH-SSO asserts back to Dashboard that the user has successfully authenticated, and Dashboard then allows the user to access the project.
3.7.1. The federation workflow
This section describes how keystone, RH-SSO and IdM interact with each other. Federation in OpenStack uses the concept of Identity Providers and Service Providers:
Identity Provider (IdP) - the service that stores the user accounts. In this case, the user accounts held in IdM, are presented to Keystone using RH-SSO.
Service Provider (SP) - the service that requires authentication from the users in the IdP. In this case, keystone is the service provider that grants Dashboard access to IdM users.
In the diagram below, keystone (the SP) communicates with RH-SSO (the IdP), which provides the necessary SAML2 WebSSO. RH-SSO is also able to serve as a universal adapter for other IdPs. In this configuration, you can point keystone at RH-SSO, and RH-SSO will forward requests on to the Identity Providers that it supports (known as authentication modules), these currently include IdM and Active Directory. This is done by having the Service Provider (SP) and Identity Provider (IdP) exchange metadata, which each sysadmin then makes a decision to trust. The result is that the IdP can confidently make assertions, and the SP can then receive these assertions.
For more information, see the federation guide: https://access.redhat.com/documentation/en-us/red_hat_openstack_platform/15/html-single/federate_with_identity_service/
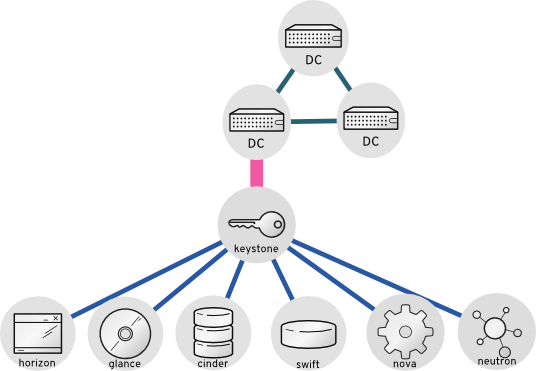
3.8. Integrate with LDAP-based services
Identity Service (keystone) can authenticate user accounts stored in LDAP-based services, such as Microsoft Active Directory Domain Services (AD DS), and Red Hat Identity Management (IdM). In this use case, keystone has read-only access to the LDAP user database authentication, and retains management over the authZ privileges assigned to authenticated accounts. The authZ function (permissions, roles, projects) is still performed by keystone, whereby permissions and roles are assigned to the LDAP accounts using the keystone management tools.
3.8.1. How LDAP integration works
In the diagram below, keystone uses an encrypted LDAPS connection to connect to an Active Directory Domain Controller. When a user logs in to horizon, keystone receives the supplied user credentials and passes them to Active Directory for authZ.
For information on integrating OpenStack with AD DS and IdM, see the integration guide: https://access.redhat.com/documentation/en-us/red_hat_openstack_platform/15/html-single/integrate_with_identity_service/