
Chapter 7. Building certified container images
You can use the Partner Build Service to build your application containers for certification. The Build Service builds containers from Git repositories that are Internet-accessible publicly or privately with an SSH key.
This section describes the steps to use the automated Build Service as part of the Red Hat OpenStack and NFV Zone to automatically build containerized partner platform plugins to Red Hat OpenStack Platform 15 base containers.
Prerequisites
To access the Automated Build System, you need to:
- Register with Red Hat Connect for Technology Partners.
- Apply for Zone access to the Red Hat OpenStack & NFV zone.
- Create a Product. The information you provide will be used when the certification is published in our catalog.
- Create a git repository for your plugin, with your Dockerfile and any components that you will include in the container.
Any problems registering with or accessing the Red Hat Connect site can be reported to connect@redhat.com.
7.1. Adding a container project
One project represents one partner image. If you have multiple images, you need to create multiple projects.
Procedure
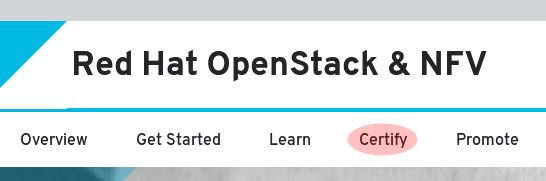
- Log into "Red Hat Connect for Technology Partners" and click Zones.
- Scroll down and select the Red Hat OpenStack & NFV zone. Click anywhere in the box.
Click Certify to access your company’s existing products and projects.
- Click Add Project to create a new project.
Set the Project Name.
- Project name is not visible outside the system.
-
The project name should include
[product][version]-[extended-base-container-image]-[your-plugin] -
For OpenStack purposes the format is
rhospXX-baseimage-myplugin. -
Example:
rhosp15-openstack-cinder-volume-myplugin
Select the Product, Product Version and Release Category based on your product/plugin and its version.
- Product and its version should be created prior to creating projects.
- Set the label release category to Tech Preview. Generally Available is not an option until you have completed API testing using Red Hat Certification. Refer to the plugin certification requirements once you have certified your container image
- Select the Red Hat Product and Red Hat Product Version based on the base image you are modifying with your partner plugin. For this release, please select Red Hat OpenStack Platform and 15.
- Click Submit to create the new project.
At this stage, Red Hat will assess and confirm certification of your project. Send an email to connect@redhat.com stating whether the plugin is in tree or out of tree in regards to the upstream code.
- In Tree means the plugin is included in the OpenStack upstream code base and the plugin image is built by Red Hat and distributed with Red Hat OpenStack Platform 15.
- Out of Tree means the plugin image is not included of the OpenStack upstream code base and not distributed within Red Hat OpenStack Platform 15.
After the Red Hat confirms the plugin status, move on to the Certification Checklist.
7.2. Following the container certification checklist
Certified containers meet Red Hat’s standards for packaging, distribution, and maintenance. Certified containers imply a commitment from partners to keep their images up-to-date and represent the highest level of trust and supportability for container-capable platforms, including Red Hat OpenStack Platform.
Procedure
- Click Certification Checklist.
- Complete all sections of the checklist. If you need more information on an item, click the drop down arrow on the left to view the items information and links to other resources.
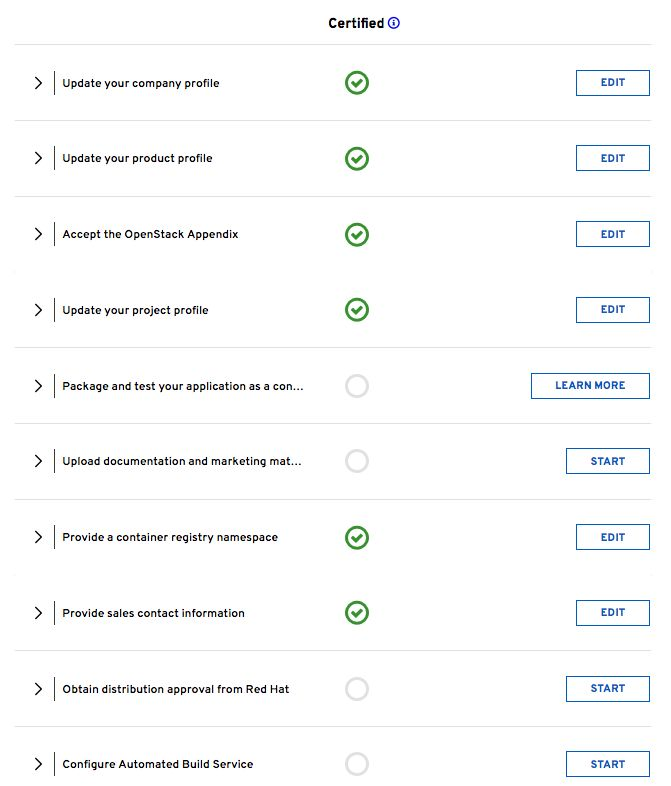
The following checklist items include:
- Update your company profile
- Ensures your company profile is up to date.
- Update your product profile
- This page relates to the product’s profile such as product type, description, repository URL, version, and contact distribution list.
- Accept the OpenStack Appendix
- Site Agreement for the Container Terms.
- Update project profile
- Check the image settings such as auto publish, registry namespace, release category, supported platforms.
In the Supported Platforms section, you must select an option. Select an option to allow you to save other required fields on this page.
- Package and test your application as a container
- Follow the instructions on this page to configure the build service. The build service will be dependent on the completion of the previous steps.
- Upload documentation and marketing materials
- This sends you to the product page. Scroll to the bottom and click on Add new Collateral to upload your product information.
A minimum of 3 materials are required, with 1 being a mandatory “document” type.
- Provide a container registry namespace
- This is the same as the project page profile page.
- Provide sales contact information
- This information is the same as the company profile.
- Obtain distribution approval from Red Hat
- Red Hat will provide approval for this step.
- Configure Automated Build Service
- The configuration information to perform the build and scan of the container image.
The last item in the checklist is Configure Automated Build Service. Before we configure this service, you must ensure your project contains a dockerfile that conforms to Red Hat’s certification standards.
7.3. Dockerfile requirements
As a part of the image build process, the build service scans your built image to ensure it complies with Red Hat’s standards. Use the following guidelines as a basis for the dockerfile to include with your project:
- The base image must be a Red Hat image. Any images using Ubuntu, Debian, and CentOS as a base will not pass the scanner.
You must configure the required labels:
-
name -
maintainer -
vendor -
version -
release -
summary
-
-
You must include a software license(s) as a text file within the image. Add the software license(s) to the
licensesdirectory at the root of your project. -
You must configure a user other than
root.
The following dockerfile example demonstrates the required information necessary for the scan:
FROM registry.redhat.io/rhosp15-rhel8/openstack-cinder-volume
MAINTAINER VenderX Systems Engineering <maintainer@vendorX.com>

###Required Labels
LABEL name="rhosp15-rhel8/openstack-cinder-volume-vendorx-plugin" \
      maintainer="maintainer@vendorX.com" \
      vendor="VendorX" \
      version="3.7" \
      release="1" \
      summary="Red Hat OpenStack Platform 15.0 cinder-volume VendorX PluginY" \
      description="Red Hat OpenStack Platform 15.0 cinder-volume VendorX PluginY"


USER root

###Adding package
###repo exmple
COPY vendorX.repo /etc/yum.repos.d/vendorX.repo

###adding package with curl
RUN curl -L -o /verdorX-plugin.rpm http://vendorX.com/vendorX-plugin.rpm

###adding local package
COPY verdorX-plugin.rpm /

# Enable a repo to install a package
RUN dnf clean all
RUN yum-config-manager --enable openstack-15-for-rhel-8-x86_64-rpms
RUN dnf install -y vendorX-plugin
RUN yum-config-manager --disable openstack-15-for-rhel-8-x86_64-rpms

# Add required license as text file in Liceses directory (GPL, MIT, APACHE, Partner End User Agreement, etc)
RUN mkdir /licenses
COPY licensing.txt /licenses

USER cinder
7.4. Setting project details
This procedure set details for the project such as the namespace and registry for your container image.
Procedure
- Click Project Settings.
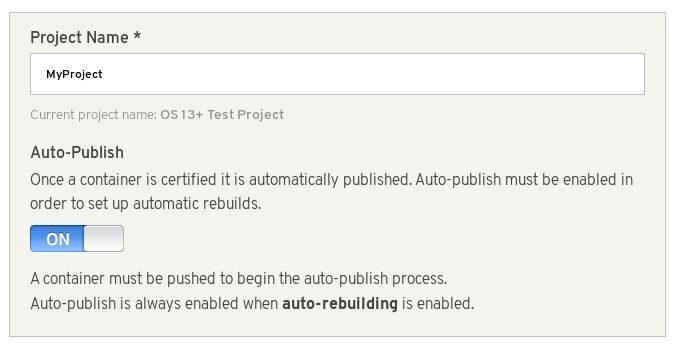
Ensure project’s name is in a correct format. Optionally, set Auto-Publish to ON if you want automatically publish containers that pass certification. Certified containers are published in the Red Hat Container Catalog.
Set the
Container Registry Namespace. Follow the online instructions.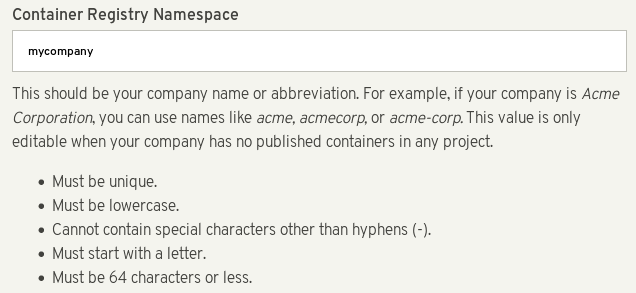
- The container registry namespace should be name of your company.
-
Final registry URL would be then
registry.connect.redhat.com/namespace/repository:tag. -
Example:
registry.connect.redhat.com/mycompany/rhosp15-openstack-cinder-volume-myplugin:1.0
Set the Outbound Repository Name and Outbound Repository Descriptions. Follow the online instructions. The outbound repository name should be same as the project name.
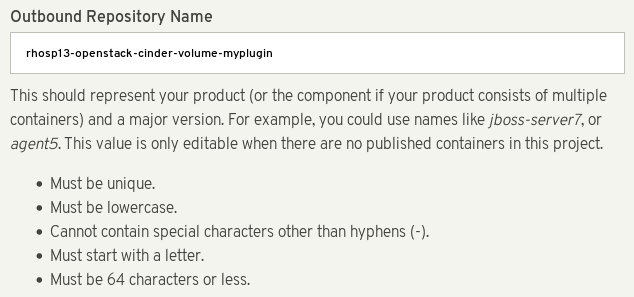
-
[product][version]-[extended_base_container_image]-[your_plugin] -
For OpenStack purposes the format is
rhospXX-baseimage-myplugin -
Final registry URL would be then
registry.connect.redhat.com/namespace/repository:tag -
Example:
registry.connect.redhat.com/mycompany/rhosp15-openstack-cinder-volume-myplugin:1.0
-
Add additional information about your project in the relevant fields, such as:
- Repository Description
- Supporting Documentation for Primed
- Click Submit.
7.5. Building a container image with the build service
The following procedure shows how to build the container image for your partner plugin.
Procedure
- Click Build Service.
Click Configure Build Service to set up your build details.
- Check the Red Hat Container Build is set to ON.
- Add your Git Source URL and optionally add your Source Code SSH Key if your git repository is protected. The URL can be HTML or SSH. SSH is required for protected git repositories.
-
Optionally, add Dockerfile Name or leave blank if your Dockerfile name is
Dockerfile. - Optionally, add the Context Directory if the docker build context root is not the root of the git repository. Otherwise, leave this field blank.
- Set the Branch in your git repository to base the container image.
- Click Submit to finalize the Build Service settings.
- Click Start Build.
Add a Tag Name and click Submit. It can take up to six minutes for the build to complete.
- The tag name should be a version of your plugin
-
Final reference URL would be
registry.connect.redhat.com/namespace/repository:tag -
Example:
registry.connect.redhat.com/mycompany/rhosp15-openstack-cinder-volume-myplugin:1.0
- Click Refresh to see if your build is complete. Optionally, click the matching Build ID to view the build details and logs.
-
The build service both builds and scans the image. This normally takes 10-15 minutes to complete. Once the scan completes, you can click the
Viewlink to expand the scan results.
7.6. Correcting failed scan results
The Scan Details page displays the result of the scan, including any failed items. If your image scan reports a FAILED status, use the following procedure to find out how to correct these failures.
Procedure
- On the Container Information page, click the View link to expand the scan results.
Click the failed item. For example, in the following screenshot, the
has_licensescheck has failed.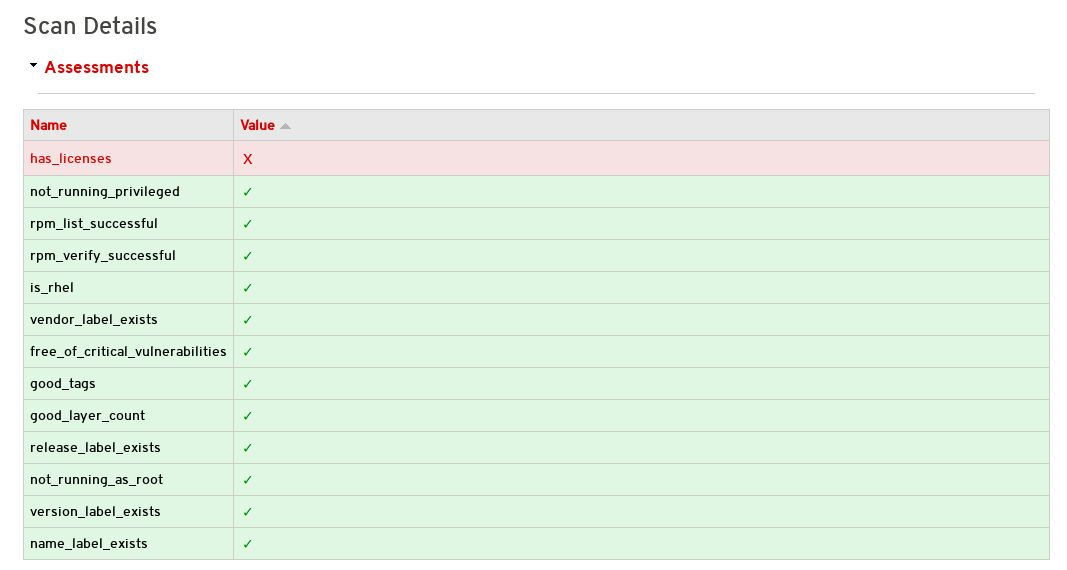
- Clicking the failed item opens the Policy Guide at the relevant section and provides more information on how to correct the issue.
If you receive an Access Denied warning when accessing the Policy Guide, contact connect@redhat.com
7.7. Publishing a container image
After the container image passed the scan, you can publish the container image.
Procedure
- On the Container Information page, click the Publish link to publish the container image live.
- The Publish link changes to Unpublish. If you need to unpublish a container, click this link.
Once you have published the link, check the certification documentation for further information on certifying your plugin. See Section 1.1, “Partner Integration Requirements” for links to certification documentation.