
Chapter 8. Configuring an OVS-DPDK deployment
This section describes how to deploy DPDK with Open vSwitch (OVS-DPDK) within the Red Hat OpenStack Platform (RHOSP) environment. The overcloud usually consists of nodes in predefined roles such as Controller nodes, Compute nodes, and different storage node types. Each of these default roles contains a set of services defined in the core heat templates on the director node.
You must install and configure the undercloud before you can deploy the overcloud. For more information, see: Director Installation and Usage Guide.
You must determine the best values for the OVS-DPDK parameters that you set in the network-environment.yaml file to optimize your RHOSP network for OVS-DPDK.
Do not edit or change isolated_cores or other values in etc/tuned/cpu-partitioning-variables.conf that are modified by these director heat templates.
8.1. Deriving DPDK parameters with workflows
This feature is available in this release as a Technology Preview, and therefore is not fully supported by Red Hat. It should only be used for testing, and should not be deployed in a production environment. For more information about Technology Preview features, see Scope of Coverage Details.
For an overview of the Mistral workflow for DPDK, see Section 7.2, “Overview of workflows and derived parameters”.
Prerequisites
You must have Bare Metal introspection, including hardware inspection_extras, enabled to generate the data retrieved by this workflow. Hardware inspection extras are enabled by default. See Inspecting the Hardware of Nodes.
Define the Workflows and Input Parameters for DPDK
The following lists the input parameters you can provide to the OVS-DPDK workflows:
- num_phy_cores_per_numa_node_for_pmd
- This input parameter specifies the required minimum number of cores for the NUMA node associated with the DPDK NIC. One physical core is assigned for the other NUMA nodes not associated with DPDK NIC. Ensure that this parameter is set to 1.
- huge_page_allocation_percentage
-
This input parameter specifies the required percentage of total memory (excluding
NovaReservedHostMemory) that can be configured as huge pages. TheKernelArgsparameter is derived using the calculated huge pages based on thehuge_page_allocation_percentagespecified. Ensure that this parameter is set to 50.
The workflows use these input parameters and the bare-metal introspection details to calculate appropriate DPDK parameter values.
Perform the following steps to define the workflows and input parameters for DPDK:
Copy the
usr/share/openstack-tripleo-heat-templates/plan-samples/plan-environment-derived-params.yamlfile to a local directory and set the input parameters to suit your environment.workflow_parameters: tripleo.derive_params.v1.derive_parameters: # DPDK Parameters # # Specifies the minimum number of CPU physical cores to be allocated for DPDK # PMD threads. The actual allocation will be based on network config, if # the a DPDK port is associated with a numa node, then this configuration # will be used, else 1. num_phy_cores_per_numa_node_for_pmd: 1 # Amount of memory to be configured as huge pages in percentage. Ouf the # total available memory (excluding the NovaReservedHostMemory), the # specified percentage of the remaining is configured as huge pages. huge_page_allocation_percentage: 50Run the
openstack overcloud deploycommand with the following options:-
The
update-plan-onlyoption - The role file and all environment files specific to your environment
The
plan-environment-derived-parms.yamlfile with the--plan-environment-fileoptional argument$ openstack overcloud deploy --templates --update-plan-only \ -r /home/stack/roles_data.yaml \ -e /home/stack/<environment-file> \ ... #repeat as necessary ... -p /home/stack/plan-environment-derived-params.yaml
-
The
The output of this command shows the derived results, which are also merged into the plan-environment.yaml file.
Started Mistral Workflow tripleo.validations.v1.check_pre_deployment_validations. Execution ID: 55ba73f2-2ef4-4da1-94e9-eae2fdc35535
Waiting for messages on queue 472a4180-e91b-4f9e-bd4c-1fbdfbcf414f with no timeout.
Removing the current plan files
Uploading new plan files
Started Mistral Workflow tripleo.plan_management.v1.update_deployment_plan. Execution ID: 7fa995f3-7e0f-4c9e-9234-dd5292e8c722
Plan updated.
Processing templates in the directory /tmp/tripleoclient-SY6RcY/tripleo-heat-templates
Invoking workflow (tripleo.derive_params.v1.derive_parameters) specified in plan-environment file
Started Mistral Workflow tripleo.derive_params.v1.derive_parameters. Execution ID: 2d4572bf-4c5b-41f8-8981-c84a363dd95b
Workflow execution is completed. result:
ComputeOvsDpdkParameters:
 IsolCpusList: 1,2,3,4,5,6,7,9,10,17,18,19,20,21,22,23,11,12,13,14,15,25,26,27,28,29,30,31
 KernelArgs: default_hugepagesz=1GB hugepagesz=1G hugepages=32 iommu=pt intel_iommu=on
   isolcpus=1,2,3,4,5,6,7,9,10,17,18,19,20,21,22,23,11,12,13,14,15,25,26,27,28,29,30,31
 NovaReservedHostMemory: 4096
 NovaVcpuPinSet: 2,3,4,5,6,7,18,19,20,21,22,23,10,11,12,13,14,15,26,27,28,29,30,31
 OvsDpdkCoreList: 0,16,8,24
 OvsDpdkMemoryChannels: 4
 OvsDpdkSocketMemory: 1024,1024
 OvsPmdCoreList: 1,17,9,25
You cannot derive the OvsDpdkMemoryChannels parameter from introspection details. In most cases, this value should be 4.
Deploy the overcloud with the derived parameters
Perform the following steps to deploy the overcloud with these derived parameters:
Copy the derived parameters from the deploy command output to the
network-environment.yamlfile.# DPDK compute node. ComputeOvsDpdkParameters: KernelArgs: default_hugepagesz=1GB hugepagesz=1G hugepages=32 iommu=pt intel_iommu=on TunedProfileName: "cpu-partitioning" IsolCpusList: "1,2,3,4,5,6,7,9,10,17,18,19,20,21,22,23,11,12,13,14,15,25,26,27,28,29,30,31" NovaVcpuPinSet: ['2,3,4,5,6,7,18,19,20,21,22,23,10,11,12,13,14,15,26,27,28,29,30,31'] NovaReservedHostMemory: 4096 OvsDpdkSocketMemory: "1024,1024" OvsDpdkMemoryChannels: "4" OvsDpdkCoreList: "0,16,8,24" OvsPmdCoreList: "1,17,9,25"NoteThese parameters apply to the specific role, ComputeOvsDpdk. You can apply these parameters globally, but role-specific parameters overwrite global parameters.
- Deploy the overcloud using the role file and all environment files specific to your environment. For more information, see Deploying the Overcloud.
In a cluster with Compute, ComputeOvsDpdk and ComputeSriov, the existing workflow to derive parameters applies the formula to the ComputeOvsDpdk role only.
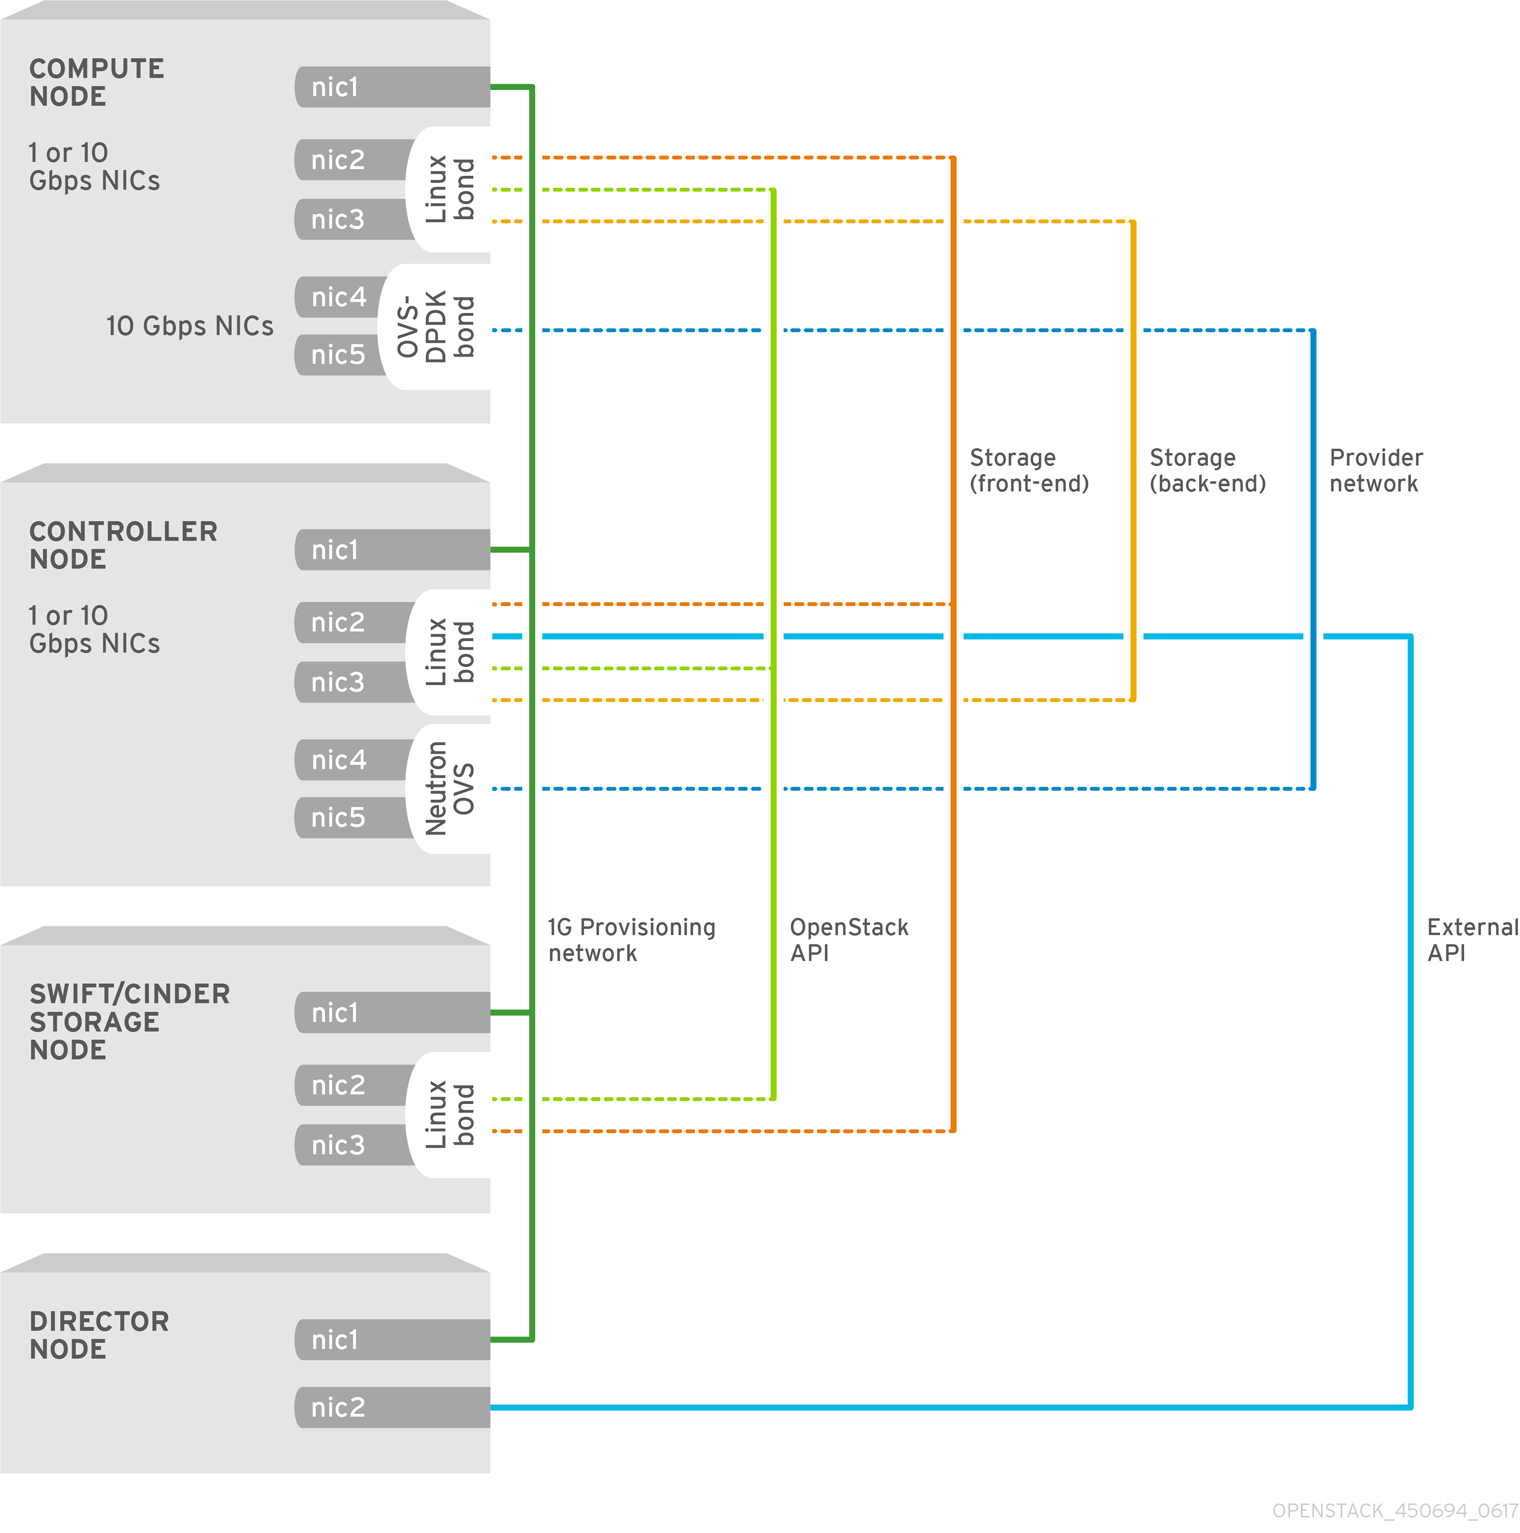
8.2. OVS-DPDK topology
With Red Hat OpenStack Platform, you can create custom deployment roles, using the composable roles feature, adding or removing services from each role. For more information on Composable Roles, see Composable Roles and Services.
This image shows an example Open vSwitch with Data Plane Development Kit (OVS-DPDK) topology with two bonded ports for the control plane and data plane:
To configure OVS-DPDK, complete the following tasks:
-
If you use composable roles, copy and modify the
roles_data.yamlfile to add the custom role for OVS-DPDK. -
Update the appropriate
network-environment.yamlfile to include parameters for kernel arguments and DPDK arguments. -
Update the
compute.yamlfile to include the bridge for DPDK interface parameters. -
Update the
controller.yamlfile to include the same bridge details for DPDK interface parameters. -
Run the
overcloud_deploy.shscript to deploy the overcloud with the DPDK parameters.
This guide provides examples for CPU assignments, memory allocation, and NIC configurations that can vary from your topology and use case. For more information about hardware and configuration options, see: Network Functions Virtualization Product Guide and Chapter 2, Hardware requirements.
Prerequisites
- OVS 2.10
- DPDK 17
- Tested NIC. For a list of tested NICs for NFV, see Section 2.1, “Tested NICs”.
Red Hat OpenStack Platform operates in OVS client mode for OVS-DPDK deployments.
8.3. Setting the MTU value for OVS-DPDK interfaces
Red Hat OpenStack Platform supports jumbo frames for Open vSwitch with Data Plane Development Kit (OVS-DPDK). To set the maximum transmission unit (MTU) value for jumbo frames you must:
-
Set the global MTU value for networking in the
network-environment.yamlfile. -
Set the physical DPDK port MTU value in the
compute.yamlfile. This value is also used by the vhost user interface. - Set the MTU value within any guest instances on the Compute node to ensure that you have a comparable MTU value from end to end in your configuration.
VXLAN packets include an extra 50 bytes in the header. Calculate your MTU requirements based on these additional header bytes. For example, an MTU value of 9000 means the VXLAN tunnel MTU value is 8950 to account for these extra bytes.
You do not need any special configuration for the physical NIC because the NIC is controlled by the DPDK PMD and has the same MTU value set by the compute.yaml file. You cannot set an MTU value larger than the maximum value supported by the physical NIC.
To set the MTU value for OVS-DPDK interfaces:
Set the
NeutronGlobalPhysnetMtuparameter in thenetwork-environment.yamlfile.parameter_defaults: # MTU global configuration NeutronGlobalPhysnetMtu: 9000
NoteEnsure that the NeutronDpdkSocketMemory value in the
network-environment.yamlfile is large enough to support jumbo frames. See Section 7.4.2, “Memory parameters” for details.Set the MTU value on the bridge to the Compute node in the
controller.yamlfile.- type: ovs_bridge name: br-link0 use_dhcp: false members: - type: interface name: nic3 mtu: 9000Set the MTU values for an OVS-DPDK bond in the
compute.yamlfile:- type: ovs_user_bridge name: br-link0 use_dhcp: false members: - type: ovs_dpdk_bond name: dpdkbond0 mtu: 9000 rx_queue: 2 members: - type: ovs_dpdk_port name: dpdk0 mtu: 9000 members: - type: interface name: nic4 - type: ovs_dpdk_port name: dpdk1 mtu: 9000 members: - type: interface name: nic5
8.4. Configuring a firewall for security groups
Data plane interfaces require a high degree of performance in a stateful firewall. To protect these interfaces, consider deploying a telco grade firewall as a virtual network function (VNF).
To configure the control plane interfaces, set the NeutronOVSFirewallDriver parameter to openvswitch. This configures Red Hat OpenStack Platform Networking to use the flow-based OVS firewall driver. This is set in the network-environment.yaml file under parameter_defaults.
Example:
parameter_defaults: NeutronOVSFirewallDriver: openvswitch
It is important to disable OVS firewall driver for data plane interfaces, where applicable. This can be done with the openstack port set command.
Example:
openstack port set --no-security-group --disable-port-security ${PORT}8.5. Setting multiqueue for OVS-DPDK interfaces
To set set same number of queues for interfaces in Open vSwitch with Data Plane Development Kit (OVS-DPDK) on the Compute node, modify the compute.yaml file:
- type: ovs_user_bridge
  name: br-link0
  use_dhcp: false
  members:
    - type: ovs_dpdk_bond
      name: dpdkbond0
      mtu: 9000
      rx_queue: 2
      members:
        - type: ovs_dpdk_port
          name: dpdk0
          mtu: 9000
          members:
            - type: interface
              name: nic4
        - type: ovs_dpdk_port
          name: dpdk1
          mtu: 9000
          members:
            - type: interface
name: nic58.6. Deploying the overcloud
Ensure parameters for your DPDK compute role populate in
network-environment.yaml. If necessary, copy these parameters from: derived OVS-DPDK.# DPDK compute node. ComputeOvsDpdkParameters: KernelArgs: default_hugepagesz=1GB hugepagesz=1G hugepages=32 iommu=pt intel_iommu=on isolcpus=1-7,17-23,9-15,25-31 TunedProfileName: "cpu-partitioning" IsolCpusList: "1-7,17-23,9-15,25-31" NovaVcpuPinSet: ['2-7,18-23,10-15,26-31'] NovaReservedHostMemory: 4096 OvsDpdkSocketMemory: "1024,1024" OvsDpdkMemoryChannels: "4" OvsDpdkCoreList: "0,16,8,24" OvsPmdCoreList: "1,17,9,25"Deploy the overcloud using the
openstack overcloud deploycommand.- Include the role file and all environment files specific to your environment.
Apply the
KernelArgsandTunedProfileparameters by including thehost-config-and-reboot.yamlfile from/usr/share/openstack-tripleo-heat-templates/environmentsto your deployment script:TEMPLATES_HOME=”/usr/share/openstack-tripleo-heat-templates” CUSTOM_TEMPLATES=”/home/stack/templates” openstack overcloud deploy --templates \ -r ${CUSTOM_TEMPLATES}/roles_data.yaml \ -e ${TEMPLATES_HOME}/environments/host-config-and-reboot.yaml \ -e ${CUSTOM_TEMPLATES}/network-environment.yaml \ -e ${CUSTOM_TEMPLATES}/controller.yaml -e ${CUSTOM_TEMPLATES}/computeovsdpdk.yaml \ ...
8.7. Known limitations
There are limitations when configuring OVS-DPDK with Red Hat OpenStack Platform for the NFV use case:
- Use Linux bonds for control plane networks. Ensure that the PCI devices in the Linux bond are on the same NUMA node for optimum performance. Red Hat does not support Neutron Linux bridge configuration.
- Every instance running on the hosts with OVS-DPDK requires huge pages. If huge pages are not present in the guest, the interface appears but does not function.
- With OVS-DPDK, there is a performance degradation of services that use tap devices, such as Distributed Virtual Routing (DVR). The resulting performance is not suitable for a production environment.
-
When using OVS-DPDK, all bridges on the same Compute node must be of type
ovs_user_bridge. The director might accept the configuration, but Red Hat does not support mixingovs_bridgeandovs_user_bridgeon the same node.
8.8. Creating a flavor and deploying an instance for OVS-DPDK
After you configure Open vSwitch with Data Plane Development Kit (OVS-DPDK) for your Red Hat OpenStack Platform deployment with NFV, you can create a flavor and deploy an instance with the following steps:
Create an aggregate group and add relevant hosts for OVS-DPDK. Define metadata, for example
dpdk=true, that matches defined flavor metadata.# openstack aggregate create dpdk_group # openstack aggregate add host dpdk_group [compute-host] # openstack aggregate set --property dpdk=true dpdk_group
NoteUse host aggregates to separate CPU-pinned instances from unpinned instances. Instances without CPU pinning have different resourcing requirements of instances with CPU pinning.
Create a flavor.
# openstack flavor create <flavor> --ram <MB> --disk <GB> --vcpus <#>
Set additional flavor properties. Note that the defined metadata,
dpdk=true, matches the defined metadata in the DPDK aggregate.# openstack flavor set <flavor> --property dpdk=true --property hw:cpu_policy=dedicated --property hw:mem_page_size=1GB --property hw:emulator_threads_policy=isolate
In this example,
m1.medium_huge_4cpuis the flavor name and the remaining parameters set the other properties for the flavor.For details on the emulator threads policy for performance improvements, see: Configure Emulator Threads to run on a Dedicated Physical CPU.
Create the network.
# openstack network create net1 --provider-physical-network tenant --provider-network-type vlan --provider-segment <VLAN-ID>
# openstack subnet create subnet1 --network net1 --subnet-range 192.0.2.0/24 --dhcp
Deploy an instance.
# openstack server create --flavor <flavor> --image <glance image> --nic net-id=<network ID>
To use multi-queue with OVS-DPDK, set the hw_vif_multiqueue_enabled property on an image, before you set the hw.vif_multiqueue_enabled property on a flavor:
Set the image properties.
# openstack image set --property hw_vif_multiqueue_enabled=true <image>
Set additional flavor properties.
# openstack flavor set --property hw:vif_multiqueue_enabled=true <flavor>
8.9. Troubleshooting the configuration
This section describes the steps to troubleshoot the Open vSwitch with Data Plane Development Kit (DPDK-OVS) configuration.
Review the bridge configuration and confirm that the bridge was created with the
datapath_type=netdev.# ovs-vsctl list bridge br0 _uuid : bdce0825-e263-4d15-b256-f01222df96f3 auto_attach : [] controller : [] datapath_id : "00002608cebd154d" datapath_type : netdev datapath_version : "<built-in>" external_ids : {} fail_mode : [] flood_vlans : [] flow_tables : {} ipfix : [] mcast_snooping_enable: false mirrors : [] name : "br0" netflow : [] other_config : {} ports : [52725b91-de7f-41e7-bb49-3b7e50354138] protocols : [] rstp_enable : false rstp_status : {} sflow : [] status : {} stp_enable : falseConfirm that the docker container
neutron_ovs_agentis configured to start automatically.# docker inspect neutron_ovs_agent | grep -A1 RestartPolicy "RestartPolicy": { "Name": "always",If the container has issues with starting, you can view any related messages.
# less /var/log/containers/neutron/openvswitch-agent.log
Confirm that the PMD CPU mask of the
ovs-dpdkare pinned to the CPUs. In case of HT, use sibling CPUs.For example, observe CPU 4:
# cat /sys/devices/system/cpu/cpu4/topology/thread_siblings_list
4,20
Use CPU 4 and 20:
# ovs-vsctl set Open_vSwitch . other_config:pmd-cpu-mask=0x100010
Display their status:
# tuna -t ovs-vswitchd -CP
thread  ctxt_switches pid SCHED_ rtpri affinity voluntary nonvoluntary       cmd
3161	OTHER 	0    	6	765023      	614	ovs-vswitchd
3219   OTHER 	0    	6     	1        	0   	handler24
3220   OTHER 	0    	6     	1        	0   	handler21
3221   OTHER 	0    	6     	1        	0   	handler22
3222   OTHER 	0    	6     	1        	0   	handler23
3223   OTHER 	0    	6     	1        	0   	handler25
3224   OTHER 	0    	6     	1        	0   	handler26
3225   OTHER 	0    	6     	1        	0   	handler27
3226   OTHER 	0    	6     	1        	0   	handler28
3227   OTHER 	0    	6     	2        	0   	handler31
3228   OTHER 	0    	6     	2        	4   	handler30
3229   OTHER 	0    	6     	2        	5   	handler32
3230   OTHER 	0    	6	953538      	431   revalidator29
3231   OTHER 	0    	6   1424258      	976   revalidator33
3232   OTHER 	0    	6   1424693      	836   revalidator34
3233   OTHER 	0    	6	951678      	503   revalidator36
3234   OTHER 	0    	6   1425128      	498   revalidator35
*3235   OTHER 	0    	4	151123       	51       	pmd37*
*3236   OTHER 	0   	20	298967       	48       	pmd38*
3164   OTHER 	0    	6 	47575        	0  dpdk_watchdog3
3165   OTHER 	0    	6	237634        	0   vhost_thread1
3166   OTHER 	0    	6  	3665        	0       	urcu2