
Chapter 6. Deploying second-tier Ceph storage on OpenStack
Using OpenStack director, you can deploy different Red Hat Ceph Storage performance tiers by adding new Ceph nodes dedicated to a specific tier in a Ceph cluster.
For example, you can add new object storage daemon (OSD) nodes with SSD drives to an existing Ceph cluster to create a Block Storage (cinder) backend exclusively for storing data on these nodes. A user creating a new Block Storage volume can then choose the desired performance tier: either HDDs or the new SSDs.
This type of deployment requires Red Hat OpenStack Platform director to pass a customized CRUSH map to ceph-ansible. The CRUSH map allows you to split OSD nodes based on disk performance, but you can also use this feature for mapping physical infrastructure layout.
The following sections demonstrate how to deploy four nodes where two of the nodes use SSDs and the other two use HDDs. The example is kept simple to communicate a repeatable pattern. However, a production deployment should use more nodes and more OSDs to be supported as per the Red Hat Ceph Storage hardware selection guide.
6.1. Create a CRUSH map
The CRUSH map allows you to put OSD nodes into a CRUSH root. By default, a “default” root is created and all OSD nodes are included in it.
Inside a given root, you define the physical topology, rack, rooms, and so forth, and then place the OSD nodes in the desired hierarchy (or bucket). By default, no physical topology is defined; a flat design is assumed as if all nodes are in the same rack.
See Crush Administration in the Storage Strategies Guide for details about creating a custom CRUSH map.
6.2. Mapping the OSDs
Complete the following step to map the OSDs.
Procedure
Declare the OSDs/journal mapping:
parameter_defaults:
  CephAnsibleDisksConfig:
   devices:
   - /dev/sda
   - /dev/sdb
   dedicated_devices:
   - /dev/sdc
   - /dev/sdc
   osd_scenario: non-collocated
   journal_size: 8192
6.3. Setting the replication factor
Complete the following step to set the replication factor.
This is normally supported only for full SSD deployment. See Red Hat Ceph Storage: Supported configurations.
Procedure
Set the default replication factor to two. This example splits four nodes into two different roots.
parameter_defaults:
  CephPoolDefaultSize: 2
If you upgrade a deployment that uses gnocchi as the backend, you might encounter deployment timeout. To prevent this timeout, use the following CephPool definition to customize the gnocchi pool:
parameter_defaults
    CephPools:  {"name": metrics, "pg_num": 128, "pgp_num": 128, "size": 1}
6.4. Defining the CRUSH hierarchy
Director provides the data for the CRUSH hierarchy, but ceph-ansible actually passes that data by getting the CRUSH mapping through the Ansible inventory file. Unless you keep the default root, you must specify the location of the root for each node.
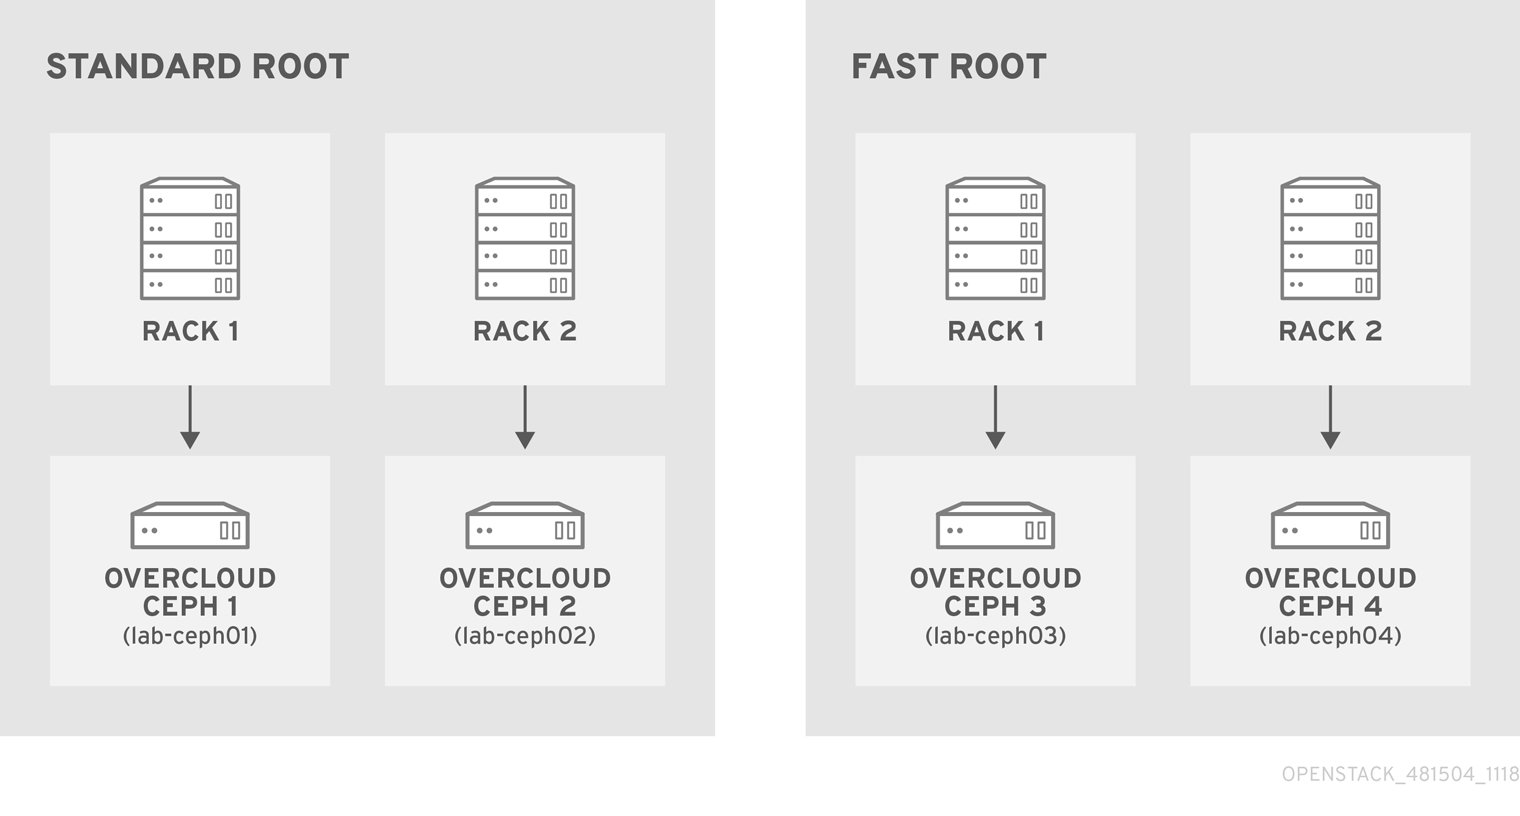
For example if node lab-ceph01 (provisioning IP 172.16.0.26) is placed in rack1 inside the fast_root, the Ansible inventory should resemble the following:
172.16.0.26:
osd_crush_location: {host: lab-ceph01, rack: rack1, root: fast_root}
When you use director to deploy Ceph, you don’t actually write the Ansible inventory; it is generated for you. Therefore, you must use NodeDataLookup to append the data.
NodeDataLookup works by specifying the system product UUID stored on the motherboard of the systems. The Bare Metal service (ironic) also stores this information after the introspection phase.
To create a CRUSH map that supports second-tier storage, complete the following steps:
Procedure
Run the following commands to retrieve the UUIDs of the four nodes:
for ((x=1; x<=4; x++)); \ { echo "Node overcloud-ceph0${x}"; \ openstack baremetal introspection data save overcloud-ceph0${x} | jq .extra.system.product.uuid; } Node overcloud-ceph01 "32C2BC31-F6BB-49AA-971A-377EFDFDB111" Node overcloud-ceph02 "76B4C69C-6915-4D30-AFFD-D16DB74F64ED" Node overcloud-ceph03 "FECF7B20-5984-469F-872C-732E3FEF99BF" Node overcloud-ceph04 "5FFEFA5F-69E4-4A88-B9EA-62811C61C8B3"NoteIn the example, overcloud-ceph0[1-4] are the Ironic nodes names; they will be deployed as
lab-ceph0[1–4](via HostnameMap.yaml).Specify the node placement as follows:
Root Rack Node standard_root
rack1_std
overcloud-ceph01 (lab-ceph01)
rack2_std
overcloud-ceph02 (lab-ceph02)
fast_root
rack1_fast
overcloud-ceph03 (lab-ceph03)
rack2_fast
overcloud-ceph04 (lab-ceph04)
NoteYou cannot have two buckets with the same name. Even if
lab-ceph01andlab-ceph03are in the same physical rack, you cannot have two buckets calledrack1. Therefore, we named themrack1_stdandrack1_fast.NoteThis example demonstrates how to create a specific route called “standard_root” to illustrate multiple custom roots. However, you could have kept the HDDs OSD nodes in the default root.
Use the following
NodeDataLookupsyntax:NodeDataLookup: {"SYSTEM_UUID": {"osd_crush_location": {"root": "$MY_ROOT", "rack": "$MY_RACK", "host": "$OVERCLOUD_NODE_HOSTNAME"}}}NoteYou must specify the system UUID and then the CRUSH hierarchy from top to bottom. Also, the
hostparameter must point to the node’s overcloud host name, not the Bare Metal service (ironic) node name. To match the example configuration, enter the following:parameter_defaults: NodeDataLookup: {"32C2BC31-F6BB-49AA-971A-377EFDFDB111": {"osd_crush_location": {"root": "standard_root", "rack": "rack1_std", "host": "lab-ceph01"}}, "76B4C69C-6915-4D30-AFFD-D16DB74F64ED": {"osd_crush_location": {"root": "standard_root", "rack": "rack2_std", "host": "lab-ceph02"}}, "FECF7B20-5984-469F-872C-732E3FEF99BF": {"osd_crush_location": {"root": "fast_root", "rack": "rack1_fast", "host": "lab-ceph03"}}, "5FFEFA5F-69E4-4A88-B9EA-62811C61C8B3": {"osd_crush_location": {"root": "fast_root", "rack": "rack2_fast", "host": "lab-ceph04"}}}Enable CRUSH map management at the ceph-ansible level:
parameter_defaults:
  CephAnsibleExtraConfig:
    create_crush_tree: true
Use scheduler hints to ensure the Bare Metal service node UUIDs correctly map to the hostnames:
parameter_defaults:
  CephStorageCount: 4
  OvercloudCephStorageFlavor: ceph-storage
  CephStorageSchedulerHints:
    'capabilities:node': 'ceph-%index%'
Tag the Bare Metal service nodes with the corresponding hint:
openstack baremetal node set --property capabilities='profile:ceph-storage,node:ceph-0,boot_option:local' overcloud-ceph01

openstack baremetal node set --property capabilities=profile:ceph-storage,'node:ceph-1,boot_option:local' overcloud-ceph02

openstack baremetal node set --property capabilities='profile:ceph-storage,node:ceph-2,boot_option:local' overcloud-ceph03

openstack baremetal node set --property capabilities='profile:ceph-storage,node:ceph-3,boot_option:local' overcloud-ceph04
NoteFor more information about predictive placement, see Assigning Specific Node IDs in the Advanced Overcloud Customization guide.
6.5. Defining CRUSH map rules
Rules define how the data is written on a cluster. After the CRUSH map node placement is complete, define the CRUSH rules.
Procedure
Use the following syntax to define the CRUSH rules:
parameter_defaults: CephAnsibleExtraConfig: crush_rules: - name: $RULE_NAME root: $ROOT_NAME type: $REPLICAT_DOMAIN default: true/falseNoteSetting the default parameter to
truemeans that this rule will be used when you create a new pool without specifying any rule. There may only be one default rule.In the following example, rule
standardpoints to the OSD nodes hosted on thestandard_rootwith one replicate per rack. Rulefastpoints to the OSD nodes hosted on thestandard_rootwith one replicate per rack:parameter_defaults: CephAnsibleExtraConfig: crush_rule_config: true crush_rules: - name: standard root: standard_root type: rack default: true - name: fast root: fast_root type: rack default: falseNoteYou must set
crush_rule_configtotrue.
6.6. Configuring OSP pools
Ceph pools are configured with a CRUSH rules that define how to store data. This example features all built-in OSP pools using the standard_root (the standard rule) and a new pool using fast_root (the fast rule).
Procedure
Use the following syntax to define or change a pool property:
- name: $POOL_NAME
     pg_num: $PG_COUNT
     rule_name: $RULE_NAME
     application: rbd
List all OSP pools and set the appropriate rule (standard, in this case), and create a new pool called
tier2that uses the fast rule. This pool will be used by Block Storage (cinder).parameter_defaults: CephPools: - name: tier2 pg_num: 64 rule_name: fast application: rbd - name: volumes pg_num: 64 rule_name: standard application: rbd - name: vms pg_num: 64 rule_name: standard application: rbd - name: backups pg_num: 64 rule_name: standard application: rbd - name: images pg_num: 64 rule_name: standard application: rbd - name: metrics pg_num: 64 rule_name: standard application: openstack_gnocchi
6.7. Configuring Block Storage to use the new pool
Add the Ceph pool to the cinder.conf file to enable Block Storage (cinder) to consume it:
Procedure
Update
cinder.confas follows:parameter_defaults: CinderRbdExtraPools: - tier2
6.8. Verifying customized CRUSH map
After the openstack overcloud deploy command creates or updates the overcloud, complete the following step to verify that the customized CRUSH map was correctly applied.
Be careful if you move a host from one route to another.
Procedure
Connect to a Ceph monitor node and run the following command:
# ceph osd tree
ID WEIGHT  TYPE NAME               UP/DOWN REWEIGHT PRIMARY-AFFINITY
-7 0.39996 root standard_root
-6 0.19998     rack rack1_std
-5 0.19998         host lab-ceph02
 1 0.09999             osd.1            up  1.00000          1.00000
 4 0.09999             osd.4            up  1.00000          1.00000
-9 0.19998     rack rack2_std
-8 0.19998         host lab-ceph03
 0 0.09999             osd.0            up  1.00000          1.00000
 3 0.09999             osd.3            up  1.00000          1.00000
-4 0.19998 root fast_root
-3 0.19998     rack rack1_fast
-2 0.19998         host lab-ceph01
 2 0.09999             osd.2            up  1.00000          1.00000
 5 0.09999             osd.5            up  1.00000          1.00000