
Network Functions Virtualization Planning and Configuration Guide
Planning and Configuring the Network Functions Virtualization (NFV) Red Hat OpenStack Platform Deployment
Abstract
Preface
Red Hat OpenStack Platform provides the foundation to build a private or public cloud on top of Red Hat Enterprise Linux. It offers a massively scalable, fault-tolerant platform for the development of cloud-enabled workloads.
This guide describes the steps to plan and configure single root I/O virtualization (SR-IOV) and Open vSwitch (OVS) with Data Plane Development Kit (OVS-DPDK) using the Red Hat OpenStack Platform director for network functions virtualization (NFV) deployments.
Chapter 1. Overview
Network Functions Virtualization (NFV) is a software solution that virtualizes a network function on general purpose, cloud-based infrastructure. NFV allows the Communication Service Provider to move away from traditional hardware.
For a high-level overview of NFV concepts, see the Network Functions Virtualization Product Guide.
OVS-DPDK and SR-IOV configuration depends on your hardware and topology. This guide provides examples for CPU assignments, memory allocation, and NIC configurations that might vary from your topology and use case.
Use Red Hat OpenStack Platform director to isolate specific network types, for example, external, tenant, internal API, and so on. You can deploy a network on a single network interface or distributed over a multiple-host network interface. With Open vSwitch you can create bonds by assigning multiple interfaces to a single bridge. Configure network isolation in a Red Hat OpenStack Platform installation with template files. If you do not provide template files, the service networks deploy on the provisioning network. There are two types of template configuration files:
-
network-environment.yaml- this file contains network details, such as subnets and IP address ranges, for the overcloud nodes. This file also contains the different settings that override the default parameter values for various scenarios. -
Host network templates, for example,
compute.yamlandcontroller.yaml- define the network interface configuration for the overcloud nodes. The values of the network details are provided by thenetwork-environment.yamlfile.
These heat template files are located at /usr/share/openstack-tripleo-heat-templates/ on the undercloud node.
The Hardware requirements and Software requirements sections provide more details on how to plan and configure the heat template files for NFV using the Red Hat OpenStack Platform director.
You can edit YAML files to configure NFV. For an introduction to the YAML file format, see YAML in a Nutshell.
Chapter 2. Hardware requirements
This section describes the hardware requirements for NFV.
You can use Red Hat Technologies Ecosystem to check for a list of certified hardware, software, cloud providers, and components.
For a complete list of the certified hardware for Red Hat OpenStack Platform, see Red Hat OpenStack Platform certified hardware.
2.1. Tested NICs
For a list of tested NICs for NFV, see Network Adapter Support.
If you configure OVS-DPDK on Mellanox ConnectX-4 or ConnectX-5 network interfaces, you must set the corresponding kernel driver in the compute-ovs-dpdk.yaml file:
members
 - type: ovs_dpdk_port
    name: dpdk0
    driver: mlx5_core
    members:
    - type: interface
      name: enp3s0f0
2.2. Discovering your NUMA node topology
When you plan your deployment, you must understand the NUMA topology of your Compute node to partition the CPU and memory resources for optimum performance. To determine the NUMA information, perform one of the following tasks:
- Enable hardware introspection to retrieve this information from bare-metal nodes.
- Log on to each bare-metal node to manually collect the information.
You must install and configure the undercloud before you can retrieve NUMA information through hardware introspection. For more information about undercloud configuration, see Director Installation and Usage Guide.
Retrieving hardware introspection details
The bare metal service hardware inspection extras is enabled by default to retrieve hardware details. You can use these hardware details to configure your overcloud. For more information on the inspection_extras parameter in the undercloud.conf file, see Configuring the Director.
For example, the numa_topology collector is part of these hardware inspection extras and includes the following information for each NUMA node:
- RAM (in kilobytes)
- Physical CPU cores and their sibling threads
- NICs associated with the NUMA node
Procedure
- To retrieve the information listed above, substitute <UUID> with the UUID of the bare-metal node to complete the following command:
$ openstack baremetal introspection data save <UUID> | jq .numa_topology
The following example shows the retrieved NUMA information for a bare-metal node:
{
  "cpus": [
    {
      "cpu": 1,
      "thread_siblings": [
        1,
        17
      ],
      "numa_node": 0
    },
    {
      "cpu": 2,
      "thread_siblings": [
        10,
        26
      ],
      "numa_node": 1
    },
    {
      "cpu": 0,
      "thread_siblings": [
        0,
        16
      ],
      "numa_node": 0
    },
    {
      "cpu": 5,
      "thread_siblings": [
        13,
        29
      ],
      "numa_node": 1
    },
    {
      "cpu": 7,
      "thread_siblings": [
        15,
        31
      ],
      "numa_node": 1
    },
    {
      "cpu": 7,
      "thread_siblings": [
        7,
        23
      ],
      "numa_node": 0
    },
    {
      "cpu": 1,
      "thread_siblings": [
        9,
        25
      ],
      "numa_node": 1
    },
    {
      "cpu": 6,
      "thread_siblings": [
        6,
        22
      ],
      "numa_node": 0
    },
    {
      "cpu": 3,
      "thread_siblings": [
        11,
        27
      ],
      "numa_node": 1
    },
    {
      "cpu": 5,
      "thread_siblings": [
        5,
        21
      ],
      "numa_node": 0
    },
    {
      "cpu": 4,
      "thread_siblings": [
        12,
        28
      ],
      "numa_node": 1
    },
    {
      "cpu": 4,
      "thread_siblings": [
        4,
        20
      ],
      "numa_node": 0
    },
    {
      "cpu": 0,
      "thread_siblings": [
        8,
        24
      ],
      "numa_node": 1
    },
    {
      "cpu": 6,
      "thread_siblings": [
        14,
        30
      ],
      "numa_node": 1
    },
    {
      "cpu": 3,
      "thread_siblings": [
        3,
        19
      ],
      "numa_node": 0
    },
    {
      "cpu": 2,
      "thread_siblings": [
        2,
        18
      ],
      "numa_node": 0
    }
  ],
  "ram": [
    {
      "size_kb": 66980172,
      "numa_node": 0
    },
    {
      "size_kb": 67108864,
      "numa_node": 1
    }
  ],
  "nics": [
    {
      "name": "ens3f1",
      "numa_node": 1
    },
    {
      "name": "ens3f0",
      "numa_node": 1
    },
    {
      "name": "ens2f0",
      "numa_node": 0
    },
    {
      "name": "ens2f1",
      "numa_node": 0
    },
    {
      "name": "ens1f1",
      "numa_node": 0
    },
    {
      "name": "ens1f0",
      "numa_node": 0
    },
    {
      "name": "eno4",
      "numa_node": 0
    },
    {
      "name": "eno1",
      "numa_node": 0
    },
    {
      "name": "eno3",
      "numa_node": 0
    },
    {
      "name": "eno2",
      "numa_node": 0
    }
  ]
}
2.3. BIOS settings
The following table describes the required BIOS settings for NFV:
Table 2.1. BIOS Settings
| Parameter | Setting |
|---|---|
|
| Disabled |
|
| Disabled |
|
| Enabled |
|
| Enabled |
|
| Enabled |
|
| Enabled |
|
| Performance |
|
| Enabled |
|
| Disabled |
|
| Enabled for Intel cards if VFIO functionality is needed |
Chapter 3. Software requirements
This section describes the supported configurations and drivers, and subscription details necessary for NFV.
3.1. Registering and enabling repositories
To install Red Hat OpenStack Platform, you must register Red Hat OpenStack Platform director using the Red Hat Subscription Manager, and enable the required repositories. For more information, see Preparing for director installation.
Procedure
Register your system with the Content Delivery Network, and enter your Customer Portal user name and password when prompted.
[stack@director ~]$ sudo subscription-manager register
Determine the entitlement Pool ID for Red Hat OpenStack Platform director. For example:
[stack@director ~]$ sudo subscription-manager list --available --all --matches="Red Hat OpenStack"

Subscription Name:   Name of SKU
Provides:            Red Hat Single Sign-On
                     Red Hat Enterprise Linux Workstation
                     Red Hat CloudForms
                     Red Hat OpenStack
                     Red Hat Software Collections (for RHEL Workstation)
                     Red Hat Virtualization
SKU:                 SKU-Number
Contract:            Contract-Number
Pool ID:             {Pool-ID}-123456
Provides Management: Yes
Available:           1
Suggested:           1
Service Level:       Support-level
Service Type:        Service-Type
Subscription Type:   Sub-type
Ends:                End-date
System Type:         Physical
Include the
Pool IDvalue in the following command to attach the Red Hat OpenStack Platform 15 entitlement.[stack@director ~]$ sudo subscription-manager attach --pool={Pool-ID}-123456Disable the default repositories.
subscription-manager repos --disable=*
Enable the required repositories for Red Hat OpenStack Platform with NFV.
$ sudo subscription-manager repos --enable=rhel-8-for-x86_64-baseos-rpms \
--enable=rhel-8-for-x86_64-appstream-rpms \
--enable=rhel-8-for-x86_64-highavailability-rpms \
--enable=ansible-2.8-for-rhel-8-x86_64-rpms \
--enable=openstack-15-for-rhel-8-x86_64-rpms \
--enable=rhel-8-for-x86_64-nfv-rpms \
--enable=advanced-virt-for-rhel-8-x86_64-rpms \
--enable=fast-datapath-for-rhel-8-x86_64-rpms
Perform an update on your system for the latest base system packages.
[stack@director ~]$ sudo dnf update -y
[stack@director ~]$ sudo reboot
To register your overcloud nodes, see Ansible Based Registration.
3.2. Supported configurations for NFV deployments
Red Hat OpenStack Platform (RHOSP) supports the following NFV deployments using director:
- Single root I/O virtualization (SR-IOV)
- Open vSwitch with Data Plane Development Kit (OVS-DPDK)
Additionally, you can deploy Red Hat OpenStack Platform with any of the following features:
- Composable roles
- Hyper-converged infrastructure (limited support)
- Real-time KVM
- OVS hardware offload (Technology preview)
Red Hat’s embedded OpenDaylight SDN solution was deprecated in RHOSP 14. Red Hat continues to provide support and bug fixes for OpenDaylight, with all support ending with the RHOSP 13 lifecycle on June 27, 2021.
RHOSP 15 NFV deployments with Open Virtual Network (OVN) as the default SDN solution are unsupported. Use the following steps to deploy RHOSP with the OVS mechanism driver:
Procedure
Set the
neutron_driverparameter tonullin thecontainers-prepare-parameter.yamlfile.parameter_defaults: ContainerImagePrepare: - push_destination: true set: neutron_driver: openvswitch ...Include the
neutron-ovs.yamlenvironment file in the/usr/share/openstack-tripleo-heat-templates/environments/servicesdirectory with your deployment script.TEMPLATES=/usr/share/openstack-tripleo-heat-templates openstack overcloud deploy --templates \ -e ${TEMPLATES}/environments/network-environment.yaml \ -e ${TEMPLATES}/environments/network-isolation.yaml \ -e ${TEMPLATES}/environments/host-config-and-reboot.yaml \ -e ${TEMPLATES}/environments/services/neutron-ovs.yaml \ -e ${TEMPLATES}/environments/services/neutron-ovs-dpdk.yaml \ -e ${TEMPLATES}/environments/services/neutron-sriov.yaml \ -e /home/stack/containers-prepare-parameter.yaml
3.3. Supported drivers
For a complete list of supported drivers, see Component, Plug-In, and Driver Support in Red Hat OpenStack Platform .
For a list of NICs tested for NFV deployments with Red Hat OpenStack, see Tested NICs.
3.4. Compatibility with third party software
For a complete list of products and services tested, supported, and certified to perform with Red Hat OpenStack Platform, see Third Party Software compatible with Red Hat OpenStack Platform. You can filter the list by product version and software category.
For a complete list of products and services tested, supported, and certified to perform with Red Hat Enterprise Linux, see Third Party Software compatible with Red Hat Enterprise Linux. You can filter the list by product version and software category.
Chapter 4. Network considerations
The undercloud host requires at least the following networks:
- Provisioning network - Provides DHCP and PXE boot functions to help discover bare-metal systems for use in the overcloud.
- External network - A separate network for remote connectivity to all nodes. The interface connecting to this network requires a routable IP address, either defined statically or dynamically through an external DHCP service.
The minimal overcloud network configuration includes the following NIC configurations:
- Single NIC configuration - One NIC for the provisioning network on the native VLAN and tagged VLANs that use subnets for the different overcloud network types.
- Dual NIC configuration - One NIC for the provisioning network and the other NIC for the external network.
- Dual NIC configuration - One NIC for the provisioning network on the native VLAN and the other NIC for tagged VLANs that use subnets for the different overcloud network types.
- Multiple NIC configuration - Each NIC uses a subnet for a different overcloud network type.
For more information on the networking requirements, see Networking requirements.
Chapter 5. Planning an SR-IOV deployment
Optimize single root I/O virtualization (SR-IOV) deployments for NFV by setting individual parameters based on your Compute node hardware.
See Discovering your NUMA node topology to evaluate your hardware impact on the SR-IOV parameters.
5.1. Hardware partitioning for an SR-IOV deployment
To achieve high performance with SR-IOV, partition the resources between the host and the guest.
A typical topology includes 14 cores per NUMA node on dual socket Compute nodes. Both hyper-threading (HT) and non-HT cores are supported. Each core has two sibling threads. One core is dedicated to the host on each NUMA node. The VNF handles the SR-IOV interface bonding. All the interrupt requests (IRQs) are routed on the host cores. The VNF cores are dedicated to the VNFs. They provide isolation from other VNFs and isolation from the host. Each VNF must use resources on a single NUMA node. The SR-IOV NICs used by the VNF must also be associated with that same NUMA node. This topology does not have a virtualization overhead. The host, OpenStack Networking (neutron), and Compute (nova) configuration parameters are exposed in a single file for ease, consistency, and to avoid incoherence that is fatal to proper isolation, causing preemption and packet loss. The host and virtual machine isolation depend on a tuned profile, which takes care of the boot parameters and any Red Hat OpenStack Platform modifications based on the list of CPUs to isolate.
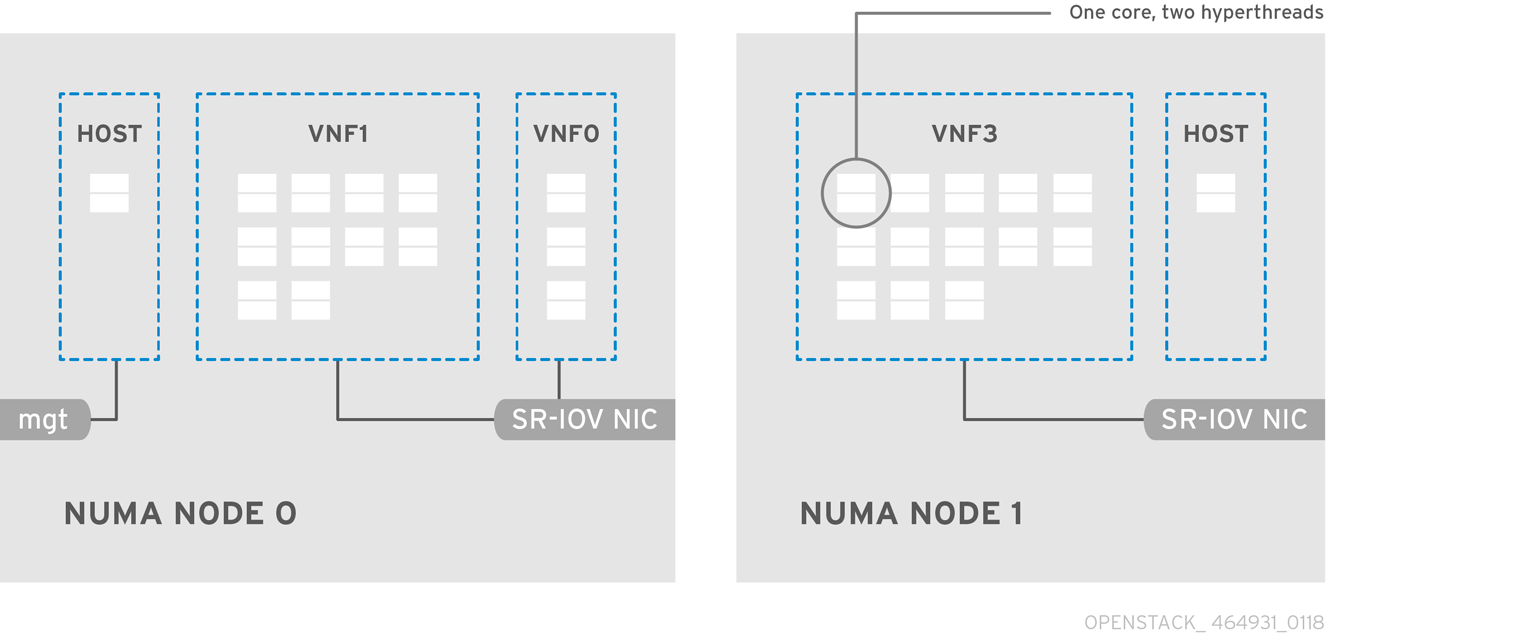
5.2. Topology of an NFV SR-IOV deployment
The following image has two virtual network functions (VNFs) each with the management interface represented by mgt and the data plane interfaces. The management interface manages the ssh access and other management functions. The data plane interfaces bond the VNFs to Data Plane Development Kit (DPDK) to ensure high availability. VNFs bond the data plane interfaces using the DPDK library. The image also has two redundant provider networks. The Compute node has two regular NICs bonded together and shared between the VNF management and the Red Hat OpenStack Platform API management.

The image shows a VNF that leverages DPDK at an application level and has access to SR-IOV virtual functions (VFs) and physical functions (PFs), together for better availability or performance, depending on the fabric configuration. DPDK improves performance, while the VF/PF DPDK bonds provide support for failover/availability. The VNF vendor must ensure that their DPDK poll mode driver (PMD) supports the SR-IOV card that is being exposed as a VF/PF. The management network uses Open vSwitch (OVS) so the VNF accesses a “mgmt” network device using the standard virtIO drivers. Operators can use that device to initially connect to the VNF and ensure that their DPDK application bonds properly the two VF/PFs.
5.2.1. Topology for NFV SR-IOV without HCI
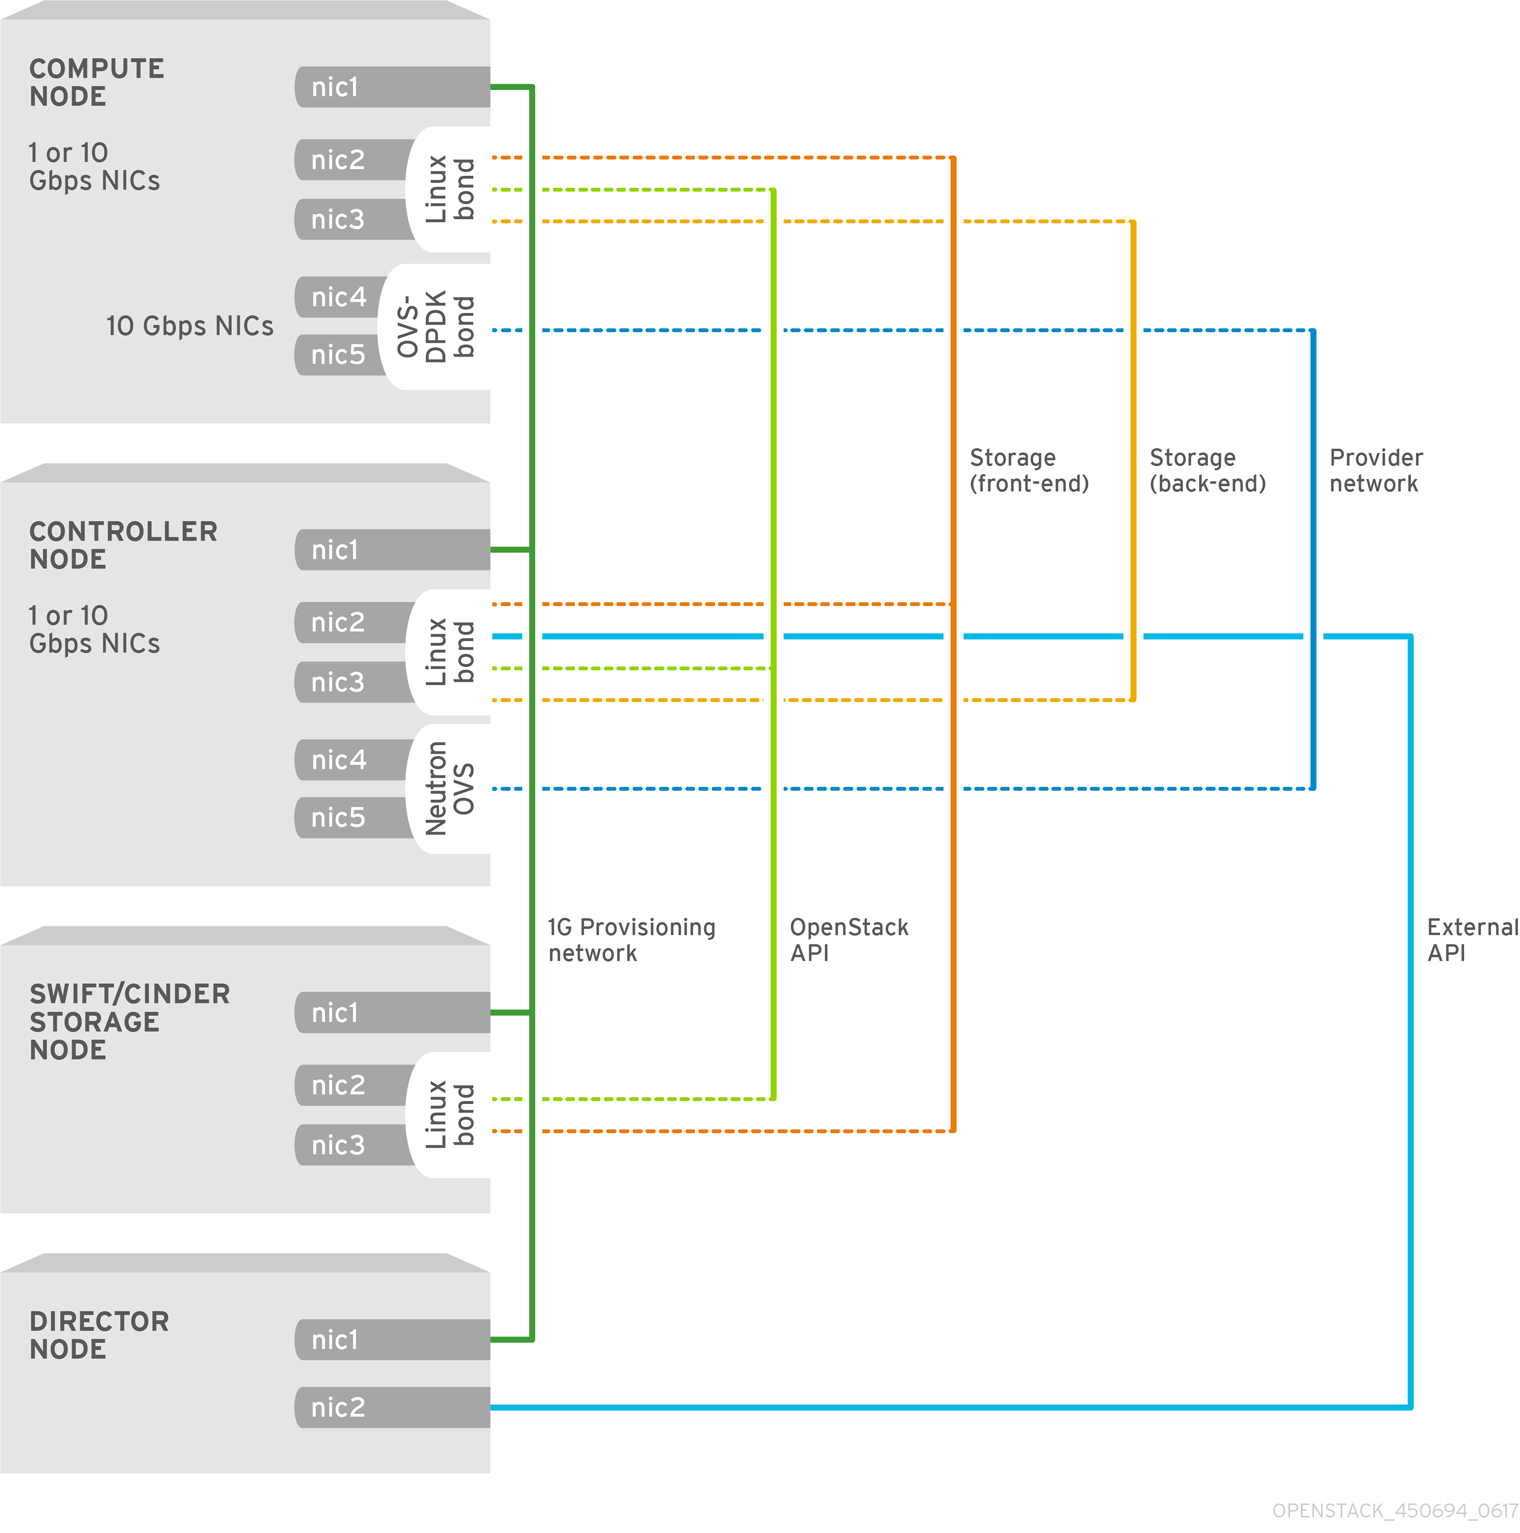
The following image shows the topology for single root I/O virtualization (SR-IOV) without hyper-converged infrastructure (HCI) for the NFV use case. It consists of compute and controller nodes with 1 Gbps NICs, and the Director node.

Chapter 6. Deploying SR-IOV technologies
You can achieve near bare metal performance with single root I/O virtualization (SR-IOV), by allowing instances from OpenStack direct access to a shared PCIe resource through virtual resources.
6.1. Prerequisites
- Install and configure the undercloud before deploying the overcloud. For more information, see: Director Installation and Usage Guide.
Do not manually edit values in /etc/tuned/cpu-partitioning-variables.conf that are modified by Director heat templates.
6.2. Configuring SR-IOV
The CPU assignments, memory allocation and NIC configurations of the following examples might differ from your topology and use case.
Generate the built-in
ComputeSriovto define nodes in the OpenStack cluster that runNeutronSriovAgent,NeutronSriovHostConfigand default compute services.# openstack overcloud roles generate \ -o /home/stack/templates/roles_data.yaml \ Controller ComputeSriov
To prepare the SR-IOV containers, include the
neutron-sriov.yamlandroles_data.yamlfiles when you generate theovercloud_images.yamlfile.SERVICES=\ /usr/share/openstack-tripleo-heat-templates/environments/services openstack tripleo container image prepare \ --namespace=registry.redhat.io/rhosp15-rhel8 \ --push-destination=192.168.24.1:8787 \ --prefix=openstack- \ --tag-from-label {version}-{release} \ -e ${SERVICES}/neutron-sriov.yaml \ --roles-file /home/stack/templates/roles_data.yaml \ --output-env-file=/home/stack/templates/overcloud_images.yaml \ --output-images-file=/home/stack/local_registry_images.yamlNoteThe push-destination IP address is the address that you previously set with the
local_ipparameter in theundercloud.confconfiguration file.For more information on container image preparation, see Director Installation and Usage.
To apply the
KernelAgsandTunedProfileparameters, include thehost-config-and-reboot.yamlfile from/usr/share/openstack-tripleo-heat-templates/environmentswith your deployment script.openstack overcloud deploy --templates \ … \ -e /usr/share/openstack-tripleo-heat-templates/environments/host-config-and-reboot.yaml \ ...
Configure the parameters for the SR-IOV nodes under
parameter_defaultsappropriately for your cluster, and your hardware configuration. These settings typically belong in thenetwork-environment.yamlfile.NeutronNetworkType: 'vlan' NeutronNetworkVLANRanges: - tenant:22:22 - tenant:25:25 NeutronTunnelTypes: ''In the same file, configure role specific parameters for SR-IOV compute nodes.
NoteThe
numvfsparameter replaces theNeutronSriovNumVFsparameter in the network configuration templates. Red Hat does not support modification of theNeutronSriovNumVFsparameter or thenumvfsparameter after deployment. If you modify either parameter after deployment, it might cause a disruption for the running instances that have an SR-IOV port on that physical function (PF). In this case, you must hard reboot these instances to make the SR-IOV PCI device available again.ComputeSriovParameters: IsolCpusList: "1-19,21-39" KernelArgs: "default_hugepagesz=1GB hugepagesz=1G hugepages=32 iommu=pt intel_iommu=on isolcpus=1-19,21-39" TunedProfileName: "cpu-partitioning" NeutronBridgeMappings: - tenant:br-link0 NeutronPhysicalDevMappings: - tenant:p7p1 - tenant:p7p2 NeutronSriovNumVFs: - p7p1:5 - p7p2:5 NovaPCIPassthrough: - devname: "p7p1" physical_network: "tenant" - devname: "p7p2" physical_network: "tenant" NovaVcpuPinSet: '1-19,21-39' NovaReservedHostMemory: 4096Configure the SR-IOV-enabled interfaces in the
compute.yamlnetwork configuration template. To create SR-IOV virtual functions (VFs), configure the interfaces as standalone NICs:- type: interface name: p7p3 mtu: 9000 use_dhcp: false defroute: false nm_controlled: true hotplug: true - type: interface name: p7p4 mtu: 9000 use_dhcp: false defroute: false nm_controlled: true hotplug: trueEnsure that the list of default filters includes the value
AggregateInstanceExtraSpecsFilter.NovaSchedulerDefaultFilters: ['AvailabilityZoneFilter','ComputeFilter','ComputeCapabilitiesFilter','ImagePropertiesFilter','ServerGroupAntiAffinityFilter','ServerGroupAffinityFilter','PciPassthroughFilter','AggregateInstanceExtraSpecsFilter']
- Deploy the overcloud.
TEMPLATES_HOME="/usr/share/openstack-tripleo-heat-templates"
CUSTOM_TEMPLATES="/home/stack/templates"
openstack overcloud deploy --templates \
-r ${CUSTOM_TEMPLATES}/roles_data.yaml \
-e ${TEMPLATES_HOME}/environments/host-config-and-reboot.yaml \
-e ${TEMPLATES_HOME}/environments/services/neutron-ovs.yaml \
-e ${TEMPLATES_HOME}/environments/services/neutron-sriov.yaml \
-e ${CUSTOM_TEMPLATES}/network-environment.yaml6.3. NIC Partitioning (Technology Preview)
This feature is available in this release as a Technology Preview, and therefore is not fully supported by Red Hat. It should only be used for testing, and should not be deployed in a production environment. For more information about Technology Preview features, see Scope of Coverage Details.
You can configure single root I/O virtualization (SR-IOV) so that an Red Hat OpenStack Platform host can use virtual functions (VFs).
When you partition a single, high-speed NIC into multiple VFs, you can use the NIC for both control and data plane traffic. You can then apply a QoS (Quality of Service) priority value to VF interfaces as desired.
Procedure
Ensure that you complete the following steps when creating the templates for an overcloud deployment:
Use the interface type
sriov_pfin anos-net-configrole file to configure a physical function (PF) that the host can use.- type: sriov_pf name: <interface name> use_dhcp: false numvfs: <number of vfs> promisc: <true/false> #optional (Defaults to true)NoteThe
numvfsparameter replaces theNeutronSriovNumVFsparameter in the network configuration templates. Red Hat does not support modification of theNeutronSriovNumVFsparameter or thenumvfsparameter after deployment. If you modify either parameter after deployment, it might cause a disruption for the running instances that have an SR-IOV port on that PF. In this case, you must hard reboot these instances to make the SR-IOV PCI device available again.
Use the interface type
sriov_pfto configure VFs in a bond that the host can use.- type: linux_bond name: internal_bond bonding_options: mode=active-backup use_dhcp: false members: - type: sriov_vf device: nic7 vfid: 1 - type: sriov_vf device: nic8 vfid: 1 - type: vlan vlan_id: get_param: InternalApiNetworkVlanID device: internal_bond addresses: - ip_netmask: get_param: InternalApiIpSubnetThe VLAN tag must be unique across all VFs that belong to a common PF device. You must assign VLAN tags to an interface type:
- linux_bond
- ovs_bridge
- ovs_dpdk_port
- The applicable VF ID range starts at zero, and ends at the total number of VFs minus one.
To reserve VFs for VMs, use the
NovaPCIPassthroughparameter. You must assign a regex value to theaddressparameter to identify the VFs that you want to pass through to Nova, to be used by the virtual instances and not the host.You can obtain these values from
lspci. You might need to pre-emptively boot a compute node into a Linux environment to obtain this information.The
lspcicommand returns the address of each device in the format<bus>:<device>:<slot>. Enter these address values in theNovaPCIPassthroughparameter in the following format:NovaPCIPassthrough: - physical_network: "sriovnet2" address: {"domain": ".*", "bus": "06", "slot": "11", "function": "[5-7]"} - physical_network: "sriovnet2" address: {"domain": ".*", "bus": "06", "slot": "10", "function": "[5]"}Ensure that
IOMMUis enabled on all nodes that require NIC partitioning. For example, if you want NIC Partitioning for compute nodes, enable IOMMU using the KernelArgs parameter for that role:parameter_defaults: ComputeParameters: KernelArgs: "intel_iommu=on iommu=pt"
Validation
Check the number of VFs.
[root@overcloud-compute-0 heat-admin]# cat /sys/class/net/p4p1/device/sriov_numvfs 10 [root@overcloud-compute-0 heat-admin]# cat /sys/class/net/p4p2/device/sriov_numvfs 10
Check Linux bonds.
[root@overcloud-compute-0 heat-admin]# cat /proc/net/bonding/intapi_bond Ethernet Channel Bonding Driver: v3.7.1 (April 27, 2011) Bonding Mode: fault-tolerance (active-backup) Primary Slave: None Currently Active Slave: p4p1_1 MII Status: up MII Polling Interval (ms): 0 Up Delay (ms): 0 Down Delay (ms): 0 Slave Interface: p4p1_1 MII Status: up Speed: 10000 Mbps Duplex: full Link Failure Count: 0 Permanent HW addr: 16:b4:4c:aa:f0:a8 Slave queue ID: 0 Slave Interface: p4p2_1 MII Status: up Speed: 10000 Mbps Duplex: full Link Failure Count: 0 Permanent HW addr: b6:be:82:ac:51:98 Slave queue ID: 0 [root@overcloud-compute-0 heat-admin]# cat /proc/net/bonding/st_bond Ethernet Channel Bonding Driver: v3.7.1 (April 27, 2011) Bonding Mode: fault-tolerance (active-backup) Primary Slave: None Currently Active Slave: p4p1_3 MII Status: up MII Polling Interval (ms): 0 Up Delay (ms): 0 Down Delay (ms): 0 Slave Interface: p4p1_3 MII Status: up Speed: 10000 Mbps Duplex: full Link Failure Count: 0 Permanent HW addr: 9a:86:b7:cc:17:e4 Slave queue ID: 0 Slave Interface: p4p2_3 MII Status: up Speed: 10000 Mbps Duplex: full Link Failure Count: 0 Permanent HW addr: d6:07:f8:78:dd:5b Slave queue ID: 0
List OVS bonds
[root@overcloud-compute-0 heat-admin]# ovs-appctl bond/show ---- bond_prov ---- bond_mode: active-backup bond may use recirculation: no, Recirc-ID : -1 bond-hash-basis: 0 updelay: 0 ms downdelay: 0 ms lacp_status: off lacp_fallback_ab: false active slave mac: f2:ad:c7:00:f5:c7(dpdk2) slave dpdk2: enabled active slave may_enable: true slave dpdk3: enabled may_enable: true ---- bond_tnt ---- bond_mode: active-backup bond may use recirculation: no, Recirc-ID : -1 bond-hash-basis: 0 updelay: 0 ms downdelay: 0 ms lacp_status: off lacp_fallback_ab: false active slave mac: b2:7e:b8:75:72:e8(dpdk0) slave dpdk0: enabled active slave may_enable: true slave dpdk1: enabled may_enable: true
Show OVS connections.
[root@overcloud-compute-0 heat-admin]# ovs-vsctl show cec12069-9d4c-4fa8-bfe4-decfdf258f49 Manager "ptcp:6640:127.0.0.1" is_connected: true Bridge br-tenant fail_mode: standalone Port br-tenant Interface br-tenant type: internal Port bond_tnt Interface "dpdk0" type: dpdk options: {dpdk-devargs="0000:82:02.2"} Interface "dpdk1" type: dpdk options: {dpdk-devargs="0000:82:04.2"} Bridge "sriov2" Controller "tcp:127.0.0.1:6633" is_connected: true fail_mode: secure Port "phy-sriov2" Interface "phy-sriov2" type: patch options: {peer="int-sriov2"} Port "sriov2" Interface "sriov2" type: internal Bridge br-int Controller "tcp:127.0.0.1:6633" is_connected: true fail_mode: secure Port "int-sriov2" Interface "int-sriov2" type: patch options: {peer="phy-sriov2"} Port br-int Interface br-int type: internal Port "vhu93164679-22" tag: 4 Interface "vhu93164679-22" type: dpdkvhostuserclient options: {vhost-server-path="/var/lib/vhost_sockets/vhu93164679-22"} Port "vhu5d6b9f5a-0d" tag: 3 Interface "vhu5d6b9f5a-0d" type: dpdkvhostuserclient options: {vhost-server-path="/var/lib/vhost_sockets/vhu5d6b9f5a-0d"} Port patch-tun Interface patch-tun type: patch options: {peer=patch-int} Port "int-sriov1" Interface "int-sriov1" type: patch options: {peer="phy-sriov1"} Port int-br-vfs Interface int-br-vfs type: patch options: {peer=phy-br-vfs} Bridge br-vfs Controller "tcp:127.0.0.1:6633" is_connected: true fail_mode: secure Port phy-br-vfs Interface phy-br-vfs type: patch options: {peer=int-br-vfs} Port bond_prov Interface "dpdk3" type: dpdk options: {dpdk-devargs="0000:82:04.5"} Interface "dpdk2" type: dpdk options: {dpdk-devargs="0000:82:02.5"} Port br-vfs Interface br-vfs type: internal Bridge "sriov1" Controller "tcp:127.0.0.1:6633" is_connected: true fail_mode: secure Port "sriov1" Interface "sriov1" type: internal Port "phy-sriov1" Interface "phy-sriov1" type: patch options: {peer="int-sriov1"} Bridge br-tun Controller "tcp:127.0.0.1:6633" is_connected: true fail_mode: secure Port br-tun Interface br-tun type: internal Port patch-int Interface patch-int type: patch options: {peer=patch-tun} Port "vxlan-0a0a7315" Interface "vxlan-0a0a7315" type: vxlan options: {df_default="true", in_key=flow, local_ip="10.10.115.10", out_key=flow, remote_ip="10.10.115.21"} ovs_version: "2.10.0"
If you used NovaPCIPassthrough to pass VFs to instances, test by deploying an SR-IOV instance.
6.4. Configuring Hardware Offload (Technology Preview)
This feature is available in this release as a Technology Preview, and therefore is not fully supported by Red Hat. It should only be used for testing, and should not be deployed in a production environment. For more information about Technology Preview features, see Scope of Coverage Details.
Open vSwitch (OVS) hardware offload incorporates single root I/O virtualization (SR-IOV), and has some similar configuration steps.
6.4.1. Enabling OVS hardware offload
To enable OVS hardware offload, complete the following steps.
Generate the
ComputeSriovrole:openstack overcloud roles generate -o roles_data.yaml Controller ComputeSriov
Configure the
physical_networkparameter to match your environment.-
For VLAN, set the
physical_networkparameter to the name of the network you create in neutron after deployment. This value should also be inNeutronBridgeMappings. -
For VXLAN, set the
physical_networkparameter to the string valuenull. Ensure the
OvsHwOffloadparameter under role specific parameters has a value oftrue.Example:
parameter_defaults: ComputeSriovParameters: IsolCpusList: 2-9,21-29,11-19,31-39 KernelArgs: "default_hugepagesz=1GB hugepagesz=1G hugepages=128 intel_iommu=on iommu=pt" OvsHwOffload: true TunedProfileName: "cpu-partitioning" NeutronBridgeMappings: - tenant:br-tenant NeutronPhysicalDevMappings: - tenant:p7p1 - tenant:p7p2 NovaPCIPassthrough: - devname: "p7p1" physical_network: "null" - devname: "p7p2" physical_network: "null" NovaReservedHostMemory: 4096 NovaVcpuPinSet: 1-9,21-29,11-19,31-39
-
For VLAN, set the
Ensure that the list of default filters includes the value
NUMATopologyFilter:NovaSchedulerDefaultFilters: [\'RetryFilter',\'AvailabilityZoneFilter',\'ComputeFilter',\'ComputeCapabilitiesFilter',\'ImagePropertiesFilter',\'ServerGroupAntiAffinityFilter',\'ServerGroupAffinityFilter',\'PciPassthroughFilter',\'NUMATopologyFilter']
Configure one or more network interfaces intended for hardware offload in the
compute-sriov.yamlconfiguration file:NoteDo not use the
NeutronSriovNumVFsparameter when configuring Open vSwitch hardware offload. The number of virtual functions will be specified using thenumvfsparameter in a network configuration file used byos-net-config.- type: ovs_bridge name: br-tenant mtu: 9000 members: - type: sriov_pf name: p7p1 numvfs: 5 mtu: 9000 primary: true promisc: true use_dhcp: false link_mode: switchdevNoteDo not configure Mellanox network interfaces as a nic-config interface type
ovs-vlanbecause this prevents tunnel endpoints such as VXLAN from passing traffic due to driver limitations.Include the following files during the deployment of the overcloud:
- ovs-hw-offload.yaml
host-config-and-reboot.yaml
TEMPLATES_HOME=”/usr/share/openstack-tripleo-heat-templates” CUSTOM_TEMPLATES=”/home/stack/templates” openstack overcloud deploy --templates \ -r ${CUSTOME_TEMPLATES}/roles_data.yaml \ -e ${TEMPLATES_HOME}/environments/ovs-hw-offload.yaml \ -e ${TEMPLATES_HOME}/environments/host-config-and-reboot.yaml \ -e ${CUSTOME_TEMPLATES}/network-environment.yaml \ -e ${CUSTOME_TEMPLATES}/neutron-ovs.yaml
6.4.2. Verifying OVS hardware offload
Confirm that a pci device has its mode configured as switchdev:
# devlink dev eswitch show pci/0000:03:00.0 pci/0000:03:00.0: mode switchdev inline-mode none encap enable
Verify offload is enabled in OVS:
# ovs-vsctl get Open_vSwitch . other_config:hw-offload “true”
6.5. Deploying an instance for SR-IOV
Red Hat recommends using host aggregates to separate high performance compute hosts. For information on creating host aggregates and associated flavors for scheduling, see Creating host aggregates.
You should use host aggregates to separate CPU pinned instances from unpinned instances. Instances that do not use CPU pinning do not fulfill the resourcing requirements of instances that use CPU pinning.
To deploy an instance for single root I/O virtualization (SR-IOV), perform the following steps:
Create a flavor.
# openstack flavor create <flavor> --ram <MB> --disk <GB> --vcpus <#>
Create the network.
# openstack network create net1 --provider-physical-network tenant --provider-network-type vlan --provider-segment <VLAN-ID> # openstack subnet create subnet1 --network net1 --subnet-range 192.0.2.0/24 --dhcp
Create the port.
Use vnic-type
directto create an SR-IOV virtual function (VF) port.# openstack port create --network net1 --vnic-type direct sriov_port
Use the following to create a virtual function with hardware offload.
# openstack port create --network net1 --vnic-type direct --binding-profile '{"capabilities": ["switchdev"]} sriov_hwoffload_portUse vnic-type
direct-physicalto create an SR-IOV PF port.# openstack port create --network net1 --vnic-type direct-physical sriov_port
Deploy an instance.
# openstack server create --flavor <flavor> --image <image> --nic port-id=<id> <instance name>
6.6. Creating host aggregates
For increased performance, Red Hat recommends deploying guests using cpu pinning and huge pages. You can schedule high performance instances on a subset of hosts by matching aggregate metadata with flavor metadata.
Ensure that the
AggregateInstanceExtraSpecsFiltervalue is included in thescheduler_default_filtersparameter in thenova.confconfiguration file. You can set this configuration through the heat parameterNovaSchedulerDefaultFiltersunder role-specific parameters before deployment.ComputeOvsDpdkSriovParameters: NovaSchedulerDefaultFilters: ['AggregateInstanceExtraSpecsFilter', 'RetryFilter','AvailabilityZoneFilter','ComputeFilter','ComputeCapabilitiesFilter','ImagePropertiesFilter','ServerGroupAntiAffinityFilter','ServerGroupAffinityFilter','PciPassthroughFilter','NUMATopologyFilter']NoteThis parameter can be added to heat templates and the original deployment script re-run to add this to the configuration of an exiting cluster.
Create an aggregate group for single root I/O virtualization (SR-IOV) and add relevant hosts. Define metadata, for example,
sriov=true, that matches defined flavor metadata.# openstack aggregate create sriov_group # openstack aggregate add host sriov_group compute-sriov-0.localdomain # openstack aggregate set sriov_group sriov=true
Create a flavor.
# openstack flavor create <flavor> --ram <MB> --disk <GB> --vcpus <#>
Set additional flavor properties. Note that the defined metadata,
sriov=true, matches the defined metadata on the SR-IOV aggregate.openstack flavor set --property sriov=true --property hw:cpu_policy=dedicated --property hw:mem_page_size=1GB <flavor>
Chapter 7. Planning your OVS-DPDK deployment
To optimize your Open vSwitch with Data Plane Development Kit (OVS-DPDK) deployment for NFV, you should understand how OVS-DPDK uses the Compute node hardware such as CPU, NUMA nodes, memory, NICs, and the considerations for determining the individual OVS-DPDK parameters based on your Compute node.
For a high-level introduction to CPUs and NUMA topology, see: NFV performance considerations in the NFV Product Guide.
7.1. OVS-DPDK with CPU partitioning and NUMA topology
OVS-DPDK partitions the hardware resources for host, guests, and OVS-DPDK. The OVS-DPDK Poll Mode Drivers (PMDs) run DPDK active loops, which require dedicated cores. This means a list of CPUs and huge pages are dedicated to OVS-DPDK.
A sample partitioning includes 16 cores per NUMA node on dual-socket Compute nodes. The traffic requires additional NICs because the NICs cannot be shared between the host and OVS-DPDK.
DPDK PMD threads must be reserved on both NUMA nodes even if a NUMA node does not have an associated DPDK NIC.
OVS-DPDK performance also requires a reservation of a block of memory local to the NUMA node. Use NICs associated with the same NUMA node that you use for memory and CPU pinning. Ensure that both interfaces in a bond are from NICs on the same NUMA node.
7.2. Overview of workflows and derived parameters
This feature is available in this release as a Technology Preview, and therefore is not fully supported by Red Hat. It should only be used for testing, and should not be deployed in a production environment. For more information about Technology Preview features, see Scope of Coverage Details.
You can use the OpenStack Workflow (mistral) service to derive parameters based on the capabilities of your available bare-metal nodes. With Red Hat OpenStack Platform workflows, you define a set of tasks and actions to perform in a yaml file. You can use a pre-defined workbook, derive_params.yaml, in the tripleo-common/workbooks/ directory. This workbook provides workflows to derive each supported parameter from the results retrieved from Bare Metal introspection. The derive_params.yaml workflows use the formulas from tripleo-common/workbooks/derive_params_formulas.yaml to calculate the derived parameters.
You can modify the formulas in derive_params_formulas.yaml to suit your environment.
The derive_params.yaml workbook assumes all nodes for a given composable role have the same hardware specifications. The workflow considers the flavor-profile association and nova placement scheduler to match nodes associated with a role and uses the introspection data from the first node that matches the role.
For more information on Red Hat OpenStack Platform workflows, see: Troubleshooting Workflows and Executions.
You can use the -p or --plan-environment-file option to add a custom plan_environment.yaml file to the openstack overcloud deploy command. The custom plan_environment.yaml file provides a list of workbooks and any input values to pass into the workbook. The triggered workflows merge the derived parameters back into the custom plan_environment.yaml, where they are available for the overcloud deployment. You can use these derived parameter results to prepare your overcloud images.
For more information on how to use the --plan-environment-file option in your deployment, see Plan Environment Metadata .
7.3. Derived OVS-DPDK parameters
The workflows in derive_params.yaml derive the DPDK parameters associated with the matching role that uses the ComputeNeutronOvsDpdk service.
The following is the list of parameters the workflows can automatically derive for OVS-DPDK:
- IsolCpusList
- KernelArgs
- NovaReservedHostMemory
- NovaVcpuPinSet
- OvsDpdkCoreList
- OvsDpdkSocketMemory
- OvsPmdCoreList
The OvsDpdkMemoryChannels parameter cannot be derived from the introspection memory bank data since the format of memory slot names are not consistent across different hardware environments.
In most cases, the default number for OvsDpdkMemoryChannels is four. Use your hardware manual to determine the number of memory channels per socket and use this value to override the default value.
For configuration details, see Section 8.1, “Deriving DPDK parameters with workflows”.
7.4. Overview of manually calculated OVS-DPDK parameters
This section describes how Open vSwitch (OVS) with Data Plane Development Kit (OVS-DPDK) uses parameters within the director network_environment.yaml heat templates to configure the CPU and memory for optimum performance. Use this information to evaluate the hardware support on your Compute nodes and how best to partition that hardware to optimize your OVS-DPDK deployment.
If you want to generate these values automatically, you can use the derived_parameters.yaml workflow. For more information, see Overview of workflows and derived parameters
Always pair CPU sibling threads, also called logical CPUs, together for the physical core when allocating CPU cores.
To determine the CPU and NUMA nodes on your Compute nodes, see Discovering your NUMA node topology. Use this information to map CPU and other parameters to support the host, guest instance, and OVS-DPDK process needs.
7.4.1. CPU parameters
OVS-DPDK uses the following CPU-partitioning parameters:
- OvsPmdCoreList
Provides the CPU cores that are used for the DPDK poll mode drivers (PMD). Choose CPU cores that are associated with the local NUMA nodes of the DPDK interfaces.
OvsPmdCoreListis used for thepmd-cpu-maskvalue in Open vSwitch. Use theOvsPmdCoreListparameter to set the following configurations:- Pair the sibling threads together.
-
Exclude all cores from the
OvsDpdkCoreList -
Avoid allocating the logical CPUs, or both thread siblings, of the first physical core on both NUMA nodes, as these should be used for the
OvsDpdkCoreListparameter. - Performance depends on the number of physical cores allocated for this PMD core list. On the NUMA node which is associated with a DPDK NIC, allocate the required cores.
For NUMA nodes with a DPDK NIC:
- Determine the number of physical cores required based on the performance requirement and include all the sibling threads, or logical CPUs for each physical core.
For NUMA nodes without a DPDK NIC:
- Allocate the sibling threads, or logical CPUs, of one physical core, excluding the first physical core of the NUMA node.
DPDK PMD threads must be reserved on both NUMA nodes, even if a NUMA node does not have an associated DPDK NIC.
- NovaVcpuPinSet
Sets cores for CPU pinning. The Compute node uses these cores for guest instances.
NovaVcpuPinSetis used as thevcpu_pin_setvalue in thenova.conffile. Use theNovaVcpuPinSetparameter to set the following configurations:-
Exclude all cores from the
OvsPmdCoreListand theOvsDpdkCoreList. - Include all remaining cores.
- Pair the sibling threads together.
-
Exclude all cores from the
- NovaComputeCpuSharedSet
-
Sets the cores to be used for emulator threads. This defines the value of the nova.conf parameter
cpu_shared_set. The recommended value for this parameter matches the value set forOvsDpdkCoreList. - IsolCpusList
A set of CPU cores isolated from the host processes. This parameter is used as the
isolated_coresvalue in thecpu-partitioning-variable.conffile for thetuned-profiles-cpu-partitioningcomponent. Use theIsolCpusListparameter to set the following configurations:-
Match the list of cores in
OvsPmdCoreListandNovaVcpuPinSet. - Pair the sibling threads together.
-
Match the list of cores in
- OvsDpdkCoreList
Provides CPU cores for non-datapath OVS-DPDK processes, such as handler and revalidator threads. This parameter has no impact on overall datapath performance on multi-NUMA node hardware. This parameter is used for the
dpdk-lcore-maskvalue in OVS, and these cores are shared with the host. Use theOvsDpdkCoreListparameter to set the following configurations:- Allocate the first physical core and sibling thread from each NUMA node, even if the NUMA node has no associated DPDK NIC.
-
These cores must be mutually exclusive from the list of cores in
OvsPmdCoreListandNovaVcpuPinSet.
7.4.2. Memory parameters
OVS-DPDK uses the following memory parameters:
- OvsDpdkMemoryChannels
Maps memory channels in the CPU per NUMA node. The
OvsDpdkMemoryChannelsparameter is used by Open vSwitch (OVS) as theother_config:dpdk-extra=”-n <value>”value. Use the following steps to calculate necessary values forOvsDpdkMemoryChannels:-
Use
dmidecode -t memoryor your hardware manual to determine the number of memory channels available. -
Use
ls /sys/devices/system/node/node* -dto determine the number of NUMA nodes. - Divide the number of memory channels available by the number of NUMA nodes.
-
Use
- NovaReservedHostMemory
-
Reserves memory in MB for tasks on the host. This value is used by the Compute node as the
reserved_host_memory_mbvalue innova.conf. The static recommended value is 4096 MB. - OvsDpdkSocketMemory
Specifies the amount of memory in MB to pre-allocate from the hugepage pool, per NUMA node. This value is used by OVS as the
other_config:dpdk-socket-memvalue. Use the following steps to calculate necessary values forOvsDpdkSocketMemory:-
Provide as a comma-separated list. Calculate the
OvsDpdkSocketMemoryvalue from the MTU value of each NIC on the NUMA node. - For a NUMA node without a DPDK NIC, use the static recommendation of 1024 MB (1GB).
The following equation approximates the value for
OvsDpdkSocketMemory:MEMORY_REQD_PER_MTU = (ROUNDUP_PER_MTU + 800) * (4096 * 64) Bytes
- 800 is the overhead value.
- 4096 * 64 is the number of packets in the mempool.
- Add the MEMORY_REQD_PER_MTU for each of the MTU values set on the NUMA node and add another 512 MB as buffer. Round the value up to a multiple of 1024.
-
Provide as a comma-separated list. Calculate the
Sample Calculation - MTU 2000 and MTU 9000
DPDK NICs dpdk0 and dpdk1 are on the same NUMA node 0 and configured with MTUs 9000 and 2000 respectively. The sample calculation to derive the memory required is as follows:
Round off the MTU values to the nearest 1024 bytes.
The MTU value of 9000 becomes 9216 bytes. The MTU value of 2000 becomes 2048 bytes.
Calculate the required memory for each MTU value based on these rounded byte values.
Memory required for 9000 MTU = (9216 + 800) * (4096*64) = 2625634304 Memory required for 2000 MTU = (2048 + 800) * (4096*64) = 746586112
Calculate the combined total memory required, in bytes.
2625634304 + 746586112 + 536870912 = 3909091328 bytes.
This calculation represents (Memory required for MTU of 9000) + (Memory required for MTU of 2000) + (512 MB buffer).
Convert the total memory required into MB.
3909091328 / (1024*1024) = 3728 MB.
Round this value up to the nearest multiple of 1024.
3724 MB rounds up to 4096 MB.
Use this value to set
OvsDpdkSocketMemory.OvsDpdkSocketMemory: “4096,1024”
Sample Calculation - MTU 2000
DPDK NICs dpdk0 and dpdk1 are on the same NUMA node 0 and configured with MTUs 2000 and 2000 respectively. The sample calculation to derive the memory required is as follows:
Round off the MTU values to the nearest 1024 bytes.
The MTU value of 2000 becomes 2048 bytes.
Calculate the required memory for each MTU value based on these rounded byte values.
Memory required for 2000 MTU = (2048 + 800) * (4096*64) = 746586112
Calculate the combined total memory required, in bytes.
746586112 + 536870912 = 1283457024 bytes.
This calculation represents (Memory required for MTU of 2000) + (512 MB buffer).
Convert the total memory required into MB.
1283457024 / (1024*1024) = 1224 MB.
Round this value up to the nearest multiple of 1024.
1224 MB rounds up to 2048 MB.
Use this value to set
OvsDpdkSocketMemory.OvsDpdkSocketMemory: “2048,1024”
7.4.3. Networking parameters
- NeutronDpdkDriverType
-
Sets the driver type used by DPDK. Use the default of
vfio-pci. - NeutronDatapathType
-
Datapath type for OVS bridges. DPDK uses the default value of
netdev. - NeutronVhostuserSocketDir
-
Sets the vhost-user socket directory for OVS. Use
/var/lib/vhost_socketsfor vhost client mode.
7.4.4. Other parameters
- NovaSchedulerDefaultFilters
- Provides an ordered list of filters that the Compute node uses to find a matching Compute node for a requested guest instance.
- VhostuserSocketGroup
-
Sets the vhost-user socket directory group. The default value is
qemu.VhostuserSocketGroupshould be set tohugetlbfsso that the ovs-vswitchd and qemu processes can access the shared hugepages and unix socket used to configure the virtio-net device. This value is role specific and should be applied to any role leveraging OVS-DPDK. - KernelArgs
Provides multiple kernel arguments to
/etc/default/grubfor the Compute node at boot time. Add the following parameters based on your configuration:hugepagesz: Sets the size of the huge pages on a CPU. This value can vary depending on the CPU hardware. Set to 1G for OVS-DPDK deployments (default_hugepagesz=1GB hugepagesz=1G). Use the following command to check for thepdpe1gbCPU flag, to ensure your CPU supports 1G.lshw -class processor | grep pdpe1gb
-
hugepages count: Sets the number of hugepages available. This value depends on the amount of host memory available. Use most of your available memory, excludingNovaReservedHostMemory. You must also configure the huge pages count value within the Red Hat OpenStack Platform flavor associated with your Compute nodes. -
iommu: For Intel CPUs, add“intel_iommu=on iommu=pt”` -
isolcpus: Sets the CPU cores to be tuned. This value matchesIsolCpusList.
7.4.5. Instance extra specifications
Before deploying instances in an NFV environment, create a flavor that utilizes CPU pinning, huge pages, and emulator thread pinning.
- hw:cpu_policy
-
Set the value of this parameter to
dedicated, so that a guest uses pinned CPUs. Instances created from a flavor with this parameter set have an effective overcommit ratio of 1:1. The default isshared. - hw:mem_page_size
Set the value of this parameter to a valid string of a specific value with standard suffix (For example,
4KB,8MB, or1GB). Use 1GB to match the hugepagesz boot parameter. The number of huge pages available for the virtual machines is the boot parameter minus theOvsDpdkSocketMemory. The following values are valid:- small (default) - The smallest page size is used
- large - Only use large page sizes. (2MB or 1GB on x86 architectures)
- any - The compute driver could attempt large pages, but default to small if none are available.
- hw:emulator_threads_policy
-
Set the value of this parameter to
shareso that emulator threads are locked to CPUs that you’ve identified in the heat parameter,NovaComputeCpuSharedSet. If an emulator thread is running on a vCPU being used for the poll mode driver (PMD) or real-time processing, you can experience packet loss or missed deadlines.
7.5. Two NUMA node example OVS-DPDK deployment
This example Compute node includes the following two NUMA nodes:
- NUMA 0 has cores 0-7. The sibling thread pairs are (0,1), (2,3), (4,5), and (6,7)
- NUMA 1 has cores 8-15. The sibling thread pairs are (8,9), (10,11), (12,13), and (14,15).
- Each NUMA node connects to a physical NIC (NIC1 on NUMA 0 and NIC2 on NUMA 1).
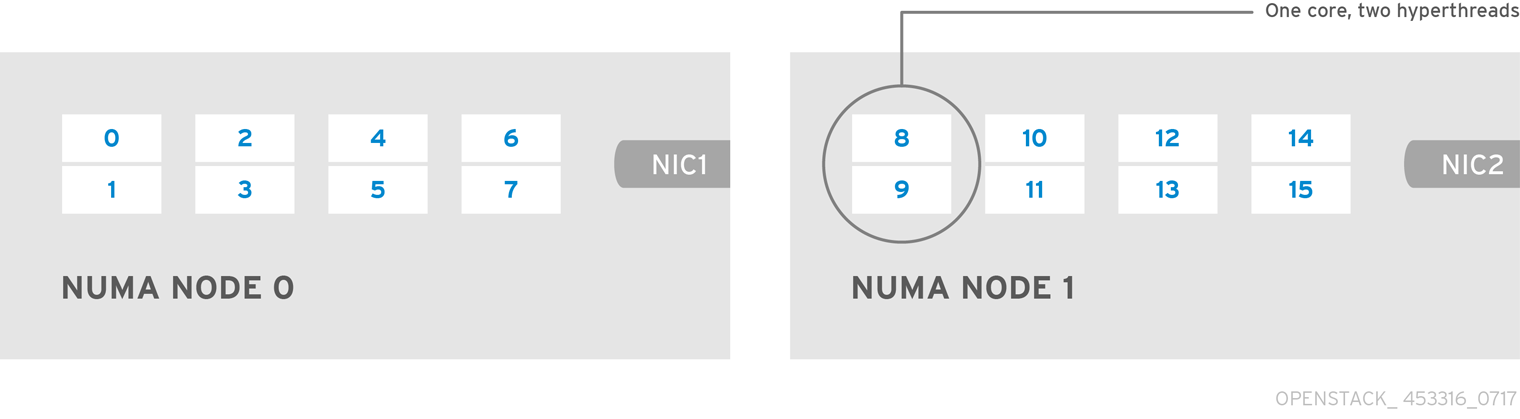
Reserve the first physical cores, or both thread pairs, on each NUMA node (0,1 and 8,9) for non data path DPDK processes (OvsDpdkCoreList).
This example also assumes a 1500 MTU configuration, so the OvsDpdkSocketMemory is the same for all use cases:
OvsDpdkSocketMemory: “1024,1024”
NIC 1 for DPDK, with one physical core for PMD
In this use case, you allocate one physical core on NUMA 0 for PMD. You must also allocate one physical core on NUMA 1, even though there is no DPDK enabled on the NIC for that NUMA node. The remaining cores not reserved for OvsDpdkCoreList are allocated for guest instances. The resulting parameter settings are:
OvsPmdCoreList: “2,3,10,11” NovaVcpuPinSet: “4,5,6,7,12,13,14,15”
NIC 1 for DPDK, with two physical cores for PMD
In this use case, you allocate two physical cores on NUMA 0 for PMD. You must also allocate one physical core on NUMA 1, even though there is no DPDK enabled on the NIC for that NUMA node. The remaining cores not reserved for OvsDpdkCoreList are allocated for guest instances. The resulting parameter settings are:
OvsPmdCoreList: “2,3,4,5,10,11” NovaVcpuPinSet: “6,7,12,13,14,15”
NIC 2 for DPDK, with one physical core for PMD
In this use case, you allocate one physical core on NUMA 1 for PMD. You must also allocate one physical core on NUMA 0, even though there is no DPDK enabled on the NIC for that NUMA node. The remaining cores (not reserved for OvsDpdkCoreList) are allocated for guest instances. The resulting parameter settings are:
OvsPmdCoreList: “2,3,10,11” NovaVcpuPinSet: “4,5,6,7,12,13,14,15”
NIC 2 for DPDK, with two physical cores for PMD
In this use case, you allocate two physical cores on NUMA 1 for PMD. You must also allocate one physical core on NUMA 0, even though there is no DPDK enabled on the NIC for that NUMA node. The remaining cores (not reserved for OvsDpdkCoreList) are allocated for guest instances. The resulting parameter settings are:
OvsPmdCoreList: “2,3,10,11,12,13” NovaVcpuPinSet: “4,5,6,7,14,15”
NIC 1 and NIC2 for DPDK, with two physical cores for PMD
In this use case, you allocate two physical cores on each NUMA node for PMD. The remaining cores (not reserved for OvsDpdkCoreList) are allocated for guest instances. The resulting parameter settings are:
OvsPmdCoreList: “2,3,4,5,10,11,12,13” NovaVcpuPinSet: “6,7,14,15”
7.6. Topology of an NFV OVS-DPDK deployment
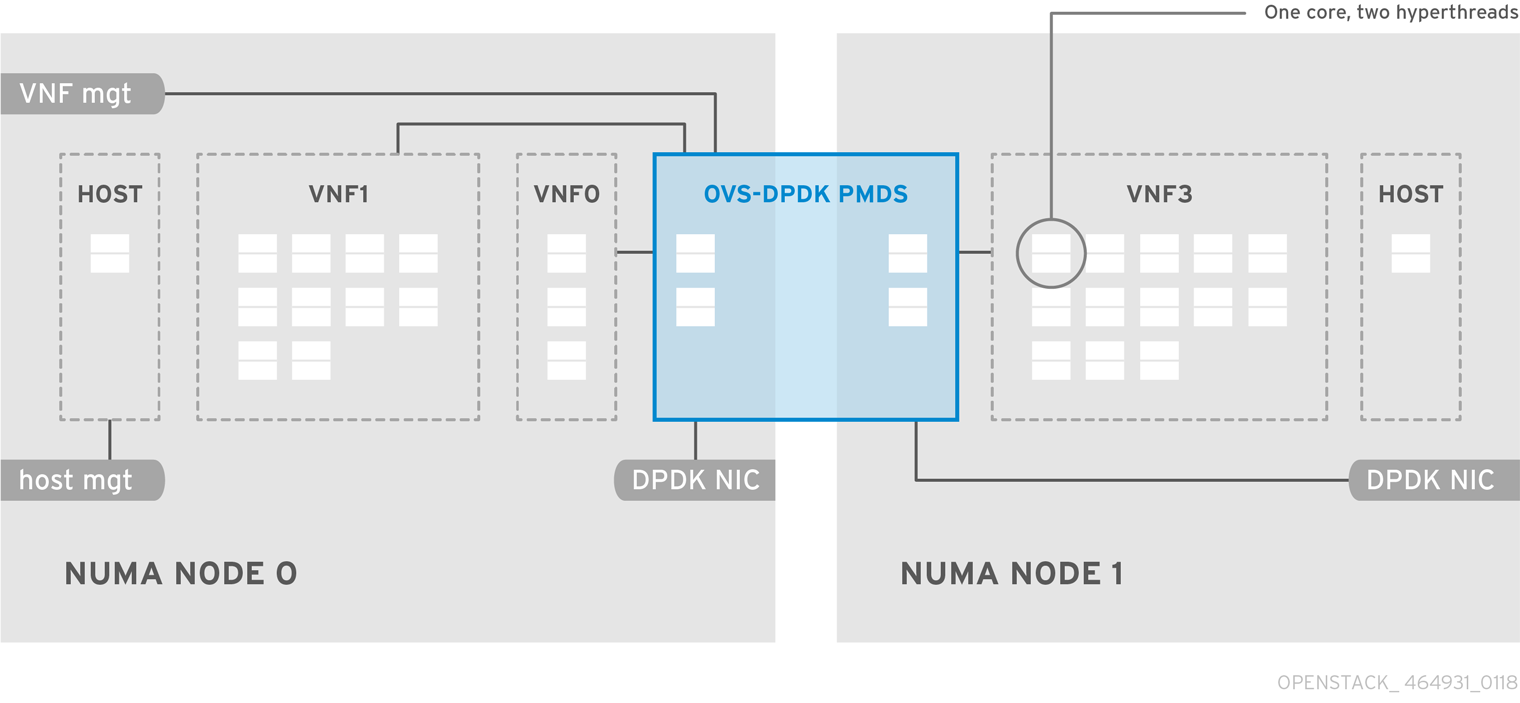
This example deployment shows an Open vSwitch with Data Plane Development Kit (OVS-DPDK) configuration and consists of two virtual network functions (VNFs) with two interfaces each: the management interface represented by mgt, and the data plane interface. In the OVS-DPDK deployment, the VNFs run with inbuilt DPDK that supports the physical interface. OVS-DPDK manages the bonding at the vSwitch level. In an OVS-DPDK deployment, it is recommended that you do not mix kernel and OVS-DPDK NICs as this can lead to performance degradation. To separate the management (mgt) network connected to the Base provider network for the virtual machine, ensure you have additional NICs. The Compute node consists of two regular NICs for the Red Hat OpenStack Platform (RHOSP) API management that can be reused by the Ceph API but cannot be shared with any RHOSP tenant.

NFV OVS-DPDK topology
The following image shows the topology for OVS_DPDK for the NFV use case. It consists of Compute and Controller nodes with 1 or 10 Gbps NICs, and the director node.
Chapter 8. Configuring an OVS-DPDK deployment
This section describes how to deploy DPDK with Open vSwitch (OVS-DPDK) within the Red Hat OpenStack Platform (RHOSP) environment. The overcloud usually consists of nodes in predefined roles such as Controller nodes, Compute nodes, and different storage node types. Each of these default roles contains a set of services defined in the core heat templates on the director node.
You must install and configure the undercloud before you can deploy the overcloud. For more information, see: Director Installation and Usage Guide.
You must determine the best values for the OVS-DPDK parameters that you set in the network-environment.yaml file to optimize your RHOSP network for OVS-DPDK.
Do not edit or change isolated_cores or other values in etc/tuned/cpu-partitioning-variables.conf that are modified by these director heat templates.
8.1. Deriving DPDK parameters with workflows
This feature is available in this release as a Technology Preview, and therefore is not fully supported by Red Hat. It should only be used for testing, and should not be deployed in a production environment. For more information about Technology Preview features, see Scope of Coverage Details.
For an overview of the Mistral workflow for DPDK, see Section 7.2, “Overview of workflows and derived parameters”.
Prerequisites
You must have Bare Metal introspection, including hardware inspection_extras, enabled to generate the data retrieved by this workflow. Hardware inspection extras are enabled by default. See Inspecting the Hardware of Nodes.
Define the Workflows and Input Parameters for DPDK
The following lists the input parameters you can provide to the OVS-DPDK workflows:
- num_phy_cores_per_numa_node_for_pmd
- This input parameter specifies the required minimum number of cores for the NUMA node associated with the DPDK NIC. One physical core is assigned for the other NUMA nodes not associated with DPDK NIC. Ensure that this parameter is set to 1.
- huge_page_allocation_percentage
-
This input parameter specifies the required percentage of total memory (excluding
NovaReservedHostMemory) that can be configured as huge pages. TheKernelArgsparameter is derived using the calculated huge pages based on thehuge_page_allocation_percentagespecified. Ensure that this parameter is set to 50.
The workflows use these input parameters and the bare-metal introspection details to calculate appropriate DPDK parameter values.
Perform the following steps to define the workflows and input parameters for DPDK:
Copy the
usr/share/openstack-tripleo-heat-templates/plan-samples/plan-environment-derived-params.yamlfile to a local directory and set the input parameters to suit your environment.workflow_parameters: tripleo.derive_params.v1.derive_parameters: # DPDK Parameters # # Specifies the minimum number of CPU physical cores to be allocated for DPDK # PMD threads. The actual allocation will be based on network config, if # the a DPDK port is associated with a numa node, then this configuration # will be used, else 1. num_phy_cores_per_numa_node_for_pmd: 1 # Amount of memory to be configured as huge pages in percentage. Ouf the # total available memory (excluding the NovaReservedHostMemory), the # specified percentage of the remaining is configured as huge pages. huge_page_allocation_percentage: 50Run the
openstack overcloud deploycommand with the following options:-
The
update-plan-onlyoption - The role file and all environment files specific to your environment
The
plan-environment-derived-parms.yamlfile with the--plan-environment-fileoptional argument$ openstack overcloud deploy --templates --update-plan-only \ -r /home/stack/roles_data.yaml \ -e /home/stack/<environment-file> \ ... #repeat as necessary ... -p /home/stack/plan-environment-derived-params.yaml
-
The
The output of this command shows the derived results, which are also merged into the plan-environment.yaml file.
Started Mistral Workflow tripleo.validations.v1.check_pre_deployment_validations. Execution ID: 55ba73f2-2ef4-4da1-94e9-eae2fdc35535 Waiting for messages on queue 472a4180-e91b-4f9e-bd4c-1fbdfbcf414f with no timeout. Removing the current plan files Uploading new plan files Started Mistral Workflow tripleo.plan_management.v1.update_deployment_plan. Execution ID: 7fa995f3-7e0f-4c9e-9234-dd5292e8c722 Plan updated. Processing templates in the directory /tmp/tripleoclient-SY6RcY/tripleo-heat-templates Invoking workflow (tripleo.derive_params.v1.derive_parameters) specified in plan-environment file Started Mistral Workflow tripleo.derive_params.v1.derive_parameters. Execution ID: 2d4572bf-4c5b-41f8-8981-c84a363dd95b Workflow execution is completed. result: ComputeOvsDpdkParameters: IsolCpusList: 1,2,3,4,5,6,7,9,10,17,18,19,20,21,22,23,11,12,13,14,15,25,26,27,28,29,30,31 KernelArgs: default_hugepagesz=1GB hugepagesz=1G hugepages=32 iommu=pt intel_iommu=on isolcpus=1,2,3,4,5,6,7,9,10,17,18,19,20,21,22,23,11,12,13,14,15,25,26,27,28,29,30,31 NovaReservedHostMemory: 4096 NovaVcpuPinSet: 2,3,4,5,6,7,18,19,20,21,22,23,10,11,12,13,14,15,26,27,28,29,30,31 OvsDpdkCoreList: 0,16,8,24 OvsDpdkMemoryChannels: 4 OvsDpdkSocketMemory: 1024,1024 OvsPmdCoreList: 1,17,9,25
You cannot derive the OvsDpdkMemoryChannels parameter from introspection details. In most cases, this value should be 4.
Deploy the overcloud with the derived parameters
Perform the following steps to deploy the overcloud with these derived parameters:
Copy the derived parameters from the deploy command output to the
network-environment.yamlfile.# DPDK compute node. ComputeOvsDpdkParameters: KernelArgs: default_hugepagesz=1GB hugepagesz=1G hugepages=32 iommu=pt intel_iommu=on TunedProfileName: "cpu-partitioning" IsolCpusList: "1,2,3,4,5,6,7,9,10,17,18,19,20,21,22,23,11,12,13,14,15,25,26,27,28,29,30,31" NovaVcpuPinSet: ['2,3,4,5,6,7,18,19,20,21,22,23,10,11,12,13,14,15,26,27,28,29,30,31'] NovaReservedHostMemory: 4096 OvsDpdkSocketMemory: "1024,1024" OvsDpdkMemoryChannels: "4" OvsDpdkCoreList: "0,16,8,24" OvsPmdCoreList: "1,17,9,25"NoteThese parameters apply to the specific role, ComputeOvsDpdk. You can apply these parameters globally, but role-specific parameters overwrite global parameters.
- Deploy the overcloud using the role file and all environment files specific to your environment. For more information, see Deploying the Overcloud.
In a cluster with Compute, ComputeOvsDpdk and ComputeSriov, the existing workflow to derive parameters applies the formula to the ComputeOvsDpdk role only.
8.2. OVS-DPDK topology
With Red Hat OpenStack Platform, you can create custom deployment roles, using the composable roles feature, adding or removing services from each role. For more information on Composable Roles, see Composable Roles and Services.
This image shows an example Open vSwitch with Data Plane Development Kit (OVS-DPDK) topology with two bonded ports for the control plane and data plane:
To configure OVS-DPDK, complete the following tasks:
-
If you use composable roles, copy and modify the
roles_data.yamlfile to add the custom role for OVS-DPDK. -
Update the appropriate
network-environment.yamlfile to include parameters for kernel arguments and DPDK arguments. -
Update the
compute.yamlfile to include the bridge for DPDK interface parameters. -
Update the
controller.yamlfile to include the same bridge details for DPDK interface parameters. -
Run the
overcloud_deploy.shscript to deploy the overcloud with the DPDK parameters.
This guide provides examples for CPU assignments, memory allocation, and NIC configurations that can vary from your topology and use case. For more information about hardware and configuration options, see: Network Functions Virtualization Product Guide and Chapter 2, Hardware requirements.
Prerequisites
- OVS 2.10
- DPDK 17
- Tested NIC. For a list of tested NICs for NFV, see Section 2.1, “Tested NICs”.
Red Hat OpenStack Platform operates in OVS client mode for OVS-DPDK deployments.
8.3. Setting the MTU value for OVS-DPDK interfaces
Red Hat OpenStack Platform supports jumbo frames for Open vSwitch with Data Plane Development Kit (OVS-DPDK). To set the maximum transmission unit (MTU) value for jumbo frames you must:
-
Set the global MTU value for networking in the
network-environment.yamlfile. -
Set the physical DPDK port MTU value in the
compute.yamlfile. This value is also used by the vhost user interface. - Set the MTU value within any guest instances on the Compute node to ensure that you have a comparable MTU value from end to end in your configuration.
VXLAN packets include an extra 50 bytes in the header. Calculate your MTU requirements based on these additional header bytes. For example, an MTU value of 9000 means the VXLAN tunnel MTU value is 8950 to account for these extra bytes.
You do not need any special configuration for the physical NIC because the NIC is controlled by the DPDK PMD and has the same MTU value set by the compute.yaml file. You cannot set an MTU value larger than the maximum value supported by the physical NIC.
To set the MTU value for OVS-DPDK interfaces:
Set the
NeutronGlobalPhysnetMtuparameter in thenetwork-environment.yamlfile.parameter_defaults: # MTU global configuration NeutronGlobalPhysnetMtu: 9000
NoteEnsure that the NeutronDpdkSocketMemory value in the
network-environment.yamlfile is large enough to support jumbo frames. See Section 7.4.2, “Memory parameters” for details.Set the MTU value on the bridge to the Compute node in the
controller.yamlfile.- type: ovs_bridge name: br-link0 use_dhcp: false members: - type: interface name: nic3 mtu: 9000Set the MTU values for an OVS-DPDK bond in the
compute.yamlfile:- type: ovs_user_bridge name: br-link0 use_dhcp: false members: - type: ovs_dpdk_bond name: dpdkbond0 mtu: 9000 rx_queue: 2 members: - type: ovs_dpdk_port name: dpdk0 mtu: 9000 members: - type: interface name: nic4 - type: ovs_dpdk_port name: dpdk1 mtu: 9000 members: - type: interface name: nic5
8.4. Configuring a firewall for security groups
Data plane interfaces require a high degree of performance in a stateful firewall. To protect these interfaces, consider deploying a telco grade firewall as a virtual network function (VNF).
To configure the control plane interfaces, set the NeutronOVSFirewallDriver parameter to openvswitch. This configures Red Hat OpenStack Platform Networking to use the flow-based OVS firewall driver. This is set in the network-environment.yaml file under parameter_defaults.
Example:
parameter_defaults: NeutronOVSFirewallDriver: openvswitch
It is important to disable OVS firewall driver for data plane interfaces, where applicable. This can be done with the openstack port set command.
Example:
openstack port set --no-security-group --disable-port-security ${PORT}8.5. Setting multiqueue for OVS-DPDK interfaces
To set set same number of queues for interfaces in Open vSwitch with Data Plane Development Kit (OVS-DPDK) on the Compute node, modify the compute.yaml file:
- type: ovs_user_bridge
name: br-link0
use_dhcp: false
members:
- type: ovs_dpdk_bond
name: dpdkbond0
mtu: 9000
rx_queue: 2
members:
- type: ovs_dpdk_port
name: dpdk0
mtu: 9000
members:
- type: interface
name: nic4
- type: ovs_dpdk_port
name: dpdk1
mtu: 9000
members:
- type: interface
name: nic58.6. Deploying the overcloud
Ensure parameters for your DPDK compute role populate in
network-environment.yaml. If necessary, copy these parameters from: derived OVS-DPDK.# DPDK compute node. ComputeOvsDpdkParameters: KernelArgs: default_hugepagesz=1GB hugepagesz=1G hugepages=32 iommu=pt intel_iommu=on isolcpus=1-7,17-23,9-15,25-31 TunedProfileName: "cpu-partitioning" IsolCpusList: "1-7,17-23,9-15,25-31" NovaVcpuPinSet: ['2-7,18-23,10-15,26-31'] NovaReservedHostMemory: 4096 OvsDpdkSocketMemory: "1024,1024" OvsDpdkMemoryChannels: "4" OvsDpdkCoreList: "0,16,8,24" OvsPmdCoreList: "1,17,9,25"Deploy the overcloud using the
openstack overcloud deploycommand.- Include the role file and all environment files specific to your environment.
Apply the
KernelArgsandTunedProfileparameters by including thehost-config-and-reboot.yamlfile from/usr/share/openstack-tripleo-heat-templates/environmentsto your deployment script:TEMPLATES_HOME=”/usr/share/openstack-tripleo-heat-templates” CUSTOM_TEMPLATES=”/home/stack/templates” openstack overcloud deploy --templates \ -r ${CUSTOM_TEMPLATES}/roles_data.yaml \ -e ${TEMPLATES_HOME}/environments/host-config-and-reboot.yaml \ -e ${CUSTOM_TEMPLATES}/network-environment.yaml \ -e ${CUSTOM_TEMPLATES}/controller.yaml -e ${CUSTOM_TEMPLATES}/computeovsdpdk.yaml \ ...
8.7. Known limitations
There are limitations when configuring OVS-DPDK with Red Hat OpenStack Platform for the NFV use case:
- Use Linux bonds for control plane networks. Ensure that the PCI devices in the Linux bond are on the same NUMA node for optimum performance. Red Hat does not support Neutron Linux bridge configuration.
- Every instance running on the hosts with OVS-DPDK requires huge pages. If huge pages are not present in the guest, the interface appears but does not function.
- With OVS-DPDK, there is a performance degradation of services that use tap devices, such as Distributed Virtual Routing (DVR). The resulting performance is not suitable for a production environment.
-
When using OVS-DPDK, all bridges on the same Compute node must be of type
ovs_user_bridge. The director might accept the configuration, but Red Hat does not support mixingovs_bridgeandovs_user_bridgeon the same node.
8.8. Creating a flavor and deploying an instance for OVS-DPDK
After you configure Open vSwitch with Data Plane Development Kit (OVS-DPDK) for your Red Hat OpenStack Platform deployment with NFV, you can create a flavor and deploy an instance with the following steps:
Create an aggregate group and add relevant hosts for OVS-DPDK. Define metadata, for example
dpdk=true, that matches defined flavor metadata.# openstack aggregate create dpdk_group # openstack aggregate add host dpdk_group [compute-host] # openstack aggregate set --property dpdk=true dpdk_group
NoteUse host aggregates to separate CPU-pinned instances from unpinned instances. Instances without CPU pinning have different resourcing requirements of instances with CPU pinning.
Create a flavor.
# openstack flavor create <flavor> --ram <MB> --disk <GB> --vcpus <#>
Set additional flavor properties. Note that the defined metadata,
dpdk=true, matches the defined metadata in the DPDK aggregate.# openstack flavor set <flavor> --property dpdk=true --property hw:cpu_policy=dedicated --property hw:mem_page_size=1GB --property hw:emulator_threads_policy=isolate
In this example,
m1.medium_huge_4cpuis the flavor name and the remaining parameters set the other properties for the flavor.For details on the emulator threads policy for performance improvements, see: Configure Emulator Threads to run on a Dedicated Physical CPU.
Create the network.
# openstack network create net1 --provider-physical-network tenant --provider-network-type vlan --provider-segment <VLAN-ID> # openstack subnet create subnet1 --network net1 --subnet-range 192.0.2.0/24 --dhcp
Deploy an instance.
# openstack server create --flavor <flavor> --image <glance image> --nic net-id=<network ID>
To use multi-queue with OVS-DPDK, set the hw_vif_multiqueue_enabled property on an image, before you set the hw.vif_multiqueue_enabled property on a flavor:
Set the image properties.
# openstack image set --property hw_vif_multiqueue_enabled=true <image>
Set additional flavor properties.
# openstack flavor set --property hw:vif_multiqueue_enabled=true <flavor>
8.9. Troubleshooting the configuration
This section describes the steps to troubleshoot the Open vSwitch with Data Plane Development Kit (DPDK-OVS) configuration.
Review the bridge configuration and confirm that the bridge was created with the
datapath_type=netdev.# ovs-vsctl list bridge br0 _uuid : bdce0825-e263-4d15-b256-f01222df96f3 auto_attach : [] controller : [] datapath_id : "00002608cebd154d" datapath_type : netdev datapath_version : "<built-in>" external_ids : {} fail_mode : [] flood_vlans : [] flow_tables : {} ipfix : [] mcast_snooping_enable: false mirrors : [] name : "br0" netflow : [] other_config : {} ports : [52725b91-de7f-41e7-bb49-3b7e50354138] protocols : [] rstp_enable : false rstp_status : {} sflow : [] status : {} stp_enable : falseConfirm that the docker container
neutron_ovs_agentis configured to start automatically.# docker inspect neutron_ovs_agent | grep -A1 RestartPolicy "RestartPolicy": { "Name": "always",If the container has issues with starting, you can view any related messages.
# less /var/log/containers/neutron/openvswitch-agent.log
Confirm that the PMD CPU mask of the
ovs-dpdkare pinned to the CPUs. In case of HT, use sibling CPUs.For example, observe CPU 4:
# cat /sys/devices/system/cpu/cpu4/topology/thread_siblings_list 4,20
Use CPU 4 and 20:
# ovs-vsctl set Open_vSwitch . other_config:pmd-cpu-mask=0x100010
Display their status:
# tuna -t ovs-vswitchd -CP thread ctxt_switches pid SCHED_ rtpri affinity voluntary nonvoluntary cmd 3161 OTHER 0 6 765023 614 ovs-vswitchd 3219 OTHER 0 6 1 0 handler24 3220 OTHER 0 6 1 0 handler21 3221 OTHER 0 6 1 0 handler22 3222 OTHER 0 6 1 0 handler23 3223 OTHER 0 6 1 0 handler25 3224 OTHER 0 6 1 0 handler26 3225 OTHER 0 6 1 0 handler27 3226 OTHER 0 6 1 0 handler28 3227 OTHER 0 6 2 0 handler31 3228 OTHER 0 6 2 4 handler30 3229 OTHER 0 6 2 5 handler32 3230 OTHER 0 6 953538 431 revalidator29 3231 OTHER 0 6 1424258 976 revalidator33 3232 OTHER 0 6 1424693 836 revalidator34 3233 OTHER 0 6 951678 503 revalidator36 3234 OTHER 0 6 1425128 498 revalidator35 *3235 OTHER 0 4 151123 51 pmd37* *3236 OTHER 0 20 298967 48 pmd38* 3164 OTHER 0 6 47575 0 dpdk_watchdog3 3165 OTHER 0 6 237634 0 vhost_thread1 3166 OTHER 0 6 3665 0 urcu2
Chapter 9. Tuning a Red Hat OpenStack Platform environment
9.1. Pinning emulator threads
Emulator threads handle interrupt requests and non-blocking processes for virtual machine hardware emulation. These threads float across the vCPUs that the guest uses for processing. If threads used for the poll mode driver (PMD) or real-time processing run on these vCPUs, you can experience packet loss or missed deadlines.
You can separate emulator threads from VM processing tasks by pinning the threads to their own vCPUs, increasing performance as a result.
9.1.1. Configuring CPUs to host emulator threads
To improve performance, reserve a subset of pCPUs for hosting emulator threads. Red Hat recommends using pCPUs identified in the OvsDpdkCoreList parameter.
Procedure
Deploy an overcloud with
NovaComputeCpuSharedSetdefined for a given role. The value ofNovaComputeCpuSharedSetapplies to thecpu_shared_setparameter in the nova.conf file for hosts within that role.parameter_defaults: ComputeOvsDpdkParameters: OvsDpdkCoreList: “0-1,16-17” NovaComputeCpuSharedSet: “0-1,16-17”Create a flavor to build instances with emulator threads separated into a shared pool.
openstack flavor create --ram <size_mb> --disk <size_gb> --vcpus <vcpus> <flavor>
Add the
hw:emulator_threads_policyextra specification, and set the value toshare. Instances created with this flavor use the vCPUs defined in thecpu_share_setparameter in the nova.conf file.openstack flavor set <flavor> --property hw:emulator_threads_policy=share
You must set the cpu_share_set parameter in the nova.conf file manually or with heat to enable the share policy for this extra specification.
9.1.2. Verify the emulator thread pinning
Procedure
Identify the host for a given instance and the name of the instance.
openstack server show <instance_id>
Use SSH to log in to the identified host as heat-admin.
ssh heat-admin@compute-1 [compute-1]$ sudo virsh dumpxml instance-00001 | grep `'emulatorpin cpuset'`
9.2. Enabling RT-KVM for NFV workloads
This section describes the steps to install and configure Red Hat Enterprise Linux 8.0 Real Time KVM (RT-KVM) for the Red Hat OpenStack Platform. Red Hat OpenStack Platform provides real-time capabilities with a real-time Compute node role that provisions Red Hat Enterprise Linux for real-time, as well as the additional RT-KVM kernel module, and automatic configuration of the Compute node.
9.2.1. Planning for your RT-KVM Compute nodes
You must use Red Hat certified servers for your RT-KVM Compute nodes. For more information, see: Red Hat Enterprise Linux for Real Time 7 certified servers.
For more information on how to enable the rhel-8-server-nfv-rpms repository for RT-KVM, and ensuring your system is up to date, see Registering and updating your undercloud .
You need a separate subscription to a Red Hat OpenStack Platform for Real Time SKU before you can access this repository.
Building the real-time image
To build the overcloud image for Real-time Compute nodes:
Install the libguestfs-tools package on the undercloud to get the virt-customize tool:
(undercloud) [stack@undercloud-0 ~]$ sudo dnf install libguestfs-tools
ImportantIf you install the
libguestfs-toolspackage on the undercloud, disableiscsid.socketto avoid port conflicts with thetripleo_iscsidservice on the undercloud:$ sudo systemctl disable --now iscsid.socket
Extract the images:
(undercloud) [stack@undercloud-0 ~]$ tar -xf /usr/share/rhosp-director-images/overcloud-full.tar (undercloud) [stack@undercloud-0 ~]$ tar -xf /usr/share/rhosp-director-images/ironic-python-agent.tar
Copy the default image:
(undercloud) [stack@undercloud-0 ~]$ cp overcloud-full.qcow2 overcloud-realtime-compute.qcow2
Register your image to enable Red Hat repositories relevant to your customizations. Replace
[username]and[password]with valid credentials in the following example.virt-customize -a overcloud-realtime-compute.qcow2 --run-command \ 'subscription-manager register --username=[username] --password=[password]'
NoteRemove credentials from the history file anytime they are used on the command prompt. You can delete individual lines in history using the
history -dcommand followed by the line number.Obtain a list of pool IDs from your account’s subscriptions, and attach the appropriate pool ID to your image.
sudo subscription-manager list --all --available | less ... virt-customize -a overcloud-realtime-compute.qcow2 --run-command \ 'subscription-manager attach --pool [pool-ID]'
Add repositories necessary for Red Hat OpenStack Platform with NFV.
virt-customize -a overcloud-realtime-compute.qcow2 --run-command \ 'sudo subscription-manager repos --enable=rhel-8-for-x86_64-baseos-rpms \ --enable=rhel-8-for-x86_64-appstream-rpms \ --enable=rhel-8-for-x86_64-highavailability-rpms \ --enable=ansible-2.8-for-rhel-8-x86_64-rpms \ --enable=openstack-15-for-rhel-8-x86_64-rpms \ --enable=rhel-8-for-x86_64-nfv-rpms \ --enable=advanced-virt-for-rhel-8-x86_64-rpms \ --enable=fast-datapath-for-rhel-8-x86_64-rpms'
Create a script to configure real-time capabilities on the image.
(undercloud) [stack@undercloud-0 ~]$ cat <<'EOF' > rt.sh #!/bin/bash set -eux dnf -v -y --setopt=protected_packages= erase kernel.$(uname -m) dnf -v -y install kernel-rt kernel-rt-kvm tuned-profiles-nfv-host EOF
Run the script to configure the RT image:
(undercloud) [stack@undercloud-0 ~]$ virt-customize -a overcloud-realtime-compute.qcow2 -v --run rt.sh 2>&1 | tee virt-customize.log
NoteYou might see the following error in the
rt.shscript output:grubby fatal error: unable to find a suitable template. You can safely ignore this error.To verify that the packages installed correctly, examine the
virt-customize.logfile that you created with the previous command.(undercloud) [stack@undercloud-0 ~]$ cat virt-customize.log | grep Verifying Verifying : kernel-3.10.0-957.el7.x86_64 1/1 Verifying : 10:qemu-kvm-tools-rhev-2.12.0-18.el7_6.1.x86_64 1/8 Verifying : tuned-profiles-realtime-2.10.0-6.el7_6.3.noarch 2/8 Verifying : linux-firmware-20180911-69.git85c5d90.el7.noarch 3/8 Verifying : tuned-profiles-nfv-host-2.10.0-6.el7_6.3.noarch 4/8 Verifying : kernel-rt-kvm-3.10.0-957.10.1.rt56.921.el7.x86_64 5/8 Verifying : tuna-0.13-6.el7.noarch 6/8 Verifying : kernel-rt-3.10.0-957.10.1.rt56.921.el7.x86_64 7/8 Verifying : rt-setup-2.0-6.el7.x86_64 8/8
Relabel SELinux:
(undercloud) [stack@undercloud-0 ~]$ virt-customize -a overcloud-realtime-compute.qcow2 --selinux-relabel
Extract vmlinuz and initrd:
(undercloud) [stack@undercloud-0 ~]$ mkdir image (undercloud) [stack@undercloud-0 ~]$ guestmount -a overcloud-realtime-compute.qcow2 -i --ro image (undercloud) [stack@undercloud-0 ~]$ cp image/boot/vmlinuz-3.10.0-862.rt56.804.el7.x86_64 ./overcloud-realtime-compute.vmlinuz (undercloud) [stack@undercloud-0 ~]$ cp image/boot/initramfs-3.10.0-862.rt56.804.el7.x86_64.img ./overcloud-realtime-compute.initrd (undercloud) [stack@undercloud-0 ~]$ guestunmount image
NoteThe software version in the
vmlinuzandinitramfsfilenames vary with the kernel version.Upload the image:
(undercloud) [stack@undercloud-0 ~]$ openstack overcloud image upload --update-existing --os-image-name overcloud-realtime-compute.qcow2
You now have a real-time image you can use with the ComputeOvsDpdkRT composable role on your selected Compute nodes.
Modifying BIOS settings on RT-KVM Compute nodes
To reduce latency on your RT-KVM Compute nodes, modify the BIOS settings. Disable all options for the following features in your Compute node BIOS settings:
- Power Management
- Hyper-Threading
- CPU sleep states
- Logical processors
For descriptions of these settings, see: Setting BIOS parameters. See your hardware manufacturer documentation for complete details on how to change BIOS settings.
9.2.2. Configuring OVS-DPDK with RT-KVM
Determine the best values for the OVS-DPDK parameters that you set in the network-environment.yaml file to optimize your OpenStack network for OVS-DPDK. For details, see: Section 8.1, “Deriving DPDK parameters with workflows”.
9.2.2.1. Generating the ComputeOvsDpdk composable role
Use the ComputeOvsDpdkRT role to specify Compute nodes that use the real-time compute image.
Generate
roles_data.yamlfor the ComputeOvsDpdkRT role.# (undercloud) [stack@undercloud-0 ~]$ openstack overcloud roles generate -o roles_data.yaml Controller ComputeOvsDpdkRT
9.2.2.2. Configuring the OVS-DPDK parameters
If you deploy Data Plane Development Kit (DPDK) without appropriate values, the deployment might fail or be unstable. Determine the best values for the OVS-DPDK parameters set in the network-environment.yaml file to optimize your Red Hat OpenStack Platform network for OVS-DPDK. For details, see: Section 8.1, “Deriving DPDK parameters with workflows” .
Add the nic configuration for the OVS-DPDK role you use under
resource_registry:resource_registry: # Specify the relative/absolute path to the config files you want to use for override the default. OS::TripleO::ComputeOvsDpdkRT::Net::SoftwareConfig: nic-configs/compute-ovs-dpdk.yaml OS::TripleO::Controller::Net::SoftwareConfig: nic-configs/controller.yaml
Under
parameter_defaults, set the OVS-DPDK and RT-KVM parameters:# DPDK compute node. ComputeOvsDpdkRTParameters: KernelArgs: "default_hugepagesz=1GB hugepagesz=1G hugepages=32 iommu=pt intel_iommu=on isolcpus=1-7,17-23,9-15,25-31" TunedProfileName: "realtime-virtual-host" IsolCpusList: "1,2,3,4,5,6,7,9,10,17,18,19,20,21,22,23,11,12,13,14,15,25,26,27,28,29,30,31" NovaVcpuPinSet: ['2,3,4,5,6,7,18,19,20,21,22,23,10,11,12,13,14,15,26,27,28,29,30,31'] NovaReservedHostMemory: 4096 OvsDpdkSocketMemory: "1024,1024" OvsDpdkMemoryChannels: "4" OvsDpdkCoreList: "0,16,8,24" OvsPmdCoreList: "1,17,9,25" VhostuserSocketGroup: "hugetlbfs" ComputeOvsDpdkRTImage: "overcloud-realtime-compute"
9.2.2.2.1. Deploying the overcloud
Deploy the overcloud for ML2-OVS:
(undercloud) [stack@undercloud-0 ~]$ openstack overcloud deploy \ --templates \ -r /home/stack/ospd-15-vlan-dpdk-ctlplane-bonding-rt/roles_data.yaml \ -e /usr/share/openstack-tripleo-heat-templates/environments/network-isolation.yaml \ -e /usr/share/openstack-tripleo-heat-templates/environments/host-config-and-reboot.yaml \ -e /usr/share/openstack-tripleo-heat-templates/environments/services/neutron-ovs.yaml \ -e /usr/share/openstack-tripleo-heat-templates/environments/services/neutron-ovs-dpdk.yaml \ -e /home/stack/ospd-15-vxlan-dpdk-data-bonding-rt-hybrid/containers-prepare-parameter.yaml \ -e /home/stack/ospd-15-vxlan-dpdk-data-bonding-rt-hybrid/network-environment.yaml
9.2.3. Launching an RT-KVM instance
To launch an RT-KVM instance on a real-time enabled Compute node:
Create an RT-KVM flavor on the overcloud:
# openstack flavor create r1.small 99 4096 20 4 # openstack flavor set --property hw:cpu_policy=dedicated 99 # openstack flavor set --property hw:cpu_realtime=yes 99 # openstack flavor set --property hw:mem_page_size=1GB 99 # openstack flavor set --property hw:cpu_realtime_mask="^0-1" 99 # openstack flavor set --property hw:cpu_emulator_threads=isolate 99
Launch an RT-KVM instance:
# openstack server create --image <rhel> --flavor r1.small --nic net-id=<dpdk-net> test-rt
Optional: Verify that the instance uses the assigned emulator threads:
# virsh dumpxml <instance-id> | grep vcpu -A1 <vcpu placement='static'>4</vcpu> <cputune> <vcpupin vcpu='0' cpuset='1'/> <vcpupin vcpu='1' cpuset='3'/> <vcpupin vcpu='2' cpuset='5'/> <vcpupin vcpu='3' cpuset='7'/> <emulatorpin cpuset='0-1'/> <vcpusched vcpus='2-3' scheduler='fifo' priority='1'/> </cputune>
9.3. Trusted Virtual Functions
You can configure physical functions (PFs) to trust virtual functions (VFs) so that VFs can perform some privileged actions. For example, you can use this configuration to allow VFs to enable promiscuous mode or to change a hardware address.
9.3.1. Providing trust
Prerequisites
- An operational installation with Red Hat OpenStack Platform director
Procedure
Complete the following steps to deploy the overcloud with the parameters necessary to enable physical function trust of virtual functions:
Add the
NeutronPhysicalDevMappingsparameter under theparameter_defaultssection to make the link between the logical network name and the physical interface.parameter_defaults: NeutronPhysicalDevMappings: "sriov2:p5p2"
Add the new property "trusted" to the existing parameters related to SR-IOV.
parameter_defaults: NeutronPhysicalDevMappings: "sriov2:p5p2" NeutronSriovNumVFs: ["p5p2:8"] NovaPCIPassthrough: - devname: "p5p2" physical_network: "sriov2" trusted: "true"NoteYou must include quotation marks around the value "true".
ImportantComplete the following step only in trusted environments. This step enables non-administrative accounts the ability to bind trusted ports.
Modify permissions to allow users the capability of creating and updating port bindings.
parameter_defaults: NeutronApiPolicies: { operator_create_binding_profile: { key: 'create_port:binding:profile', value: 'rule:admin_or_network_owner'}, operator_get_binding_profile: { key: 'get_port:binding:profile', value: 'rule:admin_or_network_owner'}, operator_update_binding_profile: { key: 'update_port:binding:profile', value: 'rule:admin_or_network_owner'} }
9.3.2. Utilizing trusted VFs
Execute the following on a fully deployed overcloud to utilize trusted VFs.
Creating a trusted VF network
Create a network of type vlan.
openstack network create trusted_vf_network --provider-network-type vlan \ --provider-segment 111 --provider-physical-network sriov2 \ --external --disable-port-security
Create a subnet.
openstack subnet create --network trusted_vf_network \ --ip-version 4 --subnet-range 192.168.111.0/24 --no-dhcp \ subnet-trusted_vf_network
Create a port, setting the
vnic-typeoption to direct, and thebinding-profileoption to true.openstack port create --network sriov111 \ --vnic-type direct --binding-profile trusted=true \ sriov111_port_trusted
Create an instance binding it to the previously created trusted port.
openstack server create --image rhel --flavor dpdk --network internal --port trusted_vf_network_port_trusted --config-drive True --wait rhel-dpdk-sriov_trusted
Verify the trusted virtual function configuration on the hypervisor
- On the compute node that hosts the newly created instance, run the following command:
# ip link
7: p5p2: <BROADCAST,MULTICAST,UP,LOWER_UP> mtu 9000 qdisc mq state UP mode DEFAULT group default qlen 1000
link/ether b4:96:91:1c:40:fa brd ff:ff:ff:ff:ff:ff
vf 6 MAC fa:16:3e:b8:91:c2, vlan 111, spoof checking off, link-state auto, trust on, query_rss off
vf 7 MAC fa:16:3e:84:cf:c8, vlan 111, spoof checking off, link-state auto, trust off, query_rss off-
View the output of the
ip linkcommand and verify that the trust status of the virtual function istrust on. The example output contains details of an environment that contains two ports. Note thatvf 6contains the texttrust on.
9.4. Configuring RX/TX queue size
You can experience packet loss at high packet rates above 3.5 million packets per second (mpps) for many reasons, such as:
- a network interrupt
- a SMI
- packet processing latency in the Virtual Network Function
To prevent packet loss, increase the queue size from the default of 512 to a maximum of 1024.
Prerequisites
- To configure RX, ensure that you have libvirt v2.3 and QEMU v2.7.
- To configure TX, ensure that you have libvirt v3.7 and QEMU v2.10.
Procedure
To increase the RX and TX queue size, include the following lines to the
parameter_defaults:section of a relevant director role. Here is an example with ComputeOvsDpdk role:parameter_defaults: ComputeOvsDpdkParameters: -NovaLibvirtRxQueueSize: 1024 -NovaLibvirtTxQueueSize: 1024
Testing
You can observe the values for RX queue size and TX queue size in the nova.conf file:
[libvirt] rx_queue_size=1024 tx_queue_size=1024
You can check the values for RX queue size and TX queue size in the VM instance XML file generated by libvirt on the compute host.
<devices> <interface type='vhostuser'> <mac address='56:48:4f:4d:5e:6f'/> <source type='unix' path='/tmp/vhost-user1' mode='server'/> <model type='virtio'/> <driver name='vhost' rx_queue_size='1024' tx_queue_size='1024' /> <address type='pci' domain='0x0000' bus='0x00' slot='0x10' function='0x0'/> </interface> </devices>To verify the values for RX queue size and TX queue size, use the following command on a KVM host:
$ virsh dumpxml <vm name> | grep queue_size
- You can check for improved performance, such as 3.8 mpps/core at 0 frame loss.
9.5. Configuring a NUMA-aware vSwitch
This feature is available in this release as a Technology Preview, and therefore is not fully supported by Red Hat. It should only be used for testing, and should not be deployed in a production environment. For more information about Technology Preview features, see Scope of Coverage Details.
Before you implement a NUMA-aware vSwitch, examine the following components of your hardware configuration:
- The number of physical networks.
- The placement of PCI cards.
- The physical architecture of the servers.
Memory-mapped I/O (MMIO) devices, such as PCIe NICs, are associated with specific NUMA nodes. When a VM and the NIC are on different NUMA nodes, there is a significant decrease in performance. To increase performance, align PCIe NIC placement and instance processing on the same NUMA node.
Use this feature to ensure that instances that share a physical network are located on the same NUMA node. To optimize datacenter hardware, you can leverage load-sharing VMs by using multiple networks, different network types, or bonding.
To architect NUMA-node load sharing and network access correctly, you must understand the mapping of the PCIe slot and the NUMA node. For detailed information on your specific hardware, refer to your vendor’s documentation.
To prevent a cross-NUMA configuration, place the VM on the correct NUMA node, by providing the location of the NIC to Nova.
Prerequisites
- You have enabled the filter “NUMATopologyFilter”
Procedure
-
Set a new
NeutronPhysnetNUMANodesMappingparameter to map the physical network to the NUMA node that you associate with the physical network. If you use tunnels, such as VxLAN or GRE, you must also set the
NeutronTunnelNUMANodesparameter.parameter_defaults: NeutronPhysnetNUMANodesMapping: {<physnet_name>: [<NUMA_NODE>]} NeutronTunnelNUMANodes: <NUMA_NODE>,<NUMA_NODE>
Here is an example with two physical networks tunneled to NUMA node 0:
- one tenant network associated with NUMA node 0
one management network without any affinity
parameter_defaults: NeutronBridgeMappings: - tenant:br-link0 NeutronPhysnetNUMANodesMapping: {tenant: [1], mgmt: [0,1]} NeutronTunnelNUMANodes: 0
Testing
Observe the configuration in the file /var/lib/config-data/puppet-generated/nova_libvirt/etc/nova/nova.conf
[neutron_physnet_tenant] numa_nodes=1 [neutron_tunnel] numa_nodes=1
Confirm the new configuration with the
lscpucommand:$ lscpu
- Launch a VM, with the NIC attached to the appropriate network
9.6. Configuring Quality of Service (QoS) in an NFVi environment
For details on Configuring QoS, see Configure Quality-of-Service (QoS). Support is limited to QoS rule type bandwidth-limit on SR-IOV and OVS-DPDK egress interfaces.
Chapter 10. Example: Configuring OVS-DPDK and SR-IOV with VXLAN tunnelling
This section describes how to deploy Compute nodes with both OVS-DPDK and SR-IOV interfaces. The cluster installs with ML2/OVS and VXLAN tunnelling.
You must determine the best values for the OVS-DPDK parameters that you set in the network-environment.yaml file to optimize your OpenStack network for OVS-DPDK. See Deriving DPDK parameters with workflows for details.
10.1. Configuring roles data
Red Hat OpenStack Platform provides a set of default roles in the roles_data.yaml file. You can create your own roles_data.yaml file to support the roles you require.
In this example, the ComputeOvsDpdkSriov role is created. For information on creating roles in Red Hat OpenStack Platform, see Advanced Overcloud Customization. For details on the specific role used for this example, see roles_data.yaml.
10.2. Configuring OVS-DPDK parameters
You must determine the best values for the OVS-DPDK parameters that you set in the network-environment.yaml file to optimize your OpenStack network for OVS-DPDK. For details, see: Deriving DPDK parameters with workflows.
Add the custom resources for OVS-DPDK under
resource_registry:resource_registry: # Specify the relative/absolute path to the config files you want to use for override the default. OS::TripleO::ComputeOvsDpdkSriov::Net::SoftwareConfig: nic-configs/computeovsdpdksriov.yaml OS::TripleO::Controller::Net::SoftwareConfig: nic-configs/controller.yamlUnder
parameter_defaults, set the tunnel type tovxlanand the network type tovxlan,vlan:NeutronTunnelTypes: 'vxlan' NeutronNetworkType: 'vxlan,vlan'
Under
parameters_defaults, set the bridge mapping:# The OVS logical->physical bridge mappings to use. NeutronBridgeMappings: - dpdk-mgmt:br-link0
Under
parameter_defaults, set the role-specific parameters for theComputeOvsDpdkSriovrole:########################## # OVS DPDK configuration # ########################## ComputeOvsDpdkSriovParameters: KernelArgs: "default_hugepagesz=1GB hugepagesz=1G hugepages=32 iommu=pt intel_iommu=on isolcpus=2-19,22-39" TunedProfileName: "cpu-partitioning" IsolCpusList: "2-19,22-39" NovaVcpuPinSet: ['4-19,24-39'] NovaReservedHostMemory: 4096 OvsDpdkSocketMemory: "3072,1024" OvsDpdkMemoryChannels: "4" OvsDpdkCoreList: "0,20,1,21" OvsPmdCoreList: "2,22,3,23" NovaComputeCpuSharedSet: [0,20,1,21] NovaLibvirtRxQueueSize: 1024 NovaLibvirtTxQueueSize: 1024NoteYou must assign at least one CPU with sibling thread on each NUMA node with or without DPDK NICs present for DPDK PMD to avoid failures in creating guest instances. This is expressed in the example through the
OvsPmdCoreListparameter, having cores 2 and 22 from NUMA 1, and having cores 3 and 23 from NUMA 2.NoteThese huge pages are consumed by the virtual machines, and also by OVS-DPDK using the
OvsDpdkSocketMemoryparameter as shown in this procedure. The number of huge pages available for the VMs is thebootparameter minus theOvsDpdkSocketMemory.You must also add
hw:mem_page_size=1GBto the flavor you associate with the DPDK instance.NoteOvsDPDKCoreListandOvsDpdkMemoryChannelsare the required settings for this procedure. If you deploy DPDK without appropriate values, the deployment might fail or be unstable.Configure the role-specific parameters for SR-IOV:
NovaPCIPassthrough: - devname: "p7p3" trusted: "true" physical_network: "sriov-1" - devname: "p7p4" trusted: "true" physical_network: "sriov-2"
10.3. Configuring the Controller node
Create the control plane Linux bond for an isolated network.
- type: linux_bond name: bond_api bonding_options: "mode=active-backup" use_dhcp: false dns_servers: get_param: DnsServers members: - type: interface name: nic2 primary: trueAssign VLANs to this Linux bond.
- type: vlan vlan_id: get_param: InternalApiNetworkVlanID device: bond_api addresses: - ip_netmask: get_param: InternalApiIpSubnet - type: vlan vlan_id: get_param: StorageNetworkVlanID device: bond_api addresses: - ip_netmask: get_param: StorageIpSubnet - type: vlan vlan_id: get_param: StorageMgmtNetworkVlanID device: bond_api addresses: - ip_netmask: get_param: StorageMgmtIpSubnet - type: vlan vlan_id: get_param: ExternalNetworkVlanID device: bond_api addresses: - ip_netmask: get_param: ExternalIpSubnet routes: - default: true next_hop: get_param: ExternalInterfaceDefaultRouteCreate the OVS bridge for access to neutron-dhcp-agent and neutron-metadata-agent services.
- type: ovs_bridge name: br-link0 use_dhcp: false mtu: 9000 members: - type: interface name: nic3 mtu: 9000 - type: vlan vlan_id: get_param: TenantNetworkVlanID mtu: 9000 addresses: - ip_netmask: get_param: TenantIpSubnet
10.4. Configuring the Compute node for DPDK and SR-IOV
Create the computeovsdpdksriov.yaml file from the default compute.yaml file and make the following changes:
Create the control plane Linux bond for an isolated network.
- type: linux_bond name: bond_api bonding_options: "mode=active-backup" use_dhcp: false dns_servers: get_param: DnsServers members: - type: interface name: nic3 primary: true - type: interface name: nic4Assign VLANs to this Linux bond.
- type: vlan vlan_id: get_param: InternalApiNetworkVlanID device: bond_api addresses: - ip_netmask: get_param: InternalApiIpSubnet - type: vlan vlan_id: get_param: StorageNetworkVlanID device: bond_api addresses: - ip_netmask: get_param: StorageIpSubnetSet a bridge with a DPDK port to link to the controller.
- type: ovs_user_bridge name: br-link0 use_dhcp: false ovs_extra: - str_replace: template: set port br-link0 tag=_VLAN_TAG_ params: _VLAN_TAG_: get_param: TenantNetworkVlanID addresses: - ip_netmask: get_param: TenantIpSubnet members: - type: ovs_dpdk_bond name: dpdkbond0 mtu: 9000 rx_queue: 2 members: - type: ovs_dpdk_port name: dpdk0 members: - type: interface name: nic7 - type: ovs_dpdk_port name: dpdk1 members: - type: interface name: nic8NoteTo include multiple DPDK devices, repeat the
typecode section for each DPDK device that you want to add.NoteWhen using OVS-DPDK, all bridges on the same Compute node must be of type
ovs_user_bridge. The director might accept the configuration, but Red Hat OpenStack Platform does not support mixingovs_bridgeandovs_user_bridgeon the same node.
10.5. Deploying the overcloud
-
Run the
overcloud_deploy.shscript to deploy the overcloud.
openstack overcloud deploy \ --templates \ -r /home/stack/ospd-15-vxlan-dpdk-sriov-ctlplane-dataplane-bonding-hybrid/roles_data.yaml \ -e /usr/share/openstack-tripleo-heat-templates/environments/network-isolation.yaml \ -e /usr/share/openstack-tripleo-heat-templates/environments/host-config-and-reboot.yaml \ -e /usr/share/openstack-tripleo-heat-templates/environments/neutron-ovs.yaml \ -e /usr/share/openstack-tripleo-heat-templates/environments/neutron-ovs-dpdk.yaml \ -e /usr/share/openstack-tripleo-heat-templates/environments/neutron-sriov.yaml \ -e /usr/share/openstack-tripleo-heat-templates/environments/collectd-environment.yaml \ -e /home/stack/ospd-15-vxlan-dpdk-sriov-ctlplane-dataplane-bonding-hybrid/api-policies.yaml \ -e /home/stack/ospd-15-vxlan-dpdk-sriov-ctlplane-dataplane-bonding-hybrid/network-environment.yaml \ -e /home/stack/overcloud_images.yaml \ --log-file overcloud_install.log &> overcloud_install.log
Chapter 11. Upgrading Red Hat OpenStack platform with NFV
There are additional considerations and steps required to upgrade Red Hat OpenStack Platform with OVS-DPDK configured. For more information, see: Preparing an NFV-Configured Overcloud.
Chapter 12. NFV performance
Red Hat OpenStack Platform director configures the Compute nodes to enforce resource partitioning and fine tuning to achieve line rate performance for the guest virtual network functions (VNFs). The key performance factors in the NFV use case are throughput, latency, and jitter.
You can enable high performance packet switching between physical NICs and virtual machines using data plane development kit (DPDK) accelerated virtual machines. OVS 2.10 embeds support for DPDK 17 and includes support for vhost-user multiqueue, allowing scalable performance. OVS-DPDK provides line rate performance for guest VNFs.
Single root I/O virtualization (SR-IOV) networking provides enhanced performance characteristics, including improved throughput for specific networks and virtual machines.
Other important features for performance tuning include huge pages, NUMA alignment, host isolation, and CPU pinning. VNF flavors require huge pages and emulator thread isolation for better performance. Host isolation and CPU pinning improve NFV performance and prevent spurious packet loss.
For a high-level introduction to CPUs and NUMA topology, see: NFV Performance Considerations and Configure Emulator Threads to run on a Dedicated Physical CPU.
Chapter 13. Finding more information
The following table includes additional Red Hat documentation for reference:
The Red Hat OpenStack Platform documentation suite can be found here: Red Hat OpenStack Platform Documentation Suite
Table 13.1. List of Available Documentation
| Component | Reference |
|---|---|
| Red Hat Enterprise Linux | Red Hat OpenStack Platform is supported on Red Hat Enterprise Linux 8.0. For information on installing Red Hat Enterprise Linux, see the corresponding installation guide at: Red Hat Enterprise Linux Documentation Suite. |
| Red Hat OpenStack Platform | To install Red Hat OpenStack Platform (RHOSP) components and their dependencies, use the Red Hat OpenStack Platform director. The director uses a basic RHOSP installation as the undercloud to install, configure, and manage the RHOSP nodes in the final overcloud. You need one extra host machine for the installation of the undercloud, in addition to the environment necessary for the deployed overcloud. For detailed instructions, see Red Hat OpenStack Platform Director Installation and Usage. For information on configuring advanced features for a Red Hat OpenStack Platform enterprise environment using the Red Hat OpenStack Platform director such as network isolation, storage configuration, SSL communication, and general configuration method, see Advanced Overcloud Customization. |
| NFV Documentation | For a high level overview of the NFV concepts, see the Network Functions Virtualization Product Guide. |
Appendix A. Sample DPDK SR-IOV YAML files
This section provides sample YAML files as a reference for adding single root I/O virtualization (SR-IOV) and Data Plane Development Kit (DPDK) interfaces on the same compute node.
These templates are from a fully-configured environment and include parameters unrelated to NFV, that might not be relevant or appropriate for your deployment.
A.1. Sample VXLAN DPDK SRIOV YAML files
A.1.1. roles_data.yaml
###############################################################################
# File generated by TripleO
###############################################################################
###############################################################################
# Role: Controller #
###############################################################################
- name: Controller
description: |
Controller role that has all the controller services loaded and handles
Database, Messaging and Network functions.
CountDefault: 1
tags:
- primary
- controller
networks:
- External
- InternalApi
- Storage
- StorageMgmt
- Tenant
# For systems with both IPv4 and IPv6, you may specify a gateway network for
# each, such as ['ControlPlane', 'External']
default_route_networks: ['External']
HostnameFormatDefault: '%stackname%-controller-%index%'
# Deprecated & backward-compatible values (FIXME: Make parameters consistent)
# Set uses_deprecated_params to True if any deprecated params are used.
uses_deprecated_params: True
deprecated_param_extraconfig: 'controllerExtraConfig'
deprecated_param_flavor: 'OvercloudControlFlavor'
deprecated_param_image: 'controllerImage'
deprecated_nic_config_name: 'controller.yaml'
ServicesDefault:
- OS::TripleO::Services::Aide
- OS::TripleO::Services::AodhApi
- OS::TripleO::Services::AodhEvaluator
- OS::TripleO::Services::AodhListener
- OS::TripleO::Services::AodhNotifier
- OS::TripleO::Services::AuditD
- OS::TripleO::Services::BarbicanApi
- OS::TripleO::Services::BarbicanBackendSimpleCrypto
- OS::TripleO::Services::BarbicanBackendDogtag
- OS::TripleO::Services::BarbicanBackendKmip
- OS::TripleO::Services::BarbicanBackendPkcs11Crypto
- OS::TripleO::Services::CACerts
- OS::TripleO::Services::CeilometerAgentCentral
- OS::TripleO::Services::CeilometerAgentNotification
- OS::TripleO::Services::CephExternal
- OS::TripleO::Services::CephMds
- OS::TripleO::Services::CephMgr
- OS::TripleO::Services::CephMon
- OS::TripleO::Services::CephRbdMirror
- OS::TripleO::Services::CephRgw
- OS::TripleO::Services::CertmongerUser
- OS::TripleO::Services::CinderApi
- OS::TripleO::Services::CinderBackendDellPs
- OS::TripleO::Services::CinderBackendDellSc
- OS::TripleO::Services::CinderBackendDellEMCUnity
- OS::TripleO::Services::CinderBackendDellEMCVMAXISCSI
- OS::TripleO::Services::CinderBackendDellEMCVNX
- OS::TripleO::Services::CinderBackendDellEMCXTREMIOISCSI
- OS::TripleO::Services::CinderBackendNetApp
- OS::TripleO::Services::CinderBackendScaleIO
- OS::TripleO::Services::CinderBackendVRTSHyperScale
- OS::TripleO::Services::CinderBackendNVMeOF
- OS::TripleO::Services::CinderBackup
- OS::TripleO::Services::CinderHPELeftHandISCSI
- OS::TripleO::Services::CinderScheduler
- OS::TripleO::Services::CinderVolume
- OS::TripleO::Services::Clustercheck
- OS::TripleO::Services::Collectd
- OS::TripleO::Services::Congress
- OS::TripleO::Services::ContainerImagePrepare
- OS::TripleO::Services::DesignateApi
- OS::TripleO::Services::DesignateCentral
- OS::TripleO::Services::DesignateProducer
- OS::TripleO::Services::DesignateWorker
- OS::TripleO::Services::DesignateMDNS
- OS::TripleO::Services::DesignateSink
- OS::TripleO::Services::Docker
- OS::TripleO::Services::Ec2Api
- OS::TripleO::Services::Etcd
- OS::TripleO::Services::ExternalSwiftProxy
- OS::TripleO::Services::Fluentd
- OS::TripleO::Services::GlanceApi
- OS::TripleO::Services::GlanceRegistry
- OS::TripleO::Services::GnocchiApi
- OS::TripleO::Services::GnocchiMetricd
- OS::TripleO::Services::GnocchiStatsd
- OS::TripleO::Services::HAproxy
- OS::TripleO::Services::HeatApi
- OS::TripleO::Services::HeatApiCloudwatch
- OS::TripleO::Services::HeatApiCfn
- OS::TripleO::Services::HeatEngine
- OS::TripleO::Services::Horizon
- OS::TripleO::Services::Ipsec
- OS::TripleO::Services::IronicApi
- OS::TripleO::Services::IronicConductor
- OS::TripleO::Services::IronicInspector
- OS::TripleO::Services::IronicPxe
- OS::TripleO::Services::IronicNeutronAgent
- OS::TripleO::Services::Iscsid
- OS::TripleO::Services::Keepalived
- OS::TripleO::Services::Kernel
- OS::TripleO::Services::Keystone
- OS::TripleO::Services::LoginDefs
- OS::TripleO::Services::ManilaApi
- OS::TripleO::Services::ManilaBackendCephFs
- OS::TripleO::Services::ManilaBackendIsilon
- OS::TripleO::Services::ManilaBackendNetapp
- OS::TripleO::Services::ManilaBackendUnity
- OS::TripleO::Services::ManilaBackendVNX
- OS::TripleO::Services::ManilaBackendVMAX
- OS::TripleO::Services::ManilaScheduler
- OS::TripleO::Services::ManilaShare
- OS::TripleO::Services::Memcached
- OS::TripleO::Services::MetricsQdr
- OS::TripleO::Services::MistralApi
- OS::TripleO::Services::MistralEngine
- OS::TripleO::Services::MistralExecutor
- OS::TripleO::Services::MistralEventEngine
- OS::TripleO::Services::MongoDb
- OS::TripleO::Services::MySQL
- OS::TripleO::Services::MySQLClient
- OS::TripleO::Services::NeutronApi
- OS::TripleO::Services::NeutronBgpVpnApi
- OS::TripleO::Services::NeutronSfcApi
- OS::TripleO::Services::NeutronCorePlugin
- OS::TripleO::Services::NeutronDhcpAgent
- OS::TripleO::Services::NeutronL2gwAgent
- OS::TripleO::Services::NeutronL2gwApi
- OS::TripleO::Services::NeutronL3Agent
- OS::TripleO::Services::NeutronLbaasv2Agent
- OS::TripleO::Services::NeutronLbaasv2Api
- OS::TripleO::Services::NeutronLinuxbridgeAgent
- OS::TripleO::Services::NeutronMetadataAgent
- OS::TripleO::Services::NeutronML2FujitsuCfab
- OS::TripleO::Services::NeutronML2FujitsuFossw
- OS::TripleO::Services::NeutronOvsAgent
- OS::TripleO::Services::NeutronVppAgent
- OS::TripleO::Services::NovaApi
- OS::TripleO::Services::NovaConductor
- OS::TripleO::Services::NovaConsoleauth
- OS::TripleO::Services::NovaIronic
- OS::TripleO::Services::NovaMetadata
- OS::TripleO::Services::NovaPlacement
- OS::TripleO::Services::NovaScheduler
- OS::TripleO::Services::NovaVncProxy
- OS::TripleO::Services::Ntp
- OS::TripleO::Services::ContainersLogrotateCrond
- OS::TripleO::Services::OctaviaApi
- OS::TripleO::Services::OctaviaDeploymentConfig
- OS::TripleO::Services::OctaviaHealthManager
- OS::TripleO::Services::OctaviaHousekeeping
- OS::TripleO::Services::OctaviaWorker
- OS::TripleO::Services::OpenDaylightApi
- OS::TripleO::Services::OpenDaylightOvs
- OS::TripleO::Services::OVNDBs
- OS::TripleO::Services::OVNController
- OS::TripleO::Services::Pacemaker
- OS::TripleO::Services::PankoApi
- OS::TripleO::Services::OsloMessagingRpc
- OS::TripleO::Services::OsloMessagingNotify
- OS::TripleO::Services::Redis
- OS::TripleO::Services::Rhsm
- OS::TripleO::Services::RsyslogSidecar
- OS::TripleO::Services::SaharaApi
- OS::TripleO::Services::SaharaEngine
- OS::TripleO::Services::Securetty
- OS::TripleO::Services::SensuClient
- OS::TripleO::Services::SkydiveAgent
- OS::TripleO::Services::SkydiveAnalyzer
- OS::TripleO::Services::Snmp
- OS::TripleO::Services::Sshd
- OS::TripleO::Services::SwiftProxy
- OS::TripleO::Services::SwiftDispersion
- OS::TripleO::Services::SwiftRingBuilder
- OS::TripleO::Services::SwiftStorage
- OS::TripleO::Services::Tacker
- OS::TripleO::Services::Timezone
- OS::TripleO::Services::TripleoFirewall
- OS::TripleO::Services::TripleoPackages
- OS::TripleO::Services::Tuned
- OS::TripleO::Services::Vpp
- OS::TripleO::Services::Zaqar
- OS::TripleO::Services::Ptp
- OS::TripleO::Services::Xinetd
###############################################################################
# Role: ComputeOvsDpdkSriov #
###############################################################################
- name: ComputeOvsDpdkSriov
description: |
Compute OvS DPDK Role
CountDefault: 1
networks:
- InternalApi
- Tenant
- Storage
RoleParametersDefault:
VhostuserSocketGroup: "hugetlbfs"
TunedProfileName: "cpu-partitioning"
ServicesDefault:
- OS::TripleO::Services::Aide
- OS::TripleO::Services::AuditD
- OS::TripleO::Services::BootParams
- OS::TripleO::Services::CACerts
- OS::TripleO::Services::CephClient
- OS::TripleO::Services::CephExternal
- OS::TripleO::Services::CertmongerUser
- OS::TripleO::Services::Collectd
- OS::TripleO::Services::ComputeCeilometerAgent
- OS::TripleO::Services::ComputeNeutronCorePlugin
- OS::TripleO::Services::ComputeNeutronL3Agent
- OS::TripleO::Services::ComputeNeutronMetadataAgent
- OS::TripleO::Services::ComputeNeutronOvsDpdk
- OS::TripleO::Services::NeutronSriovAgent
- OS::TripleO::Services::NeutronSriovHostConfig
- OS::TripleO::Services::Docker
- OS::TripleO::Services::Fluentd
- OS::TripleO::Services::Ipsec
- OS::TripleO::Services::Iscsid
- OS::TripleO::Services::Kernel
- OS::TripleO::Services::LoginDefs
- OS::TripleO::Services::MetricsQdr
- OS::TripleO::Services::MySQLClient
- OS::TripleO::Services::NeutronBgpVpnBagpipe
- OS::TripleO::Services::NovaCompute
- OS::TripleO::Services::NovaLibvirt
- OS::TripleO::Services::NovaLibvirtGuests
- OS::TripleO::Services::NovaMigrationTarget
- OS::TripleO::Services::Ntp
- OS::TripleO::Services::ContainersLogrotateCrond
- OS::TripleO::Services::OpenDaylightOvs
- OS::TripleO::Services::OVNMetadataAgent
- OS::TripleO::Services::Rhsm
- OS::TripleO::Services::RsyslogSidecar
- OS::TripleO::Services::Securetty
- OS::TripleO::Services::SensuClient
- OS::TripleO::Services::SkydiveAgent
- OS::TripleO::Services::Snmp
- OS::TripleO::Services::Sshd
- OS::TripleO::Services::Timezone
- OS::TripleO::Services::TripleoFirewall
- OS::TripleO::Services::TripleoPackages
- OS::TripleO::Services::PtpA.1.2. network-environment.yaml
resource_registry:
# Specify the relative/absolute path to the config files you want to use for override the default.
OS::TripleO::ComputeOvsDpdkSriov::Net::SoftwareConfig: nic-configs/computeovsdpdksriov.yaml
OS::TripleO::Controller::Net::SoftwareConfig: nic-configs/controller.yaml
parameter_defaults:
# Customize all these values to match the local environment
InternalApiNetCidr: 10.10.10.0/24
TenantNetCidr: 10.10.2.0/24
StorageNetCidr: 10.10.3.0/24
StorageMgmtNetCidr: 10.10.4.0/24
ExternalNetCidr: 172.20.12.112/28
# CIDR subnet mask length for provisioning network
ControlPlaneSubnetCidr: '24'
InternalApiAllocationPools: [{'start': '10.10.10.10', 'end': '10.10.10.200'}]
TenantAllocationPools: [{'start': '10.10.2.100', 'end': '10.10.2.200'}]
StorageAllocationPools: [{'start': '10.10.3.100', 'end': '10.10.3.200'}]
StorageMgmtAllocationPools: [{'start': '10.10.4.100', 'end': '10.10.4.200'}]
# Use an External allocation pool which will leave room for floating IPs
ExternalAllocationPools: [{'start': '172.20.12.114', 'end': '172.20.12.125'}]
# Set to the router gateway on the external network
ExternalInterfaceDefaultRoute: 172.20.12.126
# Gateway router for the provisioning network (or Undercloud IP)
ControlPlaneDefaultRoute: 192.168.24.1
# Generally the IP of the Undercloud
EC2MetadataIp: 192.168.24.1
InternalApiNetworkVlanID: 10
TenantNetworkVlanID: 11
StorageNetworkVlanID: 12
StorageMgmtNetworkVlanID: 13
ExternalNetworkVlanID: 14
# Define the DNS servers (maximum 2) for the overcloud nodes
DnsServers: ["8.8.8.8","8.8.4.4"]
# May set to br-ex if using floating IPs only on native VLAN on bridge br-ex
NeutronExternalNetworkBridge: "''"
# The tunnel type for the tenant network (vxlan or gre). Set to '' to disable tunneling.
NeutronTunnelTypes: 'vxlan'
# The tenant network type for Neutron (vlan or vxlan).
NeutronNetworkType: 'vxlan,vlan'
# The OVS logical->physical bridge mappings to use.
NeutronBridgeMappings: 'dpdk-mgmt:br-link0'
# The Neutron ML2 and OpenVSwitch vlan mapping range to support.
NeutronNetworkVLANRanges: 'dpdk-mgmt:22:22,dpdk-mgmt:25:25,sriov-1:600:600,sriov-2:601:601'
# Nova flavor to use.
OvercloudControllerFlavor: controller
OvercloudComputeOvsDpdkSriovFlavor: compute
# Number of nodes to deploy.
ControllerCount: 3
ComputeOvsDpdkSriovCount: 2
# NTP server configuration.
NtpServer: clock.redhat.com
# MTU global configuration
NeutronGlobalPhysnetMtu: 9000
# Configure the classname of the firewall driver to use for implementing security groups.
NeutronOVSFirewallDriver: openvswitch
SshServerOptions:
UseDns: 'no'
ControllerHostnameFormat: 'controller-%index%'
ComputeOvsDpdkSriovHostnameFormat: 'compute-%index%'
# Collectd server that will gather information from overcloud deployment - Service Assurance
CollectdServer: 192.0.90.1
CollectdConnectionType: "network"
##########################
# OVS DPDK configuration #
##########################
ComputeOvsDpdkSriovParameters:
KernelArgs: "default_hugepagesz=1GB hugepagesz=1G hugepages=32 iommu=pt intel_iommu=on isolcpus=2-19,22-39"
TunedProfileName: "cpu-partitioning"
IsolCpusList: "2-19,22-39"
NovaVcpuPinSet: ['4-19,24-39']
NovaReservedHostMemory: 4096
OvsDpdkSocketMemory: "3072,1024"
OvsDpdkMemoryChannels: "4"
OvsDpdkCoreList: "0,20,1,21"
OvsPmdCoreList: "2,22,3,23"
NovaComputeCpuSharedSet: [0,20,1,21]
# below lines are for history - now this is resolved and we are not
# required to pass extra hiera data variables - refer BZ -
# https://bugzilla.redhat.com/show_bug.cgi?id=1617927
NovaLibvirtRxQueueSize: 1024
NovaLibvirtTxQueueSize: 1024
NovaPCIPassthrough:
- devname: "p7p3"
trusted: "true"
physical_network: "sriov-1"
- devname: "p7p4"
trusted: "true"
physical_network: "sriov-2"
NeutronPhysicalDevMappings: "sriov-1:p7p3,sriov-2:p7p4"
NeutronSriovNumVFs: "p7p3:5,p7p4:5"A.1.3. controller.yaml
heat_template_version: rocky
description: >
Software Config to drive os-net-config to configure VLANs for the
controller role.
parameters:
ControlPlaneIp:
default: ''
description: IP address/subnet on the ctlplane network
type: string
ExternalIpSubnet:
default: ''
description: IP address/subnet on the external network
type: string
ExternalInterfaceRoutes:
default: []
description: >
Routes for the external network traffic.
JSON route e.g. [{'destination':'10.0.0.0/16', 'nexthop':'10.0.0.1'}]
Unless the default is changed, the parameter is automatically resolved
from the subnet host_routes attribute.
type: json
InternalApiIpSubnet:
default: ''
description: IP address/subnet on the internal_api network
type: string
InternalApiInterfaceRoutes:
default: []
description: >
Routes for the internal_api network traffic.
JSON route e.g. [{'destination':'10.0.0.0/16', 'nexthop':'10.0.0.1'}]
Unless the default is changed, the parameter is automatically resolved
from the subnet host_routes attribute.
type: json
StorageIpSubnet:
default: ''
description: IP address/subnet on the storage network
type: string
StorageInterfaceRoutes:
default: []
description: >
Routes for the storage network traffic.
JSON route e.g. [{'destination':'10.0.0.0/16', 'nexthop':'10.0.0.1'}]
Unless the default is changed, the parameter is automatically resolved
from the subnet host_routes attribute.
type: json
StorageMgmtIpSubnet:
default: ''
description: IP address/subnet on the storage_mgmt network
type: string
StorageMgmtInterfaceRoutes:
default: []
description: >
Routes for the storage_mgmt network traffic.
JSON route e.g. [{'destination':'10.0.0.0/16', 'nexthop':'10.0.0.1'}]
Unless the default is changed, the parameter is automatically resolved
from the subnet host_routes attribute.
type: json
TenantIpSubnet:
default: ''
description: IP address/subnet on the tenant network
type: string
TenantInterfaceRoutes:
default: []
description: >
Routes for the tenant network traffic.
JSON route e.g. [{'destination':'10.0.0.0/16', 'nexthop':'10.0.0.1'}]
Unless the default is changed, the parameter is automatically resolved
from the subnet host_routes attribute.
type: json
ManagementIpSubnet: # Only populated when including environments/network-management.yaml
default: ''
description: IP address/subnet on the management network
type: string
ManagementInterfaceRoutes:
default: []
description: >
Routes for the management network traffic.
JSON route e.g. [{'destination':'10.0.0.0/16', 'nexthop':'10.0.0.1'}]
Unless the default is changed, the parameter is automatically resolved
from the subnet host_routes attribute.
type: json
BondInterfaceOvsOptions:
default: 'bond_mode=active-backup'
description: The ovs_options string for the bond interface. Set things like
lacp=active and/or bond_mode=balance-slb using this option.
type: string
ExternalNetworkVlanID:
default: 10
description: Vlan ID for the external network traffic.
type: number
InternalApiNetworkVlanID:
default: 20
description: Vlan ID for the internal_api network traffic.
type: number
StorageNetworkVlanID:
default: 30
description: Vlan ID for the storage network traffic.
type: number
StorageMgmtNetworkVlanID:
default: 40
description: Vlan ID for the storage_mgmt network traffic.
type: number
TenantNetworkVlanID:
default: 50
description: Vlan ID for the tenant network traffic.
type: number
ManagementNetworkVlanID:
default: 60
description: Vlan ID for the management network traffic.
type: number
ExternalInterfaceDefaultRoute:
default: '10.0.0.1'
description: default route for the external network
type: string
ControlPlaneSubnetCidr:
default: ''
description: >
The subnet CIDR of the control plane network. (The parameter is
automatically resolved from the ctlplane subnet's cidr attribute.)
type: string
ControlPlaneDefaultRoute:
default: ''
description: The default route of the control plane network. (The parameter
is automatically resolved from the ctlplane subnet's gateway_ip attribute.)
type: string
DnsServers: # Override this via parameter_defaults
default: []
description: >
DNS servers to use for the Overcloud (2 max for some implementations).
If not set the nameservers configured in the ctlplane subnet's
dns_nameservers attribute will be used.
type: comma_delimited_list
EC2MetadataIp:
default: ''
description: The IP address of the EC2 metadata server. (The parameter
is automatically resolved from the ctlplane subnet's host_routes attribute.)
type: string
resources:
OsNetConfigImpl:
type: OS::Heat::SoftwareConfig
properties:
group: script
config:
str_replace:
template:
get_file: /usr/share/openstack-tripleo-heat-templates/network/scripts/run-os-net-config.sh
params:
$network_config:
network_config:
- type: interface
name: nic1
use_dhcp: false
addresses:
- ip_netmask:
list_join:
- /
- - get_param: ControlPlaneIp
- get_param: ControlPlaneSubnetCidr
routes:
- ip_netmask: 169.254.169.254/32
next_hop:
get_param: EC2MetadataIp
- type: linux_bond
name: bond_api
bonding_options: "mode=active-backup"
use_dhcp: false
dns_servers:
get_param: DnsServers
members:
- type: interface
name: nic2
primary: true
- type: vlan
vlan_id:
get_param: InternalApiNetworkVlanID
device: bond_api
addresses:
- ip_netmask:
get_param: InternalApiIpSubnet
- type: vlan
vlan_id:
get_param: StorageNetworkVlanID
device: bond_api
addresses:
- ip_netmask:
get_param: StorageIpSubnet
- type: vlan
vlan_id:
get_param: StorageMgmtNetworkVlanID
device: bond_api
addresses:
- ip_netmask:
get_param: StorageMgmtIpSubnet
- type: vlan
vlan_id:
get_param: ExternalNetworkVlanID
device: bond_api
addresses:
- ip_netmask:
get_param: ExternalIpSubnet
routes:
- default: true
next_hop:
get_param: ExternalInterfaceDefaultRoute
- type: ovs_bridge
name: br-link0
use_dhcp: false
mtu: 9000
members:
- type: interface
name: nic3
mtu: 9000
- type: vlan
vlan_id:
get_param: TenantNetworkVlanID
mtu: 9000
addresses:
- ip_netmask:
get_param: TenantIpSubnet
outputs:
OS::stack_id:
description: The OsNetConfigImpl resource.
value:
get_resource: OsNetConfigImplA.1.4. compute-ovs-dpdk.yaml
heat_template_version: rocky
description: >
Software Config to drive os-net-config to configure VLANs for the
compute role.
parameters:
ControlPlaneIp:
default: ''
description: IP address/subnet on the ctlplane network
type: string
ExternalIpSubnet:
default: ''
description: IP address/subnet on the external network
type: string
ExternalInterfaceRoutes:
default: []
description: >
Routes for the external network traffic.
JSON route e.g. [{'destination':'10.0.0.0/16', 'nexthop':'10.0.0.1'}]
Unless the default is changed, the parameter is automatically resolved
from the subnet host_routes attribute.
type: json
InternalApiIpSubnet:
default: ''
description: IP address/subnet on the internal_api network
type: string
InternalApiInterfaceRoutes:
default: []
description: >
Routes for the internal_api network traffic.
JSON route e.g. [{'destination':'10.0.0.0/16', 'nexthop':'10.0.0.1'}]
Unless the default is changed, the parameter is automatically resolved
from the subnet host_routes attribute.
type: json
StorageIpSubnet:
default: ''
description: IP address/subnet on the storage network
type: string
StorageInterfaceRoutes:
default: []
description: >
Routes for the storage network traffic.
JSON route e.g. [{'destination':'10.0.0.0/16', 'nexthop':'10.0.0.1'}]
Unless the default is changed, the parameter is automatically resolved
from the subnet host_routes attribute.
type: json
StorageMgmtIpSubnet:
default: ''
description: IP address/subnet on the storage_mgmt network
type: string
StorageMgmtInterfaceRoutes:
default: []
description: >
Routes for the storage_mgmt network traffic.
JSON route e.g. [{'destination':'10.0.0.0/16', 'nexthop':'10.0.0.1'}]
Unless the default is changed, the parameter is automatically resolved
from the subnet host_routes attribute.
type: json
TenantIpSubnet:
default: ''
description: IP address/subnet on the tenant network
type: string
TenantInterfaceRoutes:
default: []
description: >
Routes for the tenant network traffic.
JSON route e.g. [{'destination':'10.0.0.0/16', 'nexthop':'10.0.0.1'}]
Unless the default is changed, the parameter is automatically resolved
from the subnet host_routes attribute.
type: json
ManagementIpSubnet: # Only populated when including environments/network-management.yaml
default: ''
description: IP address/subnet on the management network
type: string
ManagementInterfaceRoutes:
default: []
description: >
Routes for the management network traffic.
JSON route e.g. [{'destination':'10.0.0.0/16', 'nexthop':'10.0.0.1'}]
Unless the default is changed, the parameter is automatically resolved
from the subnet host_routes attribute.
type: json
BondInterfaceOvsOptions:
default: 'bond_mode=active-backup'
description: The ovs_options string for the bond interface. Set things like
lacp=active and/or bond_mode=balance-slb using this option.
type: string
ExternalNetworkVlanID:
default: 10
description: Vlan ID for the external network traffic.
type: number
InternalApiNetworkVlanID:
default: 20
description: Vlan ID for the internal_api network traffic.
type: number
StorageNetworkVlanID:
default: 30
description: Vlan ID for the storage network traffic.
type: number
StorageMgmtNetworkVlanID:
default: 40
description: Vlan ID for the storage_mgmt network traffic.
type: number
TenantNetworkVlanID:
default: 50
description: Vlan ID for the tenant network traffic.
type: number
ManagementNetworkVlanID:
default: 60
description: Vlan ID for the management network traffic.
type: number
ExternalInterfaceDefaultRoute:
default: '10.0.0.1'
description: default route for the external network
type: string
ControlPlaneSubnetCidr:
default: ''
description: >
The subnet CIDR of the control plane network. (The parameter is
automatically resolved from the ctlplane subnet's cidr attribute.)
type: string
ControlPlaneDefaultRoute:
default: ''
description: The default route of the control plane network. (The parameter
is automatically resolved from the ctlplane subnet's gateway_ip attribute.)
type: string
DnsServers: # Override this via parameter_defaults
default: []
description: >
DNS servers to use for the Overcloud (2 max for some implementations).
If not set the nameservers configured in the ctlplane subnet's
dns_nameservers attribute will be used.
type: comma_delimited_list
EC2MetadataIp:
default: ''
description: The IP address of the EC2 metadata server. (The parameter
is automatically resolved from the ctlplane subnet's host_routes attribute.)
type: string
resources:
OsNetConfigImpl:
type: OS::Heat::SoftwareConfig
properties:
group: script
config:
str_replace:
template:
get_file: /usr/share/openstack-tripleo-heat-templates/network/scripts/run-os-net-config.sh
params:
$network_config:
network_config:
- type: interface
name: nic1
use_dhcp: false
defroute: false
- type: interface
name: nic2
use_dhcp: false
addresses:
- ip_netmask:
list_join:
- /
- - get_param: ControlPlaneIp
- get_param: ControlPlaneSubnetCidr
routes:
- ip_netmask: 169.254.169.254/32
next_hop:
get_param: EC2MetadataIp
- default: true
next_hop:
get_param: ControlPlaneDefaultRoute
- type: linux_bond
name: bond_api
bonding_options: "mode=active-backup"
use_dhcp: false
dns_servers:
get_param: DnsServers
members:
- type: interface
name: nic3
primary: true
- type: interface
name: nic4
- type: vlan
vlan_id:
get_param: InternalApiNetworkVlanID
device: bond_api
addresses:
- ip_netmask:
get_param: InternalApiIpSubnet
- type: vlan
vlan_id:
get_param: StorageNetworkVlanID
device: bond_api
addresses:
- ip_netmask:
get_param: StorageIpSubnet
- type: ovs_user_bridge
name: br-link0
use_dhcp: false
ovs_extra:
- str_replace:
template: set port br-link0 tag=_VLAN_TAG_
params:
_VLAN_TAG_:
get_param: TenantNetworkVlanID
addresses:
- ip_netmask:
get_param: TenantIpSubnet
members:
- type: ovs_dpdk_bond
name: dpdkbond0
mtu: 9000
rx_queue: 2
members:
- type: ovs_dpdk_port
name: dpdk0
members:
- type: interface
name: nic7
- type: ovs_dpdk_port
name: dpdk1
members:
- type: interface
name: nic8
             - type: interface
                name: p7p3
                mtu: 9000
                use_dhcp: false
                defroute: false
                nm_controlled: true
                hotplug: true

              - type: interface
                name: p7p4
                mtu: 9000
                use_dhcp: false
                defroute: false
                nm_controlled: true
                hotplug: true
outputs:
OS::stack_id:
description: The OsNetConfigImpl resource.
value:
get_resource: OsNetConfigImplA.1.5. overcloud_deploy.sh
#!/bin/bash

openstack overcloud deploy \
--templates \
-r /home/stack/ospd-15-vxlan-dpdk-sriov-ctlplane-dataplane-bonding-hybrid/roles_data.yaml \
-e /usr/share/openstack-tripleo-heat-templates/environments/network-isolation.yaml \
-e /usr/share/openstack-tripleo-heat-templates/environments/host-config-and-reboot.yaml \
-e /usr/share/openstack-tripleo-heat-templates/environments/neutron-ovs-dpdk.yaml \
-e /usr/share/openstack-tripleo-heat-templates/environments/neutron-sriov.yaml \
-e /usr/share/openstack-tripleo-heat-templates/environments/collectd-environment.yaml \
-e /home/stack/ospd-15-vxlan-dpdk-sriov-ctlplane-dataplane-bonding-hybrid/api-policies.yaml \
-e /home/stack/ospd-15-vxlan-dpdk-sriov-ctlplane-dataplane-bonding-hybrid/network-environment.yaml \
-e /home/stack/overcloud_images.yaml \
--log-file overcloud_install.log &> overcloud_install.log