
Undercloud and Control Plane Back Up and Restore
Procedures for backing up and restoring the undercloud and the overcloud control plane during updates and upgrades
Abstract
Chapter 1. Introduction
This feature is available in this release as a Technology Preview, and therefore is not fully supported by Red Hat. It should only be used for testing, and should not be deployed in a production environment. For more information about Technology Preview features, see Scope of Coverage Details.
You can back up the state of the Red Hat OpenStack Platform 10 undercloud and overcloud Controller nodes, hereinafter referred to as Control Plane nodes, before updates and upgrades. You can restore the undercloud and the overcloud Control Plane nodes to their previous state if an error occurs during an update or upgrade.
This procedure does not support backing up and restoring Control Plane nodes with hyperconverged or co-located Red Hat Ceph Storage monitor daemons. This scenario arises when Red Hat OpenStack Platform director deploys Ceph Storage.
1.1. Background
The Undercloud and Control Plane Back Up and Restore procedure uses the open source Relax and Recover (ReaR) disaster recovery solution, written in Bash. ReaR creates a bootable image consisting of the latest state of an undercloud or a Control Plane node. ReaR also enables a system administrator to select files for backup.
ReaR supports numerous boot media formats, including:
- ISO
- USB
- eSATA
- PXE
The examples in this document were tested using the ISO boot format.
ReaR can transport the boot images using multiple protocols, including:
- HTTP/HTTPS
- SSH/SCP
- FTP/SFTP
- NFS
- CIFS (SMB)
For the purposes of backing up and restoring the Red Hat OpenStack Platform 10 undercloud and overcloud Control Plane nodes, the examples in this document were tested using NFS.
1.2. Back Up Management Options
ReaR can use both internal and external back up management options.
Internal Back Up Management
Internal back up options include:
-
tar -
rsync
External Back Up Management
External back up management options include both open source and proprietary solutions. Open source solutions include:
- Bacula
- Bareos
Proprietary solutions include:
- EMC NetWorker (Legato)
- HP DataProtector
- IBM Tivoli Storage Manager (TSM)
- Symantec NetBackup
Chapter 2. Prepare the Backup Node
Before backing up the undercloud or Control Plane nodes, prepare the backup node to accept the backup images.
2.1. Prepare the NFS Server
ReaR can use multiple transport methods. Red Hat supports back up and restore with ReaR using NFS.
Install the NFS server on the backup node.
[root@backup ~]# yum install -y nfs-utils
Add the NFS service to the firewall to ensure ports
111and2049are open. For example:[root@backup ~]# firewall-cmd --add-service=nfs [root@backup ~]# firewall-cmd --add-service=nfs --permanent
Enable the NFS server and start it.
[root@backup ~]# systemctl enable nfs-server
[root@backup ~]# systemctl restart nfs-server
2.2. Create and Export the Backup Directory
Copying the backup ISO images from the undercloud or Control Plane nodes to the backup node requires a backup directory.
Create the backup directory.
[root@backup ~]# mkdir /ctl_plane_backups
Export the directory.
[root@backup ~]# cat > /etc/exports << EOF
/ctl_plane_backups <ip-addr-x>/24(rw,sync,no_root_squash,no_subtree_check)
EOF
Replace
<ip-addr-x>with the IP address of the network. For example, replace<ip-addr-x>/24with10.0.0.1/24, where10.0.0.1/24is the IP address and subnet mask in CIDR notation. If the undercloud and the overcloud Control Plane nodes use different networks or subnets, repeat this step for each network or subnet.
Chapter 3. Install and Configure ReaR
To back up the undercloud and the overcloud control plane, you must first install and configure Relax and Recover (ReaR) on the undercloud and on each Control Plane node.
3.1. Install the Required Packages
The Undercloud and Control Plane Back Up and Restore procedure requires the installation of the Relax and Recover (ReaR) packages and packages for generating ISO images on the undercloud node and on each Control Plane node.
Install the required packages on the undercloud and on each Control Plane node. For example:
[root@controller-x ~]# yum install rear genisoimage nfs-utils -y
Create a backup directory on the undercloud and on each Control Plane node. For example:
[root@controller-x ~]# mkdir -p /ctl_plane_backups
Mount the
ctl_plane_backupsNFS directory from the backup node running NFS on the undercloud and on each Control Plane node. For example:[root@controller-x ~]# mount -t nfs <ip-addr>:/ctl_plane_backups /ctl_plane_backups
Replace
<ip-addr>with the IP address of the backup node running the NFS server.
3.2. Create the Configuration Files
As root on the undercloud and on each Control Plane node, perform the following steps:
Create the ReaR configuration file.
[root@controller-x ~]# mkdir -p /etc/rear
[root@controller-x ~]# tee -a "/etc/rear/local.conf" > /dev/null <<'EOF'
OUTPUT=ISO
OUTPUT_URL=nfs://{{nfs_server_ip}}/ctl_plane_backups
ISO_PREFIX={{SERVER_NAME-X}}
BACKUP=NETFS
BACKUP_PROG_COMPRESS_OPTIONS=( --gzip )
BACKUP_PROG_COMPRESS_SUFFIX=".gz"
BACKUP_PROG_EXCLUDE=( '/tmp/*' '/data/*' )
BACKUP_URL=nfs://{{nfs_server_ip}}/ctl_plane_backups
BACKUP_PROG_EXCLUDE=("${BACKUP_PROG_EXCLUDE[@]}" '/media' '/var/tmp' '/var/crash')
BACKUP_PROG_OPTIONS+=( --anchored --xattrs-include='*.*' --xattrs )
EOF
Replace
{{SERVER_NAME-X}}with the hostname of the node. For example, if the node hostname iscontroller-0, replace{{SERVER_NAME-X}}withcontroller-0. Replace{{nfs_server_ip}}with the IP address of the backup node running the NFS server configured in Chapter 2, Prepare the Backup Node.ImportantIf the undercloud or Control Plane nodes use UEFI as their boot mode, you MUST add
USING_UEFI_BOOTLOADER=1to the configuration file too.Create the
rescue.conffile.[root@controller-x ~]# tee -a "/etc/rear/rescue.conf" > /dev/null <<'EOF' BACKUP_PROG_OPTIONS+=( --anchored --xattrs-include='*.*' --xattrs ) EOF
Chapter 4. Execute the Back Up Procedure
Before performing a fast forward upgrade, back up the undercloud and the overcloud Control Plane nodes so that they can be restored to their previous state should an error occur.
4.1. Back Up the Undercloud
To back up the undercloud node, execute the following as root in the command line interface of the undercloud node:
# rear -d -v mkbackup
The procedure creates an ISO image on the backup node under the /ctl_plane_backups directory.
4.2. Back up the control plane
To back up the control plane, you must first stop the pacemaker cluster. This can result in service interruption. You must back up the database as a precaution to ensure that you can restore it after you restore the control plane. Back up the control plane nodes simultaneously and avoid operating the stack to ensure state consistency. After you complete the backup procedure, start the pacemaker cluster.
Locate the database password:
# /bin/hiera -c /etc/puppet/hiera.yaml mysql::server::root_password
Back up the databases:
[heat-admin@overcloud-controller-x ~]$ mysql -uroot -p{{ mysql_root_password }} -s -N -e "select distinct table_schema from information_schema.tables where engine='innodb' and table_schema != 'mysql';" | xargs mysqldump -uroot -p{{ mysql_root_password }} --single-transaction --databases > openstack-backup-mysql.sql[heat-admin@overcloud-controller-x ~]$ mysql -uroot -p{{ mysql_root_password }} -s -N -e "SELECT CONCAT('\"SHOW GRANTS FOR ''',user,'''@''',host,''';\"') FROM mysql.user where (length(user) > 0 and user NOT LIKE 'root')" | xargs -n1 mysql -uroot -p{{ mysql_root_password }} -s -N -e | sed 's/$/;/' > openstack-backup-mysql-grants.sqlStop the pacemaker cluster and the OpenStack services:
ImportantThis procedure results in the temporary interruption of control plane services to Compute nodes. You will not be able to spin up new instances, migrate instances, authenticate requests or monitor the health of the cluster until you restore the pacemaker cluster and OpenStack services in the final step of this procedure.
On one of the control plane nodes, enter the following command:
# pcs cluster stop --all
On each control plane node, stop the OpenStack services:
# systemctl stop openstack-*
# systemctl stop neutron-*
# systemctl stop haproxy
# systemctl stop httpd
To back up the control plane, execute the following as
rootin the command line interface of each control plane node:# rear -d -v mkbackup
The procedure creates an ISO image on the backup node under the
/ctl_plane_backupsdirectory.When the backup procedure generates ISO images for each of the control plane nodes, restart the control plane nodes:
# reboot
After you restart the control plane nodes, check the status of pacemaker to ensure that the services are running correctly:
# pcs status
Chapter 5. Execute the Restore Procedure
If an error occurs during an update or upgrade, you can restore either the undercloud or overcloud Control Plane nodes or both so that they assume their previous state.
Generally, the steps are:
- Burn the bootable ISO image to a DVD, or load it through ILO remote access.
- Boot the node that requires restoration from the recovery medium.
-
Select Recover <hostname>, where
<hostname>is the name of the node to restore. -
Login as
root - Recover the backup.
5.1. Restore the Undercloud
If an error occurs during a fast-forward upgrade, you can restore the undercloud node to its previously saved state using the ISO image created using the Section 4.1, “Back Up the Undercloud” procedure. The back up procedure stores the ISO images on the backup node in the folders created during the Section 2.2, “Create and Export the Backup Directory” step.
Procedure
- Shutdown the undercloud node. Ensure that the undercloud node is shutdown completely before proceeding.
-
Restore the undercloud node by booting it with the ISO image created during the backup process. The ISO image is located under the
/ctl_plane_backupsdirectory of the Backup node. During the boot phase a boot menu will appear.
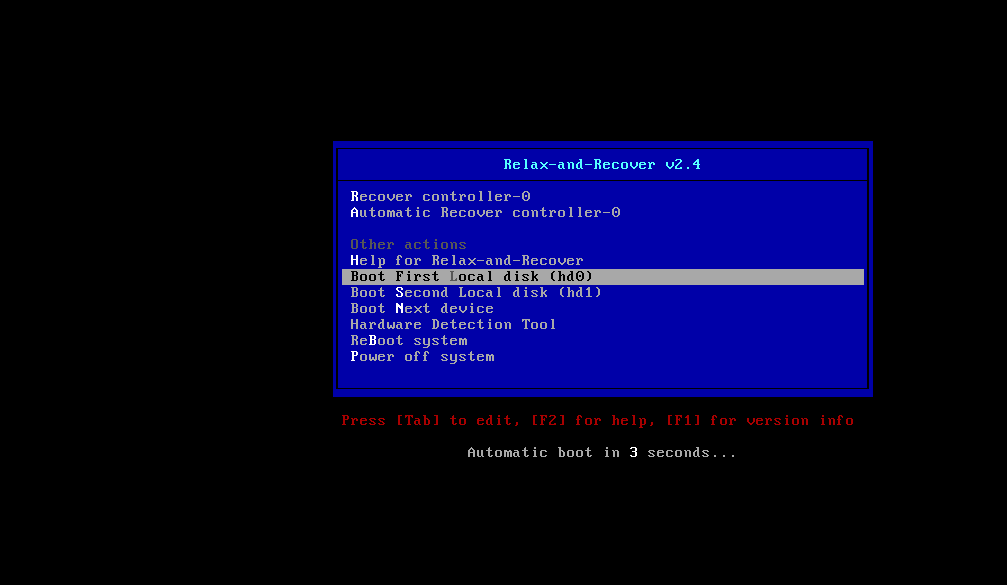
Select
Recover <Undercloud Node>where<Undercloud Node>is the name of the Undercloud node.NoteDO NOT select
Automatic Recover <Undercloud Node>. It could lead to an SELinux context mismatch.You should see the following:
Welcome to Relax-and-Recover. Run "rear recover" to restore your system!
RESCUE <Undercloud Node>:~ # rear recover
The image restore should progress quickly. Once complete, the console should echo the following:
Finished recovering your system
Exiting rear recover
Running exit tasks
Once the command line interface is available, the image is restored. Switch the node off.
RESCUE <Undercloud Node>:~ # poweroff
On boot up, the node will resume with its previous state.
5.2. Restore the Control Plane
If an error occurs during a fast-forward upgrade, you can restore the Control Plane nodes to their previously saved state using the ISO images created using the Section 4.2, “Back up the control plane” procedure. To restore the control plane, you must restore all Control Plane nodes to the previous state to ensure state consistency.
- Shutdown each Control Plane node. Ensure that the Control Plane nodes are shutdown completely before proceeding.
-
Restore the Control Plane nodes by booting them with the ISO image created during the backup process. The ISO images are located under the
/ctl_plane_backupsdirectory of the Backup node. During the boot phase a boot menu will appear.
Select
Recover <Control Plane Node>where<Control Plane Node>is the name of the Control Plane node.NoteDO NOT select
Automatic Recover <Control Plane Node>. It could lead to an SELinux context mismatch.You should see the following:
Welcome to Relax-and-Recover. Run "rear recover" to restore your system!
RESCUE <Control Plane Node>:~ # rear recover
The image restore should progress quickly. Once complete, the console should echo the following:
Finished recovering your system
Exiting rear recover
Running exit tasks
Once the command line interface is available, the image is restored. Switch the node off.
RESCUE <Control Plane Node>:~ # poweroff
On boot up, the node will resume with its previous state.
Check the status of pacemaker to ensure the services are running properly.
# pcs status