
Red Hat Training
A Red Hat training course is available for Red Hat OpenStack Platform
Partner Integration
Integrating certified third party software and hardware in an OpenStack Platform Environment
Abstract
Chapter 1. Introduction
This document has been created to help Red Hat OpenStack Platform partners in their efforts to integrate solutions with Red Hat OpenStack Platform director as the tool used to install and manage the deployment lifecycle of an OpenStack Platform environment. Integration with the director enables seamless adoption of your technology. You can find broad benefits in an optimization of resources, reduction in deployment times and reduction in lifecycle management costs.
Looking forward, OpenStack Platform director integration is a strong move toward providing rich integration with existing enterprise management systems and processes. Within the Red Hat product portfolio, tools such as CloudForms are expected to have visibility into director’s integrations and provide broader exposure for management of service deployment.
1.1. Partner Integration Overview
This guide aims to help partners integrate their software and hardware solutions in a manner that the director configures as a part of the Overcloud. This follows a workflow broken down into multiple sections that show how to perform certain integration tasks:
- Architecture - An examination of some of the technologies the director uses to perform Overcloud creation and configuration.
- Overcloud Images - The director writes a base image to each node in the Overcloud as a foundation for their node type. This section explains how to modify these images before deployment so that you can include drivers or software. This is useful for testing your drivers and configuration before contributing them upstream.
- Configuration - The director configures each service on the Overcloud, primarily using Puppet modules. This section show how Puppet modules work and how they are used to configure the Overcloud.
- Orchestration - The director uses a set of Heat templates to create and configure the Overcloud. This can also include custom environment files and Heat templates to modify the behavior of the Overcloud configuration. This section focuses on creating such templates to enable custom configuration of the Overcloud. This also involves including Puppet configuration from the previous chapter.
- Composable Services - The director breaks down individual services for a more modular approach to creating OpenStack Platform roles. This section explains the Composable Service architecture and provides an example of how to create a custom composable service.
- Integration Points - The image that the director deploys contains the required OpenStack components and set of Puppet modules for the configuration. This section discusses some of the upstream projects for contributing your component drivers and Puppet modules. This ensures that Red Hat can test them and include them in future Red Hat OpenStack Platform distributions.
- Examples - This chapter is the culmination of the knowledge from previous chapters to demonstrate how real world certified vendors currently integrate their projects into the Overcloud using the director. This includes some practical network and storage examples. This section is useful to help similar vendors integrate their own products into Red Hat OpenStack Platform’s ecosystem.
1.2. Partner Integration Requirements
You must meet several prerequisites before meaningful integration work can be completed with the director. These requirements are not limited to technical integration and also include various levels of partner solution documentation. The goal is to have a complete shared understanding of the entire integration so that Red Hat engineering, partner managers, and support resources can effectively support the work.
The first requirement is related to Red Hat OpenStack Platform solution certification. To be included with OpenStack Platform director, the partner solution must first be certified with Red Hat OpenStack Platform.
Chapter 2. Architecture
The director advocates the use of native OpenStack APIs to configure, deploy, and manage OpenStack environments itself. This means integration with director requires integrating with these native OpenStack APIs and supporting components. The major benefit of utilizing such APIs is that they are well documented, undergo extensive integration testing upstream, are mature, and makes understanding how the director works easier for those that have a foundational knowledge of OpenStack. This also means the director automatically inherits core OpenStack feature enhancements, security patches, and bug fixes.
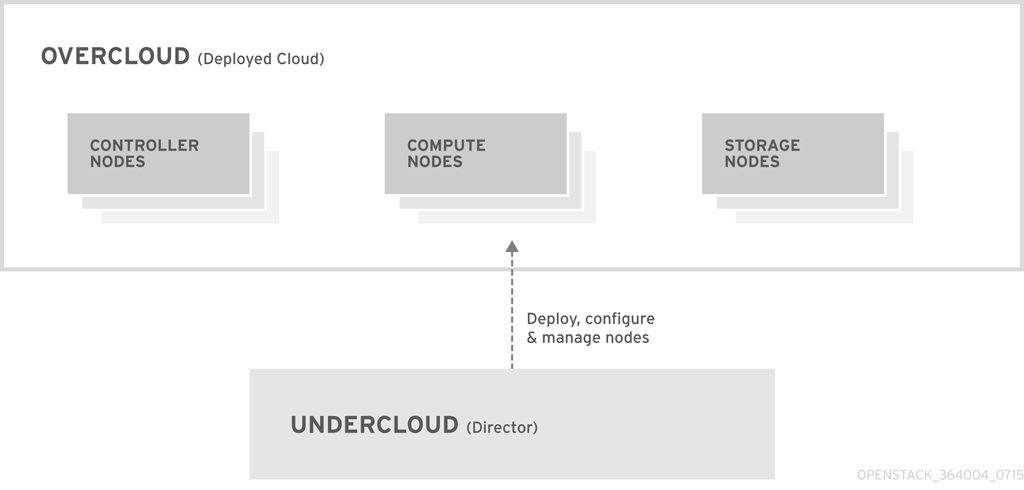
The Red Hat OpenStack Platform director is a toolset for installing and managing a complete OpenStack environment. It is based primarily on the OpenStack project TripleO, which is an abbreviation for "OpenStack-On-OpenStack". This project takes advantage of OpenStack components to install a fully operational OpenStack environment. This includes new OpenStack components that provision and control bare metal systems to use as OpenStack nodes. This provides a simple method for installing a complete Red Hat OpenStack Platform environment that is both lean and robust.
The Red Hat OpenStack Platform director uses two main concepts: an Undercloud and an Overcloud. This director itself is comprised of a subset of OpenStack components that form a single-system OpenStack environment, otherwise known as the Undercloud. The Undercloud acts as a management system that can create a production-level cloud for workloads to run. This production-level cloud is the Overcloud. For more information on the Overcloud and the Undercloud, see the Director Installation and Usage guide.
Director ships with tools, utilities, and example templates for creating an Overcloud configuration. The director captures configuration data, parameters, and network topology information then uses this information in conjunction with components such as Ironic, Heat, and Puppet to orchestrate an Overcloud installation.
Partners have varied requirements. Understanding the director’s architecture aids in understand which components matter for a given integration effort.
2.1. Core Components
This section examines some of the core components of the Red Hat OpenStack Platform director and describes how they contribute to Overcloud creation.
2.1.1. Ironic
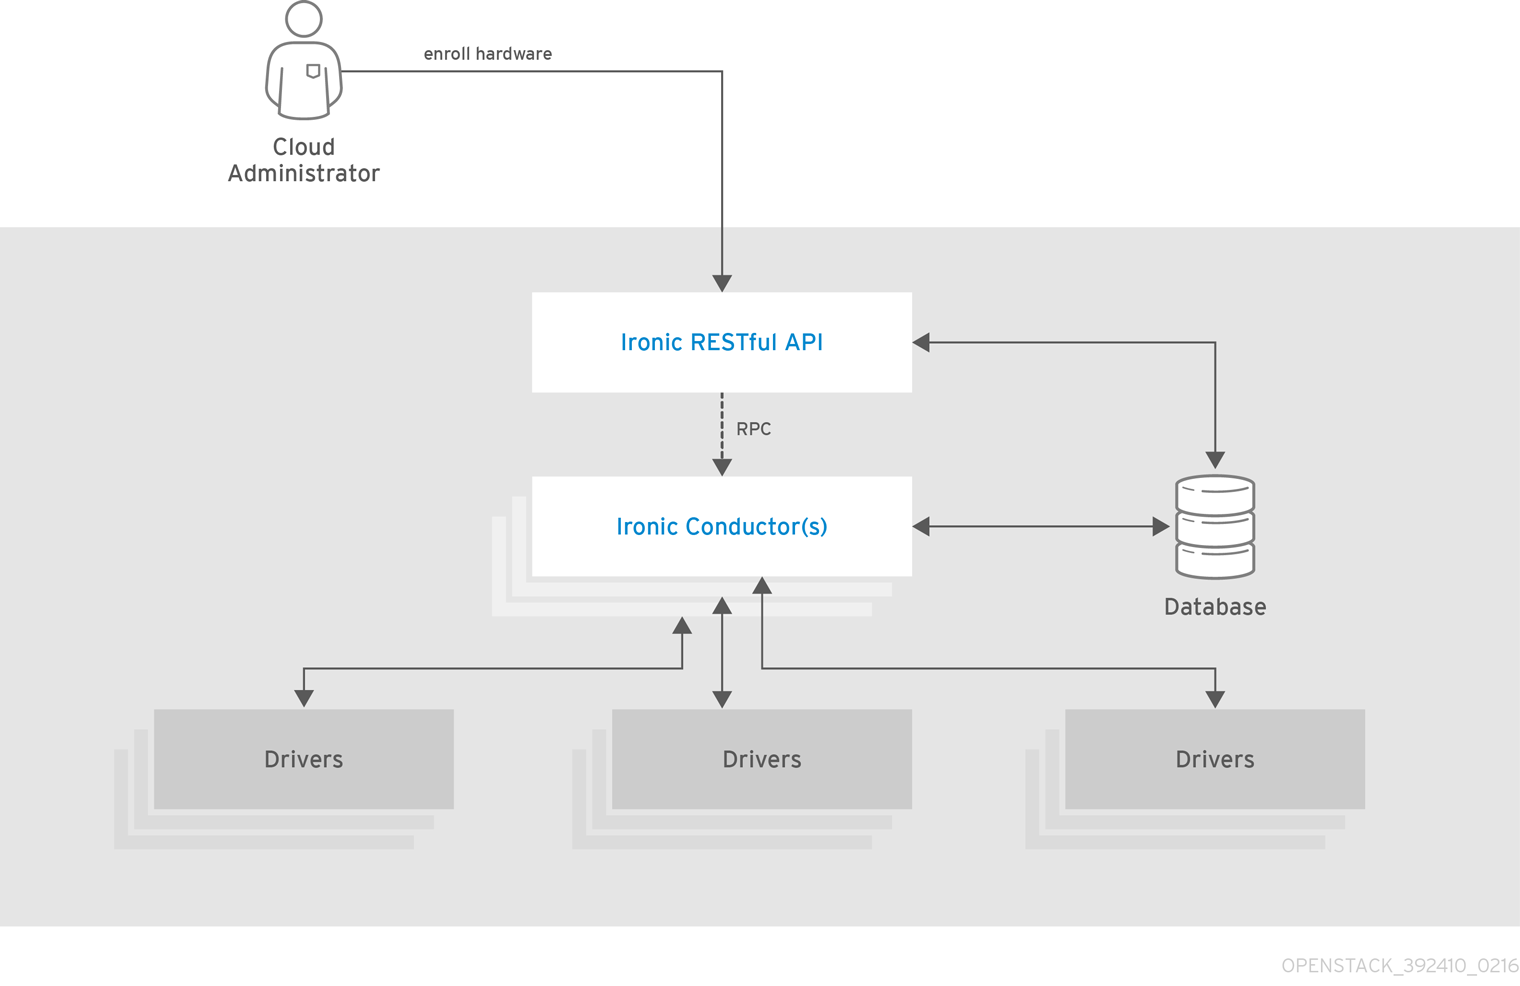
Ironic provides dedicated bare metal hosts to end users through self-service provisioning. The director uses Ironic to manage the lifecycle of the bare metal hardware in our Overcloud. Ironic has its own native API for defining bare metal nodes. Administrators aiming to provision OpenStack environments with the director must register their nodes with Ironic using a specific driver. The main supported driver is The Intelligent Platform Management Interface (IPMI) as most hardware contains some support for IPMI power management functions. However, ironic also contains vendor specific equivalents such as HP iLO, Cisco UCS, or Dell DRAC. Ironic controls the power management of the nodes and gathers hardware information or facts using a introspection mechanism. The director uses the information obtained from the introspection process to match node to various OpenStack environment roles, such as Controller nodes, Compute nodes, and storage nodes. For example, a discovered node with 10 disks will more than likely be provisioned as a storage node.
Partners wishing to have director support for their hardware will need to have driver coverage in Ironic.
2.1.2. Heat
Heat acts as an application stack orchestration engine. This allows organizations to define elements for a given application before deploying it to a cloud. This involves creating a stack template that includes a number of infrastructure resources (e.g. instances, networks, storage volumes, elastic IPs, etc) along with a set of parameters for configuration. Heat creates these resources based on a given dependency chain, monitors them for availability, and scales them where necessary. These templates enable application stacks to become portable and achieve repeatable results.
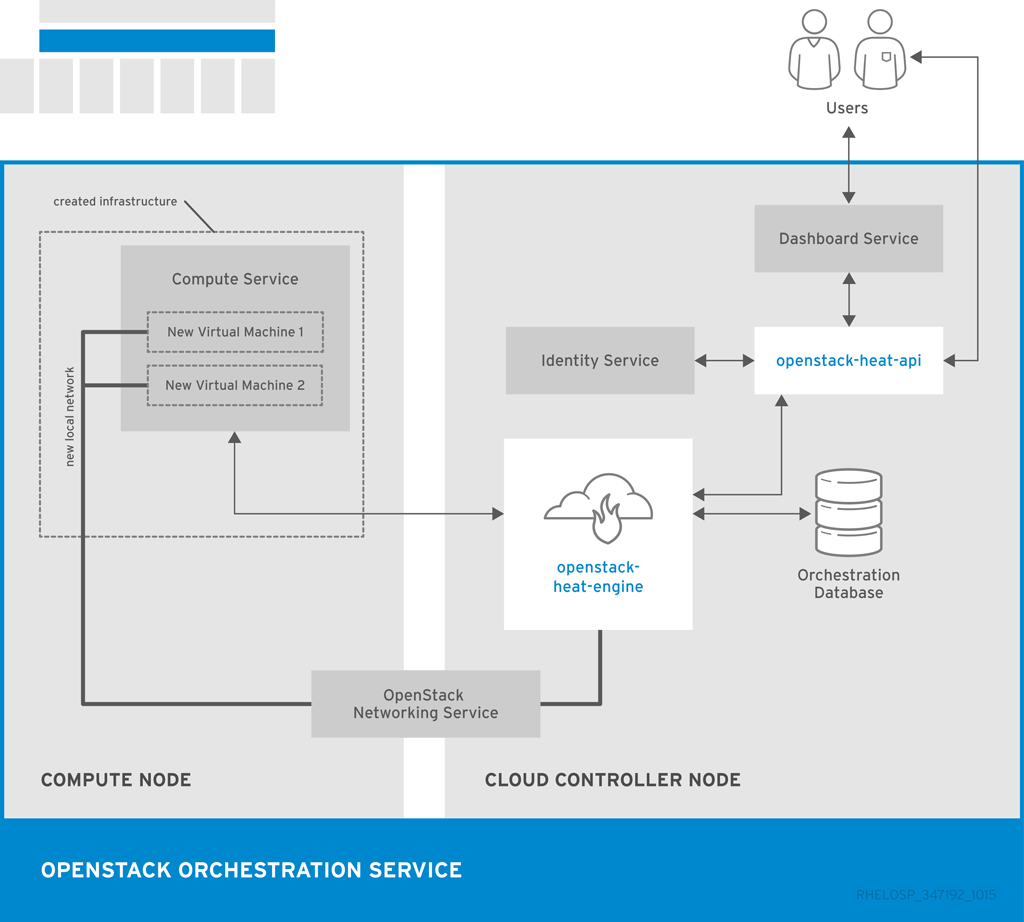
The director uses the native OpenStack Heat APIs to provision and manage the resources associated with deploying an Overcloud. This includes precise details such as defining the number of nodes to provision per node role, the software components to configure for each node, and the order in which the director configures these components and node types. The director also uses Heat for troubleshooting a deployment and making changes post-deployment with ease.
The following example is a snippet from a Heat template that defines parameters of a Controller node:
NeutronExternalNetworkBridge:
    description: Name of bridge used for external network traffic.
    type: string
    default: 'br-ex'
NeutronBridgeMappings:
    description: >
      The OVS logical->physical bridge mappings to use. See the Neutron
      documentation for details. Defaults to mapping br-ex - the external
      bridge on hosts - to a physical name 'datacentre' which can be used
      to create provider networks (and we use this for the default floating
      network) - if changing this either use different post-install network
      scripts or be sure to keep 'datacentre' as a mapping network name.
    type: string
    default: "datacentre:br-ex"
Heat consumes templates included with the director to facilitate the creation of an Overcloud, which includes calling Ironic to power the nodes. We can view the resources (and their status) of an in-progress Overcloud using the standard Heat tools. For example, you can use the Heat tools to display the Overcloud as a nested application stack.
Heat provides a comprehensive and powerful syntax for declaring and creating production OpenStack clouds. However, it requires some prior understanding and proficiency for partner integration. Every partner integration use case requires Heat templates.
2.1.3. Puppet
Puppet is a configuration management and enforcement tool. It is used as a mechanism to describe the end state of a machine and keep it that way. You define this end state in a Puppet manifest. Puppet supports two models:
- A standalone mode in which instructions in the form of manifests are ran locally
- A server mode where it retrieves its manifests from a central server, called a Puppet Master.
Administrators make changes in two ways: either uploading new manifests to a node and executing them locally, or in the client/server model by making modifications on the Puppet Master.
We use Puppet in many areas of director:
- We use Puppet on the Undercloud host locally to install and configure packages as per the configuration laid out in undercloud.conf.
- We inject the openstack-puppet-modules package into the base Overcloud image. These Puppet modules are ready for post-deployment configuration. By default, we create an image that contains all OpenStack services and use it for each node.
- We provide additional Puppet manifests and parameters to the nodes via Heat, and apply the configuration after the Overcloud’s deployment. This includes the services to enable and start and the OpenStack configuration to apply, which are dependent on the node type.
We provide Puppet hieradata to the nodes. The Puppet modules and manifests are free from site or node-specific parameters to keep the manifests consistent. The hieradata acts as a form of parameterized values that you can push to a Puppet module and reference in other areas. For example, to reference the MySQL password inside of a manifest, save this information as hieradata and reference it within the manifest.
Viewing the hieradata:
[root@localhost ~]# grep mysql_root_password hieradata.yaml # View the data in the hieradata file
openstack::controller::mysql_root_password: ‘redhat123'
Referencing it in the Puppet manifest:
[root@localhost ~]# grep mysql_root_password example.pp # Now referenced in the Puppet manifest
mysql_root_password  => hiera(‘openstack::controller::mysql_root_password')
Partner integrated services that need package installation and service enablement should consider creating Puppet modules to meet their requirement. For examples, see Section 4.2, “Obtaining OpenStack Puppet Modules” for information on how to obtain current OpenStack Puppet modules.
2.1.4. TripleO and TripleO Heat Templates
As mentioned previously, the director is based on the upstream TripleO project. This project combines a set of OpenStack services that:
- Store Overcloud images (Glance)
- Orchestrate the Overcloud (Heat)
- Provision bare metal machines (Ironic and Nova)
TripleO also includes a Heat template collection that defines a Red Hat-supported Overcloud environment. The director, using Heat, reads this template collection and orchestrates the Overcloud stack.
2.1.5. Composable Services
Each aspect of Red Hat OpenStack Platform is broken into a composable service. This means you can define different roles using different combinations of services. For example, an administrator might aim to move the networking agents from the default Controller node to a standalone Networker node.
For more information about the composable service architecture, see Chapter 6, Composable Services.
Chapter 3. Overcloud Images
The Red Hat OpenStack Platform director provides images for the Overcloud. The QCOW image in this collection contains a base set of software components that integrate together to form various Overcloud roles, such as Compute, Controller, and storage nodes. In some situations, you might aim to modify certain aspects of the Overcloud image to suit your needs, such installing additional components to nodes.
This document describes a series of actions to use the virt-customize tool to modify an existing Overcloud image to augment an existing Controller node. For example, you can use these procedures to install additional ml2 plugins, Cinder backends, or monitoring agents not shipped with the initial image.
If you modify the Overcloud image to include third-party software and report an issue, Red Hat may request you reproduce the issue using an unmodified image in accordance with our general third-party support policy: https://access.redhat.com/articles/1067.
3.1. Obtaining the Overcloud Images
The director requires several disk images for provisioning Overcloud nodes. This includes:
- A introspection kernel and ramdisk - Used for bare metal system introspection over PXE boot.
- A deployment kernel and ramdisk - Used for system provisioning and deployment.
- An Overcloud kernel, ramdisk, and full image - A base Overcloud system that is written to the node’s hard disk.
Obtain these images from the rhosp-director-images and rhosp-director-images-ipa packages:
$ sudo yum install rhosp-director-images rhosp-director-images-ipa
Extract the archives to the images directory on the stack user’s home (/home/stack/images):
$ cd ~/images
$ for i in /usr/share/rhosp-director-images/overcloud-full-latest-10.0.tar /usr/share/rhosp-director-images/ironic-python-agent-latest-10.0.tar; do tar -xvf $i; done
3.2. Initrd: Modifying the Initial Ramdisks
Some situations might require you to modify the initial ramdisk. For example, you might require a certain driver available when you boot the nodes during the introspection or provisioning processes. The following procedure shows how to modify an initial ramdisk. In the context of the Overcloud, this includes either:
-
The introspection ramdisk -
ironic-python-agent.initramfs -
The provisioning ramdisk -
overcloud-full.initrd
This procedure adds an additional RPM package to the ironic-python-agent.initramfs ramdisk as an example.
Log in as the root user and create a temporary directory for the ramdisk
# mkdir ~/ipa-tmp
# cd ~/ipa-tmp
Use the skipcpio and `cpio commands to extract the ramdisk to the temporary directory:
# /usr/lib/dracut/skipcpio ~/images/ironic-python-agent.initramfs | zcat | cpio -ivd | pax -r
Install an RPM package to the extracted contents:
# rpm2cpio ~/RPMs/python-proliantutils-2.1.7-1.el7ost.noarch.rpm | pax -r
Recreate the new ramdisk:
# find . 2>/dev/null | cpio --quiet -c -o | gzip -8  > /home/stack/images/ironic-python-agent.initramfs
# chown stack: /home/stack/images/ironic-python-agent.initramfs
Verify the new package now exists in the ramdisk:
# lsinitrd /home/stack/images/ironic-python-agent.initramfs | grep proliant
3.3. QCOW: Installing virt-customize to the director
The libguestfs-tools package contains the virt-customize tool. Install the libguestfs-tools from the rhel-7-server-rpms repository:
$ sudo yum install libguestfs-tools
3.4. QCOW: Inspecting the Overcloud Image
You might aim to explore the contents of the overcloud-full.qcow2. Create a virtual machine instance using either the qemu-system-x86_64 command:
$ sudo qemu-system-x86_64 --kernel overcloud-full.vmlinuz --initrd overcloud-full.initrd -m 1024 --append root=/dev/sda --enable-kvm overcloud-full.qcow2
Or using the following boot options in virt-manager:
- Kernel path: /overcloud-full.vmlinuz
- initrd path: /overcloud-full.initrd
- Kernel arguments: root=/dev/sda
3.5. QCOW: Setting the Root Password
Set the password for the root user on image:
$ virt-customize --selinux-relabel -a overcloud-full.qcow2 --root-password password:test
[  0.0] Examining the guest ...
[ 18.0] Setting a random seed
[ 18.0] Setting passwords
[ 19.0] Finishing off
This provides administration-level access for your nodes through the console.
3.6. QCOW: Registering the Image
Register your image temporarily to enable Red Hat repositories relevant to your customizations:
$ virt-customize --selinux-relabel -a overcloud-full.qcow2 --run-command 'subscription-manager register --username=[username] --password=[password]'
[  0.0] Examining the guest ...
[ 10.0] Setting a random seed
[ 10.0] Running: subscription-manager register --username=[username] --password=[password]
[ 24.0] Finishing off
Make sure to replace the [username] and [password] with your Red Hat customer account details. This runs the following command on the image:
subscription-manager register --username=[username] --password=[password]
This registers your Overcloud image to the Red Hat Content Delivery Network:
3.7. QCOW: Attaching a Subscription and Enabling Red Hat Repositories
Find a list of pool ID from your account’s subscriptions:
$ sudo subscription-manager list
Choose a subscription pool ID and attach it to the image:
$ virt-customize --selinux-relabel -a overcloud-full.qcow2 --run-command 'subscription-manager attach --pool [subscription-pool]'
[  0.0] Examining the guest ...
[ 12.0] Setting a random seed
[ 12.0] Running: subscription-manager attach --pool [subscription-pool]
[ 52.0] Finishing off
Make sure to replace the [subscription-pool] with your chosen subscription pool ID. This runs the following command on the image:
subscription-manager attach --pool [subscription-pool]
This adds the pool to the image, which allows you to enable Red Hat repositories with the following command:
$ subscription-manager repos --enable=[repo-id]
3.8. QCOW: Copying a Custom Repository File
Adding third-party software to the image requires additional repositories. For example, the following is an example repo file that contains configuration to use the OpenDaylight repository content:
$ cat opendaylight.repo

[opendaylight]
name=OpenDaylight Repository
baseurl=https://nexus.opendaylight.org/content/repositories/opendaylight-yum-epel-6-x86_64/
gpgcheck=0
Copy the repository file on to the image:
$ virt-customize --selinux-relabel -a overcloud-full.qcow2 --upload opendaylight.repo:/etc/yum.repos.d/
[  0.0] Examining the guest ...
[ 12.0] Setting a random seed
[ 12.0] Copying: opendaylight.repo to /etc/yum.repos.d/
[ 13.0] Finishing off
The --copy-in option copies the repository file to /etc/yum.repos.d/ on the Overcloud image.
Important: Red Hat does not offer support for software from non-certified vendors. Check with your Red Hat support representative that the software you aim to install is supported.
3.9. QCOW: Installing RPMs
Use the virt-customize command to install packages to the image:
$ virt-customize --selinux-relabel -a overcloud-full.qcow2 --install opendaylight
[  0.0] Examining the guest ...
[ 11.0] Setting a random seed
[ 11.0] Installing packages: opendaylight
[ 91.0] Finishing off
The --install option allows you to specify a package to install.
3.10. QCOW: Cleaning the Subscription Pool
After installing the necessary packages to customize the image, we now remove our subscriptions and unregister the image:
$ virt-customize --selinux-relabel -a overcloud-full.qcow2 --run-command 'subscription-manager remove --all'
[  0.0] Examining the guest ...
[ 12.0] Setting a random seed
[ 12.0] Running: subscription-manager remove --all
[ 18.0] Finishing off
This removes all subscription pools from the image.
3.11. QCOW: Unregistering the Image
Finally, unregister the image. This is so the Overcloud deployment process can deploy the image to your nodes and register each of them individually.
$ virt-customize --selinux-relabel -a overcloud-full.qcow2 --run-command 'subscription-manager unregister'
[  0.0] Examining the guest ...
[ 11.0] Setting a random seed
[ 11.0] Running: subscription-manager unregister
[ 17.0] Finishing off
3.12. Uploading the Images to the Director
After modifying the image, upload it to the director. Make sure to source the stackrc file so that you can access the director from the command line:
$ source stackrc
$ openstack overcloud image upload --image-path /home/stack/images/
This uploads the following images into the director: bm-deploy-kernel, bm-deploy-ramdisk, overcloud-full, overcloud-full-initrd, and overcloud-full-vmlinuz. These are the images for deployment and the Overcloud. The script also installs the introspection images on the director’s PXE server. View a list of the images in the CLI using the following command:
$ openstack image list
+--------------------------------------+------------------------+
| ID                                   | Name                   |
+--------------------------------------+------------------------+
| 765a46af-4417-4592-91e5-a300ead3faf6 | bm-deploy-ramdisk      |
| 09b40e3d-0382-4925-a356-3a4b4f36b514 | bm-deploy-kernel       |
| ef793cd0-e65c-456a-a675-63cd57610bd5 | overcloud-full         |
| 9a51a6cb-4670-40de-b64b-b70f4dd44152 | overcloud-full-initrd  |
| 4f7e33f4-d617-47c1-b36f-cbe90f132e5d | overcloud-full-vmlinuz |
+--------------------------------------+------------------------+
This list will not show the introspection PXE images (agent.*). The director copies these files to /httpboot.
[stack@host1 ~]$ ls /httpboot -l
total 151636
-rw-r--r--. 1 ironic ironic       269 Sep 19 02:43 boot.ipxe
-rw-r--r--. 1 root   root         252 Sep 10 15:35 inspector.ipxe
-rwxr-xr-x. 1 root   root     5027584 Sep 10 16:32 agent.kernel
-rw-r--r--. 1 root   root   150230861 Sep 10 16:32 agent.ramdisk
drwxr-xr-x. 2 ironic ironic      4096 Sep 19 02:45 pxelinux.cfg
Chapter 4. Configuration
This chapter explores how to provide additions to the OpenStack Puppet modules. This includes some basic guidelines on developing Puppet modules.
4.1. Learning Puppet Basics
The following section provide a few basic to help you understand Puppet’s syntax and the structure of a Puppet module.
4.1.1. Examining the Anatomy of a Puppet Module
Before contributing to the OpenStack modules, we need to understand the components that create a Puppet module.
- Manifests
Manifests are files that contain code to define a set of resource and their attributes. A resource is any configurable part of a system. Examples of resources include packages, services, files, users and groups, SELinux configuration, SSH key authentication, cron jobs, and more. A manifest defines each required resource using a set of key-value pairs for their attributes. For example:
  package { 'httpd':
    ensure => installed,
  }
This declaration checks if the httpd package is installed. If not, the manifest executes yum and installs it. Manifests are located in the manifest directory of a module. Puppet modules also use a test directory for test manifests. These manifests are used to test certain classes contained in your official manifests.
- Classes
- Classes act as a method for unifying multiple resources in a manifest. For example, if installing and configuring a HTTP server, you might create a class with three resources: one to install the HTTP server packages, one to configure the HTTP server, and one to start or enable the server. You can also refer to classes from other modules, which applies their configuration. For example, if you had to configure an application that also required a webserver, you can refer to the previously mentioned class for the HTTP server.
- Static Files
Modules can contain static files that Puppet can copy to certain locations on your system. These locations, and other attributes such as permissions, are defined through file resource declarations in manifests.
Static files are located in the files directory of a module.
- Templates
Sometimes configuration files require custom content. In this situation, users would create a template instead of a static file. Like static files, templates are defined in manifests and copied to locations on a system. The difference is that templates allow Ruby expressions to define customized content and variable input. For example, if you wanted to configure httpd with a customizable port then the template for the configuration file would include:
Listen <%= @httpd_port %>
The
httpd_portvariable in this case is defined in the manifest that references this template.Templates are located in the templates directory of a module.
- Plugins
Plugins allow for aspects that extend beyond the core functionality of Puppet. For example, you can use plugins to define custom facts, custom resources, or new functions. For example, a database administrator might need a resource type for PostgreSQL databases. This could help the database administrator populate PostgreSQL with a set of new databases after installing PostgreSQL. As a result, the database administrator need only create a Puppet manifest that ensures PostgreSQL installs and the databases are created afterwards.
Plugins are located in the lib directory of a module. This includes a set of subdirectories depending on the plugin type. For example:
-
/lib/facter- Location for custom facts. -
/lib/puppet/type- Location for custom resource type definitions, which outline the key-value pairs for attributes. -
/lib/puppet/provider- Location for custom resource providers, which are used in conjunction with resource type definitions to control resources. -
/lib/puppet/parser/functions- Location for custom functions.
-
4.1.2. Installing a Service
Some software requires package installations. This is one function a Puppet module can perform. This requires a resource definition that defines configurations for a certain package.
For example, to install the httpd package through the mymodule module, you would add the following content to a Puppet manifest in the mymodule module:
class mymodule::httpd {
  package { 'httpd':
    ensure => installed,
  }
}
This code defines a subclass of mymodule called httpd, then defines a package resource declaration for the httpd package. The ensure => installed attribute tells Puppet to check if the package is installed. If it is not installed, Puppet executes yum to install it.
4.1.3. Starting and Enabling a Service
After installing a package, you might aim to start the service. Use another resource declaration called service. This requires editing the manifest with the following content:
class mymodule::httpd {
  package { 'httpd':
    ensure => installed,
  }
  service { 'httpd':
    ensure => running,
    enable => true,
    require => Package["httpd"],
  }
}
This achieves a couple of things:
-
The
ensure => runningattribute checks if the service is running. If not, Puppet enables it. -
The
enable => trueattribute sets the service to run when the system boots. -
The
require => Package["httpd"]attribute defines an ordering relationship between one resource declaration and another. In this case, it ensures the httpd service starts after the httpd package installs. This creates a dependency between the service and its respective package.
4.1.4. Configuring a Service
The previous two steps show how to install and enable a service through Puppet. However, you might aim to provide some custom configuration to the services. In our example, the HTTP server already provides some default configuration in /etc/httpd/conf/httpd.conf, which provides a web host on port 80. This section adds some extra configuration to provide an additional web host on a user-specified port.
For this to occur, you use a template file to store the HTTP configuration file. This is because the user-defined port requires variable input. In the module’s templates directory, you would add a file called myserver.conf.erb with the following contents:
Listen <%= @httpd_port %>
NameVirtualHost *:<%= @httpd_port %>
<VirtualHost *:<%= @httpd_port %>>
  DocumentRoot /var/www/myserver/
  ServerName *:<%= @fqdn %>>
  <Directory "/var/www/myserver/">
    Options All Indexes FollowSymLinks
    Order allow,deny
    Allow from all
  </Directory>
</VirtualHost>
This template follows the standard syntax for Apache web server configuration. The only difference is the inclusion of Ruby escape characters to inject variables from our module. For example, httpd_port, which we use to specify the web server port.
Notice also the inclusion of fqdn, which is a variable that stores the fully qualified domain name of the system. This is known as a system fact. System facts are collected from each system prior to generating each respective system’s Puppet catalog. Puppet uses the facter command to gather these system facts and you can also run facter to view a list of these facts.
After saving this file, you would add the resource to module’s Puppet manifest :
class mymodule::httpd {
  package { 'httpd':
    ensure => installed,
  }
  service { 'httpd':
    ensure => running,
    enable => true,
    require => Package["httpd"],
  }
  file {'/etc/httpd/conf.d/myserver.conf':
  notify => Service["httpd"],
    ensure => file,
    require => Package["httpd"],
    content => template("mymodule/myserver.conf.erb"),
  }
  file { "/var/www/myserver":
    ensure => "directory",
  }
}
This achieves the following:
-
We add a file resource declaration for the server configuration file (
/etc/httpd/conf.d/myserver.conf). The content for this file is themyserver.conf.erbtemplate we created earlier. We also check thehttpdpackage is installed before adding this file. -
We also add a second file resource declaration. This one creates a directory (
/var/www/myserver) for our web server. -
We also add a relationship between the configuration file and the httpd service using the
notify => Service["httpd"]attribute. This checks our configuration file for any changes. If the file has changed, Puppet restarts the service.
4.2. Obtaining OpenStack Puppet Modules
The Red Hat OpenStack Platform uses the official OpenStack Puppet modules, which you obtain from the openstack group on Github. Navigate your browser to https://github.com/openstack and in the filters section search for puppet. All Puppet module use the prefix puppet-.
For this example, we will examine the official OpenStack Block Storage (cinder), which you can clone using the following command:
$ git clone https://github.com/openstack/puppet-cinder.git
This creates a clone of the Puppet module for Cinder.
4.3. Adding Configuration for a Puppet Module
The OpenStack modules primarily aim to configure the core service. Most also contain additional manifests to configure additional services, sometimes known as backends, agents, or plugins. For example, the cinder module contains a directory called backends, which contains configuration options for different storage devices including NFS, iSCSI, Red Hat Ceph Storage, and others.
For example, the manifests/backends/nfs.pp file contains the following configuration
define cinder::backend::nfs (
  $volume_backend_name  = $name,
  $nfs_servers          = [],
  $nfs_mount_options    = undef,
  $nfs_disk_util        = undef,
  $nfs_sparsed_volumes  = undef,
  $nfs_mount_point_base = undef,
  $nfs_shares_config    = '/etc/cinder/shares.conf',
  $nfs_used_ratio       = '0.95',
  $nfs_oversub_ratio    = '1.0',
  $extra_options        = {},
) {

  file {$nfs_shares_config:
    content => join($nfs_servers, "\n"),
    require => Package['cinder'],
    notify  => Service['cinder-volume']
  }

  cinder_config {
    "${name}/volume_backend_name":  value => $volume_backend_name;
    "${name}/volume_driver":        value =>
      'cinder.volume.drivers.nfs.NfsDriver';
    "${name}/nfs_shares_config":    value => $nfs_shares_config;
    "${name}/nfs_mount_options":    value => $nfs_mount_options;
    "${name}/nfs_disk_util":        value => $nfs_disk_util;
    "${name}/nfs_sparsed_volumes":  value => $nfs_sparsed_volumes;
    "${name}/nfs_mount_point_base": value => $nfs_mount_point_base;
    "${name}/nfs_used_ratio":       value => $nfs_used_ratio;
    "${name}/nfs_oversub_ratio":    value => $nfs_oversub_ratio;
  }

  create_resources('cinder_config', $extra_options)

}
This achieves a couple of things:
-
The
definestatement creates a defined type calledcinder::backend::nfs. A defined type is similar to a class; the main difference is Puppet evaluates a defined type multiple times. For example, you might require multiple NFS backends and as such the configuration requires multiple evaluations for each NFS share. -
The next few lines define the parameters in this configuration and their default values. The default values are overwritten if the user passes new values to the
cinder::backend::nfsdefined type. -
The
filefunction is a resource declaration that calls for the creation of a file. This file contains a list of our NFS shares and name for this file is defined in the parameters ($nfs_shares_config = '/etc/cinder/shares.conf'). Note the additional attributes: -
The
contentattribute creates a list using the$nfs_serversparameter. -
The
requireattribute ensures that thecinderpackage is installed. -
The
notifyattribute tells thecinder-volumeservice to reset. The
cinder_configfunction is a resource declaration that uses a plugin from thelib/puppet/directory in the module. This plugin adds configuration to the/etc/cinder/cinder.conffile. Each line in this resource adds a configuration options to the relevant section in thecinder.conffile. For example, if the$nameparameter ismynfs, then the following attributes:"${name}/volume_backend_name": value => $volume_backend_name; "${name}/volume_driver": value => 'cinder.volume.drivers.nfs.NfsDriver'; "${name}/nfs_shares_config": value => $nfs_shares_config;Would save the following to the
cinder.conffile:[mynfs] volume_backend_name=mynfs volume_driver=cinder.volume.drivers.nfs.NfsDriver nfs_shares_config=/etc/cinder/shares.conf
-
The
create_resourcesfunction converts a hash into a set of resources. In this case, the manifest converts the$extra_optionshash to a set of additional configuration options for the backend. This provides a flexible method to add further configuration options not included in the manifest’s core parameters.
This shows the importance of including a manifest to configure your hardware’s OpenStack driver. The manifest provides a simple method for the director to include configuration options relevant to your hardware. This acts as a main integration point for the director to configure your Overcloud to use your hardware.
4.4. Adding Hiera Data to Puppet Configuration
Puppet contains a tool called Hiera, which acts as a key/value systems that provides node-specific configuration. These keys and their values are usually stored in files located in /etc/puppet/hieradata. The /etc/puppet/hiera.yaml file defines the order that Puppet reads the files in the hieradata directory.
When configuring the Overcloud, Puppet uses this data to overwrite the default values for certain Puppet classes. For example, the default NFS mount options for cinder::backend::nfs in puppet-cinder are undefined:
$nfs_mount_options = undef,
However, you can create your own manifest that calls the cinder::backend::nfs defined type and replace this option with Hiera data:
  cinder::backend::nfs { $cinder_nfs_backend:
    nfs_mount_options   => hiera('cinder_nfs_mount_options'),
  }
This means the nfs_mount_options parameter takes uses Hiera data value from the cinder_nfs_mount_options key:
cinder_nfs_mount_options: rsize=8192,wsize=8192
Alternatively, you can use the Hiera data to overwrite cinder::backend::nfs::nfs_mount_options parameter directly so that it applies to all evalutations of the NFS configuration. For example:
cinder::backend::nfs::nfs_mount_options: rsize=8192,wsize=8192
The above Hiera data overwrites this parameter on each evaluation of cinder::backend::nfs.
Chapter 5. Orchestration
The director uses Heat Orchestration Templates (HOT) as a template format for its Overcloud deployment plan. Templates in HOT format are mostly expressed in YAML format. The purpose of a template is to define and create a stack, which is a collection of resources that heat creates, and the configuration of the resources. Resources are objects in OpenStack and can include compute resources, network configuration, security groups, scaling rules, and custom resources.
This chapter provides some basics for understanding the HOT syntax so that you can create your own template files.
5.1. Learning Heat Template Basics
5.1.1. Understanding Heat Templates
The structure of a Heat template has three main sections:
- Parameters
-
These are settings passed to heat, which provides a way to customize a stack, and any default values for parameters without passed values. These are defined in the
parameterssection of a template. - Resources
-
These are the specific objects to create and configure as part of a stack. OpenStack contains a set of core resources that span across all components. These are defined in the
resourcessection of a template. - Output
-
These are values passed from heat after the stack’s creation. You can access these values either through the heat API or client tools. These are defined in the
outputsection of a template.
Here is an example of a basic heat template:
heat_template_version: 2013-05-23

description: > A very basic Heat template.

parameters:
  key_name:
    type: string
    default: lars
    description: Name of an existing key pair to use for the instance
  flavor:
    type: string
    description: Instance type for the instance to be created
    default: m1.small
  image:
    type: string
    default: cirros
    description: ID or name of the image to use for the instance

resources:
  my_instance:
    type: OS::Nova::Server
    properties:
      name: My Cirros Instance
      image: { get_param: image }
      flavor: { get_param: flavor }
      key_name: { get_param: key_name }

output:
  instance_name:
    description: Get the instance's name
    value: { get_attr: [ my_instance, name ] }
This template uses the resource type type: OS::Nova::Server to create an instance called my_instance with a particular flavor, image, and key. The stack can return the value of instance_name, which is called My Cirros Instance.
A Heat template also requires the heat_template_version parameter, which defines the syntax version to use and the functions available. For more information, see the Official Heat Documentation.
5.1.2. Understanding Environment Files
An environment file is a special type of template that provides customization for your Heat templates. This includes three key parts:
- Resource Registry
-
This section defines custom resource names, linked to other heat templates. This essentially provides a method to create custom resources that do not exist within the core resource collection. These are defined in the
resource_registrysection of an environment file. - Parameters
-
These are common settings you apply to the top-level template’s parameters. For example, if you have a template that deploys nested stacks, such as resource registry mappings, the parameters only apply to the top-level template and not templates for the nested resources. Parameters are defined in the
parameterssection of an environment file. - Parameter Defaults
-
These parameters modify the default values for parameters in all templates. For example, if you have a Heat template that deploys nested stacks, such as resource registry mappings,the parameter defaults apply to all templates. In other words, the top-level template and those defining all nested resources. The parameter defaults are defined in the
parameter_defaultssection of an environment file.
It is recommended to use parameter_defaults instead of parameters When creating custom environment files for your Overcloud. This is so the parameters apply to all stack templates for the Overcloud.
An example of a basic environment file:
resource_registry:
  OS::Nova::Server::MyServer: myserver.yaml

parameter_defaults:
  NetworkName: my_network

parameters:
  MyIP: 192.168.0.1
For example, this environment file (my_env.yaml) might be included when creating a stack from a certain Heat template (my_template.yaml). The my_env.yaml files creates a new resource type called OS::Nova::Server::MyServer. The myserver.yaml file is a Heat template file that provides an implementation for this resource type that overrides any built-in ones. You can include the OS::Nova::Server::MyServer resource in your my_template.yaml file.
The MyIP applies a parameter only to the main Heat template that deploys along with this environment file. In this example, it only applies to the parameters in my_template.yaml.
The NetworkName applies to both the main Heat template (in this example, my_template.yaml) and the templates associated with resources included the main template, such as the OS::Nova::Server::MyServer resource and its myserver.yaml template in this example.
5.2. Obtaining the Default Director Templates
The director uses an advanced Heat template collection used to create an Overcloud. This collection is available from the openstack group on Github in the openstack-tripleo-heat-templates repository. To obtain a clone of this template collection, run the following command:
$ git clone https://github.com/openstack/tripleo-heat-templates.git
The Red Hat-specific version of this template collection is available from the openstack-tripleo-heat-template package, which installs the collection to /usr/share/openstack-tripleo-heat-templates.
There are many heat templates and environment files in this collection. However, the main files and directories to note in this template collection are:
overcloud.j2.yaml- This is the main template file used to create the Overcloud environment. This file uses Jinja2 syntax to iterate over certain sections in the template to create custom roles. The Jinja2 formatting is rendered into YAML during the overcloud deployment process.
overcloud-resource-registry-puppet.j2.yaml- This is the main environment file used to create the Overcloud environment. It provides a set of configurations for Puppet modules stored on the Overcloud image. After the director writes the Overcloud image to each node, Heat starts the Puppet configuration for each node using the resources registered in this environment file. This file uses Jinja2 syntax to iterate over certain sections in the template to create custom roles. The Jinja2 formatting is rendered into YAML during the overcloud deployment process.
roles_data.yaml- A file that defines the roles in an overcloud and maps services to each role.
capabilities-map.yaml-
A mapping of environment files for an overcloud plan. Use this file to describe and enable environment files through the director’s web UI. Custom environment files detected in an overcloud plan but not listed in the
capabilities-map.yamlare listed in the Other subtab of 2 Specify Deployment Configuration > Overall Settings on the web UI. environments-
Contains additional Heat environment files that you can use with your Overcloud creation. These environment files enable extra functions for your resulting OpenStack environment. For example, the directory contains an environment file for enabling Cinder NetApp backend storage (
cinder-netapp-config.yaml). network- A set of Heat templates to help create isolated networks and ports.
puppet-
Templates mostly driven by configuration with puppet. The aforementioned
overcloud-resource-registry-puppet.j2.yamlenvironment file uses the files in this directory to drive the application of the Puppet configuration on each node. puppet/services- A directory containing heat templates for all services in the composable service architecture.
extraconfig-
Templates used to enable extra functionality. For example, the
extraconfig/pre_deploy/rhel-registrationdirector provides the ability to register your nodes' Red Hat Enterprise Linux operating systems to the Red Hat Content Delivery network or your own Red Hat Satellite server. firstboot-
Provides example
first_bootscripts that the director uses when initially creating the nodes.
This provides a general overview of the templates the director uses for orchestrating the Overcloud creation. The next few sections show how to create your own custom templates and environment files that you can add to an Overcloud deployment.
5.3. First Boot: Customizing First Boot Configuration
The director provides a mechanism to perform configuration on all nodes upon the initial creation of the Overcloud. The director achieves this through cloud-init, which you can call using the OS::TripleO::NodeUserData resource type.
In this example, you will update the nameserver with a custom IP address on all nodes. You must first create a basic heat template (/home/stack/templates/nameserver.yaml) that runs a script to append each node’s resolv.conf with a specific nameserver. You can use the OS::TripleO::MultipartMime resource type to send the configuration script.
heat_template_version: 2014-10-16

description: >
  Extra hostname configuration

resources:
  userdata:
    type: OS::Heat::MultipartMime
    properties:
      parts:
      - config: {get_resource: nameserver_config}

  nameserver_config:
    type: OS::Heat::SoftwareConfig
    properties:
      config: |
        #!/bin/bash
        echo "nameserver 192.168.1.1" >> /etc/resolv.conf

outputs:
  OS::stack_id:
    value: {get_resource: userdata}
Next, create an environment file (/home/stack/templates/firstboot.yaml) that registers your heat template as the OS::TripleO::NodeUserData resource type.
resource_registry:
  OS::TripleO::NodeUserData: /home/stack/templates/nameserver.yaml
To add the first boot configuration, add the environment file to the stack along with your other environment files when first creating the Overcloud. For example:
$ openstack overcloud deploy --templates \
    ...
    -e /home/stack/templates/firstboot.yaml \
    ...
The -e applies the environment file to the Overcloud stack.
This adds the configuration to all nodes when they are first created and boot for the first time. Subsequent inclusions of these templates, such as updating the Overcloud stack, does not run these scripts.
You can only register the OS::TripleO::NodeUserData to one heat template. Subsequent usage overrides the heat template to use.
This achieves the following:
-
OS::TripleO::NodeUserDatais a director-based Heat resource used in other templates in the collection and applies first boot configuration to all nodes. This resource passes data for use incloud-init. The defaultNodeUserDatarefers to a Heat template that produces a blank value (firstboot/userdata_default.yaml). In our case, ourfirstboot.yamlenvironment file replaces this default with a reference to our ownnameserver.yamlfile. -
nameserver_configdefines our Bash script to run on first boot. TheOS::Heat::SoftwareConfigresource defines it as a piece of configuration to apply. -
userdataconverts the configuration fromnameserver_configinto a multi-part MIME message using theOS::Heat::MultipartMimeresource. -
The
outputsprovides an output parameterOS::stack_idwhich takes the MIME message fromuserdataand provides it to the the Heat template/resource calling it.
As a result, each node runs the following Bash script on its first boot:
#!/bin/bash
echo "nameserver 192.168.1.1" >> /etc/resolve.conf
This example shows how Heat template pass and modfy configuration from one resource to another. It also shows how to use environment files to register new Heat resources or modify existing ones.
5.4. Pre-Configuration: Customizing Specific Overcloud Roles
Previous versions of this document used the OS::TripleO::Tasks::*PreConfig resources to provide pre-configuration hooks on a per role basis. The director’s Heat template collection requires dedicated use of these hooks, which means you should not use them for custom use. Instead, use the OS::TripleO::*ExtraConfigPre hooks outlined below.
The Overcloud uses Puppet for the core configuration of OpenStack components. The director provides a set of hooks to provide custom configuration for specific node roles after the first boot completes and before the core configuration begins. These hooks include:
- OS::TripleO::ControllerExtraConfigPre
- Additional configuration applied to Controller nodes before the core Puppet configuration.
- OS::TripleO::ComputeExtraConfigPre
- Additional configuration applied to Compute nodes before the core Puppet configuration.
- OS::TripleO::CephStorageExtraConfigPre
- Additional configuration applied to Ceph Storage nodes before the core Puppet configuration.
- OS::TripleO::ObjectStorageExtraConfigPre
- Additional configuration applied to Object Storage nodes before the core Puppet configuration.
- OS::TripleO::BlockStorageExtraConfigPre
- Additional configuration applied to Block Storage nodes before the core Puppet configuration.
- OS::TripleO::[ROLE]ExtraConfigPre
-
Additional configuration applied to custom nodes before the core Puppet configuration. Replace
[ROLE]with the composable role name.
In this example, you first create a basic heat template (/home/stack/templates/nameserver.yaml) that runs a script to write to a node’s resolv.conf with a variable nameserver.
heat_template_version: 2014-10-16

description: >
  Extra hostname configuration

  parameters:
    server:
      type: json
    nameserver_ip:
      type: string
    DeployIdentifier:
      type: string

resources:
  CustomExtraConfigPre:
    type: OS::Heat::SoftwareConfig
    properties:
      group: script
      config:
        str_replace:
          template: |
            #!/bin/sh
            echo "nameserver _NAMESERVER_IP_" > /etc/resolv.conf
          params:
            _NAMESERVER_IP_: {get_param: nameserver_ip}

  CustomExtraDeploymentPre:
    type: OS::Heat::SoftwareDeployment
    properties:
      server: {get_param: server}
      config: {get_resource: CustomExtraConfigPre}
      actions: ['CREATE','UPDATE']
      input_values:
        deploy_identifier: {get_param: DeployIdentifier}

outputs:
  deploy_stdout:
    description: Deployment reference, used to trigger pre-deploy on changes
    value: {get_attr: [CustomExtraDeploymentPre, deploy_stdout]}
In this example, the resources section contains the following:
- CustomExtraConfigPre
-
This defines a software configuration. In this example, we define a Bash
scriptand Heat replaces_NAMESERVER_IP_with the value stored in thenameserver_ipparameter. - CustomExtraDeploymentPre
This executes a software configuration, which is the software configuration from the
CustomExtraConfigPreresource. Note the following:-
The
configparameter makes a reference to theCustomExtraConfigPreresource so Heat knows what configuration to apply. -
The
serverparameter retrieves a map of the Overcloud nodes. This parameter is provided by the parent template and is mandatory in templates for this hook. -
The
actionsparameter defines when to apply the configuration. In this case, we only apply the configuration when the Overcloud is created. Possible actions includeCREATE,UPDATE,DELETE,SUSPEND, andRESUME. -
input_valuescontains a parameter calleddeploy_identifier, which stores theDeployIdentifierfrom the parent template. This parameter provides a timestamp to the resource for each deployment update. This ensures the resource reapplies on subsequent overcloud updates.
-
The
Next, create an environment file (/home/stack/templates/pre_config.yaml) that registers your heat template to the role-based resource type. For example, to apply only to Controller nodes, use the ControllerExtraConfigPre hook:
resource_registry:
  OS::TripleO::ControllerExtraConfigPre: /home/stack/templates/nameserver.yaml

parameter_defaults:
  nameserver_ip: 192.168.1.1
To apply the configuration, add the environment file to the stack along with your other environment files when creating or updating the Overcloud. For example:
$ openstack overcloud deploy --templates \
    ...
    -e /home/stack/templates/pre_config.yaml \
    ...
This applies the configuration to all Controller nodes before the core configuration begins on either the initial Overcloud creation or subsequent updates.
You can only register each resource to only one Heat template per hook. Subsequent usage overrides the Heat template to use.
This achieves the following:
-
OS::TripleO::ControllerExtraConfigPreis a director-based Heat resource used in the configuration templates in the Heat template collection. This resource passes configuration to each Controller node. The defaultControllerExtraConfigPrerefers to a Heat template that produces a blank value (puppet/extraconfig/pre_deploy/default.yaml). In our case, ourpre_config.yamlenvironment file replaces this default with a reference to our ownnameserver.yamlfile. -
The environment file also passes the
nameserver_ipas aparameter_defaultvalue for our environment. This is a parameter that stores the IP address of our nameserver. Thenameserver.yamlHeat template then accepts this parameter as defined in theparameterssection. -
The template defines
CustomExtraConfigPreas a configuration resource throughOS::Heat::SoftwareConfig. Note thegroup: scriptproperty. Thegroupdefines the software configuration tool to use, which are available through a set of hooks for Heat. In this case, thescripthook runs an executable script that you define in theSoftwareConfigresource as theconfigproperty. The script itself appends
/etc/resolve.confwith the nameserver IP address. Note thestr_replaceattribute, which allows you to replace variables in thetemplatesection with parameters in theparamssection. In this case, we set the NAMESERVER_IP to the nameserver IP address, which substitutes the same variable in the script. This results in the following script:#!/bin/sh echo "nameserver 192.168.1.1" >> /etc/resolve.conf
This example shows how to create a Heat template that defines a configuration and deploys it using the OS::Heat::SoftwareConfig and OS::Heat::SoftwareDeployments before the core configuration. It also shows how to define parameters in your environment file and pass them to templates in the configuration.
5.5. Pre-Configuration: Customizing All Overcloud Roles
The Overcloud uses Puppet for the core configuration of OpenStack components. The director provides a hook to configure all node types after the first boot completes and before the core configuration begins:
- OS::TripleO::NodeExtraConfig
- Additional configuration applied to all nodes roles before the core Puppet configuration.
In this example, you first create a basic heat template (/home/stack/templates/nameserver.yaml) that runs a script to append each node’s resolv.conf with a variable nameserver.
heat_template_version: 2014-10-16

description: >
  Extra hostname configuration

parameters:
  server:
    type: string
  nameserver_ip:
    type: string
  DeployIdentifier:
    type: string

resources:
  CustomExtraConfigPre:
    type: OS::Heat::SoftwareConfig
    properties:
      group: script
      config:
        str_replace:
          template: |
            #!/bin/sh
            echo "nameserver _NAMESERVER_IP_" >> /etc/resolv.conf
          params:
            _NAMESERVER_IP_: {get_param: nameserver_ip}

  CustomExtraDeploymentPre:
    type: OS::Heat::SoftwareDeployment
    properties:
      server: {get_param: server}
      config: {get_resource: CustomExtraConfigPre}
      actions: ['CREATE','UPDATE']
      input_values:
        deploy_identifier: {get_param: DeployIdentifier}

outputs:
  deploy_stdout:
    description: Deployment reference, used to trigger pre-deploy on changes
    value: {get_attr: [CustomExtraDeploymentPre, deploy_stdout]}
In this example, the resources section contains the following:
- CustomExtraConfigPre
-
This defines a software configuration. In this example, we define a Bash
scriptand Heat replaces_NAMESERVER_IP_with the value stored in thenameserver_ipparameter. - CustomExtraDeploymentPre
This executes a software configuration, which is the software configuration from the
CustomExtraConfigPreresource. Note the following:-
The
configparameter makes a reference to theCustomExtraConfigPreresource so Heat knows what configuration to apply. -
The
serverparameter retrieves a map of the Overcloud nodes. This parameter is provided by the parent template and is mandatory in templates for this hook. -
The
actionsparameter defines when to apply the configuration. In this case, we only apply the configuration when the Overcloud is created. Possible actions includeCREATE,UPDATE,DELETE,SUSPEND, andRESUME. -
The
input_valuesparameter contains a sub-parameter calleddeploy_identifier, which stores theDeployIdentifierfrom the parent template. This parameter provides a timestamp to the resource for each deployment update. This ensures the resource reapplies on subsequent overcloud updates.
-
The
Next, create an environment file (/home/stack/templates/pre_config.yaml) that registers your heat template as the OS::TripleO::NodeExtraConfig resource type.
resource_registry:
  OS::TripleO::NodeExtraConfig: /home/stack/templates/nameserver.yaml

parameter_defaults:
  nameserver_ip: 192.168.1.1
To apply the configuration, add the environment file to the stack along with your other environment files when creating or updating the Overcloud. For example:
$ openstack overcloud deploy --templates \
    ...
    -e /home/stack/templates/pre_config.yaml \
    ...
This applies the configuration to all nodes before the core configuration begins on either the initial Overcloud creation or subsequent updates.
You can only register the OS::TripleO::NodeExtraConfig to only one Heat template. Subsequent usage overrides the Heat template to use.
This achieves the following:
-
OS::TripleO::NodeExtraConfigis a director-based Heat resource used in the configuration templates in the Heat template collection. This resource passes configuration to each node. The defaultNodeExtraConfigrefers to a Heat template that produces a blank value (puppet/extraconfig/pre_deploy/default.yaml). In our case, ourpre_config.yamlenvironment file replaces this default with a reference to our ownnameserver.yamlfile. -
The environment file also passes the
nameserver_ipas aparameter_defaultvalue for our environment. This is a parameter that stores the IP address of our nameserver. Thenameserver.yamlHeat template then accepts this parameter as defined in theparameterssection. -
The template defines
CustomExtraConfigPreas a configuration resource throughOS::Heat::SoftwareConfig. Note thegroup: scriptproperty. Thegroupdefines the software configuration tool to use, which are available through a set of hooks for Heat. In this case, thescripthook runs an executable script that you define in theSoftwareConfigresource as theconfigproperty. The script itself appends
/etc/resolve.confwith the nameserver IP address. Note thestr_replaceattribute, which allows you to replace variables in thetemplatesection with parameters in theparamssection. In this case, we set the NAMESERVER_IP to the nameserver IP address, which substitutes the same variable in the script. This results in the following script:#!/bin/sh echo "nameserver 192.168.1.1" >> /etc/resolve.conf
This example shows how to create a Heat template that defines a configuration and deploys it using the OS::Heat::SoftwareConfig and OS::Heat::SoftwareDeployments before the core configuration. It also shows how to define parameters in your environment file and pass them to templates in the configuration.
5.6. Post-Configuration: Customizing All Overcloud Roles
Previous versions of this document used the OS::TripleO::Tasks::*PostConfig resources to provide post-configuration hooks on a per role basis. The director’s Heat template collection requires dedicated use of these hooks, which means you should not use them for custom use. Instead, use the OS::TripleO::NodeExtraConfigPost hook outlined below.
A situation might occur where you have completed the creation of your Overcloud but want to add additional configuration to all roles, either on initial creation or on a subsequent update of the Overcloud. In this case, you use the following post-configuration hook:
- OS::TripleO::NodeExtraConfigPost
- Additional configuration applied to all nodes roles after the core Puppet configuration.
In this example, you first create a basic heat template (/home/stack/templates/nameserver.yaml) that runs a script to append each node’s resolv.conf with a variable nameserver.
heat_template_version: 2014-10-16

description: >
  Extra hostname configuration

parameters:
  servers:
    type: json
  nameserver_ip:
    type: string
  DeployIdentifier:
    type: string

resources:
  CustomExtraConfig:
    type: OS::Heat::SoftwareConfig
    properties:
      group: script
      config:
        str_replace:
          template: |
            #!/bin/sh
            echo "nameserver _NAMESERVER_IP_" >> /etc/resolv.conf
          params:
            _NAMESERVER_IP_: {get_param: nameserver_ip}

  CustomExtraDeployments:
    type: OS::Heat::SoftwareDeploymentGroup
    properties:
      servers:  {get_param: servers}
      config: {get_resource: CustomExtraConfig}
      actions: ['CREATE','UPDATE']
      input_values:
        deploy_identifier: {get_param: DeployIdentifier}
In this example, the resources section contains the following:
- CustomExtraConfig
-
This defines a software configuration. In this example, we define a Bash
scriptand Heat replaces_NAMESERVER_IP_with the value stored in thenameserver_ipparameter. - CustomExtraDeployments
This executes a software configuration, which is the software configuration from the
CustomExtraConfigresource. Note the following:-
The
configparameter makes a reference to theCustomExtraConfigresource so Heat knows what configuration to apply. -
The
serversparameter retrieves a map of the Overcloud nodes. This parameter is provided by the parent template and is mandatory in templates for this hook. -
The
actionsparameter defines when to apply the configuration. In this case, we only apply the configuration when the Overcloud is created. Possible actions includeCREATE,UPDATE,DELETE,SUSPEND, andRESUME. -
input_valuescontains a parameter calleddeploy_identifier, which stores theDeployIdentifierfrom the parent template. This parameter provides a timestamp to the resource for each deployment update. This ensures the resource reapplies on subsequent overcloud updates.
-
The
Next, create an environment file (/home/stack/templates/post_config.yaml) that registers your heat template as the OS::TripleO::NodeExtraConfigPost: resource type.
resource_registry:
  OS::TripleO::NodeExtraConfigPost: /home/stack/templates/nameserver.yaml

parameter_defaults:
  nameserver_ip: 192.168.1.1
To apply the configuration, add the environment file to the stack along with your other environment files when creating or updating the Overcloud. For example:
$ openstack overcloud deploy --templates \
    ...
    -e /home/stack/templates/post_config.yaml \
    ...
This applies the configuration to all nodes after the core configuration completes on either initial Overcloud creation or subsequent updates.
You can only register the OS::TripleO::NodeExtraConfigPost to only one Heat template. Subsequent usage overrides the Heat template to use.
This achieves the following:
-
OS::TripleO::NodeExtraConfigPostis a director-based Heat resource used in the post-configuration templates in the collection. This resource passes configuration to each node type through the*-post.yamltemplates. The defaultNodeExtraConfigPostrefers to a Heat template that produces a blank value (extraconfig/post_deploy/default.yaml). In our case, ourpost_config.yamlenvironment file replaces this default with a reference to our ownnameserver.yamlfile. -
The environment file also passes the
nameserver_ipas aparameter_defaultvalue for our environment. This is a parameter that stores the IP address of our nameserver. Thenameserver.yamlHeat template then accepts this parameter as defined in theparameterssection. -
The template defines
CustomExtraConfigas a configuration resource throughOS::Heat::SoftwareConfig. Note thegroup: scriptproperty. Thegroupdefines the software configuration tool to use, which are available through a set of hooks for Heat. In this case, thescripthook runs an executable script that your define in theSoftwareConfigresource as theconfigproperty. The script itself appends
/etc/resolve.confwith the nameserver IP address. Note thestr_replaceattribute, which allows you to replace variables in thetemplatesection with parameters in theparamssection. In this case, we set the NAMESERVER_IP to the nameserver IP address, which substitutes the same variable in the script. This results in the following script:#!/bin/sh echo "nameserver 192.168.1.1" >> /etc/resolve.conf
This example shows how to create a Heat template that defines a configuration and deploys it using the OS::Heat::SoftwareConfig and OS::Heat::SoftwareDeployments. It also shows how to define parameters in your environment file and pass them to templates in the configuration.
5.7. Puppet: Applying Custom Configuration to an Overcloud
Previously, we discussed adding configuration for a new backend to OpenStack Puppet modules. This section show how the director executes the application of new configuration.
Heat templates provide a hook allowing you to apply Puppet configuration with a OS::Heat::SoftwareConfig resource. The process is similar to how we include and execute Bash scripts. However, instead of the group: script hook, we use the group: puppet hook.
For example, you might have a Puppet manifest (example-puppet-manifest.pp) that enables an NFS Cinder backend using the official Cinder Puppet Module:
cinder::backend::nfs { 'mynfsserver':
  nfs_servers          => ['192.168.1.200:/storage'],
}
This Puppet configuration creates a new resource using the cinder::backend::nfs defined type. To apply this resource through Heat, create a basic Heat template (puppet-config.yaml) that runs our Puppet manifest:
heat_template_version: 2014-10-16

parameters:
  servers:
    type: json

resources:
  ExtraPuppetConfig:
    type: OS::Heat::SoftwareConfig
    properties:
      group: puppet
      config:
        get_file: example-puppet-manifest.pp
      options:
        enable_hiera: True
        enable_facter: False

  ExtraPuppetDeployment:
    type: OS::Heat::SoftwareDeployments
    properties:
      config: {get_resource: ExtraPuppetConfig}
      servers: {get_param: servers}
      actions: ['CREATE','UPDATE']
Next, create an environment file (puppet_config.yaml) that registers our Heat template as the OS::TripleO::NodeExtraConfigPost resource type.
resource_registry:
  OS::TripleO::NodeExtraConfigPost: puppet_config.yaml
This example is similar to using SoftwareConfig and SoftwareDeployments from the script hook example in the previous section. However, there are some differences in this example:
-
We set
group: puppetso that we execute thepuppethook. -
The
configattribute uses theget_fileattribute to refer to a Puppet manifest that contains our additional configuration. The
optionsattribute contains some options specific to Puppet configurations:-
The
enable_hieraoption enables the Puppet configuration to use Hiera data. -
The
enable_facteroption enables the Puppet configuration to use system facts from thefactercommand.
-
The
This example shows how to include a Puppet manifest as part of the software configuration for the Overcloud. This provides a way to apply certain configuration classes from existing Puppet modules on the Overcloud images, which helps you customize your Overcloud to use certain software and hardware.
5.8. Puppet: Customizing Hieradata for Roles
The Heat template collection contains a set of parameters to pass extra configuration to certain node types. These parameters save the configuration as hieradata for the node’s Puppet configuration. These parameters are:
- ControllerExtraConfig
- Configuration to add to all Controller nodes.
- NovaComputeExtraConfig
- Configuration to add to all Compute nodes.
- BlockStorageExtraConfig
- Configuration to add to all Block Storage nodes.
- ObjectStorageExtraConfig
- Configuration to add to all Object Storage nodes
- CephStorageExtraConfig
- Configuration to add to all Ceph Storage nodes
- [ROLE]ExtraConfig
-
Configuration to add to a composable role. Replace
[ROLE]with the composable role name. - ExtraConfig
- Configuration to add to all nodes.
To add extra configuration to the post-deployment configuration process, create an environment file that contains these parameters in the parameter_defaults section. For example, to increase the reserved memory for Compute hosts to 1024 MB and set the VNC keymap to Japanese:
parameter_defaults:
  NovaComputeExtraConfig:
    nova::compute::reserved_host_memory: 1024
    nova::compute::vnc_keymap: ja
Include this environment file when running openstack overcloud deploy.
You can only define each parameter once. Subsequent usage overrides previous values.
5.9. Adding Environment Files to an Overcloud Deployment
After developing a set of environment files relevant to your custom configuration, include these files in your Overcloud deployment. This means running the openstack overcloud deploy command with the -e option, followed by the environment file. You can specify the -e option as many times as necessary for your customization. For example:
$ openstack overcloud deploy --templates -e network-configuration.yaml -e storage-configuration.yaml -e first-boot.yaml
Environment files are stacked in consecutive order. This means that each subsequent file stacks upon both the main Heat template collection and all previous environment files. This provides a way to override resource definitions. For example, if all environment files in an Overcloud deployment define the NodeExtraConfigPost resource, then Heat uses NodeExtraConfigPost defined in the last environment file. As a result, the order of the environment files is important. Make sure to order your environment files so they are processed and stacked correctly.
Any environment files added to the Overcloud using the -e option become part of your Overcloud’s stack definition. The director requires these environment files for any post-deployment or re-deployment functions. Failure to include these files can result in damage to your Overcloud.
Chapter 6. Composable Services
Red Hat OpenStack Platform now includes the ability to define custom roles and compose service combinations on roles (see "Composable Services and Custom Roles" in Advanced Overcloud Customization). As part of the integration, you can define your own custom services and include them on chosen roles. This section explores the composable service architecture and provides an example of how to integrate a custom service into the composable service architecture.
6.1. Examining Composable Service Architecture
The core Heat template collection contains a collection of composable service templates in the puppet/services subdirectory. You can view these services with the following command:
$ ls /usr/share/openstack-tripleo-heat-templates/puppet/services
Each service template contains a description that identifies its purpose. For example, the keystone.yaml service template contains the following description:
description: >
 OpenStack Identity (`keystone`) service configured with Puppet
These service templates are registered as resources specific to a Red Hat OpenStack Platform deployment. This means you can call each resource using a unique Heat resource namespace defined in the overcloud-resource-registry-puppet.j2.yaml file. All services use the OS::TripleO::Services namespace for their resource type. For example, the keystone.yaml service template is registered to the OS::TripleO::Services::Keystone resource type:
grep "OS::TripleO::Services::Keystone" /usr/share/openstack-tripleo-heat-templates/overcloud-resource-registry-puppet.j2.yaml
  OS::TripleO::Services::Keystone: puppet/services/keystone.yaml
The overcloud.j2.yaml Heat template includes a section of Jinja2-based code to define a service list for each custom role in the roles_data.yaml file:
{{role.name}}Services:
  description: A list of service resources (configured in the Heat
               resource_registry) which represent nested stacks
               for each service that should get installed on the {{role.name}} role.
  type: comma_delimited_list
  default: {{role.ServicesDefault|default([])}}
For the default roles, this creates the following service list parameters: ControllerServices, ComputeServices, BlockStorageServices, ObjectStorageServices, and CephStorageServices.
You define the default services for each custom role in the roles_data.yaml file. For example, the default Controller role contains the following content:
- name: Controller
  CountDefault: 1
  ServicesDefault:
    - OS::TripleO::Services::CACerts
    - OS::TripleO::Services::CephMon
    - OS::TripleO::Services::CephExternal
    - OS::TripleO::Services::CephRgw
    - OS::TripleO::Services::CinderApi
    - OS::TripleO::Services::CinderBackup
    - OS::TripleO::Services::CinderScheduler
    - OS::TripleO::Services::CinderVolume
    - OS::TripleO::Services::Core
    - OS::TripleO::Services::Kernel
    - OS::TripleO::Services::Keystone
    - OS::TripleO::Services::GlanceApi
    - OS::TripleO::Services::GlanceRegistry
...
These services are then defined as the default list for the ControllerServices parameter.
You can also use an environment file to override the default list for the service parameters. For example, you can define ControllerServices as a parameter_default in an environment file to override the services list from the roles_data.yaml file.
6.2. Creating a User-Defined Composable Service
This example examines how to create a user-defined composable service and focuses on implementing a message of the day (motd) service. This example assumes the overcloud image contains a custom motd Puppet module loaded either through a configuration hook or through modifying the overcloud images as per Chapter 3, Overcloud Images.
When creating your own service, there are specific items to define in the service’s Heat template:
- parameters
The following are compulsory parameters that you must include in your service template:
-
ServiceNetMap- A map of services to networks. Use an empty hash ({}) as thedefaultvalue as this parameter is overriden with values from the parent Heat template. -
DefaultPasswords- A list of default passwords. Use an empty hash ({}) as thedefaultvalue as this parameter is overriden with values from the parent Heat template. -
EndpointMap- A list of OpenStack service endpoints to protocols. Use an empty hash ({}) as thedefaultvalue as this parameter is overriden with values from the parent Heat template.
Define any additional parameters that your service requires.
-
- outputs
The following output parameters define the service configuration on the host:
-
config_settings- Custom hieradata settings for your service. -
service_config_settings- Custom hieradata settings for another service. For example, your service might require its endpoints registered in OpenStack Identity (keystone). This provides parameters from one service to another and provide a method of cross-service configuration, even if the services are on different roles. -
global_config_settings- Custom hieradata settings distributed to all roles. step_config- A Puppet snippet to configure the service. This snippet is added to a combined manifest created and run at each step of the service configuration process. These steps are:- Step 1 - Load balancer configuration
- Step 2 - Core high availability and general services (Database, RabbitMQ, NTP)
- Step 3 - Early OpenStack Platform Service setup (Storage, Ring Building)
- Step 4 - General OpenStack Platform services
- Step 5 - Service activation (Pacemaker) and OpenStack Identity (keystone) role and user creation
In any referenced puppet manifest, you can use the
stephieradata (usinghiera('step')) to define specific actions at specific steps during the deployment process.-
The following is an example Heat template (service.yaml) for the motd service:
heat_template_version: 2016-04-08

description: >
  Message of the day service configured with Puppet

parameters:
  ServiceNetMap:
    default: {}
    type: json
  DefaultPasswords:
    default: {}
    type: json
  EndpointMap:
    default: {}
    type: json
  MotdMessage: 1
    default: |
      Welcome to my Red Hat OpenStack Platform environment!

    type: string
    description: The message to include in the motd

outputs:
  role_data:
    description: Motd role using composable services.
    value:
      service_name: motd
      config_settings: 2
        motd::content: {get_param: MotdMessage}
      step_config: | 3
        if hiera('step') >= 2 {
          include ::motd
}- 1
- The template includes a
MotdMessageparameter used to define the message of the day. The parameter includes a default message but you can override it using the same parameter in a custom environment file, which is demonstrated later. - 2
- The
outputssection defines some service hieradata inconfig_settings. Themotd::contenthieradata stores the content from theMotdMessageparameter. ThemotdPuppet class eventually reads this hieradata and passes the user-defined message to the/etc/motdfile. - 3
- The
outputssection includes a Puppet manifest snippet instep_config. The snippet checks if the configuration has reached step 2 and, if so, runs themotdPuppet class.
6.3. Including a User-Defined Composable Service
The aim for this example is to configure the custom motd service only on our overcloud’s Controller nodes. This requires a custom environment file and custom roles data file included with our deployment.
First, add the new service to an environment file (env-motd.yaml) as a registered Heat resource within the OS::TripleO::Services namespace. For this example, the resource name for our motd service is OS::TripleO::Services::Motd:
resource_registry:
  OS::TripleO::Services::Motd: /home/stack/templates/motd.yaml

parameter_defaults:
  MotdMessage: |
    You have successfully accessed my Red Hat OpenStack Platform environment!
Note that our custom environment file also includes a new message that overrides the default for MotdMessage.
The deployment will now include the motd service. However, each role that requires this new service must have an updated ServicesDefault listing in a custom roles_data.yaml file. In this example, we aim to only configure the service on Controller nodes.
Create a copy of the default roles_data.yaml file:
$ cp /usr/share/openstack-tripleo-heat-templates/roles_data.yaml ~/custom_roles_data.yaml
Edit this file, scroll to the Controller role, and include the service in the ServicesDefault listing:
- name: Controller
  CountDefault: 1
  ServicesDefault:
    - OS::TripleO::Services::CACerts
    - OS::TripleO::Services::CephMon
    - OS::TripleO::Services::CephExternal
...
    - OS::TripleO::Services::FluentdClient
    - OS::TripleO::Services::VipHosts
    - OS::TripleO::Services::Motd           # Add the service to the end
When creating an overcloud, include the resulting environment file and the custom_roles_data.yaml file with your other environment files and deployment options:
$ openstack overcloud deploy --templates -e /home/stack/templates/env-motd.yaml -r ~/custom_roles_data.yaml [OTHER OPTIONS]
This includes our custom motd service in our deployment and configures the service on Controller nodes only.
Chapter 7. Integration Points
This chapter explores the specific integration points for director integration. This includes looking at specific OpenStack components and their relationship with director or Overcloud integration. This section is not an exhaustive description of all OpenStack integration but should give you enough information to start integrating hardware and software with Red Hat OpenStack Platform.
7.1. Bare Metal Provisioning (Ironic)
The OpenStack Bare Metal Provisioning (Ironic) component is used within the director to control the power state of the nodes. The director uses a set of back-end drivers to interface with specific bare metal power controllers. These drivers are the key to enabling hardware and vendor specific extensions and capabilities. The most common driver is the IPMI driver (pxe_ipmitool) which controls the power state for any server that supports the Intelligent Platform Management Interface (IPMI).
Integrating with Ironic starts with the upstream OpenStack community first. Ironic drivers accepted upstream are automatically included in the core Red Hat OpenStack Platform product and the director by default. However, they might not be supported as per certification requirements.
Hardware drivers must undergo continuous integration testing to ensure their continued functionality. For information on third party driver testing and suitability, please see the OpenStack community page on Ironic Testing.
Upstream Repositories:
Upstream Blueprints:
- Launchpad: http://launchpad.net/ironic
Puppet Module:
Bugzilla components:
- openstack-ironic
- python-ironicclient
- python-ironic-oscplugin
- openstack-ironic-discoverd
- openstack-puppet-modules
- openstack-tripleo-heat-templates
Integration Notes:
-
The upstream project contains drivers in the
ironic/driversdirectory. -
The director performs a bulk registration of nodes defined in a JSON file. The
os-cloud-configtool (https://github.com/openstack/os-cloud-config/) parses this file to determine the node registration details and perform the registration. This means theos-cloud-configtool, specifically thenodes.pyfile, requires support for your driver. The director is automatically configured to use Ironic, which means the Puppet configuration requires little to no modification. However, if your driver is included with Ironic, you need to add your driver to the
/etc/ironic/ironic.conffile. Edit this file and search for theenabled_driversparameter. For example:enabled_drivers=pxe_ipmitool,pxe_ssh,pxe_drac
This allows Ironic to use the specified driver from the
driversdirectory.
7.2. Networking (Neutron)
OpenStack Networking (Neutron) provides the ability to create a network architecture within your cloud environment. The project provides several integration points for Software Defined Networking (SDN) vendors. These integration points usually fall into the categories of plugins or agents
A plugin allows extension and customization of pre-existing Neutron functions. Vendors can write plugins to ensure interoperability between Neutron and certified software and hardware. Most vendors should aim to develop a driver for Neutron’s Modular Layer 2 (ml2) plugin, which provides a modular backend for integrating your own drivers.
An agent provides a specific network function. The main Neutron server (and its plugins) communicate with Neutron agents. Existing examples include agents for DHCP, Layer 3 support, and bridging support.
For both plugins and agents, you can either:
- Include them for distribution as part of the OpenStack Platform solution, or
- Add them to the Overcloud images after OpenStack Platform’s distribution.
It is recommended to analyze the functionality of existing plugins and agents so you can determine how to integrate your own certified hardware and software. In particular, it is recommended to first develop a driver as a part of the ml2 plugin.
Upstream Repositories:
Upstream Blueprints:
- Launchpad: http://launchpad.net/neutron
Puppet Module:
Bugzilla components:
- openstack-neutron
- python-neutronclient
- openstack-puppet-modules
- openstack-tripleo-heat-templates
Integration Notes:
The upstream
neutronproject contains several integration points:-
The plugins are located in
neutron/plugins/ -
The ml2 plugin drivers are located in
neutron/plugins/ml2/drivers/ -
The agents are located in
neutron/agents/
-
The plugins are located in
-
Since the OpenStack Liberty release, many of the vendor-specific ml2 plugin have been moved into their own repositories beginning with
networking-. For example, the Cisco-specific plugins are located in https://github.com/openstack/networking-cisco The
puppet-neutronrepository also contains separate directories for configuring these integration points:-
The plugin configuration is located in
manifests/plugins/ -
The ml2 plugin driver configuration is located in
manifests/plugins/ml2/ -
The agent configuration is located in
manifests/agents/
-
The plugin configuration is located in
-
The
puppet-neutronrepository contains numerous additional libraries for configuration functions. For example, theneutron_plugin_ml2library adds a function to add attributes to the ml2 plugin configuration file.
7.3. Block Storage (Cinder)
OpenStack Block Storage (Cinder) provides an API that interacts with block storage devices, which OpenStack uses to create volumes. For example, Cinder provides virtual storage devices for instances. Cinder provides a core set of drivers to support different storage hardware and protocols. For example, some of the core drivers include support for NFS, iSCSI, and Red Hat Ceph Storage. Vendors can include drivers to support additional certified hardware.
Vendors have two main options with the drivers and configuration they develop:
- Include them for distribution as part of the OpenStack Platform solution, or
- Add them to the Overcloud images after OpenStack Platform’s distribution.
It is recommended to analyze the functionality of existing drivers so you can determine how to integrate your own certified hardware and software.
Upstream Repositories:
Upstream Blueprints:
- Launchpad: http://launchpad.net/cinder
Puppet Module:
Bugzilla components:
- openstack-cinder
- python-cinderclient
- openstack-puppet-modules
- openstack-tripleo-heat-templates
Integration Notes:
-
The upstream
cinderrepository contains the drivers incinder/volume/drivers/ The
puppet-cinderrepository contains two main directories for driver configuration:-
The
manifests/backenddirectory contains a set of defined types that configure the drivers. -
The
manifests/volumedirectory contains a set of classes to configure a default block storage device.
-
The
-
The
puppet-cinderrepository contains a library calledcinder_configto add attributes to the Cinder configuration files.
7.4. Image Storage (Glance)
OpenStack Image Storage (Cinder) provides an API that interacts with storage types to provide storage for images. Glance provides a core set of drivers to support different storage hardware and protocols. For example, the core drivers include support for file, OpenStack Object Storage (Swift), OpenStack Block Storage (Cinder), and Red Hat Ceph Storage. Vendors can include drivers to support additional certified hardware.
Upstream Repositories:
OpenStack:
GitHub:
Upstream Blueprints:
- Launchpad: http://launchpad.net/glance
Puppet Module:
Bugzilla components:
- openstack-glance
- python-glanceclient
- openstack-puppet-modules
- openstack-tripleo-heat-templates
Integration Notes:
- Adding vendor-specific driver is not necessary as Glance can use Cinder, which contains integretion points, to manage image storage.
-
The upstream
glance_storerepository contains the drivers inglance_store/_drivers. -
The
puppet-glancerepository contains the driver configuration in themanifests/backenddirectory. -
The
puppet-glancerepository contains a library calledglance_api_configto add attributes to the Glance configuration files.
Chapter 8. Examples
This chapter highlights some example vendor integration as part of the Red Hat OpenStack Platform.
8.1. Cisco Nexus 1000V
The Cisco Nexus 1000V is a network switch designed for virtual machine access. It also provides advanced switching and security using VXLANs, ACLs, and IGMP snooping. The ml2 driver for the Cisco Nexus 1000V is contained in the networking-cisco repository, which you can install alongside the Neutron service.
The Overcloud image contains the Neutron Puppet module (puppet-neutron), which includes a class (neutron::plugins::ml2::cisco::nexus1000v) to configure Neutron to use the Cisco Nexus 1000V. This class is located in the manifests/plugins/ml2/cisco/nexus1000v.pp manifest from the module. The class uses a set of default parameters, which you can override, and then uses the neutron_plugin_ml2 library to configure the ml2 plugin to use the Cisco Nexus 1000V:
neutron_plugin_ml2 {
  'ml2/extension_drivers'                          : value => $extension_drivers;
  'ml2_cisco_n1kv/n1kv_vsm_ips'                    : value => $n1kv_vsm_ip;
  'ml2_cisco_n1kv/username'                        : value => $n1kv_vsm_username;
  'ml2_cisco_n1kv/password'                        : value => $n1kv_vsm_password;
  'ml2_cisco_n1kv/default_policy_profile'          : value => $default_policy_profile;
  'ml2_cisco_n1kv/default_vlan_network_profile'    : value => $default_vlan_network_profile;
  'ml2_cisco_n1kv/default_vxlan_network_profile'   : value => $default_vxlan_network_profile;
  'ml2_cisco_n1kv/poll_duration'                   : value => $poll_duration;
  'ml2_cisco_n1kv/http_pool_size'                  : value => $http_pool_size;
  'ml2_cisco_n1kv/http_timeout'                    : value => $http_timeout;
  'ml2_cisco_n1kv/sync_interval'                   : value => $sync_interval;
  'ml2_cisco_n1kv/max_vsm_retries'                 : value => $max_vsm_retries;
  'ml2_cisco_n1kv/restrict_policy_profiles'        : value => $restrict_policy_profiles;
  'ml2_cisco_n1kv/enable_vif_type_n1kv'            : value => $enable_vif_type_n1kv;
}
The director’s Heat template collection contains an environment file and registered templates to configure the Hiera data for the Cisco Nexus 1000V. The environment file is located in environments/cisco-n1kv-config.yaml and contains the following default content:
resource_registry:
  OS::TripleO::ControllerExtraConfigPre: ../puppet/extraconfig/pre_deploy/controller/cisco-n1kv.yaml
  OS::TripleO::ComputeExtraConfigPre: ../puppet/extraconfig/pre_deploy/controller/cisco-n1kv.yaml

parameter_defaults:
  N1000vVSMIP: '192.0.2.50'
  N1000vMgmtGatewayIP: '192.0.2.1'
  N1000vVSMDomainID: '100'
  N1000vVSMHostMgmtIntf: 'br-ex'
The resource_registry sets the preconfiguration resources for Controller and Compute nodes (OS::TripleO::ControllerExtraConfigPre and OS::TripleO::ComputeExtraConfigPre) to use puppet/extraconfig/pre_deploy/controller/cisco-n1kv.yaml as the template to use for preconfiguration. The parameter_defaults section includes some parameters to pass to these resources.
Including this environment file in the deployment defines the Hiera data, which the Puppet uses for the Neutron Puppet module’s parameters during configuration.
Starting the actual application of the Puppet configuration is automatic. The Heat template collection contains a set of core Puppet manifests for configuring the Controller and Compute nodes. These files contain logic that detects if the Cisco Nexus 1000V Hiera data is set. If so (by including cisco-n1kv.yaml in your deployment), the manifest includes the neutron::plugins::ml2::cisco::nexus1000v class as well as the Cisco Nexus 1000V’s VEM and VSM agents:
  if 'cisco_n1kv' in hiera('neutron_mechanism_drivers') {
    include neutron::plugins::ml2::cisco::nexus1000v

    class { 'neutron::agents::n1kv_vem':
      n1kv_source          => hiera('n1kv_vem_source', undef),
      n1kv_version         => hiera('n1kv_vem_version', undef),
    }

    class { 'n1k_vsm':
      n1kv_source       => hiera('n1kv_vsm_source', undef),
      n1kv_version      => hiera('n1kv_vsm_version', undef),
    }
  }
This means configuring the Overcloud to use Cisco Nexus 1000V only requires a few steps:
Copy the
environments/cisco-n1kv-config.yamlfile to a local location so that you can edit it:$ cp /usr/share/openstack-tripleo-heat-templates/environments/cisco-n1kv-config.yaml ~/templates/.
Edit the
cisco-n1kv-config.yamlfile:-
Modify the
resource_registerysection to use absolute paths refering tocisco-n1kv.yaml Modify the
parameter_defaultssection to add Cisco Nexus 1000V parameters. See thecisco-n1kv.yamlfor referenceFor example:
resource_registry:
  OS::TripleO::ControllerExtraConfigPre: /usr/share/openstack-tripleo-heat-templates/puppet/extraconfig/pre_deploy/controller/cisco-n1kv.yaml
  OS::TripleO::ComputeExtraConfigPre: /usr/share/openstack-tripleo-heat-templates/puppet/extraconfig/pre_deploy/controller/cisco-n1kv.yaml

parameter_defaults:
  N1000vVSMIP: '192.0.2.50'
  N1000vMgmtGatewayIP: '192.0.2.1'
  N1000vVSMDomainID: '100'
  N1000vVSMHostMgmtIntf: 'br-ex'
  N1000vVSMUser: admin
  N1000vVSMPassword: p@55w0rd!
-
Modify the
Include the
cisco-n1kv-config.yamlfile in your deployment:$ openstack overcloud deploy --templates -e ~/templates/cisco-n1kv-config.yaml
This defines the Cisco Nexus 1000V configuration as a part of the Overcloud’s Hiera data. Then the Overcloud uses this Hieradata to configure Neutron’s Nexus 1000V ml2 driver during the core configuration.
This example demonstrates how the director integrates network components from a certified vendor with the Overcloud’s Neutron service.
8.2. NetApp Storage
NetApp provides several solutions for integration with OpenStack storage components. This example shows the how NetApp Storage integrates with Cinder to provide a backend for block storage.
The drivers for Cinder are contained within the project itself, which is publically available on GitHub at https://github.com/openstack/cinder. The drivers for NetApp Storage are located in the cinder/volume/drivers/netapp/ directory of the repository. This means the drivers are automatically included with Red Hat OpenStack Platform.
The configuration for NetApp is contained in the Puppet module for cinder (puppet-cinder), which the Overcloud image also contains. The manifest in the Puppet modules that contains the configuration is located at manifests/backend/netapp.pp. This manifest uses the cinder_config library to add netapp settings to the Cinder configuration files:
cinder_config {
  "${name}/nfs_mount_options":            value => $nfs_mount_options;
  "${name}/volume_backend_name":          value => $volume_backend_name;
  "${name}/volume_driver":                value => 'cinder.volume.drivers.netapp.common.NetAppDriver';
  "${name}/netapp_login":                 value => $netapp_login;
  "${name}/netapp_password":              value => $netapp_password, secret => true;
  "${name}/netapp_server_hostname":       value => $netapp_server_hostname;
  "${name}/netapp_server_port":           value => $netapp_server_port;
  "${name}/netapp_size_multiplier":       value => $netapp_size_multiplier;
  "${name}/netapp_storage_family":        value => $netapp_storage_family;
  "${name}/netapp_storage_protocol":      value => $netapp_storage_protocol;
  "${name}/netapp_transport_type":        value => $netapp_transport_type;
  "${name}/netapp_vfiler":                value => $netapp_vfiler;
  "${name}/netapp_volume_list":           value => $netapp_volume_list;
  "${name}/netapp_vserver":               value => $netapp_vserver;
  "${name}/netapp_partner_backend_name":  value => $netapp_partner_backend_name;
  "${name}/expiry_thres_minutes":         value => $expiry_thres_minutes;
  "${name}/thres_avl_size_perc_start":    value => $thres_avl_size_perc_start;
  "${name}/thres_avl_size_perc_stop":     value => $thres_avl_size_perc_stop;
  "${name}/nfs_shares_config":            value => $nfs_shares_config;
  "${name}/netapp_copyoffload_tool_path": value => $netapp_copyoffload_tool_path;
  "${name}/netapp_controller_ips":        value => $netapp_controller_ips;
  "${name}/netapp_sa_password":           value => $netapp_sa_password, secret => true;
  "${name}/netapp_storage_pools":         value => $netapp_storage_pools;
  "${name}/netapp_eseries_host_type":     value => $netapp_eseries_host_type;
  "${name}/netapp_webservice_path":       value => $netapp_webservice_path;
}
The director’s Heat template collection contains an environment file and registered templates to configure the Hiera data for a NetApp Storage backend. The environment file is located in environments/cinder-netapp-config.yaml and contains the following default content:
resource_registry:
  OS::TripleO::ControllerExtraConfigPre: ../puppet/extraconfig/pre_deploy/controller/cinder-netapp.yaml

parameter_defaults:
  CinderEnableNetappBackend: true
  CinderNetappBackendName: 'tripleo_netapp'
  CinderNetappLogin: ''
  CinderNetappPassword: ''
  CinderNetappServerHostname: ''
  CinderNetappServerPort: '80'
  CinderNetappSizeMultiplier: '1.2'
  CinderNetappStorageFamily: 'ontap_cluster'
  CinderNetappStorageProtocol: 'nfs'
  CinderNetappTransportType: 'http'
  CinderNetappVfiler: ''
  CinderNetappVolumeList: ''
  CinderNetappVserver: ''
  CinderNetappPartnerBackendName: ''
  CinderNetappNfsShares: ''
  CinderNetappNfsSharesConfig: '/etc/cinder/shares.conf'
  CinderNetappNfsMountOptions: ''
  CinderNetappCopyOffloadToolPath: ''
  CinderNetappControllerIps: ''
  CinderNetappSaPassword: ''
  CinderNetappStoragePools: ''
  CinderNetappEseriesHostType: 'linux_dm_mp'
  CinderNetappWebservicePath: '/devmgr/v2'
The resource_registry sets the preconfiguration resources for Controller nodes (OS::TripleO::ControllerExtraConfigPre) to use puppet/extraconfig/pre_deploy/controller/cinder-netapp.yaml as the template to use for preconfiguration. The parameter_defaults section includes some parameters to pass to these resources.
Including this environment file in the deployment defines the Hiera data, which the Puppet uses for the Cinder Puppet module’s parameters during configuration.
Starting the actual application of the Puppet configuration depends on the CinderEnableNetappBackend parameter. The Heat template collection contains a set of core Puppet manifests for configuring Controller nodes. These files contain logic that detects if the cinder_enable_netapp_backend Hiera data is set. The Hiera data is set using the CinderEnableNetappBackend parameter in the preconfiguration. Including cinder-netapp-config.yaml in your deployment and leaving the CinderEnableNetappBackend: true as is means the Controller Puppet manifest includes the cinder::backend::netapp class and passes the Hiera data values from the environment file:
  if hiera('cinder_enable_netapp_backend', false) {
    $cinder_netapp_backend = hiera('cinder::backend::netapp::title')

    cinder_config {
      "${cinder_netapp_backend}/host": value => 'hostgroup';
    }

    if hiera('cinder::backend::netapp::nfs_shares', undef) {
      $cinder_netapp_nfs_shares = split(hiera('cinder::backend::netapp::nfs_shares', undef), ',')
    }

    cinder::backend::netapp { $cinder_netapp_backend :
      netapp_login                 => hiera('cinder::backend::netapp::netapp_login', undef),
      netapp_password              => hiera('cinder::backend::netapp::netapp_password', undef),
      netapp_server_hostname       => hiera('cinder::backend::netapp::netapp_server_hostname', undef),
      netapp_server_port           => hiera('cinder::backend::netapp::netapp_server_port', undef),
      netapp_size_multiplier       => hiera('cinder::backend::netapp::netapp_size_multiplier', undef),
      netapp_storage_family        => hiera('cinder::backend::netapp::netapp_storage_family', undef),
      netapp_storage_protocol      => hiera('cinder::backend::netapp::netapp_storage_protocol', undef),
      netapp_transport_type        => hiera('cinder::backend::netapp::netapp_transport_type', undef),
      netapp_vfiler                => hiera('cinder::backend::netapp::netapp_vfiler', undef),
      netapp_volume_list           => hiera('cinder::backend::netapp::netapp_volume_list', undef),
      netapp_vserver               => hiera('cinder::backend::netapp::netapp_vserver', undef),
      netapp_partner_backend_name  => hiera('cinder::backend::netapp::netapp_partner_backend_name', undef),
      nfs_shares                   => $cinder_netapp_nfs_shares,
      nfs_shares_config            => hiera('cinder::backend::netapp::nfs_shares_config', undef),
      netapp_copyoffload_tool_path => hiera('cinder::backend::netapp::netapp_copyoffload_tool_path', undef),
      netapp_controller_ips        => hiera('cinder::backend::netapp::netapp_controller_ips', undef),
      netapp_sa_password           => hiera('cinder::backend::netapp::netapp_sa_password', undef),
      netapp_storage_pools         => hiera('cinder::backend::netapp::netapp_storage_pools', undef),
      netapp_eseries_host_type     => hiera('cinder::backend::netapp::netapp_eseries_host_type', undef),
      netapp_webservice_path       => hiera('cinder::backend::netapp::netapp_webservice_path', undef),
    }
  }
This means configuring the Overcloud to use NetApp Storage only requires a few steps:
Copy the
environments/cinder-netapp-config.yamlfile to a local location so that you can edit it:$ cp /usr/share/openstack-tripleo-heat-templates/environments/cinder-netapp-config.yaml ~/templates/.
Edit the
cinder-netapp-config.yamlfile:-
Modify the
resource_registerysection to use an absolute path refering tocinder-netapp.yaml Modify the
parameter_defaultssection to add NetApp parameters. See thecinder-netapp.yamlfor referenceFor example:
resource_registry:
  OS::TripleO::ControllerExtraConfigPre: /usr/share/openstack-tripleo-heat-templates/puppet/extraconfig/pre_deploy/controller/cinder-netapp.yaml

parameter_defaults:
  CinderEnableNetappBackend: true
  CinderNetappBackendName: 'tripleo_netapp'
  CinderNetappLogin: 'admin'
  CinderNetappPassword: 'p@55w0rd!'
  CinderNetappServerHostname: 'netapp.example.com'
  CinderNetappServerPort: '80'
  CinderNetappSizeMultiplier: '1.2'
  CinderNetappStorageFamily: 'ontap_cluster'
  CinderNetappStorageProtocol: 'nfs'
  CinderNetappTransportType: 'http'
  CinderNetappNfsShares: '192.168.1.200:/storage1,192.168.1.200:/storage2'
  CinderNetappNfsSharesConfig: '/etc/cinder/shares.conf'
  CinderNetappEseriesHostType: 'linux_dm_mp'
  CinderNetappWebservicePath: '/devmgr/v2'
Make sure to leave
CinderEnableNetappBackendset totrue.
-
Modify the
Include the
cinder-netapp-config.yamlfile in your deployment:$ openstack overcloud deploy --templates -e ~/templates/cinder-netapp-config.yaml
This defines the NetApp Storage configuration as a part of the Overcloud’s Hiera data. Then the Overcloud uses this Hieradata to configure Cinder’s NetApp backend during the core configuration.
This example demonstrates how the director integrates storage components from a certified vendor with the Overcloud’s Cinder service.