
Red Hat Training
A Red Hat training course is available for Red Hat OpenStack Platform
Advanced Overcloud Customization
Methods for configuring advanced features using Red Hat OpenStack Platform director
Abstract
Chapter 1. Introduction
The Red Hat OpenStack Platform director provides a set of tools to provision and create a fully featured OpenStack environment, also known as the Overcloud. The Director Installation and Usage Guide covers the preparation and configuration of the Overcloud. However, a proper production-level Overcloud might require additional configuration, including:
- Basic network configuration to integrate the Overcloud into your existing network infrastructure.
- Network traffic isolation on separate VLANs for certain OpenStack network traffic types.
- SSL configuration to secure communication on public endpoints
- Storage options such as NFS, iSCSI, Red Hat Ceph Storage, and multiple third-party storage devices.
- Registration of nodes to the Red Hat Content Delivery Network or your internal Red Hat Satellite 5 or 6 server.
- Various system level options.
- Various OpenStack service options.
This guide provides instructions for augmenting your Overcloud through the director. At this point, the director has registered the nodes and configured the necessary services for Overcloud creation. Now you can customize your Overcloud using the methods in this guide.
The examples in this guide are optional steps for configuring the Overcloud. These steps are only required to provide the Overcloud with additional functionality. Use only the steps that apply to the needs of your environment.
Chapter 2. Understanding Heat Templates
The custom configurations in this guide use Heat templates and environment files to define certain aspects of the Overcloud. This chapter provides a basic introduction to Heat templates so that you can understand the structure and format of these templates in the context of the Red Hat OpenStack Platform director.
2.1. Heat Templates
The director uses Heat Orchestration Templates (HOT) as a template format for its Overcloud deployment plan. Templates in HOT format are mostly expressed in YAML format. The purpose of a template is to define and create a stack, which is a collection of resources that heat creates, and the configuration of the resources. Resources are objects in OpenStack and can include compute resources, network configuration, security groups, scaling rules, and custom resources.
The structure of a Heat template has three main sections:
- Parameters
-
These are settings passed to heat, which provides a way to customize a stack, and any default values for parameters without passed values. These are defined in the
parameterssection of a template. - Resources
-
These are the specific objects to create and configure as part of a stack. OpenStack contains a set of core resources that span across all components. These are defined in the
resourcessection of a template. - Output
-
These are values passed from heat after the stack’s creation. You can access these values either through the heat API or client tools. These are defined in the
outputsection of a template.
Here is an example of a basic heat template:
heat_template_version: 2013-05-23

description: > A very basic Heat template.

parameters:
  key_name:
    type: string
    default: lars
    description: Name of an existing key pair to use for the instance
  flavor:
    type: string
    description: Instance type for the instance to be created
    default: m1.small
  image:
    type: string
    default: cirros
    description: ID or name of the image to use for the instance

resources:
  my_instance:
    type: OS::Nova::Server
    properties:
      name: My Cirros Instance
      image: { get_param: image }
      flavor: { get_param: flavor }
      key_name: { get_param: key_name }

output:
  instance_name:
    description: Get the instance's name
    value: { get_attr: [ my_instance, name ] }
This template uses the resource type type: OS::Nova::Server to create an instance called my_instance with a particular flavor, image, and key. The stack can return the value of instance_name, which is called My Cirros Instance.
When Heat processes a template it creates a stack for the template and a set of child stacks for resource templates. This creates a hierarchy of stacks that descend from the main stack you define with your template. You can view the stack hierarchy using this following command:
$ openstack stack list --nested
2.2. Environment Files
An environment file is a special type of template that provides customization for your Heat templates. This includes three key parts:
- Resource Registry
-
This section defines custom resource names, linked to other heat templates. This essentially provides a method to create custom resources that do not exist within the core resource collection. These are defined in the
resource_registrysection of an environment file. - Parameters
-
These are common settings you apply to the top-level template’s parameters. For example, if you have a template that deploys nested stacks, such as resource registry mappings, the parameters only apply to the top-level template and not templates for the nested resources. Parameters are defined in the
parameterssection of an environment file. - Parameter Defaults
-
These parameters modify the default values for parameters in all templates. For example, if you have a Heat template that deploys nested stacks, such as resource registry mappings,the parameter defaults apply to all templates. In other words, the top-level template and those defining all nested resources. The parameter defaults are defined in the
parameter_defaultssection of an environment file.
It is recommended to use parameter_defaults instead of parameters When creating custom environment files for your Overcloud. This is so the parameters apply to all stack templates for the Overcloud.
An example of a basic environment file:
resource_registry:
  OS::Nova::Server::MyServer: myserver.yaml

parameter_defaults:
  NetworkName: my_network

parameters:
  MyIP: 192.168.0.1
For example, this environment file (my_env.yaml) might be included when creating a stack from a certain Heat template (my_template.yaml). The my_env.yaml files creates a new resource type called OS::Nova::Server::MyServer. The myserver.yaml file is a Heat template file that provides an implementation for this resource type that overrides any built-in ones. You can include the OS::Nova::Server::MyServer resource in your my_template.yaml file.
The MyIP applies a parameter only to the main Heat template that deploys along with this environment file. In this example, it only applies to the parameters in my_template.yaml.
The NetworkName applies to both the main Heat template (in this example, my_template.yaml) and the templates associated with resources included the main template, such as the OS::Nova::Server::MyServer resource and its myserver.yaml template in this example.
2.3. Core Overcloud Heat Templates
The director contains a core heat template collection for the Overcloud. This collection is stored in /usr/share/openstack-tripleo-heat-templates.
There are many heat templates and environment files in this collection. However, the main files and directories to note in this template collection are:
overcloud.j2.yaml- This is the main template file used to create the Overcloud environment. This file uses Jinja2 syntax to iterate over certain sections in the template to create custom roles. The Jinja2 formatting is rendered into YAML during the overcloud deployment process.
overcloud-resource-registry-puppet.j2.yaml- This is the main environment file used to create the Overcloud environment. It provides a set of configurations for Puppet modules stored on the Overcloud image. After the director writes the Overcloud image to each node, Heat starts the Puppet configuration for each node using the resources registered in this environment file. This file uses Jinja2 syntax to iterate over certain sections in the template to create custom roles. The Jinja2 formatting is rendered into YAML during the overcloud deployment process.
roles_data.yaml- A file that defines the roles in an overcloud and maps services to each role.
capabilities-map.yaml-
A mapping of environment files for an overcloud plan. Use this file to describe and enable environment files through the director’s web UI. Custom environment files detected in an overcloud plan but not listed in the
capabilities-map.yamlare listed in the Other subtab of 2 Specify Deployment Configuration > Overall Settings on the web UI. environments-
Contains additional Heat environment files that you can use with your Overcloud creation. These environment files enable extra functions for your resulting OpenStack environment. For example, the directory contains an environment file for enabling Cinder NetApp backend storage (
cinder-netapp-config.yaml). network- A set of Heat templates to help create isolated networks and ports.
puppet-
Templates mostly driven by configuration with puppet. The aforementioned
overcloud-resource-registry-puppet.j2.yamlenvironment file uses the files in this directory to drive the application of the Puppet configuration on each node. puppet/services- A directory containing heat templates for all services in the composable service architecture.
extraconfig-
Templates used to enable extra functionality. For example, the
extraconfig/pre_deploy/rhel-registrationdirector provides the ability to register your nodes' Red Hat Enterprise Linux operating systems to the Red Hat Content Delivery network or your own Red Hat Satellite server. firstboot-
Provides example
first_bootscripts that the director uses when initially creating the nodes.
2.4. Including Environment Files in Overcloud Creation
The deployment command (openstack overcloud deploy) uses the -e option to include an environment file to customize your Overcloud. You can include as many environment files as necessary. However, the order of the environment files is important as the parameters and resources defined in subsequent environment files take precedence. For example, you might have two environment files:
environment-file-1.yaml
resource_registry:
  OS::TripleO::NodeExtraConfigPost: /home/stack/templates/template-1.yaml

parameter_defaults:
  RabbitFDLimit: 65536
  TimeZone: 'Japan'
environment-file-2.yaml
resource_registry:
  OS::TripleO::NodeExtraConfigPost: /home/stack/templates/template-2.yaml

parameter_defaults:
  TimeZone: 'Hongkong'
Then deploy with both environment files included:
$ openstack overcloud deploy --templates -e environment-file-1.yaml -e environment-file-2.yaml
In this example, both environment files contain a common resource type (OS::TripleO::NodeExtraConfigPost) and a common parameter (TimeZone). The openstack overcloud deploy command runs through the following process:
-
Loads the default configuration from the core Heat template collection as per the
--templateoption. -
Applies the configuration from
environment-file-1.yaml, which overrides any common settings from the default configuration. -
Applies the configuration from
environment-file-2.yaml, which overrides any common settings from the default configuration andenvironment-file-1.yaml.
This results in the following changes to the default configuration of the Overcloud:
-
OS::TripleO::NodeExtraConfigPostresource is set to/home/stack/templates/template-2.yamlas perenvironment-file-2.yaml. -
TimeZoneparameter is set toHongkongas perenvironment-file-2.yaml. -
RabbitFDLimitparameter is set to65536as perenvironment-file-1.yaml.environment-file-2.yamldoes not change this value.
This provides a method for defining custom configuration to the your Overcloud without values from multiple environment files conflicting.
2.5. Using Customized Core Heat Templates
When creating the overcloud, the director uses a core set of Heat templates located in /usr/share/openstack-tripleo-heat-templates. If you want to customize this core template collection, use a Git workflow to track changes and merge updates. Use the following git processes to help manage your custom template collection:
Initializing a Custom Template Collection
Use the following procedure to create an initial Git repository containing the Heat template collection:
Copy the templates' directory to the
stackusers directory. This example copies it to the~/templatesdirectory:$ cd ~/templates $ cp -r /usr/share/openstack-tripleo-heat-templates .
Change to the custom template directory and initialize a Git repository:
$ cd openstack-tripleo-heat-templates
$ git init .
Stage all templates for the initial commit:
$ git add *
Create an initial commit:
$ git commit -m "Initial creation of custom core heat templates"
This creates an initial master branch containing the latest core template collection. Use this branch as a basis for your custom branch and merge new template versions to this branch.
Creating a Custom Branch and Committing Changes
Use a custom branch to store your changes to the core template collection. Use the following procedure to create a my-customizations branch and add customizations to it:
Create the
my-customizationsbranch and switch to it:$ git checkout -b my-customizations
- Edit the files in the custom branch.
Stage the changes in git:
$ git add [edited files]
Commit the changes to the custom branch:
$ git commit -m "[Commit message for custom changes]"
This adds your changes as commits to the my-customizations branch. When the master branch updates, you can rebase my-customizations off master, which causes git to add these commits on to the updated template collection. This helps with tracking you customizations and replaying them on future template updates.
Updating the Custom Template Collection:
Sometimes when updating the undercloud, the openstack-tripleo-heat-templates package might also update. Use the following procedure to update your custom template collection:
Save the
openstack-tripleo-heat-templatespackage version as an environment variable:$ export PACKAGE=$(rpm -qv openstack-tripleo-heat-templates)
Change to your template collection directory and create a new branch for the updated templates:
$ cd ~/templates/openstack-tripleo-heat-templates
$ git checkout -b $PACKAGE
Remove all files in the branch and replace them with the new versions:
$ git rm -rf *
$ cp -r /usr/share/openstack-tripleo-heat-templates/* .
Add all templates for the initial commit:
$ git add *
Create a commit for the package update:
$ git commit -m "Updates for $PACKAGE"
Merge the branch into master. If using a Git management system, such as GitLab, use the management workflow. If using git locally, merge by switching to the
masterbranch and run thegit mergecommand:$ git checkout master $ git merge $PACKAGE
The master branch now contains the latest version of the core template collection. You can now rebase the my-customization branch from this updated collection.
Rebasing the Custom Branch
Use the following procedure to update the my-customization branch,:
Change to the
my-customizationsbranch:$ git checkout my-customizations
Rebase the branch off
master:$ git rebase master
This updates the my-customizations branch and replays the custom commits made to this branch.
If git reports any conflicts during the rebase, use this procedure:
Check which files contain the conflicts:
$ git status
- Resolve the conflicts of the template files identified.
Add the resolved files
$ git add [resolved files]
$ git commit
Continue the rebase:
$ git rebase --continue
Deploying Custom Templates
Use the following procedure to deploy the custom template collection:
Make sure you have switched to the
my-customizationbranch:git checkout my-customizations
Run the
openstack overcloud deploycommand with the--templatesoption to specify your local template directory:$ openstack overcloud deploy --templates /home/stack/templates/openstack-tripleo-heat-templates [OTHER OPTIONS]
The director uses the default template directory (/usr/share/openstack-tripleo-heat-templates) if you specify the --templates option without a directory.
Red Hat recommends using the methods from the following sections instead of modifying the heat template collection:
- Section 4.2, “Pre-Configuration: Customizing Specific Overcloud Roles”
- Section 4.3, “Pre-Configuration: Customizing All Overcloud Roles”
- Section 4.4, “Post-Configuration: Customizing All Overcloud Roles”
- Section 4.5, “Puppet: Customizing Hieradata for Roles”
- Section 4.7, “Puppet: Applying Custom Manifests”
Chapter 3. Parameters
Each Heat template in the director’s template collection contains a parameters section. This section defines all parameters specific to a particular overcloud service. This includes the following:
-
overcloud.j2.yaml- Default base parameters -
roles_data.yaml- Default parameters for composable roles -
puppet/services/*.yaml- Default parameters for specific services
You can modify the values for these parameters using the following method:
- Create an environment file for your custom parameters.
-
Include your custom parameters in the
parameter_defaultssection of the environment file. -
Include the environment file with the
openstack overcloud deploycommand.
The next few sections contain examples to demonstrate how to configure specific parameters for services in the puppet/services directory.
3.1. Example 1: Configuring the Timezone
The Heat template for setting the timezone (puppet/services/time/timezone.yaml) contains a TimeZone parameter. If you leave the TimeZone parameter blank, the overcloud sets the time to UTC as a default. The director recognizes the standard timezone names defined in the timezone database /usr/share/zoneinfo/. For example, if you wanted to set your time zone to Japan, you would examine the contents of /usr/share/zoneinfo to locate a suitable entry:
$ ls /usr/share/zoneinfo/
Africa      Asia       Canada   Cuba   EST      GB       GMT-0      HST      iso3166.tab  Kwajalein  MST      NZ-CHAT   posix       right      Turkey     UTC       Zulu
America     Atlantic   CET      EET    EST5EDT  GB-Eire  GMT+0      Iceland  Israel       Libya      MST7MDT  Pacific   posixrules  ROC        UCT        WET
Antarctica  Australia  Chile    Egypt  Etc      GMT      Greenwich  Indian   Jamaica      MET        Navajo   Poland    PRC         ROK        Universal  W-SU
Arctic      Brazil     CST6CDT  Eire   Europe   GMT0     Hongkong   Iran     Japan        Mexico     NZ       Portugal  PST8PDT     Singapore  US         zone.tab
The output listed above includes time zone files, and directories containing additional time zone files. For example, Japan is an individual time zone file in this result, but Africa is a directory containing additional time zone files:
$ ls /usr/share/zoneinfo/Africa/
Abidjan      Algiers  Bamako  Bissau       Bujumbura   Ceuta    Dar_es_Salaam  El_Aaiun  Harare        Kampala   Kinshasa    Lome        Lusaka  Maseru     Monrovia  Niamey       Porto-Novo  Tripoli
Accra        Asmara   Bangui  Blantyre     Cairo       Conakry  Djibouti       Freetown  Johannesburg  Khartoum  Lagos       Luanda      Malabo  Mbabane    Nairobi   Nouakchott   Sao_Tome    Tunis
Addis_Ababa  Asmera   Banjul  Brazzaville  Casablanca  Dakar    Douala         Gaborone  Juba          Kigali    Libreville  Lubumbashi  Maputo  Mogadishu  Ndjamena  Ouagadougou  Timbuktu    Windhoek
Add the entry in an environment file to set your timezone to Japan:
parameter_defaults:
  TimeZone: 'Japan'
3.2. Example 2: Disabling Layer 3 High Availability (L3HA)
The Heat template for the OpenStack Networking (neutron) API (puppet/services/neutron-api.yaml) contains a parameter to enable and disable Layer 3 High Availability (L3HA). The default for the parameter is false. However, you can enable it using the following in an environment file:
parameter_defaults:
  NeutronL3HA: true
3.3. Example 3: Configuring the Telemetry Dispatcher
The OpenStack Telemetry (ceilometer) service includes a component for a time series data storage (gnocchi). The puppet/services/ceilometer-base.yaml Heat Template allows you to switch between gnocchi and the standard database. You accomplish this with the CeilometerMeterDispatcher parameter, which you set to either:
-
gnocchi- Use the new time series database for Ceilometer dispatcher. This is the default option. -
database- Use the standard database for the Ceilometer dispatcher.
To switch to a standard database, add the following to an environment file:
parameter_defaults:
  CeilometerMeterDispatcher: database
3.4. Example 4: Configuring RabbitMQ File Descriptor Limit
For certain configurations, you might need to increase the file descriptor limit for the RabbitMQ server. The puppet/services/rabbitmq.yaml Heat template allows you to set the RabbitFDLimit parameter to the limit you require. Add the following to an environment file.
parameter_defaults:
  RabbitFDLimit: 65536
3.5. Example 5: Enabling and Disabling Parameters
In some case, you might need to initially set a parameters during a deployment, then disable the parameter for a future deployment operation, such as updates or scaling operations. For example, to include a custom RPM during the overcloud creation, you would include the following:
parameter_defaults:
  DeployArtifactURLs: ["http://www.example.com/myfile.rpm"]
If you need to disable this parameter from a future deployment, it is not enough to remove the parameter. Instead, you set the parameter to an empty value:
parameter_defaults:
  DeployArtifactURLs: []
This ensures the parameter is no longer set for subsequent deployments operations.
3.6. Identifying Parameters to Modify
Red Hat OpenStack Platform director provides many parameters for configuration. In some cases, you might experience difficulty identifying a certain option to configure and the corresponding director parameter. If there is an option you want to configure through the director, use the following workflow to identify and map the option to a specific overcloud parameter:
- Identify the option you aim to configure. Make a note of the service that uses the option.
Check the corresponding Puppet module for this option. The Puppet modules for Red Hat OpenStack Platform are located under
/etc/puppet/moduleson the director node. Each module corresponds to a particular service. For example, thekeystonemodule corresponds to the OpenStack Identity (keystone).- If the Puppet module contains a variable that controls the chosen option, move to the next step.
- If the Puppet module does not contain a variable that controls the chosen option, then no hieradata exists for this option. If possible, you can set the option manually after the overcloud completes deployment.
Check the director’s core Heat template collection for the Puppet variable in the form of hieradata. The templates in
puppet/services/*usually correspond to the Puppet modules of the same services. For example, thepuppet/services/keystone.yamltemplate provides hieradata to thekeystonemodule.- If the Heat template sets hieradata for the Puppet variable, the template should also disclose the director-based parameter to modify.
- If the Heat template does not set hieradata for the Puppet variable, use the configuration hooks to pass the hieradata using an environment file. See Section 4.5, “Puppet: Customizing Hieradata for Roles” for more information on customizing hieradata.
Workflow Example
You might aim to change the notification format for OpenStack Identity (keystone). Using the workflow, you would:
-
Identify the OpenStack parameter to configure (
notification_format). Search the
keystonePuppet module for thenotification_formatsetting. For example:$ grep notification_format /etc/puppet/modules/keystone/manifests/*
In this case, the
keystonemodule manages this option using thekeystone::notification_formatvariable.Search the
keystoneservice template for this variable. For example:$ grep "keystone::notification_format" /usr/share/openstack-tripleo-heat-templates/puppet/services/keystone.yaml
The output shows the director using the
KeystoneNotificationFormatparameter to set thekeystone::notification_formathieradata.
The following table shows the eventual mapping:
| Director Parameter | Puppet Hieradata | OpenStack Identity (keystone) option |
|---|---|---|
|
|
|
|
This means setting the KeystoneNotificationFormat in an overcloud’s environment file would set the notification_format option in the keystone.conf file during the overcloud’s configuration.
Chapter 4. Configuration Hooks
The configuration hooks provide a method to inject your own configuration functions into the Overcloud deployment process. This includes hooks for injecting custom configuration before and after the main Overcloud services configuration and hook for modifying and including Puppet-based configuration.
4.1. First Boot: Customizing First Boot Configuration
The director provides a mechanism to perform configuration on all nodes upon the initial creation of the Overcloud. The director achieves this through cloud-init, which you can call using the OS::TripleO::NodeUserData resource type.
In this example, you will update the nameserver with a custom IP address on all nodes. You must first create a basic heat template (/home/stack/templates/nameserver.yaml) that runs a script to append each node’s resolv.conf with a specific nameserver. You can use the OS::TripleO::MultipartMime resource type to send the configuration script.
heat_template_version: 2014-10-16

description: >
  Extra hostname configuration

resources:
  userdata:
    type: OS::Heat::MultipartMime
    properties:
      parts:
      - config: {get_resource: nameserver_config}

  nameserver_config:
    type: OS::Heat::SoftwareConfig
    properties:
      config: |
        #!/bin/bash
        echo "nameserver 192.168.1.1" >> /etc/resolv.conf

outputs:
  OS::stack_id:
    value: {get_resource: userdata}
Next, create an environment file (/home/stack/templates/firstboot.yaml) that registers your heat template as the OS::TripleO::NodeUserData resource type.
resource_registry:
  OS::TripleO::NodeUserData: /home/stack/templates/nameserver.yaml
To add the first boot configuration, add the environment file to the stack along with your other environment files when first creating the Overcloud. For example:
$ openstack overcloud deploy --templates \
    ...
    -e /home/stack/templates/firstboot.yaml \
    ...
The -e applies the environment file to the Overcloud stack.
This adds the configuration to all nodes when they are first created and boot for the first time. Subsequent inclusions of these templates, such as updating the Overcloud stack, does not run these scripts.
You can only register the OS::TripleO::NodeUserData to one heat template. Subsequent usage overrides the heat template to use.
4.2. Pre-Configuration: Customizing Specific Overcloud Roles
Previous versions of this document used the OS::TripleO::Tasks::*PreConfig resources to provide pre-configuration hooks on a per role basis. The director’s Heat template collection requires dedicated use of these hooks, which means you should not use them for custom use. Instead, use the OS::TripleO::*ExtraConfigPre hooks outlined below.
The Overcloud uses Puppet for the core configuration of OpenStack components. The director provides a set of hooks to provide custom configuration for specific node roles after the first boot completes and before the core configuration begins. These hooks include:
- OS::TripleO::ControllerExtraConfigPre
- Additional configuration applied to Controller nodes before the core Puppet configuration.
- OS::TripleO::ComputeExtraConfigPre
- Additional configuration applied to Compute nodes before the core Puppet configuration.
- OS::TripleO::CephStorageExtraConfigPre
- Additional configuration applied to Ceph Storage nodes before the core Puppet configuration.
- OS::TripleO::ObjectStorageExtraConfigPre
- Additional configuration applied to Object Storage nodes before the core Puppet configuration.
- OS::TripleO::BlockStorageExtraConfigPre
- Additional configuration applied to Block Storage nodes before the core Puppet configuration.
- OS::TripleO::[ROLE]ExtraConfigPre
-
Additional configuration applied to custom nodes before the core Puppet configuration. Replace
[ROLE]with the composable role name.
In this example, you first create a basic heat template (/home/stack/templates/nameserver.yaml) that runs a script to write to a node’s resolv.conf with a variable nameserver.
heat_template_version: 2014-10-16

description: >
  Extra hostname configuration

parameters:
  server:
    type: string
  nameserver_ip:
    type: string
  DeployIdentifier:
    type: string

resources:
  CustomExtraConfigPre:
    type: OS::Heat::SoftwareConfig
    properties:
      group: script
      config:
        str_replace:
          template: |
            #!/bin/sh
            echo "nameserver _NAMESERVER_IP_" > /etc/resolv.conf
          params:
            _NAMESERVER_IP_: {get_param: nameserver_ip}

  CustomExtraDeploymentPre:
    type: OS::Heat::SoftwareDeployment
    properties:
      server: {get_param: server}
      config: {get_resource: CustomExtraConfigPre}
      actions: ['CREATE','UPDATE']
      input_values:
        deploy_identifier: {get_param: DeployIdentifier}

outputs:
  deploy_stdout:
    description: Deployment reference, used to trigger pre-deploy on changes
    value: {get_attr: [CustomExtraDeploymentPre, deploy_stdout]}
In this example, the resources section contains the following:
- CustomExtraConfigPre
-
This defines a software configuration. In this example, we define a Bash
scriptand Heat replaces_NAMESERVER_IP_with the value stored in thenameserver_ipparameter. - CustomExtraDeploymentPre
This executes a software configuration, which is the software configuration from the
CustomExtraConfigPreresource. Note the following:-
The
configparameter makes a reference to theCustomExtraConfigPreresource so Heat knows what configuration to apply. -
The
serverparameter retrieves a map of the Overcloud nodes. This parameter is provided by the parent template and is mandatory in templates for this hook. -
The
actionsparameter defines when to apply the configuration. In this case, we only apply the configuration when the Overcloud is created. Possible actions includeCREATE,UPDATE,DELETE,SUSPEND, andRESUME. -
input_valuescontains a parameter calleddeploy_identifier, which stores theDeployIdentifierfrom the parent template. This parameter provides a timestamp to the resource for each deployment update. This ensures the resource reapplies on subsequent overcloud updates.
-
The
Next, create an environment file (/home/stack/templates/pre_config.yaml) that registers your heat template to the role-based resource type. For example, to apply only to Controller nodes, use the ControllerExtraConfigPre hook:
resource_registry:
  OS::TripleO::ControllerExtraConfigPre: /home/stack/templates/nameserver.yaml

parameter_defaults:
  nameserver_ip: 192.168.1.1
To apply the configuration, add the environment file to the stack along with your other environment files when creating or updating the Overcloud. For example:
$ openstack overcloud deploy --templates \
    ...
    -e /home/stack/templates/pre_config.yaml \
    ...
This applies the configuration to all Controller nodes before the core configuration begins on either the initial Overcloud creation or subsequent updates.
You can only register each resource to only one Heat template per hook. Subsequent usage overrides the Heat template to use.
4.3. Pre-Configuration: Customizing All Overcloud Roles
The Overcloud uses Puppet for the core configuration of OpenStack components. The director provides a hook to configure all node types after the first boot completes and before the core configuration begins:
- OS::TripleO::NodeExtraConfig
- Additional configuration applied to all nodes roles before the core Puppet configuration.
In this example, you first create a basic heat template (/home/stack/templates/nameserver.yaml) that runs a script to append each node’s resolv.conf with a variable nameserver.
heat_template_version: 2014-10-16

description: >
  Extra hostname configuration

parameters:
  server:
    type: string
  nameserver_ip:
    type: string
  DeployIdentifier:
    type: string

resources:
  CustomExtraConfigPre:
    type: OS::Heat::SoftwareConfig
    properties:
      group: script
      config:
        str_replace:
          template: |
            #!/bin/sh
            echo "nameserver _NAMESERVER_IP_" >> /etc/resolv.conf
          params:
            _NAMESERVER_IP_: {get_param: nameserver_ip}

  CustomExtraDeploymentPre:
    type: OS::Heat::SoftwareDeployment
    properties:
      server: {get_param: server}
      config: {get_resource: CustomExtraConfigPre}
      actions: ['CREATE','UPDATE']
      input_values:
        deploy_identifier: {get_param: DeployIdentifier}

outputs:
  deploy_stdout:
    description: Deployment reference, used to trigger pre-deploy on changes
    value: {get_attr: [CustomExtraDeploymentPre, deploy_stdout]}
In this example, the resources section contains the following:
- CustomExtraConfigPre
-
This defines a software configuration. In this example, we define a Bash
scriptand Heat replaces_NAMESERVER_IP_with the value stored in thenameserver_ipparameter. - CustomExtraDeploymentPre
This executes a software configuration, which is the software configuration from the
CustomExtraConfigPreresource. Note the following:-
The
configparameter makes a reference to theCustomExtraConfigPreresource so Heat knows what configuration to apply. -
The
serverparameter retrieves a map of the Overcloud nodes. This parameter is provided by the parent template and is mandatory in templates for this hook. -
The
actionsparameter defines when to apply the configuration. In this case, we only apply the configuration when the Overcloud is created. Possible actions includeCREATE,UPDATE,DELETE,SUSPEND, andRESUME. -
The
input_valuesparameter contains a sub-parameter calleddeploy_identifier, which stores theDeployIdentifierfrom the parent template. This parameter provides a timestamp to the resource for each deployment update. This ensures the resource reapplies on subsequent overcloud updates.
-
The
Next, create an environment file (/home/stack/templates/pre_config.yaml) that registers your heat template as the OS::TripleO::NodeExtraConfig resource type.
resource_registry:
  OS::TripleO::NodeExtraConfig: /home/stack/templates/nameserver.yaml

parameter_defaults:
  nameserver_ip: 192.168.1.1
To apply the configuration, add the environment file to the stack along with your other environment files when creating or updating the Overcloud. For example:
$ openstack overcloud deploy --templates \
    ...
    -e /home/stack/templates/pre_config.yaml \
    ...
This applies the configuration to all nodes before the core configuration begins on either the initial Overcloud creation or subsequent updates.
You can only register the OS::TripleO::NodeExtraConfig to only one Heat template. Subsequent usage overrides the Heat template to use.
4.4. Post-Configuration: Customizing All Overcloud Roles
Previous versions of this document used the OS::TripleO::Tasks::*PostConfig resources to provide post-configuration hooks on a per role basis. The director’s Heat template collection requires dedicated use of these hooks, which means you should not use them for custom use. Instead, use the OS::TripleO::NodeExtraConfigPost hook outlined below.
A situation might occur where you have completed the creation of your Overcloud but want to add additional configuration to all roles, either on initial creation or on a subsequent update of the Overcloud. In this case, you use the following post-configuration hook:
- OS::TripleO::NodeExtraConfigPost
- Additional configuration applied to all nodes roles after the core Puppet configuration.
In this example, you first create a basic heat template (/home/stack/templates/nameserver.yaml) that runs a script to append each node’s resolv.conf with a variable nameserver.
heat_template_version: 2014-10-16

description: >
  Extra hostname configuration

parameters:
  servers:
    type: json
  nameserver_ip:
    type: string
  DeployIdentifier:
    type: string

resources:
  CustomExtraConfig:
    type: OS::Heat::SoftwareConfig
    properties:
      group: script
      config:
        str_replace:
          template: |
            #!/bin/sh
            echo "nameserver _NAMESERVER_IP_" >> /etc/resolv.conf
          params:
            _NAMESERVER_IP_: {get_param: nameserver_ip}

  CustomExtraDeployments:
    type: OS::Heat::SoftwareDeploymentGroup
    properties:
      servers:  {get_param: servers}
      config: {get_resource: CustomExtraConfig}
      actions: ['CREATE','UPDATE']
      input_values:
        deploy_identifier: {get_param: DeployIdentifier}
In this example, the resources section contains the following:
- CustomExtraConfig
-
This defines a software configuration. In this example, we define a Bash
scriptand Heat replaces_NAMESERVER_IP_with the value stored in thenameserver_ipparameter. - CustomExtraDeployments
This executes a software configuration, which is the software configuration from the
CustomExtraConfigresource. Note the following:-
The
configparameter makes a reference to theCustomExtraConfigresource so Heat knows what configuration to apply. -
The
serversparameter retrieves a map of the Overcloud nodes. This parameter is provided by the parent template and is mandatory in templates for this hook. -
The
actionsparameter defines when to apply the configuration. In this case, we only apply the configuration when the Overcloud is created. Possible actions includeCREATE,UPDATE,DELETE,SUSPEND, andRESUME. -
input_valuescontains a parameter calleddeploy_identifier, which stores theDeployIdentifierfrom the parent template. This parameter provides a timestamp to the resource for each deployment update. This ensures the resource reapplies on subsequent overcloud updates.
-
The
Next, create an environment file (/home/stack/templates/post_config.yaml) that registers your heat template as the OS::TripleO::NodeExtraConfigPost: resource type.
resource_registry:
  OS::TripleO::NodeExtraConfigPost: /home/stack/templates/nameserver.yaml

parameter_defaults:
  nameserver_ip: 192.168.1.1
To apply the configuration, add the environment file to the stack along with your other environment files when creating or updating the Overcloud. For example:
$ openstack overcloud deploy --templates \
    ...
    -e /home/stack/templates/post_config.yaml \
    ...
This applies the configuration to all nodes after the core configuration completes on either initial Overcloud creation or subsequent updates.
You can only register the OS::TripleO::NodeExtraConfigPost to only one Heat template. Subsequent usage overrides the Heat template to use.
4.5. Puppet: Customizing Hieradata for Roles
The Heat template collection contains a set of parameters to pass extra configuration to certain node types. These parameters save the configuration as hieradata for the node’s Puppet configuration. These parameters are:
- ControllerExtraConfig
- Configuration to add to all Controller nodes.
- NovaComputeExtraConfig
- Configuration to add to all Compute nodes.
- BlockStorageExtraConfig
- Configuration to add to all Block Storage nodes.
- ObjectStorageExtraConfig
- Configuration to add to all Object Storage nodes
- CephStorageExtraConfig
- Configuration to add to all Ceph Storage nodes
- [ROLE]ExtraConfig
-
Configuration to add to a composable role. Replace
[ROLE]with the composable role name. - ExtraConfig
- Configuration to add to all nodes.
To add extra configuration to the post-deployment configuration process, create an environment file that contains these parameters in the parameter_defaults section. For example, to increase the reserved memory for Compute hosts to 1024 MB and set the VNC keymap to Japanese:
parameter_defaults:
  NovaComputeExtraConfig:
    nova::compute::reserved_host_memory: 1024
    nova::compute::vnc_keymap: ja
Include this environment file when running openstack overcloud deploy.
You can only define each parameter once. Subsequent usage overrides previous values.
4.6. Puppet: Customizing Hieradata for Individual Nodes
You can set Puppet hieradata for individual nodes using the Heat template collection. To accomplish this, you need to acquire the system UUID saved as part of the introspection data for a node:
$ openstack baremetal introspection data save 9dcc87ae-4c6d-4ede-81a5-9b20d7dc4a14 | jq .extra.system.product.uuid
This outputs a system UUID. For example:
"F5055C6C-477F-47FB-AFE5-95C6928C407F"
Use this system UUID in an environment file that defines node-specific hieradata and registers the per_node.yaml template to a pre-configuration hook. For example:
resource_registry:
  OS::TripleO::ComputeExtraConfigPre: /usr/share/openstack-tripleo-heat-templates/puppet/extraconfig/pre_deploy/per_node.yaml
parameter_defaults:
  NodeDataLookup: '{"F5055C6C-477F-47FB-AFE5-95C6928C407F": {"nova::compute::vcpu_pin_set": [ "2", "3" ]}}'
Include this environment file when running openstack overcloud deploy.
The per_node.yaml template generates a set of heiradata files on nodes that correspond to each system UUID and contains the hieradata you defined. If a UUID is not defined, the resulting hieradata file is empty. In the previous example, the per_node.yaml template runs on all Compute nodes (as per the OS::TripleO::ComputeExtraConfigPre hook), but only the Compute node with system UUID F5055C6C-477F-47FB-AFE5-95C6928C407F receives hieradata.
This provides a method of tailoring each node to specific requirements.
4.7. Puppet: Applying Custom Manifests
In certain circumstances, you might need to install and configure some additional components to your Overcloud nodes. You can achieve this with a custom Puppet manifest that applies to nodes on after the main configuration completes. As a basic example, you might intend to install motd to each node. The process for accomplishing is to first create a Heat template (/home/stack/templates/custom_puppet_config.yaml) that launches Puppet configuration.
heat_template_version: 2014-10-16

description: >
  Run Puppet extra configuration to set new MOTD

parameters:
  servers:
    type: json

resources:
  ExtraPuppetConfig:
    type: OS::Heat::SoftwareConfig
    properties:
      config: {get_file: motd.pp}
      group: puppet
      options:
        enable_hiera: True
        enable_facter: False

  ExtraPuppetDeployments:
    type: OS::Heat::SoftwareDeploymentGroup
    properties:
      config: {get_resource: ExtraPuppetConfig}
      servers: {get_param: servers}
This includes the /home/stack/templates/motd.pp within the template and passes it to nodes for configuration. The motd.pp file itself contains the Puppet classes to install and configure motd.
Next, create an environment file (/home/stack/templates/puppet_post_config.yaml) that registers your heat template as the OS::TripleO::NodeExtraConfigPost: resource type.
resource_registry:
  OS::TripleO::NodeExtraConfigPost: /home/stack/templates/custom_puppet_config.yaml
And finally include this environment file along with your other environment files when creating or updating the Overcloud stack:
$ openstack overcloud deploy --templates \
    ...
    -e /home/stack/templates/puppet_post_config.yaml \
    ...
This applies the configuration from motd.pp to all nodes in the Overcloud.
Chapter 5. Overcloud Registration
The Overcloud provides a method to register nodes to either the Red Hat Content Delivery Network, a Red Hat Satellite 5 server, or a Red Hat Satellite 6 server.
5.1. Registering the Overcloud with an Environment File
Copy the registration files from the Heat template collection:
$ cp -r /usr/share/openstack-tripleo-heat-templates/extraconfig/pre_deploy/rhel-registration ~/templates/.
Edit the ~/templates/rhel-registration/environment-rhel-registration.yaml and modify the following values to suit your registration method and details.
- rhel_reg_method
-
Choose the registration method. Either
portal,satellite, ordisable. - rhel_reg_type
-
The type of unit to register. Leave blank to register as a
system - rhel_reg_auto_attach
-
Automatically attach compatible subscriptions to this system. Set to
trueto enable. To disable this feature, remove this parameter from your environment file. - rhel_reg_service_level
- The service level to use for auto attachment.
- rhel_reg_release
- Use this parameter to set a release version for auto attachment. Leave blank to use the default from Red Hat Subscription Manager.
- rhel_reg_pool_id
-
The subscription pool ID to use. Use this if not auto-attaching subscriptions. To locate this ID, run
sudo subscription-manager list --available --all --matches="*OpenStack*"from the undercloud node, and use the resultingPool IDvalue. - rhel_reg_sat_url
-
The base URL of the Satellite server to register Overcloud nodes. Use the Satellite’s HTTP URL and not the HTTPS URL for this parameter. For example, use http://satellite.example.com and not https://satellite.example.com. The Overcloud creation process uses this URL to determine whether the server is a Red Hat Satellite 5 or Red Hat Satellite 6 server. If a Red Hat Satellite 6 server, the Overcloud obtains the
katello-ca-consumer-latest.noarch.rpmfile, registers withsubscription-manager, and installskatello-agent. If a Red Hat Satellite 5 server, the Overcloud obtains theRHN-ORG-TRUSTED-SSL-CERTfile and registers withrhnreg_ks. - rhel_reg_server_url
- The hostname of the subscription service to use. The default is for Customer Portal Subscription Management, subscription.rhn.redhat.com. If this option is not used, the system is registered with Customer Portal Subscription Management. The subscription server URL uses the form of https://hostname:port/prefix.
- rhel_reg_base_url
- Gives the hostname of the content delivery server to use to receive updates. The default is https://cdn.redhat.com. Since Satellite 6 hosts its own content, the URL must be used for systems registered with Satellite 6. The base URL for content uses the form of https://hostname:port/prefix.
- rhel_reg_org
-
The organization to use for registration. To locate this ID, run
sudo subscription-manager orgsfrom the undercloud node. Enter your Red Hat credentials when prompted, and use the resultingKeyvalue. - rhel_reg_environment
- The environment to use within the chosen organization.
- rhel_reg_repos
- A comma-separated list of repositories to enable.
- rhel_reg_activation_key
- The activation key to use for registration.
- rhel_reg_user; rhel_reg_password
- The username and password for registration. If possible, use activation keys for registration.
- rhel_reg_machine_name
- The machine name. Leave this as blank to use the hostname of the node.
- rhel_reg_force
-
Set to
trueto force your registration options. For example, when re-registering nodes. - rhel_reg_sat_repo
-
The repository containing Red Hat Satellite 6’s management tools, such as
katello-agent. Check the correct repository name corresponds to your Red Hat Satellite version and check that the repository is synchronized on the Satellite server. For example,rhel-7-server-satellite-tools-6.2-rpmscorresponds to Red Hat Satellite 6.2.
The deployment command (openstack overcloud deploy) uses the -e option to add environment files. Add both ~/templates/rhel-registration/environment-rhel-registration.yaml and ~/templates/rhel-registration/rhel-registration-resource-registry.yaml. For example:
$ openstack overcloud deploy --templates [...] -e /home/stack/templates/rhel-registration/environment-rhel-registration.yaml -e /home/stack/templates/rhel-registration/rhel-registration-resource-registry.yaml
Registration is set as the OS::TripleO::NodeExtraConfig Heat resource. This means you can only use this resource for registration. See Section 4.2, “Pre-Configuration: Customizing Specific Overcloud Roles” for more information.
5.2. Example 1: Registering to the Customer Portal
The following registers the overcloud nodes to the Red Hat Customer Portal using the my-openstack activation key and subscribes to pool 1a85f9223e3d5e43013e3d6e8ff506fd.
parameter_defaults:
  rhel_reg_auto_attach: ""
  rhel_reg_activation_key: "my-openstack"
  rhel_reg_org: "1234567"
  rhel_reg_pool_id: "1a85f9223e3d5e43013e3d6e8ff506fd"
  rhel_reg_repos: "rhel-7-server-rpms,rhel-7-server-extras-rpms,rhel-7-server-rh-common-rpms,rhel-ha-for-rhel-7-server-rpms,rhel-7-server-openstack-10-rpms,rhel-7-server-rhceph-2-osd-rpms,rhel-7-server-rhceph-2-mon-rpms,rhel-7-server-rhceph-2-tools-rpms"
  rhel_reg_method: "portal"
  rhel_reg_sat_repo: ""
  rhel_reg_base_url: ""
  rhel_reg_environment: ""
  rhel_reg_force: ""
  rhel_reg_machine_name: ""
  rhel_reg_password: ""
  rhel_reg_release: "7.7"
  rhel_reg_sat_url: ""
  rhel_reg_server_url: ""
  rhel_reg_service_level: ""
  rhel_reg_user: ""
  rhel_reg_type: ""
  rhel_reg_http_proxy_host: ""
  rhel_reg_http_proxy_port: ""
  rhel_reg_http_proxy_username: ""
  rhel_reg_http_proxy_password: ""
5.3. Example 2: Registering to a Red Hat Satellite 6 Server
The following registers the overcloud nodes to a Red Hat Satellite 6 Server at sat6.example.com and uses the my-openstack activation key to subscribe to pool 1a85f9223e3d5e43013e3d6e8ff506fd. In this situation, the activation key also provides the repositories to enable.
parameter_defaults:
  rhel_reg_activation_key: "my-openstack"
  rhel_reg_org: "1"
  rhel_reg_pool_id: "1a85f9223e3d5e43013e3d6e8ff506fd"
  rhel_reg_method: "satellite"
  rhel_reg_sat_url: "http://sat6.example.com"
  rhel_reg_sat_repo: "rhel-7-server-satellite-tools-6.2-rpms"
  rhel_reg_repos: ""
  rhel_reg_auto_attach: ""
  rhel_reg_base_url: ""
  rhel_reg_environment: ""
  rhel_reg_force: ""
  rhel_reg_machine_name: ""
  rhel_reg_password: ""
  rhel_reg_release: "7.7"
  rhel_reg_server_url: ""
  rhel_reg_service_level: ""
  rhel_reg_user: ""
  rhel_reg_type: ""
  rhel_reg_http_proxy_host: ""
  rhel_reg_http_proxy_port: ""
  rhel_reg_http_proxy_username: ""
  rhel_reg_http_proxy_password: ""
5.4. Example 3: Registering to a Red Hat Satellite 5 Server
The following registers the overcloud nodes to a Red Hat Satellite 5 Server at sat5.example.com, uses the my-openstack activation key, and automatically attaches subscriptions. In this situation, the activation key also provides the repositories to enable.
parameter_defaults:
  rhel_reg_auto_attach: ""
  rhel_reg_activation_key: "my-openstack"
  rhel_reg_org: "1"
  rhel_reg_method: "satellite"
  rhel_reg_sat_url: "http://sat5.example.com"
  rhel_reg_repos: ""
  rhel_reg_base_url: ""
  rhel_reg_environment: ""
  rhel_reg_force: ""
  rhel_reg_machine_name: ""
  rhel_reg_password: ""
  rhel_reg_pool_id: ""
  rhel_reg_release: "7.7"
  rhel_reg_server_url: ""
  rhel_reg_service_level: ""
  rhel_reg_user: ""
  rhel_reg_type: ""
  rhel_reg_sat_repo: ""
  rhel_reg_http_proxy_host: ""
  rhel_reg_http_proxy_port: ""
  rhel_reg_http_proxy_username: ""
  rhel_reg_http_proxy_password: ""
Chapter 6. Composable Services and Custom Roles
The Overcloud usually consists of nodes in predefined roles such as Controller nodes, Compute nodes, and different storage node types. Each of these default roles contains a set of services defined in the core Heat template collection on the director node. However, the architecture of the core Heat templates provides a method to:
- Create custom roles
- Add and remove services from each role
This chapter explores the architecture of custom roles, composable services, and methods for using them.
Guidelines and Limitations
Note the following guidelines and limitations for the composable node architecture:
-
You can assign any
systemdmanaged service to a supported standalone custom role. - You cannot split Pacemaker-managed services. This is because the Pacemaker manages the same set of services on each node within the Overcloud cluster. Splitting Pacemaker-managed services can cause cluster deployment errors. These services should remain on the Controller role.
- You cannot change to custom roles and composable services during the upgrade process from Red Hat OpenStack Platform 9 to 10. The upgrade scripts can only accommodate the default Overcloud roles.
- You can create additional custom roles after the initial deployment and deploy them to scale existing services.
- You cannot modify the list of services for any role after deploying an Overcloud. Modifying the service lists after Overcloud deployment can cause deployment errors and leave orphaned services on nodes.
Supported Custom Role Architecture
Custom roles and composable services are new features in Red Hat OpenStack Platform 10 and only a limited number of composable service combinations have been tested and verified at this early stage. Red Hat supports the following architectures when using custom roles and composable services:
- Architecture 1 - Monolithic Controller
- All controller services are contained within one Controller role. This is the default. See Section 6.8, “Service Architecture: Monolithic Controller” for more details.
- Architecture 2 - Split Controller
The controller services are split into two roles:
- Controller PCMK - Core Pacemaker-managed services such as database and load balancing
- Controller Systemd - 'systemd`-managed OpenStack Platform services
See Section 6.9, “Service Architecture: Split Controller” for more details.
- Architecture 3 - Standalone roles
- Use Architecture 1 or Architecture 2, except split the OpenStack Platform services into custom roles. See Section 6.10, “Service Architecture: Standalone Roles” for more details.
6.1. Examining Custom Role Architecture
The Overcloud creation process defines its roles using a template that contains role data. The default template is located at /usr/share/openstack-tripleo-heat-templates/roles_data.yaml and defines all the default role types: Controller, Compute, BlockStorage, ObjectStorage, and CephStorage.
If creating a custom roles_data.yaml file, the Controller role must always be the first role defined. This role is treated as the primary role.
Each role contains the following parameters:
- name
-
(Mandatory) The name of the role, which is a plain text name with no spaces or special characters. Check that the chosen name does not cause conflicts with other resources. For example, use
Networkeras a name instead ofNetwork. For recommendations on role names, see Section 6.9, “Service Architecture: Split Controller” for examples. - CountDefault
- (Optional) Defines the default number of nodes to deploy for this role.
- HostnameFormatDefault
(Optional) Defines the default hostname format for the role. The default naming convention uses the following format:
[STACK NAME]-[ROLE NAME]-[NODE ID]
For example, the default Controller nodes are named:
overcloud-controller-0
overcloud-controller-1
overcloud-controller-2
...
- ServicesDefault
- (Optional) Defines the default list of services to include on the node. See Section 6.2, “Examining Composable Service Architecture” for more information.
These options provide a means to create new roles and also define which services to include.
The openstack overcloud deploy command integrates the parameters from roles_data.yaml file into the overcloud.j2.yaml Heat template. At certain points, the overcloud.j2.yaml Heat template iterates over the list of roles from roles_data.yaml and creates parameters and resources specific to each respective role.
For example, the resource definition for each role in the overcloud.j2.yaml Heat template appears as the following snippet:
  {{role.name}}:
    type: OS::Heat::ResourceGroup
    depends_on: Networks
    properties:
      count: {get_param: {{role.name}}Count}
      removal_policies: {get_param: {{role.name}}RemovalPolicies}
      resource_def:
        type: OS::TripleO::{{role.name}}
        properties:
          CloudDomain: {get_param: CloudDomain}
          ServiceNetMap: {get_attr: [ServiceNetMap, service_net_map]}
          EndpointMap: {get_attr: [EndpointMap, endpoint_map]}
...
This snippet shows how the Jinja2-based template incorporates the {{role.name}} variable to define the name of each role as a OS::Heat::ResourceGroup resource. This in turn uses each name parameter from roles_data.yaml to name each respective OS::Heat::ResourceGroup resource.
6.2. Examining Composable Service Architecture
The core Heat template collection contains a collection of composable service templates in the puppet/services subdirectory. You can view these services with the following command:
$ ls /usr/share/openstack-tripleo-heat-templates/puppet/services
Each service template contains a description that identifies its purpose. For example, the keystone.yaml service template contains the following description:
description: >
 OpenStack Identity (`keystone`) service configured with Puppet
These service templates are registered as resources specific to a Red Hat OpenStack Platform deployment. This means you can call each resource using a unique Heat resource namespace defined in the overcloud-resource-registry-puppet.j2.yaml file. All services use the OS::TripleO::Services namespace for their resource type. For example, the keystone.yaml service template is registered to the OS::TripleO::Services::Keystone resource type:
grep "OS::TripleO::Services::Keystone" /usr/share/openstack-tripleo-heat-templates/overcloud-resource-registry-puppet.j2.yaml
  OS::TripleO::Services::Keystone: puppet/services/keystone.yaml
The overcloud.j2.yaml Heat template includes a section of Jinja2-based code to define a service list for each custom role in the roles_data.yaml file:
{{role.name}}Services:
  description: A list of service resources (configured in the Heat
               resource_registry) which represent nested stacks
               for each service that should get installed on the {{role.name}} role.
  type: comma_delimited_list
  default: {{role.ServicesDefault|default([])}}
For the default roles, this creates the following service list parameters: ControllerServices, ComputeServices, BlockStorageServices, ObjectStorageServices, and CephStorageServices.
You define the default services for each custom role in the roles_data.yaml file. For example, the default Controller role contains the following content:
- name: Controller
  CountDefault: 1
  ServicesDefault:
    - OS::TripleO::Services::CACerts
    - OS::TripleO::Services::CephMon
    - OS::TripleO::Services::CephExternal
    - OS::TripleO::Services::CephRgw
    - OS::TripleO::Services::CinderApi
    - OS::TripleO::Services::CinderBackup
    - OS::TripleO::Services::CinderScheduler
    - OS::TripleO::Services::CinderVolume
    - OS::TripleO::Services::Core
    - OS::TripleO::Services::Kernel
    - OS::TripleO::Services::Keystone
    - OS::TripleO::Services::GlanceApi
    - OS::TripleO::Services::GlanceRegistry
...
These services are then defined as the default list for the ControllerServices parameter.
You can also use an environment file to override the default list for the service parameters. For example, you can define ControllerServices as a parameter_default in an environment file to override the services list from the roles_data.yaml file.
6.3. Enabling Disabled Services
Some services are disabled by default. These services are registered as null operations (OS::Heat::None) in the overcloud-resource-registry-puppet.j2.yaml file. For example, the Block Storage backup service (cinder-backup) is disabled:
OS::TripleO::Services::CinderBackup: OS::Heat::None
To enable this service, include an environment file that links the resource to its respective Heat templates in the puppet/services directory. Some services have predefined environment files in the environments directory. For example, the Block Storage backup service uses the environments/cinder-backup.yaml file, which contains the following:
resource_registry:
  OS::TripleO::Services::CinderBackup: ../puppet/services/pacemaker/cinder-backup.yaml
...
This overrides the default null operation resource and enables the service. Include this environment file when running the openstack overcloud deploy command.
$ openstack overcloud deploy --templates -e /usr/share/openstack-tripleo-heat-templates/environments/cinder-backup.yaml
For another example of how to enable disabled services, see the Installation section of the OpenStack Data Processing guide. This section contains instructions on how to enable the OpenStack Data Processing service (sahara) on the overcloud.
6.4. Adding and Removing Services from Roles
The basic method of adding or removing services involves creating a copy of the default service list for a node role and then adding or removing services. For example, you might aim to remove OpenStack Orchestration (heat) from the Controller nodes. In this situation, create a custom copy of the default roles_data.yaml file:
$ cp /usr/share/openstack-tripleo-heat-templates/roles_data.yaml ~/templates/roles_data-no_heat.yaml
Edit the roles_data file and modify the service list for the Controller’s ServicesDefault parameter. Scroll to the OpenStack Orchestration services and remove them:
    - OS::TripleO::Services::GlanceApi
    - OS::TripleO::Services::GlanceRegistry
    - OS::TripleO::Services::HeatApi            # Remove this service
    - OS::TripleO::Services::HeatApiCfn         # Remove this service
    - OS::TripleO::Services::HeatApiCloudwatch  # Remove this service
    - OS::TripleO::Services::HeatEngine         # Remove this service
    - OS::TripleO::Services::MySQL
    - OS::TripleO::Services::NeutronDhcpAgent
Include this new roles_data file when running the openstack overcloud deploy command. For example:
$ openstack overcloud deploy --templates -r ~/templates/roles_data-no_heat.yaml
This deploys an Overcloud without OpenStack Orchestration services installed on the Controller nodes.
You can also disable services in the roles_data file using a custom environment file. Redirect the services to disable to the OS::Heat::None resource. For example:
resource_registry:
  OS::TripleO::Services::HeatApi: OS::Heat::None
  OS::TripleO::Services::HeatApiCfn: OS::Heat::None
  OS::TripleO::Services::HeatApiCloudwatch: OS::Heat::None
  OS::TripleO::Services::HeatEngine: OS::Heat::None
6.5. Creating a New Role
In this example, the aim is to create a new Networker role to host OpenStack Networking (neutron) agents only. In this situation, you create a custom roles_data files that includes the new role information.
Create a custom copy of the default roles_data.yaml file:
$ cp /usr/share/openstack-tripleo-heat-templates/roles_data.yaml ~/templates/roles_data-network_node.yaml
Edit the new roles_data file and create a new Networker role containing base and core OpenStack Networking services. For example:
- name: Networker
  CountDefault: 1
  HostnameFormatDefault: '%stackname%-networker-%index%'
  ServicesDefault:
    - OS::TripleO::Services::CACerts
    - OS::TripleO::Services::FluentdClient
    - OS::TripleO::Services::Kernel
    - OS::TripleO::Services::NeutronDhcpAgent
    - OS::TripleO::Services::NeutronL3Agent
    - OS::TripleO::Services::NeutronMetadataAgent
    - OS::TripleO::Services::NeutronOvsAgent
    - OS::TripleO::Services::Ntp
    - OS::TripleO::Services::SensuClient
    - OS::TripleO::Services::Snmp
    - OS::TripleO::Services::Timezone
    - OS::TripleO::Services::TripleoPackages
    - OS::TripleO::Services::TripleoFirewall
    - OS::TripleO::Services::VipHosts
It is also a good idea to set the CountDefault to 1 so that a default Overcloud always includes the Networking node.
If scaling the services in an existing overcloud, keep the existing services on the Controller role. If creating a new overcloud and you only want the OpenStack Networking agents to remain on the standalone role, remove the OpenStack Networking agents from the Controller role definition:
- name: Controller
  CountDefault: 1
  ServicesDefault:
    - OS::TripleO::Services::CACerts
    - OS::TripleO::Services::CephMon
    - OS::TripleO::Services::CephExternal
    - OS::TripleO::Services::CephRgw
    - OS::TripleO::Services::CinderApi
    - OS::TripleO::Services::CinderBackup
    - OS::TripleO::Services::CinderScheduler
    - OS::TripleO::Services::CinderVolume
    - OS::TripleO::Services::Core
    - OS::TripleO::Services::Kernel
    - OS::TripleO::Services::Keystone
    - OS::TripleO::Services::GlanceApi
    - OS::TripleO::Services::GlanceRegistry
    - OS::TripleO::Services::HeatApi
    - OS::TripleO::Services::HeatApiCfn
    - OS::TripleO::Services::HeatApiCloudwatch
    - OS::TripleO::Services::HeatEngine
    - OS::TripleO::Services::MySQL
    - OS::TripleO::Services::NeutronDhcpAgent       # Remove this service
    - OS::TripleO::Services::NeutronL3Agent         # Remove this service
    - OS::TripleO::Services::NeutronMetadataAgent   # Remove this service
    - OS::TripleO::Services::NeutronApi
    - OS::TripleO::Services::NeutronCorePlugin
    - OS::TripleO::Services::NeutronOvsAgent        # Remove this service
    - OS::TripleO::Services::RabbitMQ
...
You might need to define a new flavor for this role so that you can tag specific nodes. For this example, use the following commands to create a networker flavor:
$ openstack flavor create --id auto --ram 6144 --disk 40 --vcpus 4 networker
$ openstack flavor set --property "cpu_arch"="x86_64" --property "capabilities:boot_option"="local" --property "capabilities:profile"="networker" networker
Tag nodes into the new flavor using the following command:
$ openstack baremetal node set --property capabilities='profile:networker,boot_option:local' 58c3d07e-24f2-48a7-bbb6-6843f0e8ee13
Define the Networker node count and flavor using the following environment file snippet:
parameter_defaults:
  OvercloudNetworkerFlavor: networker
  NetworkerCount: 1
Include the new roles_data file and environment file when running the openstack overcloud deploy command. For example:
$ openstack overcloud deploy --templates -r ~/templates/roles_data-network_node.yaml -e ~/templates/node-count-flavor.yaml
When the deployment completes, this creates a three-node Overcloud consisting of one Controller node, one Compute node, and one Networker node. To view the Overcloud’s list of nodes, run the following command:
$ nova list
6.6. Creating a Generic Node with No Services
Red Hat OpenStack Platform provides the ability to create generic Red Hat Enterprise Linux 7 nodes without any OpenStack services configured. This is useful in situations where you need to host software outside of the core Red Hat OpenStack Platform environment. For example, OpenStack Platform provides integration with monitoring tools such as Kibana and Sensu (see Chapter 12, Monitoring Tools Configuration). While Red Hat does not provide support for the monitoring tools themselves, the director can create a generic Red Hat Enterprise Linux 7 node to host these tools.
The generic node still uses the base overcloud-full image rather than a base Red Hat Enterprise Linux 7 image. This means the node has some Red Hat OpenStack Platform software installed but not enabled or configured.
Creating a generic node requires a new role without a ServicesDefault list:
- name: Generic
Include the role in your custom roles_data file (roles_data_with_generic.yaml). Make sure to keep the existing Controller and Compute roles.
You can also include an environment file (generic-node-params.yaml) to specify how many generic Red Hat Enterprise Linux 7 nodes you require and the flavor when selecting nodes to provision. For example:
parameter_defaults:
  OvercloudGenericFlavor: baremetal
  GenericCount: 1
Include both the roles file and the environment file when running the openstack overcloud deploy command. For example:
$ openstack overcloud deploy --templates -r ~/templates/roles_data_with_generic.yaml -e ~/templates/generic-node-params.yaml
This deploys a three-node environment with one Controller node, one Compute node, and one generic Red Hat Enterprise Linux 7 node.
6.7. Creating Hyper-Converged Compute and Ceph Services
Hyper-Converged Compute and Ceph Services are a Technology Preview feature. Technology Preview features are not fully supported under Red Hat Subscription Service Level Agreements (SLAs), may not be functionally complete, and are not intended for production use. However, these features provide early access to upcoming product innovations, enabling customers to test functionality and provide feedback during the development process. For more information on the support scope for features marked as technology previews, see https://access.redhat.com/support/offerings/techpreview/.
Ceph OSD services normally run on their own Ceph Storage nodes. However, the composable services provides a method to configure the Ceph OSD services on Compute nodes instead.
For example, the default service list for each role includes the following:
Compute nodes:
- name: Compute
  CountDefault: 1
  HostnameFormatDefault: '%stackname%-novacompute-%index%'
  ServicesDefault:
    - OS::TripleO::Services::CACerts
    - OS::TripleO::Services::CephClient
    - OS::TripleO::Services::CephExternal
    - OS::TripleO::Services::Timezone
    - OS::TripleO::Services::Ntp
    - OS::TripleO::Services::Snmp
    - OS::TripleO::Services::NovaCompute
    - OS::TripleO::Services::NovaLibvirt
    - OS::TripleO::Services::Kernel
    - OS::TripleO::Services::ComputeNeutronCorePlugin
    - OS::TripleO::Services::ComputeNeutronOvsAgent
    - OS::TripleO::Services::ComputeCeilometerAgent
    - OS::TripleO::Services::ComputeNeutronL3Agent
    - OS::TripleO::Services::ComputeNeutronMetadataAgent
    - OS::TripleO::Services::TripleoPackages
    - OS::TripleO::Services::TripleoFirewall
    - OS::TripleO::Services::NeutronSriovAgent
    - OS::TripleO::Services::OpenDaylightOvs
    - OS::TripleO::Services::SensuClient
    - OS::TripleO::Services::FluentdClient
    - OS::TripleO::Services::VipHosts
Ceph Storage nodes:
- name: CephStorage
  ServicesDefault:
    - OS::TripleO::Services::CACerts
    - OS::TripleO::Services::CephOSD
    - OS::TripleO::Services::Kernel
    - OS::TripleO::Services::Ntp
    - OS::TripleO::Services::Timezone
    - OS::TripleO::Services::TripleoPackages
    - OS::TripleO::Services::TripleoFirewall
    - OS::TripleO::Services::SensuClient
    - OS::TripleO::Services::FluentdClient
    - OS::TripleO::Services::VipHosts
The Ceph Storage role contain services common to the Compute role, which means you can ignore them. One service remains: OS::TripleO::Services::CephOSD.
Create a custom version of the default roles_data file:
$ cp /usr/share/openstack-tripleo-heat-templates/roles_data.yaml ~/templates/roles_data-ceph_osd_on_compute.yaml
Edit the file to add OS::TripleO::Services::CephOSD to the Compute’s service list:
- name: Compute
  CountDefault: 1
  HostnameFormatDefault: '%stackname%-novacompute-%index%'
  ServicesDefault:
    - OS::TripleO::Services::CACerts
    - OS::TripleO::Services::CephClient
    - OS::TripleO::Services::CephOSD
    - OS::TripleO::Services::Timezone
    - OS::TripleO::Services::Ntp
    - OS::TripleO::Services::Snmp
    - OS::TripleO::Services::NovaCompute
    - OS::TripleO::Services::NovaLibvirt
    - OS::TripleO::Services::Kernel
    - OS::TripleO::Services::ComputeNeutronCorePlugin
    - OS::TripleO::Services::ComputeNeutronOvsAgent
    - OS::TripleO::Services::ComputeCeilometerAgent
    - OS::TripleO::Services::ComputeNeutronL3Agent
    - OS::TripleO::Services::ComputeNeutronMetadataAgent
    - OS::TripleO::Services::TripleoPackages
    - OS::TripleO::Services::TripleoFirewall
    - OS::TripleO::Services::NeutronSriovAgent
    - OS::TripleO::Services::OpenDaylightOvs
    - OS::TripleO::Services::SensuClient
    - OS::TripleO::Services::FluentdClient
    - OS::TripleO::Services::VipHosts
You can also safely remove the OS::TripleO::Services::CephExternal service from the Compute service list because the Overcloud does not integrate with an external Ceph Storage cluster.
Include this role file when running the openstack overcloud deploy command. For example:
$ openstack overcloud deploy --templates -r ~/templates/roles_data-ceph_osd_on_compute.yaml -e ~/template/storage-environment.yaml
Note that this command also includes a custom environment file for storage (storage-environment.yaml), which contains parameters specific to the Ceph Storage.
After the Overcloud deployment, verify the Ceph OSD installation on a Compute node. Log into a Compute node and run the following:
[root@overcloud-novacompute-0 ~]# ps ax | grep ceph
17437 ?    Ss   0:00 /bin/bash -c ulimit -n 32768; /usr/bin/ceph-osd -i 0 --pid-file /var/run/ceph/osd.0.pid -c /etc/ceph/ceph.conf --cluster ceph -f
17438 ?    Sl   0:00 /usr/bin/ceph-osd -i 0 --pid-file /var/run/ceph/osd.0.pid -c /etc/ceph/ceph.conf --cluster ceph -f
6.8. Service Architecture: Monolithic Controller
The default architecture for composable services uses a monolithic Controller that contains the core Red Hat OpenStack Platform Services. These default services are defined in the roles file included with the director’s Heat template collection (/usr/share/openstack-tripleo-heat-templates/roles_data.yaml).
Some services are disabled by default. See Section 6.3, “Enabling Disabled Services” for information on how to enable these services.
- name: Controller
  ServicesDefault:
    - OS::TripleO::Services::Apache
    - OS::TripleO::Services::AodhApi
    - OS::TripleO::Services::AodhEvaluator
    - OS::TripleO::Services::AodhListener
    - OS::TripleO::Services::AodhNotifier
    - OS::TripleO::Services::CACerts
    - OS::TripleO::Services::CeilometerAgentCentral
    - OS::TripleO::Services::CeilometerAgentNotification
    - OS::TripleO::Services::CeilometerApi
    - OS::TripleO::Services::CeilometerCollector
    - OS::TripleO::Services::CeilometerExpirer
    - OS::TripleO::Services::CephClient
    - OS::TripleO::Services::CephExternal
    - OS::TripleO::Services::CephMon
    - OS::TripleO::Services::CephRgw
    - OS::TripleO::Services::CinderApi
    - OS::TripleO::Services::CinderBackup
    - OS::TripleO::Services::CinderScheduler
    - OS::TripleO::Services::CinderVolume
    - OS::TripleO::Services::FluentdClient
    - OS::TripleO::Services::GlanceApi
    - OS::TripleO::Services::GlanceRegistry
    - OS::TripleO::Services::GnocchiApi
    - OS::TripleO::Services::GnocchiMetricd
    - OS::TripleO::Services::GnocchiStatsd
    - OS::TripleO::Services::HAproxy
    - OS::TripleO::Services::HeatApi
    - OS::TripleO::Services::HeatApiCfn
    - OS::TripleO::Services::HeatApiCloudwatch
    - OS::TripleO::Services::HeatEngine
    - OS::TripleO::Services::Horizon
    - OS::TripleO::Services::IronicApi
    - OS::TripleO::Services::IronicConductor
    - OS::TripleO::Services::Kernel
    - OS::TripleO::Services::Keepalived
    - OS::TripleO::Services::Keystone
    - OS::TripleO::Services::ManilaApi
    - OS::TripleO::Services::ManilaBackendCephFs
    - OS::TripleO::Services::ManilaBackendGeneric
    - OS::TripleO::Services::ManilaBackendNetapp
    - OS::TripleO::Services::ManilaScheduler
    - OS::TripleO::Services::ManilaShare
    - OS::TripleO::Services::Memcached
    - OS::TripleO::Services::MongoDb
    - OS::TripleO::Services::MySQL
    - OS::TripleO::Services::NeutronApi
    - OS::TripleO::Services::NeutronCorePlugin
    - OS::TripleO::Services::NeutronCorePluginML2OVN
    - OS::TripleO::Services::NeutronCorePluginMidonet
    - OS::TripleO::Services::NeutronCorePluginNuage
    - OS::TripleO::Services::NeutronCorePluginOpencontrail
    - OS::TripleO::Services::NeutronCorePluginPlumgrid
    - OS::TripleO::Services::NeutronDhcpAgent
    - OS::TripleO::Services::NeutronL3Agent
    - OS::TripleO::Services::NeutronMetadataAgent
    - OS::TripleO::Services::NeutronOvsAgent
    - OS::TripleO::Services::NovaApi
    - OS::TripleO::Services::NovaConductor
    - OS::TripleO::Services::NovaConsoleauth
    - OS::TripleO::Services::NovaIronic
    - OS::TripleO::Services::NovaScheduler
    - OS::TripleO::Services::NovaVncProxy
    - OS::TripleO::Services::Ntp
    - OS::TripleO::Services::OpenDaylightApi
    - OS::TripleO::Services::OpenDaylightOvs
    - OS::TripleO::Services::Pacemaker
    - OS::TripleO::Services::RabbitMQ
    - OS::TripleO::Services::Redis
    - OS::TripleO::Services::SaharaApi
    - OS::TripleO::Services::SaharaEngine
    - OS::TripleO::Services::SensuClient
    - OS::TripleO::Services::Sshd
    - OS::TripleO::Services::Snmp
    - OS::TripleO::Services::SwiftProxy
    - OS::TripleO::Services::SwiftRingBuilder
    - OS::TripleO::Services::Timezone
    - OS::TripleO::Services::TripleoFirewall
    - OS::TripleO::Services::TripleoPackages
    - OS::TripleO::Services::VipHosts
6.9. Service Architecture: Split Controller
You can split the services on the Controller nodes into two separate roles:
- Controller PCMK - Contains only the core services that Pacemaker manages including database and load balancing
- Controller systemd - Contains all OpenStack services
The remaining default roles (Compute, Ceph Storage, Object Storage, Block Storage) remain unaffected.
Use the following tables as a guide to creating a split controller architecture.
Some services are disabled by default. See Section 6.3, “Enabling Disabled Services” for information on how to enable these services.
Controller PCMK
The following services are the minimum services required for the Controller PCMK role.
- name: Controller
  ServicesDefault:
    - OS::TripleO::Services::CACerts
    - OS::TripleO::Services::FluentdClient
    - OS::TripleO::Services::Kernel
    - OS::TripleO::Services::Ntp
    - OS::TripleO::Services::SensuClient
    - OS::TripleO::Services::Sshd
    - OS::TripleO::Services::Snmp
    - OS::TripleO::Services::Timezone
    - OS::TripleO::Services::TripleoFirewall
    - OS::TripleO::Services::TripleoPackages
    - OS::TripleO::Services::VipHosts
    - OS::TripleO::Services::CephClient
    - OS::TripleO::Services::CephExternal
    - OS::TripleO::Services::CinderBackup
    - OS::TripleO::Services::CinderVolume
    - OS::TripleO::Services::HAproxy
    - OS::TripleO::Services::Keepalived
    - OS::TripleO::Services::ManilaBackendGeneric
    - OS::TripleO::Services::ManilaBackendNetapp
    - OS::TripleO::Services::ManilaBackendCephFs
    - OS::TripleO::Services::ManilaShare
    - OS::TripleO::Services::Memcached
    - OS::TripleO::Services::MySQL
    - OS::TripleO::Services::Pacemaker
    - OS::TripleO::Services::RabbitMQ
    - OS::TripleO::Services::Redis
Controller systemd
The following table represents the services available on the Controller systemd role:
- name: ControllerSystemd
  ServicesDefault:
    - OS::TripleO::Services::Apache
    - OS::TripleO::Services::AodhApi
    - OS::TripleO::Services::AodhEvaluator
    - OS::TripleO::Services::AodhListener
    - OS::TripleO::Services::AodhNotifier
    - OS::TripleO::Services::CACerts
    - OS::TripleO::Services::CeilometerAgentCentral
    - OS::TripleO::Services::CeilometerAgentNotification
    - OS::TripleO::Services::CeilometerApi
    - OS::TripleO::Services::CeilometerCollector
    - OS::TripleO::Services::CeilometerExpirer
    - OS::TripleO::Services::CephClient
    - OS::TripleO::Services::CephExternal
    - OS::TripleO::Services::CephMon
    - OS::TripleO::Services::CephRgw
    - OS::TripleO::Services::CinderApi
    - OS::TripleO::Services::CinderScheduler
    - OS::TripleO::Services::FluentdClient
    - OS::TripleO::Services::GlanceApi
    - OS::TripleO::Services::GlanceRegistry
    - OS::TripleO::Services::GnocchiApi
    - OS::TripleO::Services::GnocchiMetricd
    - OS::TripleO::Services::GnocchiStatsd
    - OS::TripleO::Services::HeatApi
    - OS::TripleO::Services::HeatApiCfn
    - OS::TripleO::Services::HeatApiCloudwatch
    - OS::TripleO::Services::HeatEngine
    - OS::TripleO::Services::Horizon
    - OS::TripleO::Services::IronicApi
    - OS::TripleO::Services::IronicConductor
    - OS::TripleO::Services::Kernel
    - OS::TripleO::Services::Keystone
    - OS::TripleO::Services::ManilaApi
    - OS::TripleO::Services::ManilaScheduler
    - OS::TripleO::Services::MongoDb
    - OS::TripleO::Services::NeutronApi
    - OS::TripleO::Services::NeutronCorePlugin
    - OS::TripleO::Services::NeutronCorePluginML2OVN
    - OS::TripleO::Services::NeutronCorePluginMidonet
    - OS::TripleO::Services::NeutronCorePluginNuage
    - OS::TripleO::Services::NeutronCorePluginOpencontrail
    - OS::TripleO::Services::NeutronCorePluginPlumgrid
    - OS::TripleO::Services::NeutronDhcpAgent
    - OS::TripleO::Services::NeutronL3Agent
    - OS::TripleO::Services::NeutronMetadataAgent
    - OS::TripleO::Services::NeutronOvsAgent
    - OS::TripleO::Services::NovaApi
    - OS::TripleO::Services::NovaConductor
    - OS::TripleO::Services::NovaConsoleauth
    - OS::TripleO::Services::NovaIronic
    - OS::TripleO::Services::NovaScheduler
    - OS::TripleO::Services::NovaVncProxy
    - OS::TripleO::Services::Ntp
    - OS::TripleO::Services::OpenDaylightApi
    - OS::TripleO::Services::OpenDaylightOvs
    - OS::TripleO::Services::SaharaApi
    - OS::TripleO::Services::SaharaEngine
    - OS::TripleO::Services::SensuClient
    - OS::TripleO::Services::Sshd
    - OS::TripleO::Services::Snmp
    - OS::TripleO::Services::SwiftProxy
    - OS::TripleO::Services::SwiftRingBuilder
    - OS::TripleO::Services::Timezone
    - OS::TripleO::Services::TripleoFirewall
    - OS::TripleO::Services::TripleoPackages
    - OS::TripleO::Services::VipHosts
6.10. Service Architecture: Standalone Roles
The following tables list the supported custom role collection you can create and scale with the composable service architecture in Red Hat OpenStack Platform. Group these collections together as individual roles and use them to isolate and split services in combination with the previous architectures:
Some services are disabled by default. See Section 6.3, “Enabling Disabled Services” for information on how to enable these services.
Note that all roles use a set of common services, which include:
-
OS::TripleO::Services::CACerts -
OS::TripleO::Services::FluentdClient -
OS::TripleO::Services::Kernel -
OS::TripleO::Services::Ntp -
OS::TripleO::Services::SensuClient -
OS::TripleO::Services::Sshd -
OS::TripleO::Services::Snmp -
OS::TripleO::Services::Timezone -
OS::TripleO::Services::TripleoFirewall -
OS::TripleO::Services::TripleoPackages -
OS::TripleO::Services::VipHosts
Once you have chosen the roles to include in your overcloud, remove the associated services (except for the common services) from the main Controller roles. For example, if creating a standalone Keystone role, remove the OS::TripleO::Services::Apache and OS::TripleO::Services::Keystone services from the Controller nodes. The only exceptions are the services with limited custom role support (see Table 6.1, “Custom Roles Support”).
Click on a role in the following table to view the services associated with it.
Table 6.1. Custom Roles Support
| Role | Support Status |
|---|---|
| Supported | |
| Supported | |
| Limited. If spliting, this service needs to be part of a Controller systemd role. | |
| Supported | |
| Supported | |
| Supported | |
| Supported | |
| Supported | |
| Limited. If spliting, this service needs to be part of a Controller systemd role. | |
| Supported | |
| Limited. If spliting, this service needs to be part of a Controller systemd role. | |
| Supported | |
| Supported | |
| Supported | |
| Supported | |
| Technical Preview | |
| Limited. If spliting, this service needs to be part of a Controller systemd role. | |
| Supported | |
| Supported | |
| Supported |
Ceph Storage Monitor
The following services configure Ceph Storage Monitor.
- name: CephMon
  ServicesDefault:
    - OS::TripleO::Services::CACerts
    - OS::TripleO::Services::FluentdClient
    - OS::TripleO::Services::Kernel
    - OS::TripleO::Services::Ntp
    - OS::TripleO::Services::SensuClient
    - OS::TripleO::Services::Sshd
    - OS::TripleO::Services::Snmp
    - OS::TripleO::Services::Timezone
    - OS::TripleO::Services::TripleoFirewall
    - OS::TripleO::Services::TripleoPackages
    - OS::TripleO::Services::VipHosts
    - OS::TripleO::Services::CephMon
Ceph Storage OSD
The following services configure Ceph Storage OSDs.
- name: CephStorage
  ServicesDefault:
    - OS::TripleO::Services::CACerts
    - OS::TripleO::Services::FluentdClient
    - OS::TripleO::Services::Kernel
    - OS::TripleO::Services::Ntp
    - OS::TripleO::Services::SensuClient
    - OS::TripleO::Services::Sshd
    - OS::TripleO::Services::Snmp
    - OS::TripleO::Services::Timezone
    - OS::TripleO::Services::TripleoFirewall
    - OS::TripleO::Services::TripleoPackages
    - OS::TripleO::Services::VipHosts
    - OS::TripleO::Services::CephOSD
Ceph Storage RadosGW
The following services configure Ceph Storage RadosGW. If separating these services, they need to be part of a Controller systemd role.
    - OS::TripleO::Services::CACerts
    - OS::TripleO::Services::FluentdClient
    - OS::TripleO::Services::Kernel
    - OS::TripleO::Services::Ntp
    - OS::TripleO::Services::SensuClient
    - OS::TripleO::Services::Sshd
    - OS::TripleO::Services::Snmp
    - OS::TripleO::Services::Timezone
    - OS::TripleO::Services::TripleoFirewall
    - OS::TripleO::Services::TripleoPackages
    - OS::TripleO::Services::VipHosts
    - OS::TripleO::Services::CephRgw
    - OS::TripleO::Services::CephClient
Cinder API
The following services configure the OpenStack Block Storage API.
- name: CinderApi
  ServicesDefault:
    - OS::TripleO::Services::CACerts
    - OS::TripleO::Services::FluentdClient
    - OS::TripleO::Services::Kernel
    - OS::TripleO::Services::Ntp
    - OS::TripleO::Services::SensuClient
    - OS::TripleO::Services::Sshd
    - OS::TripleO::Services::Snmp
    - OS::TripleO::Services::Timezone
    - OS::TripleO::Services::TripleoFirewall
    - OS::TripleO::Services::TripleoPackages
    - OS::TripleO::Services::VipHosts
    - OS::TripleO::Services::CinderApi
    - OS::TripleO::Services::CinderScheduler
Controller PCMK
The following services are the minimum services required for the Controller PCMK role.
- name: ControllerPcmk
  ServicesDefault:
    - OS::TripleO::Services::CACerts
    - OS::TripleO::Services::FluentdClient
    - OS::TripleO::Services::Kernel
    - OS::TripleO::Services::Ntp
    - OS::TripleO::Services::SensuClient
    - OS::TripleO::Services::Sshd
    - OS::TripleO::Services::Snmp
    - OS::TripleO::Services::Timezone
    - OS::TripleO::Services::TripleoFirewall
    - OS::TripleO::Services::TripleoPackages
    - OS::TripleO::Services::CephClient
    - OS::TripleO::Services::CephExternal
    - OS::TripleO::Services::CinderBackup
    - OS::TripleO::Services::CinderVolume
    - OS::TripleO::Services::HAproxy
    - OS::TripleO::Services::Keepalived
    - OS::TripleO::Services::ManilaBackendGeneric
    - OS::TripleO::Services::ManilaBackendNetapp
    - OS::TripleO::Services::ManilaBackendCephFs
    - OS::TripleO::Services::ManilaShare
    - OS::TripleO::Services::Memcached
    - OS::TripleO::Services::MySQL
    - OS::TripleO::Services::Pacemaker
    - OS::TripleO::Services::RabbitMQ
    - OS::TripleO::Services::Redis
    - OS::TripleO::Services::VipHosts
Glance
The following services configure the OpenStack Image service.
- name: Glance
  ServicesDefault:
    - OS::TripleO::Services::CACerts
    - OS::TripleO::Services::FluentdClient
    - OS::TripleO::Services::Kernel
    - OS::TripleO::Services::Ntp
    - OS::TripleO::Services::SensuClient
    - OS::TripleO::Services::Sshd
    - OS::TripleO::Services::Snmp
    - OS::TripleO::Services::Timezone
    - OS::TripleO::Services::TripleoFirewall
    - OS::TripleO::Services::TripleoPackages
    - OS::TripleO::Services::VipHosts
    - OS::TripleO::Services::CephClient
    - OS::TripleO::Services::CephExternal
    - OS::TripleO::Services::GlanceApi
    - OS::TripleO::Services::GlanceRegistry
Heat
The following services configure the OpenStack Orchestration service.
- name: Heat
  ServicesDefault:
    - OS::TripleO::Services::CACerts
    - OS::TripleO::Services::FluentdClient
    - OS::TripleO::Services::Kernel
    - OS::TripleO::Services::Ntp
    - OS::TripleO::Services::SensuClient
    - OS::TripleO::Services::Sshd
    - OS::TripleO::Services::Snmp
    - OS::TripleO::Services::Timezone
    - OS::TripleO::Services::TripleoFirewall
    - OS::TripleO::Services::TripleoPackages
    - OS::TripleO::Services::VipHosts
    - OS::TripleO::Services::HeatApi
    - OS::TripleO::Services::HeatApiCfn
    - OS::TripleO::Services::HeatApiCloudwatch
    - OS::TripleO::Services::HeatEngine
Horizon
The following services configure the OpenStack Dashboard.
- name: Horizon
  ServicesDefault:
    - OS::TripleO::Services::CACerts
    - OS::TripleO::Services::FluentdClient
    - OS::TripleO::Services::Kernel
    - OS::TripleO::Services::Ntp
    - OS::TripleO::Services::SensuClient
    - OS::TripleO::Services::Sshd
    - OS::TripleO::Services::Snmp
    - OS::TripleO::Services::Timezone
    - OS::TripleO::Services::TripleoFirewall
    - OS::TripleO::Services::TripleoPackages
    - OS::TripleO::Services::VipHosts
    - OS::TripleO::Services::Apache
    - OS::TripleO::Services::Horizon
Ironic
The following services configure the OpenStack Bare Metal Provisioning service. If separating these services, they need to be part of a Controller systemd role.
    - OS::TripleO::Services::CACerts
    - OS::TripleO::Services::FluentdClient
    - OS::TripleO::Services::Kernel
    - OS::TripleO::Services::Ntp
    - OS::TripleO::Services::SensuClient
    - OS::TripleO::Services::Sshd
    - OS::TripleO::Services::Snmp
    - OS::TripleO::Services::Timezone
    - OS::TripleO::Services::TripleoFirewall
    - OS::TripleO::Services::TripleoPackages
    - OS::TripleO::Services::VipHosts
    - OS::TripleO::Services::IronicApi
    - OS::TripleO::Services::IronicConductor
    - OS::TripleO::Services::NovaIronic
Keystone
The following services configure the OpenStack Identity service. When performing minor updates, make sure to update this role before updating other services.
- name: Keystone
  ServicesDefault:
    - OS::TripleO::Services::CACerts
    - OS::TripleO::Services::FluentdClient
    - OS::TripleO::Services::Kernel
    - OS::TripleO::Services::Ntp
    - OS::TripleO::Services::SensuClient
    - OS::TripleO::Services::Sshd
    - OS::TripleO::Services::Snmp
    - OS::TripleO::Services::Timezone
    - OS::TripleO::Services::TripleoFirewall
    - OS::TripleO::Services::TripleoPackages
    - OS::TripleO::Services::VipHosts
    - OS::TripleO::Services::Apache
    - OS::TripleO::Services::Keystone
Manila
The following services configure the OpenStack Shared File Systems service. If separating these services, they need to be part of a Controller systemd role.
    - OS::TripleO::Services::CACerts
    - OS::TripleO::Services::FluentdClient
    - OS::TripleO::Services::Kernel
    - OS::TripleO::Services::Ntp
    - OS::TripleO::Services::SensuClient
    - OS::TripleO::Services::Sshd
    - OS::TripleO::Services::Snmp
    - OS::TripleO::Services::Timezone
    - OS::TripleO::Services::TripleoFirewall
    - OS::TripleO::Services::TripleoPackages
    - OS::TripleO::Services::VipHosts
    - OS::TripleO::Services::ManilaApi
    - OS::TripleO::Services::ManilaScheduler
Networker
The following services configure the OpenStack Networking agents.
- name: Networker
  ServicesDefault:
    - OS::TripleO::Services::CACerts
    - OS::TripleO::Services::FluentdClient
    - OS::TripleO::Services::Kernel
    - OS::TripleO::Services::Ntp
    - OS::TripleO::Services::SensuClient
    - OS::TripleO::Services::Sshd
    - OS::TripleO::Services::Snmp
    - OS::TripleO::Services::Timezone
    - OS::TripleO::Services::TripleoFirewall
    - OS::TripleO::Services::TripleoPackages
    - OS::TripleO::Services::VipHosts
    - OS::TripleO::Services::NeutronDhcpAgent
    - OS::TripleO::Services::NeutronL3Agent
    - OS::TripleO::Services::NeutronMetadataAgent
    - OS::TripleO::Services::NeutronOvsAgent
Neutron API
The following services configure the OpenStack Networking API.
- name: NeutronApi
  ServicesDefault:
    - OS::TripleO::Services::CACerts
    - OS::TripleO::Services::FluentdClient
    - OS::TripleO::Services::Kernel
    - OS::TripleO::Services::Ntp
    - OS::TripleO::Services::SensuClient
    - OS::TripleO::Services::Sshd
    - OS::TripleO::Services::Snmp
    - OS::TripleO::Services::Timezone
    - OS::TripleO::Services::TripleoFirewall
    - OS::TripleO::Services::TripleoPackages
    - OS::TripleO::Services::VipHosts
    - OS::TripleO::Services::NeutronApi
    - OS::TripleO::Services::NeutronCorePlugin
    - OS::TripleO::Services::NeutronCorePluginML2OVN
    - OS::TripleO::Services::NeutronCorePluginMidonet
    - OS::TripleO::Services::NeutronCorePluginNuage
    - OS::TripleO::Services::NeutronCorePluginOpencontrail
    - OS::TripleO::Services::NeutronCorePluginPlumgrid
Nova
The following services configure the OpenStack Compute services.
- name: Nova
  ServicesDefault:
    - OS::TripleO::Services::CACerts
    - OS::TripleO::Services::FluentdClient
    - OS::TripleO::Services::Kernel
    - OS::TripleO::Services::Ntp
    - OS::TripleO::Services::SensuClient
    - OS::TripleO::Services::Sshd
    - OS::TripleO::Services::Snmp
    - OS::TripleO::Services::Timezone
    - OS::TripleO::Services::TripleoFirewall
    - OS::TripleO::Services::TripleoPackages
    - OS::TripleO::Services::VipHosts
    - OS::TripleO::Services::NovaApi
    - OS::TripleO::Services::NovaConductor
    - OS::TripleO::Services::NovaConsoleauth
    - OS::TripleO::Services::NovaScheduler
    - OS::TripleO::Services::NovaVncProxy
Nova Compute
The following services configure an OpenStack Compute node.
- name: Compute
  ServicesDefault:
    - OS::TripleO::Services::CACerts
    - OS::TripleO::Services::FluentdClient
    - OS::TripleO::Services::Kernel
    - OS::TripleO::Services::Ntp
    - OS::TripleO::Services::SensuClient
    - OS::TripleO::Services::Sshd
    - OS::TripleO::Services::Snmp
    - OS::TripleO::Services::Timezone
    - OS::TripleO::Services::TripleoFirewall
    - OS::TripleO::Services::TripleoPackages
    - OS::TripleO::Services::VipHosts
    - OS::TripleO::Services::CephClient
    - OS::TripleO::Services::CephExternal
    - OS::TripleO::Services::ComputeCeilometerAgent
    - OS::TripleO::Services::ComputeNeutronCorePlugin
    - OS::TripleO::Services::ComputeNeutronL3Agent
    - OS::TripleO::Services::ComputeNeutronMetadataAgent
    - OS::TripleO::Services::ComputeNeutronOvsAgent
    - OS::TripleO::Services::NeutronSriovAgent
    - OS::TripleO::Services::NovaCompute
    - OS::TripleO::Services::NovaLibvirt
    - OS::TripleO::Services::OpenDaylightOvs
OpenDaylight
The following services configure OpenDayLight. These services are technical preview for Red Hat OpenStack Platform 10.
- name: Opendaylight
  ServicesDefault:
    - OS::TripleO::Services::CACerts
    - OS::TripleO::Services::FluentdClient
    - OS::TripleO::Services::Kernel
    - OS::TripleO::Services::Ntp
    - OS::TripleO::Services::SensuClient
    - OS::TripleO::Services::Sshd
    - OS::TripleO::Services::Snmp
    - OS::TripleO::Services::Timezone
    - OS::TripleO::Services::TripleoFirewall
    - OS::TripleO::Services::TripleoPackages
    - OS::TripleO::Services::VipHosts
    - OS::TripleO::Services::OpenDaylightApi
    - OS::TripleO::Services::OpenDaylightOvs
Sahara
The following services configure the OpenStack Clustering service. If separating these services, they need to be part of a Controller systemd role.
    - OS::TripleO::Services::CACerts
    - OS::TripleO::Services::FluentdClient
    - OS::TripleO::Services::Kernel
    - OS::TripleO::Services::Ntp
    - OS::TripleO::Services::SensuClient
    - OS::TripleO::Services::Sshd
    - OS::TripleO::Services::Snmp
    - OS::TripleO::Services::Timezone
    - OS::TripleO::Services::TripleoFirewall
    - OS::TripleO::Services::TripleoPackages
    - OS::TripleO::Services::VipHosts
    - OS::TripleO::Services::SaharaApi
    - OS::TripleO::Services::SaharaEngine
Swift API
The following services configure the OpenStack Object Storage API.
- name: SwiftApi
  ServicesDefault:
    - OS::TripleO::Services::CACerts
    - OS::TripleO::Services::FluentdClient
    - OS::TripleO::Services::Kernel
    - OS::TripleO::Services::Ntp
    - OS::TripleO::Services::SensuClient
    - OS::TripleO::Services::Sshd
    - OS::TripleO::Services::Snmp
    - OS::TripleO::Services::Timezone
    - OS::TripleO::Services::TripleoFirewall
    - OS::TripleO::Services::TripleoPackages
    - OS::TripleO::Services::VipHosts
    - OS::TripleO::Services::SwiftProxy
    - OS::TripleO::Services::SwiftRingBuilder
Swift Storage
The following services configure the OpenStack Object Storage service.
- name: ObjectStorage
  ServicesDefault:
    - OS::TripleO::Services::CACerts
    - OS::TripleO::Services::FluentdClient
    - OS::TripleO::Services::Kernel
    - OS::TripleO::Services::Ntp
    - OS::TripleO::Services::SensuClient
    - OS::TripleO::Services::Sshd
    - OS::TripleO::Services::Snmp
    - OS::TripleO::Services::Timezone
    - OS::TripleO::Services::TripleoFirewall
    - OS::TripleO::Services::TripleoPackages
    - OS::TripleO::Services::VipHosts
    - OS::TripleO::Services::SwiftRingBuilder
    - OS::TripleO::Services::SwiftStorage
Telemetry
The following services configure the OpenStack Telemetry services.
- name: Telemetry
  ServicesDefault:
    - OS::TripleO::Services::CACerts
    - OS::TripleO::Services::FluentdClient
    - OS::TripleO::Services::Kernel
    - OS::TripleO::Services::Ntp
    - OS::TripleO::Services::SensuClient
    - OS::TripleO::Services::Sshd
    - OS::TripleO::Services::Snmp
    - OS::TripleO::Services::Timezone
    - OS::TripleO::Services::TripleoFirewall
    - OS::TripleO::Services::TripleoPackages
    - OS::TripleO::Services::VipHosts
    - OS::TripleO::Services::Apache
    - OS::TripleO::Services::AodhApi
    - OS::TripleO::Services::AodhEvaluator
    - OS::TripleO::Services::AodhListener
    - OS::TripleO::Services::AodhNotifier
    - OS::TripleO::Services::CeilometerAgentCentral
    - OS::TripleO::Services::CeilometerAgentNotification
    - OS::TripleO::Services::CeilometerApi
    - OS::TripleO::Services::CeilometerCollector
    - OS::TripleO::Services::CeilometerExpirer
    - OS::TripleO::Services::GnocchiApi
    - OS::TripleO::Services::GnocchiMetricd
    - OS::TripleO::Services::GnocchiStatsd
    - OS::TripleO::Services::MongoDb
6.11. Composable Service Reference
The following table contains a list of all available composable services in Red Hat OpenStack Platform.
Some services are disabled by default. See Section 6.3, “Enabling Disabled Services” for information on how to enable these services.
| Service | Description |
|---|---|
|
|
OpenStack Telemetry Alarming ( |
|
|
OpenStack Telemetry Alarming ( |
|
|
OpenStack Telemetry Alarming ( |
|
|
OpenStack Telemetry Alarming ( |
|
| Apache service configured with Puppet. Note this is typically included automatically with other services which run through Apache. |
|
| HAProxy service configured with Puppet |
|
|
OpenStack Telemetry ( |
|
|
OpenStack Telemetry ( |
|
|
OpenStack Telemetry ( |
|
|
OpenStack Telemetry ( |
|
|
OpenStack Telemetry ( |
|
| (Disabled by default) Ceph Client service |
|
| (Disabled by default) Ceph External service |
|
| (Disabled by default) Ceph Monitor service |
|
| (Disabled by default) Ceph OSD service |
|
|
OpenStack Block Storage ( |
|
|
(Disabled by default) OpenStack Block Storage ( |
|
|
OpenStack Block Storage ( |
|
|
OpenStack Block Storage ( |
|
|
OpenStack Telemetry ( |
|
|
OpenStack Networking ( |
|
|
(Disabled by default) OpenStack Networking ( |
|
|
(Disabled by default) OpenStack Networking ( |
|
|
OpenStack Networking ( |
|
| (Disabled by default) Fluentd client configured with Puppet |
|
|
OpenStack Image ( |
|
|
OpenStack Image ( |
|
|
OpenStack Telemetry Metrics ( |
|
|
OpenStack Telemetry Metrics ( |
|
|
OpenStack Telemetry Metrics ( |
|
| HAProxy service (Pacemaker-managed) configured with Puppet |
|
|
OpenStack Orchestration ( |
|
|
OpenStack Orchestration ( |
|
|
OpenStack Orchestration ( |
|
|
OpenStack Orchestration ( |
|
|
OpenStack Dashboard ( |
|
|
(Disabled by default) OpenStack Bare Metal Provisioning ( |
|
|
(Disabled by default) OpenStack Bare Metal Provisioning ( |
|
| Keepalived service configured with Puppet |
|
| Load kernel modules with kmod and configure kernel options with sysctl |
|
|
(Disabled by default) OpenStack Shared File Systems ( |
|
|
(Disabled by default) OpenStack Shared File Systems ( |
|
|
(Disabled by default) OpenStack Shared File Systems ( |
|
|
OpenStack Identity ( |
|
| Memcached service configured with Puppet |
|
| MongoDB service deployment using puppet |
|
| MySQL (Pacemaker-managed) service deployment using puppet |
|
|
OpenStack Networking ( |
|
|
OpenStack Networking ( |
|
|
OpenStack Networking ( |
|
|
OpenStack Networking ( |
|
|
OpenStack Networking ( |
|
|
OpenStack Networking ( |
|
|
OpenStack Networking ( |
|
|
OpenStack Networking ( |
|
|
OpenStack Networking ( |
|
|
OpenStack Networking ( |
|
|
OpenStack Networking ( |
|
|
OpenStack Networking ( |
|
| (Disabled by default) OpenStack Neutron SR-IOV nic agent configured with Puppet |
|
|
OpenStack Compute ( |
|
|
OpenStack Compute ( |
|
|
OpenStack Compute ( |
|
|
OpenStack Compute ( |
|
|
(Disabled by default) OpenStack Compute ( |
|
| Libvirt service configured with Puppet |
|
|
OpenStack Compute ( |
|
|
OpenStack Compute ( |
|
| NTP service deployment using Puppet. |
|
| (Disabled by default) OpenDaylight SDN controller |
|
| (Disabled by default) OpenDaylight OVS configuration |
|
| Pacemaker service configured with Puppet |
|
| RabbitMQ service (Pacemaker-managed) configured with Puppet |
|
| OpenStack Redis service configured with Puppet |
|
|
(Disabled by default) OpenStack Clustering ( |
|
|
(Disabled by default) OpenStack Clustering ( |
|
| (Disabled by default) Sensu client configured with Puppet |
|
| (Disabled by default) SSH daemon configuration. Included as a default service. |
|
| SNMP client configured with Puppet, to facilitate Ceilometer hardware monitoring in the undercloud. This service is required to enable hardware monitoring. |
|
|
OpenStack Object Storage ( |
|
|
OpenStack Object Storage ( |
|
|
OpenStack Object Storage ( |
|
| Composable Timezone service |
|
| Firewall settings |
|
| Package installation settings |
Chapter 7. Isolating Networks
The director provides methods to configure isolated Overcloud networks. This means the Overcloud environment separates network traffic types into different networks, which in turn assigns network traffic to specific network interfaces or bonds. After configuring isolated networks, the director configures the OpenStack services to use the isolated networks. If no isolated networks are configured, all services run on the Provisioning network.
This example uses separate networks for all services:
- Network 1 - Provisioning
- Network 2 - Internal API
- Network 3 - Tenant Networks
- Network 4 - Storage
- Network 5 - Storage Management
- Network 6 - Management
- Network 7 - External and Floating IP (mapped after Overcloud creation)
In this example, each Overcloud node uses two network interfaces in a bond to serve networks in tagged VLANs. The following network assignments apply to this bond:
Table 7.1. Network Subnet and VLAN Assignments
| Network Type | Subnet | VLAN |
| Internal API | 172.16.0.0/24 | 201 |
| Tenant | 172.17.0.0/24 | 202 |
| Storage | 172.18.0.0/24 | 203 |
| Storage Management | 172.19.0.0/24 | 204 |
| Management | 172.20.0.0/24 | 205 |
| External / Floating IP | 10.1.1.0/24 | 100 |
7.1. Creating Custom Interface Templates
The Overcloud network configuration requires a set of the network interface templates. You customize these templates to configure the node interfaces on a per role basis. These templates are standard Heat templates in YAML format (see Section 2.1, “Heat Templates”). The director contains a set of example templates to get you started:
-
/usr/share/openstack-tripleo-heat-templates/network/config/single-nic-vlans- Directory containing templates for single NIC with VLANs configuration on a per role basis. -
/usr/share/openstack-tripleo-heat-templates/network/config/bond-with-vlans- Directory containing templates for bonded NIC configuration on a per role basis. -
/usr/share/openstack-tripleo-heat-templates/network/config/multiple-nics- Directory containing templates for multiple NIC configuration using one NIC per role. -
/usr/share/openstack-tripleo-heat-templates/network/config/single-nic-linux-bridge-vlans- Directory containing templates for single NIC with VLANs configuration on a per role basis and using a Linux bridge instead of an Open vSwitch bridge.
These examples only contain templates for the default roles. To define the network interface configuration for a custom role, use these templates as a basis.
For this example, use the default bonded NIC example configuration as a basis. Copy the version located at /usr/share/openstack-tripleo-heat-templates/network/config/bond-with-vlans.
$ cp -r /usr/share/openstack-tripleo-heat-templates/network/config/bond-with-vlans ~/templates/nic-configs
This creates a local set of heat templates that define a bonded network interface configuration for each role. Each template contains the standard parameters, resources, and output sections. For this example, you would only edit the resources section. Each resources section begins with the following:
resources:
OsNetConfigImpl:
  type: OS::Heat::StructuredConfig
  properties:
    group: os-apply-config
    config:
      os_net_config:
        network_config:
This creates a request for the os-apply-config command and os-net-config subcommand to configure the network properties for a node. The network_config section contains your custom interface configuration arranged in a sequence based on type, which includes the following:
- interface
Defines a single network interface. The configuration defines each interface using either the actual interface name ("eth0", "eth1", "enp0s25") or a set of numbered interfaces ("nic1", "nic2", "nic3").
- type: interface name: nic2- vlan
Defines a VLAN. Use the VLAN ID and subnet passed from the
parameterssection.- type: vlan vlan_id: {get_param: ExternalNetworkVlanID} addresses: - ip_netmask: {get_param: ExternalIpSubnet}- ovs_bond
Defines a bond in Open vSwitch to join two or more
interfacestogether. This helps with redundancy and increases bandwidth.- type: ovs_bond name: bond1 members: - type: interface name: nic2 - type: interface name: nic3- ovs_bridge
Defines a bridge in Open vSwitch, which connects multiple
interface,ovs_bondandvlanobjects together.- type: ovs_bridge name: {get_input: bridge_name} members: - type: ovs_bond name: bond1 members: - type: interface name: nic2 primary: true - type: interface name: nic3 - type: vlan device: bond1 vlan_id: {get_param: ExternalNetworkVlanID} addresses: - ip_netmask: {get_param: ExternalIpSubnet}- linux_bond
Defines a Linux bond that joins two or more
interfacestogether. This helps with redundancy and increases bandwidth. Make sure to include the kernel-based bonding options in thebonding_optionsparameter. For more information on Linux bonding options, see 4.5.1. Bonding Module Directives in the Red Hat Enterprise Linux 7 Networking Guide.- type: linux_bond name: bond1 members: - type: interface name: nic2 - type: interface name: nic3 bonding_options: "mode=802.3ad"- linux_bridge
Defines a Linux bridge, which connects multiple
interface,linux_bondandvlanobjects together.- type: linux_bridge name: bridge1 addresses: - ip_netmask: list_join: - '/' - - {get_param: ControlPlaneIp} - {get_param: ControlPlaneSubnetCidr} members: - type: interface name: nic1 primary: true - type: vlan vlan_id: {get_param: ExternalNetworkVlanID} device: bridge1 addresses: - ip_netmask: {get_param: ExternalIpSubnet} routes: - ip_netmask: 0.0.0.0/0 default: true next_hop: {get_param: ExternalInterfaceDefaultRoute}
See Appendix C, Network Interface Parameters for a full list of parameters for each of these items.
For this example, you use the default bonded interface configuration. For example, the /home/stack/templates/nic-configs/controller.yaml template uses the following network_config:
resources:
  OsNetConfigImpl:
    type: OS::Heat::StructuredConfig
    properties:
      group: os-apply-config
      config:
        os_net_config:
          network_config:
            - type: interface
              name: nic1
              use_dhcp: false
              addresses:
                - ip_netmask:
                    list_join:
                      - '/'
                      - - {get_param: ControlPlaneIp}
                        - {get_param: ControlPlaneSubnetCidr}
              routes:
                - ip_netmask: 169.254.169.254/32
                  next_hop: {get_param: EC2MetadataIp}
            - type: ovs_bridge
              name: {get_input: bridge_name}
              dns_servers: {get_param: DnsServers}
              members:
                - type: ovs_bond
                  name: bond1
                  ovs_options: {get_param: BondInterfaceOvsOptions}
                  members:
                    - type: interface
                      name: nic2
                      primary: true
                    - type: interface
                      name: nic3
                - type: vlan
                  device: bond1
                  vlan_id: {get_param: ExternalNetworkVlanID}
                  addresses:
                    - ip_netmask: {get_param: ExternalIpSubnet}
                  routes:
                    - default: true
                      next_hop: {get_param: ExternalInterfaceDefaultRoute}
                - type: vlan
                  device: bond1
                  vlan_id: {get_param: InternalApiNetworkVlanID}
                  addresses:
                    - ip_netmask: {get_param: InternalApiIpSubnet}
                - type: vlan
                  device: bond1
                  vlan_id: {get_param: StorageNetworkVlanID}
                  addresses:
                    - ip_netmask: {get_param: StorageIpSubnet}
                - type: vlan
                  device: bond1
                  vlan_id: {get_param: StorageMgmtNetworkVlanID}
                  addresses:
                    - ip_netmask: {get_param: StorageMgmtIpSubnet}
                - type: vlan
                  device: bond1
                  vlan_id: {get_param: TenantNetworkVlanID}
                  addresses:
                    - ip_netmask: {get_param: TenantIpSubnet}
                - type: vlan
                  device: bond1
                  vlan_id: {get_param: ManagementNetworkVlanID}
                  addresses:
- ip_netmask: {get_param: ManagementIpSubnet}The Management network section is commented in the network interface Heat templates. Uncomment this section to enable the Management network.
This template defines a bridge (usually the external bridge named br-ex) and creates a bonded interface called bond1 from two numbered interfaces: nic2 and nic3. The bridge also contains a number of tagged VLAN devices, which use bond1 as a parent device. The template also include an interface that connects back to the director (nic1).
For more examples of network interface templates, see Appendix B, Network Interface Template Examples.
Note that a lot of these parameters use the get_param function. You would define these in an environment file you create specifically for your networks.
Unused interfaces can cause unwanted default routes and network loops. For example, your template might contain a network interface (nic4) that does not use any IP assignments for OpenStack services but still uses DHCP and/or a default route. To avoid network conflicts, remove any unused interfaces from ovs_bridge devices and disable the DHCP and default route settings:
- type: interface
  name: nic4
  use_dhcp: false
  defroute: false
7.2. Creating a Network Environment File
The network environment file is a Heat environment file that describes the Overcloud’s network environment and points to the network interface configuration templates from the previous section. You can define the subnets and VLANs for your network along with IP address ranges. You can then customize these values for the local environment.
The director contains a set of example environment files to get you started. Each environment file corresponds to the example network interface files in /usr/share/openstack-tripleo-heat-templates/network/config/:
-
/usr/share/openstack-tripleo-heat-templates/environments/net-single-nic-with-vlans.yaml- Example environment file for single NIC with VLANs configuration in thesingle-nic-vlans) network interface directory. Environment files for disabling the External network (net-single-nic-with-vlans-no-external.yaml) or enabling IPv6 (net-single-nic-with-vlans-v6.yaml) are also available. -
/usr/share/openstack-tripleo-heat-templates/environments/net-bond-with-vlans.yaml- Example environment file for bonded NIC configuration in thebond-with-vlansnetwork interface directory. Environment files for disabling the External network (net-bond-with-vlans-no-external.yaml) or enabling IPv6 (net-bond-with-vlans-v6.yaml) are also available. -
/usr/share/openstack-tripleo-heat-templates/environments/net-multiple-nics.yaml- Example environment file for a multiple NIC configuration in themultiple-nicsnetwork interface directory. An environment file for enabling IPv6 (net-multiple-nics-v6.yaml) is also available. -
/usr/share/openstack-tripleo-heat-templates/environments/net-single-nic-linux-bridge-with-vlans.yaml- Example environment file for single NIC with VLANs configuration using a Linux bridge instead of an Open vSwitch bridge, which uses the thesingle-nic-linux-bridge-vlansnetwork interface directory.
This scenario uses a modified version of the /usr/share/openstack-tripleo-heat-templates/environments/net-bond-with-vlans.yaml file. Copy this file to the stack user’s templates directory.
$ cp /usr/share/openstack-tripleo-heat-templates/environments/net-bond-with-vlans.yaml /home/stack/templates/network-environment.yaml
The environment file contains the following modified sections:
resource_registry:
  OS::TripleO::BlockStorage::Net::SoftwareConfig: /home/stack/templates/nic-configs/cinder-storage.yaml
  OS::TripleO::Compute::Net::SoftwareConfig: /home/stack/templates/nic-configs/compute.yaml
  OS::TripleO::Controller::Net::SoftwareConfig: /home/stack/templates/nic-configs/controller.yaml
  OS::TripleO::ObjectStorage::Net::SoftwareConfig: /home/stack/templates/nic-configs/swift-storage.yaml
  OS::TripleO::CephStorage::Net::SoftwareConfig: /home/stack/templates/nic-configs/ceph-storage.yaml

parameter_defaults:
  InternalApiNetCidr: 172.16.0.0/24
  TenantNetCidr: 172.17.0.0/24
  StorageNetCidr: 172.18.0.0/24
  StorageMgmtNetCidr: 172.19.0.0/24
  ManagementNetCidr: 172.20.0.0/24
  ExternalNetCidr: 10.1.1.0/24
  InternalApiAllocationPools: [{'start': '172.16.0.10', 'end': '172.16.0.200'}]
  TenantAllocationPools: [{'start': '172.17.0.10', 'end': '172.17.0.200'}]
  StorageAllocationPools: [{'start': '172.18.0.10', 'end': '172.18.0.200'}]
  StorageMgmtAllocationPools: [{'start': '172.19.0.10', 'end': '172.19.0.200'}]
  ManagementAllocationPools: [{'start': '172.20.0.10', 'end': '172.20.0.200'}]
  # Leave room for floating IPs in the External allocation pool
  ExternalAllocationPools: [{'start': '10.1.1.10', 'end': '10.1.1.50'}]
  # Set to the router gateway on the external network
  ExternalInterfaceDefaultRoute: 10.1.1.1
  # Gateway router for the provisioning network (or Undercloud IP)
  ControlPlaneDefaultRoute: 192.0.2.254
  # The IP address of the EC2 metadata server. Generally the IP of the Undercloud
  EC2MetadataIp: 192.0.2.1
  # Define the DNS servers (maximum 2) for the overcloud nodes
  DnsServers: ["8.8.8.8","8.8.4.4"]
  InternalApiNetworkVlanID: 201
  StorageNetworkVlanID: 202
  StorageMgmtNetworkVlanID: 203
  TenantNetworkVlanID: 204
  ManagementNetworkVlanID: 205
  ExternalNetworkVlanID: 100
  NeutronExternalNetworkBridge: "''"
  # Customize bonding options if required
  BondInterfaceOvsOptions:
    "bond_mode=balance-slb"
The resource_registry section contains modified links to the custom network interface templates for each node role. Also include links to network interface template for custom roles in this section using the following format:
-
OS::TripleO::[ROLE]::Net::SoftwareConfig: [FILE]
Replace [ROLE] with the role name and [FILE] with the network interface template location.
The parameter_defaults section contains a list of parameters that define the network options for each network type. For a full reference of these options, see Appendix A, Network Environment Options.
This scenario defines options for each network. All network types use an individual VLAN and subnet used for assigning IP addresses to hosts and virtual IPs. In the example above, the allocation pool for the Internal API network starts at 172.16.0.10 and continues to 172.16.0.200 using VLAN 201. This results in static and virtual IPs assigned starting at 172.16.0.10 and upwards to 172.16.0.200 while using VLAN 201 in your environment.
The External network hosts the Horizon dashboard and Public API. If using the External network for both cloud administration and floating IPs, make sure there is room for a pool of IPs to use as floating IPs for VM instances. In this example, you only have IPs from 10.1.1.10 to 10.1.1.50 assigned to the External network, which leaves IP addresses from 10.1.1.51 and above free to use for Floating IP addresses. Alternately, place the Floating IP network on a separate VLAN and configure the Overcloud after creation to use it.
The BondInterfaceOvsOptions option provides options for our bonded interface using nic2 and nic3. For more information on bonding options, see Appendix D, Bonding Options.
Changing the network configuration after creating the Overcloud can cause configuration problems due to the availability of resources. For example, if a user changes a subnet range for a network in the network isolation templates, the reconfiguration might fail due to the subnet already being in use.
7.3. Assigning OpenStack Services to Isolated Networks
Each OpenStack service is assigned to a default network type in the resource registry. These services are then bound to IP addresses within the network type’s assigned network. Although the OpenStack services are divided among these networks, the number of actual physical networks might differ as defined in the network environment file. You can reassign OpenStack services to different network types by defining a new network map in your network environment file (/home/stack/templates/network-environment.yaml). The ServiceNetMap parameter determines the network types used for each service.
For example, you can reassign the Storage Management network services to the Storage Network by modifying the highlighted sections:
parameter_defaults:
  ServiceNetMap:
    SwiftMgmtNetwork: storage # Changed from storage_mgmt
    CephClusterNetwork: storage # Changed from storage_mgmt
Changing these parameters to storage places these services on the Storage network instead of the Storage Management network. This means you only need to define a set of parameter_defaults for the Storage network and not the Storage Management network.
The director merges your custom ServiceNetMap parameter definitions into a pre-defined list of defaults taken from ServiceNetMapDefaults and overrides the defaults. The director then returns the full list including customizations back to ServiceNetMap, which is used to configure network assignments for various services.
A full list of default services can be found in the ServiceNetMapDefaults parameter within /usr/share/openstack-tripleo-heat-templates/network/service_net_map.j2.yaml.
7.4. Selecting Networks to Deploy
The settings in the resource_registry section of the environment file for networks and ports do not ordinarily need to be changed. The list of networks can be changed if only a subset of the networks are desired.
When specifying custom networks and ports, do not include the environments/network-isolation.yaml on the deployment command line. Instead, specify all the networks and ports in the network environment file.
In order to use isolated networks, the servers must have IP addresses on each network. You can use neutron in the Undercloud to manage IP addresses on the isolated networks, so you will need to enable neutron port creation for each network. You can override the resource registry in your environment file.
First, this is the complete set of the default networks and ports per role that can be deployed:
resource_registry:
  # This section is usually not modified, if in doubt stick to the defaults
  # TripleO overcloud networks
  OS::TripleO::Network::External: /usr/share/openstack-tripleo-heat-templates/network/external.yaml
  OS::TripleO::Network::InternalApi: /usr/share/openstack-tripleo-heat-templates/network/internal_api.yaml
  OS::TripleO::Network::StorageMgmt: /usr/share/openstack-tripleo-heat-templates/network/storage_mgmt.yaml
  OS::TripleO::Network::Storage: /usr/share/openstack-tripleo-heat-templates/network/storage.yaml
  OS::TripleO::Network::Tenant: /usr/share/openstack-tripleo-heat-templates/network/tenant.yaml
  OS::TripleO::Network::Management: /usr/share/openstack-tripleo-heat-templates/network/management.yaml

  # Port assignments for the VIPs
  OS::TripleO::Network::Ports::ExternalVipPort: /usr/share/openstack-tripleo-heat-templates/network/ports/external.yaml
  OS::TripleO::Network::Ports::InternalApiVipPort: /usr/share/openstack-tripleo-heat-templates/network/ports/internal_api.yaml
  OS::TripleO::Network::Ports::StorageVipPort: /usr/share/openstack-tripleo-heat-templates/network/ports/storage.yaml
  OS::TripleO::Network::Ports::StorageMgmtVipPort: /usr/share/openstack-tripleo-heat-templates/network/ports/storage_mgmt.yaml
  OS::TripleO::Network::Ports::TenantVipPort: /usr/share/openstack-tripleo-heat-templates/network/ports/tenant.yaml
  OS::TripleO::Network::Ports::ManagementVipPort: /usr/share/openstack-tripleo-heat-templates/network/ports/management.yaml
  OS::TripleO::Network::Ports::RedisVipPort: /usr/share/openstack-tripleo-heat-templates/network/ports/vip.yaml

  # Port assignments for the controller role
  OS::TripleO::Controller::Ports::ExternalPort: /usr/share/openstack-tripleo-heat-templates/network/ports/external.yaml
  OS::TripleO::Controller::Ports::InternalApiPort: /usr/share/openstack-tripleo-heat-templates/network/ports/internal_api.yaml
  OS::TripleO::Controller::Ports::StoragePort: /usr/share/openstack-tripleo-heat-templates/network/ports/storage.yaml
  OS::TripleO::Controller::Ports::StorageMgmtPort: /usr/share/openstack-tripleo-heat-templates/network/ports/storage_mgmt.yaml
  OS::TripleO::Controller::Ports::TenantPort: /usr/share/openstack-tripleo-heat-templates/network/ports/tenant.yaml
  OS::TripleO::Controller::Ports::ManagementPort: /usr/share/openstack-tripleo-heat-templates/network/ports/management.yaml

  # Port assignments for the compute role
  OS::TripleO::Compute::Ports::InternalApiPort: /usr/share/openstack-tripleo-heat-templates/network/ports/internal_api.yaml
  OS::TripleO::Compute::Ports::StoragePort: /usr/share/openstack-tripleo-heat-templates/network/ports/storage.yaml
  OS::TripleO::Compute::Ports::TenantPort: /usr/share/openstack-tripleo-heat-templates/network/ports/tenant.yaml
  OS::TripleO::Compute::Ports::ManagementPort: /usr/share/openstack-tripleo-heat-templates/network/ports/management.yaml

  # Port assignments for the ceph storage role
  OS::TripleO::CephStorage::Ports::StoragePort: /usr/share/openstack-tripleo-heat-templates/network/ports/storage.yaml
  OS::TripleO::CephStorage::Ports::StorageMgmtPort: /usr/share/openstack-tripleo-heat-templates/network/ports/storage_mgmt.yaml
  OS::TripleO::CephStorage::Ports::ManagementPort: /usr/share/openstack-tripleo-heat-templates/network/ports/management.yaml

  # Port assignments for the swift storage role
  OS::TripleO::SwiftStorage::Ports::InternalApiPort: /usr/share/openstack-tripleo-heat-templates/network/ports/internal_api.yaml
  OS::TripleO::SwiftStorage::Ports::StoragePort: /usr/share/openstack-tripleo-heat-templates/network/ports/storage.yaml
  OS::TripleO::SwiftStorage::Ports::StorageMgmtPort: /usr/share/openstack-tripleo-heat-templates/network/ports/storage_mgmt.yaml
  OS::TripleO::SwiftStorage::Ports::ManagementPort: /usr/share/openstack-tripleo-heat-templates/network/ports/management.yaml

  # Port assignments for the block storage role
  OS::TripleO::BlockStorage::Ports::InternalApiPort: /usr/share/openstack-tripleo-heat-templates/network/ports/internal_api.yaml
  OS::TripleO::BlockStorage::Ports::StoragePort: /usr/share/openstack-tripleo-heat-templates/network/ports/storage.yaml
  OS::TripleO::BlockStorage::Ports::StorageMgmtPort: /usr/share/openstack-tripleo-heat-templates/network/ports/storage_mgmt.yaml
  OS::TripleO::BlockStorage::Ports::ManagementPort: /usr/share/openstack-tripleo-heat-templates/network/ports/management.yaml
The first section of this file has the resource registry declaration for the OS::TripleO::Network::* resources. By default these resources use the OS::Heat::None resource type, which does not create any networks. By redirecting these resources to the YAML files for each network, you enable the creation of these networks.
The next several sections create the IP addresses for the nodes in each role. The controller nodes have IPs on each network. The compute and storage nodes each have IPs on a subset of the networks.
The default file only contains the port assignments for the default roles. To configure port assignments for a custom role, use the same convention as the other resource definitions and link to the appropriate Heat templates in the network/ports directory:
-
OS::TripleO::[ROLE]::Ports::ExternalPort: /usr/share/openstack-tripleo-heat-templates/network/ports/external.yaml -
OS::TripleO::[ROLE]::Ports::InternalApiPort: /usr/share/openstack-tripleo-heat-templates/network/ports/internal_api.yaml -
OS::TripleO::[ROLE]::Ports::StoragePort: /usr/share/openstack-tripleo-heat-templates/network/ports/storage.yaml -
OS::TripleO::[ROLE]::Ports::StorageMgmtPort: /usr/share/openstack-tripleo-heat-templates/network/ports/storage_mgmt.yaml -
OS::TripleO::[ROLE]::Ports::TenantPort: /usr/share/openstack-tripleo-heat-templates/network/ports/tenant.yaml -
OS::TripleO::[ROLE]::Ports::ManagementPort: /usr/share/openstack-tripleo-heat-templates/network/ports/management.yaml
Replace [ROLE] with the name of your role.
To deploy without one of the pre-configured networks, disable the network definition and the corresponding port definition for the role. For example, all references to storage_mgmt.yaml could be replaced with OS::Heat::None:
resource_registry:
  # This section is usually not modified, if in doubt stick to the defaults
  # TripleO overcloud networks
  OS::TripleO::Network::External: /usr/share/openstack-tripleo-heat-templates/network/external.yaml
  OS::TripleO::Network::InternalApi: /usr/share/openstack-tripleo-heat-templates/network/internal_api.yaml
  OS::TripleO::Network::StorageMgmt: OS::Heat::None
  OS::TripleO::Network::Storage: /usr/share/openstack-tripleo-heat-templates/network/storage.yaml
  OS::TripleO::Network::Tenant: /usr/share/openstack-tripleo-heat-templates/network/tenant.yaml

  # Port assignments for the VIPs
  OS::TripleO::Network::Ports::ExternalVipPort: /usr/share/openstack-tripleo-heat-templates/network/ports/external.yaml
  OS::TripleO::Network::Ports::InternalApiVipPort: /usr/share/openstack-tripleo-heat-templates/network/ports/internal_api.yaml
  OS::TripleO::Network::Ports::StorageVipPort: /usr/share/openstack-tripleo-heat-templates/network/ports/storage.yaml
  OS::TripleO::Network::Ports::StorageMgmtVipPort: OS::Heat::None
  OS::TripleO::Network::Ports::TenantVipPort: /usr/share/openstack-tripleo-heat-templates/network/ports/tenant.yaml
  OS::TripleO::Network::Ports::RedisVipPort: /usr/share/openstack-tripleo-heat-templates/network/ports/vip.yaml

  # Port assignments for the controller role
  OS::TripleO::Controller::Ports::ExternalPort: /usr/share/openstack-tripleo-heat-templates/network/ports/external.yaml
  OS::TripleO::Controller::Ports::InternalApiPort: /usr/share/openstack-tripleo-heat-templates/network/ports/internal_api.yaml
  OS::TripleO::Controller::Ports::StoragePort: /usr/share/openstack-tripleo-heat-templates/network/ports/storage.yaml
  OS::TripleO::Controller::Ports::StorageMgmtPort: OS::Heat::None
  OS::TripleO::Controller::Ports::TenantPort: /usr/share/openstack-tripleo-heat-templates/network/ports/tenant.yaml

  # Port assignments for the compute role
  OS::TripleO::Compute::Ports::InternalApiPort: /usr/share/openstack-tripleo-heat-templates/network/ports/internal_api.yaml
  OS::TripleO::Compute::Ports::StoragePort: /usr/share/openstack-tripleo-heat-templates/network/ports/storage.yaml
  OS::TripleO::Compute::Ports::TenantPort: /usr/share/openstack-tripleo-heat-templates/network/ports/tenant.yaml

  # Port assignments for the ceph storage role
  OS::TripleO::CephStorage::Ports::StoragePort: /usr/share/openstack-tripleo-heat-templates/network/ports/storage.yaml
  OS::TripleO::CephStorage::Ports::StorageMgmtPort: OS::Heat::None

  # Port assignments for the swift storage role
  OS::TripleO::SwiftStorage::Ports::InternalApiPort: /usr/share/openstack-tripleo-heat-templates/network/ports/internal_api.yaml
  OS::TripleO::SwiftStorage::Ports::StoragePort: /usr/share/openstack-tripleo-heat-templates/network/ports/storage.yaml
  OS::TripleO::SwiftStorage::Ports::StorageMgmtPort: OS::Heat::None

  # Port assignments for the block storage role
  OS::TripleO::BlockStorage::Ports::InternalApiPort: /usr/share/openstack-tripleo-heat-templates/network/ports/internal_api.yaml
  OS::TripleO::BlockStorage::Ports::StoragePort: /usr/share/openstack-tripleo-heat-templates/network/ports/storage.yaml
  OS::TripleO::BlockStorage::Ports::StorageMgmtPort: OS::Heat::None

parameter_defaults:
  ServiceNetMap:
    ApacheNetwork: internal_api
    NeutronTenantNetwork: tenant
    CeilometerApiNetwork: internal_api
    AodhApiNetwork: internal_api
    GnocchiApiNetwork: internal_api
    MongodbNetwork: internal_api
    CinderApiNetwork: internal_api
    CinderIscsiNetwork: storage
    GlanceApiNetwork: internal_api
    GlanceRegistryNetwork: internal_api
    IronicApiNetwork: ctlplane
    IronicNetwork: ctlplane
    KeystoneAdminApiNetwork: ctlplane # allows undercloud to config endpoints
    KeystonePublicApiNetwork: internal_api
    ManilaApiNetwork: internal_api
    NeutronApiNetwork: internal_api
    HeatApiNetwork: internal_api
    HeatApiCfnNetwork: internal_api
    HeatApiCloudwatchNetwork: internal_api
    NovaApiNetwork: internal_api
    NovaColdMigrationNetwork: ctlplane
    NovaMetadataNetwork: internal_api
    NovaVncProxyNetwork: internal_api
    NovaLibvirtNetwork: internal_api
    SwiftStorageNetwork: storage # Changed from storage_mgmt
    SwiftProxyNetwork: storage
    SaharaApiNetwork: internal_api
    HorizonNetwork: internal_api
    MemcachedNetwork: internal_api
    RabbitmqNetwork: internal_api
    RedisNetwork: internal_api
    MysqlNetwork: internal_api
    CephClusterNetwork: storage # Changed from storage_mgmt
    CephMonNetwork: storage
    CephRgwNetwork: storage
    PublicNetwork: external
    OpendaylightApiNetwork: internal_api
    CephStorageHostnameResolveNetwork: storage
    ControllerHostnameResolveNetwork: internal_api
    ComputeHostnameResolveNetwork: internal_api
    ObjectStorageHostnameResolveNetwork: internal_api
    BlockStorageHostnameResolveNetwork: internal_api
By using OS::Heat::None, no network or ports are created, so the services on the Storage Management network would default to the Provisioning network. This can be changed in the ServiceNetMap in order to move the Storage Management services to another network, such as the Storage network.
Chapter 8. Controlling Node Placement
The default behavior for the director is to randomly select nodes for each role, usually based on their profile tag. However, the director provides the ability to define specific node placement. This is a useful method to:
-
Assign specific node IDs e.g.
controller-0,controller-1, etc - Assign custom hostnames
- Assign specific IP addresses
- Assign specific Virtual IP addresses
Manually setting predictable IP addresses, virtual IP addresses, and ports for a network alleviates the need for allocation pools. However, it is recommended to retain allocation pools for each network to ease with scaling new nodes. Make sure that any statically defined IP addresses fall outside the allocation pools. For more information on setting allocation pools, see Section 7.2, “Creating a Network Environment File”.
8.1. Assigning Specific Node IDs
This procedure assigns node ID to specific nodes. Examples of node IDs include controller-0, controller-1, compute-0, compute-1, and so forth.
The first step is to assign the ID as a per-node capability that the Nova scheduler matches on deployment. For example:
openstack baremetal node set --property capabilities='node:controller-0,boot_option:local' <id>
This assigns the capability node:controller-0 to the node. Repeat this pattern using a unique continuous index, starting from 0, for all nodes. Make sure all nodes for a given role (Controller, Compute, or each of the storage roles) are tagged in the same way or else the Nova scheduler will not match the capabilities correctly.
The next step is to create a Heat environment file (for example, scheduler_hints_env.yaml) that uses scheduler hints to match the capabilities for each node. For example:
parameter_defaults:
  ControllerSchedulerHints:
    'capabilities:node': 'controller-%index%'
To use these scheduler hints, include the ` scheduler_hints_env.yaml` environment file with the overcloud deploy command during Overcloud creation.
The same approach is possible for each role via these parameters:
-
ControllerSchedulerHintsfor Controller nodes. -
NovaComputeSchedulerHintsfor Compute nodes. -
BlockStorageSchedulerHintsfor Block Storage nodes. -
ObjectStorageSchedulerHintsfor Object Storage nodes. -
CephStorageSchedulerHintsfor Ceph Storage nodes. -
[ROLE]SchedulerHintsfor custom roles. Replace[ROLE]with the role name.
Node placement takes priority over profile matching. To avoid scheduling failures, use the default baremetal flavor for deployment and not the flavors designed for profile matching (compute, control, etc). For example:
$ openstack overcloud deploy ... --control-flavor baremetal --compute-flavor baremetal ...
8.2. Assigning Custom Hostnames
In combination with the node ID configuration in Section 8.1, “Assigning Specific Node IDs”, the director can also assign a specific custom hostname to each node. This is useful when you need to define where a system is located (e.g. rack2-row12), match an inventory identifier, or other situations where a custom hostname is desired.
To customize node hostnames, use the HostnameMap parameter in an environment file, such as the ` scheduler_hints_env.yaml` file from Section 8.1, “Assigning Specific Node IDs”. For example:
parameter_defaults:
  ControllerSchedulerHints:
    'capabilities:node': 'controller-%index%'
  NovaComputeSchedulerHints:
    'capabilities:node': 'compute-%index%'
  HostnameMap:
    overcloud-controller-0: overcloud-controller-prod-123-0
    overcloud-controller-1: overcloud-controller-prod-456-0
    overcloud-controller-2: overcloud-controller-prod-789-0
    overcloud-compute-0: overcloud-compute-prod-abc-0
Define the HostnameMap in the parameter_defaults section, and set each mapping as the original hostname that Heat defines using HostnameFormat parameters (e.g. overcloud-controller-0) and the second value is the desired custom hostname for that node (e.g. overcloud-controller-prod-123-0).
Using this method in combination with the node ID placement ensures each node has a custom hostname.
8.3. Assigning Predictable IPs
For further control over the resulting environment, the director can assign Overcloud nodes with specific IPs on each network as well. Use the environments/ips-from-pool-all.yaml environment file in the core Heat template collection. Copy this file to the stack user’s templates directory.
$ cp /usr/share/openstack-tripleo-heat-templates/environments/ips-from-pool-all.yaml ~/templates/.
There are two major sections in the ips-from-pool-all.yaml file.
The first is a set of resource_registry references that override the defaults. These tell the director to use a specific IP for a given port on a node type. Modify each resource to use the absolute path of its respective template. For example:
  OS::TripleO::Controller::Ports::ExternalPort: /usr/share/openstack-tripleo-heat-templates/network/ports/external_from_pool.yaml
  OS::TripleO::Controller::Ports::InternalApiPort: /usr/share/openstack-tripleo-heat-templates/network/ports/internal_api_from_pool.yaml
  OS::TripleO::Controller::Ports::StoragePort: /usr/share/openstack-tripleo-heat-templates/network/ports/storage_from_pool.yaml
  OS::TripleO::Controller::Ports::StorageMgmtPort: /usr/share/openstack-tripleo-heat-templates/network/ports/storage_mgmt_from_pool.yaml
  OS::TripleO::Controller::Ports::TenantPort: /usr/share/openstack-tripleo-heat-templates/network/ports/tenant_from_pool.yaml
The default configuration sets all networks on all node types to use pre-assigned IPs. To allow a particular network or node type to use default IP assignment instead, simply remove the resource_registry entries related to that node type or network from the environment file.
The second section is parameter_defaults, where the actual IP addresses are assigned. Each node type has an associated parameter:
-
ControllerIPsfor Controller nodes. -
NovaComputeIPsfor Compute nodes. -
CephStorageIPsfor Ceph Storage nodes. -
BlockStorageIPsfor Block Storage nodes. -
SwiftStorageIPsfor Object Storage nodes. -
[ROLE]IPsfor custom roles. Replace[ROLE]with the role name.
Each parameter is a map of network names to a list of addresses. Each network type must have at least as many addresses as there will be nodes on that network. The director assigns addresses in order. The first node of each type receives the first address on each respective list, the second node receives the second address on each respective lists, and so forth.
For example, if an Overcloud will contain three Ceph Storage nodes, the CephStorageIPs parameter might look like:
CephStorageIPs:
  storage:
  - 172.16.1.100
  - 172.16.1.101
  - 172.16.1.102
  storage_mgmt:
  - 172.16.3.100
  - 172.16.3.101
  - 172.16.3.102
The first Ceph Storage node receives two addresses: 172.16.1.100 and 172.16.3.100. The second receives 172.16.1.101 and 172.16.3.101, and the third receives 172.16.1.102 and 172.16.3.102. The same pattern applies to the other node types.
Make sure the chosen IP addresses fall outside the allocation pools for each network defined in your network environment file (see Section 7.2, “Creating a Network Environment File”). For example, make sure the internal_api assignments fall outside of the InternalApiAllocationPools range. This avoids conflicts with any IPs chosen automatically. Likewise, make sure the IP assignments do not conflict with the VIP configuration, either for standard predictable VIP placement (see Section 8.4, “Assigning Predictable Virtual IPs”) or external load balancing (see Section 14.1, “Configuring External Load Balancing”).
If an overcloud node is deleted, do not remove its entries in the IP lists. The IP list is based on the underlying Heat indices, which do not change even if you delete nodes. To indicate a given entry in the list is no longer used, replace the IP value with a value such as DELETED or UNUSED. Entries should never be removed from the IP lists, only changed or added.
To apply this configuration during a deployment, include the ips-from-pool-all.yaml environment file with the openstack overcloud deploy command.
If using network isolation (see Chapter 7, Isolating Networks), include the ips-from-pool-all.yaml file after the network-isolation.yaml file.
For example:
$ openstack overcloud deploy --templates \
  -e /usr/share/openstack-tripleo-heat-templates/environments/network-isolation.yaml \
  -e ~/templates/ips-from-pool-all.yaml \
  [OTHER OPTIONS]
8.4. Assigning Predictable Virtual IPs
In addition to defining predictable IP addresses for each node, the director also provides a similar ability to define predictable Virtual IPs (VIPs) for clustered services. To accomplish this, edit the network environment file from Section 7.2, “Creating a Network Environment File” and add the VIP parameters in the parameter_defaults section:
parameter_defaults:
  ...
  # Predictable VIPs
  ControlFixedIPs: [{'ip_address':'192.168.201.101'}]
  InternalApiVirtualFixedIPs: [{'ip_address':'172.16.0.9'}]
  PublicVirtualFixedIPs: [{'ip_address':'10.1.1.9'}]
  StorageVirtualFixedIPs: [{'ip_address':'172.18.0.9'}]
  StorageMgmtVirtualFixedIPs: [{'ip_address':'172.19.0.9'}]
  RedisVirtualFixedIPs: [{'ip_address':'172.16.0.8'}]
Select these IPs from outside of their respective allocation pool ranges. For example, select an IP address for InternalApiVirtualFixedIPs that is not within the InternalApiAllocationPools range.
This step is only for overclouds using the default internal load balancing configuration. If assigning VIPs with an external load balancer, use the procedure in the dedicated External Load Balancing for the Overcloud guide.
Chapter 9. Enabling SSL/TLS on the Overcloud
By default, the overcloud uses unencrypted endpoints for its services. This means that the overcloud configuration requires an additional environment file to enable SSL/TLS for its Public API endpoints. The following chapter shows how to configure your SSL/TLS certificate and include it as a part of your overcloud creation.
This process only enables SSL/TLS for Public API endpoints. The Internal and Admin APIs remain unencrypted.
This process requires network isolation to define the endpoints for the Public API. See Chapter 7, Isolating Networks for instruction on network isolation.
9.1. Initializing the Signing Host
The signing host is the host that generates new certificates and signs them with a certificate authority. If you have never created SSL certificates on the chosen signing host, you might need to initialize the host so that it can sign new certificates.
The /etc/pki/CA/index.txt file stores records of all signed certificates. Check if this file exists. If it does not exist, create an empty file:
$ sudo touch /etc/pki/CA/index.txt
The /etc/pki/CA/serial file identifies the next serial number to use for the next certificate to sign. Check if this file exists. If it does not exist, create a new file with a new starting value:
$ echo '1000' | sudo tee /etc/pki/CA/serial
9.2. Creating a Certificate Authority
Normally you sign your SSL/TLS certificates with an external certificate authority. In some situations, you might aim to use your own certificate authority. For example, you might aim to have an internal-only certificate authority.
For example, generate a key and certificate pair to act as the certificate authority:
$ openssl genrsa -out ca.key.pem 4096
$ openssl req  -key ca.key.pem -new -x509 -days 7300 -extensions v3_ca -out ca.crt.pem
The openssl req command asks for certain details about your authority. Enter these details.
This creates a certificate authority file called ca.crt.pem.
9.3. Adding the Certificate Authority to Clients
For any external clients aiming to communicate using SSL/TLS, copy the certificate authority file to each client that requires access your Red Hat OpenStack Platform environment. Once copied to the client, run the following command on the client to add it to the certificate authority trust bundle:
$ sudo cp ca.crt.pem /etc/pki/ca-trust/source/anchors/
$ sudo update-ca-trust extract
For example, the undercloud requires a copy of the certificate authority file so that it can communicate with the overcloud endpoints during creation.
9.4. Creating an SSL/TLS Key
Run the following commands to generate the SSL/TLS key (server.key.pem), which we use at different points to generate our undercloud or overcloud certificates:
$ openssl genrsa -out server.key.pem 2048
9.5. Creating an SSL/TLS Certificate Signing Request
This next procedure creates a certificate signing request for the overcloud. Copy the default OpenSSL configuration file for customization.
$ cp /etc/pki/tls/openssl.cnf .
Edit the custom openssl.cnf file and set SSL parameters to use for the overcloud. An example of the types of parameters to modify include:
[req]
distinguished_name = req_distinguished_name
req_extensions = v3_req

[req_distinguished_name]
countryName = Country Name (2 letter code)
countryName_default = AU
stateOrProvinceName = State or Province Name (full name)
stateOrProvinceName_default = Queensland
localityName = Locality Name (eg, city)
localityName_default = Brisbane
organizationalUnitName = Organizational Unit Name (eg, section)
organizationalUnitName_default = Red Hat
commonName = Common Name
commonName_default = 10.0.0.1
commonName_max = 64

[ v3_req ]
# Extensions to add to a certificate request
basicConstraints = CA:FALSE
keyUsage = nonRepudiation, digitalSignature, keyEncipherment
subjectAltName = @alt_names

[alt_names]
IP.1 = 10.0.0.1
DNS.1 = 10.0.0.1
DNS.2 = myovercloud.example.com
Set the commonName_default to one of the following:
-
If using an IP to access over SSL/TLS, use the Virtual IP for the Public API. Set this VIP using the
PublicVirtualFixedIPsparameter in an environment file. For more information, see Section 8.4, “Assigning Predictable Virtual IPs”. If you are not using predictable VIPs, the director assigns the first IP address from the range defined in theExternalAllocationPoolsparameter. - If using a fully qualified domain name to access over SSL/TLS, use the domain name instead.
Include the same Public API IP address as an IP entry and a DNS entry in the alt_names section. If also using DNS, include the hostname for the server as DNS entries in the same section. For more information about openssl.cnf, run man openssl.cnf.
Run the following command to generate certificate signing request (server.csr.pem):
$ openssl req -config openssl.cnf -key server.key.pem -new -out server.csr.pem
Make sure to include the SSL/TLS key you created in Section 9.4, “Creating an SSL/TLS Key” for the -key option.
Use the server.csr.pem file to create the SSL/TLS certificate in the next section.
9.6. Creating the SSL/TLS Certificate
The following command creates a certificate for your undercloud or overcloud:
$ sudo openssl ca -config openssl.cnf -extensions v3_req -days 3650 -in server.csr.pem -out server.crt.pem -cert ca.crt.pem -keyfile ca.key.pem
This command uses:
-
The configuration file specifying the v3 extensions. Include this as the
-configoption. -
The certificate signing request from Section 9.5, “Creating an SSL/TLS Certificate Signing Request” to generate the certificate and sign it through a certificate authority. Include this as the
-inoption. -
The certificate authority you created in Section 9.2, “Creating a Certificate Authority”, which signs the certificate. Include this as the
-certoption. -
The certificate authority private key you created in Section 9.2, “Creating a Certificate Authority”. Include this as the
-keyfileoption.
This results in a certificate named server.crt.pem. Use this certificate in conjunction with the SSL/TLS key from Section 9.4, “Creating an SSL/TLS Key” to enable SSL/TLS.
9.7. Enabling SSL/TLS
Copy the enable-tls.yaml environment file from the Heat template collection:
$ cp -r /usr/share/openstack-tripleo-heat-templates/environments/enable-tls.yaml ~/templates/.
Edit this file and make the following changes for these parameters:
- SSLCertificate
Copy the contents of the certificate file (
server.crt.pem) into theSSLCertificateparameter. For example:parameter_defaults: SSLCertificate: | -----BEGIN CERTIFICATE----- MIIDgzCCAmugAwIBAgIJAKk46qw6ncJaMA0GCSqGSIb3DQEBCwUAMFgxCzAJBgNV ... sFW3S2roS4X0Af/kSSD8mlBBTFTCMBAj6rtLBKLaQbIxEpIzrgvp -----END CERTIFICATE-----ImportantThe certificate contents require the same indentation level for all new lines.
- SSLKey
Copy the contents of the private key (
server.key.pem) into theSSLKeyparameter. For example:parameter_defaults: ... SSLKey: | -----BEGIN RSA PRIVATE KEY----- MIIEowIBAAKCAQEAqVw8lnQ9RbeI1EdLN5PJP0lVO9hkJZnGP6qb6wtYUoy1bVP7 ... ctlKn3rAAdyumi4JDjESAXHIKFjJNOLrBmpQyES4XpZUC7yhqPaU -----END RSA PRIVATE KEY-----ImportantThe private key contents require the same indentation level for all new lines.
- OS::TripleO::NodeTLSData
Change the resource path for
OS::TripleO::NodeTLSData:to an absolute path:resource_registry: OS::TripleO::NodeTLSData: /usr/share/openstack-tripleo-heat-templates/puppet/extraconfig/tls/tls-cert-inject.yaml
9.8. Injecting a Root Certificate
If the certificate signer is not in the default trust store on the overcloud image, you must inject the certificate authority into the overcloud image. Copy the inject-trust-anchor.yaml environment file from the heat template collection:
$ cp -r /usr/share/openstack-tripleo-heat-templates/environments/inject-trust-anchor.yaml ~/templates/.
Edit this file and make the following changes for these parameters:
- SSLRootCertificate
Copy the contents of the root certificate authority file (
ca.crt.pem) into theSSLRootCertificateparameter. For example:parameter_defaults: SSLRootCertificate: | -----BEGIN CERTIFICATE----- MIIDgzCCAmugAwIBAgIJAKk46qw6ncJaMA0GCSqGSIb3DQEBCwUAMFgxCzAJBgNV ... sFW3S2roS4X0Af/kSSD8mlBBTFTCMBAj6rtLBKLaQbIxEpIzrgvp -----END CERTIFICATE-----ImportantThe certificate authority contents require the same indentation level for all new lines.
- OS::TripleO::NodeTLSCAData
Change the resource path for
OS::TripleO::NodeTLSCAData:to an absolute path:resource_registry: OS::TripleO::NodeTLSCAData: /usr/share/openstack-tripleo-heat-templates/puppet/extraconfig/tls/ca-inject.yaml
9.9. Configuring DNS Endpoints
If using a DNS hostname to access the overcloud through SSL/TLS, create a new environment file (~/templates/cloudname.yaml) to define the hostname of the overcloud’s endpoints. Use the following parameters:
- CloudName
- The DNS hostname of the overcloud endpoints.
- DnsServers
-
A list of DNS servers to use. The configured DNS servers must contain an entry for the configured
CloudNamethat matches the IP address of the Public API.
An example of the contents for this file:
parameter_defaults:
  CloudName: overcloud.example.com
  DnsServers: ["10.0.0.254"]
9.10. Adding Environment Files During Overcloud Creation
The deployment command (openstack overcloud deploy) uses the -e option to add environment files. Add the environment files from this section in the following order:
-
The environment file to enable SSL/TLS (
enable-tls.yaml) -
The environment file to set the DNS hostname (
cloudname.yaml) -
The environment file to inject the root certificate authority (
inject-trust-anchor.yaml) The environment file to set the public endpoint mapping:
-
If using a DNS name for accessing the public endpoints, use
/usr/share/openstack-tripleo-heat-templates/environments/tls-endpoints-public-dns.yaml -
If using a IP address for accessing the public endpoints, use
/usr/share/openstack-tripleo-heat-templates/environments/tls-endpoints-public-ip.yaml
-
If using a DNS name for accessing the public endpoints, use
For example:
$ openstack overcloud deploy --templates [...] -e /home/stack/templates/enable-tls.yaml -e ~/templates/cloudname.yaml -e ~/templates/inject-trust-anchor.yaml -e /usr/share/openstack-tripleo-heat-templates/environments/tls-endpoints-public-dns.yaml
9.11. Updating SSL/TLS Certificates
If you need to update certificates in the future:
-
Edit the
enable-tls.yamlfile and update theSSLCertificate,SSLKey, andSSLIntermediateCertificateparameters. -
If your certificate authority has changed, edit the
inject-trust-anchor.yamlfile and update theSSLRootCertificateparameter.
Once the new certificate content is in place, rerun your deployment command. For example:
$ openstack overcloud deploy --templates [...] -e /home/stack/templates/enable-tls.yaml -e ~/templates/cloudname.yaml -e ~/templates/inject-trust-anchor.yaml -e /usr/share/openstack-tripleo-heat-templates/environments/tls-endpoints-public-dns.yaml
Chapter 10. Storage Configuration
This chapter outlines several methods of configuring storage options for your Overcloud.
The Overcloud uses local and LVM storage for the default storage options. However, these options are not supported for enterprise-level Overclouds. It is recommended to use one of the storage options in this chapter.
10.1. Configuring NFS Storage
This section describes configuring the Overcloud to use an NFS share. The installation and configuration process is based on the modification of an existing environment file in the core Heat template collection.
The core heat template collection contains a set of environment files in /usr/share/openstack-tripleo-heat-templates/environments/. These environment templates help with custom configuration of some of the supported features in a director-created Overcloud. This includes an environment file to help configure storage. This file is located at /usr/share/openstack-tripleo-heat-templates/environments/storage-environment.yaml. Copy this file to the stack user’s template directory.
$ cp /usr/share/openstack-tripleo-heat-templates/environments/storage-environment.yaml ~/templates/.
The environment file contains some parameters to help configure different storage options for OpenStack’s block and image storage components, cinder and glance. In this example, you will configure the Overcloud to use an NFS share. Modify the following parameters:
- CinderEnableIscsiBackend
-
Enables the iSCSI backend. Set to
false. - CinderEnableRbdBackend
-
Enables the Ceph Storage backend. Set to
false. - CinderEnableNfsBackend
-
Enables the NFS backend. Set to
true. - NovaEnableRbdBackend
-
Enables Ceph Storage for Nova ephemeral storage. Set to
false. - GlanceBackend
-
Define the back end to use for Glance. Set to
fileto use file-based storage for images. The Overcloud will save these files in a mounted NFS share for Glance. - CinderNfsMountOptions
- The NFS mount options for the volume storage.
- CinderNfsServers
- The NFS share to mount for volume storage. For example, 192.168.122.1:/export/cinder.
- GlanceNfsEnabled
-
Enables Pacemaker to manage the share for image storage. If disabled, the Overcloud stores images in the Controller node’s file system. Set to
true. - GlanceNfsShare
- The NFS share to mount for image storage. For example, 192.168.122.1:/export/glance.
- GlanceNfsOptions
- The NFS mount options for the image storage.
The environment file’s options should look similar to the following:
parameter_defaults:
  CinderEnableIscsiBackend: false
  CinderEnableRbdBackend: false
  CinderEnableNfsBackend: true
  NovaEnableRbdBackend: false
  GlanceBackend: 'file'

  CinderNfsMountOptions: 'rw,sync'
  CinderNfsServers: '192.0.2.230:/cinder'

  GlanceNfsEnabled: true
  GlanceNfsShare: '192.0.2.230:/glance'
  GlanceNfsOptions: 'rw,sync,context=system_u:object_r:glance_var_lib_t:s0'
Include the context=system_u:object_r:glance_var_lib_t:s0 in the GlanceNfsOptions parameter to allow glance access to the /var/lib directory. Without this SELinux content, glance will fail to write to the mount point.
These parameters are integrated as part of the heat template collection. Setting them as such creates two NFS mount points for cinder and glance to use.
Save this file for inclusion in the Overcloud creation.
10.2. Configuring Ceph Storage
The director provides two main methods for integrating Red Hat Ceph Storage into an Overcloud.
- Creating an Overcloud with its own Ceph Storage Cluster
- The director has the ability to create a Ceph Storage Cluster during the creation on the Overcloud. The director creates a set of Ceph Storage nodes that use the Ceph OSD to store the data. In addition, the director install the Ceph Monitor service on the Overcloud’s Controller nodes. This means if an organization creates an Overcloud with three highly available controller nodes, the Ceph Monitor also becomes a highly available service.
- Integrating a Existing Ceph Storage into an Overcloud
- If you already have an existing Ceph Storage Cluster, you can integrate this during an Overcloud deployment. This means you manage and scale the cluster outside of the Overcloud configuration.
For more information about configuring Overcloud Ceph Storage, see the dedicated Red Hat Ceph Storage for the Overcloud guide for full instructions on both scenarios.
10.3. Configuring Third Party Storage
The director include a couple of environment files to help configure third-party storage providers. This includes:
- Dell EMC Storage Center
Deploys a single Dell EMC Storage Center back end for the Block Storage (cinder) service.
The environment file is located at
/usr/share/openstack-tripleo-heat-templates/environments/cinder-dellsc-config.yaml.See the Dell Storage Center Back End Guide for full configuration information.
- Dell EMC PS Series
Deploys a single Dell EMC PS Series back end for the Block Storage (cinder) service.
The environment file is located at
/usr/share/openstack-tripleo-heat-templates/environments/cinder-dellps-config.yaml.See the Dell EMC PS Series Back End Guide for full configuration information.
- NetApp Block Storage
Deploys a NetApp storage appliance as a back end for the Block Storage (cinder) service.
The environment file is located at
/usr/share/openstack-tripleo-heat-templates/environments/cinder-netapp-config.yaml.See the NetApp Block Storage Back End Guide for full configuration information.
Chapter 11. Configuring Containerized Compute Nodes
The director provides an option to integrate services from OpenStack’s containerization project (kolla) into the Overcloud’s Compute nodes. This includes creating Compute nodes that use Red Hat Enterprise Linux Atomic Host as a base operating system and individual containers to run different OpenStack services.
Containerized Compute nodes are a Technology Preview feature. Technology Preview features are not fully supported under Red Hat Subscription Service Level Agreements (SLAs), may not be functionally complete, and are not intended for production use. However, these features provide early access to upcoming product innovations, enabling customers to test functionality and provide feedback during the development process. For more information on the support scope for features marked as technology previews, see https://access.redhat.com/support/offerings/techpreview/.
The director’s core Heat template collection includes environment files to aid the configuration of containerized Compute nodes. These files include:
-
docker.yaml- The main environment file for configuring containerized Compute nodes. -
docker-network.yaml- The environment file for containerized Compute nodes networking without network isolation. -
docker-network-isolation.yaml- The environment file for containerized Compute nodes using network isolation.
11.1. Increasing the Stack Depth
To accommodate the number of resource stacks in the containerized compute Heat templates, you should increase the stack depth for OpenStack Orchestration (heat) on the undercloud. Use the following steps to increase the stack depth:
Edit the
/etc/heat/heat.confand search for themax_nested_stack_depthparameter. Increase this parameter’s value to10:max_nested_stack_depth = 10
Save this file.
Restart the OpenStack Orchestration (heat) service:
sudo systemctl restart openstack-heat-engine.service
Undercloud minor and major version updates can revert changes to the /etc/heat/heat.conf file. If necessary, set the heat::engine::max_nested_stack_depth hieradata to ensure the stack depth is permanent. To set undercloud hieradata, point the hieradata_override parameter in your undercloud.conf file to a file containing the custom hieradata.
11.2. Examining the Containerized Compute Environment File (docker.yaml)
The docker.yaml file is the main environment file for the containerized Compute node configuration. It includes the entries in the resource_registry:
resource_registry:
  OS::TripleO::ComputePostDeployment: ../docker/compute-post.yaml
  OS::TripleO::NodeUserData: ../docker/firstboot/install_docker_agents.yaml
- OS::TripleO::NodeUserData
-
Provides a Heat template that uses custom configuration on first boot. In this case, it installs the
openstack-heat-docker-agentscontainer on the Compute nodes when they first boot. This container provides a set of initialization scripts to configure the containerized Compute node and Heat hooks to communicate with the director. - OS::TripleO::ComputePostDeployment
Provides a Heat template with a set of post-configuration resources for Compute nodes. This includes a software configuration resource that provides a set of
tagsto Puppet:ComputePuppetConfig: type: OS::Heat::SoftwareConfig properties: group: puppet options: enable_hiera: True enable_facter: False tags: package,file,concat,file_line,nova_config,neutron_config,neutron_agent_ovs,neutron_plugin_ml2 inputs: - name: tripleo::packages::enable_install type: Boolean default: True outputs: - name: result config: get_file: ../puppet/manifests/overcloud_compute.ppThese tags define the Puppet modules to pass to the
openstack-heat-docker-agentscontainer.
The docker.yaml file includes a parameter called NovaImage that replaces the standard overcloud-full image with a different image (atomic-image) when provisioning Compute nodes. See in Section 11.3, “Uploading the Atomic Host Image” for instructions on uploading this new image.
The docker.yaml file also includes a parameter_defaults section that defines the Docker registry and images to use for our Compute node services. You can modify this section to use a local registry instead of the default registry.access.redhat.com. See Section 11.4, “Using a Local Registry” for instructions on configuring a local registry.
11.3. Uploading the Atomic Host Image
The director requires a copy of the Cloud Image for Red Hat Enterprise Linux 7 Atomic Host imported into its image store as atomic-image. This is because the Compute node requires this image for the base OS during the provisioning phase of the Overcloud creation.
Download a copy of the Cloud Image from the Red Hat Enterprise Linux 7 Atomic Host product page (https://access.redhat.com/downloads/content/271/ver=/rhel---7/7.2.2-2/x86_64/product-software) and save it to the images subdirectory in the stack user’s home directory.
Once the image download completes, import the image into the director as the stack user.
$ glance image-create --name atomic-image --file ~/images/rhel-atomic-cloud-7.2-12.x86_64.qcow2 --disk-format qcow2 --container-format bare
This imports the image alongside the other Overcloud images.
$ glance image-list
+--------------------------------------+------------------------+
| ID                                   | Name                   |
+--------------------------------------+------------------------+
| 27b5bad7-f8b2-4dd8-9f69-32dfe84644cf | atomic-image           |
| 08c116c6-8913-427b-b5b0-b55c18a01888 | bm-deploy-kernel       |
| aec4c104-0146-437b-a10b-8ebc351067b9 | bm-deploy-ramdisk      |
| 9012ce83-4c63-4cd7-a976-0c972be747cd | overcloud-full         |
| 376e95df-c1c1-4f2a-b5f3-93f639eb9972 | overcloud-full-initrd  |
| 0b5773eb-4c64-4086-9298-7f28606b68af | overcloud-full-vmlinuz |
+--------------------------------------+------------------------+
11.4. Using a Local Registry
The default configuration uses Red Hat’s container registry for image downloads. However, as an optional step, you can use a local registry to conserve bandwidth during the Overcloud creation process.
You can use an existing local registry or install a new one. To install a new registry, use the instructions in "Get Started with Docker Formatted Container Images" in Getting Started with Containers.
Pull the required images into your registry:
$ sudo docker pull registry.access.redhat.com/rhosp10_tech_preview/openstack-nova-compute:latest
$ sudo docker pull registry.access.redhat.com/rhosp10_tech_preview/openstack-data:latest
$ sudo docker pull registry.access.redhat.com/rhosp10_tech_preview/openstack-nova-libvirt:latest
$ sudo docker pull registry.access.redhat.com/rhosp10_tech_preview/openstack-neutron-openvswitch-agent:latest
$ sudo docker pull registry.access.redhat.com/rhosp10_tech_preview/openstack-openvswitch-vswitchd:latest
$ sudo docker pull registry.access.redhat.com/rhosp10_tech_preview/openstack-openvswitch-db-server:latest
$ sudo docker pull registry.access.redhat.com/rhosp10_tech_preview/openstack-heat-docker-agents:latest
After pulling the images, tag them with the proper registry host:
$ sudo docker tag registry.access.redhat.com/rhosp10_tech_preview/openstack-nova-compute:latest localhost:8787/registry.access.redhat.com/openstack-nova-compute:latest
$ sudo docker tag registry.access.redhat.com/rhosp10_tech_preview/openstack-data:latest localhost:8787/registry.access.redhat.com/openstack-data:latest
$ sudo docker tag registry.access.redhat.com/rhosp10_tech_preview/openstack-nova-libvirt:latest localhost:8787/registry.access.redhat.com/openstack-nova-libvirt:latest
$ sudo docker tag registry.access.redhat.com/rhosp10_tech_preview/openstack-neutron-openvswitch-agent:latest localhost:8787/registry.access.redhat.com/openstack-neutron-openvswitch-agent:latest
$ sudo docker tag registry.access.redhat.com/rhosp10_tech_preview/openstack-openvswitch-vswitchd:latest localhost:8787/registry.access.redhat.com/openstack-openvswitch-vswitchd:latest
$ sudo docker tag registry.access.redhat.com/rhosp10_tech_preview/openstack-openvswitch-db-server:latest localhost:8787/registry.access.redhat.com/openstack-openvswitch-db-server:latest
$ sudo docker tag registry.access.redhat.com/rhosp10_tech_preview/openstack-heat-docker-agents:latest localhost:8787/registry.access.redhat.com/openstack-heat-docker-agents:latest
Push them to the registry:
$ sudo docker push localhost:8787/registry.access.redhat.com/openstack-nova-compute:latest
$ sudo docker push localhost:8787/registry.access.redhat.com/openstack-data:latest
$ sudo docker push localhost:8787/registry.access.redhat.com/openstack-nova-libvirt:latest
$ sudo docker push localhost:8787/registry.access.redhat.com/openstack-neutron-openvswitch-agent:latest
$ sudo docker push localhost:8787/registry.access.redhat.com/openstack-openvswitch-vswitchd:latest
$ sudo docker push localhost:8787/registry.access.redhat.com/openstack-openvswitch-db-server:latest
$ sudo docker push localhost:8787/registry.access.redhat.com/openstack-heat-docker-agents:latest
Create a copy of the main docker.yaml environment file in the templates subdirectory:
$ cp /usr/share/openstack-tripleo-heat-templates/environments/docker.yaml ~/templates/.
Edit the file and modify the resource_registry to use absolute paths:
resource_registry:
  OS::TripleO::ComputePostDeployment: /usr/share/openstack-tripleo-heat-templates/docker/compute-post.yaml
  OS::TripleO::NodeUserData: /usr/share/openstack-tripleo-heat-templates/docker/firstboot/install_docker_agents.yaml
Set DockerNamespace in parameter_defaults to your registry URL. Also set DockerNamespaceIsRegistry to true For example:
parameter_defaults:
  DockerNamespace: registry.example.com:8787/registry.access.redhat.com
  DockerNamespaceIsRegistry: true
Your local registry now has the required docker images and the containerized Compute configuration is now set to use that registry.
11.5. Including Environment Files in the Overcloud Deployment
When running the Overcloud creation, include the main environment file (docker.yaml) and the network environment file (docker-network.yaml) for the containerized Compute nodes along with the openstack overcloud deploy command. For example:
$ openstack overcloud deploy --templates -e /usr/share/openstack-tripleo-heat-templates/environments/docker.yaml -e /usr/share/openstack-tripleo-heat-templates/environments/docker-network.yaml [OTHER OPTIONS] ...
The containerized Compute nodes also function in an Overcloud with network isolation. This also requires the main environment file along with the network isolation file (docker-network-isolation.yaml). Add these files before the network isolation files from Chapter 7, Isolating Networks. For example:
openstack overcloud deploy --templates -e /usr/share/openstack-tripleo-heat-templates/environments/docker.yaml -e /usr/share/openstack-tripleo-heat-templates/environments/docker-network-isolation.yaml -e /usr/share/openstack-tripleo-heat-templates/environments/net-single-nic-with-vlans.yaml -e /usr/share/openstack-tripleo-heat-templates/environments/network-isolation.yaml [OTHER OPTIONS] ...
The director creates an Overcloud with containerized Compute nodes.
Chapter 12. Monitoring Tools Configuration
Monitoring tools are an optional suite of tools designed to help operators maintain an OpenStack environment. The tools perform the following functions:
- Centralized logging: Allows you gather logs from all components in the OpenStack environment in one central location. You can identify problems across all nodes and services, and optionally, export the log data to Red Hat for assistance in diagnosing problems.
- Availability monitoring: Allows you to monitor all components in the OpenStack environment and determine if any components are currently experiencing outages or are otherwise not functional. You can also receive notifications when problems occur to optimize your response time.
12.1. Architecture
Monitoring tools use a client-server model with the client deployed onto the Red Hat OpenStack Platform overcloud nodes. The Fluentd service provides client-side centralized logging (CL) and the Sensu client service provides client-side availability monitoring (AM).
12.1.1. Centralized Logging
Centralized logging allows you to have one central place to view logs across your entire OpenStack environment. These logs come from the operating system, such as syslog and audit log files, infrastructure components such as RabbitMQ and MariaDB, and OpenStack services such as Identity, Compute, and others.
The centralized logging toolchain consists of a number of components, including:
- Log Collection Agent (Fluentd)
- Log Relay/Transformer (Fluentd)
- Data Store (Elasticsearch)
- API/Presentation Layer (Kibana)
The director does not deploy the server-side components for centralized logging. Red Hat does not support server-side components including the Elasticsearch database, Kibana, and Fluentd with plugins running as a log aggregator.
The centralized logging components and their interactions are laid out in the following diagrams:
Items shown in blue denote Red Hat-supported components.
Figure 12.1. Centralized logging architecture at a high level

Figure 12.2. Single-node deployment for Red Hat OpenStack Platform
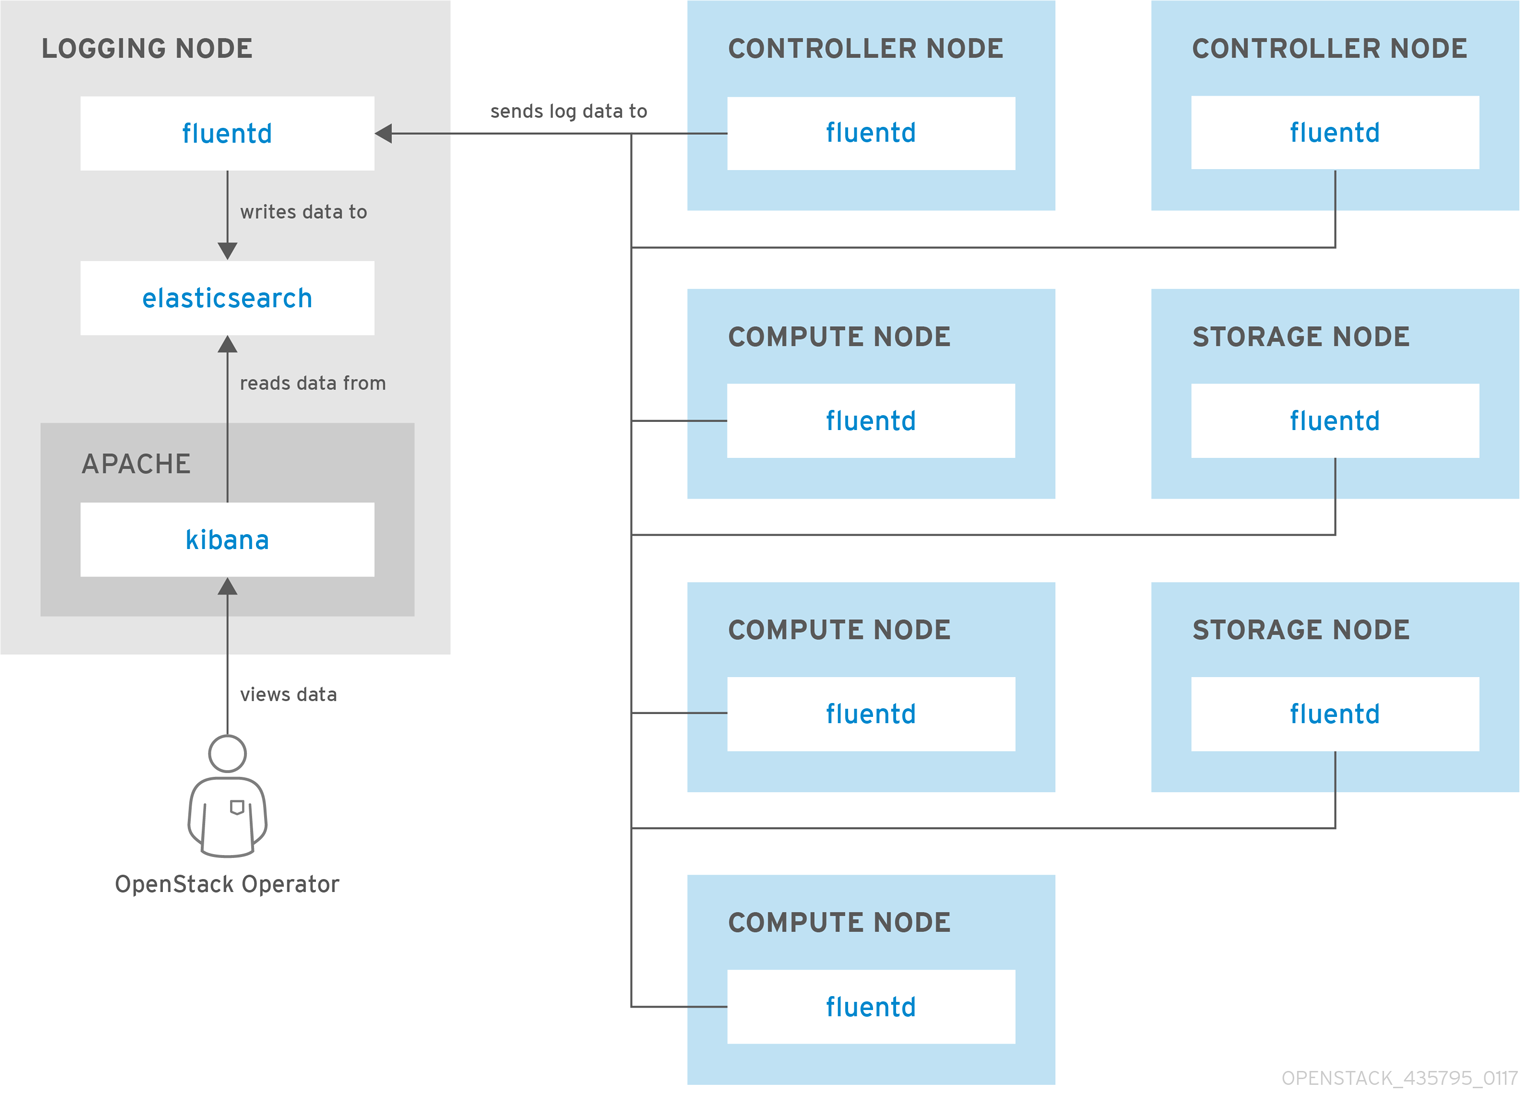
Figure 12.3. HA deployment for Red Hat OpenStack Platform
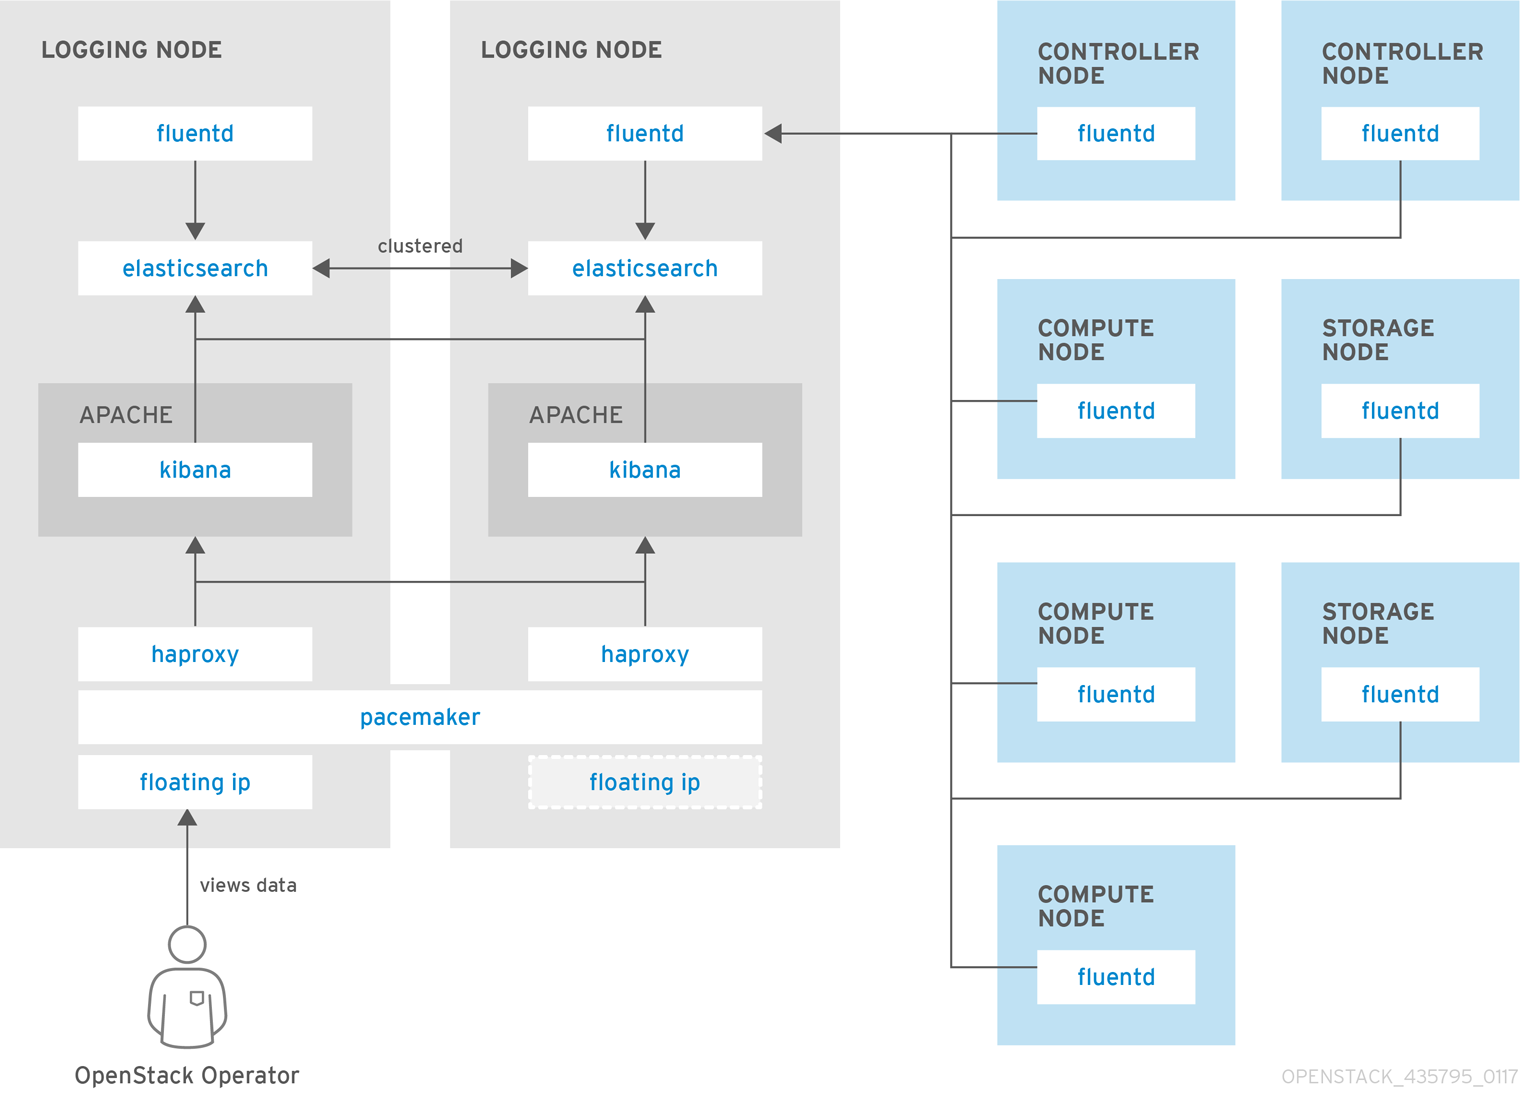
12.1.2. Availability Monitoring
Availability monitoring allows you to have one central place to monitor the high-level functionality of all components across your entire OpenStack environment.
The availability monitoring toolchain consists of a number of components, including:
- Monitoring Agent (Sensu client)
- Monitoring Relay/Proxy (RabbitMQ)
- Monitoring Controller/Server (Sensu server)
- API/Presentation Layer (Uchiwa)
The director does not deploy the server-side components for availability monitoring. Red Hat does not support server-side components including Uchiwa, Sensu Server, the Sensu API plus RabbitMQ, and a Redis instance running on a monitoring node.
The availability monitoring components and their interactions are laid out in the following diagrams:
Items shown in blue denote Red Hat-supported components.
Figure 12.4. Availability monitoring architecture at a high level
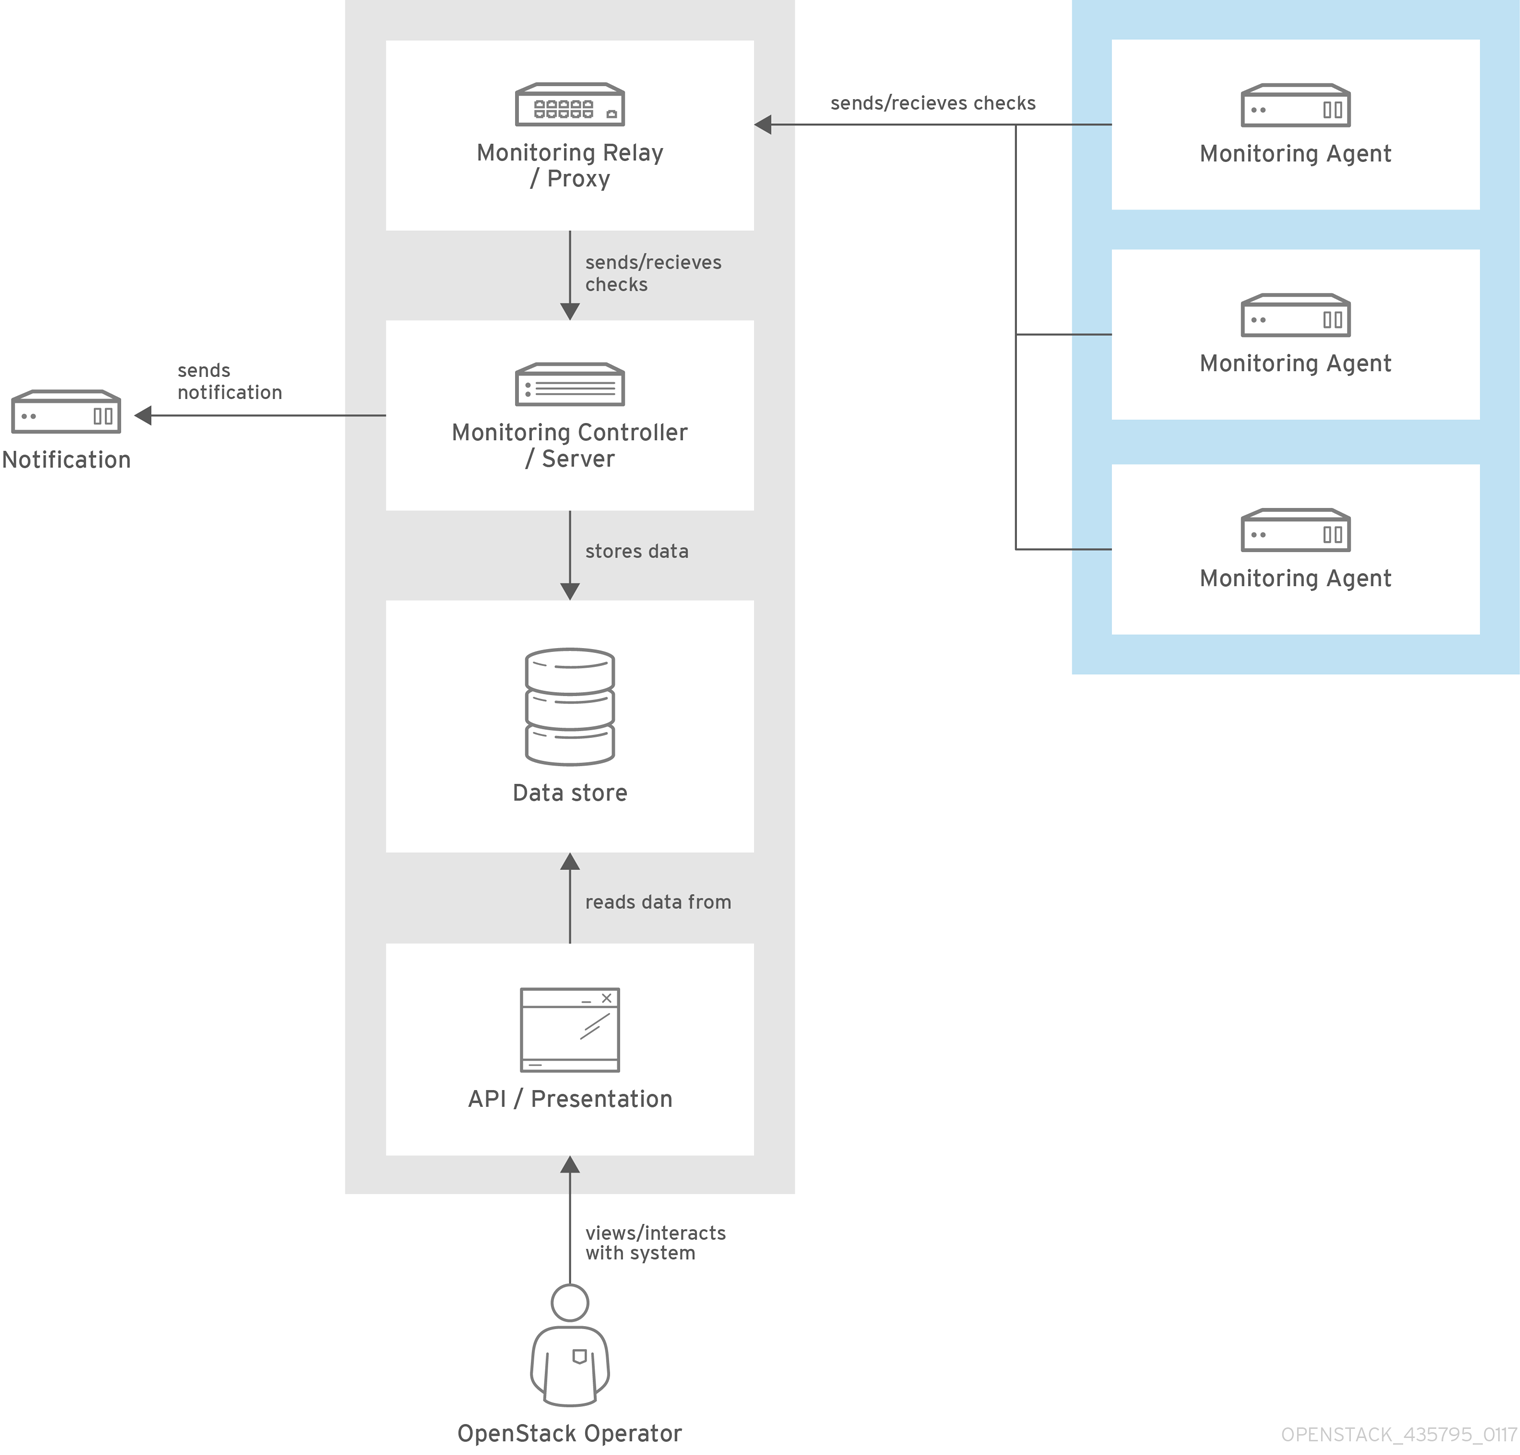
Figure 12.5. Single-node deployment for Red Hat OpenStack Platform

Figure 12.6. HA deployment for Red Hat OpenStack Platform

12.2. Install the Client-Side Tools
Prior to overcloud deployment, you need to determine the configuration settings to apply to each client. Copy the example environment files from the director’s Heat template collection and modify them to suit your environment.
12.2.1. Set Centralized Logging Client Parameters
For Fluentd configuration settings, copy /usr/share/openstack-tripleo-heat-templates/environments/logging-environment.yaml and modify the file to suit your environment. For example:
Simple configuration
resource_registry:
  OS::TripleO::Services::FluentdClient: ../puppet/services/logging/fluentd-client.yaml

parameter_defaults:
  LoggingServers:
    - host: log0.example.com
      port: 24224
    - host: log1.example.com
      port: 24224
Example SSL configuration
## (note the use of port 24284 for ssl connections)

resource_registry:
  OS::TripleO::Services::FluentdClient: ../puppet/services/logging/fluentd-client.yaml

parameter_defaults:
  LoggingServers:
    - host: 192.0.2.11
      port: 24284
  LoggingUsesSSL: true
  LoggingSharedKey: secret
  LoggingSSLCertificate: |
    -----BEGIN CERTIFICATE-----
    ...certificate data here...
    -----END CERTIFICATE-----
-
LoggingServers- The destination system that will receive Fluentd log messages. -
LoggingUsesSSL- Setting that determines whethersecure_forwardis used when forwarding log messages. -
LoggingSharedKey- The shared secret used bysecure_forward. -
LoggingSSLCertificate- The PEM-encoded contents of the SSL CA certificate.
12.2.2. Set Availability Monitoring Client Parameters
For the Sensu client configuration settings, copy /usr/share/openstack-tripleo-heat-templates/environments/monitoring-environment.yaml and modify the file to suit your environment. For example:
resource_registry:
  OS::TripleO::Services::SensuClient: ../puppet/services/monitoring/sensu-client.yaml

parameter_defaults:
  MonitoringRabbitHost: 10.10.10.10
  MonitoringRabbitPort: 5672
  MonitoringRabbitUserName: sensu
  MonitoringRabbitPassword: sensu
  MonitoringRabbitUseSSL: false
  MonitoringRabbitVhost: "/sensu"
  SensuClientCustomConfig:
    api:
      warning: 10
critical: 20-
MonitoringRabbit*- These parameters connect the Sensu client services to the RabbitMQ instance that runs on the monitoring server. -
MonitoringRabbitUseSSL- This parameter is not currently available for availability monitoring. -
SensuClientCustomConfig- Specify additional Sensu client configuration. Defines the OpenStack credentials to be used, including username/password, auth_url, tenant, and region.
12.2.3. Install Operational Tools on Overcloud Nodes
Include the modified YAML files with your openstack overcloud deploy command to install the Sensu client and Fluentd tools on all overcloud nodes. For example:
$ openstack overcloud deploy --templates -e /usr/share/openstack-tripleo-heat-templates/environments/network-isolation.yaml -e network-environment.yaml -e ~/templates/monitoring-environment.yaml -e ~/templates/logging-environment.yaml --control-scale 3 --compute-scale 1 --ntp-server 192.168.122.10
12.3. Install the Server-Side Components
Red Hat does not support the server-side components and their deployment process.
You can use the opstools-ansible playbook to install the server-side components onto Red Hat Enterprise Linux 7. These server-side components include availability monitoring and centralized logging services that complement the Red Hat-supported client-side components. The most tested opstools-ansible scenario is the deployment of server-side components onto CentOS 7. Detailed instructions can be found in the README.md: https://github.com/centos-opstools/opstools-ansible
12.4. Monitor the OpenStack Platform
See the Sensu documentation for further details about the Sensu stack infrastructure: https://sensuapp.org/docs/latest/overview/architecture.html
Red Hat supplies a set of check scripts in the osops-tools-monitoring-oschecks package. The majority of the check scripts only check the API connection to the OpenStack component. However, certain scripts also perform additional OpenStack resource tests for OpenStack Compute (nova), OpenStack Block Storage (cinder), OpenStack Image (glance), and OpenStack Networking (neutron). For example, the OpenStack Identity (keystone) API check gives the following result when keystone is running:
OK: Got a token, Keystone API is working.
12.5. Validate the Sensu Client Installation
Check the status of the
sensu-clienton each overcloud node:# systemctl status sensu-client
-
Review the error log for any issues:
/var/log/sensu/sensu-client.log -
Verify that each overcloud node has the
/etc/sensu/conf.d/rabbitmq.jsonfile that sets the IP address of the monitoring server.
12.6. Review the State of a Node
If you have a deployment of the Uchiwa dashboard, you can use it with the Sensu server to review the state of your nodes:
Login to the Uchiwa dashboard and click the
Data Centertab to confirm that the Data Center is operational.http://<SERVER_IP_ADDRESS>/uchiwa
-
Check that all overcloud nodes are in a
Connectedstate. - At a suitable time, reboot one of the overcloud nodes and review the rebooted node’s status in the Uchiwa dashboard. After the reboot completes, verify that the node successfully re-connects to the Sensu server and starts executing checks.
12.7. Review the State of an OpenStack Service
This example tests the monitoring of the openstack-ceilometer-central service.
Confirm that the
openstack-ceilometer-centralservice is running:systemctl status openstack-ceilometer-central.service
-
Connect to the Uchiwa dashboard and confirm that a successful
ceilometercheck is present and running as defined in theceilometerJSON file. Stop the
openstack-ceilometer-centralservice.NoteThis may disrupt services, so run this test at an appropriate time.
systemctl stop openstack-ceilometer-central.service
-
Log in to the Uchiwa dashboard and confirm that the failed
ceilometercheck has been reported. Start the
openstack-ceilometer-centralservice:systemctl start openstack-ceilometer-central.service
-
Log in to the Uchiwa dashboard and view the time interval between the
ceilometercheck reports to confirm that the check runs in the time interval defined in theceilometerJSON file.
Chapter 13. Security Enhancements
The following sections provide some suggestions to harden the security of your overcloud.
13.1. Managing the Overcloud Firewall
Each of the core OpenStack Platform services contains firewall rules in their respective composable service templates. This automatically creates a default set of firewall rules for each overcloud node.
The overcloud Heat templates contain a set of parameters to help with additional firewall management:
- ManageFirewall
-
Defines whether to automatically manage the firewall rules. Set to
trueto allow Puppet to automatically configure the firewall on each node. Set tofalseif you want to manually manage the firewall. The default istrue. - PurgeFirewallRules
-
Defines whether to purge the default Linux firewall rules before configuring new ones. The default is
false.
If ManageFirewall is set to true, you can create additional firewall rules on deployment. Set the tripleo::firewall::firewall_rules hieradata using a configuration hook (see Section 4.5, “Puppet: Customizing Hieradata for Roles”) in an environment file for your overcloud. This hieradata is a hash containing the firewall rule names and their respective parameters as keys, all of which are optional:
- port
- The port associated to the rule.
- dport
- The destination port associated to the rule.
- sport
- The source port associated to the rule.
- proto
-
The protocol associated to the rule. Defaults to
tcp. - action
-
The action policy associated to the rule. Defaults to
accept. - jump
-
The chain to jump to. If present, it overrides
action. - state
-
An Array of states associated to the rule. Defaults to
['NEW']. - source
- The source IP address associated to the rule.
- iniface
- The network interface associated to the rule.
- chain
-
The chain associated to the rule. Defaults to
INPUT. - destination
- The destination CIDR associated to the rule.
The following example demonstrates the syntax of the firewall rule format:
ExtraConfig:
  tripleo::firewall::firewall_rules:
    '300 allow custom application 1':
      port: 999
      proto: udp
      action: accept
    '301 allow custom application 2':
      port: 8081
      proto: tcp
      action: accept
This applies two additional firewall rules to all nodes through ExtraConfig.
Each rule name becomes the comment for the respective iptables rule. Note also each rule name starts with a three-digit prefix to help Puppet order all defined rules in the final iptables file. The default OpenStack Platform rules use prefixes in the 000 to 200 range.
13.2. Changing the Simple Network Management Protocol (SNMP) Strings
The director provides a default read-only SNMP configuration for your overcloud. It is advisable to change the SNMP strings to mitigate the risk of unauthorized users learning about your network devices.
Set the following hieradata using the ExtraConfig hook in an environment file for your overcloud:
- snmp::ro_community
-
IPv4 read-only SNMP community string. The default value is
public. - snmp::ro_community6
-
IPv6 read-only SNMP community string. The default value is
public. - snmp::ro_network
-
Network that is allowed to
RO querythe daemon. This value can be a string or an array. Default value is127.0.0.1. - snmp::ro_network6
-
Network that is allowed to
RO querythe daemon with IPv6. This value can be a string or an array. The default value is::1/128. - snmp::snmpd_config
-
Array of lines to add to the snmpd.conf file as a safety valve. The default value is
[]. See the SNMP Configuration File web page for all available options.
For example:
parameter_defaults:
  ExtraConfig:
    snmp::ro_community: mysecurestring
    snmp::ro_community6: myv6securestring
This changes the read-only SNMP community string on all nodes.
13.3. Changing the SSL/TLS Cipher and Rules for HAProxy
If you enabled SSL/TLS in the overcloud (see Chapter 9, Enabling SSL/TLS on the Overcloud), you might want to harden the SSL/TLS ciphers and rules used with the HAProxy configuration. This helps avoid SSL/TLS vulnerabilities, such as the POODLE vulnerability.
Set the following hieradata using the ExtraConfig hook in an environment file for your overcloud:
- tripleo::haproxy::ssl_cipher_suite
- The cipher suite to use in HAProxy.
- tripleo::haproxy::ssl_options
- The SSL/TLS rules to use in HAProxy.
For example, you might aim to use the following cipher and rules:
-
Cipher:
ECDHE-ECDSA-CHACHA20-POLY1305:ECDHE-RSA-CHACHA20-POLY1305:ECDHE-ECDSA-AES128-GCM-SHA256:ECDHE-RSA-AES128-GCM-SHA256:ECDHE-ECDSA-AES256-GCM-SHA384:ECDHE-RSA-AES256-GCM-SHA384:DHE-RSA-AES128-GCM-SHA256:DHE-RSA-AES256-GCM-SHA384:ECDHE-ECDSA-AES128-SHA256:ECDHE-RSA-AES128-SHA256:ECDHE-ECDSA-AES128-SHA:ECDHE-RSA-AES256-SHA384:ECDHE-RSA-AES128-SHA:ECDHE-ECDSA-AES256-SHA384:ECDHE-ECDSA-AES256-SHA:ECDHE-RSA-AES256-SHA:DHE-RSA-AES128-SHA256:DHE-RSA-AES128-SHA:DHE-RSA-AES256-SHA256:DHE-RSA-AES256-SHA:ECDHE-ECDSA-DES-CBC3-SHA:ECDHE-RSA-DES-CBC3-SHA:EDH-RSA-DES-CBC3-SHA:AES128-GCM-SHA256:AES256-GCM-SHA384:AES128-SHA256:AES256-SHA256:AES128-SHA:AES256-SHA:DES-CBC3-SHA:!DSS -
Rules:
no-sslv3 no-tls-tickets
Create an environment file with the following content:
parameter_defaults:
  ExtraConfig:
    tripleo::haproxy::ssl_cipher_suite: ECDHE-ECDSA-CHACHA20-POLY1305:ECDHE-RSA-CHACHA20-POLY1305:ECDHE-ECDSA-AES128-GCM-SHA256:ECDHE-RSA-AES128-GCM-SHA256:ECDHE-ECDSA-AES256-GCM-SHA384:ECDHE-RSA-AES256-GCM-SHA384:DHE-RSA-AES128-GCM-SHA256:DHE-RSA-AES256-GCM-SHA384:ECDHE-ECDSA-AES128-SHA256:ECDHE-RSA-AES128-SHA256:ECDHE-ECDSA-AES128-SHA:ECDHE-RSA-AES256-SHA384:ECDHE-RSA-AES128-SHA:ECDHE-ECDSA-AES256-SHA384:ECDHE-ECDSA-AES256-SHA:ECDHE-RSA-AES256-SHA:DHE-RSA-AES128-SHA256:DHE-RSA-AES128-SHA:DHE-RSA-AES256-SHA256:DHE-RSA-AES256-SHA:ECDHE-ECDSA-DES-CBC3-SHA:ECDHE-RSA-DES-CBC3-SHA:EDH-RSA-DES-CBC3-SHA:AES128-GCM-SHA256:AES256-GCM-SHA384:AES128-SHA256:AES256-SHA256:AES128-SHA:AES256-SHA:DES-CBC3-SHA:!DSS
tripleo::haproxy::ssl_options: no-sslv3 no-tls-ticketsThe cipher collection is one continuous line.
Include this environment file with your overcloud creation.
Chapter 14. Other Configurations
14.1. Configuring External Load Balancing
An Overcloud uses multiple Controllers together as a high availability cluster, which ensures maximum operational performance for your OpenStack services. In addition, the cluster provides load balancing for access to the OpenStack services, which evenly distributes traffic to the Controller nodes and reduces server overload for each node. It is also possible to use an external load balancer to perform this distribution. For example, an organization might use their own hardware-based load balancer to handle traffic distribution to the Controller nodes.
For more information about configuring external load balancing, see the dedicated External Load Balancing for the Overcloud guide for full instructions.
14.2. Configuring IPv6 Networking
As a default, the Overcloud uses Internet Protocol version 4 (IPv4) to configure the service endpoints. However, the Overcloud also supports Internet Protocol version 6 (IPv6) endpoints, which is useful for organizations that support IPv6 infrastructure. The director includes a set of environment files to help with creating IPv6-based Overclouds.
For more information about configuring IPv6 in the Overcloud, see the dedicated IPv6 Networking for the Overcloud guide for full instructions.
Appendix A. Network Environment Options
Table A.1. Network Environment Options
| Parameter | Description | Example |
|---|---|---|
| InternalApiNetCidr | The network and subnet for the Internal API network | 172.17.0.0/24 |
| StorageNetCidr | The network and subnet for the Storage network | |
| StorageMgmtNetCidr | The network and subnet for the Storage Management network | |
| TenantNetCidr | The network and subnet for the Tenant network | |
| ExternalNetCidr | The network and subnet for the External network | |
| InternalApiAllocationPools | The allocation pool for the Internal API network in a tuple format | [{start: 172.17.0.10, end: 172.17.0.200}] |
| StorageAllocationPools | The allocation pool for the Storage network in a tuple format | |
| StorageMgmtAllocationPools | The allocation pool for the Storage Management network in a tuple format | |
| TenantAllocationPools | The allocation pool for the Tenant network in a tuple format | |
| ExternalAllocationPools | The allocation pool for the External network in a tuple format | |
| InternalApiNetworkVlanID | The VLAN ID for the Internal API network | 200 |
| StorageNetworkVlanID | The VLAN ID for the Storage network | |
| StorageMgmtNetworkVlanID | The VLAN ID for the Storage Management network | |
| TenantNetworkVlanID | The VLAN ID for the Tenant network | |
| ExternalNetworkVlanID | The VLAN ID for the External network | |
| ExternalInterfaceDefaultRoute | The gateway IP address for the External network | 10.1.2.1 |
| ControlPlaneDefaultRoute | Gateway router for the Provisioning network (or Undercloud IP) | ControlPlaneDefaultRoute: 192.0.2.254 |
| ControlPlaneSubnetCidr | CIDR subnet mask length for provisioning network | ControlPlaneSubnetCidr: 24 |
| EC2MetadataIp | The IP address of the EC2 metadata server. Generally the IP of the Undercloud. | EC2MetadataIp: 192.0.2.1 |
| DnsServers | Define the DNS servers for the Overcloud nodes. Include a maximum of two. | DnsServers: ["8.8.8.8","8.8.4.4"] |
| BondInterfaceOvsOptions | The options for bonding interfaces | BondInterfaceOvsOptions:"bond_mode=balance-slb" |
| NeutronFlatNetworks | Defines the flat networks to configure in neutron plugins. Defaults to "datacentre" to permit external network creation | NeutronFlatNetworks: "datacentre" |
| NeutronExternalNetworkBridge | An Open vSwitch bridge to create on each hypervisor. Typically, this should not need to be changed. | NeutronExternalNetworkBridge: "''" |
| NeutronBridgeMappings | The logical to physical bridge mappings to use. Defaults to mapping the external bridge on hosts (br-ex) to a physical name (datacentre). You would use this for the default floating network | NeutronBridgeMappings: "datacentre:br-ex" |
| NeutronPublicInterface | Defines the interface to bridge onto br-ex for network nodes | NeutronPublicInterface: "eth0" |
| NeutronNetworkType | The tenant network type for Neutron | NeutronNetworkType: "vxlan" |
| NeutronTunnelTypes | The tunnel types for the neutron tenant network. To specify multiple values, use a comma separated string. | NeutronTunnelTypes: gre,vxlan |
| NeutronTunnelIdRanges | Ranges of GRE tunnel IDs to make available for tenant network allocation | NeutronTunnelIdRanges "1:1000" |
| NeutronVniRanges | Ranges of VXLAN VNI IDs to make available for tenant network allocation | NeutronVniRanges: "1:1000" |
| NeutronEnableTunnelling | Defines whether to enable or disable tunneling in case you aim to use a VLAN segmented network or flat network with Neutron. Defaults to enabled | |
| NeutronNetworkVLANRanges | The neutron ML2 and Open vSwitch VLAN mapping range to support. Defaults to permitting any VLAN on the datacentre physical network. | NeutronNetworkVLANRanges: "datacentre:1:1000" |
| NeutronMechanismDrivers | The mechanism drivers for the neutron tenant network. Defaults to "openvswitch". To specify multiple values, use a comma-separated string | NeutronMechanismDrivers: openvswitch,l2population |
Appendix B. Network Interface Template Examples
This appendix provides a few example Heat templates to demonstrate network interface configuration.
B.1. Configuring Interfaces
Individual interfaces might require modification. The example below shows modifications required to use the second NIC to connect to an infrastructure network with DHCP addresses, and to use the third and fourth NICs for the bond:
network_config:
  # Add a DHCP infrastructure network to nic2
  -
    type: interface
    name: nic2
    use_dhcp: true
  -
    type: ovs_bridge
    name: br-bond
    members:
      -
        type: ovs_bond
        name: bond1
        ovs_options: {get_param: BondInterfaceOvsOptions}
        members:
          # Modify bond NICs to use nic3 and nic4
          -
            type: interface
            name: nic3
            primary: true
          -
            type: interface
            name: nic4
The network interface template uses either the actual interface name ("eth0", "eth1", "enp0s25") or a set of numbered interfaces ("nic1", "nic2", "nic3"). The network interfaces of hosts within a role do not have to be exactly the same when using numbered interfaces (nic1, nic2, etc.) instead of named interfaces (eth0, eno2, etc.). For example, one host might have interfaces em1 and em2, while another has eno1 and eno2, but you can refer to both hosts' NICs as nic1 and nic2.
The order of numbered interfaces corresponds to the order of named network interface types:
-
ethXinterfaces, such aseth0,eth1, etc. These are usually onboard interfaces. -
enoXinterfaces, such aseno0,eno1, etc. These are usually onboard interfaces. -
enXinterfaces, sorted alpha numerically, such asenp3s0,enp3s1,ens3, etc. These are usually add-on interfaces.
The numbered NIC scheme only takes into account the interfaces that are live, for example, if they have a cable attached to the switch. If you have some hosts with four interfaces and some with six interfaces, you should use nic1 to nic4 and only plug four cables on each host.
B.2. Configuring Routes and Default Routes
There are two ways a host has default routes set. If the interface is using DHCP and the DHCP server offers a gateway address, the system uses a default route for that gateway. Otherwise, you can set a default route on an interface with a static IP.
Although the Linux kernel supports multiple default gateways, it only uses the one with the lowest metric. If there are multiple DHCP interfaces, this can result in an unpredictable default gateway. In this case, it is recommended to set defroute=no for interfaces other than the one using the default route.
For example, you might want a DHCP interface (nic3) to be the default route. Use the following YAML to disable the default route on another DHCP interface (nic2):
# No default route on this DHCP interface
- type: interface
  name: nic2
  use_dhcp: true
  defroute: false
# Instead use this DHCP interface as the default route
- type: interface
  name: nic3
  use_dhcp: true
The defroute parameter only applies to routes obtained through DHCP.
To set a static route on an interface with a static IP, specify a route to the subnet. For example, you can set a route to the 10.1.2.0/24 subnet through the gateway at 172.17.0.1 on the Internal API network:
    - type: vlan
      device: bond1
      vlan_id: {get_param: InternalApiNetworkVlanID}
      addresses:
      - ip_netmask: {get_param: InternalApiIpSubnet}
      routes:
      - ip_netmask: 10.1.2.0/24
        next_hop: 172.17.0.1
B.3. Using the Native VLAN for Floating IPs
Neutron uses a default empty string for its external bridge mapping. This maps the physical interface to the br-int instead of using br-ex directly. This model allows multiple Floating IP networks using either VLANs or multiple physical connections.
Use the NeutronExternalNetworkBridge parameter in the parameter_defaults section of your network isolation environment file:
  parameter_defaults:
    # Set to "br-ex" when using floating IPs on the native VLAN
    NeutronExternalNetworkBridge: "''"
Using only one Floating IP network on the native VLAN of a bridge means you can optionally set the neutron external bridge. This results in the packets only having to traverse one bridge instead of two, which might result in slightly lower CPU usage when passing traffic over the Floating IP network.
B.4. Using the Native VLAN on a Trunked Interface
If a trunked interface or bond has a network on the native VLAN, the IP addresses are assigned directly to the bridge and there will be no VLAN interface.
For example, if the External network is on the native VLAN, a bonded configuration looks like this:
network_config:
  - type: ovs_bridge
    name: {get_input: bridge_name}
    dns_servers: {get_param: DnsServers}
    addresses:
      - ip_netmask: {get_param: ExternalIpSubnet}
    routes:
      - ip_netmask: 0.0.0.0/0
        next_hop: {get_param: ExternalInterfaceDefaultRoute}
    members:
      - type: ovs_bond
        name: bond1
        ovs_options: {get_param: BondInterfaceOvsOptions}
        members:
          - type: interface
            name: nic3
            primary: true
          - type: interface
name: nic4When moving the address (and possibly route) statements onto the bridge, remove the corresponding VLAN interface from the bridge. Make the changes to all applicable roles. The External network is only on the controllers, so only the controller template requires a change. The Storage network on the other hand is attached to all roles, so if the Storage network is on the default VLAN, all roles require modifications.
B.5. Configuring Jumbo Frames
The Maximum Transmission Unit (MTU) setting determines the maximum amount of data transmitted with a single Ethernet frame. Using a larger value results in less overhead since each frame adds data in the form of a header. The default value is 1500 and using a higher value requires the configuration of the switch port to support jumbo frames. Most switches support an MTU of at least 9000, but many are configured for 1500 by default.
The MTU of a VLAN cannot exceed the MTU of the physical interface. Make sure to include the MTU value on the bond and/or interface.
The Storage, Storage Management, Internal API, and Tenant networking all benefit from jumbo frames. In testing, Tenant networking throughput was over 300% greater when using jumbo frames in conjunction with VXLAN tunnels.
It is recommended that the Provisioning interface, External interface, and any floating IP interfaces be left at the default MTU of 1500. Connectivity problems are likely to occur otherwise. This is because routers typically cannot forward jumbo frames across Layer 3 boundaries.
- type: ovs_bond
  name: bond1
  mtu: 9000
  ovs_options: {get_param: BondInterfaceOvsOptions}
  members:
    - type: interface
      name: nic3
      mtu: 9000
      primary: true
    - type: interface
      name: nic4
      mtu: 9000

# The external interface should stay at default
- type: vlan
  device: bond1
  vlan_id: {get_param: ExternalNetworkVlanID}
  addresses:
    - ip_netmask: {get_param: ExternalIpSubnet}
  routes:
    - ip_netmask: 0.0.0.0/0
      next_hop: {get_param: ExternalInterfaceDefaultRoute}

# MTU 9000 for Internal API, Storage, and Storage Management
- type: vlan
  device: bond1
  mtu: 9000
  vlan_id: {get_param: InternalApiNetworkVlanID}
  addresses:
  - ip_netmask: {get_param: InternalApiIpSubnet}
Appendix C. Network Interface Parameters
The following tables define the Heat template parameters for network interface types.
C.1. Interface Options
| Option | Default | Description |
| name | Name of the Interface | |
| use_dhcp | False | Use DHCP to get an IP address |
| use_dhcpv6 | False | Use DHCP to get a v6 IP address |
| addresses | A sequence of IP addresses assigned to the interface | |
| routes | A sequence of routes assigned to the interface | |
| mtu | 1500 | The maximum transmission unit (MTU) of the connection |
| primary | False | Defines the interface as the primary interface |
| defroute | True | Use this interface as the default route |
| persist_mapping | False | Write the device alias configuration instead of the system names |
| dhclient_args | None | Arguments to pass to the DHCP client |
| dns_servers | None | List of DNS servers to use for the interface |
C.2. VLAN Options
| Option | Default | Description |
| vlan_id | The VLAN ID | |
| device | The VLAN’s parent device to attach the VLAN. For example, use this parameter to attach the VLAN to a bonded interface device. | |
| use_dhcp | False | Use DHCP to get an IP address |
| use_dhcpv6 | False | Use DHCP to get a v6 IP address |
| addresses | A sequence of IP addresses assigned to the VLAN | |
| routes | A sequence of routes assigned to the VLAN | |
| mtu | 1500 | The maximum transmission unit (MTU) of the connection |
| primary | False | Defines the VLAN as the primary interface |
| defroute | True | Use this interface as the default route |
| persist_mapping | False | Write the device alias configuration instead of the system names |
| dhclient_args | None | Arguments to pass to the DHCP client |
| dns_servers | None | List of DNS servers to use for the VLAN |
C.3. OVS Bond Options
| Option | Default | Description |
| name | Name of the bond | |
| use_dhcp | False | Use DHCP to get an IP address |
| use_dhcpv6 | False | Use DHCP to get a v6 IP address |
| addresses | A sequence of IP addresses assigned to the bond | |
| routes | A sequence of routes assigned to the bond | |
| mtu | 1500 | The maximum transmission unit (MTU) of the connection |
| primary | False | Defines the interface as the primary interface |
| members | A sequence of interface objects to use in the bond | |
| ovs_options | A set of options to pass to OVS when creating the bond | |
| ovs_extra | A set of options to to set as the OVS_EXTRA parameter in the bond’s network configuration file | |
| defroute | True | Use this interface as the default route |
| persist_mapping | False | Write the device alias configuration instead of the system names |
| dhclient_args | None | Arguments to pass to the DHCP client |
| dns_servers | None | List of DNS servers to use for the bond |
C.4. OVS Bridge Options
| Option | Default | Description |
| name | Name of the bridge | |
| use_dhcp | False | Use DHCP to get an IP address |
| use_dhcpv6 | False | Use DHCP to get a v6 IP address |
| addresses | A sequence of IP addresses assigned to the bridge | |
| routes | A sequence of routes assigned to the bridge | |
| mtu | 1500 | The maximum transmission unit (MTU) of the connection |
| members | A sequence of interface, VLAN, and bond objects to use in the bridge | |
| ovs_options | A set of options to pass to OVS when creating the bridge | |
| ovs_extra | A set of options to to set as the OVS_EXTRA parameter in the bridge’s network configuration file | |
| defroute | True | Use this interface as the default route |
| persist_mapping | False | Write the device alias configuration instead of the system names |
| dhclient_args | None | Arguments to pass to the DHCP client |
| dns_servers | None | List of DNS servers to use for the bridge |
C.5. Linux Bond Options
| Option | Default | Description |
| name | Name of the bond | |
| use_dhcp | False | Use DHCP to get an IP address |
| use_dhcpv6 | False | Use DHCP to get a v6 IP address |
| addresses | A sequence of IP addresses assigned to the bond | |
| routes | A sequence of routes assigned to the bond | |
| mtu | 1500 | The maximum transmission unit (MTU) of the connection |
| primary | False | Defines the interface as the primary interface |
| members | A sequence of interface objects to use in the bond | |
| bonding_options | A set of options when creating the bond. For more information on Linux bonding options, see 4.5.1. Bonding Module Directives in the Red Hat Enterprise Linux 7 Networking Guide. | |
| defroute | True | Use this interface as the default route |
| persist_mapping | False | Write the device alias configuration instead of the system names |
| dhclient_args | None | Arguments to pass to the DHCP client |
| dns_servers | None | List of DNS servers to use for the bond |
C.6. Linux Bridge Options
| Option | Default | Description |
| name | Name of the bridge | |
| use_dhcp | False | Use DHCP to get an IP address |
| use_dhcpv6 | False | Use DHCP to get a v6 IP address |
| addresses | A sequence of IP addresses assigned to the bridge | |
| routes | A sequence of routes assigned to the bridge | |
| mtu | 1500 | The maximum transmission unit (MTU) of the connection |
| members | A sequence of interface, VLAN, and bond objects to use in the bridge | |
| defroute | True | Use this interface as the default route |
| persist_mapping | False | Write the device alias configuration instead of the system names |
| dhclient_args | None | Arguments to pass to the DHCP client |
| dns_servers | None | List of DNS servers to use for the bridge |
Appendix D. Bonding Options
You can bundle multiple physical NICs together to form a single logical channel known as a bond. Bonds can be configured to provide redundancy for high availability systems or increased throughput.
D.1. Network Interface Bonding and Link Aggregation Control Protocol (LACP)
Red Hat OpenStack Platform supports Linux bonds, Open vSwitch (OVS) kernel bonds, and OVS-DPDK bonds.
The bonds can be used with the optional Link Aggregation Control Protocol (LACP). LACP is a negotiation protocol that creates a dynamic bond for load balancing and fault tolerance.
On any network that interacts directly with virtual machine instances, Red Hat recommends the use of OVS kernel bonds (bond type ovs_bond) or OVS-DPDK bonds (bond type ovs_dpdk_bond) with LACP. However, do not combine OVS kernel bonds and OVS-DPDK bonds on the same node.
On control and storage networks, Red Hat recommends the use of Linux bonds with VLAN and LACP, because OVS bonds carry the potential for control plane disruption that can occur when OVS or the neutron agent is restarted for updates, hot fixes, and other events. The Linux bond/LACP/VLAN configuration provides NIC management without the OVS disruption potential. Here is an example configuration of a Linux bond with one VLAN.
params:
            $network_config:
              network_config:

              - type: linux_bond
                name: bond_api
                bonding_options: "mode=active-backup"
                use_dhcp: false
                dns_servers:
        `          get_param: DnsServers
                members:
                - type: interface
                  name: nic3
                  primary: true
                - type: interface
                  name: nic4

              - type: vlan
                vlan_id:
                  get_param: InternalApiNetworkVlanID
                device: bond_api
                addresses:
                - ip_netmask:
                    get_param: InternalApiIpSubnet
D.2. Open vSwitch Bonding Options
The Overcloud provides networking through Open vSwitch (OVS). The following table describes support for OVS kernel and OVS-DPDK for bonded interfaces. The OVS/OVS-DPDK balance-tcp mode is available as a technology preview only.
The bonding options described in the following table require OVS 2.9 or later.
| OVS Bond mode | Application | Notes | Compatible LACP options |
| active-backup | High availability (active-passive) | active, passive, or off | |
| balance-slb | Increased throughput (active-active) |
| active, passive, or off |
| balance-tcp (tech preview only ) | Not recommended (active-active) |
| active or passive |
You can configure a bonded interface in the network environment file using the BondInterfaceOvsOptions parameter as shown in this example:
parameter_defaults:
  BondInterfaceOvsOptions: "bond_mode=balance-slb"
D.3. Considerations for balance-tcp Mode
If you decide to use balance-tcp mode despite its tech preview status and the known performance issues, you must manually delete the following lines from each network interface configuration (NIC) file before deployment:
    constraints:
      - allowed_pattern: "^((?!balance.tcp).)*$"
        description: |
          The balance-tcp bond mode is known to cause packet loss and
          should not be used in BondInterfaceOvsOptions.
After you delete the constraint from each NIC file, you can set the bond mode option in the bond interface parameter:
  BondInterfaceOvsOptions:
    "bond_mode=balance-tcp"
D.4. Linux Bonding Options
You can use LACP with Linux bonding in your network interface templates. For example:
      - type: linux_bond
        name: bond1
        members:
        - type: interface
          name: nic2
        - type: interface
          name: nic3
bonding_options: "mode=802.3ad lacp_rate=[fast|slow] updelay=1000 miimon=100"-
mode- enables LACP. -
lacp_rate- defines whether LACP packets are sent every 1 second, or every 30 seconds. -
updelay- defines the minimum amount of time that an interface must be active before it is used for traffic (this helps mitigate port flapping outages). -
miimon- the interval in milliseconds that is used for monitoring the port state using the driver’s MIIMON functionality.
For more information on Linux bonding options, see 4.5.1. Bonding Module Directives in the Red Hat Enterprise Linux 7 Networking Guide.
D.5. Bonding Options
The following table provides some explanation of these options and some alternatives depending on your hardware.
Table D.1. Bonding Options
|
|
Balances flows based on source MAC address and output VLAN, with periodic rebalancing as traffic patterns change. Bonding with |
|
| This mode offers active/standby failover where the standby NIC resumes network operations when the active connection fails. Only one MAC address is presented to the physical switch. This mode does not require any special switch support or configuration, and works when the links are connected to separate switches. This mode does not provide load balancing. |
|
|
Controls the Link Aggregation Control Protocol (LACP) behavior. Only certain switches support LACP. If your switch does not support LACP, use |
|
| Sets the LACP behavior to switch to bond_mode=active-backup as a fallback. |
|
| Set the LACP heartbeat to 1 second (fast) or 30 seconds (slow). The default is slow. |
|
| Set the link detection to use miimon heartbeats (miimon) or monitor carrier (carrier). The default is carrier. |
|
| If using miimon, set the heartbeat interval in milliseconds. |
|
| Number of milliseconds a link must be up to be activated to prevent flapping. |
|
| Milliseconds between rebalancing flows between bond members. Set to zero to disable. |