
Chapter 8. Network policy
8.1. About network policy
As a cluster administrator, you can define network policies that restrict traffic to pods in your cluster.
8.1.1. About network policy
In a cluster using a network plugin that supports Kubernetes network policy, network isolation is controlled entirely by NetworkPolicy objects. In Red Hat OpenShift Service on AWS 4, OpenShift SDN supports using network policy in its default network isolation mode.
Network policy does not apply to the host network namespace. Pods with host networking enabled are unaffected by network policy rules. However, pods connecting to the host-networked pods might be affected by the network policy rules.
Network policies cannot block traffic from localhost or from their resident nodes.
By default, all pods in a project are accessible from other pods and network endpoints. To isolate one or more pods in a project, you can create NetworkPolicy objects in that project to indicate the allowed incoming connections. Project administrators can create and delete NetworkPolicy objects within their own project.
If a pod is matched by selectors in one or more NetworkPolicy objects, then the pod will accept only connections that are allowed by at least one of those NetworkPolicy objects. A pod that is not selected by any NetworkPolicy objects is fully accessible.
A network policy applies to only the TCP, UDP, ICMP, and SCTP protocols. Other protocols are not affected.
The following example NetworkPolicy objects demonstrate supporting different scenarios:
Deny all traffic:
To make a project deny by default, add a
NetworkPolicyobject that matches all pods but accepts no traffic:kind: NetworkPolicy apiVersion: networking.k8s.io/v1 metadata: name: deny-by-default spec: podSelector: {} ingress: []Only allow connections from the Red Hat OpenShift Service on AWS Ingress Controller:
To make a project allow only connections from the Red Hat OpenShift Service on AWS Ingress Controller, add the following
NetworkPolicyobject.apiVersion: networking.k8s.io/v1 kind: NetworkPolicy metadata: name: allow-from-openshift-ingress spec: ingress: - from: - namespaceSelector: matchLabels: network.openshift.io/policy-group: ingress podSelector: {} policyTypes: - IngressOnly accept connections from pods within a project:
To make pods accept connections from other pods in the same project, but reject all other connections from pods in other projects, add the following
NetworkPolicyobject:kind: NetworkPolicy apiVersion: networking.k8s.io/v1 metadata: name: allow-same-namespace spec: podSelector: {} ingress: - from: - podSelector: {}Only allow HTTP and HTTPS traffic based on pod labels:
To enable only HTTP and HTTPS access to the pods with a specific label (
role=frontendin following example), add aNetworkPolicyobject similar to the following:kind: NetworkPolicy apiVersion: networking.k8s.io/v1 metadata: name: allow-http-and-https spec: podSelector: matchLabels: role: frontend ingress: - ports: - protocol: TCP port: 80 - protocol: TCP port: 443Accept connections by using both namespace and pod selectors:
To match network traffic by combining namespace and pod selectors, you can use a
NetworkPolicyobject similar to the following:kind: NetworkPolicy apiVersion: networking.k8s.io/v1 metadata: name: allow-pod-and-namespace-both spec: podSelector: matchLabels: name: test-pods ingress: - from: - namespaceSelector: matchLabels: project: project_name podSelector: matchLabels: name: test-pods
NetworkPolicy objects are additive, which means you can combine multiple NetworkPolicy objects together to satisfy complex network requirements.
For example, for the NetworkPolicy objects defined in previous samples, you can define both allow-same-namespace and allow-http-and-https policies within the same project. Thus allowing the pods with the label role=frontend, to accept any connection allowed by each policy. That is, connections on any port from pods in the same namespace, and connections on ports 80 and 443 from pods in any namespace.
8.1.1.1. Using the allow-from-router network policy
Use the following NetworkPolicy to allow external traffic regardless of the router configuration:
apiVersion: networking.k8s.io/v1
kind: NetworkPolicy
metadata:
  name: allow-from-router
spec:
  ingress:
  - from:
    - namespaceSelector:
        matchLabels:
          policy-group.network.openshift.io/ingress: ""1
  podSelector: {}
  policyTypes:
- Ingress- 1
policy-group.network.openshift.io/ingress:""label supports both OpenShift-SDN and OVN-Kubernetes.
8.1.1.2. Using the allow-from-hostnetwork network policy
Add the following allow-from-hostnetwork NetworkPolicy object to direct traffic from the host network pods:
apiVersion: networking.k8s.io/v1
kind: NetworkPolicy
metadata:
  name: allow-from-hostnetwork
spec:
  ingress:
  - from:
    - namespaceSelector:
        matchLabels:
          policy-group.network.openshift.io/host-network: ""
  podSelector: {}
  policyTypes:
  - Ingress
8.1.2. Optimizations for network policy with OpenShift SDN
Use a network policy to isolate pods that are differentiated from one another by labels within a namespace.
It is inefficient to apply NetworkPolicy objects to large numbers of individual pods in a single namespace. Pod labels do not exist at the IP address level, so a network policy generates a separate Open vSwitch (OVS) flow rule for every possible link between every pod selected with a podSelector.
For example, if the spec podSelector and the ingress podSelector within a NetworkPolicy object each match 200 pods, then 40,000 (200*200) OVS flow rules are generated. This might slow down a node.
When designing your network policy, refer to the following guidelines:
Reduce the number of OVS flow rules by using namespaces to contain groups of pods that need to be isolated.
NetworkPolicyobjects that select a whole namespace, by using thenamespaceSelectoror an emptypodSelector, generate only a single OVS flow rule that matches the VXLAN virtual network ID (VNID) of the namespace.- Keep the pods that do not need to be isolated in their original namespace, and move the pods that require isolation into one or more different namespaces.
- Create additional targeted cross-namespace network policies to allow the specific traffic that you do want to allow from the isolated pods.
8.1.3. Optimizations for network policy with OVN-Kubernetes network plugin
When designing your network policy, refer to the following guidelines:
-
For network policies with the same
spec.podSelectorspec, it is more efficient to use one network policy with multipleingressoregressrules, than multiple network policies with subsets ofingressoregressrules. Every
ingressoregressrule based on thepodSelectorornamespaceSelectorspec generates the number of OVS flows proportional tonumber of pods selected by network policy + number of pods selected by ingress or egress rule. Therefore, it is preferable to use thepodSelectorornamespaceSelectorspec that can select as many pods as you need in one rule, instead of creating individual rules for every pod.For example, the following policy contains two rules:
apiVersion: networking.k8s.io/v1
kind: NetworkPolicy
metadata:
  name: test-network-policy
spec:
  podSelector: {}
  ingress:
  - from:
    - podSelector:
        matchLabels:
          role: frontend
  - from:
    - podSelector:
        matchLabels:
          role: backend
The following policy expresses those same two rules as one:
apiVersion: networking.k8s.io/v1
kind: NetworkPolicy
metadata:
  name: test-network-policy
spec:
  podSelector: {}
  ingress:
  - from:
    - podSelector:
        matchExpressions:
        - {key: role, operator: In, values: [frontend, backend]}
The same guideline applies to the
spec.podSelectorspec. If you have the sameingressoregressrules for different network policies, it might be more efficient to create one network policy with a commonspec.podSelectorspec. For example, the following two policies have different rules:apiVersion: networking.k8s.io/v1 kind: NetworkPolicy metadata: name: policy1 spec: podSelector: matchLabels: role: db ingress: - from: - podSelector: matchLabels: role: frontend --- apiVersion: networking.k8s.io/v1 kind: NetworkPolicy metadata: name: policy2 spec: podSelector: matchLabels: role: client ingress: - from: - podSelector: matchLabels: role: frontendThe following network policy expresses those same two rules as one:
apiVersion: networking.k8s.io/v1
kind: NetworkPolicy
metadata:
  name: policy3
spec:
  podSelector:
    matchExpressions:
    - {key: role, operator: In, values: [db, client]}
  ingress:
  - from:
    - podSelector:
        matchLabels:
          role: frontend
You can apply this optimization when only multiple selectors are expressed as one. In cases where selectors are based on different labels, it may not be possible to apply this optimization. In those cases, consider applying some new labels for network policy optimization specifically.
8.1.4. Next steps
8.2. Creating a network policy
As a user with the admin role, you can create a network policy for a namespace.
8.2.1. Example NetworkPolicy object
The following annotates an example NetworkPolicy object:
kind: NetworkPolicy
apiVersion: networking.k8s.io/v1
metadata:
  name: allow-27107 1
spec:
  podSelector: 2
    matchLabels:
      app: mongodb
  ingress:
  - from:
    - podSelector: 3
        matchLabels:
          app: app
    ports: 4
    - protocol: TCP
      port: 27017
- 1
- The name of the NetworkPolicy object.
- 2
- A selector that describes the pods to which the policy applies. The policy object can only select pods in the project that defines the NetworkPolicy object.
- 3
- A selector that matches the pods from which the policy object allows ingress traffic. The selector matches pods in the same namespace as the NetworkPolicy.
- 4
- A list of one or more destination ports on which to accept traffic.
8.2.2. Creating a network policy using the CLI
To define granular rules describing ingress or egress network traffic allowed for namespaces in your cluster, you can create a network policy.
If you log in with a user with the cluster-admin role, then you can create a network policy in any namespace in the cluster.
Prerequisites
-
Your cluster uses a network plugin that supports
NetworkPolicyobjects, such as the OVN-Kubernetes network plugin or the OpenShift SDN network plugin withmode: NetworkPolicyset. This mode is the default for OpenShift SDN. -
You installed the OpenShift CLI (
oc). -
You are logged in to the cluster with a user with
adminprivileges. - You are working in the namespace that the network policy applies to.
Procedure
Create a policy rule:
Create a
<policy_name>.yamlfile:$ touch <policy_name>.yaml
where:
<policy_name>- Specifies the network policy file name.
Define a network policy in the file that you just created, such as in the following examples:
Deny ingress from all pods in all namespaces
This is a fundamental policy, blocking all cross-pod networking other than cross-pod traffic allowed by the configuration of other Network Policies.
kind: NetworkPolicy
apiVersion: networking.k8s.io/v1
metadata:
  name: deny-by-default
spec:
  podSelector: {}
  policyTypes:
  - Ingress
  ingress: []
Allow ingress from all pods in the same namespace
kind: NetworkPolicy
apiVersion: networking.k8s.io/v1
metadata:
  name: allow-same-namespace
spec:
  podSelector:
  ingress:
  - from:
    - podSelector: {}
Allow ingress traffic to one pod from a particular namespace
This policy allows traffic to pods labelled
pod-afrom pods running innamespace-y.kind: NetworkPolicy apiVersion: networking.k8s.io/v1 metadata: name: allow-traffic-pod spec: podSelector: matchLabels: pod: pod-a policyTypes: - Ingress ingress: - from: - namespaceSelector: matchLabels: kubernetes.io/metadata.name: namespace-y
To create the network policy object, enter the following command:
$ oc apply -f <policy_name>.yaml -n <namespace>
where:
<policy_name>- Specifies the network policy file name.
<namespace>- Optional: Specifies the namespace if the object is defined in a different namespace than the current namespace.
Example output
networkpolicy.networking.k8s.io/deny-by-default created
If you log in to the web console with cluster-admin privileges, you have a choice of creating a network policy in any namespace in the cluster directly in YAML or from a form in the web console.
8.2.3. Creating a default deny all network policy
This is a fundamental policy, blocking all cross-pod networking other than network traffic allowed by the configuration of other deployed network policies. This procedure enforces a default deny-by-default policy.
If you log in with a user with the cluster-admin role, then you can create a network policy in any namespace in the cluster.
Prerequisites
-
Your cluster uses a network plugin that supports
NetworkPolicyobjects, such as the OVN-Kubernetes network plugin or the OpenShift SDN network plugin withmode: NetworkPolicyset. This mode is the default for OpenShift SDN. -
You installed the OpenShift CLI (
oc). -
You are logged in to the cluster with a user with
adminprivileges. - You are working in the namespace that the network policy applies to.
Procedure
Create the following YAML that defines a
deny-by-defaultpolicy to deny ingress from all pods in all namespaces. Save the YAML in thedeny-by-default.yamlfile:kind: NetworkPolicy apiVersion: networking.k8s.io/v1 metadata: name: deny-by-default namespace: default 1 spec: podSelector: {} 2 ingress: [] 3
Apply the policy by entering the following command:
$ oc apply -f deny-by-default.yaml
Example output
networkpolicy.networking.k8s.io/deny-by-default created
8.2.4. Creating a network policy to allow traffic from external clients
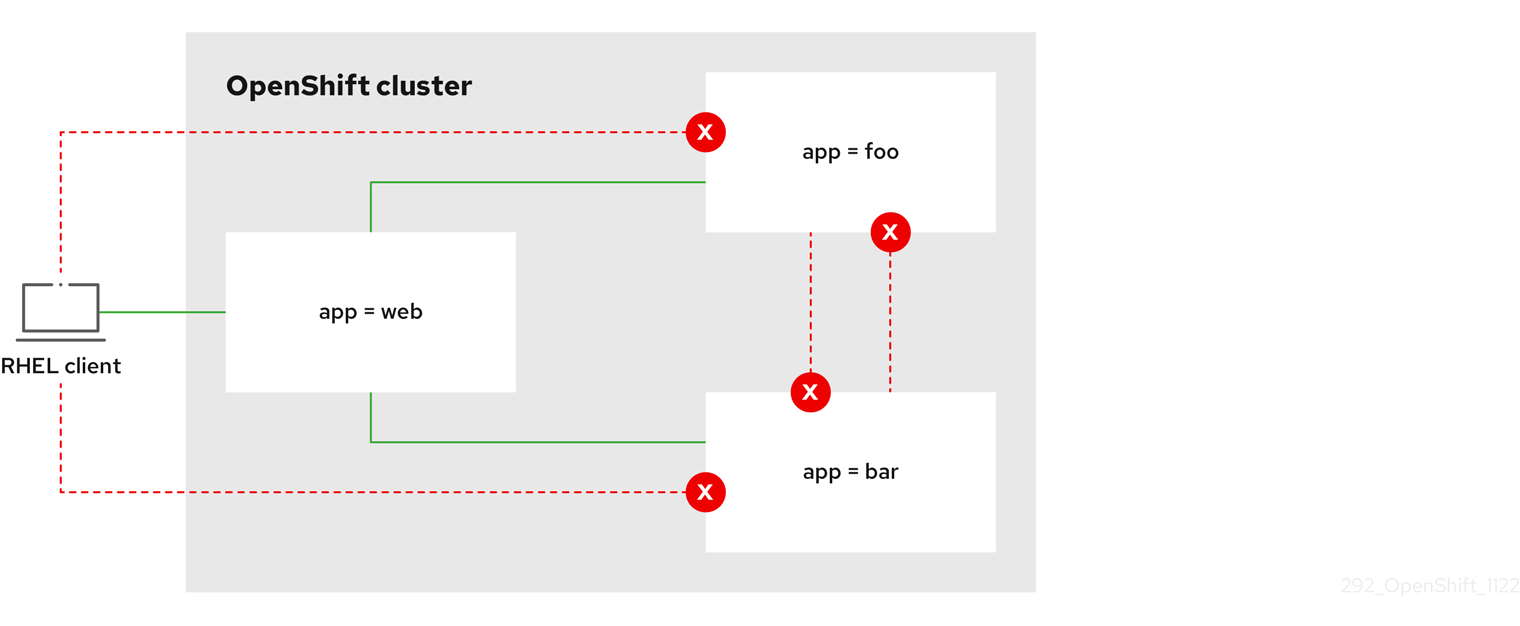
With the deny-by-default policy in place you can proceed to configure a policy that allows traffic from external clients to a pod with the label app=web.
If you log in with a user with the cluster-admin role, then you can create a network policy in any namespace in the cluster.
Follow this procedure to configure a policy that allows external service from the public Internet directly or by using a Load Balancer to access the pod. Traffic is only allowed to a pod with the label app=web.
Prerequisites
-
Your cluster uses a network plugin that supports
NetworkPolicyobjects, such as the OVN-Kubernetes network plugin or the OpenShift SDN network plugin withmode: NetworkPolicyset. This mode is the default for OpenShift SDN. -
You installed the OpenShift CLI (
oc). -
You are logged in to the cluster with a user with
adminprivileges. - You are working in the namespace that the network policy applies to.
Procedure
Create a policy that allows traffic from the public Internet directly or by using a load balancer to access the pod. Save the YAML in the
web-allow-external.yamlfile:kind: NetworkPolicy apiVersion: networking.k8s.io/v1 metadata: name: web-allow-external namespace: default spec: policyTypes: - Ingress podSelector: matchLabels: app: web ingress: - {}Apply the policy by entering the following command:
$ oc apply -f web-allow-external.yaml
Example output
networkpolicy.networking.k8s.io/web-allow-external created
This policy allows traffic from all resources, including external traffic as illustrated in the following diagram:
8.2.5. Creating a network policy allowing traffic to an application from all namespaces
If you log in with a user with the cluster-admin role, then you can create a network policy in any namespace in the cluster.
Follow this procedure to configure a policy that allows traffic from all pods in all namespaces to a particular application.
Prerequisites
-
Your cluster uses a network plugin that supports
NetworkPolicyobjects, such as the OVN-Kubernetes network plugin or the OpenShift SDN network plugin withmode: NetworkPolicyset. This mode is the default for OpenShift SDN. -
You installed the OpenShift CLI (
oc). -
You are logged in to the cluster with a user with
adminprivileges. - You are working in the namespace that the network policy applies to.
Procedure
Create a policy that allows traffic from all pods in all namespaces to a particular application. Save the YAML in the
web-allow-all-namespaces.yamlfile:kind: NetworkPolicy apiVersion: networking.k8s.io/v1 metadata: name: web-allow-all-namespaces namespace: default spec: podSelector: matchLabels: app: web 1 policyTypes: - Ingress ingress: - from: - namespaceSelector: {} 2NoteBy default, if you omit specifying a
namespaceSelectorit does not select any namespaces, which means the policy allows traffic only from the namespace the network policy is deployed to.Apply the policy by entering the following command:
$ oc apply -f web-allow-all-namespaces.yaml
Example output
networkpolicy.networking.k8s.io/web-allow-all-namespaces created
Verification
Start a web service in the
defaultnamespace by entering the following command:$ oc run web --namespace=default --image=nginx --labels="app=web" --expose --port=80
Run the following command to deploy an
alpineimage in thesecondarynamespace and to start a shell:$ oc run test-$RANDOM --namespace=secondary --rm -i -t --image=alpine -- sh
Run the following command in the shell and observe that the request is allowed:
# wget -qO- --timeout=2 http://web.default
Expected output
<!DOCTYPE html>
<html>
<head>
<title>Welcome to nginx!</title>
<style>
html { color-scheme: light dark; }
body { width: 35em; margin: 0 auto;
font-family: Tahoma, Verdana, Arial, sans-serif; }
</style>
</head>
<body>
<h1>Welcome to nginx!</h1>
<p>If you see this page, the nginx web server is successfully installed and
working. Further configuration is required.</p>

<p>For online documentation and support please refer to
<a href="http://nginx.org/">nginx.org</a>.<br/>
Commercial support is available at
<a href="http://nginx.com/">nginx.com</a>.</p>

<p><em>Thank you for using nginx.</em></p>
</body>
</html>
8.2.6. Creating a network policy allowing traffic to an application from a namespace
If you log in with a user with the cluster-admin role, then you can create a network policy in any namespace in the cluster.
Follow this procedure to configure a policy that allows traffic to a pod with the label app=web from a particular namespace. You might want to do this to:
- Restrict traffic to a production database only to namespaces where production workloads are deployed.
- Enable monitoring tools deployed to a particular namespace to scrape metrics from the current namespace.
Prerequisites
-
Your cluster uses a network plugin that supports
NetworkPolicyobjects, such as the OVN-Kubernetes network plugin or the OpenShift SDN network plugin withmode: NetworkPolicyset. This mode is the default for OpenShift SDN. -
You installed the OpenShift CLI (
oc). -
You are logged in to the cluster with a user with
adminprivileges. - You are working in the namespace that the network policy applies to.
Procedure
Create a policy that allows traffic from all pods in a particular namespaces with a label
purpose=production. Save the YAML in theweb-allow-prod.yamlfile:kind: NetworkPolicy apiVersion: networking.k8s.io/v1 metadata: name: web-allow-prod namespace: default spec: podSelector: matchLabels: app: web 1 policyTypes: - Ingress ingress: - from: - namespaceSelector: matchLabels: purpose: production 2Apply the policy by entering the following command:
$ oc apply -f web-allow-prod.yaml
Example output
networkpolicy.networking.k8s.io/web-allow-prod created
Verification
Start a web service in the
defaultnamespace by entering the following command:$ oc run web --namespace=default --image=nginx --labels="app=web" --expose --port=80
Run the following command to create the
prodnamespace:$ oc create namespace prod
Run the following command to label the
prodnamespace:$ oc label namespace/prod purpose=production
Run the following command to create the
devnamespace:$ oc create namespace dev
Run the following command to label the
devnamespace:$ oc label namespace/dev purpose=testing
Run the following command to deploy an
alpineimage in thedevnamespace and to start a shell:$ oc run test-$RANDOM --namespace=dev --rm -i -t --image=alpine -- sh
Run the following command in the shell and observe that the request is blocked:
# wget -qO- --timeout=2 http://web.default
Expected output
wget: download timed out
Run the following command to deploy an
alpineimage in theprodnamespace and start a shell:$ oc run test-$RANDOM --namespace=prod --rm -i -t --image=alpine -- sh
Run the following command in the shell and observe that the request is allowed:
# wget -qO- --timeout=2 http://web.default
Expected output
<!DOCTYPE html>
<html>
<head>
<title>Welcome to nginx!</title>
<style>
html { color-scheme: light dark; }
body { width: 35em; margin: 0 auto;
font-family: Tahoma, Verdana, Arial, sans-serif; }
</style>
</head>
<body>
<h1>Welcome to nginx!</h1>
<p>If you see this page, the nginx web server is successfully installed and
working. Further configuration is required.</p>

<p>For online documentation and support please refer to
<a href="http://nginx.org/">nginx.org</a>.<br/>
Commercial support is available at
<a href="http://nginx.com/">nginx.com</a>.</p>

<p><em>Thank you for using nginx.</em></p>
</body>
</html>
8.2.7. Creating a network policy using OpenShift Cluster Manager
To define granular rules describing the ingress or egress network traffic allowed for namespaces in your cluster, you can create a network policy.
Prerequisites
- You logged in to OpenShift Cluster Manager.
- You created an Red Hat OpenShift Service on AWS cluster.
- You configured an identity provider for your cluster.
- You added your user account to the configured identity provider.
- You created a project within your Red Hat OpenShift Service on AWS cluster.
Procedure
- From OpenShift Cluster Manager, click on the cluster you want to access.
- Click Open console to navigate to the OpenShift web console.
- Click on your identity provider and provide your credentials to log in to the cluster.
- From the administrator perspective, under Networking, click NetworkPolicies.
- Click Create NetworkPolicy.
- Provide a name for the policy in the Policy name field.
- Optional: You can provide the label and selector for a specific pod if this policy applies only to one or more specific pods. If you do not select a specific pod, then this policy will be applicable to all pods on the cluster.
- Optional: You can block all ingress and egress traffic by using the Deny all ingress traffic or Deny all egress traffic checkboxes.
- You can also add any combination of ingress and egress rules, allowing you to specify the port, namespace, or IP blocks you want to approve.
Add ingress rules to your policy:
Select Add ingress rule to configure a new rule. This action creates a new Ingress rule row with an Add allowed source drop-down menu that enables you to specify how you want to limit inbound traffic. The drop-down menu offers three options to limit your ingress traffic:
- Allow pods from the same namespace limits traffic to pods within the same namespace. You can specify the pods in a namespace, but leaving this option blank allows all of the traffic from pods in the namespace.
- Allow pods from inside the cluster limits traffic to pods within the same cluster as the policy. You can specify namespaces and pods from which you want to allow inbound traffic. Leaving this option blank allows inbound traffic from all namespaces and pods within this cluster.
- Allow peers by IP block limits traffic from a specified Classless Inter-Domain Routing (CIDR) IP block. You can block certain IPs with the exceptions option. Leaving the CIDR field blank allows all inbound traffic from all external sources.
- You can restrict all of your inbound traffic to a port. If you do not add any ports then all ports are accessible to traffic.
Add egress rules to your network policy:
Select Add egress rule to configure a new rule. This action creates a new Egress rule row with an Add allowed destination"* drop-down menu that enables you to specify how you want to limit outbound traffic. The drop-down menu offers three options to limit your egress traffic:
- Allow pods from the same namespace limits outbound traffic to pods within the same namespace. You can specify the pods in a namespace, but leaving this option blank allows all of the traffic from pods in the namespace.
- Allow pods from inside the cluster limits traffic to pods within the same cluster as the policy. You can specify namespaces and pods from which you want to allow outbound traffic. Leaving this option blank allows outbound traffic from all namespaces and pods within this cluster.
- Allow peers by IP block limits traffic from a specified CIDR IP block. You can block certain IPs with the exceptions option. Leaving the CIDR field blank allows all outbound traffic from all external sources.
- You can restrict all of your outbound traffic to a port. If you do not add any ports then all ports are accessible to traffic.
8.3. Viewing a network policy
As a user with the admin role, you can view a network policy for a namespace.
8.3.1. Example NetworkPolicy object
The following annotates an example NetworkPolicy object:
kind: NetworkPolicy
apiVersion: networking.k8s.io/v1
metadata:
  name: allow-27107 1
spec:
  podSelector: 2
    matchLabels:
      app: mongodb
  ingress:
  - from:
    - podSelector: 3
        matchLabels:
          app: app
    ports: 4
    - protocol: TCP
      port: 27017
- 1
- The name of the NetworkPolicy object.
- 2
- A selector that describes the pods to which the policy applies. The policy object can only select pods in the project that defines the NetworkPolicy object.
- 3
- A selector that matches the pods from which the policy object allows ingress traffic. The selector matches pods in the same namespace as the NetworkPolicy.
- 4
- A list of one or more destination ports on which to accept traffic.
8.3.2. Viewing network policies using the CLI
You can examine the network policies in a namespace.
If you log in with a user with the cluster-admin role, then you can view any network policy in the cluster.
Prerequisites
-
You installed the OpenShift CLI (
oc). -
You are logged in to the cluster with a user with
adminprivileges. - You are working in the namespace where the network policy exists.
Procedure
List network policies in a namespace:
To view network policy objects defined in a namespace, enter the following command:
$ oc get networkpolicy
Optional: To examine a specific network policy, enter the following command:
$ oc describe networkpolicy <policy_name> -n <namespace>
where:
<policy_name>- Specifies the name of the network policy to inspect.
<namespace>- Optional: Specifies the namespace if the object is defined in a different namespace than the current namespace.
For example:
$ oc describe networkpolicy allow-same-namespace
Output for
oc describecommandName: allow-same-namespace Namespace: ns1 Created on: 2021-05-24 22:28:56 -0400 EDT Labels: <none> Annotations: <none> Spec: PodSelector: <none> (Allowing the specific traffic to all pods in this namespace) Allowing ingress traffic: To Port: <any> (traffic allowed to all ports) From: PodSelector: <none> Not affecting egress traffic Policy Types: Ingress
If you log in to the web console with cluster-admin privileges, you have a choice of viewing a network policy in any namespace in the cluster directly in YAML or from a form in the web console.
8.3.3. Viewing network policies using OpenShift Cluster Manager
You can view the configuration details of your network policy in Red Hat OpenShift Cluster Manager.
Prerequisites
- You logged in to OpenShift Cluster Manager.
- You created an Red Hat OpenShift Service on AWS cluster.
- You configured an identity provider for your cluster.
- You added your user account to the configured identity provider.
- You created a network policy.
Procedure
- From the Administrator perspective in the OpenShift Cluster Manager web console, under Networking, click NetworkPolicies.
- Select the desired network policy to view.
- In the Network Policy details page, you can view all of the associated ingress and egress rules.
Select YAML on the network policy details to view the policy configuration in YAML format.
NoteYou can only view the details of these policies. You cannot edit these policies.
8.4. Deleting a network policy
As a user with the admin role, you can delete a network policy from a namespace.
8.4.1. Deleting a network policy using the CLI
You can delete a network policy in a namespace.
If you log in with a user with the cluster-admin role, then you can delete any network policy in the cluster.
Prerequisites
-
Your cluster uses a network plugin that supports
NetworkPolicyobjects, such as the OVN-Kubernetes network plugin or the OpenShift SDN network plugin withmode: NetworkPolicyset. This mode is the default for OpenShift SDN. -
You installed the OpenShift CLI (
oc). -
You are logged in to the cluster with a user with
adminprivileges. - You are working in the namespace where the network policy exists.
Procedure
To delete a network policy object, enter the following command:
$ oc delete networkpolicy <policy_name> -n <namespace>
where:
<policy_name>- Specifies the name of the network policy.
<namespace>- Optional: Specifies the namespace if the object is defined in a different namespace than the current namespace.
Example output
networkpolicy.networking.k8s.io/default-deny deleted
If you log in to the web console with cluster-admin privileges, you have a choice of deleting a network policy in any namespace in the cluster directly in YAML or from the policy in the web console through the Actions menu.
8.4.2. Deleting a network policy using OpenShift Cluster Manager
You can delete a network policy in a namespace.
Prerequisites
- You logged in to OpenShift Cluster Manager.
- You created an Red Hat OpenShift Service on AWS cluster.
- You configured an identity provider for your cluster.
- You added your user account to the configured identity provider.
Procedure
- From the Administrator perspective in the OpenShift Cluster Manager web console, under Networking, click NetworkPolicies.
Use one of the following methods for deleting your network policy:
Delete the policy from the Network Policies table:
- From the Network Policies table, select the stack menu on the row of the network policy you want to delete and then, click Delete NetworkPolicy.
Delete the policy using the Actions drop-down menu from the individual network policy details:
- Click on Actions drop-down menu for your network policy.
- Select Delete NetworkPolicy from the menu.
8.5. Configuring multitenant isolation with network policy
As a cluster administrator, you can configure your network policies to provide multitenant network isolation.
If you are using the OpenShift SDN network plugin, configuring network policies as described in this section provides network isolation similar to multitenant mode but with network policy mode set.
8.5.1. Configuring multitenant isolation by using network policy
You can configure your project to isolate it from pods and services in other project namespaces.
Prerequisites
-
Your cluster uses a network plugin that supports
NetworkPolicyobjects, such as the OVN-Kubernetes network plugin or the OpenShift SDN network plugin withmode: NetworkPolicyset. This mode is the default for OpenShift SDN. This mode is the default for OpenShift SDN. -
You installed the OpenShift CLI (
oc). -
You are logged in to the cluster with a user with
adminprivileges.
Procedure
Create the following
NetworkPolicyobjects:A policy named
allow-from-openshift-ingress.$ cat << EOF| oc create -f - apiVersion: networking.k8s.io/v1 kind: NetworkPolicy metadata: name: allow-from-openshift-ingress spec: ingress: - from: - namespaceSelector: matchLabels: policy-group.network.openshift.io/ingress: "" podSelector: {} policyTypes: - Ingress EOFNotepolicy-group.network.openshift.io/ingress: ""is the preferred namespace selector label for OpenShift SDN. You can use thenetwork.openshift.io/policy-group: ingressnamespace selector label, but this is a legacy label.A policy named
allow-from-openshift-monitoring:$ cat << EOF| oc create -f - apiVersion: networking.k8s.io/v1 kind: NetworkPolicy metadata: name: allow-from-openshift-monitoring spec: ingress: - from: - namespaceSelector: matchLabels: network.openshift.io/policy-group: monitoring podSelector: {} policyTypes: - Ingress EOFA policy named
allow-same-namespace:$ cat << EOF| oc create -f - kind: NetworkPolicy apiVersion: networking.k8s.io/v1 metadata: name: allow-same-namespace spec: podSelector: ingress: - from: - podSelector: {} EOFA policy named
allow-from-kube-apiserver-operator:$ cat << EOF| oc create -f - apiVersion: networking.k8s.io/v1 kind: NetworkPolicy metadata: name: allow-from-kube-apiserver-operator spec: ingress: - from: - namespaceSelector: matchLabels: kubernetes.io/metadata.name: openshift-kube-apiserver-operator podSelector: matchLabels: app: kube-apiserver-operator policyTypes: - Ingress EOFFor more details, see New
kube-apiserver-operatorwebhook controller validating health of webhook.
Optional: To confirm that the network policies exist in your current project, enter the following command:
$ oc describe networkpolicy
Example output
Name:         allow-from-openshift-ingress
Namespace:    example1
Created on:   2020-06-09 00:28:17 -0400 EDT
Labels:       <none>
Annotations:  <none>
Spec:
  PodSelector:     <none> (Allowing the specific traffic to all pods in this namespace)
  Allowing ingress traffic:
    To Port: <any> (traffic allowed to all ports)
    From:
      NamespaceSelector: network.openshift.io/policy-group: ingress
  Not affecting egress traffic
  Policy Types: Ingress


Name:         allow-from-openshift-monitoring
Namespace:    example1
Created on:   2020-06-09 00:29:57 -0400 EDT
Labels:       <none>
Annotations:  <none>
Spec:
  PodSelector:     <none> (Allowing the specific traffic to all pods in this namespace)
  Allowing ingress traffic:
    To Port: <any> (traffic allowed to all ports)
    From:
      NamespaceSelector: network.openshift.io/policy-group: monitoring
  Not affecting egress traffic
  Policy Types: Ingress