
Storage
Configuring storage for Red Hat OpenShift Service on AWS clusters
Abstract
Chapter 1. Red Hat OpenShift Service on AWS storage overview
Red Hat OpenShift Service on AWS supports Amazon Elastic Block Store (Amazon EBS) and Amazon Elastic File System (Amazon EFS) storage. You can manage container storage for persistent and non-persistent data in an Red Hat OpenShift Service on AWS cluster.
1.1. Glossary of common terms for Red Hat OpenShift Service on AWS storage
This glossary defines common terms that are used in the storage content.
- Access modes
Volume access modes describe volume capabilities. You can use access modes to match persistent volume claim (PVC) and persistent volume (PV). The following are the examples of access modes:
- ReadWriteOnce (RWO)
- ReadOnlyMany (ROX)
- ReadWriteMany (RWX)
- ReadWriteOncePod (RWOP)
- Config map
-
A config map provides a way to inject configuration data into pods. You can reference the data stored in a config map in a volume of type
ConfigMap. Applications running in a pod can use this data. - Container Storage Interface (CSI)
- An API specification for the management of container storage across different container orchestration (CO) systems.
- Dynamic Provisioning
- The framework allows you to create storage volumes on-demand, eliminating the need for cluster administrators to pre-provision persistent storage.
- Ephemeral storage
- Pods and containers can require temporary or transient local storage for their operation. The lifetime of this ephemeral storage does not extend beyond the life of the individual pod, and this ephemeral storage cannot be shared across pods.
- fsGroup
- The fsGroup defines a file system group ID of a pod.
- hostPath
- A hostPath volume in an OpenShift Container Platform cluster mounts a file or directory from the host node’s filesystem into your pod.
- KMS key
- The Key Management Service (KMS) helps you achieve the required level of encryption of your data across different services. you can use the KMS key to encrypt, decrypt, and re-encrypt data.
- Local volumes
- A local volume represents a mounted local storage device such as a disk, partition or directory.
- OpenShift Data Foundation
- A provider of agnostic persistent storage for OpenShift Container Platform supporting file, block, and object storage, either in-house or in hybrid clouds
- Persistent storage
- Pods and containers can require permanent storage for their operation. Red Hat OpenShift Service on AWS uses the Kubernetes persistent volume (PV) framework to allow cluster administrators to provision persistent storage for a cluster. Developers can use PVC to request PV resources without having specific knowledge of the underlying storage infrastructure.
- Persistent volumes (PV)
- Red Hat OpenShift Service on AWS uses the Kubernetes persistent volume (PV) framework to allow cluster administrators to provision persistent storage for a cluster. Developers can use PVC to request PV resources without having specific knowledge of the underlying storage infrastructure.
- Persistent volume claims (PVCs)
- You can use a PVC to mount a PersistentVolume into a Pod. You can access the storage without knowing the details of the cloud environment.
- Pod
- One or more containers with shared resources, such as volume and IP addresses, running in your Red Hat OpenShift Service on AWS cluster. A pod is the smallest compute unit defined, deployed, and managed.
- Reclaim policy
-
A policy that tells the cluster what to do with the volume after it is released. A volume’s reclaim policy can be
Retain,Recycle, orDelete. - Role-based access control (RBAC)
- Role-based access control (RBAC) is a method of regulating access to computer or network resources based on the roles of individual users within your organization.
- Stateless applications
- A stateless application is an application program that does not save client data generated in one session for use in the next session with that client.
- Stateful applications
-
A stateful application is an application program that saves data to persistent disk storage. A server, client, and applications can use a persistent disk storage. You can use the
Statefulsetobject in Red Hat OpenShift Service on AWS to manage the deployment and scaling of a set of Pods, and provides guarantee about the ordering and uniqueness of these Pods. - Static provisioning
- A cluster administrator creates a number of PVs. PVs contain the details of storage. PVs exist in the Kubernetes API and are available for consumption.
- Storage
- Red Hat OpenShift Service on AWS supports many types of storage, both for on-premise and cloud providers. You can manage container storage for persistent and non-persistent data in an Red Hat OpenShift Service on AWS cluster.
- Storage class
- A storage class provides a way for administrators to describe the classes of storage they offer. Different classes might map to quality of service levels, backup policies, arbitrary policies determined by the cluster administrators.
1.2. Storage types
Red Hat OpenShift Service on AWS storage is broadly classified into two categories, namely ephemeral storage and persistent storage.
1.2.1. Ephemeral storage
Pods and containers are ephemeral or transient in nature and designed for stateless applications. Ephemeral storage allows administrators and developers to better manage the local storage for some of their operations. For more information about ephemeral storage overview, types, and management, see Understanding ephemeral storage.
1.2.2. Persistent storage
Stateful applications deployed in containers require persistent storage. Red Hat OpenShift Service on AWS uses a pre-provisioned storage framework called persistent volumes (PV) to allow cluster administrators to provision persistent storage. The data inside these volumes can exist beyond the lifecycle of an individual pod. Developers can use persistent volume claims (PVCs) to request storage requirements. For more information about persistent storage overview, configuration, and lifecycle, see Understanding persistent storage.
1.3. Container Storage Interface (CSI)
CSI is an API specification for the management of container storage across different container orchestration (CO) systems. You can manage the storage volumes within the container native environments, without having specific knowledge of the underlying storage infrastructure. With the CSI, storage works uniformly across different container orchestration systems, regardless of the storage vendors you are using. For more information about CSI, see Using Container Storage Interface (CSI).
1.4. Dynamic Provisioning
Dynamic Provisioning allows you to create storage volumes on-demand, eliminating the need for cluster administrators to pre-provision storage. For more information about dynamic provisioning, see Dynamic provisioning.
Chapter 2. Understanding ephemeral storage
2.1. Overview
In addition to persistent storage, pods and containers can require ephemeral or transient local storage for their operation. The lifetime of this ephemeral storage does not extend beyond the life of the individual pod, and this ephemeral storage cannot be shared across pods.
Pods use ephemeral local storage for scratch space, caching, and logs. Issues related to the lack of local storage accounting and isolation include the following:
- Pods cannot detect how much local storage is available to them.
- Pods cannot request guaranteed local storage.
- Local storage is a best-effort resource.
- Pods can be evicted due to other pods filling the local storage, after which new pods are not admitted until sufficient storage is reclaimed.
Unlike persistent volumes, ephemeral storage is unstructured and the space is shared between all pods running on a node, in addition to other uses by the system, the container runtime, and Red Hat OpenShift Service on AWS. The ephemeral storage framework allows pods to specify their transient local storage needs. It also allows Red Hat OpenShift Service on AWS to schedule pods where appropriate, and to protect the node against excessive use of local storage.
While the ephemeral storage framework allows administrators and developers to better manage local storage, I/O throughput and latency are not directly effected.
2.2. Types of ephemeral storage
Ephemeral local storage is always made available in the primary partition. There are two basic ways of creating the primary partition: root and runtime.
Root
This partition holds the kubelet root directory, /var/lib/kubelet/ by default, and /var/log/ directory. This partition can be shared between user pods, the OS, and Kubernetes system daemons. This partition can be consumed by pods through EmptyDir volumes, container logs, image layers, and container-writable layers. Kubelet manages shared access and isolation of this partition. This partition is ephemeral, and applications cannot expect any performance SLAs, such as disk IOPS, from this partition.
Runtime
This is an optional partition that runtimes can use for overlay file systems. Red Hat OpenShift Service on AWS attempts to identify and provide shared access along with isolation to this partition. Container image layers and writable layers are stored here. If the runtime partition exists, the root partition does not hold any image layer or other writable storage.
2.3. Ephemeral storage management
Cluster administrators can manage ephemeral storage within a project by setting quotas that define the limit ranges and number of requests for ephemeral storage across all pods in a non-terminal state. Developers can also set requests and limits on this compute resource at the pod and container level.
You can manage local ephemeral storage by specifying requests and limits. Each container in a pod can specify the following:
-
spec.containers[].resources.limits.ephemeral-storage -
spec.containers[].resources.requests.ephemeral-storage
2.3.1. Ephemeral storage limits and requests units
Limits and requests for ephemeral storage are measured in byte quantities. You can express storage as a plain integer or as a fixed-point number using one of these suffixes: E, P, T, G, M, k. You can also use the power-of-two equivalents: Ei, Pi, Ti, Gi, Mi, Ki.
For example, the following quantities all represent approximately the same value: 128974848, 129e6, 129M, and 123Mi.
The suffixes for each byte quantity are case-sensitive. Be sure to use the correct case. Use the case-sensitive "M", such as used in "400M" to set the request at 400 megabytes. Use the case-sensitive "400Mi" to request 400 mebibytes. If you specify "400m" of ephemeral storage, the storage requests is only 0.4 bytes.
2.3.2. Ephemeral storage requests and limits example
The following example configuration file shows a pod with two containers:
- Each container requests 2GiB of local ephemeral storage.
- Each container has a limit of 4GiB of local ephemeral storage.
At the pod level, kubelet works out an overall pod storage limit by adding up the limits of all the containers in that pod.
-
In this case, the total storage usage at the pod level is the sum of the disk usage from all containers plus the pod’s
emptyDirvolumes. - Therefore, the pod has a request of 4GiB of local ephemeral storage, and a limit of 8GiB of local ephemeral storage.
-
In this case, the total storage usage at the pod level is the sum of the disk usage from all containers plus the pod’s
Example ephemeral storage configuration with quotas and limits
apiVersion: v1
kind: Pod
metadata:
  name: frontend
spec:
  containers:
  - name: app
    image: images.my-company.example/app:v4
    resources:
      requests:
        ephemeral-storage: "2Gi" 1
      limits:
        ephemeral-storage: "4Gi" 2
    volumeMounts:
    - name: ephemeral
      mountPath: "/tmp"
  - name: log-aggregator
    image: images.my-company.example/log-aggregator:v6
    resources:
      requests:
        ephemeral-storage: "2Gi"
      limits:
        ephemeral-storage: "4Gi"
    volumeMounts:
    - name: ephemeral
      mountPath: "/tmp"
  volumes:
    - name: ephemeral
      emptyDir: {}
2.3.3. Ephemeral storage configuration effects pod scheduling and eviction
The settings in the pod spec affect both how the scheduler makes a decision about scheduling pods and when kubelet evicts pods.
- First, the scheduler ensures that the sum of the resource requests of the scheduled containers is less than the capacity of the node. In this case, the pod can be assigned to a node only if the node’s available ephemeral storage (allocatable resource) is more than 4GiB.
- Second, at the container level, because the first container sets a resource limit, kubelet eviction manager measures the disk usage of this container and evicts the pod if the storage usage of the container exceeds its limit (4GiB). The kubelet eviction manager also marks the pod for eviction if the total usage exceeds the overall pod storage limit (8GiB).
2.4. Monitoring ephemeral storage
You can use /bin/df as a tool to monitor ephemeral storage usage on the volume where ephemeral container data is located, which is /var/lib/kubelet and /var/lib/containers. The available space for only /var/lib/kubelet is shown when you use the df command if /var/lib/containers is placed on a separate disk by the cluster administrator.
To show the human-readable values of used and available space in /var/lib, enter the following command:
$ df -h /var/lib
The output shows the ephemeral storage usage in /var/lib:
Example output
Filesystem  Size  Used Avail Use% Mounted on
/dev/disk/by-partuuid/4cd1448a-01    69G   32G   34G  49% /
Chapter 3. Understanding persistent storage
3.1. Persistent storage overview
Managing storage is a distinct problem from managing compute resources. Red Hat OpenShift Service on AWS uses the Kubernetes persistent volume (PV) framework to allow cluster administrators to provision persistent storage for a cluster. Developers can use persistent volume claims (PVCs) to request PV resources without having specific knowledge of the underlying storage infrastructure.
PVCs are specific to a project, and are created and used by developers as a means to use a PV. PV resources on their own are not scoped to any single project; they can be shared across the entire Red Hat OpenShift Service on AWS cluster and claimed from any project. After a PV is bound to a PVC, that PV can not then be bound to additional PVCs. This has the effect of scoping a bound PV to a single namespace, that of the binding project.
PVs are defined by a PersistentVolume API object, which represents a piece of existing storage in the cluster that was either statically provisioned by the cluster administrator or dynamically provisioned using a StorageClass object. It is a resource in the cluster just like a node is a cluster resource.
PVs are volume plugins like Volumes but have a lifecycle that is independent of any individual pod that uses the PV. PV objects capture the details of the implementation of the storage, be that NFS, iSCSI, or a cloud-provider-specific storage system.
High availability of storage in the infrastructure is left to the underlying storage provider.
PVCs are defined by a PersistentVolumeClaim API object, which represents a request for storage by a developer. It is similar to a pod in that pods consume node resources and PVCs consume PV resources. For example, pods can request specific levels of resources, such as CPU and memory, while PVCs can request specific storage capacity and access modes. For example, they can be mounted once read-write or many times read-only.
3.2. Lifecycle of a volume and claim
PVs are resources in the cluster. PVCs are requests for those resources and also act as claim checks to the resource. The interaction between PVs and PVCs have the following lifecycle.
3.2.1. Provision storage
In response to requests from a developer defined in a PVC, a cluster administrator configures one or more dynamic provisioners that provision storage and a matching PV.
3.2.2. Bind claims
When you create a PVC, you request a specific amount of storage, specify the required access mode, and create a storage class to describe and classify the storage. The control loop in the master watches for new PVCs and binds the new PVC to an appropriate PV. If an appropriate PV does not exist, a provisioner for the storage class creates one.
The size of all PVs might exceed your PVC size. This is especially true with manually provisioned PVs. To minimize the excess, Red Hat OpenShift Service on AWS binds to the smallest PV that matches all other criteria.
Claims remain unbound indefinitely if a matching volume does not exist or can not be created with any available provisioner servicing a storage class. Claims are bound as matching volumes become available. For example, a cluster with many manually provisioned 50Gi volumes would not match a PVC requesting 100Gi. The PVC can be bound when a 100Gi PV is added to the cluster.
3.2.3. Use pods and claimed PVs
Pods use claims as volumes. The cluster inspects the claim to find the bound volume and mounts that volume for a pod. For those volumes that support multiple access modes, you must specify which mode applies when you use the claim as a volume in a pod.
Once you have a claim and that claim is bound, the bound PV belongs to you for as long as you need it. You can schedule pods and access claimed PVs by including persistentVolumeClaim in the pod’s volumes block.
If you attach persistent volumes that have high file counts to pods, those pods can fail or can take a long time to start. For more information, see When using Persistent Volumes with high file counts in OpenShift, why do pods fail to start or take an excessive amount of time to achieve "Ready" state?.
3.2.4. Release a persistent volume
When you are finished with a volume, you can delete the PVC object from the API, which allows reclamation of the resource. The volume is considered released when the claim is deleted, but it is not yet available for another claim. The previous claimant’s data remains on the volume and must be handled according to policy.
3.2.5. Reclaim policy for persistent volumes
The reclaim policy of a persistent volume tells the cluster what to do with the volume after it is released. A volume’s reclaim policy can be Retain, Recycle, or Delete.
-
Retainreclaim policy allows manual reclamation of the resource for those volume plugins that support it. -
Recyclereclaim policy recycles the volume back into the pool of unbound persistent volumes once it is released from its claim.
The Recycle reclaim policy is deprecated in Red Hat OpenShift Service on AWS 4. Dynamic provisioning is recommended for equivalent and better functionality.
-
Deletereclaim policy deletes both thePersistentVolumeobject from Red Hat OpenShift Service on AWS and the associated storage asset in external infrastructure, such as Amazon Elastic Block Store (Amazon EBS) or VMware vSphere.
Dynamically provisioned volumes are always deleted.
3.2.6. Reclaiming a persistent volume manually
When a persistent volume claim (PVC) is deleted, the persistent volume (PV) still exists and is considered "released". However, the PV is not yet available for another claim because the data of the previous claimant remains on the volume.
Procedure
To manually reclaim the PV as a cluster administrator:
Delete the PV.
$ oc delete pv <pv-name>
The associated storage asset in the external infrastructure, such as an Amazon Elastic Block Store (Amazon EBS) volume, still exists after the PV is deleted.
- Clean up the data on the associated storage asset.
- Delete the associated storage asset. Alternately, to reuse the same storage asset, create a new PV with the storage asset definition.
The reclaimed PV is now available for use by another PVC.
3.2.7. Changing the reclaim policy of a persistent volume
To change the reclaim policy of a persistent volume:
List the persistent volumes in your cluster:
$ oc get pv
Example output
NAME                                       CAPACITY   ACCESSMODES   RECLAIMPOLICY   STATUS    CLAIM             STORAGECLASS     REASON    AGE
 pvc-b6efd8da-b7b5-11e6-9d58-0ed433a7dd94   4Gi        RWO           Delete          Bound     default/claim1    manual                     10s
 pvc-b95650f8-b7b5-11e6-9d58-0ed433a7dd94   4Gi        RWO           Delete          Bound     default/claim2    manual                     6s
 pvc-bb3ca71d-b7b5-11e6-9d58-0ed433a7dd94   4Gi        RWO           Delete          Bound     default/claim3    manual                     3s
Choose one of your persistent volumes and change its reclaim policy:
$ oc patch pv <your-pv-name> -p '{"spec":{"persistentVolumeReclaimPolicy":"Retain"}}'Verify that your chosen persistent volume has the right policy:
$ oc get pv
Example output
NAME                                       CAPACITY   ACCESSMODES   RECLAIMPOLICY   STATUS    CLAIM             STORAGECLASS     REASON    AGE
 pvc-b6efd8da-b7b5-11e6-9d58-0ed433a7dd94   4Gi        RWO           Delete          Bound     default/claim1    manual                     10s
 pvc-b95650f8-b7b5-11e6-9d58-0ed433a7dd94   4Gi        RWO           Delete          Bound     default/claim2    manual                     6s
 pvc-bb3ca71d-b7b5-11e6-9d58-0ed433a7dd94   4Gi        RWO           Retain          Bound     default/claim3    manual                     3s
In the preceding output, the volume bound to claim
default/claim3now has aRetainreclaim policy. The volume will not be automatically deleted when a user deletes claimdefault/claim3.
3.3. Persistent volumes
Each PV contains a spec and status, which is the specification and status of the volume, for example:
PersistentVolume object definition example
apiVersion: v1
kind: PersistentVolume
metadata:
  name: pv0001 1
spec:
  capacity:
    storage: 5Gi 2
  accessModes:
    - ReadWriteOnce 3
  persistentVolumeReclaimPolicy: Retain 4
  ...
status:
  ...
3.3.1. Types of PVs
Red Hat OpenShift Service on AWS (ROSA) supports the following persistent volume storage options:
- AWS Elastic Block Store (EBS)
- AWS Elastic File Store (EFS)
ROSA functions with Kubernetes Container Storage Interface (CSI) compatible volume provisioners from other storage vendors. See Configuring CSI volumes for more information about CSI drivers in ROSA.
3.3.2. Capacity
Generally, a persistent volume (PV) has a specific storage capacity. This is set by using the capacity attribute of the PV.
Currently, storage capacity is the only resource that can be set or requested. Future attributes may include IOPS, throughput, and so on.
3.3.3. Access modes
A persistent volume can be mounted on a host in any way supported by the resource provider. Providers have different capabilities and each PV’s access modes are set to the specific modes supported by that particular volume. For example, NFS can support multiple read-write clients, but a specific NFS PV might be exported on the server as read-only. Each PV gets its own set of access modes describing that specific PV’s capabilities.
Claims are matched to volumes with similar access modes. The only two matching criteria are access modes and size. A claim’s access modes represent a request. Therefore, you might be granted more, but never less. For example, if a claim requests RWO, but the only volume available is an NFS PV (RWO+ROX+RWX), the claim would then match NFS because it supports RWO.
Direct matches are always attempted first. The volume’s modes must match or contain more modes than you requested. The size must be greater than or equal to what is expected. If two types of volumes, such as NFS and iSCSI, have the same set of access modes, either of them can match a claim with those modes. There is no ordering between types of volumes and no way to choose one type over another.
All volumes with the same modes are grouped, and then sorted by size, smallest to largest. The binder gets the group with matching modes and iterates over each, in size order, until one size matches.
Volume access modes describe volume capabilities. They are not enforced constraints. The storage provider is responsible for runtime errors resulting from invalid use of the resource. Errors in the provider show up at runtime as mount errors.
The following table lists the access modes:
Table 3.1. Access modes
| Access Mode | CLI abbreviation | Description |
|---|---|---|
| ReadWriteOnce |
| The volume can be mounted as read-write by a single node. |
| ReadWriteOncePod [1] |
| The volume can be mounted as read-write by a single pod on a single node. |
- ReadWriteOncePod access mode for persistent volumes is a Technology Preview feature.
ReadWriteOncePod access mode for persistent volumes is a Technology Preview feature only. Technology Preview features are not supported with Red Hat production service level agreements (SLAs) and might not be functionally complete. Red Hat does not recommend using them in production. These features provide early access to upcoming product features, enabling customers to test functionality and provide feedback during the development process.
For more information about the support scope of Red Hat Technology Preview features, see Technology Preview Features Support Scope.
Table 3.2. Supported access modes for persistent volumes
| Volume plugin | ReadWriteOnce [1] | ReadWriteOncePod [2] | ReadOnlyMany | ReadWriteMany |
|---|---|---|---|---|
| AWS EBS [3] |
✅ |
✅ |
- |
- |
| AWS EFS |
✅ |
✅ |
✅ |
✅ |
- ReadWriteOnce (RWO) volumes cannot be mounted on multiple nodes. If a node fails, the system does not allow the attached RWO volume to be mounted on a new node because it is already assigned to the failed node. If you encounter a multi-attach error message as a result, force delete the pod on a shutdown or crashed node to avoid data loss in critical workloads, such as when dynamic persistent volumes are attached.
- ReadWriteOncePod is a Technology Preview feature.
- Use a recreate deployment strategy for pods that rely on AWS EBS.
- Only raw block volumes support the ReadWriteMany (RWX) access mode for Fibre Channel and iSCSI. For more information, see "Block volume support".
3.3.4. Phase
Volumes can be found in one of the following phases:
Table 3.3. Volume phases
| Phase | Description |
|---|---|
| Available | A free resource not yet bound to a claim. |
| Bound | The volume is bound to a claim. |
| Released | The claim was deleted, but the resource is not yet reclaimed by the cluster. |
| Failed | The volume has failed its automatic reclamation. |
You can view the name of the PVC that is bound to the PV by running the following command:
$ oc get pv <pv-claim>
3.3.4.1. Mount options
You can specify mount options while mounting a PV by using the attribute mountOptions.
For example:
Mount options example
apiVersion: v1
kind: PersistentVolume
metadata:
  name: pv0001
spec:
  capacity:
    storage: 1Gi
  accessModes:
    - ReadWriteOnce
  mountOptions: 1
    - nfsvers=4.1
  nfs:
    path: /tmp
    server: 172.17.0.2
  persistentVolumeReclaimPolicy: Retain
  claimRef:
    name: claim1
    namespace: default
- 1
- Specified mount options are used while mounting the PV to the disk.
The following PV types support mount options:
- AWS Elastic Block Store (EBS)
3.4. Persistent volume claims
Each PersistentVolumeClaim object contains a spec and status, which is the specification and status of the persistent volume claim (PVC), for example:
PersistentVolumeClaim object definition example
kind: PersistentVolumeClaim
apiVersion: v1
metadata:
  name: myclaim 1
spec:
  accessModes:
    - ReadWriteOnce 2
  resources:
    requests:
      storage: 8Gi 3
  storageClassName: gold 4
status:
  ...
3.4.1. Storage classes
Claims can optionally request a specific storage class by specifying the storage class’s name in the storageClassName attribute. Only PVs of the requested class, ones with the same storageClassName as the PVC, can be bound to the PVC. The cluster administrator can configure dynamic provisioners to service one or more storage classes. The cluster administrator can create a PV on demand that matches the specifications in the PVC.
The Cluster Storage Operator installs a default storage class. This storage class is owned and controlled by the Operator. It cannot be deleted or modified beyond defining annotations and labels. If different behavior is desired, you must define a custom storage class.
The cluster administrator can also set a default storage class for all PVCs. When a default storage class is configured, the PVC must explicitly ask for StorageClass or storageClassName annotations set to "" to be bound to a PV without a storage class.
If more than one storage class is marked as default, a PVC can only be created if the storageClassName is explicitly specified. Therefore, only one storage class should be set as the default.
3.4.2. Access modes
Claims use the same conventions as volumes when requesting storage with specific access modes.
3.4.3. Resources
Claims, such as pods, can request specific quantities of a resource. In this case, the request is for storage. The same resource model applies to volumes and claims.
3.4.4. Claims as volumes
Pods access storage by using the claim as a volume. Claims must exist in the same namespace as the pod using the claim. The cluster finds the claim in the pod’s namespace and uses it to get the PersistentVolume backing the claim. The volume is mounted to the host and into the pod, for example:
Mount volume to the host and into the pod example
kind: Pod
apiVersion: v1
metadata:
  name: mypod
spec:
  containers:
    - name: myfrontend
      image: dockerfile/nginx
      volumeMounts:
      - mountPath: "/var/www/html" 1
        name: mypd 2
  volumes:
    - name: mypd
      persistentVolumeClaim:
        claimName: myclaim 3
- 1
- Path to mount the volume inside the pod.
- 2
- Name of the volume to mount. Do not mount to the container root,
/, or any path that is the same in the host and the container. This can corrupt your host system if the container is sufficiently privileged, such as the host/dev/ptsfiles. It is safe to mount the host by using/host. - 3
- Name of the PVC, that exists in the same namespace, to use.
3.5. Block volume support
Red Hat OpenShift Service on AWS can statically provision raw block volumes. These volumes do not have a file system, and can provide performance benefits for applications that either write to the disk directly or implement their own storage service.
Raw block volumes are provisioned by specifying volumeMode: Block in the PV and PVC specification.
Pods using raw block volumes must be configured to allow privileged containers.
The following table displays which volume plugins support block volumes.
Table 3.4. Block volume support
| Volume Plugin | Manually provisioned | Dynamically provisioned | Fully supported |
|---|---|---|---|
| Amazon Elastic Block Store (Amazon EBS) | ✅ | ✅ | ✅ |
| Amazon Elastic File Storage (Amazon EFS) |
3.5.1. Block volume examples
PV example
apiVersion: v1
kind: PersistentVolume
metadata:
  name: block-pv
spec:
  capacity:
    storage: 10Gi
  accessModes:
    - ReadWriteOnce
  volumeMode: Block 1
  persistentVolumeReclaimPolicy: Retain
  fc:
    targetWWNs: ["50060e801049cfd1"]
    lun: 0
    readOnly: false
- 1
volumeModemust be set toBlockto indicate that this PV is a raw block volume.
PVC example
apiVersion: v1
kind: PersistentVolumeClaim
metadata:
  name: block-pvc
spec:
  accessModes:
    - ReadWriteOnce
  volumeMode: Block 1
  resources:
    requests:
      storage: 10Gi
- 1
volumeModemust be set toBlockto indicate that a raw block PVC is requested.
Pod specification example
apiVersion: v1
kind: Pod
metadata:
  name: pod-with-block-volume
spec:
  containers:
    - name: fc-container
      image: fedora:26
      command: ["/bin/sh", "-c"]
      args: [ "tail -f /dev/null" ]
      volumeDevices:  1
        - name: data
          devicePath: /dev/xvda 2
  volumes:
    - name: data
      persistentVolumeClaim:
        claimName: block-pvc 3
- 1
volumeDevices, instead ofvolumeMounts, is used for block devices. OnlyPersistentVolumeClaimsources can be used with raw block volumes.- 2
devicePath, instead ofmountPath, represents the path to the physical device where the raw block is mapped to the system.- 3
- The volume source must be of type
persistentVolumeClaimand must match the name of the PVC as expected.
Table 3.5. Accepted values for volumeMode
| Value | Default |
|---|---|
| Filesystem | Yes |
| Block | No |
Table 3.6. Binding scenarios for block volumes
PV volumeMode | PVC volumeMode | Binding result |
|---|---|---|
| Filesystem | Filesystem | Bind |
| Unspecified | Unspecified | Bind |
| Filesystem | Unspecified | Bind |
| Unspecified | Filesystem | Bind |
| Block | Block | Bind |
| Unspecified | Block | No Bind |
| Block | Unspecified | No Bind |
| Filesystem | Block | No Bind |
| Block | Filesystem | No Bind |
Unspecified values result in the default value of Filesystem.
3.6. Using fsGroup to reduce pod timeouts
If a storage volume contains many files (~1,000,000 or greater), you may experience pod timeouts.
This can occur because, by default, Red Hat OpenShift Service on AWS recursively changes ownership and permissions for the contents of each volume to match the fsGroup specified in a pod’s securityContext when that volume is mounted. For large volumes, checking and changing ownership and permissions can be time consuming, slowing pod startup. You can use the fsGroupChangePolicy field inside a securityContext to control the way that Red Hat OpenShift Service on AWS checks and manages ownership and permissions for a volume.
fsGroupChangePolicy defines behavior for changing ownership and permission of the volume before being exposed inside a pod. This field only applies to volume types that support fsGroup-controlled ownership and permissions. This field has two possible values:
-
OnRootMismatch: Only change permissions and ownership if permission and ownership of root directory does not match with expected permissions of the volume. This can help shorten the time it takes to change ownership and permission of a volume to reduce pod timeouts. -
Always: Always change permission and ownership of the volume when a volume is mounted.
fsGroupChangePolicy example
securityContext:
  runAsUser: 1000
  runAsGroup: 3000
  fsGroup: 2000
  fsGroupChangePolicy: "OnRootMismatch" 1
  ...
- 1
OnRootMismatchspecifies skipping recursive permission change, thus helping to avoid pod timeout problems.
The fsGroupChangePolicyfield has no effect on ephemeral volume types, such as secret, configMap, and emptydir.
Chapter 4. Configuring persistent storage
4.1. Persistent storage using AWS Elastic Block Store
Red Hat OpenShift Service on AWS clusters are prebuilt with four storage classes that use Amazon Elastic Block Store (Amazon EBS) volumes. These storage classes are ready to use and some familiarity with Kubernetes and AWS is assumed.
Following are the four prebuilt storage classes:
| Name | Provisioner |
|---|---|
| gp2 | kubernetes.io/aws-ebs |
| gp2-csi | ebs.csi.aws.com |
| gp3 (default) | kubernetes.io/aws-ebs |
| gp3-csi | ebs.csi.aws.com |
The gp3 storage class is set as default; however, you can select any of the storage classes as the default storage class.
The Kubernetes persistent volume framework allows administrators to provision a cluster with persistent storage and gives users a way to request those resources without having any knowledge of the underlying infrastructure. You can dynamically provision Amazon EBS volumes. Persistent volumes are not bound to a single project or namespace; they can be shared across the Red Hat OpenShift Service on AWS cluster. Persistent volume claims are specific to a project or namespace and can be requested by users. You can define a KMS key to encrypt container-persistent volumes on AWS. By default, newly created clusters using Red Hat OpenShift Service on AWS version 4.10 and later use gp3 storage and the AWS EBS CSI driver.
High-availability of storage in the infrastructure is left to the underlying storage provider.
4.1.1. Creating the EBS storage class
Storage classes are used to differentiate and delineate storage levels and usages. By defining a storage class, users can obtain dynamically provisioned persistent volumes.
4.1.2. Creating the persistent volume claim
Prerequisites
Storage must exist in the underlying infrastructure before it can be mounted as a volume in Red Hat OpenShift Service on AWS.
Procedure
- In the Red Hat OpenShift Service on AWS console, click Storage → Persistent Volume Claims.
- In the persistent volume claims overview, click Create Persistent Volume Claim.
Define the desired options on the page that appears.
- Select the previously-created storage class from the drop-down menu.
- Enter a unique name for the storage claim.
- Select the access mode. This selection determines the read and write access for the storage claim.
- Define the size of the storage claim.
- Click Create to create the persistent volume claim and generate a persistent volume.
4.1.3. Volume format
Before Red Hat OpenShift Service on AWS mounts the volume and passes it to a container, it checks that the volume contains a file system as specified by the fsType parameter in the persistent volume definition. If the device is not formatted with the file system, all data from the device is erased and the device is automatically formatted with the given file system.
This verification enables you to use unformatted AWS volumes as persistent volumes, because Red Hat OpenShift Service on AWS formats them before the first use.
4.1.4. Maximum number of EBS volumes on a node
By default, Red Hat OpenShift Service on AWS supports a maximum of 39 EBS volumes attached to one node. This limit is consistent with the AWS volume limits. The volume limit depends on the instance type.
As a cluster administrator, you must use either in-tree or Container Storage Interface (CSI) volumes and their respective storage classes, but never both volume types at the same time. The maximum attached EBS volume number is counted separately for in-tree and CSI volumes, which means you could have up to 39 EBS volumes of each type.
For information about accessing additional storage options, such as volume snapshots, that are not possible with in-tree volume plug-ins, see AWS Elastic Block Store CSI Driver Operator.
4.1.5. Encrypting container persistent volumes on AWS with a KMS key
Defining a KMS key to encrypt container-persistent volumes on AWS is useful when you have explicit compliance and security guidelines when deploying to AWS.
Prerequisites
- Underlying infrastructure must contain storage.
- You must create a customer KMS key on AWS.
Procedure
Create a storage class:
$ cat << EOF | oc create -f -
apiVersion: storage.k8s.io/v1
kind: StorageClass
metadata:
  name: <storage-class-name> 1
parameters:
  fsType: ext4 2
  encrypted: "true"
  kmsKeyId: keyvalue 3
provisioner: ebs.csi.aws.com
reclaimPolicy: Delete
volumeBindingMode: WaitForFirstConsumer
EOF
- 1
- Specifies the name of the storage class.
- 2
- File system that is created on provisioned volumes.
- 3
- Specifies the full Amazon Resource Name (ARN) of the key to use when encrypting the container-persistent volume. If you do not provide any key, but the
encryptedfield is set totrue, then the default KMS key is used. See Finding the key ID and key ARN on AWS in the AWS documentation.
Create a persistent volume claim (PVC) with the storage class specifying the KMS key:
$ cat << EOF | oc create -f -
apiVersion: v1
kind: PersistentVolumeClaim
metadata:
  name: mypvc
spec:
  accessModes:
    - ReadWriteOnce
  volumeMode: Filesystem
  storageClassName: <storage-class-name>
  resources:
    requests:
      storage: 1Gi
EOF
Create workload containers to consume the PVC:
$ cat << EOF | oc create -f -
kind: Pod
metadata:
  name: mypod
spec:
  containers:
    - name: httpd
      image: quay.io/centos7/httpd-24-centos7
      ports:
        - containerPort: 80
      volumeMounts:
        - mountPath: /mnt/storage
          name: data
  volumes:
    - name: data
      persistentVolumeClaim:
        claimName: mypvc
EOF
4.1.6. Additional resources
- See AWS Elastic Block Store CSI Driver Operator for information about accessing additional storage options, such as volume snapshots, that are not possible with in-tree volume plugins.
Chapter 5. Using Container Storage Interface (CSI)
5.1. Configuring CSI volumes
The Container Storage Interface (CSI) allows Red Hat OpenShift Service on AWS to consume storage from storage back ends that implement the CSI interface as persistent storage.
Red Hat OpenShift Service on AWS 4 supports version 1.6.0 of the CSI specification.
5.1.1. CSI architecture
CSI drivers are typically shipped as container images. These containers are not aware of Red Hat OpenShift Service on AWS where they run. To use CSI-compatible storage back end in Red Hat OpenShift Service on AWS, the cluster administrator must deploy several components that serve as a bridge between Red Hat OpenShift Service on AWS and the storage driver.
The following diagram provides a high-level overview about the components running in pods in the Red Hat OpenShift Service on AWS cluster.
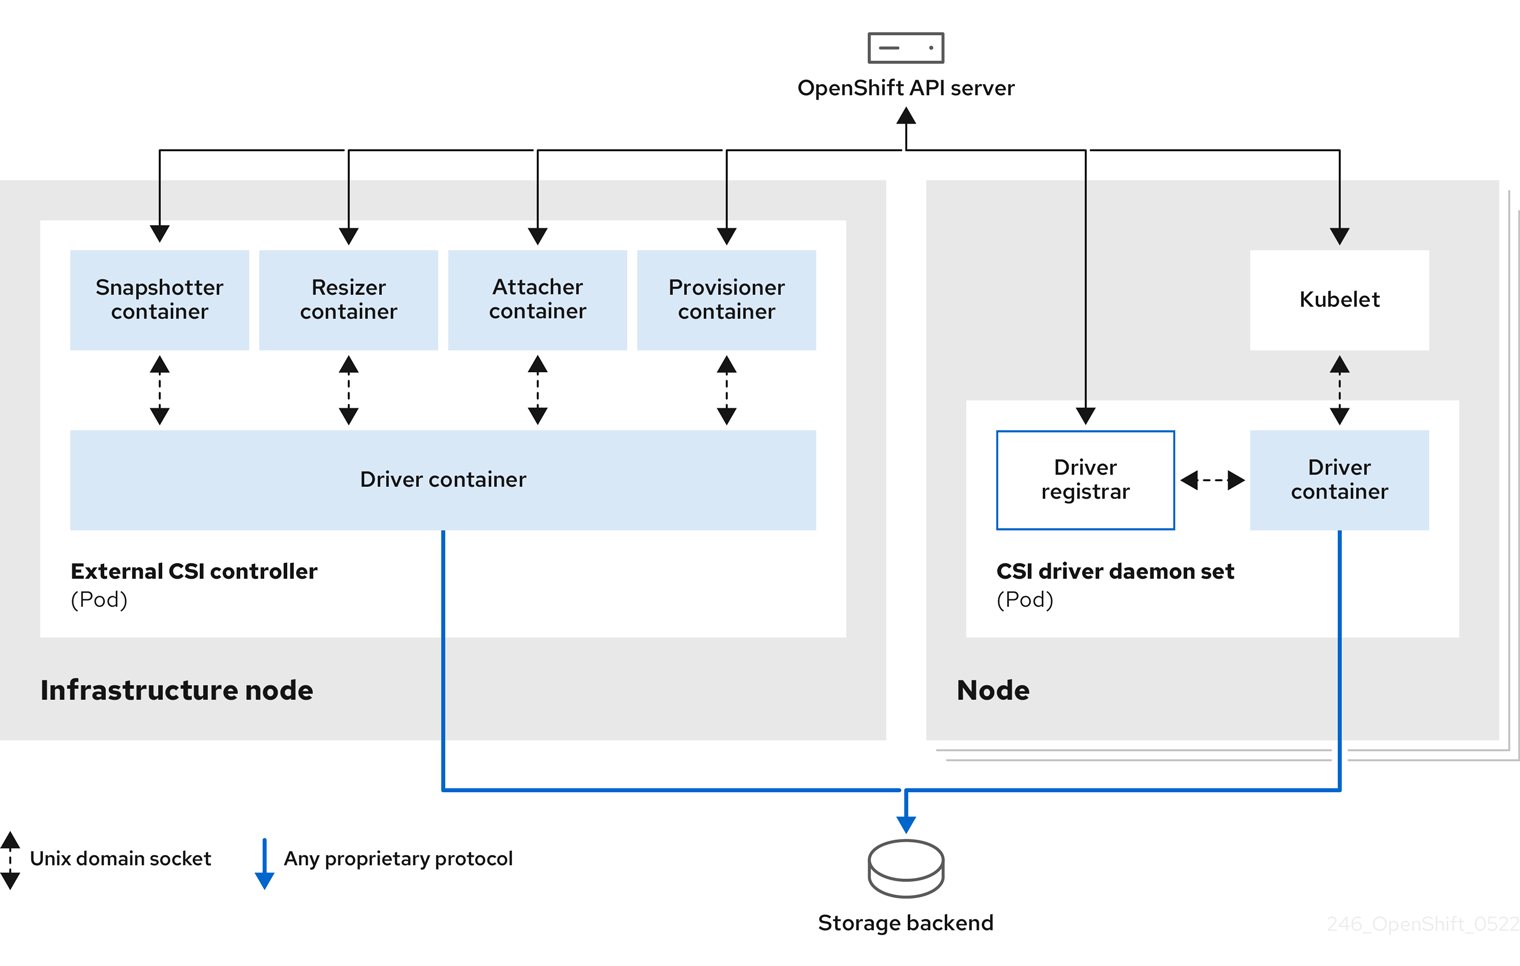
It is possible to run multiple CSI drivers for different storage back ends. Each driver needs its own external controllers deployment and daemon set with the driver and CSI registrar.
5.1.1.1. External CSI controllers
External CSI controllers is a deployment that deploys one or more pods with five containers:
-
The snapshotter container watches
VolumeSnapshotandVolumeSnapshotContentobjects and is responsible for the creation and deletion ofVolumeSnapshotContentobject. -
The resizer container is a sidecar container that watches for
PersistentVolumeClaimupdates and triggersControllerExpandVolumeoperations against a CSI endpoint if you request more storage onPersistentVolumeClaimobject. -
An external CSI attacher container translates
attachanddetachcalls from Red Hat OpenShift Service on AWS to respectiveControllerPublishandControllerUnpublishcalls to the CSI driver. -
An external CSI provisioner container that translates
provisionanddeletecalls from Red Hat OpenShift Service on AWS to respectiveCreateVolumeandDeleteVolumecalls to the CSI driver. - A CSI driver container.
The CSI attacher and CSI provisioner containers communicate with the CSI driver container using UNIX Domain Sockets, ensuring that no CSI communication leaves the pod. The CSI driver is not accessible from outside of the pod.
The attach, detach, provision, and delete operations typically require the CSI driver to use credentials to the storage backend. Run the CSI controller pods on infrastructure nodes so the credentials are never leaked to user processes, even in the event of a catastrophic security breach on a compute node.
The external attacher must also run for CSI drivers that do not support third-party attach or detach operations. The external attacher will not issue any ControllerPublish or ControllerUnpublish operations to the CSI driver. However, it still must run to implement the necessary Red Hat OpenShift Service on AWS attachment API.
5.1.1.2. CSI driver daemon set
The CSI driver daemon set runs a pod on every node that allows Red Hat OpenShift Service on AWS to mount storage provided by the CSI driver to the node and use it in user workloads (pods) as persistent volumes (PVs). The pod with the CSI driver installed contains the following containers:
-
A CSI driver registrar, which registers the CSI driver into the
openshift-nodeservice running on the node. Theopenshift-nodeprocess running on the node then directly connects with the CSI driver using the UNIX Domain Socket available on the node. - A CSI driver.
The CSI driver deployed on the node should have as few credentials to the storage back end as possible. Red Hat OpenShift Service on AWS will only use the node plugin set of CSI calls such as NodePublish/NodeUnpublish and NodeStage/NodeUnstage, if these calls are implemented.
5.1.2. CSI drivers supported by Red Hat OpenShift Service on AWS
Red Hat OpenShift Service on AWS installs certain CSI drivers by default, giving users storage options that are not possible with in-tree volume plugins.
To create CSI-provisioned persistent volumes that mount to these supported storage assets, Red Hat OpenShift Service on AWS installs the necessary CSI driver Operator, the CSI driver, and the required storage class by default. For more details about the default namespace of the Operator and driver, see the documentation for the specific CSI Driver Operator.
The following table describes the CSI drivers that are installed with Red Hat OpenShift Service on AWS and which CSI features they support, such as volume snapshots and resize.
Table 5.1. Supported CSI drivers and features in Red Hat OpenShift Service on AWS
| CSI driver | CSI volume snapshots | CSI cloning | CSI resize | Inline ephemeral volumes |
|---|---|---|---|---|
| AWS EBS |
✅ |
- |
✅ |
- |
| AWS EFS |
- |
- |
- |
- |
In addition to the drivers listed in the preceding table, ROSA functions with CSI drivers from third-party storage vendors. Red Hat does not oversee third-party provisioners or the connected CSI drivers and the vendors fully control source code, deployment, operation, and Kubernetes compatibility. These volume provisioners are considered customer-managed and the respective vendors are responsible for providing support. See the Shared responsibilities for Red Hat OpenShift Service on AWS matrix for more information.
5.1.3. Dynamic provisioning
Dynamic provisioning of persistent storage depends on the capabilities of the CSI driver and underlying storage back end. The provider of the CSI driver should document how to create a storage class in Red Hat OpenShift Service on AWS and the parameters available for configuration.
The created storage class can be configured to enable dynamic provisioning.
Procedure
Create a default storage class that ensures all PVCs that do not require any special storage class are provisioned by the installed CSI driver.
# oc create -f - << EOF
apiVersion: storage.k8s.io/v1
kind: StorageClass
metadata:
  name: <storage-class> 1
  annotations:
    storageclass.kubernetes.io/is-default-class: "true"
provisioner: <provisioner-name> 2
parameters:
EOF
5.1.4. Example using the CSI driver
The following example installs a default MySQL template without any changes to the template.
Prerequisites
- The CSI driver has been deployed.
- A storage class has been created for dynamic provisioning.
Procedure
Create the MySQL template:
# oc new-app mysql-persistent
Example output
--> Deploying template "openshift/mysql-persistent" to project default
...
# oc get pvc
Example output
NAME              STATUS    VOLUME                                   CAPACITY
ACCESS MODES   STORAGECLASS   AGE
mysql             Bound     kubernetes-dynamic-pv-3271ffcb4e1811e8   1Gi
RWO            cinder         3s
5.2. Managing the default storage class
5.2.1. Overview
Managing the default storage class allows you to accomplish several different objectives:
- Enforcing static provisioning by disabling dynamic provisioning.
- When you have other preferred storage classes, preventing the storage operator from re-creating the initial default storage class.
- Renaming, or otherwise changing, the default storage class
To accomplish these objectives, you change the setting for the spec.storageClassState field in the ClusterCSIDriver object. The possible settings for this field are:
- Managed: (Default) The Container Storage Interface (CSI) operator is actively managing its default storage class, so that most manual changes made by a cluster administrator to the default storage class are removed, and the default storage class is continuously re-created if you attempt to manually delete it.
- Unmanaged: You can modify the default storage class. The CSI operator is not actively managing storage classes, so that it is not reconciling the default storage class it creates automatically.
- Removed: The CSI operators deletes the default storage class.
5.2.2. Managing the default storage class using the web console
Prerequisites
- Access to the Red Hat OpenShift Service on AWS web console.
- Access to the cluster with cluster-admin privileges.
Procedure
To manage the default storage class using the web console:
- Log in to the web console.
- Click Administration > CustomResourceDefinitions.
-
On the CustomResourceDefinitions page, type
clustercsidriverto find theClusterCSIDriverobject. - Click ClusterCSIDriver, and then click the Instances tab.
- Click the name of the desired instance, and then click the YAML tab.
Add the
spec.storageClassStatefield with a value ofManaged,Unmanaged, orRemoved.Example
... spec: driverConfig: driverType: '' logLevel: Normal managementState: Managed observedConfig: null operatorLogLevel: Normal storageClassState: Unmanaged 1 ...- 1
spec.storageClassStatefield set to "Unmanaged"
- Click Save.
5.2.3. Managing the default storage class using the CLI
Prerequisites
- Access to the cluster with cluster-admin privileges.
Procedure
To manage the storage class using the CLI, run the following command:
oc patch clustercsidriver $DRIVERNAME --type=merge -p "{\"spec\":{\"storageClassState\":\"${STATE}\"}}" 1- 1
- Where
${STATE}is "Removed" or "Managed" or "Unmanaged".Where
$DRIVERNAMEis the provisioner name. You can find the provisioner name by running the commandoc get sc.
5.2.4. Absent or multiple default storage classes
5.2.4.1. Multiple default storage classes
Multiple default storage classes can occur if you mark a non-default storage class as default and do not unset the existing default storage class, or you create a default storage class when a default storage class is already present. With multiple default storage classes present, any persistent volume claim (PVC) requesting the default storage class (pvc.spec.storageClassName=nil) gets the most recently created default storage class, regardless of the default status of that storage class, and the administrator receives an alert in the alerts dashboard that there are multiple default storage classes, MultipleDefaultStorageClasses.
5.2.4.2. Absent default storage class
There are two possible scenarios where PVCs can attempt to use a non-existent default storage class:
- An administrator removes the default storage class or marks it as non-default, and then a user creates a PVC requesting the default storage class.
- During installation, the installer creates a PVC requesting the default storage class, which has not yet been created.
In the preceding scenarios, PVCs remain in the pending state indefinitely. To resolve this situation, create a default storage class or declare one of the existing storage classes as the default. As soon as the default storage class is created or declared, the PVCs get the new default storage class. If possible, the PVCs eventually bind to statically or dynamically provisioned PVs as usual, and move out of the pending state.
5.2.5. Changing the default storage class
Use the following procedure to change the default storage class.
For example, if you have two defined storage classes, gp3 and standard, and you want to change the default storage class from gp3 to standard.
Prerequisites
- Access to the cluster with cluster-admin privileges.
Procedure
To change the default storage class:
List the storage classes:
$ oc get storageclass
Example output
NAME TYPE gp3 (default) kubernetes.io/aws-ebs 1 standard kubernetes.io/aws-ebs- 1
(default)indicates the default storage class.
Make the desired storage class the default.
For the desired storage class, set the
storageclass.kubernetes.io/is-default-classannotation totrueby running the following command:$ oc patch storageclass standard -p '{"metadata": {"annotations": {"storageclass.kubernetes.io/is-default-class": "true"}}}'NoteYou can have multiple default storage classes for a short time. However, you should ensure that only one default storage class exists eventually.
With multiple default storage classes present, any persistent volume claim (PVC) requesting the default storage class (
pvc.spec.storageClassName=nil) gets the most recently created default storage class, regardless of the default status of that storage class, and the administrator receives an alert in the alerts dashboard that there are multiple default storage classes,MultipleDefaultStorageClasses.Remove the default storage class setting from the old default storage class.
For the old default storage class, change the value of the
storageclass.kubernetes.io/is-default-classannotation tofalseby running the following command:$ oc patch storageclass gp3 -p '{"metadata": {"annotations": {"storageclass.kubernetes.io/is-default-class": "false"}}}'Verify the changes:
$ oc get storageclass
Example output
NAME                 TYPE
gp3                  kubernetes.io/aws-ebs
standard (default)   kubernetes.io/aws-ebs
5.3. AWS Elastic Block Store CSI Driver Operator
5.3.1. Overview
Red Hat OpenShift Service on AWS is capable of provisioning persistent volumes (PVs) using the AWS EBS CSI driver.
Familiarity with persistent storage and configuring CSI volumes is recommended when working with a Container Storage Interface (CSI) Operator and driver.
To create CSI-provisioned PVs that mount to AWS EBS storage assets, Red Hat OpenShift Service on AWS installs the AWS EBS CSI Driver Operator (a Red Hat operator) and the AWS EBS CSI driver by default in the openshift-cluster-csi-drivers namespace.
- The AWS EBS CSI Driver Operator provides a StorageClass by default that you can use to create PVCs. You can disable this default storage class if desired (see Managing the default storage class). You also have the option to create the AWS EBS StorageClass as described in Persistent storage using Amazon Elastic Block Store.
- The AWS EBS CSI driver enables you to create and mount AWS EBS PVs.
5.3.2. About CSI
Storage vendors have traditionally provided storage drivers as part of Kubernetes. With the implementation of the Container Storage Interface (CSI), third-party providers can instead deliver storage plugins using a standard interface without ever having to change the core Kubernetes code.
CSI Operators give Red Hat OpenShift Service on AWS users storage options, such as volume snapshots, that are not possible with in-tree volume plugins.
Red Hat OpenShift Service on AWS defaults to using the CSI plugin to provision Amazon Elastic Block Store (Amazon EBS) storage.
For information about dynamically provisioning AWS EBS persistent volumes in Red Hat OpenShift Service on AWS, see Persistent storage using Amazon Elastic Block Store.
Additional resources
5.4. Setting up AWS Elastic File Service CSI Driver Operator
This procedure is specific to the AWS EFS CSI Driver Operator (a Red Hat operator), which is only applicable for Red Hat OpenShift Service on AWS 4.10 and later versions.
5.4.1. Overview
Red Hat OpenShift Service on AWS is capable of provisioning persistent volumes (PVs) using the AWS EFS CSI driver.
Familiarity with persistent storage and configuring CSI volumes is recommended when working with a CSI Operator and driver.
After installing the AWS EFS CSI Driver Operator, Red Hat OpenShift Service on AWS installs the AWS EFS CSI Operator and the AWS EFS CSI driver by default in the openshift-cluster-csi-drivers namespace. This allows the AWS EFS CSI Driver Operator to create CSI-provisioned PVs that mount to AWS EFS assets.
-
The AWS EFS CSI Driver Operator, after being installed, does not create a storage class by default to use to create persistent volume claims (PVCs). However, you can manually create the AWS EFS
StorageClass. The AWS EFS CSI Driver Operator supports dynamic volume provisioning by allowing storage volumes to be created on-demand. This eliminates the need for cluster administrators to pre-provision storage. - The AWS EFS CSI driver enables you to create and mount AWS EFS PVs.
Amazon Elastic File Storage (Amazon EFS) only supports regional volumes, not zonal volumes.
5.4.2. About CSI
Storage vendors have traditionally provided storage drivers as part of Kubernetes. With the implementation of the Container Storage Interface (CSI), third-party providers can instead deliver storage plugins using a standard interface without ever having to change the core Kubernetes code.
CSI Operators give Red Hat OpenShift Service on AWS users storage options, such as volume snapshots, that are not possible with in-tree volume plugins.
5.4.3. Setting up the AWS EFS CSI Driver Operator
- Install the AWS EFS CSI Driver Operator (a Red Hat operator).
- If you are using Amazon Elastic File Storage (Amazon EFS) with AWS Secure Token Service (STS), configure the AWS EFS CSI driver with STS.
- If you are using AWS EFS with AWS Secure Token Service (STS), obtain a role Amazon Resource Name (ARN) for STS. This is required for installing the AWS EFS CSI Driver Operator.
- Install the AWS EFS CSI Driver Operator.
- Install the AWS EFS CSI Driver.
5.4.3.1. Installing the AWS EFS CSI Driver Operator
The AWS EFS CSI Driver Operator (a Red Hat operator) is not installed in Red Hat OpenShift Service on AWS by default. Use the following procedure to install and configure the AWS EFS CSI Driver Operator in your cluster.
Prerequisites
- Access to the Red Hat OpenShift Service on AWS web console.
Procedure
To install the AWS EFS CSI Driver Operator from the web console:
- Log in to the web console.
Install the AWS EFS CSI Operator:
- Click Operators → OperatorHub.
- Locate the AWS EFS CSI Operator by typing AWS EFS CSI in the filter box.
Click the AWS EFS CSI Driver Operator button.
ImportantBe sure to select the AWS EFS CSI Driver Operator and not the AWS EFS Operator. The AWS EFS Operator is a community Operator and is not supported by Red Hat.
- On the AWS EFS CSI Driver Operator page, click Install.
On the Install Operator page, ensure that:
- If you are using AWS EFS with AWS Secure Token Service (STS), in the role ARN field, enter the ARN role copied from the last step of the Obtaining a role Amazon Resource Name for Security Token Service procedure.
- All namespaces on the cluster (default) is selected.
- Installed Namespace is set to openshift-cluster-csi-drivers.
Click Install.
After the installation finishes, the AWS EFS CSI Operator is listed in the Installed Operators section of the web console.
Next steps
- If you are using Amazon EFS with AWS Secure Token Service (STS), you must configure the AWS EFS CSI driver with STS. For more information, see Configuring AWS EFS CSI Driver with STS.
5.4.3.2. Configuring AWS EFS CSI Driver Operator with Secure Token Service
This procedure explains how to configure the AWS EFS CSI Driver Operator (a Red Hat operator) with Red Hat OpenShift Service on AWS on AWS Secure Token Service (STS).
Perform this procedure before you have installed the AWS EFS CSI Operator, but not yet installed the AWS EFS CSI driver as part of the Installing the AWS EFS CSI Driver Operator procedure.
If you perform this procedure after installing the driver and creating volumes, your volumes will fail to mount into pods.
Prerequisites
- You have access to the cluster as a user with the cluster-admin role.
- AWS account credentials
- You have installed the AWS EFS CSI Operator.
Procedure
Prepare the AWS account:
Create an IAM policy JSON file with the following content:
{
  "Version": "2012-10-17",
  "Statement": [
    {
      "Effect": "Allow",
      "Action": [
        "elasticfilesystem:DescribeAccessPoints",
        "elasticfilesystem:DescribeFileSystems",
        "elasticfilesystem:DescribeMountTargets",
        "ec2:DescribeAvailabilityZones",
        "elasticfilesystem:TagResource"
      ],
      "Resource": "*"
    },
    {
      "Effect": "Allow",
      "Action": [
        "elasticfilesystem:CreateAccessPoint"
      ],
      "Resource": "*",
      "Condition": {
        "StringLike": {
          "aws:RequestTag/efs.csi.aws.com/cluster": "true"
        }
      }
    },
    {
      "Effect": "Allow",
      "Action": "elasticfilesystem:DeleteAccessPoint",
      "Resource": "*",
      "Condition": {
        "StringEquals": {
          "aws:ResourceTag/efs.csi.aws.com/cluster": "true"
        }
      }
    }
  ]
}
Create an IAM trust JSON file with the following content:
{ "Version": "2012-10-17", "Statement": [ { "Effect": "Allow", "Principal": { "Federated": "arn:aws:iam::<your_aws_account_ID>:oidc-provider/<openshift_oidc_provider>" 1 }, "Action": "sts:AssumeRoleWithWebIdentity", "Condition": { "StringEquals": { "<openshift_oidc_provider>:sub": [ 2 "system:serviceaccount:openshift-cluster-csi-drivers:aws-efs-csi-driver-operator", "system:serviceaccount:openshift-cluster-csi-drivers:aws-efs-csi-driver-controller-sa" ] } } } ] }- 1
- Specify your AWS account ID and the OpenShift OIDC provider endpoint. Obtain the endpoint by running the following command:
$ rosa describe cluster \ -c $(oc get clusterversion -o jsonpath='{.items[].spec.clusterID}{"\n"}') \ -o yaml | awk '/oidc_endpoint_url/ {print $2}' | cut -d '/' -f 3,4 - 2
- Specify the OpenShift OIDC endpoint again.
Create the IAM role:
ROLE_ARN=$(aws iam create-role \
  --role-name "<your_cluster_name>-aws-efs-csi-operator" \
  --assume-role-policy-document file://<your_trust_file_name>.json \
  --query "Role.Arn" --output text); echo $ROLE_ARN
Save the output. You will use it in the next steps.
Create the IAM policy:
POLICY_ARN=$(aws iam create-policy \
  --policy-name "<your_rosa_cluster_name>-rosa-efs-csi" \
  --policy-document file://<your_policy_file_name>.json \
  --query 'Policy.Arn' --output text); echo $POLICY_ARN
Attach the IAM policy to the IAM role:
$ aws iam attach-role-policy \
  --role-name "<your_rosa_cluster_name>-aws-efs-csi-operator" \
  --policy-arn $POLICY_ARN
Create a
SecretYAML file for the driver operator:apiVersion: v1 kind: Secret metadata: name: aws-efs-cloud-credentials namespace: openshift-cluster-csi-drivers stringData: credentials: |- [default] sts_regional_endpoints = regional role_arn = <role_ARN> 1 web_identity_token_file = /var/run/secrets/openshift/serviceaccount/token- 1
- Replace
role_ARNwith the output you saved while creating the role.
Create the secret:
$ oc apply -f aws-efs-cloud-credentials.yaml
You are now ready to install the AWS EFS CSI driver.
Additional resources
5.4.3.3. Installing the AWS EFS CSI Driver
After installing the AWS EFS CSI Driver Operator (a Red Hat operator) and configuring it with STS, you install the AWS EFS CSI driver.
Prerequisites
- Access to the Red Hat OpenShift Service on AWS web console.
Procedure
- Click Administration → CustomResourceDefinitions → ClusterCSIDriver.
- On the Instances tab, click Create ClusterCSIDriver.
Use the following YAML file:
apiVersion: operator.openshift.io/v1 kind: ClusterCSIDriver metadata: name: efs.csi.aws.com spec: managementState: Managed- Click Create.
Wait for the following Conditions to change to a "True" status:
- AWSEFSDriverNodeServiceControllerAvailable
- AWSEFSDriverControllerServiceControllerAvailable
5.4.4. Creating the AWS EFS storage class
Storage classes are used to differentiate and delineate storage levels and usages. By defining a storage class, users can obtain dynamically provisioned persistent volumes.
The AWS EFS CSI Driver Operator (a Red Hat operator), after being installed, does not create a storage class by default. However, you can manually create the AWS EFS storage class.
5.4.4.1. Creating the AWS EFS storage class using the console
Procedure
- In the Red Hat OpenShift Service on AWS console, click Storage → StorageClasses.
- On the StorageClasses page, click Create StorageClass.
On the StorageClass page, perform the following steps:
- Enter a name to reference the storage class.
- Optional: Enter the description.
- Select the reclaim policy.
-
Select
efs.csi.aws.comfrom the Provisioner drop-down list. - Optional: Set the configuration parameters for the selected provisioner.
- Click Create.
5.4.4.2. Creating the AWS EFS storage class using the CLI
Procedure
Create a
StorageClassobject:kind: StorageClass apiVersion: storage.k8s.io/v1 metadata: name: efs-sc provisioner: efs.csi.aws.com parameters: provisioningMode: efs-ap 1 fileSystemId: fs-a5324911 2 directoryPerms: "700" 3 gidRangeStart: "1000" 4 gidRangeEnd: "2000" 5 basePath: "/dynamic_provisioning" 6
- 1
provisioningModemust beefs-apto enable dynamic provisioning.- 2
fileSystemIdmust be the ID of the EFS volume created manually.- 3
directoryPermsis the default permission of the root directory of the volume. In this example, the volume is accessible only by the owner.- 4 5
gidRangeStartandgidRangeEndset the range of POSIX Group IDs (GIDs) that are used to set the GID of the AWS access point. If not specified, the default range is 50000-7000000. Each provisioned volume, and thus AWS access point, is assigned a unique GID from this range.- 6
basePathis the directory on the EFS volume that is used to create dynamically provisioned volumes. In this case, a PV is provisioned as “/dynamic_provisioning/<random uuid>” on the EFS volume. Only the subdirectory is mounted to pods that use the PV.
NoteA cluster admin can create several
StorageClassobjects, each using a different EFS volume.
5.4.5. Creating and configuring access to EFS volumes in AWS
This procedure explains how to create and configure EFS volumes in AWS so that you can use them in Red Hat OpenShift Service on AWS.
Prerequisites
- AWS account credentials
Procedure
To create and configure access to an EFS volume in AWS:
- On the AWS console, open https://console.aws.amazon.com/efs.
Click Create file system:
- Enter a name for the file system.
- For Virtual Private Cloud (VPC), select your Red Hat OpenShift Service on AWS’s' virtual private cloud (VPC).
- Accept default settings for all other selections.
Wait for the volume and mount targets to finish being fully created:
- Go to https://console.aws.amazon.com/efs#/file-systems.
- Click your volume, and on the Network tab wait for all mount targets to become available (~1-2 minutes).
- On the Network tab, copy the Security Group ID (you will need this in the next step).
- Go to https://console.aws.amazon.com/ec2/v2/home#SecurityGroups, and find the Security Group used by the EFS volume.
On the Inbound rules tab, click Edit inbound rules, and then add a new rule with the following settings to allow Red Hat OpenShift Service on AWS nodes to access EFS volumes :
- Type: NFS
- Protocol: TCP
- Port range: 2049
Source: Custom/IP address range of your nodes (for example: “10.0.0.0/16”)
This step allows Red Hat OpenShift Service on AWS to use NFS ports from the cluster.
- Save the rule.
5.4.6. Dynamic provisioning for Amazon Elastic File Storage
The AWS EFS CSI driver supports a different form of dynamic provisioning than other CSI drivers. It provisions new PVs as subdirectories of a pre-existing EFS volume. The PVs are independent of each other. However, they all share the same EFS volume. When the volume is deleted, all PVs provisioned out of it are deleted too. The EFS CSI driver creates an AWS Access Point for each such subdirectory. Due to AWS AccessPoint limits, you can only dynamically provision 1000 PVs from a single StorageClass/EFS volume.
Note that PVC.spec.resources is not enforced by EFS.
In the example below, you request 5 GiB of space. However, the created PV is limitless and can store any amount of data (like petabytes). A broken application, or even a rogue application, can cause significant expenses when it stores too much data on the volume.
Using monitoring of EFS volume sizes in AWS is strongly recommended.
Prerequisites
- You have created Amazon Elastic File Storage (Amazon EFS) volumes.
- You have created the AWS EFS storage class.
Procedure
To enable dynamic provisioning:
Create a PVC (or StatefulSet or Template) as usual, referring to the
StorageClasscreated previously.apiVersion: v1 kind: PersistentVolumeClaim metadata: name: test spec: storageClassName: efs-sc accessModes: - ReadWriteMany resources: requests: storage: 5Gi
If you have problems setting up dynamic provisioning, see Amazon Elastic File Storage troubleshooting.
5.4.7. Creating static PVs with Amazon Elastic File Storage
It is possible to use an Amazon Elastic File Storage (Amazon EFS) volume as a single PV without any dynamic provisioning. The whole volume is mounted to pods.
Prerequisites
- You have created Amazon EFS volumes.
Procedure
Create the PV using the following YAML file:
apiVersion: v1
kind: PersistentVolume
metadata:
  name: efs-pv
spec:
  capacity: 1
    storage: 5Gi
  volumeMode: Filesystem
  accessModes:
    - ReadWriteMany
    - ReadWriteOnce
  persistentVolumeReclaimPolicy: Retain
  csi:
    driver: efs.csi.aws.com
    volumeHandle: fs-ae66151a 2
    volumeAttributes:
      encryptInTransit: "false" 3
- 1
spec.capacitydoes not have any meaning and is ignored by the CSI driver. It is used only when binding to a PVC. Applications can store any amount of data to the volume.- 2
volumeHandlemust be the same ID as the EFS volume you created in AWS. If you are providing your own access point,volumeHandleshould be<EFS volume ID>::<access point ID>. For example:fs-6e633ada::fsap-081a1d293f0004630.- 3
- If desired, you can disable encryption in transit. Encryption is enabled by default.
If you have problems setting up static PVs, see Amazon Elastic File Storage troubleshooting.
5.4.8. Amazon Elastic File Storage security
The following information is important for Amazon Elastic File Storage (Amazon EFS) security.
When using access points, for example, by using dynamic provisioning as described earlier, Amazon automatically replaces GIDs on files with the GID of the access point. In addition, EFS considers the user ID, group ID, and secondary group IDs of the access point when evaluating file system permissions. EFS ignores the NFS client’s IDs. For more information about access points, see https://docs.aws.amazon.com/efs/latest/ug/efs-access-points.html.
As a consequence, EFS volumes silently ignore FSGroup; Red Hat OpenShift Service on AWS is not able to replace the GIDs of files on the volume with FSGroup. Any pod that can access a mounted EFS access point can access any file on it.
Unrelated to this, encryption in transit is enabled by default. For more information, see https://docs.aws.amazon.com/efs/latest/ug/encryption-in-transit.html.
5.4.9. Amazon Elastic File Storage troubleshooting
The following information provides guidance on how to troubleshoot issues with Amazon Elastic File Storage (Amazon EFS):
-
The AWS EFS Operator and CSI driver run in namespace
openshift-cluster-csi-drivers. To initiate gathering of logs of the AWS EFS Operator and CSI driver, run the following command:
$ oc adm must-gather
[must-gather      ] OUT Using must-gather plugin-in image: quay.io/openshift-release-dev/ocp-v4.0-art-dev@sha256:125f183d13601537ff15b3239df95d47f0a604da2847b561151fedd699f5e3a5
[must-gather      ] OUT namespace/openshift-must-gather-xm4wq created
[must-gather      ] OUT clusterrolebinding.rbac.authorization.k8s.io/must-gather-2bd8x created
[must-gather      ] OUT pod for plug-in image quay.io/openshift-release-dev/ocp-v4.0-art-dev@sha256:125f183d13601537ff15b3239df95d47f0a604da2847b561151fedd699f5e3a5 created
To show AWS EFS Operator errors, view the
ClusterCSIDriverstatus:$ oc get clustercsidriver efs.csi.aws.com -o yaml
If a volume cannot be mounted to a pod (as shown in the output of the following command):
$ oc describe pod ... Type Reason Age From Message ---- ------ ---- ---- ------- Normal Scheduled 2m13s default-scheduler Successfully assigned default/efs-app to ip-10-0-135-94.ec2.internal Warning FailedMount 13s kubelet MountVolume.SetUp failed for volume "pvc-d7c097e6-67ec-4fae-b968-7e7056796449" : rpc error: code = DeadlineExceeded desc = context deadline exceeded 1 Warning FailedMount 10s kubelet Unable to attach or mount volumes: unmounted volumes=[persistent-storage], unattached volumes=[persistent-storage kube-api-access-9j477]: timed out waiting for the condition- 1
- Warning message indicating volume not mounted.
This error is frequently caused by AWS dropping packets between an Red Hat OpenShift Service on AWS node and Amazon EFS.
Check that the following are correct:
- AWS firewall and Security Groups
- Networking: port number and IP addresses
5.4.10. Uninstalling the AWS EFS CSI Driver Operator
All EFS PVs are inaccessible after uninstalling the AWS EFS CSI Driver Operator (a Red Hat operator).
Prerequisites
- Access to the Red Hat OpenShift Service on AWS web console.
Procedure
To uninstall the AWS EFS CSI Driver Operator from the web console:
- Log in to the web console.
- Stop all applications that use AWS EFS PVs.
Delete all AWS EFS PVs:
- Click Storage → PersistentVolumeClaims.
- Select each PVC that is in use by the AWS EFS CSI Driver Operator, click the drop-down menu on the far right of the PVC, and then click Delete PersistentVolumeClaims.
Uninstall the AWS EFS CSI driver:
NoteBefore you can uninstall the Operator, you must remove the CSI driver first.
- Click Administration → CustomResourceDefinitions → ClusterCSIDriver.
- On the Instances tab, for efs.csi.aws.com, on the far left side, click the drop-down menu, and then click Delete ClusterCSIDriver.
- When prompted, click Delete.
Uninstall the AWS EFS CSI Operator:
- Click Operators → Installed Operators.
- On the Installed Operators page, scroll or type AWS EFS CSI into the Search by name box to find the Operator, and then click it.
- On the upper, right of the Installed Operators > Operator details page, click Actions → Uninstall Operator.
When prompted on the Uninstall Operator window, click the Uninstall button to remove the Operator from the namespace. Any applications deployed by the Operator on the cluster need to be cleaned up manually.
After uninstalling, the AWS EFS CSI Driver Operator is no longer listed in the Installed Operators section of the web console.
Before you can destroy a cluster (openshift-install destroy cluster), you must delete the EFS volume in AWS. An Red Hat OpenShift Service on AWS cluster cannot be destroyed when there is an EFS volume that uses the cluster’s VPC. Amazon does not allow deletion of such a VPC.
5.4.11. Additional resources
Chapter 6. Generic ephemeral volumes
6.1. Overview
Generic ephemeral volumes are a type of ephemeral volume that can be provided by all storage drivers that support persistent volumes and dynamic provisioning. Generic ephemeral volumes are similar to emptyDir volumes in that they provide a per-pod directory for scratch data, which is usually empty after provisioning.
Generic ephemeral volumes are specified inline in the pod spec and follow the pod’s lifecycle. They are created and deleted along with the pod.
Generic ephemeral volumes have the following features:
- Storage can be local or network-attached.
- Volumes can have a fixed size that pods are not able to exceed.
- Volumes might have some initial data, depending on the driver and parameters.
- Typical operations on volumes are supported, assuming that the driver supports them, including snapshotting, cloning, resizing, and storage capacity tracking.
Generic ephemeral volumes do not support offline snapshots and resize.
6.2. Lifecycle and persistent volume claims
The parameters for a volume claim are allowed inside a volume source of a pod. Labels, annotations, and the whole set of fields for persistent volume claims (PVCs) are supported. When such a pod is created, the ephemeral volume controller then creates an actual PVC object (from the template shown in the Creating generic ephemeral volumes procedure) in the same namespace as the pod, and ensures that the PVC is deleted when the pod is deleted. This triggers volume binding and provisioning in one of two ways:
Either immediately, if the storage class uses immediate volume binding.
With immediate binding, the scheduler is forced to select a node that has access to the volume after it is available.
When the pod is tentatively scheduled onto a node (
WaitForFirstConsumervolumebinding mode).This volume binding option is recommended for generic ephemeral volumes because then the scheduler can choose a suitable node for the pod.
In terms of resource ownership, a pod that has generic ephemeral storage is the owner of the PVCs that provide that ephemeral storage. When the pod is deleted, the Kubernetes garbage collector deletes the PVC, which then usually triggers deletion of the volume because the default reclaim policy of storage classes is to delete volumes. You can create quasi-ephemeral local storage by using a storage class with a reclaim policy of retain: the storage outlives the pod, and in this case, you must ensure that volume clean-up happens separately. While these PVCs exist, they can be used like any other PVC. In particular, they can be referenced as data source in volume cloning or snapshotting. The PVC object also holds the current status of the volume.
Additional resources
6.3. Security
You can enable the generic ephemeral volume feature to allows users who can create pods to also create persistent volume claims (PVCs) indirectly. This feature works even if these users do not have permission to create PVCs directly. Cluster administrators must be aware of this. If this does not fit your security model, use an admission webhook that rejects objects such as pods that have a generic ephemeral volume.
The normal namespace quota for PVCs still applies, so even if users are allowed to use this new mechanism, they cannot use it to circumvent other policies.
6.4. Persistent volume claim naming
Automatically created persistent volume claims (PVCs) are named by a combination of the pod name and the volume name, with a hyphen (-) in the middle. This naming convention also introduces a potential conflict between different pods, and between pods and manually created PVCs.
For example, pod-a with volume scratch and pod with volume a-scratch both end up with the same PVC name, pod-a-scratch.
Such conflicts are detected, and a PVC is only used for an ephemeral volume if it was created for the pod. This check is based on the ownership relationship. An existing PVC is not overwritten or modified, but this does not resolve the conflict. Without the right PVC, a pod cannot start.
Be careful when naming pods and volumes inside the same namespace so that naming conflicts do not occur.
6.5. Creating generic ephemeral volumes
Procedure
-
Create the
podobject definition and save it to a file. Include the generic ephemeral volume information in the file.
my-example-pod-with-generic-vols.yaml
kind: Pod apiVersion: v1 metadata: name: my-app spec: containers: - name: my-frontend image: busybox:1.28 volumeMounts: - mountPath: "/mnt/storage" name: data command: [ "sleep", "1000000" ] volumes: - name: data 1 ephemeral: volumeClaimTemplate: metadata: labels: type: my-app-ephvol spec: accessModes: [ "ReadWriteOnce" ] storageClassName: "gp2-csi" resources: requests: storage: 1Gi- 1
- Generic ephemeral volume claim.
Chapter 7. Dynamic provisioning
7.1. About dynamic provisioning
The StorageClass resource object describes and classifies storage that can be requested, as well as provides a means for passing parameters for dynamically provisioned storage on demand. StorageClass objects can also serve as a management mechanism for controlling different levels of storage and access to the storage. Cluster Administrators (cluster-admin) or Storage Administrators (storage-admin) define and create the StorageClass objects that users can request without needing any detailed knowledge about the underlying storage volume sources.
The Red Hat OpenShift Service on AWS persistent volume framework enables this functionality and allows administrators to provision a cluster with persistent storage. The framework also gives users a way to request those resources without having any knowledge of the underlying infrastructure.
Many storage types are available for use as persistent volumes in Red Hat OpenShift Service on AWS. While all of them can be statically provisioned by an administrator, some types of storage are created dynamically using the built-in provider and plugin APIs.
7.2. Available dynamic provisioning plugins
Red Hat OpenShift Service on AWS provides the following provisioner plugins, which have generic implementations for dynamic provisioning that use the cluster’s configured provider’s API to create new storage resources:
| Storage type | Provisioner plugin name | Notes |
|---|---|---|
| Amazon Elastic Block Store (Amazon EBS) |
|
For dynamic provisioning when using multiple clusters in different zones, tag each node with |
Any chosen provisioner plugin also requires configuration for the relevant cloud, host, or third-party provider as per the relevant documentation.
7.3. Defining a storage class
StorageClass objects are currently a globally scoped object and must be created by cluster-admin or storage-admin users.
The Cluster Storage Operator installs a default storage class. This storage class is owned and controlled by the Operator. It cannot be deleted or modified beyond defining annotations and labels. If different behavior is desired, you must define a custom storage class.
The following sections describe the basic definition for a StorageClass object and specific examples for each of the supported plugin types.
7.3.1. Basic StorageClass object definition
The following resource shows the parameters and default values that you use to configure a storage class. This example uses the AWS ElasticBlockStore (EBS) object definition.
Sample StorageClass definition
kind: StorageClass 1
apiVersion: storage.k8s.io/v1 2
metadata:
  name: <storage-class-name> 3
  annotations: 4
    storageclass.kubernetes.io/is-default-class: 'true'
    ...
provisioner: kubernetes.io/aws-ebs 5
parameters: 6
  type: gp3
...
- 1
- (required) The API object type.
- 2
- (required) The current apiVersion.
- 3
- (required) The name of the storage class.
- 4
- (optional) Annotations for the storage class.
- 5
- (required) The type of provisioner associated with this storage class.
- 6
- (optional) The parameters required for the specific provisioner, this will change from plugin to plug-iin.
7.3.2. Storage class annotations
To set a storage class as the cluster-wide default, add the following annotation to your storage class metadata:
storageclass.kubernetes.io/is-default-class: "true"
For example:
apiVersion: storage.k8s.io/v1
kind: StorageClass
metadata:
  annotations:
    storageclass.kubernetes.io/is-default-class: "true"
...
This enables any persistent volume claim (PVC) that does not specify a specific storage class to automatically be provisioned through the default storage class. However, your cluster can have more than one storage class, but only one of them can be the default storage class.
The beta annotation storageclass.beta.kubernetes.io/is-default-class is still working; however, it will be removed in a future release.
To set a storage class description, add the following annotation to your storage class metadata:
kubernetes.io/description: My Storage Class Description
For example:
apiVersion: storage.k8s.io/v1
kind: StorageClass
metadata:
  annotations:
    kubernetes.io/description: My Storage Class Description
...
7.3.3. AWS Elastic Block Store (EBS) object definition
aws-ebs-storageclass.yaml
kind: StorageClass
apiVersion: storage.k8s.io/v1
metadata:
  name: <storage-class-name> 1
provisioner: kubernetes.io/aws-ebs
parameters:
  type: io1 2
  iopsPerGB: "10" 3
  encrypted: "true" 4
  kmsKeyId: keyvalue 5
  fsType: ext4 6
- 1
- (required) Name of the storage class. The persistent volume claim uses this storage class for provisioning the associated persistent volumes.
- 2
- (required) Select from
io1,gp3,sc1,st1. The default isgp3. See the AWS documentation for valid Amazon Resource Name (ARN) values. - 3
- Optional: Only for io1 volumes. I/O operations per second per GiB. The AWS volume plugin multiplies this with the size of the requested volume to compute IOPS of the volume. The value cap is 20,000 IOPS, which is the maximum supported by AWS. See the AWS documentation for further details.
- 4
- Optional: Denotes whether to encrypt the EBS volume. Valid values are
trueorfalse. - 5
- Optional: The full ARN of the key to use when encrypting the volume. If none is supplied, but
encyptedis set totrue, then AWS generates a key. See the AWS documentation for a valid ARN value. - 6
- Optional: File system that is created on dynamically provisioned volumes. This value is copied to the
fsTypefield of dynamically provisioned persistent volumes and the file system is created when the volume is mounted for the first time. The default value isext4.
7.4. Changing the default storage class
Use the following procedure to change the default storage class.
For example, if you have two defined storage classes, gp3 and standard, and you want to change the default storage class from gp3 to standard.
Prerequisites
- Access to the cluster with cluster-admin privileges.
Procedure
To change the default storage class:
List the storage classes:
$ oc get storageclass
Example output
NAME TYPE gp3 (default) kubernetes.io/aws-ebs 1 standard kubernetes.io/aws-ebs- 1
(default)indicates the default storage class.
Make the desired storage class the default.
For the desired storage class, set the
storageclass.kubernetes.io/is-default-classannotation totrueby running the following command:$ oc patch storageclass standard -p '{"metadata": {"annotations": {"storageclass.kubernetes.io/is-default-class": "true"}}}'NoteYou can have multiple default storage classes for a short time. However, you should ensure that only one default storage class exists eventually.
With multiple default storage classes present, any persistent volume claim (PVC) requesting the default storage class (
pvc.spec.storageClassName=nil) gets the most recently created default storage class, regardless of the default status of that storage class, and the administrator receives an alert in the alerts dashboard that there are multiple default storage classes,MultipleDefaultStorageClasses.Remove the default storage class setting from the old default storage class.
For the old default storage class, change the value of the
storageclass.kubernetes.io/is-default-classannotation tofalseby running the following command:$ oc patch storageclass gp3 -p '{"metadata": {"annotations": {"storageclass.kubernetes.io/is-default-class": "false"}}}'Verify the changes:
$ oc get storageclass
Example output
NAME                 TYPE
gp3                  kubernetes.io/aws-ebs
standard (default)   kubernetes.io/aws-ebs