
Authentication and authorization
Securing Red Hat OpenShift Service on AWS clusters.
Abstract
Chapter 1. Overview of authentication and authorization
1.1. Glossary of common terms for Red Hat OpenShift Service on AWS authentication and authorization
This glossary defines common terms that are used in Red Hat OpenShift Service on AWS authentication and authorization.
- authentication
- An authentication determines access to an Red Hat OpenShift Service on AWS cluster and ensures only authenticated users access the Red Hat OpenShift Service on AWS cluster.
- authorization
- Authorization determines whether the identified user has permissions to perform the requested action.
- bearer token
-
Bearer token is used to authenticate to API with the header
Authorization: Bearer <token>.
- config map
-
A config map provides a way to inject configuration data into the pods. You can reference the data stored in a config map in a volume of type
ConfigMap. Applications running in a pod can use this data. - containers
- Lightweight and executable images that consist of software and all its dependencies. Because containers virtualize the operating system, you can run containers in a data center, public or private cloud, or your local host.
- Custom Resource (CR)
- A CR is an extension of the Kubernetes API.
- group
- A group is a set of users. A group is useful for granting permissions to multiple users one time.
- HTPasswd
- HTPasswd updates the files that store usernames and password for authentication of HTTP users.
- Keystone
- Keystone is an Red Hat OpenStack Platform (RHOSP) project that provides identity, token, catalog, and policy services.
- Lightweight directory access protocol (LDAP)
- LDAP is a protocol that queries user information.
- namespace
- A namespace isolates specific system resources that are visible to all processes. Inside a namespace, only processes that are members of that namespace can see those resources.
- node
- A node is a worker machine in the Red Hat OpenShift Service on AWS cluster. A node is either a virtual machine (VM) or a physical machine.
- OAuth client
- OAuth client is used to get a bearer token.
- OAuth server
- The Red Hat OpenShift Service on AWS control plane includes a built-in OAuth server that determines the user’s identity from the configured identity provider and creates an access token.
- OpenID Connect
- The OpenID Connect is a protocol to authenticate the users to use single sign-on (SSO) to access sites that use OpenID Providers.
- pod
- A pod is the smallest logical unit in Kubernetes. A pod is comprised of one or more containers to run in a worker node.
- regular users
- Users that are created automatically in the cluster upon first login or via the API.
- request header
- A request header is an HTTP header that is used to provide information about HTTP request context, so that the server can track the response of the request.
- role-based access control (RBAC)
- A key security control to ensure that cluster users and workloads have access to only the resources required to execute their roles.
- service accounts
- Service accounts are used by the cluster components or applications.
- system users
- Users that are created automatically when the cluster is installed.
- users
- Users is an entity that can make requests to API.
1.2. About authentication in Red Hat OpenShift Service on AWS
To control access to an Red Hat OpenShift Service on AWS cluster, an administrator with the dedicated-admin role can configure user authentication and ensure only approved users access the cluster.
To interact with an Red Hat OpenShift Service on AWS cluster, users must first authenticate to the Red Hat OpenShift Service on AWS API in some way. You can authenticate by providing an OAuth access token or an X.509 client certificate in your requests to the Red Hat OpenShift Service on AWS API.
If you do not present a valid access token or certificate, your request is unauthenticated and you receive an HTTP 401 error.
An administrator can configure authentication by configuring an identity provider. You can define any supported identity provider in Red Hat OpenShift Service on AWS and add it to your cluster.
1.3. About authorization in Red Hat OpenShift Service on AWS
Authorization involves determining whether the identified user has permissions to perform the requested action.
Administrators can define permissions and assign them to users using the RBAC objects, such as rules, roles, and bindings. To understand how authorization works in Red Hat OpenShift Service on AWS, see Evaluating authorization.
You can also control access to an Red Hat OpenShift Service on AWS cluster through projects and namespaces.
Along with controlling user access to a cluster, you can also control the actions a pod can perform and the resources it can access using security context constraints (SCCs).
You can manage authorization for Red Hat OpenShift Service on AWS through the following tasks:
- Viewing local and cluster roles and bindings.
- Creating a local role and assigning it to a user or group.
- Assigning a cluster role to a user or group: Red Hat OpenShift Service on AWS includes a set of default cluster roles. You can add them to a user or group.
-
Creating cluster-admin and dedicated-admin users: The user who created the Red Hat OpenShift Service on AWS cluster can grant access to other
cluster-adminanddedicated-adminusers. - Creating service accounts: Service accounts provide a flexible way to control API access without sharing a regular user’s credentials. A user can create and use a service account in applications and also as an OAuth client.
- Scoping tokens: A scoped token is a token that identifies as a specific user who can perform only specific operations. You can create scoped tokens to delegate some of your permissions to another user or a service account.
- Syncing LDAP groups: You can manage user groups in one place by syncing the groups stored in an LDAP server with the Red Hat OpenShift Service on AWS user groups.
Chapter 2. Understanding authentication
For users to interact with Red Hat OpenShift Service on AWS, they must first authenticate to the cluster. The authentication layer identifies the user associated with requests to the Red Hat OpenShift Service on AWS API. The authorization layer then uses information about the requesting user to determine if the request is allowed.
2.1. Users
A user in Red Hat OpenShift Service on AWS is an entity that can make requests to the Red Hat OpenShift Service on AWS API. An Red Hat OpenShift Service on AWS User object represents an actor which can be granted permissions in the system by adding roles to them or to their groups. Typically, this represents the account of a developer or administrator that is interacting with Red Hat OpenShift Service on AWS.
Several types of users can exist:
| User type | Description |
|---|---|
|
|
This is the way most interactive Red Hat OpenShift Service on AWS users are represented. Regular users are created automatically in the system upon first login or can be created via the API. Regular users are represented with the |
|
|
Many of these are created automatically when the infrastructure is defined, mainly for the purpose of enabling the infrastructure to interact with the API securely. They include a cluster administrator (with access to everything), a per-node user, users for use by routers and registries, and various others. Finally, there is an |
|
|
These are special system users associated with projects; some are created automatically when the project is first created, while project administrators can create more for the purpose of defining access to the contents of each project. Service accounts are represented with the |
Each user must authenticate in some way to access Red Hat OpenShift Service on AWS. API requests with no authentication or invalid authentication are authenticated as requests by the anonymous system user. After authentication, policy determines what the user is authorized to do.
2.2. Groups
A user can be assigned to one or more groups, each of which represent a certain set of users. Groups are useful when managing authorization policies to grant permissions to multiple users at once, for example allowing access to objects within a project, versus granting them to users individually.
In addition to explicitly defined groups, there are also system groups, or virtual groups, that are automatically provisioned by the cluster.
The following default virtual groups are most important:
| Virtual group | Description |
|---|---|
|
| Automatically associated with all authenticated users. |
|
| Automatically associated with all users authenticated with an OAuth access token. |
|
| Automatically associated with all unauthenticated users. |
2.3. API authentication
Requests to the Red Hat OpenShift Service on AWS API are authenticated using the following methods:
- OAuth access tokens
-
Obtained from the Red Hat OpenShift Service on AWS OAuth server using the
<namespace_route>/oauth/authorizeand<namespace_route>/oauth/tokenendpoints. -
Sent as an
Authorization: Bearer…header. -
Sent as a websocket subprotocol header in the form
base64url.bearer.authorization.k8s.io.<base64url-encoded-token>for websocket requests.
-
Obtained from the Red Hat OpenShift Service on AWS OAuth server using the
- X.509 client certificates
- Requires an HTTPS connection to the API server.
- Verified by the API server against a trusted certificate authority bundle.
- The API server creates and distributes certificates to controllers to authenticate themselves.
Any request with an invalid access token or an invalid certificate is rejected by the authentication layer with a 401 error.
If no access token or certificate is presented, the authentication layer assigns the system:anonymous virtual user and the system:unauthenticated virtual group to the request. This allows the authorization layer to determine which requests, if any, an anonymous user is allowed to make.
2.3.1. Red Hat OpenShift Service on AWS OAuth server
The Red Hat OpenShift Service on AWS master includes a built-in OAuth server. Users obtain OAuth access tokens to authenticate themselves to the API.
When a person requests a new OAuth token, the OAuth server uses the configured identity provider to determine the identity of the person making the request.
It then determines what user that identity maps to, creates an access token for that user, and returns the token for use.
2.3.1.1. OAuth token requests
Every request for an OAuth token must specify the OAuth client that will receive and use the token. The following OAuth clients are automatically created when starting the Red Hat OpenShift Service on AWS API:
| OAuth client | Usage |
|---|---|
|
|
Requests tokens at |
|
|
Requests tokens with a user-agent that can handle |
<namespace_route>refers to the namespace route. This is found by running the following command:$ oc get route oauth-openshift -n openshift-authentication -o json | jq .spec.host
All requests for OAuth tokens involve a request to <namespace_route>/oauth/authorize. Most authentication integrations place an authenticating proxy in front of this endpoint, or configure Red Hat OpenShift Service on AWS to validate credentials against a backing identity provider. Requests to <namespace_route>/oauth/authorize can come from user-agents that cannot display interactive login pages, such as the CLI. Therefore, Red Hat OpenShift Service on AWS supports authenticating using a WWW-Authenticate challenge in addition to interactive login flows.
If an authenticating proxy is placed in front of the <namespace_route>/oauth/authorize endpoint, it sends unauthenticated, non-browser user-agents WWW-Authenticate challenges rather than displaying an interactive login page or redirecting to an interactive login flow.
To prevent cross-site request forgery (CSRF) attacks against browser clients, only send Basic authentication challenges with if a X-CSRF-Token header is on the request. Clients that expect to receive Basic WWW-Authenticate challenges must set this header to a non-empty value.
If the authenticating proxy cannot support WWW-Authenticate challenges, or if Red Hat OpenShift Service on AWS is configured to use an identity provider that does not support WWW-Authenticate challenges, you must use a browser to manually obtain a token from <namespace_route>/oauth/token/request.
Chapter 3. Managing user-owned OAuth access tokens
Users can review their own OAuth access tokens and delete any that are no longer needed.
3.1. Listing user-owned OAuth access tokens
You can list your user-owned OAuth access tokens. Token names are not sensitive and cannot be used to log in.
Procedure
List all user-owned OAuth access tokens:
$ oc get useroauthaccesstokens
Example output
NAME       CLIENT NAME                    CREATED                EXPIRES                         REDIRECT URI                                                       SCOPES
<token1>   openshift-challenging-client   2021-01-11T19:25:35Z   2021-01-12 19:25:35 +0000 UTC   https://oauth-openshift.apps.example.com/oauth/token/implicit      user:full
<token2>   openshift-browser-client       2021-01-11T19:27:06Z   2021-01-12 19:27:06 +0000 UTC   https://oauth-openshift.apps.example.com/oauth/token/display       user:full
<token3>   console                        2021-01-11T19:26:29Z   2021-01-12 19:26:29 +0000 UTC   https://console-openshift-console.apps.example.com/auth/callback   user:full
List user-owned OAuth access tokens for a particular OAuth client:
$ oc get useroauthaccesstokens --field-selector=clientName="console"
Example output
NAME       CLIENT NAME                    CREATED                EXPIRES                         REDIRECT URI                                                       SCOPES
<token3>   console                        2021-01-11T19:26:29Z   2021-01-12 19:26:29 +0000 UTC   https://console-openshift-console.apps.example.com/auth/callback   user:full
3.2. Viewing the details of a user-owned OAuth access token
You can view the details of a user-owned OAuth access token.
Procedure
Describe the details of a user-owned OAuth access token:
$ oc describe useroauthaccesstokens <token_name>
Example output
Name:                        <token_name> 1
Namespace:
Labels:                      <none>
Annotations:                 <none>
API Version:                 oauth.openshift.io/v1
Authorize Token:             sha256~Ksckkug-9Fg_RWn_AUysPoIg-_HqmFI9zUL_CgD8wr8
Client Name:                 openshift-browser-client 2
Expires In:                  86400 3
Inactivity Timeout Seconds:  317 4
Kind:                        UserOAuthAccessToken
Metadata:
  Creation Timestamp:  2021-01-11T19:27:06Z
  Managed Fields:
    API Version:  oauth.openshift.io/v1
    Fields Type:  FieldsV1
    fieldsV1:
      f:authorizeToken:
      f:clientName:
      f:expiresIn:
      f:redirectURI:
      f:scopes:
      f:userName:
      f:userUID:
    Manager:         oauth-server
    Operation:       Update
    Time:            2021-01-11T19:27:06Z
  Resource Version:  30535
  Self Link:         /apis/oauth.openshift.io/v1/useroauthaccesstokens/<token_name>
  UID:               f9d00b67-ab65-489b-8080-e427fa3c6181
Redirect URI:        https://oauth-openshift.apps.example.com/oauth/token/display
Scopes:
  user:full 5
User Name:  <user_name> 6
User UID:   82356ab0-95f9-4fb3-9bc0-10f1d6a6a345
Events:     <none>
- 1
- The token name, which is the sha256 hash of the token. Token names are not sensitive and cannot be used to log in.
- 2
- The client name, which describes where the token originated from.
- 3
- The value in seconds from the creation time before this token expires.
- 4
- If there is a token inactivity timeout set for the OAuth server, this is the value in seconds from the creation time before this token can no longer be used.
- 5
- The scopes for this token.
- 6
- The user name associated with this token.
3.3. Deleting user-owned OAuth access tokens
The oc logout command only invalidates the OAuth token for the active session. You can use the following procedure to delete any user-owned OAuth tokens that are no longer needed.
Deleting an OAuth access token logs out the user from all sessions that use the token.
Procedure
Delete the user-owned OAuth access token:
$ oc delete useroauthaccesstokens <token_name>
Example output
useroauthaccesstoken.oauth.openshift.io "<token_name>" deleted
Chapter 4. Configuring identity providers
After your Red Hat OpenShift Service on AWS cluster is created, you must configure identity providers to determine how users log in to access the cluster.
The following topics describe how to configure an identity provider using OpenShift Cluster Manager console. Alternatively, you can use the ROSA CLI (rosa) to configure an identity provider and access the cluster.
4.1. Understanding identity providers
Red Hat OpenShift Service on AWS includes a built-in OAuth server. Developers and administrators obtain OAuth access tokens to authenticate themselves to the API. As an administrator, you can configure OAuth to specify an identity provider after you install your cluster. Configuring identity providers allows users to log in and access the cluster.
4.1.1. Supported identity providers
You can configure the following types of identity providers:
| Identity provider | Description |
|---|---|
| GitHub or GitHub Enterprise | Configure a GitHub identity provider to validate usernames and passwords against GitHub or GitHub Enterprise’s OAuth authentication server. |
| GitLab | Configure a GitLab identity provider to use GitLab.com or any other GitLab instance as an identity provider. |
| | Configure a Google identity provider using Google’s OpenID Connect integration. |
| LDAP | Configure an LDAP identity provider to validate usernames and passwords against an LDAPv3 server, using simple bind authentication. |
| OpenID Connect | Configure an OpenID Connect (OIDC) identity provider to integrate with an OIDC identity provider using an Authorization Code Flow. |
| htpasswd | Configure an htpasswd identity provider for a single, static administration user. You can log in to the cluster as the user to troubleshoot issues. Important The htpasswd identity provider option is included only to enable the creation of a single, static administration user. htpasswd is not supported as a general-use identity provider for Red Hat OpenShift Service on AWS. For the steps to configure the single user, see Configuring an htpasswd identity provider. |
4.1.2. Identity provider parameters
The following parameters are common to all identity providers:
| Parameter | Description |
|---|---|
|
| The provider name is prefixed to provider user names to form an identity name. |
|
| Defines how new identities are mapped to users when they log in. Enter one of the following values:
|
When adding or changing identity providers, you can map identities from the new provider to existing users by setting the mappingMethod parameter to add.
4.2. Configuring a GitHub identity provider
Configure a GitHub identity provider to validate user names and passwords against GitHub or GitHub Enterprise’s OAuth authentication server and access your Red Hat OpenShift Service on AWS cluster. OAuth facilitates a token exchange flow between Red Hat OpenShift Service on AWS and GitHub or GitHub Enterprise.
Configuring GitHub authentication allows users to log in to Red Hat OpenShift Service on AWS with their GitHub credentials. To prevent anyone with any GitHub user ID from logging in to your Red Hat OpenShift Service on AWS cluster, you must restrict access to only those in specific GitHub organizations or teams.
Prerequisites
- The OAuth application must be created directly within the GitHub organization settings by the GitHub organization administrator.
- GitHub organizations or teams are set up in your GitHub account.
Procedure
- From OpenShift Cluster Manager, navigate to the Clusters page and select the cluster that you need to configure identity providers for.
- Click the Access control tab.
Click Add identity provider.
NoteYou can also click the Add Oauth configuration link in the warning message displayed after cluster creation to configure your identity providers.
- Select GitHub from the drop-down menu.
Enter a unique name for the identity provider. This name cannot be changed later.
An OAuth callback URL is automatically generated in the provided field. You will use this to register the GitHub application.
https://oauth-openshift.apps.<cluster_name>.<cluster_domain>/oauth2callback/<idp_provider_name>
For example:
https://oauth-openshift.apps.openshift-cluster.example.com/oauth2callback/github
- Register an application on GitHub.
- Return to Red Hat OpenShift Service on AWS and select a mapping method from the drop-down menu. Claim is recommended in most cases.
- Enter the Client ID and Client secret provided by GitHub.
- Enter a hostname. A hostname must be entered when using a hosted instance of GitHub Enterprise.
- Optional: You can use a certificate authority (CA) file to validate server certificates for the configured GitHub Enterprise URL. Click Browse to locate and attach a CA file to the identity provider.
- Select Use organizations or Use teams to restrict access to a particular GitHub organization or a GitHub team.
- Enter the name of the organization or team you would like to restrict access to. Click Add more to specify multiple organizations or teams that users can be a member of.
- Click Confirm.
Verification
- The configured identity provider is now visible on the Access control tab of the Clusters page.
4.3. Configuring a GitLab identity provider
Configure a GitLab identity provider to use GitLab.com or any other GitLab instance as an identity provider.
Prerequisites
- If you use GitLab version 7.7.0 to 11.0, you connect using the OAuth integration. If you use GitLab version 11.1 or later, you can use OpenID Connect (OIDC) to connect instead of OAuth.
Procedure
- From OpenShift Cluster Manager, navigate to the Clusters page and select the cluster that you need to configure identity providers for.
- Click the Access control tab.
Click Add identity provider.
NoteYou can also click the Add Oauth configuration link in the warning message displayed after cluster creation to configure your identity providers.
- Select GitLab from the drop-down menu.
Enter a unique name for the identity provider. This name cannot be changed later.
An OAuth callback URL is automatically generated in the provided field. You will provide this URL to GitLab.
https://oauth-openshift.apps.<cluster_name>.<cluster_domain>/oauth2callback/<idp_provider_name>
For example:
https://oauth-openshift.apps.openshift-cluster.example.com/oauth2callback/gitlab
- Add a new application in GitLab.
- Return to Red Hat OpenShift Service on AWS and select a mapping method from the drop-down menu. Claim is recommended in most cases.
- Enter the Client ID and Client secret provided by GitLab.
- Enter the URL of your GitLab provider.
- Optional: You can use a certificate authority (CA) file to validate server certificates for the configured GitLab URL. Click Browse to locate and attach a CA file to the identity provider.
- Click Confirm.
Verification
- The configured identity provider is now visible on the Access control tab of the Clusters page.
4.4. Configuring a Google identity provider
Configure a Google identity provider to allow users to authenticate with their Google credentials.
Using Google as an identity provider allows any Google user to authenticate to your server. You can limit authentication to members of a specific hosted domain with the hostedDomain configuration attribute.
Procedure
- From OpenShift Cluster Manager, navigate to the Clusters page and select the cluster that you need to configure identity providers for.
- Click the Access control tab.
Click Add identity provider.
NoteYou can also click the Add Oauth configuration link in the warning message displayed after cluster creation to configure your identity providers.
- Select Google from the drop-down menu.
Enter a unique name for the identity provider. This name cannot be changed later.
An OAuth callback URL is automatically generated in the provided field. You will provide this URL to Google.
https://oauth-openshift.apps.<cluster_name>.<cluster_domain>/oauth2callback/<idp_provider_name>
For example:
https://oauth-openshift.apps.openshift-cluster.example.com/oauth2callback/google
- Configure a Google identity provider using Google’s OpenID Connect integration.
- Return to Red Hat OpenShift Service on AWS and select a mapping method from the drop-down menu. Claim is recommended in most cases.
- Enter the Client ID of a registered Google project and the Client secret issued by Google.
- Enter a hosted domain to restrict users to a Google Apps domain.
- Click Confirm.
Verification
- The configured identity provider is now visible on the Access control tab of the Clusters page.
4.5. Configuring a LDAP identity provider
Configure the LDAP identity provider to validate user names and passwords against an LDAPv3 server, using simple bind authentication.
Prerequisites
When configuring a LDAP identity provider, you will need to enter a configured LDAP URL. The configured URL is an RFC 2255 URL, which specifies the LDAP host and search parameters to use. The syntax of the URL is:
ldap://host:port/basedn?attribute?scope?filter
URL component Description ldapFor regular LDAP, use the string
ldap. For secure LDAP (LDAPS), useldapsinstead.host:portThe name and port of the LDAP server. Defaults to
localhost:389for ldap andlocalhost:636for LDAPS.basednThe DN of the branch of the directory where all searches should start from. At the very least, this must be the top of your directory tree, but it could also specify a subtree in the directory.
attributeThe attribute to search for. Although RFC 2255 allows a comma-separated list of attributes, only the first attribute will be used, no matter how many are provided. If no attributes are provided, the default is to use
uid. It is recommended to choose an attribute that will be unique across all entries in the subtree you will be using.scopeThe scope of the search. Can be either
oneorsub. If the scope is not provided, the default is to use a scope ofsub.filterA valid LDAP search filter. If not provided, defaults to
(objectClass=*)When doing searches, the attribute, filter, and provided user name are combined to create a search filter that looks like:
(&(<filter>)(<attribute>=<username>))
ImportantIf the LDAP directory requires authentication to search, specify a
bindDNandbindPasswordto use to perform the entry search.
Procedure
- From OpenShift Cluster Manager, navigate to the Clusters page and select the cluster that you need to configure identity providers for.
- Click the Access control tab.
Click Add identity provider.
NoteYou can also click the Add Oauth configuration link in the warning message displayed after cluster creation to configure your identity providers.
- Select LDAP from the drop-down menu.
- Enter a unique name for the identity provider. This name cannot be changed later.
- Select a mapping method from the drop-down menu. Claim is recommended in most cases.
- Enter a LDAP URL to specify the LDAP search parameters to use.
- Optional: Enter a Bind DN and Bind password.
Enter the attributes that will map LDAP attributes to identities.
- Enter an ID attribute whose value should be used as the user ID. Click Add more to add multiple ID attributes.
- Optional: Enter a Preferred username attribute whose value should be used as the display name. Click Add more to add multiple preferred username attributes.
- Optional: Enter an Email attribute whose value should be used as the email address. Click Add more to add multiple email attributes.
- Optional: Click Show advanced Options to add a certificate authority (CA) file to your LDAP identity provider to validate server certificates for the configured URL. Click Browse to locate and attach a CA file to the identity provider.
Optional: Under the advanced options, you can choose to make the LDAP provider Insecure. If you select this option, a CA file cannot be used.
ImportantIf you are using an insecure LDAP connection (ldap:// or port 389), then you must check the Insecure option in the configuration wizard.
- Click Confirm.
Verification
- The configured identity provider is now visible on the Access control tab of the Clusters page.
4.6. Configuring an OpenID identity provider
Configure an OpenID identity provider to integrate with an OpenID Connect identity provider using an Authorization Code Flow.
The Authentication Operator in Red Hat OpenShift Service on AWS requires that the configured OpenID Connect identity provider implements the OpenID Connect Discovery specification.
Claims are read from the JWT id_token returned from the OpenID identity provider and, if specified, from the JSON returned by the Issuer URL.
At least one claim must be configured to use as the user’s identity.
You can also indicate which claims to use as the user’s preferred user name, display name, and email address. If multiple claims are specified, the first one with a non-empty value is used. The standard claims are:
| Claim | Description |
|---|---|
|
|
The preferred user name when provisioning a user. A shorthand name that the user wants to be referred to as, such as |
|
| Email address. |
|
| Display name. |
See the OpenID claims documentation for more information.
Prerequisites
- Before you configure OpenID Connect, check the installation prerequisites for any Red Hat product or service you want to use with your Red Hat OpenShift Service on AWS cluster.
Procedure
- From OpenShift Cluster Manager, navigate to the Clusters page and select the cluster that you need to configure identity providers for.
- Click the Access control tab.
Click Add identity provider.
NoteYou can also click the Add Oauth configuration link in the warning message displayed after cluster creation to configure your identity providers.
- Select OpenID from the drop-down menu.
Enter a unique name for the identity provider. This name cannot be changed later.
An OAuth callback URL is automatically generated in the provided field.
https://oauth-openshift.apps.<cluster_name>.<cluster_domain>/oauth2callback/<idp_provider_name>
For example:
https://oauth-openshift.apps.openshift-cluster.example.com/oauth2callback/openid
- Register a new OpenID Connect client in the OpenID identity provider by following the steps to create an authorization request.
- Return to Red Hat OpenShift Service on AWS and select a mapping method from the drop-down menu. Claim is recommended in most cases.
- Enter a Client ID and Client secret provided from OpenID.
- Enter an Issuer URL. This is the URL that the OpenID provider asserts as the Issuer Identifier. It must use the https scheme with no URL query parameters or fragments.
- Enter an Email attribute whose value should be used as the email address. Click Add more to add multiple email attributes.
- Enter a Name attribute whose value should be used as the preferred username. Click Add more to add multiple preferred usernames.
- Enter a Preferred username attribute whose value should be used as the display name. Click Add more to add multiple display names.
- Optional: Click Show advanced Options to add a certificate authority (CA) file to your OpenID identity provider.
-
Optional: Under the advanced options, you can add Additional scopes. By default, the
OpenIDscope is requested. - Click Confirm.
Verification
- The configured identity provider is now visible on the Access control tab of the Clusters page.
4.7. Configuring an htpasswd identity provider
Configure an htpasswd identity provider to create a single, static user with cluster administration privileges. You can log in to your cluster as the user to troubleshoot issues.
The htpasswd identity provider option is included only to enable the creation of a single, static administration user. htpasswd is not supported as a general-use identity provider for Red Hat OpenShift Service on AWS.
Procedure
- From OpenShift Cluster Manager, navigate to the Clusters page and select your cluster.
- Select Access control → Identity providers.
- Click Add identity provider.
- Select HTPasswd from the Identity Provider drop-down menu.
- Add a unique name in the Name field for the identity provider.
Use the suggested username and password for the static user, or create your own.
NoteThe credentials defined in this step are not visible after you select Add in the following step. If you lose the credentials, you must recreate the identity provider and define the credentials again.
- Select Add to create the htpasswd identity provider and the single, static user.
Grant the static user permission to manage the cluster:
- Under Access control → Cluster Roles and Access, select Add user.
- Enter the User ID of the static user that you created in the preceding step.
- Select Add user to grant the administration privileges to the user.
Verification
The configured htpasswd identity provider is visible on the Access control → Identity providers page.
NoteAfter creating the identity provider, synchronization usually completes within two minutes. You can log in to the cluster as the user after the htpasswd identity provider becomes available.
- The single, administrative user is visible on the Access control → Cluster Roles and Access page. The administration group membership of the user is also displayed.
4.8. Additional resources
Chapter 5. Using RBAC to define and apply permissions
5.1. RBAC overview
Role-based access control (RBAC) objects determine whether a user is allowed to perform a given action within a project.
Administrators with the dedicated-admin role can use the cluster roles and bindings to control who has various access levels to the Red Hat OpenShift Service on AWS platform itself and all projects.
Developers can use local roles and bindings to control who has access to their projects. Note that authorization is a separate step from authentication, which is more about determining the identity of who is taking the action.
Authorization is managed using:
| Authorization object | Description |
|---|---|
| Rules |
Sets of permitted verbs on a set of objects. For example, whether a user or service account can |
| Roles | Collections of rules. You can associate, or bind, users and groups to multiple roles. |
| Bindings | Associations between users and/or groups with a role. |
There are two levels of RBAC roles and bindings that control authorization:
| RBAC level | Description |
|---|---|
| Cluster RBAC | Roles and bindings that are applicable across all projects. Cluster roles exist cluster-wide, and cluster role bindings can reference only cluster roles. |
| Local RBAC | Roles and bindings that are scoped to a given project. While local roles exist only in a single project, local role bindings can reference both cluster and local roles. |
A cluster role binding is a binding that exists at the cluster level. A role binding exists at the project level. The cluster role view must be bound to a user using a local role binding for that user to view the project. Create local roles only if a cluster role does not provide the set of permissions needed for a particular situation.
This two-level hierarchy allows reuse across multiple projects through the cluster roles while allowing customization inside of individual projects through local roles.
During evaluation, both the cluster role bindings and the local role bindings are used. For example:
- Cluster-wide "allow" rules are checked.
- Locally-bound "allow" rules are checked.
- Deny by default.
5.1.1. Default cluster roles
Red Hat OpenShift Service on AWS includes a set of default cluster roles that you can bind to users and groups cluster-wide or locally.
It is not recommended to manually modify the default cluster roles. Modifications to these system roles can prevent a cluster from functioning properly.
| Default cluster role | Description |
|---|---|
|
|
A project manager. If used in a local binding, an |
|
| A user that can get basic information about projects and users. |
|
| A super-user that can perform any action in any project. When bound to a user with a local binding, they have full control over quota and every action on every resource in the project. |
|
| A user that can get basic cluster status information. |
|
| A user that can get or view most of the objects but cannot modify them. |
|
| A user that can modify most objects in a project but does not have the power to view or modify roles or bindings. |
|
| A user that can create their own projects. |
|
| A user who cannot make any modifications, but can see most objects in a project. They cannot view or modify roles or bindings. |
Be mindful of the difference between local and cluster bindings. For example, if you bind the cluster-admin role to a user by using a local role binding, it might appear that this user has the privileges of a cluster administrator. This is not the case. Binding the cluster-admin to a user in a project grants super administrator privileges for only that project to the user. That user has the permissions of the cluster role admin, plus a few additional permissions like the ability to edit rate limits, for that project. This binding can be confusing via the web console UI, which does not list cluster role bindings that are bound to true cluster administrators. However, it does list local role bindings that you can use to locally bind cluster-admin.
The relationships between cluster roles, local roles, cluster role bindings, local role bindings, users, groups and service accounts are illustrated below.
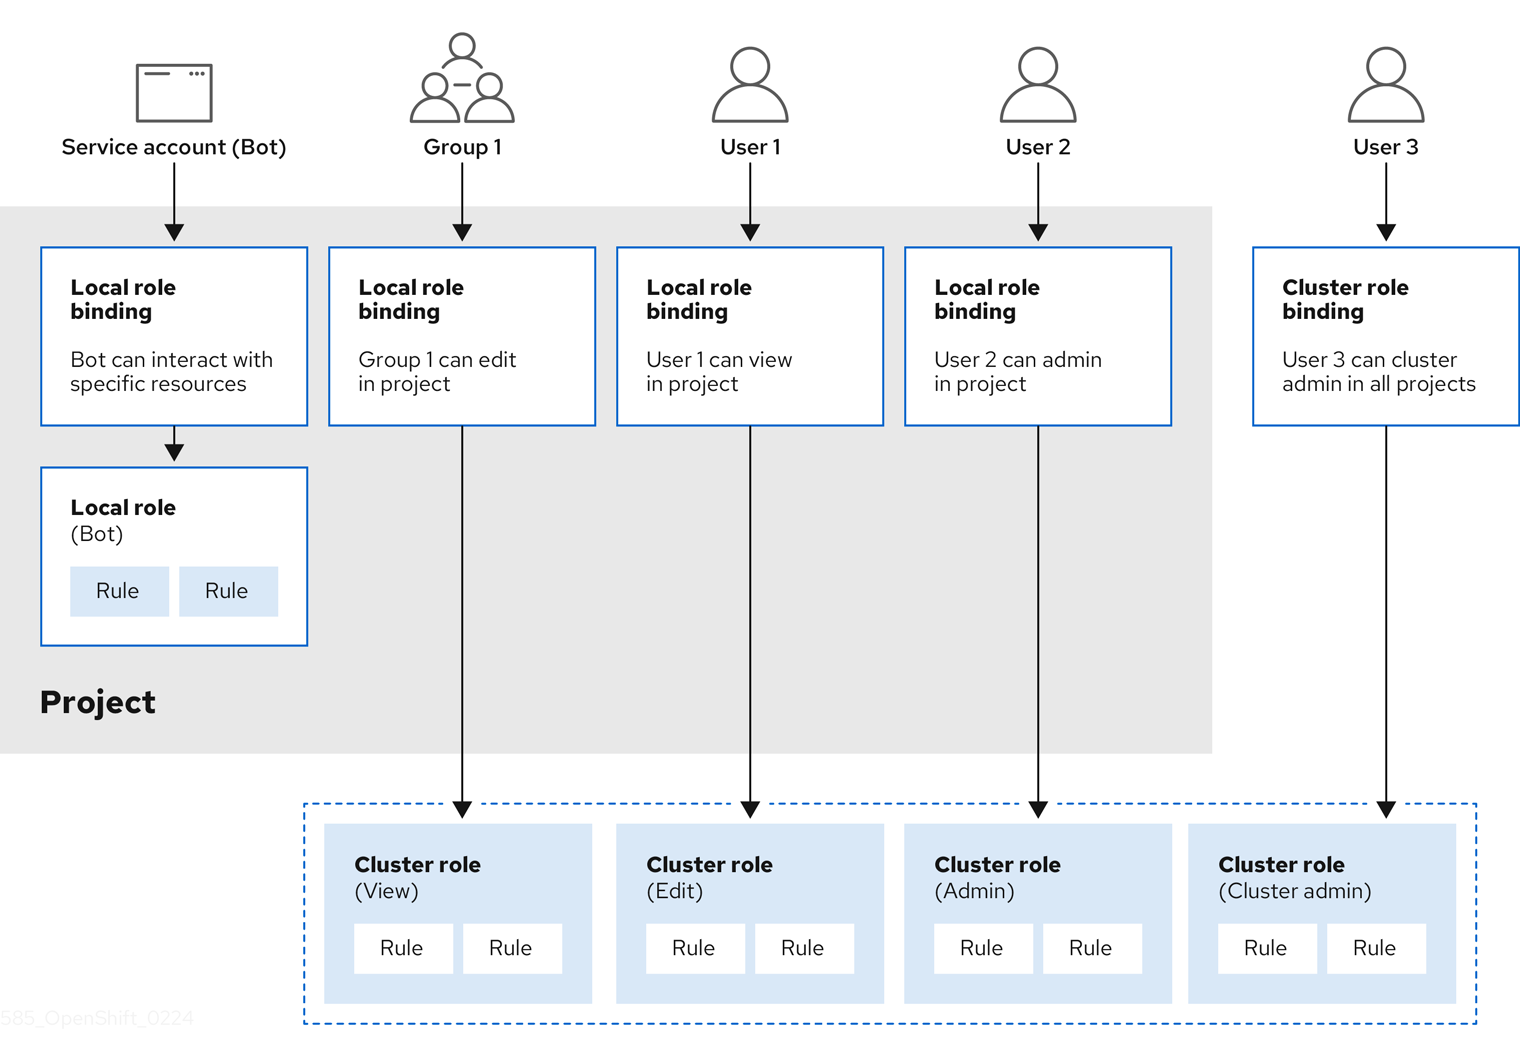
The get pods/exec, get pods/*, and get * rules grant execution privileges when they are applied to a role. Apply the principle of least privilege and assign only the minimal RBAC rights required for users and agents. For more information, see RBAC rules allow execution privileges.
5.1.2. Evaluating authorization
Red Hat OpenShift Service on AWS evaluates authorization by using:
- Identity
- The user name and list of groups that the user belongs to.
- Action
The action you perform. In most cases, this consists of:
- Project: The project you access. A project is a Kubernetes namespace with additional annotations that allows a community of users to organize and manage their content in isolation from other communities.
-
Verb : The action itself:
get,list,create,update,delete,deletecollection, orwatch. - Resource name: The API endpoint that you access.
- Bindings
- The full list of bindings, the associations between users or groups with a role.
Red Hat OpenShift Service on AWS evaluates authorization by using the following steps:
- The identity and the project-scoped action is used to find all bindings that apply to the user or their groups.
- Bindings are used to locate all the roles that apply.
- Roles are used to find all the rules that apply.
- The action is checked against each rule to find a match.
- If no matching rule is found, the action is then denied by default.
Remember that users and groups can be associated with, or bound to, multiple roles at the same time.
Project administrators can use the CLI to view local roles and bindings, including a matrix of the verbs and resources each are associated with.
The cluster role bound to the project administrator is limited in a project through a local binding. It is not bound cluster-wide like the cluster roles granted to the cluster-admin or system:admin.
Cluster roles are roles defined at the cluster level but can be bound either at the cluster level or at the project level.
5.1.2.1. Cluster role aggregation
The default admin, edit, view, and cluster-reader cluster roles support cluster role aggregation, where the cluster rules for each role are dynamically updated as new rules are created. This feature is relevant only if you extend the Kubernetes API by creating custom resources.
5.2. Projects and namespaces
A Kubernetes namespace provides a mechanism to scope resources in a cluster. The Kubernetes documentation has more information on namespaces.
Namespaces provide a unique scope for:
- Named resources to avoid basic naming collisions.
- Delegated management authority to trusted users.
- The ability to limit community resource consumption.
Most objects in the system are scoped by namespace, but some are excepted and have no namespace, including nodes and users.
A project is a Kubernetes namespace with additional annotations and is the central vehicle by which access to resources for regular users is managed. A project allows a community of users to organize and manage their content in isolation from other communities. Users must be given access to projects by administrators, or if allowed to create projects, automatically have access to their own projects.
Projects can have a separate name, displayName, and description.
-
The mandatory
nameis a unique identifier for the project and is most visible when using the CLI tools or API. The maximum name length is 63 characters. -
The optional
displayNameis how the project is displayed in the web console (defaults toname). -
The optional
descriptioncan be a more detailed description of the project and is also visible in the web console.
Each project scopes its own set of:
| Object | Description |
|---|---|
|
| Pods, services, replication controllers, etc. |
|
| Rules for which users can or cannot perform actions on objects. |
|
| Quotas for each kind of object that can be limited. |
|
| Service accounts act automatically with designated access to objects in the project. |
Administrators with the dedicated-admin role can create projects and delegate administrative rights for the project to any member of the user community. Administrators with the dedicated-admin role can also allow developers to create their own projects.
Developers and administrators can interact with projects by using the CLI or the web console.
5.3. Default projects
Red Hat OpenShift Service on AWS comes with a number of default projects, and projects starting with openshift- are the most essential to users. These projects host master components that run as pods and other infrastructure components. The pods created in these namespaces that have a critical pod annotation are considered critical, and the have guaranteed admission by kubelet. Pods created for master components in these namespaces are already marked as critical.
Do not run workloads in or share access to default projects. Default projects are reserved for running core cluster components.
The following default projects are considered highly privileged: default, kube-public, kube-system, openshift, openshift-infra, openshift-node, and other system-created projects that have the openshift.io/run-level label set to 0 or 1. Functionality that relies on admission plugins, such as pod security admission, security context constraints, cluster resource quotas, and image reference resolution, does not work in highly privileged projects.
5.4. Viewing cluster roles and bindings
You can use the oc CLI to view cluster roles and bindings by using the oc describe command.
Prerequisites
-
Install the
ocCLI. - Obtain permission to view the cluster roles and bindings.
Procedure
To view the cluster roles and their associated rule sets:
$ oc describe clusterrole.rbac
Example output
Name: admin Labels: kubernetes.io/bootstrapping=rbac-defaults Annotations: rbac.authorization.kubernetes.io/autoupdate: true PolicyRule: Resources Non-Resource URLs Resource Names Verbs --------- ----------------- -------------- ----- .packages.apps.redhat.com [] [] [* create update patch delete get list watch] imagestreams [] [] [create delete deletecollection get list patch update watch create get list watch] imagestreams.image.openshift.io [] [] [create delete deletecollection get list patch update watch create get list watch] secrets [] [] [create delete deletecollection get list patch update watch get list watch create delete deletecollection patch update] buildconfigs/webhooks [] [] [create delete deletecollection get list patch update watch get list watch] buildconfigs [] [] [create delete deletecollection get list patch update watch get list watch] buildlogs [] [] [create delete deletecollection get list patch update watch get list watch] deploymentconfigs/scale [] [] [create delete deletecollection get list patch update watch get list watch] deploymentconfigs [] [] [create delete deletecollection get list patch update watch get list watch] imagestreamimages [] [] [create delete deletecollection get list patch update watch get list watch] imagestreammappings [] [] [create delete deletecollection get list patch update watch get list watch] imagestreamtags [] [] [create delete deletecollection get list patch update watch get list watch] processedtemplates [] [] [create delete deletecollection get list patch update watch get list watch] routes [] [] [create delete deletecollection get list patch update watch get list watch] templateconfigs [] [] [create delete deletecollection get list patch update watch get list watch] templateinstances [] [] [create delete deletecollection get list patch update watch get list watch] templates [] [] [create delete deletecollection get list patch update watch get list watch] deploymentconfigs.apps.openshift.io/scale [] [] [create delete deletecollection get list patch update watch get list watch] deploymentconfigs.apps.openshift.io [] [] [create delete deletecollection get list patch update watch get list watch] buildconfigs.build.openshift.io/webhooks [] [] [create delete deletecollection get list patch update watch get list watch] buildconfigs.build.openshift.io [] [] [create delete deletecollection get list patch update watch get list watch] buildlogs.build.openshift.io [] [] [create delete deletecollection get list patch update watch get list watch] imagestreamimages.image.openshift.io [] [] [create delete deletecollection get list patch update watch get list watch] imagestreammappings.image.openshift.io [] [] [create delete deletecollection get list patch update watch get list watch] imagestreamtags.image.openshift.io [] [] [create delete deletecollection get list patch update watch get list watch] routes.route.openshift.io [] [] [create delete deletecollection get list patch update watch get list watch] processedtemplates.template.openshift.io [] [] [create delete deletecollection get list patch update watch get list watch] templateconfigs.template.openshift.io [] [] [create delete deletecollection get list patch update watch get list watch] templateinstances.template.openshift.io [] [] [create delete deletecollection get list patch update watch get list watch] templates.template.openshift.io [] [] [create delete deletecollection get list patch update watch get list watch] serviceaccounts [] [] [create delete deletecollection get list patch update watch impersonate create delete deletecollection patch update get list watch] imagestreams/secrets [] [] [create delete deletecollection get list patch update watch] rolebindings [] [] [create delete deletecollection get list patch update watch] roles [] [] [create delete deletecollection get list patch update watch] rolebindings.authorization.openshift.io [] [] [create delete deletecollection get list patch update watch] roles.authorization.openshift.io [] [] [create delete deletecollection get list patch update watch] imagestreams.image.openshift.io/secrets [] [] [create delete deletecollection get list patch update watch] rolebindings.rbac.authorization.k8s.io [] [] [create delete deletecollection get list patch update watch] roles.rbac.authorization.k8s.io [] [] [create delete deletecollection get list patch update watch] networkpolicies.extensions [] [] [create delete deletecollection patch update create delete deletecollection get list patch update watch get list watch] networkpolicies.networking.k8s.io [] [] [create delete deletecollection patch update create delete deletecollection get list patch update watch get list watch] configmaps [] [] [create delete deletecollection patch update get list watch] endpoints [] [] [create delete deletecollection patch update get list watch] persistentvolumeclaims [] [] [create delete deletecollection patch update get list watch] pods [] [] [create delete deletecollection patch update get list watch] replicationcontrollers/scale [] [] [create delete deletecollection patch update get list watch] replicationcontrollers [] [] [create delete deletecollection patch update get list watch] services [] [] [create delete deletecollection patch update get list watch] daemonsets.apps [] [] [create delete deletecollection patch update get list watch] deployments.apps/scale [] [] [create delete deletecollection patch update get list watch] deployments.apps [] [] [create delete deletecollection patch update get list watch] replicasets.apps/scale [] [] [create delete deletecollection patch update get list watch] replicasets.apps [] [] [create delete deletecollection patch update get list watch] statefulsets.apps/scale [] [] [create delete deletecollection patch update get list watch] statefulsets.apps [] [] [create delete deletecollection patch update get list watch] horizontalpodautoscalers.autoscaling [] [] [create delete deletecollection patch update get list watch] cronjobs.batch [] [] [create delete deletecollection patch update get list watch] jobs.batch [] [] [create delete deletecollection patch update get list watch] daemonsets.extensions [] [] [create delete deletecollection patch update get list watch] deployments.extensions/scale [] [] [create delete deletecollection patch update get list watch] deployments.extensions [] [] [create delete deletecollection patch update get list watch] ingresses.extensions [] [] [create delete deletecollection patch update get list watch] replicasets.extensions/scale [] [] [create delete deletecollection patch update get list watch] replicasets.extensions [] [] [create delete deletecollection patch update get list watch] replicationcontrollers.extensions/scale [] [] [create delete deletecollection patch update get list watch] poddisruptionbudgets.policy [] [] [create delete deletecollection patch update get list watch] deployments.apps/rollback [] [] [create delete deletecollection patch update] deployments.extensions/rollback [] [] [create delete deletecollection patch update] catalogsources.operators.coreos.com [] [] [create update patch delete get list watch] clusterserviceversions.operators.coreos.com [] [] [create update patch delete get list watch] installplans.operators.coreos.com [] [] [create update patch delete get list watch] packagemanifests.operators.coreos.com [] [] [create update patch delete get list watch] subscriptions.operators.coreos.com [] [] [create update patch delete get list watch] buildconfigs/instantiate [] [] [create] buildconfigs/instantiatebinary [] [] [create] builds/clone [] [] [create] deploymentconfigrollbacks [] [] [create] deploymentconfigs/instantiate [] [] [create] deploymentconfigs/rollback [] [] [create] imagestreamimports [] [] [create] localresourceaccessreviews [] [] [create] localsubjectaccessreviews [] [] [create] podsecuritypolicyreviews [] [] [create] podsecuritypolicyselfsubjectreviews [] [] [create] podsecuritypolicysubjectreviews [] [] [create] resourceaccessreviews [] [] [create] routes/custom-host [] [] [create] subjectaccessreviews [] [] [create] subjectrulesreviews [] [] [create] deploymentconfigrollbacks.apps.openshift.io [] [] [create] deploymentconfigs.apps.openshift.io/instantiate [] [] [create] deploymentconfigs.apps.openshift.io/rollback [] [] [create] localsubjectaccessreviews.authorization.k8s.io [] [] [create] localresourceaccessreviews.authorization.openshift.io [] [] [create] localsubjectaccessreviews.authorization.openshift.io [] [] [create] resourceaccessreviews.authorization.openshift.io [] [] [create] subjectaccessreviews.authorization.openshift.io [] [] [create] subjectrulesreviews.authorization.openshift.io [] [] [create] buildconfigs.build.openshift.io/instantiate [] [] [create] buildconfigs.build.openshift.io/instantiatebinary [] [] [create] builds.build.openshift.io/clone [] [] [create] imagestreamimports.image.openshift.io [] [] [create] routes.route.openshift.io/custom-host [] [] [create] podsecuritypolicyreviews.security.openshift.io [] [] [create] podsecuritypolicyselfsubjectreviews.security.openshift.io [] [] [create] podsecuritypolicysubjectreviews.security.openshift.io [] [] [create] jenkins.build.openshift.io [] [] [edit view view admin edit view] builds [] [] [get create delete deletecollection get list patch update watch get list watch] builds.build.openshift.io [] [] [get create delete deletecollection get list patch update watch get list watch] projects [] [] [get delete get delete get patch update] projects.project.openshift.io [] [] [get delete get delete get patch update] namespaces [] [] [get get list watch] pods/attach [] [] [get list watch create delete deletecollection patch update] pods/exec [] [] [get list watch create delete deletecollection patch update] pods/portforward [] [] [get list watch create delete deletecollection patch update] pods/proxy [] [] [get list watch create delete deletecollection patch update] services/proxy [] [] [get list watch create delete deletecollection patch update] routes/status [] [] [get list watch update] routes.route.openshift.io/status [] [] [get list watch update] appliedclusterresourcequotas [] [] [get list watch] bindings [] [] [get list watch] builds/log [] [] [get list watch] deploymentconfigs/log [] [] [get list watch] deploymentconfigs/status [] [] [get list watch] events [] [] [get list watch] imagestreams/status [] [] [get list watch] limitranges [] [] [get list watch] namespaces/status [] [] [get list watch] pods/log [] [] [get list watch] pods/status [] [] [get list watch] replicationcontrollers/status [] [] [get list watch] resourcequotas/status [] [] [get list watch] resourcequotas [] [] [get list watch] resourcequotausages [] [] [get list watch] rolebindingrestrictions [] [] [get list watch] deploymentconfigs.apps.openshift.io/log [] [] [get list watch] deploymentconfigs.apps.openshift.io/status [] [] [get list watch] controllerrevisions.apps [] [] [get list watch] rolebindingrestrictions.authorization.openshift.io [] [] [get list watch] builds.build.openshift.io/log [] [] [get list watch] imagestreams.image.openshift.io/status [] [] [get list watch] appliedclusterresourcequotas.quota.openshift.io [] [] [get list watch] imagestreams/layers [] [] [get update get] imagestreams.image.openshift.io/layers [] [] [get update get] builds/details [] [] [update] builds.build.openshift.io/details [] [] [update] Name: basic-user Labels: <none> Annotations: openshift.io/description: A user that can get basic information about projects. rbac.authorization.kubernetes.io/autoupdate: true PolicyRule: Resources Non-Resource URLs Resource Names Verbs --------- ----------------- -------------- ----- selfsubjectrulesreviews [] [] [create] selfsubjectaccessreviews.authorization.k8s.io [] [] [create] selfsubjectrulesreviews.authorization.openshift.io [] [] [create] clusterroles.rbac.authorization.k8s.io [] [] [get list watch] clusterroles [] [] [get list] clusterroles.authorization.openshift.io [] [] [get list] storageclasses.storage.k8s.io [] [] [get list] users [] [~] [get] users.user.openshift.io [] [~] [get] projects [] [] [list watch] projects.project.openshift.io [] [] [list watch] projectrequests [] [] [list] projectrequests.project.openshift.io [] [] [list] Name: cluster-admin Labels: kubernetes.io/bootstrapping=rbac-defaults Annotations: rbac.authorization.kubernetes.io/autoupdate: true PolicyRule: Resources Non-Resource URLs Resource Names Verbs --------- ----------------- -------------- ----- *.* [] [] [*] [*] [] [*] ...To view the current set of cluster role bindings, which shows the users and groups that are bound to various roles:
$ oc describe clusterrolebinding.rbac
Example output
Name:         alertmanager-main
Labels:       <none>
Annotations:  <none>
Role:
  Kind:  ClusterRole
  Name:  alertmanager-main
Subjects:
  Kind            Name               Namespace
  ----            ----               ---------
  ServiceAccount  alertmanager-main  openshift-monitoring


Name:         basic-users
Labels:       <none>
Annotations:  rbac.authorization.kubernetes.io/autoupdate: true
Role:
  Kind:  ClusterRole
  Name:  basic-user
Subjects:
  Kind   Name                  Namespace
  ----   ----                  ---------
  Group  system:authenticated


Name:         cloud-credential-operator-rolebinding
Labels:       <none>
Annotations:  <none>
Role:
  Kind:  ClusterRole
  Name:  cloud-credential-operator-role
Subjects:
  Kind            Name     Namespace
  ----            ----     ---------
  ServiceAccount  default  openshift-cloud-credential-operator


Name:         cluster-admin
Labels:       kubernetes.io/bootstrapping=rbac-defaults
Annotations:  rbac.authorization.kubernetes.io/autoupdate: true
Role:
  Kind:  ClusterRole
  Name:  cluster-admin
Subjects:
  Kind   Name            Namespace
  ----   ----            ---------
  Group  system:masters


Name:         cluster-admins
Labels:       <none>
Annotations:  rbac.authorization.kubernetes.io/autoupdate: true
Role:
  Kind:  ClusterRole
  Name:  cluster-admin
Subjects:
  Kind   Name                   Namespace
  ----   ----                   ---------
  Group  system:cluster-admins
  User   system:admin


Name:         cluster-api-manager-rolebinding
Labels:       <none>
Annotations:  <none>
Role:
  Kind:  ClusterRole
  Name:  cluster-api-manager-role
Subjects:
  Kind            Name     Namespace
  ----            ----     ---------
  ServiceAccount  default  openshift-machine-api

...
5.5. Viewing local roles and bindings
You can use the oc CLI to view local roles and bindings by using the oc describe command.
Prerequisites
-
Install the
ocCLI. Obtain permission to view the local roles and bindings:
-
Users with the
admindefault cluster role bound locally can view and manage roles and bindings in that project.
-
Users with the
Procedure
To view the current set of local role bindings, which show the users and groups that are bound to various roles for the current project:
$ oc describe rolebinding.rbac
To view the local role bindings for a different project, add the
-nflag to the command:$ oc describe rolebinding.rbac -n joe-project
Example output
Name:         admin
Labels:       <none>
Annotations:  <none>
Role:
  Kind:  ClusterRole
  Name:  admin
Subjects:
  Kind  Name        Namespace
  ----  ----        ---------
  User  kube:admin


Name:         system:deployers
Labels:       <none>
Annotations:  openshift.io/description:
                Allows deploymentconfigs in this namespace to rollout pods in
                this namespace.  It is auto-managed by a controller; remove
                subjects to disa...
Role:
  Kind:  ClusterRole
  Name:  system:deployer
Subjects:
  Kind            Name      Namespace
  ----            ----      ---------
  ServiceAccount  deployer  joe-project


Name:         system:image-builders
Labels:       <none>
Annotations:  openshift.io/description:
                Allows builds in this namespace to push images to this
                namespace.  It is auto-managed by a controller; remove subjects
                to disable.
Role:
  Kind:  ClusterRole
  Name:  system:image-builder
Subjects:
  Kind            Name     Namespace
  ----            ----     ---------
  ServiceAccount  builder  joe-project


Name:         system:image-pullers
Labels:       <none>
Annotations:  openshift.io/description:
                Allows all pods in this namespace to pull images from this
                namespace.  It is auto-managed by a controller; remove subjects
                to disable.
Role:
  Kind:  ClusterRole
  Name:  system:image-puller
Subjects:
  Kind   Name                                Namespace
  ----   ----                                ---------
  Group  system:serviceaccounts:joe-project
5.6. Adding roles to users
You can use the oc adm administrator CLI to manage the roles and bindings.
Binding, or adding, a role to users or groups gives the user or group the access that is granted by the role. You can add and remove roles to and from users and groups using oc adm policy commands.
You can bind any of the default cluster roles to local users or groups in your project.
Procedure
Add a role to a user in a specific project:
$ oc adm policy add-role-to-user <role> <user> -n <project>
For example, you can add the
adminrole to thealiceuser injoeproject by running:$ oc adm policy add-role-to-user admin alice -n joe
TipYou can alternatively apply the following YAML to add the role to the user:
apiVersion: rbac.authorization.k8s.io/v1
kind: RoleBinding
metadata:
  name: admin-0
  namespace: joe
roleRef:
  apiGroup: rbac.authorization.k8s.io
  kind: ClusterRole
  name: admin
subjects:
- apiGroup: rbac.authorization.k8s.io
  kind: User
  name: alice
View the local role bindings and verify the addition in the output:
$ oc describe rolebinding.rbac -n <project>
For example, to view the local role bindings for the
joeproject:$ oc describe rolebinding.rbac -n joe
Example output
Name: admin Labels: <none> Annotations: <none> Role: Kind: ClusterRole Name: admin Subjects: Kind Name Namespace ---- ---- --------- User kube:admin Name: admin-0 Labels: <none> Annotations: <none> Role: Kind: ClusterRole Name: admin Subjects: Kind Name Namespace ---- ---- --------- User alice 1 Name: system:deployers Labels: <none> Annotations: openshift.io/description: Allows deploymentconfigs in this namespace to rollout pods in this namespace. It is auto-managed by a controller; remove subjects to disa... Role: Kind: ClusterRole Name: system:deployer Subjects: Kind Name Namespace ---- ---- --------- ServiceAccount deployer joe Name: system:image-builders Labels: <none> Annotations: openshift.io/description: Allows builds in this namespace to push images to this namespace. It is auto-managed by a controller; remove subjects to disable. Role: Kind: ClusterRole Name: system:image-builder Subjects: Kind Name Namespace ---- ---- --------- ServiceAccount builder joe Name: system:image-pullers Labels: <none> Annotations: openshift.io/description: Allows all pods in this namespace to pull images from this namespace. It is auto-managed by a controller; remove subjects to disable. Role: Kind: ClusterRole Name: system:image-puller Subjects: Kind Name Namespace ---- ---- --------- Group system:serviceaccounts:joe- 1
- The
aliceuser has been added to theadminsRoleBinding.
5.7. Creating a local role
You can create a local role for a project and then bind it to a user.
Procedure
To create a local role for a project, run the following command:
$ oc create role <name> --verb=<verb> --resource=<resource> -n <project>
In this command, specify:
-
<name>, the local role’s name -
<verb>, a comma-separated list of the verbs to apply to the role -
<resource>, the resources that the role applies to -
<project>, the project name
For example, to create a local role that allows a user to view pods in the
blueproject, run the following command:$ oc create role podview --verb=get --resource=pod -n blue
-
To bind the new role to a user, run the following command:
$ oc adm policy add-role-to-user podview user2 --role-namespace=blue -n blue
5.8. Local role binding commands
When you manage a user or group’s associated roles for local role bindings using the following operations, a project may be specified with the -n flag. If it is not specified, then the current project is used.
You can use the following commands for local RBAC management.
Table 5.1. Local role binding operations
| Command | Description |
|---|---|
|
| Indicates which users can perform an action on a resource. |
|
| Binds a specified role to specified users in the current project. |
|
| Removes a given role from specified users in the current project. |
|
| Removes specified users and all of their roles in the current project. |
|
| Binds a given role to specified groups in the current project. |
|
| Removes a given role from specified groups in the current project. |
|
| Removes specified groups and all of their roles in the current project. |
5.9. Cluster role binding commands
You can also manage cluster role bindings using the following operations. The -n flag is not used for these operations because cluster role bindings use non-namespaced resources.
Table 5.2. Cluster role binding operations
| Command | Description |
|---|---|
|
| Binds a given role to specified users for all projects in the cluster. |
|
| Removes a given role from specified users for all projects in the cluster. |
|
| Binds a given role to specified groups for all projects in the cluster. |
|
| Removes a given role from specified groups for all projects in the cluster. |
5.10. Granting cluster-admin access
As the user who created the cluster, add the cluster-admin user role to your account to have the maximum administrator privileges. These privileges are not automatically assigned to your user account when you create the cluster.
Additionally, only the user who created the cluster can grant cluster access to other cluster-admin or dedicated-admin users. Users with dedicated-admin access have fewer privileges. As a best practice, limit the number of cluster-admin users to as few as possible.
Prerequisites
- You have added an identity provider (IDP) to your cluster.
- You have the IDP user name for the user you are creating.
- You are logged in to the cluster.
Procedure
Give your user
cluster-adminprivileges:$ rosa grant user cluster-admin --user=<idp_user_name> --cluster=<cluster_name>
Verify your user is listed as a cluster administrator:
$ rosa list users --cluster=<cluster_name>
Example output
GROUP             NAME
cluster-admins    rh-rosa-test-user
dedicated-admins  rh-rosa-test-user
Enter the following command to verify that your user now has
cluster-adminaccess. A cluster administrator can run this command without errors, but a dedicated administrator cannot.$ oc get all -n openshift-apiserver
Example output
NAME                  READY   STATUS    RESTARTS   AGE
pod/apiserver-6ndg2   1/1     Running   0          17h
pod/apiserver-lrmxs   1/1     Running   0          17h
pod/apiserver-tsqhz   1/1     Running   0          17h
NAME          TYPE        CLUSTER-IP      EXTERNAL-IP   PORT(S)   AGE
service/api   ClusterIP   172.30.23.241   <none>        443/TCP   18h
NAME                       DESIRED   CURRENT   READY   UP-TO-DATE   AVAILABLE   NODE SELECTOR                     AGE
daemonset.apps/apiserver   3         3         3       3            3           node-role.kubernetes.io/master=   18h
5.11. Granting dedicated-admin access
Only the user who created the cluster can grant cluster access to other cluster-admin or dedicated-admin users. Users with dedicated-admin access have fewer privileges. As a best practice, grant dedicated-admin access to most of your administrators.
Prerequisites
- You have added an identity provider (IDP) to your cluster.
- You have the IDP user name for the user you are creating.
- You are logged in to the cluster.
Procedure
Enter the following command to promote your user to a
dedicated-admin:$ rosa grant user dedicated-admin --user=<idp_user_name> --cluster=<cluster_name>
Enter the following command to verify that your user now has
dedicated-adminaccess:$ oc get groups dedicated-admins
Example output
NAME               USERS
dedicated-admins   rh-rosa-test-user
NoteA
Forbiddenerror displays if user withoutdedicated-adminprivileges runs this command.
Chapter 6. Understanding and creating service accounts
6.1. Service accounts overview
A service account is an Red Hat OpenShift Service on AWS account that allows a component to directly access the API. Service accounts are API objects that exist within each project. Service accounts provide a flexible way to control API access without sharing a regular user’s credentials.
When you use the Red Hat OpenShift Service on AWS CLI or web console, your API token authenticates you to the API. You can associate a component with a service account so that they can access the API without using a regular user’s credentials.
Each service account’s user name is derived from its project and name:
system:serviceaccount:<project>:<name>
Every service account is also a member of two groups:
| Group | Description |
|---|---|
| system:serviceaccounts | Includes all service accounts in the system. |
| system:serviceaccounts:<project> | Includes all service accounts in the specified project. |
Each service account automatically contains two secrets:
- An API token
- Credentials for the OpenShift Container Registry
The generated API token and registry credentials do not expire, but you can revoke them by deleting the secret. When you delete the secret, a new one is automatically generated to take its place.
6.2. Creating service accounts
You can create a service account in a project and grant it permissions by binding it to a role.
Procedure
Optional: To view the service accounts in the current project:
$ oc get sa
Example output
NAME       SECRETS   AGE
builder    2         2d
default    2         2d
deployer   2         2d
To create a new service account in the current project:
$ oc create sa <service_account_name> 1- 1
- To create a service account in a different project, specify
-n <project_name>.
Example output
serviceaccount "robot" created
TipYou can alternatively apply the following YAML to create the service account:
apiVersion: v1
kind: ServiceAccount
metadata:
  name: <service_account_name>
  namespace: <current_project>
Optional: View the secrets for the service account:
$ oc describe sa robot
Example output
Name:                robot
Namespace:           project1
Labels:	             <none>
Annotations:	     <none>
Image pull secrets:  robot-dockercfg-qzbhb
Mountable secrets:   robot-dockercfg-qzbhb
Tokens:              robot-token-f4khf
Events:              <none>
6.3. Examples of granting roles to service accounts
You can grant roles to service accounts in the same way that you grant roles to a regular user account.
You can modify the service accounts for the current project. For example, to add the
viewrole to therobotservice account in thetop-secretproject:$ oc policy add-role-to-user view system:serviceaccount:top-secret:robot
TipYou can alternatively apply the following YAML to add the role:
apiVersion: rbac.authorization.k8s.io/v1
kind: RoleBinding
metadata:
  name: view
  namespace: top-secret
roleRef:
  apiGroup: rbac.authorization.k8s.io
  kind: ClusterRole
  name: view
subjects:
- kind: ServiceAccount
  name: robot
  namespace: top-secret
You can also grant access to a specific service account in a project. For example, from the project to which the service account belongs, use the
-zflag and specify the<service_account_name>$ oc policy add-role-to-user <role_name> -z <service_account_name>
ImportantIf you want to grant access to a specific service account in a project, use the
-zflag. Using this flag helps prevent typos and ensures that access is granted to only the specified service account.TipYou can alternatively apply the following YAML to add the role:
apiVersion: rbac.authorization.k8s.io/v1
kind: RoleBinding
metadata:
  name: <rolebinding_name>
  namespace: <current_project_name>
roleRef:
  apiGroup: rbac.authorization.k8s.io
  kind: ClusterRole
  name: <role_name>
subjects:
- kind: ServiceAccount
  name: <service_account_name>
  namespace: <current_project_name>
To modify a different namespace, you can use the
-noption to indicate the project namespace it applies to, as shown in the following examples.For example, to allow all service accounts in all projects to view resources in the
my-projectproject:$ oc policy add-role-to-group view system:serviceaccounts -n my-project
TipYou can alternatively apply the following YAML to add the role:
apiVersion: rbac.authorization.k8s.io/v1
kind: RoleBinding
metadata:
  name: view
  namespace: my-project
roleRef:
  apiGroup: rbac.authorization.k8s.io
  kind: ClusterRole
  name: view
subjects:
- apiGroup: rbac.authorization.k8s.io
  kind: Group
  name: system:serviceaccounts
To allow all service accounts in the
managersproject to edit resources in themy-projectproject:$ oc policy add-role-to-group edit system:serviceaccounts:managers -n my-project
TipYou can alternatively apply the following YAML to add the role:
apiVersion: rbac.authorization.k8s.io/v1
kind: RoleBinding
metadata:
  name: edit
  namespace: my-project
roleRef:
  apiGroup: rbac.authorization.k8s.io
  kind: ClusterRole
  name: edit
subjects:
- apiGroup: rbac.authorization.k8s.io
  kind: Group
  name: system:serviceaccounts:managers
Chapter 7. Using service accounts in applications
7.1. Service accounts overview
A service account is an Red Hat OpenShift Service on AWS account that allows a component to directly access the API. Service accounts are API objects that exist within each project. Service accounts provide a flexible way to control API access without sharing a regular user’s credentials.
When you use the Red Hat OpenShift Service on AWS CLI or web console, your API token authenticates you to the API. You can associate a component with a service account so that they can access the API without using a regular user’s credentials.
Each service account’s user name is derived from its project and name:
system:serviceaccount:<project>:<name>
Every service account is also a member of two groups:
| Group | Description |
|---|---|
| system:serviceaccounts | Includes all service accounts in the system. |
| system:serviceaccounts:<project> | Includes all service accounts in the specified project. |
Each service account automatically contains two secrets:
- An API token
- Credentials for the OpenShift Container Registry
The generated API token and registry credentials do not expire, but you can revoke them by deleting the secret. When you delete the secret, a new one is automatically generated to take its place.
7.2. Default service accounts
Your Red Hat OpenShift Service on AWS cluster contains default service accounts for cluster management and generates more service accounts for each project.
7.2.1. Default cluster service accounts
Several infrastructure controllers run using service account credentials. The following service accounts are created in the Red Hat OpenShift Service on AWS infrastructure project (openshift-infra) at server start, and given the following roles cluster-wide:
| Service account | Description |
|---|---|
|
|
Assigned the |
|
|
Assigned the |
|
|
Assigned the |
7.2.2. Default project service accounts and roles
Three service accounts are automatically created in each project:
| Service account | Usage |
|---|---|
|
|
Used by build pods. It is given the |
|
|
Used by deployment pods and given the Note
The |
|
| Used to run all other pods unless they specify a different service account. |
All service accounts in a project are given the system:image-puller role, which allows pulling images from any image stream in the project using the internal container image registry.
7.2.3. Automatically generated secrets
By default, Red Hat OpenShift Service on AWS creates the following secrets for each service account:
- A dockercfg image pull secret
A service account token secret
NotePrior to Red Hat OpenShift Service on AWS 4.11, a second service account token secret was generated when a service account was created. This service account token secret was used to access the Kubernetes API.
Starting with Red Hat OpenShift Service on AWS 4.11, this second service account token secret is no longer created. This is because the
LegacyServiceAccountTokenNoAutoGenerationupstream Kubernetes feature gate was enabled, which stops the automatic generation of secret-based service account tokens to access the Kubernetes API.After upgrading to 4, any existing service account token secrets are not deleted and continue to function.
This service account token secret and docker configuration image pull secret are necessary to integrate the OpenShift image registry into the cluster’s user authentication and authorization system.
However, if you do not enable the ImageRegistry capability or if you disable the integrated OpenShift image registry in the Cluster Image Registry Operator’s configuration, these secrets are not generated for each service account.
Do not rely on these automatically generated secrets for your own use; they might be removed in a future Red Hat OpenShift Service on AWS release.
Workloads are automatically injected with a projected volume to obtain a bound service account token. If your workload needs an additional service account token, add an additional projected volume in your workload manifest. Bound service account tokens are more secure than service account token secrets for the following reasons:
- Bound service account tokens have a bounded lifetime.
- Bound service account tokens contain audiences.
- Bound service account tokens can be bound to pods or secrets and the bound tokens are invalidated when the bound object is removed.
For more information, see Configuring bound service account tokens using volume projection.
You can also manually create a service account token secret to obtain a token, if the security exposure of a non-expiring token in a readable API object is acceptable to you. For more information, see Creating a service account token secret.
Additional resources
- For information about requesting bound service account tokens, see Configuring bound service account tokens using volume projection.
- For information about creating a service account token secret, see Creating a service account token secret.
7.3. Creating service accounts
You can create a service account in a project and grant it permissions by binding it to a role.
Procedure
Optional: To view the service accounts in the current project:
$ oc get sa
Example output
NAME       SECRETS   AGE
builder    2         2d
default    2         2d
deployer   2         2d
To create a new service account in the current project:
$ oc create sa <service_account_name> 1- 1
- To create a service account in a different project, specify
-n <project_name>.
Example output
serviceaccount "robot" created
TipYou can alternatively apply the following YAML to create the service account:
apiVersion: v1
kind: ServiceAccount
metadata:
  name: <service_account_name>
  namespace: <current_project>
Optional: View the secrets for the service account:
$ oc describe sa robot
Example output
Name:                robot
Namespace:           project1
Labels:	             <none>
Annotations:	     <none>
Image pull secrets:  robot-dockercfg-qzbhb
Mountable secrets:   robot-dockercfg-qzbhb
Tokens:              robot-token-f4khf
Events:              <none>
Chapter 8. Using a service account as an OAuth client
8.1. Service accounts as OAuth clients
You can use a service account as a constrained form of OAuth client. Service accounts can request only a subset of scopes that allow access to some basic user information and role-based power inside of the service account’s own namespace:
-
user:info -
user:check-access -
role:<any_role>:<service_account_namespace> -
role:<any_role>:<service_account_namespace>:!
When using a service account as an OAuth client:
-
client_idissystem:serviceaccount:<service_account_namespace>:<service_account_name>. client_secretcan be any of the API tokens for that service account. For example:$ oc sa get-token <service_account_name>
-
To get
WWW-Authenticatechallenges, set anserviceaccounts.openshift.io/oauth-want-challengesannotation on the service account totrue. -
redirect_urimust match an annotation on the service account.
8.1.1. Redirect URIs for service accounts as OAuth clients
Annotation keys must have the prefix serviceaccounts.openshift.io/oauth-redirecturi. or serviceaccounts.openshift.io/oauth-redirectreference. such as:
serviceaccounts.openshift.io/oauth-redirecturi.<name>
In its simplest form, the annotation can be used to directly specify valid redirect URIs. For example:
"serviceaccounts.openshift.io/oauth-redirecturi.first":  "https://example.com"
"serviceaccounts.openshift.io/oauth-redirecturi.second": "https://other.com"
The first and second postfixes in the above example are used to separate the two valid redirect URIs.
In more complex configurations, static redirect URIs may not be enough. For example, perhaps you want all Ingresses for a route to be considered valid. This is where dynamic redirect URIs via the serviceaccounts.openshift.io/oauth-redirectreference. prefix come into play.
For example:
"serviceaccounts.openshift.io/oauth-redirectreference.first": "{\"kind\":\"OAuthRedirectReference\",\"apiVersion\":\"v1\",\"reference\":{\"kind\":\"Route\",\"name\":\"jenkins\"}}"Since the value for this annotation contains serialized JSON data, it is easier to see in an expanded format:
{
  "kind": "OAuthRedirectReference",
  "apiVersion": "v1",
  "reference": {
    "kind": "Route",
    "name": "jenkins"
  }
}
Now you can see that an OAuthRedirectReference allows us to reference the route named jenkins. Thus, all Ingresses for that route will now be considered valid. The full specification for an OAuthRedirectReference is:
{
  "kind": "OAuthRedirectReference",
  "apiVersion": "v1",
  "reference": {
    "kind": ..., 1
    "name": ..., 2
    "group": ... 3
  }
}- 1
kindrefers to the type of the object being referenced. Currently, onlyrouteis supported.- 2
namerefers to the name of the object. The object must be in the same namespace as the service account.- 3
grouprefers to the group of the object. Leave this blank, as the group for a route is the empty string.
Both annotation prefixes can be combined to override the data provided by the reference object. For example:
"serviceaccounts.openshift.io/oauth-redirecturi.first":  "custompath"
"serviceaccounts.openshift.io/oauth-redirectreference.first": "{\"kind\":\"OAuthRedirectReference\",\"apiVersion\":\"v1\",\"reference\":{\"kind\":\"Route\",\"name\":\"jenkins\"}}"
The first postfix is used to tie the annotations together. Assuming that the jenkins route had an Ingress of https://example.com, now https://example.com/custompath is considered valid, but https://example.com is not. The format for partially supplying override data is as follows:
| Type | Syntax |
|---|---|
| Scheme | "https://" |
| Hostname | "//website.com" |
| Port | "//:8000" |
| Path | "examplepath" |
Specifying a hostname override will replace the hostname data from the referenced object, which is not likely to be desired behavior.
Any combination of the above syntax can be combined using the following format:
<scheme:>//<hostname><:port>/<path>
The same object can be referenced more than once for more flexibility:
"serviceaccounts.openshift.io/oauth-redirecturi.first":  "custompath"
"serviceaccounts.openshift.io/oauth-redirectreference.first": "{\"kind\":\"OAuthRedirectReference\",\"apiVersion\":\"v1\",\"reference\":{\"kind\":\"Route\",\"name\":\"jenkins\"}}"
"serviceaccounts.openshift.io/oauth-redirecturi.second":  "//:8000"
"serviceaccounts.openshift.io/oauth-redirectreference.second": "{\"kind\":\"OAuthRedirectReference\",\"apiVersion\":\"v1\",\"reference\":{\"kind\":\"Route\",\"name\":\"jenkins\"}}"
Assuming that the route named jenkins has an Ingress of https://example.com, then both https://example.com:8000 and https://example.com/custompath are considered valid.
Static and dynamic annotations can be used at the same time to achieve the desired behavior:
"serviceaccounts.openshift.io/oauth-redirectreference.first": "{\"kind\":\"OAuthRedirectReference\",\"apiVersion\":\"v1\",\"reference\":{\"kind\":\"Route\",\"name\":\"jenkins\"}}"
"serviceaccounts.openshift.io/oauth-redirecturi.second": "https://other.com"
Chapter 9. Assuming an AWS IAM role for a service account
In Red Hat OpenShift Service on AWS clusters that use the AWS Security Token Service (STS), the OpenShift API server can be enabled to project signed service account tokens that can be used to assume an AWS Identity and Access Management (IAM) role in a pod. If the assumed IAM role has the required AWS permissions, the pods can authenticate against the AWS API using temporary STS credentials to perform AWS operations.
You can use the pod identity webhook to project service account tokens to assume an AWS Identity and Access Management (IAM) role for your own workloads. If the assumed IAM role has the required AWS permissions, the pods can run AWS SDK operations by using temporary STS credentials.
9.1. How service accounts assume AWS IAM roles in SRE owned projects
When you install a Red Hat OpenShift Service on AWS cluster that uses the AWS Security Token Service (STS), cluster-specific Operator AWS Identity and Access Management (IAM) roles are created. These IAM roles permit the Red Hat OpenShift Service on AWS cluster Operators to run core OpenShift functionality.
Cluster Operators use service accounts to assume IAM roles. When a service account assumes an IAM role, temporary STS credentials are provided for the service account to use in the cluster Operator’s pod. If the assumed role has the necessary AWS privileges, the service account can run AWS SDK operations in the pod.
Workflow for assuming AWS IAM roles in SRE owned projects
The following diagram illustrates the workflow for assuming AWS IAM roles in SRE owned projects:
Figure 9.1. Workflow for assuming AWS IAM roles in SRE owned projects
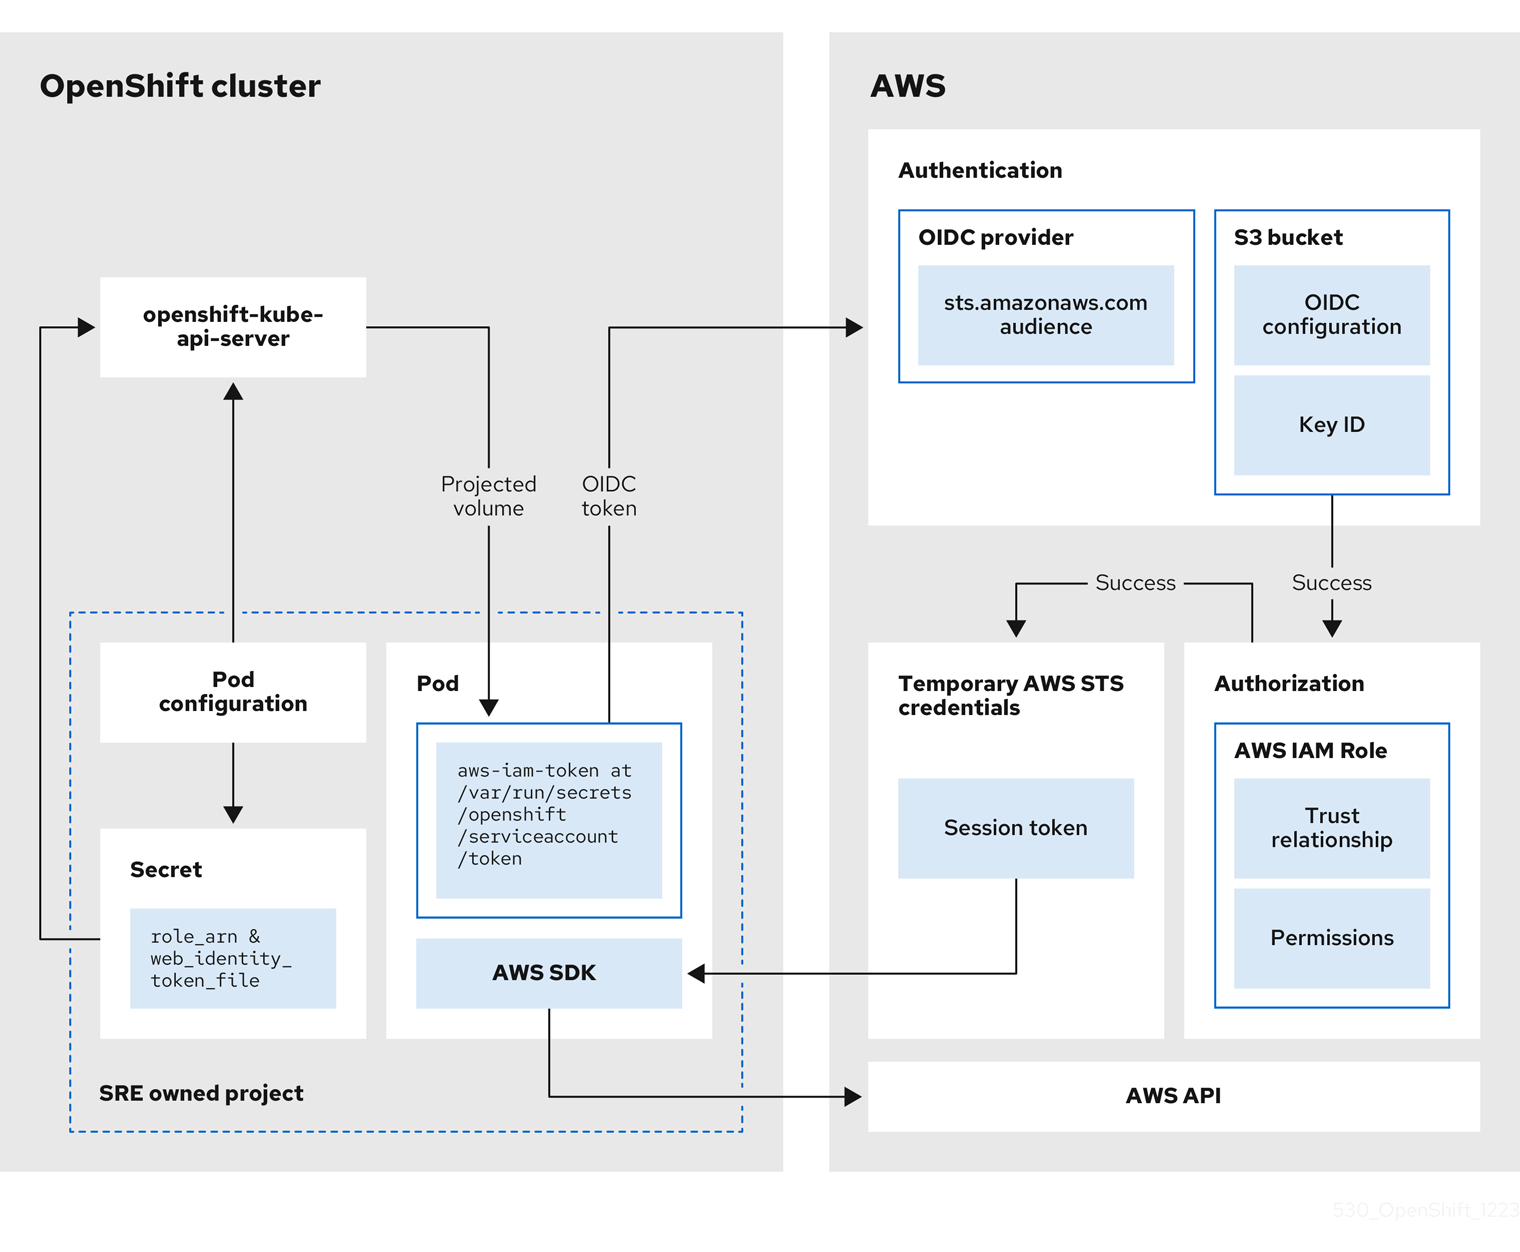
The workflow has the following stages:
Within each project that a cluster Operator runs, the Operator’s deployment spec has a volume mount for the projected service account token, and a secret containing AWS credential configuration for the pod. The token is audience-bound and time-bound. Every hour, Red Hat OpenShift Service on AWS generates a new token, and the AWS SDK reads the mounted secret containing the AWS credential configuration. This configuration has a path to the mounted token and the AWS IAM Role ARN. The secret’s credential configuration includes the following:
-
An
$AWS_ARN_ROLEvariable that has the ARN for the IAM role that has the permissions required to run AWS SDK operations. -
An
$AWS_WEB_IDENTITY_TOKEN_FILEvariable that has the full path in the pod to the OpenID Connect (OIDC) token for the service account. The full path is/var/run/secrets/openshift/serviceaccount/token.
-
An
-
When a cluster Operator needs to assume an AWS IAM role to access an AWS service (such as EC2), the AWS SDK client code running on the Operator invokes the
AssumeRoleWithWebIdentityAPI call. The OIDC token is passed from the pod to the OIDC provider. The provider authenticates the service account identity if the following requirements are met:
- The identity signature is valid and signed by the private key.
The
sts.amazonaws.comaudience is listed in the OIDC token and matches the audience configured in the OIDC provider.NoteIn Red Hat OpenShift Service on AWS with STS clusters, the OIDC provider is created during install and set as the service account issuer by default. The
sts.amazonaws.comaudience is set by default in the OIDC provider.- The OIDC token has not expired.
- The issuer value in the token has the URL for the OIDC provider.
- If the project and service account are in the scope of the trust policy for the IAM role that is being assumed, then authorization succeeds.
- After successful authentication and authorization, temporary AWS STS credentials in the form of an AWS access token, secret key, and session token are passed to the pod for use by the service account. By using the credentials, the service account is temporarily granted the AWS permissions enabled in the IAM role.
- When the cluster Operator runs, the Operator that is using the AWS SDK in the pod consumes the secret that has the path to the projected service account and AWS IAM Role ARN to authenticate against the OIDC provider. The OIDC provider returns temporary STS credentials for authentication against the AWS API.
9.2. How service accounts assume AWS IAM roles in user-defined projects
When you install a Red Hat OpenShift Service on AWS cluster that uses the AWS Security Token Service (STS), pod identity webhook resources are included by default.
You can use the pod identity webhook to enable a service account in a user-defined project to assume an AWS Identity and Access Management (IAM) role in a pod in the same project. When the IAM role is assumed, temporary STS credentials are provided for use by the service account in the pod. If the assumed role has the necessary AWS privileges, the service account can run AWS SDK operations in the pod.
To enable the pod identity webhook for a pod, you must create a service account with an eks.amazonaws.com/role-arn annotation in your project. The annotation must reference the Amazon Resource Name (ARN) of the AWS IAM role that you want the service account to assume. You must also reference the service account in your Pod specification and deploy the pod in the same project as the service account.
Pod identity webhook workflow in user-defined projects
The following diagram illustrates the pod identity webhook workflow in user-defined projects:
Figure 9.2. Pod identity webhook workflow in user-defined projects

The workflow has the following stages:
-
Within a user-defined project, a user creates a service account that includes an
eks.amazonaws.com/role-arnannotation. The annotation points to the ARN of the AWS IAM role that you want your service account to assume. When a pod is deployed in the same project using a configuration that references the annotated service account, the pod identity webhook mutates the pod. The mutation injects the following components into the pod without the need to specify them in your
PodorDeploymentresource configurations:-
An
$AWS_ARN_ROLEenvironment variable that contains the ARN for the IAM role that has the permissions required to run AWS SDK operations. -
An
$AWS_WEB_IDENTITY_TOKEN_FILEenvironment variable that contains the full path in the pod to the OpenID Connect (OIDC) token for the service account. The full path is/var/run/secrets/eks.amazonaws.com/serviceaccount/token. -
An
aws-iam-tokenvolume mounted on the mount point/var/run/secrets/eks.amazonaws.com/serviceaccount. An OIDC token file namedtokenis contained in the volume.
-
An
The OIDC token is passed from the pod to the OIDC provider. The provider authenticates the service account identity if the following requirements are met:
- The identity signature is valid and signed by the private key.
The
sts.amazonaws.comaudience is listed in the OIDC token and matches the audience configured in the OIDC provider.NoteThe pod identity webhook applies the
sts.amazonaws.comaudience to the OIDC token by default.In Red Hat OpenShift Service on AWS with STS clusters, the OIDC provider is created during install and set as the service account issuer by default. The
sts.amazonaws.comaudience is set by default in the OIDC provider.- The OIDC token has not expired.
- The issuer value in the token contains the URL for the OIDC provider.
- If the project and service account are in the scope of the trust policy for the IAM role that is being assumed, then authorization succeeds.
- After successful authentication and authorization, temporary AWS STS credentials in the form of a session token are passed to the pod for use by the service account. By using the credentials, the service account is temporarily granted the AWS permissions enabled in the IAM role.
- When you run AWS SDK operations in the pod, the service account provides the temporary STS credentials to the AWS API to verify its identity.
9.3. Assuming an AWS IAM role in your own pods
Follow the procedures in this section to enable a service account to assume an AWS Identity and Access Management (IAM) role in a pod deployed in a user-defined project.
You can create the required resources, including an AWS IAM role, a service account, a container image that includes an AWS SDK, and a pod deployed by using the image. In the example, the AWS Boto3 SDK for Python is used. You can also verify that the pod identity webhook mutates the AWS environment variables, the volume mount, and the token volume into your pod. Additionally, you can check that the service account assumes the AWS IAM role in your pod and can successfully run AWS SDK operations.
9.3.1. Setting up an AWS IAM role for a service account
Create an AWS Identity and Access Management (IAM) role to be assumed by a service account in your Red Hat OpenShift Service on AWS cluster. Attach the permissions that are required by your service account to run AWS SDK operations in a pod.
Prerequisites
- You have the permissions required to install and configure IAM roles in your AWS account.
- You have access to a Red Hat OpenShift Service on AWS cluster that uses the AWS Security Token Service (STS). Admin-level user privileges are not required.
You have the Amazon Resource Name (ARN) for the OpenID Connect (OIDC) provider that is configured as the service account issuer in your Red Hat OpenShift Service on AWS with STS cluster.
NoteIn Red Hat OpenShift Service on AWS with STS clusters, the OIDC provider is created during install and set as the service account issuer by default. If you do not know the OIDC provider ARN, contact your cluster administrator.
-
You have installed the AWS CLI (
aws).
Procedure
Create a file named
trust-policy.jsonwith the following JSON configuration:{ "Version": "2012-10-17", "Statement": [ { "Effect": "Allow", "Principal": { "Federated": "<oidc_provider_arn>" 1 }, "Action": "sts:AssumeRoleWithWebIdentity", "Condition": { "StringEquals": { "<oidc_provider_name>:sub": "system:serviceaccount:<project_name>:<service_account_name>" 2 } } } ] }- 1
- Replace
<oidc_provider_arn>with the ARN of your OIDC provider, for examplearn:aws:iam::<aws_account_id>:oidc-provider/rh-oidc.s3.us-east-1.amazonaws.com/1v3r0n44npxu4g58so46aeohduomfres. - 2
- Limits the role to the specified project and service account. Replace
<oidc_provider_name>with the name of your OIDC provider, for examplerh-oidc.s3.us-east-1.amazonaws.com/1v3r0n44npxu4g58so46aeohduomfres. Replace<project_name>:<service_account_name>with your project name and service account name, for examplemy-project:test-service-account.NoteAlternatively, you can limit the role to any service account within the specified project by using
"<oidc_provider_name>:sub": "system:serviceaccount:<project_name>:*". If you supply the*wildcard, you must replaceStringEqualswithStringLikein the preceding line.
Create an AWS IAM role that uses the trust policy that is defined in the
trust-policy.jsonfile:$ aws iam create-role \ --role-name <aws_iam_role_name> \ 1 --assume-role-policy-document file://trust-policy.json 2Example output:
ROLE    arn:aws:iam::<aws_account_id>:role/<aws_iam_role_name>        2022-09-28T12:03:17+00:00       /       AQWMS3TB4Z2N3SH7675JK   <aws_iam_role_name>
ASSUMEROLEPOLICYDOCUMENT        2012-10-17
STATEMENT       sts:AssumeRoleWithWebIdentity   Allow
STRINGEQUALS    system:serviceaccount:<project_name>:<service_account_name>
PRINCIPAL       <oidc_provider_arn>
Retain the ARN for the role in the output. The format of the role ARN is
arn:aws:iam::<aws_account_id>:role/<aws_iam_role_name>.Attach any managed AWS permissions that are required when the service account runs AWS SDK operations in your pod:
$ aws iam attach-role-policy \ --policy-arn arn:aws:iam::aws:policy/ReadOnlyAccess \ 1 --role-name <aws_iam_role_name> 2- Optional: Add custom attributes or a permissions boundary to the role. For more information, see Creating a role to delegate permissions to an AWS service in the AWS documentation.
9.3.2. Creating a service account in your project
Add a service account in your user-defined project. Include an eks.amazonaws.com/role-arn annotation in the service account configuration that references the Amazon Resource Name (ARN) for the AWS Identity and Access Management (IAM) role that you want the service account to assume.
Prerequisites
- You have created an AWS IAM role for your service account. For more information, see Setting up an AWS IAM role for a service account.
- You have access to a Red Hat OpenShift Service on AWS with AWS Security Token Service (STS) cluster. Admin-level user privileges are not required.
-
You have installed the OpenShift CLI (
oc).
Procedure
In your Red Hat OpenShift Service on AWS cluster, create a project:
$ oc new-project <project_name> 1- 1
- Replace
<project_name>with the name of your project. The name must match the project name that you specified in your AWS IAM role configuration.
NoteYou are automatically switched to the project when it is created.
Create a file named
test-service-account.yamlwith the following service account configuration:apiVersion: v1 kind: ServiceAccount metadata: name: <service_account_name> 1 namespace: <project_name> 2 annotations: eks.amazonaws.com/role-arn: "<aws_iam_role_arn>" 3
- 1
- Replace
<service_account_name>with the name of your service account. The name must match the service account name that you specified in your AWS IAM role configuration. - 2
- Replace
<project_name>with the name of your project. The name must match the project name that you specified in your AWS IAM role configuration. - 3
- Specifies the ARN of the AWS IAM role that the service account assumes for use within your pod. Replace
<aws_iam_role_arn>with the ARN for the AWS IAM role that you created for your service account. The format of the role ARN isarn:aws:iam::<aws_account_id>:role/<aws_iam_role_name>.
Create the service account in your project:
$ oc create -f test-service-account.yaml
Example output:
serviceaccount/<service_account_name> created
Review the details of the service account:
$ oc describe serviceaccount <service_account_name> 1- 1
- Replace
<service_account_name>with the name of your service account.
Example output:
Name:                <service_account_name> 1
Namespace:           <project_name> 2
Labels:              <none>
Annotations:         eks.amazonaws.com/role-arn: <aws_iam_role_arn> 3
Image pull secrets:  <service_account_name>-dockercfg-rnjkq
Mountable secrets:   <service_account_name>-dockercfg-rnjkq
Tokens:              <service_account_name>-token-4gbjp
Events:              <none>
9.3.3. Creating an example AWS SDK container image
The steps in this procedure provide an example method to create a container image that includes an AWS SDK.
The example steps use Podman to create the container image and Quay.io to host the image. For more information about Quay.io, see Getting Started with Quay.io. The container image can be used to deploy pods that can run AWS SDK operations.
In this example procedure, the AWS Boto3 SDK for Python is installed into a container image. For more information about installing and using the AWS Boto3 SDK, see the AWS Boto3 documentation. For details about other AWS SDKs, see AWS SDKs and Tools Reference Guide in the AWS documentation.
Prerequisites
- You have installed Podman on your installation host.
- You have a Quay.io user account.
Procedure
Add the following configuration to a file named
Containerfile:FROM ubi9/ubi 1 RUN dnf makecache && dnf install -y python3-pip && dnf clean all && pip3 install boto3>=1.15.0 2
From the directory that contains the file, build a container image named
awsboto3sdk:$ podman build -t awsboto3sdk .
Log in to Quay.io:
$ podman login quay.io
Tag the image in preparation for the upload to Quay.io:
$ podman tag localhost/awsboto3sdk quay.io/<quay_username>/awsboto3sdk:latest 1- 1
- Replace
<quay_username>with your Quay.io username.
Push the tagged container image to Quay.io:
$ podman push quay.io/<quay_username>/awsboto3sdk:latest 1- 1
- Replace
<quay_username>with your Quay.io username.
Make the Quay.io repository that contains the image public. This publishes the image so that it can be used to deploy a pod in your Red Hat OpenShift Service on AWS cluster:
- On https://quay.io/, navigate to the Repository Settings page for repository that contains the image.
- Click Make Public to make the repository publicly available.
9.3.4. Deploying a pod that includes an AWS SDK
Deploy a pod in a user-defined project from a container image that includes an AWS SDK. In your pod configuration, specify the service account that includes the eks.amazonaws.com/role-arn annotation.
With the service account reference in place for your pod, the pod identity webhook injects the AWS environment variables, the volume mount, and the token volume into your pod. The pod mutation enables the service account to automatically assume the AWS IAM role in the pod.
Prerequisites
- You have created an AWS Identity and Access Management (IAM) role for your service account. For more information, see Setting up an AWS IAM role for a service account.
- You have access to a Red Hat OpenShift Service on AWS cluster that uses the AWS Security Token Service (STS). Admin-level user privileges are not required.
-
You have installed the OpenShift CLI (
oc). -
You have created a service account in your project that includes an
eks.amazonaws.com/role-arnannotation that references the Amazon Resource Name (ARN) for the IAM role that you want the service account to assume. You have a container image that includes an AWS SDK and the image is available to your cluster. For detailed steps, see Creating an example AWS SDK container image.
NoteIn this example procedure, the AWS Boto3 SDK for Python is used. For more information about installing and using the AWS Boto3 SDK, see the AWS Boto3 documentation. For details about other AWS SDKs, see AWS SDKs and Tools Reference Guide in the AWS documentation.
Procedure
Create a file named
awsboto3sdk-pod.yamlwith the following pod configuration:apiVersion: v1 kind: Pod metadata: namespace: <project_name> 1 name: awsboto3sdk 2 spec: securityContext: runAsNonRoot: true seccompProfile: type: RuntimeDefault serviceAccountName: <service_account_name> 3 containers: - name: awsboto3sdk image: quay.io/<quay_username>/awsboto3sdk:latest 4 command: - /bin/bash - "-c" - "sleep 100000" 5 securityContext: allowPrivilegeEscalation: false capabilities: drop: [ALL] terminationGracePeriodSeconds: 0 restartPolicy: Never
- 1
- Replace
<project_name>with the name of your project. The name must match the project name that you specified in your AWS IAM role configuration. - 2
- Specifies the name of the pod.
- 3
- Replace
<service_account_name>with the name of the service account that is configured to assume the AWS IAM role. The name must match the service account name that you specified in your AWS IAM role configuration. - 4
- Specifies the location of your
awsboto3sdkcontainer image. Replace<quay_username>with your Quay.io username. - 5
- In this example pod configuration, this line keeps the pod running for 100000 seconds to enable verification testing in the pod directly. For detailed verification steps, see Verifying the assumed IAM role in your pod.
Deploy an
awsboto3sdkpod:$ oc create -f awsboto3sdk-pod.yaml
Example output:
pod/awsboto3sdk created
9.3.5. Verifying the assumed IAM role in your pod
After deploying an awsboto3sdk pod in your project, verify that the pod identity webhook has mutated the pod. Check that the required AWS environment variables, volume mount, and OIDC token volume are present within the pod.
You can also verify that the service account assumes the AWS Identity and Access Management (IAM) role for your AWS account when you run AWS SDK operations in the pod.
Prerequisites
- You have created an AWS IAM role for your service account. For more information, see Setting up an AWS IAM role for a service account.
- You have access to a Red Hat OpenShift Service on AWS cluster that uses the AWS Security Token Service (STS). Admin-level user privileges are not required.
-
You have installed the OpenShift CLI (
oc). -
You have created a service account in your project that includes an
eks.amazonaws.com/role-arnannotation that references the Amazon Resource Name (ARN) for the IAM role that you want the service account to assume. You have deployed a pod in your user-defined project that includes an AWS SDK. The pod references the service account that uses the pod identity webhook to assume the AWS IAM role required to run the AWS SDK operations. For detailed steps, see Deploying a pod that includes an AWS SDK.
NoteIn this example procedure, a pod that includes the AWS Boto3 SDK for Python is used. For more information about installing and using the AWS Boto3 SDK, see the AWS Boto3 documentation. For details about other AWS SDKs, see AWS SDKs and Tools Reference Guide in the AWS documentation.
Procedure
Verify that the AWS environment variables, the volume mount, and the OIDC token volume are listed in the description of the deployed
awsboto3sdkpod:$ oc describe pod awsboto3sdk
Example output:
Name: awsboto3sdk Namespace: <project_name> ... Containers: awsboto3sdk: ... Environment: AWS_ROLE_ARN: <aws_iam_role_arn> 1 AWS_WEB_IDENTITY_TOKEN_FILE: /var/run/secrets/eks.amazonaws.com/serviceaccount/token 2 Mounts: /var/run/secrets/eks.amazonaws.com/serviceaccount from aws-iam-token (ro) 3 ... Volumes: aws-iam-token: 4 Type: Projected (a volume that contains injected data from multiple sources) TokenExpirationSeconds: 86400 ...- 1
- Lists the
AWS_ROLE_ARNenvironment variable that was injected into the pod by the pod identity webhook. The variable contains the ARN of the AWS IAM role to be assumed by the service account. - 2
- Lists the
AWS_WEB_IDENTITY_TOKEN_FILEenvironment variable that was injected into the pod by the pod identity webhook. The variable contains the full path of the OIDC token that is used to verify the service account identity. - 3
- Lists the volume mount that was injected into the pod by the pod identity webhook.
- 4
- Lists the
aws-iam-tokenvolume that is mounted onto the/var/run/secrets/eks.amazonaws.com/serviceaccountmount point. The volume contains the OIDC token that is used to authenticate the service account to assume the AWS IAM role.
Start an interactive terminal in the
awsboto3sdkpod:$ oc exec -ti awsboto3sdk -- /bin/sh
In the interactive terminal for the pod, verify that the
$AWS_ROLE_ARNenvironment variable was mutated into the pod by the pod identity webhook:$ echo $AWS_ROLE_ARN
Example output:
arn:aws:iam::<aws_account_id>:role/<aws_iam_role_name> 1- 1
- The output must specify the ARN for the AWS IAM role that has the permissions required to run AWS SDK operations.
In the interactive terminal for the pod, verify that the
$AWS_WEB_IDENTITY_TOKEN_FILEenvironment variable was mutated into the pod by the pod identity webhook:$ echo $AWS_WEB_IDENTITY_TOKEN_FILE
Example output:
/var/run/secrets/eks.amazonaws.com/serviceaccount/token 1- 1
- The output must specify the full path in the pod to the OIDC token for the service account.
In the interactive terminal for the pod, verify that the
aws-iam-tokenvolume mount containing the OIDC token file was mounted by the pod identity webhook:$ mount | grep -is 'eks.amazonaws.com'
Example output:
tmpfs on /run/secrets/eks.amazonaws.com/serviceaccount type tmpfs (ro,relatime,seclabel,size=13376888k)
In the interactive terminal for the pod, verify that an OIDC token file named
tokenis present on the/var/run/secrets/eks.amazonaws.com/serviceaccount/mount point:$ ls /var/run/secrets/eks.amazonaws.com/serviceaccount/token
Example output:
/var/run/secrets/eks.amazonaws.com/serviceaccount/token 1- 1
- The OIDC token file in the
aws-iam-tokenvolume that was mounted in the pod by the pod identity webhook. The token is used to authenticate the identity of the service account in AWS.
In the pod, verify that AWS Boto3 SDK operations run successfully:
In the interactive terminal for the pod, start a Python 3 shell:
$ python3
In the Python 3 shell, import the
boto3module:>>> import boto3
Create a variable that includes the Boto3
s3service resource:>>> s3 = boto3.resource('s3')Print the names of all of the S3 buckets in your AWS account:
>>> for bucket in s3.buckets.all():
...     print(bucket.name)
...
Example output:
<bucket_name>
<bucket_name>
<bucket_name>
...
If the service account successfully assumed the AWS IAM role, the output lists all of the S3 buckets that are available in your AWS account.
9.4. Additional resources
- For more information about using AWS IAM roles with service accounts, see IAM roles for service accounts in the AWS documentation.
- For information about AWS IAM role delegation, see Creating a role to delegate permissions to an AWS service in the AWS documentation.
- For details about AWS SDKs, see AWS SDKs and Tools Reference Guide in the AWS documentation.
- For more information about installing and using the AWS Boto3 SDK for Python, see the AWS Boto3 documentation.
- For general information about webhook admission plugins for OpenShift, see Webhook admission plugins in the OpenShift Container Platform documentation.
Chapter 10. Scoping tokens
10.1. About scoping tokens
You can create scoped tokens to delegate some of your permissions to another user or service account. For example, a project administrator might want to delegate the power to create pods.
A scoped token is a token that identifies as a given user but is limited to certain actions by its scope. Only a user with the dedicated-admin role can create scoped tokens.
Scopes are evaluated by converting the set of scopes for a token into a set of PolicyRules. Then, the request is matched against those rules. The request attributes must match at least one of the scope rules to be passed to the "normal" authorizer for further authorization checks.
10.1.1. User scopes
User scopes are focused on getting information about a given user. They are intent-based, so the rules are automatically created for you:
-
user:full- Allows full read/write access to the API with all of the user’s permissions. -
user:info- Allows read-only access to information about the user, such as name and groups. -
user:check-access- Allows access toself-localsubjectaccessreviewsandself-subjectaccessreviews. These are the variables where you pass an empty user and groups in your request object. -
user:list-projects- Allows read-only access to list the projects the user has access to.
10.1.2. Role scope
The role scope allows you to have the same level of access as a given role filtered by namespace.
role:<cluster-role name>:<namespace or * for all>- Limits the scope to the rules specified by the cluster-role, but only in the specified namespace .NoteCaveat: This prevents escalating access. Even if the role allows access to resources like secrets, rolebindings, and roles, this scope will deny access to those resources. This helps prevent unexpected escalations. Many people do not think of a role like
editas being an escalating role, but with access to a secret it is.-
role:<cluster-role name>:<namespace or * for all>:!- This is similar to the example above, except that including the bang causes this scope to allow escalating access.
Chapter 11. Using bound service account tokens
You can use bound service account tokens, which improves the ability to integrate with cloud provider identity access management (IAM) services, such as AWS IAM.
11.1. About bound service account tokens
You can use bound service account tokens to limit the scope of permissions for a given service account token. These tokens are audience and time-bound. This facilitates the authentication of a service account to an IAM role and the generation of temporary credentials mounted to a pod. You can request bound service account tokens by using volume projection and the TokenRequest API.
11.2. Configuring bound service account tokens using volume projection
You can configure pods to request bound service account tokens by using volume projection.
Prerequisites
-
You have access to the cluster as a user with the
dedicated-adminrole. -
You have created a service account. This procedure assumes that the service account is named
build-robot.
Procedure
Configure a pod to use a bound service account token by using volume projection.
Create a file called
pod-projected-svc-token.yamlwith the following contents:apiVersion: v1 kind: Pod metadata: name: nginx spec: securityContext: runAsNonRoot: true 1 seccompProfile: type: RuntimeDefault 2 containers: - image: nginx name: nginx volumeMounts: - mountPath: /var/run/secrets/tokens name: vault-token securityContext: allowPrivilegeEscalation: false capabilities: drop: [ALL] serviceAccountName: build-robot 3 volumes: - name: vault-token projected: sources: - serviceAccountToken: path: vault-token 4 expirationSeconds: 7200 5 audience: vault 6- 1
- Prevents containers from running as root to minimize compromise risks.
- 2
- Sets the default seccomp profile, limiting to essential system calls, to reduce risks.
- 3
- A reference to an existing service account.
- 4
- The path relative to the mount point of the file to project the token into.
- 5
- Optionally set the expiration of the service account token, in seconds. The default value is 3600 seconds (1 hour), and this value must be at least 600 seconds (10 minutes). The kubelet starts trying to rotate the token if the token is older than 80 percent of its time to live or if the token is older than 24 hours.
- 6
- Optionally set the intended audience of the token. The recipient of a token should verify that the recipient identity matches the audience claim of the token, and should otherwise reject the token. The audience defaults to the identifier of the API server.
NoteIn order to prevent unexpected failure, Red Hat OpenShift Service on AWS overrides the
expirationSecondsvalue to be one year from the initial token generation with the--service-account-extend-token-expirationdefault oftrue. You cannot change this setting.Create the pod:
$ oc create -f pod-projected-svc-token.yaml
The kubelet requests and stores the token on behalf of the pod, makes the token available to the pod at a configurable file path, and refreshes the token as it approaches expiration.
The application that uses the bound token must handle reloading the token when it rotates.
The kubelet rotates the token if it is older than 80 percent of its time to live, or if the token is older than 24 hours.
11.3. Creating bound service account tokens outside the pod
Prerequisites
-
You have access to the cluster as a user with the
dedicated-adminrole. -
You have created a service account. This procedure assumes that the service account is named
build-robot.
Procedure
Create the bound service account token outside the pod by running the following command:
$ oc create token build-robot
Example output
eyJhbGciOiJSUzI1NiIsImtpZCI6IkY2M1N4MHRvc2xFNnFSQlA4eG9GYzVPdnN3NkhIV0tRWmFrUDRNcWx4S0kifQ.eyJhdWQiOlsiaHR0cHM6Ly9pc3N1ZXIyLnRlc3QuY29tIiwiaHR0cHM6Ly9pc3N1ZXIxLnRlc3QuY29tIiwiaHR0cHM6Ly9rdWJlcm5ldGVzLmRlZmF1bHQuc3ZjIl0sImV4cCI6MTY3OTU0MzgzMCwiaWF0IjoxNjc5NTQwMjMwLCJpc3MiOiJodHRwczovL2lzc3VlcjIudGVzdC5jb20iLCJrdWJlcm5ldGVzLmlvIjp7Im5hbWVzcGFjZSI6ImRlZmF1bHQiLCJzZXJ2aWNlYWNjb3VudCI6eyJuYW1lIjoidGVzdC1zYSIsInVpZCI6ImM3ZjA4MjkwLWIzOTUtNGM4NC04NjI4LTMzMTM1NTVhNWY1OSJ9fSwibmJmIjoxNjc5NTQwMjMwLCJzdWIiOiJzeXN0ZW06c2VydmljZWFjY291bnQ6ZGVmYXVsdDp0ZXN0LXNhIn0.WyAOPvh1BFMUl3LNhBCrQeaB5wSynbnCfojWuNNPSilT4YvFnKibxwREwmzHpV4LO1xOFZHSi6bXBOmG_o-m0XNDYL3FrGHd65mymiFyluztxa2lgHVxjw5reIV5ZLgNSol3Y8bJqQqmNg3rtQQWRML2kpJBXdDHNww0E5XOypmffYkfkadli8lN5QQD-MhsCbiAF8waCYs8bj6V6Y7uUKTcxee8sCjiRMVtXKjQtooERKm-CH_p57wxCljIBeM89VdaR51NJGued4hVV5lxvVrYZFu89lBEAq4oyQN_d6N1vBWGXQMyoihnt_fQjn-NfnlJWk-3NSZDIluDJAv7e-MTEk3geDrHVQKNEzDei2-Un64hSzb-n1g1M0Vn0885wQBQAePC9UlZm8YZlMNk1tq6wIUKQTMv3HPfi5HtBRqVc2eVs0EfMX4-x-PHhPCasJ6qLJWyj6DvyQ08dP4DW_TWZVGvKlmId0hzwpg59TTcLR0iCklSEJgAVEEd13Aa_M0-faD11L3MhUGxw0qxgOsPczdXUsolSISbefs7OKymzFSIkTAn9sDQ8PHMOsuyxsK8vzfrR-E0z7MAeguZ2kaIY7cZqbN6WFy0caWgx46hrKem9vCKALefElRYbCg3hcBmowBcRTOqaFHLNnHghhU1LaRpoFzH7OUarqX9SGQ
Additional resources
Chapter 12. Managing security context constraints
In Red Hat OpenShift Service on AWS, you can use security context constraints (SCCs) to control permissions for the pods in your cluster.
Default SCCs are created during installation and when you install some Operators or other components. As a cluster administrator, you can also create your own SCCs by using the OpenShift CLI (oc).
Do not modify the default SCCs. Customizing the default SCCs can lead to issues when some of the platform pods deploy or ROSA is upgraded. Additionally, the default SCC values are reset to the defaults during some cluster upgrades, which discards all customizations to those SCCs.
Instead of modifying the default SCCs, create and modify your own SCCs as needed. For detailed steps, see Creating security context constraints.
12.1. About security context constraints
Similar to the way that RBAC resources control user access, administrators can use security context constraints (SCCs) to control permissions for pods. These permissions determine the actions that a pod can perform and what resources it can access. You can use SCCs to define a set of conditions that a pod must run with to be accepted into the system.
Security context constraints allow an administrator to control:
-
Whether a pod can run privileged containers with the
allowPrivilegedContainerflag -
Whether a pod is constrained with the
allowPrivilegeEscalationflag - The capabilities that a container can request
- The use of host directories as volumes
- The SELinux context of the container
- The container user ID
- The use of host namespaces and networking
-
The allocation of an
FSGroupthat owns the pod volumes - The configuration of allowable supplemental groups
- Whether a container requires write access to its root file system
- The usage of volume types
-
The configuration of allowable
seccompprofiles
Do not set the openshift.io/run-level label on any namespaces in Red Hat OpenShift Service on AWS. This label is for use by internal Red Hat OpenShift Service on AWS components to manage the startup of major API groups, such as the Kubernetes API server and OpenShift API server. If the openshift.io/run-level label is set, no SCCs are applied to pods in that namespace, causing any workloads running in that namespace to be highly privileged.
12.1.1. Default security context constraints
The cluster contains several default security context constraints (SCCs) as described in the table below. Additional SCCs might be installed when you install Operators or other components to Red Hat OpenShift Service on AWS.
Do not modify the default SCCs. Customizing the default SCCs can lead to issues when some of the platform pods deploy or ROSA is upgraded. Additionally, the default SCC values are reset to the defaults during some cluster upgrades, which discards all customizations to those SCCs.
Instead of modifying the default SCCs, create and modify your own SCCs as needed. For detailed steps, see Creating security context constraints.
Table 12.1. Default security context constraints
| Security context constraint | Description |
|---|---|
|
|
Provides all features of the |
|
| Allows access to all host namespaces but still requires pods to be run with a UID and SELinux context that are allocated to the namespace. Warning This SCC allows host access to namespaces, file systems, and PIDs. It should only be used by trusted pods. Grant with caution. |
|
|
Provides all the features of the Warning This SCC allows host file system access as any UID, including UID 0. Grant with caution. |
|
| Allows using host networking and host ports but still requires pods to be run with a UID and SELinux context that are allocated to the namespace. Warning
If additional workloads are run on control plane hosts, use caution when providing access to |
|
|
Like the
|
|
| Used for the Prometheus node exporter. Warning This SCC allows host file system access as any UID, including UID 0. Grant with caution. |
|
|
Provides all features of the |
|
|
Like the
|
|
| Allows access to all privileged and host features and the ability to run as any user, any group, any FSGroup, and with any SELinux context. Warning This is the most relaxed SCC and should be used only for cluster administration. Grant with caution.
The
Note
Setting |
|
| Denies access to all host features and requires pods to be run with a UID, and SELinux context that are allocated to the namespace.
The
In clusters that were upgraded from Red Hat OpenShift Service on AWS 4.10 or earlier, this SCC is available for use by any authenticated user. The |
|
|
Like the
This is the most restrictive SCC provided by a new installation and will be used by default for authenticated users. Note
The |
12.1.2. Security context constraints settings
Security context constraints (SCCs) are composed of settings and strategies that control the security features a pod has access to. These settings fall into three categories:
| Category | Description |
|---|---|
| Controlled by a boolean |
Fields of this type default to the most restrictive value. For example, |
| Controlled by an allowable set | Fields of this type are checked against the set to ensure their value is allowed. |
| Controlled by a strategy | Items that have a strategy to generate a value provide:
|
CRI-O has the following default list of capabilities that are allowed for each container of a pod:
-
CHOWN -
DAC_OVERRIDE -
FSETID -
FOWNER -
SETGID -
SETUID -
SETPCAP -
NET_BIND_SERVICE -
KILL
The containers use the capabilities from this default list, but pod manifest authors can alter the list by requesting additional capabilities or removing some of the default behaviors. Use the allowedCapabilities, defaultAddCapabilities, and requiredDropCapabilities parameters to control such requests from the pods. With these parameters you can specify which capabilities can be requested, which ones must be added to each container, and which ones must be forbidden, or dropped, from each container.
You can drop all capabilites from containers by setting the requiredDropCapabilities parameter to ALL. This is what the restricted-v2 SCC does.
12.1.3. Security context constraints strategies
RunAsUser
MustRunAs- Requires arunAsUserto be configured. Uses the configuredrunAsUseras the default. Validates against the configuredrunAsUser.Example
MustRunAssnippet... runAsUser: type: MustRunAs uid: <id> ...
MustRunAsRange- Requires minimum and maximum values to be defined if not using pre-allocated values. Uses the minimum as the default. Validates against the entire allowable range.Example
MustRunAsRangesnippet... runAsUser: type: MustRunAsRange uidRangeMax: <maxvalue> uidRangeMin: <minvalue> ...
MustRunAsNonRoot- Requires that the pod be submitted with a non-zerorunAsUseror have theUSERdirective defined in the image. No default provided.Example
MustRunAsNonRootsnippet... runAsUser: type: MustRunAsNonRoot ...
RunAsAny- No default provided. Allows anyrunAsUserto be specified.Example
RunAsAnysnippet... runAsUser: type: RunAsAny ...
SELinuxContext
-
MustRunAs- RequiresseLinuxOptionsto be configured if not using pre-allocated values. UsesseLinuxOptionsas the default. Validates againstseLinuxOptions. -
RunAsAny- No default provided. Allows anyseLinuxOptionsto be specified.
SupplementalGroups
-
MustRunAs- Requires at least one range to be specified if not using pre-allocated values. Uses the minimum value of the first range as the default. Validates against all ranges. -
RunAsAny- No default provided. Allows anysupplementalGroupsto be specified.
FSGroup
-
MustRunAs- Requires at least one range to be specified if not using pre-allocated values. Uses the minimum value of the first range as the default. Validates against the first ID in the first range. -
RunAsAny- No default provided. Allows anyfsGroupID to be specified.
12.1.4. Controlling volumes
The usage of specific volume types can be controlled by setting the volumes field of the SCC.
The allowable values of this field correspond to the volume sources that are defined when creating a volume:
-
awsElasticBlockStore -
azureDisk -
azureFile -
cephFS -
cinder -
configMap -
csi -
downwardAPI -
emptyDir -
fc -
flexVolume -
flocker -
gcePersistentDisk -
ephemeral -
gitRepo -
glusterfs -
hostPath -
iscsi -
nfs -
persistentVolumeClaim -
photonPersistentDisk -
portworxVolume -
projected -
quobyte -
rbd -
scaleIO -
secret -
storageos -
vsphereVolume - * (A special value to allow the use of all volume types.)
-
none(A special value to disallow the use of all volumes types. Exists only for backwards compatibility.)
The recommended minimum set of allowed volumes for new SCCs are configMap, downwardAPI, emptyDir, persistentVolumeClaim, secret, and projected.
This list of allowable volume types is not exhaustive because new types are added with each release of Red Hat OpenShift Service on AWS.
For backwards compatibility, the usage of allowHostDirVolumePlugin overrides settings in the volumes field. For example, if allowHostDirVolumePlugin is set to false but allowed in the volumes field, then the hostPath value will be removed from volumes.
12.1.5. Admission control
Admission control with SCCs allows for control over the creation of resources based on the capabilities granted to a user.
In terms of the SCCs, this means that an admission controller can inspect the user information made available in the context to retrieve an appropriate set of SCCs. Doing so ensures the pod is authorized to make requests about its operating environment or to generate a set of constraints to apply to the pod.
The set of SCCs that admission uses to authorize a pod are determined by the user identity and groups that the user belongs to. Additionally, if the pod specifies a service account, the set of allowable SCCs includes any constraints accessible to the service account.
When you create a workload resource, such as deployment, only the service account is used to find the SCCs and admit the pods when they are created.
Admission uses the following approach to create the final security context for the pod:
- Retrieve all SCCs available for use.
- Generate field values for security context settings that were not specified on the request.
- Validate the final settings against the available constraints.
If a matching set of constraints is found, then the pod is accepted. If the request cannot be matched to an SCC, the pod is rejected.
A pod must validate every field against the SCC. The following are examples for just two of the fields that must be validated:
These examples are in the context of a strategy using the pre-allocated values.
An FSGroup SCC strategy of MustRunAs
If the pod defines a fsGroup ID, then that ID must equal the default fsGroup ID. Otherwise, the pod is not validated by that SCC and the next SCC is evaluated.
If the SecurityContextConstraints.fsGroup field has value RunAsAny and the pod specification omits the Pod.spec.securityContext.fsGroup, then this field is considered valid. Note that it is possible that during validation, other SCC settings will reject other pod fields and thus cause the pod to fail.
A SupplementalGroups SCC strategy of MustRunAs
If the pod specification defines one or more supplementalGroups IDs, then the pod’s IDs must equal one of the IDs in the namespace’s openshift.io/sa.scc.supplemental-groups annotation. Otherwise, the pod is not validated by that SCC and the next SCC is evaluated.
If the SecurityContextConstraints.supplementalGroups field has value RunAsAny and the pod specification omits the Pod.spec.securityContext.supplementalGroups, then this field is considered valid. Note that it is possible that during validation, other SCC settings will reject other pod fields and thus cause the pod to fail.
12.1.6. Security context constraints prioritization
Security context constraints (SCCs) have a priority field that affects the ordering when attempting to validate a request by the admission controller.
A priority value of 0 is the lowest possible priority. A nil priority is considered a 0, or lowest, priority. Higher priority SCCs are moved to the front of the set when sorting.
When the complete set of available SCCs is determined, the SCCs are ordered in the following manner:
- The highest priority SCCs are ordered first.
- If the priorities are equal, the SCCs are sorted from most restrictive to least restrictive.
- If both the priorities and restrictions are equal, the SCCs are sorted by name.
By default, the anyuid SCC granted to cluster administrators is given priority in their SCC set. This allows cluster administrators to run pods as any user by specifying RunAsUser in the pod’s SecurityContext.
12.2. About pre-allocated security context constraints values
The admission controller is aware of certain conditions in the security context constraints (SCCs) that trigger it to look up pre-allocated values from a namespace and populate the SCC before processing the pod. Each SCC strategy is evaluated independently of other strategies, with the pre-allocated values, where allowed, for each policy aggregated with pod specification values to make the final values for the various IDs defined in the running pod.
The following SCCs cause the admission controller to look for pre-allocated values when no ranges are defined in the pod specification:
-
A
RunAsUserstrategy ofMustRunAsRangewith no minimum or maximum set. Admission looks for theopenshift.io/sa.scc.uid-rangeannotation to populate range fields. -
An
SELinuxContextstrategy ofMustRunAswith no level set. Admission looks for theopenshift.io/sa.scc.mcsannotation to populate the level. -
A
FSGroupstrategy ofMustRunAs. Admission looks for theopenshift.io/sa.scc.supplemental-groupsannotation. -
A
SupplementalGroupsstrategy ofMustRunAs. Admission looks for theopenshift.io/sa.scc.supplemental-groupsannotation.
During the generation phase, the security context provider uses default values for any parameter values that are not specifically set in the pod. Default values are based on the selected strategy:
-
RunAsAnyandMustRunAsNonRootstrategies do not provide default values. If the pod needs a parameter value, such as a group ID, you must define the value in the pod specification. -
MustRunAs(single value) strategies provide a default value that is always used. For example, for group IDs, even if the pod specification defines its own ID value, the namespace’s default parameter value also appears in the pod’s groups. -
MustRunAsRangeandMustRunAs(range-based) strategies provide the minimum value of the range. As with a single valueMustRunAsstrategy, the namespace’s default parameter value appears in the running pod. If a range-based strategy is configurable with multiple ranges, it provides the minimum value of the first configured range.
FSGroup and SupplementalGroups strategies fall back to the openshift.io/sa.scc.uid-range annotation if the openshift.io/sa.scc.supplemental-groups annotation does not exist on the namespace. If neither exists, the SCC is not created.
By default, the annotation-based FSGroup strategy configures itself with a single range based on the minimum value for the annotation. For example, if your annotation reads 1/3, the FSGroup strategy configures itself with a minimum and maximum value of 1. If you want to allow more groups to be accepted for the FSGroup field, you can configure a custom SCC that does not use the annotation.
The openshift.io/sa.scc.supplemental-groups annotation accepts a comma-delimited list of blocks in the format of <start>/<length or <start>-<end>. The openshift.io/sa.scc.uid-range annotation accepts only a single block.
12.3. Example security context constraints
The following examples show the security context constraints (SCC) format and annotations:
Annotated privileged SCC
allowHostDirVolumePlugin: true
allowHostIPC: true
allowHostNetwork: true
allowHostPID: true
allowHostPorts: true
allowPrivilegedContainer: true
allowedCapabilities: 1
- '*'
apiVersion: security.openshift.io/v1
defaultAddCapabilities: [] 2
fsGroup: 3
  type: RunAsAny
groups: 4
- system:cluster-admins
- system:nodes
kind: SecurityContextConstraints
metadata:
  annotations:
    kubernetes.io/description: 'privileged allows access to all privileged and host
      features and the ability to run as any user, any group, any fsGroup, and with
      any SELinux context.  WARNING: this is the most relaxed SCC and should be used
      only for cluster administration. Grant with caution.'
  creationTimestamp: null
  name: privileged
priority: null
readOnlyRootFilesystem: false
requiredDropCapabilities: 5
- KILL
- MKNOD
- SETUID
- SETGID
runAsUser: 6
  type: RunAsAny
seLinuxContext: 7
  type: RunAsAny
seccompProfiles:
- '*'
supplementalGroups: 8
  type: RunAsAny
users: 9
- system:serviceaccount:default:registry
- system:serviceaccount:default:router
- system:serviceaccount:openshift-infra:build-controller
volumes: 10
- '*'
- 1
- A list of capabilities that a pod can request. An empty list means that none of capabilities can be requested while the special symbol
*allows any capabilities. - 2
- A list of additional capabilities that are added to any pod.
- 3
- The
FSGroupstrategy, which dictates the allowable values for the security context. - 4
- The groups that can access this SCC.
- 5
- A list of capabilities to drop from a pod. Or, specify
ALLto drop all capabilities. - 6
- The
runAsUserstrategy type, which dictates the allowable values for the security context. - 7
- The
seLinuxContextstrategy type, which dictates the allowable values for the security context. - 8
- The
supplementalGroupsstrategy, which dictates the allowable supplemental groups for the security context. - 9
- The users who can access this SCC.
- 10
- The allowable volume types for the security context. In the example,
*allows the use of all volume types.
The users and groups fields on the SCC control which users can access the SCC. By default, cluster administrators, nodes, and the build controller are granted access to the privileged SCC. All authenticated users are granted access to the restricted-v2 SCC.
Without explicit runAsUser setting
apiVersion: v1
kind: Pod
metadata:
  name: security-context-demo
spec:
  securityContext: 1
  containers:
  - name: sec-ctx-demo
    image: gcr.io/google-samples/node-hello:1.0
- 1
- When a container or pod does not request a user ID under which it should be run, the effective UID depends on the SCC that emits this pod. Because the
restricted-v2SCC is granted to all authenticated users by default, it will be available to all users and service accounts and used in most cases. Therestricted-v2SCC usesMustRunAsRangestrategy for constraining and defaulting the possible values of thesecurityContext.runAsUserfield. The admission plugin will look for theopenshift.io/sa.scc.uid-rangeannotation on the current project to populate range fields, as it does not provide this range. In the end, a container will haverunAsUserequal to the first value of the range that is hard to predict because every project has different ranges.
With explicit runAsUser setting
apiVersion: v1
kind: Pod
metadata:
  name: security-context-demo
spec:
  securityContext:
    runAsUser: 1000 1
  containers:
    - name: sec-ctx-demo
      image: gcr.io/google-samples/node-hello:1.0
- 1
- A container or pod that requests a specific user ID will be accepted by Red Hat OpenShift Service on AWS only when a service account or a user is granted access to a SCC that allows such a user ID. The SCC can allow arbitrary IDs, an ID that falls into a range, or the exact user ID specific to the request.
This configuration is valid for SELinux, fsGroup, and Supplemental Groups.
12.4. Creating security context constraints
You can create security context constraints (SCCs) by using the OpenShift CLI (oc).
Creating and modifying your own SCCs are advanced operations that might cause instability to your cluster. If you have questions about using your own SCCs, contact Red Hat Support. For information about contacting Red Hat support, see Getting support.
Prerequisites
-
Install the OpenShift CLI (
oc). -
Log in to the cluster as a user with the
cluster-adminrole.
Procedure
Define the SCC in a YAML file named
scc-admin.yaml:kind: SecurityContextConstraints apiVersion: security.openshift.io/v1 metadata: name: scc-admin allowPrivilegedContainer: true runAsUser: type: RunAsAny seLinuxContext: type: RunAsAny fsGroup: type: RunAsAny supplementalGroups: type: RunAsAny users: - my-admin-user groups: - my-admin-group
Optionally, you can drop specific capabilities for an SCC by setting the
requiredDropCapabilitiesfield with the desired values. Any specified capabilities are dropped from the container. To drop all capabilities, specifyALL. For example, to create an SCC that drops theKILL,MKNOD, andSYS_CHROOTcapabilities, add the following to the SCC object:requiredDropCapabilities: - KILL - MKNOD - SYS_CHROOT
NoteYou cannot list a capability in both
allowedCapabilitiesandrequiredDropCapabilities.CRI-O supports the same list of capability values that are found in the Docker documentation.
Create the SCC by passing in the file:
$ oc create -f scc-admin.yaml
Example output
securitycontextconstraints "scc-admin" created
Verification
Verify that the SCC was created:
$ oc get scc scc-admin
Example output
NAME        PRIV      CAPS      SELINUX    RUNASUSER   FSGROUP    SUPGROUP   PRIORITY   READONLYROOTFS   VOLUMES
scc-admin   true      []        RunAsAny   RunAsAny    RunAsAny   RunAsAny   <none>     false            [awsElasticBlockStore azureDisk azureFile cephFS cinder configMap downwardAPI emptyDir fc flexVolume flocker gcePersistentDisk gitRepo glusterfs iscsi nfs persistentVolumeClaim photonPersistentDisk quobyte rbd secret vsphere]
12.5. Configuring a workload to require a specific SCC
You can configure a workload to require a certain security context constraint (SCC). This is useful in scenarios where you want to pin a specific SCC to the workload or if you want to prevent your required SCC from being preempted by another SCC in the cluster.
To require a specific SCC, set the openshift.io/required-scc annotation on your workload. You can set this annotation on any resource that can set a pod manifest template, such as a deployment or daemon set.
The SCC must exist in the cluster and must be applicable to the workload, otherwise pod admission fails. An SCC is considered applicable to the workload if the user creating the pod or the pod’s service account has use permissions for the SCC in the pod’s namespace.
Do not change the openshift.io/required-scc annotation in the live pod’s manifest, because doing so causes the pod admission to fail. To change the required SCC, update the annotation in the underlying pod template, which causes the pod to be deleted and re-created.
Prerequisites
- The SCC must exist in the cluster.
Procedure
Create a YAML file for the deployment and specify a required SCC by setting the
openshift.io/required-sccannotation:Example
deployment.yamlapiVersion: config.openshift.io/v1 kind: Deployment apiVersion: apps/v1 spec: # ... template: metadata: annotations: openshift.io/required-scc: "my-scc" 1 # ...- 1
- Specify the name of the SCC to require.
Create the resource by running the following command:
$ oc create -f deployment.yaml
Verification
Verify that the deployment used the specified SCC:
View the value of the pod’s
openshift.io/sccannotation by running the following command:$ oc get pod <pod_name> -o jsonpath='{.metadata.annotations.openshift\.io\/scc}{"\n"}' 1- 1
- Replace
<pod_name>with the name of your deployment pod.
Examine the output and confirm that the displayed SCC matches the SCC that you defined in the deployment:
Example output
my-scc
12.6. Role-based access to security context constraints
You can specify SCCs as resources that are handled by RBAC. This allows you to scope access to your SCCs to a certain project or to the entire cluster. Assigning users, groups, or service accounts directly to an SCC retains cluster-wide scope.
Do not run workloads in or share access to default projects. Default projects are reserved for running core cluster components.
The following default projects are considered highly privileged: default, kube-public, kube-system, openshift, openshift-infra, openshift-node, and other system-created projects that have the openshift.io/run-level label set to 0 or 1. Functionality that relies on admission plugins, such as pod security admission, security context constraints, cluster resource quotas, and image reference resolution, does not work in highly privileged projects.
To include access to SCCs for your role, specify the scc resource when creating a role.
$ oc create role <role-name> --verb=use --resource=scc --resource-name=<scc-name> -n <namespace>
This results in the following role definition:
apiVersion: rbac.authorization.k8s.io/v1
kind: Role
metadata:
...
  name: role-name 1
  namespace: namespace 2
...
rules:
- apiGroups:
  - security.openshift.io 3
  resourceNames:
  - scc-name 4
  resources:
  - securitycontextconstraints 5
  verbs: 6
  - use
- 1
- The role’s name.
- 2
- Namespace of the defined role. Defaults to
defaultif not specified. - 3
- The API group that includes the
SecurityContextConstraintsresource. Automatically defined whensccis specified as a resource. - 4
- An example name for an SCC you want to have access.
- 5
- Name of the resource group that allows users to specify SCC names in the
resourceNamesfield. - 6
- A list of verbs to apply to the role.
A local or cluster role with such a rule allows the subjects that are bound to it with a role binding or a cluster role binding to use the user-defined SCC called scc-name.
Because RBAC is designed to prevent escalation, even project administrators are unable to grant access to an SCC. By default, they are not allowed to use the verb use on SCC resources, including the restricted-v2 SCC.
12.7. Reference of security context constraints commands
You can manage security context constraints (SCCs) in your instance as normal API objects using the OpenShift CLI (oc).
12.7.1. Listing security context constraints
To get a current list of SCCs:
$ oc get scc
Example output
NAME                              PRIV    CAPS                   SELINUX     RUNASUSER          FSGROUP     SUPGROUP    PRIORITY     READONLYROOTFS   VOLUMES
anyuid                            false   <no value>             MustRunAs   RunAsAny           RunAsAny    RunAsAny    10           false            ["configMap","downwardAPI","emptyDir","persistentVolumeClaim","projected","secret"]
hostaccess                        false   <no value>             MustRunAs   MustRunAsRange     MustRunAs   RunAsAny    <no value>   false            ["configMap","downwardAPI","emptyDir","hostPath","persistentVolumeClaim","projected","secret"]
hostmount-anyuid                  false   <no value>             MustRunAs   RunAsAny           RunAsAny    RunAsAny    <no value>   false            ["configMap","downwardAPI","emptyDir","hostPath","nfs","persistentVolumeClaim","projected","secret"]
hostnetwork                       false   <no value>             MustRunAs   MustRunAsRange     MustRunAs   MustRunAs   <no value>   false            ["configMap","downwardAPI","emptyDir","persistentVolumeClaim","projected","secret"]
hostnetwork-v2                    false   ["NET_BIND_SERVICE"]   MustRunAs   MustRunAsRange     MustRunAs   MustRunAs   <no value>   false            ["configMap","downwardAPI","emptyDir","persistentVolumeClaim","projected","secret"]
node-exporter                     true    <no value>             RunAsAny    RunAsAny           RunAsAny    RunAsAny    <no value>   false            ["*"]
nonroot                           false   <no value>             MustRunAs   MustRunAsNonRoot   RunAsAny    RunAsAny    <no value>   false            ["configMap","downwardAPI","emptyDir","persistentVolumeClaim","projected","secret"]
nonroot-v2                        false   ["NET_BIND_SERVICE"]   MustRunAs   MustRunAsNonRoot   RunAsAny    RunAsAny    <no value>   false            ["configMap","downwardAPI","emptyDir","persistentVolumeClaim","projected","secret"]
privileged                        true    ["*"]                  RunAsAny    RunAsAny           RunAsAny    RunAsAny    <no value>   false            ["*"]
restricted                        false   <no value>             MustRunAs   MustRunAsRange     MustRunAs   RunAsAny    <no value>   false            ["configMap","downwardAPI","emptyDir","persistentVolumeClaim","projected","secret"]
restricted-v2                     false   ["NET_BIND_SERVICE"]   MustRunAs   MustRunAsRange     MustRunAs   RunAsAny    <no value>   false            ["configMap","downwardAPI","emptyDir","persistentVolumeClaim","projected","secret"]
12.7.2. Examining security context constraints
You can view information about a particular SCC, including which users, service accounts, and groups the SCC is applied to.
For example, to examine the restricted SCC:
$ oc describe scc restricted
Example output
Name:                                  restricted
Priority:                              <none>
Access:
  Users:                               <none> 1
  Groups:                              <none> 2
Settings:
  Allow Privileged:                    false
  Allow Privilege Escalation:          true
  Default Add Capabilities:            <none>
  Required Drop Capabilities:          KILL,MKNOD,SETUID,SETGID
  Allowed Capabilities:                <none>
  Allowed Seccomp Profiles:            <none>
  Allowed Volume Types:                configMap,downwardAPI,emptyDir,persistentVolumeClaim,projected,secret
  Allowed Flexvolumes:                 <all>
  Allowed Unsafe Sysctls:              <none>
  Forbidden Sysctls:                   <none>
  Allow Host Network:                  false
  Allow Host Ports:                    false
  Allow Host PID:                      false
  Allow Host IPC:                      false
  Read Only Root Filesystem:           false
  Run As User Strategy: MustRunAsRange
    UID:                               <none>
    UID Range Min:                     <none>
    UID Range Max:                     <none>
  SELinux Context Strategy: MustRunAs
    User:                              <none>
    Role:                              <none>
    Type:                              <none>
    Level:                             <none>
  FSGroup Strategy: MustRunAs
    Ranges:                            <none>
  Supplemental Groups Strategy: RunAsAny
    Ranges:                            <none>
12.8. Additional resources
Chapter 13. Understanding and managing pod security admission
Pod security admission is an implementation of the Kubernetes pod security standards. Use pod security admission to restrict the behavior of pods.
13.1. About pod security admission
Red Hat OpenShift Service on AWS includes Kubernetes pod security admission. Pods that do not comply with the pod security admission defined globally or at the namespace level are not admitted to the cluster and cannot run.
Globally, the privileged profile is enforced, and the restricted profile is used for warnings and audits.
You can also configure the pod security admission settings at the namespace level.
Do not run workloads in or share access to default projects. Default projects are reserved for running core cluster components.
The following default projects are considered highly privileged: default, kube-public, kube-system, openshift, openshift-infra, openshift-node, and other system-created projects that have the openshift.io/run-level label set to 0 or 1. Functionality that relies on admission plugins, such as pod security admission, security context constraints, cluster resource quotas, and image reference resolution, does not work in highly privileged projects.
13.1.1. Pod security admission modes
You can configure the following pod security admission modes for a namespace:
Table 13.1. Pod security admission modes
| Mode | Label | Description |
|---|---|---|
|
|
| Rejects a pod from admission if it does not comply with the set profile |
|
|
| Logs audit events if a pod does not comply with the set profile |
|
|
| Displays warnings if a pod does not comply with the set profile |
13.1.2. Pod security admission profiles
You can set each of the pod security admission modes to one of the following profiles:
Table 13.2. Pod security admission profiles
| Profile | Description |
|---|---|
|
| Least restrictive policy; allows for known privilege escalation |
|
| Minimally restrictive policy; prevents known privilege escalations |
|
| Most restrictive policy; follows current pod hardening best practices |
13.1.3. Privileged namespaces
The following system namespaces are always set to the privileged pod security admission profile:
-
default -
kube-public -
kube-system
You cannot change the pod security profile for these privileged namespaces.
13.1.4. Pod security admission and security context constraints
Pod security admission standards and security context constraints are reconciled and enforced by two independent controllers. The two controllers work independently using the following processes to enforce security policies:
-
The security context constraint controller may mutate some security context fields per the pod’s assigned SCC. For example, if the seccomp profile is empty or not set and if the pod’s assigned SCC enforces
seccompProfilesfield to beruntime/default, the controller sets the default type toRuntimeDefault. - The security context constraint controller validates the pod’s security context against the matching SCC.
- The pod security admission controller validates the pod’s security context against the pod security standard assigned to the namespace.
13.2. About pod security admission synchronization
In addition to the global pod security admission control configuration, a controller applies pod security admission control warn and audit labels to namespaces according to the SCC permissions of the service accounts that are in a given namespace.
The controller examines ServiceAccount object permissions to use security context constraints in each namespace. Security context constraints (SCCs) are mapped to pod security profiles based on their field values; the controller uses these translated profiles. Pod security admission warn and audit labels are set to the most privileged pod security profile in the namespace to prevent displaying warnings and logging audit events when pods are created.
Namespace labeling is based on consideration of namespace-local service account privileges.
Applying pods directly might use the SCC privileges of the user who runs the pod. However, user privileges are not considered during automatic labeling.
13.2.1. Pod security admission synchronization namespace exclusions
Pod security admission synchronization is permanently disabled on system-created namespaces and openshift-* prefixed namespaces.
Namespaces that are defined as part of the cluster payload have pod security admission synchronization disabled permanently. The following namespaces are permanently disabled:
-
default -
kube-node-lease -
kube-system -
kube-public -
openshift -
All system-created namespaces that are prefixed with
openshift-
13.3. Controlling pod security admission synchronization
You can enable or disable automatic pod security admission synchronization for most namespaces.
You cannot enable pod security admission synchronization on system-created namespaces. For more information, see Pod security admission synchronization namespace exclusions.
Procedure
For each namespace that you want to configure, set a value for the
security.openshift.io/scc.podSecurityLabelSynclabel:To disable pod security admission label synchronization in a namespace, set the value of the
security.openshift.io/scc.podSecurityLabelSynclabel tofalse.Run the following command:
$ oc label namespace <namespace> security.openshift.io/scc.podSecurityLabelSync=false
To enable pod security admission label synchronization in a namespace, set the value of the
security.openshift.io/scc.podSecurityLabelSynclabel totrue.Run the following command:
$ oc label namespace <namespace> security.openshift.io/scc.podSecurityLabelSync=true
Additional resources
13.4. Configuring pod security admission for a namespace
You can configure the pod security admission settings at the namespace level. For each of the pod security admission modes on the namespace, you can set which pod security admission profile to use.
Procedure
For each pod security admission mode that you want to set on a namespace, run the following command:
$ oc label namespace <namespace> \                1
    pod-security.kubernetes.io/<mode>=<profile> \ 2
    --overwrite
13.5. About pod security admission alerts
A PodSecurityViolation alert is triggered when the Kubernetes API server reports that there is a pod denial on the audit level of the pod security admission controller. This alert persists for one day.
View the Kubernetes API server audit logs to investigate alerts that were triggered. As an example, a workload is likely to fail admission if global enforcement is set to the restricted pod security level.
For assistance in identifying pod security admission violation audit events, see Audit annotations in the Kubernetes documentation.
13.6. Additional resources
Chapter 14. Syncing LDAP groups
As an administrator with the dedicated-admin role, you can use groups to manage users, change their permissions, and enhance collaboration. Your organization may have already created user groups and stored them in an LDAP server. Red Hat OpenShift Service on AWS can sync those LDAP records with internal Red Hat OpenShift Service on AWS records, enabling you to manage your groups in one place. Red Hat OpenShift Service on AWS currently supports group sync with LDAP servers using three common schemas for defining group membership: RFC 2307, Active Directory, and augmented Active Directory.
For more information on configuring LDAP, see Configuring an LDAP identity provider.
You must have dedicated-admin privileges to sync groups.
14.1. About configuring LDAP sync
Before you can run LDAP sync, you need a sync configuration file. This file contains the following LDAP client configuration details:
- Configuration for connecting to your LDAP server.
- Sync configuration options that are dependent on the schema used in your LDAP server.
- An administrator-defined list of name mappings that maps Red Hat OpenShift Service on AWS group names to groups in your LDAP server.
The format of the configuration file depends upon the schema you are using: RFC 2307, Active Directory, or augmented Active Directory.
- LDAP client configuration
- The LDAP client configuration section of the configuration defines the connections to your LDAP server.
The LDAP client configuration section of the configuration defines the connections to your LDAP server.
LDAP client configuration
url: ldap://10.0.0.0:389 1
bindDN: cn=admin,dc=example,dc=com 2
bindPassword: <password> 3
insecure: false 4
ca: my-ldap-ca-bundle.crt 5
- 1
- The connection protocol, IP address of the LDAP server hosting your database, and the port to connect to, formatted as
scheme://host:port. - 2
- Optional distinguished name (DN) to use as the Bind DN. Red Hat OpenShift Service on AWS uses this if elevated privilege is required to retrieve entries for the sync operation.
- 3
- Optional password to use to bind. Red Hat OpenShift Service on AWS uses this if elevated privilege is necessary to retrieve entries for the sync operation. This value may also be provided in an environment variable, external file, or encrypted file.
- 4
- When
false, secure LDAP (ldaps://) URLs connect using TLS, and insecure LDAP (ldap://) URLs are upgraded to TLS. Whentrue, no TLS connection is made to the server and you cannot useldaps://URL schemes. - 5
- The certificate bundle to use for validating server certificates for the configured URL. If empty, Red Hat OpenShift Service on AWS uses system-trusted roots. This only applies if
insecureis set tofalse.
- LDAP query definition
- Sync configurations consist of LDAP query definitions for the entries that are required for synchronization. The specific definition of an LDAP query depends on the schema used to store membership information in the LDAP server.
LDAP query definition
baseDN: ou=users,dc=example,dc=com 1
scope: sub 2
derefAliases: never 3
timeout: 0 4
filter: (objectClass=person) 5
pageSize: 0 6
- 1
- The distinguished name (DN) of the branch of the directory where all searches will start from. It is required that you specify the top of your directory tree, but you can also specify a subtree in the directory.
- 2
- The scope of the search. Valid values are
base,one, orsub. If this is left undefined, then a scope ofsubis assumed. Descriptions of the scope options can be found in the table below. - 3
- The behavior of the search with respect to aliases in the LDAP tree. Valid values are
never,search,base, oralways. If this is left undefined, then the default is toalwaysdereference aliases. Descriptions of the dereferencing behaviors can be found in the table below. - 4
- The time limit allowed for the search by the client, in seconds. A value of
0imposes no client-side limit. - 5
- A valid LDAP search filter. If this is left undefined, then the default is
(objectClass=*). - 6
- The optional maximum size of response pages from the server, measured in LDAP entries. If set to
0, no size restrictions will be made on pages of responses. Setting paging sizes is necessary when queries return more entries than the client or server allow by default.
Table 14.1. LDAP search scope options
| LDAP search scope | Description |
|---|---|
|
| Only consider the object specified by the base DN given for the query. |
|
| Consider all of the objects on the same level in the tree as the base DN for the query. |
|
| Consider the entire subtree rooted at the base DN given for the query. |
Table 14.2. LDAP dereferencing behaviors
| Dereferencing behavior | Description |
|---|---|
|
| Never dereference any aliases found in the LDAP tree. |
|
| Only dereference aliases found while searching. |
|
| Only dereference aliases while finding the base object. |
|
| Always dereference all aliases found in the LDAP tree. |
- User-defined name mapping
- A user-defined name mapping explicitly maps the names of Red Hat OpenShift Service on AWS groups to unique identifiers that find groups on your LDAP server. The mapping uses normal YAML syntax. A user-defined mapping can contain an entry for every group in your LDAP server or only a subset of those groups. If there are groups on the LDAP server that do not have a user-defined name mapping, the default behavior during sync is to use the attribute specified as the Red Hat OpenShift Service on AWS group’s name.
User-defined name mapping
groupUIDNameMapping:
  "cn=group1,ou=groups,dc=example,dc=com": firstgroup
  "cn=group2,ou=groups,dc=example,dc=com": secondgroup
  "cn=group3,ou=groups,dc=example,dc=com": thirdgroup
14.1.1. About the RFC 2307 configuration file
The RFC 2307 schema requires you to provide an LDAP query definition for both user and group entries, as well as the attributes with which to represent them in the internal Red Hat OpenShift Service on AWS records.
For clarity, the group you create in Red Hat OpenShift Service on AWS should use attributes other than the distinguished name whenever possible for user- or administrator-facing fields. For example, identify the users of an Red Hat OpenShift Service on AWS group by their e-mail, and use the name of the group as the common name. The following configuration file creates these relationships:
If using user-defined name mappings, your configuration file will differ.
LDAP sync configuration that uses RFC 2307 schema: rfc2307_config.yaml
kind: LDAPSyncConfig
apiVersion: v1
url: ldap://LDAP_SERVICE_IP:389 1
insecure: false 2
rfc2307:
    groupsQuery:
        baseDN: "ou=groups,dc=example,dc=com"
        scope: sub
        derefAliases: never
        pageSize: 0
    groupUIDAttribute: dn 3
    groupNameAttributes: [ cn ] 4
    groupMembershipAttributes: [ member ] 5
    usersQuery:
        baseDN: "ou=users,dc=example,dc=com"
        scope: sub
        derefAliases: never
        pageSize: 0
    userUIDAttribute: dn 6
    userNameAttributes: [ mail ] 7
    tolerateMemberNotFoundErrors: false
    tolerateMemberOutOfScopeErrors: false
- 1
- The IP address and host of the LDAP server where this group’s record is stored.
- 2
- When
false, secure LDAP (ldaps://) URLs connect using TLS, and insecure LDAP (ldap://) URLs are upgraded to TLS. Whentrue, no TLS connection is made to the server and you cannot useldaps://URL schemes. - 3
- The attribute that uniquely identifies a group on the LDAP server. You cannot specify
groupsQueryfilters when using DN forgroupUIDAttribute. For fine-grained filtering, use the whitelist / blacklist method. - 4
- The attribute to use as the name of the group.
- 5
- The attribute on the group that stores the membership information.
- 6
- The attribute that uniquely identifies a user on the LDAP server. You cannot specify
usersQueryfilters when using DN for userUIDAttribute. For fine-grained filtering, use the whitelist / blacklist method. - 7
- The attribute to use as the name of the user in the Red Hat OpenShift Service on AWS group record.
14.1.2. About the Active Directory configuration file
The Active Directory schema requires you to provide an LDAP query definition for user entries, as well as the attributes to represent them with in the internal Red Hat OpenShift Service on AWS group records.
For clarity, the group you create in Red Hat OpenShift Service on AWS should use attributes other than the distinguished name whenever possible for user- or administrator-facing fields. For example, identify the users of an Red Hat OpenShift Service on AWS group by their e-mail, but define the name of the group by the name of the group on the LDAP server. The following configuration file creates these relationships:
LDAP sync configuration that uses Active Directory schema: active_directory_config.yaml
kind: LDAPSyncConfig
apiVersion: v1
url: ldap://LDAP_SERVICE_IP:389
activeDirectory:
    usersQuery:
        baseDN: "ou=users,dc=example,dc=com"
        scope: sub
        derefAliases: never
        filter: (objectclass=person)
        pageSize: 0
    userNameAttributes: [ mail ] 1
    groupMembershipAttributes: [ memberOf ] 2
14.1.3. About the augmented Active Directory configuration file
The augmented Active Directory schema requires you to provide an LDAP query definition for both user entries and group entries, as well as the attributes with which to represent them in the internal Red Hat OpenShift Service on AWS group records.
For clarity, the group you create in Red Hat OpenShift Service on AWS should use attributes other than the distinguished name whenever possible for user- or administrator-facing fields. For example, identify the users of an Red Hat OpenShift Service on AWS group by their e-mail, and use the name of the group as the common name. The following configuration file creates these relationships.
LDAP sync configuration that uses augmented Active Directory schema: augmented_active_directory_config.yaml
kind: LDAPSyncConfig
apiVersion: v1
url: ldap://LDAP_SERVICE_IP:389
augmentedActiveDirectory:
    groupsQuery:
        baseDN: "ou=groups,dc=example,dc=com"
        scope: sub
        derefAliases: never
        pageSize: 0
    groupUIDAttribute: dn 1
    groupNameAttributes: [ cn ] 2
    usersQuery:
        baseDN: "ou=users,dc=example,dc=com"
        scope: sub
        derefAliases: never
        filter: (objectclass=person)
        pageSize: 0
    userNameAttributes: [ mail ] 3
    groupMembershipAttributes: [ memberOf ] 4
- 1
- The attribute that uniquely identifies a group on the LDAP server. You cannot specify
groupsQueryfilters when using DN for groupUIDAttribute. For fine-grained filtering, use the whitelist / blacklist method. - 2
- The attribute to use as the name of the group.
- 3
- The attribute to use as the name of the user in the Red Hat OpenShift Service on AWS group record.
- 4
- The attribute on the user that stores the membership information.
14.2. Running LDAP sync
Once you have created a sync configuration file, you can begin to sync. Red Hat OpenShift Service on AWS allows administrators to perform a number of different sync types with the same server.
14.2.1. Syncing the LDAP server with Red Hat OpenShift Service on AWS
You can sync all groups from the LDAP server with Red Hat OpenShift Service on AWS.
Prerequisites
- Create a sync configuration file.
-
You have access to the cluster as a user with the
dedicated-adminrole.
Procedure
To sync all groups from the LDAP server with Red Hat OpenShift Service on AWS:
$ oc adm groups sync --sync-config=config.yaml --confirm
NoteBy default, all group synchronization operations are dry-run, so you must set the
--confirmflag on theoc adm groups synccommand to make changes to Red Hat OpenShift Service on AWS group records.
14.2.2. Syncing Red Hat OpenShift Service on AWS groups with the LDAP server
You can sync all groups already in Red Hat OpenShift Service on AWS that correspond to groups in the LDAP server specified in the configuration file.
Prerequisites
- Create a sync configuration file.
-
You have access to the cluster as a user with the
dedicated-adminrole.
Procedure
To sync Red Hat OpenShift Service on AWS groups with the LDAP server:
$ oc adm groups sync --type=openshift --sync-config=config.yaml --confirm
NoteBy default, all group synchronization operations are dry-run, so you must set the
--confirmflag on theoc adm groups synccommand to make changes to Red Hat OpenShift Service on AWS group records.
14.2.3. Syncing subgroups from the LDAP server with Red Hat OpenShift Service on AWS
You can sync a subset of LDAP groups with Red Hat OpenShift Service on AWS using whitelist files, blacklist files, or both.
You can use any combination of blacklist files, whitelist files, or whitelist literals. Whitelist and blacklist files must contain one unique group identifier per line, and you can include whitelist literals directly in the command itself. These guidelines apply to groups found on LDAP servers as well as groups already present in Red Hat OpenShift Service on AWS.
Prerequisites
- Create a sync configuration file.
-
You have access to the cluster as a user with the
dedicated-adminrole.
Procedure
To sync a subset of LDAP groups with Red Hat OpenShift Service on AWS, use any the following commands:
$ oc adm groups sync --whitelist=<whitelist_file> \
                   --sync-config=config.yaml      \
                   --confirm
$ oc adm groups sync --blacklist=<blacklist_file> \ --sync-config=config.yaml \ --confirm$ oc adm groups sync <group_unique_identifier> \ --sync-config=config.yaml \ --confirm$ oc adm groups sync <group_unique_identifier> \ --whitelist=<whitelist_file> \ --blacklist=<blacklist_file> \ --sync-config=config.yaml \ --confirm$ oc adm groups sync --type=openshift \ --whitelist=<whitelist_file> \ --sync-config=config.yaml \ --confirmNoteBy default, all group synchronization operations are dry-run, so you must set the
--confirmflag on theoc adm groups synccommand to make changes to Red Hat OpenShift Service on AWS group records.
14.3. Running a group pruning job
An administrator can also choose to remove groups from Red Hat OpenShift Service on AWS records if the records on the LDAP server that created them are no longer present. The prune job will accept the same sync configuration file and whitelists or blacklists as used for the sync job.
For example:
$ oc adm prune groups --sync-config=/path/to/ldap-sync-config.yaml --confirm
$ oc adm prune groups --whitelist=/path/to/whitelist.txt --sync-config=/path/to/ldap-sync-config.yaml --confirm
$ oc adm prune groups --blacklist=/path/to/blacklist.txt --sync-config=/path/to/ldap-sync-config.yaml --confirm
14.4. LDAP group sync examples
This section contains examples for the RFC 2307, Active Directory, and augmented Active Directory schemas.
These examples assume that all users are direct members of their respective groups. Specifically, no groups have other groups as members. See the Nested Membership Sync Example for information on how to sync nested groups.
14.4.1. Syncing groups using the RFC 2307 schema
For the RFC 2307 schema, the following examples synchronize a group named admins that has two members: Jane and Jim. The examples explain:
- How the group and users are added to the LDAP server.
- What the resulting group record in Red Hat OpenShift Service on AWS will be after synchronization.
These examples assume that all users are direct members of their respective groups. Specifically, no groups have other groups as members. See the Nested Membership Sync Example for information on how to sync nested groups.
In the RFC 2307 schema, both users (Jane and Jim) and groups exist on the LDAP server as first-class entries, and group membership is stored in attributes on the group. The following snippet of ldif defines the users and group for this schema:
LDAP entries that use RFC 2307 schema: rfc2307.ldif
  dn: ou=users,dc=example,dc=com
  objectClass: organizationalUnit
  ou: users
  dn: cn=Jane,ou=users,dc=example,dc=com
  objectClass: person
  objectClass: organizationalPerson
  objectClass: inetOrgPerson
  cn: Jane
  sn: Smith
  displayName: Jane Smith
  mail: jane.smith@example.com
  dn: cn=Jim,ou=users,dc=example,dc=com
  objectClass: person
  objectClass: organizationalPerson
  objectClass: inetOrgPerson
  cn: Jim
  sn: Adams
  displayName: Jim Adams
  mail: jim.adams@example.com
  dn: ou=groups,dc=example,dc=com
  objectClass: organizationalUnit
  ou: groups
  dn: cn=admins,ou=groups,dc=example,dc=com 1
  objectClass: groupOfNames
  cn: admins
  owner: cn=admin,dc=example,dc=com
  description: System Administrators
  member: cn=Jane,ou=users,dc=example,dc=com 2
  member: cn=Jim,ou=users,dc=example,dc=com
Prerequisites
- Create the configuration file.
-
You have access to the cluster as a user with the
dedicated-adminrole.
Procedure
Run the sync with the
rfc2307_config.yamlfile:$ oc adm groups sync --sync-config=rfc2307_config.yaml --confirm
Red Hat OpenShift Service on AWS creates the following group record as a result of the above sync operation:
Red Hat OpenShift Service on AWS group created by using the
rfc2307_config.yamlfileapiVersion: user.openshift.io/v1 kind: Group metadata: annotations: openshift.io/ldap.sync-time: 2015-10-13T10:08:38-0400 1 openshift.io/ldap.uid: cn=admins,ou=groups,dc=example,dc=com 2 openshift.io/ldap.url: LDAP_SERVER_IP:389 3 creationTimestamp: name: admins 4 users: 5 - jane.smith@example.com - jim.adams@example.com- 1
- The last time this Red Hat OpenShift Service on AWS group was synchronized with the LDAP server, in ISO 6801 format.
- 2
- The unique identifier for the group on the LDAP server.
- 3
- The IP address and host of the LDAP server where this group’s record is stored.
- 4
- The name of the group as specified by the sync file.
- 5
- The users that are members of the group, named as specified by the sync file.
14.4.2. Syncing groups using the RFC2307 schema with user-defined name mappings
When syncing groups with user-defined name mappings, the configuration file changes to contain these mappings as shown below.
LDAP sync configuration that uses RFC 2307 schema with user-defined name mappings: rfc2307_config_user_defined.yaml
kind: LDAPSyncConfig
apiVersion: v1
groupUIDNameMapping:
  "cn=admins,ou=groups,dc=example,dc=com": Administrators 1
rfc2307:
    groupsQuery:
        baseDN: "ou=groups,dc=example,dc=com"
        scope: sub
        derefAliases: never
        pageSize: 0
    groupUIDAttribute: dn 2
    groupNameAttributes: [ cn ] 3
    groupMembershipAttributes: [ member ]
    usersQuery:
        baseDN: "ou=users,dc=example,dc=com"
        scope: sub
        derefAliases: never
        pageSize: 0
    userUIDAttribute: dn 4
    userNameAttributes: [ mail ]
    tolerateMemberNotFoundErrors: false
    tolerateMemberOutOfScopeErrors: false
- 1
- The user-defined name mapping.
- 2
- The unique identifier attribute that is used for the keys in the user-defined name mapping. You cannot specify
groupsQueryfilters when using DN for groupUIDAttribute. For fine-grained filtering, use the whitelist / blacklist method. - 3
- The attribute to name Red Hat OpenShift Service on AWS groups with if their unique identifier is not in the user-defined name mapping.
- 4
- The attribute that uniquely identifies a user on the LDAP server. You cannot specify
usersQueryfilters when using DN for userUIDAttribute. For fine-grained filtering, use the whitelist / blacklist method.
Prerequisites
- Create the configuration file.
-
You have access to the cluster as a user with the
dedicated-adminrole.
Procedure
Run the sync with the
rfc2307_config_user_defined.yamlfile:$ oc adm groups sync --sync-config=rfc2307_config_user_defined.yaml --confirm
Red Hat OpenShift Service on AWS creates the following group record as a result of the above sync operation:
Red Hat OpenShift Service on AWS group created by using the
rfc2307_config_user_defined.yamlfileapiVersion: user.openshift.io/v1 kind: Group metadata: annotations: openshift.io/ldap.sync-time: 2015-10-13T10:08:38-0400 openshift.io/ldap.uid: cn=admins,ou=groups,dc=example,dc=com openshift.io/ldap.url: LDAP_SERVER_IP:389 creationTimestamp: name: Administrators 1 users: - jane.smith@example.com - jim.adams@example.com- 1
- The name of the group as specified by the user-defined name mapping.
14.4.3. Syncing groups using RFC 2307 with user-defined error tolerances
By default, if the groups being synced contain members whose entries are outside of the scope defined in the member query, the group sync fails with an error:
Error determining LDAP group membership for "<group>": membership lookup for user "<user>" in group "<group>" failed because of "search for entry with dn="<user-dn>" would search outside of the base dn specified (dn="<base-dn>")".
This often indicates a misconfigured baseDN in the usersQuery field. However, in cases where the baseDN intentionally does not contain some of the members of the group, setting tolerateMemberOutOfScopeErrors: true allows the group sync to continue. Out of scope members will be ignored.
Similarly, when the group sync process fails to locate a member for a group, it fails outright with errors:
Error determining LDAP group membership for "<group>": membership lookup for user "<user>" in group "<group>" failed because of "search for entry with base dn="<user-dn>" refers to a non-existent entry".
Error determining LDAP group membership for "<group>": membership lookup for user "<user>" in group "<group>" failed because of "search for entry with base dn="<user-dn>" and filter "<filter>" did not return any results".
This often indicates a misconfigured usersQuery field. However, in cases where the group contains member entries that are known to be missing, setting tolerateMemberNotFoundErrors: true allows the group sync to continue. Problematic members will be ignored.
Enabling error tolerances for the LDAP group sync causes the sync process to ignore problematic member entries. If the LDAP group sync is not configured correctly, this could result in synced Red Hat OpenShift Service on AWS groups missing members.
LDAP entries that use RFC 2307 schema with problematic group membership: rfc2307_problematic_users.ldif
  dn: ou=users,dc=example,dc=com
  objectClass: organizationalUnit
  ou: users
  dn: cn=Jane,ou=users,dc=example,dc=com
  objectClass: person
  objectClass: organizationalPerson
  objectClass: inetOrgPerson
  cn: Jane
  sn: Smith
  displayName: Jane Smith
  mail: jane.smith@example.com
  dn: cn=Jim,ou=users,dc=example,dc=com
  objectClass: person
  objectClass: organizationalPerson
  objectClass: inetOrgPerson
  cn: Jim
  sn: Adams
  displayName: Jim Adams
  mail: jim.adams@example.com
  dn: ou=groups,dc=example,dc=com
  objectClass: organizationalUnit
  ou: groups
  dn: cn=admins,ou=groups,dc=example,dc=com
  objectClass: groupOfNames
  cn: admins
  owner: cn=admin,dc=example,dc=com
  description: System Administrators
  member: cn=Jane,ou=users,dc=example,dc=com
  member: cn=Jim,ou=users,dc=example,dc=com
  member: cn=INVALID,ou=users,dc=example,dc=com 1
  member: cn=Jim,ou=OUTOFSCOPE,dc=example,dc=com 2
To tolerate the errors in the above example, the following additions to your sync configuration file must be made:
LDAP sync configuration that uses RFC 2307 schema tolerating errors: rfc2307_config_tolerating.yaml
kind: LDAPSyncConfig
apiVersion: v1
url: ldap://LDAP_SERVICE_IP:389
rfc2307:
    groupsQuery:
        baseDN: "ou=groups,dc=example,dc=com"
        scope: sub
        derefAliases: never
    groupUIDAttribute: dn
    groupNameAttributes: [ cn ]
    groupMembershipAttributes: [ member ]
    usersQuery:
        baseDN: "ou=users,dc=example,dc=com"
        scope: sub
        derefAliases: never
    userUIDAttribute: dn 1
    userNameAttributes: [ mail ]
    tolerateMemberNotFoundErrors: true 2
    tolerateMemberOutOfScopeErrors: true 3
- 1
- The attribute that uniquely identifies a user on the LDAP server. You cannot specify
usersQueryfilters when using DN for userUIDAttribute. For fine-grained filtering, use the whitelist / blacklist method. - 2
- When
true, the sync job tolerates groups for which some members were not found, and members whose LDAP entries are not found are ignored. The default behavior for the sync job is to fail if a member of a group is not found. - 3
- When
true, the sync job tolerates groups for which some members are outside the user scope given in theusersQuerybase DN, and members outside the member query scope are ignored. The default behavior for the sync job is to fail if a member of a group is out of scope.
Prerequisites
- Create the configuration file.
-
You have access to the cluster as a user with the
dedicated-adminrole.
Procedure
Run the sync with the
rfc2307_config_tolerating.yamlfile:$ oc adm groups sync --sync-config=rfc2307_config_tolerating.yaml --confirm
Red Hat OpenShift Service on AWS creates the following group record as a result of the above sync operation:
Red Hat OpenShift Service on AWS group created by using the
rfc2307_config.yamlfileapiVersion: user.openshift.io/v1 kind: Group metadata: annotations: openshift.io/ldap.sync-time: 2015-10-13T10:08:38-0400 openshift.io/ldap.uid: cn=admins,ou=groups,dc=example,dc=com openshift.io/ldap.url: LDAP_SERVER_IP:389 creationTimestamp: name: admins users: 1 - jane.smith@example.com - jim.adams@example.com- 1
- The users that are members of the group, as specified by the sync file. Members for which lookup encountered tolerated errors are absent.
14.4.4. Syncing groups using the Active Directory schema
In the Active Directory schema, both users (Jane and Jim) exist in the LDAP server as first-class entries, and group membership is stored in attributes on the user. The following snippet of ldif defines the users and group for this schema:
LDAP entries that use Active Directory schema: active_directory.ldif
dn: ou=users,dc=example,dc=com
objectClass: organizationalUnit
ou: users

dn: cn=Jane,ou=users,dc=example,dc=com
objectClass: person
objectClass: organizationalPerson
objectClass: inetOrgPerson
objectClass: testPerson
cn: Jane
sn: Smith
displayName: Jane Smith
mail: jane.smith@example.com
memberOf: admins 1

dn: cn=Jim,ou=users,dc=example,dc=com
objectClass: person
objectClass: organizationalPerson
objectClass: inetOrgPerson
objectClass: testPerson
cn: Jim
sn: Adams
displayName: Jim Adams
mail: jim.adams@example.com
memberOf: admins
- 1
- The user’s group memberships are listed as attributes on the user, and the group does not exist as an entry on the server. The
memberOfattribute does not have to be a literal attribute on the user; in some LDAP servers, it is created during search and returned to the client, but not committed to the database.
Prerequisites
- Create the configuration file.
-
You have access to the cluster as a user with the
dedicated-adminrole.
Procedure
Run the sync with the
active_directory_config.yamlfile:$ oc adm groups sync --sync-config=active_directory_config.yaml --confirm
Red Hat OpenShift Service on AWS creates the following group record as a result of the above sync operation:
Red Hat OpenShift Service on AWS group created by using the
active_directory_config.yamlfileapiVersion: user.openshift.io/v1 kind: Group metadata: annotations: openshift.io/ldap.sync-time: 2015-10-13T10:08:38-0400 1 openshift.io/ldap.uid: admins 2 openshift.io/ldap.url: LDAP_SERVER_IP:389 3 creationTimestamp: name: admins 4 users: 5 - jane.smith@example.com - jim.adams@example.com- 1
- The last time this Red Hat OpenShift Service on AWS group was synchronized with the LDAP server, in ISO 6801 format.
- 2
- The unique identifier for the group on the LDAP server.
- 3
- The IP address and host of the LDAP server where this group’s record is stored.
- 4
- The name of the group as listed in the LDAP server.
- 5
- The users that are members of the group, named as specified by the sync file.
14.4.5. Syncing groups using the augmented Active Directory schema
In the augmented Active Directory schema, both users (Jane and Jim) and groups exist in the LDAP server as first-class entries, and group membership is stored in attributes on the user. The following snippet of ldif defines the users and group for this schema:
LDAP entries that use augmented Active Directory schema: augmented_active_directory.ldif
dn: ou=users,dc=example,dc=com
objectClass: organizationalUnit
ou: users

dn: cn=Jane,ou=users,dc=example,dc=com
objectClass: person
objectClass: organizationalPerson
objectClass: inetOrgPerson
objectClass: testPerson
cn: Jane
sn: Smith
displayName: Jane Smith
mail: jane.smith@example.com
memberOf: cn=admins,ou=groups,dc=example,dc=com 1

dn: cn=Jim,ou=users,dc=example,dc=com
objectClass: person
objectClass: organizationalPerson
objectClass: inetOrgPerson
objectClass: testPerson
cn: Jim
sn: Adams
displayName: Jim Adams
mail: jim.adams@example.com
memberOf: cn=admins,ou=groups,dc=example,dc=com

dn: ou=groups,dc=example,dc=com
objectClass: organizationalUnit
ou: groups

dn: cn=admins,ou=groups,dc=example,dc=com 2
objectClass: groupOfNames
cn: admins
owner: cn=admin,dc=example,dc=com
description: System Administrators
member: cn=Jane,ou=users,dc=example,dc=com
member: cn=Jim,ou=users,dc=example,dc=com
Prerequisites
- Create the configuration file.
-
You have access to the cluster as a user with the
dedicated-adminrole.
Procedure
Run the sync with the
augmented_active_directory_config.yamlfile:$ oc adm groups sync --sync-config=augmented_active_directory_config.yaml --confirm
Red Hat OpenShift Service on AWS creates the following group record as a result of the above sync operation:
Red Hat OpenShift Service on AWS group created by using the
augmented_active_directory_config.yamlfileapiVersion: user.openshift.io/v1 kind: Group metadata: annotations: openshift.io/ldap.sync-time: 2015-10-13T10:08:38-0400 1 openshift.io/ldap.uid: cn=admins,ou=groups,dc=example,dc=com 2 openshift.io/ldap.url: LDAP_SERVER_IP:389 3 creationTimestamp: name: admins 4 users: 5 - jane.smith@example.com - jim.adams@example.com- 1
- The last time this Red Hat OpenShift Service on AWS group was synchronized with the LDAP server, in ISO 6801 format.
- 2
- The unique identifier for the group on the LDAP server.
- 3
- The IP address and host of the LDAP server where this group’s record is stored.
- 4
- The name of the group as specified by the sync file.
- 5
- The users that are members of the group, named as specified by the sync file.
14.4.5.1. LDAP nested membership sync example
Groups in Red Hat OpenShift Service on AWS do not nest. The LDAP server must flatten group membership before the data can be consumed. Microsoft’s Active Directory Server supports this feature via the LDAP_MATCHING_RULE_IN_CHAIN rule, which has the OID 1.2.840.113556.1.4.1941. Furthermore, only explicitly whitelisted groups can be synced when using this matching rule.
This section has an example for the augmented Active Directory schema, which synchronizes a group named admins that has one user Jane and one group otheradmins as members. The otheradmins group has one user member: Jim. This example explains:
- How the group and users are added to the LDAP server.
- What the LDAP sync configuration file looks like.
- What the resulting group record in Red Hat OpenShift Service on AWS will be after synchronization.
In the augmented Active Directory schema, both users (Jane and Jim) and groups exist in the LDAP server as first-class entries, and group membership is stored in attributes on the user or the group. The following snippet of ldif defines the users and groups for this schema:
LDAP entries that use augmented Active Directory schema with nested members: augmented_active_directory_nested.ldif
dn: ou=users,dc=example,dc=com
objectClass: organizationalUnit
ou: users

dn: cn=Jane,ou=users,dc=example,dc=com
objectClass: person
objectClass: organizationalPerson
objectClass: inetOrgPerson
objectClass: testPerson
cn: Jane
sn: Smith
displayName: Jane Smith
mail: jane.smith@example.com
memberOf: cn=admins,ou=groups,dc=example,dc=com 1

dn: cn=Jim,ou=users,dc=example,dc=com
objectClass: person
objectClass: organizationalPerson
objectClass: inetOrgPerson
objectClass: testPerson
cn: Jim
sn: Adams
displayName: Jim Adams
mail: jim.adams@example.com
memberOf: cn=otheradmins,ou=groups,dc=example,dc=com 2

dn: ou=groups,dc=example,dc=com
objectClass: organizationalUnit
ou: groups

dn: cn=admins,ou=groups,dc=example,dc=com 3
objectClass: group
cn: admins
owner: cn=admin,dc=example,dc=com
description: System Administrators
member: cn=Jane,ou=users,dc=example,dc=com
member: cn=otheradmins,ou=groups,dc=example,dc=com

dn: cn=otheradmins,ou=groups,dc=example,dc=com 4
objectClass: group
cn: otheradmins
owner: cn=admin,dc=example,dc=com
description: Other System Administrators
memberOf: cn=admins,ou=groups,dc=example,dc=com 5 6
member: cn=Jim,ou=users,dc=example,dc=com
When syncing nested groups with Active Directory, you must provide an LDAP query definition for both user entries and group entries, as well as the attributes with which to represent them in the internal Red Hat OpenShift Service on AWS group records. Furthermore, certain changes are required in this configuration:
-
The
oc adm groups synccommand must explicitly whitelist groups. -
The user’s
groupMembershipAttributesmust include"memberOf:1.2.840.113556.1.4.1941:"to comply with theLDAP_MATCHING_RULE_IN_CHAINrule. -
The
groupUIDAttributemust be set todn. The
groupsQuery:-
Must not set
filter. -
Must set a valid
derefAliases. -
Should not set
baseDNas that value is ignored. -
Should not set
scopeas that value is ignored.
-
Must not set
For clarity, the group you create in Red Hat OpenShift Service on AWS should use attributes other than the distinguished name whenever possible for user- or administrator-facing fields. For example, identify the users of an Red Hat OpenShift Service on AWS group by their e-mail, and use the name of the group as the common name. The following configuration file creates these relationships:
LDAP sync configuration that uses augmented Active Directory schema with nested members: augmented_active_directory_config_nested.yaml
kind: LDAPSyncConfig
apiVersion: v1
url: ldap://LDAP_SERVICE_IP:389
augmentedActiveDirectory:
    groupsQuery: 1
        derefAliases: never
        pageSize: 0
    groupUIDAttribute: dn 2
    groupNameAttributes: [ cn ] 3
    usersQuery:
        baseDN: "ou=users,dc=example,dc=com"
        scope: sub
        derefAliases: never
        filter: (objectclass=person)
        pageSize: 0
    userNameAttributes: [ mail ] 4
    groupMembershipAttributes: [ "memberOf:1.2.840.113556.1.4.1941:" ] 5
- 1
groupsQueryfilters cannot be specified. ThegroupsQuerybase DN and scope values are ignored.groupsQuerymust set a validderefAliases.- 2
- The attribute that uniquely identifies a group on the LDAP server. It must be set to
dn. - 3
- The attribute to use as the name of the group.
- 4
- The attribute to use as the name of the user in the Red Hat OpenShift Service on AWS group record.
mailorsAMAccountNameare preferred choices in most installations. - 5
- The attribute on the user that stores the membership information. Note the use of
LDAP_MATCHING_RULE_IN_CHAIN.
Prerequisites
- Create the configuration file.
-
You have access to the cluster as a user with the
dedicated-adminrole.
Procedure
Run the sync with the
augmented_active_directory_config_nested.yamlfile:$ oc adm groups sync \ 'cn=admins,ou=groups,dc=example,dc=com' \ --sync-config=augmented_active_directory_config_nested.yaml \ --confirmNoteYou must explicitly whitelist the
cn=admins,ou=groups,dc=example,dc=comgroup.Red Hat OpenShift Service on AWS creates the following group record as a result of the above sync operation:
Red Hat OpenShift Service on AWS group created by using the
augmented_active_directory_config_nested.yamlfileapiVersion: user.openshift.io/v1 kind: Group metadata: annotations: openshift.io/ldap.sync-time: 2015-10-13T10:08:38-0400 1 openshift.io/ldap.uid: cn=admins,ou=groups,dc=example,dc=com 2 openshift.io/ldap.url: LDAP_SERVER_IP:389 3 creationTimestamp: name: admins 4 users: 5 - jane.smith@example.com - jim.adams@example.com- 1
- The last time this Red Hat OpenShift Service on AWS group was synchronized with the LDAP server, in ISO 6801 format.
- 2
- The unique identifier for the group on the LDAP server.
- 3
- The IP address and host of the LDAP server where this group’s record is stored.
- 4
- The name of the group as specified by the sync file.
- 5
- The users that are members of the group, named as specified by the sync file. Note that members of nested groups are included since the group membership was flattened by the Microsoft Active Directory Server.
14.5. LDAP sync configuration specification
The object specification for the configuration file is below. Note that the different schema objects have different fields. For example, v1.ActiveDirectoryConfig has no groupsQuery field whereas v1.RFC2307Config and v1.AugmentedActiveDirectoryConfig both do.
There is no support for binary attributes. All attribute data coming from the LDAP server must be in the format of a UTF-8 encoded string. For example, never use a binary attribute, such as objectGUID, as an ID attribute. You must use string attributes, such as sAMAccountName or userPrincipalName, instead.
14.5.1. v1.LDAPSyncConfig
LDAPSyncConfig holds the necessary configuration options to define an LDAP group sync.
| Name | Description | Schema |
|---|---|---|
|
| String value representing the REST resource this object represents. Servers may infer this from the endpoint the client submits requests to. Cannot be updated. In CamelCase. More info: https://github.com/kubernetes/community/blob/master/contributors/devel/sig-architecture/api-conventions.md#types-kinds | string |
|
| Defines the versioned schema of this representation of an object. Servers should convert recognized schemas to the latest internal value, and may reject unrecognized values. More info: https://github.com/kubernetes/community/blob/master/contributors/devel/sig-architecture/api-conventions.md#resources | string |
|
|
Host is the scheme, host and port of the LDAP server to connect to: | string |
|
| Optional DN to bind to the LDAP server with. | string |
|
| Optional password to bind with during the search phase. | v1.StringSource |
|
|
If | boolean |
|
| Optional trusted certificate authority bundle to use when making requests to the server. If empty, the default system roots are used. | string |
|
| Optional direct mapping of LDAP group UIDs to Red Hat OpenShift Service on AWS group names. | object |
|
| Holds the configuration for extracting data from an LDAP server set up in a fashion similar to RFC2307: first-class group and user entries, with group membership determined by a multi-valued attribute on the group entry listing its members. | v1.RFC2307Config |
|
| Holds the configuration for extracting data from an LDAP server set up in a fashion similar to that used in Active Directory: first-class user entries, with group membership determined by a multi-valued attribute on members listing groups they are a member of. | v1.ActiveDirectoryConfig |
|
| Holds the configuration for extracting data from an LDAP server set up in a fashion similar to that used in Active Directory as described above, with one addition: first-class group entries exist and are used to hold metadata but not group membership. | v1.AugmentedActiveDirectoryConfig |
14.5.2. v1.StringSource
StringSource allows specifying a string inline, or externally via environment variable or file. When it contains only a string value, it marshals to a simple JSON string.
| Name | Description | Schema |
|---|---|---|
|
|
Specifies the cleartext value, or an encrypted value if | string |
|
|
Specifies an environment variable containing the cleartext value, or an encrypted value if the | string |
|
|
References a file containing the cleartext value, or an encrypted value if a | string |
|
| References a file containing the key to use to decrypt the value. | string |
14.5.3. v1.LDAPQuery
LDAPQuery holds the options necessary to build an LDAP query.
| Name | Description | Schema |
|---|---|---|
|
| DN of the branch of the directory where all searches should start from. | string |
|
|
The optional scope of the search. Can be | string |
|
|
The optional behavior of the search with regards to aliases. Can be | string |
|
|
Holds the limit of time in seconds that any request to the server can remain outstanding before the wait for a response is given up. If this is | integer |
|
| A valid LDAP search filter that retrieves all relevant entries from the LDAP server with the base DN. | string |
|
|
Maximum preferred page size, measured in LDAP entries. A page size of | integer |
14.5.4. v1.RFC2307Config
RFC2307Config holds the necessary configuration options to define how an LDAP group sync interacts with an LDAP server using the RFC2307 schema.
| Name | Description | Schema |
|---|---|---|
|
| Holds the template for an LDAP query that returns group entries. | v1.LDAPQuery |
|
|
Defines which attribute on an LDAP group entry will be interpreted as its unique identifier. ( | string |
|
| Defines which attributes on an LDAP group entry will be interpreted as its name to use for an Red Hat OpenShift Service on AWS group. | string array |
|
|
Defines which attributes on an LDAP group entry will be interpreted as its members. The values contained in those attributes must be queryable by your | string array |
|
| Holds the template for an LDAP query that returns user entries. | v1.LDAPQuery |
|
|
Defines which attribute on an LDAP user entry will be interpreted as its unique identifier. It must correspond to values that will be found from the | string |
|
|
Defines which attributes on an LDAP user entry will be used, in order, as its Red Hat OpenShift Service on AWS user name. The first attribute with a non-empty value is used. This should match your | string array |
|
|
Determines the behavior of the LDAP sync job when missing user entries are encountered. If | boolean |
|
|
Determines the behavior of the LDAP sync job when out-of-scope user entries are encountered. If | boolean |
14.5.5. v1.ActiveDirectoryConfig
ActiveDirectoryConfig holds the necessary configuration options to define how an LDAP group sync interacts with an LDAP server using the Active Directory schema.
| Name | Description | Schema |
|---|---|---|
|
| Holds the template for an LDAP query that returns user entries. | v1.LDAPQuery |
|
|
Defines which attributes on an LDAP user entry will be interpreted as its Red Hat OpenShift Service on AWS user name. The attribute to use as the name of the user in the Red Hat OpenShift Service on AWS group record. | string array |
|
| Defines which attributes on an LDAP user entry will be interpreted as the groups it is a member of. | string array |
14.5.6. v1.AugmentedActiveDirectoryConfig
AugmentedActiveDirectoryConfig holds the necessary configuration options to define how an LDAP group sync interacts with an LDAP server using the augmented Active Directory schema.
| Name | Description | Schema |
|---|---|---|
|
| Holds the template for an LDAP query that returns user entries. | v1.LDAPQuery |
|
|
Defines which attributes on an LDAP user entry will be interpreted as its Red Hat OpenShift Service on AWS user name. The attribute to use as the name of the user in the Red Hat OpenShift Service on AWS group record. | string array |
|
| Defines which attributes on an LDAP user entry will be interpreted as the groups it is a member of. | string array |
|
| Holds the template for an LDAP query that returns group entries. | v1.LDAPQuery |
|
|
Defines which attribute on an LDAP group entry will be interpreted as its unique identifier. ( | string |
|
| Defines which attributes on an LDAP group entry will be interpreted as its name to use for an Red Hat OpenShift Service on AWS group. | string array |