
Chapter 3. Scaling out storage capacity
To scale out storage capacity, you need to perform the following steps:
- Add a new node.
- Verify that the new node is added successfully.
- Scale up the storage capacity.
OpenShift Data Foundation does not support heterogeneous OSD sizes.
3.1. Adding a node
You can add nodes to increase the storage capacity when existing worker nodes are already running at their maximum supported OSDs, which is increment of 3 OSDs of the capacity selected during initial configuration.
Depending on the type of your deployment, you can choose one of the following procedures to add a storage node:
- For AWS or Azure or Red Hat Virtualization installer-provisioned infrastructures, see Adding a node on an installer-provisioned infrastructure.
- For AWS or VMware user-provisioned infrastructure, see Adding a node on an user-provisioned infrastructure.
- For bare metal, IBM Z or LinuxONE, VMware, or Red Hat Virtualization infrastructures, see Adding a node using a local storage device.
- For IBM Power, see Adding a node using a local storage device on IBM Power.
3.1.1. Adding a node on an installer-provisioned infrastructure
You can add a node on the following installer provisioned infrastructures:
- AWS
- Azure
- Red Hat Virtualization
- VMware
Prerequisites
- You must be logged into OpenShift Container Platform cluster.
Procedure
- Navigate to Compute → Machine Sets.
On the machine set where you want to add nodes, select Edit Machine Count.
- Add the amount of nodes, and click Save.
- Click Compute → Nodes and confirm if the new node is in Ready state.
Apply the OpenShift Data Foundation label to the new node.
- For the new node, click Action menu (⋮) → Edit Labels.
- Add cluster.ocs.openshift.io/openshift-storage, and click Save.
It is recommended to add 3 nodes, one each in different zones. You must add 3 nodes and perform this procedure for all of them.
Verification steps
- To verify that the new node is added, see Verifying the addition of a new node.
3.1.2. Adding a node on an user-provisioned infrastructure
You can add a node on an AWS or VMware user-provisioned infrastructure.
Prerequisites
- You must be logged into OpenShift Container Platform cluster.
Procedure
Depending on whether you are adding a node on an AWS or a VMware user-provisioned infrastructure, perform the following steps:
For AWS:
- Create a new AWS machine instance with the required infrastructure. See Platform requirements.
- Create a new OpenShift Container Platform node using the new AWS machine instance.
For VMware:
- Create a new virtual machine (VM) on vSphere with the required infrastructure. See Platform requirements.
- Create a new OpenShift Container Platform worker node using the new VM.
Check for certificate signing requests (CSRs) related to OpenShift Data Foundation that are in
Pendingstate.$ oc get csr
Approve all the required OpenShift Data Foundation CSRs for the new node.
$ oc adm certificate approve <Certificate_Name><Certificate_Name>- Is the name of the CSR.
- Click Compute → Nodes, confirm if the new node is in Ready state.
Apply the OpenShift Data Foundation label to the new node using any one of the following:
- From User interface
- For the new node, click Action Menu (⋮) → Edit Labels.
-
Add
cluster.ocs.openshift.io/openshift-storage, and click Save.
- From Command line interface
Apply the OpenShift Data Foundation label to the new node.
$ oc label node <new_node_name> cluster.ocs.openshift.io/openshift-storage=""<new_node_name>- Is the name of the new node.
It is recommended to add 3 nodes, one each in different zones. You must add 3 nodes and perform this procedure for all of them.
Verification steps
- To verify that the new node is added, see Verifying the addition of a new node.
3.1.3. Adding a node using a local storage device
You can add a node on the following:
- Bare metal
- IBM Z or LinuxONE
- VMware
- Red Hat Virtualization
Prerequisites
- You must be logged into the OpenShift Container Platform cluster.
- You must have three OpenShift Container Platform worker nodes with the same storage type and size attached to each node (for example, 2TB SSD or 2TB NVMe drive) as the original OpenShift Data Foundation StorageCluster was created with.
-
If you upgraded to OpenShift Data Foundation version 4.9 from a previous version, and have not already created the
LocalVolumeDiscoveryandLocalVolumeSetobjects, follow the procedure described in Post-update configuration changes for clusters backed by local storage.
Procedure
Depending on the type of infrastructure, perform the following steps:
For VMware:
- Create a new virtual machine (VM) on vSphere with the required infrastructure. See Platform requirements.
- Create a new OpenShift Container Platform worker node using the new VM.
For Red Hat Virtualization:
- Create a new VM on Red Hat Virtualization with the required infrastructure. See Platform requirements.
- Create a new OpenShift Container Platform worker node using the new VM.
For bare metal:
- Get a new bare metal machine with the required infrastructure. See Platform requirements.
- Create a new OpenShift Container Platform node using the new bare metal machine.
For IBM Z or LinuxONE:
- Get a new IBM Z or LinuxONE machine with the required infrastructure. See Platform requirements.
- Create a new OpenShift Container Platform node using the new IBM Z or LinuxONE machine.
Check for certificate signing requests (CSRs) related to OpenShift Data Foundation that are in
Pendingstate.$ oc get csr
Approve all the required OpenShift Data Foundation CSRs for the new node.
$ oc adm certificate approve <Certificate_Name><Certificate_Name>- Is the name of the CSR.
- Click Compute → Nodes, confirm if the new node is in Ready state.
Apply the OpenShift Data Foundation label to the new node using any one of the following:
- From User interface
- For the new node, click Action Menu (⋮) → Edit Labels.
-
Add
cluster.ocs.openshift.io/openshift-storage, and click Save.
- From Command line interface
Apply the OpenShift Data Foundation label to the new node.
$ oc label node <new_node_name> cluster.ocs.openshift.io/openshift-storage=""<new_node_name>- Is the name of the new node.
Click Operators → Installed Operators from the OpenShift Web Console.
From the Project drop-down list, make sure to select the project where the Local Storage Operator is installed.
- Click Local Storage.
Click the Local Volume Discovery tab.
-
Beside the
LocalVolumeDiscovery, click Action menu (⋮) → Edit Local Volume Discovery. -
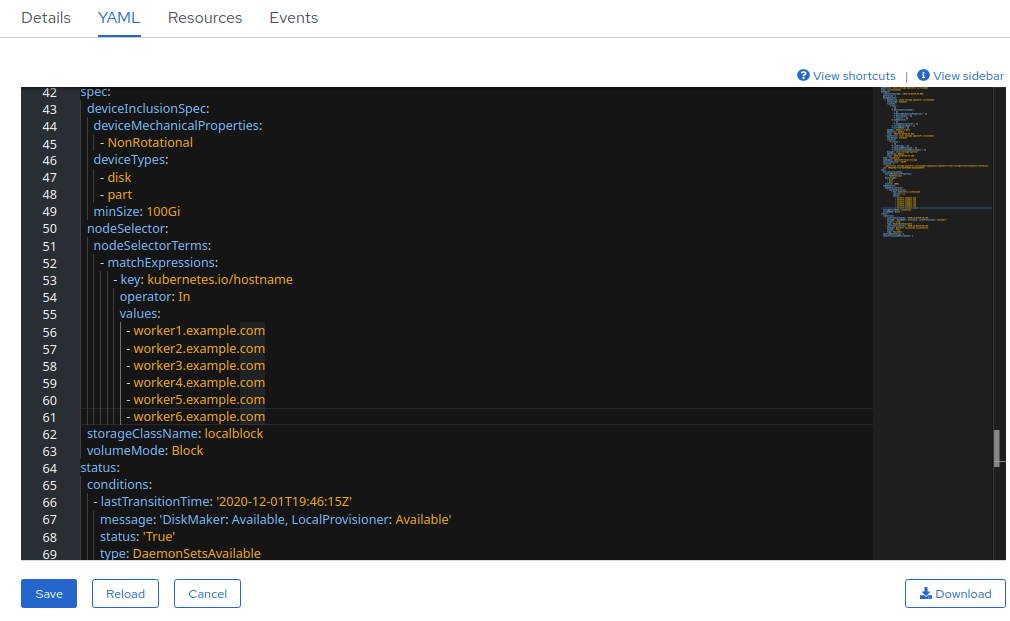
In the YAML, add the hostname of the new node in the
valuesfield under the node selector. - Click Save.
-
Beside the
Click the Local Volume Sets tab.
-
Beside the
LocalVolumeSet, click Action menu (⋮) → Edit Local Volume Set. In the YAML, add the hostname of the new node in the
valuesfield under thenode selector.Figure 3.1. YAML showing the addition of new hostnames
- Click Save.
-
Beside the
It is recommended to add 3 nodes, one each in different zones. You must add 3 nodes and perform this procedure for all of them.
Verification steps
- To verify that the new node is added, see Verifying the addition of a new node.
3.1.4. Adding a node using a local storage device on IBM Power
Prerequisites
- You must be logged into the OpenShift Container Platform cluster.
- You must have three OpenShift Container Platform worker nodes with the same storage type and size attached to each node (for example, 2TB SSD drive) as the original OpenShift Data Foundation StorageCluster was created with.
-
If you have upgraded from a previous version of OpenShift Data Foundation and have not already created a
LocalVolumeDiscoveryobject, follow the procedure described in Post-update configuration changes for clusters backed by local storage.
Procedure
- Get a new IBM Power machine with the required infrastructure. See Platform requirements.
Create a new OpenShift Container Platform node using the new IBM Power machine.
Check for certificate signing requests (CSRs) related to OpenShift Data Foundation that are in
Pendingstate.$ oc get csr
Approve all the required OpenShift Data Foundation CSRs for the new node.
$ oc adm certificate approve <Certificate_Name><Certificate_Name>- Is the name of the CSR.
- Click Compute → Nodes, confirm if the new node is in Ready state.
Apply the OpenShift Data Foundation label to the new node using any one of the following:
- From User interface
- For the new node, click Action Menu (⋮) → Edit Labels.
-
Add
cluster.ocs.openshift.io/openshift-storageand click Save.
- From Command line interface
Apply the OpenShift Data Foundation label to the new node.
$ oc label node <new_node_name> cluster.ocs.openshift.io/openshift-storage=""
<new_node_name>- Is the name of the new node.
Click Operators → Installed Operators from the OpenShift Web Console.
From the Project drop-down list, make sure to select the project where the Local Storage Operator is installed.
- Click Local Storage.
Click the Local Volume Discovery tab.
-
Click the Action menu (⋮) next to
LocalVolumeDiscovery→ Edit Local Volume Discovery. -
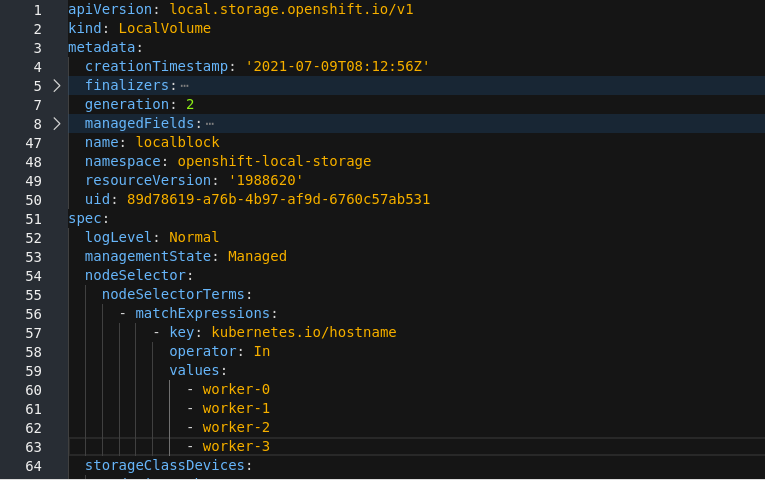
In the YAML, add the hostname of the new node in the
valuesfield under the node selector. - Click Save.
-
Click the Action menu (⋮) next to
Click the Local Volume tab.
-
Beside the
LocalVolume, click Action menu (⋮) → Edit Local Volume. In the YAML, add the hostname of the new node in the
valuesfield under thenode selector.Figure 3.2. YAML showing the addition of new hostnames
- Click Save.
-
Beside the
It is recommended to add 3 nodes, one each in different zones. You must add 3 nodes and perform this procedure for all of them.
Verification steps
- To verify that the new node is added, see Verifying the addition of a new node.
3.1.5. Verifying the addition of a new node
Execute the following command and verify that the new node is present in the output:
$ oc get nodes --show-labels | grep cluster.ocs.openshift.io/openshift-storage= |cut -d' ' -f1
Click Workloads → Pods, confirm that at least the following pods on the new node are in Running state:
-
csi-cephfsplugin-* -
csi-rbdplugin-*
-
3.2. Adding capacity to a newly added node
To add capacity to a newly added node, either use the Add Capacity option to expand the storage cluster with 3 OSDs or use the new flexible scaling feature that allows you to expand the storage cluster by any number of OSDs if it is enabled.
3.2.1. Add capacity with 3 OSDs using the Add Capacity option
To add capacity by 3 OSDs for dynamic and local storage using the Add Capacity option in the user interface, see Scaling up storage by adding capacity. The Add Capacity option is available for storage clusters with or without the flexible scaling feature enabled.
3.2.2. Add capacity using YAML
With flexible scaling enabled, you can add capacity by 1 or more OSDs at a time using the YAML instead of the default set of 3 OSDs. However, you need to make sure that you add disks in a way that the cluster remains balanced.
Flexible scaling is supported only for the internal-attached mode of storage cluster creation.
To enable flexible scaling, create a cluster with 3 nodes, and fewer than 3 availability zones. The OpenShift Web Console detects the 3 nodes spread across fewer than 3 availability zones and enables flexible scaling.
You can not enable or disable the flexible scaling feature after creating the storage cluster.
3.2.2.1. Verifying if flexible scaling is enabled
Procedure
In the Web Console, click Home → Search.
-
Enter
StorageClusterin the search field. -
Click
ocs-storagecluster. In the YAML tab, search for the keys
flexibleScalinginspecsection andfailureDomaininstatussection.If
flexible scalingis true andfailureDomainis set to host, flexible scaling feature is enabled.spec: flexibleScaling: true […] status: failureDomain: host
-
Enter
3.2.2.2. Adding capacity using the YAML in multiples of 1 OSD
To add OSDs to your storage cluster flexibly through the YAML, perform the following steps:
Prerequisites
- Administrator access to the OpenShift Container Platform web console.
- A storage cluster with flexible scaling enabled.
- Additional disks available for adding capacity.
Procedure
In the OpenShift Web Console, click Home → Search.
-
Search for
ocs-storageclusterin the search field and click onocs-storageclusterfrom the search result. - Click the Action menu (⋮) next to the storage cluster you want to scale up.
- Click Edit Storage Cluster. You are redirected to the YAML.
-
Search for
-
In the YAML, search for the key
count. This count parameter scales up the capacity. Increase the count by the number of OSDs you want to add to your cluster.
ImportantEnsure the
countparameter in the YAML is incremented depending on the number of available disks and also make sure that you add disks in a way that the cluster remains balanced.- Click Save.
You might need to wait a couple of minutes for the storage cluster to reach the Ready state.
Verification steps
Verify the Raw Capacity card.
- In the OpenShift Web Console, click Storage → OpenShift Data Foundation.
- In the Status card of the Overview tab, click Storage System and then click the storage system link from the pop up that appears.
In the Block and File tab, check the Raw Capacity card.
Note that the capacity increases based on your selections.
NoteThe raw capacity does not take replication into account and shows the full capacity.
Verify that the new OSDs and their corresponding new Persistent Volume Claims (PVCs) are created.
To view the state of the newly created OSDs:
- Click Workloads → Pods from the OpenShift Web Console.
Select
openshift-storagefrom the Project drop-down list.NoteIf the Show default projects option is disabled, use the toggle button to list all the default projects.
To view the state of the PVCs:
- Click Storage → Persistent Volume Claims from the OpenShift Web Console.
Select
openshift-storagefrom the Project drop-down list.NoteIf the Show default projects option is disabled, use the toggle button to list all the default projects.
Optional: If cluster-wide encryption is enabled on the cluster, verify that the new OSD devices are encrypted.
Identify the node(s) where the new OSD pod(s) are running.
$ oc get -o=custom-columns=NODE:.spec.nodeName pod/<OSD-pod-name><OSD-pod-name>Is the name of th OSD pod.
For example:
oc get -o=custom-columns=NODE:.spec.nodeName pod/rook-ceph-osd-0-544db49d7f-qrgqm
For each of the nodes identified in the previous step, do the following:
Create a debug pod and open a chroot environment for the selected host(s).
$ oc debug node/<node name><node name>Is the name of the node.
$ chroot /host
Check for the
cryptkeyword beside theocs-devicesetname(s).$ lsblk
Cluster reduction is supported only with the Red Hat Support Team’s assistance.