
Chapter 3. Deploying OpenShift Data Foundation on Red Hat OpenStack Platform in external mode
Red Hat OpenShift Data Foundation can use an externally hosted Red Hat Ceph Storage (RHCS) cluster as the storage provider on Red Hat OpenStack Platform. See Planning your deployment for more information.
For instructions regarding how to install a RHCS 4 cluster, see Installation guide.
Follow these steps to deploy OpenShift Data Foundation in external mode:
3.1. Installing Red Hat OpenShift Data Foundation Operator
You can install Red Hat OpenShift Data Foundation Operator using the Red Hat OpenShift Container Platform Operator Hub.
Prerequisites
-
Access to an OpenShift Container Platform cluster using an account with
cluster-adminand operator installation permissions. - You must have at least three worker nodes in the Red Hat OpenShift Container Platform cluster.
- For additional resource requirements, see the Planning your deployment guide.
When you need to override the cluster-wide default node selector for OpenShift Data Foundation, you can use the following command to specify a blank node selector for the
openshift-storagenamespace (createopenshift-storagenamespace in this case):$ oc annotate namespace openshift-storage openshift.io/node-selector=
-
Taint a node as
infrato ensure only Red Hat OpenShift Data Foundation resources are scheduled on that node. This helps you save on subscription costs. For more information, see the How to use dedicated worker nodes for Red Hat OpenShift Data Foundation section in the Managing and Allocating Storage Resources guide.
Procedure
- Log in to the OpenShift Web Console.
- Click Operators → OperatorHub.
-
Scroll or type
OpenShift Data Foundationinto the Filter by keyword box to find the OpenShift Data Foundation Operator. - Click Install.
Set the following options on the Install Operator page:
- Update Channel as stable-4.11.
- Installation Mode as A specific namespace on the cluster.
-
Installed Namespace as Operator recommended namespace openshift-storage. If Namespace
openshift-storagedoes not exist, it is created during the operator installation. Select Approval Strategy as Automatic or Manual.
If you select Automatic updates, then the Operator Lifecycle Manager (OLM) automatically upgrades the running instance of your Operator without any intervention.
If you select Manual updates, then the OLM creates an update request. As a cluster administrator, you must then manually approve that update request to update the Operator to a newer version.
- Ensure that the Enable option is selected for the Console plugin.
- Click Install.
Verification steps
-
After the operator is successfully installed, a pop-up with a message,
Web console update is availableappears on the user interface. Click Refresh web console from this pop-up for the console changes to reflect. In the Web Console:
- Navigate to Installed Operators and verify that the OpenShift Data Foundation Operator shows a green tick indicating successful installation.
- Navigate to Storage and verify if Data Foundation dashboard is available.
3.2. Creating an OpenShift Data foundation Cluster for external mode
You need to create a new OpenShift Data Foundation cluster after you install OpenShift Data Foundation operator on OpenShift Container Platform deployed on Red Hat OpenStack platform.
Prerequisites
- Ensure the OpenShift Container Platform version is 4.11 or above before deploying OpenShift Data Foundation 4.11.
- OpenShift Data Foundation operator must be installed. For more information, see Installing OpenShift Data Foundation Operator using the Operator Hub.
Red Hat Ceph Storage version 4.2z1 or later is required for the external cluster. For more information, see this knowledge base article on Red Hat Ceph Storage releases and corresponding Ceph package versions.
If you have updated the Red Hat Ceph Storage cluster from a version lower than 4.1.1 to the latest release and is not a freshly deployed cluster, you must manually set the application type for CephFS pool on the Red Hat Ceph Storage cluster to enable CephFS PVC creation in external mode.
For more details, see Troubleshooting CephFS PVC creation in external mode.
- Red Hat Ceph Storage must have Ceph Dashboard installed and configured. For more information, see Ceph Dashboard installation and access.
- Red Hat recommends that the external Red Hat Ceph Storage cluster has the PG Autoscaler enabled. For more information, see The placement group autoscaler section in the Red Hat Ceph Storage documentation.
- The external Ceph cluster should have an existing RBD pool pre-configured for use. If it does not exist, contact your Red Hat Ceph Storage administrator to create one before you move ahead with OpenShift Data Foundation deployment. Red Hat recommends to use a separate pool for each OpenShift Data Foundation cluster.
Procedure
Click Operators → Installed Operators to view all the installed operators.
Ensure that the Project selected is
openshift-storage.- Click OpenShift Data Foundation → Create Instance link of Storage Cluster.
Select Mode as External. By default, Internal is selected as deployment mode.
Figure 3.1. Connect to external cluster section on Create Storage Cluster form

- In the Connect to external cluster section, click on the Download Script link to download the python script for extracting Ceph cluster details.
For extracting the Red Hat Ceph Storage (RHCS) cluster details, contact the RHCS administrator to run the downloaded python script on a Red Hat Ceph Storage node with
admin key.Run the following command on the RHCS node to view the list of available arguments.
# python3 ceph-external-cluster-details-exporter.py --help
ImportantUse
pythoninstead ofpython3if the Red Hat Ceph Storage 4.x cluster is deployed on Red Hat Enterprise Linux 7.x (RHEL 7.x) cluster.NoteYou can also run the script from inside a MON container (containerized deployment) or from a MON node (rpm deployment).
To retrieve the external cluster details from the RHCS cluster, run the following command
# python3 ceph-external-cluster-details-exporter.py \
--rbd-data-pool-name <rbd block pool name>  [optional arguments]
For example:
# python3 ceph-external-cluster-details-exporter.py --rbd-data-pool-name ceph-rbd --monitoring-endpoint xxx.xxx.xxx.xxx --monitoring-endpoint-port xxxx --rgw-endpoint xxx.xxx.xxx.xxx:xxxx --run-as-user client.ocs
In the above example,
-
--rbd-data-pool-nameis a mandatory parameter used for providing block storage in OpenShift Data Foundation. -
--rgw-endpointis optional. Provide this parameter if object storage is to be provisioned through Ceph Rados Gateway for OpenShift Data Foundation. Provide the endpoint in the following format:<ip_address>:<port> -
--monitoring-endpointis optional. It is the IP address of the activeceph-mgrreachable from the OpenShift Container Platform cluster. If not provided, the value is automatically populated. -
--monitoring-endpoint-portis optional. It is the port associated with theceph-mgrPrometheus exporter specified by--monitoring-endpoint. If not provided, the value is automatically populated. -- run-as-useris an optional parameter used for providing a name for the Ceph user which is created by the script. If this parameter is not specified, a default user nameclient.healthcheckeris created. The permissions for the new user is set as:- caps: [mgr] allow command config
- caps: [mon] allow r, allow command quorum_status, allow command version
caps: [osd] allow rwx pool=
RGW_POOL_PREFIX.rgw.meta, allow r pool=.rgw.root, allow rw pool=RGW_POOL_PREFIX.rgw.control, allow rx pool=RGW_POOL_PREFIX.rgw.log, allow x pool=RGW_POOL_PREFIX.rgw.buckets.indexExample of JSON output generated using the python script:
[{"name": "rook-ceph-mon-endpoints", "kind": "ConfigMap", "data": {"data": "xxx.xxx.xxx.xxx:xxxx", "maxMonId": "0", "mapping": "{}"}}, {"name": "rook-ceph-mon", "kind": "Secret", "data": {"admin-secret": "admin-secret", "fsid": "<fs-id>", "mon-secret": "mon-secret"}}, {"name": "rook-ceph-operator-creds", "kind": "Secret", "data": {"userID": "client.healthchecker", "userKey": "<user-key>"}}, {"name": "rook-csi-rbd-node", "kind": "Secret", "data": {"userID": "csi-rbd-node", "userKey": "<user-key>"}}, {"name": "ceph-rbd", "kind": "StorageClass", "data": {"pool": "ceph-rbd"}}, {"name": "monitoring-endpoint", "kind": "CephCluster", "data": {"MonitoringEndpoint": "xxx.xxx.xxx.xxx", "MonitoringPort": "xxxx"}}, {"name": "rook-csi-rbd-provisioner", "kind": "Secret", "data": {"userID": "csi-rbd-provisioner", "userKey": "<user-key>"}}, {"name": "rook-csi-cephfs-provisioner", "kind": "Secret", "data": {"adminID": "csi-cephfs-provisioner", "adminKey": "<admin-key>"}}, {"name": "rook-csi-cephfs-node", "kind": "Secret", "data": {"adminID": "csi-cephfs-node", "adminKey": "<admin-key>"}}, {"name": "cephfs", "kind": "StorageClass", "data": {"fsName": "cephfs", "pool": "cephfs_data"}}, {"name": "ceph-rgw", "kind": "StorageClass", "data": {"endpoint": "xxx.xxx.xxx.xxx:xxxx", "poolPrefix": "default"}}]
-
Save the JSON output to a file with
.jsonextensionNoteFor OpenShift Data Foundation to work seamlessly, ensure that the parameters (RGW endpoint, CephFS details, RBD pool, and so on) to be uploaded using the JSON file remains unchanged on the RHCS external cluster after the storage cluster creation.
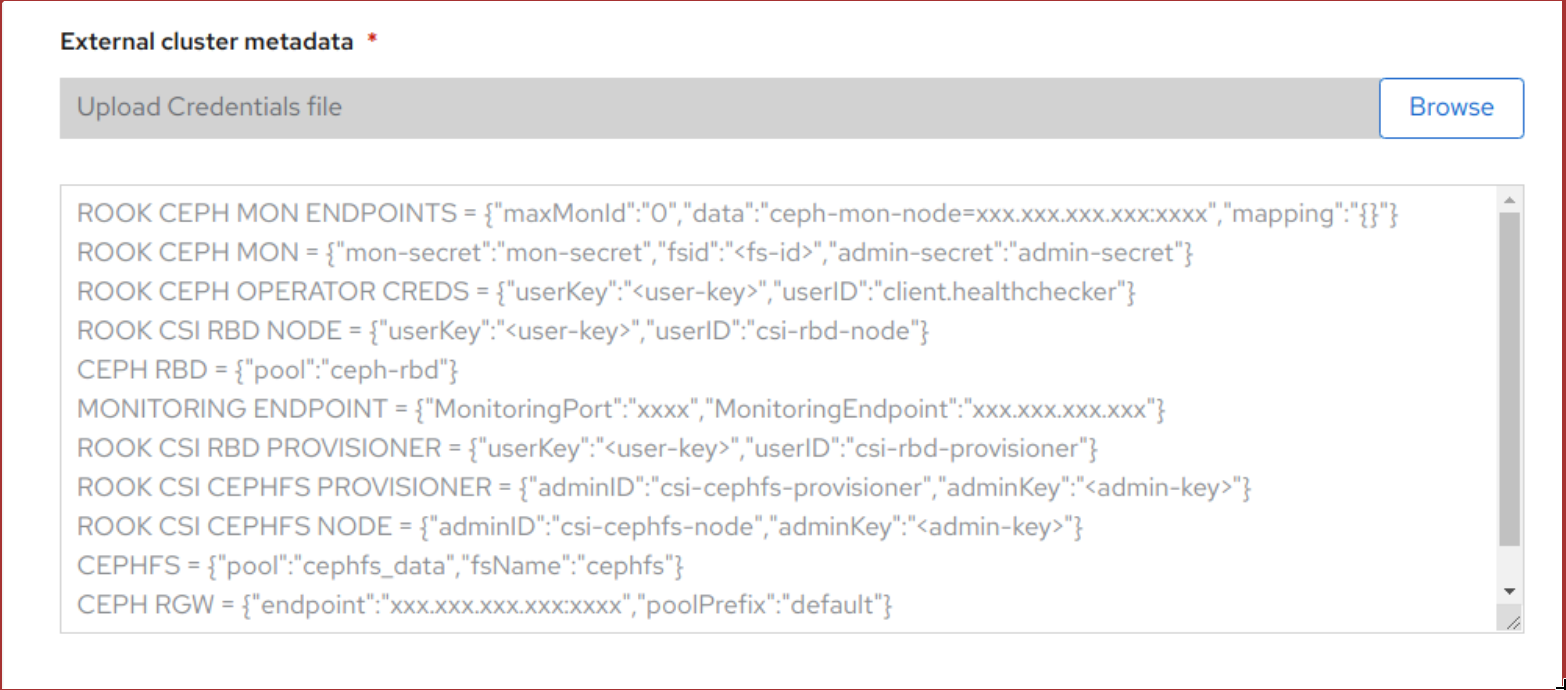
Click External cluster metadata → Browse to select and upload the JSON file.
The content of the JSON file is populated and displayed in the text box.
Figure 3.2. Json file content
Click Create.
The Create button is enabled only after you upload the
.jsonfile.
Verification steps
Verify that the final Status of the installed storage cluster shows as
Phase: Readywith a green tick mark.- Click Operators → Installed Operators → Storage Cluster link to view the storage cluster installation status.
- Alternatively, when you are on the Operator Details tab, you can click on the Storage Cluster tab to view the status.
- To verify that OpenShift Data Foundation, pods and StorageClass are successfully installed, see Verifying your external mode OpenShift Data Foundation installation.
3.3. Verifying your OpenShift Data Foundation installation for external mode
Use this section to verify that OpenShift Data Foundation is deployed correctly.
3.3.1. Verifying the state of the pods
- Click Workloads → Pods from the left pane of the OpenShift Web Console.
Select
openshift-storagefrom the Project drop-down list.NoteIf the Show default projects option is disabled, use the toggle button to list all the default projects.
For more information on the expected number of pods for each component and how it varies depending on the number of nodes, see Table 3.1, “Pods corresponding to OpenShift Data Foundation components”
Verify that the following pods are in running state:
Table 3.1. Pods corresponding to OpenShift Data Foundation components
Component Corresponding pods OpenShift Data Foundation Operator
-
ocs-operator-*(1 pod on any storage node) -
ocs-metrics-exporter-*(1 pod on any storage node) -
odf-operator-controller-manager-*(1 pod on any storage node) -
odf-console-*(1 pod on any storage node) -
csi-addons-controller-manager-*(1 pod on any storage node)
Rook-ceph Operator
rook-ceph-operator-*(1 pod on any storage node)
Multicloud Object Gateway
-
noobaa-operator-*(1 pod on any storage node) -
noobaa-core-*(1 pod on any storage node) -
noobaa-db-pg-*(1 pod on any storage node) -
noobaa-endpoint-*(1 pod on any storage node)
CSI
cephfs-
csi-cephfsplugin-*(1 pod on each storage node) -
csi-cephfsplugin-provisioner-*(2 pods distributed across storage nodes)
-
NoteIf an MDS is not deployed in the external cluster, the csi-cephfsplugin pods will not be created.
rbd-
csi-rbdplugin-*(1 pod on each storage node) -
csi-rbdplugin-provisioner-*(2 pods distributed across storage nodes)
-
-
3.3.2. Verifying that the OpenShift Data Foundation cluster is healthy
- In the OpenShift Web Console, click Storage → Data Foundation.
- In the Status card of the Overview tab, click Storage System and then click the storage system link from the pop up that appears.
- In the Status card of the Block and File tab, verify that both Storage Cluster and Data Resiliency have a green tick.
In the Details card, verify that the cluster information is displayed as follows.
+ Service Name:: OpenShift Data Foundation Cluster Name:: ocs-external-storagecluster Provider:: OpenStack Mode:: External Version:: ocs-operator-4.11.0
For more information on the health of OpenShift Data Foundation cluster using the Block and File dashboard, see Monitoring OpenShift Data Foundation.
3.3.3. Verifying that the Multicloud Object Gateway is healthy
- In the OpenShift Web Console, click Storage → Data Foundation.
In the Status card of the Overview tab, click Storage System and then click the storage system link from the pop up that appears.
- In the Status card of the Object tab, verify that both Object Service and Data Resiliency have a green tick.
- In the Details card, verify that the Multicloud Object Gateway (MCG) information is displayed.
The RADOS Object Gateway is only listed in case RADOS Object Gateway endpoint details were included while deploying OpenShift Data Foundation in external mode.
For more information on the health of OpenShift Data Foundation cluster using the object dashboard, see Monitoring OpenShift Data Foundation.
3.3.4. Verifying that the storage classes are created and listed
- Click Storage → Storage Classes from the left pane of the OpenShift Web Console.
Verify that the following storage classes are created with the OpenShift Data Foundation cluster creation:
-
ocs-external-storagecluster-ceph-rbd -
ocs-external-storagecluster-ceph-rgw -
ocs-external-storagecluster-cephfs -
openshift-storage.noobaa.io
-
-
If MDS is not deployed in the external cluster,
ocs-external-storagecluster-cephfsstorage class will not be created. -
If RGW is not deployed in the external cluster, the
ocs-external-storagecluster-ceph-rgwstorage class will not be created.
For more information regarding MDS and RGW, see Red Hat Ceph Storage documentation
3.3.5. Verifying that Ceph cluster is connected
Run the following command to verify if the OpenShift Data Foundation cluster is connected to the external Red Hat Ceph Storage cluster.
$ oc get cephcluster -n openshift-storage
NAME                                      DATADIRHOSTPATH     MONCOUNT    AGE      PHASE       MESSAGE                         HEALTH
ocs-external-storagecluster-cephcluster                                   31m15s   Connected   Cluster connected successfully  HEALTH_OK
3.3.6. Verifying that storage cluster is ready
Run the following command to verify if the storage cluster is ready and the External option is set to true.
$ oc get storagecluster -n openshift-storage
NAME                        AGE      PHASE EXTERNAL  CREATED AT              VERSION
ocs-external-storagecluster 31m15s   Ready true      2021-02-29T20:43:04Z    4.8.0
3.4. Uninstalling OpenShift Data Foundation
3.4.1. Uninstalling OpenShift Data Foundation from external storage system
Use the steps in this section to uninstall OpenShift Data Foundation. Uninstalling OpenShift Data Foundation does not remove the RBD pool from the external cluster, or uninstall the external Red Hat Ceph Storage cluster.
Uninstall Annotations
Annotations on the Storage Cluster are used to change the behavior of the uninstall process. To define the uninstall behavior, the following two annotations have been introduced in the storage cluster:
-
uninstall.ocs.openshift.io/cleanup-policy: delete -
uninstall.ocs.openshift.io/mode: graceful
The uninstall.ocs.openshift.io/cleanup-policy is not applicable for external mode.
The below table provides information on the different values that can used with these annotations:
Table 3.2. uninstall.ocs.openshift.io uninstall annotations descriptions
| Annotation | Value | Default | Behavior |
|---|---|---|---|
| cleanup-policy | delete | Yes |
Rook cleans up the physical drives and the |
| cleanup-policy | retain | No |
Rook does not clean up the physical drives and the |
| mode | graceful | Yes | Rook and NooBaa pauses the uninstall process until the PVCs and the OBCs are removed by the administrator/user |
| mode | forced | No | Rook and NooBaa proceeds with uninstall even if PVCs/OBCs provisioned using Rook and NooBaa exist respectively |
You can change the uninstall mode by editing the value of the annotation by using the following commands:
$ oc annotate storagecluster ocs-external-storagecluster -n openshift-storage uninstall.ocs.openshift.io/mode="forced" --overwrite
storagecluster.ocs.openshift.io/ocs-external-storagecluster annotated
Prerequisites
- Ensure that the OpenShift Data Foundation cluster is in a healthy state. The uninstall process can fail when some of the pods are not terminated successfully due to insufficient resources or nodes. In case the cluster is in an unhealthy state, contact Red Hat Customer Support before uninstalling OpenShift Data Foundation.
- Ensure that applications are not consuming persistent volume claims (PVCs) or object bucket claims (OBCs) using the storage classes provided by OpenShift Data Foundation.
Procedure
Delete the volume snapshots that are using OpenShift Data Foundation.
List the volume snapshots from all the namespaces
$ oc get volumesnapshot --all-namespaces
From the output of the previous command, identify and delete the volume snapshots that are using OpenShift Data Foundation.
$ oc delete volumesnapshot <VOLUME-SNAPSHOT-NAME> -n <NAMESPACE>
Delete PVCs and OBCs that are using OpenShift Data Foundation.
In the default uninstall mode (graceful), the uninstaller waits till all the PVCs and OBCs that use OpenShift Data Foundation are deleted.
If you wish to delete the Storage Cluster without deleting the PVCs beforehand, you may set the uninstall mode annotation to "forced" and skip this step. Doing so will result in orphan PVCs and OBCs in the system.
Delete OpenShift Container Platform monitoring stack PVCs using OpenShift Data Foundation.
See Removing monitoring stack from OpenShift Data Foundation
Delete OpenShift Container Platform Registry PVCs using OpenShift Data Foundation.
Removing OpenShift Container Platform registry from OpenShift Data Foundation
Delete OpenShift Container Platform logging PVCs using OpenShift Data Foundation.
Removing the cluster logging operator from OpenShift Data Foundation
Delete other PVCs and OBCs provisioned using OpenShift Data Foundation.
Given below is a sample script to identify the PVCs and OBCs provisioned using OpenShift Data Foundation. The script ignores the PVCs and OBCs that are used internally by OpenShift Data Foundation.
#!/bin/bash

RBD_PROVISIONER="openshift-storage.rbd.csi.ceph.com"
CEPHFS_PROVISIONER="openshift-storage.cephfs.csi.ceph.com"
NOOBAA_PROVISIONER="openshift-storage.noobaa.io/obc"
RGW_PROVISIONER="openshift-storage.ceph.rook.io/bucket"

NOOBAA_DB_PVC="noobaa-db"
NOOBAA_BACKINGSTORE_PVC="noobaa-default-backing-store-noobaa-pvc"

# Find all the OCS StorageClasses
OCS_STORAGECLASSES=$(oc get storageclasses | grep -e "$RBD_PROVISIONER" -e "$CEPHFS_PROVISIONER" -e "$NOOBAA_PROVISIONER" -e "$RGW_PROVISIONER" | awk '{print $1}')

# List PVCs in each of the StorageClasses
for SC in $OCS_STORAGECLASSES
do
        echo "======================================================================"
        echo "$SC StorageClass PVCs and OBCs"
        echo "======================================================================"
        oc get pvc  --all-namespaces --no-headers 2>/dev/null | grep $SC | grep -v -e "$NOOBAA_DB_PVC" -e "$NOOBAA_BACKINGSTORE_PVC"
        oc get obc  --all-namespaces --no-headers 2>/dev/null | grep $SC
        echo
done
Delete the OBCs.
$ oc delete obc <obc name> -n <project name>
Delete the PVCs.
$ oc delete pvc <pvc name> -n <project-name>
Ensure that you have removed any custom backing stores, bucket classes, and so on that are created in the cluster.
Delete the Storage Cluster object and wait for the removal of the associated resources.
$ oc delete -n openshift-storage storagesystem --all --wait=true
Delete the namespace and wait until the deletion is complete. You will need to switch to another project if
openshift-storageis the active project.For example:
$ oc project default
$ oc delete project openshift-storage --wait=true --timeout=5m
The project is deleted if the following command returns a
NotFounderror.$ oc get project openshift-storage
NoteWhile uninstalling OpenShift Data Foundation, if the namespace is not deleted completely and remains in
Terminatingstate, perform the steps in Troubleshooting and deleting remaining resources during Uninstall to identify objects that are blocking the namespace from being terminated.Confirm all PVs provisioned using OpenShift Data Foundation are deleted. If there is any PV left in the
Releasedstate, delete it.$ oc get pv $ oc delete pv <pv name>
Remove
CustomResourceDefinitions.$ oc delete crd backingstores.noobaa.io bucketclasses.noobaa.io cephblockpools.ceph.rook.io cephclusters.ceph.rook.io cephfilesystems.ceph.rook.io cephnfses.ceph.rook.io cephobjectstores.ceph.rook.io cephobjectstoreusers.ceph.rook.io noobaas.noobaa.io ocsinitializations.ocs.openshift.io storageclusters.ocs.openshift.io cephclients.ceph.rook.io cephobjectrealms.ceph.rook.io cephobjectzonegroups.ceph.rook.io cephobjectzones.ceph.rook.io cephrbdmirrors.ceph.rook.io storagesystems.odf.openshift.io --wait=true --timeout=5m
To ensure that OpenShift Data Foundation is uninstalled completely:
- In the OpenShift Container Platform Web Console, click Storage.
- Verify that OpenShift Data Foundation no longer appears under Storage.
3.4.2. Removing monitoring stack from OpenShift Data Foundation
Use this section to clean up the monitoring stack from OpenShift Data Foundation.
The PVCs that are created as a part of configuring the monitoring stack are in the openshift-monitoring namespace.
Prerequisites
PVCs are configured to use OpenShift Container Platform monitoring stack.
For information, see configuring monitoring stack.
Procedure
List the pods and PVCs that are currently running in the
openshift-monitoringnamespace.$ oc get pod,pvc -n openshift-monitoring NAME READY STATUS RESTARTS AGE pod/alertmanager-main-0 3/3 Running 0 8d pod/alertmanager-main-1 3/3 Running 0 8d pod/alertmanager-main-2 3/3 Running 0 8d pod/cluster-monitoring- operator-84457656d-pkrxm 1/1 Running 0 8d pod/grafana-79ccf6689f-2ll28 2/2 Running 0 8d pod/kube-state-metrics- 7d86fb966-rvd9w 3/3 Running 0 8d pod/node-exporter-25894 2/2 Running 0 8d pod/node-exporter-4dsd7 2/2 Running 0 8d pod/node-exporter-6p4zc 2/2 Running 0 8d pod/node-exporter-jbjvg 2/2 Running 0 8d pod/node-exporter-jj4t5 2/2 Running 0 6d18h pod/node-exporter-k856s 2/2 Running 0 6d18h pod/node-exporter-rf8gn 2/2 Running 0 8d pod/node-exporter-rmb5m 2/2 Running 0 6d18h pod/node-exporter-zj7kx 2/2 Running 0 8d pod/openshift-state-metrics- 59dbd4f654-4clng 3/3 Running 0 8d pod/prometheus-adapter- 5df5865596-k8dzn 1/1 Running 0 7d23h pod/prometheus-adapter- 5df5865596-n2gj9 1/1 Running 0 7d23h pod/prometheus-k8s-0 6/6 Running 1 8d pod/prometheus-k8s-1 6/6 Running 1 8d pod/prometheus-operator- 55cfb858c9-c4zd9 1/1 Running 0 6d21h pod/telemeter-client- 78fc8fc97d-2rgfp 3/3 Running 0 8d NAME STATUS VOLUME CAPACITY ACCESS MODES STORAGECLASS AGE persistentvolumeclaim/my-alertmanager-claim-alertmanager-main-0 Bound pvc-0d519c4f-15a5-11ea-baa0-026d231574aa 40Gi RWO ocs-external-storagecluster-ceph-rbd 8d persistentvolumeclaim/my-alertmanager-claim-alertmanager-main-1 Bound pvc-0d5a9825-15a5-11ea-baa0-026d231574aa 40Gi RWO ocs-external-storagecluster-ceph-rbd 8d persistentvolumeclaim/my-alertmanager-claim-alertmanager-main-2 Bound pvc-0d6413dc-15a5-11ea-baa0-026d231574aa 40Gi RWO ocs-external-storagecluster-ceph-rbd 8d persistentvolumeclaim/my-prometheus-claim-prometheus-k8s-0 Bound pvc-0b7c19b0-15a5-11ea-baa0-026d231574aa 40Gi RWO ocs-external-storagecluster-ceph-rbd 8d persistentvolumeclaim/my-prometheus-claim-prometheus-k8s-1 Bound pvc-0b8aed3f-15a5-11ea-baa0-026d231574aa 40Gi RWO ocs-external-storagecluster-ceph-rbd 8d
Edit the monitoring
configmap.$ oc -n openshift-monitoring edit configmap cluster-monitoring-config
Remove any
configsections that reference the OpenShift Data Foundation storage classes as shown in the following example and save it.Before editing
.
.
.
apiVersion: v1
data:
  config.yaml: |
    alertmanagerMain:
      volumeClaimTemplate:
        metadata:
          name: my-alertmanager-claim
        spec:
          resources:
            requests:
              storage: 40Gi
          storageClassName: ocs-external-storagecluster-ceph-rbd
    prometheusK8s:
      volumeClaimTemplate:
        metadata:
          name: my-prometheus-claim
        spec:
          resources:
            requests:
              storage: 40Gi
          storageClassName: ocs-external-storagecluster-ceph-rbd
kind: ConfigMap
metadata:
  creationTimestamp: "2019-12-02T07:47:29Z"
  name: cluster-monitoring-config
  namespace: openshift-monitoring
  resourceVersion: "22110"
  selfLink: /api/v1/namespaces/openshift-monitoring/configmaps/cluster-monitoring-config
  uid: fd6d988b-14d7-11ea-84ff-066035b9efa8


.
.
.
After editing
.
.
.
apiVersion: v1
data:
  config.yaml: |
kind: ConfigMap
metadata:
  creationTimestamp: "2019-11-21T13:07:05Z"
  name: cluster-monitoring-config
  namespace: openshift-monitoring
  resourceVersion: "404352"
  selfLink: /api/v1/namespaces/openshift-monitoring/configmaps/cluster-monitoring-config
  uid: d12c796a-0c5f-11ea-9832-063cd735b81c
.
.
.
In this example,
alertmanagerMainandprometheusK8smonitoring components are using the OpenShift Data Foundation PVCs.List the pods consuming the PVC.
In this example, the
alertmanagerMainandprometheusK8spods that were consuming the PVCs are in theTerminatingstate. You can delete the PVCs once these pods are no longer using OpenShift Data Foundation PVC.$ oc get pod,pvc -n openshift-monitoring NAME READY STATUS RESTARTS AGE pod/alertmanager-main-0 3/3 Terminating 0 10h pod/alertmanager-main-1 3/3 Terminating 0 10h pod/alertmanager-main-2 3/3 Terminating 0 10h pod/cluster-monitoring-operator-84cd9df668-zhjfn 1/1 Running 0 18h pod/grafana-5db6fd97f8-pmtbf 2/2 Running 0 10h pod/kube-state-metrics-895899678-z2r9q 3/3 Running 0 10h pod/node-exporter-4njxv 2/2 Running 0 18h pod/node-exporter-b8ckz 2/2 Running 0 11h pod/node-exporter-c2vp5 2/2 Running 0 18h pod/node-exporter-cq65n 2/2 Running 0 18h pod/node-exporter-f5sm7 2/2 Running 0 11h pod/node-exporter-f852c 2/2 Running 0 18h pod/node-exporter-l9zn7 2/2 Running 0 11h pod/node-exporter-ngbs8 2/2 Running 0 18h pod/node-exporter-rv4v9 2/2 Running 0 18h pod/openshift-state-metrics-77d5f699d8-69q5x 3/3 Running 0 10h pod/prometheus-adapter-765465b56-4tbxx 1/1 Running 0 10h pod/prometheus-adapter-765465b56-s2qg2 1/1 Running 0 10h pod/prometheus-k8s-0 6/6 Terminating 1 9m47s pod/prometheus-k8s-1 6/6 Terminating 1 9m47s pod/prometheus-operator-cbfd89f9-ldnwc 1/1 Running 0 43m pod/telemeter-client-7b5ddb4489-2xfpz 3/3 Running 0 10h NAME STATUS VOLUME CAPACITY ACCESS MODES STORAGECLASS AGE persistentvolumeclaim/ocs-alertmanager-claim-alertmanager-main-0 Bound pvc-2eb79797-1fed-11ea-93e1-0a88476a6a64 40Gi RWO ocs-external-storagecluster-ceph-rbd 19h persistentvolumeclaim/ocs-alertmanager-claim-alertmanager-main-1 Bound pvc-2ebeee54-1fed-11ea-93e1-0a88476a6a64 40Gi RWO ocs-external-storagecluster-ceph-rbd 19h persistentvolumeclaim/ocs-alertmanager-claim-alertmanager-main-2 Bound pvc-2ec6a9cf-1fed-11ea-93e1-0a88476a6a64 40Gi RWO ocs-external-storagecluster-ceph-rbd 19h persistentvolumeclaim/ocs-prometheus-claim-prometheus-k8s-0 Bound pvc-3162a80c-1fed-11ea-93e1-0a88476a6a64 40Gi RWO ocs-external-storagecluster-ceph-rbd 19h persistentvolumeclaim/ocs-prometheus-claim-prometheus-k8s-1 Bound pvc-316e99e2-1fed-11ea-93e1-0a88476a6a64 40Gi RWO ocs-external-storagecluster-ceph-rbd 19h
Delete relevant PVCs. Make sure you delete all the PVCs that are consuming the storage classes.
$ oc delete -n openshift-monitoring pvc <pvc-name> --wait=true --timeout=5m
3.4.3. Removing OpenShift Container Platform registry from OpenShift Data Foundation
Use this section to clean up OpenShift Container Platform registry from OpenShift Data Foundation. If you want to configure an alternative storage, see image registry
The PVCs that are created as a part of configuring OpenShift Container Platform registry are in the openshift-image-registry namespace.
Prerequisites
- The image registry should have been configured to use an OpenShift Data Foundation PVC.
Procedure
Edit the
configs.imageregistry.operator.openshift.ioobject and remove the content in the storage section.$ oc edit configs.imageregistry.operator.openshift.io
Before editing
.
.
.
storage:
  pvc:
    claim: registry-cephfs-rwx-pvc
.
.
.
After editing
.
.
.
storage:
  emptyDir: {}
.
.
.
In this example, the PVC is called
registry-cephfs-rwx-pvc, which is now safe to delete.Delete the PVC.
$ oc delete pvc <pvc-name> -n openshift-image-registry --wait=true --timeout=5m
3.4.4. Removing the cluster logging operator from OpenShift Data Foundation
Use this section to clean up the cluster logging operator from OpenShift Data Foundation.
The Persistent Volume Claims (PVCs) that are created as a part of configuring the cluster logging operator are in the openshift-logging namespace.
Prerequisites
- The cluster logging instance should have been configured to use the OpenShift Data Foundation PVCs.
Procedure
Remove the
ClusterLogginginstance in the namespace.$ oc delete clusterlogging instance -n openshift-logging --wait=true --timeout=5m
The PVCs in the
openshift-loggingnamespace are now safe to delete.Delete the PVCs.
$ oc delete pvc <pvc-name> -n openshift-logging --wait=true --timeout=5m<pvc-name>- Is the name of the PVC