
Chapter 4. Configure storage for OpenShift Container Platform services
You can use OpenShift Data Foundation to provide storage for OpenShift Container Platform services such as image registry, monitoring, and logging.
The process for configuring storage for these services depends on the infrastructure used in your OpenShift Data Foundation deployment.
Always ensure that you have plenty of storage capacity for these services. If the storage for these critical services runs out of space, the cluster becomes inoperable and very difficult to recover.
Red Hat recommends configuring shorter curation and retention intervals for these services. See Configuring the Curator schedule and the Modifying retention time for Prometheus metrics data of Monitoring guide in the OpenShift Container Platform documentation for details.
If you do run out of storage space for these services, contact Red Hat Customer Support.
4.1. Configuring Image Registry to use OpenShift Data Foundation
OpenShift Container Platform provides a built in Container Image Registry which runs as a standard workload on the cluster. A registry is typically used as a publication target for images built on the cluster as well as a source of images for workloads running on the cluster.
Follow the instructions in this section to configure OpenShift Data Foundation as storage for the Container Image Registry. On AWS, it is not required to change the storage for the registry. However, it is recommended to change the storage to OpenShift Data Foundation Persistent Volume for vSphere and Bare metal platforms.
This process does not migrate data from an existing image registry to the new image registry. If you already have container images in your existing registry, back up your registry before you complete this process, and re-register your images when this process is complete.
Prerequisites
- You have administrative access to OpenShift Web Console.
-
OpenShift Data Foundation Operator is installed and running in the
openshift-storagenamespace. In OpenShift Web Console, click Operators → Installed Operators to view installed operators. -
Image Registry Operator is installed and running in the
openshift-image-registrynamespace. In OpenShift Web Console, click Administration → Cluster Settings → Cluster Operators to view cluster operators. -
A storage class with provisioner
openshift-storage.cephfs.csi.ceph.comis available. In OpenShift Web Console, click Storage → StorageClasses to view available storage classes.
Procedure
Create a Persistent Volume Claim for the Image Registry to use.
- In the OpenShift Web Console, click Storage → Persistent Volume Claims.
-
Set the Project to
openshift-image-registry. Click Create Persistent Volume Claim.
-
From the list of available storage classes retrieved above, specify the Storage Class with the provisioner
openshift-storage.cephfs.csi.ceph.com. -
Specify the Persistent Volume Claim Name, for example,
ocs4registry. -
Specify an Access Mode of
Shared Access (RWX). - Specify a Size of at least 100 GB.
Click Create.
Wait until the status of the new Persistent Volume Claim is listed as
Bound.
-
From the list of available storage classes retrieved above, specify the Storage Class with the provisioner
Configure the cluster’s Image Registry to use the new Persistent Volume Claim.
- Click Administration → Custom Resource Definitions.
-
Click the
Configcustom resource definition associated with theimageregistry.operator.openshift.iogroup. - Click the Instances tab.
- Beside the cluster instance, click the Action Menu (⋮) → Edit Config.
Add the new Persistent Volume Claim as persistent storage for the Image Registry.
Add the following under
spec:, replacing the existingstorage:section if necessary.storage: pvc: claim: <new-pvc-name>For example:
storage: pvc: claim: ocs4registry- Click Save.
Verify that the new configuration is being used.
- Click Workloads → Pods.
-
Set the Project to
openshift-image-registry. -
Verify that the new
image-registry-*pod appears with a status ofRunning, and that the previousimage-registry-*pod terminates. -
Click the new
image-registry-*pod to view pod details. -
Scroll down to Volumes and verify that the
registry-storagevolume has a Type that matches your new Persistent Volume Claim, for example,ocs4registry.
4.2. Configuring monitoring to use OpenShift Data Foundation
OpenShift Data Foundation provides a monitoring stack that comprises of Prometheus and Alert Manager.
Follow the instructions in this section to configure OpenShift Data Foundation as storage for the monitoring stack.
Monitoring will not function if it runs out of storage space. Always ensure that you have plenty of storage capacity for monitoring.
Red Hat recommends configuring a short retention interval for this service. See the Modifying retention time for Prometheus metrics data of Monitoring guide in the OpenShift Container Platform documentation for details.
Prerequisites
- You have administrative access to OpenShift Web Console.
-
OpenShift Data Foundation Operator is installed and running in the
openshift-storagenamespace. In the OpenShift Web Console, click Operators → Installed Operators to view installed operators. -
Monitoring Operator is installed and running in the
openshift-monitoringnamespace. In the OpenShift Web Console, click Administration → Cluster Settings → Cluster Operators to view cluster operators. -
A storage class with provisioner
openshift-storage.rbd.csi.ceph.comis available. In the OpenShift Web Console, click Storage → StorageClasses to view available storage classes.
Procedure
- In the OpenShift Web Console, go to Workloads → Config Maps.
-
Set the Project dropdown to
openshift-monitoring. - Click Create Config Map.
Define a new
cluster-monitoring-configConfig Map using the following example.Replace the content in angle brackets (
<,>) with your own values, for example,retention: 24horstorage: 40Gi.Replace the storageClassName with the
storageclassthat uses the provisioneropenshift-storage.rbd.csi.ceph.com. In the example given below the name of the storageclass isocs-storagecluster-ceph-rbd.Example
cluster-monitoring-configConfig MapapiVersion: v1 kind: ConfigMap metadata: name: cluster-monitoring-config namespace: openshift-monitoring data: config.yaml: | prometheusK8s: retention: <time to retain monitoring files, e.g. 24h> volumeClaimTemplate: metadata: name: ocs-prometheus-claim spec: storageClassName: ocs-storagecluster-ceph-rbd resources: requests: storage: <size of claim, e.g. 40Gi> alertmanagerMain: volumeClaimTemplate: metadata: name: ocs-alertmanager-claim spec: storageClassName: ocs-storagecluster-ceph-rbd resources: requests: storage: <size of claim, e.g. 40Gi>- Click Create to save and create the Config Map.
Verification steps
Verify that the Persistent Volume Claims are bound to the pods.
- Go to Storage → Persistent Volume Claims.
-
Set the Project dropdown to
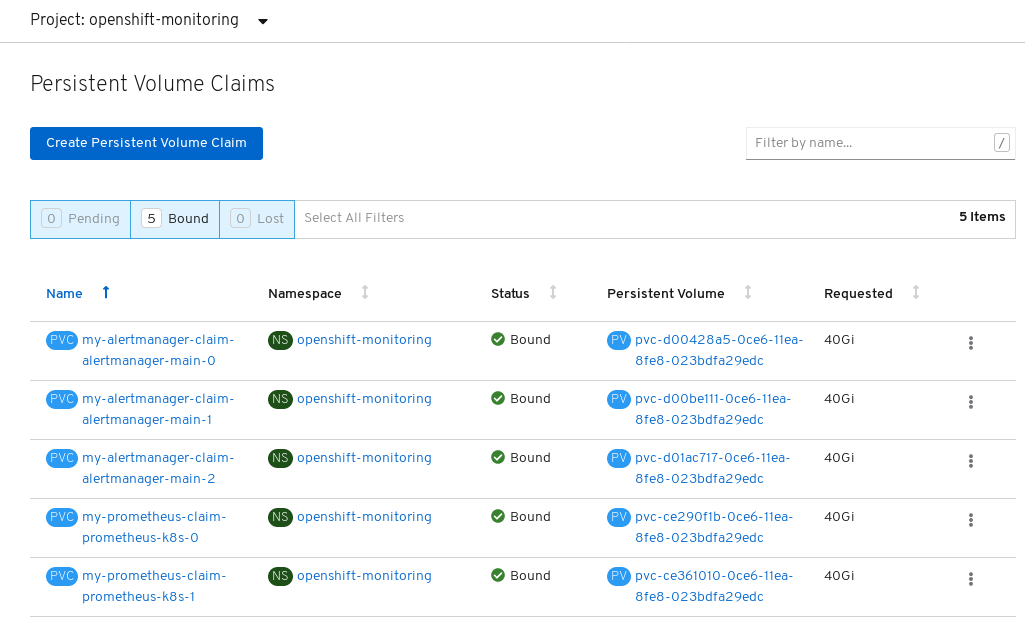
openshift-monitoring. Verify that 5 Persistent Volume Claims are visible with a state of
Bound, attached to threealertmanager-main-*pods, and twoprometheus-k8s-*pods.Figure 4.1. Monitoring storage created and bound
Verify that the new
alertmanager-main-*pods appear with a state ofRunning.- Go to Workloads → Pods.
-
Click the new
alertmanager-main-*pods to view the pod details. Scroll down to Volumes and verify that the volume has a Type,
ocs-alertmanager-claimthat matches one of your new Persistent Volume Claims, for example,ocs-alertmanager-claim-alertmanager-main-0.Figure 4.2. Persistent Volume Claims attached to
alertmanager-main-*pod
Verify that the new
prometheus-k8s-*pods appear with a state ofRunning.-
Click the new
prometheus-k8s-*pods to view the pod details. Scroll down to Volumes and verify that the volume has a Type,
ocs-prometheus-claimthat matches one of your new Persistent Volume Claims, for example,ocs-prometheus-claim-prometheus-k8s-0.Figure 4.3. Persistent Volume Claims attached to
prometheus-k8s-*pod
-
Click the new
4.3. Overprovision level policy control [Technology Preview]
Overprovision control is a mechanism that enables you to define a quota on the amount of Persistent Volume Claims (PVCs) consumed from a storage cluster, based on the specific application namespace.
When you enable the overprovision control mechanism, it prevents you from overprovisioning the PVCs consumed from the storage cluster. OpenShift provides flexibility for defining constraints that limit the aggregated resource consumption at cluster scope with the help of ClusterResourceQuota. For more information see, OpenShift ClusterResourceQuota.
With overprovision control, a ClusteResourceQuota is initiated, and you can set the storage capacity limit for each storage class. The alarm triggers when 80% of the capacity limit is consumed.
Overprovision level policy control is a Technology Preview feature. Technology Preview features are not supported with Red Hat production service level agreements (SLAs) and might not be functionally complete. Red Hat does not recommend using them in production. These features provide early access to upcoming product features, enabling customers to test functionality and provide feedback during the development process. For more information, refer to Technology Preview Features Support Scope.
For more information about OpenShift Data Foundation deployment, refer to Product Documentation and select the deployment procedure according to the platform.
Prerequisites
- Ensure that the OpenShift Data Foundation cluster is created.
Procedure
-
Deploy
storageclustereither from the command line interface or the user interface. Label the application namespace.
apiVersion: v1 kind: Namespace metadata: name: <desired_name> labels: storagequota: <desired_label>- <desired_name>
-
Specify a name for the application namespace, for example,
quota-rbd. - <desired_label>
-
Specify a label for the storage quota, for example,
storagequota1.
Edit the
storageclusterto set the quota limit on the storage class.$ oc edit storagecluster -n openshift-storage <ocs_storagecluster_name>
- <ocs_storagecluster_name>
- Specify the name of the storage cluster.
Add an entry for Overprovision Control with the desired hard limit into the
StorageCluster.Spec:apiVersion: ocs.openshift.io/v1 kind: StorageCluster spec: [...] overprovisionControl: - capacity: <desired_quota_limit> storageClassName: <storage_class_name> quotaName: <desired_quota_name> selector: labels: matchLabels: storagequota: <desired_label> [...]- <desired_quota_limit>
-
Specify a desired quota limit for the storage class, for example,
27Ti. - <storage_class_name>
-
Specify the name of the storage class for which you want to set the quota limit, for example,
ocs-storagecluster-ceph-rbd. - <desired_quota_name>
-
Specify a name for the storage quota, for example,
quota1. - <desired_label>
-
Specify a label for the storage quota, for example,
storagequota1.
-
Save the modified
storagecluster. Verify that the
clusterresourcequotais defined.NoteExpect the
clusterresourcequotawith thequotaNamethat you defined in the previous step, for example,quota1.$ oc get clusterresourcequota -A $ oc describe clusterresourcequota -A
4.4. Cluster logging for OpenShift Data Foundation
You can deploy cluster logging to aggregate logs for a range of OpenShift Container Platform services. For information about how to deploy cluster logging, see Deploying cluster logging.
Upon initial OpenShift Container Platform deployment, OpenShift Data Foundation is not configured by default and the OpenShift Container Platform cluster will solely rely on default storage available from the nodes. You can edit the default configuration of OpenShift logging (ElasticSearch) to be backed by OpenShift Data Foundation to have OpenShift Data Foundation backed logging (Elasticsearch).
Always ensure that you have plenty of storage capacity for these services. If you run out of storage space for these critical services, the logging application becomes inoperable and very difficult to recover.
Red Hat recommends configuring shorter curation and retention intervals for these services. See Cluster logging curator in the OpenShift Container Platform documentation for details.
If you run out of storage space for these services, contact Red Hat Customer Support.
4.4.1. Configuring persistent storage
You can configure a persistent storage class and size for the Elasticsearch cluster using the storage class name and size parameters. The Cluster Logging Operator creates a Persistent Volume Claim for each data node in the Elasticsearch cluster based on these parameters. For example:
spec:
    logStore:
      type: "elasticsearch"
      elasticsearch:
        nodeCount: 3
        storage:
          storageClassName: "ocs-storagecluster-ceph-rbd”
          size: "200G"
This example specifies that each data node in the cluster will be bound to a Persistent Volume Claim that requests 200GiB of ocs-storagecluster-ceph-rbd storage. Each primary shard will be backed by a single replica. A copy of the shard is replicated across all the nodes and are always available and the copy can be recovered if at least two nodes exist due to the single redundancy policy. For information about Elasticsearch replication policies, see Elasticsearch replication policy in About deploying and configuring cluster logging.
Omission of the storage block will result in a deployment backed by default storage. For example:
spec:
    logStore:
      type: "elasticsearch"
      elasticsearch:
        nodeCount: 3
        storage: {}
For more information, see Configuring cluster logging.
4.4.2. Configuring cluster logging to use OpenShift data Foundation
Follow the instructions in this section to configure OpenShift Data Foundation as storage for the OpenShift cluster logging.
You can obtain all the logs when you configure logging for the first time in OpenShift Data Foundation. However, after you uninstall and reinstall logging, the old logs are removed and only the new logs are processed.
Prerequisites
- You have administrative access to OpenShift Web Console.
-
OpenShift Data Foundation Operator is installed and running in the
openshift-storagenamespace. -
Cluster logging Operator is installed and running in the
openshift-loggingnamespace.
Procedure
- Click Administration → Custom Resource Definitions from the left pane of the OpenShift Web Console.
- On the Custom Resource Definitions page, click ClusterLogging.
- On the Custom Resource Definition Overview page, select View Instances from the Actions menu or click the Instances Tab.
On the Cluster Logging page, click Create Cluster Logging.
You might have to refresh the page to load the data.
In the YAML, replace the storageClassName with the
storageclassthat uses the provisioneropenshift-storage.rbd.csi.ceph.com. In the example given below the name of the storageclass isocs-storagecluster-ceph-rbd:apiVersion: "logging.openshift.io/v1" kind: "ClusterLogging" metadata: name: "instance" namespace: "openshift-logging" spec: managementState: "Managed" logStore: type: "elasticsearch" elasticsearch: nodeCount: 3 storage: storageClassName: ocs-storagecluster-ceph-rbd size: 200G # Change as per your requirement redundancyPolicy: "SingleRedundancy" visualization: type: "kibana" kibana: replicas: 1 curation: type: "curator" curator: schedule: "30 3 * * *" collection: logs: type: "fluentd" fluentd: {}If you have tainted the OpenShift Data Foundation nodes, you must add toleration to enable scheduling of the daemonset pods for logging.
spec: [...] collection: logs: fluentd: tolerations: - effect: NoSchedule key: node.ocs.openshift.io/storage value: 'true' type: fluentd- Click Save.
Verification steps
Verify that the Persistent Volume Claims are bound to the
elasticsearchpods.- Go to Storage → Persistent Volume Claims.
-
Set the Project dropdown to
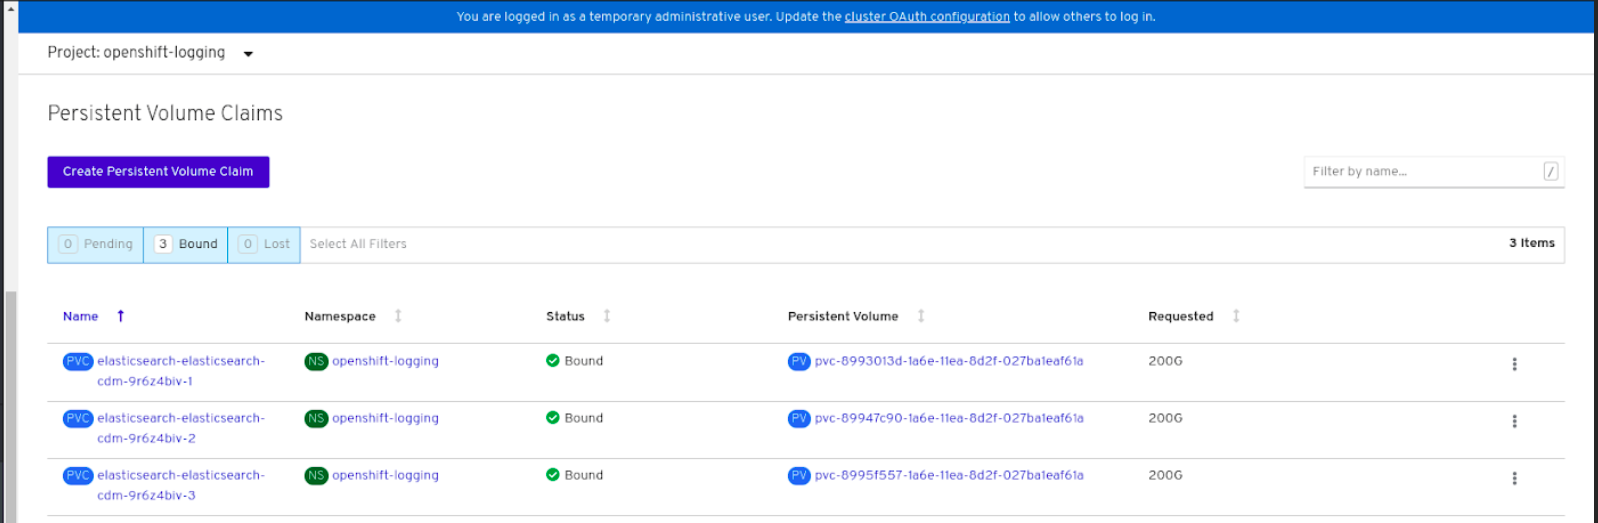
openshift-logging. Verify that Persistent Volume Claims are visible with a state of
Bound, attached toelasticsearch-* pods.Figure 4.4. Cluster logging created and bound
Verify that the new cluster logging is being used.
- Click Workload → Pods.
-
Set the Project to
openshift-logging. -
Verify that the new
elasticsearch-* pods appear with a state ofRunning. -
Click the new
elasticsearch-* pod to view pod details. -
Scroll down to Volumes and verify that the elasticsearch volume has a Type that matches your new Persistent Volume Claim, for example,
elasticsearch-elasticsearch-cdm-9r624biv-3. - Click the Persistent Volume Claim name and verify the storage class name in the PersistentVolumeClaim Overview page.
Make sure to use a shorter curator time to avoid PV full scenario on PVs attached to Elasticsearch pods.
You can configure Curator to delete Elasticsearch data based on retention settings. It is recommended that you set the following default index data retention of 5 days as a default.
config.yaml: |
    openshift-storage:
      delete:
        days: 5
For more details, see Curation of Elasticsearch Data.
To uninstall the cluster logging backed by Persistent Volume Claim, use the procedure removing the cluster logging operator from OpenShift Data Foundation in the uninstall chapter of the respective deployment guide.