
Configuring OpenShift Container Storage for Metro-DR stretch cluster
Disaster recovery tasks for cluster and storage administrators
Abstract
Making open source more inclusive
Red Hat is committed to replacing problematic language in our code, documentation, and web properties. We are beginning with these four terms: master, slave, blacklist, and whitelist. Because of the enormity of this endeavor, these changes will be implemented gradually over several upcoming releases. For more details, see our CTO Chris Wright’s message.
Providing feedback on Red Hat documentation
We appreciate your input on our documentation. Do let us know how we can make it better. To give feedback:
For simple comments on specific passages:
- Make sure you are viewing the documentation in the Multi-page HTML format. In addition, ensure you see the Feedback button in the upper right corner of the document.
- Use your mouse cursor to highlight the part of text that you want to comment on.
- Click the Add Feedback pop-up that appears below the highlighted text.
- Follow the displayed instructions.
For submitting more complex feedback, create a Bugzilla ticket:
- Go to the Bugzilla website.
- In the Component section, choose documentation.
- Fill in the Description field with your suggestion for improvement. Include a link to the relevant part(s) of documentation.
- Click Submit Bug.
Chapter 1. Introduction to metro disaster recovery using stretch cluster
Red Hat OpenShift Container Storage deployment can be stretched between two different geographical locations to provide the storage infrastructure with disaster recovery capabilities. When faced with a disaster such as one of the two locations is partially or totally not available, OpenShift Container Storage deployed on the OpenShift Container Platform deployment must be able to survive. This solution is available only for metropolitan spanned data centers with specific latency requirements between the servers of the infrastructure.
Currently, the Metro-DR solution using stretch cluster can be deployed where latencies do not exceed 4 milliseconds round-trip time (RTT) between OpenShift Container Platform nodes in different locations. Contact Red Hat Customer Support if you are planning to deploy with higher latencies.
The following diagram shows the simplest deployment for a Metro-DR stretched cluster.
OpenShift nodes and OpenShift Container Storage daemons
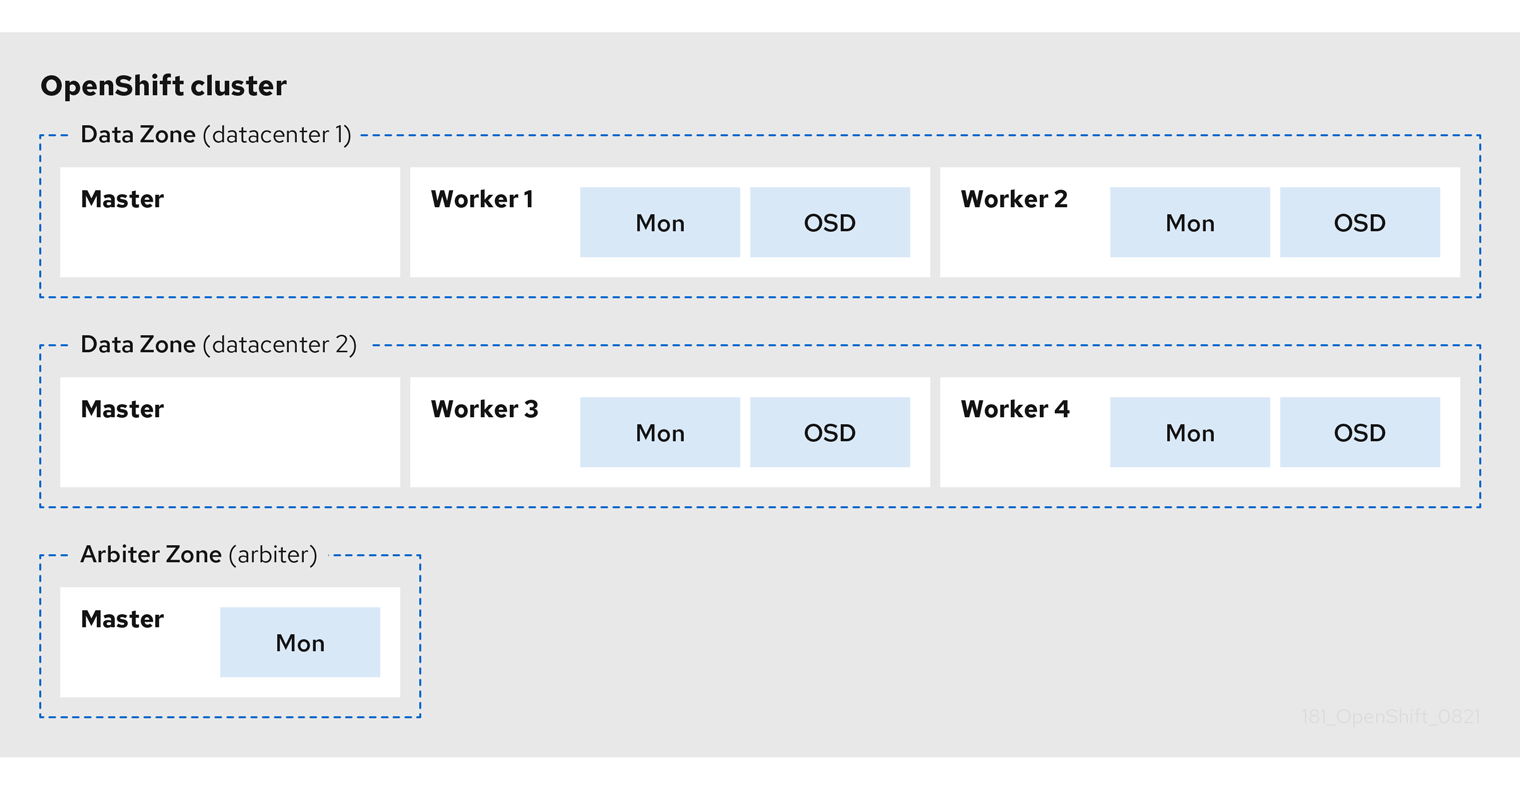
In the diagram the OpenShift Container Storage monitor pod deployed in the Arbiter zone has a built-in tolerance for master nodes. The master nodes are required for a highly available OpenShift Container Platform control plane. Also, it is critical that the OpenShift Container Platform nodes in one zone have network connectivity with the OpenShift Container Platform nodes in the other two zones.
Chapter 2. Preparing to deploy storage cluster with disaster recovery enabled
2.1. Requirements for enabling Metro-DR
- Ensure that you have at least three OpenShift Container Platform master nodes in three different zones. One master node in each of the three zones.
- Ensure that you have at least four OpenShift Container Platform worker nodes evenly distributed across the two Data Zones.
- For stretch cluster on Bare Metal, you must use SSD drive as the root drive for OpenShift Container Platform master nodes.
- Ensure that each node is pre-labeled with its zone label. For more information, see the applying topology zone labels to OpenShift Container Platform node section.
- The Metro-DR solution is designed to be deployed where latencies do not exceed 2 milliseconds between zones (4ms RTT maximum). Contact Red Hat Customer Support if you are planning to deploy with higher latencies.
You cannot enable both flexible scaling and arbiter as they have conflicting scaling logic. With flexing scaling, you can add one node at a time to the OpenShift Container Storage cluster. Whereas, in an arbiter cluster, you need to add at least one node in each of the 2 data zones.
2.2. Applying topology zone labels to OpenShift Container Platform nodes
During a site outage, the zone that has the arbiter function makes use of the arbiter label. These labels are arbitrary and must be unique for the three locations.
For example, you can label the nodes as follows
topology.kubernetes.io/zone=arbiter for Master0

topology.kubernetes.io/zone=datacenter1 for Master1, Worker1, Worker2

topology.kubernetes.io/zone=datacenter2 for Master2, Worker3, Worker4
To apply the labels to the node using oc CLI do the following:
$ oc label node <NODENAME> topology.kubernetes.io/zone=<LABEL>
To validate the labels run the following commands using the example labels for the 3 zones:
$ oc get nodes -l topology.kubernetes.io/zone=<LABEL> -o name
Alternatively, you can run a single command to see all nodes with it’s zone.
$ oc get nodes -L topology.kubernetes.io/zone
The Metro DR stretch cluster topology zone labels are now applied to the appropriate OpenShift Container Platform nodes to define the three locations.
Next step
- Installing the storage operators from OpenShift Container Platform OperatorHub.
2.3. Installing Local Storage Operator
You can install the Local Storage Operator using the Red Hat OpenShift Container Platform Operator Hub.
Prerequisite
- Access to an OpenShift Container Platform cluster using an account with cluster-admin and Operator installation permissions.
Procedure
- Log in to the OpenShift Web Console.
- Click Operators → OperatorHub.
-
Type
local storagein the Filter by keyword… box to search forLocal Storageoperator from the list of operators and click on it. - Click Install.
Set the following options on the Install Operator page:
- Channel as stable-4.8.
- Installation Mode as A specific namespace on the cluster.
- Installed Namespace as Operator recommended namespace openshift-local-storage.
- Approval Strategy as Automatic.
- Click Install.
Verification step
-
Verify that the Local Storage Operator shows the Status as
Succeeded.
2.4. Installing Red Hat OpenShift Container Storage Operator
You can install Red Hat OpenShift Container Storage Operator using the Red Hat OpenShift Container Platform Operator Hub.
Prerequisites
- Access to an OpenShift Container Platform cluster using an account with cluster-admin and Operator installation permissions.
- You have at least four (4) worker nodes evenly distributed across two (2) data centers in the Red Hat OpenShift Container Platform cluster.
- For additional resource requirements, see Planning your deployment.
When you need to override the cluster-wide default node selector for OpenShift Container Storage, you can use the following command in command line interface to specify a blank node selector for the
openshift-storagenamespace (create openshift-storage namespace in this case):$ oc annotate namespace openshift-storage openshift.io/node-selector=
-
Taint a node as
infrato ensure only Red Hat OpenShift Container Storage resources are scheduled on that node. This helps you save on subscription costs. For more information, see How to use dedicated worker nodes for Red Hat OpenShift Container Storage chapter in Managing and Allocating Storage Resources guide.
Procedure
- Navigate in the web console to the click Operators → OperatorHub.
- Scroll or type a keyword into the Filter by keyword box to search for OpenShift Container Storage Operator.
- Click Install on the OpenShift Container Storage operator page.
On the Install Operator page, the following required options are selected by default:
- Update Channel as stable-4.8.
- Installation Mode as A specific namespace on the cluster.
-
Installed Namespace as Operator recommended namespace openshift-storage. If Namespace
openshift-storagedoes not exist, it will be created during the operator installation. - Select Approval Strategy as Automatic or Manual.
Click Install.
If you selected Automatic updates, then the Operator Lifecycle Manager (OLM) automatically upgrades the running instance of your Operator without any intervention.
If you selected Manual updates, then the OLM creates an update request. As a cluster administrator, you must then manually approve that update request to have the Operator updated to the new version.
Verification steps
Verify that the OpenShift Container Storage Operator shows a green tick indicating successful installation.
Next steps
Create an OpenShift Container Storage cluster.
For information, see Creating OpenShift Container Storage cluster.
Chapter 3. Creating OpenShift Container Storage cluster
Use this procedure to create an OpenShift Container Storage cluster after you install the OpenShift Container Storage operator.
Prerequisites
- Ensure that all the requirements in Preparing to deploy storage cluster with disaster recovery enabled section are met.
Procedure
- Log in to the OpenShift Web Console.
Click Operators → Installed Operators to view all the installed operators.
Ensure that the Project selected is
openshift-storage.- Click OpenShift Container Storage → Create Instance link of Storage Cluster.
Select mode as Internal-Attached devices.
You are prompted to install the Local Storage Operator if it is not already installed. Click Install and follow the procedure as described in Installing Local Storage Operator.
You can create a dedicated storage class to consume storage by filtering a set of storage volumes.
Discover disks
Choose Select nodes option to select the labeled nodes with attached storage device(s) from data-center zones.
If the nodes to be selected are tainted and not discovered in the wizard, follow the steps provided in the Red Hat Knowledgebase Solution as a workaround to add tolerations for Local Storage Operator resources.
If the nodes selected do not match the OpenShift Container Storage cluster requirement of an aggregated 30 CPUs and 72 GiB of RAM, a minimal cluster will be deployed. For minimum starting node requirements, see Resource requirements section in Planning guide.
- Click Next.
Create Storage class
- Enter the Local Volume Set Name.
- Enter the Storage Class Name. By default, the volume set name appears for the storage class name. You can also change the name.
The nodes selected for disk discovery in the previous step are displayed in the Filter Disks By section.
Choose one of the following:
- Disks on all nodes to select all the nodes for which you discovered the devices.
- Disks on selected nodes to select a subset of the nodes for which you discovered the devices. Spread the worker nodes across three different physical nodes, racks or failure domains for high availability.
- Select SSD or NVMe to build a supported configuration. You can select HDDs for unsupported test installations.
Expand the Advanced section and set the following options:
Volume Mode
Block is selected by default.
Device Type
Select disk types. By default, Disk and Part are selected.
Disk Size
Minimum and maximum available size of the device that needs to be included.
NoteYou must set a minimum size of 100GB for the device.
Maximum Disk Limit
This indicates the maximum number of PVs that can be created on a node. If this field is left empty, then PVs are created for all the available disks on the matching nodes.
- Click Next. A pop-up to confirm creation of the new storage class is displayed.
- Click Yes to continue.
Set Capacity and nodes
Select Enable arbiter checkbox if you want to use the stretch clusters.
- Select the arbiter zone from the available drop down list.
- Select Storage Class. By default, the new storage class created in the previous step is selected.
Selected Nodes shows the nodes selected in the previous step. This list takes a few minutes to display the disks that were discovered in the previous step.
NoteCheck the zone label for each of the nodes displayed in the selected nodes section to verify that they are correctly labeled.
- Click Next.
(Optional) Set Security and network configuration
- Select the Enable encryption checkbox to encrypt block and file storage.
Choose any one or both Encryption level:
- Cluster-wide encryption to encrypt the entire cluster (block and file).
- Storage class encryption to create encrypted persistent volume (block only) using encryption enabled storage class.
Select the Connect to an external key management service checkbox. This is optional for cluster-wide encryption.
-
Key Management Service Provider is set to
Vaultby default. - Enter Vault Service Name, host Address of Vault server ('https://<hostname or ip>'), Port number and Token.
Expand Advanced Settings to enter additional settings and certificate details based on your Vault configuration:
- Enter the Key Value secret path in Backend Path that is dedicated and unique to OpenShift Container Storage.
- (Optional) Enter TLS Server Name and Vault Enterprise Namespace.
- Provide CA Certificate, Client Certificate and Client Private Key by uploading the respective PEM encoded certificate file.
- Click Save.
-
Key Management Service Provider is set to
Select Default (SDN) if you are using a single network or Custom (Multus) Network if you plan on using multiple network interfaces.
- Select a Public Network Interface from drop down.
- Select a Cluster Network Interface from drop down.
- Click Next.
- Review the configuration details. To modify any configuration settings, click Back to go back to the previous configuration page.
- Click Create.
Verification steps
Verify that the final Status of the installed storage cluster shows as
Phase: Readywith a green tick mark.- Click Operators → Installed Operators → Storage Cluster link to view the storage cluster installation status.
- Alternatively, when you are on the Operator Details tab, you can click on the Storage Cluster tab to view the status.
Click
ocs-storageclusterin the Storage Cluster tab.In the YAML tab, search for the
arbiterkey in the spec section and check the following:-
'enable' is set to
true, -
'arbiterLocation' is set
arbiter, -
'replica' is set to
4 'failureDomain' is set to
zone.spec: arbiter: enable: true [..] nodeTopologies: arbiterLocation: arbiter [..] replica: 4 status: conditions: [..] failureDomain: zone [..]
-
'enable' is set to
- To verify that all components for OpenShift Container Storage are successfully installed, see Verifying your OpenShift Container Storage installation.
Chapter 4. Verifying OpenShift Container Storage deployment
Use this section to verify that OpenShift Container Storage is deployed correctly.
4.1. Verifying the state of the pods
To verify that the pods of OpenShift Containers Storage are in running state, follow the below procedure:
Procedure
- Log in to OpenShift Web Console.
- Click Workloads → Pods from the left pane of the OpenShift Web Console.
Select openshift-storage from the Project drop down list.
For more information on the expected number of pods for each component and how it varies depending on the number of nodes, see Table 4.1, “Pods corresponding to OpenShift Container storage cluster”.
Click on the Running and Completed tabs to verify that the pods are running and in a completed state.
Table 4.1. Pods corresponding to OpenShift Container storage cluster
Component Corresponding pods OpenShift Container Storage Operator
-
ocs-operator-*(1 pod on any worker node) -
ocs-metrics-exporter-*
Rook-ceph Operator
rook-ceph-operator-*(1 pod on any worker node)
Multicloud Object Gateway
-
noobaa-operator-*(1 pod on any worker node) -
noobaa-core-*(1 pod on any storage node) -
noobaa-db-*(1 pod on any storage node) -
noobaa-endpoint-*(1 pod on any storage node)
MON
rook-ceph-mon-*(5 pods are distributed across 3 zones, 2 per data-center zones and 1 in arbiter zone)
MGR
rook-ceph-mgr-*(2 pods on any storage node)
MDS
rook-ceph-mds-ocs-storagecluster-cephfilesystem-*(2 pods are distributed across 2 data-center zones)
RGW
rook-ceph-rgw-ocs-storagecluster-cephobjectstore-*(2 pods are distributed across 2 data-center zones)
CSI
cephfs-
csi-cephfsplugin-*(1 pod on each worker node) -
csi-cephfsplugin-provisioner-*(2 pods distributed across worker nodes)
-
rbd-
csi-rbdplugin-*(1 pod on each worker node) -
csi-rbdplugin-provisioner-*(2 pods distributed across worker nodes)
-
rook-ceph-crashcollector
rook-ceph-crashcollector-*(1 pod on each storage node and 1 pod in arbiter zone)
OSD
-
rook-ceph-osd-*(1 pod for each device) -
rook-ceph-osd-prepare-ocs-deviceset-*(1 pod for each device)
-
4.2. Verifying the OpenShift Container Storage cluster is healthy
To verify that the cluster of OpenShift Container Storage is healthy, follow the steps in the procedure.
Procedure
- Click Storage → Overview and click the Block and File tab.
- In the Status card, verify that Storage Cluster and Data Resiliency has a green tick mark.
- In the Details card, verify that the cluster information is displayed.
For more information on the health of the OpenShift Container Storage clusters using the Block and File dashboard, see Monitoring OpenShift Container Storage.
4.3. Verifying the Multicloud Object Gateway is healthy
To verify that the OpenShift Container Storage Multicloud Object Gateway is healthy, follow the steps in the procedure.
Procedure
- Click Storage → Overview from the OpenShift Web Console and click the Object tab.
-
In the Status card, verify that both Object Service and Data Resiliency are in
Readystate (green tick). - In the Details card, verify that the Multicloud Object Gateway information is displayed.
For more information on the health of the OpenShift Container Storage cluster using the object service dashboard, see Monitoring OpenShift Container Storage.
4.4. Verifying that the OpenShift Container Storage specific storage classes exist
To verify the storage classes exists in the cluster, follow the steps in the procedure.
Procedure
- Click Storage → Storage Classes from the OpenShift Web Console.
Verify that the following storage classes are created with the OpenShift Container Storage cluster creation:
-
ocs-storagecluster-ceph-rbd -
ocs-storagecluster-cephfs -
openshift-storage.noobaa.io -
ocs-storagecluster-ceph-rgw
-
Chapter 5. Installing zone aware sample application
Use this section to deploy a zone aware sample application for validating an OpenShift Container Storage Metro Disaster recovery setup is configured correctly.
With latency between the data zones, one can expect to see performance degradation compared to an OpenShift cluster with low latency between nodes and zones (for example, all nodes in the same location). How much will the performance get degraded, will depend on the latency between the zones and on the application behavior using the storage (such as heavy write traffic). Please make sure to test critical applications with Metro DR cluster configuration to ensure sufficient application performance for the required service levels.
5.1. Install Zone Aware Sample Application
In this section the ocs-storagecluster-cephfs storage class is used to create a Read-Write-Many(RWX) PVC that can be used by multiple pods at the same time. The application we will use is called File Uploader.
Since this application shares the same RWX volume for storing files, we can demonstrate how an application can be spread across topology zones so that in the event of a site outage it is still available. This works for persistent data access as well because OpenShift Container Storage is configured as a Metro DR stretched cluster with zone awareness and high availability.
Create a new project:
oc new-project my-shared-storage
Deploy the example PHP application called file-uploader:
oc new-app openshift/php:7.2-ubi8~https://github.com/christianh814/openshift-php-upload-demo --name=file-uploader
Sample Output:
Found image 4f2dcc0 (9 days old) in image stream "openshift/php" under tag "7.2-ubi8" for "openshift/php:7.2-
ubi8"

Apache 2.4 with PHP 7.2
-----------------------
PHP 7.2 available as container is a base platform for building and running various PHP 7.2 applications and frameworks. PHP is an HTML-embedded scripting language. PHP attempts to make it easy for developers to write dynamically generated web pages. PHP also offers built-in database integration for several commercial and non-commercial database management systems, so writing a database-enabled webpage with PHP is fairly simple. The most common
use of PHP coding is probably as a replacement for CGI scripts.

Tags: builder, php, php72, php-72

* A source build using source code from https://github.com/christianh814/openshift-php-upload-demo will be cr
eated
* The resulting image will be pushed to image stream tag "file-uploader:latest"
* Use 'oc start-build' to trigger a new build

--> Creating resources ...
    imagestream.image.openshift.io "file-uploader" created
    buildconfig.build.openshift.io "file-uploader" created
    deployment.apps "file-uploader" created
    service "file-uploader" created
--> Success
    Build scheduled, use 'oc logs -f buildconfig/file-uploader' to track its progress.

    Application is not exposed. You can expose services to the outside world by executing one or more of the commands below:
     'oc expose service/file-uploader'

    Run 'oc status' to view your app.
View the build log and wait for the application to be deployed:
oc logs -f bc/file-uploader -n my-shared-storage
Example Output:
Cloning "https://github.com/christianh814/openshift-php-upload-demo" ...

    [...]
    Generating dockerfile with builder image image-registry.openshift-image-regis
try.svc:5000/openshift/php@sha256:d97466f33999951739a76bce922ab17088885db610c
0e05b593844b41d5494ea
STEP 1: FROM image-registry.openshift-image-registry.svc:5000/openshift/php@s
ha256:d97466f33999951739a76bce922ab17088885db610c0e05b593844b41d5494ea
STEP 2: LABEL "io.openshift.build.commit.author"="Christian Hernandez <christ
ian.hernandez@yahoo.com>"       "io.openshift.build.commit.date"="Sun Oct 1 1
7:15:09 2017 -0700"       "io.openshift.build.commit.id"="288eda3dff43b02f7f7
b6b6b6f93396ffdf34cb2"       "io.openshift.build.commit.ref"="master"       "
io.openshift.build.commit.message"="trying to modularize"       "io.openshift
.build.source-location"="https://github.com/christianh814/openshift-php-uploa
d-demo"       "io.openshift.build.image"="image-registry.openshift-image-regi
stry.svc:5000/openshift/php@sha256:d97466f33999951739a76bce922ab17088885db610
c0e05b593844b41d5494ea"
STEP 3: ENV OPENSHIFT_BUILD_NAME="file-uploader-1"     OPENSHIFT_BUILD_NAMESP
ACE="my-shared-storage"     OPENSHIFT_BUILD_SOURCE="https://github.com/christ
ianh814/openshift-php-upload-demo"     OPENSHIFT_BUILD_COMMIT="288eda3dff43b0
2f7f7b6b6b6f93396ffdf34cb2"
STEP 4: USER root
STEP 5: COPY upload/src /tmp/src
STEP 6: RUN chown -R 1001:0 /tmp/src
STEP 7: USER 1001
STEP 8: RUN /usr/libexec/s2i/assemble
---> Installing application source...
=> sourcing 20-copy-config.sh ...
---> 17:24:39     Processing additional arbitrary httpd configuration provide
d by s2i ...
=> sourcing 00-documentroot.conf ...
=> sourcing 50-mpm-tuning.conf ...
=> sourcing 40-ssl-certs.sh ...
STEP 9: CMD /usr/libexec/s2i/run
STEP 10: COMMIT temp.builder.openshift.io/my-shared-storage/file-uploader-1:3
b83e447
Getting image source signatures

[...]
The command prompt returns out of the tail mode once you see Push successful.
The new-app command deploys the application directly from the git repository and does not use the OpenShift template, hence OpenShift route resource is not created by default. We would need to create the route manually.
Let’s make our application zone aware and available by scaling it to 4 replicas and exposing it’s services:
oc expose svc/file-uploader -n my-shared-storage
oc scale --replicas=4 deploy/file-uploader -n my-shared-storage
oc get pods -o wide -n my-shared-storage
You should have 4 file-uploader Pods in a few minutes. Repeat the command above until there are 4 file-uploader Pods in Running STATUS.
You can create a PersistentVolumeClaim and attach it into an application with the oc set volume command. Execute the following
oc set volume deploy/file-uploader --add --name=my-shared-storage \
-t pvc --claim-mode=ReadWriteMany --claim-size=10Gi \
--claim-name=my-shared-storage --claim-class=ocs-storagecluster-cephfs \
--mount-path=/opt/app-root/src/uploaded \
-n my-shared-storage
This command will:
- create a PersistentVolumeClaim
- update the application deployment to include a volume definition
- update the application deployment to attach a volumemount into the specified mount-path
- cause a new deployment of the 4 application Pods
Now, let’s look at the result of adding the volume:
oc get pvc -n my-shared-storage
Example Output:
NAME                STATUS   VOLUME                                     CAPACITY   ACCESS MODES   STORAGECLASS                AGE
my-shared-storage   Bound    pvc-5402cc8a-e874-4d7e-af76-1eb05bd2e7c7   10Gi       RWX            ocs-storagecluster-cephfs   52s
Notice the ACCESSMODE being set to RWX (ReadWriteMany).
All 4 file-uploaderPods are using the same RWX volume. Without this ACCESSMODE, OpenShift will not attempt to attach multiple Pods to the same Persistent Volume reliably. If you attempt to scale up deployments that are using RWO ( ReadWriteOnce) persistent volume, the Pods will get co-located on the same node.
5.2. Modify Deployment to be Zone Aware
Currently, the file-uploader Deployment is not zone aware and can schedule all the Pods in the same zone. In this case if there is a site outage then the application would be unavailable. For more information, see using pod topology spread constraints
To make our app zone aware, we need to add pod placement rule in application deployment configuration. Run the following command and review the output as shown below. In the next step we will modify the Deployment to use the topology zone labels as shown in Start and End sections under below output.
$ oc get deployment file-uploader -o yaml -n my-shared-storage | less
Example Output:
[...]
spec:
  progressDeadlineSeconds: 600
  replicas: 4
  revisionHistoryLimit: 10
  selector:
    matchLabels:
      deployment: file-uploader
  strategy:
    rollingUpdate:
      maxSurge: 25%
      maxUnavailable: 25%
    type: RollingUpdate
  template:
    metadata:
      annotations:
        openshift.io/generated-by: OpenShiftNewApp
      creationTimestamp: null
      labels:
        deployment: file-uploader
      spec:  # <-- Start inserted lines after here
        containers:  # <-- End inserted lines before here
        - image: image-registry.openshift-image-registry.svc:5000/my-shared-storage/file-uploader@sha256:a458ea62f990e431ad7d5f84c89e2fa27bdebdd5e29c5418c70c56eb81f0a26b
          imagePullPolicy: IfNotPresent
          name: file-uploader
[...]
Edit the deployment and add the following new lines between the start and end as shown above:
$ oc edit deployment file-uploader -n my-shared-storage
[...]
      spec:
        topologySpreadConstraints:
          - labelSelector:
              matchLabels:
                deployment: file-uploader
            maxSkew: 1
            topologyKey: topology.kubernetes.io/zone
            whenUnsatisfiable: DoNotSchedule
          - labelSelector:
              matchLabels:
                deployment: file-uploader
            maxSkew: 1
            topologyKey: kubernetes.io/hostname
            whenUnsatisfiable: ScheduleAnyway
        nodeSelector:
          node-role.kubernetes.io/worker: ""
        containers:
[...]
Example output:
deployment.apps/file-uploader edited
Scale the deployment to zero Pods and then back to four Pods. This is needed because the deployment changed in terms of Pod placement.
oc scale deployment file-uploader --replicas=0 -n my-shared-storage
Example output:
deployment.apps/file-uploader scaled
And then back to 4 Pods.
$ oc scale deployment file-uploader --replicas=4 -n my-shared-storage
Example output:
deployment.apps/file-uploader scaled
Verify that the four Pods are spread across the four nodes in datacenter1 and datacenter2 zones.
$ oc get pods -o wide -n my-shared-storage | egrep '^file-uploader'| grep -v build | awk '{print $7}' | sort | uniq -cExample output:
   1 perf1-mz8bt-worker-d2hdm
   1 perf1-mz8bt-worker-k68rv
   1 perf1-mz8bt-worker-ntkp8
   1 perf1-mz8bt-worker-qpwsr
$ oc get nodes -L topology.kubernetes.io/zone | grep datacenter | grep -v master
Example output:
perf1-mz8bt-worker-d2hdm   Ready    worker   35d   v1.20.0+5fbfd19   datacenter1
perf1-mz8bt-worker-k68rv   Ready    worker   35d   v1.20.0+5fbfd19   datacenter1
perf1-mz8bt-worker-ntkp8   Ready    worker   35d   v1.20.0+5fbfd19   datacenter2
perf1-mz8bt-worker-qpwsr   Ready    worker   35d   v1.20.0+5fbfd19   datacenter2
Use the file-uploader web application using your browser to upload new files.
Find the Route that has been created:
$ oc get route file-uploader -n my-shared-storage -o jsonpath --template="http://{.spec.host}{'\n'}"This will return a route similar to this one.
Sample Output:
http://file-uploader-my-shared-storage.apps.cluster-ocs4-abdf.ocs4-abdf.sandbox744.opentlc.com
Point your browser to the web application using your route above. Your route will be different.
The web app simply lists all uploaded files and offers the ability to upload new ones as well as download the existing data. Right now there is nothing.
Select an arbitrary file from your local machine and upload it to the app.
Figure 5.1. A simple PHP-based file upload tool

- Click List uploaded files to see the list of all currently uploaded files.
The OpenShift Container Platform image registry, ingress routing, and monitoring services are not zone-aware