Chapter 9. Multicloud Object Gateway
9.1. About the Multicloud Object Gateway
The Multicloud Object Gateway (MCG) is a lightweight object storage service for OpenShift, allowing users to start small and then scale as needed on-premise, in multiple clusters, and with cloud-native storage.
9.2. Accessing the Multicloud Object Gateway with your applications
You can access the object service with any application targeting AWS S3 or code that uses AWS S3 Software Development Kit (SDK). Applications need to specify the MCG endpoint, an access key, and a secret access key. You can use your terminal or the MCG CLI to retrieve this information.
Prerequisites
- A running OpenShift Container Storage Platform
Download the MCG command-line interface for easier management:
# subscription-manager repos --enable=rh-ocs-4-for-rhel-8-x86_64-rpms
# yum install mcg
-
Alternatively, you can install the
mcgpackage from the OpenShift Container Storage RPMs found at Download RedHat OpenShift Container Storage page.
You can access the relevant endpoint, access key, and secret access key two ways:
- Section 9.2.1, “Accessing the Multicloud Object Gateway from the terminal”
Section 9.2.2, “Accessing the Multicloud Object Gateway from the MCG command-line interface”
- Accessing the MCG bucket(s) using the virtual-hosted style
Example 9.1. Example
If the client application tries to access https://<bucket-name>.s3-openshift-storage.apps.mycluster-cluster.qe.rh-ocs.com
where
<bucket-name>is the name of the MCG bucketFor example, https://mcg-test-bucket.s3-openshift-storage.apps.mycluster-cluster.qe.rh-ocs.com
A DNS entry is needed for
mcg-test-bucket.s3-openshift-storage.apps.mycluster-cluster.qe.rh-ocs.comto point to the S3 Service.
Ensure that you have a DNS entry in order to point the client application to the MCG bucket(s) using the virtual-hosted style.
9.2.1. Accessing the Multicloud Object Gateway from the terminal
Procedure
Run the describe command to view information about the MCG endpoint, including its access key (AWS_ACCESS_KEY_ID value) and secret access key (AWS_SECRET_ACCESS_KEY value):
# oc describe noobaa -n openshift-storage
The output will look similar to the following:
Name:         noobaa
Namespace:    openshift-storage
Labels:       <none>
Annotations:  <none>
API Version:  noobaa.io/v1alpha1
Kind:         NooBaa
Metadata:
  Creation Timestamp:  2019-07-29T16:22:06Z
  Generation:          1
  Resource Version:    6718822
  Self Link:           /apis/noobaa.io/v1alpha1/namespaces/openshift-storage/noobaas/noobaa
  UID:                 019cfb4a-b21d-11e9-9a02-06c8de012f9e
Spec:
Status:
  Accounts:
    Admin:
      Secret Ref:
        Name:           noobaa-admin
        Namespace:      openshift-storage
  Actual Image:         noobaa/noobaa-core:4.0
  Observed Generation:  1
  Phase:                Ready
  Readme:

  Welcome to NooBaa!
  -----------------

  Welcome to NooBaa!
    -----------------
    NooBaa Core Version:
    NooBaa Operator Version:

    Lets get started:

    1. Connect to Management console:

      Read your mgmt console login information (email & password) from secret: "noobaa-admin".

        kubectl get secret noobaa-admin -n openshift-storage -o json | jq '.data|map_values(@base64d)'

      Open the management console service - take External IP/DNS or Node Port or use port forwarding:

        kubectl port-forward -n openshift-storage service/noobaa-mgmt 11443:443 &
        open https://localhost:11443

    2. Test S3 client:

      kubectl port-forward -n openshift-storage service/s3 10443:443 &
1
      NOOBAA_ACCESS_KEY=$(kubectl get secret noobaa-admin -n openshift-storage -o json | jq -r '.data.AWS_ACCESS_KEY_ID|@base64d')
2
      NOOBAA_SECRET_KEY=$(kubectl get secret noobaa-admin -n openshift-storage -o json | jq -r '.data.AWS_SECRET_ACCESS_KEY|@base64d')
      alias s3='AWS_ACCESS_KEY_ID=$NOOBAA_ACCESS_KEY AWS_SECRET_ACCESS_KEY=$NOOBAA_SECRET_KEY aws --endpoint https://localhost:10443 --no-verify-ssl s3'
      s3 ls


    Services:
      Service Mgmt:
        External DNS:
          https://noobaa-mgmt-openshift-storage.apps.mycluster-cluster.qe.rh-ocs.com
          https://a3406079515be11eaa3b70683061451e-1194613580.us-east-2.elb.amazonaws.com:443
        Internal DNS:
          https://noobaa-mgmt.openshift-storage.svc:443
        Internal IP:
          https://172.30.235.12:443
        Node Ports:
          https://10.0.142.103:31385
        Pod Ports:
          https://10.131.0.19:8443
      serviceS3:
        External DNS: 3
          https://s3-openshift-storage.apps.mycluster-cluster.qe.rh-ocs.com
          https://a340f4e1315be11eaa3b70683061451e-943168195.us-east-2.elb.amazonaws.com:443
        Internal DNS:
          https://s3.openshift-storage.svc:443
        Internal IP:
          https://172.30.86.41:443
        Node Ports:
          https://10.0.142.103:31011
        Pod Ports:
          https://10.131.0.19:6443
The output from the oc describe noobaa command lists the internal and external DNS names that are available. When using the internal DNS, the traffic is free. The external DNS uses Load Balancing to process the traffic, and therefore has a cost per hour.
9.2.2. Accessing the Multicloud Object Gateway from the MCG command-line interface
Prerequisites
Download the MCG command-line interface:
# subscription-manager repos --enable=rh-ocs-4-for-rhel-8-x86_64-rpms
# yum install mcg
Procedure
Run the status command to access the endpoint, access key, and secret access key:
noobaa status -n openshift-storage
The output will look similar to the following:
INFO[0000] Namespace: openshift-storage
INFO[0000]
INFO[0000] CRD Status:
INFO[0003] ✅ Exists: CustomResourceDefinition "noobaas.noobaa.io"
INFO[0003] ✅ Exists: CustomResourceDefinition "backingstores.noobaa.io"
INFO[0003] ✅ Exists: CustomResourceDefinition "bucketclasses.noobaa.io"
INFO[0004] ✅ Exists: CustomResourceDefinition "objectbucketclaims.objectbucket.io"
INFO[0004] ✅ Exists: CustomResourceDefinition "objectbuckets.objectbucket.io"
INFO[0004]
INFO[0004] Operator Status:
INFO[0004] ✅ Exists: Namespace "openshift-storage"
INFO[0004] ✅ Exists: ServiceAccount "noobaa"
INFO[0005] ✅ Exists: Role "ocs-operator.v0.0.271-6g45f"
INFO[0005] ✅ Exists: RoleBinding "ocs-operator.v0.0.271-6g45f-noobaa-f9vpj"
INFO[0006] ✅ Exists: ClusterRole "ocs-operator.v0.0.271-fjhgh"
INFO[0006] ✅ Exists: ClusterRoleBinding "ocs-operator.v0.0.271-fjhgh-noobaa-pdxn5"
INFO[0006] ✅ Exists: Deployment "noobaa-operator"
INFO[0006]
INFO[0006] System Status:
INFO[0007] ✅ Exists: NooBaa "noobaa"
INFO[0007] ✅ Exists: StatefulSet "noobaa-core"
INFO[0007] ✅ Exists: Service "noobaa-mgmt"
INFO[0008] ✅ Exists: Service "s3"
INFO[0008] ✅ Exists: Secret "noobaa-server"
INFO[0008] ✅ Exists: Secret "noobaa-operator"
INFO[0008] ✅ Exists: Secret "noobaa-admin"
INFO[0009] ✅ Exists: StorageClass "openshift-storage.noobaa.io"
INFO[0009] ✅ Exists: BucketClass "noobaa-default-bucket-class"
INFO[0009] ✅ (Optional) Exists: BackingStore "noobaa-default-backing-store"
INFO[0010] ✅ (Optional) Exists: CredentialsRequest "noobaa-cloud-creds"
INFO[0010] ✅ (Optional) Exists: PrometheusRule "noobaa-prometheus-rules"
INFO[0010] ✅ (Optional) Exists: ServiceMonitor "noobaa-service-monitor"
INFO[0011] ✅ (Optional) Exists: Route "noobaa-mgmt"
INFO[0011] ✅ (Optional) Exists: Route "s3"
INFO[0011] ✅ Exists: PersistentVolumeClaim "db-noobaa-core-0"
INFO[0011] ✅ System Phase is "Ready"
INFO[0011] ✅ Exists:  "noobaa-admin"

#------------------#
#- Mgmt Addresses -#
#------------------#

ExternalDNS : [https://noobaa-mgmt-openshift-storage.apps.mycluster-cluster.qe.rh-ocs.com https://a3406079515be11eaa3b70683061451e-1194613580.us-east-2.elb.amazonaws.com:443]
ExternalIP  : []
NodePorts   : [https://10.0.142.103:31385]
InternalDNS : [https://noobaa-mgmt.openshift-storage.svc:443]
InternalIP  : [https://172.30.235.12:443]
PodPorts    : [https://10.131.0.19:8443]

#--------------------#
#- Mgmt Credentials -#
#--------------------#

email    : admin@noobaa.io
password : HKLbH1rSuVU0I/souIkSiA==

#----------------#
#- S3 Addresses -#
#----------------#

1
ExternalDNS : [https://s3-openshift-storage.apps.mycluster-cluster.qe.rh-ocs.com https://a340f4e1315be11eaa3b70683061451e-943168195.us-east-2.elb.amazonaws.com:443]
ExternalIP  : []
NodePorts   : [https://10.0.142.103:31011]
InternalDNS : [https://s3.openshift-storage.svc:443]
InternalIP  : [https://172.30.86.41:443]
PodPorts    : [https://10.131.0.19:6443]

#------------------#
#- S3 Credentials -#
#------------------#

2
AWS_ACCESS_KEY_ID     : jVmAsu9FsvRHYmfjTiHV
3
AWS_SECRET_ACCESS_KEY : E//420VNedJfATvVSmDz6FMtsSAzuBv6z180PT5c

#------------------#
#- Backing Stores -#
#------------------#

NAME                           TYPE     TARGET-BUCKET                                               PHASE   AGE
noobaa-default-backing-store   aws-s3   noobaa-backing-store-15dc896d-7fe0-4bed-9349-5942211b93c9   Ready   141h35m32s

#------------------#
#- Bucket Classes -#
#------------------#

NAME                          PLACEMENT                                                             PHASE   AGE
noobaa-default-bucket-class   {Tiers:[{Placement: BackingStores:[noobaa-default-backing-store]}]}   Ready   141h35m33s

#-----------------#
#- Bucket Claims -#
#-----------------#

No OBC's found.
You now have the relevant endpoint, access key, and secret access key in order to connect to your applications.
Example 9.2. Example
If AWS S3 CLI is the application, the following command will list buckets in OpenShift Container Storage:
AWS_ACCESS_KEY_ID=<AWS_ACCESS_KEY_ID>
AWS_SECRET_ACCESS_KEY=<AWS_SECRET_ACCESS_KEY>
aws --endpoint <ENDPOINT> --no-verify-ssl s3 ls
9.3. Adding storage resources for hybrid or Multicloud
9.3.1. Adding storage resources for hybrid or Multicloud using the MCG command line interface
The Multicloud Object Gateway (MCG) simplifies the process of spanning data across cloud provider and clusters.
To do so, add a backing storage that can be used by the MCG.
Prerequisites
Download the MCG command-line interface:
# subscription-manager repos --enable=rh-ocs-4-for-rhel-8-x86_64-rpms
# yum install mcg
-
Alternatively, you can install the
mcgpackage from the OpenShift Container Storage RPMs found here Download RedHat OpenShift Container Storage page.
Procedure
From the MCG command-line interface, run the following command:
noobaa backingstore create <backing-store-type> <backingstore_name> --access-key=<AWS ACCESS KEY> --secret-key=<AWS SECRET ACCESS KEY> --target-bucket <bucket-name>
-
Replace
<backing-store-type>with your relevant backing store type:aws-s3,google-cloud-store,azure-blob,s3-compatible, oribm-cos. -
Replace
<backingstore_name>with the name of the backingstore. -
Replace
<AWS ACCESS KEY>and<AWS SECRET ACCESS KEY>with an AWS access key ID and secret access key you created for this purpose. Replace
<bucket-name>with an existing AWS bucket name. This argument tells NooBaa which bucket to use as a target bucket for its backing store, and subsequently, data storage and administration.The output will be similar to the following:
INFO[0001] ✅ Exists: NooBaa "noobaa"
INFO[0002] ✅ Created: BackingStore "aws-resource"
INFO[0002] ✅ Created: Secret "backing-store-secret-aws-resource"
-
Replace
You can also add storage resources using a YAML:
Create a secret with the credentials:
apiVersion: v1
kind: Secret
metadata:
  name: <backingstore-secret-name>
type: Opaque
data:
  AWS_ACCESS_KEY_ID: <AWS ACCESS KEY ID ENCODED IN BASE64>
  AWS_SECRET_ACCESS_KEY: <AWS SECRET ACCESS KEY ENCODED IN BASE64>
-
You must supply and encode your own AWS access key ID and secret access key using Base64, and use the results in place of
<AWS ACCESS KEY ID ENCODED IN BASE64>and<AWS SECRET ACCESS KEY ENCODED IN BASE64>. -
Replace
<backingstore-secret-name>with a unique name.
-
You must supply and encode your own AWS access key ID and secret access key using Base64, and use the results in place of
Apply the following YAML for a specific backing store:
apiVersion: noobaa.io/v1alpha1 kind: BackingStore metadata: finalizers: - noobaa.io/finalizer labels: app: noobaa name: bs namespace: noobaa spec: awsS3: secret: name: <backingstore-secret-name> namespace: noobaa targetBucket: <bucket-name> type: <backing-store-type>-
Replace
<bucket-name>with an existing AWS bucket name. This argument tells NooBaa which bucket to use as a target bucket for its backing store, and subsequently, data storage and administration. -
Replace
<backingstore-secret-name>with the name of the secret created in the previous step. -
Replace <backing-store-type> with your relevant backing store type:
aws-s3,google-cloud-store,azure-blob,s3-compatible, oribm-cos.
-
Replace
9.3.2. Creating an s3 compatible Multicloud Object Gateway backingstore
The Multicloud Object Gateway can use any S3 compatible object storage as a backing store, for example, Red Hat Ceph Storage’s RADOS Gateway (RGW). The following procedure shows how to create an S3 compatible Multicloud Object Gateway backing store for Red Hat Ceph Storage’s RADOS Gateway. Note that when RGW is deployed, Openshift Container Storage operator creates an S3 compatible backingstore for Multicloud Object Gateway automatically.
Procedure
From the Multicloud Object Gateway (MCG) command-line interface, run the following NooBaa command:
noobaa backingstore create s3-compatible rgw-resource --access-key=<RGW ACCESS KEY> --secret-key=<RGW SECRET KEY> --target-bucket=<bucket-name> --endpoint=<RGW endpoint>
To get the
<RGW ACCESS KEY>and<RGW SECRET KEY>, run the following command using your RGW user secret name:oc get secret <RGW USER SECRET NAME> -o yaml
- Decode the access key ID and the access key from Base64 and keep them.
-
Replace
<RGW USER ACCESS KEY>and<RGW USER SECRET ACCESS KEY>with the appropriate, decoded data from the previous step. -
Replace
<bucket-name>with an existing RGW bucket name. This argument tells Multicloud Object Gateway which bucket to use as a target bucket for its backing store, and subsequently, data storage and administration. To get the
<RGW endpoint>, see Accessing the RADOS Object Gateway S3 endpoint.The output will be similar to the following:
INFO[0001] ✅ Exists: NooBaa "noobaa"
INFO[0002] ✅ Created: BackingStore "rgw-resource"
INFO[0002] ✅ Created: Secret "backing-store-secret-rgw-resource"
You can also create the backingstore using a YAML:
Create a
CephObjectStoreuser. This also creates a secret containing the RGW credentials:apiVersion: ceph.rook.io/v1 kind: CephObjectStoreUser metadata: name: <RGW-Username> namespace: openshift-storage spec: store: ocs-storagecluster-cephobjectstore displayName: "<Display-name>"
-
Replace
<RGW-Username>and<Display-name>with a unique username and display name.
-
Replace
Apply the following YAML for an S3-Compatible backing store:
apiVersion: noobaa.io/v1alpha1 kind: BackingStore metadata: finalizers: - noobaa.io/finalizer labels: app: noobaa name: <backingstore-name> namespace: openshift-storage spec: s3Compatible: endpoint: <RGW endpoint> secret: name: <backingstore-secret-name> namespace: openshift-storage signatureVersion: v4 targetBucket: <RGW-bucket-name> type: s3-compatible-
Replace
<backingstore-secret-name>with the name of the secret that was created withCephObjectStorein the previous step. -
Replace
<bucket-name>with an existing RGW bucket name. This argument tells Multicloud Object Gateway which bucket to use as a target bucket for its backing store, and subsequently, data storage and administration. -
To get the
<RGW endpoint>, see Accessing the RADOS Object Gateway S3 endpoint.
-
Replace
9.3.3. Adding storage resources for hybrid and Multicloud using the user interface
Procedure
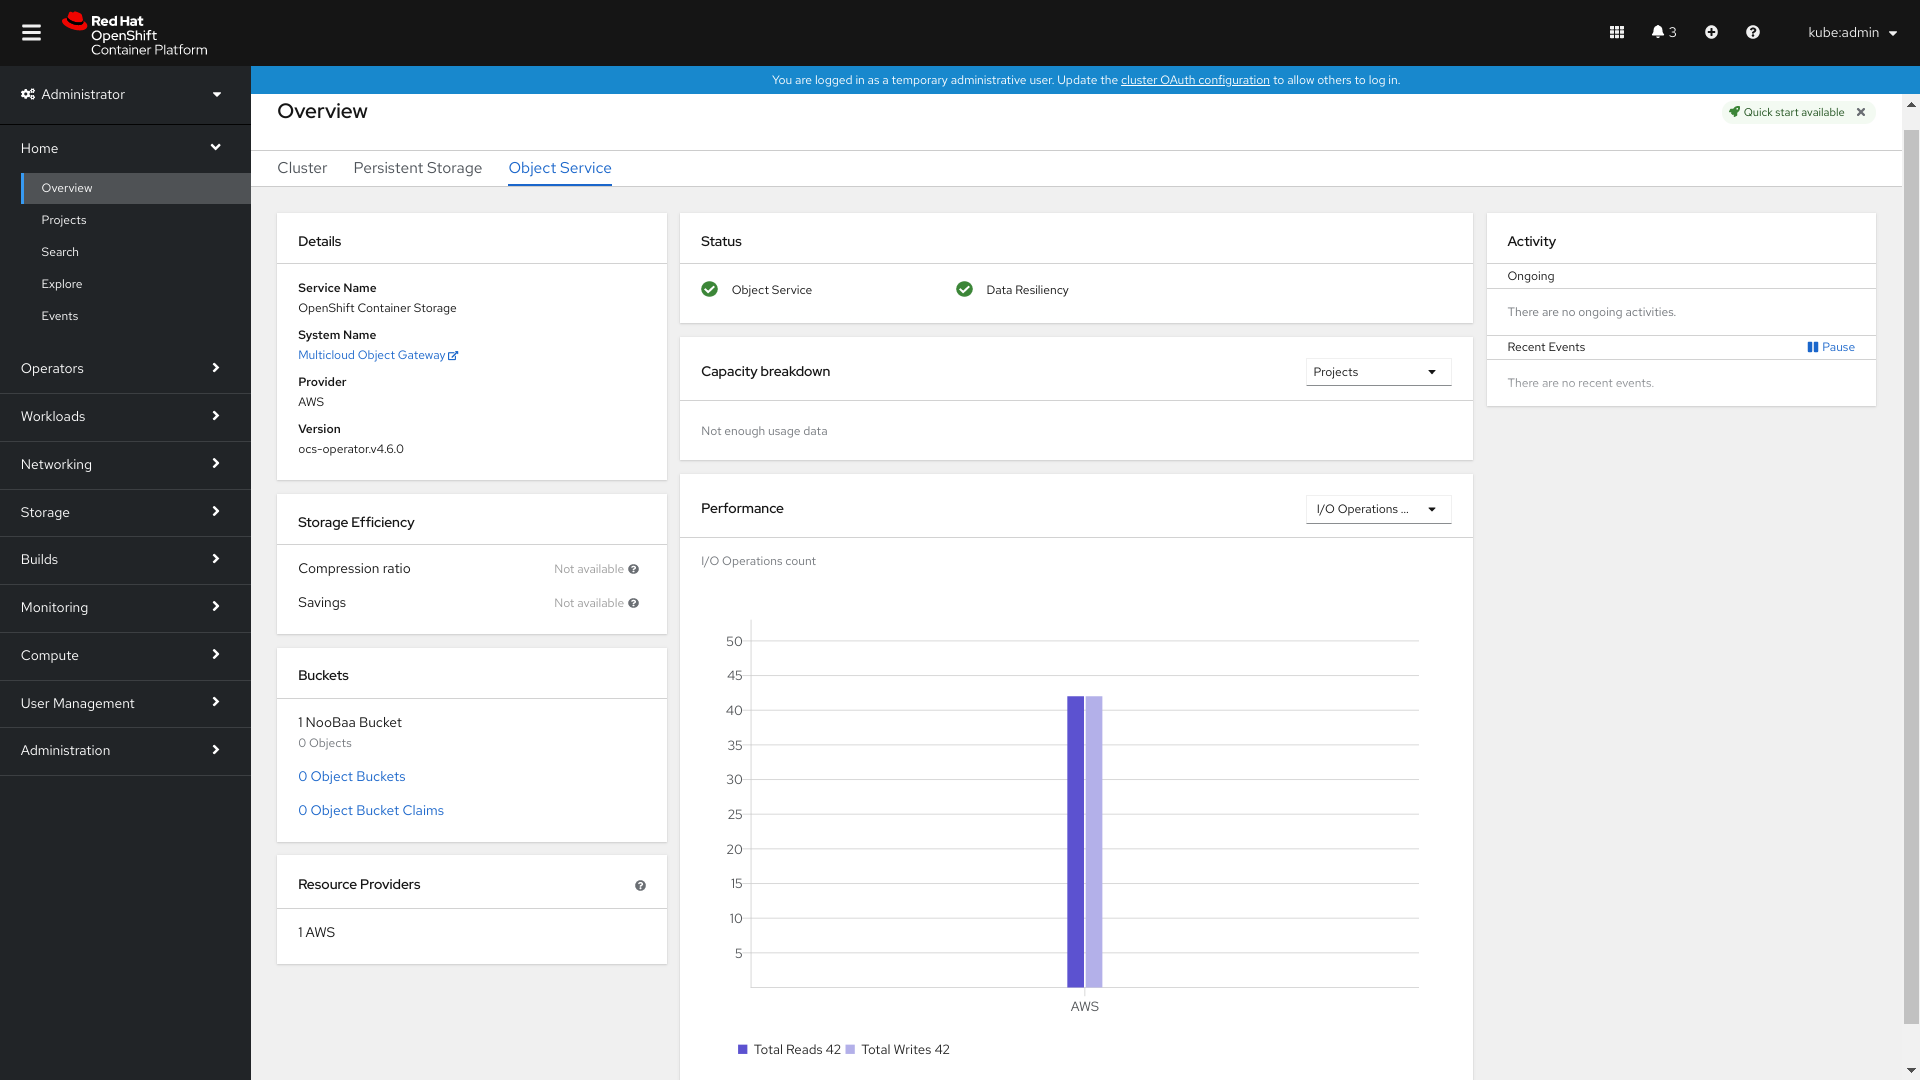
In your OpenShift Storage console, navigate to Overview → Object Service → select the Multicloud Object Gateway link:
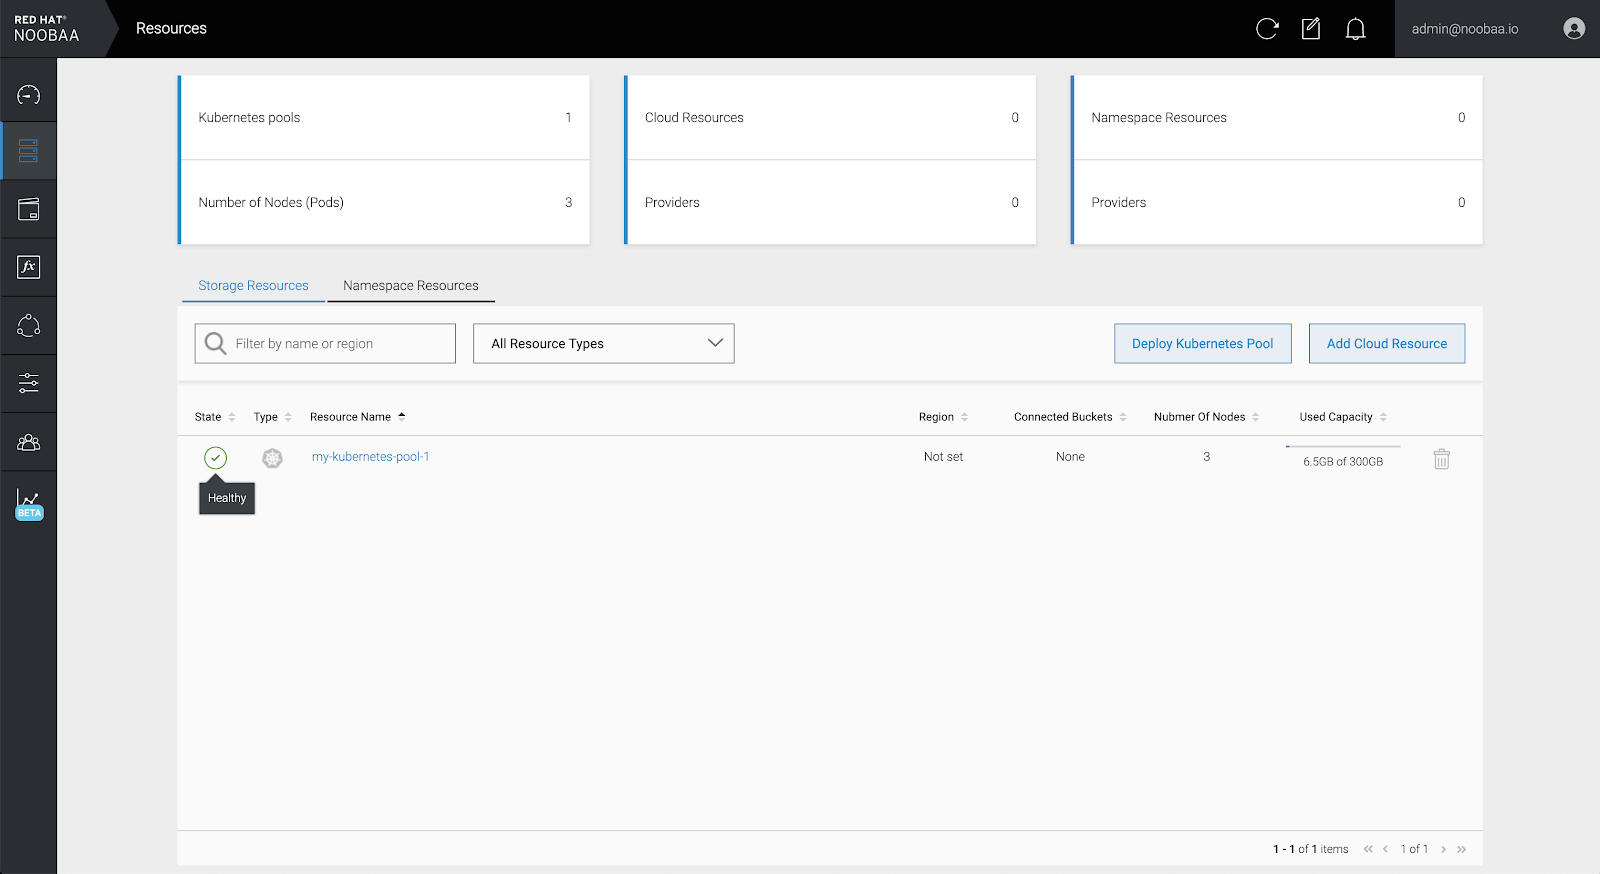
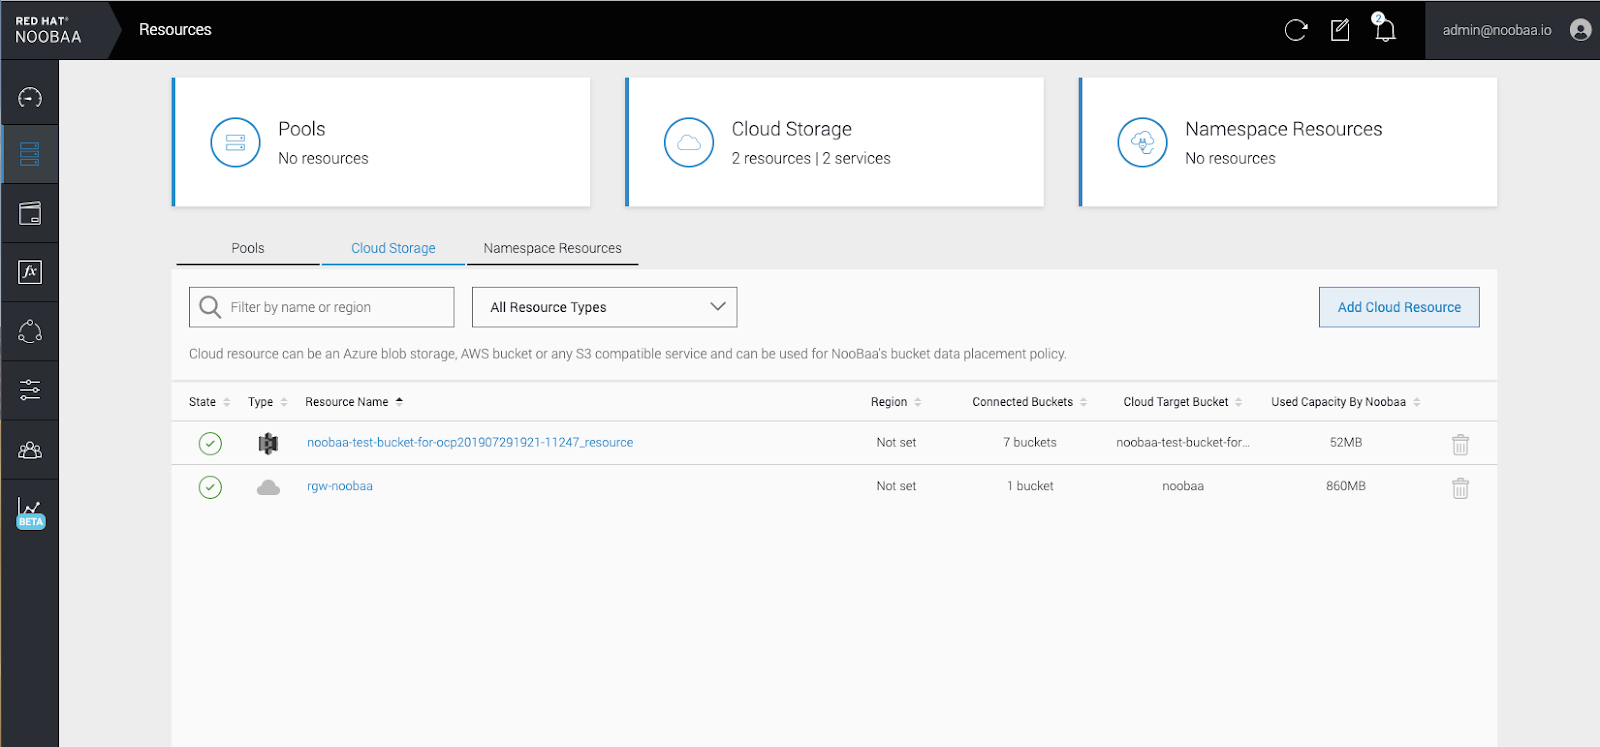
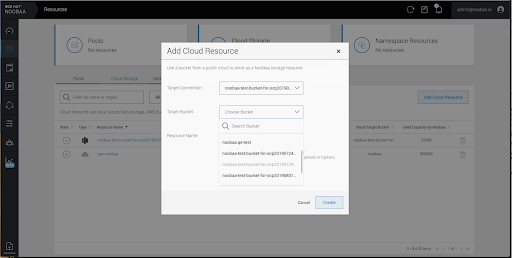
Select the Resources tab in the left, highlighted below. From the list that populates, select Add Cloud Resource:
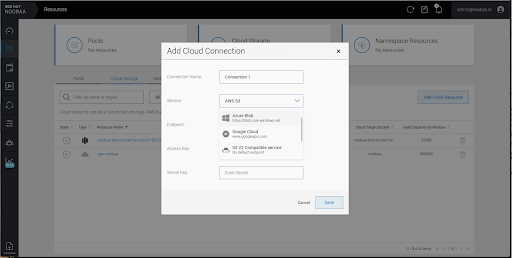
Select Add new connection:
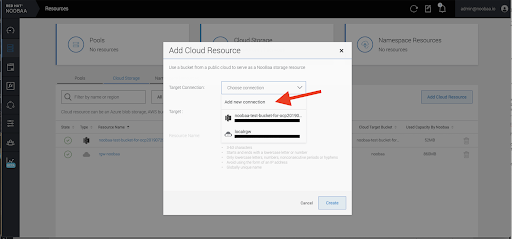
Select the relevant native cloud provider or S3 compatible option and fill in the details:
Select the newly created connection and map it to the existing bucket:
- Repeat these steps to create as many backing stores as needed.
Resources created in NooBaa UI cannot be used by OpenShift UI or MCG CLI.
9.3.4. Creating a new bucket class
Bucket class is a CRD representing a class of buckets that defines tiering policies and data placements for an Object Bucket Class (OBC).
Use this procedure to create a bucket class in OpenShift Container Storage.
Procedure
- Click Operators → Installed Operators from the left pane of the OpenShift Web Console to view the installed operators.
- Click OpenShift Container Storage Operator.
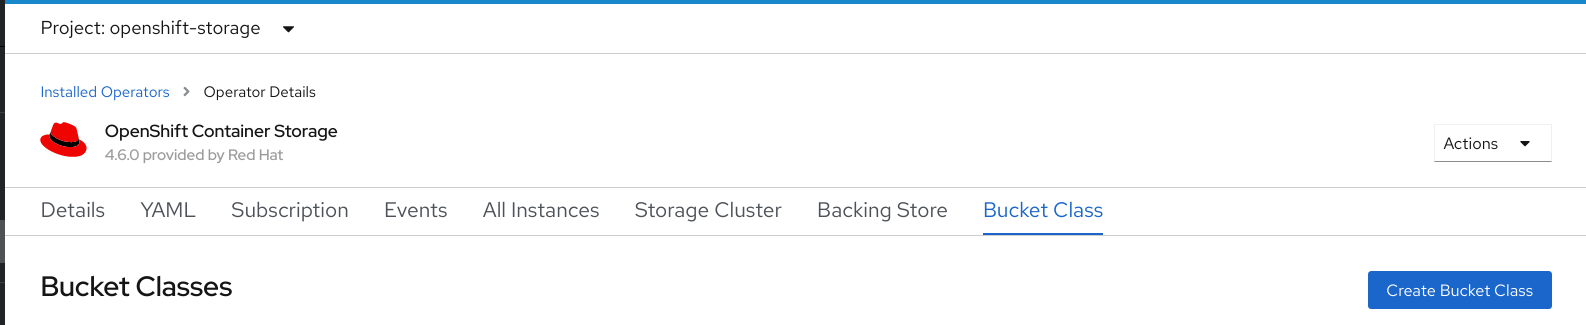
On the OpenShift Container Storage Operator page, scroll right and click the Bucket Class tab.
Figure 9.1. OpenShift Container Storage Operator page with Bucket Class tab
- Click Create Bucket Class.
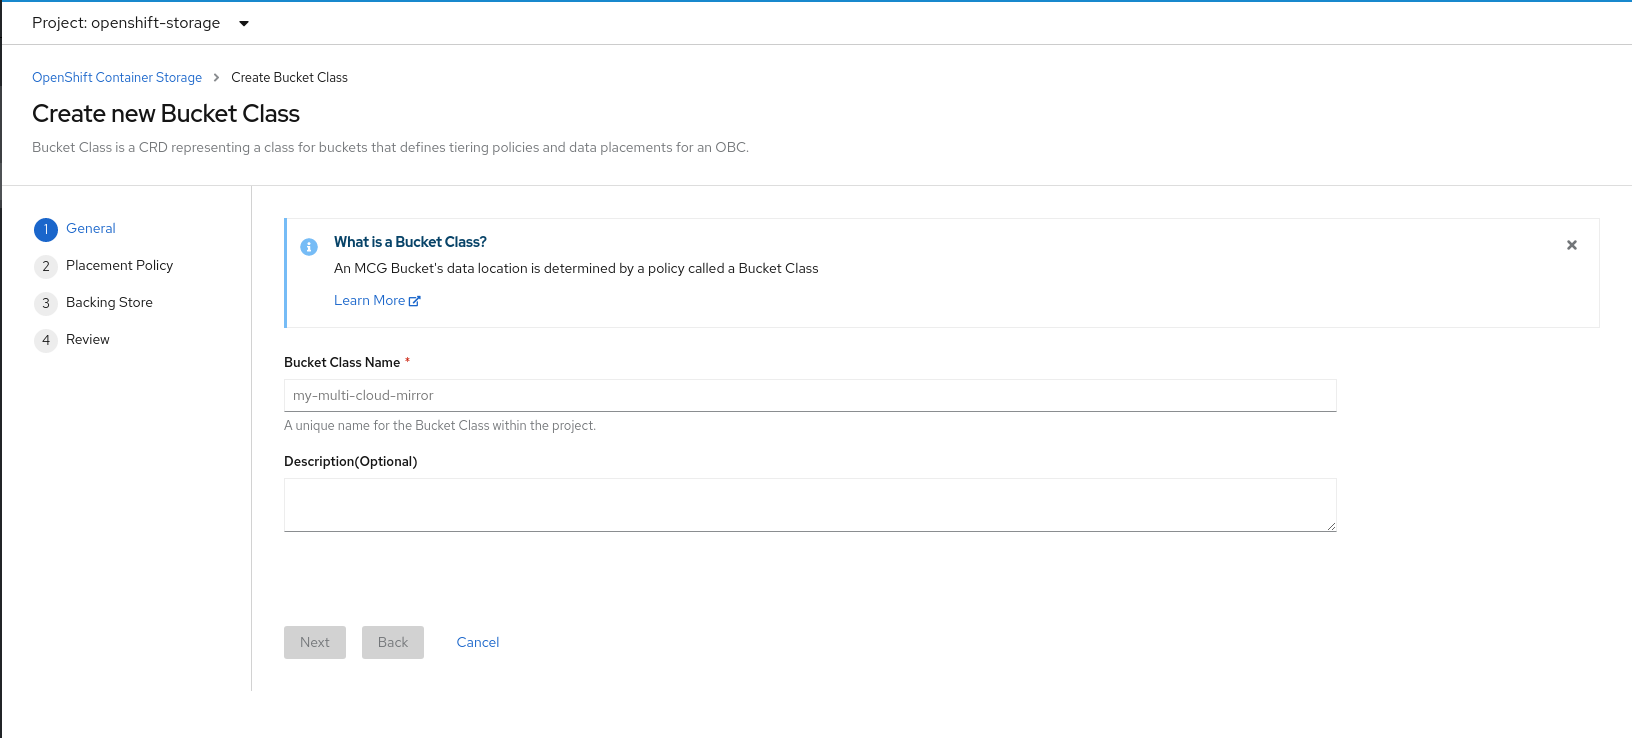
On the Create new Bucket Class page, perform the following:
Enter a Bucket Class Name and click Next.
Figure 9.2. Create Bucket Class page
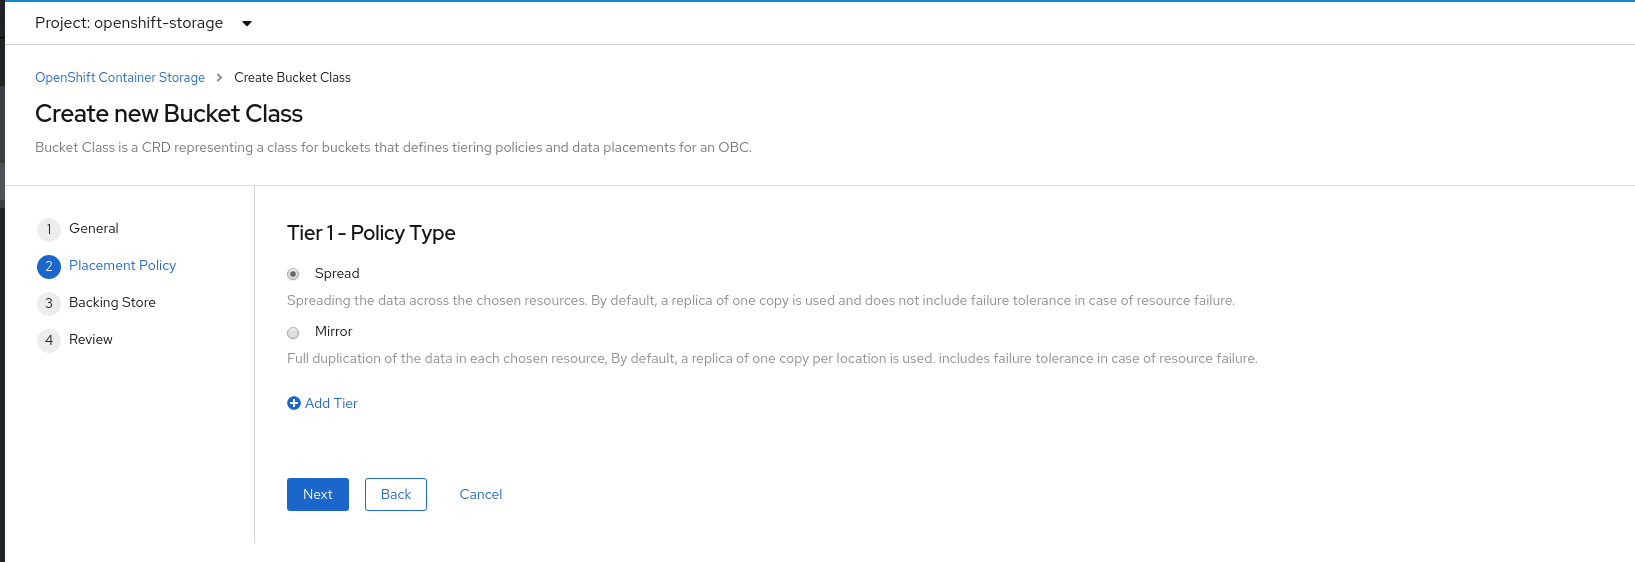
In Placement Policy, select Tier 1 - Policy Type and click Next. You can choose either one of the options as per your requirements.
- Spread allows spreading of the data across the chosen resources.
- Mirror allows full duplication of the data across the chosen resources.
Click Add Tier to add another policy tier.
Figure 9.3. Tier 1 - Policy Type selection page
Select atleast one Backing Store resource from the available list if you have selected Tier 1 - Policy Type as Spread and click Next. Alternatively, you can also create a new backing store.
Figure 9.4. Tier 1 - Backing Store selection page
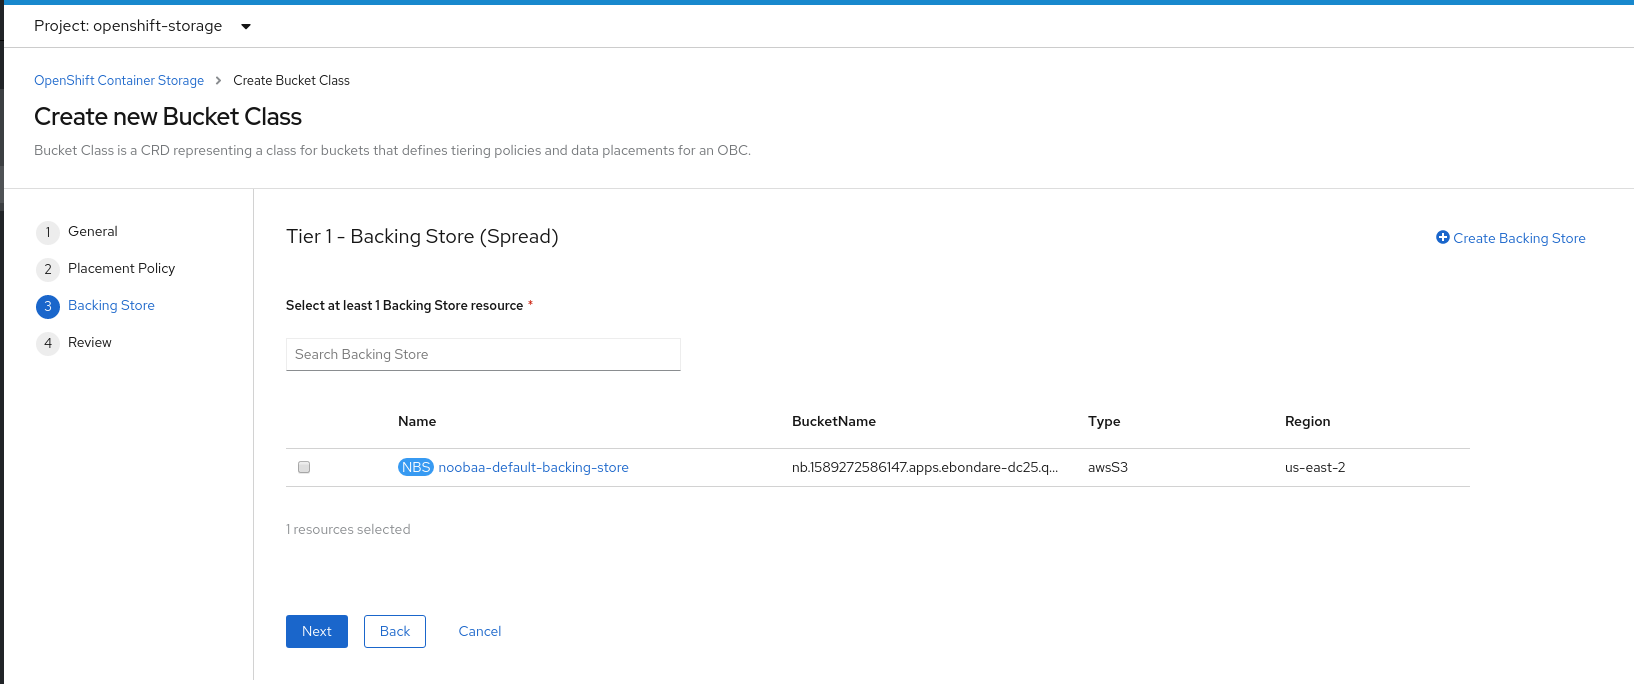
You need to select atleast 2 backing stores when you select Policy Type as Mirror in previous step.
Review and confirm Bucket Class settings.
Figure 9.5. Bucket class settings review page
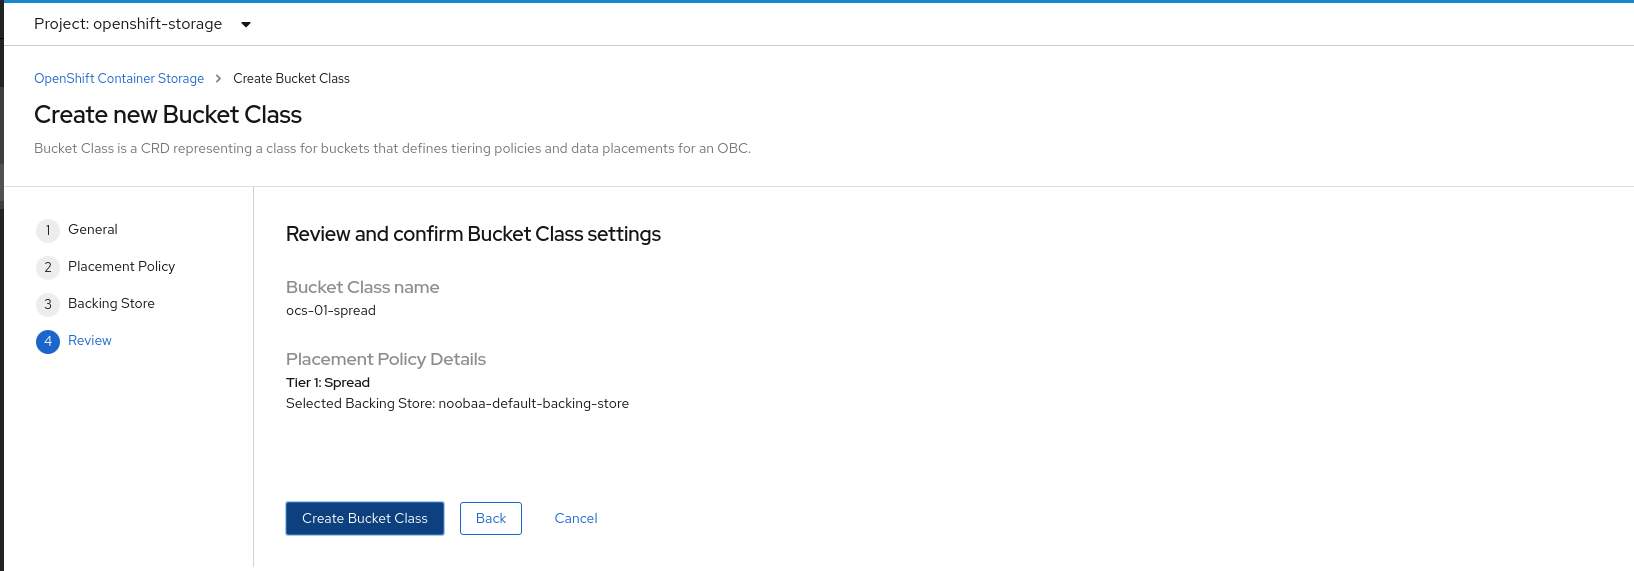
- Click Create Bucket Class.
Verification steps
- Click Operators → Installed Operators.
- Click OpenShift Container Storage Operator.
- Search for the new Bucket Class or click Bucket Class tab to view all the Bucket Classes.
9.3.5. Creating a new backing store
Use this procedure to create a new backing store in OpenShift Container Storage.
Prerequisites
- Administrator access to OpenShift.
Procedure
- Click Operators → Installed Operators from the left pane of the OpenShift Web Console to view the installed operators.
- Click OpenShift Container Storage Operator.
On the OpenShift Container Storage Operator page, scroll right and click the Backing Store tab.
Figure 9.6. OpenShift Container Storage Operator page with backing store tab
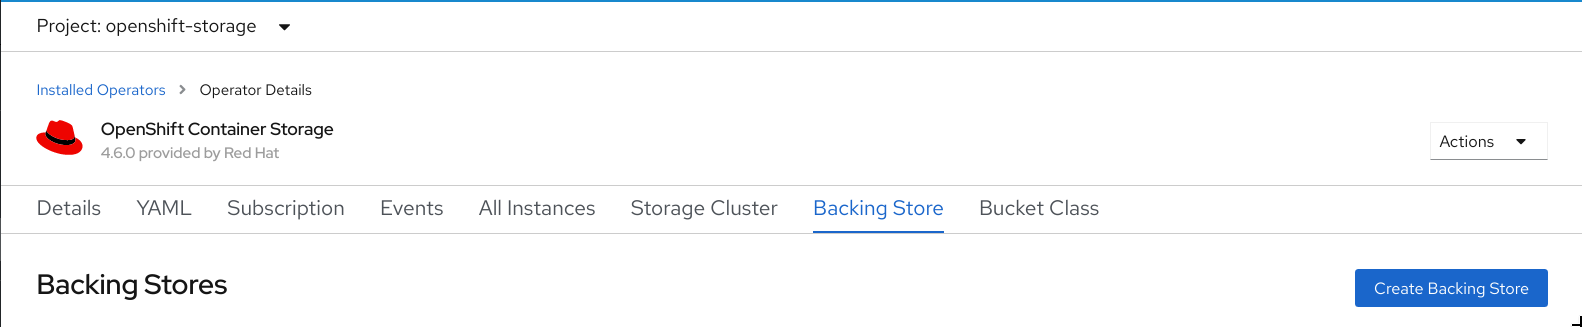
Click Create Backing Store.
Figure 9.7. Create Backing Store page
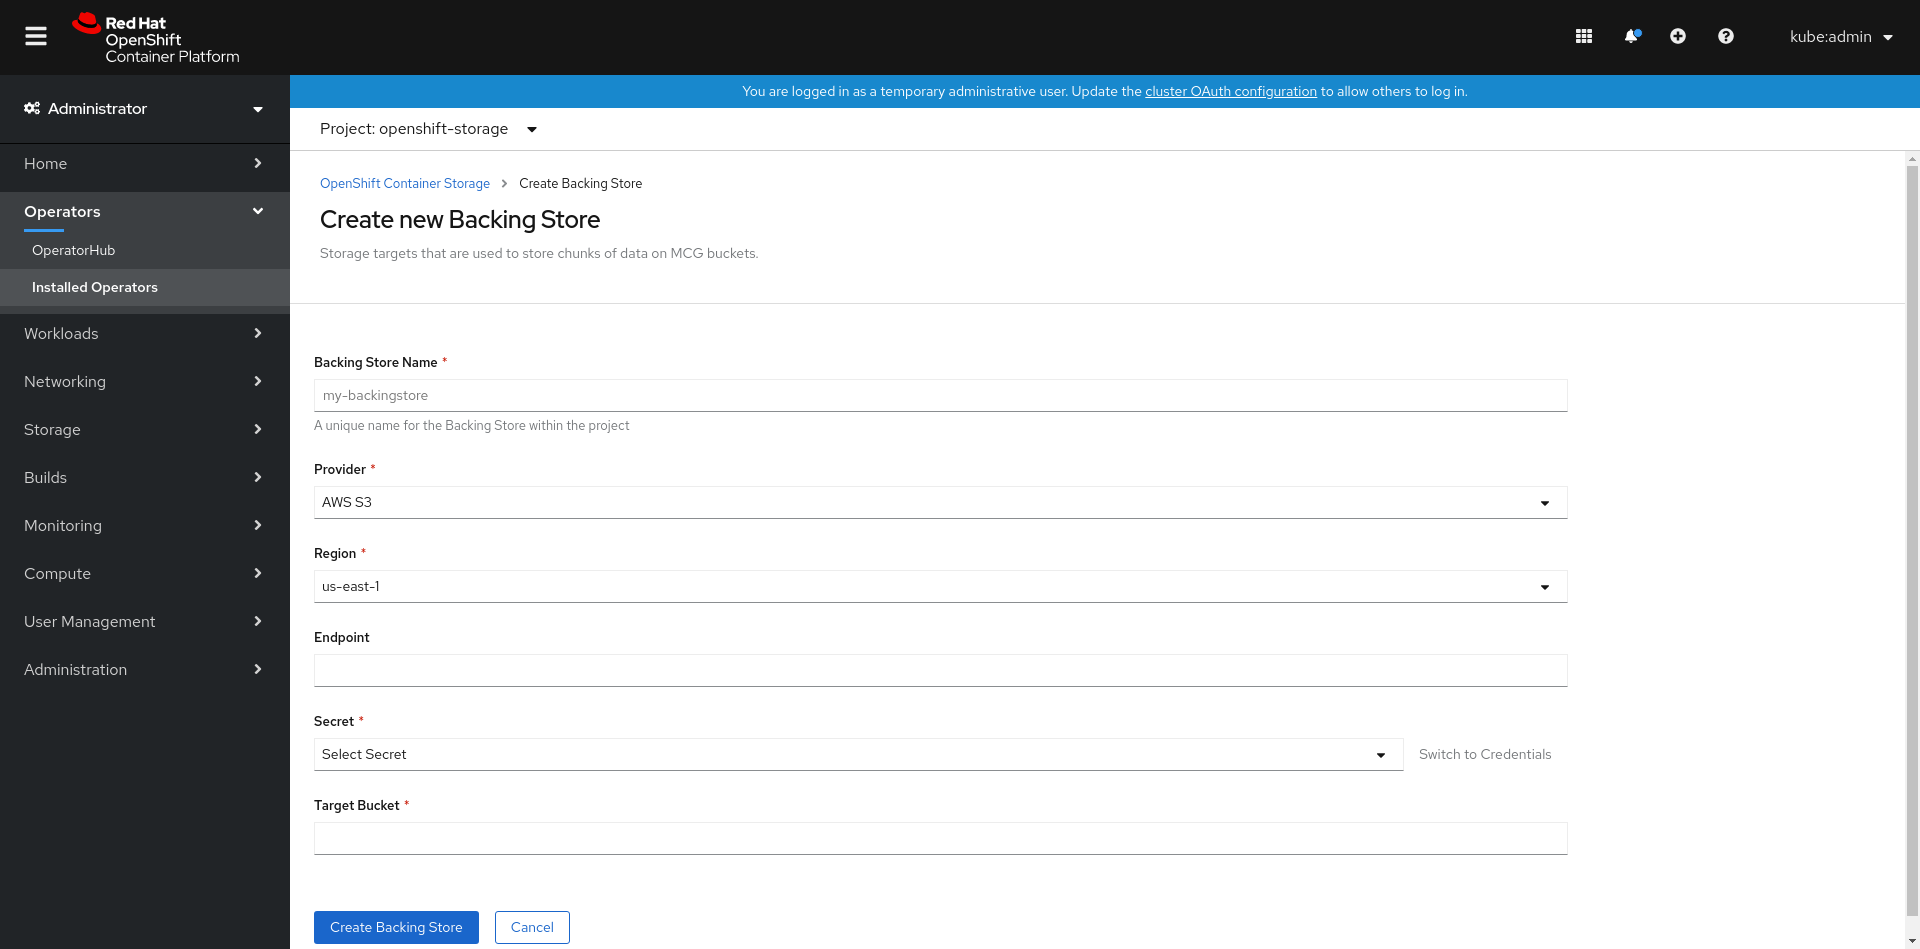
On the Create New Backing Store page, perform the following:
- Enter a Backing Store Name.
- Select a Provider.
- Select a Region.
- Enter an Endpoint. This is optional.
Select a Secret from drop down list, or create your own secret. Optionally, you can Switch to Credentials view which lets you fill in the required secrets.
For more information on creating an OCP secret, see the section Creating the secret in the Openshift Container Platform documentation.
Each backingstore requires a different secret. For more information on creating the secret for a particular backingstore, see the Section 9.3.1, “Adding storage resources for hybrid or Multicloud using the MCG command line interface” and follow the procedure for the addition of storage resources using a YAML.
NoteThis menu is relevant for all providers except Google Cloud and local PVC.
- Enter Target bucket. The target bucket is a container storage that is hosted on the remote cloud service. It allows you to create a connection that tells MCG that it can use this bucket for the system.
- Click Create Backing Store.
Verification steps
- Click Operators → Installed Operators.
- Click OpenShift Container Storage Operator.
- Search for the new backing store or click Backing Store tab to view all the backing stores.
9.4. Mirroring data for hybrid and Multicloud buckets
The Multicloud Object Gateway (MCG) simplifies the process of spanning data across cloud provider and clusters.
Prerequisites
- You must first add a backing storage that can be used by the MCG, see Section 9.3, “Adding storage resources for hybrid or Multicloud”.
Then you create a bucket class that reflects the data management policy, mirroring.
Procedure
You can set up mirroring data three ways:
9.4.1. Creating bucket classes to mirror data using the MCG command-line-interface
From the MCG command-line interface, run the following command to create a bucket class with a mirroring policy:
$ noobaa bucketclass create mirror-to-aws --backingstores=azure-resource,aws-resource --placement Mirror
Set the newly created bucket class to a new bucket claim, generating a new bucket that will be mirrored between two locations:
$ noobaa obc create mirrored-bucket --bucketclass=mirror-to-aws
9.4.2. Creating bucket classes to mirror data using a YAML
Apply the following YAML. This YAML is a hybrid example that mirrors data between local Ceph storage and AWS:
apiVersion: noobaa.io/v1alpha1
kind: BucketClass
metadata:
  name: hybrid-class
  labels:
    app: noobaa
spec:
  placementPolicy:
    tiers:
      - tier:
          mirrors:
            - mirror:
                spread:
                  - cos-east-us
            - mirror:
                spread:
                  - noobaa-test-bucket-for-ocp201907291921-11247_resource
Add the following lines to your standard Object Bucket Claim (OBC):
additionalConfig:
  bucketclass: mirror-to-aws
For more information about OBCs, see Section 9.6, “Object Bucket Claim”.
9.4.3. Configuring buckets to mirror data using the user interface
In your OpenShift Storage console, navigate to Overview → Object Service → select the Multicloud Object Gateway link:
Click the buckets icon on the left side. You will see a list of your buckets:
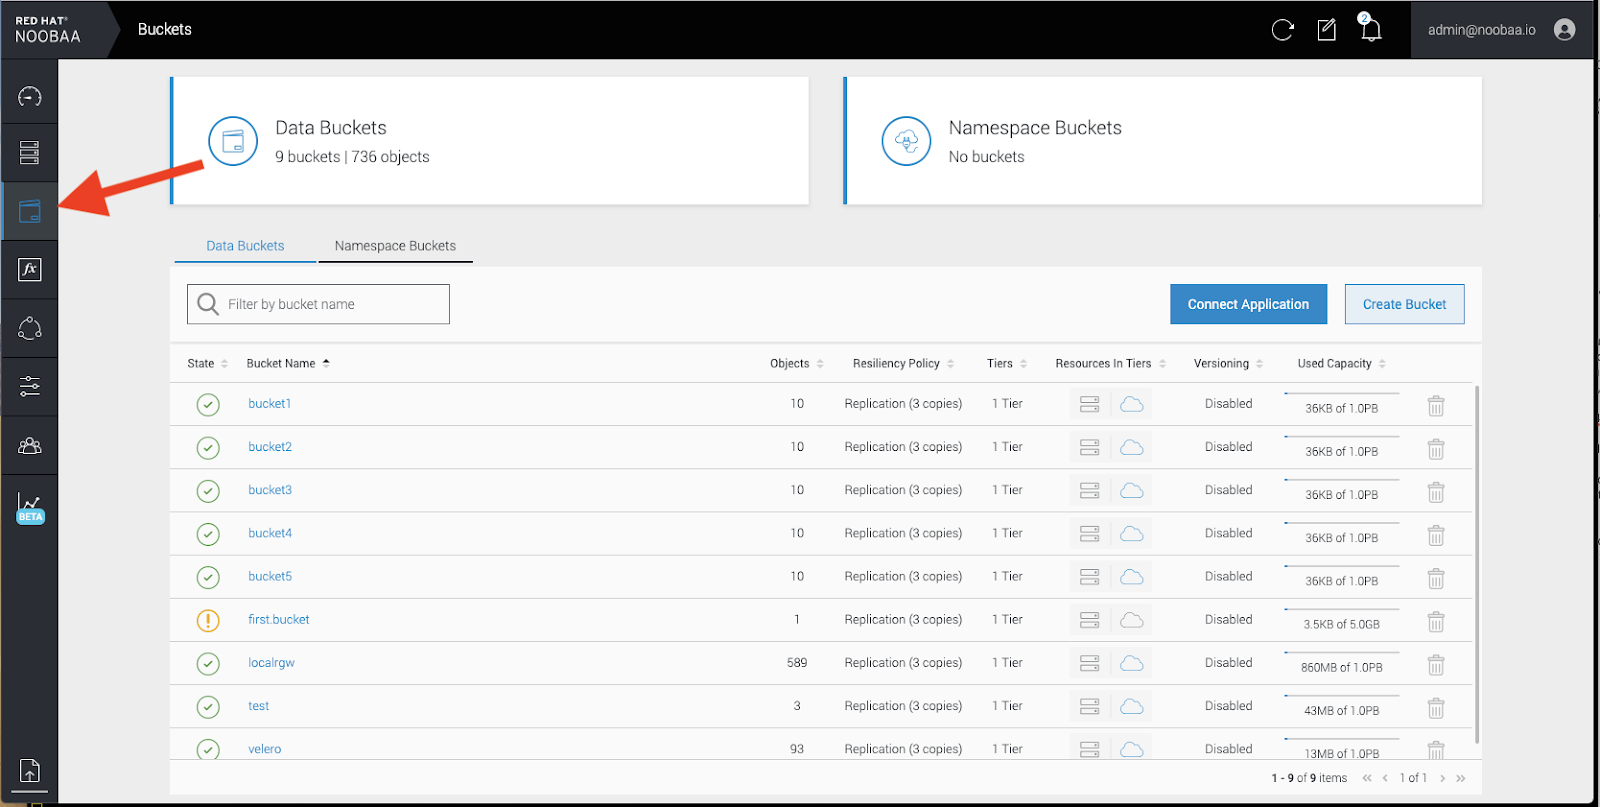
- Click the bucket you want to update.
Click Edit Tier 1 Resources:

Select Mirror and check the relevant resources you want to use for this bucket. In the following example, we mirror data between on prem Ceph RGW to AWS:
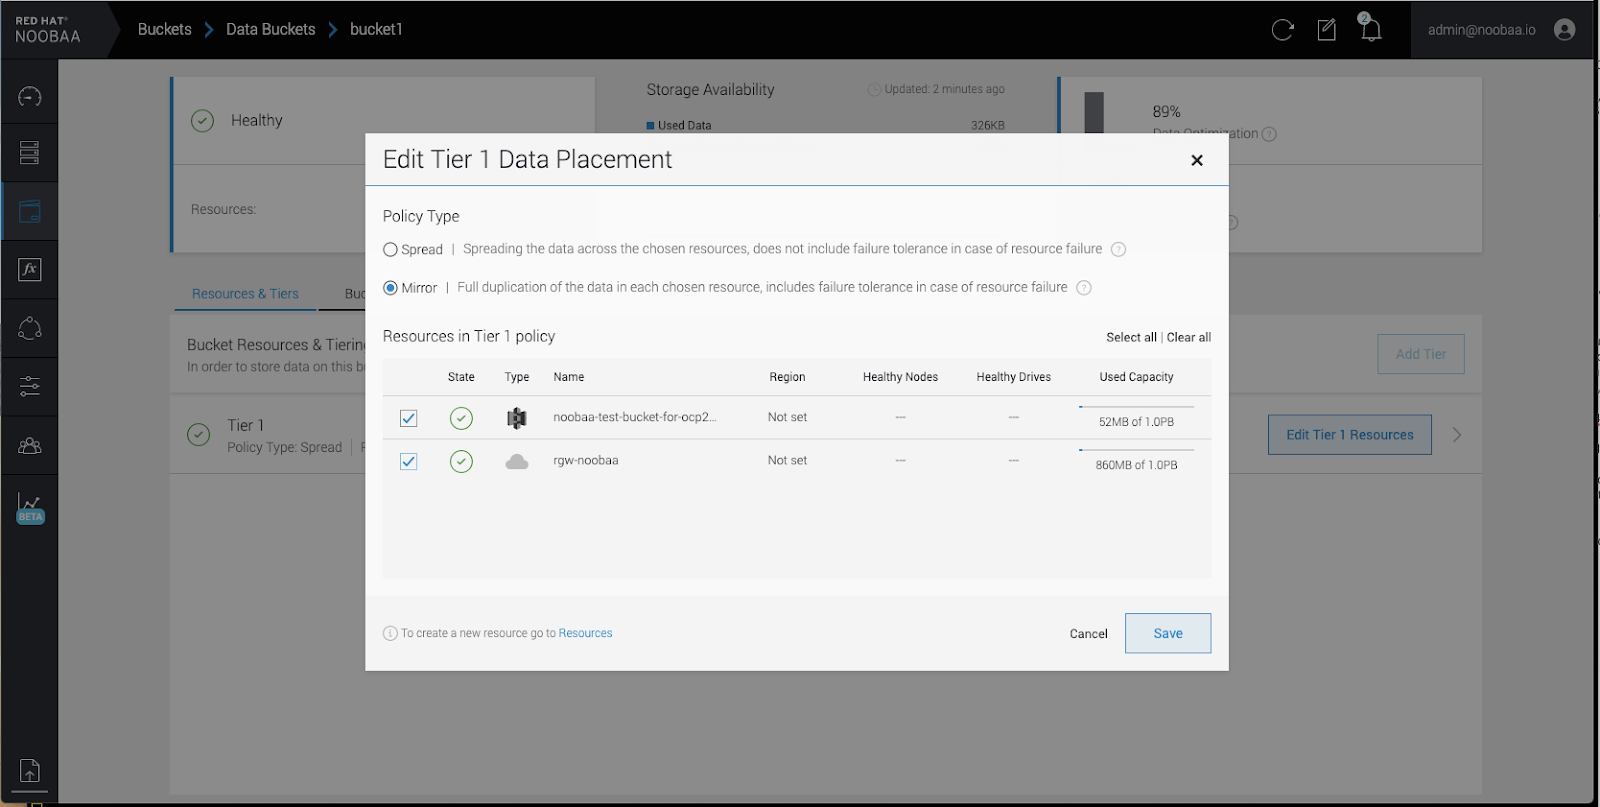
- Click Save.
Resources created in NooBaa UI cannot be used by OpenShift UI or MCG CLI.
9.5. Bucket policies in the Multicloud Object Gateway
OpenShift Container Storage supports AWS S3 bucket policies. Bucket policies allow you to grant users access permissions for buckets and the objects in them.
9.5.1. About bucket policies
Bucket policies are an access policy option available for you to grant permission to your AWS S3 buckets and objects. Bucket policies use JSON-based access policy language. For more information about access policy language, see AWS Access Policy Language Overview.
9.5.2. Using bucket policies
Prerequisites
- A running OpenShift Container Storage Platform
- Access to the Multicloud Object Gateway, see Section 9.2, “Accessing the Multicloud Object Gateway with your applications”
Procedure
To use bucket policies in the Multicloud Object Gateway:
Create the bucket policy in JSON format. See the following example:
{
    "Version": "NewVersion",
    "Statement": [
        {
            "Sid": "Example",
            "Effect": "Allow",
            "Principal": [
                    "john.doe@example.com"
            ],
            "Action": [
                "s3:GetObject"
            ],
            "Resource": [
                "arn:aws:s3:::john_bucket"
            ]
        }
    ]
}
There are many available elements for bucket policies. For details on these elements and examples of how they can be used, see AWS Access Policy Language Overview.
For more examples of bucket policies, see AWS Bucket Policy Examples.
Instructions for creating S3 users can be found in Section 9.5.3, “Creating an AWS S3 user in the Multicloud Object Gateway”.
Using AWS S3 client, use the
put-bucket-policycommand to apply the bucket policy to your S3 bucket:# aws --endpoint ENDPOINT --no-verify-ssl s3api put-bucket-policy --bucket MyBucket --policy BucketPolicy
Replace
ENDPOINTwith the S3 endpointReplace
MyBucketwith the bucket to set the policy onReplace
BucketPolicywith the bucket policy JSON fileAdd
--no-verify-sslif you are using the default self signed certificatesFor example:
# aws --endpoint https://s3-openshift-storage.apps.gogo44.noobaa.org --no-verify-ssl s3api put-bucket-policy -bucket MyBucket --policy file://BucketPolicy
For more information on the
put-bucket-policycommand, see the AWS CLI Command Reference for put-bucket-policy.
The principal element specifies the user that is allowed or denied access to a resource, such as a bucket. Currently, Only NooBaa accounts can be used as principals. In the case of object bucket claims, NooBaa automatically create an account obc-account.<generated bucket name>@noobaa.io.
Bucket policy conditions are not supported.
9.5.3. Creating an AWS S3 user in the Multicloud Object Gateway
Prerequisites
- A running OpenShift Container Storage Platform
- Access to the Multicloud Object Gateway, see Section 9.2, “Accessing the Multicloud Object Gateway with your applications”
Procedure
In your OpenShift Storage console, navigate to Overview → Object Service → select the Multicloud Object Gateway link:
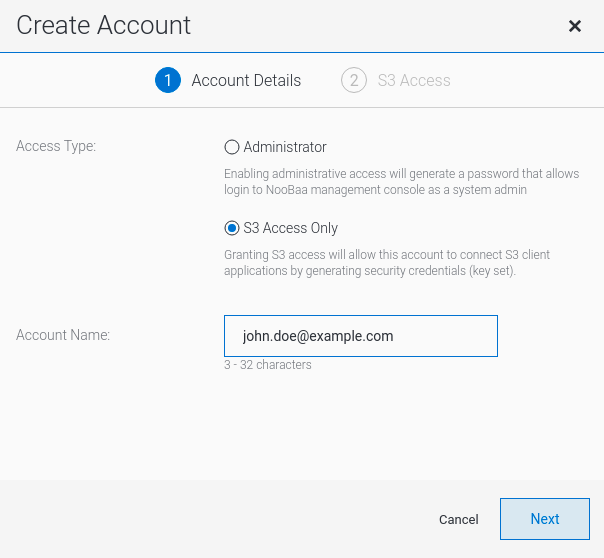
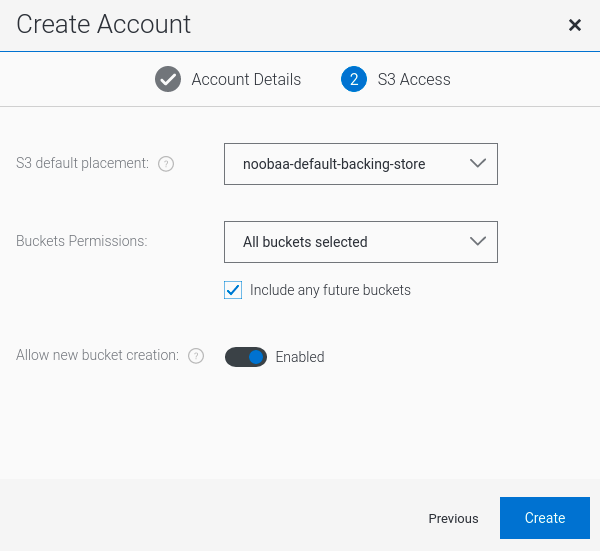
Under the Accounts tab, click Create Account:

Select S3 Access Only, provide the Account Name, for example, john.doe@example.com. Click Next:
Select S3 default placement, for example, noobaa-default-backing-store. Select Buckets Permissions. A specific bucket or all buckets can be selected. Click Create:
9.6. Object Bucket Claim
An Object Bucket Claim can be used to request an S3 compatible bucket backend for your workloads.
You can create an Object Bucket Claim three ways:
An object bucket claim creates a new bucket and an application account in NooBaa with permissions to the bucket, including a new access key and secret access key. The application account is allowed to access only a single bucket and can’t create new buckets by default.
9.6.1. Dynamic Object Bucket Claim
Similar to Persistent Volumes, you can add the details of the Object Bucket claim to your application’s YAML, and get the object service endpoint, access key, and secret access key available in a configuration map and secret. It is easy to read this information dynamically into environment variables of your application.
Procedure
Add the following lines to your application YAML:
apiVersion: objectbucket.io/v1alpha1
kind: ObjectBucketClaim
metadata:
  name: <obc-name>
spec:
  generateBucketName: <obc-bucket-name>
  storageClassName: openshift-storage.noobaa.io
These lines are the Object Bucket Claim itself.
-
Replace
<obc-name>with the a unique Object Bucket Claim name. -
Replace
<obc-bucket-name>with a unique bucket name for your Object Bucket Claim.
-
Replace
You can add more lines to the YAML file to automate the use of the Object Bucket Claim. The example below is the mapping between the bucket claim result, which is a configuration map with data and a secret with the credentials. This specific job will claim the Object Bucket from NooBaa, which will create a bucket and an account.
apiVersion: batch/v1 kind: Job metadata: name: testjob spec: template: spec: restartPolicy: OnFailure containers: - image: <your application image> name: test env: - name: BUCKET_NAME valueFrom: configMapKeyRef: name: <obc-name> key: BUCKET_NAME - name: BUCKET_HOST valueFrom: configMapKeyRef: name: <obc-name> key: BUCKET_HOST - name: BUCKET_PORT valueFrom: configMapKeyRef: name: <obc-name> key: BUCKET_PORT - name: AWS_ACCESS_KEY_ID valueFrom: secretKeyRef: name: <obc-name> key: AWS_ACCESS_KEY_ID - name: AWS_SECRET_ACCESS_KEY valueFrom: secretKeyRef: name: <obc-name> key: AWS_SECRET_ACCESS_KEY- Replace all instances of <obc-name> with your Object Bucket Claim name.
- Replace <your application image> with your application image.
Apply the updated YAML file:
# oc apply -f <yaml.file>
-
Replace
<yaml.file>with the name of your YAML file.
-
Replace
To view the new configuration map, run the following:
# oc get cm <obc-name>
Replace
obc-namewith the name of your Object Bucket Claim.You can expect the following environment variables in the output:
-
BUCKET_HOST- Endpoint to use in the application BUCKET_PORT- The port available for the application-
The port is related to the
BUCKET_HOST. For example, if theBUCKET_HOSTis https://my.example.com, and theBUCKET_PORTis 443, the endpoint for the object service would be https://my.example.com:443.
-
The port is related to the
-
BUCKET_NAME- Requested or generated bucket name -
AWS_ACCESS_KEY_ID- Access key that is part of the credentials -
AWS_SECRET_ACCESS_KEY- Secret access key that is part of the credentials
-
9.6.2. Creating an Object Bucket Claim using the command line interface
When creating an Object Bucket Claim using the command-line interface, you get a configuration map and a Secret that together contain all the information your application needs to use the object storage service.
Prerequisites
Download the MCG command-line interface:
# subscription-manager repos --enable=rh-ocs-4-for-rhel-8-x86_64-rpms
# yum install mcg
Procedure
Use the command-line interface to generate the details of a new bucket and credentials. Run the following command:
# noobaa obc create <obc-name> -n openshift-storage
Replace
<obc-name>with a unique Object Bucket Claim name, for example,myappobc.Additionally, you can use the
--app-namespaceoption to specify the namespace where the Object Bucket Claim configuration map and secret will be created, for example,myapp-namespace.Example output:
INFO[0001] ✅ Created: ObjectBucketClaim "test21obc"
The MCG command-line-interface has created the necessary configuration and has informed OpenShift about the new OBC.
Run the following command to view the Object Bucket Claim:
# oc get obc -n openshift-storage
Example output:
NAME        STORAGE-CLASS                 PHASE   AGE
test21obc   openshift-storage.noobaa.io   Bound   38s
Run the following command to view the YAML file for the new Object Bucket Claim:
# oc get obc test21obc -o yaml -n openshift-storage
Example output:
apiVersion: objectbucket.io/v1alpha1
kind: ObjectBucketClaim
metadata:
  creationTimestamp: "2019-10-24T13:30:07Z"
  finalizers:
  - objectbucket.io/finalizer
  generation: 2
  labels:
    app: noobaa
    bucket-provisioner: openshift-storage.noobaa.io-obc
    noobaa-domain: openshift-storage.noobaa.io
  name: test21obc
  namespace: openshift-storage
  resourceVersion: "40756"
  selfLink: /apis/objectbucket.io/v1alpha1/namespaces/openshift-storage/objectbucketclaims/test21obc
  uid: 64f04cba-f662-11e9-bc3c-0295250841af
spec:
  ObjectBucketName: obc-openshift-storage-test21obc
  bucketName: test21obc-933348a6-e267-4f82-82f1-e59bf4fe3bb4
  generateBucketName: test21obc
  storageClassName: openshift-storage.noobaa.io
status:
  phase: Bound
Inside of your
openshift-storagenamespace, you can find the configuration map and the secret to use this Object Bucket Claim. The CM and the secret have the same name as the Object Bucket Claim. To view the secret:# oc get -n openshift-storage secret test21obc -o yaml
Example output:
Example output:
apiVersion: v1
data:
  AWS_ACCESS_KEY_ID: c0M0R2xVanF3ODR3bHBkVW94cmY=
  AWS_SECRET_ACCESS_KEY: Wi9kcFluSWxHRzlWaFlzNk1hc0xma2JXcjM1MVhqa051SlBleXpmOQ==
kind: Secret
metadata:
  creationTimestamp: "2019-10-24T13:30:07Z"
  finalizers:
  - objectbucket.io/finalizer
  labels:
    app: noobaa
    bucket-provisioner: openshift-storage.noobaa.io-obc
    noobaa-domain: openshift-storage.noobaa.io
  name: test21obc
  namespace: openshift-storage
  ownerReferences:
  - apiVersion: objectbucket.io/v1alpha1
    blockOwnerDeletion: true
    controller: true
    kind: ObjectBucketClaim
    name: test21obc
    uid: 64f04cba-f662-11e9-bc3c-0295250841af
  resourceVersion: "40751"
  selfLink: /api/v1/namespaces/openshift-storage/secrets/test21obc
  uid: 65117c1c-f662-11e9-9094-0a5305de57bb
type: Opaque
The secret gives you the S3 access credentials.
To view the configuration map:
# oc get -n openshift-storage cm test21obc -o yaml
Example output:
apiVersion: v1
data:
  BUCKET_HOST: 10.0.171.35
  BUCKET_NAME: test21obc-933348a6-e267-4f82-82f1-e59bf4fe3bb4
  BUCKET_PORT: "31242"
  BUCKET_REGION: ""
  BUCKET_SUBREGION: ""
kind: ConfigMap
metadata:
  creationTimestamp: "2019-10-24T13:30:07Z"
  finalizers:
  - objectbucket.io/finalizer
  labels:
    app: noobaa
    bucket-provisioner: openshift-storage.noobaa.io-obc
    noobaa-domain: openshift-storage.noobaa.io
  name: test21obc
  namespace: openshift-storage
  ownerReferences:
  - apiVersion: objectbucket.io/v1alpha1
    blockOwnerDeletion: true
    controller: true
    kind: ObjectBucketClaim
    name: test21obc
    uid: 64f04cba-f662-11e9-bc3c-0295250841af
  resourceVersion: "40752"
  selfLink: /api/v1/namespaces/openshift-storage/configmaps/test21obc
  uid: 651c6501-f662-11e9-9094-0a5305de57bb
The configuration map contains the S3 endpoint information for your application.
9.6.3. Creating an Object Bucket Claim using the OpenShift Web Console
You can create an Object Bucket Claim (OBC) using the OpenShift Web Console.
Prerequisites
- Administrative access to the OpenShift Web Console.
- In order for your applications to communicate with the OBC, you need to use the configmap and secret. For more information about this, see Section 9.6.1, “Dynamic Object Bucket Claim”.
Procedure
- Log into the OpenShift Web Console.
- On the left navigation bar, click Storage → Object Bucket Claims.
Click Create Object Bucket Claim:

Enter a name for your object bucket claim and select the appropriate storage class based on your deployment, internal or external, from the dropdown menu:
Internal mode
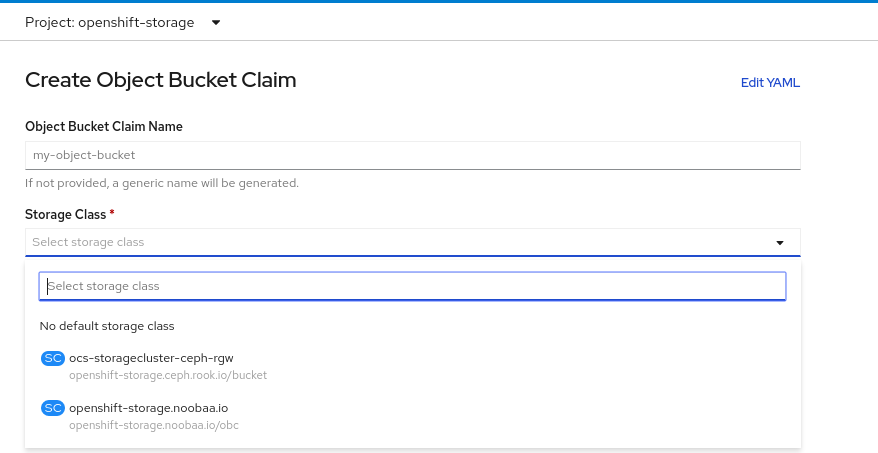
The following storage classes, which were created after deployment, are available for use:
-
ocs-storagecluster-ceph-rgwuses the Ceph Object Gateway (RGW) -
openshift-storage.noobaa.iouses the Multicloud Object Gateway
External mode

The following storage classes, which were created after deployment, are available for use:
-
ocs-external-storagecluster-ceph-rgwuses the Ceph Object Gateway (RGW) openshift-storage.noobaa.iouses the Multicloud Object GatewayNoteThe RGW OBC storage class is only available with fresh installations of OpenShift Container Storage version 4.5. It does not apply to clusters upgraded from previous OpenShift Container Storage releases.
-
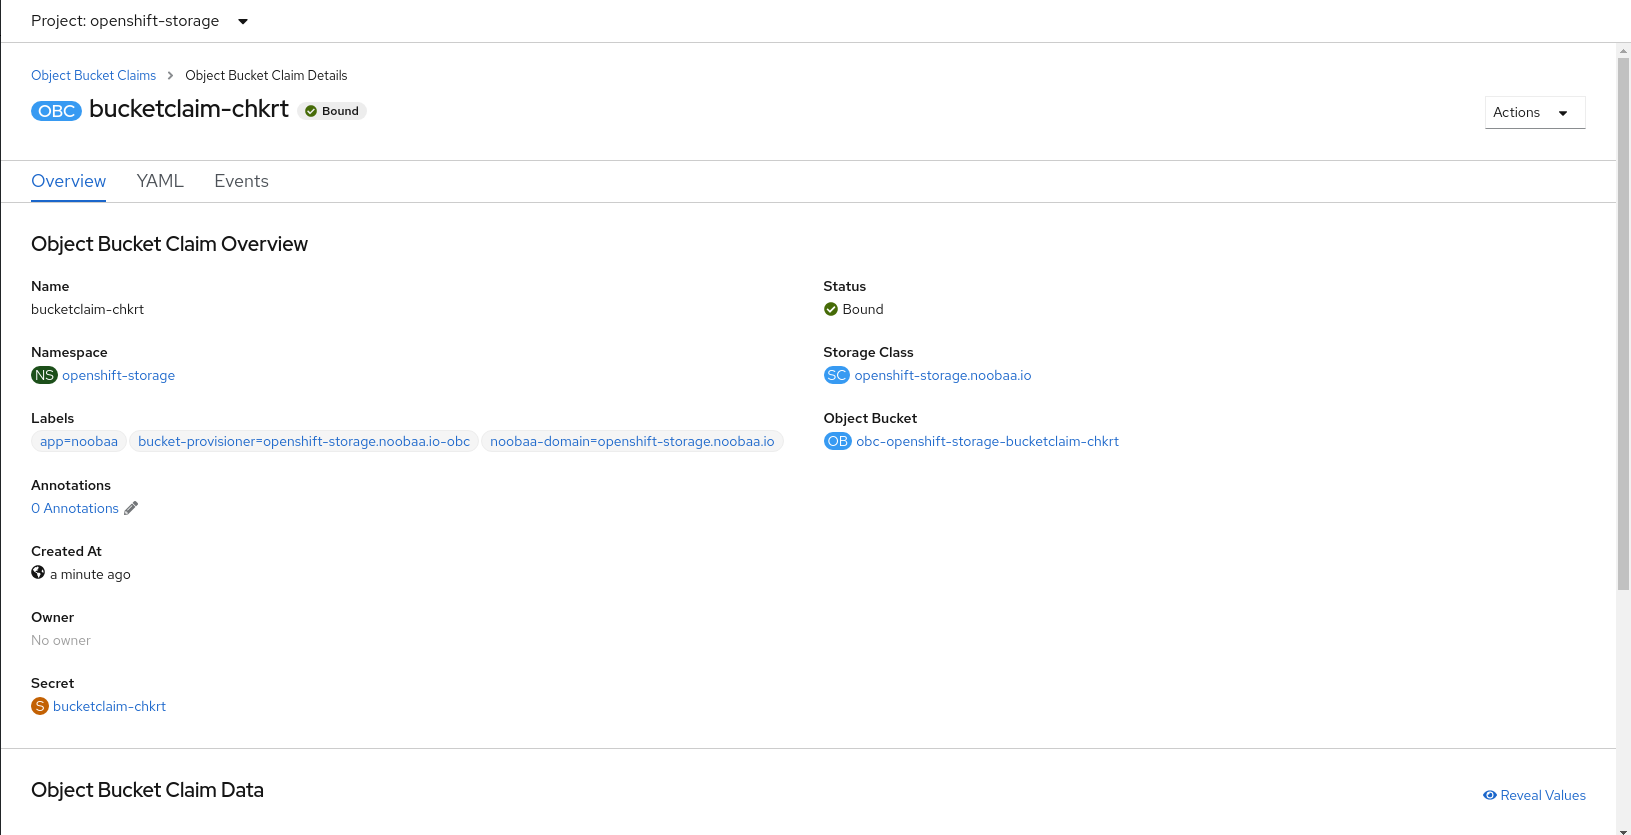
Click Create.
Once you create the OBC, you are redirected to its detail page:
Additional Resources
9.7. Scaling Multicloud Object Gateway performance by adding endpoints
The Multicloud Object Gateway performance may vary from one environment to another. In some cases, specific applications require faster performance which can be easily addressed by scaling S3 endpoints.
The Multicloud Object Gateway resource pool is a group of NooBaa daemon containers that provide two types of services enabled by default:
- Storage service
- S3 endpoint service
9.7.1. S3 endpoints in the Multicloud Object Gateway
The S3 endpoint is a service that every Multicloud Object Gateway provides by default that handles the heavy lifting data digestion in the Multicloud Object Gateway. The endpoint service handles the inline data chunking, deduplication, compression, and encryption, and it accepts data placement instructions from the Multicloud Object Gateway.
9.7.2. Scaling with storage nodes
Prerequisites
- A running OpenShift Container Storage cluster on OpenShift Container Platform with access to the Multicloud Object Gateway.
A storage node in the Multicloud Object Gateway is a NooBaa daemon container attached to one or more Persistent Volumes and used for local object service data storage. NooBaa daemons can be deployed on Kubernetes nodes. This can be done by creating a Kubernetes pool consisting of StatefulSet pods.
Procedure
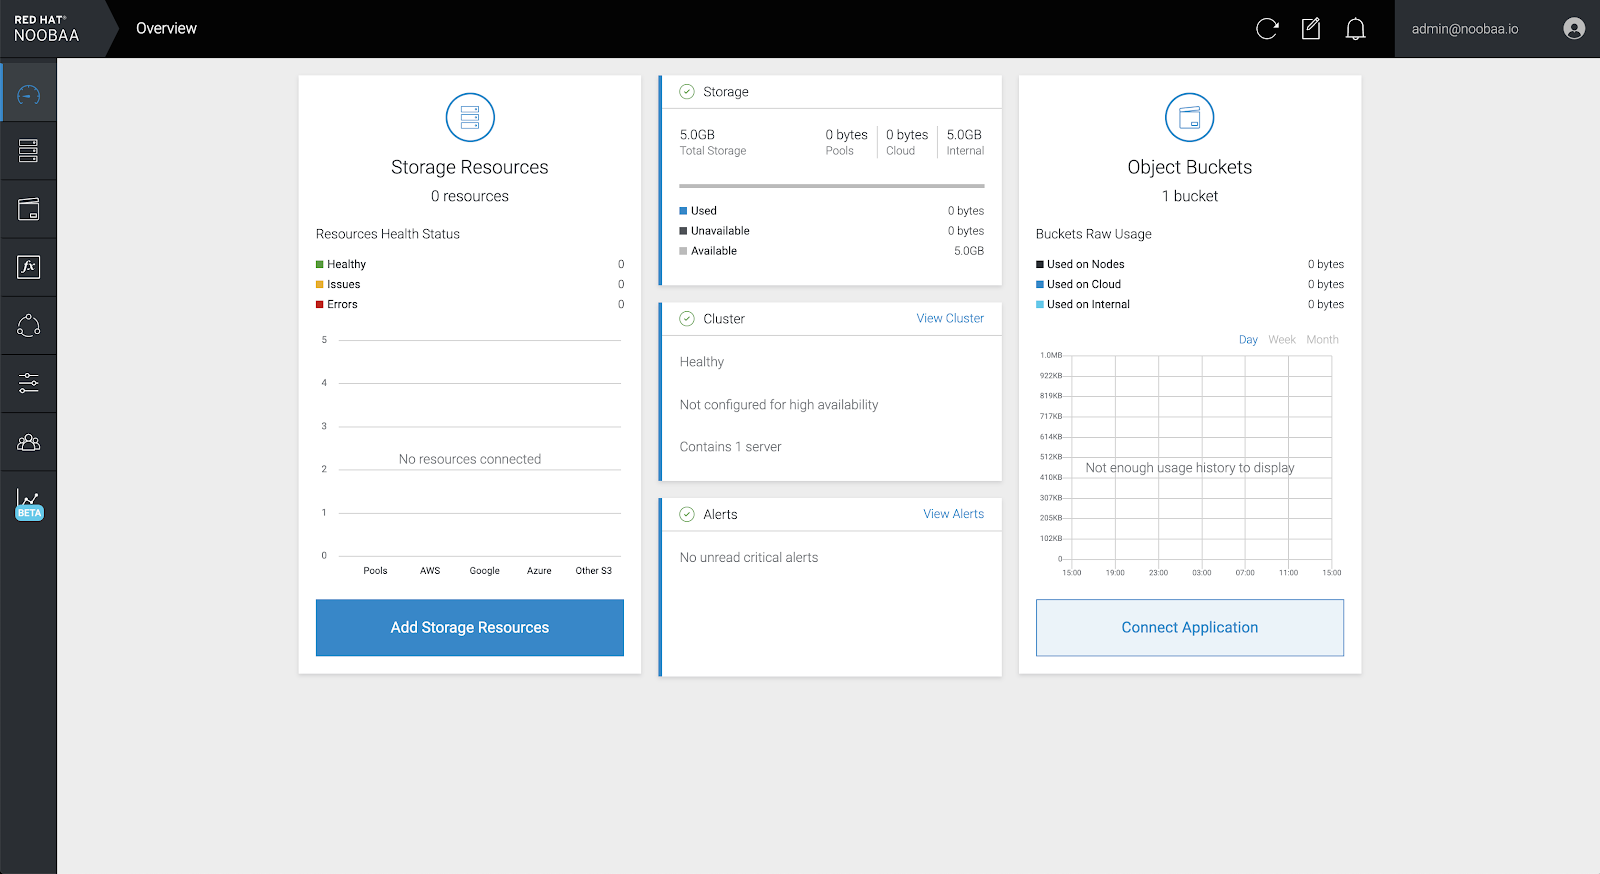
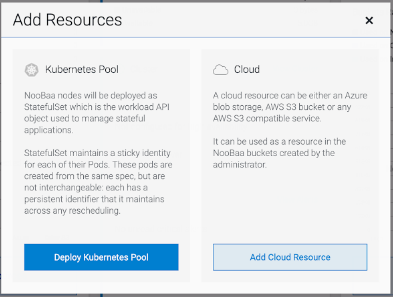
In the Multicloud Object Gateway user interface, from the Overview page, click Add Storage Resources:
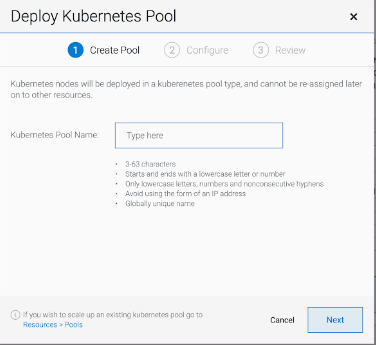
In the window, click Deploy Kubernetes Pool:
In the Create Pool step create the target pool for the future installed nodes.
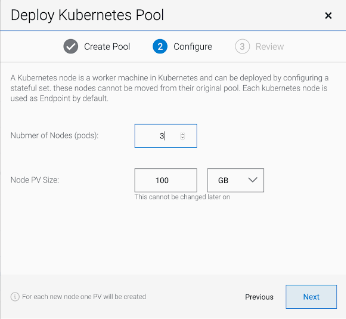
In the Configure step, configure the number of requested pods and the size of each PV. For each new pod, one PV is be created.
- In the Review step, you can find the details of the new pool and select the deployment method you wish to use: local or external deployment. If local deployment is selected, the Kubernetes nodes will deploy within the cluster. If external deployment is selected, you will be provided with a YAML file to run externally.
All nodes will be assigned to the pool you chose in the first step, and can be found under Resources → Storage resources → Resource name: