Chapter 7. Replacing Storage Devices
7.1. Replacing operational or failed storage devices on IBM Power Systems
You can replace an object storage device (OSD) in OpenShift Container Storage deployed using local storage devices on IBM Power Systems. Use this procedure when an underlying storage device needs to be replaced.
Procedure
Identify the OSD that needs to be replaced and the OpenShift Container Platform node that has the OSD scheduled on it.
# oc get -n openshift-storage pods -l app=rook-ceph-osd -o wide
Example output:
rook-ceph-osd-0-86bf8cdc8-4nb5t   0/1     crashLoopBackOff   0   24h   10.129.2.26     worker-0     <none>       <none>
rook-ceph-osd-1-7c99657cfb-jdzvz   1/1     Running   0          24h     10.128.2.46     worker-1     <none>       <none>
rook-ceph-osd-2-5f9f6dfb5b-2mnw9    1/1     Running   0          24h     10.131.0.33    worker-2     <none>       <none>
In this example,
rook-ceph-osd-0-86bf8cdc8-4nb5tneeds to be replaced andworker-0is the RHOCP node on which the OSD is scheduled.NoteIf the OSD to be replaced is healthy, the status of the pod will be
Running.Scale down the OSD deployment for the OSD to be replaced.
# osd_id_to_remove=0
# oc scale -n openshift-storage deployment rook-ceph-osd-${osd_id_to_remove} --replicas=0
where
osd_id_to_removeis the integer in the pod name immediately after therook-ceph-osdprefix. In this example, the deployment name isrook-ceph-osd-0.Example output:
deployment.apps/rook-ceph-osd-0 scaled
Verify that the
rook-ceph-osdpod is terminated.# oc get -n openshift-storage pods -l ceph-osd-id=${osd_id_to_remove}Example output:
No resources found in openshift-storage namespace.
NoteIf the
rook-ceph-osdpod is interminatingstate, use theforceoption to delete the pod.# oc delete pod rook-ceph-osd-0-86bf8cdc8-4nb5t --grace-period=0 --force
Example output:
warning: Immediate deletion does not wait for confirmation that the running resource has been terminated. The resource may continue to run on the cluster indefinitely.
  pod "rook-ceph-osd-0-86bf8cdc8-4nb5t" force deleted
Remove the old OSD from the cluster so that a new OSD can be added.
Identify the
DeviceSetassociated with the OSD to be replaced.# oc get -n openshift-storage -o yaml deployment rook-ceph-osd-${osd_id_to_remove} | grep ceph.rook.io/pvcExample output:
ceph.rook.io/pvc: ocs-deviceset-localblock-0-data-0-64xjl
    ceph.rook.io/pvc: ocs-deviceset-localblock-0-data-0-64xjl
In this example, the PVC name is
ocs-deviceset-localblock-0-data-0-64xjl.Remove the old OSD from the cluster
# oc process -n openshift-storage ocs-osd-removal -p FAILED_OSD_IDS=${osd_id_to_remove} | oc -n openshift-storage create -f -Example Output:
job.batch/ocs-osd-removal-0 created
WarningThis step results in OSD being completely removed from the cluster. Make sure that the correct value of
osd_id_to_removeis provided.
Verify that the OSD is removed successfully by checking the status of the
ocs-osd-removalpod. A status ofCompletedconfirms that the OSD removal job completed successfully.# oc get pod -l job-name=ocs-osd-removal-${osd_id_to_remove} -n openshift-storageNoteIf
ocs-osd-removalfails and the pod is not in the expectedCompletedstate, check the pod logs for further debugging. For example:# oc logs ${osd_id_to_remove} -n openshift-storage --tail=-1Delete the persistent volume claim (PVC) resources associated with the OSD to be replaced.
Identify the PV associated with the PVC.
# oc get -n openshift-storage pvc ocs-deviceset-<x>-<y>-<pvc-suffix>
where,
x,y, andpvc-suffixare the values in theDeviceSetidentified in an step 4(a).Example output:
NAME                      STATUS        VOLUME        CAPACITY   ACCESS MODES   STORAGECLASS   AGE
ocs-deviceset-localblock-0-data-0-64xjl   Bound    local-pv-8137c873    256Gi      RWO     localblock     24h
In this example, the associated PV is
local-pv-8137c873.Identify the name of the device to be replaced.
# oc get pv local-pv-<pv-suffix> -o yaml | grep path
where,
pv-suffixis the value in the PV name identified in an earlier step.Example output:
path: /mnt/local-storage/localblock/vdc
In this example, the device name is
vdc.Identify the
prepare-podassociated with the OSD to be replaced.# oc describe -n openshift-storage pvc ocs-deviceset-<x>-<y>-<pvc-suffix> | grep Mounted
where,
x,y, andpvc-suffixare the values in theDeviceSetidentified in an earlier step.Example output:
Mounted By: rook-ceph-osd-prepare-ocs-deviceset-localblock-0-data-0-64knzkc
In this example the
prepare-podname isrook-ceph-osd-prepare-ocs-deviceset-localblock-0-data-0-64knzkc.Delete the
osd-preparepod before removing the associated PVC.# oc delete -n openshift-storage pod rook-ceph-osd-prepare-ocs-deviceset-<x>-<y>-<pvc-suffix>-<pod-suffix>
where,
x,y,pvc-suffix, andpod-suffixare the values in theosd-preparepod name identified in an earlier step.Example output:
pod "rook-ceph-osd-prepare-ocs-deviceset-localblock-0-data-0-64knzkc" deleted
Delete the PVC associated with the OSD to be replaced.
# oc delete -n openshift-storage pvc ocs-deviceset-<x>-<y>-<pvc-suffix>
where,
x,y, andpvc-suffixare the values in theDeviceSetidentified in an earlier step.Example output:
persistentvolumeclaim "ocs-deviceset-localblock-0-data-0-64xjl" deleted
Replace the old device and use the new device to create a new OpenShift Container Platform PV.
Log in to OpenShift Container Platform node with the device to be replaced. In this example, the OpenShift Container Platform node is
worker-0.# oc debug node/worker-0
Example output:
Starting pod/worker-0-debug ...
To use host binaries, run `chroot /host`
Pod IP: 192.168.88.21
If you don't see a command prompt, try pressing enter.
# chroot /host
Record the
/dev/diskthat is to be replaced using the device name,vdc, identified earlier.# ls -alh /mnt/local-storage/localblock
Example output:
total 0
drwxr-xr-x. 2 root root 17 Nov  18 15:23 .
drwxr-xr-x. 3 root root 24 Nov  18 15:23 ..
lrwxrwxrwx. 1 root root  8 Nov  18 15:23 vdc -> /dev/vdc
Find the name of the
LocalVolumeSetCR, and remove or comment out the device/dev/diskthat is to be replaced.# oc get -n openshift-local-storage localvolumeset NAME AGE localblock 25h
Log in to OpenShift Container Platform node with the device to be replaced and remove the old
symlink.# oc debug node/worker-0
Example output:
Starting pod/worker-0-debug ...
To use host binaries, run `chroot /host`
Pod IP: 192.168.88.21
If you don't see a command prompt, try pressing enter.
# chroot /host
Identify the old
symlinkfor the device name to be replaced. In this example, the device name isvdc.# ls -alh /mnt/local-storage/localblock
Example output:
total 0
drwxr-xr-x. 2 root root 17 Nov  18 15:23 .
drwxr-xr-x. 3 root root 24 Nov  18 15:23 ..
lrwxrwxrwx. 1 root root  8 Nov  18 15:23 vdc -> /dev/vdc
Remove the
symlink.# rm /mnt/local-storage/localblock/vdc
Verify that the
symlinkis removed.# ls -alh /mnt/local-storage/localblock
Example output:
total 0
drwxr-xr-x. 2 root root 6 Nov 18 17:11 .
drwxr-xr-x. 3 root root 24 Nov 18 15:23 ..
ImportantFor new deployments of OpenShift Container Storage 4.5 or later, LVM is not in use,
ceph-volumeraw mode is in play instead. Therefore, additional validation is not needed and you can proceed to the next step.
Delete the PV associated with the device to be replaced, which was identified in earlier steps. In this example, the PV name is
local-pv-8137c873.# oc delete pv local-pv-8137c873
Example output:
persistentvolume "local-pv-8137c873" deleted
- Replace the device with the new device.
Log back into the correct OpenShift Cotainer Platform node and identify the device name for the new drive. The device name must change unless you are reseating the same device.
# lsblk
Example output:
NAME                         MAJ:MIN RM   SIZE RO TYPE MOUNTPOINT
vda                          252:0    0   40G  0 disk
|-vda1                       252:1    0    4M  0 part
|-vda2                       252:2    0  384M  0 part /boot
`-vda4                       252:4    0 39.6G  0 part
  `-coreos-luks-root-nocrypt 253:0    0 39.6G  0 dm   /sysroot
vdb                          252:16   0  512B  1 disk
vdd                          252:32   0  256G  0 disk
In this example, the new device name is
vdd.-
After the new
/dev/diskis available ,it will be auto detected by localvolumeset. Verify that there is a new PV in
Availablestate and of the correct size.# oc get pv | grep 256Gi
Example output:
local-pv-1e31f771   256Gi   RWO    Delete  Bound  openshift-storage/ocs-deviceset-localblock-2-data-0-6xhkf   localblock    24h
local-pv-ec7f2b80   256Gi   RWO    Delete  Bound  openshift-storage/ocs-deviceset-localblock-1-data-0-hr2fx   localblock    24h
local-pv-8137c873   256Gi   RWO    Delete  Available                                                          localblock    32m
Create new OSD for new device.
Deploy the new OSD by restarting the
rook-ceph-operatorto force operator reconciliation.Identify the name of the
rook-ceph-operator.# oc get -n openshift-storage pod -l app=rook-ceph-operator
Example output:
NAME                                  READY   STATUS    RESTARTS   AGE
rook-ceph-operator-85f6494db4-sg62v   1/1     Running   0          1d20h
Delete the
rook-ceph-operator.# oc delete -n openshift-storage pod rook-ceph-operator-85f6494db4-sg62v
Example output:
pod "rook-ceph-operator-85f6494db4-sg62v" deleted
In this example, the rook-ceph-operator pod name is
rook-ceph-operator-85f6494db4-sg62v.Verify that the
rook-ceph-operatorpod is restarted.# oc get -n openshift-storage pod -l app=rook-ceph-operator
Example output:
NAME                                  READY   STATUS    RESTARTS   AGE
rook-ceph-operator-85f6494db4-wx9xx   1/1     Running   0          50s
Creation of the new OSD may take several minutes after the operator restarts.
Verfication steps
Verify that there is a new OSD running and a new PVC created.
# oc get -n openshift-storage pods -l app=rook-ceph-osd
Example output:
rook-ceph-osd-0-76d8fb97f9-mn8qz   1/1     Running   0          23m
rook-ceph-osd-1-7c99657cfb-jdzvz   1/1     Running   1          25h
rook-ceph-osd-2-5f9f6dfb5b-2mnw9   1/1     Running   0          25h
# oc get -n openshift-storage pvc | grep localblock
Example output:
ocs-deviceset-localblock-0-data-0-q4q6b   Bound    local-pv-8137c873       256Gi     RWO         localblock         10m
ocs-deviceset-localblock-1-data-0-hr2fx   Bound    local-pv-ec7f2b80       256Gi     RWO         localblock         1d20h
ocs-deviceset-localblock-2-data-0-6xhkf   Bound    local-pv-1e31f771       256Gi     RWO         localblock         1d20h
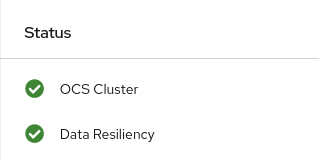
Log in to OpenShift Web Console and view the storage dashboard.
Figure 7.1. OSD status in OpenShift Container Platform storage dashboard after device replacement