
Managing and allocating storage resources
Management tasks for cluster and storage administrators
Abstract
Chapter 1. Overview
Read this document to understand how to create, configure, and allocate storage to core services or hosted applications in Red Hat OpenShift Container Storage.
- Chapter 2, Storage classes and storage pools shows you how to create custom storage classes and storage pools.
- Chapter 3, Configure storage for OpenShift Container Platform services shows you how to use OpenShift Container Storage for core OpenShift Container Platform services.
- Chapter 4, Backing OpenShift Container Platform applications with OpenShift Container Storage provides information about how to configure OpenShift Container Platform applications to use OpenShift Container Storage.
- Adding file and object storage to an existing external OpenShift Container Storage cluster
- Chapter 6, How to use dedicated worker nodes for Red Hat OpenShift Container Storage provides information about how to use dedicated worker nodes for Red Hat OpenShift Container Storage.
- Chapter 7, Managing Persistent Volume Claims provides information about managing Persistent Volume Claim requests, and automating the fulfillment of those requests.
- Chapter 8, Volume Snapshots shows you how to create, restore, and delete volume snapshots.
- Chapter 9, Volume cloning shows you how to create volume clones.
- Chapter 10, Managing container storage interface (CSI) component placements provides information about setting tolerations to bring up container storage interface component on the nodes.
Chapter 2. Storage classes and storage pools
The OpenShift Container Storage operator installs a default storage class depending on the platform in use. This default storage class is owned and controlled by the operator and it cannot be deleted or modified. However, you can create a custom storage class if you want the storage class to have a different behavior.
You can create multiple storage pools which map to storage classes that provide the following features:
- Enable applications with their own high availability to use persistent volumes with two replicas, potentially improving application performance.
- Save space for persistent volume claims using storage classes with compression enabled.
Custom storage classes are not supported for external mode OpenShift Container Storage clusters.
With a minimal cluster of a single device set, only two new storage classes can be created. Every storage cluster expansion allows two new additional storage classes.
2.1. Creating storage classes and pools
You can create a storage class using an existing pool or you can create a new pool for the storage class while creating it.
Prerequisites
Ensure that the OpenShift Container Storage cluster is in Ready state.
Procedure
- Log in to OpenShift Web Console.
- Click Storage → Storage Classes.
- Click Create Storage Class.
- Enter the storage class Name and Description.
- Select either Delete or Retain for the Reclaim Policy. By default, Delete is selected.
- Select RBD Provisioner which is the plugin used for provisioning the persistent volumes.
You can either create a new pool or use an existing one.
- Create a new pool
- Enter a name for the pool.
- Choose 2-way-Replication or 3-way-Replication as the Data Protection Policy.
Select Enable compression if you need to compress the data.
Enabling compression can impact application performance and might prove ineffective when data to be written is already compressed or encrypted. Data written before enabling compression will not be compressed.
- Click Create to create the storage pool.
- Click Finish after the pool is created.
- Click Create to create the storage class.
- Use an existing pool
- Choose a pool from the list.
- Click Create to create the storage class with the selected pool.
Chapter 3. Configure storage for OpenShift Container Platform services
You can use OpenShift Container Storage to provide storage for OpenShift Container Platform services such as image registry, monitoring, and logging.
The process for configuring storage for these services depends on the infrastructure used in your OpenShift Container Storage deployment.
Always ensure that you have plenty of storage capacity for these services. If the storage for these critical services runs out of space, the cluster becomes inoperable and very difficult to recover.
Red Hat recommends configuring shorter curation and retention intervals for these services. See Configuring the Curator schedule and the Modifying retention time for Prometheus metrics data of Monitoring guide in the OpenShift Container Platform documentation for details.
If you do run out of storage space for these services, contact Red Hat Customer Support.
3.1. Configuring Image Registry to use OpenShift Container Storage
OpenShift Container Platform provides a built in Container Image Registry which runs as a standard workload on the cluster. A registry is typically used as a publication target for images built on the cluster as well as a source of images for workloads running on the cluster.
Follow the instructions in this section to configure OpenShift Container Storage as storage for the Container Image Registry. On AWS, it is not required to change the storage for the registry. However, it is recommended to change the storage to OpenShift Container Storage Persistent Volume for vSphere and Bare metal platforms.
This process does not migrate data from an existing image registry to the new image registry. If you already have container images in your existing registry, back up your registry before you complete this process, and re-register your images when this process is complete.
Prerequisites
- You have administrative access to OpenShift Web Console.
-
OpenShift Container Storage Operator is installed and running in the
openshift-storagenamespace. In OpenShift Web Console, click Operators → Installed Operators to view installed operators. -
Image Registry Operator is installed and running in the
openshift-image-registrynamespace. In OpenShift Web Console, click Administration → Cluster Settings → Cluster Operators to view cluster operators. -
A storage class with provisioner
openshift-storage.cephfs.csi.ceph.comis available. In OpenShift Web Console, click Storage → Storage Classes to view available storage classes.
Procedure
Create a Persistent Volume Claim for the Image Registry to use.
- In the OpenShift Web Console, click Storage → Persistent Volume Claims.
-
Set the Project to
openshift-image-registry. Click Create Persistent Volume Claim.
-
From the list of available storage classes retrieved above, specify the Storage Class with the provisioner
openshift-storage.cephfs.csi.ceph.com. -
Specify the Persistent Volume Claim Name, for example,
ocs4registry. -
Specify an Access Mode of
Shared Access (RWX). - Specify a Size of at least 100 GB.
Click Create.
Wait until the status of the new Persistent Volume Claim is listed as
Bound.
-
From the list of available storage classes retrieved above, specify the Storage Class with the provisioner
Configure the cluster’s Image Registry to use the new Persistent Volume Claim.
- Click Administration →Custom Resource Definitions.
-
Click the
Configcustom resource definition associated with theimageregistry.operator.openshift.iogroup. - Click the Instances tab.
- Beside the cluster instance, click the Action Menu (⋮) → Edit Config.
Add the new Persistent Volume Claim as persistent storage for the Image Registry.
Add the following under
spec:, replacing the existingstorage:section if necessary.storage: pvc: claim: <new-pvc-name>For example:
storage: pvc: claim: ocs4registry- Click Save.
Verify that the new configuration is being used.
- Click Workloads → Pods.
-
Set the Project to
openshift-image-registry. -
Verify that the new
image-registry-*pod appears with a status ofRunning, and that the previousimage-registry-*pod terminates. -
Click the new
image-registry-*pod to view pod details. -
Scroll down to Volumes and verify that the
registry-storagevolume has a Type that matches your new Persistent Volume Claim, for example,ocs4registry.
3.2. Configuring monitoring to use OpenShift Container Storage
OpenShift Container Storage provides a monitoring stack that is comprised of Prometheus and AlertManager.
Follow the instructions in this section to configure OpenShift Container Storage as storage for the monitoring stack.
Monitoring will not function if it runs out of storage space. Always ensure that you have plenty of storage capacity for monitoring.
Red Hat recommends configuring a short retention interval for this service. See the Modifying retention time for Prometheus metrics data of Monitoring guide in the OpenShift Container Platform documentation for details.
Prerequisites
- You have administrative access to OpenShift Web Console.
-
OpenShift Container Storage Operator is installed and running in the
openshift-storagenamespace. In OpenShift Web Console, click Operators → Installed Operators to view installed operators. -
Monitoring Operator is installed and running in the
openshift-monitoringnamespace. In OpenShift Web Console, click Administration → Cluster Settings → Cluster Operators to view cluster operators. -
A storage class with provisioner
openshift-storage.rbd.csi.ceph.comis available. In OpenShift Web Console, click Storage → Storage Classes to view available storage classes.
Procedure
- In the OpenShift Web Console, go to Workloads → Config Maps.
-
Set the Project dropdown to
openshift-monitoring. - Click Create Config Map.
Define a new
cluster-monitoring-configConfig Map using the following example.Replace the content in angle brackets (
<,>) with your own values, for example,retention: 24horstorage: 40Gi.Replace the storageClassName with the
storageclassthat uses the provisioneropenshift-storage.rbd.csi.ceph.com. In the example given below the name of the storageclass isocs-storagecluster-ceph-rbd.Example
cluster-monitoring-configConfig MapapiVersion: v1 kind: ConfigMap metadata: name: cluster-monitoring-config namespace: openshift-monitoring data: config.yaml: | prometheusK8s: retention: <time to retain monitoring files, e.g. 24h> volumeClaimTemplate: metadata: name: ocs-prometheus-claim spec: storageClassName: ocs-storagecluster-ceph-rbd resources: requests: storage: <size of claim, e.g. 40Gi> alertmanagerMain: volumeClaimTemplate: metadata: name: ocs-alertmanager-claim spec: storageClassName: ocs-storagecluster-ceph-rbd resources: requests: storage: <size of claim, e.g. 40Gi>- Click Create to save and create the Config Map.
Verification steps
Verify that the Persistent Volume Claims are bound to the pods.
- Go to Storage → Persistent Volume Claims.
-
Set the Project dropdown to
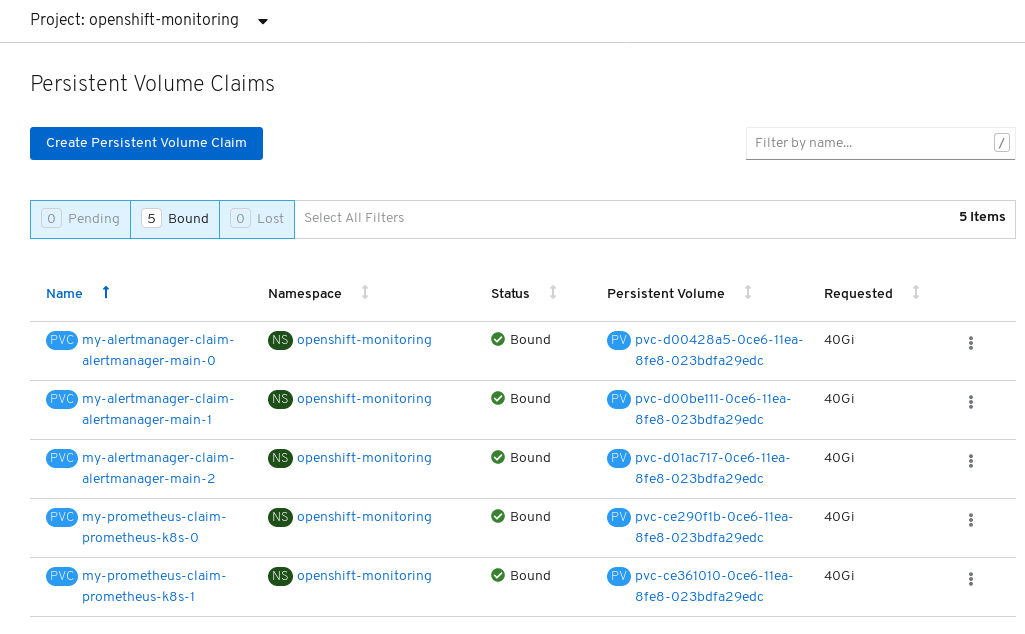
openshift-monitoring. Verify that 5 Persistent Volume Claims are visible with a state of
Bound, attached to threealertmanager-main-*pods, and twoprometheus-k8s-*pods.Monitoring storage created and bound
Verify that the new
alertmanager-main-*pods appear with a state ofRunning.- Go to Workloads → Pods
-
Click the new
alertmanager-main-*pods to view the pod details. Scroll down to Volumes and verify that the volume has a Type,
ocs-alertmanager-claimthat matches one of your new Persistent Volume Claims, for example,ocs-alertmanager-claim-alertmanager-main-0.Persistent Volume Claims attached to
alertmanager-main-*pod
Verify that the new
prometheus-k8s-*pods appear with a state ofRunning.-
Click the new
prometheus-k8s-*pods to view the pod details. Scroll down to Volumes and verify that the volume has a Type,
ocs-prometheus-claimthat matches one of your new Persistent Volume Claims, for example,ocs-prometheus-claim-prometheus-k8s-0.Persistent Volume Claims attached to
prometheus-k8s-*pod
-
Click the new
3.3. Cluster logging for OpenShift Container Storage
You can deploy cluster logging to aggregate logs for a range of OpenShift Container Platform services. For information about how to deploy cluster logging, see Deploying cluster logging.
Upon initial OpenShift Container Platform deployment, OpenShift Container Storage is not configured by default and the OpenShift Container Platform cluster will solely rely on default storage available from the nodes. You can edit the default configuration of OpenShift logging (ElasticSearch) to be backed by OpenShift Container Storage to have OpenShift Container Storage backed logging (Elasticsearch).
Always ensure that you have plenty of storage capacity for these services. If you run out of storage space for these critical services, the logging application becomes inoperable and very difficult to recover.
Red Hat recommends configuring shorter curation and retention intervals for these services. See Cluster logging curator in the OpenShift Container Platform documentation for details.
If you run out of storage space for these services, contact Red Hat Customer Support.
3.3.1. Configuring persistent storage
You can configure a persistent storage class and size for the Elasticsearch cluster using the storage class name and size parameters. The Cluster Logging Operator creates a Persistent Volume Claim for each data node in the Elasticsearch cluster based on these parameters. For example:
spec:
    logStore:
      type: "elasticsearch"
      elasticsearch:
        nodeCount: 3
        storage:
          storageClassName: "ocs-storagecluster-ceph-rbd”
          size: "200G"
This example specifies that each data node in the cluster will be bound to a Persistent Volume Claim that requests 200GiB of ocs-storagecluster-ceph-rbd storage. Each primary shard will be backed by a single replica. A copy of the shard is replicated across all the nodes and are always available and the copy can be recovered if at least two nodes exist due to the single redundancy policy. For information about Elasticsearch replication policies, see Elasticsearch replication policy in About deploying and configuring cluster logging.
Omission of the storage block will result in a deployment backed by default storage. For example:
spec:
    logStore:
      type: "elasticsearch"
      elasticsearch:
        nodeCount: 3
        storage: {}
For more information, see Configuring cluster logging.
3.3.2. Configuring cluster logging to use OpenShift Container Storage
Follow the instructions in this section to configure OpenShift Container Storage as storage for the OpenShift cluster logging.
You can obtain all the logs when you configure logging for the first time in OpenShift Container Storage. However, after you uninstall and reinstall logging, the old logs are removed and only the new logs are processed.
Prerequisites
- You have administrative access to OpenShift Web Console.
-
OpenShift Container Storage Operator is installed and running in the
openshift-storagenamespace. -
Cluster logging Operator is installed and running in the
openshift-loggingnamespace.
Procedure
- Click Administration → Custom Resource Definitions from the left pane of the OpenShift Web Console.
- On the Custom Resource Definitions page, click ClusterLogging.
- On the Custom Resource Definition Overview page, select View Instances from the Actions menu or click the Instances Tab.
On the Cluster Logging page, click Create Cluster Logging.
You might have to refresh the page to load the data.
In the YAML, replace the storageClassName with the
storageclassthat uses the provisioneropenshift-storage.rbd.csi.ceph.com. In the example given below the name of the storageclass isocs-storagecluster-ceph-rbd:apiVersion: "logging.openshift.io/v1" kind: "ClusterLogging" metadata: name: "instance" namespace: "openshift-logging" spec: managementState: "Managed" logStore: type: "elasticsearch" elasticsearch: nodeCount: 3 storage: storageClassName: ocs-storagecluster-ceph-rbd size: 200G # Change as per your requirement redundancyPolicy: "SingleRedundancy" visualization: type: "kibana" kibana: replicas: 1 curation: type: "curator" curator: schedule: "30 3 * * *" collection: logs: type: "fluentd" fluentd: {}If you have tainted the OpenShift Container Storage nodes, you must add toleration to enable scheduling of the daemonset pods for logging.
spec: [...] collection: logs: fluentd: tolerations: - effect: NoSchedule key: node.ocs.openshift.io/storage value: 'true' type: fluentd- Click Save.
Verification steps
Verify that the Persistent Volume Claims are bound to the
elasticsearchpods.- Go to Storage → Persistent Volume Claims.
-
Set the Project dropdown to
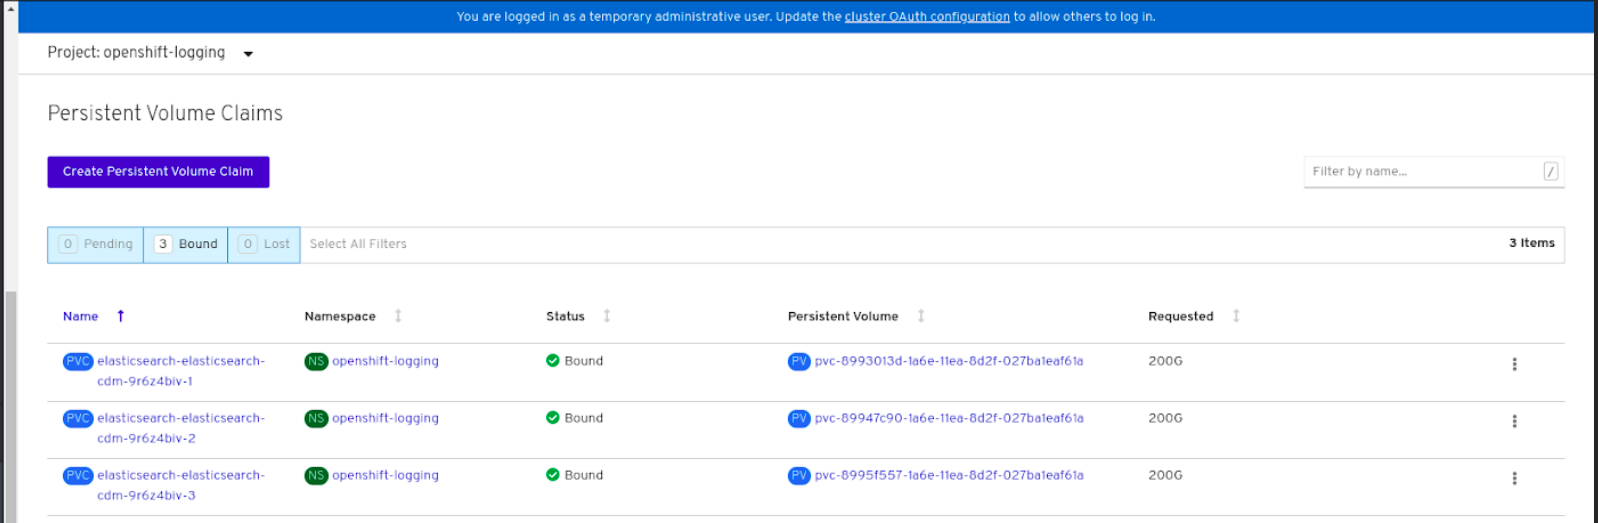
openshift-logging. Verify that Persistent Volume Claims are visible with a state of
Bound, attached toelasticsearch-* pods.Figure 3.1. Cluster logging created and bound
Verify that the new cluster logging is being used.
- Click Workload → Pods.
-
Set the Project to
openshift-logging. -
Verify that the new
elasticsearch-* pods appear with a state ofRunning. -
Click the new
elasticsearch-* pod to view pod details. -
Scroll down to Volumes and verify that the elasticsearch volume has a Type that matches your new Persistent Volume Claim, for example,
elasticsearch-elasticsearch-cdm-9r624biv-3. - Click the Persistent Volume Claim name and verify the storage class name in the PersistenVolumeClaim Overview page.
Make sure to use a shorter curator time to avoid PV full scenario on PVs attached to Elasticsearch pods.
You can configure Curator to delete Elasticsearch data based on retention settings. It is recommended that you set the following default index data retention of 5 days as a default.
config.yaml: |
    openshift-storage:
      delete:
        days: 5
For more details, see Curation of Elasticsearch Data.
To uninstall the cluster logging backed by Persistent Volume Claim, use the procedure removing the cluster logging operator from OpenShift Container Storage in the uninstall chapter of the respective deployment guide.
Chapter 4. Backing OpenShift Container Platform applications with OpenShift Container Storage
You cannot directly install OpenShift Container Storage during the OpenShift Container Platform installation. However, you can install OpenShift Container Storage on an existing OpenShift Container Platform by using the Operator Hub and then configure the OpenShift Container Platform applications to be backed by OpenShift Container Storage.
Prerequisites
- OpenShift Container Platform is installed and you have administrative access to OpenShift Web Console.
-
OpenShift Container Storage is installed and running in the
openshift-storagenamespace.
Procedure
In the OpenShift Web Console, perform one of the following:
Click Workloads → Deployments.
In the Deployments page, you can do one of the following:
- Select any existing deployment and click Add Storage option from the Action menu (⋮).
Create a new deployment and then add storage.
- Click Create Deployment to create a new deployment.
-
Edit the
YAMLbased on your requirement to create a deployment. - Click Create.
- Select Add Storage from the Actions drop down menu on the top right of the page.
Click Workloads → Deployment Configs.
In the Deployment Configs page, you can do one of the following:
- Select any existing deployment and click Add Storage option from the Action menu (⋮).
Create a new deployment and then add storage.
- Click Create Deployment Config to create a new deployment.
-
Edit the
YAMLbased on your requirement to create a deployment. - Click Create.
- Select Add Storage from the Actions drop down menu on the top right of the page.
In the Add Storage page, you can choose one of the following options:
- Click the Use existing claim option and select a suitable PVC from the drop down list.
Click the Create new claim option.
-
Select the appropriate
CephFSorRBDstorage class from the Storage Class drop down list. - Provide a name for the Persistent Volume Claim.
Select ReadWriteOnce (RWO) or ReadWriteMany (RWX) access mode.
NoteReadOnlyMany (ROX) is deactivated as it is not supported.
Select the size of the desired storage capacity.
NoteYou can expand block PVs but cannot reduce the storage capacity after the creation of Persistent Volume Claim.
-
Select the appropriate
- Specify the mount path and subpath (if required) for the mount path volume inside the container.
- Click Save.
Verification steps
Depending on your configuration, perform one of the following:
- Click Workloads → Deployments.
- Click Workloads → Deployment Configs.
- Set the Project as required.
- Click the deployment for which you added storage to view the deployment details.
- Scroll down to Volumes and verify that your deployment has a Type that matches the Persistent Volume Claim that you assigned.
- Click the Persistent Volume Claim name and verify the storage class name in the Persistent Volume Claim Overview page.
Chapter 5. Adding file and object storage to an existing external OpenShift Container Storage cluster
When OpenShift Container Storage is configured in external mode, there are several ways to provide storage for persistent volume claims and object bucket claims.
- Persistent volume claims for block storage are provided directly from the external Red Hat Ceph Storage cluster.
- Persistent volume claims for file storage can be provided by adding a Metadata Server (MDS) to the external Red Hat Ceph Storage cluster.
- Object bucket claims for object storage can be provided either by using the Multicloud Object Gateway or by adding the Ceph Object Gateway to the external Red Hat Ceph Storage cluster.
Use the following process to add file storage (using Metadata Servers) or object storage (using Ceph Object Gateway) or both to an external OpenShift Container Storage cluster that was initially deployed to provide only block storage.
Prerequisites
- Your OpenShift Container Platform cluster is installed with version 4.6.
- Your OpenShift Container Storage nodes are installed with version 4.6 of the OpenShift Container Storage Operator.
- If you upgraded to version 4.6 from a previous version, enable monitoring: Enabling monitoring for the Object Service dashboard
Your external Red Hat Ceph Storage cluster is configured with one or both of the following:
- a Ceph Object Gateway (RGW) endpoint that can be accessed by the OpenShift Container Platform cluster for object storage
- a Metadata Server (MDS) pool for file storage
-
Ensure that you know the parameters used with the
ceph-external-cluster-details-exporter.pyscript during external OpenShift Container Storage cluster deployment.
Procedure
Download the OpenShift Container Storage version of the
ceph-external-cluster-details-exporter.pypython script using the following command:oc get csv $(oc get csv -n openshift-storage | grep ocs-operator | awk '{print $1}') -n openshift-storage -o jsonpath='{.metadata.annotations.external\.features\.ocs\.openshift\.io/export-script}' | base64 --decode > ceph-external-cluster-details-exporter.pyUpdate permission caps on the external Red Hat Ceph Storage cluster by running
ceph-external-cluster-details-exporter.pyon any client node in the external Red Hat Ceph Storage cluster. You may need to ask your Red Hat Ceph Storage administrator to do this.# python3 ceph-external-cluster-details-exporter.py --upgrade \ --run-as-user=ocs-client-name \ --rgw-pool-prefix rgw-pool-prefix
--run-as-user-
The client name used during OpenShift Container Storage cluster deployment. Use the default client name
client.healthcheckerif a different client name was not set. --rgw-pool-prefix- The prefix used for the Ceph Object Gateway pool. This can be omitted if the default prefix is used.
Generate and save configuration details from the external Red Hat Ceph Storage cluster.
Generate configuration details by running
ceph-external-cluster-details-exporter.pyon any client node in the external Red Hat Ceph Storage cluster.# python3 ceph-external-cluster-details-exporter.py --rbd-data-pool-name rbd-block-pool-name --monitoring-endpoint ceph-mgr-prometheus-exporter-endpoint --monitoring-endpoint-port ceph-mgr-prometheus-exporter-port --run-as-user ocs-client-name --rgw-endpoint rgw-endpoint --rgw-pool-prefix rgw-pool-prefix
--monitoring-endpoint- The IP address of the active Ceph Manager that can be reached from the OpenShift Container Storage cluster.
--monitoring-endpoint-port- The port for the Ceph Manager Prometheus Exporter endpoint.
--run-as-user- The client name used during OpenShift Container Storage cluster deployment. Use the default client name client.healthchecker if a different client name was not set.
--rgw-endpoint- Provide this parameter to provision object storage through Ceph Object Gateway for OpenShift Container Storage. (optional parameter)
--rgw-pool-prefix- The prefix used for the Ceph Object Gateway pool. This can be omitted if the default prefix is used.
User permissions are updated as shown:
caps: [mgr] allow command config
caps: [mon] allow r, allow command quorum_status, allow command version
caps: [osd] allow rwx pool=default.rgw.meta, allow r pool=.rgw.root, allow rw pool=default.rgw.control, allow rx pool=default.rgw.log, allow x pool=default.rgw.buckets.index
NoteEnsure that all the parameters (including the optional arguments) except the Ceph Object Gateway details (if provided), are the same as what was used during the deployment of Openshift Container Storage in external mode.
Save the output of the script in an
external-cluster-config.jsonfile.The following example output shows the generated configuration changes in bold text.
[{"name": "rook-ceph-mon-endpoints", "kind": "ConfigMap", "data": {"data": "xxx.xxx.xxx.xxx:xxxx", "maxMonId": "0", "mapping": "{}"}}, {"name": "rook-ceph-mon", "kind": "Secret", "data": {"admin-secret": "admin-secret", "fsid": "<fs-id>", "mon-secret": "mon-secret"}}, {"name": "rook-ceph-operator-creds", "kind": "Secret", "data": {"userID": "client.healthchecker", "userKey": "<user-key>"}}, {"name": "rook-csi-rbd-node", "kind": "Secret", "data": {"userID": "csi-rbd-node", "userKey": "<user-key>"}}, {"name": "ceph-rbd", "kind": "StorageClass", "data": {"pool": "ceph-rbd"}}, {"name": "monitoring-endpoint", "kind": "CephCluster", "data": {"MonitoringEndpoint": "xxx.xxx.xxx.xxx", "MonitoringPort": "xxxx"}}, {"name": "rook-csi-rbd-provisioner", "kind": "Secret", "data": {"userID": "csi-rbd-provisioner", "userKey": "<user-key>"}}, {"name": "rook-csi-cephfs-provisioner", "kind": "Secret", "data": {"adminID": "csi-cephfs-provisioner", "adminKey": "<admin-key>"}}, {"name": "rook-csi-cephfs-node", "kind": "Secret", "data": {"adminID": "csi-cephfs-node", "adminKey": "<admin-key>"}}, {"name": "cephfs", "kind": "StorageClass", "data": {"fsName": "cephfs", "pool": "cephfs_data"}}, {"name": "ceph-rgw", "kind": "StorageClass", "data": {"endpoint": "xxx.xxx.xxx.xxx:xxxx", "poolPrefix": "default"}}]
Upload the generated JSON file.
- Log in to the OpenShift web console.
- Click Workloads → Secrets.
-
Set project to
openshift-storage. - Click on rook-ceph-external-cluster-details.
- Click Actions (⋮) → Edit Secret
-
Click Browse and upload the
external-cluster-config.jsonfile. - Click Save.
Verification steps
- Click Overview → Home → Persistent Storage and verify the health of the OpenShift Container Storage cluster.
If you added a Metadata Server for file storage:
-
Click Workloads → Pods and verify that
csi-cephfsplugin-*pods are created new and are in the Running state. -
Click Storage → Storage Classes and verify that the
ocs-external-storagecluster-cephfsstorage class is created.
-
Click Workloads → Pods and verify that
If you added the Ceph Object Gateway for object storage:
-
Click Storage → Storage Classes and verify that the
ocs-external-storagecluster-ceph-rgwstorage class is created. - Click Home → Overview from the left pane of the OpenShift Web Console and click the Object Service tab. On the Status card, verify that the Object Service displays a green tick icon.
-
Click Storage → Storage Classes and verify that the
Chapter 6. How to use dedicated worker nodes for Red Hat OpenShift Container Storage
Using infrastructure nodes to schedule Red Hat OpenShift Container Storage resources saves on Red Hat OpenShift Container Platform subscription costs. Any Red Hat OpenShift Container Platform (RHOCP) node that has an infra node-role label requires an OpenShift Container Storage subscription, but not an RHOCP subscription.
It is important to maintain consistency across environments with or without Machine API support. Because of this, it is highly recommended in all cases to have a special category of nodes labeled as either worker or infra or have both roles. See the Section 6.3, “Manual creation of infrastructure nodes” section for more information.
6.1. Anatomy of an Infrastructure node
Infrastructure nodes for use with OpenShift Container Storage have a few attributes. The infra node-role label is required to ensure the node does not consume RHOCP entitlements. The infra node-role label is responsible for ensuring only OpenShift Container Storage entitlements are necessary for the nodes running OpenShift Container Storage.
-
Labeled with
node-role.kubernetes.io/infra
Adding an OpenShift Container Storage taint with a NoSchedule effect is also required so that the infra node will only schedule OpenShift Container Storage resources.
-
Tainted with
node.ocs.openshift.io/storage="true"
The label identifies the RHOCP node as an infra node so that RHOCP subscription cost is not applied. The taint prevents non OpenShift Container Storage resources to be scheduled on the tainted nodes.
Example of the taint and labels required on infrastructure node that will be used to run OpenShift Container Storage services:
    spec:
      taints:
      - effect: NoSchedule
        key: node.ocs.openshift.io/storage
        value: "true"
      metadata:
        creationTimestamp: null
        labels:
          node-role.kubernetes.io/worker: ""
          node-role.kubernetes.io/infra: ""
          cluster.ocs.openshift.io/openshift-storage: ""
6.2. Machine sets for creating Infrastructure nodes
If the Machine API is supported in the environment, then labels should be added to the templates for the Machine Sets that will be provisioning the infrastructure nodes. Avoid the anti-pattern of adding labels manually to nodes created by the machine API. Doing so is analogous to adding labels to pods created by a deployment. In both cases, when the pod/node fails, the replacement pod/node will not have the appropriate labels.
In EC2 environments, you will need three machine sets, each configured to provision infrastructure nodes in a distinct availability zone (such as us-east-2a, us-east-2b, us-east-2c). Currently, OpenShift Container Storage does not support deploying in more than three availability zones.
The following Machine Set template example creates nodes with the appropriate taint and labels required for infrastructure nodes. This will be used to run OpenShift Container Storage services.
  template:
    metadata:
      creationTimestamp: null
      labels:
        machine.openshift.io/cluster-api-cluster: kb-s25vf
        machine.openshift.io/cluster-api-machine-role: worker
        machine.openshift.io/cluster-api-machine-type: worker
        machine.openshift.io/cluster-api-machineset: kb-s25vf-infra-us-west-2a
    spec:
      taints:
      - effect: NoSchedule
        key: node.ocs.openshift.io/storage
        value: "true"
      metadata:
        creationTimestamp: null
        labels:
          node-role.kubernetes.io/infra: ""
          cluster.ocs.openshift.io/openshift-storage: ""
6.3. Manual creation of infrastructure nodes
Only when the Machine API is not supported in the environment should labels be directly applied to nodes. Manual creation requires that at least 3 RHOCP worker nodes are available to schedule OpenShift Container Storage services, and that these nodes have sufficient CPU and memory resources. To avoid the RHOCP subscription cost, the following is required:
oc label node <node> node-role.kubernetes.io/infra=""
oc label node <node> cluster.ocs.openshift.io/openshift-storage=""
Adding a NoSchedule OpenShift Container Storage taint is also required so that the infra node will only schedule OpenShift Container Storage resources and repel any other non-OpenShift Container Storage workloads.
oc adm taint node <node> node.ocs.openshift.io/storage="true":NoSchedule
Do not remove the node-role node-role.kubernetes.io/worker=""
The removal of the node-role.kubernetes.io/worker="" can cause issues unless changes are made both to the OpenShift scheduler and to MachineConfig resources.
If already removed, it should be added again to each infra node. Adding node-role node-role.kubernetes.io/infra="" and OpenShift Container Storage taint is sufficient to conform to entitlement exemption requirements.
Chapter 7. Managing Persistent Volume Claims
7.1. Configuring application pods to use OpenShift Container Storage
Follow the instructions in this section to configure OpenShift Container Storage as storage for an application pod.
Prerequisites
- You have administrative access to OpenShift Web Console.
-
OpenShift Container Storage Operator is installed and running in the
openshift-storagenamespace. In OpenShift Web Console, click Operators → Installed Operators to view installed operators. - The default storage classes provided by OpenShift Container Storage are available. In OpenShift Web Console, click Storage → Storage Classes to view default storage classes.
Procedure
Create a Persistent Volume Claim (PVC) for the application to use.
- In OpenShift Web Console, click Storage → Persistent Volume Claims.
- Set the Project for the application pod.
Click Create Persistent Volume Claim.
- Specify a Storage Class provided by OpenShift Container Storage.
-
Specify the PVC Name, for example,
myclaim. - Select the required Access Mode.
- Specify a Size as per application requirement.
-
Click Create and wait until the PVC is in
Boundstatus.
Configure a new or existing application pod to use the new PVC.
For a new application pod, perform the following steps:
- Click Workloads →Pods.
- Create a new application pod.
Under the
spec:section, addvolume:section to add the new PVC as a volume for the application pod.volumes: - name: <volume_name> persistentVolumeClaim: claimName: <pvc_name>For example:
volumes:
  - name: mypd
    persistentVolumeClaim:
      claimName: myclaim
For an existing application pod, perform the following steps:
- Click Workloads →Deployment Configs.
- Search for the required deployment config associated with the application pod.
- Click on its Action menu (⋮) → Edit Deployment Config.
Under the
spec:section, addvolume:section to add the new PVC as a volume for the application pod and click Save.volumes: - name: <volume_name> persistentVolumeClaim: claimName: <pvc_name>For example:
volumes:
  - name: mypd
    persistentVolumeClaim:
      claimName: myclaim
Verify that the new configuration is being used.
- Click Workloads → Pods.
- Set the Project for the application pod.
-
Verify that the application pod appears with a status of
Running. - Click the application pod name to view pod details.
-
Scroll down to Volumes section and verify that the volume has a Type that matches your new Persistent Volume Claim, for example,
myclaim.
7.2. Viewing Persistent Volume Claim request status
Use this procedure to view the status of a PVC request.
Prerequisites
- Administrator access to OpenShift Container Storage.
Procedure
- Log in to OpenShift Web Console.
- Click Storage → Persistent Volume Claims
- Search for the required PVC name by using the Filter textbox. You can also filter the list of PVCs by Name or Label to narrow down the list
- Check the Status column corresponding to the required PVC.
- Click the required Name to view the PVC details.
7.3. Reviewing Persistent Volume Claim request events
Use this procedure to review and address Persistent Volume Claim (PVC) request events.
Prerequisites
- Administrator access to OpenShift Web Console.
Procedure
- Log in to OpenShift Web Console.
- Click Home → Overview → Persistent Storage
- Locate the Inventory card to see the number of PVCs with errors.
- Click Storage → Persistent Volume Claims
- Search for the required PVC using the Filter textbox.
- Click on the PVC name and navigate to Events
- Address the events as required or as directed.
7.4. Expanding Persistent Volume Claims
OpenShift Container Storage 4.6 introduces the ability to expand Persistent Volume Claims providing more flexibility in the management of persistent storage resources.
Expansion is supported for the following Persistent Volumes:
-
PVC with ReadWriteOnce (RWO) and ReadWriteMany (RWX) access that is based on Ceph File System (CephFS) for volume mode
Filesystem. -
PVC with ReadWriteOnce (RWO) access that is based on Ceph RADOS Block Devices (RBDs) with volume mode
Filesystem. -
PVC with ReadWriteOnce (RWO) access that is based on Ceph RADOS Block Devices (RBDs) with volume mode
Block.
OSD and MON PVC expansion is not supported by Red Hat.
Prerequisites
- Administrator access to OpenShift Web Console.
Procedure
-
In OpenShift Web Console, navigate to
Storage→Persistent Volume Claims. - Click the Action Menu (⋮) next to the Persistent Volume Claim you want to expand.
Click
Expand PVC: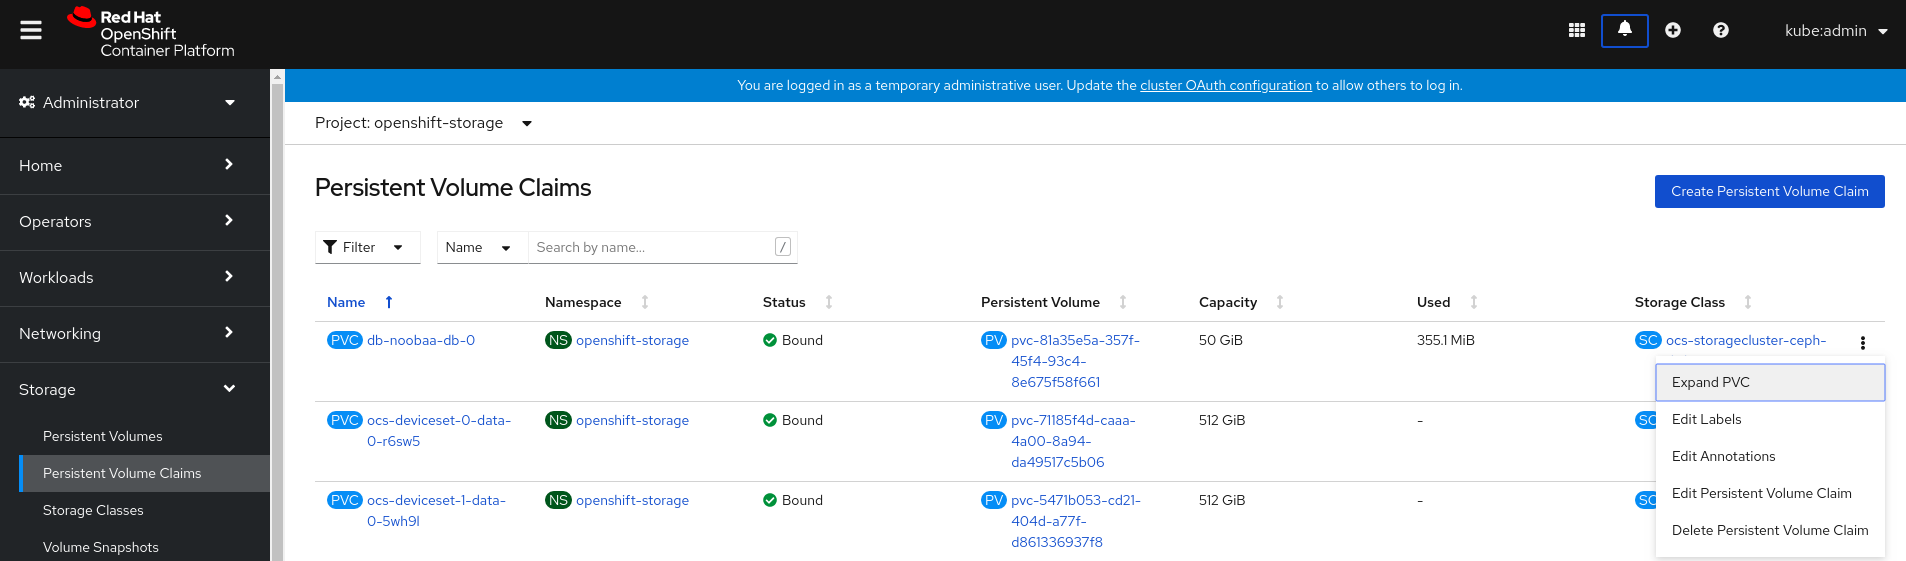
Select the new size of the Persistent Volume Claim, then click
Expand: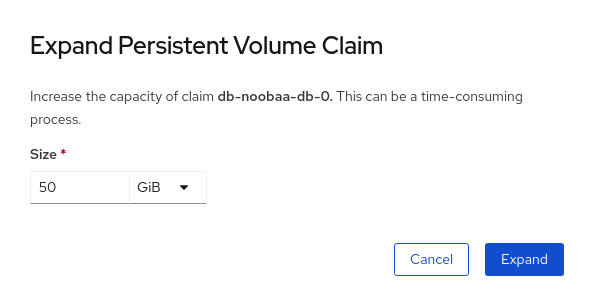
To verify the expansion, navigate to the PVC’s details page and verify the
Capacityfield has the correct size requested.NoteWhen expanding PVCs based on Ceph RADOS Block Devices (RBDs), if the PVC is not already attached to a pod the
Condition typeisFileSystemResizePendingin the PVC’s details page. Once the volume is mounted, filesystem resize succeeds and the new size is reflected in theCapacityfield.
7.5. Dynamic provisioning
7.5.1. About dynamic provisioning
The StorageClass resource object describes and classifies storage that can be requested, as well as provides a means for passing parameters for dynamically provisioned storage on demand. StorageClass objects can also serve as a management mechanism for controlling different levels of storage and access to the storage. Cluster Administrators (cluster-admin) or Storage Administrators (storage-admin) define and create the StorageClass objects that users can request without needing any intimate knowledge about the underlying storage volume sources.
The OpenShift Container Platform persistent volume framework enables this functionality and allows administrators to provision a cluster with persistent storage. The framework also gives users a way to request those resources without having any knowledge of the underlying infrastructure.
Many storage types are available for use as persistent volumes in OpenShift Container Platform. While all of them can be statically provisioned by an administrator, some types of storage are created dynamically using the built-in provider and plug-in APIs.
7.5.2. Dynamic provisioning in OpenShift Container Storage
Red Hat OpenShift Container Storage is software-defined storage that is optimised for container environments. It runs as an operator on OpenShift Container Platform to provide highly integrated and simplified persistent storage management for containers.
OpenShift Container Storage supports a variety of storage types, including:
- Block storage for databases
- Shared file storage for continuous integration, messaging, and data aggregation
- Object storage for archival, backup, and media storage
Version 4 uses Red Hat Ceph Storage to provide the file, block, and object storage that backs persistent volumes, and Rook.io to manage and orchestrate provisioning of persistent volumes and claims. NooBaa provides object storage, and its Multicloud Gateway allows object federation across multiple cloud environments (available as a Technology Preview).
In OpenShift Container Storage 4, the Red Hat Ceph Storage Container Storage Interface (CSI) driver for RADOS Block Device (RBD) and Ceph File System (CephFS) handles the dynamic provisioning requests. When a PVC request comes in dynamically, the CSI driver has the following options:
-
Create a PVC with ReadWriteOnce (RWO) and ReadWriteMany (RWX) access that is based on Ceph RBDs with volume mode
Block -
Create a PVC with ReadWriteOnce (RWO) access that is based on Ceph RBDs with volume mode
Filesystem -
Create a PVC with ReadWriteOnce (RWO) and ReadWriteMany (RWX) access that is based on CephFS for volume mode
Filesystem
The judgment of which driver (RBD or CephFS) to use is based on the entry in the storageclass.yaml file.
7.5.3. Available dynamic provisioning plug-ins
OpenShift Container Platform provides the following provisioner plug-ins, which have generic implementations for dynamic provisioning that use the cluster’s configured provider’s API to create new storage resources:
| Storage type | Provisioner plug-in name | Notes |
|---|---|---|
| OpenStack Cinder |
| |
| AWS Elastic Block Store (EBS) |
|
For dynamic provisioning when using multiple clusters in different zones, tag each node with |
| AWS Elastic File System (EFS) | Dynamic provisioning is accomplished through the EFS provisioner pod and not through a provisioner plug-in. | |
| Azure Disk |
| |
| Azure File |
|
The |
| GCE Persistent Disk (gcePD) |
| In multi-zone configurations, it is advisable to run one OpenShift Container Platform cluster per GCE project to avoid PVs from being created in zones where no node in the current cluster exists. |
|
|
Any chosen provisioner plug-in also requires configuration for the relevant cloud, host, or third-party provider as per the relevant documentation.
Chapter 8. Volume Snapshots
A volume snapshot is the state of the storage volume in a cluster at a particular point in time. These snapshots help to use storage more efficiently by not having to make a full copy each time and can be used as building blocks for developing an application.
Volume snapshot class allows an administrator to specify different attributes belonging to a volume snapshot object. The OpenShift Container Storage operator installs default volume snapshot classes depending on the platform in use. The operator owns and controls these default volume snapshot classes and they cannot be deleted or modified.
You can create multiple snapshots of the same persistent volume claim (PVC). For CephFS, you can create up to 100 snapshots per PVC. For RADOS Block Device (RBD), you can create up to 512 snapshots per PVC.
You cannot schedule periodic creation of snapshots.
8.1. Creating volume snapshots
You can create a volume snapshot either from the Persistent Volume Claim (PVC) page or the Volume Snapshots page.
Prerequisites
-
PVC must be in
Boundstate and must not be in use.
OpenShift Container Storage only provides crash consistency for a volume snapshot of a PVC if a pod is using it. For application consistency, be sure to first tear down a running pod to ensure consistent snapshots or use any quiesce mechanism provided by the application to ensure it.
Procedure
- From the Persistent Volume Claims page
- Click Storage → Persistent Volume Claims from the OpenShift Web Console.
To create a volume snapshot, do one of the following:
- Beside the desired PVC, click Action menu (⋮) → Create Snapshot.
- Click on the PVC for which you want to create the snapshot and click Actions → Create Snapshot.
- Enter a Name for the volume snapshot.
- Choose the Snapshot Class from the drop-down list.
- Click Create. You will be redirected to the Details page of the volume snapshot that is created.
- From the Volume Snapshots page
- Click Storage → Volume Snapshots from the OpenShift Web Console.
- In the Volume Snapshots page, click Create Volume Snapshot.
- Choose the required Project from the drop-down list.
- Choose the Persistent Volume Claim from the drop-down list.
- Enter a Name for the snapshot.
- Choose the Snapshot Class from the drop-down list.
- Click Create. You will be redirected to the Details page of the volume snapshot that is created.
Verification steps
- Go to the Details page of the PVC and click the Volume Snapshots tab to see the list of volume snapshots. Verify that the new volume snapshot is listed.
- Click Storage → Volume Snapshots from the OpenShift Web Console. Verify that the new volume snapshot is listed.
-
Wait for the volume snapshot to be in
Readystate.
8.2. Restoring volume snapshots
When you restore a volume snapshot, a new Persistent Volume Claim (PVC) gets created. The restored PVC is independent of the volume snapshot and the parent PVC.
You can restore a volume snapshot from either the Persistent Volume Claim page or the Volume Snapshots page.
Procedure
- From the Persistent Volume Claims page
You can restore volume snapshot from the Persistent Volume Claims page only if the parent PVC is present.
- Click Storage → Persistent Volume Claims from the OpenShift Web Console.
- Click on the PVC name which has the volume snapshot that needs to be restored as a new PVC.
- In the Volume Snapshots tab, beside the desired volume snapshot, click Action menu (⋮) → Restore as new PVC.
- Enter a name for the new PVC.
Select the Storage Class name.
Note(For Rados Block Device (RBD)) You must select a storage class with the same pool as that of the parent PVC.
- Click Restore. You will be redirected to the new PVC details page.
- From the Volume Snapshots page
- Click Storage → Volume Snapshots from the OpenShift Web Console.
- Beside the desired volume snapshot click Action Menu (⋮) → Restore as new PVC.
- Enter a name for the new PVC.
Select the Storage Class name.
Note(For Rados Block Device (RBD)) You must select a storage class with the same pool as that of the parent PVC.
- Click Restore. You will be redirected to the new PVC details page.
When you restore volume snapshots, the PVCs are created with the access mode of the parent PVC only if the parent PVC exists. Otherwise, the PVCs are created only with the ReadWriteOnce (RWO) access mode. Currently, you cannot specify the access mode using the OpenShift Web Console. However, you can specify the access mode from the CLI using the YAML. For more information, see Restoring a volume snapshot.
Verification steps
- Click Storage → Persistent Volume Claims from the OpenShift Web Console and confirm that the new PVC is listed in the Persistent Volume Claims page.
-
Wait for the new PVC to reach
Boundstate.
8.3. Deleting volume snapshots
Prerequisites
- For deleting a volume snapshot, the volume snapshot class which is used in that particular volume snapshot should be present.
Procedure
- From Persistent Volume Claims page
- Click Storage → Persistent Volume Claims from the OpenShift Web Console.
- Click on the PVC name which has the volume snapshot that needs to be deleted.
- In the Volume Snapshots tab, beside the desired volume snapshot, click Action menu (⋮) → Delete Volume Snapshot.
- From Volume Snapshots page
- Click Storage → Volume Snapshots from the OpenShift Web Console.
- In the Volume Snapshots page, beside the desired volume snapshot click Action menu (⋮) → Delete Volume Snapshot.
Verfication steps
- Ensure that the deleted volume snapshot is not present in the Volume Snapshots tab of the PVC details page.
- Click Storage → Volume Snapshots and ensure that the deleted volume snapshot is not listed.
Chapter 9. Volume cloning
A clone is a duplicate of an existing storage volume that is used as any standard volume. You create a clone of a volume to make a point in time copy of the data. A persistent volume claim (PVC) cannot be cloned with a different size. You can create up to 512 clones per PVC for both CephFS and RADOS Block Device (RBD).
9.1. Creating a clone
Prerequisites
-
Source PVC must be in
Boundstate and must not be in use.
Do not create a clone of a PVC if a Pod is using it. Doing so might cause data corruption because the PVC is not quiesced (paused).
Procedure
- Click Storage → Persistent Volume Claims from the OpenShift Web Console.
To create a clone, do one of the following:
- Beside the desired PVC, click Action menu (⋮) → Clone PVC.
- Click on the PVC that you want to clone and click Actions → Clone PVC.
- Enter a Name for the clone.
Click Clone. You will be redirected to the new PVC details page.
NoteClones are created with the access mode of the parent PVC. Currently, you cannot specify the access mode using the OpenShift Web Console UI. However, you can specify the access mode from the CLI using the YAML. For more information, see Provisioning a CSI volume clone.
Wait for the cloned PVC status to become
Bound.The cloned PVC is now available to be consumed by the pods. This cloned PVC is independent of its dataSource PVC.
Chapter 10. Managing container storage interface (CSI) component placements
Each cluster consists of a number of dedicated nodes such as infra and storage nodes. However, an infra node with a custom taint will not be able to use OpenShift Container Storage Persistent Volume Claims (PVCs) on the node. So, if you want to use such nodes, you can set tolerations to bring up csi-plugins on the nodes. For more information, see https://access.redhat.com/solutions/4827161.
Procedure
Edit the configmap to add the toleration for the custom taint. Remember to save before exiting the editor.
$ oc edit configmap rook-ceph-operator-config -n openshift-storage
Display the
configmapto check the added toleration.$ oc get configmap rook-ceph-operator-config -n openshift-storage -o yaml
Example output of the added toleration for the taint,
nodetype=infra:NoSchedule:apiVersion: v1 data: [...] CSI_PLUGIN_TOLERATIONS: | - key: nodetype operator: Equal value: infra effect: NoSchedule - key: node.ocs.openshift.io/storage operator: Equal value: "true" effect: NoSchedule [...] kind: ConfigMap metadata: [...]Restart the
rook-ceph-operatorif thecsi-cephfsplugin-* andcsi-rbdplugin-* pods fail to come up on their own on the infra nodes.$ oc delete -n openshift-storage pod <name of the rook_ceph_operator pod>
Example :
$ oc delete -n openshift-storage pod rook-ceph-operator-5446f9b95b-jrn2j

pod "rook-ceph-operator-5446f9b95b-jrn2j" deleted
Verification step
Verify that the csi-cephfsplugin-* and csi-rbdplugin-* pods are running on the infra nodes.