Deploying and managing OpenShift Container Storage using IBM Power Systems
How to install and manage
Abstract
Preface
Red Hat OpenShift Container Storage 4.6 supports deployment on existing Red Hat OpenShift Container Platform (RHOCP) IBM Power clusters in connected environments.
Only internal Openshift Container Storage clusters are supported on IBM Power Systems. See Planning your deployment for more information about deployment requirements.
To deploy OpenShift Container Storage, follow the appropriate deployment process:
Internal mode
Chapter 1. Planning your deployment
1.1. Introduction to Red Hat OpenShift Container Storage
Red Hat OpenShift Container Storage is a highly integrated collection of cloud storage and data services for Red Hat OpenShift Container Platform. It is available as part of the Red Hat OpenShift Container Platform Service Catalog, packaged as an operator to facilitate simple deployment and management.
Red Hat OpenShift Container Storage services are primarily made available to applications by way of storage classes that represent the following components:
- Block storage devices, catering primarily to database workloads. Prime examples include Red Hat OpenShift Container Platform logging and monitoring, and PostgreSQL.
- Shared and distributed file system, catering primarily to software development, messaging, and data aggregation workloads. Examples include Jenkins build sources and artifacts, Wordpress uploaded content, Red Hat OpenShift Container Platform registry, and messaging using JBoss AMQ.
- Multicloud object storage, featuring a lightweight S3 API endpoint that can abstract the storage and retrieval of data from multiple cloud object stores.
- On premises object storage, featuring a robust S3 API endpoint that scales to tens of petabytes and billions of objects, primarily targeting data intensive applications. Examples include the storage and access of row, columnar, and semi-structured data with applications like Spark, Presto, Red Hat AMQ Streams (Kafka), and even machine learning frameworks like TensorFlow and Pytorch.
OpenShift Container Storage 4.6 on IBM Power Systems supports only block and file storage and not the object storage.
Red Hat OpenShift Container Storage version 4.x integrates a collection of software projects, including:
- Ceph, providing block storage, a shared and distributed file system, and on-premises object storage
- Ceph CSI, to manage provisioning and lifecycle of persistent volumes and claims
- NooBaa, providing a Multicloud Object Gateway
- OpenShift Container Storage, Rook-Ceph, and NooBaa operators to initialize and manage OpenShift Container Storage services.
1.2. Architecture of OpenShift Container Storage
Red Hat OpenShift Container Storage provides services for, and can run internally from Red Hat OpenShift Container Platform.
Red Hat OpenShift Container Storage architecture
Red Hat OpenShift Container Storage supports deployment into Red Hat OpenShift Container Platform clusters deployed on Installer Provisioned Infrastructure or User Provisioned Infrastructure. For details about these two approaches, see OpenShift Container Platform - Installation process.
For information about the architecture and lifecycle of OpenShift Container Platform, see OpenShift Container Platform architecture.
1.2.1. About operators
Red Hat OpenShift Container Storage comprises three main operators, which codify administrative tasks and custom resources so that task and resource characteristics can be easily automated. Administrators define the desired end state of the cluster, and the OpenShift Container Storage operators ensure the cluster is either in that state, or approaching that state, with minimal administrator intervention.
OpenShift Container Storage operator
A meta-operator that codifies and enforces the recommendations and requirements of a supported Red Hat OpenShift Container Storage deployment by drawing on other operators in specific, tested ways. This operator provides the storage cluster resource that wraps resources provided by the Rook-Ceph and NooBaa operators.
Rook-Ceph operator
This operator automates the packaging, deployment, management, upgrading, and scaling of persistent storage and file, block, and object services. It creates block and file storage classes for all environments, and creates an object storage class and services object bucket claims made against it in on-premises environments.
Additionally, for internal mode clusters, it provides the Ceph cluster resource, which manages the deployments and services representing the following:
- Object storage daemons (OSDs)
- Monitors (MONs)
- Manager (MGR)
- Metadata servers (MDS)
- Object gateways (RGW) on-premises only
NooBaa operator
This operator automates the packaging, deployment, management, upgrading, and scaling of the Multicloud Object Gateway object service. It creates an object storage class and services object bucket claims made against it.
Additionally, it provides the NooBaa cluster resource, which manages the deployments and services for NooBaa core, database, and endpoint.
1.2.2. Storage cluster deployment approach
Flexibility is a core tenet of Red Hat OpenShift Container Storage, as evidenced by its growing list of operating modalities. This section provides you with information that will help you understand deployment of OpenShift Container Storage within OpenShift Container Platform.
Deployment of Red Hat OpenShift Container Storage entirely within Red Hat OpenShift Container Platform has all the benefits of operator based deployment and management. There are two different deployment modalities available when Red Hat OpenShift Container Storage is running entirely within Red Hat OpenShift Container Platform:
- Simple
- Optimized
Simple deployment
Red Hat OpenShift Container Storage services run co-resident with applications, managed by operators in Red Hat OpenShift Container Platform.
A simple deployment is best for situations where
- Storage requirements are not clear
- OpenShift Container Storage services will run co-resident with applications
- Creating a node instance of a specific size is difficult (bare metal)
In order for Red Hat OpenShift Container Storage to run co-resident with applications, they must have local storage devices, or portable storage devices attached to them dynamically. For example, SAN volumes dynamically provisioned by PowerVC.
Optimized deployment
OpenShift Container Storage services run on dedicated infrastructure nodes managed by Red Hat OpenShift Container Platform.
An optimized approach is best for situations when:
- Storage requirements are clear
- OpenShift Container Storage services run on dedicated infrastructure nodes
- Creating a node instance of a specific size is easy (Cloud, Virtualized environment, etc.)
1.2.3. Node types
Nodes run the container runtime, as well as services, to ensure that containers are running, and maintain network communication and separation between pods. In OpenShift Container Storage, there are three types of nodes.
Table 1.1. Types of nodes
| Node Type | Description |
|---|---|
| Master | These nodes run processes that expose the Kubernetes API, watch and schedule newly created pods, maintain node health and quantity, and control interaction with underlying cloud providers. |
| Infrastructure (Infra) | Infra nodes run cluster level infrastructure services such as logging, metrics, registry, and routing. These are optional in OpenShift Container Platform clusters. It is recommended to use infra nodes for OpenShift Container Storage in virtualized and cloud environments.
To create Infra nodes, you can provision new nodes labeled as |
| Worker | Worker nodes are also known as application nodes since they run applications. When OpenShift Container Storage is deployed in internal mode, a minimal cluster of 3 worker nodes is required, where the nodes are recommended to be spread across three different racks, or availability zones, to ensure availability. In order for OpenShift Container Storage to run on worker nodes, they must either have local storage devices, or portable storage devices attached to them dynamically. When it is deployed in external mode, it runs on multiple nodes to allow rescheduling by K8S on available nodes in case of a failure. Examples of portable storage devices are EBS volumes on EC2, or vSphere Virtual Volumes on VMware. |
Nodes that run only storage workloads require a subscription for Red Hat OpenShift Container Storage. Nodes that run other workloads in addition to storage workloads require both Red Hat OpenShift Container Storage and Red Hat OpenShift Container Platform subscriptions. See Section 1.4, “Subscriptions” for more information.
1.3. Security considerations
1.3.1. Data encryption options
Encryption lets you encode and obscure your data to make it impossible to understand if it is stolen. Red Hat OpenShift Container Storage 4.6 provides support for at-rest encryption of all disks in the storage cluster, meaning that your data is encrypted when it is written to disk, and decrypted when it is read from the disk.
OpenShift Container Storage 4.6 uses Linux Unified Key System (LUKS) version 2 based encryption with a key size of 512 bits and the aes-xts-plain64 cipher. Each device has a different encryption key, which is stored as a Kubernetes secret.
You can enable or disable encryption for your whole cluster during cluster deployment. It is disabled by default. Working with encrypted data incurs only a very small penalty to performance.
Data encryption is only supported for new clusters deployed using OpenShift Container Storage 4.6. It is not supported on existing clusters that are upgraded to version 4.6.
1.4. Subscriptions
1.4.1. Subscription offerings
Red Hat OpenShift Container Storage subscription is based on “core-pairs,” similar to Red Hat OpenShift Container Platform. The Red Hat OpenShift Container Storage 2-core subscription is based on the number of logical cores on the CPUs in the system where OpenShift Container Platform runs.
As with OpenShift Container Platform:
- OpenShift Container Storage subscriptions are stackable to cover larger hosts.
- Cores can be distributed across as many virtual machines (VMs) as needed. For example, a 2-core subscription at SMT level of 8 will provide 2 cores or 16 vCPUs that can be used across any number of VMs.
- OpenShift Container Storage subscriptions are available with Premium or Standard support.
1.4.2. Disaster recovery subscriptions
Red Hat OpenShift Container Storage does not offer disaster recovery (DR), cold backup, or other subscription types. Any system with OpenShift Container Storage installed, powered-on or powered-off, running workload or not, requires an active subscription.
1.4.3. Cores versus vCPUs and simultaneous multithreading (SMT)
Making a determination about whether or not a particular system consumes one or more cores is currently dependent on the level of simultaneous multithreading configured (SMT). IBM Power systems provide simultaneous multithreading levels of 1, 2, 4 or 8.
For systems where SMT is configured the calculation of cores depends on the SMT level. Therefore, a 2-core subscription 2 vCPU on SMT level of 1, 4 vCPUs on SMT level of 2, 8 vCPUs on SMT level of 4 and 16 vCPUs on SMT level of 8. A large virtual machine (VM) might have 16 vCPUs, which at a SMT level 8 will be equivalent of 2 subscription cores. As subscriptions come in 2-core units, you will need 1 2-core subscription to cover these 2 cores or 16 vCPUs.
1.4.4. Shared Processor Pools
IBM Power Systems have a notion of shared processor pools. The processors in a shared processor pool can be shared across the nodes in the cluster. The aggregate compute capacity required for a OpenShift Container Storage should be a multiple of core-pairs.
1.4.5. Subscription requirements
OpenShift Container Storage components can run on either OpenShift Container Platform worker or infrastructure nodes, for which either Red Hat CoreOS (RHCOS) or Red Hat Enterprise Linux (RHEL) 7 can be used as the host operating system. When worker nodes are used for OpenShift Container Storage components, those nodes are required to have subscriptions for both OpenShift Container Platform and OpenShift Container Storage. When infrastructure nodes are used, those nodes are only required to have OpenShift Container Storage subscriptions. Labels are used to indicate whether a node should be considered a worker or infrastructure node, see How to use dedicated worker nodes for Red Hat OpenShift Container Storage in the Managing and Allocating Storage Resources guide.
1.5. Infrastructure requirements
1.5.1. Platform requirements
Red Hat OpenShift Container Storage can be combined with an OpenShift Container Platform release that is one minor release behind or ahead of the OpenShift Container Storage version.
OpenShift Container Storage 4.6 can run on:
- OpenShift Container Platform 4.5 (one version behind) for internal mode only
- OpenShift Container Platform 4.6 (same version)
For a complete list of supported platform versions, see the Red Hat OpenShift Container Storage and Red Hat OpenShift Container Platform interoperability matrix.
When upgrading Red Hat OpenShift Container Platform, you must upgrade Local Storage Operator version to match with the Red Hat OpenShift Container Platform version in order to have the Local Storage Operator fully supported with Red Hat OpenShift Container Storage.
1.5.1.1. IBM Power Systems [Technology Preview]
Supports internal Red Hat Openshift Container Storage clusters only.
An Internal cluster must both meet storage device requirements and have a storage class providing local SSD via the Local Storage Operator.
1.5.2. Resource requirements
OpenShift Container Storage services consist of an initial set of base services, followed by additional device sets. All of these OpenShift Container Storage services pods are scheduled by kubernetes on OpenShift Container Platform nodes according to Pod Placement Rules.
Table 1.2. Aggregate minimum resource requirements
| Deployment Mode | Base services |
|---|---|
| Internal |
|
| External |
|
Example: For a 3 node cluster in an internal-attached devices mode deployment, a minimum of 3 x 16 = 48 units of CPU and 3 x 64 = 192 GB of memory is required.
1.5.3. Pod placement rules
Kubernetes is responsible for pod placement based on declarative placement rules. The OpenShift Container Storage base service placement rules for Internal cluster can be summarized as follows:
-
Nodes are labeled with the
cluster.ocs.openshift.io/openshift-storagekey - Nodes are sorted into pseudo failure domains if none exist
- Components requiring high availability are spread across failure domains
- A storage device must be accessible in each failure domain
This leads to the requirement that there be at least three nodes, and that nodes be in three distinct rack or zone failure domains in the case of pre-existing topology labels.
For additional device sets, there must be a storage device, and sufficient resources for the pod consuming it, in each of the three failure domains. Manual placement rules can be used to override default placement rules, but generally this approach is only suitable for bare metal deployments.
1.5.4. Storage device requirements
Use this section to understand the different storage capacity requirements that you can consider when planning deployments and upgrades on IBM Power Systems.
Local storage devices
For local storage deployment, any disk size of 4 TiB or less can be used, and all disks should be of the same size and type. The number of local storage devices that can run per node is a function of the node size and resource requirements. Expanding the cluster in multiples of three, one node in each failure domain, is an easy way to satisfy pod placement rules.
Disk partitioning is not supported.
Capacity planning
Always ensure that available storage capacity stays ahead of consumption. Recovery is difficult if available storage capacity is completely exhausted, and requires more intervention than simply adding capacity or deleting or migrating content.
Capacity alerts are issued when cluster storage capacity reaches 75% (near-full) and 85% (full) of total capacity. Always address capacity warnings promptly, and review your storage regularly to ensure that you do not run out of storage space. If you do run out of storage space completely, contact Red Hat Customer Support.
The following tables show example node configurations for Red Hat OpenShift Container Storage with dynamic storage devices.
Table 1.3. Example initial configurations with 3 nodes
| Storage Device size | Storage Devices per node | Total capacity | Usable storage capacity |
|---|---|---|---|
| 0.5 TiB | 1 | 1.5 TiB | 0.5 TiB |
| 2 TiB | 1 | 6 TiB | 2 TiB |
| 4 TiB | 1 | 12 TiB | 4 TiB |
Table 1.4. Example of expanded configurations with 30 nodes (N)
| Storage Device size (D) | Storage Devices per node (M) | Total capacity (D * M * N) | Usable storage capacity (D*M*N/3) |
|---|---|---|---|
| 0.5 TiB | 3 | 45 TiB | 15 TiB |
| 2 TiB | 6 | 360 TiB | 120 TiB |
| 4 TiB | 9 | 1080 TiB | 360 TiB |
To start deploying your OpenShift Container Storage on IBM Power Systems, you can use the deployment guide.
Chapter 2. Deploying using local storage devices
Deploying OpenShift Container Storage on OpenShift Container Platform using local storage devices provided by IBM Power Systems enables you to create internal cluster resources. This results in internal provisioning of the base services, which helps to make additional storage classes available to applications.
Only internal Openshift Container Storage clusters are supported on IBM Power Systems. See Planning your deployment for more information about deployment requirements.
2.1. Requirements for installing OpenShift Container Storage using local storage devices
- You must upgrade to OpenShift Container Platform 4.6 before deploying OpenShift Container Storage 4.6. For information, see Updating OpenShift Container Platform clusters guide.
- The Local Storage Operator version must match the Red Hat OpenShift Container Platform version in order to have the Local Storage Operator fully supported with Red Hat OpenShift Container Storage. The Local Storage Operator does not get upgraded when Red Hat OpenShift Container Platform is upgraded.
You must have at least three OpenShift Container Platform worker nodes in the cluster with locally attached storage devices on each of them.
- Each of the three selected nodes must have at least one raw block device available to be used by OpenShift Container Storage.
- The devices to be used must be empty, that is, there should be no persistent volumes (PVs), volume groups (VGs), or local volumes (LVs) remaining on the disks.
- For minimum starting node requirements, see Resource requirements section in Planning guide.
You must have a minimum of three labeled nodes.
Each node that has local storage devices to be used by OpenShift Container Storage must have a specific label to deploy OpenShift Container Storage pods. To label the nodes, use the following command:
$ oc label nodes <NodeNames> cluster.ocs.openshift.io/openshift-storage=''
2.2. Installing Red Hat OpenShift Container Storage Operator
You can install Red Hat OpenShift Container Storage Operator using the Red Hat OpenShift Container Platform Operator Hub. For information about the hardware and software requirements, see Planning your deployment.
Prerequisites
- You must be logged into the OpenShift Container Platform (RHOCP) cluster.
- You must have at least three worker nodes in the RHOCP cluster.
When you need to override the cluster-wide default node selector for OpenShift Container Storage, you can use the following command in command line interface to specify a blank node selector for the openshift-storage namespace:
$ oc annotate namespace openshift-storage openshift.io/node-selector=
Procedure
Click Operators → OperatorHub in the left pane of the OpenShift Web Console.
Figure 2.1. List of operators in the Operator Hub
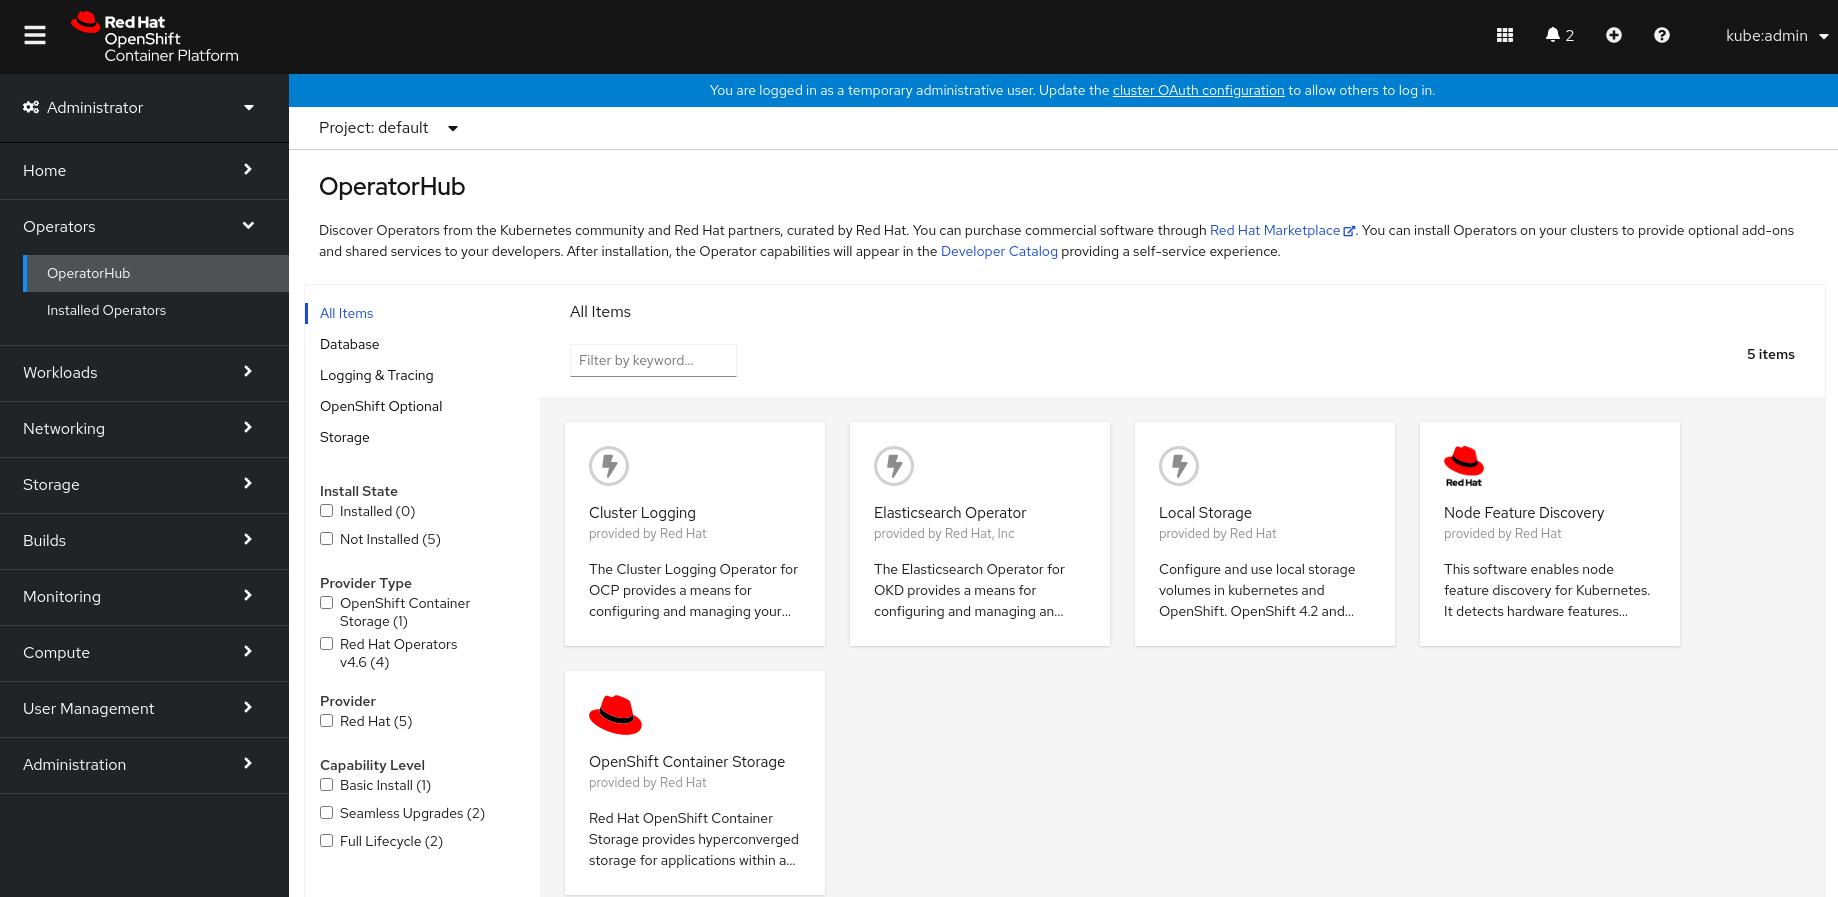
Click on OpenShift Container Storage.
You can use the Filter by keyword text box or the filter list to search for OpenShift Container Storage from the list of operators.
On the OpenShift Container Storage operator page, click Install.
Figure 2.2. Install Operator page

After Clicking on Install button, following page will appear.
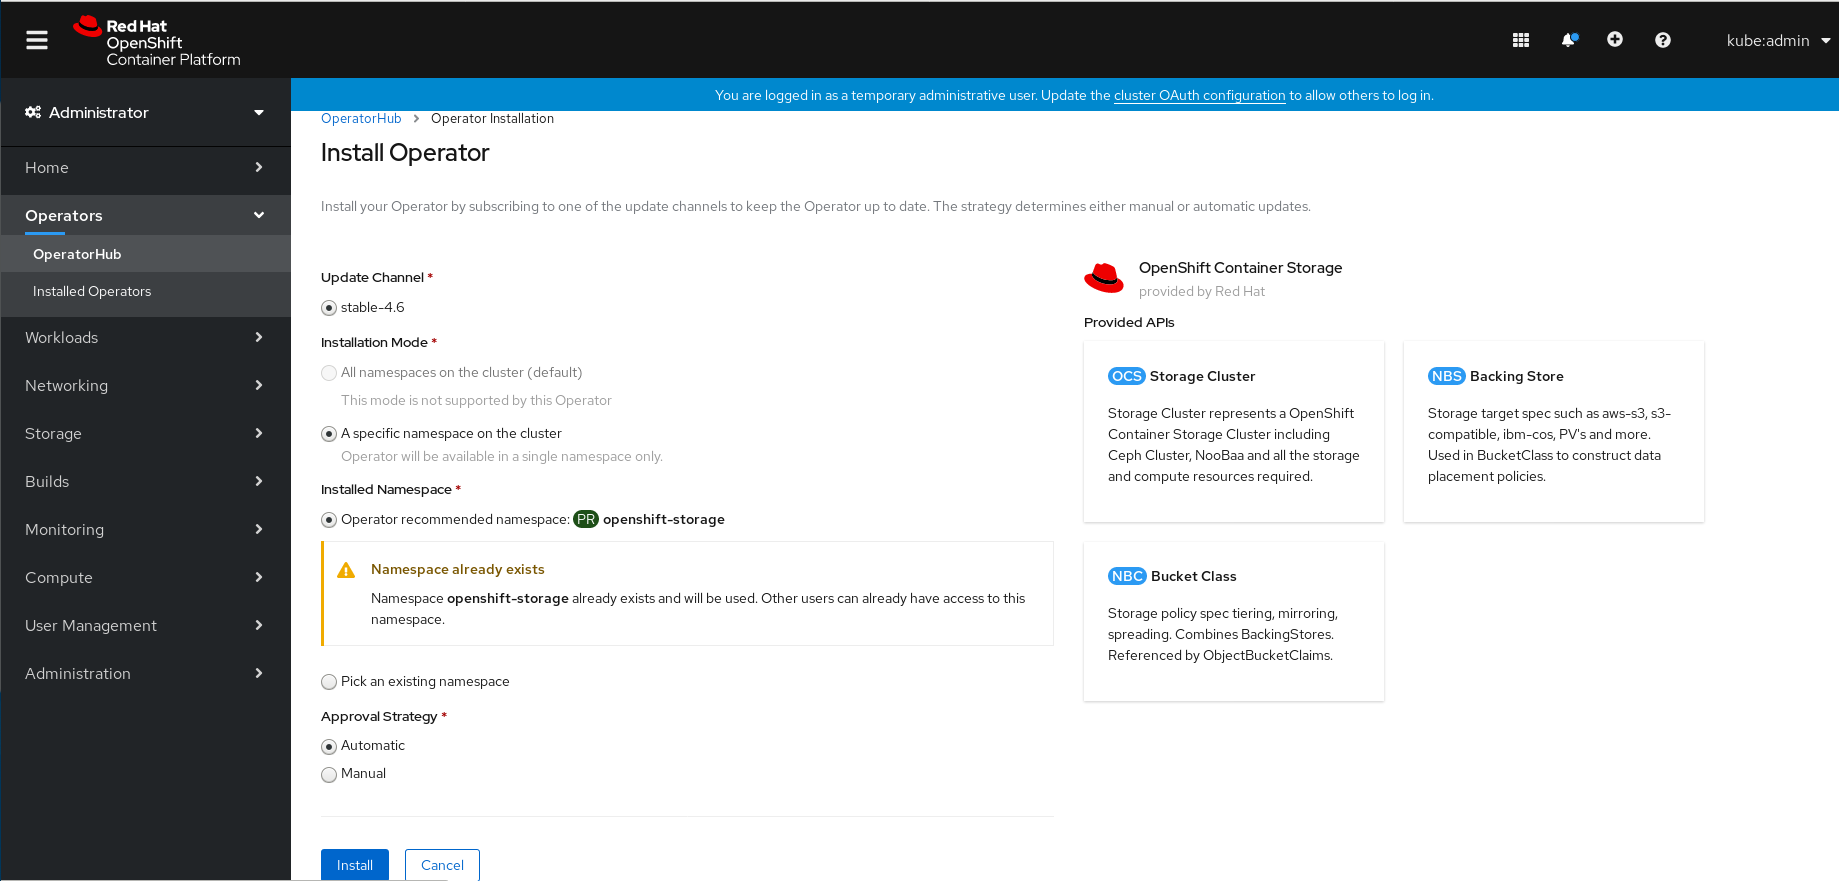
On the Install Operator page, ensure the following options are selected
- Update Channel as stable-4.6
- Installation Mode as A specific namespace on the cluster
-
Installed Namespace as Operator recommended namespace PR openshift-storage. If Namespace
openshift-storagedoes not exist, it will be created during the operator installation. - Enable operator recommended cluster monitoring on this namespace checkbox is selected. This is required for cluster monitoring.
- Approval Strategy as Automatic
Click Install.
Figure 2.3. Installed Operators dashboard

Verification steps
- Verify that OpenShift Container Storage Operator shows the Status as Succeeded on the Installed Operators dashboard.
2.3. Installing Local Storage Operator
Use this procedure to install the Local Storage Operator from the Operator Hub before creating OpenShift Container Storage clusters on local storage devices.
Prerequisites
Create a namespace called
openshift-local-storageas follows:- Click Administration → Namespaces in the left pane of the OpenShift Web Console.
- Click Create Namespace.
-
In the Create Namespace dialog box, enter
openshift-local-storagefor Name. - Select No restrictions option for Default Network Policy.
- Click Create.
Procedure
- Click Operators → OperatorHub in the left pane of the OpenShift Web Console.
- Search for Local Storage Operator from the list of operators and click on it.
Click Install.
Figure 2.4. Install Operator page
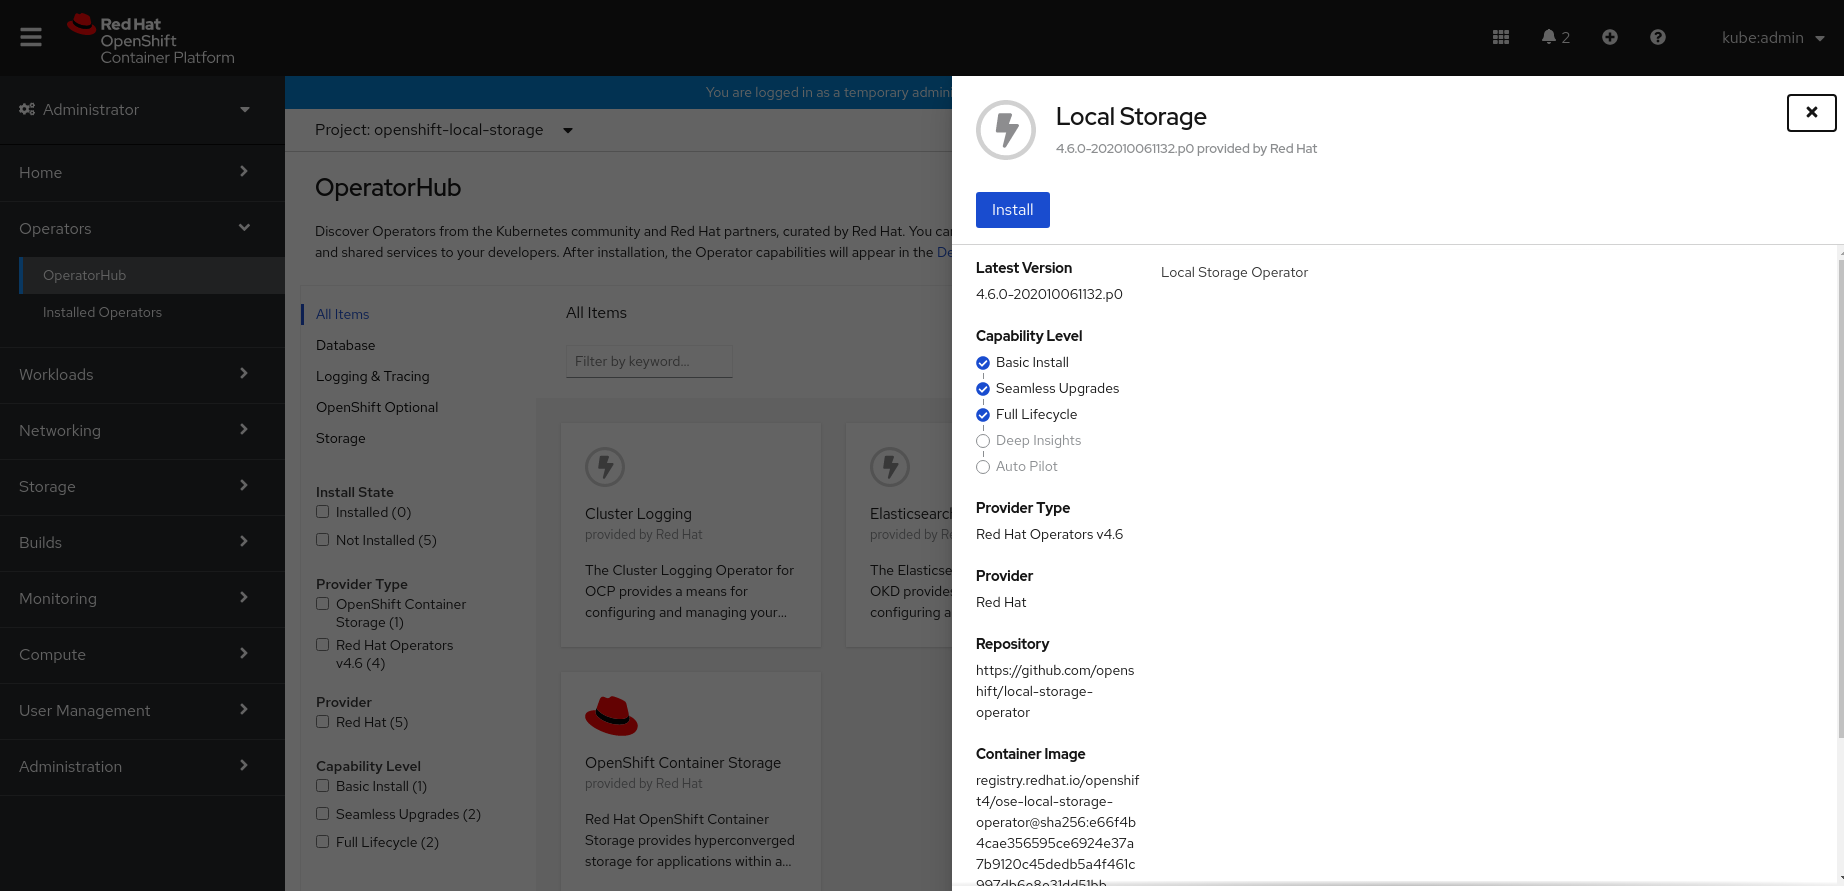
After Clicking on Install button, following page will appear.
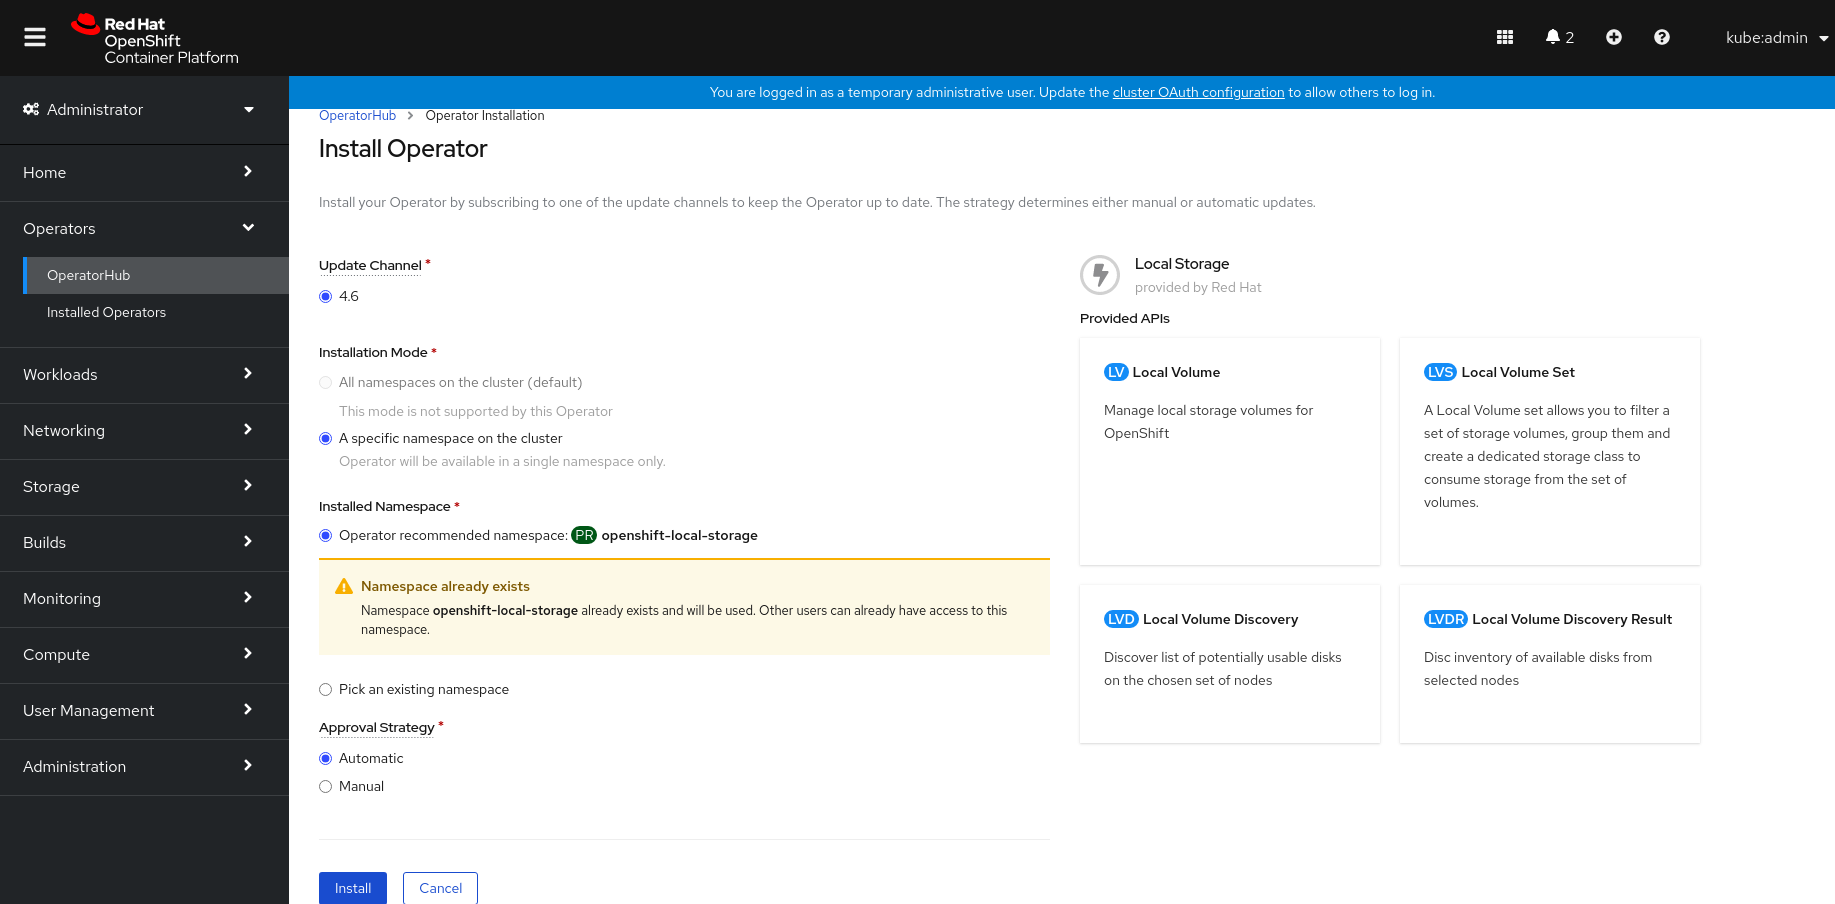
On the Install Operator page, ensure the following options are selected
- Update Channel as stable-4.6
- Installation Mode as A specific namespace on the cluster
- Installed Namespace as openshift-local-storage.
- Approval Strategy as Automatic
Click Install.
Figure 2.5. Installed Operators dashboard
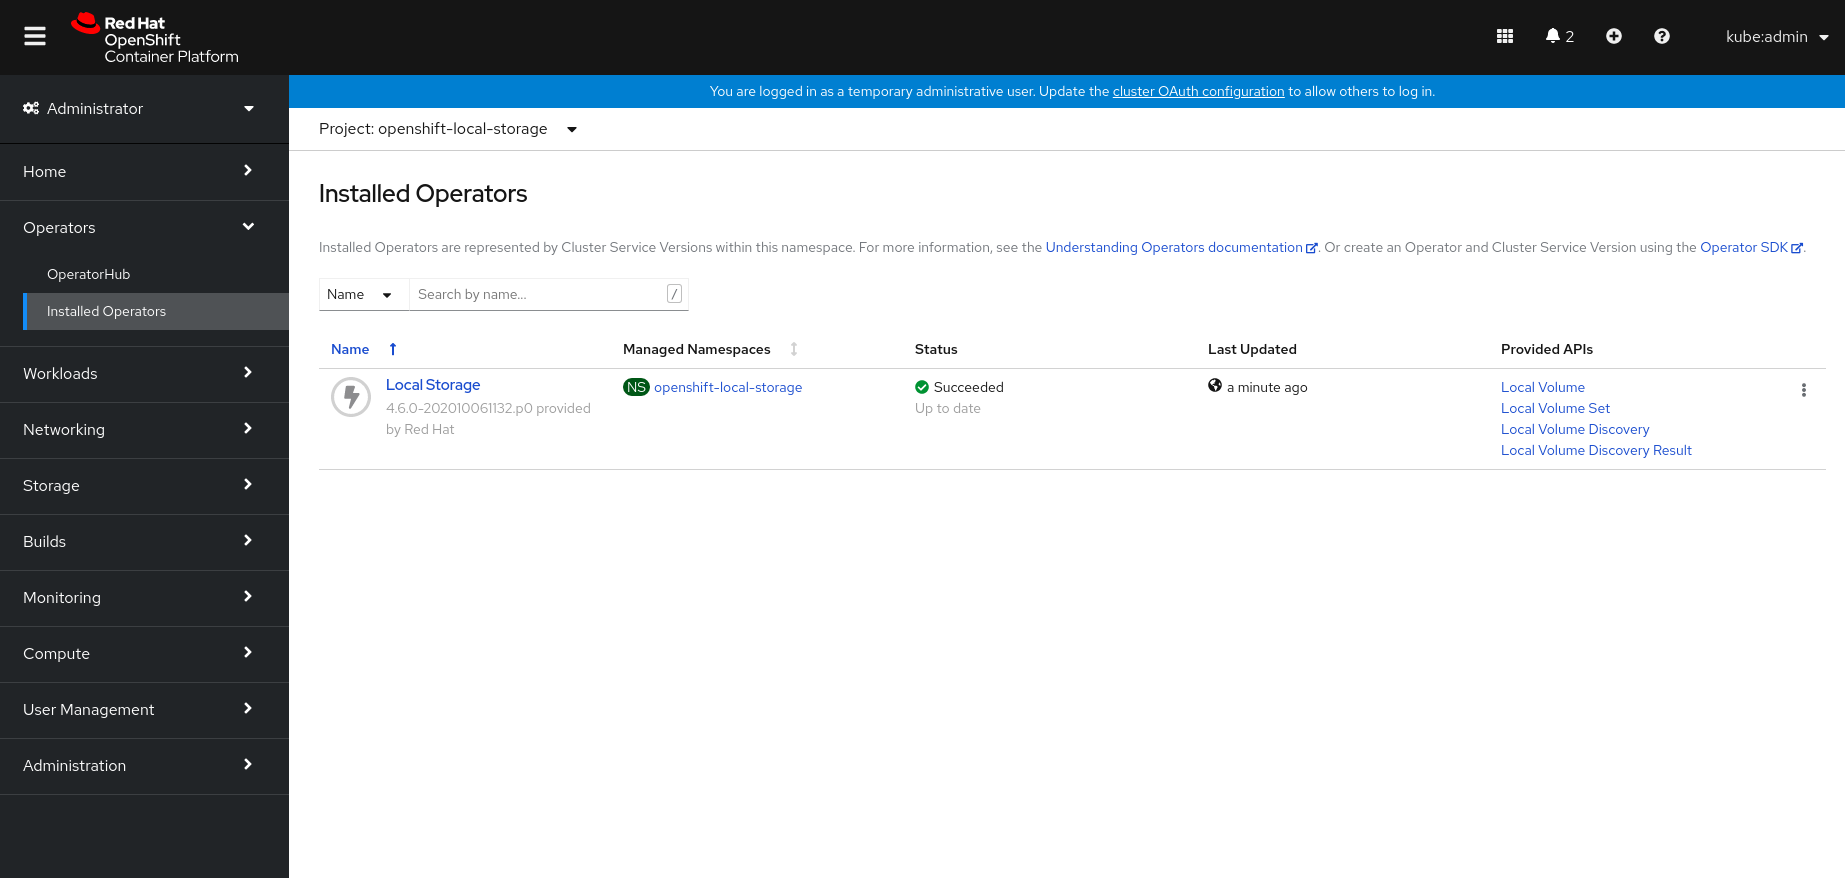
Verification steps
-
Verify that the Local Storage Operator shows the Status as
Succeeded.
2.4. Finding available storage devices
Use this procedure to identify the device names for each of the three or more worker nodes that you have labeled with the OpenShift Container Storage label cluster.ocs.openshift.io/openshift-storage='' before creating PVs for IBM Power Systems.
Procedure
List and verify the name of the worker nodes with the OpenShift Container Storage label.
$ oc get nodes -l cluster.ocs.openshift.io/openshift-storage=
Example output:
NAME        STATUS   ROLES    AGE     VERSION
worker-0    Ready    worker   39h   v1.18.3+2cf11e2
worker-1    Ready    worker   39h   v1.18.3+2cf11e2
Worker-2    Ready    worker   39h   v1.18.3+2cf11e2
Log in to each worker node that is used for OpenShift Container Storage resources and disk that has additional storage attached for each available raw block device.
$ oc debug node/<Nodename>
Example output:
$ oc debug node/worker-0
Starting pod/worker-0-debug ...
To use host binaries, run `chroot /host`
Pod IP: 192.168.88.11
If you don't see a command prompt, try pressing enter.
sh-4.2# chroot /host
sh-4.4# lsblk
NAME                  MAJ:MIN  RM   SIZE  RO  TYPE  MOUNTPOINT
loop0                  7:0     0    256GG  0   loop
vda                    252:0   0     40G  0 disk
|-vda1                 252:1   0     4M   0 part
|-vda2                 252:2   0    384M  0 part     /boot
`-vda4                 252:4   0   39.6G  0 part
  `-coreos-luks-root-nocrypt 253:0  0 39.6G  0 dm   /sysroot
vdb                    252:16  0   512B   1  disk
vdc                    252:32  0   256G   0  disk
In this example, for worker-0, the available local device is
vdc- Repeat the above step for all the other worker nodes that have the storage devices to be used by OpenShift Container Storage. See this Knowledge Base article for more details.
2.5. Creating OpenShift Container Storage cluster on IBM Power Systems
Prerequisites
- Ensure that all the requirements in the Requirements for installing OpenShift Container Storage using local storage devices section are met.
- You must have three worker nodes with the same storage type and size attached to each node (for example, 200 GB) to use local storage devices on IBM Power Systems.
Verify your OpenShift Container Platform worker nodes are labeled for OpenShift Container Storage:
oc get nodes -l cluster.ocs.openshift.io/openshift-storage -o jsonpath='{range .items[*]}{.metadata.name}{"\n"}'
To identify storage devices on each node, refer to Finding available storage devices.
Procedure
- Log into the OpenShift Web Console.
In
openshift-local-storagenamespace Click Operators → Installed Operators from the left pane of the OpenShift Web Console to view the installed operators.Figure 2.6. Local Storage Operator page
- Click the Local Storage installed operator.
On the Operator Details page, click the Local Volume Set link.
Figure 2.7. Local Volume Set tab

Click Create Local Volume Set.
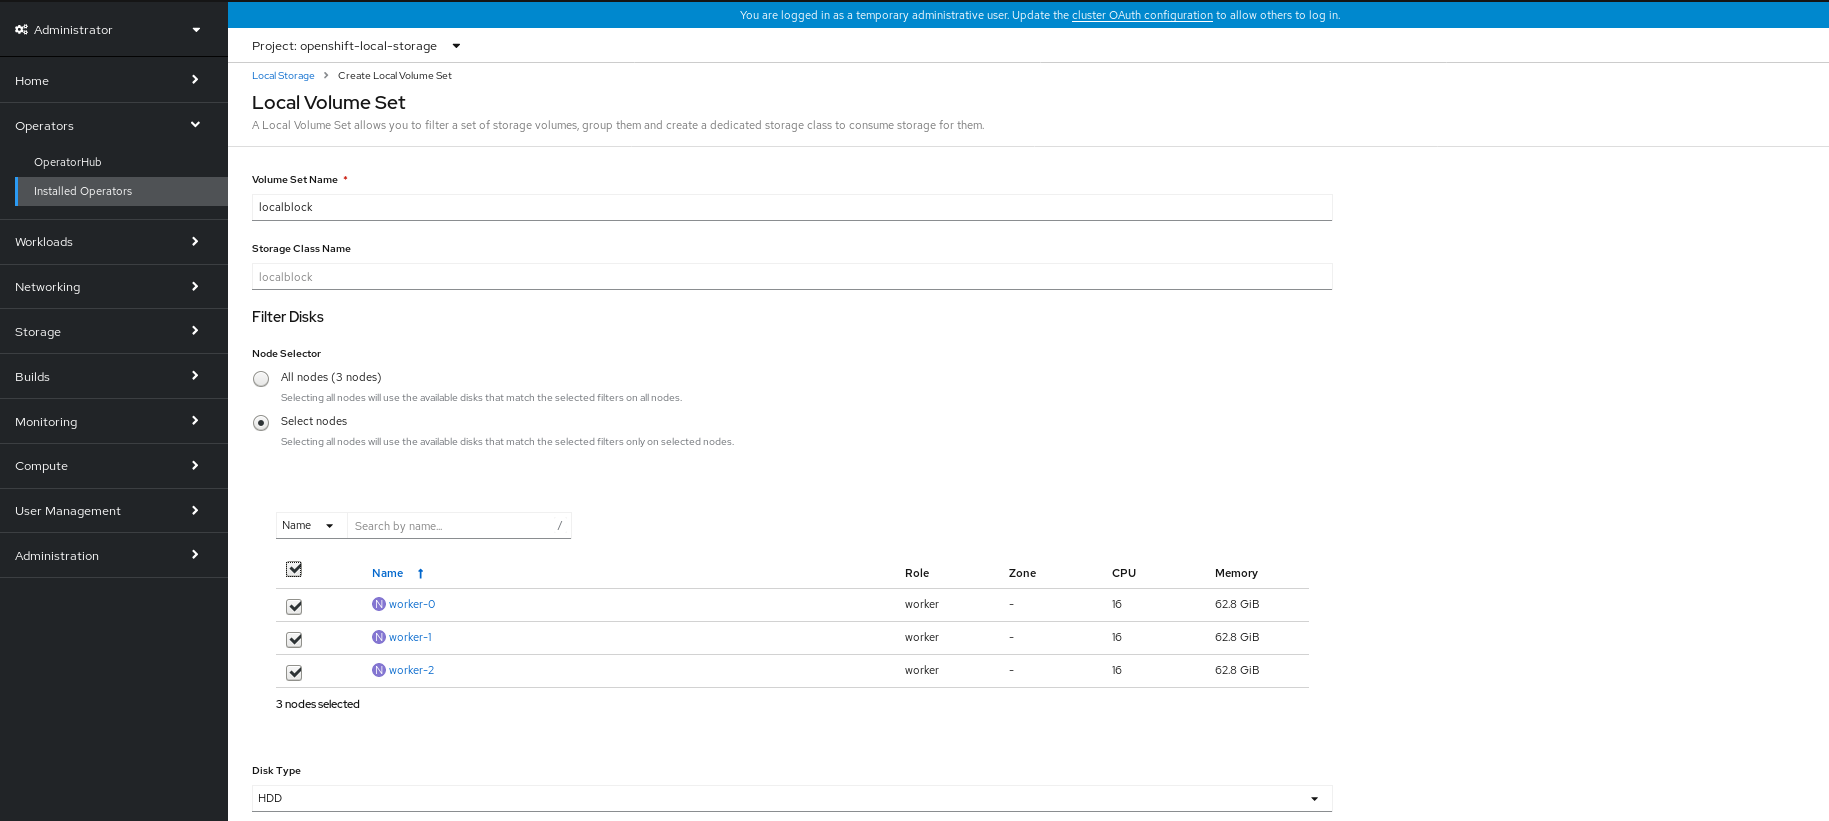
- Enter the Volume Set name. By default, Storage Class name appears for the Volume Set name.
To discover available disks, you can choose one of the following:
- All nodes to discover disks in all the nodes.
- Select nodes to choose a subset of nodes from a list of nodes
- Select the Disk type.
- In the Advanced options, you can choose Block for the Disk mode, choose the minimum disk size equivalent to the size of additional attached disk, maximum disk size and set maximum disks limit.
Click Create.
The Create button is enabled only after you select a minimum of three nodes. Local Volume Set is created with one volume per worker node with the available disks.
In
openshift-storagenamespace Click Operators → Installed Operators from the left pane of the OpenShift Web Console to view the installed operators.Figure 2.8. OpenShift Container Storage Operator page
- Click the OpenShift Container Storage installed operator.
On the Operator Details page, click the Storage Cluster link.
Figure 2.9. Storage Cluster tab

Click Create Storage Cluster.

- Select Internal-Attached devices for the Select Mode.
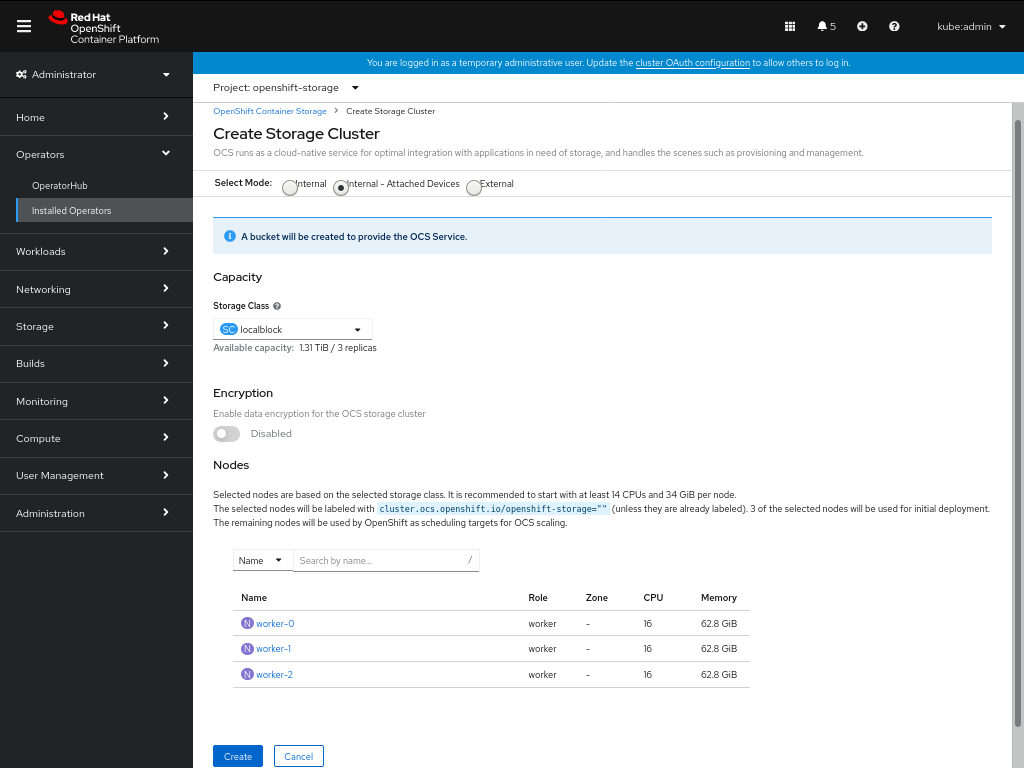
- Select the required storage class.
- Enable or Disable data encryption for the storage cluster based on the requirement.
- The nodes corresponding to the storage class are displayed based on the storage class that you selected from the drop down.
Click Create.
The Create button is enabled only after you select a minimum of three nodes. A new storage cluster of three volumes will be created with one volume per worker node. The default configuration uses a replication factor of 3.
Verification steps
See Verifying your OpenShift Container Storage installation.
Chapter 3. Verifying OpenShift Container Storage deployment for internal mode
Use this section to verify that OpenShift Container Storage is deployed correctly.
3.1. Verifying the state of the pods
To determine if OpenShift Container storage is deployed successfully, you can verify that the pods are in Running state.
Procedure
- Click Workloads → Pods from the left pane of the OpenShift Web Console.
Select openshift-storage from the Project drop down list.
For more information on the expected number of pods for each component and how it varies depending on the number of nodes, see Table 3.1, “Pods corresponding to OpenShift Container storage cluster”.
NoteWhen you need to override the cluster-wide default node selector for OpenShift Container Storage, you can perform the following steps through the command line interface:
Specify a blank node selector for the
openshift-storagenamespace.$ oc annotate namespace openshift-storage openshift.io/node-selector=
Delete the original pods generated by the
DaemonSets.oc delete pod -l app=csi-cephfsplugin -n openshift-storage oc delete pod -l app=csi-rbdplugin -n openshift-storage
Verify that the following pods are in running and completed state by clicking on the Running and the Completed tabs:
Table 3.1. Pods corresponding to OpenShift Container storage cluster
Component Corresponding pods OpenShift Container Storage Operator
ocs-operator-*(1 pod on any worker node)
Rook-ceph Operator
rook-ceph-operator-*(1 pod on any worker node)
MON
rook-ceph-mon-*(3 pods distributed across storage nodes)
MGR
rook-ceph-mgr-*(1 pod on any storage node)
MDS
rook-ceph-mds-ocs-storagecluster-cephfilesystem-*(2 pods distributed across storage nodes)
RGW
rook-ceph-rgw-ocs-storagecluster-cephobjectstore-*(2 pods distributed across storage nodes)CSI
cephfs-
csi-cephfsplugin-*(1 pod on each worker node) -
csi-cephfsplugin-provisioner-*(2 pods distributed across storage nodes)
-
rbd-
csi-rbdplugin-*(1 pod on each worker node) -
csi-rbdplugin-provisioner-*(2 pods distributed across storage nodes)
-
rook-ceph-drain-canary
rook-ceph-drain-canary-*(1 pod on each storage node)
rook-ceph-crashcollector
rook-ceph-crashcollector-*(1 pod on each storage node)
OSD
-
rook-ceph-osd-*(1 pod for each device) -
rook-ceph-osd-prepare-ocs-deviceset-*(1 pod for each device)
3.2. Verifying the OpenShift Container Storage cluster is healthy
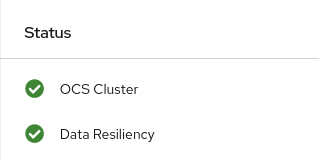
- Click Home → Overview from the left pane of the OpenShift Web Console and click Persistent Storage tab.
In the Status card, verify that OCS Cluster and Data Resiliency has a green tick mark as shown in the following image:
Figure 3.1. Health status card in Persistent Storage Overview Dashboard

In the Details card, verify that the cluster information is displayed as follows:
- Service Name
- OpenShift Container Storage
- Cluster Name
- ocs-storagecluster-cephcluster
- Provider
- None
- Mode
- Internal
- Version
- ocs-operator:v4.6.0
For more information on the health of OpenShift Container Storage cluster using the persistent storage dashboard, see Monitoring OpenShift Container Storage.
3.3. Verifying that the OpenShift Container Storage specific storage classes exist
To verify the storage classes exists in the cluster:
- Click Storage → Storage Classes from the left pane of the OpenShift Web Console.
Verify that the following storage classes are created with the OpenShift Container Storage cluster creation:
-
ocs-storagecluster-ceph-rbd -
ocs-storagecluster-cephfs -
openshift-storage.noobaa.io -
ocs-storagecluster-ceph-rgw
-
Chapter 4. Uninstalling OpenShift Container Storage
4.1. Uninstalling OpenShift Container Storage on Internal mode
Use the steps in this section to uninstall OpenShift Container Storage.
Uninstall Annotations
Annotations on the Storage Cluster are used to change the behavior of the uninstall process. To define the uninstall behavior, the following two annotations have been introduced in the storage cluster:
-
uninstall.ocs.openshift.io/cleanup-policy: delete -
uninstall.ocs.openshift.io/mode: graceful
The below table provides information on the different values that can used with these annotations:
Table 4.1. uninstall.ocs.openshift.io uninstall annotations descriptions
| Annotation | Value | Default | Behavior |
|---|---|---|---|
| cleanup-policy | delete | Yes |
Rook cleans up the physical drives and the |
| cleanup-policy | retain | No |
Rook does not clean up the physical drives and the |
| mode | graceful | Yes | Rook and NooBaa pauses the uninstall process until the PVCs and the OBCs are removed by the administrator/user |
| mode | forced | No | Rook and NooBaa proceeds with uninstall even if PVCs/OBCs provisioned using Rook and NooBaa exist respectively. |
You can change the cleanup policy or the uninstall mode by editing the value of the annotation by using the following commands:
$ oc annotate storagecluster ocs-storagecluster uninstall.ocs.openshift.io/cleanup-policy="retain" --overwrite
storagecluster.ocs.openshift.io/ocs-storagecluster annotated
$ oc annotate storagecluster ocs-storagecluster uninstall.ocs.openshift.io/mode="forced" --overwrite
storagecluster.ocs.openshift.io/ocs-storagecluster annotated
Prerequisites
- Ensure that the OpenShift Container Storage cluster is in a healthy state. The uninstall process can fail when some of the pods are not terminated successfully due to insufficient resources or nodes. In case the cluster is in an unhealthy state, contact Red Hat Customer Support before uninstalling OpenShift Container Storage.
- Ensure that applications are not consuming persistent volume claims (PVCs) using the storage classes provided by OpenShift Container Storage.
- If any custom resources (such as custom storage classes, cephblockpools) were created by the admin, they must be deleted by the admin after removing the resources which consumed them.
Procedure
Delete the volume snapshots that are using OpenShift Container Storage.
List the volume snapshots from all the namespaces.
$ oc get volumesnapshot --all-namespaces
From the output of the previous command, identify and delete the volume snapshots that are using OpenShift Container Storage.
$ oc delete volumesnapshot <VOLUME-SNAPSHOT-NAME> -n <NAMESPACE>
Delete PVCs that are using OpenShift Container Storage.
In the default uninstall mode (graceful), the uninstaller waits till all the PVCs that use OpenShift Container Storage are deleted.
If you wish to delete the Storage Cluster without deleting the PVCs beforehand, you may set the uninstall mode annotation to "forced" and skip this step. Doing so will result in orphan PVCs in the system.
Delete OpenShift Container Platform monitoring stack PVCs using OpenShift Container Storage.
See Section 4.2, “Removing monitoring stack from OpenShift Container Storage”
Delete OpenShift Container Platform Registry PVCs using OpenShift Container Storage.
See Section 4.3, “Removing OpenShift Container Platform registry from OpenShift Container Storage”
Delete OpenShift Container Platform logging PVCs using OpenShift Container Storage.
See Section 4.4, “Removing the cluster logging operator from OpenShift Container Storage”
Delete other PVCs provisioned using OpenShift Container Storage.
Given below is a sample script to identify the PVCs provisioned using OpenShift Container Storage. The script ignores the PVCs that are used internally by Openshift Container Storage.
#!/bin/bash RBD_PROVISIONER="openshift-storage.rbd.csi.ceph.com" CEPHFS_PROVISIONER="openshift-storage.cephfs.csi.ceph.com" NOOBAA_PROVISIONER="openshift-storage.noobaa.io/obc" RGW_PROVISIONER="openshift-storage.ceph.rook.io/bucket" NOOBAA_DB_PVC="noobaa-db" NOOBAA_BACKINGSTORE_PVC="noobaa-default-backing-store-noobaa-pvc" # Find all the OCS StorageClasses OCS_STORAGECLASSES=$(oc get storageclasses | grep -e "$RBD_PROVISIONER" -e "$CEPHFS_PROVISIONER" -e "$NOOBAA_PROVISIONER" -e "$RGW_PROVISIONER" | awk '{print $1}') # List PVCs in each of the StorageClasses for SC in $OCS_STORAGECLASSES do echo "======================================================================" echo "$SC StorageClass PVCs" echo "======================================================================" oc get pvc --all-namespaces --no-headers 2>/dev/null | grep $SC | grep -v -e "$NOOBAA_DB_PVC" -e "$NOOBAA_BACKINGSTORE_PVC" echo doneNoteOmit
RGW_PROVISIONERfor cloud platforms.Delete the PVCs.
$ oc delete pvc <pvc name> -n <project-name>
NoteEnsure that you have removed any custom backing stores, bucket classes, etc., created in the cluster.
Delete the Storage Cluster object and wait for the removal of the associated resources.
$ oc delete -n openshift-storage storagecluster --all --wait=true
Check for cleanup pods if the
uninstall.ocs.openshift.io/cleanup-policywas set todelete(default) and ensure that their status isCompleted.$ oc get pods -n openshift-storage | grep -i cleanup NAME READY STATUS RESTARTS AGE cluster-cleanup-job-<xx> 0/1 Completed 0 8m35s cluster-cleanup-job-<yy> 0/1 Completed 0 8m35s cluster-cleanup-job-<zz> 0/1 Completed 0 8m35s
Confirm that the directory
/var/lib/rookis now empty. This directory will be empty only if theuninstall.ocs.openshift.io/cleanup-policyannotation was set todelete(default).$ for i in $(oc get node -l cluster.ocs.openshift.io/openshift-storage= -o jsonpath='{ .items[*].metadata.name }'); do oc debug node/${i} -- chroot /host ls -l /var/lib/rook; doneIf encryption was enabled at the time of install, remove
dm-cryptmanageddevice-mappermapping from OSD devices on all the OpenShift Container Storage nodes.Create a
debugpod andchrootto the host on the storage node.$ oc debug node <node name> $ chroot /host
Get Device names and make note of the OpenShift Container Storage devices.
$ dmsetup ls
ocs-deviceset-0-data-0-57snx-block-dmcrypt (253:1)
Remove the mapped device.
$ cryptsetup luksClose --debug --verbose ocs-deviceset-0-data-0-57snx-block-dmcrypt
If the above command gets stuck due to insufficient privileges, run the following commands:
-
Press
CTRL+Zto exit the above command. Find PID of the
cryptsetupprocess which was stuck.$ ps
Example output:
PID     TTY    TIME     CMD
778825   ?     00:00:00 cryptsetup
Take a note of the
PIDnumber to kill. In this example,PIDis778825.Terminate the process using
killcommand.$ kill -9 <PID>
Verify that the device name is removed.
$ dmsetup ls
-
Press
Delete the namespace and wait till the deletion is complete. You will need to switch to another project if
openshift-storageis the active project.For example:
$ oc project default
$ oc delete project openshift-storage --wait=true --timeout=5m
The project is deleted if the following command returns a
NotFounderror.$ oc get project openshift-storage
NoteWhile uninstalling OpenShift Container Storage, if namespace is not deleted completely and remains in
Terminatingstate, perform the steps in Troubleshooting and deleting remaining resources during Uninstall to identify objects that are blocking the namespace from being terminated.- Delete local storage operator configurations if you have deployed OpenShift Container Storage using local storage devices. See Removing local storage operator configurations.
Unlabel the storage nodes.
$ oc label nodes  --all cluster.ocs.openshift.io/openshift-storage-
$ oc label nodes  --all topology.rook.io/rack-
Remove the OpenShift Container Storage taint if the nodes were tainted.
$ oc adm taint nodes --all node.ocs.openshift.io/storage-
Confirm all PVs provisioned using OpenShift Container Storage are deleted. If there is any PV left in the
Releasedstate, delete it.$ oc get pv $ oc delete pv <pv name>
Delete the Multicloud Object Gateway storageclass.
$ oc delete storageclass openshift-storage.noobaa.io --wait=true --timeout=5m
Remove
CustomResourceDefinitions.$ oc delete crd backingstores.noobaa.io bucketclasses.noobaa.io cephblockpools.ceph.rook.io cephclusters.ceph.rook.io cephfilesystems.ceph.rook.io cephnfses.ceph.rook.io cephobjectstores.ceph.rook.io cephobjectstoreusers.ceph.rook.io noobaas.noobaa.io ocsinitializations.ocs.openshift.io storageclusterinitializations.ocs.openshift.io storageclusters.ocs.openshift.io cephclients.ceph.rook.io cephobjectrealms.ceph.rook.io cephobjectzonegroups.ceph.rook.io cephobjectzones.ceph.rook.io cephrbdmirrors.ceph.rook.io --wait=true --timeout=5m
To ensure that OpenShift Container Storage is uninstalled completely, on the OpenShift Container Platform Web Console,
- Click Home → Overview to access the dashboard.
- Verify that the Persistent Storage tab no longer appear next to the Cluster tab.
4.1.1. Removing local storage operator configurations
Use the instructions in this section only if you have deployed OpenShift Container Storage using local storage devices.
For OpenShift Container Storage deployments only using localvolume resources, go directly to step 8.
Procedure
-
Identify the
LocalVolumeSetand the correspondingStorageClassNamebeing used by OpenShift Container Storage. Set the variable SC to the
StorageClassproviding theLocalVolumeSet.$ export SC="<StorageClassName>"
Delete the
LocalVolumeSet.$ oc delete localvolumesets.local.storage.openshift.io <name-of-volumeset> -n openshift-local-storage
Delete the local storage PVs for the given
StorageClassName.$ oc get pv | grep $SC | awk '{print $1}'| xargs oc delete pvDelete the
StorageClassName.$ oc delete sc $SC
Delete the symlinks created by the
LocalVolumeSet.[[ ! -z $SC ]] && for i in $(oc get node -l cluster.ocs.openshift.io/openshift-storage= -o jsonpath='{ .items[*].metadata.name }'); do oc debug node/${i} -- chroot /host rm -rfv /mnt/local-storage/${SC}/; doneDelete
LocalVolumeDiscovery.$ oc delete localvolumediscovery.local.storage.openshift.io/auto-discover-devices -n openshift-local-storage
Removing
LocalVolumeresources (if any).Use the following steps to remove the
LocalVolumeresources that were used to provision PVs in the current or previous OpenShift Container Storage version. Also, ensure that these resources are not being used by other tenants on the cluster.For each of the local volumes, do the following:
-
Identify the
LocalVolumeand the correspondingStorageClassNamebeing used by OpenShift Container Storage. Set the variable LV to the name of the LocalVolume and variable SC to the name of the StorageClass
For example:
$ LV=local-block
$ SC=localblock
Delete the local volume resource.
$ oc delete localvolume -n local-storage --wait=true $LV
Delete the remaining PVs and StorageClasses if they exist.
$ oc delete pv -l storage.openshift.com/local-volume-owner-name=${LV} --wait --timeout=5m
$ oc delete storageclass $SC --wait --timeout=5m
Clean up the artifacts from the storage nodes for that resource.
$ [[ ! -z $SC ]] && for i in $(oc get node -l cluster.ocs.openshift.io/openshift-storage= -o jsonpath='{ .items[*].metadata.name }'); do oc debug node/${i} -- chroot /host rm -rfv /mnt/local-storage/${SC}/; doneExample output:
Starting pod/node-xxx-debug ...
To use host binaries, run `chroot /host`
removed '/mnt/local-storage/localblock/nvme2n1'
removed directory '/mnt/local-storage/localblock'

Removing debug pod ...
Starting pod/node-yyy-debug ...
To use host binaries, run `chroot /host`
removed '/mnt/local-storage/localblock/nvme2n1'
removed directory '/mnt/local-storage/localblock'

Removing debug pod ...
Starting pod/node-zzz-debug ...
To use host binaries, run `chroot /host`
removed '/mnt/local-storage/localblock/nvme2n1'
removed directory '/mnt/local-storage/localblock'

Removing debug pod ...
-
Identify the
4.2. Removing monitoring stack from OpenShift Container Storage
Use this section to clean up the monitoring stack from OpenShift Container Storage.
The PVCs that are created as a part of configuring the monitoring stack are in the openshift-monitoring namespace.
Prerequisites
PVCs are configured to use OpenShift Container Platform monitoring stack.
For information, see configuring monitoring stack.
Procedure
List the pods and PVCs that are currently running in the
openshift-monitoringnamespace.$ oc get pod,pvc -n openshift-monitoring NAME READY STATUS RESTARTS AGE pod/alertmanager-main-0 3/3 Running 0 8d pod/alertmanager-main-1 3/3 Running 0 8d pod/alertmanager-main-2 3/3 Running 0 8d pod/cluster-monitoring- operator-84457656d-pkrxm 1/1 Running 0 8d pod/grafana-79ccf6689f-2ll28 2/2 Running 0 8d pod/kube-state-metrics- 7d86fb966-rvd9w 3/3 Running 0 8d pod/node-exporter-25894 2/2 Running 0 8d pod/node-exporter-4dsd7 2/2 Running 0 8d pod/node-exporter-6p4zc 2/2 Running 0 8d pod/node-exporter-jbjvg 2/2 Running 0 8d pod/node-exporter-jj4t5 2/2 Running 0 6d18h pod/node-exporter-k856s 2/2 Running 0 6d18h pod/node-exporter-rf8gn 2/2 Running 0 8d pod/node-exporter-rmb5m 2/2 Running 0 6d18h pod/node-exporter-zj7kx 2/2 Running 0 8d pod/openshift-state-metrics- 59dbd4f654-4clng 3/3 Running 0 8d pod/prometheus-adapter- 5df5865596-k8dzn 1/1 Running 0 7d23h pod/prometheus-adapter- 5df5865596-n2gj9 1/1 Running 0 7d23h pod/prometheus-k8s-0 6/6 Running 1 8d pod/prometheus-k8s-1 6/6 Running 1 8d pod/prometheus-operator- 55cfb858c9-c4zd9 1/1 Running 0 6d21h pod/telemeter-client- 78fc8fc97d-2rgfp 3/3 Running 0 8d NAME STATUS VOLUME CAPACITY ACCESS MODES STORAGECLASS AGE persistentvolumeclaim/my-alertmanager-claim-alertmanager-main-0 Bound pvc-0d519c4f-15a5-11ea-baa0-026d231574aa 40Gi RWO ocs-storagecluster-ceph-rbd 8d persistentvolumeclaim/my-alertmanager-claim-alertmanager-main-1 Bound pvc-0d5a9825-15a5-11ea-baa0-026d231574aa 40Gi RWO ocs-storagecluster-ceph-rbd 8d persistentvolumeclaim/my-alertmanager-claim-alertmanager-main-2 Bound pvc-0d6413dc-15a5-11ea-baa0-026d231574aa 40Gi RWO ocs-storagecluster-ceph-rbd 8d persistentvolumeclaim/my-prometheus-claim-prometheus-k8s-0 Bound pvc-0b7c19b0-15a5-11ea-baa0-026d231574aa 40Gi RWO ocs-storagecluster-ceph-rbd 8d persistentvolumeclaim/my-prometheus-claim-prometheus-k8s-1 Bound pvc-0b8aed3f-15a5-11ea-baa0-026d231574aa 40Gi RWO ocs-storagecluster-ceph-rbd 8d
Edit the monitoring
configmap.$ oc -n openshift-monitoring edit configmap cluster-monitoring-config
Remove any
configsections that reference the OpenShift Container Storage storage classes as shown in the following example and save it.Before editing
.
.
.
apiVersion: v1
data:
  config.yaml: |
    alertmanagerMain:
      volumeClaimTemplate:
        metadata:
          name: my-alertmanager-claim
        spec:
          resources:
            requests:
              storage: 40Gi
          storageClassName: ocs-storagecluster-ceph-rbd
    prometheusK8s:
      volumeClaimTemplate:
        metadata:
          name: my-prometheus-claim
        spec:
          resources:
            requests:
              storage: 40Gi
          storageClassName: ocs-storagecluster-ceph-rbd
kind: ConfigMap
metadata:
  creationTimestamp: "2019-12-02T07:47:29Z"
  name: cluster-monitoring-config
  namespace: openshift-monitoring
  resourceVersion: "22110"
  selfLink: /api/v1/namespaces/openshift-monitoring/configmaps/cluster-monitoring-config
  uid: fd6d988b-14d7-11ea-84ff-066035b9efa8
.
.
.
After editing
.
.
.
apiVersion: v1
data:
  config.yaml: |
kind: ConfigMap
metadata:
  creationTimestamp: "2019-11-21T13:07:05Z"
  name: cluster-monitoring-config
  namespace: openshift-monitoring
  resourceVersion: "404352"
  selfLink: /api/v1/namespaces/openshift-monitoring/configmaps/cluster-monitoring-config
  uid: d12c796a-0c5f-11ea-9832-063cd735b81c
.
.
.
In this example,
alertmanagerMainandprometheusK8smonitoring components are using the OpenShift Container Storage PVCs.Delete relevant PVCs. Make sure you delete all the PVCs that are consuming the storage classes.
$ oc delete -n openshift-monitoring pvc <pvc-name> --wait=true --timeout=5m
4.3. Removing OpenShift Container Platform registry from OpenShift Container Storage
Use this section to clean up OpenShift Container Platform registry from OpenShift Container Storage. If you want to configure an alternative storage, see image registry
The PVCs that are created as a part of configuring OpenShift Container Platform registry are in the openshift-image-registry namespace.
Prerequisites
- The image registry should have been configured to use an OpenShift Container Storage PVC.
Procedure
Edit the
configs.imageregistry.operator.openshift.ioobject and remove the content in the storage section.$ oc edit configs.imageregistry.operator.openshift.io
Before editing
.
.
.
storage:
  pvc:
    claim: registry-cephfs-rwx-pvc
.
.
.
After editing
.
.
.
storage:
  emptyDir: {}
.
.
.
In this example, the PVC is called
registry-cephfs-rwx-pvc, which is now safe to delete.Delete the PVC.
$ oc delete pvc <pvc-name> -n openshift-image-registry --wait=true --timeout=5m
4.4. Removing the cluster logging operator from OpenShift Container Storage
Use this section to clean up the cluster logging operator from OpenShift Container Storage.
The PVCs that are created as a part of configuring cluster logging operator are in the openshift-logging namespace.
Prerequisites
- The cluster logging instance should have been configured to use OpenShift Container Storage PVCs.
Procedure
Remove the
ClusterLogginginstance in the namespace.$ oc delete clusterlogging instance -n openshift-logging --wait=true --timeout=5m
The PVCs in the
openshift-loggingnamespace are now safe to delete.Delete PVCs.
$ oc delete pvc <pvc-name> -n openshift-logging --wait=true --timeout=5m
Chapter 5. Scaling storage nodes
To scale the storage capacity of OpenShift Container Storage in internal mode, you can do either of the following:
- Scale up storage nodes - Add storage capacity to the existing Red Hat OpenShift Container Storage worker nodes
- Scale out storage nodes - Add new worker nodes containing storage capacity
5.1. Requirements for scaling storage nodes
Before you proceed to scale the storage nodes, refer to the following sections to understand the node requirements for your specific Red Hat OpenShift Container Storage instance:
- Platform requirements
Storage device requirements
Always ensure that you have plenty of storage capacity.
If storage ever fills completely, it is not possible to add capacity or delete or migrate content away from the storage to free up space. Completely full storage is very difficult to recover.
Capacity alerts are issued when cluster storage capacity reaches 75% (near-full) and 85% (full) of total capacity. Always address capacity warnings promptly, and review your storage regularly to ensure that you do not run out of storage space.
If you do run out of storage space completely, contact Red Hat Customer Support.
5.2. Scaling up storage by adding capacity to your OpenShift Container Storage nodes using local storage devices
Use this procedure to add storage capacity (additional storage devices) to your configured local storage based OpenShift Container Storage worker nodes on IBM Power Systems infrastructures.
Prerequisites
- You must be logged into OpenShift Container Platform (RHOCP) cluster.
You must have installed local storage operator. Use the following procedures, see
- You must have three OpenShift Container Platform worker nodes with the same storage type and size attached to each node (for example, 0.5TB SSD) as the original OpenShift Container Storage StorageCluster was created with.
Procedure
To add storage capacity to OpenShift Container Platform nodes with OpenShift Container Storage installed, you need to
Find the available devices that you want to add, that is, a minimum of one device per worker node. You can follow the procedure for finding available storage devices in the respective deployment guide.
NoteMake sure you perform this process for all the existing nodes (minimum of 3) for which you want to add storage.
Check if the new disk is added to the node by running lsblk inside node.
$ oc debug node/worker-0
$lsblk
Example output:
Creating debug namespace/openshift-debug-node-ggrqr ...
Starting pod/worker-2-debug ...
To use host binaries, run `chroot /host`
Pod IP: 192.168.88.23
If you don't see a command prompt, try pressing enter.
sh-4.4# chroot /host
sh-4.4# lsblk
NAME                         MAJ:MIN RM  SIZE RO TYPE MOUNTPOINT
loop0                          7:0    0  256G  0 loop
vda                          252:0    0   40G  0 disk
|-vda1                       252:1    0    4M  0 part
|-vda2                       252:2    0  384M  0 part /boot
`-vda4                       252:4    0 39.6G  0 part
  `-coreos-luks-root-nocrypt 253:0    0 39.6G  0 dm   /sysroot
vdb                          252:16   0  512B  1 disk
vdc                          252:32   0  256G  0 disk
vdd                          252:48   0  256G  0 disk
sh-4.4#
sh-4.4#
Removing debug pod ...
Removing debug namespace/openshift-debug-node-ggrqr ...
- Newly added disk will automatically gets discovered by LocalVolumeSet.
Display the newly created PVs with
storageclassname used inlocalVolumeSetCR.$ oc get pv | grep localblock | grep Available
Example output:
local-pv-290020c2   256Gi   RWO     Delete  Available   localblock      2m35s
local-pv-7702952c   256Gi   RWO     Delete  Available   localblock      2m27s
local-pv-a7a567d    256Gi   RWO     Delete  Available   localblock      2m22s
...
There are three more available PVs of same size which will be used for new OSDs.
- Navigate to the OpenShift Web Console.
- Click on Operators on the left navigation bar.
- Select Installed Operators.
In the window, click OpenShift Container Storage Operator:
In the top navigation bar, scroll right and click Storage Cluster tab.
- The visible list should have only one item. Click (⋮) on the far right to extend the options menu.
Select Add Capacity from the options menu.
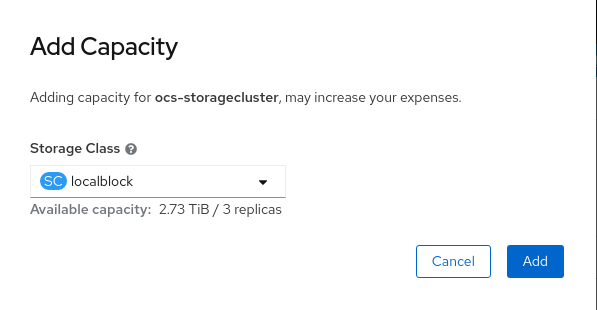
From this dialog box, set the Storage Class name to the name used in the
localVolumesetCR. Available Capacity displayed is based on the local disks available in storage class.- Once you are done with your setting, click Add. You might need to wait a couple of minutes for the storage cluster to reach Ready state.
Verify that the new OSDs and their corresponding new PVCs are created.
$ oc get -n openshift-storage pods -l app=rook-ceph-osd
Example output:
NAME                               READY   STATUS    RESTARTS   AGE
rook-ceph-osd-0-6f8655ff7b-gj226   1/1     Running   0          1h
rook-ceph-osd-1-6c66d77f65-cfgfq   1/1     Running   0          1h
rook-ceph-osd-2-69f6b4c597-mtsdv   1/1     Running   0          1h
rook-ceph-osd-3-c784bdbd4-w4cmj    1/1     Running   0          5m
rook-ceph-osd-4-6d99845f5b-k7f8n   1/1     Running   0          5m
rook-ceph-osd-5-fdd9897c9-r9mgb    1/1     Running   0          5m
In the above example, osd-3, osd-4, and osd-5 are the newly added pods to the OpenShift Container Storage cluster.
$ oc get pvc -n openshift-storage |grep localblock
Example output:
ocs-deviceset-localblock-0-data-0-sfsgf   Bound    local-pv-8137c873      256Gi     RWO    localblock  1h
ocs-deviceset-localblock-0-data-1-qhs9m   Bound    local-pv-290020c2      256Gi     RWO    localblock  10m
ocs-deviceset-localblock-1-data-0-499r2   Bound    local-pv-ec7f2b80      256Gi     RWO    localblock  1h
ocs-deviceset-localblock-1-data-1-p9rth   Bound    local-pv-a7a567d       256Gi     RWO    localblock  10m
ocs-deviceset-localblock-2-data-0-8pzjr   Bound    local-pv-1e31f771      256Gi     RWO    localblock  1h
ocs-deviceset-localblock-2-data-1-7zwwn   Bound    local-pv-7702952c      256Gi     RWO    localblock  10m
In the above example, we see three new PVCs are created.
Verification steps
Navigate to Overview → Persistent Storage tab, then check the Capacity breakdown card.
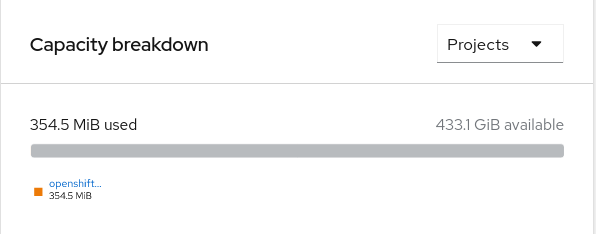
Note that the capacity increases based on your selections.
ImportantOpenShift Container Storage does not support cluster reduction either by reducing OSDs or reducing nodes.
5.3. Scaling out storage capacity
To scale out storage capacity, you need to perform the following steps:
- Add a new node
- Verify that the new node is added successfully
- Scale up the storage capacity
5.3.1. Adding a node
You can add nodes to increase the storage capacity when existing worker nodes are already running at their maximum supported OSDs, which is increment of 3 OSDs of the capacity selected during initial configuration.
To add a storage node for IBM Power Systems, see Section 5.3.1.1, “Adding a node using a local storage device”
5.3.1.1. Adding a node using a local storage device
Prerequisites
- You must be logged into OpenShift Container Platform (RHOCP) cluster.
- You must have three OpenShift Container Platform worker nodes with the same storage type and size attached to each node (for example, 2TB SSD) as the original OpenShift Container Storage StorageCluster was created with.
Procedure
Perform the following steps:
- Get a new IBM Power machine with the required infrastructure. See Platform requirements.
- Create a new OpenShift Container Platform node using the new IBM Power machine.
Check for certificate signing requests (CSRs) related to OpenShift Container Storage that are in
Pendingstate:$ oc get csr
Approve all required OpenShift Container Storage CSRs for the new node:
$ oc adm certificate approve <Certificate_Name>
- Click Compute → Nodes, confirm if the new node is in Ready state.
Apply the OpenShift Container Storage label to the new node using any one of the following:
- From User interface
- For the new node, click Action Menu (⋮) → Edit Labels
-
Add
cluster.ocs.openshift.io/openshift-storageand click Save.
- From Command line interface
Execute the following command to apply the OpenShift Container Storage label to the new node:
$ oc label node <new_node_name> cluster.ocs.openshift.io/openshift-storage=""
Click Operators → Installed Operators from the OpenShift Web Console.
From the Project drop-down list, make sure to select the project where the Local Storage Operator is installed.
- Click on Local Storage.
- Click the Local Volume Sets tab.
-
Beside the
LocalVolumeSet, click Action menu (⋮) → Edit Local Volume Set. In the YAML, add the hostname of the new node in the
valuesfield under thenode selector.Figure 5.1. YAML showing the addition of new hostnames

- Click Save.
It is recommended to add 3 nodes each in different zones. You must add 3 nodes and perform this procedure for all of them.
Verification steps
- To verify that the new node is added, see Verifying the addition of a new node.
5.3.2. Verifying the addition of a new node
Execute the following command and verify that the new node is present in the output:
$ oc get nodes --show-labels | grep cluster.ocs.openshift.io/openshift-storage= |cut -d' ' -f1
Click Workloads → Pods, confirm that at least the following pods on the new node are in Running state:
-
csi-cephfsplugin-* -
csi-rbdplugin-*
-
5.4. Scaling up storage capacity
To scale up storage capacity, see Scaling up storage by adding capacity.
Chapter 6. Replacing nodes
For OpenShift Container Storage, node replacement can be performed proactively for an operational node and reactively for a failed node for the IBM Power Systems related deployments.
6.1. Replacing an operational or failed storage node on IBM Power Systems
Prerequisites
- Red Hat recommends that replacement nodes are configured with similar infrastructure and resources to the node being replaced.
- You must be logged into OpenShift Container Platform (RHOCP) cluster.
Procedure
Check the labels on the failed node and make note of the rack label.
$ oc get nodes --show-labels | grep failed-node-nameIdentify the mon (if any) and object storage device (OSD) pods that are running in the failed node.
$ oc get pods -n openshift-storage -o wide | grep -i failed-node-nameScale down the deployments of the pods identified in the previous step.
For example:
$ oc scale deployment rook-ceph-mon-a --replicas=0 -n openshift-storage
$ oc scale deployment rook-ceph-osd-1 --replicas=0 -n openshift-storage
$ oc scale deployment --selector=app=rook-ceph-crashcollector,node_name=failed-node-name  --replicas=0 -n openshift-storage
Mark the failed node so that it cannot be scheduled for work.
$ oc adm cordon failed-node-nameDrain the failed node of existing work.
$ oc adm drain failed-node-name --force --delete-local-data --ignore-daemonsetsNoteIf the failed node is not connected to the network, remove the pods running on it by using the command:
$ oc get pods -A -o wide | grep -i failed-node-name |  awk '{if ($4 == "Terminating") system ("oc -n " $1 " delete pods " $2  " --grace-period=0 " " --force ")}'
$ oc adm drain failed-node-name --force --delete-local-data --ignore-daemonsets
Delete the failed node.
$ oc delete node failed-node-name- Get a new IBM Power machine with required infrastructure. See Installing a cluster on IBM Power Systems.
- Create a new OpenShift Container Platform node using the new IBM Power Systems machine.
Check for certificate signing requests (CSRs) related to OpenShift Container Storage that are in
Pendingstate:$ oc get csr
Approve all required OpenShift Container Storage CSRs for the new node:
$ oc adm certificate approve certificate-name- Click Compute → Nodes in OpenShift Web Console, confirm if the new node is in Ready state.
Apply the OpenShift Container Storage label to the new node using your preferred interface:
From OpenShift web console
- For the new node, click Action Menu (⋮) → Edit Labels.
-
Add
cluster.ocs.openshift.io/openshift-storageand click Save.
From the command line interface
Execute the following command to apply the OpenShift Container Storage label to the new node:
$ oc label node new-node-name cluster.ocs.openshift.io/openshift-storage=""
Add the local storage devices available in these worker nodes to the OpenShift Container Storage StorageCluster.
Determine which
localVolumeSetto edit.Replace local-storage-project in the following commands with the name of your local storage project. The default project name is
openshift-local-storagein OpenShift Container Storage 4.6 and later. Previous versions uselocal-storageby default.# oc get -n local-storage-project localvolumeset NAME AGE localblock 25hUpdate the
localVolumeSetdefinition to include the new node and remove the failed node.# oc edit -n local-storage-project localvolumeset localblock [...] nodeSelector: nodeSelectorTerms: - matchExpressions: - key: kubernetes.io/hostname operator: In values: #- worker-0 - worker-1 - worker-2 - worker-3 [...]
Remember to save before exiting the editor.
Verify that the new
localblockPV is available.$ oc get pv | grep localblock NAME CAPACITY ACCESSMODES RECLAIMPOLICY STATUS CLAIM STORAGECLASS AGE local-pv-3e8964d3 500Gi RWO Delete Bound ocs-deviceset-localblock-2-data-0-mdbg9 localblock 25h local-pv-414755e0 500Gi RWO Delete Bound ocs-deviceset-localblock-1-data-0-4cslf localblock 25h local-pv-b481410 500Gi RWO Delete Available localblock 3m24s local-pv-5c9b8982 500Gi RWO Delete Bound ocs-deviceset-localblock-0-data-0-g2mmc localblock 25h
Change to the
openshift-storageproject.$ oc project openshift-storage
Remove the failed OSD from the cluster. You can specify multiple failed OSDs if required.
Identify the PVC as afterwards we need to delete PV associated with that specific PVC.
# osd_id_to_remove=1
# oc get -n openshift-storage -o yaml deployment rook-ceph-osd-${osd_id_to_remove} | grep ceph.rook.io/pvc
where,
osd_id_to_removeis the integer in the pod name immediately after therook-ceph-osd prefix. In this example, the deployment name isrook-ceph-osd-1.Example output:
ceph.rook.io/pvc: ocs-deviceset-localblock-0-data-0-g2mmc
    ceph.rook.io/pvc: ocs-deviceset-localblock-0-data-0-g2mmc
In this example, the PVC name is
ocs-deviceset-localblock-0-data-0-g2mmc.Remove the failed OSD from the cluster.
# oc process -n openshift-storage ocs-osd-removal -p FAILED_OSD_IDS=${osd_id_to_remove},{osd_id_to_remove2} | oc create -f -
Verify that the OSD is removed successfully by checking the status of the
ocs-osd-removalpod.A status of
Completedconfirms that the OSD removal job succeeded.# oc get pod -l job-name=ocs-osd-removal-${osd_id_to_remove} -n openshift-storageNoteIf
ocs-osd-removalfails and the pod is not in the expectedCompletedstate, check the pod logs for further debugging. For example:# oc logs -l job-name=ocs-osd-removal-${osd_id_to_remove} -n openshift-storage --tail=-1Delete the PV associated with the failed node.
Identify the PV associated with the PVC.
# oc get -n openshift-storage pvc ocs-deviceset-<x>-<y>-<pvc-suffix>
where,
x,y, andpvc-suffixare the values in theDeviceSetidentified in the previous step.For example:
# oc get -n openshift-storage pvc ocs-deviceset-localblock-0-data-0-g2mmc
NAME                      STATUS        VOLUME        CAPACITY   ACCESS MODES   STORAGECLASS   AGE
ocs-deviceset-localblock-0-data-0-g2mmc   Bound   local-pv-5c9b8982   500Gi      RWO            localblock     24h
In this example, the associated PV is
local-pv-5c9b8982.Delete the PV.
# oc delete pv <persistent-volume>
For example:
# oc delete pv local-pv-5c9b8982
persistentvolume "local-pv-5c9b8982" deleted
Delete the
crashcollectorpod deployment.$ oc delete deployment --selector=app=rook-ceph-crashcollector,node_name=failed-node-name -n openshift-storageDeploy the new OSD by restarting the
rook-ceph-operatorto force operator reconciliation.# oc get -n openshift-storage pod -l app=rook-ceph-operator
Example output:
NAME                                  READY   STATUS    RESTARTS   AGE
rook-ceph-operator-77758ddc74-dlwn2   1/1     Running   0          1d20h
Delete the
rook-ceph-operator.# oc delete -n openshift-storage pod rook-ceph-operator-77758ddc74-dlwn2
Example output:
pod "rook-ceph-operator-77758ddc74-dlwn2" deleted
Verify that the
rook-ceph-operatorpod is restarted.# oc get -n openshift-storage pod -l app=rook-ceph-operator
Example output:
NAME                                  READY   STATUS    RESTARTS   AGE
rook-ceph-operator-77758ddc74-wqf25   1/1     Running   0          66s
Creation of the new OSD and
monmight take several minutes after the operator restarts.Delete the
ocs-osd-removaljob.# oc delete job ocs-osd-removal-${osd_id_to_remove}For example:
# oc delete job ocs-osd-removal-1
job.batch "ocs-osd-removal-1" deleted
Verification steps
Execute the following command and verify that the new node is present in the output:
$ oc get nodes --show-labels | grep cluster.ocs.openshift.io/openshift-storage= |cut -d' ' -f1
Click Workloads → Pods, confirm that at least the following pods on the new node are in Running state:
-
csi-cephfsplugin-* -
csi-rbdplugin-*
-
Verify that all other required OpenShift Container Storage pods are in Running state.
Make sure that the new incremental
monis created and is in theRunningstate.$ oc get pod -n openshift-storage | grep mon
Example output:
rook-ceph-mon-b-74f6dc9dd6-4llzq                                   1/1     Running     0          6h14m
rook-ceph-mon-c-74948755c-h7wtx                                  1/1     Running     0          4h24m
rook-ceph-mon-d-598f69869b-4bv49                                   1/1     Running     0          162m
OSD and Mon might take several minutes to get to the
Runningstate.
- If verification steps fail, contact Red Hat Support.
Chapter 7. Replacing Storage Devices
7.1. Replacing operational or failed storage devices on IBM Power Systems
You can replace an object storage device (OSD) in OpenShift Container Storage deployed using local storage devices on IBM Power Systems. Use this procedure when an underlying storage device needs to be replaced.
Procedure
Identify the OSD that needs to be replaced and the OpenShift Container Platform node that has the OSD scheduled on it.
# oc get -n openshift-storage pods -l app=rook-ceph-osd -o wide
Example output:
rook-ceph-osd-0-86bf8cdc8-4nb5t   0/1     crashLoopBackOff   0   24h   10.129.2.26     worker-0     <none>       <none>
rook-ceph-osd-1-7c99657cfb-jdzvz   1/1     Running   0          24h     10.128.2.46     worker-1     <none>       <none>
rook-ceph-osd-2-5f9f6dfb5b-2mnw9    1/1     Running   0          24h     10.131.0.33    worker-2     <none>       <none>
In this example,
rook-ceph-osd-0-86bf8cdc8-4nb5tneeds to be replaced andworker-0is the RHOCP node on which the OSD is scheduled.NoteIf the OSD to be replaced is healthy, the status of the pod will be
Running.Scale down the OSD deployment for the OSD to be replaced.
# osd_id_to_remove=0
# oc scale -n openshift-storage deployment rook-ceph-osd-${osd_id_to_remove} --replicas=0
where
osd_id_to_removeis the integer in the pod name immediately after therook-ceph-osdprefix. In this example, the deployment name isrook-ceph-osd-0.Example output:
deployment.apps/rook-ceph-osd-0 scaled
Verify that the
rook-ceph-osdpod is terminated.# oc get -n openshift-storage pods -l ceph-osd-id=${osd_id_to_remove}Example output:
No resources found in openshift-storage namespace.
NoteIf the
rook-ceph-osdpod is interminatingstate, use theforceoption to delete the pod.# oc delete pod rook-ceph-osd-0-86bf8cdc8-4nb5t --grace-period=0 --force
Example output:
warning: Immediate deletion does not wait for confirmation that the running resource has been terminated. The resource may continue to run on the cluster indefinitely.
  pod "rook-ceph-osd-0-86bf8cdc8-4nb5t" force deleted
Remove the old OSD from the cluster so that a new OSD can be added.
Identify the
DeviceSetassociated with the OSD to be replaced.# oc get -n openshift-storage -o yaml deployment rook-ceph-osd-${osd_id_to_remove} | grep ceph.rook.io/pvcExample output:
ceph.rook.io/pvc: ocs-deviceset-localblock-0-data-0-64xjl
    ceph.rook.io/pvc: ocs-deviceset-localblock-0-data-0-64xjl
In this example, the PVC name is
ocs-deviceset-localblock-0-data-0-64xjl.Remove the old OSD from the cluster
# oc process -n openshift-storage ocs-osd-removal -p FAILED_OSD_IDS=${osd_id_to_remove} | oc -n openshift-storage create -f -Example Output:
job.batch/ocs-osd-removal-0 created
WarningThis step results in OSD being completely removed from the cluster. Make sure that the correct value of
osd_id_to_removeis provided.
Verify that the OSD is removed successfully by checking the status of the
ocs-osd-removalpod. A status ofCompletedconfirms that the OSD removal job completed successfully.# oc get pod -l job-name=ocs-osd-removal-${osd_id_to_remove} -n openshift-storageNoteIf
ocs-osd-removalfails and the pod is not in the expectedCompletedstate, check the pod logs for further debugging. For example:# oc logs ${osd_id_to_remove} -n openshift-storage --tail=-1Delete the persistent volume claim (PVC) resources associated with the OSD to be replaced.
Identify the PV associated with the PVC.
# oc get -n openshift-storage pvc ocs-deviceset-<x>-<y>-<pvc-suffix>
where,
x,y, andpvc-suffixare the values in theDeviceSetidentified in an step 4(a).Example output:
NAME                      STATUS        VOLUME        CAPACITY   ACCESS MODES   STORAGECLASS   AGE
ocs-deviceset-localblock-0-data-0-64xjl   Bound    local-pv-8137c873    256Gi      RWO     localblock     24h
In this example, the associated PV is
local-pv-8137c873.Identify the name of the device to be replaced.
# oc get pv local-pv-<pv-suffix> -o yaml | grep path
where,
pv-suffixis the value in the PV name identified in an earlier step.Example output:
path: /mnt/local-storage/localblock/vdc
In this example, the device name is
vdc.Identify the
prepare-podassociated with the OSD to be replaced.# oc describe -n openshift-storage pvc ocs-deviceset-<x>-<y>-<pvc-suffix> | grep Mounted
where,
x,y, andpvc-suffixare the values in theDeviceSetidentified in an earlier step.Example output:
Mounted By: rook-ceph-osd-prepare-ocs-deviceset-localblock-0-data-0-64knzkc
In this example the
prepare-podname isrook-ceph-osd-prepare-ocs-deviceset-localblock-0-data-0-64knzkc.Delete the
osd-preparepod before removing the associated PVC.# oc delete -n openshift-storage pod rook-ceph-osd-prepare-ocs-deviceset-<x>-<y>-<pvc-suffix>-<pod-suffix>
where,
x,y,pvc-suffix, andpod-suffixare the values in theosd-preparepod name identified in an earlier step.Example output:
pod "rook-ceph-osd-prepare-ocs-deviceset-localblock-0-data-0-64knzkc" deleted
Delete the PVC associated with the OSD to be replaced.
# oc delete -n openshift-storage pvc ocs-deviceset-<x>-<y>-<pvc-suffix>
where,
x,y, andpvc-suffixare the values in theDeviceSetidentified in an earlier step.Example output:
persistentvolumeclaim "ocs-deviceset-localblock-0-data-0-64xjl" deleted
Replace the old device and use the new device to create a new OpenShift Container Platform PV.
Log in to OpenShift Container Platform node with the device to be replaced. In this example, the OpenShift Container Platform node is
worker-0.# oc debug node/worker-0
Example output:
Starting pod/worker-0-debug ...
To use host binaries, run `chroot /host`
Pod IP: 192.168.88.21
If you don't see a command prompt, try pressing enter.
# chroot /host
Record the
/dev/diskthat is to be replaced using the device name,vdc, identified earlier.# ls -alh /mnt/local-storage/localblock
Example output:
total 0
drwxr-xr-x. 2 root root 17 Nov  18 15:23 .
drwxr-xr-x. 3 root root 24 Nov  18 15:23 ..
lrwxrwxrwx. 1 root root  8 Nov  18 15:23 vdc -> /dev/vdc
Find the name of the
LocalVolumeSetCR, and remove or comment out the device/dev/diskthat is to be replaced.# oc get -n openshift-local-storage localvolumeset NAME AGE localblock 25h
Log in to OpenShift Container Platform node with the device to be replaced and remove the old
symlink.# oc debug node/worker-0
Example output:
Starting pod/worker-0-debug ...
To use host binaries, run `chroot /host`
Pod IP: 192.168.88.21
If you don't see a command prompt, try pressing enter.
# chroot /host
Identify the old
symlinkfor the device name to be replaced. In this example, the device name isvdc.# ls -alh /mnt/local-storage/localblock
Example output:
total 0
drwxr-xr-x. 2 root root 17 Nov  18 15:23 .
drwxr-xr-x. 3 root root 24 Nov  18 15:23 ..
lrwxrwxrwx. 1 root root  8 Nov  18 15:23 vdc -> /dev/vdc
Remove the
symlink.# rm /mnt/local-storage/localblock/vdc
Verify that the
symlinkis removed.# ls -alh /mnt/local-storage/localblock
Example output:
total 0
drwxr-xr-x. 2 root root 6 Nov 18 17:11 .
drwxr-xr-x. 3 root root 24 Nov 18 15:23 ..
ImportantFor new deployments of OpenShift Container Storage 4.5 or later, LVM is not in use,
ceph-volumeraw mode is in play instead. Therefore, additional validation is not needed and you can proceed to the next step.
Delete the PV associated with the device to be replaced, which was identified in earlier steps. In this example, the PV name is
local-pv-8137c873.# oc delete pv local-pv-8137c873
Example output:
persistentvolume "local-pv-8137c873" deleted
- Replace the device with the new device.
Log back into the correct OpenShift Cotainer Platform node and identify the device name for the new drive. The device name must change unless you are reseating the same device.
# lsblk
Example output:
NAME                         MAJ:MIN RM   SIZE RO TYPE MOUNTPOINT
vda                          252:0    0   40G  0 disk
|-vda1                       252:1    0    4M  0 part
|-vda2                       252:2    0  384M  0 part /boot
`-vda4                       252:4    0 39.6G  0 part
  `-coreos-luks-root-nocrypt 253:0    0 39.6G  0 dm   /sysroot
vdb                          252:16   0  512B  1 disk
vdd                          252:32   0  256G  0 disk
In this example, the new device name is
vdd.-
After the new
/dev/diskis available ,it will be auto detected by localvolumeset. Verify that there is a new PV in
Availablestate and of the correct size.# oc get pv | grep 256Gi
Example output:
local-pv-1e31f771   256Gi   RWO    Delete  Bound  openshift-storage/ocs-deviceset-localblock-2-data-0-6xhkf   localblock    24h
local-pv-ec7f2b80   256Gi   RWO    Delete  Bound  openshift-storage/ocs-deviceset-localblock-1-data-0-hr2fx   localblock    24h
local-pv-8137c873   256Gi   RWO    Delete  Available                                                          localblock    32m
Create new OSD for new device.
Deploy the new OSD by restarting the
rook-ceph-operatorto force operator reconciliation.Identify the name of the
rook-ceph-operator.# oc get -n openshift-storage pod -l app=rook-ceph-operator
Example output:
NAME                                  READY   STATUS    RESTARTS   AGE
rook-ceph-operator-85f6494db4-sg62v   1/1     Running   0          1d20h
Delete the
rook-ceph-operator.# oc delete -n openshift-storage pod rook-ceph-operator-85f6494db4-sg62v
Example output:
pod "rook-ceph-operator-85f6494db4-sg62v" deleted
In this example, the rook-ceph-operator pod name is
rook-ceph-operator-85f6494db4-sg62v.Verify that the
rook-ceph-operatorpod is restarted.# oc get -n openshift-storage pod -l app=rook-ceph-operator
Example output:
NAME                                  READY   STATUS    RESTARTS   AGE
rook-ceph-operator-85f6494db4-wx9xx   1/1     Running   0          50s
Creation of the new OSD may take several minutes after the operator restarts.
Verfication steps
Verify that there is a new OSD running and a new PVC created.
# oc get -n openshift-storage pods -l app=rook-ceph-osd
Example output:
rook-ceph-osd-0-76d8fb97f9-mn8qz   1/1     Running   0          23m
rook-ceph-osd-1-7c99657cfb-jdzvz   1/1     Running   1          25h
rook-ceph-osd-2-5f9f6dfb5b-2mnw9   1/1     Running   0          25h
# oc get -n openshift-storage pvc | grep localblock
Example output:
ocs-deviceset-localblock-0-data-0-q4q6b   Bound    local-pv-8137c873       256Gi     RWO         localblock         10m
ocs-deviceset-localblock-1-data-0-hr2fx   Bound    local-pv-ec7f2b80       256Gi     RWO         localblock         1d20h
ocs-deviceset-localblock-2-data-0-6xhkf   Bound    local-pv-1e31f771       256Gi     RWO         localblock         1d20h
Log in to OpenShift Web Console and view the storage dashboard.
Figure 7.1. OSD status in OpenShift Container Platform storage dashboard after device replacement