Deploying and managing OpenShift Container Storage using Microsoft Azure
How to install and manage
Abstract
Preface
Red Hat OpenShift Container Storage 4.5 supports deployment on existing Red Hat OpenShift Container Platform (OCP) Azure clusters.
Only internal Openshift Container Storage clusters are supported on Microsoft Azure. See Planning your deployment for more information about deployment requirements.
To deploy OpenShift Container Storage in internal mode, follow the deployment process Deploying OpenShift Container Storage on Microsoft Azure
Chapter 1. Deploying OpenShift Container Storage on Microsoft Azure
Deploying OpenShift Container Storage on OpenShift Container Platform using dynamic storage devices provided by Microsoft Azure installer-provisioned infrastructure (IPI) (type: managed-premium) enables you to create internal cluster resources. This results in internal provisioning of the base services, which helps to make additional storage classes available to applications.
Only internal Openshift Container Storage clusters are supported on Microsoft Azure. See Planning your deployment for more information about deployment requirements.
1.1. Installing Red Hat OpenShift Container Storage Operator
You can install Red Hat OpenShift Container Storage Operator using the Red Hat OpenShift Container Platform Operator Hub. For information about the hardware and software requirements, see Planning your deployment.
Prerequisites
- You must be logged into the OpenShift Container Platform cluster.
- You must have at least three worker nodes in the OpenShift Container Platform cluster.
When you need to override the cluster-wide default node selector for OpenShift Container Storage, you can use the following command in command line interface to specify a blank node selector for the openshift-storage namespace:
$ oc annotate namespace openshift-storage openshift.io/node-selector=
Procedure
Click Operators → OperatorHub in the left pane of the OpenShift Web Console.
Figure 1.1. List of operators in the Operator Hub
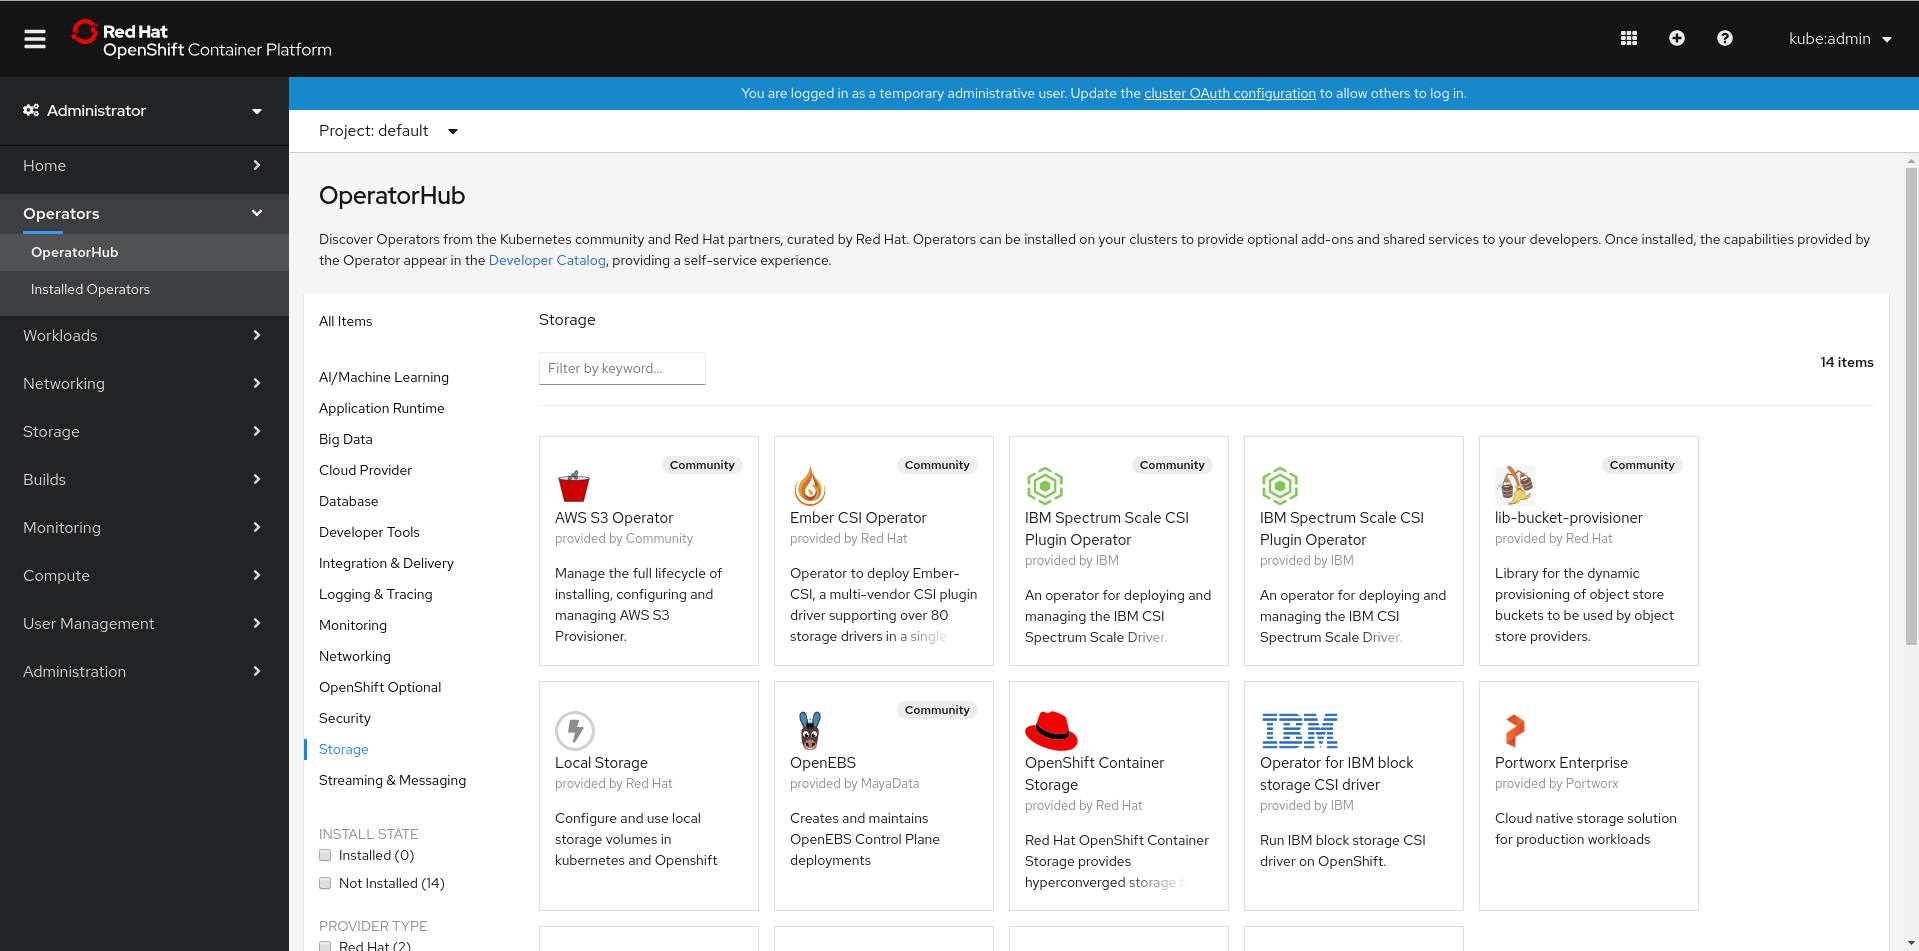
Click on OpenShift Container Storage.
You can use the Filter by keyword text box or the filter list to search for OpenShift Container Storage from the list of operators.
- On the OpenShift Container Storage operator page, click Install.
On the Install Operator page, ensure the following options are selected:
- Update Channel as stable-4.5
- Installation Mode as A specific namespace on the cluster
-
Installed Namespace as Operator recommended namespace PR openshift-storage. If Namespace
openshift-storagedoes not exist, it will be created during the operator installation. Select Approval Strategy as Automatic or Manual. Approval Strategy is set to Automatic by default.
Approval Strategy as Automatic.
NoteWhen you select the Approval Strategy as Automatic, approval is not required either during fresh installation or when updating to the latest version of OpenShift Container Storage.
- Click Install
- Wait for the install to initiate. This may take up to 20 minutes.
- Click Operators → Installed Operators
-
Ensure the Project is
openshift-storage. By default, the Project isopenshift-storage. - Wait for the Status of OpenShift Container Storage to change to Succeeded.
Approval Strategy as Manual.
NoteWhen you select the Approval Strategy as Manual, approval is required during fresh installation or when updating to the latest version of OpenShift Container Storage.
- Click Install.
- On the Installed Operators page, click ocs-operator.
- On the Subscription Details page, click the Install Plan link.
- On the InstallPlan Details page, click Preview Install Plan.
- Review the install plan and click Approve.
- Wait for the Status of the Components to change from Unknown to either Created or Present.
- Click Operators → Installed Operators
-
Ensure the Project is
openshift-storage. By default, the Project isopenshift-storage. - Wait for the Status of OpenShift Container Storage to change to Succeeded.
Verification steps
- Verify that OpenShift Container Storage Operator shows the Status as Succeeded on the Installed Operators dashboard.
1.2. Creating an OpenShift Container Storage Cluster Service in internal mode
Use this procedure to create an OpenShift Container Storage Cluster Service after you install the OpenShift Container Storage operator.
Prerequisites
- The OpenShift Container Storage operator must be installed from the Operator Hub. For more information, see Installing OpenShift Container Storage Operator using the Operator Hub.
Procedure
- Click Operators → Installed Operators from the OpenShift Web Console to view the installed operators. Ensure that the Project selected is openshift-storage.
On the Installed Operators page, click Openshift Container Storage.
Figure 1.2. OpenShift Container Storage Operator page

On the Installed Operators → Operator Details page, perform either of the following to create a Storage Cluster Service.
On the Details tab → Provided APIs → OCS Storage Cluster, click Create Instance.
Figure 1.3. Operator Details Page
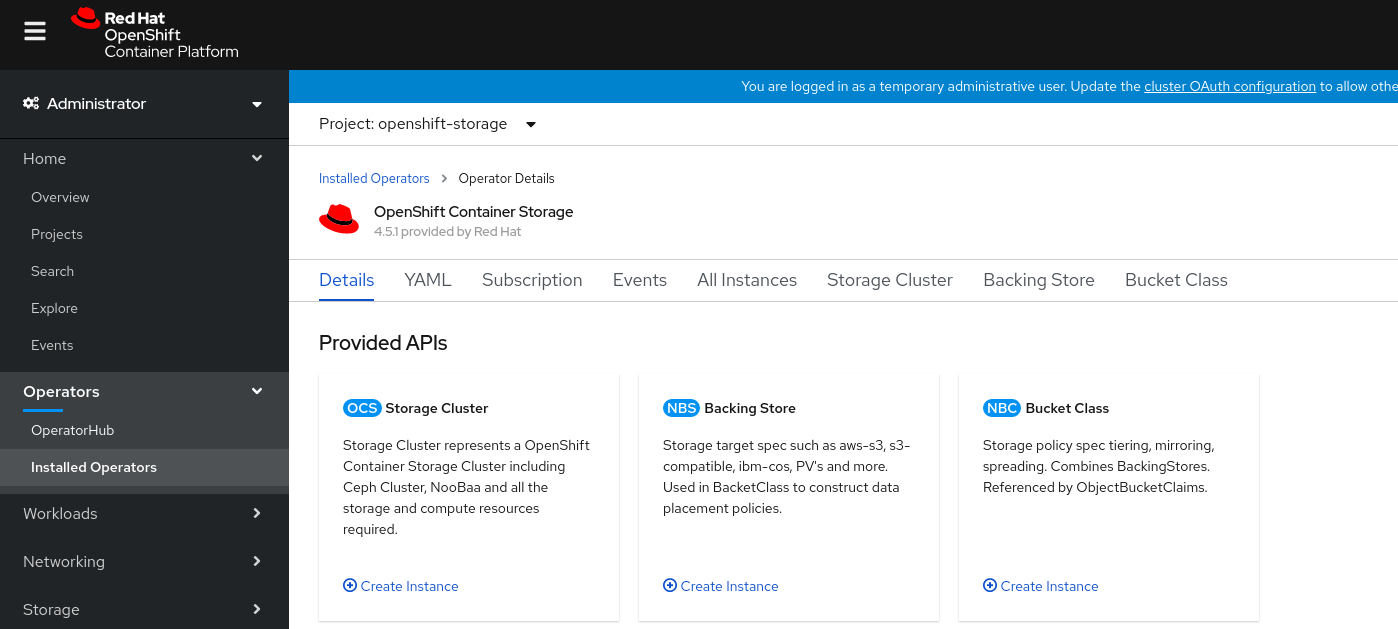
Alternatively, select the Storage cluster tab and click Create OCS Cluster Service.
Figure 1.4. Storage Cluster tab

On the Create Storage Cluster page, ensure that the following options are selected:
Figure 1.5. Create Storage Cluster page
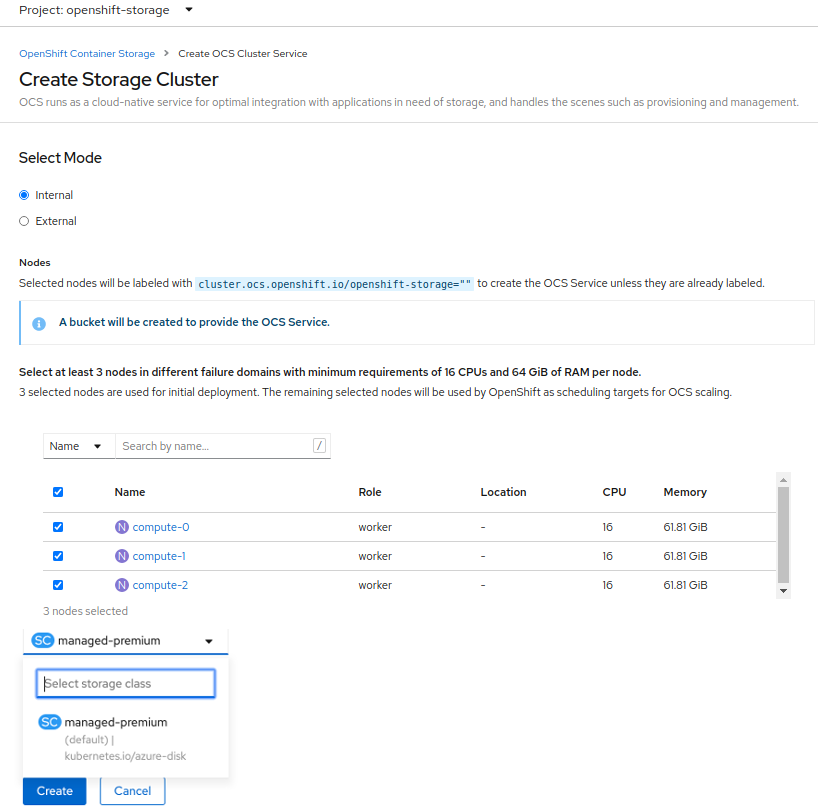
- By default, Select Mode has Internal selected.
In the Nodes section, for the use of OpenShift Container Storage service, select a minimum of three or a multiple of three worker nodes from the available list.
For cloud platforms with multiple availability zones, ensure that the Nodes are spread across different Locations/availability zones.
NoteTo find specific worker nodes in the cluster, you can filter nodes on the basis of Name or Label.
- Name allows you to search by name of the node
- Label allows you to search by selecting the predefined label
For minimum starting node requirements, see Resource requirements section in Planning guide.
-
Storage Class is set by default to
managed-premiumfor Microsoft Azure. Select OCS Service Capacity from drop down list.
NoteOnce you select the initial storage capacity, cluster expansion will only be performed using the selected usable capacity (times 3 of raw storage).
Click Create.
NoteThe Create button is enabled only after selecting a minimum of three worker nodes.
Upon successful deployment, a storage cluster with three storage devices gets created. These devices get distributed across three of the selected nodes. The configuration uses a replication factor of 3. To scale the initial cluster, see Scaling storage nodes.
Verification steps
- To verify that OpenShift Container Storage is successfully installed, see Verifying your OpenShift Container Storage installation.
Chapter 2. Verifying OpenShift Container Storage deployment
Use this section to verify that OpenShift Container Storage is deployed correctly.
2.1. Verifying the state of the pods
To determine if OpenShift Container storage is deployed successfully, you can verify that the pods are in Running state.
Procedure
- Click Workloads → Pods from the left pane of the OpenShift Web Console.
Select openshift-storage from the Project drop down list.
For more information on the expected number of pods for each component and how it varies depending on the number of nodes, see Table 2.1, “Pods corresponding to OpenShift Container storage cluster”.
Verify that the following pods are in running and completed state by clicking on the Running and the Completed tabs:
Table 2.1. Pods corresponding to OpenShift Container storage cluster
Component Corresponding pods OpenShift Container Storage Operator
ocs-operator-*(1 pod on any worker node)
Rook-ceph Operator
rook-ceph-operator-*(1 pod on any worker node)
Multicloud Object Gateway
-
noobaa-operator-*(1 pod on any worker node) -
noobaa-core-*(1 pod on any storage node) -
nooba-db-*(1 pod on any storage node) -
noobaa-endpoint-*(1 pod on any storage node)
MON
rook-ceph-mon-*(3 pods distributed across storage nodes)
MGR
rook-ceph-mgr-*(1 pod on any storage node)
MDS
rook-ceph-mds-ocs-storagecluster-cephfilesystem-*(2 pods distributed across storage nodes)
CSI
cephfs-
csi-cephfsplugin-*(1 pod on each worker node) -
csi-cephfsplugin-provisioner-*(2 pods distributed across storage nodes)
-
rbd-
csi-rbdplugin-*(1 pod on each worker node) -
csi-rbdplugin-provisioner-*(2 pods distributed across storage nodes)
-
rook-ceph-drain-canary
rook-ceph-drain-canary-*(1 pod on each storage node)
rook-ceph-crashcollector
rook-ceph-crashcollector-*(1 pod on each storage node)
OSD
-
rook-ceph-osd-*(1 pod for each device) -
rook-ceph-osd-prepare-ocs-deviceset-*(1 pod for each device)
-
2.2. Verifying the OpenShift Container Storage cluster is healthy
You can verify health of OpenShift Container Storage cluster using the persistent storage dashboard. For more information, see Monitoring OpenShift Container Storage.
- Click Home → Overview from the left pane of the OpenShift Web Console and click Persistent Storage tab.
In the Status card, verify that OCS Cluster has a green tick mark as shown in the following image:
Figure 2.1. Health status card in Persistent Storage Overview Dashboard

In the Details card, verify that the cluster information is displayed appropriately as follows:
Figure 2.2. Details card in Persistent Storage Overview Dashboard

2.3. Verifying the Multicloud Object Gateway is healthy
You can verify the health of the OpenShift Container Storage cluster using the object service dashboard. For more information, see Monitoring OpenShift Container Storage.
- Click Home → Overview from the left pane of the OpenShift Web Console and click the Object Service tab.
In the Status card, verify that the Multicloud Object Gateway (MCG) storage displays a green tick icon as shown in following image:
Figure 2.3. Health status card in Object Service Overview Dashboard

In the Details card, verify that the MCG information is displayed appropriately as follows:
Figure 2.4. Details card in Object Service Overview Dashboard

2.4. Verifying that the OpenShift Container Storage specific storage classes exist
To verify the storage classes exists in the cluster:
- Click Storage → Storage Classes from the left pane of the OpenShift Web Console.
Verify that the following storage classes are created with the OpenShift Container Storage cluster creation:
-
ocs-storagecluster-ceph-rbd -
ocs-storagecluster-cephfs -
openshift-storage.noobaa.io
-
Chapter 3. Uninstalling OpenShift Container Storage
3.1. Uninstalling OpenShift Container Storage on Internal mode
Use the steps in this section to uninstall OpenShift Container Storage instead of the Uninstall option from the user interface.
Prerequisites
- Make sure that the OpenShift Container Storage cluster is in a healthy state. The deletion might fail if some of the pods are not terminated successfully due to insufficient resources or nodes. In case the cluster is in an unhealthy state, you should contact Red Hat Customer Support before uninstalling OpenShift Container Storage.
- Make sure that applications are not consuming persistent volume claims (PVCs) or object bucket claims (OBCs) using the storage classes provided by OpenShift Container Storage. PVCs and OBCs will be deleted during the uninstall process.
Procedure
Query for PVCs and OBCs that use the OpenShift Container Storage based storage class provisioners.
For example :
$ oc get pvc -o=jsonpath='{range .items[?(@.spec.storageClassName=="ocs-storagecluster-ceph-rbd")]}{"Name: "}{@.metadata.name}{" Namespace: "}{@.metadata.namespace}{" Labels: "}{@.metadata.labels}{"\n"}{end}' --all-namespaces|awk '! ( /Namespace: openshift-storage/ && /app:noobaa/ )' | grep -v noobaa-default-backing-store-noobaa-pvc$ oc get pvc -o=jsonpath='{range .items[?(@.spec.storageClassName=="ocs-storagecluster-cephfs")]}{"Name: "}{@.metadata.name}{" Namespace: "}{@.metadata.namespace}{"\n"}{end}' --all-namespaces$ oc get obc -o=jsonpath='{range .items[?(@.spec.storageClassName=="openshift-storage.noobaa.io")]}{"Name: "}{@.metadata.name}{" Namespace: "}{@.metadata.namespace}{"\n"}{end}' --all-namespacesFollow these instructions to ensure that the PVCs and OBCs listed in the previous step are deleted.
If you have created PVCs as a part of configuring the monitoring stack, cluster logging operator, or image registry, then you must perform the clean up steps provided in the following sections as required:
- Section 3.2, “Removing monitoring stack from OpenShift Container Storage”
- Section 3.3, “Removing OpenShift Container Platform registry from OpenShift Container Storage”
Section 3.4, “Removing the cluster logging operator from OpenShift Container Storage”
For each of the remaining PVCs or OBCs, follow the steps mentioned below :
- Determine the pod that is consuming the PVC or OBC.
Identify the controlling API object such as a
Deployment,StatefulSet,DaemonSet,Job, or a custom controller.Each API object has a metadata field known as
OwnerReference. This is a list of associated objects. TheOwnerReferencewith thecontrollerfield set to true will point to controlling objects such asReplicaSet,StatefulSet,DaemonSetand so on.Ensure that the API object is not consuming PVC or OBC provided by OpenShift Container Storage. Either the object should be deleted or the storage should be replaced. Ask the owner of the project to make sure that it is safe to delete or modify the object.
NoteYou can ignore the
noobaapods.Delete the OBCs.
$ oc delete obc <obc name> -n <project name>
Delete any custom Bucket Class you have created.
$ oc get bucketclass -A | grep -v noobaa-default-bucket-class
$ oc delete bucketclass <bucketclass name> -n <project-name>
If you have created any custom Multi Cloud Gateway backingstores, delete them.
List and note the backingstores.
for bs in $(oc get backingstore -o name -n openshift-storage | grep -v noobaa-default-backing-store); do echo "Found backingstore $bs"; echo "Its has the following pods running :"; echo "$(oc get pods -o name -n openshift-storage | grep $(echo ${bs} | cut -f2 -d/))"; doneDelete each of the backingstores listed above and confirm that the dependent resources also get deleted.
for bs in $(oc get backingstore -o name -n openshift-storage | grep -v noobaa-default-backing-store); do echo "Deleting Backingstore $bs"; oc delete -n openshift-storage $bs; done
If any of the backingstores listed above were based on the pv-pool, ensure that the corresponding pod and PVC are also deleted.
$ oc get pods -n openshift-storage | grep noobaa-pod | grep -v noobaa-default-backing-store-noobaa-pod
$ oc get pvc -n openshift-storage --no-headers | grep -v noobaa-db | grep noobaa-pvc | grep -v noobaa-default-backing-store-noobaa-pvc
Delete the remaining PVCs listed in Step 1.
$ oc delete pvc <pvc name> -n <project-name>
Delete the
StorageClusterobject and wait for the removal of the associated resources.$ oc delete -n openshift-storage storagecluster --all --wait=true
Delete the namespace and wait till the deletion is complete. You will need to switch to another project if openshift-storage is the active project.
Switch to another namespace if openshift-storage is the active namespace.
For example :
$ oc project default
Delete the openshift-storage namespace.
$ oc delete project openshift-storage --wait=true --timeout=5m
Wait for approximately five minutes and confirm if the project is deleted successfully.
$ oc get project openshift-storage
Output:
Error from server (NotFound): namespaces "openshift-storage" not found
NoteWhile uninstalling OpenShift Container Storage, if namespace is not deleted completely and remains in Terminating state, perform the steps in the article Troubleshooting and deleting remaining resources during Uninstall to identify objects that are blocking the namespace from being terminated.
Clean up the storage operator artifacts on each node.
$ for i in $(oc get node -l cluster.ocs.openshift.io/openshift-storage= -o jsonpath='{ .items[*].metadata.name }'); do oc debug node/${i} -- chroot /host rm -rfv /var/lib/rook; doneEnsure you can see removed directory
/var/lib/rookin the output.Confirm that the directory no longer exists
$ for i in $(oc get node -l cluster.ocs.openshift.io/openshift-storage= -o jsonpath='{ .items[*].metadata.name }'); do oc debug node/${i} -- chroot /host ls -l /var/lib/rook; doneDelete the
openshift-storage.noobaa.iostorage class.$ oc delete storageclass openshift-storage.noobaa.io --wait=true --timeout=5m
Unlabel the storage nodes.
$ oc label nodes --all cluster.ocs.openshift.io/openshift-storage-
$ oc label nodes --all topology.rook.io/rack-
NoteYou can ignore the warnings displayed for the unlabeled nodes such as label <label> not found.
Confirm all PVs are deleted. If there is any PV left in the Released state, delete it.
# oc get pv | egrep 'ocs-storagecluster-ceph-rbd|ocs-storagecluster-cephfs'
# oc delete pv <pv name>
Remove
CustomResourceDefinitions.$ oc delete crd backingstores.noobaa.io bucketclasses.noobaa.io cephblockpools.ceph.rook.io cephclusters.ceph.rook.io cephfilesystems.ceph.rook.io cephnfses.ceph.rook.io cephobjectstores.ceph.rook.io cephobjectstoreusers.ceph.rook.io noobaas.noobaa.io ocsinitializations.ocs.openshift.io storageclusterinitializations.ocs.openshift.io storageclusters.ocs.openshift.io cephclients.ceph.rook.io --wait=true --timeout=5m
NoteUninstalling OpenShift Container Storage clusters on Microsoft Azure deletes all the OpenShift Container Storage data stored on the target buckets, however, neither the target buckets created by the user nor the ones that were automatically created during the OpenShift Container Storage installation gets deleted and the data that does not belong to OpenShift Container Storage remains on these target buckets.
To ensure that OpenShift Container Storage is uninstalled completely, on the OpenShift Container Platform Web Console,
- Click Home → Overview to access the dashboard.
- Verify that the Persistent Storage and Object Service tabs no longer appear next to the Cluster tab.
3.2. Removing monitoring stack from OpenShift Container Storage
Use this section to clean up monitoring stack from OpenShift Container Storage.
The PVCs that are created as a part of configuring the monitoring stack are in the openshift-monitoring namespace.
Prerequisites
PVCs are configured to use OpenShift Container Platform monitoring stack.
For information, see configuring monitoring stack.
Procedure
List the pods and PVCs that are currently running in the
openshift-monitoringnamespace.$ oc get pod,pvc -n openshift-monitoring NAME READY STATUS RESTARTS AGE pod/alertmanager-main-0 3/3 Running 0 8d pod/alertmanager-main-1 3/3 Running 0 8d pod/alertmanager-main-2 3/3 Running 0 8d pod/cluster-monitoring- operator-84457656d-pkrxm 1/1 Running 0 8d pod/grafana-79ccf6689f-2ll28 2/2 Running 0 8d pod/kube-state-metrics- 7d86fb966-rvd9w 3/3 Running 0 8d pod/node-exporter-25894 2/2 Running 0 8d pod/node-exporter-4dsd7 2/2 Running 0 8d pod/node-exporter-6p4zc 2/2 Running 0 8d pod/node-exporter-jbjvg 2/2 Running 0 8d pod/node-exporter-jj4t5 2/2 Running 0 6d18h pod/node-exporter-k856s 2/2 Running 0 6d18h pod/node-exporter-rf8gn 2/2 Running 0 8d pod/node-exporter-rmb5m 2/2 Running 0 6d18h pod/node-exporter-zj7kx 2/2 Running 0 8d pod/openshift-state-metrics- 59dbd4f654-4clng 3/3 Running 0 8d pod/prometheus-adapter- 5df5865596-k8dzn 1/1 Running 0 7d23h pod/prometheus-adapter- 5df5865596-n2gj9 1/1 Running 0 7d23h pod/prometheus-k8s-0 6/6 Running 1 8d pod/prometheus-k8s-1 6/6 Running 1 8d pod/prometheus-operator- 55cfb858c9-c4zd9 1/1 Running 0 6d21h pod/telemeter-client- 78fc8fc97d-2rgfp 3/3 Running 0 8d NAME STATUS VOLUME CAPACITY ACCESS MODES STORAGECLASS AGE persistentvolumeclaim/my-alertmanager-claim-alertmanager-main-0 Bound pvc-0d519c4f-15a5-11ea-baa0-026d231574aa 40Gi RWO ocs-storagecluster-ceph-rbd 8d persistentvolumeclaim/my-alertmanager-claim-alertmanager-main-1 Bound pvc-0d5a9825-15a5-11ea-baa0-026d231574aa 40Gi RWO ocs-storagecluster-ceph-rbd 8d persistentvolumeclaim/my-alertmanager-claim-alertmanager-main-2 Bound pvc-0d6413dc-15a5-11ea-baa0-026d231574aa 40Gi RWO ocs-storagecluster-ceph-rbd 8d persistentvolumeclaim/my-prometheus-claim-prometheus-k8s-0 Bound pvc-0b7c19b0-15a5-11ea-baa0-026d231574aa 40Gi RWO ocs-storagecluster-ceph-rbd 8d persistentvolumeclaim/my-prometheus-claim-prometheus-k8s-1 Bound pvc-0b8aed3f-15a5-11ea-baa0-026d231574aa 40Gi RWO ocs-storagecluster-ceph-rbd 8d
Edit the monitoring
configmap.$ oc -n openshift-monitoring edit configmap cluster-monitoring-config
Remove any
configsections that reference the OpenShift Container Storage storage classes as shown in the following example and save it.Before editing
.
.
.
apiVersion: v1
data:
  config.yaml: |
    alertmanagerMain:
      volumeClaimTemplate:
        metadata:
          name: my-alertmanager-claim
        spec:
          resources:
            requests:
              storage: 40Gi
          storageClassName: ocs-storagecluster-ceph-rbd
    prometheusK8s:
      volumeClaimTemplate:
        metadata:
          name: my-prometheus-claim
        spec:
          resources:
            requests:
              storage: 40Gi
          storageClassName: ocs-storagecluster-ceph-rbd
kind: ConfigMap
metadata:
  creationTimestamp: "2019-12-02T07:47:29Z"
  name: cluster-monitoring-config
  namespace: openshift-monitoring
  resourceVersion: "22110"
  selfLink: /api/v1/namespaces/openshift-monitoring/configmaps/cluster-monitoring-config
  uid: fd6d988b-14d7-11ea-84ff-066035b9efa8
.
.
.
After editing
.
.
.
apiVersion: v1
data:
  config.yaml: |
kind: ConfigMap
metadata:
  creationTimestamp: "2019-11-21T13:07:05Z"
  name: cluster-monitoring-config
  namespace: openshift-monitoring
  resourceVersion: "404352"
  selfLink: /api/v1/namespaces/openshift-monitoring/configmaps/cluster-monitoring-config
  uid: d12c796a-0c5f-11ea-9832-063cd735b81c
.
.
.
In this example,
alertmanagerMainandprometheusK8smonitoring components are using the OpenShift Container Storage PVCs.Delete relevant PVCs. Make sure you delete all the PVCs that are consuming the storage classes.
$ oc delete -n openshift-monitoring pvc <pvc-name> --wait=true --timeout=5m
3.3. Removing OpenShift Container Platform registry from OpenShift Container Storage
Use this section to clean up OpenShift Container Platform registry from OpenShift Container Storage. If you want to configure an alternative storage, see image registry
The PVCs that are created as a part of configuring OpenShift Container Platform registry are in the openshift-image-registry namespace.
Prerequisites
- The image registry should have been configured to use an OpenShift Container Storage PVC.
Procedure
Edit the
configs.imageregistry.operator.openshift.ioobject and remove the content in the storage section.$ oc edit configs.imageregistry.operator.openshift.io
Before editing
.
.
.
storage:
    pvc:
        claim: registry-cephfs-rwx-pvc
.
.
.
After editing
.
.
.
storage:
.
.
.
In this example, the PVC is called
registry-cephfs-rwx-pvc, which is now safe to delete.Delete the PVC.
$ oc delete pvc <pvc-name> -n openshift-image-registry --wait=true --timeout=5m
3.4. Removing the cluster logging operator from OpenShift Container Storage
Use this section to clean up the cluster logging operator from OpenShift Container Storage.
The PVCs that are created as a part of configuring cluster logging operator are in openshift-logging namespace.
Prerequisites
- The cluster logging instance should have been configured to use OpenShift Container Storage PVCs.
Procedure
Remove the
ClusterLogginginstance in the namespace.$ oc delete clusterlogging instance -n openshift-logging --wait=true --timeout=5m
The PVCs in the
openshift-loggingnamespace are now safe to delete.Delete PVCs.
$ oc delete pvc <pvc-name> -n openshift-logging --wait=true --timeout=5m
Chapter 4. Configure storage for OpenShift Container Platform services
You can use OpenShift Container Storage to provide storage for OpenShift Container Platform services such as image registry, monitoring, and logging.
The process for configuring storage for these services depends on the infrastructure used in your OpenShift Container Storage deployment.
Always ensure that you have plenty of storage capacity for these services. If the storage for these critical services runs out of space, the cluster becomes inoperable and very difficult to recover.
Red Hat recommends configuring shorter curation and retention intervals for these services. See Configuring Curator and Modifying retention time for Prometheus metrics data in the OpenShift Container Platform documentation for details.
If you do run out of storage space for these services, contact Red Hat Customer Support.
4.1. Configuring Image Registry to use OpenShift Container Storage
OpenShift Container Platform provides a built in Container Image Registry which runs as a standard workload on the cluster. A registry is typically used as a publication target for images built on the cluster as well as a source of images for workloads running on the cluster.
Follow the instructions in this section to configure OpenShift Container Storage as storage for the Container Image Registry. On Azure, it is not required to change the storage for the registry.
This process does not migrate data from an existing image registry to the new image registry. If you already have container images in your existing registry, back up your registry before you complete this process, and re-register your images when this process is complete.
Prerequisites
- You have administrative access to OpenShift Web Console.
-
OpenShift Container Storage Operator is installed and running in the
openshift-storagenamespace. In OpenShift Web Console, click Operators → Installed Operators to view installed operators. -
Image Registry Operator is installed and running in the
openshift-image-registrynamespace. In OpenShift Web Console, click Administration → Cluster Settings → Cluster Operators to view cluster operators. -
A storage class with provisioner
openshift-storage.cephfs.csi.ceph.comis available. In OpenShift Web Console, click Storage → Storage Classes to view available storage classes.
Procedure
Create a Persistent Volume Claim for the Image Registry to use.
- In OpenShift Web Console, click Storage → Persistent Volume Claims.
-
Set the Project to
openshift-image-registry. Click Create Persistent Volume Claim.
-
From the list of available storage classes retrieved above, specify the Storage Class with the provisioner
openshift-storage.cephfs.csi.ceph.com. -
Specify the Persistent Volume Claim Name, for example,
ocs4registry. -
Specify an Access Mode of
Shared Access (RWX). - Specify a Size of at least 100 GB.
Click Create.
Wait until the status of the new Persistent Volume Claim is listed as
Bound.
-
From the list of available storage classes retrieved above, specify the Storage Class with the provisioner
Configure the cluster’s Image Registry to use the new Persistent Volume Claim.
- Click Administration →Custom Resource Definitions.
-
Click the
Configcustom resource definition associated with theimageregistry.operator.openshift.iogroup. - Click the Instances tab.
- Beside the cluster instance, click the Action Menu (⋮) → Edit Config.
Add the new Persistent Volume Claim as persistent storage for the Image Registry.
Add the following under
spec:, replacing the existingstorage:section if necessary.storage: pvc: claim: <new-pvc-name>For example:
storage: pvc: claim: ocs4registry- Click Save.
Verify that the new configuration is being used.
- Click Workloads → Pods.
-
Set the Project to
openshift-image-registry. -
Verify that the new
image-registry-*pod appears with a status ofRunning, and that the previousimage-registry-*pod terminates. -
Click the new
image-registry-*pod to view pod details. -
Scroll down to Volumes and verify that the
registry-storagevolume has a Type that matches your new Persistent Volume Claim, for example,ocs4registry.
4.2. Configuring monitoring to use OpenShift Container Storage
OpenShift Container Storage provides a monitoring stack that is comprised of Prometheus and AlertManager.
Follow the instructions in this section to configure OpenShift Container Storage as storage for the monitoring stack.
Monitoring will not function if it runs out of storage space. Always ensure that you have plenty of storage capacity for monitoring.
Red Hat recommends configuring a short retention intervals for this service. See the Modifying retention time for Prometheus metrics data sub section of Configuring persistent storage in the OpenShift Container Platform documentation for details.
Prerequisites
- You have administrative access to OpenShift Web Console.
-
OpenShift Container Storage Operator is installed and running in the
openshift-storagenamespace. In OpenShift Web Console, click Operators → Installed Operators to view installed operators. -
Monitoring Operator is installed and running in the
openshift-monitoringnamespace. In OpenShift Web Console, click Administration → Cluster Settings → Cluster Operators to view cluster operators. -
A storage class with provisioner
openshift-storage.rbd.csi.ceph.comis available. In OpenShift Web Console, click Storage → Storage Classes to view available storage classes.
Procedure
- In OpenShift Web Console, go to Workloads → Config Maps.
-
Set the Project dropdown to
openshift-monitoring. - Click Create Config Map.
Define a new
cluster-monitoring-configConfig Map using the following example.Replace the content in angle brackets (
<,>) with your own values, for example,retention: 24horstorage: 40Gi.Replace the storageClassName with the
storageclassthat uses the provisioneropenshift-storage.rbd.csi.ceph.com. In the example given below the name of the storageclass isocs-storagecluster-ceph-rbd.Example
cluster-monitoring-configConfig MapapiVersion: v1 kind: ConfigMap metadata: name: cluster-monitoring-config namespace: openshift-monitoring data: config.yaml: | prometheusK8s: retention: <time to retain monitoring files, e.g. 24h> volumeClaimTemplate: metadata: name: ocs-prometheus-claim spec: storageClassName: ocs-storagecluster-ceph-rbd resources: requests: storage: <size of claim, e.g. 40Gi> alertmanagerMain: volumeClaimTemplate: metadata: name: ocs-alertmanager-claim spec: storageClassName: ocs-storagecluster-ceph-rbd resources: requests: storage: <size of claim, e.g. 40Gi>- Click Create to save and create the Config Map.
Verification steps
Verify that the Persistent Volume Claims are bound to the pods.
- Go to Storage → Persistent Volume Claims.
-
Set the Project dropdown to
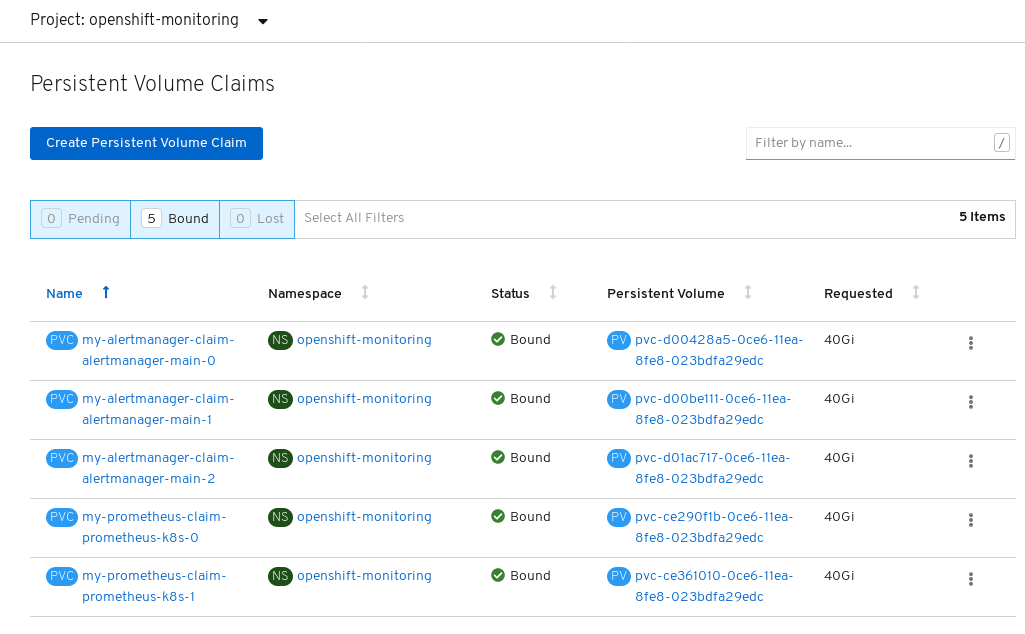
openshift-monitoring. Verify that 5 Persistent Volume Claims are visible with a state of
Bound, attached to threealertmanager-main-*pods, and twoprometheus-k8s-*pods.Monitoring storage created and bound
Verify that the new
alertmanager-main-*pods appear with a state ofRunning.-
Click the new
alertmanager-main-*pods to view the pod details. Scroll down to Volumes and verify that the volume has a Type,
ocs-alertmanager-claimthat matches one of your new Persistent Volume Claims, for example,ocs-alertmanager-claim-alertmanager-main-0.Persistent Volume Claims attached to
alertmanager-main-*pod
-
Click the new
Verify that the new
prometheus-k8s-*pods appear with a state ofRunning.-
Click the new
prometheus-k8s-*pods to view the pod details. Scroll down to Volumes and verify that the volume has a Type,
ocs-prometheus-claimthat matches one of your new Persistent Volume Claims, for example,ocs-prometheus-claim-prometheus-k8s-0.Persistent Volume Claims attached to
prometheus-k8s-*pod
-
Click the new
4.3. Cluster logging for OpenShift Container Storage
You can deploy cluster logging to aggregate logs for a range of OpenShift Container Platform services. For information about how to deploy cluster logging, see Deploying cluster logging.
Upon initial OpenShift Container Platform deployment, OpenShift Container Storage is not configured by default and the OpenShift Container Platform cluster will solely rely on default storage available from the nodes. You can edit the default configuration of OpenShift logging (ElasticSearch) to be backed by OpenShift Container Storage to have OpenShift Container Storage backed logging (Elasticsearch).
Always ensure that you have plenty of storage capacity for these services. If you run out of storage space for these critical services, the logging application becomes inoperable and very difficult to recover.
Red Hat recommends configuring shorter curation and retention intervals for these services. See Configuring Curator in the OpenShift Container Platform documentation for details.
If you run out of storage space for these services, contact Red Hat Customer Support.
4.3.1. Configuring persistent storage
You can configure a persistent storage class and size for the Elasticsearch cluster using the storage class name and size parameters. The Cluster Logging Operator creates a Persistent Volume Claim for each data node in the Elasticsearch cluster based on these parameters. For example:
spec:
    logStore:
      type: "elasticsearch"
      elasticsearch:
        nodeCount: 3
        storage:
          storageClassName: "ocs-storagecluster-ceph-rbd”
          size: "200G"
This example specifies that each data node in the cluster will be bound to a Persistent Volume Claim that requests 200GiB of ocs-storagecluster-ceph-rbd storage. Each primary shard will be backed by a single replica. A copy of the shard is replicated across all the nodes and are always available and the copy can be recovered if at least two nodes exist due to the single redundancy policy. For information about Elasticsearch replication policies, see Elasticsearch replication policy in About deploying and configuring cluster logging.
Omission of the storage block will result in a deployment backed by default storage. For example:
spec:
    logStore:
      type: "elasticsearch"
      elasticsearch:
        nodeCount: 3
        storage: {}
For more information, see Configuring cluster logging.
4.3.2. Configuring cluster logging to use OpenShift Container Storage
Follow the instructions in this section to configure OpenShift Container Storage as storage for the OpenShift cluster logging.
You can obtain all the logs when you configure logging for the first time in OpenShift Container Storage. However, after you uninstall and reinstall logging, the old logs are removed and only the new logs are processed.
Prerequisites
- You have administrative access to OpenShift Web Console.
-
OpenShift Container Storage Operator is installed and running in the
openshift-storagenamespace. -
Cluster logging Operator is installed and running in the
openshift-loggingnamespace.
Procedure
- Click Administration → Custom Resource Definitions from the left pane of the OpenShift Web Console.
- On the Custom Resource Definitions page, click ClusterLogging.
- On the Custom Resource Definition Overview page, select View Instances from the Actions menu or click the Instances Tab.
On the Cluster Logging page, click Create Cluster Logging.
You might have to refresh the page to load the data.
In the YAML, replace the storageClassName with the
storageclassthat uses the provisioneropenshift-storage.rbd.csi.ceph.com. In the example given below the name of the storageclass isocs-storagecluster-ceph-rbd:apiVersion: "logging.openshift.io/v1" kind: "ClusterLogging" metadata: name: "instance" namespace: "openshift-logging" spec: managementState: "Managed" logStore: type: "elasticsearch" elasticsearch: nodeCount: 3 storage: storageClassName: ocs-storagecluster-ceph-rbd size: 200G redundancyPolicy: "SingleRedundancy" visualization: type: "kibana" kibana: replicas: 1 curation: type: "curator" curator: schedule: "30 3 * * *" collection: logs: type: "fluentd" fluentd: {}- Click Save.
Verification steps
Verify that the Persistent Volume Claims are bound to the
elasticsearchpods.- Go to Storage → Persistent Volume Claims.
-
Set the Project dropdown to
openshift-logging. Verify that Persistent Volume Claims are visible with a state of
Bound, attached toelasticsearch-* pods.Figure 4.1. Cluster logging created and bound

Verify that the new cluster logging is being used.
- Click Workload → Pods.
-
Set the Project to
openshift-logging. -
Verify that the new
elasticsearch-* pods appear with a state ofRunning. -
Click the new
elasticsearch-* pod to view pod details. -
Scroll down to Volumes and verify that the elasticsearch volume has a Type that matches your new Persistent Volume Claim, for example,
elasticsearch-elasticsearch-cdm-9r624biv-3. - Click the Persistent Volume Claim name and verify the storage class name in the PersistenVolumeClaim Overview page.
Make sure to use a shorter curator time to avoid PV full scenario on PVs attached to Elasticsearch pods.
You can configure Curator to delete Elasticsearch data based on retention settings. It is recommended that you set the following default index data retention of 5 days as a default.
config.yaml: |
    openshift-storage:
      delete:
        days: 5
For more details, see Curation of Elasticsearch Data.
To uninstall the cluster logging backed by Persistent Volume Claim, use the procedure removing the cluster logging operator from OpenShift Container Storage in the uninstall chapter of the respective deployment guide.
Chapter 5. Backing OpenShift Container Platform applications with OpenShift Container Storage
You cannot directly install OpenShift Container Storage during the OpenShift Container Platform installation. However, you can install OpenShift Container Storage on an existing OpenShift Container Platform by using the Operator Hub and then configure the OpenShift Container Platform applications to be backed by OpenShift Container Storage.
Prerequisites
- OpenShift Container Platform is installed and you have administrative access to OpenShift Web Console.
-
OpenShift Container Storage is installed and running in the
openshift-storagenamespace.
Procedure
In the OpenShift Web Console, perform one of the following:
Click Workloads → Deployments.
In the Deployments page, you can do one of the following:
- Select any existing deployment and click Add Storage option from the Action menu (⋮).
Create a new deployment and then add storage.
- Click Create Deployment to create a new deployment.
-
Edit the
YAMLbased on your requirement to create a deployment. - Click Create.
- Select Add Storage from the Actions drop down menu on the top right of the page.
Click Workloads → Deployment Configs.
In the Deployment Configs page, you can do one of the following:
- Select any existing deployment and click Add Storage option from the Action menu (⋮).
Create a new deployment and then add storage.
- Click Create Deployment Config to create a new deployment.
-
Edit the
YAMLbased on your requirement to create a deployment. - Click Create.
- Select Add Storage from the Actions drop down menu on the top right of the page.
In the Add Storage page, you can choose one of the following options:
- Click the Use existing claim option and select a suitable PVC from the drop down list.
Click the Create new claim option.
-
Select the appropriate
CephFSorRBDstorage class from the Storage Class drop down list. - Provide a name for the Persistent Volume Claim.
Select ReadWriteOnce (RWO) or ReadWriteMany (RWX) access mode.
NoteReadOnlyMany (ROX) is deactivated as it is not supported.
Select the size of the desired storage capacity.
NoteYou cannot resize the storage capacity after the creation of Persistent Volume Claim.
-
Select the appropriate
- Specify the mount path and subpath (if required) for the mount path volume inside the container.
- Click Save.
Verification steps
Depending on your configuration, perform one of the following:
- Click Workloads → Deployments.
- Click Workloads → Deployment Configs.
- Set the Project as required.
- Click the deployment for you which you added storage to view the deployment details.
- Scroll down to Volumes and verify that your deployment has a Type that matches the Persistent Volume Claim that you assigned.
- Click the Persistent Volume Claim name and verify the storage class name in the PersistenVolumeClaim Overview page.
Chapter 6. Scaling storage nodes
To scale the storage capacity of OpenShift Container Storage, you can do either of the following:
- Scale up storage nodes - Add storage capacity to the existing OpenShift Container Storage worker nodes
- Scale out storage nodes - Add new worker nodes containing storage capacity
6.1. Requirements for scaling storage nodes
Before you proceed to scale the storage nodes, refer to the following sections to understand the node requirements for your specific Red Hat OpenShift Container Storage instance:
- Platform requirements
Storage device requirements
Always ensure that you have plenty of storage capacity.
If storage ever fills completely, it is not possible to add capacity or delete or migrate content away from the storage to free up space. Completely full storage is very difficult to recover.
Capacity alerts are issued when cluster storage capacity reaches 75% (near-full) and 85% (full) of total capacity. Always address capacity warnings promptly, and review your storage regularly to ensure that you do not run out of storage space.
If you do run out of storage space completely, contact Red Hat Customer Support.
6.2. Scaling up storage by adding capacity to your OpenShift Container Storage nodes on Microsoft Azure infrastructure
Use this procedure to add storage capacity and performance to your configured Red Hat OpenShift Container Storage worker nodes.
Prerequisites
- A running OpenShift Container Storage Platform
- Administrative privileges on the OpenShift Web Console
Procedure
- Navigate to the OpenShift Web Console.
- Click on Operators on the left navigation bar.
- Select Installed Operators.
In the window, click OpenShift Container Storage Operator:

In the top navigation bar, scroll right and click Storage Cluster tab.

- The visible list should have only one item. Click (⋮) on the far right to extend the options menu.
Select Add Capacity from the options menu.

From this dialog box, you can set the requested additional capacity and the storage class. Add capacity will show the capacity selected at the time of installation and will allow to add the capacity only in this increment. The storage class should be set to managed-premium.
NoteThe effectively provisioned capacity will be three times as much as what you see in the Raw Capacity field because OpenShift Container Storage uses a replica count of 3.
- Once you are done with your setting, click Add. You might need to wait a couple of minutes for the storage cluster to reach Ready state.
Verification steps
Navigate to Overview → Persistent Storage tab, then check the Capacity breakdown card.

- Note that the capacity increases based on your selections.
As of OpenShift Container Storage 4.2, cluster reduction, whether by reducing OSDs or nodes, is not supported.
6.3. Scaling out storage capacity by adding new nodes
To scale out storage capacity, you need to perform the following:
- Add a new node to increase the storage capacity when existing worker nodes are already running at their maximum supported OSDs, which is the increment of 3 OSDs of the capacity selected during initial configuration.
- Verify that the new node is added successfully
- Scale up the storage capacity after the node is added
6.3.1. Adding a node on Microsoft Azure installer-provisioned infrastructure
Prerequisites
- You must be logged into OpenShift Container Platform (OCP) cluster.
Procedure
- Navigate to Compute → Machine Sets.
- On the machine set where you want to add nodes, select Edit Machine Count.
- Add the amount of nodes, and click Save.
- Click Compute → Nodes and confirm if the new node is in Ready state.
Apply the OpenShift Container Storage label to the new node.
- For the new node, Action menu (⋮) → Edit Labels.
- Add cluster.ocs.openshift.io/openshift-storage and click Save.
It is recommended to add 3 nodes each in different zones. You must add 3 nodes and perform this procedure for all of them.
Verification steps
To verify that the new node is added, see Section 6.3.2, “Verifying the addition of a new node”.
6.3.2. Verifying the addition of a new node
Execute the following command and verify that the new node is present in the output:
$ oc get nodes --show-labels | grep cluster.ocs.openshift.io/openshift-storage= |cut -d' ' -f1
Click Workloads → Pods, confirm that at least the following pods on the new node are in Running state:
-
csi-cephfsplugin-* -
csi-rbdplugin-*
-
6.3.3. Scaling up storage capacity
After you add a new node to OpenShift Container Storage, you must scale up the storage capacity as described in Scaling up storage by adding capacity.
Chapter 7. Multicloud Object Gateway
7.1. About the Multicloud Object Gateway
The Multicloud Object Gateway (MCG) is a lightweight object storage service for OpenShift, allowing users to start small and then scale as needed on-premise, in multiple clusters, and with cloud-native storage.
7.2. Accessing the Multicloud Object Gateway with your applications
You can access the object service with any application targeting AWS S3 or code that uses AWS S3 Software Development Kit (SDK). Applications need to specify the MCG endpoint, an access key, and a secret access key. You can use your terminal or the MCG CLI to retrieve this information.
Prerequisites
- A running OpenShift Container Storage Platform
Download the MCG command-line interface for easier management:
# subscription-manager repos --enable=rh-ocs-4-for-rhel-8-x86_64-rpms
# yum install mcg
-
Alternatively, you can install the
mcgpackage from the OpenShift Container Storage RPMs found at Download RedHat OpenShift Container Storage page.
You can access the relevant endpoint, access key, and secret access key two ways:
7.2.1. Accessing the Multicloud Object Gateway from the terminal
Procedure
Run the describe command to view information about the MCG endpoint, including its access key (AWS_ACCESS_KEY_ID value) and secret access key (AWS_SECRET_ACCESS_KEY value):
# oc describe noobaa -n openshift-storage
The output will look similar to the following:
Name:         noobaa
Namespace:    openshift-storage
Labels:       <none>
Annotations:  <none>
API Version:  noobaa.io/v1alpha1
Kind:         NooBaa
Metadata:
  Creation Timestamp:  2019-07-29T16:22:06Z
  Generation:          1
  Resource Version:    6718822
  Self Link:           /apis/noobaa.io/v1alpha1/namespaces/openshift-storage/noobaas/noobaa
  UID:                 019cfb4a-b21d-11e9-9a02-06c8de012f9e
Spec:
Status:
  Accounts:
    Admin:
      Secret Ref:
        Name:           noobaa-admin
        Namespace:      openshift-storage
  Actual Image:         noobaa/noobaa-core:4.0
  Observed Generation:  1
  Phase:                Ready
  Readme:

  Welcome to NooBaa!
  -----------------

  Welcome to NooBaa!
    -----------------
    NooBaa Core Version:
    NooBaa Operator Version:

    Lets get started:

    1. Connect to Management console:

      Read your mgmt console login information (email & password) from secret: "noobaa-admin".

        kubectl get secret noobaa-admin -n openshift-storage -o json | jq '.data|map_values(@base64d)'

      Open the management console service - take External IP/DNS or Node Port or use port forwarding:

        kubectl port-forward -n openshift-storage service/noobaa-mgmt 11443:443 &
        open https://localhost:11443

    2. Test S3 client:

      kubectl port-forward -n openshift-storage service/s3 10443:443 &
1
      NOOBAA_ACCESS_KEY=$(kubectl get secret noobaa-admin -n openshift-storage -o json | jq -r '.data.AWS_ACCESS_KEY_ID|@base64d')
2
      NOOBAA_SECRET_KEY=$(kubectl get secret noobaa-admin -n openshift-storage -o json | jq -r '.data.AWS_SECRET_ACCESS_KEY|@base64d')
      alias s3='AWS_ACCESS_KEY_ID=$NOOBAA_ACCESS_KEY AWS_SECRET_ACCESS_KEY=$NOOBAA_SECRET_KEY aws --endpoint https://localhost:10443 --no-verify-ssl s3'
      s3 ls


    Services:
      Service Mgmt:
        External DNS:
          https://noobaa-mgmt-openshift-storage.apps.mycluster-cluster.qe.rh-ocs.com
          https://a3406079515be11eaa3b70683061451e-1194613580.us-east-2.elb.amazonaws.com:443
        Internal DNS:
          https://noobaa-mgmt.openshift-storage.svc:443
        Internal IP:
          https://172.30.235.12:443
        Node Ports:
          https://10.0.142.103:31385
        Pod Ports:
          https://10.131.0.19:8443
      serviceS3:
        External DNS: 3
          https://s3-openshift-storage.apps.mycluster-cluster.qe.rh-ocs.com
          https://a340f4e1315be11eaa3b70683061451e-943168195.us-east-2.elb.amazonaws.com:443
        Internal DNS:
          https://s3.openshift-storage.svc:443
        Internal IP:
          https://172.30.86.41:443
        Node Ports:
          https://10.0.142.103:31011
        Pod Ports:
          https://10.131.0.19:6443
The output from the oc describe noobaa command lists the internal and external DNS names that are available. When using the internal DNS, the traffic is free. The external DNS uses Load Balancing to process the traffic, and therefore has a cost per hour.
7.2.2. Accessing the Multicloud Object Gateway from the MCG command-line interface
Prerequisites
Download the MCG command-line interface:
# subscription-manager repos --enable=rh-ocs-4-for-rhel-8-x86_64-rpms
# yum install mcg
Procedure
Run the status command to access the endpoint, access key, and secret access key:
noobaa status -n openshift-storage
The output will look similar to the following:
INFO[0000] Namespace: openshift-storage
INFO[0000]
INFO[0000] CRD Status:
INFO[0003] ✅ Exists: CustomResourceDefinition "noobaas.noobaa.io"
INFO[0003] ✅ Exists: CustomResourceDefinition "backingstores.noobaa.io"
INFO[0003] ✅ Exists: CustomResourceDefinition "bucketclasses.noobaa.io"
INFO[0004] ✅ Exists: CustomResourceDefinition "objectbucketclaims.objectbucket.io"
INFO[0004] ✅ Exists: CustomResourceDefinition "objectbuckets.objectbucket.io"
INFO[0004]
INFO[0004] Operator Status:
INFO[0004] ✅ Exists: Namespace "openshift-storage"
INFO[0004] ✅ Exists: ServiceAccount "noobaa"
INFO[0005] ✅ Exists: Role "ocs-operator.v0.0.271-6g45f"
INFO[0005] ✅ Exists: RoleBinding "ocs-operator.v0.0.271-6g45f-noobaa-f9vpj"
INFO[0006] ✅ Exists: ClusterRole "ocs-operator.v0.0.271-fjhgh"
INFO[0006] ✅ Exists: ClusterRoleBinding "ocs-operator.v0.0.271-fjhgh-noobaa-pdxn5"
INFO[0006] ✅ Exists: Deployment "noobaa-operator"
INFO[0006]
INFO[0006] System Status:
INFO[0007] ✅ Exists: NooBaa "noobaa"
INFO[0007] ✅ Exists: StatefulSet "noobaa-core"
INFO[0007] ✅ Exists: Service "noobaa-mgmt"
INFO[0008] ✅ Exists: Service "s3"
INFO[0008] ✅ Exists: Secret "noobaa-server"
INFO[0008] ✅ Exists: Secret "noobaa-operator"
INFO[0008] ✅ Exists: Secret "noobaa-admin"
INFO[0009] ✅ Exists: StorageClass "openshift-storage.noobaa.io"
INFO[0009] ✅ Exists: BucketClass "noobaa-default-bucket-class"
INFO[0009] ✅ (Optional) Exists: BackingStore "noobaa-default-backing-store"
INFO[0010] ✅ (Optional) Exists: CredentialsRequest "noobaa-cloud-creds"
INFO[0010] ✅ (Optional) Exists: PrometheusRule "noobaa-prometheus-rules"
INFO[0010] ✅ (Optional) Exists: ServiceMonitor "noobaa-service-monitor"
INFO[0011] ✅ (Optional) Exists: Route "noobaa-mgmt"
INFO[0011] ✅ (Optional) Exists: Route "s3"
INFO[0011] ✅ Exists: PersistentVolumeClaim "db-noobaa-core-0"
INFO[0011] ✅ System Phase is "Ready"
INFO[0011] ✅ Exists:  "noobaa-admin"

#------------------#
#- Mgmt Addresses -#
#------------------#

ExternalDNS : [https://noobaa-mgmt-openshift-storage.apps.mycluster-cluster.qe.rh-ocs.com https://a3406079515be11eaa3b70683061451e-1194613580.us-east-2.elb.amazonaws.com:443]
ExternalIP  : []
NodePorts   : [https://10.0.142.103:31385]
InternalDNS : [https://noobaa-mgmt.openshift-storage.svc:443]
InternalIP  : [https://172.30.235.12:443]
PodPorts    : [https://10.131.0.19:8443]

#--------------------#
#- Mgmt Credentials -#
#--------------------#

email    : admin@noobaa.io
password : HKLbH1rSuVU0I/souIkSiA==

#----------------#
#- S3 Addresses -#
#----------------#

1
ExternalDNS : [https://s3-openshift-storage.apps.mycluster-cluster.qe.rh-ocs.com https://a340f4e1315be11eaa3b70683061451e-943168195.us-east-2.elb.amazonaws.com:443]
ExternalIP  : []
NodePorts   : [https://10.0.142.103:31011]
InternalDNS : [https://s3.openshift-storage.svc:443]
InternalIP  : [https://172.30.86.41:443]
PodPorts    : [https://10.131.0.19:6443]

#------------------#
#- S3 Credentials -#
#------------------#

2
AWS_ACCESS_KEY_ID     : jVmAsu9FsvRHYmfjTiHV
3
AWS_SECRET_ACCESS_KEY : E//420VNedJfATvVSmDz6FMtsSAzuBv6z180PT5c

#------------------#
#- Backing Stores -#
#------------------#

NAME                           TYPE     TARGET-BUCKET                                               PHASE   AGE
noobaa-default-backing-store   aws-s3   noobaa-backing-store-15dc896d-7fe0-4bed-9349-5942211b93c9   Ready   141h35m32s

#------------------#
#- Bucket Classes -#
#------------------#

NAME                          PLACEMENT                                                             PHASE   AGE
noobaa-default-bucket-class   {Tiers:[{Placement: BackingStores:[noobaa-default-backing-store]}]}   Ready   141h35m33s

#-----------------#
#- Bucket Claims -#
#-----------------#

No OBC's found.
You now have the relevant endpoint, access key, and secret access key in order to connect to your applications.
Example 7.1. Example
If AWS S3 CLI is the application, the following command will list buckets in OCS:
AWS_ACCESS_KEY_ID=<AWS_ACCESS_KEY_ID>
AWS_SECRET_ACCESS_KEY=<AWS_SECRET_ACCESS_KEY>
aws --endpoint <ENDPOINT> --no-verify-ssl s3 ls
7.3. Adding storage resources for hybrid or Multicloud
7.3.1. Adding storage resources for hybrid or Multicloud using the MCG command line interface
The Multicloud Object Gateway (MCG) simplifies the process of spanning data across cloud provider and clusters.
To do so, add a backing storage that can be used by the MCG.
Prerequisites
Download the MCG command-line interface:
# subscription-manager repos --enable=rh-ocs-4-for-rhel-8-x86_64-rpms
# yum install mcg
-
Alternatively, you can install the
mcgpackage from the OpenShift Container Storage RPMs found here Download RedHat OpenShift Container Storage page.
Procedure
From the MCG command-line interface, run the following command:
noobaa backingstore create <backing-store-type> <backingstore_name> --access-key=<AWS ACCESS KEY> --secret-key=<AWS SECRET ACCESS KEY> --target-bucket <bucket-name>
-
Replace
<backing-store-type>with your relevant backing store type:aws-s3,google-cloud-store,azure-blob,s3-compatible, oribm-cos. -
Replace
<backingstore_name>with the name of the backingstore. -
Replace
<AWS ACCESS KEY>and<AWS SECRET ACCESS KEY>with an AWS access key ID and secret access key you created for this purpose. Replace
<bucket-name>with an existing AWS bucket name. This argument tells NooBaa which bucket to use as a target bucket for its backing store, and subsequently, data storage and administration.The output will be similar to the following:
INFO[0001] ✅ Exists: NooBaa "noobaa"
INFO[0002] ✅ Created: BackingStore "aws-resource"
INFO[0002] ✅ Created: Secret "backing-store-secret-aws-resource"
-
Replace
You can also add storage resources using a YAML:
Create a secret with the credentials:
apiVersion: v1
kind: Secret
metadata:
  name: <backingstore-secret-name>
type: Opaque
data:
  AWS_ACCESS_KEY_ID: <AWS ACCESS KEY ID ENCODED IN BASE64>
  AWS_SECRET_ACCESS_KEY: <AWS SECRET ACCESS KEY ENCODED IN BASE64>
-
You must supply and encode your own AWS access key ID and secret access key using Base64, and use the results in place of
<AWS ACCESS KEY ID ENCODED IN BASE64>and<AWS SECRET ACCESS KEY ENCODED IN BASE64>. -
Replace
<backingstore-secret-name>with a unique name.
-
You must supply and encode your own AWS access key ID and secret access key using Base64, and use the results in place of
Apply the following YAML for a specific backing store:
apiVersion: noobaa.io/v1alpha1 kind: BackingStore metadata: finalizers: - noobaa.io/finalizer labels: app: noobaa name: bs namespace: noobaa spec: awsS3: secret: name: <backingstore-secret-name> namespace: noobaa targetBucket: <bucket-name> type: <backing-store-type>-
Replace
<bucket-name>with an existing AWS bucket name. This argument tells NooBaa which bucket to use as a target bucket for its backing store, and subsequently, data storage and administration. -
Replace
<backingstore-secret-name>with the name of the secret created in the previous step. -
Replace <backing-store-type> with your relevant backing store type:
aws-s3,google-cloud-store,azure-blob,s3-compatible, oribm-cos.
-
Replace
7.3.2. Creating an s3 compatible Multicloud Object Gateway backingstore
The Multicloud Object Gateway can use any S3 compatible object storage as a backing store, for example, Red Hat Ceph Storage’s RADOS Gateway (RGW). The following procedure shows how to create an S3 compatible Multicloud Object Gateway backing store for Red Hat Ceph Storage’s RADOS Gateway. Note that when RGW is deployed, Openshift Container Storage operator creates an S3 compatible backingstore for Multicloud Object Gateway automatically.
Procedure
From the Multicloud Object Gateway (MCG) command-line interface, run the following NooBaa command:
noobaa backingstore create s3-compatible rgw-resource --access-key=<RGW ACCESS KEY> --secret-key=<RGW SECRET KEY> --target-bucket=<bucket-name> --endpoint=http://rook-ceph-rgw-ocs-storagecluster-cephobjectstore.openshift-storage.svc.cluster.local:80
To get the
<RGW ACCESS KEY>and<RGW SECRET KEY>, run the following command using your RGW user secret name:oc get secret <RGW USER SECRET NAME> -o yaml
- Decode the access key ID and the access key from Base64 and keep them.
-
Replace
<RGW USER ACCESS KEY>and<RGW USER SECRET ACCESS KEY>with the appropriate, decoded data from the previous step. Replace
<bucket-name>with an existing RGW bucket name. This argument tells Multicloud Object Gateway which bucket to use as a target bucket for its backing store, and subsequently, data storage and administration.The output will be similar to the following:
INFO[0001] ✅ Exists: NooBaa "noobaa"
INFO[0002] ✅ Created: BackingStore "rgw-resource"
INFO[0002] ✅ Created: Secret "backing-store-secret-rgw-resource"
You can also create the backingstore using a YAML:
Create a
CephObjectStoreuser. This also creates a secret containing the RGW credentials:apiVersion: ceph.rook.io/v1 kind: CephObjectStoreUser metadata: name: <RGW-Username> namespace: openshift-storage spec: store: ocs-storagecluster-cephobjectstore displayName: "<Display-name>"
-
Replace
<RGW-Username>and<Display-name>with a unique username and display name.
-
Replace
Apply the following YAML for an S3-Compatible backing store:
apiVersion: noobaa.io/v1alpha1 kind: BackingStore metadata: finalizers: - noobaa.io/finalizer labels: app: noobaa name: <backingstore-name> namespace: openshift-storage spec: s3Compatible: endpoint: http://rook-ceph-rgw-ocs-storagecluster-cephobjectstore.openshift-storage.svc.cluster.local:80 secret: name: <backingstore-secret-name> namespace: openshift-storage signatureVersion: v4 targetBucket: <RGW-bucket-name> type: s3-compatible-
Replace
<backingstore-secret-name>with the name of the secret that was created withCephObjectStorein the previous step. -
Replace
<bucket-name>with an existing RGW bucket name. This argument tells Multicloud Object Gateway which bucket to use as a target bucket for its backing store, and subsequently, data storage and administration.
-
Replace
7.3.3. Adding storage resources for hybrid and Multicloud using the user interface
Procedure
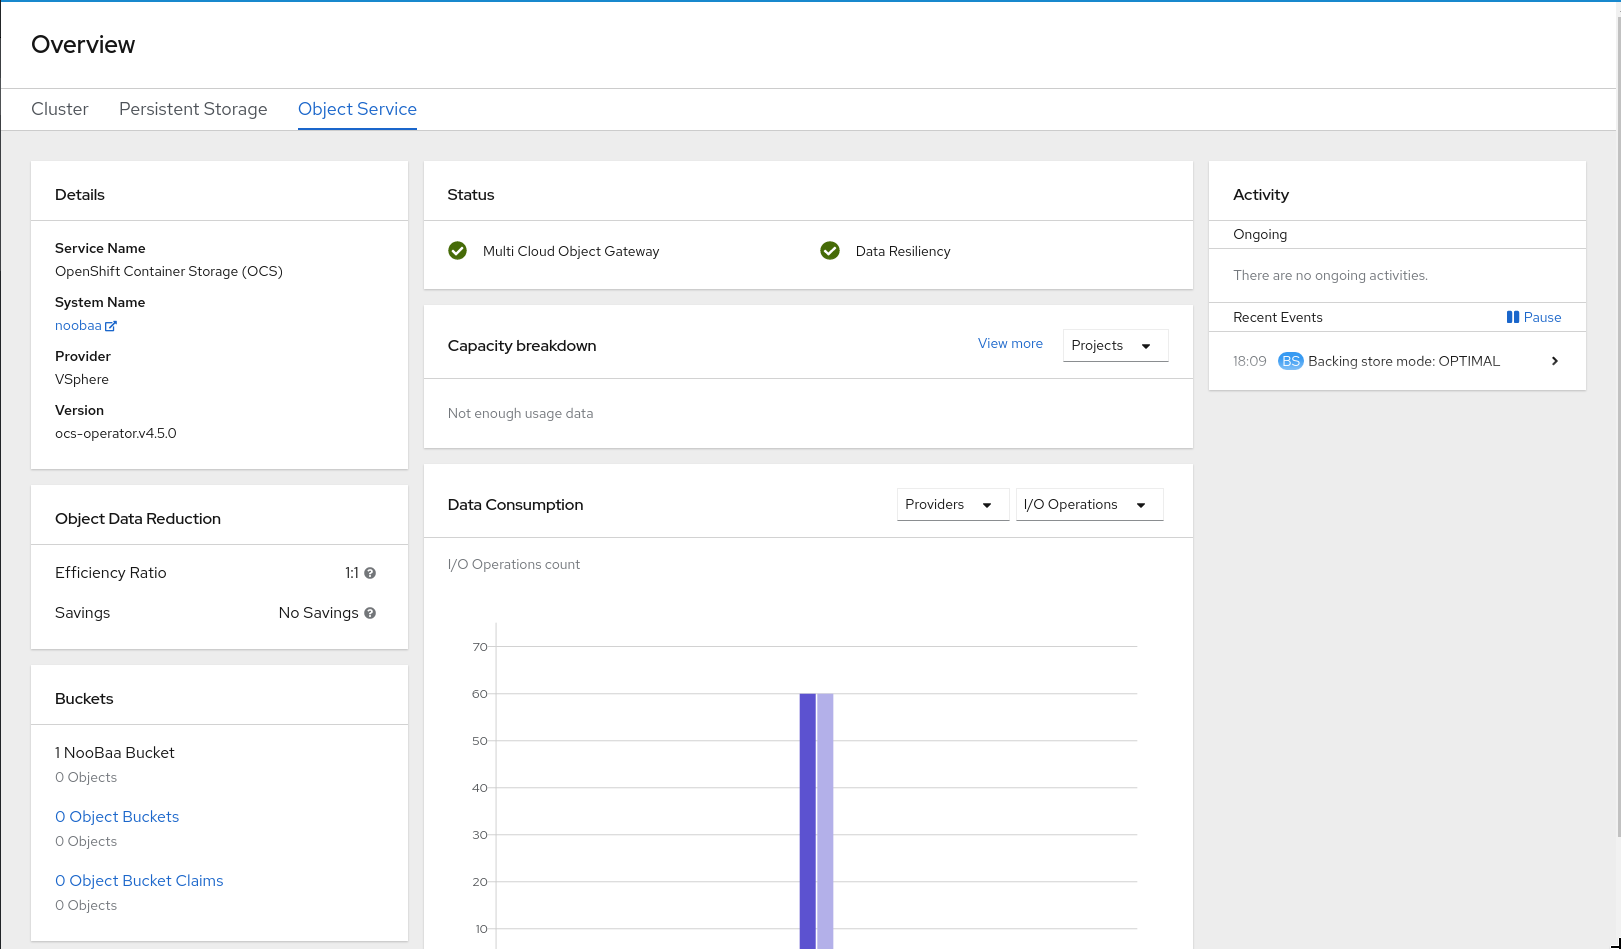
In your OpenShift Storage console, navigate to Overview → Object Service → select the noobaa link:
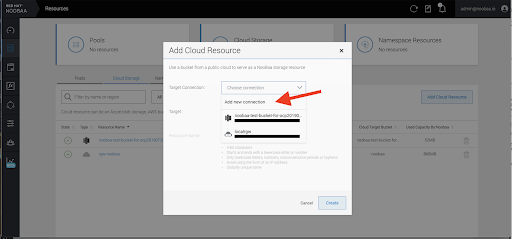
Select the Resources tab in the left, highlighted below. From the list that populates, select Add Cloud Resource:

Select Add new connection:
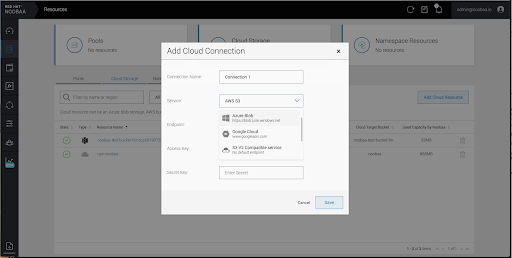
Select the relevant native cloud provider or S3 compatible option and fill in the details:
Select the newly created connection and map it to the existing bucket:

- Repeat these steps to create as many backing stores as needed.
Resources created in NooBaa UI cannot be used by OpenShift UI or MCG CLI.
7.3.4. Creating a new bucket class
Bucket class is a CRD representing a class of buckets that defines tiering policies and data placements for an Object Bucket Class (OBC).
Use this procedure to create a bucket class in OpenShift Container Storage.
Procedure
- Click Operators → Installed Operators from the left pane of the OpenShift Web Console to view the installed operators.
- Click OpenShift Container Storage Operator.
On the OpenShift Container Storage Operator page, scroll right and click the Bucket Class tab.
Figure 7.1. OpenShift Container Storage Operator page with Bucket Class tab

- Click Create Bucket Class.
On the Create new Bucket Class page, perform the following:
Enter a Bucket Class Name and click Next.
Figure 7.2. Create Bucket Class page

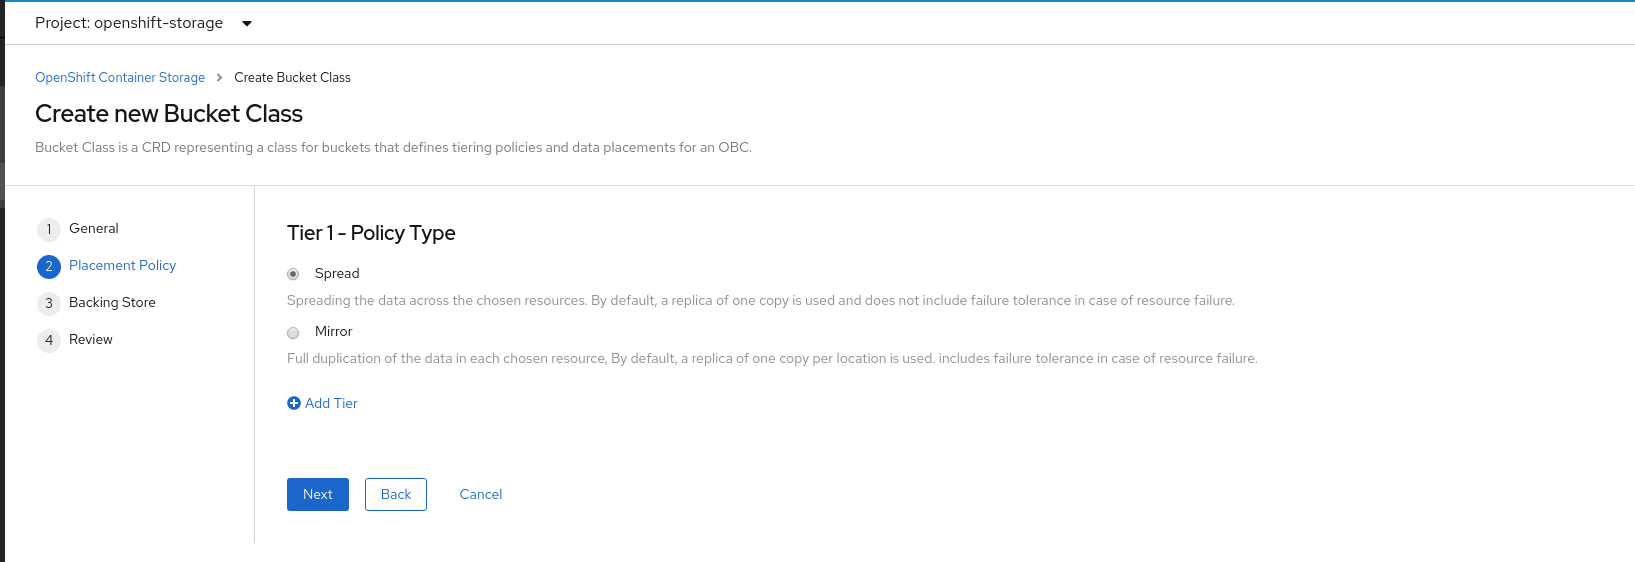
In Placement Policy, select Tier 1 - Policy Type and click Next. You can choose either one of the options as per your requirements.
- Spread allows spreading of the data across the chosen resources.
- Mirror allows full duplication of the data across the chosen resources.
Click Add Tier to add another policy tier.
Figure 7.3. Tier 1 - Policy Type selection page
Select atleast one Backing Store resource from the available list if you have selected Tier 1 - Policy Type as Spread and click Next. Alternatively, you can also create a new backing store.
Figure 7.4. Tier 1 - Backing Store selection page

You need to select atleast 2 backing stores when you select Policy Type as Mirror in previous step.
Review and confirm Bucket Class settings.
Figure 7.5. Bucket class settings review page

- Click Create Bucket Class.
Verification steps
- Click Operators → Installed Operators.
- Click OpenShift Container Storage Operator.
- Search for the new Bucket Class or click Bucket Class tab to view all the Bucket Classes.
7.3.5. Creating a new backing store
Use this procedure to create a new backing store in OpenShift Container Storage.
Prerequisites
- Administrator access to OpenShift.
Procedure
- Click Operators → Installed Operators from the left pane of the OpenShift Web Console to view the installed operators.
- Click OpenShift Container Storage Operator.
On the OpenShift Container Storage Operator page, scroll right and click the Backing Store tab.
Figure 7.6. OpenShift Container Storage Operator page with backing store tab

Click Create Backing Store.
Figure 7.7. Create Backing Store page
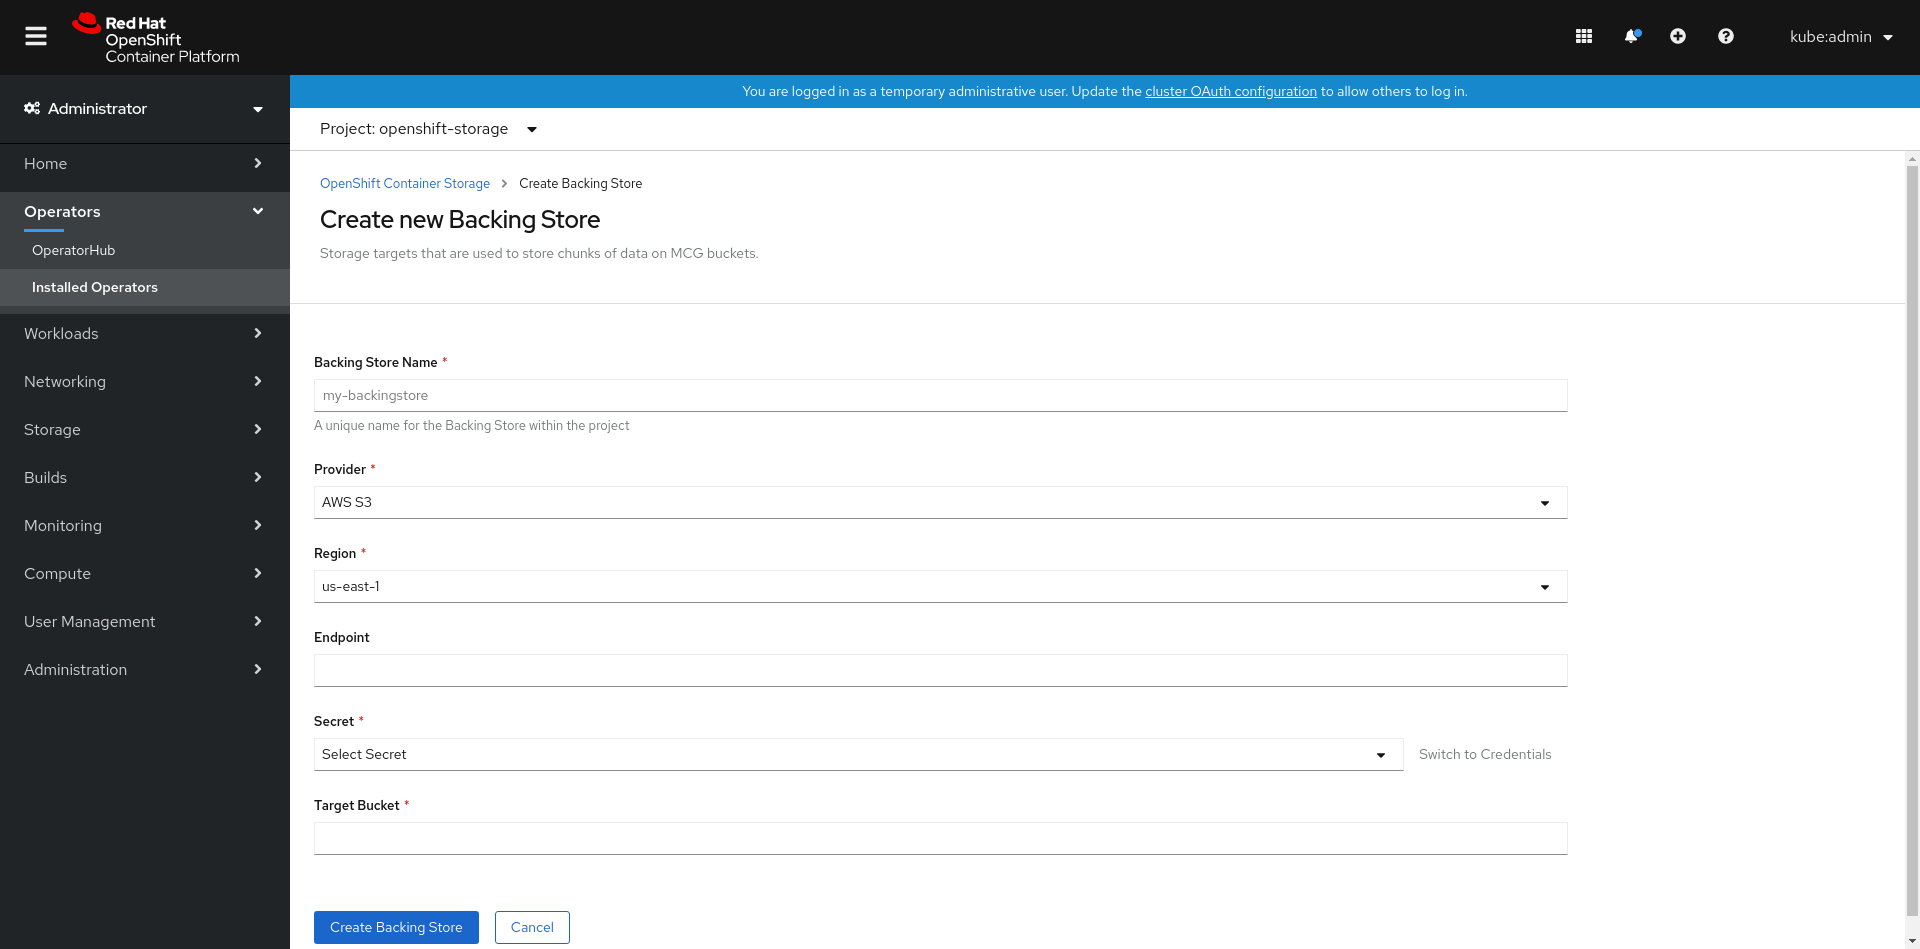
On the Create New Backing Store page, perform the following:
- Enter a Backing Store Name.
- Select a Provider.
- Select a Region.
- Enter an Endpoint. This is optional.
Select a Secret from drop down list, or create your own secret. Optionally, you can Switch to Credentials view which lets you fill in the required secrets.
For more information on creating an OCP secret, see the section Creating the secret in the Openshift Container Platform documentation.
Each backingstore requires a different secret. For more information on creating the secret for a particular backingstore, see the Section 7.3.1, “Adding storage resources for hybrid or Multicloud using the MCG command line interface” and follow the procedure for the addition of storage resources using a YAML.
NoteThis menu is relevant for all providers except Google Cloud and local PVC.
- Enter Target bucket. The target bucket is a container storage that is hosted on the remote cloud service. It allows you to create a connection that tells MCG that it can use this bucket for the system.
- Click Create Backing Store.
Verification steps
- Click Operators → Installed Operators.
- Click OpenShift Container Storage Operator.
- Search for the new backing store or click Backing Store tab to view all the backing stores.
7.4. Mirroring data for hybrid and Multicloud buckets
The Multicloud Object Gateway (MCG) simplifies the process of spanning data across cloud provider and clusters.
Prerequisites
- You must first add a backing storage that can be used by the MCG, see Section 7.3, “Adding storage resources for hybrid or Multicloud”.
Then you create a bucket class that reflects the data management policy, mirroring.
Procedure
You can set up mirroring data three ways:
7.4.1. Creating bucket classes to mirror data using the MCG command-line-interface
From the MCG command-line interface, run the following command to create a bucket class with a mirroring policy:
$ noobaa bucketclass create mirror-to-aws --backingstores=azure-resource,aws-resource --placement Mirror
Set the newly created bucket class to a new bucket claim, generating a new bucket that will be mirrored between two locations:
$ noobaa obc create mirrored-bucket --bucketclass=mirror-to-aws
7.4.2. Creating bucket classes to mirror data using a YAML
Apply the following YAML. This YAML is a hybrid example that mirrors data between local Ceph storage and AWS:
apiVersion: noobaa.io/v1alpha1
kind: BucketClass
metadata:
  name: hybrid-class
  labels:
    app: noobaa
spec:
  placementPolicy:
    tiers:
      - tier:
          mirrors:
            - mirror:
                spread:
                  - cos-east-us
            - mirror:
                spread:
                  - noobaa-test-bucket-for-ocp201907291921-11247_resource
Add the following lines to your standard Object Bucket Claim (OBC):
additionalConfig:
  bucketclass: mirror-to-aws
For more information about OBCs, see Section 7.6, “Object Bucket Claim”.
7.4.3. Configuring buckets to mirror data using the user interface
In your OpenShift Storage console, navigate to Overview → Object Service → select the noobaa link:

Click the buckets icon on the left side. You will see a list of your buckets:

- Click the bucket you want to update.
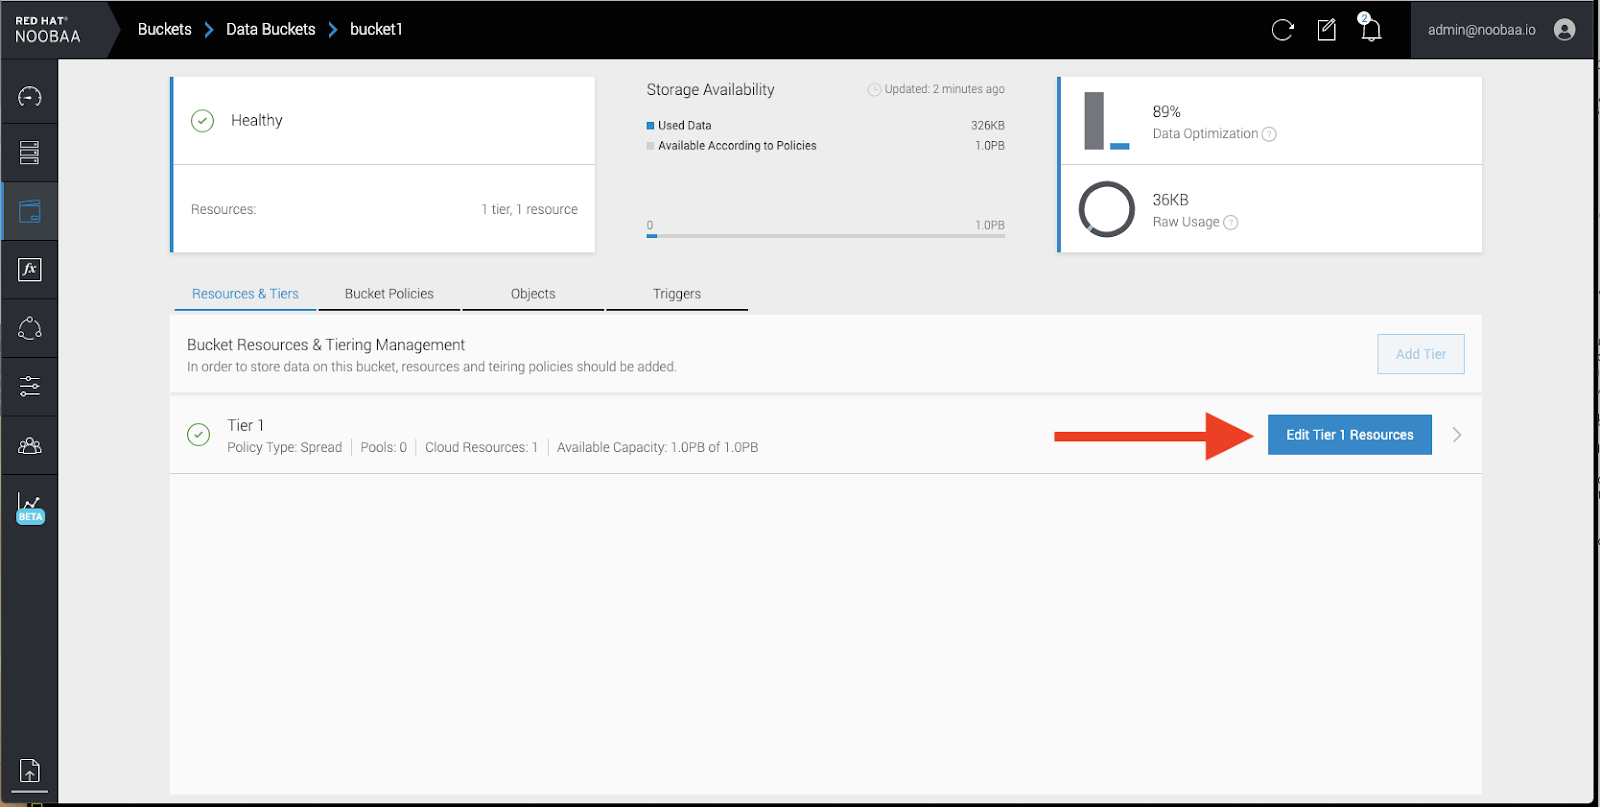
Click Edit Tier 1 Resources:
Select Mirror and check the relevant resources you want to use for this bucket. In the following example, we mirror data between on prem Ceph RGW to AWS:
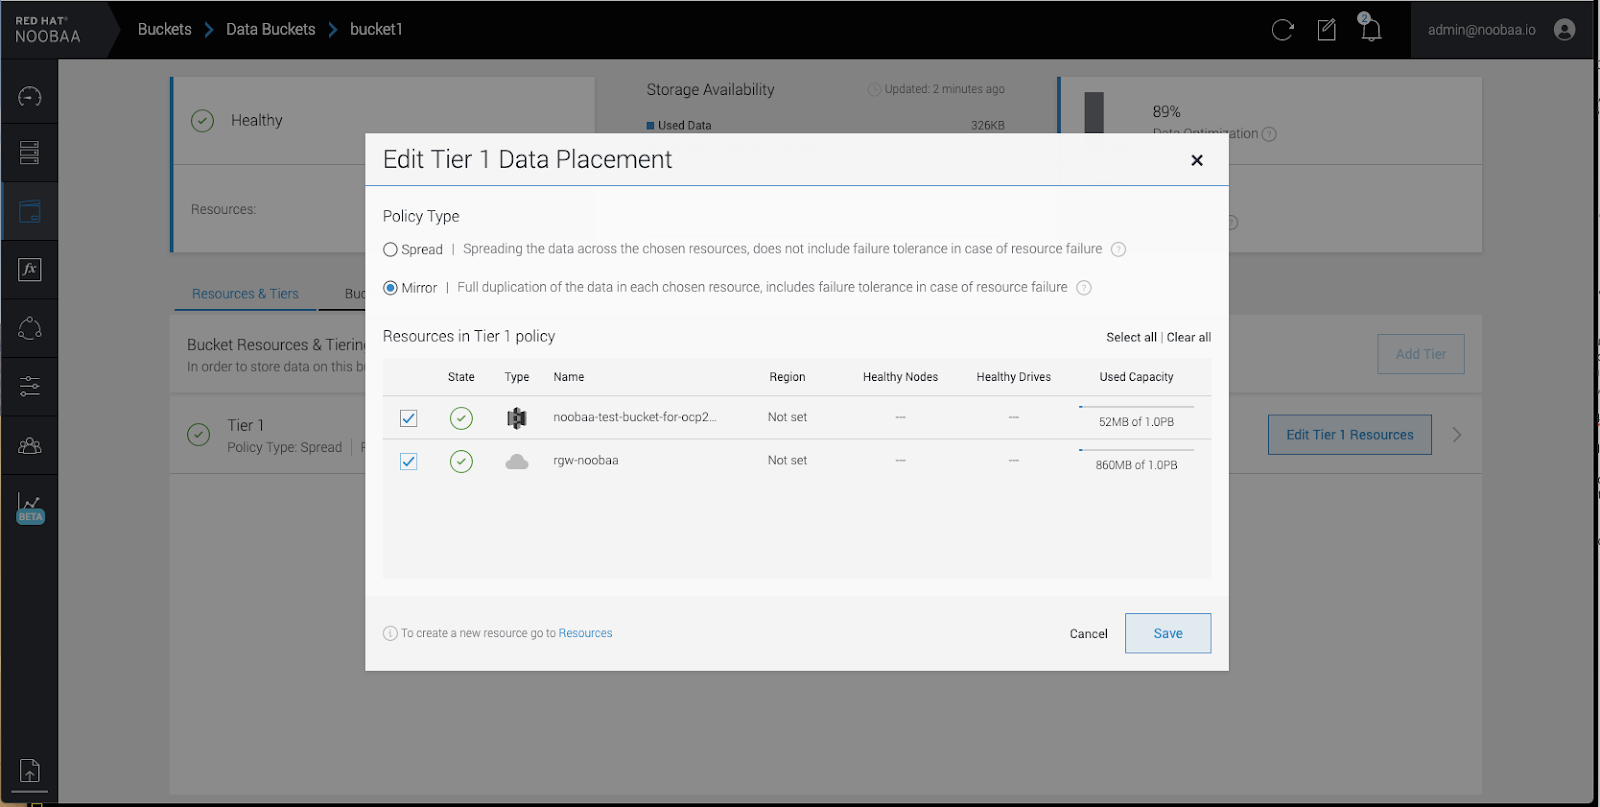
- Click Save.
Resources created in NooBaa UI cannot be used by OpenShift UI or MCG CLI.
7.5. Bucket policies in the Multicloud Object Gateway
OpenShift Container Storage supports AWS S3 bucket policies. Bucket policies allow you to grant users access permissions for buckets and the objects in them.
7.5.1. About bucket policies
Bucket policies are an access policy option available for you to grant permission to your AWS S3 buckets and objects. Bucket policies use JSON-based access policy language. For more information about access policy language, see AWS Access Policy Language Overview.
7.5.2. Using bucket policies
Prerequisites
- A running OpenShift Container Storage Platform
- Access to the Multicloud Object Gateway, see Section 7.2, “Accessing the Multicloud Object Gateway with your applications”
Procedure
To use bucket policies in the Multicloud Object Gateway:
Create the bucket policy in JSON format. See the following example:
{
    "Version": "NewVersion",
    "Statement": [
        {
            "Sid": "Example",
            "Effect": "Allow",
            "Principal": [
                    "john.doe@example.com"
            ],
            "Action": [
                "s3:GetObject"
            ],
            "Resource": [
                "arn:aws:s3:::john_bucket"
            ]
        }
    ]
}
There are many available elements for bucket policies. For details on these elements and examples of how they can be used, see AWS Access Policy Language Overview.
For more examples of bucket policies, see AWS Bucket Policy Examples.
Instructions for creating S3 users can be found in Section 7.5.3, “Creating an AWS S3 user in the Multicloud Object Gateway”.
Using AWS S3 client, use the
put-bucket-policycommand to apply the bucket policy to your S3 bucket:# aws --endpoint ENDPOINT --no-verify-ssl s3api put-bucket-policy --bucket MyBucket --policy BucketPolicy
Replace
ENDPOINTwith the S3 endpointReplace
MyBucketwith the bucket to set the policy onReplace
BucketPolicywith the bucket policy JSON fileAdd
--no-verify-sslif you are using the default self signed certificatesFor example:
# aws --endpoint https://s3-openshift-storage.apps.gogo44.noobaa.org --no-verify-ssl s3api put-bucket-policy -bucket MyBucket --policy file://BucketPolicy
For more information on the
put-bucket-policycommand, see the AWS CLI Command Reference for put-bucket-policy.
The principal element specifies the user that is allowed or denied access to a resource, such as a bucket. Currently, Only NooBaa accounts can be used as principals. In the case of object bucket claims, NooBaa automatically create an account obc-account.<generated bucket name>@noobaa.io.
Bucket policy conditions are not supported.
7.5.3. Creating an AWS S3 user in the Multicloud Object Gateway
Prerequisites
- A running OpenShift Container Storage Platform
- Access to the Multicloud Object Gateway, see Section 7.2, “Accessing the Multicloud Object Gateway with your applications”
Procedure
In your OpenShift Storage console, navigate to Overview → Object Service → select the noobaa link:

Under the Accounts tab, click Create Account:

Select S3 Access Only, provide the Account Name, for example, john.doe@example.com. Click Next:

Select S3 default placement, for example, noobaa-default-backing-store. Select Buckets Permissions. A specific bucket or all buckets can be selected. Click Create:
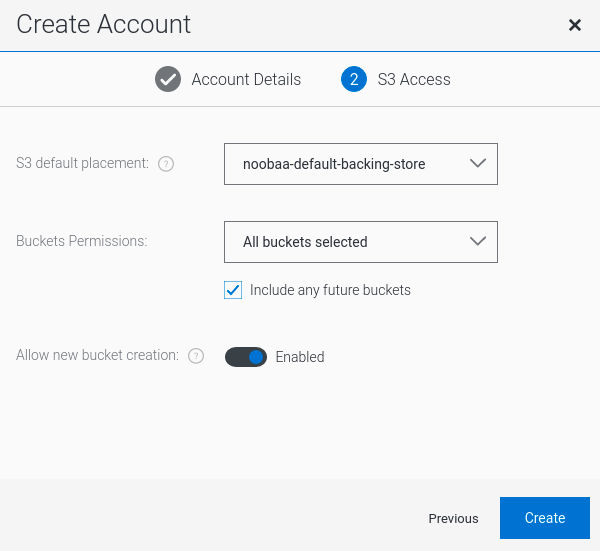
7.6. Object Bucket Claim
An Object Bucket Claim can be used to request an S3 compatible bucket backend for your workloads.
You can create an Object Bucket Claim three ways:
An object bucket claim creates a new bucket and an application account in NooBaa with permissions to the bucket, including a new access key and secret access key. The application account is allowed to access only a single bucket and can’t create new buckets by default.
7.6.1. Dynamic Object Bucket Claim
Similar to Persistent Volumes, you can add the details of the Object Bucket claim to your application’s YAML, and get the object service endpoint, access key, and secret access key available in a configuration map and secret. It is easy to read this information dynamically into environment variables of your application.
Procedure
Add the following lines to your application YAML:
apiVersion: objectbucket.io/v1alpha1
kind: ObjectBucketClaim
metadata:
  name: <obc-name>
spec:
  generateBucketName: <obc-bucket-name>
  storageClassName: openshift-storage.noobaa.io
These lines are the Object Bucket Claim itself.
-
Replace
<obc-name>with the a unique Object Bucket Claim name. -
Replace
<obc-bucket-name>with a unique bucket name for your Object Bucket Claim.
-
Replace
You can add more lines to the YAML file to automate the use of the Object Bucket Claim. The example below is the mapping between the bucket claim result, which is a configuration map with data and a secret with the credentials. This specific job will claim the Object Bucket from NooBaa, which will create a bucket and an account.
apiVersion: batch/v1 kind: Job metadata: name: testjob spec: template: spec: restartPolicy: OnFailure containers: - image: <your application image> name: test env: - name: BUCKET_NAME valueFrom: configMapKeyRef: name: <obc-name> key: BUCKET_NAME - name: BUCKET_HOST valueFrom: configMapKeyRef: name: <obc-name> key: BUCKET_HOST - name: BUCKET_PORT valueFrom: configMapKeyRef: name: <obc-name> key: BUCKET_PORT - name: AWS_ACCESS_KEY_ID valueFrom: secretKeyRef: name: <obc-name> key: AWS_ACCESS_KEY_ID - name: AWS_SECRET_ACCESS_KEY valueFrom: secretKeyRef: name: <obc-name> key: AWS_SECRET_ACCESS_KEY- Replace all instances of <obc-name> with your Object Bucket Claim name.
- Replace <your application image> with your application image.
Apply the updated YAML file:
# oc apply -f <yaml.file>
-
Replace
<yaml.file>with the name of your YAML file.
-
Replace
To view the new configuration map, run the following:
# oc get cm <obc-name> -o yaml
Replace
obc-namewith the name of your Object Bucket Claim.You can expect the following environment variables in the output:
-
BUCKET_HOST- Endpoint to use in the application BUCKET_PORT- The port available for the application-
The port is related to the
BUCKET_HOST. For example, if theBUCKET_HOSTis https://my.example.com, and theBUCKET_PORTis 443, the endpoint for the object service would be https://my.example.com:443.
-
The port is related to the
-
BUCKET_NAME- Requested or generated bucket name -
AWS_ACCESS_KEY_ID- Access key that is part of the credentials -
AWS_SECRET_ACCESS_KEY- Secret access key that is part of the credentials
-
7.6.2. Creating an Object Bucket Claim using the command line interface
When creating an Object Bucket Claim using the command-line interface, you get a configuration map and a Secret that together contain all the information your application needs to use the object storage service.
Prerequisites
Download the MCG command-line interface:
# subscription-manager repos --enable=rh-ocs-4-for-rhel-8-x86_64-rpms
# yum install mcg
Procedure
Use the command-line interface to generate the details of a new bucket and credentials. Run the following command:
# noobaa obc create <obc-name> -n openshift-storage
Replace
<obc-name>with a unique Object Bucket Claim name, for example,myappobc.Additionally, you can use the
--app-namespaceoption to specify the namespace where the Object Bucket Claim configuration map and secret will be created, for example,myapp-namespace.Example output:
INFO[0001] ✅ Created: ObjectBucketClaim "test21obc"
The MCG command-line-interface has created the necessary configuration and has informed OpenShift about the new OBC.
Run the following command to view the Object Bucket Claim:
# oc get obc -n openshift-storage
Example output:
NAME        STORAGE-CLASS                 PHASE   AGE
test21obc   openshift-storage.noobaa.io   Bound   38s
Run the following command to view the YAML file for the new Object Bucket Claim:
# oc get obc test21obc -o yaml -n openshift-storage
Example output:
apiVersion: objectbucket.io/v1alpha1
kind: ObjectBucketClaim
metadata:
  creationTimestamp: "2019-10-24T13:30:07Z"
  finalizers:
  - objectbucket.io/finalizer
  generation: 2
  labels:
    app: noobaa
    bucket-provisioner: openshift-storage.noobaa.io-obc
    noobaa-domain: openshift-storage.noobaa.io
  name: test21obc
  namespace: openshift-storage
  resourceVersion: "40756"
  selfLink: /apis/objectbucket.io/v1alpha1/namespaces/openshift-storage/objectbucketclaims/test21obc
  uid: 64f04cba-f662-11e9-bc3c-0295250841af
spec:
  ObjectBucketName: obc-openshift-storage-test21obc
  bucketName: test21obc-933348a6-e267-4f82-82f1-e59bf4fe3bb4
  generateBucketName: test21obc
  storageClassName: openshift-storage.noobaa.io
status:
  phase: Bound
Inside of your
openshift-storagenamespace, you can find the configuration map and the secret to use this Object Bucket Claim. The CM and the secret have the same name as the Object Bucket Claim. To view the secret:# oc get -n openshift-storage secret test21obc -o yaml
Example output:
Example output:
apiVersion: v1
data:
  AWS_ACCESS_KEY_ID: c0M0R2xVanF3ODR3bHBkVW94cmY=
  AWS_SECRET_ACCESS_KEY: Wi9kcFluSWxHRzlWaFlzNk1hc0xma2JXcjM1MVhqa051SlBleXpmOQ==
kind: Secret
metadata:
  creationTimestamp: "2019-10-24T13:30:07Z"
  finalizers:
  - objectbucket.io/finalizer
  labels:
    app: noobaa
    bucket-provisioner: openshift-storage.noobaa.io-obc
    noobaa-domain: openshift-storage.noobaa.io
  name: test21obc
  namespace: openshift-storage
  ownerReferences:
  - apiVersion: objectbucket.io/v1alpha1
    blockOwnerDeletion: true
    controller: true
    kind: ObjectBucketClaim
    name: test21obc
    uid: 64f04cba-f662-11e9-bc3c-0295250841af
  resourceVersion: "40751"
  selfLink: /api/v1/namespaces/openshift-storage/secrets/test21obc
  uid: 65117c1c-f662-11e9-9094-0a5305de57bb
type: Opaque
The secret gives you the S3 access credentials.
To view the configuration map:
# oc get -n openshift-storage cm test21obc -o yaml
Example output:
apiVersion: v1
data:
  BUCKET_HOST: 10.0.171.35
  BUCKET_NAME: test21obc-933348a6-e267-4f82-82f1-e59bf4fe3bb4
  BUCKET_PORT: "31242"
  BUCKET_REGION: ""
  BUCKET_SUBREGION: ""
kind: ConfigMap
metadata:
  creationTimestamp: "2019-10-24T13:30:07Z"
  finalizers:
  - objectbucket.io/finalizer
  labels:
    app: noobaa
    bucket-provisioner: openshift-storage.noobaa.io-obc
    noobaa-domain: openshift-storage.noobaa.io
  name: test21obc
  namespace: openshift-storage
  ownerReferences:
  - apiVersion: objectbucket.io/v1alpha1
    blockOwnerDeletion: true
    controller: true
    kind: ObjectBucketClaim
    name: test21obc
    uid: 64f04cba-f662-11e9-bc3c-0295250841af
  resourceVersion: "40752"
  selfLink: /api/v1/namespaces/openshift-storage/configmaps/test21obc
  uid: 651c6501-f662-11e9-9094-0a5305de57bb
The configuration map contains the S3 endpoint information for your application.
7.6.3. Creating an Object Bucket Claim using the OpenShift Web Console
You can create an Object Bucket Claim (OBC) using the OpenShift Web Console.
Prerequisites
- Administrative access to the OpenShift Web Console.
- In order for your applications to communicate with the OBC, you need to use the configmap and secret. For more information about this, see Section 7.6.1, “Dynamic Object Bucket Claim”.
Procedure
- Log into the OpenShift Web Console.
- On the left navigation bar, click Storage → Object Bucket Claims.
Click Create Object Bucket Claim:

Enter a name for your object bucket claim and select the appropriate storage class based on your deployment, internal or external, from the dropdown menu:
Internal mode
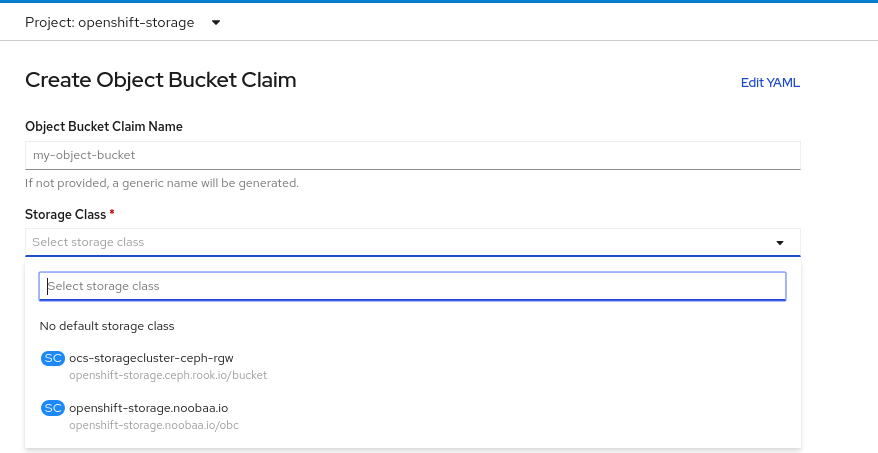
The following storage classes, which were created after deployment, are available for use:
-
ocs-storagecluster-ceph-rgwuses the Ceph Object Gateway (RGW) -
openshift-storage.noobaa.iouses the Multicloud Object Gateway
External mode
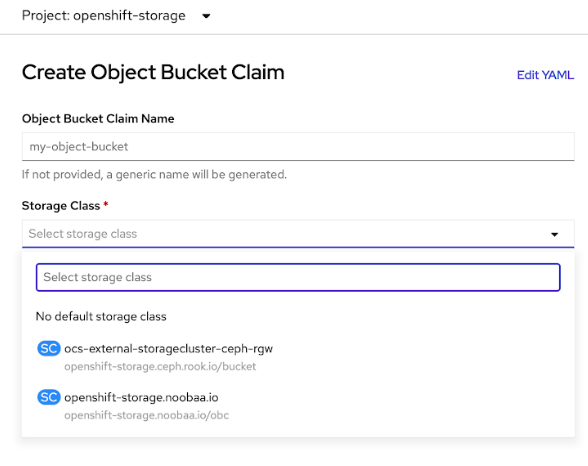
The following storage classes, which were created after deployment, are available for use:
-
ocs-external-storagecluster-ceph-rgwuses the Ceph Object Gateway (RGW) openshift-storage.noobaa.iouses the Multicloud Object GatewayNoteThe RGW OBC storage class is only available with fresh installations of OpenShift Container Storage version 4.5. It does not apply to clusters upgraded from previous OpenShift Container Storage releases.
-
Click Create.
Once you create the OBC, you are redirected to its detail page:
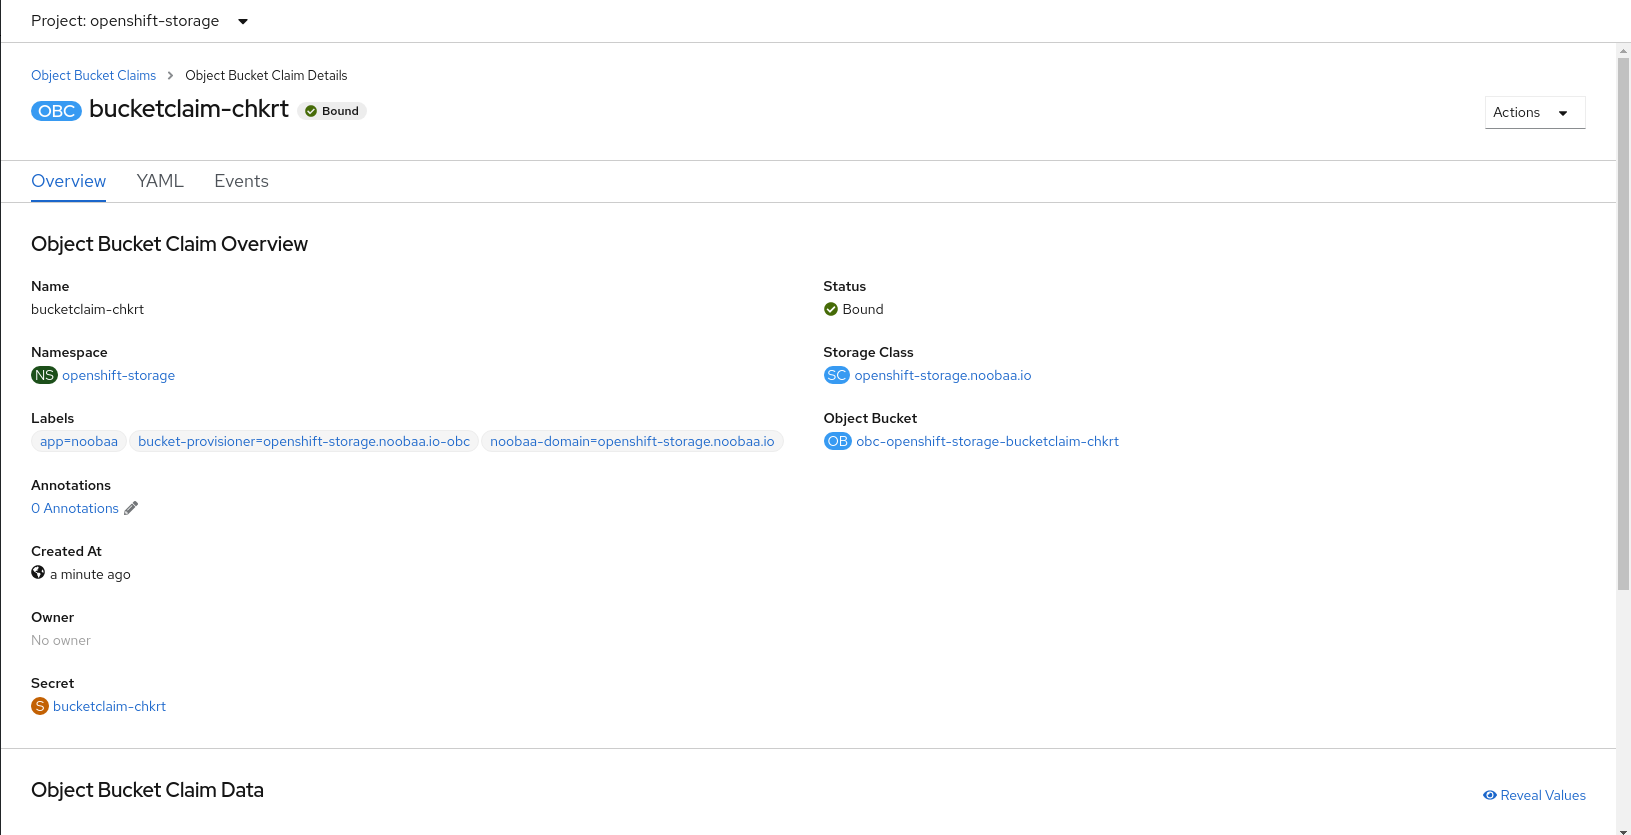
Additional Resources
7.7. Scaling Multicloud Object Gateway performance by adding endpoints
The Multicloud Object Gateway performance may vary from one environment to another. In some cases, specific applications require faster performance which can be easily addressed by scaling S3 endpoints.
The Multicloud Object Gateway resource pool is a group of NooBaa daemon containers that provide two types of services enabled by default:
- Storage service
- S3 endpoint service
7.7.1. S3 endpoints in the Multicloud Object Gateway
The S3 endpoint is a service that every Multicloud Object Gateway provides by default that handles the heavy lifting data digestion in the Multicloud Object Gateway. The endpoint service handles the inline data chunking, deduplication, compression, and encryption, and it accepts data placement instructions from the Multicloud Object Gateway.
7.7.2. Scaling with storage nodes
Prerequisites
- A running OpenShift Container Storage cluster on OpenShift Container Platform with access to the Multicloud Object Gateway.
A storage node in the Multicloud Object Gateway is a NooBaa daemon container attached to one or more Persistent Volumes and used for local object service data storage. NooBaa daemons can be deployed on Kubernetes nodes. This can be done by creating a Kubernetes pool consisting of StatefulSet pods.
Procedure
In the Multicloud Object Gateway user interface, from the Overview page, click Add Storage Resources:
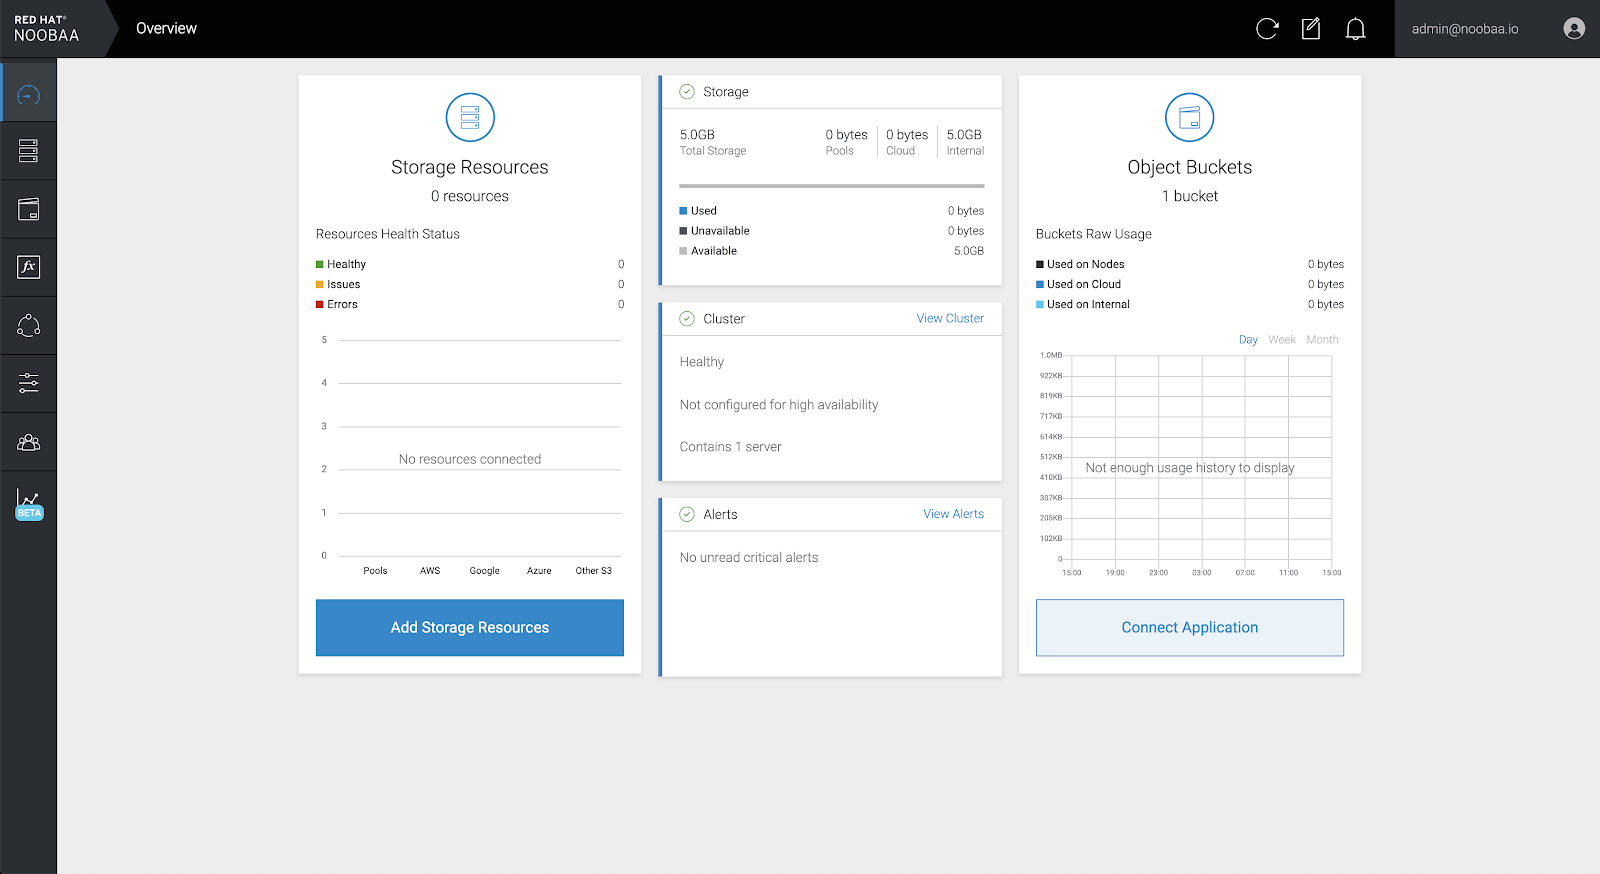
In the window, click Deploy Kubernetes Pool:
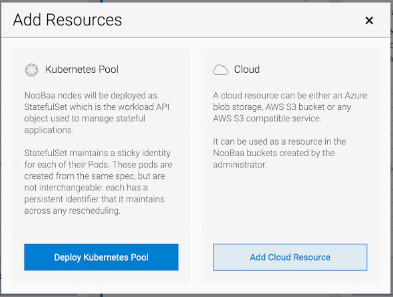
In the Create Pool step create the target pool for the future installed nodes.
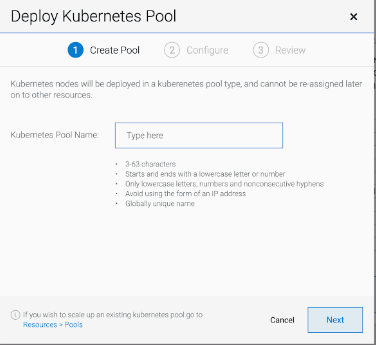
In the Configure step, configure the number of requested pods and the size of each PV. For each new pod, one PV is be created.
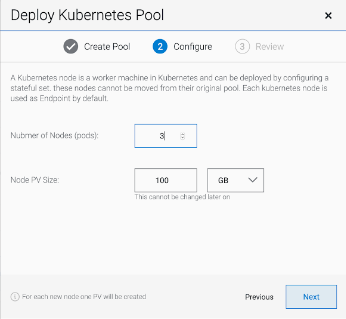
- In the Review step, you can find the details of the new pool and select the deployment method you wish to use: local or external deployment. If local deployment is selected, the Kubernetes nodes will deploy within the cluster. If external deployment is selected, you will be provided with a YAML file to run externally.
All nodes will be assigned to the pool you chose in the first step, and can be found under Resources → Storage resources → Resource name:

Chapter 8. Managing persistent volume claims
Expanding PVCs is not supported for PVCs backed by OpenShift Container Storage.
8.1. Configuring application pods to use OpenShift Container Storage
Follow the instructions in this section to configure OpenShift Container Storage as storage for an application pod.
Prerequisites
- You have administrative access to OpenShift Web Console.
-
OpenShift Container Storage Operator is installed and running in the
openshift-storagenamespace. In OpenShift Web Console, click Operators → Installed Operators to view installed operators. - The default storage classes provided by OpenShift Container Storage are available. In OpenShift Web Console, click Storage → Storage Classes to view default storage classes.
Procedure
Create a Persistent Volume Claim (PVC) for the application to use.
- In OpenShift Web Console, click Storage → Persistent Volume Claims.
- Set the Project for the application pod.
Click Create Persistent Volume Claim.
- Specify a Storage Class provided by OpenShift Container Storage.
-
Specify the PVC Name, for example,
myclaim. - Select the required Access Mode.
- Specify a Size as per application requirement.
-
Click Create and wait until the PVC is in
Boundstatus.
Configure a new or existing application pod to use the new PVC.
For a new application pod, perform the following steps:
- Click Workloads →Pods.
- Create a new application pod.
Under the
spec:section, addvolume:section to add the new PVC as a volume for the application pod.volumes: - name: <volume_name> persistentVolumeClaim: claimName: <pvc_name>For example:
volumes:
  - name: mypd
    persistentVolumeClaim:
      claimName: myclaim
For an existing application pod, perform the following steps:
- Click Workloads →Deployment Configs.
- Search for the required deployment config associated with the application pod.
- Click on its Action menu (⋮) → Edit Deployment Config.
Under the
spec:section, addvolume:section to add the new PVC as a volume for the application pod and click Save.volumes: - name: <volume_name> persistentVolumeClaim: claimName: <pvc_name>For example:
volumes:
  - name: mypd
    persistentVolumeClaim:
      claimName: myclaim
Verify that the new configuration is being used.
- Click Workloads → Pods.
- Set the Project for the application pod.
-
Verify that the application pod appears with a status of
Running. - Click the application pod name to view pod details.
-
Scroll down to Volumes section and verify that the volume has a Type that matches your new Persistent Volume Claim, for example,
myclaim.
8.2. Viewing Persistent Volume Claim request status
Use this procedure to view the status of a PVC request.
Prerequisites
- Administrator access to OpenShift Container Storage.
Procedure
- Log in to OpenShift Web Console.
- Click Storage → Persistent Volume Claims
- Search for the required PVC name by using the Filter textbox. You can also filter the list of PVCs by Name or Label to narrow down the list
- Check the Status column corresponding to the required PVC.
- Click the required Name to view the PVC details.
8.3. Reviewing Persistent Volume Claim request events
Use this procedure to review and address Persistent Volume Claim (PVC) request events.
Prerequisites
- Administrator access to OpenShift Web Console.
Procedure
- Log in to OpenShift Web Console.
- Click Home → Overview → Persistent Storage
- Locate the Inventory card to see the number of PVCs with errors.
- Click Storage → Persistent Volume Claims
- Search for the required PVC using the Filter textbox.
- Click on the PVC name and navigate to Events
- Address the events as required or as directed.
8.4. Dynamic provisioning
8.4.1. About dynamic provisioning
The StorageClass resource object describes and classifies storage that can be requested, as well as provides a means for passing parameters for dynamically provisioned storage on demand. StorageClass objects can also serve as a management mechanism for controlling different levels of storage and access to the storage. Cluster Administrators (cluster-admin) or Storage Administrators (storage-admin) define and create the StorageClass objects that users can request without needing any intimate knowledge about the underlying storage volume sources.
The OpenShift Container Platform persistent volume framework enables this functionality and allows administrators to provision a cluster with persistent storage. The framework also gives users a way to request those resources without having any knowledge of the underlying infrastructure.
Many storage types are available for use as persistent volumes in OpenShift Container Platform. While all of them can be statically provisioned by an administrator, some types of storage are created dynamically using the built-in provider and plug-in APIs.
8.4.2. Dynamic provisioning in OpenShift Container Storage
Red Hat OpenShift Container Storage is software-defined storage that is optimised for container environments. It runs as an operator on OpenShift Container Platform to provide highly integrated and simplified persistent storage management for containers.
OpenShift Container Storage supports a variety of storage types, including:
- Block storage for databases
- Shared file storage for continuous integration, messaging, and data aggregation
- Object storage for archival, backup, and media storage
Version 4.5 uses Red Hat Ceph Storage to provide the file, block, and object storage that backs persistent volumes, and Rook.io to manage and orchestrate provisioning of persistent volumes and claims. NooBaa provides object storage, and its Multicloud Gateway allows object federation across multiple cloud environments (available as a Technology Preview).
In OpenShift Container Storage 4.5, the Red Hat Ceph Storage Container Storage Interface (CSI) driver for RADOS Block Device (RBD) and Ceph File System (CephFS) handles the dynamic provisioning requests. When a PVC request comes in dynamically, the CSI driver has the following options:
-
Create a PVC with ReadWriteOnce (RWO) and ReadWriteMany (RWX) access that is based on Ceph RBDs with volume mode
Block -
Create a PVC with ReadWriteOnce (RWO) access that is based on Ceph RBDs with volume mode
Filesystem -
Create a PVC with ReadWriteOnce (RWO) and ReadWriteMany (RWX) access that is based on CephFS for volume mode
Filesystem
The judgement of which driver (RBD or CephFS) to use is based on the entry in the storageclass.yaml file.
8.4.3. Available dynamic provisioning plug-ins
OpenShift Container Platform provides the following provisioner plug-ins, which have generic implementations for dynamic provisioning that use the cluster’s configured provider’s API to create new storage resources:
| Storage type | Provisioner plug-in name | Notes |
|---|---|---|
| OpenStack Cinder |
| |
| AWS Elastic Block Store (EBS) |
|
For dynamic provisioning when using multiple clusters in different zones, tag each node with |
| AWS Elastic File System (EFS) | Dynamic provisioning is accomplished through the EFS provisioner pod and not through a provisioner plug-in. | |
| Azure Disk |
| |
| Azure File |
|
The |
| GCE Persistent Disk (gcePD) |
| In multi-zone configurations, it is advisable to run one OpenShift Container Platform cluster per GCE project to avoid PVs from being created in zones where no node in the current cluster exists. |
|
|
Any chosen provisioner plug-in also requires configuration for the relevant cloud, host, or third-party provider as per the relevant documentation.
Chapter 9. Replacing storage nodes
You can choose one of the following procedures to replace storage nodes:
9.1. Replacing operational nodes on Azure installer-provisioned infrastructure
Use this procedure to replace an operational node on Azure installer-provisioned infrastructure (IPI).
Procedure
- Log in to OpenShift Web Console and click Compute → Nodes.
- Identify the node that needs to be replaced. Take a note of its Machine Name.
Mark the node as unschedulable using the following command:
$ oc adm cordon <node_name>
Drain the node using the following command:
$ oc adm drain <node_name> --force --delete-local-data --ignore-daemonsets
ImportantThis activity may take at least 5-10 minutes or more. Ceph errors generated during this period are temporary and are automatically resolved when the new node is labeled and functional.
- Click Compute → Machines. Search for the required machine.
- Besides the required machine, click the Action menu (⋮) → Delete Machine.
- Click Delete to confirm the machine deletion. A new machine is automatically created.
Wait for new machine to start and transition into Running state.
ImportantThis activity may take at least 5-10 minutes or more.
- Click Compute → Nodes, confirm if the new node is in Ready state.
Apply the OpenShift Container Storage label to the new node using any one of the following:
- From User interface
- For the new node, click Action Menu (⋮) → Edit Labels
-
Add
cluster.ocs.openshift.io/openshift-storageand click Save.
- From Command line interface
Execute the following command to apply the OpenShift Container Storage label to the new node:
$ oc label node <new_node_name> cluster.ocs.openshift.io/openshift-storage=""
Verification steps
Execute the following command and verify that the new node is present in the output:
$ oc get nodes --show-labels | grep cluster.ocs.openshift.io/openshift-storage= |cut -d' ' -f1
Click Workloads → Pods, confirm that at least the following pods on the new node are in Running state:
-
csi-cephfsplugin-* -
csi-rbdplugin-*
-
- Verify that all other required OpenShift Container Storage pods are in Running state.
- If verification steps fail, kindly contact Red Hat Support.
9.2. Replacing failed nodes on Azure installer-provisioned infrastructure
Perform this procedure to replace a failed node which is not operational on Azure installer-provisioned infrastructure (IPI) for OpenShift Container Storage.
Procedure
- Log in to OpenShift Web Console and click Compute → Nodes.
- Identify the faulty node and click on its Machine Name.
- Click Actions → Edit Annotations, and click Add More.
-
Add
machine.openshift.io/exclude-node-drainingand click Save. - Click Actions → Delete Machine, and click Delete.
A new machine is automatically created, wait for new machine to start.
ImportantThis activity may take at least 5-10 minutes or more. Ceph errors generated during this period are temporary and are automatically resolved when the new node is labeled and functional.
- Click Compute → Nodes, confirm if the new node is in Ready state.
Apply the OpenShift Container Storage label to the new node using any one of the following:
- From User interface
- For the new node, click Action Menu (⋮) → Edit Labels
-
Add
cluster.ocs.openshift.io/openshift-storageand click Save.
- From Command line interface
Execute the following command to apply the OpenShift Container Storage label to the new node:
$ oc label node <new_node_name> cluster.ocs.openshift.io/openshift-storage=""
- [Optional]: If the failed Azure instance is not removed automatically, terminate the instance from Azure console.
Verification steps
Execute the following command and verify that the new node is present in the output:
$ oc get nodes --show-labels | grep cluster.ocs.openshift.io/openshift-storage= |cut -d' ' -f1
Click Workloads → Pods, confirm that at least the following pods on the new node are in Running state:
-
csi-cephfsplugin-* -
csi-rbdplugin-*
-
- Verify that all other required OpenShift Container Storage pods are in Running state.
- If verification steps fail, kindly contact Red Hat Support.
Chapter 10. Replacing storage devices
10.1. Replacing operational or failed storage devices on Azure installer-provisioned infrastructure
When you need to replace a device in a dynamically created storage cluster on an Azure installer-provisioned infrastructure, you must replace the storage node. For information about how to replace nodes, see:
Chapter 11. Updating OpenShift Container Storage
To update your cluster, you must first update Red Hat OpenShift Container Platform, and then, update Red Hat OpenShift Container Storage. It is recommended to use the same version of Red Hat OpenShift Container Platform with Red Hat OpenShift Container Storage. Refer to this Red Hat Knowledgebase article for a complete OpenShift Container Platform and OpenShift Container Storage supportability and compatibility matrix.
You can update OpenShift Container Storage in:
The update procedure is the same for proxy environment.
11.1. Updating OpenShift Container Storage in internal mode
Use the following procedures to update your OpenShift Container Storage cluster deployed in internal mode.
11.1.1. Enabling automatic updates for OpenShift Container Storage operator in internal mode
Use this procedure to enable automatic update approval for updating OpenShift Container Storage operator in OpenShift Container Platform.
Prerequisites
- Under Persistent Storage in Status card, confirm that the OCS cluster is healthy and data is resilient.
- Update the OpenShift Container Platform cluster to the latest stable release of version 4.4.X or 4.5.Y, see Updating Clusters.
Switch the Red Hat OpenShift Container Storage channel from
stable-4.4tostable-4.5. For details about channels, see OpenShift Container Platform upgrade channels and releases.NoteYou are required to switch channels only when you are updating minor versions (for example, updating from 4.4 to 4.5) and not when updating between batch updates of 4.5 (for example, updating from 4.5.0 to 4.5.1).
Ensure that all OpenShift Container Storage Pods, including the operator pods, are in
Runningstate in theopenshift-storage namespace.To view the state of the pods, click Workloads → Pods from the left pane of the OpenShift Web Console. Select openshift-storage from the Project drop down list.
- Ensure that you have sufficient time to complete the Openshift Container Storage (OCS) update process, as the update time varies depending on the number of OSDs that run in the cluster.
Procedure
- Log in to OpenShift Web Console.
- Click Operators → Installed Operators
-
Select the
openshift-storageproject. - Click on the OpenShift Container Storage operator name.
- Click Subscription tab and click the link under Approval.
- Select Automatic (default) and click Save.
Perform one of the following depending on the Upgrade Status:
Upgrade Status shows requires approval.
NoteUpgrade status shows requires approval if the new OpenShift Container Storage version is already detected in the channel, and approval strategy was changed from Manual to Automatic at the time of update.
- Click on the Install Plan link.
- On the InstallPlan Details page, click Preview Install Plan.
- Review the install plan and click Approve.
- Wait for the Status to change from Unknown to Created.
- Click Operators → Installed Operators
-
Select the
openshift-storageproject. - Wait for the Status to change to Up to date
Upgrade Status does not show requires approval:
- Wait for the update to initiate. This may take up to 20 minutes.
- Click Operators → Installed Operators
-
Select the
openshift-storageproject. - Wait for the Status to change to Up to date
Verification steps
- Click Overview → Persistent Storage tab and in Status card confirm that the OCS cluster has a green tick mark indicating it is healthy.
Click Operators → Installed Operators → OpenShift Container Storage Operator. Under Storage Cluster, verify that the cluster service status is
Ready.NoteOnce updated from OpenShift Container Storage version 4.4 to 4.5, the
Versionfield here will still display 4.4. This is because theocs-operatordoes not update the string represented in this field.Ensure that all OpenShift Container Storage Pods, including the operator pods, are in
Runningstate in theopenshift-storage namespace.To view the state of the pods, click Workloads → Pods from the left pane of the OpenShift Web Console. Select openshift-storage from the Project drop down list.
- If verification steps fail, kindly contact Red Hat Support.
Additional Resources
If you face any issues while updating OpenShift Container Storage, see the Commonly required logs for troubleshooting section in the Troubleshooting guide.
11.1.2. Manually updating OpenShift Container Storage operator in internal mode
Use this procedure to update OpenShift Container Storage operator by providing manual approval to the install plan.
Prerequisites
- Under Persistent Storage in Status card, confirm that the OCS cluster is healthy and data is resilient.
- Update the OpenShift Container Platform cluster to the latest stable release of version 4.4.X or 4.5.Y, see Updating Clusters.
Switch the Red Hat OpenShift Container Storage channel channel from
stable-4.4tostable-4.5. For details about channels, see OpenShift Container Platform upgrade channels and releases.NoteYou are required to switch channels only when you are updating minor versions (for example, updating from 4.4 to 4.5) and not when updating between batch updates of 4.5 (for example, updating from 4.5.0 to 4.5.1).
Ensure that all OpenShift Container Storage Pods, including the operator pods, are in
Runningstate in theopenshift-storage namespace.To view the state of the pods, click Workloads → Pods from the left pane of the OpenShift Web Console. Select openshift-storage from the Project drop down list.
- Ensure that you have sufficient time to complete the Openshift Container Storage (OCS) update process, as the update time varies depending on the number of OSDs that run in the cluster.
Procedure
- Log in to OpenShift Web Console.
- Click Operators → Installed Operators
-
Select the
openshift-storageproject. - Click on the OpenShift Container Storage operator name.
- Click Subscription tab and click the link under Approval.
- Select Manual and click Save.
- Wait for the Upgrade Status to change to Upgrading.
- If the Upgrade Status shows requires approval, click on requires approval.
- On the InstallPlan Details page, click Preview Install Plan.
- Review the install plan and click Approve.
- Wait for the Status to change from Unknown to Created.
- Click Operators → Installed Operators
-
Select the
openshift-storageproject. - Wait for the Status to change to Up to date
Verification steps
- Click Overview → Persistent Storage tab and in Status card confirm that the OCS cluster has a green tick mark indicating it is healthy.
Click Operators → Installed Operators → OpenShift Container Storage Operator. Under Storage Cluster, verify that the cluster service status is
Ready.NoteOnce updated from OpenShift Container Storage version 4.4 to 4.5, the
Versionfield here will still display 4.4. This is because theocs-operatordoes not update the string represented in this field.Ensure that all OpenShift Container Storage Pods, including the operator pods, are in
Runningstate in theopenshift-storage namespace.To view the state of the pods, click Workloads → Pods from the left pane of the OpenShift Web Console. Select openshift-storage from the Project drop down list.
- If verification steps fail, kindly contact Red Hat Support.
Additional Resources
If you face any issues while updating OpenShift Container Storage, see the Commonly required logs for troubleshooting section in the Troubleshooting guide.
11.2. Preparing to update in a disconnected environment
When your Red Hat OpenShift Container Storage environment is not directly connected to the internet, some additional configuration is required to provide the Operator Lifecycle Manager (OLM) with alternatives to the default Operator Hub and image registries.
See the OpenShift Container Platform documentation for more general information: Updating an Operator catalog image.
To configure your cluster for disconnected update:
When these steps are complete, Continue with update as usual.
11.2.1. Adding mirror registry authentication details
Prerequisites
- Verify that your existing disconnected cluster uses OpenShift Container Platform 4.3 or higher.
-
Verify that you have an
oc clientversion of 4.4 or higher. - Prepare a mirror host with a mirror registry. See Preparing your mirror host for details.
Procedure
-
Log in to the OpenShift Container Platform cluster using the
cluster-adminrole. Locate your
auth.jsonfile.This file is generated when you use podman or docker to log in to a registry. It is located in one of the following locations:
-
~/.docker/auth.json -
/run/user/<UID>/containers/auth.json -
/var/run/containers/<UID>/auth.json
-
Obtain your unique Red Hat registry pull secret and paste it into your
auth.jsonfile. It will look something like this.{ "auths": { "cloud.openshift.com": { "auth": "*****************", "email": "user@example.com" }, "quay.io": { "auth": "*****************", "email": "user@example.com" }, "registry.connect.redhat.com": { "auth": "*****************", "email": "user@example.com" }, "registry.redhat.io": { "auth": "*****************", "email": "user@example.com" } } }Export environment variables with the appropriate details for your setup.
$ export AUTH_FILE="<location_of_auth.json>"
$ export MIRROR_REGISTRY_DNS="<your_registry_url>:<port>"
Use
podmanto log in to the mirror registry and store the credentials in the${AUTH_FILE}.$ podman login ${MIRROR_REGISTRY_DNS} --tls-verify=false --authfile ${AUTH_FILE}This adds the mirror registry to the
auth.jsonfile.{ "auths": { "cloud.openshift.com": { "auth": "*****************", "email": "user@example.com" }, "quay.io": { "auth": "*****************", "email": "user@example.com" }, "registry.connect.redhat.com": { "auth": "*****************", "email": "user@example.com" }, "registry.redhat.io": { "auth": "*****************", "email": "user@example.com" }, "<mirror_registry>": { "auth": "*****************", } } }
11.2.2. Building and mirroring the Red Hat operator catalog
Follow this process on a host that has access to Red Hat registries to create a mirror of those registries.
Prerequisites
- Run these commands as a cluster administrator.
-
Be aware that mirroring the
redhat-operatorcatalog can take hours to complete, and requires substantial available disk space on the mirror host.
Procedure
Build the catalog for
redhat-operators.Set
--fromto theose-operator-registrybase image using the tag that matches the target OpenShift Container Platform cluster major and minor version.$ oc adm catalog build --appregistry-org redhat-operators \ --from=registry.redhat.io/openshift4/ose-operator-registry:v4.5 \ --to=${MIRROR_REGISTRY_DNS}/olm/redhat-operators:v2 \ --registry-config=${AUTH_FILE} \ --filter-by-os="linux/amd64" --insecureMirror the catalog for
redhat-operators.This is a long operation and can take 1-5 hours. Make sure there is 100 GB available disk space on the mirror host.
$ oc adm catalog mirror ${MIRROR_REGISTRY_DNS}/olm/redhat-operators:v2 \
${MIRROR_REGISTRY_DNS} --registry-config=${AUTH_FILE} --insecure
11.2.3. Creating Operator imageContentSourcePolicy
After the oc adm catalog mirror command is completed, the imageContentSourcePolicy.yaml file gets created. The output directory for this file is usually, ./[catalog image name]-manifests). Use this procedure to add any missing entries to the .yaml file and apply them to cluster.
Procedure
Check the content of this file for the mirrors mapping shown as follows:
spec: repositoryDigestMirrors: - mirrors: - <your_registry>/ocs4 source: registry.redhat.io/ocs4 - mirrors: - <your_registry>/rhceph source: registry.redhat.io/rhceph - mirrors: - <your_registry>/openshift4 source: registry.redhat.io/openshift4 - mirrors: - <your_registry>/rhscl source: registry.redhat.io/rhscl-
Add any missing entries to the end of the
imageContentSourcePolicy.yamlfile. Apply the imageContentSourcePolicy.yaml file to the cluster.
$ oc apply -f ./[output dir]/imageContentSourcePolicy.yaml
Once the Image Content Source Policy is updated, all the nodes (master, infra, and workers) in the cluster need to be updated and rebooted. This process is automatically handled through the Machine Config Pool operator and take up to 30 minutes although the exact elapsed time might vary based on the number of nodes in your OpenShift cluster. You can monitor the update process by using the
oc get mcpcommand or theoc get nodecommand.
11.2.4. Updating redhat-operator CatalogSource
Procedure
Recreate a
CatalogSourceobject that references the catalog image for Red Hat operators.NoteMake sure you have mirrored the correct catalog source with the correct version (that is,
v2).
+ Save the following in a redhat-operator-catalogsource.yaml file, remembering to replace <your_registry> with your mirror registry URL:
+
apiVersion: operators.coreos.com/v1alpha1
kind: CatalogSource
metadata:
  name: redhat-operators
  namespace: openshift-marketplace
spec:
  sourceType: grpc
  icon:
    base64data: PHN2ZyBpZD0iTGF5ZXJfMSIgZGF0YS1uYW1lPSJMYXllciAxIiB4bWxucz0iaHR0cDovL3d3dy53My5vcmcvMjAwMC9zdmciIHZpZXdCb3g9IjAgMCAxOTIgMTQ1Ij48ZGVmcz48c3R5bGU+LmNscy0xe2ZpbGw6I2UwMDt9PC9zdHlsZT48L2RlZnM+PHRpdGxlPlJlZEhhdC1Mb2dvLUhhdC1Db2xvcjwvdGl0bGU+PHBhdGggZD0iTTE1Ny43Nyw2Mi42MWExNCwxNCwwLDAsMSwuMzEsMy40MmMwLDE0Ljg4LTE4LjEsMTcuNDYtMzAuNjEsMTcuNDZDNzguODMsODMuNDksNDIuNTMsNTMuMjYsNDIuNTMsNDRhNi40Myw2LjQzLDAsMCwxLC4yMi0xLjk0bC0zLjY2LDkuMDZhMTguNDUsMTguNDUsMCwwLDAtMS41MSw3LjMzYzAsMTguMTEsNDEsNDUuNDgsODcuNzQsNDUuNDgsMjAuNjksMCwzNi40My03Ljc2LDM2LjQzLTIxLjc3LDAtMS4wOCwwLTEuOTQtMS43My0xMC4xM1oiLz48cGF0aCBjbGFzcz0iY2xzLTEiIGQ9Ik0xMjcuNDcsODMuNDljMTIuNTEsMCwzMC42MS0yLjU4LDMwLjYxLTE3LjQ2YTE0LDE0LDAsMCwwLS4zMS0zLjQybC03LjQ1LTMyLjM2Yy0xLjcyLTcuMTItMy4yMy0xMC4zNS0xNS43My0xNi42QzEyNC44OSw4LjY5LDEwMy43Ni41LDk3LjUxLjUsOTEuNjkuNSw5MCw4LDgzLjA2LDhjLTYuNjgsMC0xMS42NC01LjYtMTcuODktNS42LTYsMC05LjkxLDQuMDktMTIuOTMsMTIuNSwwLDAtOC40MSwyMy43Mi05LjQ5LDI3LjE2QTYuNDMsNi40MywwLDAsMCw0Mi41Myw0NGMwLDkuMjIsMzYuMywzOS40NSw4NC45NCwzOS40NU0xNjAsNzIuMDdjMS43Myw4LjE5LDEuNzMsOS4wNSwxLjczLDEwLjEzLDAsMTQtMTUuNzQsMjEuNzctMzYuNDMsMjEuNzdDNzguNTQsMTA0LDM3LjU4LDc2LjYsMzcuNTgsNTguNDlhMTguNDUsMTguNDUsMCwwLDEsMS41MS03LjMzQzIyLjI3LDUyLC41LDU1LC41LDc0LjIyYzAsMzEuNDgsNzQuNTksNzAuMjgsMTMzLjY1LDcwLjI4LDQ1LjI4LDAsNTYuNy0yMC40OCw1Ni43LTM2LjY1LDAtMTIuNzItMTEtMjcuMTYtMzAuODMtMzUuNzgiLz48L3N2Zz4=
    mediatype: image/svg+xml
  image: <your_registry>/olm/redhat-operators:v2
  displayName: Redhat Operators Catalog
  publisher: Red Hat
Create a catalogsource using the redhat-operator-catalogsource.yaml file:
$ oc apply -f redhat-operator-catalogsource.yaml
Verify that the new
redhat-operatorpod is running.$ oc get pod -n openshift-marketplace | grep redhat-operators
11.2.5. Continue to update
After your alternative catalog source is configured, you can continue to the appropriate update process:

