
Managing OpenShift Container Storage
Instructions for cluster and storage administrators
Abstract
Chapter 1. Overview
Managing OpenShift Container Storage is written to help administrators understand how to manage and administer their Red Hat OpenShift Container Storage cluster.
Most management tasks focus on a single resource. This document is divided into chapters based on the resource that an administrator is trying to modify:
- Chapter 2, Configure storage for OpenShift Container Platform services shows you how to use OpenShift Container Storage for core OpenShift Container Platform services.
- Chapter 3, Backing OpenShift Container Platform applications with OpenShift Container Storage provides information about how to configure OpenShift Container Platform applications to use OpenShift Container Storage.
- Chapter 4, Scaling storage nodes provides information about scaling storage capacity of OpenShift Container Storage nodes.
- Chapter 5, Managing persistent volume claims provides information about managing Persistent Volume Claim requests, and automating the fulfillment of those requests.
- Chapter 6, Managing container storage interface (CSI) component placements provides information about setting tolerations to bring up container storage interface component on the nodes.
- Chapter 7, Multicloud Object Gateway provides information about the Multicloud Object Gateway.
- Chapter 9, Replacing storage nodes shows you how to replace an operational or failed node on AWS UPI, AWS IPI, and VMware UPI for OpenShift Container Storage.
- Chapter 10, Replacing storage devices provides instructions for replacing a device for OpenShift Container Storage deployed dynamically on VMware and bare metal infrastructures and OpenShift Container Storage deployed using local storage devices.
- Chapter 11, Updating OpenShift Container Storage provides instructions for upgrading your OpenShift Container Storage cluster.
Chapter 2. Configure storage for OpenShift Container Platform services
You can use OpenShift Container Storage to provide storage for OpenShift Container Platform services such as image registry, monitoring, and logging.
The process for configuring storage for these services depends on the infrastructure used in your OpenShift Container Storage deployment.
Always ensure that you have plenty of storage capacity for these services. If the storage for these critical services runs out of space, the cluster becomes inoperable and very difficult to recover.
Red Hat recommends configuring shorter curation and retention intervals for these services. See Configuring Curator and Modifying retention time for Prometheus metrics data in the OpenShift Container Platform documentation for details.
If you do run out of storage space for these services, contact Red Hat Customer Support.
2.1. Configuring Image Registry to use OpenShift Container Storage
OpenShift Container Platform provides a built in Container Image Registry which runs as a standard workload on the cluster. A registry is typically used as a publication target for images built on the cluster as well as a source of images for workloads running on the cluster.
Follow the instructions in this section to configure OpenShift Container Storage as storage for the Container Image Registry. On AWS, it is not required to change the storage for the registry. However, it is recommended to change the storage to OpenShift Container Storage persistent volume for vSphere and Baremetal platforms.
This process does not migrate data from an existing image registry to the new image registry. If you already have container images in your existing registry, back up your registry before you complete this process, and re-register your images when this process is complete.
Prerequisites
- You have administrative access to OpenShift Web Console.
-
OpenShift Container Storage Operator is installed and running in the
openshift-storagenamespace. In OpenShift Web Console, click Operators → Installed Operators to view installed operators. -
Image Registry Operator is installed and running in the
openshift-image-registrynamespace. In OpenShift Web Console, click Administration → Cluster Settings → Cluster Operators to view cluster operators. -
The
ocs-storagecluster-cephfsstorage class is available. In OpenShift Web Console, click Storage → Storage Classes to view available storage classes.
Procedure
Create a Persistent Volume Claim for the Image Registry to use.
- In OpenShift Web Console, click Storage → Persistent Volume Claims.
-
Set the Project to
openshift-image-registry. Click Create Persistent Volume Claim.
-
Specify a Storage Class of
ocs-storagecluster-cephfs. -
Specify the Persistent Volume Claim Name, for example,
ocs4registry. -
Specify an Access Mode of
Shared Access (RWX). - Specify a Size of at least 100 GB.
Click Create.
Wait until the status of the new Persistent Volume Claim is listed as
Bound.
-
Specify a Storage Class of
Configure the cluster’s Image Registry to use the new Persistent Volume Claim.
- Click Administration →Custom Resource Definitions.
-
Click the
Configcustom resource definition associated with theimageregistry.operator.openshift.iogroup. - Click the Instances tab.
- Beside the cluster instance, click the Action Menu (⋮) → Edit Config.
Add the new Persistent Volume Claim as persistent storage for the Image Registry.
Add the following under
spec:, replacing the existingstorage:section if necessary.storage: pvc: claim: <new-pvc-name>For example:
storage: pvc: claim: ocs4registry- Click Save.
Verify that the new configuration is being used.
- Click Workloads → Pods.
-
Set the Project to
openshift-image-registry. -
Verify that the new
image-registry-*pod appears with a status ofRunning, and that the previousimage-registry-*pod terminates. -
Click the new
image-registry-*pod to view pod details. -
Scroll down to Volumes and verify that the
registry-storagevolume has a Type that matches your new Persistent Volume Claim, for example,ocs4registry.
2.2. Configuring monitoring to use OpenShift Container Storage
OpenShift Container Storage provides a monitoring stack that is comprised of Prometheus and AlertManager.
Follow the instructions in this section to configure OpenShift Container Storage as storage for the monitoring stack.
Monitoring will not function if it runs out of storage space. Always ensure that you have plenty of storage capacity for monitoring.
Red Hat recommends configuring a short retention intervals for this service. See the Modifying retention time for Prometheus metrics data sub section of Configuring persistent storage in the OpenShift Container Platform documentation for details.
Prerequisites
- You have administrative access to OpenShift Web Console.
-
OpenShift Container Storage Operator is installed and running in the
openshift-storagenamespace. In OpenShift Web Console, click Operators → Installed Operators to view installed operators. -
Monitoring Operator is installed and running in the
openshift-monitoringnamespace. In OpenShift Web Console, click Administration → Cluster Settings → Cluster Operators to view cluster operators. -
The
ocs-storagecluster-ceph-rbdstorage class is available. In OpenShift Web Console, click Storage → Storage Classes to view available storage classes.
Procedure
- In OpenShift Web Console, go to Workloads → Config Maps.
-
Set the Project dropdown to
openshift-monitoring. - Click Create Config Map.
Define a new
cluster-monitoring-configConfig Map using the following example.Replace the content in angle brackets (
<,>) with your own values, for example,retention: 24horstorage: 40Gi.Example
cluster-monitoring-configConfig MapapiVersion: v1 kind: ConfigMap metadata: name: cluster-monitoring-config namespace: openshift-monitoring data: config.yaml: | prometheusK8s: retention: <time to retain monitoring files, e.g. 24h> volumeClaimTemplate: metadata: name: ocs-prometheus-claim spec: storageClassName: ocs-storagecluster-ceph-rbd resources: requests: storage: <size of claim, e.g. 40Gi> alertmanagerMain: volumeClaimTemplate: metadata: name: ocs-alertmanager-claim spec: storageClassName: ocs-storagecluster-ceph-rbd resources: requests: storage: <size of claim, e.g. 40Gi>- Click Create to save and create the Config Map.
Verification steps
Verify that the Persistent Volume claims are bound to the pods.
- Go to Storage → Persistent Volume Claims.
-
Set the Project dropdown to
openshift-monitoring. Verify that 5 Persistent Volume Claims are visible with a state of
Bound, attached to threealertmanager-main-*pods, and twoprometheus-k8s-*pods.Monitoring storage created and bound

Verify that the new
alertmanager-main-*pods appear with a state ofRunning.-
Click the new
alertmanager-main-*pods to view the pod details. Scroll down to Volumes and verify that the volume has a Type,
ocs-alertmanager-claimthat matches one of your new Persistent Volume Claims, for example,ocs-alertmanager-claim-alertmanager-main-0.Persistent Volume Claims attached to
alertmanager-main-*pod
-
Click the new
Verify that the new
prometheus-k8s-*pods appear with a state ofRunning.-
Click the new
prometheus-k8s-*pods to view the pod details. Scroll down to Volumes and verify that the volume has a Type,
ocs-prometheus-claimthat matches one of your new Persistent Volume Claims, for example,ocs-prometheus-claim-prometheus-k8s-0.Persistent Volume Claims attached to
prometheus-k8s-*pod
-
Click the new
2.3. Cluster logging for OpenShift Container Storage
You can deploy cluster logging to aggregate logs for a range of OpenShift Container Platform services. For information about how to deploy cluster logging, see Deploying cluster logging.
Upon initial OpenShift Container Platform deployment, OpenShift Container Storage is not configured by default and the OpenShift Container Platform cluster will solely rely on default storage available from the nodes. You can edit the default configuration of OpenShift logging (ElasticSearch) to be backed by OpenShift Container Storage to have OpenShift Container Storage backed logging (Elasticsearch).
Always ensure that you have plenty of storage capacity for these services. If you run out of storage space for these critical services, the logging application becomes inoperable and very difficult to recover.
Red Hat recommends configuring shorter curation and retention intervals for these services. See Configuring Curator in the OpenShift Container Platform documentation for details.
If you run out of storage space for these services, contact Red Hat Customer Support.
2.3.1. Configuring persistent storage
You can configure a persistent storage class and size for the Elasticsearch cluster using the storage class name and size parameters. The Cluster Logging Operator creates a Persistent Volume Claim for each data node in the Elasticsearch cluster based on these parameters. For example:
spec:
    logStore:
      type: "elasticsearch"
      elasticsearch:
        nodeCount: 3
        storage:
          storageClassName: "ocs-storagecluster-ceph-rbd”
          size: "200G"
This example specifies that each data node in the cluster will be bound to a Persistent Volume Claim that requests 200GiB of ocs-storagecluster-ceph-rbd storage. Each primary shard will be backed by a single replica. A copy of the shard is replicated across all the nodes and are always available and the copy can be recovered if at least two nodes exist due to the single redundancy policy. For information about Elasticsearch replication policies, see Elasticsearch replication policy in About deploying and configuring cluster logging.
Omission of the storage block will result in a deployment backed by default storage. For example:
spec:
    logStore:
      type: "elasticsearch"
      elasticsearch:
        nodeCount: 3
        storage: {}
For more information, see Configuring cluster logging.
2.3.2. Configuring cluster logging to use OpenShift Container Storage
Follow the instructions in this section to configure OpenShift Container Storage as storage for the OpenShift cluster logging.
You can obtain all the logs when you configure logging for the first time in OpenShift Container Storage. However, after you uninstall and reinstall logging, the old logs are removed and only the new logs are processed.
Prerequisites
- You have administrative access to OpenShift Web Console.
-
OpenShift Container Storage Operator is installed and running in the
openshift-storagenamespace. -
Cluster logging Operator is installed and running in the
openshift-loggingnamespace.
Procedure
- Click Administration → Custom Resource Definitions from the left pane of the OpenShift Web Console.
- On the Custom Resource Definitions page, click ClusterLogging.
- On the Custom Resource Definition Overview page, select View Instances from the Actions menu or click the Instances Tab.
On the Cluster Logging page, click Create Cluster Logging.
You might have to refresh the page to load the data.
In the YAML, replace the code with the following:
apiVersion: "logging.openshift.io/v1" kind: "ClusterLogging" metadata: name: "instance" namespace: "openshift-logging" spec: managementState: "Managed" logStore: type: "elasticsearch" elasticsearch: nodeCount: 3 storage: storageClassName: ocs-storagecluster-ceph-rbd size: 200G redundancyPolicy: "SingleRedundancy" visualization: type: "kibana" kibana: replicas: 1 curation: type: "curator" curator: schedule: "30 3 * * *" collection: logs: type: "fluentd" fluentd: {}- Click Save.
Verification steps
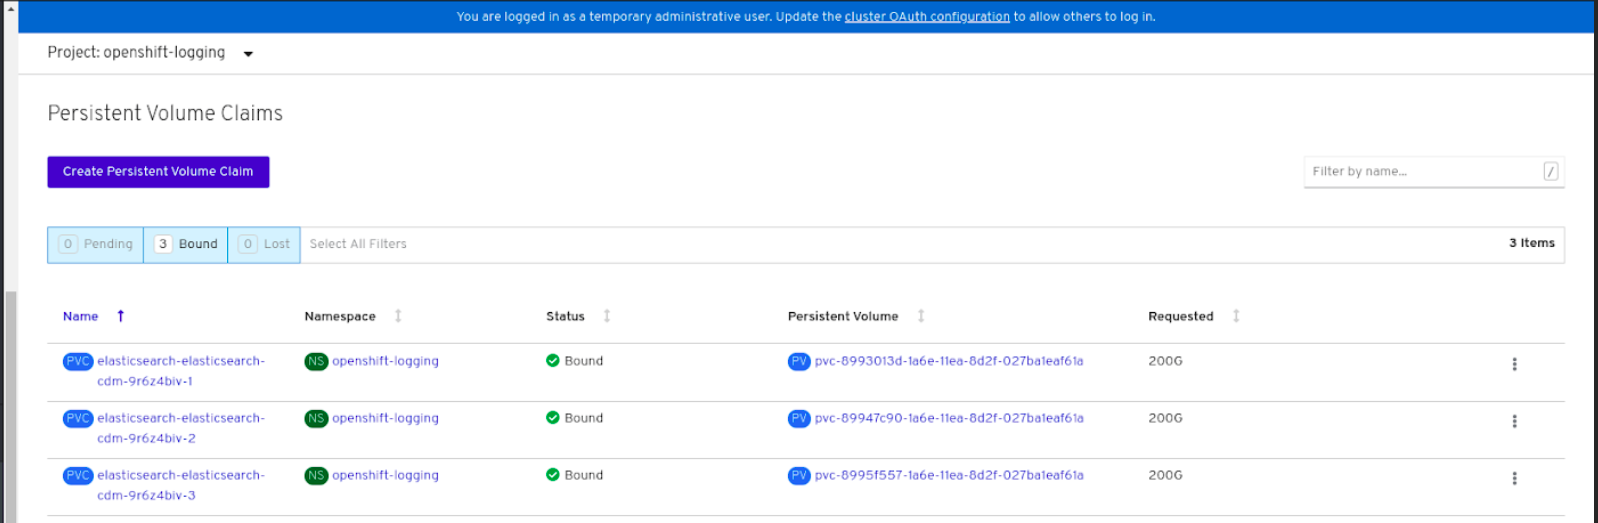
Verify that the Persistent Volume Claims are bound to the
elasticsearchpods.- Go to Storage → Persistent Volume Claims.
-
Set the Project dropdown to
openshift-logging. Verify that Persistent Volume Claims are visible with a state of
Bound, attached toelasticsearch-* pods.Figure 2.1. Cluster logging created and bound
Verify that the new cluster logging is being used.
- Click Workload → Pods.
-
Set the Project to
openshift-logging. -
Verify that the new
elasticsearch-* pods appear with a state ofRunning. -
Click the new
elasticsearch-* pod to view pod details. -
Scroll down to Volumes and verify that the elasticsearch volume has a Type that matches your new Persistent Volume Claim, for example,
elasticsearch-elasticsearch-cdm-9r624biv-3. - Click the Persistent Volume Claim name and verify the storage class name in the PersistenVolumeClaim Overview page.
Make sure to use a shorter curator time to avoid PV full scenario on PVs attached to Elasticsearch pods.
You can configure Curator to delete Elasticsearch data based on retention settings. It is recommended that you set the following default index data retention of 5 days as a default.
config.yaml: |
    openshift-storage:
      delete:
        days: 5
For more details, see Curation of Elasticsearch Data.
To uninstall cluster logging backed by Persistent Volume Claim, use the steps in Removing the cluster logging operator from OpenShift Container Storage.
Chapter 3. Backing OpenShift Container Platform applications with OpenShift Container Storage
You cannot directly install OpenShift Container Storage during the OpenShift Container Platform installation. However, you can install OpenShift Container Storage on an existing OpenShift Container Platform by using the Operator Hub and then configure the OpenShift Container Platform applications to be backed by OpenShift Container Storage.
Prerequisites
- OpenShift Container Platform is installed and you have administrative access to OpenShift Web Console.
-
OpenShift Container Storage is installed and running in the
openshift-storagenamespace.
Procedure
In the OpenShift Web Console, perform one of the following:
Click Workloads → Deployments.
In the Deployments page, you can do one of the following:
- Select any existing deployment and click Add Storage option from the Action menu (⋮).
Create a new deployment and then add storage.
- Click Create Deployment to create a new deployment.
-
Edit the
YAMLbased on your requirement to create a deployment. - Click Create.
- Select Add Storage from the Actions drop down menu on the top right of the page.
Click Workloads → Deployment Configs.
In the Deployment Configs page, you can do one of the following:
- Select any existing deployment and click Add Storage option from the Action menu (⋮).
Create a new deployment and then add storage.
- Click Create Deployment Config to create a new deployment.
-
Edit the
YAMLbased on your requirement to create a deployment. - Click Create.
- Select Add Storage from the Actions drop down menu on the top right of the page.
In the Add Storage page, you can choose one of the following options:
- Click the Use existing claim option and select a suitable PVC from the drop down list.
Click the Create new claim option.
-
Select
ocs-storagecluster-ceph-rbdorocs-storagecluster-cephfsstorage class from the Storage Class drop down list. - Provide a name for the Persistent Volume Claim.
Select ReadWriteOnce (RWO) or ReadWriteMany (RWX) access mode.
NoteReadOnlyMany (ROX) is deactivated as it is not supported.
Select the size of the desired storage capacity.
NoteYou cannot resize the storage capacity after the creation of Persistent Volume Claim.
-
Select
- Specify the mount path and subpath (if required) for the mount path volume inside the container.
- Click Save.
Verification steps
Depending on your configuration, perform one of the following:
- Click Workloads → Deployments.
- Click Workloads → Deployment Configs.
- Set the Project as required.
- Click the deployment for you which you added storage to view the deployment details.
- Scroll down to Volumes and verify that your deployment has a Type that matches the Persistent Volume Claim that you assigned.
- Click the Persistent Volume Claim name and verify the storage class name in the PersistenVolumeClaim Overview page.
Chapter 4. Scaling storage nodes
To scale the storage capacity of OpenShift Container Storage, you can do either of the following:
- Scale up storage nodes - Add storage capacity to the existing Red Hat OpenShift Container Storage worker nodes
- Scale out storage nodes - Add new worker nodes containing storage capacity
4.1. Requirements for scaling storage nodes
Before you proceed to scale the storage nodes, refer to the following sections to understand the node requirements for your specific Red Hat OpenShift Container Storage instance:
- Supported Infrastructure and Platforms
Supported configurations
Always ensure that you have plenty of storage capacity.
If storage ever fills completely, it is not possible to add capacity or delete or migrate content away from the storage to free up space. Completely full storage is very difficult to recover.
Capacity alerts are issued when cluster storage capacity reaches 75% (near-full) and 85% (full) of total capacity. Always address capacity warnings promptly, and review your storage regularly to ensure that you do not run out of storage space.
If you do run out of storage space completely, contact Red Hat Customer Support.
4.1.1. Supported Deployments for Red Hat OpenShift Container Storage
User-provisioned infrastructure:
- Amazon Web Services (AWS)
- VMware
- Bare metal
Installer-provisioned infrastructure:
- Amazon Web Services (AWS)
4.2. Scaling up storage capacity
Depending on the type of your deployment, you can choose one of the following procedures to scale up storage capacity.
- For AWS or VMware infrastructures using dynamic or automated provisioning of storage devices, see Section 4.2.1, “Scaling up storage by adding capacity to your OpenShift Container Storage nodes on AWS or VMware infrastructure”
- For bare metal, Amazon EC2 I3, or VMware infrastructures using local storage devices, see Section 4.2.2, “Scaling up storage by adding capacity to your OpenShift Container Storage nodes using local storage devices”
4.2.1. Scaling up storage by adding capacity to your OpenShift Container Storage nodes on AWS or VMware infrastructure
Use this procedure to add storage capacity and performance to your configured Red Hat OpenShift Container Storage worker nodes.
Prerequisites
- A running OpenShift Container Storage Platform
- Administrative privileges on the OpenShift Web Console
Procedure
- Navigate to the OpenShift Web Console.
- Click on Operators on the left navigation bar.
- Select Installed Operators.
In the window, click OpenShift Container Storage Operator:
In the top navigation bar, scroll right and click Storage Cluster tab.

- The visible list should have only one item. Click (⋮) on the far right to extend the options menu.
Select Add Capacity from the options menu.

From this dialog box, you can set the requested additional capacity and the storage class. Add capacity shows the capacity selected at the time of installation and allows to add the capacity only in this increment. On AWS, the storage class should be set to gp2. On VMWare, the storage class should be set to thin.
NoteThe effectively provisioned capacity will be three times as much as what you see in the Raw Capacity field because OpenShift Container Storage uses a replica count of 3.
- Click Add. You can see the status of the storage cluster after it reaches the Ready state. You might need to wait a couple of minutes after you see the Ready state.
Verification steps
Navigate to Overview → Persistent Storage tab, then check the Capacity breakdown card.

- Note that the capacity increases based on your selections.
OpenShift Container Storage does not support cluster reduction either by reducing OSDs or reducing nodes.
4.2.2. Scaling up storage by adding capacity to your OpenShift Container Storage nodes using local storage devices
Use this procedure to add storage capacity (additional storage devices) to your configured local storage based OpenShift Container Storage worker nodes on bare metal, Amazon EC2 I3, and VMware infrastructures.
Scaling up storage on Amazon EC2 I3 is a Technology Preview feature. Technology Preview features are not supported with Red Hat production service level agreements (SLAs) and might not be functionally complete. Red Hat does not recommend using them in production. These features provide early access to upcoming product features, enabling customers to test functionality and provide feedback during the development process.
For Amazon EC2 I3 infrastructure, adding nodes is the only option for adding capacity, as deployment is done using both the available NVMe devices.
Prerequisites
- You must be logged into OpenShift Container Platform (OCP) cluster.
- You must have installed local storage operator. For information, see Installing Local Storage Operator.
- You must have three OpenShift Container Platform worker nodes with the same storage type and size attached to each node (for example, 2TB NVMe drive) as the original OCS StorageCluster was created with.
Procedure
To add storage capacity to OpenShift Container Platform nodes with OpenShift Container Storage installed, you need to
Find the unique
by-ididentifier for available devices that you want to add, that is, a minimum of one device per worker node. Follow procedure finding available storage devices.NoteMake sure you perform this process for all the existing nodes (minimum of 3) for which you want to add storage.
Add unique device
by-id.$ oc edit -n local-storage localvolume local-block
Example output:
spec:
  logLevel: Normal
  managementState: Managed
  nodeSelector:
    nodeSelectorTerms:
    - matchExpressions:
      - key: cluster.ocs.openshift.io/openshift-storage
        operator: In
        values:
        - ""
  storageClassDevices:
  - devicePaths:
    - /dev/disk/by-id/nvme-INTEL_SSDPE2KX010T7_PHLF733402P51P0GGN
    - /dev/disk/by-id/nvme-INTEL_SSDPE2KX010T7_PHLF733402LM1P0GGN
    - /dev/disk/by-id/nvme-INTEL_SSDPE2KX010T7_PHLF733402M21P0GGN
    - /dev/disk/by-id/nvme-INTEL_SSDPE2KX010T7_PHLF733402B71P0GGN    # newly  added device by-id
    - /dev/disk/by-id/nvme-INTEL_SSDPE2KX010T7_PHLF733402A31P0GGN    # newly  added device by-id
    - /dev/disk/by-id/nvme-INTEL_SSDPE2KX010T7_PHLF733402Q71P0GGN    # newly  added device by-id
    storageClassName: localblock
    volumeMode: Block
Make sure to save the changes after editing the CR.
localvolume.local.storage.openshift.io/local-block edited
You can see that in this CR new devices using
by-idhave been added. Each device maps tonvme1n1on one of the three worker nodes.-
nvme-INTEL_SSDPE2KX010T7_PHLF733402B71P0GGN -
nvme-INTEL_SSDPE2KX010T7_PHLF733402A31P0GGN -
nvme-INTEL_SSDPE2KX010T7_PHLF733402Q71P0GGN
-
Display PVs with
storageclassname used inlocalVolumeCR.$ oc get pv | grep localblock | grep Available
Example output:
local-pv-5ee61dcc   894Gi   RWO     Delete  Available   localblock      2m35s
local-pv-b1fa607a   894Gi   RWO     Delete  Available   localblock      2m27s
local-pv-e971c51d   894Gi   RWO     Delete  Available   localblock      2m22s
...
There are three more available PVs of same size which will be used for new OSDs.
To expand storage capacity, increase the
countby 1 forStorageDeviceSetsinStorageClusterCR.$ oc edit storageclusters.ocs.openshift.io -n openshift-storage
Example output:
spec:
  monDataDirHostPath: /var/lib/rook
  storageDeviceSets:
  - config: {}
    count: 2    # <-- increase this count by 1
    dataPVCTemplate:
      metadata:
        creationTimestamp: null
      spec:
        accessModes:
        - ReadWriteOnce
        resources:
          requests:
            storage: 894Gi
        storageClassName: localblock
        volumeMode: Block
      status: {}
    name: ocs-deviceset
    placement: {}
    replica: 3
    resources: {}
  version: 4.4.0
Make sure to save the changes after editing the CR.
storagecluster.ocs.openshift.io/ocs-storagecluster edited
ImportantTo ensure that the OSDs have a guaranteed size across the nodes, the storage size for
storageDeviceSetsmust be specified as less than or equal to the size of the desired PVs created on the nodes.Verify that there are three new OSDs running and their corresponding new PVCs are created.
$ oc get -n openshift-storage pods -l app=rook-ceph-osd
Example output:
NAME                               READY   STATUS    RESTARTS   AGE
rook-ceph-osd-0-77c4fdb758-qshw4   1/1     Running   0          1h
rook-ceph-osd-1-8645c5fbb6-656ks   1/1     Running   0          1h
rook-ceph-osd-2-86895b854f-r4gt6   1/1     Running   0          1h
rook-ceph-osd-3-dc7f787dd-gdnsz    1/1     Running   0          10m
rook-ceph-osd-4-554b5c46dd-hbf9t   1/1     Running   0          10m
rook-ceph-osd-5-5cf94c4448-k94j6   1/1     Running   0          10m
In the above example, osd-3, osd-4, and osd-5 are the newly added pods to the OpenShift Container Storage cluster.
$ oc get pvc -n openshift-storage |grep localblock
Example output:
ocs-deviceset-0-0-qc29m   Bound    local-pv-fc5562d3    894Gi   RWO  localblock  1h
ocs-deviceset-0-1-qdmrl   Bound    local-pv-b1fa607a    894Gi   RWO  localblock  10m
ocs-deviceset-1-0-mpwmk   Bound    local-pv-58cdd0bc    894Gi   RWO  localblock  1h
ocs-deviceset-1-1-85892   Bound    local-pv-e971c51d    894Gi   RWO  localblock  10m
ocs-deviceset-2-0-rll47   Bound    local-pv-29d8ad8d    894Gi   RWO  localblock  1h
ocs-deviceset-2-1-cgth2   Bound    local-pv-5ee61dcc    894Gi   RWO  localblock  10m
In the above example, we see three new PVCs are created.
Verification steps
4.3. Scaling out storage capacity
To scale out storage capacity, you need to perform the following:
- Add a new node to increase the storage capacity when existing worker nodes are already running at their maximum supported OSDs, which is the increment of 3 OSDs of the capacity selected during initial configuration.
- Verify that the new node is added successfully
- Scale up the storage capacity after the node is added
Depending on the type of your deployment, you can choose one of the following procedures to add a storage node:
- For AWS installer-provisioned infrastructure, see Section 4.3.1, “Adding a node on an AWS installer-provisioned infrastructure”
- For AWS or VMware user-provisioned infrastructure, see Section 4.3.2, “Adding a node on an AWS or a VMware user-provisioned infrastructure”
- For bare metal, Amazon EC2 I3, or VMware infrastructures, see Section 4.3.3, “Adding a node using a local storage device”
4.3.1. Adding a node on an AWS installer-provisioned infrastructure
Prerequisites
- You must be logged into OpenShift Container Platform (OCP) cluster.
Procedure
- Navigate to Compute → Machine Sets.
- On the machine set where you want to add nodes, select Edit Count.
- Add the amount of nodes, and click Save.
- Click Compute → Nodes and confirm if the new node is in Ready state.
Apply the OpenShift Container Storage label to the new node.
- For the new node, Action menu (⋮) → Edit Labels.
- Add cluster.ocs.openshift.io/openshift-storage and click Save.
It is recommended to add 3 nodes each in different zones. You must add 3 nodes and perform this procedure for all of them.
Verification steps
To verify that the new node is added, see Section 4.3.4, “Verifying the addition of a new node”.
4.3.2. Adding a node on an AWS or a VMware user-provisioned infrastructure
Prerequisites
- You must be logged into OpenShift Container Platform (OCP) cluster.
Procedure
Depending on whether you are adding a node on an AWS user provisioned infrastructure or a VMware user-provisioned infrastructure, perform the following steps:
For AWS
- Create a new AWS machine instance with the required infrastructure. See Supported Infrastructure and Platforms.
- Create a new OpenShift Container Platform node using the new AWS machine instance.
For VMware:
- Create a new VM on vSphere with the required infrastructure. See Supported Infrastructure and Platforms.
- Create a new OpenShift Container Platform worker node using the new VM.
Check for certificate signing requests (CSRs) related to OpenShift Container Storage that are in
Pendingstate:$ oc get csr
Approve all required OpenShift Container Storage CSRs for the new node:
$ oc adm certificate approve <Certificate_Name>
- Click Compute → Nodes, confirm if the new node is in Ready state.
Apply the OpenShift Container Storage label to the new node using any one of the following:
- From User interface
- For the new node, click Action Menu (⋮) → Edit Labels
-
Add
cluster.ocs.openshift.io/openshift-storageand click Save.
- From Command line interface
Execute the following command to apply the OpenShift Container Storage label to the new node:
$ oc label node <new_node_name> cluster.ocs.openshift.io/openshift-storage=""
NoteIt is recommended to add 3 nodes each in different zones. You must add 3 nodes and perform this procedure for all of them.
Verification steps
To verify that the new node is added, see Section 4.3.4, “Verifying the addition of a new node”.
4.3.3. Adding a node using a local storage device
Use this procedure to add a node on bare metal, Amazon EC2, and VMware infrastructures.
Scaling storage nodes for Amazon EC2 infrastructure is a Technology Preview feature. Technology Preview features are not supported with Red Hat production service level agreements (SLAs) and might not be functionally complete. Red Hat does not recommend using them in production. These features provide early access to upcoming product features, enabling customers to test functionality and provide feedback during the development process.
Prerequisites
- You must be logged into OpenShift Container Platform (OCP) cluster.
- You must have three OpenShift Container Platform worker nodes with the same storage type and size attached to each node (for example, 2TB NVMe drive) as the original OCS StorageCluster was created with.
Procedure
Depending on whether you are adding a node on bare metal, Amazon EC2, or VMware infrastructure, perform the following steps:
For Amazon EC2
- Create a new Amazon EC2 I3 machine instance with the required infrastructure. See Creating a MachineSet in AWS and Supported Infrastructure and Platforms.
- Create a new OpenShift Container Platform node using the new Amazon EC2 I3 machine instance.
For VMware:
- Create a new VM on vSphere with the required infrastructure. See Supported Infrastructure and Platforms.
- Create a new OpenShift Container Platform worker node using the new VM.
For bare metal:
- Get a new bare metal machine with the required infrastructure. See Supported Infrastructure and Platforms.
- Create a new OpenShift Container Platform node using the new bare metal machine.
Check for certificate signing requests (CSRs) related to OpenShift Container Storage that are in
Pendingstate:$ oc get csr
Approve all required OpenShift Container Storage CSRs for the new node:
$ oc adm certificate approve <Certificate_Name>
- Click Compute → Nodes, confirm if the new node is in Ready state.
Apply the OpenShift Container Storage label to the new node using any one of the following:
- From User interface
- For the new node, click Action Menu (⋮) → Edit Labels
-
Add
cluster.ocs.openshift.io/openshift-storageand click Save.
- From Command line interface
Execute the following command to apply the OpenShift Container Storage label to the new node:
$ oc label node <new_node_name> cluster.ocs.openshift.io/openshift-storage=""
NoteIt is recommended to add 3 nodes each in different zones. You must add 3 nodes and perform this procedure for all of them.
Verification steps
To verify that the new node is added, see Section 4.3.4, “Verifying the addition of a new node”.
4.3.4. Verifying the addition of a new node
Execute the following command and verify that the new node is present in the output:
$ oc get nodes --show-labels | grep cluster.ocs.openshift.io/openshift-storage= |cut -d' ' -f1
Click Workloads → Pods, confirm that at least the following pods on the new node are in Running state:
-
csi-cephfsplugin-* -
csi-rbdplugin-*
-
4.3.5. Scaling up storage capacity
To scale up storage capacity, see Scaling up storage by adding capacity.
Chapter 5. Managing persistent volume claims
Expanding PVCs is not supported for PVCs backed by OpenShift Container Storage.
5.1. Configuring application pods to use OpenShift Container Storage
Follow the instructions in this section to configure OpenShift Container Storage as storage for an application pod.
Prerequisites
- You have administrative access to OpenShift Web Console.
-
OpenShift Container Storage Operator is installed and running in the
openshift-storagenamespace. In OpenShift Web Console, click Operators → Installed Operators to view installed operators. - The default storage classes provided by OpenShift Container Storage are available. In OpenShift Web Console, click Storage → Storage Classes to view default storage classes.
Procedure
Create a Persistent Volume Claim (PVC) for the application to use.
- In OpenShift Web Console, click Storage → Persistent Volume Claims.
- Set the Project for the application pod.
Click Create Persistent Volume Claim.
- Specify a Storage Class provided by OpenShift Container Storage.
-
Specify the PVC Name, for example,
myclaim. - Select the required Access Mode.
- Specify a Size as per application requirement.
-
Click Create and wait until the PVC is in
Boundstatus.
Configure a new or existing application pod to use the new PVC.
For a new application pod, perform the following steps:
- Click Workloads →Pods.
- Create a new application pod.
Under the
spec:section, addvolume:section to add the new PVC as a volume for the application pod.volumes: - name: <volume_name> persistentVolumeClaim: claimName: <pvc_name>For example:
volumes:
  - name: mypd
    persistentVolumeClaim:
      claimName: myclaim
For an existing application pod, perform the following steps:
- Click Workloads →Deployment Configs.
- Search for the required deployment config associated with the application pod.
- Click on its Action menu (⋮) → Edit Deployment Config.
Under the
spec:section, addvolume:section to add the new PVC as a volume for the application pod and click Save.volumes: - name: <volume_name> persistentVolumeClaim: claimName: <pvc_name>For example:
volumes:
  - name: mypd
    persistentVolumeClaim:
      claimName: myclaim
Verify that the new configuration is being used.
- Click Workloads → Pods.
- Set the Project for the application pod.
-
Verify that the application pod appears with a status of
Running. - Click the application pod name to view pod details.
-
Scroll down to Volumes section and verify that the volume has a Type that matches your new Persistent Volume Claim, for example,
myclaim.
5.2. Viewing Persistent Volume Claim request status
Expanding Persistent Volume Claims (PVCs) is not supported for PVCs backed by OpenShift Container Storage.
Use this procedure to view the status of a PVC request.
Prerequisites
- Administrator access to OpenShift Container Storage.
Procedure
- Log in to OpenShift Web Console.
- Click Storage → Persistent Volume Claims
- Search for the required PVC name by using the Filter textbox.
- Check the Status column corresponding to the required PVC.
- Click the required Name to view the PVC details.
5.3. Reviewing Persistent Volume Claim request events
Use this procedure to review and address Persistent Volume Claim (PVC) request events.
Prerequisites
- Administrator access to OpenShift Web Console.
Procedure
- Log in to OpenShift Web Console.
- Click Home → Overview → Persistent Storage
- Locate the Inventory card to see the number of PVCs with errors.
- Click Storage → Persistent Volume Claims
- Search for the required PVC using the Filter textbox.
- Click on the PVC name and navigate to Events
- Address the events as required or as directed.
5.4. Dynamic provisioning
5.4.1. About dynamic provisioning
The StorageClass resource object describes and classifies storage that can be requested, as well as provides a means for passing parameters for dynamically provisioned storage on demand. StorageClass objects can also serve as a management mechanism for controlling different levels of storage and access to the storage. Cluster Administrators (cluster-admin) or Storage Administrators (storage-admin) define and create the StorageClass objects that users can request without needing any intimate knowledge about the underlying storage volume sources.
The OpenShift Container Platform persistent volume framework enables this functionality and allows administrators to provision a cluster with persistent storage. The framework also gives users a way to request those resources without having any knowledge of the underlying infrastructure.
Many storage types are available for use as persistent volumes in OpenShift Container Platform. While all of them can be statically provisioned by an administrator, some types of storage are created dynamically using the built-in provider and plug-in APIs.
5.4.2. Dynamic provisioning in OpenShift Container Storage
Red Hat OpenShift Container Storage is software-defined storage that is optimised for container environments. It runs as an operator on OpenShift Container Platform to provide highly integrated and simplified persistent storage management for containers.
OpenShift Container Storage supports a variety of storage types, including:
- Block storage for databases
- Shared file storage for continuous integration, messaging, and data aggregation
- Object storage for archival, backup, and media storage
Version 4.4 uses Red Hat Ceph Storage to provide the file, block, and object storage that backs persistent volumes, and Rook.io to manage and orchestrate provisioning of persistent volumes and claims. NooBaa provides object storage, and its Multicloud Gateway allows object federation across multiple cloud environments (available as a Technology Preview).
In OpenShift Container Storage 4.4, the Red Hat Ceph Storage Container Storage Interface (CSI) driver for RADOS Block Device (RBD) and Ceph File System (CephFS) handles the dynamic provisioning requests. When a PVC request comes in dynamically, the CSI driver has the following options:
-
Create a PVC with ReadWriteOnce (RWO) and ReadWriteMany (RWX) access that is based on Ceph RBDs with volume mode
Block -
Create a PVC with ReadWriteOnce (RWO) access that is based on Ceph RBDs with volume mode
Filesystem -
Create a PVC with ReadWriteOnce (RWO) and ReadWriteMany (RWX) access that is based on CephFS for volume mode
Filesystem
The judgement of which driver (RBD or CephFS) to use is based on the entry in the storageclass.yaml file.
5.4.3. Available dynamic provisioning plug-ins
OpenShift Container Platform provides the following provisioner plug-ins, which have generic implementations for dynamic provisioning that use the cluster’s configured provider’s API to create new storage resources:
| Storage type | Provisioner plug-in name | Notes |
|---|---|---|
| AWS Elastic Block Store (EBS) |
|
For dynamic provisioning when using multiple clusters in different zones, tag each node with |
| AWS Elastic File System (EFS) | Dynamic provisioning is accomplished through the EFS provisioner pod and not through a provisioner plug-in. | |
| Azure Disk |
| |
| Azure File |
|
The |
| Ceph File System (POSIX Compliant filesystem) |
| Provisions a volume for ReadWriteMany (RWX) or ReadWriteOnce (RWO) access modes using the Ceph Filesytem configured in a Ceph cluster. |
| Ceph RBD (Block Device) |
| Provisions a volume for RWO access mode for Ceph RBD, RWO and RWX access mode for block PVC, and RWO access mode for Filesystem PVC. |
| GCE Persistent Disk (gcePD) |
| In multi-zone configurations, it is advisable to run one OpenShift Container Platform cluster per GCE project to avoid PVs from being created in zones where no node in the current cluster exists. |
| S3 Bucket (MCG Object Bucket Claim) |
| Provisions an object bucket claim to support S3 API calls through the Multicloud Object Gateway (MCG). The exact storage backing the S3 bucket is dependent on the MCG configuration and the type of deployment. |
|
|
Any chosen provisioner plug-in also requires configuration for the relevant cloud, host, or third-party provider as per the relevant documentation.
Chapter 6. Managing container storage interface (CSI) component placements
Each cluster consists of a number of dedicated nodes such as infra and storage nodes. However, a infra node will not be able to use OpenShift Container Storage persistent volume claims (PVCs) on the node. So, if you want to use such nodes, you can set tolerations to bring up csi-plugins on the nodes. For more information, see https://access.redhat.com/solutions/4827161.
Procedure
Create a
configmaprook-ceph-operator-config.$ oc create -f rook-ceph-operator-config.yaml configmap/rook-ceph-operator-config created
Display
configmap.$ oc get configmap rook-ceph-operator-config -n openshift-storage -o yaml
Example output of
configmapwithkeyset tonodetypeandvalueset toinfra:apiVersion: v1 data: CSI_PLUGIN_TOLERATIONS: | - effect: NoSchedule key: nodetype operator: Equal value: infra - effect: NoSchedule key: node.ocs.openshift.io/storage operator: Exists kind: ConfigMap metadata: creationTimestamp: "2020-03-23T11:49:27Z" name: rook-ceph-operator-config namespace: openshift-storage resourceVersion: "114879" selfLink: /api/v1/namespaces/openshift-storage/configmaps/rook-ceph-operator-config uid: ac22e63a-8df1-4650-a57f-89bf7a2ce06a-
Restart the
rook-ceph-operator.
Verification step
Verify that the csi-cephfsplugin-* and csi-rbdplugin-* pods are running on the infra nodes.
Chapter 7. Multicloud Object Gateway
7.1. About the Multicloud Object Gateway
The Multicloud Object Gateway (MCG) is a lightweight object storage service for OpenShift, allowing users to start small and then scale as needed on-premise, in multiple clusters, and with cloud-native storage.
7.2. Accessing the Multicloud Object Gateway with your applications
You can access the object service with any application targeting AWS S3 or code that uses AWS S3 Software Development Kit (SDK). Applications need to specify the MCG endpoint, an access key, and a secret access key. You can use your terminal or the MCG CLI to retrieve this information.
Prerequisites
- A running OpenShift Container Storage Platform
Download the MCG command-line interface for easier management:
# subscription-manager repos --enable=rh-ocs-4-for-rhel-8-x86_64-rpms
# yum install mcg
-
Alternatively, you can install the
mcgpackage from the OpenShift Container Storage RPMs found here https://access.redhat.com/downloads/content/547/ver=4/rhel---8/4/x86_64/packages
You can access the relevant endpoint, access key, and secret access key two ways:
7.2.1. Accessing the Multicloud Object Gateway from the terminal
Procedure
Run the describe command to view information about the MCG endpoint, including its access key (AWS_ACCESS_KEY_ID value) and secret access key (AWS_SECRET_ACCESS_KEY value):
# oc describe noobaa -n openshift-storage
The output will look similar to the following:
Name:         noobaa
Namespace:    openshift-storage
Labels:       <none>
Annotations:  <none>
API Version:  noobaa.io/v1alpha1
Kind:         NooBaa
Metadata:
  Creation Timestamp:  2019-07-29T16:22:06Z
  Generation:          1
  Resource Version:    6718822
  Self Link:           /apis/noobaa.io/v1alpha1/namespaces/openshift-storage/noobaas/noobaa
  UID:                 019cfb4a-b21d-11e9-9a02-06c8de012f9e
Spec:
Status:
  Accounts:
    Admin:
      Secret Ref:
        Name:           noobaa-admin
        Namespace:      openshift-storage
  Actual Image:         noobaa/noobaa-core:4.0
  Observed Generation:  1
  Phase:                Ready
  Readme:

  Welcome to NooBaa!
  -----------------

  Welcome to NooBaa!
    -----------------
    NooBaa Core Version:
    NooBaa Operator Version:

    Lets get started:

    1. Connect to Management console:

      Read your mgmt console login information (email & password) from secret: "noobaa-admin".

        kubectl get secret noobaa-admin -n openshift-storage -o json | jq '.data|map_values(@base64d)'

      Open the management console service - take External IP/DNS or Node Port or use port forwarding:

        kubectl port-forward -n openshift-storage service/noobaa-mgmt 11443:443 &
        open https://localhost:11443

    2. Test S3 client:

      kubectl port-forward -n openshift-storage service/s3 10443:443 &
1
      NOOBAA_ACCESS_KEY=$(kubectl get secret noobaa-admin -n openshift-storage -o json | jq -r '.data.AWS_ACCESS_KEY_ID|@base64d')
2
      NOOBAA_SECRET_KEY=$(kubectl get secret noobaa-admin -n openshift-storage -o json | jq -r '.data.AWS_SECRET_ACCESS_KEY|@base64d')
      alias s3='AWS_ACCESS_KEY_ID=$NOOBAA_ACCESS_KEY AWS_SECRET_ACCESS_KEY=$NOOBAA_SECRET_KEY aws --endpoint https://localhost:10443 --no-verify-ssl s3'
      s3 ls


    Services:
      Service Mgmt:
        External DNS:
          https://noobaa-mgmt-openshift-storage.apps.mycluster-cluster.qe.rh-ocs.com
          https://a3406079515be11eaa3b70683061451e-1194613580.us-east-2.elb.amazonaws.com:443
        Internal DNS:
          https://noobaa-mgmt.openshift-storage.svc:443
        Internal IP:
          https://172.30.235.12:443
        Node Ports:
          https://10.0.142.103:31385
        Pod Ports:
          https://10.131.0.19:8443
      serviceS3:
        External DNS: 3
          https://s3-openshift-storage.apps.mycluster-cluster.qe.rh-ocs.com
          https://a340f4e1315be11eaa3b70683061451e-943168195.us-east-2.elb.amazonaws.com:443
        Internal DNS:
          https://s3.openshift-storage.svc:443
        Internal IP:
          https://172.30.86.41:443
        Node Ports:
          https://10.0.142.103:31011
        Pod Ports:
          https://10.131.0.19:6443
The output from the oc describe noobaa command lists the internal and external DNS names that are available. When using the internal DNS, the traffic is free. The external DNS uses Load Balancing to process the traffic, and therefore has a cost per hour.
7.2.2. Accessing the Multicloud Object Gateway from the MCG command-line interface
Prerequisites
Download the MCG command-line interface:
# subscription-manager repos --enable=rh-ocs-4-for-rhel-8-x86_64-rpms
# yum install mcg
Procedure
Run the status command to access the endpoint, access key, and secret access key:
noobaa status -n openshift-storage
The output will look similar to the following:
INFO[0000] Namespace: openshift-storage
INFO[0000]
INFO[0000] CRD Status:
INFO[0003] ✅ Exists: CustomResourceDefinition "noobaas.noobaa.io"
INFO[0003] ✅ Exists: CustomResourceDefinition "backingstores.noobaa.io"
INFO[0003] ✅ Exists: CustomResourceDefinition "bucketclasses.noobaa.io"
INFO[0004] ✅ Exists: CustomResourceDefinition "objectbucketclaims.objectbucket.io"
INFO[0004] ✅ Exists: CustomResourceDefinition "objectbuckets.objectbucket.io"
INFO[0004]
INFO[0004] Operator Status:
INFO[0004] ✅ Exists: Namespace "openshift-storage"
INFO[0004] ✅ Exists: ServiceAccount "noobaa"
INFO[0005] ✅ Exists: Role "ocs-operator.v0.0.271-6g45f"
INFO[0005] ✅ Exists: RoleBinding "ocs-operator.v0.0.271-6g45f-noobaa-f9vpj"
INFO[0006] ✅ Exists: ClusterRole "ocs-operator.v0.0.271-fjhgh"
INFO[0006] ✅ Exists: ClusterRoleBinding "ocs-operator.v0.0.271-fjhgh-noobaa-pdxn5"
INFO[0006] ✅ Exists: Deployment "noobaa-operator"
INFO[0006]
INFO[0006] System Status:
INFO[0007] ✅ Exists: NooBaa "noobaa"
INFO[0007] ✅ Exists: StatefulSet "noobaa-core"
INFO[0007] ✅ Exists: Service "noobaa-mgmt"
INFO[0008] ✅ Exists: Service "s3"
INFO[0008] ✅ Exists: Secret "noobaa-server"
INFO[0008] ✅ Exists: Secret "noobaa-operator"
INFO[0008] ✅ Exists: Secret "noobaa-admin"
INFO[0009] ✅ Exists: StorageClass "openshift-storage.noobaa.io"
INFO[0009] ✅ Exists: BucketClass "noobaa-default-bucket-class"
INFO[0009] ✅ (Optional) Exists: BackingStore "noobaa-default-backing-store"
INFO[0010] ✅ (Optional) Exists: CredentialsRequest "noobaa-cloud-creds"
INFO[0010] ✅ (Optional) Exists: PrometheusRule "noobaa-prometheus-rules"
INFO[0010] ✅ (Optional) Exists: ServiceMonitor "noobaa-service-monitor"
INFO[0011] ✅ (Optional) Exists: Route "noobaa-mgmt"
INFO[0011] ✅ (Optional) Exists: Route "s3"
INFO[0011] ✅ Exists: PersistentVolumeClaim "db-noobaa-core-0"
INFO[0011] ✅ System Phase is "Ready"
INFO[0011] ✅ Exists:  "noobaa-admin"

#------------------#
#- Mgmt Addresses -#
#------------------#

ExternalDNS : [https://noobaa-mgmt-openshift-storage.apps.mycluster-cluster.qe.rh-ocs.com https://a3406079515be11eaa3b70683061451e-1194613580.us-east-2.elb.amazonaws.com:443]
ExternalIP  : []
NodePorts   : [https://10.0.142.103:31385]
InternalDNS : [https://noobaa-mgmt.openshift-storage.svc:443]
InternalIP  : [https://172.30.235.12:443]
PodPorts    : [https://10.131.0.19:8443]

#--------------------#
#- Mgmt Credentials -#
#--------------------#

email    : admin@noobaa.io
password : HKLbH1rSuVU0I/souIkSiA==

#----------------#
#- S3 Addresses -#
#----------------#

1
ExternalDNS : [https://s3-openshift-storage.apps.mycluster-cluster.qe.rh-ocs.com https://a340f4e1315be11eaa3b70683061451e-943168195.us-east-2.elb.amazonaws.com:443]
ExternalIP  : []
NodePorts   : [https://10.0.142.103:31011]
InternalDNS : [https://s3.openshift-storage.svc:443]
InternalIP  : [https://172.30.86.41:443]
PodPorts    : [https://10.131.0.19:6443]

#------------------#
#- S3 Credentials -#
#------------------#

2
AWS_ACCESS_KEY_ID     : jVmAsu9FsvRHYmfjTiHV
3
AWS_SECRET_ACCESS_KEY : E//420VNedJfATvVSmDz6FMtsSAzuBv6z180PT5c

#------------------#
#- Backing Stores -#
#------------------#

NAME                           TYPE     TARGET-BUCKET                                               PHASE   AGE
noobaa-default-backing-store   aws-s3   noobaa-backing-store-15dc896d-7fe0-4bed-9349-5942211b93c9   Ready   141h35m32s

#------------------#
#- Bucket Classes -#
#------------------#

NAME                          PLACEMENT                                                             PHASE   AGE
noobaa-default-bucket-class   {Tiers:[{Placement: BackingStores:[noobaa-default-backing-store]}]}   Ready   141h35m33s

#-----------------#
#- Bucket Claims -#
#-----------------#

No OBC's found.
You now have the relevant endpoint, access key, and secret access key in order to connect to your applications.
Example 7.1. Example
If AWS S3 CLI is the application, the following command will list buckets in OCS:
AWS_ACCESS_KEY_ID=<AWS_ACCESS_KEY_ID>
AWS_SECRET_ACCESS_KEY=<AWS_SECRET_ACCESS_KEY>
aws --endpoint <ENDPOINT> --no-verify-ssl s3 ls
7.3. Adding storage resources for hybrid or Multicloud
7.3.1. Creating a new backing store
Use this procedure to create a new backing store in OpenShift Container Storage.
Prerequisites
- Administrator access to OpenShift.
Procedure
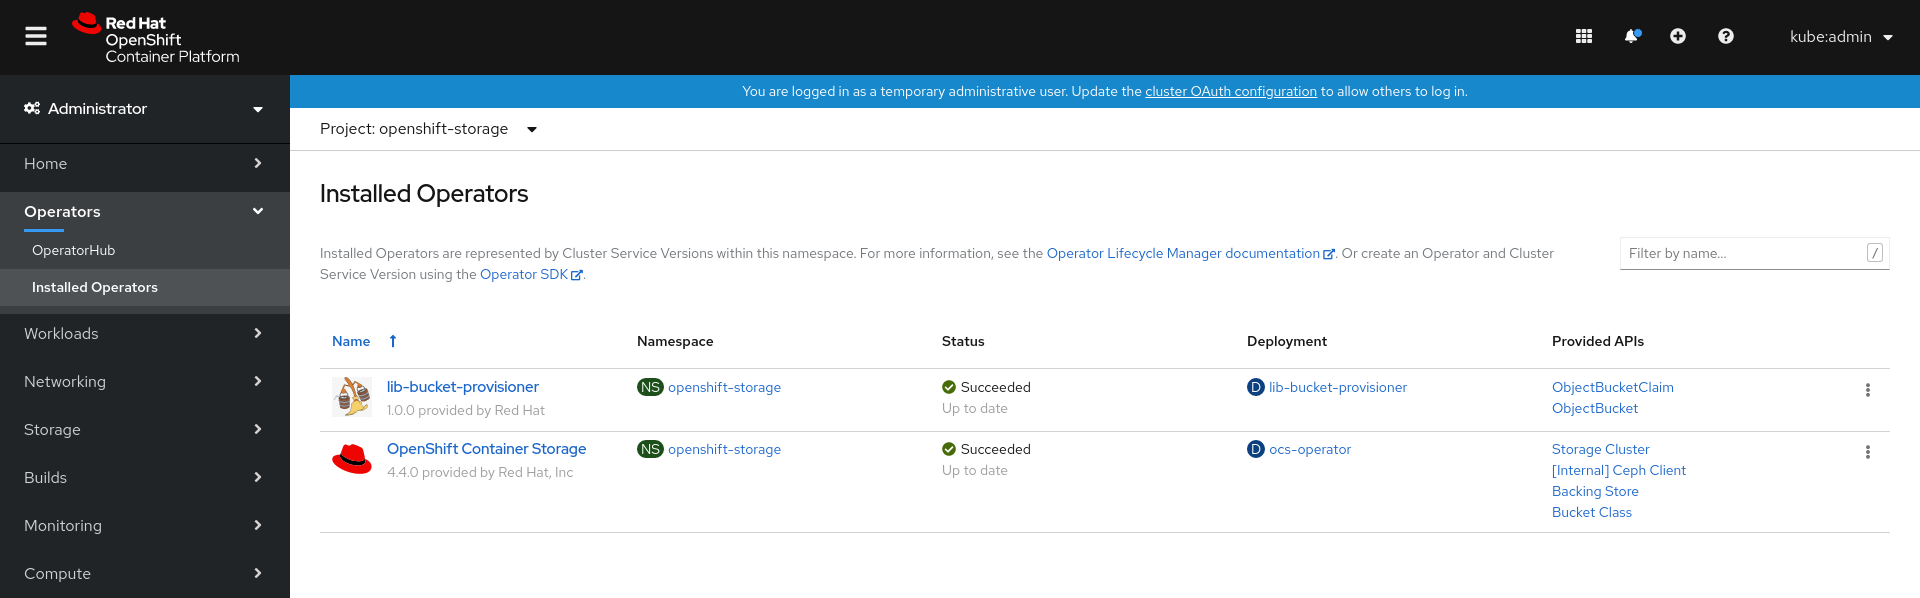
- Click Operators → Installed Operators from the left pane of the OpenShift Web Console to view the installed operators.
- Click OpenShift Container Storage Operator.
On the OpenShift Container Storage Operator page, scroll right and click the Backing Store tab.
Figure 7.1. OpenShift Container Storage Operator page with backing store tab

Click Create Backing Store.
Figure 7.2. Create Backing Store page

On the Create New Backing Store page, perform the following:
- Enter a Backing Store Name.
- Select a Provider.
- Select a Region.
- Enter an Endpoint. This is optional.
Select a Secret from drop down list, or create your own secret. Optionally, you can Switch to Credentials view which lets you fill in the required secrets.
For more information on creating an OCP secret, see the section Creating the secret in the Openshift Container Platform documentation.
Each backingstore requires a different secret. For more information on creating the secret for a particular backingstore, see the Section 7.3.2, “Adding storage resources for hybrid or Multicloud using the MCG command line interface” and follow the procedure for the addition of storage resources using a YAML.
NoteThis menu is relevant for all providers except Google Cloud and local PVC.
- Enter Target bucket. The target bucket is a container storage that is hosted on the remote cloud service. It allows you to create a connection that tells MCG that it can use this bucket for the system.
- Click Create Backing Store.
Verification steps
- Click Operators → Installed Operators.
- Click OpenShift Container Storage Operator.
- Search for the new backing store or click Backing Store tab to view all the backing stores.
7.3.2. Adding storage resources for hybrid or Multicloud using the MCG command line interface
The Multicloud Object Gateway (MCG) simplifies the process of spanning data across cloud provider and clusters.
You must add a backing storage that can be used by the MCG.
Depending on the type of your deployment, you can choose one of the following procedures to create a backing storage:
- For creating an AWS-backed backingstore, see Section 7.3.2.1, “Creating an AWS-backed backingstore”
- For creating an IBM COS-backed backingstore, see Section 7.3.2.2, “Creating an IBM COS-backed backingstore”
- For creating an Azure-backed backingstore, see Section 7.3.2.3, “Creating an Azure-backed backingstore”
For VMWare deployments, skip to Section 7.3.3, “Creating an s3 compatible Multicloud Object Gateway backingstore” for further instructions.
7.3.2.1. Creating an AWS-backed backingstore
Prerequisites
Download the Multicloud Object Gateway (MCG) command-line interface:
# subscription-manager repos --enable=rh-ocs-4-for-rhel-8-x86_64-rpms
# yum install mcg
-
Alternatively, you can install the
mcgpackage from the OpenShift Container Storage RPMs found here https://access.redhat.com/downloads/content/547/ver=4/rhel---8/4/x86_64/packages
Procedure
From the MCG command-line interface, run the following command:
noobaa backingstore create <backingstore_name> --access-key=<AWS ACCESS KEY> --secret-key=<AWS SECRET ACCESS KEY> --target-bucket <bucket-name>
-
Replace
<backingstore_name>with the name of the backingstore. -
Replace
<AWS ACCESS KEY>and<AWS SECRET ACCESS KEY>with an AWS access key ID and secret access key you created for this purpose. Replace
<bucket-name>with an existing AWS bucket name. This argument tells Multicloud Object Gateway which bucket to use as a target bucket for its backing store, and subsequently, data storage and administration.The output will be similar to the following:
INFO[0001] ✅ Exists: NooBaa "noobaa"
INFO[0002] ✅ Created: BackingStore "aws-resource"
INFO[0002] ✅ Created: Secret "backing-store-secret-aws-resource"
You can also add storage resources using a YAML:
Create a secret with the credentials:
apiVersion: v1
kind: Secret
metadata:
  name: <backingstore-secret-name>
type: Opaque
data:
  AWS_ACCESS_KEY_ID: <AWS ACCESS KEY ID ENCODED IN BASE64>
  AWS_SECRET_ACCESS_KEY: <AWS SECRET ACCESS KEY ENCODED IN BASE64>
-
You must supply and encode your own AWS access key ID and secret access key using Base64, and use the results in place of
<AWS ACCESS KEY ID ENCODED IN BASE64>and<AWS SECRET ACCESS KEY ENCODED IN BASE64>. -
Replace
<backingstore-secret-name>with a unique name.
-
You must supply and encode your own AWS access key ID and secret access key using Base64, and use the results in place of
Apply the following YAML for a specific backing store:
apiVersion: noobaa.io/v1alpha1 kind: BackingStore metadata: finalizers: - noobaa.io/finalizer labels: app: noobaa name: bs namespace: openshift-storage spec: awsS3: secret: name: <backingstore-secret-name> namespace: noobaa targetBucket: <bucket-name> type: aws-s3-
Replace
<bucket-name>with an existing AWS bucket name. This argument tells Multicloud Object Gateway which bucket to use as a target bucket for its backing store, and subsequently, data storage and administration. -
Replace
<backingstore-secret-name>with the name of the secret created in the previous step.
-
Replace
7.3.2.2. Creating an IBM COS-backed backingstore
Prerequisites
Download the Multicloud Object Gateway (MCG) command-line interface:
# subscription-manager repos --enable=rh-ocs-4-for-rhel-8-x86_64-rpms
# yum install mcg
-
Alternatively, you can install the
mcgpackage from the OpenShift Container Storage RPMs found here https://access.redhat.com/downloads/content/547/ver=4/rhel---8/4/x86_64/packages
Procedure
From the MCG command-line interface, run the following command:
noobaa backingstore create ibm-cos <backingstore_name> --access-key=<IBM ACCESS KEY> --secret-key=<IBM SECRET ACCESS KEY> --endpoint=<IBM COS ENDPOINT> --target-bucket <bucket-name>
-
Replace
<backingstore_name>with the name of the backingstore. Replace
<IBM ACCESS KEY>,<IBM SECRET ACCESS KEY>,<IBM COS ENDPOINT>with an IBM access key ID, secret access key and the appropriate regional endpoint that corresponds to the location of the existing IBM bucket.To generate the above keys on IBM cloud, you must include HMAC credentials while creating the service credentials for your target bucket.
Replace
<bucket-name>with an existing IBM bucket name. This argument tells Multicloud Object Gateway which bucket to use as a target bucket for its backing store, and subsequently, data storage and administration.The output will be similar to the following:
INFO[0001] ✅ Exists: NooBaa "noobaa"
INFO[0002] ✅ Created: BackingStore "ibm-resource"
INFO[0002] ✅ Created: Secret "backing-store-secret-ibm-resource"
-
Replace
You can also add storage resources using a YAML:
Create a secret with the credentials:
apiVersion: v1
kind: Secret
metadata:
  name: <backingstore-secret-name>
type: Opaque
data:
  IBM_COS_ACCESS_KEY_ID: <IBM COS ACCESS KEY ID ENCODED IN BASE64>
  IBM_COS_SECRET_ACCESS_KEY: <IBM COS SECRET ACCESS KEY ENCODED IN BASE64>
-
You must supply and encode your own IBM COS access key ID and secret access key using Base64, and use the results in place of
<IBM COS ACCESS KEY ID ENCODED IN BASE64>and<IBM COS SECRET ACCESS KEY ENCODED IN BASE64>. -
Replace
<backingstore-secret-name>with a unique name.
-
You must supply and encode your own IBM COS access key ID and secret access key using Base64, and use the results in place of
Apply the following YAML for a specific backing store:
apiVersion: noobaa.io/v1alpha1 kind: BackingStore metadata: finalizers: - noobaa.io/finalizer labels: app: noobaa name: bs namespace: openshift-storage spec: ibmCos: endpoint: <endpoint> secret: name: <backingstore-secret-name> namespace: openshift-storage targetBucket: <bucket-name> type: ibm-cos-
Replace
<bucket-name>with an existing IBM COS bucket name. This argument tells Multicloud Object Gateway which bucket to use as a target bucket for its backing store, and subsequently, data storage and administration. -
Replace
<endpoint>with a regional endpoint that corresponds to the location of the existing IBM bucket name. This argument tells Multicloud Object Gateway which endpoint to use for its backing store, and subsequently, data storage and administration. -
Replace
<backingstore-secret-name>with the name of the secret created in the previous step.
-
Replace
7.3.2.3. Creating an Azure-backed backingstore
Prerequisites
Download the Multicloud Object Gateway (MCG) command-line interface:
# subscription-manager repos --enable=rh-ocs-4-for-rhel-8-x86_64-rpms
# yum install mcg
-
Alternatively, you can install the
mcgpackage from the OpenShift Container Storage RPMs found here https://access.redhat.com/downloads/content/547/ver=4/rhel---8/4/x86_64/packages
Procedure
From the MCG command-line interface, run the following command:
noobaa backingstore create azure-blob <backingstore_name> --account-key=<AZURE ACCOUNT KEY> --account-name=<AZURE ACCOUNT NAME> --target-blob-container <blob container name>
-
Replace
<backingstore_name>with the name of the backingstore. -
Replace
<AZURE ACCOUNT KEY>and<AZURE ACCOUNT NAME>with an AZURE account key and account name you created for this purpose. Replace
<blob container name>with an existing Azure blob container name. This argument tells Multicloud Object Gateway which bucket to use as a target bucket for its backing store, and subsequently, data storage and administration.The output will be similar to the following:
INFO[0001] ✅ Exists: NooBaa "noobaa"
INFO[0002] ✅ Created: BackingStore "azure-resource"
INFO[0002] ✅ Created: Secret "backing-store-secret-azure-resource"
-
Replace
You can also add storage resources using a YAML:
Create a secret with the credentials:
apiVersion: v1
kind: Secret
metadata:
  name: <backingstore-secret-name>
type: Opaque
data:
  AccountName: <AZURE ACCOUNT NAME ENCODED IN BASE64>
  AccountKey: <AZURE ACCOUNT KEY ENCODED IN BASE64>
-
You must supply and encode your own Azure Account Name and Account Key using Base64, and use the results in place of
<AZURE ACCOUNT NAME ENCODED IN BASE64>and<AZURE ACCOUNT KEY ENCODED IN BASE64>. -
Replace
<backingstore-secret-name>with a unique name.
-
You must supply and encode your own Azure Account Name and Account Key using Base64, and use the results in place of
Apply the following YAML for a specific backing store:
apiVersion: noobaa.io/v1alpha1 kind: BackingStore metadata: finalizers: - noobaa.io/finalizer labels: app: noobaa name: bs namespace: openshift-storage spec: azureBlob: secret: name: <backingstore-secret-name> namespace: openshift-storage targetBlobContainer: <blob-container-name> type: azure-blob-
Replace
<blob-container-name>with an existing Azure blob container name. This argument tells Multicloud Object Gateway which bucket to use as a target bucket for its backing store, and subsequently, data storage and administration. -
Replace
<backingstore-secret-name>with the name of the secret created in the previous step.
-
Replace
7.3.3. Creating an s3 compatible Multicloud Object Gateway backingstore
The Multicloud Object Gateway can use any S3 compatible object storage as a backing store, for example, Red Hat Ceph Storage’s RADOS Gateway (RGW). The following procedure shows how to create an S3 compatible Multicloud Object Gateway backing store for Red Hat Ceph Storage’s RADOS Gateway. Note that when RGW is deployed, Openshift Container Storage operator creates an S3 compatible backingstore for Multicloud Object Gateway automatically.
Procedure
From the Multicloud Object Gateway (MCG) command-line interface, run the following NooBaa command:
noobaa backingstore create s3-compatible rgw-resource --access-key=<RGW ACCESS KEY> --secret-key=<RGW SECRET KEY> --target-bucket=<bucket-name> --endpoint=http://rook-ceph-rgw-ocs-storagecluster-cephobjectstore.openshift-storage.svc.cluster.local:80
To get the
<RGW ACCESS KEY>and<RGW SECRET KEY>, run the following command using your RGW user secret name:oc get secret <RGW USER SECRET NAME> -o yaml
- Decode the access key ID and the access key from Base64 and keep them.
-
Replace
<RGW USER ACCESS KEY>and<RGW USER SECRET ACCESS KEY>with the appropriate, decoded data from the previous step. Replace
<bucket-name>with an existing RGW bucket name. This argument tells Multicloud Object Gateway which bucket to use as a target bucket for its backing store, and subsequently, data storage and administration.The output will be similar to the following:
INFO[0001] ✅ Exists: NooBaa "noobaa"
INFO[0002] ✅ Created: BackingStore "rgw-resource"
INFO[0002] ✅ Created: Secret "backing-store-secret-rgw-resource"
You can also create the backingstore using a YAML:
Create a
CephObjectStoreuser. This also creates a secret containing the RGW credentials:apiVersion: ceph.rook.io/v1 kind: CephObjectStoreUser metadata: name: <RGW-Username> namespace: openshift-storage spec: store: ocs-storagecluster-cephobjectstore displayName: "<Display-name>"
-
Replace
<RGW-Username>and<Display-name>with a unique username and display name.
-
Replace
Apply the following YAML for an S3-Compatible backing store:
apiVersion: noobaa.io/v1alpha1 kind: BackingStore metadata: finalizers: - noobaa.io/finalizer labels: app: noobaa name: <backingstore-name> namespace: openshift-storage spec: s3Compatible: endpoint: http://rook-ceph-rgw-ocs-storagecluster-cephobjectstore.openshift-storage.svc.cluster.local:80 secret: name: <backingstore-secret-name> namespace: openshift-storage signatureVersion: v4 targetBucket: <RGW-bucket-name> type: s3-compatible-
Replace
<backingstore-secret-name>with the name of the secret that was created withCephObjectStorein the previous step. -
Replace
<bucket-name>with an existing RGW bucket name. This argument tells Multicloud Object Gateway which bucket to use as a target bucket for its backing store, and subsequently, data storage and administration.
-
Replace
7.3.4. Adding storage resources for hybrid and Multicloud using the user interface
Procedure
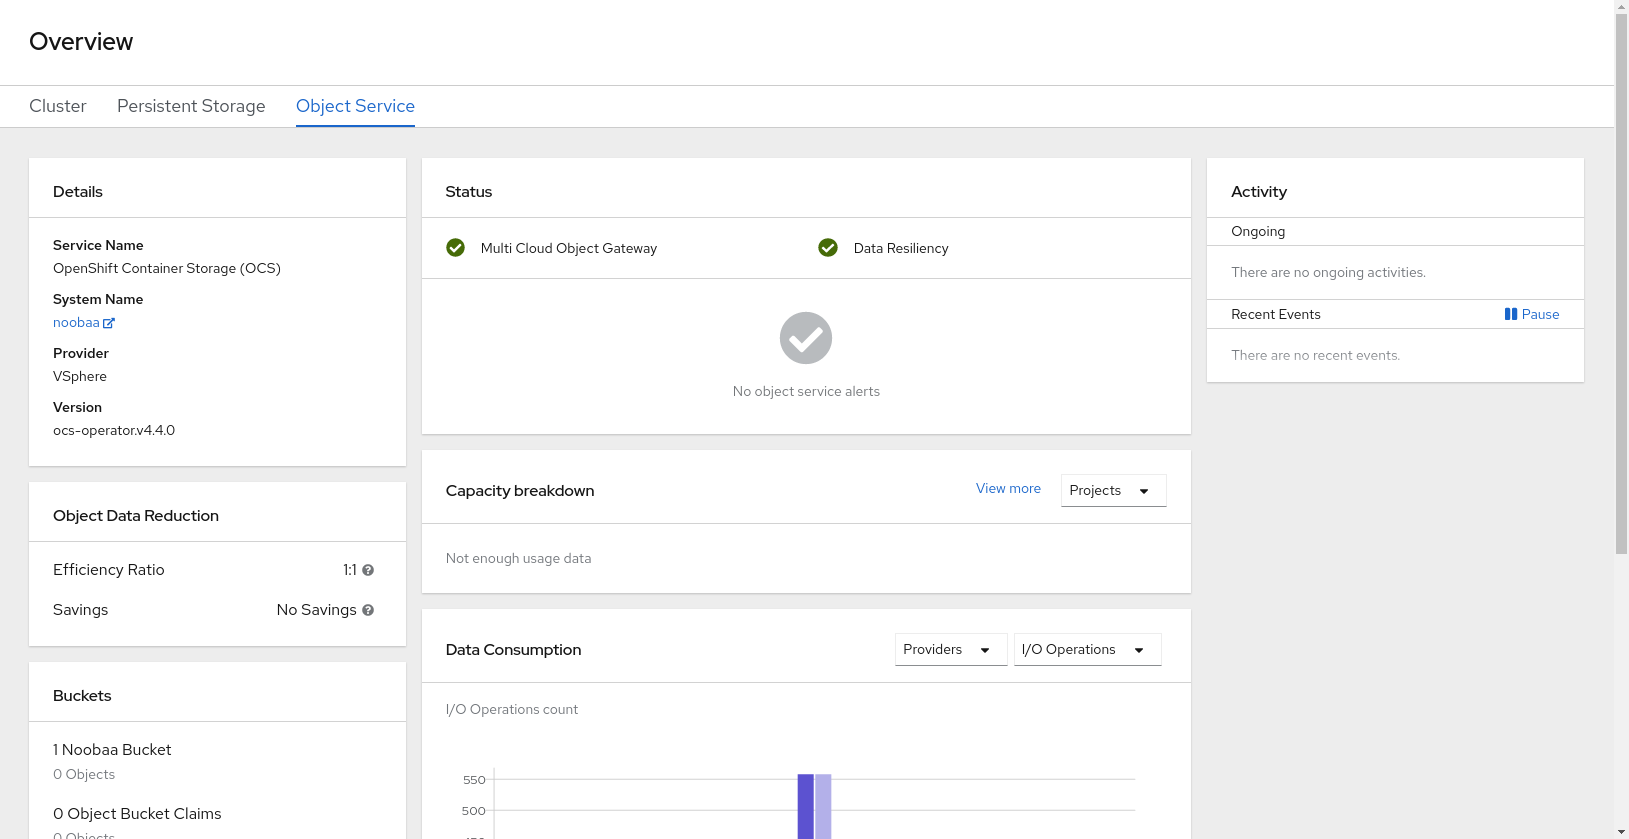
In your OpenShift Storage console, navigate to Overview → Object Service → select the noobaa link:
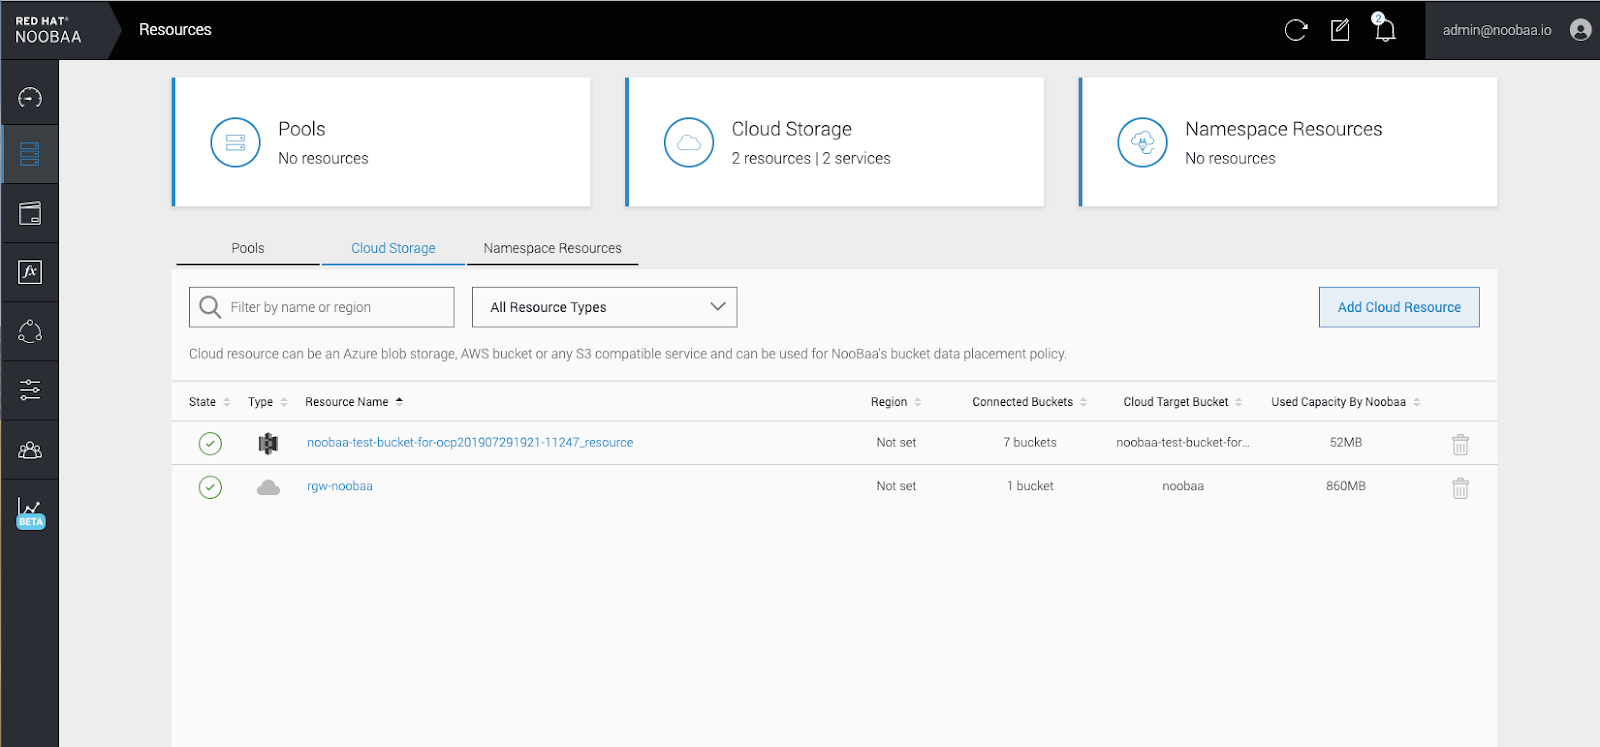
Select the Resources tab in the left, highlighted below. From the list that populates, select Add Cloud Resource:
Select Add new connection:
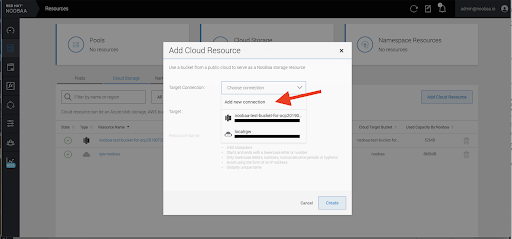
Select the relevant native cloud provider or S3 compatible option and fill in the details:

Select the newly created connection and map it to the existing bucket:
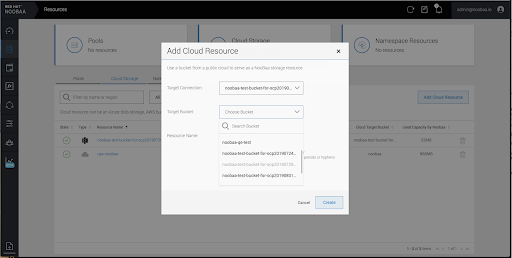
- Repeat these steps to create as many backing stores as needed.
Resources created in NooBaa UI cannot be used by OpenShift UI or MCG CLI.
7.3.5. Creating a new bucket class
Bucket class is a CRD representing a class of buckets that defines tiering policies and data placements for an Object Bucket Class (OBC).
Use this procedure to create a bucket class in OpenShift Container Storage.
Procedure
- Click Operators → Installed Operators from the left pane of the OpenShift Web Console to view the installed operators.
- Click OpenShift Container Storage Operator.
On the OpenShift Container Storage Operator page, scroll right and click the Bucket Class tab.
Figure 7.3. OpenShift Container Storage Operator page with Bucket Class tab
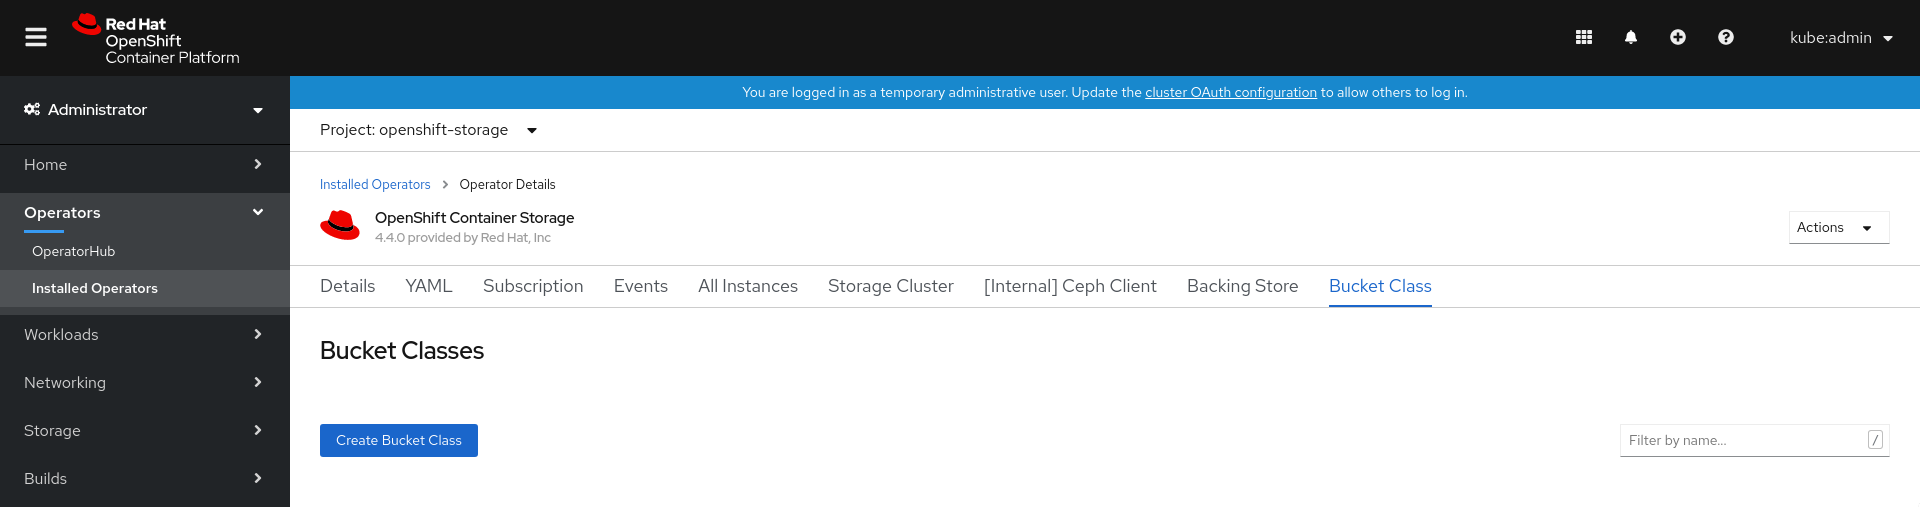
- Click Create Bucket Class.
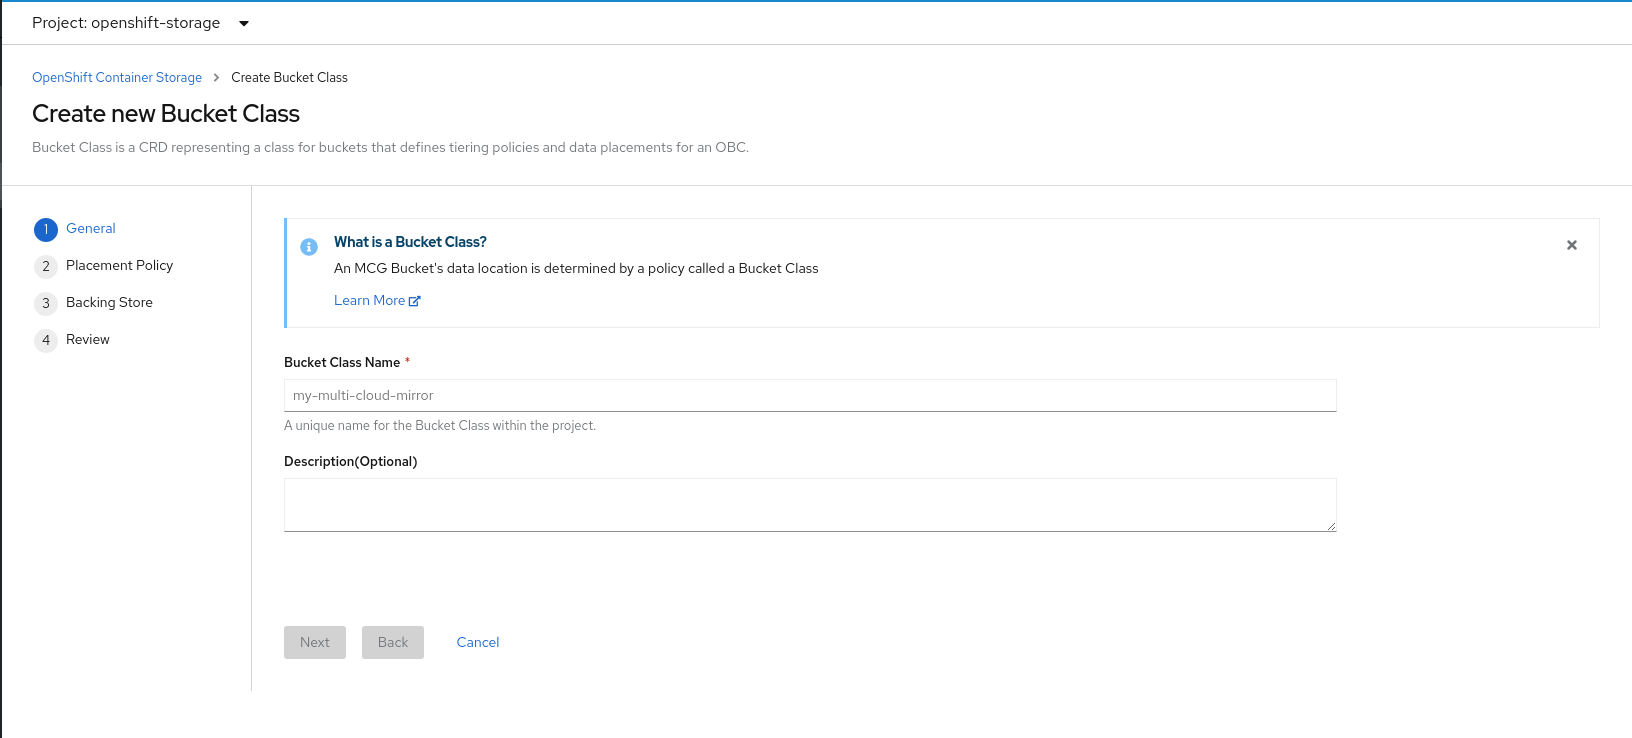
On the Create new Bucket Class page, perform the following:
Enter a Bucket Class Name and click Next.
Figure 7.4. Create Bucket Class page
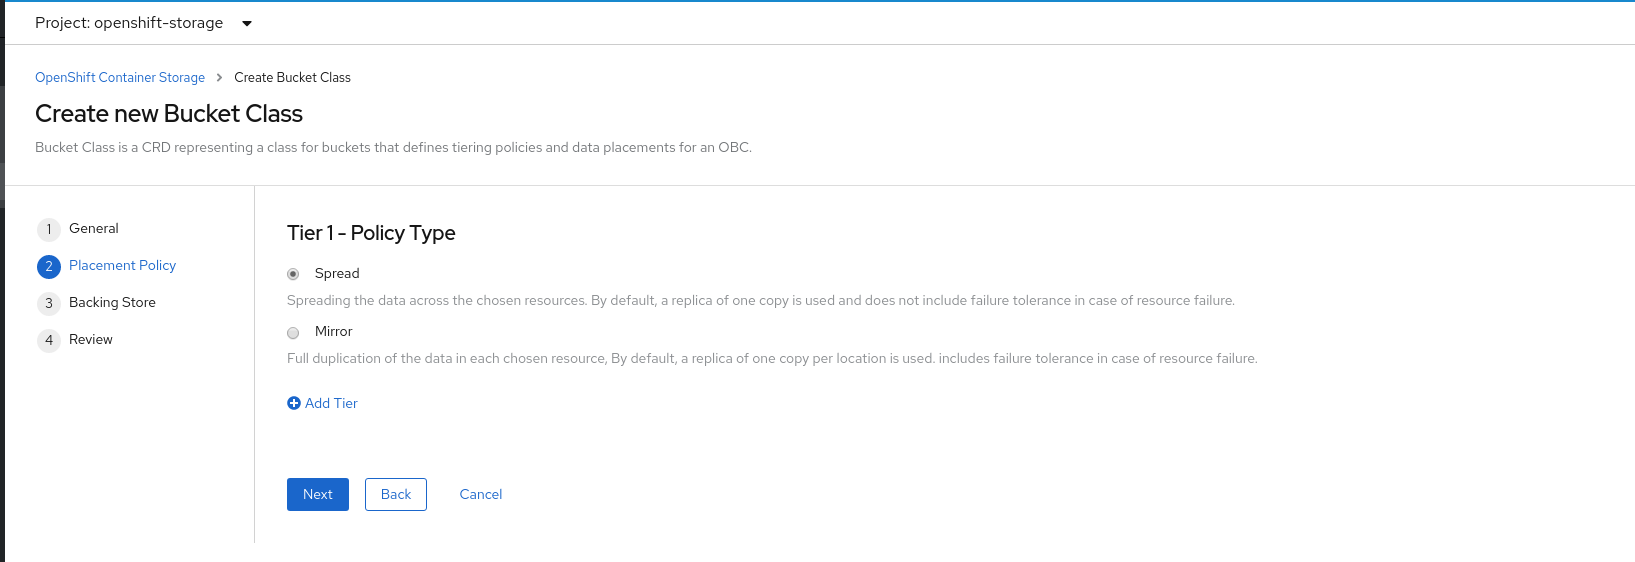
In Placement Policy, select Tier 1 - Policy Type and click Next. You can choose either one of the options as per your requirements.
- Spread allows spreading of the data across the chosen resources.
- Mirror allows full duplication of the data across the chosen resources.
Click Add Tier to add another policy tier.
Figure 7.5. Tier 1 - Policy Type selection page
Select atleast one Backing Store resource from the available list if you have selected Tier 1 - Policy Type as Spread and click Next. Alternatively, you can also create a new backing store.
Figure 7.6. Tier 1 - Backing Store selection page

You need to select atleast 2 backing stores when you select Policy Type as Mirror in previous step.
Review and confirm Bucket Class settings.
Figure 7.7. Bucket class settings review page
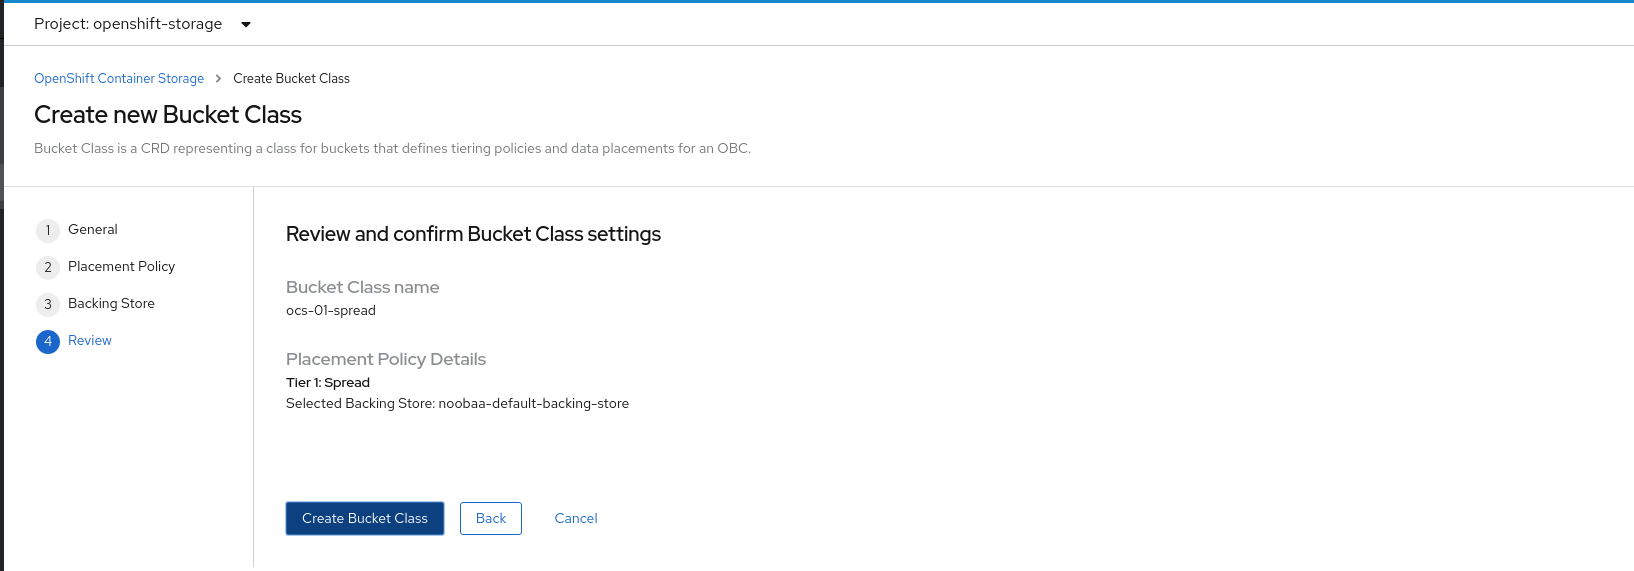
- Click Create Bucket Class.
Verification steps
- Click Operators → Installed Operators.
- Click OpenShift Container Storage Operator.
- Search for the new Bucket Class or click Bucket Class tab to view all the Bucket Classes.
7.4. Mirroring data for hybrid and Multicloud buckets
The Multicloud Object Gateway (MCG) simplifies the process of spanning data across cloud provider and clusters.
Prerequisites
- You must first add a backing storage that can be used by the MCG, see Section 7.3, “Adding storage resources for hybrid or Multicloud”.
Then you create a bucket class that reflects the data management policy, mirroring.
Procedure
You can set up mirroring data three ways:
7.4.1. Creating bucket classes to mirror data using the MCG command-line-interface
From the MCG command-line interface, run the following command to create a bucket class with a mirroring policy:
$ noobaa bucketclass create mirror-to-aws --backingstores=azure-resource,aws-resource --placement Mirror
Set the newly created bucket class to a new bucket claim, generating a new bucket that will be mirrored between two locations:
$ noobaa obc create mirrored-bucket --bucketclass=mirror-to-aws
7.4.2. Creating bucket classes to mirror data using a YAML
Apply the following YAML. This YAML is a hybrid example that mirrors data between local Ceph storage and AWS:
apiVersion: noobaa.io/v1alpha1
kind: BucketClass
metadata:
  name: hybrid-class
  labels:
    app: noobaa
spec:
  placementPolicy:
    tiers:
      - tier:
          mirrors:
            - mirror:
                spread:
                  - cos-east-us
            - mirror:
                spread:
                  - noobaa-test-bucket-for-ocp201907291921-11247_resource
Add the following lines to your standard Object Bucket Claim (OBC):
additionalConfig:
  bucketclass: mirror-to-aws
For more information about OBCs, see Section 7.6, “Object Bucket Claim”.
7.4.3. Configuring buckets to mirror data using the user interface
In your OpenShift Storage console, navigate to Overview → Object Service → select the noobaa link:
Click the buckets icon on the left side. You will see a list of your buckets:

- Click the bucket you want to update.
Click Edit Tier 1 Resources:
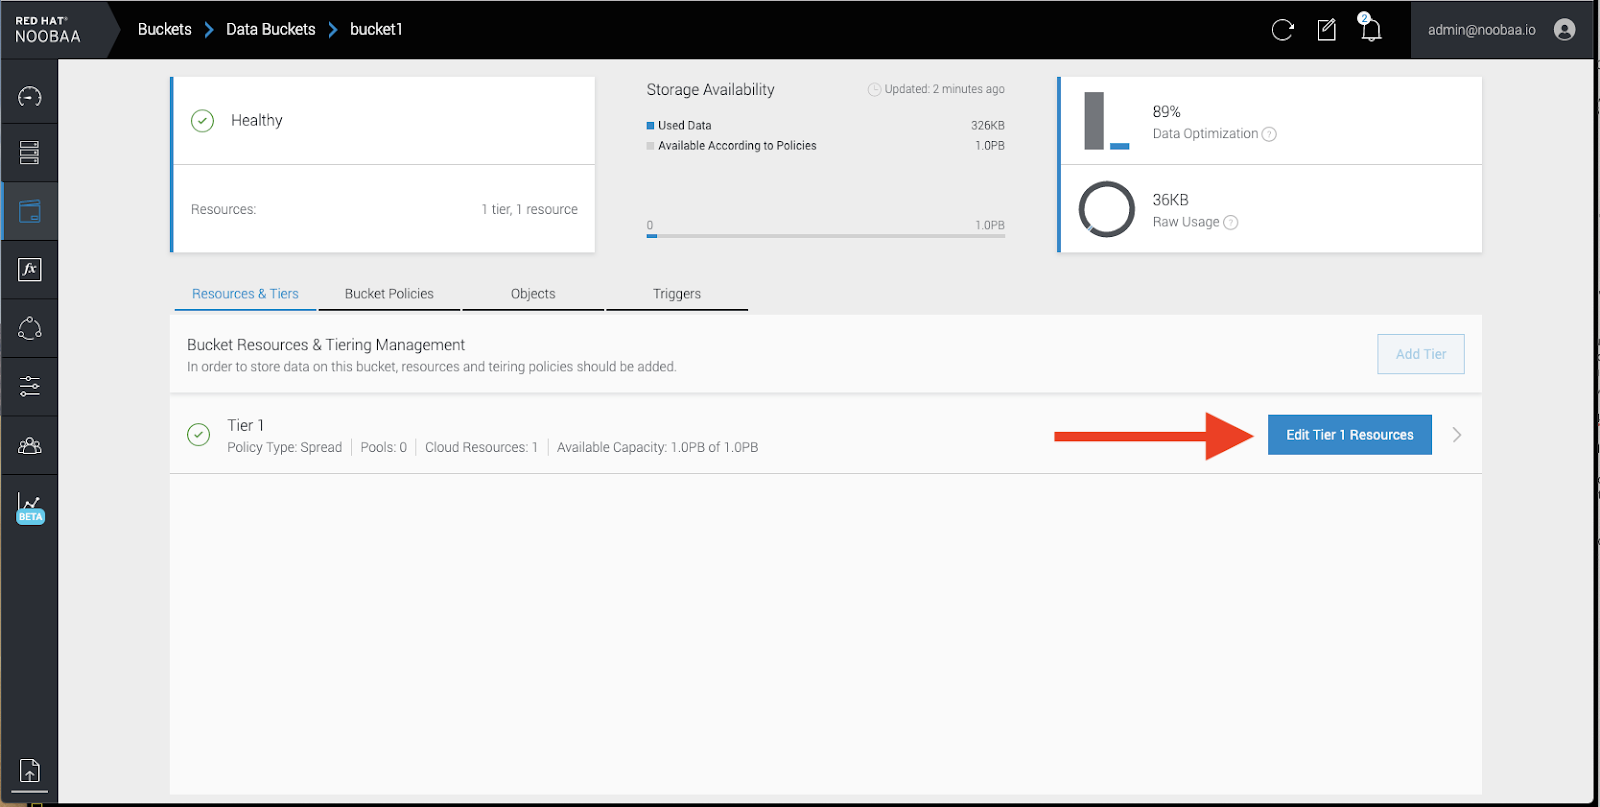
Select Mirror and check the relevant resources you want to use for this bucket. In the following example, we mirror data between on prem Ceph RGW to AWS:

- Click Save.
Resources created in NooBaa UI cannot be used by OpenShift UI or MCG CLI.
7.5. Bucket policies in the Multicloud Object Gateway
OpenShift Container Storage supports AWS S3 bucket policies. Bucket policies allow you to grant users access permissions for buckets and the objects in them.
7.5.1. About bucket policies
Bucket policies are an access policy option available for you to grant permission to your AWS S3 buckets and objects. Bucket policies use JSON-based access policy language. For more information about access policy language, see AWS Access Policy Language Overview.
7.5.2. Using bucket policies
Prerequisites
- A running OpenShift Container Storage Platform
- Access to the Multicloud Object Gateway, see Section 7.2, “Accessing the Multicloud Object Gateway with your applications”
Procedure
To use bucket policies in the Multicloud Object Gateway:
Create the bucket policy in JSON format. See the following example:
{
    "Version": "NewVersion",
    "Statement": [
        {
            "Sid": "Example",
            "Effect": "Allow",
            "Principal": [
                    "john.doe@example.com"
            ],
            "Action": [
                "s3:GetObject"
            ],
            "Resource": [
                "arn:aws:s3:::john_bucket"
            ]
        }
    ]
}
There are many available elements for bucket policies. For details on these elements and examples of how they can be used, see AWS Access Policy Language Overview.
For more examples of bucket policies, see AWS Bucket Policy Examples.
Instructions for creating S3 users can be found in Section 7.5.3, “Creating an AWS S3 user in the Multicloud Object Gateway”.
Using AWS S3 client, use the
put-bucket-policycommand to apply the bucket policy to your S3 bucket:# aws --endpoint ENDPOINT --no-verify-ssl s3api put-bucket-policy --bucket MyBucket --policy BucketPolicy
Replace
ENDPOINTwith the S3 endpointReplace
MyBucketwith the bucket to set the policy onReplace
BucketPolicywith the bucket policy JSON fileAdd
--no-verify-sslif you are using the default self signed certificatesFor example:
# aws --endpoint https://s3-openshift-storage.apps.gogo44.noobaa.org --no-verify-ssl s3api put-bucket-policy -bucket MyBucket --policy file://BucketPolicy
For more information on the
put-bucket-policycommand, see the AWS CLI Command Reference for put-bucket-policy.
The principal element specifies the user that is allowed or denied access to a resource, such as a bucket. Currently, Only NooBaa accounts can be used as principals. In the case of object bucket claims, NooBaa automatically create an account obc-account.<generated bucket name>@noobaa.io.
Bucket policy conditions are not supported.
7.5.3. Creating an AWS S3 user in the Multicloud Object Gateway
Prerequisites
- A running OpenShift Container Storage Platform
- Access to the Multicloud Object Gateway, see Section 7.2, “Accessing the Multicloud Object Gateway with your applications”
Procedure
In your OpenShift Storage console, navigate to Overview → Object Service → select the noobaa link:
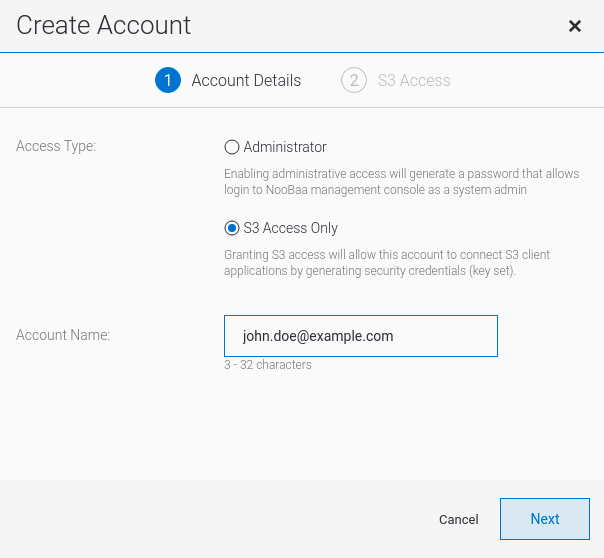
Under the Accounts tab, click Create Account:
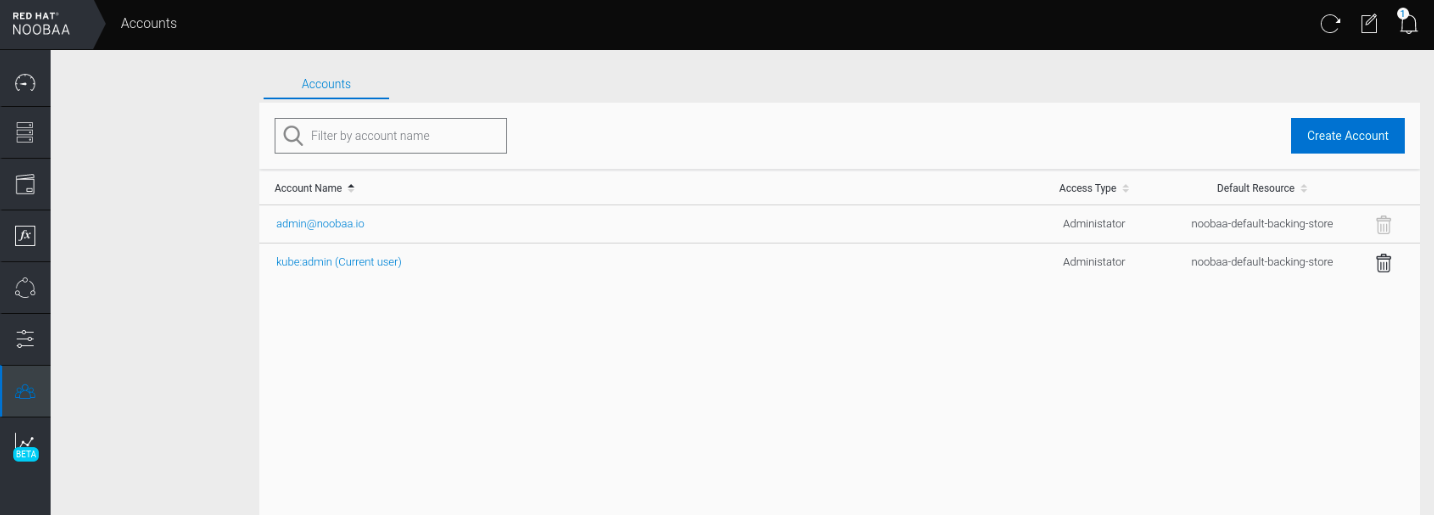
Select S3 Access Only, provide the Account Name, for example, john.doe@example.com. Click Next:
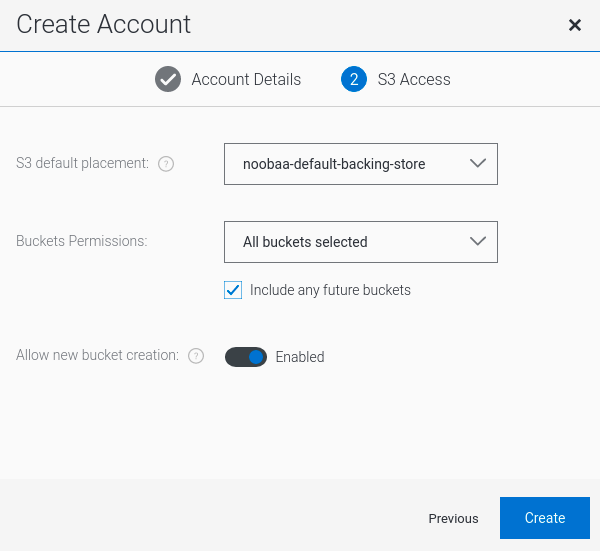
Select S3 default placement, for example, noobaa-default-backing-store. Select Buckets Permissions. A specific bucket or all buckets can be selected. Click Create:
7.6. Object Bucket Claim
An Object Bucket Claim can be used to request an S3 compatible bucket backend for your workloads.
You can create an Object Bucket Claim three ways:
An object bucket claim creates a new bucket and an application account in NooBaa with permissions to the bucket, including a new access key and secret access key. The application account is allowed to access only a single bucket and can’t create new buckets by default.
7.6.1. Dynamic Object Bucket Claim
Similar to persistent volumes, you can add the details of the Object Bucket claim to your application’s YAML, and get the object service endpoint, access key, and secret access key available in a configuration map and secret. It is easy to read this information dynamically into environment variables of your application.
Procedure
Add the following lines to your application YAML:
apiVersion: objectbucket.io/v1alpha1
kind: ObjectBucketClaim
metadata:
  name: <obc-name>
spec:
  generateBucketName: <obc-bucket-name>
  storageClassName: noobaa
These lines are the Object Bucket Claim itself.
-
Replace
<obc-name>with the a unique Object Bucket Claim name. -
Replace
<obc-bucket-name>with a unique bucket name for your Object Bucket Claim.
-
Replace
You can add more lines to the YAML file to automate the use of the Object Bucket Claim. The example below is the mapping between the bucket claim result, which is a configuration map with data and a secret with the credentials. This specific job will claim the Object Bucket from NooBaa, which will create a bucket and an account.
apiVersion: batch/v1 kind: Job metadata: name: testjob spec: template: spec: restartPolicy: OnFailure containers: - image: <your application image> name: test env: - name: BUCKET_NAME valueFrom: configMapKeyRef: name: <obc-name> key: BUCKET_NAME - name: BUCKET_HOST valueFrom: configMapKeyRef: name: <obc-name> key: BUCKET_HOST - name: BUCKET_PORT valueFrom: configMapKeyRef: name: <obc-name> key: BUCKET_PORT - name: AWS_ACCESS_KEY_ID valueFrom: secretKeyRef: name: <obc-name> key: AWS_ACCESS_KEY_ID - name: AWS_SECRET_ACCESS_KEY valueFrom: secretKeyRef: name: <obc-name> key: AWS_SECRET_ACCESS_KEY- Replace all instances of <obc-name> with your Object Bucket Claim name.
- Replace <your application image> with your application image.
Apply the updated YAML file:
# oc apply -f <yaml.file>
-
Replace
<yaml.file>with the name of your YAML file.
-
Replace
To view the new configuration map, run the following:
# oc get cm <obc-name>
Replace
obc-namewith the name of your Object Bucket Claim.You can expect the following environment variables in the output:
-
BUCKET_HOST- Endpoint to use in the application BUCKET_PORT- The port available for the application-
The port is related to the
BUCKET_HOST. For example, if theBUCKET_HOSTis https://my.example.com, and theBUCKET_PORTis 443, the endpoint for the object service would be https://my.example.com:443.
-
The port is related to the
-
BUCKET_NAME- Requested or generated bucket name -
AWS_ACCESS_KEY_ID- Access key that is part of the credentials -
AWS_SECRET_ACCESS_KEY- Secret access key that is part of the credentials
-
7.6.2. Creating an Object Bucket Claim using the command line interface
When creating an Object Bucket Claim using the command-line interface, you get a configuration map and a Secret that together contain all the information your application needs to use the object storage service.
Prerequisites
Download the MCG command-line interface:
# subscription-manager repos --enable=rh-ocs-4-for-rhel-8-x86_64-rpms
# yum install mcg
Procedure
Use the command-line interface to generate the details of a new bucket and credentials. Run the following command:
# noobaa obc create <obc-name> -n openshift-storage
Replace
<obc-name>with a unique Object Bucket Claim name, for example,myappobc.Additionally, you can use the
--app-namespaceoption to specify the namespace where the Object Bucket Claim configuration map and secret will be created, for example,myapp-namespace.Example output:
INFO[0001] ✅ Created: ObjectBucketClaim "test21obc"
The MCG command-line-interface has created the necessary configuration and has informed OpenShift about the new OBC.
Run the following command to view the Object Bucket Claim:
# oc get obc -n openshift-storage
Example output:
NAME        STORAGE-CLASS                 PHASE   AGE
test21obc   openshift-storage.noobaa.io   Bound   38s
Run the following command to view the YAML file for the new Object Bucket Claim:
# oc get obc test21obc -o yaml -n openshift-storage
Example output:
apiVersion: objectbucket.io/v1alpha1
kind: ObjectBucketClaim
metadata:
  creationTimestamp: "2019-10-24T13:30:07Z"
  finalizers:
  - objectbucket.io/finalizer
  generation: 2
  labels:
    app: noobaa
    bucket-provisioner: openshift-storage.noobaa.io-obc
    noobaa-domain: openshift-storage.noobaa.io
  name: test21obc
  namespace: openshift-storage
  resourceVersion: "40756"
  selfLink: /apis/objectbucket.io/v1alpha1/namespaces/openshift-storage/objectbucketclaims/test21obc
  uid: 64f04cba-f662-11e9-bc3c-0295250841af
spec:
  ObjectBucketName: obc-openshift-storage-test21obc
  bucketName: test21obc-933348a6-e267-4f82-82f1-e59bf4fe3bb4
  generateBucketName: test21obc
  storageClassName: openshift-storage.noobaa.io
status:
  phase: Bound
Inside of your
openshift-storagenamespace, you can find the configuration map and the secret to use this Object Bucket Claim. The CM and the secret have the same name as the Object Bucket Claim. To view the secret:# oc get -n openshift-storage secret test21obc -o yaml
Example output:
Example output:
apiVersion: v1
data:
  AWS_ACCESS_KEY_ID: c0M0R2xVanF3ODR3bHBkVW94cmY=
  AWS_SECRET_ACCESS_KEY: Wi9kcFluSWxHRzlWaFlzNk1hc0xma2JXcjM1MVhqa051SlBleXpmOQ==
kind: Secret
metadata:
  creationTimestamp: "2019-10-24T13:30:07Z"
  finalizers:
  - objectbucket.io/finalizer
  labels:
    app: noobaa
    bucket-provisioner: openshift-storage.noobaa.io-obc
    noobaa-domain: openshift-storage.noobaa.io
  name: test21obc
  namespace: openshift-storage
  ownerReferences:
  - apiVersion: objectbucket.io/v1alpha1
    blockOwnerDeletion: true
    controller: true
    kind: ObjectBucketClaim
    name: test21obc
    uid: 64f04cba-f662-11e9-bc3c-0295250841af
  resourceVersion: "40751"
  selfLink: /api/v1/namespaces/openshift-storage/secrets/test21obc
  uid: 65117c1c-f662-11e9-9094-0a5305de57bb
type: Opaque
The secret gives you the S3 access credentials.
To view the configuration map:
# oc get -n openshift-storage cm test21obc -o yaml
Example output:
apiVersion: v1
data:
  BUCKET_HOST: 10.0.171.35
  BUCKET_NAME: test21obc-933348a6-e267-4f82-82f1-e59bf4fe3bb4
  BUCKET_PORT: "31242"
  BUCKET_REGION: ""
  BUCKET_SUBREGION: ""
kind: ConfigMap
metadata:
  creationTimestamp: "2019-10-24T13:30:07Z"
  finalizers:
  - objectbucket.io/finalizer
  labels:
    app: noobaa
    bucket-provisioner: openshift-storage.noobaa.io-obc
    noobaa-domain: openshift-storage.noobaa.io
  name: test21obc
  namespace: openshift-storage
  ownerReferences:
  - apiVersion: objectbucket.io/v1alpha1
    blockOwnerDeletion: true
    controller: true
    kind: ObjectBucketClaim
    name: test21obc
    uid: 64f04cba-f662-11e9-bc3c-0295250841af
  resourceVersion: "40752"
  selfLink: /api/v1/namespaces/openshift-storage/configmaps/test21obc
  uid: 651c6501-f662-11e9-9094-0a5305de57bb
The configuration map contains the S3 endpoint information for your application.
7.6.3. Creating an Object Bucket Claim using the OpenShift Web Console
You can create an Object Bucket Claim (OBC) using the OpenShift Web Console.
Prerequisites
- Administrative access to the OpenShift Web Console.
Procedure
- Log into the OpenShift Web Console.
- On the left navigation bar, click Storage → Object Bucket Claims.
In the following window, click Create Object Bucket Claim:

In the following window, enter a name for your object bucket claim, and select the appropriate storage class and bucket class from the dropdown menus:

Click Create.
Once the OBC is created, you will be redirected to its detail page:

Once you’ve created the OBC, you can attach it to a deployment.
- On the left navigation bar, click Storage → Object Bucket Claims.
- Click the action menu (⋮) next to the OBC you created.
From the drop down menu, select Attach to Deployment.

In the following window, select the desired deployment from the drop down menu, then click Attach:

In order for your applications to communicate with the OBC, you need to use the configmap and secret. For more information about this, see Section 7.6.1, “Dynamic Object Bucket Claim”.
7.6.3.1. Delete an Object Bucket Claim
On the Object Bucket Claims page, click on the action menu (⋮) next to the OBC that you want to delete.
Select Delete Object Bucket Claim from menu.

- Click Delete.
7.6.3.2. Viewing object buckets using the Multicloud Object Gateway user interface
You can view the details of object buckets created for Object Bucket Claims (OBCs).
Procedure
To view the object bucket details:
- Log into the OpenShift Web Console.
On the left navigation bar, click Storage → Object Buckets:
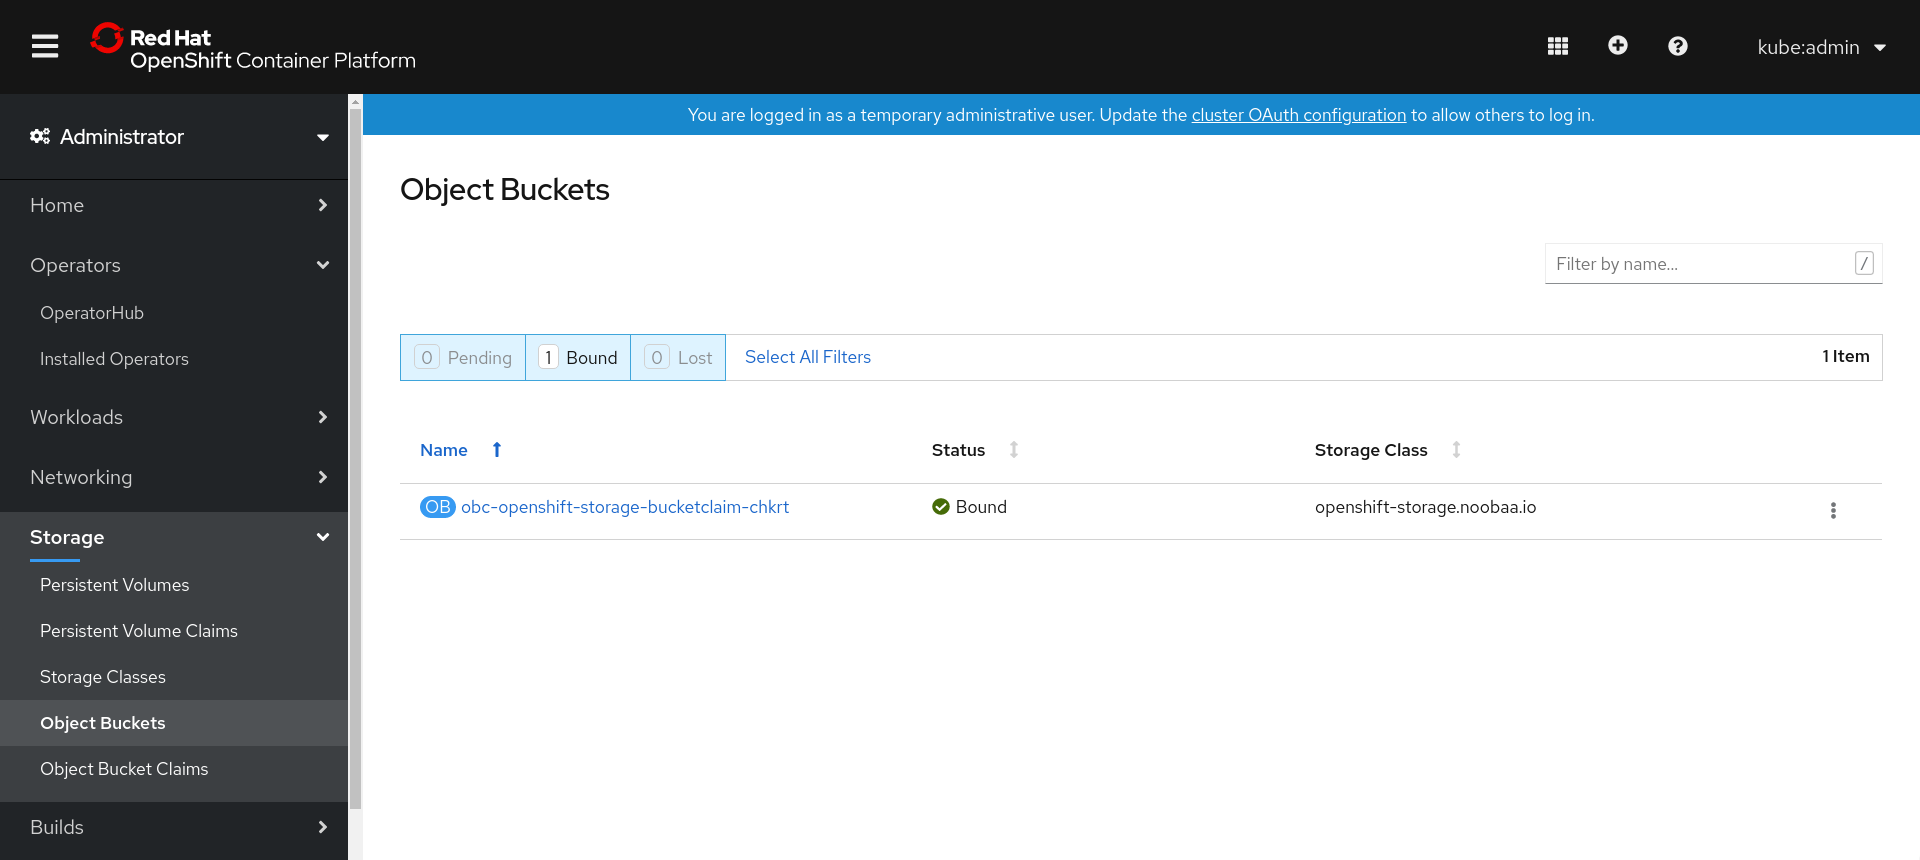
You can also navigate to the details page of a specific OBC and click the Resource link to view the object buckets for that OBC.
Select the object bucket you want to see details for. You will be navigated to the object bucket’s details page:
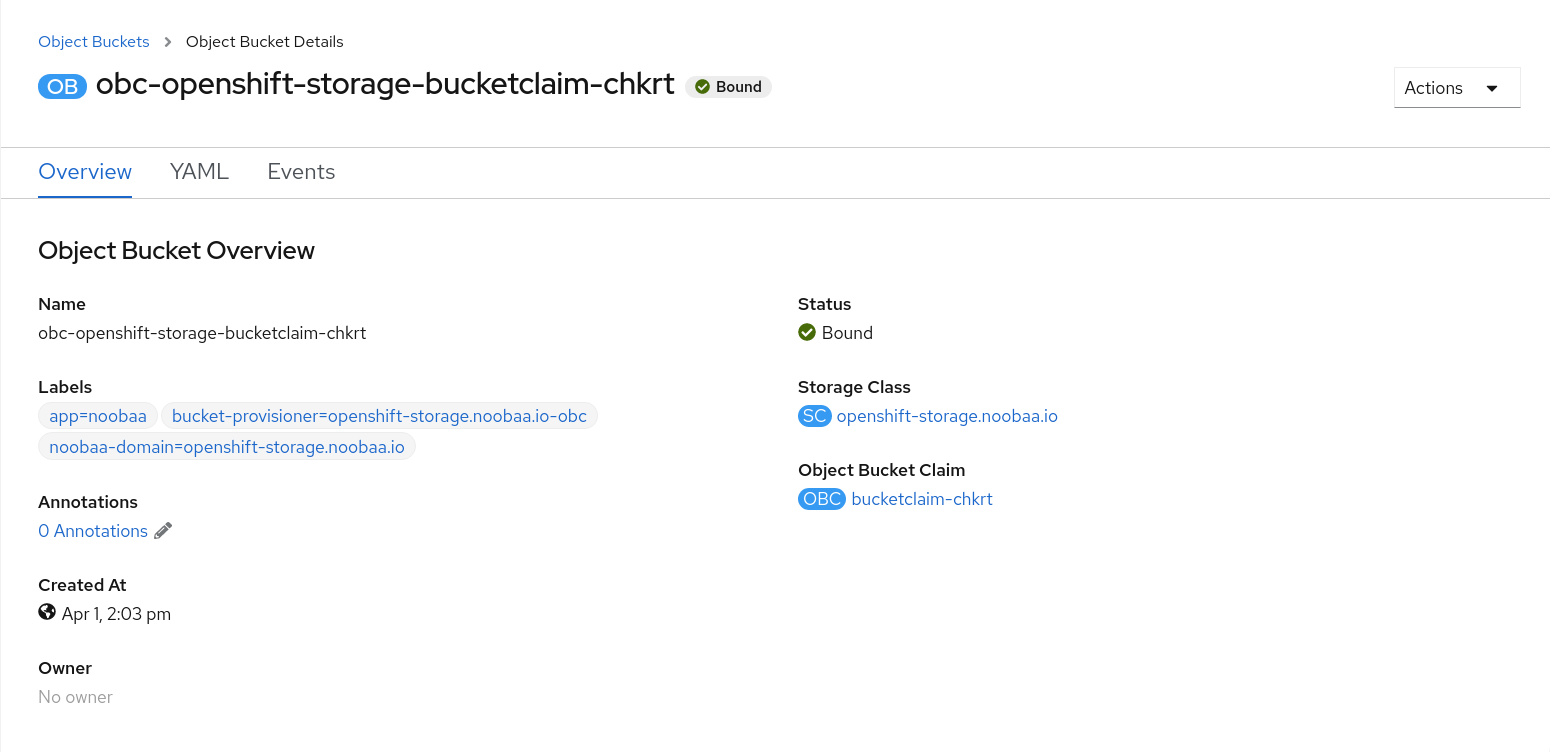
7.7. Scaling Multicloud Object Gateway performance by adding endpoints
The Multicloud Object Gateway performance may vary from one environment to another. In some cases, specific applications require faster performance which can be easily addressed by scaling S3 endpoints.
The Multicloud Object Gateway resource pool is a group of NooBaa daemon containers that provide two types of services enabled by default:
- Storage service
- S3 endpoint service
Scaling Multicloud Object Gateway performance by adding endpoints is a Technology Preview feature. Technology Preview features are not supported with Red Hat production service level agreements (SLAs) and might not be functionally complete. Red Hat does not recommend using them in production. These features provide early access to upcoming product features, enabling customers to test functionality and provide feedback during the development process.
For more information, see Technology Preview Features Support Scope.
7.7.1. S3 endpoints in the Multicloud Object Gateway
The S3 endpoint is a service that every Multicloud Object Gateway provides by default that handles the heavy lifting data digestion in the Multicloud Object Gateway. The endpoint service handles the data chunking, deduplication, compression, and encryption, and it accepts data placement instructions from the Multicloud Object Gateway.
7.7.2. Scaling with storage nodes
Prerequisites
- A running OpenShift Container Storage cluster on OpenShift Container Platform with access to the Multicloud Object Gateway.
A storage node in the Multicloud Object Gateway is a NooBaa daemon container attached to one or more persistent volumes and used for local object service data storage. NooBaa daemons can be deployed on Kubernetes nodes. This can be done by creating a Kubernetes pool consisting of StatefulSet pods.
Procedure
In the Mult-Cloud Object Gateway user interface, from the Overview page, click Add Storage Resources:

In the window, click Deploy Kubernetes Pool:
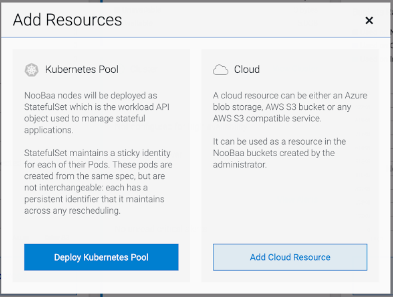
In the Create Pool step create the target pool for the future installed nodes.

In the Configure step, configure the number of requested pods and the size of each PV. For each new pod, one PV is be created.

- In the Review step, you can find the details of the new pool and select the deployment method you wish to use: local or external deployment. If local deployment is selected, the Kubernetes nodes will deploy within the cluster. If external deployment is selected, you will be provided with a YAML file to run externally.
All nodes will be assigned to the pool you chose in the first step, and can be found under Resources → Storage resources → Resource name:

Chapter 8. Accessing the RADOS Object Gateway S3 endpoint
Users can access the RADOS Object Gateway (RGW) endpoint directly.
Prerequisites
- A running OpenShift Container Storage Platform
Procedure
Run
oc get servicecommand to get the RGW service name.$ oc get service NAME TYPE rook-ceph-rgw-ocs-storagecluster-cephobjectstore ClusterIP CLUSTER-IP EXTERNAL-IP PORT(S) AGE 172.30.99.207 <none> 80/TCP 4d15h
Run
oc exposecommand to expose the RGW service.$ oc expose svc/<RGW service name> --hostname=<route name>
Replace
<RGW-service name>with the RGW service name from the previous step.Replace
<route name>with a route you want to create for the RGW service.For example:
$ oc expose svc/rook-ceph-rgw-ocs-storagecluster-cephobjectstore --hostname=rook-ceph-rgw-ocs.ocp.host.example.com
Run
oc get routecommand to confirmoc exposeis successful and there is an RGW route.$ oc get route NAME HOST/PORT PATH rook-ceph-rgw-ocs-storagecluster-cephobjectstore rook-ceph-rgw-ocsocp.host.example.com SERVICES PORT TERMINATION WILDCARD rook-ceph-rgw-ocs-storagecluster-cephobjectstore http <none>
Verify
To verify the
ENDPOINT, run the following command:aws s3 --no-verify-ssl --endpoint <ENDPOINT> ls
Replace
<ENDPOINT>with the route that you get from the command in the above step 3.For example:
$ aws s3 --no-verify-ssl --endpoint http://rook-ceph-rgw-ocs.ocp.host.example.com ls
To get the access key and secret of the default user ocs-storagecluster-cephobjectstoreuser, run the following commands:
Access key:
$ oc get secret rook-ceph-object-user-ocs-storagecluster-cephobjectstore-ocs-storagecluster-cephobjectstoreuser -o yaml | grep -w "AccessKey:" | head -n1 | awk '{print $2}' | base64 --decodeSecret key:
$ oc get secret rook-ceph-object-user-ocs-storagecluster-cephobjectstore-ocs-storagecluster-cephobjectstoreuser -o yaml | grep -w "SecretKey:" | head -n1 | awk '{print $2}' | base64 --decode
Chapter 9. Replacing storage nodes
Depending on the type of your deployment, you can choose one of the following procedures to replace storage nodes:
For dynamically provisioned storage nodes deployed on AWS, see:
- Section 9.1.1, “Replacing operational nodes on AWS user-provisioned infrastructures”
- Section 9.1.2, “Replacing failed nodes on AWS user-provisioned infrastructures”
- Section 9.1.3, “Replacing operational nodes on AWS installer-provisioned infrastructures”
- Section 9.1.4, “Replacing failed nodes on AWS installer-provisioned infrastructures”
For dynamically created storage nodes deployed on VMware, see:
For storage nodes deployed using local storage devices, see:
9.1. Dynamically provisioned OpenShift Container Storage deployed on AWS infrastructures
9.1.1. Replacing operational nodes on AWS user-provisioned infrastructures
Perform this procedure to replace an operational node on AWS user-provisioned infrastructure.
Procedure
- Identify the node that needs to be replaced.
Mark the node as unschedulable using the following command:
$ oc adm cordon <node_name>
Drain the node using the following command:
$ oc adm drain <node_name> --force --delete-local-data --ignore-daemonsets
ImportantThis activity may take at least 5-10 minutes or more. Ceph errors generated during this period are temporary and are automatically resolved when the new node is labeled and functional.
Delete the node using the following command:
$ oc delete nodes <node_name>
- Create a new AWS machine instance with the required infrastructure. See Supported Infrastructure and Platforms.
- Create a new OpenShift Container Platform node using the new AWS machine instance.
Check for certificate signing requests (CSRs) related to OpenShift Container Platform that are in
Pendingstate:$ oc get csr
Approve all required OpenShift Container Platform CSRs for the new node:
$ oc adm certificate approve <Certificate_Name>
- Click Compute → Nodes, confirm if the new node is in Ready state.
Apply the OpenShift Container Storage label to the new node using any one of the following:
- From User interface
- For the new node, click Action Menu (⋮) → Edit Labels
-
Add
cluster.ocs.openshift.io/openshift-storageand click Save.
- From Command line interface
Execute the following command to apply the OpenShift Container Storage label to the new node:
$ oc label node <new_node_name> cluster.ocs.openshift.io/openshift-storage=""
Verification steps
Execute the following command and verify that the new node is present in the output:
$ oc get nodes --show-labels | grep cluster.ocs.openshift.io/openshift-storage= |cut -d' ' -f1
Click Workloads → Pods, confirm that at least the following pods on the new node are in Running state:
-
csi-cephfsplugin-* -
csi-rbdplugin-*
-
- Verify that all other required OpenShift Container Storage pods are in Running state.
- If verification steps fail, kindly contact Red Hat Support.
9.1.2. Replacing failed nodes on AWS user-provisioned infrastructures
Perform this procedure to replace a failed node which is not operational on AWS user-provisioned infrastructure (UPI) for OpenShift Container Storage.
Procedure
- Identify the AWS machine instance of the node that needs to be replaced.
- Log in to AWS and terminate the identified AWS machine instance.
- Create a new AWS machine instance with the required infrastructure. See Supported Infrastructure and Platforms.
- Create a new OpenShift Container Platform node using the new AWS machine instance.
Check for certificate signing requests (CSRs) related to OpenShift Container Platform that are in
Pendingstate:$ oc get csr
Approve all required OpenShift Container Platform CSRs for the new node:
$ oc adm certificate approve <Certificate_Name>
- Click Compute → Nodes, confirm if the new node is in Ready state.
Apply the OpenShift Container Storage label to the new node using any one of the following:
- From User interface
- For the new node, click Action Menu (⋮) → Edit Labels
-
Add
cluster.ocs.openshift.io/openshift-storageand click Save.
- From Command line interface
Execute the following command to apply the OpenShift Container Storage label to the new node:
$ oc label node <new_node_name> cluster.ocs.openshift.io/openshift-storage=""
Verification steps
Execute the following command and verify that the new node is present in the output:
$ oc get nodes --show-labels | grep cluster.ocs.openshift.io/openshift-storage= |cut -d' ' -f1
Click Workloads → Pods, confirm that at least the following pods on the new node are in Running state:
-
csi-cephfsplugin-* -
csi-rbdplugin-*
-
- Verify that all other required OpenShift Container Storage pods are in Running state.
- If verification steps fail, contact Red Hat Support.
9.1.3. Replacing operational nodes on AWS installer-provisioned infrastructures
Use this procedure to replace an operational node on AWS installer-provisioned infrastructure (IPI).
Procedure
- Log in to OpenShift Web Console and click Compute → Nodes.
- Identify the node that needs to be replaced. Take a note of its Machine Name.
Mark the node as unschedulable using the following command:
$ oc adm cordon <node_name>
Drain the node using the following command:
$ oc adm drain <node_name> --force --delete-local-data --ignore-daemonsets
ImportantThis activity may take at least 5-10 minutes or more. Ceph errors generated during this period are temporary and are automatically resolved when the new node is labeled and functional.
- Click Compute → Machines. Search for the required machine.
- Besides the required machine, click the Action menu (⋮) → Delete Machine.
- Click Delete to confirm the machine deletion. A new machine is automatically created.
Wait for new machine to start and transition into Running state.
ImportantThis activity may take at least 5-10 minutes or more.
- Click Compute → Nodes, confirm if the new node is in Ready state.
Apply the OpenShift Container Storage label to the new node using any one of the following:
- From User interface
- For the new node, click Action Menu (⋮) → Edit Labels
-
Add
cluster.ocs.openshift.io/openshift-storageand click Save.
- From Command line interface
Execute the following command to apply the OpenShift Container Storage label to the new node:
$ oc label node <new_node_name> cluster.ocs.openshift.io/openshift-storage=""
Verification steps
Execute the following command and verify that the new node is present in the output:
$ oc get nodes --show-labels | grep cluster.ocs.openshift.io/openshift-storage= |cut -d' ' -f1
Click Workloads → Pods, confirm that at least the following pods on the new node are in Running state:
-
csi-cephfsplugin-* -
csi-rbdplugin-*
-
- Verify that all other required OpenShift Container Storage pods are in Running state.
- If verification steps fail, kindly contact Red Hat Support.
9.1.4. Replacing failed nodes on AWS installer-provisioned infrastructures
Perform this procedure to replace a failed node which is not operational on AWS installer-provisioned infrastructure (IPI) for OpenShift Container Storage.
Procedure
- Log in to OpenShift Web Console and click Compute → Nodes.
- Identify the faulty node and click on its Machine Name.
- Click Actions → Edit Annotations, and click Add More.
-
Add
machine.openshift.io/exclude-node-drainingand click Save. - Click Actions → Delete Machine, and click Delete.
A new machine is automatically created, wait for new machine to start.
ImportantThis activity may take at least 5-10 minutes or more. Ceph errors generated during this period are temporary and are automatically resolved when the new node is labeled and functional.
- Click Compute → Nodes, confirm if the new node is in Ready state.
Apply the OpenShift Container Storage label to the new node using any one of the following:
- From User interface
- For the new node, click Action Menu (⋮) → Edit Labels
-
Add
cluster.ocs.openshift.io/openshift-storageand click Save.
- From Command line interface
Execute the following command to apply the OpenShift Container Storage label to the new node:
$ oc label node <new_node_name> cluster.ocs.openshift.io/openshift-storage=""
- [Optional]: If the failed AWS instance is not removed automatically, terminate the instance from AWS console.
Verification steps
Execute the following command and verify that the new node is present in the output:
$ oc get nodes --show-labels | grep cluster.ocs.openshift.io/openshift-storage= |cut -d' ' -f1
Click Workloads → Pods, confirm that at least the following pods on the new node are in Running state:
-
csi-cephfsplugin-* -
csi-rbdplugin-*
-
- Verify that all other required OpenShift Container Storage pods are in Running state.
- If verification steps fail, kindly contact Red Hat Support.
9.2. Dynamically provisioned OpenShift Container Storage deployed on VMware infrastructures
9.2.1. Replacing operational nodes on VMware user-provisioned infrastructures
Perform this procedure to replace an operational node on VMware user-provisioned infrastructure (UPI).
Procedure
- Identify the node and its VM that needs to be replaced.
Mark the node as unschedulable using the following command:
$ oc adm cordon <node_name>
Drain the node using the following command:
$ oc adm drain <node_name> --force --delete-local-data --ignore-daemonsets
ImportantThis activity may take at least 5-10 minutes or more. Ceph errors generated during this period are temporary and are automatically resolved when the new node is labeled and functional.
Delete the node using the following command:
$ oc delete nodes <node_name>
Log in to vSphere and terminate the identified VM.
ImportantVM should be deleted only from the inventory and not from the disk.
- Create a new VM on vSphere with the required infrastructure. See Supported Infrastructure and Platforms.
- Create a new OpenShift Container Platform worker node using the new VM.
Check for certificate signing requests (CSRs) related to OpenShift Container Platform that are in
Pendingstate:$ oc get csr
Approve all required OpenShift Container Platform CSRs for the new node:
$ oc adm certificate approve <Certificate_Name>
- Click Compute → Nodes, confirm if the new node is in Ready state.
Apply the OpenShift Container Storage label to the new node using any one of the following:
- From User interface
- For the new node, click Action Menu (⋮) → Edit Labels
-
Add
cluster.ocs.openshift.io/openshift-storageand click Save.
- From Command line interface
Execute the following command to apply the OpenShift Container Storage label to the new node:
$ oc label node <new_node_name> cluster.ocs.openshift.io/openshift-storage=""
Verification steps
Execute the following command and verify that the new node is present in the output:
$ oc get nodes --show-labels | grep cluster.ocs.openshift.io/openshift-storage= |cut -d' ' -f1
Click Workloads → Pods, confirm that at least the following pods on the new node are in Running state:
-
csi-cephfsplugin-* -
csi-rbdplugin-*
-
- Verify that all other required OpenShift Container Storage pods are in Running state.
- If verification steps fail, kindly contact Red Hat Support.
9.2.2. Replacing failed nodes on VMware user-provisioned infrastructures
Perform this procedure to replace a failed node on VMware user-provisioned infrastructure (UPI).
Procedure
- Identify the node and its VM that needs to be replaced.
Delete the node using the following command:
$ oc delete nodes <node_name>
Log in to vSphere and terminate the identified VM.
ImportantVM should be deleted only from the inventory and not from the disk.
- Create a new VM on vSphere with the required infrastructure. See Supported Infrastructure and Platforms.
- Create a new OpenShift Container Platform worker node using the new VM.
Check for certificate signing requests (CSRs) related to OpenShift Container Platform that are in
Pendingstate:$ oc get csr
Approve all required OpenShift Container Platform CSRs for the new node:
$ oc adm certificate approve <Certificate_Name>
- Click Compute → Nodes, confirm if the new node is in Ready state.
Apply the OpenShift Container Storage label to the new node using any one of the following:
- From User interface
- For the new node, click Action Menu (⋮) → Edit Labels
-
Add
cluster.ocs.openshift.io/openshift-storageand click Save.
- From Command line interface
Execute the following command to apply the OpenShift Container Storage label to the new node:
$ oc label node <new_node_name> cluster.ocs.openshift.io/openshift-storage=""
Verification steps
Execute the following command and verify that the new node is present in the output:
$ oc get nodes --show-labels | grep cluster.ocs.openshift.io/openshift-storage= |cut -d' ' -f1
Click Workloads → Pods, confirm that at least the following pods on the new node are in Running state:
-
csi-cephfsplugin-* -
csi-rbdplugin-*
-
- Verify that all other required OpenShift Container Storage pods are in Running state.
- If verification steps fail, kindly contact Red Hat Support.
9.3. OpenShift Container Storage deployed using local storage devices
While replacing a node, the hostname of the new Openshift Container Storage node should not be the same as the hostname of any decommissioned Openshift Container Storage node due to a known issue. As a workaround, we recommend to use a new hostname for adding the replaced node back into the cluster.
9.3.1. Replacing failed storage nodes on Amazon EC2 infrastructure
The ephemeral storage of Amazon EC2 I3 for OpenShift Container Storage might cause data loss when there is an instance power off. Use this procedure to recover from such an instance power off on Amazon EC2 infrastructure.
Replacing storage nodes in Amazon EC2 I3 infrastructure is a Technology Preview feature. Technology Preview features are not supported with Red Hat production service level agreements (SLAs) and might not be functionally complete. Red Hat does not recommend using them in production. These features provide early access to upcoming product features, enabling customers to test functionality and provide feedback during the development process.
Prerequisites
- You must be logged into OpenShift Container Platform (OCP) cluster.
Procedure
Identify the node and get labels on the node to be replaced.
$ oc get nodes --show-labels | grep <node_name>
Identify the mon (if any) and OSDs that are running in the node to be replaced.
$ oc get pods -n openshift-storage -o wide | grep -i <node_name>
Scale down the deployments of the pods identified in the previous step.
For example:
$ oc scale deployment rook-ceph-mon-c --replicas=0 -n openshift-storage
$ oc scale deployment rook-ceph-osd-0 --replicas=0 -n openshift-storage
$ oc scale deployment --selector=app=rook-ceph-crashcollector,node_name=<node_name>  --replicas=0 -n openshift-storage
Mark the nodes as unschedulable.
$ oc adm cordon <node_name>
Drain the node.
$ oc adm drain <node_name> --force --delete-local-data --ignore-daemonsets
NoteIf the failed node is not connected to the network, remove the pods running on it by using the command:
$ oc get pods -A -o wide | grep -i <node_name> |  awk '{if ($4 == "Terminating") system ("oc -n " $1 " delete pods " $2  " --grace-period=0 " " --force ")}'
$ oc adm drain <node_name> --force --delete-local-data --ignore-daemonsets
Remove the failed node.
For Installer provisioned infrastructure, delete the machine corresponding to the failed node. A new node is automatically added.
- Click Compute → Machines. Search for the required machine.
- Besides the required machine, click the Action menu (⋮) → Delete Machine.
- Click Delete to confirm the machine deletion. A new machine is automatically created.
Wait for the new machine to start and transition into Running state.
ImportantThis activity may take at least 5-10 minutes or more.
For User provisioned infrastructure, follow the below mentioned steps
Delete the node.
$ oc delete node <node_name>
- Create a new Amazon EC2 I3 machine instance with the required infrastructure. See Supported Infrastructure and Platforms.
- Create a new OpenShift Container Platform node using the new Amazon EC2 I3 machine instance.
Check for certificate signing requests (CSRs) related to OpenShift Container Platform that are in Pending state:
$ oc get csr
Approve all required OpenShift Container Platform CSRs for the new node:
$ oc adm certificate approve <Certificate_Name>
- [Optional]: If the failed AWS instance is not removed automatically, terminate the instance from AWS console.
- Click Compute → Nodes in OpenShift web console. Confirm if the new node is in Ready state.
Apply the OpenShift Container Storage label to the new node using any one of the following:
- From User interface
- For the new node, click Action Menu (⋮) → Edit Labels.
-
Add
cluster.ocs.openshift.io/openshift-storageand click Save.
- From Command line interface
Execute the following command to apply the OpenShift Container Storage label to the new node:
$ oc label node <new_node_name> cluster.ocs.openshift.io/openshift-storage=""
Add the local storage devices available in the new worker node to the OpenShift Container Storage StorageCluster.
Add the new disk entries to LocalVolume CR.
Edit
LocalVolumeCR. You can either remove or comment out the failed device/dev/disk/by-id/{id}and add the new/dev/disk/by-id/{id}.$ oc get -n local-storage localvolume NAME AGE local-block 25h
$ oc edit -n local-storage localvolume local-block
Example output:
[...]
    storageClassDevices:
    - devicePaths:
      - /dev/disk/by-id/nvme-Amazon_EC2_NVMe_Instance_Storage_AWS10382E5D7441494EC
      - /dev/disk/by-id/nvme-Amazon_EC2_NVMe_Instance_Storage_AWS1F45C01D7E84FE3E9
      - /dev/disk/by-id/nvme-Amazon_EC2_NVMe_Instance_Storage_AWS136BC945B4ECB9AE4
      - /dev/disk/by-id/nvme-Amazon_EC2_NVMe_Instance_Storage_AWS10382E5D7441464EP
  #   - /dev/disk/by-id/nvme-Amazon_EC2_NVMe_Instance_Storage_AWS1F45C01D7E84F43E7
  #   - /dev/disk/by-id/nvme-Amazon_EC2_NVMe_Instance_Storage_AWS136BC945B4ECB9AE8
      - /dev/disk/by-id/nvme-Amazon_EC2_NVMe_Instance_Storage_AWS6F45C01D7E84FE3E9
      - /dev/disk/by-id/nvme-Amazon_EC2_NVMe_Instance_Storage_AWS636BC945B4ECB9AE4
      storageClassName: localblock
      volumeMode: Block
[...]
Make sure to save the changes after editing the CR.
You can see that in this CR the below two new devices using by-id have been added.
-
nvme-Amazon_EC2_NVMe_Instance_Storage_AWS6F45C01D7E84FE3E9 -
nvme-Amazon_EC2_NVMe_Instance_Storage_AWS636BC945B4ECB9AE4
-
Display PVs with
localblock.$ oc get pv | grep localblock
Example output:
local-pv-3646185e   2328Gi  RWO     Delete      Available                                               localblock  9s
local-pv-3933e86    2328Gi  RWO     Delete      Bound       openshift-storage/ocs-deviceset-2-1-v9jp4   localblock  5h1m
local-pv-8176b2bf   2328Gi  RWO     Delete      Bound       openshift-storage/ocs-deviceset-0-0-nvs68   localblock  5h1m
local-pv-ab7cabb3   2328Gi  RWO     Delete      Available                                               localblock  9s
local-pv-ac52e8a    2328Gi  RWO     Delete      Bound       openshift-storage/ocs-deviceset-1-0-knrgr   localblock  5h1m
local-pv-b7e6fd37   2328Gi  RWO     Delete      Bound       openshift-storage/ocs-deviceset-2-0-rdm7m   localblock  5h1m
local-pv-cb454338   2328Gi  RWO     Delete      Bound       openshift-storage/ocs-deviceset-0-1-h9hfm   localblock  5h1m
local-pv-da5e3175   2328Gi  RWO     Delete      Bound       openshift-storage/ocs-deviceset-1-1-g97lq   localblock  5h
...
Delete each PV and OSD associated with failed node using the following steps.
Identify the DeviceSet associated with the OSD to be replaced.
$ osd_id_to_remove=0
$ oc get -n openshift-storage -o yaml deployment rook-ceph-osd-${osd_id_to_remove} | grep ceph.rook.io/pvc
where,
osd_id_to_removeis the integer in the pod name immediately after therook-ceph-osdprefix. In this example, the deployment name isrook-ceph-osd-0.Example output:
ceph.rook.io/pvc: ocs-deviceset-0-0-nvs68
    ceph.rook.io/pvc: ocs-deviceset-0-0-nvs68
Identify the PV associated with the PVC.
$ oc get -n openshift-storage pvc ocs-deviceset-<x>-<y>-<pvc-suffix>
where, x, y, and pvc-suffix are the values in the DeviceSet identified in an earlier step.
Example output:
NAME                      STATUS        VOLUME        CAPACITY   ACCESS MODES   STORAGECLASS   AGE
ocs-deviceset-0-0-nvs68   Bound   local-pv-8176b2bf   2328Gi      RWO            localblock     4h49m
In this example, the associated PV is
local-pv-8176b2bf.Delete the PVC which was identified in earlier steps. In this example, the PVC name is ocs-deviceset-0-0-nvs68.
$ oc delete pvc ocs-deviceset-0-0-nvs68 -n openshift-storage
Example output:
persistentvolumeclaim "ocs-deviceset-0-0-nvs68" deleted
Delete the PV which was identified in earlier steps. In this example, the PV name is local-pv-8176b2bf.
$ oc delete pv local-pv-8176b2bf
Example output:
persistentvolume "local-pv-8176b2bf" deleted
Remove the failed OSD from the cluster.
$ oc process -n openshift-storage ocs-osd-removal -p FAILED_OSD_ID=${osd_id_to_remove} | oc create -f -Verify that the OSD is removed successfully by checking the status of the
ocs-osd-removalpod. A status ofCompletedconfirms that the OSD removal job succeeded.# oc get pod -l job-name=ocs-osd-removal-${osd_id_to_remove} -n openshift-storageNoteIf
ocs-osd-removalfails and the pod is not in the expectedCompletedstate, check the pod logs for further debugging. For example:# oc logs -l job-name=ocs-osd-removal-${osd_id_to_remove} -n openshift-storage --tail=-1Delete the OSD pod deployment.
$ oc delete deployment rook-ceph-osd-${osd_id_to_remove} -n openshift-storage
Delete
crashcollectorpod deployment identified in an earlier step.$ oc delete deployment --selector=app=rook-ceph-crashcollector,node_name=<old_node_name> -n openshift-storage
Deploy the new OSD by restarting the
rook-ceph-operatorto force operator reconciliation.$ oc get -n openshift-storage pod -l app=rook-ceph-operator
Example output:
NAME                                  READY   STATUS    RESTARTS   AGE
rook-ceph-operator-6f74fb5bff-2d982   1/1     Running   0          5h3m
Delete the
rook-ceph-operator.$ oc delete -n openshift-storage pod rook-ceph-operator-6f74fb5bff-2d982
Example output:
pod "rook-ceph-operator-6f74fb5bff-2d982" deleted
Verify that the
rook-ceph-operatorpod is restarted.$ oc get -n openshift-storage pod -l app=rook-ceph-operator
Example output:
NAME                                  READY   STATUS    RESTARTS   AGE
rook-ceph-operator-6f74fb5bff-7mvrq   1/1     Running   0          66s
Creation of the new OSD may take several minutes after the operator starts.
Delete the
ocs-osd-removaljob(s).$ oc delete job ocs-osd-removal-${osd_id_to_remove}Example output:
job.batch "ocs-osd-removal-0" deleted
Verification steps
Execute the following command and verify that the new node is present in the output:
$ oc get nodes --show-labels | grep cluster.ocs.openshift.io/openshift-storage= |cut -d' ' -f1
Click Workloads → Pods, confirm that at least the following pods on the new node are in Running state:
-
csi-cephfsplugin-* -
csi-rbdplugin-*
-
Verify that all other required OpenShift Container Storage pods are in Running state.
Also, ensure that the new incremental mon is created and is in the Running state.
$ oc get pod -n openshift-storage | grep mon
Example output:
rook-ceph-mon-a-64556f7659-c2ngc    1/1     Running     0   5h1m
rook-ceph-mon-b-7c8b74dc4d-tt6hd    1/1     Running     0   5h1m
rook-ceph-mon-d-57fb8c657-wg5f2     1/1     Running     0   27m
OSDs and mon’s might take several minutes to get to the Running state.
- If verification steps fail, contact Red Hat Support.
9.3.2. Replacing failed storage nodes on VMware infrastructure
Prerequisites
- You must be logged into OpenShift Container Platform (OCP) cluster.
Procedure
Identify the node and get labels on the node to be replaced.
$ oc get nodes --show-labels | grep <node_name>
Identify the
mon(if any) and OSDs that are running in the node to be replaced.$ oc get pods -n openshift-storage -o wide | grep -i <node_name>
Scale down the deployments of the pods identified in the previous step.
For example:
$ oc scale deployment rook-ceph-mon-c --replicas=0 -n openshift-storage
$ oc scale deployment rook-ceph-osd-0 --replicas=0 -n openshift-storage
$ oc scale deployment --selector=app=rook-ceph-crashcollector,node_name=<node_name>  --replicas=0 -n openshift-storage
Mark the node as unschedulable.
$ oc adm cordon <node_name>
Drain the node.
$ oc adm drain <node_name> --force --delete-local-data --ignore-daemonsets
NoteIf the failed node is not connected to the network, remove the pods running on it by using the command:
$ oc get pods -A -o wide | grep -i <node_name> |  awk '{if ($4 == "Terminating") system ("oc -n " $1 " delete pods " $2  " --grace-period=0 " " --force ")}'
$ oc adm drain <node_name> --force --delete-local-data --ignore-daemonsets
Delete the node.
$ oc delete node <node_name>
- Create a new VM on VMware with the required infrastructure. See Supported Infrastructure and Platforms.
- Create a new OpenShift Container Platform worker node using the new VM.
Check for certificate signing requests (CSRs) related to OpenShift Container Platform that are in
Pendingstate:$ oc get csr
Approve all required OpenShift Container Platform CSRs for the new node:
$ oc adm certificate approve <Certificate_Name>
- Click Compute → Nodes in OpenShift Web Console, confirm if the new node is in Ready state.
Apply the OpenShift Container Storage label to the new node using any one of the following:
- From User interface
- For the new node, click Action Menu (⋮) → Edit Labels.
-
Add
cluster.ocs.openshift.io/openshift-storageand click Save.
- From Command line interface
Execute the following command to apply the OpenShift Container Storage label to the new node:
$ oc label node <new_node_name> cluster.ocs.openshift.io/openshift-storage=""
Add the local storage devices available in these worker nodes to the OpenShift Container Storage StorageCluster.
Add a new disk entry to
LocalVolumeCR.Edit
LocalVolumeCR and remove or comment out failed device/dev/disk/by-id/{id}and add the new/dev/disk/by-id/{id}. In this example, the new device is/dev/disk/by-id/scsi-36000c29f5c9638dec9f19b220fbe36b1.# oc get -n local-storage localvolume NAME AGE local-block 25h
# oc edit -n local-storage localvolume local-block
Example output:
[...]
    storageClassDevices:
    - devicePaths:
      - /dev/disk/by-id/scsi-36000c29346bca85f723c4c1f268b5630
      - /dev/disk/by-id/scsi-36000c29134dfcfaf2dfeeb9f98622786
  #   - /dev/disk/by-id/scsi-36000c2962b2f613ba1f8f4c5cf952237
      - /dev/disk/by-id/scsi-36000c29f5c9638dec9f19b220fbe36b1
      storageClassName: localblock
      volumeMode: Block
[...]
Make sure to save the changes after editing the CR.
Display PVs with
localblock.$ oc get pv | grep localblock
Example output:
local-pv-3e8964d3                          100Gi      RWO            Delete           Bound       openshift-storage/ocs-deviceset-2-0-79j94   localblock                             25h
local-pv-414755e0                          100Gi      RWO            Delete           Bound       openshift-storage/ocs-deviceset-1-0-959rp   localblock                             25h
local-pv-b481410                           100Gi      RWO            Delete           Available                                               localblock                             3m24s
local-pv-d9c5cbd6                          100Gi      RWO            Delete           Bound     openshift-storage/ocs-deviceset-0-0-nvs68   localblock
Delete the PV associated with the failed node.
Identify the
DeviceSetassociated with the OSD to be replaced.# osd_id_to_remove=0 # oc get -n openshift-storage -o yaml deployment rook-ceph-osd-${osd_id_to_remove} | grep ceph.rook.io/pvcwhere,
osd_id_to_removeis the integer in the pod name immediately after therook-ceph-osd prefix. In this example, the deployment name isrook-ceph-osd-0.Example output:
ceph.rook.io/pvc: ocs-deviceset-0-0-nvs68
    ceph.rook.io/pvc: ocs-deviceset-0-0-nvs68
In this example, the PVC name is
ocs-deviceset-0-0-nvs68.Identify the PV associated with the PVC.
# oc get -n openshift-storage pvc ocs-deviceset-<x>-<y>-<pvc-suffix>
where,
x,y, andpvc-suffixare the values in theDeviceSetidentified in the previous step.Example output:
NAME                      STATUS        VOLUME        CAPACITY   ACCESS MODES   STORAGECLASS   AGE
ocs-deviceset-0-0-nvs68   Bound   local-pv-d9c5cbd6   100Gi      RWO            localblock     24h
In this example, the associated PV is
local-pv-d9c5cbd6.Delete the PVC.
oc delete pvc <pvc-name> -n openshift-storage
Delete the PV.
# oc delete pv local-pv-d9c5cbd6
Example output:
persistentvolume "local-pv-d9c5cbd6" deleted
Remove the failed OSD from the cluster.
# oc process -n openshift-storage ocs-osd-removal -p FAILED_OSD_ID=${osd_id_to_remove} | oc create -f -Verify that the OSD is removed successfully by checking the status of the
ocs-osd-removalpod. A status ofCompletedconfirms that the OSD removal job succeeded.# oc get pod -l job-name=ocs-osd-removal-${osd_id_to_remove} -n openshift-storageNoteIf
ocs-osd-removalfails and the pod is not in the expectedCompletedstate, check the pod logs for further debugging. For example:# oc logs -l job-name=ocs-osd-removal-${osd_id_to_remove} -n openshift-storage --tail=-1Delete OSD pod deployment and crashcollector pod deployment.
$ oc delete deployment rook-ceph-osd-${osd_id_to_remove} -n openshift-storage
$ oc delete deployment --selector=app=rook-ceph-crashcollector,node_name=<old_node_name> -n openshift-storage
Deploy the new OSD by restarting the
rook-ceph-operatorto force operator reconciliation.# oc get -n openshift-storage pod -l app=rook-ceph-operator
Example output:
NAME                                  READY   STATUS    RESTARTS   AGE
rook-ceph-operator-6f74fb5bff-2d982   1/1     Running   0          1d20h
Delete the
rook-ceph-operator.# oc delete -n openshift-storage pod rook-ceph-operator-6f74fb5bff-2d982
Example output:
pod "rook-ceph-operator-6f74fb5bff-2d982" deleted
Verify that the
rook-ceph-operatorpod is restarted.# oc get -n openshift-storage pod -l app=rook-ceph-operator
Example output:
NAME                                  READY   STATUS    RESTARTS   AGE
rook-ceph-operator-6f74fb5bff-7mvrq   1/1     Running   0          66s
Creation of the new OSD and
monmight take several minutes after the operator restarts.
Delete the
ocs-osd-removaljob.# oc delete job ocs-osd-removal-${osd_id_to_remove}Example output:
job.batch "ocs-osd-removal-0" deleted
Verification steps
Execute the following command and verify that the new node is present in the output:
$ oc get nodes --show-labels | grep cluster.ocs.openshift.io/openshift-storage= |cut -d' ' -f1
Click Workloads → Pods, confirm that at least the following pods on the new node are in
Runningstate:-
csi-cephfsplugin-* -
csi-rbdplugin-*
-
Verify that all other required OpenShift Container Storage pods are in
Runningstate.Make sure that the new incremental
monis created and is in theRunningstate.$ oc get pod -n openshift-storage | grep mon
Example output:
rook-ceph-mon-c-64556f7659-c2ngc                                  1/1     Running     0          6h14m
rook-ceph-mon-d-7c8b74dc4d-tt6hd                                  1/1     Running     0          4h24m
rook-ceph-mon-e-57fb8c657-wg5f2                                   1/1     Running     0          162m
OSD and Mon might take several minutes to get to the
Runningstate.
- If verification steps fail, contact Red Hat Support.
9.3.3. Replacing failed storage nodes on bare metal infrastructure
Prerequisites
- You must be logged into OpenShift Container Platform (OCP) cluster.
Procedure
Identify the node and get labels on the node to be replaced. Make a note of the rack label.
$ oc get nodes --show-labels | grep <node_name>
Identify the mon (if any) and object storage device (OSD) pods that are running in the node to be replaced.
$ oc get pods -n openshift-storage -o wide | grep -i <node_name>
Scale down the deployments of the pods identified in the previous step.
For example:
$ oc scale deployment rook-ceph-mon-c --replicas=0 -n openshift-storage
$ oc scale deployment rook-ceph-osd-0 --replicas=0 -n openshift-storage
$ oc scale deployment --selector=app=rook-ceph-crashcollector,node_name=<node_name>  --replicas=0 -n openshift-storage
Mark the node as unschedulable.
$ oc adm cordon <node_name>
Drain the node.
$ oc adm drain <node_name> --force --delete-local-data --ignore-daemonsets
NoteIf the failed node is not connected to the network, remove the pods running on it by using the command:
$ oc get pods -A -o wide | grep -i <node_name> |  awk '{if ($4 == "Terminating") system ("oc -n " $1 " delete pods " $2  " --grace-period=0 " " --force ")}'
$ oc adm drain <node_name> --force --delete-local-data --ignore-daemonsets
Delete the node.
$ oc delete node <node_name>
- Get a new bare metal machine with required infrastructure. See Installing a cluster on bare metal.
- Create a new OpenShift Container Platform node using the new bare metal machine.
Check for certificate signing requests (CSRs) related to OpenShift Container Storage that are in
Pendingstate:$ oc get csr
Approve all required OpenShift Container Storage CSRs for the new node:
$ oc adm certificate approve <Certificate_Name>
- Click Compute → Nodes in OpenShift Web Console, confirm if the new node is in Ready state.
Apply the OpenShift Container Storage label to the new node using any one of the following:
- From User interface
- For the new node, click Action Menu (⋮) → Edit Labels.
-
Add
cluster.ocs.openshift.io/openshift-storageand click Save.
- From Command line interface
Execute the following command to apply the OpenShift Container Storage label to the new node:
$ oc label node <new_node_name> cluster.ocs.openshift.io/openshift-storage=""
Add the local storage devices available in these worker nodes to the OpenShift Container Storage StorageCluster.
Add a new disk entry to
LocalVolumeCR.Edit
LocalVolumeCR and remove or comment out failed device/dev/disk/by-id/{id}and add the new/dev/disk/by-id/{id}. In this example, the new device is/dev/disk/by-id/scsi-36000c29f5c9638dec9f19b220fbe36b1.# oc get -n local-storage localvolume NAME AGE local-block 25h
# oc edit -n local-storage localvolume local-block
Example output:
[...]
    storageClassDevices:
    - devicePaths:
      - /dev/disk/by-id/scsi-36000c29346bca85f723c4c1f268b5630
      - /dev/disk/by-id/scsi-36000c29134dfcfaf2dfeeb9f98622786
  #   - /dev/disk/by-id/scsi-36000c2962b2f613ba1f8f4c5cf952237
      - /dev/disk/by-id/scsi-36000c29f5c9638dec9f19b220fbe36b1
      storageClassName: localblock
      volumeMode: Block
[...]
Make sure to save the changes after editing the CR.
Display PVs with
localblock.$ oc get pv | grep localblock
Example output:
local-pv-3e8964d3                          100Gi      RWO            Delete           Bound       openshift-storage/ocs-deviceset-2-0-79j94   localblock                             25h
local-pv-414755e0                          100Gi      RWO            Delete           Bound       openshift-storage/ocs-deviceset-1-0-959rp   localblock                             25h
local-pv-b481410                           100Gi      RWO            Delete           Available                                               localblock                             3m24s
local-pv-d9c5cbd6                          100Gi      RWO            Delete           Bound    openshift-storage/ocs-deviceset-0-0-nvs68   localblock
Delete the PV associated with the failed node.
Identify the
DeviceSetassociated with the OSD to be replaced.# osd_id_to_remove=0 # oc get -n openshift-storage -o yaml deployment rook-ceph-osd-${osd_id_to_remove} | grep ceph.rook.io/pvcwhere,
osd_id_to_removeis the integer in the pod name immediately after therook-ceph-osd prefix. In this example, the deployment name isrook-ceph-osd-0.Example output:
ceph.rook.io/pvc: ocs-deviceset-0-0-nvs68
    ceph.rook.io/pvc: ocs-deviceset-0-0-nvs68
In this example, the PVC name is
ocs-deviceset-0-0-nvs68.Identify the PV associated with the PVC.
# oc get -n openshift-storage pvc ocs-deviceset-<x>-<y>-<pvc-suffix>
where,
x,y, andpvc-suffixare the values in theDeviceSetidentified in the previous step.Example output:
NAME                      STATUS        VOLUME        CAPACITY   ACCESS MODES   STORAGECLASS   AGE
ocs-deviceset-0-0-nvs68   Bound   local-pv-d9c5cbd6   100Gi      RWO            localblock     24h
In this example, the associated PV is
local-pv-d9c5cbd6.Delete the PVC.
oc delete pvc <pvc-name> -n openshift-storage
Delete the PV.
# oc delete pv local-pv-d9c5cbd6
Example output:
persistentvolume "local-pv-d9c5cbd6" deleted
Remove the failed OSD from the cluster.
# oc process -n openshift-storage ocs-osd-removal -p FAILED_OSD_ID=${osd_id_to_remove} | oc create -f -Verify that the OSD is removed successfully by checking the status of the
ocs-osd-removalpod. A status ofCompletedconfirms that the OSD removal job succeeded.# oc get pod -l job-name=ocs-osd-removal-${osd_id_to_remove} -n openshift-storageNoteIf
ocs-osd-removalfails and the pod is not in the expectedCompletedstate, check the pod logs for further debugging. For example:# oc logs -l job-name=ocs-osd-removal-${osd_id_to_remove} -n openshift-storage --tail=-1Delete OSD pod deployment and crashcollector pod deployment.
$ oc delete deployment rook-ceph-osd-${osd_id_to_remove} -n openshift-storage
$ oc delete deployment --selector=app=rook-ceph-crashcollector,node_name=<old_node_name> -n openshift-storage
Deploy the new OSD by restarting the
rook-ceph-operatorto force operator reconciliation.# oc get -n openshift-storage pod -l app=rook-ceph-operator
Example output:
NAME                                  READY   STATUS    RESTARTS   AGE
rook-ceph-operator-6f74fb5bff-2d982   1/1     Running   0          1d20h
Delete the
rook-ceph-operator.# oc delete -n openshift-storage pod rook-ceph-operator-6f74fb5bff-2d982
Example output:
pod "rook-ceph-operator-6f74fb5bff-2d982" deleted
Verify that the
rook-ceph-operatorpod is restarted.# oc get -n openshift-storage pod -l app=rook-ceph-operator
Example output:
NAME                                  READY   STATUS    RESTARTS   AGE
rook-ceph-operator-6f74fb5bff-7mvrq   1/1     Running   0          66s
Creation of the new OSD and
monmight take several minutes after the operator restarts.
Delete the
ocs-osd-removaljob.# oc delete job ocs-osd-removal-${osd_id_to_remove}Example output:
job.batch "ocs-osd-removal-0" deleted
Verification steps
Execute the following command and verify that the new node is present in the output:
$ oc get nodes --show-labels | grep cluster.ocs.openshift.io/openshift-storage= |cut -d' ' -f1
Click Workloads → Pods, confirm that at least the following pods on the new node are in Running state:
-
csi-cephfsplugin-* -
csi-rbdplugin-*
-
Verify that all other required OpenShift Container Storage pods are in Running state.
Make sure that the new incremental
monis created and is in theRunningstate.$ oc get pod -n openshift-storage | grep mon
Example output:
rook-ceph-mon-c-64556f7659-c2ngc                                  1/1     Running     0          6h14m
rook-ceph-mon-d-7c8b74dc4d-tt6hd                                  1/1     Running     0          4h24m
rook-ceph-mon-e-57fb8c657-wg5f2                                   1/1     Running     0          162m
OSD and Mon might take several minutes to get to the
Runningstate.
- If verification steps fail, contact Red Hat Support.
Chapter 10. Replacing storage devices
Depending on the type of your deployment, you can choose one of the following procedures to replace a storage device:
For dynamically created storage clusters deployed on AWS, see:
- For dynamically created storage clusters deployed on VMware, see Section 10.2.1, “Replacing operational or failed storage devices on VMware user-provisioned infrastructure”
For storage clusters deployed using local storage devices, see:
10.1. Dynamically provisioned OpenShift Container Storage deployed on AWS
10.1.1. Replacing operational or failed storage devices on AWS user-provisioned infrastructure
When you need to replace a device in a dynamically created storage cluster on an AWS user-provisioned infrastructure, you must replace the storage node. For information about how to replace nodes, see:
10.1.2. Replacing operational or failed storage devices on AWS installer-provisioned infrastructure
When you need to replace a device in a dynamically created storage cluster on an AWS installer-provisioned infrastructure, you must replace the storage node. For information about how to replace nodes, see:
10.2. Dynamically provisioned OpenShift Container Storage deployed on VMware
10.2.1. Replacing operational or failed storage devices on VMware user-provisioned infrastructure
Use this procedure when a virtual machine disk (VMDK) needs to be replaced in OpenShift Container Storage which is deployed dynamically on VMware infrastructure. This procedure helps to create a new persistent volume claim (PVC) on a new volume and remove the old object storage device (OSD).
Procedure
Identify the OSD that needs to be replaced.
# oc get -n openshift-storage pods -l app=rook-ceph-osd -o wide
Example output:
rook-ceph-osd-0-6d77d6c7c6-m8xj6    0/1    CrashLoopBackOff    0    24h   10.129.0.16   compute-2   <none>           <none>
rook-ceph-osd-1-85d99fb95f-2svc7    1/1    Running    0    24h   10.128.2.24   compute-0   <none>           <none>
rook-ceph-osd-2-6c66cdb977-jp542    1/1    Running    0    24h   10.131.2.32   compute-1   <none>           <none>
In this example,
rook-ceph-osd-0-6d77d6c7c6-m8xj6needs to be replaced.NoteIf the OSD to be replaced is healthy, the status of the pod will be Running.
Scale down the OSD deployment for the OSD to be replaced
# osd_id_to_remove=0
# oc scale -n openshift-storage deployment rook-ceph-osd-${osd_id_to_remove} --replicas=0
where,
osd_id_to_removeis the integer in the pod name immediately after therook-ceph-osdprefix. In this example, the deployment name isrook-ceph-osd-0.Example output:
deployment.extensions/rook-ceph-osd-0 scaled
Verify that the
rook-ceph-osdpod is terminated.# oc get -n openshift-storage pods -l ceph-osd-id=${osd_id_to_remove}Example output:
No resources found.
NoteIf the
rook-ceph-osdpod is interminatingstate, use theforceoption to delete the pod.# oc delete pod rook-ceph-osd-0-6d77d6c7c6-m8xj6 --force --grace-period=0
Example output:
warning: Immediate deletion does not wait for confirmation that the running resource has been terminated. The resource may continue to run on the cluster indefinitely.
  pod "rook-ceph-osd-0-6d77d6c7c6-m8xj6" force deleted
Remove the old OSD from the cluster so that a new OSD can be added.
# oc process -n openshift-storage ocs-osd-removal -p FAILED_OSD_ID=${osd_id_to_remove} | oc create -f -WarningThis step results in OSD being completely removed from the cluster. Make sure that the correct value of
osd_id_to_removeis provided.Verify that the OSD is removed successfully by checking the status of the
ocs-osd-removalpod. A status ofCompletedconfirms that the OSD removal job succeeded.# oc get pod -l job-name=ocs-osd-removal-${osd_id_to_remove} -n openshift-storageNoteIf
ocs-osd-removalfails and the pod is not in the expectedCompletedstate, check the pod logs for further debugging. For example:# oc logs -l job-name=ocs-osd-removal-${osd_id_to_remove} -n openshift-storage --tail=-1Delete the PVC resources associated with the OSD to be replaced.
Identify the
DeviceSetassociated with the OSD to be replaced.# oc get -n openshift-storage -o yaml deployment rook-ceph-osd-${osd_id_to_remove} | grep ceph.rook.io/pvcExample output:
ceph.rook.io/pvc: ocs-deviceset-0-0-nvs68
    ceph.rook.io/pvc: ocs-deviceset-0-0-nvs68
In this example, the PVC name is
ocs-deviceset-0-0-nvs68.Identify the PV associated with the PVC.
# oc get -n openshift-storage pvc ocs-deviceset-<x>-<y>-<pvc-suffix>
where,
x,y, andpvc-suffixare the values in theDeviceSetidentified in the previous step.Example output:
NAME                      STATUS   VOLUME                                     CAPACITY   ACCESS MODES   STORAGECLASS   AGE
ocs-deviceset-0-0-nvs68   Bound    pvc-0e621d45-7d18-4d35-a282-9700c3cc8524   512Gi      RWO            thin           24h
In this example, the PVC is
ocs-deviceset-0-0-nvs68that is identified in the previous step and associated PV ispvc-0e621d45-7d18-4d35-a282-9700c3cc8524.Identify the
prepare-podassociated with the OSD to be replaced. Use the PVC name obtained in an earlier step.# oc describe -n openshift-storage pvc ocs-deviceset-<x>-<y>-<pvc-suffix> | grep Mounted
where,
x,y, andpvc-suffixare the values in theDeviceSetidentified in an earlier step.Example output:
Mounted By: rook-ceph-osd-prepare-ocs-deviceset-0-0-nvs68-zblp7
Delete the
osd-preparepod before removing the associated PVC.# oc delete -n openshift-storage pod rook-ceph-osd-prepare-ocs-deviceset-<x>-<y>-<pvc-suffix>-<pod-suffix>
where,
x,y,pvc-suffix, andpod-suffixare the values in theosd-preparepod name identified in the previous step.Example output:
pod "rook-ceph-osd-prepare-ocs-deviceset-0-0-nvs68-zblp7" deleted
Delete the PVC associated with the device.
# oc delete -n openshift-storage pvc ocs-deviceset-<x>-<y>-<pvc-suffix>
where,
x,y, andpvc-suffixare the values in theDeviceSetidentified in an earlier step.Example output:
persistentvolumeclaim "ocs-deviceset-0-0-nvs68" deleted
Create new OSD for new device.
Delete the deployment for the OSD to be replaced.
# oc delete -n openshift-storage deployment rook-ceph-osd-${osd_id_to_remove}Example output:
deployment.extensions/rook-ceph-osd-0 deleted
Verify that the PV for the device identified in an earlier step is deleted.
# oc get -n openshift-storage pv pvc-0e621d45-7d18-4d35-a282-9700c3cc8524
Example output:
Error from server (NotFound): persistentvolumes "pvc-0e621d45-7d18-4d35-a282-9700c3cc8524" not found
In this example, the PV name is
pvc-0e621d45-7d18-4d35-a282-9700c3cc8524.If the PV still exists, delete the PV associated with the device.
# oc delete pv pvc-0e621d45-7d18-4d35-a282-9700c3cc8524
Example output:
persistentvolume "pvc-0e621d45-7d18-4d35-a282-9700c3cc8524" deleted
In this example, the PV name is
pvc-0e621d45-7d18-4d35-a282-9700c3cc8524.
Deploy the new OSD by restarting the
rook-ceph-operatorto force operator reconciliation.Identify the name of the
rook-ceph-operator.# oc get -n openshift-storage pod -l app=rook-ceph-operator
Example output:
NAME                                  READY   STATUS    RESTARTS   AGE
rook-ceph-operator-6f74fb5bff-2d982   1/1     Running   0          1d20h
Delete the
rook-ceph-operator.# oc delete -n openshift-storage pod rook-ceph-operator-6f74fb5bff-2d982
Example output:
pod "rook-ceph-operator-6f74fb5bff-2d982" deleted
In this example, the rook-ceph-operator pod name is
rook-ceph-operator-6f74fb5bff-2d982.Verify that the
rook-ceph-operatorpod is restarted.# oc get -n openshift-storage pod -l app=rook-ceph-operator
Example output:
NAME                                  READY   STATUS    RESTARTS   AGE
rook-ceph-operator-6f74fb5bff-7mvrq   1/1     Running   0          66s
Creation of the new OSD may take several minutes after the operator restarts.
Delete the
ocs-osd-removaljob.# oc delete job ocs-osd-removal-${osd_id_to_remove}Example output:
job.batch "ocs-osd-removal-0" deleted
Verfication steps
Verify that there is a new OSD running and a new PVC created.
# oc get -n openshift-storage pods -l app=rook-ceph-osd
Example output:
rook-ceph-osd-0-5f7f4747d4-snshw                                  1/1     Running     0          4m47s
rook-ceph-osd-1-85d99fb95f-2svc7                                  1/1     Running     0          1d20h
rook-ceph-osd-2-6c66cdb977-jp542                                  1/1     Running     0          1d20h
# oc get -n openshift-storage pvc
Example output:
NAME                      STATUS   VOLUME                                     CAPACITY   ACCESS MODES   STORAGECLASS    AGE
ocs-deviceset-0-0-2s6w4   Bound    pvc-7c9bcaf7-de68-40e1-95f9-0b0d7c0ae2fc   512Gi      RWO            thin            5m
ocs-deviceset-1-0-q8fwh   Bound    pvc-9e7e00cb-6b33-402e-9dc5-b8df4fd9010f   512Gi      RWO            thin            1d20h
ocs-deviceset-2-0-9v8lq   Bound    pvc-38cdfcee-ea7e-42a5-a6e1-aaa6d4924291   512Gi      RWO            thin            1d20h
Log in to OpenShift Web Console and view the storage dashboard.
Figure 10.1. OSD status in OpenShift Container Platform storage dashboard after device replacement
10.3. OpenShift Container Storage deployed using local storage devices
10.3.1. Replacing failed storage devices on Amazon EC2 infrastructure
When you need to replace a storage device on an Amazon EC2 (storage-optimized I3) infrastructure, you must replace the storage node. For information about how to replace nodes, see Replacing failed storage nodes on Amazon EC2 infrastructure.
10.3.2. Replacing operational or failed storage devices on VMware and bare metal infrastructures
You can replace an object storage device (OSD) in OpenShift Container Storage deployed using local storage devices on bare metal and VMware infrastructures. Use this procedure when an underlying storage device needs to be replaced.
Procedure
Identify the OSD that needs to be replaced and the OpenShift Container Platform node that has the OSD scheduled on it.
# oc get -n openshift-storage pods -l app=rook-ceph-osd -o wide
Example output:
rook-ceph-osd-0-6d77d6c7c6-m8xj6    0/1    CrashLoopBackOff    0    24h   10.129.0.16   compute-2   <none>           <none>
rook-ceph-osd-1-85d99fb95f-2svc7    1/1    Running    0    24h   10.128.2.24   compute-0   <none>           <none>
rook-ceph-osd-2-6c66cdb977-jp542    1/1    Running    0    24h   10.130.0.18   compute-1   <none>           <none>
In this example,
rook-ceph-osd-0-6d77d6c7c6-m8xj6needs to be replaced andcompute-2is the OCP node on which the OSD is scheduled.NoteIf the OSD to be replaced is healthy, the status of the pod will be
Running.Scale down the OSD deployment for the OSD to be replaced.
# osd_id_to_remove=0
# oc scale -n openshift-storage deployment rook-ceph-osd-${osd_id_to_remove} --replicas=0
where
osd_id_to_removeis the integer in the pod name immediately after therook-ceph-osdprefix. In this example, the deployment name isrook-ceph-osd-0.Example output:
deployment.extensions/rook-ceph-osd-0 scaled
Verify that the
rook-ceph-osdpod is terminated.# oc get -n openshift-storage pods -l ceph-osd-id=${osd_id_to_remove}Example output:
No resources found in openshift-storage namespace.
NoteIf the
rook-ceph-osdpod is interminatingstate, use theforceoption to delete the pod.# oc delete pod rook-ceph-osd-0-6d77d6c7c6-m8xj6 --grace-period=0 --force
Example output:
warning: Immediate deletion does not wait for confirmation that the running resource has been terminated. The resource may continue to run on the cluster indefinitely.
  pod "rook-ceph-osd-0-6d77d6c7c6-m8xj6" force deleted
Remove the old OSD from the cluster so that a new OSD can be added.
Delete any old
ocs-osd-removaljobs.# oc delete job ocs-osd-removal-${osd_id_to_remove}Example output:
job.batch "ocs-osd-removal-0" deleted
Remove the old OSD from the cluster
# oc process -n openshift-storage ocs-osd-removal -p FAILED_OSD_ID=${osd_id_to_remove} | oc create -f -WarningThis step results in OSD being completely removed from the cluster. Make sure that the correct value of
osd_id_to_removeis provided.
Verify that the OSD is removed successfully by checking the status of the
ocs-osd-removalpod. A status ofCompletedconfirms that the OSD removal job succeeded.# oc get pod -l job-name=ocs-osd-removal-${osd_id_to_remove} -n openshift-storageNoteIf
ocs-osd-removalfails and the pod is not in the expectedCompletedstate, check the pod logs for further debugging. For example:# oc logs -l job-name=ocs-osd-removal-${osd_id_to_remove} -n openshift-storage --tail=-1Delete the persistent volume claim (PVC) resources associated with the OSD to be replaced.
Identify the
DeviceSetassociated with the OSD to be replaced.# oc get -n openshift-storage -o yaml deployment rook-ceph-osd-${osd_id_to_remove} | grep ceph.rook.io/pvcExample output:
ceph.rook.io/pvc: ocs-deviceset-0-0-nvs68
    ceph.rook.io/pvc: ocs-deviceset-0-0-nvs68
In this example, the PVC name is
ocs-deviceset-0-0-nvs68.Identify the PV associated with the PVC.
# oc get -n openshift-storage pvc ocs-deviceset-<x>-<y>-<pvc-suffix>
where,
x,y, andpvc-suffixare the values in theDeviceSetidentified in an earlier step.Example output:
NAME                      STATUS        VOLUME        CAPACITY   ACCESS MODES   STORAGECLASS   AGE
ocs-deviceset-0-0-nvs68   Bound   local-pv-d9c5cbd6   100Gi      RWO            localblock     24h
In this example, the associated PV is
local-pv-d9c5cbd6.Identify the name of the device to be replaced.
# oc get pv local-pv-<pv-suffix> -o yaml | grep path
where,
pv-suffixis the value in the PV name identified in an earlier step.Example output:
path: /mnt/local-storage/localblock/sdb
In this example, the device name is
sdb.Identify the
prepare-podassociated with the OSD to be replaced.# oc describe -n openshift-storage pvc ocs-deviceset-<x>-<y>-<pvc-suffix> | grep Mounted
where,
x,y, andpvc-suffixare the values in theDeviceSetidentified in an earlier step.Example output:
Mounted By: rook-ceph-osd-prepare-ocs-deviceset-0-0-nvs68-zblp7
In this example the
prepare-podname isrook-ceph-osd-prepare-ocs-deviceset-0-0-nvs68-zblp7.Delete the
osd-preparepod before removing the associated PVC.# oc delete -n openshift-storage pod rook-ceph-osd-prepare-ocs-deviceset-<x>-<y>-<pvc-suffix>-<pod-suffix>
where,
x,y,pvc-suffix, andpod-suffixare the values in theosd-preparepod name identified in an earlier step.Example output:
pod "rook-ceph-osd-prepare-ocs-deviceset-0-0-nvs68-zblp7" deleted
Delete the PVC associated with the OSD to be replaced.
# oc delete -n openshift-storage pvc ocs-deviceset-<x>-<y>-<pvc-suffix>
where,
x,y, andpvc-suffixare the values in theDeviceSetidentified in an earlier step.Example output:
persistentvolumeclaim "ocs-deviceset-0-0-nvs68" deleted
Replace the old device and use the new device to create a new OpenShift Container Platform PV.
Log in to OpenShift Container Platform node with the device to be replaced. In this example, the OpenShift Container Platform node is
compute-2.# oc debug node/compute-2
Example output:
Starting pod/compute-2-debug ...
To use host binaries, run `chroot /host`
Pod IP: 10.70.56.66
If you don't see a command prompt, try pressing enter.
# chroot /host
Record the
/dev/disk/by-id/{id}that is to be replaced using the device name,sdb, identified earlier.# ls -alh /mnt/local-storage/localblock
Example output:
total 0
drwxr-xr-x. 2 root root 17 Apr  8 23:03 .
drwxr-xr-x. 3 root root 24 Apr  8 23:03 ..
lrwxrwxrwx. 1 root root 54 Apr  8 23:03 sdb -> /dev/disk/by-id/scsi-36000c2962b2f613ba1f8f4c5cf952237
Find the name of the
LocalVolumeCR, and remove or comment out the device/dev/disk/by-id/{id}that is to be replaced.# oc get -n local-storage localvolume NAME AGE local-block 25h
# oc edit -n local-storage localvolume local-block
Example output:
[...]
  storageClassDevices:
  - devicePaths:
    - /dev/disk/by-id/scsi-36000c29346bca85f723c4c1f268b5630
    - /dev/disk/by-id/scsi-36000c29134dfcfaf2dfeeb9f98622786
#   - /dev/disk/by-id/scsi-36000c2962b2f613ba1f8f4c5cf952237
    storageClassName: localblock
    volumeMode: Block
[...]
Make sure to save the changes after editing the CR.
Log in to OpenShift Container Platform node with the device to be replaced and remove the old
symlink.# oc debug node/compute-2
Example output:
Starting pod/compute-2-debug ...
To use host binaries, run `chroot /host`
Pod IP: 10.70.56.66
If you don't see a command prompt, try pressing enter.
# chroot /host
Identify the old
symlinkfor the device name to be replaced. In this example, the device name issdb.# ls -alh /mnt/local-storage/localblock
Example output:
total 0
drwxr-xr-x. 2 root root 28 Apr 10 00:42 .
drwxr-xr-x. 3 root root 24 Apr  8 23:03 ..
lrwxrwxrwx. 1 root root 54 Apr  8 23:03 sdb -> /dev/disk/by-id/scsi-36000c2962b2f613ba1f8f4c5cf952237
Remove the
symlink.# rm /mnt/local-storage/localblock/sdb
Verify that the
symlinkis removed.# ls -alh /mnt/local-storage/localblock
Example output:
total 0
drwxr-xr-x. 2 root root 17 Apr 10 00:56 .
drwxr-xr-x. 3 root root 24 Apr  8 23:03 ..
ImportantBoth
/dev/mapperand/dev/should be checked to see if there are orphans related tocephbefore moving on. Use the results ofvgdisplayto find these orphans. If there is anything in/dev/mapperor/dev/ceph-*withcephin the name that is not from the list of VG Names, usedmsetupto remove it.
Delete the PV associated with the device to be replaced, which was identified in earlier steps. In this example, the PV name is
local-pv-d9c5cbd6.# oc delete pv local-pv-d9c5cbd6
Example output:
persistentvolume "local-pv-d9c5cbd6" deleted
- Replace the device with the new device.
Log back into the correct OpenShift Cotainer Platform node and identify the device name for the new drive. The device name can be the same as the old device, but the
by-idmust change unless you are reseating the same device.# lsblk
Example output:
NAME                         MAJ:MIN RM  SIZE RO TYPE MOUNTPOINT
sda                            8:0    0   60G  0 disk
|-sda1                         8:1    0  384M  0 part /boot
|-sda2                         8:2    0  127M  0 part /boot/efi
|-sda3                         8:3    0    1M  0 part
`-sda4                         8:4    0 59.5G  0 part
  `-coreos-luks-root-nocrypt 253:0    0 59.5G  0 dm   /sysroot
sdb                            8:16   0  100G  0 disk
In this example, the new device name is
sdb.Identify the
/dev/disk/by-id/{id}for the new device and record it.# ls -alh /dev/disk/by-id | grep sdb
Example output:
lrwxrwxrwx. 1 root root 9 Apr 9 20:45 scsi-36000c29f5c9638dec9f19b220fbe36b1 -> ../../sdb
After the new
/dev/disk/by-id/{id}is available a new disk entry can be added to theLocalVolumeCR.Find the name of the
LocalVolumeCR.# oc get -n local-storage localvolume NAME AGE local-block 25h
Edit
LocalVolumeCR and add the new/dev/disk/by-id/{id}. In this example the new device is/dev/disk/by-id/scsi-36000c29f5c9638dec9f19b220fbe36b1.# oc edit -n local-storage localvolume local-block
Example output:
[...]
  storageClassDevices:
  - devicePaths:
    - /dev/disk/by-id/scsi-36000c29346bca85f723c4c1f268b5630
    - /dev/disk/by-id/scsi-36000c29134dfcfaf2dfeeb9f98622786
#   - /dev/disk/by-id/scsi-36000c2962b2f613ba1f8f4c5cf952237
    - /dev/disk/by-id/scsi-36000c29f5c9638dec9f19b220fbe36b1
    storageClassName: localblock
    volumeMode: Block
[...]
Make sure to save the changes after editing the CR.
Verify that there is a new PV in
Availablestate and of the correct size.# oc get pv | grep 100Gi
Example output:
local-pv-3e8964d3                          100Gi      RWO            Delete           Bound       openshift-storage/ocs-deviceset-2-0-79j94   localblock                             25h
local-pv-414755e0                          100Gi      RWO            Delete           Bound       openshift-storage/ocs-deviceset-1-0-959rp   localblock                             25h
local-pv-b481410                           100Gi      RWO            Delete           Available
Create new OSD for new device.
Delete the deployment for the OSD to be replaced.
# osd_id_to_remove=0
# oc delete -n openshift-storage deployment rook-ceph-osd-${osd_id_to_remove}
Example output:
deployment.extensions/rook-ceph-osd-0 deleted
Deploy the new OSD by restarting the
rook-ceph-operatorto force operator reconciliation.Identify the name of the
rook-ceph-operator.# oc get -n openshift-storage pod -l app=rook-ceph-operator
Example output:
NAME                                  READY   STATUS    RESTARTS   AGE
rook-ceph-operator-6f74fb5bff-2d982   1/1     Running   0          1d20h
Delete the
rook-ceph-operator.# oc delete -n openshift-storage pod rook-ceph-operator-6f74fb5bff-2d982
Example output:
pod "rook-ceph-operator-6f74fb5bff-2d982" deleted
In this example, the rook-ceph-operator pod name is
rook-ceph-operator-6f74fb5bff-2d982.Verify that the
rook-ceph-operatorpod is restarted.# oc get -n openshift-storage pod -l app=rook-ceph-operator
Example output:
NAME                                  READY   STATUS    RESTARTS   AGE
rook-ceph-operator-6f74fb5bff-7mvrq   1/1     Running   0          66s
Creation of the new OSD may take several minutes after the operator restarts.
Verfication steps
Verify that there is a new OSD running and a new PVC created.
# oc get -n openshift-storage pods -l app=rook-ceph-osd
Example output:
rook-ceph-osd-0-5f7f4747d4-snshw                                  1/1     Running     0          4m47s
rook-ceph-osd-1-85d99fb95f-2svc7                                  1/1     Running     0          1d20h
rook-ceph-osd-2-6c66cdb977-jp542                                  1/1     Running     0          1d20h
# oc get -n openshift-storage pvc | grep localblock
Example output:
ocs-deviceset-0-0-c2mqb   Bound    local-pv-b481410                          100Gi     RWO            localblock                    5m
ocs-deviceset-1-0-959rp   Bound    local-pv-414755e0                          100Gi     RWO            localblock                    1d20h
ocs-deviceset-2-0-79j94   Bound    local-pv-3e8964d3                          100Gi     RWO            localblock                    1d20h
Log in to OpenShift Web Console and view the storage dashboard.
Figure 10.2. OSD status in OpenShift Container Platform storage dashboard after device replacement
Chapter 11. Updating OpenShift Container Storage
It is recommended to use the same version of Red Hat OpenShift Container Platform with Red Hat OpenShift Container Storage. Refer to this Red Hat Knowledgebase article for a complete OpenShift Container Platform and OpenShift Container Storage supportability and compatibility matrix.
First, you must update Red Hat OpenShift Container Platform ,and then, update Red Hat OpenShift Container Storage. If using Local Storage Operator, Local Storage Operator version must match with the Red Hat OpenShift Container Platform version in order to have the Local Storage Operator fully supported with Red Hat OpenShift Container Storage. Local Storage Operator does not get updated when Red Hat OpenShift Container Platform is updated. To check if your OpenShift Container Storage cluster uses the Local Storage Operator, see the Checking for Local Storage Operator deployments section of the Troubleshooting Guide.
If your cluster was deployed using local storage devices and uses the Local Storage Operator in Openshift Container Storage version 4.3, you must re-install the cluster and not update to version 4.4. For details on installation, see Installing OpenShift Container Storage using local storage devices.
11.1. Enabling automatic updates for OpenShift Container Storage operator
Use this procedure to enable automatic update approval for updating OpenShift Container Storage operator in OpenShift Container Platform.
Prerequisites
- Update the OpenShift Container Platform cluster to the latest stable release of version 4.3.X or 4.4.Y, see Updating Clusters.
Switch the Red Hat OpenShift Container Storage channel channel from
stable-4.3tostable-4.4. For details about channels, see OpenShift Container Platform upgrade channels and releases.NoteYou are required to switch channels only when you are updating minor versions (for example, updating from 4.3 to 4.4) and not when updating between batch updates of 4.4 (for example, updating from 4.4.0 to 4.4.1).
-
Ensure that all OpenShift Container Storage nodes are in
Readystatus. - Under Persistent Storage in Status card, confirm that the Ceph cluster is healthy and data is resilient.
- Ensure that you have sufficient time to complete the Openshift Container Storage (OCS) update process, as the update time varies depending on the number of OSDs that run in the cluster.
Procedure
- Log in to OpenShift Web Console.
- Click Operators → Installed Operators
-
Select the
openshift-storageproject. - Click on the OpenShift Container Storage operator name.
- Click Subscription tab and click the link under Approval.
- Select Automatic (default) and click Save.
Perform one of the following depending on the Upgrade Status:
Upgrade Status shows requires approval.
- Click on the Install Plan link.
- On the InstallPlan Details page, click Preview Install Plan.
- Review the install plan and click Approve.
- Wait for the Status to change from Unknown to Created.
- Click Operators → Installed Operators
-
Select the
openshift-storageproject. - Wait for the Status to change to Up to date
Upgrade Status does not show requires approval:
- Wait for the update to initiate. This may take up to 20 minutes.
- Click Operators → Installed Operators
-
Select the
openshift-storageproject. - Wait for the Status to change to Up to date
Verification steps
- Click Overview → Persistent Storage tab and in Status card confirm that the OpenShift Container Storage cluster has a green tick mark indicating it is healthy.
- Click Operators → Installed Operators → OpenShift Container Storage Operator.
Under Storage Cluster, verify that the cluster service status in
Ready.NoteOnce updated from OpenShift Container Storage version 4.3 to 4.4, the
Versionfield here will still display 4.3. This is because theocs-operatordoes not update the string represented in this field.- If verification steps fail, kindly contact Red Hat Support.
11.2. Manually updating OpenShift Container Storage operator
Use this procedure to update OpenShift Container Storage operator by providing manual approval to the install plan.
Prerequisites
- Update the OpenShift Container Platform cluster to the latest stable release of version 4.3.X or 4.4.Y, see Updating Clusters.
Switch the Red Hat OpenShift Container Storage channel channel from
stable-4.3tostable-4.4. For details about channels, see OpenShift Container Platform upgrade channels and releases.NoteYou are required to switch channels only when you are updating minor versions (for example, updating from 4.3 to 4.4) and not when updating between batch updates of 4.4 (for example, updating from 4.4.0 to 4.4.1).
-
Ensure that all OpenShift Container Storage nodes are in
Readystatus. - Under Persistent Storage in Status card, confirm that the Ceph cluster is healthy and data is resilient.
- Ensure that you have sufficient time to complete the Openshift Container Storage (OCS) update process, as the update time varies depending on the number of OSDs that run in the cluster.
Procedure
- Log in to OpenShift Web Console.
- Click Operators → Installed Operators
-
Select the
openshift-storageproject. - Click Subscription tab and click the link under Approval.
- Select Manual and click Save.
- Wait for the Upgrade Status to change to Upgrading.
- If the Upgrade Status shows requires approval, click on requires approval.
- On the InstallPlan Details page, click Preview Install Plan.
- Review the install plan and click Approve.
- Wait for the Status to change from Unknown to Created.
- Click Operators → Installed Operators
-
Select the
openshift-storageproject. - Wait for the Status to change to Up to date
Verification steps
- Click Overview → Persistent Storage tab and in Status card confirm that the Ceph cluster has a green tick mark indicating it is healthy.
- Click Operators → Installed Operators → OpenShift Container Storage Operator.
Under Storage Cluster, verify that the cluster service status in
Ready.NoteOnce updated from OpenShift Container Storage version 4.3 to 4.4, the
Versionfield here will still display 4.3. This is because theocs-operatordoes not update the string represented in this field.- If verification steps fail, kindly contact Red Hat Support.