
Chapter 2. Configure storage for OpenShift Container Platform services
You can use OpenShift Container Storage to provide storage for OpenShift Container Platform services such as image registry, monitoring, and logging.
The process for configuring storage for these services depends on the infrastructure used in your OpenShift Container Storage deployment.
Always ensure that you have plenty of storage capacity for these services. If the storage for these critical services runs out of space, the cluster becomes inoperable and very difficult to recover.
Red Hat recommends configuring shorter curation and retention intervals for these services. See Configuring Curator and Modifying retention time for Prometheus metrics data in the OpenShift Container Platform documentation for details.
If you do run out of storage space for these services, contact Red Hat Customer Support.
2.1. Configuring Image Registry to use OpenShift Container Storage
OpenShift Container Platform provides a built in Container Image Registry which runs as a standard workload on the cluster. A registry is typically used as a publication target for images built on the cluster as well as a source of images for workloads running on the cluster.
Follow the instructions in this section to configure OpenShift Container Storage as storage for the Container Image Registry. On AWS, it is not required to change the storage for the registry. However, it is recommended to change the storage to OpenShift Container Storage persistent volume for vSphere platform.
This process does not migrate data from an existing image registry to the new image registry. If you already have container images in your existing registry, back up your registry before you complete this process, and re-register your images when this process is complete.
Prerequisites
- You have administrative access to OpenShift Web Console.
-
OpenShift Container Storage Operator is installed and running in the
openshift-storagenamespace. In OpenShift Web Console, click Operators → Installed Operators to view installed operators. -
Image Registry Operator is installed and running in the
openshift-image-registrynamespace. In OpenShift Web Console, click Administration → Cluster Settings → Cluster Operators to view cluster operators. -
The
ocs-storagecluster-cephfsstorage class is available. In OpenShift Web Console, click Storage → Storage Classes to view available storage classes.
Procedure
Create a Persistent Volume Claim for the Image Registry to use.
- In OpenShift Web Console, click Storage → Persistent Volume Claims.
-
Set the Project to
openshift-image-registry. Click Create Persistent Volume Claim.
-
Specify a Storage Class of
ocs-storagecluster-cephfs. -
Specify the Persistent Volume Claim Name, for example,
ocs4registry. -
Specify an Access Mode of
Shared Access (RWX). - Specify a Size of at least 100 GB.
Click Create.
Wait until the status of the new Persistent Volume Claim is listed as
Bound.
-
Specify a Storage Class of
Configure the cluster’s Image Registry to use the new Persistent Volume Claim.
- Click Administration →Custom Resource Definitions.
-
Click the
Configcustom resource definition associated with theimageregistry.operator.openshift.iogroup. - Click the Instances tab.
- Beside the cluster instance, click the Action Menu (⋮) → Edit Config.
Add the new Persistent Volume Claim as persistent storage for the Image Registry.
Add the following under
spec:, replacing the existingstorage:section if necessary.storage: pvc: claim: <new-pvc-name>For example:
storage: pvc: claim: ocs4registry- Click Save.
Verify that the new configuration is being used.
- Click Workloads → Pods.
-
Set the Project to
openshift-image-registry. -
Verify that the new
image-registry-*pod appears with a status ofRunning, and that the previousimage-registry-*pod terminates. -
Click the new
image-registry-*pod to view pod details. -
Scroll down to Volumes and verify that the
registry-storagevolume has a Type that matches your new Persistent Volume Claim, for example,ocs4registry.
2.2. Configuring monitoring to use OpenShift Container Storage
OpenShift Container Storage provides a monitoring stack that is comprised of Prometheus and AlertManager.
Follow the instructions in this section to configure OpenShift Container Storage as storage for the monitoring stack.
Monitoring will not function if it runs out of storage space. Always ensure that you have plenty of storage capacity for monitoring.
Red Hat recommends configuring a short retention intervals for this service. See the Modifying retention time for Prometheus metrics data sub section of Configuring persistent storage in the OpenShift Container Platform documentation for details.
Prerequisites
- You have administrative access to OpenShift Web Console.
-
OpenShift Container Storage Operator is installed and running in the
openshift-storagenamespace. In OpenShift Web Console, click Operators → Installed Operators to view installed operators. -
Monitoring Operator is installed and running in the
openshift-monitoringnamespace. In OpenShift Web Console, click Administration → Cluster Settings → Cluster Operators to view cluster operators. -
The
ocs-storagecluster-ceph-rbdstorage class is available. In OpenShift Web Console, click Storage → Storage Classes to view available storage classes.
Procedure
- In OpenShift Web Console, go to Workloads → Config Maps.
-
Set the Project dropdown to
openshift-monitoring. - Click Create Config Map.
Define a new
openshift-monitoring-configConfig Map using the following example.Replace the content in angle brackets (
<,>) with your own values, for example,retention: 24horstorage: 40Gi.Example
openshift-monitoring-configConfig MapapiVersion: v1 kind: ConfigMap metadata: name: cluster-monitoring-config namespace: openshift-monitoring data: config.yaml: | prometheusK8s: retention: <time to retain monitoring files, e.g. 24h> volumeClaimTemplate: metadata: name: ocs-prometheus-claim spec: storageClassName: ocs-storagecluster-ceph-rbd resources: requests: storage: <size of claim, e.g. 40Gi> alertmanagerMain: volumeClaimTemplate: metadata: name: ocs-alertmanager-claim spec: storageClassName: ocs-storagecluster-ceph-rbd resources: requests: storage: <size of claim, e.g. 40Gi>- Click Create to save and create the Config Map.
Verification steps
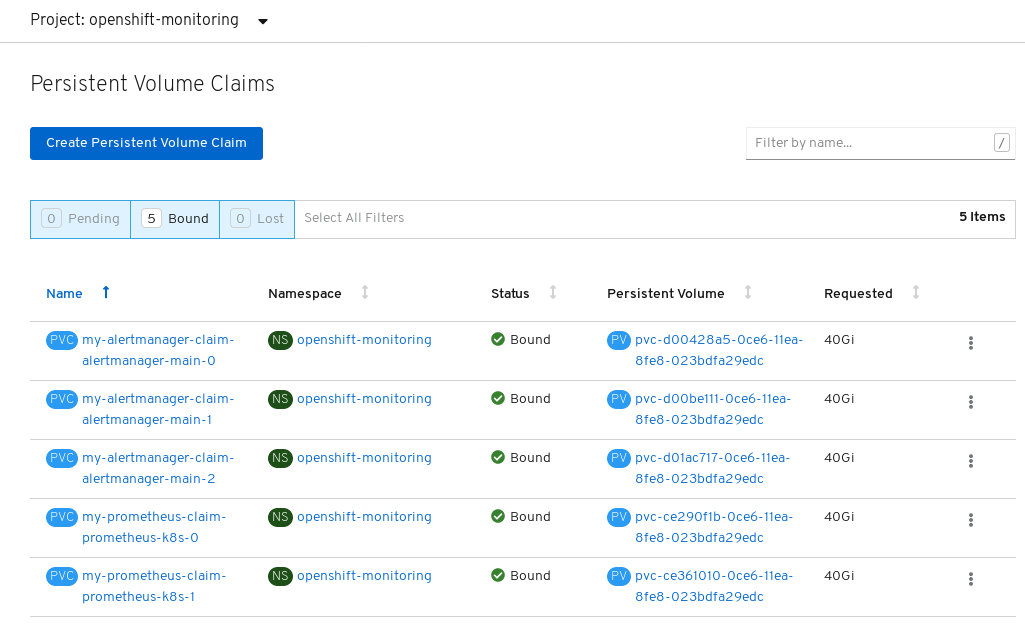
Verify that the Persistent Volume claims are bound to the pods.
- Go to Storage → Persistent Volume Claims.
-
Set the Project dropdown to
openshift-monitoring. Verify that 5 Persistent Volume Claims are visible with a state of
Bound, attached to threealertmanager-main-*pods, and twoprometheus-k8s-*pods.Monitoring storage created and bound
Verify that the new
alertmanager-main-*pods appear with a state ofRunning.-
Click the new
alertmanager-main-*pods to view the pod details. Scroll down to Volumes and verify that the volume has a Type,
ocs-alertmanager-claimthat matches one of your new Persistent Volume Claims, for example,ocs-alertmanager-claim-alertmanager-main-0.Persistent Volume Claims attached to
alertmanager-main-*pod
-
Click the new
Verify that the new
prometheus-k8s-*pods appear with a state ofRunning.-
Click the new
prometheus-k8s-*pods to view the pod details. Scroll down to Volumes and verify that the volume has a Type,
ocs-prometheus-claimthat matches one of your new Persistent Volume Claims, for example,ocs-prometheus-claim-prometheus-k8s-0.Persistent Volume Claims attached to
prometheus-k8s-*pod
-
Click the new
2.3. Cluster logging for OpenShift Container Storage
You can deploy cluster logging to aggregate logs for a range of OpenShift Container Platform services. For information about how to deploy cluster logging, see Deploying cluster logging.
Upon initial OpenShift Container Platform deployment, OpenShift Container Storage is not configured by default and the OpenShift Container Platform cluster will solely rely on default storage available from the nodes. You can edit the default configuration of OpenShift logging (ElasticSearch) to be backed by OpenShift Container Storage to have OpenShift Container Storage backed logging (Elasticsearch).
Always ensure that you have plenty of storage capacity for these services. If you run out of storage space for these critical services, the logging application becomes inoperable and very difficult to recover.
Red Hat recommends configuring shorter curation and retention intervals for these services. See Configuring Curator in the OpenShift Container Platform documentation for details.
If you run out of storage space for these services, contact Red Hat Customer Support.
2.3.1. Configuring persistent storage
You can configure a persistent storage class and size for the Elasticsearch cluster using the storage class name and size parameters. The Cluster Logging Operator creates a Persistent Volume Claim for each data node in the Elasticsearch cluster based on these parameters. For example:
spec:
    logStore:
      type: "elasticsearch"
      elasticsearch:
        nodeCount: 3
        storage:
          storageClassName: "ocs-storagecluster-ceph-rbd”
          size: "200G"
This example specifies that each data node in the cluster will be bound to a Persistent Volume Claim that requests 200GiB of ocs-storagecluster-ceph-rbd storage. Each primary shard will be backed by a single replica. A copy of the shard is replicated across all the nodes and are always available and the copy can be recovered if at least two nodes exist due to the single redundancy policy. For information about Elasticsearch replication policies, see Elasticsearch replication policy in About deploying and configuring cluster logging.
Omission of the storage block will result in a deployment backed by default storage. For example:
spec:
    logStore:
      type: "elasticsearch"
      elasticsearch:
        nodeCount: 3
        storage: {}
For more information, see Configuring cluster logging.
2.3.2. Configuring cluster logging to use OpenShift Container Storage
Follow the instructions in this section to configure OpenShift Container Storage as storage for the OpenShift cluster logging.
You can obtain all the logs when you configure logging for the first time in OpenShift Container Storage. However, after you uninstall and reinstall logging, the old logs are removed and only the new logs are processed.
Prerequisites
- You have administrative access to OpenShift Web Console.
-
OpenShift Container Storage Operator is installed and running in the
openshift-storagenamespace. -
Cluster logging Operator is installed and running in the
openshift-loggingnamespace.
Procedure
- Click Administration → Custom Resource Definitions from the left pane of the OpenShift Web Console.
- On the Custom Resource Definitions page, click ClusterLogging.
- On the Custom Resource Definition Overview page, select View Instances from the Actions menu or click the Instances Tab.
On the Cluster Logging page, click Create Cluster Logging.
You might have to refresh the page to load the data.
In the YAML, replace the code with the following:
apiVersion: "logging.openshift.io/v1" kind: "ClusterLogging" metadata: name: "instance" namespace: "openshift-logging" spec: managementState: "Managed" logStore: type: "elasticsearch" elasticsearch: nodeCount: 3 storage: storageClassName: ocs-storagecluster-ceph-rbd size: 200G redundancyPolicy: "SingleRedundancy" visualization: type: "kibana" kibana: replicas: 1 curation: type: "curator" curator: schedule: "30 3 * * *" collection: logs: type: "fluentd" fluentd: {}- Click Save.
Verification steps
Verify that the Persistent Volume Claims are bound to the
elasticsearchpods.- Go to Storage → Persistent Volume Claims.
-
Set the Project dropdown to
openshift-logging. Verify that Persistent Volume Claims are visible with a state of
Bound, attached toelasticsearch-* pods.Figure 2.1. Cluster logging created and bound

Verify that the new cluster logging is being used.
- Click Workload → Pods.
-
Set the Project to
openshift-logging. -
Verify that the new
elasticsearch-* pods appear with a state ofRunning. -
Click the new
elasticsearch-* pod to view pod details. -
Scroll down to Volumes and verify that the elasticsearch volume has a Type that matches your new Persistent Volume Claim, for example,
elasticsearch-elasticsearch-cdm-9r624biv-3. - Click the Persistent Volume Claim name and verify the storage class name in the PersistenVolumeClaim Overview page.
Make sure to use a shorter curator time to avoid PV full scenario on PVs attached to Elasticsearch pods.
You can configure Curator to delete Elasticsearch data based on retention settings. It is recommended that you set the following default index data retention of 5 days as a default.
config.yaml: |
    openshift-storage:
      delete:
        days: 5
For more details, see Curation of Elasticsearch Data.
To uninstall cluster logging backed by Persistent Volume Claim, use the steps in Removing the cluster logging operator from OpenShift Container Storage.
2.4. Object Bucket Claim
OpenShift Container Storage introduces a new concept called Object Bucket Claim. An Object Bucket Claim can be used to request an S3 compatible bucket backend for your workloads.
You can create an Object Bucket Claim two ways:
2.4.1. Dynamic Object Bucket Claim
Similar to persistent volumes, you can add the details of the Object Bucket claim to your application’s YAML, and get the object service endpoint, access key, and secret access key available in a configuration map and secret. It is easy to read this information dynamically into environment variables of your application.
Procedure
Add the following lines to your application YAML:
apiVersion: objectbucket.io/v1alpha1
kind: ObjectBucketClaim
metadata:
  name: <obc-name>
spec:
  generateBucketName: <obc-bucket-name>
  storageClassName: noobaa
These lines are the Object Bucket Claim itself.
-
Replace
<obc-name>with the a unique Object Bucket Claim name. -
Replace
<obc-bucket-name>with a unique bucket name for your Object Bucket Claim.
-
Replace
You can add more lines to the YAML file to automate the use of the Object Bucket Claim. The example below is the mapping between the bucket claim result, which is a configuration map with data and a secret with the credentials. This specific job will claim the Object Bucket from NooBaa, which will create a bucket and an account.
apiVersion: batch/v1 kind: Job metadata: name: testjob spec: template: spec: restartPolicy: OnFailure containers: - image: <your application image> name: test env: - name: BUCKET_NAME valueFrom: configMapKeyRef: name: <obc-name> key: BUCKET_NAME - name: BUCKET_HOST valueFrom: configMapKeyRef: name: <obc-name> key: BUCKET_HOST - name: BUCKET_PORT valueFrom: configMapKeyRef: name: <obc-name> key: BUCKET_PORT - name: AWS_ACCESS_KEY_ID valueFrom: secretKeyRef: name: <obc-name> key: AWS_ACCESS_KEY_ID - name: AWS_SECRET_ACCESS_KEY valueFrom: secretKeyRef: name: <obc-name> key: AWS_SECRET_ACCESS_KEY- Replace all instances of <obc-name> with your Object Bucket Claim name.
- Replace <your application image> with your application image.
Apply the updated YAML file:
# oc apply -f <yaml.file>
-
Replace
<yaml.file>with the name of your YAML file.
-
Replace
To view the new configuration map, run the following:
# oc get cm <obc-name>
Replace
obc-namewith the name of your Object Bucket Claim.You can expect the following environment variables in the output:
-
BUCKET_HOST- Endpoint to use in the application BUCKET_PORT- The port available for the application-
The port is related to the
BUCKET_HOST. For example, if theBUCKET_HOSTis https://my.example.com, and theBUCKET_PORTis 443, the endpoint for the object service would be https://my.example.com:443.
-
The port is related to the
-
BUCKET_NAME- Requested or generated bucket name -
AWS_ACCESS_KEY_ID- Access key that is part of the credentials -
AWS_SECRET_ACCESS_KEY- Secret access key that is part of the credentials
-
2.4.2. Creating an Object Bucket Claim using the command line interface
When creating an Object Bucket Claim using the command-line interface, you get a configuration map and a Secret that together contain all the information your application needs to use the object storage service.
Prerequisites
Download the MCG command-line interface:
# subscription-manager repos --enable=rh-ocs-4-for-rhel-8-x86_64-rpms
# yum install mcg
Procedure
Use the command-line interface to generate the details of a new bucket and credentials. Run the following command:
# noobaa obc create <obc-name> -n openshift-storage
Replace
<obc-name>with a unique Object Bucket Claim name, for example,myappobc.Additionally, you can use the
--app-namespaceoption to specify the namespace where the Object Bucket Claim configuration map and secret will be created, for example,myapp-namespace.Example output:
INFO[0001] ✅ Created: ObjectBucketClaim "test21obc"
The MCG command-line-interface has created the necessary configuration and has informed OpenShift about the new OBC.
Run the following command to view the Object Bucket Claim:
# oc get obc -n openshift-storage
Example output:
NAME        STORAGE-CLASS                 PHASE   AGE
test21obc   openshift-storage.noobaa.io   Bound   38s
Run the following command to view the YAML file for the new Object Bucket Claim:
# oc get obc test21obc -o yaml -n openshift-storage
Example output:
apiVersion: objectbucket.io/v1alpha1
kind: ObjectBucketClaim
metadata:
  creationTimestamp: "2019-10-24T13:30:07Z"
  finalizers:
  - objectbucket.io/finalizer
  generation: 2
  labels:
    app: noobaa
    bucket-provisioner: openshift-storage.noobaa.io-obc
    noobaa-domain: openshift-storage.noobaa.io
  name: test21obc
  namespace: openshift-storage
  resourceVersion: "40756"
  selfLink: /apis/objectbucket.io/v1alpha1/namespaces/openshift-storage/objectbucketclaims/test21obc
  uid: 64f04cba-f662-11e9-bc3c-0295250841af
spec:
  ObjectBucketName: obc-openshift-storage-test21obc
  bucketName: test21obc-933348a6-e267-4f82-82f1-e59bf4fe3bb4
  generateBucketName: test21obc
  storageClassName: openshift-storage.noobaa.io
status:
  phase: Bound
Inside of your
openshift-storagenamespace, you can find the configuration map and the secret to use this Object Bucket Claim. The CM and the secret have the same name as the Object Bucket Claim. To view the secret:# oc get -n openshift-storage secret test21obc -o yaml
Example output:
Example output:
apiVersion: v1
data:
  AWS_ACCESS_KEY_ID: c0M0R2xVanF3ODR3bHBkVW94cmY=
  AWS_SECRET_ACCESS_KEY: Wi9kcFluSWxHRzlWaFlzNk1hc0xma2JXcjM1MVhqa051SlBleXpmOQ==
kind: Secret
metadata:
  creationTimestamp: "2019-10-24T13:30:07Z"
  finalizers:
  - objectbucket.io/finalizer
  labels:
    app: noobaa
    bucket-provisioner: openshift-storage.noobaa.io-obc
    noobaa-domain: openshift-storage.noobaa.io
  name: test21obc
  namespace: openshift-storage
  ownerReferences:
  - apiVersion: objectbucket.io/v1alpha1
    blockOwnerDeletion: true
    controller: true
    kind: ObjectBucketClaim
    name: test21obc
    uid: 64f04cba-f662-11e9-bc3c-0295250841af
  resourceVersion: "40751"
  selfLink: /api/v1/namespaces/openshift-storage/secrets/test21obc
  uid: 65117c1c-f662-11e9-9094-0a5305de57bb
type: Opaque
The secret gives you the S3 access credentials.
To view the configuration map:
# oc get -n openshift-storage cm test21obc -o yaml
Example output:
apiVersion: v1
data:
  BUCKET_HOST: 10.0.171.35
  BUCKET_NAME: test21obc-933348a6-e267-4f82-82f1-e59bf4fe3bb4
  BUCKET_PORT: "31242"
  BUCKET_REGION: ""
  BUCKET_SUBREGION: ""
kind: ConfigMap
metadata:
  creationTimestamp: "2019-10-24T13:30:07Z"
  finalizers:
  - objectbucket.io/finalizer
  labels:
    app: noobaa
    bucket-provisioner: openshift-storage.noobaa.io-obc
    noobaa-domain: openshift-storage.noobaa.io
  name: test21obc
  namespace: openshift-storage
  ownerReferences:
  - apiVersion: objectbucket.io/v1alpha1
    blockOwnerDeletion: true
    controller: true
    kind: ObjectBucketClaim
    name: test21obc
    uid: 64f04cba-f662-11e9-bc3c-0295250841af
  resourceVersion: "40752"
  selfLink: /api/v1/namespaces/openshift-storage/configmaps/test21obc
  uid: 651c6501-f662-11e9-9094-0a5305de57bb
The configuration map contains the S3 endpoint information for your application.