
Red Hat Training
A Red Hat training course is available for Red Hat Satellite
Chapter 4. Red Hat Update Agent
The Red Hat Update Agent is your connection to Red Hat Network on Red Hat Enterprise Linux 4 It enables you to register your systems, create System Profiles, and alter the settings by which your organization and RHN interact. Once registered, your systems can use the Red Hat Update Agent to retrieve the latest software packages from Red Hat. This tool allows you to always have the most up-to-date Red Hat Enterprise Linux systems with all security updates, bug fixes, and software package enhancements.
Remember, this tool must be run on the system you wish to update. You cannot use the Red Hat Update Agent on the system if it is not entitled to an RHN service offering.
Warning
Only systems running Red Hat Enterprise Linux 3 and later can use the Red Hat Update Agent to register with RHN. Systems running Red Hat Enterprise Linux 2.1 must use Red Hat Network Registration Client before starting the Red Hat Update Agent. Refer to Chapter 2, The
rhn_register Client for instructions, then return to this chapter for Red Hat Update Agent instructions.
Important
You must use Red Hat Update Agent Version 2.5.4 or higher to upgrade your kernel automatically. It installs the updated kernel and configures LILO or GRUB to boot the new kernel the next time the system is rebooted. To ensure that you are running the latest version, execute the command
up2date up2date. If you do not have the latest version installed, this command updates it.
4.1. Starting the Red Hat Update Agent
If you are not running the X Window System or prefer the command line version of the Red Hat Update Agent, skip to Section 4.3, “Command Line Version”.
You must be root to run the Red Hat Update Agent. If started as a standard user, Red Hat Update Agent prompts you to enter the root password before proceeding. The Red Hat Update Agent can be started using one of the following methods:
For Red Hat Enterprise Linux 5:
- On the GNOME and KDE desktops, (the main menu on the panel) => .
- At a shell prompt (for example, an xterm or gnome-terminal), type the command
system-config-packages.
For Red Hat Enterprise Linux 4:
- On the GNOME and KDE desktops, go to Applications (the main menu on the panel) => => .
- At a shell prompt (for example, an xterm or gnome-terminal), type the command
up2date.
If you choose the last option and start the application from a shell prompt, you can specify the options in Table 4.1, “Graphical Update Agent Options”. To view these options, type the command
up2date --help.
For example, use the following command to specify the directory in which to download the updated packages (temporarily overriding your saved configuration):
up2date --tmpdir=/tmp/up2date/Table 4.1. Graphical Update Agent Options
| Option | Description |
|---|---|
--configure | Configure Red Hat Update Agent options. Refer to Section 4.4, “Configuration” for detailed instructions. |
-d, --download | Download packages only; do not install them. This argument temporarily overrides the configuration option Do not install packages after retrieval. Use this option if you prefer to install the packages manually. |
-f, --force | Force package installation. This option temporarily overrides the file, package, and configuration skip lists. |
-i, --install | Install packages after they are downloaded. This argument temporarily overrides the configuration option Do not install packages after retrieval. |
-k, --packagedir | Specify a colon separated path of directories in which to look for packages before trying to download them. |
--nosig | Do not use GPG to check package signatures. This option temporarily overrides the saved configuration option. |
--tmpdir=directory | Temporarily override the configured package directory. The default location is /var/spool/up2date. This option is useful if you do not have enough space in the configured location. |
--dbpath=dir | Specify an alternate RPM database to use temporarily. |
The first time you run the Red Hat Update Agent, two dialog boxes appear that you will not see in subsequent startups: Configure Proxy Server and Install GPG Key.
As shown in Figure 4.1, “Configure Proxy Server”, the first dialog box to appear prompts you for HTTP Proxy Server information. This is useful if your network connection requires you to use a proxy server to make HTTP connections. To use this feature, select the Enable HTTP Proxy checkbox and type your proxy server in the text field with the format HOST:PORT, such as
squid.mysite.org:3128. Additionally, if your proxy server requires a username and password, select the Use Authentication checkbox and enter your username and password in the respective text fields.
An HTTP Proxy Server is not required by Red Hat Network. If you do not want to use this feature, click the button without making any selections. Note that the Red Hat Network Server dropdown menu at the top of the dialog box is only useful to RHN Proxy and Satellite customers. These customers should refer to the RHN Client Configuration Guide for registration steps. Also note that this dialog box is actually the General tab of the Red Hat Update Agent Configuration Tool. Refer to Section 4.4, “Configuration” for detailed instructions.

Figure 4.1. Configure Proxy Server
The second dialog box to appear prompts you to install the Red Hat GPG key, as shown in Figure 4.2, “Install GPG Key”. This key is used to verify the packages you download for security purposes. Click to install the key, and you will not see this message again.
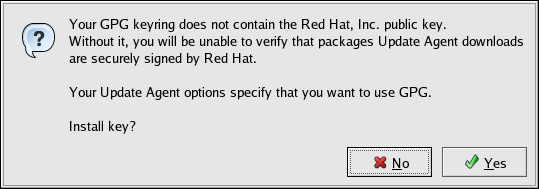
Figure 4.2. Install GPG Key