Red Hat Training
A Red Hat training course is available for Red Hat JBoss Operations Network
27.7. Provisioning Bundles
27.7.1. Managing Bundle Groups
Bundle groups are an integral part of defining access controls for JBoss ON. Bundles cannot be deployed until they belong to a bundle group, which is assigned to an appropriately configured role.
27.7.1.1. Creating Bundle Groups
Resource groups are covered in Chapter 6, Managing Groups. Resource groups are used to organize individual resources to simplify overall management by consolidating maintenance operations or to maintain access controls.
Bundle groups are analogous to resource groups. Bundle groups consolidate some deployment operations to make it easier to control application lifecycles. More important, bundle groups provide a level of access control in two facets: controlling user access to both create and deploy bundles and resource limits to control where bundles are deployed.
- Click the Bundles tab in the top menu.
- In the Bundle Groups area at the bottom, click the New button.

- Enter a name and description for the group.

- Select the group members. If any bundles have been uploaded, then they can be added to the group when it created.Alternatively, bundles can be added to a bundle group when they are created, updated, or by editing the group.
- Click the Save button.
27.7.1.2. Assigning Bundles to Bundle Groups
The bundle upload wizard (both for new bundles and for update) includes a step to add or remove the bundle to a bundle group. A bundle can also be added or removed from a bundle group at any time.
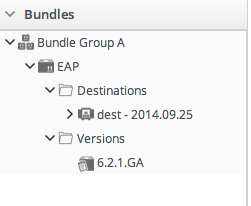
When a bundle belongs to a bundle group, it is listed under that bundle group in the hierarchy. This organization helps define the development and deployment lifecycle for bundles.
A user can only see bundles which belong to a bundle group which the user has rights to. The only exception is for users which have the global view bundles permission. Those users can see all bundles, regardless of group assignments — including bundles which do not belong to any group. When a bundle belongs to no group, it is in an unassigned group. As soon as it is assigned to a group, then its location in the hierarchy is updated.
Figure 27.4. Bundle Groups and Unassigned Bundles in the Bundle Hierarchy

Important
A bundle must belong to a bundle group for access controls to apply. In other words, a bundle must belong to a bundle group before it can be viewed by users or deployed to a resource.
- Click the Bundles tab in the top menu.
- In the Bundle Groups area at the bottom, click the name of the bundle group to edit.
- Select the group members to add or remove from the group. When a bundle is selected in a box, the corresponding arrow becomes active to move it to the other box.

- Click the Save button.
27.7.2. Uploading Bundles to JBoss ON
All of the files associated with a distribution — the recipe, any JARs or ZIPs, and any configuration files — have to be accessible to JBoss ON. Either the files need to be uploaded and stored in the JBoss ON database or a URL needs to be configured, where the server can download the packages.
Note
If the files are all combined in a single ZIP file to upload, then the recipe file must be in the top level of the package.
- In the top menu, click the Bundles tab.

- At the bottom of the Bundles section, click the New button.

- Upload the distribution package or the recipe file.
 There are three options on how the bundle distribution is made available to the JBoss ON server:
- URL points to any URL, such as an FTP site or SVN or GIT repo, where there is a complete bundle distribution file available. If the repository requires authentication, then the username and password for a user account can be given to allow the server to authenticate to the site.NoteUsing an SVN or GIT repo allows you to pull the packages directly from a build system.
- Upload uploads a single bundle distribution file (which includes both the recipe an all associated files) from the local system to the JBoss ON server.
- Recipe uploads a recipe file only, and then any additional files required for the bundle are uploaded separately. This option includes an edit field where the uploaded recipe can be edited before it is sent to the server.
- Select any groups in the left box to which to assign the bundle, and click the arrow to move it to the Assigned box.
 Bundle groups are required for access control. Without a group assignment, users are unable to view bundles (unless they have the global view bundles permission) or to deploy the bundles.
 - Upload any associated files that were not uploaded previously. For the URL and Upload, all of the files are usually uploaded in a single file, so there is nothing to do on this screen. For the Recipe option, all of the files listed in the recipe must be uploaded manually at this step.

- The final screen shows all of the information for the new bundle. Click Finish to save the new bundle.

27.7.3. Deploying Bundles to a Resource
Bundles are deployed to resources by deploying the bundle to a JBoss ON group. Any compatible group that contains resources which support bundles (platforms and JBoss AS resources by default) is automatically listed as an option for the destination.
For platforms, the groups cannot contain different operating systems and architectures. However, the same bundle distribution file and properties can be used for any platform because the provisioning process will automatically format the deployment directory and provisioned files to match the platform's architecture.
- In the top menu, click the Bundles tab.

- Scroll to the bottom of the window and click the Deploy button.Alternatively, click the name of the bundle in the list, and then click the deploy button at the top of the bundle page.
- Select the bundles to deploy from the list on the left and use the arrows to move them to the box on the right.

- Once the bundles are selected, define the destination information.The destination is a combination of the resources the bundle is deployed on and the directory to which is it deployed. Each destination is uniquely defined for each bundle.To define the destination, first select the resource group from the Resource drop-down menu. The resource group identifies the type of resource to which the bundle is being deployed, and the resource type defines other deployment parameters. When the group is selected, then the base location is defined. For a platform, this is the root directory. For a JBoss AS instance, it is the installation directory. For custom resources, the base location is defined in the plug-in descriptor.NoteIf you haven't created a compatible group or if you want to create a new group specifically for this bundle deployment, click the + icon to create the group. Then, continue with the provisioning process.Set the actual deployment directory to which to deploy the bundle. This directory is a relative path to the plug-in-defined base location.

- Select the version of the bundle to deploy. If there are multiple versions of a bundle available, then any of those versions can be selected. There are also quick options to deploy the latest version or the currently deployed version.

- If there are any user-defined properties, then they are entered in the fields in the next page. User-defined properties are configured in the bundle recipe using tokens.

- Fill in the information about the specific deployment instance. The checkbox sets the option on whether to overwrite anything in the existing deployment directory or whether to preserve any existing files.

- The final screen shows the progress for deploying the packages. Click Finish to complete the deployment.
27.7.4. Viewing the Bundle Deployment History
A bundle has two areas of information: one for its versions and one for its destinations (places where it is deployed). The main bundle entry shows only those two things, the versions and the destinations. The version area is a way to track and control the content of the bundle, while the destinations area is a way to track and control the process of deploying bundles.
Figure 27.5. Bundles, Versions, and Destinations

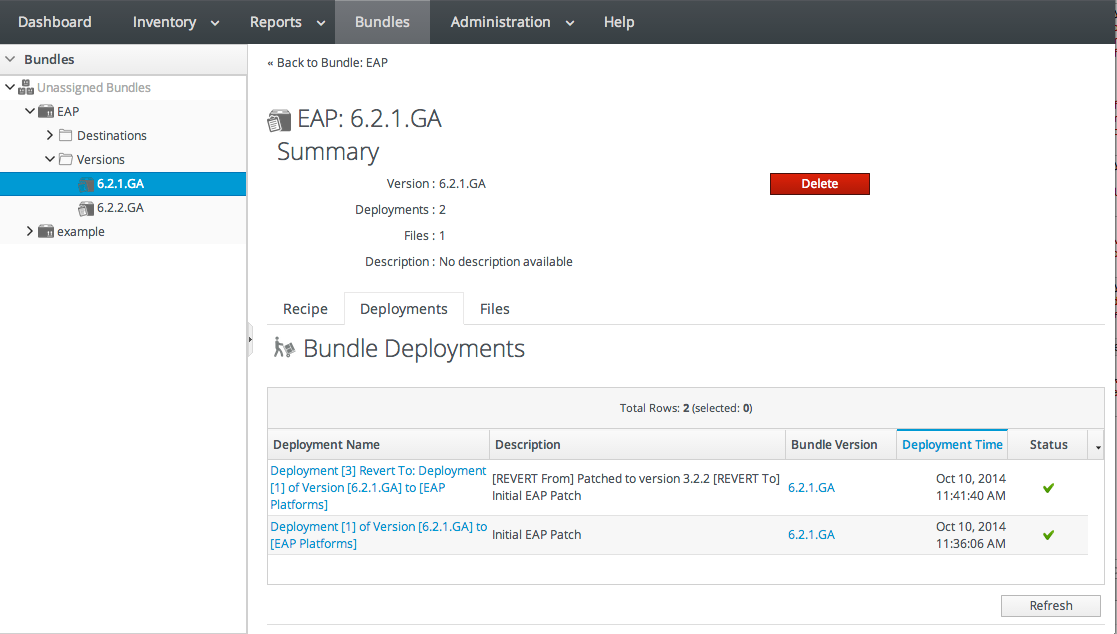
Selecting a version under the main bundle entry shows its recipe (on the Summary tab) and a list of all of the files associated with that particular version (on the Files tab). The Deployments tab shows every destination, with timestamps and comments, that that particular version of the bundle has been deployed to.
Figure 27.6. Deployment Information for a Version

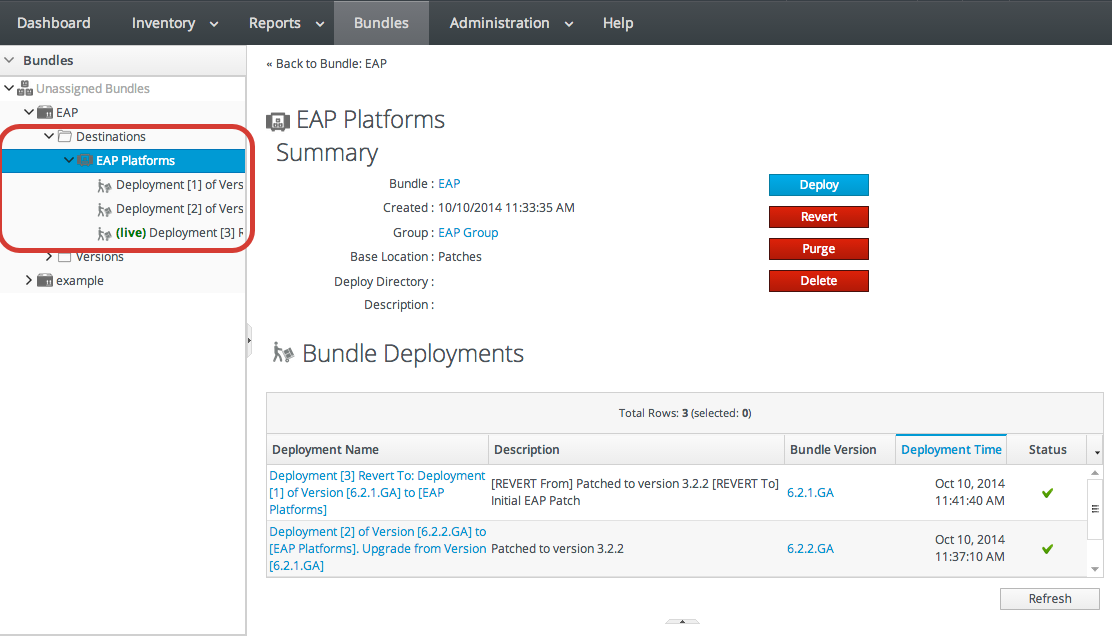
A destination entry shows only a list of versions that have been deployed to that destination. In a sense, the destination area is the best areas to track the audit history of an application. Each deployment of a bundle version to a destination is listed below the destination, with the live version marked. Reversions are also marked, showing what version the deployment was downgraded to.
Figure 27.7. Deployment History for a Destination

Along with showing the history of deployments and updates, the destinations area is the place where new versions can be deployed or reverted most directly.
27.7.5. Reverting a Deployed Bundle
Ant bundles can be rolled back to a previous version number or a previous deployment of that bundle. This provides some extra protection and flexibility when deploying and managing applications, particularly for testing and production systems.
- In the top menu, click the Bundles tab.

- In the left navigation window, expand the bundle node, and then open the Destinations folder beneath it.
- Select the destination from the left navigation.
- In the main window for the destination, click the Revert button.

- The next page shows the summary of the current deployment and the immediate previous deployment, which it will be reverted to.

- Add any notes to the revert action. Optionally, select the checkbox to clean the deployment directory and install the previous version fresh.

- Click Finish on the final screen to complete the rollback.
27.7.6. Deploying a Bundle to a Clean Destination
A bundle can be deployed to a destination where there may already be an application, files, or even a previous bundle deployment. When deploying a new bundle, there are two options for how the provisioning process handles the update:
- Preserve the existing files and directories, with appropriate upgrades, according to the recipe configuration (Section 27.5.7.3, “WARNING: The Managed (Target) Directory and Overwriting or Saving Files”)
- Completely overwrite the existing files and deploy the bundle in an empty directory
To deploy the bundle in a clean directory, then select the Clean Deploy checkbox when running through the deployment wizard in Section 27.7.3, “Deploying Bundles to a Resource”.

27.7.7. Purging a Bundle from a Resource
Purging a bundle removes all of the files associated with the bundle from all of the target resources. However, this does not remove the bundle from the JBoss ON database, so it can be easily re-deployed to the same resources later or to other resources.
Important
The exact files that are purged mirrors how the bundle manages the deployment directory. By default, purging includes deleting the deployment directory (compliance=full). If the deployment directory is used by other applications – like an app server
deploy/ directory — then those other applications or files will also be deleted. After purging, there is no live deployment and nothing to revert.
- In the top menu, click the Bundles tab.

- In the left navigation window, expand the bundle node, and then open the Destinations folder beneath it.
- Select the destination from the left navigation.
- In the main window for the destination, click the Purge button.

- When prompted, confirm that you want to remove the bundled application and configuration from the target resources.
27.7.8. Upgrading Ant Bundles
The bundle upgrade process decides whether to upgrade (meaning, overwrite) files within the application's deployment directory by comparing the MD5 hash codes on the files. There are several different upgrade scenarios:
- If the hash code on the new file is different than the original file and there are no local modifications, then JBoss ON installs the new file over the existing file.
- If the hash code on the new file is different than the original file and there are local modifications, then JBoss ON backs up the original file and installs the new file.
- If the hash code on the new file and the original file is the same and there are local modifications on the original file, then the provisioning process preserves the original file, in place.
- If there was no file in the previous bundle but there is one in the new bundle, then the new file is used and any file that was added manually is backed up.
Backed up files are saved to a
backup/ directory within the deployment's destination directory. If the original file was located outside the application's directory (like, it was stored according to an absolute location rather than a relative location), then it is saved in an ext-backup/ directory within the deployment's destination directory.
Note
If a file is ignored in the recipe, then the file is left unchanged. Never ignore files packaged in the bundle. Only files generated by the applications, such as log and data files, should be ignored by the provisioning process since they should be preserved for the upgraded instance.
If a completely fresh installation is required, then it is possible to run a clean deployment. This is described in Section 27.7.6, “Deploying a Bundle to a Clean Destination”.
27.7.9. Deleting a Bundle from the JBoss ON Server
Deleting a bundle removes all of its recipes and associated files from the JBoss ON database. It also removes the bundle from any bundle groups to which it belonged.
The deployed applications or configuration remain intact on the target resources.
- In the top menu, click the Bundles tab.

- In the left navigation window, expand the bundle node, and then open the Destinations folder beneath it.
- Select the destination from the left navigation.
- In the main window for the destination, click the Delete button.

- When prompted, confirm that you want to delete the bundle.

