
Red Hat Training
A Red Hat training course is available for Red Hat JBoss Operations Network
Using JBoss Operations Network for Monitoring, Deploying, and Managing Resources
for maintaining an efficient JBoss and IT infrastructure
Edition 3.2
Abstract
Document Information
1. Document History
| Revision History | |||
|---|---|---|---|
| Revision 3.2-18 | May 24, 2014 | ||
| |||
| Revision 3.2-15 | December 11, 2013 | ||
| |||
Chapter 1. Using the JBoss ON Web Interface
1.1. Supported Web Browsers
- Firefox 17 or later
- Internet Explorer 9
1.2. Logging into the JBoss ON Web UI
rhq-server.properties file, JBoss ON is completely administered through its web interface.
http://server.example.com:7080
rhqadmin.
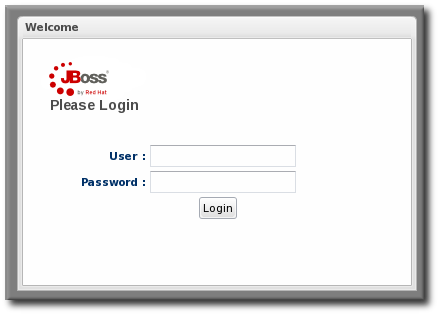
Figure 1.1. Logging into JBoss ON
1.3. Configuring Internet Explorer
- In Internet Explorer, click the gear icon in the upper right corner and select .
- Open the Security tab, and select the Local intranet icon.
- Click the button.
- Click the button at the bottom of the pop-up window.
- Enter the JBoss ON server hostname or IP address in the Add this webiste to the zone: field, and click the .
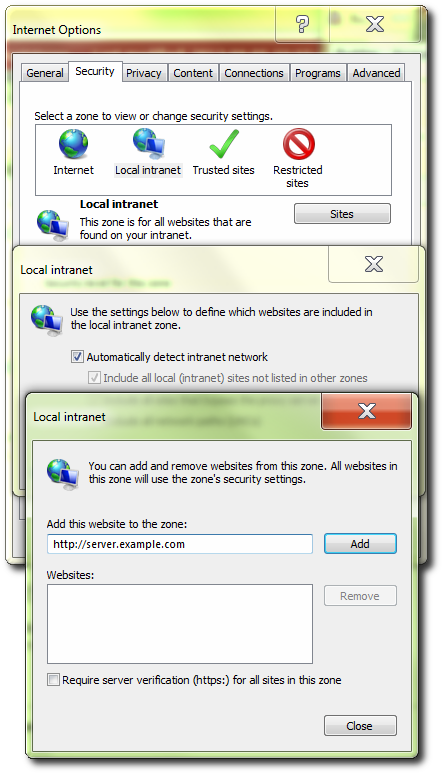
- Close out the options windows.
1.4. A High Level Walk-Through
- The top menu
- The left menu tables
- The dashboard
- Resource-based tables, which can be for the resource inventory, a summary report, or the results of a search
- Configuration pages which both provide details for and access to elements in JBoss ON, including resources, groups, plug-ins, and JBoss ON server settings
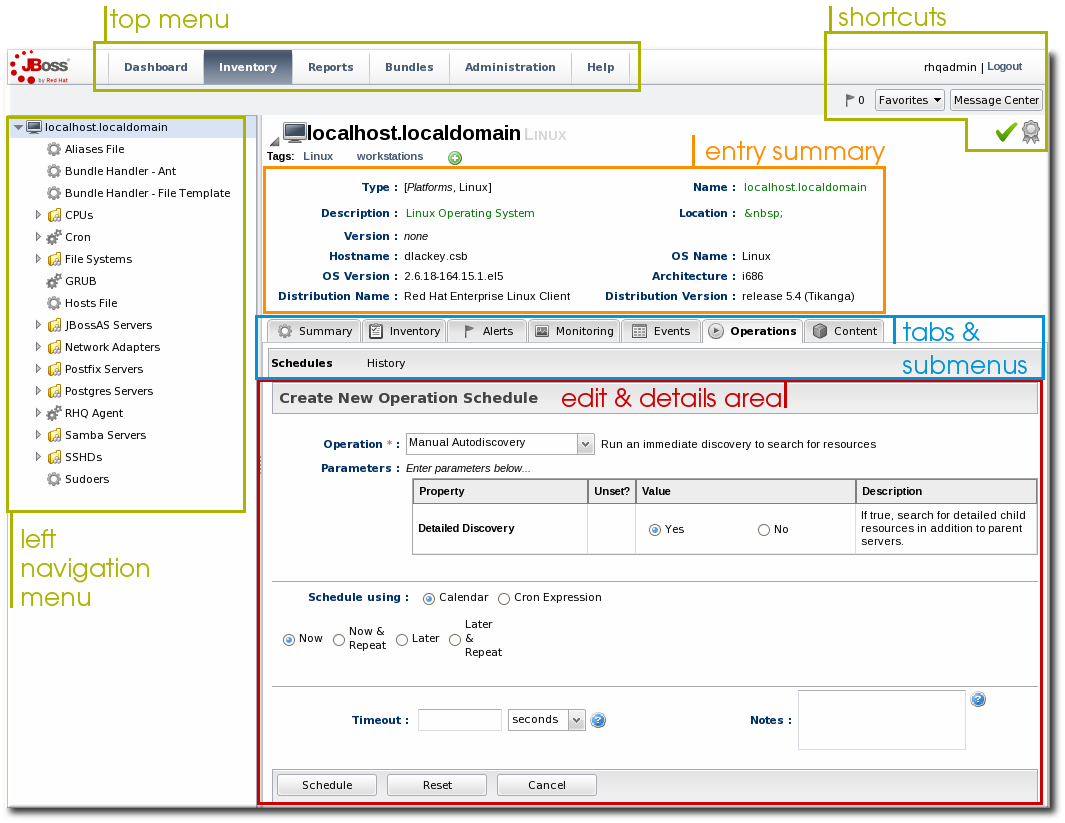
Figure 1.2. UI Elements All Together
1.4.1. The Top Menu

Figure 1.3. The Top Menu
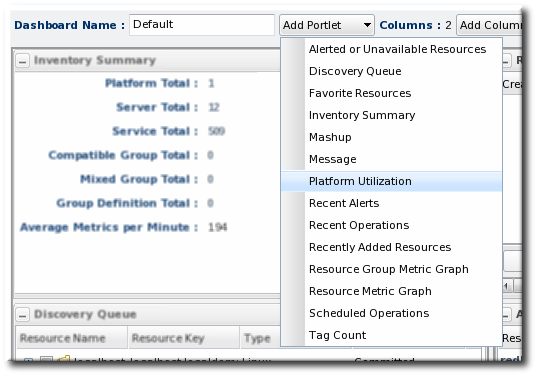
- The Dashboard contains a global overview of JBoss ON and its resources. Different, configurable snapshot summaries (called portlets) show different aspects of the resources and server, such as the discovery queue, recent alerts, recent operations, and resource counts.
- The Inventory tab shows both resources and groups.
- The Reports tab shows pre-defined reports. These are slightly different than the Dashboard, which focuses exclusively on resource information: the reports look at the current actions of the different subsystem (or major functional areas) of JBoss ON, such as alerts, operations, metric collection, and configuration history.
- The Bundles tab opens the provisioning and content functional area. This is for uploading and deploying content bundles that are used to provision new applications.
- Administration goes to all areas related to configuring the JBoss ON server itself. This includes server settings, plug-ins, users and security, and agent settings.
1.4.2. The Left Menu
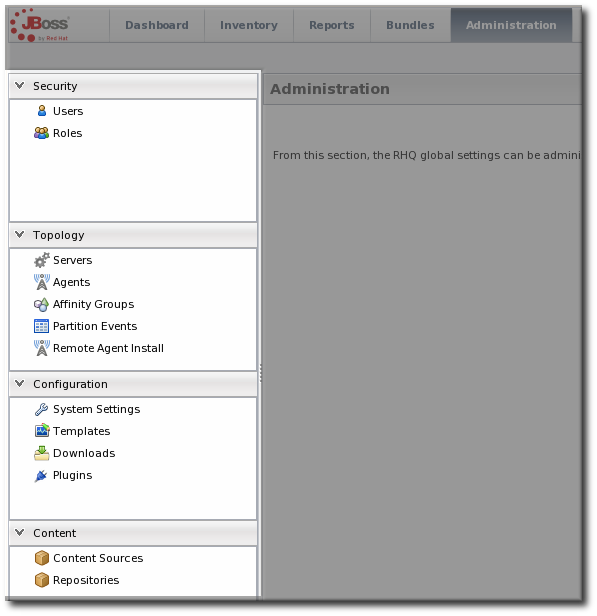
Figure 1.4. The Left Menu

Figure 1.5. Collapsing the Left Menu
1.4.3. Dashboard
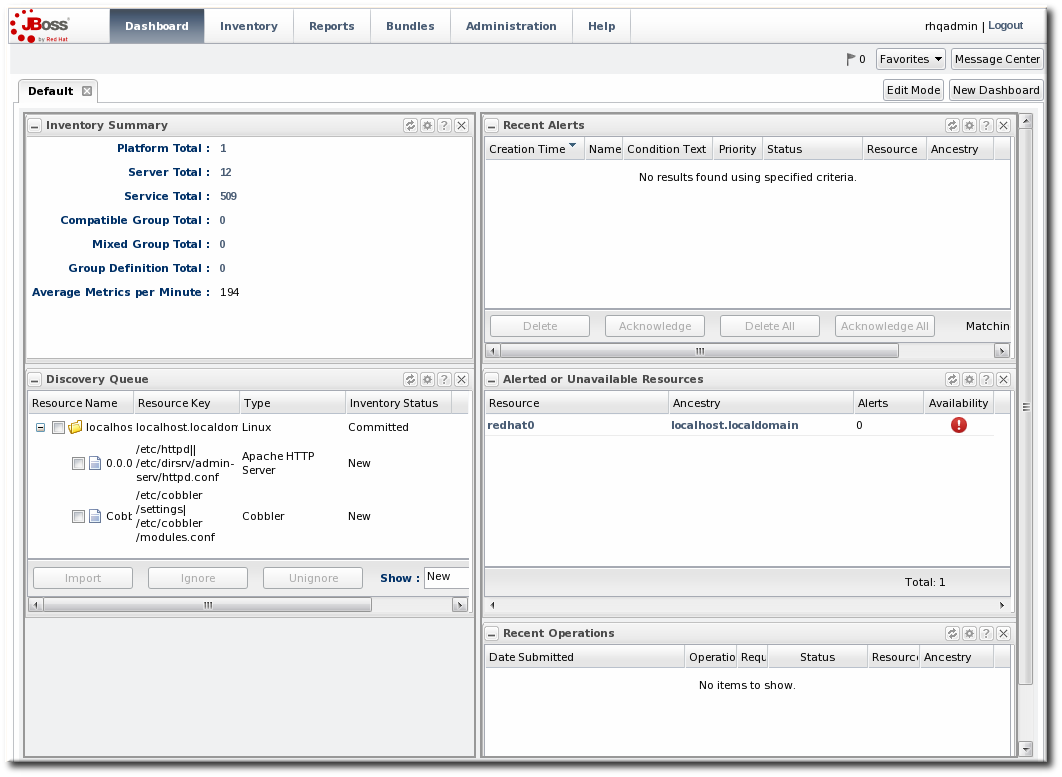
Figure 1.6. Dashboard View
1.4.4. Inventory Browsers and Summaries
- Tabs for different areas, with subtabs that further break down information
- A table of results
- Icons that open a configuration or task option for that specific entity
- Buttons that perform actions (create, delete, or some other specific action) on the entries; some of these buttons aren't active unless an entry is selected
Figure 1.7. Inventory Browser
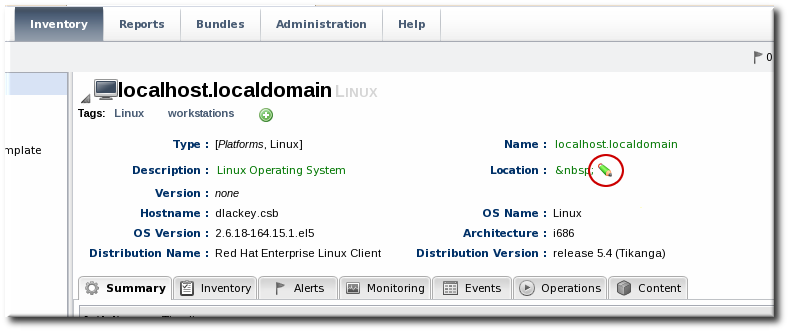
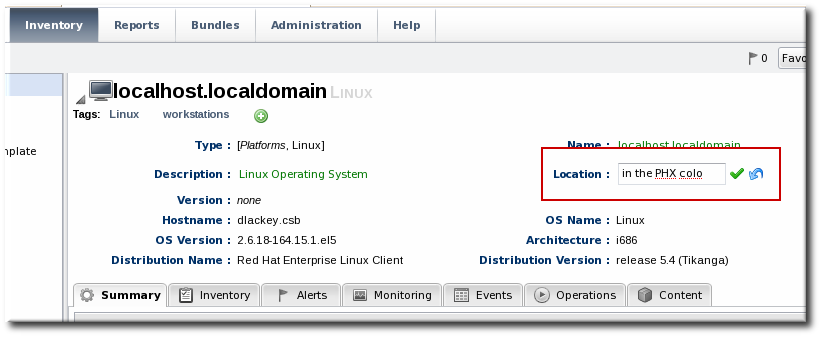
1.4.5. Entry Details Pages
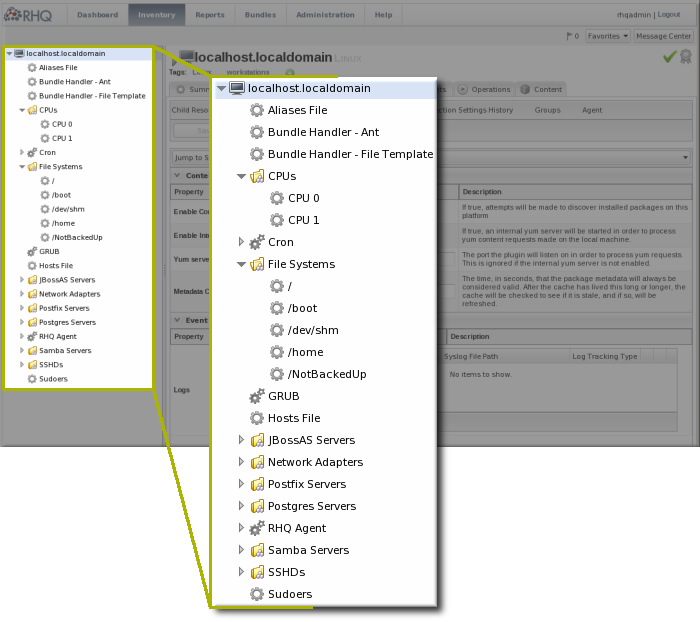
Figure 1.8. Resource Tree
Note
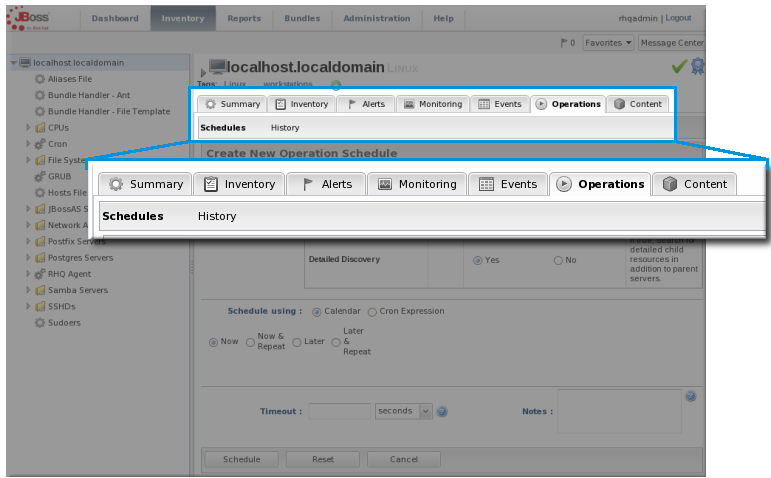
Figure 1.9. Tabs for a Resource Entry
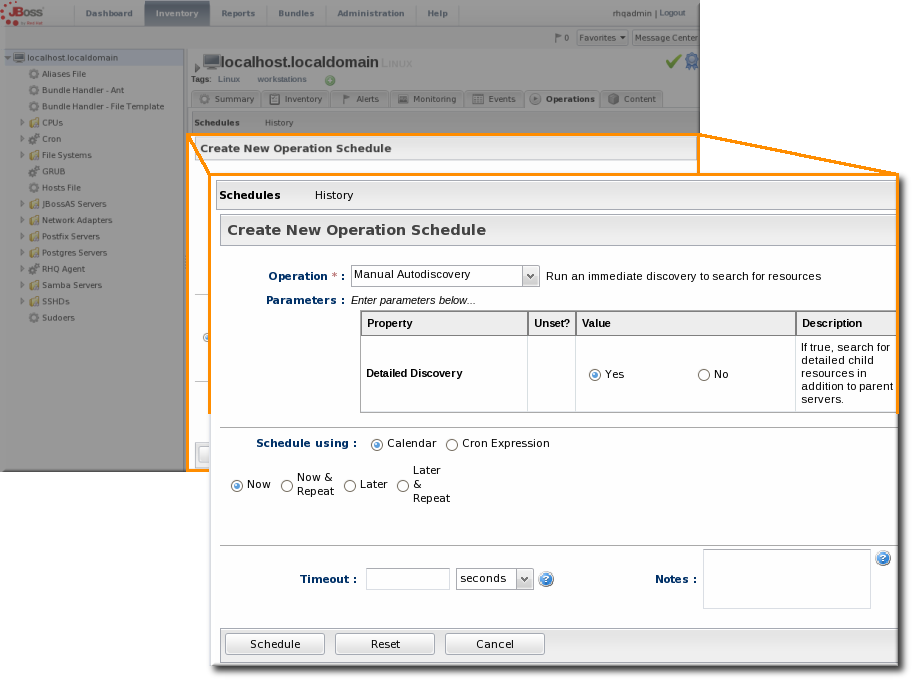
Figure 1.10. Editable Areas for a Resource Entry
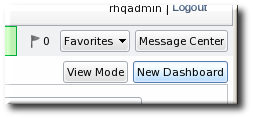
1.4.6. Shortcuts in the UI
- The Message Center shows all notifications that have been sent by the JBoss ON server. This includes alerts, configuration changes, changes to the inventory, or error messages for the server or UI.
- The Favorites button can be used to navigate to selected resources and groups quickly, while the little blue ribbon on resource pages can be used to add that resource to the favorites list.
- The resource available is shown as a green check mark if the resource is available and a red X if the resource is down.
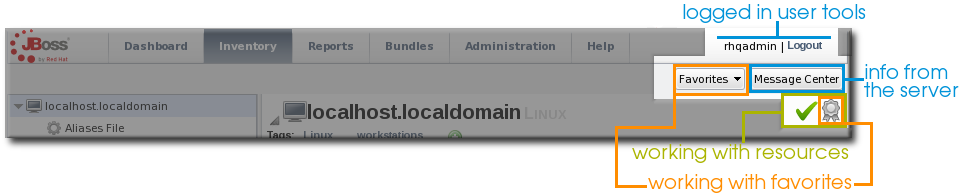
Figure 1.11. Shortcuts
1.5. Getting Notifications in the Message Center
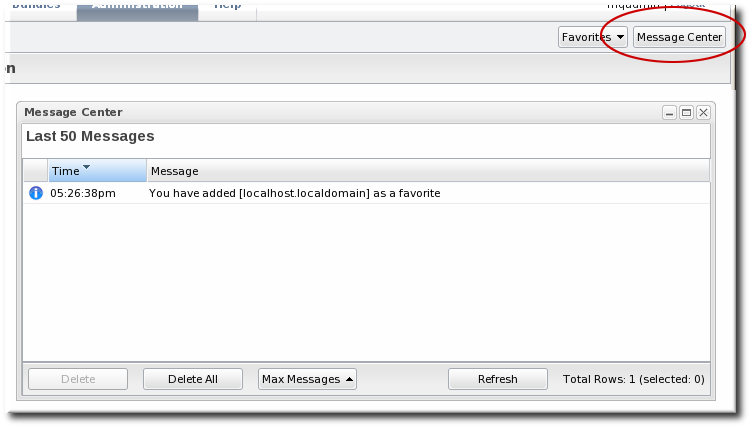
Figure 1.12. Message Center
1.6. Sorting and Changing Table Displays

Figure 1.13. Basic Table Sorting on the Partition Events List
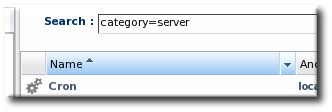
Figure 1.14. Basic Table Sorting on the Server Resources List

Figure 1.15. Advanced Table Sorting on the Server Resources List
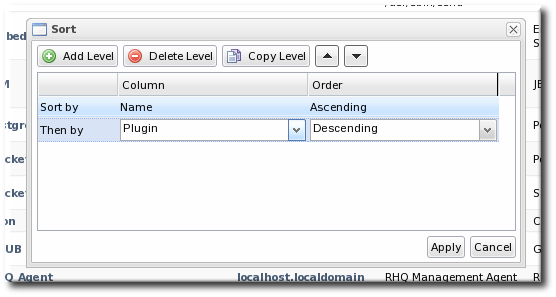
Figure 1.16. Changing the Sort Method
1.7. Customizing the Dashboard
Note
1.7.1. Editing Portlets

Figure 1.17. Portlet Icons
1.7.2. Adding and Editing Dashboards
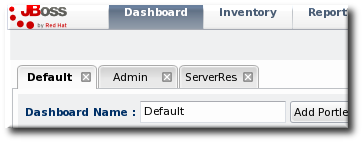
Figure 1.18. Tabbed Dashboards
- Click the button in the far right of the main Dashboard.
Note
The process of editing and adding Dashboards is very similar. The only difference is that to edit a Dashboard, you click the button. - The new Dashboard opens in the edit mode. Enter a name for the new Dashboard.

- Add the desired portlets to the Dashboard. If necessary, change the number of columns to fit the number of portlets.
1.8. Setting Favorites

Figure 1.19. Favorites Icon

Figure 1.20. Favorites List
1.9. Deleting Entries
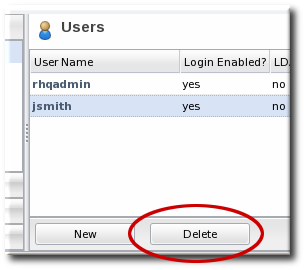
Figure 1.21. Delete Button in the Area Browser
Note
Chapter 2. Dynamic Searches for Resources and Groups
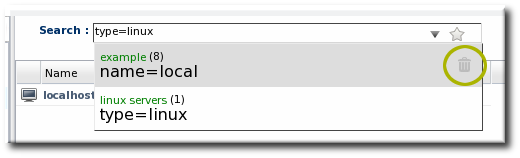
2.1. About Search Suggestions
- Saved searches, which contain previous custom search strings and a count of resources which match that search
- Query searches, which provide prompts for available resource traits
- Text searches, which provide a list of resources based on some property in the resource which matches the text prompt
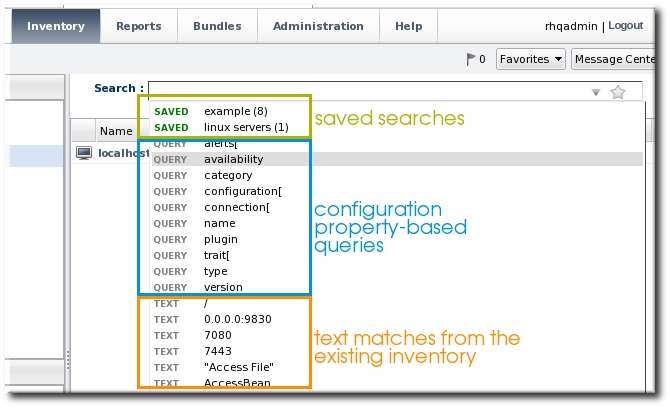
Figure 2.1. Types of Search Suggestions
Figure 2.2. Highlighting Search Terms
2.2. About the Dynamic Search Syntax
[search_area].[search_property] operator value operator additional_search
resource. part of the search.
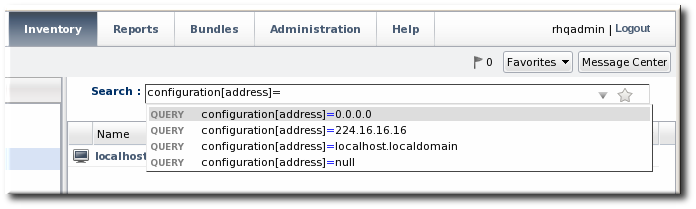
Figure 2.3. Searching by Resources Traits
2.2.1. Basic String Searches
Figure 2.4. Matching the Search Term
agen has search suggestions that match (case-insensitive) every resource that has that string anywhere in its name, at the beginning (Agent Plugin Container), middle (RHQ Agent Launcher Script), or end (rhq_agent). Likewise, the results include every resource with that string, regardless of where it appears in the resource entry or attribute.
Important
*) or regular expressions.
postgres table myexampletable
"My Compatible Group"
'test box'
plugin=jboss 123.4.5.6
trait[partitionName]='my example group' server.example.com
name="Production's Main Group"
'Hello world requires a closing single quote; Production's does not.
^) character sets that a search term must appear at the beginning of the result string. For example:
resource.id=^100$). For example:
script$
Table 2.1. String Operators
| Operator | Description |
|---|---|
| string | The string can occur anywhere in the result string. |
| ^string | The given string must appear at the beginning of the result value. |
| string$ | The given string must appear at the end of the result value. |
| ^string$ | The result must be an exact match of the given string, with no leading or trailing characters. |
Note
resource.trait[Database.startTime] = null
null will look for a resource or group with a value of the string null:
name = "null"
2.2.2. Property Searches
trait) is different than looking for an entry with an ID that includes 80 (id). The available properties are listed in Table 2.2, “Resource Search Contexts” and Table 2.3, “Group Search Contexts”.
Note
resource.type.plugin = Postgres
Important
connection, configuration, and trait use the internal property names for the property names (connection[property_name]) rather than the names used in the JBoss ON GUI.
Table 2.2. Resource Search Contexts
| Property | Description |
|---|---|
| resource.id | The resource ID number assigned by JBoss ON. |
| resource.name | The resource name, which is displayed in the UI. |
| resource.version | The version number of the resource. |
| resource.type.plugin | The resource type, defined by the plug-in used to manage the resource. |
| resource.type.name | The resource type, by name. |
| resource.type.category | The resource type category (platform, server, or service). |
| resource.availability | The resource availability, either UP or DOWN. |
| resource.pluginConfiguration[property-name] | The value of any possible configuration entry in a plug-in. |
| resource.resourceConfiguration[property-name] | The value of any possible configuration entry in a resource. |
| resource.trait[property-name] | The value of any possible measurement trait for a resource. |
Table 2.3. Group Search Contexts
| Property | Description |
|---|---|
| group.name | The name of the group. |
| group.plug-in | For a compatible group, the plug-in which defines the resource type for this group. |
| group.type | For a compatible group, the resource type for this group. |
| group.category | The resource type category (platform, server, or service). |
| group.kind | The type of group, either mixed or compatible. |
| group.availability | The availability of resource in the group, either UP or DOWN. |
Table 2.4. Search String Operators
| Operator | Description |
|---|---|
| = | Case-insensitive match. |
| == | Case-exact match. |
| != | Case-insensitive negative match (meaning, the value is not the string). |
| !== | Case-exact negative match (meaning, the value is not the string). |
2.2.3. Complex AND and OR Searches
postgres server myserver
postgres AND server AND myserver
|). For example:
postgres | jbossas
a | b c
Note
(a | b) (c | d)
(a) (b | (c d))
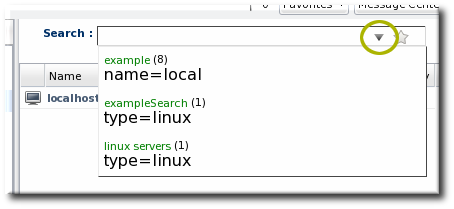
2.3. Saving, Reusing, and Deleting Dynamic Searches
- Run the search.

- Click the star in the right of the search bar. When the field comes up, enter the name for the new search.
 The search name is then displayed in green.
Chapter 3. Viewing and Exporting Reports
3.1. Types of Reports
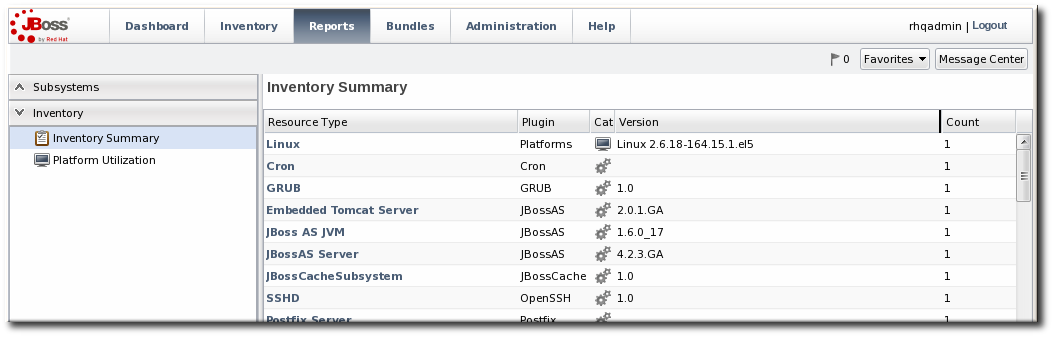
Figure 3.1. Inventory Summary Report
Table 3.1. Types of Reports
| Report Name | Description | Has Filters? |
|---|---|---|
| Subsystem Reports | ||
| Suspect Metrics | Lists any metrics outside the established baselines for a given resource. All suspect metrics for all resources are listed, but the baselines which mark the metric may be different for each resource, even different between resources of the same type. | No |
| Configuration History | Lists all configuration changes, for all resources. Version numbers are incremented globally, not per resource. The configuration history shows the version number for the change, the date it was submitted and completed, its status, and the type of change (individual or through a group). | No |
| Recent Operations | Lists all operations for all resources, by date that the operation was submitted (not necessarily run), the operation type, and its status. | Yes |
| Recent Alerts | Lists every fired alert for all resources, with the name of the resource, the alert definition which was fired, and the alerting condition. | Yes |
| Alert Definitions | Lists all configured alert definitions, for all resources, with their priority and whether they are enabled. | No |
| Recent Drift | Contains a list of all snapshots, for all resources and drift definitions. | Yes |
| Inventory Reports | ||
| Inventory Summary | Contains a complete list of resources currently in the inventory, broken down by resource type and version number. | No |
| Platform Utilization | Shows the current CPU percentage, actual used memory, and swap space. | No |
| Drift Compliance | Shows a list of all resource types which support drift and then shows how many drift definitions are configured and whether the group is compliant. Clicking on a resource type shows the list of resources configured for drift and their individual compliance status. | No |
3.2. Exporting Report Data to CSV
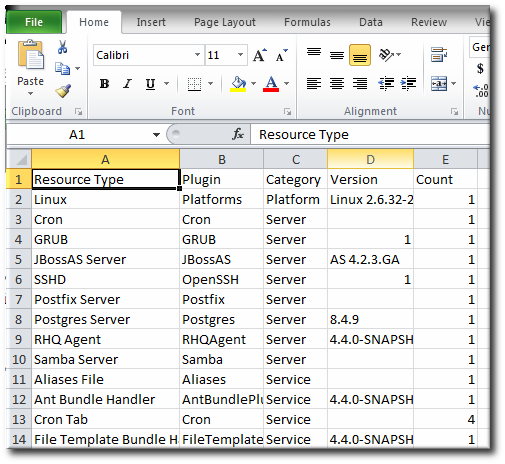
Figure 3.2. Exported Inventory Summary
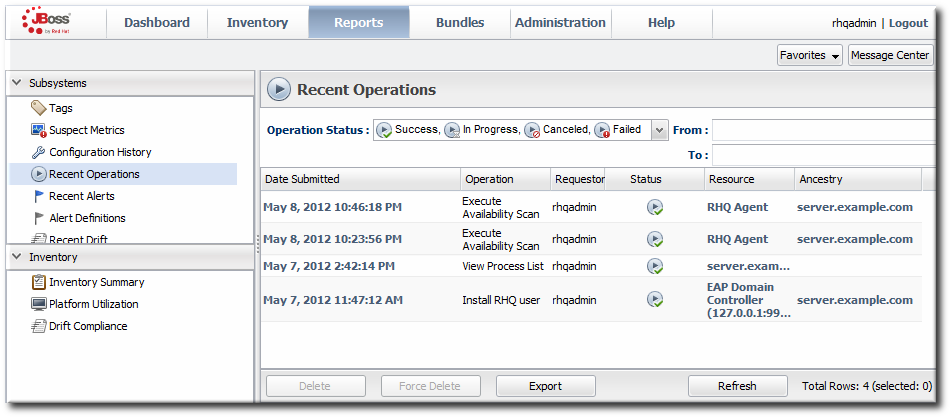
Figure 3.3. Report with Date Filters
Part I. Inventory, Resources, and Groups
Chapter 4. Interactions with System Users for Agents and Resources
- JBoss EAP servers
- PostgreSQL databases
- Tomcat servers
- Apache servers
- Generic JVMs
Table 4.1. Cheat Sheet for Agent and Resource Users
| Resource | User Information |
|---|---|
| PostgreSQL | No effect for monitoring and discovery.
The agent user must have read/write permissions to the PostgreSQL configuration file for configuration viewing and editing.
|
| Apache | No effect for monitoring and discovery.
The agent user must have read/write permissions to the Apache configuration file for configuration viewing and editing.
|
| Tomcat | Must use the same user or can't be discovered |
| JMX server or JVM | Different users are fine when using JMX remoting; cannot be discovered with different users and the attach API |
| JBoss AS/EAP | Different users are all right, but requires read permissions on run.jar and execute and search permission on all ancestor directories for run.jar |
4.1. The Agent User
4.2. Agent Users and Discovery
- For JBoss EAP resources, the agent must have read permissions to the
run.jarfile, plus execute and search permissions for every directory in the path to therun.jarfile. - When a JBoss EAP 6 instance is installed from an RPM, the agent user must belong to the same system group which runs the EAP instance. This is
jboss, by default. - Tomcat servers can only be discovered if the JBoss ON agent and the Tomcat server are running as the same user. Even if the agent is running as root, the Tomcat server cannot be discovered if it is running as a different user than the agent.
- If a JVM or JMX server is running with JMX remoting, then it can be discovered if the agent is running as a different user. However, if it is running with using the attach API, it has to be running as the same user as the agent for the resource to be discovered.
4.3. Users and Management Tasks
- Discovery
- Deploying applications
- Executing scripts
- Running start, stop, and restart operations
- Creating child resources through the JBoss ON UI
- Viewing and editing resource configuration
sudo.
4.4. Using sudo with JBoss ON Operations
sudo is for long-running operations, such as starting a service or a process, or for scripts which are owned by a resource user. The user which executes the script should be the same as the resource user because that user already has the proper authorization and permissions.
sudo rights to the given command.
- There can be no required interaction from the user, including no password prompts.
- It should be possible for the agent to pass variables to the script.
sudo for resource scripts:
- Grant the JBoss ON agent user
sudorights to the specific script or command. For example, to run a script as thejbossadminuser:[root@server ~]# visudo jbosson-agent hostname=(jbossadmin) NOPASSWD: /opt/jboss-eap/jboss-as/bin/*myScript*.sh
Using theNOPASSWDoption runs the command without prompting for a password.Important
JBoss ON passes command-line arguments with the start script when it starts an EAP instance. This can be done either by including the full command-line script (including arguments) in thesudoersentry or by using thesudo -uuser command in a wrapper script or a script prefix.The second option has a simplersudoersentry - Create or edit a wrapper script to use. Instead of invoking the resource's script directly, invoke the wrapper script which uses
sudoto run the script.Note
For the EAP start script, it is possible to set a script prefix in the connection settings, instead of creating a separate wrapper script:/usr/bin/sudo -u jbosson-agent
For example, for a start script wrapper,start-myScript.sh:#!/bin/sh # start-myScript.sh # Helper script to execute start-myConfig.sh as the user jbosson-agent # sudo -u jbosson-agent /opt/jboss-eap/jboss-as/bin/start-myConfig.sh
- Create the start script, with any arguments or settings to pass with the
run.shscript. For example, forstart-myConfig.sh:nohup ./run.sh -c MyConfig -b jonagent-host 2>&1> jboss-MyConfig.out &
Chapter 5. Managing the Resource Inventory
5.1. About the Inventory: Resources
5.1.1. Managed Resources: Platforms, Servers, and Services
- Platforms (operating systems)
- Servers
- Services
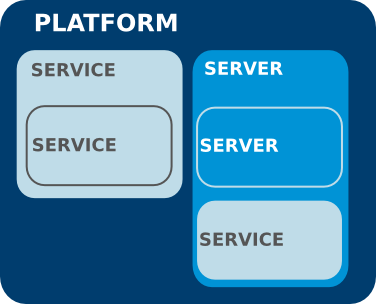
Figure 5.1. An Example Resource Hierarchy
- A resource can only have one parent.
- A server can be a child of a platform (such as JBoss AS on Linux) or another server (such as Tomcat embedded in JBoss AS).
- A service can be a child of a platform, a server (such as the JMS queue on JBoss AS), or another service (e.g. a table inside a database).
- Platforms, servers, and services can have many children services.
Note
5.1.2. Content-Backed Resources
Important
5.1.3. Resources in the Inventory Used by JBoss ON
rhq-agent-env.sh script. Adding these resources to the JBoss ON inventory allows JBoss ON to monitor and manage all of the agents and servers in the deployment.
5.2. Discovering Resources
5.2.1. Finding New Resources: Discovery
Note
5.2.2. Running Discovery Scans Manually
discovery command at the agent command prompt:
- Click the Inventory tab in the top menu.
- Open the Servers - Top Level Resources link on the left, and select the agent resource.
- Open the Operations tab for the agent.
- In the Schedules subtab, click the New button.
- Select the Manual Discovery operation from the drop-down menu, and select whether to run a detailed discovery (servers and services) or a simple discovery (servers only).
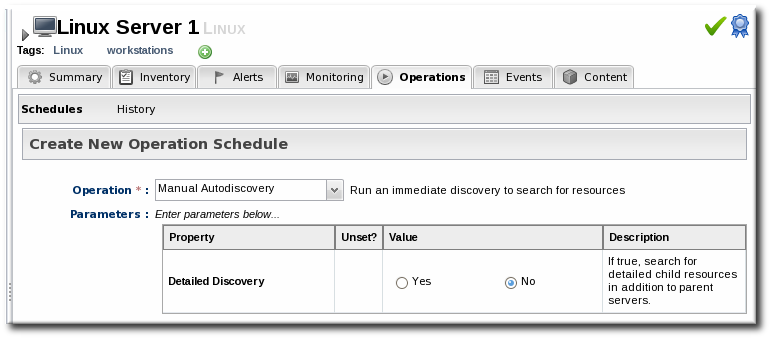
- In the Schedule area, select the radio button to run the operation immediately.
- Click the button to set up the operation.

5.2.3. Importing Resources from the Discovery Queue
- Click the Inventory tab in the top menu.
- In the Resources menu on the left, select Discovery Queue.
- Select the checkbox of the resources to be imported. Selecting a parent resource (such as a platform) gives the option to automatically import all of its children, too.
- Click the button at the bottom of the UI.
5.2.4. Ignoring Discovered Resources
Note
- Select Inventory from the top menu.
- Select the Discovery Queue item under the Resources menu on the left side of the screen.
- Select the checkbox of the resource to be ignored. Selecting a parent resource automatically selects all of its children.
- Click the Ignore button at the bottom of the page.
Note
5.2.5. Ignoring Imported Resources
- Inventory Resources pages,
- the Inventory page of the parent resource, or
- the resource Groups inventory page.
Note
Note
5.2.5.1. Ignoring Resources from a Resources page
- From the Inventory menu, select the relevant resource view under Resources. For example;
- Inventory > Resources > All Resources, or
- Inventory > Resources > Services.
- Select the row containing the resource to ignore. Multiple resources can be selected if required.
- Click the button at the bottom of the page.
5.2.5.2. Ignoring resources from the Inventory page of the parent resource
- From the Inventory menu, select the relevant resource view under Resources. For example;
- Inventory > Resources > All Resources, or
- Inventory > Resources > Services.
- Locate and select the parent resource from the resource list.
- Within the parent resource page, select the Inventory tab.
- From the parent resources Inventory tab, select the Child Resources sub-tab.
- Select the row containing the resource to be ignored from the Child Resources list. Multiple rows can be selected if required.
- Click the button at the bottom of the page.
5.2.5.3. Ignoring resources from a Groups page
- From the Inventory menu, select the relevant resource group under Groups. For example;
- Inventory > Groups > All Groups, or
- Inventory > Groups > Compatible Groups
- Locate the resource group that contains the resource to be ignored.
- Within the resource group page, select the Inventory tab.
- From the resource groups Inventory tab, select the Members sub-tab.
- Select the row containing the resource to be ignored from the Members list. Multiple rows can be selected if required.
- Click the button at the bottom of the page.
5.2.6. Ignoring an Entire Resource Type
Note
- In the top menu, click the Administration tab.

- In the menu table on the left, select the item.
- Every available resource type, based on the loaded agent plug-ins, is listed in the Ignored Resource Types page. To ignore a resource, click the pencil icon.
 That toggles whatever the current enabled/disabled setting is for ignoring the resource. If a resource type is enabled, then it will be discovered by the agent. If it is disabled, it will be ignored.
 - Scroll to the bottom of the page and click the button.
5.3. Resources That Require Additional Configuration for Discovery
5.3.1. Configuring the Agent to Discover EAP 6 Instances
- The agent must have read permissions to the
run.jarfile, plus execute and search permissions for every directory in the path to therun.jarfile. - When a JBoss EAP 6 instance is installed from an RPM, the agent user must belong to the same system group which runs the EAP instance. This is
jboss, by default.
5.3.2. Configuring Tomcat/EWS Servers for Discovery (Windows)
- Run
regedit. - Navigate to Java preferences key for the Tomcat server,
HKEY_LOCAL_MACHINE\SOFTWARE\Apache Software Foundation\Procrun2.0\TomcatVer#\Parameters\Java. - Edit the Options attribute, and add these parameters:
-Dcom.sun.management.jmxremote.port=9876
-Dcom.sun.management.jmxremote.ssl=false
-Dcom.sun.management.jmxremote.authenticate=false
- Restart the Tomcat service.
5.4. Importing New Resources Manually
Note
- Click the Inventory tab in the top menu.
- Search for the parent resource of the new resource.Chapter 2, Dynamic Searches for Resources and Groups has information on searching for resources using dynamic searches.
- Click the Inventory tab of the parent resource.
- Click the Import button in the bottom of the Inventory tab, and select the type of child resource. The selection menu lists the possible types of child resources for that parent.

- Fill in the properties to identify and connect to the new resource. Each resource type in the system has a different set of required properties.
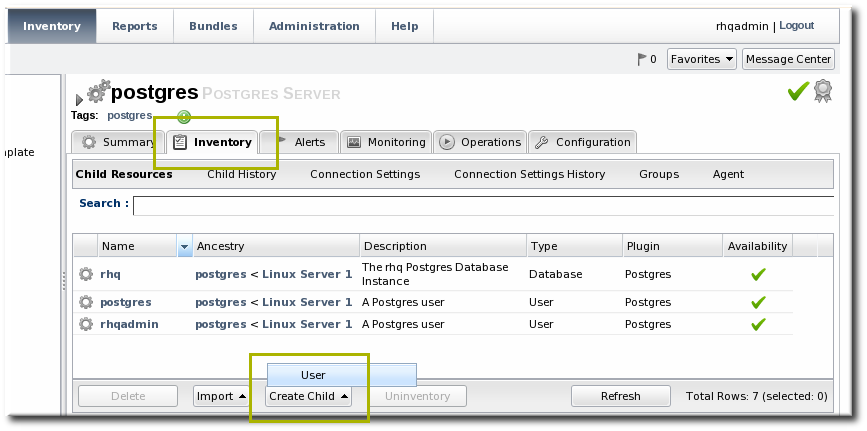
5.5. Creating Child Resources
Note
Note
- Click the Inventory tab in the top menu.
- Search for the parent resource of the new resource.Chapter 2, Dynamic Searches for Resources and Groups has information on searching for resources using dynamic searches.
- Click the Inventory tab of the parent resource.
- Click the Create Child button in the bottom of the Inventory tab, and select the type of child resource. The selection menu lists the possible types of child resources for that parent.
- Give the name and description for the new resource.

- Fill in the properties to identify and connect to the new resource. Each resource type in the system has a different set of required properties.
5.6. Viewing and Editing Resource Information
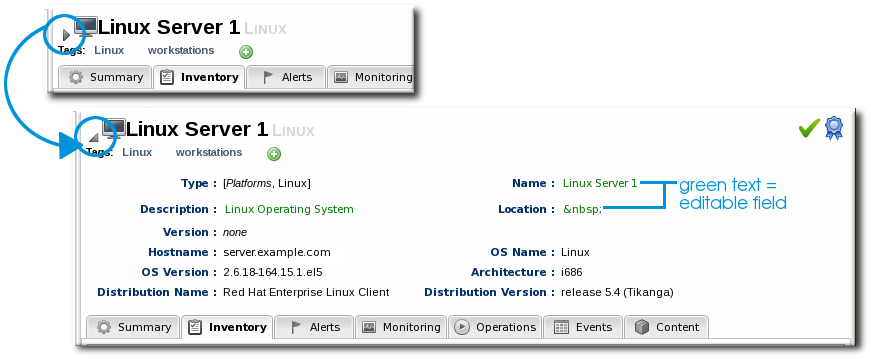
Figure 5.2. Expanding Resource Entry Details
5.7. Managing Connection Settings
Note
- Click the Inventory tab in the top menu.
- Search for the resource.Chapter 2, Dynamic Searches for Resources and Groups has information on searching for resources using dynamic searches.
- Click the name of the resource to go to its entry page.
- Open the Inventory tab for the resource, and click the Connection Settings subtab.
- Change the connection information for the resource.
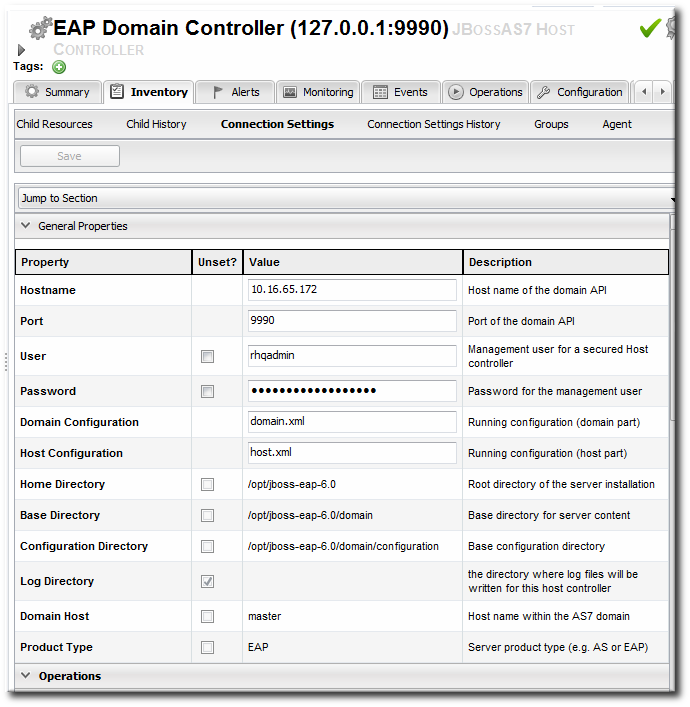 If a field is not editable immediately, select the Unset checkbox, and then enter new information in the field.
 - Click the button.
5.8. Uninventorying and Deleting Resources
5.8.1. A Comparison of Uninventorying and Deleting Resources
5.8.2. Use Caution When Removing Resources
Uninventorying a resource removes all of the data that JBoss ON has for that resource: its metric data and historical monitoring data, alerts, drift and configuration history, operation history, and other data. Once the resource is uninventoried, its data can never be recovered.
If a parent resource is removed from JBoss ON, then all of its children are also removed. Removing an EAP server, for example, removes all of its deployed web applications from the JBoss ON inventory. Removing a platform removes all servers, services, and resources on that platform.
Even though a resource is uninventoried and all of its data in JBoss ON is permanently removed, the underlying resource still exists. This means that the resource can still be discovered. To prevent the resource from being discovered and re-added to the inventory, ignore the resource, as in Section 5.2.4, “Ignoring Discovered Resources”.
Some resource types can be deleted, meaning the resource itself is removed from the machine, not just from the JBoss ON inventory. Anything that relies on that resource can experience failures because the resource is deleted. For example, if a datasource for an EAP server is deleted, that datasource is removed from the EAP server itself. Any application which attempts to connect to that datasource will then stop working, since it does not exist anymore.
5.8.3. Uninventorying through the Inventory Tab
- Click the Inventory tab in the top menu.
- Select the resource category in the Resources table on the left, and, if necessary, filter for the resource.
- Select the resource to uninventory from the list, and click the button.

- When prompted, confirm that the resource should be uninventoried.

- To prevent the resource from being re-imported into the inventory, ignore it when it is discovered in the next discovery scan. This is covered in Section 5.2.4, “Ignoring Discovered Resources”.
5.8.4. Uninventorying through the Parent Inventory
- Click the Inventory tab in the top menu.
- Search for the parent resource of the resource.Chapter 2, Dynamic Searches for Resources and Groups has information on searching for resources using dynamic searches.
- Click the Inventory tab for the parent resource.
- Click on the line of the child resource to uninventory. To select multiple entries, use the Ctrl key.

- Click the button.
- When prompted, confirm that the resource should be uninventoried.
- To prevent the resource from being re-imported into the inventory, ignore it when it is discovered in the next discovery scan. This is covered in Section 5.2.4, “Ignoring Discovered Resources”.
5.8.5. Uninventorying through a Group Inventory
- In the Inventory tab in the top menu, select the compatible or mixed groups item in the Groups menu on the left.

- Click the name of the group.
- Open the Inventory tab for the group, and open the Members submenu.
- Click on the line of the group member to uninventory. To select multiple entries, use the Ctrl key.

- Click the button.
- When prompted, confirm that the resource should be uninventoried.
- To prevent the resource from being re-imported into the inventory, ignore it when it is discovered in the next discovery scan. This is covered in Section 5.2.4, “Ignoring Discovered Resources”.
5.8.6. Deleting a Resource
- Deletes the resource from the underlying machine.
- Removes the resource from the inventory.
- Removes any child resources from JBoss ON.
- Preserves the inventory information in JBoss ON for the resource, including alerts, drift definitions, metric data, and configuration and operation histories.
Warning
- Click the Inventory tab in the top menu.
- Search for the parent resource of the resource to delete.Chapter 2, Dynamic Searches for Resources and Groups has information on searching for resources using dynamic searches.
- Click the Inventory tab of the parent resource.
- Select the resource to delete from the list of children.
- Click the Delete button in the bottom of the Inventory tab.

5.9. Viewing Inventory Summary Reports
- Resource type
- The JBoss ON server plug-in which manages the resource
- The JBoss ON category for the resource (platform, server, or service)
- The version number or numbers for resource of the resource type in inventory
- The total number of resources of that type in the inventory
- In the top menu, click the Reports tab.
- In the Inventory menu box in the menu table on the left, select the report.
- Click the name of any resource type to go to the inventory list for that resource type.
Note
inventorySummary.csv.
Chapter 6. Managing Groups
6.1. About Groups
Table 6.1. Types of Groups
| Type | Description | Static or Dynamic |
|---|---|---|
| Mixed groups | Contains resources of any resource type. There is no limit to how many or what types of resources can be placed into a mixed group. Mixed groups are useful for granting access permissions to users for a set of grouped resources. | Static |
| Compatible groups | Contains only resources of the same type. Compatible groups make it possible to perform an operation against every member of the group at the same time, removing the need to individually upgrade multiple resources of the same type, or perform other operations one at a time on resources across the entire enterprise. | Static |
| Recursive groups | Includes all the descendant, or child, resources of resources within the group. Recursive groups show both the explicit member availability and the child resource availability. | Static (members) and dynamic (children) |
| Autogroups | Shows every resource as part of a resource hierarchy with the platform at the top, and child and descendant resources below the platform. Child resources of the same type are automatically grouped into an autogroup. | Dynamic |
6.1.1. Dynamic and Static Groups
6.1.2. About Autogroups
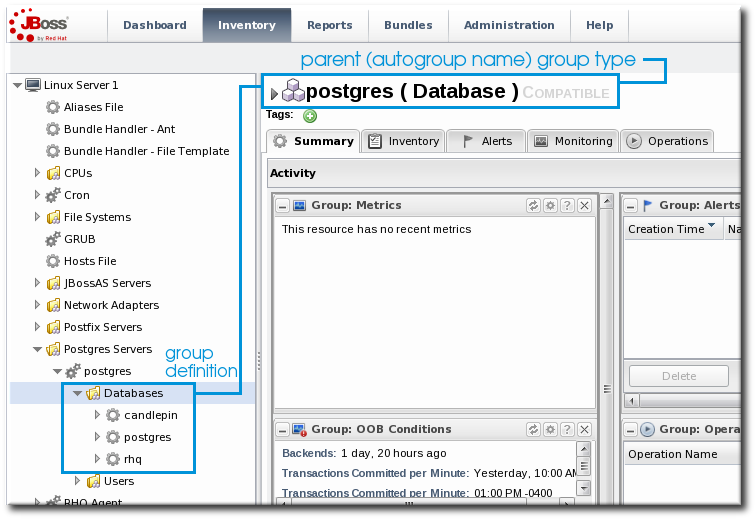
Figure 6.1. PostgreSQL Autogroup
6.1.3. Comparing Compatible and Mixed Groups
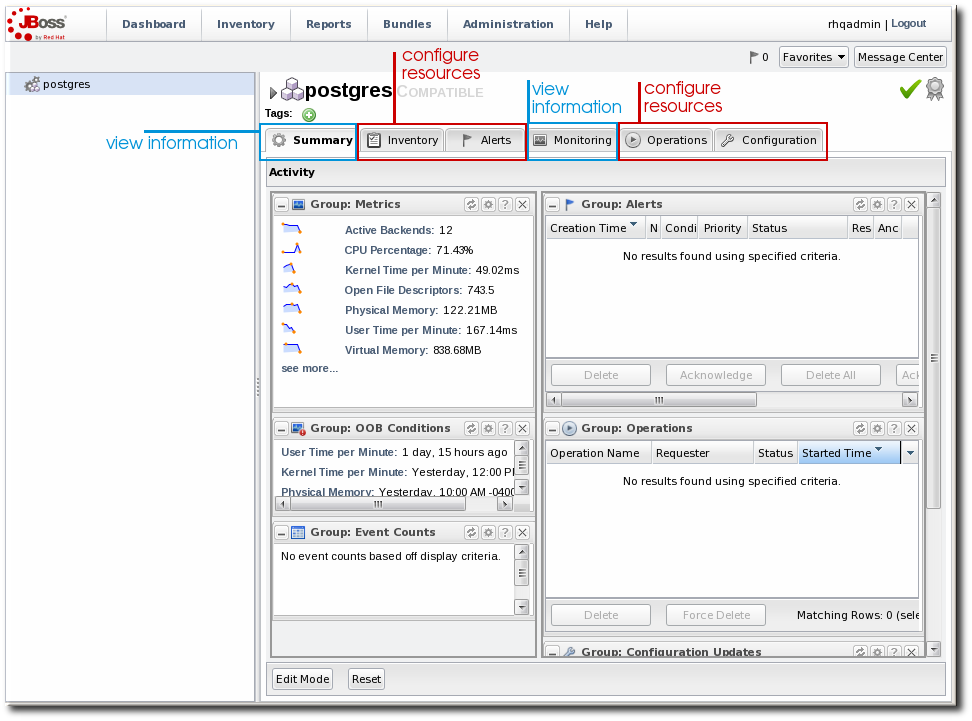
Figure 6.2. Compatible Group Entry
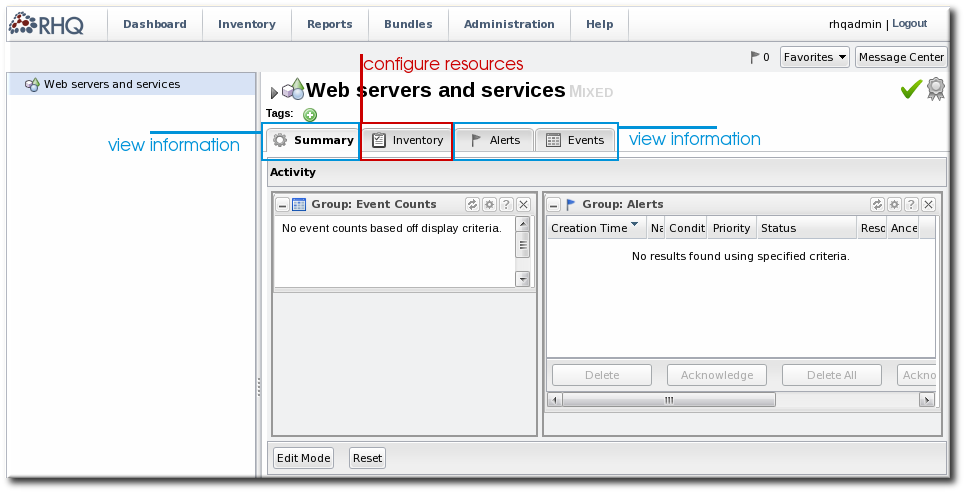
Figure 6.3. Mixed Group Entry
6.1.4. Leveraging Recursive Groups
6.2. Creating Groups
- Click the Inventory tab in the top menu.
- In the Groups box in the left menu, select the type of group to create, either compatible or mixed.Compatible groups have resources all of the same type, while mixed groups have members of different types. The differences in the types of members means that there are different ways that compatible and mixed groups can be managed, as covered in Section 6.1.3, “Comparing Compatible and Mixed Groups”.

- Enter a name and description for the group.
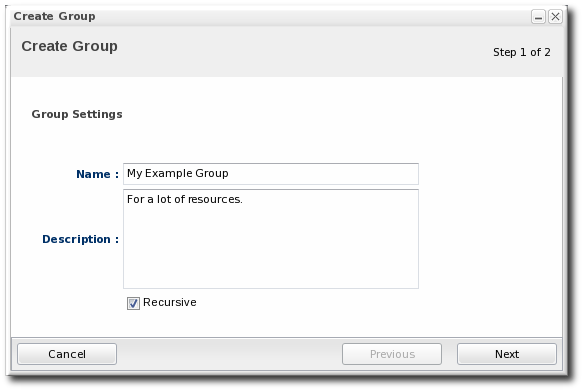 Marking groups recursive can make it easier to manage resources, particularly when setting role access controls. For example, administrators can grant users access to the group and automatically include any child resources of the member resources.
 - Select the group members. It is possible to filter the choices based on name, type, and category.

6.3. Changing Group Membership
- In the Inventory tab in the top menu, select the compatible or mixed groups item in the Groups menu on the left.
- Click the name of the group.
- Open the Inventory tab for the group, and open the Members submenu.
- Click the button at the bottom of the page.

- Select the resources to add to the group from the box on the left; to remove members, select them from the box on the right. Use the arrows to move the selected resources. To select multiple resources, use Ctrl+click.

- Click the button.
6.4. Editing Compatible Group Connection Properties
- If all of the resources in the group have identical values for a property, the group connection property is that exact value.
- If even one resource has a different value than the rest of the resources in the group, that property will have a special marker value of ~ Mixed Values ~.
- In the Inventory tab in the top menu, select the Compatible Groups item in the Groups menu on the left.
- Click the name of the compatible group.
- Open the Inventory tab for the group, and click the Connection Settings sub-item.
- To edit a property, click the green pencil by the field.

- To change all resources to the same value, click the Unset checkbox for the field Set all values to.... To change a specific resource, click the Unset checkbox for that resource and then give the new value.

Note
Chapter 7. Using Dynamic Groups
Note
7.1. About Dynamic Groups Syntax
7.1.1. General Expression Syntax
- By a specific resource attribute or value (a simple expression)
- By the resource type (a pivoted expression)
- By membership in another group (a narrowing expression)
expression 1
exprA1
exprA2
groupby exprB1
groupby exprB2

expression 2
exprA2
exprA1
groupby exprB2
groupby exprB1
Note
Table 7.1. Dynamic Group Properties
| Type | Supported Attributes | ||||||
|---|---|---|---|---|---|---|---|
| Related to the resource itself | |||||||
|
resource
|
| ||||||
| Related to the resource type | |||||||
|
resourceType
|
| ||||||
| Related to the resource configuration | |||||||
|
plug-inConfiguration
|
Any plugin configuration property
| ||||||
|
resourceConfiguration
|
Any resource configuration property
| ||||||
| Related to the resource monitoring data | |||||||
|
traits
|
Any monitoring trait
| ||||||
|
availability
|
The current state, either UP or DOWN
| ||||||
resource.attribute, then it applies to the resource which will be a member of the group. However, it is possible to use an attribute in an ancestor or child entry to identify a group member recursively.
resource.id = 10001
resource.parent:
resource.parent.id = 10001
- resource
- resource.child
- resource.parent
- resource.grandParent
7.1.2. Simple Expressions: Looking for a Value
resource.attribute[string-expression] = value
resource.parent.type.category = Platform
resource.trait is the generic resource attribute, and a sub-attribute like partitionName identifies the actual parameter.
empty keyword searches for resources which have a specific attribute with a null value:
empty resource.attribute[string-expression]
empty keyword is used, then there is no value given with the expression.
not empty keyword, which looks for every resource with that attribute, regardless of the attribute value, as long as it is not null. As with the empty keyword, there is no reason to give a value with the expression, since every value matches the expression.
not empty resource.attribute[string-expression]
7.1.3. Pivot Expressions: Grouping by an Attribute
groupby keyword:
groupby resource.attribute
parent.name attribute creates a unique group based on every parent resource.
groupby resource.parent.name
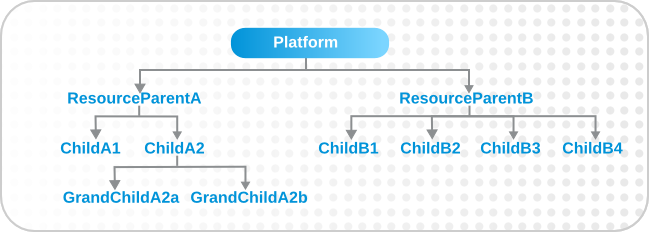
Figure 7.1. Resources and Parents
7.1.4. Narrowing Expressions: Members of a Group
Note
memberof keyword specifies a group name. If the group is a recursive group, then all of the recursive members are included as part of the group for evaluation.
memberof = "Dev Resource Group"
groupby resource.type.name
Note
memberof changes when the dynagroup is recalculated.
memberof expressions are allowed in the group definition, with each memberof expression referencing a single group. If multiple memberof expressions are used, they are treated as AND expressions; any matching resource must be a member of all specified groups.
7.1.5. Compound Expressions
resource.parent.type.category = Platform
resource.parent.type.category = Platform
resource.name.contains = JBossAS
groupby resource.type.plugin
groupby resource.type.name
groupby resource.parent.name
resource.type.category = server
groupby resource.type.plugin
groupby resource.type.name
groupby resource.parent.name
resource.type.plugin = JBossAS
resource.type.name = JBossAS Server
empty resource.pluginConfiguration[principal]
7.1.6. Unsupported Expressions
All given configuration properties in an expression must be only from the resource configuration or only from the plug-in configuration. Expressions cannot be taken from both.
A property can only be used once in a dynagroup definition.
valid
resource.trait[x] = foo

not valid
resource.trait[x] = foo
resource.trait[y] = bar
resource.trait expression can only occur once in a definition:
resource.grandParent.trait[Trait.hostname].contains = stage
resource.parent.type.plugin = JBossAS5
resource.type.name = Web Application (WAR)
resource.grandParent.trait[Trait.hostname].contains = stage
resource.parent.type.plugin = JBossAS5
resource.type.name = Web Application (WAR)
resource.trait[contextRoot] = jmx-console
There was a problem calculating the results: java.lang.IllegalArgumentException: org.hibernate.QueryParameterException: could not locate named parameter [arg2]
resource.parent.trait[x] = foo
resource.grandParent.trait[y] = bar
7.1.7. Dynagroup Expression Examples
Example 7.1. JBoss Clusters
resource.type.plugin = JBossAS
resource.type.name = JBossAS Server
groupby resource.trait[partitionName]
Example 7.2. A Group for Each Platform Type
resource.type.plugin = Platforms
resource.type.category = PLATFORM
groupby resource.type.name
Example 7.3. Autogroups
groupby resource.type.plugin
groupby resource.type.name
groupby resource.parent.name
Note
Example 7.4. Raw Measurement Tables
resource.type.plugin= Postgres
resource.type.name = Table
resource.parent.name = rhq Database
resource.name.contains = rhq_meas_data_num_
Example 7.5. Only Agents with Multicast Detection
resource.type.plugin= RHQAgent
resource.type.name = RHQ Agent
resource.resourceConfiguration[rhq.communications.multicast-detector.enabled] =  true
Example 7.6. Only Windows Platforms with Event Tracking
resource.type.plugin= Platforms
resource.type.name = Windows
resource.pluginConfiguration[eventTrackingEnabled] =  true
Example 7.7. JBoss AS Servers by Machine
groupby resource.parent.trait[Trait.hostname]
resource.type.plugin = JBossAS
resource.type.name = JBossAS Server
7.2. Creating Dynamic Groups
- Click the Inventory tab in the top menu.
- In the Groups menu box on the left, click the Dynagroup Definitions link.

- Click the button to open the dynamic group definition form.

- Fill in the name and description for the dynamic group. The name can be important because it is prepended to any groups created by the definition, as a way of identifying the logic used to create the group.

- Fill in the search expressions. This can be done by entering expressions directly in the Expression box or by using a saved expression.Saved expressions are have a wizard to help build and validate the expressions. To create a saved expression, click the green button by the drop-down menu. Several options for the expression are active or inactive depending on the other selections; this prevents invalid expressions.
 The Expression box at the top shows the currently created expression.
 - After entering the expressions, set whether the dynamic group is recursive.
- Set an optional recalculation interval. By default, dynamic groups do not recalculate their members automatically, meaning the recalculation value is set to 0. To recalculate the group membership, set the Recalculation interval to the time frequency, in milliseconds.
Note
Recalculating a group definition across large inventories could be resource-intensive for the JBoss ON server, so be careful when setting the recalculation interval. For large inventories, set a longer interval, such as an hour, to avoid affecting the JBoss ON server performance.
7.3. Recalculating Group Members
- Click the Inventory tab in the top menu.
- In the Groups menu on the left, click the Dynagroup Definitions link.
- In the list of dynagroups, select the row of the dynagroup definition to calculate.
- Click the Recalculate button at the bottom of the table.
Chapter 8. Creating User Accounts
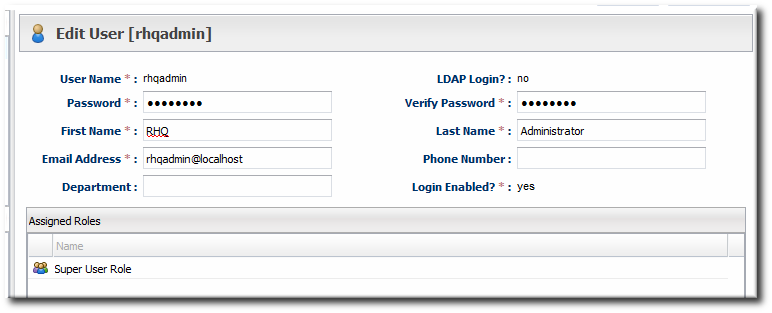
8.1. Managing the rhqadmin Account
rhqadmin. This superuser has the default password rhqadmin.
Note
rhqadmin account cannot be deleted, even if other superuser accounts are created. Additionally, the role assignments for rhqadmin cannot be changed; it is always a superuser account.
Important
- Click the Administration tab in the top menu.
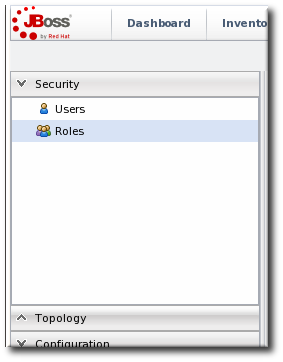
- In the Security table on the left, select Users.

- Click the name of
rhqadmin. - In the edit user form, change the password to a new, complex value.
8.2. Creating a New User
- Click the Administration tab in the top menu.
- In the Security table on the left, select Users.
- Click the button at the bottom of the list of current users.
- Fill in description of the new user. The Enable Login value must be set to Yes for the new user account to be active.

- Select the required role from the Available Roles area, and then click the arrow pointing to the Assigned Roles to assign the role.
- Click the button to save the new user with the role assigned.
8.3. Editing User Entries
- Click the Administration tab in the top menu.
- From the Security menu, select Users.
- Click the name of the user whose entry will be edited.
- In the edit user form, change whatever details need to be changed, and save.

8.4. Disabling User Accounts
- Click the Administration tab in the top menu.
- In the Security table on the left, select Users.
- Click the name of the user whose entry will be edited.
- In the edit user form, change the Enable Login radio button to No.
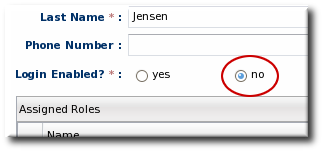
- Click the button to save the new user with the role assigned.
8.5. Changing Role Assignments for Users
- Click the Administration tab in the top menu.
- From the Security menu, select Users.
- Click the name of the user to edit.
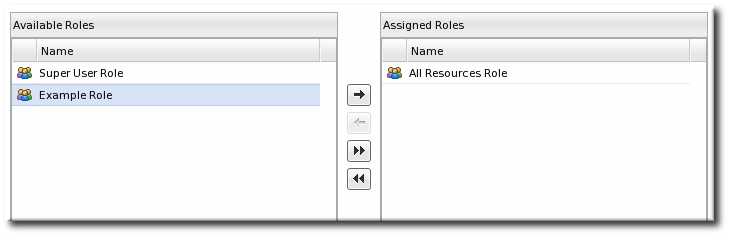
- To add a role to a user, select the required role from the Available Roles area, click the arrow pointing to the Assigned Roles area. To remove a role, select the assigned role on the right and click the arrow pointing to the left.
- Click to save the role assignments.
Chapter 9. Managing Roles and Access Control
9.1. Security in JBoss ON
9.1.1. Access Control and Permissions
- Global permissions apply to JBoss ON server configuration. This covers administrative tasks, like creating users, editing roles, creating groups, importing resources into the inventory, or changing JBoss ON server properties.
- Resource-level permissions apply to actions that a user can perform on specific resources in the JBoss ON inventory. These cover actions like creating alerts, configuring monitoring, and changing resource configuration. Resource-level permissions are tied to the subsystem areas within JBoss ON.
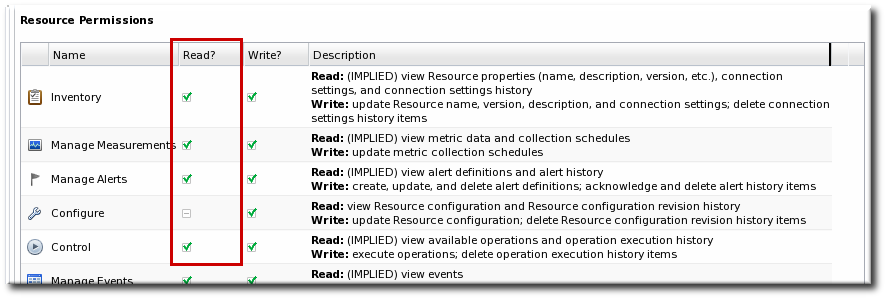
Figure 9.1. Read Access Option
Note
Table 9.1. JBoss ON Access Control Definitions
| Access Control Type | Description |
|---|---|
| Global Permissions | |
| Manage Security | Equivalent to a superuser. Security permissions grant the user the rights to create and edit any entries in JBoss ON, including other users, roles, and resources, to change JBoss ON server settings, and to control inventory.
Warning
The Security access control level is extremely powerful, so be cautious about which users are assigned it. Limit the number of superusers to as few as necessary.
|
| Manage Inventory | Allows any operation to be performed on any JBoss ON resource, including importing new resources. |
| Manage Settings | Allows a user to add or modify any settings in the JBoss ON server configuration itself. This includes operations like deploying plug-ins or using LDAP authentication. |
| Manage Bundle Groups | Allows a user to add and remove members of a bundle group; implicitly, it includes the permission to view bundles. This is analogous to the Manage Inventory permission for resources.
Note
This permission is required for all bundle-level create, deploy, and delete permissions.
|
| Deploy Bundles to Groups | Allows a user to deploy a bundle to any resource group to which the user has access. |
| View Bundles | Allows a user to view all bundles, regardless of the bundle group assignment. |
| Create Bundles | Allows a user to create and update bundle versions. When a bundle is created, it must be assigned to bundle group, unless the user has the View Bundles permission; in that case, a user can create a bundle and leave it unassigned. |
| Delete Bundles | Allows a user to delete any bundle which he has permission to view. |
| Manage Bundles (Deprecated) | Allows a user to upload and manage bundles (packages) used for provisioning resources.
This permission has been deprecated. It is included for backward-compatibility with older bundle configuration and user roles. However, this permission offered no ability to limit access to certain bundles, groups, or resources (for deployment); without this fine-grained control, this permission could only be applied to high-level administrators to maintain security.
|
| Manage Repositories | Allows a user to access any configured repository, including private repositories and repositories without specified owners. Users with this right can also associated content sources with repositories. |
| View Users | Allows a user to view the account details (excluding role assignments) for other users in JBoss ON. |
| Resource-Level Permissions | |
| Inventory | Allows a user to edit resource details and connection settings — meaning the information about the resource in the JBoss ON inventory. This does not grant rights to edit the resource configuration. |
| Manage Measurements | Allows the user to configure monitoring settings for the resource. |
| Manage Alerts | Allows the user to create alerts and notifications on a resource. Configuring new alert senders changes the server settings and is therefore a function of the global Settings permissions. |
| Control | Allows a user to run operations (which are also called control actions) on a resource. |
| Configure | Allows users to change the configuration settings on the resource through JBoss ON.
Note
The user still must have adequate permissions on the resource to allow the configuration changes to be made.
|
| Manage Drift | Allows the user to create, modify, and delete resource and template drift definitions. It also allows the user to manage drift information, such as viewing and comparing snapshots. |
| Manage Content | Allows the user to manage content providers and repositories that are available to resources. |
| Create Child Resources | Allows the user to manually create a child resource for the specified resource type. |
| Delete Child Resources | Allows the user to delete or uninventory a child resource for the specified resource type. |
| Bundle-Level Permissions | |
| Assign Bundles to Group | Allows a user to add bundles to a group. For explicit bundle groups, this is the only permission required. To add bundles to the unassigned group (which essentially removes it from all group membership), this also requires the global View Bundles permission. |
| Unassign Bundles from Group | Allows a user to remove bundles from a group. |
| View Bundles in Group | Allows a user to view any bundle within a group to which the user has permissions. |
| Create Bundles in Group | Allows a user to create a new bundle within a bundle group to which he has permission. This also allows a user to update the version of an existing bundle within the bundle group. |
| Delete Bundles from Group | Allows a user to delete both bundle versions and entire bundles from the server, so long as they belong to a group to which the user has permissions. |
| Deploy Bundles to Group | Allows a user to deploy any bundle which he can view (regardless of create and delete permissions) to any resource within a resource group to which he has permissions. |
9.1.2. Access and Roles
Note
- A superuser role provides complete access to everything in JBoss ON. This role cannot be modified or deleted. The user created when the JBoss ON server was first installed is automatically a member of this role.
- An all resources role exists that provides full permissions to every resource in JBoss ON (but not to JBoss ON administrative functions like creating users). This is a useful role for IT users, for example, who need to be able to change the configuration or set up alerts for resources managed by JBoss ON but who don't require access over JBoss ON server or agent settings.
9.1.3. Access and Groups
Bundle Group A                  Resource Group A
     |                                 |
     V                                 V
  Role 1   <---  User A  --->    Role 2
     ^                                 ^
     |                                 |
  Permissions                     Permissions
   - view bundles in group         - deploy bundles to group
   - create bundles
9.2. Creating a New Role
Note
- Create any resources groups which will be associated with the role. Creating groups is described in Section 6.2, “Creating Groups”.By default, JBoss ON uses only resource groups to associate with a role, and these are required. However, optional user groups from an LDAP directory can also be assigned to a role, so that the group members are automatically treated as role members. LDAP groups must be configured in the server settings, as described in Section 10.3.2, “Associating LDAP User Groups to Roles”.
- In the top menu, click the Administration tab.
- In the menu table on the left, select the item.
- The list of current roles comes up in the main task window. Click the button at the bottom of the list.
- Give the role a descriptive name. This makes it easier to manage permissions across roles.
- Global permissions grant permissions to areas of the JBoss ON server and configuration.
- Resource permissions grant permissions for managing resources.
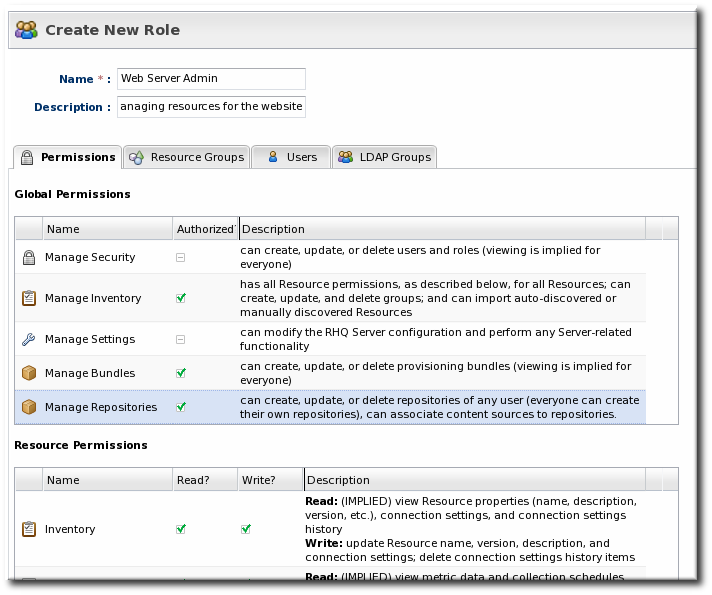 The specific access permissions are described in Table 9.1, “JBoss ON Access Control Definitions”.
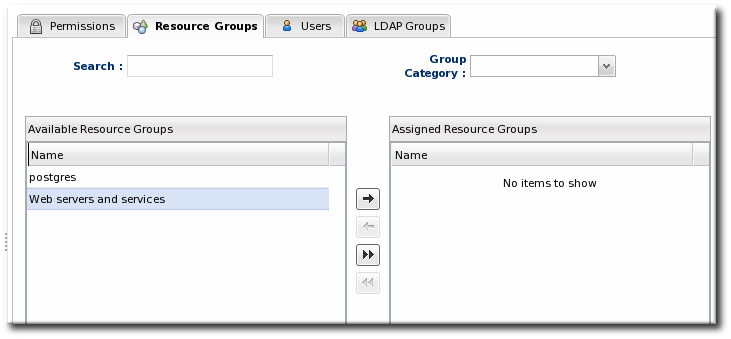 Move the required groups from the Available Resource Groups area on the left to the Assigned Resource Groups on the right as required.
- At the bottom, click the button.
- Select the Users tab to assign users to the role.
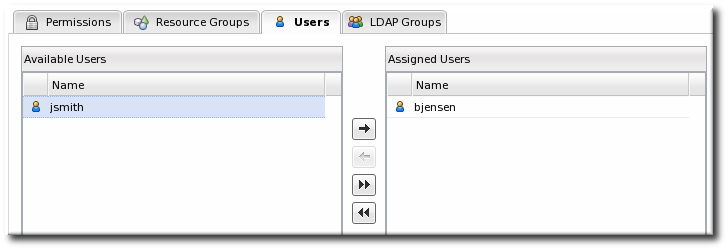 Move the required user from the Available Users area on the left, to the Assigned Users on the right as required.
 - Click the arrow in the upper right to close the create window.
9.3. Extended Example: Read-Only Access for Business Users
Example Co. needs some of its management team to be able to read and access JBoss ON data to track infrastructure performance and maintenance, define incident response procedures, and plan equipment upgrades. While these business users need to view JBoss ON information, they should not be able to edit any of the configuration, which is handled by the IT and development departments.
Tim the IT Guy first defines what actions the business users need to perform, and they need to be able to see everything:
- View resources in the inventory and histories for adding and deleting resources.
- View monitoring information, including measurements and events.
- View alerts.
- View content and bundles and any deployments to resources.
- View configuration drift.
- View all resource histories for configuration and operations.
- View user details to get information for auditing actions.
Business users are given access to all of the information they need, without being able to change any configuration or inventory accidentally.
9.4. Extended Example: View All Resources, Edit Some Resources
Example Corp. has three major groups associated with its IT infrastructure: development, QE, and production. Each group requires information from the other teams to help maintain their configuration, manage performance settings, and roll out new applications, but they should only be able to manage their own systems.
Tim the IT Guy first defines the different relationships that need to be expressed within the access controls:
- Everyone needs to be able to view performance data for all stacks within the infrastructure.
- The individual divisions need write access to their own systems.
- At least some administrators within each group require the ability to update system configuration.
- At least some administrators within each group require the ability to create and deploy bundles to manage applications within their own groups.
- A mixed group which contains all of the resources within each given stack environment. The stacks include platforms, Postgres databases, EAP servers, web contexts, and other resources used to manage the production environment.This results in three groups: Dev Stack, QE Stack, and Production Stack.
- An "all stacks" nested group which includes all three stack groups.This group is not for all resources — it only includes the stack groups, excluding JBoss ON-related resources and other managed resources not relevant to those stacks.
- Since these environments include application development, each organization also requires its own bundle group to maintain deployments.
- There has to be a mechnism to promote bundles between environments. Tim the IT Guy creates "Promote Bundles" group where bundles can be added when they are ready to be moved into a different environment.
- View-only rights to all resources, including configuration view-only rights
- Edit rights to resources within the stacks for monitoring, alerts, drift, operations, and inventory
- Edit rights to resources within the stacks for configuration
- View bundle rights within the stacks
- Create and deploy bundle rights within the stacks
- Regular users
- Administrators which manage resource configuration
- Administrators which can create (promote) bundles between groups
       Dev Stack
      Bundle Group
           |
       Role BG1
           |
           V
     Regular Joe
      ^         ^
      |         |
   Role RG1  Role RG2
      |         |
 "All Stack"   Dev Stack
  Resource     Resource
Group Group ^
|
Role RG1 <------Permissions
| |
"All Stack" View.alerts
Resource View.inventory
Group View.measurements
View.etc...
View.configuration ^
|
Role RG2 <------Permissions
| |
Dev Stack Edit.alerts
Resource Edit.inventory
Group Edit.measurements
Edit.etc...
Deploy.bundles Dev Stack
Bundle Group
|
Role BG1 <-----Permissions
| |
V View.bundles
Create.bundles"Regular Joe" roles
|
V
Group Lead <------Role RG3
|
Permissions
|
Edit.configuration Dev Stack Permission:
Bundle Group Create.Bundles
\ /
\ /
Role BG1
|
V
Role BG2 ----> Group Lead <---- Role BG3
/ \ / \
/ \ / \
QE Stack Permission: Prod Stack Permission:
Bundle Group Create.Bundles Bundle Group Create.BundlesUsers within each group are granted access to view whatever performance and configuration information they need, but they can only make changes to resources within their specified group. Only administrators within each group can make configuration changes.
Chapter 10. Integrating LDAP Services for Authentication and Authorization
Important
10.1. Supported Directory Services
- Red Hat Directory Server 8.1, 8.2, and 9.0
- Microsoft Active Directory 2003 and 2008
10.2. LDAP for User Authentication
10.2.1. About LDAP Authentication and Account Creation
Warning
Note
JONUser=true, which can make it easier and more precise to locate entries.
Note
10.2.2. Issues Related to Using LDAP for a User Store
jsmith) and password, but is improperly assigned the JBoss ON role membership of LDAP user John Smith (LDAP UID jsmith) because her JBoss ON user ID was the same as his LDAP user ID, and her account was incorrectly mapped to his LDAP account and, therefore, his LDAP group membership.
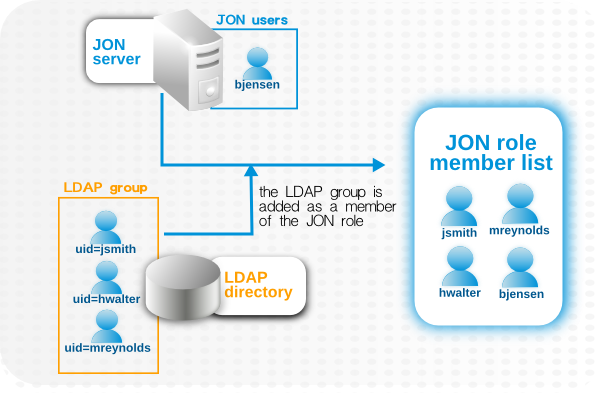
Figure 10.1. LDAP Groups, JBoss ON Roles, and Role Members
- Only create regular user accounts in one place. If LDAP should be used for authentication, then only add or delete user accounts in the LDAP directory.
- Ideally, limit JBoss ON user accounts to special, administrative users and rely on the LDAP directory for regular accounts.
- Try to design roles around LDAP groups, meaning that JBoss ON user accounts in those roles should be limited to admin accounts or avoided altogether.
10.2.3. Configuring LDAP User Authentication
- In the top menu, click the Administration tab.
- In the menu table on the left, select the item.

- Jump to the LDAP Configuration Properties area.
- Check the Use LDAP Authentication checkbox so that JBoss ON will use the LDAP user directory as its identity store.
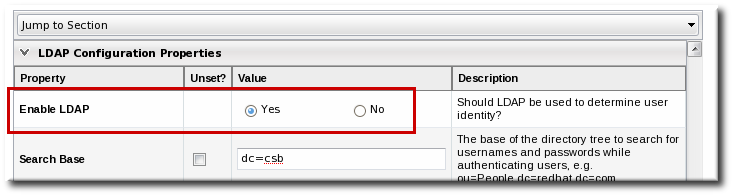
- Configure the connection settings to connect to the specific LDAP directory.
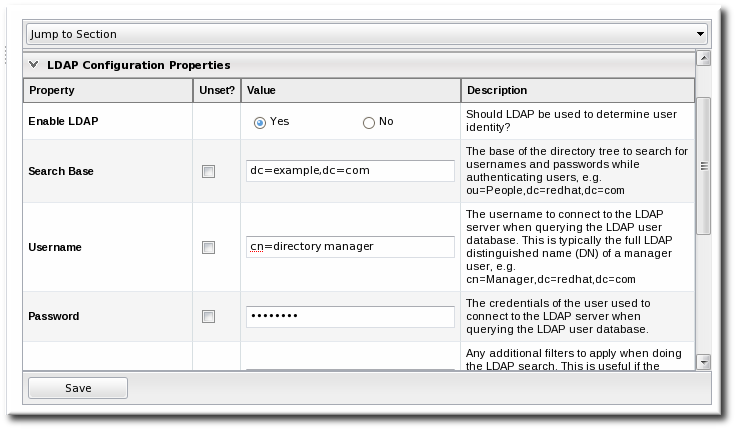
- Give the LDAP URL of the LDAP server. This has the format
ldap://hostname[:port]. For example:ldap://server.example.com:389
By default, this connects to the localhost over port 389 (standard LDAP port) or 636 (secure LDAP port, if SSL is selected). - To use a secure connection, check the Use SSL checkbox. When using SSL, make sure that the LDAP directory is actually running over SSL, and make sure that the connection URL points to the appropriate SSL port and protocol:
ldap
s://server.example.com:636 - Give the bind credentials to use to connect to the server. The username is the full LDAP distinguished name of the user as whom JBoss ON binds to the directory.
Note
The user must exist in the LDAP directory before configuring the LDAP settings in JBoss ON. Otherwise, login attempts to the JBoss ON server will fail.Also, make sure that the JBoss ON user has appropriate read and search access to the user and group subtrees in the LDAP directory.
- Set the search parameters that JBoss ON uses when searching the LDAP directory for matching user entries.
- The search base is the point in the directory tree where the server begins looking for entries. If this is used only for user authentication or if all JBoss ON-related entries are in the same subtree, then this can reference a specific subtree:
ou=user,ou=JON,dc=example,dc=com
If the users or groups are spread across the directory, then select the base DN:dc=example,dc=com
- Optionally, set a search filter to use to search for a specific subset of entries. This can improve search performance and results, particularly when all JBoss ON-related entries share a common LDAP attribute, like a custom
JonUserattribute. The filter can use wild cards (objectclass=*) or specific values (JonUser=true). - Set the LDAP naming attribute; this is the element on the farthest left of the full distinguished name. For example, in
uid=jsmith,ou=people,dc=example,dc=com, the far left element isuid=jsmith, and the naming attribute isuid.The default naming attribute in Active Directory iscn. In Red Hat Directory Server, the default naming attribute isuid.
- Save the LDAP settings.
Note
The Group Filter and Member Property fields aren't required for user authentication. They're used for configuring LDAP groups to be assigned to roles, as in Section 10.3.2, “Associating LDAP User Groups to Roles”.
10.3. Roles and LDAP User Groups
10.3.1. About Group Authorization
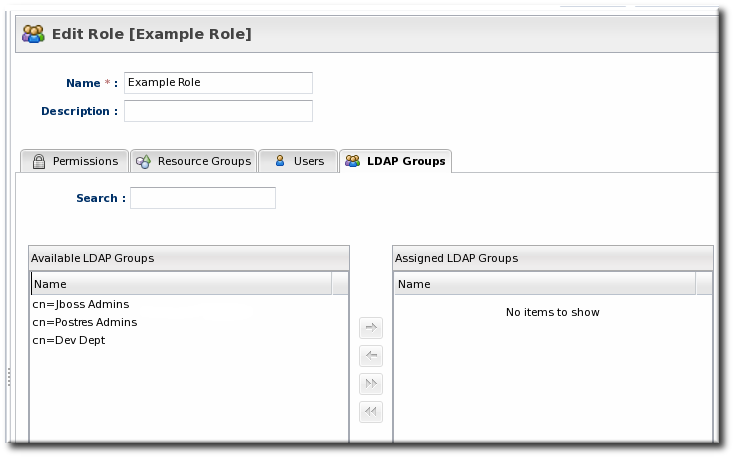
Figure 10.2. Groups Assigned to a Role
- An LDAP directory server connection has to be configured.
- There has to be an LDAP attribute given to search for group entries.For Active Directory, this is generally the
groupobject class. For Red Hat Directory Server, this is generallygroupOfUniqueNames. Other standard object classes are available, and it is also possible to use a custom, even JBoss ON-specific, object class. - There has to be an LDAP attribute given to identify members in the group.Common member attributes are
memberanduniqueMember.
(&(group_filter)(member_attribute=user_DN))
member attribute on an Active Directory group:
ldapsearch -h server.example.com -x -D "cn=Administrator,cn=Users,dc=example,dc=com" -W -b "dc=example,dc=com" -x '(&(objectclass=group)(member=CN=John Smith,CN=Users,DC=example,DC=com))'uniqueMember attribute on groupOfUniqueNames groups more commonly than member and group. For example:
/usr/lib64/mozldap6/ldapsearch -D "cn=directory manager" -w secret -p 389 -h server.example.com -b "ou=People,dc=example,dc=com" -s sub "(&(objectclass=groupOfUniqueNames)(uniqueMember=uid=jsmith,ou=People,dc=example,dc=com))"Note
10.3.2. Associating LDAP User Groups to Roles
- In the top menu, click the Administration tab.
- In the menu table on the left, select the item.
- Jump to the LDAP Configuration Properties area.
- Set up the LDAP connections, as described in Section 10.2.3, “Configuring LDAP User Authentication”. It is not required that the LDAP directory be used as the identity store in order to configure LDAP authorization, but it is recommended.
- Set the parameters to use for the server to use to search for LDAP groups and their members.The search filter that JBoss ON constructs looks like this:
(&(group_filter)(member_attribute=user_DN))
- The Group Search Filter field sets how to search for the group entry. This is usually done by specifying the type of group to search for through its object class:
(objectclass=groupOfUniqueNames)
- The Group Member Filter field gives the attribute that the specified group type uses to store member distinguished names. For example:
uniqueMember
The user_DN is dynamically supplied by JBoss ON when a user logs into the UI. - Save the LDAP settings.
10.4. Extended Example: memberOf and LDAP Configuration
Authentication is the process of verifying someone's identity. Authorization is the process of determining what access permissions that identity has. Users are authorized to perform tasks based on the permissions granted to their role assignments.
There are two things to configure: how to identify users for authentication and how to organize users for authorization.
- A single group to identify JBoss ON users in the LDAP directory
- Multiple, existing LDAP groups which are used to determine different levels of access to JBoss ON
JONUser, which make it easy to search for matching users.
memberOf attribute is automatically added to user entries to indicate a group that the user belongs to.
memberOf attribute to user entries as members are added and removed to the group. Tim the IT Guy only has to use the memberOf attribute on those user accounts as the search filter for authentication.
dn: uid=jsmith,ou=people,dc=example,dc=com
uid: jsmith
cn: John Smith
... 8< ...
memberOf: cn=JON User Group,ou=groups,dc=example,dc=com
memberOf: cn=IT Administrators,ou=groups,dc=example,dc=com
memberOf attribute for that specific JBoss ON group:
memberOf='cn=JON User Group,ou=groups,dc=example,dc=com'
- IT Administrators Group is mapped to a role with manage inventory permissions.
- IT Manager Group is mapped to a role with view (but no write) permissions for all of the resources and with view users permissions.
- Business Manager Group is mapped to a role with permissions to read all resource configuration, bundles, drift, measurements, operations, and alerts, but no write permissions.
Tim the IT Guy only has to create and manage one LDAP group, the JON Users Group, to set up all authentication and users for JBoss ON. He does not have to change the LDAP schema or even modify user entries directly.
Part II. Managing Resource Configuration
Chapter 11. Executing Resource Operations
11.1. Operations: An Introduction
11.1.1. A Summary of Operation Benefits
- They allow additional parameters (depending on how the operation is defined in the plug-in), such as command arguments and environment variables.
- They validate any operation parameters, command-line arguments, or environment variables much as JBoss ON validates resource configuration changes.
- They can be run on group of resources as long as they are all of the same type.
- Operations can be ordered to run on group resources in a certain order.
- They can be run on a recurrently schedule or one specific time.
- Operations keep a history of both successes and failures, so that it is possible to audit the operations executed on a resource both for operations run for that specific resource and done on that resources as part of a group.
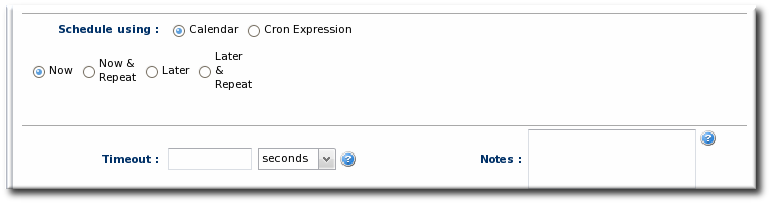
11.1.2. About Scheduling Operations
- Using the calendar setting to select a time. There are three different ways to schedule an operation using the calendar: immediately, at a set point in the future, or on a recurring schedule. The recurring schedules can be indefinite or run within a specific time period.
- Using a cron expression. This is used almost exclusively for recurring jobs and can be used to set very complex execution schedules.
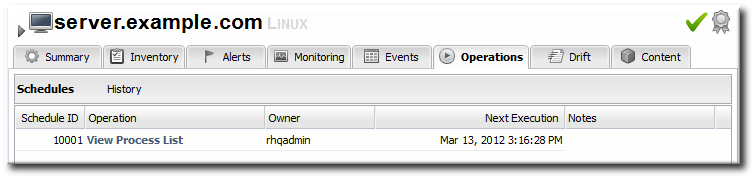
Figure 11.1. A Scheduled Operation
Note
11.1.3. About Operation Histories
11.2. Managing Operations: Procedures
11.2.1. Scheduling Operations
- Click the Inventory tab in the top menu.
- Select the resource type in the Resources menu table on the left, and then browse or search for the resource.

- Click the Operations tab.
- In the Schedules tab, click the New button.The types of operations that are available vary, depending on the specific type of resource.
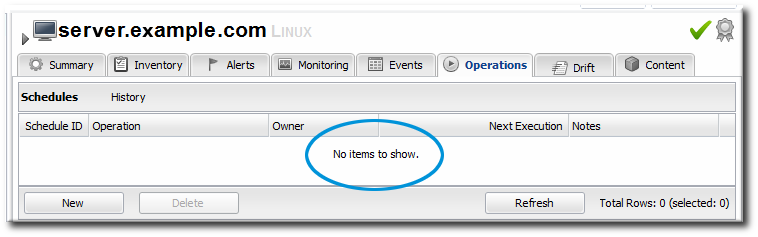
Note
The Schedules tab shows a list of scheduled operations, meaning operations which are configured but have not yet been run. If there are no scheduled operations, then the tab has a description that reads No items to show. That does not mean that there are no operations available for the resource; it only means that no operations have been scheduled. - Fill in all of the required information about the operation, such as port numbers, file locations, or command arguments.
- In the Schedule area, set when to run the operation.When using the Calendar, the operation can run immediately, at a specified time, or on a repeatable schedule, as selected from the date widget.The Cron Expression is used for recurring jobs, based on a
cronjob. These expressions have the format min hour day-of-month month day-of-week, with the potential values of 0-59 0-23 1-31 1-12 1-7; using an asterisk means that any value can be set. - Set other rules for the operations, like a timeout period and notes on the operation itself.
- Click the button to set up the operation.
11.2.2. Viewing the Operation History
Note
- Click the Inventory tab in the top menu.
- Select the resource type in the Resources menu table on the left, and then browse or search for the resource.
- Click the Operations tab.
- Click the History subtab.
 Every completed or in progress operation is listed, with an icon indicating its current status.
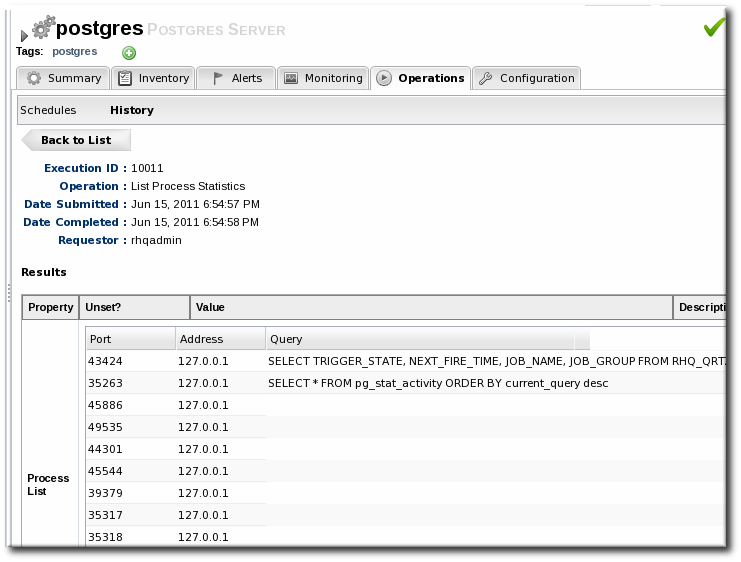
 - Click the name of the operation to view further details. The history details page shows the start and end times of the operation, the stdout output of the operation or other operation messages, as well as the name of the user who scheduled the operation.
11.2.3. Canceling Pending Operations
- Click the Inventory tab in the top menu.
- Select the resource type in the Resources menu table on the left, and then browse or search for the resource.
- Click the Operations tab.
- In the Schedules tab, click the line of the operation to cancel.
- Click Delete, and confirm the action.
Note
11.2.4. Ordering Group Operations
Note
- In the Inventory tab in the top menu, select the Compatible Groups item in the Groups menu on the left.
- Click the name of the group to run the operation on.
- Configure the operation, as in Section 11.2.1, “Scheduling Operations”.
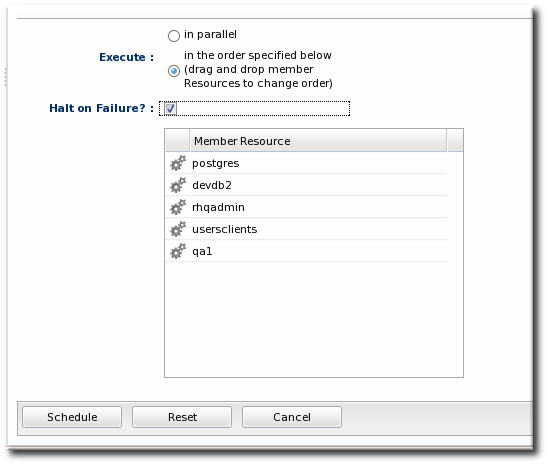
- In the Resource Operation Order area, set the operation to execute on all resources at the same time (in parallel) or in a specified order. If the operation must occur in resources in a certain order, then all of the group members are listed in the Member Resources box, and they can be rearranged by dragging and dropping them into the desired order.Optionally, select the Halt on failure checkbox to stop the group queue for the operation if it fails on any resource.
11.2.5. Running Scripts as Operations for JBoss Servers
.batfor Windows.shfor Unix and Linux.plscripts for Unix and Linux
Note
- Click the Inventory tab in the top menu.
- Select the resource type in the Resources menu table on the left, and then browse or search for the resource.
- Click the Operations tab.
- In the Schedules tab, click the New button.
- Select Execute script as the operation type from the Operation drop-down menu.

Note
The Execute script option is only available for JBoss AS and JBoss AS 5 resources, by default, and only if a script is available to execute. - Enter any command-line arguments in the Parameters text box.Each new argument has the format name=value; and is added on a new line. If the variable's value contains properties with the syntax
%propertyName%, then JBoss ON interprets the value as the current values of the corresponding properties from the script's parent resource's connection properties. - Finish configuring the operation, as in Section 11.2.1, “Scheduling Operations”.
11.2.6. Setting an Operation Timeout Default
Note
- Open the
rhq-server.propertiesfile.vim serverRoot/jon-server-3.2.GA1/bin/rhq-server.properties
- Change or add the value of the
rhq.server.operation-timeoutparameter to the amount of time, in seconds, for the server to wait before an operation times out.rhq.server.operation-timeout=60
11.2.7. Operation History Report
Figure 11.2. Operation History Report
Note
configurationHistory.csv.
Chapter 12. Summary: Using JBoss ON to Make Changes in Resource Configuration
- Directly edit resource configuration. JBoss ON can edit the configuration files of a variety of different managed resources through the JBoss ON UI.
- Audit and revert resource configuration changes. For the specific configuration files that JBoss ON manages for supported resources, you can view individual changes to the configuration properties and revert them to any previous version.
- Define and monitor configuration drift. System configuration is a much more holistic entity than specific configuration properties in specific configuration files. Multiple files for an application or even an entire platform work together to create an optimum configuration. Drift is the (natural and inevitable) deviation from that optimal configuration. Drift management allows you to define what the baseline, desired configuration is and then tracks all changes from that baseline.
12.1. Easy, Structured Configuration
key1 = value1
key2 value2
<default-configuration>
    <ci:list-property name="my-list">
        <c:simple-property name="element" type="string"/>
        <ci:values>
           <ci:simple-value value="a"/>
           <ci:simple-value value="b"/>
           <ci:simple-value value="c"/>
        </ci:values>
    </ci:list-property>
</default-configuration>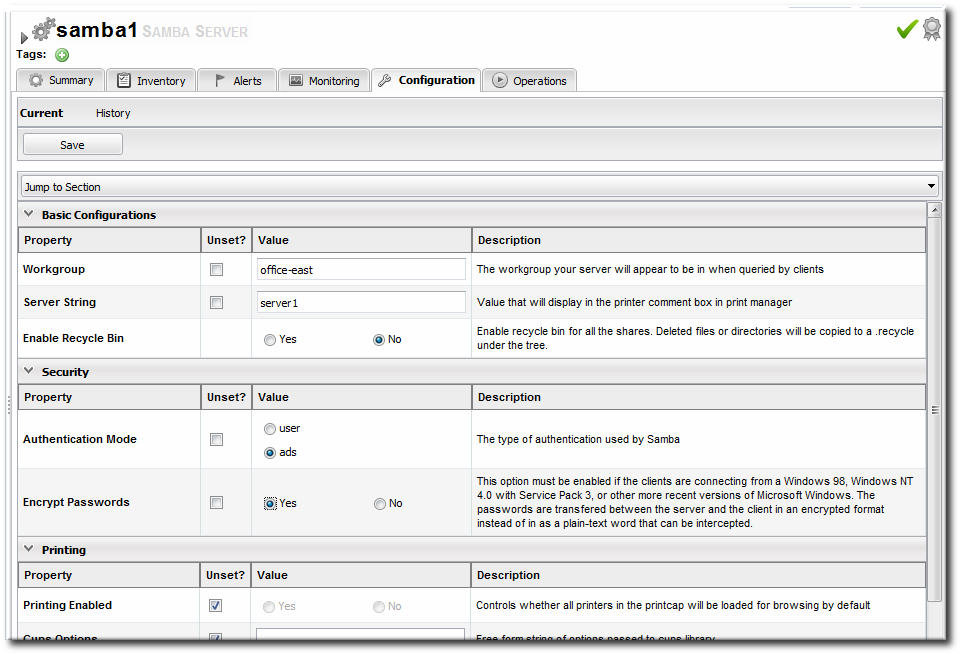
Figure 12.1. Configuration Form for a Samba Server
Note
- There is instant validation on the format of properties that are set through the UI.
- Audit trails for all configuration changes can be viewed in the resource history for both external and JBoss ON-initiated configuration changes.
- Configuration changes can be reverted to a previous stable state if an error occurs.
- Configuration changes can be made to groups of resource of the same type, so multiple resources (even on different machines) can be changed simultaneously.
- Alerts can be used in conjunction with configuration changes, either simply to send automatic announcements of any configuration changes or to initiate operations or scripts on related resources as configuration changes are made.
- Access control rules are in effect for configuration changes, so JBoss ON users can be prevented from viewing or initiating changes on certain resources.
12.2. Identifying What Configuration Properties Can Be Changed

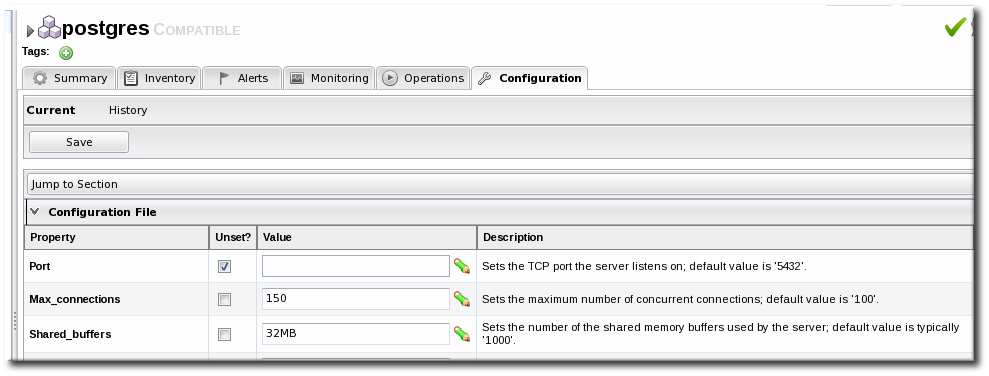
Figure 12.2. Configuration Tab
12.3. Auditing and Reverting Resource Configuration Changes
12.4. Tracking Configuration Drift
Note
- Drift looks at whole files within a directory, including added and deleted files and binary files.
- Drift supports user-defined templates which can be applied to any resource which supports drift monitoring.
- Drift can keep a running history of changes where each changeset (snapshot) is compared against the previous set of changes. Alternatively, JBoss ON can compare each change against a defined baseline snapshot.
- System password changes
- System ACL changes
- Database and server URL changes
- JBoss settings changes
- Changed JAR, WAR, and other binary files used by applications
- Script changes
Note
Chapter 13. Changing the Configuration for a Resource
13.1. Changing the Configuration on a Single Resource
- Click the Inventory tab in the top menu.
- Select the resource type in the Resources menu table on the left, and then browse or search for the resource.
- Open the Configuration tab for the resource.
- Click the Current subtab.
- To edit a field, make sure the Unset checkbox is not selected. The Unset checkbox means that JBoss ON won't submit any values for that resource and any values are taken from the resource itself.Then, make any changes to the configuration.The list of available configuration properties, and their descriptions, are listed for each resource type in the Resource Reference: Monitoring, Operation, and Configuration Options.

- Click the button at the top of the properties list.
13.2. Changing the Configuration for a Compatible Group
Note
- The group members must all be the same resource type.
- All group member resources must be available (
UP). - No other configuration update requests can be in progress for the group or any of its member resources.
- The current member configurations must be successfully retrieved from the agents.
- Click the Inventory tab in the top menu.
- In the Groups box in the left menu, select the Compatible Group link.
- Select the group to edit.
- Open the Configuration tab.
- Click the Current subtab.
- To edit a field, make sure the Unset checkbox is not selected. The Unset checkbox means that JBoss ON won't submit any values for that resource and any values are taken from the resource itself.Then, make any changes to the configuration.The list of available configuration properties, and their descriptions, are listed for each resource type in the Resource Reference: Monitoring, Operation, and Configuration Options.
Note
It is possible to change the configuration for all members by editing the form directly, but it is also possible to change the configuration for a subset of the group members. Click the green pencil icon, and then change the configuration settings for the members individually. - Click the button at the top of the form.
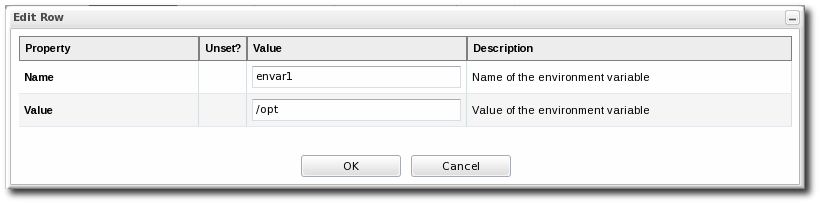
13.3. Editing Script Environment Variables
Important
- Click the Inventory tab in the top menu.
- Search for the script resource.
- Open the Configuration tab for the script resource.
- Click the green plus sign (+) to add an environment variable.

- Enter the environment variable. Each new environment variable has the format name=value; and is added on a new line.
 If the variable's value contains properties with the syntax
%propertyName%, then JBoss ON interprets the value as the current values of the corresponding properties from the script's parent resource's connection properties. - After resetting an environment variable, restart the JBoss ON agent to propagate the changes. If the agent isn't restarted, new variables will not be propagated to the resource and will not resolve when the script is next executed, even if the configuration is correct.
Note
@echo off in Windows scripts to prevent echoing the executed commands along with the execution results.
13.4. Configuring Apache for Configuration Management (Deprecated)
13.4.1. Considerations and Notes for Apache Configuration Management
Apache configuration management is supported through a special Augeas agent plug-in, which connects with and manages the Augeas lens on the Linux instance. The Augeas agent plug-in is deprecated in JBoss ON 3.1.1 and may be removed in a later release.
The Augeas lens is not required for Apache monitoring. It is only used for Apache configuration management. An Apache resource can be monitored, with alerting, operations, and all other management tasks available without any additional configuration. The Augeas lens is used only for editing the Apache configuration files and virtual hosts through JBoss ON.
Apache configuration management is only supported for Apache instances installed on Linux.
If the /tmp directory is configured a noexec in the fstab file, the agent throws exceptions because it cannot properly initialize the Augeas lens. In that case, the Configuration tab is unavailable for the Apache resource.
/tmp directory does not have noexec set as an option.
#
# /etc/fstab
#
tmpfs /dev/shm tmpfs defaults 0 0
devpts                  /dev/pts                devpts  gid=5,mode=620  0 0
sysfs                   /sys                    sysfs   defaults        0 0
proc                    /proc                   proc    defaults        0 0
13.4.2. Enabling Configuration Management
- Click the Inventory tab in the top menu.
- Select the resource type in the Resources menu table on the left, and then search for the Apache resource.

- Click the IP address of the Apache instance.
- Open the Inventory tab, then click the Connections subtab.
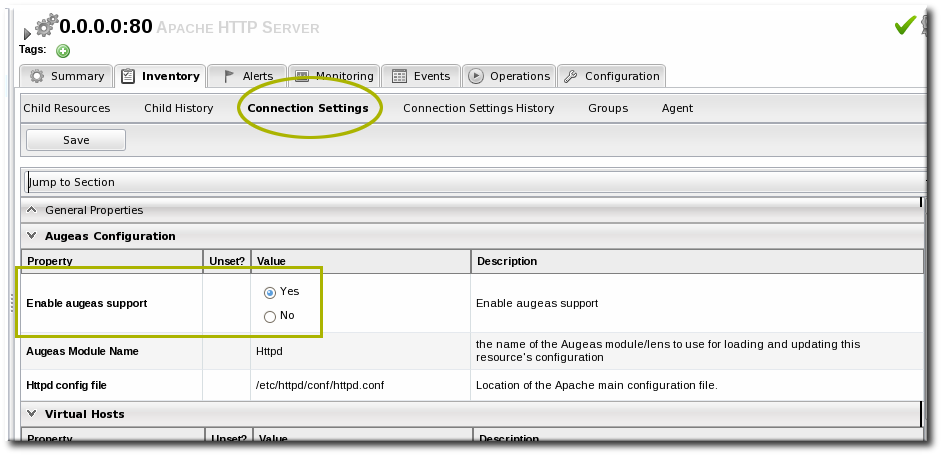
- Jump to the Augeas Configuration section.
- Select the Yes radio button to enable the Augeas lens.
Chapter 14. Tracking Resource Configuration Changes
Note
14.1. Tracking and Comparing Configuration Changes
- Click the Inventory tab in the top menu.
- Select the resource type in the Resources menu table on the left, and then browse or search for the resource.
- Open the Configuration tab for the resource.
- Click the History subtab.
- Select the line of the configuration version to view or compare. Use the Ctrl key to select multiple versions. The current (most recent successful) configuration state is marked by a green check mark.
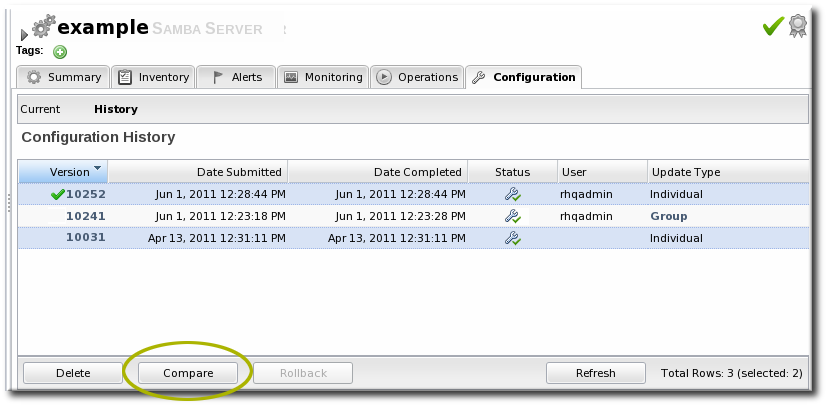
- Click the button.
- The pop-up window shows all of the changes in a directory-style layout, with each of the configuration areas as a high-level directory. Any changes are marked in red, and the values are shown for each selected version.
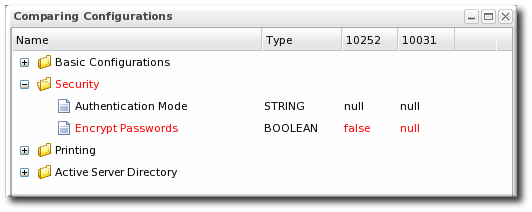
14.2. Reverting Configuration Changes
- Click the Inventory tab in the top menu.
- Select the resource type in the Resources menu table on the left, and then browse or search for the resource.
- Open the Configuration tab for the resource.
- Click the History subtab.
- Select the line of the configuration version to roll back to. The current (most recent successful) configuration state is marked by a green check mark.

- Click the button.
14.3. Viewing the Configuration History Report
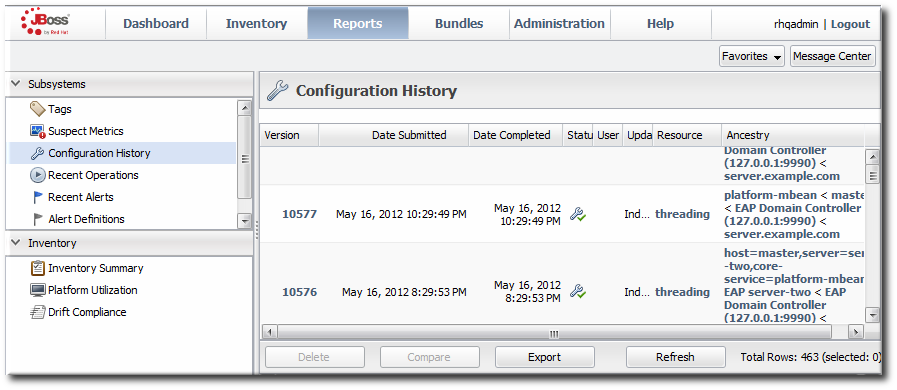
Figure 14.1. Configuration History Report
Note
configurationHistory.csv.
Chapter 15. Managing Configuration Drift
15.1. Understanding Drift
- What directories (and files within those directories) matter for drift monitoring? Even though a drift definition is defined for a resource, the actual drift detection is performed at the directory level. Drift monitoring, then, can hit anywhere on a platform — even outside resources managed by JBoss ON.
- How do you identify a change? Do you compare it to the version immediately before it or to an established baseline?
15.1.1. Drift Definitions and Detection
- From the plug-in configuration (pluginConfiguration). This means, it can be taken from any of the connection properties for the resource. Connection properties can include log files, deployment directories, and installation directories, depending on the resource type.
- From the resource configuration (resourceConfiguration). This means, it can be taken from any of the configurable properties for the resource.
- From a trait (measurementTrait). Traits are informational measurement properties for the resource.
- An explicit filesystem location. If none of the resource properties have the proper location or if a different location should be used for drift, then the directory can be specified in the fileSystem property.
Note
/etc/ that only includes changes to *.conf files, the elements in the drift definition are:
Value context: fileSystem
Value name: /etc
Includes: **/*.conf
Note
Table 15.1. Combinations to Include Specific Files
| Files to Monitor for Drift | 'Includes' Path | 'Includes' Pattern |
|---|---|---|
| /etc and all its subdirectories | Blank | Blank |
| For *.conf files in /etc and all subdirectories | . | **/*.conf[a] |
| For *.conf files only in the /etc directory, with no subdirectories (/etc/*.conf) | . | *.conf |
| For *.conf files only in a subdirectory one level below /etc (/etc/*/*.conf) | Not possible | Not possible |
| For any file in a specific subdirectory (yum.repos.d/) below /etc | yum.repos.d (subdirectory name) | Blank |
[a]
This must have a double asterisk for the directory part. It will not work with a single asterisk.
| ||
Note
15.1.2. Snapshots, Deltas, and Baseline Images
Note
- It can compare against the next-most recent version of the files.
- It can compare against a defined, stable baseline.
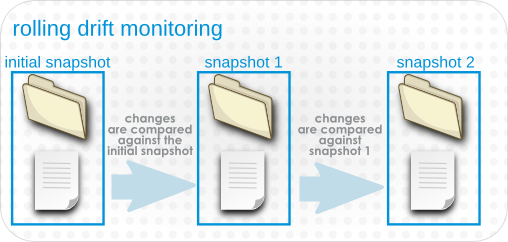
Figure 15.1. Rolling Snapshots
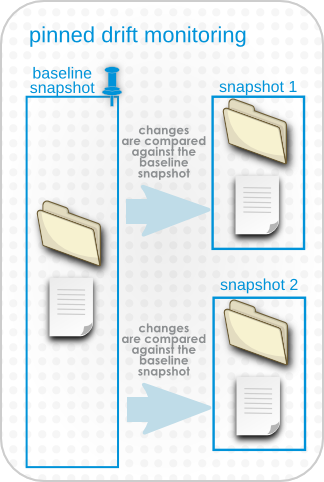
Figure 15.2. Pinned Snapshots
15.1.3. Destination Directories with Special File Types
ln -ls /home/dev/libs /usr/share/jbossas/server/libs
libs/ directory in the JBoss Enterprise Application Platform home directory, it will follow the symlink back to /home/dev/libs, and include all of those files in the drift snapshot.
Important
excludes parameter in the drift definition to exclude the symlink.
Note
excludes parameter in the drift definition to exclude any named pipes in the target directory.
Table 15.2. Drift Definitions and Unix File Types
| File Type | Supported by Drift? |
|---|---|
| File | Yes |
| Directory | Yes |
| Symbolic link | Yes |
| Pipe | No |
| Socket | No |
| Device | No |
15.1.4. Drift and Resource Types
rhq-plugin.xml descriptor, then that resource type supports drift. The template is a starting point (not an enforced configuration, like alert or metric collection templates).
- All platforms
- JBoss EAP 6 (AS 7), and all resources which use the JBoss AS 5 plug-in
- JBoss AS/EAP 5, and all resources which use the JBoss AS 5 plug-in
- JBoss AS/EAP 4 (deprecated)
Note
15.1.5. Space Considerations for Drift Monitoring
- The size of the directory being monitored. In some cases, it may be better to monitor multiple smaller subdirectories rather than one large, high-level directory.
- The frequency of drift detection runs, balancing the need to capture changes versus the number of backup copies.
- How long drift snapshots are stored. By default, unused snapshots (meaning, unpinned snapshots) are stored for 31 days and then deleted. Changing how long snapshots are stored can help manage the database size.
15.1.6. Back to Drift Monitoring
Drift monitoring is the ability to track changes to target locations. The JBoss ON GUI allows you to view snapshots all together, compare changes for individual files between snapshots, view the current configuration, and view change details. It also provides inventory and drift reports and indicates, at a glance, whether a resource is compliant with an associated pinned snapshot.
A specific alert condition exists that will trigger an alert whenever there is drift. For rolling snapshots, this will send an alert once (and only once) for each drift snapshot. For pinned snapshots, the drift alert is fired for every detection run for as long as the resource is out of compliance, even if there are no subsequent changes.
Note
15.2. Adding a Drift Definition for a Resource
Important
- Click the Inventory tab in the top menu.
- Select the resource type in the Resources menu table on the left, and then browse or search for the resource.
- Open the Drift tab for the resource.

- Click the at the bottom to add a new definition.
- Select the template to use to as the basis for the new definition.Plug-in defined templates are defined in the platform and JBoss server resources, as well as any other resource which supports drift monitoring. Additional, user-defined templates can be also be created and applied.

- Give a unique name to the definition. The name and the base directory are combined to identify the definition within JBoss ON.

- Define the settings for the definition, like the interval and whether it is associated with the template. The properties are listed in Table 15.3, “Drift Definition Properties”.
- Set the base directory. This is the top-most directory where drift detection is run for the definition, and the scan recourses down.The template itself defines an initial directory, but it may be useful to set a more specific directory to use.
- Click the button with the green plus (+) sign to add a subdirectory to include or exclude. The directory can be the base directory by specifying a period (.) as the directory. The pattern identifies which files within the directory to recognize by the service, either to explicitly include or explicitly exclude.The filters support Ant-like FilePatterns, using a path and pattern. The patterns support asterisks (*) as wildcards for any number of characters and question marks (?) for single character wild cards. For example,
**/*.confcan be used to include only.conffiles in any subdirectory. There can be multiple include/exclude filters. Each directory and pattern can be added separately.
Table 15.3. Drift Definition Properties
| Property | Description |
|---|---|
| Name | A name for the drift detection definition. The name and the base directory, together, uniquely identify the definition. |
| Base Directory: Value Context | The type of configuration property which is used to identify the base directory. This identifies what type of element in the resource supplies the value. There are four options:
|
| Base Directory: Value Name | The actual value for the drift detection definition to use for the base directory context. For example, if this is a file system context, then the value name is the directory path. |
| Includes | Explicitly includes directories, files, or files and directories matching a pattern, relative to the base directory, in the drift detection.
The filters support Ant-like FilePatterns, using a path and pattern. The patterns support asterisks (*) as wildcards for any number of characters and question marks (?) for single character wild cards.
If a pattern is used, then a path must be specified, even if the path is the base directory. For example, to include only
.conf files in the base directory, the pattern is *.conf and the path is a period (.) to indicate the local directory.
|
| Excludes | Explicitly excludes directories, files, or files and directories matching a pattern, relative to the base directory, from the drift detection.
The filters support Ant-like FilePatterns, using a path and pattern. The patterns support asterisks (*) as wildcards for any number of characters and question marks (?) for single character wild cards.
If a pattern is used, then a path must be specified, even if the path is the base directory. For example, to include only
.conf files in the base directory, the pattern is *.conf and the path is a period (.) to indicate the local directory.
|
| Enabled | Enables or disables the definition. Disabling a definition means that no detection scans are run. |
| Interval | Sets the frequency, in seconds, where the definition is eligible for a detection run. This is not a hard setting. Because load or other scheduled operations for the agent, the detection run is not guaranteed to run at the specified interval. |
| Pinned | Sets whether drift is determined in a rolling way or if it is associated (pinned) with a baseline snapshot. If this is set when the definition is created, then the initial snapshot is used as the baseline.
Definitions attached to a pinned template cannot be unpinned. Definitions which are attached to an unpinned template or which are not attached to a template can be pinned or unpinned freely.
|
| Drift Handling Mode | Sets whether drift changes are treated as events which trigger an alert (the default) or as expected, so that no alerts are triggered. |
| Attached to Template | Sets whether the resource-level definition is subordinate to a template. If it is attached to a template, then any changes to the template are reflected in the resource definition, including if the template is deleted.
By default, definitions are attached to the template from which they are created.
|
| Description | A simple text description of the definition. |
15.3. Creating a Drift Definition Template
15.3.1. About Resources and Drift Definition Templates
Example 15.1. A JBoss Server Drift Definition Template
<drift-definition name="Template-Base Files"
                  description="Monitor base application server files for drift. It defines monitoring for some standard sub-directories of the HOME directory.  Note, it is not recommeded to monitor all files for an application server. There are many files, and many temp files.">
    <basedir>
         <value-context>pluginConfiguration</value-context>
         <value-name>homeDir</value-name>
    </basedir>
    <includes>
	<include path="bin" />
        <include path="lib" />
        <include path="client" />
    </includes>
</drift-definition>- Drift templates are not automatically applied to a resource, unlike other template types in JBoss ON. Drift templates are used as the basis for creating resource-level definitions.
- Default drift templates are defined for resources as part of their plug-in descriptor. Custom, user-defined templates can be added along with those defaults.
- Every drift definition is based on a template initially, even if that definition is not attached to that template post-creation.
- Snapshots (the file sets associated with drift definitions) always originate on a resource with a drift definition first. For any content to be associate with a template, the resource-level snapshot has to be promoted up to the template. Drift templates do not generate snapshots or files and then push that down to the resource.
15.3.2. Creating a Drift Definition Template
- Click the Administration tab in the top menu.
- Select the Drift Definition Templates menu table on the left.
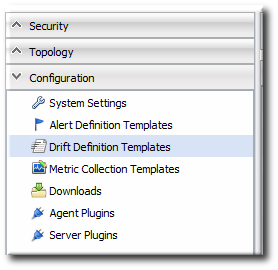
- Click the pencil icon for the resource type to add the template to. Not all resources support drift, so they cannot be selected.
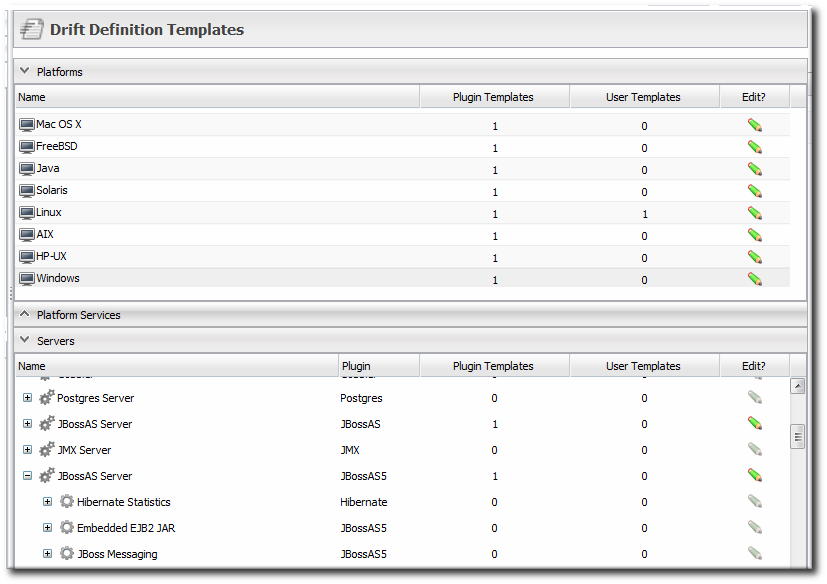
- Click the at the bottom to add a new template.
- Select the template to use to as the basis for the new template.Plug-in defined templates are defined in the platform and JBoss server resources, as well as any other resource which supports drift monitoring. Additional, user-defined templates can be also be created and applied.
- Give a unique name to the template. The name and the base directory are combined to identify the definition within JBoss ON.
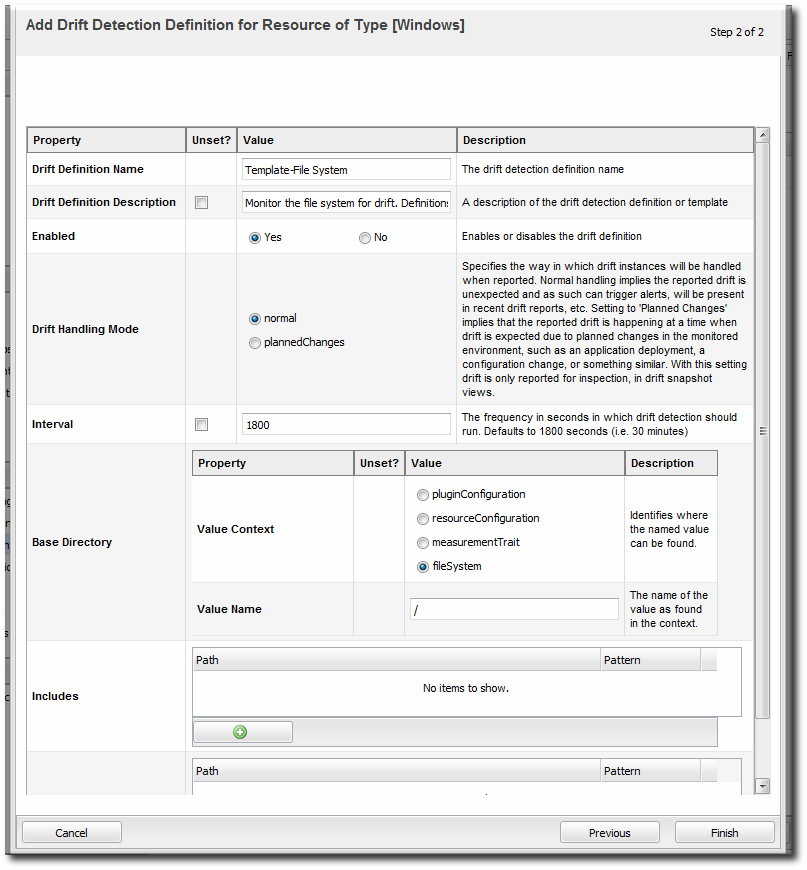
- Define the settings for the definition, like the interval and whether it is enabled by default. The properties are listed in Table 15.3, “Drift Definition Properties”.
- Set the base directory. This is the top-most directory where drift detection is run for the definition, and the scan recourses down.
- Click the button with the green plus (+) sign to add a subdirectory to include or exclude. The directory can be the base directory by specifying a period (.) as the directory. The pattern identifies which files within the directory to recognize by the service, either to explicitly include or explicitly exclude.The filters support Ant-like FilePatterns, using a path and pattern. The patterns support asterisks (*) as wildcards for any number of characters and question marks (?) for single character wild cards. For example,
**/*.confcan be used to include only.conffiles in any subdirectory.
15.4. Editing Drift Definitions

15.5. Viewing Snapshots and Changes
Note
15.5.1. Viewing the Snapshot Carousel
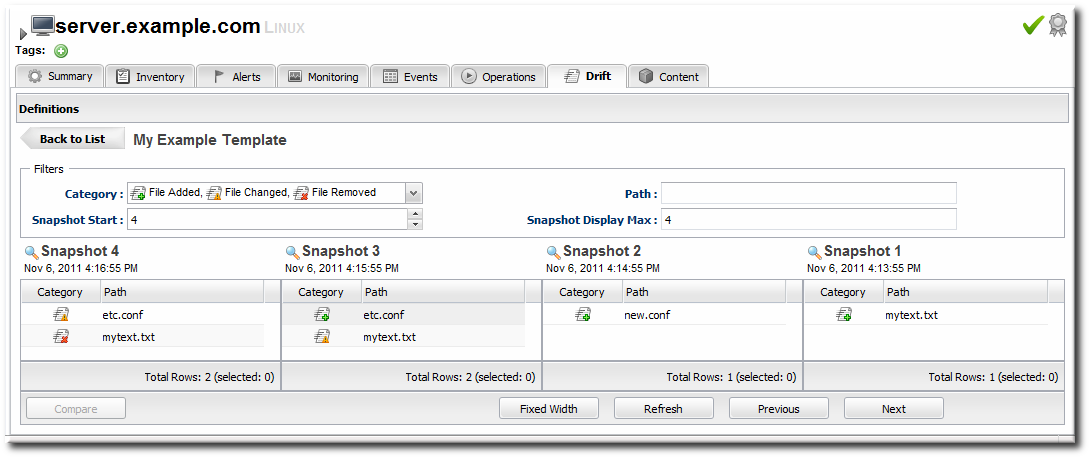
Figure 15.3. Viewing Snapshots
- Click the Inventory tab in the top menu.
- Search for the resource.
- Click the Drift tab for the resource.
- Click the name of the drift definition.
- The snapshot carousel shows, by default, the four most recent snapshots.
- Optionally, filter the snapshots to view. There are two elements that can be used to search for snapshots:
- The change type within the snapshot, whether a file was added, deleted, or modified.
- The path of a change within the snapshot. This path filter is a substring filter based on the paths and files in the drift entries.

15.5.2. Comparing Drift Changes
Note
- Click the Inventory tab in the top menu.
- Search for the resource.
- Click the Drift tab for the resource.
- Click the name of the drift definition.
- Click the names of the files to compare.
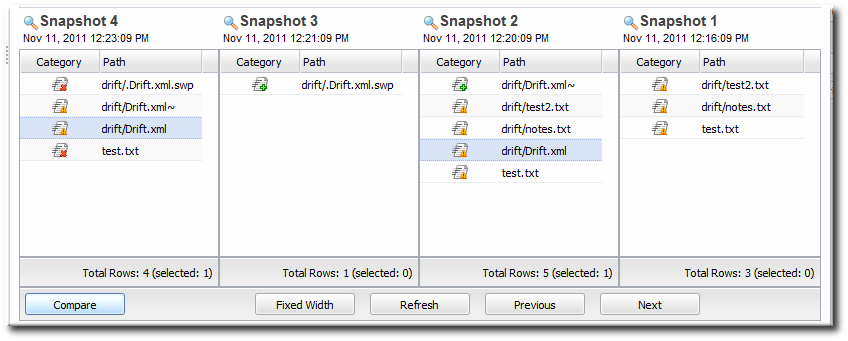
- Click .
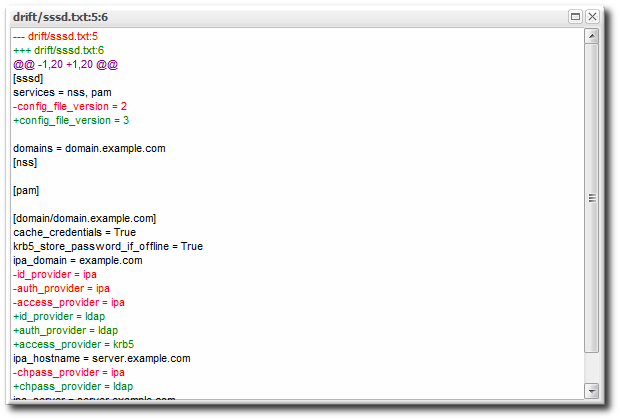
Figure 15.4. Change Set Diffs
15.5.3. Viewing Snapshot Details
- Click the Inventory tab in the top menu.
- Search for the resource.
- Click the Drift tab for the resource.
- Click the name of the drift definition.
- In the snapshot carousel, click the magnifying glass by the name of the snapshot to view.
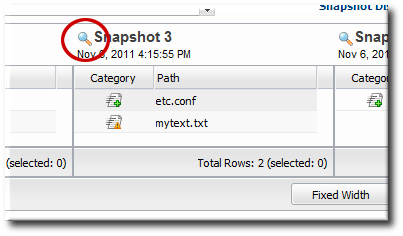
- Expand the directory to show the list of changes for that snapshot.
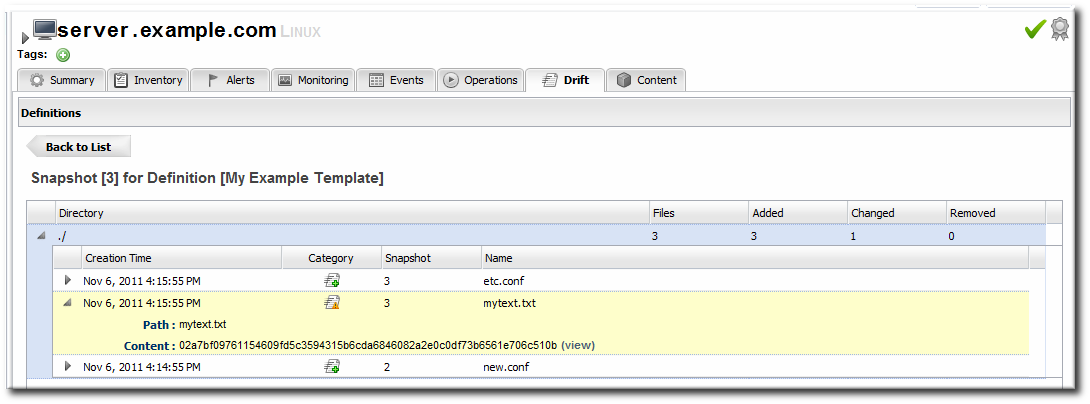
- To see the details of a specific change, click the (view) link.
- The details for that file shows links to display the immediate previous version of the file, the changed version of the file, and a diff between the two.
 When clicking the view link, the page title has the version number along with the file name. For example, when viewing version 6 of
myfile.txt, the title is myfile.txt:6.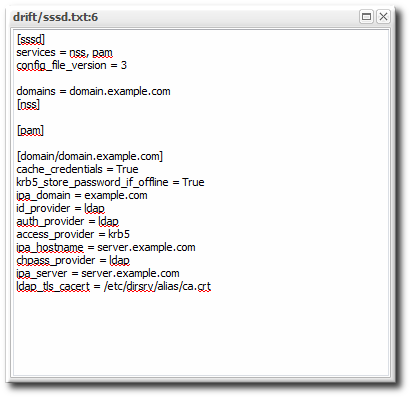
15.5.4. Seeing Drift Events in the Timeline
- Click the Inventory tab in the top menu.
- Search for the resource.
- In the Summary tab, click the Timeline subtab.
- The detection runs where drift was detected show up in the timeline as Drift Detected. To see only drift events in the timeline, clear all but the Drift checkbox.The time interval can be reset to adjust the span of the timeline.
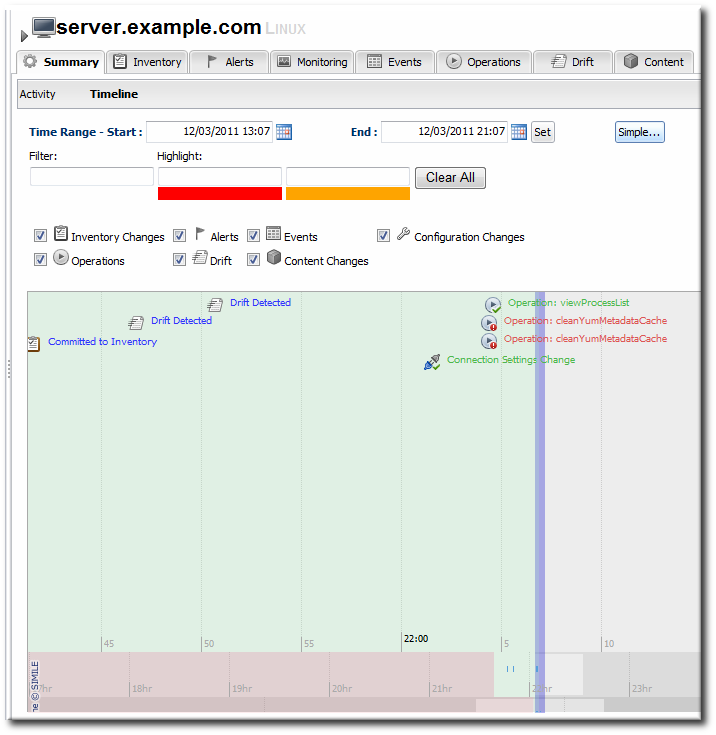
15.5.5. Checking Drift Snapshot Reports
- Click the Reports tab in the top navigation menu.
- Select the Recent Drift report from the Subsystems report list.
- Every drift instance is listed, sorted by the snapshot creation time.
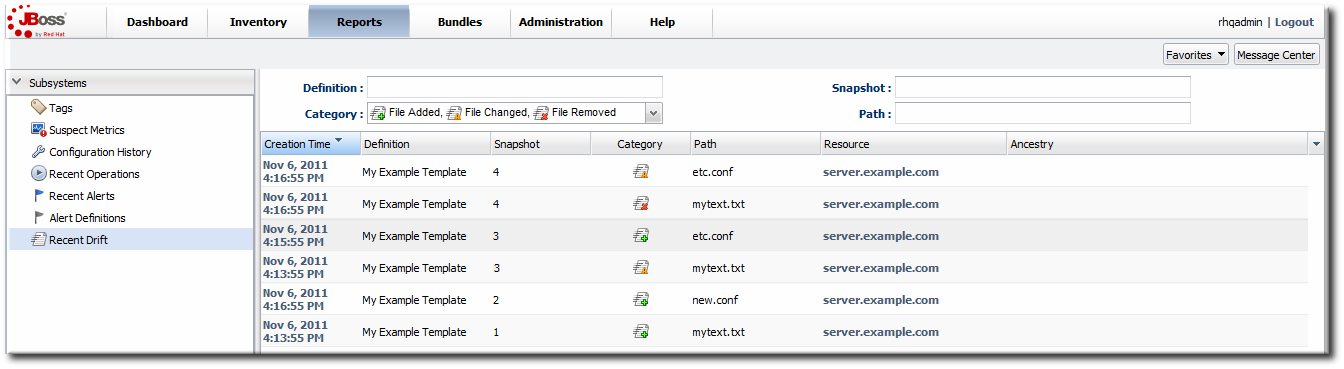
- Optionally, filter the list of drift changes. There are four filter options:
- The definition name
- The snapshot number (which crosses drift definitions)
- The change type within the snapshot, whether a file was added, deleted, or modified.
- The path of a change within the snapshot. This path can be a directory, a specific file name, or a search expression.
Note
recentDrift.csv.
15.6. Pinning Snapshots and Managing Compliance
15.6.1. More About Pinning Snapshots
- It removes any snapshots that were created before that snapshot. For example, if an administrator decides to pin Snapshot 7, Snapshot 0 (the initial image) through Snapshot 6 are all deleted, and Snapshot 7 becomes the new Snapshot 0.
- It creates a baseline image that every change is compared against rather than keeping a moving tally of changes.
- It changes the behavior of drift alerts (Section 15.8, “Defining Drift Alerts”) so that alerts are sent continually until the system configuration is back in compliance with the pinned snapshot.
- The definition it is pinned to cannot be deleted until the snapshot is unpinned.
- If a snapshot is pinned to a template, then all of the resource-level definitions attached to that template automatically use the pinned snapshot as their baseline.
- Any new file added after a snapshot is pinned (or any file deleted) is going to be reported as a new file in every subsequent snapshot. This is because the new snapshot is always compared against the baseline snapshot, so the file is always new to the baseline.There is some logic to prevent drift from reporting the same change incessantly. If
file1.txtis added, the agent creates snapshot 1. When the agent does its next detection run, it recognizes thatfile1.txtis not in the baseline, but as long as the SHA forfile1.txthas not changed, the agent does not report it as new drift and does not take a new snapshot. Iffile1.txtis modified, however, the agent notices the new SHA and sends a new snapshot — with the modifiedfile1.txtstill listed as a new file, because it is compared against the baseline, not the previous version.
15.6.2. When to Pin to a Resource and When to Pin to a Template
- Pinning a snapshot to a resource-level definition establishes a baseline for that resource alone. This makes sense while you are still developing an ideal baseline image or for unique environments that may not transition over to other resources.Pinning to a resource definition allows a lot of flexibility. It is easy to pin and unpin and select a new snapshot as the baseline, to let administrators develop an ideal configuration with a minimal impact on drift events, alerting, and monitoring because the changes are contained.
- Pinning a snapshot to a template means that baseline can be applied to every resource that uses that template; it allows that one single snapshot to be used across multiple resources. This is makes sense for any kind of repeatable configuration areas and for production or critical systems which must have consistent configuration.Pinning to a template is very powerful for maintaining consistency across an entire infrastructure once an ideal configuration has been developed.
Note
15.6.3. Pinning to a Resource-Level Definition
- Click the Inventory tab in the top menu.
- Search for the resource.
- Click the Drift tab.
- Click the name of the drift definition.
- In the snapshot carousel, click the magnifying glass by the name of the snapshot to pin.
Note
The initial snapshot is not displayed in the carousel. To pin the initial snapshot, click the thumbtack icon in the Pinned column of the drift definition list. That opens the initial snapshot.If a snapshot has already been pinned, then clicking the thumbtack icon opens the pinned snapshot. - At the bottom of the change list, click the button.

15.6.4. Pinning to a Template
- Click the Inventory tab in the top menu.
- Search for the resource.
- Click the Drift tab.
- Click the name of the drift definition.
- In the snapshot carousel, click the magnifying glass by the name of the snapshot to pin.
Note
The initial snapshot is not displayed in the carousel. To pin the initial snapshot, click the thumbtack icon in the Pinned column of the drift definition list. That opens the initial snapshot.If a snapshot has already been pinned, then clicking the thumbtack icon opens the pinned snapshot. - At the bottom of the change list, click the button.
- If the resource-level template is based on or attached to an existing template, then you can associate the snapshot with that existing template. If the base directory for the resource-level snapshot does not match any existing drift template, then you must create a new template.
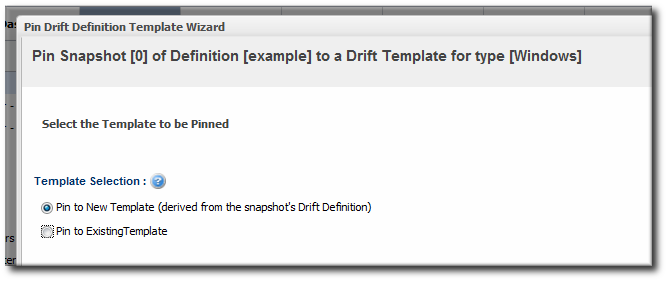
- Create the drift template, as in Section 15.3, “Creating a Drift Definition Template”.
15.6.5. Checking Drift Compliance Reports
- Click the Reports tab in the top navigation menu.
- Select the Drift Compliance report from the Inventory report list.
- Every resource with a drift definition is listed by type and with an icon to indicate whether it is compliant (
 ) or non-compliant (
 ).
).

- To get information about the specific resources, click the resource type name; this opens a second inventory report under the main report. All of the resources of that type are listed with their compliance state.
Note
driftCompliance.csv.
15.6.6. Unpinning a Snapshot
- Click the Inventory tab in the top menu.
- Search for the resource.
- Click the Drift tab.
- Click the pin icon for the drift definition.
15.7. Extended Example: Defining Required EAP Configuration
Tim the IT Guy at Example Corp. has one EAP server running in his production environment. Because of the production load, the EAP server was routinely running out of memory, which was degrading its performance and causing downtime for Example Corp.'s website.
There are three things that Tim wants to accomplish to maintain his EAP performance:
- Find a way to consistently apply configuration to EAP instances.He defines a template for JBoss EAP instances (Section 15.3, “Creating a Drift Definition Template”). To maintain consistency, the template sets the Attach to template value to true, and each resource-level drift definition will preserve that settings. This ensures that any changes to the template are automatically applied to the JBoss resource drift definitions.
- Use his current production settings as a basis for future EAP instances.He pins his latest snapshot, with the higher heap settings, to the template definition (Section 15.6.4, “Pinning to a Template”). Every EAP instance is going to be compared against that baseline, so any with the wrong heap setting will immediately be marked out of compliance.
- Be made aware of specific differences between his current EAP settings and his preferred settings.He creates an alert definition (Section 15.8, “Defining Drift Alerts”) which specifically targets the
bin/run.conffile. This way, he knows precisely whether the heap settings and other JVM settings are wrong for his new instance. He can even use alerts to gather more information about how his EAP instance configuration is different, like using a CLI script to compare the current EAP configuration against the pinned snapshot and then send him the diff.
Tim brings a new server online, with a new EAP instance for the production environment. He applies the drift template to the new resource and, within a few minutes, receives a notification that his run.conf file is not compliant with his preferred configuration. He changes the heap settings on the new EAP instance without having to wait for performance degradation to remember the change.
15.8. Defining Drift Alerts
Note
- Click the Inventory tab in the top menu.
- Select the resource type in the Resources menu table on the left, and then browse or search for the resource.
- Click the resource name in the list.
- Click the Alerts tab for the resource.
- In the Definitions subtab, click the New button to create the new alert.
- In the General Properties tab, give the basic information about the alert.
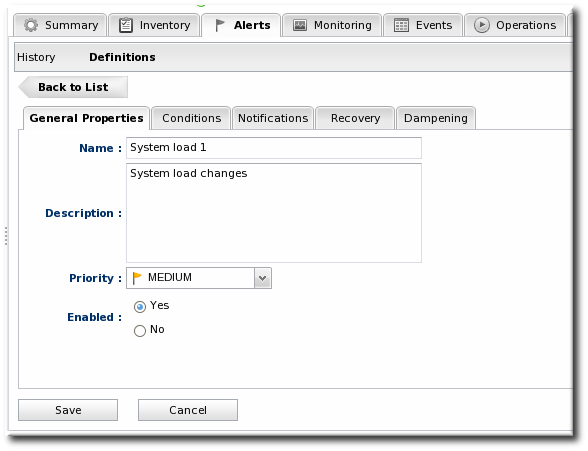 It may be useful to set a Priority if the drift definition contains critical configuration files.
 - In the Conditions tab, select the Drift Detection option from the conditions list. To use the alert for all drift changes, leave the fields blank. Otherwise, enter the specific drift definition name and (optionally) the directories or files that must be modified for the alert to be triggered.

Note
There can be more than one condition set to trigger an alert, meaning that you can use the same alert for multiple drift definitions or files. - In the Notifications tab, click Add to set a notification for the alert.Select the method to use to send the alert notification in the Sender option, and fill in the required information.
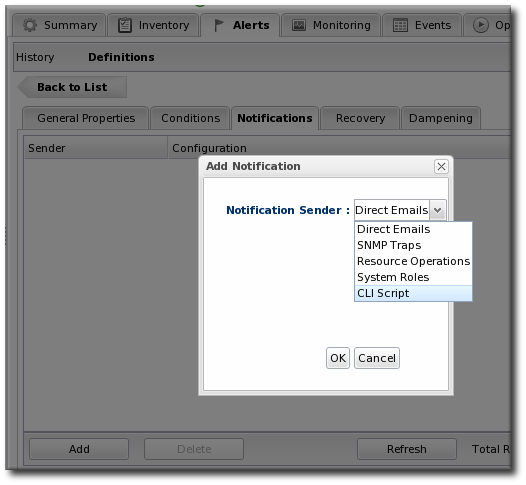 The Sender option first sets the specific type of alert method (such as email or SNMP) and then opens the appropriate form to fill in the details for that specific method.
 - Optionally, in the Dampening tab, give the dampening (or frequency) rule on how often to send notifications for drift.
Note
For pinned snapshots, it can be useful to use dampening rules to keep from getting a flood of alerts before a drift problem is remedied.Dampening only makes sense for a definition with a pinned snapshot. A pinned definition will fire alerts with every alert scan (every 10 minutes) for as long as it is out of compliance, even if there are no further changes. A rolling definition only fires an alert once, when drift is detected. Any of the dampening rules can be used. The ultimate goal is to limit the number of times that the same alert is set for a resource that is out of compliance with a pinned definition. For example, Time period sets a limit on the number of times in a given time period that an alert is issued if the alert condition occurs. Setting the occurrence to 1 and the time period to 4 hours means that when drift is detected once, the server sends an alert and then waits another 4 hours before sending the next alert.
 - Click OK to save the alert definition.
15.9. Extended Example: Reverting a JBoss Server to Its Original Configuration Using Bundles and Server Scripts
In Section 15.7, “Extended Example: Defining Required EAP Configuration”, Tim the IT Guy at Example Corp. set up drift templates and alerts to help manage the configuration on his production EAP servers. However, his resolution was done manually. When the drift alert notified him that his EAP server was out of compliance, he edited the run.conf directly to adjust the heap size.
The goal is to have JBoss ON respond intelligently to drift without requiring any action from Tim the IT Guy. There are two features that allow automated responses:
- Using bundles to provision updated files or applications. A bundle is a ZIP file that contains an Ant recipe and any required content (such as configuration files or JARs) for an application. JBoss ON can provision this content on a platform or a JBoss server in a specified directory.
- Launching JBoss ON CLI scripts in response to an alert. One of the possible alert notifications is a server-side alert sender. A JBoss ON CLI script is loaded as content and stored in the JBoss ON server; when the alert fires, it initiates the specified, stored CLI script.
- Create a bundle file based on the pinned snapshot configuration. The content of the bundle depends on the needs of the deployment. It can be specific configuration files, like
bin/run.conf, or it can be a full EAP server.Note
If the bundle contains the full EAP server, then it can be used to create the initial EAP server. - Deploy the bundle with the full EAP server to create the new EAP instance. (Or, if the bundle only has configuration files, create the EAP instances.)
- Set up the drift definitions, based on the previously configured template (Section 15.7, “Extended Example: Defining Required EAP Configuration”), for the new EAP instance.
- Create a JBoss ON CLI script (in JavaScript) that will automatically deploy the specified bundle to the appropriate destination. An example is in Example 15.2, “fix-eap.js Script”; in that script, replace the
destinationIdandbundleVersionIdwith the real ID numbers for the destination entry and bundle version entry in JBoss ON. - Create an alert definition that triggers on the drift detection condition and uses the CLI script notification type, pointing to the JavaScript file that you created.
Any time drift is detected on the EAP server, it triggers an alert, same as in Section 15.7, “Extended Example: Defining Required EAP Configuration”. This time, the alert launches the CLI script in response and automatically deploys the bundle — which already has the approved EAP configuration — to the resource. This means that the EAP server is never more than a few minutes out of compliance, roughly the length of one alert scan. All without requiring intervention from Tim the IT Guy.
Example 15.2. fix-eap.js Script
/**
 * If obj is a JS array or a java.util.Collection, each element is passed to
 * the callback function. If obj is a java.util.Map, each map entry is passed
 * to the callback function as a key/value pair. If obj is none of the
 * aforementioned types, it is treated as a generic object and each of its
 * properties is passed to the callback function as a name/value pair.
 */
function foreach(obj, fn) {
  if (obj instanceof Array) {
    for (i in obj) {
      fn(obj[i]);
    }
  }
  else if (obj instanceof java.util.Collection) {
    var iterator = obj.iterator();
    while (iterator.hasNext()) {
      fn(iterator.next());
    }
  }
  else if (obj instanceof java.util.Map) {
    var iterator = obj.entrySet().iterator()
    while (iterator.hasNext()) {
      var entry = iterator.next();
      fn(entry.key, entry.value);
    }
  }
  else {   // assume we have a generic object
    for (i in obj) {
      fn(i, obj[i]);
    }
  }
}

/**
 * Iterates over obj similar to foreach. fn should be a predicate that evaluates
 * to true or false. The first match that is found is returned.
 */
function find(obj, fn) {
  if (obj instanceof Array) {
    for (i in obj) {
      if (fn(obj[i])) {
        return obj[i]
      }
    }
  }
  else if (obj instanceof java.util.Collection) {
    var iterator = obj.iterator();
    while (iterator.hasNext()) {
      var next = iterator.next();
      if (fn(next)) {
        return next;
      }
    }
  }
  else if (obj instanceof java.util.Map) {
    var iterator = obj.entrySet().iterator();
    while (iterator.hasNext()) {
      var entry = iterator.next();
      if (fn(entry.key, entry.value)) {
        return {key: entry.key, value: entry.value};
      }
    }
  }
  else {
    for (i in obj) {
      if (fn(i, obj[i])) {
        return {key: i, value: obj[i]};
      }
    }
  }
  return null;
}

/**
 * Iterates over obj similar to foreach. fn should be a predicate that evaluates
 * to true or false. All of the matches are returned in a java.util.List.
 */
function findAll(obj, fn) {
  var matches = java.util.ArrayList();
  if ((obj instanceof Array) || (obj instanceof java.util.Collection)) {
    foreach(obj, function(element) {
      if (fn(element)) {
        matches.add(element);
      }
    });
  }
  else {
    foreach(obj, function(key, value) {
      if (fn(theKey, theValue)) {
        matches.add({key: theKey, value: theValue});
      }
    });
  }
  return matches;
}

/**
 * A convenience function to convert javascript hashes into RHQ's configuration
 * objects.
 * <p>
 * The conversion of individual keys in the hash follows these rules:
 * <ol>
 * <li> if a value of a key is a javascript array, it is interpreted as PropertyList
 * <li> if a value is a hash, it is interpreted as a PropertyMap
 * <li> otherwise it is interpreted as a PropertySimple
 * <li> a null or undefined value is ignored
 * </ol>
 * <p>
 * Note that the conversion isn't perfect, because the hash does not contain enough
 * information to restore the names of the list members.
 * <p>
 * Example: <br/>
 * <pre><code>
 * {
 *   simple : "value",
 *   list : [ "value1", "value2"],
 *   listOfMaps : [ { k1 : "value", k2 : "value" }, { k1 : "value2", k2 : "value2" } ]
 * }
 * </code></pre>
 * gets converted to a configuration object:
 * Configuration:
 * <ul>
 * <li> PropertySimple(name = "simple", value = "value")
 * <li> PropertyList(name = "list")
 *      <ol>
 *      <li>PropertySimple(name = "list", value = "value1")
 *      <li>PropertySimple(name = "list", value = "value2")
 *      </ol>
 * <li> PropertyList(name = "listOfMaps")
 *      <ol>
 *      <li> PropertyMap(name = "listOfMaps")
 *           <ul>
 *           <li>PropertySimple(name = "k1", value = "value")
 *           <li>PropertySimple(name = "k2", value = "value")
 *           </ul>
 *      <li> PropertyMap(name = "listOfMaps")
 *           <ul>
 *           <li>PropertySimple(name = "k1", value = "value2")
 *           <li>PropertySimple(name = "k2", value = "value2")
 *           </ul>
 *      </ol>
 * </ul>
 * Notice that the members of the list have the same name as the list itself
 * which generally is not the case.
 */
function asConfiguration(hash) {

	config = new Configuration;

	for(key in hash) {
		value = hash[key];

		if (value == null) {
			continue;
		}

		(function(parent, key, value) {
			function isArray(obj) {
				return typeof(obj) == 'object' && (obj instanceof Array);
			}

			function isHash(obj) {
				return typeof(obj) == 'object' && !(obj instanceof Array);
			}

			function isPrimitive(obj) {
				return typeof(obj) != 'object';
			}

			//this is an anonymous function, so the only way it can call itself
			//is by getting its reference via argument.callee. Let's just assign
			//a shorter name for it.
			var me = arguments.callee;

			var prop = null;

			if (isPrimitive(value)) {
				prop = new PropertySimple(key, new java.lang.String(value));
			} else if (isArray(value)) {
				prop = new PropertyList(key);
				for(var i = 0; i < value.length; ++i) {
					var v = value[i];
					if (v != null) {
						me(prop, key, v);
					}
				}
			} else if (isHash(value)) {
				prop = new PropertyMap(key);
				for(var i in value) {
					var v = value[i];
					if (value != null) {
						me(prop, i, v);
					}
				}
			}

			if (parent instanceof PropertyList) {
				parent.add(prop);
			} else {
				parent.put(prop);
			}
		})(config, key, value);
	}

	return config;
}

/**
 * Opposite of <code>asConfiguration</code>. Converts an RHQ's configuration object
 * into a javascript hash.
 *
 * @param configuration
 */
function asHash(configuration) {
	ret = {}

	iterator = configuration.getMap().values().iterator();
	while(iterator.hasNext()) {
		prop = iterator.next();

		(function(parent, prop) {
			function isArray(obj) {
				return typeof(obj) == 'object' && (obj instanceof Array);
			}

			function isHash(obj) {
				return typeof(obj) == 'object' && !(obj instanceof Array);
			}

			var me = arguments.callee;

			var representation = null;

			if (prop instanceof PropertySimple) {
				representation = prop.stringValue;
			} else if (prop instanceof PropertyList) {
				representation = [];

				for(var i = 0; i < prop.list.size(); ++i) {
					var child = prop.list.get(i);
					me(representation, child);
				}
			} else if (prop instanceof PropertyMap) {
				representation = {};

				var childIterator = prop.getMap().values().iterator();
				while(childIterator.hasNext()) {
					var child = childIterator.next();

					me(representation, child);
				}
			}

			if (isArray(parent)) {
				parent.push(representation);
			} else if (isHash(parent)) {
				parent[prop.name] = representation;
			}
		})(ret, prop);
	}
	(function(parent) {

	})(configuration);

	return ret;
}

/**
 * A simple function to create a new bundle version from a zip file containing
 * the bundle.
 *
 * @param pathToBundleZipFile the path to the bundle on the local file system
 *
 * @return an instance of BundleVersion class describing what's been created on
 * the RHQ server.
 */
function createBundleVersion(pathToBundleZipFile) {
	var bytes = getFileBytes(pathToBundleZipFile)
	return BundleManager.createBundleVersionViaByteArray(bytes)
}

/**
 * This is a helper function that one can use to find out what base directories
 * given resource type defines.
 * <p>
 * These base directories then can be used when specifying bundle destinations.
 *
 * @param resourceTypeId
 * @returns a java.util.Set of ResourceTypeBundleConfiguration objects
 */
function getAllBaseDirectories(resourceTypeId) {
	var crit = new ResourceTypeCriteria;
	crit.addFilterId(resourceTypeId);
	crit.fetchBundleConfiguration(true);

	var types = ResourceTypeManager.findResourceTypesByCriteria(crit);

	if (types.size() == 0) {
		throw "Could not find a resource type with id " + resourceTypeId;
	} else if (types.size() > 1) {
		throw "More than one resource type found with id " + resourceTypeId + "! How did that happen!";
	}

	var type = types.get(0);

	return type.getResourceTypeBundleConfiguration().getBundleDestinationBaseDirectories();
}

/**
 * Creates a new destination for given bundle. Once a destination exists,
 * actual bundle versions can be deployed to it.
 * <p>
 * Note that this only differs from the <code>BundleManager.createBundleDestination</code>
 * method in the fact that one can provide bundle and resource group names instead of their
 * ids.
 *
 * @param destinationName the name of the destination to be created
 * @param description the description for the destination
 * @param bundleName the name of the bundle to create the destination for
 * @param groupName name of a group of resources that the destination will handle
 * @param baseDirName the name of the basedir definition that represents where inside the
 *                    deployment of the individual resources the bundle will get deployed
 * @param deployDir the specific sub directory of the base dir where the bundles will get deployed
 *
 * @return BundleDestination object
 */
function createBundleDestination(destinationName, description, bundleName, groupName, baseDirName, deployDir) {
	var groupCrit = new ResourceGroupCriteria;
	groupCrit.addFilterName(groupName);
	var groups = ResourceGroupManager.findResourceGroupsByCriteria(groupCrit);

	if (groups.empty) {
		throw "No group called '" + groupName + "' found.";
	}

	var group = groups.get(0);

	var bundleCrit = new BundleCriteria;
	bundleCrit.addFilterName(bundleName);
	var bundles = BundleManager.findBundlesByCriteria(bundleCrit);

	if (bundles.empty) {
		throw "No bundle called '" + bundleName + "' found.";
	}

	var bundle = bundles.get(0);

	return BundleManager.createBundleDestination(bundle.id, destinationName, description, baseDirName, deployDir, group.id);
}

/**
 * Tries to deploy given bundle version to provided destination using given configuration.
 * <p>
 * This method blocks while waiting for the deployment to complete or fail.
 *
 * @param destination the bundle destination (or id thereof)
 * @param bundleVersion the bundle version to deploy (or id thereof)
 * @param deploymentConfiguration the deployment configuration. This can be an ordinary
 * javascript object (hash) or an instance of RHQ's Configuration. If it is the former,
 * it is converted to a Configuration instance using the <code>asConfiguration</code>
 * function from <code>util.js</code>. Please consult the documentation of that method
 * to understand the limitations of that approach.
 * @param description the deployment description
 * @param isCleanDeployment if true, perform a wipe of the deploy directory prior to the deployment; if false,
 * perform as an upgrade to the existing deployment, if any
 *
 * @return the BundleDeployment instance describing the deployment
 */
function deployBundle(destination, bundleVersion, deploymentConfiguration, description, isCleanDeployment) {
	var destinationId = destination;
	if (typeof(destination) == 'object') {
		destinationId = destination.id;
	}

	var bundleVersionId = bundleVersion;
	if (typeof(bundleVersion) == 'object') {
		bundleVersionId = bundleVersion.id;
	}

	var deploymentConfig = deploymentConfiguration;
	if (!(deploymentConfiguration instanceof Configuration)) {
		deploymentConfig = asConfiguration(deploymentConfiguration);
	}

	var deployment = BundleManager.createBundleDeployment(bundleVersionId, destinationId, description, deploymentConfig);

	deployment = BundleManager.scheduleBundleDeployment(deployment.id, isCleanDeployment);

	var crit = new BundleDeploymentCriteria;
	crit.addFilterId(deployment.id);

	while (deployment.status == BundleDeploymentStatus.PENDING || deployment.status == BundleDeploymentStatus.IN_PROGRESS) {
		java.lang.Thread.currentThread().sleep(1000);
		var dps = BundleManager.findBundleDeploymentsByCriteria(crit);
		if (dps.empty) {
			throw "The deployment disappeared while we were waiting for it to complete.";
		}

		deployment = dps.get(0);
	}

	return deployment;
}


var destinationId = 10002;
var bundleVersionId = 10002;
var deploymentConfig = null;
var description = "redeploy due to drift";
// NOTE: It's essential that isCleanDeployment=true, otherwise files that have drifted will not be replaced with their
//       original versions from the bundle.
var isCleanDeployment = true;
deployBundle(10002, 10002, deploymentConfig, description, true);
15.10. Running Drift Detection Manually
- Click the Inventory tab in the top menu.
- Search for the resource.
- Click the Drift tab.
- Select the drift definition to run the scan for.
- Click the button.
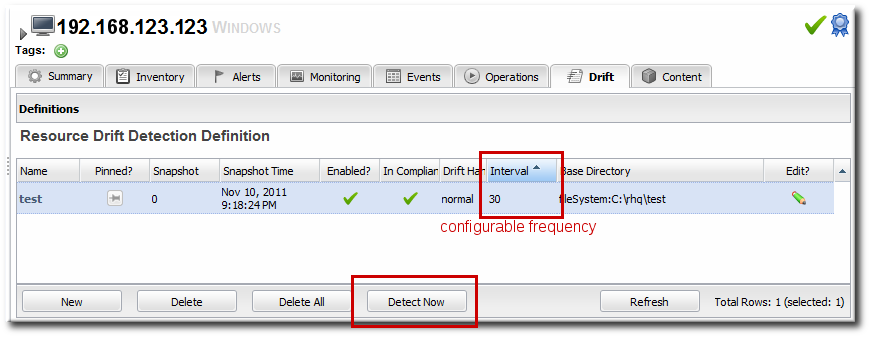
15.11. Setting Planned Changes or Disabling Drift Definitions
- Set the drift handling mode to planned changes. This keeps running drift detection scans and records changes. Since the changes are expected, though, it doesn't trigger a drift detection event, so it does not issue a drift alert.
- Actually disable the drift definition. This suspends the drift detection runs for the definition, not just drift events.
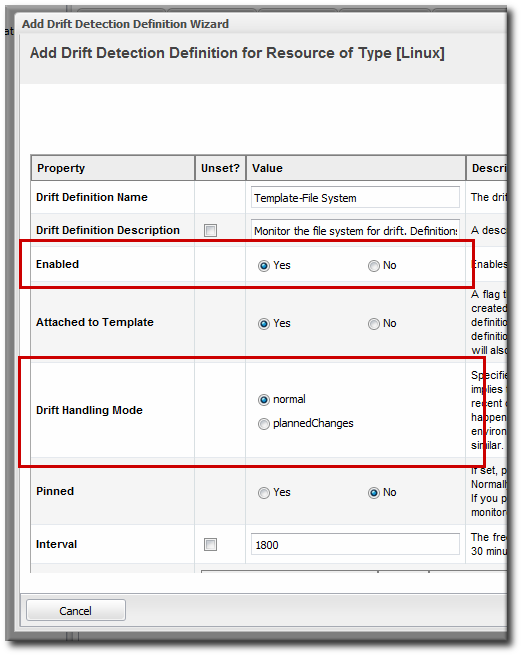
Figure 15.5. Drift Handling Mode and Enable Options
15.12. Changing How Long Drift Snapshots Are Stored
- In the System Configuration menu, select the item.
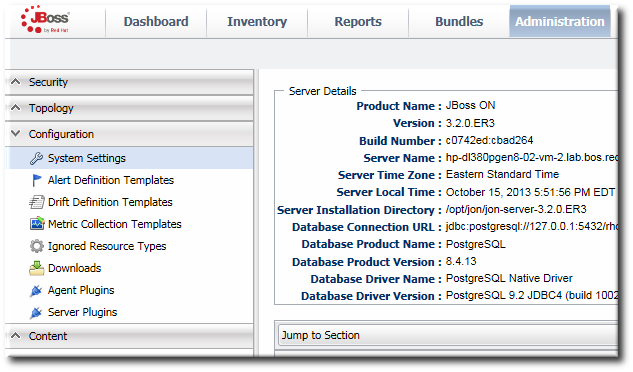
- Scroll to the Data Manager Configuration Properties section.
- Change the storage times for the drift snapshots. Unused snapshots are not pinned or a baseline, while orphaned snapshots are related to disabled definitions.
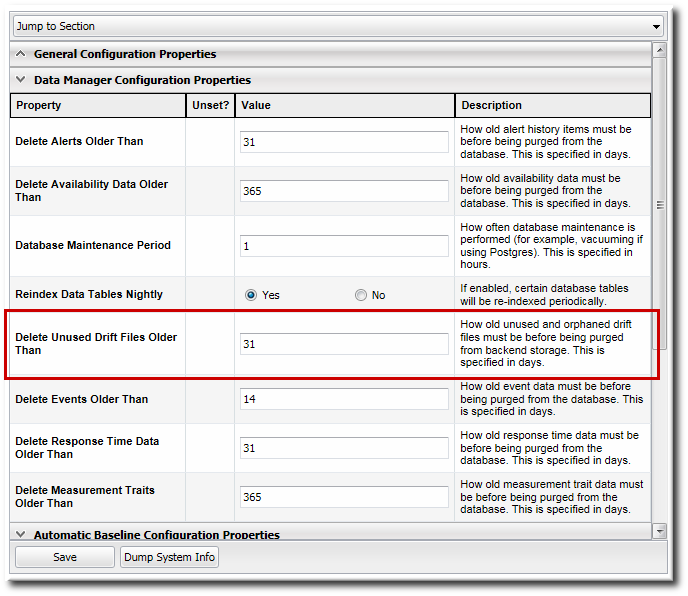
15.13. Understanding Drift and JBoss ON Agents and Servers
15.13.1. Drift Inventory
agentRoot/rhq-agent/data/ directory. The information in this directory is deleted if the agent is started with new configuration (--cleanconfig) or it can be intentionally purged (--purgedata). If the drift information is lost, then the agent requests the last snapshot from the JBoss ON server.
15.13.2. The Drift Server Plug-in
Warning
Part III. Monitoring
Chapter 16. Introduction: Monitoring and Responding to Resource Activity
16.1. Monitoring and Types of Data
- Availability or "up and down" monitoring
- This is both basic and critical. Availability is status information about the resource, whether it is running or stopped.
- Numeric metrics
- Metrics are the core performance data for a resource. Almost every software product exposes some sort of information about itself, some measurable facet that can be checked. This is usually This numeric information is collected by JBoss ON, on defined schedules.Metric information is processed by the server. There are three states of the monitoring data used:
- Raw data, which are the readings collected on schedule by the agent and sent to the server
- Aggregated data, which is compressed data processed by the server into 1-hour, 6-hour, and 24-hour averages and used to calculate baselines and normal operating ranges for resources. These aggregated data are the information displayed in the monitoring graphs and returned in the CLI as metrics.
- Live values, which are ad hoc requests for the current value of a metric.Metric values are rolling live-streams of the resource state; they are essentially snapshots that the agent takes of the readings on predefined schedules. Those data are then aggregated into means and averages to use to track resource performance.Live values are immediate, aggregated, current readings of a metric value.
Metric information is especially important because it is collected and stored long-term. This allows for historical views on resource performance, as well as recent views. - Logfile messages (events)
- While JBoss ON is not a log viewer, it can monitor specified logs and check for important log messages based on severity or strings within the log messages. This is event monitoring, and it allows JBoss ON to identify incidents for a resource and to send an alert notification and, if necessary, take corrective action based on dynamic information outside normal metrics.
- Response time metrics
- Certain types of resources (URLs for web servers or session beans) depend on responsiveness as a component of overall performance. Response time or call-time data tracks how quickly the URL or session bean responds to client requests and helps determine that the overall application is performant.
- Descriptive strings (traits)
- Most resources have some relatively static information that describe the resource itself, such as an instance name, build date, or version number. This information is a trait. As with other attributes for a resource, this can be monitored. Traits are useful to identify changes to the underlying application, like a version update.
16.2. Alerts and Responses to Changing Conditions
- Alerts communicate that there has been a problem, based on parameters defined by an administrator.
- Alerts respond to incidents automatically. Administrators can automatically initiate an operation, run a JBoss ON CLI script to change JBoss ON or resource configuration, redeploy content, or run a shell script, all in response to an alert condition.Automatic, administrator-defined responses to alerts make it significantly easier for administrators to address infrastructure problems quickly, and can mitigate the effect of outages.
16.3. Potential Impact on Server Performance
- Database performance, which is the primary factor in most environments
- Network bandwidth
- Up to 30,000 metrics can be collected per minute
- Up to 100,000 alerts can be fired per day (roughly 70 per minute)
Note
16.4. Differences with Monitoring Based on Different Resource Types
Chapter 17. Monitoring Reports and Data
- Dashboards with metrics portlets for individual resources, compatible groups, and the main dashboard
- Timelines, which aggregate all collected data, events, configuration, operations, and other changes for a resource
- Resource-level charts and tables for metrics
- A suspect metrics report for outlier or out-of-bounds metrics
17.1. Dashboards and Portlets
17.1.1. Resource-Level Dashboards
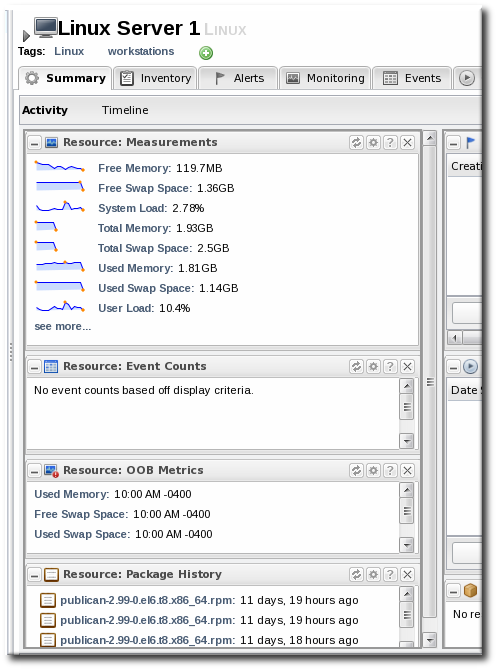
Figure 17.1. Resource Summary Tab
17.1.2. Main Dashboard
- Platform Utilization, which shows free memory, CPU usage, and other metrics related to platform performance.
- Alerted or Unavailable Resources, which shows a list of the most recent five resources which have issued an alert or been reported as down
- A graph for a specific metric for a compatible group
- A graph for a specific metric for a resource
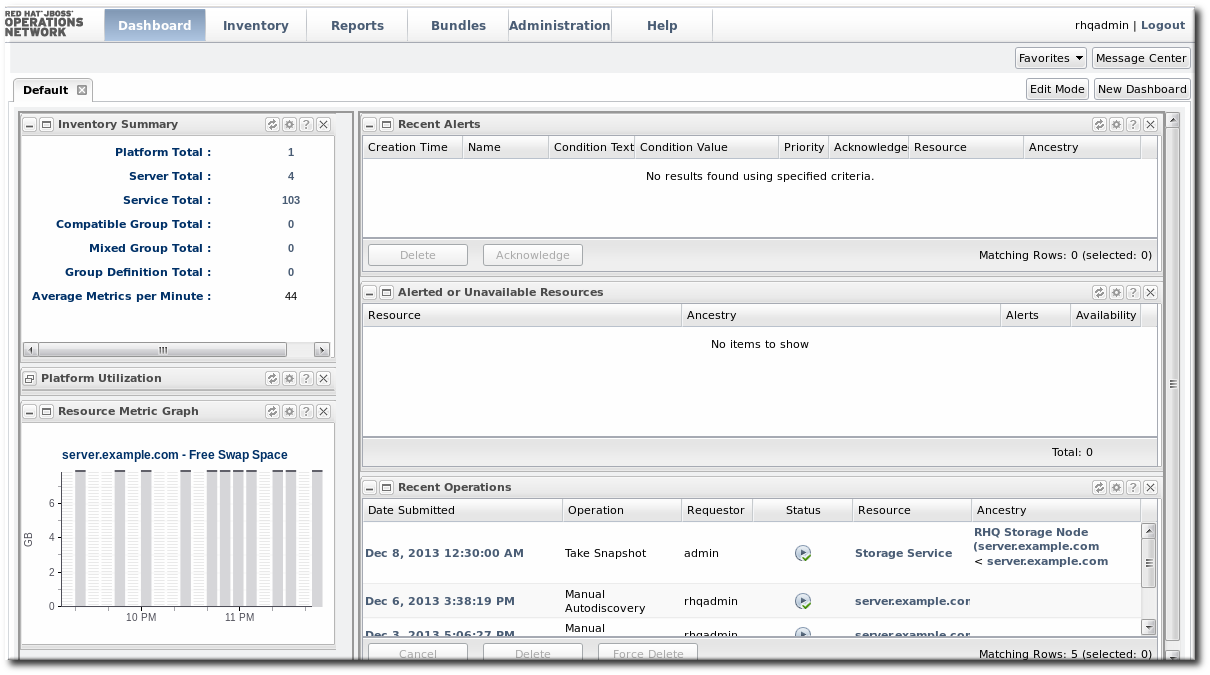
Figure 17.2. Dashboard Portlets with MOnitoring Data
17.1.3. Adding Monitoring Metrics to the Main Dashboard
- Click the Inventory tab in the top menu.
- Select the resource type in the Resources menu table on the left, and then browse or search for the resource.
- In the resource hierarchy on the left, right-click the resource name.
- Scroll down to the menu item, select the metric from the list, and then select the dashboard to add the chart to.

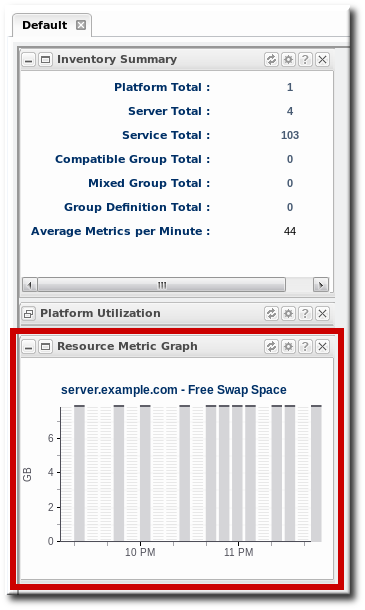
17.2. Summary Timelines
Figure 17.3. Summary Timeline
17.3. Resource-Level Metrics Charts
- Section 19.2, “Viewing Metrics and Baseline Charts” for graphs and tables of the same metrics information
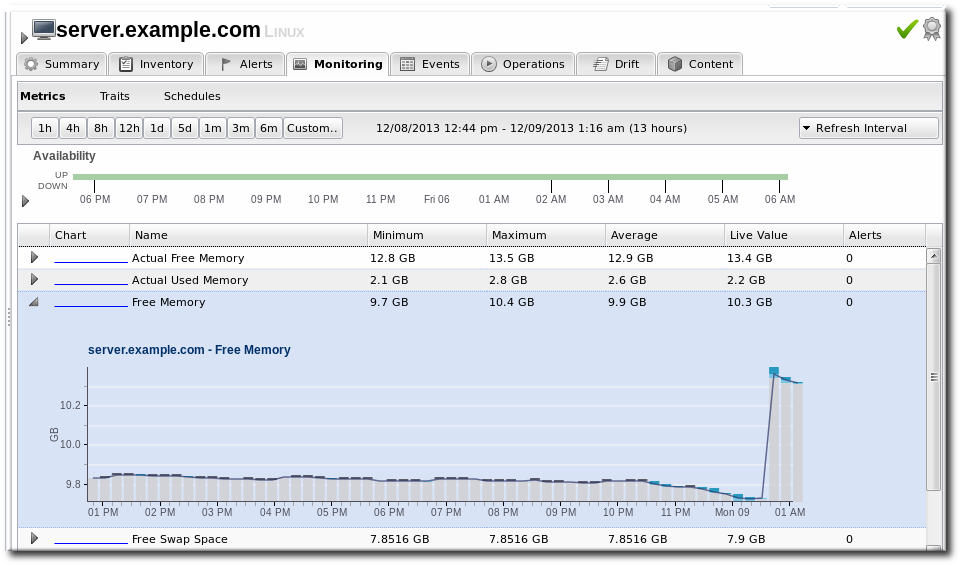
Figure 17.4. Metrics Chart
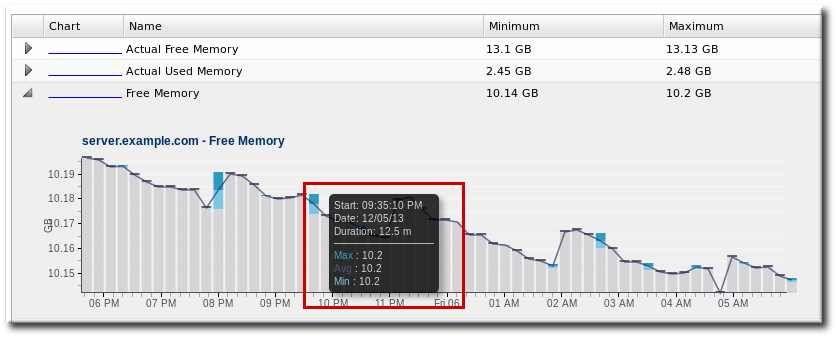
Figure 17.5. Hovering over a Data Point
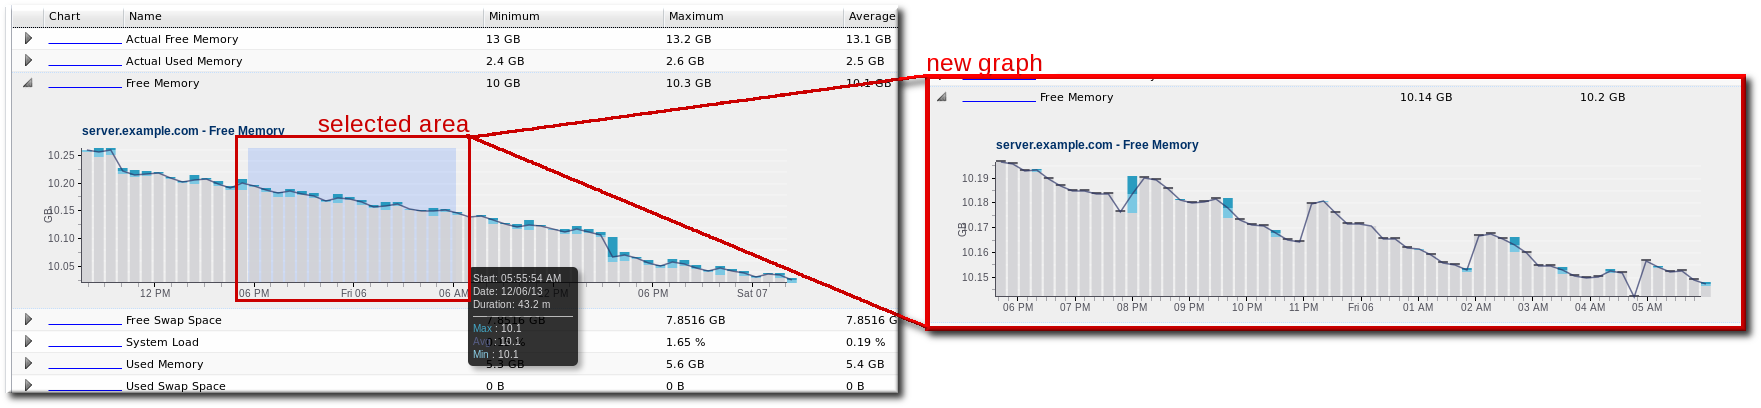
Figure 17.6. Selecting a Subset of the Graph
17.4. Suspect Metrics Report
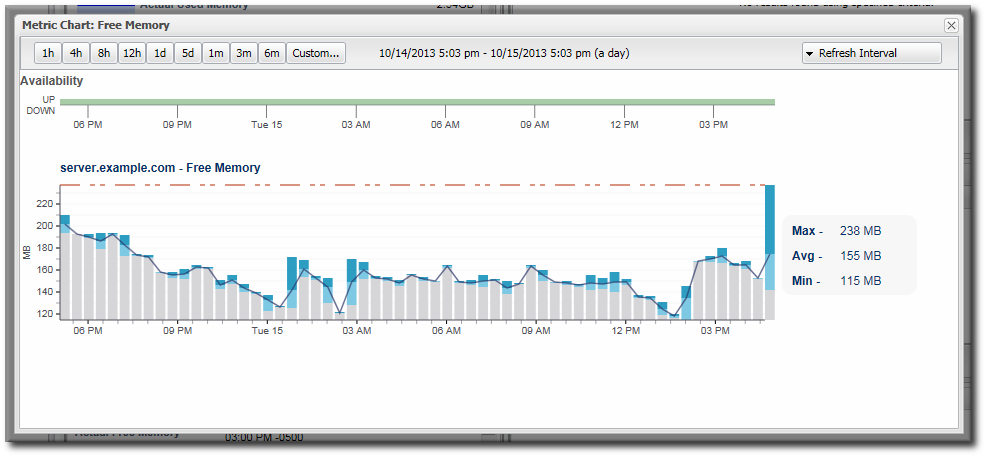
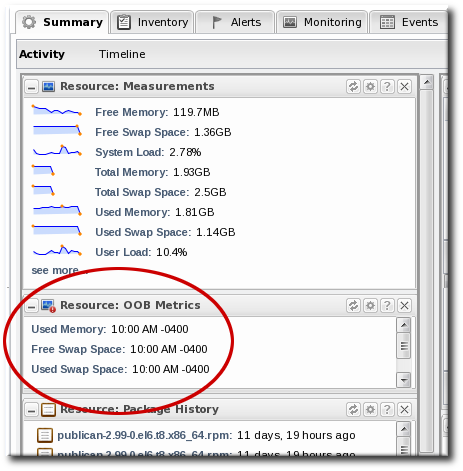
Figure 17.7. Out of Bounds Portlet
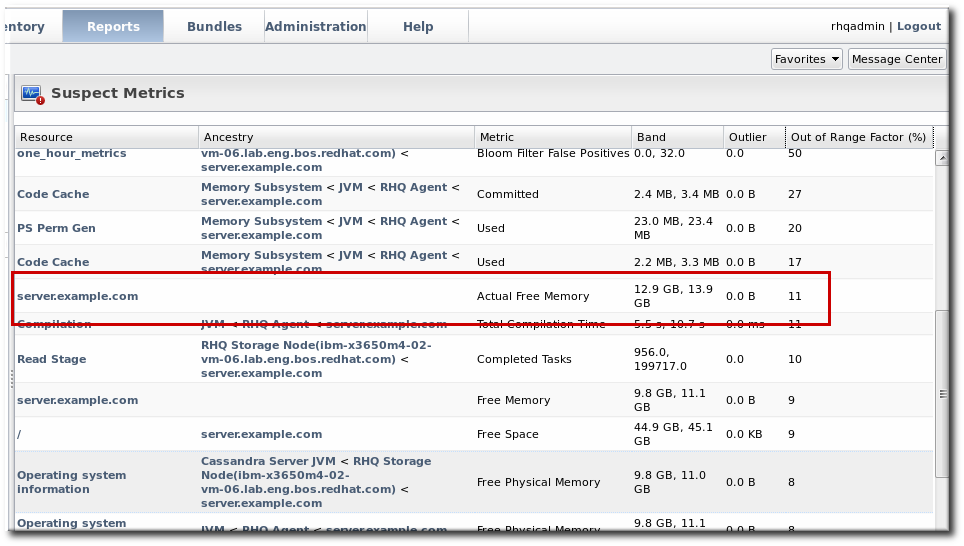
Figure 17.8. Suspect Metrics Reports
Note
suspectMetrics.csv.
17.5. Platform Utilization Report
- Current CPU percentage
- The actual memory usage, based on the available physical memory, buffer, and cache
- Swap
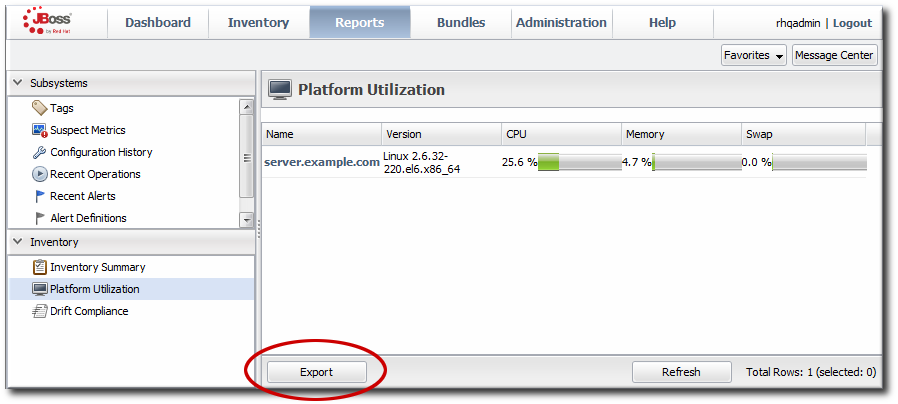
Figure 17.9. Platform Utilization Report
Note
Note
platformUtilization.csv.
Chapter 18. Availability
18.1. Core "Up and Down" Monitoring

Figure 18.1. Resource Availability

Figure 18.2. Availability Uptime Percentage
Note
18.1.1. Long Scan Times and Async Availability Collection
AvailabilityCollectorRunnable class in the JBoss ON plug-in API. Details for this class are available in the plug-in API and Writing Custom Plug-ins.
Note
ADDITIONAL_JAVA_OPTIONS parameters in the rhq-agent-env.sh file:
RHQ_AGENT_ADDITIONAL_JAVA_OPTS="$RHQ_AGENT_ADDITIONAL_JAVA_OPTS -Drhq.agent.plugins.availability-scan.timeout=15000"
18.1.2. Synchronous Availability
Note
18.1.3. Availability States
Table 18.1. Availability States
| State | Description | Icon |
|---|---|---|
| Available (UP) | The resource is running and responding to availability status checks. | |
| Down | The resource is not responding to availability checks. | |
| Unknown | The agent does not have a record of the resource's state. This could be because the resource has been newly added to the inventory and has not had its first availability check or because the agent is down. | |
| Disabled | The resource has been administratively marked as unavailable. The resource (in reality) could be running or stopped. Disabling a resource means that the server ignores the availability reports from the agent to prevent unnecessary alerts based on a (known) down or cycling state. | |
| Mixed (For groups only.)[a] | The resources in a group have different availability states. | |
[a]
A similar warning sign can be displayed next to the resource availability at the top of the resource details page. That warning indicates that an error message or suspect metric has been returned for that resource, not that the resource's availability is in a warning state.
| ||
18.1.4. Parent-Child States and Backfilling
18.1.5. Collection Intervals and Agent Scan Periods
- An agent heartbeat ping (analogous to the platform's availability) is sent to the server every minute.
- Server availability is checked every minute.
- Service availability is checked every 10 minutes.
> avail -- force
avail command runs the check for the next scheduled resources, not all resources.
18.2. Viewing a Resource's Availability Charts
- Click the Inventory tab in the top menu.
- Select the resource category, such as servers or services, in the Resources menu table on the left. Then browse or search for the resource.
- Click the name of the resource in the list.
- Open the resource's Monitoring tab.
- Click the Availability subtab.
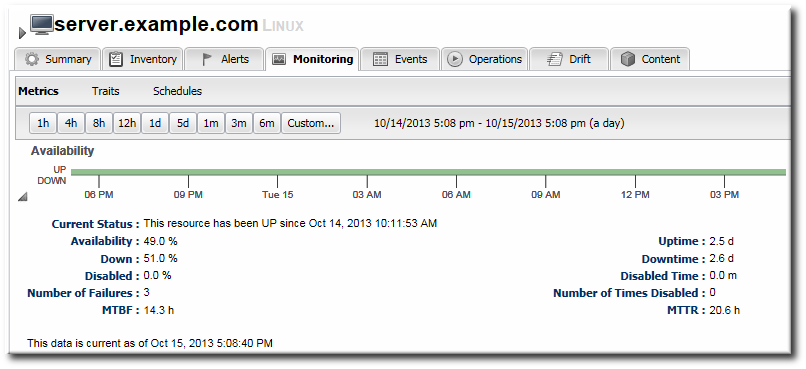
Figure 18.3. Availability Charts
18.3. Detailed Discussion: Availability Duration and Performance
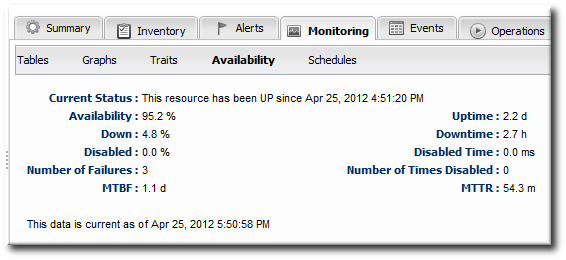
Figure 18.4. Availability Counts
- Total time in up, down, and disabled states
- Percentage of time time in up, down, and disabled states
- The number of times the resource has been in a down or disabled state
- The mean time between failures (MTBF) and mean time to recovery (MTTR)
Note
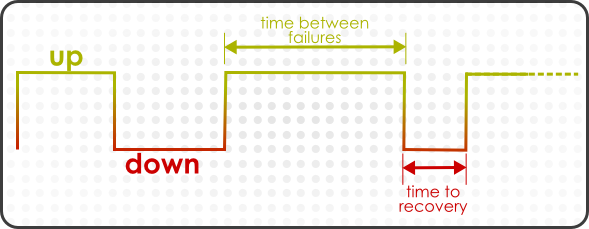
Figure 18.5. Up and Down Monitoring
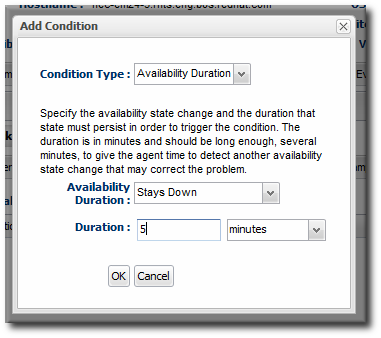
Figure 18.6. Availability Duration Alert
Note
18.4. Detailed Discussion: "Not Up" Alert Conditions
- Up
- Down
- Unknown
- Disabled
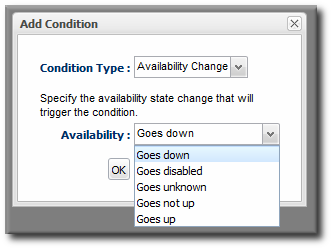
Figure 18.7. Availability Change Conditions
Note
18.5. Viewing Group Availability
- Click the Inventory tab in the top menu.
- Select the compatible or mixed groups item in the Groups menu on the left.
- Click the name of the group.
- Click the Inventory tab for the group.
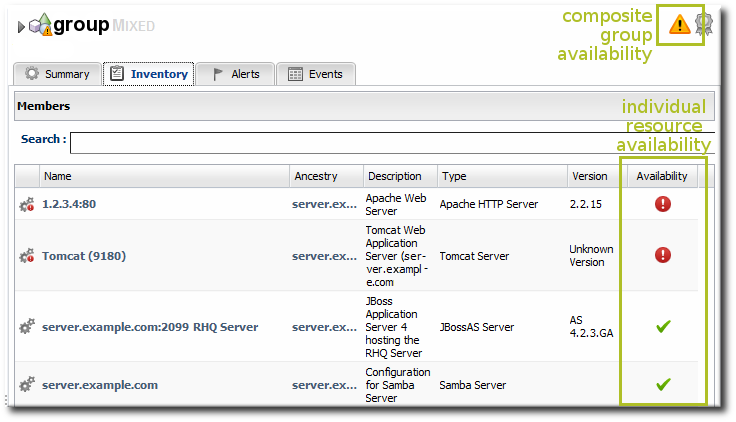
Figure 18.8. Group Availability
Note
Table 18.2. Group Availability States
| If the Resource States Are .... | ... the Group State Is ... |
|---|---|
| Empty Group (Unknown) | Empty |
| All Red (Down) | Red (Down) |
| Some Down or Unknown | Yellow (Mixed) |
| Some Orange (Disabled) | Orange (Disabled) |
| All Green (Up) | Green (Up) |
18.6. Disabling Resources for Maintenance
- If the agent is still up, then the resource availability is still reported. It is just ignored by the JBoss ON server, and is not included in any availability calculations.
- Disabling a parent resource automatically disables all of its children, too.
- Click the Inventory tab in the top menu.
- Select the resource category, such as servers or services, in the Resources menu table on the left. Then browse or search for the resource.
- Select the resource in the list.
- Click the button at the bottom of the page.

- When prompted, confirm that the resource should be disabled.
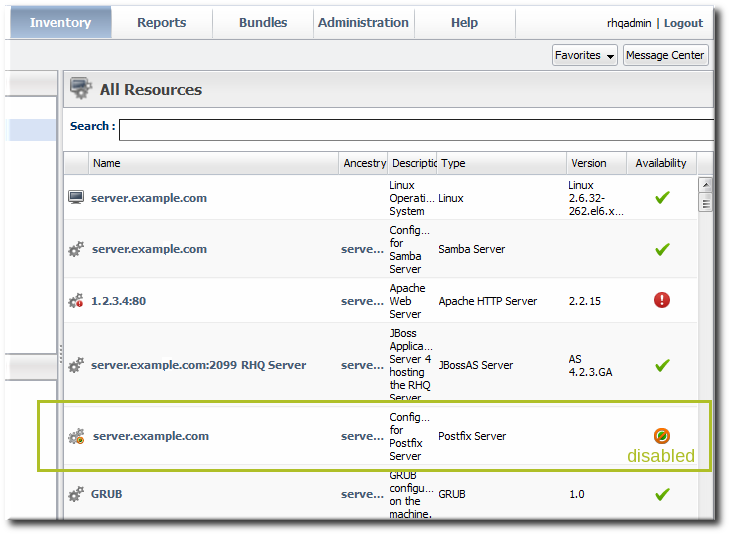
Figure 18.9. Disabled Resource
Note
18.7. Allowing Plug-ins to Disable and Enable Resources Automatically
AvailabilityContext.disable() and AvailabilityContext.enable() methods as part of its availability definition in its component JAR files.
Important
18.8. Changing the Availability Check Interval
- Click the Inventory tab in the top menu.
- Select the resource category, such as servers or services, in the Resources menu table on the left. Then browse or search for the resource.
- Click the Monitoring tab on the resource entry.
- Click the Schedules subtab.
- Select the availability metric, and enter the desired collection period in the Collection Interval field, with the appropriate time unit (seconds, minutes, or hours).
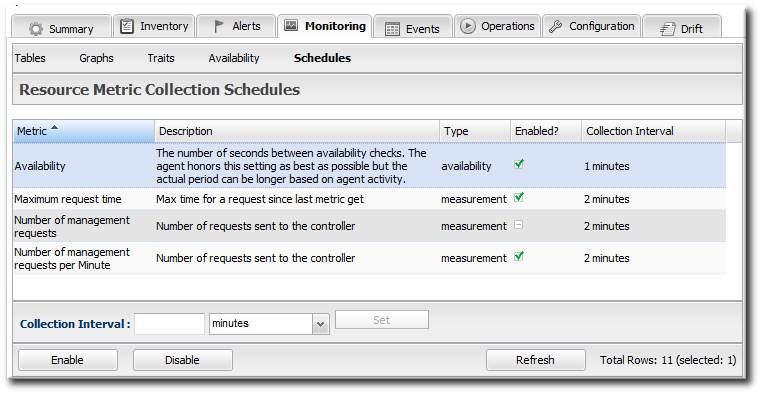
Note
Availability schedules can be set on compatible groups or resource type templates. Setting it at the group or resource type level changes multiple resources simultaneously. - Click Set.
18.9. Changing the Agent's Availability Scan Period
Note
- Open the agent configuration file.
vim agentRoot/rhq-agent/conf/agent-configuration.xml
- Uncomment the lines in the XML file, and set the new scan time (in seconds).
<entry key="rhq.agent.plugins.availability-scan.period-secs" value="60"/>
- Restart the agent in the foreground of a terminal. Use the
--cleanconfigoption to force the agent to read the new configuration from the configuration file.agentRoot/rhq-agent/bin/rhq-agent.sh --cleanconfig
Chapter 19. Metrics and Measurements
19.1. Direct Information about Resources
Figure 19.1. Metric Graph
19.1.1. Raw Metrics, Displayed Metrics, and Storing Data
19.1.2. Current Values
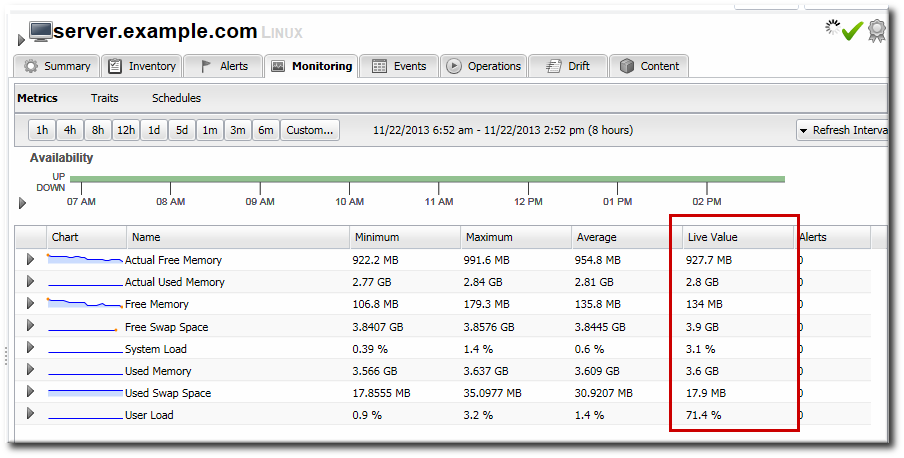
Figure 19.2. Live Values Column
Note
19.1.3. Counting Metrics: Dynamic Values and Trend Values
- Dynamic values show a momentary and changeable value, a current state. This includes things like the current number of connections to an application server or the CPU usage on a platform.
- Trend values are cumulative counts, totals since the resource was started or over its lifetime. These values only progress in a single direction (ususally, but not always, higher)
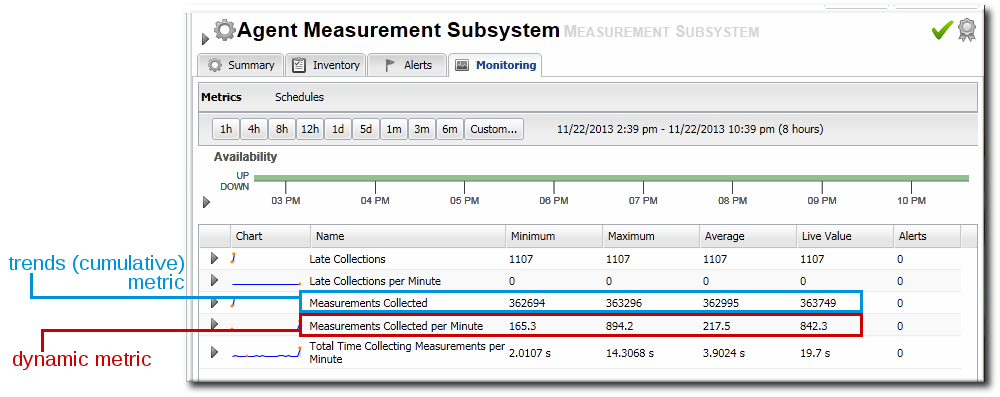
Figure 19.3. Dynamic and Trend Values for Metrics
19.1.4. Baselines and Out-of-Bounds Metrics
Note
Figure 19.4. Suspect Metrics Reports
Note
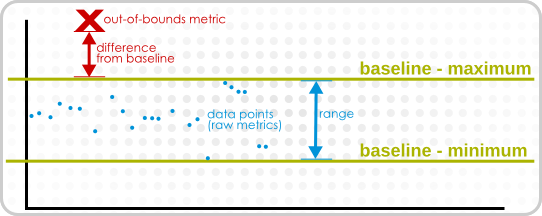
Figure 19.5. Out-of-Bound Factors
19.1.5. Collection Schedules
19.1.6. Metric Schedules and Resource Type Templates
19.2. Viewing Metrics and Baseline Charts
- The resource-level Summary
- Graphs
- Tables
Figure 19.6. Individual Metric Graph
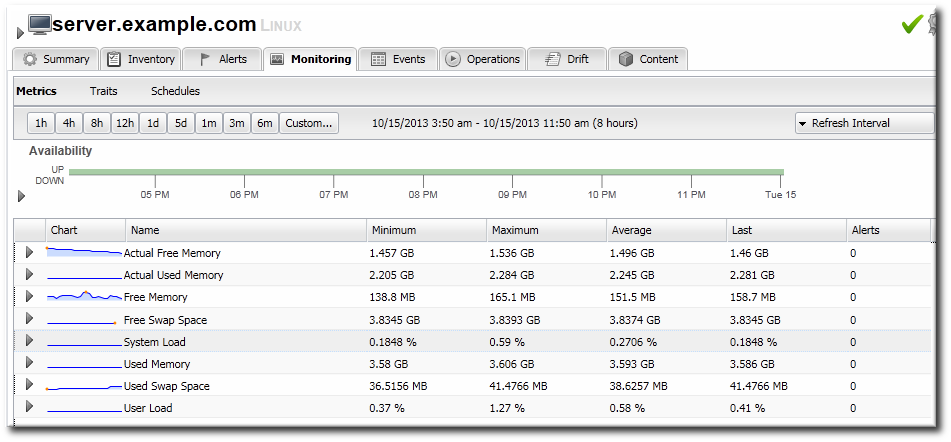
Figure 19.7. Metrics Table
Figure 19.8. Metric Graph within the Table
19.3. Defining Metrics Collection
19.3.1. Setting Baseline Calculation Properties
- In the System Configuration menu, select the item.
- Scroll to the Automatic Baseline Configuration Properties section.
- Change the settings to define the window used for calculation.

- Baseline Frequency sets the interval, in days, for how often baselines are recalculated. The default is three days.
- Baseline Dataset sets the time interval, in days, used to calculate the baseline. The default is seven days.
19.3.2. Setting Collection Intervals for a Specific Resource
- Click the Inventory tab in the top menu.
- Select the resource category, such as servers or services, in the Resources menu table on the left. Then browse or search for the resource.
- Click the Monitoring tab on the resource entry.
- Click the Schedules subtab.
- Select the metric for which to change the monitoring frequency. Multiple metrics can be selected, if they will all be changed to the same frequency.

- Enter the desired collection period in the Collection Interval field, with the appropriate time unit (seconds, minutes, or hours).
- Click Set.
19.3.3. Enabling and Disabling Metrics for a Specific Resource
- Click the Inventory tab in the top menu.
- Select the resource type in the Resources menu table on the left, and then browse or search for the resource.
- Click the Monitoring tab on the resource entry.
- Click the Schedules sub tab.
- Select the metrics to enable or disable.

- Click the Enable or Disable button.
19.3.4. Changing Metrics Templates
Note
- In the top navigation, open the Administration menu, and then the System Configuration menu.

- Select the Metric Collection Templates menu item. This opens a long list of resource types, both for platforms and server types.
- Locate the type of resource for which to create the template definition.

- Click the pencil icon to edit the metric collection schedule templates.
- Select the required metrics to enable or disable, and click the or button.
- To edit the frequency that a metric is collected, select the Update schedules for existing resources of marked type checkbox, and then enter the desired time frame into the Collection Interval for Selected: field.

- Click the button.
19.3.5. Adding a PostgreSQL Query as a Metric
- metricColumn
- count(id)
SELECT 'metricColumn', count(id) FROM my_application_user WHERE is_logged_in = true
SELECT statement defines the metric for the JBoss ON agent. The rest of the query collects the data from the database. Simple as that.
- Click the Inventory tab in the top menu.
- Search for the PostgreSQL resource.
- Click the Inventory tab for the PostgreSQL database.
- Click the Import button in the bottom of the Inventory tab, and select Query.

- Fill in the properties for the query metric. Three fields are particularly important:
- The Table gives which table within the database contains the data; this is whatever is in the
FROMstatement in the query. - The Metric Query contains the full query to run. The
SELECTstatement must be'metricColumn',count(id)to format the query properly for the JBoss ON agent to interpret it as a metric.SELECT 'metricColumn', count(id) FROM my_application_user WHERE is_logged_in = true
- The Name field is not important in configuring the metric, but it is important identifying the metric later.


Figure 19.9. Query: Total Logged-in User Count
Chapter 20. Events
20.1. Events, Logs, and Resources
- Linux (syslog)
- Windows (Windows event logs)
- Apache server (log files)
- JBoss EAP server (log files)
Note
20.2. Event Date Formatting
date severity [class] message
YYYY-mm-dd HH:mm:ss,SSS
HH:mm:ss,SSS
dd MM yyyy HH:mm:ss,SSS
date SEVERITY [org.foo.bar] my message
date [SEVERITY] [org.foo.bar] my message
date ( SEVERITY ) [org.foo.bar] my message
20.3. Defining a New Event
- Click the Inventory tab in the top menu.
- Select the resource type in the Resources menu table on the left, and then browse or search for the resource.
- Click the Inventory tab on the resource entry.
- Select the Connection Settings subtab.
- Click green plus icon under the Events Log section to add a log instance to monitor.

- Enable event log collection.
- Set the parameters for the event log collection.Depending on the resource being configured, there are slightly different options for the event log configuration. All of the resources all allow different filters to identify which log messages to include:
- A minimum severity of any error message.
- A regular expression or pattern to use on log message strings.
Additionally, the application servers and Linux allow different log locations to be specified. (The Windows resource uses its System Event Log.) Along with accommodating custom log locations, it also allows for other logging services to be used. For Linux, this allows both platform and program logs to be monitored; for application services, this allows logs within a messaging service to be checked.As discussed in Section 20.2, “Event Date Formatting”, there are different potential date formats that can be used in logging; if anything other than log4j is used, the pattern can be specified so that the agent can read the log entries.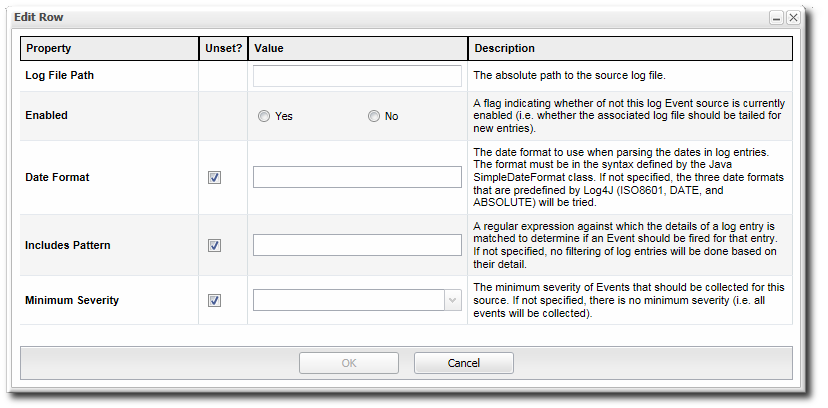
Figure 20.1. EAP Event Log Configuration
Unlike either the application servers or Windows, Linux systems can log events in a system file or in a listener. If an rsyslog server or local syslog listener is configured, then it is possible to select a listener (rather than a local file) and to add the listener port and bind address for a remote server.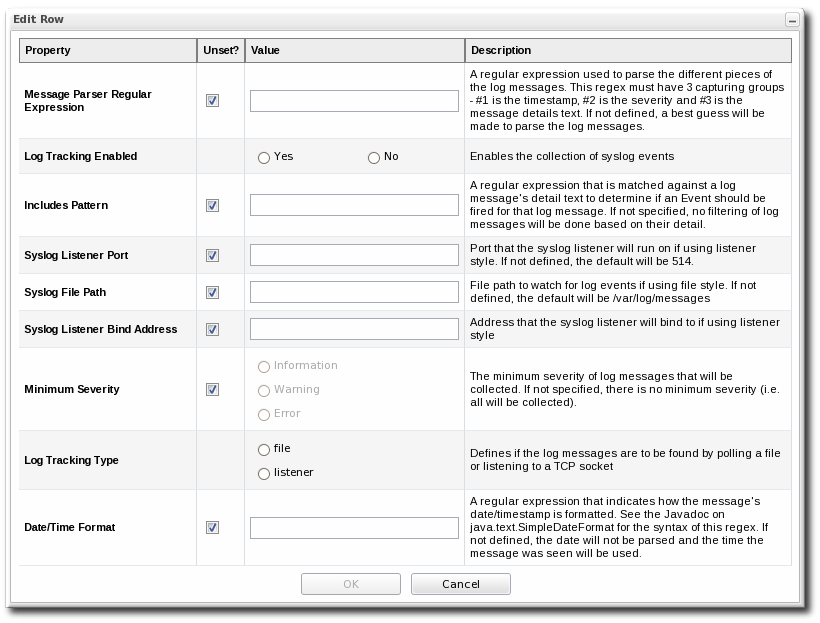
Figure 20.2. Linux Event Log Configuration
20.4. Viewing Events
- Click the Inventory tab in the top menu.
- Select the resource type in the Resources menu table on the left, and then browse or search for the resource.
- Click the Events tab on the resource entry. Events can be filtered by severity (debug, info, warn, error, and fatal).
- Click the specific event for further details.

20.5. Detailed Discussion: Event Correlation
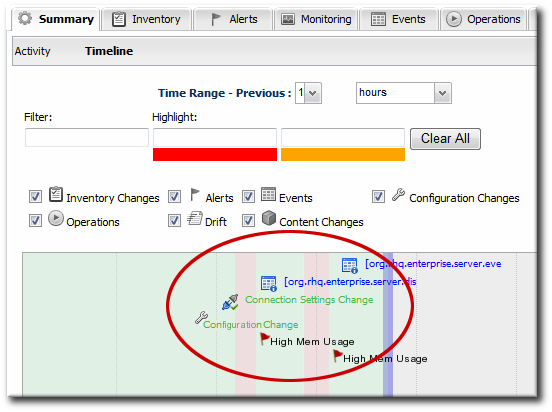
Figure 20.3. Resource Timeline Cluster
Chapter 21. URL Response Time Monitoring
21.1. Call-Time (or Response Time) Monitoring for URLs
- Session beans, for EJB method calls.
- Web servers (standalone or embedded in an application server), for URL responses. Web servers require an additional response time filter with configuration on what URL resources to measure for response times.
21.2. Viewing Call Time Metrics

Figure 21.1. URL Metrics for a Web Server
21.3. Extended Example: Website Performance
A significant amount of Example Co.'s business, services, and support is tied to its website. Customers have to be able to access the site to purchase products, schedule training or consulting, and to receive most support and help. If the site is slow or if some resources are inaccessible, customers immediately have a negative experience.
Tim the IT Guy identifies three different ways that he can capture web application performance information:
- Response times for individual URLs
- Throughput information like total number of requests and responses
- Counts for critical HTTP response codes
- If there are poor response times and a high number of HTTP error 500 responses, then the alert can be configured with an operation to restart the web server (Section 25.3.2, “Detailed Discussion: Initiating an Operation”).
- If there are poor response times and a high number of HTTP error 404 response (meaning that resources may not be delivered properly), then the alert is configured to restart the database.
- If there are poor response times and a high number of total requests per minute, then it may mean that there is simply too much load on the server. The alert can be configured to create another web server instance to help with load balancing; using a JBoss ON CLI script allows the JBoss ON server to create new resources as necessary and deploy bundles of the appropriate web apps (Section 25.3.3, “Detailed Discussion: Initiating Resource Scripts”).
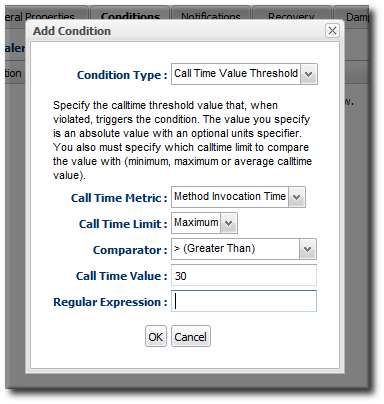
21.4. Configuring EJB Call-Time Metrics
- Click the Inventory tab in the top menu.
- Select the Services menu table on the left, and then navigate to the EJB resource.
Note
It is probably easier to search for the session bean by name, if you know it. - Click the Monitoring tab on the EJB resource entry.
- Click the Schedules subtab.
- Select the Method Invocation Time metric. This metric is the calltime type.

- Click the at the bottom of the list.
21.5. Configuring Response Time Metrics for JBoss EAP 6/AS 7
21.5.1. Installing the Response Time Filters
- Make sure that you have created a management user to access the JBoss EAP 6 instance.For more information, see the JBoss AS 7.1 documentation.
- In the connection properties for the EAP 6 instance, configure the agent to connect using the secure HTTPS management interface.
Note
To collect response time metrics, the EAP 6 agent plug-in must be configured to connect to the secure HTTPS management interface. - Download the response time packages for JBoss from the JBoss ON UI. The response time filters are packaged as AS 7 modules. There are two modules to obtain:
rhq-rtfilter-module.zip
rhq-rtfilter-subsystem-module.zip
Note
This can also be done from the command line usingwget:[root@server ~]# wget http://server.example.com:7080/downloads/connectors/rhq-rtfilter-module.zip [root@server ~]# wget http://server.example.com:7080/downloads/connectors/rhq-rtfilter-subsystem-module.zip
- Click the Administration tab in the top menu.
- In the Configuration menu box on the left, select the item.

- Click the rhq-rtfilter-module.zip and
rhq-rtfilter-subsystem-module.ziplinks, and save the files to an accessible directory, like the/tmpdirectory.
- Open the
modules/directory for the JBoss EAP 6 instance. For example:[root@server ~]# cd /opt/jboss-eap-6.0/modules/
- Unzip the
rhq-rtfilter-module.ziparchive to install the response time filter JAR and the associatedmodule.xmlfile.[root@server modules]# unzip /tmp/rhq-rtfilter-module.zip
- Open the configuration file for the server,
domain.xmlorstandalone.xml. - Deploy the response time module globally by adding the module to the list of global modules in the <subsystem> element.
<profile...
	<subsystem xmlns="urn:jboss:domain:ee:1.1">
		<global-modules>
		    <module name="org.rhq.helpers.rhq-rtfilter" slot="main"/>
		</global-modules>
	</subsystem>
</profile>
- Save the file.
- Unzip the
rhq-rtfilter-subsystem-module.ziparchive to install the subsystem response time filter JAR and the associatedmodule.xmlfile.[root@server modules]# unzip /tmp/rhq-rtfilter-subsystem-module.zip
This installs the filters as a subsystem for the application server or individual web apps. - After the filters have been installed, the JBoss EAP 6 server needs to be configured to use them.The response time filter can be deployed globally, for all web applications hosted by the EAP/AS instance, or it can be configured for a specific web application.To deploy the filter as a global subsystem:
- Open the configuration file for the server,
domain.xmlorstandalone.xml. - Add the an
<extensions>element for the response time filter.<extension module="org.rhq.helpers.rhq-rtfilter-subsystem"/>
- Add a
<subsystem>element beneath the<profileelement.All that is required for response time filtering to work is the default<subsystem>element, without any optional parameters. However, the parameters can be uncommented and set as necessary; the different ones are described in Table 21.1, “Parameters Available for User-Defined <filter> Settings”.The<subsystem>element should be added even if none of the optional parameters are set.<subsystem xmlns="urn:rhq:rtfilter:1.0"> <!-- Optional parameters. <init-param> <param-name>chopQueryString</param-name> <param-value>true</param-value> </init-param> <init-param> <param-name>logDirectory</param-name> <param-value>/tmp</param-value> </init-param> <init-param> <param-name>logFilePrefix</param-name> <param-value>localhost_7080_</param-value> </init-param> <init-param> <param-name>dontLogRegEx</param-name> <param-value></param-value> </init-param> <init-param> <param-name>matchOnUriOnly</param-name> <param-value>true</param-value> </init-param> <init-param> <param-name>timeBetweenFlushesInSec</param-name> <param-value>73</param-value> </init-param> <init-param> <param-name>flushAfterLines</param-name> <param-value>13</param-value> </init-param> <init-param> <param-name>maxLogFileSize</param-name> <param-value>5242880</param-value> </init-param> --> </subsystem>
To configure the response time filters for an individual web application:- Open the web application's
web.xmlfile.[root@server ~]# vim WARHomeDir/WEB-INF/web.xml
- Add the filter and, depending on the configuration, filter mapping elements to the file. This activates the response time filtering.All that is required for response time filtering to work is the default
<filter>element, without any optional parameters. However, the parameters can be uncommented and set as necessary; the different ones are described in Table 21.1, “Parameters Available for User-Defined <filter> Settings”.<filter> <filter-name>RhqRtFilter</filter-name> <filter-class>org.rhq.helpers.rtfilter.filter.RtFilter</filter-class> <!-- Optional parameters. <init-param> <param-name>chopQueryString</param-name> <param-value>true</param-value> </init-param> <init-param> <param-name>logDirectory</param-name> <param-value>/tmp</param-value> </init-param> <init-param> <param-name>logFilePrefix</param-name> <param-value>localhost_7080_</param-value> </init-param> <init-param> <param-name>dontLogRegEx</param-name> <param-value></param-value> </init-param> <init-param> <param-name>matchOnUriOnly</param-name> <param-value>true</param-value> </init-param> <init-param> <param-name>timeBetweenFlushesInSec</param-name> <param-value>73</param-value> </init-param> <init-param> <param-name>flushAfterLines</param-name> <param-value>13</param-value> </init-param> <init-param> <param-name>maxLogFileSize</param-name> <param-value>5242880</param-value> </init-param> --> </filter> <!-- Use this only when also enabling the RhqRtFilter in the filter <filter-mapping> <filter-name>RhqRtFilter</filter-name> <url-pattern>/*</url-pattern> </filter-mapping> -->
- Restart the JBoss EAP/AS server to load the new
web.xmlsettings.
Table 21.1. Parameters Available for User-Defined <filter> Settings
|
Parameter
|
Description
|
|---|---|
|
chopQueryString
|
Only the URI part of a query will be logged if this parameter is set to true. Otherwise the whole query line will be logged. Default is true.
|
|
logDirectory
|
The directory where the log files will be written to. Default setting is {
jboss.server.log.dir}/rt/ (usually server/xxx/log/rt). If this property is not defined, the fallback is {java.io.tmpdir}/rt/ (/tmp/ on UNIX®, and ~/Application Data/Local Settings/Temp – check the TEMP environment variable) is used. If you specify this init parameter, no directory rt/ will be created, but the directory you have provided will be taken literally.
|
|
logFilePrefix
|
A prefix that is put in front of the log file names. Default is the empty string.
|
|
dontLogRegEx
|
A regular expression that is applied to query strings. See java.util.regex.Pattern. If the parameter is not given or an empty string, no pattern is applied.
|
|
matchOnUriOnly
|
Should the dontLogRegEx be applied to the URI part of the query (true) or to the whole query string (false). Default is true.
|
|
timeBetweenFlushesInSec
|
Log lines are buffered by default. When the given number of seconds have passed and a new request is received, the buffered lines will be flushed to disk even if the number of lines to flush after (see next point) is not yet reached.. Default value is 60 seconds (1 Minute).
|
|
flushAfterLines
|
Log lines are buffered by default. When the given number of lines have been buffered, they are flushed to disk. Default value is 10 lines.
|
|
maxLogFileSize
|
The maximum allowed size, in bytes, of the log files; if a log file exceeds this limit, the filter will truncate it; the default value is 5242880 (5 MB).
|
|
vHostMappingFile
|
This properties file must exist on the Tomcat process classpath. For example, in the ../conf/vhost-mappings.properties. The file contains mappings from the 'incoming' vhost (server name) to the vhost that should be used as the prefix in the response time log file name. If no mapping is present (no file or no entry response times are set), then the incoming vhost (server name) is used. For example:
pickeldi.users.acme.com=pickeldi
pickeldi=
%HOST%=
The first mapping states that if the incoming vhost is 'host1.users.acme.com', then the log file name should get a vhost of 'host1' as prefix, separated by a _ from the context root portion. The second mapping states that if the 'incoming' vhost is 'host1', then no prefix, and no _, should be used. The third mapping uses a special left-hand-side token, '%HOST%'. This mapping states that if the 'incoming' vhost is a representation of localhost then no prefix, and no _ , should be used.
%HOST% will match the host name, or canonical host name or IP address, as returned by the implementation of InetAddress.getLocalHost().
The second and third mappings are examples of empty right hand side, but could just as well have provided a vhost.
This is a one time replacement. There is no recursion in the form that the result of the first line would then be applied to the second one.
|
21.5.2. Enabling the Call-Time Metric
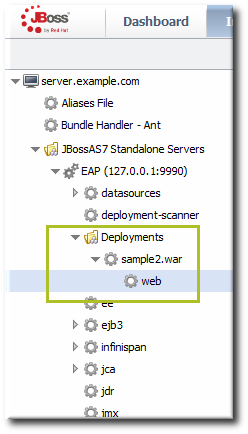
Figure 21.2. Web Runtime Resource
- Click the Inventory tab in the top menu.
- Click the Servers - Top Level Imports item, and select the JBoss EAP 6 resource.
- Navigate to the deployment resource, and expand the application to the web subsystem.
- Click the Monitoring tab on the web resource entry.
- Click the Schedules subtab.
- Select the Response Time metric. This metric is the calltime type.
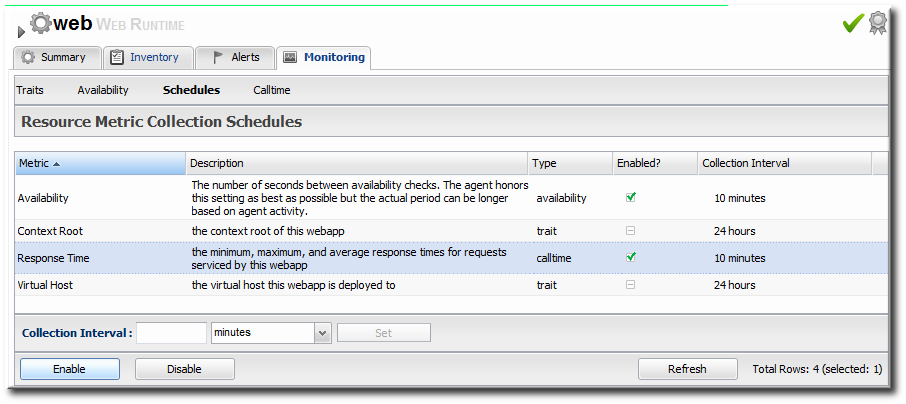
- Click the at the bottom of the list.
- Click the Inventory tab on the web entry.
- Select the Connection Settings subtab.
- Unset the check boxes for the response time configuration and fill in the appropriate values for the web application.

- The response times log which is used by that specific web application. The log file is a required setting for call-time data collection to work..
- Any files, elements, or pages to exclude from response time measurements. The response times log records times for all resources the web server serves, including support files like CSS files and icons or background images.
- The same page can be accessed with different parameters passed along in the URL. The Response Time Url Transforms field provides a regular expression that can be used to strip or substitute the passed parameters.
21.6. Setting up Response Time Monitoring for Apache, EWS/Tomcat, and JBoss EAP 5
21.6.1. Parameters for User-Defined <filter>s
Table 21.2. Parameters for User-Defined <filter>s
|
Parameter
|
Description
|
|---|---|
|
chopQueryString
|
Only the URI part of a query will be logged if this parameter is set to true. Otherwise the whole query line will be logged. Default is true.
|
|
logDirectory
|
The directory where the log files will be written to. Default setting is {
jboss.server.log.dir}/rt/ (usually server/xxx/log/rt). If this property is not defined, the fallback is {java.io.tmpdir}/rt/ (/tmp/ on UNIX®, and ~/Application Data/Local Settings/Temp – check the TEMP environment variable) is used. If you specify this init parameter, no directory rt/ will be created, but the directory you have provided will be taken literally.
|
|
logFilePrefix
|
A prefix that is put in front of the log file names. Default is the empty string.
|
|
dontLogRegEx
|
A regular expression that is applied to query strings. See java.util.regex.Pattern. If the parameter is not given or an empty string, no pattern is applied.
|
|
matchOnUriOnly
|
Should the dontLogRegEx be applied to the URI part of the query (true) or to the whole query string (false). Default is true.
|
|
timeBetweenFlushesInSec
|
Log lines are buffered by default. When the given number of seconds have passed and a new request is received, the buffered lines will be flushed to disk even if the number of lines to flush after (see next point) is not yet reached.. Default value is 60 seconds (1 Minute).
|
|
flushAfterLines
|
Log lines are buffered by default. When the given number of lines have been buffered, they are flushed to disk. Default value is 10 lines.
|
|
maxLogFileSize
|
The maximum allowed size, in bytes, of the log files; if a log file exceeds this limit, the filter will truncate it; the default value is 5242880 (5 MB).
|
|
vHostMappingFile
|
This properties file must exist in the Tomcat process classpath. For example, in the
conf/vhost-mappings.properties file. The file contains mappings from the 'incoming' vhost (server name) to the vhost that should be used as the prefix in the response time log file name. If no mapping is present (no file or no entry response times are set), then the incoming vhost (server name) is used. For example:
pickeldi.users.acme.com=pickeldi
pickeldi=
%HOST%=
The first mapping states that if the incoming vhost is 'host1.users.acme.com', then the log file name should get a vhost of 'host1' as prefix, separated by a _ from the context root portion. The second mapping states that if the 'incoming' vhost is 'host1', then no prefix, and no _, should be used. The third mapping uses a special left-hand-side token, '%HOST%'. This mapping states that if the 'incoming' vhost is a representation of localhost then no prefix, and no _ , should be used.
%HOST% will match the host name, or canonical host name or IP address, as returned by the implementation of InetAddress.getLocalHost().
The second and third mappings are examples of empty right hand side, but could just as well have provided a vhost.
This is a one time replacement. There is no recursion in the form that the result of the first line would then be applied to the second one.
|
21.6.2. Installing Response Time Filters for JBoss EAP/AS 5
- Download the Response Time packages for JBoss from the JBoss ON UI.
Note
This can also be done from the command line usingwget:[root@server ~]# wget http://server.example.com:7080/downloads/connectors/connector-rtfilter.zip
- Click the Administration tab in the top menu.
- In the Configuration menu box on the left, select the item.
- Click the connector-rtfilter.zip link, and save the file.
- Unzip the connectors.
[root@server ~]# unzip connector-rtfilter.zip
- Copy the
rhq-rtfilter-version.jarfile into thelib/directory for the profile.[root@server ~]# cp connector-rtfilter/rhq-rtfilter-version.jar JbossHomeDir/server/profileName/lib/
JBoss EAP/AS already includes thecommons-logging.jarfile, which is also required for response time filtering. - Then, configure the
web.xmlfor the EAP/AS instance.The response time filter can be deployed globally, for all web applications hosted by the EAP/AS instance or it can be configured for a specific web application.To configure it globally, edit the globalweb.xmlfile:[root@server ~]# vim JbossHomeDir/server/configName/deployers/jbossweb.deployer/web.xml
To configure it for a single web app, edit that one web app'sweb.xmlfile:[root@server ~]# vim WARLocation/WEB-INF/web.xml
- Add the filter and, depending on the configuration, filter mapping elements to the file. This activates the response time filtering.All that is required for response time filtering to work is the default
<filter>element, without any optional parameters. However, the parameters can be uncommented and set as necessary; the different ones are described in Table 21.2, “Parameters for User-Defined <filter>s”.<filter> <filter-name>RhqRtFilter</filter-name> <filter-class>org.rhq.helpers.rtfilter.filter.RtFilter</filter-class> <!-- Optional parameters. <init-param> <param-name>chopQueryString</param-name> <param-value>true</param-value> </init-param> <init-param> <param-name>logDirectory</param-name> <param-value>/tmp</param-value> </init-param> <init-param> <param-name>logFilePrefix</param-name> <param-value>localhost_7080_</param-value> </init-param> <init-param> <param-name>dontLogRegEx</param-name> <param-value></param-value> </init-param> <init-param> <param-name>matchOnUriOnly</param-name> <param-value>true</param-value> </init-param> <init-param> <param-name>timeBetweenFlushesInSec</param-name> <param-value>73</param-value> </init-param> <init-param> <param-name>flushAfterLines</param-name> <param-value>13</param-value> </init-param> <init-param> <param-name>maxLogFileSize</param-name> <param-value>5242880</param-value> </init-param> --> </filter> <!-- Use this only when also enabling the RhqRtFilter in the filter <filter-mapping> <filter-name>RhqRtFilter</filter-name> <url-pattern>/*</url-pattern> </filter-mapping> --> - Restart the JBoss EAP/AS server to load the new
web.xmlsettings. - Enable the HTTP metrics, as described in Section 21.6.5, “Configuring HTTP Response Time Metrics”, so that JBoss ON checks for the response time metrics on the application server.
21.6.3. Configuring Apache Servers for Response Time Metrics
- To use the Response Time module, the Apache server needs to have been compiled with shared object support. For Red Hat Enterprise Linux systems and EWS servers, this is enabled by default.To verify that the Apache server was compiled with shared object support, use the
apachectl -lcommand to list the compiled modules and look for themod_so.cmodule:[root@server ~]# apachectl -l Compiled in modules: core.c prefork.c http_core.c mod_so.c
Use the- -enable-module=sooption:[jsmith@server ~]$ ./configure - -enable-module=so [jsmith@server ~]$ make install
- Download the Apache binaries from the JBoss ON UI.
- Log into the JBoss ON UI.
https://server.example.com:7080
- Click the Administration tab in the top menu.
- In the Configuration menu box on the left, select the item.
- Click the connector-apache.zip link, and save the file.
- Extract the Apache connectors.
[root@server ~]# unzip connector-apache.zip
- Compile the Response Time module.
Note
apxsmust be installed, andmakemust be installed and in the user PATH.[root@server ~]# cd apacheMOduleRoot/apache-rt/sources [root@server sources]# chmod +x build_apache_module.sh [root@server sources]# ./build_apache_module.sh 2.x apache_install_directory/bin/apxs
- Then, install the Response Time module on the Apache server.
[root@server sources]# cp apache2.x/.libs/mod_rt.so apache_install_directory/modules
- Open the
httpd.conffile. For example:[root@server ~]# vim apache_install_directory/conf/httpd.conf
- Enable the module in the Apache's
httpd.conffile by appending this line to the end of the file:LoadModule rt_module modules/mod_rt.so LogFormat "%S" rt_log
When setting the log format, the variable%Shas a capital S. - To configure response time logging for the main Apache server, add the following line at the top level of the file:
CustomLog logs/myhost.com80_rt.log rt_log
To configure response time logging for a virtual host, add the following line somewhere within the<VirtualHost>block:CustomLog logs/myhost.com8080_rt.log rt_log
Make sure the response time log file name is different for the main server and each virtual host. Consider using the host and port from theServerNamedirective be used to form the file name, such as host_port_rt.log. - Restart the Apache server:
[root@server ~]# apachectl -k restart
- To confirm that the Response Time module was installed successfully, check that the response time log files configured via the CustomLog directive now exist.
- Enable the HTTP metrics, as described in Section 21.6.5, “Configuring HTTP Response Time Metrics”, so that JBoss ON checks for the response time metrics on the application server.
21.6.4. Installing Response Time Filters for Tomcat
- Download the Response Time packages for Tomcat from the JBoss ON UI.
- Click the Administration tab in the top menu.
- In the Configuration menu box on the left, select the item.
- Click the connector-rtfilter.zip link, and save the file.
- Unzip the Response Time connectors.
unzip connector-rtfilter.zip
The package contains two JAR files,commons-logging-version.jarandrhq-rtfilter-version.jar. Tomcat 5 servers use only thecommons-logging-version.jarfile, while Tomcat 6 servers require both files. - Copy the appropriate JAR files into the Tomcat configuration directory. The directory location depends on the Tomcat or JBoss instance (for embedded Tomcat) being modified.For example, on a standalone Tomcat 5.5:
cp commons-logging-version.jar /var/lib/tomcat5/server/lib/
On Tomcat 6:cp rhq-rtfilter-version.jar /var/lib/tomcat6/lib/ cp commons-logging-version.jar /var/lib/tomcat6/lib/
For example, on an embedded Tomcat instance:cp rhq-rtfilter-version.jar JBoss_install_dir/server/default/deploy/jboss-web.deployer/ cp commons-logging-version.jar JBoss_install_dir/server/default/deploy/jboss-web.deployer/
- Open the
web.xmlfile to add the filter definition. The exact location of the file depends on the server instance and whether it is a standalone or embedded server; several common locations are listed in Table 21.3, “web.xml Configuration File Locations”. - Add either a
<filter>or a<filter-mapping>entry to configuration the Response Time filter in the Tomcat server. Either a<filter>or a<filter-mapping>entry can be used, but not both.The most basic filter definition references simply the Response Time filter name and class in the<filter>element. This loads the response time filter with all of the default settings.<filter> <filter-name>RhqRtFilter </filter-name> <filter-class>org.rhq.helpers.rtfilter.filter.RtFilter </filter-class> </filter>The filter definition can be expanded with user-defined configuration values by adding<init-paramelements. This loads the response time filter with all of the default settings.<filter> <filter-name>RhqRtFilter </filter-name> <filter-class>org.rhq.helpers.rtfilter.filter.RtFilter </filter-class> <init-param> <description>Name of vhost mapping file. This properties file must be in the Tomcat process classpath.</description> <param-name>vHostMappingFile</param-name> <param-value>vhost-mappings.properties</param-value> </init-param> ... </filter>The available parameters are listed in Table 21.2, “Parameters for User-Defined <filter>s”.Alternatively, set a<filter-map>entry which gives the name of the response time filter and pattern to use to match the URL which will be monitored.<filter-mapping> <filter-name>RhqRtFilter </filter-name> <url-pattern>/* </url-pattern> </filter-mapping>Note
Put the Response Time filter in front of any other configured filter so that the response time metrics will include all of the other response times, total, in the measurement. - Restart the Tomcat instance to load the new configuration.
- Enable the HTTP metrics, as described in Section 21.6.5, “Configuring HTTP Response Time Metrics”, so that JBoss ON checks for the response time metrics on the application server.
Table 21.3. web.xml Configuration File Locations
| Tomcat Version | Embedded Server Type | File Location |
|---|---|---|
| Tomcat 6 | Standalone Server | /var/lib/tomcat6/webapps/project/WEB-INF/web.xml |
| Tomcat 5 | Standalone Server | /var/lib/tomcat5/webapps/project/WEB-INF/web.xml |
| Tomcat 6 | EAP 5 | JBOSS_HOME/server/config/deployers/jbossweb.deployer/web.xml |
| Tomcat 6 | JBoss 4.2, JBoss EAP4 | JBOSS_HOME/server/config/deploy/jboss-web.deployer/conf/web.xml |
| Tomcat 5.5 | JBoss 4.0.2 | JBOSS_HOME/server/config/deploy/jbossweb-tomcat55.sar/conf/web.xml |
| Tomcat 5.0 | JBoss 3.2.6 | JBOSS_HOME/server/config/deploy/jbossweb-tomcat50.sar/conf/web.xml |
| Tomcat 4.1 | JBoss 3.2.3 | JBOSS_HOME/server/config/deploy/jbossweb-tomcat41.sar/web.xml |
21.6.5. Configuring HTTP Response Time Metrics
- Install the response time filter for the web server.For Apache, simply install the filters; for Tomcat, there is additional configuration required to set up the filter entry in the
web.xmlfile.If necessary, set up the filter entry in theweb.xmlfile. See Section 21.6, “Setting up Response Time Monitoring for Apache, EWS/Tomcat, and JBoss EAP 5”. - Click the Inventory tab in the top menu.
- Select the Servers menu table on the left, and then navigate to the web application, and select the web application context for which to run the response time monitoring.
- Click the Connection Settings tab on the web application context resource, and scroll to the Response Time configuration section.
- Configure the response time properties for the web server. The agent has to know what log file the web server uses to record response time data.Optionally, the server can perform certain transformations on the collected data.
- The response times log records times for all resources the web server serves, including support files like CSS files and icons or background images. These resources can be excluded from the response time calculations in the Response Time Url Excludes field.
- The same page can be accessed with different parameters passed along in the URL. The Response Time Url Transforms field provides a regular expression that can be used to strip or substitute the passed parameters.

- Click the button.
- Click the Monitoring tab on the web server resource entry.
- Click the Schedules subtab.
- Select the HTTP Response Time metric. This metric is the calltime type.

- Click the at the bottom of the list.
Chapter 22. Resource Traits
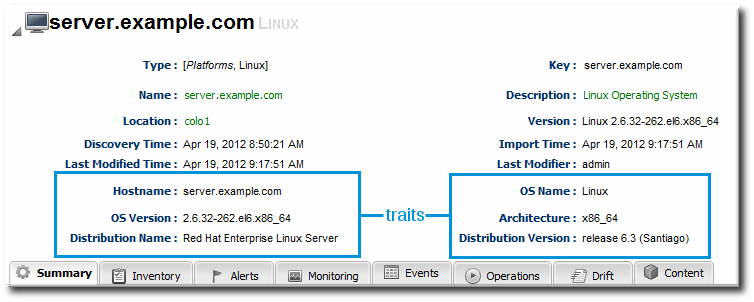
Figure 22.1. Resource Details
22.1. Collection Interval
22.2. Viewing Traits
- The trait name. The traits which are monitored for a resource are defined with other monitoring settings in the resource type's plug-in descriptor.
- The trait value.
- The time of the last collection where a change in trait information was detected.
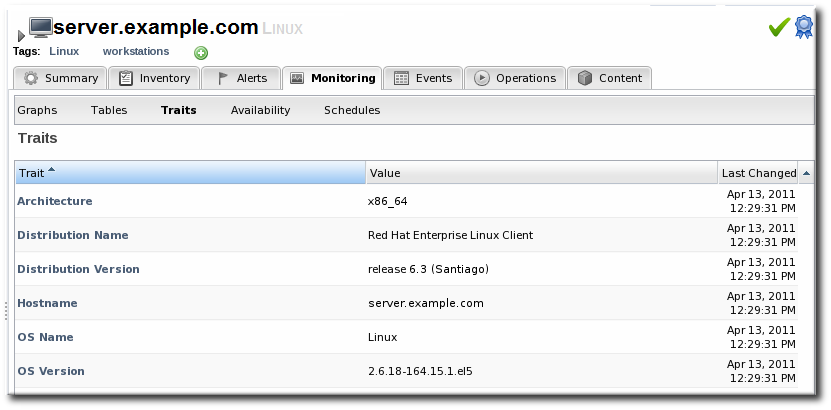
Figure 22.2. Trait Charts
22.3. Extended Example: Alerting and Traits
Trait information tends to be static. While traits can, and do, change, they do so infrequently. Also, traits convey descriptive information about a resource, not state data or dynamic measurements, so traits are not critical for IT administrators to track closely.
For example, Tim the IT Guy has automatic updates configured for his Red Hat Enterprise Linux development and QA servers. Because his production environment has controlled application and system updates, there are no automatic updates for those servers.
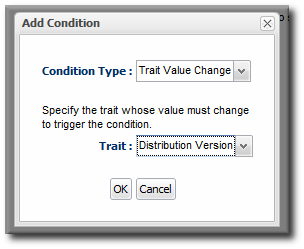
Figure 22.3. Trait Alert Condition
- He sets two conditions, using an OR operator. The alert triggers when the distribution version changes or when the operating system version changes. This catches both minor and major updates to the operating system or kernel.
- It is set to low priority so it is informative but not critical.
- Tim decides that the alert notification is sent to his JBoss ON user, so he sees notifications when he logs in. He could also configure an email notification for high-priority resources.
Chapter 23. Resources Which Require Special Configuration for Monitoring
23.1. Configuring Tomcat/JWS Servers for Monitoring
Note
23.2. Configuring the Apache SNMP Module
Important
apachectl -l command to list the compiled modules and look for the mod_so.c module:
[root@server ~]# apachectl -l
Compiled in modules:
  core.c
  prefork.c
  http_core.c
  mod_so.c
--enable-module=so option:
$ ./configure --enable-module=so
$ make install
- Download the Apache binaries from the JBoss ON UI.
- Log into the JBoss ON UI.
https://server.example.com:7080
- Click the Administration tab in the top menu.
- In the Configuration menu box on the left, select the item.
- Scroll to Connector Downloads, and click the
connector-apache.ziplink to download the Apache connectors.
- Unzip the Apache connectors in a directory that is accessible to the JBoss ON agent.
unzip connector-apache.zip
- Each Apache version and platform has its own package that contains the Apache-SNMP connectors. Extract the Apache connectors in a directory that is accessible to the JBoss ON agent. Binaries are available for Red Hat Enterprise Linux 32-bit and 64-bit and Windows 32-bit.For example, on Red Hat Enterprise Linux 32-bit:
[jsmith@server ~]$ cd apacheModuleRoot/apache-snmp/binaries/
[jsmith@server binaries]$ tar xjvf snmp_module-x86-linux-apache#.tar.bz2
# is the Apache server version number.Note
Apache connectors can be compiled for other platforms, like Solaris, from the source files inapacheRoot/apache-snmp/binaries/sources. For example:[jsmith@server ~]$ cd JON_AGENT_INSTALL_DIR/product_connectors/apache-snmp/sources [jsmith@server sources]$ ./build_apache_snmp.sh APACHE_VERSION APACHE_2.x_INSTALL_DIR/bin/apxs
To compile the Apache-SNMP connector,apxs,perl,make, andautomakemust all be installed and in userPATH. - Install the module. For example:
[root@server ~]# cd apacheModuleRoot/apache-snmp/binaries/snmp_module_#

[root@server snmp_module]# cp module/* apache_install_directory/modules

[root@server snmp_module]# cp conf/* apache_install_directory/conf

[root@server snmp_module]# mkdir apache_install_directory/var
On Windows:> xcopy /e JON_AGENT_INSTALL_DIR\product_connectors\apache-snmp\binaries\x86
- Open the
httpd.conffile for editing. For example:[root@server ~]# vim apache_install_directory/conf/httpd.conf
- Enable the module by adding these lines to the
httpd.conffile.LoadModule snmpcommon_module modules/libsnmpcommon.so LoadModule snmpagt_module modules/libsnmpmonagt.so SNMPConf conf SNMPVar var
For Windows:LoadModule snmpcommon_module modules/snmpcommon.so LoadModule snmpagt_module modules/snmpmonagt.so SNMPConf conf SNMPVar var
- Make sure the main Apache configuration section, as well as each
<VirtualHost>configuration block, contains aServerNamedirective with a port. The SNMP module uses this directive to uniquely identify the main server and each virtual host, so eachServerNamedirective must contain a unique value. For example:ServerName main.example.com:80 ... <VirtualHost vhost1.example.com:80> ServerName vhost1.example.com:80 ... </VirtualHost>
- If there is more than one Apache instance on the same machine, it is possible to use different SNMP files for each instance.
- Each Apache instance has its own
httpd.conffile. Set theSNMPConfdirectory in each file to its own SNMP configuration directory. For example, for instance1:vim instance1-httpd.conf SNMPConf /opt/apache-instance1/conf
Then, for instance2:vim instance2-httpd.conf SNMPConf /opt/apache-instance2/conf
Eachsnmpd.conffile should be in the specified directory. - Edit the
agentaddressproperty in apache_install_directory/conf/snmpd.confso that each instance has a different value agent address and port, so there is no conflict between instances.See the snmpd.conf documentation for a description of this property's syntax.
- Restart the Apache server. For example:
apachectl -k restart
- Verify that the SNMP module was properly installed. If the module is loaded, then there will be lines referencing the SNMP module in the errors log:
grep SNMP apache_installation_dir/logs/error_log

[Wed Mar 19 09:54:34 2008] [notice] Apache/2.0.63 (Unix) CovalentSNMP/2.3.0 configured -- resuming normal operations
[Wed Mar 19 09:54:35 2008] [notice] SNMP: CovalentSNMP/2.3.0 started (user '1000' - SNMP address '1610' - pid '26738')
23.3. Metrics Collection Considerations with Apache and SNMP
- Bytes received for GET requests per minute
- Bytes received for POST requests per minute
- Total number of bytes received per minute
Chapter 24. Storing Monitoring Data
- Raw metrics are collected every few minutes and are aggregated in a rolling average in one-hour windows to produce minimum, average, and maximum values.
- One-hour values are combined and averaged in six-hour periods.
- Six-hour periods are combined and aggregated into 24-hour (1 day) windows.
24.1. Changing Storage Lengths for Monitoring Data
24.1.1. Default Storage Lengths
Table 24.1. Storage Times for Data
| Data | Length of Time | Configurable or Hardcoded | SQL or NoSQL Database |
|---|---|---|---|
| Raw measurements | 7 days | Hardcoded | NoSQL |
| 1-hour aggregate | 14 days | Hardcoded | NoSQL |
| 6-hour aggregate | 31 days | Hardcoded | NoSQL |
| 24-hour aggregate | 365 days | Hardcoded | NoSQL |
| Traits | 365 days | Configurable | SQL |
| Availability data | 365 days | Configurable | SQL |
| Events data | 14 days | Configurable | SQL |
| Response-time metrics | 31 days | Configurable | SQL |
Note
Note
24.1.2. Changing the Storage Times for Different Monitoring Data
- In the System Configuration menu, select the item.
- Scroll to the Data Manager Configuration Properties section.
- Change the storage times for the different types of monitoring data.
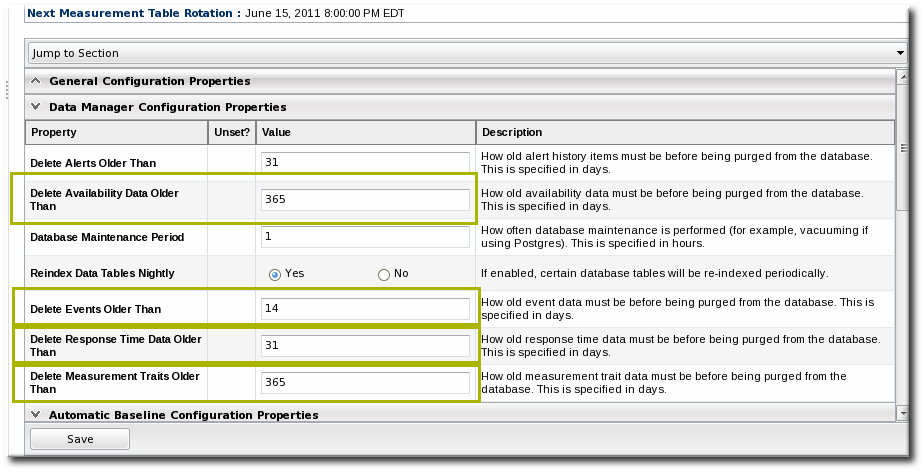 There are four settings that relate directly to storing monitoring data:
- Response time data for web servers and EJB resources. This is kept for one month (31 days) by default.
- Events information, meaning all of the log files generated by the agent for the resource. The default storage time for event logs is two weeks.
- Traits for resources. The default time is one year (365 days).
- Availability information. The default time is one year (365 days).
24.2. Exporting Raw Data
MeasurementDataManager class has a method to find the metric values for a specific resource within a certain time range:
findDataForResource(resourceId,[metricId],startTime,endTime,numberOfRecords)
exporter.file = '/export/metrics/metrics.csv'
exporter.format = 'csv'
var start = new Date() - 8* 3600 * 1000;
var end = new Date()
var data = MeasurementDataManager.findDataForResource(10003,[10473],start,end,60)
exporter.write(data.get(0))
24.3. Deploying and Managing Storage Nodes
24.3.1. About High-Speed Metrics Storage
Note
- Dedicated CPU
- More available physical memory
- Faster disks
- More disk space
rhqctl install --storage command. The storage node always requires a companion agent.
- The agent sends the storage node configuration to the JBoss ON server. The JBoss ON server then sends that updated storage cluster information to every agent associated with a storage node.Each companion agent then updates its storage cluster configuration, in the
rhq-storage-auth.conf, with the hostname or IP address of the new node. (Likewise, when a node is removed, the server sends the information to each of the companion agents, and the agent removes the hostname or IP address from the list in the local storage node'srhq-storage-auth.conffile.) - The server receives monitoring data from all agents (not just those associated with a storage node), and sends that information to an available storage node to be stored.
- The storage nodes replicate their monitoring data among each other for high availability and integrity.
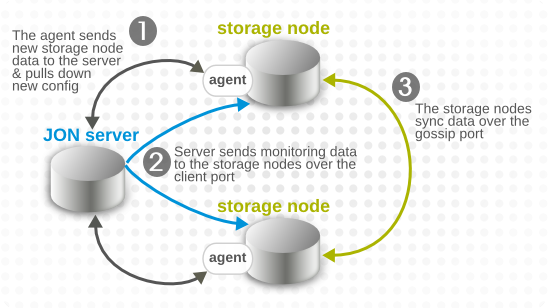
Figure 24.1. Server, Agent, and Metrics Storage Node Communication
- The hostname or IP address of every storage node, stored in the
rhq-storage-auth.conf - A common port number for the JBoss ON server to use to communicate with the storage node (the client port)
- A common port number for the other storage nodes in the cluster to use to sync data between each other (the gossip port)
- Replicating data between the storage nodes (over the gossip port)
- Taking local snapshots and backing up the data locally
24.3.2. Deploying and Undeploying Storage Nodes
- The bits are installed on a local system and the storage node is registered with the JBoss ON server.
- The new node information is deployed to the cluster.
24.3.2.1. Storage Node Requirements
- The hostnames and IP addresses of all storage nodes and the hostname and bind addresses of the JBoss ON server and agents must all be fully-resolvable in DNS. If the IP addresses and hostnames of the storage nodes, servers, or agents are not properly formatted in DNS, then all communication between the different JBoss ON components will fail.
- The firewall must allow communication over the two ports used by the storage nodes. By default, the ports are 9142 and 7100 for the server/client and gossip ports, respectively.
24.3.2.2. Installing Additional Nodes
rhq-storage.properties file with the correct ports before running the installation script.
--agent-preference option to supply the server bind address. For example:
[root@server ~]# serverRoot/jon-server-3.2.GA1/bin/rhqctl install --storage --agent-preference="rhq.agent.server.bind-address=0.0.0.0"
Note
rhqctl command must be run as root. On Windows, the command prompt must be opened with the option Run as Administrator.
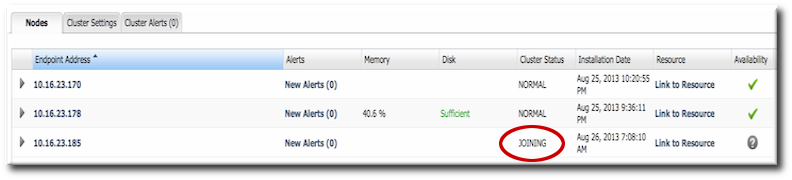
Figure 24.2. Joining the Cluster
Warning
rhq-storage-auth.conf file so that the allowed hosts list cannot be altered to allow an attacker to gain access to the cluster and the stored data.
24.3.2.3. Deploying Nodes Manually
Warning
rhq-storage-auth.conf file so that the allowed hosts list cannot be altered to allow an attacker to gain access to the cluster and the stored data.
- Install a node using the
rhqctl installcommand. - Click the Administration tab in the top navigation bar.
- In the Topology area on the left, select the Storage Nodes item.

- In the Nodes tab, select the row of the node to deploy.

- Click the button.
Deploy operation on the storage node resource.
Note
// deploy a storage node
nodes = StorageNodeManager.findStorageNodesByCriteria(StorageNodeCriteria());
node = nodes.get(0); StorageNodeManager.deployStorageNode(node);
24.3.2.4. Removing Nodes
- Click the Administration tab in the top navigation bar.
- In the Topology area on the left, select the Storage Nodes item.
- In the Nodes tab, select the row of the node to remove. To select multiple rows, hold the Ctrl key and click the desired rows.
- Click the button, and confirm the operation.
Undeploy operation on the storage node resource.
Note
// undeploy a storage node
nodes = StorageNodeManager.findStorageNodesByCriteria(StorageNodeCriteria());
node = nodes.get(0); StorageNodeManager.undeployStorageNode(node);
Chapter 25. Defining Alerts
25.1. Planning Alerts
- The information that identifies that specific alert definition — the name, priority, and whether it is active (Section 25.1.2, “Basic Procedure for Setting Alerts for a Resource”)
- The conditions that trigger the alert, which depends on the area of the resource being monitored (Section 25.2, “Alert Conditions”)
- The method and settings to use to send the alert (Section 25.3, “Alert Responses”)
25.1.1. An Alerting Strategy in Four Questions
25.1.1.1. What's the Condition?
25.1.1.2. What's the Frequency?
25.1.1.3. What's the Response to Take?
25.1.1.4. How Many Resources Does This Affect?
Note
25.1.2. Basic Procedure for Setting Alerts for a Resource
Note
- Click the Inventory tab in the top menu.
- Select the resource type in the Resources menu table on the left, and then browse or search for the resource.
- Click the resource name in the list.
- Click the Alerts tab for the resource.
- In the Definitions subtab, click the New button to create the new alert.
- In the General Properties tab, give the basic information about the alert.
- Name. Gives the name of the specific alert definition. This must be unique for the resource.
- Description. Contains an optional description of the alert; this can be very useful if you want to trigger different kinds of alert responses at different conditions for the same resource.
- Priority. Sets the priority or severity that is given to an alert triggered by this definition.
- Enabled. Sets whether the alert definition is active. Alert definitions can be disabled to prevent unnecessary or spurious alerts if there is, for instance, a network outage or routine maintenance window for the resource.
- In the Conditions tab, set the metric or issue that triggers the alert. Click the Add button to bring up the conditions form.

Note
There can be more than one condition set to trigger an alert. For example, you may only want to receive a notification for a server if its CPU goes above 80% and its available memory drops below 25MB. The ALL setting for the conditions restricts the alert notification to only when both criteria are met. Alternatively, you may want to know when either one occurs so that you can immediately change the load balancing configuration for the network. In that case, the ANY setting fires off a notification as soon as even one condition threshold is met.- Click the Add a new condition button.
- From the initial drop-down menu, select the type of condition. The categories of conditions are described in Table 25.1, “Types of Alert Conditions”, and the exact conditions available to be set for every resource are listed in the Resource Monitoring Reference.
- Set the values for the condition.
- In the Notifications tab, click Add to set a notification for the alert.
- Select the method to use to send the alert notification in the Sender option.The Sender option first sets the specific type of alert method (such as email or SNMP) and then opens the appropriate form to fill in the details for that specific method.
- Fill in the required information for the alert sender method. The method may require contact information, SNMP settings, operations, or scripts, depending on what is selected.

- In the Recovery tab, set whether to disable an alert until the resource state is recovered. Optionally, select another alert to enable (or recover) when this alert fires.
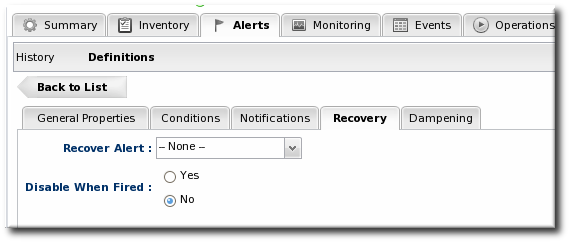 A recover alert takes a disabled alert and re-enables it. This is used for two alerts which show changing states, like a pair of alerts to show when availability goes down and then back up.
 - In the Dampening tab, give the dampening (or frequency) rule on how often to send notifications for the same alert event.The frequency for sending alerts depends on the expected behavior of the resource. There has to be a balance between sending too many alerts and sending too few. There are several frequency settings:
- Consecutive. Sends an alert if the condition occurs a certain number of times in a row for metric calculations. For example, if this is set to three, then the condition must be detected in three consecutive metric collection periods for the alert to be fired. If this is set to one, then it sends an alert every time the condition occurs.
- Last N evaluations. This sets a number of times that the condition has to occur in a given number of monitoring evaluations cycles before an alert is sent.
- Time period. The other two similar dampening rules set a recurrence based on the JBoss ON monitoring cycles. This sets the alerting rule based on a specific time period.
- Click OK to save the alert definition.
25.1.3. Enabling and Disabling Alert Definitions
- Click the Inventory tab in the top menu.
- Select the resource type in the Resources menu table on the left, and then browse or search for the resource.
- Click the Alerts tab.
- In the Definitions subtab, select any of the definitions to enable or disable.
- Click the Enable or Disable button.
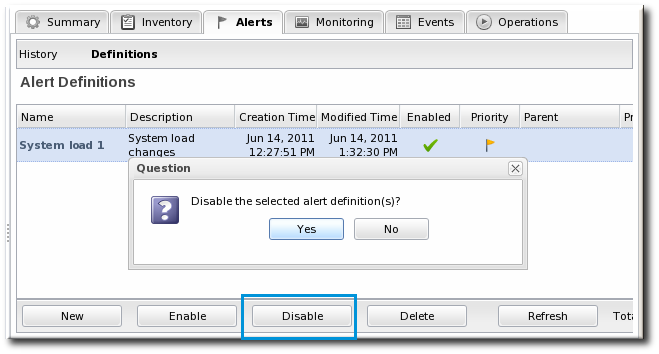
- Confirm the action.
25.1.4. Group Alerting and Alert Templates
- Alert templates
- Alerts on compatible groups
Note
25.1.4.1. Creating Alert Definition Templates
Note
- In the top navigation, open the Administration menu, and then the System Configuration menu.
- Select the Alert Templates menu item. This opens a long list of resource types, both for platforms and server types.
- Locate the type of resource for which to create the template definition.
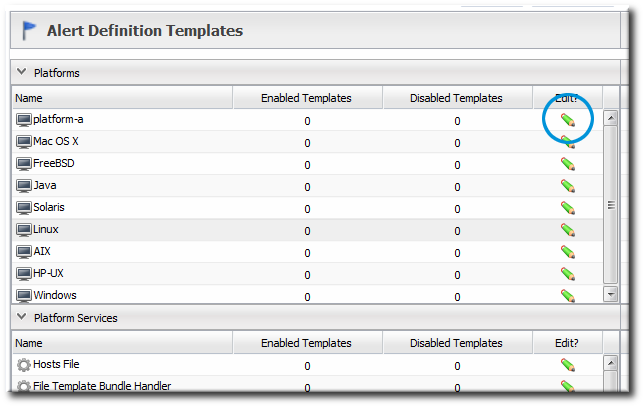
- Click the button to create a global alert definition. Set up the alert exactly the same way as setting an alert for a single resource (as in Section 25.1.2, “Basic Procedure for Setting Alerts for a Resource”).

- Save the template.
25.1.4.2. Configuring Group Alerts
- In the Inventory tab in the top menu, select the Compatible Groups item in the Groups menu on the left.
- In the main window, select the group to add the alert to.
- Click the Alerts tab for the group.
- In the Definitions subtab, click the button.

- Configure the basic alert definition and notifications, as in Section 25.1.2, “Basic Procedure for Setting Alerts for a Resource”.
25.2. Alert Conditions
25.2.1. Reasons for Firing an Alert
Table 25.1. Types of Alert Conditions
| Condition Type | Description |
|---|---|
| Metric | A specific monitoring area that is checked and the thresholds for that area which trigger a response. Metrics are usually numeric responses of some sort (e.g., percent CPU usage, number of requests, or a cache hit ratio). |
| Trait | A change in a value for a specific setting. Traits are usually string values. |
| Availability | A sudden change in whether the resource is available or unavailable. |
| Operation | A specific action or task that is performed on the resource. |
| Events | A certain type of error message, matching a given string, is recorded. Events are filtered from system or application log files, and the types of events recognized in JBoss ON depend on the event configuration for the resource. |
| Drift | A resource has changed from a predefined configuration. |
25.2.2. Detailed Discussion: Ranges, AND, and OR Operators with Conditions
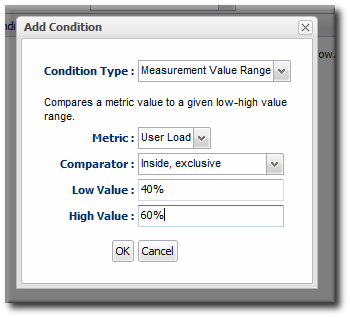
Figure 25.1. Alert Condition Range
25.2.3. Detailed Discussion: Conditions Based on Log File Messages
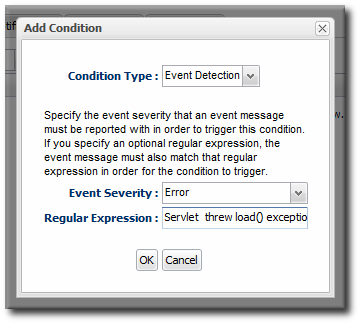
Figure 25.2. Log File Conditions
Note
25.2.4. Detailed Discussion: Dampening

Figure 25.3. Dampening Filter
- JBoss ON could send an alert every time the condition is encountered. In that case, there would be multiple alerts issued if the CPU percentage bounced around, while only one alert would be sent if it hit it briefly or hit it and stayed there.
- JBoss ON could send an alert only if the condition was encountered a certain number of times consecutively or X number of times out of Y number of polls. In this case, only a recurring or sustained problem would trigger an alert. A momentary spike or trough wouldn't be enough to fire a notification.A condition may need to occur several times over a short period of time for it to be a problem, but once is not a problem. For example, a server may bounce between 78% and 80% CPU over several minutes, it could hit 80% once for only a few seconds, or it could hit 80% and stay there. The condition may only be relevant if the CPU hits 80% and stays, and the other readings can be ignored.
- A notification is sent only if the problem occurs within a set time period. This can be useful to track the frequency of recurring problems or to track how long a condition persisted.
Note
25.2.5. Detailed Discussion: Automatically Disabling and Recovering Alerts
- A pair of alerts work as mutual toggle switches. When one alert is active, the other is disabled. When Alert A is fired, it can be set to recover a specified Alert B — so Alert B essentially takes its place.
- Alerts work as a kind of cascade. If Alert A is fired, that enables Alert B, which then enables Alert C. In some situations, any one given condition may not be a problem, but it becomes a problem if they occur sequentially in a short amount of time.
Figure 25.4. Disable and Recover Alerts
Tim the IT Guy has several servers that he uses for email routing and other business operations, and then he has a couple of machines that he holds in reserve as backups.
mail-server-a.example.com has his primary mail server, and he only wants to bring mail-server-b.example.com online if mail-server-a goes offline, and then he wants it to go back in reserve when mail-server-a comes back.
Tim creates a set of alert definitions to help handle the transition between his mail servers.
- The first alert definition fires when the
mail-server-aplatform changes availability state to goes down.The notification does a couple of things:- Deploy a bundle with the latest mail server configuration to another platform,
mail-server-b. - Execute a command-line script on
mail-server-bto start the mail service. - Email Tim the IT Guy to let him know that
mail-server-ais unavailable.
For recovery, the alert does two things:- Disable the current alert. It only needs to fire once, to get the backup server online.
- Recover (or enable) Alert B, so that JBoss ON waits for
mail-server-ato come back up.
- The second alert definition, Alert B, is only in effect while mail-server-a is offline. This alert fires as soon as
mail-server-bchanges availability state to goes up.- This alert definition basically waits around as long as
mail-server-ais down. Whenmail-server-ais back online, Alert B's notification is to execute a command-line script onmail-server-bto stop the mail service. - Alert B also sends a notification email to Tim the IT Guy to let him know that
mail-server-ais available again.
For recovery, the alert does two things:- Disable the current alert. Like with Alert A, Alert B only needs to fire once, to shut off the backup as soon as the primary server is back.
- Recover (or enable) Alert A, so the JBoss ON waits again for
mail-server-ato go down.
25.3. Alert Responses
Important
25.3.1. Notifying Administrators and Responding to Alerts
- Email, to one or multiple addresses
- SNMP traps
- Messages to JBoss ON users
- Running a resource operation (on the alerting resource or any other resource in inventory)
- Running a resource script (specific type of resource operation)
- JBoss ON CLI scripts
Note
Note
25.3.2. Detailed Discussion: Initiating an Operation
- Alert operations are fired responsively to address any alert or event.
- Alert operations can be initiated on any resource in the JBoss ON inventory, not only the resource which sent the alert. That means that an operation can be run for a different application on the same host server or even on an entirely different server.
25.3.2.1. Using Tokens with Alert Operations
<%space.param_name%>
alert or resource. The param_name gives the entry value that is being supplied. For example, to point to the URL of the specific fired alert, the token would be <%alert.url%>, while to pull in the resource name, the token would be <%resource.name%>.
Table 25.2. Available Alert Operation Tokens
| Information about ... | Token | Description |
|---|---|---|
| Fired Alert | alert.willBeDisabled | Will the alert definition be disabled after firing? |
| Fired Alert | alert.id | The id of this particular alert |
| Fired Alert | alert.url | Url to the alert details page |
| Fired Alert | alert.name | Name from the defining alert definition |
| Fired Alert | alert.priority | Priority of this alert |
| Fired Alert | alert.description | Description of this alert |
| Fired Alert | alert.firedAt | Time the alert fired |
| Fired Alert | alert.conditions | A text representation of the conditions that led to this alert |
| Alerting Resource | resource.id | ID of the resource |
| Alerting Resource | resource.platformType | Type of the platform the resource is on |
| Alerting Resource | resource.platformName | Name of the platform the resource is on |
| Alerting Resource | resource.typeName | Resource type name |
| Alerting Resource | resource.name | Name of the resource |
| Alerting Resource | resource.platformId | ID of the platform the resource is on |
| Alerting Resource | resource.parentName | Name of the parent resource |
| Alerting Resource | resource.parentId | ID of the parent resource |
| Alerting Resource | resource.typeId | Resource type id |
| Target Resource | targetResource.parentId | ID of the target's parent resource |
| Target Resource | targetResource.platformName | Name of the platform the target resource is on |
| Target Resource | targetResource.platformId | ID of the platform the target resource is on |
| Target Resource | targetResource.parentName | Name of the target's parent resource |
| Target Resource | targetResource.typeId | Resource type of the target resource id |
| Target Resource | targetResource.platformType | Type of the platform the target resource is on |
| Target Resource | targetResource.name | Name of the target resource |
| Target Resource | targetResource.id | ID of the target resource |
| Target Resource | targetResource.typeName | Resource type name of the target resource |
| Operation | operation.id | ID of the operation fired |
| Operation | operation.name | Name of the operation fired |
25.3.2.2. Setting Alert Operations
Note
Figure 25.5. Senders
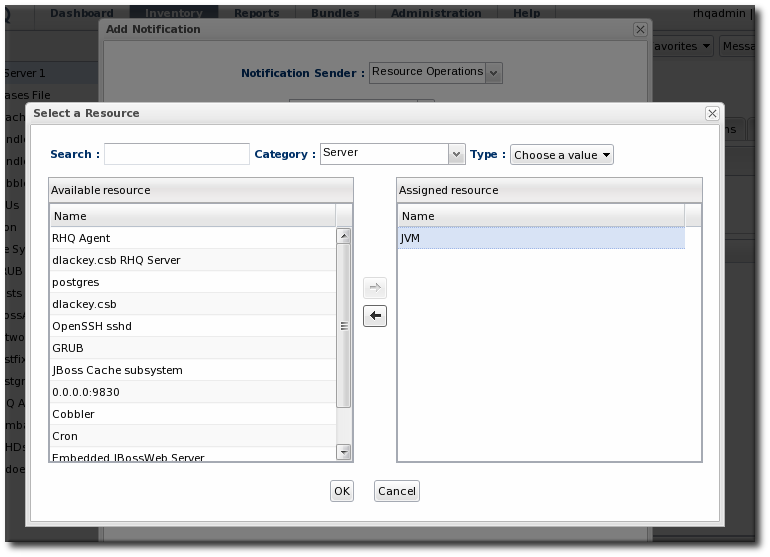
Figure 25.6. Resource Selection
Important
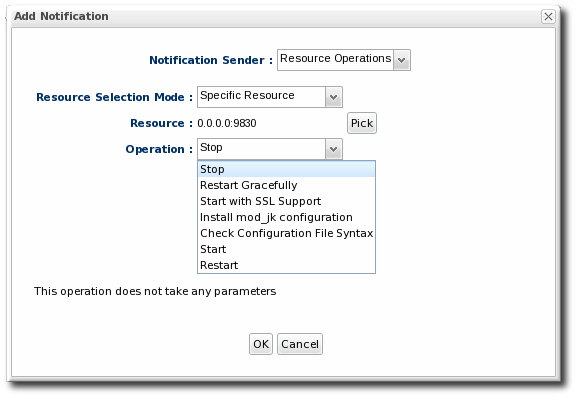
Figure 25.7. Operation Settings
25.3.3. Detailed Discussion: Initiating Resource Scripts
Note
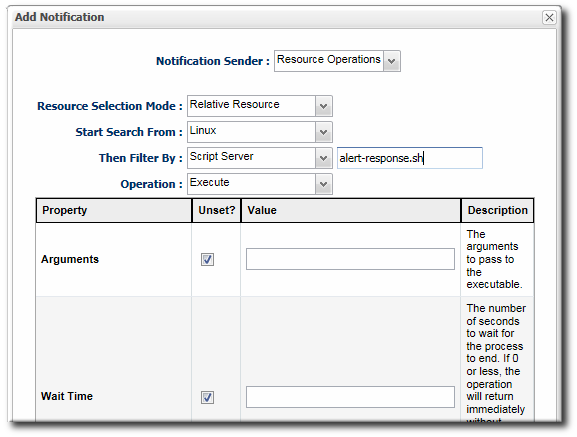
Figure 25.8. Resource Script Settings
Important
25.3.4. Detailed Discussion: Launching JBoss ON CLI Scripts from an Alert
25.3.4.1. Notes for Using CLI Script Notifications
Unlike resource scripts, CLI scripts are not treated as resources in the inventory. These are tools available to and used by the JBoss ON server itself (not limited or associated with any given resource).
The CLI script must use the proper API to perform the operation on the server. JBoss ON has several different API sets, depending on the task being performed. To connect to a server and run a script requires the remoting API, which allows commands to be executed on the server remotely.
The CLI script can actually reference an alert object for the alert which triggers the script by using a pre-defined alert variable.
alert variable implicitly identifies the alert definition and specific alert instance which has been fired. This allows you to create a proxy resource definition in the script that could be applied to any resource which uses that alert script.
var myResource = ProxyFactory.getResource(alert.alertDefinition.resource.id)
The resources themselves may impose limits on where a CLI script can be run or what operations it can perform. For example, for security reasons, a CLI script cannot perform a JNDI lookup on a local resource (performing a lookup on the server running the CLI script), but it can perform a remote JNDI lookup. Another common issue is that a JBoss ON server cannot run a restart operation on itself.
25.3.4.2. Writing Alert-Relevant CLI Scripts
var myResource = ProxyFactory.getResource(alert.alertDefinition.resource.id)

var definitionCriteria = new MeasurementDefinitionCriteria()
definitionCriteria.addFilterDisplayName('Sessions created per Minute')
definitionCriteria.addFilterResourceTypeId(myResource.resourceType.id)

var definitions = MeasumentDefinitionManager.findMeasurementDefinitionsByCriteria(definitionCriteria)

if (definitions.empty) {
   throw new java.lang.Exception("Could not get 'Sessions created per Minute' metric on resource "
      + myResource.id)
}

var definition = definitions.get(0)

var startDate = new Date() - 8 * 3600 * 1000 //8 hrs in milliseconds
var endDate = new Date()

var data = MeasurementDataManager.findDataForResource(myResource.id, [ definition.id ], startDate, endDate, 60)

exporter.setTarget('csv', '/the/output/folder/for/my/metrics/' + endDate + '.csv')

exporter.write(data.get(0))

var dataSource = ProxyFactory.getResource(10411)

connectionTest = dataSource.testConnection()

if (connectionTest == null || connectionTest.get('result').booleanValue == false) {
    //ok, this means we had problems connecting to the database
    //let's suppose there's an executable bash script somewhere on the server that
    //the admins use to restart the database
    java.lang.Runtime.getRuntime().exec('/somewhere/on/the/server/restart-database.sh')
}/alert-scripts/.
25.3.4.3. Configuring a CLI Script Notification
- Upload the script to a content repository.
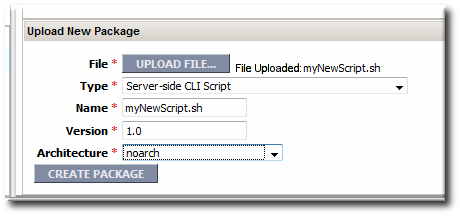
Note
Create a separate repository for alert CLI scripts. - Search for the resource, and configure the basic alert definition, as in Section 25.1.2, “Basic Procedure for Setting Alerts for a Resource”.
- In the Notifications tab for the alert definition, give the notification method a name, and select the CLI Script method from the drop-down menu.
- First, select the JBoss ON user as whom to run the script. The default is as the user who is creating the notification.

- Select the repository which contains the CLI script. If you are uploading a new script, this is the repository to which the script will be added.
- Select the CLI script to use from the drop-down menu, which lists all of the scripts in the specified repository. Alternatively, click the button to browse to a script on the local machine.
- Click to save the notification. The line in the Notifications tab shows the script, the repository, and the user as whom it will run.

25.3.5. Configuring SNMP for Notifications
- Configuring the SNMP alert plug-in for the server.
- Configuring the actual alert with an SNMP notification.
25.3.5.1. JBoss ON SNMP Information
/etc/RHQ-mib.txt. The default configuration for the MIB is shown in Example 25.1, “Default Alert Object in JBoss ON MIB”. The base OID for the JBoss ON alert is 1.3.6.1.4.1.18016.2.1 (org.dod.internet.private.enterprise.jboss.rhq.alert).
Example 25.1. Default Alert Object in JBoss ON MIB
--internet(1.3.6.1)
+--private(4)
| +--enterprises(1)
| +--jboss(18016)
| +--rhq(2)
| +--alert(1)
| | +-- r-n DisplayString alertName(1)
| | +-- r-n DisplayString alertResourceName(2)
| | +-- r-n DisplayString alertPlatformName(3)
| | +-- r-n DisplayString alertCondition(4)
| | +-- r-n DisplayString alertSeverity(5)
| | +-- r-n DisplayString alertUrl(6)
| | +-- r-n DisplayString alertHierarchy(7)
| +--alertNotifications(2)
| | +--alertNotifPrefix(0)
| | +--alertNotification(1) [alertName,alertResourceName,alertPlatformName,alertCondition,alertSeverity,alertUrl,alertHierarchy]
| +--rhqServer(3)
+--snmpV2(6)
+--snmpModules(3)
+--rhqMIB(1)
+--rhqTraps(3)
+--rhqTrapPrefix(0)
Note
[root@server ~]# snmptrapd -m RHQ-MIB -M/opt/local/share/mibs/ietf
-M gives the path to the SNMP server's MIB directory.
Jul 8 15:13:31 snert snmptrapd[42372]: 127.0.0.1: Enterprise Specific Trap (.0) Uptime: 0:00:00.00, RHQ-MIB::alertName = STRING: test, RHQ-MIB::alertResourceName = STRING: snert, RHQ-MIB::alertPlatformName = STRING: snert, RHQ-MIB::alertCondition = STRING:
- Condition 1: Free Memory < 1.024,0MB
- Date/Time: 2013/07/08 15:13:05 MESZ
- Details: 12,9MB
, RHQ-MIB::alertSeverity = STRING: medium, RHQ-MIB::alertUrl = STRING: http://localhost:7080/coregui/CoreGUI.html#Resource/10001/Alerts/History/12204, RHQ-MIB::alertHierarchy = STRING: snert
tcpdump, just all on the same line:
22:06:19.043208 IP localhost.56445 > localhost.snmptrap: Trap(352) E:18016.2.3 0.0.0.0 enterpriseSpecific s=0 0 E:18016.2.1.1="test" E:18016.2.1.2="snert" E:18016.2.1.3="snert" E:18016.2.1.4="^J- Condition 1: Free Memory < 4,0GB^J- Date/Time: 2013/07/10 22:06:01 MESZ^J - Details: 179,2MB^J" E:18016.2.1.5="medium" E:18016.2.1.6="http://localhost:7080/coregui/CoreGUI.html#Resource/10001/Alerts/History/10038" E:18016.2.1.7="snert"
25.3.5.2. Configuring the SNMP Alert Plug-in
- In the top menu, select the Administration tab.
- In the System Configuration menu, select the ServerPlugins item.

- Click the name of the SNMP plug-in in the list.

- In the plug-in details page, expand the Plugin Configuration section.
- Fill in the required SNMP configuration:
- Select the appropriate SNMP version.
- Give the hostname, port number, and transport protocol for the SNMP trap server. The default settings point to the localhost for the JBoss ON server and port 162.
- Set the trap OID. This is, by default, the RHQ OID.
- For SNMP 1 and 2. Give the name of the community.

Note
This sets global defaults for SNMP alert notifications. Different settings can be given to individual alert notifications when an alert definition is created. - SNMP version 1 and version 3 both require additional configuration, as listed in Table 25.3, “SNMP v1 Configuration Settings” and Table 25.4, “SNMP v3 Configuration Settings”. Expand the version-specific configuration section and fill in the information about the SNMP agent.
 It may be necessary to unselect the Unset checkbox to allow the fields to be edited.
Table 25.3. SNMP v1 Configuration Settings
| Field | Description |
|---|---|
| Generic ID | The ID of the trap. The SNMP standards defines numbers from 0-6, with 6 meaning "enterprise specific," which is the default. |
| Enterprise OID | The OID of the JBoss ON server itself. The default value is taken from the RHQ MIB as SMIv2.enterprise.jboss.rhq.rhqServer. |
| Specific OID | A custom OID to use with the trap notification. This can be empty. |
| Agent address | The IP address of the alert sender, which means the IP address of the JBoss ON server. |
Table 25.4. SNMP v3 Configuration Settings
| Field | Description |
|---|---|
| Auth protocol | The encryption algorithm for authentication requests. Setting this requires a corresponding authentication passphrase to be set. If there is no passphrase, this value must be none. |
| Privacy protocol | Sets the encryption method used with trap messages. This is used with the authentication proocol. |
| Engine Id | |
| Target Context name | |
| Auth passphrase | Sets the password used for authentication; this has a miminum length of eight (8) characters. This is required if an Auth Protocol value is set. |
| Privacy passphrase | Sets the password used for managing encrypted communication. This is required if authentication is used. |
| Security name | Gives the username to use for authentication to the trap receiver. |
25.3.5.3. Configuring the SNMP Alert Notification
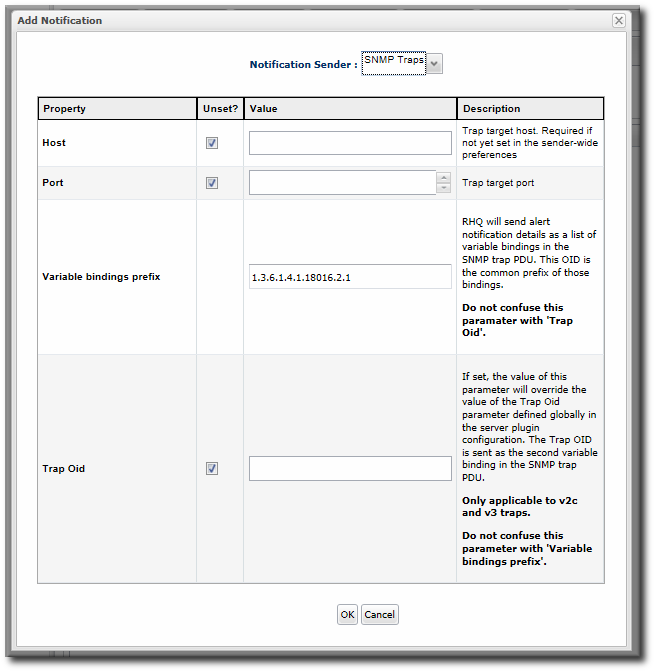
Figure 25.9. JBoss ON SNMP Trap Information
- The hostname for the SNMP manager. If this is not set, the default from the global configuration is used.
- The port number for the SNMP manager. If this is not set, the default from the global configuration is used.
- A variable binding prefix. Optional. This prepends the given string to the beginning of the individual variables sent by the trap. This can be a way to identify the JBoss ON server, resource, or alert which is sending the trap. The default is set in the RHQ MIB,
SMIv2.enterprise.jboss.rhq.alert. - The trap OID. This is the specific OID to use with the trap definition. If this is not set, the default from the global configuration is used; by default, this is the RHQ-MIB,
1.3.6.1.4.1.18016.2.1.
25.4. Viewing Alert Data
25.4.1. Viewing the Alert Definitions Report
- Select the Reports tab in the top navigation bar.
- In the Subsystems menu box on the left, select Alert Definitions.
- The definitions report shows a list of all configured definitions, for all resources in the inventory.
 The results table provide the most basic information for the definitions:
- The resource (Name).
- The parent or ancestry. Since resources are arranged hierarchically, sorting by the parent is very useful for finding all alert definitions for all services and applications that relate to a high-level resource like a server.
- The description of the alert.
- Whether it is active (enabled).
Note
Note
alertDefinitions.csv.
25.4.2. Viewing Alerts
25.4.2.1. Viewing Alert Details for a Specific Resource
Note
- Click the Inventory tab in the top menu.
- Select the resource type in the Resources menu table on the left, and then browse or search for the resource.
- Click the resource in the list.
- Click the Alerts tab, and make sure that the History subtab is selected.
- In the list, click the timestamp or alert definition name for the fired alert.

- The alert page has tabs for each detail for the alert, including which alert definition was triggered, the conditions that triggered, and any operations that were launched as a result.

25.4.2.2. Viewing the Fired Alerts Report
- Select the Reports tab in the top navigation bar.
- In the Subsystems menu box on the left, select Recent Alerts.

- The resource (Name)
- The parent (ancestor)
- The name of the definition which triggered the alert
- The condition which triggered the alert
- The value of the resource at the time the alert was sent
- The date, which is very useful for correlating the alert notification to an external event
Note
Note
recentAlerts.csv.
25.4.2.3. Viewing Alerts in the Dashboard
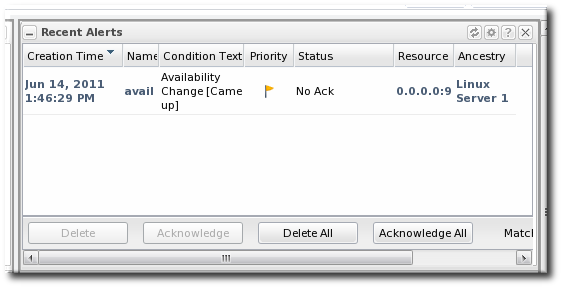
Figure 25.10. Recent Alerts Portlet
- A time range for when the alert was fired
- The alert priority (which is initially configured in the alert definition)
- In the top menu, click Dashboard.
- In the Recent Alerts portlet, click the gear icon to open the portlet configuration page.

- Change the display criteria as desired.
25.4.3. Acknowledging an Alert
- Through the Recent Alerts Report
- Through a group
- Through the resource entry
- Select the Reports tab in the top navigation bar.
- In the Subsystems menu box on the left, select Recent Alerts.
- Select the alert to acknowledge.
- Click the Acknowledge button, and, when prompted, confirm the action.

Note

Figure 25.11. Alert Acknowledgment
Part IV. Deploying Applications and Content
Chapter 26. Summary: Using JBoss ON to Deploy Applications and Update Content
- Resource-level content through the Content tabs
- Provisioning applications through bundles
- It can deliver packages, updates, and patches to a resource.
- It can deploy content to a resource and even create a new child resource. This is particularly useful with web and application servers which can have different contexts as children.
- It can discover the current packages installed on a resource, creating a package digest that administrators can use to manage that asset.
- Use Ant calls to perform operations before or after deploying the bundle
- Allow user-defined values or edits to configuration at the time a bundle is provisioned
- Have multiple versions of the same content bundle deployed and deployable to resources at the same time
- Revert to an earlier bundle version
Chapter 27. Deploying Content and Applications Through Bundles
27.1. An Introduction to Provisioning Content Bundles
27.1.1. Bundles: Content and Recipes
deploy.xml; this must always be located in the top level of the bundle archive.
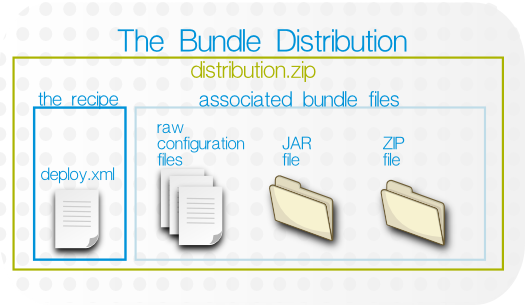
Figure 27.1. Bundle Layout
27.1.2. Destinations (and Bundle Deployments)
- A compatible resource group (of either platforms or JBoss servers)
- A base location, which is the root directory to use to deploy the bundle. Resource plug-ins define a base location for that specific resource type in the
<bundle-target>element. This can be the root directory or, for JBoss servers, common directories like the profile directory. There may be multiple available base locations. - The deployment directory, which is a subdirectory beneath the base directory where the bundle content is actually sent.
deploy/myApp/ directory. The JBoss AS5 plug-in defines two possible base locations, one for the installation directory and one for the profile directory. The administrator chooses the profile directory, since the application is an exploded JAR file. The agent then derives the real, absolute path of the application from those three elements:
JBoss AS group + {$PROFILE_DIR} + deploy/myApp//opt/jbossas/default/server/, then the destination is:
/opt/jbossas/default/server/deploy/myApp/
C:\jbossas\server\, then the path is derived slightly differently, appropriate for the platform:
C:\jbossas\default\server\deploy\myApp
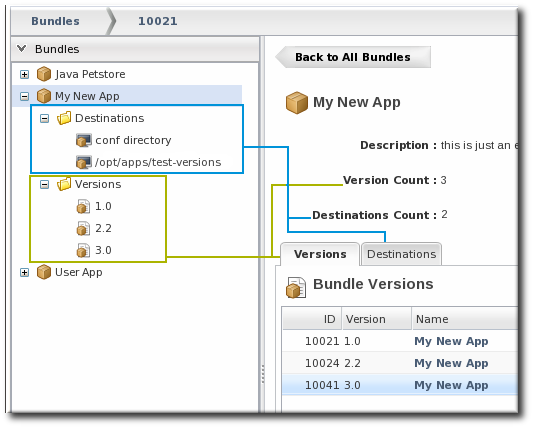
Figure 27.2. Bundles, Versions, and Destinations
27.1.3. File Handling During Provisioning
A bundle file contains a set of files and directories that should be pushed to a resource. However, the provisioning process does not merely copy the files over to the deployment directory. Provisioning treats a bundle as, essentially, a template that defines the entire content structure for the target (root) directory.
app.conf
lib/myapp.jar
deploy/myApp/, then the final configuration is going to be:
deploy/myApp/app.conf
deploy/myApp/lib/myapp.jar
deploy/myApp/, then they will be removed before the bundle is copied over, so that the deployment directory looks exactly the way the bundle is configured.
deploy/myApp/, then that behavior is totally acceptable because the defined application content should be the only content in that directory. However, bundles can contain a variety of content and can be deployed almost anywhere on a platform or within a JBoss server. In a lot of real life infrastructures, the directory where the bundle is deployed may have existing data that should be preserved.
compliance option can be set to filesAndDirectories, which means that provisioning will copy over the bundle and create the appropriate files and subdirectories, but it will not manage (remove) the existing content in the directory.
Warning
/etc on a platform or a critical directory like deploy/ or conf/, then all of the existing files and subdirectories in that directory are deleted. This can cause performance problems or data loss.
Even if the compliance option is set to filesAndDirectories, subdirectories and files contained in the bundle are always managed by the bundle, even if they existed before the bundle was deployed.
deploy/ directory has this layout before any bundle is deployed:
deploy/
deploy/notes.txt
deploy/myApp1/
deploy/myApp2/
deploy/myApp2/first.txt
myApp2/
myApp2/foo.txt
myApp2/bar.txt
compliance is set to filesAdDirectories, the existing files in the deploy/ remain untouched, except for what is in the myApp2/ subdirectory, because that directory is defined by the bundle. So, the final directory layout is this:
deploy/ (ignored)
deploy/notes.txt (ignored)
deploy/myApp1/ (ignored)
deploy/myApp2/ (managed)
myApp2/foo.txt (managed)
myApp2/bar.txt (managed)
Note
/home/.rhqdeployments/resourceID/backup.
After the initial deployment, there can be instances where files are added to the deployment directory, such as log files or additional data.
<rhq:ignore> element, which tells the provisioning process to ignore those files within the deployment directory.
27.1.4. Requirements and Resource Types
- Platforms, all types
- JBoss EAP 6 (AS 7) standalone servers[5]
- JBoss EAP 5 and any server which uses the JBoss AS 5 plug-in
- JBoss EAP 4 (deprecated)
27.1.5. Provisioning and Agent User System Permission
27.1.6. Provisioning and Roles
27.1.7. Space Considerations for Bundles
27.1.8. Bundles and JBoss ON Server and Agent Plug-ins
27.1.8.1. Resource Support and the Agent Resource Plug-in
<bundle-target> element simply defines allowed base directories for the resource which can be used as base directories in the bundle definition.
<server name="JBossAS:JBossAS Server" ...>
   <bundle-target>
      <destination-base-dir name="Library Directory" description="Where the jar libraries are">
         <value-context>pluginConfiguration</value-context>
         <value-name>lib.dir</value-name>
      </destination-base-dir>
      <destination-base-dir name="Deploy Directory" description="Where the deployments are">
         <value-context>pluginConfiguration</value-context>
         <value-name>deploy.dir</value-name>
      </destination-base-dir>
   </bundle-target>
</server><bundle-target> can use the already-configured base directory or it can set different directories to use. In the example, two directories — the deploy/ and lib/ directories — are given as supported base directories. When a bundle definition is created, the wizard offers the choice of which directory to use.
27.1.8.2. Server-Side and Agent Plug-ins for Recipe Types
Note
27.1.9. Managing and Deploying Bundles with the JBoss ON CLI
- A new JBoss application server can be deployed when an existing JBoss server experiences a heavy load or decreased performance.
- Configuration files for a selected snapshot image can be immediately deployed to a platform or JBoss server to remedy configuration drift, in response to a drift alert.
- A new web context can be deployed when another web is disabled within a
mod_clusterdomain.
27.2. Extended Example: Common Provisioning Use Cases (and How They Handle Files)
- Deploying a full application server
- Deploying a web application to an application server
- Deploying configuration files
Important
27.2.1. Deploying A Full Application Server
This is the core use for the provisioning system, deploying an entire application server. This bundle contains the complete configuration stack for a server like JBoss EAP (or Tomcat or Apache). The bundle contains all of the files used by the application — the JAR and configuration files and scripts for the EAP server, and all EAR or WAR web applications that are to be deployed on that EPA instance. All of the application server and web app files and directories are zipped into an archive, with the deploy.xml which defines the Ant recipe.
Because this is a complete application server, it will be deployed into its own, new (or empty) directory, such as /opt/my-application. That directory will be dedicated to the application server, so it will be entirely managed by the bundle.
compliance is set to full. This means:
- Only files and subdirectories in the bundle distribution file will be in the root directory.
- Any existing files or subdirectories will be deleted.
- If files or subdirectories are added to the root directory, then they will be deleted when the bundle is updated or redeployed, unless those files are explicitly ignored (a setting in the recipe).
27.2.2. Deploying A Web Application
/opt/my-application/deploy
myApp1.war to the deploy/ directory.
/opt/my-application/deploy/myapp1.war/
In this case, the bundle file contains only the WAR file itself and the deploy.xml recipe.
Unlike the application server, when deploying the web app, there are or could be other web apps also in the deploy/ directory. The bundle system, then, should not manage the root directory, meaning existing or new files should be allowed within the root directory even if they are not included in the bundle.
compliance=fileAndDirectories, which tells the provisioning system to leave alone any existing files in the directory that are outside the bundle.
Note
compliance=filesAndDirectories only preserves files outside the bundle deployment. If the bundle directory is deploy/myApp/, then any files in deploy/myApp/ or subdirectories like deploy/myApp/WEB-INF/ will be overwritten or removed when the bundle is deployed. The subdirectories defined in the bundle distribution are still entirely managed by the bundle system.
- Include all of the web applications in the same bundle distribution. For example, to deploy
myApp1.warandmyApp2.warto thedeploy/directory, both WAR files can be included in the same bundle and deployed todeploy/myApp1.war/anddeploy/myApp2.war/simultaneously. - It may not be possible to roll all of the web apps into the same bundle. Instead of using
deploy/as the root directory, there could be two different bundle distributions that use a subdirectory as the root directory. For example, the first web app could usedeploy/myApp1/so that the final deployment isdeploy/myApp1/myApp1.war/, while the second app usesdeploy/myApp2/, resulting indeploy/myApp2/myApp2.war/.This allows the two web applications to be deployed, updated, and reverted independently of each other.
27.2.3. Deploying Configuration Files
- New login configuration, in
server/default/conf/login-config/xml - New JMX console users, in
server/default/conf/props/jmx-console.properties
conf/ directory for the application server.
The bundle must contain all of the files that are expected to be in the conf/login-config/ and conf/props/ subdirectories, not just the two new files that the administrator wants to use. Additionally, the compliance parameter in the recipe must be set to filesAndDirectories so that all of the existing configuration files in the root directory, conf/, are preserved.
As with deploying a web app, the intent is to add new content, not to replace existing content. Setting compliance=filesAndDirectories only preserves files outside the bundle deployment. However, because there are two subdirectories defined in the bundle, JBoss ON will manage all of the content in those subdirectories. This means:
- The recipe has to have
compliance=filesAndDirectoriesset for the bundle to preserve the other files in theconf/root directory. - Any files in the subdirectories of the bundle —
conf/log-config/andconf/props/— will be overwritten when the bundle is deployed. The provisioning process can ignore files in the root directory, but it always manages (meaning, updates, adds, or deletes) files in any subdirectories identified in the bundle so that they match the content of the bundle. - Existing files in the
conf/log-config/andconf/props/subdirectories must be included in the bundle distribution.
Note
/opt/bundle/. Then, an Ant post-install task can be defined in the recipe that copies the configuration files from the root directory into the application server's conf/ directory.
27.3. Extended Example: Provisioning Applications to a JBoss EAP Server (Planning)
Tim the IT Guy at Example Co. has to manage the full application lifecycle for Example Music's online band management application, MusicApp. There are two environments: one for QA and one for the live site. Both environments contain a mix of Windows and Linux servers.
The best plan for Tim is to work backwards, starting with the way he wants his ideal QA and production environments to be configured.
- The QA environment needs ...
- New builds directly from the GIT repository, every week.
- A completely clean directory to begin from with every deployment.
- There is a separate QA environment for each of Example Co.'s web applications, so MusicApp is the only application running on those specific servers.
- The production environment needs ...
- A stable build that can be safely stored in JBoss ON.
- To save historic data. The production environment has both log directories and user-supplied data directories that need to be preserved between application upgrades.
- A couple of different web applications run on the same production servers.
- MusicApp should be deployed to the
deploy/directory, but because it is not the only application that they run, it will have its own webapp context subdirectory. While this is not strictly necessary in the devel environment (where MusicApp is the only application), this maintains consistency with the final deployment destination. - Both recipes will configure the application JAR file,
MusicApp.jar, to be exploded when it is deployed. - The client archive file,
MyMusic.jar, will not be exploded (<rhq:file ... exploded="false">). - Tokens are defined in the raw configuration files and the recipe for the port numbers, IP addresses, and application names.
- The QA environment always requires a pristine deployment. This requires three settings:
- The
compliancevalue is always full, so no existing files are preserved during the initial deployment. - No
<rhq:ignore>elements are set, so no generated files are preserved during an upgrade. - The
cleanDeploymentoption is always set in the JBoss ON CLI script that automates deployments. This removes all bundle-associated files in the directory before deploying the new bundle.
- The production environment needs to preserve its existing data between upgrades, which requires two settings:
- The
compliancevalue is always filesAndDirectories, which preserves existing files during the initial deployment. - Two
<rhq:ignore>elements are set, one for the log directory and one for the data directory containing the site member uploads.
deploy.xml with the other application files in a ZIP file and uploads the entire bundle directly to JBoss ON, so it is stored in the JBoss ON database.
deploy.xml separately, but he points the provisioning wizard to the GIT URL for all of the associated packages. When the bundle is deployed, JBoss ON takes the packages from the repository.
Tim deployed version 1 of the bundle to the production environment, and he deployed version 2 to the QA environment.
27.4. The Workflow for Creating and Deploying a Bundle
- Identify what files belong in the archive, such as an application server, an individual web application, configuration files for drift management, or other things.
- Determine how the location where the bundle will be deployed will be handled. Existing files and directories can be overwritten or preserved, depending on the definitions in the recipe. This is covered in Section 27.1.3, “File Handling During Provisioning” and Section 27.5.7.3, “WARNING: The Managed (Target) Directory and Overwriting or Saving Files”.
- Identify what information will be deployment-specific, such as whether the deployed content will require a port number, hostname, or other setting. Some of these values can use tokens in the configuration file and the provisioning process can interactively prompt for the specific value at deployment time.Tokens are covered in Section 27.5.5, “Using Templatized Configuration Files”.
- Create the content which will be deployed.
- Create an Ant recipe, named
deploy.xml. The recipe defines what content and configuration files are part of the bundle and how that content should be deployed on the bundle destination. Pre- and post-install targets are supported, so there can be additional processing on the local system to configure or start services as required.Ant recipes and tasks are covered in Section 27.5.3, “Breakdown of an Ant Recipe” and Section 27.5.4, “Using Ant Tasks”. - After the bundle content, configuration file, and recipe are created, compress all of those files into a bundle archive. This must have the
deploy.xmlrecipe file in the top level of the directory and then the other files in the distribution, relative to thatdeploy.xmlfile. This is illustrated in Section 27.1.1, “Bundles: Content and Recipes”.Note
JBoss ON allows JAR and ZIP formats for the bundle archive. - Optionally, verify that the bundle is correctly formatted by running the bundle deployer tool. This is covered in Section 27.6, “Testing Bundle Packages”.
- Create the groups of resources to which to deploy the bundle.
- Upload the bundle to the JBoss ON server, as described in Section 27.7.2, “Uploading Bundles to JBoss ON”.
- Deploy the bundle to the target groups, as described in Section 27.7.3, “Deploying Bundles to a Resource”.
27.5. Creating Ant Bundles
- An Ant recipe file named
deploy.xml - Any associated application files. These application files can be anything; commonly, they fall into two categories:
- Archive files (JAR or ZIP files)
- Raw text configuration files, which can include tokens where users define the values when the bundle is deployed
Note
27.5.1. Supported Ant Versions
Table 27.1. Ant Versions
| Software | Version |
|---|---|
| Ant |
|
| Ant-Contrib |
|
27.5.2. Additional Ant References
- Apache Ant documentation main page
- Apache Ant documentation for the build file
27.5.3. Breakdown of an Ant Recipe
deploy.xml.
Example 27.1. Simple Ant Recipe
<project> root element and defined targets and tasks. The elements defined in the <rhq:bundle> area pass metadata to the JBoss ON provisioning system when the project is built.
deploy.xml file simply identifies the file as an an script and references the provisioning Ant elements.
<?xml version="1.0"?>
<project name="test-bundle" default="main"
	xmlns:rhq="antlib:org.rhq.bundle">
<rhq:bundle> element contains information about the specific version of the bundle (including, naturally enough, an optional version number).
<rhq:bundle name="Example App" version="2.4" description="an example bundle">
<rhq:bundle> element that defines the name of the application. However, the bundle element contains all of the information about the application and, importantly, how the provisioning system should handle content contained in the application.
port token defined in Section 27.5.5, “Using Templatized Configuration Files”, the <rhq:input-property> element identifies it in the recipe. The name argument is the input_field value in the token, the description argument gives the field description used in the UI and the other arguments set whether the value is required, what its allowed syntax is, and any default values to supply. (This doesn't list the files which use tokens, only the tokens themselves.)
	<rhq:input-property
            name="listener.port"
            description="This is where the product will listen for incoming messages"
            required="true"
            defaultValue="8080"
type="integer"/><rhq:deployment-unit> element. The entire application — its name, included ZIP or JAR files, configuration files, Ant targets — are all defined in the <rhq:deployment-unit> parent element.
<rhq:deployment-unit> directly. In this, the name is appserver, and one preinstall target and one postinstall target are set.
<rhq:deployment-unit name="appserver" preinstallTarget="preinstall" postinstallTarget="postinstall" compliance="filesAndDirectories">
<rhq:deployment-unit> element: the compliance argument. Provisioning doesn't simply copy over files; as described in Section 27.1.3, “File Handling During Provisioning”, it remakes the directory to match what is in the bundle. If there are any existing files in the deployment directory when the bundle is first deployed, they are deleted by default. Setting compliance to filesAndDirectories means that the provisioning process does not manage the deployment directory — meaning any existing files are left alone when the bundle is deployed.
/home/.rhqdeployments/resourceID/backup.
<rhq:file> element. The name is the name of the configuration file within the bundle, while the destinationFile is the relative (to the deployment directory) path and filename of the file after it is deployed.
<rhq:file name="test-v2.properties" destinationFile="conf/test.properties" replace="true"/>
<rhq:archive> element within the deployment-unit. The <rhq:archive> element does three things:
- Identify the archive file by name.
- Define how to handle the archive. Simply put, it sets whether to copy the archive over to the destination and then leave it as-is, still as an archive, or whether to extract the archive once it is deployed. This is called exploding the archive. If an archive is exploded, then a postinstall task can be called to move or edit files, as necessary.
- Identify any files within the archive which contain tokens that need to be realized. This is a child element,
<rhq:fileset>. This can use wildcards to include types of files or files within subdirectories or it can explicitly state which files to process.
            <rhq:archive name="MyApp.zip" exploded="true">
                <rhq:replace>
                    <rhq:fileset>
                        <include name="**/*.properties"/>
                    </rhq:fileset>
                </rhq:replace>
</rhq:archive><rhq:ignore> element. In this case, any *.log files within the logs/ directory are saved.
            <rhq:ignore>
                <rhq:fileset>
                    <include name="logs/*.log"/>
                </rhq:fileset>
            </rhq:ignore>
        </rhq:deployment-unit>
</rhq:bundle><rhq:deployment-unit> arguments. Most common Ant tasks are supported (as described in Section 27.5.4, “Using Ant Tasks”). This uses a preinstall task to print which directory the bundle is being deployed to and whether the operation was successful. The postinstall task prints a message when the deployment is complete.
<target name="main" />

    <target name="preinstall">
        <echo>Deploying Test Bundle v2.4 to ${rhq.deploy.dir}...</echo>
	<property name="preinstallTargetExecuted" value="true"/>
	<rhq:audit status="SUCCESS" action="Preinstall Notice" info="Preinstalling to ${rhq.deploy.dir}" message="Another optional message">
		Some additional, optional details regarding
		the deployment of ${rhq.deploy.dir}
	</rhq:audit>
    </target>

    <target name="postinstall">
        <echo>Done deploying Test Bundle v2.4 to ${rhq.deploy.dir}.</echo>
        <property name="postinstallTargetExecuted" value="true"/>
    </target>
</project>27.5.4. Using Ant Tasks
deploy.xml file with some JBoss ON-specific elements. An Ant bundle distribution file supports more complex Ant configuration, including Ant tasks and targets.
27.5.4.1. Supported Ant Tasks
<antcall> and <macrodef>). This includes common commands like echo, mkdir, and touch — whatever is required to deploy the content fully.
Important
<antcall> element cannot be used with the Ant recipe. <antcall> calls a target within the deploy.xml file, which loops back to the file, which calls the <antcall> task again, which calls the deploy.xml file again. This creates an infinite loop.
<antcall>, use the <ant> task to reference a separate XML file which contains the custom Ant targets. This is described in Section 27.5.4.3, “Calling Ant Targets”.
Important
macrodef call, and therefore macro definitions, are not supported with Ant bundles.
27.5.4.2. Using Default, Pre-Install, and Post-Install Targets
<project> allows a default target, which is required by the provisioning system. This is a no-op because the Ant recipe mainly defines the metadata for and identifies files used by the provisioning process. Other operations aren't necessary. This target is required by Ant, even though it is a no-op target. Use pre- and post-install targets to perform tasks with the bundle before and after it is unpacked.
<target name="main" />
27.5.4.3. Calling Ant Targets
<antcall> does not work in an Ant bundle recipe; it self-referentially calls the <rhq:bundle> task in an infinite loop. However, it is possible to process tasks that are outside the default target. This can be done using pre- and post install targets (Section 27.5.4.2, “Using Default, Pre-Install, and Post-Install Targets”).
- In
deploy.xmlfor the Ant recipe, add a<rhq:deployment-unit>element which identifies the Ant target.<rhq:deployment-unit name="jar" postinstallTarget="myExampleCall">
- Then, define the target.
<target name="myExampleCall"> <ant antfile="another.xml" target="doSomething"> <property name="param1" value="111"></property> </ant> </target> - Create a separate
another.xmlfile in the same directory as thedeploy.xmlfile. This file contains the Ant task.<?xml version="1.0"?> <project name="another" default="main"> <target name="doSomething"> <echo>inside doSomething. param1=${param1}</echo> </target> </project>
27.5.5. Using Templatized Configuration Files
Note
<rhq:input-property> key in the Ant recipe. For examples, see Section 27.5.8.2, “rhq:input-property” and Example 27.1, “Simple Ant Recipe”.
input_field=@@property@@
port=@@listener.port@@
<rhq:input-property> key in the Ant XML file.
<rhq:input-property
    name="listener.port"
    ... />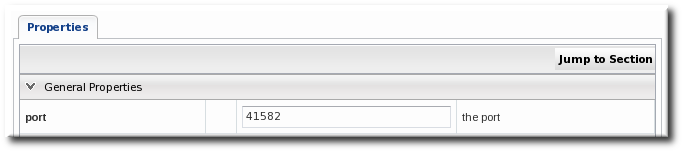
Figure 27.3. Port Token During Provisioning
Table 27.2. Variables Defined by JBoss ON
| Token | Description |
|---|---|
| rhq.deploy.dir | The directory location where the bundle will be installed. |
| rhq.deploy.id | A unique ID assigned to the specific bundle deployment. |
| rhq.deploy.name | The name of the bundle deployment. |
@@rhq.system.hostname@@
Table 27.3. System-Defined Tokens
| Token Name | Taken From... | Java API |
|---|---|---|
| rhq.system.hostname | Java API | SystemInfo.getHostname() |
| rhq.system.os.name | Java API | SystemInfo.getOperatingSystemName() |
| rhq.system.os.version | Java API | SystemInfo.getOperatingSystemVersion() |
| rhq.system.os.type | Java API | SystemInfo.getOperatingSystemType().toString() |
| rhq.system.architecture | Java API | SystemInfo.getSystemArchitecture() |
| rhq.system.cpu.count | Java API | SystemInfo.getNumberOfCpus() |
| rhq.system.interfaces.java.address | Java API | InetAddress.getByName(SystemInfo.getHostname()).getHostAddress() |
| rhq.system.interfaces.network_adapter_name.mac | Java API | NetworkAdapterInfo.getMacAddress() |
| rhq.system.interfaces.network_adapter_name.type | Java API | NetworkAdapterInfo.getType() |
| rhq.system.interfaces.network_adapter_name.flags | Java API | NetworkAdapterInfo.getAllFlags() |
| rhq.system.interfaces.network_adapter_name.address | Java API | NetworkAdapterInfo.getUnicastAddresses().get(0).getHostAddress() |
| rhq.system.interfaces.network_adapter_name.multicast.address | Java API | NetworkAdapterInfo.getMulticastAddresses().get(0).getHostAddress() |
| rhq.system.sysprop.java.io.tmpdir | Java system property | |
| rhq.system.sysprop.file.separator | Java system property | |
| rhq.system.sysprop.line.separator | Java system property | |
| rhq.system.sysprop.path.separator | Java system property | |
| rhq.system.sysprop.java.home | Java system property | |
| rhq.system.sysprop.java.version | Java system property | |
| rhq.system.sysprop.user.timezone | Java system property | |
| rhq.system.sysprop.user.region | Java system property | |
| rhq.system.sysprop.user.country | Java system property | |
| rhq.system.sysprop.user.language | Java system property |
27.5.6. Processing JBoss ON Properties and Ant Properties
<rhq:input-property> tags. These are input properties; at the time the bundle is deployed, the server parses the configuration in the file and prompts for any input properties. It then deploys the bundle using those user-defined values.
<property> tags — but in a more limited way than a normal Ant build system.
<rhq:bundle> element for the archive file <rhq:archive> and any other associated content.
27.5.7. Limits and Considerations for Ant Recipes
27.5.7.1. Unsupported Ant Tasks
<antcall>(instead, use<ant>to reference a separate XML file in the bundle which contains the Ant targets)<macrodef>and macro definitions
27.5.7.2. Symlinks
java.util.zip) included for the bundling system does not support symbolic links. Therefore, bundle recipes and configuration files cannot use symlinks.
<untar src="abc.tar.gz" compression="gzip" dest="somedirectory"/>
27.5.7.3. WARNING: The Managed (Target) Directory and Overwriting or Saving Files
- The file in the current directory is also in the bundle. In this case, the bundle file always overwrites the current file. (There is one exception to this. If the file in the bundle has not been updated and is the same version as the local file, but the local file has modifications. In that case, the local file is preserved.)
- The file in the current directory does not exist in the bundle. In that case, the bundle deletes the file in the current directory.
compliance, <rhq:ignore>, and cleanDeployment.
All of the information about the application being deployed is defined in the <rhq:deployment-unit> element in a bundle recipe. The compliance attribute on the <rhq:deployment-unit> element sets how the provisioning process should handle existing files in the deployment directory.
Note
/home/.rhqdeployments/resourceID/backup.
compliance attribute applies to both the initial deployment and upgrade operations, so this can be used to preserve files that may exist in a directory before a bundle is ever deployed.
Note
There can be files that are used or created by an application, apart from the bundle, which need to be preserved after a bundle deployment. This can include things like log files, instance-specific configuration files, or user-supplied content like images. These files can be ignored during the provisioning process, which preserves the files instead of removing them.
<rhq:ignore> element and list the directories or files to preserve.
<rhq:ignore>
    <rhq:fileset>
        <include name="logs/*.log"/>
    </rhq:fileset>
</rhq:ignore><rhq:ignore> element only applies when bundles are updated; it does not apply when a bundle is initially provisioned.
<rhq:ignore> element only applies to file that exist outside the bundle. Any files that are in the bundle will overwrite any corresponding files in the deployment directory, even if they are specified in the <rhq:ignore> element.
Both compliance and <rhq:ignore> are set in the recipe. At the time that the bundle is actually provisioned, there is an option to run a clean deployment. The clean deployment option deletes everything in the deployment directory and provisions the bundle in a clean directory, regardless of the compliance and <rhq:ignore> settings in the recipe.
27.5.8. A Reference of JBoss ON Ant Recipe Elements
27.5.8.1. rhq:bundle
| Attribute | Description | Optional or Required |
|---|---|---|
| name | The name given to the bundle. | Required |
| version | The version string for this specific bundle. Bundles can have the same name, but each bundle of that name must have a unique version string. These version strings normally conform to an OSGi style of versioning, such as 1.0 or 1.2.FINAL. | Required |
| description | A readable description of this specific bundle version. | Optional |
<rhq:bundle name="example" version="1.0" description="an example bundle">
27.5.8.2. rhq:input-property
Note
<rhq:input-property> definition.
| Attribute | Description | Optional or Required |
|---|---|---|
| name | The name of the user-defined property. Within the recipe, this property can be referred to by this name, in the format ${property_name}. | Required |
| description | A readable description of the property. This is the text string displayed in the JBoss ON bundle UI when the bundle is deployed. | Required |
| type | Sets the syntax accepted for the user-defined value. There are several different options:
| Required |
| required | Sets whether the property is required or optional for configuration. The default value is false, which means the property is optional. If this argument isn't given, then it is assumed that the property is optional. | Optional |
| defaultValue | Gives a value for the property to use if the user does not define a value when the bundle is deployed. | Optional |
<rhq:input-property
    name="listener.port"
    description="This is where the product will listen for incoming messages"
    required="true"
    defaultValue="8080"
    type="integer"/>
27.5.8.3. rhq:deployment-unit
<rhq:deployment-unit> element in a bundle recipe.
| Attribute | Description | Optional or Required |
|---|---|---|
| name | The name of the application. | Required |
| compliance | Sets whether JBoss ON should manage all files in the top root directory (deployment directory) where the bundle is deployed. If filesAndDirectories, any unrelated files found in the top deployment directory (files not included in the bundle) are ignored and will not be overwritten or removed when future bundle updates are deployed. The default is full, which means that the provisioning process manages all files and directories and removes or overwrites anything not in the bundle.
Any existing content in the root directory is backed up before it is deleted, so it can be restored later. The backup directory is
/home/.rhqdeployments/resourceID/backup.
| Optional |
| preinstallTarget | An Ant target that is invoked before the deployment unit is installed. | Optional |
| postinstallTarget | An Ant target that is invoked after the deployment unit is installed. | Optional |
<rhq:deployment-unit name="appserver" preinstallTarget="preinstall" postinstallTarget="postinstall">
27.5.8.4. rhq:archive
Note
${} property definition.
| Attribute | Description | Optional or Required |
|---|---|---|
| name | The filename of the archive file to include in the bundle.
Important
If the archive file is packaged with the Ant recipe file inside the bundle distribution ZIP file, then the name must contain the relative path to the location of the archive file in the ZIP file.
| Required |
| exploded | Sets whether the archive's contents will be extracted and stored into the bundle destination directory (true) or whether to store the files in the same relative directory as is given in the name attribute (false). If the files are exploded, they are extracted starting in the deployment directory. Post-install targets can be used to move files after they have been extracted. | Optional |
<rhq:archive name="file.zip">
    <rhq:replace>
         <rhq:fileset>
               <include name="**/*.properties"/>
         </rhq:fileset>
    </rhq:replace>
</rhq:archive>
27.5.8.5. rhq:url-archive
rhq:archive except that the server accesses the archive over the network rather than including the archive directly in the bundle distribution file.
| Attribute | Description | Optional or Required |
|---|---|---|
| url | Gives the URL to the location of the archive file. The archive is downloaded and installed in the deployment directory.
Note
For the bundle to be successfully deployed, the URL must be accessible to all agent machines where this bundle is to be deployed. If an agent cannot access the URL, it cannot pull down the archive and thus cannot deploy it on the machine.
| Required |
| exploded | If true, the archive's contents will be extracted and stored into the bundle destination directory; if false, the zip file will be compressed and stored in the top level destination directory.
Note
If the files are exploded, they are extracted starting in the deployment directory. Post-install targets can be used to move files after they have been extracted.
| Optional |
<rhq:url-archive url="http://server.example.com/apps/files/archive.zip">
    <rhq:replace>
         <rhq:fileset>
               <include name="**/*.properties"/>
         </rhq:fileset>
    </rhq:replace>
</rhq:url-archive>
27.5.8.6. rhq:file
<rhq:file> element calls out files that require processing before they should be copied to the destination. The attributes on the <rhq:file> element set the name of the raw file in the bundle distribution ZIP file and the name of the target file that it should be copied to.
Note
${} property definition.
| Attribute | Description | Optional or Required |
|---|---|---|
| name | The name of the raw configuration file.
Important
If the configuration file is packaged with the Ant recipe file inside the bundle distribution ZIP file, then the name must contain the relative path to the location of the file within the ZIP file.
| Required |
| destinationFile | The full path and filename for the file on the destination resource. Relative paths must be relative to the final deployment directory (defined in the rhq.deploy.dir parameter when the bundle is deployed). It is also possible to use absolute paths, as long as both the directory and the filename are specified.
Note
If the destinationDir attribute is used, the destinationFile attribute cannot be used.
| Required, unless destinationDir is used |
| destinationDir | The directory where this file is to be copied. If this is a relative path, it is relative to the deployment directory given by the user when the bundle is deployed. If this is an absolute path, that is the location on the filesystem where the file will be copied.
This attribute sets the directory for the file to be copied to. The actual file name is set in the
name attribute.
If the
destinationFile attribute is used, the destinationDir attribute cannot be used.
| Required, unless destinationFile is used |
| replace | Indicates whether the file is templatized and requires additional processing to realize the token values. | Required |
<rhq:file name="test-v2.properties" destinationFile="subdir/test.properties" replace="true"/>
destinationDir nor the destinationFile attribute is used, then the raw file is placed in the same location under the deployment directory as its location in the bundle distribution.
27.5.8.7. rhq:url-file
rhq:file, contains the information to identify and process configuration files for the application which have token values that must be realized. This option specifies a remote file which is downloaded from the given URL, rather than being included in the bundle archive.
| Attribute | Description | Optional or Required |
|---|---|---|
| url | Gives the URL to the templatized file. The file is downloaded and installed in the deployment directory.
Note
For the bundle to be successfully deployed, the URL must be accessible to all agent machines where this bundle is to be deployed. If an agent cannot access the URL, it cannot pull down the archive and thus cannot deploy it on the machine.
| Required |
| destinationFile | The full path and filename for the file on the destination resource. Relative paths must be relative to the final deployment directory (defined in the rhq.deploy.dir parameter when the bundle is deployed). It is also possible to use absolute paths, as long as both the directory and the filename are specified.
Note
If the destinationDir attribute is used, the destinationFile attribute cannot be used.
| Required, unless destinationDir is used |
| destinationDir | The directory where this file is to be copied. If this is a relative path, it is relative to the deployment directory given by the user when the bundle is deployed. If this is an absolute path, that is the location on the filesystem where the file will be copied.
This attribute sets the directory for the file to be copied to. The actual file name is set in the
name attribute.
If the
destinationFile attribute is used, the destinationDir attribute cannot be used.
| Required, unless destinationFile is used |
| replace | Indicates whether the file is templatized and requires additional processing to realize the token values. | Required |
<rhq:url-file url="http://server.example.com/apps/files/test.conf" destinationFile="subdir/test.properties" replace="true"/>
destinationDir nor the destinationFile attribute is used, then the raw file is placed in the same location under the deployment directory as its location in the bundle distribution.
27.5.8.8. rhq:audit
rhq:audit configuration sends information to the server about the additional processing steps and their results.
| Attribute | Description | Optional or Required |
|---|---|---|
| status | The status of the processing. The possible values are SUCCESS, WARN, and FAILURE. The default is SUCCESS. | Optional |
| action | The name of the processing step. | Required |
| info | A short summary of what the action is doing, such as the name of the target of the action or an affected filename. | Optional |
| message | A brief text string which provides additional information about the action. | Optional |
<rhq:audit status="SUCCESS" action="Preinstall Notice" info="Preinstalling to ${rhq.deploy.dir}" message="Another optional message">
	Some additional, optional details regarding
	the deployment of ${rhq.deploy.dir}
</rhq:audit>
27.5.8.9. rhq:replace
<rhq:fileset> elements, contained in the archive which need to have token values realized when the archive is deployed.
<rhq:replace> element.
<rhq:archive name="file.zip">
    <rhq:replace>
        <rhq:fileset>
            <include name="**/*.properties"/>
        </rhq:fileset>
    </rhq:replace>
</rhq:archive>
27.5.8.10. rhq:ignore
<rhq:replace>, contains a list of files or directories in the instance to save.
Note
Important
/opt/myapp and Bundle B to /opt/myapp/webapp1).
<rhq:ignore>
    <rhq:fileset>
        <include name="logs/*.log"/>
    </rhq:fileset>
</rhq:ignore>
27.5.8.11. rhq:fileset
<rhq:replace> and <rhq:ignore> — define file lists in either the archive file or the deployment directory. This element contains the list of files.
| Child Element | Description |
|---|---|
| <include name=filename /> | The filename of the file. For <rhq:replace>, this is a file within the archive (JAR or ZIP) file which is templatized and must have its token values realized. For <rhq:ignore>, this is a file in the application's deployment directory which should be ignored and preserved when the bundle is upgraded. |
<rhq:replace>
     <rhq:fileset>
         <include name="**/*.properties"/>
     </rhq:fileset>
</rhq:replace>
27.5.8.12. rhq:system-service
| Attribute | Description | Optional or Required |
|---|---|---|
| name | The name of the script. | Required |
| scriptFile | The filename of the script. If the script file is packaged with the Ant recipe file inside the bundle distribution ZIP file, then the scriptFile must contain the relative path to the location of the file in the ZIP file. | Required |
| configFile | The name of any configuration or properties file used by the script. If the configuration file is packaged with the Ant recipe file inside the bundle distribution ZIP file, then the configFile must contain the relative path to the location of the file in the ZIP file. | Optional |
| overwriteScript | Sets whether to overwrite any existing init file to configure the application as a system service. | Optional |
| startLevels | Sets the run level for the application service. | Optional |
| startPriority | Sets the start order or priority for the application service. | Optional |
| stopPriority | Sets the stop order or priority for the application service. | Optional |
<rhq:system-service name="example-bundle-init" scriptFile="example-init-script"
      configFile="example-init-config" overwriteScript="true"
      startLevels="3,4,5" startPriority="80" stopPriority="20"/>
27.6. Testing Bundle Packages
27.6.1. Installing the Bundle Deployer Tool
- Click the Administration tab in the top menu.
- Select the Downloads in the left menu table.
- Scroll to the Bundle Deployer Download section, and click the package download link.

- Save the
.zipfile into the directory where the bundle tool should be installed, such as/opt/. - Unzip the packages.
cd /opt/

unzip rhq-bundle-deployer-version.zip
27.6.2. Using the Bundle Deployer Tool
Important
- Unzip the bundle distribution package to check (or copy an unzipped directory that contains the application files). For example:
mkdir /tmp/test-bundle
cd /tmp/test-bundle
unzip MyBundle.zip
- Open the top directory of the bundle distribution, where the
deploy.xmlAnt recipe file is. - Set the bundle deployer tool location in the PATH.
PATH="/opt/rhq-bundle-deployer-3.0.0/bin:$PATH"
- Run the bundle deploy tool, and use the format
-Dinput_properties to pass the values to user-defined tokens in the templatized files. For example:rhq-ant -Drhq.deploy.dir=/opt/exampleApp -Dlistener.port=7081
This installs the application in/opt/exampleAppand sets a port value of 7081.Note
Optionally, use therhq.deploy.idattribute to set an identifier for the deployment. The default is 0, which means a new deployment. When bundles are deployed in the UI, the server assigns a unique ID to the deployment. Using therhq.deploy.idattribute on a new deployment simulates the server's ID assignment.Using therhq.deploy.idattribute if there is already a previous deployment allows you to test the upgrade performance of the bundle. Performing an upgrade requires a new, unique ID number.
27.7. Provisioning Bundles
27.7.1. Managing Bundle Groups
27.7.1.1. Creating Bundle Groups
- Click the Bundles tab in the top menu.
- In the Bundle Groups area at the bottom, click the button.

- Enter a name and description for the group.
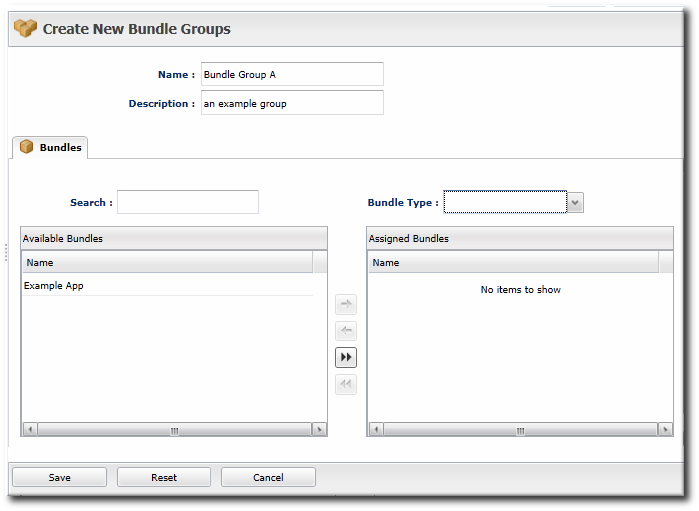
- Select the group members. If any bundles have been uploaded, then they can be added to the group when it created.Alternatively, bundles can be added to a bundle group when they are created, updated, or by editing the group.
- Click the button.
27.7.1.2. Assigning Bundles to Bundle Groups
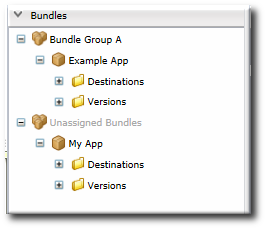
Figure 27.4. Bundle Groups and Unassigned Bundles in the Bundle Hierarchy
Important
- Click the Bundles tab in the top menu.
- In the Bundle Groups area at the bottom, click the name of the bundle group to edit.
- Select the group members to add or remove from the group. When a bundle is selected in a box, the corresponding arrow becomes active to move it to the other box.
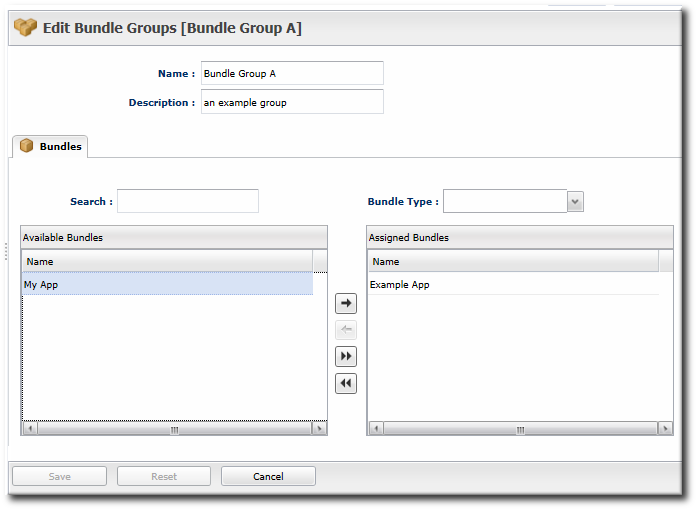
- Click the button.
27.7.2. Uploading Bundles to JBoss ON
Note
- In the top menu, click the Bundles tab.

- At the bottom of the Bundles section, click the button.

- Upload the distribution package or the recipe file.
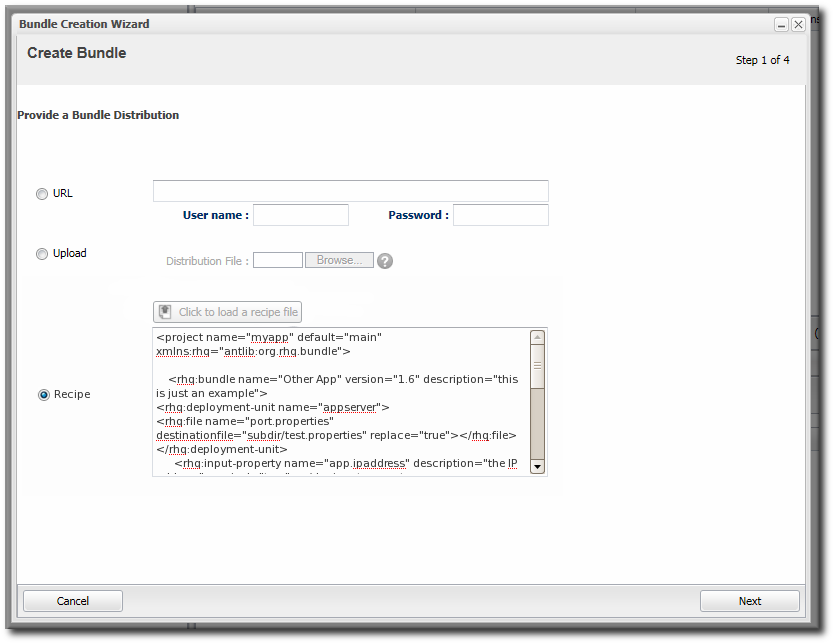 There are three options on how the bundle distribution is made available to the JBoss ON server:
- URL points to any URL, such as an FTP site or SVN or GIT repo, where there is a complete bundle distribution file available. If the repository requires authentication, then the username and password for a user account can be given to allow the server to authenticate to the site.
Note
Using an SVN or GIT repo allows you to pull the packages directly from a build system. - Upload uploads a single bundle distribution file (which includes both the recipe an all associated files) from the local system to the JBoss ON server.
- Recipe uploads a recipe file only, and then any additional files required for the bundle are uploaded separately. This option includes an edit field where the uploaded recipe can be edited before it is sent to the server.
- Select any groups in the left box to which to assign the bundle, and click the arrow to move it to the Assigned box.
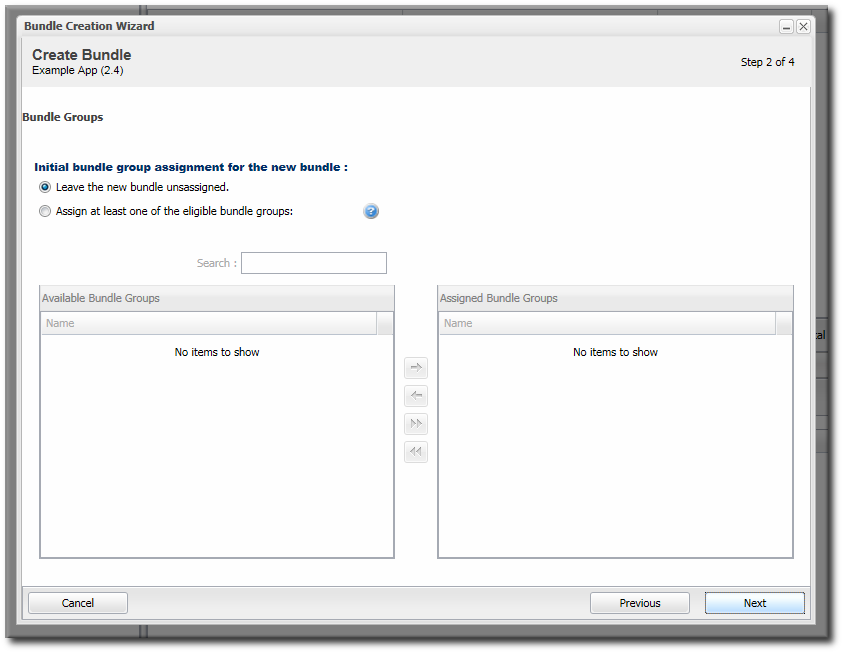 Bundle groups are required for access control. Without a group assignment, users are unable to view bundles (unless they have the global view bundles permission) or to deploy the bundles.
 - Upload any associated files that were not uploaded previously. For the URL and Upload, all of the files are usually uploaded in a single file, so there is nothing to do on this screen. For the Recipe option, all of the files listed in the recipe must be uploaded manually at this step.
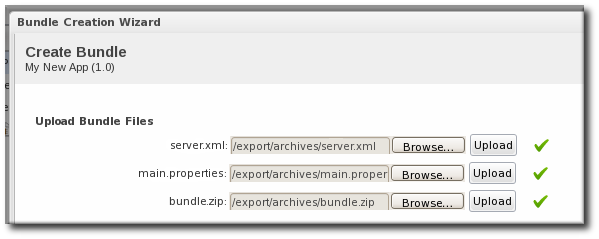
- The final screen shows all of the information for the new bundle. Click to save the new bundle.
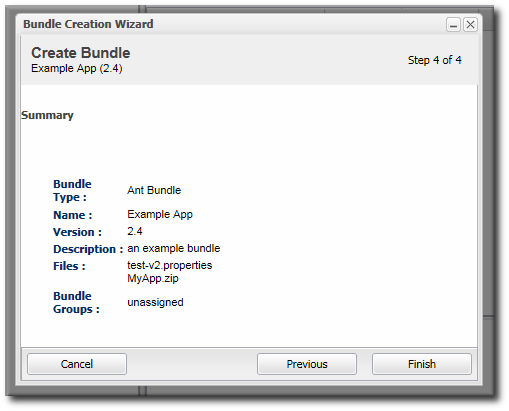
27.7.3. Deploying Bundles to a Resource
- In the top menu, click the Bundles tab.
- Scroll to the bottom of the window and click the button.Alternatively, click the name of the bundle in the list, and then click the deploy button at the top of the bundle page.
- Select the bundles to deploy from the list on the left and use the arrows to move them to the box on the right.
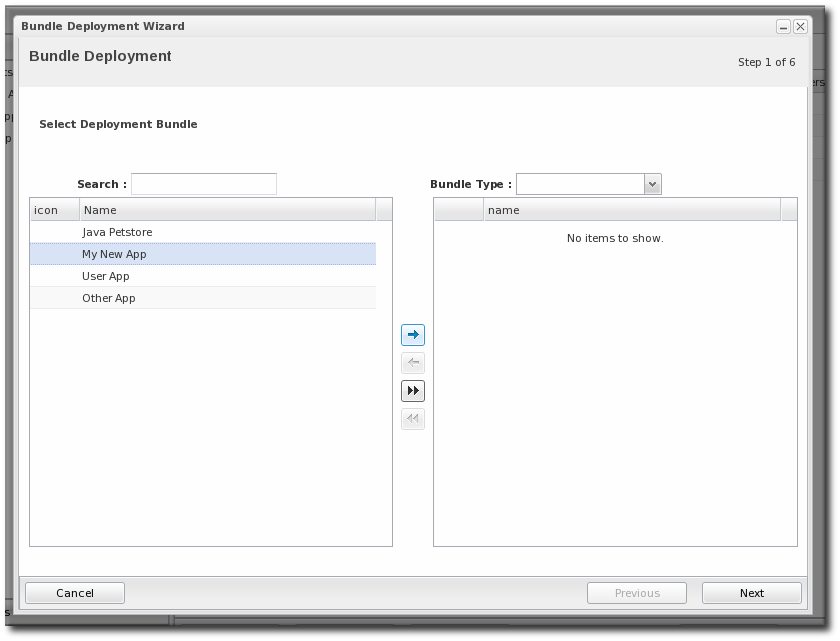
- Once the bundles are selected, define the destination information.The destination is a combination of the resources the bundle is deployed on and the directory to which is it deployed. Each destination is uniquely defined for each bundle.To define the destination, first select the resource group from the Resource drop-down menu. The resource group identifies the type of resource to which the bundle is being deployed, and the resource type defines other deployment parameters. When the group is selected, then the base location is defined. For a platform, this is the root directory. For a JBoss AS instance, it is the installation directory. For custom resources, the base location is defined in the plug-in descriptor.
Note
If you haven't created a compatible group or if you want to create a new group specifically for this bundle deployment, click the+icon to create the group. Then, continue with the provisioning process.Set the actual deployment directory to which to deploy the bundle. This directory is a relative path to the plug-in-defined base location.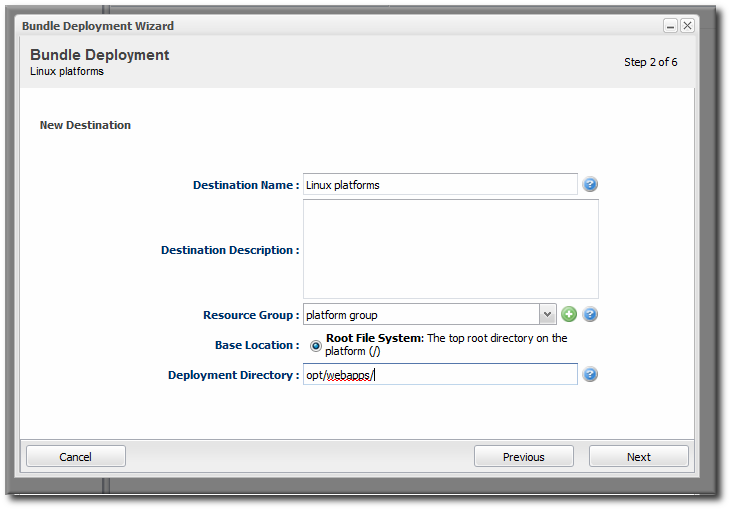
- Select the version of the bundle to deploy. If there are multiple versions of a bundle available, then any of those versions can be selected. There are also quick options to deploy the latest version or the currently deployed version.

- If there are any user-defined properties, then they are entered in the fields in the next page. User-defined properties are configured in the bundle recipe using tokens.

- Fill in the information about the specific deployment instance. The checkbox sets the option on whether to overwrite anything in the existing deployment directory or whether to preserve any existing files.
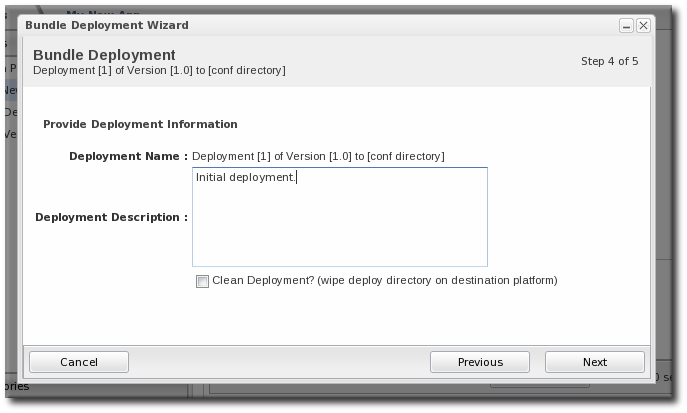
- The final screen shows the progress for deploying the packages. Click Finish to complete the deployment.
27.7.4. Viewing the Bundle Deployment History
Figure 27.5. Bundles, Versions, and Destinations
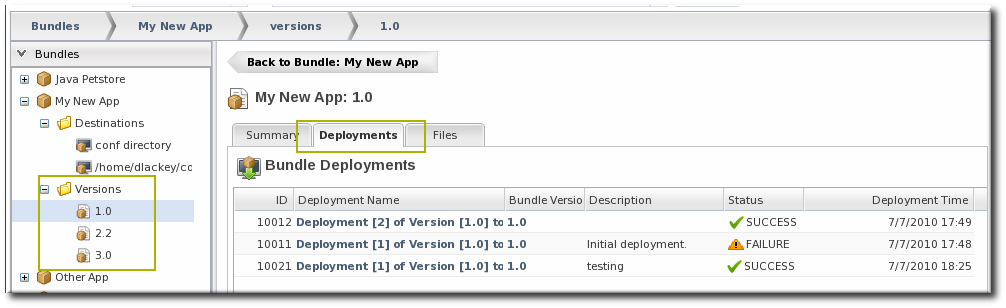
Figure 27.6. Deployment Information for a Version
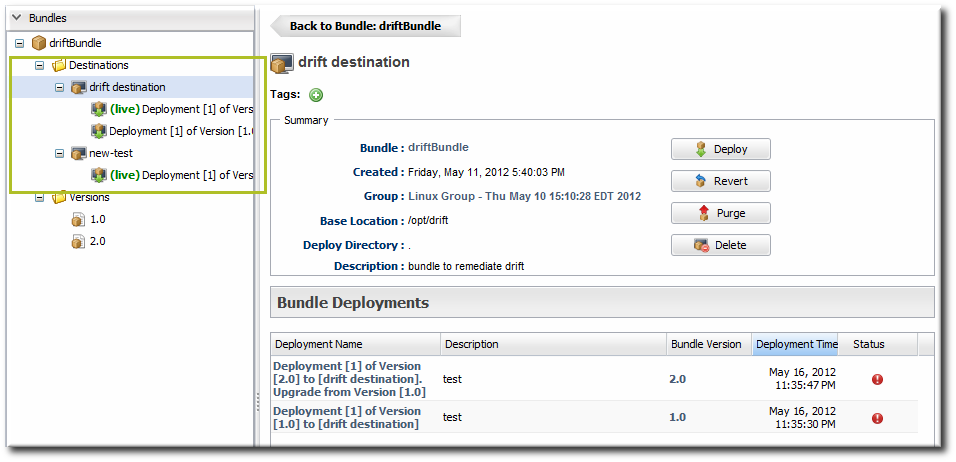
Figure 27.7. Deployment History for a Destination
27.7.5. Reverting a Deployed Bundle
- In the top menu, click the Bundles tab.
- In the left navigation window, expand the bundle node, and then open the Destinations folder beneath it.
- Select the destination from the left navigation.
- In the main window for the destination, click the button.
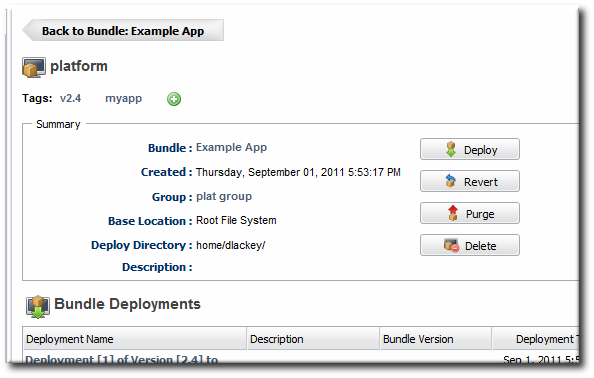
- The next page shows the summary of the current deployment and the immediate previous deployment, which it will be reverted to.
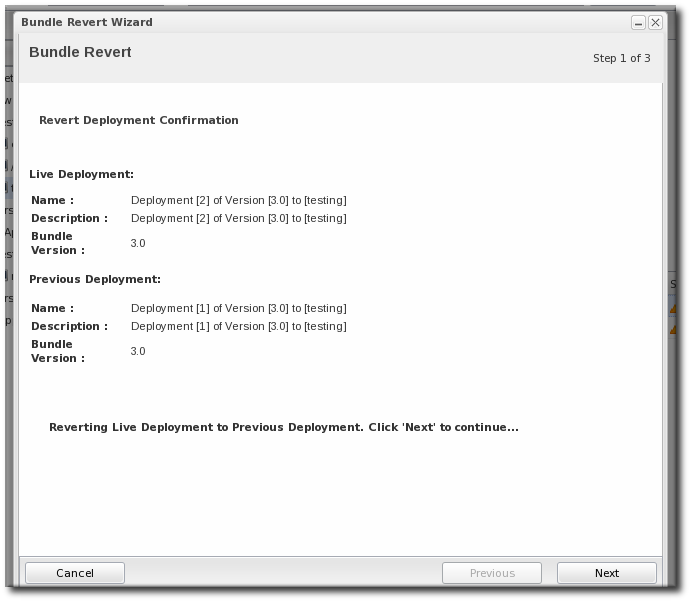
- Add any notes to the revert action. Optionally, select the checkbox to clean the deployment directory and install the previous version fresh.
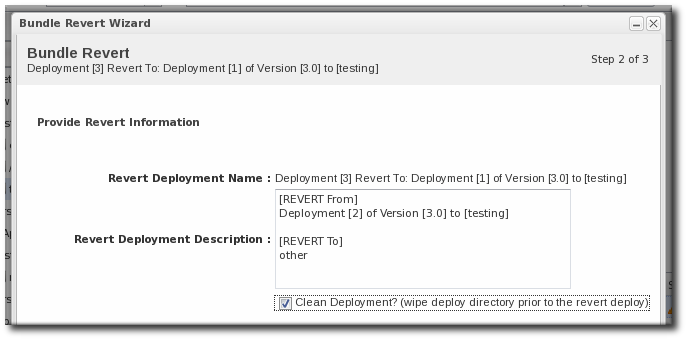
- Click Finish on the final screen to complete the rollback.
27.7.6. Deploying a Bundle to a Clean Destination
- Preserve the existing files and directories, with appropriate upgrades, according to the recipe configuration (Section 27.5.7.3, “WARNING: The Managed (Target) Directory and Overwriting or Saving Files”)
- Completely overwrite the existing files and deploy the bundle in an empty directory

27.7.7. Purging a Bundle from a Resource
Important
compliance=full). If the deployment directory is used by other applications – like an app server deploy/ directory — then those other applications or files will also be deleted. After purging, there is no live deployment and nothing to revert.
- In the top menu, click the Bundles tab.
- In the left navigation window, expand the bundle node, and then open the Destinations folder beneath it.
- Select the destination from the left navigation.
- In the main window for the destination, click the button.
- When prompted, confirm that you want to remove the bundled application and configuration from the target resources.
27.7.8. Upgrading Ant Bundles
- If the hash code on the new file is different than the original file and there are no local modifications, then JBoss ON installs the new file over the existing file.
- If the hash code on the new file is different than the original file and there are local modifications, then JBoss ON backs up the original file and installs the new file.
- If the hash code on the new file and the original file is the same and there are local modifications on the original file, then the provisioning process preserves the original file, in place.
- If there was no file in the previous bundle but there is one in the new bundle, then the new file is used and any file that was added manually is backed up.
backup/ directory within the deployment's destination directory. If the original file was located outside the application's directory (like, it was stored according to an absolute location rather than a relative location), then it is saved in an ext-backup/ directory within the deployment's destination directory.
Note
27.7.9. Deleting a Bundle from the JBoss ON Server
- In the top menu, click the Bundles tab.
- In the left navigation window, expand the bundle node, and then open the Destinations folder beneath it.
- Select the destination from the left navigation.
- In the main window for the destination, click the button.
- When prompted, confirm that you want to delete the bundle.
27.8. Extended Example: Using Bundle Groups and Access Control within the Provisioning Process
Note
27.8.1. Global v. Group Permissions for Creating and Deploying
Example 27.2. A User Deploys Bundles Anywhere
Role R1 <--- User U
   |
   v
View Bundles
Create Bundles
Deploy Bundles
Example 27.3. Deploy Bundles to a Specific Resource Group: Single Role
Resource Group X ---> Role R <--- User U
                        ^
                        |
                 View Bundles
Deploy Bundles To GroupExample 27.4. Deploy Bundles to a Specific Resource Group: Two Roles
Resource Group X ---> Role R1 <--- User U    -->  Role R2
                         ^                           ^
                         |                           |
                Deploy Bundles To Group        View Bundles
27.8.2. Permissions and the Application Development Workflow
Example 27.5. Creating Bundles in a Specific Bundle Group
Bundle Group A ---> Role R1 <--- User U --->  Role R2
                         ^                         ^
                         |                         |
Create Bundles In Group View BundlesExample 27.6. Multiple Users Updating Each Others' Bundles
Bundle Group A
     |
     v
  Role R1 <--- User U1, User U2, User U3
     ^
     |
Create Bundles In Group
Delete Bundles From GroupExample 27.7. Team Lead Creates Bundles - Team Members Deploy Bundles
Bundle Group A                                    Bundle Group A
     |                                                   |
     v                                                   v
  Role R1 <--- User TeamLeader   Resource Group X ---> Role R2 <--- Users TeamMember1, TeamMember2
     ^                                                   ^
     |                                                   |
Create Bundles In Group Deploy Bundles To GroupChapter 28. Managing Resource-Level Content Updates
28.1. About Content
28.1.1. What Content Is: Packages
28.1.2. Where Content Comes From: Providers and Repositories
28.1.3. Package Versions and History
META-INF/MANIFEST.MF file (for EARs and WARs).
SPEC(IMPLEMENTATION)[sha256=abcd1234]
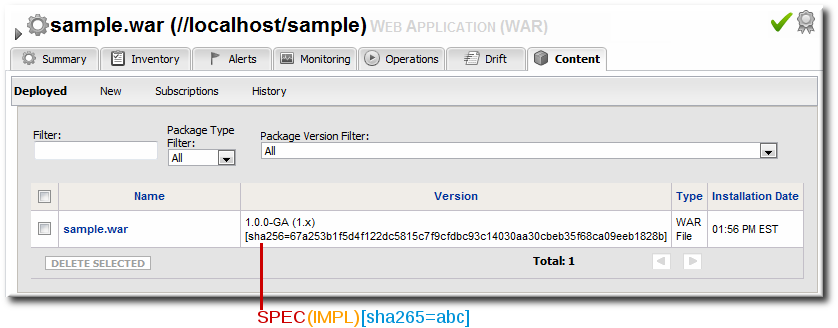
Figure 28.1. Package Version Numbers
META-INF/MANIFEST.MF file with these version numbers:
Manifest-Version: 1.0
Created-By: Apache Maven
Specification-Title: My Example App
Specification-Version: 1.0.0-GA
Specification-Vendor: Example, Corp.
Implementation-Title: My Example App
Implementation-Version: 1.x
Implementation-Vendor-Id: org.example
Implementation-Vendor: Example, Corp.
...
1.0.0-GA(1.x)[sha256=abcd1234]
META-INF/MANIFEST.MF file does not contain one of the specification version or the implementation version, then only one is used. For example, if only the implementation version is given:
(1.x)[sha256=abcd1234]
[sha256=abcd1234]
MANIFEST.MF file. This allows the agent to check the file during discovery scans to verify the version of the package quickly.
Manifest-Version: 1.0
Created-By: Apache Maven
RHQ-Sha256: 570f196c4a1025a717269d16d11d6f37
...Note
META-INF/MANIFEST.MF file, the deployed content is not exactly identical to the content packages that were uploaded.
Note
Note
28.1.4. Authorization to Repositories and Packages
- Owner sets write access to a repository. It assigns the repository to belong to a specific user. If no user is specified, then only users with the manage repositories permission have the right to access those repositories.
- Private sets read (download) access to the repository. It sets whether the repository can be viewed by anyone or only by the owner and users with the manage repositories permission. Public repositories are viewable by everyone, regardless of the owner.
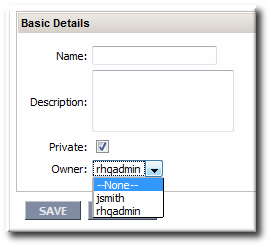
Figure 28.2. Repository Ownership and Access Settings
Note
28.1.5. Space Considerations for Content
28.2. Creating a Content Source
Table 28.1. Types of Content Sources
| Source Type | Description | Requires Credentials? |
|---|---|---|
| Remote URL | Downloads from a remote URL. This can use a couple of different protocols, such as FTP. | No |
| HTTP | Similar to the Remote URL content source, connects over a network connection to the source. This uses specifically the HTTP protocol.
The HTTP content source can also connect to an HTTP proxy.
HTTPS is not supported.
| Optionally allows credentials to log into the given HTTP site or the proxy server[a] |
| JBoss Customer Portal Feed (RSS) | Similar to the Remote URL content source, except that it works specifically with the Customer Portal RSS feed for JBoss cumulative patches. | Yes[a] |
| Local Disk | Connects to a single local directory (on the local system or NFS-mounted) and looks for packages of the specified type and architecture to download. | No |
[a]
Any passwords given in the content source configuration are obfuscated in the JBoss ON database.
| ||
28.2.1. Creating a Content Source (General)
- In the top menu, click the Administration tab.
- In the Content menu table on the left, select the item.
- Below the list of current content sources, click the button.

- Select the content source type, which defines how the content is delivered from the source. Table 28.1, “Types of Content Sources” describes the different content sources.
- When the content source type is selected, a form automatically opens to fill in the basic details and configuration for the resource. These basic details identify the content source in the JBoss ON server and are the same for each content source type, while the configuration is specific to the content source type.

- Give a unique name and optional description for the content source provider.
- The schedule sets how frequently the content in the JBoss ON database is updated by the content source; this uses a standard Quartz Cron Syntax.
- The lazy load setting sets whether to download packages only when they are installed (Yes) or if all packages should be download immediately.
- The download mode sets how the content is stored in JBoss ON. The default is DATABASE, which stores all packages in the JBoss ON database instance. The other options are to store the packages on a network filesystem or not to store them at all.
- Fill in the other configuration information for the content source. The required information varies depending on the content source type. This is going to require some kind of connection information, such as a URL or directory path, and possibly authentication information, like a username and password.
Note
Any passwords stored for content sources are obfuscated in the JBoss ON database.
28.2.2. Creating a Content Source (Local Disk)
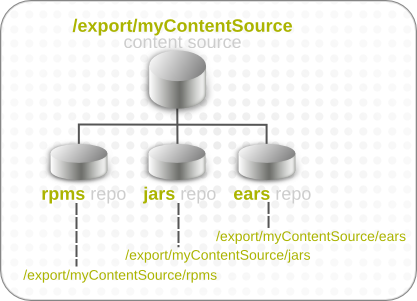
Figure 28.3. Local Disk Structure
Important
/export/myContentSource/test and /export/myContentSource/subdir/test.
- Set up the content source as in Section 28.2.1, “Creating a Content Source (General)”.
Note
If the subdirectories to sync already exist, then the content source configuration prompts for possible repositories to associate with the local disk provider based on the subdirectory names. - Enter the root directory path.

- Enter the content package information, which the JBoss ON server uses to identify the packages to pull into the content storage.
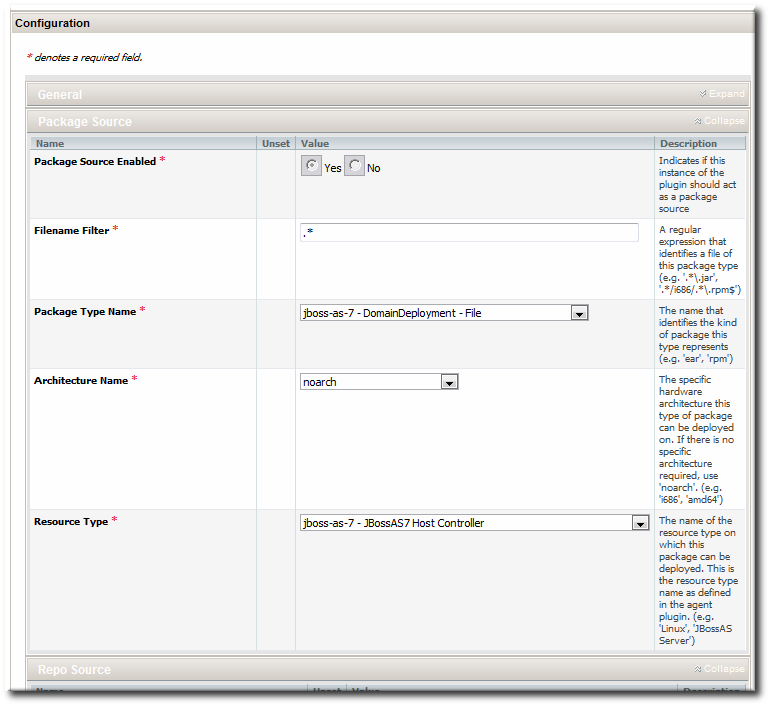
- Create the repository, as in Section 28.3.1, “Creating a Repository”, and give it the name of the subdirectory to use.
Important
Each subdirectory name must be unique through the hierarchy of the root directory tree. For example, there should not be directories named/export/myContentSource/testand/export/myContentSource/subdir/test.Having two directories, even at different levels, with the same name can result in unpredictable package sync behavior. - Create the subdirectory on the local system, and copy in the packages which should be added to the JBoss ON content system.
28.3. Managing Repositories
28.3.1. Creating a Repository
- In the top menu, click the Administration tab.
- In the Content menu table on the left, select the item.
- Below the list of current repositories, click the button.

- Fill in the name and a description. Additionally, set the authorization restrictions for the repository by setting an owner for the repo and whether it is public or private.Only users with the repositories permission can set an owner. All repositories created by users without the repositories permission automatically belong to that user.

- Click .
- On the Repositories page, click the name of the new repository in the list.
- Optional. To change the default synchronization schedule, click the button and enter a new schedule, in a cron format, in the Sync Schedule field.
- Add content sources to supply content to the repository, as in Section 28.3.2.1, “Associating Content Sources with a Repository”.More than one content source can supply content to a repository.
- Associate resources with the repository, as in Section 28.3.3, “Associating Resources with the Repository”. A resource can only receive packages from a repository if it is associated with the repository.
Note
You can search for specific resources or types of resources and subscribe multiple resources at once.
28.3.2. Linking Content Sources to Repositories
28.3.2.1. Associating Content Sources with a Repository
- In the top menu, click the Administration tab.
- In the Content menu table on the left, select the item.
- On the Repositories page, click the name of the repository in the list.
- In the Content Sources section of the repository's details page, click the button to add existing content sources to the repository.

- Select checkboxes next to the content sources to associate with the repository.

- Click the button.
28.3.2.2. Importing a Content Source into Repositories
- In the top menu, click the Administration tab.
- In the Content menu table on the left, select the item.
- On the Repositories page, click the button.
- Select the radio button by the name of the content source to import.
- When the content source is selected, then a list of available repositories for that content source automatically opens. In the Available repositories.... area, select the checkbox by the name of each repository to associate with the content source.

- Click the button.
Note
28.3.3. Associating Resources with the Repository
28.3.3.1. Adding Resources to a Repository
- In the top menu, click the Administration tab.
- In the Content menu table on the left, select the item.
- On the Repositories page, click the name of the repository to edit.
- In the Resources section, click the button to add resources to the repository.
- Select checkboxes next to the resources to associate with the repository. It is possible to filter the list of resources by name or by type.

- Click the button.
28.3.3.2. Managing the Repositories for a Resource
- Select the resource type in the Resources menu table on the left, and then browse or search for the resource.
- Click the Content tab of the resource.
- Open the Subscriptions subtab.
- The Available Repositories section has a list of repositories that the resource isn't subscribed to. Click the checkboxes by all of the repositories to subscribe the resource to.

- Click .
28.4. Uploading Packages
- In the top menu, click the Administration tab.
- In the Content menu table on the left, select the item.
- On the Repositories page, click the name of the repository in the list.
- Scroll to the bottom of the page, to the Upload Packages section.
- Click the button to upload the package.
- In the pop-up window, click the button to browse to the package, then click the button.

- Some information about the package is automatically filled in, including the name and a default UI version number. Set the package type, architecture, and any other necessary information.If a version number is set, then this value is displayed in the UI. If not, then a version number is calculated, based on the spec version and implementation version in
MANIFEST.MF(for EARs and WARs) or the calculated SHA-256 value for the package itself. Internally, the package is identified by the SHA value.SPEC(IMPLEMENTATION)[sha256=abcd1234]
Note
For exploded content for EARs and WARs, the calculated SHA-256 version number is written into theMANIFEST.MFfile. - Click the button to finish adding the package to the repository.
28.5. Synchronizing Content Sources or Repositories
28.5.1. Scheduling Synchronization
*     *    *    *     *  [sync-command]
-     -     -     -     -
|     |     |     |     |
|     |     |     |     +----- Day of Week (0=Sunday ... 6=Saturday)
|     |     |     +------- Month (1 - 12)
|     |     +--------- Date (1 - 31)
|     +----------- Hour (0 - 23)
+------------- Minute (0 - 59)
0 3 * * 2,5
- In the top menu, click the Administration tab.
- In the Content menu table on the left, select either the or item.
- Click the name of the item to edit.
- Reset the cron schedule in the Sync Schedule field.
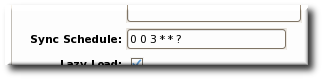
- Click .
28.5.2. Manually Synchronizing Content Sources or Resources
- In the top menu, click the Administration tab.
- In the Content menu table on the left, select the or item.
- Click the name of the item to edit.
- Click the button. All of the synchronization attempts, with the outcome of the operation, are listed at the bottom of the screen.
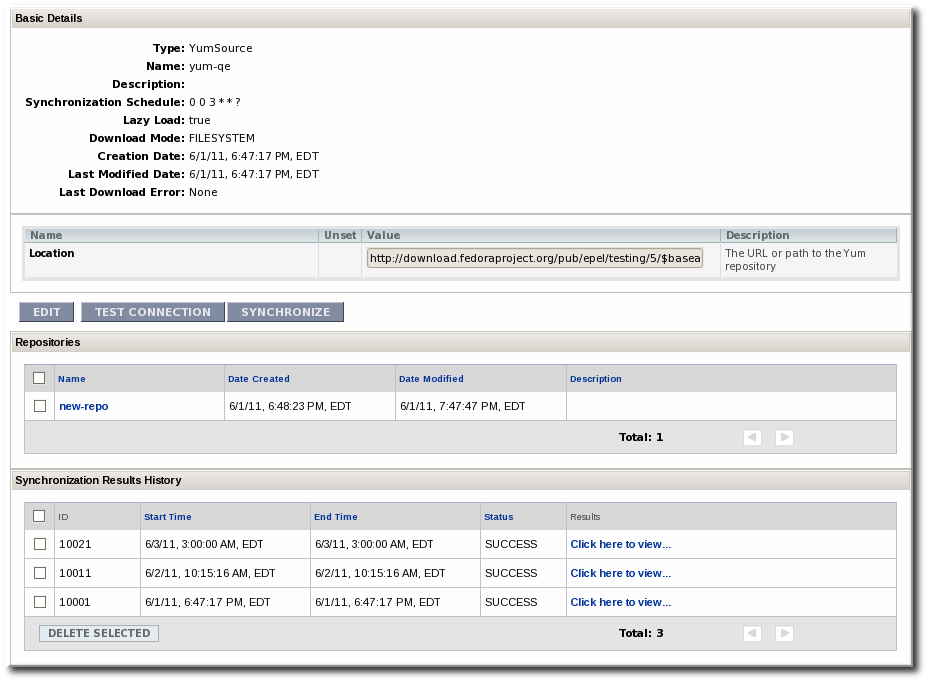
Note

28.6. Tracking Content Versions for a Resource
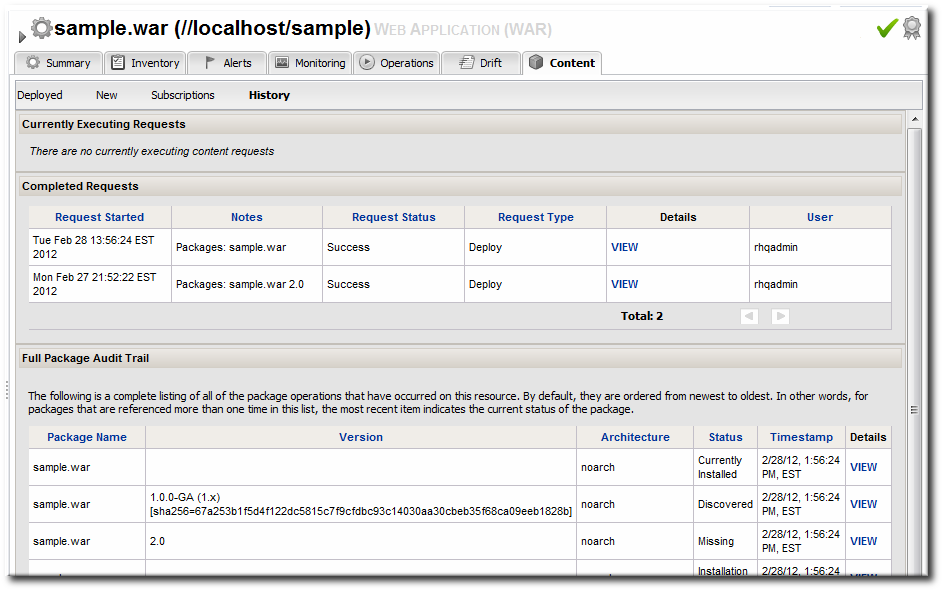
Figure 28.4. Package History for a Resource
Part V. Managing JBoss Resources
Chapter 29. How JBoss ON Manages JBoss Resources
29.1. How JBoss ON Works with JBoss Software
- Monitoring, event logging, availability, and alerting ("Setting up Monitoring, Alerts, and Operations")
- Managing software updates and patches (Section 32.4, “Applying JBoss Patches from the Patch RSS Feed”)
- Deployed web applications (Section 32.3, “Deploying Applications”)
- Clusters and web contexts (Section 32.5, “Managing mod_cluster Deployments for JBoss EAP 5 (Tech Preview)”)
29.2. What's Covered in This Guide
- Content management for EARs and WARs and other web applications
- Managing JBoss server clusters
- Managing JBoss server domains
- Monitoring JBoss instances
29.3. Installing JBoss Plug-in Packs
Table 29.1. Supported JBoss Products
| Product | Versions | Plug-in Pack |
|---|---|---|
| JBoss AS or EAP |
| EAP |
| JBoss AS |
| Tech Preview |
| mod_cluster |
| Tech Preview |
| Hibernate | EAP | |
| JBoss Cache Service |
| EAP |
| JMX | EAP | |
| JMS Manager Service (HornetQ) | EAP | |
| Business Rules Management Service (BRMS/Drools) |
| BRMS |
| Data Services Platform (EDS-P/Teiid) |
| EDS |
| Developer Studio (ModeShape) |
| ModeShape |
| Tomcat (Web Services) |
| EWS |
| ESB Services (SOA-P) |
| SOA-P |
- Download the plug-in JAR files from the Customer Support Portal.In the Customer Support Portal, click Software, and then select the JBoss ON for Plug-in drop-down box.
- Download the plug-in packs.
- Unzip the additional plug-in packs. This creates a subdirectory with the name
jon-plugin-pack-plugin_name-3.2.GA1. - Copy the new plug-ins from the
jon-plugin-pack-plugin_name-3.2.GA1/directory to the JBoss ON server plug-in directory.[root@server rhq-agent]# cp myDirectory/jon-plugin-pack-plugin_name-3.2.GA1/* /opt/jon/jon-server-3.2.GA1/plugins
The server polls this directory every few minutes to look for updated plug-ins. - Once the plug-ins have been deployed to the server, reload the agent plug-ins on the agents themselves.This can be done from the command line using the agent's
pluginscommand:> plugins update
This can also be done in the JBoss ON GUI by scheduling an update plugins operation for an agent or a group or agents.
Chapter 30. General Tasks
30.1. Setting up a Custom JVM for Discovery
30.1.1. Required JVM Configuration for Discovery
- Sun JMX remoting is enabled, with a port system property specified in the command line.
-Dcom.sun.management.jmxremote.port=12345 com.xyz.MyAppMain
- A Sun/Oracle-compatible Java process is accessible through the
com.sun.tools.attachAPI, and the resource key is specified as a system property in the command line.-Dorg.rhq.resourceKey=KEY com.xyz.MyAppMain
30.1.2. Excluding Java Processes from Discovery
rhq.jmxplugin.process-filters, which lists strings to ignore specifically from the Generic JMX Plug-in discovery scan. If a Java process contains any of the strings in the filter, it is excluded from discovery as a JMX server[6].
RHQ_AGENT_ADDITIONAL_JAVA_OPTS="-Drhq.jmxplugin.process-filters=org.rhq.enterprise.agent.AgentMain,org.jboss.Main,catalina.startup.Bootstrap"
- Open the agent configuration file.
[jbosson-agent@server ~]$ vim agentRoot/rhq-agent/conf/agent-configuration.xml
- In the
RHQ_AGENT_ADDITIONAL_JAVA_OPTSlink, add the string to exclude to therhq.jmxplugin.process-filtersoption. This can be the classname or any other identifying string which is in the command line for the given process.For example:RHQ_AGENT_ADDITIONAL_JAVA_OPTS="-Drhq.jmxplugin.process-filters=org.rhq.enterprise.agent.AgentMain,org.jboss.Main,catalina.startup.Bootstrap
,com.abc.OtherAppMain"Therhq.jmxplugin.process-filtersvalue is a comma-separated list of strings. - Restart the agent with the
--configoption to load the new configuration.[jbosson-agent@server ~]$ agentRoot/rhq-agent/bin/rhq-agent.sh --config
30.1.3. Manually Importing a JVM Resource
Note
- Click the Inventory tab in the top menu.
- Select the platform resource.
- Click the Inventory tab of the platform.
- Click the Import button in the bottom of the Inventory tab, and select the JMX server resource type.
- Select the type of JVM, and set all of the connection properties correctly, depending on the type of JVM selected.
- Fill in the connection information for the JVM. This varies depending on the JVM type, but it includes options like a URL and port, directory paths for client libraries, directory paths for classes, and login credentials.
- Click the to import the instance.
30.2. Enabling the Agent to Connect to Secured JMX Servers
-Dcom.sun.management.jmxremote
-Dcom.sun.management.jmxremote.port=5222
-Dcom.sun.management.jmxremote.ssl=false
-Dcom.sun.management.jmxremote.authenticate=true
-Dcom.sun.management.jmxremote.password.file=/jmxremote.password
-Dcom.sun.management.jmxremote.access.file=/jmxremote.access
Note
The agent generally reads the connection credentials from the jmx-console-*.properties file in the JbossASInstallDir/server/default/conf/props/ directory.
jmx-console-users.properties file, so there is no way for the agent to get the credentials.
- Open the
jmx-console-*.propertiesfile for editing. For example:[root@server ~]# vim JbossASInstallDir/server/default/conf/props/jmx-console-users.properties
- Uncomment or add a line for the admin user.
admin=admin
By default, the agent uses the jmx-console-*.properties file for a username, not the access files. It is possible to change the connection settings for the resource so that the agent uses the access files, going through the remote endpoint, which were specified in the JMX server's command line.
- Click the Inventory tab in the top menu.
- Search for the JMX server in the Servers area of the Inventory, or open the JBoss EAP instance and navigate through its children to find the JMX server instance.
- On the JMX server's entry page, open the Inventory tab, and select the Connection Settings subtab.
- Enter the user name and password to set in the JMX remote access files.
- Click the button.
JBoss ON can connect to the parent resource, and then use that to connect to the JMX server, rather than connecting through the remoting endpoint. This does not require using any user credentials, since the parent can connect to the child resource using internal authentication.
- Click the Inventory tab in the top menu.
- Search for the JMX server in the Servers area of the Inventory, or open the JBoss EAP instance and navigate through its children to find the JMX server instance.
- On the JMX server's entry page, open the Inventory tab, and select the Connection Settings subtab.
- Unset all of the connection properties except for the Type property.
- For the Type property, select the Parent value.
- Click the button.
Chapter 31. Managing JBoss EAP 6 (AS 7)
31.1. The Structure of JBoss EAP 6
Note
31.1.1. "Classic" Structure: Standalone Servers
standalone.xml file. Almost every entry in that file is identified as a child of the server. For example, these subsystem entries create the ee and jmx child resources for the server:
<subsystem xmlns="urn:jboss:domain:ee:1.1"/>
<subsystem xmlns="urn:jboss:domain:jmx:1.1">
    <show-model value="true"/>
    <remoting-connector/>
</subsystem>standalone.xml.
Figure 31.1. Standalone Server Configuration
31.1.2. Separating Configuration and Real-Time Operations: Domains
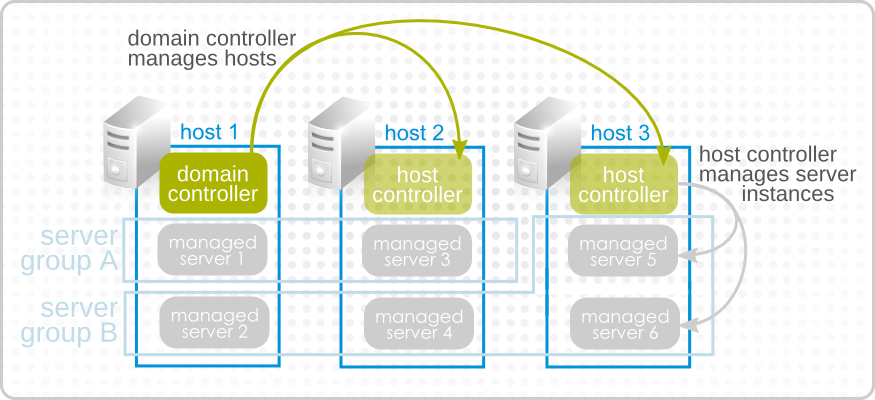
Figure 31.2. Simple Domain Structure
domain.xml file. This lists all of the configured profiles and subsystems, server groups, socket binding configuration, system properties, deployments, and other settings. As with the standalone server, almost every entry is discovered and added to the inventory as a resource. For example, this creates a server group resource, with a child deployment resource and a child JVM resource for the server group.
Example 31.1. Server Group domain.xml Entry
        <server-group name="main-server-group" profile="full">
            <jvm name="default">
                <heap size="1303m" max-size="1303m"/>
                <permgen max-size="256m"/>
            </jvm>
            <socket-binding-group ref="full-sockets"/>
            <deployments>
                <deployment name="sample2.war" runtime-name="sample2.war"/>
            </deployments>
</server-group> host.xml file. These managed servers have virtually no configuration of their own; they simply point back to the original server group configuration to use in the domain.
    <servers>
        <server name="server-one" group="main-server-group"/>
        <server name="server-two" group="other-server-group">
            <!-- server-two avoids port conflicts by incrementing the ports in
                 the default socket-group declared in the server-group -->
            <socket-bindings port-offset="150"/>
        </server>
    </servers>
Figure 31.3. EAP 6 Console

Figure 31.4. Domain Resources

Figure 31.5. Domain Components in the JBoss ON Inventory
31.1.3. EAP 6 Resources in JBoss ON
domain.xml, host.xml, or standalone.xml is interpreted as a resource type. Because EAP 6 draws a distinction between configuration components and operational components, the EAP 6 resource types in JBoss ON do different things; some resources define configuration, while others are used for monitoring, alerting, and operations.
31.1.4. The Purpose of Managing EAP 6 Resources with JBoss ON
- Additional monitoring metrics for resources, with stored historical data, resource-specific operational baselines, and alternate display types
- Configuration and connection setting histories
- Inventory change histories when children are added or removed through JBoss ON
- Package versioning and repositories for controlled package updates
- Configuration, monitoring, and alerting for underlying and associated resources, like the platform, Apache and Tomcat web servers, and plug-ins like
mod_cluster
31.2. Upgrading the JBoss EAP 6 Resource Plug-in
Note
- Delete the original tech preview plug-in and purge it from the JBoss ON database. Purging the plug-in allows the server to deploy the new plug-in in its place.
- In the top menu, click the Administration tab.
- In the Configuration box on the left navigation bar, click the Agent Plugins link.

- Select the EAP 6 tech preview plug-in.
- Click the Delete button.
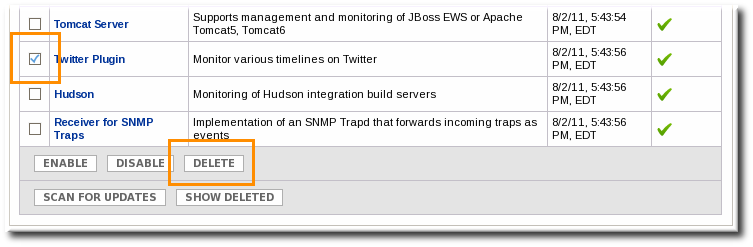
- Click the SHOW DELETED button at the bottom of the plug-ins list.
- Select the EAP 6 plug-in, and then click the PURGE button. This removes the entry in the JBoss ON database that tells the servers to ignore that original tech preview plug-in and any updates to it.

Important
Wait for the purge operation to complete before continuing with the upgrade process.
- If the server has not already been upgraded, upgrade the JBoss ON server, as described in the server upgrade section of the Installation Guide.
- Install the EAP 6 plug-in pack, as described in the installing plug-in packs section of the Installation Guide.
- Import the EAP 6 server and its children, and manage the resources as normal.
31.3. Setting up JBoss EAP 6 Instances
31.3.1. Configuring the Agent to Discover EAP 6 Instances
- The agent must have read permissions to the
run.jarfile, plus execute and search permissions for every directory in the path to therun.jarfile. - When a JBoss EAP 6 instance is installed from an RPM, the agent user must belong to the same system group which runs the EAP instance. This is
jboss, by default.
31.3.2. Configuration for Servers and Profiles
31.3.2.1. Differences for Standalone Servers and Domains
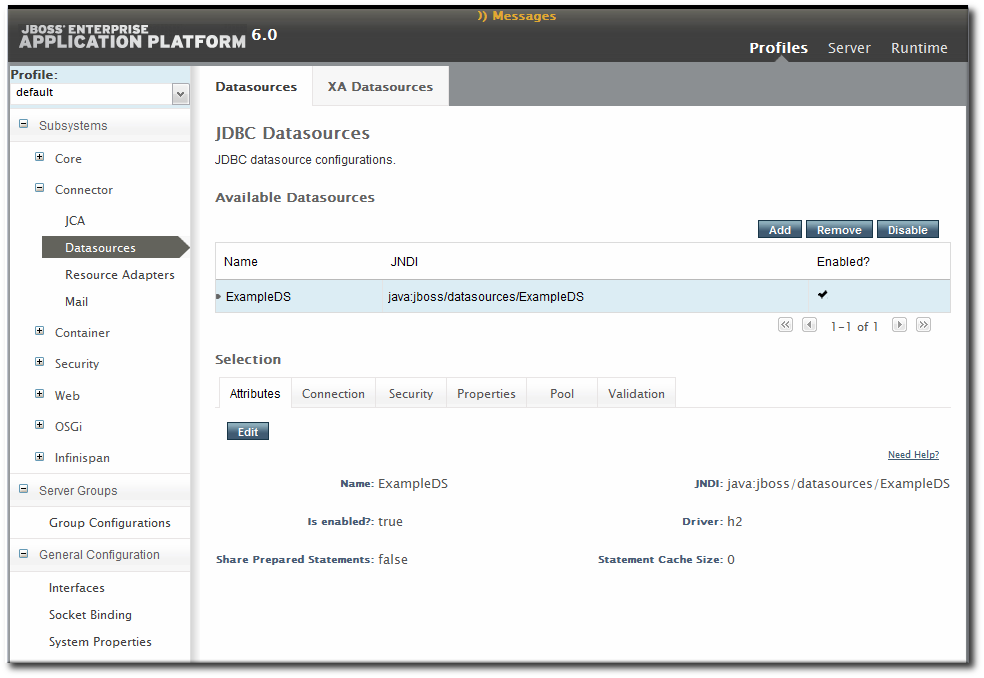
Figure 31.6. Profiles Area in the EAP 6 Console
- Subsystem configuration is located in the profile resources within the Profiles autogroup for the domain controller.
- JVM definitions are configured under the domain controller (domain-wide defaults), server group (group-wide settings), or the managed server (local settings).
- Network interfaces are configured under the domain controller.
- Socket bindings themselves are configured as part of the domain controller configuration, in the entries under the SocketBindings autogroup for the domain controller. Each server group and managed server has an offset, a number that is added to the socket bindings value, which is used to give the managed servers unique port numbers in the domain; these offsets are set on the server group and managed server connection settings.
- System properties can be set on almost any server resource: the domain controller, host controller, server group, managed server.
31.3.2.2. Requried Management Interfaces on EAP 6
/host=instanceName/core-service=management/management-interface=http-interface:add(interface=http,port="\${jboss.management.http.port:9990}",security-realm=ManagementRealm31.3.2.3. Configuration Features in JBoss ON
- View the change history, including diffs between versions
- Rollback changes to any previous version, simply by clicking a button
- Track which users made changes, as part of an audit trail
- Use alerting to notify administrators of any configuration changes
- Define drift monitoring to track configuration changes against a defined baseline and to control unexpected configuration changes
31.3.3. Creating Management Users
- Using an LDAP directory or external data store. This is the most secure implementation for EAP 6 and is recommended.
- Creating a management user through JBoss ON.
- Creating a local EAP account through the EAP
add-userscript.
31.3.3.1. Setting the Credentials for a Management User
- Click the Inventory tab in the top menu.
- Select Servers - Top Level Imports in the Resources menu table on the left. Select the JBoss EAP 6 server, either the standalone server or the domain controller.
- In the inventory tree, select the top resource entry for the server.
- Open the Inventory tab.
- Select the Connection Settings subtab.
- Fill in the username and password for the management user that was created in EAP 6.

- Click the button at the top of the page.
31.3.3.2. Creating a Management User Through JBoss ON
add-user utility, with predefined configuration for the user and additional configuration for JBoss ON.
rhqadmin user in the ManagementRealm for the EAP 6 server. This is the default security realm; in production environments, it is strongly recommended that you use a different management realm.
Note
- Click the Inventory tab in the top menu.
- Select Servers - Top Level Imports in the Resources menu table on the left. Select the JBoss EAP 6 server, either the standalone server or the domain controller.
- In the inventory tree, select the top resource entry for the server.
- Open the Operations tab.
- Click the New button at the bottom of the page.
- Select the Install RHQ User option from the drop-down menu.
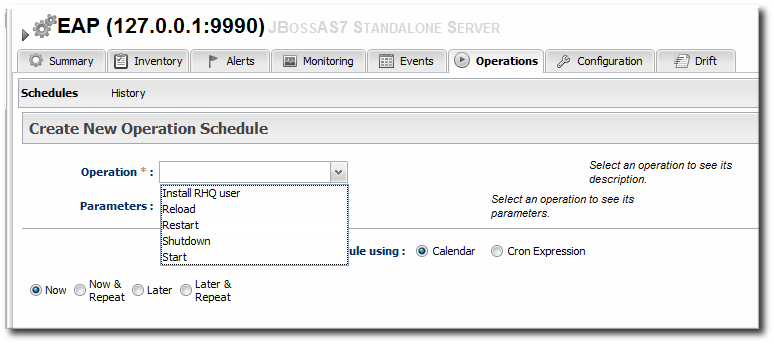
- Click the Schedule button.
31.3.3.3. Creating a Management User in EAP 6
add-user.sh utility creates and configures a local EAP user which the agent can use to connect to the EAP 6 instance. After creating the user in EAP, that user's credentials must be supplied to the resource's connection properties configuration in JBoss ON.
Note
add-user.sh script has some security limitations: It only creates the user in the default management realm (ManagementRealm). If any other security realm is used — which is recommended for production environments — then this script cannot be used to create a user for the JBoss ON agent.
- Run the
add-userutility to create the user.[root@server ~]# cd /opt/jboss-eap-6.0 [root@server bin]# ./add-user.sh What type of user do you wish to add? a) Management User (mgmt-users.properties) b) Application User (application-users.properties) (a): a Enter the details of the new user to add. Realm (ManagementRealm) : Username : jonadmin Password : Re-enter Password : About to add user 'jonadmin' for realm 'ManagementRealm' Is this correct yes/no? yes
- Set that user in the connection settings for the EAP 6 server resource in JBoss ON.
- Click the Inventory tab in the top menu.
- Select Servers - Top Level Imports in the Resources menu table on the left. Select the JBoss EAP 6 server, either the standalone server or the domain controller.
- In the inventory tree, select the top resource entry for the server.
- Open the Inventory tab.
- Select the Connection Settings subtab.
- Fill in the username and password for the management user that was created in EAP 6.
- Click the button at the top of the page.
31.3.4. Creating a Dynamic Group for EAP 6 Resources
- Click the Inventory tab in the top menu.
- In the Groups area on the left, click the Dynagroup Definitions link.
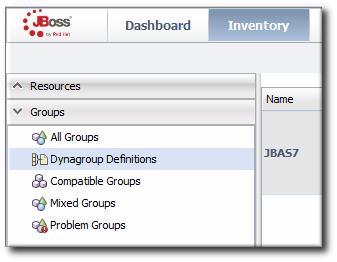
- Enter the expression to create compatible groups for each EAP 6 server type.
resource.type.plugin = JBossAS7
resource.type.category = SERVER
resource.parent.type.category = PLATFORM
groupby resource.pluginConfiguration[productType]
groupby resource.type.name
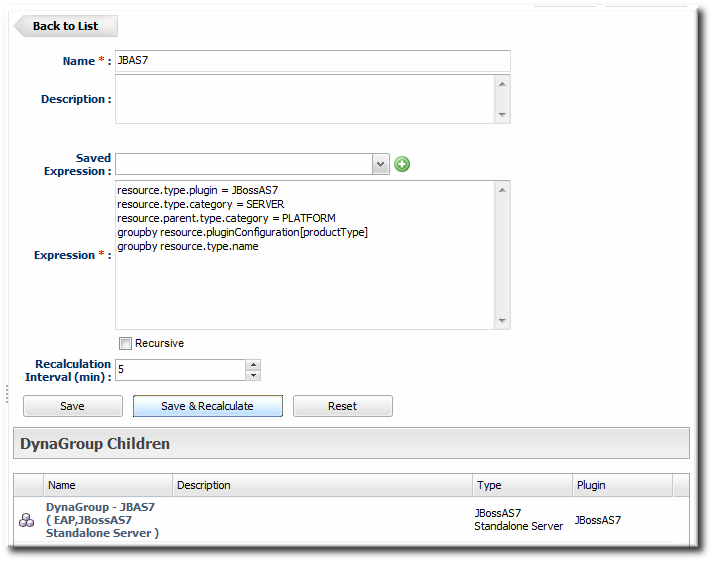
- Click the button in the middle of the page.
31.3.5. Setting Start Script Arguments, Environment Variables, and JAVA_OPTS
31.3.5.1. Start Script Discovery and Settings
- The discovery process identifies, or attempts to identify, the start script used, including custom start scripts.
- Discovery detects a subset of environment variables set in the
run.conffile or parent process that are required for the start script to work.Note
Although the discovery process does detect some environment variables, the discovery scan does not detectJAVA_OPTSvalues.The connection properties for the start script intentionally defer to therun.conffile forJAVA_OPTSvalues. - Discovery attempts to detect any arguments passed with the start script itself.
- Discovery attempts to detect what user the script is running as and assign a prefix command to use with the start script. For example, if the start script is running as the
jbossuser and the JBoss ON agent is running asjonagent, then the discovery script automatically assigns asudocommand,sudo -u jboss -g jboss, to pass with the start script.
Note
-XX:PermSize=256M), the argument value will not be updated if the server is restarted later with a different setting value.
31.3.5.2. Start Script Arguments and Drift Monitoring
Example 31.2. System Properties Without Violating the Drift Definition
31.3.5.3. Changing Start Script Configuration
- Click the Inventory tab in the top menu.
- Select Servers - Top Level Imports in the Resources menu table on the left. Select the JBoss EAP 6 server.
- In the inventory tree, select the top resource entry for the server.
- Open the Inventory tab, and select the Connection Settings subtab.
- Expand the Operations area.
- Change or add start script settings. These are the scripts and settings that the JBoss ON agent uses when running a start or restart operation on the EAP 6 server.

- To use a custom start script, one other than
domain.shorstandalone.sh, enter the path and script name. - Optionally, enter a prefix to use with the script when running the start script.When the start script is discovered, the agent tries to determine the user the script is running as and assign a prefix command to use with the start script. For example, if the start script is running as the
jbossuser and the JBoss ON agent is running asjonagent, then the discovery script automatically assigns asudocommand,sudo -u jboss -g jboss, to pass with the start script.Additionally, JBoss ON assigns thenohupcommand as a prefix so that if the JBoss Enterprise Application Platform is started by the agent and the agent process dies, the JBoss Enterprise Application Platform process continues running. - Set any environment variables, one per line.
- Set any script arguments, one per line. For regular JAVA_OPTS, these arguments usually are
-X,-D, or-P. Some useful-XXarguments are listed in the JVM options documentation from Sun. Some useful system properties for EAP 6 are listed with the JBoss AS7 project documentation.The EAP 6 default start scripts use arun.sh-style script, so the arguments use that format. A custom script can use different arguments or options.
- Click the Save button at the top of the page.
31.3.6. Changing Port Numbers
31.3.6.1. Changing Socket Binding Ports
- Click the Inventory tab in the top menu.
- Select Servers - Top Level Imports in the Resources menu table on the left. Select the JBoss EAP 6 server.
- In the inventory tree, select the SocketBindingsGroup compatible group, and then select the socket binding to edit.
- Open the Configuration tab.
- Click the green pencil icon to edit an existing socket definition or click the green plus sign (+) to create a new one.

- Change the Port number to any available port between 1025 and 65535. On Linux, available port numbers can be determined using
iptables. Optionally, configure multicast settings for the socket. If there are multiple instances of JBoss servers on the same system or in the same cluster, then multicast may be configured for cluster communication.
 - Click the Save button at the top of the page.
31.3.6.2. Changing Port Offsets for Server Groups in a Domain
Note
host.xml file. This can be set when the managed server is created in JBoss ON, but it cannot be edited afterward.
- Click the Inventory tab in the top menu.
- Select Servers - Top Level Imports in the Resources menu table on the left. Select the JBoss EAP 6 server.
- In the inventory tree, expand the Server Groups node, and select the server group.
- Open the Configuration tab for the server group.
- In the Port Offset field, enter the new value for the offset.

- Click at the top of the page.
31.3.7. Editing Network Interfaces
- Click the Inventory tab in the top menu.
- Select Servers - Top Level Imports in the Resources menu table on the left. Select the JBoss EAP 6 server.
- In the inventory tree, select the Network Interfaces group under the main server entry, and select the interface (management, public, or unsecure).
- Open the Configuration tab.
- Set either the specific IP address for the interface to use or set which type of IP address to use (IPv4, IPv6, or either). Either the IP address or the IP address type must be set.
 Because either a specific IP address or an IP address type can be set, and which property is used is optional, the UI does not enforce that a selection is made. For the network interface to work properly, however, some kind of IP address configuration must be set.
 - Click the Save button at the top of the page.
31.3.8. Setting System Properties
domain.xml file. When editing a host controller or a managed server, the properties are added to the server's entry in the host.xml file.
Note
-D or -P arguments.
Note
- Click the Inventory tab in the top menu.
- Select Servers - Top Level Imports in the Resources menu table on the left. Select the JBoss EAP 6 server.
- In the inventory tree, select the top resource entry for the server.
- Open the Configuration tab.
- Expand the Properties section.
- Click the green plus (+) icon at the bottom of the Paths list.
- Fill in the new property information.
- The system property name.
- The value of the property.
- If the property should be loaded immediately to the running JVM or if it should be loaded when the JVM is started. The default is to load it immediately.
- Click .
31.3.9. Adding System Paths
Note
jboss.*, user.*, and java.*.
- Click the Inventory tab in the top menu.
- Select Servers - Top Level Imports in the Resources menu table on the left. Select the JBoss EAP 6 server.
- In the inventory tree, select the top resource entry for the server.
- Open the Configuration tab.
- Expand the Paths section.
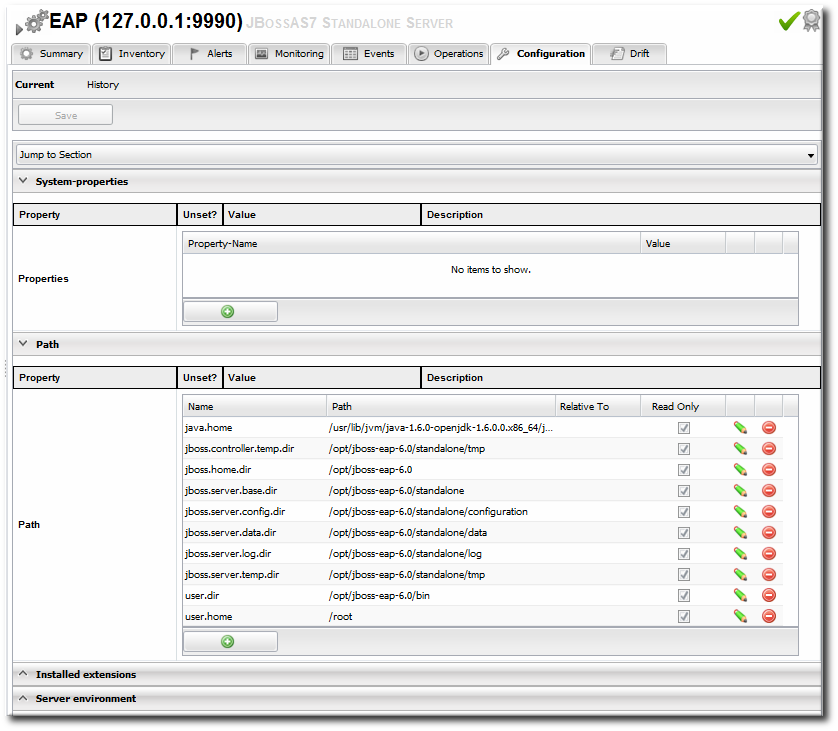
- Click the green plus (+) icon at the bottom of the Paths list.
- Fill in the path information.

- The name of the path to create.
- The path (absolute or relative) to create.
- If a relative path was given as the Path value, then de-select the Unset? checkbox for the Relative field, and enter the name of the system path that it is relative to.For example, if the new path is
devel/, and this is relative to the EAP home directory, then the Relative value is java.home.dir. This results in a final path of/opt/jboss-eap-6.0/devel/. - If the property is read-only. A read-only property cannot be edited after it is created. Read-only paths (aside from the default paths) have to be deleted and recreated if they need to be changed.
- Click .
31.3.10. Editing Connection Settings
31.3.10.1. Changing the General Properties for an EAP 6 Server
- Click the Inventory tab in the top menu.
- Select Servers - Top Level Imports in the Resources menu table on the left. Select the JBoss EAP 6 server.
- In the inventory tree, select the top resource entry for the server.
- Open the Inventory tab, and select the Connection Settings subtab.
- The server connection properties are in the General Properties section. Only some of the properties can be edited. Information that is derived from the JBoss EAP 6 installation itself, like the home directory, base directory, and server type (EAP or AS) is displayed, but is inactive.
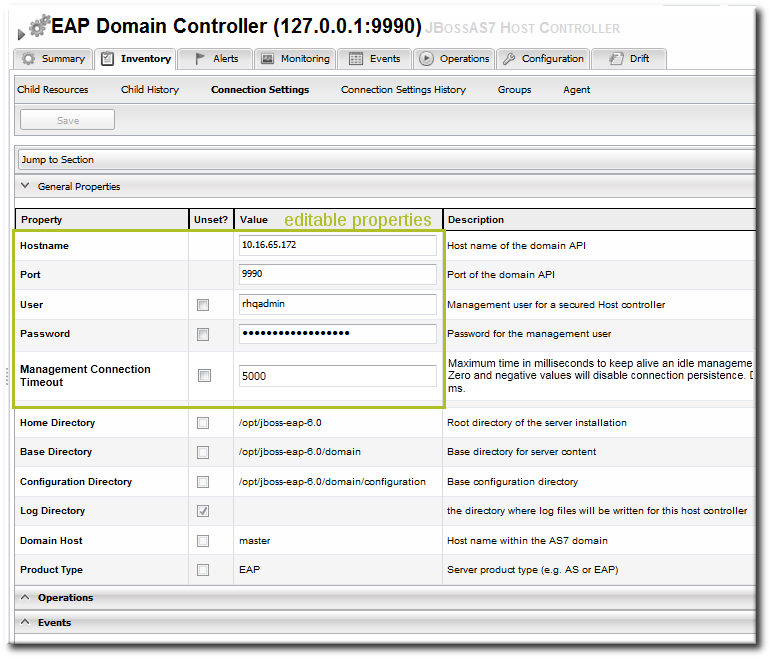
- Hostname gives IP address to use to connect to the server. This is usually 127.0.0.1, but if the management interface configuration has been changed, then the IP address may be a public IP instead of the localhost.
- Port is the port of the management interface.
- Username and Password are the credentials of the JBoss EAP 6 user for the agent to use to log in. If this user was created using the install RHQ user operation, then the user is
rhqadmin. - Domain Controllers Only. With the standalone server, all of the configuration and the server instance definition are in the same file,
standalone.xmlor any other configuration file passed to the start script. For domains, the server configuration is defined in one file (for the domain controller), while the server instances are defined in a separate file (for the host controller). The Domain Configuration and Host Configuration fields give the names of the files within thedomain/configuration/directory to reference for profile configuration and for managed server instances, respectively.
- Click the button at the top of the page.
Note
31.3.10.2. Viewing Installation Paths for EAP 6 Child Resources
main-server-group definition is in the domain controller's domain.xml file:
    <server-groups>
        <server-group name="main-server-group" profile="full">
		... 8< ...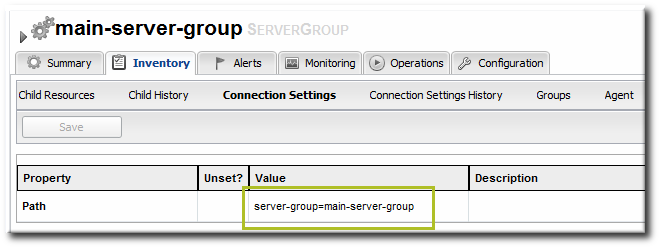
Figure 31.7. Child Resource Connection Settings
31.3.11. Viewing Installed Extensions
domain.xml or standalone.xml).
    <extensions>
        <extension module="org.jboss.as.clustering.infinispan"/>
        <extension module="org.jboss.as.clustering.jgroups"/>
        <extension module="org.jboss.as.cmp"/>
        <extension module="org.jboss.as.configadmin"/>
        <extension module="org.jboss.as.connector"/>
        <extension module="org.jboss.as.ee"/>
        <extension module="org.jboss.as.ejb3"/>
... 8< ...- Click the Inventory tab in the top menu.
- Select Servers - Top Level Imports in the Resources menu table on the left. Select the JBoss EAP 6 server.
- In the inventory tree, select the top resource entry for the server.
- Open the Configuration tab.
- Expand the Installed extensions section.

Note
31.3.12. Reloading the Server Configuration
Note
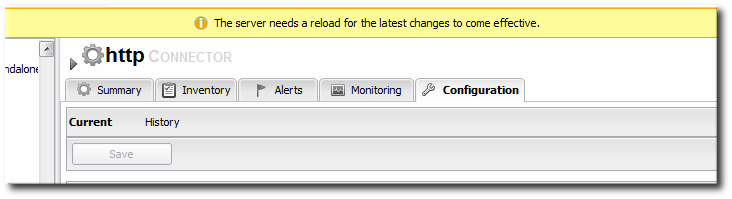
Figure 31.8. Reload Configuration Message
Note
Note
- Click the Inventory tab in the top menu.
- Select Servers - Top Level Imports in the Resources menu table on the left. Select the JBoss EAP 6 server.
- In the inventory tree, select the top resource entry for the server.
- Open the Operations tab.
- Click the New button at the bottom of the page.
- Select the Reload) option from the drop-down menu.
- Click the Schedule button.
31.3.13. Controlling Configuration Drift
- Set drift definitions that track the critical configuration directories, such as
domain/configuration/andstandalone/configuration/, but that exclude directories which will have constantly changing data, such as logging, library, and data directories. Even within the configuration directories, create exclude rules for thehost_xml_history/,domain_xml_history/, andstandalone_xml_history/directories, since those are not proper configuration files and should not be tracked. - Once the desired configuration is in place, pin that configuration to the drift definition. This sets the desired configuration as the baseline. All changes will be compared against that baseline.
- Create an archive of the blessed configuration.
- Create a bundle definition that can be automatically deployed to reset the EAP 6 configuration and remediate drift.When creating the he destination should be the platform of the EAP 6 resource. The destination could be the standalone server or the domain controller, but using the platform allows you to deploy the bundle to an expendable directory, like
/tmp/mybundles/holding, and then run a post-install task that copies the configuration files into the configuration directory.Deploying a bundle generally removes whatever existing files are in the target directory and replaces them with the bundle. There are ways to control that behavior, but, generally, it is safest to have the contents of the bundle match exactly what the final deployment will be.Since it may not be feasible to have the entire configuration directory in the bundle, deploying to a separate location on the filesystem preserves the configuration directory, and only the important configuration files are updated (when they are copied by the Ant task).For more on bundles and remedying drift, see the bundles chapter in "Deploying Applications and Content" and the drift-bundle CLI example script in "Writing JBoss ON Command-Line Scripts." - Set up alerts for configuration drift that do two things:
- Send a notification email to administrators.
- Run a CLI script on the platform that automatically deploys the bundle.
Chapter 25, Defining Alerts has information on how to configure alert notifications that launch a JBoss ON server-side script or that run an operation on another resource.
Note
domain.xml and standalone.xml. That will trigger a drift alert, if alerting is configured.
31.3.14. Tracking and Reverting Configuration Changes
- Click the Inventory tab in the top menu.
- Select Servers - Top Level Imports in the Resources menu table on the left. Select the JBoss EAP 6 server.
- In the inventory tree, select the top resource entry for the server.
- Open the Configuration tab, and select the History subtab.
Note
Change history pages are kept for resource configuration (the Configuration tab) and the connection settings (the Inventory > Connection Settings tab). - Clicking the change ID number opens the configuration settings that were in effect for that version.

- Changes can be compared to one another, in a standard diff format, by selecting them from the list and clicking the button.

- The current, live version of the configuration can be reverted to any previous version by selecting the desired previous version in the list and clicking the button.

31.4. Creating JBoss EAP 6 Resources
31.4.1. Tracking the Child History
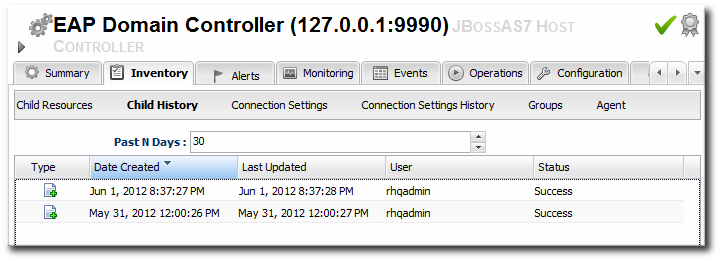
Figure 31.9. Child History
31.4.2. Creating Server Groups
- Click the Inventory tab in the top menu.
- Select Servers - Top Level Imports in the Resources menu table on the left.
- Right-click the domain controller entry.

- In the Create New menu, select the item for .
- Enter the name for the new server group.
- Enter the settings for the server group: the profile to use, the socket bindings group to use, and any system properties to set.
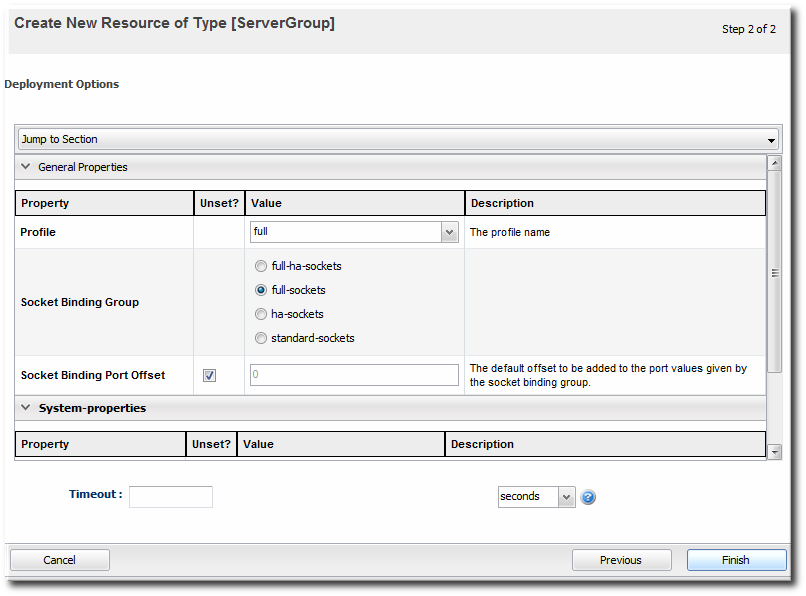
- Click .
31.4.3. Creating Managed Servers
Note
Note
- Click the Inventory tab in the top menu.
- Select Servers - Top Level Imports in the Resources menu table on the left.
- Right-click the domain controller entry.
- In the Create New menu, select the item for .
- Enter the name for the new server.
- Enter the settings for the server:
- The EAP 6 domain host to create the server on.
- The server group to add the server to.
- The socket binding group to use. This gives the base port numbers for the server instance to use.
- The port offset. This is the number to add to the socket bindings settings to determine the actual port numbers for the server instance. If the socket binding port is 1000, and the offset is 150, then the port number used for that interface on the managed server is 1150.
- Whether the server starts automatically when the EAP 6 host starts.
- Any system properties for the server.
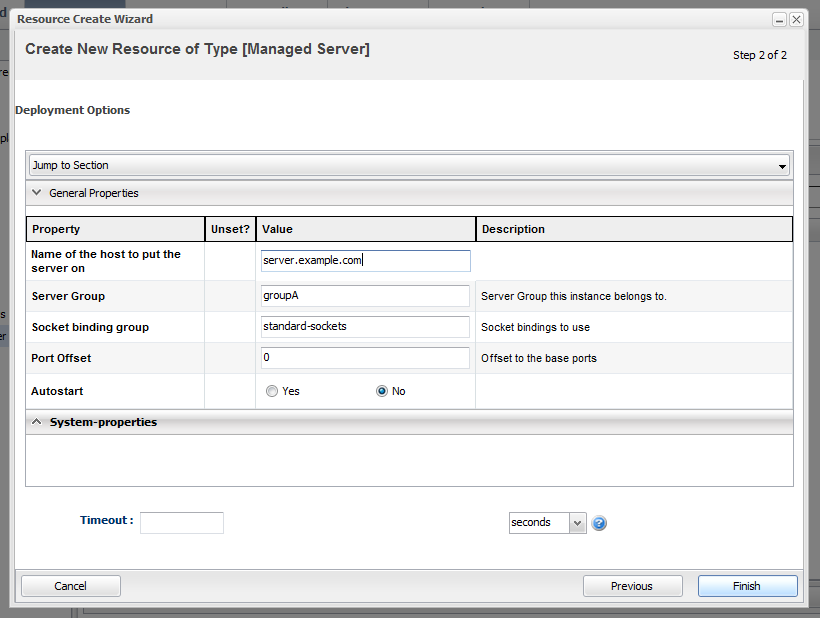
- Click .
31.4.4. Changing JVM Definitions
31.4.4.1. JVM Definitions as Resources
Figure 31.10. JVM Definitions in the EAP 6 Console
31.4.4.2. Creating a JVM Definition
Important
- Click the Inventory tab in the top menu.
- Select Servers - Top Level Imports in the Resources menu table on the left.
- Right-click the entry to which to add the JVM definition.
- In the Create New menu, select the item for .
- Enter the name for the definition.
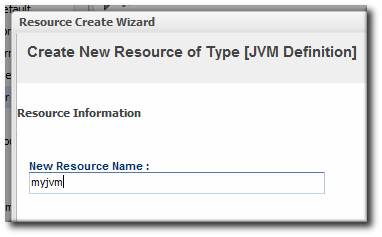
Note
The name of JVM definition can be anything for a host controller. For a managed server or server group, the name of the JVM definition must be the same as the host controller JVM definition which is the base of the definition. - Enter the settings for the JVM. Any settings which are left blank use the values defined in the parent JVM definition.
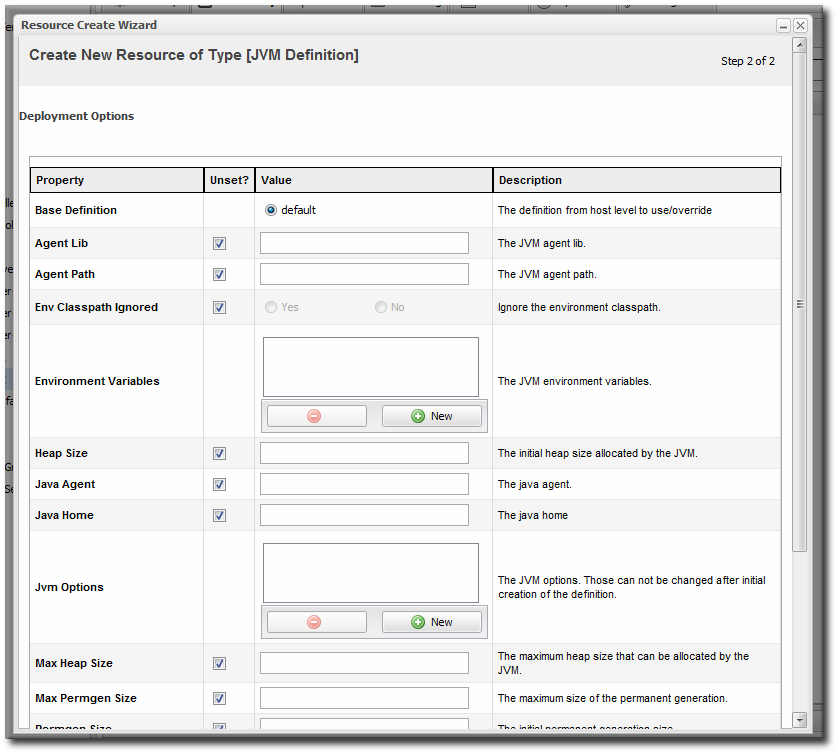 Most of the configuration for the JVM relates to memory and resource usage, along with options to pass environment variables or other settings to the JVM. The values of these settings can have a positive impact on both the resource performance and the overall system performance.The configuration settings are listed in Table 31.1, “JVM Definition Properties”.
 - Click .
Table 31.1. JVM Definition Properties
| Property | Description |
|---|---|
| JVM Options | Sets any other Java option. Many of these are documented with the Java provider, such as Sun's documentation at http://www.oracle.com/technetwork/java/javase/tech/vmoptions-jsp-140102.html. |
| Environment variables | Sets environments variables to use with the JVM. |
| Heap Size | Sets the initial heap size for the JVM. |
| Max Heap Size | Sets the maximum allowed heap size for the JVM. Setting this too low can cause out of memory errors. |
| Permgen Size | Sets the initial size of the permanent generation. |
| Max Permgen Size | Sets the maximum size of the permanent generation. |
| Type | The type of JVM. This can be Sun or IBM, the two supported Java types for JBoss ON. |
31.4.4.3. Editing a JVM Definition
- Click the Inventory tab in the top menu.
- Select Servers - Top Level Imports in the Resources menu table on the left.
- Select the EAP server and navigate to the appropriate JVM definition entry.
- Open the Configuration tab.

- Change any of the JVM settings. These are listed in Table 31.1, “JVM Definition Properties”.
- Click the button at the top of the page.
31.4.5. A Short List of Parent-Child Resources
Note
Table 31.2. A Short List of Parent-Child Resources
| Resource | Child Resource Types |
|---|---|
| Standalone server |
|
| Domain Controller |
|
| Host |
|
| Server Groups |
|
| Datasources (under Profiles) |
|
| Infinispan > Hibernate |
|
| Logging |
|
| Web |
|
31.5. Deploying Web Applications
Important
31.5.1. Runtime Information and Deployment Resources
31.5.1.1. Views of Deployments

Figure 31.11. Deployments in the Runtime Page
- A web application is treated as a separate entity, in and of itself. It has its own place in the inventory; its association with domains and server groups is reflected as it is a child of those resources.JBoss ON also records package details, like its file size and an identifying SHA256 hash.
- A web application has a history. Updates to packages are recorded in a changelog which makes it possible to track how the application has been maintained.
- Web applications can be monitored. Response time metrics specifically track the performance of web applications, apart from the performance or monitoring of the underlying server.
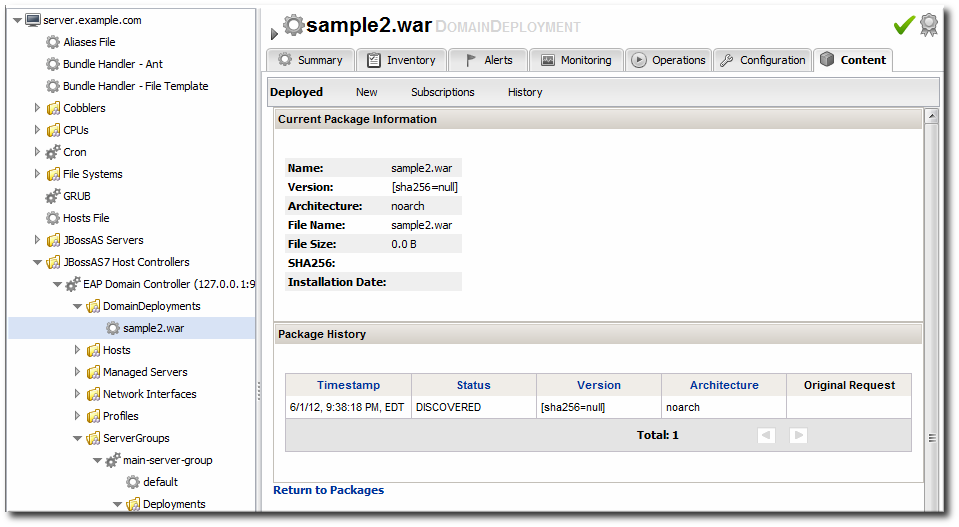
Figure 31.12. Deployment Resource Details in JBoss ON
- Creating content repositories to store patches and updates
- Tracking multiple versions of content
- Reverting software packages to a previous version (particularly for standalone servers)
- Using the same content repository for multiple EAP instances, including multiple domains and standalone server
- Tracking (and auditing) changes to content
31.5.1.2. Deployment Paths for Standalone Servers and Domains
- Create a deployment as a child resource
- Use a bundle to provision the application in the deployment directory
31.5.2. Deploying Web Applications to a Domain
Note
- Click the Inventory tab in the top menu.
- Select Servers - Top Level Imports in the Resources menu table on the left. Select the JBoss EAP 6 domain controller.
- Right-click the domain controller entry.
- In the Create New menu, select the item for .
- Enter the version number.
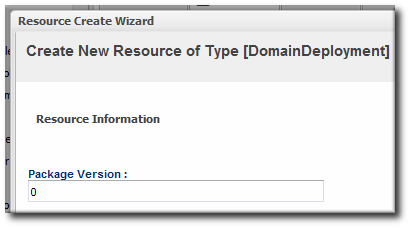
- Upload the EAR, WAR, or JAR file.
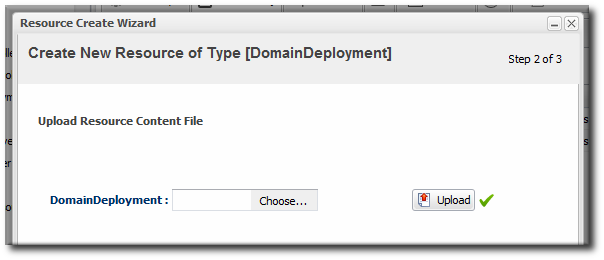
- Optionally, enter a runtime name for the deployment.

- At the bottom of the wizard, set an optional timeout period. This is how long the JBoss ON server will wait during the deployment process before determining that the deployment has failed.
Note
The timeout period only applies to the server's reporting a result. If the operation continues running, it can still complete successfully, and the web application is deployed.Particularly for large application files, do not set a low timeout period, or the server will mark the deployment as having failed. If the deployment completes later, the web application must be imported into the inventory manually; it will not be discovered by the agent. - Click .
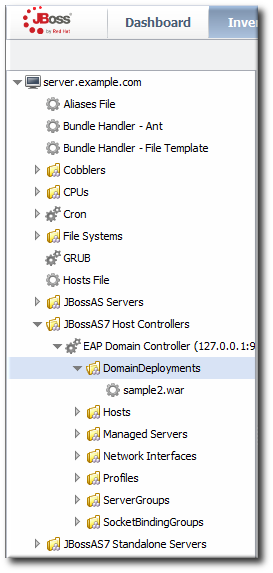
Figure 31.13. Domain Deployments Directory
31.5.3. Assigning Web Applications to a Server Group
Note
Important
Note
- Click the Inventory tab in the top menu.
- Select Servers - Top Level Imports in the Resources menu table on the left. Select the JBoss EAP 6 domain controller.
- Expand the DomainDeployments folder.To deploy all web applications in the deployments folder, select the deployments folder itself to run the operation.To deploy a single web application, select the specific web application.
- Open the Operations tab for the server.
- Click the New button at the bottom of the page.
- Select the Assign to Server-Group option from the drop-down menu.
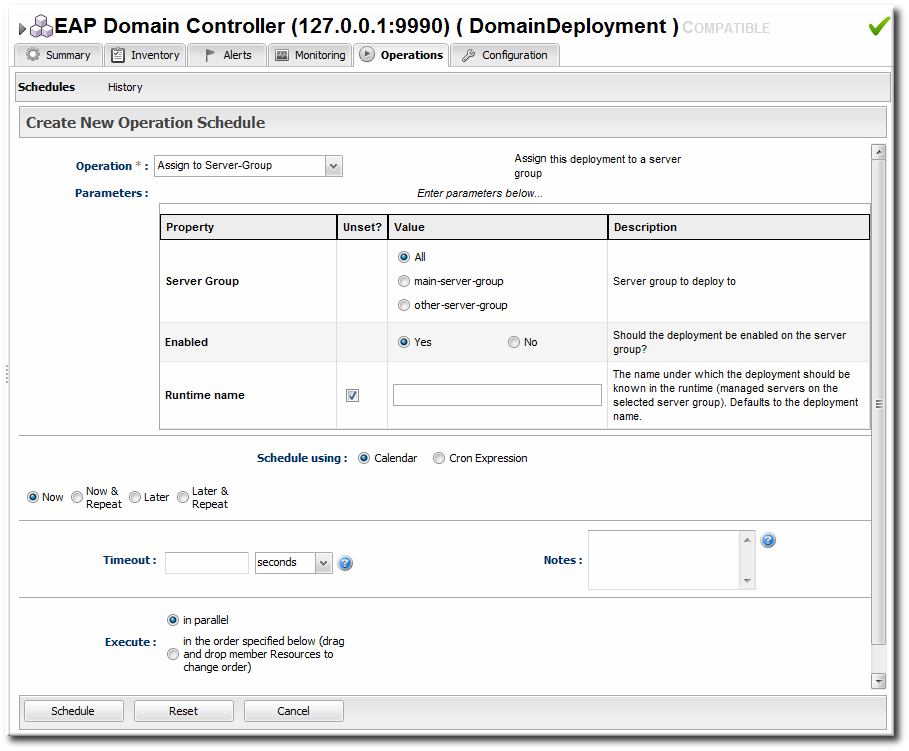
- Select which group (or all groups) to deploy the application to.
- Enter the standard information for operations, like the schedule for when to run the operation and the timeout period.
Note
The timeout period sets how long the server waits before assuming that the operation has timed out and failed. This does not necessarily mean that the operation has failed or stopped running; it could complete successfully past the time out period. - If there are multiple web applications being deployed, then set the Execute radio button to the way set the order that the packages are deployed. All packages can be deployed at once, or they can be deployed in a specific order.
- Click the Schedule button.
- Optionally, run a discovery scan on the agent to discover the new content resource. By default, discovery scans for services are only made every 24 hours, so there could be a long delay in discovering new content.
- Open the agent entry in the UI.
- Open the Operations tab, and select the execute prompt command operation.
- Enter the
discoverycommand as an operation rgument. This runs a discovery scan. - Click the Schedule button.
31.5.4. Extended Example: Assigning Web Applications and Managing Updates
Tim the IT Guy wants to have a clear progression for web applications, from development through staging and production. The native structure in EAP 6 allows him to create different server groups and deploy content from his central domain controller to the appropriate server groups as it passes testing at each stage.
- Tim first outlines what server groups he needs to maintain. For a simple environment, he just wants three groups: testing, staging, and production.
- He creates two content repositories, one for patches and one for new versions of the web application.
- He creates the domain deployment and then promotes the web application to the testing server group.
- Tim configures response time monitoring for the web application. Once it meets the required performance parameters in the testing area, Tim promotes the deployment to the staging and then production server groups.
The package history for each deployment allows Tim to track when the web application was deployed, its version, and its content.
31.5.5. Enabling and Disabling Web Applications
- Click the Inventory tab in the top menu.
- Select Servers - Top Level Imports in the Resources menu table on the left. Select the JBoss EAP 6 domain controller.
- In the inventory tree, expand the ServerGroups folder, and select the server group from the list.
- Expand the Deployments folder, and select the web application to enable or disable.
- Open the Operations tab for the web app.
- Click the New button at the bottom of the page.
- Select the Enable (or Disable) option from the drop-down menu.
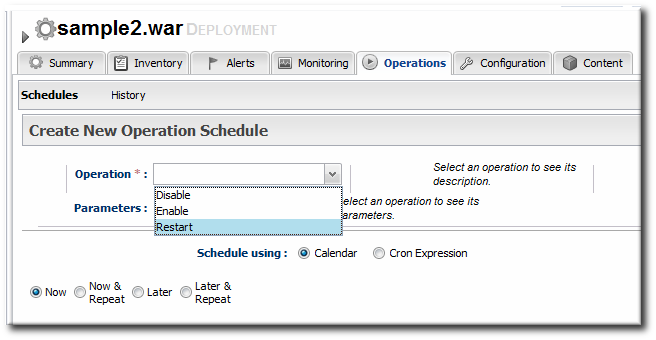
- Click the Schedule button.
31.5.6. Updating Deployment Content
- Click the Inventory tab in the top menu.
- Select Servers - Top Level Imports in the Resources menu table on the left. Select the JBoss EAP 6 server.
- Open the Deployments folder (for the domain, standalone server, or server group), and select the web application to update.
- On the web application details page, open the Content tab, and click the New subtab.
- Click the button.
- Click the button.
- In the pop-up window, click the Add button, and browse the local filesystem to the updated content file to be uploaded.
- Click the UPLOAD button.
- Select the repository where the web application package should be stored. While this is not required, it is beneficial to store the updated package in JBoss ON so that it is available to other JBoss EAP 6 deployments.

- Fill in the version information.
- Confirm the details for the new package, then click .
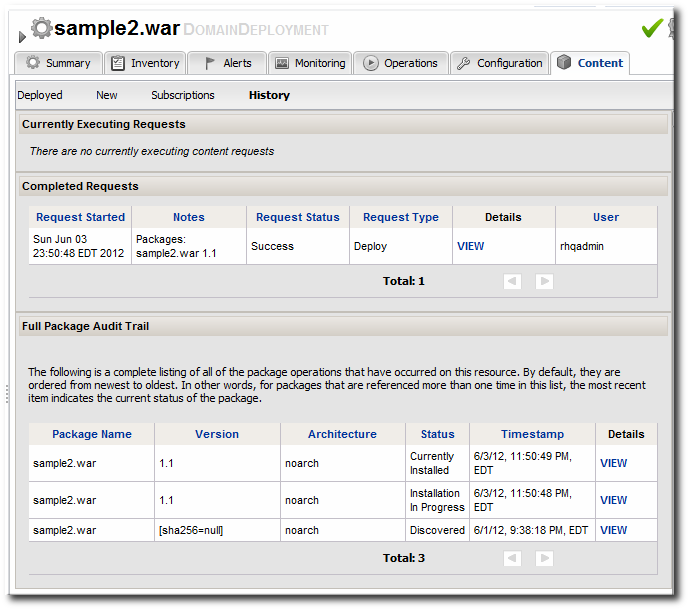
Figure 31.14. Deployment History for a Resource
31.5.7. Deploying Web Applications to a Standalone Server
31.5.7.1. Deploying a Web Application as a Child Resource
Important
discovery command. This runs a discovery scan.
- Click the Inventory tab in the top menu.
- Select Servers - Top Level Imports in the Resources menu table on the left. Select the JBoss EAP 6 standalone server.
- Right-click the standalone server entry in the navigation tree.
- In the Create New menu, select the item for .
- Enter the version number.
- Upload the EAR, WAR, or JAR file.
- Optionally, enter a runtime name for the deployment.
- At the bottom of the wizard, set an optional timeout period. This is how long the JBoss ON server will wait during the deployment process before determining that the deployment has failed.
Note
The timeout period only applies to the server's reporting a result. If the operation continues running, it can still complete successfully, and the web application is deployed.Particularly for large application files, do not set a low timeout period, or the server will mark the deployment as having failed. If the deployment completes later, the web application must be imported into the inventory manually; it will not be discovered by the agent. - Click .
31.5.7.2. Deploying Web Applications Through Bundles
- In the top menu, click the Bundles tab.
- Upload the distribution file, and go through the deployment wizard to create the bundle version.
- Scroll to the bottom of the window and click the button.
- Select the bundles to deploy.
- Define the destination information for the JBoss standalone server. A destination is a combination of a compatible group (containing the JBoss resource) and the directory to which to deploy the bundle.
- Complete the deployment wizard, setting any require properties.
31.5.8. Tracking Content History and Reverting Changes
Figure 31.15. Deployment History for a Resource
- If the domain deployment or server group deployment is associated with a content repository, then upload an updated package to the content repository and sync the change over to the associated resources.
- Upload an updated package to the domain deployment and use the deploy to group operation to send the updated package to the server groups.
31.5.9. Troubleshooting Deployments
- Q: My deployment says it failed, but when I tried to redeploy the package, it fails because it says the resource already exists.
- Q: I tried to deploy a package to a server group and it seemed to be successful, but I don't see the deployment listed.
- The agent discovery scan hasn't run. There can be several hours between discovery runs, so it can take awhile for the application to appear in the discovery queue. To work around this, run a discovery scan on the agent.
- The package has already been deployed to the domain. Creating a deployment child on a server group actually attempts to create the deployment on the domain (where the content is stored) and then deploys it to the server group. If the package already exists in the domain, then attempting to re-create the deployment on the server group fails as a duplicate.In this case, use the deploy to server group operation on the domain controller to deploy the application.
31.6. Monitoring JBoss EAP 6 Resources
31.6.1. Runtime Information and JBoss ON Monitoring
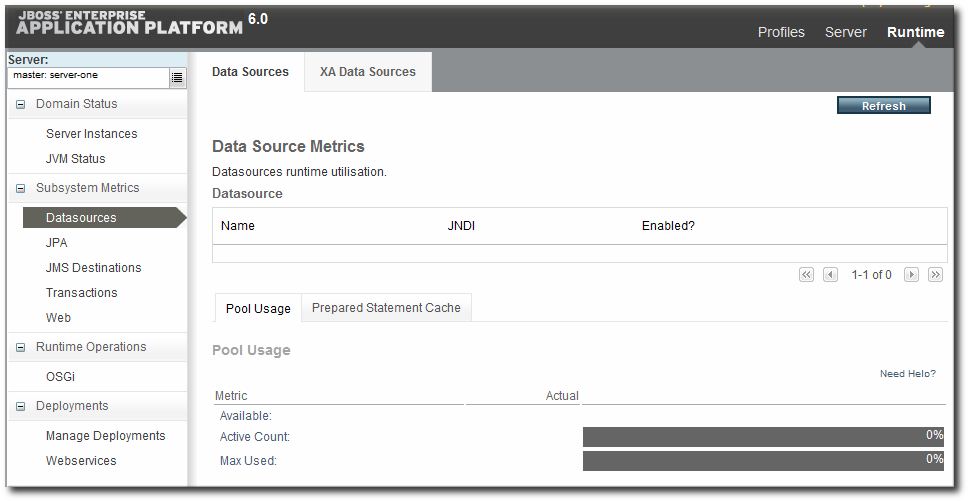
Figure 31.16. EAP 6 Runtime Metrics
- Time-based monitoring graphs for each metric
- Operating parameters, or baselines calculated on the real performance of the resource
- Availability uptime percentages, recovery times, and mean down time
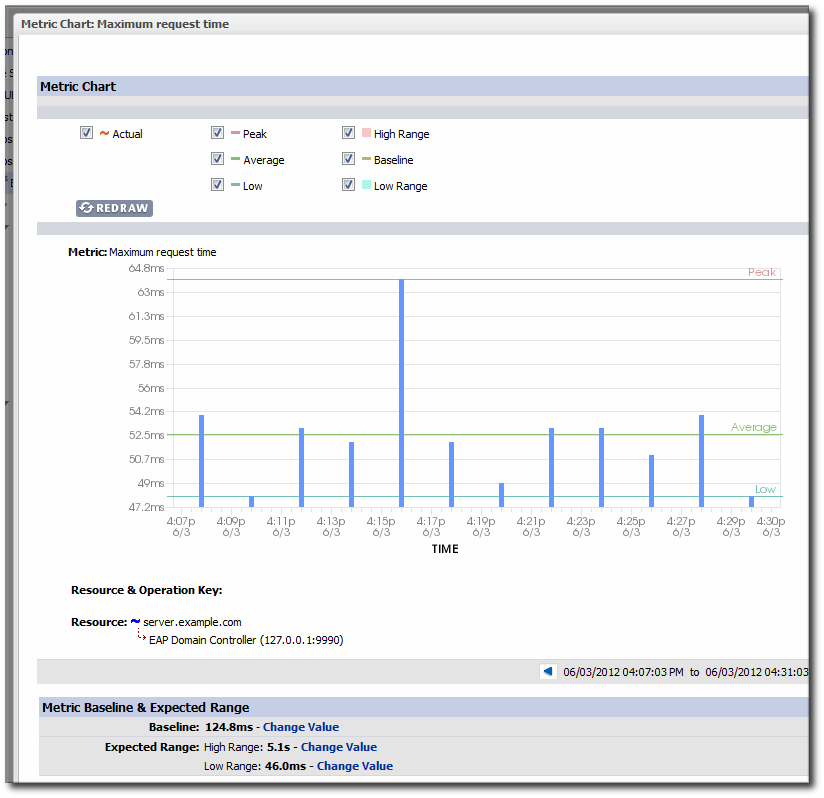
Figure 31.17. JBoss ON Baselines for a Single Metric
- More metrics are available for resources. At a minimum, every resource has availability monitoring. Some resources — like datasources and managed servers — have dozens more metrics that can be enabled for routine monitoring.
- Response time monitoring can be configured for specific URLs and pages for web applications. This allows administrators to track usability and customer experience for web applications along with internal metrics like connection counts.
- Event log monitoring can filter important messages from different error logs. This allows JBoss ON to respond (through alerts) to issues that may not have crossed a performance threshold yet, and it also makes it possible for administrators to correlate log events with observed performance metrics.
31.6.2. Setting up Monitoring for EAP 6 Resources
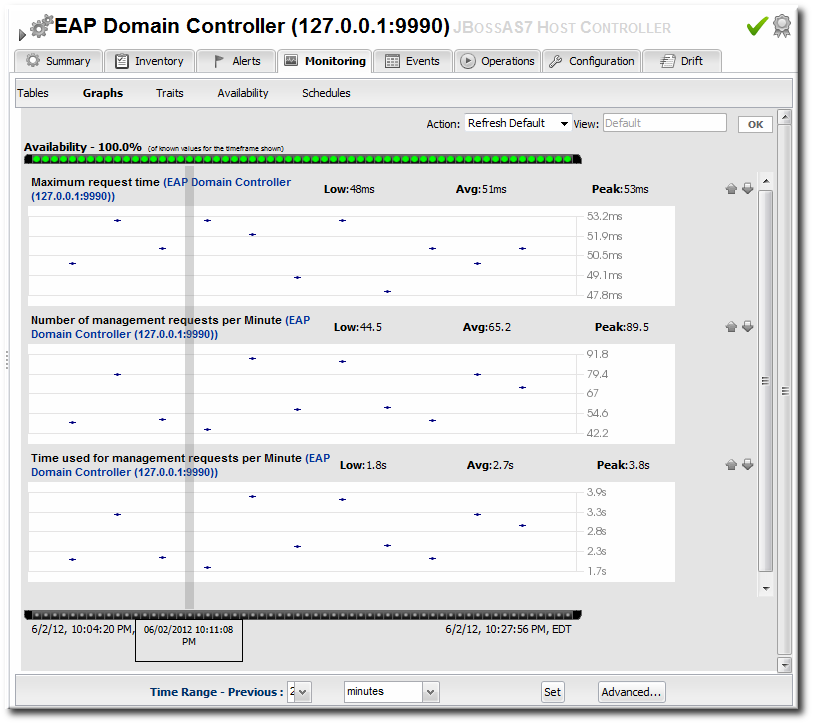
Figure 31.18. Monitoring Graph
Note
31.6.2.1. Enabling Additional Metrics
Note
Note
- Click the Inventory tab in the top menu.
- Select Servers - Top Level Imports in the Resources menu table on the left. Then select the JBoss EAP 6 server and navigate to the resource to edit.
- Click the Monitoring tab on the resource entry.
- Click the Schedules subtab.
- To enable a metric:
- Select the metric row. Multiple metrics can be selected using the Ctrl key.
- Click the button at the bottom of the page.
- To change a collection interval for a metric:
- Select the metric row. Multiple metrics can be selected using the Ctrl key, if they will all be changed to the same frequency.

- Enter the desired collection period in the Collection Interval field, with the appropriate time unit (seconds, minutes, or hours).
- Click Set.
Note
Changing the collection interval for a disabled metric automatically enables the metric.
31.6.2.2. Availability Monitoring
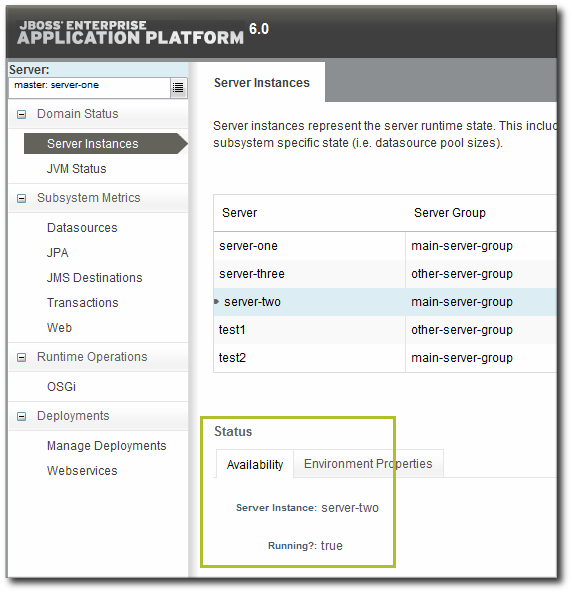
Figure 31.19. Availability in the EAP 6 Console
- Its overall uptime percentage
- Total time spent in different states (up, down, or disabled)
- The total number of failures (times it has gone down)
- The mean time between failures, which is essentially the mean time that a resource is up and available
- The mean time to recovery, which is the mean amount of time that it takes a resource to come back up after a failure
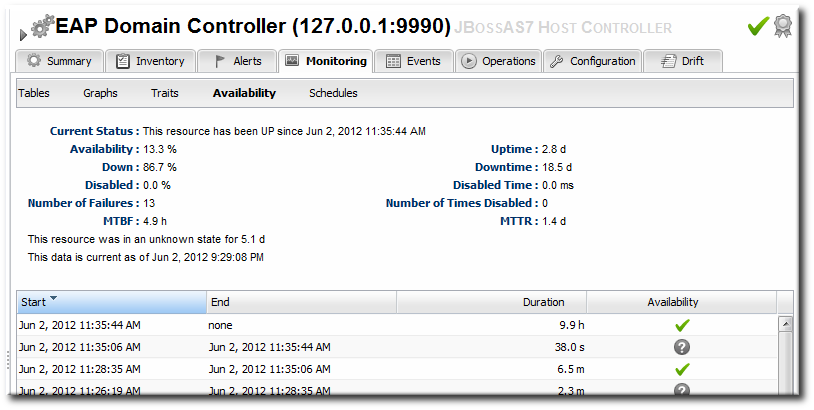
Figure 31.20. Availability in JBoss ON
Note
31.6.3. Configuring Events Monitoring
Note
- Host controllers, in
domain/log/host-controller.log - Managed servers, in
domain/servers/server-three/log/server.log - Standalone servers, in
standalone/log/server.log
- Click the Inventory tab in the top menu.
- Click the Servers - Top Level Imports item, and select the JBoss EAP 6 resource.
- Navigate to the appropriate EAP 6 resource.
- Click the Inventory tab on the resource entry.
- Select the Connection Settings subtab.
- Click green plus icon under the Events Log section.
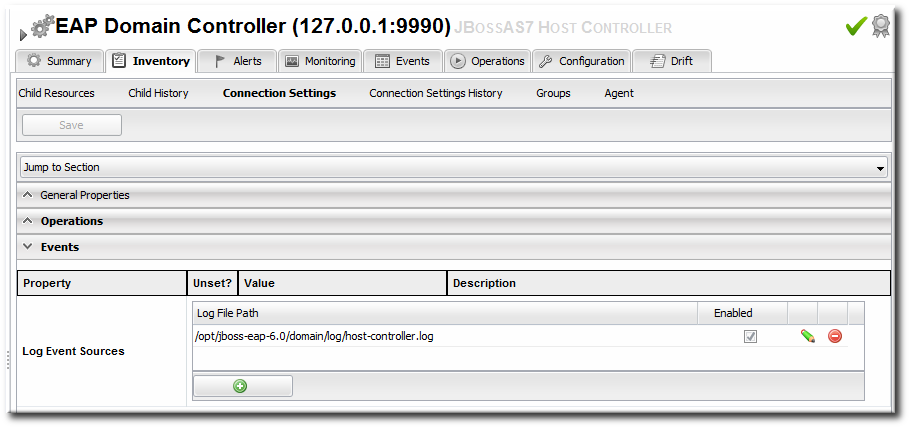
- Enable the event entry.Optionally, set the date format, string filters to include messages, or the severity of the messages to include.
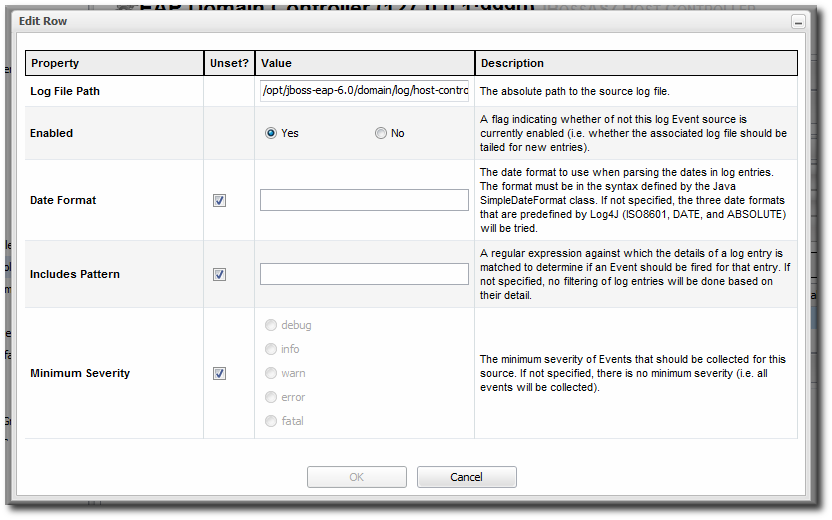
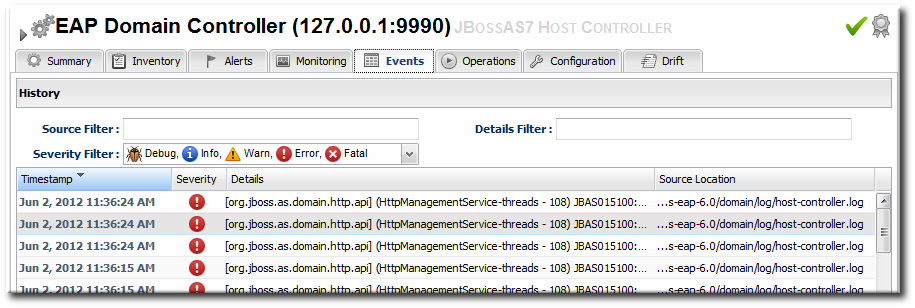
Figure 31.21. JBoss EAP 6 Event Logging
31.6.4. Alerting on JBoss EAP 6 Resources
- Email an administrator
- Run a restart operation on the alerting resource
- Run an operation on the parent of the alerting resource
- Run a shell script
- Run a JBoss ON server-side scriptServer-side scripts are extremely powerful. A script can perform almost any management task in JBoss ON: change resource configuration, deploy updated packages, create new resources, delete existing resources, run an operation, or all of the above. For more information on writing server-side scripts, see "Writing JBoss ON Command-Line Scripts".
31.7. Using the mod_cluster Services in EAP 6
mod_cluster modules provides dynamic load balancing between web contexts on a JBoss application server and an Apache web server.
mod_cluster: configuring the module on JBoss to manage the web applications and configuring the module on Apache to manage sessions and routing.
mod_cluster subsystem for JBoss EAP 6 for both domain servers and standalone servers.
31.7.1. About mod_cluster and JBoss ON
mod_cluster module, a subsystem on EAP 6, communicates between the web applications on a JBoss EAP server and an Apache web server. Multiple JBoss EAP servers can be involved in a mod_cluster group, and those servers can be managed servers, standalone servers, or a mix of both.

Figure 31.22. The mod_cluster Topology
mod_cluster module. For domains, the other-server-group server group is configured to use the full-ha profiles, though any profile which supports high availability can be used (such as the ha profile or a custom profile). For standalone servers, the server must be started with the standalone-ha.xml configuration.
mod_cluster server is the master node; that is the administering mod_cluster service. Every other member of the cluster is a worker node.
Note
mod_cluster in general is available with the mod_cluster project documentation.
mod_cluster domain depends on the profile that resource is associated with, which is largely outside of the control of JBoss ON. (Of course, a standalone server can be started with the high availability configuration with the JAVA_OPTS settings in JBoss ON for start scripts, or a new managed server can be created that uses a high availability profile. But the profile definitions themselves are created and maintained outside of JBoss ON.)
mod_cluster configuration itself. The cluster settings include multicast (advertising), load balancing, session handling, and network settings.
31.7.2. Configuring Multicast for Load Balancing
mod_cluster can use multicast signals to inform nodes which proxy servers are available. This allows nodes to register themselves automatically to the domain.
Note
- Click the Inventory tab in the top menu.
- Select Servers - Top Level Imports in the Resources menu table on the left. Then select the JBoss EAP 6 server which hosts the
mod_clusterservice (the master node). - Navigate to the
mod_clusterservice resource.
- Click the Configuration tab on the resource entry.
- Go to the Advertise Options section.

- Change the multicast settings.To use a specific load balancer for the
mod_clusternodes, set the Balancer field to the load balancer name and, optionally, the Domain field to the load balancer group, which is one of the groups configured on the balancer itself.Important
The Balancer and Domain values must match the configuration for the corresponding Apache server. - Click the button at the top of the page.
31.7.3. Excluding Web Contexts from Discovery
mod_cluster service. If a web context should not be included in the cluster, it can be excluded, by name.
- Click the Inventory tab in the top menu.
- Select Servers - Top Level Imports in the Resources menu table on the left. Then select the JBoss EAP 6 server which hosts the
mod_clusterservice (the master node). - Navigate to the
mod_clusterservice resource. - Click the Configuration tab on the resource entry.
- Go to the Web Context Options section.

- Unset the Excluded Contexts field, and add the names of any contexts to exclude.
Note
Some internal contexts for JBoss EAP are excluded by default. This should be kept in the excludes list; any new contexts to exclude should be added to the existing list. - Click the button at the top of the page.
31.7.4. Configuring Web Context Metrics
mod_cluster can use different types of metrics to determine how to balance traffic most efficiently. These metrics are described in the mod_cluster documentation. These metrics include things like active sessions, request counts, and traffic.
mod_cluster subsystem configuration for JBoss ON to monitor (and existing metrics can be removed).
- Click the Inventory tab in the top menu.
- Select Servers - Top Level Imports in the Resources menu table on the left. Then select the JBoss EAP 6 server which hosts the
mod_clusterservice (the master node). - Navigate to the
mod_clusterservice resource. - Click the Operations tab on the resource entry.
- Select the Add (Custom) Metrics operation from the drop-down menu.

- Fill in the metric information. The default metrics are listed in the mod_cluster documentation.
- Click the button at the bottom of the page.
Chapter 32. Managing JBoss EAP 5
32.1. Discovering JBoss EAP/AS 5 Servers
32.1.1. Discovering and Managing the JBoss AS/EAP 5 JVM
- Open the
run.conffile. For example, on Red Hat Enterprise Linux:[root@server ~]# vim jbossInstallDir/bin/run.conf
- Add the
JAVA_OPTSsettings to use the platform MBean server.On Red Hat Enterprise Linux:JAVA_OPTS="$JAVA_OPTS -Djboss.platform.mbeanserver"
On Windows:set JAVA_OPTS=%JAVA_OPTS% -Djboss.platform.mbeanserver
- Restart the JBoss Enterprise Application Platform.
32.1.2. Enabling Remote Access to JMX and Profile Service
- Verify that the JBoss Naming Protocol server (JNP) is deployed. (It is deployed by default.)Open the
jboss-service.xmlfile:[root@server ~]# vim jbossInstallDir/server/config/conf/jboss-service.xml
Then, make sure that there is a line enabling the JNP connector.<mbean code="org.jboss.naming.NamingService"> ... </mbean>
- While not required, it is recommended that you enable authentication for the JNP service. (This is enabled by default.)
- Open the
jmx-invoker-service.xmlfile.[root@server ~]# vim jbossInstallDir/server/config/deploy/jmx-invoker-service.xml
- Add a line for the JMX connector authentication.
<interceptor code="org.jboss.jmx.connector.invoker.AuthenticationInterceptor" securityDomain="java:/jaas/jmx-console"/> - Make sure that the admin user is listed in the JMX users properties file. When a new JBoss EAP resource is discovered, the agent reads the JMX username and password from this file and stores them in the discovered JBoss EAP resource's connection settings. These settings are then used to connect to the EAP server's JNP service.
[root@server ~]# vim jbossInstallDir/server/config/conf/props/jmx-console-users.properties
- Uncomment or add the user information. This is a simple key/value pair, username=password. For example:
admin=admin
- Restart the JBoss Enterprise Application Platform.
32.1.3. Setting Start Script Arguments, Environment Variables, and JAVA_OPTS
32.1.3.1. Start Script Discovery and Settings
- The discovery process identifies, or attempts to identify, the start script that was used to start the EAP server, whether it was
run.sh|bator a custom start script. - Discovery detects a subset of environment variables set in the
run.conffile or parent process that are required for the start script to work.Note
Although the discovery process does detect some environment variables, the discovery scan does notJAVA_OPTSvalues.The connection properties for the start script intentionally defer to therun.conffile forJAVA_OPTSvalues. - Discovery attempts to detect any arguments passed to the start script itself.
Note
-XX:PermSize=256M), the argument value will not be updated if the server is restarted later with a different setting value.
32.1.3.2. Start Script Arguments and Drift Monitoring
Example 32.1. System Properties Without Violating the Drift Definition
32.1.3.3. Changing Start Script Configuration
- Click the Inventory tab in the top menu.
- Select Servers - Top Level Imports in the Resources menu table on the left. Select the JBoss EAP 5 server.
- In the inventory tree, select the top resource entry for the server.
- Open the Inventory tab, and select the Connection Settings subtab.
- Expand the Operations section.
- Change or add start script settings. These are the scripts and settings that the JBoss ON agent uses when running a start or restart operation on the EAP 5 server.
- To use a custom start script, enter the path and script name.
- Optionally, enter a prefix to use with the script when running the start script.
- Set any environment variables, one per line.
- Set any script arguments, one per line. For regular JAVA_OPTS, these arguments usually are
-X,-D, or-P. Some useful-XXarguments are listed in the JVM options documentation from Sun.The EAP 5 default start scripts use arun.sh-style script, so the arguments use that format. A custom script can use different arguments or options.
- Click the Save button at the top of the page.
32.2. Creating JBoss EAP 5 Child Resources
32.2.1. Creating Data Sources
Note
- Search for the JBoss server instance to which to deploy the data source.
- On the details page for the selected JBoss server instance, open the Inventory tab.
- In the Create New drop-down menu, select the item for .
- Select a template for the data source. There are three data sources templates to populate a data source with common information:
- The default template is used with SQL databases like PostgreSQL or MySQL.
- The Oracle Local TX is used for Oracle databases with local transactions.
- The Oracle XA template is used for Oracle databases with XA transactions.
- Along with the obvious settings, like the resource name, enter the information for the specific child resource to be deployed:
- The type of data source to create, either No TX Data Sources, Local TX Data Sources or XA Data Sources
- A unique JNDI name for the DataSource wrapper to use to bind under
- The fully qualified name of the JDBC driver or DataSource class, such as
org.postgresql.Driver - The JDBC driver connection URL string, such as
jdbc:postgresql://127.0.0.1:5432/foo - The username and password to use to connect to the data source
- The minimum and maximum connection pool sizes for this data source
Additional settings are available under the Advanced Settings area.
32.2.2. Creating Connection Factories
Note
- Search for the JBoss server instance to which to deploy the connection factory.
- On the details page for the selected JBoss server instance, open the Inventory tab.
- In the Create New drop-down menu, select the item for .
- Along with the obvious settings, like the resource name, enter the information for the specific child resource to be deployed:
- The type of connection factory to create, either tx-connection-factory (transaction) or no-tx-connection-factory (no transaction)
- A unique JNDI name for the DataSource wrapper to use to bind under
- The username and password to use to connect to the data source
- The minimum and maximum connection pool sizes for this data source
Additional settings are available under the Advanced Settings area.
32.2.3. Creating JMS Queues and Topics
Note
- Search for the JBoss messaging service to which to deploy the JMS queue or topic.
- On the details page for the selected JBoss messaging service, open the Inventory tab.
- In the Create New drop-down menu, select the or item.
- Aside from the obvious settings, like the resource name, the JMS Queue or JMS Topic entry requires two additional parameters:
- The name of the queue or topic to use as the JMX object name
- A unique JNDI name for the DataSource wrapper to use to bind under
Additional settings are available under the Advanced Settings area.
32.3. Deploying Applications
32.3.1. Space Considerations for Deploying Applications
32.3.2. Deploying EAR and WAR Files
Important
discovery command. This runs a discovery scan.
- Search for the JBoss server instance to which to deploy the EAR or WAR.
- On the details page for the selected JBoss server instance, open the Inventory tab.
- In the Create New menu at the bottom, select the item for or , as appropriate.

- Enter the version number.
 This is not used for the resource. The actual version number is calculated based on the spec version and implementation version in
MANIFEST.MF, if any are given, or the calculated SHA-256 value for the package itself:SPEC(IMPLEMENTATION)[sha256=abcd1234]
If no version numbers are defined inMANIFEST.MF, then the SHA value is used. The SHA value is always used to identify the package version internally.Note
When the EAR or WAR file is exploded after it is deployed, theMANIFEST.MFfile is updated to include the calculated SHA version number. For example:Manifest-Version: 1.0 Created-By: Apache Maven
RHQ-Sha256: 570f196c4a1025a717269d16d11d6f37...For more information on package versioning, see "Deploying Applications and Content". - Upload the EAR/WAR file.
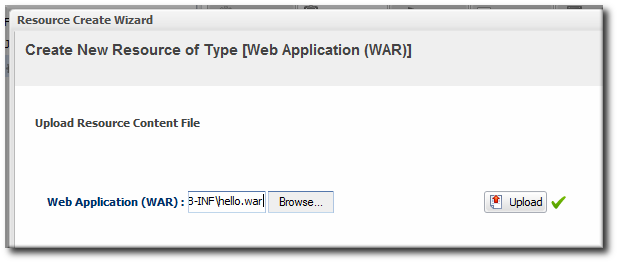
- Enter the information for the application to be deployed.

- Whether the file should be exploded (unzipped) when it is deployed.
- The path to the directory to which to deploy the EAR or WAR package. The destination directory is relative to the JBoss server instance installation directory; this cannot contain an absolute path or go up a parent directory.
- Whether to back up any existing file with the same name in the target directory.
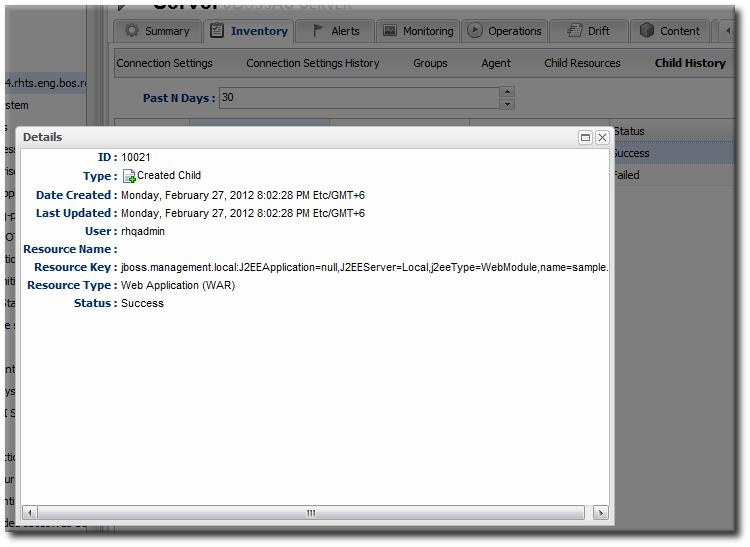
Figure 32.1. WAR Child Resource
32.3.3. Updating Applications
- Browse to the EAR or WAR resource in the JBoss ON UI.
- In the EAR or WAR resource details page, open the Content tab, and click the New subtab.

- Click the button.
- Click the button.

- In the pop-up window, click the Add button, and browse the local filesystem to the updated WAR or EAR file to be uploaded.

- Click the UPLOAD button to load the file and dismiss the window.
- In the main form, select the repository where the WAR or EAR file package should be stored. If one exists, select an existing repository or a subscribed repository for the resource. Otherwise, create a new repository.
- Optionally, set the version number for the EAR/WAR package.If this is set, then this value is displayed in the UI. If not, then a version number is calculated, based on the spec version and implementation version in
MANIFEST.MF, if any are given, or the calculated SHA-256 value for the package itself. Internally, the package is identified by the SHA value.SPEC(IMPLEMENTATION)[sha256=abcd1234]
For more information on package versioning, see "Deploying Applications and Content". - Confirm the details for the new package, then click .

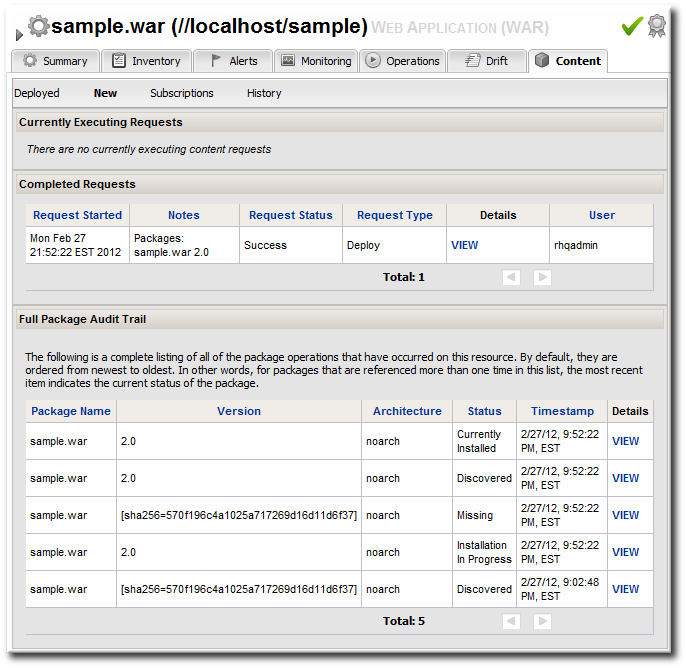
Figure 32.2. Deployment History for a Resource
32.3.4. Deleting an Application
- Browse to the EAR or WAR resource in the JBoss ON UI.
- In the EAR or WAR resource details page, open the Content tab, and click the Deployed subtab.
- Select the checkbox by the EAR/WAR package, and click the button.

32.4. Applying JBoss Patches from the Patch RSS Feed
Note
32.4.1. Planning How to Patch JBoss Resources
- Identifying and configuring content sources
- Planning how to execute manual steps
32.4.1.1. Identifying Content Sources
Note
Note
32.4.1.2. Planning Manual Steps
- The file to be patched is not present in the configuration.
- There are files that need to be removed manually.
- Configuration files, such as XML or Java properties files, require patches that need to be applied manually.
- Seam is being used and must be patched manually.
32.4.2. Enabling the Default JBoss Patch Content Source
Note
- In the Administration tab in the top menu, open the menu and select the Content Sources item.
- Click the JBoss Customer Portal Patch Feed source.
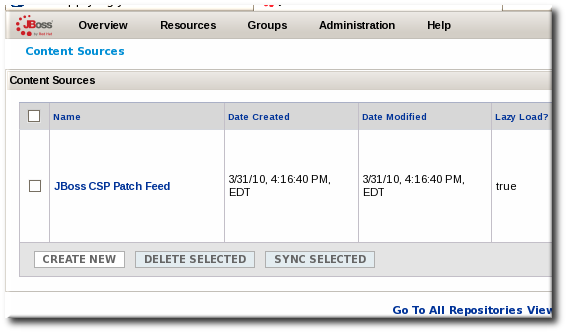
- Click the Edit button at the bottom of the Customer Portal Feed Settings area to modify the content source.
- Fill in the required connection information.

- The Customer Portal username and password.
Note
The Customer Portal password is obfuscated when it is stored in the JBoss ON database. - The URL for the content source (https://access.redhat.com/jbossnetwork/restricted/feed/software.html?product=all&downloadType=all&flavor=rss&version=&jonVersion=2.0).
- The activation state. This should be Yes to enable automatic patching.
Most of the default settings, such as the schedule, can be kept.Important
Keep the Lazy Load checkbox activated, or all patches defined in the RSS feed, 1 GB of data, is preemptively downloaded by the JBoss ON server. - Click .
- Optionally, use button to force the content source to pull down the latest RSS Feed and synchronize it with the local data. The history of synchronization attempts is listed in the Synchronization Results section.
- Complete any manual steps (Section 32.4.1.2, “Planning Manual Steps”) to finish applying the patches.
32.4.3. Subscribing a Specific Resource to the Default JBoss Patch Repository
Note
- In the Resources item in the top menu, go to the Servers item.
- Search for the JBoss instance to subscribe to the repository.
- On the JBoss server resource's entry page, open the Content tab and select the Subscriptions subtab. The JBoss patches repository is listed as available for subscription.
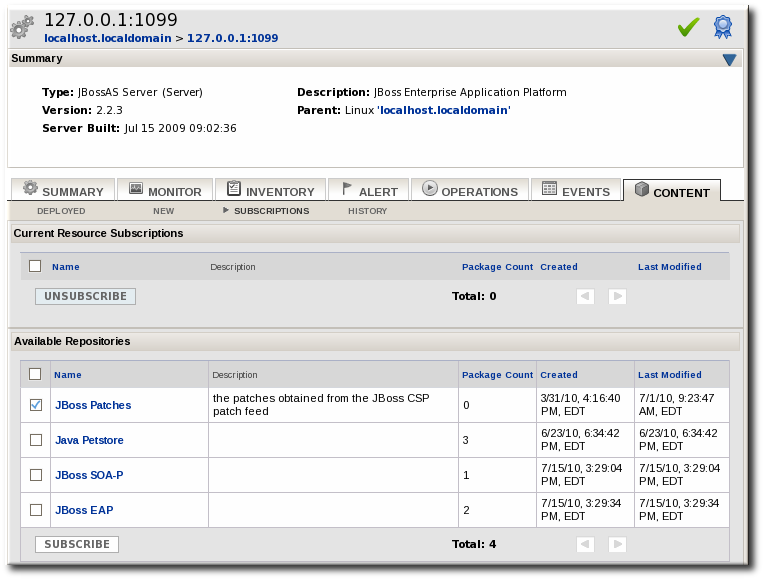
- Select the checkbox beside the JBoss patches repository, and click the button. When the assignment is complete, the repository is listed under the Current Resource Subscriptions area, rather than Available Repositories.

32.4.4. Subscribing Multiple JBoss Resources to the Default JBoss Patch Repository
Note
- In the Administration tab in the top menu, open the menu and select the Repositories item.
- Click the JBoss Patch Channel.The JBoss patch repository is associated with the JBoss patch content source by default. To associate the repository to another content source, click the button and assign the content source.
- In the main page for the repository, click the button to subscribe JBoss resources to the patch repository.
- In the search area, select Server in the drop-down menu.
- Select all the JBoss server instance resources to subscribe to this repository.
32.4.5. Applying a Patch
Note
- Stop the JBoss instance.
- In the Resources item in the top menu, go to the Servers item.
- Search for the JBoss instance to patch.
- On the JBoss server resource's entry page, open the Content tab and select the New subtab. This lists all of the packages and patches which are available for that specific resource type.
- Select the checkboxes beside the names of the patched to install, and click the button.
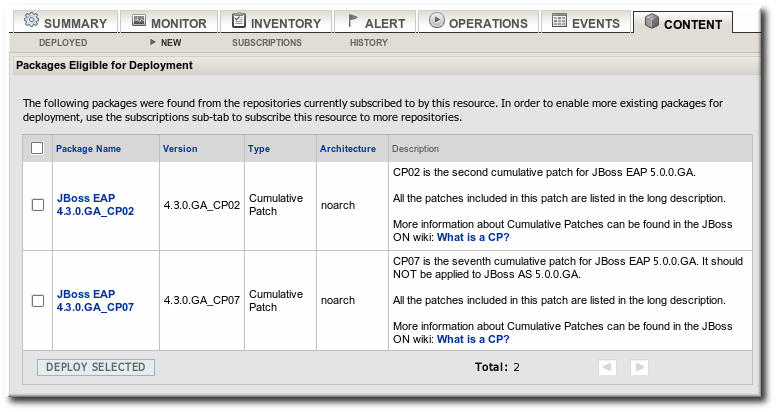
- Review the information on the page and verify everything is correct. Click the VIEW link in the Instructions column to review the steps that will be performed during the package installation process.
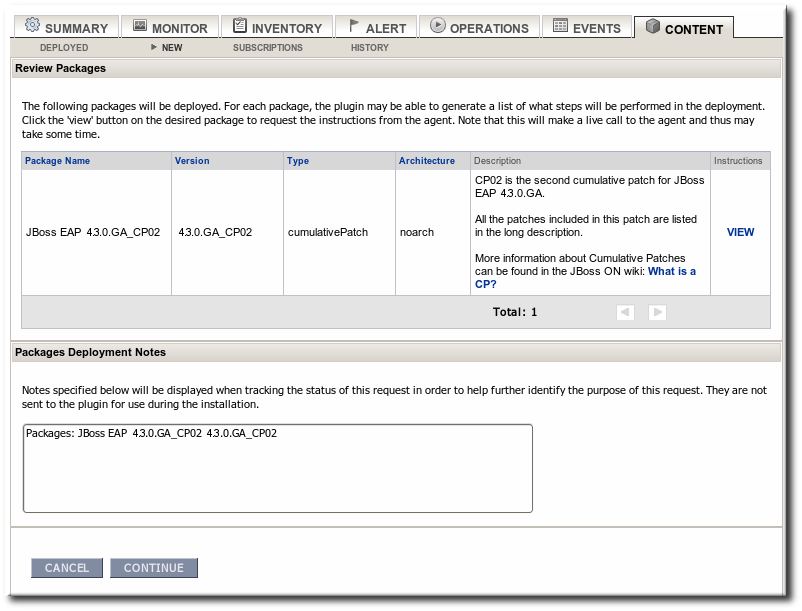
- Optionally, enter any notes to describe the patch deployment or environment.
- Click the button to install the updates. The patch process runs in the background; the progress can be viewed in the History subtab of the Content tab.
- When the installation process is complete, the patch job is listed in the Completed Requests area. Clicking the button displays the list of steps that performed in the process and whether they succeeded, failed, or were skipped.

- When the patch process is complete, start the JBoss instance.
32.5. Managing mod_cluster Deployments for JBoss EAP 5 (Tech Preview)
mod_cluster module provides intelligent, dynamic load balancing for web applications. There are two halves to mod_cluster: one in the JBoss application server (which manages the web application contexts) and one in the HTTP server (which manages sessions and routing). JBoss ON monitors and manages the mod_cluster module within the JBoss server.
32.5.1. About mod_cluster
mod_cluster is an HTTP load balancer that provides a level of intelligence and control over web applications that is not available with other HTTP load balancers. mod_cluster has lots of features that improve performance and management, but two are crucial:
- By using multicast (advertising),
mod_clustersignals workers what proxy servers are available, so workers can register themselves dynamically with the cluster domain. - Using a special communication layer between the JBoss server and the HTTP server,
mod_clustercan not only register when a web context is enabled but also when it is disabled and removed from load balancing. This allowsmod_clusterto handle full web application life cycles.
mod_cluster is in the product documentation at http://www.jboss.org/mod_cluster.
mod_cluster has two modules: one for the HTTP server which handles routing and load balancing and one for the JBoss server to manage the web application contexts. Both modules must be installed and configured for the cluster to function.
Figure 32.3. The mod_cluster Topology
mod_cluster domain is imported as a child resource for the JBoss server. The web application contexts are listed as children resources for the cluster, with contexts as children within the mod_cluster module.
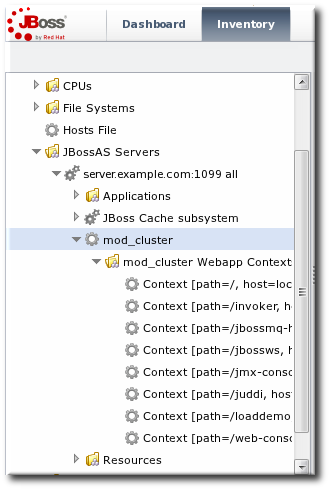
Figure 32.4. The mod_cluster Resource Hierarchy
Important
mod_cluster module in the HTTP server is configured externally from JBoss ON and is not managed by JBoss ON.
mod_cluster module in the JBoss server can be managed by JBoss ON, and it is critical that the cluster is properly configured in order for JBoss ON to manage its resources. JBoss ON detects mod_cluster like any other JMX resource (such as Hibernate).
mod_cluster:
32.5.2. Managing mod_cluster
mod_cluster properties provide direct management over how the mod_cluster domain operates. Almost any part of the mod_cluster configuration can be managed through JBoss ON, but two elements are critical for domain behavior:
- How the
mod_clusterdomain handles sticky sessions. Sticky sessions are enabled inmod_clusterby default, but this can be disabled or its behavior can be changed through the configuration properties. - Enabling advertising (multicast).
mod_clustercan send the JBoss information to any VirtualHost configured in the HTTP server. This allows workers to find the cluster and register themselves with the JBoss server dynamically.
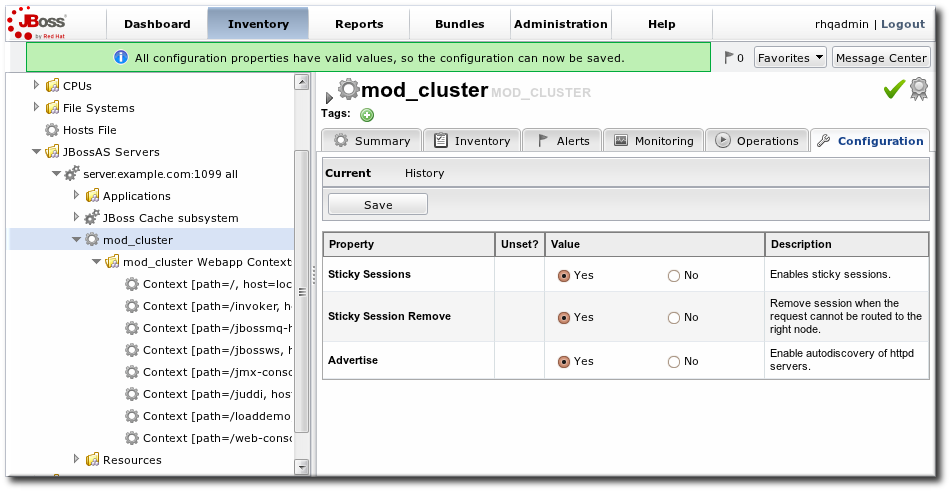
Figure 32.5. Setting Server-Level Properties
mod_cluster domain. The obvious ones that impact the web application contexts are enabling and disabling all contexts. The other options are used to reset the mod_cluster domain after an error (reset the node) or reload the cluster configuration after making changes to the cluster properties.
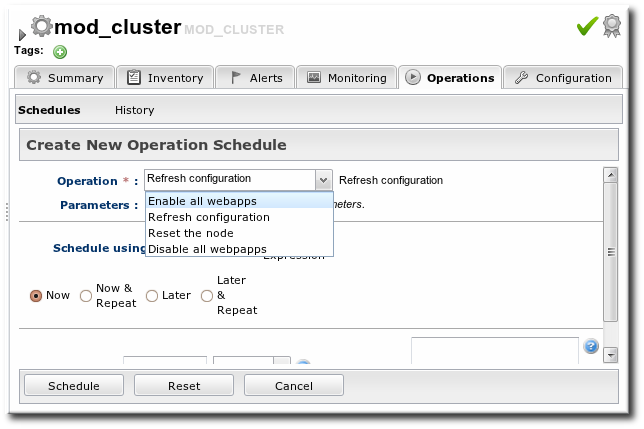
Figure 32.6. Running Server-Level Operations
32.5.3. Managing Web Applications Contexts
mod_cluster load-balancing cluster.
mod_cluster domain.

Figure 32.7. Running Web Application Context Operations
Appendix A. Frequently Asked Questions
- A.1. General
- Q: What is the difference between JBoss Operations Network and RHQ?
- Q: Is there a publicly available issue tracker system to search for bugs and submit enhancement requests?
- Q: What databases are supported?
- Q: Why can't I start JBoss ON with Java 5?
- Q: How can I find what my user preferences are?
- Q: What is the syntax for regular expressions used within JBoss ON?
- Q: How often does JBoss ON check the availability of resources?
- Q: Why is the JBoss ON agent waiting at startup?
- Q: How do I install a supported version of PostgreSQL on Red Hat Enterprise Linux?
- Q: How can I run SQL commands against the JBoss ON database from the JBoss ON console?
- Q: Is JBoss ON supported on VMWare?
- Q: To help debug Out Of Memory conditions, how do I get the agent or server to dump heap when it runs out of memory or on demand?
- A.2. Installation and Upgrade Issues
- Q: I'm seeing error messages when I install (or upgrade) my server. What do they mean?
- Q: I've installed my server, but I can't connect to it. What's wrong?
- Q: The installer fails on PostgreSQL with "Relation RHQ_Principal does not exist."
- Q: I upgraded my server, but when I try to connect to the installer page to configure it, it keeps trying to redirect me to the (old) coregui/ module. How do I get to the installer?
- Q: The JBoss ON install fails on Oracle with the ORA-01843.
- A.3. User Interface
- Q: How can I ignore an auto-discovered resource?
- Q: I selected a search suggestion from the resource search box, but I didn't get any results. Why?
- Q: Errors and stack traces in the GWT Message Center are sometimes not helpful. How can I find out what the real problem is?
- Q: Why are the graphs and charts on the MONITOR tab in the GUI not displayed?
- A.4. Server
- Q: When I start the server, I see servlet errors in my logs. What's wrong?
- Q: How do I get debug messages from the JBoss ON server?
- Q: How can I specify command-line options for the server JVM?
- Q: How do I purge my schema of all data?
- Q: How can I debug JDBC access and trace SQL?
- Q: How can I confirm my server's email/SMTP settings are correct?
- Q: My server machine does not have a writable directory called /var/run. How can I get my rhq-server.sh script to successfully write out its pid file?
- Q: When I try to start the server, I get an exception with the cause "Exception creating identity" and the server fails to start. How can I fix this?
- Q: My server logs are showing the message "Have not heard from agent ... Will be backfilled since we suspect it is down." What does that mean?
- Q: What ports do I have to be concerned about when setting up a firewall between servers and agents?
- Q: I installed the server as a Windows service, but it is failing to start with no error messages. How can I start the server as a Windows service?
- Q: How do I fix an ORA-12519, TNS:no appropriate service handler found error when using Oracle XE?
- Q: I am seeing this error in my server logs or stack trace: WARN [QueryTranslatorImpl] firstResult/maxResults specified with collection fetch; applying in memory. What does that mean and what is causing it?
- Q: How do I stop the server from periodically logging messages that say a plug-in is "the same logical plug-in" but has "different content" and "will be considered obsolete"?
- Q: What is the difference between LDAP user authentication and LDAP group authorization in JBoss ON?
- Q: How do I set up LDAP group authorization?
- A.5. Agent
- Q: I have a physical machine hosting multiple virtual machines with shared disk resources. How can I run an agent on each virtual instance?
- Q: How do I get debug messages from the JBoss ON agent?
- Q: How do I restrict which agents are allowed to connect to the server?
- Q: Do I have to run the agent as root?
- Q: How do I clean start the JBoss ON agent, as if newly installed?
- Q: How can I do a "clean config" for an agent running as a background Windows service?
- Q: How can I update the plug-ins on all my agents?
- Q: How can I change the agent name after it has already been registered?
- Q: I want to run agents on all my machines, but only one starts OK. The rest fail due to binding to a wrong address.
- Q: When starting the agent via a Windows service, the agent fails to start, and I see the error "java.lang.IllegalStateException: The name of this agent is not defined - you cannot start the agent until you give it a valid name" in the agent wrapper log file. What does this mean?
- Q: My agent setup is correct but my agent is getting the following message: "Cause: org.jboss.remoting.CannotConnectException: Can not connect http client invoker."
- Q: My agent machine does not have a writable directory called /var/run. How can I get my rhq-agent-wrapper.sh script to successfully write out its pid file?
- Q: How often does the agent scan for resources?
- Q: How can I view the agent's persisted configuration?
- Q: How can I find out what environment variables and Java system properties are set in my agent JVM process?
- Q: How can I get a dump of inventory information from an agent running on another machine?
- Q: I need to change the IP address of my agent machine. How do I keep my server and agent up to date with that change?
- Q: How can I stop my agent from thinking the server keeps going up and down when the server has remained running the whole time?
- A.6. Log Messages
- A.7. Server and Agent Plug-ins
- A.8. General Resource Questions
- Q: I deleted a Platform from inventory. How can I rediscover it, so I can re-import it?
- Q: On a Red Hat Enterprise Linux platform, interface "sit0" is discovered, but it is always red. How can I remove this interface from inventory?
- Q: How can I collect syslog messages as JBoss ON events?
- Q: Executing a script resource fails on Red Hat Enterprise Linux.
- A.9. JBoss Resources
- Q: Why does only one JBoss AS server show green availability and all the rest show red, even though I made sure all of my JNP credentials are configured properly in my resources' connection properties?
- Q: When I import a server like JBoss EAP 5 or Tomcat, I see its child JVM resource in inventory, but it is red (DOWN). Why?
- Q: When trying to monitor a JBoss EAP instance, I get the error "Connection failure Failed to authenticate principal=null, securityDomain=jmx-console."
- Q: When monitoring a JBoss AS instance, I'm not seeing any JVM resources beneath it.
- Q: Can I monitor JBoss AS 5.1?
- Q: My agent can detect my JBoss server and gets its connection properties, but the JNP connection fails. Why?
- A.10. Postgres Resources
- Q: Why is the agent showing an error in my PostgreSQL discovery about authentication failed for user "postgres"?
- Q: Why are most of the metrics for my Postgres resource showing up as NaN?
- Q: How many database connections are necessary to monitor a Postgres database?
- Q: Why can't I drop my database that is inventoried in JBoss ON?
- A.11. Apache Resources
- Q: Where can I get the Apache connectors?
- Q: I have instrumented Apache with the Response Time module, but no RT metrics are being shown for my VirtualHosts.
- Q: Some of my Apache metrics show values of zero. Why?
- Q: What is the Augeas plug-in?
- Q: Why does my agent log have the error "java.lang.UnsatisfiedLinkError: Unable to load library 'augeas': libaugeas.so: cannot open shared object file: No such file or directory"?
- Q: Why does my Apache SNMP module fail to start with an error?
- A.12. Tomcat Resources
- A.13. Provisioning and Content
- A.14. Alerts
- A.15. Monitoring
- A.16. Operations
A.1. General
http://server.hostname:7080/admin/test/sql.jsp page, run this SQL command:
select id, name, string_value
from rhq_config_property
where configuration_id = (select configuration_id
from rhq_subject
where name = 'your-user-name')
rhq.agent.plugins.availability-scan.period-secs setting. The default is 30 seconds. For performance reasons, it should never be lower than 30 seconds. It is possible to extend the scan interval by setting a new interval as one of the ADDITIONAL_JAVA_OPTIONS values. For example:
RHQ_AGENT_ADDITIONAL_JAVA_OPTS="-Drhq.agent.plugins.availability-scan.period-secs=45"
If the agent returns this message at start up, it means that the agent is known to the server under one name but is sending a different name when it starts:
Cause: [org.rhq.core.clientapi.server.core.AgentRegistrationException:The
agent asking for registration is trying to register the same address/port
[172.31.7.7:16163] that is already registered under a different name [example];
if this new agent is actually the same as the original, then re-register with
the same name]
--clean and give the correct name.
This is an agent state where the server cannot be reached because the server is down or because a firewall has blocked the traffic. Make sure port 7080 on the server machine is reachable from the agent's machine. You can check this through a web browser.
An error saying that the server cannot ping the agent's endpoint means that the agent can communicate with the server, but the server cannot communicate with the agent. This may mean that the agent port is blocked by a firewall.
The server has rejected the agent registration request. Cause:
[org.rhq.core.clientapi.server.core.AgentRegistrationException:Server cannot
ping the agent's endpoint. The agent's endpoint is probably invalid or there
is a firewall preventing the server from connecting to the agent. Endpoint:
socket://172.31.7.3:12345/....
This usually means that the server has a different security token than the one the agent was sending. This could have resulted from the java preferences entry being mangled, for example, by testing with different agent versions or VMs.
11:40:48,454 WARN [CommandProcessor] {CommandProcessor.failed-
authentication}Command failed to be authenticated! This command will be
ignored and not processed: Command: type=[remotepojo]; cmd-in-response=
[false]; config=[{rhq.security-token=1217855913569-109582636-403140853869881172, rhq.send-throttle=true}];
params=
[{targetInterfaceName=org.rhq.core.clientapi.server.core.CoreServerService,
invocation=NameBasedInvocation[getLatestPlugins]}]--clean option.
Here, the agent successfully starts, but there may be other agent communication problems, like no monitoring data are sent. Trying to ping the agent command line can return an error like the following:
sending> ping


Pinging...


Failed to execute prompt command [ping]. Cause:
org.rhq.enterprise.communications.command.server.AuthenticationException:Command
failed to be authenticated! This command will be ignored and not processed:
Command: type=[remotepojo]; cmd-in-response=[false]; config=[{rhq.security-
token=1214208960346-102975580-7334156733284942657, rhq.send-throttle=true}];
params=[{targetInterfaceName=org.rhq.enterprise.communications.Ping,
invocation=NameBasedInvocation[ping]}]Make sure the IP address of your computer can be reverse-mapped to the computer name, and that this name maps back to the same IP address. This needs to be true for all your hosts.
$ dig -x 172.31.7.7
[...]
;; ANSWER SECTION:
7.7.31.172.in-addr.arpa. 86400 IN     PTR     example
$
$ dig example
[...]
;; ANSWER SECTION:
example       74030   IN      A       172.31.7.7
- Log into http://rhn.redhat.com with your RHN/JBoss credentials.
- Add the Red Hat Application Stack v2 channel.
- Update the system:
sudo yum update
- Then update PostgreSQL specifically:
sudo yum install postgresql-server
Thedatadirectory is installed in/var/lib/pgsql/data. JBoss ON supports PostgreSQL 8.2.4 and later 8.2.x versions and all releases of PostgreSQL 8.3, 8.4, and 9.0. - Install and configure the JBoss ON server as normal.
http://server.example.com:7080/admin/test/sql.jsp
RHQ_AGENT_ADDITIONAL_JAVA_OPTS or RHQ_SERVER_ADDITIONAL_JAVA_OPTS variables).
-XX:+HeapDumpOnOutOfMemoryError -XX:+HeapDumpOnCtrlBreakTo drop the heap dump file in a particular location, add a path:
-XX:HeapDumpPath=locationSee the SUN JVM Debugging Options for more info.
A.2. Installation and Upgrade Issues
ERROR [ClientCommandSenderTask] {ClientCommandSenderTask.send-failed}Failed to send
command [Command: type=[remotepojo]; cmd-in-response=[false]; config=[{rhq.timeout=1000,
rhq.send-throttle=true}]; params=[{targetInterfaceName=org.rhq.enterprise.communications.Ping,
invocation=NameBasedInvocation[ping]}]]. Cause: org.jboss.remoting.CannotConnectException:[.....]rhq-server.properties file. The java.rmi.server.hostname parameter must be set manually to the real IP address of the server, which matches the value of the jboss.bind.address parameter. Restart the server after editing the rhq-server.properties file to load the new settings.
pg_hba.conf and check that the permissions have been enabled. The Installation Guide has more information on setting up PostgreSQL for installation.
coregui/ module. How do I get to the installer?
coregui/ module and attempt to redirect you there automatically after upgrading, even though the upgraded coregui/ module has not yet been loaded.
http:/server.example.com:7080/installer/start.jsf
- Put Oracle in a different locale.
- Edit one of the server distribution files before running the installer:
- Remove the old server directory and unzip the install package again.
- Open the
serverRoot/jon-server-3.2.GA1/jbossas/server/default/rhq-installer.war/WEB-INF/classesdirectory. - Edit
db-data-combined.xml. Update a few dates in the form 01-APR-08 to be in the current locale. - Save the file.
- Re-run the installer and choose to overwrite the database.
A.3. User Interface
- Import the platform and leave that server unchecked.
- When the platform is successfully imported, select the server and click Ignore.
type==CPU, even though CPU is in the service category. If you select type==CPU, then nothing is returned in the search, because the search results are filtered by the category, and the search is implicitly set to the server category.
java.lang.RuntimeException:[1312480384219] ...
java.lang.NoClassDefFoundError: Could not initialize class org..enterprise.gui.image.chart.ColumnChart
yum install urw-fonts
A.4. Server
Servlet.service() class recorded in the logs:
22:55:35,319 ERROR [[ServerInvokerServlet]] Servlet.service() for servlet
ServerInvokerServlet threw exception
java.lang.reflect.UndeclaredThrowableException
        at $Proxy421.processRequest(Unknown Source)
        at
org.jboss.remoting.transport.servlet.web.ServerInvokerServlet.processRequest(ServerInvokerServlet.java:128)
        at
org.jboss.remoting.transport.servlet.web.ServerInvokerServlet.doPost(ServerInvokerServlet.java:157)
        at javax.servlet.http.HttpServlet.service(HttpServlet.java:710)
        at javax.servlet.http.HttpServlet.service(HttpServlet.java:803)
... more ...serverRoot/jon-server-3.2.GA1/jbossas/server/default/conf/jboss-log4j.xml configuration file to enable debug messages by uncommenting the org.rhq category. This will set its priority to DEBUG. Debug messages will now be emitted for all JBoss ON subsystems to the log file. If you want debug messages to be emitted only for a smaller subset of the JBoss ON server internals, you can specify which categories you want by uncommenting them, or alternatively, you can add your own categories.
log4j.xml with comments that briefly explain what types of debug messages can be expected from a particular category. You can also emit debug messages for third-party subsystems like JBoss/Remoting and Hibernate. Some of these are already commented out in log4j.xml.
log4j.xml file, save the file and then restart the JBoss ON server.
serverRoot/jon-server-3.2.GA1/bin/rhq-server.sh|bat stop
serverRoot/jon-server-3.2.GA1/bin/rhq-server.sh|bat start
serverRoot/jon-server-3.2.GA1/logs/rhq-server-log4j.log.
Note
INFO. If you want your debug messages to also appear on the console, you must change the CONSOLE appender's threshold setting to DEBUG.
RHQ_SERVER_DEBUG to any value. After setting this variable when you start the launcher, scripts will output debug messages.
RHQ_SERVER_JAVA_OPTS environment variable. For example:
RHQ_SERVER_JAVA_OPTS="-Dapp.name=rhq-server -Xms256M -Xmx1024M
-XX:PermSize=128M -XX:MaxPermSize=256M
-Djava.net.preferIPv4Stack= true"
 export RHQ_SERVER_JAVA_OPTS
RHQ_SERVER_ADDITIONAL_JAVA_OPTS environment variable. For example:
 RHQ_SERVER_ADDITIONAL_JAVA_OPTS= "-Dfoo= true"
 export RHQ_SERVER_ADDITIONAL_JAVA_OPTS
wrapper.java.additional.n lines to <server-install-dir>\bin\wrapper\rhq-server-wrapper.inc (you may need to create the file). For example:
- wrapper.java.additional.12=-verbosegc:file=gc-log.txt
- wrapper.java.additional.13=-XX:+HeapDumpOnOutOfMemoryError
- wrapper.java.additional.14=-XX:HeapDumpPath=heap-dump.txt
- Save the current JBoss ON server directory.
mv jon-server-3.2.GA1/ jon-server-3.2.GA1.bak/
- Unzip the latest JBoss ON binaries.
unzip jon-server-3.2.GA1.zip
- Start the new server process.
serverRoot/jon-server-3.2.GA1/bin/rhqctl.sh start
- Open the JBoss ON GUI and go through the installation setup. When given the choice, select the option to Overwrite existing data. This removes all of the data for the previous installation of the server.
rhqadmin user and open the email test page:
http://server.example.com/admin/test/email.jsp
RHQ_SERVER_PIDFILE_DIR to the full path of the directory where you want the pid file to be stored. When you run the script, that variable's value will override the default location. If you have a script that is 2.1 or older, directly edit rhq-server.sh and change /var/run to the desired directory.
Caused by: java.lang.RuntimeException: Exception creating identity: my.host.name.com: my.host.name.com
|         at org.jboss.remoting.ident.Identity.get(Identity.java:211)
/etc/hosts). This will ensure that JBoss ON will continue to work correctly even if DNS fails. However, using host files may not be practical for your environment. If this is the case, please take some time before you begin your JBoss ON installation to verify that each host you plan to run JBoss ON on can correctly resolve every other hostname in your planned environment using a tool such as nslookup.
Note
[org.rhq.enterprise.server.core.AgentManagerBean] Have not heard from agent [agent_name]
since [timestamp]. Will be backfilled since we suspect it is down
- The agent actually shut down or crashed.
- The machine the agent is running on shut down or crashed.
- The network between the agent and server went down, prohibiting the agent from connecting to the server and sending the availability report.
- The machine the agent is running on is bogged down, thus slowing up the agent and prohibiting the agent from being able to send up reports fast enough.
Note
rhq-server.bat console to see if it can be run by that user. Then, install the server as a Windows Service with the RHQ_SERVER_RUN_AS_ME environment variable set to true:
rhq-server.bat remove
set RHQ_SERVER_RUN_AS_ME=true
rhq-server.bat install
ALTER SYSTEM SET PROCESSES=150 SCOPE=SPFILE;Then restart the Oracle XE database.
jsmith is attempting to log into JBoss ON. Authentication is the process of checking that the jsmith trying to log in is the same as the jsmith user that JBoss ON has in its database; this can be validated by verifying the password. Once jsmith logs in, then JBoss ON determines what resources jsmith can view and whether he can edit those resources' configuration, provision new applications, change server settings, and perform other tasks in JBoss ON.
Note
- The information to connect to the LDAP server, in the form of an LDAP URL. For example, ldap://server.example.com:1389.
- The username and password to use to connect to the server. This account should have read access to the subtrees being searched.
- The search base. This is the point in the directory tree to begin looking for entries. This should be high enough to include all entries that you want to include and low enough to improve performance and prevent unwanted access. For example, if you have
ou=Web Team,dc=example,dc=comandou=Engineering,dc=example,dc=comand you want to include groups in both subtrees in JBoss ON, then set the search base high up the tree, todc=example,dc=com. If you only want the engineering groups to be used by JBoss ON, then set the search base toou=Engineering,dc=example,dc=com. - The group filter. This creates the search filter to use to search for group entries. This can use the group object class, which is particularly useful if there is a custom attribute for JBoss ON-related entries. This can also point to other elements — like the group name, a locality, or a string in the entry description — that are useful or meaningful to identify JBoss ON-related groups.
- The member attribute. There are different types of group object classes, and most use different attributes to identify group members. For example, the
groupOfUniqueNamesobject classes lists its members with theuniqueMemberattribute.
A.5. Agent
RHQ_AGENT_DEBUG to any value. When you start the agent, both the launcher scripts and the agent itself will output debug messages. When you use this environment variable, the agent will use an internal log4j configuration file.
log4j categories have DEBUG priority, edit the conf/log4j.xml file and restart the agent to load the changes. Do not set RHQ_AGENT_DEBUG if you want the agent to use the log4j.xml file; setting that environment variable causes the agent to override this log4j.xml with an internally configured log4j configuration.
agentRoot/rhq-agent/logs directory.
RHQ_AGENT_DEBUG and then install the service:
rhq-agent-wrapper.bat install
- Create a file for the restriction rule, with this name and location:
vim serverInstallDir/jbossas/server/default/deploy/rhq.ear/jboss-remoting-servlet-invoker-2x.r3040.jon.war/WEB-INF/context.xml
- Add this content to the file:
<?xml version="1.0" encoding="UTF-8"?>
<Context>
<Valve className="org.apache.catalina.valves.RemoteAddrValve"
allow="192.168.*,142.104.128.*,10.224.27.182"/>
</Context>
Theallow=attribute lists the IPs that are allowed to connect to the server. All other IPs are blocked.
postgres.conf. Running the agent as a non-root user without PostgreSQL privileges means that the agent cannot read and manage the file. (And there will be log messages in the agent log saying so.) There are other resources that have similarly privileged files, like iptables and even some JBoss servers.
- Remove the platform entry from the JBoss ON server inventory. Since the platform entry is representative of the agent entry, this effectively removes the agent from the JBoss ON topology.
- Stop the agent and then restart it using the
--fullcleanconfig (-L)command-line option.agentRoot/rhq-agent/bin/rhq-agent.sh --fullcleanconfig
The--fullcleanconfigoption removes all of the local inventory for the agent, reloads its configuration fresh from theagent-configuration.xmlfile, and re-registers the agent with the server.Optionally, pass the--configargument to have it start up with a user-specified configuration file. Otherwise, the defaultconf/agent-configuration.xmlfile is used. If no directory is given, then the command looks for the configuration file in the agent'sconf/directory.agentRoot/rhq-agent/bin/rhq-agent.sh --fullcleanconfig -c my-agent-configuration.xml
agent-configuration.xml file. To force the agent to re-read its configuration from file, you won't be able to start it in the foreground, which makes re-configuring it a little bit more difficult.
config --import agent-configuration.xml command.
rhq-agent-wrapper.conf file and add a line for a third parameter:
wrapper.app.parameter.3=--cleanconfigThis forces the agent to re-read its configuration from the
agent-configuration.xml every time it is started as a service. In this case, the agent-configuration.xml must be preconfigured with all of the required (and optional) settings for the agent, so that it restarts with the correct configuration.
plugins update at any agent prompt or through the UI with the Update All Plugins task in the agent's OPERATION tab.
resource.resourceType.pluginName = RHQAgent
resource.resourceType.typeName = RHQ Agent
Note
FATAL [main] (org.jboss.on.agent.AgentMain)-
{AgentMain.startup-error}The agent encountered an error during startup
and must abort java.net.BindException: Cannot assign requested address
agent-configuration.xml manually (to change IP addresses, for example) after setting up the agent? The agent's configuration XML file is not referenced after the agent is setup because its configuration is persisted using Java Preferences. Persisting the configuration allows the agent to be updated or re-installed without losing its configuration. To change the agent's configuration file and have those changes picked up, restart the agent and pass the --config command line option (or -c which is shorthand for --config). This tells the agent to re-read the configuration file and override any old configuration it persisted before.
$HOME/.java on Red Hat Enterprise Linux). This is usually not an issue on Windows since the Java preferences are stored in the registry. If you are running the agents as the same user and your user's home directory is shared, then have the agents use different Java preferences names. Edit your agents' agent-configuration.xml files and change their Java preferences node names from default to something that makes them unique across all agents. For example:
<node name="NewName">
--pref option. Since you changed the configuration file, restart the agent with the -c to specify the configuration file.
agentRoot/rhq-agent/bin/rhq-agent.sh --pref NewName -c agent-configuration.xml
--pref option to pass in the node name.
java.util.prefs.userRoot to point to another, unique, location for preference. When the agent starts, Java will use the value of that system property as the location where it will store its Java Preferences. You can set this system property on the agent by setting the RHQ_AGENT_ADDITIONAL_JAVA_OPTS environment variable. When you set that environment variable, rhq-agent.sh will add its value to the default set of Java options when passing in options to the agent's Java VM:
set RHQ_AGENT_ADDITIONAL_JAVA_OPTS="-Djava.util.prefs.userRoot=/etc/rhq-agent-prefs"
agentRoot/rhq-agent/bin/rhq-agent.sh
/var/run. How can I get my rhq-agent-wrapper.sh script to successfully write out its pid file?
RHQ_AGENT_PIDFILE_DIR to the full path of the directory where you want the pid file to be stored. When you run the script, that variable's value will override the default location. If you have an older script (2.1 or older), directly edit rhq-agent-wrapper.sh and change /var/run to the desired directory.
Note
agent-configuration.xml and overlaid with the value given at the agent setup. After the agent is initially configured, it persists that configuration and never refers back to agent-configuration.xml, unless you clear the configuration.
- If the agent is in the JBoss ON inventory, simply go to your agent's Configuration tab to view its live configuration. This is the same configuration that is persisted.
- If the agent is currently running in non-daemon mode (i.e. you have the agent prompt on your console), you can use the
getconfigorconfigprompt commands to view the live configuration. Typehelp getconfigorhelp configfor more information. - If the agent is in the JBoss ON inventory, run the Execute Prompt Command operation and invoke the
getconfigprompt command. - Because the agent configuration is stored in the standard Java Preferences API backing store, you can use any tool that can examine Java preferences, such as Google's Java Preferences Tool. This is a GUI tool that can give you a file system-like view into your Java preferences. The agent preferences are stored in the
Userpreferences node under the node namerhq-agent. Depending on the-poption that is passed to the agent for its node name when it is started, the actual configuration settings are found under a sub-node underrhq-agent. The default preferences node is calleddefault, so typically your agent's persisted configuration is found in the user preferences underrhq-agent/default.
Warning
version agent prompt command shows a list of the agent process' environment variables and system properties. version --sysprops provides a list of all the system properties, and version --env provides a list of all the environment variables. (At the agent prompt, run help version for the syntax of that command.)
data/inventory.dat file. Copy that file to the local machine. Then, run an agent on the local machine, with the same plug-ins as the other agent. The agent doesn't necessarily have to be connected to a server, but the plug-in container must be started, so the agent has to have been registered. Then, export the information from the imported DAT file.:
inventory --xml --export=/bad-inventory.xml /the/bad/inventory.dat
--export option, the XML will simply be dumped to the stdout console window.
rhq.communications.connector.bind-address which sets the value of the IP address the agent binds to when it starts its server socket (the thing it listens to for incoming messages from the server).
- Change the agent's configuration so that preference value is the same as the new IP address. Issue a setconfig prompt command on the agent prompt:
setconfig rhq.communications.connector.bind-address=IP_address
Do not changeagent-configuration.xml; the changes will not take effect.If the agent is running in the background as a daemon process, shut it down with the script (rhq-agent-wrapper.sh|bat) and restart it. - Restart the agent after editing its configuration.
INFO (org.rhq.enterprise.agent.AgentAutoDiscoveryListener)- {AgentAutoDiscoveryListener.server-offline}
The Agent has auto-detected the Server going offline [InvokerLocator
[servlet://server:7080/jboss-remoting-servlet-invoker
/ServerInvokerServlet?rhq.communications.connector.rhqtype=server]] -
the agent will stop sending new messages
...
INFO (org.rhq.enterprise.agent.AgentAutoDiscoveryListener)- {AgentAutoDiscoveryListener.server-online}
The Agent has auto-detected the Server coming online [InvokerLocator
[servlet://server:7080/jboss-remoting-servlet-invoker
/ServerInvokerServlet?rhq.communications.connector.rhqtype=server]] -
the agent will be able to start sending messages now
- rhq.agent.server-auto-detection
- rhq.communications.multicast-detector.enabled
rhq.agent.client.server-polling-interval-msecs value is larger than 0, typically 60000. Otherwise, the agent will never be able to know when the server goes down.
A.6. Log Messages
02:31:33,095 WARN  [CommandProcessor] {CommandProcessor.failed-authentication}
Command failed to be authenticated! This command will be ignored and not processed:
Command: type=[identify]; cmd-in-response=[false]; config=[{}]; params=[null]--cleanconfig command line option to clean out its configuration and re-register.
Note
13:43:10,781 WARN [LoadContexts] fail-safe cleanup (collections) :
org.hibernate.engine.loading.CollectionLoadContext@103583b
<rs=org.postgresql.jdbc3.Jdbc3ResultSet@d16f5b>
A.7. Server and Agent Plug-ins
rhq-plug-in.xml plug-in descriptor.
A.8. General Resource Questions
> discovery -f
NETWORKING_IPV6 value in /etc/sysconfig/network:
NETWORKING_IPV6=noWarning
/etc/modprobe.conf to include the following lines:
alias net-pf-10 off
alias ipv6 off
service ip6tables stop
chkconfig ip6tables off
/etc/rsyslog.conf) so that JBoss ON understands. For example:
$template RHQfmt,"%timegenerated:::date-rfc3339%,%syslogpriority-text%,%syslogfacility-text%:%msg%\n"
RHQfmt in the syslog configuration so it writes messages out in that format, JBoss ON understands the log messages fully. For example:
$template RHQfmt,"%timegenerated:::date-rfc3339%,%syslogpriority-text%,%syslogfacility-text%:%msg%\n"
*.* /var/log/messages-for-rhq;RHQfmt
*.* @@127.0.0.1:5514;RHQfmt
/var/log/messages-for-rhq and sends the messages over TCP to a listener on port 5514, as configured in the platform's connection properties.
Execute operation on a script resource, it immediately fails with an error message saying that the script cannot be executed, then ensure that the script itself is executable. Set the script to execute:
chmod a+x scriptname
A.9. JBoss Resources
-Dcom.sun.management.jmxremote
-Dcom.sun.management.jmxremote.port=5222
-Dcom.sun.management.jmxremote.ssl=false
-Dcom.sun.management.jmxremote.authenticate=true
-Dcom.sun.management.jmxremote.password.file=/jmxremote.password
-Dcom.sun.management.jmxremote.access.file=/jmxremote.access
Note
-c) starts the instance in production configuration.
jboss.platform.mbeanserver system property set. For example, in Red Hat Enterprise Linux, the ${JBOSS_HOME}\bin\run.conf file should have this setting:
JAVA_OPTS="$JAVA_OPTS -Djboss.platform.mbeanserver"
C:\Program Files.
2012-01-12 15:03:38,982 DEBUG [ResourceContainer.invoker.daemon-1] (org.rhq.plugins.jbossas5.ApplicationServerComponent)- Failed to connect to Profile Service.
java.lang.RuntimeException: Failed to lookup JNDI name 'ProfileService' from InitialContext.
	at org.rhq.plugins.jbossas5.connection.AbstractProfileServiceConnectionProvider.lookup(AbstractProfileServiceConnectionProvider.java:84)

[snip]
A.10. Postgres Resources
- The postgres user has been deleted.
- The password for the postgres user has been changed.
- On Linux, the administrative login has been set to
ident sameuser.
- Inventory the discovered Postgres resource. Its availability will show as down and it will not find any child resources.
- Navigate to the INVENTORY tab for the Postgres resource.
- Under Connection Properties, click the Edit button.
- Change the role name and password fields to reflect a valid super user account on the Postgres instance.
pg_hba.conf file.
postgres.conf file:
stats_start_collector = on
A.11. Apache Resources
- Can the agent's system user read the
_rt logfiles? For instance, under RHEL/Apache, the default permissions of/var/log/httpdare 700, root:ls -arltd /var/log/httpd/ drwx------ 2 root root 4096 Jul 28 11:36 /var/log/httpd/
A workaround is to specify an alternate log directory for the httpd logs or, alternatively, to change the permissions of/var/log/httpd. Both of these have specific security implications. You could also run the agent as root; while this is the least preferable option, there are cases where this is necessary in order to not compromise system security by modifying file permissions. For example, JBoss ON cannot monitor the postgres daemon without root permissions, due to 700, postgres permissions on its data directory. Since those permissions shouldn't be altered, the only remaining option is to run the agent as root. - Have you enabled the Response Time Metric for the Apache Vhost Template and enabled Response Time? It is disabled by default.
- Administration > System Configuration > Templates | Apache HTTP Server > Apache Virtual Host, and click Edit Metric Template.
- Select the checkbox next to HTTP Response Time.
- At the bottom of the page, select Update schedules for existing resources of marked type.
- Set the collection interval.
- Click the Go button ().
Note
- Bytes Received for GET Requests per Minute
- Bytes Received for POST Requests per Minute
- Total Number of Bytes Received per Minute
- hosts
- grub
- apt
| Error | Cause |
|---|---|
| Syntax error on line 1376 of /etc/httpd/conf/httpd.conf: Unable to write to SNMPvar directory" (on stderr) | Ensure the directory specified via the "SNMPVar" directive exists and is writable by the user that owns the Apache process. |
| init_master_agent: Invalid local port (Permission denied)" (in the error_log file) |
See if your Apache error_log contains a log message similar to the following:
[notice] SELinux policy enabled; httpd running as context user_u:system_r:httpd_t:s0
This means the SELinux (Security-Enhanced Linux) policy is preventing the httpd process from binding to the SNMP agent port, 1610 by default. To resolve the problem, change SELinux to permissive mode by running the command
/usr/bin/setenforce 0 and then restarting Apache. You should then see a message similar to the following in your error_log:
[notice] SELinux policy enabled; httpd running as context user_u:system_r:unconfined_t"
This message has the term unconfined_t. This indicates SELinux is no longer restricting the process.
|
A.12. Tomcat Resources
A.13. Provisioning and Content
<property name="a" />. It has to have an explicitly defined closing tag, like <property name="a"></property>. If you don't want to revise your Ant script XML file, copy and paste the recipe directly into the text field instead of uploading the file.
A.14. Alerts
INFO  [CacheConsistencyManagerBean] localhost took [51]ms to reload global cache
INFO  [CacheConsistencyManagerBean] localhost took [49]ms to reload cache for 1 agents
A.15. Monitoring
- It is enabled
- The path to the log is valid; and
- The selected date format matches what you have in the logs
java.text.SimpleDateFormat.
A.16. Operations
Index
A
- access controls, Security in JBoss ON
- about read rights, Access Control and Permissions
- applying to resources, Creating a New Role
- assigning to users, Changing Role Assignments for Users
- list of permissions, Access Control and Permissions
- to repositories, Authorization to Repositories and Packages
- users, Creating User Accounts
- alerts
- acknowledging, Acknowledging an Alert
- assigning operations, Detailed Discussion: Initiating an Operation
- available operation tokens, Using Tokens with Alert Operations
- conditions, Reasons for Firing an Alert
- configuring, Planning Alerts
- configuring and managing, Alert Conditions, Alert Responses
- configuring for groups, Configuring Group Alerts
- creating definition templates, Creating Alert Definition Templates
- definitions report, Viewing the Alert Definitions Report
- enabling and disabling definitions, Enabling and Disabling Alert Definitions
- fired alerts report, Viewing the Fired Alerts Report
- groups and templates, Group Alerting and Alert Templates
- histories and acknowledgments, Viewing Alert Data
- initiating CLI scripts, Notes for Using CLI Script Notifications
- JNDI lookups, Notes for Using CLI Script Notifications
- initiating resource scripts, Detailed Discussion: Initiating Resource Scripts
- notification methods, Notifying Administrators and Responding to Alerts
- operations, Detailed Discussion: Initiating an Operation, Setting Alert Operations
- setting, Basic Procedure for Setting Alerts for a Resource
- setting dashboard display, Viewing Alerts in the Dashboard
- SNMP, Configuring SNMP for Notifications, Configuring the SNMP Alert Plug-in
- SNMP notifications, Configuring the SNMP Alert Notification
- tokens and operations, Using Tokens with Alert Operations
- using templates and group alerts, Group Alerting and Alert Templates
- viewing, Viewing Alerts
- viewing alerts for specific resource, Viewing Alert Details for a Specific Resource
- Ant
- recipe example, Breakdown of an Ant Recipe
- upgrading bundles, Upgrading Ant Bundles
- Apache
- configuring for configuration management, Configuring Apache for Configuration Management (Deprecated)
- configuring response time metrics, Configuring Apache Servers for Response Time Metrics
- configuring the SNMP module, Configuring the Apache SNMP Module
- auditing
- viewing configuration changes, Tracking and Comparing Configuration Changes
- authentication
- and LDAP, Configuring LDAP User Authentication
- configuring LDAP, Configuring LDAP User Authentication
- storing credentials, LDAP for User Authentication
- authorization
- for LDAP groups and roles, Roles and LDAP User Groups
- to repositories, Authorization to Repositories and Packages
- auto discovery
- availability, Availability
- charts, Viewing a Resource's Availability Charts
- troubleshooting, Core "Up and Down" Monitoring
- uptime percentage, Core "Up and Down" Monitoring
B
- boundary characters
- in searches, Basic String Searches
- bundles
- and the CLI, Managing and Deploying Bundles with the JBoss ON CLI
- Ant recipe, Breakdown of an Ant Recipe
- creating, Creating Ant Bundles
- creating associated archive files, The Workflow for Creating and Deploying a Bundle
- deleting a bundle from a resource, Purging a Bundle from a Resource
- deleting from the server, Deleting a Bundle from the JBoss ON Server
- deploying to a clean destination, Deploying a Bundle to a Clean Destination
- deploying to a resource, Deploying Bundles to a Resource
- destinations, Destinations (and Bundle Deployments)
- reverting deployed bundles, Reverting a Deployed Bundle
- template configuration, Using Templatized Configuration Files
- testing deployment, Testing Bundle Packages
- upgrading, Upgrading Ant Bundles
- uploading, Uploading Bundles to JBoss ON
- viewing deployment history, Viewing the Bundle Deployment History
C
- call-time data, URL Response Time Monitoring
- CLI, Managing and Deploying Bundles with the JBoss ON CLI
- running for alerts, Detailed Discussion: Launching JBoss ON CLI Scripts from an Alert
- configuration
- alerts, Alert Conditions, Alert Responses
- Apache for configuration management, Configuring Apache for Configuration Management (Deprecated)
- Apache servers for response time filters, Configuring Apache Servers for Response Time Metrics
- Apache SNMP module, Configuring the Apache SNMP Module
- changing a single resource, Changing the Configuration on a Single Resource
- drift management, Managing Configuration Drift
- for groups, Changing the Configuration for a Compatible Group
- overview, Summary: Using JBoss ON to Make Changes in Resource Configuration
- response time filters for Tomcat, Installing Response Time Filters for Tomcat
- reverting changes, Reverting Configuration Changes
- viewing and comparing changes, Tracking and Comparing Configuration Changes
- configuration drift, Managing Configuration Drift
- content, Summary: Using JBoss ON to Deploy Applications and Update Content
- authorization, Authorization to Repositories and Packages
- packages, About Content
- providers, About Content
- resources, About Content
- content sources
- and passwords, Creating a Content Source (General)
- associating with repositories, Associating Content Sources with a Repository
- creating, Creating a Content Source
- importing, Linking Content Sources to Repositories
- importing multiple content sources into multiple repositories, Importing a Content Source into Repositories
- manually synchronizing, Manually Synchronizing Content Sources or Resources
- scheduling synchronization, Scheduling Synchronization
- synchronization, Synchronizing Content Sources or Repositories
D
- dashboard
- alerts settings, Viewing Alerts in the Dashboard
- data storage
- monitoring, Storing Monitoring Data
- deploying apps
- deployment
- bundles on resources, Deploying Bundles to a Resource
- bundles to clean destinations, Deploying a Bundle to a Clean Destination
- testing bundles, Testing Bundle Packages
- view bundle history, Viewing the Bundle Deployment History
- discovery
- ignoring resources, Ignoring Discovered Resources
- importing, Importing Resources from the Discovery Queue
- manual, Running Discovery Scans Manually
- resources, Importing Resources from the Discovery Queue
- secured JMX server, Enabling the Agent to Connect to Secured JMX Servers
- drift
- dynamic search
- groups and resources, Dynamic Searches for Resources and Groups
- null, Basic String Searches
- saving, reusing, and deleting, Saving, Reusing, and Deleting Dynamic Searches
- syntax, About the Dynamic Search Syntax
- using quotation marks, Basic String Searches
E
- events
- defining new events, Defining a New Event
- overview, Events
- viewing, Viewing Events
G
- groups
- alerts and templates, Group Alerting and Alert Templates
- and roles, Access and Roles
- assigning to roles, Creating a New Role
- changing resource configuration, Changing the Configuration for a Compatible Group
- configuring alerts, Configuring Group Alerts
- dynamic search, Dynamic Searches for Resources and Groups
- empty groups, General Expression Syntax
- overview, Managing Groups
- search context, Property Searches
I
- importing
- content sources, Linking Content Sources to Repositories
- content sources into multiple repositories, Importing a Content Source into Repositories
- discovery, Importing Resources from the Discovery Queue
- inventory
- importing, Managing the Resource Inventory
- overview, About the Inventory: Resources
- reports, Viewing Inventory Summary Reports
J
- JBoss
- applying patches, Applying JBoss Patches from the Patch RSS Feed
- CLI scripts and alerts
- JNDI lookups, Notes for Using CLI Script Notifications
- enabling the default patch content source, Enabling the Default JBoss Patch Content Source
- managing and configuring, How JBoss ON Manages JBoss Resources
- subscribing resources to the default patch, Subscribing Multiple JBoss Resources to the Default JBoss Patch Repository
- JBoss EAP
- discovering secure JMX servers, Enabling the Agent to Connect to Secured JMX Servers
- JBoss EAP 6/AS 7
- configuring response time metrics, Configuring Response Time Metrics for JBoss EAP 6/AS 7
- JBoss EAP/AS 5
- configuring response time metrics, Installing Response Time Filters for JBoss EAP/AS 5
- JBoss ON
- access control, Security in JBoss ON
- and LDAP, Configuring LDAP User Authentication
- configuring, Configuring LDAP User Authentication
- and SNMP, JBoss ON SNMP Information
- authorization, Roles and LDAP User Groups
- supported LDAP servers, About LDAP Authentication and Account Creation
- JMX server
- discovery, Setting up a Custom JVM for Discovery, Enabling the Agent to Connect to Secured JMX Servers
- excluding processes, Excluding Java Processes from Discovery
- required configuration, Required JVM Configuration for Discovery
- manually importing, Manually Importing a JVM Resource
- JNDI
- CLI scripts and alerts, Notes for Using CLI Script Notifications
- JVM
- discovery, Setting up a Custom JVM for Discovery
- excluding processes, Excluding Java Processes from Discovery
- required configuration, Required JVM Configuration for Discovery
- manually importing, Manually Importing a JVM Resource
L
- LDAP
- assigning groups to roles, Access and Roles
- authorization, Roles and LDAP User Groups
- for authentication, Configuring LDAP User Authentication
- configuring, Configuring LDAP User Authentication
- configuring SSL, Configuring LDAP User Authentication
- supported servers, About LDAP Authentication and Account Creation
- user groups and roles, Associating LDAP User Groups to Roles
- LDAP group object classes, About Group Authorization
- member attributes, About Group Authorization
- search parameters, About Group Authorization
- verifying credentials, About LDAP Authentication and Account Creation
M
- metrics, Metrics and Measurements
- baselines, Baselines and Out-of-Bounds Metrics
- storage database, Deploying and Managing Storage Nodes
- monitoring
- call-time data, URL Response Time Monitoring
- changing defaults, Changing Metrics Templates
- changing the resource availability scan period, Changing the Agent's Availability Scan Period
- collection schedules, Collection Schedules
- configuring response time filters for JBoss EAP 6/AS 7 servers, Configuring Response Time Metrics for JBoss EAP 6/AS 7
- configuring response time filters for JBoss EAP/AS 5 servers, Installing Response Time Filters for JBoss EAP/AS 5
- configuring Tomcat, Configuring Tomcat/JWS Servers for Monitoring
- enabling and disabling metrics, Enabling and Disabling Metrics for a Specific Resource
- operations, Monitoring Reports and Data
- out of bounds (OOB), Baselines and Out-of-Bounds Metrics
- problem metrics, Baselines and Out-of-Bounds Metrics
- resources with special configuration, Resources Which Require Special Configuration for Monitoring
- response time filters, URL Response Time Monitoring
- setting collection intervals, Setting Collection Intervals for a Specific Resource
- storage limits for data, Storing Monitoring Data
- traits, Resource Traits
N
- notifications
- SNMP and alerts, Configuring the SNMP Alert Notification
O
- operations, Operations: An Introduction
- alerts, Detailed Discussion: Initiating an Operation
- alerts and tokens, Using Tokens with Alert Operations
- canceling, Canceling Pending Operations
- executing scripts, Running Scripts as Operations for JBoss Servers
- ordering group, Ordering Group Operations
- scheduling, About Scheduling Operations, Scheduling Operations
- scripts, Running Scripts as Operations for JBoss Servers
- setting alert operations, Setting Alert Operations
- timeout defaults, Setting an Operation Timeout Default
- timeouts, About Scheduling Operations
- viewing history, Viewing the Operation History
P
- packages
- authorization, Authorization to Repositories and Packages
- patches
- applying, Applying a Patch
- permissions, Security in JBoss ON
- applying to groups, Creating a New Role
- assigning to users, Changing Role Assignments for Users
- list of, Access Control and Permissions
- pipes, Destination Directories with Special File Types
R
- reports
- alert definitions, Viewing the Alert Definitions Report
- inventory, Viewing Inventory Summary Reports
- repositories
- associating with content sources, Associating Content Sources with a Repository
- associating with resources, Associating Resources with the Repository
- authorization, Authorization to Repositories and Packages
- creating, Creating a Repository
- importing content sources into multiple repositories, Importing a Content Source into Repositories
- managing, Managing Repositories
- managing content, About Content
- managing repositories on resources, Managing the Repositories for a Resource
- synchronizing and content sources, Synchronizing Content Sources or Repositories
- resources
- access control, Security in JBoss ON
- access permissions on, Access Control and Permissions
- and managing inventory, Managing the Resource Inventory
- and managing repositories, Managing the Repositories for a Resource
- and roles, Access and Roles
- associating with repositories, Associating Resources with the Repository
- changing configuration for single resources, Changing the Configuration on a Single Resource
- changing group configuration, Changing the Configuration for a Compatible Group
- child
- connection factories, Creating Connection Factories
- data sources, Creating Data Sources
- EAR and WAR, Deploying EAR and WAR Files
- JMS queues and topics, Creating JMS Queues and Topics
- child types, Deploying Applications
- creating children, Creating Child Resources
- deleting entries, Deleting Entries
- discovery and imports, Importing Resources from the Discovery Queue
- dynamic search, Dynamic Searches for Resources and Groups
- enabling and disabling metric collection, Enabling and Disabling Metrics for a Specific Resource
- groups, Managing Groups
- ignoring discovered resources, Ignoring Discovered Resources
- inventory reports, Viewing Inventory Summary Reports
- managed, Managed Resources: Platforms, Servers, and Services
- manual discovery, Running Discovery Scans Manually
- monitoring, Monitoring Reports and Data
- monitoring collection intervals, Setting Collection Intervals for a Specific Resource
- packages, About Content
- reverting configuration changes, Reverting Configuration Changes
- running discovery, Importing Resources from the Discovery Queue
- scripts as resources, Editing Script Environment Variables
- search context, Property Searches
- setting alerts, Basic Procedure for Setting Alerts for a Resource
- uninventory, Uninventorying and Deleting Resources
- viewing alerts for specific resources, Viewing Alert Details for a Specific Resource
- viewing configuration changes, Tracking and Comparing Configuration Changes
- response time filters
- configuring Apache, Configuring Apache Servers for Response Time Metrics
- configuring JBoss EAP 6/AS 7, Configuring Response Time Metrics for JBoss EAP 6/AS 7
- configuring JBoss EAP/AS 5, Installing Response Time Filters for JBoss EAP/AS 5
- configuring Tomcat, Installing Response Time Filters for Tomcat
- response-time filters, URL Response Time Monitoring
- roles, Access and Roles
- adding or removing users, Changing Role Assignments for Users
- and groups, Access and Roles
- and LDAP user groups, Associating LDAP User Groups to Roles
- LDAP group object classes, About Group Authorization
- member attributes, About Group Authorization
- searching for members, About Group Authorization
- and users, Access and Roles
- assigning groups, Creating a New Role
- assigning users from LDAP groups, Access and Roles
- creating, Creating a New Role
- default, Access and Roles
- setting permissions, Creating a New Role
- types of members, Access and Roles
S
- scripts
- as operations, Running Scripts as Operations for JBoss Servers
- as resources, Editing Script Environment Variables
- from alerts, Detailed Discussion: Initiating Resource Scripts
- initiating from alerts
- search
- groups context, Property Searches
- resource context, Property Searches
- string operators, Property Searches
- using quotation marks, Basic String Searches
- secure connections
- using for LDAP authentication, Configuring LDAP User Authentication
- security
- users, Creating User Accounts
- self-registering
- server
- access control, Security in JBoss ON
- global rights, Access Control and Permissions
- resource-level rights, Access Control and Permissions
- and LDAP groups for roles, Associating LDAP User Groups to Roles
- building LDAP search, About Group Authorization
- LDAP group object classes, About Group Authorization
- member attributes, About Group Authorization
- LDAP authentication, Configuring LDAP User Authentication
- configuring, Configuring LDAP User Authentication
- SNMP
- alert notification, Configuring the SNMP Alert Notification
- and JBoss ON, JBoss ON SNMP Information
- configuring alerts, Configuring the SNMP Alert Plug-in
- configuring for alerts, Configuring SNMP for Notifications
- configuring the Apache module, Configuring the Apache SNMP Module
- SSL
- using for LDAP authentication, Configuring LDAP User Authentication
- storage nodes, Deploying and Managing Storage Nodes
- symlinks, Destination Directories with Special File Types
- synchronization
- content sources, Synchronizing Content Sources or Repositories
- repositories and content sources, Synchronizing Content Sources or Repositories
- scheduling and content sources, Scheduling Synchronization
T
- timeout
- manually discover app, Deploying Web Applications to a Domain, Deploying a Web Application as a Child Resource
- tokens
- alerts and operations, Using Tokens with Alert Operations
- Tomcat
- configuring response time filters, Installing Response Time Filters for Tomcat
- monitoring configuration, Configuring Tomcat/JWS Servers for Monitoring
- traits, Resource Traits
U
- UI
- A Tour of the UI, Using the JBoss ON Web Interface
- access control, Security in JBoss ON
- dashboard, Dashboard
- deleting entries, Deleting Entries
- details page, Entry Details Pages
- inventory, Inventory Browsers and Summaries
- left menu, The Left Menu
- logging in, Logging into the JBoss ON Web UI
- setting favorites, Setting Favorites
- uptime percentage, Core "Up and Down" Monitoring
- users
- and roles, Access and Roles
- assigning LDAP user groups to roles, Access and Roles
- authentication, Configuring LDAP User Authentication
- changing access controls, Changing Role Assignments for Users
- changing roles, Changing Role Assignments for Users
- configuring LDAP authentication, Configuring LDAP User Authentication
- creating new, Creating a New User
- disabling accounts, Disabling User Accounts
- editing details, Editing User Entries
- security, Creating User Accounts
- using LDAP to self-register, About LDAP Authentication and Account Creation