
Red Hat Training
A Red Hat training course is available for Red Hat JBoss Operations Network
Initial Setup for the Resource Inventory, Groups, and Users
for initially setting up resources and security in JBoss ON
Abstract
1. Using the JBoss ON Web Interface
1.1. Supported Web Browsers
- Firefox 10
- Internet Explorer 8
1.2. Logging into the JBoss ON Web UI
rhq-server.properties file, JBoss ON is completely administered through its web interface.
http://server.example.com:7080
rhqadmin.
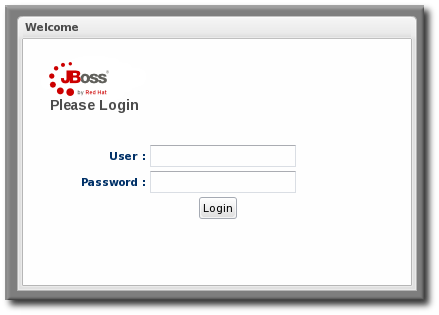
Figure 1. Logging into JBoss ON
Note
1.3. A High Level Walk-Through
- The top menu
- The left menu tables
- The dashboard
- Resource-based tables, which can be for the resource inventory, a summary report, or the results of a search
- Configuration pages which both provide details for and access to elements in JBoss ON, including resources, groups, plug-ins, and JBoss ON server settings

Figure 2. UI Elements All Together
1.3.1. The Top Menu

Figure 3. The Top Menu
- The Dashboard contains a global overview of JBoss ON and its resources. Different, configurable snapshot summaries (called portlets) show different aspects of the resources and server, such as the discovery queue, recent alerts, recent operations, and resource counts.
- The Inventory tab shows both resources and groups.
- The Reports tab shows pre-defined reports. These are slightly different than the Dashboard, which focuses exclusively on resource information: the reports look at the current actions of the different subsystem (or major functional areas) of JBoss ON, such as alerts, operations, metric collection, and configuration history.
- The Bundles tab opens the provisioning and content functional area. This is for uploading and deploying content bundles that are used to provision new applications.
- Administration goes to all areas related to configuring the JBoss ON server itself. This includes server settings, plug-ins, users and security, and agent settings.
1.3.2. The Left Menu
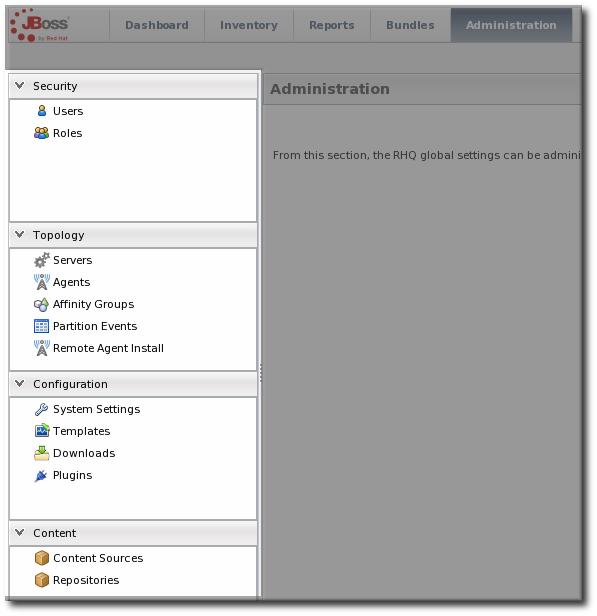
Figure 4. The Left Menu
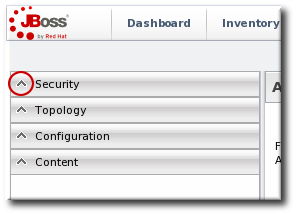
Figure 5. Collapsing the Left Menu
1.3.3. Dashboard
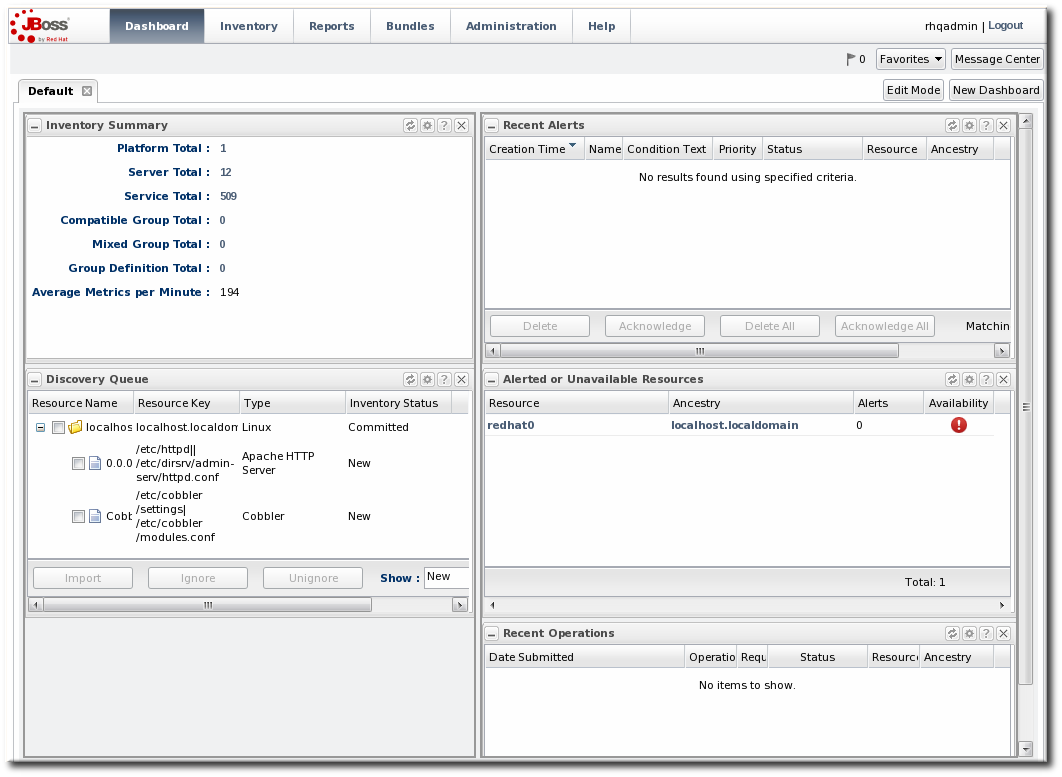
Figure 6. Dashboard View
1.3.4. Inventory Browsers and Summaries
- Tabs for different areas, with subtabs that further break down information
- A table of results
- Icons that open a configuration or task option for that specific entity
- Buttons that perform actions (create, delete, or some other specific action) on the entries; some of these buttons aren't active unless an entry is selected
Figure 7. Inventory Browser
1.3.5. Entry Details Pages
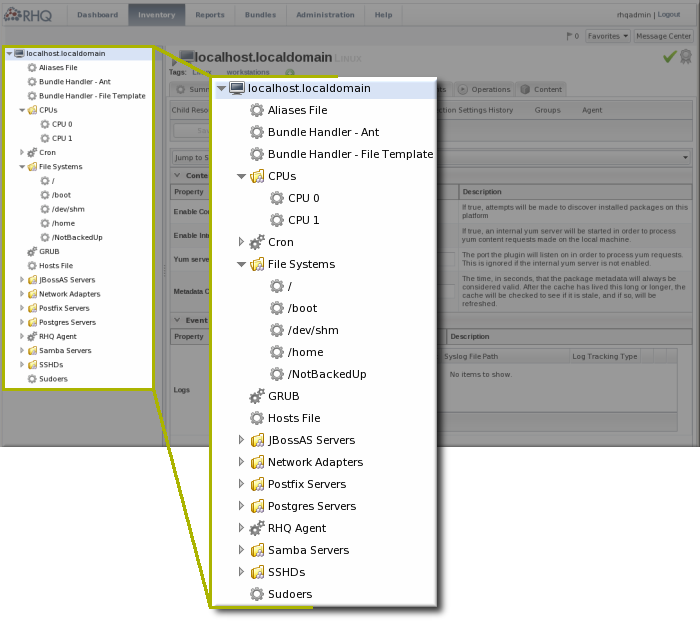
Figure 8. Resource Tree
Note
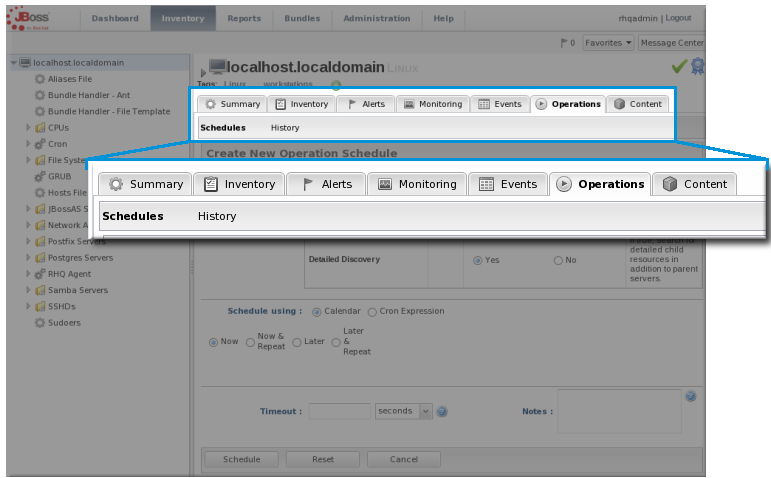
Figure 9. Tabs for a Resource Entry
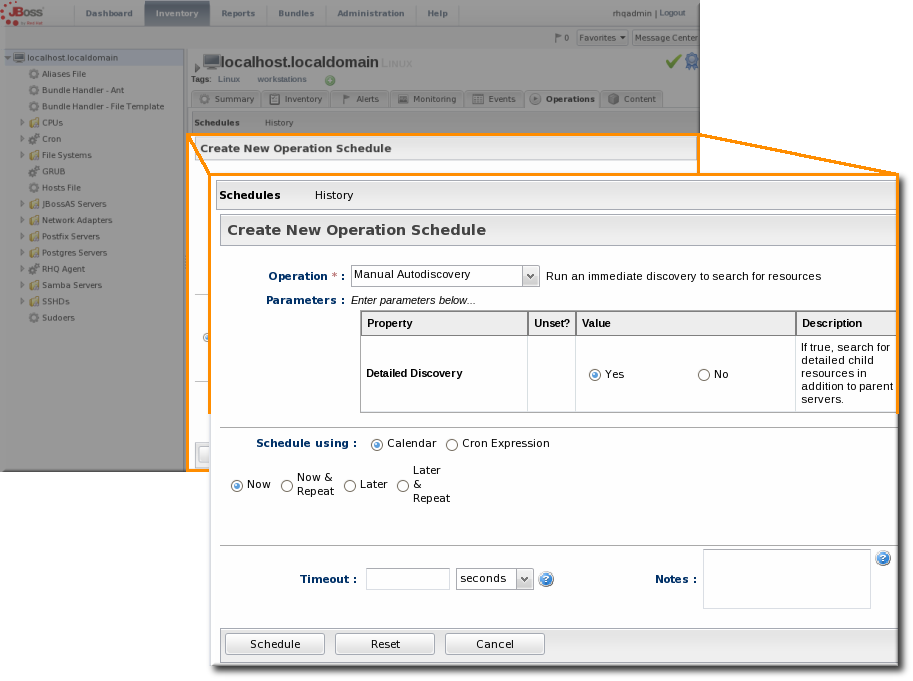
Figure 10. Editable Areas for a Resource Entry
1.3.6. Shortcuts in the UI
- The Message Center shows all notifications that have been sent by the JBoss ON server. This includes alerts, configuration changes, changes to the inventory, or error messages for the server or UI.
- The alerts area shows the total number of current alerts for all resources in the inventory.
- The Favorites button can be used to navigate to selected resources and groups quickly, while the little blue ribbon on resource pages can be used to add that resource to the favorites list.
- The resource available is shown as a green check mark if the resource is available and a red X if the resource is down.

Figure 11. Shortcuts
1.4. Getting Notifications in the Message Center
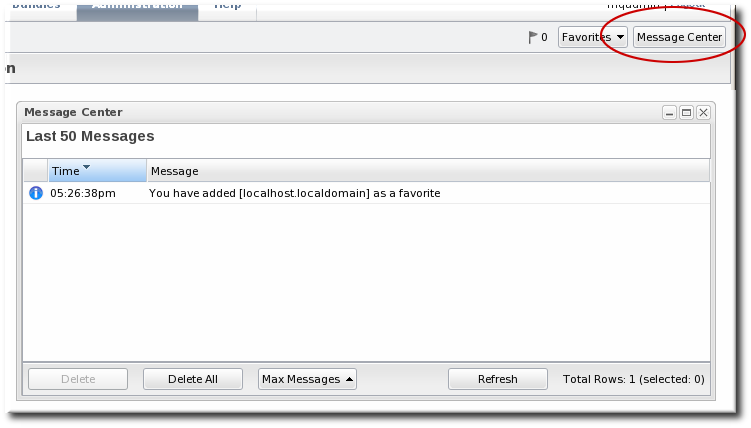
Figure 12. Message Center
1.5. Sorting and Changing Table Displays
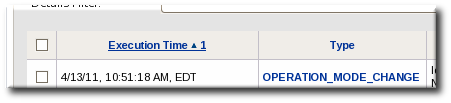
Figure 13. Basic Table Sorting on the Partition Events List

Figure 14. Basic Table Sorting on the Server Resources List

Figure 15. Advanced Table Sorting on the Server Resources List
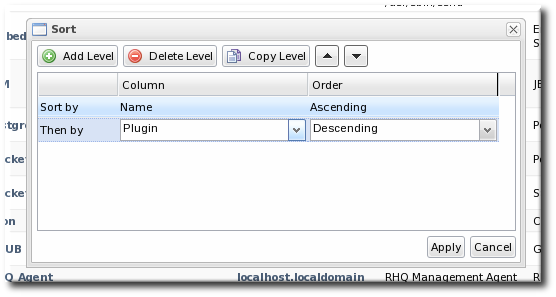
Figure 16. Changing the Sort Method
1.6. Customizing the Dashboard
Note
1.6.1. Editing Portlets

Figure 17. Portlet Icons
1.6.2. Adding and Editing Dashboards

Figure 18. Tabbed Dashboards
- Click the button in the far right of the main Dashboard.

Note
The process of editing and adding Dashboards is very similar. The only difference is that to edit a Dashboard, you click the button. - The new Dashboard opens in the edit mode. Enter a name for the new Dashboard.

- Add the desired portlets to the Dashboard. If necessary, change the number of columns to fit the number of portlets.

1.7. Setting Favorites

Figure 19. Favorites Icon

Figure 20. Favorites List
1.8. Deleting Entries
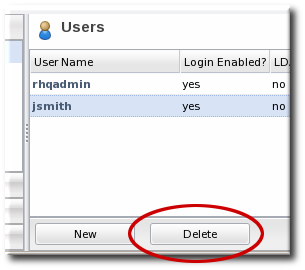
Figure 21. Delete Button in the Area Browser
Note
2. Dynamic Searches for Resources and Groups
2.1. About Search Suggestions
- Saved searches, which contain previous custom search strings and a count of resources which match that search
- Query searches, which provide prompts for available resource traits
- Text searches, which provide a list of resources based on some property in the resource which matches the text prompt

Figure 22. Types of Search Suggestions

Figure 23. Highlighting Search Terms
2.2. About the Dynamic Search Syntax
[search_area].[search_property] operator value operator additional_search
resource. part of the search.
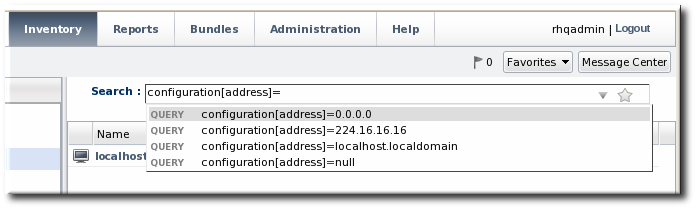
Figure 24. Searching by Resources Traits
2.2.1. Basic String Searches
Figure 25. Matching the Search Term
agen has search suggestions that match (case-insensitive) every resource that has that string anywhere in its name, at the beginning (Agent Plugin Container), middle (RHQ Agent Launcher Script), or end (rhq_agent). Likewise, the results include every resource with that string, regardless of where it appears in the resource entry or attribute.
Important
*) or regular expressions.
postgres table myexampletable
"My Compatible Group"
'test box'
plugin=jboss 123.4.5.6
trait[partitionName]='my example group' server.example.com
name="Production's Main Group"
'Hello world requires a closing single quote; Production's does not.
^) character sets that a search term must appear at the beginning of the result string. For example:
resource.id=^100$). For example:
script$
Table 1. String Operators
| Operator | Description |
|---|---|
| string | The string can occur anywhere in the result string. |
| ^string | The given string must appear at the beginning of the result value. |
| string$ | The given string must appear at the end of the result value. |
| ^string$ | The result must be an exact match of the given string, with no leading or trailing characters. |
Note
resource.trait[Database.startTime] = null
null will look for a resource or group with a value of the string null:
name = "null"
2.2.2. Property Searches
trait) is different than looking for an entry with an ID that includes 80 (id). The available properties are listed in Table 2, “Resource Search Contexts” and Table 3, “Group Search Contexts”.
Note
resource.type.plugin = Postgres
Important
connection, configuration, and trait use the internal property names for the property names (connection[property_name]) rather than the names used in the JBoss ON GUI.
Table 2. Resource Search Contexts
| Property | Description |
|---|---|
| resource.id | The resource ID number assigned by JBoss ON. |
| resource.name | The resource name, which is displayed in the UI. |
| resource.version | The version number of the resource. |
| resource.type.plugin | The resource type, defined by the plug-in used to manage the resource. |
| resource.type.name | The resource type, by name. |
| resource.type.category | The resource type category (platform, server, or service). |
| resource.availability | The resource availability, either UP or DOWN. |
| resource.pluginConfiguration[property-name] | The value of any possible configuration entry in a plug-in. |
| resource.resourceConfiguration[property-name] | The value of any possible configuration entry in a resource. |
| resource.trait[property-name] | The value of any possible measurement trait for a resource. |
Table 3. Group Search Contexts
| Property | Description |
|---|---|
| group.name | The name of the group. |
| group.plug-in | For a compatible group, the plug-in which defines the resource type for this group. |
| group.type | For a compatible group, the resource type for this group. |
| group.category | The resource type category (platform, server, or service). |
| group.kind | The type of group, either mixed or compatible. |
| group.availability | The availability of resource in the group, either UP or DOWN. |
Table 4. Search String Operators
| Operator | Description |
|---|---|
| = | Case-insensitive match. |
| == | Case-exact match. |
| != | Case-insensitive negative match (meaning, the value is not the string). |
| !== | Case-exact negative match (meaning, the value is not the string). |
2.2.3. Complex AND and OR Searches
postgres server myserver
postgres AND server AND myserver
|). For example:
postgres | jbossas
a | b c
Note
(a | b) (c | d)
(a) (b | (c d))
2.3. Saving, Reusing, and Deleting Dynamic Searches
- Run the search.

- Click the star in the right of the search bar. When the field comes up, enter the name for the new search.
 The search name is then displayed in green.


3. Viewing and Exporting Reports
3.1. Types of Reports
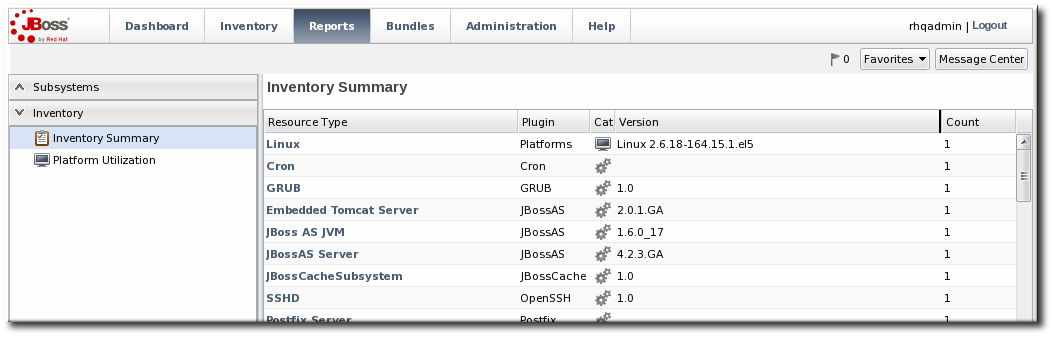
Figure 26. Inventory Summary Report
Table 5. Types of Reports
| Report Name | Description | Has Filters? |
|---|---|---|
| Subsystem Reports | ||
| Suspect Metrics | Lists any metrics outside the established baselines for a given resource. All suspect metrics for all resources are listed, but the baselines which mark the metric may be different for each resource, even different between resources of the same type. | No |
| Configuration History | Lists all configuration changes, for all resources. Version numbers are incremented globally, not per resource. The configuration history shows the version number for the change, the date it was submitted and completed, its status, and the type of change (individual or through a group). | No |
| Recent Operations | Lists all operations for all resources, by date that the operation was submitted (not necessarily run), the operation type, and its status. | Yes |
| Recent Alerts | Lists every fired alert for all resources, with the name of the resource, the alert definition which was fired, and the alerting condition. | Yes |
| Alert Definitions | Lists all configured alert definitions, for all resources, with their priority and whether they are enabled. | No |
| Recent Drift | Contains a list of all snapshots, for all resources and drift definitions. | Yes |
| Inventory Reports | ||
| Inventory Summary | Contains a complete list of resources currently in the inventory, broken down by resource type and version number. | No |
| Platform Utilization | Shows the current CPU percentage, actual used memory, and swap space. | No |
| Drift Compliance | Shows a list of all resource types which support drift and then shows how many drift definitions are configured and whether the group is compliant. Clicking on a resource type shows the list of resources configured for drift and their individual compliance status. | No |
3.2. Exporting Report Data to CSV

Figure 27. Exported Inventory Summary
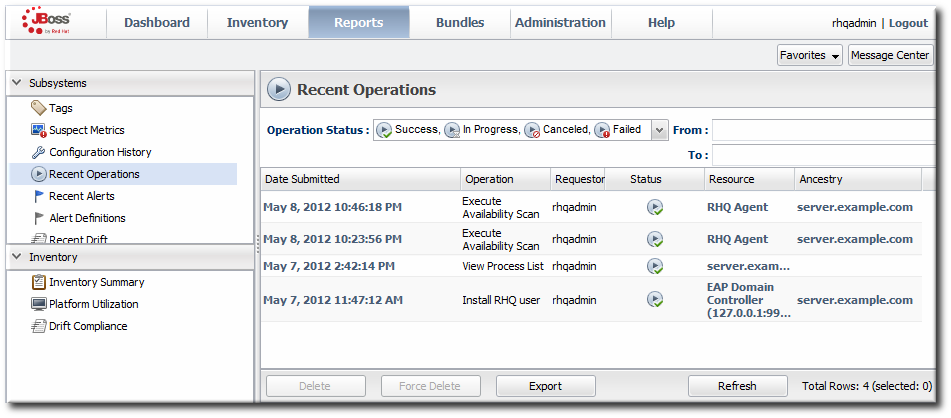
Figure 28. Report with Date Filters
4. Managing the Resource Inventory
4.1. About the Inventory: Resources
4.1.1. Managed Resources: Platforms, Servers, and Services
- Platforms (operating systems)
- Servers
- Services

Figure 29. An Example Resource Hierarchy
- A resource can only have one parent.
- A server can be a child of a platform (such as JBoss AS on Linux) or another server (such as Tomcat embedded in JBoss AS).
- A service can be a child of a platform, a server (such as the JMS queue on JBoss AS), or another service (e.g. a table inside a database).
- Platforms, servers, and services can have many children services.
Note
Table 6. Default Resources Supported in JBoss ON
| Managed Platform | |||
| AIX | FreeBSD | HP-UX | Java |
| Linux | Mac OS X | Solaris | Windows |
| Managed Servers | |||
| Apache HTTP Server | JBoss BRMS (Drools) | JMS Manager Service (HornetQ) | Hibernate Services |
| Host Server | HTTPService | IIS Server | JBoss EAP/AS 4 and 5 |
| JBoss Cache Services 2.x and 3.x | JBoss ESB and ESB 5 | JMX Server | mod_cluster |
| Oracle | PostgreSQL | JBoss Developer Studio (ModeShape) | Tomcat Server |
| JBoss ON Agent | JBoss ON Server | ||
4.1.2. Content-Backed Resources
4.1.3. Resources in the Inventory Used by JBoss ON
rhq-agent-env.sh script. Adding these resources to the JBoss ON inventory allows JBoss ON to monitor and manage all of the agents and servers in the deployment.
4.2. Interactions with System Users for Agents and Resources
- JBoss EAP servers
- PostgreSQL databases
- Tomcat servers
- Apache servers
- Generic JVMs
Table 7. Cheat Sheet for Agent and Resource Users
| Resource | User Information |
|---|---|
| PostgreSQL | No effect for monitoring and discovery.
The agent user must have read/write permissions to the PostgreSQL configuration file for configuration viewing and editing.
|
| Apache | No effect for monitoring and discovery.
The agent user must have read/write permissions to the Apache configuration file for configuration viewing and editing.
|
| Tomcat | Must use the same user or can't be discovered |
| JMX server or JVM | Different users are fine when using JMX remoting; cannot be discovered with different users and the attach API |
| JBoss AS/EAP | Different users are all right, but requires read permissions on run.jar and execute and search permission on all ancestor directories for run.jar |
4.2.1. The Agent User
4.2.2. Agent Users and Discovery
- For JBoss EAP resources, the agent must have read permissions to the
run.jarfile, plus execute and search permissions for every directory in the path to therun.jarfile. - Tomcat servers can only be discovered if the JBoss ON agent and the Tomcat server are running as the same user. Even if the agent is running as root, the Tomcat server cannot be discovered if it is running as a different user than the agent.
- If a JVM or JMX server is running with JMX remoting, then it can be discovered if the agent is running as a different user. However, if it is running with using the attach API, it has to be running as the same user as the agent for the resource to be discovered.
4.2.3. Users and Management Tasks
- Discovery
- Deploying applications
- Executing scripts
- Running start, stop, and restart operations
- Creating child resources through the JBoss ON UI
- Viewing and editing resource configuration
sudo.
4.2.4. Using sudo with JBoss ON Operations
sudo is for long-running operations, such as starting a service or a process, or for scripts which are owned by a resource user. The user which executes the script should be the same as the resource user because that user already has the proper authorization and permissions.
sudo rights to the given command.
- There can be no required interaction from the user, including no password prompts.
- It should be possible for the agent to pass variables to the script.
sudo for resource scripts:
- Grant the JBoss ON agent user
sudorights to the specific script or command. For example, to run a script as thejbossadminuser:[root@server ~]# visudo jbosson-agent hostname=(jbossadmin) NOPASSWD: /opt/jboss-eap/jboss-as/bin/*myScript*.sh
Using theNOPASSWDoption runs the command without prompting for a password.Important
JBoss ON passes command-line arguments with the start script when it starts an EAP instance. This can be done either by including the full command-line script (including arguments) in thesudoersentry or by using thesudo -uuser command in a wrapper script or a script prefix.The second option has a simplersudoersentry - Create or edit a wrapper script to use. Instead of invoking the resource's script directly, invoke the wrapper script which uses
sudoto run the script.Note
For the EAP start script, it is possible to set a script prefix in the connection settings, instead of creating a separate wrapper script:/usr/bin/sudo -u jbosson-agent
For example, for a start script wrapper,start-myScript.sh:#!/bin/sh # start-myScript.sh # Helper script to execute start-myConfig.sh as the user jbosson-agent # sudo -u jbosson-agent /opt/jboss-eap/jboss-as/bin/start-myConfig.sh
- Create the start script, with any arguments or settings to pass with the
run.shscript. For example, forstart-myConfig.sh:nohup ./run.sh -c MyConfig -b jonagent-host 2>&1> jboss-MyConfig.out &
4.3. Discovering Resources
4.3.1. Finding New Resources: Discovery
4.3.2. Running Discovery Scans Manually
discovery command at the agent command prompt:
- Click the Inventory tab in the top menu.
- Open the Servers - Top Level Resources link on the left, and select the agent resource.
- Open the Operations tab for the agent.
- In the Schedules subtab, click the New button.
- Select the Manual Discovery operation from the drop-down menu, and select whether to run a detailed discovery (servers and services) or a simple discovery (servers only).

- In the Schedule area, select the radio button to run the operation immediately.

- Click the button to set up the operation.

4.3.3. Importing Resources from the Discovery Queue
- Click the Inventory tab in the top menu.
- In the Resources menu on the left, select Discovery Queue.
- Select the checkbox of the resources to be imported. Selecting a parent resource (such as a platform) gives the option to automatically import all of its children, too.
- Click the button at the bottom of the UI.
4.3.4. Ignoring Discovered Resources
Note
- Select Inventory from the top menu.
- Select the Discovery Queue item under the Resources menu on the left side of the screen.
- Select the checkbox of the resource to be ignored. Selecting a parent resource automatically selects all of its children.
- Click the Ignore button at the bottom of the page.
Note
4.4. Importing New Resources Manually
Note
- Click the Inventory tab in the top menu.
- Search for the parent resource of the new resource.Section 2, “Dynamic Searches for Resources and Groups” has information on searching for resources using dynamic searches.
- Click the Inventory tab of the parent resource.
- Click the Import button in the bottom of the Inventory tab, and select the type of child resource. The selection menu lists the possible types of child resources for that parent.

- Fill in the properties to identify and connect to the new resource. Each resource type in the system has a different set of required properties.

4.5. Setting up a JVM for Discovery
4.5.1. Required JVM Configuration for Discovery
- Sun JMX remoting is enabled, with a port system property specified in the command line.
-Dcom.sun.management.jmxremote.port=12345 com.xyz.MyAppMain
- A Sun/Oracle-compatible Java process is accessible through the
com.sun.tools.attachAPI, and the resource key is specified as a system property in the command line.-Dorg.rhq.resourceKey=KEY com.xyz.MyAppMain
4.5.2. Excluding Java Processes from Discovery
rhq.jmxplugin.process-filters, which lists strings to ignore specifically from the Generic JMX Plug-in discovery scan. If a Java process contains any of the strings in the filter, it is excluded from discovery as a JMX server[2].
RHQ_AGENT_ADDITIONAL_JAVA_OPTS="-Drhq.jmxplugin.process-filters=org.rhq.enterprise.agent.AgentMain,org.jboss.Main,catalina.startup.Bootstrap"
- Open the agent configuration file.
[jbosson-agent@server ~]$ vim agentRoot/rhq-agent/conf/agent-configuration.xml
- In the
RHQ_AGENT_ADDITIONAL_JAVA_OPTSlink, add the string to exclude to therhq.jmxplugin.process-filtersoption. This can be the classname or any other identifying string which is in the command line for the given process.For example:RHQ_AGENT_ADDITIONAL_JAVA_OPTS="-Drhq.jmxplugin.process-filters=org.rhq.enterprise.agent.AgentMain,org.jboss.Main,catalina.startup.Bootstrap
,com.abc.OtherAppMain"Therhq.jmxplugin.process-filtersvalue is a comma-separated list of strings. - Restart the agent with the
--configoption to load the new configuration.[jbosson-agent@server ~]$ agentRoot/rhq-agent/bin/rhq-agent.sh --config
4.5.3. Manually Importing a JVM Resource
Note
- Open the platform resource, and create the child as described in Section 4.4, “Importing New Resources Manually”.
- Select the type of JVM. The default JVM covers a lot of different types, including Tomcat servers, local VMs, and different IBM JVMs.

- Fill in the connection information for the JVM. This varies depending on the JVM type, but it includes options like a URL and port, directory paths for client libraries, directory paths for classes, and login credentials.

- Click the to import the instance.
4.6. Configuring Tomcat/EWS Servers for Discovery (Windows)
- Run
regedit. - Navigate to Java preferences key for the Tomcat server,
HKEY_LOCAL_MACHINE\SOFTWARE\Apache Software Foundation\Procrun2.0\TomcatVer#\Parameters\Java. - Edit the Options attribute, and add these parameters:
-Dcom.sun.management.jmxremote.port=9876
-Dcom.sun.management.jmxremote.ssl=false
-Dcom.sun.management.jmxremote.authenticate=false
- Restart the Tomcat service.
4.7. Creating Child Resources
Note
Note
- Click the Inventory tab in the top menu.
- Search for the parent resource of the new resource.Section 2, “Dynamic Searches for Resources and Groups” has information on searching for resources using dynamic searches.
- Click the Inventory tab of the parent resource.
- Click the Create Child button in the bottom of the Inventory tab, and select the type of child resource. The selection menu lists the possible types of child resources for that parent.

- Give the name and description for the new resource.

- Fill in the properties to identify and connect to the new resource. Each resource type in the system has a different set of required properties.
4.8. Viewing and Editing Resource Information
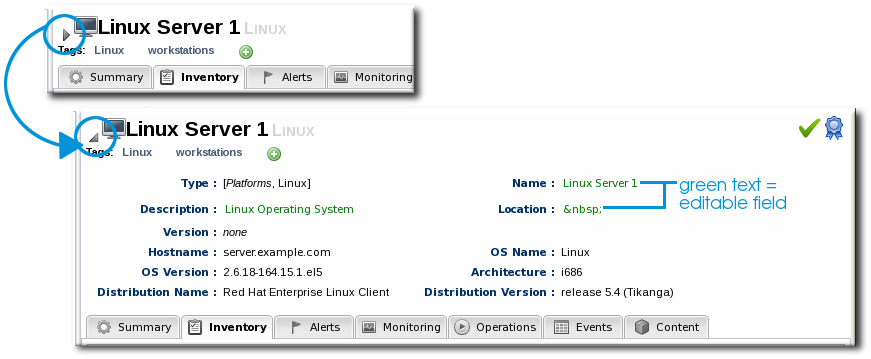
Figure 30. Expanding Resource Entry Details


4.9. Managing Connection Settings
Note
- Click the Inventory tab in the top menu.
- Search for the resource.Section 2, “Dynamic Searches for Resources and Groups” has information on searching for resources using dynamic searches.
- Click the name of the resource to go to its entry page.
- Open the Inventory tab for the resource, and click the Connection Settings subtab.
- Change the connection information for the resource.
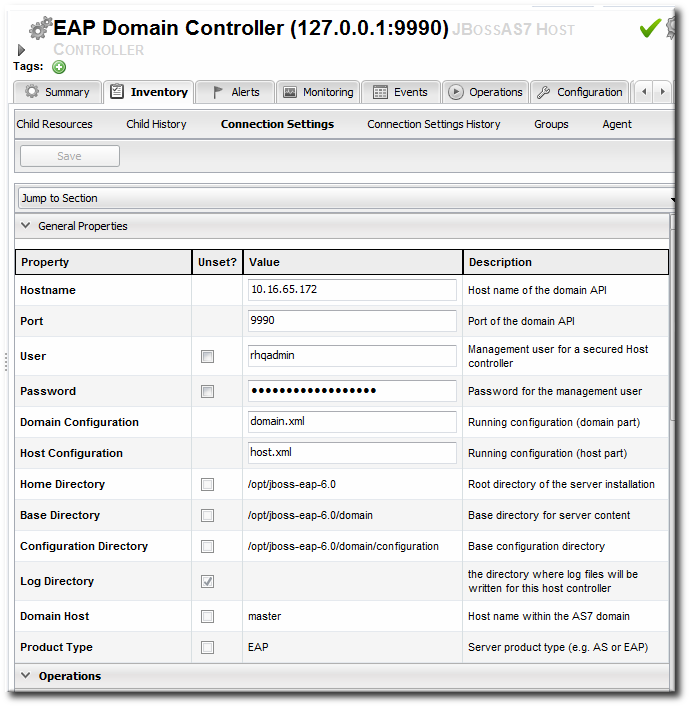 If a field is not editable immediately, select the Unset checkbox, and then enter new information in the field.
 - Click the button.
4.10. Uninventorying and Deleting Resources
4.10.1. A Comparison of Uninventorying and Deleting Resources
4.10.2. Use Caution When Removing Resources
Uninventorying a resource removes all of the data that JBoss ON has for that resource: its metric data and historical monitoring data, alerts, drift and configuration history, operation history, and other data. Once the resource is uninventoried, its data can never be recovered.
If a parent resource is removed from JBoss ON, then all of its children are also removed. Removing an EAP server, for example, removes all of its deployed web applications from the JBoss ON inventory. Removing a platform removes all servers, services, and resources on that platform.
Even though a resource is uninventoried and all of its data in JBoss ON is permanently removed, the underlying resource still exists. This means that the resource can still be discovered. To prevent the resource from being discovered and re-added to the inventory, ignore the resource, as in Section 4.3.4, “Ignoring Discovered Resources”.
Some resource types can be deleted, meaning the resource itself is removed from the machine, not just from the JBoss ON inventory. Anything that relies on that resource can experience failures because the resource is deleted. For example, if a datasource for an EAP server is deleted, that datasource is removed from the EAP server itself. Any application which attempts to connect to that datasource will then stop working, since it does not exist anymore.
4.10.3. Uninventorying through the Inventory Tab
- Click the Inventory tab in the top menu.
- Select the resource category in the Resources table on the left, and, if necessary, filter for the resource.
- Select the resource to uninventory from the list, and click the button.

- When prompted, confirm that the resource should be uninventoried.

- To prevent the resource from being re-imported into the inventory, ignore it when it is discovered in the next discovery scan. This is covered in Section 4.3.4, “Ignoring Discovered Resources”.
4.10.4. Uninventorying through the Parent Inventory
- Click the Inventory tab in the top menu.
- Search for the parent resource of the resource.Section 2, “Dynamic Searches for Resources and Groups” has information on searching for resources using dynamic searches.
- Click the Inventory tab for the parent resource.
- Click on the line of the child resource to uninventory. To select multiple entries, use the Ctrl key.

- Click the button.
- When prompted, confirm that the resource should be uninventoried.
- To prevent the resource from being re-imported into the inventory, ignore it when it is discovered in the next discovery scan. This is covered in Section 4.3.4, “Ignoring Discovered Resources”.
4.10.5. Uninventorying through a Group Inventory
- In the Inventory tab in the top menu, select the compatible or mixed groups item in the Groups menu on the left.

- Click the name of the group.
- Open the Inventory tab for the group, and open the Members submenu.
- Click on the line of the group member to uninventory. To select multiple entries, use the Ctrl key.

- Click the button.
- When prompted, confirm that the resource should be uninventoried.
- To prevent the resource from being re-imported into the inventory, ignore it when it is discovered in the next discovery scan. This is covered in Section 4.3.4, “Ignoring Discovered Resources”.
4.10.6. Deleting a Resource
- Deletes the resource from the underlying machine.
- Removes the resource from the inventory.
- Removes any child resources from JBoss ON.
- Preserves the inventory information in JBoss ON for the resource, including alerts, drift definitions, metric data, and configuration and operation histories.
Warning
- Click the Inventory tab in the top menu.
- Search for the parent resource of the resource to delete.Section 2, “Dynamic Searches for Resources and Groups” has information on searching for resources using dynamic searches.
- Click the Inventory tab of the parent resource.
- Select the resource to delete from the list of children.
- Click the Delete button in the bottom of the Inventory tab.

4.11. Viewing Inventory Summary Reports
- Resource type
- The JBoss ON server plug-in which manages the resource
- The JBoss ON category for the resource (platform, server, or service)
- The version number or numbers for resource of the resource type in inventory
- The total number of resources of that type in the inventory
- In the top menu, click the Reports tab.
- In the Inventory menu box in the menu table on the left, select the report.
- Click the name of any resource type to go to the inventory list for that resource type.
Note
inventorySummary.csv.
5. Managing Groups
5.1. About Groups
Table 8. Types of Groups
| Type | Description | Static or Dynamic |
|---|---|---|
| Mixed groups | Contains resources of any resource type. There is no limit to how many or what types of resources can be placed into a mixed group. Mixed groups are useful for granting access permissions to users for a set of grouped resources. | Static |
| Compatible groups | Contains only resources of the same type. Compatible groups make it possible to perform an operation against every member of the group at the same time, removing the need to individually upgrade multiple resources of the same type, or perform other operations one at a time on resources across the entire enterprise. | Static |
| Recursive groups | Includes all the descendant, or child, resources of resources within the group. Recursive groups show both the explicit member availability and the child resource availability. | Static (members) and dynamic (children) |
| Autogroups | Shows every resource as part of a resource hierarchy with the platform at the top, and child and descendant resources below the platform. Child resources of the same type are automatically grouped into an autogroup. | Dynamic |
5.1.1. Dynamic and Static Groups
5.1.2. About Autogroups
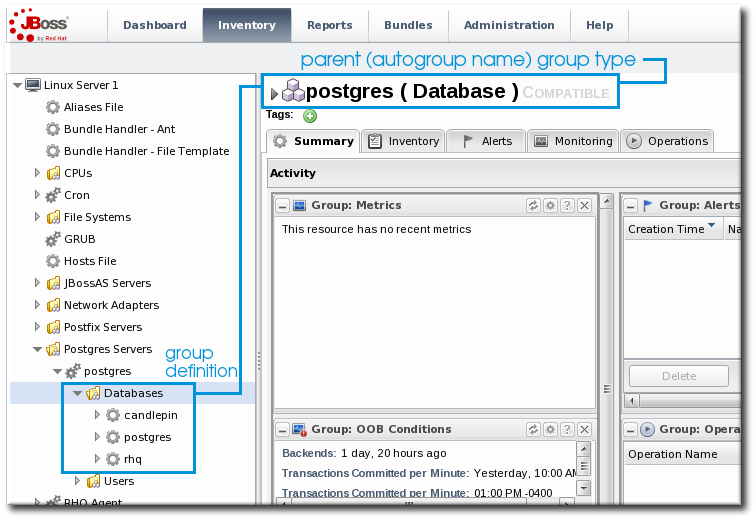
Figure 31. PostgreSQL Autogroup
5.1.3. Comparing Compatible and Mixed Groups
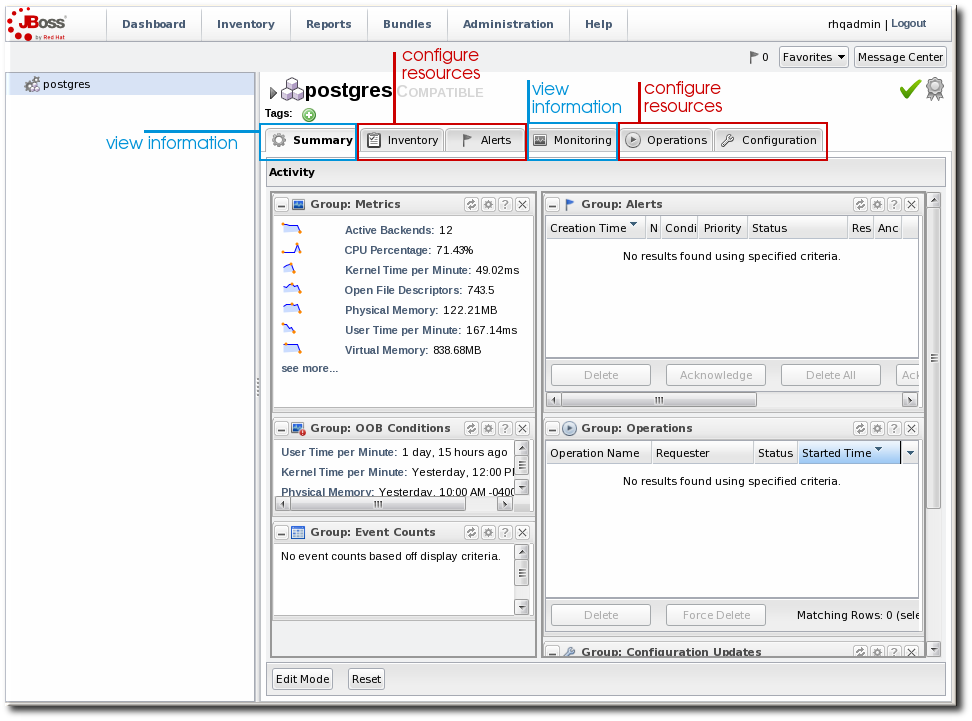
Figure 32. Compatible Group Entry
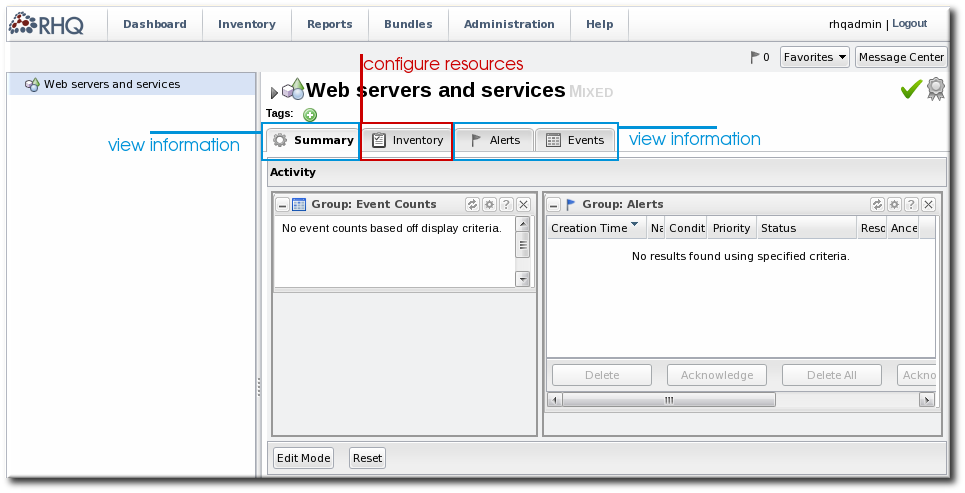
Figure 33. Mixed Group Entry
5.1.4. Leveraging Recursive Groups
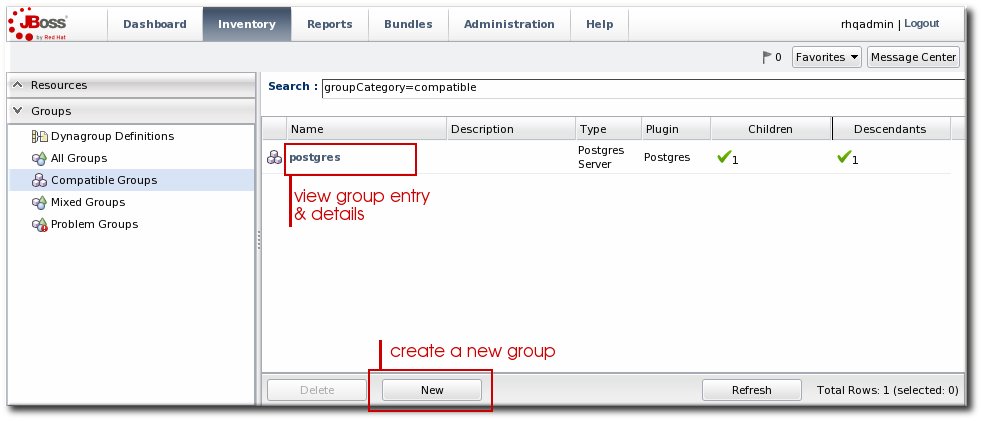
5.2. Creating Groups
- Click the Inventory tab in the top menu.
- In the Groups box in the left menu, select the type of group to create, either compatible or mixed.Compatible groups have resources all of the same type, while mixed groups have members of different types. The differences in the types of members means that there are different ways that compatible and mixed groups can be managed, as covered in Section 5.1.3, “Comparing Compatible and Mixed Groups”.
- Enter a name and description for the group.
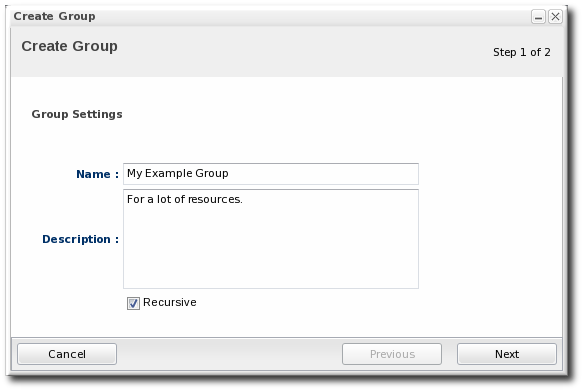 Marking groups recursive can make it easier to manage resources, particularly when setting role access controls. For example, administrators can grant users access to the group and automatically include any child resources of the member resources.
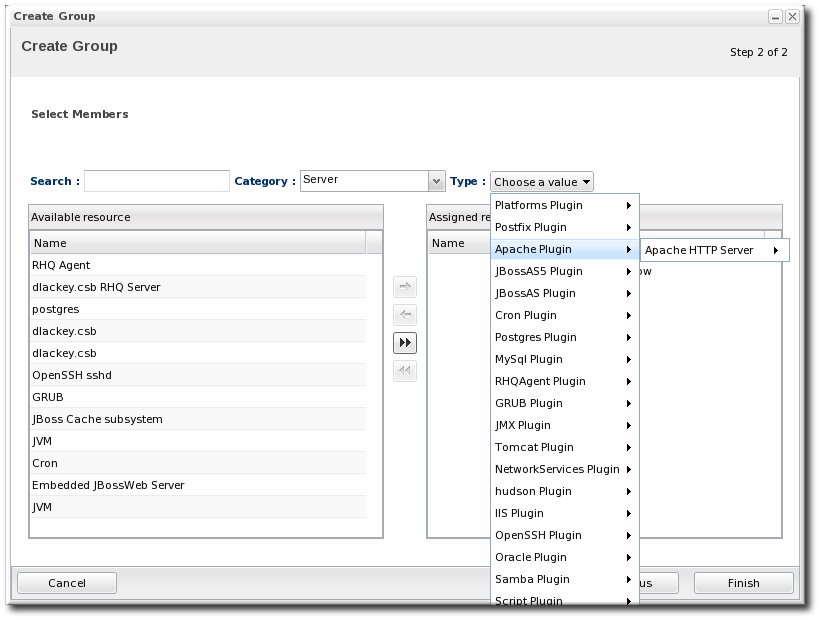
 - Select the group members. It is possible to filter the choices based on name, type, and category.
5.3. Changing Group Membership
- In the Inventory tab in the top menu, select the compatible or mixed groups item in the Groups menu on the left.
- Click the name of the group.
- Open the Inventory tab for the group, and open the Members submenu.
- Click the button at the bottom of the page.

- Select the resources to add to the group from the box on the left; to remove members, select them from the box on the right. Use the arrows to move the selected resources. To select multiple resources, use Ctrl+click.

- Click the button.
5.4. Editing Compatible Group Connection Properties
- If all of the resources in the group have identical values for a property, the group connection property is that exact value.
- If even one resource has a different value than the rest of the resources in the group, that property will have a special marker value of ~ Mixed Values ~.
- In the Inventory tab in the top menu, select the Compatible Groups item in the Groups menu on the left.
- Click the name of the compatible group.
- Open the Inventory tab for the group, and click the Connection Settings sub-item.
- To edit a property, click the green pencil by the field.

- To change all resources to the same value, click the Unset checkbox for the field Set all values to.... To change a specific resource, click the Unset checkbox for that resource and then give the new value.

Note
6. Using Dynamic Groups
Note
6.1. About Dynamic Groups Syntax
6.1.1. General Expression Syntax
expression 1
exprA1
exprA2
groupby exprB1
groupby exprB2

expression 2
exprA2
exprA1
groupby exprB2
groupby exprB1
Note
Table 9. Dynamic Group Properties
| Type | Supported Attributes | ||||||
|---|---|---|---|---|---|---|---|
| Related to the resource itself | |||||||
|
resource
|
| ||||||
| Related to the resource type | |||||||
|
resourceType
|
| ||||||
| Related to the resource configuration | |||||||
|
plug-inConfiguration
|
Any plugin configuration property
| ||||||
|
resourceConfiguration
|
Any resource configuration property
| ||||||
| Related to the resource monitoring data | |||||||
|
traits
|
Any monitoring trait
| ||||||
|
availability
|
The current state, either UP or DOWN
| ||||||
resource.attribute, then it applies to the resource which will be a member of the group. However, it is possible to use an attribute in an ancestor or child entry to identify a group member recursively.
resource.id = 10001
resource.parent:
resource.parent.id = 10001
- resource
- resource.child
- resource.parent
- resource.grandParent
6.1.2. Simple Expressions
resource.attribute[string-expression] = value
resource.parent.type.category = Platform
resource.trait is the generic resource attribute, and a sub-attribute like partitionName identifies the actual parameter.
empty keyword searches for resources which have a specific attribute with a null value:
empty resource.attribute[string-expression]
empty keyword is used, then there is no value given with the expression.
not empty keyword, which looks for every resource with that attribute, regardless of the attribute value, as long as it is not null. As with the empty keyword, there is no reason to give a value with the expression, since every value matches the expression.
not empty resource.attribute[string-expression]
6.1.3. Pivot Expressions
groupby keyword:
groupby resource.attribute
parent.name attribute creates a unique group based on every parent resource.
groupby resource.parent.name
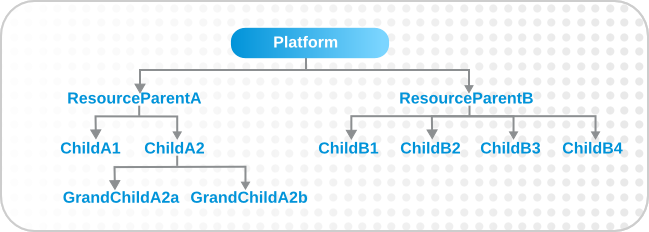
Figure 34. Resources and Parents
6.1.4. Compound Expressions
resource.parent.type.category = Platform
resource.parent.type.category = Platform
resource.name.contains = JBossAS
groupby resource.type.plugin
groupby resource.type.name
groupby resource.parent.name
resource.type.category = server
groupby resource.type.plugin
groupby resource.type.name
groupby resource.parent.name
resource.type.plugin = JBossAS
resource.type.name = JBossAS Server
empty resource.pluginConfiguration[principal]
6.1.5. Unsupported Expressions
All given configuration properties in an expression must be only from the resource configuration or only from the plug-in configuration. Expressions cannot be taken from both.
A property can only be used once in a dynagroup definition.
valid
resource.trait[x] = foo

not valid
resource.trait[x] = foo
resource.trait[y] = bar
resource.trait expression can only occur once in a definition:
resource.grandParent.trait[Trait.hostname].contains = stage
resource.parent.type.plugin = JBossAS5
resource.type.name = Web Application (WAR)
resource.grandParent.trait[Trait.hostname].contains = stage
resource.parent.type.plugin = JBossAS5
resource.type.name = Web Application (WAR)
resource.trait[contextRoot] = jmx-console
There was a problem calculating the results: java.lang.IllegalArgumentException: org.hibernate.QueryParameterException: could not locate named parameter [arg2]
resource.parent.trait[x] = foo
resource.grandParent.trait[y] = bar
6.1.6. Dynagroup Expression Examples
Example 1. JBoss Clusters
resource.type.plugin = JBossAS
resource.type.name = JBossAS Server
groupby resource.trait[partitionName]
Example 2. A Group for Each Platform Type
resource.type.plugin = Platforms
resource.type.category = PLATFORM
groupby resource.type.name
Example 3. Autogroups
groupby resource.type.plugin
groupby resource.type.name
groupby resource.parent.name
Note
Example 4. Raw Measurement Tables
resource.type.plugin= Postgres
resource.type.name = Table
resource.parent.name = rhq Database
resource.name.contains = rhq_meas_data_num_
Example 5. Only Agents with Multicast Detection
resource.type.plugin= RHQAgent
resource.type.name = RHQ Agent
resource.resourceConfiguration[rhq.communications.multicast-detector.enabled] =  true
Example 6. Only Windows Platforms with Event Tracking
resource.type.plugin= Platforms
resource.type.name = Windows
resource.pluginConfiguration[eventTrackingEnabled] =  true
Example 7. JBoss AS Servers by Machine
groupby resource.parent.trait[Trait.hostname]
resource.type.plugin = JBossAS
resource.type.name = JBossAS Server
6.2. Creating Dynamic Groups
- Click the Inventory tab in the top menu.
- In the Groups menu box on the left, click the Dynagroup Definitions link.

- Click the button to open the dynamic group definition form.

- Fill in the name and description for the dynamic group. The name can be important because it is prepended to any groups created by the definition, as a way of identifying the logic used to create the group.

- Fill in the search expressions. This can be done by entering expressions directly in the Expression box or by using a saved expression.Saved expressions are have a wizard to help build and validate the expressions. To create a saved expression, click the green button by the drop-down menu. Several options for the expression are active or inactive depending on the other selections; this prevents invalid expressions.
 The Expression box at the top shows the currently created expression.
 - After entering the expressions, set whether the dynamic group is recursive.
- Set an optional recalculation interval. By default, dynamic groups do not recalculate their members automatically, meaning the recalculation value is set to 0. To recalculate the group membership, set the Recalculation interval to the time frequency, in milliseconds.
Note
Recalculating a group definition across large inventories could be resource-intensive for the JBoss ON server, so be careful when setting the recalculation interval. For large inventories, set a longer interval, such as an hour, to avoid affecting the JBoss ON server performance.
6.3. Recalculating Group Members
- Click the Inventory tab in the top menu.
- In the Groups menu on the left, click the Dynagroup Definitions link.
- In the list of dynagroups, select the row of the dynagroup definition to calculate.
- Click the Recalculate button at the bottom of the table.
7. Creating User Accounts
7.1. Managing the rhqadmin Account
rhqadmin. This superuser has the default password rhqadmin.
Note
rhqadmin account cannot be deleted, even if other superuser accounts are created. Additionally, the role assignments for rhqadmin cannot be changed; it is always a superuser account.
Important
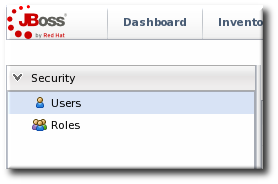
- Click the Administration tab in the top menu.
- In the Security table on the left, select Users.
- Click the name of
rhqadmin. - In the edit user form, change the password to a new, complex value.

7.2. Creating a New User
- Click the Administration tab in the top menu.
- In the Security table on the left, select Users.
- Click the button at the bottom of the list of current users.
- Fill in description of the new user. The Enable Login value must be set to Yes for the new user account to be active.

- Select the required role from the Available Roles area, and then click the arrow pointing to the Assigned Roles to assign the role.
- Click the button to save the new user with the role assigned.
7.3. Editing User Entries
- Click the Administration tab in the top menu.
- From the Security menu, select Users.
- Click the name of the user whose entry will be edited.
- In the edit user form, change whatever details need to be changed, and save.

7.4. Disabling User Accounts
- Click the Administration tab in the top menu.
- In the Security table on the left, select Users.
- Click the name of the user whose entry will be edited.
- In the edit user form, change the Enable Login radio button to No.

- Click the button to save the new user with the role assigned.
7.5. Changing Role Assignments for Users
- Click the Administration tab in the top menu.
- From the Security menu, select Users.
- Click the name of the user to edit.
- To add a role to a user, select the required role from the Available Roles area, click the arrow pointing to the Assigned Roles area. To remove a role, select the assigned role on the right and click the arrow pointing to the left.

- Click to save the role assignments.
8. Managing Roles and Access Control
8.1. Security in JBoss ON
8.1.1. Access Control and Permissions
- Global permissions apply to JBoss ON server configuration. This covers administrative tasks, like creating users, editing roles, creating groups, importing resources into the inventory, or changing JBoss ON server properties.
- Resource-level permissions apply to actions that a user can perform on specific resources in the JBoss ON inventory. These cover actions like creating alerts, configuring monitoring, and changing resource configuration. Resource-level permissions are tied to the subsystem areas within JBoss ON.
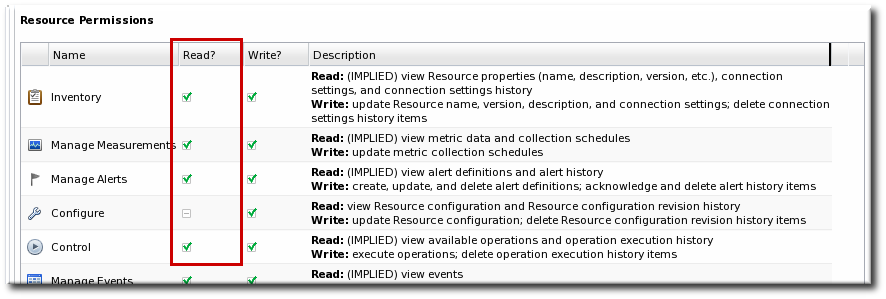
Figure 35. Read Access Option
Note
Table 10. JBoss ON Access Control Definitions
| Access Control Type | Description |
|---|---|
| Global Permissions | |
| Manage Security | Equivalent to a superuser. Security permissions grant the user the rights to create and edit any entries in JBoss ON, including other users, roles, and resources, to change JBoss ON server settings, and to control inventory.
Warning
The Security access control level is extremely powerful, so be cautious about which users are assigned it. Limit the number of superusers to as few as necessary.
|
| Manage Inventory | Allows any operation to be performed on any JBoss ON resource, including importing new resources. |
| Manage Settings | Allows a user to add or modify any settings in the JBoss ON server configuration itself. This includes operations like deploying plug-ins or using LDAP authentication. |
| Manage Bundles | Allows a user to upload and manage bundles (packages) used for provisioning resources. |
| Manage Repositories | Allows a user to access any configured repository, including private repositories and repositories without specified owners. Users with this right can also associated content sources with repositories. |
| View Users | Allows a user to view the account details (excluding role assignments) for other users in JBoss ON. |
| Resource-Level Permissions | |
| Inventory | Allows a user to edit resource details and connection settings — meaning the information about the resource in the JBoss ON inventory. This does not grant rights to edit the resource configuration. |
| Manage Measurements | Allows the user to configure monitoring settings for the resource. |
| Manage Alerts | Allows the user to create alerts and notifications on a resource. Configuring new alert senders changes the server settings and is therefore a function of the global Settings permissions. |
| Control | Allows a user to run operations (which are also called control actions) on a resource. |
| Configure | Allows users to change the configuration settings on the resource through JBoss ON.
Note
The user still must have adequate permissions on the resource to allow the configuration changes to be made.
|
| Manage Drift | Allows the user to create, modify, and delete resource and template drift definitions. It also allows the user to manage drift information, such as viewing and comparing snapshots. |
| Manage Content | Allows the user to manage content providers and repositories that are available to resources. |
| Create Child Resources | Allows the user to manually create a child resource for the specified resource type. |
| Delete Child Resources | Allows the user to delete or uninventory a child resource for the specified resource type. |
8.1.2. Access and Roles
Note
- A superuser role provides complete access to everything in JBoss ON. This role cannot be modified or deleted. The user created when the JBoss ON server was first installed is automatically a member of this role.
- An all resources role exists that provides full permissions to every resource in JBoss ON (but not to JBoss ON administrative functions like creating users). This is a useful role for IT users, for example, who need to be able to change the configuration or set up alerts for resources managed by JBoss ON but who don't require access over JBoss ON server or agent settings.
8.2. Creating a New Role
Note
- Create any resources groups which will be associated with the role. Creating groups is described in Section 5.2, “Creating Groups”.By default, JBoss ON uses only resource groups to associate with a role, and these are required. However, optional user groups from an LDAP directory can also be assigned to a role, so that the group members are automatically treated as role members. LDAP groups must be configured in the server settings, as described in Section 9.3.2, “Associating LDAP User Groups to Roles”.
- In the top menu, click the Administration tab.

- In the menu table on the left, select the item.
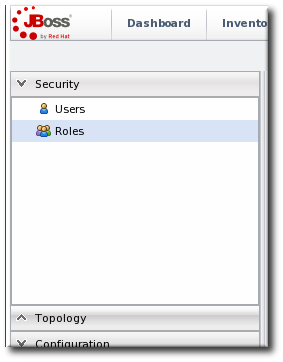
- The list of current roles comes up in the main task window. Click the button at the bottom of the list.
- Give the role a descriptive name. This makes it easier to manage permissions across roles.
- Global permissions grant permissions to areas of the JBoss ON server and configuration.
- Resource permissions grant permissions for managing resources.
 The specific access permissions are described in Table 10, “JBoss ON Access Control Definitions”.
 Move the required groups from the Available Resource Groups area on the left to the Assigned Resource Groups on the right as required.
- At the bottom, click the button.
- Select the Users tab to assign users to the role.
 Move the required user from the Available Users area on the left, to the Assigned Users on the right as required.
 - Click the arrow in the upper right to close the create window.
8.3. Extended Example: Read-Only Access for Business Users
Example Co. needs some of its management team to be able to read and access JBoss ON data to track infrastructure performance and maintenance, define incident response procedures, and plan equipment upgrades. While these business users need to view JBoss ON information, they should not be able to edit any of the configuration, which is handled by the IT and development departments.
Tim the IT Guy first defines what actions the business users need to perform, and they need to be able to see everything:
- View resources in the inventory and histories for adding and deleting resources.
- View monitoring information, including measurements and events.
- View alerts.
- View content and bundles and any deployments to resources.
- View configuration drift.
- View all resource histories for configuration and operations.
- View user details to get information for auditing actions.
Business users are given access to all of the information they need, without being able to change any configuration or inventory accidentally.
9. Integrating LDAP Services for Authentication and Authorization
Important
9.1. Supported Directory Services
- Red Hat Directory Server 8.1, 8.2, and 9.0
- Microsoft Active Directory 2003 and 2008
9.2. LDAP for User Authentication
9.2.1. About LDAP Authentication and Account Creation
Warning
Note
JONUser=true, which can make it easier and more precise to locate entries.
Note
9.2.2. Issues Related to Using LDAP for a User Store
jsmith) and password, but is improperly assigned the JBoss ON role membership of LDAP user John Smith (LDAP UID jsmith) because her JBoss ON user ID was the same as his LDAP user ID, and her account was incorrectly mapped to his LDAP account and, therefore, his LDAP group membership.
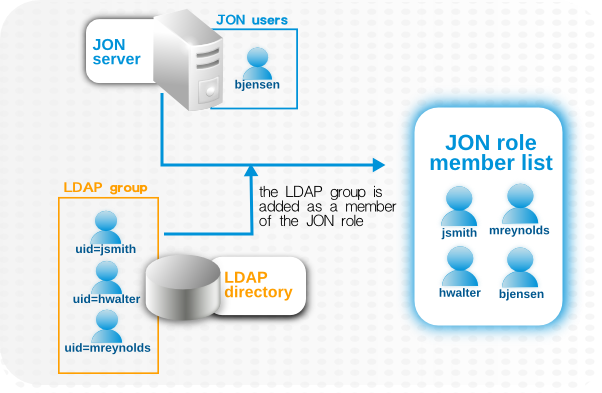
Figure 36. LDAP Groups, JBoss ON Roles, and Role Members
- Only create regular user accounts in one place. If LDAP should be used for authentication, then only add or delete user accounts in the LDAP directory.
- Ideally, limit JBoss ON user accounts to special, administrative users and rely on the LDAP directory for regular accounts.
- Try to design roles around LDAP groups, meaning that JBoss ON user accounts in those roles should be limited to admin accounts or avoided altogether.
9.2.3. Configuring LDAP User Authentication
- In the top menu, click the Administration tab.
- In the menu table on the left, select the item.
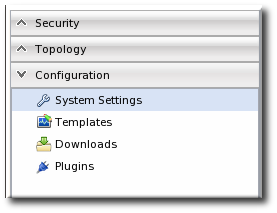
- Jump to the LDAP Configuration Properties area.
- Check the Use LDAP Authentication checkbox so that JBoss ON will use the LDAP user directory as its identity store.
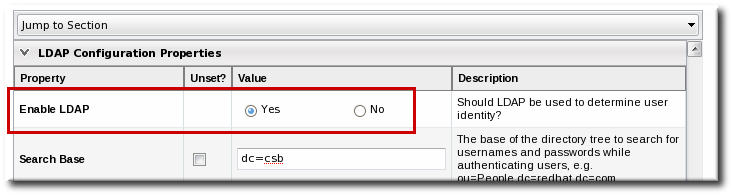
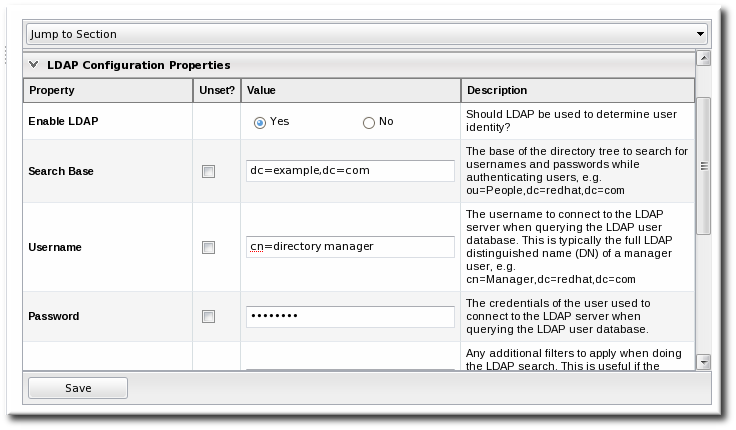
- Configure the connection settings to connect to the specific LDAP directory.
- Give the LDAP URL of the LDAP server. This has the format
ldap://hostname[:port]. For example:ldap://server.example.com:389
By default, this connects to the localhost over port 389 (standard LDAP port) or 636 (secure LDAP port, if SSL is selected). - To use a secure connection, check the Use SSL checkbox. When using SSL, make sure that the LDAP directory is actually running over SSL, and make sure that the connection URL points to the appropriate SSL port and protocol:
ldap
s://server.example.com:636 - Give the bind credentials to use to connect to the server. The username is the full LDAP distinguished name of the user as whom JBoss ON binds to the directory.
Note
The user must exist in the LDAP directory before configuring the LDAP settings in JBoss ON. Otherwise, login attempts to the JBoss ON server will fail.Also, make sure that the JBoss ON user has appropriate read and search access to the user and group subtrees in the LDAP directory.
- Set the search parameters that JBoss ON uses when searching the LDAP directory for matching user entries.
- The search base is the point in the directory tree where the server begins looking for entries. If this is used only for user authentication or if all JBoss ON-related entries are in the same subtree, then this can reference a specific subtree:
ou=user,ou=JON,dc=example,dc=com
If the users or groups are spread across the directory, then select the base DN:dc=example,dc=com
- Optionally, set a search filter to use to search for a specific subset of entries. This can improve search performance and results, particularly when all JBoss ON-related entries share a common LDAP attribute, like a custom
JonUserattribute. The filter can use wild cards (objectclass=*) or specific values (JonUser=true). - Set the LDAP naming attribute; this is the element on the farthest left of the full distinguished name. For example, in
uid=jsmith,ou=people,dc=example,dc=com, the far left element isuid=jsmith, and the naming attribute isuid.The default naming attribute in Active Directory iscn. In Red Hat Directory Server, the default naming attribute isuid.
- Save the LDAP settings.
Note
The Group Filter and Member Property fields aren't required for user authentication. They're used for configuring LDAP groups to be assigned to roles, as in Section 9.3.2, “Associating LDAP User Groups to Roles”.
9.3. Roles and LDAP User Groups
9.3.1. About Group Authorization

Figure 37. Groups Assigned to a Role
- An LDAP directory server connection has to be configured.
- There has to be an LDAP attribute given to search for group entries.For Active Directory, this is generally the
groupobject class. For Red Hat Directory Server, this is generallygroupOfUniqueNames. Other standard object classes are available, and it is also possible to use a custom, even JBoss ON-specific, object class. - There has to be an LDAP attribute given to identify members in the group.Common member attributes are
memberanduniqueMember.
(&(group_filter)(member_attribute=user_DN))
member attribute on an Active Directory group:
ldapsearch -h server.example.com -x -D "cn=Administrator,cn=Users,dc=example,dc=com" -W -b "dc=example,dc=com" -x '(&(objectclass=group)(member=CN=John Smith,CN=Users,DC=example,DC=com))'uniqueMember attribute on groupOfUniqueNames groups more commonly than member and group. For example:
/usr/lib64/mozldap6/ldapsearch -D "cn=directory manager" -w secret -p 389 -h server.example.com -b "ou=People,dc=example,dc=com" -s sub "(&(objectclass=groupOfUniqueNames)(uniqueMember=uid=jsmith,ou=People,dc=example,dc=com))"Note
9.3.2. Associating LDAP User Groups to Roles
- In the top menu, click the Administration tab.
- In the menu table on the left, select the item.
- Jump to the LDAP Configuration Properties area.
- Set up the LDAP connections, as described in Section 9.2.3, “Configuring LDAP User Authentication”. It is not required that the LDAP directory be used as the identity store in order to configure LDAP authorization, but it is recommended.
- Set the parameters to use for the server to use to search for LDAP groups and their members.The search filter that JBoss ON constructs looks like this:
(&(group_filter)(member_attribute=user_DN))
- The Group Search Filter field sets how to search for the group entry. This is usually done by specifying the type of group to search for through its object class:
(objectclass=groupOfUniqueNames)
- The Group Member Filter field gives the attribute that the specified group type uses to store member distinguished names. For example:
uniqueMember
The user_DN is dynamically supplied by JBoss ON when a user logs into the UI. - Save the LDAP settings.
9.4. Extended Example: memberOf and LDAP Configuration
Authentication is the process of verifying someone's identity. Authorization is the process of determining what access permissions that identity has. Users are authorized to perform tasks based on the permissions granted to their role assignments.
There are two things to configure: how to identify users for authentication and how to organize users for authorization.
- A single group to identify JBoss ON users in the LDAP directory
- Multiple, existing LDAP groups which are used to determine different levels of access to JBoss ON
JONUser, which make it easy to search for matching users.
memberOf attribute is automatically added to user entries to indicate a group that the user belongs to.
memberOf attribute to user entries as members are added and removed to the group. Tim the IT Guy only has to use the memberOf attribute on those user accounts as the search filter for authentication.
dn: uid=jsmith,ou=people,dc=example,dc=com
uid: jsmith
cn: John Smith
... 8< ...
memberOf: cn=JON User Group,ou=groups,dc=example,dc=com
memberOf: cn=IT Administrators,ou=groups,dc=example,dc=com
memberOf attribute for that specific JBoss ON group:
memberOf='cn=JON User Group,ou=groups,dc=example,dc=com'
- IT Administrators Group is mapped to a role with manage inventory permissions.
- IT Manager Group is mapped to a role with view (but no write) permissions for all of the resources and with view users permissions.
- Business Manager Group is mapped to a role with permissions to read all resource configuration, bundles, drift, measurements, operations, and alerts, but no write permissions.
Tim the IT Guy only has to create and manage one LDAP group, the JON Users Group, to set up all authentication and users for JBoss ON. He does not have to change the LDAP schema or even modify user entries directly.
10. Document Information
10.1. Giving Feedback
- Select the JBoss products group.
- Select JBoss Operations Network from the list.
- Set the component to Documentation.
- Set the version number to 3.1.2.
- For errors, give the page number (for the PDF) or URL (for the HTML), and give a succinct description of the problem, such as incorrect procedure or typo.For enhancements, put in what information needs to be added and why.
- Give a clear title for the bug. For example,
"Incorrect command example for setup script options"is better than"Bad example".
10.2. Document History
| Revision History | ||||
|---|---|---|---|---|
| Revision 3.1.2-2.400 | 2013-10-31 | |||
| ||||
| Revision 3.1.2-2 | January 23, 2013 | |||
| ||||
| Revision 3.1.1-1 | September 19, 2012 | |||
| ||||
| Revision 3.1-0 | June 12, 2012 | |||
| ||||
Index
A
- access controls, Security in JBoss ON
- about read rights, Access Control and Permissions
- applying to resources, Creating a New Role
- assigning to users, Changing Role Assignments for Users
- list of permissions, Access Control and Permissions
- users, Creating User Accounts
- authentication
- and LDAP, Configuring LDAP User Authentication
- configuring LDAP, Configuring LDAP User Authentication
- storing credentials, LDAP for User Authentication
- authorization
- for LDAP groups and roles, Roles and LDAP User Groups
B
- boundary characters
- in searches, Basic String Searches
D
- discovery
- ignoring resources, Ignoring Discovered Resources
- importing, Importing Resources from the Discovery Queue
- manual, Running Discovery Scans Manually
- resources, Importing Resources from the Discovery Queue
- dynamic search
- groups and resources, Dynamic Searches for Resources and Groups
- null, Basic String Searches
- saving, reusing, and deleting, Saving, Reusing, and Deleting Dynamic Searches
- syntax, About the Dynamic Search Syntax
- using quotation marks, Basic String Searches
G
- groups
- and roles, Access and Roles
- assigning to roles, Creating a New Role
- dynamic search, Dynamic Searches for Resources and Groups
- empty groups, General Expression Syntax
- overview, Managing Groups
- search context, Property Searches
I
- importing
- discovery, Importing Resources from the Discovery Queue
- inventory
- importing, Managing the Resource Inventory
- overview, About the Inventory: Resources
- reports, Viewing Inventory Summary Reports
J
- JBoss ON
- access control, Security in JBoss ON
- and LDAP, Configuring LDAP User Authentication
- configuring, Configuring LDAP User Authentication
- authorization, Roles and LDAP User Groups
- supported LDAP servers, About LDAP Authentication and Account Creation
L
- LDAP
- assigning groups to roles, Access and Roles
- authorization, Roles and LDAP User Groups
- for authentication, Configuring LDAP User Authentication
- configuring, Configuring LDAP User Authentication
- configuring SSL, Configuring LDAP User Authentication
- supported servers, About LDAP Authentication and Account Creation
- user groups and roles, Associating LDAP User Groups to Roles
- LDAP group object classes, About Group Authorization
- member attributes, About Group Authorization
- search parameters, About Group Authorization
- verifying credentials, About LDAP Authentication and Account Creation
P
- permissions, Security in JBoss ON
- applying to groups, Creating a New Role
- assigning to users, Changing Role Assignments for Users
- list of, Access Control and Permissions
R
- reports
- inventory, Viewing Inventory Summary Reports
- resources
- access control, Security in JBoss ON
- access permissions on, Access Control and Permissions
- and managing inventory, Managing the Resource Inventory
- and roles, Access and Roles
- creating children, Creating Child Resources
- deleting entries, Deleting Entries
- discovery and imports, Importing Resources from the Discovery Queue
- dynamic search, Dynamic Searches for Resources and Groups
- groups, Managing Groups
- ignoring discovered resources, Ignoring Discovered Resources
- inventory reports, Viewing Inventory Summary Reports
- managed, Managed Resources: Platforms, Servers, and Services
- manual discovery, Running Discovery Scans Manually
- running discovery, Importing Resources from the Discovery Queue
- search context, Property Searches
- uninventory, Uninventorying and Deleting Resources
- roles, Access and Roles
- adding or removing users, Changing Role Assignments for Users
- and groups, Access and Roles
- and LDAP user groups, Associating LDAP User Groups to Roles
- LDAP group object classes, About Group Authorization
- member attributes, About Group Authorization
- searching for members, About Group Authorization
- and users, Access and Roles
- assigning groups, Creating a New Role
- assigning users from LDAP groups, Access and Roles
- creating, Creating a New Role
- default, Access and Roles
- setting permissions, Creating a New Role
- types of members, Access and Roles
S
- search
- groups context, Property Searches
- resource context, Property Searches
- string operators, Property Searches
- using quotation marks, Basic String Searches
- secure connections
- using for LDAP authentication, Configuring LDAP User Authentication
- security
- users, Creating User Accounts
- self-registering
- server
- access control, Security in JBoss ON
- global rights, Access Control and Permissions
- resource-level rights, Access Control and Permissions
- and LDAP groups for roles, Associating LDAP User Groups to Roles
- building LDAP search, About Group Authorization
- LDAP group object classes, About Group Authorization
- member attributes, About Group Authorization
- LDAP authentication, Configuring LDAP User Authentication
- configuring, Configuring LDAP User Authentication
- SSL
- using for LDAP authentication, Configuring LDAP User Authentication
U
- UI
- A Tour of the UI, Using the JBoss ON Web Interface
- access control, Security in JBoss ON
- dashboard, Dashboard
- deleting entries, Deleting Entries
- details page, Entry Details Pages
- inventory, Inventory Browsers and Summaries
- left menu, The Left Menu
- logging in, Logging into the JBoss ON Web UI
- setting favorites, Setting Favorites
- users
- and roles, Access and Roles
- assigning LDAP user groups to roles, Access and Roles
- authentication, Configuring LDAP User Authentication
- changing access controls, Changing Role Assignments for Users
- changing roles, Changing Role Assignments for Users
- configuring LDAP authentication, Configuring LDAP User Authentication
- creating new, Creating a New User
- disabling accounts, Disabling User Accounts
- editing details, Editing User Entries
- security, Creating User Accounts
- using LDAP to self-register, About LDAP Authentication and Account Creation