
Red Hat Training
A Red Hat training course is available for Red Hat JBoss Operations Network
Deploying Applications and Content
for provisioning applications and managing content streams
Abstract
1. Summary: Using JBoss ON to Deploy Applications and Update Content
- Resource-level content through the Content tabs
- Provisioning applications through bundles
- It can deliver packages, updates, and patches to a resource.
- It can deploy content to a resource and even create a new child resource. This is particularly useful with web and application servers which can have different contexts as children.
- It can discover the current packages installed on a resource, creating a package digest that administrators can use to manage that asset.
- Use Ant calls to perform operations before or after deploying the bundle
- Allow user-defined values or edits to configuration at the time a bundle is provisioned
- Have multiple versions of the same content bundle deployed and deployable to resources at the same time
- Revert to an earlier bundle version
2. Provisioning Applications and Content
2.1. An Introduction to Provisioning Content Bundles
2.1.1. Bundles: Content and Recipes
deploy.xml; this must always be located in the top level of the bundle archive.
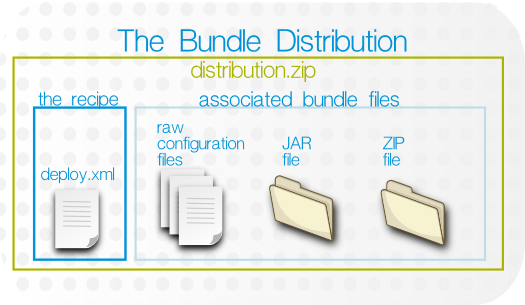
Figure 1. Bundle Layout
2.1.2. Destinations (and Bundle Deployments)
- A compatible resource group (of either platforms or JBoss servers)
- A base location, which is the root directory to use to deploy the bundle. Resource plug-ins define a base location for that specific resource type in the
<bundle-target>element. This can be the root directory or, for JBoss servers, common directories like the profile directory. There may be multiple available base locations. - The deployment directory, which is a subdirectory beneath the base directory where the bundle content is actually sent.
deploy/myApp/ directory. The JBoss AS5 plug-in defines two possible base locations, one for the installation directory and one for the profile directory. The administrator chooses the profile directory, since the application is an exploded JAR file. The agent then derives the real, absolute path of the application from those three elements:
JBoss AS group + {$PROFILE_DIR} + deploy/myApp//opt/jbossas/default/server/, then the destination is:
/opt/jbossas/default/server/deploy/myApp/
C:\jbossas\server\, then the path is derived slightly differently, appropriate for the platform:
C:\jbossas\default\server\deploy\myApp
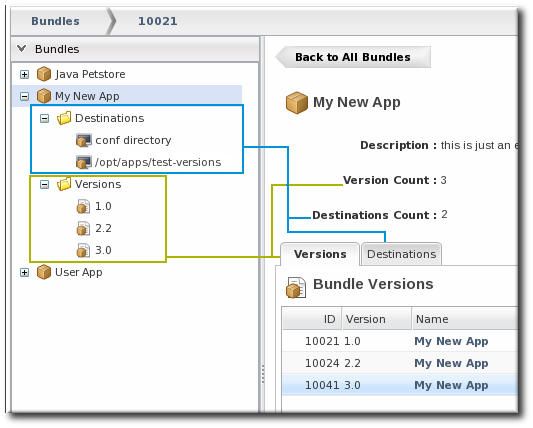
Figure 2. Bundles, Versions, and Destinations
2.1.3. File Handling During Provisioning
app.conf
lib/myapp.jar
deploy/, then the final directory configuration is going to be:
deploy/app.conf
deploy/lib/myapp.jar
deploy/, then they will be removed before the bundle is copied over, so that the deployment directory looks exactly the way the bundle is configured.
deploy/myApp/, then that behavior is totally acceptable because the defined application content should be the only content in that directory. However, bundles can contain a variety of different files and directories and can be deployed almost anywhere on a platform or within a JBoss server. In a lot of deployment scenarios, the deployment directory will have existing data that should be preserved.
Note
<rhq:ignore> element, which tells the provisioning process to ignore those files within the deployment directory.
Important
manageRootDir=true). If the deployment directory is used by other applications – like an app server deploy/ directory — then those other applications or files will also be deleted. After purging, there is no live deployment and nothing to revert.
2.1.4. Requirements and Resource Types
- Platforms, all types
- JBoss AS 4
- JBoss AS 5 and any server which uses the JBoss AS 5 plug-in
2.1.5. Additional Ant References
- Apache Ant documentation main page
- Apache Ant documentation for the build file
2.2. Extended Example: Provisioning Applications to a JBoss EAP Server (Planning)
Tim the IT Guy at Example Co. has to manage the full application lifecycle for Example Music's online band management application, MusicApp. There are two environments: one for QA and one for the live site. Both environments contain a mix of Windows and Linux servers.
The best plan for Tim is to work backwards, starting with the way he wants his ideal QA and production environments to be configured.
- The QA environment needs ...
- New builds directly from the GIT repository, every week.
- A completely clean directory to begin from with every deployment.
- There is a separate QA environment for each of Example Co.'s web applications, so MusicApp is the only application running on those specific servers.
- The production environment needs ...
- A stable build that can be safely stored in JBoss ON.
- To save historic data. The production environment has both log directories and user-supplied data directories that need to be preserved between application upgrades.
- A couple of different web applications run on the same production servers.
- MusicApp should be deployed to the
deploy/directory, but because it is not the only application that they run, it will have its own webapp context subdirectory. While this is not strictly necessary in the devel environment (where MusicApp is the only application), this maintains consistency with the final deployment destination. - Both recipes will configure the application JAR file,
MusicApp.jar, to be exploded when it is deployed. - The client archive file,
MyMusic.jar, will not be exploded (<rhq:file ... exploded="false">). - Tokens are defined in the raw configuration files and the recipe for the port numbers, IP addresses, and application names.
- The QA environment always requires a pristine deployment. This requires three settings:
- The
manageRootDirvalue is always true, so no existing files are preserved during the initial deployment. - No
<rhq:ignore>elements are set, so no generated files are preserved during an upgrade. - The
cleanDeploymentoption is always set in the JBoss ON CLI script that automates deployments. This removes all bundle-associated files in the directory before deploying the new bundle.
- The production environment needs to preserve its existing data between upgrades, which requires two settings:
- The
manageRootDirvalue is always false, which preserves existing files during the initial deployment. - Two
<rhq:ignore>elements are set, one for the log directory and one for the data directory containing the site member uploads.
deploy.xml with the other application files in a ZIP file and uploads the entire bundle directly to JBoss ON, so it is stored in the JBoss ON database.
deploy.xml separately, but he points the provisioning wizard to the GIT URL for all of the associated packages. When the bundle is deployed, JBoss ON takes the packages from the repository.
Tim deployed version 1 of the bundle to the production environment, and he deployed version 2 to the QA environment.
2.3. Creating Ant Bundles
- An Ant recipe file named
deploy.xml - Any associated application files. These application files can be anything; commonly, they fall into two categories:
- Archive files (JAR or ZIP files)
- Raw text configuration files, which can include tokens where users define the values when the bundle is deployed
2.3.1. Using Templatized Configuration Files
Note
<rhq:input-property> key in the Ant recipe. For examples, see Section 2.3.2.4.2, “rhq:input-property” and Example 1, “Simple Ant Recipe”.
input_field=@@property@@
port=@@listener.port@@
<rhq:input-property> key in the Ant XML file.
<rhq:input-property
    name="listener.port"
    ... />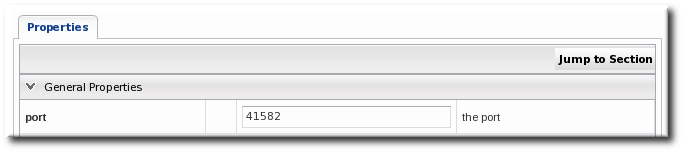
Figure 3. Port Token During Provisioning
Table 1. Variables Defined by JBoss ON
| Token | Description |
|---|---|
| rhq.deploy.dir | The directory location where the bundle will be installed. |
| rhq.deploy.id | A unique ID assigned to the specific bundle deployment. |
| rhq.deploy.name | The name of the bundle deployment. |
@@rhq.system.hostname@@
Table 2. System-Defined Tokens
| Token Name | Taken From... | Java API |
|---|---|---|
| rhq.system.hostname | Java API | SystemInfo.getHostname() |
| rhq.system.os.name | Java API | SystemInfo.getOperatingSystemName() |
| rhq.system.os.version | Java API | SystemInfo.getOperatingSystemVersion() |
| rhq.system.os.type | Java API | SystemInfo.getOperatingSystemType().toString() |
| rhq.system.architecture | Java API | SystemInfo.getSystemArchitecture() |
| rhq.system.cpu.count | Java API | SystemInfo.getNumberOfCpus() |
| rhq.system.interfaces.java.address | Java API | InetAddress.getByName(SystemInfo.getHostname()).getHostAddress() |
| rhq.system.interfaces.network_adapter_name.mac | Java API | NetworkAdapterInfo.getMacAddress() |
| rhq.system.interfaces.network_adapter_name.type | Java API | NetworkAdapterInfo.getType() |
| rhq.system.interfaces.network_adapter_name.flags | Java API | NetworkAdapterInfo.getAllFlags() |
| rhq.system.interfaces.network_adapter_name.address | Java API | NetworkAdapterInfo.getUnicastAddresses().get(0).getHostAddress() |
| rhq.system.interfaces.network_adapter_name.multicast.address | Java API | NetworkAdapterInfo.getMulticastAddresses().get(0).getHostAddress() |
| rhq.system.sysprop.java.io.tmpdir | Java system property | |
| rhq.system.sysprop.file.separator | Java system property | |
| rhq.system.sysprop.line.separator | Java system property | |
| rhq.system.sysprop.path.separator | Java system property | |
| rhq.system.sysprop.java.home | Java system property | |
| rhq.system.sysprop.java.version | Java system property | |
| rhq.system.sysprop.user.timezone | Java system property | |
| rhq.system.sysprop.user.region | Java system property | |
| rhq.system.sysprop.user.country | Java system property | |
| rhq.system.sysprop.user.language | Java system property |
2.3.2. Creating Ant Recipes
Note
2.3.2.1. Breakdown of an Ant Recipe
deploy.xml.
Example 1. Simple Ant Recipe
<project> root element and defined targets and tasks. The elements defined in the <rhq:bundle> area pass metadata to the JBoss ON provisioning system when the project is built.
deploy.xml file simply identifies the file as an an script and references the provisioning Ant elements.
<?xml version="1.0"?>
<project name="test-bundle" default="main"
	xmlns:rhq="antlib:org.rhq.bundle">
<rhq:bundle> element contains information about the specific version of the bundle (including, naturally enough, an optional version number).
<rhq:bundle name="Example App" version="2.4" description="an example bundle">
<rhq:bundle> element that defines the name of the application. However, the bundle element contains all of the information about the application and, importantly, how the provisioning system should handle content contained in the application.
port token defined in Section 2.3.1, “Using Templatized Configuration Files”, the <rhq:input-property> element identifies it in the recipe. The name argument is the input_field value in the token, the description argument gives the field description used in the UI and the other arguments set whether the value is required, what its allowed syntax is, and any default values to supply. (This doesn't list the files which use tokens, only the tokens themselves.)
	<rhq:input-property
            name="listener.port"
            description="This is where the product will listen for incoming messages"
            required="true"
            defaultValue="8080"
type="integer"/><rhq:deployment-unit> element. The entire application — its name, included ZIP or JAR files, configuration files, Ant targets — are all defined in the <rhq:deployment-unit> parent element.
<rhq:deployment-unit> directly. In this, the name is appserver, and one preinstall target and one postinstall target are set.
<rhq:deployment-unit name="appserver" preinstallTarget="preinstall" postinstallTarget="postinstall" manageRootDir="false">
<rhq:deployment-unit> element: the manageRootDir argument. Provisioning doesn't simply copy over files; as described in Section 2.1.3, “File Handling During Provisioning”, it remakes the directory to match what is in the bundle. If there are any existing files in the deployment directory when the bundle is first deployed, they are deleted by default. Setting manageRootDir to false means that the provisioning process does not manage the deployment directory — meaning any existing files are left alone when the bundle is deployed.
<rhq:file> element. The name is the name of the configuration file within the bundle, while the destinationFile is the relative (to the deployment directory) path and filename of the file after it is deployed.
<rhq:file name="test-v2.properties" destinationFile="conf/test.properties" replace="true"/>
<rhq:archive> element within the deployment-unit. The <rhq:archive> element does three things:
- Identify the archive file by name.
- Define how to handle the archive. Simply put, it sets whether to copy the archive over to the destination and then leave it as-is, still as an archive, or whether to extract the archive once it is deployed. This is called exploding the archive. If an archive is exploded, then a postinstall task can be called to move or edit files, as necessary.
- Identify any files within the archive which contain tokens that need to be realized. This is a child element,
<rhq:fileset>. This can use wildcards to include types of files or files within subdirectories or it can explicitly state which files to process.
            <rhq:archive name="MyApp.zip" exploded="true">
                <rhq:replace>
                    <rhq:fileset>
                        <include name="**/*.properties"/>
                    </rhq:fileset>
                </rhq:replace>
</rhq:archive><rhq:ignore> element. In this case, any *.log files within the logs/ directory are saved.
            <rhq:ignore>
                <rhq:fileset>
                    <include name="logs/*.log"/>
                </rhq:fileset>
            </rhq:ignore>
        </rhq:deployment-unit>
</rhq:bundle><rhq:deployment-unit> arguments. Most common Ant tasks are supported (as described in Section 2.3.2.3, “Using Ant Tasks”). This uses a preinstall task to print which directory the bundle is being deployed to and whether the operation was successful. The postinstall task prints a message when the deployment is complete.
<target name="main" />

    <target name="preinstall">
        <echo>Deploying Test Bundle v2.4 to ${rhq.deploy.dir}...</echo>
	<property name="preinstallTargetExecuted" value="true"/>
	<rhq:audit status="SUCCESS" action="Preinstall Notice" info="Preinstalling to ${rhq.deploy.dir}" message="Another optional message">
		Some additional, optional details regarding
		the deployment of ${rhq.deploy.dir}
	</rhq:audit>
    </target>

    <target name="postinstall">
        <echo>Done deploying Test Bundle v2.4 to ${rhq.deploy.dir}.</echo>
        <property name="postinstallTargetExecuted" value="true"/>
    </target>
</project>2.3.2.2. Saving Files During Provisioning
- The file in the current directory is also in the bundle. In this case, the bundle file always overwrites the current file. (There is one exception to this. If the file in the bundle has not been updated and is the same version as the local file, but the local file has modifications. In that case, the local file is preserved.)
- The file in the current directory does not exist in the bundle. In that case, the bundle deletes the file in the current directory.
manageRootDir, <rhq:ignore>, and cleanDeployment.
All of the information about the application being deployed is defined in the <rhq:deployment-unit> element in a bundle recipe. The manageRootDir attribute on the <rhq:deployment-unit> element sets how the provisioning process should handle existing files in the deployment directory.
manageRootDir attribute applies to both the initial deployment and upgrade operations, so this can be used to preserve files that may exist in a directory before a bundle is ever deployed.
Note
There can be files that are used or created by an application, apart from the bundle, which need to be preserved after a bundle deployment. This can include things like log files, instance-specific configuration files, or user-supplied content like images. These files can be ignored during the provisioning process, which preserves the files instead of removing them.
<rhq:ignore> element and list the directories or files to preserve.
<rhq:ignore>
    <rhq:fileset>
        <include name="logs/*.log"/>
    </rhq:fileset>
</rhq:ignore><rhq:ignore> element only applies when bundles are updated; it does not apply when a bundle is initially provisioned.
<rhq:ignore> element only applies to file that exist outside the bundle. Any files that are in the bundle will overwrite any corresponding files in the deployment directory, even if they are specified in the <rhq:ignore> element.
Both manageRootDir and <rhq:ignore> are set in the recipe. At the time that the bundle is actually provisioned, there is an option to run a clean deployment. The clean deployment option deletes everything in the deployment directory and provisions the bundle in a clean directory, regardless of the manageRootDir and <rhq:ignore> settings in the recipe.
2.3.2.3. Using Ant Tasks
deploy.xml file with some JBoss ON-specific elements. An Ant bundle distribution file supports more complex Ant configuration, including Ant tasks and targets.
2.3.2.3.1. Supported Ant Tasks
<antcall> and <macrodef>). This includes common commands like echo, mkdir, and touch — whatever is required to deploy the content fully.
Important
<antcall> element cannot be used with the Ant recipe. <antcall> calls a target within the deploy.xml file, which loops back to the file, which calls the <antcall> task again, which calls the deploy.xml file again. This creates an infinite loop.
<antcall>, use the <ant> task to reference a separate XML file which contains the custom Ant targets. This is described in Section 2.3.2.3.3, “Calling Ant Targets”.
Important
macrodef call, and therefore macro definitions, are not supported with Ant bundles.
2.3.2.3.2. Using Default, Pre-Install, and Post-Install Targets
<project> allows a default target, which is required by the provisioning system. This is a no-op because the Ant recipe mainly defines the metadata for and identifies files used by the provisioning process. Other operations aren't necessary. This target is required by Ant, even though it is a no-op target. Use pre- and post-install targets to perform tasks with the bundle before and after it is unpacked.
<target name="main" />
2.3.2.3.3. Calling Ant Targets
<antcall> does not work in an Ant bundle recipe; it self-referentially calls the <rhq:bundle> task in an infinite loop. However, it is possible to process tasks that are outside the default target. This can be done using pre- and post install targets (Section 2.3.2.3.2, “Using Default, Pre-Install, and Post-Install Targets”).
- In
deploy.xmlfor the Ant recipe, add a<rhq:deployment-unit>element which identifies the Ant target.<rhq:deployment-unit name="jar" postinstallTarget="myExampleCall">
- Then, define the target.
<target name="myExampleCall"> <ant antfile="another.xml" target="doSomething"> <property name="param1" value="111"></property> </ant> </target> - Create a separate
another.xmlfile in the same directory as thedeploy.xmlfile. This file contains the Ant task.<?xml version="1.0"?> <project name="another" default="main"> <target name="doSomething"> <echo>inside doSomething. param1=${param1}</echo> </target> </project>
2.3.2.4. A Reference of JBoss ON Ant Recipe Elements
2.3.2.4.1. rhq:bundle
| Attribute | Description | Optional or Required |
|---|---|---|
| name | The name given to the bundle. | Required |
| version | The version string for this specific bundle. Bundles can have the same name, but each bundle of that name must have a unique version string. These version strings normally conform to an OSGi style of versioning, such as 1.0 or 1.2.FINAL. | Required |
| description | A readable description of this specific bundle version. | Optional |
<rhq:bundle name="example" version="1.0" description="an example bundle">
2.3.2.4.2. rhq:input-property
Note
<rhq:input-property> definition.
| Attribute | Description | Optional or Required |
|---|---|---|
| name | The name of the user-defined property. Within the recipe, this property can be referred to by this name, in the format ${property_name}. | Required |
| description | A readable description of the property. This is the text string displayed in the JBoss ON bundle UI when the bundle is deployed. | Required |
| type | Sets the syntax accepted for the user-defined value. There are several different options:
| Required |
| required | Sets whether the property is required or optional for configuration. The default value is false, which means the property is optional. If this argument isn't given, then it is assumed that the property is optional. | Optional |
| defaultValue | Gives a value for the property to use if the user does not define a value when the bundle is deployed. | Optional |
<rhq:input-property
    name="listener.port"
    description="This is where the product will listen for incoming messages"
    required="true"
    defaultValue="8080"
    type="integer"/>
2.3.2.4.3. rhq:deployment-unit
<rhq:deployment-unit> element in a bundle recipe.
| Attribute | Description | Optional or Required |
|---|---|---|
| name | The name of the application. | Required |
| manageRootDir | Sets whether JBoss ON should manage all files in the top root directory (deployment directory) where the bundle is deployed. If false, any unrelated files found in the top deployment directory are ignored and will not be overwritten or removed when future bundle updates are deployed. The default is true. | Optional |
| preinstallTarget | An Ant target that is invoked before the deployment unit is installed. | Optional |
| postinstallTarget | An Ant target that is invoked after the deployment unit is installed. | Optional |
<rhq:deployment-unit name="appserver" preinstallTarget="preinstall" postinstallTarget="postinstall">
2.3.2.4.4. rhq:archive
| Attribute | Description | Optional or Required |
|---|---|---|
| name | The filename of the archive file to include in the bundle.
Important
If the archive file is packaged with the Ant recipe file inside the bundle distribution ZIP file, then the name must contain the relative path to the location of the archive file in the ZIP file.
| Required |
| exploded | Sets whether the archive's contents will be extracted and stored into the bundle destination directory (true) or whether to store the files in the same relative directory as is given in the name attribute (false). If the files are exploded, they are extracted starting in the deployment directory. Post-install targets can be used to move files after they have been extracted. | Optional |
<rhq:archive name="file.zip">
    <rhq:replace>
         <rhq:fileset>
               <include name="**/*.properties"/>
         </rhq:fileset>
    </rhq:replace>
</rhq:archive>
2.3.2.4.5. rhq:url-archive
rhq:archive except that the server accesses the archive over the network rather than including the archive directly in the bundle distribution file.
| Attribute | Description | Optional or Required |
|---|---|---|
| url | Gives the URL to the location of the archive file. The archive is downloaded and installed in the deployment directory.
Note
For the bundle to be successfully deployed, the URL must be accessible to all agent machines where this bundle is to be deployed. If an agent cannot access the URL, it cannot pull down the archive and thus cannot deploy it on the machine.
| Required |
| exploded | If true, the archive's contents will be extracted and stored into the bundle destination directory; if false, the zip file will be compressed and stored in the top level destination directory.
Note
If the files are exploded, they are extracted starting in the deployment directory. Post-install targets can be used to move files after they have been extracted.
| Optional |
<rhq:url-archive url="http://server.example.com/apps/files/archive.zip">
    <rhq:replace>
         <rhq:fileset>
               <include name="**/*.properties"/>
         </rhq:fileset>
    </rhq:replace>
</rhq:url-archive>
2.3.2.4.6. rhq:file
<rhq:file> element calls out files that require processing before they should be copied to the destination. The attributes on the <rhq:file> element set the name of the raw file in the bundle distribution ZIP file and the name of the target file that it should be copied to.
| Attribute | Description | Optional or Required |
|---|---|---|
| name | The name of the raw configuration file.
Important
If the configuration file is packaged with the Ant recipe file inside the bundle distribution ZIP file, then the name must contain the relative path to the location of the file within the ZIP file.
| Required |
| destinationFile | The full path and filename for the file on the destination resource. Relative paths must be relative to the final deployment directory (defined in the rhq.deploy.dir parameter when the bundle is deployed). It is also possible to use absolute paths, as long as both the directory and the filename are specified.
Note
If the destinationDir attribute is used, the destinationFile attribute cannot be used.
| Required, unless destinationDir is used |
| destinationDir | The directory where this file is to be copied. If this is a relative path, it is relative to the deployment directory given by the user when the bundle is deployed. If this is an absolute path, that is the location on the filesystem where the file will be copied.
This attribute sets the directory for the file to be copied to. The actual file name is set in the
name attribute.
If the
destinationFile attribute is used, the destinationDir attribute cannot be used.
| Required, unless destinationFile is used |
| replace | Indicates whether the file is templatized and requires additional processing to realize the token values. | Required |
<rhq:file name="test-v2.properties" destinationFile="subdir/test.properties" replace="true"/>
destinationDir nor the destinationFile attribute is used, then the raw file is placed in the same location under the deployment directory as its location in the bundle distribution.
2.3.2.4.7. rhq:url-file
rhq:file, contains the information to identify and process configuration files for the application which have token values that must be realized. This option specifies a remote file which is downloaded from the given URL, rather than being included in the bundle archive.
| Attribute | Description | Optional or Required |
|---|---|---|
| url | Gives the URL to the templatized file. The file is downloaded and installed in the deployment directory.
Note
For the bundle to be successfully deployed, the URL must be accessible to all agent machines where this bundle is to be deployed. If an agent cannot access the URL, it cannot pull down the archive and thus cannot deploy it on the machine.
| Required |
| destinationFile | The full path and filename for the file on the destination resource. Relative paths must be relative to the final deployment directory (defined in the rhq.deploy.dir parameter when the bundle is deployed). It is also possible to use absolute paths, as long as both the directory and the filename are specified.
Note
If the destinationDir attribute is used, the destinationFile attribute cannot be used.
| Required, unless destinationDir is used |
| destinationDir | The directory where this file is to be copied. If this is a relative path, it is relative to the deployment directory given by the user when the bundle is deployed. If this is an absolute path, that is the location on the filesystem where the file will be copied.
This attribute sets the directory for the file to be copied to. The actual file name is set in the
name attribute.
If the
destinationFile attribute is used, the destinationDir attribute cannot be used.
| Required, unless destinationFile is used |
| replace | Indicates whether the file is templatized and requires additional processing to realize the token values. | Required |
<rhq:url-file url="http://server.example.com/apps/files/test.conf" destinationFile="subdir/test.properties" replace="true"/>
destinationDir nor the destinationFile attribute is used, then the raw file is placed in the same location under the deployment directory as its location in the bundle distribution.
2.3.2.4.8. rhq:audit
rhq:audit configuration sends information to the server about the additional processing steps and their results.
| Attribute | Description | Optional or Required |
|---|---|---|
| status | The status of the processing. The possible values are SUCCESS, WARN, and FAILURE. The default is SUCCESS. | Optional |
| action | The name of the processing step. | Required |
| info | A short summary of what the action is doing, such as the name of the target of the action or an affected filename. | Optional |
| message | A brief text string which provides additional information about the action. | Optional |
<rhq:audit status="SUCCESS" action="Preinstall Notice" info="Preinstalling to ${rhq.deploy.dir}" message="Another optional message">
	Some additional, optional details regarding
	the deployment of ${rhq.deploy.dir}
</rhq:audit>
2.3.2.4.9. rhq:replace
<rhq:fileset> elements, contained in the archive which need to have token values realized when the archive is deployed.
<rhq:replace> element.
<rhq:archive name="file.zip">
    <rhq:replace>
        <rhq:fileset>
            <include name="**/*.properties"/>
        </rhq:fileset>
    </rhq:replace>
</rhq:archive>
2.3.2.4.10. rhq:ignore
<rhq:replace>, contains a list of files or directories in the instance to save.
Note
Important
/opt/myapp and Bundle B to /opt/myapp/webapp1).
<rhq:ignore>
    <rhq:fileset>
        <include name="logs/*.log"/>
    </rhq:fileset>
</rhq:ignore>
2.3.2.4.11. rhq:fileset
<rhq:replace> and <rhq:ignore> — define file lists in either the archive file or the deployment directory. This element contains the list of files.
| Child Element | Description |
|---|---|
| <include name=filename /> | The filename of the file. For <rhq:replace>, this is a file within the archive (JAR or ZIP) file which is templatized and must have its token values realized. For <rhq:ignore>, this is a file in the application's deployment directory which should be ignored and preserved when the bundle is upgraded. |
<rhq:replace>
     <rhq:fileset>
         <include name="**/*.properties"/>
     </rhq:fileset>
</rhq:replace>
2.3.2.4.12. rhq:system-service
| Attribute | Description | Optional or Required |
|---|---|---|
| name | The name of the script. | Required |
| scriptFile | The filename of the script. If the script file is packaged with the Ant recipe file inside the bundle distribution ZIP file, then the scriptFile must contain the relative path to the location of the file in the ZIP file. | Required |
| configFile | The name of any configuration or properties file used by the script. If the configuration file is packaged with the Ant recipe file inside the bundle distribution ZIP file, then the configFile must contain the relative path to the location of the file in the ZIP file. | Optional |
| overwriteScript | Sets whether to overwrite any existing init file to configure the application as a system service. | Optional |
| startLevels | Sets the run level for the application service. | Optional |
| startPriority | Sets the start order or priority for the application service. | Optional |
| stopPriority | Sets the stop order or priority for the application service. | Optional |
<rhq:system-service name="example-bundle-init" scriptFile="example-init-script"
      configFile="example-init-config" overwriteScript="true"
      startLevels="3,4,5" startPriority="80" stopPriority="20"/>
2.3.3. Creating an Associated Archive File
.conf, and text files. These can be templatized to supply user- and system-specific information (as described in Section 2.3.1, “Using Templatized Configuration Files”).
2.3.4. Testing Bundle Packages
2.3.4.1. Installing the Bundle Deployer Tool
- Click the Administration tab in the top menu.

- Select the Downloads in the left menu table.
- Scroll to the Bundle Deployer Download section, and click the package download link.
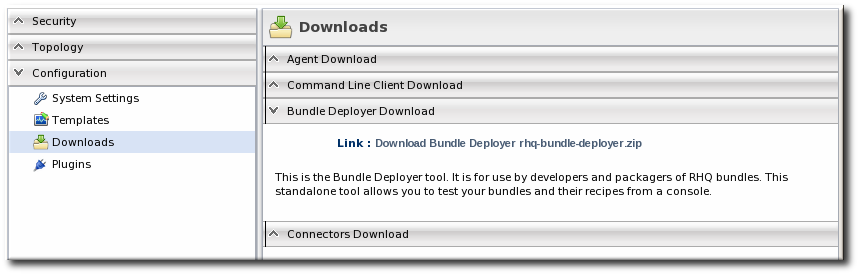
- Save the
.zipfile into the directory where the bundle tool should be installed, such as/opt/. - Unzip the packages.
cd /opt/

unzip rhq-bundle-deployer-version.zip
2.3.4.2. Using the Bundle Deployer Tool
Important
- Unzip the bundle distribution package to check (or copy an unzipped directory that contains the application files). For example:
mkdir /tmp/test-bundle
cd /tmp/test-bundle
unzip MyBundle.zip
- Open the top directory of the bundle distribution, where the
deploy.xmlAnt recipe file is. - Set the bundle deployer tool location in the PATH.
PATH="/opt/rhq-bundle-deployer-3.0.0/bin:$PATH"
- Run the bundle deploy tool, and use the format
-Dinput_properties to pass the values to user-defined tokens in the templatized files. For example:rhq-ant -Drhq.deploy.dir=/opt/exampleApp -Dlistener.port=7081
This installs the application in/opt/exampleAppand sets a port value of 7081.Note
Optionally, use therhq.deploy.idattribute to set an identifier for the deployment. The default is 0, which means a new deployment. When bundles are deployed in the UI, the server assigns a unique ID to the deployment. Using therhq.deploy.idattribute on a new deployment simulates the server's ID assignment.Using therhq.deploy.idattribute if there is already a previous deployment allows you to test the upgrade performance of the bundle. Performing an upgrade requires a new, unique ID number.
2.4. Provisioning Bundles
2.4.1. Uploading Bundles to JBoss ON
Note
- In the top menu, click the Bundles tab.

- Scroll to the bottom of the window and click the button.
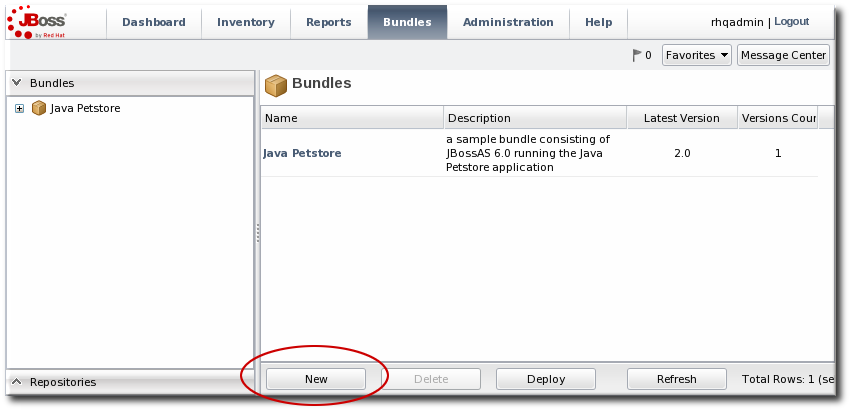
- Upload the distribution package or the recipe file.
 There are three options on how the bundle distribution is made available to the JBoss ON server:
- URL points to any URL, such as an FTP site or SVN or GIT repo, where there is a complete bundle distribution file available.
Note
Using an SVN or GIT repo allows you to pull the packages directly from a build system. - Upload uploads a single bundle distribution file (which includes both the recipe an all associated files) from the local system to the JBoss ON server.
- Recipe uploads a recipe file only, and then any additional files required for the bundle are uploaded separately. This option includes an edit field where the uploaded recipe can be edited before it is sent to the server.
Note
When uploading a recipe file separately than the bundle archive files, every closing tag be explicitly stated (meaning every entry must have the format<tag></tag>, not the abbreviated format<tag />). Otherwise, the recipe may be incorrectly interpreted in the text box and fail to upload to the server.The XML must be well-formed, or the recipe fails validation and the upload fails.Additionally, the Recipe option's upload button does not work on Internet Explorer. To add a recipe file using this option with Internet Explorer, copy the entire recipe file and paste it directly into the text box.
- In the next screen, upload any associated files that were not uploaded previously. For the URL and Upload, all of the files are usually uploaded in a single file, so there is nothing to do on this screen. For the Recipe option, all of the files listed in the recipe must be uploaded manually at this step.

- The final screen shows all of the information for the new bundle. Click to save the new bundle.

2.4.2. Deploying Bundles to a Resource
- In the top menu, click the Bundles tab.
- Scroll to the bottom of the window and click the button.Alternatively, click the name of the bundle in the list, and then click the deploy button at the top of the bundle page.
- Select the bundles to deploy from the list on the left and use the arrows to move them to the box on the right.

- Once the bundles are selected, define the destination information.The destination is a combination of the resources the bundle is deployed on and the directory to which is it deployed. Each destination is uniquely defined for each bundle.To define the destination, first select the resource group from the Resource drop-down menu. The resource group identifies the type of resource to which the bundle is being deployed, and the resource type defines other deployment parameters. When the group is selected, then the base location is defined. For a platform, this is the root directory. For a JBoss AS instance, it is the installation directory. For custom resources, the base location is defined in the plug-in descriptor.
Note
If you haven't created a compatible group or if you want to create a new group specifically for this bundle deployment, click the+icon to create the group. Then, continue with the provisioning process.Set the actual deployment directory to which to deploy the bundle. This directory is a relative path to the plug-in-defined base location.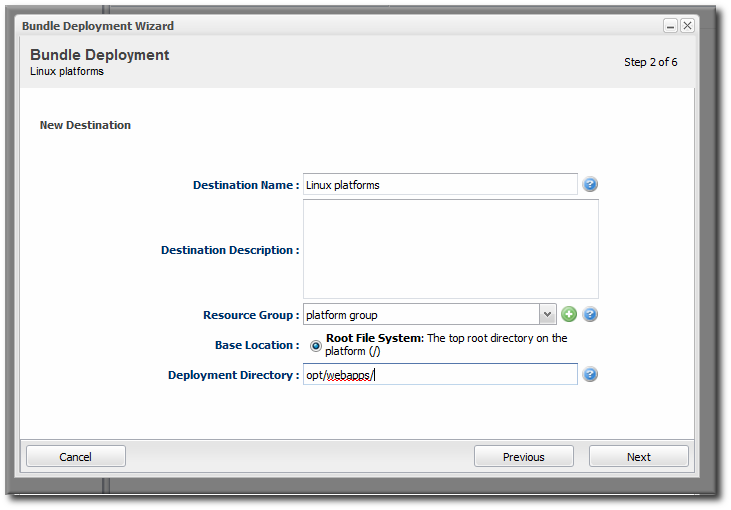
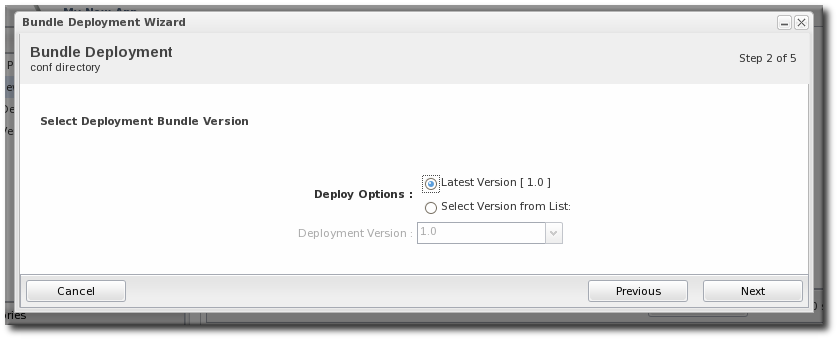
- Select the version of the bundle to deploy. If there are multiple versions of a bundle available, then any of those versions can be selected. There are also quick options to deploy the latest version or the currently deployed version.
- If there are any user-defined properties, then they are entered in the fields in the next page. User-defined properties are configured in the bundle recipe using tokens.

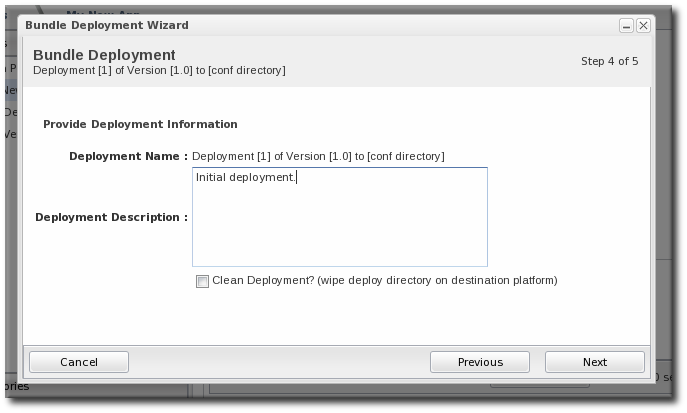
- Fill in the information about the specific deployment instance. The checkbox sets the option on whether to overwrite anything in the existing deployment directory or whether to preserve any existing files.
- The final screen shows the progress for deploying the packages. Click Finish to complete the deployment.
2.4.3. Viewing the Bundle Deployment History
Figure 4. Bundles, Versions, and Destinations

Figure 5. Deployment Information for a Version
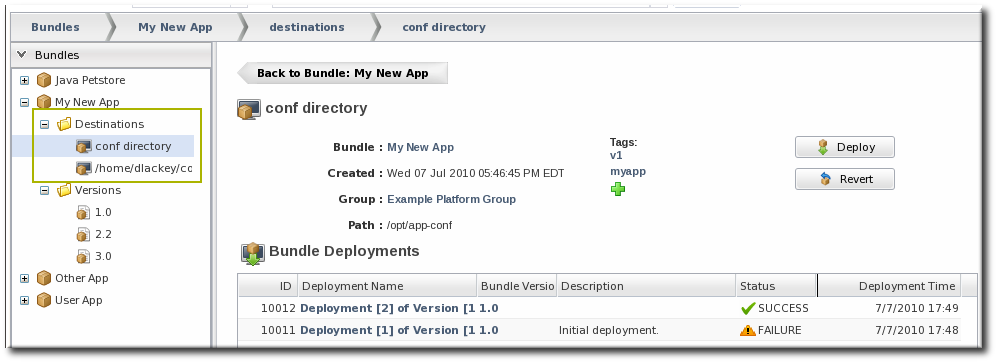
Figure 6. Deployment History for a Destinations
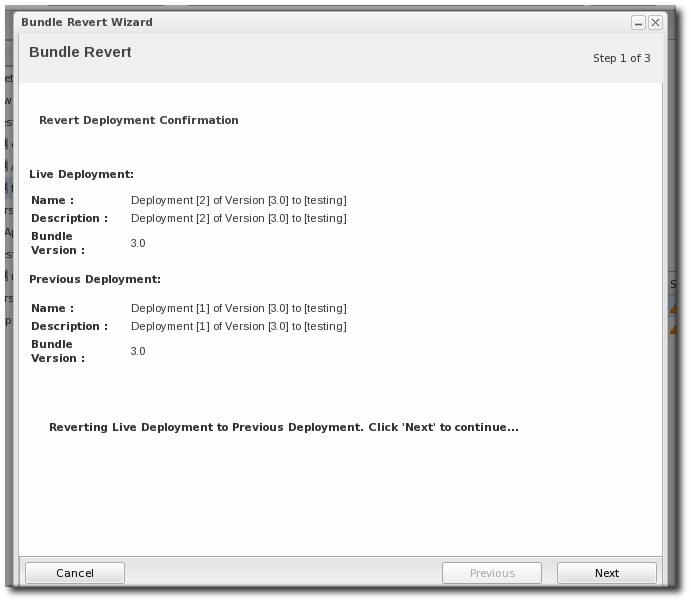
2.4.4. Reverting a Deployed Bundle
- In the top menu, click the Bundles tab.
- In the left navigation window, expand the bundle node, and then open the Destinations folder beneath it.
- Select the destination from the left navigation.
- In the main window for the destination, click the button.

- The next page shows the summary of the current deployment and the immediate previous deployment, which it will be reverted to.
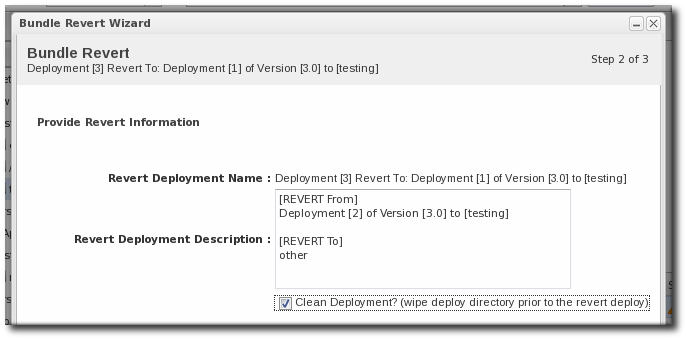
- Add any notes to the revert action. Optionally, select the checkbox to clean the deployment directory and install the previous version fresh.
- Click Finish on the final screen to complete the rollback.
2.4.5. Deploying a Bundle to a Clean Destination
- Preserve the existing files and directories, with appropriate upgrades, according to the recipe configuration (Section 2.3.2.2, “Saving Files During Provisioning”)
- Completely overwrite the existing files and deploy the bundle in an empty directory

2.4.6. Purging a Bundle from a Resource
Important
manageRootDir=true). If the deployment directory is used by other applications – like an app server deploy/ directory — then those other applications or files will also be deleted. After purging, there is no live deployment and nothing to revert.
- In the top menu, click the Bundles tab.
- In the left navigation window, expand the bundle node, and then open the Destinations folder beneath it.
- Select the destination from the left navigation.
- In the main window for the destination, click the button.
- When prompted, confirm that you want to remove the bundled application and configuration from the target resources.
2.4.7. Upgrading Ant Bundles
- If the hash code on the new file is different than the original file and there are no local modifications, then JBoss ON installs the new file over the existing file.
- If the hash code on the new file is different than the original file and there are local modifications, then JBoss ON backs up the original file and installs the new file.
- If the hash code on the new file and the original file is the same and there are local modifications on the original file, then the provisioning process preserves the original file, in place.
- If there was no file in the previous bundle but there is one in the new bundle, then the new file is used and any file that was added manually is backed up.
backup/ directory within the deployment's destination directory. If the original file was located outside the application's directory (like, it was stored according to an absolute location rather than a relative location), then it is saved in an ext-backup/ directory within the deployment's destination directory.
Note
2.4.8. Deleting a Bundle from the JBoss ON Server
- In the top menu, click the Bundles tab.
- In the left navigation window, expand the bundle node, and then open the Destinations folder beneath it.
- Select the destination from the left navigation.
- In the main window for the destination, click the button.
- When prompted, confirm that you want to delete the bundle.
2.5. Bundles and JBoss ON Servers and Agents
2.5.1. Resource Support and the Agent Resource Plug-in
<bundle-target> element simply defines allowed base directories for the resource which can be used as base directories in the bundle definition.
<server name="JBossAS:JBossAS Server" ...>
   <bundle-target>
      <destination-base-dir name="Library Directory" description="Where the jar libraries are">
         <value-context>pluginConfiguration</value-context>
         <value-name>lib.dir</value-name>
      </destination-base-dir>
      <destination-base-dir name="Deploy Directory" description="Where the deployments are">
         <value-context>pluginConfiguration</value-context>
         <value-name>deploy.dir</value-name>
      </destination-base-dir>
   </bundle-target>
</server><bundle-target> can use the already-configured base directory or it can set different directories to use. In the example, two directories — the deploy/ and lib/ directories — are given as supported base directories. When a bundle definition is created, the wizard offers the choice of which directory to use.
2.5.2. Server-Side and Agent Plug-ins for Recipe Types
Note
2.6. Managing and Deploying Bundles with the JBoss ON CLI
- A new JBoss application server can be deployed when an existing JBoss server experiences a heavy load or decreased performance.
- Configuration files for a selected snapshot image can be immediately deployed to a platform or JBoss server to remedy configuration drift, in response to a drift alert.
- A new web context can be deployed when another web is disabled within a
mod_clusterdomain.
3. Managing Resource-Level Content Updates
3.1. About Content
3.1.1. What Content Is: Packages
3.1.2. Where Content Comes From: Providers and Repositories
3.1.3. Package Versions and History
META-INF/MANIFEST.MF file (for EARs and WARs).
SPEC(IMPLMENTATION)[sha256=abcd1234]
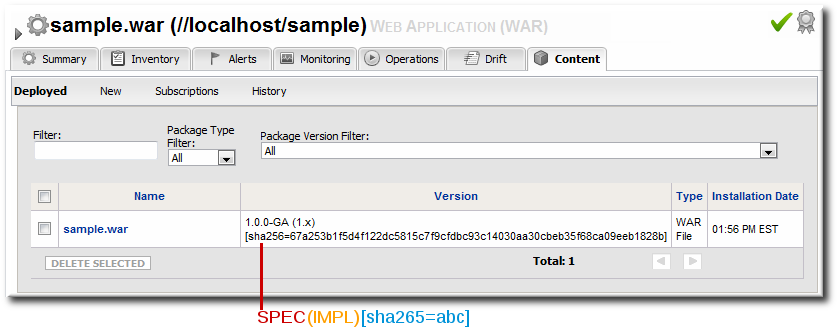
Figure 7. Package Version Numbers
META-INF/MANIFEST.MF file with these version numbers:
Manifest-Version: 1.0
Created-By: Apache Maven
Specification-Title: My Example App
Specification-Version: 1.0.0-GA
Specification-Vendor: Example, Corp.
Implementation-Title: My Example App
Implementation-Version: 1.x
Implementation-Vendor-Id: org.example
Implementation-Vendor: Example, Corp.
...
1.0.0-GA(1.x)[sha256=abcd1234]
META-INF/MANIFEST.MF file does not contain one of the specification version or the implementation version, then only one is used. For example, if only the implementation version is given:
(1.x)[sha256=abcd1234]
[sha256=abcd1234]
MANIFEST.MF file. This allows the agent to check the file during discovery scans to verify the version of the package quickly.
Manifest-Version: 1.0
Created-By: Apache Maven
RHQ-Sha256: 570f196c4a1025a717269d16d11d6f37
...Note
META-INF/MANIFEST.MF file, the deployed content is not exactly identical to the content packages that were uploaded.
Note
Note
3.1.4. Authorization to Repositories and Packages
- Owner sets write access to a repository. It assigns the repository to belong to a specific user. If no user is specified, then only users with the manage repositories permission have the right to access those repositories.
- Private sets read (download) access to the repository. It sets whether the repository can be viewed by anyone or only by the owner and users with the manage repositories permission. Public repositories are viewable by everyone, regardless of the owner.
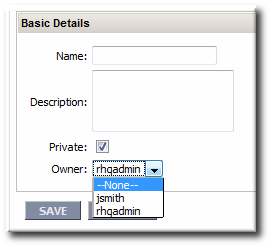
Figure 8. Repository Ownership and Access Settings
Note
3.2. Creating a Content Source
- In the top menu, click the Administration tab.
- In the Content menu table on the left, select the item.
- Below the list of current content sources, click the button.

- Select the content source type, which defines how the content is delivered from the source. A content source type can be a remote URL, an HTTP server, a yum repository, or local disk.
- When the content source type is selected, a form automatically opens to fill in the basic details and configuration for the resource. These basic details identify the content source in the JBoss ON server and are the same for each content source type, while the configuration is specific to the content source type.

- Give a unique name and optional description for the content source provider.
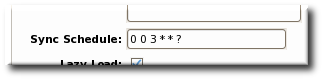
- The schedule sets how frequently the content in the JBoss ON database is updated by the content source; this uses a standard Quartz Cron Syntax.
- The lazy load setting sets whether to download packages only when they are installed (Yes) or if all packages should be download immediately.
- The download mode sets how the content is stored in JBoss ON. The default is DATABASE, which stores all packages in the JBoss ON database instance. The other options are to store the packages on a network filesystem or not to store them at all.
- Fill in the other configuration information for the content source. The required information varies depending on the content source type. This is going to require some kind of connection information, such as a URL or directory path, and possibly authentication information, like a username and password.
3.3. Managing Repositories
3.3.1. Creating a Repository
- In the top menu, click the Administration tab.
- In the Content menu table on the left, select the item.
- Below the list of current repositories, click the button.

- Fill in the name and a description. Additionally, set the authorization restrictions for the repository by setting an owner for the repo and whether it is public or private.Only users with the repositories permission can set an owner. All repositories created by users without the repositories permission automatically belong to that user.

- Click .
- On the Repositories page, click the name of the new repository in the list.
- Optional. To change the default synchronization schedule, click the button and enter a new schedule, in a cron format, in the Sync Schedule field.
- Add content sources to supply content to the repository, as in Section 3.3.2.1, “Associating Content Sources with a Repository”.More than one content source can supply content to a repository.
- Associate resources with the repository, as in Section 3.3.3, “Associating Resources with the Repository”. A resource can only receive packages from a repository if it is associated with the repository.
Note
You can search for specific resources or types of resources and subscribe multiple resources at once.
3.3.2. Linking Content Sources to Repositories
3.3.2.1. Associating Content Sources with a Repository
- In the top menu, click the Administration tab.
- In the Content menu table on the left, select the item.
- On the Repositories page, click the name of the repository in the list.
- In the Content Sources section of the repository's details page, click the button to add existing content sources to the repository.

- Select checkboxes next to the content sources to associate with the repository.

- Click the button.
3.3.2.2. Importing a Content Source into Repositories
- In the top menu, click the Administration tab.
- In the Content menu table on the left, select the item.
- On the Repositories page, click the button.
- Select the radio button by the name of the content source to import.
- When the content source is selected, then a list of available repositories for that content source automatically opens. In the Available repositories.... area, select the checkbox by the name of each repository to associate with the content source.

- Click the button.
Note
3.3.3. Associating Resources with the Repository
3.3.3.1. Adding Resources to a Repository
- In the top menu, click the Administration tab.
- In the Content menu table on the left, select the item.
- On the Repositories page, click the name of the repository to edit.
- In the Resources section, click the button to add resources to the repository.
- Select checkboxes next to the resources to associate with the repository. It is possible to filter the list of resources by name or by type.
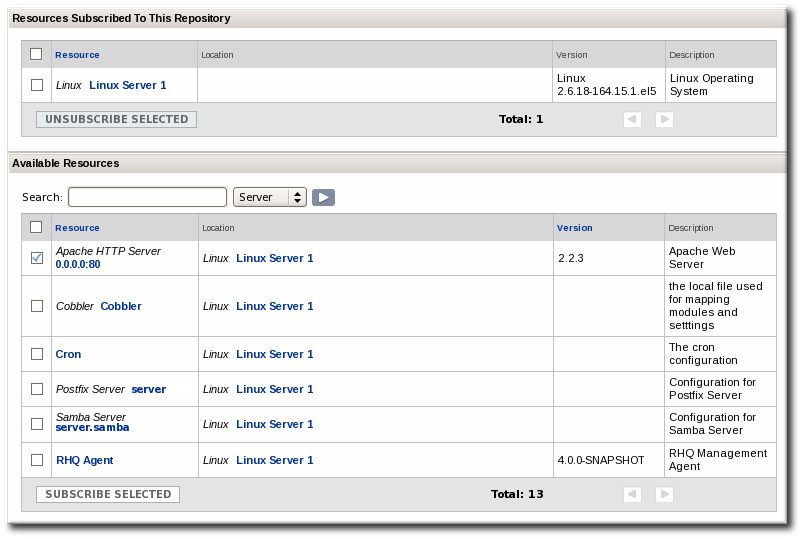
- Click the button.
3.3.3.2. Managing the Repositories for a Resource
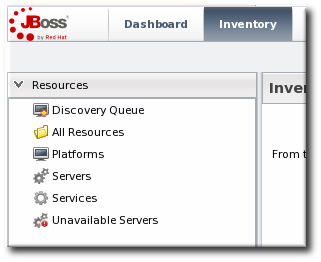
- Select the resource type in the Resources menu table on the left, and then browse or search for the resource.
- Click the Content tab of the resource.
- Open the Subscriptions subtab.
- The Available Repositories section has a list of repositories that the resource isn't subscribed to. Click the checkboxes by all of the repositories to subscribe the resource to.

- Click .
3.4. Uploading Packages
- In the top menu, click the Administration tab.
- In the Content menu table on the left, select the item.
- On the Repositories page, click the name of the repository in the list.
- Scroll to the bottom of the page, to the Upload Packages section.
- Click the button to upload the package.
- In the pop-up window, click the button to browse to the package, then click the button.

- Some information about the package is automatically filled in, including the name and a default UI version number. Set the package type, architecture, and any other necessary information.
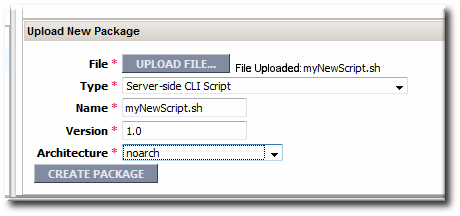 If a version number is set, then this value is displayed in the UI. If not, then a version number is calculated, based on the spec version and implementation version in
MANIFEST.MF(for EARs and WARs) or the calculated SHA-256 value for the package itself. Internally, the package is identified by the SHA value.SPEC(IMPLMENTATION)[sha256=abcd1234]
Note
For exploded content for EARs and WARs, the calculated SHA-256 version number is written into theMANIFEST.MFfile. - Click the button to finish adding the package to the repository.
3.5. Synchronizing Content Sources or Repositories
3.5.1. Scheduling Synchronization
*     *    *    *     *  [sync-command]
-     -     -     -     -
|     |     |     |     |
|     |     |     |     +----- Day of Week (0=Sunday ... 6=Saturday)
|     |     |     +------- Month (1 - 12)
|     |     +--------- Date (1 - 31)
|     +----------- Hour (0 - 23)
+------------- Minute (0 - 59)
0 3 * * 2,5
- In the top menu, click the Administration tab.
- In the Content menu table on the left, select either the or item.
- Click the name of the item to edit.
- Reset the cron schedule in the Sync Schedule field.
- Click .
3.5.2. Manually Synchronizing Content Sources or Resources
- In the top menu, click the Administration tab.
- In the Content menu table on the left, select the or item.
- Click the name of the item to edit.
- Click the button. All of the synchronization attempts, with the outcome of the operation, are listed at the bottom of the screen.

Note

3.6. Tracking Content Versions for a Resource
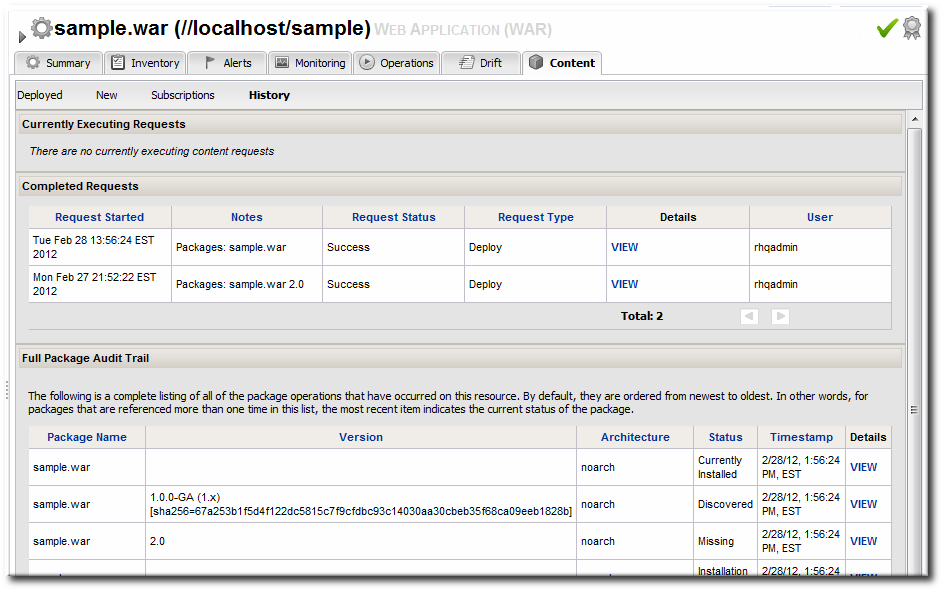
Figure 9. Package History for a Resource
4. Deploying Applications on Application Servers
4.1. Setting Permissions for Agent and Resource Users
MANIFEST.MF file, the agent creates one when it writes the SHA-256 value for the package. When the JBoss AS server tries to remove the WAR application later (and the JBoss AS user is different than the agent user), then the removal fails. The JBoss AS server cannot delete the MANIFEST.MF file. The agent then rediscovers the application directory and re-initiates the deployment operation for the removed WAR.
Note
MANIFEST.MF file — meaning, a situation where the agent creates a file within the deployment directory. Even if the agent and JBoss AS users are different, this situation does not occur if the application is not exploded or where the agent does not write any files.
- Add the agent user and the resource user to the same primary group.
- Set the
umaskvalue for the agent user to give read and write permissions, such as660. For example:vim /home/rhqagent/.bashrc umask 660
4.2. Deploying EAR and WAR Files
- Search for the JBoss server instance to which to deploy the EAR or WAR.
- On the details page for the selected JBoss server instance, open the Inventory tab.
- In the Create New menu at the bottom, select the item for or , as appropriate.

- Enter the version number.
 This is not used for the resource. The actual version number is calculated based on the spec version and implementation version in
MANIFEST.MF, if any are given, or the caluclated SHA-256 value for the package itself:SPEC(IMPLMENTATION)[sha256=abcd1234]
If no version numbers are defined inMANIFEST.MF, then the SHA value is used. The SHA value is always used to identify the package version internally.Note
When the EAR or WAR file is exploded after it is deployed, theMANIFEST.MFfile is updated to include the calculated SHA version number. For example:Manifest-Version: 1.0 Created-By: Apache Maven
RHQ-Sha256: 570f196c4a1025a717269d16d11d6f37...For more information on package versioning, see "Deploying Applications and Content". - Upload the EAR/WAR file.

- Enter the information for the application to be deployed.

- Whether the file should be exploded (unzipped) when it is deployed.
- The path to the directory to which to deploy the EAR or WAR package. The destination directory is relative to the JBoss server instance installation directory; this cannot contain an absolute path or go up a parent directory.
- Whether to back up any existing file with the same name in the target directory.
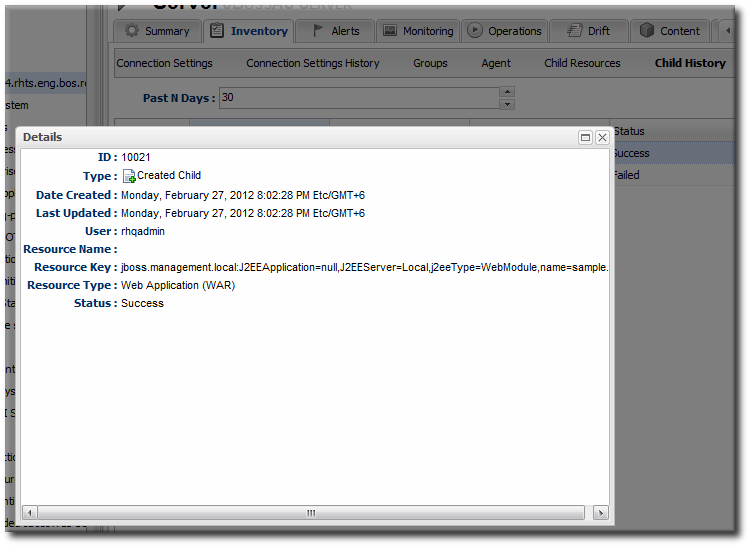
Figure 10. WAR Child Resource
4.3. Updating Applications
- Browse to the EAR or WAR resource in the JBoss ON UI.
- In the EAR or WAR resource details page, open the Content tab, and click the New subtab.

- Click the button.
- Click the button.

- In the pop-up window, click the Add button, and browse the local filesystem to the updated WAR or EAR file to be uploaded.
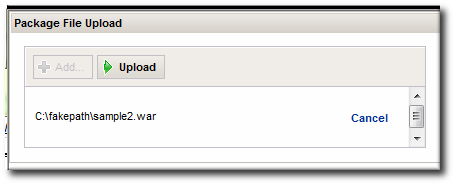
- Click the UPLOAD button to load the file and dismiss the window.
- In the main form, select the repository where the WAR or EAR file package should be stored. If one exists, select an existing repository or a subscribed repository for the resource. Otherwise, create a new repository.
- Optionally, set the version number for the EAR/WAR package.If this is set, then this value is displayed in the UI. If not, then a version number is calculated, based on the spec version and implementation version in
MANIFEST.MF, if any are given, or the calculated SHA-256 value for the package itself. Internally, the package is identified by the SHA value.SPEC(IMPLMENTATION)[sha256=abcd1234]
For more information on package versioning, see "Deploying Applications and Content". - Confirm the details for the new package, then click .

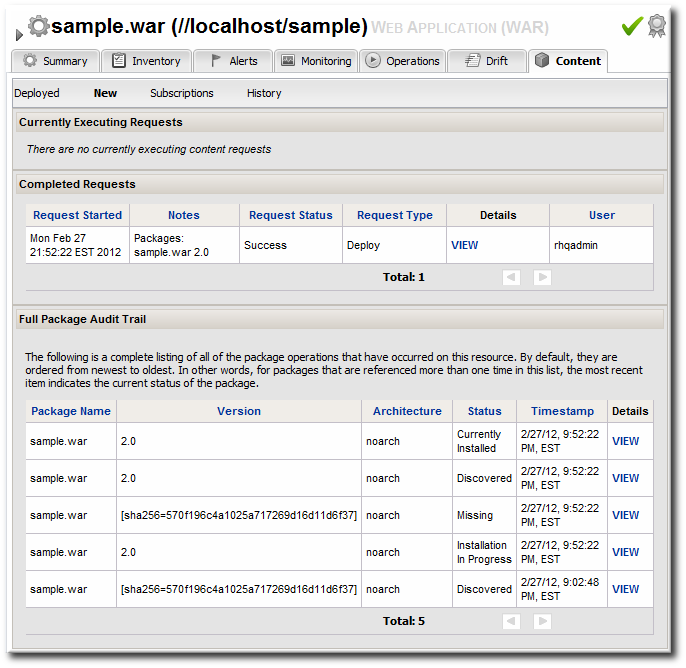
Figure 11. Deployment History for a Resource
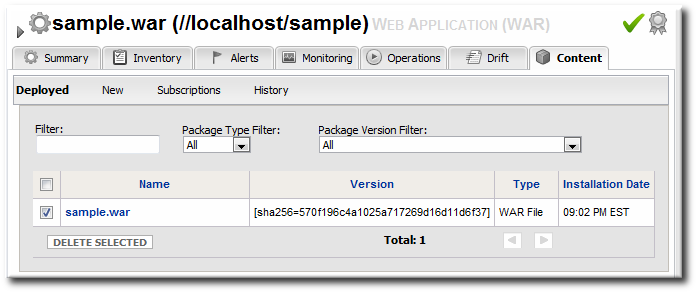
4.4. Deleting an Application
- Browse to the EAR or WAR resource in the JBoss ON UI.
- In the EAR or WAR resource details page, open the Content tab, and click the Deployed subtab.
- Select the checkbox by the EAR/WAR package, and click the button.
5. Document Information
5.1. Document History
| Revision History | |||
|---|---|---|---|
| Revision 3.0.1-5 | 2013-10-31 | ||
| |||
| Revision 3.0.1-0 | March 18, 2012 | ||
| |||
| Revision 3.0-1 | January 26, 2012 | ||
| |||
| Revision 3.0-0 | December 7, 2011 | ||
| |||
Index
A
- access controls
- to repositories, Authorization to Repositories and Packages
- Ant
- recipe example, Breakdown of an Ant Recipe
- recipes, Creating Ant Recipes
- upgrading bundles, Upgrading Ant Bundles
- authorization
- to repositories, Authorization to Repositories and Packages
B
- bundles
- and the CLI, Managing and Deploying Bundles with the JBoss ON CLI
- Ant, Creating Ant Recipes
- Ant recipe, Breakdown of an Ant Recipe
- creating, Creating Ant Bundles
- creating associated archive files, Creating an Associated Archive File
- deleting a bundle from a resource, Purging a Bundle from a Resource
- deleting from the server, Deleting a Bundle from the JBoss ON Server
- deploying to a clean destination, Deploying a Bundle to a Clean Destination
- deploying to a resource, Deploying Bundles to a Resource
- destinations, Destinations (and Bundle Deployments)
- reverting deployed bundles, Reverting a Deployed Bundle
- template configuration, Using Templatized Configuration Files
- testing deployment, Testing Bundle Packages
- upgrading, Upgrading Ant Bundles
- uploading, Uploading Bundles to JBoss ON
- viewing deployment history, Viewing the Bundle Deployment History
C
- CLI, Managing and Deploying Bundles with the JBoss ON CLI
- content, Summary: Using JBoss ON to Deploy Applications and Update Content
- authorization, Authorization to Repositories and Packages
- packages, About Content
- providers, About Content
- resources, About Content
- content sources
- associating with repositories, Associating Content Sources with a Repository
- creating, Creating a Content Source
- importing, Linking Content Sources to Repositories
- importing multiple content sources into multiple repositories, Importing a Content Source into Repositories
- manually synchronizing, Manually Synchronizing Content Sources or Resources
- scheduling synchronization, Scheduling Synchronization
- synchronization, Synchronizing Content Sources or Repositories
D
- deployment
- bundles on resources, Deploying Bundles to a Resource
- bundles to clean destinations, Deploying a Bundle to a Clean Destination
- testing bundles, Testing Bundle Packages
- view bundle history, Viewing the Bundle Deployment History
I
- importing
- content sources, Linking Content Sources to Repositories
- content sources into multiple repositories, Importing a Content Source into Repositories
P
- packages
- authorization, Authorization to Repositories and Packages
R
- recipes
- Ant, Creating Ant Recipes
- repositories
- associating with content sources, Associating Content Sources with a Repository
- associating with resources, Associating Resources with the Repository
- authorization, Authorization to Repositories and Packages
- creating, Creating a Repository
- importing content sources into multiple repositories, Importing a Content Source into Repositories
- managing, Managing Repositories
- managing content, About Content
- managing repositories on resources, Managing the Repositories for a Resource
- synchronizing and content sources, Synchronizing Content Sources or Repositories
- resources
- and managing repositories, Managing the Repositories for a Resource
- associating with repositories, Associating Resources with the Repository
- child
- EAR and WAR, Deploying EAR and WAR Files
- child types, Deploying Applications on Application Servers
- packages, About Content
S
- synchronization
- content sources, Synchronizing Content Sources or Repositories
- repositories and content sources, Synchronizing Content Sources or Repositories
- scheduling and content sources, Scheduling Synchronization