
Red Hat Training
A Red Hat training course is available for Red Hat Fuse
Chapter 8. Getting Started with SwitchYard
8.1. The Remote Invoker Quickstart Application
8.1.1. Overview of the Remote Invoker Quickstart
- Remote Invoker
- To evaluate an offer on an automobile and make a decision on whether to accept the offer or not. You need to implement the CreditCheck service using business rules and the Dealer service using CDI. The Dealer service evaluates the offer and submits the applicant to a credit check, before replying with an answer to the client.This process includes unit tests to test each service individually and a test driver called RemoteClient which demonstrates the use of an HTTP-based Remote Invoker to invoke a SwitchYard service remotely.
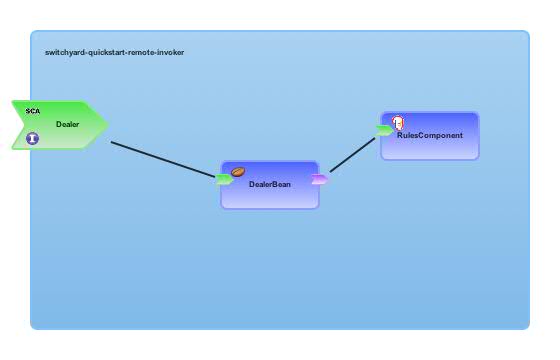
Figure 8.1. Remote Invoker Image
8.1.2. Using the Remote Invoker Quickstart
Prerequisites
- Maven 3.0.x must be installed.
Procedure 8.1. Task
- Open a terminal.
- Navigate to the
EAP_HOME/quickstarts/switchyard/remote-invokerdirectory. - Run the following command:
mvn clean install
The Remote Invoker quickstart is ready for use.
8.1.3. Running the Remote Invoker Quickstart Application
This topic demonstrates how to run and test the Remote Invoker quickstart application on the command line using Maven.
The application server must be running.
Procedure 8.2. Task
- Navigate to the Remote Invoker quickstart application directory:
cd EAP_HOME/quickstarts/switchyard/remote-invoker
- Run the following command to deploy the quickstart application:
mvn jboss-as:deploy
This will package the Remote Invoker quickstart inEAP_HOME/quickstarts/switchyard/remote-invoker/target/switchyard-quickstart-remote-invoker.jarand deploy it to the application server. You can confirm it has been deployed by checking the application server log or by logging into the Management Console and navigating to → from the view.The application is enabled by default. - Run the following command to test the quickstart application:
mvn exec:java
This will run the test class specified bymainClassin the application'spom.xmlfile, in this case,EAP_HOME/quickstarts/switchyard/remote-invoker/src/test/java/org/switchyard/quickstarts/remoteinvoker/RemoteClient.java.You will receive the following message:================================== Was the offer accepted? true ==================================
You will also see the following message in the server log:Approving credit for John Smith
Note
mvn package from within the quickstart application directory.
8.1.4. Undeploying the Remote Invoker Quickstart Application
This topic demonstrates how to undeploy the Remote Invoker quickstart application on the command line using Maven.
The application server must be running.
Procedure 8.3. Task
- Navigate to the Remote Invoker quickstart application directory:
cd EAP_HOME/quickstarts/switchyard/remote-invoker
- Run the following command to remove the deployed quickstart:
mvn jboss-as:undeploy
The Remote Invoker quickstart is no longer deployed to the application server. You can confirm it has been removed by checking the application server log or by logging into the Management Console and navigating to → from the view.
8.2. Create a Scheduled Service
camel-quartz-binding quickstart application is provided in the EAP_HOME/quickstarts/switchyard/ directory as an example. You can follow the instructions in the provided Readme.md file to build and deploy this application.
By the end of this tutorial you will have the knowledge and skills necessary to develop, deploy and test a scheduled service for your own integrated solutions. The service will be implemented as a SwitchYard application, making use of the camel-quartz component. You will develop the application with the JBoss Integration and SOA Development tools, provided as a plug-in for JBoss Developer Studio.
- The JBoss Integration and SOA Development tools are installed for JBoss Developer Studio.
- Maven is installed and configured.
Create a new SwitchYard project in JBoss Developer Studio.
- Select → → . Then select the appropriate wizard: → and select .
- Choose a project name (we are using
switchyard-example) and select . - You are now prompted to provide SwitchYard Project Configuration. Choose the Bean and Scheduling SwitchYard components.This automatically adds the following dependencies to the project's
pom.xmlfile so they are included when the project is built:<dependency> <groupId>org.switchyard.components</groupId> <artifactId>switchyard-component-bean</artifactId> <version>${switchyard.version}</version> </dependency> <dependency> <groupId>org.switchyard.components</groupId> <artifactId>switchyard-component-camel-quartz</artifactId> <version>${switchyard.version}</version> </dependency> - Select to proceed.
At this point, the new project is generated and appears in the Project Explorer view. You can double-click on thepom.xmlfile to open it, select the pom.xml tab, and confirm the dependencies added in the steps above.Open theswitchyard.xmlfile (found undersrc/main/resources). By default, the file opens on the Design tab. This large blue canvas is referred to as the composite.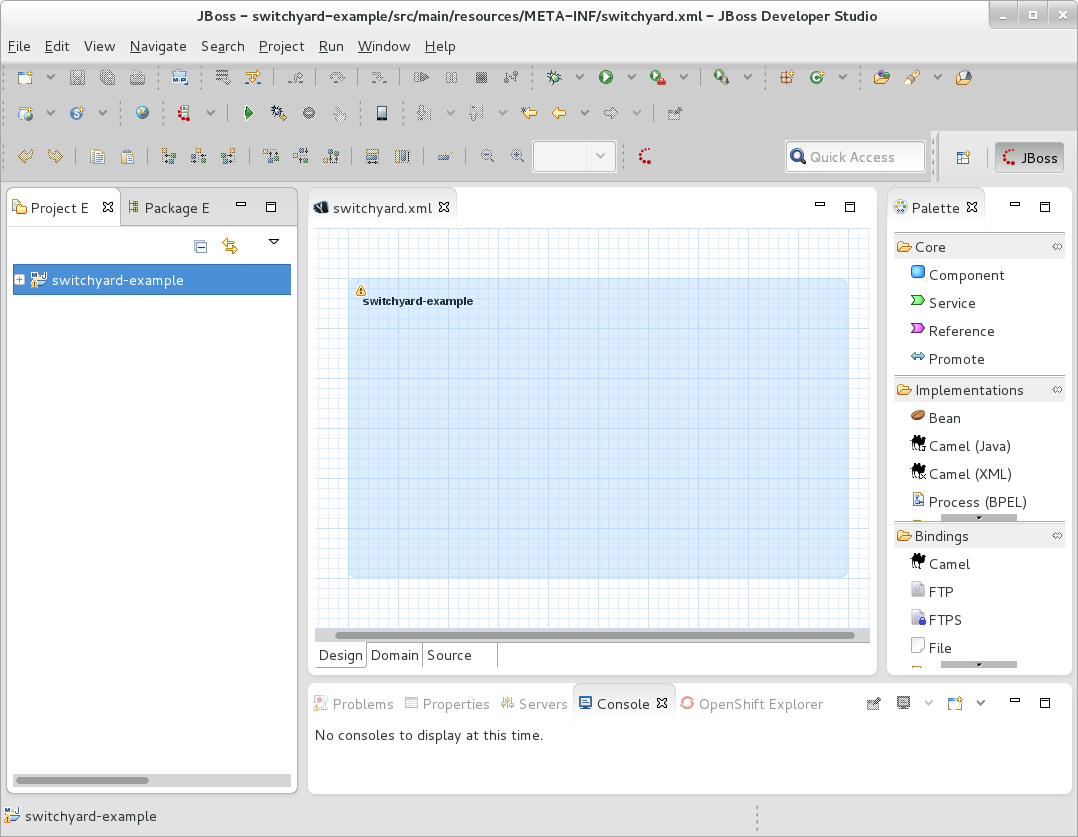 Click on the Source tab to see the underlying project XML:
<?xml version="1.0" encoding="UTF-8"?>
<sy:switchyard ... >
  <sca:composite name="switchyard-example" targetNamespace="urn:com.example.switchyard:switchyard-example:1.0">
  </sca:composite>
</sy:switchyard>
Important
Red Hat does not recommend editing this XML directly. Read more...Add a Bean implementation.
- Click back to the Design tab for the
switchyard.xmlfile. - Click and drag a Bean implementation from the SwitchYard Palette onto your composite. This will automatically invoke the New Bean Service wizard. If the Palette is not yet visible, select → → , then expand General and select Palette.
- In the New Bean Service wizard, select the Interface link. This will open the New Java Interface wizard.
- In the New Java Interface wizard, set the interface name to
GreetingServiceand select . This will take you back to the previous wizard. - Select and save your changes.
Your project now has a component and a component service, represented by the blue rectangle and small green chevron, respectively. Given that this is a Bean implementation (indicated by the coffee bean icon), two new files have been added to your project. TheGreetingServiceBeanclass corresponds to the component and theGreetingServiceinterface corresponds to the component service.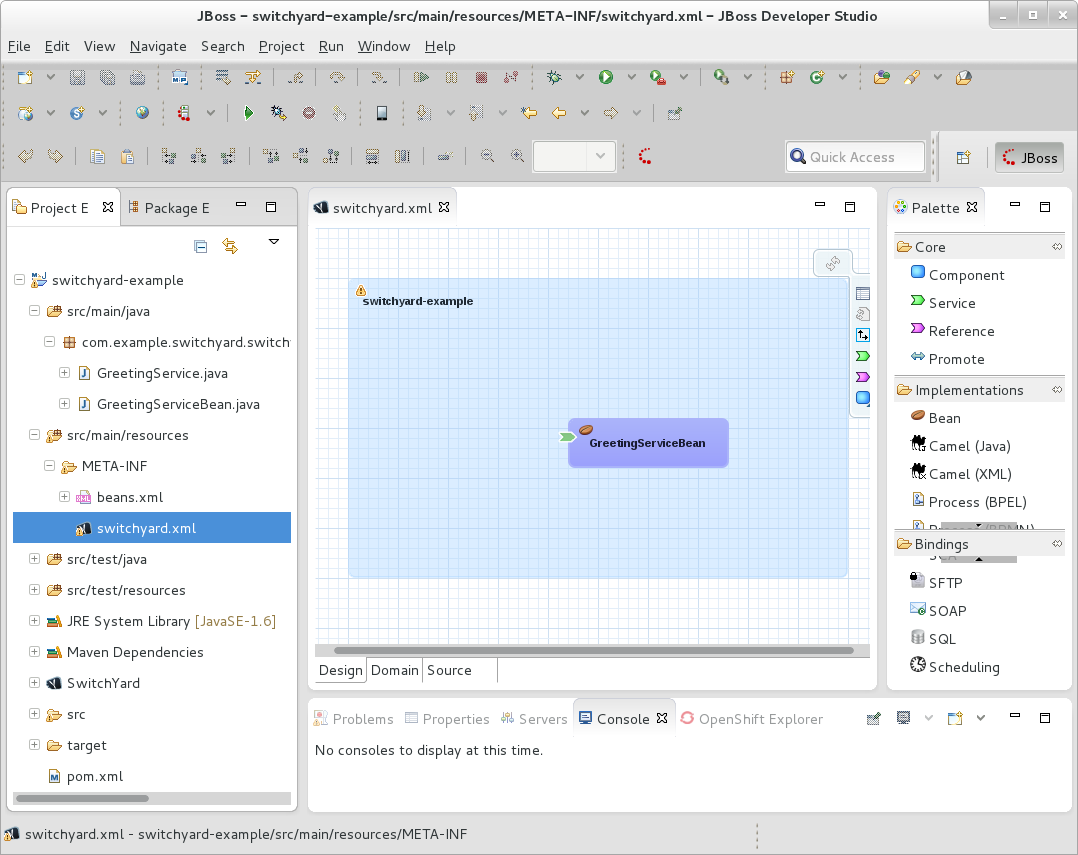 This design is captured by the following underlying XML:
<sca:component name="GreetingServiceBean">
  <bean:implementation.bean class="com.example.switchyard.switchyard_example.GreetingServiceBean"/>
    <sca:service name="GreetingService">
      <sca:interface.java interface="com.example.switchyard.switchyard_example.GreetingService"/>
    </sca:service>
</sca:component>
Customize the Bean.
- Double-click on the component service (the small green chevron) and add the following
greet()method.package com.example.switchyard.switchyard_example; public interface GreetingService { void greet(); } - Save your changes to the
GreetingServicefile. - Now double-click on the
GreetingServiceBeancomponent and update the code as follows.package com.example.switchyard.switchyard_example; import org.switchyard.component.bean.Service; @Service(GreetingService.class) public class GreetingServiceBean implements GreetingService { private int times; @Override public final void greet() { System.out.println((times++) + ". Service executed."); } } - Save your changes to the
GreetingServiceBeanfile.
Add a Service.
- Click and drag a Service from the SwitchYard Palette onto your composite. This will automatically invoke the New Service wizard.
- In the New Service wizard, select . Then choose the
GreetingServiceinterface which was created in the previous step, and select . - Select and save your changes to the
switchyard.xmlfile.
You have now created a composite service, represented by the large, green chevron.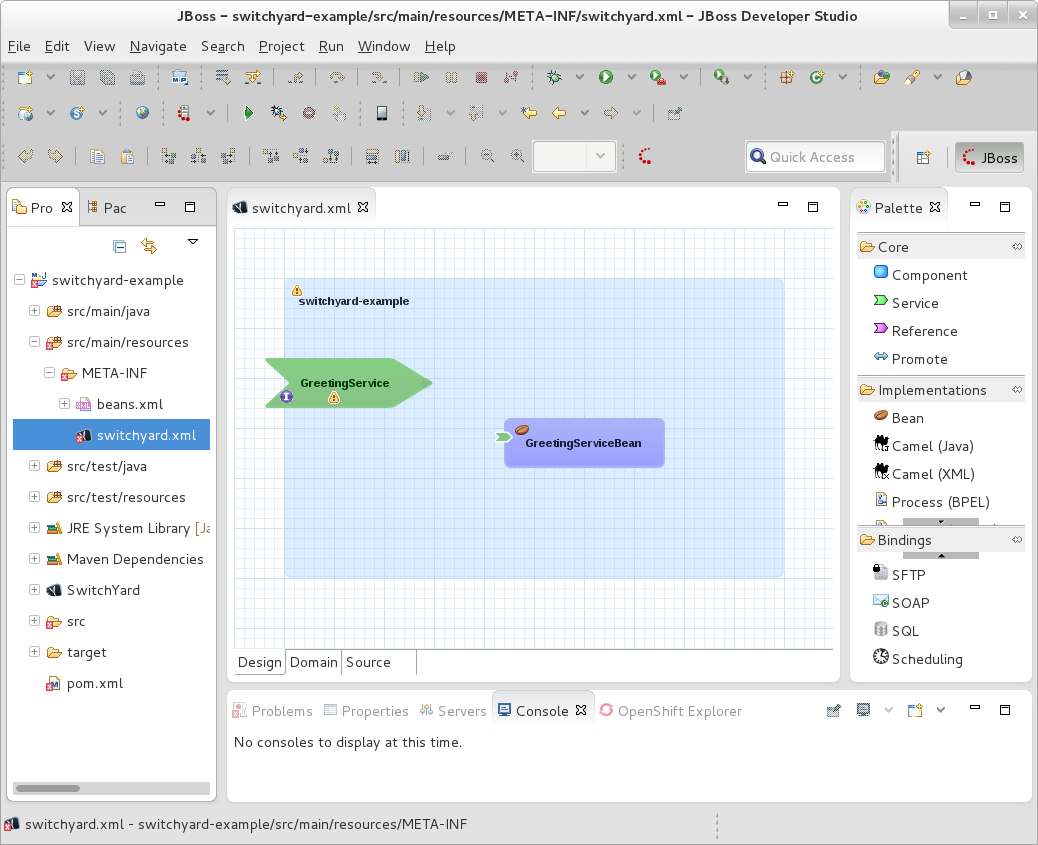 The following entry has been added to the underlying XML:
<sca:service name="GreetingService">
  <sca:interface.java interface="com.example.switchyard.switchyard_example.GreetingService"/>
</sca:service>
Note
At this point your project will report an error: Attribute 'promote' must appear on element 'sca:service'. This is because a composite service can only be realized by promoting a component service within the application. This is resolved in the next step.Promote the component service.
- Click on the tip of the large green chevron (representing the composite service), and drag your cursor to connect it to the tail of the smaller green chevron (representing the component service).

- Save your changes.
The component service is now promoted, with the following update to the XML:<sca:service name="GreetingService" promote="GreetingServiceBean/GreetingService"> <sca:interface.java interface="com.example.switchyard.switchyard_example.GreetingService"/> </sca:service>
Add a Scheduling binding.
- Click and drag a Scheduling binding from the SwitchYard Palette onto your composite service (the large green chevron). You will be prompted to provide Scheduling Binding Details.
- Enter a name for your binding (we are using
EverySecondJob) and enter the following value for Cron.* * * * * ?
Important
Ensure there is a single space between each of the characters above. Otherwise, the binding will not be created successfully. - Select and save your changes.
The scheduling icon now appears on the composite service: The following XML is added within the
sca:serviceelement accordingly:<quartz:binding.quartz name="EverySecondJob"> <quartz:name>EverySecondJob</quartz:name> <quartz:cron>* * * * * ?</quartz:cron> </quartz:binding.quartz>
Build and deploy the application.
You are now ready to build and deploy your application.- From within the application's top directory (containing the application's
pom.xmlfile), build the application with the following command:mvn clean install
- Start the application server.
[me@localhost jboss-eap-6.1]$
./bin/standalone.sh - Open a browser and navigate to http://localhost:9990/console/index.html.
- Select → from the Runtime view.
- Select to open the Create Deployment wizard. Select and then select the file to deploy from the project's
targetfolder; for example,~/workspace/switchyard-example/target/switchyard-example-0.0.1-SNAPSHOT.jar. Select . - Select Next to proceed to Step 2, then select .
- Your deployment has been added to the list of Available Deployments but now you need to enable it. Select the deployment from the list, select the button and then .
Now that the application is deployed and running, the following output appears (and continues to do so every second) in the server terminal window:16:06:43,020 INFO [stdout] (DefaultQuartzScheduler-camel-1_Worker-2) 1. Service executed. 16:06:44,019 INFO [stdout] (DefaultQuartzScheduler-camel-1_Worker-3) 2. Service executed. 16:06:45,009 INFO [stdout] (DefaultQuartzScheduler-camel-1_Worker-4) 3. Service executed. 16:06:46,009 INFO [stdout] (DefaultQuartzScheduler-camel-1_Worker-5) 4. Service executed. 16:06:47,010 INFO [stdout] (DefaultQuartzScheduler-camel-1_Worker-6) 5. Service executed. 16:06:48,011 INFO [stdout] (DefaultQuartzScheduler-camel-1_Worker-7) 6. Service executed. ...
8.3. Create a Web Service Proxy
- If you are using multiple versions of a service, you need intelligent routing to figure out which version of the service a client is invoking.
- If the web service does not provide security on its own, you might need to add a layer of security.
- You might want additional auditing/logging.
- You might have to transform/manipulate messages to make them compatible with the service.
- You might want to change the backend service later, without forcing a change on the client.
[client] <---> [web service proxy] <---> [web service]
camel-soap-proxy quickstart application (in the EAP_HOME/quickstarts/switchyard directory) is provided as an example. You can follow the instructions in the provided Readme.md file to build and deploy this application.
This tutorial consists of three parts:
- Deploy and test a web service.
- Develop a web service proxy that acts as a proxy to the web service.
- Deploy and test the web service proxy.
- The JBoss Integration and SOA Development tools are installed for JBoss Developer Studio.
- Maven is installed and configured.
- Your application server is running (it is assumed, for this tutorial, on default port http://localhost:8080).
camel-soap-proxy quickstart application provides a suitable web service, ReverseService.war, for the purpose of this exercise. Given a SOAP message, this web service responds with the message text reversed. In this section you will build, deploy and test this web service.
- From your
EAP_HOME/quickstarts/switchyard/camel-soap-proxydirectory, run the following command:$ mvn clean install
This builds the quickstart application, including the web service required for this exercise:EAP_HOME/quickstarts/switchyard/camel-soap-proxy/target/ReverseService.war. - Deploy the service to your running application server by copying the
ReverseService.warfile to the server'sdeploymentsfolder,EAP_HOME/standalone/deployments/.The service is now ready to accept requests on http://localhost:8080/ReverseService. - Use your favorite SOAP client to test the service. If you send the following request:
<SOAP-ENV:Envelope xmlns:SOAP-ENV="http://schemas.xmlsoap.org/soap/envelope/">
    <SOAP-ENV:Header/>
    <SOAP-ENV:Body>
        <ns2:reverse xmlns:ns2="urn:switchyard-quickstart:camel-soap-proxy:1.0">
            <text>Hello world!</text>
        </ns2:reverse>
    </SOAP-ENV:Body>
</SOAP-ENV:Envelope>
You receive the following response, with the message text reversed:<soap:Envelope xmlns:soap="http://schemas.xmlsoap.org/soap/envelope/"> <soap:Body> <ns2:reverseResponse xmlns:ns2="urn:switchyard-quickstart:camel-soap-proxy:1.0"> <text>!dlrow olleH</text> </ns2:reverseResponse> </soap:Body> </soap:Envelope>Note
You can confirm the web service address (and retrieve the associated WSDL) using JBoss Management Console. Login to the console (default address is http://localhost:9990/console/). From the Runtime view, navigate to Manage Deployments. Select → → . Note the URL provided for WSDL.
Now that the web service has been deployed on the server, develop the proxy to interface to it.
Create a new SwitchYard project in JBoss Developer Studio.
- Select → → . Then select the appropriate wizard: → and select .
- Choose a project name (we are using
switchyard-example) and select . - Select to proceed.
At this point, the new project is generated and appears in the Project Explorer view.Add the WSDL file for the web service as a resource.
- Copy the WSDL file for the deployed service to
.../switchyard-example/src/main/resources/META-INF. You can do this usingwget. For example, on the command line, from within the application'sMETA-INFdirectory, run:wget http://localhost:8080/ReverseService?wsdl -O ReverseService.wsdl
- In JBoss Developer Studio, right-click on the project in the Project Explorer view, and select Refresh. Navigate the project files to confirm the file has been added as a resource.
Add a Camel (XML) implementation.
- Open the Design tab for the
switchyard.xmlfile. - Click and drag a Camel (XML) implementation from the SwitchYard Palette onto the composite (the blank canvas). This invokes a wizard to help you create a new Camel route file resource. If the Palette is not yet visible, select → → , then expand General and select Palette.
- In the wizard, select the WSDL option, and browse to select the
ReverseService.wsdlfile for the interface. - Change the Service Name to
ProxyService. - Select and save the project.
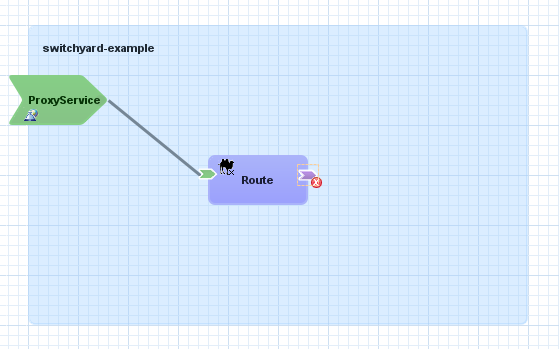
Your project now has a component and a component service, represented by the blue rectangle and small green chevron, respectively. Aroute.xmlfile has been added to your project, corresponding to the component. TheReverseService.wsdlcorresponds to the component service. If you double-click on either of these graphical entities, the corresponding file opens for viewing.Promote the component service.
- Move your cursor over the component service and select Promote Service.

- You are prompted to provide details for the promotion. Leave the default values. Select , and save the project.Your component service has now been promoted to a corresponding composite service (represented by the large green chevron):

Create a component reference.
- Move your cursor over the component and select Reference.

- You are prompted to provide details for the new reference. Select the WSDL option, and browse to select the
ReverseService.wsdlfile for the interface. Leave the default Service Name asReverseService. - Select and save the project.Your component now has a component reference (small purple chevron). An error appears until it is promoted in the next step.
Promote the component reference.
- Move your cursor over the component reference and select Promote Reference.
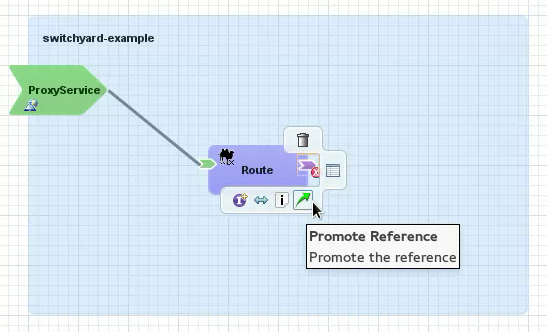
- You are prompted to provide details for the promotion. Leave the default values. Select , and save the project.Your component reference has now been promoted to a corresponding composite reference (represented by the large purple chevron):

Create a route from the proxy endpoint to the web service endpoint.
- Open the
route.xmlfile. You can open it from the Project Explorer or by double-clicking on the Camel Route component. By default it opens in the Design view. Select the Source view to expose the Spring XML. - From looking at the XML, you can see that, currently, any traffic received from the proxy service will be logged.To forward this traffic on to the web service, add the web service as an endpoint:
<?xml version="1.0" encoding="ASCII"?> <routes xmlns="http://camel.apache.org/schema/spring"> <route> <from uri="switchyard://ProxyService"/> <log message="ProxyService - message received: ${body}"/> <to uri="switchyard://ReverseService"/> </route> </routes> - Save your changes.
Add a SOAP binding to the composite service.
- Drag a SOAP binding from the SwitchYard Palette onto the composite service (ProxyService).
- You are prompted for SOAP binding details. Set the following values, leaving all other default values:
Property Value Name soap-proxyContext path proxyServer Port :${webPort} - Select and save your changes.
Add a SOAP binding to the composite reference.
- Drag a SOAP binding from the SwitchYard Palette onto the composite reference (ReverseService).
- You are prompted for SOAP binding details. Set the following values, leaving all other default values:
Property Value Name soap-serviceEndpoint Address http://localhost:${webPort}/ReverseService - Select and save your changes.
Define the value of
webPort.- From the Domain view of the
switchyard.xmlfile, add a domain property with the following values:Name Value webPort${org.switchyard.component.http.standalone.port:8080} - Save your changes.
Build and deploy the web service proxy.
- From within the application's top directory (containing the application's
pom.xmlfile), build the application with the following command:mvn clean install
- Open a browser and navigate to http://localhost:9990/console/index.html.
- Select → from the Runtime view.
- Select to open the Create Deployment wizard. Select and then select the file to deploy from the project's
targetfolder; for example,~/workspace/switchyard-example/target/switchyard-example-0.0.1-SNAPSHOT.jar. Select . - Select Next to proceed to Step 2, then select .
- Your deployment has been added to the list of Available Deployments but now you need to enable it. Select the deployment from the list, select the button and then .
Test your application.
Your web service proxy is now ready to accept requests on http://localhost:8080/proxy/ReverseService.- Use your favorite SOAP client to send a message to test the proxy service in the same way as you did when you tested the web service, only use the proxy address instead. After sending a message, you receive a response with the text reversed, the same as when it was sent directly to the web service. However, when sending to the proxy, you can see that the message is also logged on the server as prescribed by the
route.xmlin the proxy service; for example:11:50:29,100 INFO [route2] (http-/127.0.0.1:8080-14) ProxyService - message received: <ns2:reverse xmlns:ns2="urn:switchyard-quickstart:camel-soap-proxy:1.0"> <text>Hello world!</text> </ns2:reverse>