
Red Hat Training
A Red Hat training course is available for Red Hat Fuse
Getting Started Guide
Use this guide to learn how to produce results quickly and efficiently.
Abstract
Chapter 1. Red Hat JBoss Fuse Service Works
1.1. What is Red Hat JBoss Fuse Service Works?
1.2. Core Capabilities
- Enterprise Integration Pattern (EIP) Based Development
- The versatile EIP framework is implemented in routing and transformation processes for faster and more efficient integration solutions.
- High Performance Messaging
- A high performance messaging broker supports messaging patterns such as publish-subscribe, point-to-point and store-forward, and multiple cross language clients.
- Service Development
- The web services framework exposes integration assets as services and calls external services, supporting all major web services standards. It also supports RESTful calls.
- Structured Service Development
- A lightweight service development framework provides full lifecycle support for developing, deploying, and managing service-based applications.
- Automatable Registry with Workflow
- Manage the lifecycle of services from design, development and deployment by defining, exposing and enforcing rules or policies.
- Business Transaction Monitoring
- Capture service activity information, define and collect metrics, and define alerts and SLAs.
1.3. System Integration
1.4. Integration Use Case
1.5. Utilizing Red Hat JBoss Fuse Service Works in a Business Environment
Chapter 2. Read Me
2.1. Back Up Your Data
Warning
2.2. Red Hat Documentation Site
2.3. EAP_HOME
EAP_HOME refers to the root directory of the Red Hat JBoss Enterprise Application Platform installation on which JBoss Fuse Service Works is deployed.
2.4. MODE
MODE will either be standalone or domain depending on whether your instance of JBoss Enterprise Application Platform is running in standalone or domain mode. Substitute one of these whenever you see MODE in a file path in this documentation.
Chapter 3. Downloading Red Hat JBoss Fuse Service Works
3.1. About the Red Hat Customer Portal
- Manage and maintain Red Hat entitlements and support contracts;
- Download officially-supported software;
- Access product documentation and the Red Hat Knowledgebase;
- Contact Global Support Services; and
- File bugs against Red Hat products.
3.2. JBoss Fuse Service Works 6.0.0 Packages for Download
Table 3.1.
| Package | Description |
|---|---|
| Red Hat JBoss Fuse Service Works 6.0.0 Javadocs for Run-Time Governance | Javadocs for Run-Time Governance. |
| Red Hat JBoss Fuse Service Works 6.0.0 Javadocs for S-RAMP | Javadocs for S-RAMP. |
| Red Hat JBoss Fuse Service Works 6.0.0 Javadocs for SwitchYard | Javadocs for SwitchYard. |
| Red Hat JBoss Fuse Service Works 6.0.0 Maven Repository | Red Hat provides a Maven repository containing artifacts required to build applications for Red Hat JBoss Fuse Service Works. This package enables users to setup the repository offline. |
| Red Hat JBoss Fuse Service Works 6.0.0 Source Code | The source code package contains the complete source code for the Red Hat JBoss Fuse Service Works product. |
| Red Hat JBoss Fuse Service Works 6.0.0 Installer | Red Hat provides this tool to simplify product installation. The installer can be run with a graphical interface or from a script on the command line. |
3.3. Download Files from the Red Hat Customer Portal
Prerequisites
- Before you begin this task, you need a Customer Portal account. Browse to https://access.redhat.com and click the Register link in the upper right corner to create an account.
Procedure 3.1. Log in and Download Files from the Red Hat Customer Portal
- Browse to https://access.redhat.com and click the Log in link in the top right corner. Enter your credentials and click Log In.Result
You are logged into RHN and you are returned to the main web page at https://access.redhat.com.
Navigate to the Downloads page.
Use one of the following options to navigate to the Downloads page.- Click the Downloads link in the top navigation bar.
- Navigate directly to https://access.redhat.com/downloads/.
Select the product and version to download.
Use one of the following ways to choose the correct product and version to download.- Step through the navigation one level at a time.
- Search for your product using the search area at the top right-hand side of the screen.
Download the appropriate file for your operating system and installation method of choice.
Depending on the product you choose, you may have the choice of a Zip archive, RPM, or native installer for a specific operating system and architecture. Click either the file name or the Download link to the right of the file you want to download.
The file is downloaded to your computer.
3.4. Checksum Validation
3.5. Verify Downloaded Files
Procedure 3.2. Verify File Checksums on Red Hat Enterprise Linux
Obtain checksum values for the downloaded file
- Navigate to https://access.redhat.com/jbossnetwork/. Login if required.
- Select your Product and Version.
- Select the package you want to verify to navigate to the Software Details page.
- Take note of the MD5 and SHA-256 checksum values.
Run a checksum tool on the file
- Navigate to the directory containing the downloaded file in a terminal window.
- Run
md5sum downloaded_file. - Run
sha256sum downloaded_file.
Example output:[localhost]$ md5sum downloaded_file 4564d1a5190110dbe8170e50d7353a97 downloaded_file [localhost]$ sha256sum downloaded_file 25b6bd3c5f47b316639b014d041cdb6a515e3a4a32d30a479141cd8ceecb853e downloaded_file
Compare the checksum values
- Compare the checksum values returned by the
md5sumandsha256sumcommands with the corresponding values displayed on the Software Details page. - Download the file again if the two checksum values are not identical. A difference between the checksum values indicates that the file has either been corrupted during download or has been modified since it was uploaded to the server. Contact Red Hat Support for assistance if after several downloads the checksum does not successfully validate.
- The downloaded file is safe to use if the two checksum values are identical.
The integrity of the downloaded file is verified.
Note
Chapter 4. Installing Red Hat JBoss Fuse Service Works
4.1. Installing JBoss Fuse Service Works by GUI
Prerequisites
- You must have already downloaded the Red Hat JBoss Fuse Service Works installer file from Red Hat Customer Portal.
- You must have a supported JDK installed. See Red Hat JBoss Fuse Service Works Supported Configurations.
- If you would like to configure use of the online Maven repository during this installation, you must have Maven already installed.
Important
Note
- Set
JAVA_HOMEto the version of Java. For example,/usr/lib/jvm/java-1.7.0-openjdk-1.7.0.VERSION/. - Set
PATHto include the same version of Java. - Set
JBOSS_HOMEto yourjboss-eap-6.1directory.
Procedure 4.1. Install JBoss Fuse Service Works
- Open a new terminal and navigate to the folder where you have downloaded the JBoss Fuse Service Works installer file.
- Run the following command, replacing 6.0.0.GA-redhat-4 for the version you downloaded if required:
java -jar jboss-fsw-installer-6.0.0.GA-redhat-4.jar
- You are presented with the End User License Agreement. If you agree with the terms, select I accept the terms of this license agreement and then select to continue.
- You are prompted for the location in which you want to install JBoss Fuse Service Works. Specify a location and select . You will be notified that an instance of JBoss EAP will be placed in the chosen location. Select to proceed.
Warning
A warning message is displayed if the directory already exists. Red Hat does not recommend installing over the top of an existing installation. However, if you wish to proceed, select to continue. - You are prompted for the installation packs to install. Select to continue with the default options.
Note
Depending on your deployment, you can select packs other than the default options. For example, if you do not wish to install every pack, you could select SwitchYard and Run-Time Governance Client only, for a basic installation. - You are prompted to create an administrative user. Once created, this user will be added to the ManagementRealm and can be used to access the Management Console and other applications secured using ManagementRealm. Enter the new username and password in the appropriate fields and select .
- You are prompted to create a governance user. It will give you access to S-RAMP, DTGov and RTGov consoles along with the S-RAMP Command Line Interface. Enter a username and password and select .
- You are then prompted to setup your Maven repository. This will enable you to build the quickstarts provided. Specify the location of an existing or new location for your Maven settings file (typically
~/.m2/settings.xml). If you do not currently have a settings file, a newsettings.xmlfile will be created for you in the location you provide. Select .Note
If you choose to skip the maven repository setup, you will be asked to confirm this decision. Select to continue. - You are prompted to configure the SAML keystore. It is used by a Java KeyStore to sign authentication tokens. Enter the SAML keystore password and select .
- You are then prompted to enable the Java Security Manager. It enforces access rules at the JVM runtime based on one or more security polices. Select when you are ready to proceed.
Important
Enabling the Java Security Manager may reduce server performance. - At this point you are asked to choose between the default or advanced configuration. Select the default configuration for a basic configuration, and select to continue.
- You are prompted to configure the password vault. Enter the Vault keystore password in the appropriate fields and select .
- You are presented with a screen specifying default database settings. The installer creates a database that is used to hold data for various components of FSW, including BPEL, jBPM and S-RAMP.Change the username and password to something secure and select to continue.
Warning
The default database is an H2 database. Red Hat recommends configuring an alternative database for production systems, using the advanced configuration options. - You are presented with a list of packages that will be installed. Select to proceed.
- The installation will commence. A status bar for each component will display its progress. Once this is complete, select .
- Additional processing of tasks will commence. When the status bar indicates this has been completed, select .
- The console displays a message to let you know that the application has been successfully installed. Also, it offers you a list of URLs for accessing the Administration and BPEL Consoles, S-RAMP and DTGov User Interfaces and Gadget Server.If you want to repeat the same installation on other machines, select and choose a location and filename for the script.
- Select .
The basic installation is complete.
Note
izpack.mode=privileged option to the installation command:
java -Dizpack.mode=privileged -jar jboss-fsw-installer-6.0.0.GA-redhat-4.jar
Chapter 5. Starting and Stopping the Application Server
Note
5.1. Start JBoss EAP 6 as a Standalone Server
This topic covers the steps to start JBoss EAP 6 as a Standalone Server.
Procedure 5.1. Start the Platform Service as a Standalone Server
For Red Hat Enterprise Linux.
Run the command:EAP_HOME/bin/standalone.shFor Microsoft Windows Server.
Run the command:EAP_HOME\bin\standalone.batOptional: Specify additional parameters.
To print a list of additional parameters to pass to the start-up scripts, use the-hparameter.
The JBoss EAP 6 Standalone Server instance starts.
5.2. Stop JBoss EAP 6 as a Standalone Server
Stopping JBoss Enterprise Application Platform using the Management CLI.
- Run the
EAP_HOME/bin/jboss-cli.shcommand to launch the Management CLI.$ EAP_HOME/bin/jboss-cli.sh
- Run the
connectcommand to connect to the server.[disconnected /] connect
- Run the
shutdowncommand to stop the server.[standalone@localhost:9999 /] shutdown
- Run the
quitcommand to close the Management CLI.[standalone@localhost:9999 /] quit
Stopping JBoss Enterprise Application Platform by pressing CTRL+C.
Press Ctrl+C in the server window (the terminal window where JBoss Enterprise Application Platform was started).ResultEach of these alternatives stops JBoss Enterprise Application Platform.
Chapter 6. Maven Repositories
6.1. About Maven
http:// when located on an HTTP server, or file:// when located on a file server. The default repository is the public remote Maven 2 Central Repository.
settings.xml file. You can either configure global Maven settings in the M2_HOME/conf/settings.xml file, or user-level settings in the USER_HOME/.m2/settings.xml file.
Note
6.2. About The Provided Maven Repositories
settings.xml file during installation, Maven is already configured to use the online repositories. If you did not provide the location during installation, you need to configure Maven manually by following the procedure in Section 6.4, “Configuring Maven to Use the Online Repositories” or Section 6.3, “Configuring Maven to Use the File System Repositories”.
Important
6.3. Configuring Maven to Use the File System Repositories
In situations where you cannot use the online repositories, you will have to download and configure the required repositories locally.
Procedure 6.1.
- Download the following ZIP archives containing the required repositories:
Note
Alternatively, the ZIP archives can be downloaded from http://access.redhat.com/jbossnetwork/. - Unzip the downloaded ZIP files into an arbitrary location in a local file system.
- Add entries for the unzipped repositories to Maven's
settings.xmlfile. The following code sample contains a profile with the repositories and an activation entry for the profile:<?xml version="1.0" encoding="UTF-8" standalone="no"?> <settings xmlns="http://maven.apache.org/SETTINGS/1.0.0" xmlns:xsi="http://www.w3.org/2001/XMLSchema-instance" xsi:schemaLocation="http://maven.apache.org/xsd/settings-1.0.0.xsd"> <localRepository/> <profiles> <!-- Profile with local repositories required by Fuse Service Works --> <profile> <id>fsw-local-repos</id> <repositories> <repository> <id>fsw-6.0.0.GA-redhat-2-repository</id> <name>FSW 6.0.0.GA Repository</name> <url>file://<!-- path to the repository -->/fsw-6.0.0.GA-redhat-2-repository</url> <layout>default</layout> <releases> <enabled>true</enabled> <updatePolicy>never</updatePolicy> </releases> <snapshots> <enabled>false</enabled> <updatePolicy>never</updatePolicy> </snapshots> </repository> <repository> <id>jboss-eap-6.1.1.GA-maven-repository</id> <name>EAP 6.1.1.GA Repository</name> <url>file://<!-- path to the repository -->/jboss-eap-6.1.1.GA-maven-repository</url> <layout>default</layout> <releases> <enabled>true</enabled> <updatePolicy>never</updatePolicy> </releases> <snapshots> <enabled>false</enabled> <updatePolicy>never</updatePolicy> </snapshots> </repository> </repositories> <pluginRepositories> <pluginRepository> <id>fsw-6.0.0.GA-redhat-2-repository</id> <name>FSW 6.0.0.GA Repository</name> <url>file://<!-- path to the repository -->/fsw-6.0.0.GA-redhat-2-repository</url> <layout>default</layout> <releases> <enabled>true</enabled> <updatePolicy>never</updatePolicy> </releases> <snapshots> <enabled>false</enabled> <updatePolicy>never</updatePolicy> </snapshots> </pluginRepository> <pluginRepository> <id>jboss-eap-6.1.1.GA-maven-repository</id> <name>EAP 6.1.1 GA Repository</name> <url>file://<!-- path to the repository -->/jboss-eap-6.1.1.GA-maven-repository</url> <layout>default</layout> <releases> <enabled>true</enabled> <updatePolicy>never</updatePolicy> </releases> <snapshots> <enabled>false</enabled> <updatePolicy>never</updatePolicy> </snapshots> </pluginRepository> </pluginRepositories> </profile> </profiles> <activeProfiles> <!-- Activation of the Fuse Service Works profile --> <activeProfile>fsw-local-repos</activeProfile> </activeProfiles> </settings>
Important
bpm-service quickstart application will not build without two additional repositories. If you want to build this application, download the following repositories and add them to your setting.xml file in the same way as that shown above.
The Maven repositories are downloaded, unzipped in a local file system, registered in Maven's settings.xml file, and ready to be used when performing Maven builds.
- Q: Why does the bpm-service quickstart application fail on build?
- Q: Why do I still get errors when building or deploying my applications?
- Q: Why is JBoss Developer Studio using my old Maven configuration?
bpm-service quickstart application fail on build?
When you build or deploy the bpm-service quickstart application, it fails with the following error:
[ERROR] Failed to execute goal on project switchyard-quickstart-bpm-service: Could not resolve dependencies for project org.switchyard.quickstarts:switchyard-quickstart-bpm-service:jar:1.1.1-p5-redhat-1: The following artifacts could not be resolved: org.jboss.netty:netty:jar:3.2.6.Final-redhat-2, org.apache.lucene:lucene-queryparser:jar:3.6.2-redhat-4: Could not find artifact org.jboss.netty:netty:jar:3.2.6.Final-redhat-2 in fsw-6.0.0.GA-redhat-2-repository (file:///home/belong/maven_repos/fsw-6.0.0.GA-redhat-2-repository) -> [Help 1]
The bpm-service quickstart application requires an additional two dependencies, provided by the JBoss EAP 6.0.1 and JBoss Web Framework Kit 2.5.0 Maven repositories.
- Download the following ZIP archives, and unzip them into a location of your choice:
- Add entries for the unzipped repositories to your Maven
settings.xmlfile:<?xml version="1.0" encoding="UTF-8" standalone="no"?> <settings xmlns="http://maven.apache.org/SETTINGS/1.0.0" xmlns:xsi="http://www.w3.org/2001/XMLSchema-instance" xsi:schemaLocation="http://maven.apache.org/xsd/settings-1.0.0.xsd"> <localRepository/> <profiles> <!-- Profile with local repositories required by Fuse Service Works --> <profile> <id>fsw-local-repos</id> <repositories> <repository> <id>fsw-6.0.0.GA-redhat-2-repository</id> <name>FSW 6.0.0.GA Repository</name> <url>file://<!-- path to the repository -->/fsw-6.0.0.GA-redhat-2-repository</url> <layout>default</layout> <releases> <enabled>true</enabled> <updatePolicy>never</updatePolicy> </releases> <snapshots> <enabled>false</enabled> <updatePolicy>never</updatePolicy> </snapshots> </repository> <repository> <id>jboss-eap-6.1.1.GA-maven-repository</id> <name>EAP 6.1.1.GA Repository</name> <url>file://<!-- path to the repository -->/jboss-eap-6.1.1.GA-maven-repository</url> <layout>default</layout> <releases> <enabled>true</enabled> <updatePolicy>never</updatePolicy> </releases> <snapshots> <enabled>false</enabled> <updatePolicy>never</updatePolicy> </snapshots> </repository> <repository> <id>jboss-wfk-2.5.0-maven-repository</id> <name>JBoss WFK 2.5.0 Repository</name> <url>file://<!-- path to the repository -->/jboss-wfk-2.5.0-maven-repository</url> <layout>default</layout> <releases> <enabled>true</enabled> <updatePolicy>never</updatePolicy> </releases> <snapshots> <enabled>false</enabled> <updatePolicy>never</updatePolicy> </snapshots> </repository> <repository> <id>jboss-eap-6.0.1-maven-repository</id> <name>EAP 6.0.1 Repository</name> <url>file://<!-- path to the repository -->/jboss-eap-6.0.1-maven-repository</url> <layout>default</layout> <releases> <enabled>true</enabled> <updatePolicy>never</updatePolicy> </releases> <snapshots> <enabled>false</enabled> <updatePolicy>never</updatePolicy> </snapshots> </repository> </repositories> <pluginRepositories> <pluginRepository> <id>fsw-6.0.0.GA-redhat-2-repository</id> <name>FSW 6.0.0.GA Repository</name> <url>file://<!-- path to the repository -->/fsw-6.0.0.GA-redhat-2-repository</url> <layout>default</layout> <releases> <enabled>true</enabled> <updatePolicy>never</updatePolicy> </releases> <snapshots> <enabled>false</enabled> <updatePolicy>never</updatePolicy> </snapshots> </pluginRepository> <pluginRepository> <id>jboss-eap-6.1.1.GA-maven-repository</id> <name>EAP 6.1.1 GA Repository</name> <url>file://<!-- path to the repository -->/jboss-eap-6.1.1.GA-maven-repository</url> <layout>default</layout> <releases> <enabled>true</enabled> <updatePolicy>never</updatePolicy> </releases> <snapshots> <enabled>false</enabled> <updatePolicy>never</updatePolicy> </snapshots> </pluginRepository> <pluginRepository> <id>jboss-wfk-2.5.0-maven-repository</id> <name>JBoss WFK 2.5.0 Repository</name> <url>file://<!-- path to the repository -->/jboss-wfk-2.5.0-maven-repository</url> <layout>default</layout> <releases> <enabled>true</enabled> <updatePolicy>never</updatePolicy> </releases> <snapshots> <enabled>false</enabled> <updatePolicy>never</updatePolicy> </snapshots> </pluginRepository> <pluginRepository> <id>jboss-eap-6.0.1-maven-repository</id> <name>EAP 6.0.1 Repository</name> <url>file://<!-- path to the repository -->/jboss-eap-6.0.1-maven-repository</url> <layout>default</layout> <releases> <enabled>true</enabled> <updatePolicy>never</updatePolicy> </releases> <snapshots> <enabled>false</enabled> <updatePolicy>never</updatePolicy> </snapshots> </pluginRepository> </pluginRepositories> </profile> </profiles> <activeProfiles> <!-- Activation of the Fuse Service Works profile --> <activeProfile>fsw-local-repos</activeProfile> </activeProfiles> </settings>
When you build or deploy a project, it fails with one or both of the following errors:
[ERROR] Failed to execute goal on project PROJECT_NAMECould not find artifact ARTIFACT_NAME
Your cached local Maven repository might contain outdated artifacts.
To resolve the issue, delete the cached local repository – the ~/.m2/repository/ directory on Linux or the %SystemDrive%\Users\USERNAME\.m2\repository\ directory on Windows – and run mvn clean install -U. This will force Maven to download correct versions of required artifacts when performing the next build.
You have updated your Maven configuration, but this configuration is not reflected in JBoss Developer Studio.
If JBoss Developer Studio is running when you modify your Maven settings.xml file, this configuration will not be reflected in JBoss Developer Studio.
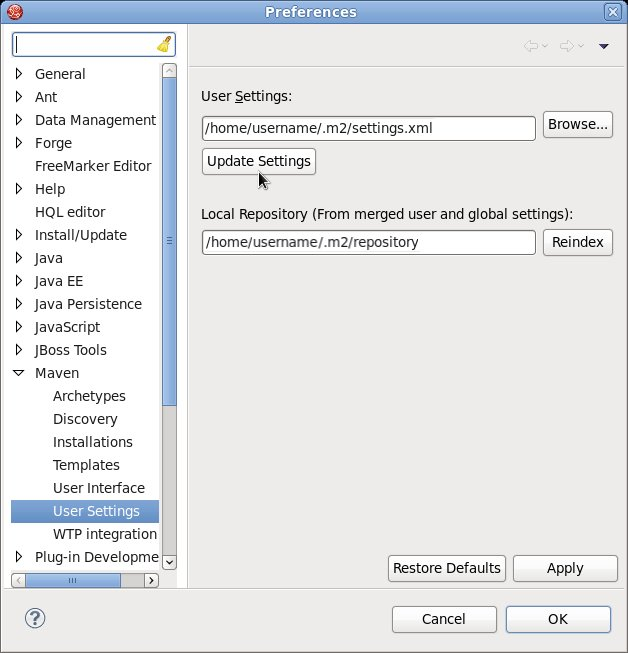
Figure 6.1. Update Maven User Settings
6.4. Configuring Maven to Use the Online Repositories
settings.xml file during installation, Maven is already configured to use the online repositories. If you did not provide the location during installation, you need to configure Maven manually by following the procedure in Section 6.4, “Configuring Maven to Use the Online Repositories” or Section 6.3, “Configuring Maven to Use the File System Repositories”.
Procedure 6.2. Configuring Maven to Use the Online Repositories
- Add entries for the online repositories to Maven's
settings.xmlfile as in the code sample below:<settings xmlns="http://maven.apache.org/SETTINGS/1.0.0" xmlns:xsi="http://www.w3.org/2001/XMLSchema-instance" xsi:schemaLocation="http://maven.apache.org/SETTINGS/1.0.0 http://maven.apache.org/xsd/settings-1.0.0.xsd"> <profiles> <!-- Profile with online repositories required by Fuse Service Works --> <profile> <id>fsw-online-repos</id> <repositories> <repository> <id>jboss-ga-repository</id> <url>http://maven.repository.redhat.com/techpreview/all</url> <releases> <enabled>true</enabled> </releases> <snapshots> <enabled>false</enabled> </snapshots> </repository> <repository> <id>jboss-public-repository</id> <url>http://repository.jboss.org/nexus/content/repositories/public/</url> <releases> <enabled>true</enabled> </releases> <snapshots> <enabled>false</enabled> </snapshots> </repository> </repositories> <pluginRepositories> <pluginRepository> <id>jboss-ga-plugin-repository</id> <url>http://maven.repository.redhat.com/techpreview/all</url> <releases> <enabled>true</enabled> </releases> <snapshots> <enabled>false</enabled> </snapshots> </pluginRepository> <pluginRepository> <id>jboss-public-plugin-repository</id> <url>http://repository.jboss.org/nexus/content/repositories/public/</url> <releases> <enabled>true</enabled> </releases> <snapshots> <enabled>false</enabled> </snapshots> </pluginRepository> </pluginRepositories> </profile> </profiles> <activeProfiles> <!-- Activation of the Fuse Service Works profile --> <activeProfile>fsw-online-repos</activeProfile> </activeProfiles> </settings> - If you modified the
settings.xmlfile while JBoss Developer Studio was running, you must refresh Maven settings in the IDE. From the menu, choose → . In the Preferences Window, expand Maven and choose User Settings. Click the button to refresh the Maven user settings in JBoss Developer Studio.Figure 6.2. Update Maven User Settings
Maven has been configured to use the online repositories provided for Red Hat JBoss Fuse Service Works.
Important
- Missing artifact ARTIFACT_NAME
- [ERROR] Failed to execute goal on project PROJECT_NAME; Could not resolve dependencies for PROJECT_NAME
~/.m2/repository/ directory on Linux or the %SystemDrive%\Users\USERNAME\.m2\repository\ directory on Windows. This will force Maven to download correct versions of required artifacts during the next build.
6.5. Dependency Management
pom.xml file. Adding the BOM and parent will ensure that correct versions of plugins and transitive dependencies from the provided Maven repositories are included in the project.
pom.xml file:
org.jboss.ip.component.management:ip-parent:1.1-redhat-5
dependencyManagement section:
org.jboss.ip.component.management:ip-dependency-management-all:1.1-redhat-5org.jboss.component.management:jboss-dependency-management-all:6.1.1.Final-redhat-61
<parent>
  <groupId>org.jboss.ip.component.management</groupId>
  <artifactId>ip-parent</artifactId>
  <version>1.1-redhat-5</version>
</parent>

...

<dependencyManagement>
  <dependencies>
    <dependency>
      <groupId>org.jboss.ip.component.management</groupId>
      <artifactId>ip-dependency-management-all</artifactId>
      <type>pom</type>
      <version>1.1-redhat-5</version>
      <scope>import</scope>
    </dependency>
    <dependency>
      <groupId>org.jboss.component.management</groupId>
      <artifactId>jboss-dependency-management-all</artifactId>
      <type>pom</type>
      <version>6.1.1.Final-redhat-61</version>
      <scope>import</scope>
    </dependency>
  </dependencies>
</dependencyManagement>Chapter 7. Installing JBoss Developer Studio
7.1. Install JBoss Developer Studio
Procedure 7.1. Install with the Universal Installer
- Log into the Customer Portal at https://access.redhat.com.
- From the menu bar click .
- Under , click .

Figure 7.1. Download Red Hat JBoss Middleware Software on the Customer Portal
- Under Software Downloads, select the following options:
- From the Product list, select JBoss Developer Studio.
- From the Version list, select 7.1.x.
- For the JBoss Developer Studio universal installer, click for the
Red Hat JBoss Developer Studio 7.1.x Stand Alone Universal Binarydownload file. - For the JBoss Developer Studio and JBoss EAP universal installer, click for the
Red Hat JBoss Developer Studio 7.1.x Universal Binary with JBoss EAPdownload file.
This downloads a universal installer.jarfile.- On the command line, navigate to
path/to/.jarand enterjava -jar jbdevstudio-product-universal-version.jar
where version is substituted to match the name of the.jarfile.Note
Alternatively, to start the installer you may be able to double-click the.jarfile. - When the Installer window opens, click .
- After reading and agreeing to the terms of the End User License Agreement, click I accept the terms of this license agreement and click .
- In the Select the installation path field, type the path where you want JBoss Developer Studio to be installed or click to navigate to the location. When the Select the installation path field shows the correct path, click . When you are prompted about the specified location being created or overwritten, review the message and, if satisfied, click or as appropriate.

Figure 7.2. Installation Step 3: Select Target Folder
- In the Select Java VM step, Default Java VM is automatically selected. Ensure that the disabled text field contains the path of the Java developer kit you want to use. This is based on the default Java developer kit of your system. To change the specified Java developer kit, click Specific Java VM and type the path of the Java developer kit in the text field or use the button to locate the Java developer kit. When the text field shows the correct Java developer kit path, click .
Important
You must specify a Java developer kit with a 32-bit JRE to install a 32-bit version of JBoss Developer Studio and a 64-bit JRE to install a 64-bit version of JBoss Developer Studio. To change the bit version of the Java developer kit to be used for installing JBoss Developer Studio, complete the appropriate step for your operating system:- On OS X operating systems, from the Installation type list click the appropriate bit version.
- On Linux distributions and Microsoft Windows operating systems, in the text field type the path to the appropriate bit version of the Java developer kit.

Figure 7.3. Installation Step 4: Select Java VM
- Review the details in the Summary Information window and, if they are correct, click . Installation commences.
- When the Pack installation progress bar shows Finished, click . The installation process is now complete.
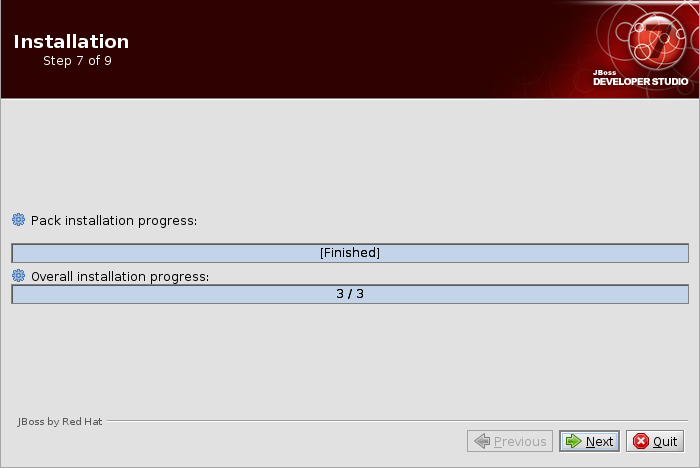
Figure 7.4. Installation Step 7: Installation Progress in Finished State
- To create shortcuts for starting JBoss Developer Studio, select the Create shortcuts in the Start-Menu and Create additional shortcut on the desktop check boxes and click .
- To automatically start JBoss Developer Studio when the Installer window closes, select the Run JBoss Developer Studio after installation check box. Click to close the Installer window.
Important
/etc/security/limits.conf file and ensure that the soft nofile and hard nofile variables have values of 9216 at a minimum. If the variables have smaller values, the values must be increased to 9216. If the variables are not specified, the following lines must be added to the file:
* soft nofile 9216
* hard nofile 9216
7.2. Installing JBoss Developer Studio Integration Stack
Procedure 7.2. Install JBoss Developer Studio Integration Stack
- Start JBoss Developer Studio.
- In JBoss Central, select the Software/Update tab. Scroll through the list to locate JBoss Developer Studio Integration Stack. Select the check box next to JBoss Integration and SOA Development and click .

Figure 7.5. Find JBoss Developer Studio Integration Stack in JBoss Central Software/Update Tab
- In the Install wizard, ensure the check boxes are selected for the software you want to install and click . It is recommended that you install all of the selected components.
- Review the details of the items listed for install and click . After reading and agreeing to the license(s), click I accept the terms of the license agreement(s) and click . The Installing Software window opens and reports the progress of the installation.
- During the installation process you may receive warnings about installing unsigned content. If this is the case, check the details of the content and if satisfied click to continue with the installation.

Figure 7.6. Warning Prompt for Installing Unsigned Content
- Once installing is complete, you are prompted to restart the IDE. Click to restart now and if you need to save any unsaved changes to open projects. Note that changes do not take effect until the IDE is restarted.
Important
Chapter 8. Getting Started with SwitchYard
8.1. The Remote Invoker Quickstart Application
8.1.1. Overview of the Remote Invoker Quickstart
- Remote Invoker
- To evaluate an offer on an automobile and make a decision on whether to accept the offer or not. You need to implement the CreditCheck service using business rules and the Dealer service using CDI. The Dealer service evaluates the offer and submits the applicant to a credit check, before replying with an answer to the client.This process includes unit tests to test each service individually and a test driver called RemoteClient which demonstrates the use of an HTTP-based Remote Invoker to invoke a SwitchYard service remotely.
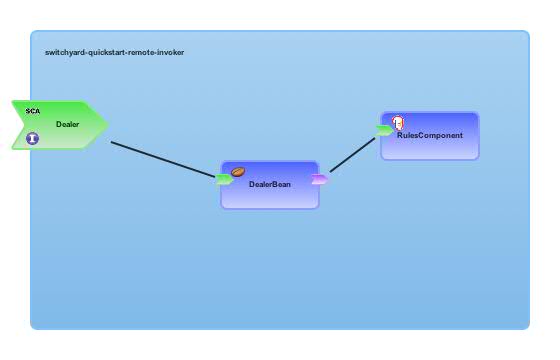
Figure 8.1. Remote Invoker Image
8.1.2. Using the Remote Invoker Quickstart
Prerequisites
- Maven 3.0.x must be installed.
Procedure 8.1. Task
- Open a terminal.
- Navigate to the
EAP_HOME/quickstarts/switchyard/remote-invokerdirectory. - Run the following command:
mvn clean install
The Remote Invoker quickstart is ready for use.
8.1.3. Running the Remote Invoker Quickstart Application
This topic demonstrates how to run and test the Remote Invoker quickstart application on the command line using Maven.
The application server must be running.
Procedure 8.2. Task
- Navigate to the Remote Invoker quickstart application directory:
cd EAP_HOME/quickstarts/switchyard/remote-invoker
- Run the following command to deploy the quickstart application:
mvn jboss-as:deploy
This will package the Remote Invoker quickstart inEAP_HOME/quickstarts/switchyard/remote-invoker/target/switchyard-quickstart-remote-invoker.jarand deploy it to the application server. You can confirm it has been deployed by checking the application server log or by logging into the Management Console and navigating to → from the view.The application is enabled by default. - Run the following command to test the quickstart application:
mvn exec:java
This will run the test class specified bymainClassin the application'spom.xmlfile, in this case,EAP_HOME/quickstarts/switchyard/remote-invoker/src/test/java/org/switchyard/quickstarts/remoteinvoker/RemoteClient.java.You will receive the following message:================================== Was the offer accepted? true ==================================
You will also see the following message in the server log:Approving credit for John Smith
Note
mvn package from within the quickstart application directory.
8.1.4. Undeploying the Remote Invoker Quickstart Application
This topic demonstrates how to undeploy the Remote Invoker quickstart application on the command line using Maven.
The application server must be running.
Procedure 8.3. Task
- Navigate to the Remote Invoker quickstart application directory:
cd EAP_HOME/quickstarts/switchyard/remote-invoker
- Run the following command to remove the deployed quickstart:
mvn jboss-as:undeploy
The Remote Invoker quickstart is no longer deployed to the application server. You can confirm it has been removed by checking the application server log or by logging into the Management Console and navigating to → from the view.
8.2. Create a Scheduled Service
camel-quartz-binding quickstart application is provided in the EAP_HOME/quickstarts/switchyard/ directory as an example. You can follow the instructions in the provided Readme.md file to build and deploy this application.
By the end of this tutorial you will have the knowledge and skills necessary to develop, deploy and test a scheduled service for your own integrated solutions. The service will be implemented as a SwitchYard application, making use of the camel-quartz component. You will develop the application with the JBoss Integration and SOA Development tools, provided as a plug-in for JBoss Developer Studio.
- The JBoss Integration and SOA Development tools are installed for JBoss Developer Studio.
- Maven is installed and configured.
Create a new SwitchYard project in JBoss Developer Studio.
- Select → → . Then select the appropriate wizard: → and select .
- Choose a project name (we are using
switchyard-example) and select . - You are now prompted to provide SwitchYard Project Configuration. Choose the Bean and Scheduling SwitchYard components.This automatically adds the following dependencies to the project's
pom.xmlfile so they are included when the project is built:<dependency> <groupId>org.switchyard.components</groupId> <artifactId>switchyard-component-bean</artifactId> <version>${switchyard.version}</version> </dependency> <dependency> <groupId>org.switchyard.components</groupId> <artifactId>switchyard-component-camel-quartz</artifactId> <version>${switchyard.version}</version> </dependency> - Select to proceed.
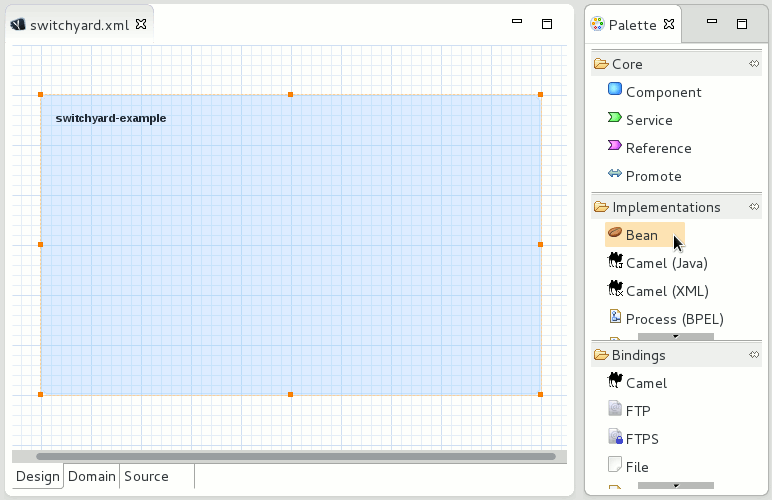
At this point, the new project is generated and appears in the Project Explorer view. You can double-click on thepom.xmlfile to open it, select the pom.xml tab, and confirm the dependencies added in the steps above.Open theswitchyard.xmlfile (found undersrc/main/resources). By default, the file opens on the Design tab. This large blue canvas is referred to as the composite.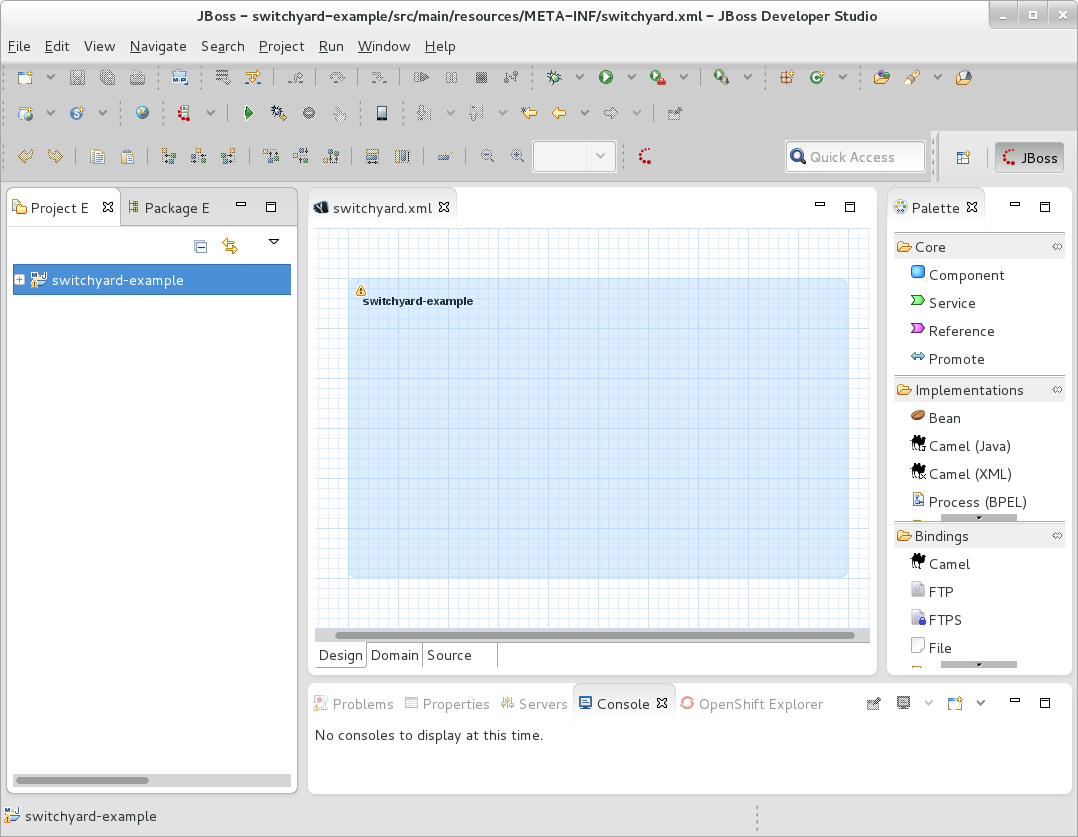 Click on the Source tab to see the underlying project XML:
<?xml version="1.0" encoding="UTF-8"?>
<sy:switchyard ... >
  <sca:composite name="switchyard-example" targetNamespace="urn:com.example.switchyard:switchyard-example:1.0">
  </sca:composite>
</sy:switchyard>
Important
Red Hat does not recommend editing this XML directly. Read more...Add a Bean implementation.
- Click back to the Design tab for the
switchyard.xmlfile. - Click and drag a Bean implementation from the SwitchYard Palette onto your composite. This will automatically invoke the New Bean Service wizard. If the Palette is not yet visible, select → → , then expand General and select Palette.
- In the New Bean Service wizard, select the Interface link. This will open the New Java Interface wizard.
- In the New Java Interface wizard, set the interface name to
GreetingServiceand select . This will take you back to the previous wizard. - Select and save your changes.
Your project now has a component and a component service, represented by the blue rectangle and small green chevron, respectively. Given that this is a Bean implementation (indicated by the coffee bean icon), two new files have been added to your project. TheGreetingServiceBeanclass corresponds to the component and theGreetingServiceinterface corresponds to the component service.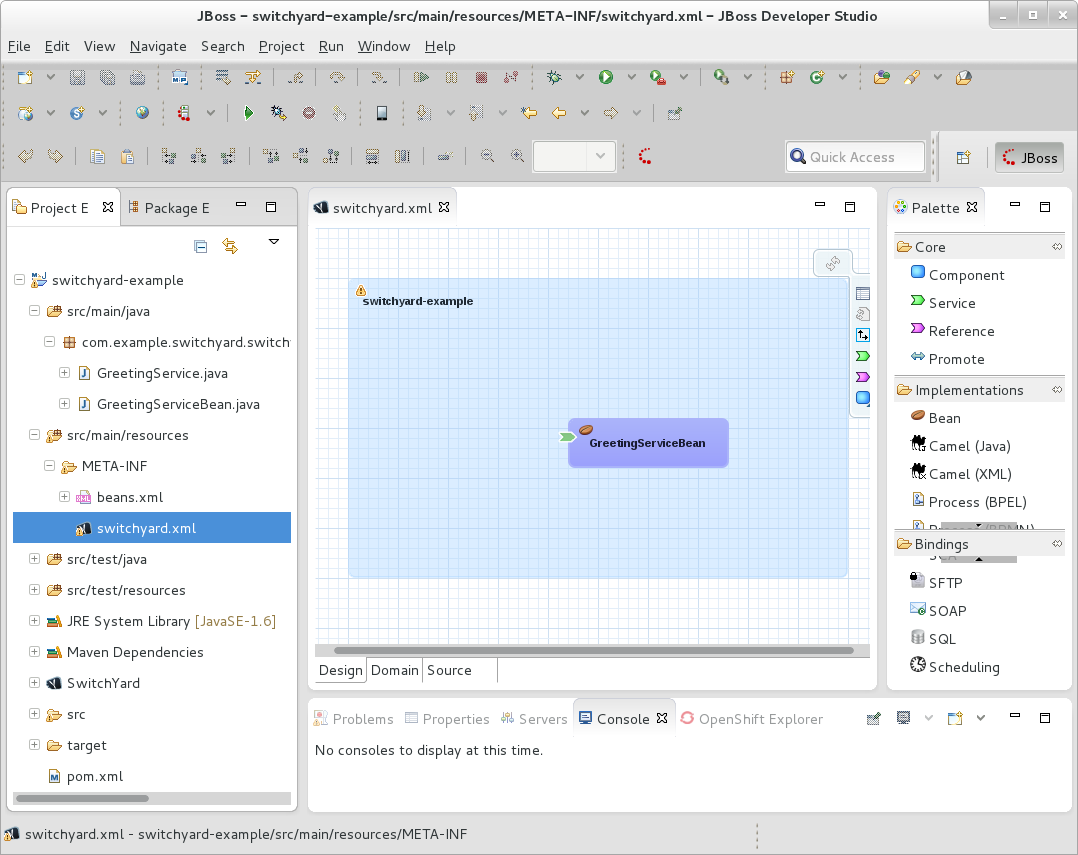 This design is captured by the following underlying XML:
<sca:component name="GreetingServiceBean">
  <bean:implementation.bean class="com.example.switchyard.switchyard_example.GreetingServiceBean"/>
    <sca:service name="GreetingService">
      <sca:interface.java interface="com.example.switchyard.switchyard_example.GreetingService"/>
    </sca:service>
</sca:component>
Customize the Bean.
- Double-click on the component service (the small green chevron) and add the following
greet()method.package com.example.switchyard.switchyard_example; public interface GreetingService { void greet(); } - Save your changes to the
GreetingServicefile. - Now double-click on the
GreetingServiceBeancomponent and update the code as follows.package com.example.switchyard.switchyard_example; import org.switchyard.component.bean.Service; @Service(GreetingService.class) public class GreetingServiceBean implements GreetingService { private int times; @Override public final void greet() { System.out.println((times++) + ". Service executed."); } } - Save your changes to the
GreetingServiceBeanfile.
Add a Service.
- Click and drag a Service from the SwitchYard Palette onto your composite. This will automatically invoke the New Service wizard.
- In the New Service wizard, select . Then choose the
GreetingServiceinterface which was created in the previous step, and select . - Select and save your changes to the
switchyard.xmlfile.
You have now created a composite service, represented by the large, green chevron.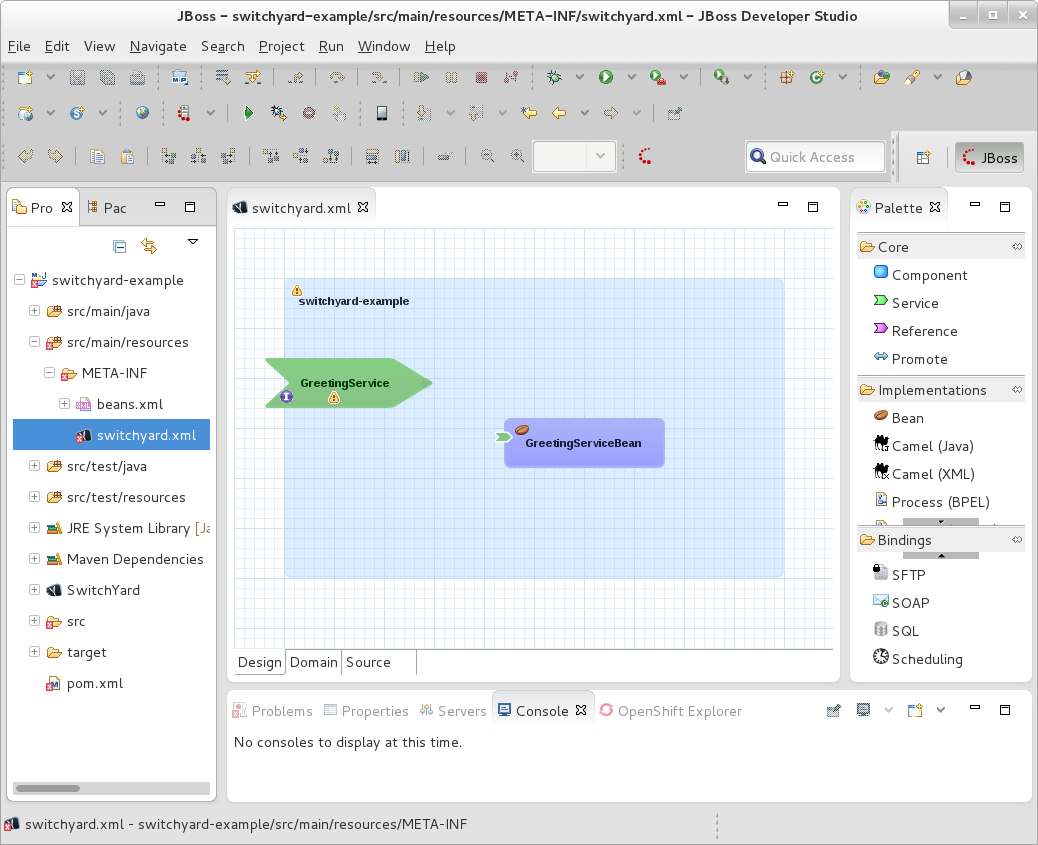 The following entry has been added to the underlying XML:
<sca:service name="GreetingService">
  <sca:interface.java interface="com.example.switchyard.switchyard_example.GreetingService"/>
</sca:service>
Note
At this point your project will report an error: Attribute 'promote' must appear on element 'sca:service'. This is because a composite service can only be realized by promoting a component service within the application. This is resolved in the next step.Promote the component service.
- Click on the tip of the large green chevron (representing the composite service), and drag your cursor to connect it to the tail of the smaller green chevron (representing the component service).

- Save your changes.
The component service is now promoted, with the following update to the XML:<sca:service name="GreetingService" promote="GreetingServiceBean/GreetingService"> <sca:interface.java interface="com.example.switchyard.switchyard_example.GreetingService"/> </sca:service>
Add a Scheduling binding.
- Click and drag a Scheduling binding from the SwitchYard Palette onto your composite service (the large green chevron). You will be prompted to provide Scheduling Binding Details.
- Enter a name for your binding (we are using
EverySecondJob) and enter the following value for Cron.* * * * * ?
Important
Ensure there is a single space between each of the characters above. Otherwise, the binding will not be created successfully. - Select and save your changes.
The scheduling icon now appears on the composite service: The following XML is added within the
sca:serviceelement accordingly:<quartz:binding.quartz name="EverySecondJob"> <quartz:name>EverySecondJob</quartz:name> <quartz:cron>* * * * * ?</quartz:cron> </quartz:binding.quartz>
Build and deploy the application.
You are now ready to build and deploy your application.- From within the application's top directory (containing the application's
pom.xmlfile), build the application with the following command:mvn clean install
- Start the application server.
[me@localhost jboss-eap-6.1]$
./bin/standalone.sh - Open a browser and navigate to http://localhost:9990/console/index.html.
- Select → from the Runtime view.
- Select to open the Create Deployment wizard. Select and then select the file to deploy from the project's
targetfolder; for example,~/workspace/switchyard-example/target/switchyard-example-0.0.1-SNAPSHOT.jar. Select . - Select Next to proceed to Step 2, then select .
- Your deployment has been added to the list of Available Deployments but now you need to enable it. Select the deployment from the list, select the button and then .
Now that the application is deployed and running, the following output appears (and continues to do so every second) in the server terminal window:16:06:43,020 INFO [stdout] (DefaultQuartzScheduler-camel-1_Worker-2) 1. Service executed. 16:06:44,019 INFO [stdout] (DefaultQuartzScheduler-camel-1_Worker-3) 2. Service executed. 16:06:45,009 INFO [stdout] (DefaultQuartzScheduler-camel-1_Worker-4) 3. Service executed. 16:06:46,009 INFO [stdout] (DefaultQuartzScheduler-camel-1_Worker-5) 4. Service executed. 16:06:47,010 INFO [stdout] (DefaultQuartzScheduler-camel-1_Worker-6) 5. Service executed. 16:06:48,011 INFO [stdout] (DefaultQuartzScheduler-camel-1_Worker-7) 6. Service executed. ...
8.3. Create a Web Service Proxy
- If you are using multiple versions of a service, you need intelligent routing to figure out which version of the service a client is invoking.
- If the web service does not provide security on its own, you might need to add a layer of security.
- You might want additional auditing/logging.
- You might have to transform/manipulate messages to make them compatible with the service.
- You might want to change the backend service later, without forcing a change on the client.
[client] <---> [web service proxy] <---> [web service]
camel-soap-proxy quickstart application (in the EAP_HOME/quickstarts/switchyard directory) is provided as an example. You can follow the instructions in the provided Readme.md file to build and deploy this application.
This tutorial consists of three parts:
- Deploy and test a web service.
- Develop a web service proxy that acts as a proxy to the web service.
- Deploy and test the web service proxy.
- The JBoss Integration and SOA Development tools are installed for JBoss Developer Studio.
- Maven is installed and configured.
- Your application server is running (it is assumed, for this tutorial, on default port http://localhost:8080).
camel-soap-proxy quickstart application provides a suitable web service, ReverseService.war, for the purpose of this exercise. Given a SOAP message, this web service responds with the message text reversed. In this section you will build, deploy and test this web service.
- From your
EAP_HOME/quickstarts/switchyard/camel-soap-proxydirectory, run the following command:$ mvn clean install
This builds the quickstart application, including the web service required for this exercise:EAP_HOME/quickstarts/switchyard/camel-soap-proxy/target/ReverseService.war. - Deploy the service to your running application server by copying the
ReverseService.warfile to the server'sdeploymentsfolder,EAP_HOME/standalone/deployments/.The service is now ready to accept requests on http://localhost:8080/ReverseService. - Use your favorite SOAP client to test the service. If you send the following request:
<SOAP-ENV:Envelope xmlns:SOAP-ENV="http://schemas.xmlsoap.org/soap/envelope/">
    <SOAP-ENV:Header/>
    <SOAP-ENV:Body>
        <ns2:reverse xmlns:ns2="urn:switchyard-quickstart:camel-soap-proxy:1.0">
            <text>Hello world!</text>
        </ns2:reverse>
    </SOAP-ENV:Body>
</SOAP-ENV:Envelope>
You receive the following response, with the message text reversed:<soap:Envelope xmlns:soap="http://schemas.xmlsoap.org/soap/envelope/"> <soap:Body> <ns2:reverseResponse xmlns:ns2="urn:switchyard-quickstart:camel-soap-proxy:1.0"> <text>!dlrow olleH</text> </ns2:reverseResponse> </soap:Body> </soap:Envelope>Note
You can confirm the web service address (and retrieve the associated WSDL) using JBoss Management Console. Login to the console (default address is http://localhost:9990/console/). From the Runtime view, navigate to Manage Deployments. Select → → . Note the URL provided for WSDL.
Now that the web service has been deployed on the server, develop the proxy to interface to it.
Create a new SwitchYard project in JBoss Developer Studio.
- Select → → . Then select the appropriate wizard: → and select .
- Choose a project name (we are using
switchyard-example) and select . - Select to proceed.
At this point, the new project is generated and appears in the Project Explorer view.Add the WSDL file for the web service as a resource.
- Copy the WSDL file for the deployed service to
.../switchyard-example/src/main/resources/META-INF. You can do this usingwget. For example, on the command line, from within the application'sMETA-INFdirectory, run:wget http://localhost:8080/ReverseService?wsdl -O ReverseService.wsdl
- In JBoss Developer Studio, right-click on the project in the Project Explorer view, and select Refresh. Navigate the project files to confirm the file has been added as a resource.
Add a Camel (XML) implementation.
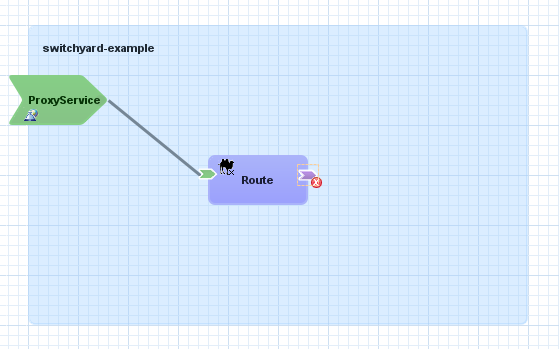
- Open the Design tab for the
switchyard.xmlfile. - Click and drag a Camel (XML) implementation from the SwitchYard Palette onto the composite (the blank canvas). This invokes a wizard to help you create a new Camel route file resource. If the Palette is not yet visible, select → → , then expand General and select Palette.
- In the wizard, select the WSDL option, and browse to select the
ReverseService.wsdlfile for the interface. - Change the Service Name to
ProxyService. - Select and save the project.
Your project now has a component and a component service, represented by the blue rectangle and small green chevron, respectively. Aroute.xmlfile has been added to your project, corresponding to the component. TheReverseService.wsdlcorresponds to the component service. If you double-click on either of these graphical entities, the corresponding file opens for viewing.Promote the component service.
- Move your cursor over the component service and select Promote Service.

- You are prompted to provide details for the promotion. Leave the default values. Select , and save the project.Your component service has now been promoted to a corresponding composite service (represented by the large green chevron):

Create a component reference.
- Move your cursor over the component and select Reference.

- You are prompted to provide details for the new reference. Select the WSDL option, and browse to select the
ReverseService.wsdlfile for the interface. Leave the default Service Name asReverseService. - Select and save the project.Your component now has a component reference (small purple chevron). An error appears until it is promoted in the next step.
Promote the component reference.
- Move your cursor over the component reference and select Promote Reference.
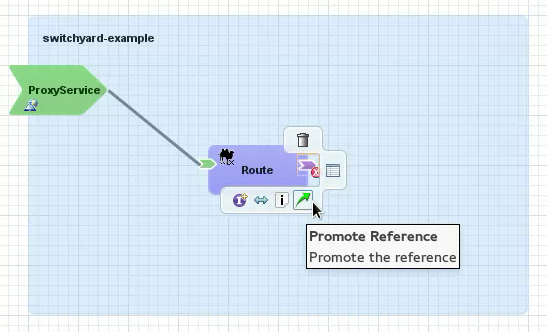
- You are prompted to provide details for the promotion. Leave the default values. Select , and save the project.Your component reference has now been promoted to a corresponding composite reference (represented by the large purple chevron):

Create a route from the proxy endpoint to the web service endpoint.
- Open the
route.xmlfile. You can open it from the Project Explorer or by double-clicking on the Camel Route component. By default it opens in the Design view. Select the Source view to expose the Spring XML. - From looking at the XML, you can see that, currently, any traffic received from the proxy service will be logged.To forward this traffic on to the web service, add the web service as an endpoint:
<?xml version="1.0" encoding="ASCII"?> <routes xmlns="http://camel.apache.org/schema/spring"> <route> <from uri="switchyard://ProxyService"/> <log message="ProxyService - message received: ${body}"/> <to uri="switchyard://ReverseService"/> </route> </routes> - Save your changes.
Add a SOAP binding to the composite service.
- Drag a SOAP binding from the SwitchYard Palette onto the composite service (ProxyService).
- You are prompted for SOAP binding details. Set the following values, leaving all other default values:
Property Value Name soap-proxyContext path proxyServer Port :${webPort} - Select and save your changes.
Add a SOAP binding to the composite reference.
- Drag a SOAP binding from the SwitchYard Palette onto the composite reference (ReverseService).
- You are prompted for SOAP binding details. Set the following values, leaving all other default values:
Property Value Name soap-serviceEndpoint Address http://localhost:${webPort}/ReverseService - Select and save your changes.
Define the value of
webPort.- From the Domain view of the
switchyard.xmlfile, add a domain property with the following values:Name Value webPort${org.switchyard.component.http.standalone.port:8080} - Save your changes.
Build and deploy the web service proxy.
- From within the application's top directory (containing the application's
pom.xmlfile), build the application with the following command:mvn clean install
- Open a browser and navigate to http://localhost:9990/console/index.html.
- Select → from the Runtime view.
- Select to open the Create Deployment wizard. Select and then select the file to deploy from the project's
targetfolder; for example,~/workspace/switchyard-example/target/switchyard-example-0.0.1-SNAPSHOT.jar. Select . - Select Next to proceed to Step 2, then select .
- Your deployment has been added to the list of Available Deployments but now you need to enable it. Select the deployment from the list, select the button and then .
Test your application.
Your web service proxy is now ready to accept requests on http://localhost:8080/proxy/ReverseService.- Use your favorite SOAP client to send a message to test the proxy service in the same way as you did when you tested the web service, only use the proxy address instead. After sending a message, you receive a response with the text reversed, the same as when it was sent directly to the web service. However, when sending to the proxy, you can see that the message is also logged on the server as prescribed by the
route.xmlin the proxy service; for example:11:50:29,100 INFO [route2] (http-/127.0.0.1:8080-14) ProxyService - message received: <ns2:reverse xmlns:ns2="urn:switchyard-quickstart:camel-soap-proxy:1.0"> <text>Hello world!</text> </ns2:reverse>
Chapter 9. Getting Started with Camel on JBoss EAP
9.1. Camel CXF Example
Maven 3.0.x must be installed and configured.
- Open a terminal and navigate to the
EAP_HOME/quickstarts/camel/camel-example-cxf-tomcatdirectory. - Run the following command to build and package the example:
mvn clean install
If this command executes successfully, the application will be packaged inEAP_HOME/quickstarts/camel/camel-example-cxf-tomcat/target/camel-example-cxf-tomcat.war. - If your application server is not running. Start it now. You can check if your server is running by opening a browser and navigating to http://localhost:8080. If you can login successfully to the management console, the server is running.
- Deploy the
camel-example-cxf-tomcatexample to the running server by copying thecamel-example-cxf-tomcat.warfile to the server's deployment directory,EAP_HOME/MODE/deployments. - You can use a Web browser to query the WSDL contract from the newly deployed Web service. Navigate to the following URL:
- Run the test client against the deployed Web service. From the quickstart directory, enter the following command:
mvn exec:java
If the client runs successfully, you should see some output like the following in your command window:... [INFO] --- exec-maven-plugin:1.1.1:java (default-cli) @ camel-example-cxf-tomcat --- 2013-07-24 13:59:16,829 [teClient.main()] INFO ReflectionServiceFactoryBean - Creating Service {http://incident.cxf.example.camel.apache.org/}IncidentService from class org.apache.camel.example.cxf.incident.IncidentService OK;123 IN PROGRESS [INFO] ------------------------------------------------------------------------ [INFO] BUILD SUCCESS [INFO] ------------------------------------------------------------------------ [INFO] Total time: 7.445s [INFO] Finished at: Wed Jul 24 13:59:17 CEST 2013 [INFO] Final Memory: 10M/81M [INFO] ------------------------------------------------------------------------ - If you have an interface such as soapUI installed, you can test the service using requests such as the following sample SOAP requests:
<soap:Envelope xmlns:soap="http://schemas.xmlsoap.org/soap/envelope/">
    <soap:Body>
        <ns1:reportIncident xmlns:ns1="http://incident.cxf.example.camel.apache.org/">
            <arg0>
                <details>blah blah</details>
                <email>davsclaus@apache.org</email>
                <familyName>Smith</familyName>
                <givenName>Bob</givenName>
                <incidentDate>2011-11-25</incidentDate>
                <incidentId>123</incidentId>
                <phone>123-456-7890</phone>
                <summary>blah blah summary</summary>
            </arg0>
        </ns1:reportIncident>
    </soap:Body>
</soap:Envelope>
<soap:Envelope xmlns:soap="http://schemas.xmlsoap.org/soap/envelope/"> <soap:Body> <ns1:statusIncident xmlns:ns1="http://incident.cxf.example.camel.apache.org/"> <arg0> <incidentId>456</incidentId> </arg0> </ns1:statusIncident> </soap:Body> </soap:Envelope>
Note
README.txt file located in that quickstart's directory.
9.2. Camel Servlet Example
Maven 3.0.x must be installed and configured.
- Open a terminal and navigate to the
EAP_HOME/quickstarts/camel/camel-example-servlet-tomcatdirectory. - Run the following command to build and package the example:
mvn clean install
If this command executes successfully, the application will be packaged inEAP_HOME/quickstarts/camel/camel-example-servlet-tomcat/target/camel-example-servlet-tomcat-VERSION.war. - If your application server is not running. Start it now. You can check if your server is running by opening a browser and navigating to http://localhost:8080. If you can login successfully to the management console, the server is running.
- Deploy the
camel-example-servlet-tomcatexample to the running server by copying thecamel-example-servlet-tomcat-VERSION.warfile to the server's deployment directory,EAP_HOME/MODE/deployments. - Navigate to the following URL in your browser (assuming VERSION is
2.10.0.redhat-60024): - You can test the servlet by following the link in the text: "To get started click this link."
Note
README.txt file located in that quickstart's directory.
Appendix A. Quickstart Applications
A.1. About Quickstart Applications
EAP_HOME/quickstarts directory of your installation.
Note
A.2. Sample SwitchYard Quickstarts
EAP_HOME/quickstarts/switchyard directory:
- remote-invoker
- The RemoteInvoker serves as a remote invocation client for SwitchYard services. It allows non-SwitchYard applications to invoke any service in SwitchYard which uses a <binding.sca> binding. It is also used by the internal clustering channel to facilitate intra-cluster communication between instances.
- bean-service
- Implements a service using a CDI bean and exposes it through a SOAP gateway.
- bpm-service
- Uses BPMN 2 to provide and utilize SwitchYard services.
- camel-service
- This is a basic routing example that uses XML and Java DSL Camel routes.
- camel-jms-binding
- Demonstrates how a Camel component can be used as a SwitchYard gateway.
- demos/orders
- Launches a web application which invokes a SwitchYard service from a JSF.
Note
You can find additional quickstarts by going to thequickstartsdirectory.
A.3. Using SwitchYard Quickstarts
Prerequisites
- Maven 3.0.x must be installed.
Note
Run the following command to verify that Maven is installed successfully on your machine:mvn --version
Procedure A.1. Task
- Open a terminal.
- Navigate to a quickstart directory under
EAP_HOME/quickstarts/switchyardwhere the projectpom.xmlfile for the quickstart application is located. For example:EAP_HOME/quickstarts/switchyard/remote-invoker - Run the following command:
mvn clean install
The quickstart compiles and is ready for use.
A.4. Running Quickstarts from JBoss Developer Studio
This topic demonstrates how to import a quickstart application to JBoss Developer Studio and then deploy it to a running application server.
The JBoss Integration and SOA Development tools must be installed from the JBoss Developer Studio Integration Stack.
Procedure A.2. Task
- Open JBoss Developer Studio.
- Click → → → .
- Select and navigate to the quickstart directory, for example,
EAP_HOME/quickstarts/switchyard/bean-serviceand then select .The import tool will scan the directory to locate the associatedpom.xmlfile. - Select .
- The quickstart is listed in the Project Explorer tab. You can expand the project to explore its contents.
- In the Project Explorer tab, right-click on the project's name and click → → .
The quickstart application is deployed to the server and will be enabled by default.
Appendix B. Prerequisite Software
B.1. Install Open JDK on Red Hat Linux
- Subscribe to the Base Channel Obtain the OpenJDK from the RHN base channel. (Your installation of Red Hat Enterprise Linux is subscribed to this channel by default.)
- Install the Package. Use the yum utility to install OpenJDK:
yum install java-1.7.0-openjdk-devel - Verify that Open JDK is now your system default. You can ensure the correct JDK is set as the system default by following the steps below.
- As a root user, run the alternatives command for java:
/usr/sbin/alternatives --config java - Select
/usr/lib/jvm /jre-1.7.0-openjdk/bin/java. - Apply the same for javac:
/usr/sbin/alternatives --config javac - Select
/usr/lib/jvm /java-1.7.0-openjdk/bin/java.
Open JDK is installed successfully on your machine.
B.2. Install Maven
The following software must be installed:
- An archiving tool for extracting the contents of compressed files.
- Open JDK.
Procedure B.1. Install Maven
Download Maven.
- Enter http://maven.apache.org/download.cgi in the address bar of a browser.
- Download
apache-maven-3.0.5ZIP file and save it to your hard drive.
Install and configure Maven.
On Red Hat Enterprise Linux
- Extract the ZIP archive to the directory where you wish to install Maven.
- Open a terminal.
- Add the M2_HOME environment variable by entering the following command:
export M2_HOME=/usr/local/apache-maven/apache-maven-3.0.x
- Add the M2 environment variable by entering the following command:
export M2=$M2_HOME/bin
- Add the M2 environment variable to your path by entering the following command:
export PATH=$M2:$PATH
- Make sure that JAVA_HOME is set to the location of your JDK. For example:
export JAVA_HOME=/usr/lib/jvm/java-1.7.0-openjdk.x86_64
- Make sure that $JAVA_HOME/bin is in your PATH environment variable.
- Run the following command to verify that Maven is installed successfully on your machine:
mvn --version
On Microsoft Windows
- Extract the ZIP archive to the directory where you wish to install Maven. The subdirectory
apache-maven-3.0.xis created from the archive. - Press Start+Pause|Break. The System Properties dialog box is displayed.
- Click the Advanced tab and click Environment Variables.
- Under System Variables, select Path.
- Click Edit and add the two Maven paths using a semicolon to separate each entry.
- Add the M2_HOME variable and set the path to
C:\Program Files\Apache Software Foundation\apache-maven-3.0.X. - Add the M2 variable and set the value to %M2_HOME%\bin.
- Update or create the Path environment variable:
- Add the %M2% variable to allow Maven to be executed from the command line.
- Add the variable %JAVA_HOME%\bin to set the path to the correct Java installation.
- Click OK to close all the dialog boxes including the System Properties dialog box.
- Open Windows command prompt and run the following command to verify that Maven is installed successfully on your machine:
mvn --version
Maven is successfully installed and configured on your machine.
Appendix C. Revision History
| Revision History | |||
|---|---|---|---|
| Revision 6.0.0-70 | Wednesday July 22 2015 | ||
| |||
| Revision 6.0.0-69 | Friday June 5 2015 | ||
| |||
| Revision 6.0.0-68 | Tuesday April 14 2015 | ||
| |||
| Revision 6.0.0-67 | Thursday March 19 2015 | ||
| |||
| Revision 6.0.0-66 | Monday February 23 2015 | ||
| |||
| Revision 6.0.0-65 | Wednesday December 17 2014 | ||
| |||
| Revision 6.0.0-64 | Wednesday December 10 2014 | ||
|
| |||