
Red Hat Training
A Red Hat training course is available for Red Hat Fuse
Administration and Configuration Guide
Use this guide to further configure and monitor Red Hat JBoss Fuse Service Works.
Abstract
Chapter 1. Red Hat JBoss Fuse Service Works
1.1. What is Red Hat JBoss Fuse Service Works?
1.2. Core Functionality
- Enterprise Integration Pattern (EIP) Based Development
- The versatile EIP framework is implemented in routing and transformation processes for faster and more efficient integration solutions.
- High Performance Messaging
- A high performance messaging broker supports messaging patterns such as publish-subscribe, point-to-point, and store-forward, and multiple cross language clients.
- Service Development
- The web services framework exposes integration assets as services and calls external services, supporting all major web services standards. It also supports RESTful calls.
- Structured Service Development
- A lightweight service development framework provides full life-cycle support for developing, deploying, and managing service-based applications.
- Automatable Registry with Workflow
- Manage the life-cycle of services from design, development, and deployment by defining, exposing, and enforcing rules or policies.
- Business Transaction Monitoring
- Capture service activity information, define and collect metrics, and define alerts and SLAs.
1.3. System Integration
1.4. Core and Components
1.5. Components of Red Hat JBoss Fuse Service Works
Table 1.1. Red Hat JBoss Fuse Service Works Components
| Component | Function |
|---|---|
|
SwitchYard
|
Service delivery framework
|
|
JBoss Rules
|
Business rules engine with complex event processing
|
|
Design Time Governance
|
A service registry/repository
|
|
Runtime Governance
|
Service activity monitoring
|
|
JBoss Operations Network
|
Operations, administration, and management tools
|
|
JBoss EAP
|
A full JavaEE application server
|
|
Apache Camel
|
Rules Based Router
|
|
Smooks
|
Framework for processing XML and non-XML data using Java
|
|
ModeShape
|
Data Store
|
|
HornetQ
|
Messaging and Integration Patterns Server
|
|
Apache CXF
|
Services Framework
|
- Bean Services with CDI
- SwitchYard leverages the power of Java EE6 and CDI to allow Java objects become services by adding an @Service annotation to your bean. Beans are automatically registered at runtime and references to other services can be injected as CDI beans using the @Inject annotation. Use CDI in your JSP and JSF applications to inject enterprise services into the web tier.
- Declarative Transformation
- With declarative transformation in SwitchYard, you can define the transformation and types to which it applies. SwitchYard automatically registers and executes the transformation. Choose from Smooks, Java, XSLT, JSON, and more.
- Decision Services with JBoss Rules
- Encapsulate business rules as decision services using the JBoss Rules component in SwitchYard. Each service has a well-defined contract with protocol binding details and marshaling details abstracted away by SwitchYard.
- Smooks
- This transformation engine can be used in conjunction with Red Hat JBoss Fuse Service Works to process messages.
- Business Process Execution Language (BPEL)
- You can use web services to orchestrate business rules using this language. It is included with Red Hat JBoss Fuse Service Works for the execution of business process instructions.
- JBoss Rules
- This is the rules engine that is packaged with Red Hat JBoss Fuse Service Works. It can infer data from the messages it receives to determine which actions need to be performed.
- Testing
- Comprehensive unit test support is provided to allow you to test services as you develop them.
1.6. Red Hat JBoss Fuse Service Works Features
- SwitchYard
- SwitchYard is a lightweight service delivery framework providing full life-cycle support for developing, deploying, and managing service-oriented applications.
- Business Process Execution Language (BPEL)
- You can use web services to orchestrate business rules using this language. It is included with Red Hat JBoss Fuse Service Works for the execution of business process instructions.
- Smooks
- This transformation engine can be used in conjunction with Red Hat JBoss Fuse Service Works to process messages. It can also be used to split messages and send them to the correct destination.
- JBoss Rules
- This is the rules engine that is packaged with Red Hat JBoss Fuse Service Works. It can infer data from the messages it receives to determine which actions need to be performed.
1.7. Integration Use Case
Chapter 2. Read Me
2.1. Back Up Your Data
Warning
2.2. Red Hat Documentation Site
2.3. EAP_HOME
EAP_HOME refers to the root directory of the Red Hat JBoss Enterprise Application Platform installation on which JBoss Fuse Service Works is deployed.
2.4. MODE
Note
MODE will either be standalone or domain depending on whether your instance of JBoss Enterprise Application Platform is running in standalone or domain mode. Substitute one of these whenever you see MODE in a file path in this documentation.
Chapter 3. The Administration Interfaces
- SwitchYard
- JBoss EAP Management Console
- JBoss EAP Management CLI
- JBoss Operations Network
- Business Rules Orchestration
- BPEL Console
- Governance
- Runtime Governance Console
- Design Time Governance Console
- S-RAMP Console
- S-RAMP Management CLI
Chapter 4. Managing SwitchYard with JBoss EAP Management Console
4.1. JBoss EAP Management Console
4.1.1. Log in to the Management Console
Prerequisites
- JBoss EAP 6 must be running.
Navigate to the Management Console start page
Launch your web browser and navigate to the Management Console in your web browser at http://localhost:9990/console/App.htmlNote
Port 9990 is predefined as the Management Console socket binding.- Enter the username and password of the account that you created previously to log in to the Management Console login screen.
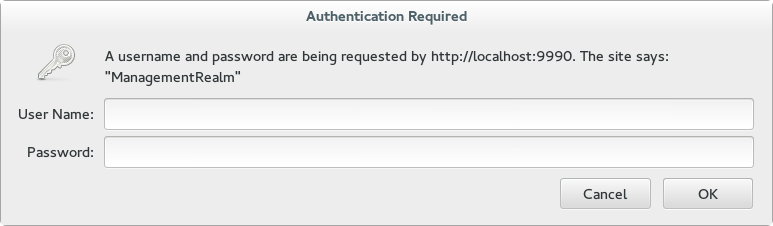
Figure 4.1. Log in screen for the Management Console
Once logged in, you are redirected to the following address and the the Management Console landing page appears: http://localhost:9990/console/App.html#home
4.1.2. Deploy an Application Using the Management Console
- Select the Runtime tab at the top of the console.
- Expand the menu and select to go to the Deployments panel.
- Select . A
Create Deploymentdialog box will appear. - In the dialog box, click . Browse to the file you want to deploy and select it for upload. Click to proceed.
- Verify the deployment name and runtime name that appear in the Create Deployments dialog box. Click to upload the file once the names are verified.
4.1.3. SwitchYard Management Console
- A view of the applications and services deployed on the server.
- A view of various execution metrics.
- A view of the SwitchYard subsystem configuration.
Note
4.2. Metrics Views
- System : metrics for the entire SwitchYard runtime (all deployed applications)
- Message Counts: This shows the total number of messages, number of successful messages and number of failed messages.
- Processing time: This shows the total, minimum, average and maximum processing times.
- Service : metrics for a composite service in an application. Additional metric details are provided for the following:
- Gateway: metrics for each binding on the service (For example, FTP metrics for service "ABC")
- Operation: metrics for each operation on the service
- Service Reference : metrics for references invoked by the service
- Reference : metrics for a composite reference in an application. Additional metric details are provided for the following:
- Gateway : metrics for each binding on the reference (For example, FTP metrics for reference "ABC")
- Operation : metrics for each operation on the reference
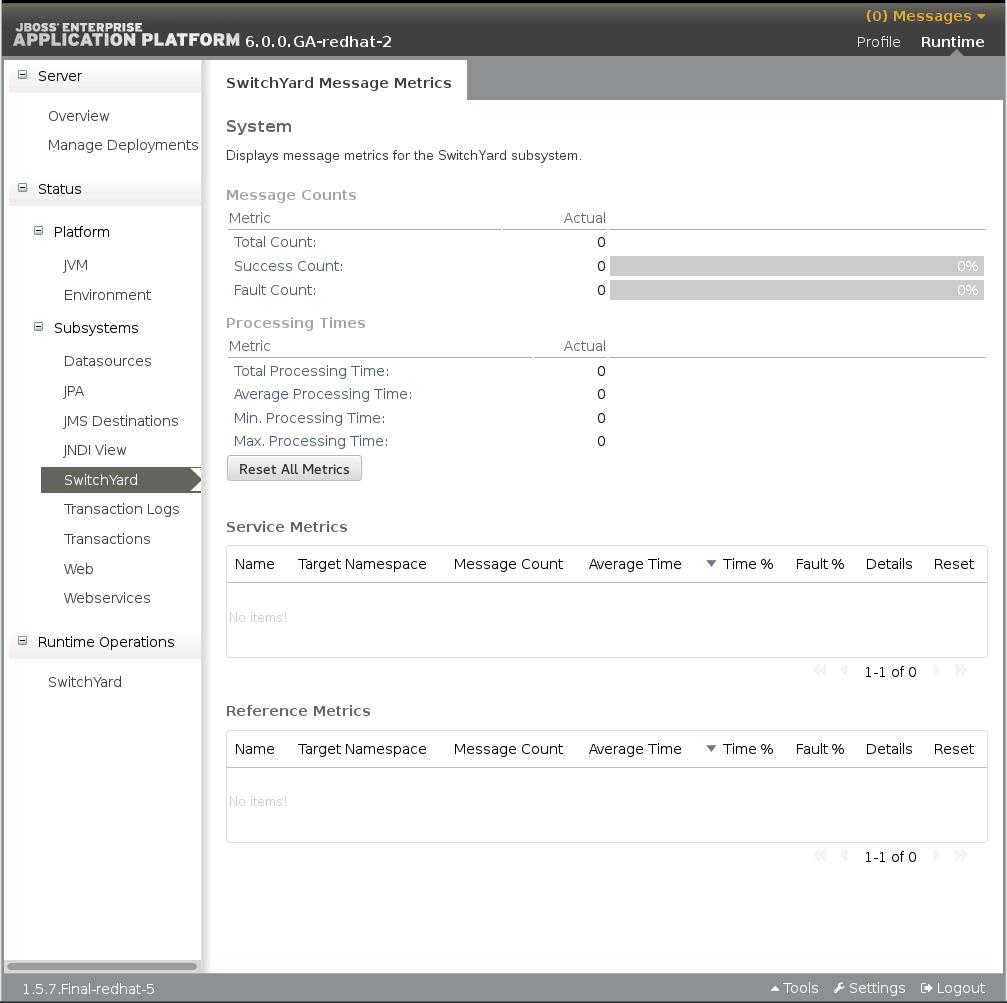
Figure 4.2. JBoss EAP Management Console SwitchYard Metrics Page
4.3. Application Views
- Applications: lists all SwitchYard applications deployed on the serverFor each application there is an Application Details panel. This panel contains information for each deployed SwitchYard application, and will show the details when the application is selected in the Applications list.
- Services: lists all Services provided by the applications deployed on the server
- References: lists all service References used by applications deployed on the server
- Artifacts: lists all artifacts referenced by applications deployed on the server
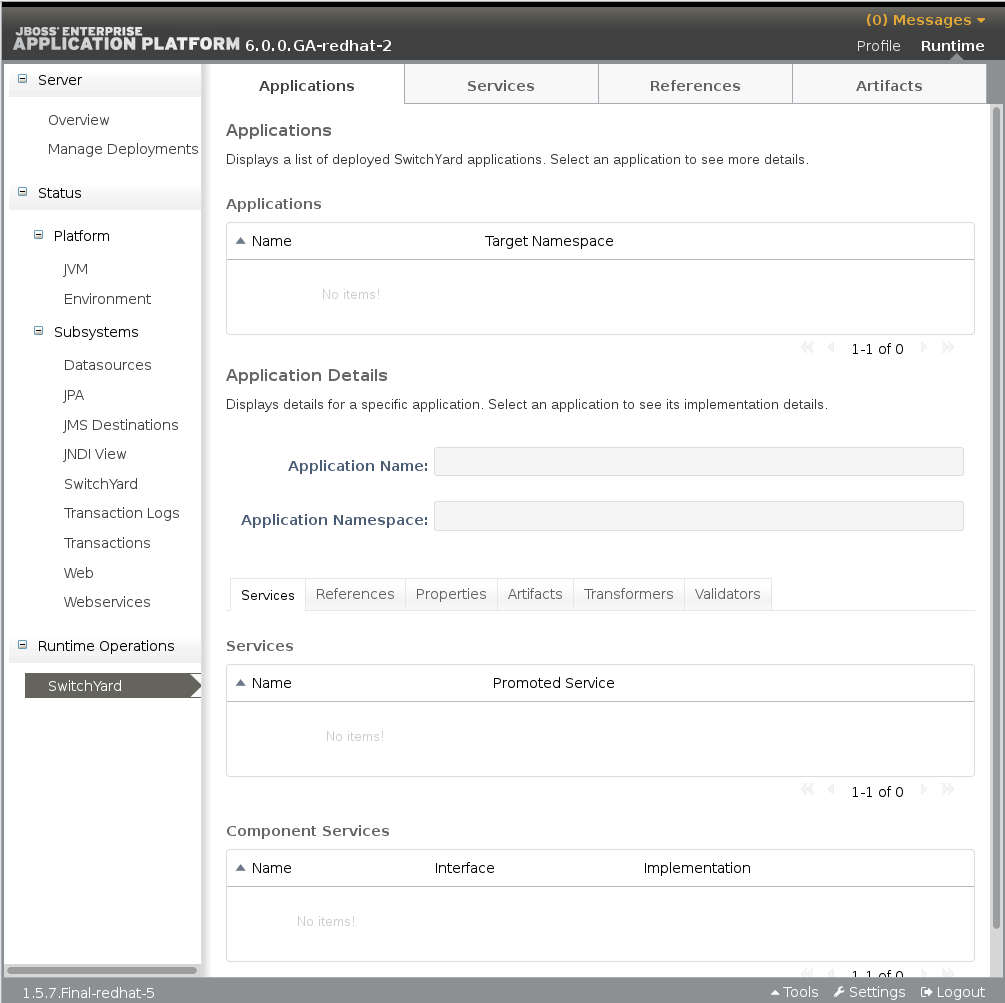
Figure 4.3. JBoss EAP Management Console Runtime Operations page
4.3.1. Applications
Table 4.1. JBoss EAP Management Console operations available for SwitchYard Applications page
| Operation Name | Function |
|---|---|
|
Services
|
Services provided by the application. Select a service to open the tab which will display details for the service.
|
|
References
|
References used by the application. Select a reference to open the tab which will display details for the reference.
|
|
Properties
|
Properties defined in the application. The properties may also be edited within this view.
|
|
Artifacts
|
Artifacts referenced by the application. Select an artifact to open the main tab, which displays details for the artifact
|
|
Transformers
|
Transformers configured in the application.
|
|
Validators
|
Validators configured in the application.
|
Table 4.2. SwitchYard Applications page, Services Tab, Services Table.
| Operation Name | Function |
|---|---|
|
Name
|
The name of the component service
|
|
Promoted Service
|
The name of the component service providing the implementation for the service.
|
Table 4.3. SwitchYard Applications page, Services Tab, Component Services Table.
| Operation Name | Function |
|---|---|
|
Name
|
The name of the component service
|
|
Interface
|
The name of the component service providing the implementation for the service.
|
|
Implementation
|
Provides a link for viewing the implementation details of the component
|
- The technology used to implement the component (For example, Camel).
- A list of references required by the component.
- The raw configuration for the implementation.
Table 4.4. SwitchYard Applications page, Artifacts Tab, Artifact References Table.
| Operation Name | Function |
|---|---|
|
Name
|
The name of the referenced artifact
|
|
URL
|
The location of the artifact.
|
Table 4.5. SwitchYard Applications page, Transformers Tab
| Operation Name | Function |
|---|---|
|
From
|
The from type supported by the transformer.
|
|
To
|
The to type supported by the transformer.
|
|
Type
|
The implementation technology used by the transformer (For example Java and XSLT).
|
Table 4.6. SwitchYard Applications page, Validators Tab
| Operation Name | Function |
|---|---|
|
Name
|
The name of the validator.
|
|
Type
|
The type of the validator.
|
4.3.2. Services
Table 4.7. JBoss EAP Management Console operations available for SwitchYard Services page
| Operation Name | Function |
|---|---|
|
Name
|
The service name
|
|
Target Namespace
|
The namespace that the service is defined in.
|
Table 4.8. SwitchYard Services page, Service Details section
| Operation Name | Function |
|---|---|
|
Name
|
The service name
|
|
Target Namespace
|
The namespace that the service is defined in.
|
|
Application
|
The application providing the service (this links to the main Applications tab)
|
|
Interface
|
The interface provided by the service.
|
|
Promoted Service
|
The component service implementing the service
|
|
Gateways
|
Lists the gateways providing access to the service
|
|
Throttling
|
Throttling configuration for the service
|
Table 4.9. SwitchYard Services page, Service Details section, Gateways Tab
| Operation Name | Function |
|---|---|
|
Name
|
The name pf the gateway.
|
|
Type
|
The type of the gateway (For example, SOAP and HornetQ)
|
|
Status
|
The status of the gateway (For example, started, stopped)
|
|
Start/Stop
|
Click the button to start or stop the gateway.
|
|
Configuration
|
The component service implementing the service
|
|
Gateways
|
Click the button to open a dialog that displays the raw configuration for the gateway
|
Table 4.10. SwitchYard Services page, Service Details section, Throttling Tab
| Operation Name | Function |
|---|---|
|
Edit
|
Switch to edit mode, allowing the user to change the throttling configuration.
|
|
Enable
|
Enable/disable throttling for the service
|
|
Status
|
The status of the gateway (For example, started, stopped)
|
|
Start/Stop
|
Click the button to start or stop the gateway.
|
|
Maximum Requests
|
The maximum number of requests per period before throttling occurs
|
|
Time Period
|
The time period over which requests are counted (cannot be edited)
|
4.3.3. References
Table 4.11. JBoss EAP Management Console operations available for SwitchYard References page
| Operation Name | Function |
|---|---|
|
Name
|
The name of the reference
|
|
Namespace
|
The namespace that the reference is defined in.
|
Table 4.12. SwitchYard References page, Reference Details section
| Operation Name | Function |
|---|---|
|
Name
|
The name of the reference
|
|
Namespace
|
The namespace that the reference is defined in.
|
|
Application
|
The application containing the reference (this links to the main tab)
|
|
Interface
|
The interface provided by the reference.
|
Table 4.13. SwitchYard References page, Gateways table
| Operation Name | Function |
|---|---|
|
Name
|
The name of the gateway
|
|
Type
|
The type of the gateway (For example, SOAP, HornetQ)
|
|
Status
|
The status of the gateway (For example, started, stopped)
|
|
Start/Stop
|
Click the button to start or stop the gateway
|
|
Configuration
|
Click the button to open a dialog displaying the raw configuration for the gateway
|
4.3.4. Artifacts
4.4. SwitchYard Runtime Details
- Name: the component name, for example, SOAP, Camel.
- The Configured Properties section providing component specific details. For most components, this section lists any configurable properties and their current settings.
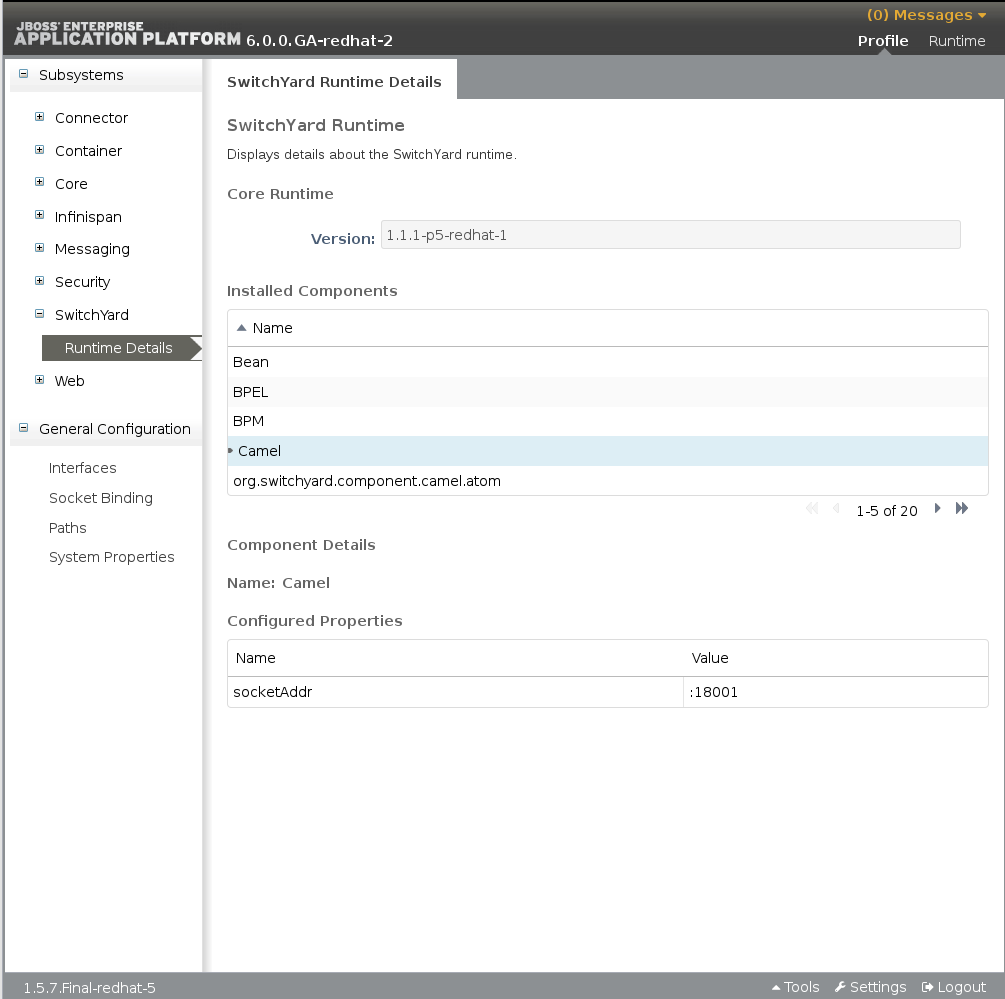
Figure 4.4. JBoss EAP Management Console SwitchYard Runtime Details Page
Chapter 5. Managing SwitchYard with JBoss Management CLI
5.1. About the Management Command Line Interface (CLI)
5.2. Launch the Management CLI
Procedure 5.1. Launch CLI in Linux or Microsoft Windows Server
Launch the CLI in Linux
Run theEAP_HOME/bin/jboss-cli.shfile by entering the following at a command line:$ EAP_HOME/bin/jboss-cli.sh
Launch the CLI in Microsoft Windows Server
Run theEAP_HOME\bin\jboss-cli.batfile by double-clicking it, or by entering the following at a command line:C:\>EAP_HOME\bin\jboss-cli.bat
5.3. Quit the Management CLI
quit command:
[domain@localhost:9999 /] quit5.4. Connect to a Managed Server Instance Using the Management CLI
Prerequisites
Procedure 5.2. Connect to a Managed Server Instance
Run the
connectcommandFrom the Management CLI, enter theconnectcommand:[disconnected /]
connectConnected to domain controller at localhost:9999- Alternatively, to connect to a managed server when starting the Management CLI on a Linux system, use the
--connectparameter:$
EAP_HOME/bin/jboss-cli.sh --connect - The
--connectparameter can be used to specify the host and port of the server. To connect to the address192.168.0.1with the port value9999the following would apply:$
EAP_HOME/bin/jboss-cli.sh --connect --controller=192.168.0.1:9999
5.5. Deploy an Application in a Standalone Server Using the Management CLI
Prerequisites
Procedure 5.3. Deploy an Application in a Standalone Server
Run the
deploycommandFrom the Management CLI, enter thedeploycommand with the path to the application deployment.[standalone@localhost:9999 /]
deploy /path/to/test-application.warNote that a successful deploy does not produce any output to the CLI.
The specified application is now deployed in the standalone server.
5.6. Undeploy an Application in a Standalone Server Using the Management CLI
Prerequisites
Procedure 5.4. Undeploy an Application in a Standalone Server
undeploy command will undeploy and delete the deployment content from a standalone instance of JBoss EAP. To retain the deployment content, add the parameter --keep-content.
Run the
undeploycommandTo undeploy the application and delete the deployment content, enter the Management CLIundeploycommand with the filename of the application deployment.[standalone@localhost:9999 /]
undeploy test-application.warTo undeploy the application, but retain the deployment content, enter the Management CLIundeploycommand with the filename of the application deployment and the parameter--keep-content.[standalone@localhost:9999 /]
undeploy test-application.war--keep-content
The specified application is now undeployed. Note that the undeploy command does not produce any output to the Management CLI if it is successful.
5.7. Management CLI commands for SwitchYard
Prerequisites
Note
- By completing partially entered commands if there is enough entered for it to be unique.
- By presenting a list of options if a unique result cannot be found, or if the command is missing.
[standalone@localhost:9999 /] /subsystem=switchyard:Table 5.1. JBoss EAP Management CLI operations available for SwitchYard subsystem
| Operation Name | Function |
|---|---|
|
get-version
|
This will show the version of SwitchYard currently running on the JBoss EAP instance.
|
|
list-applications
|
This shows a list of the SwitchYard applications currently running on the JBoss EAP instance.
|
|
list-references
|
Lists the references used for SwitchYard applications currently running on the JBoss EAP instance.
|
|
read-application
|
This lists the details for SwitchYard applications running on the JBoss EAP instance.
|
|
read-references
|
Lists the references used by SwitchYard applications running on the JBoss EAP instance.
|
|
read-service
|
Lists the services and details used by SwitchYard applications running on the JBoss EAP instance.
|
|
reset-metrics
|
Reset the message metrics for the SwitchYard subsystem.
|
|
show-metrics
|
List the message metrics for the SwitchYard subsystem.
|
|
start-gateway
|
Start the gateway for a SwitchYard service.
|
|
stop-gateway
|
Stop the gateway for a SwitchYard service.
|
|
update-throttling
|
Update message throttling for a SwitchYard service.
|
|
stop-gateway
|
Stop the gateway for a SwitchYard service.
|
|
uses-artifacts
|
Lists the artifacts used throughout the SwitchYard subsystem.
|
[standalone@localhost:9999 /] /subsystem=switchyard:operation-nameNote
Chapter 6. JBoss Operations Network
6.1. JBoss Operations Network
6.2. Installing JBoss Operations Network for JBoss Fuse Service Works
To use JBoss Operations Network with Fuse Service Works, JBoss Operations Network must be installed as instructed in the JON Server Installation chapter of the Installing the JBoss ON Server. Note that both the Server and the Agent must be installed. See Installing and Upgrading an Agent on a Managed Platform from the JAR File for more information about installing the Agent.
When JBoss Operations Network has been correctly installed, it will automatically detect the JBoss Fuse Service Works services.
Procedure 6.1.
- Ensure that JBoss Operations Network and the JBoss Fuse Service Works instance of JBoss EAP are running. Log in to the JBoss Operations Network server GUI.
- Click on the button at the top of the page.
- Select from the menu on the left hand side. Select server from the list presented on the Servers page.
- Select the tab on the page, then click .
- Update the User and Passwords fields on the section with an administrator User ID and Password for the JBoss Fuse Service Works JBoss EAP instance.
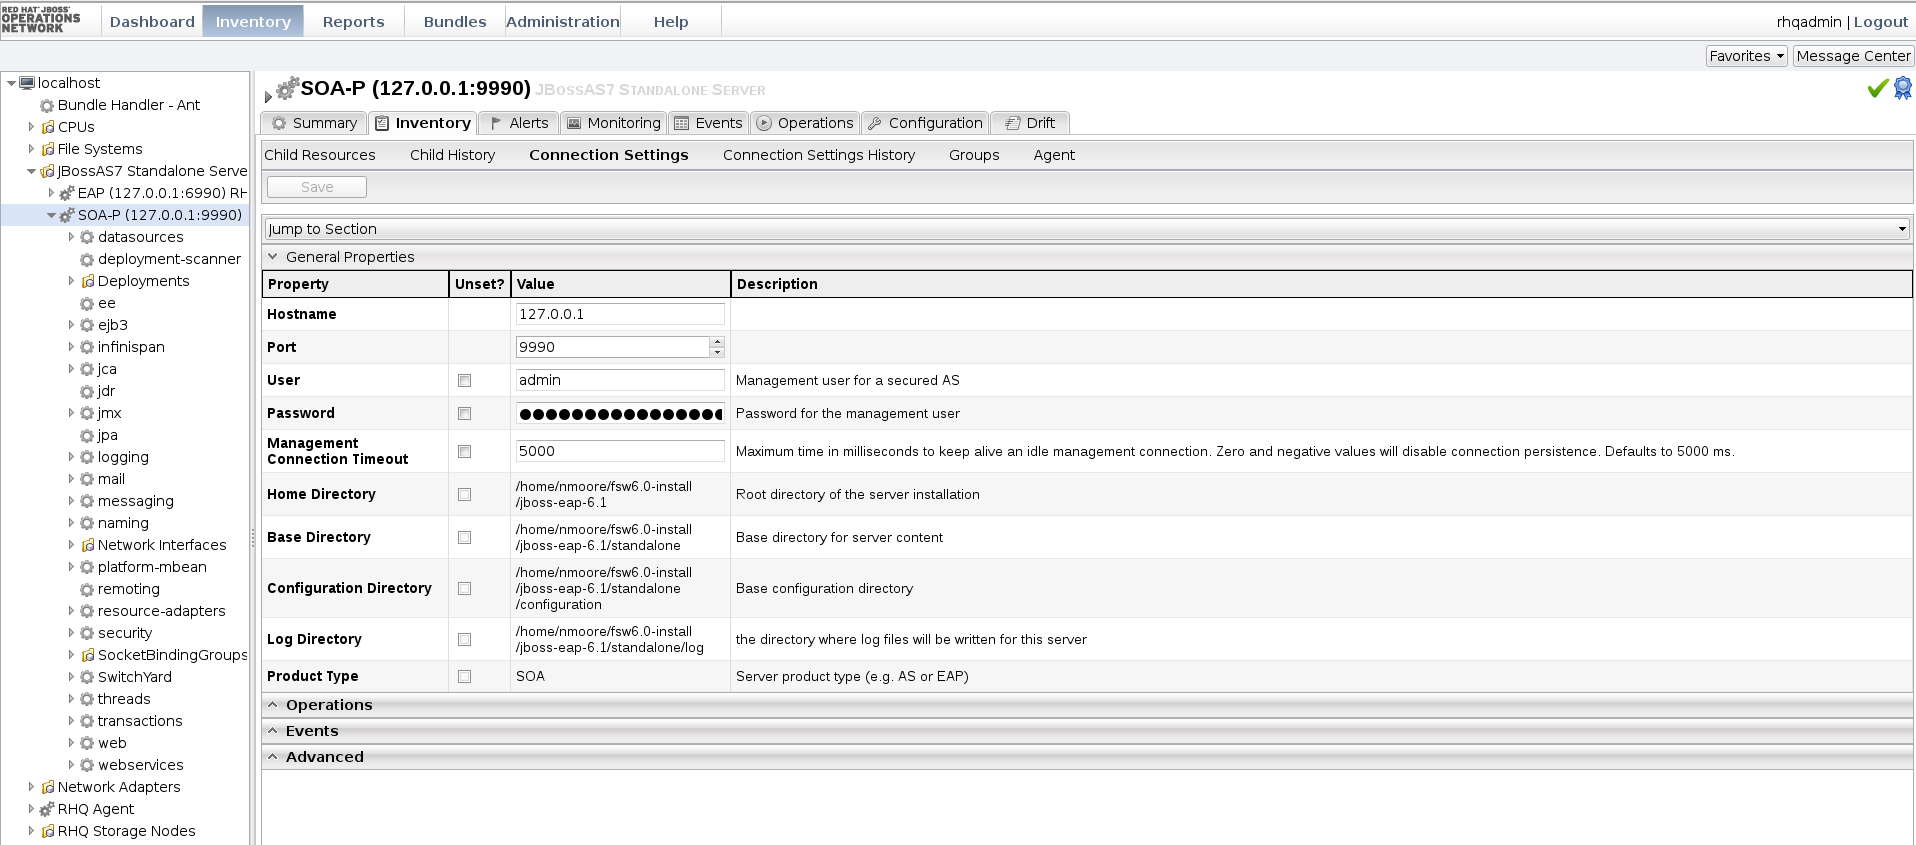
Figure 6.1. JBoss Operations Network Server Connection Settings Page
6.3. JBoss Operations Network Functions
Table 6.1. JBoss Operations Network functions most relevant for Red Hat JBoss Fuse Service Works
| Function | Link |
|---|---|
|
Configure the Agent to Discover JBoss EAP Instances
| |
|
Deploy Web Applications to a Standalone Server
| |
|
Troubleshooting Deployments
| |
|
Monitoring EAP Resources including Run Time information and metrics for SwitchYard
| |
|
Set up alerts on JBoss EAP Resources
|
6.4. Automatic Service Discovery
Chapter 7. BPEL Console
7.1. About the BPEL Console
- any process definitions you have deployed to the BPEL engine
- the process instances executing in the BPEL engine
- a process execution history
- the query pertaining to the execution history
7.2. Log in to the BPEL Console
Note
bpel-console window within your browser.
admin as the default userid and admin as the default password.
7.3. Process Definition
7.4. Deploying Process Definition
7.5. Manually Undeploy a Process
Procedure 7.1. task
- Launch a web browser and navigate to http://localhost:8080/bpel-console.
- Enter your user name and password.
- Click on the Runtime tab.
- Select the Deployments option. You will now be able to see the version information and current status (active or retired) of each process definition.
- Check if there is any active process consisting of any unfinished instances, retire the process.
- Undeploy the process only when there is no active process instance.
Warning
7.6. Active Process Instance
7.7. View the Process Version
Procedure 7.2. task
- Launch a web browser and navigate to http://localhost:8080/bpel-console.
- Enter your user name and password.
- Click on the tab to see which BPEL processes are currently deployed. The process version information for each of these processes is also visible.
- Only one version of a process can be active at a time. When you open a process definition, the active version is automatically selected.
Note
7.8. About Business Process Analytics Format
7.9. View the BPAF Data
Procedure 7.3. task
- Launch a web browser and navigate to http://localhost:8080/bpel-console.
- Enter your user name and password.
- Click on the Managed Instances tab to see which BPEL processes are currently deployed. The process version information for each of these processes is also visible.
- Select a process definition to open it.
- Use the Execution History to produce a chart. Here you can specify a particular period of time to review and choose whether or not to include failed and terminated instances in the chart.
7.11. Configuring Logging Functionality
Procedure 7.4. task
- Open the
deploy.xmlfile in a text editor.Note
deploy.xmlfile exists with every BPEL deployment unit. - Configure the
deploy.xmlfile as follows:<deploy xmlns="schemas" xmlns:bpl="examples" xmlns:intf="examples/wsdl"> <process name="bpl:HelloGoodbye"> <active>true</active> <process-events generate="all"/> <provide partnerLink="helloGoodbyePartnerLink"> <service name="intf:HelloGoodbyeService" port="HelloGoodbyePort"/> </provide> </process> </deploy>
Note
Add theprocess-eventselement to generate all the events. For more information, navigate to the Apache ODE events http://ode.apache.org/ode-execution-events link. - Save the file and exit.
7.12. View the Instance Data
Procedure 7.5. task
- Launch a web browser and navigate to http://localhost:8080/bpel-console.
- Enter your user name and password.
- Under the Managed Instances tab, select the Open Button list to view the deployed process definitions. When you select any one of the process, it displays the list of process definitions and version of that particular process.
- Select a process instance to open it. You can see its details in the Execution Details panel.
- Click the Instance Data button. It displays all the details about the process.
- Click the Execution Path button. It opens the related instance execution graph.
Note
The instance execution graph is a visual representation of a running instance of a process. It tells the user about the process instance's performance over time. - The View tab shows the instance execution graph, while the Source tab below it shows all of the "activity" events.
7.13. View a History Instance Query
Procedure 7.6. Task
- Log into the BPEL Web Console.
- Choose a process definition and a process status from the list box.You can also optionally choose to input the correlation key, the start time and the end time as search criteria.
- Go to the History Instances List and double-click on a row. A window will pop up showing you all of the execution events that happened when that process ran.
7.14. Active Process Definition
7.15. Retired Process Definition
7.16. Manually Retire an Active Process Definition
Procedure 7.7. Task
- Launch a web browser and go to http://localhost:8080/bpel-console.
- Input your user name and password.
- Click on the Runtime tab.
- Select the Deployments option.You will now be able to see the version information and current status (active or retired) of each process definition.
- Select the particular version of the process definition you want to retire and then press the button.
Note
If you undeploy a process, its end-points will only deactivate if no previous versions of that process have ever existed.
7.17. Enable Execution Events
Procedure 7.8. task
- Open the
deploy.xmlfile in a text editor. - Add
<process-events generate="all"/>parameter in thedeploy.xmlfile.
Events are successfully enabled.
Chapter 8. Runtime Governance Console
8.1. Overlord Runtime Governance
8.2. Accessing Overlord Runtime Governance
Procedure 8.1. Task
- Start the server.
- Access the following URL:
http://localhost:8080/gadget-web
- Enter a username and specify a password. A default user is provided called fswAdmin.
- When the Overlord Runtime Governance UI is displayed the first time, you must enter a new page by pressing the + button.
- To browse gadgets, click on the Gadget Store button.
8.3. Gadgets
- Response Time
- The Response Time gadget shows average, minimum and maximum summary metrics from the service operations invoked over a period of time. The gadget configuration can be used to select a particular service to display. It is also possible to customize the gadget further to display only the metrics from a particular operation on that service.
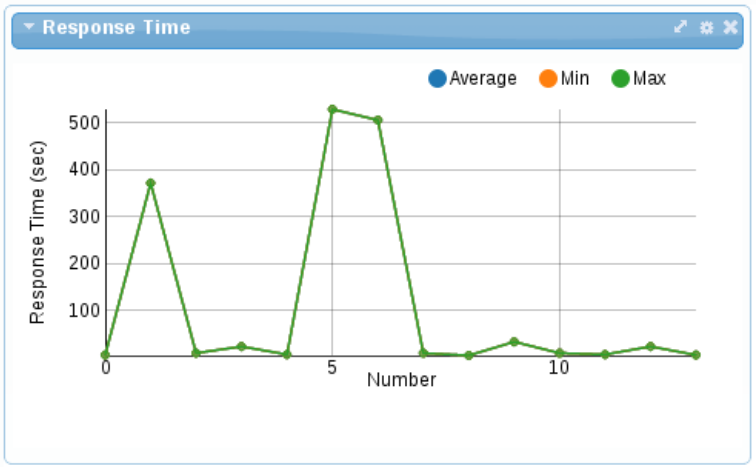
Figure 8.1. Response Time
The X-axis represents the number of response time metrics captured for the particular services or operation. Note that it is not related to time. The collection of metrics in the underlying active collection displayed has a maximum size, hence it only discards the metrics when it reaches that maximum threshold. - Situations
- Situations are created by event processors when they detect a "situation of interest". For example, an error or service level agreement violation. These situations are captured in a predefined active collection that is configured to only show the latest situations. They are automatically removed from the collection after a specified time period. This ensures that the gadget displaying the situations only shows the latest problems that are occurring. However, situations can also be reported via JMX for more long term management.
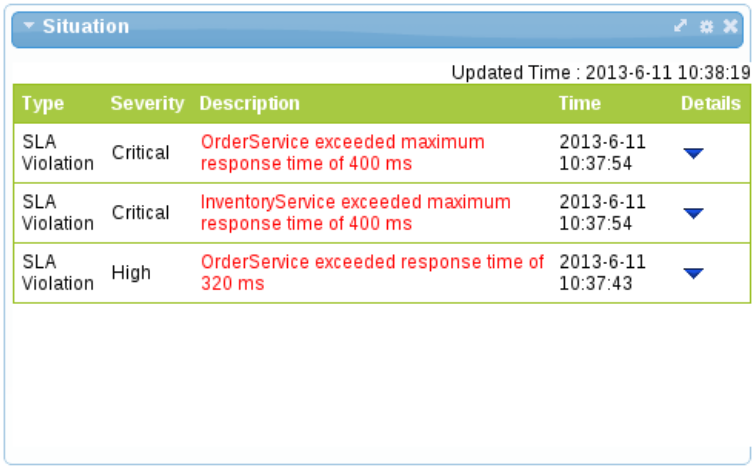
Figure 8.2. Situations
- Call Trace
- The Call Trace gadget provides the means to display the invocation history of a particular business transaction instance. The business transaction is identified by entering its globally unique identifier in the gadget’s configuration.The business transaction id is specific to the messages being monitored. For example, a purchasing business transaction may have a purchase order number that is carried with the various business messages. This information can be extracted from the message contents using an "information processor", and the extract value specified in the call trace gadget's configuration.
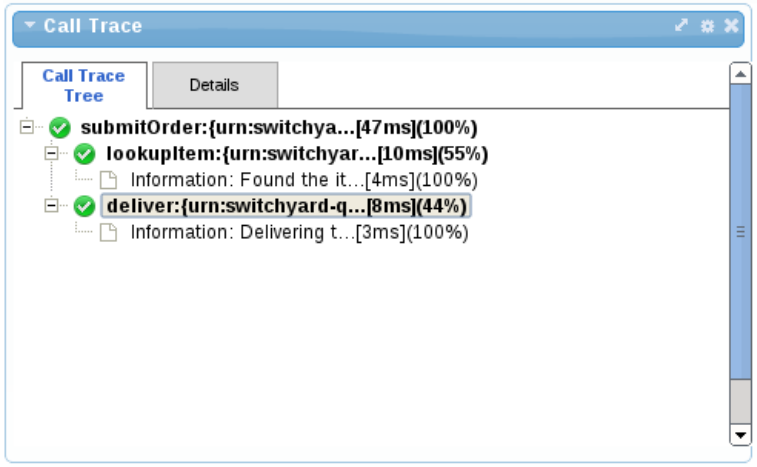
Figure 8.3. Call Trace
- Service Overview
- The Service Overview gadget provides a graphical representation of the dependencies (invocation/usage) between services. When displayed as part of a group of gadgets, the representation shows the status of each service and link as a color (green being normal). If the gadget is enlarged, further details are included, such as the service and operation names. Metrics are visible by hovering over an object. When a situation is reported, a red dot will be displayed on that component.
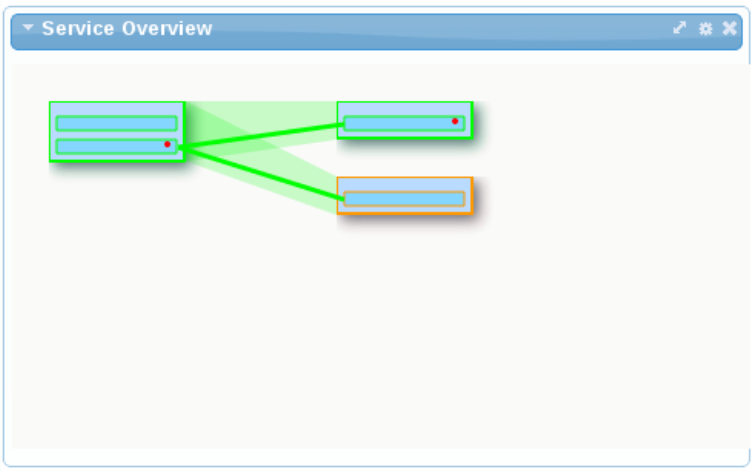
Figure 8.4. Service Overview
Chapter 9. Design Time Governance Console
9.1. Accessing the DTGov Dashboard
Procedure 9.1. Task
- Start the server.
- Access the following URL:
http://localhost:8080/dtgov-ui
- Enter your credentials and log in. The Dashboard will be displayed.
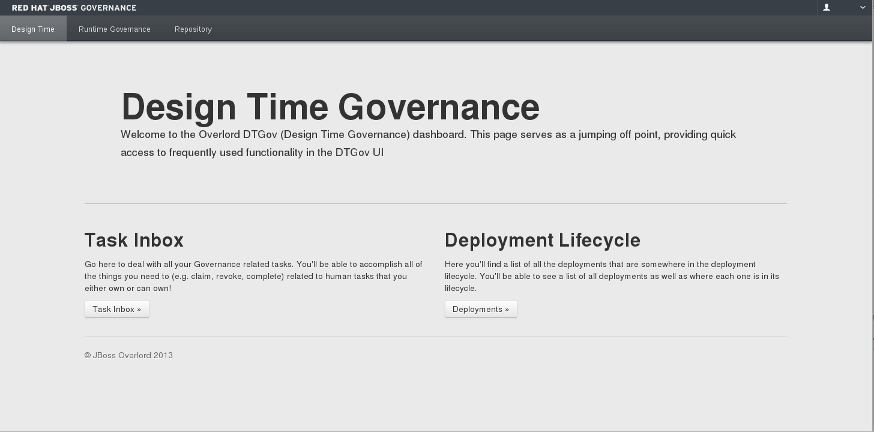
9.2. DTGov Dashboard Home Screen Options
- Task Inbox
- Clicking this option will take you to a list of all the governance-related tasks within JBoss Fuse Service Works. Here you can view task filters, task owners, priorities and the dates for which the task is set to be performed.
- Deployment Lifecycle
- Clicking this option will show you a list of all the deployments that exist within the current lifecycle. You can view the type, environment and dates initiated for any deployment. You can also perform a search to find a deployment.
- Repository
- By clicking this tab at the top of the screen, you are able to view artifacts in the S-RAMP Browser. Clicking the
Artifactsbutton will show you the core porpertioes, classifiers, and custom properties for the artifacts in the current lifecycle.
Chapter 10. S-RAMP
10.1. S-RAMP
- A foundation document that describes the core concepts.
- An Atom based protocol binding document that describes an Atom based API.
- Core Properties
- Custom Properties
- Classifiers
- Relationships
10.2. S-RAMP Console
10.2.1. S-RAMP Dashboard
- Type
- Date Created
- Date Last Modified
- Created By
- Last Modified
- Origin (Any, Primary or Derived)
10.2.2. Accessing the S-RAMP Dashboard
Procedure 10.1. Task
- In a browser, navigate to http://localhost:8080/s-ramp-ui .
- Enter your administrator username and password when prompted.
The S-RAMP dashboard will be displayed.
10.3. S-RAMP Management CLI
10.3.1. Connect to the S-RAMP Server
- Open a command terminal and navigate to
EAP_HOME/bindirectory. - Start the JBoss EAP server by entering following command:
$ ./standalone.sh - Open another terminal and type
./s-ramp.sh. Then typeconnectand press Tab key. The command will auto-complete to says-ramp:connect http://localhost:8080/s-ramp-server.Enter username and password to connect via the S-RAMP shell. The username and password are defined in sramp.properties.
When you press Tab key, the command will auto-complete to say s-ramp:connect http://localhost:8080/s-ramp-server and when you press the return key the cursor will go from red to green indicating successful connection to S-ramp server.
10.3.2. Browse the S-RAMP Repository
- Run this command:
s-ramp:query /s-rampHere is an example of the output of this command:Querying the S-RAMP repository: /s-ramp Atom Feed (9 entries) Idx Type Name --- ---- ---- 1 ImageDocument user-properties.png 2 Document overlord.demo.CheckDeployment-taskform.flt 3 BrmsPkgDocument SRAMPPackage.pkg 4 ImageDocument overlord.demo.SimpleReleaseProcess-image.png 5 ImageDocument run-build-install.png 6 Document overlord.demo.SimpleReleaseProcess-taskform.flt 7 ImageDocument audio-input-microphone-3.png 8 BpmnDocument overlord.demo.SimpleReleaseProcess.bpmn 9 TextDocument HttpClientWorkDefinitions.wid - To obtain the metaData of overlord.demo.SimpleReleaseProcess.bpmn (which is number 8 in the list in the output example), issue this command:
s-ramp:getMetaData feed:8Meta Data for: 31b3acbc-cda8-4856-9e34-d3e645283035 -------------- -- Core S-RAMP Info -- Type: BpmnDocument Model: ext UUID: 31b3acbc-cda8-4856-9e34-d3e645283035 Name: overlord.demo.SimpleReleaseProcess.bpmn Derived: false Created By: anonymous Created On: 2013-03-08T14:00:37.036-05:00 Modified By: anonymous Modified On: 2013-03-18T14:58:46.328-04:00 s-ramp>
Chapter 11. Runtime Governance Configuration
11.1. Enabling Runtime Governance
$JBOSS_HOME/standalone/configuration/overlord-rtgov.properties file. By default, the value of the collectionEnabled is set to false.
11.2. Configuring Run-Time Governance
SwitchYard uses Run-Time Governance to facilitate complete control over the shared services by following a policy based approach. SwitchYard classifies Run-Time Governance into two aspects:
- Policy definition and enforcement
- Collection and exposure of run-time metrics for services and service references
11.3. Overlord Run-Time Governance Configuration
Procedure 11.1. Task
- To view the Overlord Run-Time Governance properties, access the properties file located in
$JBOSS_HOME/standalone/configuration/overlord-rtgov.properties. - Add and modify classes to manage governance.
11.4. Common Properties
Table 11.1. Common Properties
| Name | Description |
|---|---|
| collectionEnabled | This property will determine whether activity information is collected when the server is initially started. This value can be changed at runtime using the ActivityCollector MBean. |
| ActivityServerLogger.maxThreads | This property will determine the maximum number of threads used by the activity collector to report all the activity units to the server. |
| ActivityServerLogger.durationBetweenFailureReports | This property controls the duration (in milliseconds) between a failure being reported, if the client is having trouble contacting the activity server. |
| ActivityServerLogger.activityListQueueSize | This property defines the queue size for pending activity lists, that are awaiting being reported to the activity server. |
| ActivityServerLogger.freeActivityListQueueSize | This property defines the queue size to manage free activity lists that can be reused. |
| BatchedActivityUnitLogger.maxUnitCount, BatchedActivityUnitLogger.maxTimeInterval | Activity unit batch logging properties. |
| infinispan.container | JNDI name for default cluster to use when not specified explicitly. |
11.5. Server Properties
Table 11.2. Server Properties
| Name | Description |
|---|---|
| MVELSeverityAnalyzer.scriptLocation | Optional location of a MVEL script used to determine severity levels for nodes and links within the service overview diagram. |
11.6. Client Properties
Table 11.3. Client Properties
| Name | Description |
|---|---|
| RESTActivityServer.serverURL | This is the URL of the activity server collecting the activity events. |
| RESTActivityServer.serverUsername | The username used to access the REST service. |
| RESTActivityServer.serverPassword | The password used to access the REST service. |
11.7. Database
$JBOSS_HOME/standalone/configuration/standalone.xml.
Note
<validation>
<validate-on-match>true</validate-on-match>
<valid-connection-checker class-name="org.jboss.jca.adapters.jdbc.extensions.postgres.PostgreSQLValidConnectionChecker"/>
<exception-sorter class-name="org.jboss.jca.adapters.jdbc.extensions.postgres.PostgreSQLExceptionSorter"/>
</validation>
11.8. Caching
standalone-full-ha.xml), it provides a default clustered cache container, which is referenced in the infinispan.container property in the overlord-rtgov.properties file.
Note
standalone-full-ha.xml file.
11.9. Caching Example
<cache-container name="cluster" aliases="ha-partition" default-cache="default">
    <transport lock-timeout="60000"/>
    <replicated-cache name="default" mode="SYNC" batching="true">
        <locking isolation="REPEATABLE_READ"/>
    </replicated-cache>

    <!-- Configuration for Runtime Governance caches -->

    <replicated-cache name="Principals" mode="SYNC">
        <locking isolation="REPEATABLE_READ"/>
        <transaction mode="FULL_XA" locking="PESSIMISTIC"/>
    </replicated-cache>
</cache-container>
Chapter 12. Design-Time Governance Configuration and Workflows
12.1. Overview
- Design-Time Governance Back-End Configuration - includes
dtgov.propertiesfile - Design-Time Governance User Interface Configuration - includes
dtgov-ui.propertiesfile
12.2. Design-Time Governance Back-End Configuration
jboss-eap/standalone/configuration/dtgov.properties
governance.file.name
12.3. Design-Time Governance User Interface (UI) Configuration
jboss-eap/standalone/configuration/dtgov-ui.properties
dtgov-ui.config.file.name
12.4. Design-Time Governance Configuration Properties
Note
# # S-RAMP Connection details
sramp.repo.url
sramp.repo.auth.provider
sramp.repo.user
sramp.repo.password
sramp.repo.validating
sramp.repo.auth.saml.issuer
sramp.repo.auth.saml.service

# Location of the DTGov WAR
governance.url
# Frequency with which to poll S-RAMP for query matches
governance.query.interval
# Location in JNDI of the email service
governance.jndi.email.reference
# "From" information to use when sending email (domain and address)
governance.email.domain
governance.email.from

# RHQ connection info
rhq.rest.user
rhq.rest.password
rhq.base.url

# BPM connection info
governance.bpm.user
governance.bpm.password
governance.bpm.url

# JAAS user used to invoke DTGov provided services
governance.user
governance.password

# Deployment targets configured for the DTGov deployment service
governance.targets

# Mapping of S-RAMP query to governance workflow
governance.queries

# Location of the DTGov UI
dtgov.ui.url

# S-RAMP
s-ramp-wagon
dtgov.s-ramp-wagon.snapshots
dtgov.s-ramp-wagon.releases

# DTGov Workflow maven info
dtgov.workflows.group
dtgov.workflows.name
dtgov.workflows.version
dtgov.workflows.package
# # S-RAMP API connection endpoint
dtgov-ui.s-ramp.atom-api.endpoint
# Whether to validate the S-RAMP connection
dtgov-ui.s-ramp.atom-api.validating
# What kind of authentication to use (class name)
dtgov-ui.s-ramp.atom-api.authentication.provider
# Only used when the provider is basic auth
dtgov-ui.s-ramp.atom-api.authentication.basic.username
dtgov-ui.s-ramp.atom-api.authentication.basic.password
# Only used when the provider is SAML bearer token auth
dtgov-ui.s-ramp.atom-api.authentication.saml.issuer
dtgov-ui.s-ramp.atom-api.authentication.saml.service
dtgov-ui.s-ramp.atom-api.authentication.saml.sign-assertions
dtgov-ui.s-ramp.atom-api.authentication.saml.keystore
dtgov-ui.s-ramp.atom-api.authentication.saml.keystore-password
dtgov-ui.s-ramp.atom-api.authentication.saml.key-alias
dtgov-ui.s-ramp.atom-api.authentication.saml.key-password

# Task API connection endpoint
dtgov-ui.task-api.endpoint
# Implementation of a task client
dtgov-ui.task-client.class
# Authentication to use when invoking the task API
dtgov-ui.task-api.authentication.provider
# Only used when using basic auth
dtgov-ui.task-api.authentication.basic.username
dtgov-ui.task-api.authentication.basic.password
# Only used when using saml bearer token auth
dtgov-ui.task-api.authentication.saml.issuer
dtgov-ui.task-api.authentication.saml.service
dtgov-ui.task-api.authentication.saml.sign-assertions
dtgov-ui.task-api.authentication.saml.keystore
dtgov-ui.task-api.authentication.saml.keystore-password
dtgov-ui.task-api.authentication.saml.key-alias
dtgov-ui.task-api.authentication.saml.key-password

# Deployment lifecycle base classifier
dtgov-ui.deployment-lifecycle.classifiers.base
dtgov-ui.deployment-lifecycle.classifiers.initial
# Classifier to use when querying for all deployments
dtgov-ui.deployment-lifecycle.classifiers.all
dtgov-ui.deployment-lifecycle.classifiers.in-progress
# This next one is a prefix for any property that will indicate a possible classifier stage that
# should be displayed in the UI.  In the dtgov ui configuration file, multiple properties would
# be specified that begin with this prefix and have a value of the format  {label}:{classifier}
dtgov-ui.deployment-lifecycle.classifiers.stage
# And another one that is a prefix for any property that will indicate a possible deployment type
# that should be displayed in the UI.  In the dtgov ui configuration file, multiple properties would
# be specified that begin with this prefix and have a value of the format  {label}:{type}
dtgov-ui.deployment-lifecycle.types

# S-RAMP UI integration properties
dtgov-ui.s-ramp-browser.url-base
12.5. Design-Time Governance Configuration Examples
Here is an example of the back-end configuration:
sramp.repo.url=http://localhost:8080/s-ramp-server/
sramp.repo.auth.provider=org.overlord.sramp.governance.auth.BasicAuthenticationProvider
sramp.repo.user=dtgov
sramp.repo.password=DTG_PASSWORD
sramp.repo.validating=true
Here is an example of the User Interface configuration:
dtgov-ui.s-ramp.atom-api.endpoint=http://localhost:8080/s-ramp-server
dtgov-ui.s-ramp.atom-api.authentication.provider=org.overlord.dtgov.ui.server.services.sramp.SAMLBearerTokenAuthenticationProvider
dtgov-ui.s-ramp.atom-api.authentication.saml.issuer=/dtgov-ui
dtgov-ui.s-ramp.atom-api.authentication.saml.service=/s-ramp-server
dtgov-ui.s-ramp.atom-api.validating=true
12.6. Governance Workflows
- Create a new workflow, or adapt a sample workflow.
- Deploy the workflow to S-RAMP.
- Map S-RAMP query to BPMN2 process name. That is, configure a workflow to execute when repository content changes.
12.7. Installing Sample Workflow
- Navigate to jboss-eap-6.1/dtgov-data and create a local
settings.xmlcontaining the user credentials for the S-RAMP repository. This file must also contain the Overlord admin password that you configured during installation. Here is an example:<settings xmlns="http://maven.apache.org/SETTINGS/1.0.0" xmlns:xsi="http://www.w3.org/2001/XMLSchema-instance" xsi:schemaLocation="http://maven.apache.org/SETTINGS/1.0.0 http://maven.apache.org/xsd/settings-1.0.0.xsd"> <servers> <server> <id>local-sramp-repo</id> <username>admin</username> <password>cust0mpwd</password> </server> <server> <id>local-sramp-repo-snapshots</id> <username>admin</username> <password>cust0mpwd</password> </server> </servers> </settings> - Ensure that the server is up and running, and deploy the "SimpleReleaseProcess" sample workflow to the server by running the following command:
mvn -s local-settings.xml deploy
Chapter 13. Managing User Accounts
13.1. Adding a New User for the Management Interfaces
The management interfaces in JBoss Fuse Service Works are secured by default as there are no user accounts initially available, unless you have installed the platform using the graphical installer. This is a security precaution to prevent security breaches from remote systems due to simple configuration errors. Local non-HTTP access is protected by a SASL mechanism, with a negotiation happening between the client and server each time the client connects for the first time from the localhost.
Note
Procedure 13.1. Create the Initial Administrative User for the Remote Management Interfaces
Invoke the
add-user.shoradd-user.batscript.Change to theEAP_HOME/bin/directory. Invoke the appropriate script for your operating system.- Red Hat Enterprise Linux
[user@host bin]$./add-user.sh
Choose to add a Management user.
Hit ENTER to select the default optionato add a Management user. This user is added to theManagementRealmand is authorized to perform management operations using the web-based Management Console or command-line based Management CLI. The other choice,b, adds a user to theApplicationRealm, and provides no particular permissions. That realm is provided for use with applications.Enter the desired username and password.
When prompted, enter the username and password. You will be prompted to confirm the password.Review the information and confirm.
You are prompted to confirm the information. If you are satisfied, typeyes.Choose whether the user represents a remote JBoss EAP 6 server instance.
Besides administrators, the other type of user which occasionally needs to be added to JBoss EAP 6 in theManagementRealmis a user representing another instance of JBoss EAP 6, which must be able to authenticate to join a cluster as a member. The next prompt allows you to designate your added user for this purpose. If you selectyes, you will be given a hashedsecretvalue, representing the user's password, which would need to be added to a different configuration file. For the purposes of this task, answernoto this question.Enter additional users.
You can enter additional users if desired by repeating the procedure. You can also add them at any time on a running system. Instead of choosing the default security realm, you can add users to other realms to fine-tune their authorizations.Create users non-interactively.
You can create users non-interactively, by passing in each parameter at the command line. This approach is not recommended on shared systems, because the passwords will be visible in log and history files. The syntax for the command, using the management realm, is:[user@host bin]$./add-user.sh username passwordTo use the application realm, use the-aparameter.[user@host bin]$./add-user.sh -a username password- You can suppress the normal output of the add-user script by passing the
--silentparameter. This applies only if the minimum parametersusernameandpasswordhave been specified. Error messages will still be shown.
Any users you add are activated within the security realms you have specified. Users active within the ManagementRealm realm are able to manage JBoss EAP 6 from remote systems.
13.2. Add-user Command Arguments
add-user.sh or add-user.bat command.
Table 13.1. Add-user Command Arguments
| Command Line Argument | Argument Value | Description |
|---|---|---|
|
-a
|
N/A
|
This argument specifies to create a user in the application realm. If omitted, the default is to create a user in the management realm.
|
|
-dc
|
DOMAIN_CONFIGURATION_DIRECTORY
|
This argument specifies the domain configuration directory that will contain the properties files. If it is omitted, the default directory is
EAP_HOME/domain/configuration/.
|
|
-sc
|
SERVER_CONFIGURATION_DIRECTORY
|
This argument specifies an alternate standalone server configuration directory that will contain the properties files. If it is omitted, the default directory is
EAP_HOME/standalone/configuration/.
|
|
-up
--user-properties
|
USER_PROPERTIES_FILE
|
This argument specifies the name of the alternate user properties file. It can an absolute path or it can be a file name used in conjunction with the
-sc or -dc argument that specifies the alternate configuration directory.
|
|
-g
--group
|
GROUP_LIST
|
A comma-separated list of groups to assign to this user.
|
|
-gp
--group-properties
|
GROUP_PROPERTIES_FILE
|
This argument specifies the name of the alternate group properties file. It can an absolute path or it can be a file name used in conjunction with the
-sc or -dc argument that specifies the alternate configuration directory.
|
|
-p
--password
|
PASSWORD
|
The password of the user. The password must satisfy the following requirements:
|
|
-u
--user
|
USER_NAME
|
The name of the user.
|
|
-r
--realm
|
REALM_NAME
|
The name of the realm used to secure the management interfaces. If omitted, the default is "ManagementRealm".
|
|
-s
--silent
|
N/A
|
Run the add-user script with no output to the console.
|
|
-h
--help
|
N/A
|
Display usage information for the add-user script.
|
13.3. Alternative Properties Files for User Management Information
By default, user and role information created using the add-user.sh script is stored in properties files located in the server configuration directory. The server configuration information is stored in the EAP_HOME/standalone/configuration/ directory and the domain configuration information is stored in the EAP_HOME/domain/configuration/ directory. This topic describes how to override the default file names and locations.
Procedure 13.2. Alternative Properties Files
- To specify an alternative directory for the server configuration, use the
-scargument. This argument specifies an alternative directory that will contain the server configuration properties files. - To specify an alternative directory for the domain configuration, use the
-dcargument. This argument specifies an alternative directory that will contain the domain configuration properties files. - To specify an alternative user configuration properties file, use the
-upor--user-propertiesargument. It can an absolute path or it can be a file name used in conjunction with the-scor-dcargument that specifies the alternative configuration directory. - To specify an alternative group configuration properties file, use the
-gpor--group-propertiesargument. It can an absolute path or it can be a file name used in conjunction with the-scor-dcargument that specifies the alternative configuration directory.
Note
add-user command is intended to operate on existing properties files. Any alternative properties files specified in command line arguments must exist or you will see the following error:
JBAS015234: No appusers.properties files found
13.4. Governance
13.4.1. S-RAMP User Management
add-user.bat script. Otherwise run the add-user.sh script. Both of these scripts can be found in EAP's bin directory.
[user@host jboss-eap-6.1]$ pwd
/home/user/FSW6/jboss-eap-6.1
[user@host jboss-eap-6.1]$ ./bin/add-user.sh

What type of user do you wish to add?
 a) Management User (mgmt-users.properties)
 b) Application User (application-users.properties)
(a): b

Enter the details of the new user to add.
Realm (ApplicationRealm) : ApplicationRealm
Username : fitzuser
Password : P4SSW0RD!
Re-enter Password : P4SSW0RD!
What roles do you want this user to belong to? (Please enter a comma separated list, or leave blank for none)[  ]: overlorduser,admin.sramp
About to add user 'fitzuser' for realm 'ApplicationRealm'
Is this correct yes/no? yes
Added user 'fitzuser' to file '/home/user/FSW6/jboss-eap-6.1/standalone/configuration/application-users.properties'
Added user 'fitzuser' to file '/home/user/FSW6/jboss-eap-6.1/domain/configuration/application-users.properties'
Added user 'fitzuser' with roles overlorduser,admin.sramp to file '/home/user/FSW6/jboss-eap-6.1/standalone/configuration/application-roles.properties'
Added user 'fitzuser' with roles overlorduser,admin.sramp to file '/home/user/FSW6/jboss-eap-6.1/domain/configuration/application-roles.properties'
Is this new user going to be used for one AS process to connect to another AS process?
e.g. for a slave host controller connecting to the master or for a Remoting connection for server to server EJB calls.
yes/no? no
There are several roles that the user must have in order to interact with the S-RAMP repository. These roles are as follows:
- overlorduser : users must have this role in order to access the S-RAMP user interface (browser)
- admin.sramp : users must have this role in order to access the S-RAMP repository (both read and write)
Note
standalone.xml file and set the new repository name in standalone/configuration/sramp.properties (under sramp.config.jcr.repository.jndi-path), make sure you modify the user's roles. If the role that grants users access to the ModeShape repository is admin.sramp, where the ModeShape role is admin on repository named sramp, ensure you change this value to admin.<new repository name> in the application-roles.properties file.
13.4.2. Design-Time Governance User Management
add-user.bat script. Otherwise run the add-user.sh script. Both of these scripts can be found in EAP's bin directory.
There are several roles that the user must have in order to interact with Design-Time Governance. These roles are as follows:
- overlorduser : users must have this role in order to access the DTGov user interface
- admin.sramp : users must have this role in order to access the S-RAMP repository (both read and write)
- dev : users with this role will be able to view and complete Dev environment and developer human tasks
- test : users with this role will be able to view and complete Test environment human tasks
- stage : users with this role will be able to view and complete Staging environment human tasks
- prod : users with this role will be able to view and complete Production environment human tasks
- ba : users with this role will be able to view and complete business analyst human tasks
- arch : users with this role will be able to view and complete architect human tasks
Chapter 14. Configuring Red Hat JBoss Fuse Service Works to Run as a Background Service
14.1. Introduction
14.2. Running JBoss Fuse Service Works as a Service on a Headless Server
Prerequisites
- Install JBoss EAP 6 or later
- Administrator privileges on the server are required.
Use the following procedure to install JBoss Fuse Service Works as a service on Red Hat Enterprise Linux when the installation has been done using the graphical installer.
Procedure 14.1. Setup the Service
Locate the start-up script and configuration file
The start-up script and an associated configuration file are located in theEAP_HOME/bin/init.d/directory. Open the configuration filejboss-as.confto edit it.Customize the start-up options in the
jboss-as.conffileThere are several options within thejboss-as.conffile. At the minimum, specify the correct values forJBOSS_HOMEand theJBOSS_USERvariables. If these variables are absent, add them.Copy files into system directories
- Copy the modified configuration file to the
/etc/jboss-asdirectory.[user@host init.d]$sudo mkdir /etc/jboss-as[user@host init.d]$sudo cp jboss-as.conf /etc/jboss-as/ - Copy the start-up script to the
/etc/init.ddirectory.[user@host init.d]$sudo cp jboss-as-standalone.sh /etc/init.d
Add the start-up script as a service.
Add the newjboss-as-standalone.shservice to list of automatically started services, using thechkconfigservice management command.[user@host init.d]$sudo chkconfig --add jboss-as-standalone.shStart the service.
Test that the service has been installed correctly by using the standard syntax for starting Red Hat Enterprise Linux services.[user@host bin]$sudo service jboss-as-standalone.sh startIf everything has gone correctly, you should get a green [OK]. If you get an error, check the error logs and make sure your paths are correct in the configuration file.Make the service start automatically when you restart your server.
To add the service to the list of services which start automatically when your server restarts, issue the following command.[user@host init.d]$sudo chkconfig jboss-as-standalone.sh on
JBoss Fuse Service Works starts automatically when Red Hat Enterprise Linux reaches its default run-level, and stops automatically when the operating system goes through its shutdown routine.
Chapter 15. Configuring Red Hat JBoss Fuse Service Works to Run in a Clustered Environment
15.1. About Cluster Service Registry in SwitchYard
- Service Name: It stores the name of a service.
- Domain Name: It stores the name of a domain.
- Endpoint Address: It stores the physical access point for the service.
- Node Name: It stores the cluster node on which the service is deployed.
- Service Contract: It stores the abstract invocation contract for the service which consists of the message exchange pattern and message types.
15.2. Setting Up SwitchYard in a Clustered Environment
- Shared Runtime Registry: A shared, distributed runtime registry that enable individual instances to publish and query service endpoint details.
- Remote Communication Channels: An internal communication protocol that enables a service client to invoke a service, hosted in a remote instance.
Note
15.3. Creating a Cluster of SwitchYard Instances
# start instance 1
node1> bin/standalone.sh -c standalone-ha.xml -Djboss.node.name=node1
# start instance 2
node> bin/standalone.sh -c standalone-ha.xml -Djboss.node.name=node2 -Djboss.socket.binding.port-offset=1000
15.4. Enabling Clustering in your SwitchYard Application
- Start two or more instances on different nodes.
- Indicate the services that are clustered in the
switchyard.xmlfile.
Note
standalone-ha.xml file.
<binding.sca> with clustering enabled to it.
<sca:service name="Goodbye" promote="GoodbyeBean/Goodbye">
  <sca:interface.java interface="com.example.Goodbye"/>
  <sca:binding.sca sy:clustered="true"/>
</sca:service>
<sca:reference name="Goodbye" multiplicity="0..1" promote="GreetingBean/Goodbye">
  <sca:interface.java interface="com.example.Goodbye"/>
  <sca:binding.sca sy:clustered="true"/>
</sca:reference>
15.5. Governance and S-RAMP in a Clustered Environment
Procedure 15.1. Configuring Governance and S-RAMP in a Clustered Environment
- Add the
<distributable/>entry inside the<web-app>element of the followingweb.xmlfiles:standalone/deployments/s-ramp-server.war/WEB-INF/web.xmlstandalone/deployments/s-ramp-ui.war/WEB-INF/web.xmlstandalone/deployments/dtgov.war/WEB-INF/web.xmlstandalone/deployments/dtgov-ui.war/WEB-INF/web.xmlstandalone/deployments/overlord-commons-idp.war/WEB-INF/web.xmlstandalone/deployments/overlord-rtgov/gadget-web.war/WEB-INF/web.xmlstandalone/deployments/overlord-rtgov/gadgets.war/WEB-INF/web.xmlstandalone/deployments/overlord-rtgov/overlord-rtgov.war/WEB-INF/web.xml
- Add the
<replication-config>entry:<replication-config> <cache-name>web/sso</cache-name> </replication-config>
inside the<jboss-web>element of the followingjboss-web.xmlfiles:standalone/deployments/s-ramp-server.war/WEB-INF/jboss-web.xmlstandalone/deployments/s-ramp-ui.war/WEB-INF/jboss-web.xmlstandalone/deployments/dtgov.war/WEB-INF/jboss-web.xmlstandalone/deployments/dtgov-ui.war/WEB-INF/jboss-web.xmlstandalone/deployments/overlord-commons-idp.war/WEB-INF/jboss-web.xmlstandalone/deployments/overlord-rtgov/gadget-web.war/WEB-INF/jboss-web.xmlstandalone/deployments/overlord-rtgov/gadgets.war/WEB-INF/jboss-web.xmlstandalone/deployments/overlord-rtgov/overlord-rtgov.war/WEB-INF/jboss-web.xml
- Configure the ModeShape and Infinispan subsystems, and the jGroups TCP Stack in the
standalone/configuration/standalone-ha.xmlfile as in the following code sample:<!-- Infinispan subsystem configuration --> <cache-container name="modeshape" module="org.modeshape" start="EAGER"> <transport lock-timeout="60000" /> <replicated-cache name="sramp" mode="SYNC" batching="true"> <locking isolation="NONE" /> <transaction mode="NON_XA" /> <string-keyed-jdbc-store datasource="java:jboss/datasources/srampDS" passivation="false" purge="false"> <string-keyed-table prefix="ispn_bucket"> <id-column name="id" type="VARCHAR(500)" /> <data-column name="datum" type="VARBINARY(60000)" /> <timestamp-column name="version" type="BIGINT" /> </string-keyed-table> </string-keyed-jdbc-store> </replicated-cache> </cache-container> <cache-container name="modeshape-binary-cache-container" aliases="modeshape-binary-cache" module="org.modeshape"> <transport lock-timeout="60000" /> <replicated-cache name="sramp-binary-fs" mode="SYNC" batching="true"> <transaction mode="NON_XA" /> <file-store relative-to="jboss.server.data.dir" path="modeshape/binary-store/sramp-binary-data-${jboss.node.name}" passivation="false" purge="false" /> </replicated-cache> </cache-container> <!-- ModeShape subsystem configuration --> <subsystem xmlns="urn:jboss:domain:modeshape:1.0"> <repository name="sramp" cache-name="sramp" cache-container="modeshape" security-domain="overlord-idp" anonymous-roles="readonly" cluster-name="sramp-cluster" cluster-stack="tcp"> <indexing rebuild-upon-startup="if_missing" /> <local-file-index-storage path="modeshape/clustered-repo/${jboss.node.name}_indexes" /> <cache-binary-storage data-cache-name="binary-fs" metadata-cache-name="binary-fs-meta" cache-container="modeshape-binary-cache-container" /> </repository> </subsystem> <!-- jgroups tcp stack configuration --> <subsystem xmlns="urn:jboss:domain:jgroups:1.1" default-stack="udp"> ... <stack name="tcp"> ... <protocol type="TCPPING"> <property name="initial_hosts">0.0.0.0[7600],0.0.0.0[7600]</property> <property name="num_initial_members">2</property> <property name="port_range">0</property> <property name="timeout">2000</property> </protocol> </stack> </subsystem>
Chapter 16. Starting Red Hat JBoss Fuse Service Works in an Enterprise Environment
16.1. Introduction
127.0.0.1, or localhost, by default. One of the interfaces is called management, and is used by the Management Console, CLI, and API. The other is called public, and is used to deploy applications. These interfaces are not special or significant, but are provided as a starting point.
management interface uses ports 9990 and 9999 by default, and the public interface uses port 8080, or port 8443 if you use HTTPS.
Warning
16.2. Specify the Network Interface
Stop JBoss EAP 6.
Stop JBoss EAP 6 by sending an interrupt in the appropriate way for your operating system. If you are running JBoss EAP 6 as a foreground application, the typical way to do this is to press Ctrl+C.Restart JBoss EAP 6, specifying the bind address.
Use the-bcommand-line switch to start JBoss EAP 6 on a specific interface.Example 16.1. Specify the public interface.
EAP_HOME/bin/domain.sh -b 10.1.1.1
Example 16.2. Specify the management interface.
EAP_HOME/bin/domain.sh -bmanagement=10.1.1.1
Example 16.3. Specify different addresses for each interface.
EAP_HOME/bin/domain.sh -bmanagement=127.0.0.1 -b 10.1.1.1
Example 16.4. Bind the public interface to all network interfaces.
EAP_HOME/bin/domain.sh -b 0.0.0.0
-bcommand-line switch to specify an IP address at run-time, so this is not recommended. If you do decide to do this, be sure to stop JBoss EAP 6 completely before editing the XML file.
Appendix A. Revision History
| Revision History | |||
|---|---|---|---|
| Revision 6.0.0-26 | Wednesday July 22 2015 | ||
| |||
| Revision 6.0.0-25 | Thursday May 14 2015 | ||
| |||
| Revision 6.0.0-24 | Tuesday April 14 2015 | ||
| |||
| Revision 6.0.0-23 | Monday February 23 2015 | ||
| |||
| Revision 6.0.0-22 | Tuesday January 13 2015 | ||
| |||
| Revision 6.0.0-21 | Wednesday December 17 2014 | ||
|
| |||