
Red Hat Training
A Red Hat training course is available for Red Hat Fuse
Tooling Tutorials
Tooling Tutorials
Abstract
Chapter 1. Using the Fuse Tooling Resource Files
Experienced users may want to focus only on the tutorials that demonstrate the tooling’s new features. To do so, you need to download and install the requisite resource files. The prefabricated message files are used by all tutorials, but the prefabricated routing context files are specific to particular tutorials. With the exception of Chapter 2, To Create a New Route, using these prefabricated resource files enables you to complete the remaining tutorials in any order. Without them, you must complete each tutorial sequentially, as the code generated by one tutorial is the starting point for the next tutorial.
Prerequisites
You must complete Chapter 2, To Create a New Route, to create the project, the new routing context, and the folder that will hold the test messages. The code generated by this tutorial is used by Chapter 3, To Run a Route and by Chapter 4, To Add a Content-Based Router.
Downloading the resource files
Click here to download the jbds-10.1.zip file. Move it to a convenient location external to the CBRroute project’s workspace, and unzip it. It contains two folders:
MessagesThis folder contains six prefabricated message files named
message1.xml,message2.xml,…,message6.xmlused in all of the tutorials. In Chapter 2, To Create a New Route, you will create the directory in which to store these message files, and also learn how to create them.blueprintContextsThis folder contains two prefabricated routing context files named
blueprint5.xml, andblueprint6.xml, which can be used in one or more of the tutorials:Use prefabricated routing context file: To complete tutorials: blueprint5.xmlTo Add Another Route to the CBR Routing Context
blueprint6.xmlTo Debug a Routing Context
To Trace a Message Through a Route
To Test a Route with JUnit
To Publish a Fuse Project to Red Hat JBoss Fuse
Noteblueprint5.xmlis the routing context file generated by completing Chapter 4, To Add a Content-Based Router.
Installing the prefabricated routing context files
To install the blueprint#.xml files:
-
Delete the existing
blueprint.xmlfile from theCBRroute/src/main/resources/OSGI-INF/blueprint/folder. -
Copy the
blueprint#.xmlfile that corresponds to the tutorial that you want to complete to the vacatedCBRroute/src/main/resources/OSGI-INF/blueprint/folder. -
Rename the
blueprint#.xmlfileblueprint.xml. - Follow the instructions for completing the target tutorial.
Chapter 2. To Create a New Route
This tutorial walks you through the process of creating a Fuse Integration project, adding a route to it, and adding two endpoints to the route. It assumes that you have already set up your workspace and that Red Hat JBoss Fuse Tooling is running inside Red Hat JBoss Developer Studio.
Goals
In this tutorial you will:
- Create a Fuse Integration project
- Create a new routing context
Create a route
- Add file endpoints to the route
- Connect the endpoints
- Configure the endpoints
- Create a folder in your project to store test messages that you create for your route
- Create the test messages
Prerequisites
- JBoss Developer Studio 11.2 installed
- Red Hat JBoss Fuse Tooling 10.2 installed in JBoss Developer Studio 11.2
- In Developer Studio, select menu:Window[ > > Preferences > > Fuse Tooling > > Editor > ] and confirm selection of this option: If enabled the ID values will be used for labels if existing. This ensures that the label of the patterns and components that you place on the canvas will be the same as the labels shown in these tutorials.
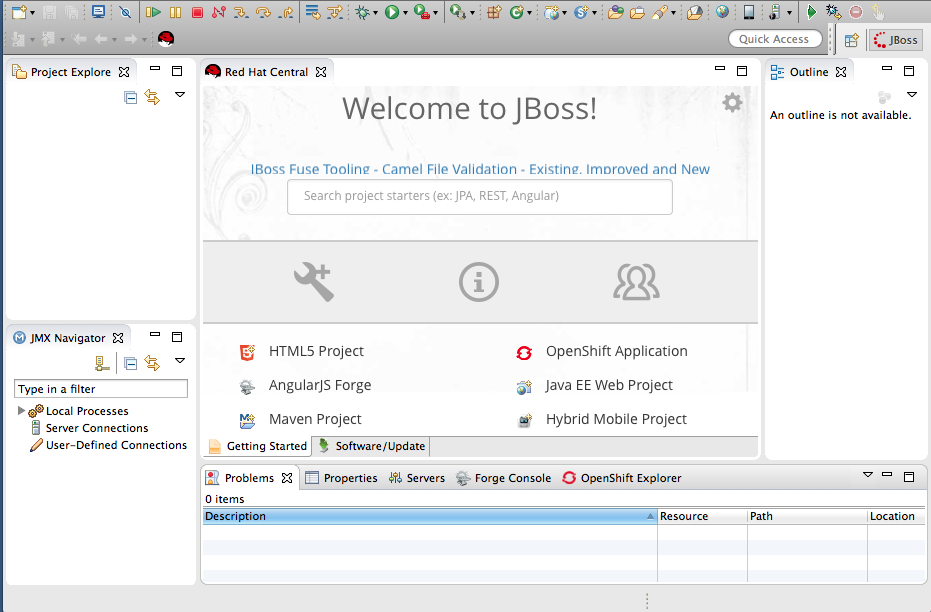
When you start Developer Studio for the first time, it opens in the JBoss perspective:
You can start this tutorial in the JBoss perspective or in the Fuse Integration perspective. If you start it in the JBoss perspective, the tooling will ask to switch you to the Fuse Integration perspective at the appropriate point in the tutorial.
Creating the Fuse Integration project
To create a Fuse Integration project:
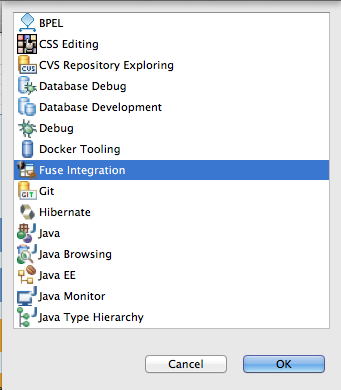
From the menu bar, select menu:File[ > > New > > Other > > JBoss Fuse > > Fuse Integration Project > ] and click to open the New Fuse Integration Project wizard:
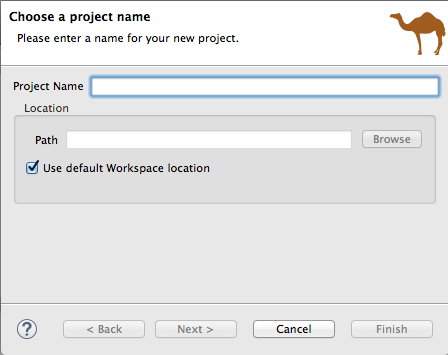
-
In the Project Name field, enter
CBRroute. - Leave the Use default workspace location option as is.
Click to open the Select a Target Runtime page:
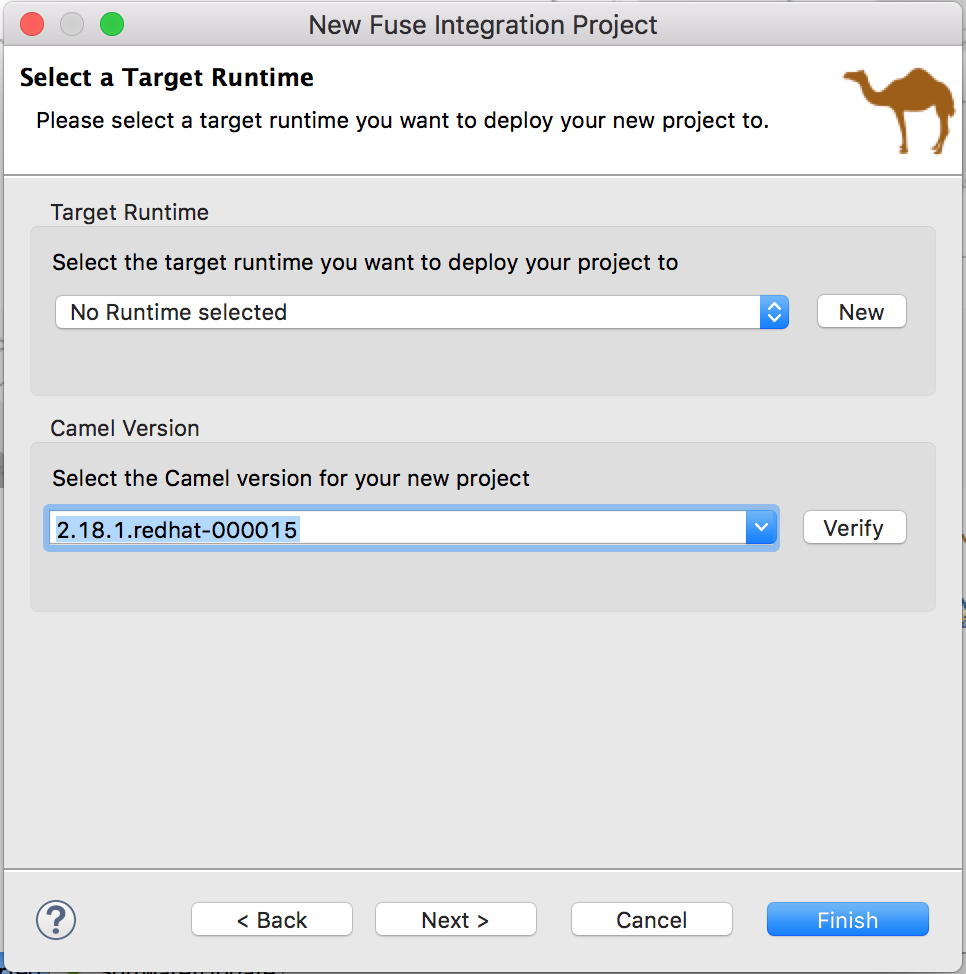
Accept No Runtime selected for Target Runtime, and 2.18.1.redhat-000015 for Camel Version.
NoteYou will add the runtime later in the tutorial Chapter 9, To Publish a Fuse Project to JBoss Fuse.
Click to open the Advanced Project Setup page:
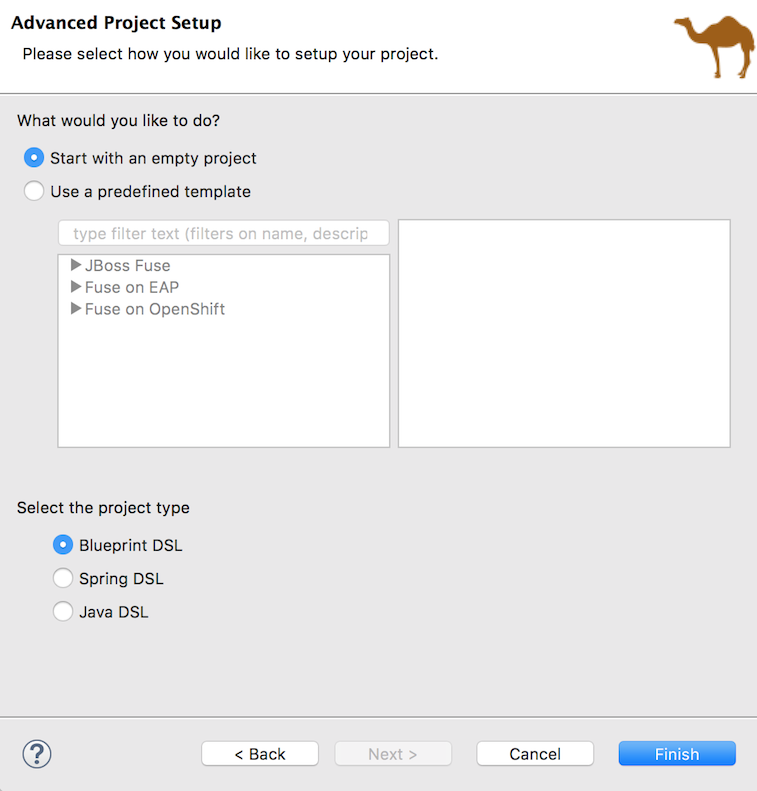
- Leave the Start with an empty project and Blueprint DSL options selected.
Click .
Fuse Tooling starts downloading from the Maven repository all of the files it needs to build the project, and then adds the new project to Project Explorer.
If you are not in the Fuse Integration perspective, the tooling asks whether you want to switch to it now:

Click to open the new
CBRrouteproject in the Fuse Integration perspective: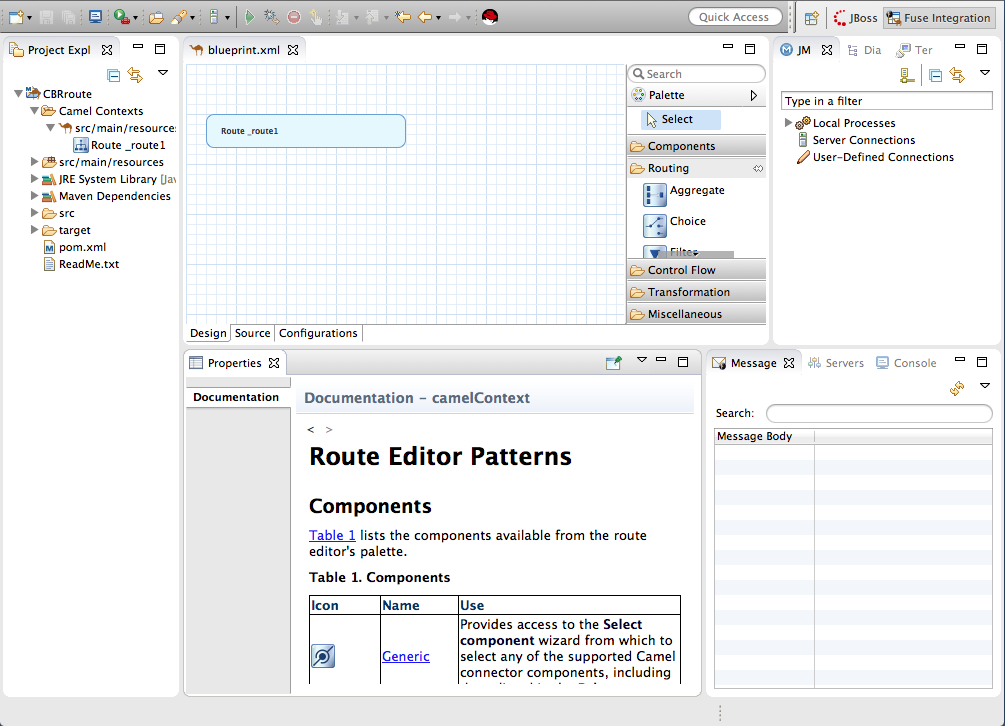
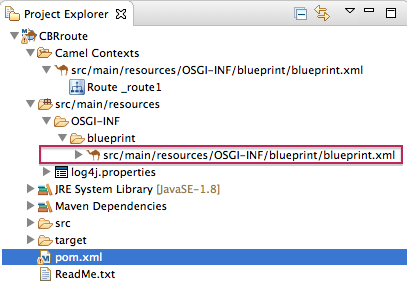
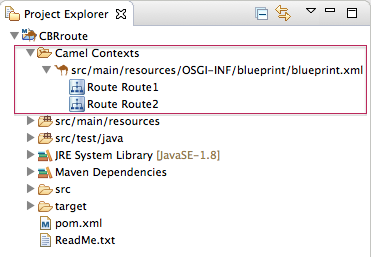
The new
CBRrouteproject contains everything needed to create and run routes. As shown in Figure 2.1, “Generated project files”, the files generated forCBRrouteinclude:-
CBRroute/pom.xml(Maven project file) CBRroute/src/main/resources/OSGI-INF/blueprint/blueprint.xml(Blueprint XML file containing the routing rules)Figure 2.1. Generated project files
 Note
NoteNotice that the
pom.xmlentry in Project Explorer is decorated wth a warning symbol.You can safely ignore this warning or eliminate it by opening the
pom.xmlfile in the tooling’s XML editor, and delete the<version>element from each dependency:camel-core,camel-blueprint, andcamel-test-blueprint. Save thepom.xmlfile.
-
Creating the route
To create the route:
- Click the Design tab at the bottom, left of the canvas to return to the graphic display of the route.
Drag a File component (
 ) from the Palette's Components drawer to the canvas, and drop it in the
 Route_route1container node.The File component changes to a
From _from1node inside theRoute_route1container node.On the canvas, select the
From _from1node.The Properties view, located below the canvas, displays the node’s property fields for editing.
In the Properties view, click the Advanced tab:

You need to create a folder for the project’s source data and enter that folder’s name in the Directory Name field.
-
In Project Explorer, right-click
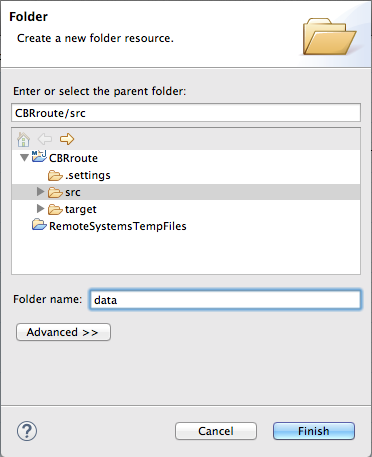
CBRroute/src/to open the context menu. Select menu:[ > New > > Folder > ] to open the New Folder wizard:
-
Check that
CBRroute/srcappears in the Enter or select the parent folder field. Otherwise enter it manually, or select it from the graphical representation of the project’s hierarchy. In the Folder name field, enter
data, and then click Finish.The new
datafolder appears in Project Explorer, under thesrcfolder:
-
In Project Explorer, right-click
-
In the Properties view, return to the
From _from1node’s Advanced tab. In the Directory Name field, enter
src/data:
The path
src/datais relative to the project’s directory.On the Consumer tab, enable the Noop option by clicking its check box.
The Noop option prevents the
message#.xmlfiles being deleted from thesrc/datafolder, and it enables idempotency to ensure that eachmessage#.xmlfile is consumed only once.Select the Details tab to open the file node’s Details page.
The tooling automatically populates the Uri field with the Directory Name and Noop properties you configured on the Advanced tab. It also populates the Id field with an autogenerated ID (
_from1):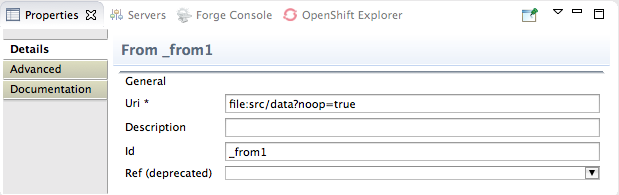
- Leave the autogenerated Id as is.
Drag another File component from the Palette's Components drawer and drop it in the
Route_route1container node.The File component changes to a
To _to1node inside theRoute_route1container node.On the canvas, select the
To _to1node.The Properties view, located below the canvas, displays the node’s property fields for editing.
On the Details tab, enter
file:target/messages/othersin the Uri field, and_Othersin the Id field: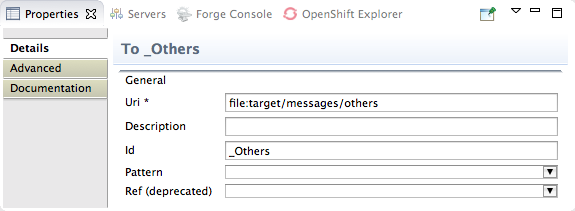 Note
NoteThe tooling will create the
target/messages/othersfolder at runtime.In the
Route_route1container, select the From _from1 node and drag it’s connector arrow ( ) over the To_Others node, then release it:
 Note
NoteThe two file nodes are connected and aligned on the canvas according to the route editor’s layout direction preference setting. The choices are Right and Down (default).
NoteIf you do not connect the nodes before you close the project, the tooling automatically connects them when you reopen it.
- Select → to save the route.
Click the Source tab at bottom, left of the canvas to display the XML for the route. The camelContext element will look like Example 2.1, “XML for CBRroute”:
Example 2.1. XML for CBRroute
<?xml version="1.0" encoding="UTF-8"?>

<blueprint xmlns="http://www.osgi.org/xmlns/blueprint/v1.0.0"
    xmlns:xsi="http://www.w3.org/2001/XMLSchema-instance"
    xsi:schemaLocation="http://www.osgi.org/xmlns/blueprint/v1.0.0
    https://www.osgi.org/xmlns/blueprint/v1.0.0/blueprint.xsd
    http://camel.apache.org/schema/blueprint
    http://camel.apache.org/schema/blueprint/camel-blueprint.xsd">

    <camelContext id="_context1" xmlns="http://camel.apache.org/schema/blueprint">
        <route id="_route1">
            <from id="_from1" uri="file:src/data?noop=true"/>
            <to id="_Others" uri="file:target/messages/others"/>
        </route>
    </camelContext>
</blueprint>
Creating test messages
Before you can run your route, you need to create test messages to send through it.
-
In Project Explorer, right-click
CBRrouteto open the context menu. Click menu:New[ > > Fuse Message > ] to open the New File wizard:
-
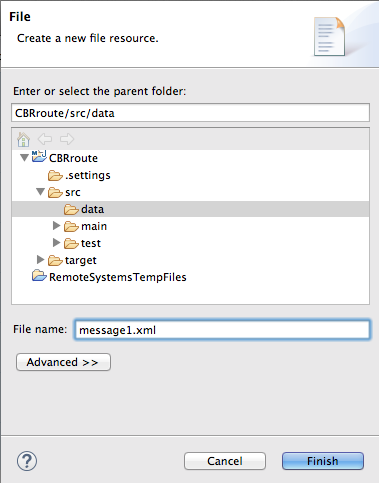
Check that
CBRroute/src/dataappears in the Enter or select the parent folder field. Otherwise enter it manually, or select it from the graphical representation of the project’s hierarchy. -
In the field, enter
message1.xml. Click to open the test message,
message1.xmlin the Design tab: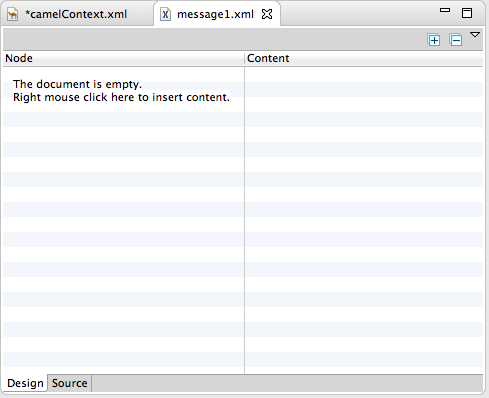
Click the tab at the bottom of the canvas:
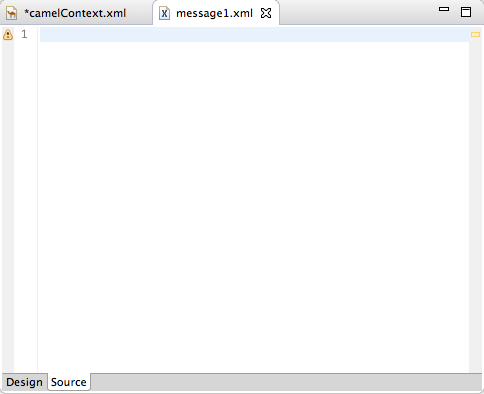
In the tab, enter this text:
<?xml version="1.0" encoding="UTF-8"?> <order> <customer> <name>Brooklyn Zoo</name> <city>Brooklyn</city> <country>USA</country> </customer> <orderline> <animal>wombat</animal> <quantity>15</quantity> <maxAllowed>25</maxAllowed> </orderline> </order>NoteYou can safely ignore the
 on the last line of the newly created
 message1.xmlfile, which advises you that there are no grammar constraints (DTD or XML Schema) referenced by the document.- Save the file, and close it.
If you haven’t already done so, download the prefabricated test message files (see Chapter 1, Using the Fuse Tooling Resource Files for instructions). Copy
message2.xmlthroughmessage6.xmlinto the newly createdCBRroute/src/datafolder. You will use all six test messages in the remaining Fuse Tooling tutorials.Table 2.1, “Preconstructed test messages” shows the contents of each remaining prefabricated message file.
Table 2.1. Preconstructed test messages
msg# <name> <city> <country> <animal> <quantity> <maxAllowed> 2
San Diego Zoo
San Diego
USA
giraffe
3
2
3
London Zoo
London
Great Britain
penguin
12
20
4
Bristol Zoo
Bristol
Great Britain
emu
5
4
5
Paris Zoo
Paris
France
giraffe
2
2
6
Hellabrunn Gardens
Munich
Germany
penguin
18
20
Next steps
After you have created and designed your route, you can run it by deploying it into your local Apache Camel runtime, as described in Chapter 3, To Run a Route.
Further reading
To learn more about using the editor, see the Editing a routing context in the route editor section in "Tooling User Guide".
Chapter 3. To Run a Route
This tutorial walks you through the process of running a route.
Goals
In this tutorial you will:
- Run a route as a Local Camel Context (without tests)
- Send messages through the route
- Examine the messages received by the endpoints
Prerequisites
To complete this tutorial you will need the CBRroute project created in Chapter 2, To Create a New Route.
Running the route
To run the route:
- Open the CBRroute project you created in the section called “Creating the Fuse Integration project”.
In Project Explorer, select
CBRroute/Camel Contexts/src/main/resources/OSGi-INF/blueprint/blueprint.xml: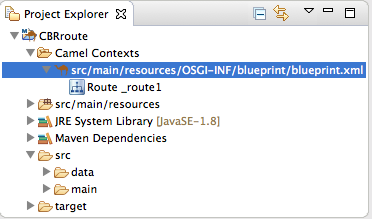
Right-click it to open the context menu, then select menu:Run As[ > > Local Camel Context (without tests) > ].
NoteIf you select Local Camel Context instead, the tooling automatically tries to run the routing context against a supplied JUnit test. Because one does not exist, the tooling reverts to running the routing context without tests. In the Chapter 8, To Test a Route with JUnit tutorial, you will create a JUnit test case and modify it specifically for testing the CBRroute project.
The Console panel opens to display log messages that reflect the progress of the project’s execution. At the beginning, Maven downloads the resources necessary to update the local Maven repository, which may take a few minutes.
Messages similar to the following at the end of the output indicate that the route executed successfully:
...
[Blueprint Extender: 3] BlueprintCamelContext INFO  Route: _route1 started and consuming from:Endpoint[file://src/data?noop=true]
[Blueprint Extender: 3] BlueprintCamelContext INFO  Total 1 routes, of which 1 are started.
[Blueprint Extender: 1] BlueprintCamelContext INFO  Apache Camel 2.18.0.redhat-000015 (CamelContext: ...) started in 0.163 seconds
[Blueprint Extender: 3] BlueprintCamelContext INFO  Apache Camel 2.18.0.redhat-000015 (CamelContext: ...) started in 0.918 seconds
-
To shutdown the route, click
 located at the top, right of the Console panel.
Verifying the route
To verify that the route executed properly:
-
In Project Explorer, select
CBRroute. - Right-click it to open the context menu, then select Refresh.
In Project Explorer, locate the folder
target/messages/and expand it: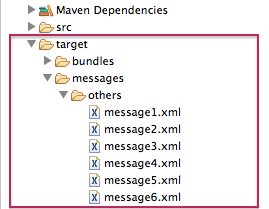
-
Verify that the
target/messages/othersfolder contains the six message files,message1.xmlthroughmessage6.xml. Double-click
message1.xmlto open it in the route editor’s Design tab, then select the Source tab at the bottom, left of the canvas to see the XML code.Its contents should match that shown in Example 3.1, “Contents of message1.xml”.
Example 3.1. Contents of message1.xml
<?xml version="1.0" encoding="UTF-8"?>

<order>
  <customer>
    <name>Brooklyn Zoo</name>
    <city>Brooklyn</city>
    <country>USA</country>
  </customer>
  <orderline>
    <animal>wombat</animal>
    <quantity>15</quantity>
    <maxAllowed>25</maxAllowed>
  </orderline>
</order>
Further reading
To learn more about:
- Configuring runtime profiles, see see the Editing a routing context in the route editor section in "Tooling User Guide".
- Deploying Apache Camel applications see Developing and Deploying Applications.
Chapter 4. To Add a Content-Based Router
This tutorial shows how to add a content-based router with logging to a route.
Goals
In this tutorial you will:
- Add a content-based router to your route
Configure the content-based router
- Add a log endpoint to each output branch of the content-based router
- Add a Set Header EIP after each log endpoint
- Add an Otherwise branch to the content-based router
Prerequisites
To complete this tutorial you will need the CBRroute project you created in Chapter 2, To Create a New Route.
Adding and configuring a content-based router
To add and configure a content-based router for your route:
-
In Project Explorer, double-click
CBRroute/src/main/resources/OSGI-INF/blueprint/blueprint.xmlto open yourCBRrouteproject. -
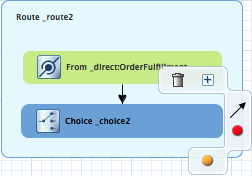
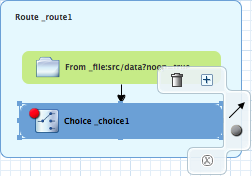
On the canvas, select the
To_Othersnode and then select the trash can above and to the right to delete it. In the Palette, open the Routing drawer and drag a Choice (
 ) pattern to the canvas and drop it in the
 Route_route1container.The
Route_route1container expands to accommodate theChoice_choice1node.In the
Route_route1container, select theFrom_from1node and drag its connector arrow over theChoice_choice1node, then release it: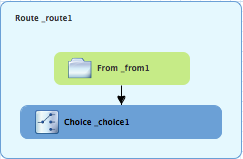
In the Properties view,
_choice1appears in the Id field: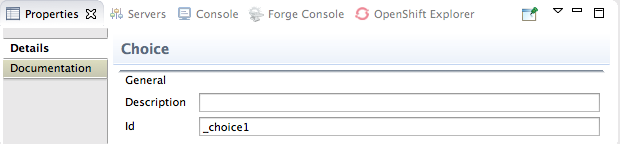
Leave the Id field as is.
From the Routing drawer, drag a When (
 ) pattern to the canvas and drop it on the
 Choice_choice1node: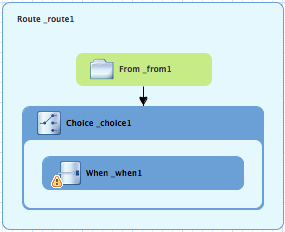
The
Choice_choice1container expands to accommodate theWhen_when1node. The decorating the
 When_when1node indicates that one or more required property values must be set.NoteThe tooling prevents you from dropping a pattern at an invalid drop point in a Route container.
On the canvas, select the
When_when1node, to open its properties in the Properties view: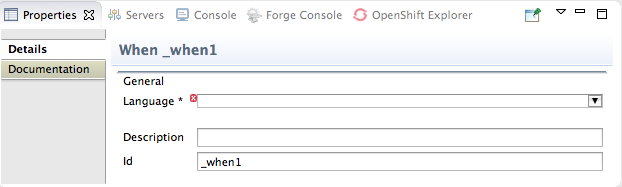
Click the
 button in the Language field to open the list of available languages, and select xpath:
 Note
NoteOnce you select the expression Language, the Properties view displays its properties in an indented list directly below the Language field. The Id property in this list sets the ID of the expression. The Id property following the Description field sets the ID of the
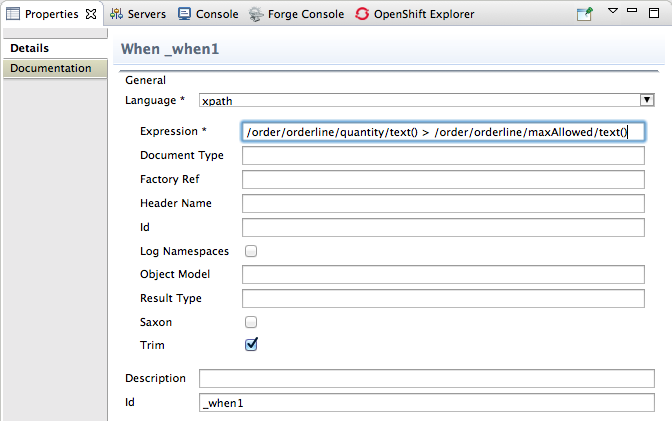
Whennode.In the Expression field, enter
/order/orderline/quantity/text() > /order/orderline/maxAllowed/text().This expression determines which messages will transit this path in the route.
Leave each of the remaining properties as is.
Enabling Trim removes any leading or trailing white spaces and line breaks from the message.
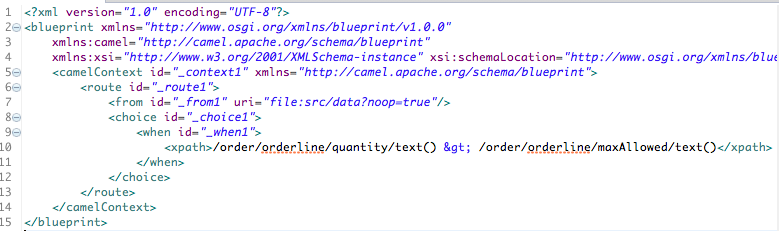
- On the menu bar, click → to save the routing context file.
Click the Source tab to view the XML for the route:
Adding and configuring logging
To add logging to your route:
-
In the Palette, open the Components drawer and select a Log (
 ) component.
Drag the Log component to the canvas and drop it on the
When_when1node: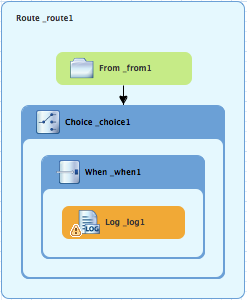
The
When_when1container expands to accommodate theLog_log1node.-
On the canvas, select the
Log_log1node to open its properties in the Properties view. In the Message field, enter
quantity requested exceeds the maximum allowed - contact customer: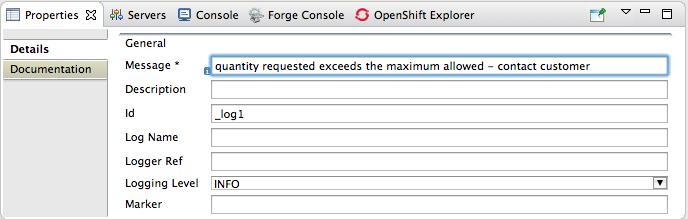
Leave each of the remaining properties as is.
NoteIn the Fuse Integration perspective’s Messages view, the tooling inserts the contents of the log node’s Id field in the Trace Node Id column for message instances, when tracing is enabled on the route (see Chapter 7, To Trace a Message Through a Route). In the Console, it adds the contents of the log node’s Message field to the log data whenever the route runs.
- On the menu bar, click → to save the routing context file.
Adding and configuring message headers
To add and configure message headers:
-
In the Palette, open the Transformation drawer and select a Set Header (
 ) pattern.
Drag the Set Header pattern to the canvas and drop it in the
When_when1container.The
When_when1container expands to accommodate theSetHeader_setHeader1node.On the canvas, select the
Log_log1node and drag its connector arrow over theSetHeader_setHeader1node, and then release it: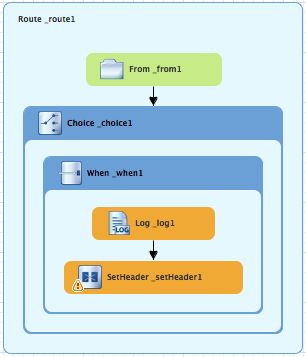
On the canvas, select the
SetHeader_setHeader1node to open its properties in the Properties view: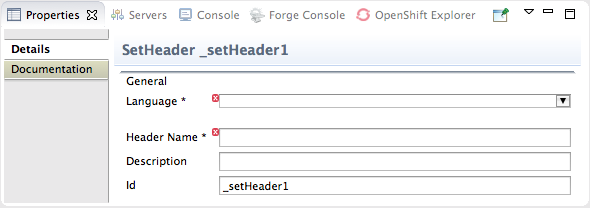
Click the
button in the Language field to open the list of available languages, and select constant:

-
In the Expression field, enter
InvalidOrders. -
In the Header Name field, enter
Destination. - Leave each of the remaining properties as is.
-
In the Palette, open the Components drawer and select the File (
) component.
Drag the File component to the canvas and drop it in the
When_when1container.The
When_when1container expands to accommodate theTo_to1node.On the canvas, select the
SetHeader_setHeader1node and drag its connector arrow over theTo_to1node, and then release it: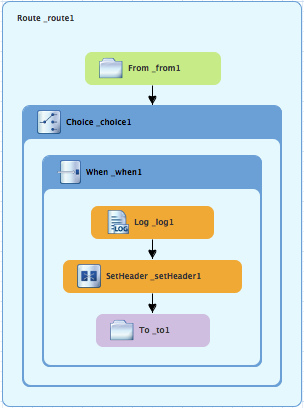
On the canvas, select the
To_to1node to open its properties in the Properties view: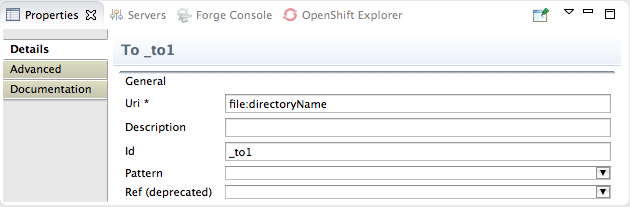
On the Details tab, replace directoryName with
target/messages/invalidOrdersin the Uri field, and enter_Invalidin the Id field: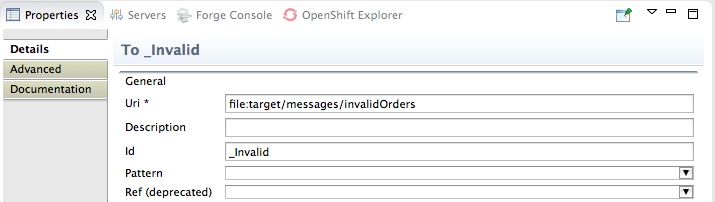
- On the menu bar, click → to save the routing context file.
Click the Source tab to view the XML for the route:
Adding and configuring an otherwise branch
To add and configure the otherwise branch of your route:
-
In the Palette, open the Routing drawer and select the Otherwise (
) pattern.
Drag the Otherwise pattern to the canvas and drop it into the
Choice_choice1container: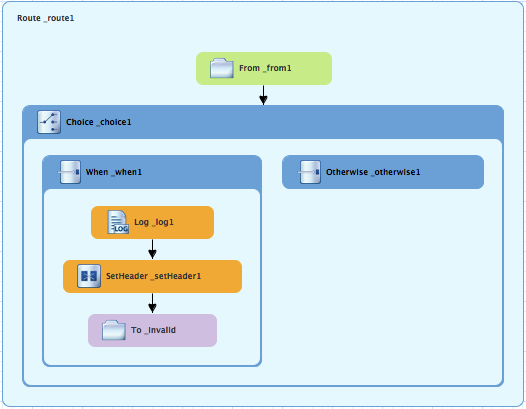
The
Choice_choice1container expands to accommodate theOtherwise_otherwise1node.-
On the canvas, select the
Otherwise_otherwise1node to open its properties in the Properties. In the Id field, enter
_else2: Note
NoteThe
else2node will eventually route to the terminalfile:node (file:target/messages/validOrders) any message that does not match the XPath expression set for theWhen_when1node.-
In the Palette, open the Components drawer and select the Log (
) component.
Drag the Log component to the canvas and drop it on the
Otherwise_else2node: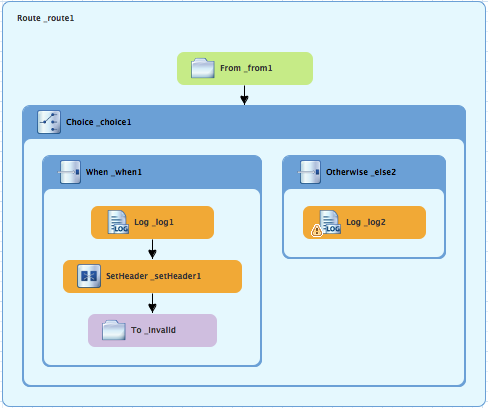
The
Otherwise-else2container expands to accommodate theLog_log2node.-
On the canvas, select the
Log_log2node to open its properties in the Properties view. In the Message field, enter
valid order - process: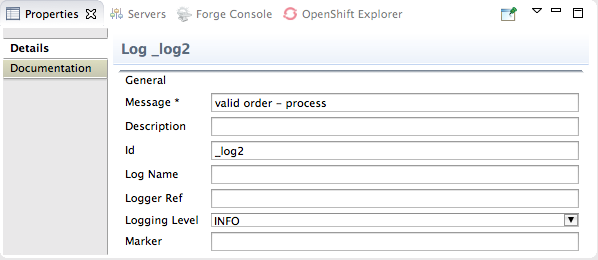
Leave each of the remaining properties as is.
- In the Palette, open the Transformation drawer and select the Set Header pattern.
Drag the Set Header pattern to the canvas and drop it into the
Otherwise_else2container.The
Otherwise_else2container expands to accommodate theSetHeader_setHeader2node.On the canvas, select the
Log_log2node and drag its connector arrow over theSetHeader_setHeader2node, and then release it: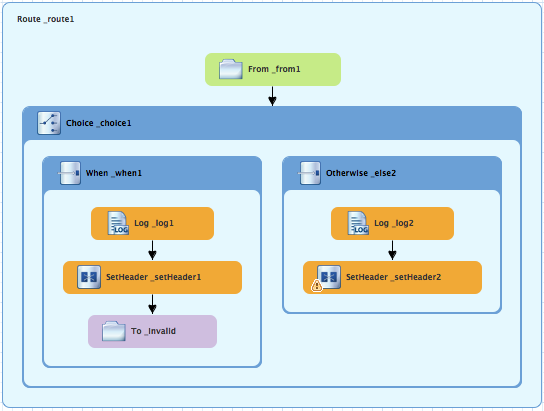 Note
NoteYou can collapse containers to free up space when the diagram becomes congested. To do so, select the container you want to collapse, and then click its
 button:
To reopen the container, select it and then click its
 button:
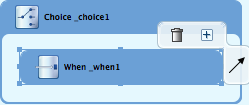
Collapsing and expanding containers in the Design tab does not affect the routing context file. It remains unchanged.
-
On the canvas, select the
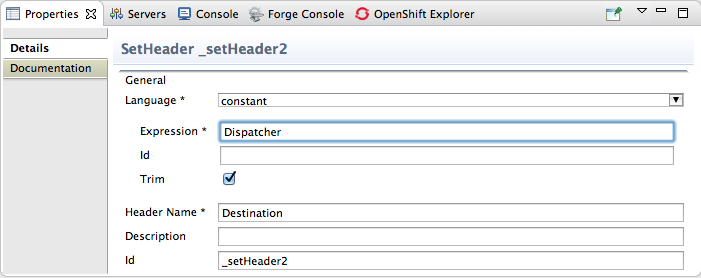
SetHeader_setHeader2node to open its properties in the Properties view. Click the
button in the Language field to open the list of available languages, and select constant:
-
In the Expression field, enter
Dispatcher. -
In the Header Name field, enter
Destination. - Leave each of the remaining properties as is.
-
In the Palette, open the Components drawer and select the File (
) component.
Drag the File component to the canvas and drop it into the
Otherwise_else2container.The
Otherwise_else2container expands to accommodate theTo_to1node.On the canvas, select the
SetHeader_setHeader2node, and drag its connector arrow over theTo_to1node and then release it: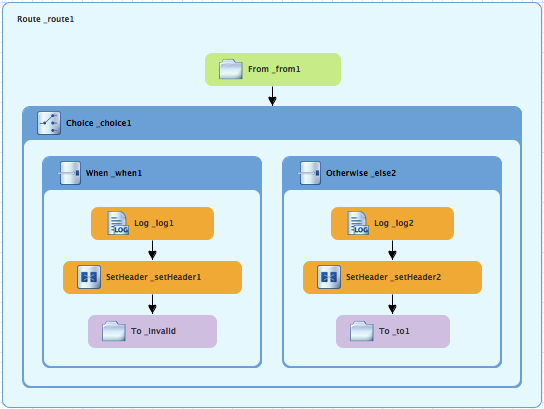
-
On the canvas, select the
To_to1node to open its properties in the Properties view. In the URI field, replace directoryName with
target/messages/validOrders, and in the Id field, enter_Valid: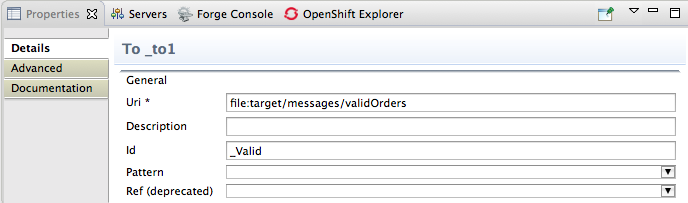
On the menu bar, click → to save the routing context file.
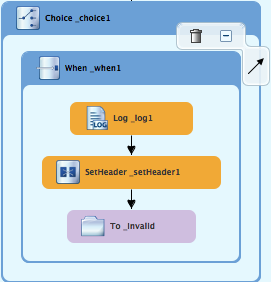
This is the completed content-based router with logs and message headers:
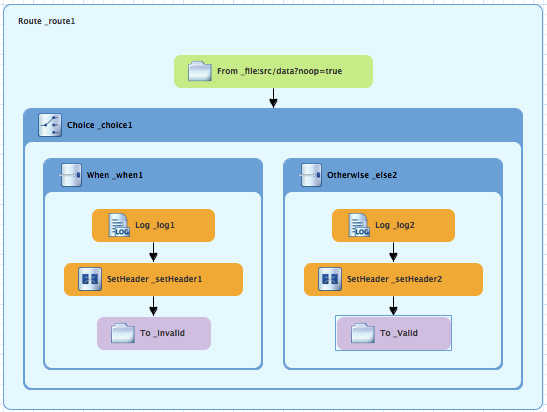
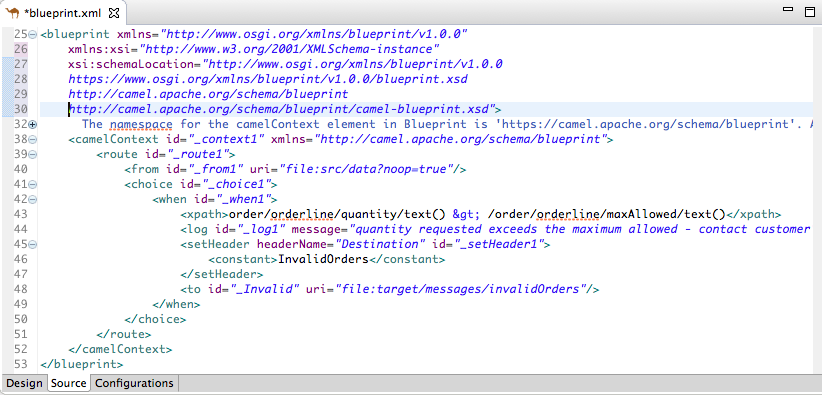
Click the Source tab at the bottom, left of the canvas to display the XML for the route.
The camelContext element will look like that shown in Example 4.1, “XML for content-based router”.
Example 4.1. XML for content-based router
<?xml version="1.0" encoding="UTF-8"?>
<blueprint xmlns="http://www.osgi.org/xmlns/blueprint/v1.0.0"
    xmlns:xsi="http://www.w3.org/2001/XMLSchema-instance"
    xsi:schemaLocation="http://www.osgi.org/xmlns/blueprint/v1.0.0
    https://www.osgi.org/xmlns/blueprint/v1.0.0/blueprint.xsd
    http://camel.apache.org/schema/blueprint
    http://camel.apache.org/schema/blueprint/camel-blueprint.xsd">

  <camelContext id="_context1" xmlns="http://camel.apache.org/schema/blueprint">
    <route id="_route1">
        <from id="_from1" uri="file:src/data?noop=true"/>
        <choice id="_choice1">
           <when id="_when1">
              <xpath>order/orderline/quantity/text() > /order/orderline/maxAllowed/text()</xpath>
              <log id="_log1" message="quantity requested exceeds the maximum allowed - contact customer"/>
              <setHeader headerName="Destination" id="_setHeader1">
                  <constant>InvalidOrders</constant>
              </setHeader>
              <to id="_Invalid" uri="file:target/messages/invalidOrders"/>
           </when>
           <otherwise id="_else2">
              <log id="_log2" message="valid order - process"/>
              <setHeader headerName="Destination" id="_setHeader2">
                  <constant>Dispatcher</constant>
              </setHeader>
              <to id="_Valid" uri="file:target/messages/validOrders"/>
           </otherwise>
        </choice>
    </route>
  </camelContext>
</blueprint>
Next steps
You can run the new route as described in the section called “Running the route”.
After you run it, you can easily verify whether the route executed properly by checking the target destinations in Project Explorer:
-
Select
CBRroute. - Right-click it to open the context menu, then select Refresh.
Under the project root node (
CBRroute), locate the foldertarget/messages/and expand it.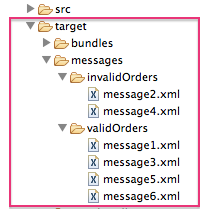
Check that the
target/messages/invalidOrdersfolder containsmessage2.xmlandmessage4.xml.In these messages, the value of the
quantityelement should exceed the value of themaxAllowedelement.Check that the
target/messages/validOrdersfolder contains the four message files that contain valid orders:message1.xml,message3.xml,message5.xmlandmessage6.xml.In these messages, the value of the
quantityelement should be less than or equal to the value of themaxAllowedelement.NoteTo view message content, double-click each message to open it in the route editor’s XML editor.
Further reading
To learn more about message enrichment see:
Chapter 5. To Add Another Route to the CBR Routing Context
This tutorial shows you how to add a second route to the blueprint.xml file in the CBRroute project. The second route:
- Takes messages directly from the terminal end of the first route’s otherwise branch
- Sorts the messages according to customers' country
-
Sends each message to the corresponding
countryfolder in theCBRroute/target/messagesfolder.
Goals
In this tutorial you will:
- Reconfigure the existing route for direct connection to a second route
-
Add a second route to your
<camelContext> - Configure the new route to take messages directly from the otherwise branch of the first route
- Add a content-based router to the new route
- Add and configure a message header, logging, and target destination to each output branch of the new route’s content-based router
Prerequisites
To complete this tutorial you will need the CBRroute project you modified in Chapter 4, To Add a Content-Based Router.
If you skipped any tutorial after Chapter 2, To Create a New Route, you can use the prefabricated blueprint5.xml file to work through this tutorial (for details, see Chapter 1, Using the Fuse Tooling Resource Files).
Reconfiguring the existing route for direct connection
To configure the existing route for direct connection with the new route:
-
Open your
CBRroute/src/main/resources/OSGI-INF/blueprint/blueprint.xmlin the route editor. -
On the canvas, select the
Route_route1container to open its properties in the Properties view. -
Scroll down to the Shutdown Route property and enter
Default. -
On the canvas, select the terminal file node
To_Validto display its properties in the Properties view. -
In the Uri field, delete the existing text, and then enter
direct:OrderFulfillment. -
In the Id field, enter
_Fulfill.
Instead of repurposing the existing To_Valid terminal file node, you could have replaced it with a → component, configuring it with the same property values as the repurposed To_Valid node.
Adding the second route
To add a route to the routing context:
-
In the Palette, open the Routing drawer and select the Route (
 ) pattern.
Drag the Route pattern to the canvas and drop it next to the
Route_route1container: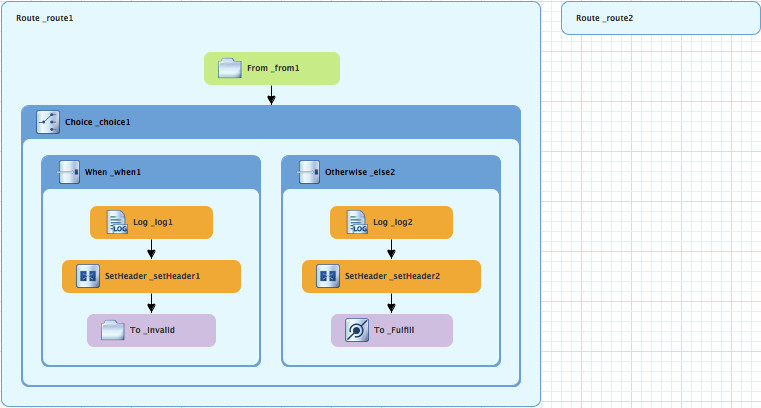
The Route pattern becomes the
Route_route2container node on the canvas.-
Click the
Route_route2container node to display its properties in the Properties view. - Leave each of the properties as is.
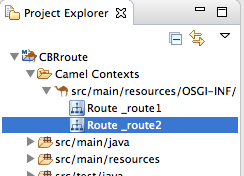
As your multiroute routing context grows in complexity, you may want to focus the route editor on an individual route while you work on it. To do so, in Project Explorer, double-click the route you want the route editor to display on the canvas; for example Route_route2:
To display all routes in the routing context on the canvas, double-click the project’s .xml context file entry (src/main/resources/OSGI-INF/…) at the top of the Camel Contexts folder.
Building and configuring the USA branch of the second route
In the Palette, open the Components drawer and drag a Direct component (
 ) to the canvas and drop it in the
 Route_route2container: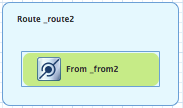
The
Route_route2container expands to accommodate theFrom_from2node.On the canvas, select the
From_from2node to open its properties in the Properties view: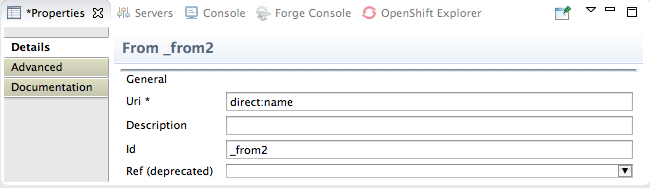
-
In the Uri field, replace name (following
direct:) withOrderFulfillment, and in the Id field, enter_direct:OrderFulfillment. In the Palette, open the Routing drawer and drag a Choice (
) pattern to the canvas and drop it in the Route_route2container.The
Route_route2container expands to accommodate theChoice_choice2node.In the
Route_route2container, select thedirect:OrderFulfillmentnode and drag its connector arrow over theChoice_choice2node, then release it:
-
In the Properties view, leave each of the
Choice_choice2node’s properties as is. In the Palette, open the Routing drawer and drag a When (
) pattern to the canvas and drop it in the Choice_choice2container: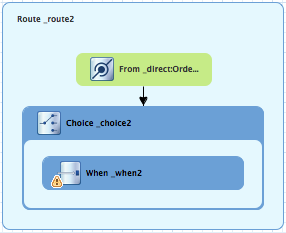
The
Choice_choice2container expands to accommodate theWhen_when2node.On the canvas, select the
When_when2node to open its properties in the Properties view: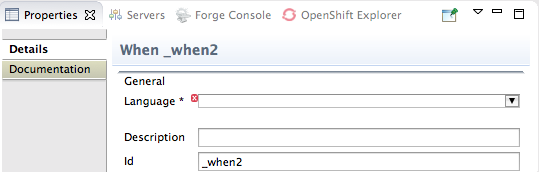
Set the node’s properties this way:
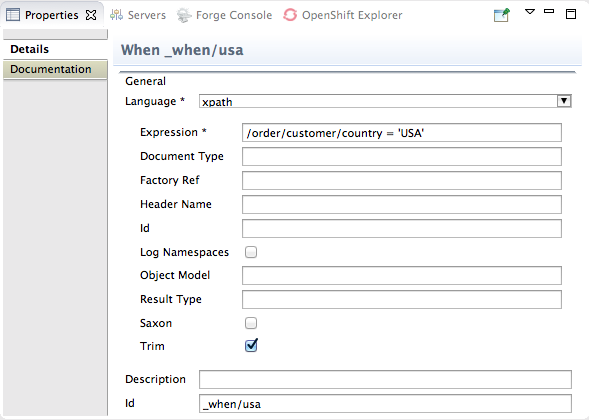
- Select xpath from the Language drop-down menu.
-
Enter
/order/customer/country = 'USA'in the Expression field. - Leave Trim enabled.
Enter
_when/usain the Id field.NoteOnce you select the expression Language, the Properties view displays its properties in an indented list directly below the Language field. The Id property in this list sets the ID of the expression. The Id property following the Description field sets the ID of the
Whennode.
In the Palette, open the Transformation drawer and drag the Set Header pattern to the canvas and drop on the
When_when/usanode: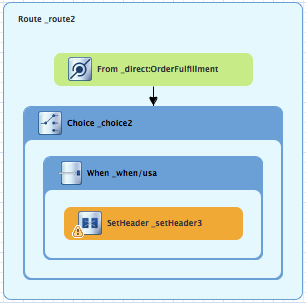
The
When_when/usacontainer expands to accommodate theSetHeader_setHeader3node.On the canvas, select the
SetHeader_setHeader3node to open its properties in the Properties view: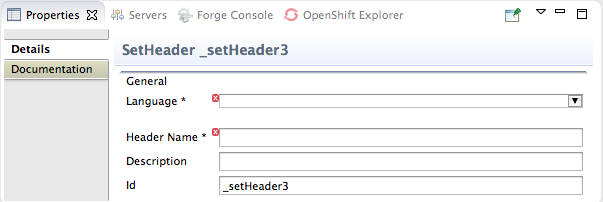
Set the node’s properties this way:

- Select constant from the Language drop-down menu.
-
Enter
USAin the Expression field. - Leave Trim enabled.
-
Enter
Destinationin the Header Name field. -
Enter
_setHead_usain the Id field.
In the Palette, open the Components drawer and drag a Log component (
) to the canvas and drop it in the When_when/usacontainer.The
When_when/usacontainer expands to accommodate theLog_log3node.On the canvas, select the
SetHeader_setHead_usanode and drag its connector arrow over theLog_log3node, then release it: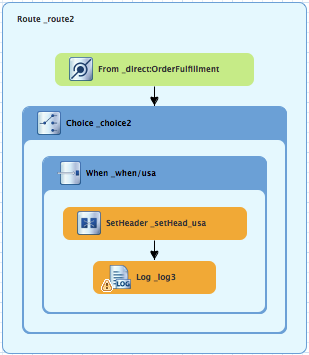
On the canvas, select the
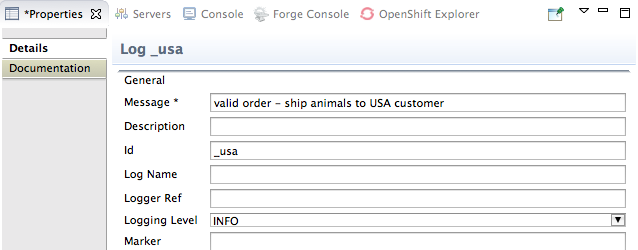
Log_log3node to open its properties in the Properties view: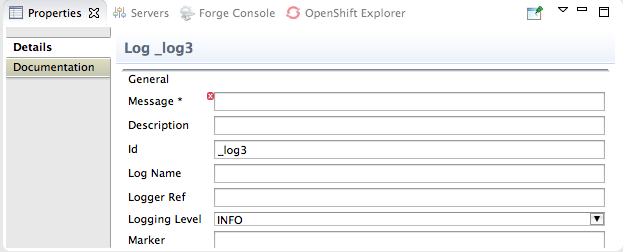
In the Properties view:
-
Enter
Valid order - ship animals to USA customerin the Message field. -
Enter
_usain the Id field. - Leave Logging Level as is.
-
Enter
In the Palette, open the Components drawer and drag a File component (
) to the canvas and drop it in the When_when/usacontainer.The
When_when/usacontainer expands to accommodate theTo_to1node.On the canvas, select the
Log_usanode and drag its connector arrow over theTo_to1node, then release it:
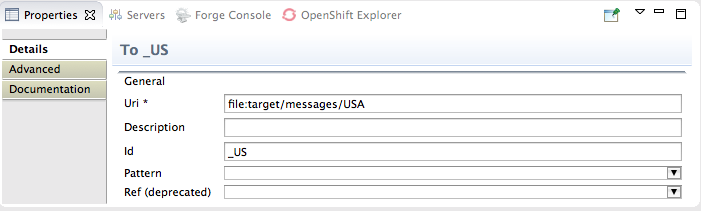
In the Properties view:
-
Replace directoryName with
target/messages/USAin the Uri field. -
Enter
_USin the Id field.
-
Replace directoryName with
On the menu bar, click → to save the routing context file.
The USA branch of
Route_route2should look like this: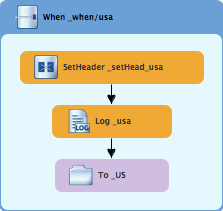
Building and configuring the Great Britain branch of the second route
With Route_route2 displayed on the canvas:
In the Palette, open the Routing drawer and drag a When pattern (
) to the canvas and drop it in the Choice_choice2container: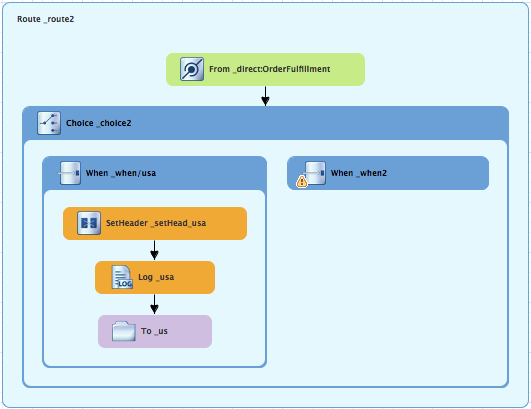
The
Choice_choice2container expands to accommodate theWhen_when2node.-
On the canvas, select the
When_when2node to open its properties in the Properties view. In the Properties view:
- Select xpath from the Language drop-down menu.
-
Enter
/order/customer/country = 'Great Britain'in the Expression field. - Leave Trim enabled.
-
Enter
_when/gbin the Id field.
In the Palette, open the Transformation drawer and drag a Set Header pattern (
) to the canvas and drop it on the When_when/gbnode: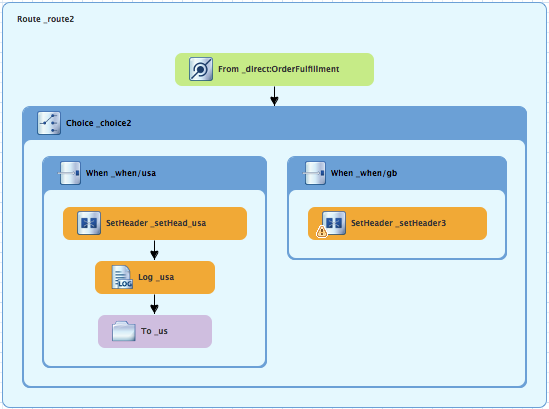
The
When_when/gbcontainer expands to accommodate theSetHeader_setHeader3node.-
On the canvas, select the
SetHeader_setHeader3node to open its properties in the Properties view. In the Properties view:
- Select constant from the Language drop-down menu.
-
Enter
UKin the Expression field. - Leave Trim as is.
-
Enter
Destinationin the Header Name field. -
Enter
_setHead_ukin the Id field.
In the Palette, open the Components drawer and drag a Log pattern (
) to the canvas and drop it in the When_when/gbcontainer.The
When_when/gbcontainer expands to accommodate theLog_log3node.On the canvas, select the
SetHeader_setHead_uknode and drag its connector arrow over theLog_log3node, and then release it: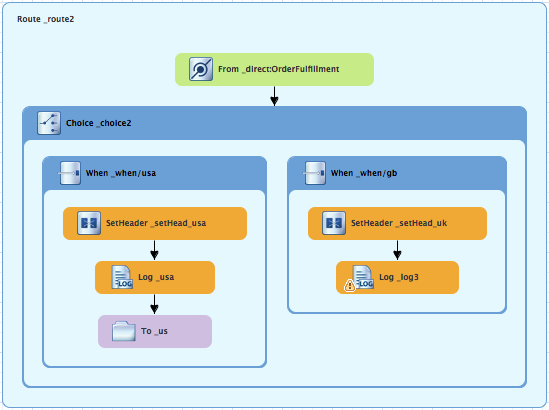
-
On the canvas, select the
Log_log3node to open its properties in the Properties view. In the Properties view:
-
Enter
Valid order - ship animals to UK customerin the Message field. -
Enter
_ukin the Id field. - Leave the Logging Level as is.
-
Enter
From the Components drawer, drag a File pattern (
) to the canvas and drop it in the When_when/gbcontainer.The
When_when/gbcontainer expands to accommodate theTo_to1node.On the canvas, select the
Log_uknode and drag its connector arrow over theTo_to1node, and then release it: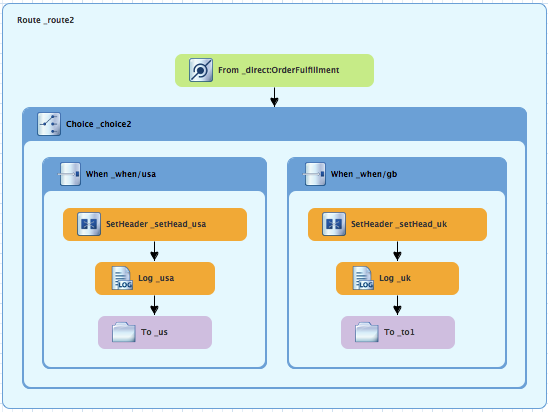
-
On the canvas, select the
To_to1node to open its properties in the Properties view. In the Properties view:
-
Replace directoryName with
target/messages/GreatBritainin the Uri field. -
Enter
_UKin the Id field.
-
Replace directoryName with
On the menu bar, click → to save the routing context file.
The Great Britain branch of
Route_route2should look like this: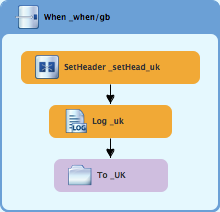
Building and configuring the Germany branch of the second route
With Route_route2 displayed on the canvas:
In the Palette, open the Routing drawer and drag a When pattern (
) to the canvas and drop it in the Choice_choice2container: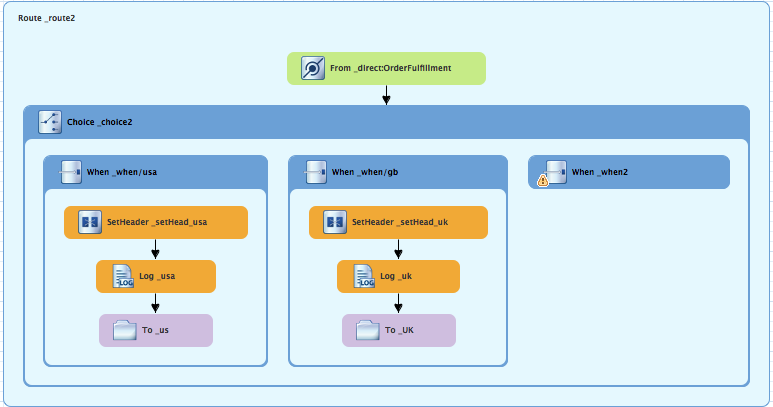
The
Choice_choice2container expands to accommodate theWhen_when2node.-
On the canvas, select the
When_when2node to open its properties in the Properties view. In the Properties view:
- Select xpath from the Language drop-down menu.
-
Enter
/order/customer/country = 'Germany'in the Expression field. - Leave Trim enabled.
-
Enter
_when/gerin the Id field.
In the Palette, open the Transformation drawer and drag a Set Header pattern (
) to the canvas and drop it on the When_when/gernode: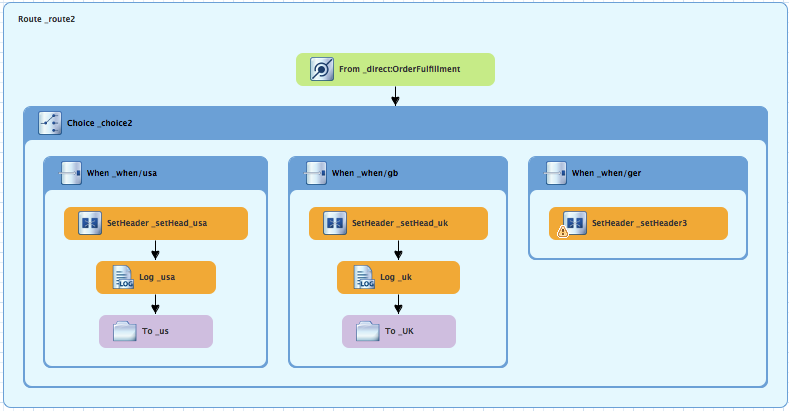
The
When_when/gercontainer expands to accommodate theSetHeader_setHeader3node.-
On the canvas, select the
SetHeader_setHeader3node to open its properties in the Properties view. In the Properties view:
- Select constant from the Language drop-down menu.
-
Enter
Germanyin the Expression field. - Leave Trim as is.
-
Enter
Destinationin the Header Name field. -
Enter
_setHead_gerin the Id field.
In the Palette, open the Components drawer and drag a Log pattern (
) to the canvas and drop it in the When_when/gercontainer.The
When_when/gercontainer expands to accommodate theLog_log3node.On the canvas, select the
SetHeader_setHead_gernode and drag its connector arrow over theLog_log3node, and then release it:
-
On the canvas, select the
Log_log3node to open its properties in the Properties view. In the Properties view:
-
Enter
Valid order - ship animals to Germany customerin the Message field. -
Enter
_gerin the Id field. - Leave the Logging Level as is.
-
Enter
From the Components drawer, drag a File pattern (
) to the canvas and drop it in the When_when/gercontainer.The
When_when/gercontainer expands to accommodate theTo_to1node.On the canvas, select the
Log_gernode and drag its connector arrow over theTo_to1node, and then release it: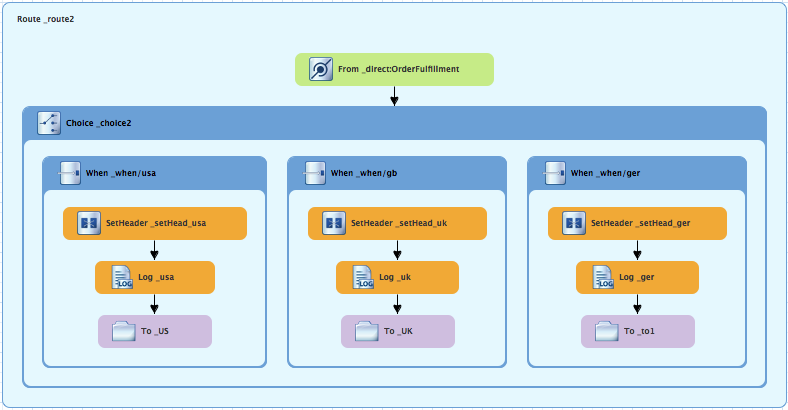
-
On the canvas, select the
To_to1node to open its properties in the Properties view. In the Properties view:
-
Replace directoryName with
target/messages/Germanyin the Uri field. -
Enter
_GERin the Id field.
-
Replace directoryName with
On the menu bar, click → to save the routing context file.
The Germany branch of
Route_route2should look like this: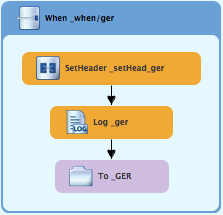
Building and configuring the France branch of the second route
With Route_route2 displayed on the canvas:
In the Palette, open the *Routing drawer and drag an Otherwise pattern (
) to the canvas and drop it in the Choice_choice2container: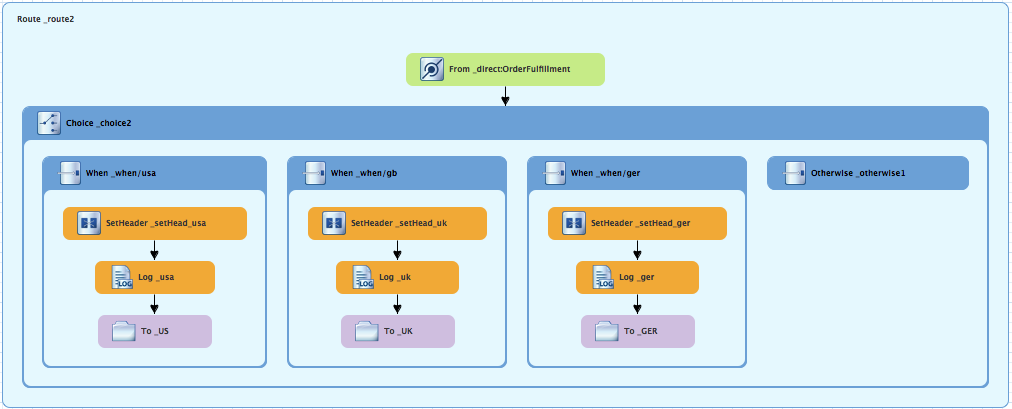
The
Choice_choice2container expands to accommodate theOtherwise_otherwise1node.-
On the canvas, select the
Otherwise_otherwise1node to open its properties in the Properties view. -
In the Properties view, enter
_else/frin the Id field. In the Palette, open the Transformation drawer and drag a Set Header pattern (
) to the canvas and drop it on the Otherwise_else/frnode:
The
Otherwise_else/frcontainer expands to accommodate theSetHeader_setHeader3node.-
On the canvas, select the
SetHeader_setHeader3node to open its properties in the Properties view. In the Properties view:
- Select constant from the Language drop-down menu.
-
Enter
Francein the Expression field. - Leave Trim as is.
-
Enter
Destinationin the Header Name field. -
Enter
_setHead_frin the Id field.
In the Palette, open the Components drawer and drag a Log pattern (
) to the canvas and drop it in the Otherwise_else/frcontainer.The
Otherwise_else/frcontainer expands to accommodate theLog_log3node.On the canvas, select the
SetHeader_setHead_frnode and drag its connector arrow over theLog_log3node, and then release it: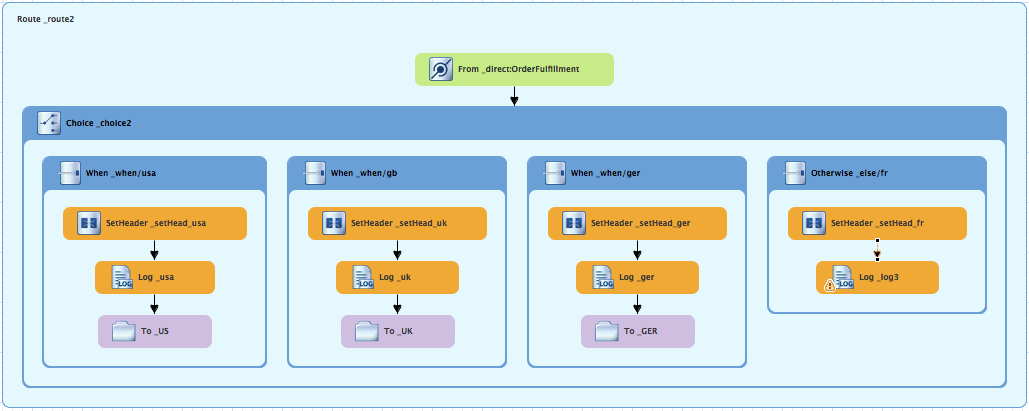
-
On the canvas, select the
Log_log3node to open its properties in the Properties view. In the Properties view:
-
Enter
Valid order - ship animals to France customerin the Message field. -
Enter
_frin the Id field. - Leave the Logging Level as is.
-
Enter
From the Components drawer, drag a File pattern (
) to the canvas and drop it in the Otherwise_else/frcontainer.The
Otherwise_else/frcontainer expands to accommodate theTo_to1node.On the canvas, select the
Log_frnode and drag its connector arrow over theTo_to1node, and then release it: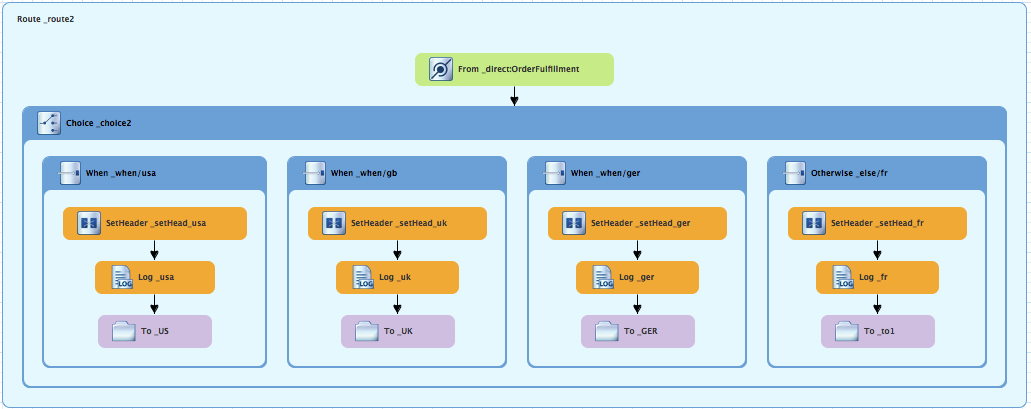
-
On the canvas, select the
To_to1node to open its properties in the Properties view. In the Properties view:
-
Replace directoryName with
target/messages/Francein the Uri field. -
Enter
_FRin the Id field.
-
Replace directoryName with
On the menu bar, click → to save the routing context file.
The France branch of
Route_route2should look like this: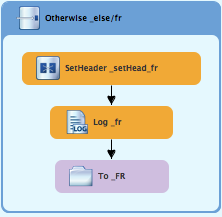
Finishing up
If needed, on the menu bar, select → to save the routing context.
The routes on the canvas should look like this:
image::./images/tutCBRRte1Completed.png[Completed first route in the CBRroute routing context]
image::./images/tutCBRRte2Completed.png[Completed second route in the CBRroute routing context]
Click the Source tab at the bottom, left of the canvas to display the XML for the route.
The camelContext element should look like that shown in Example 5.1, “XML for dual-route content-based router”:
Example 5.1. XML for dual-route content-based router
<?xml version="1.0" encoding="UTF-8"?>

<blueprint xmlns="http://www.osgi.org/xmlns/blueprint/v1.0.0"
    xmlns:xsi="http://www.w3.org/2001/XMLSchema-instance"
    xsi:schemaLocation="http://www.osgi.org/xmlns/blueprint/v1.0.0
    https://www.osgi.org/xmlns/blueprint/v1.0.0/blueprint.xsd
    http://camel.apache.org/schema/blueprint
    http://camel.apache.org/schema/blueprint/camel-blueprint.xsd">

  <camelContext id="_context1" xmlns="http://camel.apache.org/schema/blueprint">
      <route id="_route1" shutdownRoute="Default">
          <from id="_from1" uri="file:src/data?noop=true"/>
          <choice id="_choice1">
              <when id="_when1">
                  <xpath>/order/orderline/quantity/text() > /order/orderline/maxAllowed/text()</xpath>
                  <log id="_log1" message="quantity exceeds the maximum allowed - contact customer"/>
                  <setHeader headerName="Destination" id="_setHeader1">
                      <constant>InvalidOrders</constant>
                  </setHeader>
                  <to id="_Invalid" uri="file:target/messages/invalidOrders"/>
              </when>
              <otherwise id="_else2">
                  <log id="_log2" message="valid order - process"/>
                  <setHeader headerName="Destination" id="_setHeader2">
                      <constant>Dispatcher</constant>
                  </setHeader>
                  <to id="_Fulfill" uri="direct:OrderFulfillment"/>
              </otherwise>
          </choice>
      </route>
      <route id="_route2">
          <from id="_direct:OrderFulfillment" uri="direct:OrderFulfillment"/>
          <choice id="_choice2">
              <when id="_when/usa">
                  <xpath>/order/customer/country = 'USA'</xpath>
                  <setHeader headerName="Destination" id="_setHead_usa">
                      <constant>USA</constant>
                  </setHeader>
                  <log id="_usa" message="Valid order - ship to USA customer"/>
                  <to id="_US" uri="file:target/messages/USA"/>
              </when>
              <when id="_when/gb">
                  <xpath>/order/customer/country = 'Great Britain'</xpath>
                  <setHeader headerName="Destination" id="_setHead_uk">
                      <constant>UK</constant>
                  </setHeader>
                  <log id="_uk" message="Valid order - ship animals to UK customer"/>
                  <to id="_UK" uri="file:target/messages/GreatBritain"/>
              </when>
              <when id="_when/ger">
                  <xpath>/order/customer/country = 'Germany'</xpath>
                  <setHeader headerName="Destination" id="_setHead_ger">
                      <constant>Germany</constant>
                  </setHeader>
                  <log id="_ger" message="Valid order - ship to Germany customer"/>
                  <to id="_GER" uri="file:target/messages/Germany"/>
              </when>
              <otherwise id="_else/fr">
                  <setHeader headerName="Destination" id="_setHead_fr">
                      <constant>France</constant>
                  </setHeader>
                  <log id="_fr" message="Valid order - ship animals to France customer"/>
                  <to id="_FR" uri="file:target/messages/France"/>
              </otherwise>
          </choice>
      </route>
  </camelContext>
</blueprint>
If the tooling added the attribute shutdownRoute=" " to the second route element (<route id="route2">), delete that attribute. Otherwise, the CBRroute project might fail to run.
Next steps
You can run the new route as described in the section called “Running the route”.
Check the end of the Console’s output. You should see these lines:

Check the target destinations in Project Explorer to verify that the routes executed properly:
-
Select
CBRroute. - Right-click it to open the context menu, then select Refresh.
Expand the folder
target/messages/as shown in Figure 5.1, “Target message destinations in Project Explorer”. Themessage*.xmlfiles should be dispersed in your target destinations like this:Figure 5.1. Target message destinations in Project Explorer
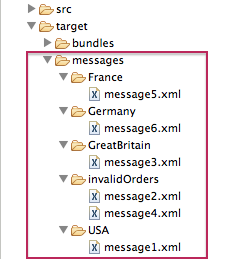 Note
NoteTo view message content, double-click a message to open it in the route view’s XML editor.
Further reading
To learn more about the Direct component see the Red Hat JBoss Fuse: Apache Camel Component Reference at Red Hat JBoss Fuse 6.3 documentation
Chapter 6. To Debug a Routing Context
This tutorial shows how to use the Camel debugger for only a locally running routing context. The routing context and each node with a breakpoint set must have a unique ID. The tooling automatically assigns a unique ID to the camelContext element and to components and patterns dropped on the canvas, but you can change these IDs to customize your project.
Goals
In this tutorial you will:
- In the Design tab, set breakpoints on the nodes of interest in Route1
- Switch to Route2, and set breakpoints on the nodes of interest
- Invoke the Camel debugger
- Step through the route, examining route and message variables as they change
- Step through the route again, changing the value of message variables and observing the effects
Prerequisites
To complete this tutorial you will need the CBRroute project you updated in Chapter 5, To Add Another Route to the CBR Routing Context.
If you skipped any tutorial after Chapter 2, To Create a New Route you can use the prefabricated blueprintContext6.xml file to work through this tutorial (for details, see Chapter 1, Using the Fuse Tooling Resource Files).
Setting breakpoints
You can set both conditional and unconditional breakpoints, but in this tutorial, you will set unconditional breakpoints only.
-
If necessary, open your
CBRroute/src/main/resources/OSGI-INF/blueprint/blueprint.xmlin the route editor. -
In Project Explorer, expand
Camel Contexts/src/main/resources/OSGI-INF/blueprintto expose both route entries. -
Double-click the
Route_route1entry to switch focus toRoute_route1in the Design tab. On the canvas, select the
Choice_choice1node, and then click its icon to set an unconditional breakpoint:

 Note
NoteIn the route editor, you can disable or delete a specific breakpoint by clicking the node’s
 icon or its
 icon, respectively. You can delete all set breakpoints by right-clicking the canvas and selecting Delete all breakpoints.
Repeat [setBPstep] to set an unconditional breakpoint on the following
Route_Route1nodes:-
Log_log1 -
SetHeader_setHeader1 -
To_Invalid -
Log_log2 -
SetHeader_setHeader2 -
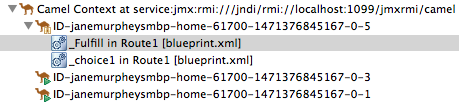
To_Fulfill
-
-
In Project Explorer, double-click
Route_route2undersrc/main/resources/OSGI-INF/blueprintto openRoute_route2on the canvas. Repeat [setBPstep] to set an unconditional breakpoint on the following
Route_Route2nodes:-
Choice_choice2 -
SetHeader_setHead_usa -
Log_usa -
To_US -
SetHeader_setHead_uk -
Log_uk -
To_UK -
SetHeader_setHead_ger -
Log_ger -
To_GER -
SetHeader_setHead_fr -
Log_fr -
To_FR
-
Stepping through the CBRroute routing context
You can step through the routing context in two ways:
-
Step over (
 ) - Jumps to the next node of execution in the routing context, regardless of breakpoints.
-
Resume (
 ) - Jumps to the next active breakpoint in the routing context.
You can temporarily narrow then later re-expand the debugger’s focus by disabling and re-enabling the breakpoints you set in the routing context. This enables you, for example, to focus on problematic nodes in your routing context. To do so, open the Breakpoints tab and clear the check box of each breakpoint you want to temporarily disable. Then use
to step through the route. The debugger will skip over the disabled breakpoints.
-
In Project Explorer, expand the root node
CBRrouteto expose theblueprint.xmlfile in theCamel Contextsfolder. Right-click the
blueprint.xmlfile to open its context menu, and then click menu:Debug As…[ > > Local Camel Context > ].The Camel debugger suspends execution at the first breakpoint it encounters and asks whether you want to open Debug perspective now:
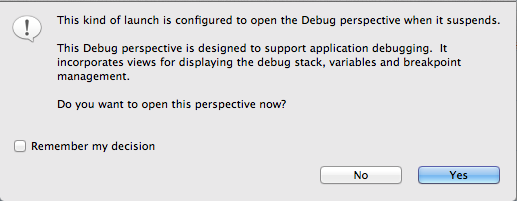
Click .
NoteIf you click , the confirmation pane appears several more times. After the third refusal, it disappears, and the Camel debugger resumes execution. To interact with the debugger at this point, you need to open the Debug perspective by clicking menu:Window[ > > Open Perspective > > Debug > ].
Debug perspective opens with the routing context suspended at
_choice1 in Route1 [blueprint.xml]as shown in the Debug view: Note
NoteBreakpoints are held for a maximum of five minutes before the debugger automatically resumes, moving on to the next breakpoint or to the end of the routing context, whichever comes next.
In the Variables view, expand the nodes to expose the variables and values available for each node.
As you step through the routing context, the variables whose values have changed since the last breakpoint are highlighted in yellow. You may need to expand the nodes at each breakpoint to reveal variables that have changed.
Click
to step to the next breakpoint, _log2 in Route1 [blueprint.xml]: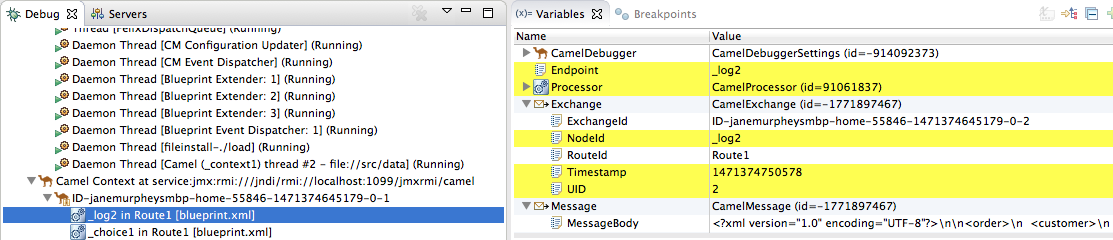
-
Expand the nodes in the Variables view to examine the variables that have changed since the last breakpoint at
_choice1 in Route1 [blueprintxt.xml]. Click
to step to the next breakpoint, _setHeader2 in Route1 [blueprint.xml].Examine the variables that changed since the breakpoint at
_log2 in Route1 [blueprint.xml].In the Debug view, click
_log2 in Route1 [blueprint.xml]to populate the Variables view with the variable values from the breakpoint_log2 in Route1 [blueprint.xml]for a quick comparison.In the Debug view, you can switch between breakpoints within the same message flow to quickly compare and monitor changing variable values in the Variables view.
NoteMessage flows can vary in length. For messages that transit the
InvalidOrdersbranch ofRoute_route1, the message flow is short. For messages that transit theValidOrdersbranch ofRoute_route1, which continues on toRoute_route2, the message flow is longer.Continue stepping through the routing context. When one message completes the routing context and the next message enters it, the new message flow appears in the Debug view, tagged with a new breadcrumb ID:
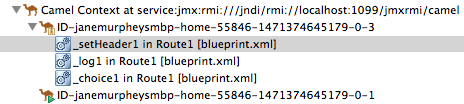
In this case,
ID-janemurpheysmbp-home-55846-1471374645179-0-3identifies the second message flow, corresponding tomessage2.xmlhaving entered the routing context. Breadcrumb IDs are incremented by 2.NoteExchange and Message IDs are identical and remain unchanged throughout a message’s passage through the routing context. Their IDs are constructed from the message flow’s breadcrumb ID, and incremented by 1. So, in the case of
message2.xml, itsExchangeIdandMessageIdareID-janemurpheysmbp-home-55846-1471374645179-0-4.When
message3.xmlenters the breakpoint_choice1 in Route_route1 [blueprint.xml], examine the Processor variables. The values displayed are the metrics accumulated formessage1.xmlandmessage2.xml, which previously transited the routing context: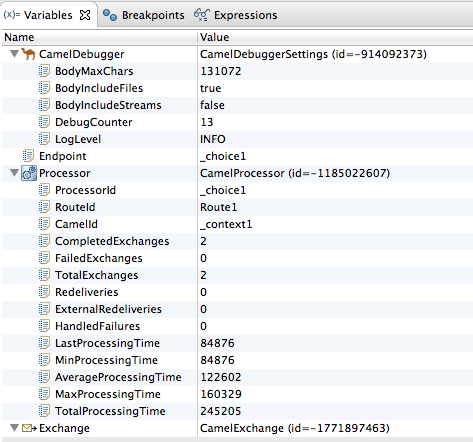
Timing metrics are in milliseconds.
-
Continue stepping each message through the routing context, examining variables and console output at each processing step. When
message6.xmlenters the breakpointTo_GER in Route2 [blueprint.xml], the debugger begins shutting down the breadcrumb threads. In the Menu bar, click
 to terminate the Camel debugger. This will cause the Console to terminate, but you will have to manually clear the output.
Note
to terminate the Camel debugger. This will cause the Console to terminate, but you will have to manually clear the output.
NoteWith a thread or endpoint selected under the Camel Context node in the Debug view, you need to click
twice - first to terminate the thread or endpoint and second to terminate the Camel Context, thus the session.
In the Menu bar, right-click
 to open the context menu, and then select Close to close Debug perspective.
Doing so automatically returns you to perspective from which you launched the Camel debugger.
In Project Explorer, open the project’s context menu, and select Refresh to refresh the display.
NoteIf you terminated the session prematurely, before all messages transited the routing context, you might see, under the
CBRroute/src/datafolder, a message like this:message3.xml.camelLock. You need to remove it before you run the debugger on the project again. To do so, double-click the.camelLockmessage to open its context menu, and then select Delete. When asked, click to confirm deletion.Expand the
CBRroute/target/messages/* directories to check that the messages were delivered to their expected destinations:- Leave the routing context as is, with all previous breakpoints set and enabled.
Changing the value of a variable
In this session, you will add variables to a watch list to easily check how their values change as messages pass through the routing context. You will also change the value of a variable in the body of two messages and observe how the change affects each message’s route through the routing context.
-
Follow [startDebugger1] through [startDebugger3] in the section called “Stepping through the CBRroute routing context” to rerun the Camel debugger on the
CBRrouteproject. With
message1stopped at the first breakpoint,_choice1 in Route1 [blueprint.xml], add the variablesNodeIdandRouteId(in theExchangecategory) andMessageBodyandCamelFileName(in theMessagecategory) to the watch list.For each of the four variables:
- In the Variables view, expand the appropriate category to expose the target variable:
Right-click the variable (in this case,
NodeIdin theExchangecategory) to open the context menu and select Watch: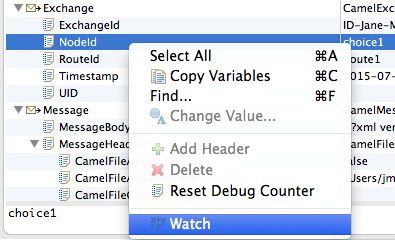
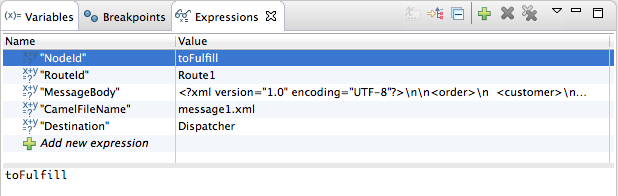
The Expressions tab opens, listing the variable you selected to watch:

- Repeat [selectVariable] for each of the three remaining variables.
- Switch back to the Variables view.
-
Step
message1through the routing context until it reaches the fourth breakpoint,_Fulfill in Route1 [blueprint.xml]. -
In the Variables view, expand the
Messagecategory. Repeat [selectVariable] to add the variable
Destinationto the watch list.The Expressions view should now contain these variables:
 Note
NoteThe pane below the list of variables displays the value of the selected variable.
NoteThe Expressions view retains all variables you add to the list until you explicitly remove them.
-
Step
message1through the rest of the routing context. -
Stop
message2at_choice1 in Route1 [blueprint.xml]. -
In the Variables view, expand the
Messagecategory to expose theMessageBodyvariable. Right-click
MessageBodyto open its context menu, and select Change Value…: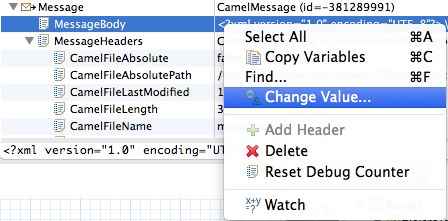
Change the value of
quantityfrom 3 to 2: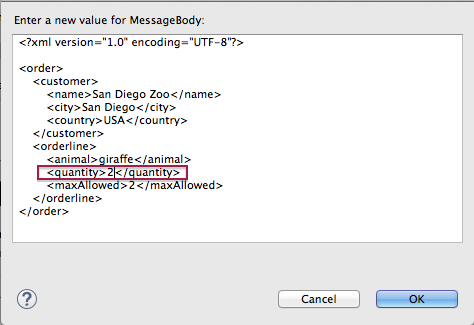
This changes the in-memory value only.
- Click .
Switch to the Expressions view, and select the
MessageBodyvariable.The pane below the list of variables displays the entire body of
message2, making it easy to check the current value of order items: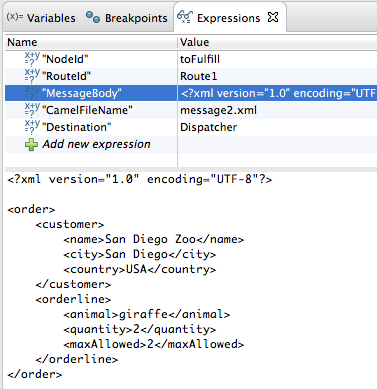 Note
NoteCreating a watch list makes it easy for you to quickly check the current value of multiple variables of interest.
Click
to step to the next breakpoint.
Instead of following the branch leading to
To_Invalid,message2now follows the branch leading toTo_FulfillandRoute_route2: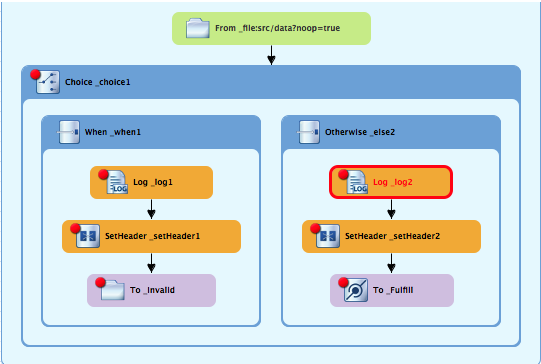
-
Step
message2through the routing context, checking the Debug view, the Variables view, and the Console output at each step. -
Stop
message3at_choice1 in Route1 [blueprint.xml]. Switch to the Breakpoints view, and disable all breakpoints (13) listed below
_choice1: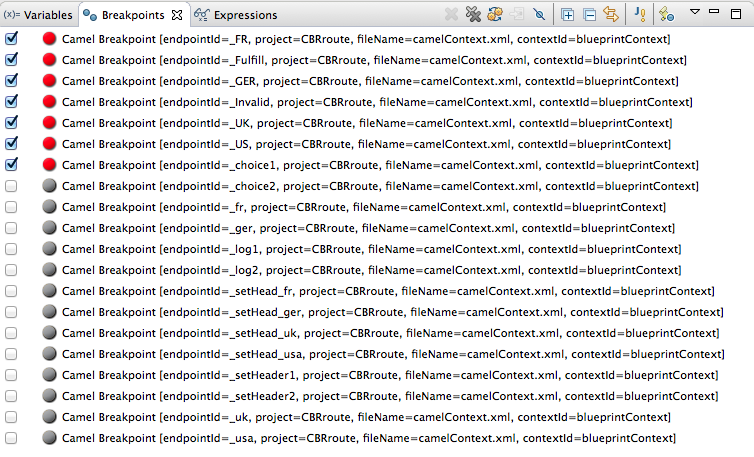
Click
to step to the next breakpoint:
The debugger jumps to
_FulFill in Route1 [blueprint.xml].Click
again to step to the next breakpoint:
The debugger jumps to
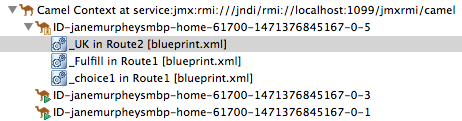
_UK in Route2 [blueprint.xml].- In the Breakpoints view, re-enable all disabled breakpoints.
- Switch back to the Variables view.
-
Click
to step to the next breakpoint, and stop
message4at_choice1 in Route1 [blueprint.xml]. -
Right-click
MessageBodyto open its context menu, and select Change Value…. Change the value of
quantityfrom 5 to 4: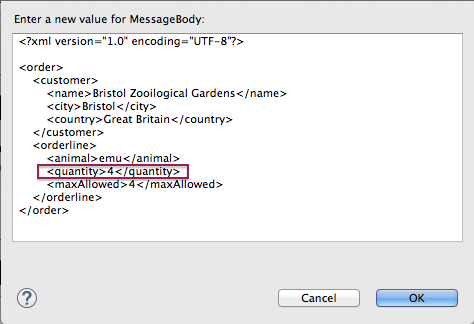
- Click .
-
Switch to the Expressions view, and select the
MessageBodyvariable to check the value ofquantityin the body ofmessage4. -
Repeat [varChgRestart1] and [varChgRestart2] to step
message4through the routing context. -
Click
repeatedly to quickly step
message5andmessage6through the routing context. In the tool bar, click
to terminate the Camel debugger:
This will also cause the Console to terminate, but you will have to click its
 button to clear the output.
In the Menu bar, right-click
to open the context menu, and then select Close to close Debug perspective.
Doing so automatically returns you to the perspective from which you launched the Camel debugger.
- In Project Explorer, open the project’s context menu, and select Refresh to refresh the display.
Expand the
CBRroute/target/messages/* directories to check whether the messages were delivered as expected: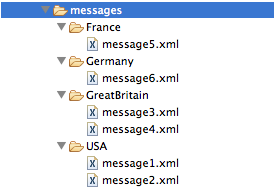
You should see that no messages were sent to the
invalidOrders. Instead,message2.xmlshould appear in theUSAfolder, andmessage4.xmlshould appear theGreatBritainfolder.
Next steps
Next you will trace messages through your routing context to see where you can optimize and fine tune your routing context’s performance, as described in Chapter 7, To Trace a Message Through a Route.
Chapter 7. To Trace a Message Through a Route
This tutorial shows you how to trace a message through a route.
Goals
In this tutorial you will:
-
Run the
CBRroutein the Fuse Integration perspective -
Enable tracing on the
CBRroute -
Drop messages onto the
CBRrouteand track them through all route nodes
Prerequisites
To complete this tutorial you will need the CBRroute project you updated in Chapter 5, To Add Another Route to the CBR Routing Context.
If you skipped any tutorial after Chapter 2, To Create a New Route, you can use the prefabricated blueprint6.xml file to work through this tutorial (for details, see Chapter 1, Using the Fuse Tooling Resource Files).
Accessing Fuse Integration perspective
If you are not already working in Fuse Integration perspective:
Click the
 button on the right side of the tool bar, and then select Fuse Integration from the list:
Fuse Integration perspective opens in the default layout:

Drag the JMX Navigator tab to the far right of the Terminal tab and drop it there:
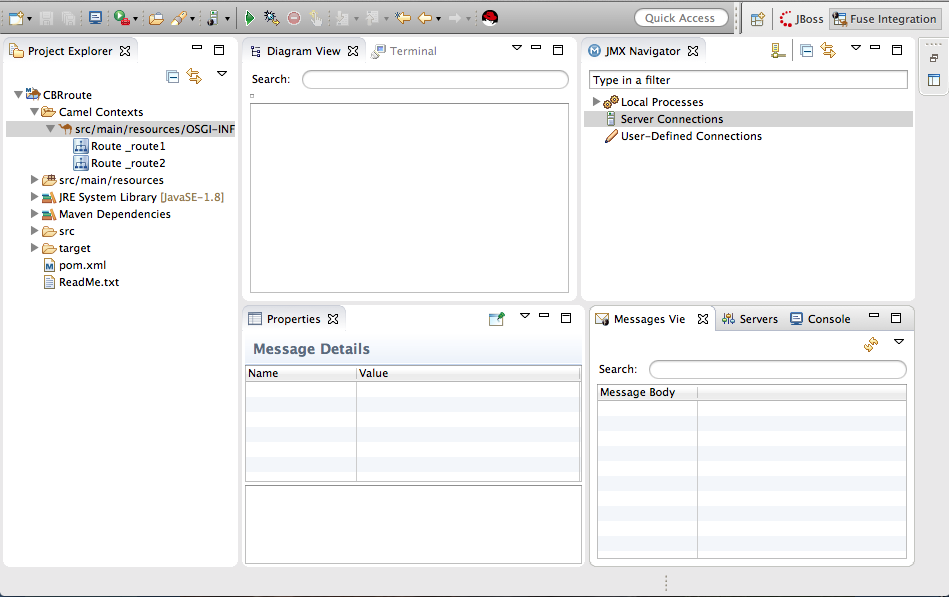
This arrangement provides more space for Diagram View to display the routing context’s nodes graphically, which makes it easier for you to visually trace the path that messages take in traversing the routing context.
NoteTo make it easy to access a routing context
.xmlfile, especially when a project consists of multiple contexts, the tooling lists them under theCamel Contextsfolder in Project Explorer.Additionally, all routes in a routing context are displayed as icons directly under their context file entry. To display a single route in the routing context on the canvas, double-click its icon in Project Explorer. To display all routes in the routing context, double-click the context file entry.
Starting message tracing
To start message tracing on the CBRroute project:
-
In Project Explorer, expand the
CBRrouteproject to exposesrc/main/resources/OSGI-INF/blueprint/blueprint.xml. -
Right-click
src/main/resources/OSGI-INF/blueprint/blueprint.xmlto open the context menu. Select menu:Run As[ > > Local Camel Context (without tests) > ].
NoteIf you select Local Camel Context, the tooling reverts to running without tests because you have not yet created a JUnit test for the
CBRrouteproject. You will do that later in Chapter 8, To Test a Route with JUnit.In JMX Navigator, expand
Local Processes.When you first expand
Local Processes, you see the nodemaven[Id][Disconnected]: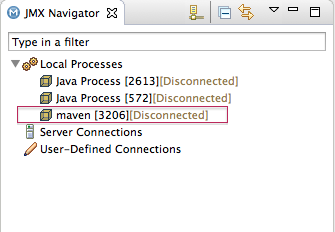
When you click this node, it changes to
Local Camel Context[Id][Disconnected](retaining the same Id as its predecessor):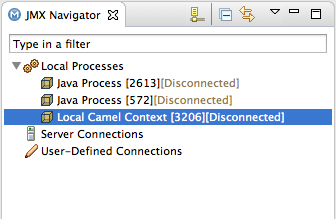
Double click
Local Camel Context[Id][Disconnected]to connect to it, and then expand the elements of your route: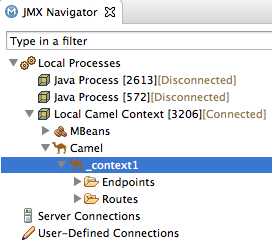
Right-click the
_context1node to open the context menu, and select Start Tracing: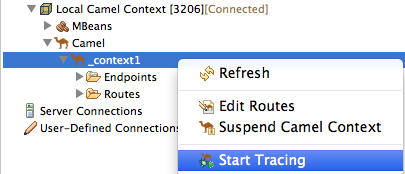
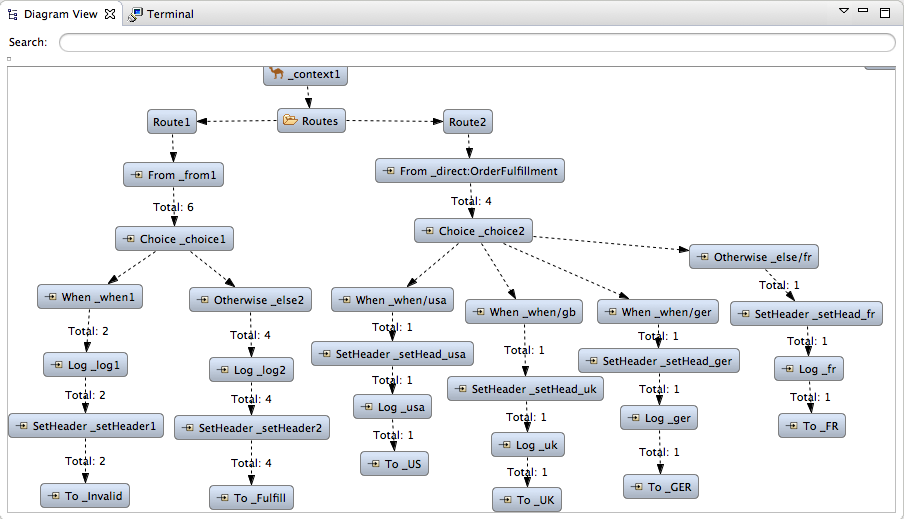
The tooling displays a graphical representation of your routing context in Diagram View:
Dropping messages on the running CBRroute project
To drop messages on the running CBRroute project:
In Project Explorer, expand
CBRroute/src/data, so you can access the message files (message1.xmlthroughmessage6.xml):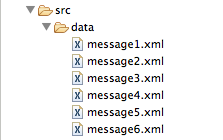
Drag
message1.xmland drop it on the_context1>Endpoints>file>src/data?noop=truenode in JMX Navigator: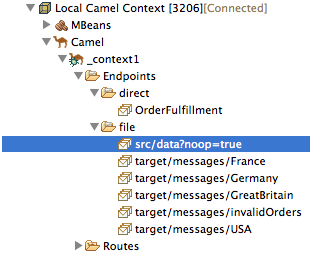
As the message traverses the route, the tooling traces and records its passage at each step. To update Diagram View with the new message count, you need to click the
_context1node in JMX Navigator.NoteThe
Local Camel Context[xxx]tree collapses to the_context1node after you drop the next message on the inputsrc/data?noop=truenode. You need not re-expand it. When dragging the other messages, hover over each node in the tree to expose the next node, until you reach thesrc/data?noop=truenode. Then drop the message on it. This method prevents the tooling from redrawing the graphical representation in Diagram View.
Initializing and configuring Messages View
You need to initialize Messages View before it will display message traces. You also need to configure the columns in Messages View if you want them to persist across all message traces.
- Switch from Console to Messages View.
Click the
_context1node in JMX Navigator to initialize Messages View withmessage1.xml's details.NoteYou can control columnar layout in all of the tooling’s tables. Use the drag method to temporarily rearrange tabular format. For example, drag a column’s border rule to expand or contract its width. To hide a column, totally contract its borders. Drag the column header to relocate a column within the table. For your arrangement to persist, you must use the menu:View Menu[ > > Configure Columns… > ] method instead.
In Messages View, click the
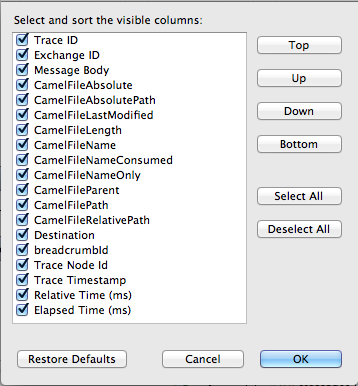
 icon on the panel’s menu bar, and select Configure Columns… to open the Configure Columns wizard:
 Note
NoteNotice that the message header, Destination, which you set for the messages in your routing context, appears in the list.
You can include or exclude items from Messages View by selecting or deselecting them. You can rearrange the columnar order in which items appear in Messages View by highlighting individual, selected items and moving them up or down in the list.
In the Configure Columns wizard, select and order the columns this way:
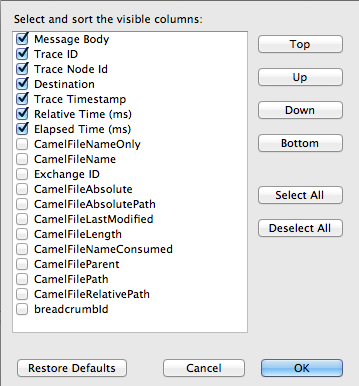
These columns and their order will persist in Messages View until you change them again.
Arranging Diagram View
To see all message flow paths clearly, you’ll probably need to rearrange the nodes by dragging them to fit neatly in Diagram View. You may also need to adjust the size of the other views and tabs in Red Hat JBoss Developer Studio to allow Diagram View to expand.
Stepping through message traces
To step through the message traces:
In Messages View, click the
 (Refresh button) on top, right of the panel’s menu bar to populate the view with
 message1.xml's message traces.Each time you drop a message on the input
srcnode in JMX Navigator, you need to refresh Messages View to populate it with the message traces.Click one of the message traces to see more details about it in Properties view:
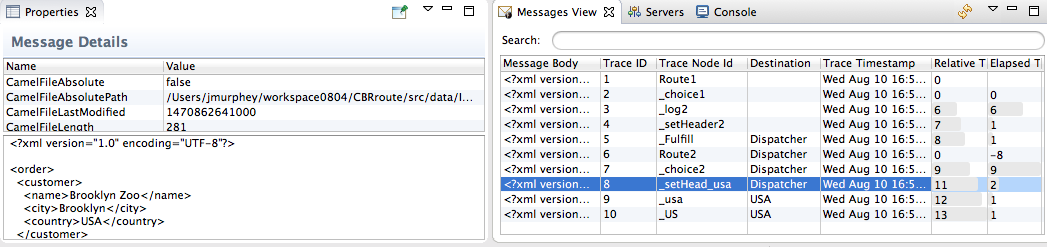
The tooling displays the details about a message trace (including message headers when they are set) in the top half of the Properties view and the contents of the message instance in the bottom half of the Properties view. So, if your application sets headers at any step within a route, you can check the Message Details to see whether they were set as expected.
You can step through the message instances by highlighting each one to see how a particular message traversed the route and whether it was processed as expected at each step in the route.
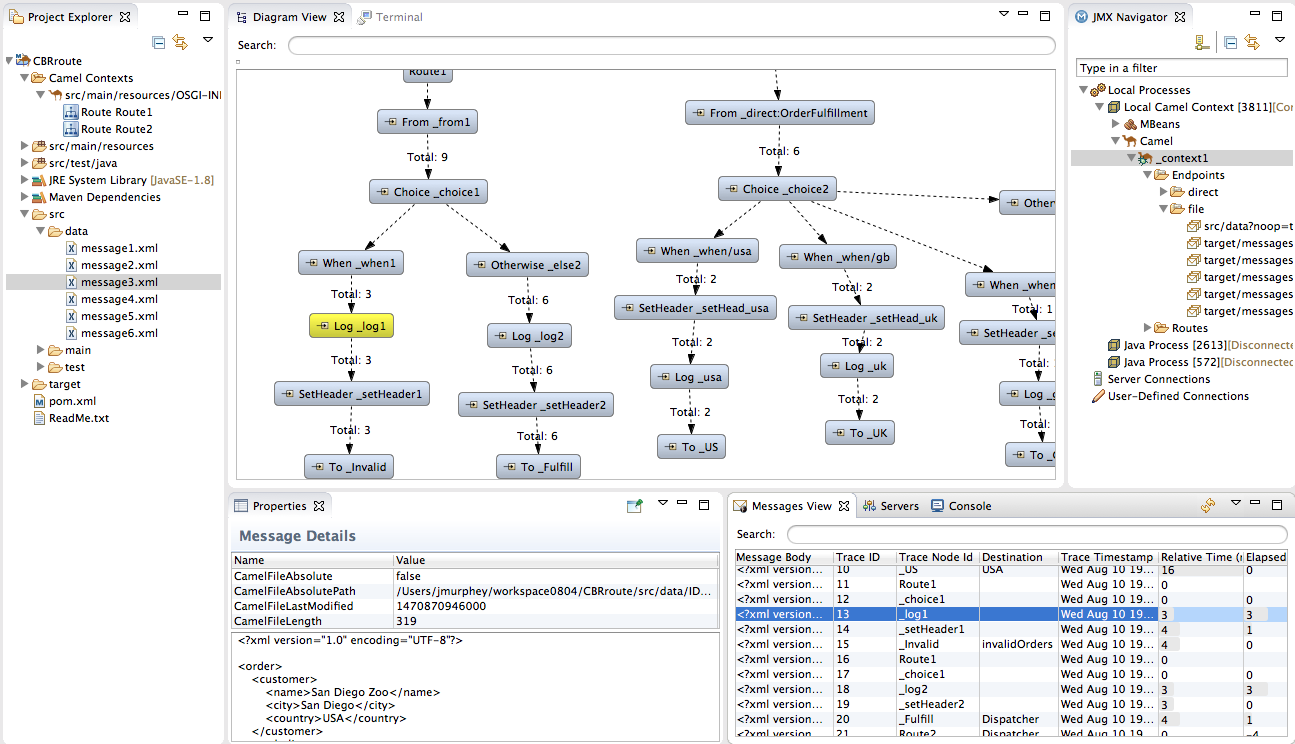
In Diagram View, the associated step in the route is highlighted:

Finishing up
Drag
message2.xmland drop it on the_context1>Endpoints>file>src/data?noop=truenode in JMX Navigator.Hover over each node in the tree until you expose the
src/data?noop=truenode, then dropmessage2.xmlon it.- Switch from Console to Messages View.
In Messages View, click the
(Refresh button) on top, right of the panel’s menu bar to populate the view with message2.xml's message traces.NoteYou can repeat [msg1drag] through [msgView] for the remaining messages in
CBRroute/src/data/at any time, as long as tracing remains enabled.On each subsequent drop, remember to click the
(Refresh button) on the panel’s menu bar to populate Messages View with the new message traces.
The tooling draws the route in Diagram View, tagging paths exiting a processing step with timing and performance metrics (in milliseconds). Only the metric Total exchanges is displayed in the diagram:
Hovering over the displayed metrics reveals additional metrics about message flow:
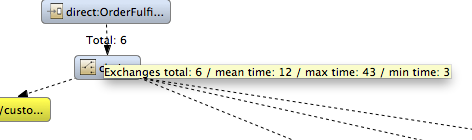
- Mean time the step took to process a message
- Maximum time the step took to process a message
- Minimum time the step took to process a message
When done:
-
In JMX Navigator, right-click
_context1and select Stop Tracing Context from the context menu. -
Open the Console and click the
button in the upper right of the panel to stop the Console. Then click the
button to clear console output.
-
In JMX Navigator, right-click
Next steps
After you create a JUnit test case for your project, you can run your project as a Local Camel Context, instead of Local Camel Context (without tests). See Chapter 8, To Test a Route with JUnit for details.
Chapter 8. To Test a Route with JUnit
This tutorial shows you how to use the New Camel Test Case wizard to create a test case for your route and then test the route.
Overview
The New Camel Test Case wizard generates a boilerplate JUnit test case. When you create or modify a route (for example, adding more processors to it), you create or modify the generated test case to add expectations and assertions specific to the route you created or updated.This ensures that the test is valid for the route.
Goals
In this tutorial you will:
-
Create the
/src/test/folder to store the JUnit test case -
Generate the JUnit test case for the
CBRrouteproject - Modify the newly generated JUnit test case
-
Modify the
CBRrouteproject’spom.xmlfile -
Run the
CBRroutewith the new JUnit test case - Observe the output
Prerequisites
To complete this tutorial you need the CBRroute project you used in Chapter 7, To Trace a Message Through a Route
If you skipped any tutorial after Chapter 2, To Create a New Route, you can use the prefabricated blueprintContext6.xml file to work through this tutorial (for details, see Chapter 1, Using the Fuse Tooling Resource Files).
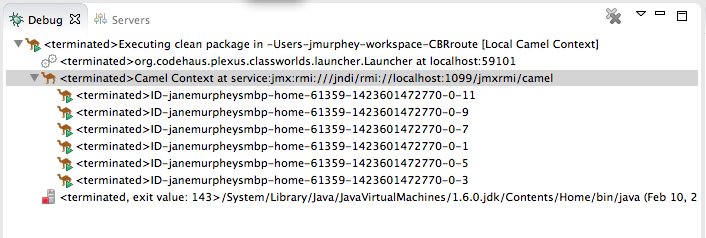
Delete any trace-generated messages from the CBRroute project’s /src/data/ directory and /target/messages/ subdirectories in Project Explorer. Trace-generated messages begin with the ID- prefix. For example, Figure 8.1, “Trace-generated messages” shows six trace-generated messages:
Figure 8.1. Trace-generated messages
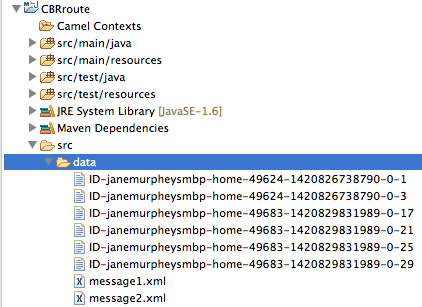
Select all trace-generated messages in batch, right-click to open the context menu, and select Delete.
Creating the src/test folder
Before you create a JUnit test case for the CBRroute project, you must create a folder for it that is included in the build path:
-
In Project Explorer, right-click the
CBRrouteproject’s root to open the context menu, and then select menu:New[ > > Folder > ]. In the New Folder dialog, in the project tree pane, expand the
CBRroutenode and select thesrcfolder.Make sure
CBRroute/srcappears in the Enter or select the parent folder field.In Folder name, enter
/test/java: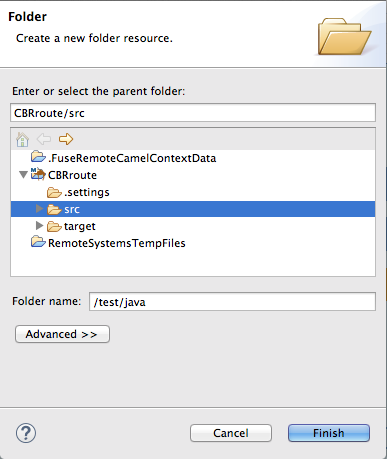
Click .
In Project Explorer, the new
src/test/javafolder appears under thesrc/main/resourcesfolder: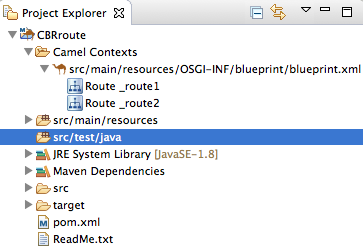
Verify that the new
/src/test/javafolder is included in the build path.-
In Project Explorer, right-click the
/src/test/javafolder to open the context menu. Select Build Path to see the menu options:
The menu option Remove from Build Path verifies that the
/src/test/javafolder is currently included in the build path: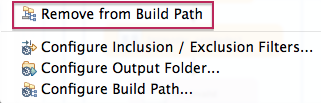
-
In Project Explorer, right-click the
Creating the JUnit test case
To create a JUnit test case for the CBRroute project:
-
In Project Explorer, select
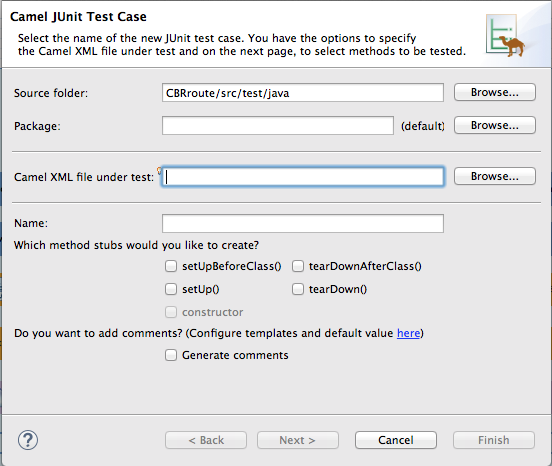
src/test/java. Right-click it to open the context menu, and then select menu:New[ > > Camel Test Case > ]:
-
In the Camel JUnit Test Case wizard, make sure the
Source folderfield containsCBRroute/src/test/java. To find the proper folder, click .
.
-
In the Package field, enter
tutorial.cbr.route. This is the package that will include the new test case. Next to the Camel XML file under test field, click to open a file explorer configured to screen for XML files, and then select the
CBRrouteproject’sblueprint.xmlfile: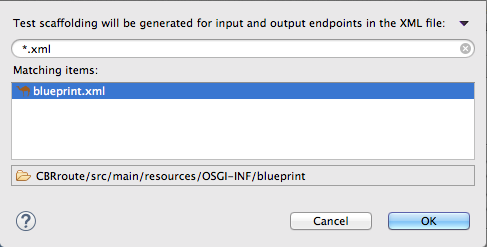
Click .
 Note
NoteThe Name field defaults to BlueprintXmlTest.
- Click to open the Test Endpoints page.
By default, all endpoints are selected and will be included in the test case. Click .
NoteIf prompted, add JUnit to the build path.
The artifacts for the test are added to your project and appear in Project Explorer under src/test/java. The class implementing the test case opens in the tooling’s Java editor:
package tutorial.cbr.route;

import org.apache.camel.EndpointInject;
import org.apache.camel.Produce;
import org.apache.camel.ProducerTemplate;
import org.apache.camel.builder.RouteBuilder;
import org.apache.camel.component.mock.MockEndpoint;
import org.apache.camel.test.blueprint.CamelBlueprintTestSupport;
import org.junit.Test;

public class BlueprintXmlTest extends CamelBlueprintTestSupport {

	// TODO Create test message bodies that work for the route(s) being tested
	// Expected message bodies

	protected object[] expectBodies = {
        "<something id='1'>expectedBody1</something>",
        "<something id='2'>expectedBody2</something>";

	// Templates to send to input endpoints
	@Produce(uri = "file:src/data?noop=true")
	protected ProducerTemplate inputEndpoint;
	@Produce(uri = "direct:OrderFulfillment")
	protected ProducerTemplate input2Endpoint;

	// Mock endpoints used to consume messages from the output endpoints and
	// then perform assertions
	@EndpointInject(uri = "mock:output")
	protected MockEndpoint outputEndpoint;
	@EndpointInject(uri = "mock:output2")
	protected MockEndpoint output2Endpoint;
	@EndpointInject(uri = "mock:output3")
	protected MockEndpoint output3Endpoint;
	@EndpointInject(uri = "mock:output4")
	protected MockEndpoint output4Endpoint;
	@EndpointInject(uri = "mock:output5")
	protected MockEndpoint output5Endpoint;
	@EndpointInject(uri = "mock:output6")
	protected MockEndpoint output6Endpoint;

	@Test
	public void testCamelRoute() throws Exception {
		// Create routes from the output endpoints to our mock endpoints so we can
		// assert expectations
		context.addRoutes(new RouteBuilder() {
			@Override
			public void configure() throws Exception {
				from("file:target/messages/invalidOrders").to(outputEndpoint);
				from("file:target/messages/GreatBritain").to(output3Endpoint);
				from("file:target/messages/Germany").to(output4Endpoint);
				from("file:target/messages/USA").to(output2Endpoint);
				from("file:target/messages/France").to(output5Endpoint);
			}
		});

		// Define some expectations

		// TODO Ensure expectations make sense for the route(s) we're testing
		outputEndpoint.expectedBodiesReceivedInAnyOrder(expectedBodies);

		// Send some messages to input endpoints
		for (Object expectedBody : expectedBodies) {
			inputEndpoint.sendBody(expectedBody);
		}

		// Validate our expectations
		assertMockEndpointsSatisfied();
	}

	@Override
	protected String getBlueprintDescriptor() {
		return "OSGI-INF/blueprint/blueprint.xml";
	}

}
This generated JUnit test case is insufficient for the CBRroute project, and it will fail to run successfully. You need to modify it and the project’s pom.xml, as described in the section called “Modifying the BlueprintXmlTest file” and the section called “Modifying the pom.xml file”.
Modifying the BlueprintXmlTest file
You must modify the BlueprintXmlTest.java file to:
- Import several classes that support required file functions
-
Create variables for holding the content of the various source
.xmlfiles -
Read the content of the source
.xmlfiles Define appropriate expectations
In Project Explorer, expand the
CBRrouteproject to expose theBlueprintXmlTest.javafile: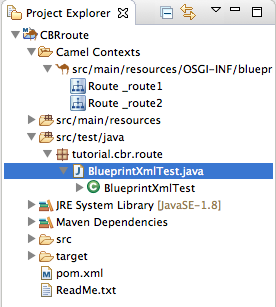
-
Double-click
BlueprintXmlTest.javato open the file in the tooling’s Java editor. -
In the Java editor, click the expand button next to
import org.apache.camel.EndpointInject;to expand the list. Add the two lines shown below. Adding the first line will cause an error that will be resolved when you update the
pom.xmlfile as instructed in the next section.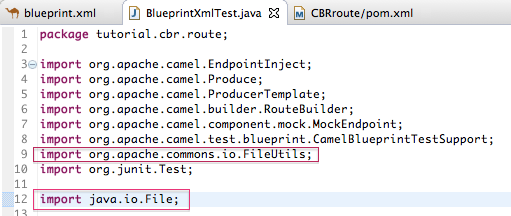
-
Scroll down to the lines that follow directly after
// Expected message bodies. Replace those lines —
protected Object[] expectedBodies={ …… expectedBody2</something>"};— with theprotected String body#;lines shown here: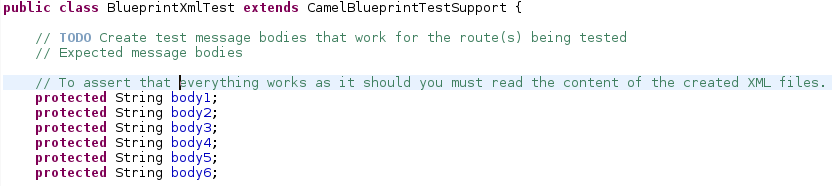
Scroll down to the line
public void testCamelRoute() throws Exception {, and insert directly after it the linesbody# = FileUtils.readFileToString(new File("src/data/message#.xml"), "UTF-8");shown below. These lines will indicate an error until you update thepom.xmlfile as instructed in the next section.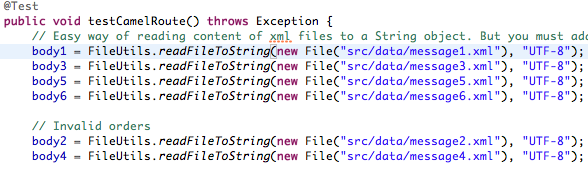
-
Scroll down to the lines that follow directly after
// TODO Ensure expectations make sense for the route(s) we’re testing. Replace the block of code that begins with
outputEndpoint.expectedBodiesReceivedInAnyOrder(expectedBodies);and ends with …inputEndpoint.sendBody(expectedBody); }with the lines shown here: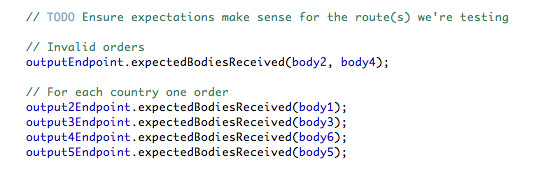
Leave the remaining code as is.
- Save the file.
Check that your updated
BlueprintXmlTest.javafile has the required modifications. It should look something like this:package tutorial.cbr.route; import org.apache.camel.EndpointInject; import org.apache.camel.Produce; import org.apache.camel.ProducerTemplate; import org.apache.camel.builder.RouteBuilder; import org.apache.camel.component.mock.MockEndpoint; import org.apache.camel.test.blueprint.CamelBlueprintTestSupport; import org.apache.commons.io.FileUtils; import org.junit.Test; import java.io.File; public class BlueprintXmlTest extends CamelBlueprintTestSupport { // TODO Create test message bodies that work for the route(s) being tested // Expected message bodies // To assert that everything works as it should, you must read // the content of the created xml files protected String body1; protected String body2; protected String body3; protected String body4; protected String body5; protected String body6; // Templates to send to input endpoints @Produce(uri = "file:src/data?noop=true") protected ProducerTemplate inputEndpoint; // Mock endpoints used to consume messages from the output endpoints // and then perform assertions @EndpointInject(uri = "mock:output") protected MockEndpoint outputEndpoint; @EndpointInject(uri = "mock:output2") protected MockEndpoint output2Endpoint; @EndpointInject(uri = "mock:output3") protected MockEndpoint output3Endpoint; @EndpointInject(uri = "mock:output4") protected MockEndpoint output4Endpoint; @EndpointInject(uri = "mock:output5") protected MockEndpoint output5Endpoint; @Test public void testCamelRoute() throws Exception { // Easy way of reading content of xml files to String object, but you must // add a dependency to the commons-io project to the CBRroute pom.xml file body1 = FileUtils.readFileToString(new File("src/data/message1.xml"), "UTF-8"); body3 = FileUtils.readFileToString(new File("src/data/message3.xml"), "UTF-8"); body5 = FileUtils.readFileToString(new File("src/data/message5.xml"), "UTF-8"); body6 = FileUtils.readFileToString(new File("src/data/message6.xml"), "UTF-8"); // Invalid Orders body2 = FileUtils.readFileToString(new File("src/data/message2.xml"), "UTF-8"); body4 = FileUtils.readFileToString(new File("src/data/message4.xml"), "UTF-8"); context.addRoutes(new RouteBuilder() { @Override public void configure() throws Exception { from("file:target/messages/invalidOrders").to(outputEndpoint); from("file:target/messages/GreatBritain").to(output3Endpoint); from("file:target/messages/Germany").to(output4Endpoint); from("file:target/messages/USA").to(output2Endpoint); from("file:target/messages/France").to(output5Endpoint); } }); // Define some expectations // TODO Ensure expectations make sense for the route(s) we're testing // Invalid Orders outputEndpoint.expectedBodiesReceived(body2, body4); //For each country, one order output2Endpoint.expectedBodiesReceived(body1); output3Endpoint.expectedBodiesReceived(body3); output4Endpoint.expectedBodiesReceived(body6); output5Endpoint.expectedBodiesReceived(body5); // Validate our expectations assertMockEndpointsSatisfied(); } @Override protected String getBlueprintDescriptor() { return "OSGI-INF/blueprint/blueprint.xml"; } }
Modifying the pom.xml file
You need to add a dependency on the commons-io project to the CBRroute project’s pom.xml file:
-
In Project Explorer, double-click
pom.xml, located below thetargetfolder, to open the file in the tooling’s XML editor. -
Click the
pom.xmltab at the bottom of the page to open the file for editing. Add these lines to the end of the
<dependencies>section:<dependency> <groupId>commons-io</groupId> <artifactId>commons-io</artifactId> <version>2.5</version> <scope>test</scope> </dependency>Save the file.
The contents of the entire
pom.xmlfile should look like this:<?xml version="1.0" encoding="UTF-8"?> <project xsi:schemaLocation="http://maven.apache.org/POM/4.0.0 http://maven.apache.org/xsd/maven-4.0.0.xsd" xmlns="http://maven.apache.org/POM/4.0.0" xmlns:xsi="http://www.w3.org/2001/XMLSchema-instance"> <modelVersion>4.0.0</modelVersion> <groupId>co</groupId> <artifactId>camel-blueprint</artifactId> <version>1.0.0-SNAPSHOT</version> <packaging>bundle</packaging> <name>Camel Blueprint Quickstart</name> <description>Empty Camel Blueprint Example</description> <licenses> <license> <name>Apache License, Version 2.0</name> <url>http://www.apache.org/licenses/LICENSE-2.0.html</url> <distribution>repo</distribution> </license> </licenses> <properties> <camel.version>2.18.1.redhat-000015</camel.version> <project.reporting.outputEncoding>UTF-8</project.reporting.outputEncoding> <version.maven-bundle-plugin>2.3.7<</version.maven-bundle-plugin> <jboss.fuse.bom.version>6.3.0.redhat-187</jboss.fuse.bom.version> <project.build.sourceEncoding>UTF-8</project.build.sourceEncoding> </properties> <dependencyManagement> <dependencies> <dependency> <groupId>org.jboss.fuse.bom</groupId> <artifactId>jboss-fuse-parent</artifactId> <version>${jboss.fuse.bom.version}</version> <type>pom</type> <scope>import</scope> </dependency> </dependencies> </dependencyManagement> <dependencies> <dependency> <groupId>org.apache.camel</groupId> <artifactId>camel-core</artifactId> <version>${camel.version}</version> </dependency> <dependency> <groupId>org.apache.camel</groupId> <artifactId>camel-blueprint</artifactId> <version>${camel.version}</version> </dependency> <dependency> <groupId>org.slf4j</groupId> <artifactId>slf4j-api</artifactId> </dependency> <dependency> <groupId>org.slf4j</groupId> <artifactId>slf4j-log4j12</artifactId> </dependency> <dependency> <groupId>log4j</groupId> <artifactId>log4j</artifactId> </dependency> <dependency> <groupId>org.apache.camel</groupId> <artifactId>camel-test-blueprint</artifactId> <version>${camel.version}</version> <scope>test</scope> </dependency> <dependency> <groupId>commons-io</groupId> <artifactId>commons-io</artifactId> <version>2.5</version> <scope>test</scope> </dependency> </dependencies> <repositories> <repository> <releases> <enabled>true</enabled> <updatePolicy>never</updatePolicy> </releases> <snapshots> <enabled>false</enabled> </snapshots> <id>fuse-public-repository</id> <name>FuseSource Community Release Repository</name> <url>https://repo.fusesource.com/nexus/content/groups/public</url> </repository> <repository> <releases> <enabled>true</enabled> <updatePolicy>never</updatePolicy> </releases> <snapshots> <enabled>false</enabled> </snapshots> <id>red-hat-ga-repository</id> <name>Red Hat GA Repository</name> <url>https://maven.repository.redhat.com/ga</url> </repository> <repository> <id>fuse-ea</id> <url>http://download.eng.brq.redhat.com/brewroot/repos/jb-fuse-6.2-build/latest/maven</url> </repository> <repository> <id>redhat-ea-repository</id> <url>https://maven.repository.redhat.com/earlyaccess/all</url> </repository> </repositories> <pluginRepositories> <pluginRepository> <releases> <enabled>true</enabled> <updatePolicy>never</updatePolicy> </releases> <snapshots> <enabled>false</enabled> </snapshots> <id>fuse-public-repository</id> <name>FuseSource Community Release Repository</name> <url>https://repo.fusesource.com/nexus/content/groups/public</url> </pluginRepository> <pluginRepository> <releases> <enabled>true</enabled> <updatePolicy>never</updatePolicy> </releases> <snapshots> <enabled>false</enabled> </snapshots> <id>red-hat-ga-repository</id> <name>Red Hat GA Repository</name> <url>https://maven.repository.redhat.com/ga<url> </pluginRepository> <pluginRepository> <id>fuse-ea</id> <url>http://download.eng.brq.redhat.com/brewroot/repos/jb-fuse-6.2-build/latest/maven</url> </pluginRepository> <pluginRepository> <id>redhat-ea-repository</id> <url>https://maven.repository.redhat.com/earlyaccess/all</url> </pluginRepository> <pluginRepository> <id>camelStaging</id> <url>https://repository.jboss.org/nexus/content/repositories/fusesource_releases_external-2384</url> </pluginRepository> </pluginRepositories> <build> <defaultGoal>install</defaultGoal> <plugins> <plugin> <groupId>org.apache.felix</groupId> <artifactId>maven-bundle-plugin</artifactId> <version>${version.maven-bundle-plugin}</version> <extensions>true</extensions> <configuration> <instructions> <Bundle-SymbolicName>CBRroute</Bundle-SymbolicName> <Bundle-Name>Empty Camel Blueprint Example [CBRroute]</Bundle-Name> </instructions> </configuration> </plugin> <plugin> <artifactId>maven-compiler-plugin</artifactId> <version>3.5.1</version> <configuration> <source>1.8</source> <target>1.8</target> </configuration> </plugin> <plugin> <artifactId>maven-resources-plugin</artifactId> <version>3.0.1</version> <configuration> <encoding>UTF-8</encoding> </configuration> </plugin> <plugin> <groupId>org.apache.camel</groupId> <artifactId>camel-maven-plugin</artifactId> <version>${camel.version}</version> <configuration> <useBlueprint>true</useBlueprint> </configuration> </plugin> </plugins> </build> </project>
Running the JUnit test
To run the test:
- Switch to JBoss perspective to free up more workspace.
-
Select the project root,
CBRroute, in the Project Explorer. - Open the context menu.
Select menu:Run As[ > JUnit Test].
NoteBy default, the JUnit view opens in the sidebar. (To provide a better view, drag it to the bottom, right panel that displays the Console, Servers, and Properties tabs.)
If the test runs successfully, you’ll see something like this:
 Note
NoteSometimes the test fails the first time JUnit is run on a project. Rerunning the test ususally results in a successful outcome.
When the test does fail, you’ll see something like this:
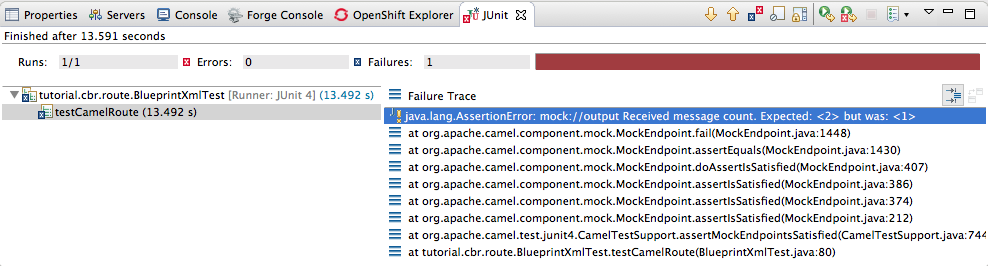 Note
NoteJUnit will fail if your execution environment is not set to Java SE 8 or 7. The message bar at the top of the JUnit tab will display an error message indicating that it cannot find the correct SDK.
To resolve the issue, open the project’s context menu, and select menu:Run As[ > > Run Configurations > > JRE > ]. Click the button next to the Execution environment field to locate and select a Java SE 8 or 7 environment.
Examine the output and take action to resolve any test failures.
To see more of the errors displayed in the JUnit panel, click
 on the panel’s menu bar to maximize the view.
Before you run the JUnit test case again, delete any JUnit-generated test messages from the CBRroute project’s
/src/datafolder in Project Explorer (see Figure 8.1, “Trace-generated messages”).
Further reading
To learn more about JUnit testing see JUnit.
Chapter 9. To Publish a Fuse Project to JBoss Fuse
This tutorial walks you through the process of publishing an Apache Camel project to Red Hat JBoss Fuse. It assumes that you have an instance of Red Hat JBoss Fuse installed on the same machine on which you are running the Red Hat JBoss Fuse Tooling.
Goals
In this tutorial you will:
- Define a Red Hat JBoss Fuse server
- Configure the publishing options
-
Start up the Red Hat JBoss Fuse server and publish the
CBRrouteproject - Connect to the Red Hat JBoss Fuse server
-
Verify whether the
CBRrouteproject’s bundle was successfully built and published -
Uninstall the
CBRrouteproject
Prerequisites
To complete this tutorial you will need:
- Access to a Red Hat JBoss Fuse 6.3 instance
- The CBRroute project you updated in Chapter 8, To Test a Route with JUnit
Defining a Red Hat JBoss Fuse Server
To define a server:
- Open Fuse Integration perspective.
- Click the Servers tab in the lower, right panel to open the Servers view.
Click the link No servers are available. Click this link to create a new server… to open the Define a New Server page.
NoteTo define a new server when one is already defined, right-click inside the Servers view to open the context menu, and then select menu:New[ > > Server > ].
Expand the JBoss Fuse node to expose the available server options:
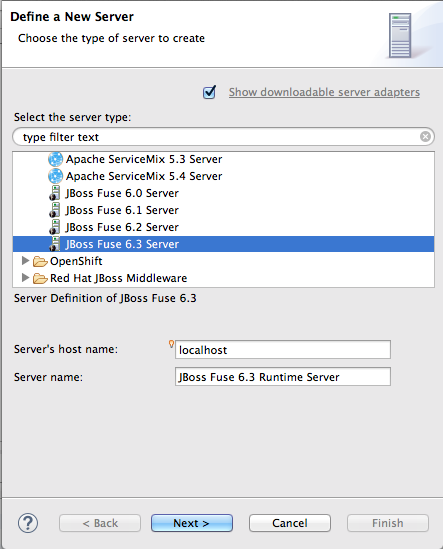
- Click JBoss Fuse 6.3 Server.
Accept the defaults for Server’s host name (localhost) and Server name (JBoss Fuse 6.3 Runtime Server), and then click to open the JBoss Fuse Runtime page:
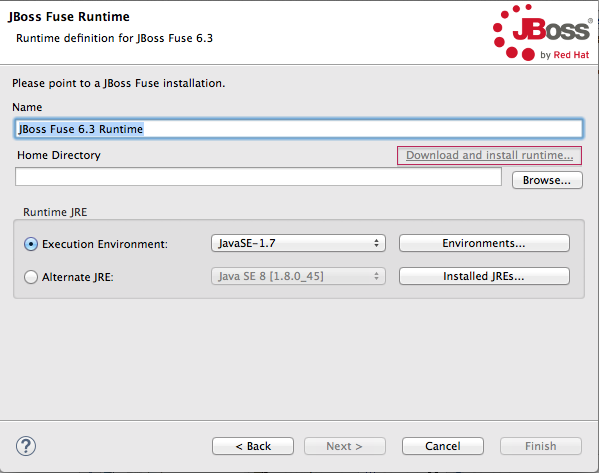 Note
NoteIf you do not have JBoss Fuse 6.3 already installed, you can download it now using the Download and install runtime… link.
NoteIf you have already defined a JBoss Fuse 6.3 server, the tooling skips this page, and instead displays the configuration details page shown in [configDetails].
- Accept the default for Name (JBoss Fuse 6.3 Runtime).
- Click next to the Home Directory field, to navigate to the JBoss Fuse 6.3 installation and select it.
Select the runtime JRE from the drop-down menu next to Execution Environment.
Select either JavaSE-1.8 (recommended) or JavaSE-1.7. If neither appears as an option, click the Environments… button and select either version from the list.
NoteThe JBoss Fuse 6.3 server requires Java 8 (recommended) or Java 7. To select either version for the Execution Environment, you must have previously installed it.
Leave the Alternate JRE option as is.
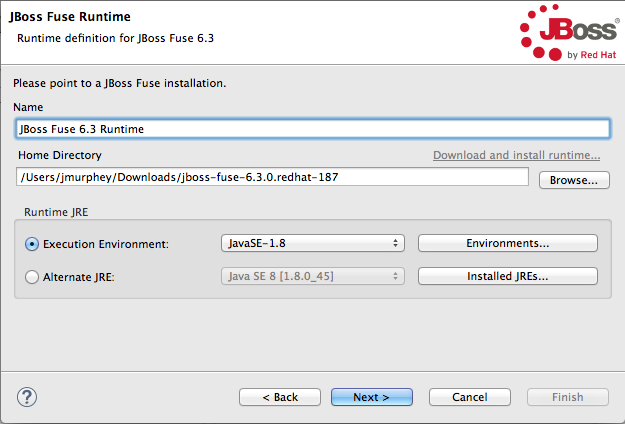
Click to save the runtime definition for JBoss Fuse 6.3 Server and open the JBoss Fuse server configuration details page:
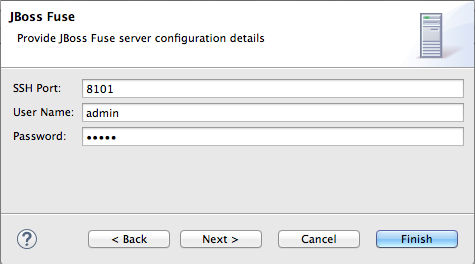
Accept the default for SSH Port (8101).
The runtime uses the SSH port to connect to the server’s Karaf shell. If this default is incorrect, you can discover the correct port number by looking in the Red Hat JBoss Fuse installDir
/etc/org.apache.karaf.shell.cfgfile.In User Name, enter the name used to log into the server.
This is a user name stored in the Red Hat JBoss Fuse installDir
/etc/users.propertiesfile.NoteIf the default user has been activated (uncommented) in the
/etc/users.propertiesfile, the tooling autofills User Name and Password with the default user’s name and password, as shown in [configDetails].If one has not been set, you can either add one to that file using the format
user=password,role(for example,joe=secret,Administrator), or you can set one using the karafjaascommand set:-
jaas:realms— to list the realms -
jaas:manage --index 1— to edit the first (server) realm -
jaas:useradd <username> <password>— to add a user and associated password -
jaas:roleadd <username> Administrator— to specify the new user’s role jaas:update— to update the realm with the new user informationIf a jaas realm has already been selected for the server, you can discover the user name by issuing the command
JBossFuse:karaf@root>jaas:users.
-
In Password:, enter the password required for User name to log into the server.
This is the password set either in Red Hat JBoss Fuse’s installDir
/etc/users.propertiesfile or by the karafjaascommands.Click .
JBoss Fuse 6.3 Runtime Server [stopped, Synchronized] appears in the Servers view.
In the view, expand JBoss Fuse 6.3 Runtime Server [stopped, Synchronized]:

] appears as a node under JBoss Fuse 6.3 Runtime Server [stopped, Synchronized] entry.
Configuring the publishing options
Using publishing options, you can configure how and when your CBRroute project is published to a running server:
- Automatically, immediately upon saving changes made to the project
- Automatically, at configured intervals after you have changed and saved the project
- Manually, when you select a publish operation
In this tutorial, you are going to configure immediate publishing upon saving changes to the CBRroute project. To do so:
In the view, double-click the JBoss Fuse 6.3 Runtime Server [stopped, Synchronized] entry to display its overview:
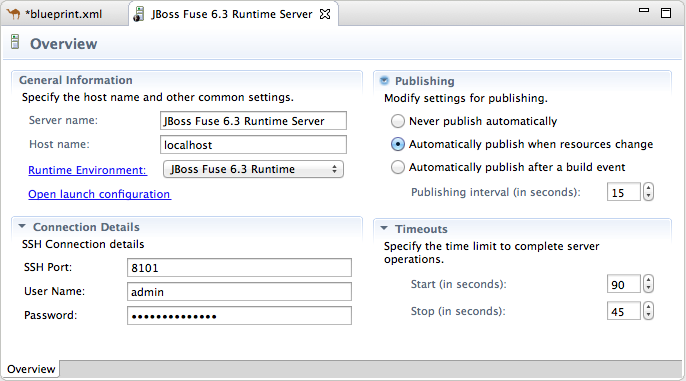
On the server’s Overview page, expand the Publishing section to expose the options.
Make sure the option Automatically publish when resources change is enabled.
Change the value of Publishing interval to speed up or delay publishing the project when changes have been made.
To configure manual publishing:
- Enable the option on the server’s Overview page.
- Disable the option on the server’s Add and Remove page.
Then to manually publish changes made to selective resources configured on the running server, use the Full Publish option on the resource’s context menu in the Servers view. The Incremental Publish option is not supported and clicking it results in a full publish.
Starting the Red Hat JBoss Fuse server
This section provides instructions for starting the Fuse server and then assigning the CBRroute module to it for immediate publishing.
In the Servers view, select JBoss Fuse 6.3 Runtime Server and click
 to start it.
Important
to start it.
ImportantA warning that the host identification has changed may appear. Click to replace the key only if the JBoss Fuse 6.3 server runtime is installed on the same machine where Red Hat JBoss Fuse Tooling is running! Otherwise click and contact your system administrator.
Wait a few seconds for JBoss Fuse 6.3 Server to start up. When it does:
The Terminal view displays the JBoss Fuse splash screen:
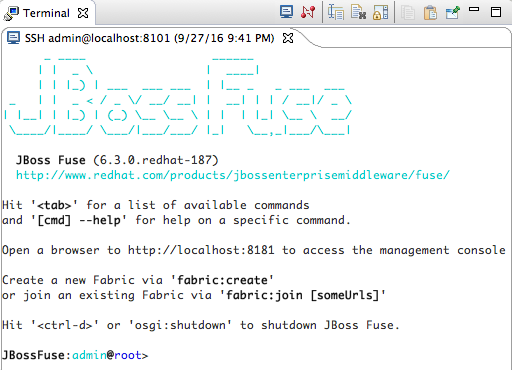
Servers view displays:

JMX Navigator displays JBoss Fuse 6.3 Runtime Server[Disconnected]:

- In the Servers view, right-click JBoss Fuse 6.3 Runtime Server [Started] to open the context menu.
Select Add and Remove to open the Add and Remove page:
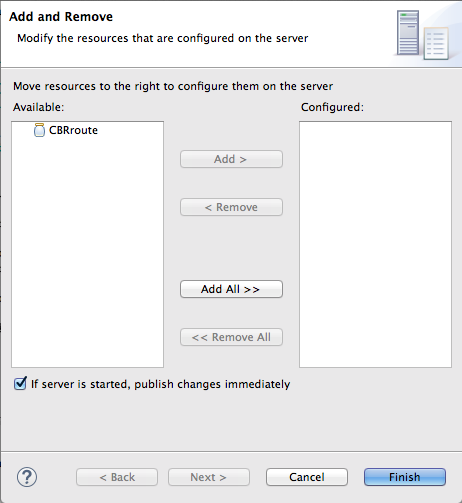
Make sure the option If server is started, publish changes immediately is checked.
Select
CBRrouteand click to assign it to the JBoss Fuse server;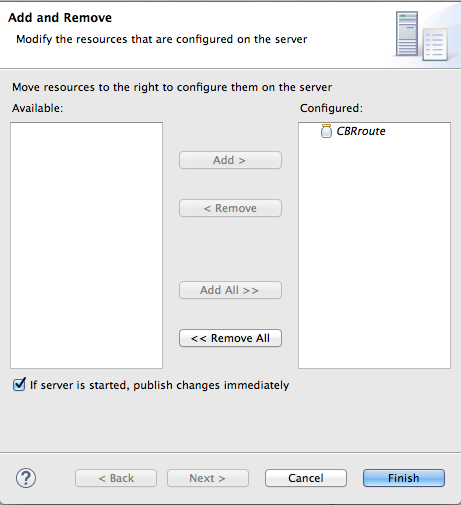
Click .

JBoss Fuse 6.3 Runtime Server [Started, Synchronized]
NoteFor a server, synchronized means that all modules published on the server are identical to their local counterparts.
CBRroute [Started, Synchronized]
NoteFor a module, synchronized means that the published module is identical to its local counterpart. Because automatic publishing is enabled, changes made to the CBRroute project are published in seconds (according to the value of the Publishing interval).
- JMX[Disconnected]
Connecting to the JBoss Fuse 6.3 runtime server
When you connect to the JBoss Fuse 6.3 Runtime Server, you can see the published elements of your CBRroute project and interact with them. The instructions in this section will show a display such as the following:
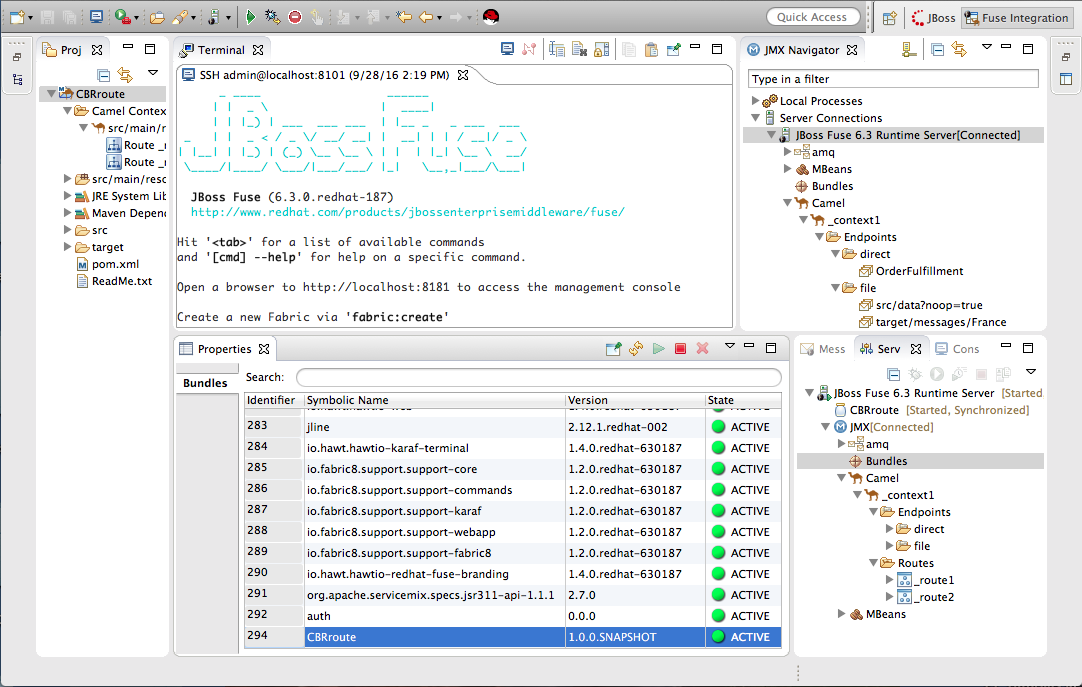
- In the Servers view, double-click JMX[Disconnected] to connect to the runtime server.
Expand the
Camelfolder in the Servers view or JMX Navigator to expose the elements of theCBRroute.You can interact with the
CBRrouterouting context using either the Servers view or JMX Navigator, but JMX Navigator provides more room to expand the routing context’s nodes, making it easier for you to access them.NoteOnce the
_context1node appears in JMX Navigator under Server Connections (or in the Servers view under JMX[Connected]), you can start tracing on it, as described in Chapter 7, To Trace a Message Through a Route.Click the Bundles node to populate the Properties view with the list of bundles installed on the JBoss Fuse 6.3 Runtime Server:
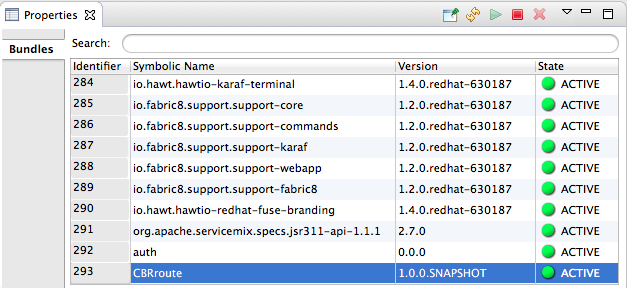
Start typing
CBRroutein the Properties view’s Search field to quickly determine whether your project’sCBRroutebundle is included in the list. Note that it is the last bundle in the list, identified by its Symbolic Name,CBRroute, which is the name you gave your project when you created it.NoteAlternatively, you can issue the
osgi:listcommand in the Terminal view to see a generated list of bundles installed on the JBoss Fuse server runtime. The tooling uses a different naming scheme for OSGi bundles displayed by theosgi:listcommand. In this case, the command returnsEmpty Camel Blueprint Project [CBRroute], which appears at the end of the list of installed bundles.In the
<build>section of project’spom.xmlfile, you can find the bundle’s symbolic name and its bundle name (OSGi) listed in themaven-bundle-pluginentry: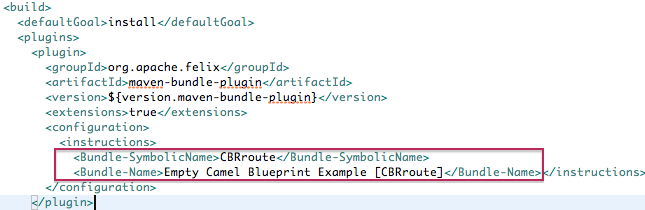
Uninstalling the CBRroute project
You do not need to disconnect the JMX connection or stop the server to uninstall a published resource.
To remove the CBRroute resource from the JBoss Fuse runtime server:
- In the Servers view, right-click JBoss Fuse 6.3 Runtime Server to open the context menu.
Select Add and Remove:
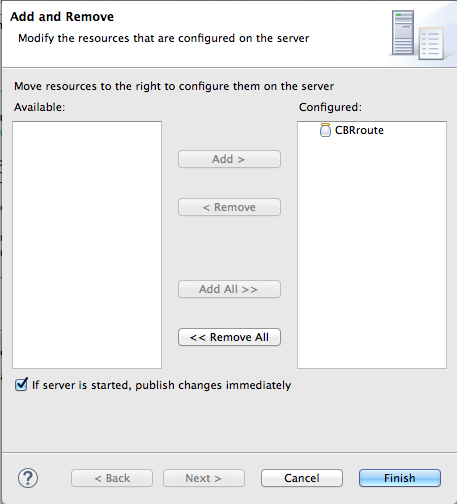
-
In the Configured column, select
CBRroute, and then click to move theCBRrouteresource to the Available column. - Click .
In the Servers view, right-click JMX[Connected] to open the context menu, and then click Refresh.
The
Cameltree under JMX[Connected] disappears.NoteIn JMX Navigator, the
Cameltree under Server Connections > JBoss Fuse 6.3 Runtime Server[Connected] also disappears.-
With the Bundles page displayed, start typing
CBRroute`in the Properties view’s Search field to verify that the bundle has been removed.