
Red Hat Training
A Red Hat training course is available for Red Hat Fuse
Developing Applications Using JAX-WS
Standards-based service development
Copyright © 2013 Red Hat, Inc. and/or its affiliates.
Abstract
Part I. Starting from Java Code
Abstract
Chapter 1. Bottom-Up Service Development
Abstract
- Create a Service Endpoint Interface (SEI) that defines the methods you want to expose as a service.TipYou can work directly from a Java class, but working from an interface is the recommended approach. Interfaces are better suited for sharing with the developers who are responsible for developing the applications consuming your service. The interface is smaller and does not provide any of the service's implementation details.
- Add the required annotations to your code.
- Generate the WSDL contract for your service.TipIf you intend to use the SEI as the service's contract, it is not necessary to generate a WSDL contract.
- Publish the service as a service provider.
1.1. Creating the SEI
Overview
- Green field development — In this pattern, you are developing a new service without any existing Java code or WSDL. It is best to start by creating the SEI. You can then distribute the SEI to any developers that are responsible for implementing the service providers and consumers that use the SEI.NoteThe recommended way to do green field service development is to start by creating a WSDL contract that defines the service and its interfaces. See Part II, “Starting from WSDL”.
- Service enablement — In this pattern, you typically have an existing set of functionality that is implemented as a Java class, and you want to service enable it. This means that you must do two things:
- Create an SEI that contains only the operations that are going to be exposed as part of the service.
- Modify the existing Java class so that it implements the SEI.
NoteAlthough you can add the JAX-WS annotations to a Java class, it is not recommended.
Writing the interface
wsdl:portType element. The methods defined by the SEI correspond to wsdl:operation elements in the wsdl:portType element.
Example 1.1. Simple SEI
package com.fusesource.demo;

public interface quoteReporter
{
  public Quote getQuote(String ticker);
}
Implementing the interface
Example 1.2. Simple Implementation Class
package com.fusesource.demo;

import java.util.*;

public class stockQuoteReporter implements quoteReporter
{
  ...
public Quote getQuote(String ticker)
  {
    Quote retVal = new Quote();
    retVal.setID(ticker);
    retVal.setVal(Board.check(ticker));[1]
    Date retDate = new Date();
    retVal.setTime(retDate.toString());
    return(retVal);
  }
}
1.2. Annotating the Code
- The target namespace for the service.
- The name of the class used to hold the request message
- The name of the class used to hold the response message
- If an operation is a one way operation
- The binding style the service uses
- The name of the class used for any custom exceptions
- The namespaces under which the types used by the service are defined
1.2.1. Required Annotations
Overview
@WebService annotation on both the SEI and the implementation class.
The @WebService annotation
@WebService annotation is defined by the javax.jws.WebService interface and it is placed on an interface or a class that is intended to be used as a service. @WebService has the properties described in Table 1.1, “@WebService Properties”
Table 1.1. @WebService Properties
| Property | Description |
|---|---|
| name | Specifies the name of the service interface. This property is mapped to the name attribute of the wsdl:portType element that defines the service's interface in a WSDL contract. The default is to append PortType to the name of the implementation class. [a] |
| targetNamespace | Specifies the target namespace where the service is defined. If this property is not specified, the target namespace is derived from the package name. |
| serviceName | Specifies the name of the published service. This property is mapped to the name attribute of the wsdl:service element that defines the published service. The default is to use the name of the service's implementation class. [a] |
| wsdlLocation | Specifies the URL where the service's WSDL contract is stored. This must be specified using a relative URL. The default is the URL where the service is deployed. |
| endpointInterface | Specifies the full name of the SEI that the implementation class implements. This property is only specified when the attribute is used on a service implementation class. |
| portName | Specifies the name of the endpoint at which the service is published. This property is mapped to the name attribute of the wsdl:port element that specifies the endpoint details for a published service. The default is the append Port to the name of the service's implementation class.[a] |
[a]
When you generate WSDL from an SEI the interface's name is used in place of the implementation class' name.
| |
@WebService annotation's properties. However, it is recommended that you provide as much information as you can.
Annotating the SEI
@WebService annotation. Because the SEI is the contract that defines the service, you should specify as much detail as possible about the service in the @WebService annotation's properties.
@WebService Annotation” shows the interface defined in Example 1.1, “Simple SEI” with the @WebService annotation.
Example 1.3. Interface with the @WebService Annotation
package com.fusesource.demo;

import javax.jws.*;

@WebService(name="quoteUpdater", 1
            targetNamespace="http:\\demos.redhat.com", 2
	        serviceName="updateQuoteService", 3
            wsdlLocation="http:\\demos.redhat.com\quoteExampleService?wsdl", 4
            portName="updateQuotePort") 5
public interface quoteReporter
{
  public Quote getQuote(String ticker);
}
@WebService annotation in Example 1.3, “Interface with the @WebService Annotation” does the following:
- 1
- Specifies that the value of the
nameattribute of thewsdl:portTypeelement defining the service interface isquoteUpdater. - 2
- Specifies that the target namespace of the service is http:\\demos.redhat.com.
- 3
- Specifies that the value of the
nameof thewsdl:serviceelement defining the published service isupdateQuoteService. - 4
- Specifies that the service will publish its WSDL contract at http:\\demos.redhat.com\quoteExampleService?wsdl.
- 5
- Specifies that the value of the
nameattribute of thewsdl:portelement defining the endpoint exposing the service isupdateQuotePort.
Annotating the service implementation
@WebService annotation, you also must annotate the service implementation class with the @WebService annotation. When adding the annotation to the service implementation class you only need to specify the endpointInterface property. As shown in Example 1.4, “Annotated Service Implementation Class” the property must be set to the full name of the SEI.
Example 1.4. Annotated Service Implementation Class
package org.eric.demo;

import javax.jws.*;

@WebService(endpointInterface="com.fusesource.demo.quoteReporter")
public class stockQuoteReporter implements quoteReporter
{
public Quote getQuote(String ticker)
  {
  ...
  }
}
1.2.2. Optional Annotations
@WebService annotation is sufficient for service enabling a Java interface or a Java class, it does not fully describe how the service will be exposed as a service provider. The JAX-WS programming model uses a number of optional annotations for adding details about your service, such as the binding it uses, to the Java code. You add these annotations to the service's SEI.
1.2.2.1. Defining the Binding Properties with Annotations
Overview
The @SOAPBinding annotation
@SOAPBinding annotation is defined by the javax.jws.soap.SOAPBinding interface. It provides details about the SOAP binding used by the service when it is deployed. If the @SOAPBinding annotation is not specified, a service is published using a wrapped doc/literal SOAP binding.
@SOAPBinding annotation on the SEI and any of the SEI's methods. When it is used on a method, setting of the method's @SOAPBinding annotation take precedence.
@SOAPBinding Properties” shows the properties for the @SOAPBinding annotation.
Table 1.2. @SOAPBinding Properties
| Property | Values | Description |
|---|---|---|
| style | Style.DOCUMENT (default)
Style.RPC
| Specifies the style of the SOAP message. If RPC style is specified, each message part within the SOAP body is a parameter or return value and appears inside a wrapper element within the soap:body element. The message parts within the wrapper element correspond to operation parameters and must appear in the same order as the parameters in the operation. If DOCUMENT style is specified, the contents of the SOAP body must be a valid XML document, but its form is not as tightly constrained. |
| use | Use.LITERAL (default)
Use.ENCODED[a]
| Specifies how the data of the SOAP message is streamed. |
| parameterStyle [b] | ParameterStyle.BARE
ParameterStyle.WRAPPED (default)
| Specifies how the method parameters, which correspond to message parts in a WSDL contract, are placed into the SOAP message body. If BARE is specified, each parameter is placed into the message body as a child element of the message root. If WRAPPED is specified, all of the input parameters are wrapped into a single element on a request message and all of the output parameters are wrapped into a single element in the response message. |
[a]
Use.ENCODED is not currently supported.
| ||
Document bare style parameters
@SOAPBinding annotation with its style property set to Style.DOCUMENT, and its parameterStyle property set to ParameterStyle.BARE.
- The operation must have no more than one input or input/output parameter.
- If the operation has a return type other than void, it must not have any output or input/output parameters.
- If the operation has a return type of void, it must have no more than one output or input/output parameter.
@WebParam annotation or the @WebResult annotation are not counted against the number of allowed parameters.
Document wrapped parameters
@SOAPBinding annotation with its style property set to Style.DOCUMENT, and its parameterStyle property set to ParameterStyle.WRAPPED.
@RequestWrapper annotation” annotation and the the section called “The @ResponseWrapper annotation” annotation.
Example
Example 1.5. Specifying a Document Bare SOAP Binding with the SOAP Binding Annotation
package org.eric.demo;

import javax.jws.*;
import javax.jws.soap.*;
import javax.jws.soap.SOAPBinding.*;

@WebService(name="quoteReporter")
@SOAPBinding(parameterStyle=ParameterStyle.BARE)
public interface quoteReporter
{
  ...
}
1.2.2.2. Defining Operation Properties with Annotations
Overview
- What the exchanged messages look like in XML
- If the message can be optimized as a one way message
- The namespaces where the messages are defined
The @WebMethod annotation
@WebMethod annotation is defined by the javax.jws.WebMethod interface. It is placed on the methods in the SEI. The @WebMethod annotation provides the information that is normally represented in the wsdl:operation element describing the operation to which the method is associated.
@WebMethod Properties” describes the properties of the @WebMethod annotation.
Table 1.3. @WebMethod Properties
The @RequestWrapper annotation
@RequestWrapper annotation is defined by the javax.xml.ws.RequestWrapper interface. It is placed on the methods in the SEI. The @RequestWrapper annotation specifies the Java class implementing the wrapper bean for the method parameters of the request message starting a message exchange. It also specifies the element names, and namespaces, used by the runtime when marshalling and unmarshalling the request messages.
@RequestWrapper Properties” describes the properties of the @RequestWrapper annotation.
Table 1.4. @RequestWrapper Properties
| Property | Description |
|---|---|
| localName | Specifies the local name of the wrapper element in the XML representation of the request message. The default value is either the name of the method, or the value of the the section called “The @WebMethod annotation” annotation's operationName property. |
| targetNamespace | Specifies the namespace under which the XML wrapper element is defined. The default value is the target namespace of the SEI. |
| className | Specifies the full name of the Java class that implements the wrapper element. |
@SOAPBinding annotation, and its parameterStyle property is set to ParameterStyle.BARE, this annotation is ignored.
The @ResponseWrapper annotation
@ResponseWrapper annotation is defined by the javax.xml.ws.ResponseWrapper interface. It is placed on the methods in the SEI. The @ResponseWrapper specifies the Java class implementing the wrapper bean for the method parameters in the response message in the message exchange. It also specifies the element names, and namespaces, used by the runtime when marshaling and unmarshalling the response messages.
@ResponseWrapper Properties” describes the properties of the @ResponseWrapper annotation.
Table 1.5. @ResponseWrapper Properties
| Property | Description |
|---|---|
| localName | Specifies the local name of the wrapper element in the XML representation of the response message. The default value is either the name of the method with Response appended, or the value of the the section called “The @WebMethod annotation” annotation's operationName property with Response appended. |
| targetNamespace | Specifies the namespace where the XML wrapper element is defined. The default value is the target namespace of the SEI. |
| className | Specifies the full name of the Java class that implements the wrapper element. |
@SOAPBinding annotation and its parameterStyle property is set to ParameterStyle.BARE, this annotation is ignored.
The @WebFault annotation
@WebFault annotation is defined by the javax.xml.ws.WebFault interface. It is placed on exceptions that are thrown by your SEI. The @WebFault annotation is used to map the Java exception to a wsdl:fault element. This information is used to marshall the exceptions into a representation that can be processed by both the service and its consumers.
@WebFault Properties” describes the properties of the @WebFault annotation.
Table 1.6. @WebFault Properties
The @Oneway annotation
@Oneway annotation is defined by the javax.jws.Oneway interface. It is placed on the methods in the SEI that will not require a response from the service. The @Oneway annotation tells the run time that it can optimize the execution of the method by not waiting for a response and by not reserving any resources to process a response.
- They return void
- They have no parameters that implement the
Holderinterface - They do not throw any exceptions that can be passed back to a consumer
Example
Example 1.6. SEI with Annotated Methods
package com.fusesource.demo;

import javax.jws.*;
import javax.xml.ws.*;

@WebService(name="quoteReporter")
public interface quoteReporter
{
  @WebMethod(operationName="getStockQuote")
  @RequestWrapper(targetNamespace="http://demo.redhat.com/types",
                  className="java.lang.String")
  @ResponseWrapper(targetNamespace="http://demo.redhat.com/types",
                   className="org.eric.demo.Quote")
  public Quote getQuote(String ticker);
}
1.2.2.3. Defining Parameter Properties with Annotations
Overview
wsdl:message elements and their wsdl:part elements. JAX-WS provides annotations that allow you to describe the wsdl:part elements that are generated for the method parameters.
The @WebParam annotation
@WebParam annotation is defined by the javax.jws.WebParam interface. It is placed on the parameters of the methods defined in the SEI. The @WebParam annotation allows you to specify the direction of the parameter, if the parameter will be placed in the SOAP header, and other properties of the generated wsdl:part.
@WebParam Properties” describes the properties of the @WebParam annotation.
Table 1.7. @WebParam Properties
| Property | Values | Description |
|---|---|---|
| name | Specifies the name of the parameter as it appears in the generated WSDL document. For RPC bindings, this is the name of the wsdl:part representing the parameter. For document bindings, this is the local name of the XML element representing the parameter. Per the JAX-WS specification, the default is argN, where N is replaced with the zero-based argument index (i.e., arg0, arg1, etc.). | |
| targetNamespace | Specifies the namespace for the parameter. It is only used with document bindings where the parameter maps to an XML element. The default is to use the service's namespace. | |
| mode | Mode.IN (default)[a]
Mode.OUT
Mode.INOUT
| Specifies the direction of the parameter. |
| header | false (default)
true
| Specifies if the parameter is passed as part of the SOAP header. |
| partName | Specifies the value of the name attribute of the wsdl:part element for the parameter. This property is used for document style SOAP bindings. | |
The @WebResult annotation
@WebResult annotation is defined by the javax.jws.WebResult interface. It is placed on the methods defined in the SEI. The @WebResult annotation allows you to specify the properties of the wsdl:part that is generated for the method's return value.
@WebResult Properties” describes the properties of the @WebResult annotation.
Table 1.8. @WebResult Properties
Example
Example 1.7. Fully Annotated SEI
package com.fusesource.demo;

import javax.jws.*;
import javax.xml.ws.*;
import javax.jws.soap.*;
import javax.jws.soap.SOAPBinding.*;
import javax.jws.WebParam.*;

@WebService(targetNamespace="http://demo.redhat.com",
            name="quoteReporter")
@SOAPBinding(style=Style.RPC, use=Use.LITERAL)
public interface quoteReporter
{
  @WebMethod(operationName="getStockQuote")
  @RequestWrapper(targetNamespace="http://demo.redhat.com/types",
                  className="java.lang.String")
  @ResponseWrapper(targetNamespace="http://demo.redhat.com/types",
                   className="org.eric.demo.Quote")
  @WebResult(targetNamespace="http://demo.redhat.com/types",
             name="updatedQuote")
  public Quote getQuote(
                        @WebParam(targetNamespace="http://demo.redhat.com/types",
                                  name="stockTicker",
                                  mode=Mode.IN)
                        String ticker
  );
}
1.2.3. Apache CXF Annotations
1.2.3.1. WSDL Documentation
@WSDLDocumentation annotation
@WSDLDocumentation annotation is defined by the org.apache.cxf.annotations.WSDLDocumentation interface. It can be placed on the SEI or the SEI methods.
wsdl:documentation elements after the SEI is converted to WSDL. By default, the documentation elements appear inside the port type, but you can specify the placement property to make the documentation appear at other locations in the WSDL file. Table 1.9, “@WSDLDocumentation properties” shows the properties supported by the @WSDLDocumentation annotation.
Table 1.9. @WSDLDocumentation properties
| Property | Description |
|---|---|
value | (Required) A string containing the documentation text. |
placement | (Optional) Specifies where in the WSDL file this documentation is to appear. For the list of possible placement values, see the section called “Placement in the WSDL contract”. |
faultClass | (Optional) If the placement is set to be FAULT_MESSAGE, PORT_TYPE_OPERATION_FAULT, or BINDING_OPERATION_FAULT, you must also set this property to the Java class that represents the fault. |
@WSDLDocumentationCollection annotation
@WSDLDocumentationCollection annotation is defined by the org.apache.cxf.annotations.WSDLDocumentationCollection interface. It can be placed on the SEI or the SEI methods.
Placement in the WSDL contract
placement property, which is of type WSDLDocumentation.Placement. The placement can have one of the following values:
WSDLDocumentation.Placement.BINDINGWSDLDocumentation.Placement.BINDING_OPERATIONWSDLDocumentation.Placement.BINDING_OPERATION_FAULTWSDLDocumentation.Placement.BINDING_OPERATION_INPUTWSDLDocumentation.Placement.BINDING_OPERATION_OUTPUTWSDLDocumentation.Placement.DEFAULTWSDLDocumentation.Placement.FAULT_MESSAGEWSDLDocumentation.Placement.INPUT_MESSAGEWSDLDocumentation.Placement.OUTPUT_MESSAGEWSDLDocumentation.Placement.PORT_TYPEWSDLDocumentation.Placement.PORT_TYPE_OPERATIONWSDLDocumentation.Placement.PORT_TYPE_OPERATION_FAULTWSDLDocumentation.Placement.PORT_TYPE_OPERATION_INPUTWSDLDocumentation.Placement.PORT_TYPE_OPERATION_OUTPUTWSDLDocumentation.Placement.SERVICEWSDLDocumentation.Placement.SERVICE_PORTWSDLDocumentation.Placement.TOP
Example of @WSDLDocumentation
@WSDLDocumentation annotation to the SEI and to one of its methods.
Example 1.8. Using @WSDLDocumentation
@WebService
@WSDLDocumentation("A very simple example of an SEI")
public interface HelloWorld {
    @WSDLDocumentation("A traditional form of greeting")
    String sayHi(@WebParam(name = "text") String text);
}documentation elements are, respectively, PORT_TYPE and PORT_TYPE_OPERATION.
Example 1.9. WSDL generated with documentation
<wsdl:definitions ... >
  ...
  <wsdl:portType name="HelloWorld">
 <wsdl:documentation>A very simple example of an SEI</wsdl:documentation>
    <wsdl:operation name="sayHi">
 <wsdl:documentation>A traditional form of greeting</wsdl:documentation>
      <wsdl:input name="sayHi" message="tns:sayHi">
    </wsdl:input>
      <wsdl:output name="sayHiResponse" message="tns:sayHiResponse">
    </wsdl:output>
    </wsdl:operation>
  </wsdl:portType>
  ...
</wsdl:definitions>
Example of @WSDLDocumentationCollection
@WSDLDocumentationCollection annotation to an SEI.
Example 1.10. Using @WSDLDocumentationCollection
@WebService
@WSDLDocumentationCollection(
    {
        @WSDLDocumentation("A very simple example of an SEI"),
        @WSDLDocumentation(value = "My top level documentation",
                           placement = WSDLDocumentation.Placement.TOP),
        @WSDLDocumentation(value = "Binding documentation",
                           placement = WSDLDocumentation.Placement.BINDING)
    }
)
public interface HelloWorld {
    @WSDLDocumentation("A traditional form of Geeky greeting")
    String sayHi(@WebParam(name = "text") String text);
}
1.2.3.2. Schema Validation of Messages
@SchemaValidation annotation
@SchemaValidation annotation is defined by the org.apache.cxf.annotations.SchemaValidation interface. It is placed on the SEI.
Example
HelloWorld SEI.
Example 1.11. Activating schema validation
@WebService
@SchemaValidation
public interface HelloWorld {
    String sayHi(@WebParam(name = "text") String text);
}
1.2.3.3. Specifying the Data Binding
@DataBinding annotation
@DataBinding annotation is defined by the org.apache.cxf.annotations.DataBinding interface. It is placed on the SEI.
@DataBinding annotation must be the class that provides the data binding, ClassName.class.
Supported data bindings
org.apache.cxf.jaxb.JAXBDataBinding(Default) The standard JAXB data binding.org.apache.cxf.sdo.SDODataBindingThe Service Data Objects (SDO) data binding is based on the Apache Tuscany SDO implementation. If you want to use this data binding in the context of a Maven build, you need to add a dependency on thecxf-rt-databinding-sdoartifact.org.apache.cxf.aegis.databinding.AegisDatabindingIf you want to use this data binding in the context of a Maven build, you need to add a dependency on thecxf-rt-databinding-aegisartifact.org.apache.cxf.xmlbeans.XmlBeansDataBindingIf you want to use this data binding in the context of a Maven build, you need to add a dependency on thecxf-rt-databinding-xmlbeansartifact.org.apache.cxf.databinding.source.SourceDataBindingThis data binding belongs to the Apache CXF core.org.apache.cxf.databinding.stax.StaxDataBindingThis data binding belongs to the Apache CXF core.
Example
HelloWorld SEI
Example 1.12. Setting the data binding
@WebService
@DataBinding(org.apache.cxf.sdo.SDODataBinding.class)
public interface HelloWorld {
    String sayHi(@WebParam(name = "text") String text);
}
1.2.3.4. Compressing Messages
@GZIP annotation
@GZIP annotation is defined by the org.apache.cxf.annotations.GZIP interface. It is placed on the SEI.
Accept header will be added and, if the server supports GZIP compression, the response will be gzipped and any subsequent requests will be also.
@GZIP annotation.
Table 1.10. @GZIP Properties
| Property | Description |
|---|---|
threshold | Messages smaller than the size specified by this property are not gzipped. Default is -1 (no limit). |
@FastInfoset
@FastInfoset annotation is defined by the org.apache.cxf.annotations.FastInfoset interface. It is placed on the SEI.
Accept header will be added and, if the server supports FastInfoset, the response will be in FastInfoset and any subsequent requests will be also.
@FastInfoset annotation.
Table 1.11. @FastInfoset Properties
| Property | Description |
|---|---|
force | A boolean property that forces the use of FastInfoset format, instead of negotiating. When true, force the use of FastInfoset format; otherwise, negotiate. Default is false. |
Example of @GZIP
HelloWorld SEI.
Example 1.13. Enabling GZIP
@WebService
@GZIP
public interface HelloWorld {
    String sayHi(@WebParam(name = "text") String text);
}
Exampe of @FastInfoset
HelloWorld SEI.
Example 1.14. Enabling FastInfoset
@WebService
@FastInfoset
public interface HelloWorld {
    String sayHi(@WebParam(name = "text") String text);
}
1.2.3.5. Enable Logging on an Endpoint
@Logging annotation
@Logging annotation is defined by the org.apache.cxf.annotations.Logging interface. It is placed on the SEI.
Table 1.12. @Logging Properties
| Property | Description |
|---|---|
limit | Specifies the size limit, beyond which the message is truncated in the logs. Default is 64K. |
inLocation | Specifies the location to log incoming messages. Can be either <stderr>, <stdout>, <logger>, or a filename. Default is <logger>. |
outLocation | Specifies the location to log outgoing messages. Can be either <stderr>, <stdout>, <logger>, or a filename. Default is <logger>. |
Example
HelloWorld SEI, where incoming messages are sent to <stdout> and outgoing messages are sent to <logger>.
Example 1.15. Logging configuration using annotations
@WebService
@Logging(limit=16000, inLocation="<stdout>")
public interface HelloWorld {
    String sayHi(@WebParam(name = "text") String text);
}
1.2.3.6. Adding Properties and Policies to an Endpoint
wsdl:policy elements that appear in the WSDL contract. By contrast, properties are Apache CXF-specific and they are normally set by defining jaxws:properties elements in the Apache CXF Spring configuration file.
1.2.3.6.1. Adding properties
@EndpointProperty annotation
@EndpointProperty annotation is defined by the org.apache.cxf.annotations.EndpointProperty interface. It is placed on the SEI.
jaxws:properties element in a Spring configuration file as follows:
<beans xmlns="http://www.springframework.org/schema/beans"
   xmlns:xsi="http://www.w3.org/2001/XMLSchema-instance"
   xmlns:jaxws="http://cxf.apache.org/jaxws"
   ... >

   <jaxws:endpoint
      id="MyService"
      address="https://localhost:9001/MyService"
      serviceName="interop:MyService"
      endpointName="interop:MyServiceEndpoint"
      implementor="com.foo.MyService">

      <jaxws:properties>
         <entry key="ws-security.callback-handler" value="interop.client.UTPasswordCallback"/>
         <entry key="ws-security.signature.properties" value="etc/keystore.properties"/>
         <entry key="ws-security.encryption.properties" value="etc/truststore.properties"/>
         <entry key="ws-security.encryption.username" value="useReqSigCert"/>
      </jaxws:properties>

   </jaxws:endpoint>
</beans>@EndpointProperty annotations to the SEI, as shown in Example 1.16, “Configuring WS-Security Using @EndpointProperty Annotations”.
Example 1.16. Configuring WS-Security Using @EndpointProperty Annotations
@WebService
@EndpointProperty(name="ws-security.callback-handler" value="interop.client.UTPasswordCallback")
@EndpointProperty(name="ws-security.signature.properties" value="etc/keystore.properties")
@EndpointProperty(name="ws-security.encryption.properties" value="etc/truststore.properties")
@EndpointProperty(name="ws-security.encryption.username" value="useReqSigCert")
public interface HelloWorld {
    String sayHi(@WebParam(name = "text") String text);
}
@EndpointProperties annotation
@EndpointProperties annotation is defined by the org.apache.cxf.annotations.EndpointProperties interface. It is placed on the SEI.
@EndpointProperty annotations into a list. Using @EndpointProperties, it is possible to re-write Example 1.16, “Configuring WS-Security Using @EndpointProperty Annotations” as shown in Example 1.17, “Configuring WS-Security Using an @EndpointProperties Annotation”.
Example 1.17. Configuring WS-Security Using an @EndpointProperties Annotation
@WebService
@EndpointProperties(
  {
  @EndpointProperty(name="ws-security.callback-handler" value="interop.client.UTPasswordCallback"),
  @EndpointProperty(name="ws-security.signature.properties" value="etc/keystore.properties"),
  @EndpointProperty(name="ws-security.encryption.properties" value="etc/truststore.properties"),
  @EndpointProperty(name="ws-security.encryption.username" value="useReqSigCert")
})
public interface HelloWorld {
    String sayHi(@WebParam(name = "text") String text);
}
1.2.3.6.2. Adding policies
@Policy annotation
@Policy annotation is defined by the org.apache.cxf.annotations.Policy interface. It can be placed on the SEI or the SEI methods.
wsdl:policy element. If a WSDL contract is to be generated from the SEI (for example, using the java2ws command-line tool), you can specify whether or not you want to include this policy in the WSDL.
@Policy annotation.
Table 1.13. @Policy Properties
| Property | Description |
|---|---|
uri | (Required) The location of the file containing the policy definition. |
includeInWSDL | (Optional) Whether to include the policy in the generated contract, when generating WSDL. Default is true. |
placement | (Optional) Specifies where in the WSDL file this documentation is to appear. For the list of possible placement values, see the section called “Placement in the WSDL contract”. |
faultClass | (Optional) If the placement is set to be BINDING_OPERATION_FAULT or PORT_TYPE_OPERATION_FAULT, you must also set this property to specify which fault this policy applies to. The value is the Java class that represents the fault. |
@Policies annotation
@Policies annotation is defined by the org.apache.cxf.annotations.Policies interface. It can be placed on the SEI or thse SEI methods.
@Policy annotations into a list.
Placement in the WSDL contract
placement property, which is of type Policy.Placement. The placement can have one of the following values:
Policy.Placement.BINDING
Policy.Placement.BINDING_OPERATION
Policy.Placement.BINDING_OPERATION_FAULT
Policy.Placement.BINDING_OPERATION_INPUT
Policy.Placement.BINDING_OPERATION_OUTPUT
Policy.Placement.DEFAULT
Policy.Placement.PORT_TYPE
Policy.Placement.PORT_TYPE_OPERATION
Policy.Placement.PORT_TYPE_OPERATION_FAULT
Policy.Placement.PORT_TYPE_OPERATION_INPUT
Policy.Placement.PORT_TYPE_OPERATION_OUTPUT
Policy.Placement.SERVICE
Policy.Placement.SERVICE_PORT
Example of @Policy
HelloWorld SEI and how to associate a policy with the sayHi method. The policies themselves are stored in XML files in the file system, under the annotationpolicies directory.
@WebService
@Policy(uri = "annotationpolicies/TestImplPolicy.xml",
        placement = Policy.Placement.SERVICE_PORT),
@Policy(uri = "annotationpolicies/TestPortTypePolicy.xml",
        placement = Policy.Placement.PORT_TYPE)
public interface HelloWorld {
    @Policy(uri = "annotationpolicies/TestOperationPTPolicy.xml",
            placement = Policy.Placement.PORT_TYPE_OPERATION),
    String sayHi(@WebParam(name = "text") String text);
}
Example of @Policies
@Policies annotation to group multiple @Policy annotations into a list, as shown in the following example:
@WebService
@Policies({
    @Policy(uri = "annotationpolicies/TestImplPolicy.xml",
            placement = Policy.Placement.SERVICE_PORT),
    @Policy(uri = "annotationpolicies/TestPortTypePolicy.xml",
            placement = Policy.Placement.PORT_TYPE)
})
public interface HelloWorld {
    @Policy(uri = "annotationpolicies/TestOperationPTPolicy.xml",
            placement = Policy.Placement.PORT_TYPE_OPERATION),
    String sayHi(@WebParam(name = "text") String text);
}
1.3. Generating WSDL
| Revision History | |
|---|---|
| 5/23/12 | |
| Changed the description of code generation to use Maven instead of command line tools to reflect best practices. | |
Using Maven
java2ws Maven plug-in's -wsdl option. For a detailed listing of options for the java2ws Maven plug-in see java2ws.
java2ws Maven plug-in to generate WSDL.
Example 1.18. Generating WSDL from Java
<plugin>
  <groupId>org.apache.cxf</groupId>
  <artifactId>cxf-java2ws-plugin</artifactId>
  <version>${cxf.version}</version>
  <executions>
    <execution>
      <id>process-classes</id>
      <phase>process-classes</phase>
      <configuration>
        <className>className</className>
        <genWsdl>true</genWsdl>
      </configuration>
      <goals>
        <goal>java2ws</goal>
      </goals>
    </execution>
  </executions>
</plugin>
Example
Example 1.19. Generated WSDL from an SEI
<?xml version="1.0" encoding="UTF-8"?>
<wsdl:definitions targetNamespace="http://demo.eric.org/"
          xmlns:tns="http://demo.eric.org/"
		  xmlns:ns1=""
		  xmlns:xsd="http://www.w3.org/2001/XMLSchema"
		  xmlns:ns2="http://demo.eric.org/types"
		  xmlns:soap="http://schemas.xmlsoap.org/wsdl/soap/"
		  xmlns:wsdl="http://schemas.xmlsoap.org/wsdl/">
  <wsdl:types>
    <xsd:schema>
      <xs:complexType name="quote">
        <xs:sequence>
          <xs:element name="ID" type="xs:string" minOccurs="0"/>
          <xs:element name="time" type="xs:string" minOccurs="0"/>
          <xs:element name="val" type="xs:float"/>
        </xs:sequence>
      </xs:complexType>
    </xsd:schema>
  </wsdl:types>
  <wsdl:message name="getStockQuote">
    <wsdl:part name="stockTicker" type="xsd:string">
    </wsdl:part>
  </wsdl:message>
  <wsdl:message name="getStockQuoteResponse">
    <wsdl:part name="updatedQuote" type="tns:quote">
    </wsdl:part>
  </wsdl:message>
  <wsdl:portType name="quoteReporter">
    <wsdl:operation name="getStockQuote">
      <wsdl:input name="getQuote" message="tns:getStockQuote">
    </wsdl:input>
      <wsdl:output name="getQuoteResponse" message="tns:getStockQuoteResponse">
    </wsdl:output>
    </wsdl:operation>
  </wsdl:portType>
  <wsdl:binding name="quoteReporterBinding" type="tns:quoteReporter">
    <soap:binding style="rpc" transport="http://schemas.xmlsoap.org/soap/http" />
    <wsdl:operation name="getStockQuote">
      <soap:operation style="rpc" />
      <wsdl:input name="getQuote">
        <soap:body use="literal" />
      </wsdl:input>
      <wsdl:output name="getQuoteResponse">
        <soap:body use="literal"/>
      </wsdl:output>
    </wsdl:operation>
  </wsdl:binding>
  <wsdl:service name="quoteReporterService">
    <wsdl:port name="quoteReporterPort" binding="tns:quoteReporterBinding">
      <soap:address location="http://localhost:9000/quoteReporterService" />
    </wsdl:port>
  </wsdl:service>
</wsdl:definitions>Chapter 2. Developing a Consumer Without a WSDL Contract
Abstract
- Create a
Serviceobject for the service on which the consumer will invoke operations. - Add a port to the
Serviceobject.
2.1. Creating a Service Object
Overview
javax.xml.ws.Service class represents the wsdl:service element which contains the definition of all of the endpoints that expose a service. As such, it provides methods that allow you to get endpoints, defined by wsdl:port elements, that are proxies for making remote invocations on a service.
Service class provides the abstractions that allow the client code to work with Java types as opposed to working with XML documents.
The create() methods
Service class has two static create() methods that can be used to create a new Service object. As shown in Example 2.1, “Service create() Methods”, both of the create() methods take the QName of the wsdl:service element the Service object will represent, and one takes a URI specifying the location of the WSDL contract.
?wsdl.
Example 2.1. Service create() Methods
public static Service create(URL wsdlLocation,
                             QName serviceName)
    throws WebServiceException;
public static Service create(QName serviceName)
throws WebServiceException;serviceName parameter is a QName. The value of its namespace part is the target namespace of the service. The service's target namespace is specified in the targetNamespace property of the @WebService annotation. The value of the QName's local part is the value of wsdl:service element's name attribute. You can determine this value in one of the following ways:
- It is specified in the serviceName property of the
@WebServiceannotation. - You append
Serviceto the value of the name property of the@WebServiceannotation. - You append
Serviceto the name of the SEI.
Example
Service Object” shows code for creating a Service object for the SEI shown in Example 1.7, “Fully Annotated SEI”.
Example 2.2. Creating a Service Object
Service Object” does the following:
- 1
- Builds the QName for the service using the targetNamespace property and the name property of the
@WebServiceannotation. - 2
- Calls the single parameter
create()method to create a newServiceobject.NoteUsing the single parametercreate()frees you from having any dependencies on accessing a WSDL contract.
2.2. Adding a Port to a Service
Overview
wsdl:port element, and the Service object creates a proxy instance for each of the endpoints defined in a WSDL contract, if one is specified. If you do not specify a WSDL contract when you create your Service object, the Service object has no information about the endpoints that implement your service, and therefore cannot create any proxy instances. In this case, you must provide the Service object with the information needed to represent a wsdl:port element using the addPort() method.
The addPort() method
Service class defines an addPort() method, shown in Example 2.3, “The addPort() Method”, that is used in cases where there is no WSDL contract available to the consumer implementation. The addPort() method allows you to give a Service object the information, which is typically stored in a wsdl:port element, necessary to create a proxy for a service implementation.
Example 2.3. The addPort() Method
void addPort(QName portName,
             String bindingId,
             String endpointAddress)
throws WebServiceException;portName is a QName. The value of its namespace part is the target namespace of the service. The service's target namespace is specified in the targetNamespace property of the @WebService annotation. The value of the QName's local part is the value of wsdl:port element's name attribute. You can determine this value in one of the following ways:
- Specify it in the portName property of the
@WebServiceannotation. - Append
Portto the value of the name property of the@WebServiceannotation. - Append
Portto the name of the SEI.
bindingId parameter is a string that uniquely identifies the type of binding used by the endpoint. For a SOAP binding you use the standard SOAP namespace: http://schemas.xmlsoap.org/soap/. If the endpoint is not using a SOAP binding, the value of the bindingId parameter is determined by the binding developer.
endpointAddress parameter is the address where the endpoint is published. For a SOAP/HTTP endpoint, the address is an HTTP address. Transports other than HTTP use different address schemes.
Example
Service Object” shows code for adding a port to the Service object created in Example 2.2, “Creating a Service Object”.
Example 2.4. Adding a Port to a Service Object
package com.fusesource.demo;

import javax.xml.namespace.QName;
import javax.xml.ws.Service;

public class Client
{
public static void main(String args[])
  {
    ...
1    QName portName = new QName("http://demo.redhat.com", "stockQuoteReporterPort");
2    s.addPort(portName,
3              "http://schemas.xmlsoap.org/soap/",
4              "http://localhost:9000/StockQuote");
    ...
  }
}Service Object” does the following:
2.3. Getting a Proxy for an Endpoint
Overview
Service object provides service proxies for all of the endpoints it is aware of through the getPort() method. Once you have a service proxy, you can invoke its methods. The proxy forwards the invocation to the remote service endpoint using the connection details specified in the service's contract.
The getPort() method
getPort() method, shown in Example 2.5, “The getPort() Method”, returns a service proxy for the specified endpoint. The returned proxy is of the same class as the SEI.
Example 2.5. The getPort() Method
public <T> T getPort(QName portName,
                     Class<T> serviceEndpointInterface)
throws WebServiceException;portName parameter is a QName that identifies the wsdl:port element that defines the endpoint for which the proxy is created. The value of the serviceEndpointInterface parameter is the fully qualified name of the SEI.
portName parameter is typically the same as the value used for the portName parameter when calling addPort().
Example
Service Object”.
Example 2.6. Getting a Service Proxy
package com.fusesource.demo;

import javax.xml.namespace.QName;
import javax.xml.ws.Service;

public class Client
{
public static void main(String args[])
  {
    ...
    quoteReporter proxy = s.getPort(portName, quoteReporter.class);
    ...
  }
}
2.4. Implementing the Consumer's Business Logic
Overview
@OneWay annotation, the call returns immediately.
Example
Example 2.7. Consumer Implemented without a WSDL Contract
package com.fusesource.demo;

import java.io.File;
import java.net.URL;
import javax.xml.namespace.QName;
import javax.xml.ws.Service;

public class Client
{
public static void main(String args[])
  {
    QName serviceName = new QName("http://demo.eric.org", "stockQuoteReporter");
1  Service s = Service.create(serviceName);

    QName portName = new QName("http://demo.eric.org", "stockQuoteReporterPort");
2  s.addPort(portName, "http://schemas.xmlsoap.org/soap/", "http://localhost:9000/EricStockQuote");

3  quoteReporter proxy = s.getPort(portName, quoteReporter.class);

4  Quote quote = proxy.getQuote("ALPHA");
    System.out.println("Stock "+quote.getID()+" is worth "+quote.getVal()+" as of "+quote.getTime());
  }
}Part II. Starting from WSDL
Abstract
Chapter 3. A Starting Point WSDL Contract
Greeter, in the wsdl:portType element. The contract also defines the endpoint which will implement the service in the wsdl:port element.
Example 3.1. HelloWorld WSDL Contract
<?xml version="1.0" encoding=";UTF-8"?>
<wsdl:definitions name="HelloWorld"
                  targetNamespace="http://apache.org/hello_world_soap_http"
                  xmlns="http://schemas.xmlsoap.org/wsdl/"
                  xmlns:soap="http://schemas.xmlsoap.org/wsdl/soap/"
                  xmlns:tns="http://apache.org/hello_world_soap_http"
                  xmlns:x1="http://apache.org/hello_world_soap_http/types"
                  xmlns:wsdl="http://schemas.xmlsoap.org/wsdl/"
                  xmlns:xsd="http://www.w3.org/2001/XMLSchema">
  <wsdl:types>
    <schema targetNamespace="http://apache.org/hello_world_soap_http/types"
            xmlns="http://www.w3.org/2001/XMLSchema"
            elementFormDefault="qualified"><element name="sayHi">
      <element name="sayHi">
        <complexType>
          <sequence>
            <element name="requestType" type="string"/>
          </sequence>
        </complexType>
      </element>
      <element name="sayHiResponse">
        <complexType>
          <sequence>
            <element name="responseType" type="string"/>
          </sequence>
        </complexType>
      </element>
      <element name="greetMe">
        <complexType>
          <sequence>
            <element name="requestType" type="string"/>
          </sequence>
        </complexType>
      </element>
      <element name="greetMeResponse">
        <complexType>
          <sequence>
            <element name="responseType" type="string"/>
          </sequence>
        </complexType>
      </element>
      <element name="greetMeOneWay">
        <complexType>
          <sequence>
            <element name="requestType" type="string"/>
          </sequence>
        </complexType>
      </element>
      <element name="pingMe">
        <complexType/>
      </element>
      <element name="pingMeResponse">
        <complexType/>
      </element>
      <element name="faultDetail">
        <complexType>
          <sequence>
            <element name="minor" type="short"/>
            <element name="major" type="short"/>
          </sequence>
        </complexType>
      </element>
    </schema>
  </wsdl:types>

  <wsdl:message name="sayHiRequest">
    <wsdl:part element="x1:sayHi" name="in"/>
  </wsdl:message>
  <wsdl:message name="sayHiResponse">
    <wsdl:part element="x1:sayHiResponse" name="out"/>
  </wsdl:message>
  <wsdl:message name="greetMeRequest">
    <wsdl:part element="x1:greetMe" name="in"/>
  </wsdl:message>
  <wsdl:message name="greetMeResponse">
    <wsdl:part element="x1:greetMeResponse" name="out"/>
  </wsdl:message>
  <wsdl:message name="greetMeOneWayRequest">
    <wsdl:part element="x1:greetMeOneWay" name="in"/>
  </wsdl:message>
  <wsdl:message name="pingMeRequest">
    <wsdl:part name="in" element="x1:pingMe"/>
  </wsdl:message>
  <wsdl:message name="pingMeResponse">
    <wsdl:part name="out" element="x1:pingMeResponse"/>
  </wsdl:message>
  <wsdl:message name="pingMeFault">
    <wsdl:part name="faultDetail" element="x1:faultDetail"/>
  </wsdl:message>

  <wsdl:portType name="Greeter">
1    <wsdl:operation name="sayHi">
      <wsdl:input message="tns:sayHiRequest" name="sayHiRequest"/>
      <wsdl:output message="tns:sayHiResponse" name="sayHiResponse"/>
    </wsdl:operation>

2    <wsdl:operation name="greetMe">
      <wsdl:input message="tns:greetMeRequest" name="greetMeRequest"/>
      <wsdl:output message="tns:greetMeResponse" name="greetMeResponse"/>
    </wsdl:operation>

3    <wsdl:operation name="greetMeOneWay">
      <wsdl:input message="tns:greetMeOneWayRequest" name="greetMeOneWayRequest"/>
    </wsdl:operation>

4    <wsdl:operation name="pingMe">
      <wsdl:input name="pingMeRequest" message="tns:pingMeRequest"/>
      <wsdl:output name="pingMeResponse" message="tns:pingMeResponse"/>
      <wsdl:fault name="pingMeFault" message="tns:pingMeFault"/>
    </wsdl:operation>
  </wsdl:portType>

  <wsdl:binding name="Greeter_SOAPBinding" type="tns:Greeter">
    ...
  </wsdl:binding>

  <wsdl:service name="SOAPService">
    <wsdl:port binding="tns:Greeter_SOAPBinding" name="SoapPort">
      <soap:address location="http://localhost:9000/SoapContext/SoapPort"/>
    </wsdl:port>
  </wsdl:service>
</wsdl:definitions>Greeter interface defined in Example 3.1, “HelloWorld WSDL Contract” defines the following operations:
- 1
- sayHi — Has a single output parameter, of xsd:string.
- 2
- greetMe — Has an input parameter, of xsd:string, and an output parameter, of xsd:string.
- 3
- greetMeOneWay — Has a single input parameter, of xsd:string. Because this operation has no output parameters, it is optimized to be a oneway invocation (that is, the consumer does not wait for a response from the server).
- 4
- pingMe — Has no input parameters and no output parameters, but it can raise a fault exception.
Chapter 4. Top-Down Service Development
| Revision History | |
|---|---|
| 5/23/12 | |
| Changed the description of code generation to use Maven instead of command line tools to reflect best practices. | |
Abstract
4.1. Generating the Starting Point Code
| Revision History | |
|---|---|
| 5/23/12 | |
| Changed the description of code generation to use Maven instead of command line tools to reflect best practices. | |
Overview
wsdl:portType element, is mapped to a service endpoint interface (SEI). Any complex types defined in the WSDL are mapped into Java classes following the mapping defined by the Java Architecture for XML Binding (JAXB) specification. The endpoint defined by the wsdl:service element is also generated into a Java class that is used by consumers to access service providers implementing the service.
cxf-codegen-plugin Maven plug-in generates this code. It also provides options for generating starting point code for your implementation. The code generator provides a number of options for controlling the generated code.
Running the code generator
Example 4.1. Service Code Generation
<plugin>
  <groupId>org.apache.cxf</groupId>
  <artifactId>cxf-codegen-plugin</artifactId>
  <version>${cxf.version}</version>
  <executions>
    <execution>
      <id>generate-sources</id>
      <phase>generate-sources</phase>
      <configuration>
        <sourceRoot>outputDir</sourceRoot>
        <wsdlOptions>
          <wsdlOption>
            <wsdl>wsdl</wsdl>
            <extraargs>
              <extraarg>-server</extraarg>
              <extraarg>-impl</extraarg>
            </extraargs>
          </wsdlOption>
        </wsdlOptions>
      </configuration>
      <goals>
        <goal>wsdl2java</goal>
      </goals>
    </execution>
  </executions>
</plugin>- The
-imploption generates a shell implementation class for eachwsdl:portTypeelement in the WSDL contract. - The
-serveroption generates a simplemain()to run your service provider as a stand alone application. - The
sourceRootspecifies that the generated code is written to a directory called outputDir. wsdlelement specifies the WSDL contract from which code is generated.
Generated code
Table 4.1. Generated Classes for a Service Provider
| File | Description |
|---|---|
portTypeName.java | The SEI. This file contains the interface your service provider implements. You should not edit this file. |
serviceName.java | The endpoint. This file contains the Java class consumers use to make requests on the service. |
portTypeNameImpl.java | The skeleton implementation class. Modify this file to build your service provider. |
portTypeNameServer.java | A basic server mainline that allows you to deploy your service provider as a stand alone process. For more information see Chapter 8, Publishing a Service. |
Generated packages
wsdl:portType element, the wsdl:service element, and the wsdl:port element) are placed in a package based on the target namespace of the WSDL contract. The classes generated to implement the types defined in the types element of the contract are placed in a package based on the targetNamespace attribute of the types element.
- The leading
http://orurn://are stripped off the namespace. - If the first string in the namespace is a valid Internet domain, for example it ends in
.comor.gov, then the leadingwww.is stripped off the string, and the two remaining components are flipped. - If the final string in the namespace ends with a file extension of the pattern
.xxxor.xx, then the extension is stripped. - The remaining strings in the namespace are appended to the resulting string and separated by dots.
- All letters are made lowercase.
4.2. Implementing the Service Provider
Generating the implementation code
-impl flag.
Generated code
portTypeName.java— The service interface(SEI) for the service.portTypeNameImpl.java— The class you will use to implement the operations defined by the service.
Implement the operation's logic
portTypeNameImpl.java. You usually use standard Java to implement the business logic. If your service uses custom XML Schema types, you must use the generated classes for each type to manipulate them. There are also some Apache CXF specific APIs that can be used to access some advanced features.
Example
Example 4.2. Implementation of the Greeter Service
package demo.hw.server;

import org.apache.hello_world_soap_http.Greeter;

@javax.jws.WebService(portName = "SoapPort", serviceName = "SOAPService",
                      targetNamespace = "http://apache.org/hello_world_soap_http",
                      endpointInterface = "org.apache.hello_world_soap_http.Greeter")

public class GreeterImpl implements Greeter {

    public String greetMe(String me) {
       System.out.println("Executing operation greetMe");
       System.out.println("Message received: " + me + "\n");
       return "Hello " + me;
    }

    public void greetMeOneWay(String me) {
       System.out.println("Executing operation greetMeOneWay\n");
       System.out.println("Hello there " + me);
    }

    public String sayHi() {
       System.out.println("Executing operation sayHi\n");
       return "Bonjour";
    }

    public void pingMe() throws PingMeFault {
       FaultDetail faultDetail = new FaultDetail();
       faultDetail.setMajor((short)2);
       faultDetail.setMinor((short)1);
       System.out.println("Executing operation pingMe, throwing PingMeFault exception\n");
       throw new PingMeFault("PingMeFault raised by server", faultDetail);
    }
}
Chapter 5. Developing a Consumer From a WSDL Contract
Abstract
5.1. Generating the Stub Code
Overview
cxf-codegen-plugin Maven plug-in generates the stub code from the WSDL contract. The stub code provides the supporting code that is required to invoke operations on the remote service.
cxf-codegen-plugin Maven plug-in generates the following types of code:
- Stub code — Supporting files for implementing a consumer.
- Starting point code — Sample code that connects to the remote service and invokes every operation on the remote service.
Generating the consumer code
cxf-codegen-plugin Maven plug-in. Example 5.1, “Consumer Code Generation” shows how to use the code generator to generate consumer code.
Example 5.1. Consumer Code Generation
<plugin>
  <groupId>org.apache.cxf</groupId>
  <artifactId>cxf-codegen-plugin</artifactId>
  <version>${cxf.version}</version>
  <executions>
    <execution>
      <id>generate-sources</id>
      <phase>generate-sources</phase>
      <configuration>
        <sourceRoot>outputDir</sourceRoot>
        <wsdlOptions>
          <wsdlOption>
            <wsdl>wsdl</wsdl>
            <extraargs>
              <extraarg>-client</extraarg>
            </extraargs>
          </wsdlOption>
        </wsdlOptions>
      </configuration>
      <goals>
        <goal>wsdl2java</goal>
      </goals>
    </execution>
  </executions>
</plugin>-client option generates starting point code for the consumer's main() method.
cxf-codegen-plugin Maven plug-in see cxf-codegen-plugin.
Generated code
- org.apache.hello_world_soap_http — This package is generated from the
http://apache.org/hello_world_soap_httptarget namespace. All of the WSDL entities defined in this namespace (for example, the Greeter port type and the SOAPService service) map to Java classes this Java package. - org.apache.hello_world_soap_http.types — This package is generated from the
http://apache.org/hello_world_soap_http/typestarget namespace. All of the XML types defined in this namespace (that is, everything defined in thewsdl:typeselement of the HelloWorld contract) map to Java classes in this Java package.
cxf-codegen-plugin Maven plug-in fall into the following categories:
- Classes representing WSDL entities in the org.apache.hello_world_soap_http package. The following classes are generated to represent WSDL entities:
Greeter— A Java interface that represents the Greeterwsdl:portTypeelement. In JAX-WS terminology, this Java interface is the service endpoint interface (SEI).SOAPService— A Java service class (extendingjavax.xml.ws.Service) that represents the SOAPServicewsdl:serviceelement.PingMeFault— A Java exception class (extendingjava.lang.Exception) that represents the pingMeFaultwsdl:faultelement.
- Classes representing XML types in the org.objectweb.hello_world_soap_http.types package. In the HelloWorld example, the only generated types are the various wrappers for the request and reply messages. Some of these data types are useful for the asynchronous invocation model.
5.2. Implementing a Consumer
Overview
- Service class
- SEI
Generated service class
ServiceName_Service[2], which extends the javax.xml.ws.Service base class.
Example 5.2. Outline of a Generated Service Class
@WebServiceClient(name="..." targetNamespace="..."
                  wsdlLocation="...")
public class ServiceName extends javax.xml.ws.Service
{
  ...
  public ServiceName(URL wsdlLocation, QName serviceName) { }

  public ServiceName() { }

  @WebEndpoint(name="...")
  public SEI getPortName() { }
  .
  .
  .
}ServiceName class in Example 5.2, “Outline of a Generated Service Class” defines the following methods:
ServiceName(URL wsdlLocation, QName serviceName)— Constructs a service object based on the data in thewsdl:serviceelement with the QName ServiceName service in the WSDL contract that is obtainable from wsdlLocation.ServiceName()— The default constructor. It constructs a service object based on the service name and the WSDL contract that were provided at the time the stub code was generated (for example, when running the wsdl2java tool). Using this constructor presupposes that the WSDL contract remains available at a specified location.getPortName()— Returns a proxy for the endpoint defined by thewsdl:portelement with thenameattribute equal to PortName. A getter method is generated for everywsdl:portelement defined by the ServiceName service. Awsdl:serviceelement that contains multiple endpoint definitions results in a generated service class with multiplegetPortName()methods.
Service endpoint interface
wsdl:portType element. Each operation defined in the original wsdl:portType element maps to a corresponding method in the SEI. The operation's parameters are mapped as follows:
- The input parameters are mapped to method arguments.
- The first output parameter is mapped to a return value.
- If there is more than one output parameter, the second and subsequent output parameters map to method arguments (moreover, the values of these arguments must be passed using Holder types).
wsdl:portType element defined in Example 3.1, “HelloWorld WSDL Contract”. For simplicity, Example 5.3, “The Greeter Service Endpoint Interface” omits the standard JAXB and JAX-WS annotations.
Example 5.3. The Greeter Service Endpoint Interface
package org.apache.hello_world_soap_http;
  ...
public interface Greeter
{
  public String sayHi();
  public String greetMe(String requestType);
  public void greetMeOneWay(String requestType);
  public void pingMe() throws PingMeFault;
}
Consumer main function
Example 5.4. Consumer Implementation Code
package demo.hw.client;

import java.io.File;
import java.net.URL;
import javax.xml.namespace.QName;
import org.apache.hello_world_soap_http.Greeter;
import org.apache.hello_world_soap_http.PingMeFault;
import org.apache.hello_world_soap_http.SOAPService;

public final class Client {

  private static final QName SERVICE_NAME =
  new QName("http://apache.org/hello_world_soap_http",
            "SOAPService");

  private Client()
  {
  }

  public static void main(String args[]) throws Exception
  {
1 if (args.length == 0)
    {
      System.out.println("please specify wsdl");
      System.exit(1);
    }

2 URL wsdlURL;
    File wsdlFile = new File(args[0]);
    if (wsdlFile.exists())
    {
      wsdlURL = wsdlFile.toURL();
    }
    else
    {
      wsdlURL = new URL(args[0]);
    }

    System.out.println(wsdlURL);
3 SOAPService ss = new SOAPService(wsdlURL,SERVICE_NAME);
4 Greeter port = ss.getSoapPort();
    String resp;

5 System.out.println("Invoking sayHi...");
    resp = port.sayHi();
    System.out.println("Server responded with: " + resp);
    System.out.println();

    System.out.println("Invoking greetMe...");
    resp = port.greetMe(System.getProperty("user.name"));
    System.out.println("Server responded with: " + resp);
    System.out.println();

    System.out.println("Invoking greetMeOneWay...");
    port.greetMeOneWay(System.getProperty("user.name"));
    System.out.println("No response from server as method is OneWay");
    System.out.println();

6 try {
      System.out.println("Invoking pingMe, expecting exception...");
      port.pingMe();
    } catch (PingMeFault ex) {
      System.out.println("Expected exception: PingMeFault has occurred.");
      System.out.println(ex.toString());
    }
    System.exit(0);
  }
}Client.main() method from Example 5.4, “Consumer Implementation Code” proceeds as follows:
- 1
- Provided that the Apache CXF runtime classes are on your classpath, the runtime is implicitly initialized. There is no need to call a special function to initialize Apache CXF.
- 2
- The consumer expects a single string argument that gives the location of the WSDL contract for HelloWorld. The WSDL contract's location is stored in
wsdlURL. - 3
- You create a service object using the constructor that requires the WSDL contract's location and service name.
- 4
- Call the appropriate
getPortName()method to obtain an instance of the required port. In this case, the SOAPService service supports only the SoapPort port, which implements theGreeterservice endpoint interface. - 5
- The consumer invokes each of the methods supported by the
Greeterservice endpoint interface. - 6
- In the case of the
pingMe()method, the example code shows how to catch thePingMeFaultfault exception.
Part III. Common Development Tasks
Abstract
Chapter 6. Finding WSDL at Runtime
Abstract
6.1. Instantiating a Proxy by Injection
Overview
Procedure
- Deploy the required WSDL documents in a well known location that all parts of the application can access.TipIf you are deploying the application as a WAR file, it is recommended that you place all of the WSDL documents and XML Schema documents in the
WEB-INF/wsdlfolder of the WAR.TipIf you are deploying the application as a JAR file, it is recommended that you place all of the WSDL documents and XML Schema documents in theMETA-INF/wsdlfolder of the JAR. - Configure a JAX-WS client endpoint for the proxy that is being injected.
- Inject the proxy into your service provide using the
@Resourceannotation.
Configuring the proxy
jaxws:client element in you application's configuration file. This tells the runtime to instantiate a org.apache.cxf.jaxws.JaxWsClientProxy object with the specified properties. This object is the proxy that will be injected into the service provider.
id—Specifies the ID used to identify the client to be injected.serviceClass—Specifies the SEI of the service on which the proxy makes requests.
Example 6.1. Configuration for a Proxy to be Injected into a Service Implementation
<beans ...
  xmlns:jaxws="http://cxf.apache.org/jaxws"
  ...
  schemaLocation="...
    http://cxf.apache.org/jaxws http://cxf.apache.org/schemas/jaxws.xsd
    ...">
  <jaxws:client id="bookClient"
                serviceClass="org.apache.cxf.demo.BookService"
                wsdlLocation="classpath:books.wsdl"/>
  ...
</beans>wsdlLocation attribute instructs the runtime to load the WSDL from the classpath. If books.wsdl in on the classpath, the runtime will be able to find it.
Coding the provider implementation
@Resource as shown in Example 6.2, “Injecting a Proxy into a Service Implementation”.
Example 6.2. Injecting a Proxy into a Service Implementation
package demo.hw.server;

import org.apache.hello_world_soap_http.Greeter;

@javax.jws.WebService(portName = "SoapPort", serviceName = "SOAPService",
                      targetNamespace = "http://apache.org/hello_world_soap_http",
                      endpointInterface = "org.apache.hello_world_soap_http.Greeter")
public class StoreImpl implements Store {

@Resource(name="bookClient")
private BookService proxy;

}id attribute. The configured proxy is injected into the BookService object declared immediately after the annotation. You can use this object to make invocations on the proxy's external service.
6.2. Using a JAX-WS Catalog
Overview
a standard catalog facility to be used when resolving any Web service document that is part of the description of a Web service, specifically WSDL and XML Schema documents.
Writing the catalog
- a document's public identifier and/or a system identifier to a URI.
- the URI of a resource to another URI.
Table 6.1. Common JAX-WS Catalog Elements
| Element | Description |
|---|---|
uri | Maps a URI to an alternate URI. |
rewriteURI | Rewrites the beginning of a URI. For example, this element allows you to map all URIs that start with http://cxf.apache.org to URIs that start with classpath:. |
uriSuffix | Maps a URI to an alternate URI based on the suffix of the original URI. For example you could map all URIs that end in foo.xsd to classpath:foo.xsd. |
Packaging the catalog
META-INF/jax-ws-catalog.xml. If your application is packaged into a single JAR, or WAR, you can place the catalog into a single file.
6.3. Using a contract resolver
Overview
ServiceContractResolver interface. You also need to register your custom resolver with the bus.
Implementing the contract resolver
org.apache.cxf.endpoint.ServiceContractResolver interface. As shown in Example 6.3, “ServiceContractResolver Interface”, this interface has a single method, getContractLocation(), that needs to be implemented. getContractLocation() takes the QName of a service and returns the URI for the service's WSDL contract.
Example 6.3. ServiceContractResolver Interface
public interface ServiceContractResolver
{
   URI getContractLocation(QName qname);
}Registering the contract resolver programmatically
org.apache.cxf.endpoint.ServiceContractResolverRegistry interface. However, you do not need to implement your own registry. Apache CXF provides a default implementation in the org.apache.cxf.endpoint.ServiceContractResolverRegistryImpl class.
- Get a reference to the default bus object.
- Get the service contract registry from the bus using the bus'
getExtension()method. - Create an instance of your contract resolver.
- Register your contract resolver with the registry using the registry's
register()method.
Example 6.4. Registering a Contract Resolver
Registering a contract resolver using configuration
- Add an
init()method to your contract resolver implementation. - Add logic to your
init()method that registers the contract resolver with the contract resolver registry as shown in Example 6.4, “Registering a Contract Resolver”. - Decorate the
init()method with the@PostConstructannotation.
Example 6.5. Service Contract Resolver that can be Registered Using Configuration
import javax.annotation.PostConstruct;
import javax.annotation.Resource;
import javax.xml.namespace.QName;

import org.apache.cxf.Bus;
import org.apache.cxf.BusFactory;

public class UddiResolver implements ServiceContractResolver
{
  private Bus bus;
  ...

  @PostConstruct
  public void init()
  {
    BusFactory bf=BusFactory.newInstance();
    Bus bus=bf.createBus();
    if (null != bus)
    {
      ServiceContractResolverRegistry resolverRegistry = bus.getExtension(ServiceContractResolverRegistry.class);
      if (resolverRegistry != null)
      {
        resolverRegistry.register(this);
      }
    }
  }

  public URI getContractLocation(QName serviceName)
  {
    ...
  }
}bean element to the client's configuration. The bean element's class attribute is the name of the class implementing the contract resolver.
org.apache.cxf.demos.myContractResolver class.
Example 6.6. Bean Configuring a Contract Resolver
<beans xmlns="http://www.springframework.org/schema/beans"
      xmlns:xsi="http://www.w3.org/2001/XMLSchema-instance"
       xsi:schemaLocation="
http://www.springframework.org/schema/beans http://www.springframework.org/schema/beans/spring-beans.xsd">
  ...
  <bean id="myResolver" class="org.apache.cxf.demos.myContractResolver" />
  ...
</beans>
Contract resolution order
getContractLocation() method in the order in which the resolvers were registered. It returns the first URI returned from one of the registered contract resolvers.
Chapter 7. Generic Fault Handling
Abstract
7.1. Runtime Faults
Overview
javax.xml.ws.WebServiceException exception.
APIs that throw WebServiceException
WebServiceException” lists some of the JAX-WS APIs that can throw the generic WebServiceException exception.
Table 7.1. APIs that Throw WebServiceException
| API | Reason |
|---|---|
Binding.setHandlerChain() | There is an error in the handler chain configuration. |
BindingProvider.getEndpointReference() | The specified class is not assigned from a W3CEndpointReference. |
Dispatch.invoke() | There is an error in the Dispatch instance's configuration or an error occurred while communicating with the service. |
Dispatch.invokeAsync() | There is an error in the Dispatch instance's configuration. |
Dispatch.invokeOneWay() | There is an error in the Dispatch instance's configuration or an error occurred while communicating with the service. |
LogicalMessage.getPayload() | An error occurred when using a supplied JAXBContext to unmarshall the payload. The cause field of the WebServiceException contains the original JAXBException. |
LogicalMessage.setPayload() | An error occurred when setting the payload of the message. If the exception is thrown when using a JAXBContext, the cause field of the WebServiceException contains the original JAXBException. |
WebServiceContext.getEndpointReference() | The specified class is not assigned from a W3CEndpointReference. |
7.2. Protocol Faults
Overview
Types of protocol exceptions
Table 7.2. Types of Generic Protocol Exceptions
| Exception Class | When Thrown |
|---|---|
javax.xml.ws.ProtocolException | This exception is the generic protocol exception. It can be caught regardless of the protocol in use. It can be cast into a specific fault type if you are using the SOAP binding or the HTTP binding. When using the XML binding in combination with the HTTP or JMS transports, the generic protocol exception cannot be cast into a more specific fault type. |
javax.xml.ws.soap.SOAPFaultException | This exception is thrown by remote invocations when using the SOAP binding. For more information see the section called “Using the SOAP protocol exception”. |
| javax.xml.ws.http.HTTPException | This exception is thrown when using the Apache CXF HTTP binding to develop RESTful Web services. For more information see "Developing RESTful Web Services". |
Using the SOAP protocol exception
SOAPFaultException exception wraps a SOAP fault. The underlying SOAP fault is stored in the fault field as a javax.xml.soap.SOAPFault object.
SOAPFaultException using the exceptions creator and throw it back to the consumer. Example 7.1, “Throwing a SOAP Protocol Exception” shows code for creating and throwing a SOAPFaultException if the method is passed an invalid parameter.
Example 7.1. Throwing a SOAP Protocol Exception
public Quote getQuote(String ticker)
{
  ...
  if(tickers.length()<3)
  {
    SOAPFault fault = SOAPFactory.newInstance().createFault();
    fault.setFaultString("Ticker too short");
    throw new SOAPFaultException(fault);
  }
  ...
}SOAPFaultException exception they can retrieve the underlying cause of the exception by examining the wrapped SOAPFault exception. As shown in Example 7.2, “Getting the Fault from a SOAP Protocol Exception”, the SOAPFault exception is retrieved using the SOAPFaultException exception's getFault() method.
Example 7.2. Getting the Fault from a SOAP Protocol Exception
...
try
{
  proxy.getQuote(ticker);
}
catch (SOAPFaultException sfe)
{
  SOAPFault fault = sfe.getFault();
  ...
}
Chapter 8. Publishing a Service
Abstract
- deploying a server as a standalone Java application
- deploying a server into an OSGi container without Spring-DM
8.1. APIs Used to Publish a Service
Overview
javax.xml.ws.Enddpoint class does the work of publishing a JAX-WS service provider. To publishing an endpoint do the following:
- Create an
Endpointobject for your service provider. - Publish the endpoint.
- Stop the endpoint when application shuts down.
Endpoint class provides methods for creating and publishing service providers. It also provides a method that can create and publish a service provider in a single method call.
Instantiating an service provider
Endpoint object. You instantiate an Endpoint object for your service provider using one of the following methods:
static Endpoint create(Object implementor);Thiscreate()method returns anEndpointfor the specified service implementation. TheEndpointobject is created using the information provided by the implementation class'javax.xml.ws.BindingTypeannotation, if it is present. If the annotation is not present, theEndpointuses a default SOAP 1.1/HTTP binding.static Endpoint create(URI bindingID,
Object implementor);Thiscreate()method returns anEndpointobject for the specified implementation object using the specified binding. This method overrides the binding information provided by thejavax.xml.ws.BindingTypeannotation, if it is present. If thebindingIDcannot be resolved, or it isnull, the binding specified in thejavax.xml.ws.BindingTypeis used to create theEndpoint. If neither thebindingIDor thejavax.xml.ws.BindingTypecan be used, theEndpointis created using a default SOAP 1.1/HTTP binding.static Endpoint publish(String address,
Object implementor);Thepublish()method creates anEndpointobject for the specified implementation, and publishes it. The binding used for theEndpointobject is determined by the URL scheme of the providedaddress. The list of bindings available to the implementation are scanned for a binding that supports the URL scheme. If one is found theEndpointobject is created and published. If one is not found, the method fails.TipUsingpublish()is the same as invoking one of thecreate()methods, and then invoking thepublish()method used in publish to an address.
Endpoint creation methods must either be an instance of a class annotated with javax.jws.WebService and meeting the requirements for being an SEI implementation or it must be an instance of a class annotated with javax.xml.ws.WebServiceProvider and implementing the Provider interface.
Publishing a service provider
Endpoint methods:
void publish(String address);Thispublish()method publishes the service provider at the address specified.ImportantTheaddress's URL scheme must be compatible with one of the service provider's bindings.void publish(Object serverContext);Thispublish()method publishes the service provider based on the information provided in the specified server context. The server context must define an address for the endpoint, and the context must also be compatible with one of the service provider's available bindings.
Stopping a published service provider
stop() method. The stop() method, shown in Example 8.1, “Method for Stopping a Published Endpoint”, shuts down the endpoint and cleans up any resources it is using.
Example 8.1. Method for Stopping a Published Endpoint
void stop();8.2. Publishing a Service in a Plain Java Application
| Revision History | |
|---|---|
| 5/23/12 | |
| Changed the description of code generation to use Maven instead of command line tools to reflect best practices. | |
Overview
main() method. Apache CXF provides you two options for writing your application's main() method.
- use the
main()method generated by the wsdl2java tool - write a custom
main()method that publishes the endpoints
Generating a Server Mainline
-server flag makes the tool generate a simple server mainline. The generated server mainline, as shown in Example 8.2, “Generated Server Mainline”, publishes one service provider for each port element in the specified WSDL contract.
Example 8.2. Generated Server Mainline
package org.apache.hello_world_soap_http;

import javax.xml.ws.Endpoint;

public class GreeterServer {

    protected GreeterServer() throws Exception {
        System.out.println("Starting Server");
1        Object implementor = new GreeterImpl();
2        String address = "http://localhost:9000/SoapContext/SoapPort";
3        Endpoint.publish(address, implementor);
    }

    public static void main(String args[]) throws Exception {
        new GreeterServer();
        System.out.println("Server ready...");

        Thread.sleep(5 * 60 * 1000);
        System.out.println("Server exiting");
        System.exit(0);
    }
}Writing a Server Mainline
- Instantiate an
javax.xml.ws.Endpointobject for the service provider. - Create an optional server context to use when publishing the service provider.
- Publish the service provider using one of the
publish()methods. - Stop the service provider when the application is ready to exit.
Example 8.3. Custom Server Mainline
package org.apache.hello_world_soap_http;

import javax.xml.ws.Endpoint;

public class GreeterServer
{
  protected GreeterServer() throws Exception
  {
  }

  public static void main(String args[]) throws Exception
  {
1    GreeterImpl impl = new GreeterImpl();
2    Endpoint endpt.create(impl);
3    endpt.publish("http://localhost:9000/SoapContext/SoapPort");

    boolean done = false;
4   while(!done)
    {
      ...
    }

5   endpt.stop();
    System.exit(0);
  }
}8.3. Publishing a Service in an OSGi Container
Overview
The bundle activator interface
org.osgi.framework.BundleActivator interface. The BundleActivator interface, shown in Example 8.4, “Bundle Activator Interface”, it has two methods that need to be implemented.
Example 8.4. Bundle Activator Interface
interface BundleActivator
{
  public void start(BundleContext context)
  throws java.lang.Exception;

  public void stop(BundleContext context)
  throws java.lang.Exception;
}start() method is called by the container when it starts the bundle. This is where you instantiate and publish the endpoints.
stop() method is called by the container when it stops the bundle. This is where you would stop the endpoints.
Implementing the start method
- Instantiate an
javax.xml.ws.Endpointobject for the service provider. - Create an optional server context to use when publishing the service provider.
- Publish the service provider using one of the
publish()methods.
Example 8.5. Bundle Activator Start Method for Publishing an Endpoint
package com.widgetvendor.osgi;

import javax.xml.ws.Endpoint;
import org.osgi.framework.BundleActivator;
import org.osgi.framework.BundleContext;

public class widgetActivator implements BundleActivator
{
  private Endpoint endpt;
  ...

  public void start(BundleContext context)
  {
1    WidgetOrderImpl impl = new WidgetOrderImpl();
2    endpt = Endpoint.create(impl);
3    endpt.publish("http://localhost:9000/SoapContext/SoapPort");
  }

  ...

}Implementing the stop method
Example 8.6. Bundle Activator Stop Method for Stopping an Endpoint
package com.widgetvendor.osgi;

import javax.xml.ws.Endpoint;
import org.osgi.framework.BundleActivator;
import org.osgi.framework.BundleContext;

public class widgetActivator implements BundleActivator
{
  private Endpoint endpt;
  ...

  public void stop(BundleContext context)
  {
    endpt.stop();
  }

  ...

}
Informing the container
com.widgetvendor.osgi.widgetActivator.
Example 8.7. Bundle Activator Manifest Entry
Bundle-Activator: com.widgetvendor.osgi.widgetActivator
Part IV. Working with Data Types
Abstract
Chapter 9. Basic Data Binding Concepts
Abstract
9.1. Including and Importing Schema Definitions
Overview
<include/> and <import/> schema tags. These tags enable you to insert definitions from external files or resources into the scope of a schema element. The essential difference between including and importing is:
- Including brings in definitions that belong to the same target namespace as the enclosing schema element.
- Importing brings in definitions that belong to a different target namespace from the enclosing schema element.
xsd:include syntax
<include schemaLocation="anyURI" />
Example 9.1. Example of a Schema that Includes Another Schema
<definitions targetNamespace="http://schemas.redhat.com/tests/schema_parser"
             xmlns:tns="http://schemas.redhat.com/tests/schema_parser"
             xmlns:xsd="http://www.w3.org/2001/XMLSchema"
             xmlns="http://schemas.xmlsoap.org/wsdl/">
  <types>
    <schema targetNamespace="http://schemas.redhat.com/tests/schema_parser"
            xmlns="http://www.w3.org/2001/XMLSchema">
      <include schemaLocation="included.xsd"/>
      <complexType name="IncludingSequence">
        <sequence>
          <element name="includedSeq" type="tns:IncludedSequence"/>
        </sequence>
      </complexType>
    </schema>
  </types>
  ...
</definitions>
Example 9.2. Example of an Included Schema
<schema targetNamespace="http://schemas.redhat.com/tests/schema_parser"
        xmlns="http://www.w3.org/2001/XMLSchema">
  <!-- Included type definitions -->
  <complexType name="IncludedSequence">
    <sequence>
      <element name="varInt" type="int"/>
      <element name="varString" type="string"/>
    </sequence>
  </complexType>
</schema>
xsd:import syntax
<import namespace="namespaceAnyURI"
schemaLocation="schemaAnyURI" />Example 9.3. Example of a Schema that Includes Another Schema
<definitions targetNamespace="http://schemas.redhat.com/tests/schema_parser"
             xmlns:tns="http://schemas.redhat.com/tests/schema_parser"
             xmlns:xsd="http://www.w3.org/2001/XMLSchema"
             xmlns="http://schemas.xmlsoap.org/wsdl/">
  <types>
    <schema targetNamespace="http://schemas.redhat.com/tests/schema_parser"
            xmlns="http://www.w3.org/2001/XMLSchema">
      <import namespace="http://schemas.redhat.com/tests/imported_types"
              schemaLocation="included.xsd"/>
      <complexType name="IncludingSequence">
        <sequence>
          <element name="includedSeq" type="tns:IncludedSequence"/>
        </sequence>
      </complexType>
    </schema>
  </types>
  ...
</definitions>
Example 9.4. Example of an Included Schema
<schema targetNamespace="http://schemas.redhat.com/tests/imported_types"
        xmlns="http://www.w3.org/2001/XMLSchema">
  <!-- Included type definitions -->
  <complexType name="IncludedSequence">
    <sequence>
      <element name="varInt" type="int"/>
      <element name="varString" type="string"/>
    </sequence>
  </complexType>
</schema>
Using non-referenced schema documents
- Convert the schema document to a WSDL document using the xsd2wsdl tool.
- Generate Java for the types using the wsdl2java tool on the generated WSDL document.ImportantYou will get a warning from the wsdl2java tool stating that the WSDL document does not define any services. You can ignore this warning.
- Add the generated classes to your classpath.
9.2. XML Namespace Mapping
Overview
Package naming
- The URI scheme, if present, is stripped.NoteApache CXF will only strip the http:, https:, and urn: schemes.For example, the namespace
http:\\www.widgetvendor.com\types\widgetTypes.xsdbecomes\\widgetvendor.com\types\widgetTypes.xsd. - The trailing file type identifier, if present, is stripped.For example,
\\www.widgetvendor.com\types\widgetTypes.xsdbecomes\\widgetvendor.com\types\widgetTypes. - The resulting string is broken into a list of strings using
/and:as separators.So,\\www.widgetvendor.com\types\widgetTypesbecomes the list{"www.widegetvendor.com", "types", "widgetTypes"}. - If the first string in the list is an internet domain name, it is decomposed as follows:
- The leading
www.is stripped. - The remaining string is split into its component parts using the
.as the separator. - The order of the list is reversed.
So,{"www.widegetvendor.com", "types", "widgetTypes"}becomes{"com", "widegetvendor", "types", "widgetTypes"}NoteInternet domain names end in one of the following:.com,.net,.edu,.org,.gov, or in one of the two-letter country codes. - The strings are converted into all lower case.So,
{"com", "widegetvendor", "types", "widgetTypes"}becomes{"com", "widegetvendor", "types", "widgettypes"}. - The strings are normalized into valid Java package name components as follows:
- If the strings contain any special characters, the special characters are converted to an underscore(
_). - If any of the strings are a Java keyword, the keyword is prefixed with an underscore(
_). - If any of the strings begin with a numeral, the string is prefixed with an underscore(
_).
- The strings are concatenated using
.as a separator.So,{"com", "widegetvendor", "types", "widgettypes"}becomes the package name com.widgetvendor.types.widgettypes.
http:\\www.widgetvendor.com\types\widgetTypes.xsd are mapped to the Java package com.widgetvendor.types.widgettypes.
Package contents
- A class implementing each complex type defined in the schemaFor more information on complex type mapping see Chapter 12, Using Complex Types.
- An enum type for any simple types defined using the
enumerationfacetFor more information on how enumerations are mapped see Section 11.3, “Enumerations”. - A public
ObjectFactoryclass that contains methods for instantiating objects from the schemaFor more information on theObjectFactoryclass see Section 9.3, “The Object Factory”. - A
package-info.javafile that provides metadata about the classes in the package
9.3. The Object Factory
Overview
Complex type factory methods
typeName createtypeName();
widgetType, Apache CXF generates a class called WidgetType to implement it. Example 9.5, “Complex Type Object Factory Entry” shows the generated creation method in the object factory.
Example 9.5. Complex Type Object Factory Entry
public class ObjectFactory
{
  ...
  WidgetType createWidgetType()
  {
    return new WidgetType();
  }
  ...
}
Element factory methods
JAXBElement<T> objects. The creation method takes the form:
public JAXBElement<elementType> createelementName(elementType value);
comment of type xsd:string, Apache CXF generates the object factory method shown in Example 9.6, “Element Object Factory Entry”
Example 9.6. Element Object Factory Entry
public class ObjectFactory
{
  ...
    @XmlElementDecl(namespace = "...", name = "comment")
    public JAXBElement<String> createComment(String value) {
        return new JAXBElement<String>(_Comment_QNAME, String.class, null, value);
    }
  ...
}
9.4. Adding Classes to the Runtime Marshaller
Overview
schema element. It also contains any types that are generated from the namespaces of any schemas that are imported into the WSDL contract.
schema element is accomplished using the @XmlSeeAlso annotation. If your application needs to work with types that are generated outside the scope of your application's WSDL document, you can edit the @XmlSeeAlso annotation to add them to the JAXB map.
Using the @XmlSeeAlso annotation
@XmlSeeAlso annotation can be added to the SEI of your service. It contains a comma separated list of classes to include in the JAXB context. Example 9.7, “Syntax for Adding Classes to the JAXB Context” shows the syntax for using the @XmlSeeAlso annotation.
Example 9.7. Syntax for Adding Classes to the JAXB Context
import javax.xml.bind.annotation.XmlSeeAlso;
@WebService()
@XmlSeeAlso({Class1.class, Class2.class, ..., ClassN.class})
   public class GeneratedSEI {
       ...
    }
ObjectFactory classes generated to support the needed types. Including the ObjectFactory class includes all of the classes that are known to the object factory.
Example
@XmlSeeAlso.
Example 9.8. Adding Classes to the JAXB Context
...
import javax.xml.bind.annotation.XmlSeeAlso;
...
@WebService()
@XmlSeeAlso({org.apache.schemas.types.test.ObjectFactory.class,org.apache.schemas.tests.group_test.ObjectFactory.class})
   public interface Foo {
       ...
   }
Chapter 10. Using XML Elements
Abstract
Overview
element element in the global scope of an XML Schema document To make it easier for Java developers to work with elements, Apache CXF maps globally scoped elements to either a special JAXB element class or to a Java class that is generated to match its content type.
type attribute or if the element is defined using an in-line type definition. Elements defined with in-line type definitions are mapped to Java classes.
XML Schema mapping
element elements. element elements has one required attribute. The name specifies the name of the element as it appears in an XML document.
name attribute element elements have the optional attributes listed in Table 10.1, “Attributes Used to Define an Element”.
Table 10.1. Attributes Used to Define an Element
| Attribute | Description |
|---|---|
type | Specifies the type of the element. The type can be any XML Schema primitive type or any named complex type defined in the contract. If this attribute is not specified, you will need to include an in-line type definition. |
nillable | Specifies if an element can be left out of a document entirely. If nillable is set to true, the element can be omitted from any document generated using the schema. |
abstract | Specifies if an element can be used in an instance document. true indicates that the element cannot appear in the instance document. Instead, another element whose substitutionGroup attribute contains the QName of this element must appear in this element's place. For information on how this attribute effects code generation see the section called “Java mapping of abstract elements”. |
substitutionGroup | Specifies the name of an element that can be substituted with this element. For more information on using type substitution see Chapter 14, Element Substitution. |
default | Specifies a default value for an element. For information on how this attribute effects code generation see the section called “Java mapping of elements with a default value”. |
fixed | Specifies a fixed value for the element. |
Example 10.1. Simple XML Schema Element Definition
<element name="joeFred" type="xsd:string" />
complexType element or a simpleType element. Once you specify whether the type of data is complex or simple, you can define any type of data needed using the tools available for each type of data.
Example 10.2. XML Schema Element Definition with an In-Line Type
<element name="skate">
  <complexType>
    <sequence>
      <element name="numWheels" type="xsd:int" />
      <element name="brand" type="xsd:string" />
    </sequence>
  </complexType>
</element>
Java mapping of elements with a named type
JAXBElement<T> objects where the template class is determined by the value of the element element's type attribute. For primitive types, the template class is derived using the wrapper class mapping described in the section called “Wrapper classes”. For complex types, the Java class generated to support the complex type is used as the template class.
Example 10.3. Object Factory Method for a Globally Scoped Element
public class ObjectFactory {

    private final static QName _name_QNAME = new QName("targetNamespace", "localName");

  ...

   @XmlElementDecl(namespace = "targetNamespace", name = "localName")
    public JAXBElement<type> createname(type value);

}Example 10.4. Object Factory for a Simple Element
public class ObjectFactory {

    private final static QName _JoeFred_QNAME = new QName("...", "joeFred");

  ...

   @XmlElementDecl(namespace = "...", name = "joeFred")
    public JAXBElement<String> createJoeFred(String value);

}
Example 10.5. Using a Globally Scoped Element
JAXBElement<String> element = createJoeFred("Green");
String color = element.getValue();
Using elements with named types in WSDL
JAXBElement<T>. Instead it is mapped to a regular Java type or class.
Example 10.6. WSDL Using an Element as a Message Part
<?xml version="1.0" encoding=";UTF-8"?>
<wsdl:definitions name="HelloWorld"
                  targetNamespace="http://apache.org/hello_world_soap_http"
                  xmlns="http://schemas.xmlsoap.org/wsdl/"
                  xmlns:soap="http://schemas.xmlsoap.org/wsdl/soap/"
                  xmlns:tns="http://apache.org/hello_world_soap_http"
                  xmlns:x1="http://apache.org/hello_world_soap_http/types"
                  xmlns:wsdl="http://schemas.xmlsoap.org/wsdl/"
                  xmlns:xsd="http://www.w3.org/2001/XMLSchema">
  <wsdl:types>
    <schema targetNamespace="http://apache.org/hello_world_soap_http/types"
            xmlns="http://www.w3.org/2001/XMLSchema"
            elementFormDefault="qualified"><element name="sayHi">
      <element name="sayHi" type="string"/>
      <element name="sayHiResponse" type="string"/>
    </schema>
  </wsdl:types>

  <wsdl:message name="sayHiRequest">
    <wsdl:part element="x1:sayHi" name="in"/>
  </wsdl:message>
  <wsdl:message name="sayHiResponse">
    <wsdl:part element="x1:sayHiResponse" name="out"/>
  </wsdl:message>

  <wsdl:portType name="Greeter">
    <wsdl:operation name="sayHi">
      <wsdl:input message="tns:sayHiRequest" name="sayHiRequest"/>
      <wsdl:output message="tns:sayHiResponse" name="sayHiResponse"/>
    </wsdl:operation>
  </wsdl:portType>
  ...
</wsdl:definitions>sayHi operation.
Example 10.7. Java Method Using a Global Element as a Part
String sayHi(String in);Java mapping of elements with an in-line type
@XmlRootElement annotation. The @XmlRootElement annotation has two useful properties: name and namespace. These attributes are described in Table 10.2, “Properties for the @XmlRootElement Annotation”.
Table 10.2. Properties for the @XmlRootElement Annotation
| Property | Description |
|---|---|
| name | Specifies the value of the XML Schema element element's name attribute. |
| namespace | Specifies the namespace in which the element is defined. If this element is defined in the target namespace, the property is not specified. |
@XmlRootElement annotation is not used if the element meets one or more of the following conditions:
- The element's
nillableattribute is set totrue - The element is the head element of a substitution groupFor more information on substitution groups see Chapter 14, Element Substitution.
Java mapping of abstract elements
abstract attribute is set to true the object factory method for instantiating instances of the type is not generated. If the element is defined using an in-line type, the Java class supporting the in-line type is generated.
Java mapping of elements with a default value
default attribute is used the defaultValue property is added to the generated @XmlElementDecl annotation. For example, the element defined in Example 10.8, “XML Schema Element with a Default Value” results in the object factory method shown in Example 10.9, “Object Factory Method for an Element with a Default Value”.
Example 10.8. XML Schema Element with a Default Value
<element name="size" type="xsd:int" default="7"/>
Example 10.9. Object Factory Method for an Element with a Default Value
@XmlElementDecl(namespace = "...", name = "size", defaultValue = "7")
    public JAXBElement<Integer> createUnionJoe(Integer value) {
        return new JAXBElement<Integer>(_Size_QNAME, Integer.class, null, value);
    }
Chapter 11. Using Simple Types
Abstract
simpleType element. They are used to specify elements that do not contain any children or attributes. They are generally mapped to native Java constructs and do not require the generation of special classes to implement them. Enumerated simple types do not result in generated code because they are mapped to Java enum types.
11.1. Primitive Types
Overview
Mappings
Table 11.1. XML Schema Primitive Type to Java Native Type Mapping
| XML Schema Type | Java Type |
|---|---|
| xsd:string | String |
| xsd:integer | BigInteger |
| xsd:int | int |
| xsd:long | long |
| xsd:short | short |
| xsd:decimal | BigDecimal |
| xsd:float | float |
| xsd:double | double |
| xsd:boolean | boolean |
| xsd:byte | byte |
| xsd:QName | QName |
| xsd:dateTime | XMLGregorianCalendar |
| xsd:base64Binary | byte[] |
| xsd:hexBinary | byte[] |
| xsd:unsignedInt | long |
| xsd:unsignedShort | int |
| xsd:unsignedByte | short |
| xsd:time | XMLGregorianCalendar |
| xsd:date | XMLGregorianCalendar |
| xsd:g | XMLGregorianCalendar |
| xsd:anySimpleType [a] | Object |
| xsd:anySimpleType [b] | String |
| xsd:duration | Duration |
| xsd:NOTATION | QName |
[a]
For elements of this type.
[b]
For attributes of this type.
| |
Wrapper classes
- An
elementelement with itsnillableattribute set totrueas shown:<element name="finned" type="xsd:boolean" nillable="true" /> - An
elementelement with itsminOccursattribute set to0and itsmaxOccursattribute set to1, or itsmaxOccursattribute not specified, as shown :<element name="plane" type="xsd:string" minOccurs="0" />
- An
attributeelement with itsuseattribute set tooptional, or not specified, and having neither itsdefaultattribute nor itsfixedattribute specified, as shown:<element name="date"> <complexType> <sequence/> <attribute name="calType" type="xsd:string" use="optional" /> </complexType> </element>
Table 11.2. Primitive Schema Type to Java Wrapper Class Mapping
| Schema Type | Java Type |
|---|---|
| xsd:int | java.lang.Integer |
| xsd:long | java.lang.Long |
| xsd:short | java.lang.Short |
| xsd:float | java.lang.Float |
| xsd:double | java.lang.Double |
| xsd:boolean | java.lang.Boolean |
| xsd:byte | java.lang.Byte |
| xsd:unsignedByte | java.lang.Short |
| xsd:unsignedShort | java.lang.Integer |
| xsd:unsignedInt | java.lang.Long |
| xsd:unsignedLong | java.math.BigInteger |
| xsd:duration | java.lang.String |
11.2. Simple Types Defined by Restriction
Overview
simpleType element.
Procedure
- Determine the base type for your new simple type.
- Determine what restrictions define the new type based on the available facets for the chosen base type.
- Using the syntax shown in this section, enter the appropriate
simpleTypeelement into the types section of your contract.
Defining a simple type in XML Schema
Example 11.1. Simple type syntax
<simpleType name="typeName">
  <restriction base="baseType">
    <facet value="value" />
    <facet value="value" />
    ...
  </restriction>
</simpleType>simpleType element and identified by the value of the name attribute. The base type from which the new simple type is being defined is specified by the base attribute of the xsd:restriction element. Each facet element is specified within the restriction element. The available facets and their valid settings depend on the base type. For example, xsd:string has a number of facets including:
lengthminLengthmaxLengthpatternwhitespace
TX is a valid value, but tx or tX are not valid values.
Example 11.2. Postal Code Simple Type
<xsd:simpleType name="postalCode">
  <xsd:restriction base="xsd:string">
    <xsd:pattern value="[A-Z]{2}" />
  </xsd:restriction>
</xsd:simpleType>
Mapping to Java
String because the base type of postalCode is xsd:string. For example, the WSDL fragment shown in Example 11.3, “Credit Request with Simple Types” results in a Java method, state(), that takes a parameter, postalCode, of String.
Example 11.3. Credit Request with Simple Types
<message name="stateRequest">
  <part name="postalCode" type="postalCode" />
</message>
...
<portType name="postalSupport">
  <operation name="state">
    <input message="tns:stateRequest" name="stateRec" />
    <output message="tns:stateResponse" name="credResp" />
  </operation>
</portType>
Enforcing facets
true. Example 11.4, “Service Provider Configured to Use Schema Validation” shows the configuration for a service provider that uses schema validation
Example 11.4. Service Provider Configured to Use Schema Validation
<jaxws:endpoint name="{http://apache.org/hello_world_soap_http}SoapPort"
                wsdlLocation="wsdl/hello_world.wsdl"
                createdFromAPI="true">
  <jaxws:properties>
    <entry key="schema-validation-enabled" value="true" />
  </jaxws:properties>
</jaxws:endpoint>11.3. Enumerations
Overview
xsd:enumeration facet. Unlike atomic simple types, they are mapped to Java enums.
Defining an enumerated type in XML Schema
xsd:enumeration facet. Each xsd:enumeration facet defines one possible value for the enumerated type.
biglargemungogargantuan
Example 11.5. XML Schema Defined Enumeration
<simpleType name="widgetSize">
  <restriction base="xsd:string">
    <enumeration value="big"/>
    <enumeration value="large"/>
    <enumeration value="mungo"/>
    <enumeration value="gargantuan"/>
  </restriction>
Mapping to Java
- The name of the type is taken from the
nameattribute of the simple type definition and converted to a Java identifier.In general, this means converting the first character of the XML Schema's name to an uppercase letter. If the first character of the XML Schema's name is an invalid character, an underscrore (_) is prepended to the name. - For each
enumerationfacet, an enum constant is generated based on the value of thevalueattribute.The constant's name is derived by converting all of the lowercase letters in the value to their uppercase equivalent. - A constructor is generated that takes the Java type mapped from the enumeration's base type.
- A public method called
value()is generated to access the facet value that is represented by an instance of the type.The return type of thevalue()method is the base type of the XML Schema type. - A public method called
fromValue()is generated to create an instance of the enum type based on a facet value.The parameter type of thevalue()method is the base type of the XML Schema type. - The class is decorated with the
@XmlEnumannotation.
Example 11.6. Generated Enumerated Type for a String Bases XML Schema Enumeration
@XmlType(name = "widgetSize")
@XmlEnum
public enum WidgetSize {

    @XmlEnumValue("big")
    BIG("big"),
    @XmlEnumValue("large")
    LARGE("large"),
    @XmlEnumValue("mungo")
    MUNGO("mungo"),
    @XmlEnumValue("gargantuan")
    GARGANTUAN("gargantuan");
    private final String value;

    WidgetSize(String v) {
        value = v;
    }

    public String value() {
        return value;
    }

    public static WidgetSize fromValue(String v) {
        for (WidgetSize c: WidgetSize.values()) {
            if (c.value.equals(v)) {
                return c;
            }
        }
        throw new IllegalArgumentException(v);
    }

}
11.4. Lists
Overview
primeList, using a list type is shown in Example 11.7, “List Type Example”.
Example 11.7. List Type Example
<primeList>1 3 5 7 9 11 13<\primeList>
List<T> objects. The only variation to this pattern is when a message part is mapped directly to an instance of an XML Schema list type.
Defining list types in XML Schema
simpleType element. The most common syntax used to define a list type is shown in Example 11.8, “Syntax for XML Schema List Types”.
Example 11.8. Syntax for XML Schema List Types
<simpleType name="listType">
  <list itemType="atomicType">
    <facet value="value" />
    <facet value="value" />
    ...
  </list>
</simpleType>Table 11.3. List Type Facets
| Facet | Effect |
|---|---|
length | Defines the number of elements in an instance of the list type. |
minLength | Defines the minimum number of elements allowed in an instance of the list type. |
maxLength | Defines the maximum number of elements allowed in an instance of the list type. |
enumeration | Defines the allowable values for elements in an instance of the list type. |
pattern | Defines the lexical form of the elements in an instance of the list type. Patterns are defined using regular expressions. |
simpleList element shown in Example 11.7, “List Type Example”, is shown in Example 11.9, “Definition of a List Type”.
Example 11.9. Definition of a List Type
<simpleType name="primeListType">
  <list itemType="int"/>
</simpleType>
<element name="primeList" type="primeListType"/>
Example 11.10. Alternate Syntax for List Types
<simpleType name="listType">
  <list>
    <simpleType>
      <restriction base="atomicType">
        <facet value="value"/>
        <facet value="value"/>
        ...
      </restriction>
    </simpleType>
  </list>
  </simpleType>
Mapping list type elements to Java
List<T> object. The template class used by the List<T> is the wrapper class mapped from the list's base type. For example, the list type defined in Example 11.9, “Definition of a List Type” is mapped to a List<Integer>.
Mapping list type parameters to Java
List<T> object. The base type of the array is the wrapper class of the list type's base class.
Example 11.11. WSDL with a List Type Message Part
<definitions ...>
  ...
  <types ...>
    <schema ... >
      <simpleType name="primeListType">
        <list itemType="int"/>
      </simpleType>
      <element name="primeList" type="primeListType"/>
    </schemas>
  </types>
  <message name="numRequest">
    <part name="inputData" element="xsd1:primeList" />
  </message>
  <message name="numResponse">;
    <part name="outputData" type="xsd:int">
  ...
  <portType name="numberService">
    <operation name="primeProcessor">
      <input name="numRequest" message="tns:numRequest" />
      <output name="numResponse" message="tns:numResponse" />
    </operation>
    ...
  </portType>
  ...
</definitions>
Example 11.12. Java Method with a List Type Parameter
public interface NumberService {

    @XmlList
    @WebResult(name = "outputData", targetNamespace = "", partName = "outputData")
    @WebMethod
    public int primeProcessor(
        @WebParam(partName = "inputData", name = "primeList", targetNamespace = "...")
        java.lang.Integer[] inputData
    );
}
11.5. Unions
Overview
1 or the string first. Unions are mapped to Java Strings.
Defining in XML Schema
simpleType element. They contain at least one union element that defines the member types of the union. The member types of the union are the valid types of data that can be stored in an instance of the union. They are defined using the union element's memberTypes attribute. The value of the memberTypes attribute contains a list of one or more defined simple type names. Example 11.13, “Simple Union Type” shows the definition of a union that can store either an integer or a string.
Example 11.13. Simple Union Type
<simpleType name="orderNumUnion">
  <union memberTypes="xsd:string xsd:int" />
</simpleType>
union element. Example 11.14, “Union with an Anonymous Member Type” shows an example of a union containing an anonymous member type that restricts the possible values of a valid integer to the range 1 through 10.
Example 11.14. Union with an Anonymous Member Type
<simpleType name="restrictedOrderNumUnion">
  <union memberTypes="xsd:string">
    <simpleType>
      <restriction base="xsd:int">
        <minInclusive value="1" />
        <maxInclusive value="10" />
      </restriction>
    </simpleType>
  </union>
</simpleType>
Mapping to Java
String objects. By default, Apache CXF does not validate the contents of the generated object. To have Apache CXF validate the contents you will must configure the runtime to use schema validation as described in the section called “Enforcing facets”.
11.6. Simple Type Substitution
Overview
xsi:type attribute. The default mapping of simple types to Java primitive types, however, does not fully support simple type substitution. The runtime can handle basic simple type substitution, but information is lost. The code generators can be customized to generate Java classes that facilitate lossless simple type substitution.
Default mapping and marshaling
xsi:type attribute meets one of the following conditions:
- It specifies a primitive type that is compatible with the element's schema type.
- It specifies a type that derives by restriction from the element’s schema type.
- It specifies a complex type that derives by extension from the element’s schema type.
xsi:type attribute. If the type substitution is from a complex type to a simple type, only the value directly related to the simple type is preserved. Any other elements and attributes added by extension are lost.
Supporting lossless type substitution
- Set the
globalBindingscustomization element'smapSimpleTypeDeftotrue.This instructs the code generator to create Java value classes for all named simple types defined in the global scope.For more information see Section 15.3, “Generating Java Classes for Simple Types”. - Add a
javaTypeelement to theglobalBindingscustomization element.This instructs the code generators to map all instances of an XML Schema primitive type to s specific class of object.For more information see Section 15.2, “Specifying the Java Class of an XML Schema Primitive”. - Add a
baseTypecustomization element to the specific elements you want to customize.ThebaseTypecustomization element allows you to specify the Java type generated to represent a property. To ensure the best compatibility for simple type substitution, usejava.lang.Objectas the base type.For more information see Section 15.6, “Specifying the Base Type of an Element or an Attribute”.
Chapter 12. Using Complex Types
Abstract
12.1. Basic Complex Type Mapping
Overview
Defining in XML Schema
complexType element. The complexType element wraps the rest of elements used to define the structure of the data. It can appear either as the parent element of a named type definition, or as the child of an element element anonymously defining the structure of the information stored in the element. When the complexType element is used to define a named type, it requires the use of the name attribute. The name attribute specifies a unique identifier for referencing the type.
Table 12.1. Elements for Defining How Elements Appear in a Complex Type
| Element | Description |
|---|---|
all | All of the elements defined as part of the complex type must appear in an instance of the type. However, they can appear in any order. |
choice | Only one of the elements defined as part of the complex type can appear in an instance of the type. |
sequence | All of the elements defined as part of the complex type must appear in an instance of the type, and they must also appear in the order specified in the type definition. |
element element children to the definition.
Example 12.1. XML Schema Complex Type
<complexType name="sequence">
  <sequence>
    <element name="name" type="xsd:string" />
    <element name="street" type="xsd:short" />
    <element name="city" type="xsd:string" />
    <element name="state" type="xsd:string" />
    <element name="zipCode" type="xsd:string" />
  </sequence>
</complexType>
Mapping to Java
@XmlType annotation. If the mapping is for a named complex type, the annotations name is set to the value of the complexType element's name attribute. If the complex type is defined as part of an element definition, the value of the @XmlType annotation's name property is the value of the element element's name attribute.
@XmlRootElement annotation if it is generated for a complex type defined as part of an element definition.
- All Complex Type
- All complex types are defined using the
allelement. They are annotated as follows:- The
@XmlTypeannotation's propOrder property is empty. - Each element is decorated with the
@XmlElementannotation. - The
@XmlElementannotation's required property is set totrue.
Example 12.2, “Mapping of an All Complex Type” shows the mapping for an all complex type with two elements.Example 12.2. Mapping of an All Complex Type
@XmlType(name = "all", propOrder = { }) public class All { @XmlElement(required = true) protected BigDecimal amount; @XmlElement(required = true) protected String type; public BigDecimal getAmount() { return amount; } public void setAmount(BigDecimal value) { this.amount = value; } public String getType() { return type; } public void setType(String value) { this.type = value; } } - Choice Complex Type
- Choice complex types are defined using the
choiceelement. They are annotated as follows:- The
@XmlTypeannotation's propOrder property lists the names of the elements in the order they appear in the XML Schema definition. - None of the member variables are annotated.
Example 12.3, “Mapping of a Choice Complex Type” shows the mapping for a choice complex type with two elements.Example 12.3. Mapping of a Choice Complex Type
@XmlType(name = "choice", propOrder = { "address", "floater" }) public class Choice { protected Sequence address; protected Float floater; public Sequence getAddress() { return address; } public void setAddress(Sequence value) { this.address = value; } public Float getFloater() { return floater; } public void setFloater(Float value) { this.floater = value; } } - Sequence Complex Type
- A sequence complex type is defined using the
sequenceelement. It is annotated as follows:- The
@XmlTypeannotation's propOrder property lists the names of the elements in the order they appear in the XML Schema definition. - Each element is decorated with the
@XmlElementannotation. - The
@XmlElementannotation's required property is set totrue.
Example 12.4, “Mapping of a Sequence Complex Type” shows the mapping for the complex type defined in Example 12.1, “XML Schema Complex Type”.Example 12.4. Mapping of a Sequence Complex Type
@XmlType(name = "sequence", propOrder = {
    "name",
    "street",
    "city",
    "state",
    "zipCode"
})
public class Sequence {

    @XmlElement(required = true)
    protected String name;
    protected short street;
    @XmlElement(required = true)
    protected String city;
    @XmlElement(required = true)
    protected String state;
    @XmlElement(required = true)
    protected String zipCode;

    public String getName() {
        return name;
    }

    public void setName(String value) {
        this.name = value;
    }

    public short getStreet() {
        return street;
    }

    public void setStreet(short value) {
        this.street = value;
    }

    public String getCity() {
        return city;
    }

    public void setCity(String value) {
        this.city = value;
    }

    public String getState() {
        return state;
    }

    public void setState(String value) {
        this.state = value;
    }

    public String getZipCode() {
        return zipCode;
    }

    public void setZipCode(String value) {
        this.zipCode = value;
    }
}
12.2. Attributes
Overview
attribute elements and attributeGroup elements within the scope of a complexType element. When defining structures for an XML document attribute declarations provide a means of adding information that is specified within the tag, not the value that the tag contains. For example, when describing the XML element <value currency="euro">410<\value> in XML Schema the currency attribute is described using an attribute element as shown in Example 12.5, “XML Schema Defining and Attribute”.
attributeGroup element allows you to define a group of reusable attributes that can be referenced by all complex types defined by the schema. For example, if you are defining a series of elements that all use the attributes category and pubDate, you could define an attribute group with these attributes and reference them in all the elements that use them. This is shown in Example 12.7, “Attribute Group Definition”.
use attribute is set to either optional or required are treated as elements of a structure. For each attribute declaration contained within a complex type description, an element is generated in the class for the attribute, along with the appropriate getter and setter methods.
Defining an attribute in XML Schema
attribute element has one required attribute, name, that is used to identify the attribute. It also has four optional attributes that are described in Table 12.2, “Optional Attributes Used to Define Attributes in XML Schema”.
Table 12.2. Optional Attributes Used to Define Attributes in XML Schema
| Attribute | Description |
|---|---|
use | Specifies if the attribute is required. Valid values are required, optional, or prohibited. optional is the default value. |
type | Specifies the type of value the attribute can take. If it is not used the schema type of the attribute must be defined in-line. |
default | Specifies a default value to use for the attribute. It is only used when the attribute element's use attribute is set to optional. |
fixed | Specifies a fixed value to use for the attribute. It is only used when the attribute element's use attribute is set to optional. |
Example 12.5. XML Schema Defining and Attribute
<element name="value">
  <complexType>
    <xsd:simpleContent>
      <xsd:extension base="xsd:integer">
        <xsd:attribute name="currency" type="xsd:string"
                       use="required"/>
      </xsd:extension>
    </xsd:simpleContent>
  </xsd:complexType>
</xsd:element>type attribute is omitted from the attribute element, the format of the data must be described in-line. Example 12.6, “Attribute with an In-Line Data Description” shows an attribute element for an attribute, category, that can take the values autobiography, non-fiction, or fiction.
Example 12.6. Attribute with an In-Line Data Description
<attribute name="category" use="required">
  <simpleType>
    <restriction base="xsd:string">
      <enumeration value="autobiography"/>
      <enumeration value="non-fiction"/>
      <enumeration value="fiction"/>
    </restriction>
  </simpleType>
</attribute>
Using an attribute group in XML Schema
- Define the attribute group.An attribute group is defined using an
attributeGroupelement with a number ofattributechild elements. TheattributeGrouprequires anameattribute that defines the string used to refer to the attribute group. Theattributeelements define the members of the attribute group and are specified as shown in the section called “Defining an attribute in XML Schema”. Example 12.7, “Attribute Group Definition” shows the description of the attribute groupcatalogIndecies. The attribute group has two members:category, which is optional, andpubDate, which is required.Example 12.7. Attribute Group Definition
<attributeGroup name="catalogIndices"> <attribute name="category" type="catagoryType" /> <attribute name="pubDate" type="dateTime" use="required" /> </attributeGroup> - Use the attribute group in the definition of a complex type.You use attribute groups in complex type definitions by using the
attributeGroupelement with therefattribute. The value of therefattribute is the name given the attribute group that you want to use as part of the type definition. For example if you want to use the attribute groupcatalogIndeciesin the complex type dvdType, you would use <attributeGroup ref="catalogIndecies" /> as shown in Example 12.8, “Complex Type with an Attribute Group”.Example 12.8. Complex Type with an Attribute Group
<complexType name="dvdType">
  <sequence>
    <element name="title" type="xsd:string" />
    <element name="director" type="xsd:string" />
    <element name="numCopies" type="xsd:int" />
  </sequence>
  <attributeGroup ref="catalogIndices" />
</complexType>
Mapping attributes to Java
@XmlAttribute annotation. If the attribute is required, the @XmlAttribute annotation's required property is set to true.
Example 12.9. techDoc Description
<complexType name="techDoc">
  <all>
    <element name="product" type="xsd:string" />
    <element name="version" type="xsd:short" />
  </all>
  <attribute name="usefullness" type="xsd:float"
             use="optional" default="0.01" />
</complexType>
Example 12.10. techDoc Java Class
@XmlType(name = "techDoc", propOrder = {

})
public class TechDoc {

    @XmlElement(required = true)
    protected String product;
    protected short version;
    @XmlAttribute
    protected Float usefullness;

    public String getProduct() {
        return product;
    }

    public void setProduct(String value) {
        this.product = value;
    }

    public short getVersion() {
        return version;
    }

    public void setVersion(short value) {
        this.version = value;
    }

    public float getUsefullness() {
        if (usefullness == null) {
            return 0.01F;
        } else {
            return usefullness;
        }
    }

    public void setUsefullness(Float value) {
        this.usefullness = value;
    }
}default attribute and the fixed attribute instruct the code generators to add code to the getter method generated for the attribute. This additional code ensures that the specified value is returned if no value is set.
fixed attribute is treated the same as the default attribute. If you want the fixed attribute to be treated as a Java constant you can use the customization described in Section 15.5, “Customizing Fixed Value Attribute Mapping”.
Mapping attribute groups to Java
category and pubDate to support the members of the attribute group as shown in Example 12.11, “dvdType Java Class”.
Example 12.11. dvdType Java Class
@XmlType(name = "dvdType", propOrder = {
    "title",
    "director",
    "numCopies"
})
public class DvdType {

    @XmlElement(required = true)
    protected String title;
    @XmlElement(required = true)
    protected String director;
    protected int numCopies;
    @XmlAttribute
    protected CatagoryType category;
    @XmlAttribute(required = true)
    @XmlSchemaType(name = "dateTime")
    protected XMLGregorianCalendar pubDate;

    public String getTitle() {
        return title;
    }

    public void setTitle(String value) {
        this.title = value;
    }

    public String getDirector() {
        return director;
    }

    public void setDirector(String value) {
        this.director = value;
    }

    public int getNumCopies() {
        return numCopies;
    }

    public void setNumCopies(int value) {
        this.numCopies = value;
    }

    public CatagoryType getCatagory() {
        return catagory;
    }

    public void setCatagory(CatagoryType value) {
        this.catagory = value;
    }

    public XMLGregorianCalendar getPubDate() {
        return pubDate;
    }

    public void setPubDate(XMLGregorianCalendar value) {
        this.pubDate = value;
    }

}
12.3. Deriving Complex Types from Simple Types
Overview
Derivation by extension
Example 12.12. Deriving a Complex Type from a Simple Type by Extension
<complexType name="internationalPrice">
    <simpleContent>
        <extension base="xsd:decimal">
            <attribute name="currency" type="xsd:string"/>
        </extension>
    </simpleContent>
</complexType>simpleContent element indicates that the new type does not contain any sub-elements. The extension element specifies that the new type extends xsd:decimal.
Derivation by restriction
Example 12.13. Deriving a Complex Type from a Simple Type by Restriction
<complexType name="idType">
  <simpleContent>
    <restriction base="xsd:string">
     <length value="10" />
     <attribute name="expires" type="xsd:dateTime" />
    </restriction>
  </simpleContent>
</complexType>simpleContent element signals that the new type does not contain any children. This example uses a restriction element to constrain the possible values used in the new type. The attribute element adds the element to the new type.
Mapping to Java
@XmlType annotation. The generated class contains a member variable, value, of the simple type from which the complex type is derived. The member variable is decorated with the @XmlValue annotation. The class also has a getValue() method and a setValue() method. In addition, the generated class has a member variable, and the associated getter and setter methods, for each attribute that extends the simple type.
Example 12.14. idType Java Class
@XmlType(name = "idType", propOrder = {
    "value"
})
public class IdType {

    @XmlValue
    protected String value;
    @XmlAttribute
    @XmlSchemaType(name = "dateTime")
    protected XMLGregorianCalendar expires;

    public String getValue() {
        return value;
    }

    public void setValue(String value) {
        this.value = value;
    }

    public XMLGregorianCalendar getExpires() {
        return expires;
    }

    public void setExpires(XMLGregorianCalendar value) {
        this.expires = value;
    }

}
12.4. Deriving Complex Types from Complex Types
Overview
complexContent element. When generating the Java class to represent the derived complex type, Apache CXF extends the base type’s class. In this way, the generated Java code preserves the inheritance hierarchy intended in the XML Schema.
Schema syntax
complexContent element, and either the extension element or the restriction element. The complexContent element specifies that the included data description includes more than one field. The extension element and the restriction element, which are children of the complexContent element, specify the base type being modified to create the new type. The base type is specified by the base attribute.
Extending a complex type
extension element to define the additional elements and attributes that make up the new type. All elements that are allowed in a complex type description are allowable as part of the new type’s definition. For example, you can add an anonymous enumeration to the new type, or you can use the choice element to specify that only one of the new fields can be valid at a time.
orderNumber and amtDue.
Example 12.15. Deriving a Complex Type by Extension
<complexType name="widgetOrderInfo">
  <sequence>
    <element name="amount" type="xsd:int"/>
    <element name="order_date" type="xsd:dateTime"/>
    <element name="type" type="xsd1:widgetSize"/>
    <element name="shippingAddress" type="xsd1:Address"/>
  </sequence>
  <attribute name="rush" type="xsd:boolean" use="optional" />
</complexType>
<complexType name="widgetOrderBillInfo">
  <complexContent>
    <extension base="xsd1:widgetOrderInfo">
      <sequence>
        <element name="amtDue" type="xsd:decimal"/>
        <element name="orderNumber" type="xsd:string"/>
      </sequence>
      <attribute name="paid" type="xsd:boolean"
                 default="false" />
    </extension>
  </complexContent>
</complexType>
Restricting a complex type
restriction element to limit the possible values of the base type's elements or attributes. When restricting a complex type you must list all of the elements and attributes of the base type. For each element you can add restrictive attributes to the definition. For example, you can add a maxOccurs attribute to an element to limit the number of times it can occur. You can also use the fixed attribute to force one or more of the elements to have predetermined values.
city element, the state element, and the zipCode element are fixed.
Example 12.16. Defining a Complex Type by Restriction
<complexType name="Address">
  <sequence>
    <element name="name" type="xsd:string"/>
    <element name="street" type="xsd:short" maxOccurs="3"/>
    <element name="city" type="xsd:string"/>
    <element name="state" type="xsd:string"/>
    <element name="zipCode" type="xsd:string"/>
  </sequence>
</complexType>
<complexType name="wallawallaAddress">
  <complexContent>
    <restriction base="xsd1:Address">
      <sequence>
        <element name="name" type="xsd:string"/>
        <element name="street" type="xsd:short"
                 maxOccurs="3"/>
        <element name="city" type="xsd:string"
                 fixed="WallaWalla"/>
        <element name="state" type="xsd:string"
                 fixed="WA" />
        <element name="zipCode" type="xsd:string"
                 fixed="99362" />
      </sequence>
    </restriction>
  </complexContent>
</complexType>
Mapping to Java
@XmlSeeAlso annotation. The base class' @XmlSeeAlso annotation lists all of the classes that extend the base class.
WidgetOrderInfo and WidgetBillOrderInfo. WidgetOrderBillInfo extends WidgetOrderInfo because widgetOrderBillInfo is derived by extension from widgetOrderInfo. Example 12.17, “WidgetOrderBillInfo” shows the generated class for widgetOrderBillInfo.
Example 12.17. WidgetOrderBillInfo
@XmlType(name = "widgetOrderBillInfo", propOrder = {
    "amtDue",
    "orderNumber"
})
public class WidgetOrderBillInfo
    extends WidgetOrderInfo
{
    @XmlElement(required = true)
    protected BigDecimal amtDue;
    @XmlElement(required = true)
    protected String orderNumber;
    @XmlAttribute
    protected Boolean paid;

    public BigDecimal getAmtDue() {
        return amtDue;
    }

    public void setAmtDue(BigDecimal value) {
        this.amtDue = value;
    }

    public String getOrderNumber() {
        return orderNumber;
    }

    public void setOrderNumber(String value) {
        this.orderNumber = value;
    }

    public boolean isPaid() {
        if (paid == null) {
            return false;
        } else {
            return paid;
        }
    }

    public void setPaid(Boolean value) {
        this.paid = value;
    }
}
12.5. Occurrence Constraints
12.5.1. Occurrence Constraints on the All Element
XML Schema
all element do not allow for multiple occurrences of the structure defined by the all element. You can, however, make the structure defined by the all element optional by setting its minOccurs attribute to 0.
Mapping to Java
all element's minOccurs attribute to 0 has no effect on the generated Java class.
12.5.2. Occurrence Constraints on the Choice Element
Overview
choice element can only appear once in an instance of a complex type. You can change the number of times the element chosen to represent the structure defined by a choice element is allowed to appear using its minOccurs attribute and its mxOccurs attribute. Using these attributes you can specify that the choice type can occur zero to an unlimited number of times in an instance of a complex type. The element chosen for the choice type does not need to be the same for each occurrence of the type.
Using in XML Schema
minOccurs attribute specifies the minimum number of times the choice type must appear. Its value can be any positive integer. Setting the minOccurs attribute to 0 specifies that the choice type does not need to appear inside an instance of the complex type.
maxOccurs attribute specifies the maximum number of times the choice type can appear. Its value can be any non-zero, positive integer or unbounded. Setting the maxOccurs attribute to unbounded specifies that the choice type can appear an infinite number of times.
Example 12.18. Choice Occurrence Constraints
<complexType name="ClubEvent">
  <choice minOccurs="0" maxOccurs="unbounded">
    <element name="MemberName" type="xsd:string"/>
    <element name="GuestName" type="xsd:string"/>
  </choice>
</complexType>
Mapping to Java
List<T> object that holds all of the data for the multiple occurrences of the sequence. For example, if the sequence defined in Example 12.18, “Choice Occurrence Constraints” occurred two times, then the list would have two items.
Or and the first letter of the variable name is converted to lower case. For example, the member variable generated from Example 12.18, “Choice Occurrence Constraints” would be named memberNameOrGuestName.
- If the member elements are of the same type the generated list will contain
JAXBElement<T>objects. The base type of theJAXBElement<T>objects is determined by the normal mapping of the member elements' type. - If the member elements are of different types and their Java representations implement a common interface, the list will contains objects of the common interface.
- If the member elements are of different types and their Java representations extend a common base class, the list will contains objects of the common base class.
- If none of the other conditions are met, the list will contain
Objectobjects.
@XmlType annotation. The annotation's name property is set to the value of the name attribute from the parent element of the XML Schema definition. The annotation's propOrder property contains the single member variable representing the elements in the sequence.
@XmlElements annotation. The @XmlElements annotation contains a comma separated list of @XmlElement annotations. The list has one @XmlElement annotation for each member element defined in the XML Schema definition of the type. The @XmlElement annotations in the list have their name property set to the value of the XML Schema element element's name attribute and their type property set to the Java class resulting from the mapping of the XML Schema element element's type.
Example 12.19. Java Representation of Choice Structure with an Occurrence Constraint
@XmlType(name = "ClubEvent", propOrder = {
    "memberNameOrGuestName"
})
public class ClubEvent {

    @XmlElementRefs({
        @XmlElementRef(name = "GuestName", type = JAXBElement.class),
        @XmlElementRef(name = "MemberName", type = JAXBElement.class)
    })
    protected List<JAXBElement<String>> memberNameOrGuestName;

    public List<JAXBElement<String>> getMemberNameOrGuestName() {
        if (memberNameOrGuestName == null) {
            memberNameOrGuestName = new ArrayList<JAXBElement<String>>();
        }
        return this.memberNameOrGuestName;
    }

}
minOccurs set to 0
minOccurs element is specified and its value is 0, the code generators generate the Java class as if the minOccurs attribute were not set.
12.5.3. Occurrence Constraints on Elements
Overview
element element's minOccurs attribute and maxOccurs attribute. The default value for both attributes is 1.
minOccurs set to 0
minOccurs attribute to 0, the @XmlElement annotation decorating the corresponding Java member variable is changed. Instead of having its required property set to true, the @XmlElement annotation's required property is set to false.
minOccurs set to a value greater than 1
element element's minOccurs attribute to a value greater than one. However, the generated Java class will not support the XML Schema constraint. Apache CXF generates the supporting Java member variable as if the minOccurs attribute were not set.
Elements with maxOccurs set
maxOccurs attribute to a value greater than 1. You can set the maxOccurs attribute's value to unbounded to specify that the member element can appear an unlimited number of times.
maxOccurs attribute set to a value greater than 1 to a Java member variable that is a List<T> object. The base class of the list is determined by mapping the element's type to Java. For XML Schema primitive types, the wrapper classes are used as described in the section called “Wrapper classes”. For example, if the member element is of type xsd:int the generated member variable is a List<Integer> object.
12.5.4. Occurrence Constraints on Sequences
Overview
sequence element can only appear once in an instance of a complex type. You can change the number of times the sequence of elements defined by a sequence element is allowed to appear using its minOccurs attribute and its maxOccurs attribute. Using these attributes you can specify that the sequence type can occur zero to an unlimited number of times in an instance of a complex type.
Using XML Schema
minOccurs attribute specifies the minimum number of times the sequence must occur in an instance of the defined complex type. Its value can be any positive integer. Setting the minOccurs attribute to 0 specifies that the sequence does not need to appear inside an instance of the complex type.
maxOccurs attribute specifies the upper limit for how many times the sequence can occur in an instance of the defined complex type. Its value can be any non-zero, positive integer or unbounded. Setting the maxOccurs attribute to unbounded specifies that the sequence can appear an infinite number of times.
Example 12.20. Sequence with Occurrence Constraints
<complexType name="CultureInfo">
  <sequence minOccurs="0" maxOccurs="2">
    <element name="Name" type="string"/>
    <element name="Lcid" type="int"/>
  </sequence>
</complexType>
Mapping to Java
List<T> object that holds all of the data for the multiple occurrences of the sequence. For example, if the sequence defined in Example 12.20, “Sequence with Occurrence Constraints” occurred two times, then the list would have four items.
And and the first letter of the variable name is converted to lower case. For example, the member variable generated from Example 12.20, “Sequence with Occurrence Constraints” is named nameAndLcid.
- If the member elements are of the same type the generated list will contain
JAXBElement<T>objects. The base type of theJAXBElement<T>objects is determined by the normal mapping of the member elements' type. - If the member elements are of different types and their Java representations implement a common interface, the list will contains objects of the common interface.
- If the member elements are of different types and their Java representations extend a common base class, the list will contain objects of the common base class.
- If none of the other conditions are met, the list will contain
Objectobjects.
@XmlType annotation. The annotation's name property is set to the value of the name attribute from the parent element of the XML Schema definition. The annotation's propOrder property contains the single member variable representing the elements in the sequence.
@XmlElements annotation. The @XmlElements annotation contains a comma separated list of @XmlElement annotations. The list has one @XmlElement annotation for each member element defined in the XML Schema definition of the type. The @XmlElement annotations in the list have their name property set to the value of the XML Schema element element's name attribute and their type property set to the Java class resulting from the mapping of the XML Schema element element's type.
Example 12.21. Java Representation of Sequence with an Occurrence Constraint
@XmlType(name = "CultureInfo", propOrder = {
    "nameAndLcid"
})
public class CultureInfo {

    @XmlElements({
        @XmlElement(name = "Name", type = String.class),
        @XmlElement(name = "Lcid", type = Integer.class)
    })
    protected List<Serializable> nameAndLcid;

    public List<Serializable> getNameAndLcid() {
        if (nameAndLcid == null) {
            nameAndLcid = new ArrayList<Serializable>();
        }
        return this.nameAndLcid;
    }

}
minOccurs set to 0
minOccurs element is specified and its value is 0, the code generators generate the Java class as if the minOccurs attribute is not set.
12.6. Using Model Groups
Overview
group element, and are similar to complex type definitions. The mapping of model groups to Java is also similar to the mapping for complex types.
Defining a model group in XML Schema
group element with the name attribute. The value of the name attribute is a string that is used to refer to the group throughout the schema. The group element, like the complexType element, can have the sequence element, the all element, or the choice element as its immediate child.
element elements. For each member of the group, specify one element element. Group members can use any of the standard attributes for the element element including minOccurs and maxOccurs. So, if your group has three elements and one of them can occur up to three times, you define a group with three element elements, one of which uses maxOccurs="3". Example 12.22, “XML Schema Model Group” shows a model group with three elements.
Example 12.22. XML Schema Model Group
<group name="passenger">
  <sequence>
    <element name="name" type="xsd:string" />
    <element name="clubNum" type="xsd:long" />
    <element name="seatPref" type="xsd:string"
             maxOccurs="3" />
  </sequence>
</group>
Using a model group in a type definition
group element with the ref attribute. The value of the ref attribute is the name given to the group when it was defined. For example, to use the group defined in Example 12.22, “XML Schema Model Group” you use <group ref="tns:passenger" /> as shown in Example 12.23, “Complex Type with a Model Group”.
Example 12.23. Complex Type with a Model Group
<complexType name="reservation">
  <sequence>
    <group ref="tns:passenger" />
    <element name="origin" type="xsd:string" />
    <element name="destination" type="xsd:string" />
    <element name="fltNum" type="xsd:long" />
  </sequence>
</complexType>passenger element and it contains the member elements defined by the group shown in Example 12.22, “XML Schema Model Group”. An example of an instance of reservation is shown in Example 12.24, “Instance of a Type with a Model Group”.
Example 12.24. Instance of a Type with a Model Group
<reservation>
  <passenger>
    <name>A. Smart</name>
    <clubNum>99</clubNum>
    <seatPref>isle1</seatPref>
  </passenger>
  <origin>LAX</origin>
  <destination>FRA</destination>
  <fltNum>34567</fltNum>
</reservation>
Mapping to Java
Example 12.25. Type with a Group
@XmlType(name = "reservation", propOrder = {
    "name",
    "clubNum",
    "seatPref",
    "origin",
    "destination",
    "fltNum"
})
public class Reservation {

    @XmlElement(required = true)
    protected String name;
    protected long clubNum;
    @XmlElement(required = true)
    protected List<String> seatPref;
    @XmlElement(required = true)
    protected String origin;
    @XmlElement(required = true)
    protected String destination;
    protected long fltNum;

    public String getName() {
        return name;
    }

    public void setName(String value) {
        this.name = value;
    }

    public long getClubNum() {
        return clubNum;
    }

    public void setClubNum(long value) {
        this.clubNum = value;
    }

    public List<String> getSeatPref() {
        if (seatPref == null) {
            seatPref = new ArrayList<String>();
        }
        return this.seatPref;
    }

    public String getOrigin() {
        return origin;
    }

    public void setOrigin(String value) {
        this.origin = value;
    }

    public String getDestination() {
        return destination;
    }

    public void setDestination(String value) {
        this.destination = value;
    }

    public long getFltNum() {
        return fltNum;
    }

    public void setFltNum(long value) {
        this.fltNum = value;
    }
Multiple occurrences
group element's maxOccurs attribute to a value greater than one. To allow for multiple occurrences of the model group Apache CXF maps the model group to a List<T> object. The List<T> object is generated following the rules for the group's first child:
- If the group is defined using a
sequenceelement see Section 12.5.4, “Occurrence Constraints on Sequences”. - If the group is defined using a
choiceelement see Section 12.5.2, “Occurrence Constraints on the Choice Element”.
Chapter 13. Using Wild Card Types
Abstract
13.1. Using Any Elements
Overview
any element is used to create a wild card place holder in complex type definitions. When an XML element is instantiated for an XML Schema any element, it can be any valid XML element. The any element does not place any restrictions on either the content or the name of the instantiated XML element.
Example 13.1. XML Schema Type Defined with an Any Element
<element name="FlyBoy">
  <complexType>
    <sequence>
      <any />
      <element name="rank" type="xsd:int" />
    </sequence>
  </complexType>
</element>
Example 13.2. XML Document with an Any Element
<FlyBoy>
  <learJet>CL-215</learJet>
  <rank>2</rank>
</element>
<FlyBoy>
  <viper>Mark II</viper>
  <rank>1</rank>
</element>
any elements are mapped to either a Java Object object or a Java org.w3c.dom.Element object.
Specifying in XML Schema
any element can be used when defining sequence complex types and choice complex types. In most cases, the any element is an empty element. It can, however, take an annotation element as a child.
any element's attributes.
Table 13.1. Attributes of the XML Schema Any Element
| Attribute | Description |
|---|---|
namespace |
Specifies the namespace of the elements that can be used to instantiate the element in an XML document. The valid values are:
|
maxOccurs | Specifies the maximum number of times an instance of the element can appear in the parent element. The default value is 1. To specify that an instance of the element can appear an unlimited number of times, you can set the attribute's value to unbounded. |
minOccurs | Specifies the minimum number of times an instance of the element can appear in the parent element. The default value is 1. |
processContents |
Specifies how the element used to instantiate the any element should be validated. Valid values are:
|
any element
Example 13.3. Complex Type Defined with an Any Element
<complexType name="surprisePackage">
  <sequence>
    <any processContents="lax" />
    <element name="to" type="xsd:string" />
    <element name="from" type="xsd:string" />
  </sequence>
</complexType>
Mapping to Java
any elements result in the creation of a Java property named any. The property has associated getter and setter methods. The type of the resulting property depends on the value of the element's processContents attribute. If the any element's processContents attribute is set to skip, the element is mapped to a org.w3c.dom.Element object. For all other values of the processContents attribute an any element is mapped to a Java Object object.
@XmlAnyElement annotation. This annotation has an optional lax property that instructs the runtime what to do when marshaling the data. Its default value is false which instructs the runtime to automatically marshal the data into a org.w3c.dom.Element object. Setting lax to true instructs the runtime to attempt to marshal the data into JAXB types. When the any element's processContents attribute is set to skip, the lax property is set to its default value. For all other values of the processContents attribute, lax is set to true.
Example 13.4. Java Class with an Any Element
public class SurprisePackage {

    @XmlAnyElement(lax = true)
    protected Object any;
    @XmlElement(required = true)
    protected String to;
    @XmlElement(required = true)
    protected String from;

    public Object getAny() {
        return any;
    }

    public void setAny(Object value) {
        this.any = value;
    }

    public String getTo() {
        return to;
    }

    public void setTo(String value) {
        this.to = value;
    }

    public String getFrom() {
        return from;
    }

    public void setFrom(String value) {
        this.from = value;
    }

}
Marshalling
any element has its lax set to false, or the property is not specified, the runtime makes no attempt to parse the XML data into JAXB objects. The data is always stored in a DOM Element object.
any element has its lax set to true, the runtime attempts to marshal the XML data into the appropriate JAXB objects. The runtime attempts to identify the proper JAXB classes using the following procedure:
- It checks the element tag of the XML element against the list of elements known to the runtime. If it finds a match, the runtime marshals the XML data into the proper JAXB class for the element.
- It checks the XML element's
xsi:typeattribute. If it finds a match, the runtime marshals the XML element into the proper JAXB class for that type. - If it cannot find a match it marshals the XML data into a DOM
Elementobject.
wsdl:types element, any data types added to the contract through inclusion, and any types added to the contract through importing other schemas. You can also make the runtime aware of additional types using the @XmlSeeAlso annotation which is described in Section 9.4, “Adding Classes to the Runtime Marshaller”.
Unmarshalling
any element has its lax set to false, or the property is not specified, the runtime will only accept DOM Element objects. Attempting to use any other type of object will result in a marshalling error.
any element has its lax set to true, the runtime uses its internal map between Java data types and the XML Schema constructs they represent to determine the XML structure to write to the wire. If the runtime knows the class and can map it to an XML Schema construct, it writes out the data and inserts an xsi:type attribute to identify the type of data the element contains.
@XmlSeeAlso annotation which is described in Section 9.4, “Adding Classes to the Runtime Marshaller”.
13.2. Using the XML Schema anyType Type
Overview
Object class. It is the class from which all other Java classes are sub-typed.
Using in XML Schema
element element's type element. It can also be used as the base type from which other types are defined.
Example 13.5. Complex Type with a Wild Card Element
<complexType name="wildStar">
  <sequence>
    <element name="name" type="xsd:string" />
    <element name="ship" type="xsd:anyType" />
  </sequence>
</complexType>
Mapping to Java
Object objects. Example 13.6, “Java Representation of a Wild Card Element” shows the mapping of Example 13.5, “Complex Type with a Wild Card Element” to a Java class.
Example 13.6. Java Representation of a Wild Card Element
public class WildStar {

    @XmlElement(required = true)
    protected String name;
    @XmlElement(required = true)
    protected Object ship;

    public String getName() {
        return name;
    }

    public void setName(String value) {
        this.name = value;
    }

    public Object getShip() {
        return ship;
    }

    public void setShip(Object value) {
        this.ship = value;
    }
}Marshalling
xsi:type attribute to determine the actual type used to construct the data in the element. If the xsi:type attribute is not present, the runtime attempts to identify the element's actual data type by introspection. If the element's actual data type is determined to be one of the types known by the application's JAXB context, the element is marshaled into a JAXB object of the proper type.
org.w3c.dom.Element object. You will then need to work with the element's content using the DOM APis.
wsdl:types element, any data types added to the contract through inclusion, and any types added to the contract through importing other schema documents. You can also make the runtime aware of additional types using the @XmlSeeAlso annotation which is described in Section 9.4, “Adding Classes to the Runtime Marshaller”.
Unmarshalling
xsi:type attribute to identify the type of data the element contains. If the data is stored in a org.w3c.dom.Element object, the runtime writes the XML structure represented by the object but it does not include an xsi:type attribute.
@XmlSeeAlso annotation which is described in Section 9.4, “Adding Classes to the Runtime Marshaller”.
13.3. Using Unbound Attributes
Overview
Defining in XML Schema
anyAttribute element. It can be used wherever an attribute element can be used. The anyAttribute element has no attributes, as shown in Example 13.7, “Complex Type with an Undeclared Attribute”.
Example 13.7. Complex Type with an Undeclared Attribute
<complexType name="arbitter">
  <sequence>
    <element name="name" type="xsd:string" />
    <element name="rate" type="xsd:float" />
  </sequence>
  <anyAttribute />
</complexType>Example 13.8. Examples of Elements Defined with a Wild Card Attribute
<officer rank="12"><name>...</name><rate>...</rate></officer>
<lawyer type="divorce"><name>...</name><rate>...</rate></lawyer>
<judge><name>...</name><rate>...</rate></judge>
Mapping to Java
anyAttribute element is mapped to Java, the code generator adds a member called otherAttributes to the generated class. otherAttributes is of type java.util.Map<QName, String> and it has a getter method that returns a live instance of the map. Because the map returned from the getter is live, any modifications to the map are automatically applied. Example 13.9, “Class for a Complex Type with an Undeclared Attribute” shows the class generated for the complex type defined in Example 13.7, “Complex Type with an Undeclared Attribute”.
Example 13.9. Class for a Complex Type with an Undeclared Attribute
public class Arbitter {

    @XmlElement(required = true)
    protected String name;
    protected float rate;

    @XmlAnyAttribute
    private Map<QName, String> otherAttributes = new HashMap<QName, String>();

    public String getName() {
        return name;
    }

    public void setName(String value) {
        this.name = value;
    }

    public float getRate() {
        return rate;
    }

    public void setRate(float value) {
        this.rate = value;
    }

    public Map<QName, String> getOtherAttributes() {
        return otherAttributes;
    }

}
Working with undeclared attributes
otherAttributes member of the generated class expects to be populated with a Map object. The map is keyed using QNames. Once you get the map , you can access any attributes set on the object and set new attributes on the object.
Example 13.10. Working with Undeclared Attributes
Chapter 14. Element Substitution
Abstract
14.1. Substitution Groups in XML Schema
Overview
Syntax
substitutionGroup attribute of the XML Schema element element. The value of the substitutionGroup attribute is the name of the element that the element being defined replaces. For example, if your head element is widget, adding the attribute substitutionGroup="widget" to an element named woodWidget specifies that anywhere a widget element is used, you can substitute a woodWidget element. This is shown in Example 14.1, “Using a Substitution Group”.
Example 14.1. Using a Substitution Group
<element name="widget" type="xsd:string" />
<element name="woodWidget" type="xsd:string"
         substitutionGroup="widget" />
Type restrictions
Example 14.2. Substitution Group with Complex Types
<complexType name="widgetType">
  <sequence>
    <element name="shape" type="xsd:string" />
    <element name="color" type="xsd:string" />
  </sequence>
</complexType>
<complexType name="woodWidgetType">
  <complexContent>
    <extension base="widgetType">
      <sequence>
        <element name="woodType" type="xsd:string" />
      </sequence>
    </extension>
  </complexContent>
</complexType>
<complexType name="plasticWidgetType">
  <complexContent>
    <extension base="widgetType">
      <sequence>
        <element name="moldProcess" type="xsd:string" />
      </sequence>
    </extension>
  </complexContent>
</complexType>
<element name="widget" type="widgetType" />
<element name="woodWidget" type="woodWidgetType"
         substitutionGroup="widget" />
<element name="plasticWidget" type="plasticWidgetType"
         substitutionGroup="widget" />
<complexType name="partType">
  <sequence>
    <element ref="widget" />
  </sequence>
</complexType>
<element name="part" type="partType" />widget, is defined as being of type widgetType. Each element of the substitution group extends widgetType to include data that is specific to ordering that type of widget.
part elements in Example 14.3, “XML Document using a Substitution Group” are valid.
Example 14.3. XML Document using a Substitution Group
<part>
  <widget>
    <shape>round</shape>
    <color>blue</color>
  </widget>
</part>
<part>
  <plasticWidget>
    <shape>round</shape>
    <color>blue</color>
    <moldProcess>sandCast</moldProcess>
  </plasticWidget>
</part>
<part>
  <woodWidget>
    <shape>round</shape>
    <color>blue</color>
    <woodType>elm</woodType>
  </woodWidget>
</part>
Abstract head elements
abstract attribute of an element element to true, as shown in Example 14.4, “Abstract Head Definition”. Using this schema, a valid review element can contain either a positiveComment element or a negativeComment element, but cannot contain a comment element.
Example 14.4. Abstract Head Definition
<element name="comment" type="xsd:string" abstract="true" />
<element name="positiveComment" type="xsd:string"
         substitutionGroup="comment" />
<element name="negtiveComment" type="xsd:string"
         substitutionGroup="comment" />
<element name="review">
  <complexContent>
    <all>
      <element name="custName" type="xsd:string" />
      <element name="impression" ref="comment" />
    </all>
  </complexContent>
</element>
14.2. Substitution Groups in Java
Overview
JAXBElement class' support for wildcard definitions. Because the members of a substitution group must all share a common base type, the classes generated to support the elements' types also share a common base type. In addition, Apache CXF maps instances of the head element to JAXBElement<? extends T> properties.
Generated object factory methods
@XmlElementDecl annotation decorating the object factory method includes two additional properties, as described in Table 14.1, “Properties for Declaring a JAXB Element is a Member of a Substitution Group”.
Table 14.1. Properties for Declaring a JAXB Element is a Member of a Substitution Group
| Property | Description |
|---|---|
| substitutionHeadNamespace | Specifies the namespace where the head element is defined. |
| substitutionHeadName | Specifies the value of the head element's name attribute. |
@XmlElementDecl contains only the default namespace property and the default name property.
Example 14.5. Object Factory Method for a Substitution Group
public class ObjectFactory {

    private final static QName _Widget_QNAME = new QName(...);
    private final static QName _PlasticWidget_QNAME = new QName(...);
    private final static QName _WoodWidget_QNAME = new QName(...);

    public ObjectFactory() {
    }

    public WidgetType createWidgetType() {
        return new WidgetType();
    }

    public PlasticWidgetType createPlasticWidgetType() {
        return new PlasticWidgetType();
    }

    public WoodWidgetType createWoodWidgetType() {
        return new WoodWidgetType();
    }

    @XmlElementDecl(namespace="...", name = "widget")
    public JAXBElement<WidgetType> createWidget(WidgetType value) {
        return new JAXBElement<WidgetType>(_Widget_QNAME, WidgetType.class, null, value);
    }

    @XmlElementDecl(namespace = "...", name = "plasticWidget", substitutionHeadNamespace = "...", substitutionHeadName = "widget")
    public JAXBElement<PlasticWidgetType> createPlasticWidget(PlasticWidgetType value) {
        return new JAXBElement<PlasticWidgetType>(_PlasticWidget_QNAME, PlasticWidgetType.class, null, value);
    }

    @XmlElementDecl(namespace = "...", name = "woodWidget", substitutionHeadNamespace = "...", substitutionHeadName = "widget")
    public JAXBElement<WoodWidgetType> createWoodWidget(WoodWidgetType value) {
        return new JAXBElement<WoodWidgetType>(_WoodWidget_QNAME, WoodWidgetType.class, null, value);
    }

}
Substitution groups in interfaces
JAXBElement<? extends T> class. The runtime relies on Java's native type hierarchy to support the type substitution, and Java will catch any attempts to use unsupported types.
@XmlSeeAlso annotation. This annotation specifies a list of classes required by the runtime for marshalling. Fore more information on using the @XmlSeeAlso annotation see Section 9.4, “Adding Classes to the Runtime Marshaller”.
Example 14.6. WSDL Interface Using a Substitution Group
<message name="widgetMessage">
    <part name="widgetPart" element="xsd1:widget" />
  </message>
  <message name="numWidgets">
    <part name="numInventory" type="xsd:int" />
  </message>
  <message name="badSize">
    <part name="numInventory" type="xsd:int" />
  </message>
  <portType name="orderWidgets">
    <operation name="placeWidgetOrder">
      <input message="tns:widgetOrder" name="order" />
      <output message="tns:widgetOrderBill" name="bill" />
      <fault message="tns:badSize" name="sizeFault" />
    </operation>
    <operation name="checkWidgets">
      <input message="tns:widgetMessage" name="request" />
      <output message="tns:numWidgets" name="response" />
    </operation>
  </portType>
Example 14.7. Generated Interface Using a Substitution Group
@WebService(targetNamespace = "...", name = "orderWidgets")
@XmlSeeAlso({com.widgetvendor.types.widgettypes.ObjectFactory.class})
public interface OrderWidgets {

    @SOAPBinding(parameterStyle = SOAPBinding.ParameterStyle.BARE)
    @WebResult(name = "numInventory", targetNamespace = "", partName = "numInventory")
    @WebMethod
    public int checkWidgets(
        @WebParam(partName = "widgetPart", name = "widget", targetNamespace = "...")
        com.widgetvendor.types.widgettypes.WidgetType widgetPart
    );
}@XmlSeeAlso annotation. Listing the object factory for a namespace provides access to all of the generated classes for that namespace.
Substitution groups in complex types
JAXBElement<? extends T> property. It does not map it to a property containing an instance of the generated class generated to support the substitution group.
Example 14.8. Complex Type Using a Substitution Group
<complexType name="widgetOrderInfo">
  <sequence>
    <element name="amount" type="xsd:int"/>
    <element ref="xsd1:widget"/>
  </sequence>
</complexType>
Example 14.9. Java Class for a Complex Type Using a Substitution Group
@XmlAccessorType(XmlAccessType.FIELD)
@XmlType(name = "widgetOrderInfo", propOrder = {"amount","widget",})
public class WidgetOrderInfo {

    protected int amount;
    @XmlElementRef(name = "widget", namespace = "...", type = JAXBElement.class)
    protected JAXBElement<? extends WidgetType> widget;
    public int getAmount() {
        return amount;
    }

    public void setAmount(int value) {
        this.amount = value;
    }

    public JAXBElement<? extends WidgetType> getWidget() {
        return widget;
    }

    public void setWidget(JAXBElement<? extends WidgetType> value) {
        this.widget = ((JAXBElement<? extends WidgetType> ) value);
    }

}
Setting a substitution group property
JAXBElement<? extends T> class. When the element is simply mapped to an object of the generated value class, you work with the object the same way you work with other Java objects that are part of a type hierarchy. You can substitute any of the subclasses for the parent class. You can inspect the object to determine its exact class, and cast it appropriately.
JAXBElement<? extends T> object to hold instances of a substitution group, you must wrap the element's value in a JAXBElement<? extends T> object. The best method to do this is to use the element creation methods provided by the object factory. They provide an easy means for creating an element based on its value.
Example 14.10. Setting a Member of a Substitution Group
ObjectFactory of = new ObjectFactory(); 1
PlasticWidgetType pWidget = of.createPlasticWidgetType(); 2
pWidget.setShape = "round';
pWidget.setColor = "green";
pWidget.setMoldProcess = "injection";

JAXBElement<PlasticWidgetType> widget = of.createPlasticWidget(pWidget); 3

WidgetOrderInfo order = of.createWidgetOrderInfo(); 4
order.setWidget(widget); 5
- 1
- Instantiates an object factory.
- 2
- Instantiates a
PlasticWidgetTypeobject. - 3
- Instantiates a
JAXBElement<PlasticWidgetType>object to hold a plastic widget element. - 4
- Instantiates a
WidgetOrderInfoobject. - 5
- Sets the
WidgetOrderInfoobject's widget to theJAXBElementobject holding the plastic widget element.
Getting the value of a substitution group property
JAXBElement<? extends T> object. You must to use the JAXBElement<? extends T> object's getValue() method. The following options determine the type of object returned by the getValue() method:
- Use the
isInstance()method of all the possible classes to determine the class of the element's value object. - Use the
JAXBElement<? extends T>object'sgetName()method to determine the element's name.ThegetName()method returns a QName. Using the local name of the element, you can determine the proper class for the value object. - Use the
JAXBElement<? extends T>object'sgetDeclaredType()method to determine the class of the value object.ThegetDeclaredType()method returns theClassobject of the element's value object.WarningThere is a possibility that thegetDeclaredType()method will return the base class for the head element regardless of the actual class of the value object.
getName() method.
Example 14.11. Getting the Value of a Member of the Substitution Group
String elementName = order.getWidget().getName().getLocalPart();
if (elementName.equals("woodWidget")
{
  WoodWidgetType widget=order.getWidget().getValue();
}
else if (elementName.equals("plasticWidget")
{
  PlasticWidgetType widget=order.getWidget().getValue();
}
else
{
  WidgetType widget=order.getWidget().getValue();
}
14.3. Widget Vendor Example
checkWidgets and placeWidgetOrder. Example 14.12, “Widget Ordering Interface” shows the interface for the ordering service.
Example 14.12. Widget Ordering Interface
<message name="widgetOrder">
  <part name="widgetOrderForm" type="xsd1:widgetOrderInfo"/>
</message>
<message name="widgetOrderBill">
  <part name="widgetOrderConformation"
        type="xsd1:widgetOrderBillInfo"/>
</message>
<message name="widgetMessage">
  <part name="widgetPart" element="xsd1:widget" />
</message>
<message name="numWidgets">
  <part name="numInventory" type="xsd:int" />
</message>
<portType name="orderWidgets">
  <operation name="placeWidgetOrder">
    <input message="tns:widgetOrder" name="order"/>
    <output message="tns:widgetOrderBill" name="bill"/>
  </operation>
  <operation name="checkWidgets">
    <input message="tns:widgetMessage" name="request" />
    <output message="tns:numWidgets" name="response" />
  </operation>
</portType>
Example 14.13. Widget Ordering SEI
@WebService(targetNamespace = "http://widgetVendor.com/widgetOrderForm", name = "orderWidgets")
@XmlSeeAlso({com.widgetvendor.types.widgettypes.ObjectFactory.class})
public interface OrderWidgets {

    @SOAPBinding(parameterStyle = SOAPBinding.ParameterStyle.BARE)
    @WebResult(name = "numInventory", targetNamespace = "", partName = "numInventory")
    @WebMethod
    public int checkWidgets(
        @WebParam(partName = "widgetPart", name = "widget", targetNamespace = "http://widgetVendor.com/types/widgetTypes")
        com.widgetvendor.types.widgettypes.WidgetType widgetPart
    );

    @SOAPBinding(parameterStyle = SOAPBinding.ParameterStyle.BARE)
    @WebResult(name = "widgetOrderConformation", targetNamespace = "", partName = "widgetOrderConformation")
    @WebMethod
    public com.widgetvendor.types.widgettypes.WidgetOrderBillInfo placeWidgetOrder(
        @WebParam(partName = "widgetOrderForm", name = "widgetOrderForm", targetNamespace = "")
        com.widgetvendor.types.widgettypes.WidgetOrderInfo widgetOrderForm
    ) throws BadSize;
}14.3.1. The checkWidgets Operation
Overview
checkWidgets is a simple operation that has a parameter that is the head member of a substitution group. This operation demonstrates how to deal with individual parameters that are members of a substitution group. The consumer must ensure that the parameter is a valid member of the substitution group. The service must properly determine which member of the substitution group was sent in the request.
Consumer implementation
checkWidgets() without using any special code. When developing the logic to invoke checkWidgets() you can pass in an object of one of the classes generated to support the widget substitution group.
checkWidgets()” shows a consumer invoking checkWidgets().
Example 14.14. Consumer Invoking checkWidgets()
System.out.println("What type of widgets do you want to order?");
System.out.println("1 - Normal");
System.out.println("2 - Wood");
System.out.println("3 - Plastic");
System.out.println("Selection [1-3]");
String selection = reader.readLine();
String trimmed = selection.trim();
char widgetType = trimmed.charAt(0);
switch (widgetType)
{
  case '1':
  {
    WidgetType widget = new WidgetType();
    ...
    break;
  }
  case '2':
  {
    WoodWidgetType widget = new WoodWidgetType();
    ...
    break;
  }
  case '3':
  {
    PlasticWidgetType widget = new PlasticWidgetType();
    ...
    break;
  }
  default :
    System.out.println("Invaid Widget Selection!!");
}

proxy.checkWidgets(widgets);
Service implementation
checkWidgets() gets a widget description as a WidgetType object, checks the inventory of widgets, and returns the number of widgets in stock. Because all of the classes used to implement the substitution group inherit from the same base class, you can implement checkWidgets() without using any JAXB specific APIs.
widget extend the WidgetType class. Because of this fact, you can use instanceof to determine what type of widget was passed in and simply cast the widgetPart object into the more restrictive type if appropriate. Once you have the proper type of object, you can check the inventory of the right kind of widget.
checkWidgets()” shows a possible implementation.
Example 14.15. Service Implementation of checkWidgets()
public int checkWidgets(WidgetType widgetPart)
{
  if (widgetPart instanceof WidgetType)
  {
    return checkWidgetInventory(widgetType);
  }
  else if (widgetPart instanceof WoodWidgetType)
  {
    WoodWidgetType widget = (WoodWidgetType)widgetPart;
    return checkWoodWidgetInventory(widget);
  }
  else if (widgetPart instanceof PlasticWidgetType)
  {
    PlasticWidgetType widget = (PlasticWidgetType)widgetPart;
    return checkPlasticWidgetInventory(widget);
  }
}
14.3.2. The placeWidgetOrder Operation
Overview
placeWidgetOrder uses two complex types containing the substitution group. This operation demonstrates to use such a structure in a Java implementation. Both the consumer and the service must get and set members of a substitution group.
Consumer implementation
placeWidgetOrder() the consumer must construct a widget order containing one element of the widget substitution group. When adding the widget to the order, the consumer should use the object factory methods generated for each element of the substitution group. This ensures that the runtime and the service can correctly process the order. For example, if an order is being placed for a plastic widget, the ObjectFactory.createPlasticWidget() method is used to create the element before adding it to the order.
WidgetOrderInfo object.
Example 14.16. Setting a Substitution Group Member
ObjectFactory of = new ObjectFactory();

WidgetOrderInfo order = new of.createWidgetOrderInfo();
...
System.out.println();
System.out.println("What color widgets do you want to order?");
String color = reader.readLine();
System.out.println();
System.out.println("What shape widgets do you want to order?");
String shape = reader.readLine();
System.out.println();
System.out.println("What type of widgets do you want to order?");
System.out.println("1 - Normal");
System.out.println("2 - Wood");
System.out.println("3 - Plastic");
System.out.println("Selection [1-3]");
String selection = reader.readLine();
String trimmed = selection.trim();
char widgetType = trimmed.charAt(0);
switch (widgetType)
{
  case '1':
  {
    WidgetType widget = of.createWidgetType();
    widget.setColor(color);
    widget.setShape(shape);
    JAXB<WidgetType> widgetElement = of.createWidget(widget);
    order.setWidget(widgetElement);
    break;
  }
  case '2':
  {
    WoodWidgetType woodWidget = of.createWoodWidgetType();
    woodWidget.setColor(color);
    woodWidget.setShape(shape);
    System.out.println();
    System.out.println("What type of wood are your widgets?");
    String wood = reader.readLine();
    woodWidget.setWoodType(wood);
    JAXB<WoodWidgetType> widgetElement = of.createWoodWidget(woodWidget);
    order.setWoodWidget(widgetElement);
    break;
  }
  case '3':
  {
    PlasticWidgetType plasticWidget = of.createPlasticWidgetType();
    plasticWidget.setColor(color);
    plasticWidget.setShape(shape);
    System.out.println();
    System.out.println("What type of mold to use for your
                        widgets?");
    String mold = reader.readLine();
    plasticWidget.setMoldProcess(mold);
    JAXB<WidgetType> widgetElement = of.createPlasticWidget(plasticWidget);
    order.setPlasticWidget(widgetElement);
    break;
  }
  default :
    System.out.println("Invaid Widget Selection!!");
    }
Service implementation
placeWidgetOrder() method receives an order in the form of a WidgetOrderInfo object, processes the order, and returns a bill to the consumer in the form of a WidgetOrderBillInfo object. The orders can be for a plain widget, a plastic widget, or a wooden widget. The type of widget ordered is determined by what type of object is stored in widgetOrderForm object’s widget property. The widget property is a substitution group and can contain a widget element, a woodWidget element, or a plasticWidget element.
JAXBElement<? extends T> object's getName() method to determine the element's QName. The QName can then be used to determine which element in the substitution group is in the order. Once the element included in the bill is known, you can extract its value into the proper type of object.
placeWidgetOrder()” shows a possible implementation.
Example 14.17. Implementation of placeWidgetOrder()
public com.widgetvendor.types.widgettypes.WidgetOrderBillInfo placeWidgetOrder(WidgetOrderInfo widgetOrderForm)
{
  ObjectFactory of = new ObjectFactory(); 1

  WidgetOrderBillInfo bill = new WidgetOrderBillInfo() 2

   // Copy the shipping address and the number of widgets
   // ordered from widgetOrderForm to bill
   ...

  int numOrdered = widgetOrderForm.getAmount(); 3

  String elementName = widgetOrderForm.getWidget().getName().getLocalPart(); 4
  if (elementName.equals("woodWidget") 5
  {
    WoodWidgetType widget=order.getWidget().getValue(); 6
    buildWoodWidget(widget, numOrdered);

    // Add the widget info to bill
    JAXBElement<WoodWidgetType> widgetElement = of.createWoodWidget(widget); 7
    bill.setWidget(widgetElement); 8

    float amtDue = numOrdered * 0.75;
    bill.setAmountDue(amtDue); 9
  }
  else if (elementName.equals("plasticWidget")
  {
    PlasticWidgetType widget=order.getWidget().getValue();
    buildPlasticWidget(widget, numOrdered);

    // Add the widget info to bill
    JAXBElement<PlasticWidgetType> widgetElement = of.createPlasticWidget(widget);
    bill.setWidget(widgetElement);

    float amtDue = numOrdered * 0.90;
    bill.setAmountDue(amtDue);
  }
  else
  {
    WidgetType widget=order.getWidget().getValue();
    buildWidget(widget, numOrdered);

    // Add the widget info to bill
    JAXBElement<WidgetType> widgetElement = of.createWidget(widget);
    bill.setWidget(widgetElement);

    float amtDue = numOrdered * 0.30;
    bill.setAmountDue(amtDue);
  }

  return(bill);
}placeWidgetOrder()” does the following:
- 1
- Instantiates an object factory to create elements.
- 2
- Instantiates a
WidgetOrderBillInfoobject to hold the bill. - 3
- Gets the number of widgets ordered.
- 4
- Gets the local name of the element stored in the order.
- 5
- Checks to see if the element is a
woodWidgetelement. - 6
- Extracts the value of the element from the order to the proper type of object.
- 7
- Creates a
JAXBElement<T>object placed into the bill. - 8
- Sets the bill object's widget property.
- 9
- Sets the bill object's amountDue property.
Chapter 15. Customizing How Types are Generated
Abstract
15.1. Basics of Customizing Type Mappings
Overview
Namespace
http://java.sun.com/xml/ns/jaxb. You must add a namespace declaration similar to the one shown in Example 15.1, “JAXB Customization Namespace”. This is added to the root element of all XML documents defining JAXB customizations.
Example 15.1. JAXB Customization Namespace
xmlns:jaxb="http://java.sun.com/xml/ns/jaxb"
Version declaration
jaxb:version attribute to the root element of the external binding declaration. If you are using in-line customization, you must include the jaxb:version attribute in the schema element containing the customizations. The value of the attribute is always 2.0.
jaxb:version attribute used in a schema element.
Example 15.2. Specifying the JAXB Customization Version
< schema ...
        jaxb:version="2.0">
Using in-line customization
xsd:appinfo element of the XML schema construct that is being modified.
Example 15.3. Customized XML Schema
<schema targetNamespace="http://widget.com/types/widgetTypes"
        xmlns="http://www.w3.org/2001/XMLSchema"
        xmlns:jaxb="http://java.sun.com/xml/ns/jaxb"
        jaxb:version="2.0">
  <complexType name="size">
    <annotation>
      <appinfo>
        <jaxb:class name="widgetSize" />
      </appinfo>
    </annotation>
    <sequence>
      <element name="longSize" type="xsd:string" />
      <element name="numberSize" type="xsd:int" />
    </sequence>
  </complexType>
<schema>
Using an external binding declaration
jaxb:bindings elements. Example 15.4, “JAXB External Binding Declaration Syntax” shows the syntax of an external binding declaration.
Example 15.4. JAXB External Binding Declaration Syntax
<jaxb:bindings xmlns:jaxb="http://java.sun.com/xml/ns/jaxb"
               xmlns:xsd="http://www.w3.org/2001/XMLSchema"
               jaxb:version="2.0">
  <jaxb:bindings [schemaLocation="schemaUri" | wsdlLocation="wsdlUri">
    <jaxb:bindings node="nodeXPath">
      binding declaration
    </jaxb:bindings>
    ...
  </jaxb:bindings>
<jaxb:bindings>schemaLocation attribute and the wsdlLocation attribute are used to identify the schema document to which the modifications are applied. Use the schemaLocation attribute if you are generating code from a schema document. Use the wsdlLocation attribute if you are generating code from a WSDL document.
node attribute is used to identify the specific XML schema construct that is to be modified. It is an XPath statement that resolves to an XML Schema element.
widgetSchema.xsd, shown in Example 15.5, “XML Schema File”, the external binding declaration shown in Example 15.6, “External Binding Declaration” modifies the generation of the complex type size.
Example 15.5. XML Schema File
<schema targetNamespace="http://widget.com/types/widgetTypes"
        xmlns="http://www.w3.org/2001/XMLSchema"
        xmlns:wsdl="http://schemas.xmlsoap.org/wsdl/"
        version="1.0">
  <complexType name="size">
    <sequence>
      <element name="longSize" type="xsd:string" />
      <element name="numberSize" type="xsd:int" />
    </sequence>
  </complexType>
<schema>
Example 15.6. External Binding Declaration
<jaxb:bindings xmlns:jaxb="http://java.sun.com/xml/ns/jaxb"
               xmlns:xsd="http://www.w3.org/2001/XMLSchema"
               jaxb:version="2.0">
  <jaxb:bindings schemaLocation="wsdlSchema.xsd">
    <jaxb:bindings node="xsd:complexType[@name='size']">
        <jaxb:class name="widgetSize" />
    </jaxb:bindings>
  </jaxb:bindings>
<jaxb:bindings>-b binding-file option, as shown below:
wsdl2java -b widgetBinding.xml widget.wsdl15.2. Specifying the Java Class of an XML Schema Primitive
Overview
javaType customization element allows you to customize the mapping between an XML Schema primitive type and a Java primitive type. It can be used to customize the mappings at both the global level and the individual instance level. You can use the javaType element as part of a simple type definition or as part of a complex type definition.
javaType customization element you must specify methods for converting the XML representation of the primitive type to and from the target Java class. Some mappings have default conversion methods. For instances where there are no default mappings, Apache CXF provides JAXB methods to ease the development of the required methods.
Syntax
javaType customization element takes four attributes, as described in Table 15.1, “Attributes for Customizing the Generation of a Java Class for an XML Schema Type”.
Table 15.1. Attributes for Customizing the Generation of a Java Class for an XML Schema Type
| Attribute | Required | Description |
|---|---|---|
name | Yes | Specifies the name of the Java class to which the XML Schema primitive type is mapped. It must be either a valid Java class name or the name of a Java primitive type. You must ensure that this class exists and is accessible to your application. The code generator does not check for this class. |
xmlType | No | Specifies the XML Schema primitive type that is being customized. This attribute is only used when the javaType element is used as a child of the globalBindings element. |
parseMethod | No | Specifies the method responsible for parsing the string-based XML representation of the data into an instance of the Java class. For more information see the section called “Specifying the converters”. |
printMethod | No | Specifies the method responsible for converting a Java object to the string-based XML representation of the data. For more information see the section called “Specifying the converters”. |
javaType customization element can be used in three ways:
- To modify all instances of an XML Schema primitive type — The
javaTypeelement modifies all instances of an XML Schema type in the schema document when it is used as a child of theglobalBindingscustomization element. When it is used in this manner, you must specify a value for thexmlTypeattribute that identifies the XML Schema primitive type being modified.Example 15.7, “Global Primitive Type Customization” shows an in-line global customization that instructs the code generators to usejava.lang.Integerfor all instances of xsd:short in the schema.Example 15.7. Global Primitive Type Customization
<schema targetNamespace="http://widget.com/types/widgetTypes" xmlns="http://www.w3.org/2001/XMLSchema" xmlns:wsdl="http://schemas.xmlsoap.org/wsdl/" xmlns:jaxb="http://java.sun.com/xml/ns/jaxb" jaxb:version="2.0"> <annotation> <appinfo> <jaxb:globalBindings ...> <jaxb:javaType name="java.lang.Integer" xmlType="xsd:short" /> </globalBindings </appinfo> </annotation> ... </schema> - To modify a simple type definition — The
javaTypeelement modifies the class generated for all instances of an XML simple type when it is applied to a named simple type definition. When using thejavaTypeelement to modify a simple type definition, do not use thexmlTypeattribute.Example 15.8, “Binding File for Customizing a Simple Type” shows an external binding file that modifies the generation of a simple type named zipCode.Example 15.8. Binding File for Customizing a Simple Type
<jaxb:bindings xmlns:jaxb="http://java.sun.com/xml/ns/jaxb" xmlns:xsd="http://www.w3.org/2001/XMLSchema" jaxb:version="2.0"> <jaxb:bindings wsdlLocation="widgets.wsdl"> <jaxb:bindings node="xsd:simpleType[@name='zipCode']"> <jaxb:javaType name="com.widgetVendor.widgetTypes.zipCodeType" parseMethod="com.widgetVendor.widgetTypes.support.parseZipCode" printMethod="com.widgetVendor.widgetTypes.support.printZipCode" /> </jaxb:bindings> </jaxb:bindings> <jaxb:bindings> - To modify an element or attribute of a complex type definition — The
javaTypecan be applied to individual parts of a complex type definition by including it as part of a JAXB property customization. ThejavaTypeelement is placed as a child to the property'sbaseTypeelement. When using thejavaTypeelement to modify a specific part of a complex type definition, do not use thexmlTypeattribute.Example 15.9, “Binding File for Customizing an Element in a Complex Type” shows a binding file that modifies an element of a complex type.Example 15.9. Binding File for Customizing an Element in a Complex Type
<jaxb:bindings xmlns:jaxb="http://java.sun.com/xml/ns/jaxb"
               xmlns:xsd="http://www.w3.org/2001/XMLSchema"
               jaxb:version="2.0">
  <jaxb:bindings schemaLocation="enumMap.xsd">
    <jaxb:bindings node="xsd:ComplexType[@name='widgetOrderInfo']">
      <jaxb:bindings node="xsd:element[@name='cost']">
        <jaxb:property>
          <jaxb:baseType>
            <jaxb:javaType name="com.widgetVendor.widgetTypes.costType"
                            parseMethod="parseCost"
                            printMethod="printCost" >
          </jaxb:baseType>
        </jaxb:property>
      </jaxb:bindings>
    </jaxb:bindings>
  </jaxb:bindings>
<jaxb:bindings>
For more information on using thebaseTypeelement see Section 15.6, “Specifying the Base Type of an Element or an Attribute”.
Specifying the converters
javaType element to customize the mapping of an XML Schema primitive type, the code generator creates an adapter class that is used to marshal and unmarshal the customized XML Schema primitive type. A sample adapter class is shown in Example 15.10, “JAXB Adapter Class”.
Example 15.10. JAXB Adapter Class
public class Adapter1 extends XmlAdapter<String, javaType>
{
  public javaType unmarshal(String value)
  {
    return(parseMethod(value));
  }

  public String marshal(javaType value)
  {
    return(printMethod(value));
  }
}
parseMethod attribute and printMethod attribute. The values must identify valid Java methods. You can specify the method's name in one of two ways:
- A fully qualified Java method name in the form of packagename.ClassName.methodName
- A simple method name in the form of methodNameWhen you only provide a simple method name, the code generator assumes that the method exists in the class specified by the
javaTypeelement'snameattribute.
parseMethod attribute is not provided, the code generator assumes that the Java class specified by the name attribute has a constructor whose first parameter is a Java String object. The generated adapter's unmarshal() method uses the assumed constructor to populate the Java object with the XML data.
printMethod attribute is not provided, the code generator assumes that the Java class specified by the name attribute has a toString() method. The generated adapter's marshal() method uses the assumed toString() method to convert the Java object to XML data.
javaType element's name attribute specifies a Java primitive type, or one of the Java primitive's wrapper types, the code generators use the default converters. For more information on default converters see the section called “Default primitive type converters”.
What is generated
javaType customization element triggers the generation of one adapter class for each customization of an XML Schema primitive type. The adapters are named in sequence using the pattern AdapterN. If you specify two primitive type customizations, the code generators create two adapter classes: Adapter1 and Adapter2.
- The method is decorated with an
@XmlJavaTypeAdapterannotation.The annotation instructs the runtime which adapter class to use when processing instances of this element. The adapter class is specified as a class object. - The default type is replaced by the class specified by the
javaTypeelement'snameattribute.
Example 15.11. Customized Object Factory Method for a Global Element
@XmlElementDecl(namespace = "http://widgetVendor.com/types/widgetTypes", name = "shorty")
    @XmlJavaTypeAdapter(org.w3._2001.xmlschema.Adapter1 .class)
    public JAXBElement<Integer> createShorty(Integer value) {
        return new JAXBElement<Integer>(_Shorty_QNAME, Integer.class, null, value);
}- The property is decorated with an
@XmlJavaTypeAdapterannotation.The annotation instructs the runtime which adapter class to use when processing instances of this element. The adapter class is specified as a class object. - The property's
@XmlElementincludes a type property.The value of the type property is the class object representing the generated object's default base type. In the case of XML Schema primitive types, the class isString. - The property is decorated with an
@XmlSchemaTypeannotation.The annotation identifies the XML Schema primitive type of the construct. - The default type is replaced by the class specified by the
javaTypeelement'snameattribute.
Example 15.12. Customized Complex Type
public class NumInventory {

    @XmlElement(required = true, type = String.class)
    @XmlJavaTypeAdapter(Adapter1 .class)
    @XmlSchemaType(name = "short")
    protected Integer numLeft;
    @XmlElement(required = true)
    protected String size;

    public Integer getNumLeft() {
        return numLeft;
    }

    public void setNumLeft(Integer value) {
        this.numLeft = value;
    }

    public String getSize() {
        return size;
    }

    public void setSize(String value) {
        this.size = value;
    }

}
Implementing converters
javaType element, except that it should call the methods specified by the parseMethod attribute and the printMethod attribute. You are responsible for providing implementations of the methods the runtime calls. The implemented methods must be capable of working with the lexical structures of the XML primitive type.
javax.xml.bind.DatatypeConverter class. This class provides methods for parsing and printing all of the XML Schema primitive types. The parse methods take string representations of the XML data and they return an instance of the default type defined in Table 11.1, “XML Schema Primitive Type to Java Native Type Mapping”. The print methods take an instance of the default type and they return a string representation of the XML data.
DatatypeConverter class can be found at http://java.sun.com/webservices/docs/1.6/api/javax/xml/bind/DatatypeConverter.html.
Default primitive type converters
javaType element's name attribute, it is not necessary to specify values for the parseMethod attribute or the printMethod attribute. The Apache CXF runtime substitutes default converters if no values are provided.
DatatypeConverter class to parse the XML data. The default converters will also provide any type casting necessary to make the conversion work.
15.3. Generating Java Classes for Simple Types
Overview
globalBindings customization element's mapSimpleTypeDef to true.
Adding the customization
globalBinding element's mapSimpleTypeDef attribute and set its value to true.
Example 15.13. in-Line Customization to Force Generation of Java Classes for SimpleTypes
<schema targetNamespace="http://widget.com/types/widgetTypes"
        xmlns="http://www.w3.org/2001/XMLSchema"
        xmlns:wsdl="http://schemas.xmlsoap.org/wsdl/"
        xmlns:jaxb="http://java.sun.com/xml/ns/jaxb"
        jaxb:version="2.0">
  <annotation>
    <appinfo>
      <jaxb:globalBindings mapSimpleTypeDef="true" />
    </appinfo>
  </annotation>
  ...
</schema>
Example 15.14. Binding File to Force Generation of Constants
<jaxb:bindings xmlns:jaxb="http://java.sun.com/xml/ns/jaxb"
               xmlns:xsd="http://www.w3.org/2001/XMLSchema"
               jaxb:version="2.0">
  <jaxb:bindings schemaLocation="types.xsd">
    <jaxb:globalBindings mapSimpleTypeDef="true" />
  <jaxb:bindings>
<jaxb:bindings>Generated classes
Example 15.15. Simple Type for Customized Mapping
<simpleType name="simpleton">
  <restriction base="xsd:string">
    <maxLength value="10"/>
  </restriction>
</simpleType>
Example 15.16. Customized Mapping of a Simple Type
@XmlAccessorType(XmlAccessType.FIELD)
@XmlType(name = "simpleton", propOrder = {"value"})
public class Simpleton {

    @XmlValue
    protected String value;

    public String getValue() {
        return value;
    }

    public void setValue(String value) {
        this.value = value;
    }

}
15.4. Customizing Enumeration Mapping
Overview
jaxb:typesafeEnumClass element along with one or more jaxb:typesafeEnumMember elements.
globalBindings customization.
Member name customizer
globalBinding element's typesafeEnumMemberName attribute. The typesafeEnumMemberName attribute's values are described in Table 15.2, “Values for Customizing Enumeration Member Name Generation”.
Table 15.2. Values for Customizing Enumeration Member Name Generation
| Value | Description |
|---|---|
skipGeneration(default) | Specifies that the Java enum type is not generated and generates a warning. |
generateName | Specifies that member names will be generated following the pattern VALUE_N. N starts off at one, and is incremented for each member of the enumeration. |
generateError | Specifies that the code generator generates an error when it cannot map an enumeration to a Java enum type. |
Example 15.17. Customization to Force Type Safe Member Names
<schema targetNamespace="http://widget.com/types/widgetTypes"
        xmlns="http://www.w3.org/2001/XMLSchema"
        xmlns:wsdl="http://schemas.xmlsoap.org/wsdl/"
        xmlns:jaxb="http://java.sun.com/xml/ns/jaxb"
        jaxb:version="2.0">
  <annotation>
    <appinfo>
      <jaxb:globalBindings typesafeEnumMemberName="generateName" />
    </appinfo>
  </annotation>
  ...
</schema>
Class customizer
jaxb:typesafeEnumClass element specifies that an XML Schema enumeration should be mapped to a Java enum type. It has two attributes that are described in Table 15.3, “Attributes for Customizing a Generated Enumeration Class”. When the jaxb:typesafeEnumClass element is specified in-line, it must be placed inside the xsd:annotation element of the simple type it is modifying.
Table 15.3. Attributes for Customizing a Generated Enumeration Class
| Attribute | Description |
|---|---|
name | Specifies the name of the generated Java enum type. This value must be a valid Java identifier. |
map | Specifies if the enumeration should be mapped to a Java enum type. The default value is true. |
Member customizer
jaxb:typesafeEnumMember element specifies the mapping between an XML Schema enumeration facet and a Java enum type constant. You must use one jaxb:typesafeEnumMember element for each enumeration facet in the enumeration being customized.
- It can be placed inside the
xsd:annotationelement of theenumerationfacet it is modifying. - They can all be placed as children of the
jaxb:typesafeEnumClasselement used to customize the enumeration.
jaxb:typesafeEnumMember element has a name attribute that is required. The name attribute specifies the name of the generated Java enum type constant. It's value must be a valid Java identifier.
jaxb:typesafeEnumMember element also has a value attribute. The value is used to associate the enumeration facet with the proper jaxb:typesafeEnumMember element. The value of the value attribute must match one of the values of an enumeration facets' value attribute. This attribute is required when you use an external binding specification for customizing the type generation, or when you group the jaxb:typesafeEnumMember elements as children of the jaxb:typesafeEnumClass element.
Examples
Example 15.18. In-line Customization of an Enumerated Type
<schema targetNamespace="http://widget.com/types/widgetTypes"
        xmlns="http://www.w3.org/2001/XMLSchema"
        xmlns:wsdl="http://schemas.xmlsoap.org/wsdl/"
        xmlns:jaxb="http://java.sun.com/xml/ns/jaxb"
        jaxb:version="2.0">
  <simpleType name="widgetInteger">
    <annotation>
      <appinfo>
        <jaxb:typesafeEnumClass />
      </appinfo>
    </annotation>
    <restriction base="xsd:int">
      <enumeration value="1">
        <annotation>
          <appinfo>
            <jaxb:typesafeEnumMember name="one" />
          </appinfo>
        </annotation>
      </enumeration>
      <enumeration value="2">
        <annotation>
          <appinfo>
            <jaxb:typesafeEnumMember name="two" />
          </appinfo>
        </annotation>
      </enumeration>
      <enumeration value="3">
        <annotation>
          <appinfo>
            <jaxb:typesafeEnumMember name="three" />
          </appinfo>
        </annotation>
      </enumeration>
      <enumeration value="4">
        <annotation>
          <appinfo>
            <jaxb:typesafeEnumMember name="four" />
          </appinfo>
        </annotation>
      </enumeration>
    </restriction>
  </simpleType>
<schema>
Example 15.19. In-line Customization of an Enumerated Type Using a Combined Mapping
<schema targetNamespace="http://widget.com/types/widgetTypes"
        xmlns="http://www.w3.org/2001/XMLSchema"
        xmlns:wsdl="http://schemas.xmlsoap.org/wsdl/"
        xmlns:jaxb="http://java.sun.com/xml/ns/jaxb"
        jaxb:version="2.0">
  <simpleType name="widgetInteger">
    <annotation>
      <appinfo>
        <jaxb:typesafeEnumClass>
            <jaxb:typesafeEnumMember value="1" name="one" />
            <jaxb:typesafeEnumMember value="2" name="two" />
            <jaxb:typesafeEnumMember value="3" name="three" />
            <jaxb:typesafeEnumMember value="4" name="four" />
        </jaxb:typesafeEnumClass>
      </appinfo>
    </annotation>
    <restriction base="xsd:int">
      <enumeration value="1" />
      <enumeration value="2" />
      <enumeration value="3" />
      <enumeration value="4" >
    </restriction>
  </simpleType>
<schema>
Example 15.20. Binding File for Customizing an Enumeration
<jaxb:bindings xmlns:jaxb="http://java.sun.com/xml/ns/jaxb"
               xmlns:xsd="http://www.w3.org/2001/XMLSchema"
               jaxb:version="2.0">
  <jaxb:bindings schemaLocation="enumMap.xsd">
    <jaxb:bindings node="xsd:simpleType[@name='widgetInteger']">
        <jaxb:typesafeEnumClass>
            <jaxb:typesafeEnumMember value="1" name="one" />
            <jaxb:typesafeEnumMember value="2" name="two" />
            <jaxb:typesafeEnumMember value="3" name="three" />
            <jaxb:typesafeEnumMember value="4" name="four" />
        </jaxb:typesafeEnumClass>
    </jaxb:bindings>
  </jaxb:bindings>
<jaxb:bindings>
15.5. Customizing Fixed Value Attribute Mapping
Overview
globalBindings customization element. You can also customize the mapping of fixed value attributes to Java constants at a more localized level using the property element.
Global customization
globalBinding element's fixedAttributeAsConstantProperty attribute. Setting this attribute to true instructs the code generator to map any attribute defined using fixed attribute to a Java constant.
Example 15.21. in-Line Customization to Force Generation of Constants
<schema targetNamespace="http://widget.com/types/widgetTypes"
        xmlns="http://www.w3.org/2001/XMLSchema"
        xmlns:wsdl="http://schemas.xmlsoap.org/wsdl/"
        xmlns:jaxb="http://java.sun.com/xml/ns/jaxb"
        jaxb:version="2.0">
  <annotation>
    <appinfo>
      <jaxb:globalBindings fixedAttributeAsConstantProperty="true" />
    </appinfo>
  </annotation>
  ...
</schema>
Example 15.22. Binding File to Force Generation of Constants
<jaxb:bindings xmlns:jaxb="http://java.sun.com/xml/ns/jaxb"
               xmlns:xsd="http://www.w3.org/2001/XMLSchema"
               jaxb:version="2.0">
  <jaxb:bindings schemaLocation="types.xsd">
    <jaxb:globalBindings fixedAttributeAsConstantProperty="true" />
  <jaxb:bindings>
<jaxb:bindings>
Local mapping
property element's fixedAttributeAsConstantProperty attribute. Setting this attribute to true instructs the code generator to map any attribute defined using fixed attribute to a Java constant.
Example 15.23. In-Line Customization to Force Generation of Constants
<schema targetNamespace="http://widget.com/types/widgetTypes"
        xmlns="http://www.w3.org/2001/XMLSchema"
        xmlns:wsdl="http://schemas.xmlsoap.org/wsdl/"
        xmlns:jaxb="http://java.sun.com/xml/ns/jaxb"
        jaxb:version="2.0">
  <complexType name="widgetAttr">
    <sequence>
      ...
    </sequence>
    <attribute name="fixer" type="xsd:int" fixed="7">
      <annotation>
        <appinfo>
          <jaxb:property fixedAttributeAsConstantProperty="true" />
        </appinfo>
      </annotation>
     </attribute>
  </complexType>
  ...
</schema>
Example 15.24. Binding File to Force Generation of Constants
<jaxb:bindings xmlns:jaxb="http://java.sun.com/xml/ns/jaxb"
               xmlns:xsd="http://www.w3.org/2001/XMLSchema"
               jaxb:version="2.0">
  <jaxb:bindings schemaLocation="types.xsd">
    <jaxb:bindings node="xsd:complexType[@name='widgetAttr']">
      <jaxb:bindings node="xsd:attribute[@name='fixer']">
            <jaxb:property fixedAttributeAsConstantProperty="true" />
        </jaxb:bindings>
    </jaxb:bindings>
  </jaxb:bindings>
<jaxb:bindings>
Java mapping
fixed attribute, the attribute is mapped to a Java constant, as shown in Example 15.25, “Mapping of a Fixed Value Attribute to a Java Constant”.
Example 15.25. Mapping of a Fixed Value Attribute to a Java Constant
@XmlAttribute
public final static type NAME = value;
attribute element's name attribute to all capital letters.
attribute element's fixed attribute.
Example 15.26. Fixed Value Attribute Mapped to a Java Constant
@XmlRootElement(name = "widgetAttr")
public class WidgetAttr {

    ...

  @XmlAttribute
  public final static int FIXER = 7;

  ...

}
15.6. Specifying the Base Type of an Element or an Attribute
Overview
Customization usage
baseType customization element. The baseType customization element is a child of the JAXB property element, so it must be properly nested.
baseType customization element's name attribute, or a javaType child element. The name attribute is used to map the default class of the generated object to another class within the same class hierarchy. The javaType element is used when you want to map XML Schema primitive types to a Java class.
name attribute and a javaType child element in the same baseType customization element.
Specializing or generalizing the default mapping
baseType customization element's name attribute is used to redefine the class of the generated object to a class within the same Java class hierarchy. The attribute specifies the fully qualified name of the Java class to which the XML Schema construct is mapped. The specified Java class must be either a super-class or a sub-class of the Java class that the code generator normally generates for the XML Schema construct. For XML Schema primitive types that map to Java primitive types, the wrapper class is used as the default base class for the purpose of customization.
java.lang.Integer as its default base class. The value of the name attribute can specify any super-class of Integer such as Number or Object.
Object object.
Object object.
Example 15.27. In-Line Customization of a Base Type
<complexType name="widgetOrderInfo">
  <all>
    <element name="amount" type="xsd:int" />
     <element name="shippingAdress" type="Address>
      <annotation>
        <appinfo>
           <jaxb:property>
             <jaxb:baseType name="java.lang.Object" />
           </jaxb:property>
        </appinfo>
      </annotation>
    </element>
    <element name="type" type="xsd:string"/>
  </all>
</complexType>
Example 15.28. External Binding File to Customize a Base Type
<jaxb:bindings xmlns:jaxb="http://java.sun.com/xml/ns/jaxb"
               xmlns:xsd="http://www.w3.org/2001/XMLSchema"
               jaxb:version="2.0">
  <jaxb:bindings schemaLocation="enumMap.xsd">
    <jaxb:bindings node="xsd:ComplexType[@name='widgetOrderInfo']">
      <jaxb:bindings node="xsd:element[@name='shippingAddress']">
        <jaxb:property>
          <jaxb:baseType name="java.lang.Object" />
        </jaxb:property>
      </jaxb:bindings>
    </jaxb:bindings>
  </jaxb:bindings>
<jaxb:bindings>@XmlElement annotation includes a type property. The value of the type property is the class object representing the generated object's default base type. In the case of XML Schema primitive types, the class is the wrapper class of the corresponding Java primitive type.
Example 15.29. Java Class with a Modified Base Class
public class WidgetOrderInfo {

    protected int amount;
    @XmlElement(required = true)
    protected String type;
    @XmlElement(required = true, type = Address.class)
    protected Object shippingAddress;

    ...
    public Object getShippingAddress() {
        return shippingAddress;
    }


    public void setShippingAddress(Object value) {
        this.shippingAddress = value;
    }

}
Usage with javaType
javaType element can be used to customize how elements and attributes defined using XML Schema primitive types are mapped to Java objects. Using the javaType element provides a lot more flexibility than simply using the baseType element's name attribute. The javaType element allows you to map a primitive type to any class of object.
javaType element, see Section 15.2, “Specifying the Java Class of an XML Schema Primitive”.
Chapter 16. Using A JAXBContext Object
Abstract
JAXBContext object allows the Apache CXF's runtime to transform data between XML elements and Java object. Application developers need to instantiate a JAXBContext object they want to use JAXB objects in message handlers and when implementing consumers that work with raw XML messages.
Overview
JAXBContext object is a low-level object used by the runtime. It allows the runtime to convert between XML elements and their corresponding Java representations. An application developer generally does not need to work with JAXBContext objects. The marshaling and unmarshaling of XML data is typically handled by the transport and binding layers of a JAX-WS application.
JAXBContext object using one of the two available JAXBContext.newInstance() methods.
Best practices
JAXBContext objects are resource intensive to instantiate. It is recommended that an application create as few instances as possible. One way to do this is to create a single JAXBContext object that can manage all of the JAXB objects used by your application and share it among as many parts of your application as possible.
JAXBContext objects are thread safe.
Getting a JAXBContext object using an object factory
JAXBContext class provides a newInstance() method, shown in Example 16.1, “Getting a JAXB Context Using Classes”, that takes a list of classes that implement JAXB objects.
Example 16.1. Getting a JAXB Context Using Classes
static JAXBContext newInstance(Class... classesToBeBound)
throws JAXBException;JAXBObject object will be able to marshal and unmarshal data for the JAXB object implemented by the classes passed into the method. It will also be able to work with any classes that are statically referenced from any of the classes passed into the method.
newInstance() method it is not efficient. A more efficient way to accomplish the same goal is to pass in the object factory, or object factories, generated for your application. The resulting JAXBContext object will be able to manage any JAXB classes the specified object factories can instantiate.
Getting a JAXBContext object using package names
JAXBContext class provides a newInstance() method, shown in Example 16.2, “Getting a JAXB Context Using Classes”, that takes a colon (:) seperated list of package names. The specified packages should contain JAXB objects derived from XML Schema.
Example 16.2. Getting a JAXB Context Using Classes
static JAXBContext newInstance(String contextPath)
throws JAXBException;JAXBContext object will be able to marshal and unmarshal data for all of the JAXB objects implemented by the classes in the specified packages.
Part V. Advanced Programming Tasks
Abstract
Chapter 17. Using SOAP over JMS
Overview
- SOAP/JMS service addressed are specified using a special JMS URI
- you must use the Apache CXF specific factory objects to use SOAP/JMS endpoints
JMS URIs
Example 17.1. JMS URI syntax
jms:variant:destination?options
Table 17.1. JMS URI variants
| Variant | Description |
|---|---|
| jndi | Specifies that the destination is a JNDI name for the target destination. When using this variant, you must provide the configuration for accessing the JNDI provider. |
| topic | Specifies that the destination is the name of the topic to be used as the target destination. The string provided is passed into Session.createTopic() to create a representation of the destination. |
| queue | Specifies that the destination is the name of the queue to be used as the target destination. The string provided is passed into Session.createQueue() to create a representation of the destination. |
Table 17.2. JMS properties settable as URI options
| Property | Default | Description |
|---|---|---|
deliveryMode | PERSISTENT | Specifies whether to use JMS PERSISTENT or NON_PERSISTENT message semantics. In the case of PERSISTENT delivery mode, the JMS broker stores messages in persistent storage before acknowledging them; whereas NON_PERSISTENT messages are kept in memory only. |
replyToName |
Explicitly specifies the reply destination to appear in the
JMSReplyTo header. Setting this property is recommended for applications that have request-reply semantics because the JMS provider will assign a temporary reply queue if one is not explicitly set.
The value of this property has an interpretation that depends on the variant specified in the JMS URI:
| |
priority | 4 | Specifies the JMS message priority, which ranges from 0 (lowest) to 9 (highest). |
timeToLive | 0 | Time (in milliseconds) after which the message will be discarded by the JMS provider. 0 represents an infinite lifetime. |
jndiConnectionFactoryName | Specifies the JNDI name of the JMS connection factory. | |
jndiInitialContextFactory | Specifies the fully qualified Java class name of the JNDI provider (which must be of javax.jms.InitialContextFactory type). Equivalent to setting the java.naming.factory.initial Java system property. | |
jndiURL | Specifies the URL that initializes the JNDI provider. Equivalent to setting the java.naming.provider.url Java system property. |
Publishing a service
publish() method cannot be used to publish a SOAP/JMS service. Instead, you must use the Apache CXF's JaxWsServerFactoryBean class as shown in Example 17.2, “Publishing a SOAP/JMS service”.
Example 17.2. Publishing a SOAP/JMS service
1String address = "jms:jndi:dynamicQueues/test.cxf.jmstransport.queue3"
    + "?jndiInitialContextFactory"
    + "=org.apache.activemq.jndi.ActiveMQInitialContextFactory"
    + "&jndiConnectionFactoryName=ConnectionFactory"
    + "&jndiURL=tcp://localhost:61500";
Hello implementor = new HelloImpl();
2JaxWsServerFactoryBean svrFactory = new JaxWsServerFactoryBean();
svrFactory.setServiceClass(Hello.class);
3svrFactory.setAddress(address);
4svrFactory.setTransportId(JMSSpecConstants.SOAP_JMS_SPECIFICIATION_TRANSPORTID);
svrFactory.setServiceBean(implementor);
svrFactory.create();
Consuming a service
JaxWsProxyFactoryBean class as shown in Example 17.3, “Consuming a SOAP/JMS service”.
Example 17.3. Consuming a SOAP/JMS service
// Java
public void invoke() throws Exception {
1    String address = "jms:jndi:dynamicQueues/test.cxf.jmstransport.queue3"
        + "?jndiInitialContextFactory"
        + "=org.apache.activemq.jndi.ActiveMQInitialContextFactory"
        + "&jndiConnectionFactoryName=ConnectionFactory&jndiURL=tcp://localhost:61500";
2    JaxWsProxyFactoryBean factory = new JaxWsProxyFactoryBean();
3    factory.setAddress(address);
4    factory.setTransportId(JMSSpecConstants.SOAP_JMS_SPECIFICIATION_TRANSPORTID);
    factory.setServiceClass(Hello.class);
    Hello client = (Hello)factory.create();
    String reply = client.sayHi(" HI");
    System.out.println(reply);
}Chapter 18. Developing Asynchronous Applications
| Revision History | |
|---|---|
| 5/23/12 | |
| Changed the description of code generation to use Maven instead of command line tools to reflect best practices. | |
Abstract
- Polling approach — To invoke the remote operation using the polling approach, you call a method that has no output parameters, but returns a
javax.xml.ws.Responseobject. TheResponseobject (which inherits from thejavax.util.concurrency.Futureinterface) can be polled to check whether or not a response message has arrived. - Callback approach — To invoke the remote operation using the callback approach, you call a method that takes a reference to a callback object (of
javax.xml.ws.AsyncHandlertype) as one of its parameters. When the response message arrives at the client, the runtime calls back on theAsyncHandlerobject, and gives it the contents of the response message.
18.1. WSDL for Asynchronous Examples
GreeterAsync, which contains a single operation, greetMeSometime.
Example 18.1. WSDL Contract for Asynchronous Example
<?xml version="1.0" encoding="UTF-8"?><wsdl:definitions xmlns="http://schemas.xmlsoap.org/wsdl/"
                  xmlns:soap="http://schemas.xmlsoap.org/wsdl/soap/"
                  xmlns:tns="http://apache.org/hello_world_async_soap_http"
                  xmlns:x1="http://apache.org/hello_world_async_soap_http/types"
                  xmlns:wsdl="http://schemas.xmlsoap.org/wsdl/"
                  xmlns:xsd="http://www.w3.org/2001/XMLSchema"
                  targetNamespace="http://apache.org/hello_world_async_soap_http"
                  name="HelloWorld">
  <wsdl:types>
    <schema targetNamespace="http://apache.org/hello_world_async_soap_http/types"
            xmlns="http://www.w3.org/2001/XMLSchema"
            xmlns:x1="http://apache.org/hello_world_async_soap_http/types"
            elementFormDefault="qualified">
      <element name="greetMeSometime">
        <complexType>
          <sequence>
            <element name="requestType" type="xsd:string"/>
          </sequence>
        </complexType>
      </element>
      <element name="greetMeSometimeResponse">
        <complexType>
          <sequence>
            <element name="responseType"
                     type="xsd:string"/>
          </sequence>
        </complexType>
      </element>
    </schema>
  </wsdl:types>

  <wsdl:message name="greetMeSometimeRequest">
    <wsdl:part name="in" element="x1:greetMeSometime"/>
  </wsdl:message>
  <wsdl:message name="greetMeSometimeResponse">
    <wsdl:part name="out"
               element="x1:greetMeSometimeResponse"/>
  </wsdl:message>

  <wsdl:portType name="GreeterAsync">
    <wsdl:operation name="greetMeSometime">
      <wsdl:input name="greetMeSometimeRequest"
                  message="tns:greetMeSometimeRequest"/>
      <wsdl:output name="greetMeSometimeResponse"
                   message="tns:greetMeSometimeResponse"/>
    </wsdl:operation>
  </wsdl:portType>

  <wsdl:binding name="GreeterAsync_SOAPBinding"
                type="tns:GreeterAsync">
    ...
  </wsdl:binding>

  <wsdl:service name="SOAPService">
    <wsdl:port name="SoapPort"
               binding="tns:GreeterAsync_SOAPBinding">
      <soap:address location="http://localhost:9000/SoapContext/SoapPort"/>
    </wsdl:port>
  </wsdl:service>
</wsdl:definitions>
18.2. Generating the Stub Code
Overview
jaxws:bindings tag (where the jaxws prefix is tied to the http://java.sun.com/xml/ns/jaxws namespace). There are two ways of specifying a binding declaration:
- External Binding Declaration
- When using an external binding declaration the
jaxws:bindingselement is defined in a file separate from the WSDL contract. You specify the location of the binding declaration file to code generator when you generate the stub code. - Embedded Binding Declaration
- When using an embedded binding declaration you embed the
jaxws:bindingselement directly in a WSDL contract, treating it as a WSDL extension. In this case, the settings injaxws:bindingsapply only to the immediate parent element.
Using an external binding declaration
Example 18.2. Template for an Asynchronous Binding Declaration
<bindings xmlns:xsd="http://www.w3.org/2001/XMLSchema"
          xmlns:wsdl="http://schemas.xmlsoap.org/wsdl/"
          wsdlLocation="AffectedWSDL"
          xmlns="http://java.sun.com/xml/ns/jaxws">
  <bindings node="AffectedNode">
    <enableAsyncMapping>true</enableAsyncMapping>
  </bindings>
</bindings>wsdl:definitions, if you want the entire WSDL contract to be affected. The jaxws:enableAsyncMapping element is set to true to enable the asynchronous invocation feature.
GreeterAsync interface, you can specify <bindings node="wsdl:definitions/wsdl:portType[@name='GreeterAsync']"> in the preceding binding declaration.
async_binding.xml, you would set up your POM as shown in Example 18.3, “Consumer Code Generation”.
Example 18.3. Consumer Code Generation
<plugin>
  <groupId>org.apache.cxf</groupId>
  <artifactId>cxf-codegen-plugin</artifactId>
  <version>${cxf.version}</version>
  <executions>
    <execution>
      <id>generate-sources</id>
      <phase>generate-sources</phase>
      <configuration>
        <sourceRoot>outputDir</sourceRoot>
        <wsdlOptions>
          <wsdlOption>
            <wsdl>hello_world.wsdl</wsdl>
            <extraargs>
              <extraarg>-client</extraarg>
              <extraarg>-b async_binding.xml</extraarg>
            </extraargs>
          </wsdlOption>
        </wsdlOptions>
      </configuration>
      <goals>
        <goal>wsdl2java</goal>
      </goals>
    </execution>
  </executions>
</plugin>-b option tells the code generator where to locate the external binding file.
Using an embedded binding declaration
jaxws:bindings element and its associated jaxws:enableAsynchMapping child directly into the WSDL. You also must add a namespace declaration for the jaxws prefix.
Example 18.4. WSDL with Embedded Binding Declaration for Asynchronous Mapping
<wsdl:definitions xmlns="http://schemas.xmlsoap.org/wsdl/"
                  ...
                  xmlns:jaxws="http://java.sun.com/xml/ns/jaxws"
                  ...>
  ...
  <wsdl:portType name="GreeterAsync">
    <wsdl:operation name="greetMeSometime">
      <jaxws:bindings>
        <jaxws:enableAsyncMapping>true</jaxws:enableAsyncMapping>
      </jaxws:bindings>
      <wsdl:input name="greetMeSometimeRequest"
                  message="tns:greetMeSometimeRequest"/>
      <wsdl:output name="greetMeSometimeResponse"
                   message="tns:greetMeSometimeResponse"/>
    </wsdl:operation>
  </wsdl:portType>
  ...
</wsdl:definitions>wsdl:definitions element the code generator creates asynchronous methods for all of the operations defined in the WSDL document. If it is placed as a child of a wsdl:portType element the code generator creates asynchronous methods for all of the operations defined in the interface. If it is placed as a child of a wsdl:operation element the code generator creates asynchronous methods for only that operation.
Generated interface
GreeterAsync SEI (in the file GreeterAsync.java) is defined as shown in Example 18.5, “Service Endpoint Interface with Methods for Asynchronous Invocations”.
Example 18.5. Service Endpoint Interface with Methods for Asynchronous Invocations
package org.apache.hello_world_async_soap_http;

import org.apache.hello_world_async_soap_http.types.GreetMeSometimeResponse;
...

public interface GreeterAsync
{
  public Future<?> greetMeSometimeAsync(
        java.lang.String requestType,
        AsyncHandler<GreetMeSometimeResponse> asyncHandler
    );

    public Response<GreetMeSometimeResponse> greetMeSometimeAsync(
        java.lang.String requestType
    );

    public java.lang.String greetMeSometime(
        java.lang.String requestType
    );
}greetMeSometime(), two asynchronous methods are also generated for the greetMeSometime operation:
18.3. Implementing an Asynchronous Client with the Polling Approach
OperationNameAsync() and is returned a Response<T> object that it polls for a response. What the client does while it is waiting for a response is depends on the requirements of the application. There are two basic patterns for handling the polling:
- Non-blocking polling — You periodically check to see if the result is ready by calling the non-blocking
Response<T>.isDone()method. If the result is ready, the client processes it. If it not, the client continues doing other things. - Blocking polling — You call
Response<T>.get()right away, and block until the response arrives (optionally specifying a timeout).
Using the non-blocking pattern
Example 18.6. Non-Blocking Polling Approach for an Asynchronous Operation Call
package demo.hw.client;

import java.io.File;
import java.util.concurrent.Future;

import javax.xml.namespace.QName;
import javax.xml.ws.Response;

import org.apache.hello_world_async_soap_http.*;

public final class Client {
  private static final QName SERVICE_NAME
    = new QName("http://apache.org/hello_world_async_soap_http",
                "SOAPService");

  private Client() {}

  public static void main(String args[]) throws Exception {

    // set up the proxy for the client

1    Response<GreetMeSometimeResponse> greetMeSomeTimeResp =
      port.greetMeSometimeAsync(System.getProperty("user.name"));

2      while (!greetMeSomeTimeResp.isDone()) {
      // client does some work
      }
3      GreetMeSometimeResponse reply = greetMeSomeTimeResp.get();
      // process the response

      System.exit(0);
  }
}- 1
- Invokes the
greetMeSometimeAsync()on the proxy.The method call returns theResponse<GreetMeSometimeResponse>object to the client immediately. The Apache CXF runtime handles the details of receiving the reply from the remote endpoint and populating theResponse<GreetMeSometimeResponse>object.NoteThe runtime transmits the request to the remote endpoint'sgreetMeSometime()method and handles the details of the asynchronous nature of the call transparently. The endpoint, and therefore the service implementation, never worries about the details of how the client intends to wait for a response. - 2
- Checks to see if a response has arrived by checking the
isDone()of the returnedResponseobject.If the response has not arrived, the client continues working before checking again. - 3
- When the response arrives, the client retrieves it from the
Responseobject using theget()method.
Using the blocking pattern
Response object's isDone() is never called. Instead, the Response object's get() method is called immediately after invoking the remote operation. The get() blocks until the response is available.
get() method.
Example 18.7. Blocking Polling Approach for an Asynchronous Operation Call
package demo.hw.client;

import java.io.File;
import java.util.concurrent.Future;

import javax.xml.namespace.QName;
import javax.xml.ws.Response;

import org.apache.hello_world_async_soap_http.*;

public final class Client {
  private static final QName SERVICE_NAME
    = new QName("http://apache.org/hello_world_async_soap_http",
                "SOAPService");

  private Client() {}

  public static void main(String args[]) throws Exception {

    // set up the proxy for the client

    Response<GreetMeSometimeResponse> greetMeSomeTimeResp =
      port.greetMeSometimeAsync(System.getProperty("user.name"));
    GreetMeSometimeResponse reply = greetMeSomeTimeResp.get();
      // process the response
      System.exit(0);
  }
}
18.4. Implementing an Asynchronous Client with the Callback Approach
- Create a callback class that implements the
AsyncHandlerinterface.NoteYour callback object can perform any amount of response processing required by your application. - Make remote invocations using the
operationNameAsync()that takes the callback object as a parameter and returns aFuture<?>object. - If your client requires access to the response data, you can poll the returned
Future<?>object'sisDone()method to see if the remote endpoint has sent the response.TipIf the callback object does all of the response processing, it is not necessary to check if the response has arrived.
Implementing the callback
javax.xml.ws.AsyncHandler interface. The interface defines a single method:
void handleResponse(Response<T> res);handleResponse() method to notify the client that the response has arrived. Example 18.8, “The javax.xml.ws.AsyncHandler Interface” shows an outline of the AsyncHandler interface that you must implement.
Example 18.8. The javax.xml.ws.AsyncHandler Interface
public interface javax.xml.ws.AsyncHandler
{
  void handleResponse(Response<T> res)
}
Example 18.9. Callback Implementation Class
package demo.hw.client;

import javax.xml.ws.AsyncHandler;
import javax.xml.ws.Response;

import org.apache.hello_world_async_soap_http.types.*;

public class GreeterAsyncHandler implements AsyncHandler<GreetMeSometimeResponse>
{
1  private GreetMeSometimeResponse reply;

2  public void handleResponse(Response<GreetMeSometimeResponse>
                             response)
  {
    try
    {
      reply = response.get();
    }
    catch (Exception ex)
    {
      ex.printStackTrace();
    }
  }

3  public String getResponse()
  {
    return reply.getResponseType();
  }
}- 1
- Defines a member variable,
response, that holds the response returned from the remote endpoint. - 2
- Implements
handleResponse().This implementation simply extracts the response and assigns it to the member variablereply. - 3
- Implements an added method called
getResponse().This method is a convenience method that extracts the data fromreplyand returns it.
Implementing the consumer
Example 18.10. Callback Approach for an Asynchronous Operation Call
package demo.hw.client;

import java.io.File;
import java.util.concurrent.Future;

import javax.xml.namespace.QName;
import javax.xml.ws.Response;

import org.apache.hello_world_async_soap_http.*;

public final class Client {
  ...

  public static void main(String args[]) throws Exception
  {
    ...
    // Callback approach
1    GreeterAsyncHandler callback = new GreeterAsyncHandler();

2    Future<?> response =
      port.greetMeSometimeAsync(System.getProperty("user.name"),
                                callback);
3    while (!response.isDone())
    {
      // Do some work
    }
4    resp = callback.getResponse();
    ...
    System.exit(0);
  }
}- 1
- Instantiates a callback object.
- 2
- Invokes the
greetMeSometimeAsync()that takes the callback object on the proxy.The method call returns theFuture<?>object to the client immediately. The Apache CXF runtime handles the details of receiving the reply from the remote endpoint, invoking the callback object'shandleResponse()method, and populating theResponse<GreetMeSometimeResponse>object.NoteThe runtime transmits the request to the remote endpoint'sgreetMeSometime()method and handles the details of the asynchronous nature of the call without the remote endpoint's knowledge. The endpoint, and therefore the service implementation, does not need to worry about the details of how the client intends to wait for a response. - 3
- Uses the returned
Future<?>object'sisDone()method to check if the response has arrived from the remote endpoint. - 4
- Invokes the callback object's
getResponse()method to get the response data.
18.5. Catching Exceptions Returned from a Remote Service
Overview
ExecutionException exception. The actual exception thrown by the service is stored in the ExecutionException exception's cause field.
Catching the exception
Response<T> object's get() method throws the exception. The consumer will not discover that an error was encountered in processing the request until it attempts to retrieve the response message.
Response<T> object's get() method does not throw either user modeled exceptions nor the generic JAX-WS exceptions. Instead, it throws a java.util.concurrent.ExecutionException exception.
Getting the exception details
ExecutionException exception's cause field. The details about the remote exception are extracted by getting the value of the cause field and examining the stored exception. The stored exception can be any user defined exception or one of the generic JAX-WS exceptions.
Example
Example 18.11. Catching an Exception using the Polling Approach
package demo.hw.client;

import java.io.File;
import java.util.concurrent.Future;

import javax.xml.namespace.QName;
import javax.xml.ws.Response;

import org.apache.hello_world_async_soap_http.*;

public final class Client
{
  private static final QName SERVICE_NAME
    = new QName("http://apache.org/hello_world_async_soap_http",
                "SOAPService");

  private Client() {}

  public static void main(String args[]) throws Exception
  {
    ...
    // port is a previously established proxy object.
    Response<GreetMeSometimeResponse> resp =
       port.greetMeSometimeAsync(System.getProperty("user.name"));

    while (!resp.isDone())
    {
      // client does some work
    }

    try 1
    {
      GreetMeSometimeResponse reply = greetMeSomeTimeResp.get();
      // process the response
    }
    catch (ExecutionException ee) 2
    {
       Throwable cause = ee.getCause(); 3
       System.out.println("Exception "+cause.getClass().getName()+" thrown by the remote service.");
    }
  }
}Chapter 19. Using Raw XML Messages
Abstract
Dispatch interface is the client-side interface, and the Provider interface is the server-side interface.
19.1. Using XML in a Consumer
Dispatch interface is a low-level JAX-WS API that allows you work directly with raw messages. It accepts and returns messages, or payloads, of a number of types including DOM objects, SOAP messages, and JAXB objects. Because it is a low-level API, the Dispatch interface does not perform any of the message preparation that the higher-level JAX-WS APIs perform. You must ensure that the messages, or payloads, that you pass to the Dispatch object are properly constructed, and make sense for the remote operation being invoked.
19.1.1. Usage Modes
Overview
Dispatch objects have two usage modes:
- Message mode
- Message Payload mode (Payload mode)
Dispatch object determines the amount of detail that is passed to the user level code.
Message mode
Dispatch object works with complete messages. A complete message includes any binding specific headers and wrappers. For example, a consumer interacting with a service that requires SOAP messages must provide the Dispatch object's invoke() method a fully specified SOAP message. The invoke() method also returns a fully specified SOAP message. The consumer code is responsible for completing and reading the SOAP message's headers and the SOAP message's envelope information.
Dispatch object uses message mode provide the value java.xml.ws.Service.Mode.MESSAGE when creating the Dispatch object. For more information about creating a Dispatch object see the section called “Creating a Dispatch object”.
Payload mode
Dispatch object works with only the payload of a message. For example, a Dispatch object working in payload mode works only with the body of a SOAP message. The binding layer processes any binding level wrappers and headers. When a result is returned from the invoke() method the binding level wrappers and headers are already striped away, and only the body of the message is left.
Dispatch object uses payload mode provide the value java.xml.ws.Service.Mode.PAYLOAD when creating the Dispatch object. For more information about creating a Dispatch object see the section called “Creating a Dispatch object”.
19.1.2. Data Types
Overview
Dispatch objects are low-level objects, they are not optimized for using the same JAXB generated types as the higher level consumer APIs. Dispatch objects work with the following types of objects:
Using Source objects
Dispatch object accepts and returns objects that are derived from the javax.xml.transform.Source interface. Source objects are supported by any binding, and in either message mode or payload mode.
Source objects are low level objects that hold XML documents. Each Source implementation provides methods that access the stored XML documents and then manipulate its contents. The following objects implement the Source interface:
DOMSource- Holds XML messages as a Document Object Model(DOM) tree. The XML message is stored as a set of
Nodeobjects that are accessed using thegetNode()method. Nodes can be either updated or added to the DOM tree using thesetNode()method. SAXSource- Holds XML messages as a Simple API for XML (SAX) object. SAX objects contain an
InputSourceobject that holds the raw data and anXMLReaderobject that parses the raw data. StreamSource- Holds XML messages as a data stream. The data stream can be manipulated the same as any other data stream.
Dispatch object so that it uses generic Source objects, Apache CXF returns the messages as SAXSource objects.
Using SOAPMessage objects
Dispatch objects can use javax.xml.soap.SOAPMessage objects when the following conditions are true:
- The
Dispatchobject is using the SOAP binding - The
Dispatchobject is using message mode
SOAPMessage object holds a SOAP message. They contain one SOAPPart object and zero or more AttachmentPart objects. The SOAPPart object contains the SOAP specific portions of the SOAP message including the SOAP envelope, any SOAP headers, and the SOAP message body. The AttachmentPart objects contain binary data that is passed as an attachment.
Using DataSource objects
Dispatch objects can use objects that implement the javax.activation.DataSource interface when the following conditions are true:
- The
Dispatchobject is using the HTTP binding - The
Dispatchobject is using message mode
DataSource objects provide a mechanism for working with MIME typed data from a variety of sources, including URLs, files, and byte arrays.
Using JAXB objects
Dispatch objects are intended to be low level APIs that allow you to work with raw messages, they also allow you to work with JAXB objects. To work with JAXB objects a Dispatch object must be passed a JAXBContext that can marshal and unmarshal the JAXB objects in use. The JAXBContext is passed when the Dispatch object is created.
JAXBContext object as the parameter to the invoke() method. You can also cast the returned message into any JAXB object understood by the JAXBContext object.
JAXBContext object see Chapter 16, Using A JAXBContext Object.
19.1.3. Working with Dispatch Objects
Procedure
Dispatch object to invoke a remote service the following sequence should be followed:
Creating a Dispatch object
Dispatch object do the following:
- Create a
Serviceobject to represent thewsdl:serviceelement that defines the service on which theDispatchobject will make invocations. See Section 2.1, “Creating a Service Object”. - Create the
Dispatchobject using theServiceobject'screateDispatch()method, shown in Example 19.1, “ThecreateDispatch()Method”.Example 19.1. The
createDispatch()Methodpublic Dispatch<T> createDispatch(QName portName,
java.lang.Class<T> type,
Service.Mode mode)
throws WebServiceException;NoteIf you are using JAXB objects the method signature forcreateDispatch()is:public Dispatch<T> createDispatch(QName portName,
javax.xml.bind.JAXBContext context,
Service.Mode mode)
throws WebServiceException;Table 19.1, “Parameters forcreateDispatch()” describes the parameters for thecreateDispatch()method.Table 19.1. Parameters for
createDispatch()Parameter Description portNameSpecifies the QName of the wsdl:portelement that represents the service provider where theDispatchobject will make invocations.typeSpecifies the data type of the objects used by theDispatchobject. See Section 19.1.2, “Data Types”.When working with JAXB objects, this parameter specifies theJAXBContextobject used to marshal and unmarshal the JAXB objects.modeSpecifies the usage mode for the Dispatchobject. See Section 19.1.1, “Usage Modes”.
Dispatch Object” shows the code for creating a Dispatch object that works with DOMSource objects in payload mode.
Example 19.2. Creating a Dispatch Object
package com.fusesource.demo;

import javax.xml.namespace.QName;
import javax.xml.ws.Service;

public class Client
{
public static void main(String args[])
  {
    QName serviceName = new QName("http://org.apache.cxf", "stockQuoteReporter");
    Service s = Service.create(serviceName);

    QName portName = new QName("http://org.apache.cxf", "stockQuoteReporterPort");
    Dispatch<DOMSource> dispatch = s.createDispatch(portName,
                                                  DOMSource.class,
                                                  Service.Mode.PAYLOAD);
    ...
Constructing request messages
Dispatch objects, requests must be built from scratch. The developer is responsible for ensuring that the messages passed to a Dispatch object match a request that the targeted service provider can process. This requires precise knowledge about the messages used by the service provider and what, if any, header information it requires.
- The root element of the request is based in the value of the
nameattribute of thewsdl:operationelement corresponding to the operation being invoked.WarningIf the service being invoked uses doc/literal bare messages, the root element of the request is based on the value of thenameattribute of thewsdl:partelement referred to by thewsdl:operationelement. - The root element of the request is namespace qualified.
- If the service being invoked uses rpc/literal messages, the top-level elements in the request will not be namespace qualified.ImportantThe children of top-level elements may be namespace qualified. To be certain you must check their schema definitions.
- If the service being invoked uses rpc/literal messages, none of the top-level elements can be null.
- If the service being invoked uses doc/literal messages, the schema definition of the message determines if any of the elements are namespace qualified.
Synchronous invocation
Dispatch object's invoke() method shown in Example 19.3, “The Dispatch.invoke() Method”.
Example 19.3. The Dispatch.invoke() Method
T invoke(T msg)
throws WebServiceException;invoke() method are determined when the Dispatch object is created. For example if you create a Dispatch object using createDispatch(portName, SOAPMessage.class, Service.Mode.MESSAGE), both the response and the request are SOAPMessage objects.
JAXBContext object can marshal and unmarshal. Also, the response and the request can be different JAXB objects.
Dispatch Object” shows code for making a synchronous invocation on a remote service using a DOMSource object.
Example 19.4. Making a Synchronous Invocation Using a Dispatch Object
// Creating a DOMSource Object for the request
DocumentBuilder db = DocumentBuilderFactory.newDocumentBuilder();
Document requestDoc = db.newDocument();
Element root = requestDoc.createElementNS("http://org.apache.cxf/stockExample",
                                          "getStockPrice");
root.setNodeValue("DOW");
DOMSource request = new DOMSource(requestDoc);

// Dispatch disp created previously
DOMSource response = disp.invoke(request);
Asynchronous invocation
Dispatch objects also support asynchronous invocations. As with the higher level asynchronous APIs discussed in Chapter 18, Developing Asynchronous Applications, Dispatch objects can use both the polling approach and the callback approach.
invokeAsync() method returns a Response<t> object that can be polled to see if the response has arrived. Example 19.5, “The Dispatch.invokeAsync() Method for Polling” shows the signature of the method used to make an asynchronous invocation using the polling approach.
Example 19.5. The Dispatch.invokeAsync() Method for Polling
Response <T> invokeAsync(T msg)
throws WebServiceException;invokeAsync() method takes an AsyncHandler implementation that processes the response when it is returned. Example 19.6, “The Dispatch.invokeAsync() Method Using a Callback” shows the signature of the method used to make an asynchronous invocation using the callback approach.
Example 19.6. The Dispatch.invokeAsync() Method Using a Callback
Future<?> invokeAsync(T msg,
                      AsyncHandler<T> handler)
throws WebServiceException;invoke() method, the type of the response and the type of the request are determined when you create the Dispatch object.
Oneway invocation
Dispatch object's invokeOneWay(). Example 19.7, “The Dispatch.invokeOneWay() Method” shows the signature for this method.
Example 19.7. The Dispatch.invokeOneWay() Method
void invokeOneWay(T msg)
throws WebServiceException;Dispatch object is created. For example if the Dispatch object is created using createDispatch(portName, DOMSource.class, Service.Mode.PAYLOAD), then the request is packaged into a DOMSource object.
JAXBContext object can marshal and unmarshal.
Dispatch Object” shows code for making a oneway invocation on a remote service using a JAXB object.
Example 19.8. Making a One Way Invocation Using a Dispatch Object
// Creating a JAXBContext and an Unmarshaller for the request
JAXBContext jbc = JAXBContext.newInstance("org.apache.cxf.StockExample");
Unmarshaller u = jbc.createUnmarshaller();

// Read the request from disk
File rf = new File("request.xml");
GetStockPrice request = (GetStockPrice)u.unmarshal(rf);

// Dispatch disp created previously
disp.invokeOneWay(request);
19.2. Using XML in a Service Provider
Provider interface is a low-level JAX-WS API that allows you to implement a service provider that works directly with messages as raw XML. The messages are not packaged into JAXB objects before being passed to an object that implements the Provider interface.
19.2.1. Messaging Modes
Overview
Provider interface have two messaging modes:
Message mode
Provider implementation works with complete messages. A complete message includes any binding specific headers and wrappers. For example, a Provider implementation that uses a SOAP binding receives requests as fully specified SOAP message. Any response returned from the implementation must be a fully specified SOAP message.
Provider implementation uses message mode by provide the value java.xml.ws.Service.Mode.MESSAGE as the value to the javax.xml.ws.ServiceMode annotation, as shown in Example 19.9, “Specifying that a Provider Implementation Uses Message Mode”.
Example 19.9. Specifying that a Provider Implementation Uses Message Mode
@WebServiceProvider
@ServiceMode(value=Service.Mode.MESSAGE)
public class stockQuoteProvider implements Provider<SOAPMessage>
{
  ...
}
Payload mode
Provider implementation works with only the payload of a message. For example, a Provider implementation working in payload mode works only with the body of a SOAP message. The binding layer processes any binding level wrappers and headers.
Provider implementation uses payload mode by provide the value java.xml.ws.Service.Mode.PAYLOAD as the value to the javax.xml.ws.ServiceMode annotation, as shown in Example 19.10, “Specifying that a Provider Implementation Uses Payload Mode”.
Example 19.10. Specifying that a Provider Implementation Uses Payload Mode
@WebServiceProvider
@ServiceMode(value=Service.Mode.PAYLOAD)
public class stockQuoteProvider implements Provider<DOMSource>
{
  ...
}@ServiceMode annotation, the Provider implementation uses payload mode.
19.2.2. Data Types
Overview
Provider implementations cannot use the same JAXB generated types as the higher level consumer APIs. Provider implementations work with the following types of objects:
Using Source objects
Provider implementation can accept and return objects that are derived from the javax.xml.transform.Source interface. Source objects are low level objects that hold XML documents. Each Source implementation provides methods that access the stored XML documents and manipulate its contents. The following objects implement the Source interface:
DOMSource- Holds XML messages as a Document Object Model(DOM) tree. The XML message is stored as a set of
Nodeobjects that are accessed using thegetNode()method. Nodes can be either updated or added to the DOM tree using thesetNode()method. SAXSource- Holds XML messages as a Simple API for XML (SAX) object. SAX objects contain an
InputSourceobject that holds the raw data and anXMLReaderobject that parses the raw data. StreamSource- Holds XML messages as a data stream. The data stream can be manipulated the same as any other data stream.
Provider object so that it uses generic Source objects, Apache CXF returns the messages as SAXSource objects.
Source objects the developer is responsible for ensuring that all required binding specific wrappers are added to the message. For example, when interacting with a service expecting SOAP messages, the developer must ensure that the required SOAP envelope is added to the outgoing request and that the SOAP envelope's contents are correct.
Using SOAPMessage objects
Provider implementations can use javax.xml.soap.SOAPMessage objects when the following conditions are true:
- The
Providerimplementation is using the SOAP binding - The
Providerimplementation is using message mode
SOAPMessage object holds a SOAP message. They contain one SOAPPart object and zero or more AttachmentPart objects. The SOAPPart object contains the SOAP specific portions of the SOAP message including the SOAP envelope, any SOAP headers, and the SOAP message body. The AttachmentPart objects contain binary data that is passed as an attachment.
Using DataSource objects
Provider implementations can use objects that implement the javax.activation.DataSource interface when the following conditions are true:
- The implementation is using the HTTP binding
- The implementation is using message mode
DataSource objects provide a mechanism for working with MIME typed data from a variety of sources, including URLs, files, and byte arrays.
19.2.3. Implementing a Provider Object
Overview
Provider interface is relatively easy to implement. It only has one method, invoke(), that must be implemented. In addition it has three simple requirements:
- An implementation must have the
@WebServiceProviderannotation. - An implementation must have a default public constructor.
- An implementation must implement a typed version of the
Providerinterface.In other words, you cannot implement aProvider<T>interface. You must implement a version of the interface that uses a concrete data type as listed in Section 19.2.2, “Data Types”. For example, you can implement an instance of aProvider<SAXSource>.
Provider interface is in the logic handling the request messages and building the proper responses.
Working with messages
Provider implementations receive requests as raw XML data, and must send responses as raw XML data. This requires that the developer has intimate knowledge of the messages used by the service being implemented. These details can typically be found in the WSDL document describing the service.
- The root element of a request is based in the value of the
nameattribute of thewsdl:operationelement that corresponds to the operation that is invoked.WarningIf the service uses doc/literal bare messages, the root element of the request is based on the value ofnameattribute of thewsdl:partelement referred to by thewsdl:operationelement. - The root element of all messages is namespace qualified.
- If the service uses rpc/literal messages, the top-level elements in the messages are not namespace qualified.ImportantThe children of top-level elements might be namespace qualified, but to be certain you will must check their schema definitions.
- If the service uses rpc/literal messages, none of the top-level elements can be null.
- If the service uses doc/literal messages, then the schema definition of the message determines if any of the elements are namespace qualified.
The @WebServiceProvider annotation
Provider implementation must be decorated with the @WebServiceProvider annotation.
@WebServiceProvider Properties” describes the properties that can be set for the @WebServiceProvider annotation.
Table 19.2. @WebServiceProvider Properties
| Property | Description |
|---|---|
| portName | Specifies the value of the name attribute of the wsdl:port element that defines the service's endpoint. |
| serviceName | Specifies the value of the name attribute of the wsdl:service element that contains the service's endpoint. |
| targetNamespace | Specifies the targetname space of the service's WSDL definition. |
| wsdlLocation | Specifies the URI for the WSDL document defining the service. |
Implementing the invoke() method
Provider interface has only one method, invoke(), that must be implemented. The invoke() method receives the incoming request packaged into the type of object declared by the type of Provider interface being implemented, and returns the response message packaged into the same type of object. For example, an implementation of a Provider<SOAPMessage> interface receives the request as a SOAPMessage object and returns the response as a SOAPMessage object.
Provider implementation determines the amount of binding specific information the request and the response messages contain. Implementations using message mode receive all of the binding specific wrappers and headers along with the request. They must also add all of the binding specific wrappers and headers to the response message. Implementations using payload mode only receive the body of the request. The XML document returned by an implementation using payload mode is placed into the body of the request message.
Examples
Provider<SOAPMessage> Implementation” shows a Provider implementation that works with SOAPMessage objects in message mode.
Example 19.11. Provider<SOAPMessage> Implementation
import javax.xml.ws.Provider;
import javax.xml.ws.Service;
import javax.xml.ws.ServiceMode;
import javax.xml.ws.WebServiceProvider;

1@WebServiceProvider(portName="stockQuoteReporterPort"
                    serviceName="stockQuoteReporter")
2@ServiceMode(value="Service.Mode.MESSAGE")
public class  stockQuoteReporterProvider implements Provider<SOAPMessage>
{
3public stockQuoteReporterProvider()
  {
  }

4public SOAPMessage invoke(SOAPMessage request)
  {
5  SOAPBody requestBody = request.getSOAPBody();
6  if(requestBody.getElementName.getLocalName.equals("getStockPrice"))
    {
7    MessageFactory mf = MessageFactory.newInstance();
      SOAPFactory sf = SOAPFactory.newInstance();

8    SOAPMessage response = mf.createMessage();
      SOAPBody respBody = response.getSOAPBody();
      Name bodyName = sf.createName("getStockPriceResponse");
      respBody.addBodyElement(bodyName);
      SOAPElement respContent = respBody.addChildElement("price");
      respContent.setValue("123.00");
      response.saveChanges();
9    return response;
    }
    ...
  }
}
Provider<SOAPMessage> Implementation” does the following:
- 1
- Specifies that the following class implements a
Providerobject that implements the service whosewsdl:serviceelement is namedstockQuoteReporter, and whosewsdl:portelement is namedstockQuoteReporterPort. - 2
- Specifies that this
Providerimplementation uses message mode. - 3
- Provides the required default public constructor.
- 4
- Provides an implementation of the
invoke()method that takes aSOAPMessageobject and returns aSOAPMessageobject. - 5
- Extracts the request message from the body of the incoming SOAP message.
- 6
- Checks the root element of the request message to determine how to process the request.
- 7
- Creates the factories required for building the response.
- 8
- Builds the SOAP message for the response.
- 9
- Returns the response as a
SOAPMessageobject.
Provider<DOMSource> Implementation” shows an example of a Provider implementation using DOMSource objects in payload mode.
Example 19.12. Provider<DOMSource> Implementation
import javax.xml.ws.Provider;
import javax.xml.ws.Service;
import javax.xml.ws.ServiceMode;
import javax.xml.ws.WebServiceProvider;

1@WebServiceProvider(portName="stockQuoteReporterPort" serviceName="stockQuoteReporter")
2@ServiceMode(value="Service.Mode.PAYLOAD")
public class  stockQuoteReporterProvider implements Provider<DOMSource>
3public stockQuoteReporterProvider()
  {
  }

4public DOMSource invoke(DOMSource request)
  {
    DOMSource response = new DOMSource();
    ...
    return response;
  }
}
Provider<DOMSource> Implementation” does the following:
- 1
- Specifies that the class implements a
Providerobject that implements the service whosewsdl:serviceelement is namedstockQuoteReporter, and whosewsdl:portelement is namedstockQuoteReporterPort. - 2
- Specifies that this
Providerimplementation uses payload mode. - 3
- Provides the required default public constructor.
- 4
- Provides an implementation of the
invoke()method that takes aDOMSourceobject and returns aDOMSourceobject.
Chapter 20. Working with Contexts
Abstract
20.1. Understanding Contexts
Overview
Handler implementations have direct access to the contexts and can access all properties that are set in them. Service implementations access contexts by having them injected, and can only access properties that are set in the APPLICATION scope. Consumer implementations can only access properties that are set in the APPLICATION scope.
Figure 20.1. Message Contexts and Message Processing Path
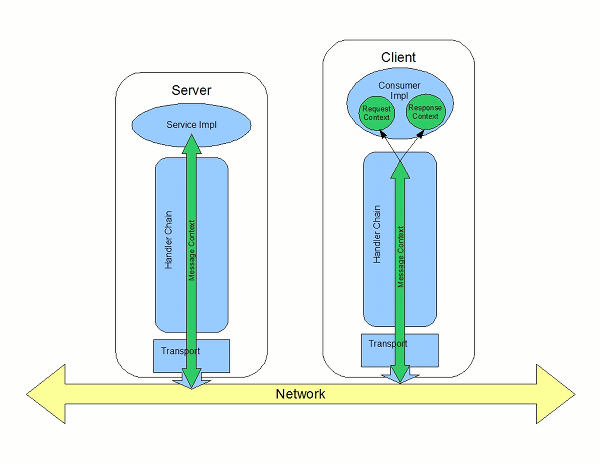
How properties are stored in a context
javax.xml.ws.handler.MessageContext interface. The MessageContext interface extends the java.util.Map<String key, Object value> interface. Map objects store information as key value pairs.
String that identifies the property. The value of a property can be any value stored in any Java object. When the value is returned from a message context, the application must know the type to expect and cast accordingly. For example, if a property's value is stored in a UserInfo object it is still returned from a message context as an Object object that must be cast back into a UserInfo object.
Property scopes
APPLICATION- Properties scoped as
APPLICATIONare available to JAX-WSHandlerimplementations, consumer implementation code, and service provider implementation code. If a handler needs to pass a property to the service provider implementation, it sets the property's scope toAPPLICATION. All properties set from either the consumer implementation or the service provider implementation contexts are automatically scoped asAPPLICATION. HANDLER- Properties scoped as
HANDLERare only available to JAX-WSHandlerimplementations. Properties stored in a message context from aHandlerimplementation are scoped asHANDLERby default.
setScope() method. Example 20.1, “The MessageContext.setScope() Method” shows the method's signature.
Example 20.1. The MessageContext.setScope() Method
void setScope(String key,
              MessageContext.Scope scope)
throws java.lang.IllegalArgumentException;MessageContext.Scope.APPLICATIONMessageContext.Scope.HANDLER
Overview of contexts in handlers
Handler interface have direct access to a message's context information. The message's context information is passed into the Handler implementation's handleMessage(), handleFault(), and close() methods.
Handler implementations have access to all of the properties stored in the message context, regardless of their scope. In addition, logical handlers use a specialized message context called a LogicalMessageContext. LogicalMessageContext objects have methods that access the contents of the message body.
Overview of contexts in service implementations
APPLICATION from the message context. The service provider's implementation object accesses the message context through the WebServiceContext object.
Overview of contexts in consumer implementations
- Request context — holds a copy of the properties used for outgoing requests
- Response context — holds a copy of the properties from an incoming response
Handler implementations.
APPLICATION in its message context to the consumer implementation's response context.
20.2. Working with Contexts in a Service Implementation
Overview
WebServiceContext interface. From the WebServiceContext object you can obtain a MessageContext object that is populated with the current request's context properties in the application scope. You can manipulate the values of the properties, and they are propagated back through the response chain.
MessageContext interface inherits from the java.util.Map interface. Its contents can be manipulated using the Map interface's methods.
Obtaining a context
- Declare a variable of type
WebServiceContext. - Decorate the variable with the
javax.annotation.Resourceannotation to indicate that the context information is being injected into the variable. - Obtain the
MessageContextobject from theWebServiceContextobject using thegetMessageContext()method.ImportantgetMessageContext()can only be used in methods that are decorated with the@WebMethodannotation.
Example 20.2. Obtaining a Context Object in a Service Implementation
import javax.xml.ws.*;
import javax.xml.ws.handler.*;
import javax.annotation.*;

@WebServiceProvider
public class WidgetServiceImpl
{
  @Resource
  WebServiceContext wsc;

  @WebMethod
  public String getColor(String itemNum)
  {
    MessageContext context = wsc.getMessageContext();
  }

  ...
}
Reading a property from a context
MessageContext object for your implementation, you can access the properties stored there using the get() method shown in Example 20.3, “The MessageContext.get() Method”.
Example 20.3. The MessageContext.get() Method
V get(Object key);get() is inherited from the Map interface.
key parameter is the string representing the property you want to retrieve from the context. The get() returns an object that must be cast to the proper type for the property. Table 20.1, “Properties Available in the Service Implementation Context” lists a number of the properties that are available in a service implementation's context.
operation element that represents the invoked operation.
Example 20.4. Getting a Property from a Service's Message Context
import javax.xml.ws.handler.MessageContext;
import org.apache.cxf.message.Message;

  ...
  // MessageContext context retrieved in a previous example
  QName wsdl_operation = (QName)context.get(Message.WSDL_OPERATION);
Setting properties in a context
MessageContext object for your implementation, you can set properties, and change existing properties, using the put() method shown in Example 20.5, “The MessageContext.put() Method”.
Example 20.5. The MessageContext.put() Method
V put(K key,
      V value)
throws ClassCastException, IllegalArgumentException, NullPointerException;put() method replaces the existing value with the new value and returns the old value. If the property does not already exist in the message context, the put() method sets the property and returns null.
Example 20.6. Setting a Property in a Service's Message Context
import javax.xml.ws.handler.MessageContext;
import org.apache.cxf.message.Message;

  ...
  // MessageContext context retrieved in a previous example
  context.put(Message.RESPONSE_CODE, new Integer(404));
Supported contexts
Table 20.1. Properties Available in the Service Implementation Context
| Base Class | |
|---|---|
| Property Name | Description |
org.apache.cxf.message.Message | |
PROTOCOL_HEADERS[a] | Specifies the transport specific header information. The value is stored as a java.util.Map<String, List<String>>. |
RESPONSE_CODE[a] | Specifies the response code returned to the consumer. The value is stored as an Integer object. |
ENDPOINT_ADDRESS | Specifies the address of the service provider. The value is stored as a String. |
HTTP_REQUEST_METHOD[a] | Specifies the HTTP verb sent with a request. The value is stored as a String. |
PATH_INFO[a] |
Specifies the path of the resource being requested. The value is stored as a
String.
The path is the portion of the URI after the hostname and before any query string. For example, if an endpoint's URI is http://cxf.apache.org/demo/widgets the path is
/demo/widgets.
|
QUERY_STRING[a] |
Specifies the query, if any, attached to the URI used to invoke the request. The value is stored as a
String.
Queries appear at the end of the URI after a
?. For example, if a request is made to http://cxf.apache.org/demo/widgets?color the query is color.
|
MTOM_ENABLED | Specifies whether or not the service provider can use MTOM for SOAP attachments. The value is stored as a Boolean. |
SCHEMA_VALIDATION_ENABLED | Specifies whether or not the service provider validates messages against a schema. The value is stored as a Boolean. |
FAULT_STACKTRACE_ENABLED | Specifies if the runtime provides a stack trace along with a fault message. The value is stored as a Boolean. |
CONTENT_TYPE | Specifies the MIME type of the message. The value is stored as a String. |
BASE_PATH |
Specifies the path of the resource being requested. The value is stored as a
java.net.URL.
The path is the portion of the URI after the hostname and before any query string. For example, if an endpoint's URL is http://cxf.apache.org/demo/widgets the base path is
/demo/widgets.
|
ENCODING | Specifies the encoding of the message. The value is stored as a String. |
FIXED_PARAMETER_ORDER | Specifies whether the parameters must appear in the message in a particular order. The value is stored as a Boolean. |
MAINTAIN_SESSION | Specifies if the consumer wants to maintain the current session for future requests. The value is stored as a Boolean. |
WSDL_DESCRIPTION[a] | Specifies the WSDL document that defines the service being implemented. The value is stored as a org.xml.sax.InputSource object. |
WSDL_SERVICE[a] | Specifies the qualified name of the wsdl:service element that defines the service being implemented. The value is stored as a QName. |
WSDL_PORT[a] | Specifies the qualified name of the wsdl:port element that defines the endpoint used to access the service. The value is stored as a QName. |
WSDL_INTERFACE[a] | Specifies the qualified name of the wsdl:portType element that defines the service being implemented. The value is stored as a QName. |
WSDL_OPERATION[a] | Specifies the qualified name of the wsdl:operation element that corresponds to the operation invoked by the consumer. The value is stored as a QName. |
javax.xml.ws.handler.MessageContext | |
MESSAGE_OUTBOUND_PROPERTY | Specifies if a message is outbound. The value is stored as a Boolean. true specifies that a message is outbound. |
INBOUND_MESSAGE_ATTACHMENTS |
Contains any attachments included in the request message. The value is stored as a
java.util.Map<String, DataHandler>.
The key value for the map is the MIME Content-ID for the header.
|
OUTBOUND_MESSAGE_ATTACHMENTS |
Contains any attachments for the response message. The value is stored as a
java.util.Map<String, DataHandler>.
The key value for the map is the MIME Content-ID for the header.
|
WSDL_DESCRIPTION | Specifies the WSDL document that defines the service being implemented. The value is stored as a org.xml.sax.InputSource object. |
WSDL_SERVICE | Specifies the qualified name of the wsdl:service element that defines the service being implemented. The value is stored as a QName. |
WSDL_PORT | Specifies the qualified name of the wsdl:port element that defines the endpoint used to access the service. The value is stored as a QName. |
WSDL_INTERFACE | Specifies the qualified name of the wsdl:portType element that defines the service being implemented. The value is stored as a QName. |
WSDL_OPERATION | Specifies the qualified name of the wsdl:operation element that corresponds to the operation invoked by the consumer. The value is stored as a QName. |
HTTP_RESPONSE_CODE | Specifies the response code returned to the consumer. The value is stored as an Integer object. |
HTTP_REQUEST_HEADERS | Specifies the HTTP headers on a request. The value is stored as a java.util.Map<String, List<String>>. |
HTTP_RESPONSE_HEADERS | Specifies the HTTP headers for the response. The value is stored as a java.util.Map<String, List<String>>. |
HTTP_REQUEST_METHOD | Specifies the HTTP verb sent with a request. The value is stored as a String. |
SERVLET_REQUEST | Contains the servlet's request object. The value is stored as a javax.servlet.http.HttpServletRequest. |
SERVLET_RESPONSE | Contains the servlet's response object. The value is stored as a javax.servlet.http.HttpResponse. |
SERVLET_CONTEXT | Contains the servlet's context object. The value is stored as a javax.servlet.ServletContext. |
PATH_INFO |
Specifies the path of the resource being requested. The value is stored as a
String.
The path is the portion of the URI after the hostname and before any query string. For example, if an endpoint's URL is http://cxf.apache.org/demo/widgets the path is
/demo/widgets.
|
QUERY_STRING |
Specifies the query, if any, attached to the URI used to invoke the request. The value is stored as a
String.
Queries appear at the end of the URI after a
?. For example, if a request is made to http://cxf.apache.org/demo/widgets?color the query string is color.
|
REFERENCE_PARAMETERS | Specifies the WS-Addressing reference parameters. This includes all of the SOAP headers whose wsa:IsReferenceParameter attribute is set to true. The value is stored as a java.util.List. |
org.apache.cxf.transport.jms.JMSConstants | |
JMS_SERVER_HEADERS | Contains the JMS message headers. For more information see Section 20.4, “Working with JMS Message Properties”. |
[a]
When using HTTP this property is the same as the standard JAX-WS defined property.
| |
20.3. Working with Contexts in a Consumer Implementation
Overview
BindingProvider interface. The BindingProvider instance holds context information in two separate contexts:
- Request Context
- The request context enables you to set properties that affect outbound messages. Request context properties are applied to a specific port instance and, once set, the properties affect every subsequent operation invocation made on the port, until such time as a property is explicitly cleared. For example, you might use a request context property to set a connection timeout or to initialize data for sending in a header.
- Response Context
- The response context enables you to read the property values set by the response to the last operation invocation made from the current thread. Response context properties are reset after every operation invocation. For example, you might access a response context property to read header information received from the last inbound message.
Obtaining a context
javax.xml.ws.BindingProvider interface. The BindingProvider interface has two methods for obtaining a context:
getRequestContext()- The
getRequestContext()method, shown in Example 20.7, “ThegetRequestContext()Method”, returns the request context as aMapobject. The returnedMapobject can be used to directly manipulate the contents of the context.Example 20.7. The
getRequestContext()MethodMap<String, Object> getRequestContext(); getResponseContext()- The
getResponseContext(), shown in Example 20.8, “ThegetResponseContext()Method”, returns the response context as aMapobject. The returnedMapobject's contents reflect the state of the response context's contents from the most recent successful request on a remote service made in the current thread.Example 20.8. The
getResponseContext()MethodMap<String, Object> getResponseContext();
BindingProvider interface, a BindingProvider object can be obtained by casting a proxy object. The contexts obtained from the BindingProvider object are only valid for operations invoked on the proxy object used to create it.
Example 20.9. Getting a Consumer's Request Context
// Proxy widgetProxy obtained previously
BindingProvider bp = (BindingProvider)widgetProxy;
Map<String, Object> responseContext = bp.getResponseContext();
Reading a property from a context
java.util.Map<String, Object> objects. The map has keys that are String objects and values that contain arbitrary objects. Use java.util.Map.get() to access an entry in the map of response context properties.
Example 20.10. Reading a Response Context Property
// Invoke an operation.
port.SomeOperation();

// Read response context property.
java.util.Map<String, Object> responseContext =
  ((javax.xml.ws.BindingProvider)port).getResponseContext();
PropertyType propValue = (PropertyType) responseContext.get(ContextPropertyName);
Setting properties in a context
java.util.Map<String, Object> objects. The map has keys that are String objects and values that are arbitrary objects. To set a property in a context use the java.util.Map.put() method.
BindingProvider.ENDPOINT_ADDRESS_PROPERTY.
Example 20.11. Setting a Request Context Property
// Set request context property.
java.util.Map<String, Object> requestContext =
     ((javax.xml.ws.BindingProvider)port).getRequestContext();
requestContext.put(BindingProvider.ENDPOINT_ADDRESS_PROPERTY, "http://localhost:8080/widgets");

// Invoke an operation.
port.SomeOperation();Supported contexts
Table 20.2. Consumer Context Properties
| Base Class | |
|---|---|
| Property Name | Description |
javax.xml.ws.BindingProvider | |
ENDPOINT_ADDRESS_PROPERTY | Specifies the address of the target service. The value is stored as a String. |
USERNAME_PROPERTY[a] | Specifies the username used for HTTP basic authentication. The value is stored as a String. |
PASSWORD_PROPERTY[b] | Specifies the password used for HTTP basic authentication. The value is stored as a String. |
SESSION_MAINTAIN_PROPERTY[c] | Specifies if the client wants to maintain session information. The value is stored as a Boolean object. |
| org.apache.cxf.ws.addressing.JAXWSAConstants | |
CLIENT_ADDRESSING_PROPERTIES | Specifies the WS-Addressing information used by the consumer to contact the desired service provider. The value is stored as a org.apache.cxf.ws.addressing.AddressingProperties. |
| org.apache.cxf.transports.jms.context.JMSConstants | |
JMS_CLIENT_REQUEST_HEADERS | Contains the JMS headers for the message. For more information see Section 20.4, “Working with JMS Message Properties”. |
[a]
This property is overridden by the username defined in the HTTP security settings.
[b]
This property is overridden by the password defined in the HTTP security settings.
[c]
The Apache CXF ignores this property.
| |
20.4. Working with JMS Message Properties
20.4.1. Inspecting JMS Message Headers
org.apache.cxf.transports.jms.context.JMSMessageHeadersType object.
Getting the JMS Message Headers in a Service
WebServiceContext object, do the following:
- Obtain the context as described in the section called “Obtaining a context”.
- Get the message headers from the message context using the message context's
get()method with the parameterorg.apache.cxf.transports.jms.JMSConstants.JMS_SERVER_HEADERS.
Example 20.12. Getting JMS Message Headers in a Service Implementation
import org.apache.cxf.transport.jms.JMSConstants;
import org.apache.cxf.transports.jms.context.JMSMessageHeadersType;
@WebService(serviceName = "HelloWorldService",
portName = "HelloWorldPort",
endpointInterface = "org.apache.cxf.hello_world_jms.HelloWorldPortType",
targetNamespace = "http://cxf.apache.org/hello_world_jms")
public class GreeterImplTwoWayJMS implements HelloWorldPortType
{
@Resource
protected WebServiceContext wsContext;
...
@WebMethod
public String greetMe(String me)
{
MessageContext mc = wsContext.getMessageContext();
JMSMessageHeadersType headers = (JMSMessageHeadersType) mc.get(JMSConstants.JMS_SERVER_HEADERS);
...
}
...
}Getting JMS Message Header Properties in a Consumer
- Get the response context as described in the section called “Obtaining a context”.
- Get the JMS message header properties from the response context using the context's
get()method withorg.apache.cxf.transports.jms.JMSConstants.JMS_CLIENT_RESPONSE_HEADERSas the parameter.
Example 20.13. Getting the JMS Headers from a Consumer Response Header
import org.apache.cxf.transports.jms.context.*; // Proxy greeter initialized previously 1BindingProvider bp = (BindingProvider)greeter; 2Map<String, Object> responseContext = bp.getResponseContext(); 3JMSMessageHeadersType responseHdr = (JMSMessageHeadersType) responseContext.get(JMSConstants.JMS_CLIENT_REQUEST_HEADERS); ... }
20.4.2. Inspecting the Message Header Properties
Standard JMS Header Properties
Table 20.3. JMS Header Properties
| Property Name | Property Type | Getter Method |
|---|---|---|
| Correlation ID | string | getJMSCorralationID() |
| Delivery Mode | int | getJMSDeliveryMode() |
| Message Expiration | long | getJMSExpiration() |
| Message ID | string | getJMSMessageID() |
| Priority | int | getJMSPriority() |
| Redelivered | boolean | getJMSRedlivered() |
| Time Stamp | long | getJMSTimeStamp() |
| Type | string | getJMSType() |
| Time To Live | long | getTimeToLive() |
Optional Header Properties
JMSMessageHeadersType.getProperty(). The optional properties are returned as a List of org.apache.cxf.transports.jms.context.JMSPropertyType. Optional properties are stored as name/value pairs.
Example
Example 20.14. Reading the JMS Header Properties
// JMSMessageHeadersType messageHdr retrieved previously 1System.out.println("Correlation ID: "+messageHdr.getJMSCorrelationID()); 2System.out.println("Message Priority: "+messageHdr.getJMSPriority()); 3System.out.println("Redelivered: "+messageHdr.getRedelivered()); JMSPropertyType prop = null; 4List<JMSPropertyType> optProps = messageHdr.getProperty(); 5Iterator<JMSPropertyType> iter = optProps.iterator(); 6while (iter.hasNext()) { prop = iter.next(); System.out.println("Property name: "+prop.getName()); System.out.println("Property value: "+prop.getValue()); }
- 1
- Prints the value of the message's correlation ID.
- 2
- Prints the value of the message's priority property.
- 3
- Prints the value of the message's redelivered property.
- 4
- Gets the list of the message's optional header properties.
- 5
- Gets an
Iteratorto traverse the list of properties. - 6
- Iterates through the list of optional properties and prints their name and value.
20.4.3. Setting JMS Properties
JMS Header Properties
Table 20.4. Settable JMS Header Properties
| Property Name | Property Type | Setter Method |
|---|---|---|
| Correlation ID | string | setJMSCorralationID() |
| Delivery Mode | int | setJMSDeliveryMode() |
| Priority | int | setJMSPriority() |
| Time To Live | long | setTimeToLive() |
- Create an
org.apache.cxf.transports.jms.context.JMSMessageHeadersTypeobject. - Populate the values you want to set using the appropriate setter methods described in Table 20.4, “Settable JMS Header Properties”.
- Set the values to the request context by calling the request context's
put()method usingorg.apache.cxf.transports.jms.JMSConstants.JMS_CLIENT_REQUEST_HEADERSas the first argument, and the newJMSMessageHeadersTypeobject as the second argument.
Optional JMS Header Properties
JMSMessageHeadersType object that is used to set the other JMS header properties. They are stored as a List object containing org.apache.cxf.transports.jms.context.JMSPropertyType objects. To add optional properties to the JMS header do the following:
- Create a
JMSPropertyTypeobject. - Set the property's name field using
setName(). - Set the property's value field using
setValue(). - Add the property to the JMS message header using
JMSMessageHeadersType.getProperty().add(JMSPropertyType). - Repeat the procedure until all of the properties have been added to the message header.
Client Receive Timeout
put() method with org.apache.cxf.transports.jms.JMSConstants.JMS_CLIENT_RECEIVE_TIMEOUT as the first argument and a long representing the amount of time in milliseconds that you want the consumer to wait as the second argument.
Example
Example 20.15. Setting JMS Properties using the Request Context
import org.apache.cxf.transports.jms.context.*; // Proxy greeter initialized previously 1InvocationHandler handler = Proxy.getInvocationHandler(greeter); BindingProvider bp= null; 2if (handler instanceof BindingProvider) { 3 bp = (BindingProvider)handler; 4 Map<String, Object> requestContext = bp.getRequestContext(); 5 JMSMessageHeadersType requestHdr = new JMSMessageHeadersType(); 6 requestHdr.setJMSCorrelationID("WithBob"); 7 requestHdr.setJMSExpiration(3600000L); 8 JMSPropertyType prop = new JMSPropertyType; 9 prop.setName("MyProperty"); prop.setValue("Bluebird"); 10 requestHdr.getProperty().add(prop); 11 requestContext.put(JMSConstants.CLIENT_REQUEST_HEADERS, requestHdr); 12 requestContext.put(JMSConstants.CLIENT_RECEIVE_TIMEOUT, new Long(1000)); }
- 1
- Gets the
InvocationHandlerfor the proxy whose JMS properties you want to change. - 2
- Checks to see if the
InvocationHandleris aBindingProvider. - 3
- Casts the returned
InvocationHandlerobject into aBindingProviderobject to retrieve the request context. - 4
- Gets the request context.
- 5
- Creates a
JMSMessageHeadersTypeobject to hold the new message header values. - 6
- Sets the Correlation ID.
- 7
- Sets the Expiration property to 60 minutes.
- 8
- Creates a new
JMSPropertyTypeobject. - 9
- Sets the values for the optional property.
- 10
- Adds the optional property to the message header.
- 11
- Sets the JMS message header values into the request context.
- 12
- Sets the client receive timeout property to 1 second.
Chapter 21. Writing Handlers
Abstract
21.1. Handlers: An Introduction
Overview
Figure 21.1. Message Exchange Path
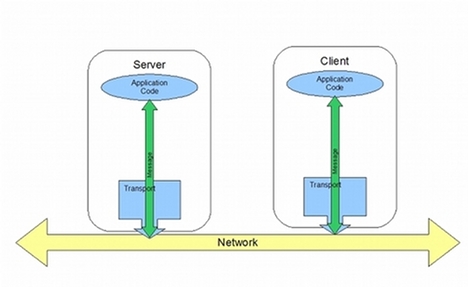
Figure 21.2. Message Exchange Path with Handlers

Handler types
- Logical Handler
- Logical handlers can process the message payload and the properties stored in the message context. For example, if the application uses pure XML messages, the logical handlers have access to the entire message. If the application uses SOAP messages, the logical handlers have access to the contents of the SOAP body. They do not have access to either the SOAP headers or any attachments unless they were placed into the message context.Logical handlers are placed closest to the application code on the handler chain. This means that they are executed first when a message is passed from the application code to the transport. When a message is received from the network and passed back to the application code, the logical handlers are executed last.
- Protocol Handler
- Protocol handlers can process the entire message received from the network and the properties stored in the message context. For example, if the application uses SOAP messages, the protocol handlers would have access to the contents of the SOAP body, the SOAP headers, and any attachments.Protocol handlers are placed closest to the transport on the handler chain. This means that they are executed first when a message is received from the network. When a message is sent to the network from the application code, the protocol handlers are executed last.TipThe only protocol handler supported by Apache CXF is specific to SOAP.
Implementation of handlers
- handleMessage()
- The
handleMessage()method is the central method in any handler. It is the method responsible for processing normal messages. - handleFault()
handleFault()is the method responsible for processing fault messages.- close()
close()is called on all executed handlers in a handler chain when a message has reached the end of the chain. It is used to clean up any resources consumed during message processing.
- The specific interface that is implementedAll handlers implement an interface that derives from the
Handlerinterface. Logical handlers implement theLogicalHandlerinterface. Protocol handlers implement protocol specific extensions of theHandlerinterface. For example, SOAP handlers implement theSOAPHandlerinterface. - The amount of information available to the handlerProtocol handlers have access to the contents of messages and all of the protocol specific information that is packaged with the message content. Logical handlers can only access the contents of the message. Logical handlers have no knowledge of protocol details.
Adding handlers to an application
- Determine whether the handler is going to be used on the service providers, the consumers, or both.
- Determine which type of handler is the most appropriate for the job.
- Implement the proper interface.To implement a logical handler see Section 21.2, “Implementing a Logical Handler”.To implement a protocol handler see Section 21.4, “Implementing a Protocol Handler”.
- Configure your endpoint(s) to use the handlers.
21.2. Implementing a Logical Handler
Overview
javax.xml.ws.handler.LogicalHandler interface. The LogicalHandler interface, shown in Example 21.1, “LogicalHandler Synopsis” passes a LogicalMessageContext object to the handleMessage() method and the handleFault() method. The context object provides access to the body of the message and to any properties set into the message exchange's context.
Example 21.1. LogicalHandler Synopsis
public interface LogicalHandler extends Handler
{
boolean handleMessage(LogicalMessageContext context);
boolean handleFault(LogicalMessageContext context);
void close(LogicalMessageContext context);
}Procedure
- Implement any initialization logic required by the handler.
- Implement the message handling logic.
- Implement the fault handling logic.
- Implement the logic for closing the handler when it is finished.
- Implement any logic for cleaning up the handler's resources before it is destroyed.
21.3. Handling Messages in a Logical Handler
Overview
handleMessage() method.
handleMessage() method receives a LogicalMessageContext object that provides access to the message body and any properties stored in the message context.
handleMessage() method returns either true or false depending on how message processing is to continue. It can also throw an exception.
Getting the message data
LogicalMessageContext object passed into logical message handlers allows access to the message body using the context's getMessage() method. The getMessage() method, shown in Example 21.2, “Method for Getting the Message Payload in a Logical Handler”, returns the message payload as a LogicalMessage object.
Example 21.2. Method for Getting the Message Payload in a Logical Handler
LogicalMessage getMessage();LogicalMessage object, you can use it to manipulate the message body. The LogicalMessage interface, shown in Example 21.3, “Logical Message Holder”, has getters and setters for working with the actual message body.
Example 21.3. Logical Message Holder
LogicalMessage {Source getPayload();Object getPayload(JAXBContext context);void setPayload(Object payload,
JAXBContext context);void setPayload(Source payload);
}
Working with the message body as an XML object
javax.xml.transform.dom.DOMSource object.
getPayload() method that has no parameters returns the message payload as a DOMSource object. The returned object is the actual message payload. Any changes made to the returned object change the message body immediately.
DOMSource object using the setPayload() method that takes the single Source object.
Working with the message body as a JAXB object
JAXBContext object to transform the message payload into JAXB objects.
- Get a
JAXBContextobject that can manage the data types in the message body.For information on creating aJAXBContextobject see Chapter 16, Using AJAXBContextObject. - Get the message body as shown in Example 21.4.
Example 21.4. Getting the Message Body as a JAXB Object
JAXBContext jaxbc = JAXBContext(myObjectFactory.class); Object body = message.getPayload(jaxbc); - Cast the returned object to the proper type.
- Manipulate the message body as needed.
- Put the updated message body back into the context as shown in Example 21.5.
Example 21.5. Updating the Message Body Using a JAXB Object
message.setPayload(body, jaxbc);
Working with context properties
APPLICATION scope and the HANDLER scope.
Map. To access the properties stored in the context, you use the get() method and put() method inherited from the Map interface.
HANDLER. If you want the application code to be able to access the property you need to use the context's setScope() method to explicitly set the property's scope to APPLICATION.
Determining the direction of the message
MessageContext.MESSAGE_OUTBOUND_PROPERTY key as shown in Example 21.6, “Getting the Message's Direction from the SOAP Message Context”.
Example 21.6. Getting the Message's Direction from the SOAP Message Context
Boolean outbound; outbound = (Boolean)smc.get(MessageContext.MESSAGE_OUTBOUND_PROPERTY);
Boolean object. You can use the object's booleanValue() method to determine the property's value. If the property is set to true, the message is outbound. If the property is set to false the message is inbound.
Determining the return value
handleMessage() method completes its message processing has a direct impact on how message processing proceeds. It can complete by doing one of the following actions:
- Return
true—Returningtruesignals to the Apache CXF runtime that message processing should continue normally. The next handler, if any, has itshandleMessage()invoked. - Return
false—Returningfalsesignals to the Apache CXF runtime that normal message processing must stop. How the runtime proceeds depends on the message exchange pattern in use for the current message.For request-response message exchanges the following happens:- The direction of message processing is reversed.For example, if a request is being processed by a service provider, the message stops progressing toward the service's implementation object. Instead, it is sent back towards the binding for return to the consumer that originated the request.
- Any message handlers that reside along the handler chain in the new processing direction have their
handleMessage()method invoked in the order in which they reside in the chain. - When the message reaches the end of the handler chain it is dispatched.
For one-way message exchanges the following happens:- Message processing stops.
- All previously invoked message handlers have their
close()method invoked. - The message is dispatched.
- Throw a
ProtocolExceptionexception—Throwing aProtocolExceptionexception, or a subclass of this exception, signals the Apache CXF runtime that fault message processing is beginning. How the runtime proceeds depends on the message exchange pattern in use for the current message.For request-response message exchanges the following happens:- If the handler has not already created a fault message, the runtime wraps the message in a fault message.
- The direction of message processing is reversed.For example, if a request is being processed by a service provider, the message stops progressing toward the service's implementation object. Instead, it is sent back towards the binding for return to the consumer that originated the request.
- Any message handlers that reside along the handler chain in the new processing direction have their
handleFault()method invoked in the order in which they reside in the chain. - When the fault message reaches the end of the handler chain it is dispatched.
For one-way message exchanges the following happens:- If the handler has not already created a fault message, the runtime wraps the message in a fault message.
- Message processing stops.
- All previously invoked message handlers have their
close()method invoked. - The fault message is dispatched.
- Throw any other runtime exception—Throwing a runtime exception other than a
ProtocolExceptionexception signals the Apache CXF runtime that message processing is to stop. All previously invoked message handlers have theclose()method invoked and the exception is dispatched. If the message is part of a request-response message exchange, the exception is dispatched so that it is returned to the consumer that originated the request.
Example
handleMessage() message for a logical message handler that is used by a service consumer. It processes requests before they are sent to the service provider.
Example 21.7. Logical Message Handler Message Processing
public class SmallNumberHandler implements LogicalHandler<LogicalMessageContext>
{
public final boolean handleMessage(LogicalMessageContext messageContext)
{
try
{
boolean outbound = (Boolean)messageContext.get(MessageContext.MESSAGE_OUTBOUND_PROPERTY);
if (outbound) 1
{
LogicalMessage msg = messageContext.getMessage(); 2
JAXBContext jaxbContext = JAXBContext.newInstance(ObjectFactory.class);
Object payload = msg.getPayload(jaxbContext); 3
if (payload instanceof JAXBElement)
{
payload = ((JAXBElement)payload).getValue();
}
if (payload instanceof AddNumbers) 4
{
AddNumbers req = (AddNumbers)payload;
int a = req.getArg0();
int b = req.getArg1();
int answer = a + b;
if (answer < 20) 5
{
AddNumbersResponse resp = new AddNumbersResponse(); 6
resp.setReturn(answer);
msg.setPayload(new ObjectFactory().createAddNumbersResponse(resp),
jaxbContext);
return false; 7
}
}
else
{
throw new WebServiceException("Bad Request"); 8
}
}
return true; 9
}
catch (JAXBException ex) 10
{
throw new ProtocolException(ex);
}
}
...
}- 1
- Checks if the message is an outbound request.If the message is an outbound request, the handler does additional message processing.
- 2
- Gets the
LogicalMessagerepresentation of the message payload from the message context. - 3
- Gets the actual message payload as a JAXB object.
- 4
- Checks to make sure the request is of the correct type.If it is, the handler continues processing the message.
- 5
- Checks the value of the sum.If it is less than the threshold of 20 then it builds a response and returns it to the client.
- 6
- Builds the response.
- 7
- Returns
falseto stop message processing and return the response to the client. - 8
- Throws a runtime exception if the message is not of the correct type.This exception is returned to the client.
- 9
- Returns
trueif the message is an inbound response or the sum does not meet the threshold.Message processing continues normally. - 10
- Throws a
ProtocolExceptionif a JAXB marshalling error is encountered.The exception is passed back to the client after it is processed by thehandleFault()method of the handlers between the current handler and the client.
21.4. Implementing a Protocol Handler
Overview
javax.xml.ws.handler.soap.SOAPHandler interface.
SOAPHandler interface, shown in Example 21.8, “SOAPHandler Synopsis”, uses a SOAP specific message context that provides access to the message as a SOAPMessage object. It also allows you to access the SOAP headers.
Example 21.8. SOAPHandler Synopsis
public interface SOAPHandler extends Handler
{
boolean handleMessage(SOAPMessageContext context);
boolean handleFault(SOAPMessageContext context);
void close(SOAPMessageContext context);
Set<QName> getHeaders()
}getHeaders(). This additional method returns the QNames of the header blocks the handler can process.
Procedure
- Implement any initialization logic required by the handler.
- Implement the message handling logic.
- Implement the fault handling logic.
- Implement the
getHeaders()method. - Implement the logic for closing the handler when it is finished.
- Implement any logic for cleaning up the handler's resources before it is destroyed.
Implementing the getHeaders() method
getHeaders(), shown in Example 21.9, “The SOAPHander.getHeaders() Method”, method informs the Apache CXF runtime what SOAP headers the handler is responsible for processing. It returns the QNames of the outer element of each SOAP header the handler understands.
Example 21.9. The SOAPHander.getHeaders() Method
Set<QName> getHeaders();null is sufficient. However, if the application uses the mustUnderstand attribute of any of the SOAP headers, then it is important to specify the headers understood by the application's SOAP handlers. The runtime checks the set of SOAP headers that all of the registered handlers understand against the list of headers with the mustUnderstand attribute set to true. If any of the flagged headers are not in the list of understood headers, the runtime rejects the message and throws a SOAP must understand exception.
21.5. Handling Messages in a SOAP Handler
Overview
handleMessage() method.
handleMessage() method receives a SOAPMessageHandler object that provides access to the message body as a SOAPMessage object and the SOAP headers associated with the message. In addition, the context provides access to any properties stored in the message context.
handleMessage() method returns either true or false depending on how message processing is to continue. It can also throw an exception.
Working with the message body
getMessage() method. It returns the message as a live SOAPMessage object. Any changes to the message in the handler are automatically reflected in the message stored in the context.
setMessage() method. The setMessage() method takes a SOAPMessage object.
Getting the SOAP headers
SOAPMessage object's getHeader() method. This will return the SOAP header as a SOAPHeader object that you will need to inspect to find the header elements you wish to process.
getHeaders() method, shown in Example 21.10, “The SOAPMessageContext.getHeaders() Method”, that will return an array containing JAXB objects for the specified SOAP headers.
Example 21.10. The SOAPMessageContext.getHeaders() Method
Ojbect[] getHeaders(QName header,
JAXBContext context,
boolean allRoles);allRoles parameter to false. That instructs the runtime to only return the SOAP headers that are applicable to the active SOAP roles.
JAXBContext object see Chapter 16, Using A JAXBContext Object.
Working with context properties
APPLICATION scope and the Handler scope.
Map. To access the properties stored in the context, you use the get() method and put() method inherited from the Map interface.
HANDLER. If you want the application code to be able to access the property you need to use the context's setScope() method to explicitly set the property's scope to APPLICATION.
Determining the direction of the message
MessageContext.MESSAGE_OUTBOUND_PROPERTY key as shown in Example 21.11, “Getting the Message's Direction from the SOAP Message Context”.
Example 21.11. Getting the Message's Direction from the SOAP Message Context
Boolean outbound; outbound = (Boolean)smc.get(MessageContext.MESSAGE_OUTBOUND_PROPERTY);
Boolean object. You can use the object's booleanValue() method to determine the property's value. If the property is set to true, the message is outbound. If the property is set to false the message is inbound.
Determining the return value
handleMessage() method completes its message processing has a direct impact on how message processing proceeds. It can complete by doing one of the following actions:
- return
true—Returningtruesignals to the Apache CXF runtime that message processing should continue normally. The next handler, if any, has itshandleMessage()invoked. - return
false—Returningfalsesignals to the Apache CXF runtime that normal message processing is to stop. How the runtime proceeds depends on the message exchange pattern in use for the current message.For request-response message exchanges the following happens:- The direction of message processing is reversed.For example, if a request is being processed by a service provider, the message will stop progressing toward the service's implementation object. It will instead be sent back towards the binding for return to the consumer that originated the request.
- Any message handlers that reside along the handler chain in the new processing direction have their
handleMessage()method invoked in the order in which they reside in the chain. - When the message reaches the end of the handler chain it is dispatched.
For one-way message exchanges the following happens:- Message processing stops.
- All previously invoked message handlers have their
close()method invoked. - The message is dispatched.
- throw a
ProtocolExceptionexception—Throwing aProtocolExceptionexception, or a subclass of this exception, signals the Apache CXF runtime that fault message processing is to start. How the runtime proceeds depends on the message exchange pattern in use for the current message.For request-response message exchanges the following happens:- If the handler has not already created a fault message, the runtime wraps the message in a fault message.
- The direction of message processing is reversed.For example, if a request is being processed by a service provider, the message will stop progressing toward the service's implementation object. It will be sent back towards the binding for return to the consumer that originated the request.
- Any message handlers that reside along the handler chain in the new processing direction have their
handleFault()method invoked in the order in which they reside in the chain. - When the fault message reaches the end of the handler chain it is dispatched.
For one-way message exchanges the following happens:- If the handler has not already created a fault message, the runtime wraps the message in a fault message.
- Message processing stops.
- All previously invoked message handlers have their
close()method invoked. - The fault message is dispatched.
- throw any other runtime exception—Throwing a runtime exception other than a
ProtocolExceptionexception signals the Apache CXF runtime that message processing is to stop. All previously invoked message handlers have theclose()method invoked and the exception is dispatched. If the message is part of a request-response message exchange the exception is dispatched so that it is returned to the consumer that originated the request.
Example
handleMessage() implementation that prints the SOAP message to the screen.
Example 21.12. Handling a Message in a SOAP Handler
public boolean handleMessage(SOAPMessageContext smc)
{
PrintStream out;
Boolean outbound = (Boolean)smc.get(MessageContext.MESSAGE_OUTBOUND_PROPERTY); 1
if (outbound.booleanValue()) 2
{
out.println("\nOutbound message:");
}
else
{
out.println("\nInbound message:");
}
SOAPMessage message = smc.getMessage(); 3
message.writeTo(out); 4
out.println();
return true;
}21.6. Initializing a Handler
Overview
Order of initialization
- The handler's constructor is called.
- Any resources that are specified by the
@Resourceannotation are injected. - The method decorated with
@PostConstructannotation, if it is present, is called.NoteMethods decorated with the@PostConstructannotation must have a void return type and have no parameters. - The handler is place in the
Readystate.
21.7. Handling Fault Messages
Overview
handleFault() method for processing fault messages when a ProtocolException exception is thrown during message processing.
handleFault() method receives either a LogicalMessageContext object or SOAPMessageContext object depending on the type of handler. The received context gives the handler's implementation access to the message payload.
handleFault() method returns either true or false, depending on how fault message processing is to proceed. It can also throw an exception.
Getting the message payload
handleFault() method is similar to the one received by the handleMessage() method. You use the context's getMessage() method to access the message payload in the same way. The only difference is the payload contained in the context.
LogicalMessageContext see Section 21.3, “Handling Messages in a Logical Handler”.
SOAPMessageContext see Section 21.5, “Handling Messages in a SOAP Handler”.
Determining the return value
handleFault() method completes its message processing has a direct impact on how message processing proceeds. It completes by performing one of the following actions:
- Return
true - Returning
truesignals that fault processing should continue normally. ThehandleFault()method of the next handler in the chain will be invoked. - Return
false - Returning
falsesignals that fault processing stops. Theclose()method of the handlers that were invoked in processing the current message are invoked and the fault message is dispatched. - Throw an exception
- Throwing an exception stops fault message processing. The
close()method of the handlers that were invoked in processing the current message are invoked and the exception is dispatched.
Example
handleFault() that prints the message body to the screen.
Example 21.13. Handling a Fault in a Message Handler
public final boolean handleFault(LogicalMessageContext messageContext)
{
System.out.println("handleFault() called with message:");
LogicalMessage msg=messageContext.getMessage();
System.out.println(msg.getPayload());
return true;
}21.8. Closing a Handler
close() method. This is the appropriate place to clean up any resources that were used by the handler during message processing or resetting any properties to a default state.
close() method.
21.9. Releasing a Handler
Overview
Order of release
- The handler finishes processing any active messages.
- The runtime invokes the method decorated with the
@PreDestroyannotation.This method should clean up any resources used by the handler. - The handler's destructor is called.
21.10. Configuring Endpoints to Use Handlers
21.10.1. Programmatic Configuration
21.10.1.1. Adding a Handler Chain to a Consumer
Overview
Binding object.
Procedure
- Create a
List<Handler>object to hold the handler chain. - Create an instance of each handler that will be added to the chain.
- Add each of the instantiated handler objects to the list in the order they are to be invoked by the runtime.
- Get the
Bindingobject from the service proxy.TipApache CXF provides an implementation of theBindinginterface calledorg.apache.cxf.jaxws.binding.DefaultBindingImpl. - Set the handler chain on the proxy using the
Bindingobject'ssetHandlerChain()method.
Example
Example 21.14. Adding a Handler Chain to a Consumer
import javax.xml.ws.BindingProvider; import javax.xml.ws.handler.Handler; import java.util.ArrayList; import java.util.List; import org.apache.cxf.jaxws.binding.DefaultBindingImpl; ... SmallNumberHandler sh = new SmallNumberHandler(); 1 List<Handler> handlerChain = new ArrayList<Handler>(); 2 handlerChain.add(sh); 3 DefaultBindingImpl binding = ((BindingProvider)proxy).getBinding(); 4 binding.getBinding().setHandlerChain(handlerChain); 5
21.10.1.2. Adding a Handler Chain to a Service Provider
Overview
@HandlerChain annotation. The annotation points to a meta-data file defining the handler chain used by the service provider.
Procedure
- Decorate the provider's implementation class with the
@HandlerChainannotation. - Create a handler configuration file that defines the handler chain.
The @HandlerChain annotation
javax.jws.HandlerChain annotation decorates service provider's implementation class. It instructs the runtime to load the handler chain configuration file specified by its file property.
- a URL
- a relative path name
handlers.xml. handlers.xml must be located in the directory from which the service provider is run.
Example 21.15. Service Implementation that Loads a Handler Chain
import javax.jws.HandlerChain;
import javax.jws.WebService;
...
@WebService(name = "AddNumbers",
targetNamespace = "http://apache.org/handlers",
portName = "AddNumbersPort",
endpointInterface = "org.apache.handlers.AddNumbers",
serviceName = "AddNumbersService")
@HandlerChain(file = "handlers.xml")
public class AddNumbersImpl implements AddNumbers
{
...
}Handler configuration file
http://java.sun.com/xml/ns/javaee.
handler-chains element. The handler-chains element has one or more handler-chain elements.
handler-chain element define a handler chain. Table 21.1, “Elements Used to Define a Server-Side Handler Chain” describes the handler-chain element's children.
Table 21.1. Elements Used to Define a Server-Side Handler Chain
| Element | Description |
|---|---|
handler | Contains the elements that describe a handler. |
service-name-pattern | Specifies the QName of the WSDL service element defining the service to which the handler chain is bound. You can use * as a wildcard when defining the QName. |
port-name-pattern | Specifies the QName of the WSDL port element defining the endpoint to which the handler chain is bound. You can use * as a wildcard when defining the QName. |
protocol-binding |
Specifies the message binding for which the handler chain is used. The binding is specified as a URI or using one of the following aliases:
##SOAP11_HTTP, ##SOAP11_HTTP_MTOM, ##SOAP12_HTTP, ##SOAP12_HTTP_MTOM, or ##XML_HTTP.
For more information about message binding URIs see appendix "Apache CXF Binding IDs" in "Configuring Web Service Endpoints".
|
handler-chain element is only required to have a single handler element as a child. It can, however, support as many handler elements as needed to define the complete handler chain. The handlers in the chain are executed in the order they specified in the handler chain definition.
protocol-binding, are used to limit the scope of the defined handler chain. For example, if you use the service-name-pattern element, the handler chain will only be attached to service providers whose WSDL port element is a child of the specified WSDL service element. You can only use one of these limiting children in a handler element.
handler element defines an individual handler in a handler chain. Its handler-class child element specifies the fully qualified name of the class implementing the handler. The handler element can also have an optional handler-name element that specifies a unique name for the handler.
Example 21.16. Handler Configuration File
<handler-chains xmlns="http://java.sun.com/xml/ns/javaee"
xmlns:xsi="http://www.w3.org/2001/XMLSchema-instance"
xsi:schemaLocation="http://java.sun.com/xml/ns/javaee">
<handler-chain>
<handler>
<handler-name>LoggingHandler</handler-name>
<handler-class>demo.handlers.common.LoggingHandler</handler-class>
</handler>
<handler>
<handler-name>AddHeaderHandler</handler-name>
<handler-class>demo.handlers.common.AddHeaderHandler</handler-class>
</handler>
</handler-chain>
</handler-chains>21.10.2. Spring Configuration
Overview
jaxwxs:handlers child to the element configuring the endpoint.
Procedure
- If the endpoint does not already have a configuration element, add one.For more information on configuring Apache CXF endpoints see chapter "Configuring JAX-WS Endpoints" in "Configuring Web Service Endpoints".
- Add a
jaxws:handlerschild element to the endpoint's configuration element. - For each handler in the chain, add a
beanelement specifying the class that implements the handler.TipIf your handler implementation is used in more than one place you can reference abeanelement using therefelement.
The handlers element
jaxws:handlers element defines a handler chain in an endpoint's configuration. It can appear as a child to all of the JAX-WS endpoint configuration elements. These are:
jaxws:endpointconfigures a service provider.jaxws:serveralso configures a service provider.jaxws:clientconfigures a service consumer.
- add a
beanelement defining the implementation class - use a
refelement to refer to a namedbeanelement from elsewhere in the configuration file
Example
Example 21.17. Configuring an Endpoint to Use a Handler Chain In Spring
<beans ...
xmlns:jaxws="http://cxf.apache.org/jaxws"
...
schemaLocation="...
http://cxf.apache.org/jaxws http://cxf.apache.org/schemas/jaxws.xsd
...">
<jaxws:endpoint id="HandlerExample"
implementor="org.apache.cxf.example.DemoImpl"
address="http://localhost:8080/demo">
<jaxws:handlers>
<bean class="demo.handlers.common.LoggingHandler" />
<bean class="demo.handlers.common.AddHeaderHandler" />
</jaxws:handlers>
</jaws:endpoint>
</beans>Appendix A. Maven Tooling Reference
Name
Plug-in Setup — before you can use the Apache CXF plug-ins, you must first add the proper dependencies and repositories to your POM.
Dependencies
- the JAX-WS frontend
<dependency> <groupId>org.apache.cxf</groupId> <artifactId>cxf-rt-frontend-jaxws</artifactId> <version>version</version> </dependency>
- the HTTP transport
<dependency> <groupId>org.apache.cxf</groupId> <artifactId>cxf-rt-transports-http</artifactId> <version>version</version> </dependency>
- the Jetty transport
<dependency> <groupId>org.apache.cxf</groupId> <artifactId>cxf-rt-transports-http-jetty</artifactId> <version>version</version> </dependency>
Repositories
- the plug-in repository
<pluginRepository> <id>fusesource.m2</id> <name>Apache CXF Open Source Community Release Repository</name> <url>http://repo.fusesource.com/nexus/content/groups/public/</url> <snapshots> <enabled>false</enabled> </snapshots> <releases> <enabled>true</enabled> </releases> </pluginRepository> - the Apache CXF release repository
<repository> <id>fusesource.m2</id> <name>Apache CXF Open Source Community Release Repository</name> <url>http://repo.fusesource.com/nexus/content/groups/public/</url> <snapshots> <enabled>false</enabled> </snapshots> <releases> <enabled>true</enabled> </releases> </repository> - the Apache CXF snapshot repository
<repository> <id>fusesource.m2-snapshot</id> <name>Apache CXF Open Source Community Snapshot Repository</name> <url>http://repo.fusesource.com/nexus/content/groups/public-snapshots/</url> <snapshots> <enabled>true</enabled> </snapshots> <releases> <enabled>false</enabled> </releases> </repository>
Name
cxf-codegen-plugin — generates JAX-WS compliant Java code from a WSDL document
Synopsis
<plugin>
<groupId>org.apache.cxf</groupId>
<artifactId>cxf-codegen-plugin</artifactId>
<version>version</version>
<executions>
<execution>
<id>generate-sources</id>
<configuration>
<defaultOptions>
<option>...</option>
...
</defaultOptions>
<wsdlOptions>
<wsdlOption>
<wsdl>wsdlPath</wsdl>
<option>...</option>
...
</wsdlOption>
...
</wsdlOptions>
</configuration>
<goals>
<goal>wsdl2java</goal>
</goals>
</execution>
</executions>
</plugin>Description
wsdl2java task takes a WSDL document and generates fully annotated Java code from which to implement a service. The WSDL document must have a valid portType element, but it does not need to contain a binding element or a service element. Using the optional arguments you can customize the generated code.
WSDL options
wsdlOptions element is required to configure the plug-in. The wsdlOptions element's wsdl child is required and specifies a WSDL document to be processed by the plug-in. In addition to the wsdl element, the wsdlOptions element can take a number of children that can customize how the WSDL document is processed.
wsdlOptions element can be listed in the plug-in configuration. Each element configures a single WSDL document for processing.
Default options
defaultOptions element is an optional element. It can be used to set options that are used across all of the specified WSDL documents.
wsdlOptions element, the value in the wsdlOptions element takes precedent.
Options
| Option | Interpretation |
|---|---|
-? | Displays the online help for this utility. |
-help | |
-h | |
-fe frontend | Specifies the front end used by the code generator. The default is jaxws.[a] |
-db databinding | Specifies the data binding used by the code generator. The default is jaxb.[b] |
-wv wsdlVersion | Specifies the WSDL version expected by the tool. The default is 1.1.[c] |
-p [wsdlNamespace=]PackageName | Specifies zero, or more, package names to use for the generated code. Optionally specifies the WSDL namespace to package name mapping. |
-b bindingName | Specifies zero, or more, JAXWS or JAXB binding files. Use spaces to separate multiple entries. |
-sn serviceName | Specifies the name of the WSDL service for which code is to be generated. The default is to generate code for every service in the WSDL document. |
-d output-directory | Specifies the directory into which the generated code files are written. |
-catalog catalogUrl | Specifies the URL of an XML catalog to use for resolving imported schemas and WSDL documents. |
-compile | Compiles generated Java files. |
-classdir complile-class-dir | Specifies the directory into which the compiled class files are written. |
-client | Generates starting point code for a client mainline. |
-server | Generates starting point code for a server mainline. |
-impl | Generates starting point code for an implementation object. |
-all | Generates all starting point code: types, service proxy, service interface, server mainline, client mainline, implementation object, and an Ant build.xml file. |
-ant | Generates the Ant build.xml file. |
-keep | Instructs the tool to not overwrite any existing files. |
-defaultValues[=DefaultValueProvider] | Instructs the tool to generate default values for the generated client and the generated implementation. Optionally, you can also supply the name of the class used to generate the default values. By default, the RandomValueProvider class is used. |
-nexclude schema-namespace[=java-packagename] | Ignore the specified WSDL schema namespace when generating code. This option may be specified multiple times. Also, optionally specifies the Java package name used by types described in the excluded namespace(s). |
-exsh (true/false) | Enables or disables processing of extended soap header message binding. Default is false. |
-dns (true/false) | Enables or disables the loading of the default namespace package name mapping. Default is true. |
-dex (true/false) | Enables or disables the loading of the default excludes namespace mapping. Default is true. |
-wsdlLocation wsdlLocation | Specifies the value of the @WebService annotation's wsdlLocation property. |
-xjcargs | Specifies a comma separated list of arguments to be passed to directly to the XJC when the JAXB data binding is being used. To get a list of all possible XJC arguments use the -xjc-X. |
-noAddressBinding | Instructs the tool to use the Apache CXF proprietary WS-Addressing type instead of the JAX-WS 2.1 compliant mapping. |
-validate | Instructs the tool to validate the WSDL document before attempting to generate any code. |
-v | Displays the version number for the tool. |
-verbose | Displays comments during the code generation process. |
-quiet | Suppresses comments during the code generation process. |
| wsdlfile | The path and name of the WSDL file to use in generating the code. |
[a]
Currently, Apache CXF only provides the JAX-WS front end for the code generator.
[b]
Currently, Apache CXF only provides the JAXB data binding for the code generator.
[c]
Currently, Apache CXF only provides WSDL 1.1 support for the code generator.
| |
Name
java2ws — generates a WSDL document from Java code
Synopsis
<plugin>
<groupId>org.apache.cxf</groupId>
<artifactId>cxf-java2ws-plugin</artifactId>
<version>version</version>
<executions>
<execution>
<id>process-classes</id>
<phase>process-classes</phase>
<configuration>
<className>className</className>
<option>...</option>
...
</configuration>
<goals>
<goal>java2ws</goal>
</goals>
</execution>
</executions>
</plugin>Description
- a WSDL document
- the server code needed to deploy the service as a POJO
- client code for accessing the service
- wrapper and fault beans
Required configuration
className configuration element is present. The element's value is the fully qualified name of the SEI to be processed.
Optional configuration
| Element | Description |
|---|---|
frontend | Specifies front end to use for processing the SEI and generating the support classes. jaxws is the default. simple is also supported. |
databinding | Specifies the data binding used for processing the SEI and generating the support classes. The default when using the JAX-WS front end is jaxb. The default when using the simple frontend is aegis. |
genWsdl | Instructs the tool to generate a WSDL document when set to true. |
genWrapperbean | Instructs the tool to generate the wrapper bean and the fault beans when set to true. |
genClient | Instructs the tool to generate client code when set to true. |
genServer | Instructs the tool to generate server code when set to true. |
outputFile | Specifies the name of the generated WSDL file. |
classpath | Specifies the classpath searched when processing the SEI. |
soap12 | Specifies that the generated WSDL document is to include a SOAP 1.2 binding when set to true. |
targetNamespace | Specifies the target namespace to use in the generated WSDL file. |
serviceName | Specifies the value of the generated service element's name attribute. |
Index
Symbols
- @DataBinding, Specifying the Data Binding
- @EndpointProperties, @EndpointProperties annotation
- @EndpointProperty, @EndpointProperty annotation
- @FastInfoset, @FastInfoset
- @GZIP, @GZIP annotation
- @HandlerChain, The @HandlerChain annotation
- @Logging, Enable Logging on an Endpoint
- @Oneway, The @Oneway annotation
- @Policies, @Policies annotation
- @Policy, @Policy annotation
- @PostConstruct, Order of initialization
- @PreDestroy, Releasing a Handler
- @RequestWrapper, The @RequestWrapper annotation
- className property, The @RequestWrapper annotation
- localName property, The @RequestWrapper annotation
- targetNamespace property, The @RequestWrapper annotation
- @Resource, Coding the provider implementation, Obtaining a context, Order of initialization
- @ResponseWrapper, The @ResponseWrapper annotation
- className property, The @ResponseWrapper annotation
- localName property, The @ResponseWrapper annotation
- targetNamespace property, The @ResponseWrapper annotation
- @SchemaValidation, Schema Validation of Messages
- @ServiceMode, Message mode, Payload mode
- @SOAPBinding, The @SOAPBinding annotation
- parameterStyle property, The @SOAPBinding annotation
- style property, The @SOAPBinding annotation
- use property, The @SOAPBinding annotation
- @WebFault, The @WebFault annotation
- faultName property, The @WebFault annotation
- name property, The @WebFault annotation
- targetNamespace property, The @WebFault annotation
- @WebMethod, The @WebMethod annotation, Obtaining a context
- action property, The @WebMethod annotation
- exclude property, The @WebMethod annotation
- operationName property, The @WebMethod annotation
- @WebParam, The @WebParam annotation
- header property, The @WebParam annotation
- mode property, The @WebParam annotation
- name property, The @WebParam annotation
- partName property, The @WebParam annotation
- targetNamespace property, The @WebParam annotation
- @WebResult, The @WebResult annotation
- header property, The @WebResult annotation
- name property, The @WebResult annotation
- partName property, The @WebResult annotation
- targetNamespace property, The @WebResult annotation
- @WebService, The @WebService annotation
- endpointInterface property, The @WebService annotation
- name property, The @WebService annotation
- portName property, The @WebService annotation
- serviceName property, The @WebService annotation
- targetNamespace property, The @WebService annotation
- wsdlLocation property, The @WebService annotation
- @WebServiceProvider, The @WebServiceProvider annotation
- @WSDLDocumentation, @WSDLDocumentation annotation
- @WSDLDocumentationCollection, @WSDLDocumentationCollection annotation
- @XmlAnyElement, Mapping to Java
- @XmlAttribute, Mapping attributes to Java
- @XmlElement, Mapping to Java, Mapping to Java, Mapping to Java
- required property, minOccurs set to 0
- type property, What is generated, Specializing or generalizing the default mapping
- @XmlElementDecl
- defaultValue, Java mapping of elements with a default value
- substitutionHeadName, Generated object factory methods
- substitutionHeadNamespace, Generated object factory methods
- @XmlElements, Mapping to Java, Mapping to Java
- @XmlEnum, Mapping to Java
- @XmlJavaTypeAdapter, What is generated
- @XmlRootElement, Java mapping of elements with an in-line type
- @XmlSchemaType, What is generated
- @XmlSeeAlso, Using the @XmlSeeAlso annotation, Mapping to Java, Substitution groups in interfaces
- @XmlType, Mapping to Java, Mapping to Java, Mapping to Java
A
- annotations
- @DataBinding (see @DataBinding)
- @EndpointProperties (see @EndpointProperties)
- @EndpointProperty (see @EndpointProperty)
- @FastInfoset (see @FastInfoset)
- @GZIP (see @GZIP)
- @HandlerChain (see @HandlerChain)
- @Logging (see @Logging)
- @Oneway (see @Oneway)
- @Policies (see @Policies)
- @Policy (see @Policy)
- @PostConstruct (see @PostConstruct)
- @PreDestroy (see @PreDestroy)
- @RequestWrapper (see @RequestWrapper)
- @Resource (see @Resource)
- @ResponseWrapper (see @ResponseWrapper)
- @SchemaValidation (see @SchemaValidation)
- @ServiceMode (see @ServiceMode)
- @SOAPBinding (see @SOAPBinding)
- @WebFault (see @WebFault)
- @WebMethod (see @WebMethod)
- @WebParam (see @WebParam)
- @WebResult (see @WebResult)
- @WebService (see @WebService)
- @WebServiceProvider (see @WebServiceProvider)
- @WSDLDocumentation (see @WSDLDocumentation)
- @WSDLDocumentationCollection (see @WSDLDocumentationCollection)
- @XmlAttribute (see @XmlAttribute)
- @XmlElement (see @XmlElement)
- @XmlElementDecl (see @XmlElementDecl)
- @XmlEnum (see @XmlEnum)
- @XmlJavaTypeAdapter (see @XmlJavaTypeAdapter)
- @XmlRootElement (see @XmlRootElement)
- @XmlSchemaType (see @XmlSchemaType)
- @XmlType (see @XmlType)
- any element, Specifying in XML Schema
- anyAttribute, Defining in XML Schema
- anyType, Using in XML Schema
- mapping to Java, Mapping to Java
- asynchronous applications
- callback approach, Developing Asynchronous Applications
- implementation
- polling approach, Developing Asynchronous Applications
- implementation patterns, Implementing an Asynchronous Client with the Polling Approach
- using a Dispatch object, Asynchronous invocation
- asynchronous methods, Generated interface
- callback approach, Generated interface
- pooling approach, Generated interface
- attributes
- optional, Wrapper classes
B
- baseType, Supporting lossless type substitution, Customization usage
- name attribute, Specializing or generalizing the default mapping
- BindingProvider
- getRequestContext() method, Obtaining a context
- getResponseContext() method, Obtaining a context
- BundleActivator, The bundle activator interface
C
- close(), Implementation of handlers
- code generation
- consumer, Generating the consumer code
- customization, Generating the Stub Code
- service provider, Running the code generator
- service provider implementation, Generating the implementation code
- WSDL contract, Generating WSDL
- code generator, Generating a Server Mainline
- constants, Customizing Fixed Value Attribute Mapping
- consumer
- implementing business logic, Implementing the Consumer's Business Logic, Consumer main function
- consumer contexts, Working with Contexts in a Consumer Implementation
- context
- request
- consumer, Overview
- WebServiceContext (see WebServiceContext)
- contract resolver
- implementing, Implementing the contract resolver
- registering, Registering the contract resolver programmatically
- createDispatch(), Creating a Dispatch object
- cxf-codegen-plugin, Running the code generator, Generating the implementation code, Generating the Stub Code, Generating a Server Mainline
D
- DataSource, Using DataSource objects, Using DataSource objects
- DatatypeConverter, Implementing converters
- Dispatch object
- creating, Creating a Dispatch object
- invoke() method, Synchronous invocation
- invokeAsync() method, Asynchronous invocation
- invokeOneWay() method, Oneway invocation
- message mode, Message mode
- message payload mode, Payload mode
- payload mode, Payload mode
- DOMSource, Using Source objects, Using Source objects
E
- element, XML Schema mapping
- elements
- custom mapping, Customizing Fixed Value Attribute Mapping
- mapping to Java
- in-line type definition, Java mapping of elements with an in-line type
- named type definition, Java mapping of elements with a named type
- XML Schema definition, XML Schema mapping
- endpoint
- adding to a Service object, Adding a Port to a Service
- determining the address, The addPort() method
- determining the binding type, The addPort() method
- determining the port name, The addPort() method
- getting, Getting a Proxy for an Endpoint, Generated service class, Instantiating an service provider
- Endpoint
- enumerations
- custom mapping, Customizing Enumeration Mapping
- defining in schema, Defining an enumerated type in XML Schema
- ExecutionException, Catching the exception
F
- facets
- enforcing, Enforcing facets
G
- generated code
- asynchronous operations, Generated interface
- consumer, Generated code
- packages, Generated packages, Generated code
- server mainline, Generating a Server Mainline
- service implementation, Generated code
- service provider, Generated code
- stub code, Generated code
- WSDL contract, Generating WSDL
- getRequestContext(), Obtaining a context
- getResponseContext(), Obtaining a context
- globalBindings
- fixedAttributeAsConstantProperty attribute, Global customization
- mapSimpleTypeDef, Supporting lossless type substitution
- mapSimpleTypeDef attribute, Adding the customization
- typesafeEnumMemberName attribute, Member name customizer
H
- handleFault(), Implementation of handlers
- handleMessage(), Implementation of handlers
- handler, Handler configuration file
- handler-chain, Handler configuration file
- handler-chains, Handler configuration file
- handler-class, Handler configuration file
- handler-name, Handler configuration file
- handleResponse(), Implementing the callback
- handlers
- constructor, Order of initialization
- initializing, Order of initialization
- logical, Handler types
- protocol, Handler types
I
- implementation
- asynchronous callback object, Implementing the callback
- asynchronous client
- callback approach, Implementing an Asynchronous Client with the Callback Approach
- callbacks, Implementing the consumer
- polling approach, Implementing an Asynchronous Client with the Polling Approach
- consumer, Implementing the Consumer's Business Logic, Consumer main function, Using XML in a Consumer
- SEI, Implementing the interface
- server mainline, Writing a Server Mainline
- service, Implementing a Provider Object
- service operations, Implementing the interface, Implement the operation's logic
J
- java.util.concurrent.ExecutionException, Catching the exception
- java2ws, Generating WSDL
- javaType, Syntax, Usage with javaType
- parseMethod attribute, Specifying the converters
- printMethod attribute, Specifying the converters
- javax.xml.ws.AsyncHandler, Implementing the callback
- javax.xml.ws.Service (see Service object)
- javax.xml.ws.WebServiceException, Runtime Faults
- jaxb:bindings, Using an external binding declaration
- jaxb:property, Customization usage
- JAXBContext, Using A JAXBContext Object
- newInstance(Class...), Getting a JAXBContext object using an object factory
- newInstance(String), Getting a JAXBContext object using package names
- jaxws:client
- wsdlLocation, Configuring the proxy
- jaxws:handlers, The handlers element
- JaxWsProxyFactoryBean, Consuming a service
- JaxWsServerFactoryBean, Publishing a service
- JMS
- getting JMS message headers in a service, Getting the JMS Message Headers in a Service
- getting optional header properties, Optional Header Properties
- inspecting message header properties, Inspecting JMS Message Headers
- setting message header properties, JMS Header Properties
- setting optional message header properties, Optional JMS Header Properties
- setting the client's timeout, Client Receive Timeout
- JMS URIs, JMS URIs
L
- list type
- XML Schema definition, Defining list types in XML Schema
- logical handler, Handler types
- LogicalHander
- handleFault(), Handling Fault Messages
- handleMessage(), Handling Messages in a Logical Handler
- LogicalHandler
- close(), Closing a Handler
- LogicalMessage, Getting the message data
- LogicalMessageContext, Overview of contexts in handlers
- getMessage(), Getting the message data
M
- message context
- getting a property, Reading a property from a context
- properties, How properties are stored in a context, Property scopes
- property scopes
- APPLICATION, Property scopes
- HANDLER, Property scopes
- reading values, Reading a property from a context
- request
- consumer, Setting JMS Properties
- response
- setting a property, Setting properties in a context
- setting properties, Setting properties in a context
- MessageContext, Obtaining a context
- get() method, Reading a property from a context
- put() method, Setting properties in a context
- setScope() method, Property scopes
- MessageContext.MESSAGE_OUTBOUND_PROPERTY, Determining the direction of the message, Determining the direction of the message
N
- namespace
- package name mapping, Package naming
- nillable, Wrapper classes
O
- object factory
- creating complex type instances, Complex type factory methods
- creating element instances, Element factory methods
- ObjectFactory
- complex type factory, Complex type factory methods
- element factory, Element factory methods
P
- package name mapping, Generated packages
- parameter mapping, Service endpoint interface
- port-name-pattern, Handler configuration file
- primitive types, Mappings
- property
- fixedAttributeAsConstantProperty attribute, Local mapping
- protocol handler, Handler types
- protocol-binding, Handler configuration file
- Provider
- invoke() method, Implementing the invoke() method
- message mode, Message mode
- payload mode, Payload mode
R
- request context, Working with Contexts in a Consumer Implementation, Setting JMS Properties
- accessing, Obtaining a context
- consumer, Overview
- setting properties, Setting properties in a context
- response context, Working with Contexts in a Consumer Implementation
- accessing, Obtaining a context
- consumer, Overview, Getting JMS Message Header Properties in a Consumer
- getting JMS message headers, Getting JMS Message Header Properties in a Consumer
- reading values, Reading a property from a context
- Response<T>.get()
- exceptions, Catching the exception
S
- SAXSource, Using Source objects, Using Source objects
- schema validation, Enforcing facets
- SEI, Creating the SEI, Generated code, Service endpoint interface
- annotating, Annotating the Code
- creating, Writing the interface
- creation patterns, Overview
- generated from WSDL contract, Generated code
- relationship to wsdl:portType, Writing the interface, Service endpoint interface
- required annotations, Annotating the SEI
- service
- implementing the operations, Implement the operation's logic
- service enablement, Overview
- service endpoint interface (see SEI)
- service implementation, Generated code, Implementing a Provider Object
- operations, Implementing the interface
- required annotations, Annotating the service implementation
- Service object, Creating a Service Object
- adding an endpoint, Adding a Port to a Service
- determining the port name, The addPort() method
- addPort() method, Adding a Port to a Service
- bindingId parameter, The addPort() method
- endpointAddress parameter, The addPort() method
- portName parameter, The addPort() method
- create() method, The create() methods
- serviceName parameter, The create() methods
- createDispatch() method, Creating a Dispatch object
- creating, The create() methods, Generated service class
- determining the service name, The create() methods
- generated from a WSDL contract, Generated code
- generated methods, Generated service class
- getPort() method, The getPort() method
- portName parameter, The getPort() method
- getting a service proxy, Getting a Proxy for an Endpoint
- relationship to wsdl:service element, Creating a Service Object, Generated code
- service provider
- implementation, Implementing a Provider Object
- publishing, Publishing a service provider
- service provider implementation
- generating, Generating the implementation code
- service providers contexts, Working with Contexts in a Service Implementation
- service proxy
- service-name-pattern, Handler configuration file
- Service.Mode.MESSAGE, Message mode, Message mode
- Service.Mode.PAYLOAD, Payload mode, Payload mode
- ServiceContractResolver, Implementing the contract resolver
- simple type
- define by restriction, Defining a simple type in XML Schema
- simple types
- enumerations, Defining an enumerated type in XML Schema
- mapping to Java, Mapping to Java
- primitive, Mappings
- wrapper classes, Wrapper classes
- SOAP headers
- mustUnderstand, Implementing the getHeaders() method
- SOAP/JMS, Using SOAP over JMS
- address, JMS URIs
- consuming, Consuming a service
- publishing, Publishing a service
- SOAPHander
- getHeaders(), Implementing the getHeaders() method
- handleFault(), Handling Fault Messages
- handleMessage(), Handling Messages in a SOAP Handler
- SOAPHandler
- close(), Closing a Handler
- SOAPMessage, Using SOAPMessage objects, Using SOAPMessage objects, Working with the message body
- SOAPMessageContext
- get(), Working with context properties
- getMessage(), Working with the message body
- Source, Using Source objects, Using Source objects
- StreamSource, Using Source objects, Using Source objects
- substitution group
- in complex types, Substitution groups in complex types
- in interfaces, Substitution groups in interfaces
- object factory, Generated object factory methods
T
- type customization
- external declaration, Using an external binding declaration
- in-line, Using in-line customization
- JAXB version, Version declaration
- namespace, Namespace
- type packages
- contents, Package contents
- name generation, Package naming
- typesafeEnumClass, Class customizer
- typesafeEnumMember, Member customizer
U
- union types
- mapping to Java, Mapping to Java
- XML Schema definition, Defining in XML Schema
W
- WebServiceContext
- getMessageContext() method, Obtaining a context
- getting the JMS message headers, Getting the JMS Message Headers in a Service
- WebServiceException, Runtime Faults
- WSDL contract
- generation, Generating WSDL
- wsdl:documentation, WSDL Documentation
- wsdl:portType, Writing the interface, Generated code, Service endpoint interface
- wsdl:service, Creating a Service Object, Generated code
Legal Notice
Trademark Disclaimer
Legal Notice
Third Party Acknowledgements
- JLine (http://jline.sourceforge.net) jline:jline:jar:1.0License: BSD (LICENSE.txt) - Copyright (c) 2002-2006, Marc Prud'hommeaux
mwp1@cornell.eduAll rights reserved.Redistribution and use in source and binary forms, with or without modification, are permitted provided that the following conditions are met:- Redistributions of source code must retain the above copyright notice, this list of conditions and the following disclaimer.
- Redistributions in binary form must reproduce the above copyright notice, this list of conditions and the following disclaimer in the documentation and/or other materials provided with the distribution.
- Neither the name of JLine nor the names of its contributors may be used to endorse or promote products derived from this software without specific prior written permission.
THIS SOFTWARE IS PROVIDED BY THE COPYRIGHT HOLDERS AND CONTRIBUTORS "AS IS" AND ANY EXPRESS OR IMPLIED WARRANTIES, INCLUDING, BUT NOT LIMITED TO, THE IMPLIED WARRANTIES OF MERCHANTABILITY AND FITNESS FOR A PARTICULAR PURPOSE ARE DISCLAIMED. IN NO EVENT SHALL THE COPYRIGHT OWNER OR CONTRIBUTORS BE LIABLE FOR ANY DIRECT, INDIRECT, INCIDENTAL, SPECIAL, EXEMPLARY, OR CONSEQUENTIAL DAMAGES (INCLUDING, BUT NOT LIMITED TO, PROCUREMENT OF SUBSTITUTE GOODS OR SERVICES; LOSS OF USE, DATA, OR PROFITS; OR BUSINESS INTERRUPTION) HOWEVER CAUSED AND ON ANY THEORY OF LIABILITY, WHETHER IN CONTRACT, STRICT LIABILITY, OR TORT (INCLUDING NEGLIGENCE OR OTHERWISE) ARISING IN ANY WAY OUT OF THE USE OF THIS SOFTWARE, EVEN IF ADVISED OF THE POSSIBILITY OF SUCH DAMAGE. - Stax2 API (http://woodstox.codehaus.org/StAX2) org.codehaus.woodstox:stax2-api:jar:3.1.1License: The BSD License (http://www.opensource.org/licenses/bsd-license.php)Copyright (c) <YEAR>, <OWNER> All rights reserved.Redistribution and use in source and binary forms, with or without modification, are permitted provided that the following conditions are met:
- Redistributions of source code must retain the above copyright notice, this list of conditions and the following disclaimer.
- Redistributions in binary form must reproduce the above copyright notice, this list of conditions and the following disclaimer in the documentation and/or other materials provided with the distribution.
THIS SOFTWARE IS PROVIDED BY THE COPYRIGHT HOLDERS AND CONTRIBUTORS "AS IS" AND ANY EXPRESS OR IMPLIED WARRANTIES, INCLUDING, BUT NOT LIMITED TO, THE IMPLIED WARRANTIES OF MERCHANTABILITY AND FITNESS FOR A PARTICULAR PURPOSE ARE DISCLAIMED. IN NO EVENT SHALL THE COPYRIGHT HOLDER OR CONTRIBUTORS BE LIABLE FOR ANY DIRECT, INDIRECT, INCIDENTAL, SPECIAL, EXEMPLARY, OR CONSEQUENTIAL DAMAGES (INCLUDING, BUT NOT LIMITED TO, PROCUREMENT OF SUBSTITUTE GOODS OR SERVICES; LOSS OF USE, DATA, OR PROFITS; OR BUSINESS INTERRUPTION) HOWEVER CAUSED AND ON ANY THEORY OF LIABILITY, WHETHER IN CONTRACT, STRICT LIABILITY, OR TORT (INCLUDING NEGLIGENCE OR OTHERWISE) ARISING IN ANY WAY OUT OF THE USE OF THIS SOFTWARE, EVEN IF ADVISED OF THE POSSIBILITY OF SUCH DAMAGE. - jibx-run - JiBX runtime (http://www.jibx.org/main-reactor/jibx-run) org.jibx:jibx-run:bundle:1.2.3License: BSD (http://jibx.sourceforge.net/jibx-license.html) Copyright (c) 2003-2010, Dennis M. Sosnoski.All rights reserved.Redistribution and use in source and binary forms, with or without modification, are permitted provided that the following conditions are met:
- Redistributions of source code must retain the above copyright notice, this list of conditions and the following disclaimer.
- Redistributions in binary form must reproduce the above copyright notice, this list of conditions and the following disclaimer in the documentation and/or other materials provided with the distribution.
- Neither the name of JiBX nor the names of its contributors may be used to endorse or promote products derived from this software without specific prior written permission.
THIS SOFTWARE IS PROVIDED BY THE COPYRIGHT HOLDERS AND CONTRIBUTORS "AS IS" AND ANY EXPRESS OR IMPLIED WARRANTIES, INCLUDING, BUT NOT LIMITED TO, THE IMPLIED WARRANTIES OF MERCHANTABILITY AND FITNESS FOR A PARTICULAR PURPOSE ARE DISCLAIMED. IN NO EVENT SHALL THE COPYRIGHT OWNER OR CONTRIBUTORS BE LIABLE FOR ANY DIRECT, INDIRECT, INCIDENTAL, SPECIAL, EXEMPLARY, OR CONSEQUENTIAL DAMAGES (INCLUDING, BUT NOT LIMITED TO, PROCUREMENT OF SUBSTITUTE GOODS OR SERVICES; LOSS OF USE, DATA, OR PROFITS; OR BUSINESS INTERRUPTION) HOWEVER CAUSED AND ON ANY THEORY OF LIABILITY, WHETHER IN CONTRACT, STRICT LIABILITY, OR TORT (INCLUDING NEGLIGENCE OR OTHERWISE) ARISING IN ANY WAY OUT OF THE USE OF THIS SOFTWARE, EVEN IF ADVISED OF THE POSSIBILITY OF SUCH DAMAGE. - JavaAssist (http://www.jboss.org/javassist) org.jboss.javassist:com.springsource.javassist:jar:3.9.0.GA:compileLicense: MPL (http://www.mozilla.org/MPL/MPL-1.1.html)
- HAPI-OSGI-Base Module (http://hl7api.sourceforge.net/hapi-osgi-base/) ca.uhn.hapi:hapi-osgi-base:bundle:1.2License: Mozilla Public License 1.1 (http://www.mozilla.org/MPL/MPL-1.1.txt)