
Chapter 8. Domain Management
This section discusses concepts and configuration specific to the managed domain operating mode.
For information on securing a managed domain, see the Securing a Managed Domain section of JBoss EAP How to Configure Server Security.
8.1. About Managed Domains
The managed domain operating mode allows for the management of multiple JBoss EAP instances from a single control point.
Centrally-managed JBoss EAP server collections are known as members of a domain. All JBoss EAP instances in a domain share a common management policy.
A domain consists of one domain controller, one or more host controllers, and zero or more server groups per host.
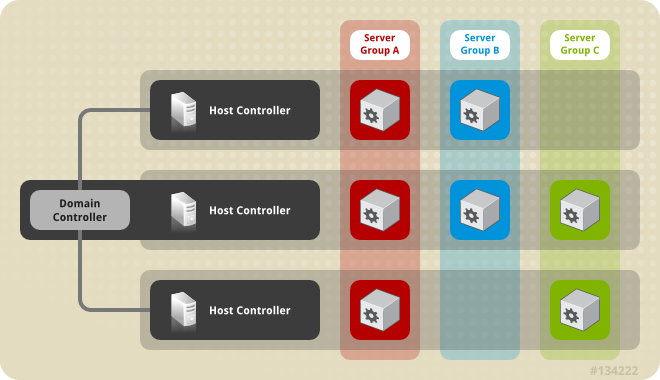
A domain controller is the central point from which the domain is controlled. It ensures that each server is configured according to the management policy of the domain. The domain controller is also a host controller.
A host controller is a physical or virtual host that interacts with the domain controller to control the lifecycle of the application server instances running on its host and to assist the domain controller to manage them. Each host can contain multiple server groups.
A server group is a set of server instances which have JBoss EAP installed on them and are managed and configured as one. The domain controller manages the configuration of and applications deployed onto server groups. Consequently, each server in a server group shares the same configuration and deployments.
Host controllers are tied to specific physical, or virtual, hosts. You can run multiple host controllers on the same hardware if you use different configurations, ensuring their ports and other resources do not conflict. It is possible for a domain controller, a single host controller, and multiple servers to run within the same JBoss EAP instance, on the same physical system.
8.1.1. About the Domain Controller
A domain controller is the JBoss EAP server instance that acts as a central management point for a domain. One host controller instance is configured to act as a domain controller.
The primary responsibilities of the domain controller are:
- Maintain the domain’s central management policy.
- Ensure all host controllers are aware of its current contents.
- Assist the host controllers in ensuring that all running JBoss EAP server instances are configured in accordance with this policy.
By default, the central management policy is stored in the EAP_HOME/domain/configuration/domain.xml file. This file is required in this directory of the host controller that is set to run as the domain controller.
The domain.xml file contains profile configurations available for use by the servers in the domain. A profile contains the detailed settings of the various subsystems available in that profile. The domain configuration also includes the definition of socket groups and the server group definitions.
A JBoss EAP 7 domain controller can administer JBoss EAP 6 hosts and servers, if the hosts and servers are running JBoss EAP 6.2 or later. For more information, see Configure a JBoss EAP 7.x Domain Controller to Administer JBoss EAP 6 Instances.
For more information, see the Start a Managed Domain and Domain Controller Configuration sections.
8.1.2. About Host Controllers
The primary responsibility of a host controller is server management. It delegates domain management tasks and is responsible for starting and stopping the individual application server processes that run on its host.
It interacts with the domain controller to help manage the communication between the servers and the domain controller. Multiple host controllers of a domain can interact with only a single domain controller. Hence, all the host controllers and server instances running on a single domain mode have a single domain controller and must belong to the same domain.
By default, each host controller reads its configuration from the EAP_HOME/domain/configuration/host.xml file located in the unzipped JBoss EAP installation file on its host’s file system. The host.xml file contains the following configuration information that is specific to the particular host:
- The names of the server instances meant to run from this installation.
-
Configurations specific to the local physical installation. For example, named interface definitions declared in
domain.xmlcan be mapped to an actual machine-specific IP address inhost.xml. And abstract path names in domain.xml can be mapped to actual file system paths inhost.xml. Any of the following configurations:
- How the host controller contacts the domain controller to register itself and access the domain configuration.
- How to find and contact a remote domain controller.
- Whether the host controller is to act as the domain controller
For more information, see the Start a Managed Domain and Host Controller Configuration sections.
8.1.3. About Process Controllers
A process controller is a small, lightweight process that is responsible for spawning the host controller process and monitoring its lifecycle. If the host controller crashes, the process controller will restart it. It also starts server processes as directed by the host controller; however, it will not automatically restart server processes that crash.
The process controller logs to the EAP_HOME/domain/log/process-controller.log file. You can set JVM options for the process controller in the EAP_HOME/bin/domain.conf file using the PROCESS_CONTROLLER_JAVA_OPTS variable.
8.1.4. About Server Groups
A server group is a collection of server instances that are managed and configured as one. In a managed domain, every application server instance belongs to a server group, even if it is the only member. The server instances in a group share the same profile configuration and deployed content.
A domain controller and a host controller enforce the standard configuration on all server instances of every server group in its domain.
A domain can consist of multiple server groups. Different server groups can be configured with different profiles and deployments. For example, a domain can be configured with different server tiers providing different services.
Different server groups can also have the same profile and deployments. This can, for example, allow for rolling application upgrades where the application is upgraded on one server group and then updated on a second server group, avoiding a complete service outage.
For more information, see the Configuring Server Groups section.
8.1.5. About Servers
A server represents an application server instance. In a managed domain, all server instances are members of a server group. The host controller launches each server instance in its own JVM process.
For more information, see the Configuring Servers section.
8.3. Launching a Managed Domain
8.3.1. Start a Managed Domain
Domain and host controllers can be started using the domain.sh or domain.bat script provided with JBoss EAP. For a complete listing of all available startup script arguments and their purposes, use the --help argument or see the Server runtime arguments and switches section.
The domain controller must be started before any slave servers in any server groups in the domain. Start the domain controller first, then start any other associated host controllers in the domain.
Start the Domain Controller
Start the domain controller with the host-master.xml configuration file, which is preconfigured for a dedicated domain controller.
$ EAP_HOME/bin/domain.sh --host-config=host-master.xmlDepending on your domain setup, you will need to make additional configurations to allow host controllers to connect. Also see the following example domain setups:
Start a Host Controller
Start the host controller with the host-slave.xml configuration file, which is preconfigured for a slave host controller.
$ EAP_HOME/bin/domain.sh --host-config=host-slave.xmlDepending on your domain setup, you will need to make additional configurations connect to, and not conflict with, the domain controller. Also see the following example domain setups:
8.3.2. Domain Controller Configuration
You must configure one host in the domain as the domain controller.
It is not supported to configure multiple domain or host controllers on the same machine when using the RPM installation method to install JBoss EAP.
Configure a host as the domain controller by adding the <local/> element in the <domain-controller> declaration. The <domain-controller> should include no other content.
<domain-controller>
  <local/>
</domain-controller>
The host acting as the domain controller must expose a management interface that is accessible to other hosts in the domain. The HTTP interface is the standard management interface.
<management-interfaces>
  <http-interface security-realm="ManagementRealm" http-upgrade-enabled="true">
    <socket interface="management" port="${jboss.management.http.port:9990}"/>
  </http-interface>
</management-interfaces>
The sample minimal domain controller configuration file, EAP_HOME/domain/configuration/host-master.xml, includes these configuration settings.
8.3.3. Host Controller Configuration
A host controller must be configured to connect to the domain controller so that the host controller can register itself with the domain.
It is not supported to configure multiple domain or host controllers on the same machine when using the RPM installation method to install JBoss EAP.
Use the <domain-controller> element of the configuration to configure a connection to the domain controller.
<domain-controller>
  <remote security-realm="ManagementRealm">
    <discovery-options>
      <static-discovery name="primary" protocol="${jboss.domain.master.protocol:remote}" host="${jboss.domain.master.address}" port="${jboss.domain.master.port:9990}"/>
    </discovery-options>
  </remote>
</domain-controller>
The sample minimal host controller configuration file, EAP_HOME/domain/configuration/host-slave.xml, includes the configuration settings to connect to a domain controller. The configuration assumes that you provide the jboss.domain.master.address property when starting the host controller.
$ EAP_HOME/bin/domain.sh --host-config=host-slave.xml -Djboss.domain.master.address=IP_ADDRESS
For more information on domain controller discovery, see the Domain Controller Discovery and Failover section.
Depending on your domain setup, you may also need to provide authentication for the host controller to be authenticated by the domain controller. See Set Up a Managed Domain on Two Machines for details on generating a management user with a secret value and updating the host controller configuration with that value.
8.3.4. Configure the Name of a Host
Every host running in a managed domain must have a unique host name. To ease administration and allow for the use of the same host configuration files on multiple hosts, the server uses the following precedence for determining the host name.
-
If set, the host element name attribute in the
host.xmlconfiguration file. -
The value of the
jboss.host.namesystem property. -
The value that follows the final period (
.) character in thejboss.qualified.host.namesystem property, or the entire value if there is no final period (.) character. -
The value that follows the period (
.) character in theHOSTNAMEenvironment variable for POSIX-based operating systems, theCOMPUTERNAMEenvironment variable for Microsoft Windows, or the entire value if there is no final period (.) character.
A host controller’s name is configured in the host element at the top of the relevant host.xml configuration file, for example:
<host xmlns="urn:jboss:domain:8.0" name="host1">
Use the following procedure to update the host name using the management CLI.
Start the JBoss EAP host controller.
$ EAP_HOME/bin/domain.sh --host-config=host-slave.xmlLaunch the management CLI, connecting to the domain controller.
$ EAP_HOME/bin/jboss-cli.sh --connect --controller=DOMAIN_CONTROLLER_IP_ADDRESS
Use the following command to set a new host name.
/host=EXISTING_HOST_NAME:write-attribute(name=name,value=NEW_HOST_NAME)
This modifies the host name attribute in the
host-slave.xmlfile as follows:<host name="NEW_HOST_NAME" xmlns="urn:jboss:domain:8.0">Reload the host controller in order for the changes to take effect.
reload --host=EXISTING_HOST_NAME
If a host controller does not have a name set in the configuration file, you can also pass in the host name at runtime.
$ EAP_HOME/bin/domain.sh --host-config=host-slave.xml -Djboss.host.name=HOST_NAME
8.4. Managing Servers
8.4.1. Configure Server Groups
The following is an example of a server group definition:
<server-group name="main-server-group" profile="full">
  <jvm name="default">
    <heap size="64m" max-size="512m"/>
  </jvm>
  <socket-binding-group ref="full-sockets"/>
  <deployments>
    <deployment name="test-application.war" runtime-name="test-application.war"/>
    <deployment name="helloworld.war" runtime-name="helloworld.war" enabled="false"/>
  </deployments>
</server-group>
Server groups can be configured using the management CLI or from the management console Runtime tab.
Add a Server Group
The following management CLI command can be used to add a server group.
/server-group=SERVER_GROUP_NAME:add(profile=PROFILE_NAME,socket-binding-group=SOCKET_BINDING_GROUP_NAME)
Update a Server Group
The following management CLI command can be used to update server group attributes.
/server-group=SERVER_GROUP_NAME:write-attribute(name=ATTRIBUTE_NAME,value=VALUE)
Remove a Server Group
The following management CLI command can be used to remove a server group.
/server-group=SERVER_GROUP_NAME:removeServer Group Attributes
A server group requires the following attributes:
-
name: The server group name. -
profile: The server group profile name. -
socket-binding-group: The default socket binding group used for servers in the group. This can be overridden on a per-server basis.
A server group includes the following optional attributes:
-
management-subsystem-endpoint: Set totrueto have servers belonging to the server group connect back to the host controller using the endpoint from theirremotingsubsystem. Theremotingsubsystem must be present for this to work. -
socket-binding-default-interface: The socket binding group default interface for this server. -
socket-binding-port-offset: The default offset to be added to the port values given by the socket binding group. -
deployments: The deployment content to be deployed on the servers in the group. -
jvm: The default JVM settings for all servers in the group. The host controller merges these settings with any other configuration provided inhost.xmlto derive the settings used to launch the server’s JVM. -
deployment-overlays: Links between a defined deployment overlay and deployments in this server group. -
system-properties: The system properties to be set on servers in the group.
8.4.2. Configure Servers
The default host.xml configuration file defines three servers:
<servers>
  <server name="server-one" group="main-server-group">
  </server>
  <server name="server-two" group="main-server-group" auto-start="true">
    <socket-bindings port-offset="150"/>
  </server>
  <server name="server-three" group="other-server-group" auto-start="false">
    <socket-bindings port-offset="250"/>
  </server>
</servers>
A server instance named server-one is associated with main-server-group and inherits the subsystem configuration and socket bindings specified by that server group. A server instance named server-two is also associated with main-server-group, but also defines a socket binding port-offset value, so as not to conflict with the port values used by server-one. A server instance named server-three is associated with other-server-group and uses that group’s configurations. It also defines a port-offset value and sets auto-start to false so that this server does not start when the host controller starts.
Servers can be configured using the management CLI or from the management console Runtime tab.
Add a Server
The following management CLI command can be used to add a server.
/host=HOST_NAME/server-config=SERVER_NAME:add(group=SERVER_GROUP_NAME)
Update a Server
The following management CLI command can be used to update server attributes.
/host=HOST_NAME/server-config=SERVER_NAME:write-attribute(name=ATTRIBUTE_NAME,value=VALUE)
Remove a Server
The following management CLI command can be used to remove a server.
/host=HOST_NAME/server-config=SERVER_NAME:remove
Server Attributes
A server requires the following attributes:
-
name: The name of the server. -
group: The name of a server group from the domain model.
A server includes the following optional attributes:
-
auto-start: Whether or not this server should be started when the host controller starts. -
socket-binding-group: The socket binding group to which this server belongs. -
socket-binding-port-offset: An offset to be added to the port values given by the socket binding group for this server. -
update-auto-start-with-server-status: Update theauto-startattribute with the status of the server. -
interface: A list of fully-specified named network interfaces available for use on the server. -
jvm: The JVM settings for this server. If not declared, the settings are inherited from the parent server group or host. -
path: A list of named file system paths. -
system-property: A list of system properties to set on this server.
8.4.3. Start and Stop Servers
You can perform operations on servers, such as starting, stopping, and reloading, from the management console by navigating to the Runtime tab and selecting the appropriate host or server group.
See the below commands for performing these operations using the management CLI.
Start Servers
You can start a single server on a particular host.
/host=HOST_NAME/server-config=SERVER_NAME:start
You can start all servers in a specified server group.
/server-group=SERVER_GROUP_NAME:start-serversStop Servers
You can stop a single server on a particular host.
/host=HOST_NAME/server-config=SERVER_NAME:stop
You can stop all servers in a specified server group.
/server-group=SERVER_GROUP_NAME:stop-serversReload Servers
You can reload a single server on a particular host.
/host=HOST_NAME/server-config=SERVER_NAME:reload
You can reload all servers in a specified server group.
/server-group=SERVER_GROUP_NAME:reload-serversKill Servers
You can kill all server processes in a specified server group.
/server-group=SERVER_GROUP_NAME:kill-servers8.5. Domain Controller Discovery and Failover
When setting up a managed domain, each host controller must be configured with information needed to contact the domain controller. In JBoss EAP, each host controller can be configured with multiple options for finding the domain controller. Host controllers iterate through the list of options until one succeeds.
A backup host controller can be promoted to domain contoller if there is a problem with the primary domain controller. This allows host controllers to automatically fail over to the new domain controller once it has been promoted.
8.5.1. Configure Domain Discovery Options
The following is an example of how to configure a host controller with multiple options for finding the domain controller.
Example: A Host Controller with Multiple Domain Controller Options
<domain-controller>
  <remote security-realm="ManagementRealm">
    <discovery-options>
      <static-discovery name="primary" protocol="${jboss.domain.master.protocol:remote}" host="172.16.81.100" port="${jboss.domain.master.port:9990}"/>
      <static-discovery name="backup" protocol="${jboss.domain.master.protocol:remote}" host="172.16.81.101" port="${jboss.domain.master.port:9990}"/>
    </discovery-options>
  </remote>
</domain-controller>
A static discovery option includes the following required attributes:
- name
- The name for this domain controller discovery option.
- host
- The remote domain controller’s host name.
- port
- The remote domain controller’s port.
In the example above, the first discovery option is the one expected to succeed. The second can be used in failover situations.
8.5.2. Start a Host Controller with a Cached Domain Configuration
A host controller can be started without a connection to the domain controller by using the --cached-dc option; however, the host controller must have previously cached its domain configuration locally from the domain controller. Starting a host controller with this --cached-dc option will cache the host controller’s domain configuration from the domain controller.
$ EAP_HOME/bin/domain.sh --host-config=host-slave.xml --cached-dc
This creates a domain.cached-remote.xml file in the EAP_HOME/domain/configuration/ directory that contains the information necessary for this host controller to temporarily manage its current servers without a domain controller connection.
By default, using the --cached-dc option only caches configuration used by this host controller, which means that it cannot be promoted to domain controller for the entire domain. See Cache the Domain Configuration for information on caching the entire domain configuration to allow a host controller to act as the domain controller.
If the domain controller is unavailable when starting this host controller with --cached-dc, the host controller will start using the cached configuration saved in the domain.cached-remote.xml file. Note that this file must exist or the host controller will fail to start.
While in this state, the host controller cannot modify the domain configuration, but can launch servers and manage deployments.
Once started with the cached configuration, the host controller will continue to attempt to reconnect to the domain controller. Once the domain controller becomes available, the host controller will automatically reconnect to it and synchronize the domain configuration. Note that some configuration changes may require you to reload the host controller to take effect. A warning will be logged on the host controller if this occurs.
8.5.3. Promote a Host Controller to Act as Domain Controller
You can promote a host controller to act as the domain controller if a problem arises with the primary domain controller. The host controller must first cache the domain configuration locally from the domain controller before it can be promoted.
Cache the Domain Configuration
Use the --backup option for any host controller that you might want to become the domain controller.
$ EAP_HOME/bin/domain.sh --host-config=host-slave.xml --backup
This creates a domain.cached-remote.xml file in the EAP_HOME/domain/configuration/ directory that contains a copy of the entire domain configuration. This configuration will be used if the host controller is reconfigured to act as the domain controller.
The ignore-unused-configuration attribute is used to determine how much configuration to cache for a particular host. A value of true means that only the configuration relevant to this host controller is cached, which would not allow it to take over as domain controller. A value of false means that the entire domain configuration is cached.
The --backup argument defaults this attribute to false to cache the entire domain. However, if you set this attribute in the host.xml file, that value is used.
You can also use the --cached-dc option alone to create a copy of the domain configuration, but must set ignore-unused-configuration to false in the host.xml to cache the entire domain. For example:
<domain-controller>
  <remote username="$local" security-realm="ManagementRealm" ignore-unused-configuration="false">
    <discovery-options>
      ...
    </discovery-options>
  </remote>
</domain-controller>
Promote a Host Controller to Be the Domain Controller
- Ensure the original domain controller is stopped.
- Use the management CLI to connect to the host controller that is to become the new domain controller.
Execute the following command to configure the host controller to act as the new domain controller.
/host=backup:write-attribute(name=domain-controller.local, value={})Execute the following command to reload the host controller.
reload --host=HOST_NAME
This host controller will now act as the domain controller.
8.6. Managed Domain Setups
8.6.1. Set Up a Managed Domain on a Single Machine
You can run multiple host controllers on a single machine by using the jboss.domain.base.dir property.
It is not supported to configure more than one JBoss EAP host controller as a system service on a single machine.
Copy the
EAP_HOME/domaindirectory for the domain controller.$ cp -r EAP_HOME/domain /path/to/domain1
Copy the
EAP_HOME/domaindirectory for a host controller.$ cp -r EAP_HOME/domain /path/to/host1
Start the domain controller using
/path/to/domain1.$ EAP_HOME/bin/domain.sh --host-config=host-master.xml -Djboss.domain.base.dir=/path/to/domain1
Start the host controller using
/path/to/host1.$ EAP_HOME/bin/domain.sh --host-config=host-slave.xml -Djboss.domain.base.dir=/path/to/host1 -Djboss.domain.master.address=IP_ADDRESS -Djboss.management.http.port=PORT
NoteWhen starting a host controller, you must specify the address of the domain controller using the
jboss.domain.master.addressproperty.Additionally, since this host controller is running on the same machine as the domain controller, you must change the management interface so that it does not conflict with the domain controller’s management interface. This command sets the
jboss.management.http.portproperty.
Each instance started in this manner will share the rest of the resources in the base installation directory, for example, EAP_HOME/modules/, but use the domain configuration from the directory specified by jboss.domain.base.dir.
8.6.2. Set Up a Managed Domain on Two Machines
You may need to configure your firewall to run this example.
You can create managed domain on two machines, where one machine is a domain controller and the other machine is a host. For more information, see About the Domain Controller.
-
IP1= IP address of the domain controller (Machine 1) -
IP2= IP address of the host (Machine 2)
Create a Managed Domain on Two Machines
On Machine 1
Add a management user so that the host can be authenticated by the domain controller.
Use the
add-user.shscript to add the management user for the host controller,HOST_NAME. Make sure to answeryesto the last prompt and note the secret value provided. This secret value will be used in the host controller configuration, and will appear similar to the line below:<secret value="SECRET_VALUE" />Start the domain controller.
Specify the
host-master.xmlconfiguration file, which is preconfigured for a dedicated domain controller. Also, set thejboss.bind.address.managementproperty to make the domain controller visible to other machines.$ EAP_HOME/bin/domain.sh --host-config=host-master.xml -Djboss.bind.address.management=IP1
On Machine 2
Update the host configuration with the user credentials.
Edit
EAP_HOME/domain/configuration/host-slave.xmland set the host name,HOST_NAME, and secret value,SECRET_VALUE.<host xmlns="urn:jboss:domain:8.0" name="HOST_NAME"> <management> <security-realms> <security-realm name="ManagementRealm"> <server-identities> <secret value="SECRET_VALUE" /> </server-identities> ...
Start the host controller.
Specify the
host-slave.xmlconfiguration file, which is preconfigured for a slave host controller. Also, set thejboss.domain.master.addressproperty to connect to the domain controller and thejboss.bind.addressproperty to set the host controller bind address.$ EAP_HOME/bin/domain.sh --host-config=host-slave.xml -Djboss.domain.master.address=IP1 -Djboss.bind.address=IP2
You can now manage the domain from the management CLI by specifying the domain controller address with the --controller parameter when launching.
$ EAP_HOME/bin/jboss-cli.sh --connect --controller=IP1
Or you can manage the domain from the management console at http://IP1:9990.
8.7. Managing JBoss EAP 7.4 Version
The latest version of JBoss EAP can manage JBoss EAP servers and host that are running an earlier version. See the following section for managing the latest version of JBoss EAP.
Red Hat has deprecated the JBoss EAP 7.4 domain controller that manages hosts and servers running JBoss EAP 6.x. This deprecated support functionality will be completely removed in the next major JBoss EAP release, which is version 8.0. JBoss EAP 8.0 only supports hosts and servers that are running in JBoss EAP 7.4.
8.7.1. Configure a JBoss EAP 7.x Domain Controller to Administer JBoss EAP 6 Instances
A JBoss EAP 7.4 domain controller can manage hosts and servers running JBoss EAP 6, if the hosts and servers are running JBoss EAP 6.2 or later.
When a JBoss EAP 7.0 domain controller is managing JBoss EAP 7.0 hosts that are on a different patch release, the JBoss EAP 7.0 domain controller does not need any configuration changes. However, the JBoss EAP 7.0 domain controller must be running a patch release that is equal to or later than the versions on the host controllers that it manages.
Complete the following tasks to successfully manage JBoss EAP 6 instances in a JBoss EAP 7 managed domain.
Once these tasks are complete, you can manage your JBoss EAP 6 servers and configurations from the JBoss EAP 7 domain controller using the management CLI. Note that JBoss EAP 6 hosts will not be able to take advantage of new JBoss EAP 7 features, such as batch processing.
Because the management console is optimized for the latest version of JBoss EAP, you should not use it to update your JBoss EAP 6 hosts, servers, and profiles. Use the management CLI instead when managing your JBoss EAP 6 configurations from a JBoss EAP 7 managed domain.
8.7.1.1. Add the JBoss EAP 6 Configuration to the JBoss EAP 7 Domain Controller
To allow the domain controller to manage your JBoss EAP 6 servers, you must provide the JBoss EAP 6 configuration details in the JBoss EAP 7 domain configuration. You can do this by copying the JBoss EAP 6 profiles, socket binding groups, and server groups to the JBoss EAP 7 domain.xml configuration file.
You will need to rename resources if any conflict with the existing names in the JBoss EAP 7 configuration. There are also some additional adjustments to make to ensure the proper behavior.
The following procedure uses the JBoss EAP 6 default profile, standard-sockets socket binding group, and main-server-group server group.
-
Edit the JBoss EAP 7
domain.xmlconfiguration file. It is recommended to back up this file before editing. Copy the applicable JBoss EAP 6 profiles to the JBoss EAP 7
domain.xmlfile.This procedure assumes that the JBoss EAP 6
defaultprofile was copied and renamed toeap6-default.JBoss EAP 7
domain.xml<profiles> ... <profile name="eap6-default"> ... </profile> </profiles>Add the necessary extensions used by this profile.
If your JBoss EAP 6 profile uses subsystems that are no longer present in JBoss EAP 7, you must add the appropriate extensions to the JBoss EAP domain configuration.
JBoss EAP 7
domain.xml<extensions> ... <extension module="org.jboss.as.configadmin"/> <extension module="org.jboss.as.threads"/> <extension module="org.jboss.as.web"/> <extensions>
Copy the applicable JBoss EAP 6 socket binding groups to the JBoss EAP 7
domain.xmlfile.This procedure assumes that the JBoss EAP 6
standard-socketssocket binding group was copied and renamed toeap6-standard-sockets.JBoss EAP 7
domain.xml<socket-binding-groups> ... <socket-binding-group name="eap6-standard-sockets" default-interface="public"> ... </socket-binding-group> </socket-binding-groups>Copy the applicable JBoss EAP 6 server groups to the JBoss EAP 7
domain.xmlfile.This procedure assumes that the JBoss EAP 6
main-server-groupserver group was copied and renamed toeap6-main-server-group. You must also update this server group to use the JBoss EAP 6 profile,eap6-default, and the JBoss EAP 6 socket binding group,eap6-standard-sockets.JBoss EAP 7
domain.xml<server-groups> ... <server-group name="eap6-main-server-group" profile="eap6-default"> ... <socket-binding-group ref="eap6-standard-sockets"/> </server-group> </server-groups>
8.7.1.2. Update the Behavior for the JBoss EAP 6 Profiles
Additional updates to the profiles used by your JBoss EAP 6 instances are necessary depending on the JBoss EAP version and desired behavior. You may require additional changes depending on the subsystems and configuration that your existing JBoss EAP 6 instances use.
Start the JBoss EAP 7 domain controller and launch its management CLI to perform the following updates. These examples assume that the JBoss EAP 6 profile is eap6-default.
Remove the
bean-validationsubsystem.JBoss EAP 7 moved bean validation functionality from the
eesubsystem into its own subsystem,bean-validation. If a JBoss EAP 7 domain controller sees a legacyeesubsystem, it adds the newbean-validationsubsystem. However, the JBoss EAP 6 hosts will not recognize this subsystem, so it must be removed.JBoss EAP 7 Domain Controller CLI
/profile=eap6-default/subsystem=bean-validation:remove
Set CDI 1.0 behavior.
This is only necessary if you want CDI 1.0 behavior for your JBoss EAP 6 servers, as opposed to behavior of later CDI versions used in JBoss EAP 7. If you want CDI 1.0 behavior, make the following updates to the
weldsubsystem.JBoss EAP 7 Domain Controller CLI
/profile=eap6-default/subsystem=weld:write-attribute(name=require-bean-descriptor,value=true)

/profile=eap6-default/subsystem=weld:write-attribute(name=non-portable-mode,value=true)
Enable datasource statistics for JBoss EAP 6.2.
This is only necessary if your profile is being used by JBoss EAP 6.2 servers. JBoss EAP 6.3 introduced the
statistics-enabledattribute, which defaults tofalseto not collect statistics; however, the JBoss EAP 6.2 behavior was to collect statistics. If this profile is used by a JBoss EAP 6.2 host and a host running a newer JBoss EAP version, the behavior would be inconsistent between hosts, which is not allowed. Therefore, profiles intended for use by a JBoss EAP 6.2 host should make the following change for their datasources.JBoss EAP 7 Domain Controller CLI
/profile=eap6-default/subsystem=datasources/data-source=ExampleDS:write-attribute(name=statistics-enabled,value=true)
8.7.1.3. Set the Server Group for the JBoss EAP 6 Servers
If you renamed the server groups, you need to update the JBoss EAP 6 host configuration to use the new server groups specified in the JBoss EAP 7 configuration. This example uses the eap6-main-server-group server group specified in the JBoss EAP 7 domain.xml.
JBoss EAP 6 host-slave.xml
<servers>
    <server name="server-one" group="eap6-main-server-group"/>
    <server name="server-two" group="eap6-main-server-group">
        <socket-bindings port-offset="150"/>
    </server>
</servers>
A host cannot use features or configuration settings that were introduced in a newer version of JBoss EAP than the one the host is running.
8.7.1.4. Prevent the JBoss EAP 6 Instances from Receiving JBoss EAP 7 Updates
The domain controller in a managed domain forwards configuration updates to its host controllers. You must use the host-exclude configuration to specify the resources that should be hidden from particular versions. Choose the appropriate preconfigured host-exclude option for your JBoss EAP 6 version: EAP62, EAP63, EAP64, or EAP64z.
The active-server-groups attribute of the host-exclude configuration specifies the list of server groups that are used by a particular version. These server groups and their associated profiles, socket binding groups, and deployment resources will be available to hosts of this version, but all others will be hidden from these hosts.
This example assumes that the version is JBoss EAP 6.4.z and adds the JBoss EAP 6 server group eap6-main-server-group as an active server group.
JBoss EAP 7 Domain Controller CLI
/host-exclude=EAP64z:write-attribute(name=active-server-groups,value=[eap6-main-server-group])
If necessary, you can specify additional socket binding groups used by your servers using the active-socket-binding-groups attribute. This is only required for socket binding groups that are not associated with the server groups specified in active-server-groups.
8.7.2. Configure a JBoss EAP 7.4 Domain Controller to Administer Previous Minor Releases of JBoss EAP
A JBoss EAP 7.4 domain controller can manage hosts and servers running from a previous minor release of JBoss EAP.
Complete the following tasks to successfully manage JBoss EAP 7.3 instances in a JBoss EAP 7.4 managed domain.
After you complete these tasks, you can manage your JBoss EAP 7.3 servers and configurations from the JBoss EAP 7.4 domain controller using the management CLI.
Because the management console is optimized for the latest version of JBoss EAP, you must use the CLI to manage your JBoss EAP 7.3 configurations from a JBoss EAP 7.4 managed domain. Do not use the management console to update JBoss EAP 7.3 hosts, servers, and profiles.
8.7.2.1. Add the JBoss EAP 7.3 Configuration to the JBoss EAP 7.4 Domain Controller
To enable the domain controller to manage your JBoss EAP 7.3 servers, you must provide the JBoss EAP 7.3 configuration details in the JBoss EAP 7.4 domain configuration. You can do this by copying the JBoss EAP 7.3 profiles, socket binding groups, and server groups to the JBoss EAP 7.4 domain.xml configuration file.
You must rename a resource if its name conflicts with resource names in the JBoss EAP 7.4 configuration.
The following procedure uses the JBoss EAP 7.3 default profile, standard-sockets socket binding group, and main-server-group server group.
Prerequisites
-
You have copied and renamed the JBoss EAP 7.3
defaultprofile toeap73-default. -
You have copied and renamed the JBoss EAP 7.3
standard-socketssocket binding group toeap73-standard-sockets. You have copied and renamed the JBoss EAP 7.3
main-server-groupserver group toeap73-main-server-group.-
You have updated the server group to use the JBoss EAP 7.3 profile,
eap73-default, and to use the JBoss EAP 7.3 socket binding group,eap73-standard-sockets.
-
You have updated the server group to use the JBoss EAP 7.3 profile,
Procedures
Edit the JBoss EAP 7.4
domain.xmlconfiguration file.ImportantBack up the JBoss EAP 7.4
domain.xmlconfiguration file before you edit the file.Copy the applicable JBoss EAP 7.3 profiles to the JBoss EAP 7.4
domain.xmlfile. For example:<profiles> ... <profile name="eap73-default"> ... </profile> </profiles>Copy the applicable JBoss EAP 7.3 socket binding groups to the JBoss EAP 7.4
domain.xmlfile. For example:<socket-binding-groups> ... <socket-binding-group name="eap73-standard-sockets" default-interface="public"> ... </socket-binding-group> </socket-binding-groups>Copy the applicable JBoss EAP 7.3 server groups to the JBoss EAP 7.4
domain.xmlfile:<server-groups> ... <server-group name="eap73-main-server-group" profile="eap73-default"> ... <socket-binding-group ref="eap73-standard-sockets"/> </server-group> </server-groups>
8.7.2.2. Set the Server Group for the JBoss EAP7.3 Servers
If you renamed the server groups, you need to update the JBoss EAP 7.3 host configuration to use the new server groups specified in the JBoss EAP 7.4 configuration. This example uses the eap73-main-server-group server group specified in the JBoss EAP 7.4 domain.xml.
JBoss EAP 7.3 host-slave.xml
<servers>
    <server name="server-one" group="eap73-main-server-group"/>
    <server name="server-two" group="eap73-main-server-group">
        <socket-bindings port-offset="150"/>
    </server>
</servers>
A host cannot use features or configuration settings that were introduced in a newer version of JBoss EAP than the one the host is running.
8.7.2.3. Prevent the JBoss EAP 7.3 Instances from Receiving JBoss EAP 7.4 Updates
A managed domain controller forwards configuration updates to its host controllers, so that a JBoss EAP 7.3 host does not receive configuration and resources that are specific to JBoss EAP 7.4. You must configure the JBoss EAP 7.3 host to ignore those resources. You can do this by setting the ignore-unused-configuration attribute on the JBoss EAP 7.3 host.
You can also use the host-exclude configuration to instruct the domain controller to hide certain resources from hosts running certain JBoss EAP versions. For an example of how to use the host-exclude configuration, see Prevent the JBoss EAP 6 Instances from Receiving JBoss EAP 7 Updates. For JBoss EAP 7.3, you use the EAP73 host-exclude option.
Set the ignore-unused-configuration attribute to true in the JBoss EAP 7.3 host controller connection configuration to the remote domain controller.
JBoss EAP 7.3 host-slave.xml
<domain-controller>
    <remote security-realm="ManagementRealm" ignore-unused-configuration="true">
        <discovery-options>
            <static-discovery name="primary" protocol="${jboss.domain.master.protocol:remote}" host="${jboss.domain.master.address}" port="${jboss.domain.master.port:9990}"/>
        </discovery-options>
    </remote>
</domain-controller>
With this setting, only the server groups used by this host, and their associated profiles, socket binding groups, and deployment resources, are made available to the host. All other resources are ignored.
8.8. Managing JBoss EAP Profiles
8.8.1. About Profiles
JBoss EAP uses profiles as a way to organize which subsystems are available to a server. A profile consists of a collection of available subsystems along with each subsystem’s specific configuration. A profile with a large number of subsystems results in a server with a large set of capabilities. A profile with a small, focused set of subsystems will have fewer capabilities but a smaller footprint.
JBoss EAP comes with five predefined profiles that should satisfy most use cases:
- default
-
Includes commonly used subsystems, such as
logging,security,datasources,infinispan,webservices,ee,ejb3,transactions, and so on. - ha
-
Includes the subsystems provided in the default profile with the addition of the
jgroupsandmodclustersubsystems for high availability - full
-
Includes the subsystems provided in the default profile with the addition of the
messaging-activemqandiiop-openjdksubsystems - full-ha
-
Includes the subsystems provided in the full profile with the addition of the
jgroupsandmodclustersubsystems for high availability - load-balancer
- Includes the minimum subsystems necessary to use the built-in mod_cluster front-end load balancer to load balance other JBoss EAP instances.
JBoss EAP offers the ability to disable extensions or unload drivers and other services manually by removing the subsystems from the configuration of existing profiles. However, for most cases this is unnecessary. Since JBoss EAP dynamically loads subsystems as they are needed, if the server or an application never use a subsystem, it will not be loaded.
In cases where the existing profiles do not provide the necessary capabilities, JBoss EAP also provides the ability to define custom profiles as well.
8.8.2. Cloning a Profile
JBoss EAP allows you to create a new profile in a managed domain by cloning an existing profile. This will create a copy of the original profile’s configuration and subsystems.
A profile can be cloned using the management CLI by using the clone operation on the desired profile to clone.
/profile=full-ha:clone(to-profile=cloned-profile)
You can also clone a profile from the management console by selecting the desired profile to clone and clicking Clone.
8.8.3. Creating Hierarchical Profiles
In a managed domain, you can create a hierarchy of profiles. This allows you to create a base profile with common extensions that other profiles can inherit.
The managed domain defines several profiles in domain.xml. If multiple profiles use the same configuration for a particular subsystem, you can configure it in just one place instead of different profiles. The values in parent profiles cannot be overridden.
In addition, each profile must be self-sufficient. If an element or subsystem is referenced, then it must be defined in the profile where it is referenced.
A profile can include other profiles in a hierarchy using the management CLI by using the list-add operation and providing the profile to include.
/profile=new-profile:list-add(name=includes, value=PROFILE_NAME)