
Installation Guide
Comprehensive instructions for installing and uninstalling Red Hat JBoss Enterprise Application Platform, including preparation and configuration.
Abstract
Chapter 1. Introduction
1.1. About the Red Hat Customer Portal
The Red Hat Customer Portal is the centralized platform for Red Hat knowledge and subscription resources. Use the Red Hat Customer Portal to do the following:
- Manage and maintain Red Hat entitlements and support contracts.
- Download officially-supported software.
- Access product documentation and the Red Hat Knowledgebase.
- Contact Global Support Services.
- File bugs against Red Hat products.
The Customer Portal is available here: https://access.redhat.com.
1.2. About the Use of EAP_HOME in this Document
In this document, the variable EAP_HOME is used to denote the path to the JBoss EAP installation. Replace this variable with the actual path to your JBoss EAP installation.
-
If you installed JBoss EAP using the ZIP install method, the install directory is the
jboss-eap-7.3directory where you extracted the ZIP archive. -
If you installed JBoss EAP using the RPM install method, the install directory is
/opt/rh/eap7/root/usr/share/wildfly/. If you used the installer to install JBoss EAP, the default path for
EAP_HOMEis${user.home}/EAP-7.3.0:-
For Red Hat Enterprise Linux and Solaris:
/home/USER_NAME/EAP-7.3.0/ -
For Microsoft Windows:
C:\Users\USER_NAME\EAP-7.3.0\
-
For Red Hat Enterprise Linux and Solaris:
If you used the Red Hat CodeReady Studio installer to install and configure the JBoss EAP server, the default path for
EAP_HOMEis${user.home}/devstudio/runtimes/jboss-eap:-
For Red Hat Enterprise Linux:
/home/USER_NAME/devstudio/runtimes/jboss-eap/ -
For Microsoft Windows:
C:\Users\USER_NAME\devstudio\runtimes\jboss-eaporC:\Documents and Settings\USER_NAME\devstudio\runtimes\jboss-eap\
-
For Red Hat Enterprise Linux:
EAP_HOME is not an environment variable. JBOSS_HOME is the environment variable used in scripts.
Chapter 2. Preparing for Installation
2.1. Choosing a JBoss EAP Installation Method
There are several different ways to install JBoss EAP. Each method is best used in certain situations. The table below provides a brief overview of each type of installation, and links to the sections that cover the relevant installation processes.
If you plan to use JBoss ON to deploy and install JBoss EAP patches, the target JBoss EAP instances must be installed using the ZIP installation method.
Table 2.1. Installation Methods
| Method | Description |
|---|---|
| The ZIP archive is suitable for installation on all supported operating systems. This method should be used if you wish to extract the instance manually. The ZIP installation provides a default installation of JBoss EAP, and all configuration must be done following installation. | |
| The JAR installer can either be run in a console or as a graphical wizard. Both options provide step-by-step instructions for installing and configuring the server instance. This is the preferred method to install JBoss EAP on all supported platforms. Additional setup, including the Quickstarts and Maven repository, is also possible with the installer. | |
| JBoss EAP can be installed using RPM packages on supported installations of Red Hat Enterprise Linux 6, Red Hat Enterprise Linux 7, and Red Hat Enterprise Linux 8. |
2.2. JBoss EAP Installation Prerequisites
Each installation method has a number of prerequisites. The table below covers the common requirements, as well as those specific to each installation method.
Table 2.2. JBoss EAP Installation Prerequisites
| Installation type | Prerequisites |
|---|---|
| Common Prerequisites |
|
| ZIP/Installer Prerequisites |
|
| RPM Prerequisites |
|
Chapter 3. Installing JBoss EAP
3.1. ZIP Installation
3.1.1. Downloading JBoss EAP (ZIP Installation)
Prerequisites
The JBoss EAP ZIP file is available from the Red Hat Customer Portal. The ZIP file installation is platform-independent.
- Log in to the Red Hat Customer Portal.
- Click Downloads.
- Click Red Hat JBoss Enterprise Application Platform in the Product Downloads list.
- In the Version drop-down menu, select 7.3.
- Find Red Hat JBoss Enterprise Application Platform 7.3.0 in the list and click the Download link.
3.1.2. Installing JBoss EAP (ZIP Installation)
Once the JBoss EAP ZIP installation file has been downloaded, it can be installed by extracting the package contents.
If necessary, move the ZIP file to the server and location where JBoss EAP should be installed.
NoteThe user who will be running JBoss EAP must have read and write access to this directory.
Extract the ZIP archive.
$ unzip jboss-eap-7.3.0.zip
NoteFor Windows Server, right-click the ZIP file and select Extract All.
The directory created by extracting the ZIP archive is the top-level directory for the JBoss EAP installation. This is referred to as EAP_HOME.
3.2. Installer Installation
3.2.1. Downloading JBoss EAP (Installer Installation)
Prerequisites
The JBoss EAP JAR installer is available from the Red Hat Customer Portal. The .jar archive can be used to run either the graphical or text-based installers. The installer is the preferred way to install JBoss EAP on all supported platforms.
Downloading the JBoss EAP Installer
- Open a browser and log in to the Red Hat Customer Portal at https://access.redhat.com.
- Click Downloads.
- Click Red Hat JBoss Enterprise Application in the Product Downloads list.
- In the Version drop-down menu, select 7.3.
- Find Red Hat JBoss Enterprise Application 7.3.0 Installer in the list and click the Download link.
3.2.2. Running the JBoss EAP Installer
You can run the JBoss EAP JAR installer in either graphical or text mode.
Running the JBoss EAP Graphical Installer
- Open a terminal and navigate to the directory containing the downloaded JBoss EAP Installer JAR file.
Run the graphical installer using the following command:
$ java -jar jboss-eap-7.3.0-installer.jar
Follow the instructions in the table below.
Table 3.1. JBoss EAP Installer Screens
Screen Name When it Appears Description Language Selection
Always
Choose the desired language for the installer and click OK.
License Agreement
Always
The EULA for RED HAT JBOSS MIDDLEWARE.
Select "I accept the terms of this license agreement.", and click Next.
Installation Path
Always
Select the installation path for JBoss EAP, and click Next.
Component Selection
Always
Select the components to install. Required components are disabled for deselection.
Figure 3.1. JBoss EAP Installer - Component Selection Screen

Create an Administrative User
Always
Create an administrative user and assign a password. Then click Next.
Installation Overview
Always
Review your installation options, then click Next.
Component Installation
Always
When the installation progress completes, click Next.
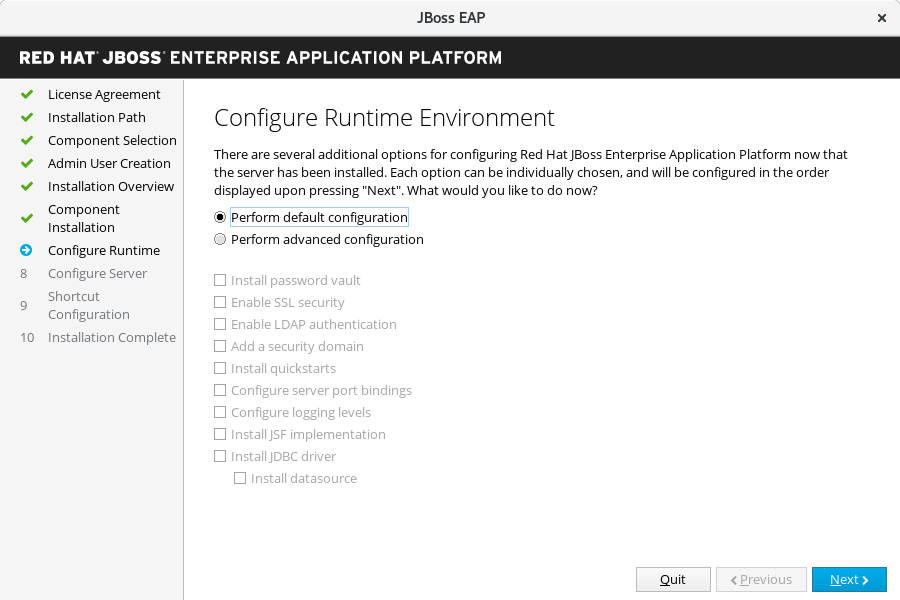
Configure Runtime Environment
Always
You can choose a default configuration for your JBoss EAP installation, or choose to perform an advanced configuration with the installer. Note that even if you choose a default configuration, you can still alter your configuration using the JBoss EAP management interfaces at a later time.
Select Perform default configuration, or select Perform advanced configuration and select the items to configure, then click Next.
Figure 3.2. JBoss EAP Installer - Configure Runtime Environment Screen
Configure Password Vault
If you choose to install a password vault in the advanced configuration of the runtime environment.
Configure a password vault to store all your sensitive passwords in an encrypted keystore, then click Next. For more information, see the password vault documentation in the How To Configure Server Security guide.
Figure 3.3. JBoss EAP Installer - Configure Password Vault Screen

SSL Security
If you choose to enable SSL Security in the advanced configuration of the runtime environment.
Specify an SSL keystore and the keystore password for securing the JBoss EAP management interfaces, then click Next. For more information, see the documentation on securing the management interfaces in the How To Configure Server Security guide.
WarningRed Hat recommends that SSLv2, SSLv3, and TLSv1.0 be explicitly disabled in favor of TLSv1.1 or TLSv1.2 in all affected packages.
LDAP Configuration
If you choose to enable LDAP authentication in the advanced configuration of the runtime environment.
Enable LDAP authentication to use an LDAP directory server as the authentication source for the management console, management CLI, and management API. When you are done, click Next. For more information, see the LDAP documentation in How to Configure Identity Management.
Figure 3.4. JBoss EAP Installer - LDAP Configuration Screen

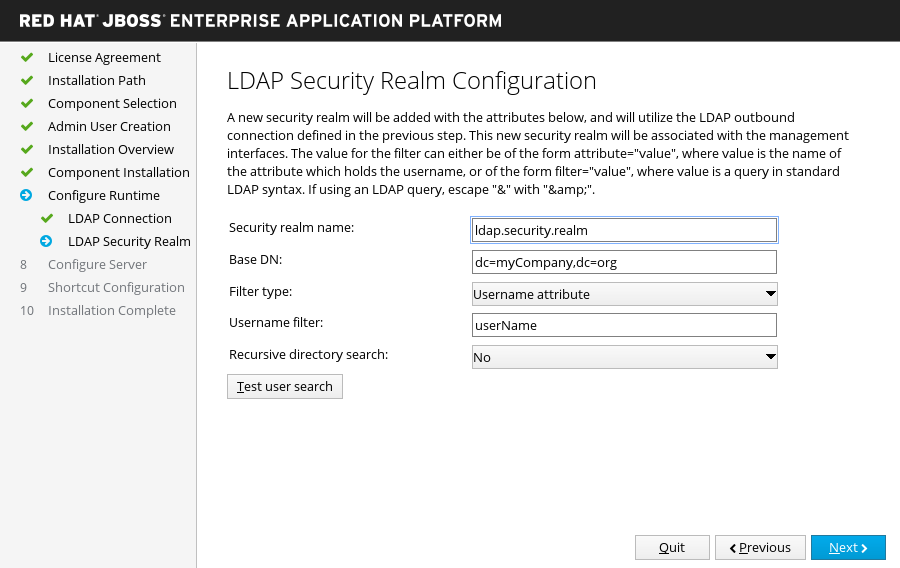
LDAP Security Realm Configuration
If you choose to enable LDAP authentication in the advanced configuration of the runtime environment.
A new security realm will be created and associated with the management interfaces, using the LDAP connection defined in the previous step.
Specify the values for your LDAP environment, then click Next. For more information, see the LDAP documentation in How to Configure Identity Management.
Figure 3.5. JBoss EAP Installer - LDAP Security Realm Configuration Screen
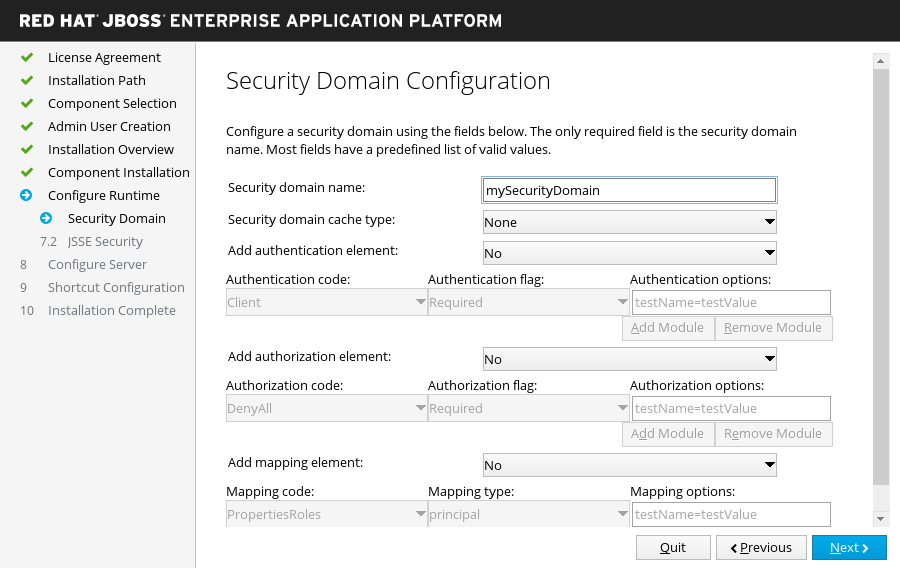
Security Domain Configuration
If you choose to add a security domain in the advanced configuration of the runtime environment.
Configure a security domain for the JBoss EAP server instance. Most of the fields are already populated with default values and do not need modification. When you are done, click Next. For more information, see Security Domains in the Security Architecture guide.
Figure 3.6. JBoss EAP Installer - Security Domain Configuration Screen
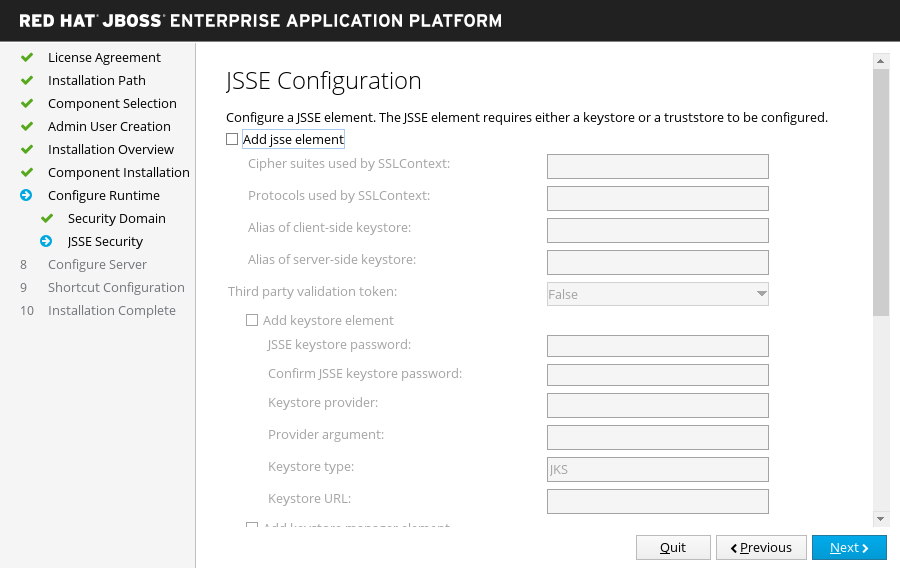
JSSE Configuration
If you choose to add a security domain in the advanced configuration of the runtime environment.
Configure Java Secure Socket Extension (JSSE) for the security domain defined in the previous step, using either a keystore or a truststore. When you are done, click Next.
Figure 3.7. JBoss EAP Installer - JSSE Configuration Screen
Quickstarts
If you choose to install quickstarts in the advanced configuration of the runtime environment.
Select the quickstart installation path, then click Next.
Maven Repository Setup
If you choose to install the quickstarts in the advanced configuration of the runtime environment.
Select your Maven repository and settings file.
Figure 3.8. JBoss EAP Installer - Maven Repository Setup Screen

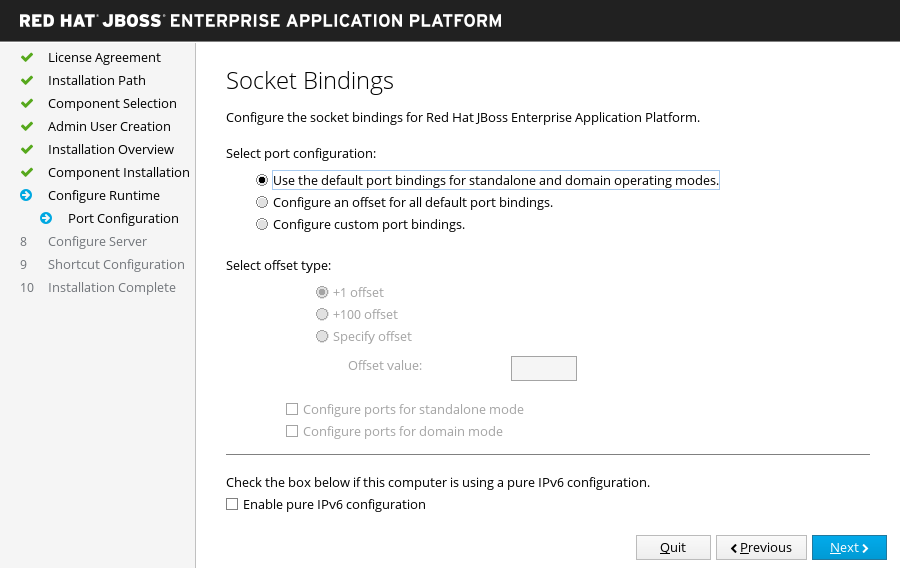
Socket Bindings
If you choose to configure server port bindings in the advanced configuration of the runtime environment.
Determine whether the installation will use the default port bindings, configure port offsets for all default bindings, or configure custom port bindings.
If you choose to configure port offsets, choose the offset number.
If you choose to configure custom bindings, select whether to configure the ports for standalone mode, domain mode, or both.
If the host is configured for IPv6 only, select the Enable pure IPv6 configuration check box and the installer will make the required configuration changes.
Click Next.
Figure 3.9. JBoss EAP Installer - Socket Bindings Screen
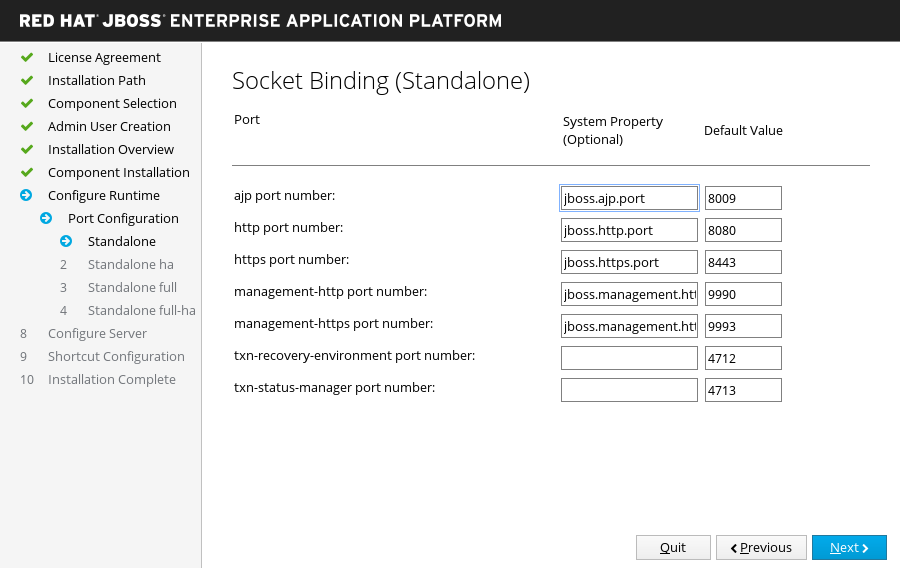
Custom Socket Bindings for Standalone Configurations
If you choose to configure custom port bindings for standalone mode.
Configure the ports and system properties for each of the standalone configurations (
standalone,standalone ha,standalone full,standalone full-ha), then click Next.Figure 3.10. JBoss EAP Installer - Custom Socket Bindings for Standalone Configurations Screen
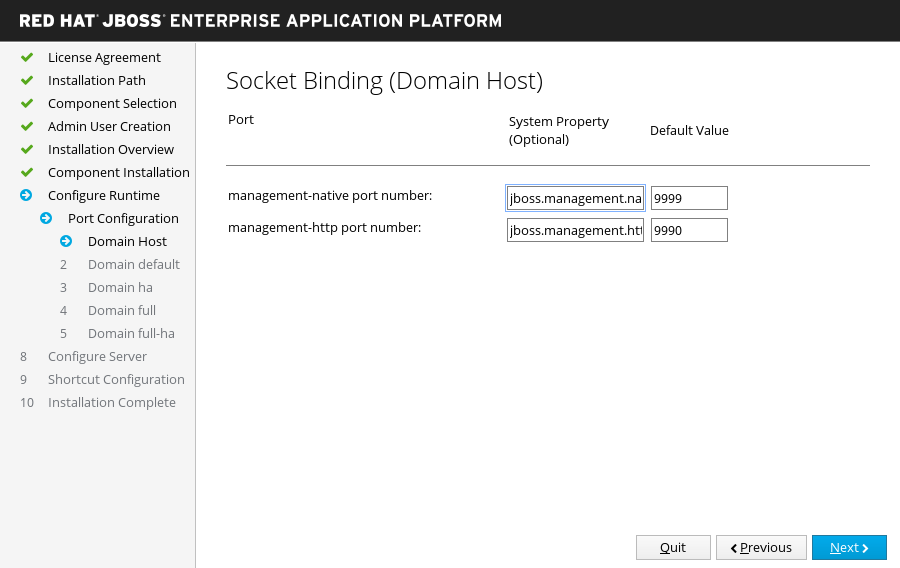
Custom Socket Bindings for Domain Configurations
If you choose to configure custom port bindings for domain mode.
Configure the ports and system properties for the host configuration (
domain host) and each of the domain profiles (domain default,domain ha,domain full,domain full-ha), then click Next.Figure 3.11. JBoss EAP Installer - Custom Socket Bindings for Domain Configurations Screen
Logging Options
If you choose to configure logging levels in the advanced configuration of the runtime environment.
Select the desired logging levels, then click Next.
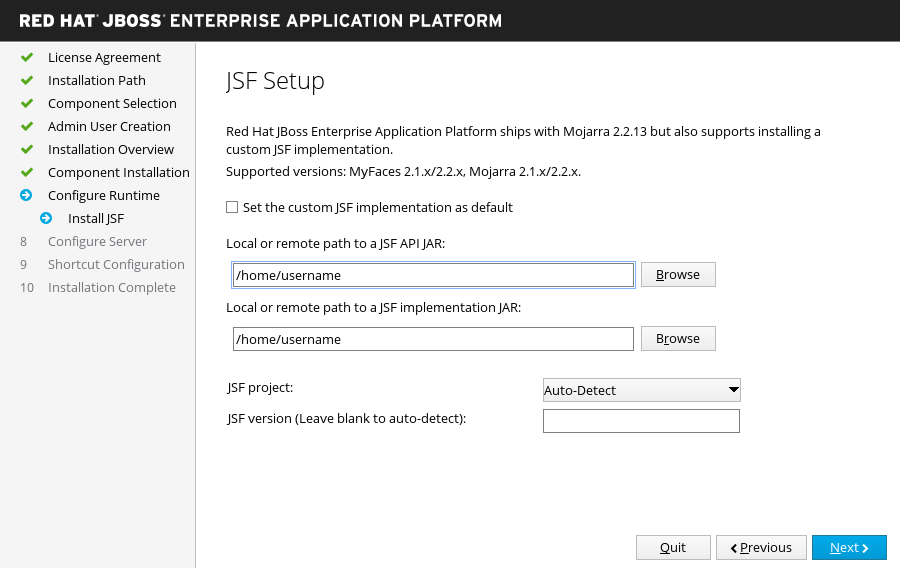
JSF Setup
If you choose to install a JSF implementation in the advanced configuration of the runtime environment.
Configure the JSF options and paths to your JSF JARs, then click Next. For more information, see Installing a JSF Implementation in the Configuration Guide.
Figure 3.12. JBoss EAP Installer - JSF Setup Screen
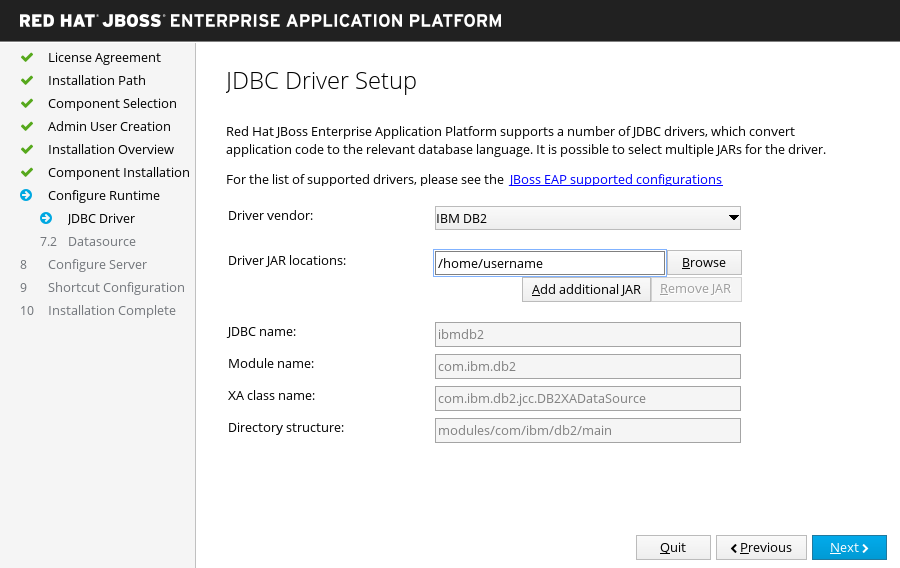
JDBC Driver Setup
If you choose to install a JDBC driver in the advanced configuration of the runtime environment.
Install and setup a JDBC driver. Choose the appropriate driver vendor from the drop down list and specify the driver JAR location(s). When you are done, click Next. For more information, see the datasource JDBC driver section in the Configuration Guide.
Figure 3.13. JBoss EAP Installer - JDBC Driver Setup Screen
Datasource Setup
If you choose to install a JDBC driver and install a datasource in the advanced configuration of the runtime environment.
Configure a datasource which can be used by applications. Provide a datasource name and configure the other options, then click Next. For more information, see the details of datasource management in the Configuration Guide.
Figure 3.14. JBoss EAP Installer - Datasource Setup Screen

Configure Server
Always
When the configuration progress completes, click Next.
Shortcut Configuration
Always
Select the Create shortcuts in the Start-Menu check box to create shortcuts. Only alphanumeric characters, dash (-) and underscore (_) characters are allowed. On Microsoft Windows, the slash (/) and backslash (\) characters are also allowed. Click Next.
Installation Complete
Always
Click Generate installation script and properties file if you want to capture the selected installation options for a future automated installation, then click Done.
Installation is now complete. The directory created by the installer is the top-level directory for the server. This is referred to as
EAP_HOME.
Running the JBoss EAP Text-based Installer
- Open a terminal and navigate to the directory containing the downloaded JBoss EAP Installer JAR.
Run the text-based installer using the following command:
$ java -jar jboss-eap-7.3.0-installer.jar -console
-
Follow the prompts to install JBoss EAP. The directory created by the installer is the top-level directory for the server. This is referred to as
EAP_HOME.
3.3. RPM Installation
From Red Hat Enterprise Linux 7, the term channel was replaced with the term repository. In these instructions only the term repository is used.
3.3.1. Choosing a Repository
Installing JBoss EAP via RPM requires a subscription to both the Red Hat Enterprise Linux Server base software repository, as well as a minor JBoss EAP repository.
For the JBoss EAP repository, you must subscribe to a minor JBoss EAP repository. A minor repository provides a specific minor release of JBoss EAP 7 and all applicable patches. This allows you to maintain the same minor version of JBoss EAP, while staying current with high severity and security patches.
For example, updating from this repository will include patches and security updates for the minor JBoss EAP version, but will not include upgrades from JBoss EAP 7.3 to JBoss EAP 7.4, if it is released.
3.3.1.1. Subscribing to a Minor JBoss EAP 7 Repository
- Ensure that your Red Hat Enterprise Linux system is registered to your account using Red Hat Subscription Manager. For more information, see the Red Hat Subscription Management documentation.
Using Red Hat Subscription Manager, subscribe to a minor JBoss EAP 7 repository using the following command. Ensure that you:
-
Replace
EAP_MINOR_VERSIONwith your intended JBoss EAP minor version. For example, for this release’s minor version, enter:7.3. Replace
RHEL_VERSIONwith either6or7depending on your Red Hat Enterprise Linux version.# subscription-manager repos --enable=jb-eap-EAP_MINOR_VERSION-for-rhel-RHEL_VERSION-server-rpms
For Red Hat Enterprise Linux 8, use the following command:
# subscription-manager repos --enable=jb-eap-EAP_MINOR_VERSION-for-rhel-RHEL_VERSION-ARCH-rpms
-
Replace
3.3.2. Installing JBoss EAP (RPM Installation)
Install JBoss EAP
Install JBoss EAP from your subscribed repository using one of the following commands:
- Install JBoss EAP and JDK 8.
# yum groupinstall jboss-eap7
Install JBoss EAP and JDK 11. JDK 11 is available for Red Hat Enterprise Linux 7 and later.
Red Hat Enterprise Linux 7:
# yum groupinstall jboss-eap7-jdk11
Red Hat Enterprise Linux 8:
# dnf groupinstall jboss-eap7-jdk11
The groupinstall command installs the specified version of JDK if that version of JDK is not installed on the system. If a different version of JDK already exists, the system will have multiple JDKs installed after the command is executed.
If there are multiple JDKs installed on your system after groupinstall is complete, check which JDK is used for JBoss EAP execution. By default, the system default JDK is used.
You can modify the default, in the following ways:
Change system wide configuration using the
alternativescommand:# alternatives --config java
The command displays a list of installed JDKs and instructions for setting a specific JDK as the default.
- Change the JDK used by JBoss EAP via JAVA_HOME property as described in RPM Service Configuration Properties section of the Configuration Guide.
Your installation is complete. The default EAP_HOME path for the RPM installation is /opt/rh/eap7/root/usr/share/wildfly.
It is not supported to configure multiple domain or host controllers on the same machine when using the RPM installation method to install JBoss EAP.
3.3.3. Changing Repositories
Over the lifespan of a JBoss EAP installation, you may want to change the software subscription from one JBoss EAP repository to another. Changing repositories is supported, but only within the following conditions.
- Changing from the current repository to a minor repository
Supported if changing to the latest minor repository.
ImportantThe JBoss EAP current repository is no longer available as of JBoss EAP 7.3. If you subscribed to the current repository for a previous release of JBoss EAP, you must change your subscription to a minor repository for this release of JBoss EAP.
- Changing from a minor repository to another minor repository
- Supported if changing to the next minor JBoss EAP version. For example, changing from JBoss EAP 7.0 to JBoss EAP 7.1 is supported, but changing from JBoss EAP 7.0 to JBoss EAP 7.2 is not supported.
Prerequisites
- Install JBoss EAP as an RPM installation.
- Choose a repository to change to, and ensure that you comply with the supported change conditions shown above.
Changing the JBoss EAP Repository
Before changing the repository, ensure that the JBoss EAP installation has all applicable updates applied:
# yum update
Using Red Hat Subscription Manager, unsubscribe from the existing repository and subscribe to the new repository you want to change to. In the command below, replace
EXISTING_REPOSITORYandNEW_REPOSITORYwith the respective repository names.# subscription-manager repos --disable=EXISTING_REPOSITORY --enable=NEW_REPOSITORY
3.4. Automated Installer Installation
If you use the JAR installer to install JBoss EAP, you can use an installation script generated from a previous install to automate future installations with the same configuration.
The automated installer is not backwards compatible. You cannot use an installation script generated from a previous version of JBoss EAP with the automated installer. You should only use installation scripts generated by the same minor version of JBoss EAP, for example JBoss EAP 7.3.
Prerequisites
- Use the JAR installer to generate an automatic installation script. The automatic installation script is an XML file.
Automated Installer Installation
- Open a terminal and navigate to the directory containing the downloaded JBoss EAP Installer JAR file.
Run the following command to install JBoss EAP using the automatic installation script XML file:
$ java -jar jboss-eap-7.3.0-installer.jar auto.xmlBy default, the installer will prompt you to enter any passwords required for the JBoss EAP configuration. You can do an unattended install by pre-setting the passwords for the installation.
NoteYou can store the automatic installation script XML file on a network host, and use HTTP or FTP to point the installer to use it for an installation. For example:
$ java -jar jboss-eap-7.3.0-installer.jar http://network-host.local/auto.xml$ java -jar jboss-eap-7.3.0-installer.jar ftp://network-host.local/auto.xml
3.4.1. Unattended Automated Installer Installation
Prerequisites
- Use the JAR installer to generate an automatic installation script. The automatic installation script is an XML file.
To do an unattended automated installer installation, you must preset the passwords required for the JBoss EAP installation.
When the installation script XML file is generated from a previous installer installation, an incomplete installation script variables file is also generated. It has the same file name as the installation script file, but with a .variables suffix.
This variables file contains a list of key and password parameters needed for an unattended automated installation.
You can provide the required passwords as a completed variables file, or as an argument when running the installer command.
Unattended Automated Installer Installation Using a Variables File
Open the
.variablesfile in a text editor and provide a password value for each key. For example:adminPassword = password#2 vault.keystorepwd = vaultkeystorepw ssl.password = user12345
Run the installer using the automatic installation script XML file. The installer detects the variables file automatically if the completed variables file is in the same directory as the installation script XML file, and you haven’t modified its file name.
$ java -jar jboss-eap-7.3.0-installer.jar auto.xml

Checking for corresponding .variables file
Variables file detected: auto.xml.variables
[ Starting automated installation ]
...
Alternatively, you can specify the path to the variables file using
-variablefile:$ java -jar jboss-eap-7.3.0-installer.jar auto.xml -variablefile auto.xml.variables
Unattended Automated Installer Installation Using the -variables Argument
Run the installer using the automatic installation script XML file, and specify the required passwords as key/value pairs using the
-variablesargument. For example:$ java -jar jboss-eap-7.3.0-installer.jar auto.xml -variables adminPassword=password#2,vault.keystorepwd=vaultkeystorepw,ssl.password=user12345
NoteIt is important that you do not have any spaces when specifying the
-variableskey/value pairs.
Chapter 4. Configuring JBoss EAP to Run as a Service
4.1. Configuring JBoss EAP as a Service in Red Hat Enterprise Linux (ZIP and Installer Installations)
Prerequisites
Configuring JBoss EAP as a Service in Red Hat Enterprise Linux
Customize the start-up options in the
jboss-eap.conffile.The startup script and an associated configuration file are located in the
EAP_HOME/bin/init.d/directory. Openjboss-eap.confin a text editor and set the options for your JBoss EAP installation.There are several options in
jboss-eap.conffile, but at the minimum you must provide the correct values forJBOSS_HOMEand theJBOSS_USER.You can customize the other options provided in the configuration file by uncommenting and editing the respective lines. If you do not, the service will default to starting a standalone JBoss EAP server using the default configuration file,
standalone.xml.NoteIf you want the service to start JBoss EAP as a managed domain, add
JBOSS_MODE=domaintojboss-eap.conf.To specify custom domain configuration files, add
JBOSS_DOMAIN_CONFIG=DOMAIN_CONFIG_FILE.xmlandJBOSS_HOST_CONFIG=HOST_CONFIG_FILE.xml. By default, JBoss EAP usesdomain.xmlandhost.xmlas the domain configuration files.Copy the service files into the system directories.
Copy the modified service configuration file to the
/etc/defaultdirectory.$ sudo cp EAP_HOME/bin/init.d/jboss-eap.conf /etc/defaultCopy the service startup script to the
/etc/init.ddirectory, and give it execute permissions:$ sudo cp EAP_HOME/bin/init.d/jboss-eap-rhel.sh /etc/init.d $ sudo chmod +x /etc/init.d/jboss-eap-rhel.sh
Add the new
jboss-eap-rhel.shservice to list of automatically started services using thechkconfigservice management command:$ sudo chkconfig --add jboss-eap-rhel.sh
Test that the service has been installed correctly by using one of the following commands.
For Red Hat Enterprise Linux 6:
$ sudo service jboss-eap-rhel.sh start
For Red Hat Enterprise Linux 7 and later:
$ sudo service jboss-eap-rhel start
The service will start. If you get an error, check the error logs and make sure that the options in the configuration file are set correctly.
To make the service start automatically when the Red Hat Enterprise Linux server starts, run the following command:
$ sudo chkconfig jboss-eap-rhel.sh on
If you want to remove the JBoss EAP service, use the following procedure.
Removing the JBoss EAP Service in Red Hat Enterprise Linux
If the service is running, open a terminal and stop the service with one of the following commands.
For Red Hat Enterprise Linux 6:
$ sudo service jboss-eap-rhel.sh stop
For Red Hat Enterprise Linux 7 and later:
$ sudo service jboss-eap-rhel stop
Remove JBoss EAP from the list of services:
$ sudo chkconfig --del jboss-eap-rhel.sh
Delete the service configuration file and startup script:
$ sudo rm /etc/init.d/jboss-eap-rhel.sh
$ sudo rm /etc/default/jboss-eap.conf
4.2. Configuring JBoss EAP as a Service in Red Hat Enterprise Linux (RPM Installation)
Prerequisites
- Install JBoss EAP as an RPM installation.
- Administrator privileges on the server.
It is not supported to configure more than one JBoss EAP instance as a system service on a single machine.
An RPM installation of JBoss EAP installs everything that is required to run JBoss EAP as a service. Use one of the following commands to activate the JBoss EAP service to start automatically at system boot.
For the commands below, replace EAP_SERVICE_NAME with either eap7-standalone for a standalone JBoss EAP server, or eap7-domain for a managed domain.
For Red Hat Enterprise Linux 6:
chkconfig EAP_SERVICE_NAME onFor Red Hat Enterprise Linux 7 and later:
systemctl enable EAP_SERVICE_NAME.service
To start or stop an RPM installation of JBoss EAP on demand, see the RPM instructions in the JBoss EAP Configuration Guide.
See the RPM service configuration files appendix in the JBoss EAP Configuration Guide for further details and options.
4.3. Configuring JBoss EAP as a Service in Microsoft Windows Server
Prerequisites
Using the set command to set system environment variables in a Windows Server command prompt will not permanently set the environment variable. You must use either the setx command, or the System interface in the Control Panel.
Configuring JBoss EAP as a Service in Microsoft Windows Server
Create two system environment variables:
-
JBOSS_HOMEpointing to the JBoss EAP installation directory. -
NOPAUSE=1
-
Install the JBoss Core Services Jsvc Package
If not already configured, download and extract the JBoss Core Services Jsvc package.
- Open a browser and log in to the Red Hat Customer Portal JBoss Software Downloads page.
- Select Apache Jsvc in the Product drop-down menu.
- Select the latest version from the Version drop-down menu.
- Find Red Hat JBoss Core Services Apache Jsvc in the list, ensuring that you select the correct platform and architecture for your system, and click the Download link.
Extract the downloaded ZIP file into the directory containing your JBoss EAP installation directory.
This will result in a
jbcs-jsvc-<VERSION>directory at the same depth as your JBoss EAP installation directory. For example:C:\Program Files ├── jboss-eap-7.3 │ ├── bin │ └── ... └── jbcs-jsvc-<VERSION>
Install the Service
Open a terminal, and change directories to
EAP_HOME\bin.Below are examples of a basic
service.bat installcommand to create a new service for either a standalone server, or a server in a managed domain. For a list of all possible options, runservice.batwithout any arguments.ImportantIf you specify the
/jbossuserand/jbosspassparameters, you must ensure that your JBoss EAP user’s password does not contain a hash (#) or a semicolon (;).Execute the following command, adjusting the log level for the service as required:
For a standalone server:
service.bat install /loglevel INFO
For a server in a managed domain:
Use the
/hostparameter to specify the name of the JBoss EAP host controller being controlled by the service. You can see valid values for the name by executingls /hostin the management CLI.Replace
EAP_HOST_NAMEin the command below with your JBoss EAP host controller name. If you specify the/hostparameter without providing a JBoss EAP host controller name, the name defaults tomaster.service.bat install /host EAP_HOST_NAME /loglevel INFO
A new Windows service will be created with name
JBossEAP7.Verify the New Service in the
ServicesconsoleOpen the Windows Services console (
services.msc) and verify that the service was created.If the default service name was used, in the list of Windows services the new service will have the display name:
JBossEAP7. From the Services console you can start and stop the service, as well change its settings of how and when it starts.Starting and Stopping the JBoss EAP Service from a Terminal
To start the service from a terminal, use the following command, changing the service name if necessary:
net start JBossEAP7
To stop the service from a terminal, use the following command, changing the service name if necessary:
net stop JBossEAP7
If you want to remove the JBoss EAP service, use the following procedure.
Removing the JBoss EAP Service in Microsoft Windows Server
If the service is running, first open a terminal and stop the service by executing the
net stopcommand with the name of the service:net stop JBossEAP7
In a terminal, change directories to
EAP_HOME\binand execute the following command:service.bat uninstall
4.4. Configuring JBoss EAP as a Service Using Jsvc
The Apache Jsvc component of the JBoss Core Services collection can be used to run JBoss EAP as a background service on Red Hat Enterprise Linux and Solaris.
Jsvc support for JBoss EAP is primarily intended for running JBoss EAP as a service on Microsoft Windows and Solaris. Although Jsvc works on Red Hat Enterprise Linux, we strongly recommend that you use the native methods for running JBoss EAP as a service on Red Hat Enterprise Linux.
Jsvc is a set of libraries and applications which allow Java applications to run on UNIX-like platforms as a background service. It allows an application to perform operations as a privileged user, and then switch identity to a non-privileged user.
Jsvc uses three processes: a launcher process, a controller process, and a controlled process. The controlled process is also the main Java thread. If the JVM crashes, the controller process will restart it within 60 seconds. Jsvc is a daemon process, and for JBoss EAP it must be started by a privileged user.
Install the JBoss Core Services Jsvc Package
For ZIP or installer installations:
- Open a browser and log in to the Red Hat Customer Portal JBoss Software Downloads page.
- Select Apache Jsvc in the Product drop-down menu.
- Select the latest version from the Version drop-down menu.
- Find Red Hat JBoss Core Services Apache Jsvc in the list, ensuring that you select the correct platform and architecture for your system, and click the Download link.
Extract the downloaded ZIP file into the directory containing your JBoss EAP installation directory.
This will result in a
jbcs-jsvc-<VERSION>directory at the same depth as your JBoss EAP installation directory. For example:/var/opt/ ├── jboss-eap-7.3 │ ├── bin │ └── ... └── jbcs-jsvc-<VERSION>The command examples for using Jsvc to start JBoss EAP assume that a
jbossuser has been created. If you have not already created a user for JBoss EAP, run the following commands to create thejbossuser and group:# groupadd -f -g 185 -r jboss # useradd -r -u 185 -g jboss -d EAP_HOME -s /sbin/nologin -c "JBoss" jboss
For RPM installations on Red Hat Enterprise Linux:
- Log in to Red Hat Subscription Manager.
- Click on Systems in the Subscriber Inventory.
Subscribe to the JBoss Core Services CDN repositories for your operating system version and architecture:
For Red Hat Enterprise Linux 6:
- jb-coreservices-1-for-rhel-6-server-rpms
For Red Hat Enterprise Linux 7 and later:
- jb-coreservices-1-for-rhel-7-server-rpms
Run the following command as the root user to install Jsvc:
# yum groupinstall jbcs-jsvc
Be sure to set the JAVA_HOME system environment variable.
Using Jsvc to Start JBoss EAP as a Standalone Server
The following commands are used are to start and stop JBoss EAP in standalone mode using Jsvc. The tables below show the paths that are needed for the commands for a ZIP/installer JBoss EAP installation, or an RPM installation.
Table 4.1. Jsvc File Locations for ZIP/Installer Installations - Standalone Server
| File Reference in Instructions | File Location |
|---|---|
|
|
|
|
|
|
|
|
|
|
|
|
Table 4.2. Jsvc File Locations for RPM Installations - Standalone Server
| File Reference in Instructions | File Location |
|---|---|
|
|
|
|
|
|
|
|
|
|
|
|
Start a standalone JBoss EAP server using Jsvc:
$ JSVC_BIN \
 -outfile LOG_DIR/jsvc.out.log   \
 -errfile LOG_DIR/jsvc.err.log   \
 -pidfile LOG_DIR/jsvc.pid  \
 -user jboss \
 -D[Standalone] -XX:+UseCompressedOops -Xms1303m \
 -Xmx1303m -XX:MaxPermSize=256m \
 -Djava.net.preferIPv4Stack=true \
 -Djboss.modules.system.pkgs=org.jboss.byteman \
 -Djava.awt.headless=true \
 -Dorg.jboss.boot.log.file=LOG_DIR/server.log \
 -Dlogging.configuration=file:CONF_DIR/logging.properties \
 -Djboss.modules.policy-permissions \
 -cp EAP_HOME/jboss-modules.jar:JSVC_JAR \
 -Djboss.home.dir=EAP_HOME \
 -Djboss.server.base.dir=EAP_HOME/standalone   \
 @org.jboss.modules.Main -start-method main \
 -mp EAP_HOME/modules \
 -jaxpmodule javax.xml.jaxp-provider \
 org.jboss.as.standalone
Stop a standalone JBoss EAP server using Jsvc:
$ JSVC_BIN \
 -stop \
 -outfile LOG_DIR/jsvc.out.log   \
 -errfile LOG_DIR/jsvc.err.log   \
 -pidfile LOG_DIR/jsvc.pid  \
 -user jboss \
 -D[Standalone] -XX:+UseCompressedOops -Xms1303m \
 -Xmx1303m -XX:MaxPermSize=256m \
 -Djava.net.preferIPv4Stack=true \
 -Djboss.modules.system.pkgs=org.jboss.byteman \
 -Djava.awt.headless=true \
 -Dorg.jboss.boot.log.file=LOG_DIR/server.log \
 -Dlogging.configuration=file:CONF_DIR/logging.properties \
 -Djboss.modules.policy-permissions \
 -cp EAP_HOME/jboss-modules.jar:JSVC_JAR \
 -Djboss.home.dir=EAP_HOME \
 -Djboss.server.base.dir=EAP_HOME/standalone   \
 @org.jboss.modules.Main -start-method main \
 -mp EAP_HOME/modules \
 -jaxpmodule javax.xml.jaxp-provider \
 org.jboss.as.standalone
Using Jsvc to Start a JBoss EAP Managed Domain
The following commands are used are to start and stop a JBoss EAP managed domain using Jsvc. The tables below show the paths that are needed for the commands for a ZIP/installer JBoss EAP installation, or an RPM installation.
Table 4.3. Jsvc File Locations for ZIP/Installer Installations - Managed Domain
| File Reference in Instructions | File Location |
|---|---|
|
|
|
|
|
|
|
|
|
|
|
|
Table 4.4. Jsvc File Locations for RPM Installations - Managed Domain
| File Reference in Instructions | File Location |
|---|---|
|
|
|
|
|
|
|
|
|
|
|
|
Before you issue the following command, be sure to set the JAVA_HOME system environment variable.
Start a JBoss EAP managed domain using Jsvc:
$ JSVC_BIN \
 -outfile LOG_DIR/jsvc.out.log   \
 -errfile LOG_DIR/jsvc.err.log   \
 -pidfile LOG_DIR/jsvc.pid  \
 -user jboss \
 -nodetach -D"[Process Controller]" -server -Xms64m \
 -Xmx512m -XX:MaxPermSize=256m \
 -Djava.net.preferIPv4Stack=true  \
 -Djboss.modules.system.pkgs=org.jboss.byteman \
 -Djava.awt.headless=true  \
 -Dorg.jboss.boot.log.file=LOG_DIR/process-controller.log \
 -Dlogging.configuration=file:CONF_DIR/logging.properties \
 -Djboss.modules.policy-permissions \
 -cp "EAP_HOME/jboss-modules.jar:JSVC_JAR" \
 org.apache.commons.daemon.support.DaemonWrapper \
 -start org.jboss.modules.Main -start-method main \
 -mp EAP_HOME/modules org.jboss.as.process-controller \
 -jboss-home EAP_HOME -jvm "${JAVA_HOME}"/bin/java \
 -mp EAP_HOME/modules -- \
 -Dorg.jboss.boot.log.file=LOG_DIR/host-controller.log \
 -Dlogging.configuration=file:CONF_DIR/logging.properties \
 -Djboss.modules.policy-permissions \
 -server -Xms64m -Xmx512m -XX:MaxPermSize=256m \
 -Djava.net.preferIPv4Stack=true \
 -Djboss.modules.system.pkgs=org.jboss.byteman \
 -Djava.awt.headless=true -- -default-jvm "${JAVA_HOME}"/bin/java \
&
Stop a JBoss EAP managed domain using Jsvc:
$ JSVC_BIN \
 -stop \
 -outfile LOG_DIR/jsvc.out.log   \
 -errfile LOG_DIR/jsvc.err.log   \
 -pidfile LOG_DIR/jsvc.pid  \
 -user jboss \
 -nodetach -D"[Process Controller]" -server -Xms64m \
 -Xmx512m -XX:MaxPermSize=256m \
 -Djava.net.preferIPv4Stack=true  \
 -Djboss.modules.system.pkgs=org.jboss.byteman \
 -Djava.awt.headless=true  \
 -Dorg.jboss.boot.log.file=LOG_DIR/process-controller.log \
 -Dlogging.configuration=file:CONF_DIR/logging.properties \
 -Djboss.modules.policy-permissions \
 -cp "EAP_HOME/jboss-modules.jar:JSVC_JAR" \
 org.apache.commons.daemon.support.DaemonWrapper \
 -start org.jboss.modules.Main -start-method main \
 -mp EAP_HOME/modules org.jboss.as.process-controller \
 -jboss-home EAP_HOME -jvm $JAVA_HOME/bin/java \
 -mp EAP_HOME/modules -- \
 -Dorg.jboss.boot.log.file=LOG_DIR/host-controller.log \
 -Dlogging.configuration=file:CONF_DIR/logging.properties \
 -Djboss.modules.policy-permissions \
 -server -Xms64m -Xmx512m -XX:MaxPermSize=256m \
 -Djava.net.preferIPv4Stack=true \
 -Djboss.modules.system.pkgs=org.jboss.byteman \
 -Djava.awt.headless=true -- -default-jvm $JAVA_HOME/bin/java
Chapter 5. Uninstalling JBoss EAP
5.1. Uninstalling JBoss EAP (ZIP Installation)
- Ensure that you back up any modified configuration files and deployments that may be reused.
- The ZIP installation method installs JBoss EAP in a single directory. Delete the installation directory to uninstall JBoss EAP.
- Also delete any other scripts that depended on JBoss EAP being installed on your machine.
5.2. Uninstalling JBoss EAP (Installer Installation)
If you installed JBoss EAP using the installer, you can uninstall JBoss EAP using the uninstaller in either graphical or text mode.
Running the JBoss EAP Graphical Uninstaller
-
Open a terminal and navigate to
EAP_HOME/Uninstaller. Run the graphical uninstaller using the following command:
$ java -jar uninstaller.jar
The graphical uninstaller is similar to following figure. Select the check box if you want to delete the JBoss EAP installation directory.
Figure 5.1. JBoss EAP Graphical Uninstaller
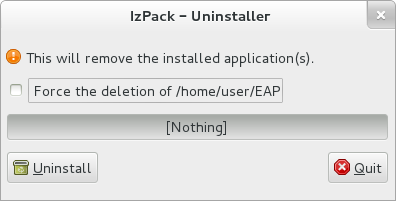
- Click Uninstall to start the uninstall process.
- When the uninstall process is finished, click Quit to exit the uninstaller.
Running the JBoss EAP Text-based Uninstaller
-
Open a terminal and navigate to
EAP_HOME/Uninstaller. Run the text-based uninstaller using the following command:
$ java -jar uninstaller.jar -console
- Follow the prompts to uninstall JBoss EAP.
5.3. Uninstalling JBoss EAP (RPM Installation)
Uninstalling a JBoss EAP installation that was installed using the RPM method is not recommended.
Because of the nature of RPM package management, it cannot be guaranteed that all installed packages and dependencies will be completely removed, or that the system will not be left in an inconsistent state caused by missing package dependencies.
Revised on 2022-02-01 13:03:45 UTC