
Getting Started with JBoss EAP for OpenShift Online
Guide to developing with Red Hat JBoss Enterprise Application Platform for OpenShift Online
Abstract
Chapter 1. Introduction
1.1. What is Red Hat JBoss Enterprise Application Platform (JBoss EAP)?
Red Hat JBoss Enterprise Application Platform 7 (JBoss EAP) is a middleware platform built on open standards and compliant with the Java Enterprise Edition 7 specification. It provides preconfigured options for features such as high-availability clustering, messaging, and distributed caching. It includes a modular structure that allows you to enable services only when required, which results in improved startup speed.
The web-based management console and management command line interface (CLI) make editing XML configuration files unnecessary and add the ability to script and automate tasks. In addition, JBoss EAP includes APIs and development frameworks that allow you to quickly develop, deploy, and run secure and scalable Jakarta EE applications. JBoss EAP 7 is a Jakarta EE 8 compatible implementation for both Web Profile and Full Platform specifications and also a certified implementation of the Java EE 8 Full Platform and Web Profile specifications.
1.2. How Does JBoss EAP Work on OpenShift?
Red Hat offers a containerized image for JBoss EAP that is designed for use with OpenShift. Using this image, developers can quickly and easily build, scale, and test applications that are deployed across hybrid environments.
1.3. Comparison: JBoss EAP and JBoss EAP for OpenShift
There are some notable differences when comparing the JBoss EAP product with the JBoss EAP for OpenShift image. The following table describes these differences and notes which features are included or supported in the current version of JBoss EAP for OpenShift.
Table 1.1. Differences between JBoss EAP and JBoss EAP for OpenShift
| JBoss EAP Feature | Status in JBoss EAP for OpenShift | Description |
|---|---|---|
| JBoss EAP management console | Not included | The JBoss EAP management console is not included in this release of JBoss EAP for OpenShift. |
| JBoss EAP management CLI | Not recommended | The JBoss EAP management CLI is not recommended for use with JBoss EAP running in a containerized environment. Any configuration changes made using the management CLI in a running container will be lost when the container restarts. The management CLI is accessible from within a pod for troubleshooting purposes. |
| Managed domain | Not supported | Although a JBoss EAP managed domain is not supported, creation and distribution of applications are managed in the containers on OpenShift. |
| Default root page | Disabled |
The default root page is disabled, but you can deploy your own application to the root context as |
| Remote messaging | Supported | Red Hat AMQ for inter-pod and remote messaging is supported. ActiveMQ Artemis is only supported for messaging within a single pod with JBoss EAP instances, and is only enabled when Red Hat AMQ is absent. |
| Transaction recovery | Partially supported | There are some unsupported transaction recovery scenarios and caveats when undertaking transaction recovery with the JBoss EAP for OpenShift image. The EAP operator is the only tested and supported option of transaction recovery in OpenShift 4. For more information about recovering transactions using the EAP operator, see EAP Operator for Safe Transaction Recovery. |
| Embedded messaging broker | Deprecated | The use of an embedded messaging broker in OpenShift containers is deprecated. Support for an embedded broker will be removed in a future release. If a container is configured to use an embedded messaging broker, and if no remote broker is configured, a warning is logged.
If the container configuration does not include messaging destinations, set the |
1.4. Version Compatibility and Support
JBoss EAP for OpenShift provides images for JDK 8, JDK 11, and Eclipse OpenJ9.
Two variants of each image are available: an S2I builder image and a runtime image. The S2I builder image contains a complete JBoss EAP server with tooling needed during S2I build. The runtime image contains dependencies needed to run JBoss EAP but does not contain a server. The server is installed in the runtime image during a chained build.
The following modifications have been applied to images in JBoss EAP for OpenShift 7.3.
- Default drivers and modules have been removed.
- Templates for MySQL and PostgreSQL have been removed. You can provision these capabilities with a custom layer.
- The Hawkular agent is not active in these images. If configured, it is ignored.
-
The default datasource,
ExampleDS, is no longer added by default at container startup. If you need the default datasource, use the environment variableENABLE_GENERATE_DEFAULT_DATASOURCEwith a value oftrue(ENABLE_GENERATE_DEFAULT_DATASOURCE=true) to include it.
The following discovery mechanism protocols are deprecated and have been replaced by other protocols:
-
The
openshift.DNS_PINGprotocol was deprecated and is replaced with thedns.DNS_PINGprotocol. If you referenced theopenshift.DNS_PINGprotocol in acustomized standalone-openshift.xmlfile, replace the protocol with thedns.DNS_PINGprotocol. -
The
openshift.KUBE_PINGdiscovery mechanism protocol was deprecated and is replaced with thekubernetes.KUBE_PINGprotocol.
JDK 8 Images
- Red Hat Universal Base Image: 7
- Prefix for template names: eap73-*
- Builder Image: https://access.redhat.com/containers/#/registry.access.redhat.com/jboss-eap-7/eap73-openjdk8-openshift-rhel7
- Runtime Image: https://access.redhat.com/containers/#/registry.access.redhat.com/jboss-eap-7/eap73-openjdk8-runtime-openshift-rhel7
A JDK 8 image for JBoss EAP is not provided for IBM Z and IBM Power Systems.
JDK 11 Images
- Red Hat Universal Base Image: 8
- Prefix for template names: eap73-openjdk11-*
- Builder Image: https://access.redhat.com/containers/#/registry.access.redhat.com/jboss-eap-7/eap73-openjdk11-openshift-rhel8
- Runtime Image: https://access.redhat.com/containers/#/registry.access.redhat.com/jboss-eap-7/eap73-openjdk11-runtime-openshift-rhel8
Eclipse OpenJ9 Images
- Red Hat Universal Base Image: 8
- Prefix for template names: eap73-*
- Builder Image: https://access.redhat.com/containers/#/registry.access.redhat.com/jboss-eap-7/eap73-openj9-11-openshift-rhel8
- Runtime Image: https://access.redhat.com/containers/#/registry.access.redhat.com/jboss-eap-7/eap73-openj9-11-runtime-openshift-rhel8
JBoss EAP for OpenShift is updated frequently. Therefore, it is important to understand which versions of the images are compatible with which versions of OpenShift. See OpenShift and Atomic Platform Tested Integrations on the Red Hat Customer Portal for more information on version compatibility and support.
Additional Resources
1.4.1. OpenShift 4.x Support
Changes in OpenShift 4.1 affect access to Jolokia, and the Open Java Console is no longer available in the OpenShift 4.x web console.
In previous releases of OpenShift, certain kube-apiserver proxied requests were authenticated and passed through to the cluster. This behavior is now considered insecure, and so, accessing Jolokia in this manner is no longer supported.
Due to changes in codebase for the OpenShift console, the link to the Open Java Console is no longer available.
1.4.2. IBM Z and IBM Power Systems Support
The s390x and ppc64le variant of libartemis-native is not included in the image. Thus, any settings related to AIO will not be taken into account.
-
journal-type: Setting thejournal-typetoASYNCIOhas no effect. The value of this attribute defaults toNIOat runtime. -
journal-max-io: This attribute has no effect. -
journal-store-enable-async-io: This attribute has no effect.
1.4.3. Upgrades from JBoss EAP 7.1 to JBoss EAP 7.3 on OpenShift
The file standalone-openshift.xml installed with JBoss EAP 7.1 on OpenShift is not compatible with JBoss EAP 7.3 and later. You must modify a standalone-openshift.xml file installed with JBoss EAP 7.1 before you use it to start a JBoss EAP 7.3 or later container for OpenShift.
1.5. Deployment Options
You can deploy the JBoss EAP Java applications on OpenShift using one of the following options:
- A JBoss EAP for OpenShift template. For more information, see Build and Run a Java Application on the JBoss EAP CD for OpenShift Image.
- The EAP operator, a JBoss EAP-specific controller that extends the OpenShift API to create, configure, and manage instances of complex stateful applications on behalf of an OpenShift user. For more information, see EAP Operator for Automating Application Deployment on OpenShift.
The EAP operator is supported only on OpenShift 4 and later versions.
Chapter 2. Build and Run a Java Application on the JBoss EAP for OpenShift Image
The following workflow demonstrates using the Source-to-Image (S2I) process to build and run a Java application on the JBoss EAP for OpenShift image.
As an example, the kitchensink quickstart is used in this procedure. It demonstrates a Jakarta EE web-enabled database application using JSF, CDI, EJB, JPA, and Bean Validation. See the kitchensink quickstart that ships with JBoss EAP 7 for more information.
2.1. Prerequisites
This workflow assumes that you already have an active OpenShift Online subscription and that you have installed the OpenShift CLI.
2.2. Prepare OpenShift for Application Deployment
-
Log in to your OpenShift instance using the
oc logincommand. Create a new project in OpenShift.
A project allows a group of users to organize and manage content separately from other groups. You can create a project in OpenShift using the following command.
$ oc new-project PROJECT_NAMEFor example, for the
kitchensinkquickstart, create a new project namedeap-demousing the following command.$ oc new-project eap-demo
Optional: Create a keystore and a secret.
NoteCreating a keystore and a secret is required if you are using any HTTPS-enabled features in your OpenShift project. For example, if you are using the
eap73-https-s2itemplate (for JDK 8) or theeap73-openjdk11-https-s2itemplate (for JDK 11), you must create a keystore and secret.This workflow demonstration for the
kitchensinkquickstart does not use an HTTPS template, so a keystore and secret are not required.Create a keystore.
WarningThe following commands generate a self-signed certificate, but for production environments Red Hat recommends that you use your own SSL certificate purchased from a verified Certificate Authority (CA) for SSL-encrypted connections (HTTPS).
You can use the Java
keytoolcommand to generate a keystore using the following command.$ keytool -genkey -keyalg RSA -alias ALIAS_NAME -keystore KEYSTORE_FILENAME.jks -validity 360 -keysize 2048
For example, for the
kitchensinkquickstart, use the following command to generate a keystore.$ keytool -genkey -keyalg RSA -alias eapdemo-selfsigned -keystore keystore.jks -validity 360 -keysize 2048
Create a secret from the keystore.
Create a secret from the previously created keystore using the following command.
$ oc create secret SECRET_NAME KEYSTORE_FILENAME.jks
For example, for the
kitchensinkquickstart, use the following command to create a secret.$ oc create secret eap7-app-secret keystore.jks
2.3. Import the Latest JBoss EAP for OpenShift Imagestreams and Templates
You must import the latest JBoss EAP for OpenShift imagestreams and templates for your JDK into the namespace of your OpenShift project.
Log in to the Red Hat Container Registry using your Customer Portal credentials to import the JBoss EAP imagestreams and templates. For more information, see Red Hat Container Registry Authentication.
Import command for JDK 8
for resource in \
  eap73-amq-persistent-s2i.json \
  eap73-amq-s2i.json \
  eap73-basic-s2i.json \
  eap73-https-s2i.json \
  eap73-image-stream.json \
  eap73-sso-s2i.json \
  eap73-starter-s2i.json \
do
  oc replace --force -f \
https://raw.githubusercontent.com/jboss-container-images/jboss-eap-7-openshift-image/eap73/templates/${resource}
done
This command imports the following imagestreams and templates.
-
The JDK 8 builder imagestream:
jboss-eap73-openshift -
The JDK 8 runtime imagestream:
jboss-eap73-runtime-openshift - All templates specified in the command.
Import command for JDK 11
for resource in \
  eap73-openjdk11-amq-persistent-s2i.json \
  eap73-openjdk11-amq-s2i.json \
  eap73-openjdk11-basic-s2i.json \
  eap73-openjdk11-https-s2i.json \
  eap73-openjdk11-image-stream.json \
  eap73-openjdk11-sso-s2i.json \
  eap73-openjdk11-starter-s2i.json \
do
  oc replace --force -f \
https://raw.githubusercontent.com/jboss-container-images/jboss-eap-7-openshift-image/eap73/templates/${resource}
done
This command imports the following imagestreams and templates.
-
The JDK 11 builder imagestream:
jboss-eap73-openjdk11-openshift -
The JDK 11 runtime imagestream:
jboss-eap73-openjdk11-runtime-openshift - All templates specified in the command.
Import command for Eclipse OpenJ9 on IBM Z and IBM Power Systems
oc replace --force -f \
https://raw.githubusercontent.com/jboss-container-images/jboss-eap-openshift-templates/eap73/eap73-openj9-image-stream.json

for resource in \
  eap73-amq-persistent-s2i.json \
  eap73-amq-s2i.json \
  eap73-basic-s2i.json \
  eap73-https-s2i.json \
  eap73-sso-s2i.json \
do
  oc replace --force -f \
https://raw.githubusercontent.com/jboss-container-images/jboss-eap-openshift-templates/eap73/templates/${resource}
done
This command imports the following imagestreams and templates.
-
The Eclipse OpenJ9 builder imagestream:
jboss-eap-7-openj9-11-openshift -
The Eclipse OpenJ9 runtime imagestream:
jboss-eap-7-openj9-11-runtime-openshift - All templates specified in the command.
The JBoss EAP imagestreams and templates imported using these commands are only available within that OpenShift project.
If you want to import the image streams and templates into a different project, add the -n PROJECT_NAME to the oc replace line of the command. For example:
...
oc replace -n PROJECT_NAME --force -f
...
If you use the cluster-samples-operator, refer to the OpenShift documentation on configuring the cluster samples operator. See Configuring the Samples Operator for details about configuring the cluster samples operator.
2.4. Deploy a JBoss EAP Source-to-Image (S2I) Application to OpenShift
After you import the images and templates, you can deploy applications to OpenShift.
OpenJDK 8 and Eclipse OpenJ9 template names use the prefix eap73-*; for example, eap73-https-s2i. OpenJDK 11 template names use the prefix eap73-openjdk11-*; for example, eap73-openjdk11-https-s2i.
Prerequisites
Optional: A template can specify default values for many template parameters, and you might have to override some, or all, of the defaults. To see template information, including a list of parameters and any default values, use the command oc describe template TEMPLATE_NAME.
Procedure
Create a new OpenShift application that uses the JBoss EAP for OpenShift image and the source code of your Java application. You can use one of the provided JBoss EAP for OpenShift templates for S2I builds. You can also choose to provision a trimmed server.
For example, to deploy the
kitchensinkquickstart using the JDK 8 builder image, enter the following command to use theeap73-basic-s2itemplate in theeap-demoproject, created in Prepare OpenShift for Application Deployment, with thekitchensinksource code on GitHub. This quickstart does not support the trimming capability.oc new-app --template=eap73-basic-s2i \1 -p IMAGE_STREAM_NAMESPACE=eap-demo \2 -p SOURCE_REPOSITORY_URL=https://github.com/jboss-developer/jboss-eap-quickstarts \3 -p SOURCE_REPOSITORY_REF=7.3.x-openshift \4 -p CONTEXT_DIR=kitchensink5
- 1
- The template to use. The
eap73prefix specifies the JDK 8 template. - 2
- The latest imagestreams and templates were imported into the project’s namespace, so you must specify the namespace where to find the imagestream. This is usually the project’s name
- 3
- URL to the repository containing the application source code.
- 4
- The Git repository reference to use for the source code. This can be a Git branch or tag reference.
- 5
- The directory within the source repository to build.
NoteUse a modified version of this command for the Eclipse OpenJ9 builder image on IBM Z and IBM Power Systems. Include the following image name parameters in the command. The JDK environment uses default values for these parameters.
- EAP_IMAGE_NAME=jboss-eap-7-openj9-11-openshift \
- EAP_RUNTIME_IMAGE_NAME=jboss-eap-7-openj9-11-runtime-openshift \
As another example, to deploy the
helloworld-html5quickstart using the JDK 11 runtime image and trimming JBoss EAP to include only thejaxrs-serverlayer, enter the following command. The command uses theeap73-openjdk11-basic-s2itemplate in theeap-demoproject, created in Prepare OpenShift for Application Deployment, with thehelloworld-html5source code on GitHub.oc new-app --template=eap73-openjdk11-basic-s2i \1 -p IMAGE_STREAM_NAMESPACE=eap-demo \2 -p SOURCE_REPOSITORY_URL=https://github.com/jboss-developer/jboss-eap-quickstarts \3 -p SOURCE_REPOSITORY_REF=7.3.x-openshift \4 -p GALLEON_PROVISION_LAYERS=jaxrs-server \5 -p CONTEXT_DIR=helloworld-html56
- 1
- The template to use. The
eap73-openjdk11prefix specifies the JDK 11 template. - 2
- The latest imagestreams and templates were imported into the project’s namespace, so you must specify the namespace where to find the imagestream. This is usually the project’s name.
- 3
- URL to the repository containing the application source code.
- 4
- The Git repository reference to use for the source code. This can be a Git branch or tag reference.
- 5
- Provision a trimmed server with only the
jaxrs-serverlayer. - 6
- The directory within the source repository to build.
NoteYou might also want to configure environment variables when creating your new OpenShift application.
For example, if you are using an HTTPS template such as
eap73-https-s2i, you must specify the required HTTPS environment variablesHTTPS_NAME,HTTPS_PASSWORD, andHTTPS_KEYSTOREto match your keystore details.NoteIf the template uses AMQ, you must include the
AMQ_IMAGE_NAMEparameter with the appropriate value.If the template uses SSO, you must include the
SSO_IMAGE_NAMEparameter with the appropriate value.Retrieve the name of the build configuration.
$ oc get bc -o name
Use the name of the build configuration from the previous step to view the Maven progress of the build.
$ oc logs -f buildconfig/BUILD_CONFIG_NAMEFor example, for the
kitchensinkquickstart, the following command shows the progress of the Maven build.$ oc logs -f buildconfig/eap-app
Additional Resources
2.5. Post Deployment Tasks
Depending on your application, some tasks might need to be performed after your OpenShift application has been built and deployed. This might include exposing a service so that the application is viewable from outside of OpenShift, or scaling your application to a specific number of replicas.
Get the service name of your application using the following command.
$ oc get service
Expose the main service as a route so you can access your application from outside of OpenShift. For example, for the
kitchensinkquickstart, use the following command to expose the required service and port.$ oc expose service/eap-app --port=8080
NoteIf you used a template to create the application, the route might already exist. If it does, continue on to the next step.
Get the URL of the route.
$ oc get route
Access the application in your web browser using the URL. The URL is the value of the
HOST/PORTfield from previous command’s output.If your application does not use the JBoss EAP root context, append the context of the application to the URL. For example, for the
kitchensinkquickstart, the URL might behttp://HOST_PORT_VALUE/kitchensink/.Optionally, you can also scale up the application instance by running the following command. This increases the number of replicas to
3.$ oc scale deploymentconfig DEPLOYMENTCONFIG_NAME --replicas=3For example, for the
kitchensinkquickstart, use the following command to scale up the application.$ oc scale deploymentconfig eap-app --replicas=3
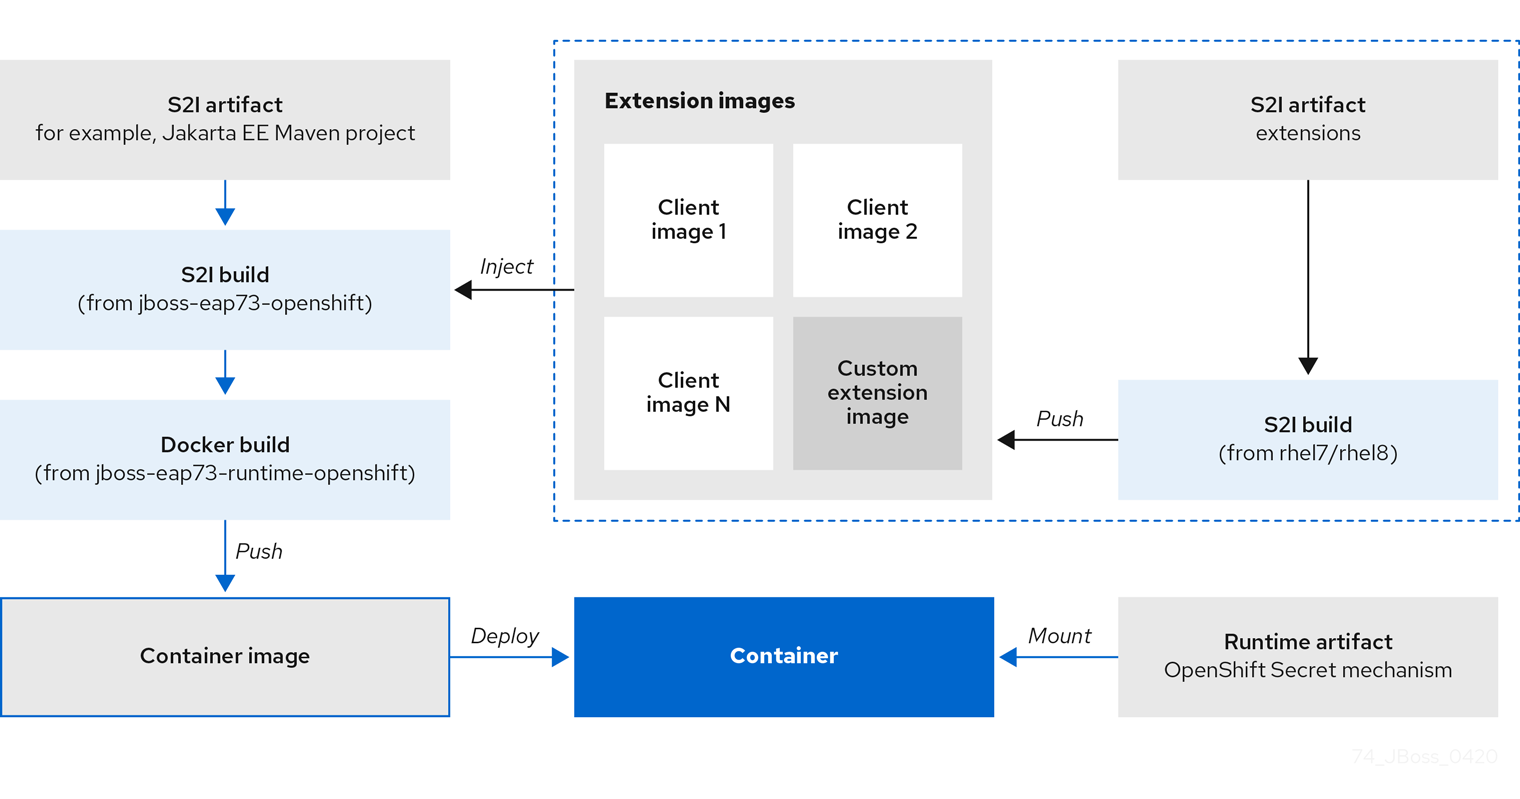
2.6. Chained Build Support in JBoss EAP for OpenShift
JBoss EAP for OpenShift supports chained builds in OpenShift.
JBoss EAP for OpenShift templates employ chained builds. When you use these templates, two builds result:
-
An intermediate image named
[application name]-build-artifacts -
The final image,
[application name]
For details about chained builds, see the OpenShift documentation.
Additional Resources
Chapter 3. Configuring the JBoss EAP for OpenShift Image for Your Java Application
The JBoss EAP for OpenShift image is preconfigured for basic use with your Java applications. However, you can configure the JBoss EAP instance inside the image. The recommended method is to use the OpenShift S2I process, together with application template parameters and environment variables.
Any configuration changes made on a running container will be lost when the container is restarted or terminated.
This includes any configuration changes made using scripts that are included with a traditional JBoss EAP installation, for example add-user.sh or the management CLI.
It is strongly recommended that you use the OpenShift S2I process, together with application template parameters and environment variables, to make any configuration changes to the JBoss EAP instance inside the JBoss EAP for OpenShift image.
3.1. How the JBoss EAP for OpenShift S2I Process Works
Flowchart illustrating the S2I process for JBoss EAP:
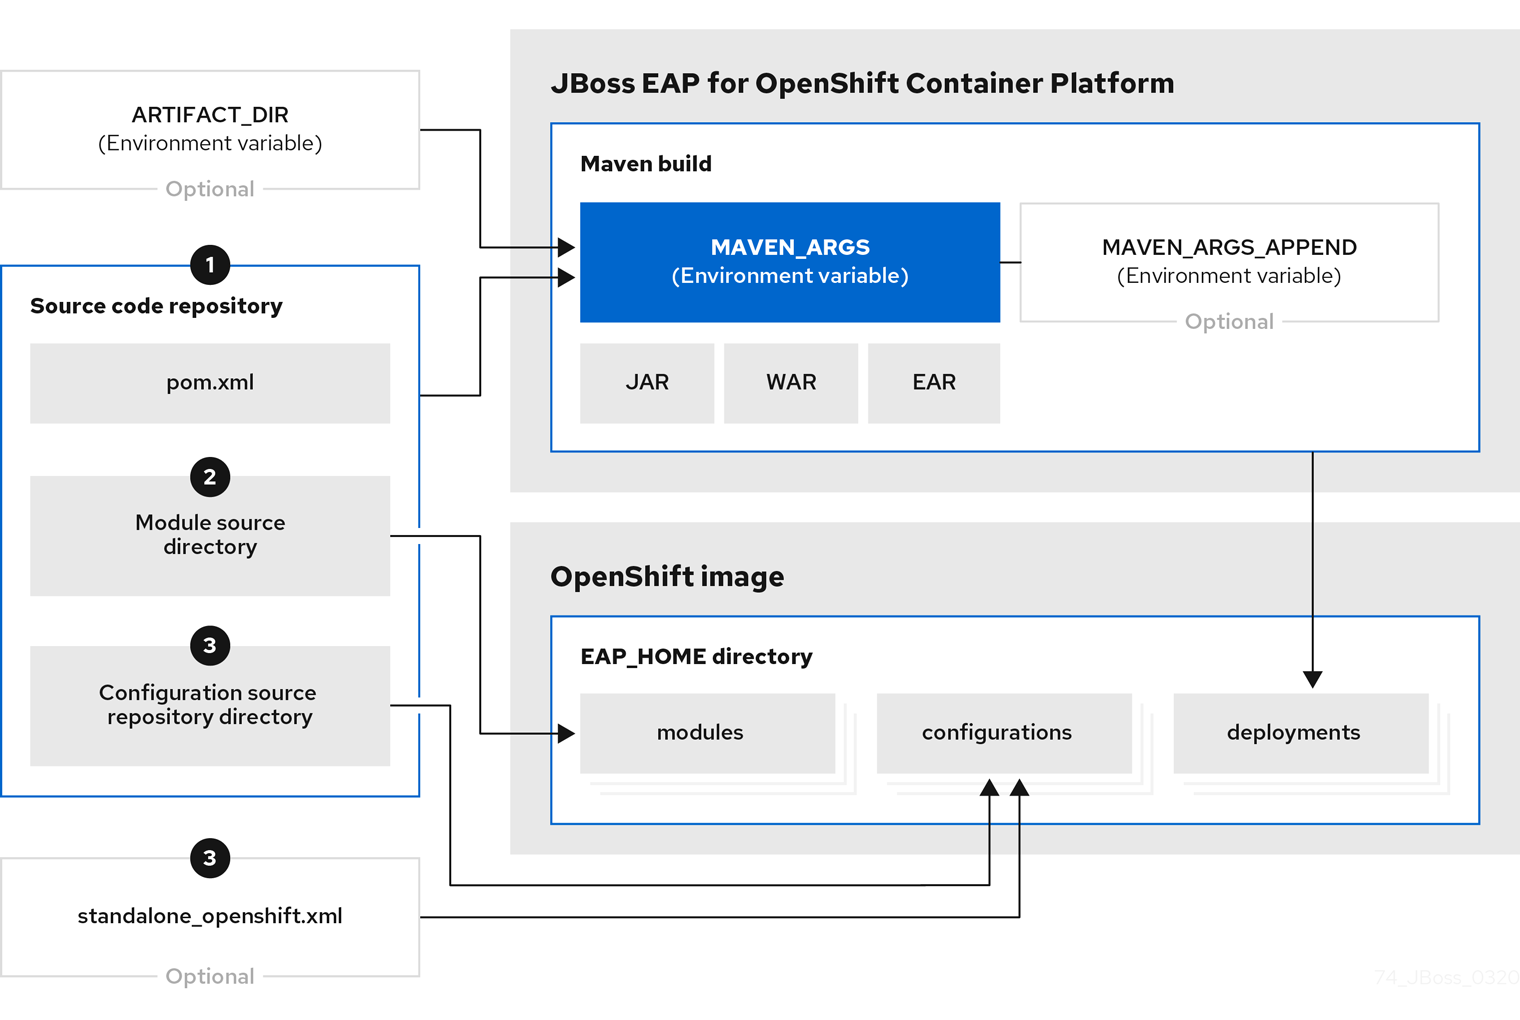
If a
pom.xmlfile is present in the source code repository, the S2I builder image initiates a Maven build process. The Maven build uses the contents of$MAVEN_ARGS.If a
pom.xmlfile is not present in the source code repository, the S2I builder image initiates a binary type build.To add custom Maven arguments or options, use
$MAVEN_ARGS_APPEND. The$MAVEN_ARGS_APPENDvariable appends options to$MAVEN_ARGS.By default, the OpenShift profile uses the Maven
packagegoal, which includes system properties for skipping tests (-DskipTests) and enabling the Red Hat GA repository (-Dcom.redhat.xpaas.repo).The results of a successful Maven build are copied to the
EAP_HOME/standalone/deployments/directory inside the JBoss EAP for OpenShift image. This includes all JAR, WAR, and EAR files from the source repository specified by the$ARTIFACT_DIRenvironmental variable. The default value ofARTIFACT_DIRis the Maven target directory.NoteTo use Maven behind a proxy on JBoss EAP for OpenShift image, set the
$HTTP_PROXY_HOSTand$HTTP_PROXY_PORTenvironment variables. Optionally, you can also set the$HTTP_PROXY_USERNAME,$HTTP_PROXY_PASSWORD, and$HTTP_PROXY_NONPROXYHOSTSvariables.-
All files in the
modulessource repository directory are copied to theEAP_HOME/modules/directory in the JBoss EAP for OpenShift image. -
All files in the
configurationsource repository directory are copied to theEAP_HOME/standalone/configuration/directory in the JBoss EAP for OpenShift image. If you want to use a custom JBoss EAP configuration file, name the filestandalone-openshift.xml.
Additional Resources
- See Binary (local) source on the OpenShift 4.2 documentation for additional information on binary type builds.
- See Artifact Repository Mirrors for additional guidance on how to instruct the S2I process to use the custom Maven artifacts repository mirror.
3.2. Configuring JBoss EAP for OpenShift Using Environment Variables
Using environment variables is the recommended method of configuring the JBoss EAP for OpenShift image. See the OpenShift documentation for instructions on specifying environment variables for application containers and build containers.
For example, you can set the JBoss EAP instance’s management username and password using environment variables when creating your OpenShift application:
oc new-app --template=eap73-basic-s2i \
 -p IMAGE_STREAM_NAMESPACE=eap-demo \
 -p SOURCE_REPOSITORY_URL=https://github.com/jboss-developer/jboss-eap-quickstarts \
 -p SOURCE_REPOSITORY_REF=7.3.x-openshift \
 -p CONTEXT_DIR=kitchensink \
 -e ADMIN_USERNAME=myspecialuser \
 -e ADMIN_PASSWORD=myspecialp@ssw0rd
This example uses the JDK 8 template. For JDK 11, use the eap73-openjdk11-basic-s2i template.
Available environment variables for the JBoss EAP for OpenShift image are listed in Reference Information.
3.2.1. JVM Memory Configuration
The OpenShift EAP image has a mechanism to automatically calculate the default JVM memory settings based on the current environment, but you can also configure the JVM memory settings using environment variables.
3.2.1.1. JVM Default Memory Settings
If a memory limit is defined for the current container, and the limit is lower than the total available memory, the default JVM memory settings are calculated automatically. Otherwise, the default JVM memory settings are the default defined in the standalone.conf file of the EAP version used as the base server for the image.
The container memory limit is retrieved from the file /sys/fs/cgroup/memory/memory.limit_in_bytes. The total available memory is retrieved using the /proc/meminfo command.
When memory settings are calculated automatically, the following formulas are used:
- Maximum heap size (-Xmx): fifty percent (50%) of user memory
- Initial heap size (-Xms): twenty-five percent (25%) of the calculated maximum heap size.
For example, the defined memory limit is 1 GB, and this limit is lower than the total available memory reported by /proc/meminfo, then the memory settings will be: -Xms128m -Xmx512
You can use the following environment variables to modify the JVM settings calculated automatically. Note that these variables are only used when default memory size is calculated automatically (in other words, when a valid container memory limit is defined).
-
JAVA_MAX_MEM_RATIO -
JAVA_INITIAL_MEM_RATIO -
JAVA_MAX_INITIAL_MEM
You can disable automatic memory calculation by setting the value of the following two environment variables to 0.
-
JAVA_INITIAL_MEM_RATIO -
JAVA_MAX_MEM_RATIO
3.2.1.2. JVM Garbage Collection Settings
The EAP image for OpenShift includes settings for both garbage collection and garbage collection logging
Garbage Collection Settings
-XX:+UseParallelOldGC -XX:MinHeapFreeRatio=10 -XX:MaxHeapFreeRatio=20 -XX:GCTimeRatio=4 -XX:AdaptiveSizePolicyWeight=90 -XX:+ExitOnOutOfMemoryError
Garbage Collection Logging Settings for Java 8 (non-modular JVM)
-verbose:gc -Xloggc:/opt/eap/standalone/log/gc.log -XX:+PrintGCDetails -XX:+PrintGCDateStamps -XX:+UseGCLogFileRotation -XX:NumberOfGCLogFiles=5 -XX:GCLogFileSize=3M -XX:-TraceClassUnloading
Garbage Collection Logging Settings for Java 11 (modular JVM)
-Xlog:gc*:file=/opt/eap/standalone/log/gc.log:time,uptimemillis:filecount=5,filesize=3M
3.2.1.3. Resource Limits in Default Settings
If set, additional default settings are included in the image.
-XX:ParallelGCThreads={core-limit} -Djava.util.concurrent.ForkJoinPool.common.parallelism={core-limit} -XX:CICompilerCount=2
The value of {core-limit} is defined using the JAVA_CORE_LIMIT environment variable, or by the CPU core limit imposed by the container.
The value of CICompilerCount is always fixed as 2.
3.2.1.4. JVM Environment Variables
Use these environment variables to configure the JVM in the EAP for OpenShift image.
Table 3.1. JVM Environment Variables
| Variable Name | Example | Default Value | JVM Settings | Description |
|---|---|---|---|---|
| JAVA_OPTS | -verbose:class | No default | Multiple |
JVM options to pass to the
Use
Using
In addition, if automatic memory calculation is not enabled, the inital Java memory (-Xms) and maximum Java memory (-Xmx) are not defined.
Add these defaults if you use |
| JAVA_OPTS_APPEND | -Dsome.property=value | No default | Multiple |
User-specified Java options to append to generated options in |
| JAVA_MAX_MEM_RATIO | 50 | 50 | -Xmx |
Use this variable when the |
| JAVA_INITIAL_MEM_RATIO | 25 | 25 | -Xms |
Use this variable when the |
| JAVA_MAX_INITIAL_MEM | 4096 | 4096 | -Xms |
Use this variable when the |
| JAVA_DIAGNOSTICS | true | false (disabled) | The settings depend on the JDK used by the container.
|
Set the value of this variable to true to include diagnostic information in standard output when events occur. If this variable is defined as true in an environment where |
| DEBUG | true | false | -agentlib:jdwp=transport=dt_socket,address=$DEBUG_PORT,server=y,suspend=n | Enables remote debugging. |
| DEBUG_PORT | 8787 | 8787 | -agentlib:jdwp=transport=dt_socket,address=$DEBUG_PORT,server=y,suspend=n | Specifies the port used for debugging. |
| JAVA_CORE_LIMIT | Undefined | -XX:parallelGCThreads -Djava.util.concurrent.ForkJoinPool.common.parallelism -XX:CICompilerCount | A user-defined limit on the number of cores. If the container reports a limit constraint, the value of the JVM settings is limited to the container core limit. The value of -XXCICompilerCount is always 2. By default, this variable is undefined. In that case, if a limit is not defined on the container, the JVM settings are not set. | |
| GC_MIN_HEAP_FREE_RATIO | 20 | 10 | -XX:MinHeapFreeRatio | Minimum percentage of heap free after garbage collection to avoid expansion. |
| GC_MAX_HEAP_FREE_RATIO | 40 | 20 | -XX:MaxHeapFreeRatio | Maximum percentage of heap free after garbage collection to avoid shrinking. |
| GC_TIME_RATIO | 4 | 4 | -XX:GCTimeRatio | Specifies the ratio of the time spent outside of garbage collection (for example, time spent in application execution) to the time spent in garbage collection. |
| GC_ADAPTIVE_SIZE_POLICY_WEIGHT | 90 | 90 | -XX:AdaptiveSizePolicyWeight | The weighting given to the current garbage collection time versus the previous garbage collection times. |
| GC_METASPACE_SIZE | 20 | 96 | -XX:MetaspaceSize | The initial metaspace size. |
| GC_MAX_METASPACE_SIZE | 100 | 256 | -XX:MaxMetaspaceSize | The maximum metaspace size. |
| GC_CONTAINER_OPTIONS | -XX:+UserG1GC | -XX:-UseParallelOldGC | -XX:-UseParallelOldGC | Specifies the Java garbage collection to use. The value of the variable should be the JRE command-line options to specify the required garbage collection. The JRE command specified overrides the default. |
The following environment variables are deprecated:
-
JAVA_OPTIONS: UseJAVA_OPTS. -
INITIAL_HEAP_PERCENT: UseJAVA_INITIAL_MEM_RATIO. -
CONTAINER_HEAP_PERCENT: UseJAVA_MAX_MEM_RATIO.
3.3. Build Extensions and Project Artifacts
The JBoss EAP for OpenShift image extends database support in OpenShift using various artifacts. These artifacts are included in the built image through different mechanisms:
- S2I artifacts that are injected into the image during the S2I process.
- Runtime artifacts from environment files provided through the OpenShift Secret mechanism.
Support for using the Red Hat-provided internal datasource drivers with the JBoss EAP for OpenShift image is now deprecated. Red Hat recommends that you use JDBC drivers obtained from your database vendor for your JBoss EAP applications.
The following internal datasources are no longer provided with the JBoss EAP for OpenShift image:
- MySQL
- PostgreSQL
For more information about installing drivers, see Modules, Drivers, and Generic Deployments.
For more information on configuring JDBC drivers with JBoss EAP, see JDBC drivers in the JBoss EAP Configuration Guide.
Note that you can also create a custom layer to install these drivers and datasources if you want to add them to a provisioned server.
Additional Resources
3.3.1. S2I Artifacts
The S2I artifacts include modules, drivers, and additional generic deployments that provide the necessary configuration infrastructure required for the deployment. This configuration is built into the image during the S2I process so that only the datasources and associated resource adapters need to be configured at runtime.
See Artifact Repository Mirrors for additional guidance on how to instruct the S2I process to utilize the custom Maven artifacts repository mirror.
3.3.1.1. Modules, Drivers, and Generic Deployments
There are a few options for including these S2I artifacts in the JBoss EAP for OpenShift image:
- Include the artifact in the application source deployment directory. The artifact is downloaded during the build and injected into the image. This is similar to deploying an application on the JBoss EAP for OpenShift image.
Include the
CUSTOM_INSTALL_DIRECTORIESenvironment variable, a list of comma-separated list of directories used for installation and configuration of artifacts for the image during the S2I process. There are two methods for including this information in the S2I:An
install.shscript in the nominated installation directory. The install script executes during the S2I process and operates with impunity.install.shScript Example#!/bin/bash injected_dir=$1 source /usr/local/s2i/install-common.sh install_deployments ${injected_dir}/injected-deployments.war install_modules ${injected_dir}/modules configure_drivers ${injected_dir}/drivers.envThe
install.shscript is responsible for customizing the base image using APIs provided byinstall-common.sh.install-common.shcontains functions that are used by theinstall.shscript to install and configure the modules, drivers, and generic deployments.Functions contained within
install-common.sh:-
install_modules -
configure_drivers install_deploymentsModules
A module is a logical grouping of classes used for class loading and dependency management. Modules are defined in the
EAP_HOME/modules/directory of the application server. Each module exists as a subdirectory, for exampleEAP_HOME/modules/org/apache/. Each module directory then contains a slot subdirectory, which defaults to main and contains themodule.xmlconfiguration file and any required JAR files.For more information about configuring
module.xmlfiles for MySQL and PostgreSQL JDBC drivers, see the Datasource Configuration Examples in the JBoss EAP Configuration Guide.Example
module.xmlFile for PostgreSQL Datasource<?xml version="1.0" encoding="UTF-8"?> <module xmlns="urn:jboss:module:1.0" name="org.postgresql"> <resources> <resource-root path="postgresql-jdbc.jar"/> </resources> <dependencies> <module name="javax.api"/> <module name="javax.transaction.api"/> </dependencies> </module>
Example
module.xmlFile for MySQL Connect/J 8 Datasource<?xml version="1.0" encoding="UTF-8"?> <module xmlns="urn:jboss:module:1.0" name="com.mysql"> <resources> <resource-root path="mysql-connector-java-8.0.Z.jar" /> </resources> <dependencies> <module name="javax.api"/> <module name="javax.transaction.api"/> </dependencies> </module>
NoteThe ".Z" in
mysql-connector-java-8.0.Z.jarindicates the version of theJARfile downloaded. The file can be renamed, but the name must match the name in themodule.xmlfile.The
install_modulesfunction ininstall.shcopies the respective JAR files to the modules directory in JBoss EAP, along with themodule.xml.Drivers
Drivers are installed as modules. The driver is then configured in
install.shby theconfigure_driversfunction, the configuration properties for which are defined in a runtime artifact environment file.Adding Datasource Drivers
The MySQL and PostgreSQL datasources are no longer provided as pre-configured internal datasources. You can still install these drivers as modules; see the description in Modules, Drivers, and Generic Deployments. You can obtain these JDBC drivers from the database vendor for your JBoss EAP applications.
Create a
drivers.envfile for each datasource to be installed.Example
drivers.envFile for MySQL Datasource#DRIVER DRIVERS=MYSQL MYSQL_DRIVER_NAME=mysql MYSQL_DRIVER_MODULE=org.mysql MYSQL_DRIVER_CLASS=com.mysql.cj.jdbc.Driver MYSQL_XA_DATASOURCE_CLASS=com.mysql.jdbc.jdbc2.optional.MysqlXADataSource
Example
drivers.envFile for PostgreSQL Datasource#DRIVER DRIVERS=POSTGRES POSTGRES_DRIVER_NAME=postgresql POSTGRES_DRIVER_MODULE=org.postgresql POSTGRES_DRIVER_CLASS=org.postgresql.Driver POSTGRES_XA_DATASOURCE_CLASS=org.postgresql.xa.PGXADataSource
For information about download locations for various drivers, such as MySQL or PostgreSQL, see JDBC Driver Download Locations in the Configuration Guide.
-
Generic Deployments
Deployable archive files, such as JARs, WARs, RARs, or EARs, can be deployed from an injected image using the install_deployments function supplied by the API in install-common.sh.
If the
CUSTOM_INSTALL_DIRECTORIESenvironment variable has been declared but noinstall.shscripts are found in the custom installation directories, the following artifact directories will be copied to their respective destinations in the built image:-
modules/*copied to$JBOSS_HOME/modules/system/layers/openshift -
configuration/*copied to$JBOSS_HOME/standalone/configuration -
deployments/*copied to$JBOSS_HOME/standalone/deployments
This is a basic configuration approach compared to the
install.shalternative, and requires the artifacts to be structured appropriately.-
3.3.2. Runtime Artifacts
3.3.2.1. Datasources
There are two types of datasources:
- Internal datasources. These datasources run on OpenShift, but are not available by default through the Red Hat Registry. Configuration of these datasources is provided by environment files added to OpenShift Secrets.
- External datasources. These datasources do not run on OpenShift. Configuration of external datasources is provided by environment files added to OpenShift Secrets.
Example: Datasource Environment File
DB_SERVICE_PREFIX_MAPPING=PostgresXA-POSTGRES=DS1
DS1_JNDI=java:jboss/datasources/pgds
DS1_DRIVER=postgresql-42.2.5.jar
DS1_USERNAME=postgres
DS1_PASSWORD=postgres
DS1_MAX_POOL_SIZE=20
DS1_MIN_POOL_SIZE=20
DS1_CONNECTION_CHECKER=org.jboss.jca.adapters.jdbc.extensions.postgres.PostgreSQLValidConnectionChecker
DS1_EXCEPTION_SORTER=org.jboss.jca.adapters.jdbc.extensions.postgres.PostgreSQLExceptionSorter
The DB_SERVICE_PREFIX_MAPPING property is a comma-separated list of datasource property prefixes. These prefixes are then appended to all properties for that datasource. Multiple datasources can then be included in a single environment file. Alternatively, each datasource can be provided in separate environment files.
Datasources contain two types of properties: connection pool-specific properties and database driver-specific properties. The connection pool-specific properties produce a connection to a datasource. Database driver-specific properties determine the driver for a datasource and are configured as a driver S2I artifact.
In the above example, DS1 is the datasource prefix, CONNECTION_CHECKER specifies a connection checker class used to validate connections for a database, and EXCEPTION_SORTER specifies the exception sorter class used to detect fatal database connection exceptions.
The datasources environment files are added to the OpenShift Secret for the project. These environment files are then called within the template using the ENV_FILES environment property, the value of which is a comma-separated list of fully qualified environment files as shown below.
{
    “Name”: “ENV_FILES”,
    “Value”: “/etc/extensions/datasources1.env,/etc/extensions/datasources2.env”
}
3.3.2.2. Resource Adapters
Configuration of resource adapters is provided by environment files added to OpenShift Secrets.
Table 3.2. Resource Adapter Properties
| Attribute | Description |
|---|---|
| PREFIX_ID | The identifier of the resource adapter as specified in the server configuration file. |
| PREFIX_ARCHIVE | The resource adapter archive. |
| PREFIX_MODULE_SLOT |
The slot subdirectory, which contains the |
| PREFIX_MODULE_ID | The JBoss Module ID where the object factory Java class can be loaded from. |
| PREFIX_CONNECTION_CLASS | The fully qualified class name of a managed connection factory or admin object. |
| PREFIX_CONNECTION_JNDI | The JNDI name for the connection factory. |
| PREFIX_PROPERTY_ParentDirectory | Directory where the data files are stored. |
| PREFIX_PROPERTY_AllowParentPaths |
Set |
| PREFIX_POOL_MAX_SIZE | The maximum number of connections for a pool. No more connections will be created in each sub-pool. |
| PREFIX_POOL_MIN_SIZE | The minimum number of connections for a pool. |
| PREFIX_POOL_PREFILL | Specifies if the pool should be prefilled. Changing this value requires a server restart. |
| PREFIX_POOL_FLUSH_STRATEGY |
How the pool should be flushed in case of an error. Valid values are: |
The RESOURCE_ADAPTERS property is a comma-separated list of resource adapter property prefixes. These prefixes are then appended to all properties for that resource adapter. Multiple resource adapter can then be included in a single environment file. In the example below, MYRA is used as the prefix for a resource adapter. Alternatively, each resource adapter can be provided in separate environment files.
Example: Resource Adapter Environment File
#RESOURCE_ADAPTER
RESOURCE_ADAPTERS=MYRA
MYRA_ID=myra
MYRA_ARCHIVE=myra.rar
MYRA_CONNECTION_CLASS=org.javaee7.jca.connector.simple.connector.outbound.MyManagedConnectionFactory
MYRA_CONNECTION_JNDI=java:/eis/MySimpleMFC
The resource adapter environment files are added to the OpenShift Secret for the project namespace. These environment files are then called within the template using the ENV_FILES environment property, the value of which is a comma-separated list of fully qualified environment files as shown below.
{
    "Name": "ENV_FILES",
    "Value": "/etc/extensions/resourceadapter1.env,/etc/extensions/resourceadapter2.env"
}
3.4. Results of using JBoss EAP Templates for OpenShift
When you use JBoss EAP templates to compile your application, two images might be generated.
An intermediate image named [application name]-build-artifacts might be generated before the final image, [application name], is created.
You can remove the [application name]-build-artifacts image after your application has been deployed.
3.5. SSO Configuration of Red Hat JBoss Enterprise Application Platform for OpenShift Images
In Red Hat JBoss Enterprise Application Platform for OpenShift images, SSO is configured to use the legacy security subsystem.
The environmment variable SSO_FORCE_LEGACY_SECURITY is set to true in these images.
If you want to use the elytron subsystem for SSO security, update the value of the SSO_FORCE_LEGACY_SECURITY environment variable to false.
3.6. Default Datasource
In JBoss EAP 7.3, the default datasource, ExampleDS, is removed.
Some quickstarts require this datasource:
-
cmt -
thread-racing
Applications developed by customers might also require the default datasource.
If you need the default datasource, use the GENERATE_DEFAULT_DATASOURCE environment variable to include it when provisioning a JBoss EAP server.
ENABLE_GENERATE_DEFAULT_DATASOURCE=true
3.7. Deployment Considerations for the JBoss EAP for OpenShift Image
3.7.1. Scaling Up and Persistent Storage Partitioning
There are two methods for deploying JBoss EAP with persistent storage: single-node partitioning, and multi-node partitioning.
Single-node partitioning stores the JBoss EAP data store directory, including transaction data, in the storage volume.
Multi-node partitioning creates additional, independent split-n directories to store the transaction data for each JBoss EAP pod, where n is an incremental integer. This communication is not altered if a JBoss EAP pod is updated, goes down unexpectedly, or is redeployed. When the JBoss EAP pod is operational again, it reconnects to the associated split directory and continues as before. If a new JBoss EAP pod is added, a corresponding split-n directory is created for that pod.
To enable the multi-node configuration you must set the SPLIT_DATA parameter to true. This results in the server creating independent split-n directories for each instance within the persistent volume which are used as their data store.
Using the environment variables like SPLIT_DATA while using the EAP operator can cause consistency issues. You must use the EAP operator to manage transaction discovery in OpenShift 4 and later versions.
Due to the different storage methods of single-node and multi-node partitioning, changing a deployment from single-node to multi-node results in the application losing all data previously stored in the data directory, including messages, transaction logs, and so on. This is also true if changing a deployment from multi-node to single-node, as the storage paths will not match.
3.7.2. Scaling Down and Transaction Recovery
When the JBoss EAP for OpenShift image is deployed using a multi-node configuration, it is possible for unexpectedly terminated transactions to be left in the data directory of a terminating pod if the cluster is scaled down.
See manual transaction recovery to complete these branches.
Chapter 4. Capability Trimming in JBoss EAP for OpenShift
When building an image that includes JBoss EAP, you can control the JBoss EAP features and subsystems to include in the image.
The default JBoss EAP server included in S2I images includes the complete server and all features. You might want to trim the capabilities included in the provisioned server. For example, you might want to reduce the security exposure of the provisioned server, or you might want to reduce the memory footprint so it is more appropriate for a microservice container.
4.1. Provision a Custom JBoss EAP Server
To provision a custom server with trimmed capabilities, pass the GALLEON_PROVISION_LAYERS environment variable during the S2I build phase.
The value of the environment variable is a comma-separated list of the layers to provision to build the server.
For example, if you specify the environment variable as GALLEON_PROVISION_LAYERS=jaxrs-server,sso, a JBoss EAP server is provisioned with the following capabilities:
- A servlet container
- The ability to configure a datasource
-
The
jaxrs,weld, andjpasubsystems - Red Hat SSO integration
4.2. Available JBoss EAP Layers
Red Hat makes available six layers to customize provisioning of the JBoss EAP server in OpenShift.
Three layers are base layers that provide core functionality. Three are decorator layers that enhance the base layers.
The following Jakarta EE specifications are not supported in any provisioning layer:
- Jakarta Server Faces 2.3
- Jakarta Enterprise Beans 3.2
- Jakarta XML Web Services 2.3
4.2.1. Base Layers
Each base layer includes core functionality for a typical server user case.
datasources-web-server
This layer includes a servlet container and the ability to configure a datasource.
This layer does not include MicroProfile capabilities.
The following are the JBoss EAP subsystems included by default in the datasources-web-server:
-
core-management -
datasources -
deployment-scanner -
ee -
elytron -
io -
jca -
jmx -
logging -
naming -
request-controller -
security-manager -
transactions -
undertow
The following Jakarta EE specifications are supported in this layer:
- Jakarta JSON Processing 1.1
- Jakarta JSON Binding 1.0
- Jakarta Servlet 4.0
- Jakarta Expression Language 3.0
- Jakarta Server Pages 2.3
- Jakarta Standard Tag Library 1.2
- Jakarta Concurrency 1.1
- Jakarta Annotations 1.3
- Jakarta XML Binding 2.3
- Jakarta Debugging Support for Other Languages 1.0
- Jakarta Transactions 1.3
- Jakarta Connectors 1.7
jaxrs-server
This layer enhances the datasources-web-server layer with the following JBoss EAP subsystems:
-
jaxrs -
weld -
jpa
This layer also adds Infinispan-based second-level entity caching locally in the container.
The following MicroProfile capability is included in this layer:
- MicroProfile REST Client
The following Jakarta EE specifications are supported in this layer in addition to those supported in the datasources-web-server layer:
- Jakarta Contexts and Dependency Injection 2.0
- Jakarta Bean Validation 2.0
- Jakarta Interceptors 1.2
- Jakarta RESTful Web Services 2.1
- Jakarta Persistence 2.2
cloud-server
This layer enhances the jaxrs-server layer with the following JBoss EAP subsystems:
-
resource-adapters -
messaging-activemq(remote broker messaging, not embedded messaging)
This layer also adds the following observability features to the jaxrs-server layer:
- MicroProfile Health
- MicroProfile Metrics
- MicroProfile Config
- MicroProfile OpenTracing
The following Jakarta EE specification is supported in this layer in addition to those supported in the jaxrs-server layer:
- Jakarta Security 1.0
4.2.2. Decorator Layers
Decorator layers are not used alone. You can configure one or more decorator layers with a base layer to deliver additional functionality.
sso
This decorator layer adds Red Hat Single Sign-On integration to the provisioned server.
observability
This decorator layer adds the following observability features to the provisioned server:
- MicroProfile Health
- MicroProfile Metrics
- MicroProfile Config
- MicroProfile OpenTracing
This layer is built in to the cloud-server layer. You do not need to add this layer to the cloud-server layer.
web-clustering
This layer adds embedded Infinispan-based web session clustering to the provisioned server.
4.3. Provisioning User-developed Layers in JBoss EAP
In addition to provisioning layers available from Red Hat, you can provision custom layers you develop.
Procedure
Build a custom layer using the Galleon Maven plugin.
For more information, see Building Custom Layers for JBoss EAP.
- Deploy the custom layer to an accessible Maven repository.
Create a custom provisioning file to reference the user-defined layer and supported JBoss EAP layers and store it in your application directory.
For more information, see Custom Provisioning Files for JBoss EAP.
Run the S2I process to provision a JBoss EAP server in OpenShift.
For more information, see Building an Application Provisioned with User-developed Layers.
4.3.1. Building Custom Layers for JBoss EAP
Create your custom layer feature pack as a Maven project.
- Custom layers depend on at least a base layer. Select the base layer that provides the capabilities you need for your custom layer.
Within the Maven project, create your layer content in the directory
src/main/resources.For example, to create layers to provision support for PostgreSQL and a PostgreSQL datasource, in the directory
src/main/resourcescreate thelayers/standalonesubdirectories. Thestandalonesubdirectory includes the following content.postgresql-driverThis directory contains a
layer-spec.xmlfile with the following content.<?xml version="1.0" ?> <layer-spec xmlns="urn:jboss:galleon:layer-spec:1.0" name="postgresql-driver"> <feature spec="subsystem.datasources"> <feature spec="subsystem.datasources.jdbc-driver"> <param name="driver-name" value="postgresql"/> <param name="jdbc-driver" value="postgresql"/> <param name="driver-xa-datasource-class-name" value="org.postgresql.xa.PGXADataSource"/> <param name="driver-module-name" value="org.postgresql.jdbc"/> </feature> </feature> <packages> <package name="org.postgresql.jdbc"/> </packages> </layer-spec>postgresql-datasourceThis directory contains a
layer-spec.xmlfile with the following content.<?xml version="1.0" ?> <layer-spec xmlns="urn:jboss:galleon:layer-spec:1.0" name="postgresql-datasource"> <dependencies> <layer name="postgresql-driver"/> </dependencies> <feature spec="subsystem.datasources.data-source"> <param name="use-ccm" value="true"/> <param name="data-source" value="PostgreSQLDS"/> <param name="enabled" value="true"/> <param name="use-java-context" value="true"/> <param name="jndi-name" value="java:jboss/datasources/${env.POSTGRESQL_DATASOURCE,env.OPENSHIFT_POSTGRESQL_DATASOURCE:PostgreSQLDS}"/> <param name="connection-url" value="jdbc:postgresql://${env.POSTGRESQL_SERVICE_HOST,\ env.OPENSHIFT_POSTGRESQL_DB_HOST}:${env.POSTGRESQL_SERVICE_PORT,\ env.OPENSHIFT_POSTGRESQL_DB_PORT}/${env.POSTGRESQL_DATABASE, env.OPENSHIFT_POSTGRESQL_DB_NAME}"/> <param name="driver-name" value="postgresql"/> <param name="user-name" value="${env.POSTGRESQL_USER, env.OPENSHIFT_POSTGRESQL_DB_USERNAME}"/> <param name="password" value="${env.POSTGRESQL_PASSWORD, env.OPENSHIFT_POSTGRESQL_DB_PASSWORD}"/> <param name="check-valid-connection-sql" value="SELECT 1"/> <param name="background-validation" value="true"/> <param name="background-validation-millis" value="60000"/> <param name="flush-strategy" value="IdleConnections"/> <param name="statistics-enabled" value="${wildfly.datasources.statistics-enabled:${wildfly.statistics-enabled:false}}" /> </feature>
In the
pom.xmlfile used to build your custom feature pack, refer to the JBoss EAP dependencies.<dependency> <groupId>org.jboss.eap</groupId> <artifactId>wildfly-ee-galleon-pack</artifactId>1 <version>7.3.0.GA-redhat-00004</version> <type>zip</type> </dependency>- 1
- When using the JBoss EAP expansion pack (JBoss EAP XP), the value of this element should be
wildfly-galleon-pack.
These dependencies are available in the Red Hat Maven repository: https://maven.repository.redhat.com/ga/
-
Use the
build-user-feature-packgoal in the Galleon Maven plugin to build custom layers.
Additional Resources
WildFly Galleon Maven Plugin Documentation
Example illustrating packaging of drivers and datasources as Galleon layers
4.3.2. Custom Provisioning Files for JBoss EAP
Custom provisioning files are XML files with the file name provisioning.xml that are stored in the galleon subdirectory.
The following code illustrates a custom provisioning file.
<?xml version="1.0" ?>
<installation xmlns="urn:jboss:galleon:provisioning:3.0">
    <feature-pack location="eap-s2i@maven(org.jboss.universe:s2i-universe)">1
        <default-configs inherit="false"/>2
        <packages inherit="false"/>3
    </feature-pack>
    <feature-pack location="com.example.demo:my-galleon-feature-pack:1.0
">4
        <default-configs inherit="false"/>
        <packages inherit="false"/>
    </feature-pack>
    <config model="standalone" name="standalone.xml">5
        <layers>
            <include name="cloud-server"/>
            <include name="my-custom-driver"/>
            <include name="my-custom-datasource"/>
        </layers>
    </config>
    <options>6
        <option name="optional-packages" value="passive+"/>
    </options>
</installation>- 1
- This element instructs the provisioning process to provision the current eap-s2i feature-pack. Note that a builder image includes only one feature pack.
- 2
- This element instructs the provisioning process to exclude default configurations.
- 3
- This element instructs the provisioning process to exclude default packages.
- 4
- This element instructs the provisioning process to provision the
com.example.demo:my-galleon-feature-pack:1.0feature pack. The child elements instruct the process to exclude default configurations and default packages. - 5
- This element instructs the provisioning process to create a custom standalone configuration. The configuration includes the
cloud-serverbase layer and themy-custom-driverandmy-custom-datasourcecustom layers from thecom.example.demo:my-galleon-feature-pack:1.0feature pack. - 6
- This element instructs the provisioning process to optimize provisioning of JBoss EAP modules.
4.3.3. Building an Application Provisioned with User-developed Layers
When you build an application from a directory that includes a custom provisioning file, the S2I build process detects the provisioning file and provisions the JBoss EAP server as instructed.
Prerequisites
- The user-developed layers must exist in an accessible Maven repository.
- The application directory must contain a valid provisioning file that refers to the user-developed layers and the feature pack that contains them.
Procedure
Enter a standard S2I build command to build the application.
For example, assume you create the following custom provisioning file in your application directory.
<?xml version="1.0" ?>
<installation xmlns="urn:jboss:galleon:provisioning:3.0">
    <feature-pack location="eap-s2i@maven(org.jboss.universe:s2i-universe)">
        <default-configs inherit="false"/>
        <packages inherit="false"/>
    </feature-pack>
    <feature-pack location="com.example.demo:my-galleon-feature-pack:1.0">
        <default-configs inherit="false"/>
        <packages inherit="false"/>
    </feature-pack>
    <config model="standalone" name="standalone.xml">
        <layers>
            <include name="cloud-server"/>
            <include name="my-custom-driver"/>
            <include name="my-custom-datasource"/>
        </layers>
    </config>
    <options>
        <option name="optional-packages" value="passive+"/>
    </options>
</installation>
The following command builds an application using the
com.example.demo:my-galleon-feature-pack:1.0feature pack, which includes themy-custom-driverandmy-custom-datasourcelayers. The resulting application is namedeap-my-custom-db. The connection to the database is configured using environment variables.oc build my-app \ -e DEMO_DB=demo \ -e DEMO_PASSWORD=demo \ -e DEMO_HOST=127.0.0.1 \ -e DEMO_PORT=5432 \ -e DEMO_USER=demo \ eap-my-custom-db
You can log in to the database on port 5432 with the user demo and the password demo.
Additional Resources
Chapter 5. Migration of Applications from JBoss EAP Imagestreams on OpenShift 4 to eap73 Imagestreams
Applications developed for the eap71 and eap72 imagestreams require changes to function correctly in the eap73 imagestream.
5.1. Updates to Liveness and Readiness Probe Configuration for eap73 Imagestreams
The YAML configuration of probes must be adjusted when migrating from the eap72 image running on OpenShift 3.11 to any eap73 image.
On the eap72 image, the default YAML configuration for a liveness probe is similar to the following code example:
Example YAML Configuration for eap72 Image on OpenShift 3.11 Liveness Probe
livenessProbe:
        exec:
          command:
            - /bin/bash
            - '-c'
            - /opt/eap/bin/livenessProbe.sh
        initialDelaySeconds: 60
        periodSeconds: 10
        successThreshold: 1
        failureThreshold: 3
In this example, the liveness probe is located at /opt/eap/bin/livenessProbe.sh within the JBoss EAP image. The probe is triggered the first time after a 60 second initial delay and then every 10 seconds after a pod is started on the JBoss EAP server.
After three unsuccessful probes, the container is deemed unhealthy and OpenShift restarts the container in its pod.
On the eap72 image, a single call lasts 5 seconds before it returns as a success or failure. The call is followed by a 10 second waiting period. This means that 3 calls last approximately 35 seconds before the container inside the pod is restarted if the JBoss EAP image is unhealthy.
On any eap73 image, a single call lasts less than 1 second. Three calls last approximately 23 seconds. The configuration of the probe for eap73 images should be adjusted in the YAML configuration as follows:
Example YAML Configuration for any eap73 Imagestream Liveness Probe
livenessProbe:
        exec:
          command:
            - /bin/bash
            - '-c'
            - /opt/eap/bin/livenessProbe.sh
        initialDelaySeconds: 60
        periodSeconds: 16
        successThreshold: 1
        failureThreshold: 3
In this example, periodSeconds has been increased by 6 seconds. Now the first call lasts 1 second, followed by a 16 second waiting period. Three calls would last approximately 34 seconds, which is nearly equivalent to the eap72 image behavior of the probe.
In the readiness probe, update periodSeconds in the YAML configuration with a similar value.
Example YAML Configuration for any eap73 Imagestream Readiness Probe
readinessProbe:
        exec:
          command:
            - /bin/bash
            - '-c'
            - /opt/eap/bin/readinessProbe.sh
        initialDelaySeconds: 10
        periodSeconds: 16
        successThreshold: 1
        failureThreshold: 3
Additional Resources
5.2. Default Datasource Removed
In JBoss EAP 7.3, the default datasource is removed from JBoss EAP imagestreams.
If you developed custom applications that use the default datasource, you can include it when provisioning a server. Use the ENABLE_GENERATE_DEFAULT_DATASOURCE environment variable with a value of true.
ENABLE_GENERATE_DEFAULT_DATASOURCE=true
5.3. Updates to standalone-openshift.xml when upgrading JBoss EAP 7.1 to JBoss EAP 7.3 on OpenShift
The configuration file standalone-openshift.xml installed with JBoss EAP 7.1 is not compatible with JBoss EAP 7.3 and later.
If you want to use the standalone-openshift.xml file after upgrading from JBoss EAP 7.1 to JBoss EAP 7.3, you must make the following changes to the file:
Update the version of the
loggingsubsystem.Replace
<subsystem xmlns="urn:jboss:domain:logging:3.0">
with
<subsystem xmlns="urn:jboss:domain:logging:8.0">
Update the log formatter in the
loggingsubsystem configuration.Replace
<custom-formatter module="org.jboss.logmanager.ext" class="org.jboss.logmanager.ext.formatters.LogstashFormatter">
    <properties>
        <property name="metaData" value="log-handler=CONSOLE"/>
    </properties>
</custom-formatter>
with
<json-formatter>
    <exception-output-type value="formatted"/>
    <key-overrides timestamp="@timestamp"/>
    <meta-data>
        <property name="@version" value="1"/>
    </meta-data>
</json-formatter>
Chapter 6. Troubleshooting
6.1. Troubleshooting Pod Restarts
Pods can restart for a number of reasons, but a common cause of JBoss EAP pod restarts might include OpenShift resource constraints, especially out-of-memory issues. See the OpenShift documentation for more information on OpenShift pod eviction.
By default, JBoss EAP for OpenShift templates are configured to automatically restart affected containers when they encounter situations like out-of-memory issues. The following steps can help you diagnose and troubleshoot out-of-memory and other pod restart issues.
Get the name of the pod that has been having trouble.
You can see pod names, as well as the number times each pod has restarted with the following command.
$ oc get pods
To diagnose why a pod has restarted, you can examine the JBoss EAP logs of the previous pod, or the OpenShift events.
To see the JBoss EAP logs of the previous pod, use the following command.
oc logs --previous POD_NAMETo see the OpenShift events, use the following command.
$ oc get events
- If a pod has restarted because of a resource issue, you can attempt to modify your OpenShift pod configuration to increase its resource requests and limits. See the OpenShift documentation for more information on configuring pod compute resources.
6.2. Troubleshooting Using the JBoss EAP Management CLI
The JBoss EAP management CLI, EAP_HOME/bin/jboss-cli.sh, is accessible from within a container for troubleshooting purposes.
It is not recommended to make configuration changes in a running pod using the JBoss EAP management CLI. Any configuration changes made using the management CLI in a running container will be lost when the container restarts.
To make configuration changes to JBoss EAP for OpenShift, see Configuring the JBoss EAP for OpenShift Image for Your Java Application.
First open a remote shell session to the running pod.
$ oc rsh POD_NAMERun the following command from the remote shell session to launch the JBoss EAP management CLI:
$ /opt/eap/bin/jboss-cli.sh
Chapter 7. EAP Operator for Automating Application Deployment on OpenShift
EAP operator is a JBoss EAP-specific controller that extends the OpenShift API. You can use the EAP operator to create, configure, manage, and seamlessly upgrade instances of complex stateful applications.
The EAP operator manages multiple JBoss EAP Java application instances across the cluster. It also ensures safe transaction recovery in your application cluster by verifying all transactions are completed before scaling down the replicas and marking a pod as clean for termination. The EAP operator uses StatefulSet for the appropriate handling of EJB remoting and transaction recovery processing. The StatefulSet ensures persistent storage and network hostname stability even after pods are restarted.
You must install the EAP operator using OperatorHub, which can be used by OpenShift cluster administrators to discover, install, and upgrade operators.
In OpenShift Container Platform 4, you can use the Operator Lifecycle Manager (OLM) to install, update, and manage the lifecycle of all operators and their associated services running across multiple clusters.
The OLM runs by default in OpenShift Container Platform 4. It aids cluster administrators in installing, upgrading, and granting access to operators running on their cluster. The OpenShift Container Platform web console provides management screens for cluster administrators to install operators, as well as grant specific projects access to use the catalog of operators available on the cluster.
For more information about operators and the OLM, see the OpenShift documentation.
7.1. Installing EAP Operator Using the Web Console
As a JBoss EAP cluster administrator, you can install an EAP operator from Red Hat OperatorHub using the OpenShift Container Platform web console. You can then subscribe the EAP operator to one or more namespaces to make it available for developers on your cluster.
Here are a few points you must be aware of before installing the EAP operator using the web console:
- Installation Mode: Choose All namespaces on the cluster (default) to have the operator installed on all namespaces or choose individual namespaces, if available, to install the operator only on selected namespaces.
- Update Channel: If the EAP operator is available through multiple channels, you can choose which channel you want to subscribe to. For example, to deploy from the stable channel, if available, select it from the list.
- Approval Strategy: You can choose automatic or manual updates. If you choose automatic updates for the EAP operator, when a new version of the operator is available, the Operator Lifecycle Manager (OLM) automatically upgrades the running instance of EAP operator. If you choose manual updates, when a newer version of the operator is available, the OLM creates an update request. You must then manually approve the update request to have the operator updated to the new version.
The following procedure might change in accordance with the modifications in the OpenShift Container Platform web console. For the latest and most accurate procedure, see the Installing from the OperatorHub using the web console section in the latest version of the Working with Operators in OpenShift Container Platform guide.
Prerequisites
-
Access to an OpenShift Container Platform cluster using an account with
cluster-adminpermissions.
Procedure
- In the OpenShift Container Platform web console, navigate to Operators→ OperatorHub.
-
Scroll down or type
EAPinto the Filter by keyword box to find the EAP operator. - Select JBoss EAP operator and click Install.
On the Create Operator Subscription page:
Select one of the following:
-
All namespaces on the cluster (default) installs the operator in the default
openshift-operatorsnamespace to watch and be made available to all namespaces in the cluster. This option is not always available. - A specific namespace on the cluster installs the operator in a specific, single namespace that you choose. The operator is made available for use only in this single namespace.
-
All namespaces on the cluster (default) installs the operator in the default
- Select an Update Channel.
- Select Automatic or Manual approval strategy, as described earlier.
Click Subscribe to make the EAP operator available to the selected namespaces on this OpenShift Container Platform cluster.
- If you selected a manual approval strategy, the subscription’s upgrade status remains Upgrading until you review and approve its install plan. After you approve the install plan on the Install Plan page, the subscription upgrade status moves to Up to date.
- If you selected an automatic approval strategy, the upgrade status moves to Up to date without intervention.
After the subscription’s upgrade status is Up to date, select Operators → Installed Operators to verify that the EAP ClusterServiceVersion (CSV) shows up and its Status changes to InstallSucceeded in the relevant namespace.
NoteFor the All namespaces… installation mode, the status displayed is InstallSucceeded in the
openshift-operatorsnamespace. In other namespaces the status displayed is Copied.-
If the Status field does not change to InstallSucceeded, check the logs in any pod in the
openshift-operatorsproject (or other relevant namespace if A specific namespace… installation mode was selected) on the Workloads → Pods page that are reporting issues to troubleshoot further.
7.2. Installing EAP Operator Using the CLI
As a JBoss EAP cluster administrator, you can install an EAP operator from Red Hat OperatorHub using the OpenShift Container Platform CLI. You can then subscribe the EAP operator to one or more namespaces to make it available for developers on your cluster.
When installing the EAP operator from the OperatorHub using the CLI, use the oc command to create a Subscription object.
Prerequisites
-
You have access to an OpenShift Container Platform cluster using an account with
cluster-adminpermissions. -
You have installed the
octool in your local system.
Procedure
View the list of operators available to the cluster from the OperatorHub:
$ oc get packagemanifests -n openshift-marketplace | grep eap
NAME        CATALOG               AGE
...
eap         Red Hat Operators     43d
...
Create a
Subscriptionobject YAML file (for example,eap-operator-sub.yaml) to subscribe a namespace to your EAP operator. The following is an exampleSubscriptionobject YAML file:apiVersion: operators.coreos.com/v1alpha1 kind: Subscription metadata: name: eap namespace: openshift-operators spec: channel: alpha installPlanApproval: Automatic name: eap 1 source: redhat-operators 2 sourceNamespace: openshift-marketplace
For information about channels and approval strategy, see the web console version of this procedure.
Create the
Subscriptionobject from the YAML file:$ oc apply -f eap-operator-sub.yaml $ oc get csv -n openshift-operators NAME DISPLAY VERSION REPLACES PHASE eap-operator.v1.0.0 JBoss EAP 1.0.0 Succeeded
The EAP operator is successfully installed. At this point, the OLM is aware of the EAP operator. A ClusterServiceVersion (CSV) for the operator appears in the target namespace, and APIs provided by the EAP operator is available for creation.
7.3. Java application deployment on OpenShift using the EAP operator
With the EAP operator, you can automate Java application deployment on OpenShift. For information about the EAP operator APIs, see EAP Operator: API Information.
You can choose one of the following application image types for deploying your Java application on OpenShift:
-
An application image based on a builder image or a runtime image. You can use the
eap-s2i-buildtemplate to prepare such an image. -
A bootable JAR application image based on the base image
registry.access.redhat.com/ubi8/openjdk-11or any other Red Hat ubi8 that supplies a higher JDK version.
Some configurations are mandatory while deploying a Java application on OpenShift using the EAP operator. Some other configurations are required only if the EAP operator CustomResource (CR) for your application references a Secret object or a ConfigMap.
Additional resources
-
For information about the
eap-s2i-buildtemplate, see The eap-s2i-build template for creating application images. -
For more information about building an application image using the
eap-s2i-buildtemplate, see Building an application image usingeap-s2i-buildtemplate. - For information about using the bootable JAR application image, see Bootable JAR for packaging EAP server and a Java application.
- For information about packaging your application image as a bootable JAR, see Using a bootable JAR on a JBoss EAP OpenShift platform.
- For information about completing the mandatory configurations while deploying your Java application on OpenShift, see Deploying a Java application using the EAP operator: Completing mandatory configurations.
- For information about completing the optional configurations while deploying your Java application on OpenShift, see Deploying a Java application using the EAP operator:Completing the optional configurations.
7.3.1. The eap-s2i-build template for creating application images
Use the eap-s2i-build template to create your application images. The eap-s2i-build template adds several parameters to configure the location of the application source repository and the EAP S2I images to use to build your application.
The APPLICATION_IMAGE parameter in the eap-s2i-build template specifies the name of the imagestream corresponding to the application image. For example, if you created an application image named my-app from the eap-s2i-build template, you can use the my-app:latest imagestreamtag from the my-app imagestream to deploy your application. For more information about the parameters used in the eap-s2i-build template, see Building an application image using eap-s2i-build template.
With this template, the EAP operator can seamlessly upgrade your applications deployed on OpenShift. To enable seamless upgrades, you must configure a webhook in your GitHub repository and specify the webhook in the build configuration. The webhook notifies OpenShift when your repository is updated and a new build is triggered.
You can use this template to build an application image using an imagestream for any JBoss EAP version, such as JBoss EAP 7.3, JBoss EAP XP, or JBoss EAP CD.
Additional resources
7.3.2. Building an application image using eap-s2i-build template
The eap-s2i-build template adds several parameters to configure the location of your application source repository and the EAP S2I images to use to build the application. With this template, you can use an imagestream for any JBoss EAP version, such as JBoss EAP 7.3, JBoss EAP XP, or JBoss EAP CD.
Procedure
- Import EAP images in OpenShift. For more information, see Importing the latest OpenShift image streams and templates for JBoss EAP XP.
- Configure the imagestream to receive updates about the changes in the application imagestream and to trigger new builds. For more information, see Configuring periodic importing of imagestreamtags.
Create the
eap-s2i-buildtemplate for building the application image using EAP S2I images:$ oc replace --force -f https://raw.githubusercontent.com/jboss-container-images/jboss-eap-openshift-templates/master/eap-s2i-build.yaml
This
eap-s2i-buildtemplate creates two build configurations and two imagestreams corresponding to the intermediate build artifacts and the final application image.Process the
eap-s2i-buildtemplate with parameters to create the resources for the final application image. The following example creates an application image,my-app:$ oc process eap-s2i-build \ -p APPLICATION_IMAGE=my-app \ 1 \ -p EAP_IMAGE=jboss-eap-xp1-openjdk11-openshift:1.0 \ 2 -p EAP_RUNTIME_IMAGE=jboss-eap-xp1-openjdk11-runtime-openshift:1.0 \ 3 -p EAP_IMAGESTREAM_NAMESPACE=$(oc project -q) \ 4 \ -p SOURCE_REPOSITORY_URL=https://github.com/jboss-developer/jboss-eap-quickstarts.git \ 5 -p SOURCE_REPOSITORY_REF=xp-1.0.x \ 6 -p CONTEXT_DIR=microprofile-config | oc create -f - 7
- 1
- The name for the application imagestream. The application image is tagged with the
latesttag. - 2
- The imagestreamtag for EAP builder image.
- 3
- The imagestreamtag for EAP runtime image.
- 4
- The namespace in which the imagestreams for Red Hat Middleware images are installed. If omitted, the
openshiftnamespace is used. Modify this only if you have installed the imagestreams in a namespace other thanopenshift. - 5
- The Git source URL of your application.
- 6
- The Git branch or tag reference
- 7
- The path within the Git repository that contains the application to build.
Prepare the application image for deployment using the EAP operator.
Configure the
WildFlyServerresource:$ cat > my-app.yaml<<EOF apiVersion: wildfly.org/v1alpha1 kind: WildFlyServer metadata: name: my-app spec: applicationImage: 'my-app:latest' replicas: 1 EOF
Apply the settings and let the EAP operator create a new
WildFlyServerresource that references this application image:$ oc apply -f my-app.yaml
View the
WildFlyServerresource with the following command:$ oc get wfly my-app
Additional resources
- For more information about importing an application imagestream, see Importing the latest OpenShift image streams and templates for JBoss EAP XP.
- For more information about periodic importing of imagestreams, see Configuring periodic importing of imagestreamtags.
7.3.3. Bootable JAR for packaging JBoss EAP server and a Java application
You can package a JBoss EAP server and your Java application as an executable JAR file, also known as a bootable JAR. This bootable JAR can be used to build a bootable JAR application image, which contains a server, a packaged application, and the runtime required to launch the server. A bootable JAR application image built in this manner can be deployed on OpenShift using the EAP operator.
To be able to deploy a bootable JAR image on OpenShift using the EAP operator, you must use the base image registry.access.redhat.com/ubi8/openjdk-11 or any other Red Hat ubi8 that supplies a higher JDK version.
The bootable JAR must be built for a server configured for the cloud environment. You can configure a server for the cloud environment by enabling it in the wildfly-jar-maven-plugin configuration.
Complete steps 1 through 6 of the Using a bootable JAR on a JBoss EAP OpenShift platform section to build a bootable JAR application image. After completing these steps, your bootable JAR application image is available as an imagestream in OpenShift and you can use the imagestreamtag in the EAP operator configuration.
The EAP operator does not recover transactions when a pod running a bootable JAR application image is scaled down. The EAP operator logs a trace describing the inability to recover the transaction when a pod is scaled down.
Additional resources
- For more information about the bootable JAR, see About the bootable JAR.
- For more information about configuring a server for cloud environment, see Configure the bootable JAR for OpenShift.
- For information about deploying your bootable JAR application image on OpenShift, see Deploying a Java application using the EAP operator: Completing mandatory configurations.
7.3.4. Deploying a Java application using the EAP operator: Completing the mandatory configurations
The following configurations are mandatory when you use the EAP operator to deploy a Java application on OpenShift.
Prerequisites
- You have installed EAP operator. For more information about installing the EAP operator, see Installing EAP Operator Using the Webconsole and Installing EAP Operator Using the CLI.
If you built your application image with the eap-s2i-build template:
- You have built a Docker image of the user application using JBoss EAP for OpenShift Source-to-Image (S2I) builder image.
-
The
APPLICATION_IMAGEparameter in youreap-s2i-buildtemplate has an imagestream, if you want to enable automatic upgrade of your application after it is deployed on OpenShift. For more information about building your application image using theeap-s2i-buildtemplate, see Building an application image using eap-s2i-build template.
If you use a bootable JAR application image:
-
You have built the bootable JAR application image using the base image
registry.access.redhat.com/ubi8/openjdk-11or any other Red Hat ubi8 that supplies a higher JDK version. - You have configured the server for cloud environment.
Procedure
- Open your web browser and log on to OperatorHub.
- Select the Project or namespace you want to use for your Java application.
- Navigate to Installed Operator and select JBoss EAP operator.
- On the Overview tab, click the Create Instance link.
Specify the application image details.
The application image specifies the Docker image that contains the Java application. If the
applicationImagefield corresponds to an imagestreamtag, any change to the image triggers an automatic upgrade of the application.You can provide any of the references of the JBoss EAP for OpenShift application image as shown in the following example:
- The name of the image: mycomp/myapp
- A tag: mycomp/myapp:1.0
- A digest: mycomp/myapp:@sha256:0af38bc38be93116b6a1d86a9c78bd14cd527121970899d719baf78e5dc7bfd2
- An imagestreamtag: my-app:latest
- An image hash: quay.io/bootable-jar/myapp@sha256:47c06c96e80d0defb777686cdb468c636d9b3b7081a35b784330a050a403e15b
Specify the size of the application. For example:
spec:
  replicas:2
Optional: If you used the bootable JAR for packaging the application, indicate so as shown in the following example:
spec:
  bootableJar: true
Configure the application environment using the
env spec. The environment variables can come directly from values, such as POSTGRESQL_SERVICE_HOST or fromSecretobjects, such as POSTGRESQL_USER. For example:spec: env: - name: POSTGRESQL_SERVICE_HOST value: postgresql - name: POSTGRESQL_SERVICE_PORT value: '5432' - name: POSTGRESQL_DATABASE valueFrom: secretKeyRef: key: database-name name: postgresql - name: POSTGRESQL_USER valueFrom: secretKeyRef: key: database-user name: postgresql - name: POSTGRESQL_PASSWORD valueFrom: secretKeyRef: key: database-password name: postgresqlAdditional resources
- For more information about completing the optional configurations while deploying your Java application on OpenShift, see Deploying a Java application using the EAP operator: Completing the optional configurations.
-
For more information about building your application image with
eap-s2i-buildtemplate, see Building an application image usingeap-s2i-buildtemplate. - For more information about packaging your application image as a bootable JAR, see Using a bootable JAR on a JBoss EAP OpenShift platform.
- For a list of environment variables, see Environment Variables.
7.3.5. Deploying a Java application using the EAP operator: Completing the optional configurations
If the EAP operator CustomResource (CR) for your application references a Secret object or a ConfigMap, complete the following optional configurations while deploying the application on OpenShift using the EAP operator.
Providing a standalone.xml file from the ConfigMap is not supported in JBoss EAP 7.
Prerequisites
- You have installed EAP operator. For more information about installing the EAP operator, see Installing EAP Operator Using the Webconsole and Installing EAP Operator Using the CLI.
- You have completed the mandatory configurations for deploying a Java application on OpenShift.
-
You have created a
Secretobject, if the EAP operator CR for your application references one. For information about creating aSecretobject, see Creating a Secret. -
You have created a
ConfigMap, if if the EAP operator CR for your application references one. For information about creating aConfigMap, see Creating a ConfigMap. -
Optional: You have created a
ConfigMapfrom thestandalone.xmlfile. For information about creating aConfigMapfrom thestandalone.xmlfile, see Creating a ConfigMap from a standalone.xml File.
Procedure
Complete the following optional configurations that are relevant to your application deployment:
- Specify the storage requirements for the server data directory.
Specify the name of the
Secretyou created inWildFlyServerSpec, so you can mount theSecretobject as a volume in the pods running the application. For example:spec: secrets: - my-secretThe
Secretis mounted at/etc/secrets/<secret name>and each key/value is stored as a file. The name of the file is the key and the content is the value. TheSecretis mounted as a volume inside the pod. The following example demonstrates commands that you can use to find key values:$ ls /etc/secrets/my-secret/ my-key my-password $ cat /etc/secrets/my-secret/my-key devuser $ cat /etc/secrets/my-secret/my-password my-very-secure-pasword
NoteModifying a
Secretobject might lead to project inconsistencies. To avoid project inconsistencies, create a newSecretobject with the same content as that of the old object. You can then update the content as required and change the reference in the EAP operator custom resource (CR) from old to new. This is considered a new CR update and the pods are reloaded.Specify the name of the
ConfigMapyou created inWildFlyServerSpecto mount it as a volume in the pods running the application. For example:spec: configMaps: - my-config
The
ConfigMapis mounted at/etc/configmaps/<configmap name>and each key/value is stored as a file. The name of the file is the key and the content is the value. TheConfigMapis mounted as a volume inside the pod. To find the key values:$ ls /etc/configmaps/my-config/ key1 key2 $ cat /etc/configmaps/my-config/key1 value1 $ cat /etc/configmaps/my-config/key2 value2
NoteModifying a
ConfigMapmight lead to project inconsistencies.To avoid project inconsistencies, create a newConfigMapwith the same content as that of the old one. You can then update the content as required and change the reference in the EAP operator custom resource (CR) from old to new. This is considered a new CR update and the pods are reloaded.If you choose to have your own standalone
ConfigMap, provide the name of theConfigMapas well as the key for thestandalone.xmlfile:standaloneConfigMap: name: clusterbench-config-map key: standalone-openshift.xmlNoteCreating a
ConfigMapfrom thestandalone.xmlfile is not supported in JBoss EAP 7.If you want to disable the default HTTP route creation in OpenShift, set
disableHTTPRoutetotrue:spec: disableHTTPRoute: true
Additional resources
- For more information about specifying the storage requirements for the server data directory, see Configuring Persistent Storage for Applications.
- For more information about completing the mandatory configurations while deploying your Java application on OpenShift, see Deploying a Java application on OpenShift using the EAP operator.
7.3.6. Creating a Secret
If the EAP operator CustomResource (CR) for your application references a Secret, you must create the Secret object before deploying your application on OpenShift using the EAP operator.
Procedure
-
To create a
Secret:
$ oc create secret generic my-secret --from-literal=my-key=devuser --from-literal=my-password='my-very-secure-pasword'
7.3.7. Creating a ConfigMap
If the EAP operator CustomResource (CR) for your application references a ConfigMap in the spec.ConfigMaps field, you must create the ConfigMap before deploying your application on OpenShift using the EAP operator.
Procedure
- To create a configmap:
 $ oc create configmap my-config --from-literal=key1=value1 --from-literal=key2=value2
configmap/my-config created
7.3.8. Creating a ConfigMap from a standalone.xml File
You can create your own JBoss EAP standalone configuration instead of using the one in the application image that comes from JBoss EAP for OpenShift Source-to-Image (S2I). The standalone.xml file must be put in a ConfigMap that is accessible by the operator.
NOTE: Providing a standalone.xml file from the ConfigMap is not supported in JBoss EAP 7.
Procedure
-
To create a
ConfigMapfrom thestandalone.xmlfile:
 $ oc create configmap clusterbench-config-map --from-file examples/clustering/config/standalone-openshift.xml
configmap/clusterbench-config-map created
7.3.9. Configuring Persistent Storage for Applications
If your application requires persistent storage for some data, such as, transaction or messaging logs that must persist across pod restarts, configure the storage spec. If the storage spec is empty, an EmptyDir volume is used by each pod of the application. However, this volume does not persist after its corresponding pod is stopped.
Procedure
Specify
volumeClaimTemplateto configure resources requirements to store the JBoss EAP standalone data directory. The name of the template is derived from the name of JBoss EAP. The corresponding volume is mounted inReadWriteOnceaccess mode.spec: storage: volumeClaimTemplate: spec: resources: requests: storage: 3GiThe persistent volume that meets this storage requirement is mounted on the
/eap/standalone/datadirectory.
7.4. Viewing metrics of an application using the EAP operator
You can view the metrics of an application deployed on OpenShift using the EAP operator.
When your cluster administrator enables metrics monitoring in your project, the EAP operator automatically displays the metrics on the OpenShift console.
Prerequisites
- Your cluster administrator has enabled monitoring for your project. For more information, see Enabling monitoring for user-defined projects.
Procedure
- In the OpenShift Container Platform web console, navigate to Monitoring→ Metrics.
- On the Metrics screen, type the name of your application in the text box to select your application. The metrics for your application appear on the screen.
All metrics related to JBoss EAP application server are prefixed with jboss. For example, jboss_undertow_request_count_total.
7.5. Uninstalling EAP Operator Using Web Console
To delete, or uninstall, EAP operator from your cluster, you can delete the subscription to remove it from the subscribed namespace. You can also remove the EAP operator’s ClusterServiceVersion (CSV) and deployment.
To ensure data consistency and safety, scale down the number of pods in your cluster to 0 before uninstalling the EAP operator.
You can uninstall the EAP operator using the web console.
If you decide to delete the entire wildflyserver definition (oc delete wildflyserver <deployment_name>), then no transaction recovery process is started and the pod is terminated regardless of unfinished transactions. The unfinished work that results from this operation might block the data changes that you later initiate. The data changes for other JBoss EAP instances involved in transactional EJB remote calls with this wildflyserver might also be blocked.
Procedure
- From the Operators→ Installed Operators page, select JBoss EAP.
- On the right-hand side of the Operator Details page, select Uninstall Operator from the Actions drop-down menu.
- When prompted by the Remove Operator Subscription window, optionally select the Also completely remove the Operator from the selected namespace check box if you want all components related to the installation to be removed. This removes the CSV, which in turn removes the pods, deployments, custom resource definitions (CRDs), and custom resources (CRs) associated with the operator.
- Click Remove. The EAP operator stops running and no longer receives updates.
7.6. Uninstalling EAP Operator using the CLI
To delete, or uninstall, the EAP operator from your cluster, you can delete the subscription to remove it from the subscribed namespace. You can also remove the EAP operator’s ClusterServiceVersion (CSV) and deployment.
To ensure data consistency and safety, scale down the number of pods in your cluster to 0 before uninstalling the EAP operator.
You can uninstall the EAP operator using the command line.
When using the command line, you uninstall the operator by deleting the subscription and CSV from the target namespace.
If you decide to delete the entire wildflyserver definition (oc delete wildflyserver <deployment_name>), then no transaction recovery process is started and the pod is terminated regardless of unfinished transactions. The unfinished work that results from this operation might block the data changes that you later initiate. The data changes for other JBoss EAP instances involved in transactional EJB remote calls with this wildflyserver might also be blocked.
Procedure
Check the current version of the EAP operator subscription in the
currentCSVfield:$ oc get subscription eap-operator -n openshift-operators -o yaml | grep currentCSV currentCSV: eap-operator.v1.0.0
Delete the EAP operator’s subscription:
$ oc delete subscription eap-operator -n openshift-operators
subscription.operators.coreos.com "eap-operator" deleted
Delete the CSV for the EAP operator in the target namespace using the
currentCSVvalue from the previous step:$ oc delete clusterserviceversion eap-operator.v1.0.0 -n openshift-operators clusterserviceversion.operators.coreos.com "eap-operator.v1.0.0" deleted
7.7. EAP Operator for Safe Transaction Recovery
EAP operator ensures data consistency before terminating your application cluster by verifying that all transactions are completed before scaling down the replicas and marking a pod as clean for termination.
This means that if you want to remove the deployment safely without data inconsistencies, you must first scale down the number of pods to 0, wait until all pods are terminated, and only then delete the wildflyserver instance.
If you decide to delete the entire wildflyserver definition (oc delete wildflyserver <deployment_name>), then no transaction recovery process is started and the pod is terminated regardless of unfinished transactions. The unfinished work that results from this operation might block the data changes that you later initiate. The data changes for other JBoss EAP instances involved in transactional EJB remote calls with this wildflyserver might also be blocked.
When the scaledown process begins the pod state (oc get pod <pod_name>) is still marked as Running, because the pod must complete all the unfinished transactions, including the remote EJB calls that target it.
If you want to monitor the state of the scaledown process, observe the status of the wildflyserver instance. For more information, see Monitoring the Scaledown Process. For information about pod statuses during scaledown, see Pod Status During Scaledown.
The EAP operator does not recover transactions when a pod running a bootable JAR application image is scaled down. The EAP operator logs a trace describing the inability to recover the transaction when a pod is scaled down.
7.7.1. StatefulSets for Stable Network Host Names
The EAP operator that manages the wildflyserver creates a StatefulSet as an underlying object managing the JBoss EAP pods.
A StatefulSet is the workload API object that manages stateful applications. It manages the deployment and scaling of a set of pods, and provides guarantees about the ordering and uniqueness of these pods.
The StatefulSet ensures that the pods in a cluster are named in a predefined order. It also ensures that pod termination follows the same order. For example, let us say, pod-1 has a transaction with heuristic outcome, and so is in the state of SCALING_DOWN_RECOVERY_DIRTY. Even if pod-0 is in the state of SCALING_DOWN_CLEAN, it is not terminated before pod-1. Until pod-1 is clean and is terminated, pod-0 remains in the SCALING_DOWN_CLEAN state. However, even if pod-0 is in the SCALING_DOWN_CLEAN state, it does not receive any new request and is practically idle.
Decreasing the replica size of the StatefulSet or deleting the pod itself has no effect and such changes are reverted.
7.7.2. Monitoring the Scaledown Process
If you want to monitor the state of the scaledown process, you must observe the status of the wildflyserver instance. For more information about the different pod statuses during scaledown, see Pod Status During Scaledown.
Procedure
To observe the state of the scaledown process:
oc describe wildflyserver <name>
- The WildFlyServer.Status.Scalingdown Pods and WildFlyServer.Status.Replicas fields shows the overall state of the active and non-active pods.
- The Scalingdown Pods field shows the number of pods which are about to be terminated when all the unfinished transactions are complete.
- The WildFlyServer.Status.Replicas field shows the current number of running pods.
- The WildFlyServer.Spec.Replicas field shows the number of pods in ACTIVE state.
- If there are no pods in scaledown process the numbers of pods in the WildFlyServer.Status.Replicas and WildFlyServer.Spec.Replicas fields are equal.
7.7.2.1. Pod Status During Scaledown
The following table describes the different pod statuses during scaledown:
Table 7.1. Pod Status Description
| Pod Status | Description |
|---|---|
| ACTIVE | The pod is active and processing requests. |
| SCALING_DOWN_RECOVERY_INVESTIGATION | The pod is about to be scaled down. The scale-down process is under investigation about the state of transactions in JBoss EAP. |
| SCALING_DOWN_RECOVERY_DIRTY | JBoss EAP contains some incomplete transactions. The pod cannot be terminated until they are cleaned. The transaction recovery process is periodically run at JBoss EAP and it waits until the transactions are completed |
| SCALING_DOWN_CLEAN |
The pod is processed by transaction scaled down processing and is marked as |
7.7.3. Scaling Down During Transactions with Heuristic Outcomes
When the outcome of a transaction is unknown, automatic transaction recovery is impossible. You must then manually recover your transactions.
Prerequisites
-
The status of your pod is stuck at
SCALING_DOWN_RECOVERY_DIRTY.
Procedure
- Access your JBoss EAP instance using CLI.
- Resolve all the heuristics transaction records in the transaction object store. For more information, see Recovering Heuristic Outcomes in the Managing Transactions on JBoss EAP.
Remove all records from the EJB client recovery folder.
Remove all files from the pod EJB client recovery directory:
$JBOSS_HOME/standalone/data/ejb-xa-recovery
oc exec <podname> rm -rf $JBOSS_HOME/standalone/data/ejb-xa-recovery
-
The status of your pod changes to
SCALING_DOWN_CLEANand the pod is terminated.
7.7.4. Configuring the transactions subsystem to use the JDBC storage for transaction log
In cases where the system does not provide a file system to store transaction logs, use the JBoss EAP S2I image to configure the JDBC object store.
S2I environment variables are not usable when JBoss EAP is deployed as a bootable JAR. In this case, you must create a Galleon layer or configure a CLI script to make the necessary configuration changes.
The JDBC object store can be set up with the environment variable TX_DATABASE_PREFIX_MAPPING. This variable has the same structure as DB_SERVICE_PREFIX_MAPPING.
Prerequisite
- You have created a datasource based on the value of the environment variables.
-
You have ensured consistent data reads and writes permissions exist between the database and the
transaction managercommunicating over the JDBC object store. For more information see configuring JDBC data sources
Procedure
Set up and configure the JDBC object store through the S2I environment variable.
Example
# Narayana JDBC objectstore configuration via s2i env variables
- name: TX_DATABASE_PREFIX_MAPPING
  value: 'PostgresJdbcObjectStore-postgresql=PG_OBJECTSTORE'
- name: POSTGRESJDBCOBJECTSTORE_POSTGRESQL_SERVICE_HOST
  value: 'postgresql'
- name: POSTGRESJDBCOBJECTSTORE_POSTGRESQL_SERVICE_PORT
  value: '5432'
- name: PG_OBJECTSTORE_JNDI
  value: 'java:jboss/datasources/PostgresJdbc'
- name: PG_OBJECTSTORE_DRIVER
  value: 'postgresql'
- name: PG_OBJECTSTORE_DATABASE
  value: 'sampledb'
- name: PG_OBJECTSTORE_USERNAME
  value: 'admin'
- name: PG_OBJECTSTORE_PASSWORD
  value: 'admin'
Verification
You can verify both the datasource configuration and transaction subsystem configuration by checking the
standalone-openshift.xmlconfiguration fileoc rsh <podname> cat /opt/eap/standalone/configuration/standalone-openshift.xml.Expected output:
<datasource jta="false" jndi-name="java:jboss/datasources/PostgresJdbcObjectStore" pool-name="postgresjdbcobjectstore_postgresqlObjectStorePool"
    enabled="true" use-java-context="true" statistics-enabled="${wildfly.datasources.statistics-enabled:${wildfly.statistics-enabled:false}}">
    <connection-url>jdbc:postgresql://postgresql:5432/sampledb</connection-url>
    <driver>postgresql</driver>
    <security>
        <user-name>admin</user-name>
        <password>admin</password>
    </security>
</datasource>

<!-- under subsystem urn:jboss:domain:transactions -->
<jdbc-store datasource-jndi-name="java:jboss/datasources/PostgresJdbcObjectStore">
     <!-- the pod name was named transactions-xa-0 -->
    <action table-prefix="ostransactionsxa0"/>
    <communication table-prefix="ostransactionsxa0"/>
    <state table-prefix="ostransactionsxa0"/>
</jdbc-store>
Additional resources
- For more information about creating datasources by using either the management console or the management CLI, see Creating Datasources in the JBoss EAP Configuration Guide.
7.8. EJB Remoting on OpenShift
For JBoss EAP to work correctly with EJB remoting calls between different JBoss EAP clusters on OpenShift, you must understand the EJB remoting configuration options on OpenShift.
When deploying on OpenShift, consider the use of the EAP operator. The EAP operator uses StatefulSet for the appropriate handling of EJB remoting and transaction recovery processing. The StatefulSet ensures persistent storage and network hostname stability even after pods are restarted.
Network hostname stability is required when the JBoss EAP instance is contacted using an EJB remote call with transaction propagation. The JBoss EAP instance must be reachable under the same hostname even if the pod restarts. The transaction manager, which is a stateful component, binds the persisted transaction data to a particular JBoss EAP instance. Because the transaction log is bound to a specific JBoss EAP instance, it must be completed in the same instance.
To prevent data loss when the JDBC transaction log store is used, make sure your database provides data-consistent reads and writes. Consistent data reads and writes are important when the database is scaled horizontally with multiple instances.
An EJB remote caller has two options to configure the remote calls:
- Define a remote outbound connection. For more information, see Configuring a Remote Outbound Connection.
- Use a programmatic JNDI lookup for the bean at the remote server. For more information, see Using Remote EJB Clients.
You must reconfigure the value representing the address of the target node depending on the EJB remote call configuration method.
The name of the target EJB for the remote call must be the DNS address of the first pod.
The StatefulSet behaviour depends on the ordering of the pods. The pods are named in a predefined order. For example, if you scale your application to three replicas, your pods have names such as eap-server-0, eap-server-1, and eap-server-2.
The EAP operator also uses a headless service that ensures a specific DNS hostname is assigned to the pod. If the application uses the EAP operator, a headless service is created with a name such as eap-server-headless. In this case, the DNS name of the first pod is eap-server-0.eap-server-headless.
The use of the hostname eap-server-0.eap-server-headless ensures that the EJB call reaches any EAP instance connected to the cluster. A bootstrap connection is used to initialize the EJB client, which gathers the structure of the EAP cluster as the next step.
7.8.1. Configuring EJB on OpenShift
You must configure the JBoss EAP servers that act as callers for EJB remoting. The target server must configure a user with permission to receive the EJB remote calls.
Prerequisites
- You have used the EAP operator and the supported JBoss EAP for OpenShift S2I image for deploying and managing the JBoss EAP application instances on OpenShift.
- The clustering is set correctly. For more information about JBoss EAP clustering, see the Clustering section.
Procedure
Create a user in the target server with permission to receive the EJB remote calls:
$JBOSS_HOME/bin/add-user.sh
Configure the caller JBoss EAP application server.
-
Create the
eap-config.xmlfile in$JBOSS_HOME/standalone/configurationusing the custom configuration functionality. For more information, see Custom Configuration. Configure the caller JBoss EAP application server with the
wildfly.config.urlproperty:JAVA_OPTS_APPEND="-Dwildfly.config.url=$JBOSS_HOME/standalone/configuration/eap-config.xml"
NoteIf you use the following example for your configuration, replace the
>>PASTE_…_HERE<<with user and password you configured.Example Configuration
<configuration>
  <authentication-client xmlns="urn:elytron:1.0">
  <authentication-rules>
          <rule use-configuration="jta">
              <match-abstract-type name="jta" authority="jboss"/>
      </rule>
      </authentication-rules>
      <authentication-configurations>
       <configuration name="jta">
               <sasl-mechanism-selector selector="DIGEST-MD5"/>
               <providers>
                   <use-service-loader />
           </providers>
       <set-user-name name=">>PASTE_USER_NAME_HERE<<"/>
           <credentials>
                    <clear-password password=">>PASTE_PASSWORD_HERE<<"/>
           </credentials>
               <set-mechanism-realm name="ApplicationRealm" />
           </configuration>
      </authentication-configurations>
  </authentication-client>
</configuration>
-
Create the
Chapter 8. Reference Information
The content in this section is derived from the engineering documentation for this image. It is provided for reference as it can be useful for development purposes and for testing beyond the scope of the product documentation.
8.1. Persistent Templates
The JBoss EAP database templates, which deploy JBoss EAP and database pods, have both ephemeral and persistent variations.
Persistent templates include an environment variable to provision a persistent volume claim, which binds with an available persistent volume to be used as a storage volume for the JBoss EAP for OpenShift deployment. Information, such as timer schema, log handling, or data updates, is stored on the storage volume, rather than in ephemeral container memory. This information persists if the pod goes down for any reason, such as project upgrade, deployment rollback, or an unexpected error.
Without a persistent storage volume for the deployment, this information is stored in the container memory only, and is lost if the pod goes down for any reason.
For example, an EE timer backed by persistent storage continues to run if the pod is restarted. Any events triggered by the timer during the restart process are enacted when the application is running again.
Conversely, if the EE timer is running in the container memory, the timer status is lost if the pod is restarted, and starts from the beginning when the pod is running again.
8.2. Information Environment Variables
The following environment variables are designed to provide information to the image and should not be modified by the user:
Table 8.1. Information Environment Variables
| Variable Name | Description and Value |
|---|---|
| JBOSS_IMAGE_NAME | The image names. Values:
|
| JBOSS_IMAGE_VERSION | The image version. Value: This is the image version number. See the Red Hat Container Catalog for the latest values: |
| JBOSS_MODULES_SYSTEM_PKGS | A comma-separated list of JBoss EAP system modules packages that are available to applications.
Value: |
| STI_BUILDER |
Provides OpenShift S2I support for
Value: |
8.3. Configuration environment variables
You can configure the following environment variables to adjust the image without requiring a rebuild.
See the JBoss EAP documentation for other environment variables that are not listed here.
Table 8.2. Configuration environment variables
| Variable Name | Description |
|---|---|
| AB_JOLOKIA_AUTH_OPENSHIFT |
Switch on client authentication for OpenShift TLS communication. The value of this parameter can be
|
| AB_JOLOKIA_CONFIG | If set, uses this fully qualified file path for the Jolokia JVM agent properties, which are described in the Jolokia reference documentation. If you set your own Jolokia properties config file, the rest of the Jolokia settings in this document are ignored.
If not set,
Example value: |
| AB_JOLOKIA_DISCOVERY_ENABLED | Enable Jolokia discovery.
Defaults to |
| AB_JOLOKIA_HOST | Host address to bind to.
Defaults to
Example value: |
| AB_JOLOKIA_HTTPS | Switch on secure communication with HTTPS.
By default self-signed server certificates are generated if no
Example value: |
| AB_JOLOKIA_ID | Agent ID to use.
The default value is the
Example value: |
| AB_JOLOKIA_OFF |
If set to Jolokia is enabled by default. |
| AB_JOLOKIA_OPTS |
Additional options to be appended to the agent configuration. They should be given in the format
Example value: |
| AB_JOLOKIA_PASSWORD | The password for basic authentication. By default, authentication is switched off.
Example value: |
| AB_JOLOKIA_PASSWORD_RANDOM |
Determines if a random
Set to |
| AB_JOLOKIA_PORT | The port to listen to.
Defaults to
Example value: |
| AB_JOLOKIA_USER | The name of the user to use for basic authentication.
Defaults to
Example value: |
| AB_PROMETHEUS_ENABLE |
If set to Note The MicroProfile Metrics subsystem is the preferred method to expose data in the Prometheus format. For more information about the MicroProfile Metrics susbsystem, see Eclipse MicroProfile in the Configuration Guide for JBoss EAP. |
| AB_PROMETHEUS_JMX_EXPORTER_CONFIG |
The path within the container to a user-specified |
| AB_PROMETHEUS_JMX_EXPORTER_PORT |
The port on which the |
| CLI_GRACEFUL_SHUTDOWN |
If set to any non-zero length value, the image will prevent shutdown with the
Example value: |
| CONTAINER_HEAP_PERCENT | Set the maximum Java heap size, as a percentage of available container memory.
Example value: |
| CUSTOM_INSTALL_DIRECTORIES | A list of comma-separated directories used for installation and configuration of artifacts for the image during the S2I process.
Example value: |
| DEFAULT_JMS_CONNECTION_FACTORY |
This value is used to specify the default JNDI binding for the JMS connection factory, for example
Example value: |
| DISABLE_EMBEDDED_JMS_BROKER | The use of an embedded messaging broker in OpenShift containers is deprecated. Support for an embedded broker will be removed in a future release. If the following conditions are true, a warning is logged.
If this variable is included with the value set to
Include this variable set to |
| ENABLE_ACCESS_LOG | Enable logging of access messages to the standard output channel. Logging of access messages is implemented using following methods:
Defaults to |
| INITIAL_HEAP_PERCENT | Set the initial Java heap size, as a percentage of the maximum heap size.
Example value: |
| JAVA_OPTS_APPEND | Server startup options.
Example value: |
| JBOSS_MODULES_SYSTEM_PKGS_APPEND |
A comma-separated list of package names that will be appended to the
Example value: |
| JGROUPS_CLUSTER_PASSWORD |
Password used to authenticate the node so it is allowed to join the JGroups cluster. Required, when using
Example value: |
| JGROUPS_ENCRYPT_KEYSTORE |
Name of the keystore file within the secret specified via
Example value: |
| JGROUPS_ENCRYPT_KEYSTORE_DIR |
Directory path of the keystore file within the secret specified via
Example value: |
| JGROUPS_ENCRYPT_NAME |
Name associated with the server’s certificate, when using
Example value: |
| JGROUPS_ENCRYPT_PASSWORD |
Password used to access the keystore and the certificate, when using
Example value: |
| JGROUPS_ENCRYPT_PROTOCOL |
JGroups protocol to use for encryption of cluster traffic. Can be either
Defaults to
Example value: |
| JGROUPS_ENCRYPT_SECRET |
Name of the secret that contains the
Example value: |
| JGROUPS_PING_PROTOCOL |
JGroups protocol to use for node discovery. Can be either |
| MQ_SIMPLE_DEFAULT_PHYSICAL_DESTINATION |
For backwards compatibility, set to |
| OPENSHIFT_DNS_PING_SERVICE_NAME | Name of the service exposing the ping port on the servers for the DNS discovery mechanism.
Example value: |
| OPENSHIFT_DNS_PING_SERVICE_PORT |
The port number of the ping port for the DNS discovery mechanism. If not specified, an attempt is made to discover the port number from the SRV records for the service, otherwise the default
Defaults to |
| OPENSHIFT_KUBE_PING_LABELS | Clustering labels selector for the Kubernetes discovery mechanism.
Example value: |
| OPENSHIFT_KUBE_PING_NAMESPACE | Clustering project namespace for the Kubernetes discovery mechanism.
Example value: |
| SCRIPT_DEBUG |
If set to |
8.4. Application Templates
Table 8.3. Application Templates
| Variable Name | Description |
|---|---|
| AUTO_DEPLOY_EXPLODED | Controls whether exploded deployment content should be automatically deployed.
Example value: |
8.5. Exposed Ports
Table 8.4. Exposed Ports
| Port Number | Description |
|---|---|
| 8443 | HTTPS |
| 8778 | Jolokia Monitoring |
8.6. Datasources
Datasources are automatically created based on the value of some of the environment variables.
The most important environment variable is DB_SERVICE_PREFIX_MAPPING, as it defines JNDI mappings for the datasources. The allowed value for this variable is a comma-separated list of POOLNAME-DATABASETYPE=PREFIX triplets, where:
-
POOLNAMEis used as thepool-namein the datasource. -
DATABASETYPEis the database driver to use. -
PREFIXis the prefix used in the names of environment variables that are used to configure the datasource.
8.6.1. JNDI Mappings for Datasources
For each POOLNAME-DATABASETYPE=PREFIX triplet defined in the DB_SERVICE_PREFIX_MAPPING environment variable, the launch script creates a separate datasource, which is executed when running the image.
The first part (before the equal sign) of the DB_SERVICE_PREFIX_MAPPING should be lowercase.
The DATABASETYPE determines the driver for the datasource.
For more information about configuring a driver, see Modules, Drivers, and Generic Deployments. The JDK 8 image has drivers for postgresql and mysql configured by default.
Do not use any special characters for the POOLNAME parameter.
Support for using the Red Hat-provided internal datasource drivers with the JBoss EAP for OpenShift image is now deprecated. Red Hat recommends that you use JDBC drivers obtained from your database vendor for your JBoss EAP applications.
The following internal datasources are no longer provided with the JBoss EAP for OpenShift image:
- MySQL
- PostgreSQL
For more information about installing drivers, see Modules, Drivers, and Generic Deployments.
For more information on configuring JDBC drivers with JBoss EAP, see JDBC drivers in the JBoss EAP Configuration Guide.
Note that you can also create a custom layer to install these drivers and datasources if you want to add them to a provisioned server.
8.6.1.1. Datasource Configuration Environment Variables
To configure other datasource properties, use the following environment variables.
Be sure to replace the values for POOLNAME, DATABASETYPE, and PREFIX in the following variable names with the appropriate values. These replaceable values are described in this section and in the Datasources section.
| Variable Name | Description |
|---|---|
| POOLNAME_DATABASETYPE_SERVICE_HOST |
Defines the database server’s host name or IP address to be used in the datasource’s
Example value: |
| POOLNAME_DATABASETYPE_SERVICE_PORT | Defines the database server’s port for the datasource.
Example value: |
| PREFIX_BACKGROUND_VALIDATION |
When set to |
| PREFIX_BACKGROUND_VALIDATION_MILLIS |
Specifies frequency of the validation, in milliseconds, when the |
| PREFIX_CONNECTION_CHECKER | Specifies a connection checker class that is used to validate connections for the particular database in use.
Example value: |
| PREFIX_DATABASE | Defines the database name for the datasource.
Example value: |
| PREFIX_DRIVER | Defines Java database driver for the datasource.
Example value: |
| PREFIX_EXCEPTION_SORTER | Specifies the exception sorter class that is used to properly detect and clean up after fatal database connection exceptions.
Example value: |
| PREFIX_JNDI |
Defines the JNDI name for the datasource. Defaults to
Example value: |
| PREFIX_JTA | Defines Jakarta Transactions option for the non-XA datasource. The XA datasources are already Jakarta Transactions capable by default.
Defaults to |
| PREFIX_MAX_POOL_SIZE | Defines the maximum pool size option for the datasource.
Example value: |
| PREFIX_MIN_POOL_SIZE | Defines the minimum pool size option for the datasource.
Example value: |
| PREFIX_NONXA |
Defines the datasource as a non-XA datasource. Defaults to |
| PREFIX_PASSWORD | Defines the password for the datasource.
Example value: |
| PREFIX_TX_ISOLATION | Defines the java.sql.Connection transaction isolation level for the datasource.
Example value: |
| PREFIX_URL | Defines connection URL for the datasource.
Example value: |
| PREFIX_USERNAME | Defines the username for the datasource.
Example value: |
When running this image in OpenShift, the POOLNAME_DATABASETYPE_SERVICE_HOST and POOLNAME_DATABASETYPE_SERVICE_PORT environment variables are set up automatically from the database service definition in the OpenShift application template, while the others are configured in the template directly as env entries in container definitions under each pod template.
8.6.1.2. Examples
These examples show how value of the DB_SERVICE_PREFIX_MAPPING environment variable influences datasource creation.
8.6.1.2.1. Single Mapping
Consider value test-postgresql=TEST.
This creates a datasource with java:jboss/datasources/test_postgresql name. Additionally, all the required settings like password and username are expected to be provided as environment variables with the TEST_ prefix, for example TEST_USERNAME and TEST_PASSWORD.
8.6.1.2.2. Multiple Mappings
You can specify multiple datasource mappings.
Always separate multiple datasource mappings with a comma.
Consider the following value for the DB_SERVICE_PREFIX_MAPPING environment variable: cloud-postgresql=CLOUD,test-mysql=TEST_MYSQL.
This creates the following two datasources:
-
java:jboss/datasources/test_mysql -
java:jboss/datasources/cloud_postgresql
Then you can use TEST_MYSQL prefix for configuring things like the username and password for the MySQL datasource, for example TEST_MYSQL_USERNAME. And for the PostgreSQL datasource, use the CLOUD_ prefix, for example CLOUD_USERNAME.
8.7. Clustering
8.7.1. Configuring a JGroups Discovery Mechanism
To enable JBoss EAP clustering on OpenShift, configure the JGroups protocol stack in your JBoss EAP configuration to use either the kubernetes.KUBE_PING or the dns.DNS_PING discovery mechanism.
Although you can use a custom standalone-openshift.xml configuration file, it is recommended that you use environment variables to configure JGroups in your image build.
The instructions below use environment variables to configure the discovery mechanism for the JBoss EAP for OpenShift image.
If you use one of the available application templates to deploy an application on top of the JBoss EAP for OpenShift image, the default discovery mechanism is dns.DNS_PING.
The dns.DNS_PING and kubernetes.KUBE_PING discovery mechanisms are not compatible with each other. It is not possible to form a supercluster out of two independent child clusters, with one using the dns.DNS_PING mechanism for discovery and the other using the kubernetes.KUBE_PING mechanism. Similarly, when performing a rolling upgrade, the discovery mechanism needs to be identical for both the source and the target clusters.
8.7.1.1. Configuring KUBE_PING
To use the KUBE_PING JGroups discovery mechanism:
The JGroups protocol stack must be configured to use
KUBE_PINGas the discovery mechanism.You can do this by setting the
JGROUPS_PING_PROTOCOLenvironment variable tokubernetes.KUBE_PING:JGROUPS_PING_PROTOCOL=kubernetes.KUBE_PING
The
KUBERNETES_NAMESPACEenvironment variable must be set to your OpenShift project name. If not set, the server behaves as a single-node cluster (a "cluster of one"). For example:KUBERNETES_NAMESPACE=PROJECT_NAMEThe
KUBERNETES_LABELSenvironment variable should be set. This should match the label set at the service level. If not set, pods outside of your application (albeit in your namespace) will try to join. For example:KUBERNETES_LABELS=application=APP_NAMEAuthorization must be granted to the service account the pod is running under to be allowed to access Kubernetes' REST API. This is done using the OpenShift CLI. The following example uses the
defaultservice account in the current project’s namespace:oc policy add-role-to-user view system:serviceaccount:$(oc project -q):default -n $(oc project -q)
Using the
eap-service-accountin the project namespace:oc policy add-role-to-user view system:serviceaccount:$(oc project -q):eap-service-account -n $(oc project -q)
NoteSee Prepare OpenShift for Application Deployment for more information on adding policies to service accounts.
8.7.1.2. Configuring DNS_PING
To use the DNS_PING JGroups discovery mechanism:
The JGroups protocol stack must be configured to use
DNS_PINGas the discovery mechanism.You can do this by setting the
JGROUPS_PING_PROTOCOLenvironment variable todns.DNS_PING:JGROUPS_PING_PROTOCOL=dns.DNS_PING
The
OPENSHIFT_DNS_PING_SERVICE_NAMEenvironment variable must be set to the name of the ping service for the cluster.OPENSHIFT_DNS_PING_SERVICE_NAME=PING_SERVICE_NAMEThe
OPENSHIFT_DNS_PING_SERVICE_PORTenvironment variable should be set to the port number on which the ping service is exposed. TheDNS_PINGprotocol attempts to discern the port from the SRV records, otherwise it defaults to8888.OPENSHIFT_DNS_PING_SERVICE_PORT=PING_PORTA ping service which exposes the ping port must be defined. This service should be headless (ClusterIP=None) and must have the following:
- The port must be named.
The service must be annotated with the
service.alpha.kubernetes.io/tolerate-unready-endpointsand thepublishNotReadyAddressesproperties, both set totrue.Note-
Use both the
service.alpha.kubernetes.io/tolerate-unready-endpointsand thepublishNotReadyAddressesproperties to ensure that the ping service works in both the older and newer OpenShift releases. - Omitting these annotations result in each node forming its own "cluster of one" during startup. Each node then merges its cluster into the other nodes' clusters after startup, because the other nodes are not detected until after they have started.
kind: Service apiVersion: v1 spec: publishNotReadyAddresses: true clusterIP: None ports: - name: ping port: 8888 selector: deploymentConfig: eap-app metadata: name: eap-app-ping annotations: service.alpha.kubernetes.io/tolerate-unready-endpoints: "true" description: "The JGroups ping port for clustering."-
Use both the
DNS_PING does not require any modifications to the service account and works using the default permissions.
8.7.2. Configuring JGroups to Encrypt Cluster Traffic
To encrypt cluster traffic for JBoss EAP on OpenShift, you must configure the JGroups protocol stack in your JBoss EAP configuration to use either the SYM_ENCRYPT or ASYM_ENCRYPT protocol.
Although you can use a custom standalone-openshift.xml configuration file, it is recommended that you use environment variables to configure JGroups in your image build.
The instructions below use environment variables to configure the protocol for cluster traffic encryption for the JBoss EAP for OpenShift image.
The SYM_ENCRYPT and ASYM_ENCRYPT protocols are not compatible with each other. It is not possible to form a supercluster out of two independent child clusters, with one using the SYM_ENCRYPT protocol for the encryption of cluster traffic and the other using the ASYM_ENCRYPT protocol. Similarly, when performing a rolling upgrade, the protocol needs to be identical for both the source and the target clusters.
8.7.2.1. Configuring SYM_ENCRYPT
To use the SYM_ENCRYPT protocol to encrypt JGroups cluster traffic:
The JGroups protocol stack must be configured to use
SYM_ENCRYPTas the encryption protocol.You can do this by setting the
JGROUPS_ENCRYPT_PROTOCOLenvironment variable toSYM_ENCRYPT:JGROUPS_ENCRYPT_PROTOCOL=SYM_ENCRYPT
The
JGROUPS_ENCRYPT_SECRETenvironment variable must be set to the name of the secret containing the JGroups keystore file used for securing the JGroups communications. If not set, cluster communication is not encrypted and a warning is issued. For example:JGROUPS_ENCRYPT_SECRET=eap7-app-secret
The
JGROUPS_ENCRYPT_KEYSTORE_DIRenvironment variable must be set to the directory path of the keystore file within the secret specified viaJGROUPS_ENCRYPT_SECRETvariable. If not set, cluster communication is not encrypted and a warning is issued. For example:JGROUPS_ENCRYPT_KEYSTORE_DIR=/etc/jgroups-encrypt-secret-volume
The
JGROUPS_ENCRYPT_KEYSTOREenvironment variable must be set to the name of the keystore file within the secret specified viaJGROUPS_ENCRYPT_SECRETvariable. If not set, cluster communication is not encrypted and a warning is issued. For example:JGROUPS_ENCRYPT_KEYSTORE=jgroups.jceks
The
JGROUPS_ENCRYPT_NAMEenvironment variable must be set to the name associated with the server’s certificate. If not set, cluster communication is not encrypted and a warning is issued. For example:JGROUPS_ENCRYPT_NAME=jgroups
The
JGROUPS_ENCRYPT_PASSWORDenvironment variable must be set to the password used to access the keystore and the certificate. If not set, cluster communication is not encrypted and a warning is issued. For example:JGROUPS_ENCRYPT_PASSWORD=mypassword
8.7.2.2. Configuring ASYM_ENCRYPT
JBoss EAP 7.3 includes a new version of the ASYM_ENCRYPT protocol. The previous version of the protocol is deprecated. If you specify the JGROUPS_CLUSTER_PASSWORD environment variable, the deprecated version of the protocol is used and a warning is printed in the pod log.
To use the ASYM_ENCRYPT protocol to encrypt JGroups cluster traffic, specify ASYM_ENCRYPT as the encryption protocol, and configure it to use a keystore configured in the elytron subsystem.
-e JGROUPS_ENCRYPT_PROTOCOL="ASYM_ENCRYPT" \
-e JGROUPS_ENCRYPT_SECRET="encrypt_secret" \
-e JGROUPS_ENCRYPT_NAME="encrypt_name" \
-e JGROUPS_ENCRYPT_PASSWORD="encrypt_password" \
-e JGROUPS_ENCRYPT_KEYSTORE="encrypt_keystore" \
-e JGROUPS_CLUSTER_PASSWORD="cluster_password"
8.8. Health Checks
The JBoss EAP for OpenShift image utilizes the liveness and readiness probes included in OpenShift by default. In addition, this image includes Eclipse MicroProfile Health, as discussed in the Configuration Guide.
The following table demonstrates the values necessary for these health checks to pass. If the status is anything other than the values found below, then the check is failed and the image is restarted per the image’s restart policy.
Table 8.5. Liveness and Readiness Checks
| Performed Test | Liveness | Readiness |
|---|---|---|
| Server Status | Any status | Running |
| Boot Errors | None | None |
| Deployment Status [a] |
N/A or no |
N/A or no |
| Eclipse MicroProfile Health [b] |
N/A or |
N/A or |
[a]
N/A is only a valid state when no deployments are present.
[b]
N/A is only a valid state when the microprofile-health-smallrye subsystem has been disabled.
| ||
8.9. Messaging
8.9.1. Configuring External Red Hat AMQ Brokers
You can configure the JBoss EAP for OpenShift image with environment variables to connect to external Red Hat AMQ brokers.
Example OpenShift Application Definition
The following example uses a template to create a JBoss EAP application connected to an external Red Hat AMQ 7 broker.
Example: JDK 8
oc new-app eap73-amq-s2i \
-p APPLICATION_NAME=eap73-mq \
-p MQ_USERNAME=MY_USERNAME \
-p MQ_PASSWORD=MY_PASSWORD
Example: JDK 11
oc new-app eap73-openjdk11-amq-s2i \
-p APPLICATION_NAME=eap73-mq \
-p MQ_USERNAME=MY_USERNAME \
-p MQ_PASSWORD=MY_PASSWORD
The template used in this example provides valid default values for the required parameters. If you do not use a template and provide your own parameters, be aware that the MQ_SERVICE_PREFIX_MAPPING name must match the APPLICATION_NAME name, appended with "-amq7=MQ".
8.10. Security Domains
To configure a new Security Domain, the user must define the SECDOMAIN_NAME environment variable.
This results in the creation of a security domain named after the environment variable. The user may also define the following environment variables to customize the domain:
Table 8.6. Security Domains
| Variable name | Description |
|---|---|
| SECDOMAIN_NAME | Defines an additional security domain.
Example value: |
| SECDOMAIN_PASSWORD_STACKING |
If defined, the
Example value: |
| SECDOMAIN_LOGIN_MODULE | The login module to be used.
Defaults to |
| SECDOMAIN_USERS_PROPERTIES | The name of the properties file containing user definitions.
Defaults to |
| SECDOMAIN_ROLES_PROPERTIES | The name of the properties file containing role definitions.
Defaults to |
8.11. HTTPS Environment Variables
| Variable name | Description |
|---|---|
| HTTPS_NAME |
If defined along with
This should be the value specified as the alias name of your keystore if you created it with the
Example value: |
| HTTPS_PASSWORD |
If defined along with
Example value: |
| HTTPS_KEYSTORE |
If defined along with
Example value: |
8.12. Administration Environment Variables
Table 8.7. Administration Environment Variables
| Variable name | Description |
|---|---|
| ADMIN_USERNAME |
If both this and
Example value: |
| ADMIN_PASSWORD |
The password for the specified
Example value: |
8.13. S2I
The image includes S2I scripts and Maven.
Maven is currently only supported as a build tool for applications that are supposed to be deployed on JBoss EAP-based containers (or related/descendant images) on OpenShift.
Only WAR deployments are supported at this time.
8.13.1. Custom Configuration
It is possible to add custom configuration files for the image. All files put into configuration/ directory will be copied into EAP_HOME/standalone/configuration/. For example to override the default configuration used in the image, just add a custom standalone-openshift.xml into the configuration/ directory. See example for such a deployment.
8.13.1.1. Custom Modules
It is possible to add custom modules. All files from the modules/ directory will be copied into EAP_HOME/modules/. See example for such a deployment.
8.13.2. Deployment Artifacts
By default, artifacts from the source target directory will be deployed. To deploy from different directories set the ARTIFACT_DIR environment variable in the BuildConfig definition. ARTIFACT_DIR is a comma-delimited list. For example: ARTIFACT_DIR=app1/target,app2/target,app3/target
8.13.3. Artifact Repository Mirrors
A repository in Maven holds build artifacts and dependencies of various types, for example, all of the project JARs, library JARs, plug-ins, or any other project specific artifacts. It also specifies locations from where to download artifacts while performing the S2I build. Besides using central repositories, it is a common practice for organizations to deploy a local custom mirror repository.
Benefits of using a mirror are:
- Availability of a synchronized mirror, which is geographically closer and faster.
- Ability to have greater control over the repository content.
- Possibility to share artifacts across different teams (developers, CI), without the need to rely on public servers and repositories.
- Improved build times.
Often, a repository manager can serve as local cache to a mirror. Assuming that the repository manager is already deployed and reachable externally at https://10.0.0.1:8443/repository/internal/, the S2I build can then use this manager by supplying the MAVEN_MIRROR_URL environment variable to the build configuration of the application as follows:
Identify the name of the build configuration to apply
MAVEN_MIRROR_URLvariable against.oc get bc -o name buildconfig/eap
Update build configuration of
eapwith aMAVEN_MIRROR_URLenvironment variable.oc env bc/eap MAVEN_MIRROR_URL="https://10.0.0.1:8443/repository/internal/" buildconfig "eap" updated
Verify the setting.
oc env bc/eap --list
# buildconfigs eap
MAVEN_MIRROR_URL=https://10.0.0.1:8443/repository/internal/
- Schedule new build of the application.
During application build, you will notice that Maven dependencies are pulled from the repository manager, instead of the default public repositories. Also, after the build is finished, you will see that the mirror is filled with all the dependencies that were retrieved and used during the build.
8.13.3.1. Secure Artifact Repository Mirror URLs
To prevent "man-in-the-middle" attacks through the Maven repository, JBoss EAP requires the use of secure URLs for artifact repository mirror URLs.
The URL should specify a secure http ("https") and a secure port.
By default, if you specify an unsecure URL, an error will be returned. You can override this behavior using the the property -Dinsecure.repositories=WARN.
8.13.4. Scripts
run-
This script uses the
openshift-launch.shscript that configures and starts JBoss EAP with thestandalone-openshift.xmlconfiguration. assemble-
This script uses Maven to build the source, create a package (WAR), and move it to the
EAP_HOME/standalone/deploymentsdirectory.
8.13.5. Custom Scripts
You can add custom scripts to run when starting a pod, before JBoss EAP is started.
You can add any script valid to run when starting a pod, including CLI scripts.
Two options are available for including scripts when starting JBoss EAP from an image:
- Mount a configmap to be executed as postconfigure.sh
- Add an install.sh script in the nominated installation directory
8.13.5.1. Mounting a configmap to execute custom scripts
Mount a configmap when you want to mount a custom script at runtime to an existing image (in other words, an image that has already been built).
To mount a configmap:
Create a configmap with content you want to include in the postconfigure.sh.
For example, create a directory called
extensionsin the project root directory to include the scriptspostconfigure.shandextensions.cliand run the following command:$ oc create configmap jboss-cli --from-file=postconfigure.sh=extensions/postconfigure.sh --from-file=extensions.cli=extensions/extensions.cli
Mount the configmap into the pods via the deployment controller (dc).
$ oc set volume dc/eap-app --add --name=jboss-cli -m /opt/eap/extensions -t configmap --configmap-name=jboss-cli --default-mode='0755' --overwrite
Example postconfigure.sh
#!/usr/bin/env bash
set -x
echo "Executing postconfigure.sh"
$JBOSS_HOME/bin/jboss-cli.sh --file=$JBOSS_HOME/extensions/extensions.cli
Example extensions.cli
embed-server --std-out=echo  --server-config=standalone-openshift.xml
:whoami
quit
8.13.5.2. Using install.sh to execute custom scripts
Use install.sh when you want to include the script as part of the image when it is built.
To execute custom scripts using install.sh:
-
In the git repository of the project that will be used during s2i build, create a directory called
.s2i. Inside the
s2idirectory, add a file called environment, with the following content:$ cat .s2i/environment CUSTOM_INSTALL_DIRECTORIES=extensions
-
Create a directory called
extensions. In the
extensionsdirectory, create the file postconfigure.sh with contents similar to the following (replace placeholder code with appropriate code for your environment):$ cat extensions/postconfigure.sh #!/usr/bin/env bash echo "Executing patch.cli" $JBOSS_HOME/bin/jboss-cli.sh --file=$JBOSS_HOME/extensions/some-cli-example.cli
In the extensions directory, create the file install.sh with contents similar to the following (replace placeholder code with appropriate code for your environment):
$ cat extensions/install.sh
#!/usr/bin/env bash
set -x
echo "Running $PWD/install.sh"
injected_dir=$1
# copy any needed files into the target build.
cp -rf ${injected_dir} $JBOSS_HOME/extensions
8.13.6. Environment Variables
You can influence the way the build is executed by supplying environment variables to the s2i build command. The environment variables that can be supplied are:
Table 8.8. s2i Environment Variables
| Variable name | Description |
|---|---|
| ARTIFACT_DIR |
The
Example value: |
| ENABLE_GENERATE_DEFAULT_DATASOURCE |
Optional. When included with the value |
| GALLEON_PROVISION_DEFAULT_FAT_SERVER |
Optional. When included with the value |
| GALLEON_PROVISION_LAYERS | Optional. Instructs the S2I process to provision the specified layers. The value is a comma-separated list of layers to provision, including one base layer and any number of decorator layers.
Example value: |
| HTTP_PROXY_HOST | Host name or IP address of a HTTP proxy for Maven to use.
Example value: |
| HTTP_PROXY_PORT | TCP Port of a HTTP proxy for Maven to use.
Example value: |
| HTTP_PROXY_USERNAME |
If supplied with
Example value: |
| HTTP_PROXY_PASSWORD |
If supplied with
Example value: |
| HTTP_PROXY_NONPROXYHOSTS | If supplied, a configured HTTP proxy will ignore these hosts.
Example value: |
| MAVEN_ARGS | Overrides the arguments supplied to Maven during build.
Example value: |
| MAVEN_ARGS_APPEND | Appends user arguments supplied to Maven during build.
Example value: |
| MAVEN_MIRROR_URL | URL of a Maven Mirror/repository manager to configure.
Example value: Note that the specified URL should be secure. For details see Section 8.13.3.1, “Secure Artifact Repository Mirror URLs”. |
| MAVEN_CLEAR_REPO | Optionally clear the local Maven repository after the build. If the server present in the image is strongly coupled to the local cache, the cache is not deleted and a warning is printed.
Example value: |
| APP_DATADIR | If defined, directory in the source from where data files are copied.
Example value: |
| DATA_DIR |
Directory in the image where data from
Example value: |
For more information, see Build and Run a Java Application on the JBoss EAP for OpenShift Image, which uses Maven and the S2I scripts included in the JBoss EAP for OpenShift image.
8.14. Single Sign-On image
This image includes the Red Hat Single Sign-On-enabled applications.
For more information on deploying the Red Hat Single Sign-On for OpenShift image with the JBoss EAP for OpenShift image, see Deploy the Red Hat Single Sign-On-enabled JBoss EAP Image on the Red Hat Single Sign-On for OpenShift guide.
Table 8.9. Single Sign-On environment variables
| Variable name | Description |
|---|---|
| SSO_URL | URL of the Single Sign-On server. |
| SSO_REALM | Single Sign-On realm for the deployed applications. |
| SSO_PUBLIC_KEY | Public key of the Single Sign-On realm. This field is optional but if omitted can leave the applications vulnerable to man-in-middle attacks. |
| SSO_USERNAME | Single Sign-On user required to access the Single Sign-On REST API.
Example value: |
| SSO_PASSWORD |
Password for the Single Sign-On user defined by the
Example value: |
| SSO_SAML_KEYSTORE |
Keystore location for SAML. Defaults to |
| SSO_SAML_KEYSTORE_PASSWORD |
Keystore password for SAML. Defaults to |
| SSO_SAML_CERTIFICATE_NAME |
Alias for keys/certificate to use for SAML. Defaults to |
| SSO_BEARER_ONLY | Single Sign-On client access type. (Optional)
Example value: |
| SSO_CLIENT |
Path for Single Sign-On redirects back to the application. Defaults to match |
| SSO_ENABLE_CORS |
If |
| SSO_SECRET | The Single Sign-On client secret for confidential access.
Example value: |
| SSO_DISABLE_SSL_CERTIFICATE_VALIDATION |
If
Example value: |
8.15. Transaction Recovery
When a cluster is scaled down, it is possible for transaction branches to be in doubt. In these cases, manual transaction recovery might be necessary.
The Automated Transaction Recovery feature is only supported for OpenShift 3 and the feature is provided as Technology Preview only.
For OpenShift 4 you can use the EAP Operator to safely recovery transactions. See EAP Operator for Safe Transaction Recovery.
8.15.1. Unsupported Transaction Recovery Scenarios
JTS transactions
Because the network endpoint of the parent is encoded in recovery coordinator IORs, recovery cannot work reliably if either the child or parent node recovers with either a new IP address, or if it is intended to be accessed using a virtualized IP address.
XTS transactions
XTS does not work in a clustered scenario for recovery purposes. See JBTM-2742 for details.
- Transactions propagated over JBoss Remoting is unsupported with OpenShift 3.
Transactions propagated over JBoss Remoting is supported with OpenShift 4 and the EAP operator.
Transactions propagated over XATerminator
Because the EIS is intended to be connected to a single instance of a Java EE application server, there are no well-defined ways to couple these processes.
8.15.2. Manual Transaction Recovery Process
8.15.2.1. Caveats
This procedure only describes how to manually recover transactions that were wholly self-contained within a single JVM. The procedure does not describe how to recover JTA transactions that have been propagated to other JVMs.
There are various network partition scenarios in which OpenShift might start multiple instances of the same pod with the same IP address and same node name and where, due to the partition, the old pod is still running. During manual recovery, this might result in a situation where you might be connected to a pod that has a stale view of the object store. If you think you are in this scenario, it is recommended that all JBoss EAP pods be shut down to ensure that none of the resource managers or object stores are in use.
When you enlist a resource in an XA transaction, it is your responsibility to ensure that each resource type is supported for recovery. For example, it is known that PostgreSQL and MySQL are well-behaved with respect to recovery, but for others, such as A-MQ and JDV resource managers, you should check documentation of the specific OpenShift release.
The deployment must use a JDBC object store.
The transaction manager relies on the uniqueness of node identifiers. The maximum byte length of an XID is set by the XA specification and cannot be changed. Due to the data that the JBoss EAP for OpenShift image must include in the XID, this leaves room for 23 bytes in the node identifier.
OpenShift coerces the node identifier to fit this 23 byte limit:
-
For all node names, even those under 23 bytes, the
-(dash) character is stripped out. - If the name is still over 23 bytes, characters are truncated from the beginning of the name until length of the name is within the 23 byte limit.
However, this process might impact the uniqueness of the identifier. For example, the names aaa123456789012345678m0jwh and bbb123456789012345678m0jwh are both truncated to 123456789012345678m0jwh, which breaks the uniqueness of the names that are expected. In another example, this-pod-is-m0jwh and thispod-is-m0jwh are both truncated to thispodism0jwh, again breaking the uniqueness of the names.
It is your responsibility to ensure that the node names you configure are unique, keeping in mind the above truncation process.
8.15.2.2. Prerequisite
It is assumed the OpenShift instance has been configured with a JDBC store, and that the store tables are partitioned using a table prefix corresponding to the pod name. This should be automatic whenever a JBoss EAP deployment is in use. You can verify that the JBoss EAP instance is using a JDBC object store by looking at the configuration of the transactions subsystem in a running pod:
Determine if the
/opt/eap/standalone/configuration/openshift-standalone.xmlconfiguration file contains an element for the transaction subsystem:<subsystem xmlns="urn:jboss:domain:transactions:3.0">
If the JDBC object store is in use, then there is an entry similar to the following:
<jdbc-store datasource-jndi-name="java:jboss/datasources/jdbcstore_postgresql"/>
NoteThe JNDI name identifies the datasource used to store the transaction logs.
8.15.2.3. Procedure
The following procedure details the process of manual transaction recovery solely for datasources.
- Use the database vendor tooling to list the XIDs (transaction branch identifiers) for in-doubt branches. It is necessary to list XIDs for all datasources that were in use by any deployments running on the pod that failed or was scaled down. Refer to the vendor documentation for the database product in use.
For each such XID, determine which pod created the transaction and check to see if that pod is still running.
- If it is running, then leave the branch alone.
If the pod is not running, assume it was removed from the cluster and you must apply the manual resolution procedure described here. Look in the transaction log storage that was used by the failed pod to see if there is a corresponding transaction log:
- If there is a log, then manually commit the XID using the vendor tooling.
- If there is not a log, assume it is an orphaned branch and roll back the XID using the vendor tooling.
The rest of this procedure explains in detail how to carry out each of these steps.
8.15.2.3.1. Resolving In-doubt Branches
First, find all the resources that the deployment is using.
It is recommended that you do this using the JBoss EAP managagement CLI. Although the resources should be defined in the JBoss EAP standalone-openshift.xml configuration file, there are other ways they can be made available to the transaction subsystem within the application server. For example, this can be done using a file in a deployment, or dynamically using the management CLI at runtime.
- Open a terminal on a pod running a JBoss EAP instance in the cluster of the failed pod. If there is no such pod, scale up to one.
-
Create a management user using the
/opt/eap/bin/add-user.shscript. -
Log into the management CLI using the
/opt/eap/bin/jboss-cli.shscript. List the datasources configured on the server. These are the ones that may contain in-doubt transaction branches.
/subsystem=datasources:read-resource
{
    "outcome" => "success",
    "result" => {
    	"data-source" => {
        	"ExampleDS" => undefined,
        	...
    	},
  ...
}
Once you have the list, find the connection URL for each of the datasources. For example:
/subsystem=datasources/data-source=ExampleDS:read-attribute(name=connection-url)
{
    "outcome" => "success",
    "result" => "jdbc:h2:mem:test;DB_CLOSE_DELAY=-1;DB_CLOSE_ON_EXIT=FALSE",
    "response-headers" => {"process-state" => "restart-required"}
}
Connect to each datasource and list any in-doubt transaction branches.
NoteThe table name that stores in-doubt branches will be different for each datasource vendor.
JBoss EAP has a default SQL query tool (H2) that you can use to check each database. For example:
java -cp /opt/eap/modules/system/layers/base/com/h2database/h2/main/h2-1.3.173.jar \
-url "jdbc:postgresql://localhost:5432/postgres" \
-user sa \
-password sa \
-sql "select gid from pg_prepared_xacts;"
Alternatively, you can use the resource’s native tooling. For example, for a PostGreSQL datasource called
sampledb, you can use the OpenShift client tools to remotely log in to the pod and query the in-doubt transaction table:$ oc rsh postgresql-2-vwf9n # rsh to the named pod sh-4.2$ psql sampledb psql (9.5.7) Type "help" for help. sampledb=# select gid from pg_prepared_xacts; 131077_AAAAAAAAAAAAAP//rBEAB440GK1aJ72oAAAAGHAtanRhLWNyYXNoLXJlYy0zLXAyY2N3_AAAAAAAAAAAAAP//rBEAB440GK1aJ72oAAAAGgAAAAEAAAAA
8.15.2.3.2. Extract the Global Transaction ID and Node Identifier from Each XID
When all XIDs for in-doubt branches are identified, convert the XIDs into a format that you can compare to the logs stored in the transaction tables of the transaction manager.
For example, the following Bash script can be used to perform this conversion. Assuming that $PG_XID holds the XID from the select statement above, then the JBoss EAP transaction ID can be obtained as follows:
PG_XID="$1"
IFS='_' read -ra lines <<< "$PG_XID"
[[ "${lines[0]}" = 131077 ]] || exit 0; # this script only works for our own FORMAT ID
PG_TID=${lines[1]}

a=($(echo "$PG_TID"| base64 -d  | xxd -ps |tr -d '\n' | while read -N16 i ; do echo 0x$i ; done))
b=($(echo "$PG_TID"| base64 -d  | xxd -ps |tr -d '\n' | while read -N8 i ; do echo 0x$i ; done))
c=("${b[@]:4}") # put the last 3 32-bit hexadecimal numbers into array c
# the negative elements of c need special handling since printf below only works with positive
# hexadecimal numbers
for i in "${!c[@]}"; do
  arg=${c[$i]}
  # inspect the MSB to see if arg is negative - if so convert it from a 2’s complement number
  [[ $(($arg>>31)) = 1 ]] && x=$(echo "obase=16; $(($arg - 0x100000000 ))" | bc) || x=$arg
  if [[ ${x:0:1} = \- ]] ; then # see if the first character is a minus sign
     neg[$i]="-";
     c[$i]=0x${x:1} # strip the minus sign and make it hex for use with printf below
  else
     neg[$i]=""
     c[$i]=$x
  fi
done
EAP_TID=$(printf %x:%x:${neg[0]}%x:${neg[1]}%x:${neg[2]}%x ${a[0]} ${a[1]} ${c[0]} ${c[1]} ${c[2]})
After completion, the $EAP_TID variable holds the global transaction ID of the transaction that created this XID. The node identifier of the pod that started the transaction is given by the output of the following bash command:
echo "$PG_TID"| base64 -d | tail -c +29
The node identifier starts from the 29th character of the PostgreSQL global transaction ID field.
- If this pod is still running, then leave this in-doubt branch alone since the transaction is still in flight.
If this pod is not running, then you need to search the relevant transaction log storage for the transaction log. The log storage is located in a JDBC table, which is named following the
os<node-identifier>jbosststxtablepattern.- If there is no such table, leave the branch alone as it is owned by some other transaction manager. The URL for the datasource containing this table is defined in the transaction subsystem description shown below.
If there is such a table, look for an entry that matches the global transaction ID.
- If there is an entry in the table that matches the global transaction ID, then the in-doubt branch needs to be committed using the datasource vendor tooling as described below.
- If there is no such entry, then the branch is an orphan and can safely be rolled back.
An example of how to commit an in-doubt PostgreSQL branch is shown below:
$ oc rsh postgresql-2-vwf9n
sh-4.2$ psql sampledb
psql (9.5.7)
Type "help" for help.
psql sampledb
commit prepared '131077_AAAAAAAAAAAAAP//rBEAB440GK1aJ72oAAAAGHAtanRh
 ----
LWNyYXNoLXJlYy0zLXAyY2N3_AAAAAAAAAAAAAP//rBEAB440GK1aJ72oAAAAGgAAAAEAAAAA';
Repeat this procedure for all datasources and in-doubt branches.
8.15.2.3.3. Obtain the List of Node Identifiers of All Running JBoss EAP Instances in Any Cluster that Can Contact the Resource Managers
Node identifiers are configured to be the same name as the pod name. You can obtain the pod names in use using the oc command. Use the following command to list the running pods:
$ oc get pods | grep Running
eap-manual-tx-recovery-app-4-26p4r   1/1       Running     0          23m
postgresql-2-vwf9n                   1/1       Running     0          41m
For each running pod, look in the output of the pod’s log and obtain the node name. For example, for first pod shown in the above output, use the following command:
$ oc logs eap-manual-tx-recovery-app-4-26p4r | grep "jboss.node.name" | head -1
jboss.node.name = tx-recovery-app-4-26p4r
The aforementioned JBoss node name identifier will always be truncated to the maximum length of 23 characters in total by removing characters from the beginning and retaining the trailing characters until the maximum length of 23 characters is reached.
8.15.2.3.4. Find the Transaction Logs
-
The transaction logs reside in a JDBC-backed object store. The JNDI name of this store is defined in the
transactionsubsystem definition of the JBoss EAP configuration file. - Look in the configuration file to find the datasource definition corresponding to the above JNDI name.
- Use the JNDI name to derive the connection URL.
You can use the URL to connect to the database and issue a
selectquery on the relevant in-doubt transaction table.Alternatively, if you know which pod the database is running on, and you know the name of the database, it might be easier to open an OpenShift remote shell into the pod and use the database tooling directly.
For example, if the JDBC store is hosted by a PostgreSQL database called
sampledbrunning on podpostgresql-2-vwf9n, then you can find the transaction logs using the following commands:NoteThe ostxrecoveryapp426p4rjbosststxtable table name listed in the following command has been chosen since it follows the pattern for JDBC table names holding the log storage entries. In your environment the table name will have similar form:
-
Starting with
osprefix. - The part in the middle is derived from the JBoss node name above, possibly deleting the "-" (dash) character if present.
-
Finally the
jbosststxtablesuffix is appended to create the final name of the table.
$ oc rsh postgresql-2-vwf9n sh-4.2$ psql sampledb psql (9.5.7) Type "help" for help. sampledb=# select uidstring from ostxrecoveryapp426p4rjbosststxtable where TYPENAME='StateManager/BasicAction/TwoPhaseCoordinator/AtomicAction' ; uidstring ------------------------------------- 0:ffff0a81009d:33789827:5a68b2bf:40 (1 row)-
Starting with
8.15.2.3.5. Cleaning Up the Transaction Logs for Reconciled In-doubt Branches
Do not delete the log unless you are certain that there are no remaining in-doubt branches.
When all the branches for a given transaction are complete, and all potential resources managers have been checked, including A-MQ and JDV, it is safe to delete the transaction log.
Issue the following command, specify the transaction log to be removed using the appropriate uidstring:
DELETE FROM ostxrecoveryapp426p4rjbosststxtable where uidstring = UIDSTRINGIf you do not delete the log, then completed transactions which failed after prepare, but which have now been resolved, will never be removed from the transaction log storage. The consequence of this is that unnecessary storage is used and future manual reconciliation will be more difficult.
8.16. Included JBoss Modules
The table below lists included JBoss Modules in the JBoss EAP for OpenShift image.
Table 8.10. Included JBoss Modules
| JBoss Module |
|---|
| org.jboss.as.clustering.common |
| org.jboss.as.clustering.jgroups |
| org.jboss.as.ee |
| org.jboss.logmanager.ext |
| org.jgroups |
| org.openshift.ping |
| net.oauth.core |
8.17. EAP Operator: API Information
The EAP operator introduces the following APIs:
8.17.1. WildFlyServer
WildFlyServer defines a custom JBoss EAP resource.
Table 8.11. WildFlyServer
| Field | Description | Scheme | Required |
|---|---|---|---|
|
| Standard object’s metadata | false | |
|
| Specification of the desired behaviour of the JBoss EAP deployment. | true | |
|
| Most recent observed status of the JBoss EAP deployment. Read-only. | false |
8.17.2. WildFlyServerList
WildFlyServerList defines a list of JBoss EAP deployments.
Table 8.12. Table
| Field | Description | Scheme | Required |
|---|---|---|---|
|
| Standard list’s metadata | false | |
|
|
List of | true |
8.17.3. WildFlyServerSpec
WildFlyServerSpec is a specification of the desired behavior of the JBoss EAP resource.
It uses a StatefulSet with a pod spec that mounts the volume specified by storage on /opt/jboss/wildfly/standalone/data.
Table 8.13. WildFlyServerSpec
| Field | Description | Scheme | Required |
|---|---|---|---|
|
| Name of the application image to be deployed | string | false |
|
| the desired number of replicas for the application | int32] | true |
|
|
Spec to specify how a standalone configuration can be read from a | false | |
|
|
Storage spec to specify how storage should be used. If omitted, an | false | |
|
| Name of the ServiceAccount to use to run the JBoss EAP pods | string | false |
|
|
List of environment variables present in the containers from | false | |
|
| List of environment variable present in the containers | false | |
|
|
List of secret names to mount as volumes in the containers. Each secret is mounted as a read-only volume at | string | false |
|
|
List of | string | false |
|
| Disable the creation a route to the HTTP port of the application service (false if omitted) | boolean | false |
|
| If connections from the same client IP are passed to the same JBoss EAP instance/pod each time (false if omitted) | boolean | false |
8.17.4. StorageSpec
StorageSpec defines the configured storage for a WildFlyServer resource. If neither an EmptyDir nor a volumeClaimTemplate is defined, a default EmptyDir is used.
The EAP Operator configures the StatefulSet using information from this StorageSpec to mount a volume dedicated to the standalone/data directory used by JBoss EAP to persist its own data. For example, transaction log). If an EmptyDir is used, the data does not survive a pod restart. If the application deployed on JBoss EAP relies on transaction, specify a volumeClaimTemplate, so that the same persistent volume can be reused upon pod restarts.
Table 8.14. Table
| Field | Description | Scheme | Required |
|---|---|---|---|
|
|
| false | |
|
|
A PersistentVolumeClaim spec to configure | false |
8.17.5. StandaloneConfigMapSpec
StandaloneConfigMapSpec defines how JBoss EAP standalone configuration can be read from a ConfigMap. If omitted, JBoss EAP uses its standalone.xml configuration from its image.
Table 8.15. StandaloneConfigMapSpec
| Field | Description | Scheme | Required |
|---|---|---|---|
|
|
Name of the | string | true |
| key |
Key of the | string | false |
8.17.6. WildFlyServerStatus
WildFlyServerStatus is the most recent observed status of the JBoss EAP deployment. Read-only.
Table 8.16. WildFlyServerStatus
| Field | Description | Scheme | Required |
|---|---|---|---|
|
| The actual number of replicas for the application | int32 | true |
|
| Hosts that route to the application HTTP service | string | true |
|
| Status of the pods | true | |
|
| Number of pods that are under scale down cleaning process | int32 | true |
8.17.7. PodStatus
PodStatus is the most recent observed status of a pod running the JBoss EAP application.
Table 8.17. PodStatus
| Field | Description | Scheme | Required |
|---|---|---|---|
|
| Name of the pod | string | true |
|
| IP address allocated to the pod | string | true |
|
| State of the pod in the scale down process. The state is ACTIVE by default, which means it serves requests. | string | false |
Revised on 2021-12-27 11:43:17 UTC