
Developing EJB Applications
Instructions and information for developers and administrators who want to develop and deploy Enterprise JavaBeans (EJB) applications for Red Hat JBoss Enterprise Application Platform.
Abstract
Chapter 1. Introduction
1.1. Overview of EJB
EJB 3.2 is an API for developing distributed, transactional, secure and portable Java EE applications through the use of server-side components called Enterprise Beans. Enterprise Beans implement the business logic of an application in a decoupled manner that encourages reuse. EJB is documented as the Java EE specification JSR 345. The Jakarta equivalent for the specification is Jakarta Enterprise Beans 3.2.
EJB 3.2 provides two profiles: full and lite. JBoss EAP 7 implements the full profile for applications built using the EJB 3.2 specifications.
1.2. EJB 3.2 Feature Set
The following EJB 3.2 features are supported by JBoss EAP 7:
- Session beans
- Message-driven beans
- EJB API groups
- No-interface views
- Local interfaces
- Remote interfaces
- AutoClosable interface
- Timer service
- Asynchronous calls
- Interceptors
- RMI/IIOP interoperability
- Transaction support
- Security
- Embeddable API
The following features are no longer supported by JBoss EAP 7:
- EJB 2.1 entity bean client views
- Entity beans with bean-managed persistence
- Entity beans with container-managed persistence
- EJB Query Language (EJB QL)
- JAX-RPC based web services: endpoints and client views
1.3. Enterprise Beans
Enterprise beans are written as Java classes and annotated with the appropriate EJB annotations. They can be deployed to the application server in their own archive (a JAR file) or be deployed as part of a Java EE application or a Jakarta EE application. The application server manages the lifecycle of each enterprise bean and provides services to them such as security, transactions and concurrency management.
An enterprise bean can also define any number of business interfaces. Business interfaces provide greater control over which of the bean’s methods are available to clients and can also allow access to clients running in remote JVMs.
There are three types of enterprise beans: session beans, message-driven beans and entity beans.
JBoss EAP does not support entity beans.
1.3.1. Writing Enterprise Beans
Enterprise beans are packaged and deployed in Java archive (JAR) files. You can deploy an enterprise bean JAR file to your application server, or include it in an enterprise archive (EAR) file and deploy it with that application. You can also deploy enterprise beans in a web archive (WAR) file alongside a web application.
1.4. Enterprise Bean Business Interfaces
An EJB business interface is a Java interface written by the bean developer which provides declarations of the public methods of a session bean that are available for clients. Session beans can implement any number of interfaces, including none (a no-interface bean).
Business interfaces can be declared as local or remote interfaces, but not both.
EJB Local Business Interfaces
An EJB local business interface declares the methods which are available when the bean and the client are in the same JVM. When a session bean implements a local business interface only the methods declared in that interface will be available to clients.
EJB Remote Business Interfaces
An EJB remote business interface declares the methods which are available to remote clients. Remote access to a session bean that implements a remote interface is automatically provided by the EJB container.
A remote client is any client running in a different JVM and can include desktop applications as well as web applications, services, and enterprise beans deployed to a different application server.
Local clients can access the methods exposed by a remote business interface.
EJB No-interface Beans
A session bean that does not implement any business interfaces is called a no-interface bean. All of the public methods of no-interface beans are accessible to local clients.
A session bean that implements a business interface can also be written to expose a no-interface view.
1.5. Legacy EJB Client Compatibility
JBoss EAP provides the EJB client library as the primary API to invoke remote EJB components.
Starting with JBoss EAP 7.1, two EJB clients are shipped:
- EJB client: The regular EJB client is not fully backward compatible.
- Legacy EJB client: The legacy EJB client provides binary backward compatibility. This legacy EJB client can run with the client applications that were initially compiled using the EJB client from JBoss EAP 7.0. All the APIs that were present in the EJB client for JBoss EAP 7.0 are present in the legacy EJB client for JBoss EAP 7.3.
You can use the legacy EJB client compatibility by including the following Maven dependency in your configuration.
<dependencyManagement>
    <dependencies>
        <dependency>
            <groupId>org.jboss.eap</groupId>
            <artifactId>wildfly-ejb-client-legacy-bom</artifactId>
            <version>EAP_BOM_VERSION</version>
            <type>pom</type>
            <scope>import</scope>
        </dependency>
    </dependencies>
</dependencyManagement>
<dependencies>
    <dependency>
        <groupId>org.jboss</groupId>
        <artifactId>jboss-ejb-client-legacy</artifactId>
    </dependency>
</dependencies>
You must use the EAP_BOM_VERSION that is available in the JBoss EAP Maven repository.
Chapter 2. Creating Enterprise Bean Projects
2.1. Create an EJB Archive Project Using Red Hat CodeReady Studio
This task describes how to create an EJB project in Red Hat CodeReady Studio.
Prerequisites
- A server and server runtime for JBoss EAP have been configured in Red Hat CodeReady Studio.
Create an EJB Project in Red Hat CodeReady Studio
Open the New EJB Project wizard.
- Navigate to the File menu, select New, then select Project.
When the New Project wizard appears, select EJB/EJB Project and click Next.
Figure 2.1. New EJB Project Wizard
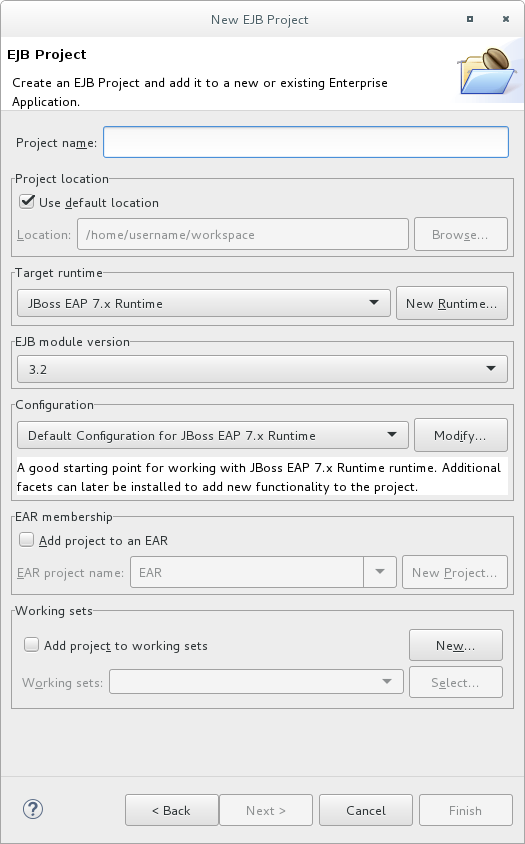
Enter the following details:
- Project name: The name of the project that appears in Red Hat CodeReady Studio, and also the default file name for the deployed JAR file.
- Project location: The directory where the project files will be saved. The default is a directory in the current workspace.
- Target runtime: This is the server runtime used for the project. This will need to be set to the same JBoss EAP runtime used by the server that you will be deploying to.
- EJB module version: This is the version of the EJB specification that your enterprise beans will comply with. Red Hat recommends using 3.2.
Configuration: This allows you to adjust the supported features in your project. Use the default configuration for your selected runtime.
Click Next to continue.
The Java project configuration screen allows you to add directories containing Java source files and specify the directory for the output of the build.
Leave this configuration unchanged and click Next.
In the EJB Module settings screen, check Generate ejb-jar.xml deployment descriptor if a deployment descriptor is required. The deployment descriptor is optional in EJB 3.2 and can be added later if required.
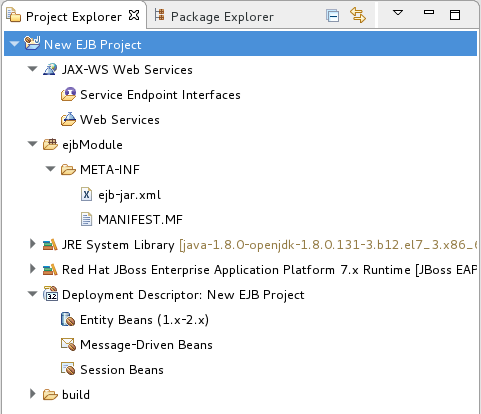
Click Finish and the project is created and will be displayed in the Project Explorer.
Figure 2.2. Newly Created EJB Project in the Project Explorer
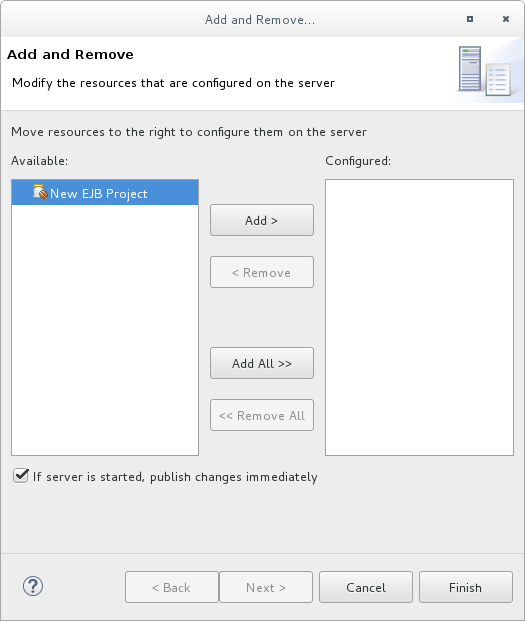
To add the project to the server for deployment, right-click on the target server in the Servers tab and choose Add and Remove.
In the Add and Remove dialog, select the resource to deploy from the Available column and click the Add button. The resource will be moved to the Configured column. Click Finish to close the dialog.
Figure 2.3. Add and Remove Dialog
You now have an EJB project in Red Hat CodeReady Studio that can build and deploy to the specified server.
If no enterprise beans are added to the project then Red Hat CodeReady Studio will display the warning stating An EJB module must contain one or more enterprise beans. This warning will disappear once one or more enterprise beans have been added to the project.
2.2. Create an EJB Archive Project in Maven
This task demonstrates how to create a project using Maven that contains one or more enterprise beans packaged in a JAR file.
Prerequisites
- Maven is already installed.
- You understand the basic usage of Maven.
Create an EJB Archive Project in Maven
Create the Maven project: An EJB project can be created using Maven’s archetype system and the
ejb-javaee7archetype. To do this run themvncommand with parameters as shown:$ mvn archetype:generate -DarchetypeGroupId=org.codehaus.mojo.archetypes -DarchetypeArtifactId=ejb-javaee7
Maven will prompt you for the
groupId,artifactId,versionandpackagefor your project.$ mvn archetype:generate -DarchetypeGroupId=org.codehaus.mojo.archetypes -DarchetypeArtifactId=ejb-javaee7 [INFO] Scanning for projects... [INFO] [INFO] ------------------------------------------------------------------------ [INFO] Building Maven Stub Project (No POM) 1 [INFO] ------------------------------------------------------------------------ [INFO] [INFO] >>> maven-archetype-plugin:2.0:generate (default-cli) @ standalone-pom >>> [INFO] [INFO] <<< maven-archetype-plugin:2.0:generate (default-cli) @ standalone-pom <<< [INFO] [INFO] --- maven-archetype-plugin:2.0:generate (default-cli) @ standalone-pom --- [INFO] Generating project in Interactive mode [INFO] Archetype [org.codehaus.mojo.archetypes:ejb-javaee7:1.5] found in catalog remote Define value for property 'groupId': : com.shinysparkly Define value for property 'artifactId': : payment-arrangements Define value for property 'version': 1.0-SNAPSHOT: : Define value for property 'package': com.shinysparkly: : Confirm properties configuration: groupId: com.company artifactId: payment-arrangements version: 1.0-SNAPSHOT package: com.company.collections Y: : [INFO] ------------------------------------------------------------------------ [INFO] BUILD SUCCESS [INFO] ------------------------------------------------------------------------ [INFO] Total time: 32.440s [INFO] Finished at: Mon Oct 31 10:11:12 EST 2011 [INFO] Final Memory: 7M/81M [INFO] ------------------------------------------------------------------------ [localhost]$
-
Add your enterprise beans: Write your enterprise beans and add them to the project under the
src/main/javadirectory in the appropriate sub-directory for the bean’s package. -
Build the project: To build the project, run the
mvn packagecommand in the same directory as thepom.xmlfile. This will compile the Java classes and package the JAR file. The built JAR file is named-.jarand is placed in thetarget/directory.
You now have a Maven project that builds and packages a JAR file. This project can contain enterprise beans and the JAR file can be deployed to an application server.
2.3. Create an EAR Project Containing an EJB Project
This task describes how to create a new enterprise archive (EAR) project in Red Hat CodeReady Studio that contains an EJB project.
Prerequisites
- A server and server runtime for JBoss EAP have been set up.
Create an EAR Project Containing an EJB Project
Open the New Java EE EAR Project Wizard.
- Navigate to the File menu, select New, then select Project.
- When the New Project wizard appears, select Java EE/Enterprise Application Project and click Next.
Figure 2.4. New EAR Application Project Wizard
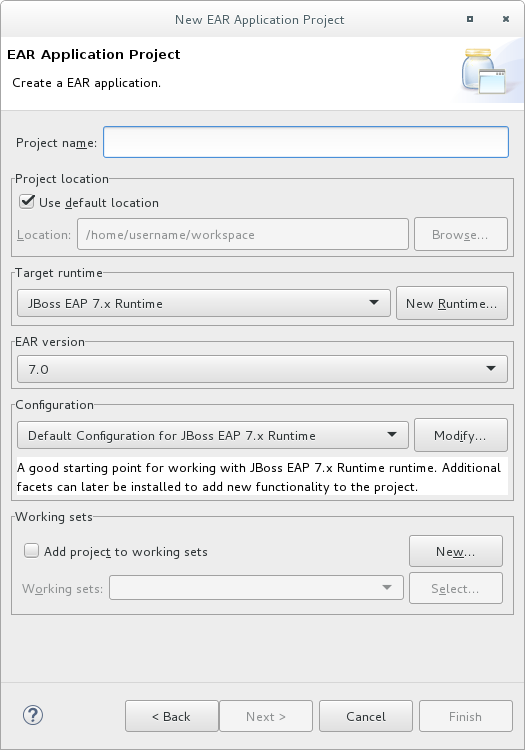
Enter the following details:
- Project name: The name of the project that appears in Red Hat CodeReady Studio, and also the default file name for the deployed EAR file.
- Project location: The directory where the project files will be saved. The default is a directory in the current workspace.
- Target runtime: This is the server runtime used for the project. This will need to be set to the same JBoss EAP runtime used by the server that you will be deploying to.
- EAR version: This is the version of the Java EE 8 specification that your project will comply with.
Configuration: This allows you to adjust the supported features in your project. Use the default configuration for your selected runtime.
Click Next to continue.
Add a new EJB module.
New modules can be added from the Enterprise Application page of the wizard. To add a new EJB Project as a module follow the steps below:
- Click New Module, uncheck Create Default Modules checkbox, select the Enterprise Java Bean and click Next. The New EJB Project wizard appears.
The New EJB Project wizard is the same as the wizard used to create new standalone EJB Projects and is described in Create an EJB Archive Project Using Red Hat CodeReady Studio.
The minimum details required to create the project are:
- Project name
- Target runtime
- EJB module version
Configuration
All the other steps of the wizard are optional. Click Finish to complete creating the EJB Project.
The newly created EJB project is listed in the Java EE module dependencies and the checkbox is checked.
Optionally, add an
application.xmldeployment descriptor.Check the Generate application.xml deployment descriptor checkbox if one is required.
Click Finish.
Two new projects will appear: the EJB project and the EAR project.
Add the build artifact to the server for deployment.
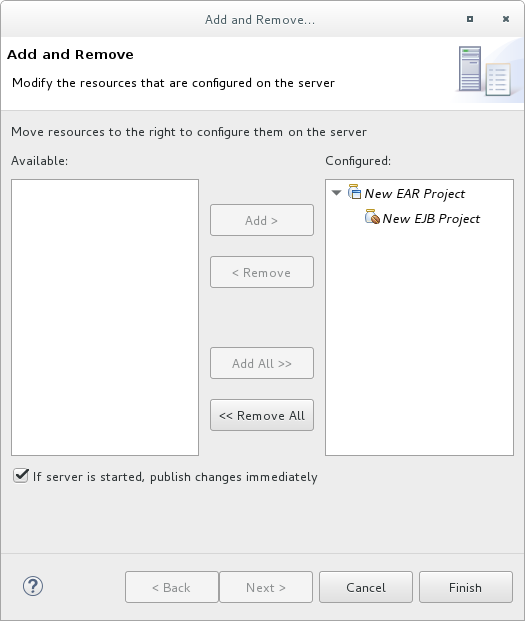
Open the Add and Remove dialog by right-clicking in the Servers tab on the server you want to deploy the built artifact to in the server tab and then select Add and Remove.
Select the EAR resource to deploy from the Available column and click the Add button. The resource will be moved to the Configured column. Click Finish to close the dialog.
Figure 2.5. Add and Remove Dialog
You now have an Enterprise Application Project with a member EJB Project. This will build and deploy to the specified server as a single EAR deployment containing an EJB subdeployment.
2.4. Add a Deployment Descriptor to an EJB Project
An EJB deployment descriptor can be added to an EJB project that was created without one. To do this, follow the procedure below.
Prerequisites
- You have a EJB project in Red Hat CodeReady Studio to which you want to add an EJB deployment descriptor.
Add a Deployment Descriptor to an EJB Project
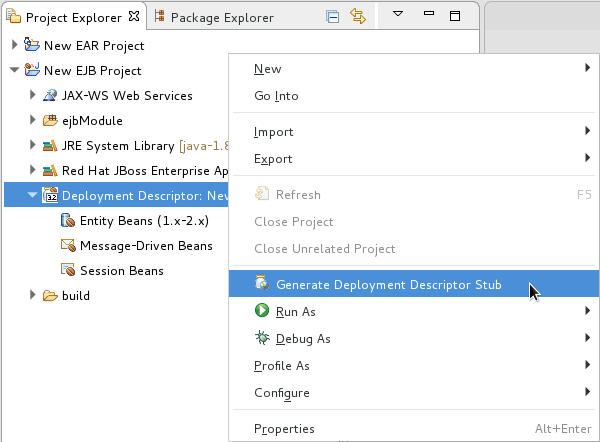
- Open the project in Red Hat CodeReady Studio.
Add a deployment descriptor.
Right-click on the Deployment Descriptor folder in the project view and select Generate Deployment Descriptor tab.
Figure 2.6. Adding a Deployment Descriptor
The new file,
ejb-jar.xml, is created inejbModule/META-INF/. Double-click on the Deployment Descriptor folder in the project view to open this file.
Chapter 3. Session Beans
3.1. Session Beans
Session beans are enterprise beans that encapsulate a set of related business processes or tasks and are injected into the classes that request them. There are three types of session bean: stateless, stateful, and singleton.
3.2. Stateless Session Beans
Stateless session beans are the simplest yet most widely used type of session bean. They provide business methods to client applications but do not maintain any state between method calls. Each method is a complete task that does not rely on any shared state within that session bean. Because there is no state, the application server is not required to ensure that each method call is performed on the same instance. This makes stateless session beans very efficient and scalable.
3.3. Stateful Session Beans
Stateful session beans are enterprise beans that provide business methods to client applications and maintain conversational state with the client. They should be used for tasks that must be done in several steps, or method calls, each of which relies on the state of the previous step being maintained. The application server ensures that each client receives the same instance of a stateful session bean for each method call.
3.4. Singleton Session Beans
Singleton session beans are session beans that are instantiated once per application and every client request for a singleton bean goes to the same instance. Singleton beans are an implementation of the Singleton Design Pattern as described in the book Design Patterns: Elements of Reusable Object-Oriented Software by Erich Gamma, Richard Helm, Ralph Johnson and John Vlissides; published by Addison-Wesley in 1994.
Singleton beans provide the smallest memory footprint of all the session bean types but must be designed as thread-safe. EJB 3.2 provides container-managed concurrency (CMC) to allow developers to implement thread safe singleton beans easily. However singleton beans can also be written using traditional multi-threaded code (bean-managed concurrency or BMC) if CMC does not provide enough flexibility.
3.5. Add Session Beans to a Project in Red Hat CodeReady Studio
Red Hat CodeReady Studio has several wizards that can be used to quickly create enterprise bean classes. The following procedure shows how to use the Red Hat CodeReady Studio wizards to add a session bean to a project.
Prerequisites
- You have a EJB or Dynamic Web Project in Red Hat CodeReady Studio to which you want to add one or more session beans.
Add Session Beans to a Project in Red Hat CodeReady Studio
- Open the project in Red Hat CodeReady Studio.
Open the Create EJB 3.x Session Bean wizard.
To open the Create EJB 3.x Session Bean wizard, navigate to the File menu, select New and then select Session Bean (EJB 3.x).
Figure 3.1. Create EJB 3.x Session Bean wizard
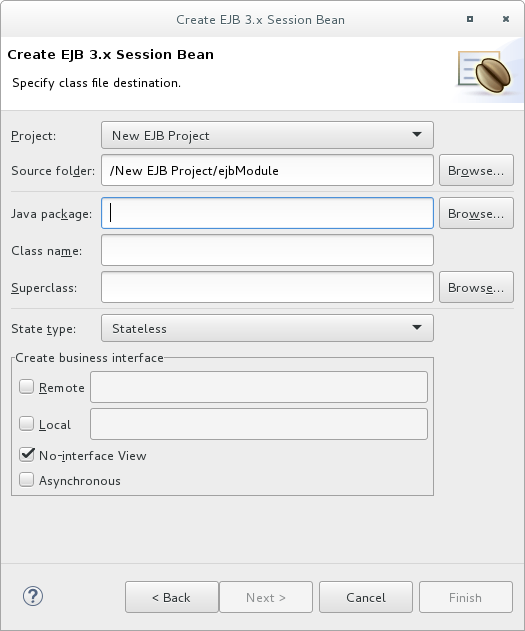
Specify following details:
- Project: Verify the correct project is selected.
- Source folder: This is the folder that the Java source files will be created in. This should not usually need to be changed.
- Package: Specify the package that the class belongs to.
- Class name: Specify the name of the class that will be the session bean.
- Superclass: The session bean class can inherit from a superclass. Specify that here if your session has a superclass.
- State type: Specify the state type of the session bean: stateless, stateful or singleton.
Business interfaces: By default the No-interface box is checked so no interfaces will be created. Check the boxes for the interfaces you wish to define and adjust the names if necessary.
Remember that enterprise beans in a web archive (WAR) only support EJB 3.2 Lite and this does not include remote business interfaces.
Click Next.
You can enter in additional information here to further customize the session bean. It is not required to change any of the information here.
Items that you can change are:
- Bean name
- Mapped name
- Transaction type (container managed or bean managed)
- Additional interfaces can be supplied that the bean must implement
- You can also specify EJB 2.x Home and Component interfaces if required
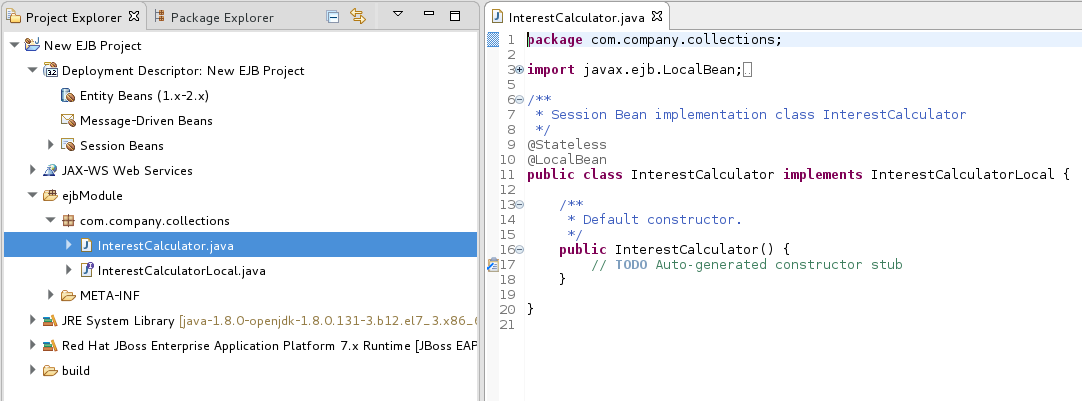
Click Finish and the new session bean will be created and added to the project. The files for any new business interfaces will also be created if they were specified.
Figure 3.2. New Session Bean in Red Hat CodeReady Studio
Chapter 4. Message-Driven Beans
4.1. Message-Driven Beans
Message-driven Beans (MDBs) provide an event driven model for application development. The methods of MDBs are not injected into or invoked from client code but are triggered by the receipt of messages from a messaging service such as a Jakarta Messaging server. The Jakarta EE specification requires that Jakarta Messaging is supported but other messaging systems can be supported as well.
MDBs are a special kind of stateless session beans. They implement a method called onMessage(Message message). This method is triggered when a Jakarta Messaging destination on which the MDB is listening receives a message. That is, MDBs are triggered by the receipt of messages from a Jakarta Messaging provider, unlike the stateless session beans where methods are usually called by EJB clients.
MDB processes messages asynchronously. By default each MDB can have up to 16 sessions, where each session processes a message. There are no message order guarantees. In order to achieve message ordering, it is necessary to limit the session pool for the MDB to 1.
Example: Management CLI Commands to Set Session Pool to 1:
/subsystem=ejb3/strict-max-bean-instance-pool=mdb-strict-max-pool:write-attribute(name=derive-size,value=undefined)

/subsystem=ejb3/strict-max-bean-instance-pool=mdb-strict-max-pool:write-attribute(name=max-pool-size,value=1)

reload
4.2. Message-Driven Beans Controlled Delivery
JBoss EAP provides three attributes that control active reception of messages on a specific MDB:
4.2.1. Delivery Active
The delivery active configuration of the message-driven beans (MDB) indicates whether the MDB is receiving messages or not. If an MDB is not receiving messages, then the messages will be saved in the queue or topic according to the topic or queue rules.
You can configure the active attribute of the delivery-group using XML or annotations, and you can change its value after deployment using the management CLI. By default, the active attribute is activated and delivery of messages occurs as soon as the MDB is deployed.
Configuring Delivery Active in the jboss-ejb3.xml File
In the jboss-ejb3.xml file, set the value of active to false to indicate that the MDB will not be receiving messages as soon as it is deployed:
<?xml version="1.1" encoding="UTF-8"?>
<jboss:ejb-jar xmlns:jboss="http://www.jboss.com/xml/ns/javaee"
    xmlns="http://java.sun.com/xml/ns/javaee"
    xmlns:xsi="http://www.w3.org/2001/XMLSchema-instance"
    xmlns:d="urn:delivery-active:1.1"
    xsi:schemaLocation="http://www.jboss.com/xml/ns/javaee http://www.jboss.org/j2ee/schema/jboss-ejb3-2_0.xsd http://java.sun.com/xml/ns/javaee http://java.sun.com/xml/ns/javaee/ejb-jar_3_1.xsd"
    version="3.1"
    impl-version="2.0">
    <assembly-descriptor>
        <d:delivery>
            <ejb-name>HelloWorldQueueMDB</ejb-name>
            <d:active>false</d:active>
        </d:delivery>
    </assembly-descriptor>
</jboss:ejb-jar>
If you want to apply the active value to all MDBs in your application, you can use a wildcard * in place of the ejb-name.
Configuring Delivery Active Using Annotations
You can also use the org.jboss.ejb3.annotation.DeliveryActive annotation. For example:
@MessageDriven(name = "HelloWorldMDB", activationConfig = {
 @ActivationConfigProperty(propertyName = "destinationType", propertyValue = "javax.jms.Queue"),
 @ActivationConfigProperty(propertyName = "destination", propertyValue = "queue/HELLOWORLDMDBQueue"),
 @ActivationConfigProperty(propertyName = "acknowledgeMode", propertyValue = "Auto-acknowledge") })
@DeliveryActive(false)

public class HelloWorldMDB implements MessageListener {
    public void onMessage(Message rcvMessage) {
      // ...
    }
}
If you use Maven to build your project, make sure you add the following dependency to the pom.xml file of your project:
<dependency>
    <groupId>org.jboss.ejb3</groupId>
    <artifactId>jboss-ejb3-ext-api</artifactId>
    <version>2.2.0.Final</version>
</dependency>
Configuring Delivery Active Using the Management CLI
You can configure the active attribute of the delivery-group after deployment using the management CLI. These management operations dynamically change the value of the active attribute, enabling or disabling delivery for the MDB. This method of changing the delivery active value does not persist if you restart the server. At runtime, connect to the instance you want to manage, then enter the path of the MDB for which you want to manage the delivery. For example:
Navigate to the instance you want to manage:
cd deployment=helloworld-mdb.war/subsystem=ejb3/message-driven-bean=HelloWorldQueueMDB
To stop the delivery to the MDB:
:stop-delivery
To start the delivery to the MDB:
:start-delivery
View the MDB Delivery Active Status
You can view the current delivery active status of any MDB using the management console:
- Select the Runtime tab and select the appropriate server.
-
Click EJB and select the child resource, for example
HelloWorldQueueMDB.
Result
You see the status as Delivery Active: true or Delivery Active: false.
4.2.2. Delivery Groups
Delivery groups provide a way to manage the delivery-active state for a group of MDBs. An MDB can belong to one or more delivery groups. Message delivery is enabled only when all the delivery groups that an MDB belongs to are active. For a clustered singleton MDB, message delivery is active only in the singleton node of the cluster and only if all the delivery groups associated with the MDB are active.
You can add a delivery group to the ejb3 subsystem using either the XML configuration or the management CLI.
Configuring Delivery Group in the jboss-ejb3.xml File
<delivery>
  <ejb-name>MdbName<ejb-name>
  <delivery-group>passive</delivery-group>
</delivery>
On the server side, delivery-groups can be enabled by having their active attribute set to true, or disabled by having their active attribute set to false, as shown in the example below:
<delivery-groups>
  <delivery-group name="group" active="true"/>
</delivery-groups>
Configuring Delivery Group Using the Management CLI
The state of delivery-groups can be updated using the management CLI. For example:
/subsystem=ejb3/mdb-delivery-group=group:add
/subsystem=ejb3/mdb-delivery-group=group:remove
/subsystem=ejb3/mdb-delivery-group=group:write-attribute(name=active,value=true)
When you set the delivery active in the jboss-ejb3.xml file or using the annotation, it persists on server restart. However, when you use the management CLI to stop or start the delivery, it does not persist on server restart.
Configuring Multiple Delivery Groups Using Annotations
You can use the org.jboss.ejb3.annotation.DeliveryGroup annotation on each MDB class belonging to a group:
@MessageDriven(name = "HelloWorldQueueMDB", activationConfig = {
        @ActivationConfigProperty(propertyName = "destinationType", propertyValue = "javax.jms.Queue"),
        @ActivationConfigProperty(propertyName = "destination", propertyValue = "queue/HELLOWORLDMDBQueue"),
        @ActivationConfigProperty(propertyName = "acknowledgeMode", propertyValue = "Auto-acknowledge") })
@DeliveryGroup("delivery-group-1")
@DeliveryGroup("delivery-group-2")
public class HelloWorldQueueMDB implements MessageListener {
...
}
4.2.3. Clustered Singleton MDBs
When an MDB is identified as a clustered singleton and is deployed in a cluster, only one node is active. This node can consume messages serially. When the server node fails, the active node from the clustered singleton MDBs starts consuming the messages.
Identify an MDB as a Clustered Singleton
You can use one of the following procedures to identify an MDB as a clustered singleton.
Use the clustered-singleton XML element as shown in the example below:
<?xml version="1.1" encoding="UTF-8"?> <jboss:ejb-jar xmlns:jboss="http://www.jboss.com/xml/ns/javaee" xmlns="http://java.sun.com/xml/ns/javaee" xmlns:xsi="http://www.w3.org/2001/XMLSchema-instance" xmlns:c="urn:clustering:1.1" xmlns:d="urn:delivery-active:1.2" xsi:schemaLocation="http://www.jboss.com/xml/ns/javaee http://www.jboss.org/j2ee/schema/jboss-ejb3-2_0.xsd http://java.sun.com/xml/ns/javaee http://java.sun.com/xml/ns/javaee/ejb-jar_3_1.xsd" version="3.1" impl-version="2.0"> <assembly-descriptor> <c:clustering> <ejb-name>HelloWorldQueueMDB</ejb-name> <c:clustered-singleton>true</c:clustered-singleton> </c:clustering> <d:delivery> <ejb-name>*</ejb-name> <d:group>delivery-group-1</d:group> <d:group>delivery-group-2</d:group> </d:delivery> </assembly-descriptor> </jboss:ejb-jar>-
In your MDB class, use the
@org.jboss.ejb3.annotation.ClusteredSingleton. This procedure requires no extra configuration at the server. You need to run the service in a clustered environment.
You have to activate the delivery-group in the entire cluster, specifically, in all nodes of the cluster, because you do not know which node of the cluster is chosen to be the singleton master. If the server chooses a node to be singleton master, and that node does not have the required delivery-group activated, no node in the cluster receives the messages.
The messaging-clustering-singleton quickstart, which ships with JBoss EAP, demonstrates the use of clustering with integrated Apache ActiveMQ Artemis. It uses the same source code as the helloworld-mdb quickstart, with a difference only in the configuration to run it as a clustered singleton. There are two Jakarta Messaging resources contained in this quickstart:
-
A queue named
HELLOWORLDMDBQueuebound in the Java Naming and Directory Interface asjava:/queue/HELLOWORLDMDBQueue -
A topic named
HELLOWORLDMDBTopicbound in the Java Naming and Directory Interface asjava:/topic/HELLOWORLDMDBTopic
Both contain a singleton configuration as specified in the jboss-ejb3.xml file:
<c:clustering>
    <ejb-name>*</ejb-name>
    <c:clustered-singleton>true</c:clustered-singleton>
</c:clustering>
The wildcard asterisk * in the <ejb-name> element indicates that all the MDBs contained in the application will be clustered singleton. As a result, only one node in the cluster will have those MDBs active at a specific time. If this active node shuts down, another node in the cluster will become the active node with the MDBs, which then becomes the singleton provider.
You can also find a configuration for the delivery group in the jboss-ejb3.xml file:
<d:delivery>
    <ejb-name>HelloWorldTopicMDB</ejb-name>
    <d:group>my-mdb-delivery-group</d:group>
</d:delivery>
In this case, only one of the MDBs, HelloWorldTopicMDB, is associated with a delivery group. All the delivery groups used by an MDB must be configured in the ejb3 subsystem configuration. The delivery group can be enabled or disabled. If the delivery group is disabled in a cluster node, all the MDBs belonging to that delivery group become inactive in the respective cluster node. When using the delivery groups in a non-clustered environment, the MDB is active whenever the delivery group is enabled.
If a delivery group is used in conjunction with the singleton provider, the MDB can be active in the singleton provider node only if that node has the delivery group enabled. Otherwise, the MDB will be inactive in that node, and all the other nodes of the cluster.
See the README.html file included with this quickstart for detailed instructions about how to configure the server for messaging clustering and to review the code examples.
For information on how to download and use the JBoss EAP quickstarts, see the Using the Quickstart Examples section in the JBoss EAP Getting Started Guide.
4.3. Create a Jakarta Messaging-based Message-Driven Bean in Red Hat CodeReady Studio
This procedure shows how to add a Jakarta Messaging-based message-driven bean to a project in Red Hat CodeReady Studio. This procedure creates an EJB 3.x message-driven bean that uses annotations.
Prerequisites
- You must have an existing project open in Red Hat CodeReady Studio.
- You must know the name and type of the Jakarta Messaging destination that the bean will be listening to.
- Support for Jakarta Messaging must be enabled in the JBoss EAP configuration to which this bean will be deployed.
Add a Jakarta Messaging-based Message-driven Bean in Red Hat CodeReady Studio
Open the Create EJB 3.x Message-Driven Bean wizard.
Go to File → New → Other. Select EJB/Message-Driven Bean (EJB 3.x) and click the Next button.
Figure 4.1. Create EJB 3.x Message-Driven Bean Wizard
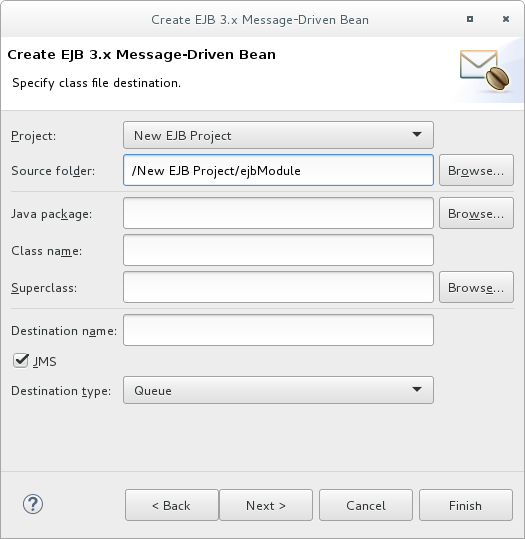
Specify class file destination details.
There are three sets of details to specify for the bean class here: project, Java class, and message destination.
Project:
- If multiple projects exist in the workspace, ensure that the correct one is selected in the Project menu.
-
The folder where the source file for the new bean will be created is
ejbModuleunder the selected project’s directory. Only change this if you have a specific requirement.
Java Class:
- The required fields are: Java package and Class name.
- It is not necessary to supply a superclass unless the business logic of your application requires it.
Message Destination:
These are the details you must supply for a Jakarta Messaging-based message-driven bean:
- Destination name, which is the queue or topic name that contains the messages that the bean will respond to.
- By default the JMS checkbox is selected. Do not change this.
Set Destination type to Queue or Topic as required.
Click the Next button.
Enter message-driven bean specific information.
The default values here are suitable for a Jakarta Messaging-based message-driven bean using container-managed transactions.
- Change the Transaction type to Bean if the Bean will use Bean-managed transactions.
- Change the Bean name if a different bean name than the class name is required.
- The JMS Message Listener interface will already be listed. You do not need to add or remove any interfaces unless they are specific to your application’s business logic.
Leave the checkboxes for creating method stubs selected.
Click the Finish button.
Result
The message-driven bean is created with stub methods for the default constructor and the onMessage() method. A Red Hat CodeReady Studio editor window opens with the corresponding file.
4.4. Specifying a Resource Adapter in jboss-ejb3.xml for an MDB
In the jboss-ejb3.xml deployment descriptor you can specify a resource adapter for an MDB to use.
To specify a resource adapter in jboss-ejb3.xml for an MDB, use the following example.
Example: jboss-ejb3.xml Configuration for an MDB Resource Adapter
<jboss xmlns="http://www.jboss.com/xml/ns/javaee"
  xmlns:jee="http://java.sun.com/xml/ns/javaee"
  xmlns:mdb="urn:resource-adapter-binding">
  <jee:assembly-descriptor>
    <mdb:resource-adapter-binding>
      <jee:ejb-name>MyMDB</jee:ejb-name>
      <mdb:resource-adapter-name>MyResourceAdapter.rar</mdb:resource-adapter-name>
    </mdb:resource-adapter-binding>
  </jee:assembly-descriptor>
</jboss>
For a resource adapter located in an EAR, you must use the following syntax for <mdb:resource-adapter-name>:
For a resource adapter that is in another EAR:
<mdb:resource-adapter-name>OtherDeployment.ear#MyResourceAdapter.rar</mdb:resource-adapter-name>
For a resource adapter that is in the same EAR as the MDB, you can omit the EAR name:
<mdb:resource-adapter-name>#MyResourceAdapter.rar</mdb:resource-adapter-name>
4.5. Using Resource Definition Annotations in MDBs Deployed to a Cluster
If you use the @JMSConnectionFactoryDefinition and @JMSDestinationDefinition annotations to create a connection factory and destination for message-driven beans, be aware that the objects are only created on the server where the MDB is deployed. They are not created on all nodes in a cluster unless the MDB is also deployed to all nodes in the cluster. Because objects configured by these annotations are only created on the server where the MDB is deployed, this affects remote Jakarta Connectors topologies where an MDB reads messages from a remote server and then sends them to a remote server.
4.6. Enable EJB and MDB Property Substitution in an Application
Red Hat JBoss Enterprise Application Platform allows you to enable property substitution in EJB and MDBs using the @ActivationConfigProperty and @Resource annotations. Property substitution requires the following configuration and code changes.
- You must enable property substitution in the JBoss EAP server configuration file.
- You must define the system properties in the server configuration file or pass them as arguments when you start the JBoss EAP server.
- You must modify the application code to use the substitution variables.
The following examples demonstrate how to modify the helloworld-mdb quickstart that ships with JBoss EAP to use property substitution. See the helloworld-mdb-propertysubstitution quickstart for the completed working example.
4.6.1. Configure the Server to Enable Property Substitution
To enable property substitution in the JBoss EAP server, you must set the annotation-property-replacement attribute in the ee subsystem of the server configuration to true.
Back up the server configuration file.
The
helloworld-mdb-propertysubstitutionquickstart example requires the full profile for a standalone server, so this is theEAP_HOME/standalone/configuration/standalone-full.xmlfile. If you are running your server in a managed domain, this is theEAP_HOME/domain/configuration/domain.xmlfile.Navigate to the JBoss EAP install directory and start the server with the full profile.
$ EAP_HOME/bin/standalone.sh -c standalone-full.xmlNoteFor Windows Server, use the
EAP_HOME\bin\standalone.batscript.Launch the management CLI.
$ EAP_HOME/bin/jboss-cli.sh --connectNoteFor Windows Server, use the
EAP_HOME\bin\jboss-cli.batscript.Type the following command to enable annotation property substitution.
/subsystem=ee:write-attribute(name=annotation-property-replacement,value=true)
You should see the following result.
{"outcome" => "success"}Review the changes to the JBoss EAP server configuration file. The
eesubsystem should now contain the following XML.Example
eeSubsystem Configuration<subsystem xmlns="urn:jboss:domain:ee:4.0"> ... <annotation-property-replacement>true</annotation-property-replacement> ... </subsystem>
4.6.2. Define the System Properties
You can specify the system properties in the server configuration file or you can pass them as command line arguments when you start the JBoss EAP server. System properties defined in the server configuration file take precedence over those passed on the command line when you start the server.
4.6.2.1. Define the System Properties in the Server Configuration
- Launch the management CLI.
Use the following command syntax to configure a system property in the JBoss EAP server.
Syntax to Add a System Property
/system-property=PROPERTY_NAME:add(value=PROPERTY_VALUE)
The following system properties are configured for the
helloworld-mdb-propertysubstitutionquickstart.Example Commands to Add System Properties
/system-property=property.helloworldmdb.queue:add(value=java:/queue/HELLOWORLDMDBPropQueue)
/system-property=property.helloworldmdb.topic:add(value=java:/topic/HELLOWORLDMDBPropTopic)
/system-property=property.connection.factory:add(value=java:/ConnectionFactory)
Review the changes to the JBoss EAP server configuration file. The following system properties should now appear in the after the
<extensions>.Example System Properties Configuration
<system-properties>
    <property name="property.helloworldmdb.queue" value="java:/queue/HELLOWORLDMDBPropQueue"/>
    <property name="property.helloworldmdb.topic" value="java:/topic/HELLOWORLDMDBPropTopic"/>
    <property name="property.connection.factory" value="java:/ConnectionFactory"/>
</system-properties>
4.6.2.2. Pass the System Properties as Arguments on Server Start
If you prefer, you can instead pass the arguments on the command line when you start the JBoss EAP server in the form of -DPROPERTY_NAME=PROPERTY_VALUE. The following is an example of how to pass the arguments for the system properties defined in the previous section.
Example Server Start Command Passing System Properties
$ EAP_HOME/bin/standalone.sh -c standalone-full.xml -Dproperty.helloworldmdb.queue=java:/queue/HELLOWORLDMDBPropQueue -Dproperty.helloworldmdb.topic=java:/topic/HELLOWORLDMDBPropTopic -Dproperty.connection.factory=java:/ConnectionFactory
4.6.3. Modify the Application Code to Use the System Property Substitutions
Replace the hard-coded @ActivationConfigProperty and @Resource annotation values with substitutions for the newly defined system properties. The following are examples of how to change the helloworld-mdb quickstart to use the newly defined system property substitutions.
Change the
@ActivationConfigPropertydestinationproperty value in theHelloWorldQueueMDBclass to use the substitution for the system property. The@MessageDrivenannotation should now look like this:HelloWorldQueueMDB Code Example
@MessageDriven(name = "HelloWorldQueueMDB", activationConfig = {
    @ActivationConfigProperty(propertyName = "destinationLookup", propertyValue = "${property.helloworldmdb.queue}"),
    @ActivationConfigProperty(propertyName = "destinationType", propertyValue = "javax.jms.Queue"),
    @ActivationConfigProperty(propertyName = "acknowledgeMode", propertyValue = "Auto-acknowledge") })
Change the
@ActivationConfigPropertydestinationproperty value in theHelloWorldTopicMDBclass to use the substitution for the system property. The@MessageDrivenannotation should now look like this:HelloWorldTopicMDB Code Example
@MessageDriven(name = "HelloWorldQTopicMDB", activationConfig = {
    @ActivationConfigProperty(propertyName = "destinationLookup", propertyValue = "${property.helloworldmdb.topic}"),
    @ActivationConfigProperty(propertyName = "destinationType", propertyValue = "javax.jms.Topic"),
    @ActivationConfigProperty(propertyName = "acknowledgeMode", propertyValue = "Auto-acknowledge") })
Change the
@Resourceannotations in theHelloWorldMDBServletClientclass to use the system property substitutions. The code should now look like this:HelloWorldMDBServletClient Code Example
/**
 * Definition of the two Jakarta Messaging Service destinations used by the quickstart
 * (one queue and one topic).
 */
 @JMSDestinationDefinitions(
     value = {
         @JMSDestinationDefinition(
             name = "java:/${property.helloworldmdb.queue}",
             interfaceName = "javax.jms.Queue",
             destinationName = "HelloWorldMDBQueue"
         ),
         @JMSDestinationDefinition(
             name = "java:/${property.helloworldmdb.topic}",
             interfaceName = "javax.jms.Topic",
             destinationName = "HelloWorldMDBTopic"
         )
     })
/**
 * <p>
 * A simple servlet 3 as client that sends several messages to a queue or a topic.
 * </p>
 *
 * <p>
 * The servlet is registered and mapped to /HelloWorldMDBServletClient using the {@linkplain WebServlet
 * @HttpServlet}.
 * </p>
 *
 * @author Serge Pagop (spagop@redhat.com)
 *
 */
@WebServlet("/HelloWorldMDBServletClient")
public class HelloWorldMDBServletClient extends HttpServlet {

    private static final long serialVersionUID = -8314035702649252239L;

    private static final int MSG_COUNT = 5;

    @Inject
    private JMSContext context;

    @Resource(lookup = "${property.helloworldmdb.queue}")
    private Queue queue;

    @Resource(lookup = "${property.helloworldmdb.topic}")
    private Topic topic;

  <!-- Remainder of code can be found in the `helloworld-mdb-propertysubstitution` quickstart. -->
Modify the
activemq-jms.xmlfile to use the system property substitution values.Example .activemq-jms.xml File
<?xml version="1.0" encoding="UTF-8"?> <messaging-deployment xmlns="urn:jboss:messaging-activemq-deployment:1.0"> <server> <jms-destinations> <jms-queue name="HELLOWORLDMDBQueue"> <entry name="${property.helloworldmdb.queue}"/> </jms-queue> <jms-topic name="HELLOWORLDMDBTopic"> <entry name="${property.helloworldmdb.topic}"/> </jms-topic> </jms-destinations> </server> </messaging-deployment>-
Deploy the application. The application now uses the values specified by the system properties for the
@Resourceand@ActivationConfigPropertyproperty values.
4.7. Activation Configuration Properties
4.7.1. Configuring MDBs Using Annotations
You can configure activation properties by using the @MessageDriven element and sub-elements which correspond to the @ActivationConfigProperty annotation. @ActivationConfigProperty is an array of activation configuration properties for MDBs. The @ActivationConfigProperty annotation specification is as follows:
@Target(value={})
@Retention(value=RUNTIME)
public @interface ActivationConfigProperty
{
	String propertyName();
	String propertyValue();
}
Example showing @ActivationConfigProperty
@MessageDriven(name="MyMDBName",
activationConfig =
{
    @ActivationConfigProperty(propertyName="destinationLookup",propertyValue="queueA"),
    @ActivationConfigProperty(propertyName = "destinationType",propertyValue = "javax.jms.Queue"),
    @ActivationConfigProperty(propertyName = "acknowledgeMode", propertyValue = "Auto-acknowledge"),
})
4.7.2. Configuring MDBs Using a Deployment Descriptor
The <message-driven> element in the ejb-jar.xml defines the bean as an MDB. The <activation-config> and elements contain the MDB configuration via the activation-config-property elements.
Example ejb-jar.xml
<?xml version="1.1" encoding="UTF-8"?>
<jboss:ejb-jar xmlns:jboss="http://www.jboss.com/xml/ns/javaee"
               xmlns="http://java.sun.com/xml/ns/javaee"
               xmlns:xsi="http://www.w3.org/2001/XMLSchema-instance"
               xsi:schemaLocation="http://www.jboss.com/xml/ns/javaee http://www.jboss.org/j2ee/schema/jboss-ejb3-2_0.xsd http://java.sun.com/xml/ns/javaee http://java.sun.com/xml/ns/javaee/ejb-jar_3_1.xsd"
               version="3.1">
    <enterprise-beans>
        <message-driven>
            <ejb-name>MyMDBName</ejb-name>
            <ejb-class>org.jboss.tutorial.mdb_deployment_descriptor.bean.MyMDBName</ejb-class>
            <activation-config>
                <activation-config-property>
                    <activation-config-property-name>destinationLookup</activation-config-property-name>
                    <activation-config-property-value>queueA</activation-config-property-value>
                </activation-config-property>
                <activation-config-property>
                    <activation-config-property-name>destinationType</activation-config-property-name>
                    <activation-config-property-value>javax.jms.Queue</activation-config-property-value>
                </activation-config-property>
                <activation-config-property>
                    <activation-config-property-name>acknowledgeMode</activation-config-property-name>
                    <activation-config-property-value>Auto-acknowledge</activation-config-property-value>
                </activation-config-property>
            </activation-config>
        </message-driven>
    <enterprise-beans>
</jboss:ejb-jar>
Table 4.1. Activation Configuration Properties Defined by Jakarta Messaging Service Specifications
| Name | Description |
|---|---|
|
| The Java Naming and Directory Interface name of the queue or topic. This is a mandatory value. |
|
|
The lookup name of an administratively defined
If not defined explicitly, pooled connection factory with name |
|
|
The type of destination valid values are |
|
|
The value for a |
|
|
The type of acknowledgement when not using transacted Jakarta Messaging. Valid values are
The default value is |
|
| The client ID of the connection. This is not a mandatory value. |
|
|
Whether topic subscriptions are durable. Valid values are
The default value is |
|
| The subscription name of the topic subscription. This is not a mandatory value. |
Table 4.2. Activation Configuration Properties Defined by JBoss EAP
| Name | Description |
|---|---|
|
|
Using this property with |
|
| Whether the connection is configured to share subscriptions.
The default value is |
|
| The user for the Jakarta Messaging connection. This is not a mandatory value. |
|
| The password for the Jakarta Messaging connection. This is not a mandatory value. |
|
| The maximum number of concurrent sessions to use. This is not a mandatory value.
The default value is |
|
| The transaction timeout for the session in milliseconds. This is not a mandatory value.
If not specified or 0, the property is ignored and the |
|
| Whether or not use Java Naming and Directory Interface to look up the destination.
The default value is |
|
|
The Java Naming and Directory Interface parameters to use in the connection. Parameters are defined as |
|
| Use local transaction instead of XA.
The default value is |
|
| Number of attempts to setup a Jakarta Messaging connection. It is possible that the MDB is deployed before the Jakarta Messaging resources are available. In that case, the resource adapter will try to set up several times until the resources are available. This applies only to inbound connections.
The default value is |
|
| Interval in milliseconds between consecutive attempts to setup a Jakarta Messaging connection. This applies only to inbound connections.
The default value is |
|
| Whether rebalancing of inbound connections is enabled or not. This parameter allows for rebalancing of all inbound connections when the underlying cluster topology changes. There is no rebalancing for outbound connections.
The default value is |
|
| A comma-separated list of entries for the white list, which is the list of trusted classes and packages. This property is used by the Jakarta Messaging resource adapter to allow objects in the list to be deserialized. For more information, see Controlling JMS ObjectMessage Deserialization in Configuring Messaging for JBoss EAP. |
|
| A comma-separated list of entries for the black list, which is the list of untrusted classes and packages. This property is used by the Jakarta Messaging resource adapter to prevent objects in the list from being deserialized. For more information, see Controlling JMS ObjectMessage Deserialization in Configuring Messaging for JBoss EAP. |
4.7.3. Some Example Use Cases for Configuring MDBs
Use case for an MDB receiving a message
For a basic scenario when MDB receives a message, see the
helloworld-mdbquickstart that is shipped with JBoss EAP.Use case for an MDB sending a message
After processing the message you may need to inform other business systems or reply to the message. In this case, you can send the message from MDB as shown in the snippet below:
package org.jboss.as.quickstarts.mdb;

import javax.annotation.Resource;
import javax.ejb.ActivationConfigProperty;
import javax.ejb.MessageDriven;
import javax.inject.Inject;
import javax.jms.JMSContext;
import javax.jms.JMSException;
import javax.jms.Message;
import javax.jms.MessageListener;
import javax.jms.Queue;

@MessageDriven(name = "MyMDB", activationConfig = {
    @ActivationConfigProperty(propertyName = "destinationLookup", propertyValue = "queue/MyMDBRequest"),
    @ActivationConfigProperty(propertyName = "destinationType", propertyValue = "javax.jms.Queue"),
    @ActivationConfigProperty(propertyName = "acknowledgeMode", propertyValue = "Auto-acknowledge") })
public class MyMDB implements MessageListener {

    @Inject
    private JMSContext jmsContext;

    @Resource(lookup = "java:/queue/ResponseDefault")
    private Queue defaultDestination;

    /**
     * @see MessageListener#onMessage(Message)
     */
    public void onMessage(Message rcvMessage) {
        try {
            Message response = jmsContext.createTextMessage("Response for message " + rcvMessage.getJMSMessageID());
            if (rcvMessage.getJMSReplyTo() != null) {
                jmsContext.createProducer().send(rcvMessage.getJMSReplyTo(), response);
            } else {
                jmsContext.createProducer().send(defaultDestination, response);
            }
        } catch (JMSException e) {
            throw new RuntimeException(e);
        }
    }
}
In the example above, after the MDB receives the message, it replies to either the destination specified in
JMSReplyToor the destination which is bound to the Java Naming and Directory Interface namejava:/queue/ResponseDefault.Use case for an MDB configuring rebalancing of inbound connection
@MessageDriven(name="MyMDBName",
    activationConfig =
    {
        @ActivationConfigProperty(propertyName = "destinationType",propertyValue = "javax.jms.Queue"),
        @ActivationConfigProperty(propertyName = "destinationLookup", propertyValue = "queueA"),
        @ActivationConfigProperty(propertyName = "rebalanceConnections", propertyValue = "true")
    }
)
Chapter 5. Invoking Session Beans
5.1. About EJB Client Contexts
JBoss EAP introduced the EJB client API for managing remote EJB invocations. The JBoss EJB client API uses the EJBClientContext, which may be associated with and be used by one or more threads concurrently. This means that an EJBClientContext can potentially contain any number of EJB receivers. An EJB receiver is a component that knows how to communicate with a server that is capable of handling the EJB invocation. Typically, EJB remote applications can be classified into the following:
- A remote client, which runs as a standalone Java application.
- A remote client, which runs within another JBoss EAP instance.
Depending on the type of remote client, from an EJB client API point of view, there can potentially be more than one EJBClientContext within a JVM.
While standalone applications typically have a single EJBClientContext that may be backed by any number of EJB receivers, this isn’t mandatory. If a standalone application has more than one EJBClientContext, an EJB client context selector is responsible for returning the appropriate context.
In case of remote clients that run within another JBoss EAP instance, each deployed application will have a corresponding EJB client context. Whenever that application invokes another EJB, the corresponding EJB client context is used to find the correct EJB receiver, which then handles the invocation.
5.2. Using Remote EJB Clients
5.2.1. Initial Context Lookup
You can pass the remote server’s address using the PROVIDER_URL property when creating an initial context:
public class Client {
    public static void main(String[] args)
            throws NamingException, PrivilegedActionException, InterruptedException {
        InitialContext ctx = new InitialContext(getCtxProperties());
        String lookupName = "ejb:/server/HelloBean!ejb.HelloBeanRemote";
        HelloBeanRemote bean = (HelloBeanRemote)ctx.lookup(lookupName);
        System.out.println(bean.hello());
        ctx.close();
    }
    public static Properties getCtxProperties() {
        Properties props = new Properties();
        props.put(Context.INITIAL_CONTEXT_FACTORY, WildFlyInitialContextFactory.class.getName());
        props.put(Context.PROVIDER_URL, "remote+http://127.0.0.1:8080");
        props.put(Context.SECURITY_PRINCIPAL, "joe");
        props.put(Context.SECURITY_CREDENTIALS, "joeIsAwesome2013!");
        return props;
    }
}
The Initial context factory to be used for the lookup is org.wildfly.naming.client.WildFlyInitialContextFactory.
5.2.2. Remote EJB Configuration File
JBoss EAP features the Elytron security framework. The wildfly-config.xml file, which is present in the META-INF/ directory of the client application’s class path, allows a wide range of authentication and authorization options for the Elytron security framework and EJB client configuration.
<configuration>
   <authentication-client xmlns="urn:elytron:client:1.2">
      <authentication-rules>
         <rule use-configuration="default" />
      </authentication-rules>
      <authentication-configurations>
         <configuration name="default">
            <sasl-mechanism-selector selector="DIGEST-MD5" />
            <set-user-name name="admin" />
            <credentials>
               <clear-password password="password123!" />
            </credentials>
         </configuration>
      </authentication-configurations>
   </authentication-client>
   <jboss-ejb-client xmlns="urn:jboss:wildfly-client-ejb:3.0">
      <connections>
         <connection uri="remote+http://127.0.0.1:8080" />
      </connections>
   </jboss-ejb-client>
</configuration>
As an alternative to embedding the PROVIDER_URL, SECURITY_PRINCIPAL and SECURITY_CREDENTIALS parameters in the initial context, you can use the <connection-uri> and <authentication-client> elements in the wildfly-config.xml file to configure the connection URI and the security settings, respectively.
5.2.3. The ClientTransaction Annotation
The @org.jboss.ejb.client.annotation.ClientTransaction annotation handles transaction propagation from an EJB client. You can mandate the propagation to fail if the client has no transaction, or prevent the transaction propagation even if the client has one active. You can use the constants of the org.jboss.ejb.client.annotation.ClientTransactionPolicy interface to control the policy of the ClientTransaction annotation. The following are the constants of the org.jboss.ejb.client.annotation.ClientTransactionPolicy interface:
- MANDATORY: Fail with exception when there is no client-side transaction context; propagate the client-side transaction context when it is present.
- NEVER: Invoke without propagating any transaction context; if a client-side transaction context is present, an exception is thrown.
- NOT_SUPPORTED: Invoke without propagating any transaction context whether or not a client-side transaction context is present.
- SUPPORTS: Invoke without a transaction if there is no client-side transaction context; propagate the client-side transaction context if it is present.
If no annotation is present, the default policy is org.jboss.ejb.client.annotation.ClientTransactionPolicy#SUPPORTS, which means that the transaction is propagated if it is present, but the propagation does not fail, regardless of whether a transaction is present or not.
@ClientTransaction(ClientTransactionPolicy.MANDATORY)
@Remote
public interface RemoteCalculator  {
   public void callRemoteEjb() { }
}
@Stateless
@Remote(RemoteCalculator.class)
public class CalculatorBean implements RemoteCalculator {

   @Override
   public void callRemoteEjb()  {   }
}
The annotation allows the remote interface provider to tell the remote interface consumer whether transactions are needed for a method.
5.3. Remote EJB Data Compression
Previous versions of JBoss EAP included a feature where the message stream that contained the EJB protocol message could be compressed. This feature has been included in JBoss EAP 6.3 and later.
Compression currently can only be specified by annotations on the EJB interface which should be on the client and server side. There is not currently an XML equivalent to specify compression hints.
Data compression hints can be specified via the JBoss annotation org.jboss.ejb.client.annotation.CompressionHint. The hint values specify whether to compress the request, response or request and response. Adding @CompressionHint defaults to compressResponse=true and compressRequest=true.
The annotation can be specified at the interface level to apply to all methods in the EJB interface such as:
import org.jboss.ejb.client.annotation.CompressionHint;

@CompressionHint(compressResponse = false)
public interface ClassLevelRequestCompressionRemoteView {
    String echo(String msg);
}
Or the annotation can be applied to specific methods in the EJB interface such as:
import org.jboss.ejb.client.annotation.CompressionHint;

public interface CompressableDataRemoteView {

    @CompressionHint(compressResponse = false, compressionLevel = Deflater.BEST_COMPRESSION)
    String echoWithRequestCompress(String msg);

    @CompressionHint(compressRequest = false)
    String echoWithResponseCompress(String msg);

    @CompressionHint
    String echoWithRequestAndResponseCompress(String msg);

    String echoWithNoCompress(String msg);
}
The compressionLevel setting shown above can have the following values:
- BEST_COMPRESSION
- BEST_SPEED
- DEFAULT_COMPRESSION
- NO_COMPRESSION
The compressionLevel setting defaults to Deflater.DEFAULT_COMPRESSION.
Class level annotation with method level overrides:
@CompressionHint
public interface MethodOverrideDataCompressionRemoteView {

    @CompressionHint(compressRequest = false)
    String echoWithResponseCompress(final String msg);

    @CompressionHint(compressResponse = false)
    String echoWithRequestCompress(final String msg);

    String echoWithNoExplicitDataCompressionHintOnMethod(String msg);
}
On the client side ensure the org.jboss.ejb.client.view.annotation.scan.enabled system property is set to true. This property tells JBoss EJB Client to scan for annotations.
5.4. EJB Client Remoting Interoperability
The default remote connection port is 8080. The jboss-ejb-client properties file looks like this:
remote.connectionprovider.create.options.org.xnio.Options.SSL_ENABLED=false
remote.connections=default
remote.connection.default.host=localhost
remote.connection.default.port=8080
remote.connection.default.connect.options.org.xnio.Options.SASL_POLICY_NOANONYMOUS=false
Default Connector
The default connector is http-remoting.
-
If a client application uses the EJB client library from JBoss EAP 6 and wants to connect to a JBoss EAP 7 server, the server must be configured to expose a remoting connector on a port other than
8080. The client must then connect using that newly configured connector. A client application that uses the EJB client library from JBoss EAP 7 and wants to connect to a JBoss EAP 6 server must be aware that the server instance does not use the
http-remotingconnector and instead uses aremotingconnector. This is achieved by defining a new client-side connection property.remote.connection.default.protocol=remote
EJB remote calls are supported for JBoss EAP 7 with JBoss EAP 6 only.
Besides EJB client remoting interoperability, you can connect to legacy clients using the following options:
- Configure the ORB for JTS Transactions in the JBoss EAP Configuration Guide.
5.5. Configure IIOP for Remote EJB Calls
JBoss EAP supports CORBA/IIOP-based access to EJB deployed on JBoss EAP.
The <iiop> element is used to enable IIOP, CORBA, invocation of EJB. The presence of this element means that the iiop-openjdk subsystem is installed. The <iiop> element includes the following two attributes:
-
enable-by-default: If this istrue, then all the EJB with EJB 2.x home interfaces are exposed through IIOP. Otherwise they must be explicitly enabled throughjboss-ejb3.xml. -
use-qualified-name: If this istrue, then the EJB are bound to the CORBA naming context with a binding name that contains the application and modules name of the deployment, such asmyear/myejbjar/MyBean. If this isfalse, then the default binding name is simply the bean name.
Even though a RemoteHome interface is not normally required for EJB 3 remote calls, it is required for any EJB 3 bean that is exposed using IIOP. You must then enable IIOP using the jboss-ejb3.xml file, or by enabling IIOP for all EJBs in the standalone-full.xml configuration file.
Enabling IIOP
To enable IIOP you must have the IIOP OpenJDK ORB subsystem installed, and the <iiop/> element present in the ejb3 subsystem configuration. The standalone-full.xml configuration that comes with the distribution has both of these enabled.
IIOP is configured in the iiop-openjdk subsystem of the server configuration file.
<subsystem xmlns="urn:jboss:domain:iiop-openjdk:2.1">
Use the following management CLI command to access and update the iiop-openjdk subsystem.
/subsystem=iiop-openjdk
The IIOP element takes two attributes that control the default behavior of the server.
<subsystem xmlns="urn:jboss:domain:ejb3:5.0">
  ...
  <iiop enable-by-default="false" use-qualified-name="false"/>
  ...
</subsystem>
The following management CLI command adds the <iiop> element under the ejb3 subsystem:
/subsystem=ejb3/service=iiop:add(enable-by-default=false, use-qualified-name=false)
Create an EJB That Communicates Using IIOP
The following example demonstrates how to make a remote IIOP call from the client:
Create an EJB 2 bean on the server:
@Remote(IIOPRemote.class)
@RemoteHome(IIOPBeanHome.class)
@Stateless
public class IIOPBean {
    public String sayHello() throws RemoteException {
         return "hello";
    }
}
Create a home implementation, which has a mandatory method
create(). This method is called by the client to obtain proxy of remote interface to invoke business methods:public interface IIOPBeanHome extends EJBHome { public IIOPRemote create() throws RemoteException; }Create a remote interface for remote connection to the EJB:
public interface IIOPRemote extends EJBObject {
    String sayHello() throws RemoteException;
}
Introduce the bean for remote call by creating a descriptor file
jboss-ejb3.xmlinMETA-INF:<?xml version="1.0" encoding="UTF-8"?> <jboss:ejb-jar xmlns:jboss="http://www.jboss.com/xml/ns/javaee" xmlns="http://java.sun.com/xml/ns/javaee" xmlns:iiop="urn:iiop" xmlns:xsi="http://www.w3.org/2001/XMLSchema-instance" xsi:schemaLocation="http://www.jboss.com/xml/ns/javaee http://www.jboss.org/j2ee/schema/jboss-ejb3-2_0.xsd http://java.sun.com/xml/ns/javaee http://www.jboss.org/j2ee/schema/jboss-ejb3-spec-2_0.xsd urn:iiop jboss-ejb-iiop_1_0.xsd" version="3.1" impl-version="2.0"> <assembly-descriptor> <iiop:iiop> <ejb-name>*</ejb-name> </iiop:iiop> </assembly-descriptor> </jboss:ejb-jar>NoteThe packed beans along with the descriptor in the JAR file is now ready to be deployed to the JBoss EAP container.
Create a context at the client side:
System.setProperty("com.sun.CORBA.ORBUseDynamicStub", "true"); final Properties props = new Properties(); props.put(Context.PROVIDER_URL, "corbaloc::localhost:3528/JBoss/Naming/root"); props.setProperty(Context.URL_PKG_PREFIXES, "org.jboss.iiop.naming:org.jboss.naming.client"); props.put(Context.INITIAL_CONTEXT_FACTORY, "com.sun.jndi.cosnaming.CNCtxFactory"); props.put(Context.OBJECT_FACTORIES, "org.jboss.tm.iiop.client.IIOPClientUserTransactionObjectFactory");NoteThe client will need to have the
wildfly iiop openjdklibrary added to its class path. The client might also need to add theorg.wildfly:wildfly-iiop-openjdkartifact as Maven dependency.Use the context lookup to narrow the reference to the
IIOPBeanHomehome interface. Then call the home interfacecreate()method to access the remote interface, which allows you to call its methods:try { Context context = new InitialContext(props); final Object iiopObj = context.lookup(IIOPBean.class.getSimpleName()); final IIOPBeanHome beanHome = (IIOPBeanHome) PortableRemoteObject.narrow(iiopObj, IIOPBeanHome.class); final IIOPRemote bean = beanHome.create(); System.out.println("Bean saying: " + bean.sayHello()); } catch (Exception e) { e.printStackTrace(); }
5.6. Configure the EJB Client Address
You can determine the EJB client address using the SessionContext interface, as shown in the example below.
public class HelloBean implements HelloBeanRemote {
    @Resource
    SessionContext ctx;
    private Long counter;
    public HelloBean() {
    }
    @PostConstruct
    public void init() {
        counter = 0L;
    }
    @Override
    @RolesAllowed("users")
    public String hello() {
        final String message = "method hello() invoked by user " + ctx.getCallerPrincipal().getName()
                + ", source addr = " +  ctx.getContextData().get("jboss.source-address").toString();
        System.out.println(message);
        return message;
    }
}
Standalone Client Configuration
You can configure the outbound-bind-addresses element within the worker element having namespace urn:xnio:3.5 in the wildfly-config.xml file. The bind-address sub-element takes the attributes match, bind-address, bind-port, as defined below.
The following is an example of the standalone client configuration using the wildfly-config.xml file.
<configuration>
    <worker xmlns="urn:xnio:3.5">
        <worker-name value="default"/>
        <outbound-bind-addresses>
            <bind-address bind-address=IP_ADDRESS_TO_BIND_TO bind-port=OPTIONAL_SOURCE_PORT_NUMBER match=CIDR_BLOCK />
        </outbound-bind-addresses>
    </worker>
</configuration>
The outbound-bind-address requires the following attributes:
-
matchis a Classless Inter-Domain Routing (CIDR) block, such as10.0.0.0/8,ff00::\8,0.0.0.0/0,::/0. -
bind-addressspecifies the IP address to bind to when the destination address matches the CIDR block specified in thematchparameter. It should be the same address family as the CIDR block. bind-portis an optional source port number that defaults to0.If no matching expression exists, then the outbound socket is not explicitly bound.
Container-based Configuration
Container-based configuration of the EJB client address is similar to the standalone client configuration defined in the wildfly-config.xml file.
The example below configures the outbound-bind-address on the default worker element of the io subsystem, which the ejb3 subsystem uses by default.
/subsystem=io/worker=default/outbound-bind-address=SPECIFY_OUTBOUND_BIND_ADDRESS:add(bind-address=IP_ADDRESS_TO_BIND_TO, bind-port=OPTIONAL_SOURCE_PORT_NUMBER, match=CIDR_BLOCK)
5.7. EJB Invocation Over HTTP
EJB invocation over HTTP includes two distinct parts: the client-side and the server-side implementations.
5.7.1. Client-side Implementation
The client-side implementation consists of an EJBReceiver that uses the Undertow HTTP client to invoke the server. Connection management is handled automatically using a connection pool.
In order to configure an EJB client application to use HTTP transport, you must add the following dependency on the HTTP transport implementation:
<dependency>
    <groupId>org.wildfly.wildfly-http-client</groupId>
    <artifactId>wildfly-http-ejb-client</artifactId>
</dependency>
To perform the HTTP invocation, you must use the http URL scheme and include the context name of the HTTP invoker, wildfly-services. For example, if you are using remote+http://localhost:8080 as the target URL, in order to use the HTTP transport, you must update this to http://localhost:8080/wildfly-services.
5.7.2. Server-side Implementation
The server-side implementation consists of a service that handles the incoming HTTP requests, unmarshals them and passes the result to the internal EJB invocation code.
In order to configure the server, the http-invoker must be enabled on each of the virtual hosts that you wish to use in the undertow subsystem. This is enabled by default in the standard configurations. If it is disabled, it can be re-enabled using the following management CLI command:
/subsystem=undertow/server=default-server/host=default-host/setting=http-invoker:add(http-authentication-factory=myfactory, path="wildfly-services")
http-invoker has two attributes: a path that defaults to wildfly-services, and one of the following:
-
An
http-authentication-factorythat must be a reference to an Elytronhttp-authentication-factory, as shown in the above command. -
A legacy
security-realm.
Note that the above two attributes are mutually exclusive: you cannot specify both an http-authentication-factory and a security-realm at the same time.
Any deployment that aims to use the http-authentication-factory must use Elytron security with the same security domain corresponding to the specified HTTP authentication factory.
Chapter 6. EJB Application Security
6.1. Security Identity
6.1.1. About EJB Security Identity
An EJB can specify an identity to use when invoking methods on other components. This is the EJB security identity, also known as invocation identity.
By default, the EJB uses its own caller identity. The identity can alternatively be set to a specific security role. Using specific security roles is useful when you want to construct a segmented security model, for example, restricting access to a set of components to internal EJB only.
6.1.2. Set the Security Identity of an EJB
The security identity of the EJB is specified through the <security-identity> tag in the security configuration. If no <security-identity> tag is present, the caller identity of the EJB is used by default.
Example: Set the Security Identity of an Enterprise JavaBeans to Be the Same as Its Caller
This example sets the security identity for method invocations made by an EJB to be the same as the current caller’s identity. This behavior is the default if you do not specify a <security-identity> element declaration.
<ejb-jar>
  <enterprise-beans>
     <session>
        <ejb-name>ASessionBean</ejb-name>
        ...
        <security-identity>
          <use-caller-identity/>
        </security-identity>
     </session>
     ...
  </enterprise-beans>
</ejb-jar>
Example: Set the Security Identity of an Enterprise JavaBeans to a Specific Role
To set the security identity to a specific role, use the <run-as> and <role-name> tags inside the <security-identity> tag.
<ejb-jar>
  <enterprise-beans>
     <session>
        <ejb-name>RunAsBean</ejb-name>
        ...
        <security-identity>
          <run-as>
             <description>A private internal role</description>
             <role-name>InternalRole</role-name>
          </run-as>
        </security-identity>
     </session>
  </enterprise-beans>
  ...
</ejb-jar>
By default, when you use <run-as>, a principal named anonymous is assigned to outgoing calls. To assign a different principal, uses the <run-as-principal>.
<session>
    <ejb-name>RunAsBean</ejb-name>
    <security-identity>
        <run-as-principal>internal</run-as-principal>
    </security-identity>
</session>
You can also use the <run-as> and <run-as-principal> elements inside a servlet element.
6.2. EJB Method Permissions
6.2.1. About EJB Method Permissions
EJB can restrict access to their methods to specific security roles.
The EJB <method-permission> element declaration specifies the roles that can invoke the interface methods of the EJB. You can specify permissions for the following combinations:
- All home and component interface methods of the named EJB
- A specified method of the home or component interface of the named EJB
- A specified method within a set of methods with an overloaded name
6.2.2. Use EJB Method Permissions
The <method-permission> element defines the logical roles that are allowed to access the EJB methods defined by <method> elements. Several examples demonstrate the syntax of the xml. Multiple method permission statements may be present, and they have a cumulative effect. The <method-permission> element is a child of the <assembly-descriptor> element of the <ejb-jar> descriptor.
The XML syntax is an alternative to using annotations for EJB method permissions.
Example: Allow Roles to Access All Methods of an Enterprise JavaBeans
<method-permission>
  <description>The employee and temp-employee roles may access any method
  of the EmployeeService bean </description>
  <role-name>employee</role-name>
  <role-name>temp-employee</role-name>
  <method>
    <ejb-name>EmployeeService</ejb-name>
    <method-name>*</method-name>
  </method>
</method-permission>
Example: Allow Roles to Access Certain Methods of an Enterprise JavaBeans and Limit Method Parameters
<method-permission>
  <description>The employee role may access the findByPrimaryKey,
  getEmployeeInfo, and the updateEmployeeInfo(String) method of
  the AcmePayroll bean </description>
  <role-name>employee</role-name>
  <method>
    <ejb-name>AcmePayroll</ejb-name>
    <method-name>findByPrimaryKey</method-name>
  </method>
  <method>
    <ejb-name>AcmePayroll</ejb-name>
    <method-name>getEmployeeInfo</method-name>
  </method>
  <method>
    <ejb-name>AcmePayroll</ejb-name>
    <method-name>updateEmployeeInfo</method-name>
    <method-params>
      <method-param>java.lang.String</method-param>
    </method-params>
  </method>
</method-permission>
Example: Allow Any Authenticated User to Access Methods of Enterprise JavaBeans
Using the <unchecked/> element allows any authenticated user to use the specified methods.
<method-permission>
  <description>Any authenticated user may access any method of the
  EmployeeServiceHelp bean</description>
  <unchecked/>
  <method>
    <ejb-name>EmployeeServiceHelp</ejb-name>
    <method-name>*</method-name>
  </method>
</method-permission>
Example: Completely Exclude Specific Enterprise JavaBeans Methods
<exclude-list>
  <description>No fireTheCTO methods of the EmployeeFiring bean may be
  used in this deployment</description>
  <method>
    <ejb-name>EmployeeFiring</ejb-name>
    <method-name>fireTheCTO</method-name>
  </method>
</exclude-list>
Example: A Complete <assembly-descriptor> Containing Several <method-permission> Blocks
<ejb-jar>
    <assembly-descriptor>
        <method-permission>
            <description>The employee and temp-employee roles may access any method of the EmployeeService bean </description>
            <role-name>employee</role-name>
            <role-name>temp-employee</role-name>
            <method>
                <ejb-name>EmployeeService</ejb-name>
                <method-name>*</method-name>
            </method>
        </method-permission>
        <method-permission>
            <description>The employee role may access the findByPrimaryKey, getEmployeeInfo, and the updateEmployeeInfo(String) method of the AcmePayroll bean </description>
            <role-name>employee</role-name>
            <method>
                <ejb-name>AcmePayroll</ejb-name>
                <method-name>findByPrimaryKey</method-name>
            </method>
            <method>
                <ejb-name>AcmePayroll</ejb-name>
                <method-name>getEmployeeInfo</method-name>
            </method>
            <method>
                <ejb-name>AcmePayroll</ejb-name>
                <method-name>updateEmployeeInfo</method-name>
                <method-params>
                    <method-param>java.lang.String</method-param>
                </method-params>
            </method>
        </method-permission>
        <method-permission>
            <description>The admin role may access any method of the EmployeeServiceAdmin bean </description>
            <role-name>admin</role-name>
            <method>
                <ejb-name>EmployeeServiceAdmin</ejb-name>
                <method-name>*</method-name>
            </method>
        </method-permission>
        <method-permission>
            <description>Any authenticated user may access any method of the EmployeeServiceHelp bean</description>
            <unchecked/>
            <method>
                <ejb-name>EmployeeServiceHelp</ejb-name>
                <method-name>*</method-name>
            </method>
        </method-permission>
        <exclude-list>
            <description>No fireTheCTO methods of the EmployeeFiring bean may be used in this deployment</description>
            <method>
                <ejb-name>EmployeeFiring</ejb-name>
                <method-name>fireTheCTO</method-name>
            </method>
        </exclude-list>
    </assembly-descriptor>
</ejb-jar>
6.3. EJB Security Annotations
6.3.1. About EJB Security Annotations
EJB javax.annotation.security annotations are defined in JSR-250. The Jakarta equivalent for these annotations is defined in the Jakarta Annotations 1.3 specification.
EJB use security annotations to pass information about security to the deployer. These include:
- @DeclareRoles
- Declares which roles are available.
- @RunAs
- Configures the propagated security identity of a component.
6.3.2. Use EJB Security Annotations
You can use either XML descriptors or annotations to control which security roles are able to call methods in your EJB. For information on using XML descriptors, see Use EJB Method Permissions.
Any method values explicitly specified in the deployment descriptor override annotation values. If a method value is not specified in the deployment descriptor, those values set using annotations are used. The overriding granularity is on a per-method basis.
Annotations for Controlling Security Permissions of Enterprise JavaBeans
- @DeclareRoles
-
Use
@DeclareRolesto define which security roles to check permissions against. If no@DeclareRolesis present, the list is built automatically from the@RolesAllowedannotation. For information about configuring roles, see the Java EE tutorial Specifying Authorized Users by Declaring Security Roles. - @RolesAllowed, @PermitAll, @DenyAll
-
Use
@RolesAllowedto list which roles are allowed to access a method or methods. Use@PermitAllor@DenyAllto either permit or deny all roles from using a method or methods. For information about configuring annotation method permissions, see the Java EE tutorial Specifying Authorized Users by Declaring Security Roles. - @RunAs
-
Use
@RunAsto specify a role a method uses when making calls from the annotated method. For information about configuring propagated security identities using annotations, see the Java EE tutorial Propagating a Security Identity (Run-As).
Example: Security Annotations Example
@Stateless
@RolesAllowed({"admin"})
@SecurityDomain("other")
public class WelcomeEJB implements Welcome {
    @PermitAll
    public String WelcomeEveryone(String msg) {
        return "Welcome to " + msg;
    }
    @RunAs("tempemployee")
    public String GoodBye(String msg) {
        return "Goodbye, " + msg;
    }
    public String GoodbyeAdmin(String msg) {
        return "See you later, " + msg;
    }
}
In this code, all roles can access method WelcomeEveryone. The GoodBye method uses the tempemployee role when making calls. Only the admin role can access method GoodbyeAdmin, and any other methods with no security annotation.
6.4. Remote Access to EJBs
6.4.1. Use Security Realms with Remote EJB Clients
One way to add security to clients which invoke EJB remotely is to use security realms. A security realm is a simple database of username/password pairs and username/role pairs. The terminology is also used in the context of web containers, with a slightly different meaning.
To authenticate a specific username/password pair that exists in a security realm against an EJB, follow these steps:
- Add a new security realm to the domain controller or standalone server.
Configure the
wildfly-config.xmlfile, which is located in the class path of the application, as shown in the following example:<configuration> <authentication-client xmlns="urn:elytron:client:1.2"> <authentication-rules> <rule use-configuration="default" /> </authentication-rules> <authentication-configurations> <configuration name="default"> <sasl-mechanism-selector selector="DIGEST-MD5" /> <set-user-name name="admin" /> <credentials> <clear-password password="password123!" /> </credentials> </configuration> </authentication-configurations> </authentication-client> <jboss-ejb-client xmlns="urn:jboss:wildfly-client-ejb:3.0"> <connections> <connection uri="remote+http://127.0.0.1:8080" /> </connections> </jboss-ejb-client> </configuration>- Create a custom remoting connector on the domain or standalone server that uses your new security realm.
- Deploy your EJB to the server group which is configured to use the profile with the custom Remoting connector, or to your standalone server if you are not using a managed domain.
6.4.2. Add a New Security Realm
Run the management CLI:
Execute the
jboss-cli.shorjboss-cli.batscript and connect to the server.Create the new security realm itself:
Run the following command to create a new security realm named
MyDomainRealmon a domain controller or a standalone server.For a domain instance, use this command:
/host=master/core-service=management/security-realm=MyDomainRealm:add()
For a standalone instance, use this command:
/core-service=management/security-realm=MyDomainRealm:add()
Create a properties file named
myfile.properties:For a standalone instance, create a file
EAP_HOME/standalone/configuration/myfile.propertiesand for a domain instance, create a fileEAP_HOME/domain/configuration/myfile.properties. These files need to have read and write access for the file owner.$ chmod 600 myfile.properties
Create the references to the properties file which will store information about the new role:
Run the following command to create a pointer to the
myfile.propertiesfile, which will contain the properties pertaining to the new role.NoteThe properties file will not be created by the included
add-user.shandadd-user.batscripts. It must be created externally.For a domain instance, use this command:
/host=master/core-service=management/security-realm=MyDomainRealm/authentication=properties:add(path=myfile.properties)
For a standalone instance, use this command:
/core-service=management/security-realm=MyDomainRealm/authentication=properties:add(path=myfile.properties)
Your new security realm is created. When you add users and roles to this new realm, the information will be stored in a separate file from the default security realms. You can manage this new file using your own applications or procedures.
When using the add-user.sh script to add a user to a non-default file, other than application-users.properties, you have to pass it the argument --user-properties myfile.properties otherwise it will try to use application-users.properties.
6.4.3. Add a User to a Security Realm
-
Run the
add-userscript. Open a terminal and change directories to theEAP_HOME/bin/directory. If you are on Red Hat Enterprise Linux or any other UNIX-like operating system, runadd-user.sh. If you are on Windows Server, runadd-user.bat. -
Choose whether to add a management user or application user. For this procedure, type
bto add an application user. -
Choose the realm the user will be added to. By default, the only available realm is
ApplicationRealm. If you have added a custom realm, you may add the user to that instead. -
Type the username, password, and roles, when prompted. Type the desired username, password, and optional roles when prompted. Verify your choice by typing
yes, or typenoto cancel the changes. The changes are written to each of the properties files for the security realm.
6.4.4. Relationship Between Security Domains and Security Realms
For EJB to be secured by security realms, they have to use a security domain which is configured to retrieve user credentials from the security realm. This means that the domain needs to contain the Remoting and RealmDirect login modules. Assigning a security domain is done by the @SecurityDomain annotation, which can be applied on an EJB.
The other security domain retrieves the user and password data from the underlying security realm. This security domain is the default one if there is no @SecurityDomain annotation on the EJB but the EJB contains any of the other security-related annotations to be considered secured.
The underlying http-remoting connector, which is used by the client to establish a connection, decides which security realm is used. For more information on http-remoting connector, see About the Remoting Subsystem in the JBoss EAP Configuration Guide.
The security realm of the default connector can be changed this way:
/subsystem=remoting/http-connector=http-remoting-connector:write-attribute(name=security-realm,value=MyDomainRealm)
6.4.5. About Remote EJB Access Using SSL Encryption
By default, the network traffic for Remote Method Invocation (RMI) of EJB2 and EJB3 Beans is not encrypted. In instances where encryption is required, Secure Sockets Layer (SSL) can be utilized so that the connection between the client and server is encrypted. Using SSL also has the added benefit of allowing the network traffic to traverse some firewalls, depending on the firewall configuration.
Red Hat recommends that SSLv2, SSLv3, and TLSv1.0 be explicitly disabled in favor of TLSv1.1 or TLSv1.2 in all affected packages.
6.5. Elytron Integration with the EJB Subsystem
Starting with JBoss EAP 7.1, it is possible to map deployments so that their security is handled by the elytron subsystem. If a deployment references a mapped security domain, its security will be handled by Elytron, otherwise its security will be handled by the legacy security subsystem. This mapping is defined in the ejb subsystem.
Within the ejb subsystem, mappings are created from a security domain name, as referenced within a deployment, to a referenced Elytron security-domain. When a mapped security domain name is configured for a bean in a deployment, this indicates that security should be handled by Elytron. New EJB security interceptors are set up instead of the existing ones.
The new EJB security interceptors make use of the Elytron SecurityDomain associated with the invocation to obtain the current SecurityIdentity and perform the following tasks:
-
Establish the
run-asprincipal. -
Create any extra roles for the
run-asprincipal. -
Create the
run-asroles. - Make authorization decisions.
JBoss EAP 7.1 introduced a new management resource in the ejb subsystem, application-security-domains. The application-security-domains element contains the application security domains that should be mapped to an Elytron security domain.
Table 6.1. Attributes of the application-security-domain
| Attribute | Description |
|---|---|
|
| This attribute refers to the name of the security domain as specified in a deployment. |
|
| This attribute is a reference to the Elytron security domain that should be used. |
|
| This attribute enables authorization using JACC. |
|
| This is a runtime attribute that lists all deployments currently referencing the ASD. |
You can configure the application-security-domain in the ejb subsystem in either of the following ways. You can use the management console, or you can use the management CLI.
6.5.1. Configure the Application Security Domain Using the Management Console
- Access the management console. For more information, see Management Console in the JBoss EAP Configuration Guide.
- Navigate to Configuration → Subsystems → EJB and click View.
- Select the Security Domain tab and configure application security domains as necessary.
6.5.2. Configure the Application Security Domain Using the Management CLI
In the following example, MyAppSecurity is a security domain that is referenced in the deployment and ApplicationDomain is an Elytron security domain that has been configured in the elytron subsystem.
/subsystem=ejb3/application-security-domain=MyAppSecurity:add(security-domain=ApplicationDomain)
The following XML is added to the ejb subsystem of the server configuration file as a result of this command.
<application-security-domains>
    <application-security-domain name="MyAppSecurity" security-domain="ApplicationDomain"/>
</application-security-domains>
See the ejb-security quickstart that ships with JBoss EAP for a simple working example of an EJB that uses Elytron to handle security.
Chapter 7. EJB Interceptors
7.1. Custom Interceptors
JBoss EAP allows you to develop and manage custom EJB interceptors.
You can create the following types of interceptors:
Client interceptors
Client interceptors run when JBoss EAP functions as a client.
Server interceptors
Server interceptors run when JBoss EAP functions as a server. These interceptors are configured globally for the server.
Container Interceptors
Container interceptors run when JBoss EAP functions as a server. These interceptors are configured in the EJB container.
Custom interceptor classes should be added to a module and stored in the $JBOSS_HOME/modules directory.
7.1.1. The Interceptor Chain
Custom interceptors are executed at specific points in the interceptor chain.
Container interceptors configured for an EJB are executed before interceptors provided by Wildfly, such as security interceptors or transaction management interceptors. Container interceptors can thus process or configure context data before invocation of Wildfly interceptors or global interceptors.
Server and client interceptors are executed after Wildfly-specific interceptors.
7.1.2. Custom Client Interceptors
Custom client interceptors implement the org.jboss.ejb.client.EJBClientInterceptor interface.
The org.jboss.ejb.client.EJBClientInvocationContext interface should also be included.
The following code illustrates an example client interceptor.
Client interceptor code example
package org.foo;
import org.jboss.ejb.client.EJBClientInterceptor;
import org.jboss.ejb.client.EJBClientInvocationContext;
public class FooInterceptor implements EJBClientInterceptor {
    @Override
    public void handleInvocation(EJBClientInvocationContext context) throws Exception {
        context.sendRequest();
    }
    @Override
    public Object handleInvocationResult(EJBClientInvocationContext context) throws Exception {
        return context.getResult();
    }
}
7.1.3. Custom Server Interceptors
Server interceptors use the @javax.annotation.AroundInvoke annotation or the javax.interceptor.AroundTimeout annotation to mark the method that is invoked during the invocation on the bean.
The following code illustrates an example server interceptor.
Server Interceptor Code Example
package org.testsuite.ejb.serverinterceptor;
import javax.annotation.PostConstruct;
import javax.interceptor.AroundInvoke;
import javax.interceptor.InvocationContext;
public class TestServerInterceptor {
    @AroundInvoke
    public Object aroundInvoke(final InvocationContext invocationContext) throws Exception {

        return invocationContext.proceed();
    }
}
7.1.4. Custom Container Interceptors
Container interceptors use the @javax.annotation.AroundInvoke annotation or the javax.interceptor.AroundTimeout annotation to mark the method that is invoked during the invocation on the bean.
Standard Jakarta EE interceptors, as defined by the Jakarta Enterprise Beans 3.2 specification, are expected to run after the container has completed security context propagation, transaction management, and other container provided invocation processing.
The following code illustrates an interceptor class that marks the iAmAround method for invocation.
Container Interceptor Code Example
public class ClassLevelContainerInterceptor {
    @AroundInvoke
    private Object iAmAround(final InvocationContext invocationContext) throws Exception {
        return this.getClass().getName() + " " + invocationContext.proceed();
    }
}
Differences Between the Container Interceptor and the Jakarta EE Interceptor API
Although container interceptors are modeled to be similar to Jakarta EE interceptors, there are some differences in the semantics of the API. For example, it is illegal for container interceptors to invoke the javax.interceptor.InvocationContext.getTarget() method because these interceptors are invoked long before the EJB components are set up or instantiated.
7.1.5. Configuring a Container Interceptor
Container interceptors use the standard Jakarta EE interceptor libraries.
Thus they use the same XSD elements that are allowed in the ejb-jar.xml file for the 3.2 version of the ejb-jar deployment descriptor.
Because they are based on the standard Jakarta EE interceptor libraries, container interceptors may only be configured using deployment descriptors. By design applications do not require any JBoss EAP-specific annotation or other library dependencies.
To configure a container interceptor:
-
Create a
jboss-ejb3.xmlfile in theMETA-INF/`directory of the EJB deployment. Configure the container interceptor elements in the descriptor file.
-
Use the
urn:container-interceptors:1.0namespace to specify configuration of container interceptor elements. -
Use the
<container-interceptors>element to specify the container interceptors. Use the
<interceptor-binding>elements to bind the container interceptor to the EJB. The interceptors can be bound in any of the following ways:- Bind the interceptor to all the EJB in the deployment using a wildcard (*).
- Bind the interceptor at the individual bean level using the specific EJB name.
Bind the interceptor at the specific method level for the EJB.
NoteThese elements are configured using the EJB 3.2 XSD in the same way as Jakarta EE interceptors.
-
Use the
The following example descriptor file illustrates configuration options.
Container Interceptor jboss-ejb3.xml File Example
<jboss xmlns="http://www.jboss.com/xml/ns/javaee"
       xmlns:jee="http://java.sun.com/xml/ns/javaee"
       xmlns:ci ="urn:container-interceptors:1.0">
    <jee:assembly-descriptor>
        <ci:container-interceptors>
            <!-- Default interceptor -->
            <jee:interceptor-binding>
                <ejb-name>*</ejb-name>
                <interceptor-class>org.jboss.as.test.integration.ejb.container.interceptor.ContainerInterceptorOne</interceptor-class>
            </jee:interceptor-binding>
            <!-- Class level container-interceptor -->
            <jee:interceptor-binding>
                <ejb-name>AnotherFlowTrackingBean</ejb-name>
                <interceptor-class>org.jboss.as.test.integration.ejb.container.interceptor.ClassLevelContainerInterceptor</interceptor-class>
            </jee:interceptor-binding>
            <!-- Method specific container-interceptor -->
            <jee:interceptor-binding>
                <ejb-name>AnotherFlowTrackingBean</ejb-name>
                <interceptor-class>org.jboss.as.test.integration.ejb.container.interceptor.MethodSpecificContainerInterceptor</interceptor-class>
                <method>
                    <method-name>echoWithMethodSpecificContainerInterceptor</method-name>
                </method>
            </jee:interceptor-binding>
            <!-- container interceptors in a specific order -->
            <jee:interceptor-binding>
                <ejb-name>AnotherFlowTrackingBean</ejb-name>
                <interceptor-order>
                    <interceptor-class>org.jboss.as.test.integration.ejb.container.interceptor.ClassLevelContainerInterceptor</interceptor-class>
                    <interceptor-class>org.jboss.as.test.integration.ejb.container.interceptor.MethodSpecificContainerInterceptor</interceptor-class>
                    <interceptor-class>org.jboss.as.test.integration.ejb.container.interceptor.ContainerInterceptorOne</interceptor-class>
                </interceptor-order>
                <method>
                    <method-name>echoInSpecificOrderOfContainerInterceptors</method-name>
                </method>
            </jee:interceptor-binding>
        </ci:container-interceptors>
    </jee:assembly-descriptor>
</jboss>
The allow-ejb-name-regex attribute allows you to use regular expressions in interceptor bindings and maps the interceptors to all the beans that match the specified regular expression. Use the following management CLI command to enable the allow-ejb-name-regex attribute of the ejb3 subsystem to true:
/subsystem=ejb3:write-attribute(name=allow-ejb-name-regex,value=true)
The schema for the urn:container-interceptors:1.0 namespace is available at http://www.jboss.org/schema/jbossas/jboss-ejb-container-interceptors_1_0.xsd.
7.1.6. Server and Client Interceptor Configuration
Server and client interceptors are added globally to the JBoss EAP configuration in the configuration file being used.
Server interceptors are added to the <server-interceptors> element in the ejb3 subsystem configuration. Client interceptors are added to the <client-interceptors> element in the ejb3 subsystem configuration.
The following example illustrates adding a server interceptor.
/subsystem=ejb3:list-add(name=server-interceptors,value={module=org.abccorp:tracing-interceptors:1.0,class=org.abccorp.TracingInterceptor})The following example illustrates adding a client interceptor.
/subsystem=ejb3:list-add(name=client-interceptors,value={module=org.abccorp:clientInterceptor:1.0,class=org.abccorp.clientInterceptor})Whenever a server interceptor or client interceptor is added or the configuration of an interceptor is changed, the server must be reloaded.
7.1.7. Changing the Security Context Identity
Rather than open multiple client connections, you can give permission to the authenticated user to switch identities and execute a request on the existing connection as a different user.
By default, when you make a remote call to an EJB that is deployed to the application server, the connection to the server is authenticated and any subsequent requests that use the connection are executed using the original authenticated identity. This is true for both client-to-server and server-to-server calls. If you need to use different identities from the same client, normally you must open multiple connections to the server so that each one is authenticated as a different identity. Instead, you can allow the authenticated user to change identities.
To change the identity of the authenticated user:
Implement the change of identity in the interceptor code.
Client interceptors
The interceptor must pass the requested identity through the context data map, which can be obtained by using a call to
EJBClientInvocationContext.getContextData(). The following example code illustrates a client interceptor that switches identities.Client Interceptor Code Example
public class ClientSecurityInterceptor implements EJBClientInterceptor {

    public void handleInvocation(EJBClientInvocationContext context) throws Exception {
        Principal currentPrincipal = SecurityActions.securityContextGetPrincipal();

        if (currentPrincipal != null) {
            Map<String, Object> contextData = context.getContextData();
            contextData.put(ServerSecurityInterceptor.DELEGATED_USER_KEY, currentPrincipal.getName());
        }
        context.sendRequest();
    }

    public Object handleInvocationResult(EJBClientInvocationContext context) throws Exception {
        return context.getResult();
    }
}
Container and server interceptors
These interceptors receive the
InvocationContextcontaining the identity and make the request to switch to that new identity. The following code illustrates an abridged example for a container interceptor:Container Interceptor Code Example
public class ServerSecurityInterceptor {

    private static final Logger logger = Logger.getLogger(ServerSecurityInterceptor.class);

    static final String DELEGATED_USER_KEY = ServerSecurityInterceptor.class.getName() + ".DelegationUser";

    @AroundInvoke
    public Object aroundInvoke(final InvocationContext invocationContext) throws Exception {
        Principal desiredUser = null;
        UserPrincipal connectionUser = null;

        Map<String, Object> contextData = invocationContext.getContextData();
        if (contextData.containsKey(DELEGATED_USER_KEY)) {
            desiredUser = new SimplePrincipal((String) contextData.get(DELEGATED_USER_KEY));

            Collection<Principal> connectionPrincipals = SecurityActions.getConnectionPrincipals();

            if (connectionPrincipals != null) {
                for (Principal current : connectionPrincipals) {
                    if (current instanceof UserPrincipal) {
                        connectionUser = (UserPrincipal) current;
                        break;
                    }
                }

            } else {
                throw new IllegalStateException("Delegation user requested but no user on connection found.");
            }
        }

        ContextStateCache stateCache = null;
        try {
            if (desiredUser != null && connectionUser != null
                && (desiredUser.getName().equals(connectionUser.getName()) == false)) {
                // The final part of this check is to verify that the change does actually indicate a change in user.
                try {
                    // We have been requested to use an authentication token
                    // so now we attempt the switch.
                    stateCache = SecurityActions.pushIdentity(desiredUser, new OuterUserCredential(connectionUser));
                } catch (Exception e) {
                    logger.error("Failed to switch security context for user", e);
                    // Don't propagate the exception stacktrace back to the client for security reasons
                    throw new EJBAccessException("Unable to attempt switching of user.");
                }
            }

            return invocationContext.proceed();
        } finally {
            // switch back to original context
            if (stateCache != null) {
                SecurityActions.popIdentity(stateCache);;
            }
        }
    }
-
An application can insert a client interceptor into the
EJBClientContextinterceptor chain programmatically or by using the service loader mechanism. For instructions to configure a client interceptor, see Using a Client Interceptor in an Application. Create a Jakarta Authentication login module.
The Jakarta Authentication LoginModule component is responsible for verifying that the user is allowed to execute requests as the requested identity. The following abridged code example shows the methods that perform the login and validation:
LoginModule Code Example
    @SuppressWarnings("unchecked")
    @Override
    public boolean login() throws LoginException {
        if (super.login() == true) {
            log.debug("super.login()==true");
            return true;
        }

        // Time to see if this is a delegation request.
        NameCallback ncb = new NameCallback("Username:");
        ObjectCallback ocb = new ObjectCallback("Password:");

        try {
            callbackHandler.handle(new Callback[] { ncb, ocb });
        } catch (Exception e) {
            if (e instanceof RuntimeException) {
                throw (RuntimeException) e;
            }
            // If the CallbackHandler can not handle the required callbacks then no chance.
            return false;
        }

        String name = ncb.getName();
        Object credential = ocb.getCredential();

        if (credential instanceof OuterUserCredential) {
            // This credential type will only be seen for a delegation request, if not seen then the request is not for us.

            if (delegationAcceptable(name, (OuterUserCredential) credential)) {
                identity = new SimplePrincipal(name);
                if (getUseFirstPass()) {
                    String userName = identity.getName();
                    if (log.isDebugEnabled())
                        log.debug("Storing username '" + userName + "' and empty password");
                    // Add the username and an empty password to the shared state map
                    sharedState.put("javax.security.auth.login.name", identity);
                    sharedState.put("javax.security.auth.login.password", "");
                }
                loginOk = true;
                return true;
            }
        }
        return false; // Attempted login but not successful.
    }

    // Make a trust user to decide if the user switch is acceptable.
    protected boolean delegationAcceptable(String requestedUser, OuterUserCredential connectionUser) {
    if (delegationMappings == null) {
        return false;
    }

    String[] allowedMappings = loadPropertyValue(connectionUser.getName(), connectionUser.getRealm());
    if (allowedMappings.length == 1 && "*".equals(allowedMappings[0])) {
        // A wild card mapping was found.
        return true;
    }
    for (String current : allowedMappings) {
        if (requestedUser.equals(current)) {
            return true;
        }
    }
    return false;
}
7.1.8. Using a Client Interceptor in an Application
An application can insert a client interceptor into the EJBClientContext interceptor chain programmatically, using the service loader mechanism, or using the ClientInterceptors annotation.
An EJBClientInterceptor can request specific data from the server side invocation context by calling org.jboss.ejb.client.EJBClientInvocationContext#addReturnedContextDataKey(String key). If the requested data is present under the provided key in the context data map, it is sent to the client.
7.1.8.1. Inserting a Client Interceptor Programmatically
After creating an EJBClientContext with the interceptor registered, insert the interceptor.
The following code illustrates how to create an EJBClientContext with the interceptor registration:
EJBClientContext ctxWithInterceptors = EJBClientContext.getCurrent().withAddedInterceptors(clientInterceptor);
After creating the EJBClientContext, two options are available to insert the interceptor:
You can run the following code with
EJBClientContextapplied using aCallableoperation. EJB calls performed within theCallableoperation will apply the client-side interceptors:ctxWithInterceptors.runCallable(() -> { // perform the calls which should use the interceptor })Alternatively you can mark the newly created
EJBClientContextas the new default:EJBClientContext.getContextManager().setThreadDefault(ctxWithInterceptors);
7.1.8.2. Inserting a Client Interceptor Using the Service Loader Mechanism
Create a META-INF/services/org.jboss.ejb.client.EJBClientInterceptor file and place or package it in the class path of the client application.
The rules for the file are dictated by the Java ServiceLoader Mechanism.
- This file is expected to contain a separate line for each fully qualified class name of the EJB client interceptor implementation.
- The EJB client interceptor classes must be available in the class path.
EJB client interceptors that are added using the service loader mechanism are added in the order they are found in the class path and are added to the end of the client interceptor chain.
7.1.8.3. Inserting a Client Interceptor Using the ClientInterceptor Annotation
The @org.jboss.ejb.client.annotation.ClientInterceptors annotation allows you to place the EJB interceptor in the client-side of the remote call.
import org.jboss.ejb.client.annotation.ClientInterceptors;
@ClientInterceptors({HelloClientInterceptor.class})

public interface HelloBeanRemote {
   public String hello();
}
Chapter 8. Clustered Enterprise JavaBeans (EJB)
8.1. About Clustered EJBs
EJB components can be clustered for high-availability scenarios. They use different protocols than HTTP components, so they are clustered in different ways. EJB 2 and 3 stateful and stateless beans can be clustered.
For information on singletons, see HA Singleton Service in the JBoss EAP Development Guide
8.2. EJB Client Code Simplification
You can simplify the EJB client code when invoking the EJB server-side clustered components. The following procedures outline the multiple ways to simplify the EJB client code:
The use of the jboss-ejb-client.properties file is deprecated in favor of the wildfly-config.xml file.
8.3. Deploying Clustered EJB
Clustering support is available in the HA profiles of JBoss EAP 7.3. Starting the standalone server with HA capabilities enabled involves starting it with the standalone-ha.xml or standalone-full-ha.xml file:
$ EAP_HOME/bin/standalone.sh --server-config=standalone-ha.xmlThis will start a single instance of the server with HA capabilities.
To be able to see the benefits of clustering, you will need more than one instance of the server. So let us start another server with HA capabilities. That another instance of the server can either be on the same machine or on some other machine. If it is on the same machine, you will need to take care of two things:
- Pass the port offset for the second instance
-
Make sure that each of the server instances have a unique
jboss.node.namesystem property.
You can do that by passing the following two system properties to the startup command:
$ EAP_HOME/bin/standalone.sh --server-config=standalone-ha.xml -Djboss.socket.binding.port-offset=PORT_OFFSET -Djboss.node.name=UNIQUE_NODE_NAME
Follow whichever approach you feel comfortable with for deploying the EJB deployment to this instance too.
Deploying the application on just one node of a standalone instance of a clustered server does not mean that it will be automatically deployed to the other clustered instance. You will have to do deploy it explicitly on the other standalone clustered instance too. Or you can start the servers in domain mode so that the deployment can be deployed to all the servers within a server group.
Now that you have deployed an application with clustered EJB on both the instances, the EJB are now capable of making use of the clustering features.
Starting with JBoss EAP 7, if JBoss EAP is started using an HA profile, the state of your stateful session bean will be replicated. You no longer need to use the @Clustered annotation to enable clustering behavior.
You can disable replication for a stateful session bean by setting passivationCapable to false in the @Stateful annotation:
@Stateful(passivationCapable=false)
This instructs the server to use the ejb cache defined by passivation-disabled-cache-ref instead of cache-ref.
To globally disable the replication of stateful session beans, use the following management CLI command:
/subsystem=ejb3:write-attribute(name=default-sfsb-cache,value=simple)
8.4. Failover for Clustered EJB
Clustered EJB have failover capability. The state of the @Stateful EJB is replicated across the cluster nodes so that if one of the nodes in the cluster goes down, some other node will be able to take over the invocations.
Under some circumstances in a clustered environment, such as when a server in the cluster crashes, the EJB client might receive an exception instead of a response. The EJB client library will automatically retry the invocation when it is safe to do so, depending on the type of the failure that occurs. However, if a request fails and it cannot be determined conclusively to be safe to retry, then you can handle the exception as appropriate for your environment. You can, however, use custom interceptors to add additional retry behavior.
8.5. Remote Standalone Clients
The use of the jboss-ejb-client.properties file is deprecated in favor of the wildfly-config.xml file.
A standalone remote client can use either the Java Naming and Directory Interface approach or native JBoss EJB client APIs to communicate with the servers. The important thing to note is that when you are invoking clustered EJB deployments, you do not have to list all the servers within the cluster. This would not have been feasible due the dynamic nature of cluster node additions within a cluster.
The remote client has to list only one of the servers with the clustering capability. This server will act as the starting point for cluster topology communication between the client and the clustered nodes.
Note that you have to configure the ejb cluster in the jboss-ejb-client.properties configuration file:
remote.clusters=ejb
remote.cluster.ejb.connect.options.org.xnio.Options.SASL_POLICY_NOANONYMOUS=false
remote.cluster.ejb.connect.options.org.xnio.Options.SSL_ENABLED=false
8.6. Cluster Topology Communication
The use of the jboss-ejb-client.properties file is deprecated in favor of the wildfly-config.xml file.
When a client connects to a server, the JBoss EJB client implementation communicates internally with the server for the cluster topology information, if the server has clustering capability. For example, assuming that server X is listed as the initial server to connect to, when the client connects to server X, the server will send back an asynchronous cluster topology message to the client. This topology message consists of the cluster name and the information of the nodes that belong to the cluster. The node information includes the node address and port number to connect to, when required. So in this example, server X will send back the cluster topology consisting of the other server Y that belongs to the cluster.
In case of stateful clustered EJB, the invocation flow happens in two steps.
- Creation of a session for the stateful bean, which happens when you do a Java Naming and Directory Interface lookup for that bean.
- Invocation of the returned proxy.
The lookup for the stateful bean, internally, triggers a synchronous session creation request from the client to the server. In this case, the session creation request goes to server X because it was configured in the jboss-ejb-client.properties file. Since server X is clustered, it will return a session id and send back an affinity of that session. In case of clustered servers, the affinity is equal to the name of the cluster to which the stateful bean belongs on the server side. For non-clustered beans, the affinity is the node name on which the session was created. This affinity will help the EJB client to route the invocations on the proxy, as appropriate, to either a node within a cluster for clustered beans, or to a specific node for non-clustered beans. While this session creation request is going on, server X will also send back an asynchronous message that contains the cluster topology. The JBoss EJB client implementation will record this topology information and use it later for connection creation to nodes within the cluster and routing invocations to those nodes, when required.
To understand how failover works, consider the same example of server X being the starting point and a client application looking up a stateful bean and invoking it. During these invocations, the client side collects the cluster topology information from the server. Assuming that for some reason server X goes down and the client application subsequently invokes on the proxy. The JBoss EJB client implementation at this stage must be aware of the affinity, and in this case it is the cluster affinity. From the cluster topology information that the client has, it knows that the cluster has two nodes, server X and server Y. When the invocation arrives, the client notices that server X is down, so it uses a selector to fetch a suitable node from the cluster nodes. When the selector returns a node from the cluster nodes, the JBoss EJB client implementation creates a connection to that node, if the connection was not already created earlier, and creates an EJB receiver out of it. Since in this example, the only other node in the cluster is server Y, the selector will return server Y as the node and the JBoss EJB client implementation will use it to create an EJB receiver out of it and use this receiver to pass on the invocation on the proxy. Effectively, the invocation has now failed over to a different node within the cluster.
8.7. Automatic Transaction Stickiness for EJB
A transaction object, which is looked up from the same context as the EJB proxy, targets the same host. Having an active transaction pins the invocation context to the same node, if the context is multi-host or clustered.
This behavior depends on whether you have outflowed your transaction or you are using a remote user transaction.
For an outflowed transaction, when an application is looked up on a specific node, all the invocations to that application under the same transaction attempt to target this node. The nodes that have already received the outflowed transaction will be preferred over nodes that have not received it yet.
For a remote user transaction, the first successful invocation will lock the transaction to the given node, and subsequent invocations under this transaction must go to the same node, otherwise an exception is thrown.
8.8. Remote Clients on Another Instance
This section explains how a client application deployed on a JBoss EAP instance invokes a clustered stateful bean that is deployed on another JBoss EAP instance.
In the following example, there are three servers involved. Servers X and Y both belong to a cluster and have clustered EJB deployed on them. There is another server instance server C, which may or may not have clustering capability. Server C acts as a client on which there is a deployment that wants to invoke the clustered beans deployed on servers X and Y and achieve failover.
The configurations are done in the jboss-ejb-client.xml file, which points to a remote outbound connection to the other server. The configuration in the jboss-ejb-client.xml file is in the deployment of server C because server C is the client. The client configuration need not point to all the clustered nodes, but just to one of them. This will act as a starting point for the communication.
In this case, a remote outbound connection is created from server C to server X and then server X is used as the starting point for the communication. Similar to the case of remote standalone clients, when the application on server C looks up a stateful bean, a session creation request is sent to server X that returns a session id and the cluster affinity for it. Server X also sends back an asynchronous message to server C containing the cluster topology. This topology information includes the node information of server Y, because server Y belongs to the cluster along with server X. Subsequent invocations on the proxy will be routed appropriately to the nodes in the cluster. If server X goes down, as explained earlier, a different node from the cluster will be selected and the invocation will be forwarded to that node.
Both remote standalone clients as well as remote clients on another JBoss EAP instance act similarly in terms of failover.
8.9. Standalone and In-server Client Configuration
The use of the jboss-ejb-client.properties file is deprecated in favor of the wildfly-config.xml file.
To connect an EJB client to a clustered EJB application, you need to expand the existing configuration in standalone EJB client or in-server EJB client to include cluster connection configuration. The jboss-ejb-client.properties for standalone EJB client, or even jboss-ejb-client.xml file for a server-side application must be expanded to include a cluster configuration.
An EJB client is any program that uses an EJB on a remote server. A client is in-server when the EJB client calling the remote server is itself running inside of a server. In other words, a JBoss EAP instance calling out to another JBoss EAP instance would be considered an in-server client.
This example shows the additional cluster configuration required for a standalone EJB client.
remote.clusters=ejb
remote.cluster.ejb.connect.options.org.xnio.Options.SASL_POLICY_NOANONYMOUS=false
remote.cluster.ejb.connect.options.org.xnio.Options.SSL_ENABLED=false
remote.cluster.ejb.username=test
remote.cluster.ejb.password=password
If an application uses the remote-outbound-connection, you need to configure the jboss-ejb-client.xml file and add cluster configuration as shown in the following example:
<jboss-ejb-client xmlns:xsi="urn:jboss:ejb-client:1.2" xsi:noNamespaceSchemaLocation="jboss-ejb-client_1_2.xsd">
  <client-context>
    <ejb-receivers>
      <!-- this is the connection to access the app-one -->
      <remoting-ejb-receiver outbound-connection-ref="remote-ejb-connection-1" />
      <!-- this is the connection to access the app-two -->
      <remoting-ejb-receiver outbound-connection-ref="remote-ejb-connection-2" />
    </ejb-receivers>

    <!-- If an outbound connection connects to a cluster,
             a list of members is provided after successful connection.
         To connect to this node this cluster element must be defined. -->

    <clusters>
      <!-- cluster of remote-ejb-connection-1 -->
      <cluster name="ejb" security-realm="ejb-security-realm-1" username="quickuser1">
        <connection-creation-options>
        <property name="org.xnio.Options.SSL_ENABLED" value="false" />
        <property name="org.xnio.Options.SASL_POLICY_NOANONYMOUS" value="false" />
        </connection-creation-options>
      </cluster>
    </clusters>
  </client-context>
</jboss-ejb-client>
For more information about remote-outbound-connection, see About the Remoting Subsystem in the JBoss EAP Configuration Guide.
For a secure connection you need to add the credentials to cluster configuration in order to avoid an authentication exception.
8.10. Implementing a Custom Load Balancing Policy for EJB Calls
The use of the jboss-ejb-client.properties file is deprecated in favor of the wildfly-config.xml file.
It is possible to implement an alternate or customized load balancing policy in order to balance an application’s EJB calls across servers.
You can implement AllClusterNodeSelector for EJB calls. The node selection behavior of AllClusterNodeSelector is similar to a default selector except that AllClusterNodeSelector uses all available cluster nodes even in case of a large cluster (number of nodes > 20). If an unconnected cluster node is returned, it is opened automatically. The following example shows AllClusterNodeSelector implementation:
package org.jboss.as.quickstarts.ejb.clients.selector;

import java.util.Arrays;
import java.util.Random;
import java.util.logging.Level;
import java.util.logging.Logger;

import org.jboss.ejb.client.ClusterNodeSelector;
public class AllClusterNodeSelector implements ClusterNodeSelector {
  private static final Logger LOGGER = Logger.getLogger(AllClusterNodeSelector.class.getName());

  @Override
  public String selectNode(final String clusterName, final String[] connectedNodes, final String[] availableNodes) {
    if(LOGGER.isLoggable(Level.FINER)) {
      LOGGER.finer("INSTANCE "+this+ " : cluster:"+clusterName+" connected:"+Arrays.deepToString(connectedNodes)+" available:"+Arrays.deepToString(availableNodes));
    }

    if (availableNodes.length == 1) {
        return availableNodes[0];
    }
    final Random random = new Random();
    final int randomSelection = random.nextInt(availableNodes.length);
    return availableNodes[randomSelection];
  }

}
You can also implement the SimpleLoadFactorNodeSelector for EJB calls. Load balancing in SimpleLoadFactorNodeSelector happens based on a load factor. The load factor (2/3/4) is calculated based on the names of nodes (A/B/C) irrespective of the load on each node. The following example shows SimpleLoadFactorNodeSelector implementation:
package org.jboss.as.quickstarts.ejb.clients.selector;

import java.util.ArrayList;
import java.util.Arrays;
import java.util.Collection;
import java.util.HashMap;
import java.util.List;
import java.util.Map;
import java.util.logging.Level;
import java.util.logging.Logger;

import org.jboss.ejb.client.DeploymentNodeSelector;
public class SimpleLoadFactorNodeSelector implements DeploymentNodeSelector {
  private static final Logger LOGGER = Logger.getLogger(SimpleLoadFactorNodeSelector.class.getName());
  private final Map<String, List<String>[]> nodes = new HashMap<String, List<String>[]>();
  private final Map<String, Integer> cursor = new HashMap<String, Integer>();

  private ArrayList<String> calculateNodes(Collection<String> eligibleNodes) {
    ArrayList<String> nodeList = new ArrayList<String>();

    for (String string : eligibleNodes) {
      if(string.contains("A") || string.contains("2")) {
        nodeList.add(string);
        nodeList.add(string);
      } else if(string.contains("B") || string.contains("3")) {
        nodeList.add(string);
        nodeList.add(string);
        nodeList.add(string);
      } else if(string.contains("C") || string.contains("4")) {
        nodeList.add(string);
        nodeList.add(string);
        nodeList.add(string);
        nodeList.add(string);
      }
    }
    return nodeList;
  }

  @SuppressWarnings("unchecked")
  private void checkNodeNames(String[] eligibleNodes, String key) {
    if(!nodes.containsKey(key) || nodes.get(key)[0].size() != eligibleNodes.length || !nodes.get(key)[0].containsAll(Arrays.asList(eligibleNodes))) {
      // must be synchronized as the client might call it concurrent
      synchronized (nodes) {
        if(!nodes.containsKey(key) || nodes.get(key)[0].size() != eligibleNodes.length || !nodes.get(key)[0].containsAll(Arrays.asList(eligibleNodes))) {
          ArrayList<String> nodeList = new ArrayList<String>();
          nodeList.addAll(Arrays.asList(eligibleNodes));

          nodes.put(key, new List[] { nodeList, calculateNodes(nodeList) });
        }
      }
    }
  }
   private synchronized String nextNode(String key) {
    Integer c = cursor.get(key);
    List<String> nodeList = nodes.get(key)[1];

    if(c == null || c >= nodeList.size()) {
      c = Integer.valueOf(0);
    }

    String node = nodeList.get(c);
    cursor.put(key, Integer.valueOf(c + 1));

    return node;
  }

  @Override
  public String selectNode(String[] eligibleNodes, String appName, String moduleName, String distinctName) {
    if (LOGGER.isLoggable(Level.FINER)) {
      LOGGER.finer("INSTANCE " + this + " : nodes:" + Arrays.deepToString(eligibleNodes) + " appName:" + appName + " moduleName:" + moduleName
          + " distinctName:" + distinctName);
    }

    // if there is only one there is no sense to choice
    if (eligibleNodes.length == 1) {
      return eligibleNodes[0];
    }
    final String key = appName + "|" + moduleName + "|" + distinctName;

    checkNodeNames(eligibleNodes, key);
    return nextNode(key);
  }
}
Configuring the jboss-ejb-client.properties File
You need to add the property remote.cluster.ejb.clusternode.selector with the name of your implementation class (AllClusterNodeSelector or SimpleLoadFactorNodeSelector). The selector will see all configured servers that are available at the invocation time. The following example uses AllClusterNodeSelector as the cluster node selector:
remote.clusters=ejb
remote.cluster.ejb.clusternode.selector=org.jboss.as.quickstarts.ejb.clients.selector.AllClusterNodeSelector
remote.cluster.ejb.connect.options.org.xnio.Options.SASL_POLICY_NOANONYMOUS=false
remote.cluster.ejb.connect.options.org.xnio.Options.SSL_ENABLED=false
remote.cluster.ejb.username=test
remote.cluster.ejb.password=password

remote.connectionprovider.create.options.org.xnio.Options.SSL_ENABLED=false
remote.connections=one,two
remote.connection.one.host=localhost
remote.connection.one.port = 8080
remote.connection.one.connect.options.org.xnio.Options.SASL_POLICY_NOANONYMOUS=false
remote.connection.one.username=user
remote.connection.one.password=user123
remote.connection.two.host=localhost
remote.connection.two.port = 8180
remote.connection.two.connect.options.org.xnio.Options.SASL_POLICY_NOANONYMOUS=false
Using EJB Client API
You need to add the property remote.cluster.ejb.clusternode.selector to the list for the PropertiesBasedEJBClientConfiguration constructor. The following example uses AllClusterNodeSelector as the cluster node selector:
Properties p = new Properties();
p.put("remote.clusters", "ejb");
p.put("remote.cluster.ejb.clusternode.selector", "org.jboss.as.quickstarts.ejb.clients.selector.AllClusterNodeSelector");
p.put("remote.cluster.ejb.connect.options.org.xnio.Options.SASL_POLICY_NOANONYMOUS", "false");
p.put("remote.cluster.ejb.connect.options.org.xnio.Options.SSL_ENABLED", "false");
p.put("remote.cluster.ejb.username", "test");
p.put("remote.cluster.ejb.password", "password");

p.put("remote.connectionprovider.create.options.org.xnio.Options.SSL_ENABLED", "false");
p.put("remote.connections", "one,two");
p.put("remote.connection.one.port", "8080");
p.put("remote.connection.one.host", "localhost");
p.put("remote.connection.two.port", "8180");
p.put("remote.connection.two.host", "localhost");

EJBClientConfiguration cc = new PropertiesBasedEJBClientConfiguration(p);
ContextSelector<EJBClientContext> selector = new ConfigBasedEJBClientContextSelector(cc);
EJBClientContext.setSelector(selector);

p = new Properties();
p.put(Context.URL_PKG_PREFIXES, "org.jboss.ejb.client.naming");
InitialContext context = new InitialContext(p);
Configuring the jboss-ejb-client.xml File
To use the load balancing policy for server to server communication, package the class together with the application and configure it within the jboss-ejb-client.xml settings located in META-INF folder. The following example uses AllClusterNodeSelector as the cluster node selector:
<jboss-ejb-client xmlns:xsi="urn:jboss:ejb-client:1.2" xsi:noNamespaceSchemaLocation="jboss-ejb-client_1_2.xsd">
  <client-context deployment-node-selector="org.jboss.ejb.client.DeploymentNodeSelector">
    <ejb-receivers>
      <!-- This is the connection to access the application. -->
      <remoting-ejb-receiver outbound-connection-ref="remote-ejb-connection-1" />
    </ejb-receivers>
    <!-- Specify the cluster configurations applicable for this client context -->
    <clusters>
      <!-- Configure the cluster of remote-ejb-connection-1. -->
      <cluster name="ejb" security-realm="ejb-security-realm-1" username="test" cluster-node-selector="org.jboss.as.quickstarts.ejb.clients.selector.AllClusterNodeSelector">
        <connection-creation-options>
          <property name="org.xnio.Options.SSL_ENABLED" value="false" />
          <property name="org.xnio.Options.SASL_POLICY_NOANONYMOUS" value="false" />
        </connection-creation-options>
      </cluster>
    </clusters>
  </client-context>
</jboss-ejb-client>
To use the above configuration with security, you will need to add ejb-security-realm-1 to client-server configuration. The following example shows the CLI commands for adding security realm (ejb-security-realm-1) the value is the base64 encoded password for the user "test":
/core-service=management/security-realm=ejb-security-realm-1:add()
/core-service=management/security-realm=ejb-security-realm-1/server-identity=secret:add(value=cXVpY2sxMjMr)
If the load balancing policy should be used for server to server communication, the class can be packaged together with the application or as a module. This class is configured in the jboss-ejb-client settings file located in the META-INF directory of the top-level EAR archive. The following example uses RoundRobinNodeSelector as the deployment node selector.
<jboss-ejb-client xmlns="urn:jboss:ejb-client:1.2">
    <client-context deployment-node-selector="org.jboss.example.RoundRobinNodeSelector">
        <ejb-receivers>
            <remoting-ejb-receiver outbound-connection-ref="..."/>
        </ejb-receivers>
        ...
    </client-context>
</jboss-ejb-client>
If you are running a standalone server, use the start option -Djboss.node.name= or the server configuration file standalone.xml to configure the server name. Ensure that the server name is unique. If you are running a managed domain, the host controller automatically validates that the names are unique.
8.11. EJB Transactions in a Clustered Environment
If the client code invokes a clustered EJB, then the cluster affinity is set automatically. If you manage transactions on the client side, you can choose to target a specific node in the cluster or you can allow the client to lazily select the cluster node to handle transactions. This section describes both options.
EJB Transactions Target a Specific Node
You can target a specific node in the cluster to handle a transaction using the following procedure.
Specify the target cluster node address using the
PROVIDER_URLproperty when creating theInitialContext.props.put(Context.PROVIDER_URL, "remote+http://127.0.0.1:8080"); ... InitialContext ctx = new InitialContext(props);
In the client, look up the
txn:RemoteUserTransactionfrom theInitialContext.UserTransaction ut = (UserTransaction)ctx.lookup("txn:RemoteUserTransaction");You can do a Java Naming and Directory Interface lookup for a
UserTransactionby setting thePROVIDER_URLproperty to the URL of the server and then look uptxn:UserTransaction, as shown in the code example below:final Hashtable<String, String> jndiProperties = new Hashtable<>(); jndiProperties.put(Context.INITIAL_CONTEXT_FACTORY, "org.wildfly.naming.client.WildFlyInitialContextFactory"); jndiProperties.put(Context.PROVIDER_URL, "remote+http://localhost:8080"); final Context context = new InitialContext(jndiProperties); SecuredEJBRemote reference = (SecuredEJBRemote) context.lookup("txn:UserTransaction");UserTransactionis not bound to any particular destination until an actual invocation takes place. Upon invocation, thisUserTransactionis bound to the respective destination for the entire lifetime of the transaction.You do not need to know the node name or the destination before beginning a
UserTransaction. Theorg.jboss.ejb.client.EJBClient.getUserTransaction()method gives you a remoteUserTransactionthat automatically selects its destination based on the first invocation. Looking up a remoteUserTransactionfrom Java Naming and Directory Interface also works the same way.NoteThe
org.jboss.ejb.client.EJBClient.getUserTransaction()method is deprecated.- When the transaction begins, all EJB invocations are then bound to that specific node for duration of the transaction, establishing server affinity.
- When the transaction ends, the server affinity is released, and the EJB proxies return to a general cluster affinity.
EJB Transactions Lazily Select a Node
You can allow the client to lazily select the cluster node to handle transactions during the first invocation pertaining to a transaction. This allows for load balancing of transactions across the cluster. To use this option, follow the procedure below.
-
Do not specify the
PROVIDER_URLproperty in theInitialContextused to invoke the EJB. In the client, look up the
txn:RemoteUserTransactionfrom theInitialContext.UserTransaction ut = (UserTransaction)ctx.lookup("txn:RemoteUserTransaction");- When the transaction begins, one cluster node is selected automatically, establishing server affinity, and all EJB invocations are then bound to that specific node for duration of the transaction.
- When the transaction ends, the server affinity is released, and the EJB proxies return to a general cluster affinity.
Chapter 9. Tuning the EJB 3 Subsystem
For tips on optimizing performance for the ejb3 subsystem, see the EJB Subsystem Tuning section of the Performance Tuning Guide.
Appendix A. Reference Material
A.1. EJB Java Naming and Directory Interface Reference
The Java Naming and Directory Interface lookup name for a session bean uses the following syntax:
ejb:<appName>/<moduleName>/<distinctName>/<beanName>!<viewClassName>?stateful
-
<appName>: If the session bean’s JAR file has been deployed within an enterprise archive (EAR) then theappNameis the name of the respective EAR. By default, the name of an EAR is its file name without the.earsuffix. The application name can be overridden in itsapplication.xmlfile. If the session bean is not deployed in an EAR, then leave theappNameblank. -
<moduleName>: ThemoduleNameis the name of the JAR file in which the session bean is deployed. The default name of the JAR file is its file name without the.jarsuffix. The module name can be overridden in the JAR’sejb-jar.xmlfile. -
<distinctName>: JBoss EAP allows each deployment to specify an optional distinct name. If the deployment does not have a distinct name, then leave thedistinctNameblank. -
<beanName>: ThebeanNameis the simple class name of the session bean to be invoked. -
<viewClassName>: TheviewClassNameis the fully qualified class name of the remote interface. This includes the package name of the interface. -
?stateful: The?statefulsuffix is required when the Java Naming and Directory Interface name refers to a stateful session bean. It is not included for other bean types.
For example, if we deployed hello.jar having a stateful bean org.jboss.example.HelloBean that exposed a remote interface org.jboss.example.Hello, then the Java Naming and Directory Interface lookup name would be:
ejb:/hello/HelloBean!org.jboss.example.Hello?stateful"
A.2. EJB Reference Resolution
This section covers how JBoss EAP implements @EJB and @Resource. Please note that XML always overrides annotations but the same rules apply.
- Rules for the @EJB annotation
-
The
@EJBannotation also has amappedName()attribute. The specification leaves this as vendor specific metadata, but JBoss EAP recognizesmappedName()as the global Java Naming and Directory Interface name of the EJB you are referencing. If you have specified amappedName(), then all other attributes are ignored and this global Java Naming and Directory Interface name is used for binding. If you specify
@EJBwith no attributes defined:@EJB ProcessPayment myEjbref;
Then the following rules apply:
-
The EJB JAR of the referencing bean is searched for an EJB with the interface used in the
@EJBinjection. If there are more than one EJB that publishes same business interface, then an exception is thrown. If there is only one bean with that interface then that one is used. - Search the EAR for EJB that publish that interface. If there are duplicates, then an exception is thrown. Otherwise the matching bean is returned.
- Search globally in JBoss EAP runtime for an EJB of that interface. Again, if duplicates are found, an exception is thrown.
-
The EJB JAR of the referencing bean is searched for an EJB with the interface used in the
-
@EJB.beanName()corresponds to<ejb-link>. If thebeanName()is defined, then use the same algorithm as@EJBwith no attributes defined except use thebeanName()as a key in the search. An exception to this rule is if you use the ejb-link # syntax: it allows you to put a relative path to a JAR in the EAR where the EJB you are referencing is located. Refer to the EJB 3.2 specification for more details.
-
The
A.3. Project Dependencies for Remote EJB Clients
Maven projects that include the invocation of session beans from remote clients require the following dependencies from the JBoss EAP Maven repository. There are two ways to declare EJB client dependencies, as described in the sub-sections below.
The artifactId versions are subject to change. See the JBoss EAP Maven Repository for the latest versions.
Maven Dependencies for Remote EJB Clients
The jboss-eap-jakartaee8 Bill of Materials (BOM) packages the correct version of many of the artifacts commonly required by a JBoss EAP application. The BOM dependency is specified in the <dependencyManagement> section of the pom.xml with the scope of import.
Example: POM File <dependencyManagement> Section
<dependencyManagement>
   <dependencies>
      <dependency>
      <groupId>org.jboss.bom</groupId>
        <artifactId>jboss-eap-jakartaee8</artifactId>
        <version>7.3.0.GA</version>
        <type>pom</type>
        <scope>import</scope>
      </dependency>
   </dependencies>
</dependencyManagement>
The remaining dependencies are specified in the <dependencies> section of the pom.xml file.
Example: POM File <dependencies> Section
<dependencies>
    <!-- Include the Enterprise Java Bean client JARs -->
    <dependency>
        <groupId>org.jboss.eap</groupId>
        <artifactId>wildfly-ejb-client-bom</artifactId>
        <type>pom</type>
    </dependency>

    <!-- Include any additional dependencies required by the application
        ...
    -->

</dependencies>
The ejb-remote quickstart that ships with JBoss EAP provides a complete working example of remote EJB client application. See the client/pom.xml file located in root directory of that quickstart for a complete example of dependency configuration for remote session bean invocation.
Single artifactID for jboss-ejb-client Dependencies
You can use the wildfly-ejb-client-bom artifactID and add the jboss-ejb-client library to include all the required dependencies for EJB clients:
<dependencyManagement>
    <dependencies>
        <dependency>
            <groupId>org.jboss.eap</groupId>
            <artifactId>wildfly-ejb-client-bom</artifactId>
            <version>EJB_CLIENT_BOM_VERSION</version>
            <type>pom</type>
            <scope>import</scope>
        </dependency>
    </dependencies>
</dependencyManagement>
<dependencies>
    <dependency>
        <groupId>org.jboss</groupId>
        <artifactId>jboss-ejb-client</artifactId>
    </dependency>
</dependencies>
You must use the EJB_CLIENT_BOM_VERSION that is available in the JBoss EAP Maven repository.
A.4. jboss-ejb3.xml Deployment Descriptor Reference
jboss-ejb3.xml is a custom deployment descriptor that can be used in either EJB JAR or WAR archives. In an EJB JAR archive it must be located in the META-INF/ directory. In a WAR archive it must be located in the WEB-INF/ directory.
The format is similar to ejb-jar.xml, using some of the same namespaces and providing some other additional namespaces. The contents of jboss-ejb3.xml are merged with the contents of ejb-jar.xml, with the jboss-ejb3.xml items taking precedence.
This document only covers the additional non-standard namespaces used by jboss-ejb3.xml. See http://java.sun.com/xml/ns/javaee/ for documentation on the standard namespaces.
The root namespace is http://www.jboss.com/xml/ns/javaee.
- Assembly descriptor namespaces
-
The following namespaces can all be used in the
<assembly-descriptor>element. They can be used to apply their configuration to a single bean, or to all beans in the deployment by using a wildcard (*) as theejb-name. - The security namespace (
urn:security) xmlns:s="urn:security"
This allows you to set the
security-domainand therun-as-principalfor an EJB.<s:security> <ejb-name>*</ejb-name> <s:security-domain>myDomain</s:security-domain> <s:run-as-principal>myPrincipal</s:run-as-principal> </s:security>
- The resource adapter namespace:
urn:resource-adapter-binding xmlns:r="urn:resource-adapter-binding"
This allows you to set the resource adapter for a Message-Driven Bean.
<r:resource-adapter-binding>
  <ejb-name>*</ejb-name>
  <r:resource-adapter-name>myResourceAdapter</r:resource-adapter-name>
</r:resource-adapter-binding>
- The IIOP namespace:
urn:iiop xmlns:u="urn:iiop"
The IIOP namespace is where IIOP settings are configured.
- The pool namespace:
urn:ejb-pool:1.0 xmlns:p="urn:ejb-pool:1.0"
This allows you to select the pool that is used by the included stateless session beans or Message-Driven Beans. Pools are defined in the server configuration.
<p:pool>
   <ejb-name>*</ejb-name>
   <p:bean-instance-pool-ref>my-pool</p:bean-instance-pool-ref>
</p:pool>
- The cache namespace:
urn:ejb-cache:1.0 xmlns:c="urn:ejb-cache:1.0"
This allows you to select the cache that is used by the included stateful session beans. Caches are defined in the server configuration.
<c:cache>
   <ejb-name>*</ejb-name>
   <c:cache-ref>my-cache</c:cache-ref>
</c:cache>
<?xml version="1.1" encoding="UTF-8"?> <jboss:ejb-jar xmlns:jboss="http://www.jboss.com/xml/ns/javaee" xmlns="http://java.sun.com/xml/ns/javaee" xmlns:xsi="http://www.w3.org/2001/XMLSchema-instance" xsi:schemaLocation="http://www.jboss.com/xml/ns/javaee http://www.jboss.org/j2ee/schema/jboss-ejb3-2_0.xsd" version="3.1" impl-version="2.0"> <enterprise-beans> <message-driven> <ejb-name>ReplyingMDB</ejb-name> <ejb-class>org.jboss.as.test.integration.ejb.mdb.messagedestination.ReplyingMDB</ejb-class> <activation-config> <activation-config-property> <activation-config-property-name>destination</activation-config-property-name> <activation-config-property-value>java:jboss/mdbtest/messageDestinationQueue </activation-config-property-value> </activation-config-property> </activation-config> </message-driven> </enterprise-beans> </jboss:ejb-jar>NoteThere are known issues with the
jboss-ejb3-spec-2_0.xsdfile that may result in schema validation errors. You can ignore these errors. For more information, see https://bugzilla.redhat.com/show_bug.cgi?id=1192591.
A.5. Configure an EJB Thread Pool
You can create an EJB thread pool using the management console or the management CLI.
A.5.1. Configuring an EJB Thread Pool Using the Management Console
Procedure
- Log in to the management console.
- Navigate to Configuration → Subsystems → EJB and click View.
- Select Container → Thread Pool.
- Click Add and specify the Name and Max Threads values.
- Click Save.
A.5.2. Configure an EJB Thread Pool Using the Management CLI
Procedure
Use the
addoperation with the following syntax:/subsystem=ejb3/thread-pool=THREAD_POOL_NAME:add(max-threads=MAX_SIZE)
-
Replace
THREAD_POOL_NAMEwith the required name for the thread pool. -
Replace
MAX_SIZEwith the maximum size of the thread pool.
-
Replace
Use the
read-resourceoperation to confirm the creation of the thread pool:/subsystem=ejb3/thread-pool=THREAD_POOL_NAME:read-resourceTo reconfigure all the services in the
ejb3subsystem to use a new thread pool, use the following commands:/subsystem=ejb3/thread-pool=bigger:add(max-threads=100, core-threads=10) /subsystem=ejb3/service=async:write-attribute(name=thread-pool-name, value="bigger") /subsystem=ejb3/service=remote:write-attribute(name=thread-pool-name, value="bigger") /subsystem=ejb3/service=timer-service:write-attribute(name=thread-pool-name, value="bigger") reload
XML Configuration Sample:
<subsystem xmlns="urn:jboss:domain:ejb3:5.0">
    ...
    <async thread-pool-name="bigger"/>
    ...
    <timer-service thread-pool-name="bigger" default-data-store="default-file-store">
    ...
    <remote connector-ref="http-remoting-connector" thread-pool-name="bigger"/>
    ...
    <thread-pools>
        <thread-pool name="default">
            <max-threads count="10"/>
            <core-threads count="5"/>
            <keepalive-time time="100" unit="milliseconds"/>
        </thread-pool>
        <thread-pool name="bigger">
            <max-threads count="100"/>
            <core-threads count="5"/>
        </thread-pool>
    </thread-pools>
    ...
A.5.3. EJB Thread Pool Attributes
EJB thread pools can be configured using attributes to run more efficiently for specific configuration needs.
-
The
max-threadsattribute determines the total or maximum number of threads that the executor supports.
/subsystem=ejb3/thread-pool=default:write-attribute(name=max-threads, value=9)
{"outcome" => "success"}-
The
core-threadsattribute determines the number of threads that are kept in the executor’s pool. This includes idle threads. If thecore-threadsattribute is not specified, it will default to the value ofmax-threads.
/subsystem=ejb3/thread-pool=default:write-attribute(name=core-threads, value=3)
{"outcome" => "success"}-
The
keepalive-timeattribute determines the amount of time that a non-core thread will be allowed to remain idle. After this time, the non-core thread is removed.
/subsystem=ejb3/thread-pool=default:write-attribute(name=keepalive-time, value={time=5, unit=MINUTES})
{"outcome"=> "success"}-
To change the time without changing the units of time for the
keepalive-timeattribute, use the following command:
/subsystem=ejb3/thread-pool=default:write-attribute(name=keepalive-time.time, value=10)
{"outcome"=> "success"}
Revised on 2022-02-01 13:02:13 UTC