
Red Hat Training
A Red Hat training course is available for Red Hat JBoss Enterprise Application Platform
How to Setup SSO with SAML v2
How to Setup SSO with SAML v2
Abstract
Chapter 1. SSO with SAMLv2 Deeper Dive
The basics of SSO and SAML are covered in the Security Architecture for Red Hat JBoss Enterprise Application Platform. This section takes a deeper dive into the components involved in SAML v2 and SSO.
1.1. What is SAML v2?
Security Assertion Markup Language (SAML) is a data format and protocol that allows two parties, usually an identity provider and a service provider, to exchange authentication and authorization information. This information is exchanged in the form of SAML tokens (containing assertions) which are issued by Identity Providers to subjects for authenticating with Service Providers. The ability for subjects to use (and reuse) SAML tokens issued from an identity provider and with multiple service providers allows SAML v2 facilitate browser-based SSO.
1.1.1. Building Blocks
The most important concept to keep in mind with SAML is that its all about passing security assertions between entities. SAML has several components it uses to accomplish this task.
1.1.1.1. Entities
Entities are all parties involved in creating and passing assertions. SAML has the concept of three distinct entites: subject, identity provider, and service provider.
The subject, (also referred to as the principal) which is the user in most cases, is requesting access to a resource on a service provider which is secured by SAML.
The service provider (SP) requires proof (i.e. an assertion) of the subject’s identity, which it needs from the identity provider.
The identity provider (IDP) provides a set of assertions (in the form of a token) about a subject that can be used in authentication and authorization decisions by service providers.
In summary, subjects get issued assertions, identity providers issue those assertions, and service providers use those assertions to authenticate and authorize subjects.
1.1.1.2. Security Assertions
A security assertion is a set of statements issued by an identity provider about a subject. Service providers use these assertions to make access-control decisions about a subject. Statements can take the following forms:
- Authentication
- Authentication assertions assert that a subject successfully authenticated using specified method at a specific point in time. An authentication context containing other information about the authenticated subject may also be specified in an authentication statement.
- Attribute
- Attribute assertions assert that a subject has certain attributes.
- Authorization Decision
- Authorization Decision assertions assert a response (accept or deny) to an authorization request for a subject on a resource.
Example:
This user logged in as Sarah at 9:30 using a username and password. Sarah is a member of the Managers group. Sarah is accepted to access the Employee Information resource.
- The statement This user logged in as Sarah at 9:30 using a username and password is an Authentication assertion.
- The statement Sarah is a member of the Managers group is an Attribute assertion.
- The statement Sarah is accepted to access the Employee Information resource is an Authorization Decision assertion.
Assertions are packaged as SAML tokens and transported using SAML protocols.
1.1.1.3. Protocols
A SAML protocol describes how assertions are packaged, usually in the form of a request and response, as well as the rules on the correct way to process them. These rules must be followed by both the producers and consumers of the requests and responses. A request can ask for specific, known assertions or query identity providers for authentication, attribute, or authorization decisions. The messages (requests and responses) which include security assertions, are formatted in XML and adhere to a specified schema.
1.1.1.4. Bindings
SAML bindings specify how SAML protocols map to other standard protocols used for transport and messaging. Some examples include:
- A SAML binding that maps to an HTTP redirect
- A SAML binding that maps to an HTTP POST
- A SAML binding that maps SAML requests/responses to SOAP requests and responses
1.1.1.5. Profiles
SAML profiles use assertions, protocols, and bindings to support specific use cases such as Web Browser SSO, Single Logout, and Assertion Query.
1.2. How Does SAML v2 Work with SSO
The basics of Browser-Based SSO with SAML v2 are covered in the Red Hat JBoss Enterprise Application Platform 6 Security Architecture document, specifically in the Browser-Based SSO Using SAML and Multiple Red Hat JBoss Enterprise Application Platform Instances and Multiple Applications Using Browser-Based SSO with SAML sections. This section gives a more in-depth explanation regarding the SAML profiles and bindings related to Browser-based SSO with SAML v2.
1.2.1. Web Browser SSO Profile
The Web Browser SSO profile specifies the way an identity provider (IDP), service provider (SP), and principal (in the form a browser agent) handle browser-based SSO. Both the SP and IDP have several bindings each that can be used in the Web Browser SSO profile, allowing many possible flows. Additionally, this profile supports message flows initiated from either the IDP or SP. This profile also supports the IDP pushing the SAML assertion to the SP or the SP pulling the assertion from the IDP. Flows initiated from either the SP or IDP are explained at a high level in the Red Hat JBoss Enterprise Application Platform 6 Security Architecture document. SAML assertions being pushed from the IDP utilizes HTTP POST messages or HTTP redirects. SAML assertions that are pulled by SPs involve sending an artifact to the receiver which is then dereferenced in order to obtain the assertions.
The basic flow of the Web Browser SSO profile is as follows:
- Principal HTTP request to SP: The principal first attempts to access a secured resource at the SP via an HTTP User Agent (e.g. a browser). If the principal has already been issued a SAML token with a valid security context, the SP will allow or decline the principal (the last step). Otherwise, the SP will attempt to locate the IDP for the authentication request.
- SP determines IDP: The SP locates the IDP and its endpoint that supports the SP’s preferred binding. This allows the SP to send an authentication request to the IDP. The specific means of this process are may vary between implementations.
-
Authentication Request issued from SP to IDP via principal: Once the SP determines the IDP location and endpoint, the SP issues an Authentication Request (
<AuthnRequest>message) which will be delivered by the user agent (principal) to the IDP. The HTTP Redirect, HTTP POST, or HTTP Artifact SAML bindings can be used to transfer the message to the IDP via the user agent. - IDP identifies principal: Once Authentication Request is delivered to the IDP by the principal, the principal will be identified by the IDP. The identification method is not specifically defined by the Web Browser SSO profile and may be accomplished in a number of ways (e.g. authentication via FORM, using existing session information, kerberos authentication, etc)
-
IDP issues Response to SP: Once the principal is identified, the IDP issues a Response (
<Response>message) to be delivered back to the SP for granting (or declining) access by the principal using the user agent. This message will contain at least one authentication assertion and can be used to indicate errors as well. HTTP POST or HTTP Artifacts can be used to transfer this message, but HTTP Redirect cannot be used due to URL length constraints with most user agents. If the user agent initiated an IDP-based flow (e.g. by attempting to access the IDP directly instead of an SP), the process would begin at this step. If successful, the HTTP Post or HTTP Artifact will be sent to a location which is pre-configured in the IDP. - SP allows (or declines) access to principal: Once the SP receives the Response, it may grant access for the requested resource to the principal (by creating a security context), deny access, or do its own error handling.
JBoss EAP 6 does not support the SAML artifact binding.
HTTP Redirect bindings make use of HTTP GET requests and the URL query paramaters to transmit protocol messages. Messages sent in this manner are also URL and Base-64 encoded before being sent and decoded by the receiver. HTTP POST bindings send messages via form data and also do a base-64 encode/decode on the message. Both SPs and IDPs can transmit and receive messages using redirect or POST bindings. Due to the limitation of URL lengths in certain scenarios, HTTP Redirect is usually used when passing short messages, and HTTP POST is used when passing longer messages.
1.2.2. Global Logout Profile
The Global Logout Profile allows a principal who has authenticated with a set of IDPs and SPs, to log out and have that assertion be propagated to one or more associated IDPs and SPs.
When a principal authenticates with an IDP, the principal and IDP have established an authentication session. The IDP may then issue assertions to various SPs (or relying parties), based on that authentication. From there if principal attempts to access any secured resources within those SPs, the SPs may choose to establish additional sessions with the principal based on that assertion issued from the IDP (hence relying on the IDP).
Once a session (or set of sessions) is created, a principal may be logged out of sessions individually using various means, or they may use the Global Logout Profile to logout of all sessions and from all SPs and IDPs at once. The Global Logout Profile can use the HTTP Redirect, HTTP POST or HTTP Artifact bindings in its flow. It can also use SOAP binding in certain cases which are not in the scope of this document.
Single Logout Profile can be used as a synonym to Global Logout Profile.
JBoss EAP 6 does not support the SAML artifact binding.
As with the Web Browser SSO profile fiow, the Global Logout Profile flow may be initiated either at the IDP or the SP.
The basic flow of the Global Logout Profile is as follows:
-
Logout issued to IDP by Session Participant: A session participant (i.e. Service Providers or other relying parties) terminates its own session with the principal and sends a Logout Request (
<LogoutRequest>message) to the IDP that initially issued the security assertion for the principal. This request can be sent directly between the IDP and relying party, or indirectly by using the principal’s user agent (i.e. browser) as a pass through. - IDP identifies Session Participant: Once the IDP receives the Logout Request, it uses that request to determine what sessions to terminate with which relying parties (including any sessions the IDP owns as a session authority or session participant). For each session, the IDP issues a Logout Request to the relying party and waits for a Logout Response from each before issuing a new Logout Response back to the original session participant. In cases where the Global Logout Profile flow was initiated at the IDP, the flow begins at this step and some other mechanism is used to determine the sessions and SPs.
-
Logout issued by IDP: Once the IDP determines all of the sessions and associated relying parties, it sends a Logout Request (
<LogoutRequest>message) to each relying party and awaits a Logout Response. These requests may be sent directly between the IDP and the relying parties or indirectly through the principal’s user agent. -
Logout response issued by Session Participant or Authority: Each relying party (including the IDP itself in some cases), attempts to terminate the session as directed by the IDP in the Logout Request and returns a Logout Response (
<LogoutResponse>message) back to the IDP. As with the Logout Request, the response may be issued directly between the relying party and the IDP or indirectly through the principal’s user agent. -
IDP issues Logout response to original Session Participant: Once all the Logout Responses have been received from the relying parties, the IDP sends a new Logout Response (
<LogoutResponse>message) back to original session participant who requested the logout. As with the other parts of this flow, this response may be passed directly between the IDP and the session participant or indirectly through the principal’s user agent. In cases where the Logout Request was initiated at the IDP, this step is omitted.
The IDP-initiated portion of the Global Logout Profile is not supported in JBoss EAP 6.
The direction communication between the IDP and SP portion of the Global Logout Profile is not supported in JBoss EAP 6.
1.2.3. Multiple IDPs and the Identity Discovery Profile
Browser-base SSO via SAML v2 also supports having multiple IDPs and can be used in both the Web Browser SSO profile as as well as the Global Logout profile. In cases where multiple-IDP’s are configured, the Identity Discovery SAML profile is used to determine which IDP a principal uses. This is accomplished by reading and writing cookies with domain information and a list of IDPs.
1.3. Further Reading
For full details on the SAML v2 please see the official SAML 2.0 specification.
Chapter 2. How To Setup SSO with SAML v2
This section details the actual steps for setting up SSO via SAML v2 using JBoss EAP 6.
2.1. Components
As covered in the Section 1.1.1.1, “Entities” section as well as in the Security Architecture for Red Hat JBoss Enterprise Application Platform 6 document, there are three entites or parties involved in Browser-Based SSO using SAML v2:
- A principal using a user agent (browser) to request access to a secured resource.
- A service provider (SP) housing the secured resource.
- An identity provider (IDP) which issues security assertions to principals, allowing them to access secured resources on service providers (SPs).
In addition, the following will be needed to support browser-based SSO via SAML v2:
- Separate web applications serving as SPs and IDPs
- JBoss EAP 6 instances to host the SPs and IDPs
- Security Domains to support the SPs and IDPs
2.2. IDP and SP Setup and Configuration
This section covers setting up an application to be either an SP or IDP as well as setting up an JBoss EAP 6 instance to host those applications.
2.2.1. Setting up an IDP
To set up an application to serve as an IDP, the following steps must be performed:
The security domain should be created and configured before creating and deploying the application.
2.2.1.1. 1. Create a Security Domain for an IDP
The IDP handles challenging a principal for their credentials, handling the authentication and authorization of that principal, and issuing the proper security (SAML v2) assertions based on the result. This requires that an identity store be configured via a security domain. The only requirement around creating this security domain and identity store is that it has authentication and authorization mechanisms properly defined. Meaning, essentially many differently identity stores (e.g. properties file, database, ldap, etc) and their associated login modules could be used to support an IDP application. For more information on security domains, please see the Security Domains section of the Red Hat JBoss Enterprise Application Platform 6 Security Architecture document.
In the below example, a simple UsersRoles login module using properties files for an identity store is used.
CLI for Creating a Security Domain
/subsystem=security/security-domain=idp:add(cache-type=default)
/subsystem=security/security-domain=idp/authentication=classic:add
/subsystem=security/security-domain=idp/authentication=classic/login-module=UsersRoles:add( \
  code=UsersRoles, \
  flag=required, \
  module-options=[ \
    ("usersProperties"=>"idp-users.properties"), \
    ("rolesProperties"=>"idp-roles.properties") \
  ])
reload
Resulting XML
<security-domain name="idp" cache-type="default">
  <authentication>
    <login-module code="UsersRoles" flag="required">
      <module-option name="usersProperties" value="${jboss.server.config.dir}/idp-users.properties"/>
      <module-option name="rolesProperties" value="${jboss.server.config.dir}/idp-roles.properties"/>
    </login-module>
  </authentication>
</security-domain>
The above CLI commands were done assuming a standalone instance of JBoss EAP 6. For more details on using the CLI with JBoss EAP 6 domains, please consult The Management CLI section of the Red Hat JBoss Enterprise Application Platform 6 Administration and Configuration Guide.
Property Files
The UsersRoles login module utilizes properties files to store the user/password and user/role information. For more specifics of the UsersRoles module, please consult the Red Hat JBoss Enterprise Application Platform 6 Security Guide. In this example, the properties files contain the following:
idp-users.properties
Eric=samplePass
Alan=samplePass
idp-roles.properties
Eric=All
Alan=
2.2.1.2. 2. Configure the web.xml File for an IDP
The web.xml file for an IDP should contain the following:
-
A
<security-constraint>with a<web-resource-collection>containing a<url-pattern>that maps to the URL pattern of the secured area. Optionally,<security-constraint>may also contain an<auth-constraint>stipulating the allowed roles. -
A
<login-config>configured for FORM authentication. -
If any roles were specified in the
<auth-constraint>, those roles should be defined in a<security-role>. - Optionally, resources used by the login form (e.g. images, styles, etc) can be specified by an additional security constraint to be unsecured so they may be accessed prior to authentication (i.e. on the login page).
The <security-constraint> and <security-role> elements enable administrators to setup restricted or unrestricted areas based on URL patterns and roles. This allows resources to be secured or unsecured.
The <login-config> defines the the login and error pages used by the IDP when authenticating users.
Example web.xml file:
<web-app>
  <display-name>IDP</display-name>
  <description>IDP</description>
<!-- Define a security constraint that gives unlimited access to images -->
  <security-constraint>
    <web-resource-collection>
      <web-resource-name>Images</web-resource-name>
      <url-pattern>/images/*</url-pattern>
    </web-resource-collection>
  </security-constraint>
<!-- Define a security constraint that requires the All role to access resources -->
  <security-constraint>
    <web-resource-collection>
      <web-resource-name>IDP</web-resource-name>
      <url-pattern>/*</url-pattern>
    </web-resource-collection>
    <auth-constraint>
      <role-name>All</role-name>
    </auth-constraint>
  </security-constraint>
<!-- Define the Login Configuration for this Application -->
  <login-config>
    <auth-method>FORM</auth-method>
    <realm-name>IDP Application</realm-name>
    <form-login-config>
      <form-login-page>/jsp/login.jsp</form-login-page>
      <form-error-page>/jsp/error.jsp</form-error-page>
    </form-login-config>
  </login-config>
<!-- Security roles referenced by this web application -->
  <security-role>
    <description>The role that is required to log in to the IDP Application</description>
    <role-name>All</role-name>
  </security-role>
</web-app>
It is recommended that a welcome page defined in the application. By default, JBoss EAP 6 will look for a file called index.jsp but this can configured using the <welcome-file-list> in the web.xml.
Example login.jsp file:
<html>
<head></head>
<body>
  <form id="login_form" name="login_form" method="post"
  action="j_security_check" enctype="application/x-www-form-urlencoded">
    <center>
      <p>Welcome to the <b>IDP</b></p>
      <p>Please login to proceed.</p>
    </center>
    <div style="margin-left: 15px;">
      <p>
        <label for="username">Username</label>
        <br />
        <input id="username" type="text" name="j_username"/>
      </p>
      <p>
        <label for="password">Password</label>
        <br />
        <input id="password" type="password" name="j_password" value=""/>
      </p>
      <center>
        <input id="submit" type="submit" name="submit" value="Login"/>
      </center>
    </div>
  </form>
</body>
</html>
Example error.jsp file:
<html>
<head></head>
<body>
  <p>Login failed, please go back and try again.</p>
</body>
</html>
2.2.1.3. 3. Configure the Authenticator for an IDP
The authenticator is responsible for the authentication of users and for issuing and validating security assertions (in case, SAML v2 assertions). The authenticator is configured in the form of a <valve> that resides in the jboss-web.xml file along with the security domain to be used in authenticating and authorizing principals (see Step 1).
The jboss-web.xml file should have the following: - A <security-domain> to specify which security domain to use for authentication and authorization. - A <valve> configured to use the SSO valve class (e.g. org.picketlink.identity.federation.bindings.tomcat.idp.IDPWebBrowserSSOValve)
An example jboss-web.xml file:
<jboss-web>
    <security-domain>idp</security-domain>
    <context-root>identity</context-root>
    <valve>
        <class-name>
        org.picketlink.identity.federation.bindings.tomcat.idp.IDPWebBrowserSSOValve
        </class-name>
    </valve>
</jboss-web>
2.2.1.4. 4. Declare the Necessary Dependencies for an IDP
The web application serving as the IDP requires a dependency to be defined in jboss-deployment-structure.xml, so that the org.picketlink classes can be located. JBoss EAP 6 provides all necessary org.picketlink and related classes, the application just needs to declare them as dependencies to use them.
Using jboss-deployment-structure.xml to declare dependencies
<jboss-deployment-structure>
  <deployment>
    <dependencies>
      <module name="org.picketlink"/>
    </dependencies>
  </deployment>
</jboss-deployment-structure>
Alternatively, this dependency may be defined in a META-INF/MANIFEST.MF file instead:
Using META-INF/MANIFEST.MF to declare dependencies
Manifest-Version: 1.0
Build-Jdk: 1.6.0_24
Dependencies: org.picketlink
2.2.1.5. 5. Create and Configure a picketlink.xml File for an IDP
The picketlink.xml file is responsible for the behavior of the Authenticator and is loaded at the application’s startup.
The file should contain at least the following elements:
-
<PicketLinkIDP>defining the url of the IDP (<IdentityURL>) and any hosts trusted by the identity provider. -
<Handlers>defining the set of handlers needed for processing the SAML requests and responses.
An Example picketlink.xml file
<PicketLink xmlns="urn:picketlink:identity-federation:config:2.1">
  <PicketLinkIDP xmlns="urn:picketlink:identity-federation:config:2.1">
    <IdentityURL>${idp.url::http://localhost:8080/identity/}</IdentityURL>
    <Trust>
      <Domains>localhost,example.com</Domains>
    </Trust>
  </PicketLinkIDP>
  <Handlers xmlns="urn:picketlink:identity-federation:handler:config:2.1">
    <Handler class="org.picketlink.identity.federation.web.handlers.saml2.SAML2IssuerTrustHandler" />
    <Handler class="org.picketlink.identity.federation.web.handlers.saml2.SAML2LogOutHandler" />
    <Handler class="org.picketlink.identity.federation.web.handlers.saml2.SAML2AuthenticationHandler" />
    <Handler class="org.picketlink.identity.federation.web.handlers.saml2.RolesGenerationHandler" />
  </Handlers>
</PicketLink>
Handlers are implemented using a Chain of Responsibility, with each individual handler performing logic on request and responses in the order defined in picketlink.xml. It is very important to pay attention to the order in which the handlers are configured.
By default, picketlink.xml is located in the WEB-INF directory of the IDP web application. However, a custom path to a picketlink.xml that is external to the application can be configured. This is useful in cases where multiple applications across one or more JBoss EAP 6 instances share the same picketlink.xml configuration.
Setting custom location for picketlink.xml
Add two paramaters to the valve element in the application’s jboss-web.xml specifying for the path to picketlink.xml, and timerInterval which specifies the interval in milliseconds to reload the configuration.
Example
<jboss-web>
...
<valve>
  <class-name>...</class-name>
    <param>
      <param-name>timerInterval</param-name>
      <param-value>5000</param-value>
    </param>
    <param>
      <param-name>configFile</param-name>
      <param-value>path-to/picketlink.xml</param-value>
    </param>
</valve>
</jboss-web>
2.2.2. Setting up an SP
To set up an application to serve as an SP, the following steps must be performed:
The security domain should be created and configured before creating and deploying the application.
2.2.2.1. 1. Create a Security Domain for an SP
Since the IDP handles challenging the user for their credentials and issuing security (SAML v2) assertions, the SP is in charge of validating those assertions. A security domain is still needed to perform this validation, but an identity store is not. In this case, the security domain for the SP must use the SAML2LoginModule.
CLI for Adding Security Domain
/subsystem=security/security-domain=sp:add(cache-type=default)
/subsystem=security/security-domain=sp/authentication=classic:add
/subsystem=security/security-domain=sp/authentication=classic/login-module=SAML2LoginModule:add( \
  code=org.picketlink.identity.federation.bindings.jboss.auth.SAML2LoginModule, \
  flag=required)
reload
Resulting XML
<security-domain name="sp" cache-type="default">
  <authentication>
    <login-module code="org.picketlink.identity.federation.bindings.jboss.auth.SAML2LoginModule"
      flag="required"/>
   </authentication>
</security-domain>
The above CLI commands were done assuming a standalone instance of JBoss EAP 6. For more details on using the CLI with JBoss EAP 6 domains, please consult The Management CLI section of the Red Hat JBoss Enterprise Application Platform 6 Administration and Guide.
The SAML2LoginModule allows for authentication decisions to be deferred to an IDP, which will be configured in the SP’s picketlink.xml.
2.2.2.2. 2. Configure the web.xml File for an SP
The web.xml file for an SP should contain the following:
-
A
<security-constraint>with a<web-resource-collection>containing a<url-pattern>that maps to the URL pattern of the secured area. Optionally,<security-constraint>may also contain an<auth-constraint>stipulating the allowed roles. -
If any roles were specified in the
<auth-constraint>, those roles should be defined in a<security-role>.
An Example web.xml File
<web-app>
  <display-name>SP</display-name>
  <description>SP</description>
  <!-- Define a Security Constraint on this Application -->
  <security-constraint>
    <web-resource-collection>
      <web-resource-name>SP</web-resource-name>
      <url-pattern>/*</url-pattern>
    </web-resource-collection>
    <auth-constraint>
      <role-name>All</role-name>
    </auth-constraint>
  </security-constraint>
  <!-- Security roles referenced by this web application -->
  <security-role>
      <description>
     The role that is required to log in to the SP Application
    </description>
    <role-name>All</role-name>
  </security-role>
It is recommended that a welcome page defined in the application. By default, JBoss EAP 6 will look for a file called index.jsp but this can configured using the <welcome-file-list> in the web.xml.
The logout process will attempt to redirect principals to logout.jsp on successful logout. Please ensure this file is defined at the directory root of the application.
2.2.2.3. 3. Configure the Authenticator for an SP
The authenticator is responsible for the authentication of principals based on the security assertions (in this case, SAML v2 assertions) issued by the IDP. They intercept each request made to the application, check if a SAML assertion is present in the request, validate the assertions, execute principal’s SAML specific validations, and create a security context for the principal in the requested application.
The authenticator is configured in the form of a <valve> that resides in the jboss-web.xml file along with the security domain to be used in authenticating and authorizing principals (see Step 1).
The jboss-web.xml file for an SP should have the following:
-
A
<security-domain>to specify which security domain to use for authentication and authorization. -
A
<valve>configured to use the SSO Service Provider valve class (e.g. org.picketlink.identity.federation.bindings.tomcat.sp.ServiceProviderAuthenticator)
An Example jboss-web.xml File:
<jboss-web>
  <security-domain>sp</security-domain>
  <context-root>sales-post</context-root>
  <valve>
    <class-name>org.picketlink.identity.federation.bindings.tomcat.sp.ServiceProviderAuthenticator</class-name>
  </valve>
</jboss-web>
2.2.2.4. 4. Declare the Necessary Dependencies for an SP
The web application serving as the SP requires a dependency to be defined in jboss-deployment-structure.xml, so that the org.picketlink classes can be located. JBoss EAP 6 provides all necessary org.picketlink and related classes, the application just needs to declare them as dependencies to use them.
Using jboss-deployment-structure.xml to declare dependencies
<jboss-deployment-structure>
  <deployment>
    <dependencies>
      <module name="org.picketlink"/>
    </dependencies>
  </deployment>
</jboss-deployment-structure>
Alternatively, this dependency may be defined in a META-INF/MANIFEST.MF file instead:
Using META-INF/MANIFEST.MF to declare dependencies
Manifest-Version: 1.0
Build-Jdk: 1.6.0_24
Dependencies: org.picketlink
2.2.2.5. 5. Create and Configure a picketlink.xml File for an SP
The picketlink.xml file is responsible for the behavior of the Authenticator and is loaded at the application’s startup.
The file should contain at least the following elements:
-
<PicketLinkSP>defining the url of the IDP (<IdentityURL>) and the url the SP (<ServiceURL>). -
<Handlers>defining the set of handlers needed for processing the SAML requests and responses.
An Example picketlink.xml file
<PicketLink xmlns="urn:picketlink:identity-federation:config:2.1">
  <PicketLinkSP xmlns="urn:picketlink:identity-federation:config:2.1" BindingType="POST">
    <IdentityURL>${idp.url::http://localhost:8080/identity/}</IdentityURL>
    <ServiceURL>${sales-post.url::http://localhost:8080/sales-post/}</ServiceURL>
  </PicketLinkSP>
  <Handlers xmlns="urn:picketlink:identity-federation:handler:config:2.1">
    <Handler class="org.picketlink.identity.federation.web.handlers.saml2.SAML2LogOutHandler" />
    <Handler class="org.picketlink.identity.federation.web.handlers.saml2.SAML2AuthenticationHandler" />
    <Handler class="org.picketlink.identity.federation.web.handlers.saml2.RolesGenerationHandler" />
  </Handlers>
</PicketLink>
While not recommended, the SP may also be configured to use HTTP/REDIRECT by changing BindingType="POST" to BindingType="REDIRECT".
Handlers are implemented using a Chain of Responsibility, with each individual handler performing logic on request and responses in the order defined in picketlink.xml. It is very important to pay attention to the order in which the handlers are configured.
By default, picketlink.xml is located in the WEB-INF directory of the IDP web application. However, a custom path to a picketlink.xml that is external to the application can be configured. This is useful in cases where multiple applications across one or more JBoss EAP 6 instances share the same picketlink.xml configuration.
Setting custom location for picketlink.xml
Add two paramaters to the valve element in the application’s jboss-web.xml specifying for the path to picketlink.xml, and timerInterval which specifies the interval in milliseconds to reload the configuration.
Example
<jboss-web>
...
  <valve>
    <class-name>...</class-name>
      <param>
        <param-name>timerInterval</param-name>
        <param-value>5000</param-value>
      </param>
      <param>
        <param-name>configFile</param-name>
        <param-value>path-to/picketlink.xml</param-value>
      </param>
  </valve>
</jboss-web>
2.2.3. Using SP-initiated Flow
The SP-inited Flow is a common use case citied when describing browser-based SSO, and was covered in the Browser-Based SSO Using SAML and Multiple Red Hat JBoss Enterprise Application Platform Instances and Multiple Applications Using Browser-Based SSO with SAML sections of the Red Hat JBoss Enterprise Application Platform 6 Security Architecture document. In summary, a principal attempts to access a secured resource in a SP. The SP starts the flow by checking for a principal’s security assertions and redirecting any unauthenticated principal’s to the IDP. Upon successful authentication with the IDP, the principal is then redirected back to the initial SP with their security assertions for the SP to validate and permit/deny access to the original resource requested.
Walkthrough
- A principal attempts to access secured resource on a SP.
- SP performs a check on the principal. If the principal has not yet authenticated, they need to be redirected to the IDP. If they have already authenticated, then all other steps are skipped and the final step is performed.
- The SP locates the IDP and issue an authentication request to the IDP via the principal’s browser.
- The IDP attempts to authenticate the principal (e.g. challenging them with a login page) using the configured identity store.
- After the principal is identified by the IDP (e.g. successful login), the IDP issues a response (containing SAML v2 assertions with the principal’s security-related information) to the SP via the principal’s browser.
- The SP performs a check on the principal’s security assertions, and based the information contained in those assertions, the SP allows (or denies) access to the requested resource.
This flow requires no additional steps or configuration to setup. All redirects are handled by the configured SPs and IDPs and links to both secured and unsecured resources require no additional changes.
2.2.4. Using IDP-Initiated Flow
Most examples of browser-based SSO via SAML v2 using a SP-initiated flow as covered in the previous section, but SAML v2 supports an additional flow: the IDP-initiated or Unsolicited Response flow. In this scenario, the SP does not initiate the authentication flow and receive a SAML response from the IDP. Instead, the flow starts on the IDP-side and once authenticated, the principal can choose a specific SP from a list and then get redirected to its URL.
Walkthrough
- Principal accesses the IDP.
- The IDP seeing that there is neither SAML request nor response, assumes an IDP first scenario using SAML.
- The IDP challenges the principal to authenticate.
- Upon authentication, the IDP shows the hosted section where the principal gets a page that links to all the SP applications.
- The principal chooses an SP application.
- The IDP redirects the principal to the service provider with a SAML assertion in the query parameter, SAML response. In the cases where the POST binding is used, the IDP sends the SAML assertion to the service provider via an HTTP POST.
- The SP checks the SAML assertion and provides access.
Hosted Section
The hosted section is a location to direct users after a successful authentication in the IDP-initiated flow or if a principal, who has already authenticated, attempts to access the root of the IDP directly. By default, the hosted section is located at /hosted/ but may be changed in the picketlink.xml file by adding the HostedURI attribute to the <PicketLinkIDP> element:
<PicketLink xmlns="urn:picketlink:identity-federation:config:2.1">
  <PicketLinkIDP xmlns="urn:picketlink:identity-federation:config:2.1" HostedURI="/hosted/">
    ...
  </PicketLinkIDP>
</Picketlink>
Linking to SPs
Once the user is authenticated, the IDP shows a page with links to all service provider applications. A link will usually look like this:
<a href="http://localhost:8080/identity?SAML_VERSION=2.0&TARGET=http://localhost:8080/sales-post/">Sales</a>
Note that the link above redirects the user to the IDP passing the TARGET query parameter, whose value is the URL to the target SP application. Once the user clicks the link above, the IDP extracts the TARGET parameter from the request, builds an SAML v2 response, and redirects the user to the target URL. When the user hits the SP, they are automatically authenticated. The SAML_VERSION query parameter is used to specify the SAML version that must be used by the IDP to create the SAML response.
2.2.5. Configuring the Global Logout Profile
2.2.5.1. Global Logout Profile
A Global Logout Profile initiated at one service provider logs out the user from the Identity Provider (IDP) and all the service providers.
For a Global Logout Profile to function appropriately ensure that only up to five SPs are configured per IDP.
Configure picketlink.xml
Add the SAML2LogOutHandler in the picketlink.xml.
Create a logout.jsp page
As part of the logout process, the users will be redirected to a logout.jsp page located in the root directory of the Service Provider application. Ensure that this page is created.
Example logout.jsp
<html>
  <head></head>
  <body>
    <p>You have successfully logged out.</p>
  </body>
</html>
Configure Global Logout Profile Links for the SPs
Use GLO=true as a URL parameter in a link to an SP resource to initiate the Global Logout Profile process.
Example Logout Link
<a href="?GLO=true">Click to LogOut</a>
2.2.5.2. Local Logout
In addition to global logout profile, local logout may also be used. Local logout, in contrast to global logout profile, logs a principal out of a single SP while leaving the session at the IDP and other SPs completely intact. Basically, local logout allows principals to be "locally logged out" at a single SP.
The process for using Local Logout is essentially the same as Global Logout Profile, with the URL parameter in the logout link taking the form of LLO=true.
Example Logout Link
<a href="?LLO=true">Click to LogOut</a>
When a principal clicks on the Local Logout link at the SP, the SP will invalidate their session and forward the principal to the configured logout page.
If using Local Logout, please be aware of the security implications that result from it. Meaning, when a principal is only disconnected from one service provider, they still have an active session with the IDP and other SPs that may allow them to still access secured resources. While this behavior may be desired in circumstances, it is strongly recommended to use Global Logout in most scenarios.
2.3. Configuring IDPs and SPs via the Management Console
In addition to configuring IDPs and SP manually, SSO via SAML v2 may also be configured via a JBoss EAP 6 subsystem. This method of configuration is known as the Domain Model and allows all the configuration to reside centrally on the JBoss EAP 6 instance and not with the individual applications. This also enables the SSO configuration to be created and updated using the JBoss EAP management interfaces such as the Management Console and CLI.
Federations
When using the JBoss EAP subsystem to configure and deploy IDPs and SPs, they are grouped together in a Federation. A Federation can be understood as a Circle of Trust. A Circle of trust contains applications that share common configurations (certificates, SAML-specific configurations, etc) and domains that trust each other to accurately document the processes used to identify a user, the type of authentication system used, and any policies associated with the resulting authentication credentials. Each federation has one IDP and many SPs. The federation also defines trust relationship between SPs and IDPs, removing the need for each SP to individual track and maintain that information.
2.3.1. Configuring the Subsystem
Before the subsystem can be used to setup federations, it needs to be enabled and configured in JBoss EAP 6. The following steps are needed to enable and configure the subsystem:
It is recommended that these steps be preformed while the JBoss EAP 6 instance is not running.
2.3.1.1. 1. Update the Extensions
In the JBoss EAP 6 configuration file (standalone.xml for standalone instances or domain.xml for domains), add the org.wildfly.extension.picketlink extension:
<extensions>
  ...
  <extension module="org.wildfly.extension.picketlink"/>
  ...
</extensions>
2.3.1.2. 2. Add the Subsystems
In the JBoss EAP 6 configuration file (standalone.xml for standalone instances or domain.xml for domains), add the jboss:domain:picketlink-federation:1.1 subsystem:
<profile>
  ...
  <subsystem xmlns="urn:jboss:domain:picketlink-federation:1.1"/>
  ...
</profile>
Examples of configuration may also be found in the docs/examples/configs/standalone-picketlink.xml file under the JBoss EAP 6 install directory.
2.3.2. Setting up a Federation
Once the subsystem has been setup and configured, it may be used (via the management interfaces) to configure federations. Configuring a federations requires the following steps:
2.3.2.1. 1. Preparing the SP and IDP Applications
As was covered in the previous section, when configuring SSO via SAML v2 manually, the following files were required to be created or updated:
-
web.xml -
jboss-web.xml -
picketlink.xml -
jboss-deployment-structure.xml
When using the subsystem to setup federations for SSO via SAML v2, the vast majority of the configuration happens from the management interfaces without having to update any of those files. The only configuration that must be done to the application is to configure the <security-constraint> and associated <security-role> in the web.xml of the IDPs and SPs. In addition, the <login-config> in the web.xml as well as the login and error pages will also have to be present in the IDP.
Preparing IDPs and SPs Already Configured
If an IDP or SP has already been configured as outlined in the previous section, the following files will need to be removed:
-
jboss-web.xml -
picketlink.xml -
jboss-deployment-structure.xml
Once the applications have been prepared, they may be deployed.
2.3.2.2. 2. Creating a Federation via the Management Interface
Once the JBoss EAP 6 instance has been configured and the applications have been setup and deployed, a federation may be created from the Management Console.
- Navigate to Management Console using a Web Browser for Example: http://localhost:9990/console
- Click on the Configuration tab at the top
- Click on PicketLink → Federation in the menu on the left side
-
Click on the Add button to create a new federation
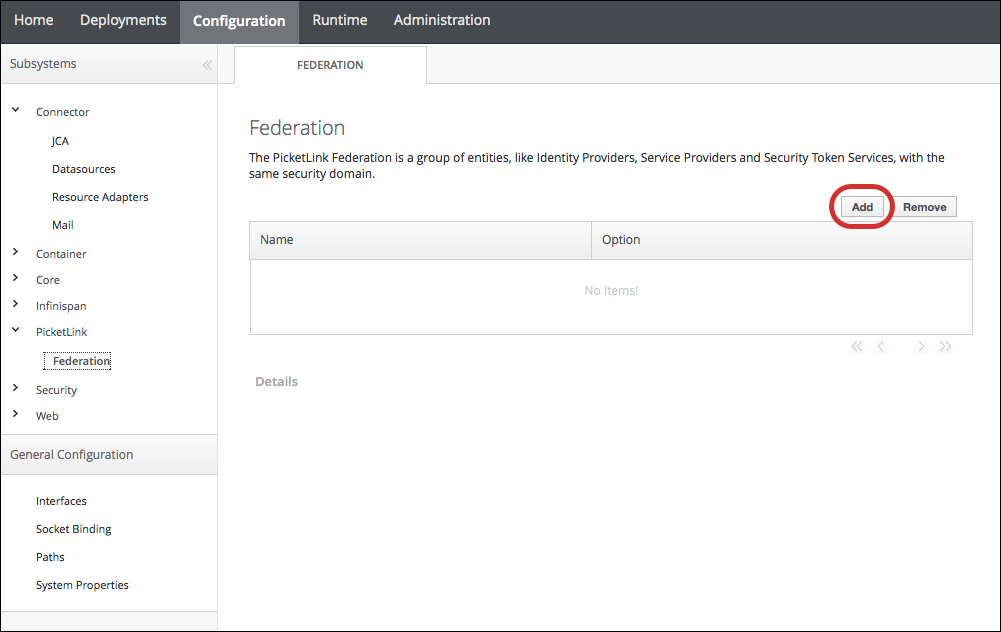
- Enter a name for the federation and click Save
-
Click on the View for the federation to begin configuring

-
Select Identity Provider under the Federation tab and click Add to configure a new IDP
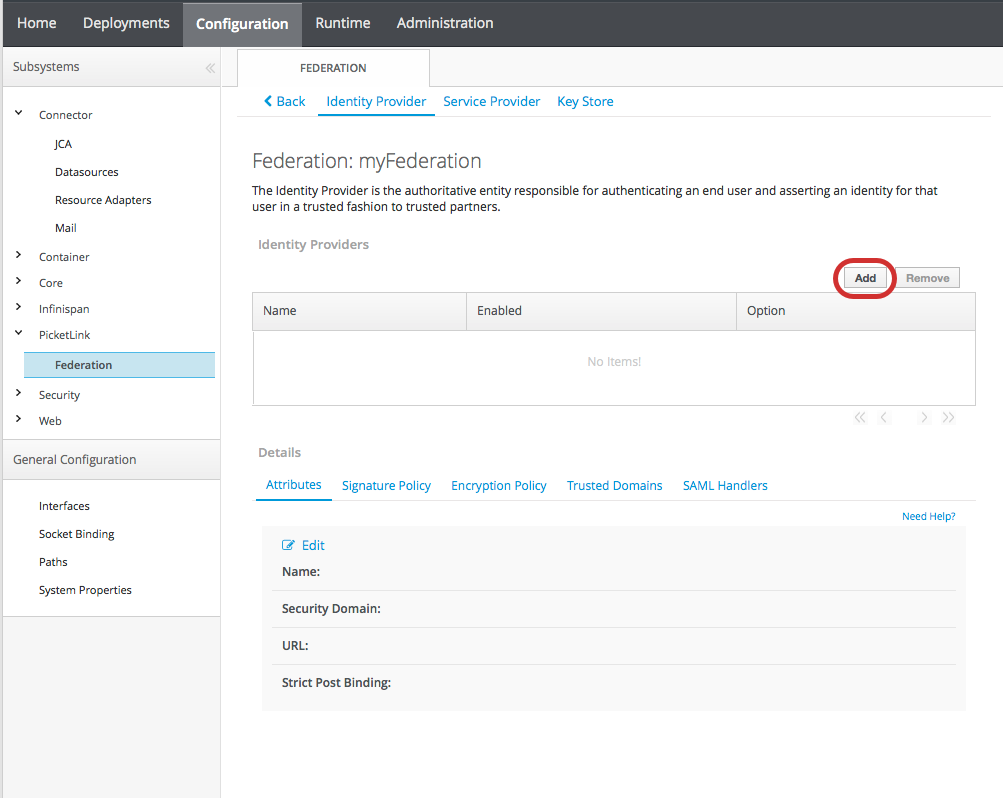
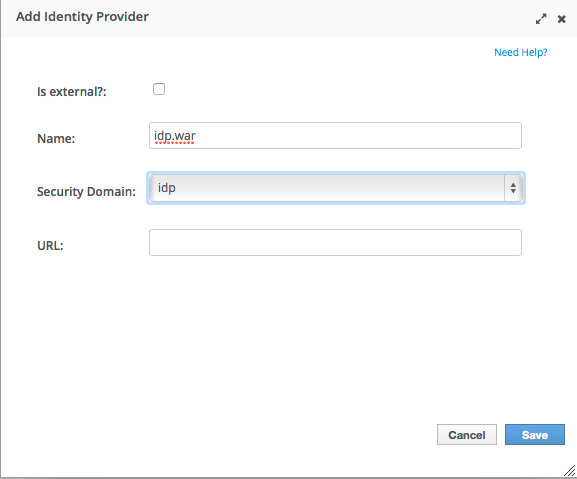
-
Enter in the information of the deployed IDP and click Save
-
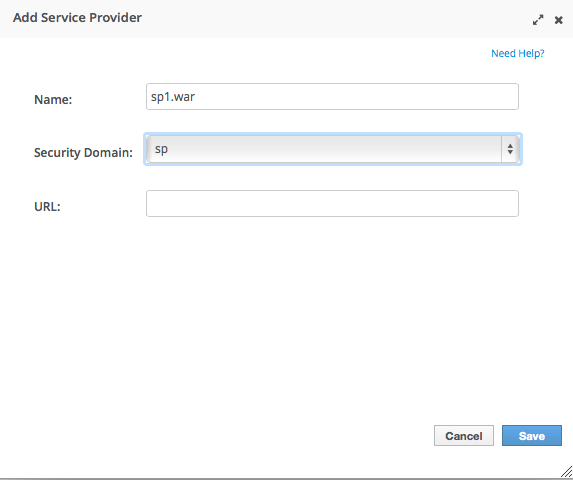
Select Service Provider under the Federation tab and click Add to configure a new SP
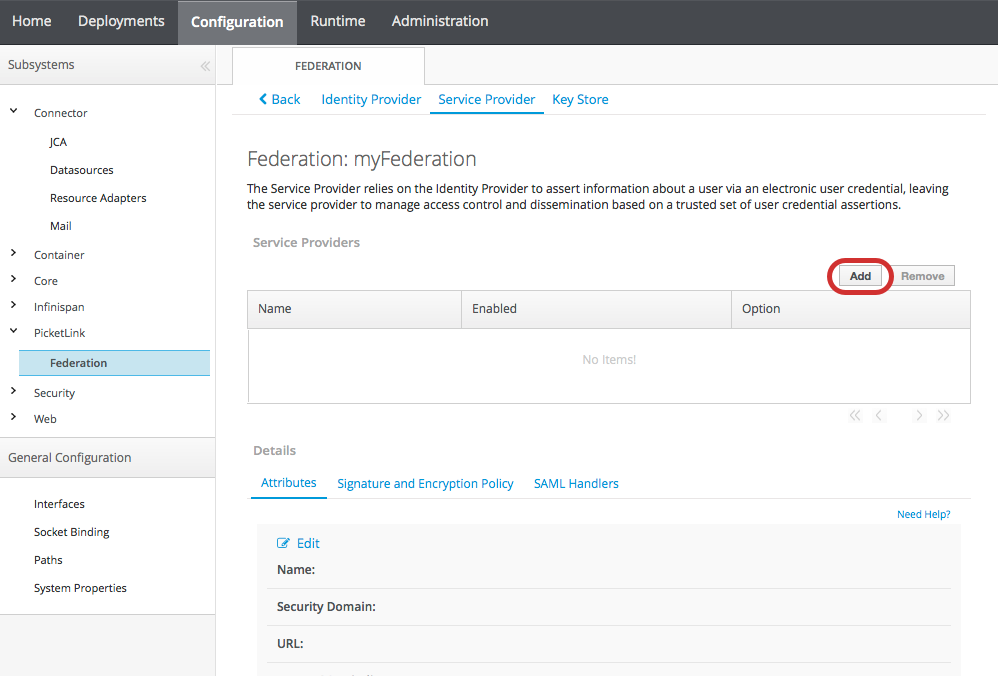
-
Enter in the information of the deployed SP and click Save
The Details section in both the Identity Provider and Service Provider subtabs may be used to configure additional details or make updates to an existing IDP or SP:
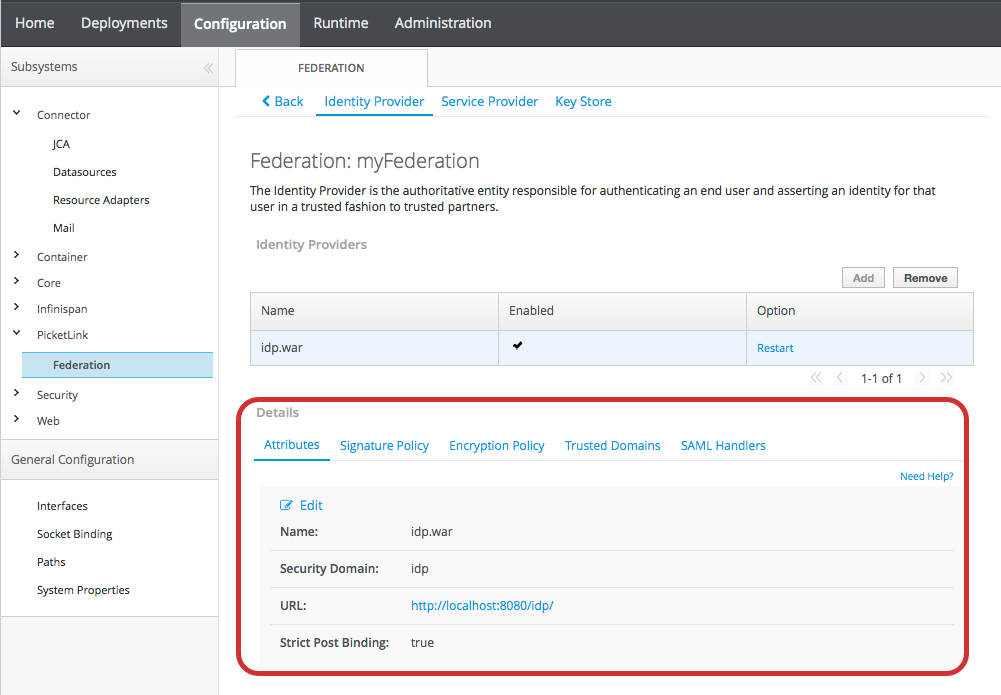
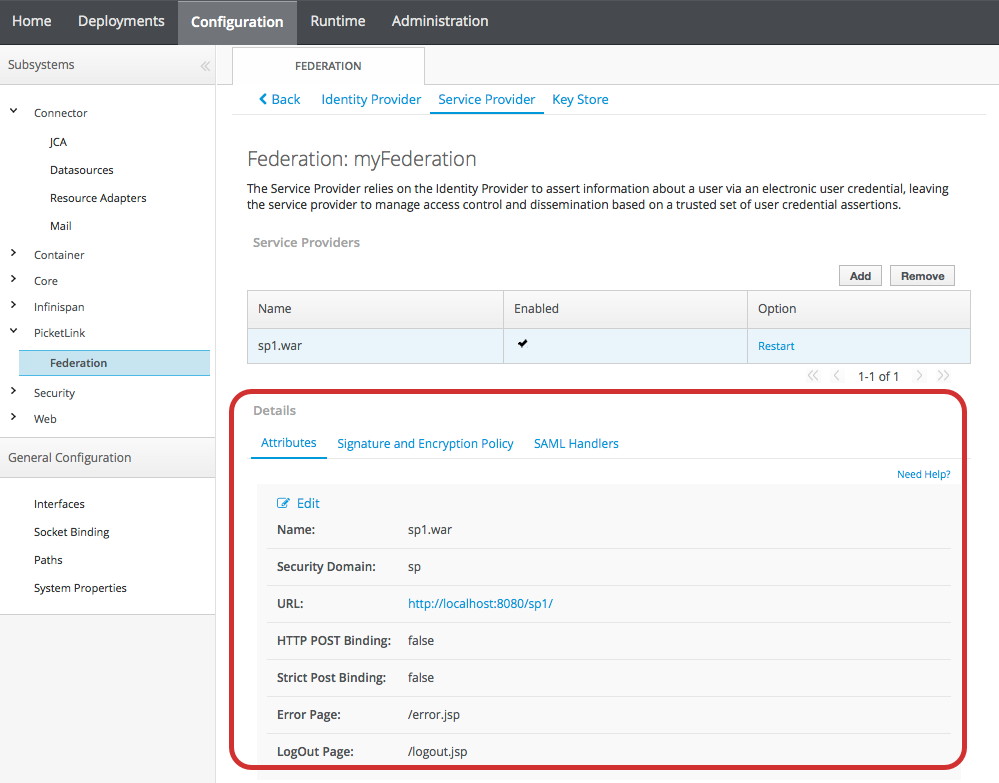
When configuration changes are made relating to any IDPs or SPs within a federation (including any security domains used by the IDPs or SPs), it best to restart the affected IDPs and/or SPs. This can be accomplished using the Restart option on the Identity Provider and Service Provider subtab.
2.4. Configuring Identity Stores for IDPs
Since IDPs use security domains, the functionality of an IDP is independent from the actual identity store that backs it. As a result, administrators have many options when configuring security domains for IDPs. The specifics around security domains and login modules can be found in the Security Subsystem section of the Red Hat JBoss Enterprise Application Platform 6 Security Architecture. Just as with setting up any login module for a security domain, please keep in mind that different identity stores offer different functionality and performance tradeoffs.
The following steps are needed for setting up a security domain that uses an identity store:
For the purposes of this document, the Database login module and Ldap login module are shown as examples, but other identity stores and login modules may also be configured for use with IDPs.
The CLI commands for this section were done assuming a standalone instance of JBoss EAP 6. For more details on using the CLI with JBoss EAP 6 domains, please consult The Management CLI section of the Red Hat JBoss Enterprise Application Platform 6 Administration and Guide.
2.4.1. 1. Setting up the Identity Store
Before a security domain and login module can be configured to use an identity provider, the identity provider (and sometimes an connection to that identity provider) must be setup.
2.4.1.1. Configuring the Identity Store for the Database Login Module
The following operations are needed for setting up the Identity Store for the Database login module:
- Database Setup
- Adding a Datasource
Database Setup
The first item needed for a Database-Backed Identity Store is a database for the login module to use.
The following datapoints are needed:
- Usernames
- Passwords
- Roles
- Role Groups
The Database Login module requires the ability to create a query that maps usernames to passwords and a query that maps usernames to roles and role groups. This information can be stored within the database in variety of ways, but creating a database with tables is not in the scope of this document. For the purposes of this example, it’s assumed the following tables have been created:
Table 2.1. sso-users
| username | passwd |
|---|---|
| Sarah | Testing123! |
Table 2.2. sso-roles
| username | role | role-group |
|---|---|---|
| Sarah | Sample | SSO-Users |
Adding a Datasource
Creating datasources are not in the scope of this document. For specifics on setting up a datasource, please see the Datasource Management section of the Administration and Configuration Guide.
For the purposes of this example, it is assumed that a datasource named idpDS has been created, properly configured, and deployed to the JBoss EAP 6 instance. This datasource has a connection to the database storing the sso-users and sso-roles tables.
2.4.1.2. Configuring the Identity Store for the Ldap Login Module
A properly configured LDAP server is required prior to setting up the Ldap login module. Unlike the Database login module, a datasource is not needed for setting up the Ldap login module. The basics of LDAP and how it relates to JBoss EAP 6 security are covered in the Red Hat JBoss Enterprise Application Platform 6 Security Architecture document.
Setting up an LDAP Server
Setting up an LDAP server is not in the scope of this document. For more information on setting up an LDAP server, please consult the RHEL System’s Administration Guide. For the purposes of this example, the LDAP server can be reached at http://ldaphost.example.com:1389/.
Directory Information
The directory structure and organization of an LDAP server can vary greatly depending on the use case and organizational needs. For the purposes of this example, the below entries have been created (show in LDIF format):
dn: dc=example,dc=com
objectclass: top
objectclass: dcObject
objectclass: organization
dc: example
o:  Example
#=============================
dn: ou=People,dc=example,dc=com
objectclass: top
objectclass: organizationalUnit
ou: People
#=============================
dn: uid=jsmith,ou=People,dc=example,dc=com
objectclass: top
objectclass: uidObject
objectclass: person
uid: jsmith
cn: John
sn: Smith
userPassword: theduke
#=============================
dn: ou=Roles,dc=example,dc=com
objectclass: top
objectclass: organizationalUnit
ou: Roles
#=============================
dn: cn=Sample,ou=Roles,dc=example,dc=com
objectclass: top
objectclass: groupOfNames
cn: Sample
member: uid=jsmith,ou=People,dc=example,dc=com
description: the Sample group
2.4.2. 2. Adding the Security Domain
Once the identity store itself has been setup and any needed connection between the JBoss EAP 6 instance and the identity store has been configured, the security domain may be created and configured. The below command shows how to create an empty security domain, replacing MY-DOMAIN with the desired name of the security domain.
CLI for Adding a Security Domain
/subsystem=security/security-domain=MY-DOMAIN:add(cache-type=default)
2.4.3. 3. Adding the Authentication Section and Login Module to the Security Domain
After the empty security domain has been created, the authentication section must be created with a login module added to it. The below command shows how to add an empty authentication section to an existing security domain, replacing MY-DOMAIN with the name of the security domain.
CLI for Adding an Authentication Section to a Security Domain
/subsystem=security/security-domain=MY-DOMAIN/authentication=classic:add
Once the empty authentication section has been created, a login module may then be added to it and configured to use the desired identity store. After adding a login module to a security domain, a configuration reload is usually required.
Below is the general command structure for adding a login module and reloading the configuration, replacing MY-DOMAIN, MY-LOGIN-MODULE, and MY-CONFIGURATION with the appropriate information:
/subsystem=security/security-domain=MY-DOMAIN/authentication=classic/login-module=MY-LOGIN-MODULE:add( MY-CONFIGURATION )
reload
2.4.3.1. Adding a Database Login Module
CLI for Configuring the Authentication Section to use the Database Login Module
/subsystem=security/security-domain=idp-db-domain/authentication=classic/login-module=Database:add( \
  code=Database, \
  flag=required, \
  module-options=[ \
    ("dsJndiName"=>"java:/idpDS"), \
    ("principalsQuery"=>"select passwd from 'sso-users' where username=?"), \
    ("rolesQuery"=>"select role, role-group from 'sso-roles' where username=?") \
  ])
CLI Reloading the configuration
reload
Resulting XML
<security-domain name="idp-db-domain" cache-type="default">
    <authentication>
        <login-module code="Database" flag="required">
            <module-option name="dsJndiName" value="java:/idpDS"/>
            <module-option name="principalsQuery" value="select passwd from 'sso-users' where username=?"/>
            <module-option name="rolesQuery" value="select role, role-group from 'sso-roles' where username=?"/>
        </login-module>
    </authentication>
</security-domain>
2.4.3.2. Adding an LDAP Login Module
The steps necessary for configuring both the LdapExtended login module (recommended) as well as the Ldap login module can be found in How To Configure Identity Management in Red Hat JBoss Enterprise Application Platform 6.
2.5. Configuring SSL/TLS with SPs and IDPs
The basics of SSL/TLS are covered in the Red Hat JBoss Enterprise Application Platform 6 Security Architecture. Adding SSL/TLS support to a browser-based SSO environment is not much different than adding it to non-SSO environment. Both the IDPs and SPs can have an HTTPS connector added to allow for traffic to be secured.
Add a new HTTPS connector.
Create a secure connector, named HTTPS, which uses the https scheme, the https socket binding (which defaults to 8443), and is set to be secure.
/subsystem=web/connector=HTTPS/:add(socket-binding=https,scheme=https,protocol=HTTP/1.1,secure=true)
Configure the SSL/TLS encryption certificate and keys.
Configure your SSL/TLS certificate, substituting your own values for the example ones. This example assumes that the keystore is copied to the server configuration directory, which is EAP_HOME/domain/configuration/ for a managed domain.
/subsystem=web/connector=HTTPS/ssl=configuration:add(name=https,certificate-key-file="${jboss.server.config.dir}/keystore.jks",password=SECRET, key-alias=KEY_ALIAS)Set the protocol to TLSv1.
/subsystem=web/connector=HTTPS/ssl=configuration/:write-attribute(name=protocol,value=TLSv1)
The above CLI commands were done assuming a standalone instance of JBoss EAP 6. For more details on using the CLI with JBoss EAP 6 domains, please consult The Management CLI section of the Red Hat JBoss Enterprise Application Platform 6 Administration and Guide.
Optional - Use an additional CertificateRoles login module on the IDP
Optionally, an additional login module for verifying the SSL/TLS certification (CertificateRoles) can be added to the security domain. This makes use of password stacking combined with the CertificateRoles login module (which extends the Certificate login module). For more details on the CertificateRoles login module, see the Red Hat JBoss Enterprise Application Platform 6 Security Guide.
The configuration example below validates any provided certificate. If no certificate is provided or if the authentication fails, the procedure falls back to a user/password based authentication.
For example:
<security-domain name="idp" cache-type="default">
    <authentication>
        <login-module code="CertificateRoles" flag="optional">
            <module-option name="password-stacking" value="useFirstPass"/>
            <module-option name="securityDomain" value="idp"/>
            <module-option name="verifier" value="org.jboss.security.auth.certs.AnyCertVerifier"/>
        </login-module>
        <login-module code="UsersRoles" flag="required">
            <module-option name="password-stacking" value="useFirstPass"/>
            <module-option name="usersProperties" value="users.properties"/>
            <module-option name="rolesProperties" value="roles.properties"/>
        </login-module>
    </authentication>
    <jsse keystore-password="change_it" keystore-url="${jboss.server.config.dir}/server.keystore" truststore-password="change_it"
        truststore-url="${jboss.server.config.dir}/server.keystore" client-auth="true"/>
</security-domain>
2.6. Additional Features
2.6.1. SAML Assertion Encryption
In addition to offering SSL/TLS encryption between IDPs and SPs, the SAML assertions themselves may also be encrypted. This is useful in securing SAML v2 assertions that are transmitted in an unsecured manner (e.g. not using SSL/TLS).
2.6.1.1. Enabling Encryption Directly in IDPs and SPs
To enable encryption of security assertions directly in IDPs and SPs, the following procedures must be performed to both the IDP and SP picketlink.xml files:
- Enable Encrypt and SupportsSignatures
- Add Handlers
- Configure the KeyProvider
1 Enable Encrypt and SupportsSignatures
To enable encryption, the <PicketLinkIDP> and <PicketLinkSP> must be updated.
For the IDP, add or update the Encrypt and SupportsSignatures attributes in <PicketLinkIDP> to be true:
<PicketLink xmlns="urn:picketlink:identity-federation:config:2.1">
  ...
  <PicketLinkIDP xmlns="urn:picketlink:identity-federation:config:2.1"
    Encrypt="true" SupportsSignatures="true">
    ...
  </PicketLinkIDP>
</PicketLink>
For the SP, add or update the SupportsSignatures attribute in <PicketLinkSP> to be true:
<PicketLink xmlns="urn:picketlink:identity-federation:config:2.1">
  ...
  <PicketLinkSP xmlns="urn:picketlink:identity-federation:config:2.1"
        SupportsSignatures="true">
  ...
  </PicketLinkSP>
</PicketLink>
2 Add Handlers
In addition, handlers must be added to <Handlers>.
For the IDP add SAML2EncryptionHandler and SAML2SignatureValidationHandler to the picketlink.xml file:
<PicketLink xmlns="urn:picketlink:identity-federation:config:2.1">
  ...
  <Handlers xmlns="urn:picketlink:identity-federation:handler:config:2.1">
    <Handler class="org.picketlink.identity.federation.web.handlers.saml2.SAML2IssuerTrustHandler" />
    <Handler class="org.picketlink.identity.federation.web.handlers.saml2.SAML2LogOutHandler" />
    <Handler class="org.picketlink.identity.federation.web.handlers.saml2.SAML2AuthenticationHandler" />
    <Handler class="org.picketlink.identity.federation.web.handlers.saml2.RolesGenerationHandler" />
    <Handler class="org.picketlink.identity.federation.web.handlers.saml2.SAML2EncryptionHandler" />
    <Handler class="org.picketlink.identity.federation.web.handlers.saml2.SAML2SignatureValidationHandler" />
  </Handlers>
</PicketLink>
For the SP add SAML2SignatureGenerationHandler and SAML2SignatureValidationHandler to the picketlink.xml file:
<PicketLink xmlns="urn:picketlink:identity-federation:config:2.1">
  ...
  <Handlers xmlns="urn:picketlink:identity-federation:handler:config:2.1">
    <Handler class="org.picketlink.identity.federation.web.handlers.saml2.SAML2LogOutHandler" />
    <Handler class="org.picketlink.identity.federation.web.handlers.saml2.SAML2AuthenticationHandler" />
    <Handler class="org.picketlink.identity.federation.web.handlers.saml2.RolesGenerationHandler" />
    <Handler class="org.picketlink.identity.federation.web.handlers.saml2.SAML2SignatureGenerationHandler" />
    <Handler class="org.picketlink.identity.federation.web.handlers.saml2.SAML2SignatureValidationHandler" />
  </Handlers>
</PicketLink>
Handlers are implemented using a Chain of Responsibility, with each individual handler performing logic on request and responses in the order defined in picketlink.xml. It is very important to pay attention to the order in which the handlers are configured.
The SAML2SignatureGenerationHandler should not be configured in the same chain as the SAML2EncryptoinHandler. This will cause SAML messages will be signed several times.
3 Configure Key Provider
Lastly, a <KeyProvider> element must be added to BOTH picketlink.xml files. This element provides the location and credentials for accessing the java keystore used for encrypting and decrypting security assertions. An example of generating a java keystore can be found here.
For the IDP the element should be added to <PicketLinkIDP>:
<PicketLink xmlns="urn:picketlink:identity-federation:config:2.1">
  ...
  <PicketLinkIDP xmlns="urn:picketlink:identity-federation:config:2.1"
    Encrypt="true" SupportsSignatures="true">
    ...
    <KeyProvider ClassName="org.picketlink.identity.federation.core.impl.KeyStoreKeyManager">
      <Auth Key="KeyStoreURL" Value="/my_keystore.jks" />
      <Auth Key="KeyStorePass" Value="store123" />
      <Auth Key="SigningKeyPass" Value="test123" />
      <Auth Key="SigningKeyAlias" Value="servercert" />
      <ValidatingAlias Key="idp.example.com" Value="servercert" />
      <ValidatingAlias Key="localhost" Value="servercert" />
      <ValidatingAlias Key="sp1.example.com" Value="servercert" />
      <ValidatingAlias Key="sp2.example.com" Value="servercert" />
    </KeyProvider>
    ...
  </PicketLinkIDP>
  ...
<PicketLink>
For the SP the element should be added to <PicketLinkSP>:
<PicketLink xmlns="urn:picketlink:identity-federation:config:2.1">
  ...
  <PicketLinkSP xmlns="urn:picketlink:identity-federation:config:2.1"
        SupportsSignatures="true">
    ...
    <KeyProvider ClassName="org.picketlink.identity.federation.core.impl.KeyStoreKeyManager">
      <Auth Key="KeyStoreURL" Value="/my_keystore.jks" />
      <Auth Key="KeyStorePass" Value="store123" />
      <Auth Key="SigningKeyPass" Value="test123" />
      <Auth Key="SigningKeyAlias" Value="servercert" />
      <ValidatingAlias Key="idp.example.com" Value="servercert" />
      <ValidatingAlias Key="localhost" Value="servercert" />
    </KeyProvider>
  ...
  </PicketLinkSP>
</PicketLink>
In order to properly encrypt and decrypt assertions, the IDP needs to generate signatures and the SP needs to verify those signatures as well as identify where they came from. This is accomplished via the <ValidatingAlias> element. IDPs need to have a <ValidatingAlias> for each trusted server/domain that is trusted (i.e. every entry in the <Trust> element). SPs need to have a <ValidatingAlias> for each server/domain containing an IDP.
2.6.2. Digital Signatures in Assertions
Digital Signatures allow IDPs to sign their security (SAML v2) assertions and have those signature (and assertions) validated by the SPs. This is useful for validating the authenticity of assertions, especially for assertions that are transmitted in an unsecured manner (e.g. not using SSL/TLS).
2.6.2.1. Enabling Digital Signatures Directly in IDPs and SPs
To enable digital signatures in security assertions directly in IDPs and SPs, the following procedures must be performed to both the IDP and SP picketlink.xml files:
- Enable SupportsSignatures
- Add Handlers
- Configure the KeyProvider
1 Enable SupportsSignatures
To enable digital signatures, the <PicketLinkIDP> and <PicketLinkSP> must be updated.
For the IDP and SP, add or update the SupportsSignatures attribute in <PicketLinkSP> to be true:
<PicketLink xmlns="urn:picketlink:identity-federation:config:2.1">
  ...
  <PicketLinkIDP xmlns="urn:picketlink:identity-federation:config:2.1"
    SupportsSignatures="true">
    ...
  </PicketLinkIDP>
</PicketLink>
<PicketLink xmlns="urn:picketlink:identity-federation:config:2.1">
...
<PicketLinkSP xmlns="urn:picketlink:identity-federation:config:2.1"
SupportsSignatures="true">
...
</PicketLinkSP>
</PicketLink>2 Add Handlers
In addition, handlers must be added to <Handlers>.
For the IDP and SP, add SAML2SignatureGenerationHandler and SAML2SignatureValidationHandler to the picketlink.xml file:
IDP picketlink.xml
<PicketLink xmlns="urn:picketlink:identity-federation:config:2.1">
  ...
  <Handlers xmlns="urn:picketlink:identity-federation:handler:config:2.1">
    <Handler class="org.picketlink.identity.federation.web.handlers.saml2.SAML2IssuerTrustHandler" />
    <Handler class="org.picketlink.identity.federation.web.handlers.saml2.SAML2LogOutHandler" />
    <Handler class="org.picketlink.identity.federation.web.handlers.saml2.SAML2AuthenticationHandler" />
    <Handler class="org.picketlink.identity.federation.web.handlers.saml2.RolesGenerationHandler" />
    <Handler class="org.picketlink.identity.federation.web.handlers.saml2.SAML2SignatureGenerationHandler" />
    <Handler class="org.picketlink.identity.federation.web.handlers.saml2.SAML2SignatureValidationHandler" />
  </Handlers>
</PicketLink>
SP picketlink.xml
<PicketLink xmlns="urn:picketlink:identity-federation:config:2.1">
  ...
  <Handlers xmlns="urn:picketlink:identity-federation:handler:config:2.1">
    <Handler class="org.picketlink.identity.federation.web.handlers.saml2.SAML2LogOutHandler" />
    <Handler class="org.picketlink.identity.federation.web.handlers.saml2.SAML2AuthenticationHandler" />
    <Handler class="org.picketlink.identity.federation.web.handlers.saml2.RolesGenerationHandler" />
    <Handler class="org.picketlink.identity.federation.web.handlers.saml2.SAML2SignatureGenerationHandler" />
    <Handler class="org.picketlink.identity.federation.web.handlers.saml2.SAML2SignatureValidationHandler" />
  </Handlers>
</PicketLink>
Handlers are implemented using a Chain of Responsibility, with each individual handler performing logic on request and responses in the order defined in picketlink.xml. It is very important to pay attention to the order in which the handlers are configured.
The SAML2SignatureGenerationHandler should not be configured in the same chain as the SAML2EncryptionHandler. This will cause SAML messages will be signed several times.
3 Configure Key Provider
Lastly, a <KeyProvider> element must be added to BOTH picketlink.xml files. This element provides the location and credentials for accessing the java keystore used for signing security assertions. An example of generating a java keystore can be found here.
For the IDP the element should be added to <PicketLinkIDP>:
<PicketLink xmlns="urn:picketlink:identity-federation:config:2.1">
  ...
  <PicketLinkIDP xmlns="urn:picketlink:identity-federation:config:2.1"
    SupportsSignatures="true">
    ...
    <KeyProvider ClassName="org.picketlink.identity.federation.core.impl.KeyStoreKeyManager">
      <Auth Key="KeyStoreURL" Value="/my_keystore.jks" />
      <Auth Key="KeyStorePass" Value="store123" />
      <Auth Key="SigningKeyPass" Value="test123" />
      <Auth Key="SigningKeyAlias" Value="servercert" />
      <ValidatingAlias Key="idp.example.com" Value="servercert" />
      <ValidatingAlias Key="localhost" Value="servercert" />
      <ValidatingAlias Key="sp1.example.com" Value="servercert" />
      <ValidatingAlias Key="sp2.example.com" Value="servercert" />
    </KeyProvider>
    ...
  </PicketLinkIDP>
  ...
<PicketLink>
For the SP the element should be added to <PicketLinkSP>:
<PicketLink xmlns="urn:picketlink:identity-federation:config:2.1">
  ...
  <PicketLinkSP xmlns="urn:picketlink:identity-federation:config:2.1"
        SupportsSignatures="true">
    ...
    <KeyProvider ClassName="org.picketlink.identity.federation.core.impl.KeyStoreKeyManager">
      <Auth Key="KeyStoreURL" Value="/my_keystore.jks" />
      <Auth Key="KeyStorePass" Value="store123" />
      <Auth Key="SigningKeyPass" Value="test123" />
      <Auth Key="SigningKeyAlias" Value="servercert" />
      <ValidatingAlias Key="idp.example.com" Value="servercert" />
      <ValidatingAlias Key="localhost" Value="servercert" />
    </KeyProvider>
  ...
  </PicketLinkSP>
</PicketLink>
In order to properly sign and check assertions, the IDP needs to generate signatures and the SP needs to verify those signatures as well as identify where they came from. This is accomplished via the <ValidatingAlias> element. IDPs need to have a <ValidatingAlias> for each trusted server/domain that is trusted (i.e. every entry in the <Trust> element). SPs need to have a <ValidatingAlias> for each server/domain containing an IDP.
2.6.3. Handling AJAX Requests
In certain instances, SPs may need to recieve AJAX requests to secured resources. This is handled automatically without the need of any additional configuration. so authenticated and authorized users are able to make AJAX calls without issue. This is accomplished by checking for the existence of the X-Requested-With header in the request. In addition, cases where users are not authenticated, or if the request contains the header XMLHttpRequest, the IDP will respond with a 403 (Forbidden) status code instead of the login page.